

Page 1

PIALLA ELETTRICA PEH 30 A1
PIALLA ELETTRICA
Indicazioni per l’uso e per la sicurezza
Traduzione delle istruzioni d’uso originali
ELEKTROHOBEL
Bedienungs- und Sicherheitshinweise
Originalbetriebsanleitung
IAN 93528
ELECTRIC PLANER
Operation and Safety Notes
Translation of original operation manual
Page 2

Prima di leggere aprire le due pagine con le immagini e prendere confidenza con le diverse funzioni
dell’apparecchio.
Before reading, unfold both pages containing illustrations and familiarise yourself with all functions of the
device.
Klappen Sie vor dem Lesen die beiden Seiten mit den Abbildungen aus und machen Sie sich anschließend
mit allen Funktionen des Gerätes vertraut.
IT / MT Indicazioni per l’uso e per la sicurezza Pagina 5
GB / MT Operation and Safety Notes Page 15
DE / AT / CH Bedienungs- und Sicherheitshinweise Seite 25
Page 3
111 12 313 14 2 3
4
5
6
7
A
10
5
89
B
15
9 16
5 5
Page 4
C
D
17
26
9
E
9
G
I
221817 21
19
20
F
5423
5
H
4 5°
2324 25
J
6
Page 5

Indice
Introduzione
Uso corretto ..................................................................................................................................... Pagina 6
Dotazione ........................................................................................................................................ Pagina 6
Volume di consegna ....................................................................................................................... Pagina 6
Dati tecnici ....................................................................................................................................... Pagina 6
Istruzioni di sicurezza generali per utensili elettrici
1. Sicurezza dell’area di lavoro .................................................................................................... Pagina 7
2. Sicurezza elettrica ...................................................................................................................... Pagina 7
3. Sicurezza delle persone............................................................................................................. Pagina 8
4. Utilizzo attento di dispositivi elettrici ......................................................................................... Pagina 8
5. Assistenza ................................................................................................................................... Pagina 9
Avvisi di sicurezza particolari per quest’apparecchiatura pialla elettrica .................................. Pagina 9
Indicazioni di sicurezza per la pialla ............................................................................................ Pagina 10
Accessori originali / apparecchiature addizionali originali ......................................................... Pagina 10
Messa in funzione
Accensione / Spegnimento ............................................................................................................. Pagina 10
Impostare la profondità di truciolatura .......................................................................................... Pagina 10
Risucchiare polvere / trucioli ........................................................................................................... Pagina 10
Dispositivo di parcheggio ............................................................................................................... Pagina 11
Procedimento di piallatura ............................................................................................................. Pagina 11
Mussare i bordi ............................................................................................................................... Pagina 11
Utilizzare la battuta parallela ........................................................................................................ Pagina 11
Utilizzare la battuta della profondità di piegatura ....................................................................... Pagina 11
Smontare / montare la lama della pialla ....................................................................................... Pagina 12
Sostituire le cinghie di trasmissione ................................................................................................ Pagina 12
Manutenzione e pulizia .................................................................................................. Pagina 12
Assistenza ................................................................................................................................... Pagina 13
Garanzia ...................................................................................................................................... Pagina 13
Smaltimento .............................................................................................................................. Pagina 13
Dichiarazione di conformità / Fabbricante ...................................................... Pagina 14
5 IT/MT
Page 6
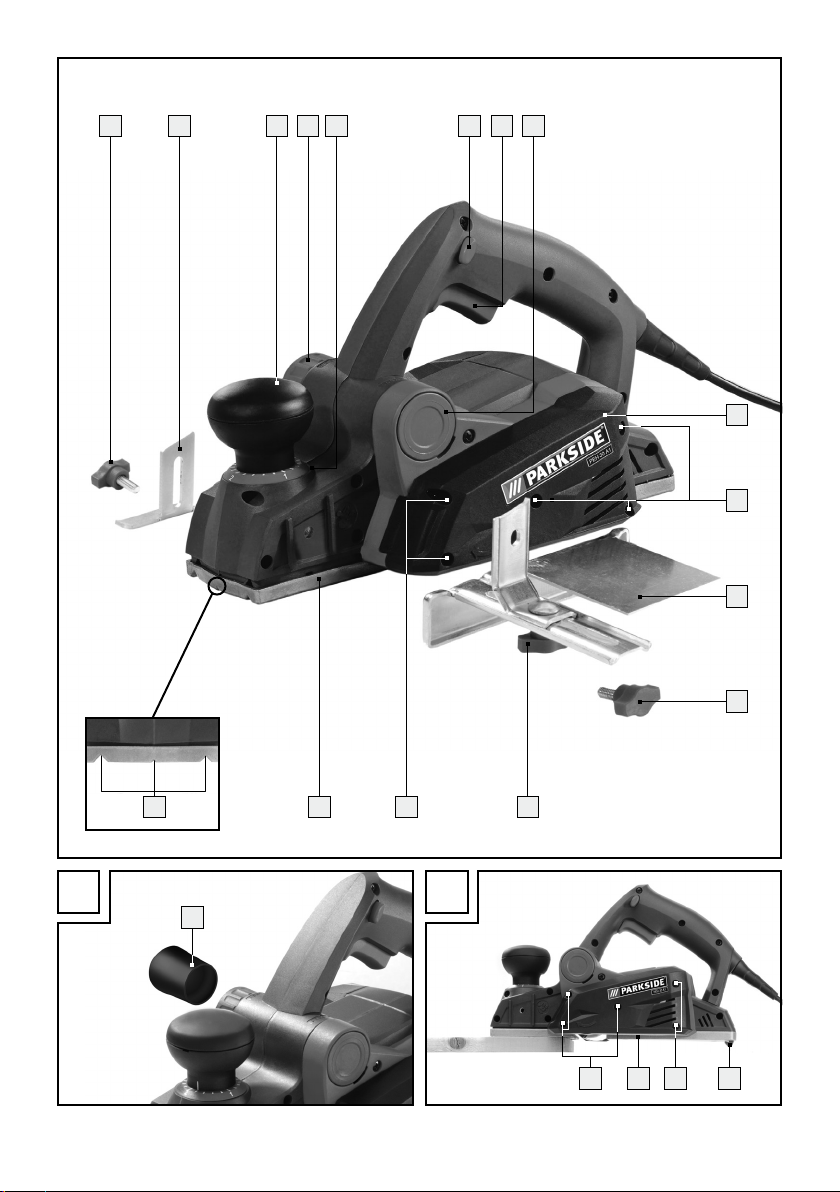
Pialla elettrica PEH 30 A1
Q
Introduzione
Ci congratuliamo con voi per l‘acquisto del vostro
nuovo prodotto. Avete optato per un prodotto di
qualità. Le istruzioni d‘uso sono parte integrante di
questo prodotto. Esse contengono importanti avvertenze sulla sicurezza, l‘impiego e lo smaltimento.
Prima dell‘utilizzo del prodotto, prendere conoscenza
di tutte le istruzioni d‘uso e delle avvertenze di sicurezza. Utilizzare il prodotto solo come descritto e
per i campi di applicazione indicati. Consegnare
tutte le documentazioni su questo prodotto quando
viene ceduto a terzi.
Q
Uso corretto
alta
11
Vite di fissaggio per la battuta della
profondità di piegatura
12
Battuta della profondità di piegatura
13
Regolatore a rotazione per l’impostazione
della profondità di truciolatura
14
Scala di profondità di truciolatura
15
Componente di riduzione
16
Dispositivo di parcheggio
17
Albero portalama
18
Elemento di truciolatura
19
Viti di fissaggio per le lame della pialla
20
Lama della pialla
21
Protezione laterale dell’onda delle lame
22
Chiave esagonale interna
23
Cinghia di trasmissione
24
Ruota grande della cinghia
25
Ruota piccola della cinghia
26
Chiave mista
L’apparecchiatura dotata di una piattaforma solida
per posizionare gli attrezzi è adatta per piallare
materiali in legno quali travi e tavole di legno. Inoltre
l’apparecchiatura è adatta per smussare obliquamente
i bordi e per piegare. Ogni altro utilizzo o modifica
dell’apparecchio si considera come non conforme
alle modalità d’uso e può provocare notevoli pericoli. Il produttore non risponde di eventuali danni
che dovessero derivare da un utilizzo dell’apparecchio non conforme alla destinazione d‘uso. Questo
apparecchio non è destinato all’utilizzo commerciale.
Q
Dotazione
1
Bloccaggio di accensione
2
Dispositivo di ACCENSIONE /
SPEGNIMENTO
3
Espulsione trucioli (a scelta verso destra /
verso sinistra)
4
Copertura cinghie
5
Viti per la copertura delle cinghie
6
Battuta parallela
7
Vite di fissaggio per battuta parallela
8
Dado di fissaggio per l’impostazione
della larghezza di piegatura
9
Fondo della pialla
10
Scanalature a V
6 IT/MT
Q
Volume di consegna
1 Pialla elettrica PEH 30 A1
1 Battuta parallela
1 Battuta della profondità di piegatura
1 Chiave esagonale interna
1 Chiave mista
1 Pezzo di riduzione
1 Istruzioni d’uso
Q
Dati tecnici
Tensione nominale: 230–240 V∼ 50 Hz
Prestazione nominale: 750 W
Numero di giri misurazionecorsa a vuoto: n
13000 min
0
Profondità di piallatura: 0–3,0 mm
Larghezza di piallatura: 82 mm
Categoria di protezione: II /
Informazioni per il rumore e le vibrazioni:
I valori di misurazione sono stati accertati in applicazione delle norme EN 60745. Il livello di pressione
acustica stimato A ammonta tipicamente a:
Livello di pressione acustica: 89 dB(A)
Livello di intensità sonora: 100 dB(A)
Scostamento di K: 3 dB
-1
Page 7

Introduzione / Istruzioni di sicurezza generali per utensili elettrici
Utilizzare strumenti di protezione dell‘udito!
Accelerazione valutata, tipica:
Vibrazione mano / braccio a
Scostamento K = 1,5 m / s
= 5,644 m / s
h
2
2
Il valore relativo al livello di
vibrazioni indicato nelle presenti istruzioni d’uso è
stato misurato in conformità alla procedura di misurazione esplicata nella norma EN 60745 e può
essere utilizzato per il confronto tra apparecchi. Il
valore relativo all‘emissione delle vibrazioni può
essere utilizzato anche per stabilire una valutazione
iniziale della sospensione.
Il livello di vibrazione potrà variare a seconda
dell’impiego dell’utensile elettrico e in alcuni casi
può essere superiore al valore indicato nelle presenti
istruzioni. Il carico di vibrazione potrebbe essere
stimato in difetto, perché l’utensile elettrico viene
utilizzato sempre in modalità simili.
Nota: Per una corretta valutazione dell’affaticamento
da vibrazioni durante un determinato periodo di lavorazione devono essere considerati anche i tempi
in cui l’apparecchio è disinserito o è funzionante,
senza però essere utilizzato. Ciò può ridurre in misura notevole l’affaticamento da vibrazioni lungo il
periodo di lavorazione complessivo.
Istruzioni di sicurezza generali
per utensili elettrici
Leggere tutte le indica-
zioni e gli avvisi di sicurezza!
canze nell’osservanza delle indicazioni e degli avvisi di sicurezza possono provocare una scossa
elettrica, un incendio e / o gravi lesioni.
Conservare tutte le indicazioni e gli avvisi
di sicurezza per eventuali necessita’ future!
La parola “attrezzo elettrico“ utilizzata nelle istruzioni
d’uso si riferisce agli attrezzi elettrici funzionanti
all’interno di una rete (con cavo di rete) e agli attrezzi elettrici che funzionano mediante batterie
(senza cavo di rete).
Eventuali man-
1. Sicurezza dell’area di lavoro
a) Mantenere l’area di lavoro pulita e
ben illuminata. Il disordine ed aree di lavoro
poco illuminate possono determinare incidenti.
b) Non lavorare con l’apparecchio in
un’atmosfera dove si trovino liquidi
infiammabili, esplosiva, gas e polveri.
Gli utensili elettrici generano scintille che possono infiammare la polvere o i gas.
c) Durante l’utilizzo del dispositivo elet-
trico tenere lontani bambini e persone
estranee. In caso di distrazione potreste
perdere il controllo dell’apparecchio.
2. Sicurezza elettrica
a) La spina di connessione dell’apparec-
chio deve essere adatta alla presa elettrica nella quale essa viene inserita. In
nessun caso l’adattatore deve essere
modificato. Non utilizzare spine con
apparecchi messi a terra. Spine non mo-
dificate e prese adatte riducono il rischio di una
scossa elettrica.
b)
Evitare il contatto del corpo con superfici
messe a terra, quali ad esempio quelle
di tubi, caloriferi, cucine economiche
e frigoriferi. Sussiste un elevato rischio di
scossa elettrica, qualora il Vostro corpo fosse
messo a terra.
c) Mantenere l’apparecchio lontano da
pioggia o umidità. La penetrazione di
acqua in un apparecchio elettrico accresce il
rischio di scossa elettrica.
d) Non utilizzare il cavo in modo non
conforme, cioè per tirare l’apparecchio, per appenderlo o per estrarre la
spina dalla presa elettrica. Tenere il
cavo lontano da calore, olio, spigoli
acuti o di parti in movimento dell’apparecchio. Cavi danneggiati o attorcigliati
accrescono il rischio di scossa elettrica.
e) In caso di lavori all’aperto utilizzare
solamente prolunghe ammesse anche
per un loro utilizzo all‘aperto. L’utilizzo
7 IT/MT
Page 8

di una tale prolunga riduce il rischio di scossa
elettrica.
f) Qualora non si possa evitare l‘eserci-
zio dell’elettroutensile in un ambiente
umido, fare uso di un interruttore
differenziale, circostanza che riduce il
rischio di una scossa elettrica.
3. Sicurezza delle persone
a) Fare sempre estrema attenzione a ciò
che si fa e accostarsi al lavoro con il
dispositivo elettrico sempre in modo
cosciente. Non utilizzare l’apparecchio
quando si è stanchi o sotto l’influsso
di droghe, alcol o medicinali. Un solo
attimo di disattenzione nell’utilizzo dell’apparecchio può provocare serie lesioni.
b) Indossare sempre l’equipaggiamento
di protezione personale e gli occhiali
protettivi. Indossando l’equipaggiamento di
protezione personale, quale una mascherina
antipolvere, scarpe di sicurezza antisdrucciolevoli, un casco di protezione o una protezione
auricolare, a seconda del tipo e dell’utilizzo
dell’apparecchiatura elettrica, riduce il rischio
di lesioni.
c) Evitare qualsiasi avvio involontario
dell’utensile. Assicurarsi che l’utensile
sia disinserito prima di collegarlo alla
rete di alimentazione elettrica, di sollevarlo o di trasportarlo. Se durante il
trasporto dell’apparecchio il dito dell’utilizzatore
si trova sull’interruttore ON / OFF oppure l’apparecchio è inserito, possono determinarsi incidenti.
d) Prima di avviare l’apparecchio, rimuo-
vere il dispositivo di regolazione o la
chiave per dadi. Un utensile o una chiave
che si trovi in una parte di apparecchio in rotazione può provocare lesioni.
e) Mantenere una postura del corpo nor-
male. Assicurarsi di avere un sostegno
sicuro e mantenere sempre l’equilibrio.
In questo modo è possibile controllare meglio
l’apparecchio, in modo particolare in caso di
situazioni impreviste.
8 IT/MT
f) Indossare un abbigliamento appropria-
to. Non indossare un abbigliamento
largo o bigiotteria. Mantenere capelli,
abbigliamento e guanti lontano da
parti in movimento. Abbigliamento sciolto,
gioielli o capelli lunghi possono essere trascinati da parti in movimento.
g) Quando vengono montati dispositivi
di aspirazione e di cattura della polvere, assicurarsi che questi siano stati
montati ed utilizzati correttamente.
L’utilizzo di questi dispositivi riduce i pericoli
provocati dalla polvere.
4. Utilizzo attento
di dispositivi elettrici
a) Non sovraccaricare l’apparecchio.
Per un determinato lavoro utilizzare
sempre il dispositivo elettrico a ciò appropriato. Con il dispositivo elettrico appro-
priato si lavora meglio e con maggiore sicurezza
nello specifico ambito di utilizzo.
b) Non utilizzare dispositivi elettrici il cui
interruttore sia difettoso. Un dispositivo
elettrico che non si può più accendere e spegnere rappresenta un pericolo, e deve essere
riparato.
c) Estrarre la spina dalla presa elettrica
prima di eseguire regolazioni all‘apparecchio, sostituire accessori o riporre
l‘apparecchio. Queste misure di prudenza
impediscono l’avvio involontario dell’apparecchio.
d) Mantenere dispositivi elettrici non uti-
lizzati fuori dalla portata di bambini.
Non fare utilizzare l’apparecchio da
persone che non lo conoscano o del
quale non abbiano letto le istruzioni
d’uso. I dispositivi elettrici sono pericolosi se
utilizzati da persone inesperte.
e) Avere cura dell’apparecchio. Control-
lare se parti mobili dell’apparecchio funzionano perfettamente e non si bloccano,
se parti di esso sono rotte o danneggiate,
che la funzionalità dell’apparecchio non
sia messa a rischio. Fare riparare le parti
danneggiate prima di utilizzare di nuovo
Page 9

Istruzioni di sicurezza generali per utensili elettrici
l’apparecchio. Molti incidenti sono provocati
dal fatto che i dispositivi elettrici non vengono
sottoposti ad una corretta manutenzione.
f) Mantenere gli utensili di taglio affilati
e puliti. Utensili di taglio curati con attenzione
e fornitidi bordi taglienti si incastrano meno
frequentemente e sono semplici da guidare
durante il lavoro.
g) Utilizzare dispositivi elettrici, accessori,
i dispositivi da inserire ecc, in conformità alle presenti istruzioni e nel modo
descritto per questo particolare tipologia di apparecchio. In questo senso,
tenere presente le condizioni di lavoro
e l’attività da eseguire. L’utilizzo di dispo-
sitivi elettrici per scopi diversi da quelli previsti
può provocare situazioni di pericolo.
5. Assistenza
a) Fare riparare l’apparecchio dal Centro
di Assistenza o da un elettricista specializzato e solo con pezzi di ricambio
originali. In questo modo viene garantita la
sicurezza dell’apparecchio.
Q
Avvisi di sicurezza particolari
per quest’apparecchiatura
pialla elettrica
Attenda l’interruzione del movimento
dell’albero portalama
positare l’apparecchiatura. Un’onda
sbloccata della lama può agganciarsi alla
superficie e causare la perdita di controllo e
pesanti ferite.
Non entri con le dita nel punto di
estrazione dei trucioli
colo di ferirsi a contatto con i componenti in rotazione.
Muova l’apparecchiatura in direzione
del materiale solo se accesa. Altrimenti
vi è il pericolo di contraccolpi, se la lama della
pialla si incastra nel materiale di lavorazione.
Durante la lavorazione la piattaforma
della pialla
9
deve assumere una
17
prima di de-
3
. Sussiste il peri-
posizione piana. Altrimenti vi è il rischio di
ferirsi, angolando la pialla.
Non esegua mai la piallatura su og-
getti in metallo. La lama della pialla / l’albero portalama
Fissi il materiale di lavorazione.
Faccia uso di dispositivi di truciolatura / di una
morsa per fissare il materiale di lavorazione. In
questo modo viene fissato in modo più sicuro
che tenendolo in mano.
Materiale contenente amianto non
può essere lavorato. L’amianto è considerato cancerogeno.
Le polveri che si formano durante la
lavorazione possono essere nocivi alla
salute, infiammabili o esplosivi. Porti
una maschera di protezione contro la polvere
e faccia uso di un dispositivo di aspirazione
della polvere / dei trucioli adatto visto che diverse polveri sono considerate cancerogeno.
Nel caso di lavorazioni a tempo prolun-
gato del legno e soprattutto di materiali
che producono polveri nocive alla salute, l’apparecchiatura va collegata con
un dispositivo di aspirazione della
polvere esterno.
Non faccia uso della pialla elettrica se
il cavo è danneggiato. I cavi danneggiati
aumentano il rischio di una scossa elettrica.
Non appoggi assolutamente le mani
vicino o davanti all’apparecchiatura e
vicino o sulla superficie di lavorazione.
Vi è il rischio di ferirsi scivolando.
In caso di pericolo estragga immedia-
tamente l’adattatore dalla presa.
In caso di pericolo, pause di lavoro e
non utilizzo estragga l’apparecchiatura dalla presa prima di eseguire una
qualsiasi operazione (ad es. cambio
del misuratore della pialla).
Tolga sempre l’adattatore dalla parte
posteriore dell’apparecchiatura.
Faccia uso esclusivo di lame da pialla
affilate.
Non imbeva i materiali o le superfici
di lavorazione con liquidi contenenti
solventi.
17
altrimenti viene danneggiata.
9 IT/MT
Page 10

Istruzioni di sicurezza generali per utensili elettrici / Messa in funzione
Eviti il contatto con componenti in
rotazione.
Non faccia mai uso dell’apparecchiatu-
ra al di fuori dell’ambito d’uso previsto
e solo se dotata di componenti/ accessori originali.
Tenga fissa l’apparecchiatura durante
il processo di lavorazione. Si assicuri di
avere una posizione sicura.
L’apparecchiatura deve essere sempre
pulita, secca e priva di olio o grassi
lubrificanti.
Indicazioni di sicurezza
per la pialla
Prima di riporre l‘utensile, aspettare fino all‘arre-
sto completo dell‘albero della lama. Se l‘albero
è in movimento, può agganciarsi alla superficie
in lavorazione, con conseguente possibile perdita di controllo e lesioni gravi.
Tenere l’utensile elettrico soltanto dalle impu-
gnature isolate, in quanto sussiste il rischio che
l’albero porta lama tocchi il cavo elettrico. Il
contatto con una linea di conduzione di corrente può mettere sotto tensione anche parti
metalliche dell’apparecchio e provocare una
scossa elettrica.
Fissare l‘utensile con una forzatura o in altro
modo a una base stabile. Se si tiene l‘utensile
soltanto con la mano o contro il proprio corpo,
prestare particolare attenzione per evitare
eventuali perdite di controllo.
Q
Messa in funzione
Q
Accensione / Spegnimento
Accensione:
Prema innanzitutto il bloccaggio di
accensione
Prema poi tenendo premuto l’interruttore di
ACCENSIONE / SPEGNIMENTO
Spegnimento:
Abbandoni l’interruttore di ACCENSIONE /
SPEGNIMENTO
Avviso: Il dispositivo di ACCENSIONE /
SPEGNIMENTO
può essere arrestato.
Q
Impostare la profondità
1
.
2
.
2
per motivi di sicurezza non
2
.
di truciolatura
Per mezzo del regolatore a rotazione 13 si può impostare la profondità della truciolatura a livelli da
0–3,0 mm sulla base della scala delle profondità
di truciolatura
Q
Risucchiare polvere / trucioli
14
.
(vedi immagine A)
PERICOLO DI FERIRSI!
Estragga sempre la presa dell’adattatore dalla
presa della corrente prima di eseguire dei lavori
all’apparecchiatura.
Q
Accessori originali / apparec-
chiature addizionali originali
Faccia uso esclusivo di accessori e
apparecchiature addizionali indicate
nelle istruzioni d’uso. L’impiego di altri
e
lementi o di altri accessori non raccomandati q
può rappresentare per Lei un pericolo di ferirsi.
10 IT/MT
Espulsione dei trucioli selezionabile
(da destra / da sinistra):
Sblocchi il dispositivo di espulsione dei trucioli 3
ruotando in direzione contraria rispetto alla direzione della freccia (a partire dalla posizione
„LOCK“).
ui
Estragga il dispositivo di espulsione dei trucioli 3
dall’apparecchiatura.
Il dispositivo di espulsione dei trucioli 3 può
essere inserito nella pialla da destra o da sinistra.
Inserisca il dispositivo di espulsione dei trucioli 3
all’interno dell’apparecchiatura.
Page 11

Messa in funzioneIstruzioni di sicurezza generali per utensili elettrici / Messa in funzione
Blocchi il dispositivo di espulsione dei trucioli 3,
eseguendo un movimento di rotazione nella
posizione “LOCK“.
Aspirazione esterna:
Se si impiegano sistemi di aspirazione della polvere,
quali ad es. un dispositivo di aspirazione per officina, si deve assolutamente impiegare il dispositivo
di riduzione
15
.
L’aspirapolvere deve essere adatto al materiale da
lavorare.
Collegare:
Inserisca il dispositivo di riduzione 15 in modo
fisso sul dispositivo di espulsione dei trucioli
3
Inserisca il tubo di un dispositivo di aspirapolvere
ammesso, quali ad es. di un dispositivo di aspirazione per officina sul dispositivo di espulsione
dei trucioli
di riduzione
3
o eventualmente sul dispositivo
15
.
Estrarre:
Estragga il tubo del dispositivo di aspirapolvere
3
dal dispositivo di espulsione dei trucioli
dal dispositivo di riduzione
15
.
o
Estragga eventualmente il dispositivo di
riduzione
15
.
Colleghi l’apparecchiatura con la parte ante-
riore della piattaforma da piallatura
materiale.
Passi l’apparecchiatura sulla superficie di lavo-
razione eseguendo un movimento regolare.
Proceda lentamente in avanti, esercitando pres-
sione sul punto intermedio della piattaforma
da piallatura
9
. L’avanzamento troppo rapido
diminuisce la qualità della superficie e può
causare l’intasamento del dispositivo di espulsione dei trucioli.
Q
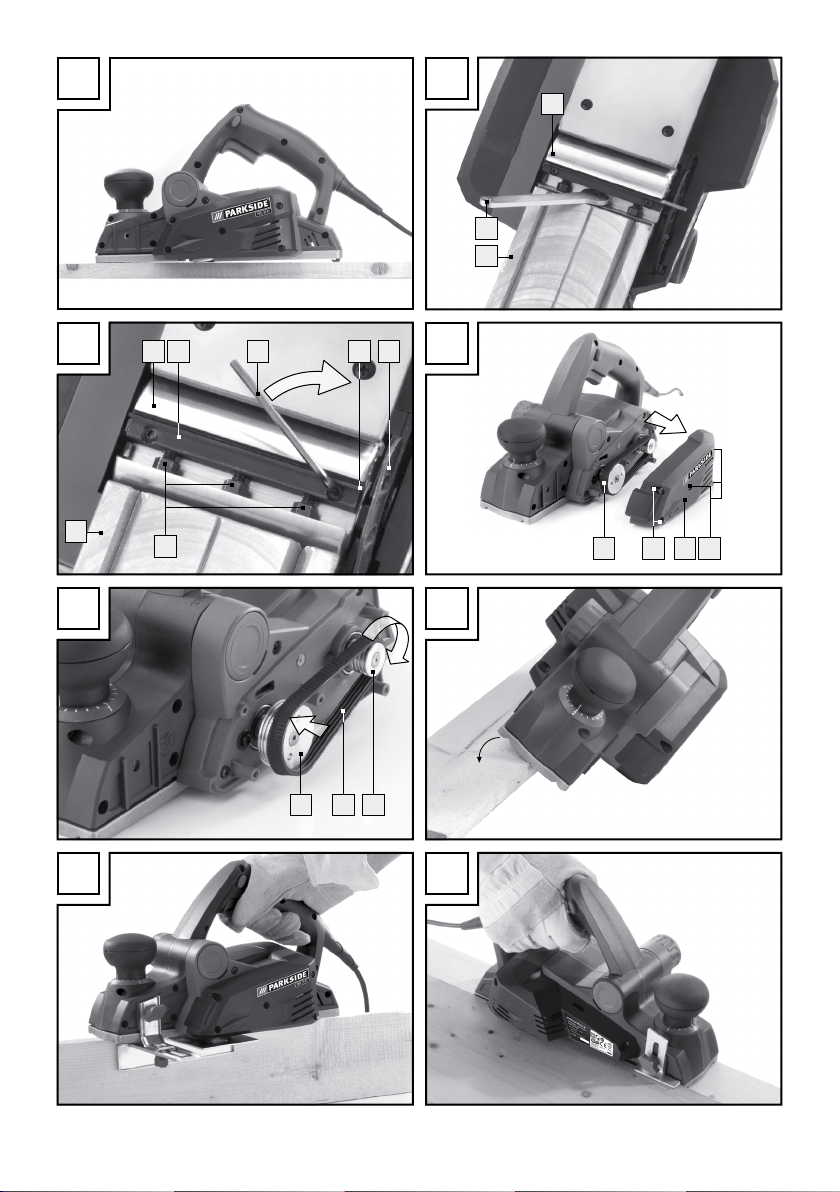
Mussare i bordi (vedi
.
immagine H)
Le scanalature a V 10 presenti nella piattaforma di
piallatura anteriore
9
permettono uno smussamen-
to semplice dei bordi dei materiali di lavorazione.
Secondo la larghezza dello smussamento deside-
rata, faccia uso della rispettiva scanalatura a V.
Inserisca la pialla con la scanalatura a V 10
nel bordo del materiale di lavorazione e lo
muova in parallelo rispetto a esso.
Q
Utilizzare la battuta parallela
(vedi immagine I)
9
con il
Q
Dispositivo di parcheggio
(vedi immagine B / C)
Il dispositivo di parcheggio 16 permette di parcheggiare l’apparecchiatura senza correre il rischio di
danneggiare il materiale da lavorare. Nel corso del
processo di lavorazione il dispositivo di parcheggio
16
viene alzato, mettendo a disposizione la parte
posteriore della piattaforma da piallatura
Q
Procedimento di piallatura
ATTENZIONE! PERICOLO DI CONTRAC-
COLPI! Conduca l’apparecchiatura in direzione
del materiale solo se accesa.
Imposti la profondità di truciolatura desiderata.
Accenda l’apparecchiatura.
9
.
Monti la battuta parallela 6 sull’apparecchia-
tura per mezzo di una vite di fissaggio
7
.
Allenti il dado della vite di fissaggio 8 e imposti
la larghezza desiderata.
Fissi nuovamente il dado di fissaggio 8.
Faccia attenzione al fatto di eseguire la pialla-
tura esercitando una pressione laterale.
Q
Utilizzare la battuta della
profondità di piegatura
(vedi immagine J)
Monti la battuta della profondità di piegatura 12
sull’apparecchiatura per mezzo di una vite di
fissaggio
I
mposti la profondità di piegatura desiderata med
ante la battuta della profondità di piegatura
11
.
i-
12
.
11 IT/MT
Page 12

Messa in funzione / Manutenzione e pulizia
Esegua la procedura di piallatura diverse volte
fino a raggiungere la profondità di piegatura
desiderata.
Q
Smontare / montare la lama
della pialla
20
(vedi immagine
D + E)
PERICOLO DI FERIRSI!
Estragga sempre l’adattatore dalla presa della corrente prima di eseguire lavori all’apparecchiatura.
ATTENZIONE! Vi è il pericolo di ferirsi con i
bordi da taglio acuti delle lame della pialla
Non venga a contatto con le lame della pialla
20
sui bordi da taglio.
La lama della pialla
20
è dotata di due lati da
taglio e può essere girata.
Sostituisca la lama della pialla 20, quando
entrambi i bordi da taglio sono spuntati.
Non affili ulteriormente la lama della pialla 20.
Girare la lama della pialla
20
o sostituirla
AVVISO IMPORTANTE:
Non allentare le due viti esagonali interne. Servono ad impostare l’altezza dell’albero portalama.
Un aggiustamento è solo necessario se Lei desidera
impiegare un altro tipo di lama di pialla, quale ad
es. una lama rustica.
Nel caso di una sostituzione della lama, sostituire
entrambe le lame per evitare uno squilibrio di rotazione.
AVVISO: Estragga innanzitutto una sola lama, in
questo modo può orientarsi alla seconda lama
montata in fabbrica per un montaggio futuro.
1. Allenti con la chiave mista
26
contenuta nel
volume di consegna le 3 viti dell’elemento di
truciolatura
Prema la protezione laterale
18
.
21
flessibile all’in-
terno della fenditura all’interno dell’involucro.
2. Estragga lateralmente l’elemento di truciolatura
18
dall’albero portalama 17.
12 IT/MT
20
3. Estragga la lama della pialla 20 lateralmente
dall’elemento di truciolatura
18
.
4. Esegua il montaggio mediante una lama della
pialla girata o nuova in sequenza inversa.
5. Le lame della pialla
20
si possono ordinare
presso l’indirizzo del servizio clienti indicato in
basso (capitolo “Garanzia“).
Q
Sostituire le cinghie di trasmis-
sione (vedi immagine F + G)
PERICOLO DI FERIRSI!
Estragga sempre l’adattatore dalla presa della
!
corrente prima di eseguire qualsiasi operazione
all’apparecchiatura.
Allenti le viti 5 e levi la copertura delle cin-
4
ghie
.
Elimini le cinghie di trasmissione 23 usurate.
Metta innanzitutto la nuova cinghia di trasmis-
23
sione
e tiri infine su la cinghia di trasmissione
eseguendo un movimento di rotazione sulla
grande ruota della cinghia
Metta la copertura della cinghia 4, fissandola
dunque con le viti
Q
Manutenzione e pulizia
Estragga sempre l’adattatore dalla presa della
corrente prima di eseguire qualsiasi operazione
all’apparecchiatura.
Mantenga sempre pulita l’apparecchiatura e
le fenditure di areazione per lavorare in modo
corretto e sicuro.
Pulisca regolarmente il dispositivo di espulsione
dei trucioli
Per pulire il dispositivo di espulsione dei trucioli
intasato, faccia uso di un attrezzo adatto (ad
es. pezzo di legno, aria a pressione, ecc.).
Per pulire l’involucro, faccia uso di una pezza
asciutta.
Elimini la polvere di piallatura aderente con un
pennello.
Non faccia assolutamente uso di oggetti acuti,
benzina, solventi oppure detergenti aggressivi
sulla piccola ruota della cinghia
24
.
5
.
PERICOLO DI FERIRSI!
3
.
25
23
,
Page 13

Manutenzione e pulizia / Assistenza / Garanzia / SmaltimentoMessa in funzione / Manutenzione e pulizia
nei confronti dei materiali sintetici. Eviti la penetrazione di liquidi all’interno dell’apparecchiatura.
Q
Assistenza
Affidare la riparazione
dell’apparecchio esclusivamente a
personale specializzato e qualificato
e con pezzi di ricambio originali, a ga-
ranzia della sicurezza dell’apparecchio.
spina o del cavo di alimentazione deve
essere eseguita esclusivamente dal
fabbricante dell’apparecchio o dal rela-
tivo servizio clienti, a garanzia della sicurezza
dell’apparecchio.
Q
Garanzia
Questo apparecchio è garantito per tre
anni a partire dalla data di acquisto.
L’apparecchio è stato prodotto con cura
e debitamente collaudato prima della
consegna. Conservare lo scontrino come
prova d’acquisto. In caso di interventi in
garanzia, contattare telefonicamente il
proprio centro di assistenza. Solo in questo modo è possibile garantire una spedizione gratuita della merce.
La garanzia vale solo per i difetti di materiale o
fabbricazione, non per i danni da trasporto, parti
soggette a usura o danni a parti fragili come ad
es. interruttori o accumulatori. Il prodotto è destinato esclusivamente all’uso domestico e non a quello
commerciale.
La garanzia decade in caso di impiego improprio
o manomissione, uso della forza e interventi non
eseguiti dalla nostra filiale di assistenza autorizzata.
Questa garanzia non costituisce alcun limite ai diritti legali del consumatore.
La sostituzione della
presenti già all’acquisto devono essere comunicati
immediatamente dopo il disimballaggio, e non oltre
due giorni dalla data di acquisto. Le riparazioni effettuate dopo la scadenza del periodo di garanzia
sono a pagamento.
IT
Assistenza Italia
Tel.: 02 36003201
e-mail: kompernass@lidl.it
IAN 93528
MT
Assistenza Malta
Tel.: 80062230
e-mail: kompernass@lidl.com.mt
IAN 93528
Q
Smaltimento
L’imballaggio è composto da materiali
ecologici, che possono essere smaltiti
presso i siti di riciclaggio locali.
Non gettare gli utensili elettrici
nei rifiuti domestici!
In conformità alla direttiva europea 2002 / 96 / EC
sui rifiuti di apparecchiature elettriche ed elettroniche
e relativa trasposizione nel diritto nazionale, gli
utensili elettrici usati devono essere raccolti separatamente e riciclati in maniera compatibile con
l’ambiente.
Informazioni sulle possibilità di smaltimento di apparecchi giunti al termine della loro vita utile sono
disponibili presso le amministrazioni comunali.
Il periodo di garanzia non viene prolungato in caso
di un intervento in garanzia. Ciò vale anche per le
componenti sostituite e riparate. I danni e difetti
13 IT/MT
Page 14

Dichiarazione di conformità / Fabbricante Table of contents
Q
Dichiarazione di conformità /
Fabbricante
Noi, KOMPERNASS HANDELS GMBH, responsabile per la documentazione: sig. Semi Uguzlu,
BURGSTRASSE 21, 44867 BOCHUM, GERMANY,
dichiarano con la presente che questo prodotto è
conforme con le seguenti norme, documenti normativi e direttive dell’Unione Europea:
Direttiva macchine
(2006 / 42 / EC)
Direttiva CE sulla bassa tensione
(2006 / 95 / EC)
Compatibilità elettromagnetica
(2004 / 108 / EC)
RoHS Direttiva
(2011 / 65 / EU)
Norme utilizzate ed armonizzate
EN 60745-1/A11:2010
EN 60745-2-14/A2:2010
EN 55014-1/A2:2011
EN 55014-2/A2:2008
EN 61000-3-2/A2:2009
EN 61000-3-3:2008
Tipo / Denominazione dell’apparecchio:
Pialla elettrica PEH 30 A1
Date of manufacture (DOM): 09–2013
Numero di serie: IAN 93528
Bochum, 30.09.2013
Semi Uguzlu
- Direttore del Reparto Qualità -
Si riservano modifiche tecniche ai fini di
ulteriori sviluppi.
14 IT/MT
Page 15

Introduction
Proper use ............................................................................................................................................ Page 16
Features and equipment ..................................................................................................................... Page 16
Included items .....................................................................................................................................Page 16
Technical data ..................................................................................................................................... Page 16
General safety advice for electrical power tools
1. Workplace safety ........................................................................................................................... Page 17
2. Electrical safety ............................................................................................................................... Page 17
3. Personal safety ................................................................................................................................ Page 18
4. Careful handling and use of electrical power tools ..................................................................... Page 18
5. Service ............................................................................................................................................. Page 19
Safety advice relating specifically to power planers ........................................................................ Page 19
Safety instructions for planers.............................................................................................................Page 19
Original accessories / attachments .................................................................................................... Page 20
Preparing for use
Switching On / Off .............................................................................................................................. Page 20
Setting the cutting depth ..................................................................................................................... Page 20
Vacuum extraction of dust / debris.....................................................................................................Page 20
Parking shoe ........................................................................................................................................ Page 20
The planing process ............................................................................................................................ Page 21
Chamfering edges...............................................................................................................................Page 21
Using the guide fence ......................................................................................................................... Page 21
Using the rebate depth stop ............................................................................................................... Page 21
Removing and installing a planer blade ............................................................................................ Page 21
Replacing a drive belt ......................................................................................................................... Page 22
Maintenance and cleaning ............................................................................................... Page 22
Service centre ..............................................................................................................................Page 22
Warranty ......................................................................................................................................... Page 22
Disposal ............................................................................................................................................ Page 23
Declaration of Conformity / Manufacturer..........................................................Page 23
15 GB/MT
Page 16

Introduction Introduction / General safety advice for electrical power tools
Electric planer PEH 30 A1
Q
Introduction
We congratulate you on the purchase of your new
device. You have chosen a high quality product. The
instructions for use are part of the product. They
contain important information concerning safety,
use and disposal. Before using the product, please
familiarise yourself with all of the safety information
and instructions for use. Only use the unit as de
and for the specified applications. If you pass the
product on to anyone else, please ensure that you
also pass on all the documentation with it.
Q
Proper use
The device is suitable for planing wood in the form
of beams or boards or the like if the workpiece is
held securely in a fixed position. The device is also
suitable for chamfering edges and for rebating.
Any other use or modification to the device shall be
considered as improper use and could give rise to
considerable risk of accident. The manufacturer will
not accept liability for loss or damage arising from
improper use. Not suitable for commercial use.
Q
Features and equipment
1
Safety lock-out
2
ON / OFF switch
3
Planing debris removal port (right / left selectable)
4
Belt cover
5
Belt cover screws
6
Guide fence
7
Guide fence fixing screws
8
Fixing nut for setting rebate width
9
Sole
10
V-groove
11
Rebate depth stop fixing screw
12
Rebate depth stop
13
Rotary control for setting planing depth
14
Cutting depth scale
15
Reducer piece
scribed
16
Parking shoe
17
Blade shaft
18
Cutting element
19
Plane blade fixing screws
20
Plane blade
21
Side blade shaft guard
22
Allen key
23
Drive belt
24
Large belt wheel
25
Small belt wheel
26
Open spanner
Q
Included items
1 Electric planer PEH 30 A1
1 Guide fence
1 Rebate depth stop
1 Allen key
1 Open spanner
1 Reducer piece
1 Operating instructions
Q
Technical data
Rated voltage: 230–240 V∼ 50 Hz
Rated power: 750 W
Design no-load speed: n
13000 rpm
0
Planing depth: 0–3.0 mm
Planing width: 82 mm
Protection class: II /
Noise and vibration data:
Measured values for noise are determined in accordance with EN 60745. The A-weighted noise level
of the electrical power tool are typically:
Sound pressure level: 89 dB(A)
Sound power level: 100 dB(A)
Uncertainty K: 3 dB
Wear ear protection!
Evaluated acceleration, typical:
Hand / arm vibration a
Uncertainty K = 1.5 m / s
= 5.644 m / s
h
2
2
16 GB/MT
Page 17

The vibration level specified in
these instructions was measured in accordance with
an EN 60745 standardised measurement process
and can be used to compare equipment. The vibration emission value specified can also serve as a
preliminary assessment of the exposure.
The vibration level will change according to the application of the electrical tool an in some cases may
exceed the value specified in these instructions. Regularly using the electric tool in such a way may make
it easy to underestimate the vibration.
Note: If you wish to make an accurate assessment
of the vibration loads experienced during a particular
period of working, you should also take into account
the intervening periods of time when the device is
switched off or is running but is not actually in use.
This can result in a much lower vibration load over
the whole of the period of working.
General safety advice for
electrical power tools
Read all the safety advice
and instructions! Failure to observe the safety
advice and instructions may result in electric shock,
fire and / or serious injury.
Keep all the safety advice and instructions
in a safe place for future reference!
The term “electrical tool” used in the safety advice
refers to electrical tools powered by mains electricity (by means of a mains lead) and electrical tools
powered by rechargeable batteries (without a
mains lead).
1. Workplace safety
a) Keep your working area clean and
well lit. Untidy or poorly lit working areas can
lead to accidents.
b) Do not work with the device in poten-
tially explosive environments in which
there are inflammable liquids, gases
or dusts. Electrical power tools create sparks,
which can ignite dusts or fumes.
c) Keep children and other people away
while you are operating the electrical
tool. Distractions can cause you to lose control
of the device.
2. Electrical safety
a)
The mains plug on the device must match
the mains socket. The plug must not be
modified in any way. Do not use an
adapter plug with devices fitted with
a protective earth. Unmodified plugs and
matching sockets reduce the risk of electric shock.
b) Avoid touching earthed surfaces such
as pipes, radiators, ovens and refrigerators with any part of your body.
There is an increased risk of electric shock if
your body is earthed.
c) Keep the device away from rain or
moisture. Water entering an electrical device
increases the risk of electric shock.
d) Do not use the mains lead for any pur-
pose for which it was not intended,
to carry the device, to hang up the device or to pull the mains plug out of
the mains socket. Keep the mains lead
away from heat, oil, sharp edges or
moving parts of the device. Damaged
or tangled mains leads increase the risk of
electric shock.
e) When working outdoors with an
electrical power tool always use extension cables that are also approved
for use outdoors. The use of an extension
cable suitable for outdoor use reduces the risk
of electric shock.
f) Use a residual current device (RCD)
for protection if operating the electrical power tool in a moist environment
is unavoidable. The use of an RCD reduces
the risk of electric shock.
e.g.
17 GB/MT
Page 18

3. Personal safety
a) Remain alert at all times, watch what
you are doing and always proceed
with caution. Do not use the device if
you are tired or under the influence of
drugs, alcohol or medication. One mo
of carelessness when using the device can lead
to serious injury.
b) Wear personal protective equipment
and always wear safety glasses. The
wearing of personal protective equipment such
as dust masks, non-slip safety shoes, safety helmets or ear protectors, appropriate to the type
of electrical power tool used and work undertaken, reduces the risk of injury.
c) Avoid unintentional operation of the
device. Check that the electrical power
tool is switched off before you connect
it to the mains, pick it up or carry it.
Accidents can happen if you carry the device
with your finger on the ON / OFF switch or with
the device switched on.
d) Remove any setting tools or spanners
before you switch the device on. A tool
or spanner left attached to a rotating part of a
device can lead to injury.
e) Avoid placing your body in an unnat-
ural position. Keep proper footing and
balance at all times. By doing this you will
be in a better position to control the device in
unforeseen circumstances.
f) Wear suitable clothing. Do not wear
loose clothing or jewellery. Keep your
hair, clothing and gloves clear of moving parts. Loose clothing, jewellery or long
hair can become trapped in moving parts.
g) If vacuum dust extraction and collection
devices are fitted do not forget to
that they are properly connected and
correctly used. The use of these devices
reduces the hazard presented by dust.
ment
check
4. Careful handling and use
of electrical power tools
a) Do not overload the device. Always
use an electrical power tool that is
intended for the task you are undertaking. By using the right electrical power
tool for the job you will work more safely and
achieve a better result.
b) Do not use an electrical power tool if
its switch is defective. An electrical power
tool that can no longer be switched on and off
is dangerous and must be repaired.
c) Pull the mains plug from the socket
before you make any adjustments to
the device, change accessories or when
the device is put away. This precaution is
intended to prevent you from unintentionally
starting the device.
d) When not in use always ensure that
electrical power tools are kept out of
reach of children. Do not let anyone use
the device if he or she is not familiar
with it or has not read the instructions
and advice. Electrical power tools are dan-
gerous when they are used by inexperienced
people.
e) Look after the device carefully. Check
that moving parts are working properly and move freely. Check for any
parts that are broken or damaged
enough to detrimentally affect the
functioning of the device. Have damaged parts repaired before you use
the device. Many accidents have their origins
in poorly maintained electrical power tools.
f) Keep cutting tools clean and sharp.
Carefully maintained cutting tools with sharp
cutting edges are less likely to jam and are
easier to control.
g) Use the electrical power tool, accesso-
ries, inserted tools etc. in accordance
with these instructions and advice, and
the stipulations drawn up for this particular type of device. In doing this, take
into account the working conditions
and the task in hand. The use of electrical
18 GB/MT
Page 19

General safety advice for electrical power toolsGeneral safety advice for electrical power tools
power tools for purposes other than those intended can lead to dangerous situations.
5. Service
a) Have your device repaired at the ser-
vice centre or by qualified specialist
personnel using original manufacturer
parts only. This will ensure that your device
remains safe to use.
Q
Safety advice relating specifi-
cally to power planers
Wait until the blade shaft 17 has com-
pletely stopped moving before you
put the device down. An exposed blade
shaft may catch on the surface and lead to loss
of control or serious injury.
Do not place your fingers in the planer
debris removal port
from rotating parts.
Always switch on the device before
placing it against the workpiece. Otherwise the device could kick back if the planer
blade gets snagged in the workpiece.
When working always keep the sole 9
flat against the workpiece. Otherwise
you could be injured if the plane tilts.
Never plane over metal objects. Other-
wise the planer blade / blade shaft
be damaged.
Secure the workpiece. Use clamps or a
vice to grip the workpiece firmly. This is much
safer than holding it with your hand.
Do not plane materials containing
asbestos. Asbestos is a known carcinogen.
The dust generated while planing
could be hazardous to health, inflammable or explosive. Wear a dust mask and
use a suitable dust / debris vacuum extraction
device. Some dusts are known carcinogens.
When planing wood for long periods
and in particular when working on
materials that give rise to dusts that
are hazardous to health, the planer
3
. Danger of injury
17
could
must be connected to a suitable external dust extraction device.
Do not use the power planer if its
mains lead is damaged. Damaged mains
leads increase the risk of electric shock.
Never support yourself by placing
your hands near or in front of the
device or on the workpiece surface.
If you slip you could be injured.
If a dangerous situation arises, pull
the mains plug immediately out of the
mains socket.
When taking a break from your
work, before carrying out any tasks
on the device itself (e.g. changing the
plane blade) or when you are not using the device, always pull the mains
plug out of the mains socket.
Always work with the mains lead lead-
ing away from the rear of the device.
Use sharp planer blades only.
Do not soak the materials or the sur-
face you are about to work on with
liquids containing solvents.
Avoid contact with rotating parts.
Never use the device for a purpose
for which it was not intended or with
non-original parts / accessories.
Hold the device securely when work-
ing. Ensure that you are standing in a stable,
well-balanced position.
Always keep the device clean, dry and
free from oil or grease.
Safety instructions for planers
Wait for the cutter spindle to stop completely
before setting down the power tool. An exposed rotating cutter spindle can catch on the
surface, resulting in loss of control and serious
injuries.
Only hold the power tool by the insulated handle
areas as the cutter spindle may touch the tool‘s
mains cable. Contact with a live wire could
cause metal parts of the device to become live
and lead to electric shock.
19 GB/MT
Page 20

Fix and secure the work piece to a stable sur-
face using clamps or other means. When only
securing the work piece by hand or against
your body it will remain unstable, which could
lead to loss of control.
Q
O
riginal accessories / attachments
Use only the accessories and attach-
ments detailed in the operating instructions. The use of attachments or accessories
other than those recommended here could lead
to you suffering an injury.
Q
Preparing for use
Q
Switching On / Off
Switching on:
First press the safety lock-out 1.
Then press and keep pressed the ON / OFF
2
switch
.
Switching off:
Release the ON / OFF switch 2.
Note: For safety reasons the ON / OFF switch
2
cannot be locked in the ON position.
Q
Setting the cutting depth
The rotary control 13 can be used to set the cutting
depth in steps from 0–3.0 mm according to the cutting depth scale
14
.
Planing debris removal port (right / left
selectable):
Release the planing debris removal port 3 by
turning it against the direction of the arrow (out
of the “Lock” position).
Pull the planing debris removal port 3 out of
the device.
The planing debris removal port 3 can be set
to face left or right in the planer.
Push the planing debris removal port 3 into
the device.
Lock the planing debris removal port 3 by
turning it into the “Lock” position.
External vacuum extraction:
If necessary fit the reducer piece
15
when using
a dust extraction system, e.g. a workshop dust
extraction system.
The vacuum cleaner / dust extraction device used
must be suitable for the material being planed.
Connection:
Place the reducer piece 15 firmly on to the
planing debris removal port
3
.
Push the hose of a suitable dust extraction device
approved for that purpose (e.g. a workshop
vacuum cleaner) on to the planing debris remov-
3
al port
or the reducer piece 15.
Removal:
Pull the hose of the dust extraction device off
the planing debris removal port
reducer piece
15
.
3
Pull off the reducer piece 15, if fitted.
Q
Parking shoe (see Figs. B / C)
or off the
Q
Vacuum extraction of dust /
debris (see Fig. A)
DANGER OF INJURY!
Before you carry out any work on the device always
pull the mains plug out of the mains socket.
20 GB/MT
The parking shoe 16 allows you to lay the device
down without the risk of damaging the workpiece.
When planing, the parking shoe
exposes the rear part of the sole
16
swings up and
9
.
Page 21

Q
The planing process
CAUTION! DANGER OF KICKBACK!
Always switch on the device before placing it
against the workpiece.
Set the required cutting depth.
Switch on the device.
Always place the front part of the sole 9 down
first on to the workpiece.
Guide the device with even forward movement
over the surface being planed.
Move the device forward at a slow rate and
ensure that the contact pressure acts evenly on
the sole
9
. Moving forward at too great a rate
results in a poorer surface quality and can lead
to blocking of the planing debris removal port.
Q
Chamfering edges (see Fig. H)
Preparing for useGeneral safety advice for electrical power tools / Preparing for use
Make the required number of passes with the
planer until desired rebate depth is achieved.
Q
Removing and installing a
planer blade 20 (see Fig. D + E)
DANGER OF INJURY!
Before you carry out any work on the device always
pull the mains plug out of the mains socket.
CAUTION! The sharp cutting edges of the plan-
er blade
touch the cutting edges of the planer blade 20.
The planer blade
can be fitted either way around.
Replace the planer blade 20 when both cutting
edges are blunt.
Do not resharpen the planer blades 20.
20
present an injury hazard! Never
20
has two cutting edges and it
The V-grooves 10 in the front sole 9 allow the de
vice
to be used for simple chamfering of workpiece edges.
Use the V-groove most appropriate to your
desired chamfer width.
Place the planer with the V-groove 10 on the
work-
piece edge and guide the planer along the edge.
Q
Using the guide fence (see Fig. I)
Attach the guide fence 6 to the device with
the fixing screw
7
.
Release the fixing nut 8 and set the guide at
the desired distance.
Retighten the fixing nut 8.
Exert some slight sideways pressure when guid-
ing the planer with the guide fence.
Q
Using the rebate depth stop
(see Fig. J)
Attach the rebate depth stop 12 to the device
with the fixing screw
Set the desired rebate depth with the rebate
depth stop
12
11
.
.
Reversing or replacing a planer blade
20
IMPORTANT INFORMATION:
Do not release the two Allen keys. They are used to
adjust the height of the blade shaft.
Adjustment is necessary only if you wish to use a
different planer blade type e.g. a profiled blade.
Always replace both blades at the same time to
avoid out of balance forces.
NOTE: If you only release one blade first then you
can use the factory-fitted second blade for orientation
when you fit the new blade.
26
.
into the slot
18
1. Release the 3 bolts of the cutting element
using the supplied open spanner
Press the removable side guard
21
in the housing.
2. Push the cutting element
the blade shaft
17
3. Push the planer blade
the cutting element
18
sideways out from
.
20
sideways out from
18
.
4. Reassembly is carried out in the reverse order
with a reversed or new planer blade.
5. Planer blades
20
can be obtained from the
service address indicated (see section about
warranty).
21 GB/MT
Page 22

Q
Replacing a drive belt
(see Figs. F + G)
DANGER OF INJURY!
Before you carry out any work on the device always
pull the mains plug out of the mains socket.
Release the screws 5 and remove the belt
cover
Remove the worn drive belt 23.
First place the new drive belt 23 on to the small
belt wheel
on to the large belt wheel
Put the belt cover 4 back into position and
fasten it into place with the screws
Q
Maintenance and cleaning
4
.
25
and then pull the drive belt 23
24
by rotating it.
5
.
the replacement carried out by the
manufacturer or its service centre. This
will ensure that your device remains safe to use.
Q
Warranty
The warranty for this appliance is for 3
years from the date of purchase. The appliance has been manufactured with care
and meticulously examined before delivery. Please retain your receipt as proof
of purchase. In the event of a warranty
claim, please make contact by telephone
with our Service Department. Only in this
way can a post-free despatch for your
goods be assured.
DANGER OF INJURY!
Before you carry out any work on the device always
pull the mains plug out of the mains socket.
Always keep the device and the ventilation
slots clean. This way you will work more safely
and produce better results.
Clean out the planing debris removal port 3
regularly.
Clean out a blocked planing debris removal
port using suitable means (e.g. piece of wood,
air under pressure, etc.).
Use a dry cloth to clean the housing.
Remove any adhering planing dust with a
narrow paint brush.
In no circumstances use sharp objects, or petrol,
solvents or cleaning agents that might attack
plastic. Do not allow any liquids to enter the
inside of the device.
Q
Service centre
Have your device repaire
d
only by qualified specialist personnel
using original manufacturer parts only.
This will ensure that your device remains safe
to use.
If the plug or mains lead
needs to be replaced, always have
The warranty covers only claims for material and
maufacturing defects, but not for transport damage,
for wearing parts or for damage to fragile components, e.g. buttons or batteries. This product is for private use only and is not intended for commercial use.
The warranty is void in the case of abusive and improper handling, use of force and internal tampering
not carried out by our authorized service branch. Your
statutory rights are not restricted in any way by this
warranty.
The warranty period will not be extended by repairs
made unter warranty. This applies also to replaced
and repaired parts. Any damage and defects extant
on purchase must be reported immediately after
unpacking the appliance, at the latest, two days after
the purchase date. Repairs made after the expiration
of the warranty period are subject to payment.
GB
Service Great Britain
Tel.: 0871 5000 720
(0,10 GBP/Min.)
e-mail: kompernass@lidl.co.uk
IAN 93528
22 GB/MT
Page 23

Warranty / Disposal / Declaration of Conformity / ManufacturerPreparing for use / Maintenance and cleaning / Service centre / Warranty
MT
Service Malta
Tel.: 80062230
e-mail: kompernass@lidl.com.mt
IAN 93528
Q
Disposal
The packaging is wholly composed of
environmentally-friendly materials that can
be disposed of at a local recycling centre.
Do not dispose of electrical power
tools with the household rubbish!
In
accordance with European Directive 2002 / 96 / E
(covering waste electrical and electronic equipment)
and its transposition into national legislation, worn
out electrical power tools must be collected sepa
and taken for environmentally compatible recycling.
Contact your local refuse disposal authority for
more details of how to dispose of your worn out
electrical devices.
rately
Q
Declaration of Conformity /
Manufacturer
We, KOMPERNASS HANDELS GMBH, the person
responsible for documents: Mr Semi Uguzlu, BURGSTRASSE 21, 44867 BOCHUM, GERMANY, hereby
declare that this product complies with the following
standards, normative documents and EU directives:
Machinery Directive
(2006 / 42 / EC)
EU Low Voltage Directive
(2006 / 95 / EC)
Electromagnetic Compatibility
(2004 / 108 / EC)
C
RoHS Directive
(2011 / 65 / EU)
Applicable harmonized standards
EN 60745-1/A11:2010
EN 60745-2-14/A2:2010
EN 55014-1/A2:2011
EN 55014-2/A2:2008
EN 61000-3-2/A2:2009
EN 61000-3-3:2008
Type / Device description:
Electric planer PEH 30 A1
Date of manufacture (DOM): 09–2013
Serial number: IAN 93528
Bochum, 30.09.2013
Semi Uguzlu
- Quality Manager -
We reserve the right to make technical modifications in the course of further development.
23 GB/MT
Page 24

24
Page 25

Inhaltsverzeichnis
Einleitung
Bestimmungsgemäßer Gebrauch ....................................................................................................... Seite 26
Ausstattung .......................................................................................................................................... Seite 26
Lieferumfang ........................................................................................................................................ Seite 26
Technische Daten ................................................................................................................................ Seite 26
Allgemeine Sicherheitshinweise für Elektrowerkzeuge
1. Arbeitsplatz-Sicherheit .................................................................................................................... Seite 27
2. Elektrische Sicherheit ...................................................................................................................... Seite 27
3. Sicherheit von Personen ................................................................................................................. Seite 28
4. Verwendung und Behandlung des Elektrowerkzeugs .................................................................. Seite 28
5. Service ............................................................................................................................................. Seite 29
Gerätespezifische Sicherheitshinweise für Elektrohobel ................................................................... Seite 29
Sicherheitshinweise für Hobel ............................................................................................................Seite 30
Originalzubehör / -zusatzgeräte ........................................................................................................ Seite 30
Inbetriebnahme
Ein- / Ausschalten.................................................................................................................................Seite 30
Spantiefe einstellen ............................................................................................................................. Seite 30
Staub / Späne absaugen .................................................................................................................... Seite 30
Parkschuh ............................................................................................................................................. Seite 31
Hobelvorgang ..................................................................................................................................... Seite 31
Kanten anfasen ...................................................................................................................................Seite 31
Parallelanschlag verwenden ..............................................................................................................Seite 31
Falztiefenanschlag verwenden ........................................................................................................... Seite 31
Hobelmesser ausbauen / einbauen ...................................................................................................Seite 31
Antriebsriemen wechseln .................................................................................................................... Seite 32
Wartung und Reinigung ..................................................................................................... Seite 32
Service ............................................................................................................................................... Seite 32
Garantie ........................................................................................................................................... Seite 32
Entsorgung ..................................................................................................................................... Seite 33
Konformitätserklärung / Hersteller ..........................................................................Seite 34
25 DE/AT/CH
Page 26

Einleitung Einleitung / Allgemeine Sicherheitshinweise für Elektrowerkzeuge
Elektrohobel PEH 30 A1
Einleitung
Wir beglückwünschen Sie zum Kauf Ihres neuen
Gerätes. Sie haben sich damit für ein hochwertiges
Produkt entschieden. Die Bedienungsanleitung ist
Teil dieses Produkts. Sie enthält wichtige Hinweise für
Sicherheit, Gebrauch und Entsorgung. Machen Sie
sich vor der Benutzung
und Sicherheitshinw
des Produkts mit allen Bedien-
eisen vertraut. Benutzen Sie das
Produkt nur wie beschrieben und für die angegebenen Einsatzbereiche. Händigen Sie alle Unterlagen
bei Weitergabe des Produkts an Dritte mit aus.
Bestimmungsgemäßer
Gebrauch
Das Gerät ist bei fester Auflage der Werkstücke
zum Hobeln von Holzwerkstoffen wie Balken oder
Brettern geeignet. Ferner eignet sich das Gerät zum
Abschrägen von Kanten und zum Falzen. Jede andere Verwendung oder Veränderung der Maschine
gilt als nicht bestimmungsgemäß und birgt erhebliche
Unfallgefahren. Für aus bestimmungswidriger Verwendung entstandene Schäden übernimmt der
Hersteller keine Haftung. Nicht für den gewerblichen
Einsatz bestimmt.
Ausstattung
1
Einschaltsperre
2
EIN- / AUS-Schalter
3
Spanauswurf (wahlweise rechts / links)
4
Riemen-Abdeckung
5
Schrauben für Riemen-Abdeckung
6
Parallelanschlag
7
Befestigungsschraube für Parallelanschlag
8
Feststellmutter für Einstellung Falzbreite
9
Hobelsohle
10
V-Nuten
11
Befestigungsschraube für Falztiefenanschlag
12
Falztiefenanschlag
13
Drehregler für Spantiefeneinstellung
14
Spantiefenskala
26 DE/AT/CH
15
Reduzierstück
16
Parkschuh
17
Messerwelle
18
Spannelement
19
Befestigungsschrauben für Hobelmesser
20
Hobelmesser
21
Seitlicher Messerwellenschutz
22
Innensechskantschlüssel
23
Antriebsriemen
24
Großes Riemenrad
25
Kleines Riemenrad
26
Maulschlüssel
Lieferumfang
1 Elektrohobel PEH 30 A1
1 Parallelanschlag
1 Falztiefenanschlag
1 Innensechskantschlüssel
1 Maulschlüssel
1 Reduzierstück
1 Bedienungsanleitung
Technische Daten
Nennspannung: 230–240 V∼ 50 Hz
Nennleistung: 750 W
Bemessungs-LeerlaufDrehzahl: n
13000 min
0
-1
Hobeltiefe: 0–3,0 mm
Hobelbreite: 82 mm
Schutzklasse: II /
Geräusch- und Vibrationsinformationen:
Messwert für Geräusch ermittelt entsprechend
EN 60745. Der A-bewertete Geräuschpegel des
Elektrowerkzeugs beträgt typischerweise:
Schalldruckpegel: 89 dB(A)
Schallleistungspegel: 100 dB(A)
Unsicherheit K: 3 dB
Gehörschutz tragen!
Bewertete Beschleunigung, typischerweise:
Hand- / Armvibration ah = 5,644 m / s
Unsicherheit K = 1,5 m / s
2
2
Page 27

Der in diesen Anweisungen
angegebene Schwingungspegel ist entsprechend
einem in EN 60745 genormten Messverfahren gemessen worden und kann für den Gerätevergleich
verwendet werden. Der angegebene Schwingungsemissionswert kann auch zu einer einleitenden Einschätzung der Aussetzung verwendet werden.
Der Schwingungspegel wird sich entsprechend dem
Einsatz des Elektrowerkzeugs verändern und kann
in manchen Fällen über dem in diesen Anweisungen
angegebenen Wert liegen. Die Schwingungsbelastung könnte unterschätzt werden, wenn das Elektrowerkzeug regelmäßig in solcher Weise verwendet
wird.
Hinweis: Für eine genaue Abschätzung der
Schwingungsbelastung während eines bestimmten
Arbeitszeitraumes sollten auch die Zeiten berücksichtigt werden, in denen das Gerät abgeschaltet ist
oder zwar läuft, aber nicht tatsächlich im Einsatz ist.
Dies kann die Schwingungsbelastung über den
gesamten Arbeitszeitraum deutlich reduzieren.
Allgemeine Sicherheitshinweise
für Elektrowerkzeuge
Lesen Sie alle Sicherheits-
hinweise und Anweisungen. Versäumnisse
bei der Einhaltung der Sicherheitshinweise und
Anweisungen können elektrischen Schlag, Brand
und / oder schwere Verletzungen verursachen.
Bewahren Sie alle Sicherheitshinweise
und Anweisungen für die Zukunft auf!
Der in den Sicherheitshinweisen verwendete Begriff
„Elektrowerkzeug“ bezieht sich auf netzbetriebene
Elektrowerk
triebene Elektrowerkzeuge (ohne Netzkabel).
zeuge (mit Netzkabel) und auf akkube-
1. Arbeitsplatz-Sicherheit
a) Halten Sie Ihren Arbeitsbereich sauber
und gut beleuchtet. Unordnung und unbeleuch-
tete Arbeitsbereiche können zu Unfällen führen.
b) Arbeiten Sie mit dem Elektrowerk-
zeug nicht in explosionsgefährdeter
Umgebung, in der sich brennbare Flüssigkeiten, Gase oder Stäube befinden.
Elektrowerkzeuge erzeugen Funken, die den
Staub oder die Dämpfe entzünden können.
c) Halten Sie Kinder und andere Personen
während der Benutzung des Elektrowerkzeugs fern. Bei Ablenkung können
Sie die Kontrolle über das Gerät verlieren.
2. Elektrische Sicherheit
a) Der Anschlussstecker des Elektrowerk-
zeuges muss in die Steckdose passen.
Der Stecker darf in keiner Weise verändert werden. Verwenden Sie keine
Adapterstecker gemeinsam mit
schutzgeerdeten Elektrowerkzeugen.
Unveränderte Stecker und passende Steckdosen
verringern das Risiko eines elektrischen Schlages.
b) Vermeiden Sie Körperkontakt mit ge-
erdeten Oberflächen, wie von Rohren,
Heizungen, Herden und Kühlschränken.
Es besteht ein erhöhtes Risiko durch elektrischen
Schlag, wenn Ihr Körper geerdet ist.
c) Halten Sie Elektrowerkzeuge von Re-
gen oder Nässe fern. Das Eindringen von
Wasser in ein Elektrogerät erhöht das Risiko
eines elektrischen Schlages.
d) Zweckentfremden Sie das Kabel nicht,
um das Elektrowerkzeug zu tragen,
aufzuhängen oder um den Stecker aus
der Steckdose zu ziehen. Halten Sie
das Kabel fern von Hitze, Öl, scharfen
Kanten oder sich bewegenden Geräteteilen. Beschädigte oder verwickelte Kabel
erhöhen das Risiko eines elektrischen Schlages.
e) Wenn Sie mit einem Elektrowerkzeug
im Freien arbeiten, verwenden Sie nur
Verlängerungskabel, die auch für den
Außenbereich zugelassen sind. Die
Anwendung eines für den Außenbereich
geeigneten Verlängerungskabels verringert
das Risiko eines elektrischen Schlages.
f) Wenn der Betrieb des Elektrowerk-
zeuges in feuchter Umgebung nicht
27 DE/AT/CH
Page 28

vermeidbar ist, verwenden Sie einen
Fehlerstromschutzschalter. Der Einsatz
eines Fehlerstromschutzschalters vermindert
das Risiko eines elektrischen Schlages.
3. Sicherheit von Personen
a)
Seien Sie stets aufmerksam, achten Sie
darauf, was Sie tun und gehen Sie mit
Vernunft an die Arbeit mit einem Elek
trowerkzeug. Benutzen Sie kein Elektrowerkzeug, wenn Sie müde sind oder
unter dem Einfluss von Drogen, Alkohol oder Medikamenten stehen. Ein
Moment der Unachtsamkeit beim Gebrauch
des Elektrowerkzeuges kann zu ernsthaften
Verletzungen führen.
b)
Tragen Sie persönliche Schutzausrüstung
und immer eine Schutzbrille. Das Tragen
persönlicher Schutzausrüstung wie Staubmask
rutschfeste Sicherheitsschuhe, Schutzhelm oder
Gehörschutz, je nach Art und Einsatz des
Elektrowerkzeuges, verringert das Risiko von
Verletzungen.
c) Vermeiden Sie eine unbeabsichtigte
Inbetriebnahme. Vergewissern Sie sich,
dass das Elektrowerkzeug ausgeschaltet ist, bevor Sie es an die Stromversorgung anschließen, es aufnehmen
oder tragen. Wenn Sie beim Tragen des
Elektrowerkzeuges den Finger am Schalter ha
oder das Gerät bereits eingeschaltet an die
Stromversorgung anschließen, kann dies zu
Unfällen führen.
d) Entfernen Sie Einstellwerkzeuge oder
Schraubenschlüssel, bevor Sie das
Elektrowerkzeug einschalten. Ein Werk-
zeug oder Schlüssel, der sich in einem drehenden
Geräteteil befindet, kann zu Verletzungen führen.
e) Vermeiden Sie eine abnormale Körper-
haltung. Sorgen Sie für einen sicheren
Stand und halten Sie jederzeit das
Gleichgewicht. Dadurch können Sie das
Elektrowerkzeug in unerwarteten Situationen
besser kontrollieren.
f) Tragen Sie geeignete Kleidung. Tragen
Sie keine weite Kleidung oder Schmuck.
28 DE/AT/CH
-
ben
Halten Sie Haare, Kleidung und Handschuhe fern von sich bewegenden
Teilen. Lockere Kleidung, Schmuck oder lange
Haare können von sich bewegenden Teilen
erfasst werden.
g) Wenn Staubabsaug- und -auffangein-
richtungen montiert werden können,
vergewissern Sie sich, dass diese
angeschlossen sind und richtig verwendet werden. Die Verwendung einer
Staubabsaugung kann Gefährdungen durch
Staub verringern.
4. Verwendung und Behandlung
des Elektrowerkzeugs
a) Überlasten Sie das Gerät nicht. Ver-
wenden Sie für Ihre Arbeit das dafür
bestimmte Elektrowerkzeug. Mit dem
e,
passenden Elektrowerkzeug arbeiten Sie besser
und sicherer im angegebenen Leistungsbereich.
b) Benutzen Sie kein Elektrowerkzeug,
dessen Schalter defekt ist. Ein Elektrowerk-
zeug, das sich nicht mehr ein- oder ausschalten
lässt, ist gefährlich und muss repariert werden.
c) Ziehen Sie den Stecker aus der Steck-
dose, bevor Sie Geräteeinstellungen
vornehmen, Zubehörteile wechseln
oder das Gerät weglegen. Diese Vorsichts-
maßnahme verhindert den unbeabsichtigten
Start des Elektrowerkzeuges.
d) Bewahren Sie unbenutzte Elektrowerk-
zeuge außerhalb der Reichweite von
Kindern auf. Lassen Sie Personen das
Gerät nicht benutzen, die mit diesem
nicht vertraut sind oder diese Anweisungen nicht gelesen haben. Elektrowerk-
zeuge sind gefährlich, wenn sie von unerfahrenen
Personen benutzt werden.
e) Pflegen Sie Elektrowerkzeuge mit
Sorgfalt. Kontrollieren Sie, ob bewegliche Teile einwandfrei funktionieren
und nicht klemmen, ob Teile gebrochen
oder so beschädigt sind, dass die Funktion des Elektrowerkzeuges beeinträchtigt ist. Lassen Sie beschädigte Teile vor
dem Einsatz des Gerätes reparieren.
Page 29

Allgemeine Sicherheitshinweise für ElektrowerkzeugeAllgemeine Sicherheitshinweise für Elektrowerkzeuge
Viele Unfälle haben ihre Ursache in schlecht
gewarteten Elektrowerkzeugen.
f) Halten Sie Schneidwerkzeuge scharf
und sauber. Sorgfältig gepflegte Schneid-
werkzeuge mit scharfen Schneidkanten verklemmen sich weniger und sind leichter zu führen.
g) Verwenden Sie Elektrowerkzeug,
Zubehör, Einsatzwerkzeuge usw.
entsprechend diesen Anweisungen.
Berücksichtigen Sie dabei die Arbeitsbedingungen und die auszuführende
Tätigkeit. Der Gebrauch von Elektrowerkzeu-
gen für andere als die vorgesehenen Anwendungen kann zu gefährlichen Situationen führen.
5. Service
a) Lassen Sie Ihr Elektrowerkzeug nur von
qualifiziertem Fachpersonal und nur
mit Original-Ersatzteilen reparieren.
Damit wird sichergestellt, dass die Sicherheit
des Elektrowerkzeugs erhalten bleibt.
Gerätespezifische Sicherheits-
hinweise für Elektrohobel
Warten Sie den Stillstand der Messer-
17
welle
gen. Eine freiliegende Messerwelle kann sich
mit der Oberfläche verhaken und zum Verlust
der Kontrolle sowie schweren Verletzungen führen.
Greifen Sie nicht mit den Fingern in
den Spanauswurf
an rotierenden Teilen.
Führen Sie das Gerät nur eingeschaltet
gegen das Werkstück. Sonst besteht
Rückschlaggefahr, wenn sich das Hobelmesser
im Werkstück verhakt.
Beim Arbeiten muss die Hobelsohle 9
flach aufliegen. Sonst besteht Verletzungsgefahr durch Verkanten des Hobels.
Hobeln Sie nie über Metallgegenstände.
Das Hobelmesser / die Messerwelle
sonst beschädigt.
Sichern Sie das Werkstück. Benutzen Sie
Spannvorrichtungen / Schraubstock, um das
ab, bevor Sie das Gerät able-
3
. Verletzungsgefahr
17
wird
Werkstück festzuhalten. Es ist damit sicherer
gehalten, als mit Ihrer Hand.
Asbesthaltiges Material darf nicht bear-
beitet werden. Asbest gilt als krebserregend.
Beim Arbeiten entstehende Stäube
können gesundheitsschädlich, brennbar oder explosiv sein. Tragen Sie eine
Staubschutzmaske und verwenden Sie eine
geeignete Staub- / Späneabsaugung. Manche
Stäube gelten als krebserregend.
Schließen Sie bei längerem Bearbeiten
von Holz und insbesondere wenn Materialien bearbeitet werden, bei denen
gesundheitsgefährdende Stäube entstehen, das Gerät an eine geeignete
externe Staubabsaugvorrichtung an.
Benutzen Sie den Elektrohobel nicht,
wenn das Kabel beschädigt ist. Beschädigte Kabel erhöhen das Risiko eines elektrischen
Schlages.
Stützen Sie auf keinen Fall die Hände
neben oder vor dem Gerät und der zu
bearbeitenden Fläche ab. Es droht Verlet-
zungsgefahr durch Abrutschen.
Ziehen Sie bei Gefahr sofort den
Netzstecker aus der Steckdose.
Ziehen Sie den Netzstecker bei Gefahr,
Arbeitspausen, Nichtgebrauch, vor
allen Arbeiten am Gerät (z.B. Wechsel
der Hobelmesser) aus der Steckdose.
Führen Sie das Netzkabel immer nach
hinten vom Gerät weg.
Verwenden Sie nur scharfe Hobelmesser.
Tränken Sie Materialien oder zu bear-
beitende Flächen nicht mit lösungsmittelhaltigen Flüssigkeiten.
Vermeiden Sie den Kontakt mit rotie-
renden Teilen.
Verwenden Sie das Gerät niemals
zweckentfremdet und nur mit Originalteilen / -zubehör.
Halten Sie das Gerät während der Ar-
beit fest. Sorgen Sie für einen sicheren Stand.
Das Gerät muss stets sauber, trocken
und frei von Öl oder Schmierfetten sein.
29 DE/AT/CH
Page 30

Sicherheitshinweise für Hobel
Spantiefe einstellen
Warten Sie den Stillstand der Messerwelle ab,
bevor Sie das Elektrowerkzeug ablegen. Eine
freiliegende, rotierende Messerwelle kann sich
mit der Oberfläche verhaken und zum Verlust
der Kontrolle sowie schweren Verletzungen
führen.
Halten Sie das Elektrowerkzeug nur an den
isolierten Griffflächen, da die Messerwelle das
eigene Netzkabel treffen kann. Der Kontakt mit
einer spannungsführenden Leitung kann auch
metallene Geräteteile unter Spannung setzen
und zu einem elektrischen Schlag führen.
Befestigen und sichern Sie das Werkstück mittels
Zwingen oder auf andere Art und Weise an
einer stabilen Unterlage. Wenn Sie das Werkstück nur mit der Hand oder gegen Ihren Körper
halten, bleibt es labil, was zum Verlust der
Kontrolle führen kann.
Originalzubehör / -zusatzgeräte
Benutzen Sie nur Zubehör und Zusatz-
geräte, die in der Bedienungsanleitung
angegeben sind. Der Gebrauch anderer
als hier empfohlenen Teile oder anderes Zubehör
kann eine Verletzungsgefahr für Sie bedeuten.
Inbetriebnahme
Mit dem Drehregler 13 kann die Spantiefe stufen
von 0–3,0 mm anhand der Spantiefenskala
weise
14
gestellt werden.
Staub / Späne absaugen
(siehe Abb. A)
VERLETZUNGSGEFAHR!
Ziehen Sie immer den Netzstecker aus der Steckdose, bevor Sie Arbeiten am Gerät durchführen.
Wählbarer Spanauswurf (rechts / links):
Entriegeln Sie den Spanauswurf 3, indem Sie
ihn entgegen der Pfeilrichtung (aus der Position
„LOCK“) drehen.
Ziehen Sie den Spanauswurf 3
Gerät hinaus.
Der Spanauswurf 3 kann rechts oder links in
den Hobel eingesetzt werden.
Schieben Sie den Spanauswurf 3 in das Gerät.
Arretieren Sie den Spanauswurf 3 durch Dre-
hen in Position „LOCK“.
Fremdabsaugung:
Bei Verwendung von Staubabsaugsystemen, z.B.
Werkstattabsauger, muss ggf. das Reduzierstück
verwendet werden.
Der Staubsauger muss für den zu bearbeitenden
Werkstoff geeignet sein.
aus dem
ein-
15
Ein- / Ausschalten
Einschalten:
Drücken Sie zunächst die Einschaltsperre 1.
Drücken und halten Sie anschließend den
EIN- / AUS-Schalter
2
.
Ausschalten:
Lassen Sie den EIN- / AUS-Schalter 2 los.
Hinweis: Der EIN- / AUS-Schalter
2
kann aus
Sicherheitsgründen nicht arretiert werden.
30 DE/AT/CH
Anschließen:
Stecken Sie ggf. das Reduzierstück 15 fest auf
den Spanauswurf
3
auf.
Schieben Sie den Schlauch einer zulässigen
Staubsaugvorrichtung, z.B. eines Werkstattstaubsaugers auf den Spanauswurf
ggf. auf das Reduzierstück
15
3
, oder
.
Entnehmen:
Ziehen Sie den Schlauch der Staubsaugvor-
richtung vom Spanauswurf
Reduzierstück
15
ab.
3
oder vom
Ziehen Sie ggf. das Reduzierstück 15 ab.
Page 31

InbetriebnahmeAllgemeine Sicherheitshinweise für Elektrowerkzeuge / Inbetriebnahme
Parkschuh (siehe Abb. B / C)
Der Parkschuh 16 ermöglicht das Abstellen des
Gerätes ohne die Gefahr einer Beschädigung des
Werkstücks. Beim Arbeitsvorgang wird der Park-
16
schuh
Hobelsohle
hoch geschwenkt und der hintere Teil der
9
freigegeben.
Hobelvorgang
VORSICHT! RÜCKSCHLAGGEFAHR!
Führen Sie das Gerät nur eingeschaltet gegen
das Werkstück.
Stellen Sie die gewünschte Spantiefe ein.
Schalten Sie das Gerät ein.
Setzen Sie das Gerät mit dem vorderen Teil der
Hobelsohle
9
an das Werkstück an.
Führen Sie das Gerät mit gleichmäßigem Vor-
schub über die zu bearbeitende Fläche.
Arbeiten Sie nur mit geringem Vorschub und üben
Sie den Druck mittig auf die Hobelsohle
9
aus.
Zu schneller Vorschub mindert die Oberflächengüte und kann zur Verstopfung des Spanauswurfes führen.
Kanten anfasen (siehe Abb. H)
Die in der vorderen Hobelsohle 9 vorhandenen
V-Nuten
10
ermöglichen ein einfaches Anfasen von
Werkstückkanten.
Verwenden Sie je nach gewünschter Fasenbreite
die entsprechende V-Nut.
Setzen Sie dazu den Hobel mit der V-Nut 10
auf die Werkstückkante auf und führen Sie ihn
an dieser entlang.
Parallelanschlag verwenden
(siehe Abb. I)
Montieren Sie den Parallelanschlag 6 mit der
Befestigungsschraube
Lösen Sie die Feststellmutter 8 und stellen Sie
die gewünschte Breite ein.
Ziehen Sie die Feststellmutter 8 wieder fest.
7
am Gerät.
Achten Sie darauf, dass der Hobel mit seitlichem
Anpressdruck geführt wird.
Falztiefenanschlag verwenden
(siehe Abb. J)
Montieren Sie den Falztiefenanschlag 12 mit
der Befestigungsschraube
11
am Gerät.
Stellen Sie die gewünschte Falztiefe mit dem
Falztiefenanschlag
12
ein.
Führen Sie den Hobelvorgang mehrmals durch,
bis die gewünschte Falztiefe erreicht ist.
Hobelmesser
20
ausbauen /
einbauen (siehe Abb. D + E)
VERLETZUNGSGEFAHR!
Ziehen Sie immer den Netzstecker aus der Steckdose, bevor Sie Arbeiten am Gerät durchführen.
VORSICHT!
der Hobelmesser
Fassen Sie die Hobelmesser
Schneidkanten an.
Das Hobelmesser
gewendet werden.
Ersetzen Sie das Hobelmesser 20, wenn beide
Schneidkanten stumpf sind.
Schärfen Sie das Hobelmesser 20 nicht nach.
Hobelmesser
WICHTIGER HINWEIS:
Die beiden Innensechskantschrauben nicht lösen.
Sie dienen zur Höhenjustierung der Messerwelle.
Eine Justierung ist nur notwendig, wenn Sie einen
anderen Hobelmessertyp, wie z.B. ein Rustikalmesser,
verwenden wollen.
Bei einem Messerwechsel immer beide Messer tauschen, um einer Unwucht vorzubeugen.
HINWEIS: Lösen Sie zunächst nur ein Messer, so
können Sie sich am werkseitig montierten zweiten
Messer für den späteren Zusammenbau orientieren.
Durch die scharfen Schneidkanten
20
besteht Verletzungsgefahr!
20
nicht an den
20
hat zwei Schneiden und kann
20
wenden oder ersetzen
31 DE/AT/CH
Page 32

1. Lösen Sie mit dem beiliegenden Maulschlüssel
26
die 3 Schrauben des Spannelementes 18.
Drücken Sie den beweglichen Seitenschutz 21
in den Spalt im Gehäuse.
2. Schieben Sie das Spannelement
aus der Messerwelle
17
.
3. Schieben Sie das Hobelmesser
dem Spannelement
4.
Führen Sie die Montage mit gedrehtem oder neuem
18
.
18
seitlich
20
seitlich aus
Hobelmesser in umgekehrter Reihenfolge durch.
5. Hobelmesser
20
erhalten Sie unter angege-
bener Serviceadresse (siehe Kapitel „Garantie“).
Antriebsriemen wechseln
(siehe Abb. F + G)
VERLETZUNGSGEFAHR!
Ziehen Sie immer den Netzstecker aus der Steckdose, bevor Sie Arbeiten am Gerät durchführen.
Lösen Sie die Schrauben 5 und nehmen Sie
die Riemenabdeckung
4
ab.
Entfernen Sie den verschlissenen Antriebs-
riemen
23
.
Legen Sie den neuen Antriebsriemen 23 zuerst
auf das kleine Riemenrad
Sie den Antriebsriemen
Drehen auf das große Riemenrad
25
auf und ziehen
23
anschließend durch
24
auf.
Setzen Sie die Riemenabdeckung 4 auf und
befestigen Sie sie mit den Schrauben
5
.
Wartung und Reinigung
Verwenden Sie keinesfalls scharfe Gegenstände,
Benzin, Lösungsmittel oder Reiniger, die Kunststoff angreifen. Vermeiden Sie, dass Flüssigkeiten in das Innere des Gerätes gelangen.
Service
Lassen Sie Ihre Elektro-
werkzeug von der Servicestelle oder
einer Elektrofachkraft und nur mit
Original-Ersatzteilen reparieren. Damit
wird sichergestellt, dass die Sicherheit des Elektrowerkzeuges erhalten bleibt.
Lassen Sie den Austausch
des Steckers oder der Netzleitung im-
mer vom Hersteller des Gerätes oder
seinem Kundendienst ausführen. Damit
wird sichergestellt, dass die Sicherheit des Gerätes erhalten bleibt.
Garantie
Sie erhalten auf dieses Gerät 3 Jahre Garantie ab Kaufdatum. Das Gerät wurde
sorgfältig produziert und vor Anlieferung
gewissenhaft geprüft. Bitte bewahren Sie
den Kassenbon als Nachweis für den Kauf
auf. Bitte setzen Sie sich im Garantiefall mit
Ihrer Servicestelle telefonisch in Verbin
dung.
Nur so kann eine kostenlose Einsendung
Ihrer Ware gewährleistet werden.
VERLETZUNGSGEFAHR!
Ziehen Sie immer den Netzstecker aus der Steckdose, bevor Sie Arbeiten am Gerät durchführen.
Halten Sie Gerät und Lüftungsschlitze stets sau-
ber, um gut und sicher zu arbeiten.
Reinigen Sie den Spanauswurf 3 regelmäßig.
Verwenden Sie zum Reinigen eines verstopften
Spanauswurfes geeignetes Werkzeug (z.B.
Holzstück, Druckluft, etc.).
Verwenden Sie zur Reinigung des Gehäuses ein
trockenes Tuch.
Entfernen Sie anhaftenden Hobelstaub mit
einem
Pinsel.
32 DE/AT/CH
Die Garantieleistung gilt nur für Material- oder Fabrikationsfehler, nicht aber für Transportschäden,
Verschleißteile oder für Beschädigungen an zerbrechlichen Teilen, z. B. Schalter oder Akkus.
Das Produkt ist lediglich für den privaten und nicht
für den gewerblichen Gebrauch bestimmt.
Bei missbräuchlicher und unsachgemäßer Behandlung, Gewaltanwendung und bei Eingriffen, die nicht
von unserer autorisierten Service-Niederlassung
vorgenommen wurden, erlischt die Garantie. Ihre
gesetzlichen Rechte werden durch diese Garantie
nicht eingeschränkt.
Page 33

Garantie / EntsorgungInbetriebnahme / Wartung und Reinigung / Service / Garantie
Die Garantiezeit wird durch die Gewährleistung nicht
verlängert. Dies gilt auch für ersetzte und reparierte
Teile. Eventuell schon beim Kauf vorhandene Schäden
und Mängel müssen sofort nach dem Auspacken
gemeldet werden, spätestens aber zwei Tage nach
Kaufdatum. Nach Ablauf der Garantiezeit anfallende
Reparaturen sind kostenpflichtig.
DE
Service Deutschland
Tel.: 0800 5435 111
E-mail: kompernass@lidl.de
IAN 93528
AT
Service Österreich
Tel.: 0820 201 222
(0,15 EUR/Min.)
E-mail: kompernass@lidl.at
IAN 93528
CH
Service Schweiz
Tel.: 0842 665566
(0,08 CHF/Min., Mobilfunk
max. 0,40 CHF/Min.)
E-mail: kompernass@lidl.ch
Möglichkeiten zur Entsorgung des ausgedienten
Gerätes erfahren Sie bei Ihrer Gemeinde- oder
Stadtverwaltung.
IAN 93528
Entsorgung
Die Verpackung besteht aus umweltfreundlichen Materialien, die Sie über die örtlichen
Recyclingstellen entsorgen können.
Werfen Sie Elektrowerkzeuge
nicht in den Hausmüll!
Gemäß Europäischer Richtlinie 2002 / 96 / EC
über Elektro- und Elektronik-Altgeräte und Umsetzung
in nationales Recht müssen verbrauchte Elektrowerkzeuge getrennt gesammelt und einer umweltgerechten Wiederverwertung zugeführt werden.
33 DE/AT/CH
Page 34

Konformitätserklärung / Hersteller
Konformitätserklärung /
Hersteller
Wir, KOMPERNASS HANDELS GMBH, Dokumente
verantwortlicher: Herr Semi Uguzlu, BURGSTRASSE 21
44867 BOCHUM, DEUTSCHLAND, erklären hiermit, dass dieses Produkt mit den folgenden Normen,
normativen Dokumenten und EG-Richtlinien übereinstimmt:
Maschinenrichtlinie
(2006 / 42 / EC)
EG-Niederspannungsrichtlinie
(2006 / 95 / EC)
Elektromagnetische Verträglichkeit
(2004 / 108 / EC)
RoHS Richtlinie
(2011 / 65 / EU)
angewandte harmonisierte Normen
EN 60745-1/A11:2010
EN 60745-2-14/A2:2010
EN 55014-1/A2:2011
EN 55014-2/A2:2008
EN 61000-3-2/A2:2009
EN 61000-3-3:2008
n-
,
Typ / Gerätebezeichnung:
Elektrohobel PEH 30 A1
Herstellungsjahr: 09–2013
Seriennummer: IAN 93528
Bochum, 30.09.2013
Semi Uguzlu
- Qualitätsmanager -
Technische Änderungen im Sinne der Weiterentwicklung sind vorbehalten.
34 DE/AT/CH
Page 35

KOMPERNASS HANDELS GMBH
BURGSTRASSE 21
44867 BOCHUM
GERMANY
Versione delle informazioni · Last Information
Update · Stand der Informationen: 09 / 2013
Ident.-No.: PEH30A1092013-IT
IAN 93528
 Loading...