

Page 1
MINI PONCEUSE A AIR COMPRIME PDMS A1
MINI PONCEUSE A AIR COMPRIME
Traduction du mode d'emploi d'origine
MINI AIR POLISHER
Translation of original operation manual
IAN 43105
DRUCKLUFT-MINISCHLEIFER
Originalbetriebsanleitung
Page 2

Avant de lire le mode d'emploi, ouvrez la page contenant les illustrations et familiarisez-vous ensuite avec
toutes les fonctions de l'appareil.
Klappen Sie vor dem Lesen die Seite mit den Abbildungen aus und machen Sie sich anschließend mit allen
Funktionen des Gerätes vertraut.
Before reading, unfold the page containing the illustrations and familiarise yourself with all functions of
the device.
FR / BE Traduction du mode d'emploi d'origine Page 1
DE / AT / CH Bedienungsanleitung Seite 11
GB Translation of original operation manual Page 21
Page 3
Page 4

Table des matières
Introduction . . . . . . . . . . . . . . . . . . . . . . . . . . . . . . . . . . . . . . . . . . . . . . . . . . . . . . 2
Usage conforme . . . . . . . . . . . . . . . . . . . . . . . . . . . . . . . . . . . . . . . . . . . . . . . . . . . . . . . . . . . . . 2
Équipement . . . . . . . . . . . . . . . . . . . . . . . . . . . . . . . . . . . . . . . . . . . . . . . . . . . . . . . . . . . . . . . . . 2
Matériel livré . . . . . . . . . . . . . . . . . . . . . . . . . . . . . . . . . . . . . . . . . . . . . . . . . . . . . . . . . . . . . . . 2
Caractéristiques techniques . . . . . . . . . . . . . . . . . . . . . . . . . . . . . . . . . . . . . . . . . . . . . . . . . . . . 2
Consignes générales de sécurité pour appareils à air comprimé . . . . . . . . . . 3
Sécurité sur le lieu de travail. . . . . . . . . . . . . . . . . . . . . . . . . . . . . . . . . . . . . . . . . . . . . . . . . . . . 3
Consignes de sécurité . . . . . . . . . . . . . . . . . . . . . . . . . . . . . . . . . . . . . . . . . . . . . . . . . . . . . . . . 3
Risque engendré par des pièces projetées . . . . . . . . . . . . . . . . . . . . . . . . . . . . . . . . . . . . . . . . . 4
Risques de happage. . . . . . . . . . . . . . . . . . . . . . . . . . . . . . . . . . . . . . . . . . . . . . . . . . . . . . . . . . 4
Risques en service . . . . . . . . . . . . . . . . . . . . . . . . . . . . . . . . . . . . . . . . . . . . . . . . . . . . . . . . . . . 4
Phénomènes dangereux dus aux mouvements répétitifs. . . . . . . . . . . . . . . . . . . . . . . . . . . . . . . 5
Phénomènes dangereux dus à la poussière et à la fumée . . . . . . . . . . . . . . . . . . . . . . . . . . . . . 5
Phénomènes dangereux dus au bruit . . . . . . . . . . . . . . . . . . . . . . . . . . . . . . . . . . . . . . . . . . . . . 5
Phénomènes dangereux dus aux vibrations . . . . . . . . . . . . . . . . . . . . . . . . . . . . . . . . . . . . . . . . 6
Risques engendrés par des accessoires . . . . . . . . . . . . . . . . . . . . . . . . . . . . . . . . . . . . . . . . . . . 6
Mise en service . . . . . . . . . . . . . . . . . . . . . . . . . . . . . . . . . . . . . . . . . . . . . . . . . . . 7
Changement d'outil . . . . . . . . . . . . . . . . . . . . . . . . . . . . . . . . . . . . . . . . . . . . . . . . . . . . . . . . . . 7
Commande . . . . . . . . . . . . . . . . . . . . . . . . . . . . . . . . . . . . . . . . . . . . . . . . . . . . . . 8
Allumer et éteindre la meuleuse . . . . . . . . . . . . . . . . . . . . . . . . . . . . . . . . . . . . . . . . . . . . . . . . . 8
FR
Maintenance et nettoyage . . . . . . . . . . . . . . . . . . . . . . . . . . . . . . . . . . . . . . . . . . 8
Mise au rebut . . . . . . . . . . . . . . . . . . . . . . . . . . . . . . . . . . . . . . . . . . . . . . . . . . . . 8
Garantie et service . . . . . . . . . . . . . . . . . . . . . . . . . . . . . . . . . . . . . . . . . . . . . . . . 8
Importateur . . . . . . . . . . . . . . . . . . . . . . . . . . . . . . . . . . . . . . . . . . . . . . . . . . . . . . 9
Traduction de la déclaration de conformité originale . . . . . . . . . . . . . . . . . . . . 9
PDMS A1
1
Page 5

MINI-MEULEUSE À AIR
FR
COMPRIMÉ PDMS A1
Introduction
WARNING!
Toutes nos félicitations pour l'achat de
votre nouvel appareil. Ainsi, vous venez
d'opter pour un produit de grande qualité.
Le mode d'emploi fait partie de ce produit. Il contient
des remarques importantes concernant la sécurité,
l'usage et la mise au rebut. Avant l'usage du produit,
veuillez vous familiariser avec toutes les consignes
d'utilisation et de sécurité. N'utilisez le produit que
conformément aux consignes et pour les domaines
d'utilisation prévus. Si vous cédez le produit à un
tiers, remettez-lui également tous les documents.
Usage conforme
La mini-meuleuse à air comprimé (ci-après dénommée
"appareil" / meuleuse) convient à meuler et ébavurer de métal. Toute autre utilisation ou modifi cation
de la machine est considérée comme non conforme
et présente des risques d'accidents non négligeables. Ne convient pas pour un
usage commercial.
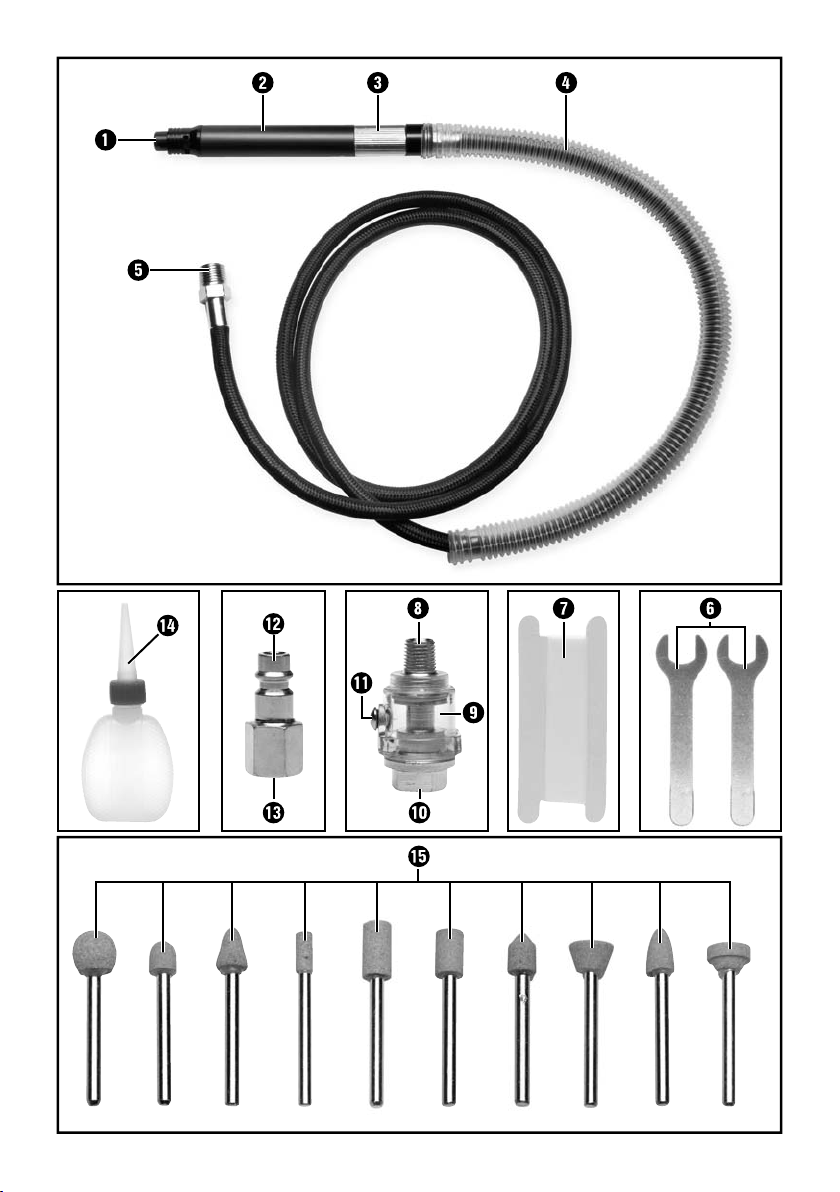
Équipement
Mandrin de serrage
Mini-meuleuse à air comprimé
Molette de réglage de vitesse
Flexible à air comprimé
Raccord fi leté1/4“
Clé de montage, calibre 9
Ruban en téfl on
Raccord fi leté1/4“
Mini-huileur d'air comprimé
Raccord taraudé1/4“
Vis à empreinte cruciforme pour orifi ce
de remplissage d'huile
Fiche de connecteur de l’air comprimé
Nipple fi leté 1/4“
Flacon d'huile
Petites meules
Matériel livré
1 mini-meuleuse à air comprimé
2 clés de montage, calibre 9
1 m de ruban en téfl on
1 réservoir d'huile pour air comprimé
1 connecteur d'air comprimé
1 mini-huileur d'air comprimé
10 petites meules
1 coff ret de transport avec hublot
1 mode d'emploi
Caractéristiques techniques
Vitesse : 0 - 54000 min
Pression de service : max. 6,3 bars
Capacité du mandrin
de serrage : 3,2 mm
Débit d'air : max. 200 l/min
Raccord d'admission
d'air : 1/4“
Matériau du carter : Aluminium
Poids mini-meuleuse
à air comprimé
avec tuyau: env. 175 g
Niveau de pression
acoustique: 79,0 dB(A)
Niveau de puissance
acoustique: 90,0 dB(A)
Incertitude K: 3 dB
Valeur de mesure déterminée
conformément à : ISO 15744, ISO 4871
Porter une protection auditive!
Valeur d'émission des vibrations = 0,744 m/s
Incertitude K = 1,5 m/s
Valeur de mesure déterminée
conformément à : EN ISO 28927-12,
2
EN12096
-1
2
2
PDMS A1
Page 6

AVERTISSEMENT!
► Les valeurs d'émission sonore indiquées dans
ces instructions ont été mesurées conformément à une méthode décrite dans la norme
EN ISO 15744 et peuvent être utilisées pour
comparer des appareils. Les valeurs d'émission
sonore vont varier en fonction de l'usage de
l'outil à air comprimé et peuvent, dans certains
cas, excéder la valeur indiquée dans ces
instructions. La sollicitation due aux émissions
sonores pourrait être sous-estimée si l'outil à
air comprimé est utilisé régulièrement de cette
manière.
REMARQUE
Pour obtenir une estimation précise de la sol-
►
licitation due aux émissions sonores pendant
un certain temps de travail, il faut également
tenir compte des périodes pendant lesquelles
l'appareil est éteint, ou de celles durant
lesquelles il est certes allumé mais n'est pas
eff ectivement utilisé. Ceci peut considérablement réduire la sollicitation due aux émissions
sonores pendant toute la durée du travail.
Consignes générales de
sécurité pour appareils
à air comprimé
AVERTISSEMENT!
► Pour les phénomènes dangereux multiples,
lire et comprendre les instructions de sécurité
avant l’installation, le fonctionnement, la
réparation, la maintenance et le changement
d’accessoires de la meuleuse d’outillage ou le
travail à proximité de celle-ci. Le non-respect
de ces instructions peut engendrer des blessures corporelles graves.
■ Il convient que seuls les opérateurs qualifi és et
expérimentés installent, règlent ou utilisent la
meuleuse d’outillage.
■ Ne pas modifi er la meuleuse d’outillage. Les
modifi cations peuvent réduire l’effi cacité des
mesures de sécurité et accroître les risques
encourus par l’opérateur.
■ Ne pas utiliser la meuleuse d’outillage si elle a
été endommagée.
Conserver tous les avertissements et toutes
les instructions pour pouvoir s'y reporter ultérieurement. Ne pas négliger les instructions
de sécurité; les confi er à l’opérateur.
Sécurité sur le lieu de travail
■ Conservez votre zone de travail propre et
bien éclairée. Les zones en désordre ou non
éclairés sont propices aux accidents.
■ Principales causes de blessures sur le lieu de
travail : dérapage, trébuchement et chute.
Faites attention aux surfaces pouvant être
devenues glissantes suite à l'utilisation de la
machine, et aux obstacles présentant le risque
de trébucher créés par le fl exible à air comprimé ou le fl exible hydraulique.
■ Usez de prudence dans des environnements
inconnus. Des dangers risquent d'êtres mas-
qués par les lignes électriques ou des lignes/
conduites d'alimentation diverses.
■ Ne travaillez jamais avec un outil à air
comprimé dans un environnement à risque
d'explosion, dans lequel se trouvent des
liquides, gaz ou poussières combustibles.
Le meulage engendre des étincelles qui peuvent
enfl ammer les poussières ou les fumées.
■ Éloignez les enfants et les autres personnes
pendant l'utilisation de l'outil à air comprimé.
Les distractions peuvent vous faire perdre le
contrôle de l'outil.
■ La meuleuse n'est pas isolée par rapport
à des sources d'énergie électrique.
Consignes de sécurité
■ Pendant l'utilisation ou la maintenance de la
meuleuse, portez toujours une protection oculaire.
■ Portez toujours une tenue de protection appro-
priée. Protégez-vous vos mains, cheveux et
vêtement contre le risque de happage par des
pièces en rotation.
■ Portez toujours une protection respiratoire en
cas de dégagement de poussière.
■ Portez toujours une protection auditive!
FR
PDMS A1
3
Page 7

■ Portez toujours des gants de protection.
■ Ne raccordez la meuleuse au réseau d'air com-
FR
primé qu'après l'avoir éteinte et avoir serré l'outil.
■ Le meulage produit des étincelles. Veillez à ce
que personne ne puisse être menacé par la
projection d'étincelles. Éloignez les matériaux
et objets combustibles.
■ Ne transportez pas la meuleuse tant qu'elle est
raccordée au réseau d'air comprimé.
■ Attention au risque que le fl exible à air com-
primé se comporte comme un fouet!
■ Il ne faut jamais utiliser la meuleuse pour percer
ou pour visser!
■ La meuleuse n'est pas homologuée pour servir
équipée de disques de tronçonnage!
■ Pendant le service, la pression d'écoulement de
l'air ne doit jamais dépasser 6,3 bars.
■ Comme source d'énergie, n'utilisez jamais
d'oxygène ou d'autres gaz combustibles.
■ Après avoir achevé l'opération de travail, étei-
gnez la meuleuse, attendez qu'elle s'immobilise
puis déposez-la sur une surface sûre.
Attention ! La meuleuse continue de tourner
après l'extinction.
■ Après avoir achevé l'opération de travail,
débranchez la meuleuse de son alimentation en
air comprimé.
■ Attention : il peut y avoir risque que le traitement
de certains matériaux dégage de la poussière
et des vapeurs génératrices d'une atmosphère
explosive. Utilisez un aspirateur ainsi qu'un
équipement de protection approprié.
Risque engendré par des pièces
projetées
■ Si la pièce, des accessoires voire l'outil machine
lui-même cassent, des débris risquent d'être
projetés à grande vitesse.
■ Pendant l'utilisation de la machine avec des
meules tiges ou lors du remplacement d'accessoires sur la machine, portez toujours une
protection oculaire résistante aux impacts. Le
niveau de protection nécessaire doit être évalué
séparément pour chaque utilisation.
■ Il faut s'assurer que la pièce soit fi xée de
manière sûre.
■ Vérifi ez régulièrement si la vitesse de la meuleuse
est adaptée à celle indiquée pour les meules
tiges. Ces vérifi cations de vitesse doivent avoir
lieu sans meule tige installée / sans abrasif et
en conformité avec les instructions du fabricant.
■ Assurez-vous que les étincelles engendrées par
l'utilisation et les fragments ne créent aucun risque.
■ Débranchez la meuleuse de l'alimentation en
énergie avant de changer d'abrasif et avant
une opération de maintenance.
■ Il convient d’évaluer également les risques
encourus par les tiers à ce stade.
Risques de happage
Si des vêtements amples, bijoux, colliers, cheveux
ou gants ne sont pas maintenus loin de la machine
et de ses accessoires, cela engendre un risque
d'étouff ement, d'arrachage du cuir chevelu et/ou
de blessures (coupures).
Risques en service
■ Évitez tout contact avec l'arbre en rotation et
avec l'outil installé, ceci pour empêcher de vous
entailler les mains et d'autres parties du corps.
■ Pendant l'utilisation de la machine, les mains de
l'utilisateur peuvent être exposées à des risques
par exemple de coupure ainsi que d'érafl ures et
d'échaudement. Pour vous protéger les mains,
portez des gants appropriés.
■ L'utilisateur ainsi que le personnel de maintenance
doivent être physiquement en mesure de maîtriser
la taille, la masse et la puissance de la machine.
■ Tenez la machine correctement : Soyez prêt à
contrer les mouvements habituels mais aussi
ceux inopinés : tenez vos deux mains prêtes.
■ Veillez à placer votre corps bien en équilibre et
à tenir l'appareil de manière sûre.
■ Utilisez uniquement les lubrifi ants recommandés
par le fabricant.
■ Il faut porter des lunettes de protection ; le
port de gants de protection et d'une tenue de
protection est recommandé.
■ Lime rotative : il ne faut jamais l'utiliser à une
vitesse supérieure à la vitesse nominale.
■ Pendant des travaux au dessus de la tête, portez
toujours un casque de protection.
4
PDMS A1
Page 8

■ Souvenez-vous que l'outil équipant la machine conti-
nue de tourner après la fi n de l'opération de travail.
■ Il faut avertir du risque d'explosion ou d'un
départ de feu concernant le matériau travaillé.
■ Relâcher le dispositif de marche/arrêt en cas
d’interruption de l’alimentation en énergie.
Phénomènes dangereux dus aux
mouvements répétitifs
■ Lors de l’utilisation d’une meuleuse d’outillage
dans le cadre du travail, l’opérateur peut ressentir un engourdissement au niveau des mains,
des bras, des épaules, de la nuque ou d’autres
parties du corps.
■ Lors de l’utilisation d’une meuleuse d’outillage,
il convient que l’opérateur adopte une posture
confortable, conserve un bon appui des pieds
et évite les postures inhabituelles ou instables.
Il convient que l’opérateur change de posture
au cours d’une tâche longue, ce qui peut contribuer à éviter la gêne et la fatigue.
■ Si l’opérateur ressent des symptômes tels qu’une
gêne récurrente ou persistante, une douleur, un
élancement, un endolorissement, des fourmillements, un engourdissement, ou une sensation
de brûlure ou d’ankylose, il convient de ne pas
ignorer ces signes d’avertissement. Il convient
que l’opérateur informe rapidement l’employeur
et consulte un médecin du travail qualifi é.
Phénomènes dangereux dus à la
poussière et à la fumée
■ Les poussières et fumées générées par l’utilisa-
tion de la meuleuse d’outillage peuvent aff ecter
la santé (par exemple cancers, anomalies
congénitales, asthme et/ou dermatoses);
l’évaluation des risques et la mise en place de
contrôles appropriés pour ces phénomènes
dangereux sont capitales.
■ Il convient que l’évaluation des risques prenne
en compte la poussière résultant de l’utilisation
de la machine et le potentiel de volatilité de la
poussière existante.
■ Faire fonctionner et entretenir la meuleuse
d’outillage tel que conseillé dans la notice
d’instructions afi n de minimiser les émissions de
poussière ou de fumée.
■ Orienter les gaz refoulés de manière à mini-
miser les déplacements de poussière dans des
environnements poussiéreux.
■ Si des poussières ou des fumées sont produites,
la priorité doit être de les contrôler au point
d’émission.
■ Il convient d’utiliser et d’entretenir correctement
toutes les fonctions ou accessoires intégrés
permettant la collecte, l’extraction ou la suppression de poussières ou fumées ambiantes
conformément aux instructions du fabricant.
■ Sélectionner, entretenir et remplacer le consom-
mable/outil tel que conseillé dans la notice
d’instructions afi n d’empêcher toute production
supplémentaire inutile de poussière ou de
fumée.
■ Utiliser une protection respiratoire conformé-
ment aux instructions de l’employeur et tel
qu’exigé par la réglementation de sécurité et de
santé au travail.
■ Le travail de certains matériaux crée des émis-
sions de poussières et de fumée à l’origine d’un
environnement potentiellement explosif.
Phénomènes dangereux dus au bruit
■ Une exposition à des niveaux acoustiques
élevés peut provoquer des pertes d’audition
permanentes et invalidantes ainsi que d’autres
problèmes comme des acouphènes (tintement,
bourdonnement, siffl ement ou vrombissement
dans les oreilles). En conséquence, l’évaluation
des risques et la mise en place de contrôles
appropriés pour ces phénomènes dangereux
sont capitales.
■ Les contrôles appropriés visant à réduire le
risque peuvent comporter des actions, comme
l’amortissement des matériaux, afi n d’empêcher
les pièces de tinter.
■ Utiliser une protection acoustique conformément
aux instructions de l’employeur et tel qu’exigé
par la réglementation de sécurité et de santé
au travail.
■ Faire fonctionner et entretenir la meuleuse
d’outillage tel que conseillé dans la notice d’instructions afi n d’éviter une augmentation inutile
du niveau de bruit.
FR
PDMS A1
5
Page 9
■ Sélectionner, entretenir et remplacer le consom-
FR
mable/outil tel que conseillé dans la notice
d’instructions afi n de prévenir toute augmentation inutile de bruit.
■ Si la meuleuse d’outillage est dotée d’un silen-
cieux, toujours s’assurer qu’il est en place et en
bon état de fonctionnement lorsque la machine
fonctionne.
Phénomènes dangereux dus aux
vibrations
■ L’exposition à des vibrations peut engendrer
des dommages invalidants aux nerfs et à la
circulation sanguine des mains et des bras.
■ Porter une tenue chaude lors d’un travail dans
le froid et garder les mains chaudes et sèches.
■ Si la peau des doigts ou des mains commence
à s’engourdir, à fourmiller, à blanchir ou si elle
devient douloureuse, interrompre l’utilisation de
la meuleuse d’outillage et consulter un médecin.
■ Faire fonctionner et entretenir la meuleuse
d’outillage tel que conseillé dans la notice d’instructions afi n d’éviter toute augmentation inutile
des niveaux de vibrations.
■ Sélectionner, entretenir et remplacer le
consommable/l’outil tel que conseillé dans la
notice d’instructions afi n d’éviter toute augmentation inutile du niveau de vibrations.
■ Suspendre le poids de la machine à un banc,
à un appareil à tension ou à un équilibreur, si
possible.
■ Tenir l’outil sans pression excessive mais
fermement, en prenant en considération les
forces de réaction de la main requise car le
risque issu des vibrations est généralement plus
élevé lorsque la force de préhension est plus
importante.
■ Un montage incorrect ou un outil endommagé
peut être à l’origine d’un niveau de vibrations
excessif.
Risques engendrés par des accessoires
■ Avant d'incorporer ou de changer l'outillage
machine ou des accessoires, débranchez la
meuleuse à meules tiges de sa source d'énergie.
■ Utilisez exclusivement des accessoires et consom-
mables de la taille et du type recommandés par
le fabricant de la meuleuse à meules tiges.
■ Pendant et après l'utilisation, évitez tout contact
direct avec l'outil de la machine car il peut s'être
échauff é ou présenter des arêtes vives.
■ La vitesse de service maximale recommandée
par la meuleuse à meules tiges doit être égale
ou supérieure à la vitesse nominale mentionnée
sur la machine.
■ Ne montez jamais de meule, disque à tronçonner
ou fraise sur une meuleuse pour meules tiges.
Une meule qui éclate peut provoquer des blessures très graves voire la mort.
■ N'utilisez jamais de meules ébréchées, fi ssurées
ou qui ont peut-être chuté.
■ Seul peut être utilisé un outillage machine homo-
logué présentant le diamètre de queue adapté.
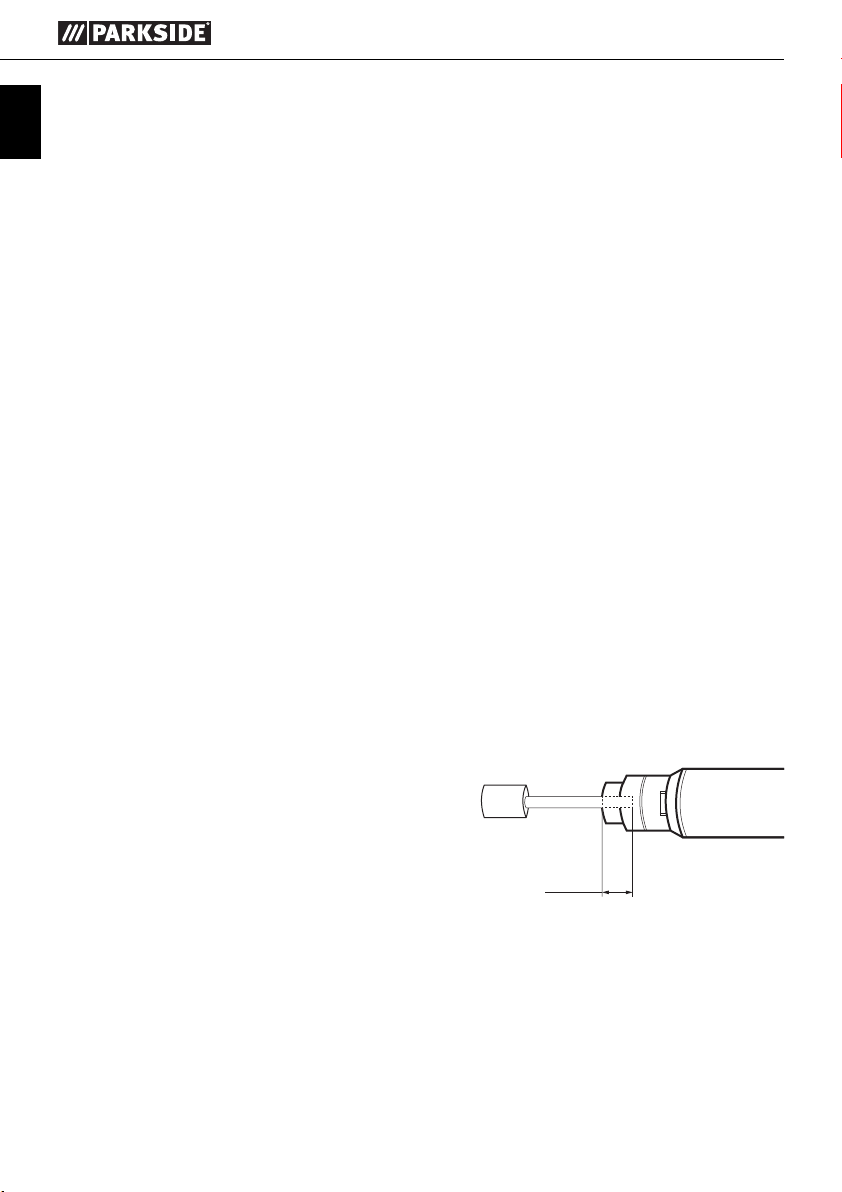
■ Souvenez-vous qu'en présence de corps abrasifs
de petite taille, il faut réduire leur vitesse de
rotation vu l'accroissement de longueur (porte-àfaux) entre l'extrémité des pinces de serrage et
le petit corps abrasif. Il faut s'assurer que la
longueur de serrage minimum (10 mm) soit
respectée. (voir la fi gure 1)
min. 10 mm
Fig. 1
■ Ayez conscience du risque que le mandrin de
serrage et le diamètre de la queue du petit corps
abrasif ne soient pas adaptés l'un à l'autre.
6
PDMS A1
Page 10
Mise en service
REMARQUE
La meuleuse ne doit être utilisée qu'exclusive-
►
ment avec de l'air comprimé épuré contenant
un brouillard d'huile, et la pression maximale
de travail (6,3 bars) ne doit pas être dépassée dans l'appareil. Pour réguler la pression
de travail, il faut équiper le compresseur d'un
détendeur.
► Enveloppez tous les raccords fi letés avec le
ruban en téfl on livré d'origine .
♦ Raccordez l'appareil à une source d'air com-
primé appropriée.
♦ Commencez par visser le nipple d'enfi chage
fi leté 1/4“ sur le raccord fi leté 1/4“ du
mini-huileur d'air comprimé .
♦ Ensuite, versez 1-2 gouttes d'huile spéciale pour
air comprimé dans le mini-huileur d'air comprimé
. A cette fi n, desserrez la vis à empreinte cruciforme obturant l'orifi ce de remplissage
sur le mini-huileur d'air comprimé
doucement le fl acon d'huile livré d'origine
pour que l'huile pénètre par l'orifi ce à cet eff et.
REMARQUE
Constituant l'étage de traitement en aval du
►
détendeur, un atomiseur d'huile lubrifi e la
meuleuse continuellement et de manière optimale. Un atomiseur d'huile communique les
fi nes gouttes d'huile à l'air circulant et garantit
ainsi une lubrifi cation régulière.
♦ Maintenant, vissez le raccord fi leté 1/4“
dans le raccord taraudé 1/4“ équipant le
mini-huileur d'air comprimé .
♦ Enfoncez ensuite le raccord rapide terminant le
fl exible à air comprimé (non livré d'origine) sur
la fi che de connecteur de l’air comprimé . Le
verrouillage a lieu automatiquement
♦ Reliez l'autre extrémité du fl exible à air comprimé
avec le détendeur (à fi ltre) situé contre le compresseur.
et comprimez
Changement d'outil
Débranchez la meuleuse du réseau d'air comprimé
avant chaque changement d'outil.
Utilisez toujours un outillage en bon état. Veillez
en outre à ce que la longueur de serrage de la
queue dans le mandrin ne soit pas inférieure à la
longueur minimum.
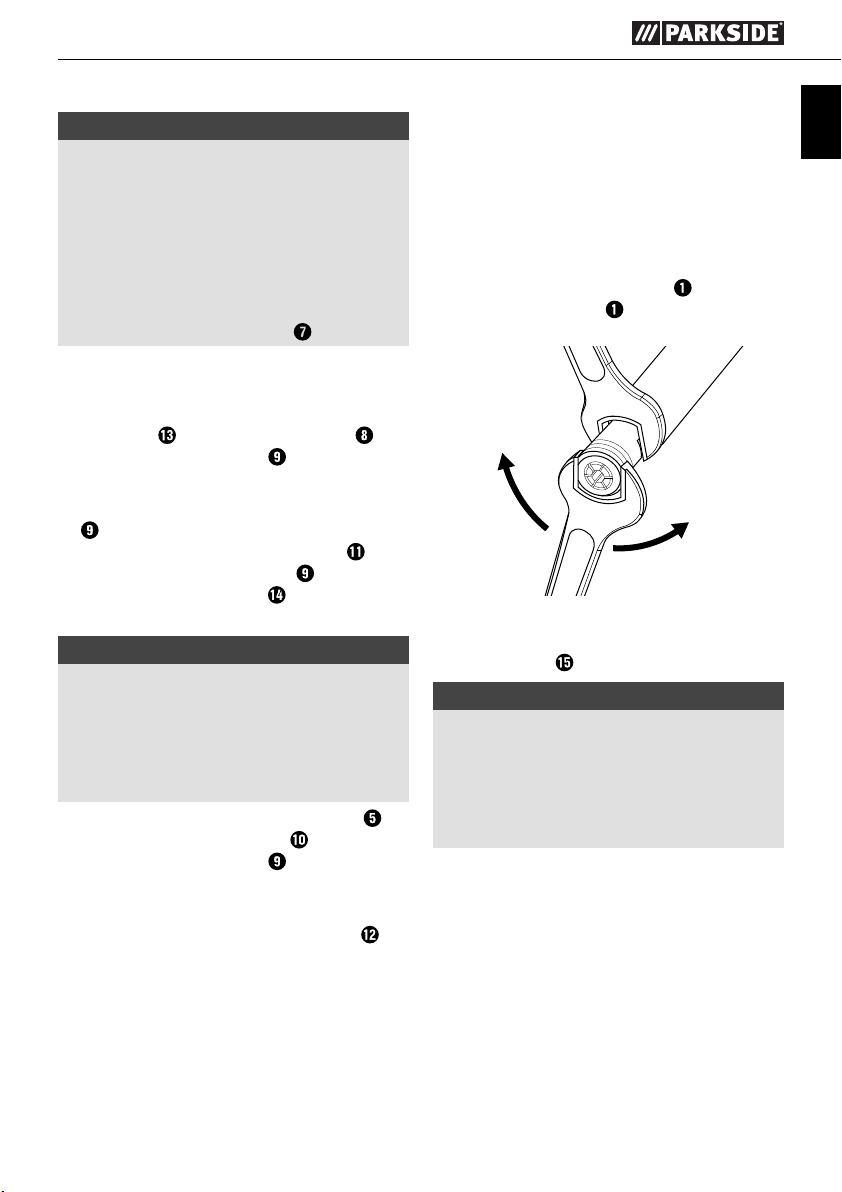
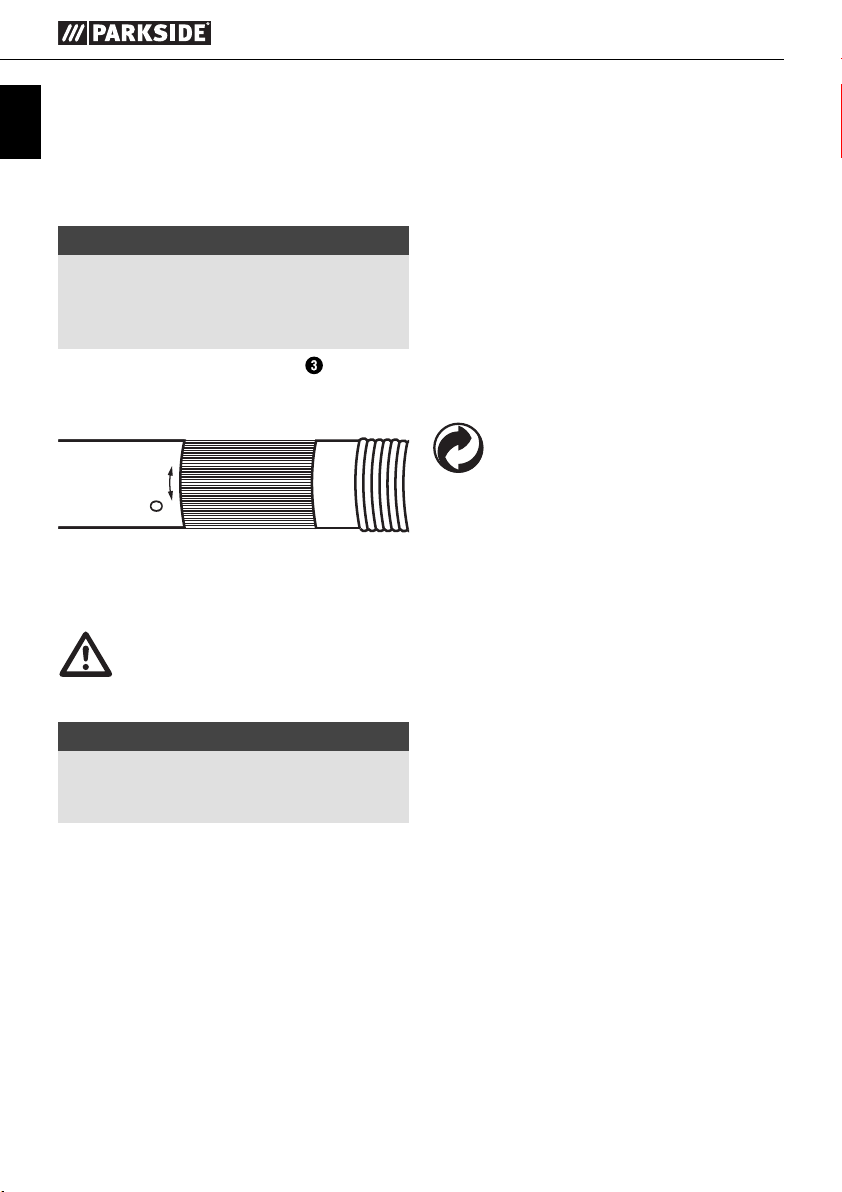
♦ Avec les clés fi gurant parmi les accessoires,
retenez la broche et le mandrin , puis ouvrez
ou fermez le mandrin dans le sens de la
fl èche (voir fi g. 3).
CLÔTURE
OUVERTURE
Fig. 3
♦ Maintenant, mettez l'une des 10 diff érentes
petites meules en place.
REMARQUE
Gardez à l'esprit le risque que le mandrin de
►
serrage et le diamètre de la queue du corps
abrasif ne soient pas adaptés l'un à l'autre.
Les corps abrasifs incorrectement fi xés peuvent
engendrer de fortes vibrations, donc un
risque de blessure !
♦ Assurez-vous que l'outil de meulage soit correcte-
ment fi xé et eff ectuez un essai de marche pendant 30 secondes, à la vitesse de marche à
vide, en vous tenant bien d'aplomb.
FR
PDMS A1
7
Page 11
Commande
FR
Allumer et éteindre la meuleuse
A l'aide du détendeur, réglez la pression de travail
sur la valeur correcte. Utilisez l'appareil à une
pression de travail d'au maximum 6,3 bars.
REMARQUE
Une pression de travail accrue n'apporte
►
aucun gain de puissance et ne fait qu'accroître la consommation d'air comprimé tout
en accélérant l'usure de l'appareil.
♦ En tournant la molette de vitesse (repérée
par 0 / 1), vous allumez la meuleuse et haussez ou réduisez la vitesse (voir la fi gure 2).
1
Fig. 2
Maintenance et nettoyage
AVERTISSEMENT! RISQUE DE
BLESSURE ! Avant d'eff ectuer des
travaux de maintenance, débranchez
la meuleuse du réseau d'air comprimé.
REMARQUE
Pour garantir un fonctionnement impeccable et
une longue durée de vie à la meuleuse, il faut
respecter les consignes suivantes:
■ Il revêt une importance cruciale que la lubrifi ca-
tion par huile soit suffi sante et constante pour
que le fonctionnement soit optimal.
■ Vérifi ez la vitesse de fonctionnement à vide
régulièrement ainsi qu’après chaque maintenance: A cette fi n, utilisez un compte-tours et
eff ectuez la mesure sans serrer d’outil dans
l’appareil. A partir d’une pression d’écoulement
de 6,3 bars, il ne faut en aucun cas dépasser la
vitesse de fonctionnement à vide.
■ Nettoyez les salissures éventuellement présentes
sur l’entrée d’air de la mini-meuleuse pneumatique.
■ Pour protéger la mini-meuleuse pneumatique
contre les impuretés, il faudrait la remettre
immédiatement après usage dans sa mallette
de transport livrée d’origine.
■ Ne remettez l’appareil dans la mallette
qu’après qu’il a entièrement refroidi.
■ Si la mini-meuleuse pneumatique devait malgré
tout.
■ Ne nettoyez la meuleuse qu’avec un chiff on
doux et sec ou à l’air comprimé.
■ N’utilisez en aucun cas de produits nettoyants
agressifs et/ou provoquant des rayures.
Mise au rebut
L'emballage se compose de matières
recyclables. Il peut être éliminé dans
les conteneurs de recyclage locaux.
Ne jetez pas l'appareil dans la poubelle des
déchets ménagers normaux.
Se renseigner auprès de votre mairie ou des services
de votre commune pour connaître les possibilités
de mise au rebut de votre appareil usagé.
Garantie et service
Cet appareil est garanti 3 ans à partir de la
date d'achat. L'appareil a été fabriqué avec
soin et consciencieusement contrôlé avant
sa livraison. Veuillez conserver le ticket de
caisse en guise de preuve d'achat. Dans le
cas où la garantie s'applique, veuillez appeler le service après-vente compétent. Cette
condition doit être respectée pour assurer
l'expédition gratuite de votre marchandise.
La prestation de garantie s'applique uniquement
aux vices de matériau ou de fabrication, et non
aux dégâts de transport, aux pièces d'usure ou aux
dégâts subis par des pièces fragiles telles que les
commutateurs ou les batteries. Le produit est destiné
uniquement à un usage privé et ne répond pas à
un usage professionnel. La garantie est annulée
en cas de manipulation incorrecte et inappropriée,
d'usage de la force et en cas d'intervention non
réalisée par notre centre de service après-vente
agréé. Vos droits légaux ne sont pas restreints par
la présente garantie. L'exercice de la garantie ne
8
PDMS A1
Page 12

prolonge pas la période de garantie.
Cette disposition s'applique également aux pièces
remplacées ou réparées. Signalez sans attendre
toute anomalie éventuelle sur le matériel au moment
de l'achat, au plus tard deux jours après la date
d'achat. Toute réparation fera l'objet d'une facturation après expiration de la période de garantie.
Indépendamment de la garantie commerciale
souscrite, le vendeur reste tenu des défauts de
conformité du bien et des vices rédhibitoires dans les
conditions prévues aux articles L211-4 et suivants
du Code de la consommation et aux articles 1641
et suivants du Code Civil.
Service France
Tel.: 0800 919270
E-Mail: kompernass@lidl.fr
IAN 43105
Service Belgique
Tel.: 070 270 171 (0,15 EUR/Min.)
E-Mail: kompernass@lidl.be
IAN 43105
Heures de service de notre hotline : du lundi au
vendredi de 8 h à 20 h (HEC)
Importateur
KOMPERNASS HANDELS GMBH
BURGSTRASSE 21
44867 BOCHUM
GERMANY
www.kompernass.com
Traduction de la déclaration de
conformité originale
Nous soussignés, KOMPERNASS HANDELS GMBH,
responsables du document: M. Semi Uguzlu,
BURGSTR. 21, 44867 BOCHUM, DEUTSCHLAND,
déclarons par la présente que ce produit est en
conformité avec les normes, documents normatifs
et directives CE suivants:
Directive Machines
(2006 / 42 / EC)
Normes harmonisées appliquées:
EN ISO 11148-9: 2011
Désignation du modèle de la machine:
Mini-meuleuse à air comprimé PDMS A1
Année de construction: 01 - 2014
Numéro de série: IAN 43105
Bochum, le 30/06/2013
Semi Uguzlu
-Responsable qualité-
Sous réserve de modifi cations techniques à des
fi ns d'amélioration.
FR
PDMS A1
9
Page 13

10
PDMS A1
Page 14

Inhaltsverzeichnis
Einleitung . . . . . . . . . . . . . . . . . . . . . . . . . . . . . . . . . . . . . . . . . . . . . . . . . . . . . . . 12
Bestimmungsgemäßer Gebrauch . . . . . . . . . . . . . . . . . . . . . . . . . . . . . . . . . . . . . . . . . . . . . . . 12
Ausstattung . . . . . . . . . . . . . . . . . . . . . . . . . . . . . . . . . . . . . . . . . . . . . . . . . . . . . . . . . . . . . . . . 12
Lieferumfang . . . . . . . . . . . . . . . . . . . . . . . . . . . . . . . . . . . . . . . . . . . . . . . . . . . . . . . . . . . . . . . 12
Technische Daten . . . . . . . . . . . . . . . . . . . . . . . . . . . . . . . . . . . . . . . . . . . . . . . . . . . . . . . . . . . 12
Allgemeine Sicherheitshinweise für Druckluftgeräte . . . . . . . . . . . . . . . . . . . . 13
Arbeitsplatz-Sicherheit . . . . . . . . . . . . . . . . . . . . . . . . . . . . . . . . . . . . . . . . . . . . . . . . . . . . . . . 13
Sicherheitshinweise . . . . . . . . . . . . . . . . . . . . . . . . . . . . . . . . . . . . . . . . . . . . . . . . . . . . . . . . . . 13
Gefährdungen durch herausgeschleuderte Teile . . . . . . . . . . . . . . . . . . . . . . . . . . . . . . . . . . . 14
Gefährdungen durch Verfangen . . . . . . . . . . . . . . . . . . . . . . . . . . . . . . . . . . . . . . . . . . . . . . . 14
Gefährdungen im Betrieb . . . . . . . . . . . . . . . . . . . . . . . . . . . . . . . . . . . . . . . . . . . . . . . . . . . . . 14
Gefährdungen durch wiederholte Bewegungen . . . . . . . . . . . . . . . . . . . . . . . . . . . . . . . . . . . 15
Gefährdungen durch Staub und Dämpfe . . . . . . . . . . . . . . . . . . . . . . . . . . . . . . . . . . . . . . . . . 15
Gefährdungen durch Lärm . . . . . . . . . . . . . . . . . . . . . . . . . . . . . . . . . . . . . . . . . . . . . . . . . . . . 16
Gefährdungen durch Schwingungen . . . . . . . . . . . . . . . . . . . . . . . . . . . . . . . . . . . . . . . . . . . . 16
Zusätzliche Sicherheitsanweisungen für pneumatische Maschinen . . . . . . . . . . . . . . . . . . . . . 16
Gefährdungen durch Zubehörteile . . . . . . . . . . . . . . . . . . . . . . . . . . . . . . . . . . . . . . . . . . . . . . 17
Inbetriebnahme . . . . . . . . . . . . . . . . . . . . . . . . . . . . . . . . . . . . . . . . . . . . . . . . .17
Werkzeugwechsel . . . . . . . . . . . . . . . . . . . . . . . . . . . . . . . . . . . . . . . . . . . . . . . . . . . . . . . . . . 18
Bedienung . . . . . . . . . . . . . . . . . . . . . . . . . . . . . . . . . . . . . . . . . . . . . . . . . . . . . .18
Schleifmaschine Ein- und Ausschalten . . . . . . . . . . . . . . . . . . . . . . . . . . . . . . . . . . . . . . . . . . . 18
DE
AT
CH
Wartung und Reinigung . . . . . . . . . . . . . . . . . . . . . . . . . . . . . . . . . . . . . . . . . . . 18
Entsorgung . . . . . . . . . . . . . . . . . . . . . . . . . . . . . . . . . . . . . . . . . . . . . . . . . . . . . 19
Garantie und Service . . . . . . . . . . . . . . . . . . . . . . . . . . . . . . . . . . . . . . . . . . . . . 19
Importeur . . . . . . . . . . . . . . . . . . . . . . . . . . . . . . . . . . . . . . . . . . . . . . . . . . . . . . 19
Original-Konformitätserklärung . . . . . . . . . . . . . . . . . . . . . . . . . . . . . . . . . . . .20
PDMS A1
11
Page 15

DRUCKLUFT-MINISCHLEIFER
PDMS A1
Einleitung
DE
AT
CH
WARNING!
Wir beglückwünschen Sie zum Kauf Ihres
neuen Gerätes. Sie haben sich damit für
ein hochwertiges Produkt entschieden. Die
Bedienungsanleitung ist Teil dieses Produkts. Sie
enthält wichtige Hinweise für Sicherheit, Gebrauch
und Entsorgung. Machen Sie sich vor der Benutzung
des Produkts mit allen Bedien- und Sicherheitshinweisen vertraut. Benutzen Sie das Produkt nur wie
beschrieben und für die angegebenen Einsatzbereiche. Händigen Sie alle Unterlagen bei Weitergabe
des Produkts an Dritte mit aus.
Bestimmungsgemäßer Gebrauch
Der Druckluft-Minischleifer (nachfolgend „Gerät“/
Schleifmaschine genannt) ist zum Schleifen und
Entgraten von Metall geeignet. Jede andere Verwendung oder Veränderung der Maschine gilt als nicht
bestimmungsgemäß und birgt erhebliche Unfallgefahren. Nicht zum gewerblichen Gebrauch.
Ausstattung
Spannfutter
Druckluft-Minischleifer
Drehzahl-Stellrad
Druckluftschlauch
Gewindeanschlussstück 1/4“
Montageschlüssel SW 9
Tefl onband
Gewindeanschlussstück 1/4“
Mini-Druckluftöler
Innengewindeanschluss 1/4“
Kreuzschlitzschraube für Öleinfüllöff nung
Druckluft-Anschlussstecker
Gewindestecknippel 1/4“
Ölfl asche
Schleifsteine
Lieferumfang
1 Druckluft-Minischleifer
2 Montageschlüssel SW 9
1m Tefl onband
1 Druckluft-Öl-Behälter
1 Druckluft-Anschlussstecker
1 Mini-Druckluftöler
10 Schleifsteine
1 Transportkoff er mit Sichtfenster
1 Betriebsanleitung
Technische Daten
Drehzahl: 0 - 54000 min
Arbeitsdruck: max. 6,3 bar
Spannfutterkapazität: 3,2 mm
Luftdurchfl uss: max. 200 l/min
Lufteinlass: 1/4“
Gehäuse Material: Aluminium
Gewicht
(Druckluft-Minischleifer
mit Schlauch): ca. 175 g
Schalldruckpegel: 79,0 dB(A)
Schallleistungspegel: 90,0 dB(A)
Unsicherheit K: 3 dB
Messwert ermittelt
entsprechend: ISO 15744, ISO 4871
Gehörschutz tragen!
Schwingungsemissionswert = 0,744 m/s
Unsicherheit K = 0,043 m/s2
Messwert ermittelt
entsprechend: ISO 28927-12,
EN 12096
-1
2
12
PDMS A1
Page 16

WARNUNG!
► Die in diesen Anweisungen angegebenen
Lärmemissionswerte sind entsprechend einem
in EN ISO 15744 genormten Messverfahren
gemessen worden und können für den Gerätevergleich verwendet werden. Die Lärmemissionswerte werden sich entsprechend dem
Einsatz des Druckluftwerkzeugs verändern
und können in manchen Fällen über dem in
diesen Anweisungen angegebenen Werten
liegen. Die Lärmemissionsbelastung könnte
unterschätzt werden, wenn das Druckluftwerkzeug regelmäßig in solcher Weise verwendet
wird.
HINWEIS
Für eine genaue Abschätzung der Lärmemis-
►
sionsbelastung während eines bestimmten
Arbeitszeitraumes sollten auch die Zeiten
berücksichtigt werden, in denen das Gerät
abgeschaltet ist oder zwar läuft, aber nicht
tatsächlich im Einsatz ist. Dies kann die
Lärmemissionsbelastung über den gesamten
Arbeitszeitraum deutlich reduzieren.
Allgemeine
Sicherheitshinweise
für Druckluftgeräte
WARNUNG!
► Für mehrfache Gefährdungen: Die Sicher-
heitshinweise sind vor dem Einrichten, dem
Betrieb, der Reparatur, der Wartung und dem
Austausch von Zubehörteilen an der Schleifmaschine für Schleifstifte sowie vor der Arbeit
in der Nähe der Maschine zu lesen und
müssen verstanden werden. Ist dies nicht der
Fall, so kann dies zu schweren körperlichen
Verletzungen führen.
■ Die Schleifmaschine für Schleifstifte sollte aus-
schließlich von entsprechend qualifi zierten und
geschulten Bedienungspersonen eingerichtet,
eingestellt oder verwendet werden.
■ Diese Schleifmaschine für Schleifstifte darf nicht
verändert werden. Veränderungen können die
Wirksamkeit der Sicherheitsmaßnahmen verringern und die Risiken für die Bedienungsperson
erhöhen.
■ Benutzen Sie niemals beschädigte Maschinen.
Bewahren Sie alle Sicherheitshinweise und
Anweisungen für die Zukunft auf.
Die Sicherheitsanweisungen dürfen nicht
verloren gehen — Geben Sie sie der Bedienungsperson.
Arbeitsplatz-Sicherheit
■ Halten Sie Ihren Arbeitsbereich sauber und
gut beleuchtet. Unordnung und unbeleuchtete
Arbeitsbereiche können zu Unfällen führen.
■ Ausrutschen, Stolpern und Stürzen sind
Hauptgründe für Verletzungen am Arbeitsplatz. Achten Sie auf Oberfl ächen, die durch
den Gebrauch der Maschine rutschig geworden
sein können, und auf durch den Luft- oder den
Hydraulikschlauch bedingte Stolpergefahren.
■ Gehen Sie in unbekannten Umgebungen mit
Vorsicht vor. Es können versteckte Gefährdun-
gen durch Strom- oder sonstige Versorgungsleitungen gegeben sein.
■ Arbeiten Sie mit dem Druckluftwerkzeug nicht
in explosionsgefährdeter Umgebung, in der sich
brennbare Flüssigkeiten, Gase oder Stäube befi nden. Beim Schleifen entstehen Funken, die den
Staub oder die Dämpfe entzünden können.
■ Halten Sie Kinder und andere Personen während
der Benutzung des Druckluftwerkzeugs fern.
Bei Ablenkung können Sie die Kontrolle über
das Gerät verlieren.
■ Schleifmaschine ist gegenüber elektrischen
Kraftquellen nicht isoliert.
Sicherheitshinweise
■ Tragen Sie beim Einsatz oder Wartung der
Schleifmaschine stets Augenschutz.
■ Tragen Sie stets geeignete Schutzkleidung.
Schützen Sie Ihre Hände, Haare und Kleidung
vor dem Erfassen durch rotierende Teile.
■ Tragen Sie stets bei Staubentwicklung einen
Atemschutz.
■ Tragen Sie stets Gehörschutz.
DE
AT
CH
PDMS A1
13
Page 17

■ Tragen Sie stets Schutzhandschuhe.
■ Schließen Sie die Schleifmaschine nur im
ausgeschalteten Zustand und eingespannten
DE
AT
CH
Werkzeug an das Druckluftnetz an.
■ Beim Schleifen entstehen Funken. Achten Sie
darauf, dass keine Personen durch Funkenfl ug
gefährdet werden. Entfernen Sie auch brennbare
Materialien und Gegenstände.
■ Tragen Sie die Schleifmaschine nicht, wenn die
Schleifmaschine am Druckluftschlauch angeschlossen ist.
■ Beachten Sie die Gefahr eines schlagenden
Druckluftschlauches!
■ Die Schleifmaschine darf nicht zum Bohren oder
zum Schrauben eingesetzt werden!
■ Die Schleifmaschine ist nicht für den Einsatz von
Trennschleifscheiben zugelassen!
■ Der Fließdruck von 6,3 bar darf während des
Betriebs keinesfalls überschritten werden.
■ Verwenden Sie niemals Sauerstoff oder andere
brennbare Gase als Energiequelle.
■ Schalten Sie nach Beendigung des Arbeitsgan-
ges die Schleifmaschine aus und nach Stillstand
legen Sie die Schleifmaschine sicher ab. Ach-
tung ! Schleifmaschine läuft nach.
■ Trennen Sie die Schleifmaschine nach Beendigung
des Arbeitsganges von der Druckluftversorgung.
■ Beachten Sie die Gefahr, dass beim Bearbeiten
bestimmter Materialien Staub und Dämpfe entstehen können, die eine explosionsgefährdete
Atmosphäre hervorrufen. Benutzen Sie Staubsauger sowie geeignete Schutzausrüstung.
Gefährdungen durch herausgeschleuderte Teile
■ Bei einem Bruch des Werkstücks oder von Zu-
behörteilen oder gar des Maschinenwerkzeugs
selbst können Teile mit hoher Geschwindigkeit
herausgeschleudert werden.
■ Beim Betrieb der Schleifmaschine für Schleifstif-
te bzw. beim Austausch von Zubehörteilen an
der Maschine ist immer ein schlagfester Augenschutz zu tragen. Der Grad des erforderlichen
Schutzes sollte für jede einzelne Verwendung
gesondert bewertet werden.
■ Es ist sicherzustellen, dass das Werkstück sicher
befestigt ist.
■ Prüfen Sie regelmäßig, ob die Drehzahl der
Schleifmaschine die angebrachte Drehzahlangabe für Schleifstifte nicht überschreitet. Diese
Drehzahlüberprüfungen müssen ohne installierten Schleifstift / Schleifmittel und in Übereinstimmung mit den Anweisungen des Herstellers
erfolgen.
■ Stellen Sie sicher, dass durch die Nutzung
entstehende Funken und Bruchstücke keine
Gefährdung darstellen.
■ Trennen Sie die Schleifmaschine von der
Energieversorgung bevor Sie das Schleifmittel
austauschen und vor der Wartung.
■ In diesem Falle sollten auch die Risiken für
andere Personen bewertet werden.
Gefährdungen durch Verfangen
Ersticken, Skalpierung und/oder Schnittverletzungen können auftreten, wenn locker sitzende
Kleidung, Schmuck, Halsschmuck, Haare oder
Handschuhe nicht von der Maschine und deren
Zubehörteilen ferngehalten werden.
Gefährdungen im Betrieb
■ Vermeiden Sie den Kontakt mit dem rotierenden
Schaft und dem installierten Werkzeug, um
Schnitte an Händen und anderen Körperteilen
zu verhindern.
■ Beim Einsatz der Maschine können die Hände
der Bedienungsperson Gefährdungen wie z.B.
Schnitten sowie Abschürfungen und Wärme
ausgesetzt sein. Tragen Sie geeignete Handschuhe zum Schutz der Hände.
■ Die Bedienungsperson und das Wartungsperso-
nal müssen physisch in der Lage sein, die Größe, die Masse und die Leistung der Maschine
zu handhaben.
■ Halten Sie die Maschine richtig: Seien Sie bereit,
den üblichen oder plötzlichen Bewegungen entgegenzuwirken – halten Sie beide Hände bereit.
■ Achten Sie darauf, das Ihr Körper im Gleichge-
wicht ist und dass Sie sicheren Halt haben.
■ Verwenden Sie nur die vom Hersteller empfohle-
nen Schmiermittel.
■ Es muss eine Schutzbrille getragen werden; das
14
PDMS A1
Page 18

Tragen von Schutzhandschuhen und Schutzkleidung wird empfohlen.
■ Eine rotierende Feile darf nicht bei einer
Drehzahl betrieben werden, die höher als die
Bemessungsdrehzahl ist.
■ Bei Arbeiten über Kopf ist ein Schutzhelm zu
tragen.
■ Es ist zu beachten, dass das Maschinenwerk-
zeug nach Beendigung des Arbeitsvorganges
noch ausläuft.
■ Es ist vor dem Risiko der Explosion oder eines
Feuers bezüglich des bearbeiteten Materials zu
warnen.
■ Geben Sie Befehlseinrichtung zum Ingang- und
Stillsetzen im Falle einer Unterbrechung der
Energieversorgung frei.
Gefährdungen durch wiederholte
Bewegungen
■ Bei der Verwendung einer Schleifmaschine für
Schleifstifte zum Durchführen von arbeitsbezogenen Tätigkeiten kann es möglicherweise bei
der Bedienungsperson zu unangenehmen Empfi ndungen in den Händen und Armen, sowie
im Hals- und Schulterbereich oder an anderen
Körperteilen kommen.
■ Bei der Verwendung einer Schleifmaschine für
Schleifstifte sollte die Bedienungsperson eine
bequeme Körperhaltung einnehmen, dabei auf
sicheren Halt achten und ungünstige Körperhaltungen oder solche, bei denen es schwierig ist,
das Gleichgewicht zu halten, vermeiden. Die
Bedienungsperson sollte im Verlauf von lang
andauernden Arbeiten die Körperhaltung verändern, was hilfreich bei der Vermeidung von
Unannehmlichkeiten und Ermüdung sein kann.
■ Falls die Bedienungsperson Symptome
wie z.B. andauerndes oder wiederholt auftretendes Unwohlsein, Beschwerden, Pochen,
Schmerz, Kribbeln, Taubheit, Brennen oder
Steifheit an sich wahrnimmt, sollten diese Anzeichen nicht ignoriert werden.
Die Bedienungsperson sollte in diesem Falle
einen entsprechend qualifi zierten Mediziner
konsultieren.
Gefährdungen durch Staub und
Dämpfe
■ Die beim Einsatz von Schleifmaschinen für
Schleifstifte entstehenden Stäube und Dämpfe
können gesundheitliche Schäden (wie z.B. Krebs,
Geburtsfehler, Asthma und/oder Dermatitis) verursachen; es ist unerlässlich, eine Risikobewertung
in Bezug auf diese Gefährdungen durchzuführen
und entsprechende Regelungsmechanismen zu
implementieren.
■ In die Risikobewertung sollten die bei der Ver-
wendung der Maschine entstehenden Stäube
und die dabei möglicherweise aufwirbelnden
vorhandenen Stäube einbezogen werden.
■ Die Schleifmaschine für Schleifstifte ist nach den
in dieser Anleitung enthaltenen Empfehlungen
zu betreiben und zu warten, um die Freisetzung
von Staub und Dämpfen auf ein Mindestmaß
zu reduzieren.
■ Die Abluft ist so abzuleiten, dass die Aufwirbe-
lung von Staub in staubhaltigen Umgebungen
auf ein Mindestmaß reduziert wird.
■ Falls Stäube oder Dämpfe entstehen, muss die
Hauptaufgabe sein, diese am Ort ihrer Freisetzung zu kontrollieren.
■ Alle zum Auff angen, Absaugen oder zur
Unterdrückung von Flugstaub oder Dämpfen
vorgesehenen Einbau- oder Zubehörteile der
Maschine sollten den Anweisungen des Herstellers entsprechend eingesetzt und gewartet
werden.
■ Die Verbrauchsmaterialien/Maschinenwerk-
zeuge sind den Empfehlungen dieser Anleitung
entsprechend auszuwählen, zu warten und zu
ersetzen, um eine unnötige Intensivierung der
Staub- oder Dampfentwicklung zu vermeiden.
■ Verwenden Sie Atemschutzausrüstungen nach
den Anweisungen Ihres Arbeitgebers oder wie
nach den Arbeits- und Gesundheitsschutzvorschriften gefordert.
■ Arbeiten mit bestimmten Materialien führen
zu Emissionen von Staub und Dampf, die eine
potentielle explosive Umwelt hervorrufen.
DE
AT
CH
PDMS A1
15
Page 19

Gefährdungen durch Lärm
■ Die Einwirkung hoher Lärmpegel kann bei
ungenügendem Gehörschutz zu dauerhaf-
DE
AT
CH
ten Gehörschäden, Hörverlust und anderen
Problemen, wie z.B. Tinnitus (Klingeln, Sausen,
Pfeifen oder Summen im Ohr), führen, daher
ist es unerlässlich, eine Risikobewertung in
Bezug auf diese Gefährdungen durchzuführen
und entsprechende Regelungsmechanismen zu
implementieren.
■ Zu den für die Risikominderung geeigneten
Regelungsmechanismen gehören Maßnahmen
wie z.B. die Verwendung von Dämmstoff en, um
an den Werkstücken auftretende Klingelgeräusche zu vermeiden.
■ Verwenden Sie Gehörschutzausrüstungen nach
den Anweisungen Ihres Arbeitgebers oder wie
nach den Arbeits- und Gesundheitsschutzvorschriften gefordert.
■ Die Schleifmaschine für Schleifstifte ist nach den
in dieser Anleitung enthaltenen Empfehlungen
zu betreiben und zu warten, um eine unnötige
Erhöhung des Lärmpegels zu vermeiden.
■ Die Verbrauchsmaterialien/Maschinenwerk-
zeuge sind den Empfehlungen dieser Anleitung
entsprechend auszuwählen, zu warten und
zu ersetzen, um eine unnötige Erhöhung des
Lärmpegels zu vermeiden.
■ Stellen Sie, falls die Schleifmaschine für Schleifstifte
mit einem Schalldämpfer ausgestattet ist, immer
sicher, dass dieser an seinem Platz und funktionstüchtig ist, wenn die Maschine in Betrieb ist.
Gefährdungen durch Schwingungen
■ Die Einwirkung von Schwingungen kann Schädi-
gungen an den Nerven und Störungen der Blutzirkulation in Händen und Armen verursachen.
■ Tragen Sie bei Arbeiten in kalter Umgebung
warme Kleidung und halten Sie ihre Hände
warm und trocken.
■ Falls Sie ein Taubheitsgefühl, Kribbeln oder
Schmerzen in Ihren Fingern oder Händen feststellen oder sich die Haut an Ihren Fingern oder
Händen weiß verfärbt, stellen Sie die Arbeit
mit der Schleifmaschine für Schleifstifte ein und
konsultieren Sie einen Arzt.
■ Die Schleifmaschine für Schleifstifte ist nach den
in dieser Anleitung enthaltenen Empfehlungen
zu betreiben und zu warten, um eine unnötige
Verstärkung der Schwingungen zu vermeiden.
■ Die Verbrauchsmaterialien/Maschinenwerk-
zeuge sind den Empfehlungen dieser Anleitung
entsprechend auszuwählen, zu warten und zu
ersetzen, um eine unnötige Verstärkung der
Schwingungen zu vermeiden.
■ Nutzen Sie zum Halten der Masse der Maschine,
wann immer möglich, einen Ständer, einen Spanner
oder eine Ausgleichseinrichtung.
■ Halten Sie die Maschine mit nicht allzu festem,
aber sicherem Griff unter Einhaltung der
erforderlichen Hand-Reaktionskräfte, denn das
Schwingungsrisiko wird in der Regel mit zunehmender Griff kraft größer.
■ Ein ungenügend montiertes oder beschädig-
tes Maschinenwerkzeug kann zu überhöhten
Schwingungen führen.
Zusätzliche Sicherheitsanweisungen
für pneumatische Maschinen
■ Druckluft kann ernsthafte Verletzungen verur-
sachen. Sorgen Sie im Falle, dass die Maschine
nicht gebraucht wird, sowie vor dem Austausch
von Zubehörteilen oder vor der Ausführung von
Reparaturarbeiten dafür, dass die Luftzufuhr
geschlossen ist, der Luftschlauch nicht unter Druck
steht und dass die Maschine von der Luftzufuhr
getrennt wird.
Richten Sie den Luftstrom niemals gegen sich
selbst oder gegen andere Personen.
■ Umherschlagende Schläuche können ernst-
hafte Verletzungen verursachen. Überprüfen
Sie daher immer, ob die Schläuche und ihre
Befestigungsmittel unbeschädigt sind oder sich
nicht gelöst haben.
■ Falls Universal-Drehkupplungen (Klauenkupp-
lungen) verwendet werden, müssen Arretierstifte
eingesetzt werden; Whipcheck-Schlauchsicherungen müssen verwendet werden, um Schutz
für den Fall eines Versagens der Verbindung
des Schlauchs mit der Maschine und von
Schläuchen untereinander zu bieten.
■ Sorgen Sie dafür, dass der auf der Maschine an-
16
PDMS A1
Page 20

gegebene Höchstdruck nicht überschritten wird.
■ Tragen Sie mit Luft betriebene Maschinen
niemals am Schlauch.
Gefährdungen durch Zubehörteile
■ Trennen Sie die Schleifmaschine für Schleifstifte
vor dem Einbau oder dem Auswechseln des
Maschinenwerkzeugs oder von Zubehörteilen
von der Energieversorgung.
■ Verwenden Sie ausschließlich Zubehörteile und
Verbrauchsmaterialien der vom Hersteller der
Schleifmaschine für Schleifstifte empfohlenen
Größen und Typen.
■ Vermeiden Sie während und nach der Verwen-
dung direkten Kontakt mit dem Maschinenwerkzeug, denn dieses kann sich erwärmt haben
oder scharfkantig sein.
■ Die vom Hersteller der Schleifmaschine für
Schleifstifte empfohlene maximale Betriebsdrehzahl muss gleich der auf der Maschine
gekennzeichneten Bemessungsdrehzahl oder
höher sein.
■ Niemals eine Schleifscheibe, Trennscheibe oder
Fräser auf eine Schleifmaschine für Schleifstifte montieren. Eine berstende Schleifscheibe
kann sehr ernste Verletzungen oder den Tod
verursachen.
■ Nutzen Sie keine Scheiben, die angeschlagen,
angerissen sind oder die heruntergefallen sein
könnten.
■ Nur zugelassene Maschinenwerkzeuge mit
dem passenden Schaftdurchmesser dürfen
verwendet werden.
■ Achten Sie darauf, dass zu beachten ist, das
die zulässige Drehzahl bei Kleinschleifkörpern aufgrund der Erhöhung der Lage des
Schaftes zwischen dem Spannzangenende
und dem Kleinschleifkörper herabgesetzt
werden muss (Überhang). Das Einhalten
der minimalen Einspannlänge von 10 mm
ist sicherzustellen. (siehe Abbildung 1)
min. 10 mm
Abb. 1
■ Seien Sie sich bewusst, dass die Gefahr einer
Fehlanpassung zwischen dem Schaftdurchmesser
des Kleinschleifkörpers und dem Spannfutter
besteht.
Inbetriebnahme
HINWEIS
Die Schleifmaschine darf ausschließlich mit
►
gereinigter, ölvernebelter Druckluft betrieben
werden und darf den maximalen Arbeitsdruck von 6,3 bar am Gerät nicht überschreiten. Zur Regulierung des Arbeitsdruckes muss
der Kompressor mit einem Druckminderer
ausgestattet sein.
► Umwickeln Sie alle Gewindeanschlüsse mit
dem mitgelieferten Tefl onband .
♦ Schließen Sie das Gerät an eine geeignete
Druckluftquelle an.
♦ Schrauben Sie zuerst den Gewindestecknippel
1/4“ auf das Gewindeanschlussstück 1/4“
des Mini-Druckluftölers .
♦ Befüllen Sie dann den Mini-Druckluftöler mit
1-2 Tropfen Druckluft-Spezialöl. Lösen Sie hierfür
die am Mini-Druckluftöler angebrachte Kreuzschlitzschraube der Öleinfüllöff nung und tropfen Sie mit Hilfe der im Lieferumfang enthaltenen
Ölfl asche Öl in die Öleinfüllöff nung.
HINWEIS
Als Aufbereitungsstufe nach dem Druckmin-
►
derer schmiert ein Nebelöler die Schleifmaschine kontinuierlich und optimal. Ein
Nebelöler gibt in feinen Tröpfchen Öl an die
Durchströmende Luft ab und garantiert so
eine regelmäßige Schmierung.
♦ Schrauben Sie nun das Gewindeanschlussstück
1/4“ in den Innengewindeanschluss 1/4“
des Mini-Druckluftölers .
DE
AT
CH
PDMS A1
17
Page 21

♦ Drücken Sie jetzt die Schnellkupplung des
Druckluft-Schlauches (nicht im Lieferumfang enthalten) auf den Druckluft-Anschlussstecker .
DE
AT
CH
Die Verriegelung erfolgt automatisch.
♦ Verbinden Sie das andere Ende des Druckluft-
Schlauches mit dem (Filter)-Druckminderer am
Kompressor.
Werkzeugwechsel
Vor jedem Werkzeugwechsel Schleifmaschine vom
Druckluftnetz trennen.
Verwenden Sie stets einsatzfähiges Werkzeug.
Weiter muss beachtet werden, dass die Mindestspannlänge des Schaftes in dem Spannfutter nicht
unterschritten wird.
♦ Mit dem im Zubehör befi ndlichen Schlüsseln
die Spindel und Spannfutter festhalten und
Spannfutter in Pfeilrichtung öff nen oder
schließen (siehe Abb. 3).
SCHLIESSEN
Abb. 3
♦ Setzten Sie nun einen der 10 verschiedenen
Schleifsteine ein.
HINWEIS
Beachten Sie die Gefahr einer Fehlanpas-
►
sung zwischen dem Durchmesser des Schleifkörperschaftes und dem Spannfutter. Nicht
korrekt befestigte Schleifkörper können Starke
Vibrationen verursachen – Verletzungsgefahr!
♦ Stellen Sie sicher, dass das Schleifwerkzeug
korrekt befestigt ist und führen Sie einen Probelauf von 30 Sekunden in gesicherter Lage mit
Leerlaufdrehzahl durch.
ÖFFNEN
Bedienung
Schleifmaschine Ein- und Ausschalten
Stellen Sie mit Hilfe des Druckminderers den korrekten Arbeitsdruck ein. Betreiben Sie das Gerät mit
einen Arbeitsdruck von max. 6,3 bar.
HINWEIS
Ein überhöhter Arbeitsdruck bringt keinen
►
Leistungsgewinn sondern erhöht lediglich den
Druckluft-Verbrauch und beschleunigt den
Geräteverschleiß.
♦ Durch Drehen in die jeweilige Richtung des
Drehzahl-Stellrades (gekennzeichnet mit 0 / 1)
schalten Sie die Schleifmaschine ein und erhöhen
oder verringern die Drehzahl. (siehe Abbildung 2)
1
Abb. 2
Wartung und Reinigung
WARNUNG! VERLETZUNGSGEFAHR!
Trennen Sie vor Wartungsarbeiten die
Schleifmaschine vom Druckluftnetz.
HINWEIS
Um eine einwandfreie Funktion und lange Haltbarkeit der Schleifmaschine zu gewährleisten,
sind folgende Punkte zu beachten:
■ Eine ausreichende und ständig intakte Öl-
schmierung ist für eine optimale Funktion von
ganz entscheidender Bedeutung.
■ Prüfen Sie regelmäßig die Leerlaufdrehzahl
sowie nach jeder durchgeführten Wartung:
Benutzen Sie dazu einen Drehzahlmesser und
führen Sie die Messung ohne eingespanntes
Werkzeug durch.
Bei einem Fließdruck von 6,3 bar darf die Leerlaufdrehzahl keinesfalls überschritten werden.
■ Lufteinlass des Druckluft-Minischleifers von
eventuellem Schmutz reinigen.
■ Zum Schutz vor Verunreinigungen sollte der
18
PDMS A1
Page 22

Druckluft-Minischleifer nach jedem Gebrauch im
mitgelieferten Transportkoff er verpackt werden.
■ Verpacken Sie das Gerät erst, wenn es
vollständig abgekühlt ist.
■ Sollte der Druckluft-Minischleifer dennoch
schmutzig geworden sein, beachten Sie bei der
Reinigung folgende Hinweise.
■ Reinigen Sie die Schleifmaschine nur mit einem
trockenen, weichen Tuch oder mit Druckluft.
■ Verwenden Sie auf keinen Fall scharfe und/
oder kratzende Reinigungsmittel.
Entsorgung
Die Verpackung besteht aus umweltfreund-
lichen Materialien. Sie kann in den örtlichen
Recyclebehältern entsorgt werden.
Werfen Sie das Gerät nicht in
den Hausmüll!
Möglichkeiten zur Entsorgung des ausgedienten
Gerätes erfahren Sie bei Ihrer Gemeinde- oder
Stadtverwaltung.
für ersetzte und reparierte Teile. Eventuell schon
beim Kauf vorhandene Schäden und Mängel
müssen sofort nach dem Auspacken gemeldet
werden, spätestens aber zwei Tage nach
Kaufdatum. Nach Ablauf der Garantiezeit anfallende Reparaturen sind kostenpfl ichtig.
Service Deutschland
Tel.: 0800 5435 111
E-Mail: kompernass@lidl.de
IAN 43105
Service Österreich
Tel.: 0820 201 222 (0,15 EUR/Min.)
E-Mail: kompernass@lidl.at
IAN 43105
Service Schweiz
Tel.: 0842 665566 (0,08 CHF/Min.,
Mobilfunk max. 0,40 CHF/Min.)
E-Mail: kompernass@lidl.ch
IAN 43105
Erreichbarkeit Hotline:
Montag bis Freitag von 8:00 Uhr – 20:00 Uhr (MEZ)
DE
AT
CH
Garantie und Service
Sie erhalten auf dieses Gerät 3 Jahre Garantie
ab Kaufdatum. Das Gerät wurde sorgfältig
produziert und vor Anlieferung gewissenhaft
geprüft. Bitte bewahren Sie den Kassenbon
als Nachweis für den Kauf auf. Bitte setzen
Sie sich im Garantiefall mit Ihrer Servicestelle
telefonisch in Verbindung. Nur so kann eine
kostenlose Einsendung Ihrer Ware gewährleistet werden.
Die Garantieleistung gilt nur für Material- oder
Fabrikationsfehler, nicht aber für Transportschäden,
Verschleißteile oder für Beschädigungen an
zerbrechlichen Teilen, z. B. Schalter oder Akkus.
Das Produkt ist lediglich für den privaten und nicht
für den gewerblichen Gebrauch bestimmt. Bei
missbräuchlicher und unsachgemäßer Behandlung,
Gewaltanwendung und bei Eingriff en, die nicht von
unserer autorisierten Service-Niederlassung
vorgenommen wurden, erlischt die Garantie. Ihre
gesetzlichen Rechte werden durch diese Garantie
nicht eingeschränkt. Die Garantiezeit wird durch
die Gewährleistung nicht verlängert. Dies gilt auch
PDMS A1
Importeur
KOMPERNASS HANDELS GMBH
BURGSTRASSE 21
44867 BOCHUM
GERMANY
www.kompernass.com
19
Page 23

OriginalKonformitätserklärung
Wir, KOMPERNASS HANDELS GMBH, Dokumen-
DE
tenverantwortlicher: Herr Semi Uguzlu, BURGSTR. 21,
AT
44867 BOCHUM, DEUTSCHLAND, erklären hiermit,
dass dieses Produkt mit den folgenden Normen,
CH
normativen Dokumenten und EG-Richtlinien
übereinstimmt:
Maschinenrichtlinie
(2006 / 42 / EC)
Angewandte harmonisierte Normen:
EN ISO 11148-9: 2011
Typbezeichnung der Maschine:
Druckluft-Minischleifer PDMS A1
Herstellungsjahr: 01 - 2014
Seriennummer: IAN 43105
Bochum, 30.06.2013
Semi Uguzlu
- Qualitätsmanager -
Technische Änderungen im Sinne der Weiterentwicklung sind vorbehalten.
20
PDMS A1
Page 24

Contents
Introduction . . . . . . . . . . . . . . . . . . . . . . . . . . . . . . . . . . . . . . . . . . . . . . . . . . . . . 22
Proper use . . . . . . . . . . . . . . . . . . . . . . . . . . . . . . . . . . . . . . . . . . . . . . . . . . . . . . . . . . . . . . . . 22
Features . . . . . . . . . . . . . . . . . . . . . . . . . . . . . . . . . . . . . . . . . . . . . . . . . . . . . . . . . . . . . . . . . . 22
Package contents . . . . . . . . . . . . . . . . . . . . . . . . . . . . . . . . . . . . . . . . . . . . . . . . . . . . . . . . . . . 22
Technical details . . . . . . . . . . . . . . . . . . . . . . . . . . . . . . . . . . . . . . . . . . . . . . . . . . . . . . . . . . . . 22
General safety instructions for compressed air tools . . . . . . . . . . . . . . . . . . . 23
Workplace safety . . . . . . . . . . . . . . . . . . . . . . . . . . . . . . . . . . . . . . . . . . . . . . . . . . . . . . . . . . . 23
Safety instructions . . . . . . . . . . . . . . . . . . . . . . . . . . . . . . . . . . . . . . . . . . . . . . . . . . . . . . . . . . . 23
Hazards caused by parts fl ung out . . . . . . . . . . . . . . . . . . . . . . . . . . . . . . . . . . . . . . . . . . . . . 24
Hazards caused by entanglement . . . . . . . . . . . . . . . . . . . . . . . . . . . . . . . . . . . . . . . . . . . . . . 24
Hazards during operation . . . . . . . . . . . . . . . . . . . . . . . . . . . . . . . . . . . . . . . . . . . . . . . . . . . . 24
Risks due to repetitive movements. . . . . . . . . . . . . . . . . . . . . . . . . . . . . . . . . . . . . . . . . . . . . . . 24
Risks due to dust and vapours . . . . . . . . . . . . . . . . . . . . . . . . . . . . . . . . . . . . . . . . . . . . . . . . . 25
Risks due to noise . . . . . . . . . . . . . . . . . . . . . . . . . . . . . . . . . . . . . . . . . . . . . . . . . . . . . . . . . . . 25
Risks due to vibrations . . . . . . . . . . . . . . . . . . . . . . . . . . . . . . . . . . . . . . . . . . . . . . . . . . . . . . . 25
Additional safety instructions for pneumatic machines . . . . . . . . . . . . . . . . . . . . . . . . . . . . . . . 26
Hazards caused by accessories . . . . . . . . . . . . . . . . . . . . . . . . . . . . . . . . . . . . . . . . . . . . . . . . 26
Initial operation . . . . . . . . . . . . . . . . . . . . . . . . . . . . . . . . . . . . . . . . . . . . . . . . .27
Tool-changing . . . . . . . . . . . . . . . . . . . . . . . . . . . . . . . . . . . . . . . . . . . . . . . . . . . . . . . . . . . . . . 27
Operation . . . . . . . . . . . . . . . . . . . . . . . . . . . . . . . . . . . . . . . . . . . . . . . . . . . . . . 28
Switching the grinder on and off . . . . . . . . . . . . . . . . . . . . . . . . . . . . . . . . . . . . . . . . . . . . . . . 28
GB
Maintenance and Cleaning . . . . . . . . . . . . . . . . . . . . . . . . . . . . . . . . . . . . . . . .28
Disposal . . . . . . . . . . . . . . . . . . . . . . . . . . . . . . . . . . . . . . . . . . . . . . . . . . . . . . . . 28
Warranty and service . . . . . . . . . . . . . . . . . . . . . . . . . . . . . . . . . . . . . . . . . . . . 28
Importer . . . . . . . . . . . . . . . . . . . . . . . . . . . . . . . . . . . . . . . . . . . . . . . . . . . . . . . 29
Translation of the original Conformity Declaration . . . . . . . . . . . . . . . . . . . . .29
PDMS A1
21
Page 25

COMPRESSED-AIR MINI
GRINDER PDMS A1
Introduction
WARNING!
Congratulations on the purchase of your
new appliance. You have selected a highquality product. The operating instructions
are part of this product. They contain important in-
GB
formation about safety, use and disposal.
Before using the product, familiarise yourself with all
operating and safety instructions. Use this product
only as described and only for the specifi ed areas
of application. Please also pass these operating
instructions on to any future owner(s).
Proper use
The compressed air mini grinder (hereinafter referred to as "Appliance" / grinder) is suitable for
grinding and deburring of metal. Any other uses of
or modifi cations to the appliance are deemed to
be improper usage and may result in serious physical injury. Not for commercial use.
Features
Clamping chuck
Compressed air mini grinder
Speed setting wheel
Compressed air hose
Threaded connector 1/4“
Installation spanner SW 9
Tefl on tape
Threaded connector 1/4“
Mini compressed air oiler
Female threaded connector 1/4“
Crosshead screw for oil fi ller opening
Compressed air connector plug
Threaded nipple 1/4“
Oil bottle
Whetstone
Package contents
1 compressed air mini grinder
2 installation spanners SW 9
1m Tefl on tape
1 compressed air oil container
1 compressed air connector plug
1 mini compressed air oiler
10 whetstones
1 transport case with inspection window
1 operating instructions
Technical details
Rotational speed: 0 - 54000 rpm
Working pressure: max. 6.3 bar
Chuck capacity 3.2 mm
Airfl ow: max. 200 l/min
Air inlet: 1/4“
Housing material: Aluminium
Weight
(compressed air mini
grinder with hose): approx. 175 g
Sound pressure level: 79.0 dB(A)
Sound power level: 90.0 dB(A)
Uncertainty K: 3 dB
Measured values determined in
accordance with: ISO 15744, ISO 4871
Wear ear protection!
Vibration emission value = 0.744 m/s
Uncertainty K = 0.043 m/s
Measured values determined
in accordance with: ISO 28927-12,
2
EN 12096
2
22
PDMS A1
Page 26

WARNING!
► The noise emission values specifi ed in these
instructions have been measured in accordance
with the standardised measuring procedure
specifi ed in EN ISO 15744 and can be
used to make equipment comparisons. The
noise emission values vary in accordance
with the use of the compressed air tool and
may be higher than the values specifi ed in
these instructions in some cases. It is easy to
underestimate the noise emission load if the
compressed air tool is used regularly in a
certain manner.
NOTE
For an accurate estimate of the noise emission
►
load during a certain working period, the
times during which the appliance is switched
off or is running but not actually being used
must also be taken into consideration. This
can signifi cantly reduce the noise emission
load over the total working period.
General safety
instructions for
compressed air tools
WARNING!
► For multiple hazards: Please ensure that you
have read and understood the safety instructions before adjusting, operating, repairing,
maintaining or replacing accessories on the
mini die grinder as well as before working in
the vicinity of the machine. Failure to do this
can result in serious bodily injury.
■ The mini die grinder should only be adjusted,
set or used by adequately qualifi ed and trained
operators.
■ This mini die grinder must not be modifi ed.
Modifi cations can reduce the eff ectiveness of
the safety measures and increase the risks for
the operator.
■ Never use damaged machines.
Save all warnings and instructions for future
reference! The safety instructions should not
be lost – give them to the operator.
Workplace safety
■ Keep your working area clean and well lit.
Cluttered and dark areas invite accidents.
■ Slipping, tripping up and falling are the main
causes of injuries at the workplace. Take note
of surfaces which could have become slippery
through use of the machine, and also any tripping hazards caused by air or hydraulic hoses.
■ Proceed with caution in unknown surroundings.
Hidden hazards caused by power or other supply
lines may be present.
■ Do not work with the compressed air tool
in areas subject to the risk of explosions,
or in areas where fl ammable liquids, gases
or dusts are located. Grinding work creates
sparks which may ignite the dust or fumes.
■ Keep children and other unauthorised person-
nel at a safe distance when using compressed
air tools. Distractions can cause you to lose
control.
■ The grinder is not insulated against electrical
power sources.
Safety instructions
■ Always wear eye protection when using or
servicing the grinder.
■ Always wear suitable protective clothing.
Protect your hands, hair and clothes from being
drawn in by rotating parts.
■ Always wear respiratory protection in the
presence of dust.
■ Always wear hearing protection.
■ Always wear safety gloves.
■ Only connect the grinder to the compressed air
supply when it has been switched off and when
the tool has been clamped.
■ Sparks are created during grinding. Ensure that
nobody can be endangered by fl ying sparks.
You should also remove any fl ammable materials
or objects.
■ Do not carry the grinder if it has been connected
to the compressed air hose.
■ Be aware of the hazards caused by a fl ailing
compressed air hose!
GB
PDMS A1
23
Page 27

■ The grinder may not be used for drilling or
screwing!
■ The grinder is not approved for the use of cut-off
wheels!
■ The fl ow pressure of 6.3 bar may on no account
be exceeded during operation.
■ Never use oxygen or other fl ammable gases as
GB
an energy source.
■ Once you have completed your work, switch
the grinder off and place it down securely once
it has come to a standstill.
Caution ! Grinder continues to run.
■ Once you have completed your work, disconnect
the grinder from the compressed air supply.
■ Be aware of the danger that dust and vapours,
which can create an explosion-hazardous
atmosphere, can occur when processing certain
materials. Use vacuum cleaners and suitable
protective equipment.
Hazards caused by parts fl ung out
■ If a workpiece or accessory or even part of the
machine tool itself breaks, parts can be fl ung
out at high speeds.
■ When using the grinder for grinding pencils or
when replacing accessories on the machine,
impact-proof eye protection must be worn. The
degree of necessary protection must be evaluated
especially for each individual purpose.
■ You must ensure that the workpiece has been
securely fi xed.
■ Check regularly to ensure that the grinder
rotational speed does not exceed the rotational
speed stated on the grinding pencils. This
rotational speed monitoring must take place
without an installed grinding pencil / grinding
aid and in agreement with the manufacturer's
instructions.
■ Ensure that any sparks and fragments caused
during use do not present any hazards.
■ Disconnect the grinder from the power supply
before replacing the grinding material and
before servicing.
■ In this case, the risks for others should also be
assessed.
Hazards caused by entanglement
Suff ocation, scalping or and/or cut wounds can
occur if loose clothing, jewellery, necklaces, hair
or gloves are not kept away from the machine and
its accessories.
Hazards during operation
■ Avoid contact with the rotating shaft and the
installed tools in order to prevent cuts to the
hands and other body parts.
■ When using the machine, the operator's hands
can be subject to hazards such as cuts, grazing
and heat. Wear suitable gloves to protect your
hands.
■ The operator and maintenance personnel must
be physically capable of handling the size,
mass and power of the machine.
■ Hold the machine correctly: be ready to
counteract any normal or sudden movements have both hands ready.
■ Ensure that your body is balanced and that you
have a secure standing position.
■ Use only lubricants recommended by the
manufacturer.
■ Suitable protective goggles must be worn;
wearing of safety gloves and safety clothing
is recommended.
■ A rotating fi le may not be operated at a speed
higher than its nominal speed.
■ Wear a safety helmet if working above your
head.
■ Please note that the machine tool continues to
run after completion of the working process.
■ Warning is hereby made of the risk of explosion
or fi re due to the material being worked.
■ Release the start/stop control in case of a
disruption to the electricity supply.
Risks due to repetitive movements
■ When using a mini die grinder to perform work-
related activities, operators may experience
uncomfortable sensations in their hands and
arms, as well as in the neck and shoulders or
other parts of the body.
■ When using a mini die grinder, the operator
24
PDMS A1
Page 28

should adopt a comfortable posture whilst
ensuring a secure hold and avoiding awkward
postures or positions in which it is diffi cult to
maintain balance. The operator should change
positions during the course of long-lasting tasks.
This can be helpful in the prevention of discomfort and fatigue.
■ If the operator notices symptoms such as
persistent or recurring illness, discomfort, throbbing, pain, tingling, burning or stiff ness, these
indications should not be ignored. In this case,
the operator should consult a suitably qualifi ed
physician.
Risks due to dust and vapours
■ The dust and vapours produced by using the
mini die grinder can be hazardous to health
(e.g. cause cancer, birth defects, asthma and/
or dermatitis); it is essential to carry out a risk
assessment relating to these risks and to implement corresponding regulatory mechanisms.
■ The risk assessment should include all dust
caused by the use of the machine and any
existing dust that may be whirled up at the
same time.
■ The mini die grinder must be operated and
maintained in accordance with the recommendations contained in this manual to reduce the
release of dust and vapours to a minimum.
■ The exhaust air should be routed so that the
raising of dust in already dusty environments is
kept to a minimum.
■ If dusts or vapours are created, the main prior-
ity must be to control these at the site of their
release.
■ All inserts or accessories of the machine in-
tended for collecting, extracting or suppressing
airborne dust or vapours or should be used and
serviced in accordance with the manufacturer’s
instructions.
■ Consumables/machine tools must be selected,
maintained and replaced in accordance with
the recommendations in this guide in order to
avoid unnecessary intensifi cation of dust or
vapour production.
■ Use breathing equipment as per the instructions
provided by your employer or as required by
health and safety regulations.
■ Working with certain materials can lead to
emissions of dust and vapours that are potentially explosive.
Risks due to noise
■ Excessive noise levels in conjunction with insuf-
fi cient hearing protection may lead to permanent hearing damage, hearing loss and other
problems, such as tinnitus (ringing, buzzing,
whistling or humming in your ears). Therefore it
is essential that a risk assessment is carried out
with respect to these risks and that appropriate
regulatory mechanisms are implemented.
■ Suitable regulatory mechanisms include meas-
ures such as the use of insulation materials to
avoid pinging occurring on the workpieces.
■ Use ear protection equipment as per the instruc-
tions provided by your employer or as required
by health and safety regulations.
■ The mini die grinder must be operated and
maintained in accordance with the recommendations contained in this manual to reduce any
unnecessary increase in noise levels.
■ Consumables/machine tools must be selected,
maintained and replaced in accordance with
the recommendations in this guide in order to
avoid unnecessary increase in noise levels.
■ If the mini die grinder is equipped with a
silencer, always ensure that this is in place
and is operational while the machine is being
operated.
Risks due to vibrations
■ Vibrations can damage the nerves and cause
disruptions to the blood circulation in the hands
and arms.
■ When working in a cold environment, wear
warm clothing and keep your hands warm and
dry.
■ If you notice numbness, tingling or pain in
your fi ngers or hands or notice that the skin of
your fi ngers or hands has become pale, stop
working with the mini die grinder and consult a
doctor.
GB
PDMS A1
25
Page 29

■ The mini die grinder must be operated and
maintained in accordance with the recommendations contained in this manual to reduce any
unnecessary increase in vibration.
■ Consumables/machine tools must be selected,
maintained and replaced in accordance with
the recommendations in this guide in order to
avoid unnecessary increase in vibration.
GB
■ Always use a stand, a clamp or a compensation
device to support the weight of the machine.
■ Hold the machine securely but not too fi rmly
while maintaining the necessary hand-reaction
force, as the vibration risk generally increases
the harder the machine is held.
■ An inadequately mounted or damaged ma-
chine tool can lead to excessive vibrations.
Additional safety instructions for
pneumatic machines
■ Compressed air can cause serious injury. Ensure
that the air supply is switched off , the hose
is not under pressure and that the machine
is disconnected from the air supply when the
machine is not in us, and also before exchanging accessories or carrying out repairs. Never
aim the airfl ow towards yourself or any other
person.
■ Thrashing hoses can cause serious injury.
Therefore, always check that the hoses and
their fi xings are not damaged or have not come
loose.
■ If universal rotary joints (claw couplings) are
used, locking pins must be used to provide protection; Whipchek® air hose restraints must be
used to provide protection in case of a failure at
the connection of the hose to the machine.
■ Ensure that the maximum permissible pressure
stated on the machine is not exceeded.
■ Never carry compressed-air-powered machines
by the hose.
Hazards caused by accessories
■ Disconnect the grinder for whetstones from the
power supply before fi tting or replacing the
machine tools or accessories.
■ Use only accessories and consumables of the
size and type recommended by the manufacturer
of the grinder for whetstones.
■ Avoid direct contact with the machine tool during
and after use, since this can have heated up or
have become sharp.
■ The maximum operating speed recommended
by the manufacturer of the grinder for whetstones
must be the same or higher than the rotational
speed labelled on the machine.
■ Never fi t a grinding disc, cut-off disk or milling
cutter to a grinder for whetstones. A bursting
grinding disc can lead to extremely serious
injuries or death.
■ Do not use discs which are damaged, cracked
or could have fallen down.
■ Only approved machine tools with the correct
shaft diameter may be used.
■ Please note that you must ensure that the per-
missible rotational speed of small grinding
tools is reduced due to raising the position
of the shaft between the end of the chuck
and the small grinding tool (overhang). You
must ensure that the minimum clamping
length of 10 mm is retained. (see Figure 1)
min. 10 mm
Fig. 1
■ You must be aware that there is a danger of
mismatching between the shaft diameter of the
small grinding tool and of the chuck.
26
PDMS A1
Page 30

Initial operation
NOTE
The grinder may only be operated on
►
cleaned, oil-atomised compressed air and
may not exceed the maximum operating
pressure of 6.3 bar at the appliance. The
compressor must be fi tted with a pressure
reducer to regulate the working pressure.
► Wind the Tefl on tape supplied around all
threaded connectors.
♦ Connect the appliance to a suitable compressed
air source.
♦ First screw the 1/4“ threaded nipple onto
the mini compressed air oiler 1/4“ threaded
connector .
♦ Then fi ll the mini compressed air oiler with
1-2 drops of special compressed air oil. To
do this, undo the crosshead screw at the mini
compressed air oiler
and allow a few drops of oil to enter the oil
fi ller opening with the help of the oil bottle
included in delivery.
NOTE
A mist oiler continuously and optimally lubri-
►
cates the grinder as a preparation stage
after the pressure reducer. A mist oiler adds
fi ne drops of oil to air fl owing through the
appliance and therefore guarantees regular
lubrication.
♦ Now screw the 1/4“ threaded nipple onto
the mini compressed air oiler 1/4“ female
threaded connector .
♦ Now press the quick connector on the compressed
air hose (not included in delivery) onto the Compressed air connector plug . The connection
locks automatically.
♦ Now connect the other end of the compressed
air hose to the (fi lter) pressure reducer on the
compressor.
oil fi ller opening
Tool-changing
Always disconnect the grinder from the compressed
air supply before changing tools.
Only ever use tools which are ready for use.
Furthermore, you must ensure that the minimum
clamping length of the shaft in the chuck is not
fallen below.
♦ Using the spanners included in the accessories,
hold the spindle and chuck fi rmly and open
or close the chuck in the direction of the
arrows (see Fig. 3).
CLOSE
OPEN
Fig. 3
♦ Now insert one of the 10 diff erent whetstones .
NOTE
Please note the danger caused by mismatching
►
the diameter of the grinding tool shaft and
the chuck. Incorrectly-fi xed grinding tools can
cause severe vibration - injury hazard!
♦ Ensure that the grinding tool is correctly fi xed,
and carry out a trial run of 30 seconds in a
safe area at idling speed.
GB
PDMS A1
27
Page 31

Operation
Switching the grinder on and off
Use the pressure reducer to set the correct working
pressure. Operate the appliance at a working
pressure of maximum 6.3 bar.
NOTE
An excessive working pressure does not im-
GB
►
prove performance, but only increases compressed air consumption and increases wear
on the appliance.
♦ Switch the grinder on and increase or decrease
the speed by turning the speed setting wheel
(labelled 0 / 1) appropriately (see Figure 2).
1
Fig. 2
Maintenance and Cleaning
WARNING! RISK OF INJURY!
Disconnect the grinder from the
compressed air supply before
carrying out maintenance work.
NOTE
In order to guarantee correct functioning and
long service life of the grinder, please observe
the following information:
■ Suffi cient and continuous intact oil lubrication is
of decisive importance for optimum functioning.
■ Check the idle speed regularly and after any
maintenance is performed:
use a rev counter and perform the measurement
without any clamped tools. The idle speed may
not be exceeded under any circumstances at a
residual pressure of 6.3 bar.
■ Clean any dirt from the air inlet on the com-
pressed air mini grinder.
■ To protect against contamination, the com-
pressed air mini grinder should packed away in
the supplied carrying case after each use.
■ Do not pack the appliance away until it
has cooled down completely.
■ If, despite this, the compressed air mini grinder
has become dirty, observe the following instructions when cleaning.
■ Only use a dry, soft cloth or compressed air to
clean the grinder.
■ Never use sharp or scratchy cleaning agents
under any circumstances.
Disposal
The packaging consists of environmentally
friendly material. It can be disposed of in
the local recycling containers.
Do not dispose of the appliance in the normal
domestic waste.
Your local community or municipal authorities can
provide information on how to dispose of the wornout appliance.
Warranty and service
The warranty provided for this appliance is
3 years from the date of purchase.
This appliance has been manufactured with
care and inspected meticulously prior to
delivery. Please retain your receipt as proof
of purchase. In the event of a warranty claim,
please contact your Customer Service by telephone. This is the only way to guarantee free
return of your goods.
The warranty only covers claims for material and
manufacturing defects, not for transport damage,
wearing parts or for damage to fragile components
such as switches or batteries. This appliance is intended solely for private use and not for commercial
purposes. The warranty is deemed void if this product
has been subjected to improper or inappropriate
handling, abuse or modifi cations which were not
carried out by one of our authorised service centres.
Your statutory rights are not restricted in any way by
this warranty. The warranty period is not prolonged
by repairs made under the warranty. This also
applies to replaced and repaired parts. Damage
and defects present at the time of purchase must be
reported immediately after unpacking, or no later
28
PDMS A1
Page 32

than two days after the date of purchase. Repairs
made after expiry of the warranty period are
chargeable.
Service Great Britain
Tel.: 0871 5000 720 (£ 0.10/Min.)
E-Mail: kompernass@lidl.co.uk
IAN 43105
Hotline availability:
Monday to Friday from 8:00 to 20:00 (CET)
Importer
KOMPERNASS HANDELS GMBH
BURGSTRASSE 21
44867 BOCHUM
GERMANY
www.kompernass.com
Translation of the original
Conformity Declaration
We, KOMPERNASS HANDELS GMBH, Custodian
of Documents: Mr. Semi Uguzlu, BURGSTR. 21,
44867 BOCHUM, DEUTSCHLAND, hereby
declare that this product complies with the following standards, normative documents and the EC
directives:
Machinery Directive
(2006 / 42 / EC)
Applied harmonised standards:
EN ISO 11148-9: 2011
Type designation of machine:
PDMS A1 compressed-air mini grinder
Year of manufacture: 01 - 2014
Serial number: IAN 43105
Bochum, 30/06/2013
GB
PDMS A1
Semi Uguzlu
- Quality Manager -
Subject to technical changes in the course of
further developments.
29
Page 33

30
PDMS A1
Page 34

KOMPERNASS HANDELS GMBH
BURGSTRASSE 21
44867 BOCHUM
DEUTSCHLAND / GERMANY
www.kompernass.com
Version des informations · Stand der Informationen
Last Information Update:
05 / 2014 · Ident.-No.: PDMSA1-022014-3
IAN 43105
2
 Loading...