

Parkside PAS 4 A1 Original Instructions Manual
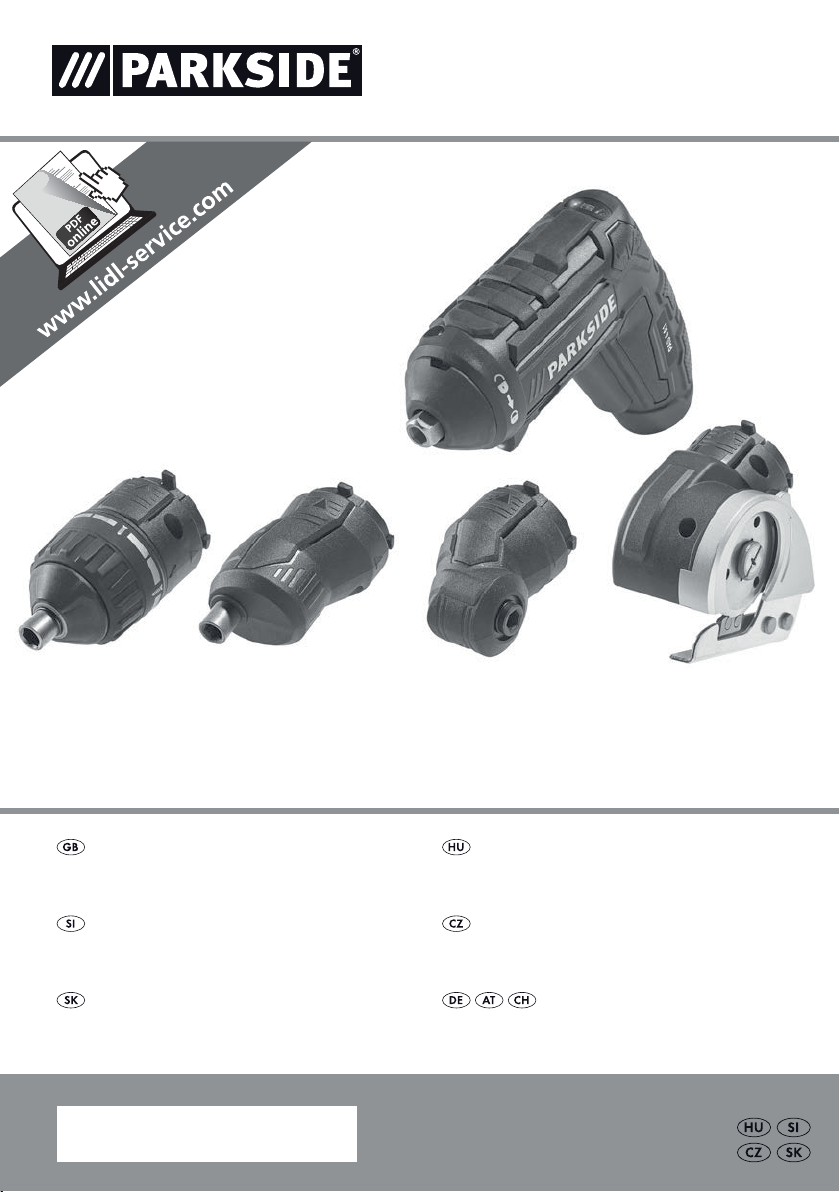
CORDLESS SCREWDRIVER PAS 4 A1
CORDLESS SCREWDRIVER
Translation of the original instructions
AKUMULATORSKI VIJAČNIK
Prevod originalnega navodila za uporabo
AKUMULÁTOROVÝ SKRUTKOVAČ
Preklad originálneho návodu na obsluhu
IAN 280464
AKKUS CSAVAROZÓ
Az originál használati utasítás fordítása
AKU ŠROUBOVÁK
Překlad originálního provozního návodu
AKKU-SCHRAUBER
Originalbetriebsanleitung
Before reading, unfold both pages containing illustrations and familiarise yourself with all functions of the
device.
Olvasás előtt kattintson az ábrákat tartalmazó mindkét oldalra és végezetül ismerje meg a készülék
mindegyik funkcióját.
Pred branjem obe strani s slikami odprite navzven in se nato seznanite z vsemi funkcijami naprave.
Před čtením si odklopte obě dvě strany s obrázky a potom se seznamte se všemi funkcemi přístroje.
Pred čítaním si odklopte obidve strany s obrázkami a potom sa oboznámte so všetkými funkciami prístroja.
Klappen Sie vor dem Lesen die beiden Seiten mit den Abbildungen aus und machen Sie sich anschließend
mit allen Funktionen des Gerätes vertraut.
GB Translation of the original instructions Page 1
HU Az originál használati utasítás fordítása Oldal 13
SI Prevod originalnega navodila za uporabo Stran 25
CZ Překlad originálního provozního návodu Strana 37
SK Preklad originálneho návodu na obsluhu Strana 49
DE / AT / CH Originalbetriebsanleitung Seite 61
A B
C D
E
F
III
II
I

Contents
Introduction ......................................................2
Intended use ................................................................ 2
Features ................................................................... 2
Package contents ............................................................ 2
Technical data .............................................................. 2
General Power Tool Safety Warnings ................................3
1. Work area safety .......................................................... 3
2. Electrical safety ........................................................... 3
3. Personal safety ............................................................ 4
4. Power tool use and care .................................................... 4
5. Use and handling of the cordless electrical power tool ............................. 5
6. Service .................................................................. 5
Safety guidelines for screw drivers ............................................... 6
Extended safety guidelines .................................................... 6
Safety guidelines for the cutting attachment ........................................ 6
Safety guidelines for battery chargers ............................................ 6
Before use .......................................................7
Charging the appliance battery (see fig. A) ........................................ 7
Assemble the attachments ..................................................... 7
Changing bits/screw driver bits (see fig. D) ........................................ 7
Replacing the cutting blade (see figs. E + F) ....................................... 8
Operation .......................................................8
Switching the cordless screwdriver on/off ......................................... 8
Changing the direction of rotation ............................................... 8
Tips and tricks ............................................................... 8
Maintenance, storage and cleaning ..................................9
Disposal .........................................................9
Kompernass Handels GmbH warranty ..............................10
Service .........................................................11
Importer .......................................................11
Translation of the original Conformity Declaration .....................12
PAS 4 A1
GB │1 ■
CORDLESS SCREWDRIVER
PAS 4 A1
Introduction
Congratulations on the purchase of your new appliance. You have chosen a high-quality product. The
operating instructions are part of this product. They
contain important information about safety, usage
and disposal. Before using the product, please
familiarise yourself with all operating and safety instructions. Use the product only as described and for
the range of applications specified. Please also pass
these operating instructions on to any future owner.
Intended use
This appliance is designed for screwing into wood,
plastic and metal. The cutting attachment is designed
exclusively for cutting soft materials, such as card and
similar materials up to a thickness of 6 mm. Use this
product only as described and for the areas of applications specified. The appliance is not intended for
commercial use. Any other usage or modification of
the appliance is deemed to be improper and carries a
significant risk of accidents. The manufacturer accepts
no responsibility for damage(s) attributable to misuse.
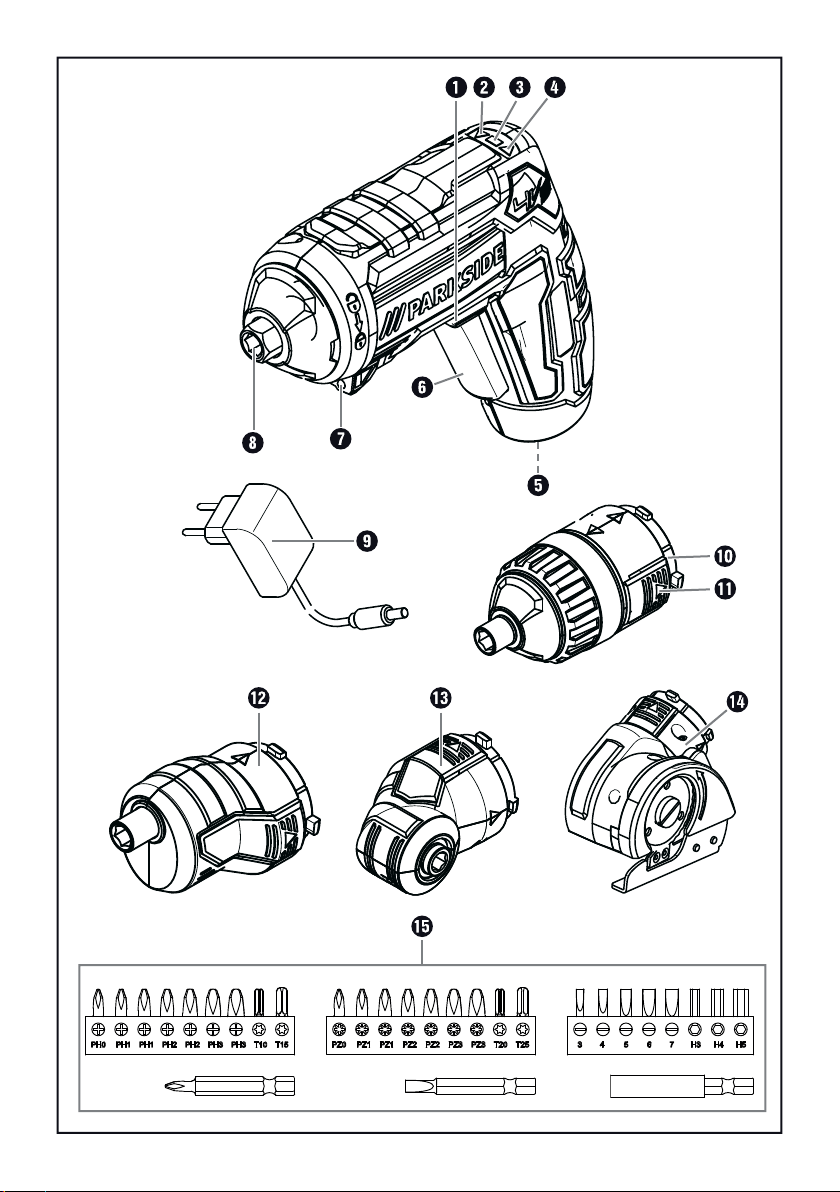
Features
Rotation direction switch/safety lock-out
Motor direction indicator for clockwise rotation
Battery charge level indicator
Motor direction indicator for anticlockwise
rotation
Charging socket (appliance)
ON/OFF switch
LED lamps
Tool holder
Charger
Torque attachment
Lock button
Eccentric attachment
Angle attachment
Cutting attachment
Bits and bit extension
Package contents
1 cordless screwdriver PAS 4 A1
1 charger PAS 4 A1-1
1 carrying tool bag
26 bits x 25 mm
2 bits x 50 mm
1 bit extension
1 torque attachment
1 eccentric attachment
1 angle attachment
1 cutting attachment
1 set of operating instructions
Technical data
Cordless screwdriver: PAS 4 A1
Nominal voltage: 4 V
Battery (integrated): (1 cell)
Battery capacity: 1500 mAh
Rated idle speed: n
Torque: max. 4.0 Nm
Tool holder: 6.35 mm (¼")
Use only the following charger to charge the
cordless tool:
PAS 4 A1-1:
INPUT:
Rated voltage: 100–240V ∼ 50/60Hz
(AC)
Rated current: max. 0.5 A
Polarity: positive
OUTPUT:
Rated voltage: 5.5 V
Rated current: 1700 mA
Charging time: approx. 1 hr
Protection class: II /
(DC)
200 rpm
0
(DC)
(double insulation)
■ 2 │ GB
PAS 4 A1

Noise and vibration data:
The measured values have been determined in
accordance with EN60745. The A-rated noise
level of the tool is typically:
Sound pressure level: L
Sound power level: L
Uncertainty K: K
= 67.8dB (A)
pA
= 78.8 dB (A)
WA
= 3 dB
pA/WA
Vibration values (vector total of three directions)
determined in accordance with EN 60745:
Screws:
Vibration emission value: a
Uncertainty: K = 1.5 m/s
= 0.79 m/s
h
2
NOTE
► The vibration level specified in these instruc-
tions has been measured in accordance with
a standardised measuring procedure and
can be used for equipment comparisons. The
specified vibration emission value can also
be used to make an initial exposure estimate.
WARNING!
► The vibration level will vary according to the
use of the power tool and may sometimes
be higher than the value specified in these
instructions.
Regular use of the power tool in this way may
cause the user to underestimate the vibration. To estimate the vibration load during a
specific working period accurately, periods
during which the appliance is switched off
(or running, but not being used) must also
be taken into account. This can significantly
reduce the vibration load over the total working period.
General Power Tool
Safety Warnings
WARNING!
► Read all safety warnings and all instruc-
tions. Failure to follow the safety information
and instructions may result in electric shock,
fire and/or serious injury.
2
Save all warnings and instructions for future
reference.
The term "power tool" in the warnings refers to your
mains-operated (corded) power tool or batteryoperated (cordless) power tool.
1. Work area safety
a) Keep your work area clean and well lit.
Cluttered or dark areas invite accidents.
b) Do not operate power tools in explosive atmo-
spheres, such as in the presence of flammable
liquids, gases or dust. Power tools create sparks
which may ignite the dust or fumes.
c) Keep children and bystanders away while
operating a power tool. Distractions can cause
you to lose control.
2. Electrical safety
a) Power tool plugs must match the outlet. Never
modify the plug in any way. Do not use any
adapter plugs with earthed (grounded) power
tools. Unmodified plugs and matching outlets
will reduce risk of electric shock.
b) Avoid body contact with earthed or grounded
surfaces, such as pipes, radiators, ranges and
refrigerators. There is an increased risk of elec-
tric shock if your body is earthed or grounded.
c) Do not expose power tools to rain or wet
conditions. Water entering a power tool will
increase the risk of electric shock.
PAS 4 A1
GB │3 ■

d) Do not abuse the mains cable. Never use the
cable for carrying, pulling or unplugging the
power tool. Keep mains cable away from heat,
oil, sharp edges or moving parts. Damaged
or entangled cables increase the risk of electric
shock.
e) When working outdoors with an electrical
power tool always use extension cords that
are also suitable for use outdoors. The use
of an extension cord suitable for outdoor use
reduces the risk of electric shock.
f) If operating a power tool in a damp location
is unavoidable, use a residual current device
(RCD) protected supply. Use of an RCD reduces
the risk of electric shock.
f) Dress properly. Do not wear loose clothing or
jewellery. Keep your hair and clothing away
from moving parts. Loose clothes, jewellery or
long hair can be caught in moving parts.
g) If devices are provided for the connection of
dust extraction and collection facilities, ensure
these are connected and properly used. The
use of an extraction system can reduce hazards
caused by dust.
h) Do not allow yourself to get lulled into a false
sense of security and do not ignore the safety
regulations for power tools, even if you are
familiar with the power tool after repeated
use. Careless handling can lead to serious
injuries within a fraction of a second.
3. Personal safety
a) Stay alert, watch what you are doing and
use common sense when operating a power
tool. Do not use a power tool while you are
tired or under the influence of drugs, alcohol
or medication. A moment of inattention while
operating power tools may result in serious
personal injury.
b) Use personal protective equipment. Always
wear eye protection. Protective equipment such
as a dust mask, non-skid safety shoes, a hard
hat, or hearing protection, depending on the
type and use of the electric tool, will reduce the
risk of personal injuries.
c) Prevent unintentional starting. Ensure the
switch is in the off position before connecting
to power source and/or battery pack, picking
up or carrying the tool. Carrying the power
tool with your finger on the ON/OFF switch or
connecting the power tool to the mains supply
whilst it is switched on can lead to serious accidents.
d) Remove any adjusting key or wrench before
turning the power tool on. A tool or wrench
attached to a rotating component of the power
tool can cause serious injuries.
e) Do not overreach. Keep proper footing and
balance at all times. This enables better control
of the power tool in unexpected situations.
4. Power tool use and care
a) Do not overload the power tool. Use the
correct power tool for your application.
The correct power tool will do the job better
and more safely at the rate for which it was
designed.
b) Do not use the power tool if the switch does
not turn it on and off. Any power tool that cannot be controlled with the switch is dangerous
and must be repaired.
c) Disconnect the plug from the power source
and/or remove a removable battery pack
before making any adjustments, changing
accessories, or storing the power tool. This
precaution is intended to prevent you from
unintentionally starting the device.
d) Store idle power tools out of the reach of
children. Do not allow anyone to operate the
device who is not familiar with the device or
who has not read these instructions. Power
tools are dangerous if used by people who are
inexperienced.
e) Look after power tools and accessories with
care. Check for misalignment or binding of
moving parts, breakage of parts and any
other condition that may affect the power
tool's operation. Arrange for damaged
components to be repaired before using the
power tool. Many accidents are caused by
poorly maintained power tools.
■ 4 │ GB
PAS 4 A1

f) Keep cutting tools sharp and clean. Properly
maintained cutting tools with sharp cutting
edges are less likely to bind and are easier to
control.
g) Use the power tool, accessories and accessory
tools etc. in accordance with these instructions,
taking into account the working conditions
and the work to be performed. The use of
power tools for purposes other than those
intended can result in hazardous situations.
h) Keep the handles and handle surfaces dry,
clean and free from oil and grease. Slippery
handles and handle surfaces do not allow safe
use and operation of the power tool in unforeseen situations.
5. Use and handling of the cordless
electrical power tool
a) Charge the rechargeable battery unit using
only the charger recommended by the manufacturer. Chargers are often designed for a
particular type of rechargeable battery unit.
There is a risk of fire if the battery charger specified for a particular type of battery is used with
other batteries.
b) Only the rechargeable battery units supplied
are to be used with an electrical power tool.
The use of other rechargeable batteries may
result in injury or a fire hazard.
c) When they are not being used, store re-
chargeable battery units away from paper
clips, coins, keys, nails, screws or other small
metal objects that could cause the contacts
to be bridged. Short-circuiting the contacts of
a rechargeable battery unit may result in heat
damage or fire.
d) Fluids may leak out of rechargeable battery
units if they are misused. If this happens,
avoid contact with the fluid. If contact occurs,
flush the affected area with water. Seek additional medical help if any of the fluid gets into
your eyes. Escaping battery fluid may cause
skin irritation or burns.
CAUTION! RISK OF EXPLOSION!
Never charge non-rechargeable
batteries!
■ Protect the rechargeable battery from heat,
for example from continuous exposure to
sunlight, fire, water and moisture. There is a
risk of explosion.
6. Service
a) Have your power tool serviced by a qualified
repair person using only identical replacement parts. This will ensure that the safety of
the power tool is maintained.
PAS 4 A1
GB │5 ■
Safety guidelines for screw drivers
WARNING!
■ Hold power tool by insulated gripping
surfaces, when performing an operation
where the fastener may contact hidden
wiring or its own cord. If a screw comes into
contact with a live wire, this may make exposed metal parts of the power tool live and
could give the operator an electric shock.
Extended safety guidelines
■ Do not use a damaged or modified battery.
Damaged or modified batteries may behave
unexpectedly and cause fires, explosions or
pose a risk of injury.
■ Do not expose a battery to fire or exces-
sively high temperatures. Fire or temperatures
in excess of 130°C (265°F) can cause an
explosion.
■ Follow all instructions regarding charging
and never charge the battery or the cordless
tool outside of the temperature range given in
the operating instructions. Incorrect charging
or charging outside of the permissible temperature range can destroy the battery and increase
the risk of fire.
Safety guidelines for the cutting
attachment
DANGER!
■ Always use cutting blades of the correct size
and with an appropriate central fixing bore.
Safety guidelines for battery chargers
■ This appliance may be used by
children aged 8 years and above
and by persons with limited physical, sensory or mental capabilities
or lack of experience and knowledge, provided that they are under supervision or have been told
how to use the appliance safely
and are aware of the potential
risks. Do not allow children to
use the appliance as a plaything.
Cleaning and user maintenance
tasks may not be carried out by
children unless they are supervised.
The charger is suitable for
indoor use only.
DANGER!
■ Keep your hands clear of the cutting area
and the cutting blade.
■ Before carrying out any work on the appli-
ance, ensure that the rotation direction switch
is in the middle. This prevents unintentional
switching on.
■ Do not cut unless the blade guard is fully
functional. Defective blade guards will not
protect you against unintentional contact with
the cutting blade.
■ Before each use, check whether the blade
guard is perfect condition and that the cutting
blade is firmly fitted.
■ 6 │ GB
■ If the connecting cable needs to
be replaced, this must be carried
out by the manufacturer or an
official representative in order to
avoid safety hazards.
PAS 4 A1
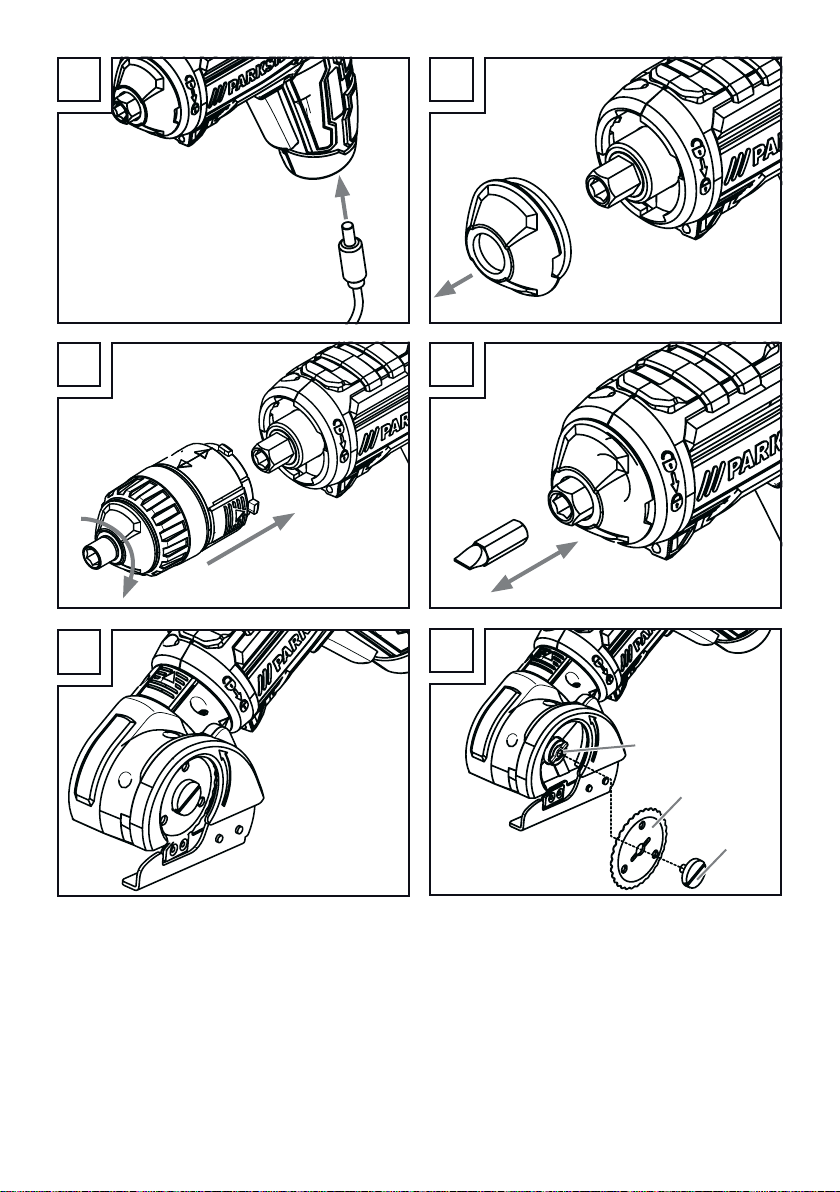
Before use
Assemble the attachments
Charging the appliance battery
(see fig. A)
NOTE
The battery is supplied partially charged.
►
Before first use, charge the battery in the
charger for at least 1 hours. This guarantees
full battery power. Li-ion batteries can be
charged at any time without adversely
affecting their service life. Interruption of the
charging process will not damage the
battery.
► If the battery charge level indicator
up red during use, the battery is at less than
30% of its capacity and needs to be
charged.
► Never charge the cordless appliance when
the ambient temperature is below 10°C or
above 40°C. If a lithium-ion battery is to be
stored for an extended period, the charge
level should be checked regularly. The
optimum charge level is between 50% and
80%. The storage climate should be cool and
dry and the ambient temperature should be
between 0°C and 50°C.
Start charging:
♦ Connect the charger
50/60 Hz power source.
♦ Connect the charger
on the device.
The battery is fully charged when the battery level
indication
Stop charging:
♦ Disconnect the charger
power supply.
♦ Disconnect the charger
socket
changes from red to green.
on the device.
to a 100–240 V ∼
to the charging socket
from the mains
from the charging
lights
Usage:
- With the torque attachment
soon as the screw is tight. Set the required torque
from one of the 10 levels.
- The eccentric attachment
even in locations that are close to the wall.
- The angle attachment
right angles.
- The cutting attachment
materials, such as card and similar materials up to
a thickness of 6 mm.
Assembly:
NOTE
► Before carrying out any work on the appli-
ance, ensure that the rotation direction switch
is in the middle. This prevents unintentional
switching on.
♦ Start by removing the rubber cap from the tool
holder (see fig. B).
♦ Now you can fit the supplied attachments to the
appliance. To do this, fit the attachment onto
the appliance and turn it in the direction of the
arrow so that the attachment clicks into place
(see fig. C, example torque attachment
Dismantling:
♦ To remove the attachments from the appliance,
press the locking button
ment away from the arrow. Now the attachment
can be pulled forwards and off the appliance.
♦ Afterwards, replace the rubber cap on the tool
holder.
screwing stops as
allows you to screw
allows you to screw at
allows you to cut soft
).
and turn the attach-
Changing bits/screw driver bits
(see fig. D)
Inserting:
♦ Insert the bit into the tool holder
Removal:
♦ Pull the bit out of the tool holder
.
.
PAS 4 A1
GB │7 ■
Replacing the cutting blade
(see figs. E + F)
NOTE
► Before carrying out any work on the
appliance, ensure that the rotation direction
switch
unintentional switching on.
♦ Start by connecting the cutting attachment
to the appliance. This blocks the motor spindle
and allows the screw to be removed.
♦ Unscrew the screw (I).
♦ Remove the cutting blade (II) by pulling it
downwards.
♦ Push in a new cutting blade (II) from below
ensuring that the ground edge of the blade
faces you.
Turn around the blade (II) until it fits onto the
tool fitting (III).
♦ Tighten the screw (I).
♦ The attachment can now be used again.
CAUTION!
► There is an arrow (
of the cutting attachment. This shows you
the recommended running direction of the
cutting blade.
is in the middle. This prevents
) on the blade guard
Operation
Switching the cordless screwdriver
on/off
Switching on:
♦ To start the appliance, press the ON/OFF
switch
Switching off:
♦ Release the ON/OFF switch
appliance.
Changing the direction of rotation
Clockwise:
♦ Push the rotation direction switch
♦ Press the ON/OFF switch
rotation indicator lights up. You can now
screw in the screws.
Anti-clockwise:
♦ Push the rotation direction switch
♦ Press the ON/OFF switch
rotation indicator lights up. You can now
unscrew the screws.
Safety lock-out:
♦ Push the rotation direction switch
middle position. The ON/OFF switch is
blocked.
NOTE
and keep it pressed in.
. The clockwise
. The anticlockwise
to switch off the
to the left.
to the right.
into the
■ 8 │ GB
► When the ON/OFF switch
still possible to activate the LED lamps .
To do this, press the ON/OFF switch .
is locked it is
Tips and tricks
Screw bits are labelled according to their dimensions and their shape. If you are unsure, always try
the particular screw bit out to see whether it sits in
the screw head without any free play.
PAS 4 A1
Maintenance, storage and
cleaning
WARNING! RISK OF ELECTRIC
SHOCK! Before cleaning, disconnect
the charger
NOTE
► Before carrying out any work on the
appliance, ensure that the rotation direction
switch
unintentional switching on.
The cordless screwdriver is maintenance-free.
■ The appliance must always be kept clean, dry
and free from oil or grease.
■ Never allow liquids to get into the appliance.
■ Use a cloth to clean the housing. Never use
petrol, solvents or cleansers which can damage
plastic.
WARNING!
■ Remove the attachments before cleaning.
Clean them with a dry cloth.
■ Always ensure the appliance and attach-
ments are clean, free of dust and dry before
storing.
is in the middle. This prevents
from the mains socket.
Disposal
The packaging is made from environmen-
tally friendly material and can be disposed
of at your local recycling plant.
Do not dispose of power tools in
your normal household waste!
In accordance with European Directive
2012/19/EU
Equipment and its integration into national law,
used power tools must be disposed of separately
and recycled in an environmentally friendly manner.
Your local community or municipal authorities
can provide information on how to dispose of the
appliance.
Do not dispose of batteries in your
Defective or worn-out rechargeable batteries must
be recycled according to Directive 2006/66/EC.
Take the battery pack and/or appliance to a
nearby collection facility.
Please consult your local authorities regarding
suitable disposal of worn out power tools/battery packs.The integrated lithium-ion battery may
only be removed by trained personnel. To remove
the battery from the housing, the battery must be
empty and the screws unscrewed from the housing.
The connections on the battery must individually
disconnected and isolated.
on Waste Electrical and Electronic
normal household waste!
PAS 4 A1
GB │9 ■

Kompernass Handels GmbH
warranty
Dear Customer,
This appliance has a 3-year warranty valid from
the date of purchase. If this product has any faults,
you, the buyer, have certain statutory rights. Your
statutory rights are not restricted in any way by the
warranty described below.
Warranty conditions
The validity period of the warranty starts from the
date of purchase. Please keep your original receipt
in a safe place. This document will be required as
proof of purchase.
If any material or production fault occurs within
three years of the date of purchase of the product,
we will either repair or replace the product for you
at our discretion. This warranty service is dependent on you presenting the defective appliance and
the proof of purchase (receipt) and a short written
description of the fault and its time of occurrence.
If the defect is covered by the warranty, your product
will either be repaired or replaced by us. The repair
or replacement of a product does not signify the
beginning of a new warranty period.
Warranty period and statutory claims for
defects
The warranty period is not prolonged by repairs
effected under the warranty. This also applies to
replaced and repaired components. Any damage
and defects present at the time of purchase must
be reported immediately after unpacking. Repairs
carried out after expiry of the warranty period shall
be subject to a fee.
Scope of the warranty
This appliance has been manufactured in accordance
with strict quality guidelines and inspected meticulously prior to delivery.
The warranty covers material faults or production
faults. The warranty does not extend to product parts
subject to normal wear and tear or fragile parts such
as switches, batteries, baking moulds or parts made
of glass.
The warranty does not apply if the product has been
damaged, improperly used or improperly maintained.
The directions in the operating instructions for the
product regarding proper use of the product are
to be strictly followed. Uses and actions that are
discouraged in the operating instructions or which
are warned against must be avoided.
This product is intended solely for private use and
not for commercial purposes. The warranty shall be
deemed void in cases of misuse or improper handling,
use of force and modifications/repairs which have
not been carried out by one of our authorised
Service centres.
Warranty claim procedure
To ensure quick processing of your case, please
observe the following instructions:
■ Please have the till receipt and the item number
(e.g. IAN 12345) available as proof of purchase.
■ You will find the item number on the type plate,
an engraving on the front page of the instructions
(bottom left), or as a sticker on the rear or bottom of the appliance.
■ If functional or other defects occur, please
contact the service department listed either by
telephone or by e-mail.
■ You can return a defective product to us free of
charge to the service address that will be provided
to you. Ensure that you enclose the proof of
purchase (till receipt) and information about
what the defect is and when it occurred.
■ 10 │ GB
PAS 4 A1
NOTE
► For Parkside and Florabest tools, please send
us only the defective item without the accessories (e.g. battery, storage case, assembly
tools, etc.).
You can download these instructions
along with many other manuals,
product videos and software on
www.lidl-service.com.
Service
WARNING!
► Have the power tool repaired by the service
centre or a qualified electrician and only
using genuine replacement parts.
This will ensure that the safety of the appliance is maintained.
► Always ensure that the power plug or
the mains cable is replaced only by the
manufacturer of the appliance or by an
approved customer service provider.
This will ensure that the safety of the appliance is maintained.
Service Great Britain
Tel.: 0871 5000 720 (£ 0.10/Min.)
E-Mail: kompernass@lidl.co.uk
IAN 280464
Importer
Please note that the following address is not the
service address. Please use the service address
provided in the operating instructions.
KOMPERNASS HANDELS GMBH
BURGSTRASSE 21
44867 BOCHUM
GERMANY
www.kompernass.com
PAS 4 A1
GB │11 ■

Translation of the original Conformity Declaration
We, KOMPERNASS HANDELS GMBH, documents officer: Mr. Semi Uguzlu, BURGSTR. 21,
44867 BOCHUM, GERMANY, hereby declare that this product complies with the following standards,
normative documents and EC directives:
Machinery Directive
(2006/42/EC)
EC Low Voltage Directive
(2014/35/EU)
EMC (Electromagnetic Compatibility)
(2014/30/EU)
RoHS Directive
(2011 / 65 / EU)*
* The manufacturer bears the full responsibility for compliance with this conformity declaration. The object
of the declaration described above complies with the requirements of the Directive 2011/65/EU of
the European Parliament and Council of 8 June 2011 on the limitations of use of certain dangerous
substances in electrical and electronic appliances.
Applied harmonised standards:
EN 60745-1/A11:2010
EN 60745-2-2:2010
EN ISO 12100:2010
EN 60335-1:2012
EN 60335-2-29:2004+A2
EN 62233:2008
EN 55014-1:2006+A1:2009+A2:2011
EN 55014-2:1997+A1:2001+A2:2008
EN 61000-3-2:2014
EN 61000-3-3:2013
Type/appliance designation: cordless screwdriver PAS 4 A1
Year of manufacture: 08 - 2016
Serial number: IAN 280464
Bochum, 04/10/2016
Semi Uguzlu - Quality Manager -
We reserve the right to technical changes in the context of further product development.
■ 12 │ GB
PAS 4 A1

Tartalomjegyzék
Bevezető .......................................................14
Rendeltetésszerű használat ................................................... 14
Felszereltség ............................................................... 14
A csomag tartalma .......................................................... 14
Műszaki adatok ............................................................14
Általános biztonsági utasítások elektromos kéziszerszámokhoz .........15
1. Munkahelyi biztonság ..................................................... 15
2. Elektromos biztonság ......................................................15
3. Személyi biztonság ....................................................... 16
4. Az elektromos kéziszerszám használata és kezelése ............................. 16
5. Az akkumulátoros kéziszerszám használata és kezelése ...........................17
6. Szerviz .................................................................17
A csavarozóval kapcsolatos biztonsági utasítások. . . . . . . . . . . . . . . . . . . . . . . . . . . . . . . . . . 18
További biztonsági utasítások .................................................18
Vágó-tartozékkal kapcsolatos biztonsági utasítások ................................18
Töltővel kapcsolatos biztonsági utasítások ........................................18
Üzembe helyezés előtt ............................................19
Készülék akkumulátorának töltése (lásd az A ábrát) ................................ 19
Tartozékok felszerelése ......................................................19
Bitek / csavarozó fejek cseréje (lásd a D ábrát) ...................................20
Vágólemez cseréje (lásd az E + F ábrát) .........................................20
Üzembe helyezés ................................................20
Az akkus csavarozó be- és kikapcsolása ......................................... 20
Forgásirányváltás ...........................................................20
Ötletek és fogások ..........................................................20
Karbantartás, tárolás és tisztítás ...................................21
Ártalmatlanítás ..................................................21
JÓTÁLLÁSI TÁJÉKOZTATÓ ..........................................22
Szerviz .........................................................24
Importőr .......................................................24
Az eredeti megfelelőségi nyilatkozat fordítása .......................24
PAS 4 A1
HU │13 ■
AKKUS CSAVAROZÓ PAS 4 A1
Bevezető
Gratulálunk új készüléke megvásárlásához.
Vásárlásával kiváló minőségű termék mellett döntött. A használati útmutató a termék része. Fontos
tudnivalókat tartalmaz a biztonságra, használatra
és ártalmatlanításra vonatkozóan. A termék használata előtt ismerkedjen meg valamennyi kezelési
és biztonsági utasítással. Csak a leírtak szerint és
a megadott célokra használja a készüléket. A készülék harmadik személynek történő továbbadása
esetén adja át a készülékhez tartozó valamennyi
leírást is.
Rendeltetésszerű használat
A készülék fába, műanyagba és fémbe történő
csavarozásra szolgál. A vágó-tartozékkal kizárólag legfeljebb 6mm vastag puha anyagok, pl.
kartonok és hasonlók vághatók. A készüléket csak
a leírtak szerint és a megadott alkalmazási területen használja. A készülék ipari használatra nem
alkalmas. A készülék minden más használata vagy
módosítása nem rendeltetésszerűnek minősül és
jelentős balesetveszélyt okozhat. A nem rendeltetésszerű használatból eredő károkért a gyártó nem
vállal felelősséget.
Felszereltség
forgásirányváltó kapcsoló / kapcsolózár
óramutató járásával megegyező irányú
működést jelző forgásirány-jelző
akkumulátor töltésszintjelző
óramutató járásával ellentétes irányú működést
jelző forgásirány-jelző
töltőaljzat
BE/KI kapcsoló
LED-lámpák
szerszámbefogó
töltő
forgatónyomaték-tartozék
kioldó gomb
excenter-tartozék
derékszög-tartozék
vágó-tartozék
bit és bit-hosszabbító
A csomag tartalma
1 akkus csavarozó PAS 4 A1
1 töltő PAS 4 A1-1
1 táska
26 bit x 25 mm
2 bit x 50 mm
1 bit-hosszabbító
1 forgatónyomaték-tartozék
1 excenter-tartozék
1 derékszög-tartozék
1 vágó-tartozék
1 használati útmutató
Műszaki adatok
Akkus csavarozó: PAS 4 A1
Névleges feszültség: 4 V
Akkumulátor (integrált): (1 cella)
Akkumulátor kapacitása: 1500 mAh
Névleges üresjárati
fordulatszám: n
Forgatónyomaték: max. 4,0 Nm
Szerszámbefogó: 6,35 mm (¼“)
Az akkumulátoros szerszám töltéséhez
csak az alábbi töltőt használja:
PAS 4 A1-1:
BEMENET/input:
Névleges feszültség: 100-240V ∼ 50/60 Hz
(váltóáram)
Névleges áram: max. 0,5 A
Polaritás: pozitív
KIMENET/output:
Névleges feszültség: 5,5 V
Névleges áram: 1700 mA
Töltési idő: kb. 1 óra
Védelmi osztály: II /
(egyenáram)
200 min
0
(dupla szigetelés)
-1
(egyenáram)
■14 │ HU
PAS 4 A1
Zaj- és rezgésinformációk:
A zaj mért értéke az EN 60745 szabványnak
megfelelően került meghatározásra. Az elektromos
szerszám A-súlyozott zajszintjének jellemző értéke:
Hangnyomásszint: L
Hangerőszint: L
Bizonytalansági K érték: K
= 67,8 dB (A)
pA
= 78,8 dB (A)
WA
= 3 dB
pA/WA
Rezgés értékek (három irány vektorösszege) az
EN 60745 szerint meghatározva:
Csavarozás:
Rezgés kibocsátási érték: a
= 0,79 m/s
h
Bizonytalansági érték: K = 1,5 m/s
2
2
TUDNIVALÓ
► A jelen használati útmutatóban megadott
rezgésszint szabványos mérési eljárással lett
meghatározva és felhasználható a készülékek összehasonlítására. A megadott rezgés
kibocsátási érték a kitettség előzetes megbecsüléséhez is felhasználható.
FIGYELMEZTETÉS!
► A rezgésszint az elektromos kéziszerszám
alkalmazásától függően változik és egyes
esetekben túllépheti a jelen útmutatókban
megadott értéket.
A rezgésterhelés alulbecsült lehet, ha az
elektromos kéziszerszámot rendszeresen így
használják. A rezgésterhelés adott munkaidőszakon belüli pontos becsléséhez azokat az
időszakokat is figyelembe kell venni, amikor a
készülék ki van kapcsolva, vagy bár működik,
de ténylegesen nincs használatban. Ez a
teljes munkaidőtartamra nézve jelentősen
csökkentheti a rezgésterhelést.
Általános biztonsági
utasítások elektromos
kéziszerszámokhoz
FIGYELMEZTETÉS!
► Olvassa el az összes biztonsági előírást és
utasítást. A biztonsági előírások és utasítások
figyelmen kívül hagyása áramütést, tüzet és/
vagy súlyos sérüléseket okozhat.
Őrizze meg az összes biztonsági előírást és
utasítást későbbi használatra.
A biztonsági előírásokban használt „elektromos
kéziszerszám“ kifejezés hálózatról (hálózati kábelen át) üzemeltetett elektromos kéziszerszámokra
és akkumulátoros elektromos kéziszerszámokra
(hálózati kábel nélkül) vonatkozik.
1. Munkahelyi biztonság
a) Tartsa tisztán és jól megvilágítva a munkate-
rületét. A rendetlenség és a rosszul megvilágí-
tott munkaterület balesetet okozhat.
b) Ne dolgozzon a készülékkel olyan robba-
násveszélyes környezetben, ahol gyúlékony
folyadékok, gázok vagy porok vannak. Az
elektromos kéziszerszámok szikráznak, amik
meggyújthatják a port vagy gőzöket.
c) Az elektromos kéziszerszám használata köz-
ben ne engedjen közel gyermekeket és más
személyeket. Ha elterelik a figyelmét, elveszít-
heti uralmát a készülék felett.
2. Elektromos biztonság
a) Az elektromos kéziszerszám csatlakozódugó-
jának illeszkednie kell a csatlakozóaljzatba.
A csatlakozót semmilyen módon nem szabad
megváltoztatni. A földelt elektromos kéziszerszámokat ne használja adapterrel. A nem
módosított csatlakozó és a megfelelő csatlakozóaljzat használata csökkenti az elektromos
áramütés veszélyét.
b) Ügyeljen arra, hogy teste ne érintkezzen
földelt felülettel, mint például csővezeték, fűtőtest, tűzhely vagy hűtőszekrény felületével.
Az áramütés kockázata nagyobb, ha a teste
földelve van.
PAS 4 A1
HU │15 ■

c) Óvja az elektromos kéziszerszámot esőtől
vagy nedves környezettől. Növeli az áramütés
kockázatát, ha víz kerül az elektromos kéziszerszámba.
d) Ne használja a csatlakozóvezetéket rendelte-
tésellenes célra, ne hordozza és ne akassza
fel az elektromos kéziszerszámot a kábelnél
fogva és ne a vezetéknél fogva húzza ki a
csatlakozódugót az aljzatból. Tartsa távol a
csatlakozóvezetéket hőtől, olajtól, éles szegélyektől vagy mozgó alkatrészektől. A sérült
vagy összecsavarodott csatlakozóvezeték növeli
az áramütés kockázatát.
e) Ha a szabadban dolgozik az elektromos ké-
ziszerszámmal, akkor csak olyan hosszabbító
kábelt használjon, ami kültéren is használható. A kültéri használatra alkalmas hosszabbító
kábellel csökkentheti az áramütés veszélyét.
f) Ha az elektromos kéziszerszám nedves
helyen történő használata elkerülhetetlen,
akkor használjon hibaáram védőkapcsolót.
A hibaáram védőkapcsoló használata csökkenti
az áramütés veszélyének kockázatát.
3. Személyi biztonság
a) Legyen figyelmes, ügyeljen arra, amit csinál
és megfontoltan végezze a munkát az elektromos kéziszerszámmal. Ne használjon elektromos kéziszerszámot, ha fáradt, vagy ha
kábítószer, alkohol vagy gyógyszer hatása
alatt áll. Az elektromos kéziszerszám haszná-
latakor már egy pillanatnyi figyelmetlenség is
komoly sérüléseket okozhat.
b) Viseljen személyi védőfelszerelést és mindig
vegyen fel védőszemüveget. Az elektromos
kéziszerszám jellegének és alkalmazásának
megfelelő személyi védőfelszerelés, például
pormaszk, csúszásmentes biztonsági cipő,
védősisak vagy fülvédő csökkenti a személyi
sérülések veszélyét.
c) Előzze meg a készülék véletlenszerű bekap-
csolását. Győződjön meg arról, hogy az
elektromos kéziszerszám ki van kapcsolva,
mielőtt a villamos hálózatra és/vagy az akkumulátorra csatlakoztatja, illetve kézbe veszi
vagy viszi. Balesetet okozhat, ha az elektromos
kéziszerszám hordozása közben az ujja a kapcsolón van vagy az elektromos kéziszerszám
már bekapcsolt állapotban van, amikor csatlakoztatja az áramellátásra.
d) Távolítsa el a beállításhoz használt szerszá-
mokat vagy csavarkulcsokat az elektromos
kéziszerszám bekapcsolása előtt. Az elekt-
romos kéziszerszám forgó részében maradt
szerszám vagy kulcs balesetet okozhat.
e) Kerülje a normálistól eltérő testtartást. Vegyen
fel biztonságos álló helyzetet és tartsa meg
folyamatosan az egyensúlyát. Ily módon vá-
ratlan helyzetekben is jobban úrrá tud lenni a
készüléken.
f) Viseljen alkalmas ruházatot. Ne viseljen bő
ruházatot vagy ékszert. Tartsa távol a haját
és ruháját a mozgó részektől. A laza ruházat,
az ékszer vagy a hosszú haj beleakadhat a
mozgó részekbe.
g) Amennyiben a készülékhez porelszívó és por-
gyűjtő berendezés is szerelhető, akkor ezeket
csatlakoztassa és megfelelően használja.
A porelszívó alkalmazása csökkentheti a por
általi veszélyeztetést.
h) Ne gondolja, hogy biztonságban van és ne
hagyja figyelmen kívül az elektromos kéziszerszámokra vonatkozó biztonsági előírásokat akkor sem, ha többszöri használat után
jól ismeri az elektromos kéziszerszám használatát. A figyelmetlen használat a másodperc
töredéke alatt súlyos sérüléseket okozhat.
4. Az elektromos kéziszerszám
használata és kezelése
a) Ne terhelje túl az elektromos kéziszerszámot.
Használja a munkájának megfelelő elektromos kéziszerszámot. Megfelelő elektromos
kéziszerszámmal jobban és biztonságosabban
tud dolgozni az adott teljesítmény-tartományban.
■16 │ HU
PAS 4 A1

b) Ne használjon olyan elektromos kéziszerszá-
mot, amelyiknek hibás a kapcsolója. Ha az
elektromos kéziszerszámot már nem lehet be-
és kikapcsolni, akkor a használata veszélyes és
meg kell javíttatni.
c) Húzza ki a hálózati csatlakozódugót a csatla-
kozóaljzatból és/vagy távolítsa el a levehető
akkumulátort, mielőtt beállításokat végez a
készüléken, betétszerszámokat cserél vagy
az elektromos kéziszerszámot elteszi. Ezzel a
megelőző biztonsági intézkedéssel megakadályozható az elektromos kéziszerszám véletlen
bekapcsolása.
d) A nem használt elektromos kéziszerszámot
gyermekektől elzárva tárolja. Ne engedje,
hogy olyan személyek használják az elektromos kéziszerszámot, akik nem ismerik annak
használatát vagy nem olvasták az erre vonatkozó utasításokat. Az elektromos kéziszerszá-
mok veszélyesek, ha tapasztalatlan személyek
használják.
e) Gondosan ápolja az elektromos kéziszerszá-
mokat és a betétszerszámokat. Ellenőrizze,
hogy a mozgó részek tökéletesen működnek
és nincsenek beszorulva, részei nincsenek
eltörve vagy olyannyira megsérülve, hogy az
befolyásolná az elektromos kéziszerszám működését. Az elektromos kéziszerszám használata előtt javíttassa meg a sérült részeket.
Sok balesetet a rosszul karbantartott elektromos
kéziszerszámok okoznak.
f) A vágószerszámokat tartsa mindig élesen és
tisztán. A gondosan karbantartott éles vágóeszközök kisebb valószínűséggel szorulnak be és
könnyebben irányíthatók.
g) Az elektromos kéziszerszámot, a tartozékokat,
a betétszerszámokat stb. a használati utasításoknak megfelelően használja. Vegye figyelembe a munkakörülményeket és az elvégzendő feladatot. Az elektromos kéziszerszám
nem rendeltetésszerű használata veszélyes
helyzeteket teremthet.
h) A markolatokat és fogófelületeket tartsa szá-
razon, tisztán és olaj- illetve zsírmentesen.
A csúszós markolatok és fogófelületek nem
teszik lehetővé az elektromos kéziszerszám
biztonságos használatát és irányítását váratlan
helyzetekben.
5. Az akkumulátoros kéziszerszám
használata és kezelése
a) Az akkumulátort csak a gyártó által ajánlott
töltővel töltse. Olyan töltő esetén, amely egy
bizonyos típusú akkumulátor töltésére alkalmas,
tűzveszély áll fenn, ha másfajta akkumulátorral
használják.
b) Csak az elektromos kéziszerszámba való
akkumulátort használja. Más akkumulátorok
használata sérülést okozhat és tűzveszélyes.
c) A nem használt akkumulátort tartsa megfe-
lelő távolságban gémkapcsoktól, érméktől,
kulcsoktól, szögektől, csavaroktól vagy más
apró fémtárgyaktól, amelyek rövidzárlatot
okozhatnak. Az akkumulátor érintkezői közötti
rövidzárlat égési sérülést vagy tüzet okozhat.
d) Helytelen alkalmazás esetén folyadék szivá-
roghat ki az akkumulátorból. Ne érjen hozzá. Ha véletlenül mégis hozzáérne, öblítse le
vízzel. Ha a folyadék szembe kerül, forduljon
orvoshoz. A kiszivárgó akkumulátor-folyadék
bőrirritációt vagy égési sérülést okozhat.
VIGYÁZAT! ROBBANÁSVESZÉLY!
Soha ne töltsön fel egyszer
használatos elemeket.
■ Védje az akkumulátort hőségtől, például tar-
tós napsütéstől, tűztől, víztől és nedvességtől.
Robbanásveszély áll fenn.
6. Szerviz
a) Az elektromos kéziszerszámot csak szakkép-
zett szakemberrel és csak eredeti cserealkatrészekkel javíttassa. Ezzel biztosíthatja az
elektromos kéziszerszám hosszan tartó, biztonságos működését.
PAS 4 A1
HU │17 ■
A csavarozóval kapcsolatos biztonsági utasítások
Töltővel kapcsolatos biztonsági
utasítások
FIGYELMEZTETÉS!
■ A készüléket csak a szigetelt markoló-
felületénél fogja meg, ha olyan munkát
végez, ahol a csavar rejtett áramvezetékekbe ütközhet. A csavar feszültség alatt álló
vezetékkel történő érintkezése a készülék fém
részeit is feszültség alá helyezheti és áramütést okozhat.
További biztonsági utasítások
■ Ne használjon sérült vagy módosított akku-
mulátort. A sérült vagy módosított akkumuláto-
rok kiszámíthatatlanul viselkedhetnek és tüzet,
robbanást vagy sérülést okozhatnak.
■ Ne tegye ki az akkumulátort tűznek vagy
magas hőmérsékletnek. Tűz vagy 130 °C
(265°F) feletti hőmérséklet robbanást okozhat.
■ Kövesse a töltésre vonatkozó utasításokat és
soha ne töltse az akkumulátort és az akkumulátoros kéziszerszámot a használati útmutatóban megadott hőmérséklet-tartományon kívül.
A helytelen töltés és a megengedett hőmérséklet-tartományon kívüli töltés tönkre teheti az
akkumulátort és növeli a tűzveszélyt.
Vágó-tartozékkal kapcsolatos
biztonsági utasítások
VESZÉLY!
■ Ne nyúljon kezével a vágó területbe és a
vágólemezhez.
■ Mielőtt munkákat végez a készüléken,
ellenőrizze, hogy a forgásirány kapcsoló
középen van. Ez megakadályozza a véletlen
bekapcsolódást.
■ Csak működőképes védőburkolattal vágjon.
A hibás védőburkolat nem védi meg Önt
attól, hogy véletlenül a vágólemezhez érjen.
■ Minden használat előtt ellenőrizze, hogy a
védőburkolat kifogástalan állapotban van és
a vágólemez meg van húzva.
■ Mindig megfelelő méretű és megfelelő befo-
gófurattal rendelkező vágólemezt használjon.
■ A készüléket 8 éves kor feletti
gyermekek és csökkent fizikai,
érzékszervi vagy szellemi képességű vagy tapasztalattal, illetve
ismeretekkel nem rendelkező személyek felügyelet mellett használhatják, vagy ha felvilágosították
őket a készülék biztonságos
használatáról és megértették az
ebből eredő veszélyeket. Gyermekek nem játszhatnak a készülékkel. Tisztítást és a felhasználó
általi karbantartást felügyelet
nélküli gyermekek nem végezhetnek.
A töltő kizárólag beltéri
használatra alkalmas.
■ Amennyiben a csatlakozóve-
zeték cseréje szükséges, azt a
biztonság veszélyeztetésének
elkerülése érdekében a gyártónak vagy képviselőjének kell
elvégeznie.
■18 │ HU
PAS 4 A1
Üzembe helyezés előtt
Tartozékok felszerelése
Készülék akkumulátorának töltése
(lásd az A ábrát)
TUDNIVALÓ
Az akkumulátor részben feltöltve kerül kiszállí-
►
tásra. Üzembe helyezés előtt töltse legalább
1 óráig az akkumulátort. Ezzel biztosítható
az akkumulátor teljes teljesítménye. A lítium-ion
akkumulátor bármikor tölthető anélkül, hogy
csökkenne az élettartama. A töltés megszakítása nem tesz kárt az akkumulátorban.
► Ha az akkumulátor töltésjelzője
közben pirosan világítani kezd, akkor az
akkumulátor kapacitása kevesebb, mint 30%
és fel kell tölteni.
► Soha ne töltse az akkumulátoros szerszámot,
ha a környezet hőmérséklete 10°C alatt
vagy 40°C felett van. A lítium-ion akkumulátor hosszabb tárolása esetén rendszeresen
ellenőrizni kell az akkumulátor töltöttségét.
Az optimális töltöttségi állapot 50% és 80%
között van. Hűvös, száraz helyen, 0°C és
50 °C közötti hőmérsékleten kell tárolni.
A töltés indítása:
♦ Csatlakoztassa a töltőt
50/60 Hz áramforrásra.
♦ Csatlakoztassa a töltőt
tához .
Az akkumulátor fel van töltve, ha az akkumulátor
töltésjelzője
A töltés befejezése:
♦ Válassza le a töltőt
♦ Válassza le a töltőt
.
pirosról zöldre vált.
100 - 240 V ~
a készülék töltőaljza-
az áramforrásról.
a készülék töltőaljzatáról
működés
Rendeltetés:
- A forgatónyomaték-tartozékkal
automatikusan megáll, amint a csavar meg van
húzva. Ehhez állítsa be a szükséges forgatónyomatékot a 10 fokozaton belül.
- Az excenter-tartozék
helyeken történő csavarozást.
- A derékszög-tartozék
csavarozási munkák végrehajtását.
- A vágó-tartozékkal
puha anyagok, pl. karton, szőnyeg, szövet és
hasonlók vághatók.
Felszerelés:
TUDNIVALÓ
► Mielőtt munkákat végez a készüléken, ellen-
őrizze, hogy a forgásirányváltó kapcsoló
középen van. Ez megakadályozza a véletlen
bekapcsolódást.
♦ Először húzza le a gumikupakot a szerszámbe-
fogóról (lásd a B ábrát).
♦ Ekkor a készülékre helyezhetők a mellékelt
tartozékok. Ehhez helyezze a tartozékot a
készülékre és forgassa el a nyíl irányába úgy,
hogy a tartozék bekattanjon (lásd a C ábrát,
példa forgatónyomaték-tartozék
Leszerelés:
♦ A tartozék levételéhez nyomja meg a kioldó
gombot
ellentétes irányba. Ekkor lehúzható előre a
tartozék.
♦ Ezt követően helyezze vissza a gumikupakot
a szerszámbefogóra.
és forgassa el a tartozékot a nyíllal
lehetővé teszi a fal-közeli
lehetővé teszi derékszögű
legfeljebb 6mm vastag
a csavarozás
).
PAS 4 A1
HU │19 ■
Bitek / csavarozó fejek cseréje
(lásd a D ábrát)
Behelyezés:
♦ Helyezzen be egy bitet a szerszámbefogóba
Kivétel:
♦ Húzza ki a bitet a szerszámbefogóból
Üzembe helyezés
Az akkus csavarozó be- és kikapcsolása
.
Bekapcsolás:
♦ A készülék üzembevételéhez nyomja meg és
.
tartsa lenyomva a BE/KI kapcsolót
.
Vágólemez cseréje
(lásd az E + F ábrát)
TUDNIVALÓ
► Mielőtt munkákat végez a készüléken, ellen-
őrizze, hogy a forgásirányváltó kapcsoló
középen van. Ez megakadályozza a véletlen
bekapcsolódást.
♦ Először csatlakoztassa a vágó-tartozékot
készülékre. Ezáltal blokkolva lesz a motororsó
és ki lehet csavarni a csavart.
♦ Csavarja ki a csavart (I).
♦ Vegye ki a vágólemezt (II) úgy, hogy azt lefelé
húzza.
♦ Csúsztasson be alulról egy új vágólemezt (II)
lecsiszolt élével kifelé.
Forgassa el a vágólemezt (II), amíg az be nem
kattan a befogón (III).
♦ Húzza meg a csavart (I).
♦ Ezzel ismét használható a tartozék.
FIGYELEM!
► A vágó-tartozék védőburkolatán egy nyíl
(
) található. Ez a vágólemez ajánlott
forgásirányát mutatja.
Kikapcsolás:
♦ A készülék kikapcsolásához engedje el a BE/KI
kapcsolót
.
Forgásirányváltás
Óramutató járásával megegyező irányú
működés:
a
♦ Tolja a forgásirányváltó kapcsolót
♦ Nyomja meg a BE/KI kapcsolót
mutató járásával megegyező irányú működést
jelző forgásirány-jelző világít. Ily módon
csavarokat csavarozhat be.
Óramutató járásával ellentétes irányú
működés:
♦ Tolja a forgásirányváltó kapcsolót
♦ Nyomja meg a BE/KI kapcsolót
tató járásával ellentétes irányú működést jelző
forgásirány-jelző világít. Ily módon csavarokat csavarozhat ki.
Kapcsolózár:
♦ Tolja a forgásirányváltó kapcsolót
lásba. A BE/KI kapcsoló blokkolva van.
TUDNIVALÓ
balra.
. Az óra-
jobbra.
. Az óramu-
középál-
■20 │ HU
► lezárt BE- / KI-kapcsoló
vábbra is lehetséges a LED- lámpák aktiválása. Nyomja meg a BE- / KI-kapcsolót .
lezárásakor to-
Ötletek és fogások
A csavarozóbiteket méretükkel és alakjukkal jelölik.
Ha bizonytalan, először mindig próbálja ki, hogy
a bit pontosan illeszkedik-e a csavarfejbe.
PAS 4 A1
 Loading...