

Page 1
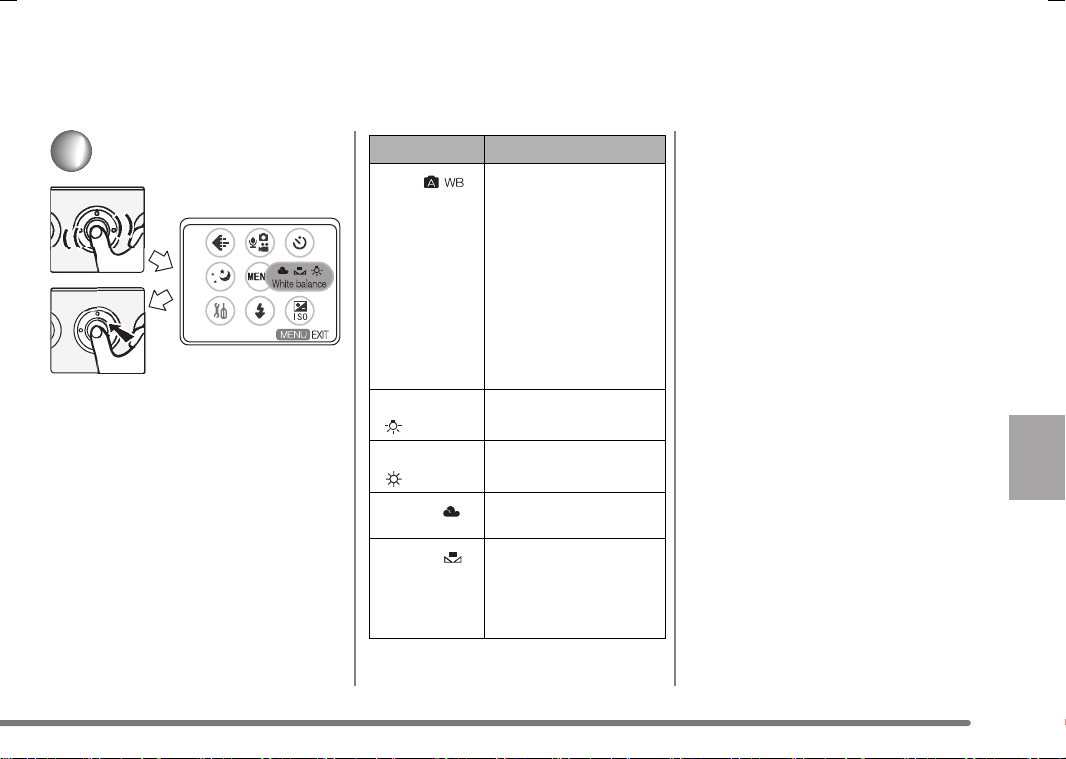
Setting the White Balance
Use this function to adjust the whiteness when a recorded scene looks bluish or reddish.
• The setting of the white balance is
reflected to other REC mode. And it
is retained even if the power is
turned off. When turning the power
on again in different lighting
conditions, set the white balance
again.
• When taking a picture with the flash,
the white balance will be automatically
adjusted, but the white balance may
not be properly adjusted when the
flash light is insufficient.
• The white balance may not be
adjusted correctly in dark places.
• Adjustment of white balance in Manual
(P42) is effective under the following
conditions.
• When recording under reddish
lighting (halogen light bulb,
incandescent light bulb, etc.).
• When recording under multiple light
sources.
• When recording a picture of
mono-tone colour.
1
Access the menu in the recording
. (P17)
mode
Select the desired item from White
balance.
• Select the item from the table on the
right.
Item Details of Setting
Auto [ ]
Incandescent
[]
Daylight
[]
Cloudy [ ]
Manual [ ]
It is designed to
automatically adjust the
camera to produce
natural tones. In most
situations it works fine.
In some situations
where several different
types of lighting are
present, enhanced
performance can be
achieved by setting the
white balance manually.
For recording under
incandescent lighting
For recording outdoors
on a bright day
For recording under a
cloudy and shady sky
For manual setting
(Read the following
page where the manual
setting is explained in
detail)
41
Page 2
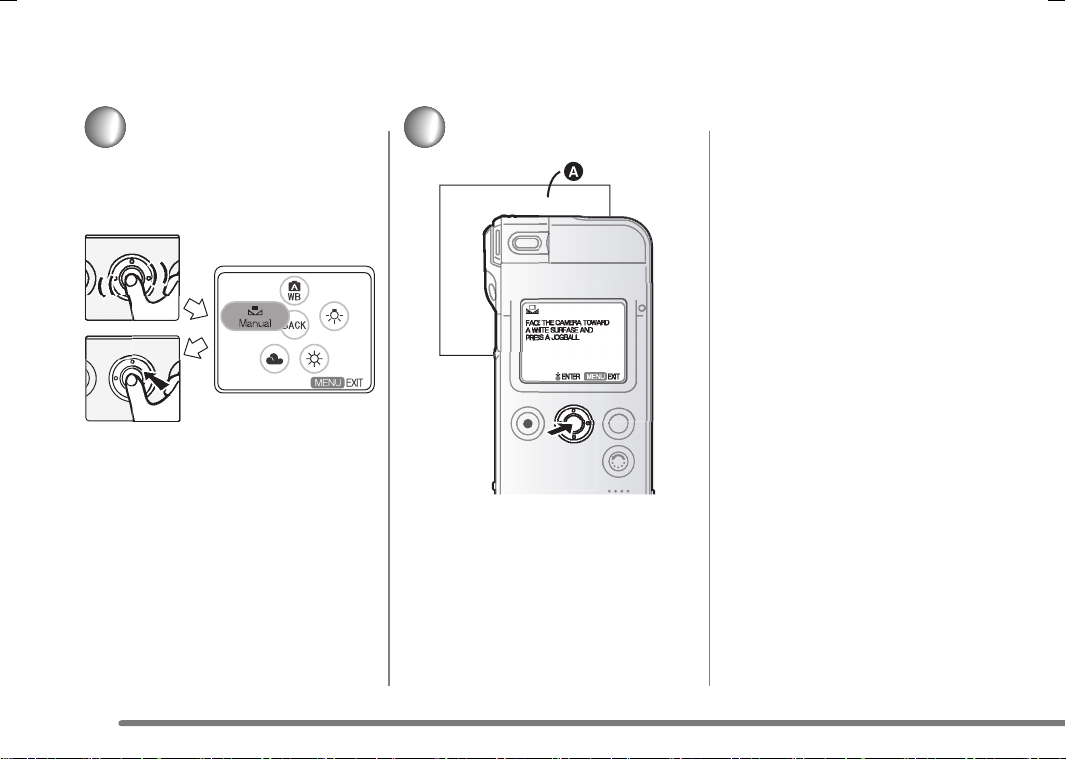
Setting the White Balance (Manual)
1
2
• When taking a picture with the flash
after setting the white balance
manually, the white balance may not
be properly adjusted. We recommend
setting the white balance to Auto
when using the flash.
• The white balance may not be able to
be set manually in too bright or dark
places. In this case, set the white
balance to the mode other than
Manual.
Access the menu in the recording
. (P17)
mode
Select Manual from White balance.
42
Aim the unit at a sheet of white
paper A or similar object so that it
completely fills the frame to white on
the LCD monitor and press the jog
ball.
• White balance is set.
Page 3
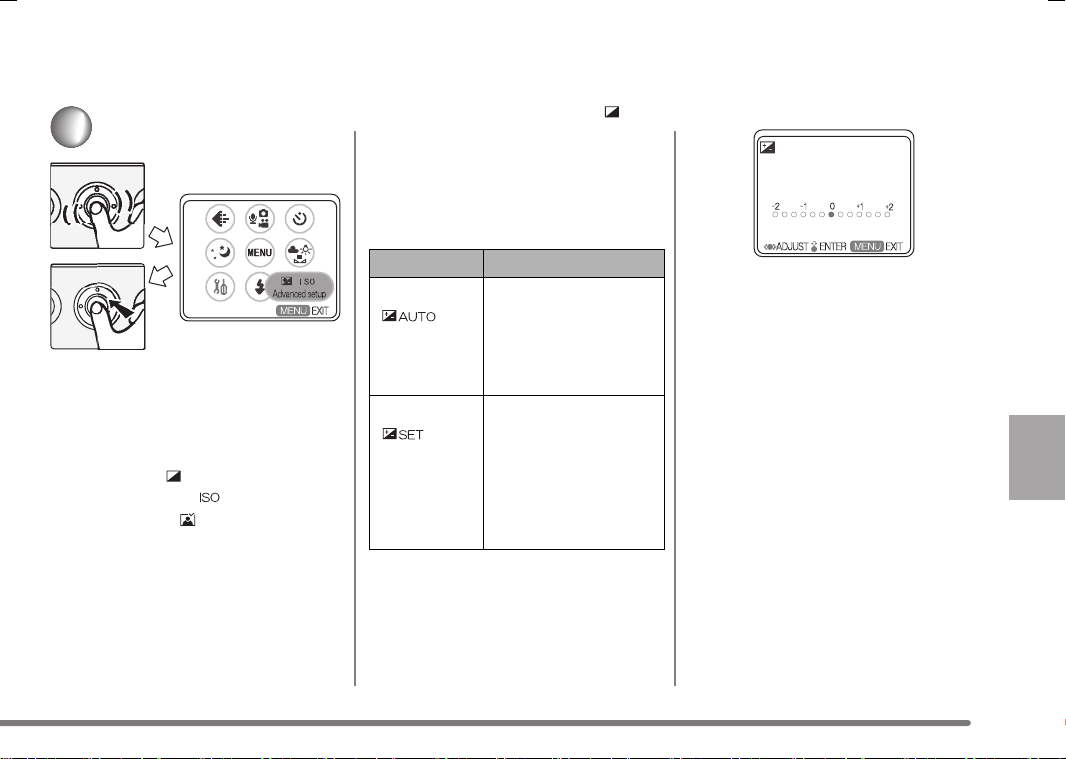
Setting the Application Menu
1
Access the menu in the recording
. (P17)
mode
Select the desired item from
Advanced setup.
• Select one from the items below.
• Exposure [ ]
• ISO Sensitivity [ ]
• Auto review [ ]
+
‑
_ Exposure Compensation [ ]
In some situations the illumination of the
background and your subject may differ.
Auto exposure systems may not always
calculate the exposure correctly. This
feature allows you to manually
compensate the exposure.
Item Details of Setting
EV auto
[]
EV manual
[]
The compensation is
automatically adjusted
according to the
brightness of the
subject and the
background.
You can compensate
from j2 EV to i2 EV
with 1/3 EV step by
rotating the jog ball.
Compensating to i
side brightens the
picture and to j side
darkens it.
+
‑
• When compensating the exposure, the
brightness of the LCD monitor may
differ from that of the recorded
pictures. Check the brightness by
playing back the picture.
43
Page 4
Setting the Application Menu (Continued)
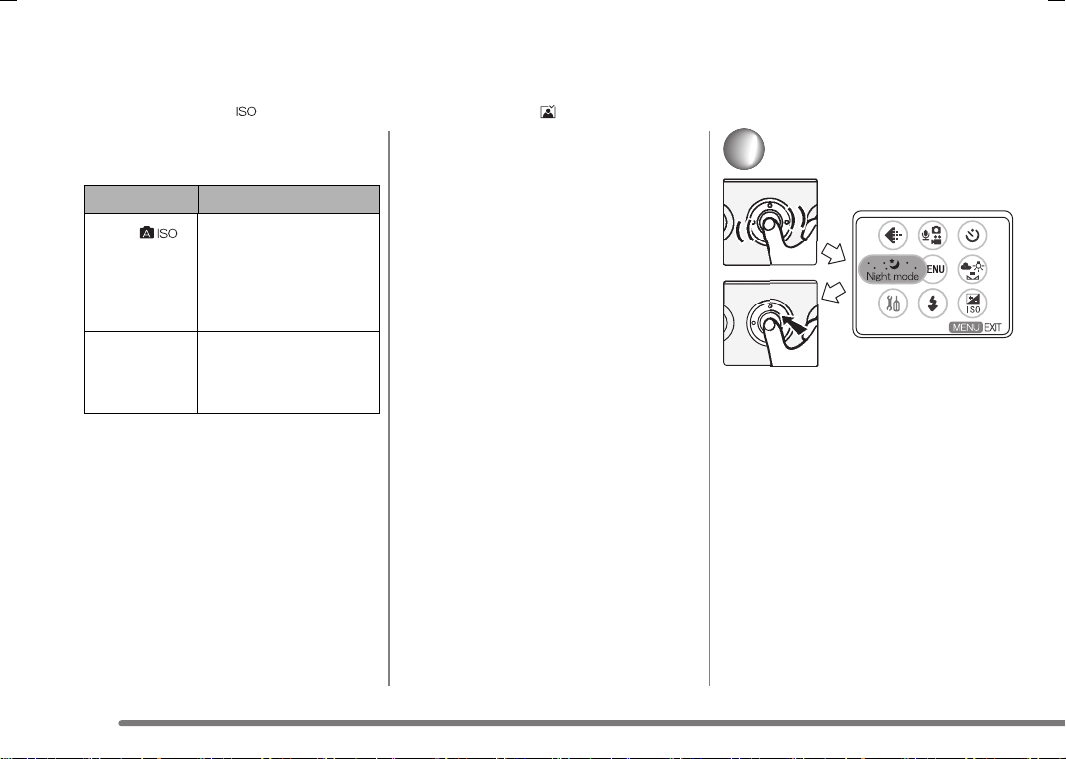
_ ISO Sensitivity [ ]
ISO is the sensitivity to light.
It is convenient to take pictures without
the flash.
Item Details of Setting
Auto [ ]
ISO 100/
ISO 200/
ISO 400
• When you take a picture in high ISO
sensitivity, picture noise appears and
the picture quality is deteriorated.
The ISO setting is
automatically increased
according to the
brightness. If the picture
is still dim, use the
flash.
Increasing the ISO
value will make the
camera more sensitive
in low light.
_ Auto Review [ ]
When setting the Auto review to ON,
you can check the picture for about 2
seconds after taking the picture. You can
delete the picture by pressing the jog ball
and selecting Yes on the confirmation
screen.
• Auto review is not activated for the
following materials.
• Video
• Burst
• Still Picture with Audio
_ Night mode
1
Access the menu in the recording
mode. (P17)
Select ON from Night mode.
• The shutter speed becomes slow and
the night scene is exposured to natural
brightness.
• When the REC mode is set to Video,
you cannot select the Night mode.
• When taking pictures outdoors at
night, be careful of camera shake.
• You can take a picture of people with
the night view background using the
flash.
44
Page 5
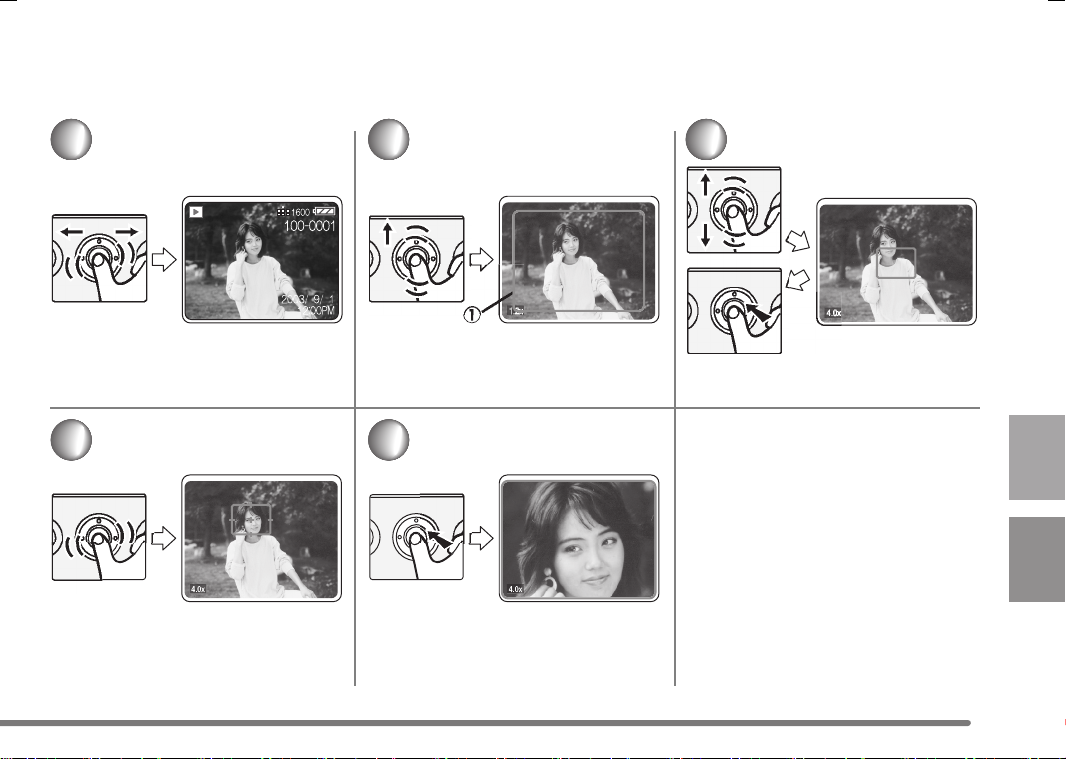
Using the Playback Zoom
1
Select the picture in the playback
mode. (P27)
4
Move the target zoom frame to the
position to magnify.
2
Roll the jog ball upwards to display
the target zoom frame
1.
5
Press the jog ball.
• The picture in the target zoom frame is
enlarged on the whole of LCD monitor.
3
Set the zoom magnification.
• After enlarging the picture, The
magnification is restored by pressing
the jog ball.
• You can playback the picture enlarging
up to 10 times.
• The more the picture is enlarged, the
more the picture quality is deteriorated.
• You can cancel the playback zoom by
pressing the MENU button.
• Playback zoom may not be done on a
picture recorded with other equipment.
45
Page 6
Marking the Picture as a “Favorite”
Pictures registered as a Favorite can be displayed as thumbnails (P35) or watched on the Slide show (P47).
_ Attaching the Background music
1
Access the menu in the playback
mode. (P17)
Select the desirable setting from
Mark.
Item Details of Setting
¡Select/
Unselect [ ]
Select/
Unselect
[]
+
You can register
the picture as
favorite. 999 files
can be registered.
You can attach the
Background music
to the picture. 36
files can be
registered.
2
Select the picture and press the jog
ball. (Only when selecting ¡,
Select/Unselect)
• ¡ or appears on the LCD monitor.
If you select the picture again, the
marking is cancelled.
• Press the MENU button to exit from
the menu.
After selecting Select/Unselect in
step 1, select Ye s in Background music
select screen.
If you are inserting the card with music
files, the list of the Background music
appears. Select 1 Background music and
press the jog ball.
_ Cancelling all marks
Select the mark [ ] [ ] to be
deleted in step 1. All pictures registered
in ¡ or are cancelled.
46
Page 7
Playing back Still Pictures on the Slide Show
Still pictures are automatically played in sequence. This function is suitable for making a story with still pictures.
• You cannot watch a slide show of the
1
Access the menu in the playback
. (P17)
mode
Select Slide show from Play mode
[].
Select the desired item from Slide
show.
• Select the item from the table on the
right.
Item Details of Setting
Slide show
[]
Slide
show
+
[]
SD slide
show
[]
¡Slide show
[]
All the pictures are
played back for about 5
seconds per 1 picture in
the order of the file
number.
The pictures set on
Mark are played back
for about 5 seconds per
1 picture.
Background music can
be attached. (P46)
The pictures set by SD
Viewer (supplied
software on the
CD-ROM) are played
back for about 5
seconds per 1 picture.
The pictures set on ¡
Mark are played back
for about 5 seconds per
1 picture.
motion image.
• You can stop slide show when
pressing the jog ball during slide show.
• You can adjust the volume with the
volume button on the remote controller
during the Mark slide show with
Background music. (The volume
control screen does not appear. You
cannot adjust the volume by keeping
the button pressed.)
• Still pictures recorded with other
equipment may not be displayed on
the Slide show or they may take time
to be displayed.
• It may take time to display the Mark
slide show with Background music. But
this is not a malfunction.
47
Page 8
Setting the Still Pictures to be Printed (DPOF print)
You can tell others which and how many pictures are to be printed by setting DPOF printing.
1
Access the menu in the playback
. (P17)
mode
Select the desired item from DPOF
print.
Item Details of Setting
Single print
[]:
All prints
[]:
Print date
[]
48
Set DPOF printing for
each files.
Set DPOF printing for
all files in the card.
Refer to P49.
2
Select the picture. (Only when
selecting Single print)
3
Select the number of printing and
press the jog ball.
• You can set the number up to 999.
• When setting to 0, DPOF setting is
cancelled.
Page 9

_ About printing with date
When selecting ON from Print date of
Step 1, you can print all the pictures that
DPOF setting is designated on Steps 1 to
3 with the date and time.
• All pictures will print with the date. You
cannot choose which pictures are
printed without the date when it is set
to ON.
• You cannot print the date on the
pictures that DPOF setting is not
designated.
• You cannot print the date on the
pictures without setting of the
recording date.
• The date may be cut or not be
displayed depending on the printer.
• When selecting OFF, the setting of all
pictures is cancelled.
_ About DPOF
DPOF is the abbreviation for Digital
Print Order Format. This feature allows
you to designate which pictures will be
printed. Some photo printers as well as
many commercial photo-processing
companies support DPOF.
If the DPOF setting is determined, you do
not need to indicate which or how many
pictures are to be printed.
• If the file is not based on the DCF
standard, the DPOF setting cannot be
designated.
DCF is the abbreviation for Design
rule for Camera File system,
stipulated by JEITA (Japan
Electronics and Information
Technology Industries Association).
• When using the DPOF feature, this
unit will overwrite any previous DPOF
settings made by other products.
• When the message of CARD FULL is
displayed, delete the unnecessary files
and designate DPOF again.
• When designating or cancelling many
files, use a fully charged battery or AC
adaptor and USB cradle.
• DPOF setting may not be added on a
picture recorded with other equipment.
49
Page 10
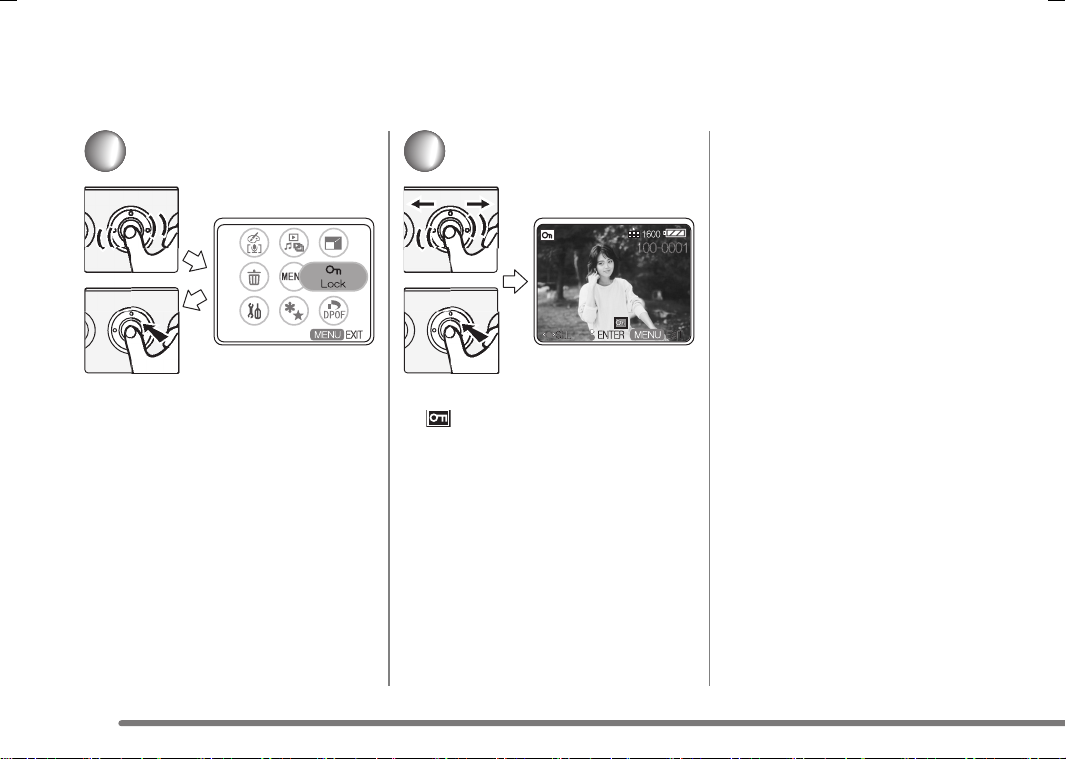
Preventing Accidental Erasure of Files (Lock setting)
We recommend locking your precious files without fail.
_ To cancel all locked files
1
Access the menu in the playback
. (P17)
mode
Select
Lock/Unlock from Lock.
2
Select the file and press the jog ball.
• [ ] is displayed on the LCD monitor.
The setting is cancelled when
selecting the picture again.
When you select Unlock all in step 1 and
then select Yes on the confirmation
screen, all the lock settings are
cancelled.
• Formatting the card will delete all the
data on the card, even if you protect
the files in this procedure. (P18)
• You cannot delete the locked files. If
you want to delete the file, cancel the
lock setting first.
• The lock setting may not be effective in
other products.
• Sliding the SD Memory Card
Write-Protect switch to LOCK prevents
the picture from deletion even if the
protection is not set. (P16)
• Audio dubbing, resizing and altering
the colour cannot be done with locked
pictures. (P51, 52, 53)
50
Page 11

Adding Audio to the Still Picture (Audio dubbing)
This is an enjoyable function to add a narration or sound to still pictures.
• When you delete the audio added or
1
2
already included in the picture, select
Erase [ ] on Step 1. And then
select Yes.
• You can record up to a 10-second
narration to a recorded picture.
• You can stop recording when pressing
the shutter button again.
• The audio dubbing cannot be used
with the motion images or locked
pictures.
• Be careful not to touch the jog ball or
any other buttons. The noise may be
recorded.
Select the desired picture and then
access the menu in the playback
. (P17)
mode
Select Add audio from Arrange
[].
Select Recording [] from Add
audio.
Press the shutter button to start.
• When audio has already been
recorded, the message is displayed.
Select Yes to start recording. The
audio that has already been recorded
will be overwritten.
Select No to cancel the recording.
51
Page 12
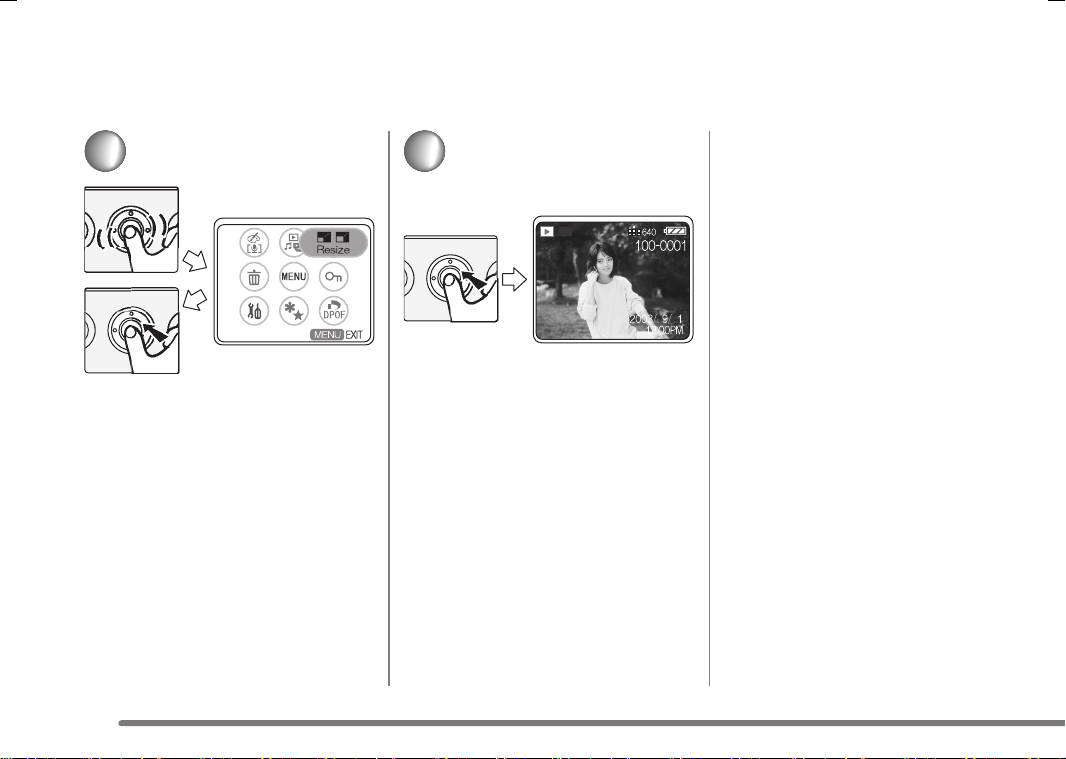
Resizing the Still Picture
This function is useful when you want to reduce the volume of still pictures for e-mail or website.
• It is not possible to resize pictures in a
1
2
size lower than/equal to 320a240 or
with an aspect ratio that is not 4:3.
• It is not possible to resize motion
images, still pictures with audio or a
locked picture.
• It may not be possible to resize
pictures recorded with other
equipment.
• The quality of resized picture may be
deteriorated.
• The date and time when a picture is
resized is recorded.
Select the desired picture and then
access the menu in the playback
mode. (P17)
Select the desirable size from
Resize.
• 640a480
• 320
a240
52
Press the jog ball to resize it.
• Confirm the message and select Yes
or No.
When selecting Yes, the source
picture is deleted.
When selecting No, the source picture
is not deleted.
• You cannot retrieve the original state
after resizing pictures.
Page 13

Altering the Colour of the Still Picture (Colour Creator)
You can add a nostalgic effect to still pictures with this function.
• Motion images, still pictures with audio
1
2
or Locked picture cannot be altered.
• Pictures recorded with other
equipment may not be altered.
• The quality of altered picture may be
deteriorated.
• The date and time when a picture has
been altered is recorded.
Select the desired picture and then
access the menu in the playback
mode. (P17)
Select Colour creator from
Arrange [].
Select the effect (Monochrome,
Sepia) and press the jog ball.
• Monochrome: The picture turns black
and white.
• Sepia: The picture turns
brownish/red to create
an aged look.
• Confirm the message and select Yes
or No.
When selecting Yes , the source
picture is deleted.
When selecting No, the source picture
is not deleted.
53
Page 14

Connecting to PC
_ Operating Environment
SD Viewer Ver.2.1 SD-Jukebox Ver.4
OS Windows 98SE, Windows Me,
CPU
RAM 64 MB or more (Windows 98SE, Me)
Display High Colour (16 bit) or more
Free hard disk
space
Drive CD-ROM drive
Interface USB port Sound Creative Labs Sound Blaster 16 or compatible device
• Even if the system requirements mentioned in these operating instructions are fulfilled, some personal computers cannot be used.
• This software cannot be used on Microsoft Windows 3.1, Windows 95, Windows 98, Windows NT and Macintosh.
• Operation on an upgraded OS is not guaranteed.
• Operation on an OS other than the one pre-installed is not guaranteed.
• Multi-CPUs environment is not supported.
• Multi-boot environment is not supported.
Windows 2000, Windows XP
Intel® Pentium® II 300 MHz or higher
(128 MB or more recommended)
128 MB or more (Windows 2000, XP)
(256 MB or more recommended)
Desktop resolution of 800 a 600 pixels or more
(True Colour (24 bit) or more recommended)
(1024 a 768 pixels or more recommended)
40 MB or more Free hard disk
- required to install this program
OS Windows 98SE, Windows Me,
CPU (Windows 98SE, Me)
RAM 128 MB or more (Windows 98SE, Me)
Display High Colour (16 bit) or more
space
Necessary
software
Drive CD-ROM drive
Interface USB port
Windows 2000 SP2 or later, Windows XP
Intel® Pen ti um® II 333 MHz or higher
(Windows 2000, XP)
Intel® Pen ti um® II 500 MHz or higher
256 MB or more (Windows 2000, XP)
Desktop resolution of 800 a 600 pixels or more
(True Colour (24 bit) or more recommended)
(1024 a 768 pixels or more recommended)
100 MB or more
DirectX 8.1 or later
(required to install this program) / A CD-ROM drive capable of
digital recording is required. Four-speed or higher is
recommended.
(Recording may not work proper ly with CD-ROM drives
connected through an IEEE1394 or USB connection.)
54
Page 15

_ Installing the USB driver (Only for Windows 98SE/Me)
Be sure to install the USB driver from the provided CD-ROM before connecting this unit to the PC. Close all
software programs (even permanently resident software) running on Windows.
• If you click on icons other than the
1
Insert the CD-ROM.
• The Set Up menu starts automatically.
• If the Set Up menu does not start
automatically, double-click on the
[Autorun.exe] from the CD-ROM.
2
Click on [USB Driver].
3
If the [Restarting Windows] dialog
box appears, click on [Finish].
• After restarting the PC, installation of
the driver will be finished.
USB driver, installation of the
respective software begins.
• For details about how to use the
supplied software, please refer to the
Help for the respective software.
• When starting [SD Viewer], if a
message stating that there is no
supported Memory Card is displayed,
confirm whether installation of the USB
driver has been finished.
55
Page 16

Connecting to PC (Continued)
_ Installing the SD Viewer
1
When the Set Up menu started, click
on [SD Viewer Ver.2.1E]
• The Set Up menu starts automatically.
• If the Set Up menu does not start
automatically, double click on the
[Autorun.exe] from the CD-ROM.
56
2
Click on [Next].
3
Carefully read End User Licence
Agreement, and click on [I agree].
Then choose the target folder and
click on [Next].
4
Click on [Finish].
• The installation of SD Viewer is
completed.
• The “SD Viewer Font” and the “SD
Viewer Edge Font” installed with SD
Viewer are only used for SD Viewer. If
they are used in other software, some
characters may not be displayed.
Page 17

_ Features of SD-Jukebox Ver.4
• Records high quality music onto an SD
Memory Card that can be played back
on this unit.
• Allows Playlists to be created
containing your favorite tracks. (If a
Playlist is selected, only the tracks in
the Playlist are played back.)
• Allows a still picture to be associated
with the music data.
_ Installing SD-Jukebox Ver.4
1
Insert the supplied CD-ROM into the
personal computer’s CD-ROM drive.
• The launcher for the installation is
activated automatically.
2
Click [SD-Jukebox Ver.4].
• When [Welcome] screen appears, click
[Next].
• If the confirmation whether you have
the right to administrate the personal
computer is displayed, click [OK] and
continue with installation.
3
Read License Agreement carefully,
and click [Yes], if you accept the
terms of the agreement.
4
Enter your name and the serial No.
described on the CD-ROM casing
and click [Next].
5
Complete the installation according
to the message.
• When the setup screen for the Media
Format 7.1 is displayed, install the
Media Format 7.1 according to the
message.
• When the DirectX 8.1 setup screen
appears, install it. (Failure to install
DirectX 8.1 disables you from using
SD-Jukebox Ver.4.)
• After rebooting the computer, the
SD-Jukebox Ver.4 is enabled.
_ Uninstalling the software
1
Click on [Start] # [Control Panel],
and select [Add/Remove Programs].
2
Select the software you want to
uninstall and click on [Add/Remove].
• Depending on the OS, the
uninstallation procedure may vary.
For details, please refer to operating
instructions of the OS used.
57
Page 18

Connecting to PC (Continued)
_ Connecting this unit to PC
When using Windows 98SE/Me,
connect only after installing the driver.
(P55)
Be sure to insert the battery and
connect the AC adaptor.
1
Connect the USB cable and the AC
adapter to the USB cradle.
• Be sure to insert the AC adaptor in a
outlet.
2
Insert the card in this unit. (P14)
3
Turn this unit on, and set to the
playback mode.
4
Attach this unit to the USB cradle.
• This unit turns to the USB connection
mode. In this mode, you cannot turn
the power off. If you turn the power off,
disconnect the USB cable first.
• When the Power/Card Access Lamp of
this unit is blinking, do not remove this
unit from the USB cradle nor
disconnect the USB cable. The
software may not function correctly
and the transmitting data may be
damaged.
• Use the supplied USB cable only.
• Do not disconnect the AC adaptor from
the PC during connection.
• When the USB connection mode
(displayed as PC ACCESSING) is not
canceled even if you turn the PC off,
disconnect the USB cable.
• If the PC is in the Standby mode while
connecting to the camera, the PC may
not recognize the camera when
recovering from the Standby mode. In
this case, restart the PC.
58
Page 19

_ Checking that this unit is
recognized correctly by the PC
1
Ensure that the [Removable Disk] is
included in [My Computer].
• Drive name (E: etc.) varies with the PC
being used.
• If this unit does not operate correctly,
please check the connection again.
_ Removing the USB connection
cable safely
If the USB connection cable is removed
or the power switched off while the PC is
working, an error dialog box may appear.
In such cases, click on [OK] to close the
dialog box. To remove the USB
connection cable without the error dialog
box being displayed, proceed as follows.
1
Double click icon on the task
tray.
• The Hardware removal dialog box
appears.
• Depending on OS Windows 98SE, etc.
the icon for safe removal may not be
displayed in the task tray. (There will
be no display depending on the set up
of the OS)
Make sure that the Power/Card access
lamp of this unit is off, then remove the
cable.
59
Page 20

Connecting to PC (Continued)
2
Click on [USB Mass Storage
Device], and click on [Stop].
3
Confirm that the [USB Mass Storage
Device] is selected, click on [OK].
4
Click on [OK].
• The USB connection cable can be
safely removed.
60
Page 21

_ Starting SD Viewer
• Thumbnail of the pictures in the
Memory Card can be displayed.
• You can input the recorded date to
the still pictures.
• Pictures in a memory card can be
copied to a PC.
• You can create slide shows easily.
• You can change the brightness and
the hue of the pictures, and add
some characters to the pictures.
• You can print out pictures checking
them on a display of a PC.
• Install the SD Viewer from the Set Up
menu (P55) before starting.
Before using for the first time, click on
[Readme] from [Start] #[All Programs]
# [Panasonic] # [SD Viewer
(D-snap)], please read the
supplementary explanation or updated
information.
1
Select [Start] # [All Programs] #
[Panasonic] # [SD Viewer (D-snap)]
# [SD Viewer for DSC].
Or when the removable disc display
appears after connecting, select
[View all images] and then click on
[OK].
61
Page 22

Connecting to PC (Continued)
Closing the SD Viewer
_
1
Click on [File] # [Exit].
• It is also possible to close by clicking
on the [
k] in the top right-hand corner
of the SD Viewer.
If the Memory card has been inserted,
the pictures in the Memory card are
displayed.
• If the Memory card is not inserted, this
message “There is no supported
memory card” is displayed. Click on
[OK] to start the SD Viewer.
• It is also possible to start by
double-clicking on the short cut icon on
the desktop.
• Do not remove this unit from the USB
cradle nor disconnect the USB cable
when SD Viewer is in use. The
software may not function correctly
and the transmitting data may be
damaged.
62
Page 23

_ About data in the card
The following files are included in the folders on the card.
• You can record up to 9999 pictures in
the folders such as 100_PANA folder.
• The files in DPOF setting are recorded
in MISC folder.
• Format the card with this unit or
SD-Jukebox Ver.4.
• [SD_AUDIO] folder are set as hidden
files. Therefore, they may not be
displayed on the Explorer or [My
Computer].
• If you recorded data not compatible
with this unit on the PC, this unit
cannot recognize the data.
• Do not delete the folders in the card on
the PC. You may not be able to read
the card with this unit.
• To read the PDF operating
instructions, Adobe Acrobat Reader
5.0 or higher is needed. (It is included
in the supplied CD-ROM.) If it is not
installed in the PC used, double-click
[AR505ENU.EXE] in [Acrobat Reader]
folder on the supplied CD-ROM and
follow the displayed message to install
it.
• To play motion images or voice memo,
install QuickTime from the supplied
CD-ROM.
• If malfunctions occur when playing
back motion pictures or audio, uninstall
[DCIM]:
[SD_AUDIO]:
DCIM
100_PANA
MISC
SD_AUDIO
Still pictures recorded
under JPEG format
(P1000001.JPG, etc.)
Motion image data,
voice data recorded
under MOV format
(P1000001.MOV,
V1000001.MOV, etc.)
Music data
(AOB001.SA1, etc.)
recorded by SD audio
PC recording software
such as
SD-Jukebox Ver.4
(supplied), etc.
QuickTime in the PC (P57), then
reinstall QuickTime in the supplied
CD-ROM before playing them.
(However, some functions in
QuickTime may be disabled.)
• When using SD Viewer, if you save still
pictures with audio or voice memos
recorded by this unit to PC and then
copy them onto the SD Memory Card
again, they may be recognized as
motion image files. However, you can
play back them as usual. If you edit
files with a software other than SD
Viewer, they may not be played on this
unit.
• To create the music, install
SD-Jukebox Ver.4. from the supplied
CD-ROM.
• When you saved image files on a PC
and rewrite them on the memory card
again to play back on this unit, we
recommend copying and moving
manually, not using “Copy of Memory
card” function or “Copy” button on the
Tool bar of the SD Viewer.
63
Page 24

LCD Monitor Display
_ When taking pictures
1 Recording mode
2 Flash mode
3 Night mode
4 White balance
5 Picture quality setting
6 Picture size
7 Battery remaining
8 Remaining pictures/time
9 Counter display
10 Digital zoom
11 Self timer mode
12 Exposure compensation
13 ISO Sensitivity
14 Date/Time (It is displayed for about 5
seconds after turning on the power or
setting the clock.)
64
_ When playing back pictures
1 Playback mode
2 Stop/Play/Reading display [ ]
3 Still picture with audio/Motion
image/Voice
4 Picture quality
5 Picture size
6 Battery remaining
7 Folder / File number
8 Counter display
9 No. of DPOF printing
10 ¡ mark
11 Protected file
12 Recorded date and time
_ When playing back music
1 Audio player mode
2 Stop/Play/Fast-forward/Fast-rewind
3 Audio quality (EQ)
4 Repeat playback
5 Battery remaining
6 Playback time
7 Title/Artist name
Page 25

Menu Screen Display
_ Menu in the recording mode
1 Quality mode (P39)
2 REC mode (Refer to next column)
3 Self timer (P40)
4 White balance (P41)
5 Advanced setup (P43)
6 Flash (P37)
7 Setup (P18)
8 Night mode (P44)
• Some items may not be displayed on
the menu when recording except still
pictures.
REC mode
1 Still picture (P20)
2 Still picture + Audio (P23)
3 Burst (P24)
4 Video (P25)
5 Voice memo (P26)
Short cut menu
When you press the MENU button for
about 1 second, the short cut menu
appears. It can carry out menu functions
quickly.
65
Page 26

Menu Screen Display (Continued)
_ Menu in the playback mode
1 Arrange (P51, 53)
2 Play mode (Refer to next column)
3 Resize (P52)
4 Lock (P50)
5 DPOF print (P48)
6 Mark (P46)
7 Setup (P18)
8 Erase file (P36)
Play mode
1 Play (P27, 28, 29, 30)
2 Thumbnail (P35)
3 Slide show (P47)
4 Audio player (P31)
Short cut menu
When you press the MENU button for
about 1 second, the short cut menu
appears. It can carry out menu functions
quickly.
66
Page 27

_ Menu in the music playback mode
1 Power save (P32)
2 Play mode (P66)
3 Playlist (P34)
4 Thumbnail (P35)
5 Repeat play (P33)
6 Controller (P33)
7 Setup (P18)
8 List (P31)
Short cut menu
When you press the MENU button for
about 1 second, the short cut menu
appears. It can carry out menu functions
quickly.
67
Page 28

Cautions for Use
_ About this unit
Keep this unit away from magnetized
equipment
(such as a microwave oven, TV, video
game equipment, etc.).
• If you use this unit on or near a TV,
images and sounds may be disturbed
due to electromagnetic wave radiation.
• Recorded data may be damaged, or
images may be distorted by strong
magnetic fields created by speakers or
large motors.
• Electromagnetic wave radiation
generated by a digital circuit (including
a microprocessor) may adversely
affect this unit, causing the disturbance
of images and sounds.
• If this unit is affected by magnetically
charged equipment and does not
function properly, turn the power off
and detach the battery and then
connect it again. Thereafter, turn the
power on.
Do not use this unit near radio
transmitters or high-voltage lines.
• If you record near radio transmitters or
high-voltage lines, recorded images or
sounds may be adversely affected.
Do not spray insecticides or volatile
chemicals onto this unit.
• If this unit is sprayed with such
chemicals, the camera body may be
damaged and the surface finish may
peel off.
• Do not keep rubber or plastic products
in contact with this unit for a long
period of time.
When you use this unit on a beach or
similar place, do not let sand or fine
dust get into the camera.
Do not wet this unit with seawater or
other liquid.
• Sand or dust may damage this unit.
The lens may be scratched, fogged or
other damages may be caused.
• In case this unit was drenched with
seawater, wipe with a well wrung cloth,
and then wipe with a dry cloth.
When carrying this unit, take care not
to drop or hit it.
Do not carry this unit in a pocket.
• The outer case may be destroyed by
the strong shock, and it may cause
malfunction of this unit. Store this unit
in the carrying case (supplied). To
protect the lens, rotate it.
Do not use benzine, thinner or alcohol
for cleaning this unit.
• Detach the battery before cleaning this
unit.
• The camera body may be deformed
and the surface finish may peel off.
• Wipe this unit with a soft, dry cloth. To
remove stubborn stains, wipe with a
cloth that is soaked in a detergent
diluted with water and afterward finish
wiping with a soft, dry cloth.
• When you use a chemical cloth, read
the instructions of the cloth.
• Wipe the stains on the lens and the
LCD monitor with the cleaning cloth
(supplied).
68
Page 29

_ Battery
The battery is a rechargeable lithium
ion battery. Its ability to generate
power is based upon the chemical
reaction that takes place inside it.
This reaction is susceptible to the
surrounding temperature and
humidity, and, if the higher or lower
the temperature becomes, the more
the battery will be affected.
Be sure to detach the battery after
use.
• If it is left attached to this unit, a minute
amount of current is consumed even
when this unit power is off. If it is left for
a long time, over discharge takes
place. The battery may become
unusable even after it is charged.
Have spare batteries on hand when
you use this unit outdoors.
• In a cold place, the recordable time will
be shorter.
• When you travel, be sure to bring the
supplied AC adapter and USB cradle
for charging in the place you are
visiting.
If the battery is dropped, check that
the terminal is not deformed.
• If the battery attached to this unit with
the terminal is deformed, it may
damage the body of SD Multi Camera.
Be sure to pull out the battery and the
card, disconnect the plug after use.
• Store the battery in a cool and dry
place with a relatively stable
temperature.
(recommended temperature: 15 25oC, recommended humidity: 40 60%)
• Extremely high or low temperatures
will shorten the life of the battery.
• If the battery is kept in hot, humid,
smoky or dusty places, the terminals
may rust and cause malfunctions.
• Store the battery in a completely
discharged state. To store the battery
for a long period of time, we
recommend charging it once every
year and storing it again after you
completely use up the charged
capacity.
Do not throw the battery into a fire.
• If you heat or burn the battery, it may
cause an explosion.
• The battery has a limited life.
69
Page 30

Cautions for Use (Continued)
_ AC adaptor
• If you use the AC adaptor near a radio
(especially when you are tuning in AM
stations), radio reception may be
disturbed. Keep the AC adaptor 1 m or
more away from radio.
• When the AC adaptor is in use, it may
generate whirring sounds. However,
this is normal.
• Keep the electrodes of the AC adaptor
clean at all times.
Put this SD Multi Camera near the
outlet to make it easy to reach for the
interrupting device (plug).
_ Charging error
When the charge lamp blinks approx. every
0.5 seconds (lighting approx. 0.25 seconds,
turning off approx. 0.25 seconds), it
suggests the following states.
• The ambient temperature or that of the
battery itself is too high or too low.
Charge the battery after warming the
temperature of periphery or battery
adequately.
• The SD Multi Camera, battery or AC
adaptor may be defective. Contact
your nearest Panasonic dealer.
_ Condensation
When using the camera outdoors during
very cold weather, dews can be formed
on the camera and the lens when you
return to a warm place.
If condensation takes place, the lens may
be fogged or the camera may not
properly operated. Take care not to
cause condensation and take the
appropriate countermeasures.
Causes of condensation
Differences in temperature and humidity
as shown below cause condensation.
• When this unit is brought into a warm
room from outdoors in the cold.
• When this unit is brought inside a car
from outside.
• When warming a cold room suddenly.
• When cool air from an air conditioner
is directly blowing on the unit.
• When the place is humid.
When condensation has taken place:
• Turn the power off and leave this unit in
this condition for about 1 hour. When
the camera become close to the
ambient temperature, the fog
disappears naturally.
• When you move this unit from a cold
place to a warm place, enclose the
camera in a plastic bag, wait until the
camera is warmed, and then take it out
of the bag.
70
Page 31

_ Memory card
When the power/card access lamp is
Blinking (when the card is being read),
do not remove the card, turn the
power off, or subject it to vibration or
impact.
Do not leave the card in places where
there is high temperature or direct
sunlight, or where electromagnetic
waves or static electricity are easily
generated. Do not bend, drop, or
subject it to strong vibration.
• If the above precautions are not taken,
the card or the recorded content may
be damaged.
Be sure to pull out and store the card
after use.
• Keep the card in the storage bag to
store or carry the card around.
• Do not allow dirt, dust or water to enter
the terminals on the back of the card.
Do not touch it with your fingers.
_ Picture data
• As a result of improper operations,
recorded data may be damaged or
erased. We are not responsible for the
loss caused by the erasure of the
recording data.
• When this message is displayed
“PLEASE WAIT”, never remove the
battery or the card, and do not
disconnect the AC adapter (supplied)
out. It may cause damage to the data
and malfunctions.
71
Page 32

Cautions for Use (Continued)
_ Maximum number of still pictures recordable on an SD Memory Card
Picture size 1600 a 1200 1280 a 960 640 a 480
Picture quality Fine Normal Fine Normal Fine Normal
8MB 81713273362
16MB 21 42 33 65 78 144
32MB 47 89 71 139 165 304
64MB 102 190 152 294 348 639
128MB 209 388 310 598 707 1299
256MB 419 777 621 1196 1414 2595
512MB 847 1568 1254 2414 2853 5233
• The number of remaining recording indication on the LCD monitor may not be decreased by taking pictures.
• These figures vary depending on the subject being photographed.
_ Maximum recording time of motion
picture on an SD Memory Card
Picture size
8MB 33 sec.
16MB 1 min. 17 sec.
32MB 2 min. 42 sec.
64MB 5 min. 41 sec.
128MB 11 min. 33 sec.
256MB 23 min. 04 sec.
512MB 46 min. 31 sec.
• These figures vary depending on the
subject being photographed.
320 a 240
(QVGA)
72
_ Maximum recording time of Voice
on an SD Memory Card
8MB 13 min. 17 sec.
16MB 30 min. 10 sec.
32MB 1 h. 02 min. 46 sec.
64MB 2 h. 11 min. 25 sec.
128MB 4 h. 26 min. 25 sec.
256MB 8 h. 51 min. 38 sec.
512MB 17 h. 51 min. 46 sec.
• “1 h. 02 min. 46 sec.” indicates 1 hour
2 minutes and 46 seconds.
• The numbers shown in the table are
approximations.
Page 33

_ LCD monitor
• In a place with drastic temperature
changes, condensation may form on
the LCD monitor. Wipe it with a soft,
dry cloth.
• Do not push the LCD monitor strongly.
It may cause unevenness and
malfunctions to the monitor.
• If this unit is extremely cold when you
turn the power on, the image on the
LCD monitor is slightly darker than
usual at first. However, as the internal
temperature increases, it goes back to
the normal brightness.
• Extremely high precision
technology is employed to produce
the LCD monitor screen featuring a
total of approximately 76,800
pixels. The result is more than
99.99% effective pixels with a mere
0.01% of the pixels inactive or
always lit. However, this is not a
malfunction and does not affect the
recorded picture.
_ Format
• Format the card on this unit. If
formatting the card using PC, use
SD-Jukebox Ver.4 (supplied).
Particularly for the Card containing
music files, check in the card using
SD-Jukebox Ver.4, with which the
music files were recorded, then format
it. (For details, read the operating
instructions for SD-Jukebox Ver.4.)
• Do not use PC (Explorer) to format it.
Otherwise, it may not be recognized by
this unit.
• When using the card formatted with
PC or the other equipment, format the
card using this unit again.
73
Page 34

Messages
The confirmation/error message is displayed on the LCD monitor.
Messages Countermeasures
NO CARD Insert the memory card.
NO TRACK Insert the card with music files.
NO PICTURE NO VOICE Insert the card with the file recorded.
CHECK CARD Remove the card once and then clean its terminal.
CARD ERROR Remove the card once and then clean its terminal. If the error persists,
UNPLAYABLE FILE Cannot play back the file which is out of standards.
CARD LOCKED Release the lock of the write-protect switch on the memory card.
ERROR
EMERGENCY STOP
Check your data, backup the data you need, and format the card with this
unit.
Turn the power off and turn it on again or remove and insert the battery. If
the error persists, consult your nearest dealer.
74
Page 35

Messages Countermeasures
PLEASE WAIT Processing the data. Please wait for a while.
LOW BATTERY The battery remaining is insufficient. Recharge the battery.
NO SELECTED DATA
CARD FULL Change the card or delete unnecessary data.
FILE LOCKED
NO TARGET DATA
CANNOT RESIZE FILE
CANNOT ARRANGE
INSERT BATTERY
SET TO PLAY MODE
CONNECT TO AC ADAPTOR
CANNOT RESET FILE NUMBER
There is no data that can be displayed as a thumbnail.
Delete the file after releasing the protection.
There is no favorite (mark) on the card.
Select the still picture recorded by this unit. The picture should be
larger than the size you select.
Select the still picture recorded by this unit.
Insert the battery and insert this unit into the cradle.
Switch to the playback mode [] when connecting this unit to PC.
Connect the AC adaptor to USB cradle when connecting this unit to
PC.
When 999 folders have been created, you cannot reset the file number.
Replace the card.
75
Page 36

Trouble Shooting
Question Answer
The power is not turned on. Is the battery inserted correctly? Check the direction of the battery.
Is the battery remained enough?
The power is immediately turned off. Is the battery exhausted? Recharge the battery or insert the fully charged battery.
Cannot record. Is the card inserted?
Is the memory of the card full? Delete some pictures before recording.
The LCD monitor is too bright or dark. Adjust the brightness of the LCD monitor properly.
The flash does not fire. Is the flash set to Flash off? Change the flash mode.
The pictures recorded with a flash are dark. Is flash covered with your finger?
Cannot playback the card. Is the card inserted?
Is there playable pictures on the card?
Is the mode set to the playback mode?
When connecting to a PC, images cannot
be transferred.
The clock is not set correctly. If you do not use this unit for a long time, the clock may be reset. In this case, this
Cannot play back music. Is there any effective music file on the card?
Is this unit connected to the PC correctly?
Does the PC recognize this unit properly?
message “SET THE CLOCK” will appear. Set the clock again.
If you record pictures without the clock setting, the date is recorded as
[1/1/2000 0:00].
76
Page 37

Question Answer
Cannot remove the battery. Pull out the projection part to remove it.
During Playback an [k] Indication is
displayed.
Playing back or recording do not function
and the screen has frozen.
The LCD Monitor remains dark when
recording the still picture or motion image.
Sound is not heard while a still picture is
played back.
While playing back a Voice file or a Music
file, the LCD Monitor is suddenly turned
off.
The data was either recorded in a different format, or data is damaged.
Turn the power off. If this unit is not turned off, remove and insert the battery.
Sound is not presented when recording or playing back of still pictures.
The LCD Monitor is automatically turned off approx. 5 seconds after starting
playback or recording a Voice file. Rolling the jog ball gently turns on the LCD
Monitor. However, in the case of not conducting any operation for approx. 5
seconds, the LCD Monitor is turned off again. (The LCD Monitor is on while
stopping playback (or pausing).)
When the Power Save is set to ON, the LCD Monitor is turned off 5 seconds after
starting playback of a Music file.
77
Page 38

Specifications
SD Multi Camera Information for your safety
Power source
Power consumption
Image sensor 1/3.2q CCD, Primary colour filter
Pixels Total number of pixels: Approx. 2,110,000
Standard Illumination 3,000 lx
Minimum Required
Illumination
Lens F4, Focal Length; 4.5 mm
Monitor 1.5-inch LCD
Microphone Mono
Recording Media SD Memory Card
DC 4.8 V (AC Adaptor)
DC 3.7 V (Battery)
1.6 W (When recording the still picture)
1.0 W (When playing back the still picture)
0.20 W (When playing back music, setting power save to ON, using supplied stereo
earphones)
Effective number of pixels: Approx. 2,000,000
80 lx
Shortest Image Distance; Approx. 50 cm from Lens
(Macro: Approx. 10 cm)
78
Page 39

Image Compression JPEG
Video Compression QuickTime Motion JPEG
Voice Compression QuickTime Linear PCM
Music Expansion AAC, MP3, WMA
Dimensions (WaHaD) Approx.51.5 a 103.7 a 13.5 mm (Thinnest part 9.9 mm)
Weight Approx. 57 g (without Battery and Memory Card)
Operating Temperature
Operating Humidity 10% - 80%
Approx. 74 g (with Battery and Memory Card)
0oC–40oC
79
Page 40

Specifications (Continued)
USB Cradle Information for your safety
Input
Output
AC Adaptor Information for your safety
Power source
DC Output
DC 4.8 V 1.0 A
DC 4.8 V 530 mA
AC110-240 V 50/60 Hz
DC 4.8 V 1.0 A
Battery Pack
Voltage/capacity 3.7 V, 530 mAh
Information for your safety
80
Page 41

Memo
81
Page 42

Memo
82
Page 43

Before opening the CD-ROM package,
please read the following.
End User License Agreement
You (“Licensee”) are granted a license for the
Software defined in this End User License
Agreement (“Agreement”) on condition that
you agree to the terms and conditions of this
Agreement. If Licensee does not agree to the
terms and conditions of this Agreement,
promptly return the Software to Matsushita
Electric Industrial Co., Ltd. (“Matsushita”), its
distributors or dealers from which you made
the purchase.
Article 1 License
Licensee is granted the right to use the
Software, including the information recorded
or described on the CD-ROM, instruction
manuals, and any other media provided to
Licensee (collectively “Software”), but all
applicable rights to patents, copyrights,
trademarks and trade secrets in the Software
are not transferred to Licensee.
Article 2 Use by a Third Party
Licensee may not use, copy, modify, transfer
or allow any third party, whether free of
charge or not, to use, copy or modify the
Software, except as expressly provided for in
this Agreement.
Article 3 Restrictions on Copying the
Software
Licensee may make a single copy of the
Software in whole or in part solely for backup purpose.
Article 4 Computer
Licensee may use the Software only on one
computer, and may not use it on more than
one computer.
Article 5 Reverse Engineering,
Decompiling or Disassembly
Licensee may not reverse engineer,
decompile, or disassemble the Software,
except to the extent either of them is
permitted under law or regulation of the
country where Licensee resides. Matsushita,
or its distributors will not be responsible for
any defects in the Software or damage to
Licensee caused by Licensee’s reverse
engineering, decompiling, or disassembly of
the Software.
Article 6 Indemnification
The Software is provided “AS-IS” without
warranty of any kind, either expressed or
implied, including, but not limited to,
warranties of non-infringement,
merchantability and/or fitness for a particular
purpose. Further, Matsushita does not
warrant that the operation of the Software will
be uninterrupted or error free. Matsushita or
any of its distributors will not be liable for any
damage suffered by Licensee arising from or
in connection with Licensee’s use of the
Software.
Article 7 Export Control
Licensee agrees not to export or re-export to
any country the Software in any form without
the appropriate export licenses under
regulations of the country where Licensee
resides, if necessary.
Article 8 Termination of License
The right granted to Licensee hereunder will
be automatically terminated if Licensee
contravenes any of the terms and conditions
of this Agreement. Upon termination hereof,
Licensee must destroy the Software and
related documentation together with all the
copies thereof at Licensee’s own expense.
83
Page 44

B
VQT0F03
F0903Sn0 ( 13500 A )
Matsushita Electric Industrial Co., Ltd.
Web Site: http://www.panasonic.co.jp/global/
 Loading...