

Page 1
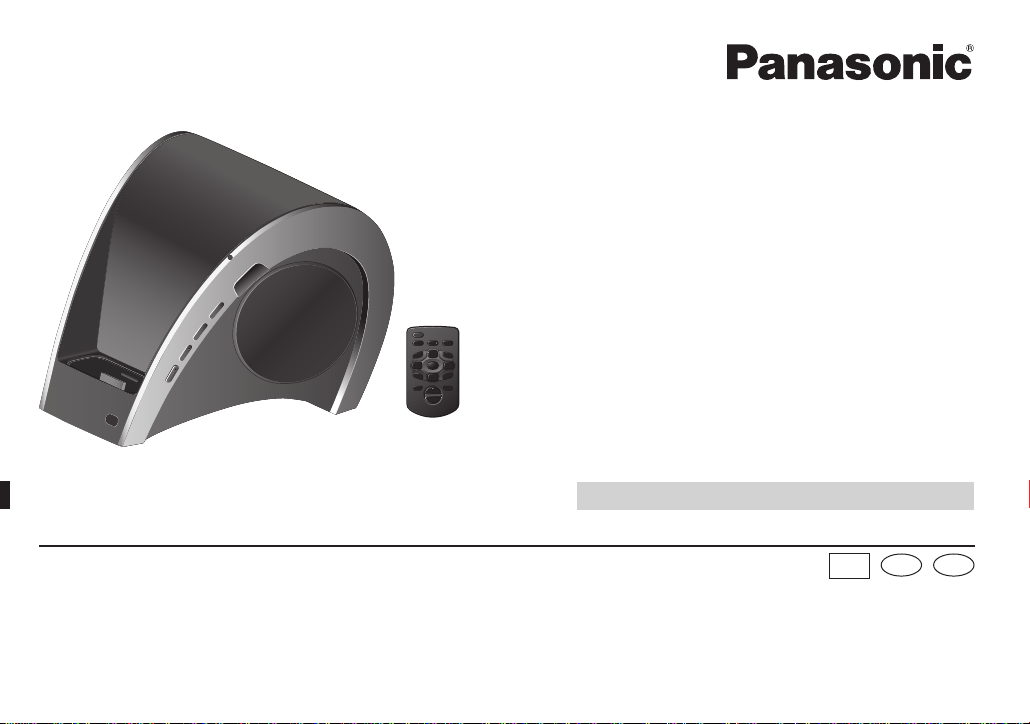
Operating Instructions
Compact Stereo System
Model No. SC-SP100
If you have any questions contact
In the U.S.A and Puerto Rico:
1-800-211-PANA (7262)
In Canada:
1-800-561-5505
La guía rápida en Español se encuentra en la página 15 a 19.
Panasonic Consumer Electronics
Company, Division of Panasonic
Corporation of North America
One Panasonic Way, Secaucus,
New Jersey 07094
http://www.panasonic.com
© Panasonic Corporation 2009
Printed in China
Panasonic Canada Inc.
5770 Ambler Drive
Mississauga, Ontario
L4W 2T3
www.panasonic.ca
PP
SpEn
RQTX1012-3Y
L1009CH3129
Page 2
Dear Customer
Thank you for purchasing this product. For optimum performance and safety, please read these instructions carefully.
Before connecting, operating or adjusting this product, please read the instructions completely. Please keep this manual for futur e
reference.
WARNING:
TO REDUCE THE RISK OF FIRE, ELECTRIC SHOCK OR
ENGLISHESPAÑOLENGLISH
PRODUCT DAMAGE,
• DO NOT EXPOSE THIS APPARATUS TO RAIN,
MOISTURE, DRIPPING OR SPLASHING AND THAT NO
OBJECTS FILLED WITH LIQUIDS, SUCH AS VASES,
SHALL BE PLACED ON THE APPARATUS.
• USE ONLY THE RECOMMENDED ACCESSORIES.
• DO NOT REMOVE THE COVER (OR BACK); THERE
ARE NO USER SERVICEABLE PARTS INSIDE. REFER
SERVICING TO QUALIFIED SERVICE PERSONNEL.
CAUTION!
DO NOT INSTALL OR PLACE THIS UNIT IN A
BOOKCASE, BUILT-IN CABINET OR IN ANOTHER
CONFINED SPACE. ENSURE THE UNIT IS WELL
VENTILATED. TO PREVENT RISK OF ELECTRIC SHOCK
OR FIRE HAZARD DUE TO OVERHEATING, ENSURE
THAT CURTAINS AND ANY OTHER MATERIALS DO NOT
OBSTRUCT THE VENTILATION VENTS.
The socket outlet shall be installed near the equipment and easily
accessible.
The mains plug of the power supply cord shall remain readily
operable.
To completely disconnect this apparatus from the AC Mains,
disconnect the power supply cord plug from AC receptacle.
RQTX1012
Product Identifi cation Marking is located on the bottom of units.
2
THE FOLLOWING APPLIES ONLY IN THE U.S.A.
FCC Note:
This equipment has been tested and found to comply with the limits
for a Class B digital device, pursuant to Part 15 of the FCC Rules.
These limits are designed to provide reasonable protection against
harmful interference in a residential installation. This equipment
generates, uses and can radiate radio frequency energy and, if
not installed and used in accordance with the instructions, may
cause harmful interference to radio communications. However,
there is no guarantee that interference will not occur in a particular
installation. If this equipment does cause harmful interference to
radio or television reception, which can be determined by turning the
equipment off and on, the user is encouraged to try to correct the
interference by one or more of the following measures:
• Reorient or relocate the receiving antenna.
• Increase the separation between the equipment and receiver.
• Connect the equipment into an outlet on a circuit different from
that to which the receiver is connected.
• Consult the dealer or an experienced radio/TV technician for help.
Any unauthorized changes or modifi cations to this equipment would
void the user’s authority to operate this device.
This device complies with Part 15 of the FCC Rules.
Operation is subject to the following two conditions:
(1) This device may not cause harmful interference, and
(2) this device must accept any interference received, including
interference that may cause undesired operation.
Declaration of Conformity
Trade name: Panasonic
Model No.: SC-SP100
Responsible Party:
Panasonic Corporation of North America
One Panasonic Way
Secaucus, NJ 07094
Support Contact:
Panasonic Consumer Electronics Company
Telephone No.: 1-800-211-PANA (7262)
Page 3
IMPORTANT SAFETY INSTRUCTIONS
Read these operating instructions carefully before using the unit. Follow the safety instructions on the unit and the applicable safety instructions
listed below. Keep these operating instructions handy for future reference.
1) Read these instructions.
2) Keep these instructions.
3) Heed all warnings.
4) Follow all instructions.
5) Do not use this apparatus near water.
6) Clean only with dry cloth.
7) Do not block any ventilation openings. Install in accordance with
the manufacturer’s instructions.
8) Do not install near any heat sources such as radiators, heat
registers, stoves, or other apparatus (including amplifi ers) that
produce heat.
9) Do not defeat the safety purpose of the polarized or groundingtype plug. A polarized plug has two blades with one wider than the
other. A grounding-type plug has two blades and a third grounding
prong. The wide blade or the third prong are provided for your
safety. If the provided plug does not fi t into your outlet, consult an
electrician for replacement of the obsolete outlet.
10) Protect the power cord from being walked on or pinched
particularly at plugs, convenience receptacles, and the point
where they exit from the apparatus.
11) Only use attachments/accessories specifi ed by the manufacturer.
12) Use only with the cart, stand, tripod, bracket, or
table specifi ed by the manufacturer, or sold with the
apparatus. When a cart is used, use caution when
moving the cart/apparatus combination to avoid
injury from tip-over.
13) Unplug this apparatus during lightning storms or
when unused for long periods of time.
14) Refer all servicing to qualifi ed service personnel. Servicing is
required when the apparatus has been damaged in any way, such
as power-supply cord or plug is damaged, liquid has been spilled
or objects have fallen into the apparatus, the apparatus has been
exposed to rain or moisture, does not operate normally, or has
been dropped.
ENGLISHESPAÑOLENGLISH
SC-SP100
THE FOLLOWING APPLIES ONLY IN THE U.S.A.
FCC Note:
This device complies with Part 15 of the FCC Rules.
Operation is subject to the conditions that this device does not
cause harmful interference.
Any unauthorized changes or modifi cations to this equipment would
void the user’s authority to operate this device.
THE FOLLOWING APPLIES ONLY IN CANADA.
This Class B digital apparatus complies with Canadian ICES-003.
–If you see this symbol–
Information on Disposal in other Countries outside the
European Union
This symbol is only valid in the European Union.
If you wish to discard this product, please contact
your local authorities or dealer and ask for the
correct method of disposal.
RQTX1012
3
Page 4
Table of contents
User memo:
DATE OF PURCHASE
DEALER NAME
DEALER ADDRESS
ENGLISHESPAÑOLENGLISH
TELEPHONE NUMBER
The model number and serial number of this product can be found
on either the back or the bottom of the unit.
Please note them in the space provided below and keep for future
reference.
MODEL NUMBER
SERIAL NUMBER
“Made for iPod” means that an electronic accessory has been
designed to connect specifi cally to iPod and has been certifi ed by
the developer to meet Apple performance standards.
“Works with iPhone” means that an electronic accessory has been
designed to connect specifi cally to iPhone and has been certifi ed by
the developer to meet Apple performance standards.
Apple is not responsible for the operation of this device or its
compliance with safety and regulatory standards.
iPod is a trademark of Apple Inc., registered in the U.S. and other
RQTX1012
countries.
4
iPhone is a trademark of Apple Inc.
SC-SP100
IMPORTANT SAFETY INSTRUCTIONS ..............3
Table of contents .................................................4
Supplied accessories ..........................................5
Compatible iPod and iPhone ..............................5
Charging the iPod or iPhone ..............................5
Preparing the remote control ............................. 6
Connecting the iPod or iPhone ..........................7
Listening to the iPod or iPhone..........................8
Connecting to the PC ..........................................9
Using other equipment .......................................9
Avoid interference with other Panasonic
equipment ........................................................9
Troubleshooting guide ......................................10
Maintenance .......................................................10
Specifi cations ....................................................10
Listening caution ...............................................11
Product Service ................................................. 11
Limited Warranty (ONLY FOR U.S.A. AND
PUERTO RICO) ..............................................12
Limited Warranty (ONLY FOR CANADA) ..........14
Español
Cómo preparar el control remoto ....................16
Cómo conectar el iPod o iPhone......................17
Cómo escuchar el iPod o iPhone .....................18
Atención al Cliente ..............................................19
Page 5
Supplied accessories
Compatible iPod and iPhone
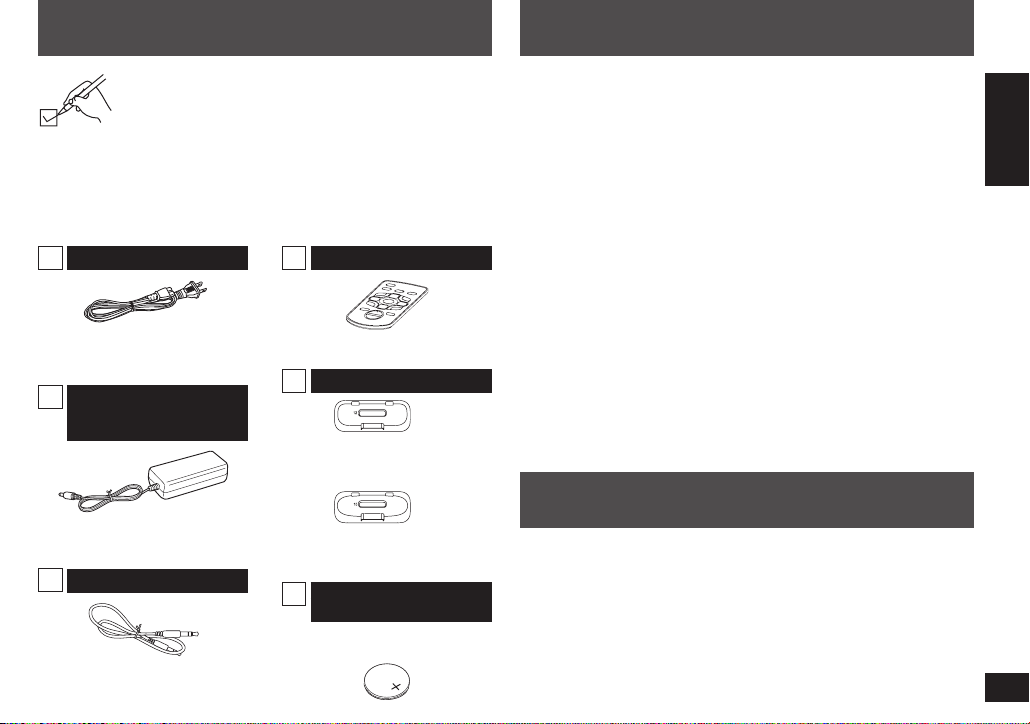
Please check and identify the supplied accessories.
Use numbers indicated in parentheses when asking
for replacement parts. (Product numbers correct as of
For U.S.A and Puerto Rico:
To order accessories, refer to “Accessory Purchases (United
States and Puerto Rico)” on page 13.
For Canada:
To order accessories, call the dealer from whom you made your
purchase.
1 AC power supply cord
1 AC adapter
1 Audio cable
October 2009. This may be subject to change.)
1 Remote control
(K2CB2CB00021)
2 Dock adapters
(switching power
supply)
(RFEAX1004)
(130-318030003)
(for iPhone 3G and iPhone 3GS)
1 Lithium Button-Type
(Battery is already installed in
he remote control.)
t
(RAKX1002)
(for iPhone)
(RFEX1001)
(RFEX1002)
batter
y
M12
M15
• iPhone 3GS (16GB, 32GB)
• iPhone 3G (8GB, 16GB)
• iPhone (4GB, 8GB, 16GB)
• iPod nano 5th generation (video camera) (8GB, 16GB)
• iPod touch 2nd generation (8GB, 16GB, 32GB, 64GB)
• iPod classic [120GB, 160GB (2009)]
• iPod nano 4th generation (video) (8GB, 16GB)
• iPod classic (160GB) (2007)
• iPod touch 1st generation (8GB, 16GB, 32GB)
• iPod nano 3rd generation (video) (4GB, 8GB)
• iPod classic (80GB)
• iPod nano 2nd generation (aluminum) (2GB, 4GB, 8GB)
• iPod 5th generation (video) (60GB, 80GB)
• iPod 5th generation (video) (30GB)
• iPod nano 1st generation (1GB, 2GB, 4GB)
• iPod 4th generation (color display) (40GB, 60GB)
• iPod 4th generation (color display) (20GB, 30GB)
• iPod 4th generation (40GB)
• iPod 4th generation (20GB)
• iPod mini (4GB, 6GB)
Compatibility depends on the software version of your iPod or iPhone.
Charging the iPod or iPhone
• The iPod or iPhone charges automatically when power is supplied to
the main unit.
• Check iPod or iPhone to see if the battery is fully recharged.
• If you are not using the iPod or iPhone for an extended period of
time after recharging has completed, disconnect it from the main
unit, as the battery will be depleted naturally. (Once fully recharged,
additional recharging will not occur.)
ENGLISHESPAÑOLENGLISH
RQTX1012
5
Page 6

Preparing the remote control
CR2025
Before using the remote control for the fi rst time, remove the insulation
sheet.
Replace the remote control battery when it stops operating, or when
the range seems reduced.
ENGLISHESPAÑOLENGLISH
Rear view
Lithium
Button-Type
battery
(CR2025)
1 Insert an object and push down
to unlock the catch.
Aim at the remote control signal sensor (\ page 8), avoiding
obstacles, at a maximum range of 7 m (23 feet) directly in front of the
main unit.
• Insert with poles aligned.
• Do not touch the terminals (+ and –) with metal objects.
• Do not recharge, disassemble, remodel, heat or throw into fi re.
• Keep out of reach of children.
• Do not heat or expose to fl ame.
• Do not leave the battery(ies) in an automobile exposed to direct
sunlight for a long period of time with doors and windows closed.
• Remove the battery if the remote control is not going to be used for a
long period of time. Store in a cool, dark place.
If any electrolyte should come into contact with your hands or clothes,
wash it off thoroughly with water.
If any electrolyte should come into contact with your eyes, never rub
the eyes.
Rinse eyes thoroughly with water, and then consult a doctor.
RQTX1012
6
Pull
Warning
Keep the Button-Type battery out of reach of children to prevent
swallowing.
Warning
Risk of fi re, explosion and burns. Do not disassemble, heat above
60°C (140°F) or incinerate.
CAUTION
Danger of explosion if battery is incorrectly replaced. Replace
only with the same or equivalent type recommended by the
manufacturer. Dispose of used batteries according to the
manufacturer’s instructions.
< For USA-California Only >
This product contains a CR Coin Cell Lithium Battery which
contains Perchlorate Material - special handling may apply.
See www.dtsc.ca.gov/hazardouswaste/perchlorate.
Page 7
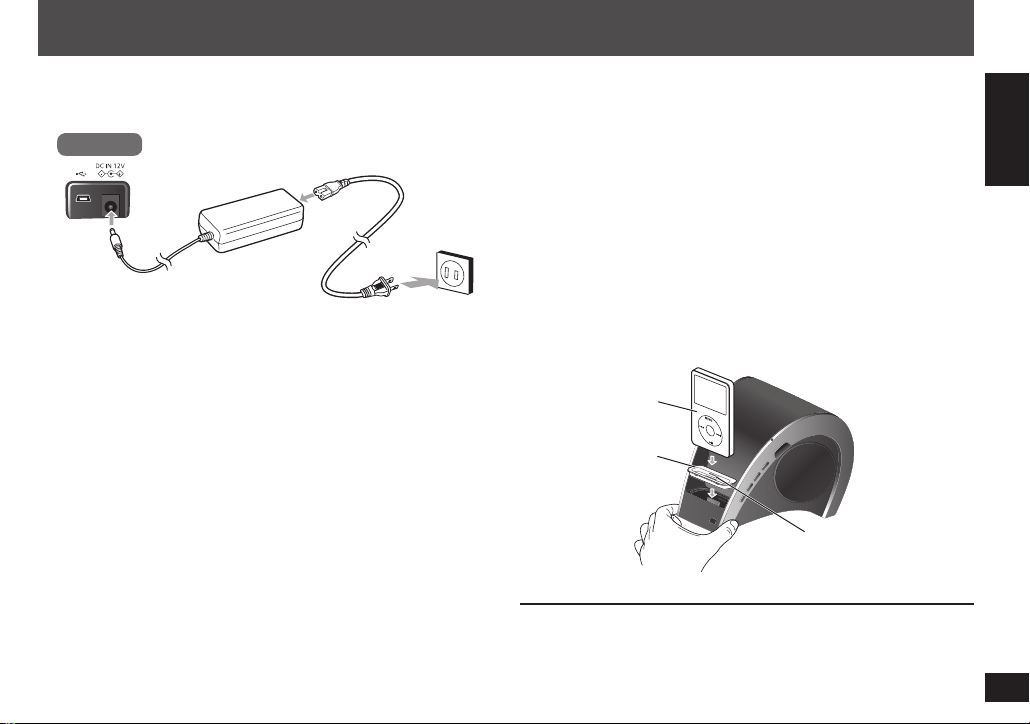
Connecting the iPod or iPhone
Connect the AC power.
1
Rear view
AC adapter
(switching power
supply) (included)
AC adapter (switching power supply)
This AC adapter operates on AC between 100 V and 240 V.
But
• In the U.S.A. and Canada, the AC adapter (switching power supply)
must be connected to a 120 V AC power supply only.
• When connecting to an AC supply outside of the U.S.A. or Canada,
use a plug adapter to suit the AC outlet confi guration.
• When connecting to a supply of greater than AC 125 V, ensure the
cord you use is suited to the voltage of the AC supply and the rated
current of the AC adapter (switching power supply).
• Contact an electrical parts distributor for assistance in selecting a
suitable AC plug adapter or AC cord set.
Note:
• The included AC power supply cord is for use with this unit only. Do
not use it with other equipment.
• Do not use an AC power supply cord from other equipment.
• Do not use any other AC adapters (switching power supplies) except
the supplied one.
AC power supply cord
(included)
2 Insert the dock adapter into the main unit.
iPod
Use the adapter supplied with your iPod or refer to Apple Inc. for
the compatible dock adapter (for details, refer to the instructions
supplied with the dock adapters), which may need to be purchased
separately.
iPhone
Use an appropriate iPhone adapter when playing an iPhone.
3 Connect the iPod or iPhone to the main unit.
Hold the main unit when connecting or disconnecting the iPod or
iPhone.
iPod
(not included)
iPod dock adapter
(not included)
When removing, insert your
fi ngernail or a fl at object and
lift upwards.
Conserving power
The system consumes a small amount of power, even when it is turned
off (approximate 0.7 W). To save power when the unit is not to be used
for a long time, unplug it from the household AC outlet.
ENGLISHESPAÑOLENGLISH
RQTX1012
7
Page 8
Listening to the iPod or iPhone
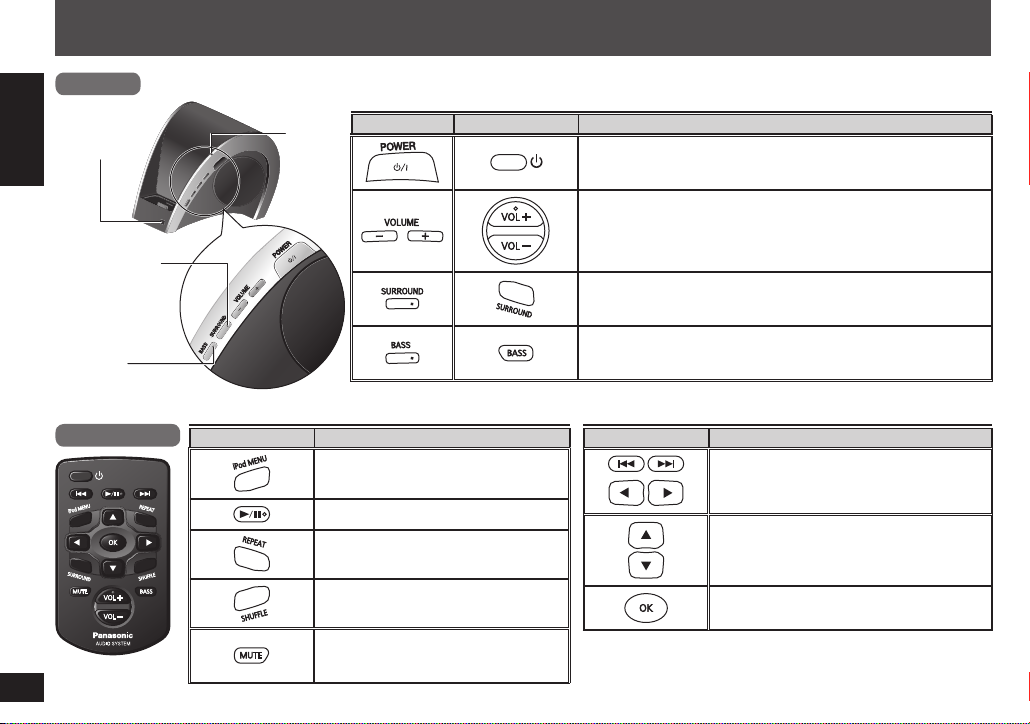
Main unit
Remote control
signal sensor
ENGLISHESPAÑOLENGLISH
SURROUND
indicator
BASS
indicator
Remote control
RQTX1012
8
You can navigate the iPod or iPhone using the buttons described.
The power indicator blinks each time a button on the remote control is pressed.
Power
indicator
Remote control Function
Main unit Remote control Function
Access the menu screens.
Playback or pause the iPod or iPhone.
Select the repeat mode of iPod or
iPhone.
Select the shuffl e mode of iPod or
iPhone.
Mute the sound from the speakers.
To cancel: Press the button again or
adjust the volume.
Turn the main unit’s power on or off.
• The power indicator lights up when the main unit is on.
Adjust the speakers’ volume level.
Turn the surround effect on or off.
• The SURROUND indicator on the main unit button lights up
when the surround function is activated.
Turn the bass effect on or off.
• The BASS indicator on the main unit button lights up when
the bass function is activated.
Remote control Function
Press to skip to the previous or next track.
Press and hold to backward or forward
search for the desired track.
Select an item on the menu screen.
Press and hold: Scrolls through the list.
Confi rm the selected menu or playback.
Note:
For iPod or iPhone operation details, please refer to iPod or
iPhone User’s Manual.
Page 9
Connecting to the PC
Using other equipment
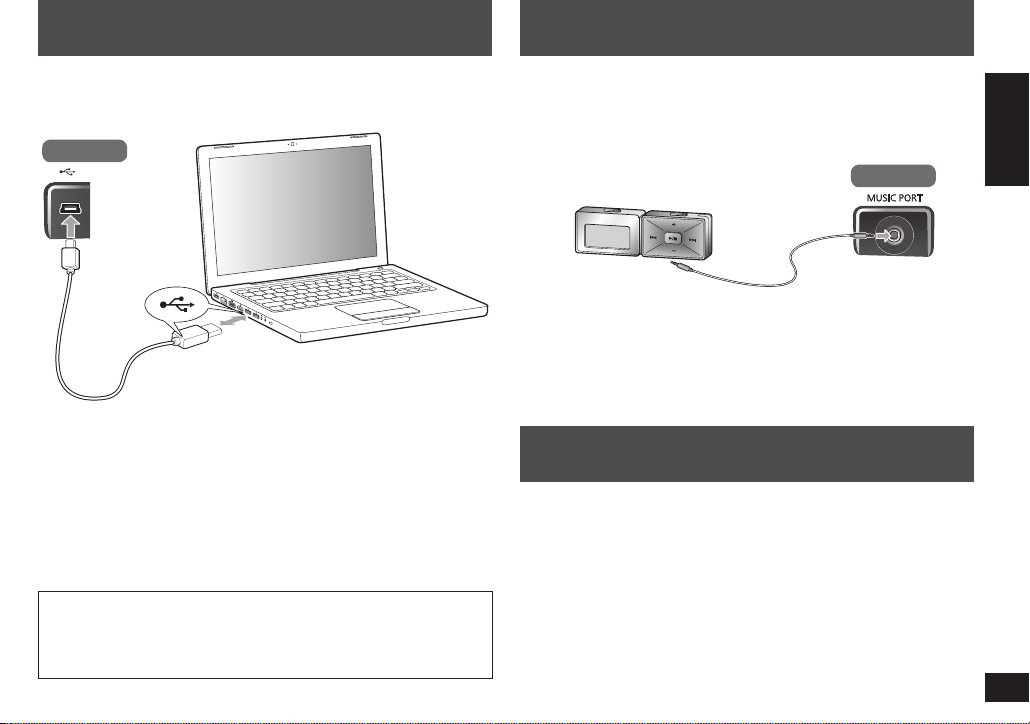
While the iPod or iPhone is connected to the main unit, you can
transfer data from the PC using the USB connectivity.
Rear view
USB cable (not included)
1 Connect the USB cable to the USB port of the main unit
and PC.
Refer to iPod or iPhone User’s Manual on PC synchronization.
2 Before disconnecting the USB cable, make sure the
procedure of safe removal of hardware from the PC is
performed.
Recording and operating problems may occur on some computer
systems.
Please note that Panasonic and Panasonic dealers cannot be held
liable for any lost data or other direct or indirect damage except in
cases of intentional or gross negligence.
Preparation
• Ensure that the iPod or iPhone is not connected to the main unit.
• Ensure that the other equipment is completely set up and its volume
reduced before connecting to the main unit.
ENGLISHESPAÑOLENGLISH
Portable audio equipment
(not included)
Audio cable (included)
Connect the other equipment such as a portable audio equipment, etc.
to the MUSIC PORT using the supplied audio cable.
Rear view
Avoid interference with other Panasonic equipment
You can operate this unit using a different mode.
The main unit and remote control must be set to the same mode.
1 Press and hold [SURROUND] on the main unit and
[BASS] on the remote control for at least 3 seconds.
The power indicator fl ashes 3 times confi rming the change.
2 Press and hold [OK] and [BASS] on the remote control
for at least 2 seconds.
To return to the default mode, repeat the above steps. For step 2,
replace [BASS] with [MUTE].
RQTX1012
9
Page 10

Troubleshooting guide
Specifi cations
Before requesting service, make the following checks. If you are in
doubt about some of the check points, or if the solutions indicated
in the following guide do not solve the problem, refer to “Customer
Services Directory (United States and Puerto Rico)” on page 13 if you
reside in the U.S.A. or Puerto Rico, or refer to “Product information” on
ENGLISHESPAÑOLENGLISH
page 11 if you reside in Canada.
No power
No sound
Remote control is
not functioning
Distorted sound
iPod or iPhone
does not charge
Unable to use PC
synchronization
• Ensure the AC power supply cord is
connected properly.
• Adjust the volume.
• Check if mute function is enabled.
• Update your iPod or iPhone with the latest
software.
• The iPod or iPhone was incorrectly inserted
into the dock. Turn off the iPod or iPhone,
remove it from the dock connector. Reinsert
it and turn it on again.
• Replace the battery.
• Ensure the iPod or iPhone is seated properly
into the unit.
• Reduce the volume.
• Set the “EQ” setting of the iPod to “Off” or
“Flat”.
• Check the connections. (\ page 7)
• Turn the main unit on.
• Check PC and iPod or iPhone connections.
(\ page 7, 9)
Maintenance
To clean this unit, wipe with a soft, dry cloth.
• Never use alcohol, paint thinner or benzine to clean this unit.
RQTX1012
• Before using chemically treated cloth, read the instructions that came
with the cloth carefully.
10
AMPLIFIER SECTION
RMS output power stereo mode
Front Ch (both channels driven)
5 W per channel (6 Ω), 1 kHz, 10% THD
Subwoofer Ch 10 W per channel (6 Ω), 100 Hz, 10% THD
Total RMS stereo mode power 20 W
TERMINALS SECTION
Music port (rear)
Sensitivity 350 mV, 13.2 kΩ
Terminal Stereo, 3.5 mm (
1
/8") jack
SPEAKER SECTION
Front speakers
Speaker unit(s) Impedance: 6 Ω
Full range 4 cm (1
Input power (IEC) 5 W (Max)
Subwoofer
Speaker unit(s) Impedance: 6 Ω
Woofer 6.5 cm (2
Passive radiator (x2) 6.5 cm (2
Input power (IEC) 10 W (Max)
5
/8") cone type
1
/2") cone type
1
/2")
GENERAL
Power supply DC 12 V (DC IN terminal)
Power consumption 16 W (unit only)
AC adapter (switching power supply) AC 100 to 240 V, 50/60 Hz
AC adapter power consumption 36 W
Dimensions (WxHxD) 175 mm x 138.8 mm x 178.5 mm
(6
Mass [Weight] 0.85 kg (1.87 lbs)
Operating temperature range 0°C to +40°C (+32°F to +104°F)
Operating humidity range 20% to 80% RH (no condensation)
Power consumption in standby mode: 0.7 W (approximate)
Note:
1) Specifi cations are subject to change without notice.
Mass and dimensions are approximate.
2) Total harmonic distortion is measured by the digital spectrum
analyser.
7
/8" x 5 15/32" x 7 1/6")
Page 11

Listening caution
Selecting fi ne audio equipment such as the unit you’ve just purchased
is only the start of your musical enjoyment. Now it’s time to consider
how you can maximize the fun and excitement your equipment
offers. This manufacturer and the Electronic Industries Association’s
Consumer Electronics Group want you to get the most out of your
equipment by playing it at a safe level. One that lets the sound come
through loud and clear without annoying blaring or distortion—and,
most importantly, without affecting your sensitive hearing.
We recommend that you avoid prolonged exposure to excessive noise.
Sound can be deceiving. Over time your hearing “comfort level” adapts
to higher volumes of sound. So what sounds “normal” can actually be
loud and harmful to your hearing.
Guard against this by setting your equipment at a safe level BEFORE
your hearing adapts.
To establish a safe level:
• Start your volume control at a low setting.
• Slowly increase the sound until you can hear it comfortably and
clearly, and without distortion.
Once you have established a comfortable sound level:
• Leave it there.
Taking a minute to do this now will help to prevent hearing damage or
loss in the future. After all, we want you listening for a lifetime.
Product Service
1. Damage requiring service – The unit should be serviced by
qualifi ed service personnel if:
(a) The AC power supply cord or AC adapter has been damaged; or
(b) Objects or liquids have gotten into the unit; or
(c) The unit has been exposed to rain; or
(d) The unit does not operate normally or exhibits a marked change
in performance; or
(e) The unit has been dropped or the cabinet damaged.
2. Servicing − Do not attempt to service the unit beyond that
described in these operating instructions. Refer all other servicing to
authorized servicing personnel.
3. Replacement parts − When parts need replacing ensure the
servicer uses parts specifi ed by the manufacturer or parts that
have the same characteristics as the original parts. Unauthorized
substitutes may result in fi re, electric shock, or other hazards.
4. Safety check − After repairs or service, ask the servicer to perform
safety checks to confi rm that the unit is in proper working condition.
The servicer will require all components to service your system.
Therefore, should service ever be necessary, be sure to bring the
entire system.
Product information
For product information or assistance with product operation:
In the U.S.A and Puerto Rico, refer to “Customer Services
Directory (United States and Puerto Rico)” on page 13.
In Canada, contact the Panasonic Canada Inc. Customer Care
Centre at 1-800-561-5505, or visit the website (www.panasonic.ca),
or an authorized Servicentre closest to you.
ENGLISHESPAÑOLENGLISH
RQTX1012
11
Page 12

Limited Warranty (ONLY FOR U.S.A. AND PUERTO RICO)
Panasonic Consumer Electronics Company,
Division of Panasonic Corporation of North America
One Panasonic Way, Secaucus, New Jersey 07094
ENGLISHESPAÑOLENGLISH
Panasonic Audio Products
Limited Warranty
Limited Warranty Coverage (For USA and Puerto Rico Only)
If your product does not work properly because of a defect in materials or
workmanship, Panasonic Consumer Electronics Company (referred to as “the
warrantor”) will, for the length of the period indicated on the chart below, which
starts with the date of original purchase (“warranty period”), at its option either
(a) repair your product with new or refurbished parts, (b) replace it with a new or
a refurbished equivalent value product, or (c) refund your purchase price. The
decision to repair, replace or refund will be made by the warrantor.
Product or Part Name Parts Labor
All Portable Audio Products except
items listed below
Multimedia & Compact Audio System One (1) year One (1) year
Rechargeable batteries (in exchange
for defective item)
SD Memory Card (in exchange for
defective item)
During the “Labor” warranty period there will be no charge for labor. During the
“Parts” warranty period, there will be no charge for parts. This Limited Warranty
excludes both parts and labor for non-rechargeable batteries, antennas, and
cosmetic parts (cabinet). This warranty only applies to products purchased and
serviced in the United States or Puerto Rico. This warranty is extended only to the
original purchaser of a new product which was not sold “as is”.
Mail-In Service
For assistance in the U.S.A. and Puerto Rico in obtaining repairs, please ship the
product prepaid to:
Panasonic Exchange Center
4900 George McVay Drive
Suite B
RQTX1012
McAllen, TX 78503
panacare@us.panasonic.com
12
One (1) year One (1) year
Ten (10) days Not Applicable
Ninety (90) days Not Applicable
When shipping the unit, carefully pack, include all accessories, and send it
prepaid, adequately insured and preferably in the original carton. If Lithium Ion
batteries are shipped by air the package must be labeled “Contains Lithium Ion
Battery (No lithium metal)”. Damaged batteries are prohibited from shipment by
US Mail. Batteries must be securely packed in a manner to prevent short-circuiting
and a package cannot contain more than 3 Lithium Ion batteries. Include a letter
detailing the complaint, a return address and provide a daytime phone number
where you can be reached. A valid registered receipt is required under the Limited
Warranty.
IF REPAIR IS NEEDED DURING THE WARRANTY PERIOD, THE PURCHASER
WILL BE REQUIRED TO FURNISH A SALES RECEIPT/PROOF OF PURCHASE
INDICATING DATE OF PURCHASE, AMOUNT PAID AND PLACE OF PURCHASE.
CUSTOMER WILL BE CHARGED FOR THE REPAIR OF ANY UNIT RECEIVED
WITHOUT SUCH PROOF OF PURCHASE.
Limited Warranty Limits And Exclusions
This warranty ONLY COVERS failures due to defects in materials or workmanship,
and DOES NOT COVER normal wear and tear or cosmetic damage. The warranty
ALSO DOES NOT COVER damages which occurred in shipment, or failures which
are caused by products not supplied by the warrantor, or failures which result from
accidents, misuse, abuse, neglect, mishandling, misapplication, alteration, faulty
installation, set-up adjustments, misadjustment of consumer controls, improper
maintenance, power line surge, lightning damage, modifi cation, introduction of
sand, humidity or liquids, commercial use such as hotel, offi ce, restaurant, or other
business or rental use of the product, or service by anyone other than a Factory
Service Center or other Authorized Servicer, or damage that is attributable to acts
of God.
THERE ARE NO EXPRESS WARRANTIES EXCEPT AS LISTED UNDER “LIMITED
WARRANTY COVERAGE”.
THE WARRANTOR IS NOT LIABLE FOR INCIDENTAL OR CONSEQUENTIAL
DAMAGES RESULTING FROM THE USE OF THIS PRODUCT, OR ARISING
OUT OF ANY BREACH OF THIS WARRANTY.
(As examples, this excludes damages for lost time, travel to and from the servicer,
loss of or damage to media or images, data or other memory or recorded content.
The items listed are not exclusive, but for illustration only.)
Page 13

Limited Warranty (ONLY FOR U.S.A. AND PUERTO RICO) (continued)
ALL EXPRESS AND IMPLIED WARRANTIES, INCLUDING THE WARRANTY OF MERCHANTABILITY, ARE LIMITED TO THE PERIOD OF THE LIMITED WARRANTY.
Some states do not allow the exclusion or limitation of incidental or consequential damages, or limitations on how long an implied warranty lasts, so the exclusions may
not apply to you.
This warranty gives you specifi c legal rights and you may also have other rights which vary from state to state. If a problem with this product develops during or after
the warranty period, you may contact your dealer or Service Center. If the problem is not handled to your satisfaction, then write to the warrantor’s Consumer Affairs
Department at the addresses listed for the warrantor.
PARTS AND SERVICE WHICH ARE NOT COVERED BY THIS LIMITED WARRANTY, ARE YOUR RESPONSIBILITY.
Customer Services Directory (United States and Puerto Rico)
Obtain Product Information and Operating Assistance; locate your nearest Dealer or Service Center; purchase Parts and
Accessories; or make Customer Service and Literature requests by visiting our Web Site at:
http://www.panasonic.com / hel p
or, contact us via the web at:
http://www.panasonic.com / contactinfo
You may also contact us directly at: 1-800-211-PANA (7262),
Monday-Friday 9am-9pm; Saturday-Sunday 10am-7pm EST.
For hearing or speech impaired TTY users, TTY: 1-877-833-8855
Accessory Purchases (United States and Puerto Rico)
Purchase Parts, Accessories and Instruction Books online for all Panasonic Products by visiting our Web Site at:
http://www.pstc.panasonic.com
Or, send your request by E-mail to:
ncpparts@us.panasonic.com
You may also contact us directly at:
1-800-332-5368 (Phone) 1-800-237-9080 (Fax Only) (Monday – Friday 9am-9pm EST.)
Panasonic Service and Technology Company
20421 84th Avenue South, Kent, WA 98032
(We Accept Visa, MasterCard, Discover Card, American Express, and Personal Checks)
ENGLISHESPAÑOLENGLISH
For hearing or speech impaired TTY users, TTY: 1-866-605-1277
As of November 2009
RQTX1012
13
Page 14

Limited Warranty (ONLY FOR CANADA)
5770 Ambler Drive, Mississauga, Ontario L4W 2T3
PANASONIC PRODUCT – LIMITED WARRANTY
Panasonic Canada Inc.
ENGLISHESPAÑOLENGLISH
Panasonic Canada Inc. warrants this product to be free from defects in material and workmanship under normal use and for a period as stated below from the date of
original purchase agrees to, at its option either (a) repair your product with new or refurbished parts, (b) replace it with a new or a refurbished equivalent value product, or
(c) refund your purchase price. The decision to repair, replace or refund will be made by Panasonic Canada Inc.
Panasonic Portable / Clock Radio (without Tape, CD, MD) One (1) year
Panasonic Audio Product One (1) year
Panasonic DVD Product One (1) year
Accessories including rechargeable batteries Ninety (90) days
This warranty is given only to the original purchaser, or the person for whom it was purchased as a gift, of a Panasonic brand product mentioned above sold by an
authorized Panasonic dealer in Canada and purchased and used in Canada, which product was not sold “as is”, and which product was delivered to you in new condition
in the original packaging.
IN ORDER TO BE ELIGIBLE TO RECEIVE WARRANTY SERVICE HEREUNDER, A PURCHASE RECEIPT OR OTHER PROOF OF DATE OF ORIGINAL PURCHASE,
SHOWING AMOUNT PAID AND PLACE OF PURCHASE IS REQUIRED
LIMITATIONS AND EXCLUSIONS
This warranty ONLY COVERS failures due to defects in materials or workmanship, and DOES NOT COVER normal wear and tear or cosmetic damage. The warranty
ALSO DOES NOT COVER damages which occurred in shipment, or failures which are caused by products not supplied by Panasonic Canada Inc., or failures which result
from accidents, misuse, abuse, neglect, mishandling, misapplication, alteration, faulty installation, set-up adjustments, misadjustment of consumer controls, improper
maintenance, power line surge, lightning damage, modifi cation, introduction of sand, humidity or liquids, commercial use such as hotel, offi ce, restaurant, or other
business or rental use of the product, or service by anyone other than a Authorized Servicer, or damage that is attributable to acts of God.
Dry cell batteries are also excluded from coverage under this warranty.
THIS EXPRESS, LIMITED WARRANTY IS IN LIEU OF ALL OTHER WARRANTIES, EXPRESS OR IMPLIED, INCLUDING ANY IMPLIED WARRANTIES OF
MERCHANTABILITY AND FITNESS FOR A PARTICULAR PURPOSE. IN NO EVENT WILL PANASONIC CANADA INC. BE LIABLE FOR ANY SPECIAL, INDIRECT OR
CONSEQUENTIAL DAMAGES RESULTING FROM THE USE OF THIS PRODUCT OR ARISING OUT OF ANY BREACH OF ANY EXPRESS OR IMPLIED WARRANTY.
(As examples, this warranty excludes damages for lost time, travel to and from the Authorized Servicer, loss of or damage to media or images, data or other memory or
recorded content. This list of items is not exhaustive, but for illustration only.)
In certain instances, some jurisdictions do not allow the exclusion or limitation of incidental or consequential damages, or the exclusion of implied warranties, so the above
limitations and exclusions may not be applicable. This warranty gives you specifi c legal rights and you may have other rights which vary depending on your province or
territory.
CONTACT INFORMATION
For product information and operation assistance, please contact:
Our Customer Care Centre: Telephone #: 1-800-561-5505
Fax #: (905) 238-2360
RQTX1012
Email link: “Support → contact us → email” on www.panasonic.ca
14
For defective product exchange within the warranty period, please contact the original dealer or our Customer Care Centre.
EXCHANGE PROGRAM
Page 15

Estimado cliente
Muchísimas gracias por haber adquirido este aparato. Lea con atención estas instrucciones para obtener las máximas prestaciones y seguridad.
Antes de conectar, operar o ajustar este producto, sírvase leer estas instrucciones completamente. Guarde este manual para su
consulta en el futuro.
ADVERTENCIA:
PARA REDUCIR EL RIESGO DE INCENDIOS,
DESCARGAS ELÉCTRICAS O DAÑOS EN EL
PRODUCTO,
• NO EXPONGA ESTE APARATO A LA LLUVIA,
HUMEDAD, GOTEO O SALPICADURAS, Y NO
COLOQUE ENCIMA DEL MISMO OBJETOS CON
LÍQUIDOS COMO, POR EJEMPLO, FLOREROS.
• UTILICE SOLAMENTE LOS ACCESORIOS
RECOMENDADOS.
• NO QUITE LA CUBIERTA (O EL PANEL TRASERO); EN
EL INTERIOR NO HAY PIEZAS QUE PUEDA REPARAR
EL USUARIO. SOLICITE LAS REPARACIONES AL
PERSONAL DE SERVICIO CUALIFICADO.
¡ADVERTENCIA!
PARA MANTENER BIEN VENTILADA ESTA UNIDAD,
NO LA INSTALE NI PONGA EN UN ESTANTE DE
LIBROS, MUEBLE EMPOTRADO U OTRO ESPACIO
DE DIMENSIONES REDUCIDAS. ASEGÚRESE QUE
CORTINAS Y OTROS MATERIALES NO OBSTRUYAN
LAS CONDICIONES DE VENTILACIÓN PARA PREVENIR
EL RIESGO DE DESCARGAS ELÉCTRICAS O
INCENDIOS DEBIDOS AL RECALENTAMIENTO.
La toma de corriente deberá estar instalada cerca del equipo y
ENGLISHESPAÑOL ESPAÑOL
donde se pueda acceder a ella fácilmente.
El enchufe del cable de la alimentación deberá estar siempre listo
para ser utilizado.
Para desconectar completamente este aparato de la red de CA,
desconecte el enchufe del cable de alimentación del receptáculo de
CA.
–Si ve este símbolo–
Información sobre la eliminación en otros países no
pertenecientes a la Unión Europea
Este símbolo sólo es válido en la Unión Europea.
Si desea desechar este producto, póngase en
contacto con las autoridades locales o con su
distribuidor para que le informen sobre el método
correcto de eliminación.
RQTX1012
15
Page 16

Cómo preparar el control remoto
CR2025
Antes de usar el control por primera vez, retire la hoja de aislamiento.
Reemplace la pila de control remoto cuando deje de funcionar, o si el rango de alcance parece estar reducido.
ENGLISHESPAÑOL ESPAÑOL
Diríjalo al sensor del control remoto (\ página 18), evitando los obstáculos, desde una distancia máxima de 7 m (23 pies) directamente frente al
aparato.
Adverten c ia
Mantenga la pila tipo botón fuera del alcance de los niños para evitar que se la traguen.
CUIDADO
Hay peligro de explosión si se sustituye incorrectamente la batería. Sólo sustituya con el mismo tipo recomendado por el fabricante o que sea
equivalente. Deseche las baterías usadas según instruye el fabricante.
RQTX1012
16
Vista posterior
Pila de litio
tipo botón
(CR2025)
Tirar
1 Introduzca un objeto y empuje hacia
abajo para desbloquear el cierre.
Page 17

Cómo conectar el iPod o iPhone
Conecte la fuente de alimentación de CA.
1
Vista posterior
Adaptador de CA
(fuente de alimentación conmutada)
(suministrado)
No use ningún otro adaptador de CA (fuente de alimentación conmutada) que no sea el suministrado.
Cable de alimentación de CA
(suministrado)
2 Introduzca el adaptador de estación de acoplamiento en el aparato principal.
iPod
Use el adaptador suministrado con su iPod o consulte a Apple Inc. para obtener el adaptador de la estación de acoplamiento compatible (para
más detalles, consulte las instrucciones suministradas con los adaptadores de la estación de acoplamiento), que puede que se tengan que
comprar por separado.
iPhone
Use un adaptador de iPhone adecuado cuando realice la reproducción desde un iPhone.
3 Conecte el iPod o iPhone a el aparato principal.
Sujete el aparato principal al conectar o desconectar el iPod o el iPhone.
ENGLISHESPAÑOL ESPAÑOL
RQTX1012
17
Page 18

Cómo escuchar el iPod o iPhone
Aparato principal
Sensor
de señal
de control
ENGLISHESPAÑOL ESPAÑOL
remoto
Indicador
SURROUND
(sonido
envolvente)
Indicador
BASS
(graves)
Control remoto
RQTX1012
18
Usted puede navegar en el iPod o iPhone usando los botones descritos.
El indicador de encendido parpadeará cada vez que se pulse un botón en el control remoto.
Indicador
de
encendido
Control remoto Función
Aparato
principal
Da acceso a las pantallas del menú.
Reproduce o pausa el iPod o iPhone.
Selecciona el modo repetir del iPod
o iPhone.
Selecciona el modo aleatorio del
iPod o iPhone.
Desactiva el sonido de las bocinas.
Para cancelar: Pulse el botón
nuevamente o ajuste el volumen.
Control remoto Función
Enciende o apaga el aparato principal.
• El indicador de encendido se ilumina cuando la unidad está
encendida.
Ajusta el nivel de volumen de las bocinas.
Activa o desactiva el efecto de sonido envolvente.
• El indicador SURROUND (sonido envolvente) del botón del
aparato principal se iluminará cuando la función de sonido
envolvente esté activada.
Activa o desactiva el efecto de sonidos graves.
• El indicador BASS (graves) del botón del aparato principal se
iluminará cuando la función de sonidos graves esté activada.
Control remoto Función
Nota:
Para la operación del iPod o iPhone, consulte el Manual del
Usuario del iPod o iPhone.
Pulse para saltar hacia la pista anterior
o siguiente.
Pulse y sujete la búsqueda hacia atrás
o hacia delante para llegar a la pista
deseada.
Seleccione un elemento en la pantalla
del menú.
Pulse y mantenga pulsado: Se desliza a
través de la lista.
Confi rme el menú o reproducción
seleccionada.
Page 19

Atención al Cliente
Directorio de Atención al ClienteDirectorio de Atención al Cliente
Obtenga información de productos y asistencia operativa; localice el distribuidor o Centro de Servicio más cercano;
compre repuestos y accesorios a través de nuestro Sitio Web para América Latina:
http://www.lar.panasonic.com
Además puede contactarnos directamente a través de nuestro Contact Center:
Panamá 800-PANA (800-7262)
Colombia 1-8000-94PANA (01-8000-947262)
Ecuador 1800-PANASONIC (1800-726276)
Costa Rica 800-PANA737 (800-7262737)
El Salvador 800-PANA (800-7262)
Guatemala 1-801-811-PANA (1-801-811-7262)
Chile 800-390-602
Desde teléfono Celular: 797-5000
Venezuela 800-PANA-800 (800-7262-800)
Uruguay 0-800-PANA (0-800-7262)
Peru 0800-00726
Argentina 0800-333-PANA (0800-333-7262)
0810-321-PANA (0810-321-7262)
Servicio en MéxicoServicio en México
Para obtener información en la República de México contáctenos a través de:
email: atencion.clientes@mx.panasonic.com
O a través de los siguientes números telefónicos:
01800-VIP-PANA (01800-847-7262) - Interior
(55) 5000-1200 - México D.F. y Area Metropolitana
ENGLISHESPAÑOL ESPAÑOL
RQTX1012
19
Page 20

20
ENGLISHESPAÑOL ESPAÑOL
RQTX1012
Page 21

Certifi cat de garantie limitée
5770 Ambler Drive, Mississauga, Ontario L4W 2T3
PRODUIT PANASONIC – GARANTIE LIMITÉE
PROGRAMME DE REMPLACEMENT
Panasonic Canada Inc. garantit que ce produit est exempt de défauts de matériaux et de main-d’œuvre dans un contexte d’utilisation normale pendant la période indiquée
ci-après à compter de la date d’achat original et, dans l’éventualité d’une défectuosité, accepte, à sa discrétion, de (a) réparer le produit avec des pièces neuves ou
remises à neuf, (b) remplacer le produit par un produit neuf ou remis à neuf d’une valeur équivalente ou (c) rembourser le prix d’achat. La décision de réparer, remplacer
ou rembourser appartient à Panasonic Canada Inc.
Radio-réveil/radio portative Panasonic (sans lecteur de cassettes, CD, MD) Un (1) an
Appareils audio Panasonic Un (1) an
Appareils DVD Panasonic Un (1) an
Accessoires, y compris piles rechargeables Quatre-vingt-dix (90) jours
La présente garantie n’est fournie qu’à l’acheteur original d’un des produits de marque Panasonic indiqués plus haut, ou à la personne l’ayant reçu en cadeau, vendu par
un détaillant Panasonic agréé au Canada et utilisé au Canada. Le produit ne doit pas avoir été « vendu tel quel » et doit avoir été livré à l’état neuf dans son emballage
d’origine.
POUR ÊTRE ADMISSIBLE AUX SERVICES AU TITRE DE LA PRÉSENTE GARANTIE, LA PRÉSENTATION D’UN REÇU D’ACHAT OU DE TOUTE AUTRE PIÈCE
JUSTIFICATIVE DE LA DATE D’ACHAT ORIGINAL, INDIQUANT LE MONTANT PAYÉ ET LE LIEU DE L’ACHAT, EST REQUISE.
RESTRICTIONS ET EXCLUSIONS
FRANÇAIS
La présente garantie COUVRE SEULEMENT les défaillances attribuables à un défaut des matériaux ou à un vice de fabrication et NE COUVRE PAS l’usure normale ni les
dommages esthétiques. La présente garantie NE COUVRE PAS NON PLUS les dommages subis pendant le transport, les défaillances causées par des produits non fournis
par Panasonic Canada Inc. ni celles résultant d’un accident, d’un usage abusif ou impropre, de négligence, d’une manutention inadéquate, d’une mauvaise application, d’une
altération, d’une installation ou de réglages impropres, d’un mauvais réglage des contrôles de l’utilisateur, d’un mauvais entretien, d’une surtension temporaire, de la foudre,
d’une modifi cation, de la pénétration de sable, de liquides ou d’humidité, d’une utilisation commerciale (dans un hôtel, un bureau, un restaurant ou tout autre usage par
affaires ou en location), d’une réparation effectuée par une entité autre qu’un centre de service Panasonic agréé ou encore d’une catastrophe naturelle.
Les piles sèches sont également exclues de la présente garantie.
CETTE GARANTIE LIMITÉE ET EXPRESSE REMPLACE TOUTE AUTRE GARANTIE, EXPRESSE OU IMPLICITE, INCLUANT LES GARANTIES IMPLICITES DU
CARACTÈRE ADÉQUAT POUR LA COMMERCIALISATION ET UN USAGE PARTICULIER. PANASONIC CANADA INC. N’AURA D’OBLIGATION EN AUCUNE
CIRCONSTANCE POUR TOUT DOMMAGE DIRECT, INDIRECT OU CONSÉCUTIF RÉSULTANT DE L’UTILISATION DE CE PRODUIT OU DÉCOULANT DE TOUTE
DÉROGATION À UNE GARANTIE EXPRESSE OU IMPLICITE. (À titre d’exemples, cette garantie exclut les dommages relatifs à une perte de temps, le transport jusqu’à
et depuis un centre de service agréé, la perte ou la détérioration de supports ou d’images, de données ou de tout autre contenu en mémoire ou enregistré. Cette liste n’est
pas exhaustive et n’est fournie qu’à des fi ns explicatives.)
Certaines juridictions ne reconnaissent pas les exclusions ou limitations de dommages indirects ou consécutifs, ou les exclusions de garanties implicites. Dans de tels
cas, les limitations stipulées ci-dessus peuvent ne pas être applicables. La présente garantie vous confère des droits précis; vous pourriez aussi avoir d’autres droits
pouvant varier selon votre province ou territoire de résidence.
DEMANDE DE RENSEIGNEMENTS
Pour tout renseignement sur les produits et de l’assistance technique, veuillez communiquer avec :
Centre de service à la clientèle : Téléphone : 1-800-561-5505
Télécopieur : (905) 238-2360
RQTX1012
Lien courriel : « Support à la clientèle → contactez-nous → courriel » à www.panasonic.ca
12
Pour le remplacement d’un produit défectueux couvert par la garantie, veuillez communiquer avec le revendeur d’origine ou notre centre de service à la clientèle.
Panasonic Canada Inc.
Page 22

Protection de l’ouïe Service après-vente
1. En cas de dommage − Confi er l’appareil à un technicien qualifi é
dans les cas suivants:
(a) lorsque le cordon d’alimentation ou l’adaptateur secteur a été
endommagé;
(b) lorsqu’un objet est tombé dans l’appareil ou si ce dernier a été
Choisir un appareil audio de qualité tel celui que vous venez d’acheter
ne représente que le début de votre plaisir musical. En effet, de
simples mesures peuvent vous permettre d’optimiser l’agrément que
votre appareil peut vous offrir. Le fabricant de cet appareil et le Groupe
des produits grand public de l’Association de l’industrie électronique
désirent que vous tiriez un plaisir maximum en l’écoutant à un niveau
sécuritaire qui, tout en assurant une reproduction claire et puissante
sans distorsion, ne puisse affecter votre ouïe.
Il est recommandé d’éviter une écoute prolongée à volume élevé.
Le son peut être trompeur. Avec le temps, votre niveau de confort
auditif s’adapte à des volumes plus élevés. Ainsi, un niveau qui semble
normal peut en fait être trop élevé et être nuisible à l’oreille.
Protégez-vous en réglant le volume à un niveau sécuritaire avant que
votre oreille ne s’adapte à un volume trop élevé.
Pour déterminer un niveau d’écoute sécuritaire :
• Régler le volume au minimum.
• Monter lentement le volume jusqu’au niveau d’écoute confortable
avant qu’il n’y ait distorsion.
Après avoir identifi é le niveau d’écoute confortable :
• Laisser l’appareil réglé à ce niveau.
Les quelques secondes que vous demandera ce réglage contribueront
à prévenir tout dommage éventuel à l’ouïe.
mouillé;
(c) lorsque l’appareil a été exposé à la pluie;
(d) lorsque l’appareil semble ne pas fonctionner normalement ou
que son rendement laisse à désirer;
(e) lorsque l’appareil a subi un choc violent ou que son coffret a été
endommagé.
2. Réparation − Ne faire aucun réglage ni ajustement autres que ceux
décrits dans le présent manuel. Confi er toute réparation à un centre
de service Panasonic agréé.
3. Pièces de rechange − S’assurer que le technicien utilise des
pièces de rechange recommandées par le fabricant ou dont les
caractéristiques sont les mêmes. L’utilisation de pièces de rechange
non autorisées peut causer un incendie, des chocs électriques ou
d’autres dangers.
4. Vérifi cation de sécurité − Demander au technicien qui a réparé
l’appareil de soumettre ce dernier à des vérifi cations pour s’assurer
qu’il peut être utilisé en toute sécurité.
Pour toute réparation ou révision, apporter tous les éléments de la
chaîne.
Demande d’informations
Pour toutes réparations, renseignements ou conseils sur le
fonctionnement du produit:
Veuillez contacter le service à la clientèle de Panasonic Canada
Inc. au 1-800-561-5505, son site Web (www.panasonic.ca) ou le
centre de service agréé le plus proche.
FRANÇAIS
RQTX1012
11
Page 23

Guide de dépannage
Spécifi cations
Avant d’appeler un centre de service, faire les vérifi cations décrites
ci-dessous. En cas de doute sur certains des points de vérifi cation, ou
si les solutions proposées dans le tableau ne résolvent pas le problème
rencontré, se reporter à la section “Demande d’informations” à la page 11.
L’appareil est
hors marche
Aucun son
La télécommande
ne fonctionne pas
FRANÇAIS
Son distordu
L’iPod ou l’iPhone
ne se charge pas
Impossible
d’utiliser la
synchronisation
sur PC
• S’assurer que le cordon d’alimentation est
branché correctement.
• Ajuster le volume.
• Vérifi er si la fonction de mise en sourdine
est activée.
• Mettre à jour la version du micrologiciel de
l’iPod ou de l’iPhone.
• L’iPod ou l’iPhone n’est pas branché
correctement à la station d’accueil.
Mettre l’iPod ou l’iPhone hors marche et
le débrancher de station d’accueil. Le
rebrancher et le remettre en marche.
• Remplacer la pile.
• Vérifi er que l’iPod ou l’iPhone est bien en
place sur la station d’accueil.
• Abaisser le niveau du volume.
• Régler la fonction Égaliseur du iPod sur
Désactivé ou plat.
• Vérifi er les connexions. (\ page 7)
• Mettre l’appareil principal en marche.
• Vérifi er les connexions du PC et de l’iPod ou
l’iPhone. (\ page 7, 9)
Entretien
Pour nettoyer l’appareil, utiliser un chiffon doux et sec.
• Ne jamais utiliser d’alcool, de diluant pour peinture ni de benzène
pour nettoyer l’appareil.
RQTX1012
• Avant d’utiliser un chiffon traité chimiquement, lire attentivement les
10
directives sur l’emballage du chiffon.
SECTION AMPLIFICATEUR
Puissance de sortie effi cace mode stéréo
Canaux avant (deux canaux)
5 W par canal (6 Ω), 1 kHz, 10% DHT
Canal d’extrêmes-graves 10 W par canal (6 Ω), 100 Hz, 10% DHT
Puissance totale de sortie effi cace mode stéréo 20 W
SECTION DE PRISES
Port musical (arrière)
Sensibilité 350 mV, 13,2 kΩ
Borne Stéréo, 3,5 mm (
1
/8 po)
SECTION ENCEINTES
Enceintes avant
Haut-parleur(s) Impédance : 6 Ω
Recouvrement complet 4 cm (1
Puissance d’entrée (CEI) 5 W (max.)
Enceinte d’extrêmes-graves
Haut-parleur(s) Impédance: 6 Ω
Grave 6,5 cm (2
Radiateur passif (x2) 6,5 cm (2
Puissance d’entrée (CEI) 10 W (max.)
5
/8 po) type à cône
1
/2 po) type à cône
1
/2 po)
DONNÉES GÉNÉRALES
Alimentation DC 12 V (Borne DC IN)
Consommation 16 W (appareil seulement)
Adaptateur c.c. (alimentation à découpage) 100 à 240 V c.a, 50/60 Hz
Consommation de l’adaptateur secteur 36 W
Dimensions (L x H x P) 175 mm x 138,8 mm x 178,5 mm
(6
Poids 0,85 kg (1,87 lb)
Température de fonctionnement 0 °C à +40 °C (+32 °F à +104 °F)
Hygrométrie Humidité relative de 20% à 80% (sans condensation)
Consommation en mode attente : 0,7 W (environ)
Nota :
1) Données sous réserve de modifi cations.
Le poids et les dimensions sont approximatifs.
2) Distorsion harmonique totale mesurée avec spectroscope
numérique.
7
/8 po x 5 15/32 po x 7 1/6 po)
Page 24

Connexion à un PC
Utilisation d’appareils auxiliaires
Lorsque l’iPod ou l’iPhone est branché à l’appareil principal, il est
possible de transférer des données à l’aide d’une connexion USB.
Vue arrière
Câble USB (vendu séparément)
1 Brancher le câble USB aux prises USB de l’appareil
principal et du PC.
Consulter le manuel d’utilisation de l’iPod et de l’iPhone pour la
synchronisation sur PC.
2 Avant de débrancher le câble USB, s’assurer de suivre
la procédure de désinstallation de périphériques en
utilisant la fonction “Safely Remove Hardware”.
Des problèmes d’enregistrement et d’opération peuvent survenir
avec certains ordinateurs.
Il est à noter que Panasonic ou les détaillants Panasonic agréés
ne sauront être tenus responsables pour les pertes de données ou
tout autre dommage direct ou indirect sauf en cas de négligence
fl agrante ou intentionnelle.
Préparatifs
• S’assurer que l’iPod ou l’iPhone n’est pas branché à l’appareil
principal.
• S’assurer que les réglages sont effectués sur l’appareil auxiliaire et
que son niveau de volume est bas avant de le brancher à l’appareil
principal.
Appareil audio portatif
(vendu séparément)
Câble audio (fourni)
Brancher l’appareil auxiliaire, comme un appareil audio portable, etc. à
la prise d’entrée MUSIC PORT à l’aide du câble audio fourni.
Vue arrière
Éviter l’interférence avec d’autres appareils Panasonic
Il n’est pas possible de piloter cet appareil à partir d’un autre mode.
L’appareil principal et la télécommande doivent être réglés au
même mode.
1 Appuyer et maintenir enfoncées les touches
[SURROUND] sur l’appareil principal et [BASS] sur la
télécommande pendant au moins 3 secondes.
L’indicateur de mise en marche/hors marche clignote 3 fois pour
confi rmer le changement.
2 Appuyer et maintenir enfoncées les touches [OK]
et [BASS] sur la télécommande pendant au moins 2
secondes.
Pour revenir au mode par défaut, répéter les étapes ci-haut. Pour
l’étape 2, remplacer [BASS] avec [MUTE].
FRANÇAIS
RQTX1012
9
Page 25

Lecture de l’iPod ou de l’iPhone
Appareil principal
Capteur de
signal de la
télécommande
Indicateur
SURROUND
(son
ambiophonique)
Indicateur
BASS
FRANÇAIS
(graves)
Télécommande
RQTX1012
8
Il est possible de piloter l’iPod ou l’iPhone à l’aide des touches qui sont décrites.
L’indicateur de mise en marche/hors marche clignote chaque fois qu’une touche est appuyée sur la
Indicateur
de mise
en
marche/
hors
marche
Télécommande Fonction
télécommande.
Accès aux écrans de menus.
Lecture ou pause de contenu musical
sur l’iPod ou l’iPhone.
Sélection de lecture en reprise sur
l’iPod ou l’iPhone.
Sélection de lecture aléatoire sur
l’iPod ou l’iPhone.
Mise en sourdine des enceintes.
Pour annuler : Appuyer à nouveau sur
la touche ou régler le volume.
Appareil
principal
Télécommande Fonction
Mettre l’appareil principal en marche/hors marche.
• L’indicateur de mise en marche/hors marche s’illumine
lorsque l’appareil principal est mis en marche.
Réglage du niveau de sortie des enceintes.
Mise en marche/hors marche de l’effet sonore ambiophonique.
• L’indicateur SURROUND (son ambiophonique) sur
l’appareil principal s’illumine lorsque la fonction d’effet
sonore ambiophonique est activée.
Mise en marche/hors marche de l’effet des graves.
• L’indicateur BASS (graves) sur l’appareil principal s’illumine
lorsque la fonction d’effet sonore des graves est activée.
Télécommande Fonction
Appuyer pour revenir à la plage
précédente ou passer à la plage suivante.
Maintenir enfoncée pour effectuer une
recherche avant ou arrière d’une plage
désirée.
Sélectionner une rubrique sur l’écran de
menu.
Maintenir enfoncée : Défi le à travers la
liste.
Confi rmer le menu sélectionné ou la
lecture.
Nota :
Pour les détails sur l’opération de l’iPod ou de l’iPhone, se
reporter à leur manuel d’utilisation.
Page 26

Raccordement de l’iPod ou de l’iPhone
Brancher le cordon d’alimentation.
1
Vue arrière
Adaptateur c.c.
(alimentation à
découpage) (fourni)
Adaptateur c.c. (alimentation à découpage)
Cet adaptateur secteur fonctionne sur une alimentation entre 100 V et
240 V.
Mais
• Aux États-Unis et au Canada, l’adaptateur secteur (alimentation à
découpage) doit être branché sur une source prise secteur de 120 V
seulement.
• Lors de la connexion à une prise secteur hors du Canada ou des
États-Unis, utiliser un adaptateur de prise secteur conforme à la
confi guration de la prise secteur.
• Lors de la connexion à une source d’alimentation de plus de 125 V,
s’assurer que le cordon utilisé est conforme à la tension de la
source et au courant assigné de l’adaptateur secteur (alimentation à
découpage).
• Contacter un fournisseur pièces électriques pour de l’aide quant au
choix d’un adaptateur de prise secteur ou d’un cordon d’alimentation.
Nota :
• Le cordon d’alimentation fourni ne doit être utilisé qu’avec cet
appareil. Ne pas l’utiliser avec un autre appareil.
• Ne pas utiliser un cordon d’alimentation provenant d’un autre
appareil.
• N’utiliser aucun autre adaptateur secteur (alimentation à découpage)
que celui fourni.
Cordon d’alimentation
(fourni)
2 Insérer l’adaptateur de station d’accueil.
iPod
Utiliser l’adaptateur fourni avec l’iPod ou consulter Apple Inc. pour
un adaptateur compatible (pour plus d’informations, consulter les
instructions d’opération fournies avec les adaptateurs de station
d’accueil), qui pourrait devoir être acheté séparément.
iPhone
Utiliser un adaptateur approprié pour l’iPhone lors de la lecture d’un
iPhone.
3 Brancher l’iPod ou l’iPhone à l’appareil principal.
Tenir l’appareil principal lors du branchement ou débranchement de
l’iPod ou de l’iPhone.
iPod
(vendu séparément)
Adaptateur de station
d’accueil pour iPod
(vendue séparément)
Lors du retrait, insérer un
ongle ou un objet plat et
soulever.
Économie d’énergie
Cet appareil consomme une petite quantité de courant, même lorsqu’il
est mis hors marche (environ 0,7 W). Pour économiser l’énergie
lorsque l’appareil n’est pas utilisé pour une période prolongée,
débrancher le cordon d’alimentation de la prise secteur.
FRANÇAIS
RQTX1012
7
Page 27

Préparatifs pour la télécommande
CR2025
Avant d’utiliser la télécommande pour la première fois, retirer sa
couverture protectrice.
Remplacer la pile de la télécommande lorsque celle-ci cesse de
fonctionner ou lorsque sa portée utile diminue.
Vue arrière
Pile au
lithium de
type bouton
(CR2025)
1 Insérer un objet et baisser pour
déverrouiller le support de la pile.
Orienter la télécommande directement vers le capteur de signal
(\ page 8), en prenant soin d’éviter les obstacles, à une distance
maximum de 7 m (23 pi).
FRANÇAIS
• Insérer la pile en respectant la polarité.
• Ne pas permettre aux terminaux (+ et –) d’entrer en contact avec des
objets de métal.
• Ne pas recharger, démonter, remonter, chauffer ou jeter au feu.
• Garder hors de la portée des enfants.
• Ne pas chauffer ou exposer au feu.
• Ne pas laisser les piles dans une automobile exposée à la lumière
directe du soleil pendant une longue période, portières et vitres
fermées.
• Retirer la pile si la télécommande n’est pas utilisée pendant une
période prolongée. Ranger dans un endroit frais et sombre.
Si de l’électrolyte entre en contact avec la peau ou les vêtements, laver
méticuleusement à l’eau.
Si de l’électrolyte entre en contact avec les yeux, ne pas frotter les
yeux.
Rincer les yeux méticuleusement à l’eau, puis consulter un médecin.
RQTX1012
6
Tirer
Attention
Garder la pile de type bouton hors de la portée des enfants pour
éviter qu’ils ne l’avalent.
Attention
Risque d’incendie, d’explosion et brûlures. Ne pas démonter,
chauffer à plus de 60 °C (140 °F) ou mettre au feu.
ATTENTION
Danger d’explosion si les piles ne sont pas remplacées
correctement. Les remplacer uniquement par des piles identiques
ou équivalentes au type recommandé par le fabricant. Respecter
les instructions du fabricant pour l’élimination des piles usagées.
Page 28

Accessoires fournis
iPod et iPhone compatibles
Vérifi er les accessoires en les cochant.
Utiliser les numéros indiqués entre parenthèses lors
de la commande de pièces de rechange. (Les numéros
de modèle des produits sont à jour en date de octobre
2009. Ces numéros peuvent être modifi és sans préavis.)
Pour la commande d’accessoires, contacter le détaillant où
l’appareil a été acheté.
1 Cordon d’alimentation
(K2CB2CB00021)
1 Télécommande
(RAKX1002)
2 Adaptateur pour
1 Adaptateur c.c.
station d’accueil
(alimentation à
découpage)
M12
(pour iPhone)
(RFEX1001)
(RFEAX1004)
M15
(pour iPhone 3G et iPhone 3GS)
(RFEX1002)
1 Câble audio
1 Pile au lithium de type
bouton
(La pile est déjà installée dans la
lécommande.)
(130-318030003)
té
• iPhone 3GS (16 Go, 32 Go)
• iPhone 3G (8 Go, 16 Go)
• iPhone (4 Go, 8 Go, 16 Go)
• iPod n ano de 5
• iPod touch de 2
• iPod classic [120 Go, 160 Go (2009)]
• iPod n ano de 4
• iPod classic (160 Go) (2007)
• iPod touch de 1
• iPod n ano de 3
• iPod classic (80 Go)
• iPod n ano de 2
• iPod de 5
• iPod de 5
• iPod n ano de 1
• iPod de 4
• iPod de 4
• iPod de 4
• iPod de 4
e
génération (caméra vidéo) (8 Go, 16 Go)
e
génération (8 Go, 16 Go, 32 Go, 64 Go)
e
génération (vidéo) (8 Go, 16 Go)
re
génération (8 Go, 16 Go, 32 Go)
e
génération (vidéo) (4 Go, 8 Go)
e
génération (aluminum) (2 Go, 4 Go, 8 Go)
e
génération (vidéo) (60 Go, 80 Go)
e
génération (vidéo) (30 Go)
re
génération (1 Go, 2 Go, 4 Go)
e
génération (affi chage couleur) (40 Go, 60 Go)
e
génération (affi chage couleur) (20 Go, 30 Go)
e
génération (40 Go)
e
génération (20 Go)
• iPod mini (4 Go, 6 Go)
La compatibilité dépend de la version du micrologiciel de votre iPod ou
iPhone.
Chargement de l’iPod ou de l’iPhone
• L’iPod ou l’iPhone se charge automatiquement lorsque du courant est
acheminé à l’appareil principal.
• Vérifi er l’iPod ou l’iPhone pour confi rmer si la batterie est
complètement rechargée.
• S’il est prévu que l’iPod ou l’iPhone ne sera pas utilisé pendant un
certain temps après avoir été rechargé, le déconnecter de l’appareil
principal puisque la batterie commencera à se décharger. (Une fois
la batterie complètement chargée, la charge ne peut se poursuivre.)
FRANÇAIS
RQTX1012
5
Page 29

Table des matières
– Si ce symbole apparaît –
Information sur la mise au rebut dans les pays n’appartenant
pas à l’Union européenne
Ce symbole est uniquement valide dans l’Union
européenne.
Si vous désirez mettre ce produit au rebut,
contactez l’administration locale ou le revendeur et
informez-vous de la bonne façon de procéder.
FRANÇAIS
La mention “Conçu pour iPod” signifi e qu’un accessoire électronique
a été spécialement conçu pour être connecté à un iPod et a été
certifi é par son développeur comme conforme aux critères de
performance Apple.
La mention “Fonctionne avec iPhone” signifi e qu’un accessoire
électronique a été spécialement conçu pour être connecté à un
iPhone et a été certifi é par son développeur comme conforme aux
critères de performance Apple.
Apple ne saura être tenue responsable du fonctionnement de
cet appareil ni de sa conformité aux normes sécuritaires et
réglementaires.
iPod est une marque déposée de Apple Inc. enregistrée aux États-
RQTX1012
Unis et dans d’autres pays.
4
iPhone est une marque déposée de Apple Inc.
IMPORTANTES MISES EN GARDE .....................3
Accessoires fournis ............................................ 5
iPod et iPhone compatibles ................................5
Chargement de l’iPod ou de l’iPhone ................5
Préparatifs pour la télécommande .....................6
Raccordement de l’iPod ou de l’iPhone ............7
Lecture de l’iPod ou de l’iPhone ........................8
Connexion à un PC ..............................................9
Utilisation d’appareils auxiliaires .......................9
Éviter l’interférence avec d’autres appareils
Panasonic .........................................................9
Guide de dépannage ......................................... 10
Entretien .............................................................10
Spécifi cations ....................................................10
Protection de l’ouïe ........................................... 11
Service après-vente...........................................11
Certifi cat de garantie limitée ...........................12
Page 30

IMPORTANTES MISES EN GARDE
Avant d’utiliser l’appareil, lire attentivement les instructions qui suivent. Se conformer tout particulièrement aux avertissements inscrits sur
l’appareil et aux consignes de sécurité indiquées ci-dessous. Conserver le présent manuel pour consultation ultérieure.
1) Lire attentivement ces instructions.
2) Conserver ces instructions.
3) Lire toutes les mises en garde.
4) Suivre toutes les instructions.
5) Ne pas utiliser cet appareil près d’une source d’eau.
6) Ne nettoyer qu’avec un chiffon sec.
7) Ne pas bloquer les évents d’aération. Installer l’appareil selon les
instructions du fabricant.
8) Ne pas installer l’appareil près d’un appareil de chauffage tel qu’un
radiateur, une cuisinière, un registre de chaleur ou tout dispositif
émettant de la chaleur (y compris un amplifi cateur).
9) Pour des raisons de sécurité, ne pas modifi er la fi che polarisée
ou celle de mise à la terre. Une fi che polarisée est une fi che à
deux lames, dont une plus large. Une fi che de mise à la terre est
une fi che à deux lames avec une broche de masse. La lame plus
large ou la broche de masse procure une protection accrue. Si
ce genre de fi che ne peut être inséré dans une prise de courant,
communiquer avec un électricien pour remplacer la prise.
10) S’assurer que le cordon est placé dans un endroit où il ne risque
pas d’être écrasé, piétiné ou coincé. Faire particulièrement
attention à ses extrémités de branchement, y compris sa fi che.
11) N’utiliser que les accessoires ou périphériques recommandés par
le fabricant.
12) N’utiliser l’appareil qu’avec une baie, support,
trépied, gabarit d’installation, etc. recommandé par
le fabricant ou vendu avec l’appareil. Si une baie
ou un support est utilisée et que l’appareil doit être
déplacé, faire attention à ne pas les renverser.
13) Débrancher cet appareil lors d’un orage ou en cas de nonutilisation prolongée.
14) Confi er l’appareil à un technicien qualifi é pour toute réparation:
cordon d’alimentation ou fi che endommagé, liquide renversé ou
objet tombé dans l’appareil, exposition à la pluie ou à une humidité
excessive, mauvais fonctionnement ou échappement de l’appareil.
FRANÇAIS
RQTX1012
3
Page 31

Cher client
Nous vous remercions d’avoir arrêté votre choix sur cet appareil. Pour en tirer un rendement optimal, lire attentivement le présent manuel.
Avant de raccorder, régler ou utiliser l’appareil, il est recommandé de lire attentivement le manuel d’utilisation. Conserver ce manuel.
Homologation:
DATE D’ACHAT
DÉTAILLANT
ADRESSE DU DÉTAILLANT
N° DE TÉL É P HONE
Il est recommandé de noter, dans l’espace prévu ci-dessous, le
numéro de modèle et le numéro de série inscrits à l’arrière, ou sous
le fond de l’appareil, et de conserver ce manuel pour référence
ultérieure.
NUMÉRO DE MODÈLE
FRANÇAIS
NUMÉRO DE SÉRIE
CE QUI SUIT NE S’APPLIQUE QU’AU CANADA.
Cet appareil numérique de la classe B est conforme à la norme
NMB-003 du Canada.
RQTX1012
SC-SP100
2
AVERTISSEMENT:
POUR RÉDUIRE LES RISQUES D’INCENDIE, DE CHOC
ÉLECTRIQUE OU DE DOMMAGE À L’APPAREIL,
• NE PAS EXPOSER CET APPAREIL À LA PLUIE, À L’HUMIDITÉ,
À L’ÉGOUTTEMENT OU AUX ÉCLABOUSSEMENTS ET
NE PLACER SUR L’APPAREIL AUCUN OBJET REMPLI DE
LIQUIDE, COMME PAR EXEMPLE DES VASES.
• UTILISER EXCLUSIVEMENT LES ACCESSOIRES
RECOMMANDÉS.
• NE PAS RETIRER LE COUVERCLE (OU LE PANNEAU
ARRIÈRE) ; IL N’Y A AUCUNE PIÈCE RÉPARABLE PAR
L’UTILISATEUR À L’INTÉRIEUR. CONFIER TOUTE RÉPARATION
À UN TECHNICIEN QUALIFIÉ.
ATTENTION!
NE PAS INSTALLER CET APPAREIL DANS UNE BIBLIOTHÈQUE,
UNE ARMOIRE OU TOUT AUTRE ESPACE CONFINÉ.
S’ASSURER QUE LA VENTILATION DE L’APPAREIL EST
ADÉQUATE. AFIN D’ÉVITER TOUT RISQUE DE CHOC
ÉLECTRIQUE OU D’INCENDIE DÛ À UN SURCHAUFFEMENT,
S’ASSURER QUE RIDEAUX OU TOUT OBJET QUELCONQUE NE
BOUCHENT LES ÉVENTS D’AÉRATION DE L’APPAREIL.
S’assurer que la prise secteur est située près de l’appareil dans un
endroit facile d’accès.
La fi che du cordon d’alimentation doit également être facile d’accès.
Pour déconnecter complètement l’appareil de sa source
d’alimentation, débrancher la fi che du cordon d’alimentation de la
prise secteur.
La plaque signalétique se trouve sur le dessous de l’appareil.
Page 32

Manuel d’utilisation
Chaîne stéréo compacte
Modèle SC-SP100
Pour toute demande de renseignements, appeler au
1-800-561-5505
Panasonic Canada Inc.
5770 Ambler Drive
Mississauga, Ontario
L4W 2T3
www.panasonic.ca
© Panasonic Corporation 2009
Imprimé en Chine
Cf
PP
RQTX1012-3Y
L1009CH3129
 Loading...