

Page 1
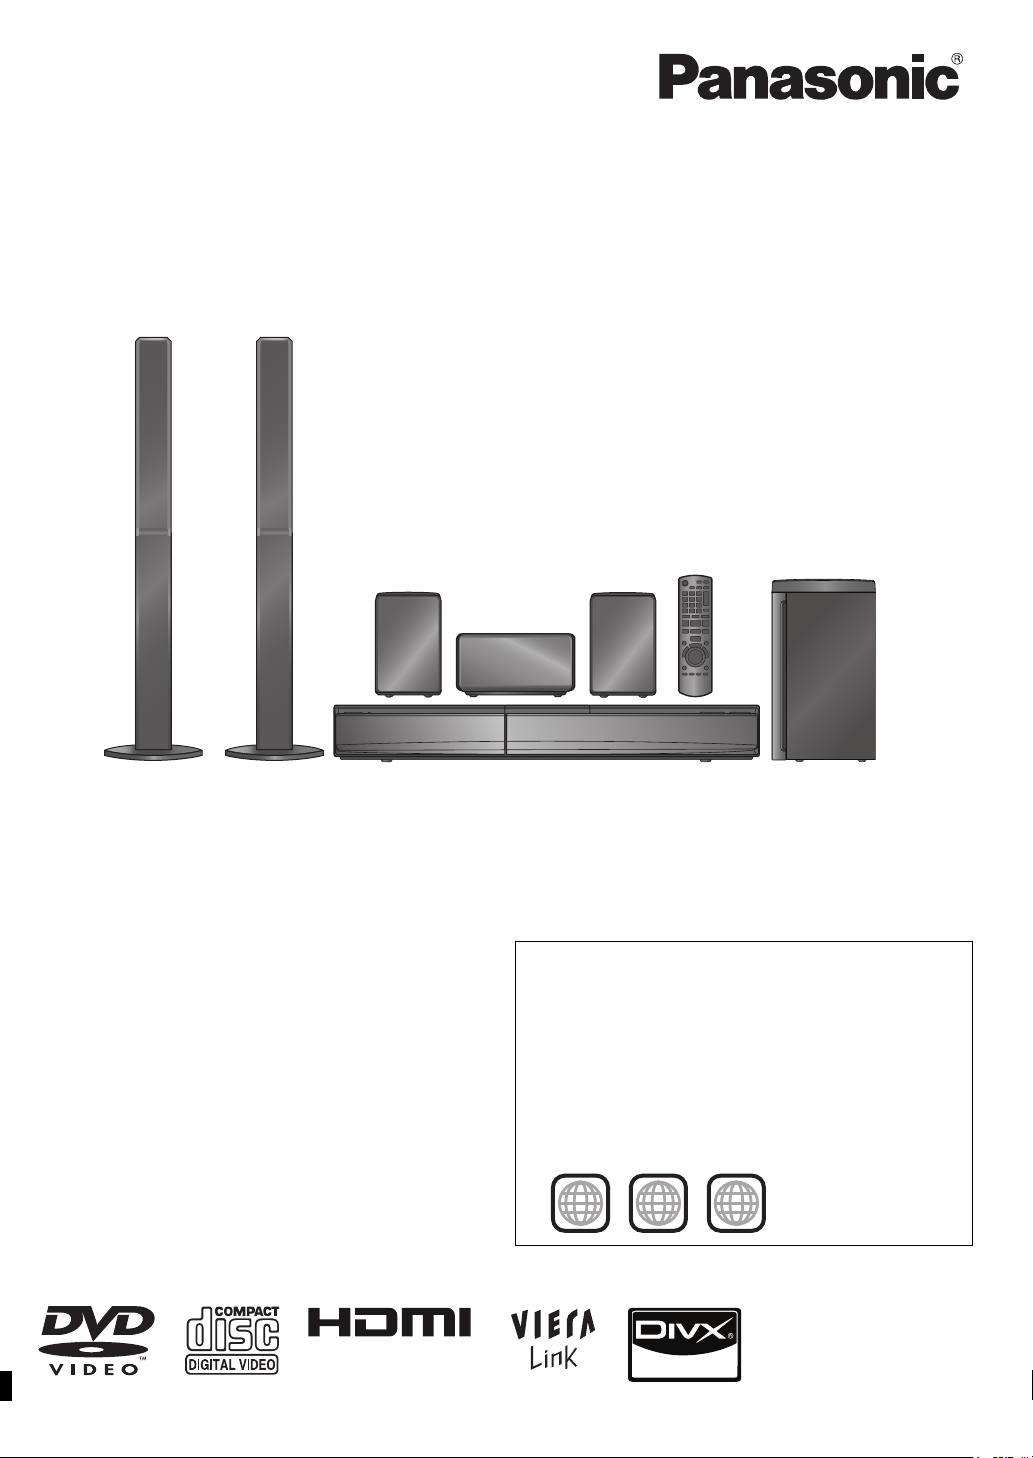
This illustration shows SC-PT580.
Obrázek představuje model SC-PT580.
Na rysunku przedstawiono model SC-PT580.
A képen az SC-PT580 típusú készülék látható.
Operating Instructions
Návod k obsluze
Instrukcja obsługi
Használati útmutató
DVD Home Theater Sound System
Systém zvuku domácího kina s DVD pâehrávaçem
Zestaw kina domowego z odtwarzaczem DVD
DVD házimozi hangrendszer
Model No. / Model č. / Nr Modelu / Típusszám SC-PT580
SC-PT880
Dear customer
Thank you for purchasing this product. For optimum performance and
safety, please read these instructions carefully.
Before connecting, operating or adjusting this product, please read
the instructions completely.
Please keep this manual for future reference.
The illustrations shown may differ from your unit.
Vážený zákazníku
Děkujeme za zakoupení tohoto výrobku. Pro dosažení optimálního
výkonu a z bezpečnostních důvodu si pečlivě přečtěte tyto pokyny.
Před zapojením, obsluhou nebo nastavením tohoto výrobku si
přečtěte celý tento návod.
Návod uschovejte k pozdějšímu použití.
Uvedené ilustrace se mohou od vašeho přístroje lišit.
Szanowny Nabywco
Dziękujemy za zakupienie tego produktu. Aby zapewnić optymalną pracę
urządzenia i jego bezpieczną obsługę, należy dokładnie przeczytać
niniejszą instrukcję.
Przed podłączeniem, użytkowaniem lub regulacją produktu należy
przeczytać całą instrukcję obsługi.
Należy zachować tę instrukcję obsługi na przyszłość.
Urzdązenie pokazane na ilustracjach może się różnić od
zakupionego urządzenia.
Tisztelt Vásárló!
Köszönjük, hogy termékünket választotta. A biztonság és a készülék
optimális teljesítménye érdekében kérjük, hogy figyelmesen olvassa el a
használati útmutatót!
A készülék csatlakoztatása, üzembe helyezése és beállítása előtt
kérjük, figyelmesen olvassa végig a használati útmutatót.
Kérjük, őrizze meg ezt az útmutatót.
Az útmutatóban látható ábrák eltérhetnek az Ön készülékétől.
Region number/Číslo regionu/Numer regionu/Régiókód
The player plays DVD-Video marked with labels containing the
region number “2” or “ALL”.
Přehrávač přehrává disky DVD-Video označené štítky s číslem
regionu “2” nebo “ALL”.
Odtwarzacz obsługuje płyty DVD-Video z numerami regionów “2” lub
“ALL”.
A DVD lejátszó a megfelelő régiókóddal “2” vagy “ALL” jelzéssel
jelölt DVD-Video lemezeket játssza le.
Example/Příklad/Przykład/Például:
2
2 ALL
3
5
[EP]
RQTX1111-1R
Page 2
Indicates features applicable to/Označuje funkce, které platí pro/Podane cechy stosują się/Az alábbi jelzések az adott készülékkel használható
funkciókat jelölik:
[PT580] : SC-PT580 only/pouze model SC-PT580/
wyłącznie do modelu SC-PT580/SC-PT580
System/Systém/Zestaw/Rendszer SC-PT580 SC-PT880
Main unit/Hlavní jednotka/Główne urządzenie/Készülék SA-PT580 SA-PT880
Speaker system/Reproduktorový
systém/System głośników/
Hangszóró rendszer
Subwoofer/Subwoofer/Głośnik niskotonowy/Extra mélysugárzó SB-HW330 SB-HW330
≥ These operating instructions are applicable to models SC-PT580 and SC-PT880. Unless otherwise indicated, illustrations in these
operating instructions are of SC-PT580.
≥ Please note that the actual controls and components, menu items, etc. of your DVD Home Theater Sound System may look
somewhat different from those shown in the illustrations in these Operating Instructions.
≥ Operations in these instructions are described mainly with the remote control, but you can perform the operations on the main unit
if the controls are the same.
≥ Tyto pokyny k obsluze platí pro modely SC-PT580 a SC-PT880. Není-li uvedeno jinak, ilustrace v tomto návodu zobrazují model
SC-PT580.
≥ Mějte prosím na paměti, že vlastní ovládací prvky a komponenty, položky menu apod. Vašeho systému ozvučení domácího kina
“Systém zvuku domácího kina s DVD pâehrávaçem” se mohou mírně lišit od prvků znázorněných na nákresech tohoto Návodu k
obsluze.
≥ Popis obsluhy v tomto návodu se týká především dálkového ovladače, avšak obsluhu lze provádět také pomocí ovládacích prvků
hlavní jednotky – jestliže jsou stejné jako na ovladači.
≥ Niniejsza instrukcja obsługi odnosi się do modeli SC-PT580 i SC-PT880. Jeżeli nie podano inaczej, ilustracje w niniejszej instrukcji
obsługi odnoszą się do SC-PT580.
≥ W rzeczywistości przyciski i elementy, funkcje menu, etc., Zestaw kina domowego z odtwarzaczem DVD mogą różnić się nieco od
tych, przedstawionych na ilustracjach niniejszej instrukcji obsługi.
≥ W instrukcji obsługi opisano głównie czynności wykonywane z poziomu pilota, można je jednak wykonać z poziomu urządzenia
głównego, jeżeli znajdujące się tam przyciski są
≥ Ez a használati útmutató az SC-PT580 és SC-PT880 típusokra vonatkozik. Ha az utasításban másként nem szerepel, a jelen
útmutató illusztrációi az SC-PT580 típusra vonatkoznak.
≥ Felhívjuk figyelmét, hogy DVD házimozi hangrendszer tényleges vezérlői és alkotórészei, menüpontjai, stb. valamelyest
eltérhetnek a jelen Használati Útmutatóban feltüntetett ábrákon láthatóktól.
≥ A használati útmutatóban ismertetett műveletek főleg a távvezérlő használatára vonatkoznak, de ezeket a műveleteket a készülék
kezelőszerveivel ugyanúgy elvégezheti.
Front speakers/Čelní reproduktory/Głośniki przednie/
Első hangsugárzók
Center speaker/Centrální reproduktor/Głośnik centralny/
Középcsatorna hangsugárzó
Surround speakers/Prostorové reproduktory/Głośniki
dźwięku przestrzennego/Háttér hangsugárzók
takie same.
[PT880] : SC-PT880 only/pouze model SC-PT880/
wyłącznie do modelu SC-PT880/SC-PT880
SB-HF330 SB-HF330
SB-HC230 SB-HC230
SB-HS230 SB-HS880
Accessories/Příslušenství/Akcesoria/Tartozékok
Please check and identify the supplied accessories.
Zkontrolujte a odlište dodané příslušenství.
Sprawdź załączone akcesoria.
Kérjük, ellenőrizze és azonosítsa a mellékelt tartozékokat.
∏ 1 Remote control/Dálkový ovladač/Pilot/Távvezérlő
(N2QAYB000515)
∏ 2 Remote control batteries/Baterie dálkového ovladače/Baterie pilota/Elem a távvezérlőhöz
∏ 1 FM indoor antenna/Pokojová anténa FM/Wewnętrzna antena FM/URH szobaantenna
∏ 1 AC mains lead/Sít’ový kabel/Przewód zasilania/Hálózati csatlakozókábel
∏ 1 Sheet of speaker cable stickers/Arch nálepek na kabely reproduktorů/Arkusze nalepek na kable głośnikowe/
Csomag címke a hangsugárzó kábelekhez
∏ [PT580]
3 Speaker cables/Kabely reproduktorů/Kabel głośnikowe/rövid kábel (középcsatorna hangsugárzóhoz)
[PT880]
1 Speaker cable/Kabel reproduktoru/Kabel głośnika/hangszórókábel
∏ [PT580]
2 Speaker stands (with cable)/Stojany reproduktorů (s kabelem)/Stojaki głośników (z kablem)/Háttér hangsugárzótartó
(kábelekkel)
[PT880]
4 Speaker stands (with cable)/Stojany reproduktorů (s kabelem)/Stojaki głośników (z kablem)/Háttér hangsugárzótartó
(kábelekkel)
∏ [PT580]
2 Bases/Základny/Podstawy/Tartótalp
[PT880]
4 Bases/Základny/Podstawy/Tartótalp
∏ [PT580]
8 Screws/šroubů/Wkrętów/Csavar
[PT880]
16 Screws/šroubů/Wkrętów/Csavar
RQ TX111 1
2
2
Page 3
RETURN
VOL
STOP
1 2 3
4 5 6
7 809
SLEEP
VOL
TV
AV
SEARCH
SKIP
SLOW
SKIP
PLAY
PAUSE
SEARCH
OK
DVD
iPod
EXT-IN
RADIO
MUTE
F
U
N
C
T
I
O
N
S
S
T
A
R
T
T
O
P
M
E
N
U
1010
EXIT
D
I
R
E
C
T
N
A
V
I
G
A
T
O
R
–REPEAT
PLAY MODE
–CH SELECT
SOUND SURROUND W.SRD FL DISPLAY
CANCEL
PLAY
LIST
MENU
A
A Pull open / Otevřete /
[Note] / [Poznamka] / [Uwaga] / [Megjegyzés]
The circled numbers indicated in the operating instructions (e.g. Press [Í]1.) correspond to the circled numbers in the above.
Zakroužkovaná čísla uvedená v návodu k obsluze (např. Stiskněte [Í]1.) odpovídají zakroužkovaným číslům viz výše.
Zakreślone cyfry zaznaczone w instrukcji obsługi (np. Wciśnij [Í]1.) odnoszą się do zakreślonych cyfr w tejże instrukcji.
RQ TX111 1
A használati utasításban feltüntetett bekarikázott számok (pl. Nyomja meg az [Í]1.gombot) a fenti bekarikázott számoknak felelnek meg.
Pociągnąć, aby otworzyć
/ Nyissa ki
iPod
OPEN/CLOSEVOLUME
SELECTOR
3
3
Page 4

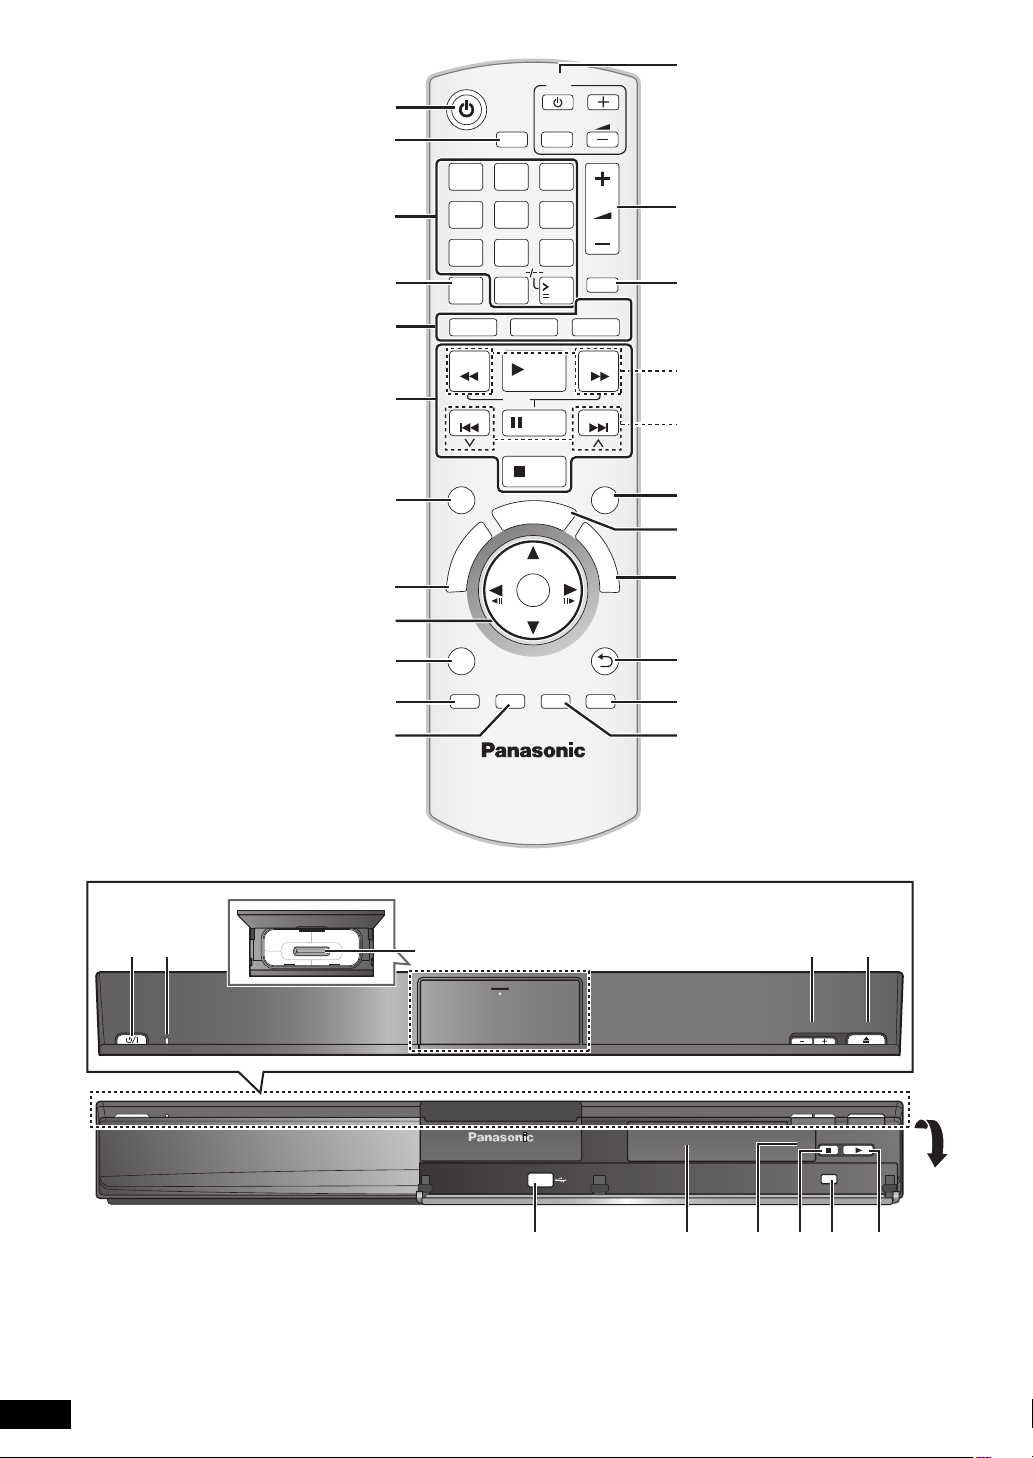
Control reference guide
Abkhazian: 6566
Afar: 6565
Afrikaans: 6570
Albanian: 8381
Amharic: 6577
Arabic: 6582
Armenian: 7289
Assamese: 6583
Aymara: 6589
Azerbaijani: 6590
Bashkir: 6665
Basque: 6985
Bengali, Bangla: 6678
Bhutani: 6890
Bihari: 6672
Breton: 6682
Bulgarian: 6671
Burmese: 7789
Byelorussian: 6669
Cambodian: 7577
Catalan: 6765
Chinese: 9072
Corsican: 6779
Croatian: 7282
Czech: 6783
Danish: 6865
Dutch: 7876
English: 6978
Esperanto: 6979
Estonian: 6984
Faroese: 7079
Fiji: 7074
Finnish: 7073
French: 7082
Frisian: 7089
Galician: 7176
Georgian: 7565
German: 6869
Greek: 6976
Greenlandic: 7576
Guarani: 7178
Gujarati: 7185
Hausa: 7265
Hebrew: 7387
Hindi: 7273
Hungarian: 7285
Icelandic: 7383
Indonesian: 7378
Interlingua: 7365
Irish: 7165
Italian: 7384
Japanese: 7465
Javanese: 7487
Kannada: 7578
Kashmiri: 7583
Kazakh: 7575
Kirghiz: 7589
Korean: 7579
Kurdish: 7585
Laotian: 7679
Latin: 7665
Latvian, Lettish: 7686
Lingala: 7678
Lithuanian: 7684
Macedonian: 7775
Malagasy: 7771
Malay: 7783
Malayalam: 7776
Maltese: 7784
Maori: 7773
Marathi: 7782
Moldavian: 7779
Mongolian: 7778
Nauru: 7865
Nepali: 7869
Norwegian: 7879
Oriya: 7982
Pashto, Pushto: 8083
Persian: 7065
Polish: 8076
Portuguese: 808 4
Punjabi: 8065
Quechua: 8185
Rhaeto-Romance:
8277
Romanian: 8279
Russian: 8285
Samoan: 8377
Sanskrit: 8365
Scots Gaelic: 7168
Serbian: 8382
Serbo-Croatian: 8372
Shona: 8378
Sindhi: 8368
Singhalese: 8373
Slovak: 8375
Slovenian: 8376
Somali: 8379
Spanish: 6983
Sundanese: 8385
Swahili: 8387
Swedish: 8386
Tagalog: 8476
Tajik: 8471
Ta mi l : 8 4 65
Ta ta r : 8 4 84
Te lu g u: 8 46 9
Thai: 8472
Tibetan: 6679
Tigrinya: 8473
Tonga: 8479
Tu rk i sh : 8 48 2
Tu rk m en : 84 75
Twi: 8487
Ukrainian: 8575
Urdu: 8582
Uzbek: 8590
Vietnamese: 8673
Volapük: 8679
Welsh: 6789
Wolof: 8779
Xhosa: 8872
Yiddish: 7473
Yoruba: 8979
Zulu: 9085
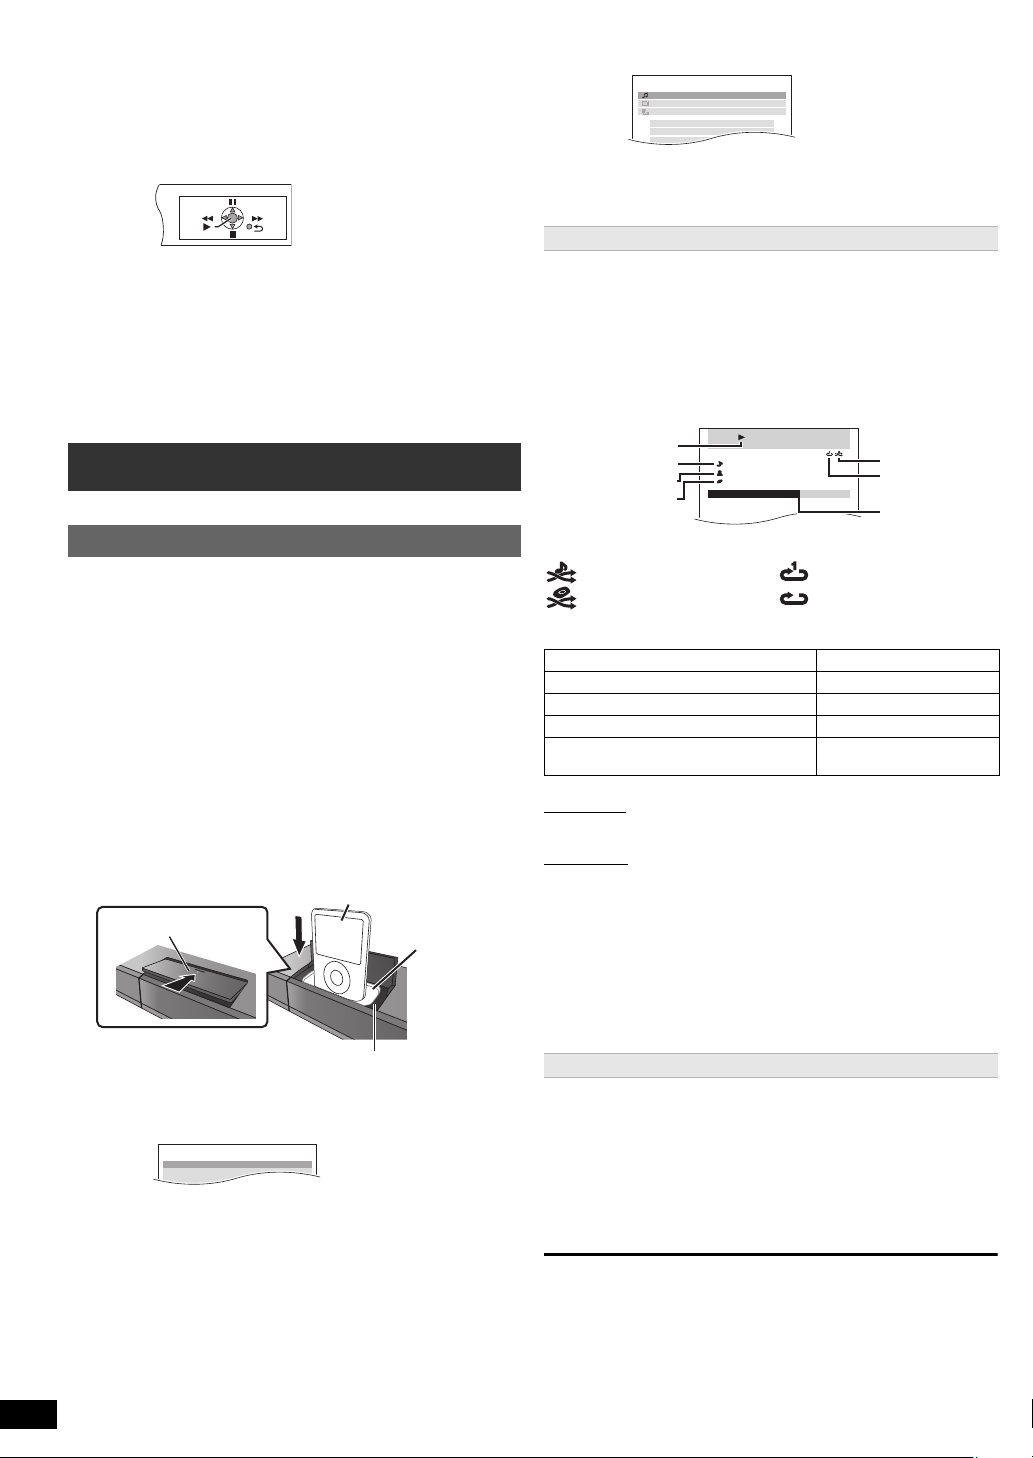
Remote control
Getting StartedPlaying DiscsOther OperationsReference
1 Turn the main unit on/off (B 9)
2 Set the Sleep timer
Press [SLEEP].
SLEEP 30 # SLEEP 60 # SLEEP 90 # SLEEP120
^-------------------------- OFF (Cancel) (--------------------------}
≥ To confirm the remaining time, press the button again.
3 Select channels and title numbers etc. / Enter numbers (B 9, 12)
4 Cancel (B 12)
5 Source select
[DVD]: Select disc as the source (B 12)
[iPod]: Select iPod/iPhone as the source (B 16)
[RADIO, EXT-IN]: Select the FM tuner or the external audio source.
6 Basic operations for play (B 12)
7 Show a disc menu or play list (B 12, 13)
8 Show a disc top menu or program list (B 12, 13)
9 Select or confirm menu items / Frame-by-frame (B 12)
: Select the play mode / Set the repeat mode (B 12)
; Select sound mode / Select speaker channel (B 11 )
< Select surround sound effects (B 11 )
= TV operations
Aim the remote control at the Panasonic TV and press the button.
[Í]: Turn the TV on/off
[AV]: Change the TV’s video input mode
[r, VOL, s]: Adjust the TV volume
This may not work properly with some models.
> Adjust the volume of the main unit
? Mute the sound
≥ “MUTE” flashes on the main unit’s display while the function is on.
≥ To cancel, press the button again or adjust the volume.
≥ Muting is cancelled when you switch the unit to standby.
@ Select radio stations manually (B 9)
A Select preset radio stations (B 9)
B Exit the display
C Show START menu (B 10)
(B 9, 10)
FM #AV #AUX #ARC #D-IN #USB
^-----------------------------------------------------------}
D Display RDS text data / Show on-screen menu (B 9, 13)
E Return to previous screen (B 12)
F Switch information on the main unit’s display (B 12)
G Turn Whisper-mode Surround on/off (B 11)
Avoiding interference with other Panasonic equipment
Other Panasonic audio/video equipment may start functioning when you
operate the unit using the supplied remote control.
You can operate this unit in another mode by setting the remote control
operating mode to “REMOTE 2”.
The main unit and remote control must be set to the same mode.
1 Press [RADIO, EXT-IN]5 to select “AUX”.
2 Press and hold [1]; on the main unit and [2] on the remote control
until the main unit’s display shows “REMOTE 2”.
3 Press and hold [OK]9 and [2] on the remote control for at least
2 seconds.
To change the mode back to “REMOTE 1”, repeat the steps above by
replacing [2] with [1].
Main unit
1 Standby/on switch (Í/I)
Press to switch the unit from on to standby mode or vice versa. In
standby mode, the unit is still consuming a small amount of power.
2 Power indicator
The indicator lights when this unit is turned on.
3 Connect iPod/iPhone (B 16)
4 Adjust the volume of the main unit
5 Open/Close the disc tray (B 12)
6 Connect USB device (B 17)
7 Display
“SRD” lights when sound is output to the surround speakers. (B 11 )
8 Remote control signal sensor
9 Stop playing
: Select the source
DVD/CD #USB #FM #AV #AUX #ARC #D-IN #IPOD
^-----------------------------------------------------------------------------------------------}
; Play disc
Language code list
RQ TX111 1
ENGLISH
4
4
Page 5
TABLE OF CONTENTS
Getting Started
Accessories . . . . . . . . . . . . . . . . . . . . . . . . . . . . . . . . . . . .2
Control reference guide. . . . . . . . . . . . . . . . . . . . . . . . . . .4
Quick Start Guide
step 1 Preparing the speakers . . . . . . . . . . . . . . . . . 6
step 2 Positioning . . . . . . . . . . . . . . . . . . . . . . . . . . . 7
step 3 Connections . . . . . . . . . . . . . . . . . . . . . . . . . . 7
Speaker connections. . . . . . . . . . . . . . . . . . . . . .7
Radio antenna connections. . . . . . . . . . . . . . . . .7
Audio and video connections . . . . . . . . . . . . . . .8
step 4 AC mains lead connection. . . . . . . . . . . . . . . 8
step 5 Preparing the remote control . . . . . . . . . . . . 8
step 6 EASY SETUP . . . . . . . . . . . . . . . . . . . . . . . . . . 9
Listening to the radio. . . . . . . . . . . . . . . . . . . . . . . . . . . . .9
Presetting stations automatically . . . . . . . . . . . . . . . . . . . . .9
Listening/confirming the preset channels . . . . . . . . . . . . . . . 9
Manual tuning . . . . . . . . . . . . . . . . . . . . . . . . . . . . . . . . . . . . 9
RDS broadcasting. . . . . . . . . . . . . . . . . . . . . . . . . . . . . . . . . 9
Using the START menu . . . . . . . . . . . . . . . . . . . . . . . . . .10
Selecting the source by the remote control . . . . . . . . . . . . 10
Listening to the TV or other device’s audio from this
unit’s speakers . . . . . . . . . . . . . . . . . . . . . . . . . . . . . . .10
Enjoying sound effects from all speakers
Enjoying surround sound effects. . . . . . . . . . . . . . . .11
Selecting sound mode. . . . . . . . . . . . . . . . . . . . . . . . . 11
Whisper-mode Surround . . . . . . . . . . . . . . . . . . . . . . .11
Adjusting the speaker output level manually . . . . . .11
Adjusting the speaker level during playback . . . . . .11
Playing Discs
Basic play. . . . . . . . . . . . . . . . . . . . . . . . . . . . . . . . . . . . . 12
Other modes of play . . . . . . . . . . . . . . . . . . . . . . . . . . . . 12
Repeat play . . . . . . . . . . . . . . . . . . . . . . . . . . . . . . . . . . . . 12
Program and Random play . . . . . . . . . . . . . . . . . . . . . . . . 12
Using navigation menus . . . . . . . . . . . . . . . . . . . . . . . . . 13
Playing data discs . . . . . . . . . . . . . . . . . . . . . . . . . . . . . . . 13
Playing DVD-R/ -RW (DVD-VR) discs . . . . . . . . . . . . . . . . 13
Using on-screen menus . . . . . . . . . . . . . . . . . . . . . . . . . 13
Other Operations
Using the VIERA Link “HDAVI ControlTM” . . . . . . . . . . . 15
What is VIERA Link “HDAVI Control” . . . . . . . . . . . . . . . . 15
What you can do with “HDAVI Control” . . . . . . . . . . . . . . . 15
Easy control only with VIERA remote control (for
“HDAVI Control 2 or later”) . . . . . . . . . . . . . . . . . . . . . . . 15
Operating other devices . . . . . . . . . . . . . . . . . . . . . . . . . 16
Using the iPod/iPhone . . . . . . . . . . . . . . . . . . . . . . . . . . . . 16
Playing from an USB device . . . . . . . . . . . . . . . . . . . . . . . 17
Reference
Changing the player settings . . . . . . . . . . . . . . . . . . . . . 17
DivX information . . . . . . . . . . . . . . . . . . . . . . . . . . . . . . . 19
Displaying DivX subtitles text . . . . . . . . . . . . . . . . . . . . . . 19
Discs that can be played. . . . . . . . . . . . . . . . . . . . . . . . . 20
Speaker installation option. . . . . . . . . . . . . . . . . . . . . . . 21
Maintenance. . . . . . . . . . . . . . . . . . . . . . . . . . . . . . . . . . . 21
Troubleshooting guide . . . . . . . . . . . . . . . . . . . . . . . . . . 22
Licenses . . . . . . . . . . . . . . . . . . . . . . . . . . . . . . . . . . . . . . 24
Specifications . . . . . . . . . . . . . . . . . . . . . . . . . . . . . . . . . 25
Safety precautions . . . . . . . . . . . . . . . . . . . . . . . . . . . . . 27
Getting StartedPlaying DiscsOther OperationsReference
CAUTION!
THIS PRODUCT UTILIZES A LASER.
USE OF CONTROLS OR ADJUSTMENTS OR PERFORMANCE OF
PROCEDURES OTHER THAN THOSE SPECIFIED HEREIN MAY
RESULT IN HAZARDOUS RADIATION EXPOSURE.
DO NOT OPEN COVERS AND DO NOT REPAIR YOURSELF.
REFER SERVICING TO QUALIFIED PERSONNEL.
WARNING:
TO REDUCE THE RISK OF FIRE, ELECTRIC SHOCK OR
PRODUCT DAMAGE,
≥DO NOT EXPOSE THIS APPARATUS TO RAIN,
MOISTURE, DRIPPING OR SPLASHING AND THAT NO
OBJECTS FILLED WITH LIQUIDS, SUCH AS VASES,
SHALL BE PLACED ON THE APPARATUS.
≥USE ONLY THE RECOMMENDED ACCESSORIES.
≥DO NOT REMOVE THE COVER (OR BACK); THERE
ARE NO USER SERVICEABLE PARTS INSIDE. REFER
SERVICING TO QUALIFIED SERVICE PERSONNEL.
THIS UNIT IS INTENDED FOR USE IN MODERATE CLIMATES.
CAUTION!
≥ DO NOT INSTALL OR PLACE THIS UNIT IN A BOOKCASE,
BUILT-IN CABINET OR IN ANOTHER CONFINED SPACE.
ENSURE THE UNIT IS WELL VENTILATED. TO PREVENT RISK
OF ELECTRIC SHOCK OR FIRE HAZARD DUE TO
OVERHEATING, ENSURE THAT CURTAINS AND ANY OTHER
MATERIALS DO NOT OBSTRUCT THE VENTILATION VENTS.
≥ DO NOT OBSTRUCT THE UNIT’S VENTILATION OPENINGS
WITH NEWSPAPERS, TABLECLOTHS, CURTAINS, AND
SIMILAR ITEMS.
≥ DO NOT PLACE SOURCES OF NAKED FLAMES, SUCH AS
LIGHTED CANDLES, ON THE UNIT.
≥ DISPOSE OF BATTERIES IN AN ENVIRONMENTALLY
FRIENDLY MANNER.
This product may receive radio interference caused by mobile
telephones during use. If such interference is apparent, please
increase separation between the product and the mobile telephone.
The socket outlet shall be installed near the equipment and easily
accessible.
The mains plug of the power supply cord shall remain readily
operable.
To completely disconnect this apparatus from the AC Mains,
disconnect the power supply cord plug from AC receptacle.
ENGLISH
RQ TX111 1
5
5
Page 6
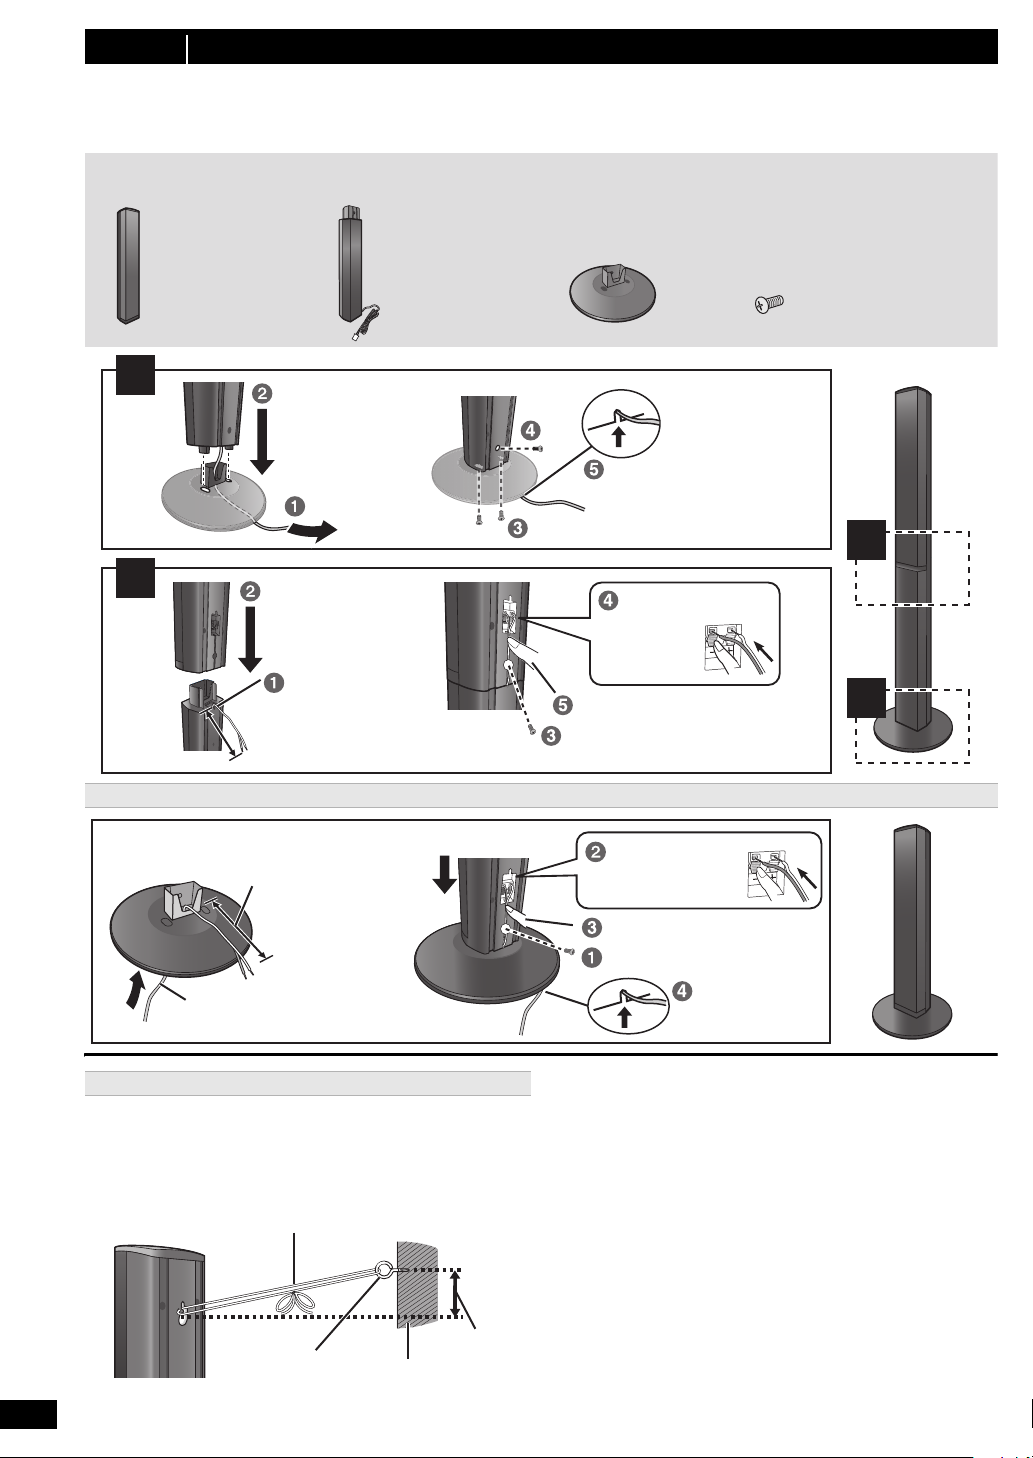
step 1 Preparing the speakers
Make sure you have all the indicated components before starting assembly, setup, and connection.
≥ Keep the screws out of reach of children to prevent swallowing.
≥ For optional wall mount, refer to page 21.
2 Front speakers
2 Front speakers
2 Surround speakers
2 Stands (with cable)
4 Stands (with cable)
4 Bases
2 Bases
8 Screws
16 Screws
[PT580]
[PT880]
[PT580]
[PT880]
[PT580]
[PT880]
[PT580]
[PT880]
1
2
2
1
Slide into the groove.
Tighten securely.
Position the cable
between the ridges.
Leave about 120 mm.
Press into the groove.
Tighten securely.
Insert the wire fully.
i: White
j: Blue line
Push!
Leave about
120 mm.
You can remove and use the
cable from the stand. To reattach
the cable, refer to page 21.
Slide into the
groove.
Press into the groove.
Tighten securely.
Insert the wire fully.
i: White
j: Blue line
Push!
Thread the speaker cable through
the base.
Attach the speaker.
String (not included)
Thread from the wall to the speaker and tie tightly.
Speaker
(rear)
Screw eye
(not included)
Approx.
150 mm
Wall
[PT580] Front speakers
[PT880] Front and surround speakers
Preparation
≥ To prevent damage or scratches, lay down a soft cloth to assemble
speakers.
≥ For assembly, use a Phillips-head screwdriver (not included).
Speaker assembly option
Preventing the speakers from falling
≥ You will need to obtain the appropriate screw eyes to match the walls
or pillars to which they are going to be fastened.
≥ Consult a qualified housing contractor concerning the appropriate
procedure when attaching to a concrete wall or a surface that may not
have strong enough support. Improper attachment may result in
damage to the wall or speakers.
RQ TX111 1
ENGLISH
6
6
Caution
≥ Do not stand on the base. Be cautious when children are near.
≥ When carrying the speaker, hold the stand and base parts.
Page 7
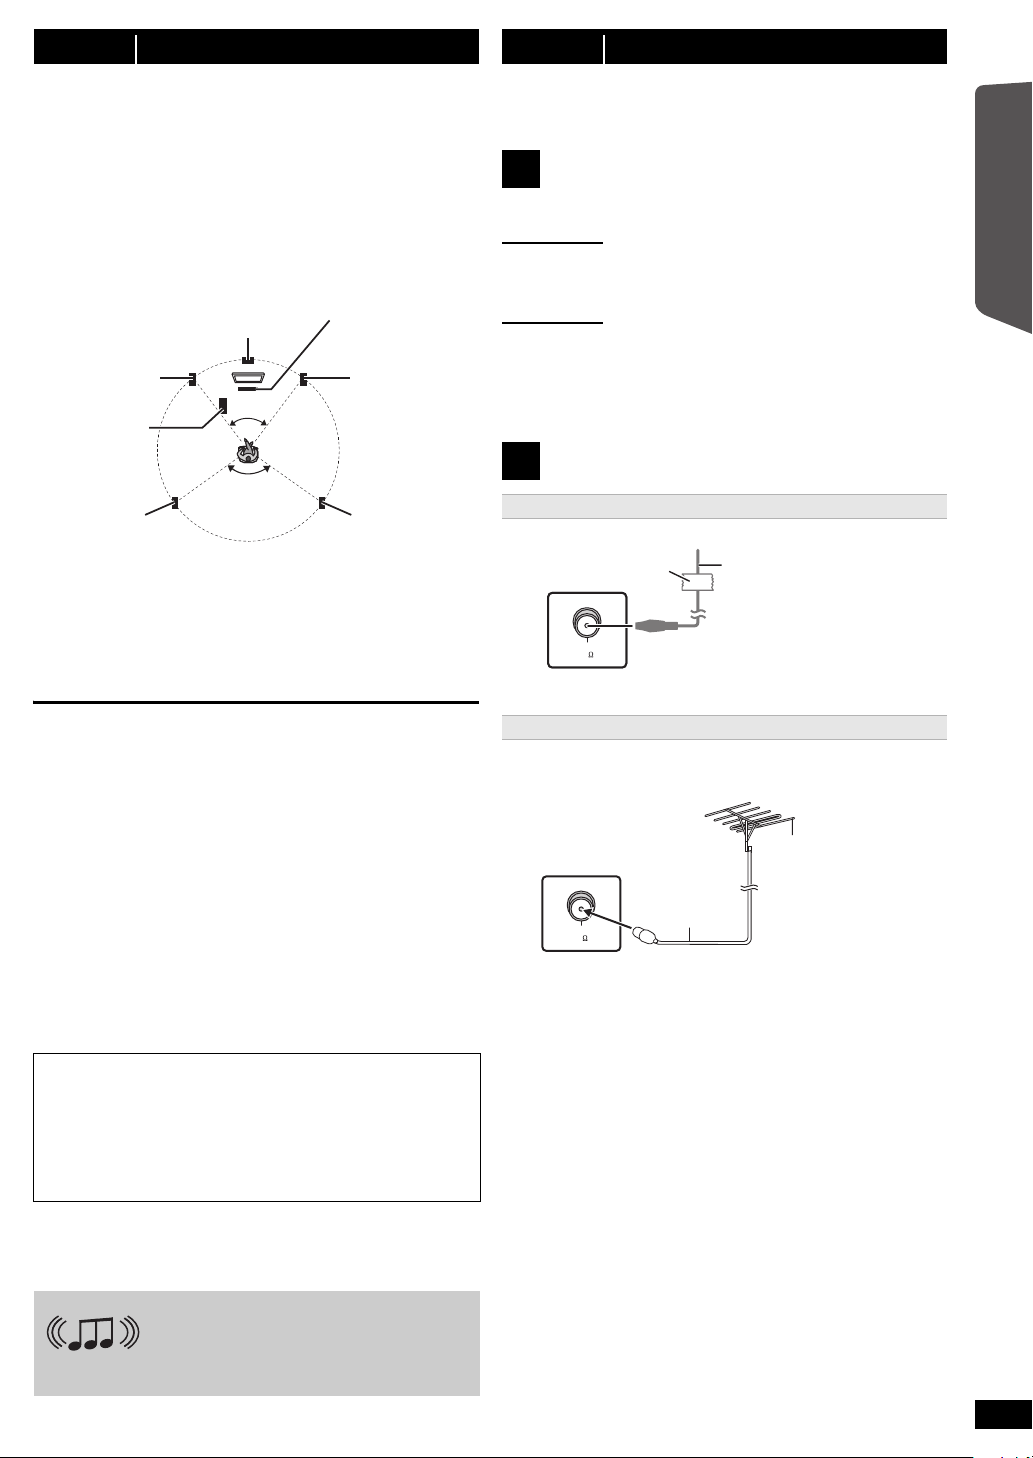
step 2 Positioning
120°
60°
Center speaker
§2
Front speaker
(left)
Subwoofer
§3
Surround
speaker (left)
Surround
speaker (right)
Front speaker
(right)
Main unit
§1
FM ANT
(75 )
Adhesive tape
Main unit (rear)
FM indoor antenna
(included)
Affix this end of the antenna
where reception is best.
FM ANT
(75 )
Use outdoor antenna if radio reception is poor.
≥ Disconnect the antenna when the unit is not in use.
≥ Do not use the outdoor antenna during an electrical storm.
Main unit (rear)
75 ≠ coaxial
cable
(not included)
FM outdoor antenna
(Using a TV antenna
(not included))
The antenna should be
installed by a competent
technician.
How you set up your speakers can affect the bass and the sound field.
Note the following points:
≥ Place speakers on flat secure bases.
≥ Placing speakers too close to floors, walls, and corners can result in
excessive bass. Cover walls and windows with thick curtains.
[Note]
Keep your speakers at least 10 mm away from the system for proper
ventilation.
Setup example (“Surround layout (Recommended)”: Standard
surround placement)
Place the front, center, and surround speakers at approximately the
same distance from the seating position. The angles in the diagram are
approximate.
§1 Position with at least 5 cm of space on all sides for proper
ventilation.
§2 Put on a rack or shelf. Vibration caused by the speaker can disrupt
the picture if it is placed directly on the TV.
§3 Place to the right or left of the TV, on the floor or a sturdy shelf so
that it will not cause vibration. Leave about 30 cm from the TV.
Depending on the room layout, you may like to use all the speakers at
the front (“Front layout (Alternative)”) (B 9, EASY SETUP settings).
step 3 Connections
Turn off all equipment before connection and read the appropriate
operating instructions.
Do not connect the AC mains lead until all other
connections are completed.
Speaker connections
1
Pay attention to the type of speaker and the connector colour when you
place the speakers.
Main unit (rear)
Connect to the terminals of the same colour.
Use of the speaker cable stickers is convenient when making cable
connections.
Speakers (rear)
Insert the wire fully, taking care not to insert beyond the wire insulation.
i: White
j: Blue line
≥ Be careful not to cross (short circuit) or reverse the polarity of the
speaker wires as doing so may damage the speakers.
Radio antenna connections
2
Using an indoor antenna
Getting Started
Quick Start Guide
Notes on speaker use
≥Use only supplied speakers
Using other speakers can damage the unit, and sound quality will be
negatively affected.
≥ You can damage your speakers and shorten their useful life if you play
sound at high levels over extended periods.
≥ Reduce the volume in the following cases to avoid damage:
– When playing distorted sound.
– When the speakers are reverberating due to a record player, noise
from FM broadcasts, or continuous signals from an oscillator, test
disc, or electronic instrument.
– When adjusting the sound quality.
– When turning the unit on or off.
If irregular colouring occurs on your TV
The center speaker is designed to be used close to a TV, but the picture
may be affected with some TVs and setup combinations.
If this occurs, turn the TV off for about 30 minutes.
The demagnetising function of the TV should correct the problem. If it
persists, move the speakers further away from the TV.
Caution
≥ The main unit and supplied speakers are to be used only as
indicated in this setup. Failure to do so may lead to damage to
the amplifier and/or the speakers, and may result in the risk of
fire. Consult a qualified service person if damage has occurred
or if you experience a sudden change in performance.
≥ Do not attempt to attach these speakers to walls using
methods other than those described in this manual.
Caution
Do not touch the front netted area of the speakers. Hold by the sides.
[PT880]
You can enjoy surround speaker sound
wirelessly when you use the optional
Panasonic wireless accessory (SH-FX71).
For details, please refer to the operating
instructions for the optional Panasonic wireless
accessory.
Using an outdoor antenna
ENGLISH
RQ TX111 1
7
7
Page 8
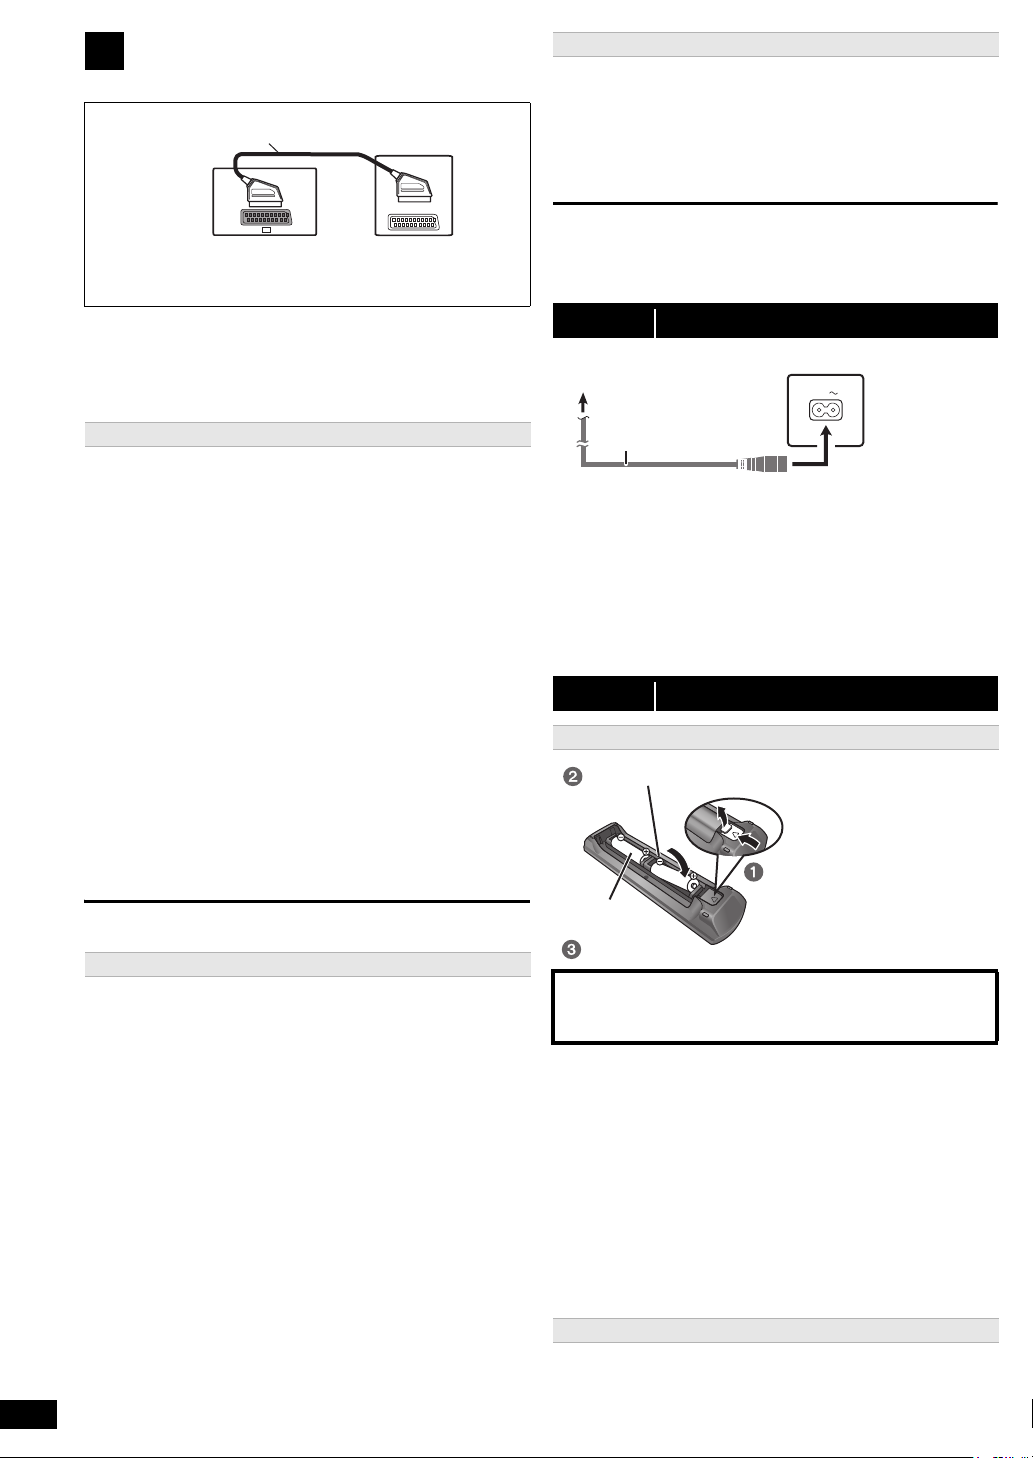
Audio and video connections
AV
AV1
SCART cable
§1
(not included)
TV
Main unit (rear)
e.g. [PT580]
To household mains socket
Main unit (rear)
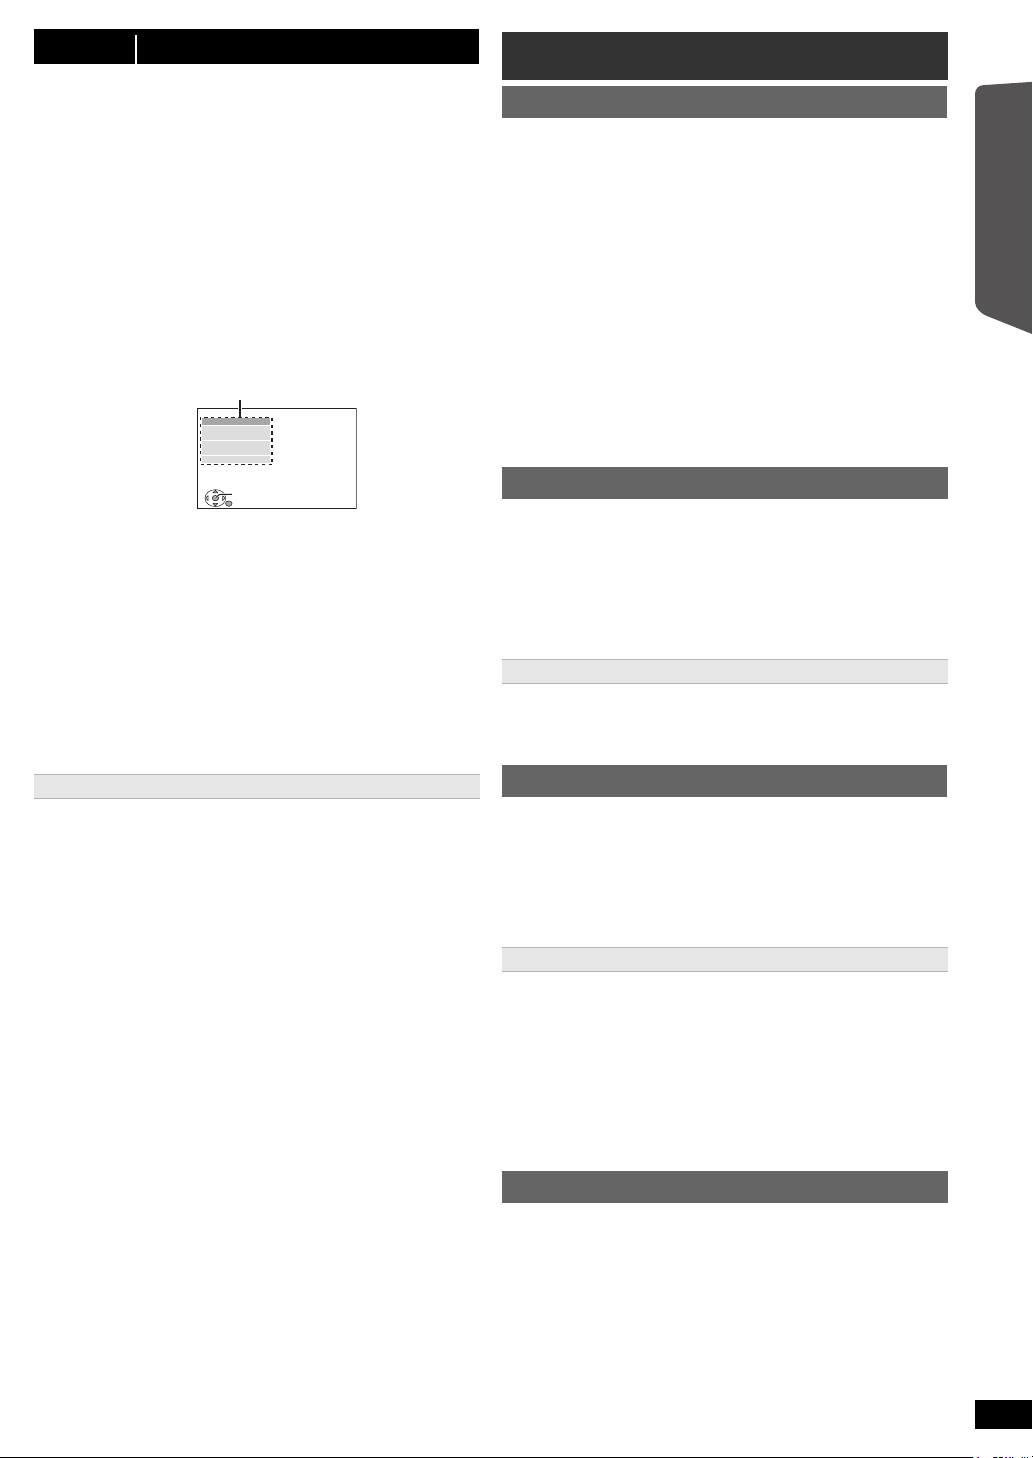
AC mains lead (included)
Press in and lift up.
Replace the cover.
Insert so the poles (r and j) match those in the remote control.
3
Basic setup example
§1 This connection will also enable you to play TV audio through
your home theater system (B 10, Selecting the source by the
remote control). Select the appropriate audio out (e.g. Monitor)
on the TV.
To improve picture quality, you can change the video signal output from
the SCART (AV) terminal to suit the type of TV you are using.
≥ Select “S-VIDEO”, “RGB 1” or “RGB 2” from “VIDEO OUT – SCART”
in VIDEO menu (B 18).
≥ When both the HDMI cable and SCART cable are connected, there
will be no RGB output from the SCART (AV) terminal.
Other video connection
[\\\\\\\\\\\HDMI\AV\OUT\\\\\\\\\]
This connection provides the best picture quality.
Connect the HDMI cable (not included) from the HDMI AV OUT
terminal on the main unit to the HDMI AV IN terminal on your TV.
≥ If your TV is not ARC compatible, make the extra audio connection.
≥ Set “VIDEO PRIORITY” to “ON” (B 18, HDMI menu).
≥ Set “VIDEO FORMAT” in Menu 4 (HDMI) (B 14).
VIERA Link “HDAVI Control”
If your Panasonic TV is VIERA Link compatible, you can operate your
TV synchronising with home theater operations or vice versa (B 15,
Using the VIERA Link “HDAVI Control
ARC (Audio Return Channel)
If the TV is ARC compatible, audio from the TV can be sent to this unit
via the HDMI cable without the need to make an extra audio connection.
≥ Refer to the operating instructions of the TV for details.
[Note]
Please use High Speed HDMI Cables that have the HDMI logo (as
≥
shown on the cover)
≥ Non-HDMI-compliant cables cannot be utilised.
≥ It is recommended that you use Panasonic’s HDMI cable.
Recommended part number:
RP-CDHS15 (1.5 m), RP-CDHS30 (3.0 m), RP-CDHS50 (5.0 m), etc.
≥ For TV with more than one HDMI terminal, refer to the operating
instructions for the TV to determine which terminal to connect to.
Do not make the video connections through the VCR.
Due to copy guard protection, the picture may not be displayed properly.
Other audio connections
[\\\\\\DIGITAL\AUDIO\IN\OPTICAL\\\\\\]
When the optical digital audio cable
decode Dolby Digital audio.
Connect the optical cable (not included) from the DIGITAL AUDIO
IN OPTICAL terminal on the main unit to the OPTICAL OUT terminal
on your TV.
[Note]
After connecting with the optical digital audio cable or HDMI
make settings to suit the type of audio from your digital equipment
(B 10).
§2 Refer to the operating instructions of the respective devices for the
settings necessary to output the audio.
§3 Only Dolby Digital and PCM can be played with this connection.
[\\\\\\\\\AUX\\\\\\\\]
Use this connection when the TV does not have an OPTICAL OUT
terminal or when the DIGITAL AUDIO IN OPTICAL terminal on this unit
is being used by the STB.
Connect the audio cable (not included) from the AUX terminal on
the main unit to the AUDIO OUT terminal on your TV.
RQ TX111 1
8
ENGLISH
8
.
TM
”).
§2, 3
§2, 3
is connected, this unit can
§2, 3
cable,
Set Top Box (cable/satellite/Blu-ray Disc Player, etc) connection
Use this connection when you want to output the original surround audio
from your STB, etc. to this unit.
Connect the optical digital audio cable (not included) from the
DIGITAL AUDIO IN OPTICAL terminal on this unit to the OPTICAL
OUT terminal on your STB.
≥ If the DIGITAL AUDIO IN OPTICAL terminal is already in use for the
TV audio, reconnect the TV audio to the AUX terminal using an audio
cable.
[Note]
If you have various sound sources (such as Blu-ray player, DVD
recorder, VCR, etc.), connect them to the available inputs on the TV and
the TV output should then be connected to the SCART (AV), AUX, HDMI
AV OUT or DIGITAL AUDIO IN OPTICAL terminal of the main unit.
step 4 AC mains lead connection
AC IN
Conserving power
The main unit consumes a small amount of power, even when it is in
standby mode (approx. 0.1 W). To save power when the unit is not to be
used for a long time, unplug it from the household mains socket.
You will need to reset some memory items after plugging in the main
unit.
[Note]
The included AC mains lead is for use with the main unit only.
Do not use it with other equipment. Also, do not use cords for other
equipment with the main unit.
step 5 Preparing the remote control
Batteries
R6/LR6, AA
CAUTION
Danger of explosion if battery is incorrectly replaced. Replace only
with the same or equivalent type recommended by the manufacturer.
Dispose of used batteries according to the manufacturer’s instructions.
≥ Use alkaline or manganese batteries.
≥ Do not heat or expose to flame.
≥ Do not leave the battery(ies) in an automobile exposed to direct
sunlight for a long period of time with doors and windows closed.
Do not:
≥ mix old and new batteries.
≥ use different types of batteries at the same time.
≥ take apart or short circuit.
≥ attempt to recharge alkaline or manganese batteries.
≥ use batteries if the covering has been peeled off.
Mishandling of batteries can cause electrolyte leakage which can
severely damage the remote control.
Remove the batteries if the remote control is not going to be used for a
long period of time. Store in a cool, dark place.
Use
Aim at the remote control signal sensor (B 4), avoiding obstacles.
Distance: Within approx. 7 m
Angle: Within approx. 20° up and down, approx. 30° to the left and right
Page 9
step 6 EASY SETUP
SET
MAIN
DISC
VIDEO
AUDIO
DISPLAY
HDMI
OTHERS
RETURN
Menu
The EASY SETUP screen assists you in making necessary
settings.
Preparation
Turn on your TV and select the appropriate video input mode (e.g.
VIDEO 1, AV 1, HDMI, etc.) to suit the connection to this unit.
≥ To change your TV’s video input mode, refer to its operating
instructions.
≥ This remote control can perform some basic TV operations (B 4).
Press [Í]1 to turn on the unit.
1
≥ When the EASY SETUP screen appears automatically, skip
steps 2 to 7.
Press [DVD]5 to select “DVD/CD”.
2
Press [START]C to show the START menu.
3
Press [3, 4]9 to select “Setup” and press [OK]9.
4
Listening to the radio
Presetting stations automatically
Up to 30 stations can be set.
Press [RADIO, EXT-IN]5 to select “FM”.
1
Press [MENU]7.
2
Each time you press the button:
LOWEST (factory preset):
To begin auto preset with the lowest frequency.
CURRENT:
To begin auto preset with the current frequency.
§ To change the frequency, refer to “Manual tuning” (B below).
Press and hold [OK]9.
3
Release the button when “FM AUTO” is displayed.
The tuner starts to preset all the stations it can receive into the
channels in ascending order.
≥ “SET OK” is displayed when the stations are set, and the radio tunes
to the last preset station.
≥ “ERROR” is displayed when automatic presetting is unsuccessful.
Preset the stations manually (B below).
Listening/confirming the preset channels
§
Getting Started
Quick Start Guide
Press [3, 4]9 to select “OTHERS” and press
5
[OK]9.
Press [3, 4]9 to select “EASY SETUP” and press
6
[OK]9.
Press [OK]9 to select “SET”.
7
Press [3, 4]9 to select “Yes” and press [OK]9.
8
Follow the messages and make the settings with
9
[3, 4, 2, 1]9 and [OK]9.
(B below, EASY SETUP settings)
Press [OK]9 to finish EASY SETUP.
10
EASY SETUP settings
≥Language
Select the language used on menu screen.
≥TV aspect
Select the aspect to suit your TV.
≥Speaker layout
Select “Surround layout (Recommended)” mode or “Front layout
(Alternative)” mode according to your speaker layout (B 7,
Positioning).
≥Speaker check
Listen to speaker output to confirm speaker connections.
≥Speaker output
Make surround sound setting for speaker output.
≥TV audio
Select the audio input connection from your TV.
For AUX connection (B 8): Select “AUX”.
For HDMI connection (B 8): Select “ARC”.
For DIGITAL AUDIO IN OPTICAL connection (B 8): Select “DIGITAL
IN”.
For SCART (AV) connection (B 8): Select “AV”.
This will be the TV audio setting for VIERA Link
[Note]
≥ If this unit is connected to a “HDAVI Control 3 or later” compatible TV
via HDMI cable, the menu language and TV aspect information will be
retrieved via VIERA Link.
≥ If this unit is connected to a “HDAVI Control 2” compatible TV via
HDMI cable, the menu language information will be retrieved via
VIERA Link.
≥ Settings in the EASY SETUP can also be changed in the player
settings (e.g. language, TV aspect, TV audio (B 17)).
“HDAVI Control”
. (
B 15
Press [RADIO, EXT-IN]5 to select “FM”.
1
Press the numbered buttons to select a channel.
2
≥ To select a 2-digit number
e.g. 12: [S10]3 B [1] B [2]
Alternatively, press [X, W]A.
≥ The FM setting is also shown on the TV display.
If noise is excessive
Press and hold [PLAY MODE]: to display “MONO”.
To cancel the mode, press and hold the button again until “AUTO ST” is
displayed.
≥ The mode is also cancelled when you change the frequency.
Manual tuning
Press [RADIO, EXT-IN]5 to select “FM”.
1
Press [SEARCH6, SEARCH5]@ to select the
2
frequency.
≥ To start automatic tuning, press and hold [SEARCH6,
SEARCH5]@ until the frequency starts scrolling. Tuning stops
when a station is found.
Presetting stations manually
Up to 30 stations can be set.
1 While listening to the radio broadcast
Press [OK]9.
2 While the frequency is flashing on the display
Press the numbered buttons to select a channel.
≥ To select a 2-digit number
e.g. 12: [S10]3 B [1] B [2]
Alternatively, press [X, W]A, and then press [OK]9.
A station previously stored is overwritten when another station is stored
in the same channel preset.
)
RDS broadcasting
The unit can display the text data transmitted by the radio data system
(RDS) available in some areas.
If the station you are listening to is transmitting RDS signals, “RDS” will
light up on the display.
While listening to the radio broadcast
Press [FUNCTIONS]D to display the text data.
Each time you press the button:
PS: Program service
PTY: Program type
FREQ: Frequency display
ENGLISH
RQ TX111 1
9
9
Page 10
PTY displays
DVD/CD Home Cinema
Input Selection
Setup
Sound
DVD/CD Home Cinema
Input Selection
Playback Disc
TOP MENU (DVD)
MENU (DVD)
Playback/menu access
NEWS VARIED FINANCE COUNTRY
AFFAIRS POP M CHILDREN NATIONAL
INFO ROCK M SOCIAL A OLDIES
SPORT M.O.R. M
EDUCATE LIGHT M PHONE IN DOCUMENT
DRAMA CLASSICS TRAVEL TEST
CULTURE OTHER M LEISURE ALARM
SCIENCE WEATHER JAZZ
§“M.O.R. M”=Middle of the road music
[Note]
Getting StartedPlaying DiscsOther OperationsReference
RDS displays may not be available if reception is poor.
§
RELIGION FOLK M
Using the START menu
You can select sound effects, desired source, change the settings, access
playback/menus, etc. by using the START menu.
Press [START]C to show the START menu.
1
≥ When using VIERA Link “HDAVI Control”, the TV also turns on
when the START menu is displayed.
e.g.
Press [3, 4]9 to select an item and press [OK]9.
2
≥ To exit, press [START]C.
Press [3, 4]9 to make the setting and press [OK]9.
3
When “Input Selection” is selected
You can select a desired source from the menu.
≥ DVD/CD (B 12), FM RADIO (B 9), AV
§1
(B below), DIGITAL IN
ARC
§1 “(TV)” will appear beside “AV”, “AUX”, “ARC” or “DIGITAL IN”,
indicating the TV audio setting for VIERA Link “HDAVI Control”
(B 15).
§2 “(STB)” will appear beside “DIGITAL IN”, indicating the STB audio
setting for VIERA Link “HDAVI Control” (B 15).
When “Setup”
You can change the settings for this unit. (B 17)
When “Sound” is selected
You can select sound quality settings (B 11, EQ (Equaliser)).
Other selectable items
The items that are displayed will vary depending on the media and
source.
When a disc is loaded or an USB device is connected, you can also
access playback or menus from the START menu.
e.g. [DVD-V]
When the on-screen control panel appears
e.g. [DVD-V] (when “Playback Disc” is selected from the START menu)
You can operate the playback with the indicated controls.
is selected
Selecting the source by the remote control
Press To select
[DVD]5 DVD/CD
[iPod]5 IPOD (B 16)
[RADIO,
EXT-IN]5
RQ TX111 1
ENGLISH
10
10
Each time you press the button:
FM:
AV:
AUX:
ARC:
D-IN:
USB:
(B 9)
For audio input through the SCART (AV)
terminal.
For audio input through the AUX terminal.
For audio input through the HDMI AV OUT
terminal.
For audio input through the DIGITAL AUDIO
IN OPTICAL terminal. (B right)
(B 17)
§1
§1, 2
(B below), AUX§1 (B below),
(B below), USB (B 17), iPod (B 16)
[Note]
Confirm the audio connection to the SCART (AV), AUX, HDMI AV OUT or
DIGITAL AUDIO IN OPTICAL terminal on the main unit when you select
the corresponding sources (B 8). Reduce the volume on the TV to its
minimum, and then adjust the volume of the main unit.
Listening to the TV or other device’s
audio from this unit’s speakers
Preparation
≥ Make sure that there is an audio connection between this unit and the
TV or other device. (B 8)
≥ Turn on the TV or/and other device.
Press [RADIO, EXT-IN]5 to choose the source that is used
to connect this unit to the TV or other device.
≥ To change the surround sound effects and sound mode, refer to
“Enjoying sound effects from all speakers” (B 11)
≥ If your Panasonic TV is VIERA Link compatible, refer to “Using the
VIERA Link “HDAVI Control
Making settings for digital audio input
Select to suit the type of audio from the DIGITAL AUDIO IN OPTICAL and
HDMI AV OUT terminal on the main unit.
Setting must be made for the “D-IN” and “ARC” selector.
≥ Underlined items are the factory presets.
Available settings
Mode Setting
DUAL: (Only works with Dolby Dual Mono)
DRC:
(Dynamic
Range
Compression)
PCM FIX: – ON
§3
:
STB
(CABLE/SAT
AUDIO)
Press [RADIO, EXT-IN]5 several times to select “D-IN”
1
or “ARC”.
Press [PLAY MODE]: and then [3, 4]9 to select the
2
mode.
While the selected mode is displayed
3
Press [2, 1]9 and select the desired setting.
§3 Only when “D-IN” is selected.
Be sure to select the device’s (STB, etc.) input channel on the TV
when making the setting.
The device must be connected to the Panasonic TV via an HDMI
cable and to this unit with an optical digital audio cable.
≥This function will not operate if “DIGITAL IN” is selected in “TV
AUDIO” (B 19).
– MAIN+SAP
– MAIN
– SAP
“SAP” = Secondary Audio Program
≥ Set PCM FIX mode to “OFF” to listen to the “MAIN”
– ON
– OFF
– OFF
≥ When receiving true 5.1-channel surround sound,
– SET
– OFF
TM
”” (B 15) for other related functions.
(stereo audio)
or “SAP” audio.
Adjust for clarity even when the volume is low by
compressing the range of the lowest sound level and
the highest sound level. Convenient for late night
viewing. (Only works with Dolby Digital)
The full dynamic range of the signal is reproduced.
Select when receiving only PCM signals.
Select when receiving Dolby Digital and PCM
signals.
select “OFF”.
Select when setting the main unit to switch to “D-IN”
when the input channel of an HDMI connected STB
is selected on the TV (B 15, Setting the STB audio
for VIERA Link “HDAVI Control”).
Select to cancel this setting.
Page 11

Enjoying sound effects from all
e.g.
AUDIO-SPEAKER SETTINGS-TEST TONE
SPEAKER
LEFT
CENTER
RIGHT
SURROUND RIGHT
TRIM LEVEL
− −
0dB
− −
0dB
speakers
≥ The following sound effects may not be available or may have no effect
with some sources.
You may experience a reduction in sound quality when these sound effects
≥
are used with some sources. If this occurs, turn the sound effects off.
[Note]
When changing the surround sound effect, Whisper-mode Surround or
the sound modes, the setting is displayed on the TV screen if “DVD/CD”
or “USB” is the selected source during video playback.
Enjoying surround sound effects
Press [SURROUND]<.
Each time you press the button:
STANDARD:
Sound is output as it was recorded/encoded. Speaker output varies
depending on the source.
MULTI-CH:
You can enjoy sound from the front speakers, as well as the surround
speakers even when playing a 2-channel sound.
MANUAL: (B below)
While “MANUAL” is displayed, press [2, 1]9 to select
other surround modes.
Each time you press [2, 1]9:
DOLBY PLII MOVIE
Suitable for movies, or videos recorded in Dolby Surround. (except
[DivX])
DOLBY PLII MUSIC
Adds 5.1-channel effects to stereo sources. (except [DivX])
S.SRD
You can enjoy sound from all speakers with stereo sources.
STEREO
Sound will only be output to the front speakers and the subwoofer from
any source.
Recommended modes to enjoy TV audio or stereo
sources from all speakers:
≥ DOLBY PLII MOVIE ≥ DOLBY PLII MUSIC ≥ S.SRD
“SRD” lights in the main unit’s display when there is output from the
surround speakers.
When the signal is DTS or Dolby Digital, “/DTS” or “/DOLBY DIGITAL” will
also be displayed respectively.
Selecting sound mode
Press [SOUND]; to select a sound mode.
1
Each time you press the button:
EQ: Equaliser
SUBW LVL: Subwoofer Level
H.BASS: Harmonic Bass
C.FOCUS: Center Focus
While the selected mode is displayed, press [2, 1]9 to
2
make the settings.
Refer to the following for setting details of each sound effect.
EQ (Equaliser)
You can select sound quality settings.
Each time you press [2, 1]9:
FLAT: Cancel (no effect is added).
HEAVY: Adds punch to rock.
CLEAR: Clarifies higher sounds.
SOFT: For background music.
SUBW LVL (Subwoofer level)
You can adjust the amount of bass. The unit automatically selects
the most suitable setting according to the type of playback
source.
LEVEL 1 ,# LEVEL 2 ,# LEVEL 3 ,# LEVEL 4
^---------------------------------------------------------------------------J
≥ The setting you make is retained and recalled every time you
play the same type of source.
H.BASS (Harmonic Bass)
You can enhance low-frequency sound so that heavy bass sound
can be heard clearly, even if the acoustics of your room are not
optimal.
ON ,------. OFF
≥ The setting you make is retained, and recalled every time you
play from the same type of source.
C.FOCUS (Center Focus)
(Effective when playing audio containing the center channel
sound or when DOLBY PLII (B left) is selected.)
You can make the sound of the center speaker seem like it is
coming from within the TV.
ON,------.OFF
Whisper-mode Surround
You can enhance the audio effect for low volume sound. (Convenient for
late night viewing.)
Press [W.SRD]G.
Each time you press the button:
ON ,--. OFF
Adjusting the speaker output level manually
Preparation
≥ To display the picture, turn on the TV and select the appropriate video
input mode.
≥ Press [r, VOL, s]> to adjust the volume to normal listening level.
≥ Press [DVD]5 to select “DVD/CD”.
≥ Select “TEST TONE” from “SPEAKER SETTINGS” in AUDIO menu
(B 18).
Press [OK]9 to enter test tone mode.
1
Test tone will be output to each channel in the following order.
LEFT, CENTER, RIGHT, SURROUND RIGHT, SURROUND LEFT
Press [OK]9 then [3, 4]9 to adjust the speaker level
2
for each speaker. (CENTER, SURROUND RIGHT,
SURROUND LEFT)
`
6dB to i6 dB (Factory preset: 0 dB)
Adjusting the speaker level during playback
(Effective when playing audio containing surround channel sound or when
“SRD” lights on the main unit’s display)
Press and hold [–CH SELECT]; to select the speaker.
1
While the speaker channel is displayed, press [–CH SELECT];.
L # C # R # RS # LS # SW
^--------------------------------------------------}
≥ SW (Subwoofer) is displayed even if the source does not include a
subwoofer channel.
While “L” or “R” is selected.
2
Press [2, 1]9 to adjust the front speaker balance.
While “C”, “RS”, “LS” or “SW” is selected.
3
Press [3]9 (increase) or [4]9 (decrease) to adjust the
speaker level for each speaker.
Getting StartedPlaying DiscsOther OperationsReference
ENGLISH
RQ TX111 1
11
11
Page 12
Basic play
Label facing up
DVD-V PROGRAM
SELECT TITLE TITLE CHAPTER
TITLE 1
TITLE 2
TITLE 3
TITLE 4
1
2
3
4
5
DVD-V RANDOM
SELECT TITLE
TITLE 1
TITLE 2
TITLE 3
Other modes of play
Preparation
To display the picture, turn on your TV and change its video input mode
(e.g. VIDEO 1, AV 1, HDMI, etc.) to suit the connection to this unit.
Press [Í]1 to turn on the unit.
1
Press [DVD]5 to select “DVD/CD”.
2
Press [< OPEN/CLOSE]5 to open the disc tray.
3
Load the disc.
4
Getting StartedPlaying DiscsOther OperationsReference
≥ Load double-sided discs so the label for the
side you want to play is facing up.
Press [1 PLAY]6 to start play.
5
≥ Press [r, VOL, s]> to adjust the volume.
[Note]
≥ DISCS CONTINUE TO ROTATE WHILE MENUS ARE DISPLAYED.
Press [∫ STOP]6 when you finish to preserve the unit’s motor and your
TV screen.
≥ Total title number may not be displayed properly on iR/iRW.
Basic controls
One touch play (remote control only): [1 PLAY]6
(during standby mode)
The main unit automatically turns on and starts playing the disc in the
tray.
Stop: [∫ STOP]6
The position is memorised while “RESUME STOP” is on the screen.
≥ Press [1 PLAY]6 to resume.
≥ Press [∫ STOP]6 again to clear the position.
Pause: [; PAUS E]6
≥ Press [1 PLAY]6 to restart play.
Skip: [SKIP:, SKIP 9]6
Search: [SEARCH6, SEARCH5]6 (during play)
Slow-motion: [SEARCH6, SEARCH5]6 (during pause)
≥ Up to 5 steps.
≥ Press [1 PLAY]6 to start normal play.
≥ [VCD] Slow-motion: Forward direction only.
≥ [MPEG4] [DivX] Slow-motion: Does not work.
Frame-by-frame: [2;, ;1]9 (during pause)
[DVD-VR] [DVD-V] [VCD]
≥ [DVD-VR] [VCD] Forward direction only.
On-screen item select: [
[3, 4, 2, 1]9: Select
[OK]9: Confirm
Enter number: Numbered buttons
[DVD-VR] [DVD-V] [VCD] [CD]
e.g. To select 12: [S10]3 B [1] B [2]
[VCD] with playback control
Press [∫ STOP]6 to cancel the PBC function, and then press the
numbered buttons.
[DVD-V] Show a disc top menu: [TOP MENU]8
[DVD-V] Show a disc menu: [MENU]7
Return to previous screen: [RETURN]E
[VCD] (with playback control) Show a disc menu: [RETURN]E
Main unit display: [FL DISPLAY]F
[DVD-VR] [DVD-V] [WMA] [MP3] [MPEG4] [DivX]
Time display
[JPEG]
SLIDE
,-. Information display (e.g. [DVD-VR] Program number)
,-.Contents number
3, 4, 2, 1, OK]9
Repeat play
This works only when the elapsed play time can be displayed. It also
works with all JPEG content.
During play, press and hold [–REPEAT]:, to show the
repeat mode.
While the repeat mode is displayed, press [–REPEAT]: to select the item
to be repeated.
e.g. [DVD-V]
`TITLE ---. `CHAP. ---. `OFF
^----------------------------------------------------b
To cancel, select “OFF”.
Items shown differ depending on the type of disc and playback mode.
Program and Random play
[DVD-V] [VCD] [CD] [WMA] [MP3] [JPEG] [MPEG4] [DivX]
Preparation
While stopped, press [PLAY MODE]: to select the play
mode.
Program and random playback screens appear sequentially.
Program ------------------------------------------) Random
^--- Exit program and random screens (}
≥ [DVD-VR] Select “DATA” in “DVD-VR/DATA” (B 19, OTHERS menu) to
play MP3, JPEG, MPEG4 or DivX contents.
≥ If “PLAYBACK MENU” screen appears, select “AUDIO/PICTURE” or
“VIDEO” (B 13, Using PLAYBACK MENU), then proceed with the
above.
≥ For a disc with both WMA/MP3 and JPEG contents, select either music
or picture contents.
WMA/MP3: Select “MUSIC PROGRAM” or “MUSIC RANDOM”.
JPEG: Select “PICTURE PROGRAM” or “PICTURE RANDOM”.
≥ [DVD-V] Some items cannot be played even if you have programmed
them.
Program play (up to 30 items)
Press [3, 4]9 to select an item and press [OK]9.
1
e.g. [DVD-V]
≥ Repeat this step to program other items.
≥ To return to the previous menu, press [RETURN]E.
Press [1 PLAY]6 to start play.
2
To select all the items
Press [3, 4]9 to select “ALL” and press [OK]9.
To clear the selected program
1Press [1]9 and then press [3, 4]9 to select the program.
2Press [CANCEL]4.
To clear the whole program
Press [1]9 several times to select “CLEAR ALL”, and then press [OK]9.
The whole program is also cleared when the disc tray is opened, the unit
is turned off or another source is selected.
Random play
(Only when the disc has groups or multiple titles.)
1
Press [3, 4]9 to select a group or title and press
[OK]9.
e.g. [DVD-V]
” represents selected. To deselect, press [OK]9 again.
≥ “
*
Press [1 PLAY]6 to start play.
2
RQ TX111 1
ENGLISH
12
12
Page 13
Using navigation menus
WMA/MP3/JPEG
MPEG4/DivX
PLAYBACK MENU
AUDIO/PICTURE
VIDEO
DATA-DISC
ROOT
Perfume
Underwater
Fantasy planet
Starpersons1
Group (Folder):
Content (File):
JPEG images G 1/ 1:C 3/ 9
Group name
Group and content
number
PG
DATE
LENGTH
TITLE
1 0:16:02
10/11
LIVE CONCERT
02:15
2 0:38:25
12/05
AUTO ACTION
01:30
PL
DATE
LENGTH
TITLE
10:00:10
11/11
CITY PENGUIN
00:01
20:01:20
12/01
FOOTBALL
01:20
T
1
C1
1:ENG
3
1
OFF
TITLE SEARCH
Current item
Item name
e.g. Menu 1 (Disc/Play) [DVD-V]
T
1:ENG
3
1
OFF
CHAPTER SEARCH
C1
1
Current setting
e.g. Menu 1 (Disc/Play) [DVD-V]
.0: No surround
.1: Mono surround
.2: Stereo surround (left/right)
.1: Low frequency effect
(not displayed if there is no signal)
.1: Center
.2: Front leftiFront right
.3: Front leftiFront rightiCenter
e.g.
Playing data discs
[WMA] [MP3] [JPEG] [MPEG4] [DivX]
[DVD-VR] Select “DATA” in “DVD-VR/DATA” (B 19, OTHERS menu) to
play MP3, JPEG, MPEG4 or DivX contents.
Playing a play list
This works only when the disc contains a play list.
While stopped, press [PLAY LIST]7.
1
e.g.
Using PLAYBACK MENU
“PLAYBACK MENU” screen appears when the disc contains both video
(MPEG4/DivX) and other format (WMA/MP3/JPEG).
Press [3, 4]9 to select “AUDIO/PICTURE” or “VIDEO” and
press [OK]9.
≥ To start play, press [1 PLAY]6.
≥ To select an item to play, refer “Playing from the selected item”
(B below).
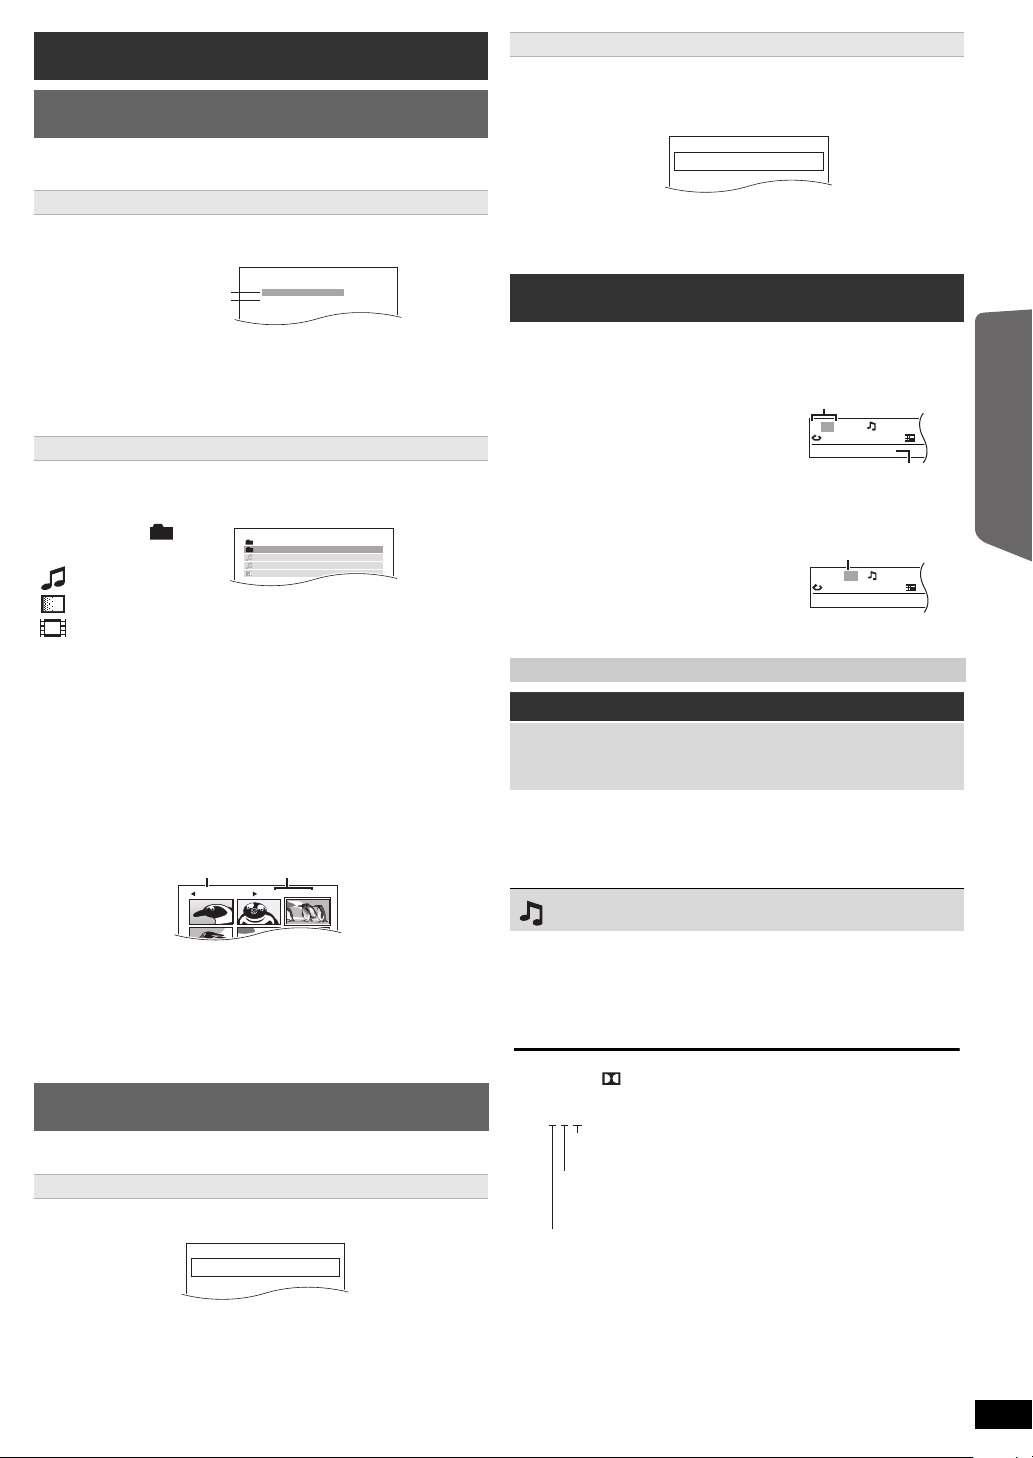
Playing from the selected item
You can select to play from your desired item while the “DATA-DISC”
screen is displayed.
e.g.
: WMA/MP3
: JPEG
: MPEG4/DivX
≥ To display/exit the screen, press [MENU]7.
Press [3, 4]9 to select an item and press [OK]9.
≥ Press [2, 1]9 to skip page by page.
≥ To return to 1 level up from the current folder, press [RETURN]E.
≥ Maximum: 28 characters for file/folder name.
Play starts from the selected content.
∫ [JPEG] Selecting the picture in Thumbnail menu
While picture is displayed, press [TOP MENU]8 to show
1
the thumbnail menu.
e.g.
Press [3, 4]9 to select the play list and press [OK]9.
2
≥ Press [2, 1]9 to skip page by page.
Using on-screen menus
Press [FUNCTIONS]D to show the on-screen menu.
1
Each time you press the button:
Menu 1 (Disc/Play)
Menu 2 (Video)
Menu 3 (Audio)
Menu 4 (HDMI)
Exit
Press [3, 4, 2, 1]9 to select the item and press
2
[OK]9.
Press [3, 4]9 to make the settings and press [OK]9.
3
Items shown differ depending on the type of disc.
Menu 1 (Disc/Play)
TRACK SEARCH, TITLE SEARCH, CONTENT SEARCH,
CHAPTER SEARCH, PG SEARCH (Program Search),
PL SEARCH (Playlist Search)
To start from a specific item
≥ [VCD] This does not work when using playback control.
e.g. [DVD-V]: T2 C5
To select numbers for data disc
e.g. 123: [S10]3 B [1] B [2] B [3] B [OK]9
Getting StartedPlaying DiscsOther OperationsReference
Other Operations
Press [3, 4, 2, 1]9 to select a picture and press
2
[OK]9.
≥ Press [SKIP:,SKIP9]6 to skip page by page.
To go to other group
1 Press [3]9 to select the group name.
2 Press [2, 1]9 to select the group and press [OK]9.
Playing DVD-R/-RW (DVD-VR) discs
[DVD-VR]
≥ Titles appear only if the titles are recorded on the disc.
≥ You cannot edit programs, play lists and disc titles.
Playing the programs
While stopped, press [DIRECT NAVIGATOR]8.
1
e.g.
Press [3, 4]9 to select the program and press [OK]9.
2
≥ Press [2, 1]9 to skip page by page.
AUDIO
[DVD-V] [DivX] (with multiple soundtracks)
To select audio soundtrack
[DVD-VR] [VCD]
To select “L”, “R”, “L+R” or “L R”
Actual operations depend on the disc. Read the disc’s instructions for
details.
Signal type/data
LPCM/PPCM/ D/DTS/MP3/MPEG: Signal type
kHz (Sampling frequency)/bit/ch (Number of channels)
3/2 .1ch
≥ [DivX] It may take some time for play to start if you change the audio on
a DivX video disc.
ENGLISH
RQ TX111 1
13
13
Page 14
PLAY SPEED
JPG
DATE
HDMI
HDMI --- INFORMATION
CONNECTED STATE
AUDIO STREAM
MAX CHANNEL
VIDEO FORMAT
COLOUR SPACE
CONNECTED
PCM
2ch
720p
YCbCr 4:4:4
[DVD-VR] [DVD-V]
To change play speed
– from “k0.6” to “k1.4” (in 0.1-unit steps)
≥ Press [1 PLAY]6 to return to normal play.
≥ After you change the speed
– Dolby Pro Logic II has no effect.
– Audio output switches to 2-channel stereo.
– Sampling frequency of 96 kHz is converted to 48 kHz.
≥ This function may not work depending on the disc’s recording.
REPEAT MODE
Getting StartedPlaying DiscsOther OperationsReference
(B 12, Repeat play)
A-B Repeat (To repeat a specified section)
Except [JPEG] [MPEG4] [DivX] [DVD-VR] (Still picture part) [VCD] (SVCD)
Press [OK]9 at the starting and ending points.
≥ Select “OFF” to cancel.
SUBTITLE
[DVD-V] [DivX] (with multiple subtitles) [VCD] (SVCD only)
To select subtitle language
≥ On iR/iRW, a subtitle number may be shown for subtitles that are
not displayed.
[DVD-VR] (with subtitle on/off information)
To select “ON” or “OFF”
≥ This may not work depending on the disc.
[DivX] (B 19, Displaying DivX subtitles text)
ANGLE
[DVD-V] (with multiple angles)
To select a video angle
When playing NTSC discs
AUTO1:
AUTO2:
VIDEO:
Automatically detects the film and video content, and
appropriately converts it.
In addition to “AUTO1”, automatically detects film
contents with different frame rates and appropriately
converts it.
Select if the video content is distorted when using
“AUTO1” or “AUTO2”.
SOURCE SELECT [DivX]
When you select “AUTO” the constructing method of the DivX contents
is automatically distinguished and output. If the picture is distorted,
select “INTERLACE” or “PROGRESSIVE” depending on which
constructing method was used when the contents were recorded to disc.
AUTO, INTERLACE, PROGRESSIVE
Menu 3 (Audio)
DIALOGUE ENHANCER
To make the dialogue in movies easier to hear
[DVD-V] (Dolby Digital, DTS, 3-channel or higher, with the dialogue
recorded in the center channel)
[DivX] (Dolby Digital, 3-channel or higher, with the dialogue recorded in
the center channel)
OFF, ON
Menu 4 (HDMI)
HDMI STATUS
To show HDMI information
e.g.
14
DATE DISPLAY
[JPEG] To select “ON” or “OFF” for picture’s date display
ROTATION
[JPEG] To rotate a picture (during pause)
0,------. 90,------.180,------.270
^--------------------------------------------J
Menu 2 (Video)
PICTURE MODE
NORMAL
CINEMA1:
CINEMA2:
DYNAMIC:
ANIMATION:
To select zoom sizes
NORMAL, AUTO (
≥ [JPEG]: during pause
TRANSFER MODE
If you have chosen “480p”/“576p”/“720p”/“1080p” or “1080i” (“VIDEO
FORMAT” in Menu 4 (HDMI)), select the method of conversion for
progressive output to suit the type of material.
≥ The setting will return to “AUTO” or “AUTO1” when the disc tray is
opened, the unit is turned off or another source is selected.
When playing PAL discs
AUTO:
VIDEO:
FILM:
RQ TX111 1
ENGLISH
14
Mellows images and enhances detail in dark scenes.
Sharpens images and enhances detail in dark scenes.
Enhances the contrast for powerful images.
Suitable for animation.
ZOOM
[DVD-VR] [DVD-V] [VCD] [MPEG4] [DivX]
Automatically detects the film and video content, and
appropriately converts it.
Select when using “AUTO”, and the content is distorted.
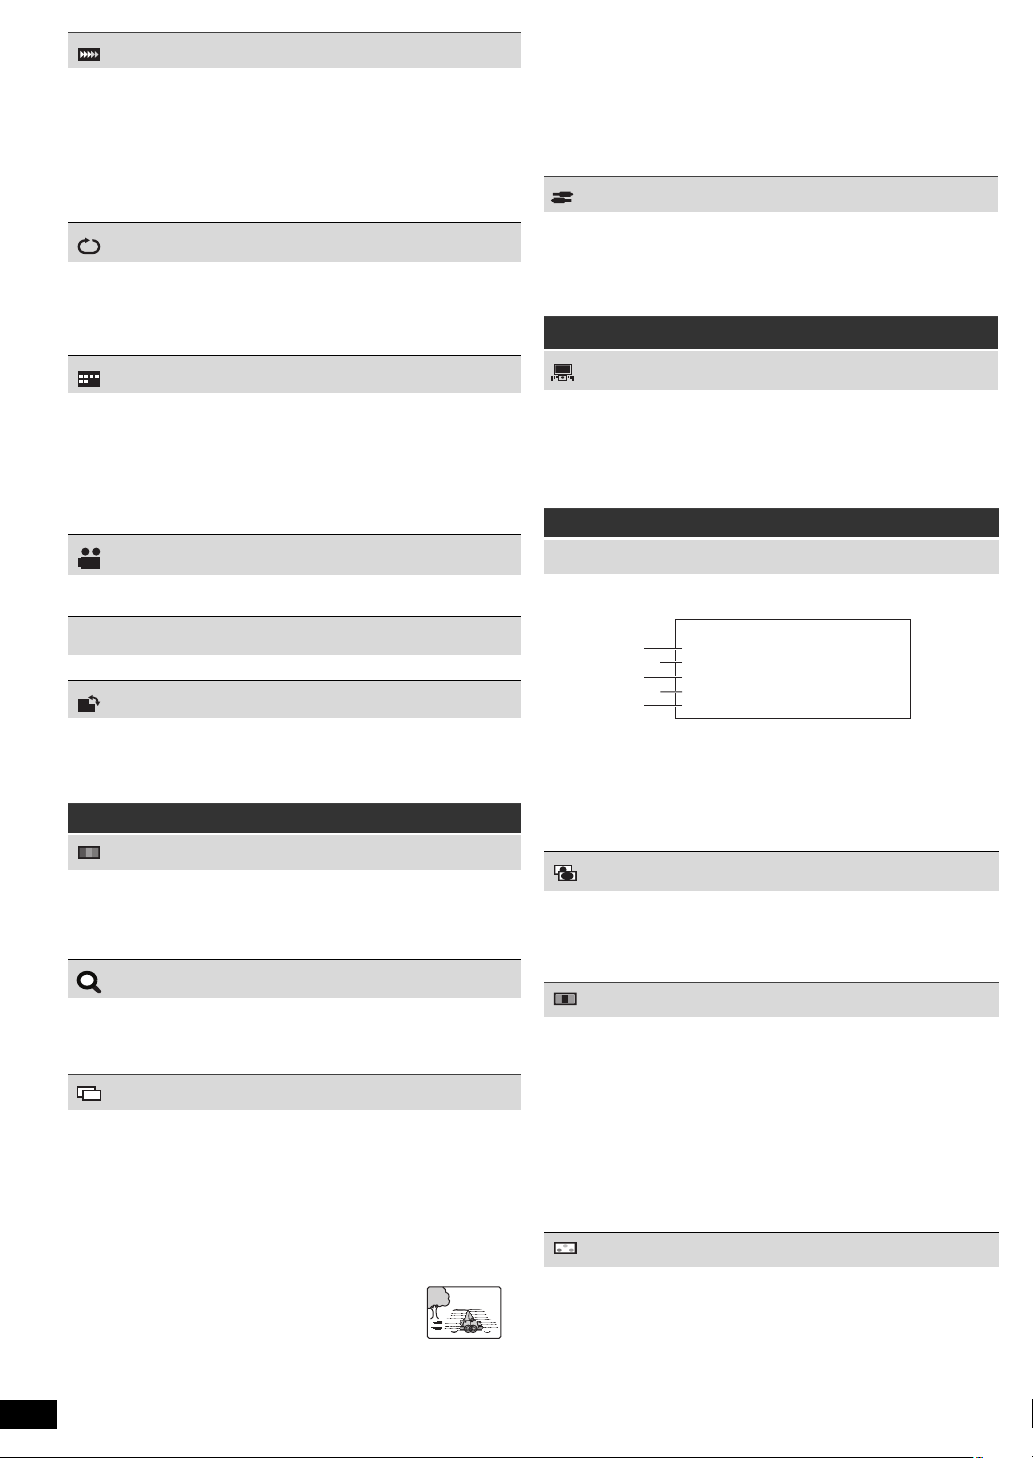
Select this if the edges of the film
content appear jagged or rough when
“AUTO” is selected.
However, if the video content is
distorted as shown in the illustration
to the right, then select “AUTO”.
), k2, k4
1 Connection status
2 Shows the output signal type.
(When “OFF” is selected in “AUDIO OUT” (B 18, HDMI menu),
“– – –” will be displayed.)
3 Shows the number of audio channels.
4 (B below, VIDEO FORMAT)
5 (B below, COLOUR SPACE)
HD ENHANCER
This works when the HDMI connection is being used with “VIDEO
PRIORITY” (B 18, HDMI menu) set to “ON”.
To sharpen the “720p”, “1080i” and “1080p” picture quality
OFF, 1 (weakest) to 3 (strongest)
VIDEO FORMAT
This works when the HDMI connection is being used with “VIDEO
PRIORITY” (B 18, HDMI menu) set to “ON”.
To select suitable picture quality with your TV
(Video recordings will be converted to, and output as, high-definition
video.)
§
480p/576p/720p/1080p (progressive)
§
480i/576i/1080i (interlaced)
≥ If the picture is distorted, press and hold [CANCEL]4 until the picture
is displayed correctly. (The output will return to “480p”/“576p”.)
§ The numbers displayed depend on the disc being played. One of
the above numbers is displayed.
COLOUR SPACE
This works when the HDMI connection is being used with “VIDEO
PRIORITY” (B 18, HDMI menu) set to “ON”.
To select suitable picture colour with your TV
YCbCr 4:2:2
YCbCr 4:4:4
RGB
” mark will appear if compatible with your TV.
≥ An “
*
≥ If the picture colour is distorted, press and hold [CANCEL]4 until the
picture colour is displayed correctly.
Page 15
Using the VIERA Link “HDAVI
DVD/CD Home Cinema
Input Selection
Playback Disc
TOP MENU (DVD)
MENU (DVD)
Playback/menu access
ControlTM”
What is VIERA Link “HDAVI Control”
VIERA Link “HDAVI Control”
VIERA Link “HDAVI Control” is a convenient function that offers linked
operations of this unit, and a Panasonic TV (VIERA) under “HDAVI
Control”. You can use this function by connecting the equipment with the
HDMI cable. See the operating instructions for connected equipment for
operational details.
≥ VIERA Link “HDAVI Control”, based on the control functions provided by
HDMI which is an industry standard known as HDMI CEC (Consumer
Electronics Control), is a unique function that we have developed and
added. As such, its operation with other manufacturers’ equipment that
supports HDMI CEC cannot be guaranteed.
≥ This unit supports “HDAVI Control 5” function.
“HDAVI Control 5” is the newest standard (current as of December,
2009) for Panasonic’s HDAVI Control compatible equipment. This
standard is compatible with Panasonic’s conventional HDAVI
equipment.
≥ Please refer to individual manuals for other manufacturers’ equipment
supporting VIERA Link function.
The TV with “HDAVI Control 2 or later” function enables the following
operation: Easy control only with VIERA remote control (for
“HDAVI Control 2 or later”) (B right).
Preparation
≥ Confirm that the HDMI connection has been made (B 8).
≥ Set “VIERA Link” to “ON” (B 19, HDMI menu).
≥ To complete and activate the connection correctly, turn on all VIERA
Link “HDAVI Control” compatible equipment and set the TV to the
corresponding HDMI input mode for this unit.
Setting the TV audio for VIERA Link “HDAVI Control”
Select “AV”, “AUX”, “ARC” or “D-IN” to work with the linked operations.
Refer to TV audio setting in EASY SETUP (B 9) or “TV AUDIO” in HDMI
menu (B 19).
Confirm the audio connection to the SCART (AV) terminal (for “AV”), AUX
terminal (for “AUX”), HDMI AV OUT terminal (for “ARC”) or DIGITAL
AUDIO IN OPTICAL terminal (for “D-IN”) (B 8).
Setting the STB audio for VIERA Link “HDAVI Control”
Select “D-IN” to work with the linked operations.
Refer to STB setting in “Making settings for digital audio input” (B 10).
Confirm the audio connection to the DIGITAL AUDIO IN OPTICAL
terminal (for “D-IN”) (B 8).
Whenever the connection or settings are changed, reconfirm the points
above.
§1 “AV”, “AUX”, “ARC” or “D-IN” (DIGITAL IN) works depending on the
TV audio setting (B above, Setting the TV audio for VIERA Link
“HDAVI Control”).
§2
“D-IN” (DIGITAL IN) works depending on the STB audio setting
(B above, Setting the STB audio for VIERA Link “HDAVI Control”).
What you can do with “HDAVI Control”
Auto lip sync
(Available when using VIERA Link “HDAVI Control” with
“HDAVI Control 3 or later” compatible TV)
This function automatically provides synchronised audio and video
output. (This works only when the source is “DVD/CD”, “USB”, “AV”
§1
“AUX”
, “ARC”§1 or “D-IN”
≥ When using “DVD/CD” or “USB” as the source, set “TIME DELAY” in
§1, 2
.)
VIDEO menu to “0 ms/AUTO” (B 18).
One touch play
You can turn on this unit and the TV, and start playing the disc with a
single press of a button.
(Remote control only)
During standby mode, press [1 PLAY]6 to start disc
playback.
This unit’s speakers will be automatically activated (B right).
[Note]
Playback may not be immediately displayed on the TV. If you miss the
beginning portion of playback, press [SKIP:]6 or [SEARCH6]6 to
go back to where playback started.
§1
,
Auto input switching
(Power on link)
When the following operations are performed, the TV will automatically
switch the input channel and display the corresponding action.
Additionally when the TV is off, the TV will automatically turn on.
– When play starts on the unit
– When an action that uses the display screen is performed (e.g., START
menu)
≥ When you switch the TV input to TV tuner mode or the STB input
channel, this unit will automatically switch to “AV”
§1, 2
or “D-IN”
mode, or when iPod/iPhone is not connected.)
≥ When this unit is in “DVD/CD” mode, the TV will automatically switch its
input mode for this unit.
≥ The TV will automatically switch to TV tuner mode when:
– you press [EXIT].
– you press [RETURN] to exit the START menu.
– you select “AV”§1, “AUX”§1, “ARC”§1 or “DIGITAL IN”§1 from the
START menu.
– playback stops ([DVD-V] [VCD]) or when this unit turns off.
§3 This does not work during playback or resume mode when “DVD/CD”
§4 Only after the TV automatically switched to the HDMI input mode for
. (For “IPOD” mode, this works only in iPod/iPhone music
§3, 4
or “USB” is selected as the source. (For “IPOD” mode, this works
only in iPod/iPhone music mode, or when iPod/iPhone is not
connected.)
this unit.
§1
, “AUX”§1, “ARC”§1
§3, 4
§4
Power off link
All connected equipment compatible with “HDAVI Control”, including this
unit, automatically turn off when you switch the TV off.
To continue audio playback even when the TV is turned off, select
“VIDEO” (B 19, “POWER OFF LINK” in HDMI menu).
[Note]
When you press [Í]1, only this unit turns off. Other connected
equipment compatible with VIERA Link “HDAVI Control” stays on.
For details, refer also to the operating instructions for your TV.
Speaker Selection
You can select whether audio is output from this unit’s speakers or the TV
speakers by using the TV menu settings. For details, refer to the
operating instructions for your TV.
Home Cinema
This unit’s speakers are active.
≥ When you turn on this unit, this unit’s speakers will be automatically
activated.
≥ When this unit is in standby mode, changing the TV speakers to this
unit’s speakers in the TV menu will automatically turn this unit on and
select “AV”
≥ The TV speakers are automatically muted.
≥ You can control the volume setting using the volume or mute button on
the TV’s remote control. (The volume level is displayed on the main
unit’s display.)
≥ To cancel muting, you can also use this unit’s remote control (B 4).
≥ If you turn off this unit, TV speakers will be automatically activated.
TV
TV speakers are active.
≥ The volume of this unit is set to “0”.
– This function works only when “DVD/CD”, “USB”, “AV”
≥ Audio output is 2-channel audio.
When switching between this unit speakers and TV speakers, the TV
screen may be blank for several seconds.
“ARC”
§1
, “AUX”§1, “ARC”§1 or “D-IN”
§1
or “D-IN”
§1, 2
is selected as the source on this unit.
§1, 2
as the source.
§1
, “AUX”§1,
Easy control only with VIERA remote control (for
“HDAVI Control 2 or later”)
You can control the playback menus of this unit with the TV’s remote
control.
1 Select this unit’s operation menu by using the TV menu settings.
(For details, refer to the operating instructions for your TV.)
The START menu will be shown.
e.g. [DVD-V]
Getting StartedPlaying DiscsOther OperationsReference
Reference
ENGLISH
RQ TX111 1
15
15
Page 16
≥ The START menu can also be shown by using a button on the TV’s
Dock adapter
(not included)
iPod/iPhone
Dock for iPod/iPhone
Push
Main unit
e.g.
iPod
Music
Home Cinema
Playlists
Artists
Albums
iPod
Home Cinema
Music
Videos
All (iPod display)
Input Selection
Sound
iPod Information
iPod Home Cinema
Good morning
Ronaldo
Happy days
3 of 20
2:43 -1:15
Playback condition
Song
Artist
Album
Current position
Shuffle mode
Repeat mode
remote control (e.g. [OPTION]).
– When “DVD/CD” or “USB” is selected as the source, the TV’s
– This does not work while iPod music playback screen is displayed
2 Select the desired item on the START menu (B 10).
When the on-screen control panel appears
e.g. [DVD-V] (when “Playback Disc” is selected from the START menu.)
You can operate the playback with the indicated controls.
Getting StartedPlaying DiscsOther OperationsReference
≥ The on-screen control panel can also be shown by using a button on the
TV’s remote control (e.g. [OPTION]).
– This works only during “DVD/CD” or “USB” playback and resume
modes or, while iPod music playback screen is displayed on the TV.
[Note]
≥ Depending on the menu, some button operations cannot be performed
from the TV’s remote control.
≥ You cannot input numbers with the numbered buttons on the TV’s
remote control ([0] to [9]). Use this unit’s remote control to select the
play list etc.
Operating other devices
You can play an external device through your home theater system.
Using the iPod/iPhone
You can enjoy iPod/iPhone music through this unit’s speakers or view
iPod/iPhone videos/photos on the TV.
Preparation
≥ To view photos/videos from the iPod/iPhone
– Ensure the video connection to the SCART (AV) terminal on this unit and
select “VIDEO” from “VIDEO OUT – SCART” in VIDEO menu (
– Operate the iPod/iPhone menu to make the appropriate photo/video
output settings for your TV. (Refer to operating instructions for your
iPod/iPhone.)
≥ To display the picture, turn on the TV and select the appropriate video
input mode.
≥ Before connecting/disconnecting the iPod/iPhone, turn the main unit off
or reduce the volume of the main unit to its minimum.
Push # to open the Dock for iPod/iPhone lid.
1
Connect the iPod/iPhone (not included) firmly.
2
≥ Attach the dock adapter which should be supplied with your iPod/
Press [iPod]5 to select “IPOD”.
3
The iPod/iPhone automatically switches to this unit’s display mode.
e.g.
Press [FUNCTIONS]D to select the menu.
4
Each time you press the button:
RQ TX111 1
ENGLISH
16
16
remote control works only during stop mode.
on the TV.
iPhone to the dock for the stable use of the iPod/iPhone.
If you need an adapter, consult your iPod/iPhone dealer.
Music menu -----------------------------------------------) Video menu
^--- iPod/iPhone menu (iPod/iPhone LCD) (-}
When using the START menu in “IPOD” mode
e.g.
Music: Shows the music menu.
Videos: Shows the video menu.
All (iPod display): Switches to iPod/iPhone menu.
iPod Information: Display iPod/iPhone details.
Enjoying music/videos
Press [FUNCTIONS]D to select music or video menu
1
on the TV.
Press [3, 4]9 to select an item and press [OK]9.
2
≥ Press [2, 1]9 to skip page by page.
≥ To return to the previous screen, press [RETURN]E.
Play starts from the selected song or video.
e.g. music playback screen
§ These icons will only appear for music mode.
: Song shuffle
: Album shuffle
B
18).
Basic controls (For music and videos only)
Button Function
[1 PLAY]6 Play
[∫ STOP]6, [; PA USE ]6 Pause
[SKIP:, SKIP 9]6 Skip
(press and hold)
[SKIP:, SKIP 9]6
Other methods of playback
Shuffle mode
Press [PLAY MODE]: several times.
SONGS, ALBUMS, OFF
Repeat mode
Press and hold [–REPEAT]: and then press the button several times
within a few seconds.
During the music/video playback: ONE, ALL, OFF
[Note]
≥ Music playback modes set on the iPod/iPhone will be maintained when
connected to the main unit. Changes made while the iPod/iPhone is
connected to the main unit will be kept on the iPod/iPhone after
disconnecting it.
≥ If the video menu is accessed, the video shuffle playback mode on the
iPod/iPhone is set to off when the iPod/iPhone is disconnected from the
unit.
Enjoying photos
1
2
The remote control operation may vary between iPod/iPhone models.
While an iPod/iPhone is connected
Do not push or pull your iPod/iPhone back and forth with great force.
About recharging the battery
≥ iPod/iPhone will start recharging regardless of whether this unit is on or
off.
≥ “IPOD ¢” will be shown on the main unit’s display during iPod/iPhone
charging in main unit standby mode.
≥ Check iPod/iPhone to see if the battery is fully recharged.
(For music playback only)
Press [FUNCTIONS]D to select the iPod/iPhone menu.
Play a slideshow on your iPod/iPhone.
You can use the remote control to operate the iPod/iPhone menu.
[3, 4]9: To navigate menu items.
[OK]9: To go to the next menu.
[RETURN]E: To return to the previous menu.
: Repeat 1 song
: Repeat all
Search
Page 17
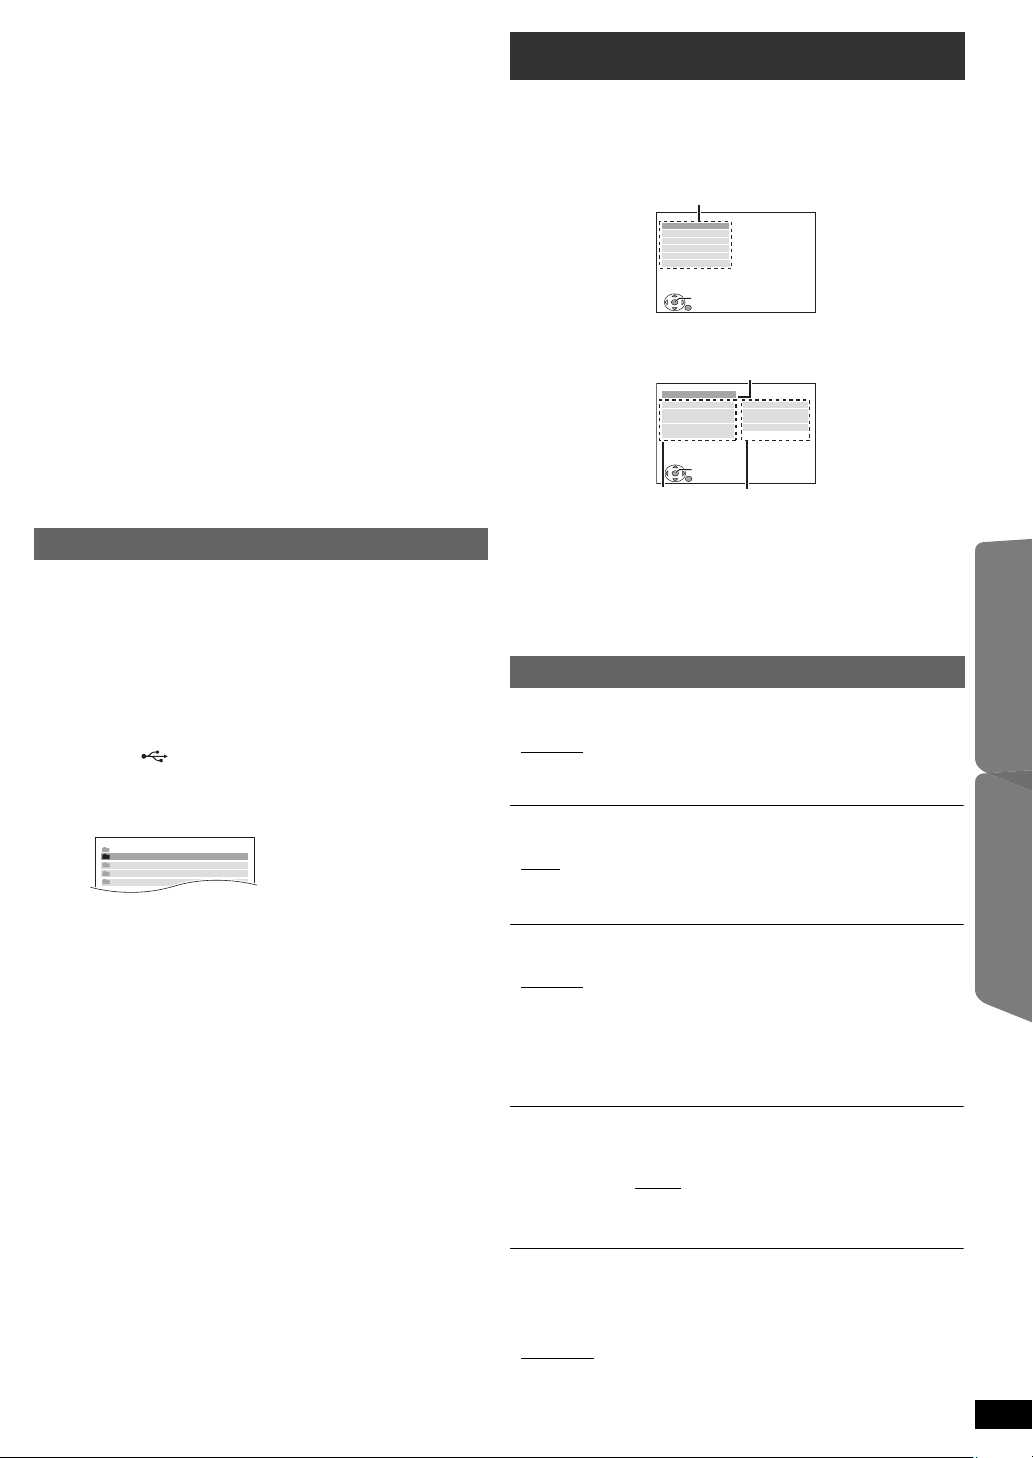
≥ If you are not using iPod/iPhone for an extended period of time after
USB
ROOT
Songs
Concert_01
Concert_02
Southern AI
Menu
SET
RETURN
DISC
CURRENT SETTINGS
AUDIO
SUBTITLE
MENUS
RATINGS
PASSWORD
ENGLISH
AUTO
ENGLISH
8 NO LIMIT
Display the current setting
of the items below
Item Setting
recharging has completed, disconnect it from main unit, as the battery
will be depleted naturally. (Once fully recharged, additional recharging
will not occur.)
Compatible iPod/iPhone (as of December 2009)
≥ iPhone 3GS (16GB, 32GB)
≥ iPhone 3G (8GB, 16GB)
≥ iPhone (4GB, 8GB, 16GB)
≥ iPod nano 5th generation (video camera) (8GB, 16GB)
≥ iPod touch 2nd generation (8GB, 16GB, 32GB, 64GB)
≥ iPod classic (120GB, 160GB (2009))
≥ iPod nano 4th generation (video) (8GB, 16GB)
≥ iPod classic (160GB (2007))
≥ iPod touch 1st generation (8GB, 16GB, 32GB)
≥ iPod nano 3rd generation (video) (4GB, 8GB)
≥ iPod classic (80GB)
≥ iPod nano 2nd generation (aluminum) (2GB, 4GB, 8GB)
≥ iPod 5th generation (video) (60GB, 80GB)
≥ iPod 5th generation (video) (30GB)
≥ iPod nano 1st generation (1GB, 2GB, 4GB)
≥ iPod 4th generation (color display) (40GB, 60GB)
≥ iPod 4th generation (color display) (20GB, 30GB)
≥ iPod 4th generation (40GB)
≥ iPod 4th generation (20GB)
≥ iPod mini (4GB, 6GB)
Compatibility depends on the software version of your iPod/iPhone.
To use the iPod touch/iPhone features
1 Press the Home button on the iPod touch/iPhone.
2 Select the iPod touch/iPhone features on the touch screen to operate.
Playing from an USB device
You can connect and play tracks or files from USB mass storage class
devices (B 25, USB Port).
Devices which are defined as USB mass storage class:
– USB devices that support bulk only transfer.
Preparation
≥ Before connecting any USB mass storage device to the unit, ensure
that the data stored therein has been backed up.
≥ It is not recommended to use a USB extension cable. The USB device
connected using the cable will not be recognised by this unit.
Connect the USB device (not included) to the
1
USB port ( 6).
Press [RADIO, EXT-IN]5 to select “USB”.
2
The menu screen appears.
e.g.
≥ If “PLAYBACK MENU” screen appears, select “AUDIO/PICTURE”
or “VIDEO” by pressing [3, 4]9 and then [OK]9.
≥ To display/exit the screen, press [MENU]7.
Press [3, 4]9 to select an item and press [OK]9.
3
≥ Press [2, 1]9 to skip page by page.
≥ To return to 1 level up from the current folder, press [RETURN]E.
Play starts from the selected content.
≥ For other operating functions, they are similar to those described in
“Playing Discs” (B 12 to 14).
[Note]
≥ Maximum: 255 folders (excluding Root folder), 4000 files, 28 characters
for file/folder name.
≥ Only one memory card will be selected when connecting a multiport
USB card reader. Typically the first memory card inserted.
Changing the player settings
Press [DVD]5 to select “DVD/CD”.
1
Press [START]C to show the START menu.
2
Press [3, 4]9 to select “Setup” and press [OK]9.
3
MAIN
DISC
VIDEO
AUDIO
DISPLAY
HDMI
OTHERS
SET
RETURN
Press [3, 4]9 to select the menu and press [OK]9.
4
Press [3, 4]9 to select the item and press [OK]9.
5
Press [3, 4]9 to make the settings and press [OK]9.
6
≥ To return to the previous screen, press [RETURN]E.
≥ To exit the screen, press [START]C.
≥ The settings remain intact even if you switch the unit to standby.
≥ Underlined items are the factory settings in the following menus.
DISC menu
AUDIO
Choose the audio language.
≥ ENGLISH
≥ RUSSIAN ≥ HUNGARIAN ≥ CZECH ≥ POLISH
≥ ORIGINAL
SUBTITLE
Choose the subtitle language.
§3
≥ AUTO
≥ GERMAN ≥ RUSSIAN ≥HUNGARIAN ≥ CZECH
≥ POLISH ≥OTHER – – – –
MENUS
Choose the language for disc menus.
≥ ENGLISH
≥ RUSSIAN ≥ HUNGARIAN ≥ CZECH ≥ POLISH
≥ OTHER – – – –
§1 The original language designated on the disc is selected.
§2 Input the appropriate code from the language code list (B 4).
§3 If the language selected for “AUDIO” is not available, subtitles appear
in that language (if available on the disc).
SUBTITLE TEXT [DivX]
Select a suitable item according to the language used for DivX subtitles
text (B 19)
≥ LATIN1 ≥LATIN2 ≥ CYRILLIC ≥TURKISH
This item is displayed only after a file with subtitle text (B 19) has been
played and when “LANGUAGE” in DISPLAY menu is set to “ENGLISH”
(B 18).
RATINGS
Set a rating level to limit DVD-Video play.
Setting ratings (When level 8 is selected)
≥ 0 LOCK ALL: To prevent play of discs without rating levels.
≥ 1 to 7
≥ 8 NO LIMIT
When you select your ratings level, a password screen is shown.
Follow the on-screen instructions.
≥ FRENCH ≥ SPANISH ≥ GERMAN
§1
≥ OTHER – – – –
§2
≥ ENGLISH ≥ FRENCH ≥ SPANISH
§2
≥ FRENCH ≥ SPANISH ≥ GERMAN
§2
Getting StartedPlaying DiscsOther OperationsReference
ENGLISH
RQ TX111 1
17
17
Page 18
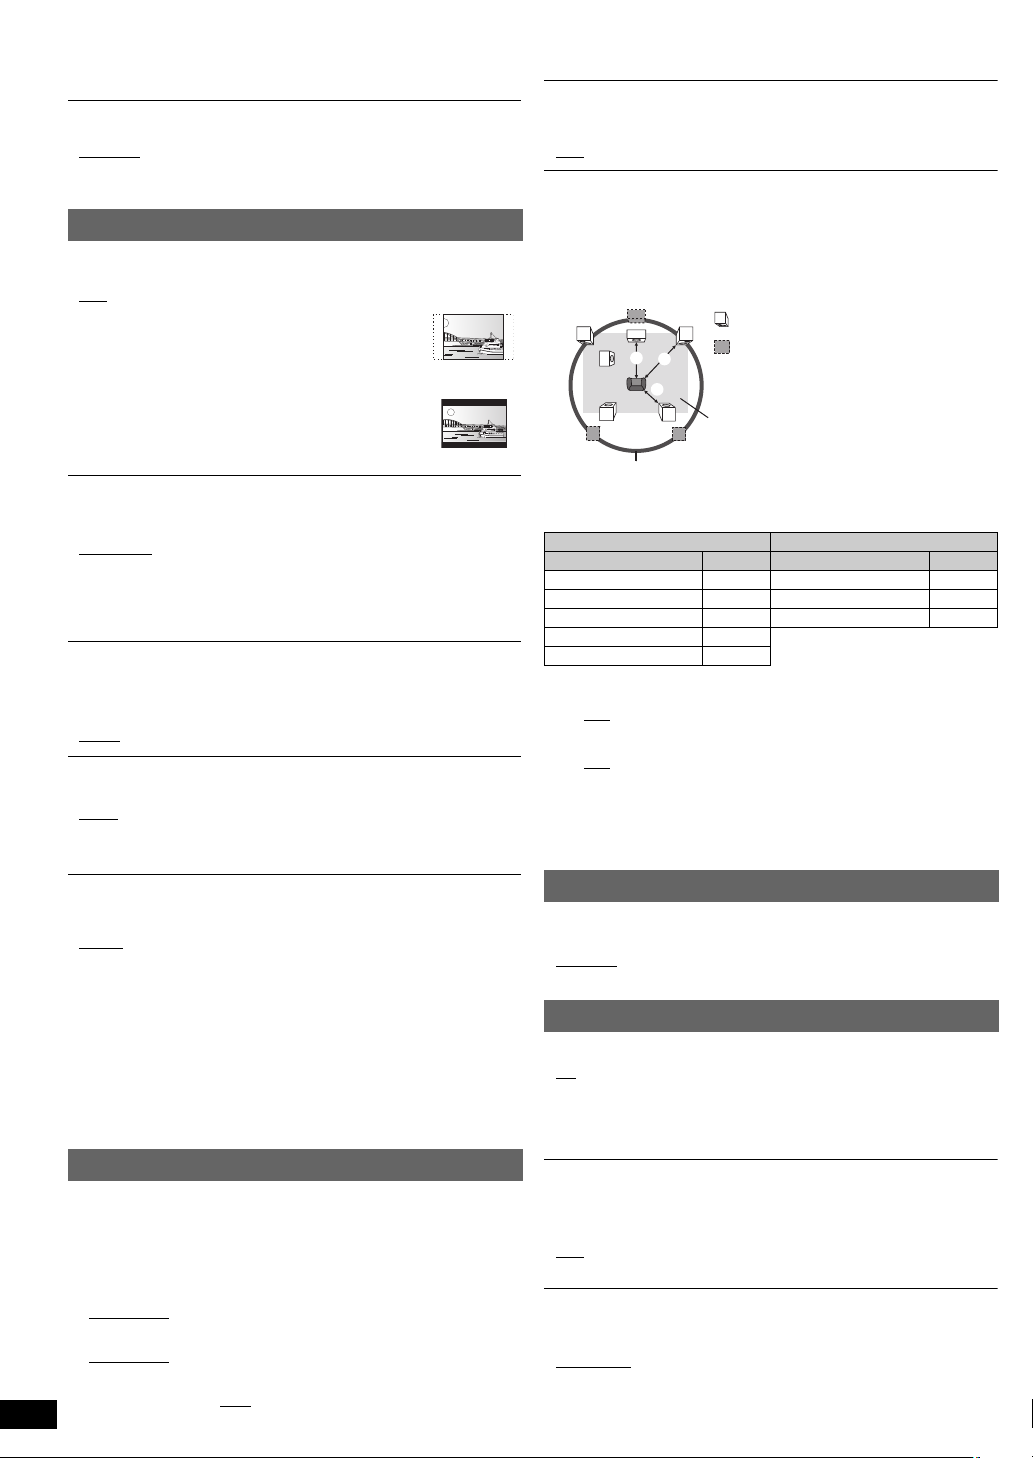
Do not forget your password.
Actual speaker position
Ideal speaker position
Primary listening
distance
Approximate room dimensions
Circle of constant primary listening distance
A message screen will be shown if a DVD-Video disc exceeding the rating
level is inserted in the unit.
Follow the on-screen instructions.
PASSWORD
Change the password for “RATINGS”.
≥ SETTING
To change ratings (When level 0 to 7 is selected)
≥ CHANGE: Follow the on-screen instructions.
VIDEO menu
TV ASPECT
Getting StartedPlaying DiscsOther OperationsReference
Choose the setting to suit your TV.
: Widescreen TV (16:9)
≥ 16:9
≥ 4:3PAN&SCAN: Regular aspect TV (4:3)
The sides of the widescreen picture are cut off so it
fills the screen (unless prohibited by the disc).
≥ 4:3LETTERBOX: Regular aspect TV (4:3)
Widescreen picture is shown in the letterbox style.
§ When audio is output from HDMI AV OUT terminal, and the
connected equipment does not support the item selected, the actual
output will depend on the performance of this connected equipment.
DYNAMIC RANGE
≥ ON: Adjusts for clarity even when the volume is low. Convenient for
late night viewing. (Only works with Dolby Digital)
≥ OFF
SPEAKER SETTINGS
Select the delay time of the speakers.
(Center and surround speakers only)
For optimum listening with 5.1-channel sound, all the speakers, except for
the subwoofer, should be the same distance from the seating position.
If you have to place the center or surround speakers closer to the seating
position, adjust the delay time to make up for the difference.
C
C
L
SW
LS
LS
RS
RS
:
R
:
:
TIME DELAY
When connected with a Plasma display, adjust if you notice the audio is
out of sync with the video.
≥ 0 ms/AUTO
≥ 20 ms ≥ 40 ms ≥ 60 ms
≥ 80 ms ≥ 100 ms
When using VIERA Link “HDAVI Control” with “HDAVI Control 3 or later”
compatible TV (B 15), select “0 ms/AUTO”.
Audio and video will automatically be set in sync.
NTSC DISC OUT
Choose PAL 60 or NTSC output when playing NTSC discs (B 20, Video
systems).
≥ NTSC: When connected to an NTSC TV.
: When connected to a PAL TV.
≥ PA L60
STILL MODE
Specify the type of picture shown when paused.
≥ AUTO
≥ FIELD: The picture is not blurred, but picture quality is lower.
≥ FRAME: Overall quality is high, but the picture may appear blurred.
VIDEO OUT – SCART
Choose the video signal format to be output from the SCART (AV)
terminal.
≥ VIDEO
≥ S-VIDEO
≥ RGB 1: (Only when connected to a RGB compatible TV)
If you always would like to view the picture from the unit in RGB signal,
select this mode. The TV screen will automatically switch to display the
picture from the unit when the unit is turned on.
≥ RGB 2: (Only when connected to a RGB compatible TV)
When in TV tuner mode, if the selector is set to “DVD/CD”, the TV screen
will automatically switch to display the picture from the unit only during disc
playback (
DVD/CD.
The TV picture will be displayed when the selector is set to “AV”. With
other selectors, the picture from this unit will be displayed.
[DVD-V] [DVD-VR] [VCD]
) or when viewing on-screen menu of
AUDIO menu
Select to suit the type of equipment you connected to the HDMI AV OUT
terminal.
Select “BITSTREAM” when the equipment can decode the bitstream
(digital form of 5.1-channel data). Otherwise, select “PCM”.
(If the bitstream is output to the equipment without a decoder, high levels
of noise can be output and may damage your speakers and hearing.)
DOLBY DIGITAL
≥BITSTREAM ≥PCM
§
DTS
≥BITSTREAM
§
MPEG
RQ TX111 1
ENGLISH
≥BITSTREAM ≥PCM
§
≥PCM
18
18
If either distance a or b is less than c, find the difference in the table
and change to the recommended setting.
a Center speaker b Surround speaker
Difference (Approx.) Setting Difference (Approx.) Setting
30 cm 1ms 150 cm 5ms
60 cm 2ms 300 cm 10ms
90 cm 3ms 450 cm 15ms
120 cm 4ms
150 cm 5ms
≥ SETTINGS:
≥ C DELAY (Center Delay):
, 1ms, 2ms, 3ms, 4ms, 5ms
0ms
Select the delay time for your center speaker.
≥ LS/RS DELAY (Left Surround/Right Surround Delay):
, 5ms, 10ms, 15ms
0ms
Select the delay time for your surround speakers.
≥ TEST TONE: SETTING
This item is only displayed when “DVD/CD” is selected.
Use the test tone for speaker level adjustments (B 11, Adjusting
the speaker output level manually).
DISPLAY menu
LANGUAGE
Choose the language for the on-screen messages.
≥ ENGLISH
≥ PУCCKИЙ ≥MAGYAR ≥ ÇESKY ≥POLSKI
≥ FRANÇAIS ≥ ESPAÑOL ≥ DEUTSCH
HDMI menu
VIDEO PRIORITY
≥ ON: When using the HDMI AV OUT terminal for video output. The
resolution of the video output from the HDMI AV OUT terminal is
optimised according to the capability of the connected
equipment (e.g. TV).
≥ OFF: When not using the HDMI AV OUT terminal for video output.
AUDIO OUT
≥ ON: When audio output is from the HDMI AV OUT terminal.
(Depending on the capabilities of the connected equipment,
audio output may differ from the audio settings of the main unit.)
: When audio output is not from the HDMI AV OUT terminal. (The
≥ OFF
audio is output using the settings of the main unit.)
RGB RANGE
This works only when “COLOUR SPACE” in Menu 4 (HDMI) is set to RGB
(B 14).
≥ STANDARD
≥ ENHANCED: When the black and white images are not distinct.
Page 19
VIERA Link
SET
OTHERS−REGISTRATION (DivX)
YOU MUST REGISTER YOUR DEVICE TO
PLAY DivX PROTECTED VIDEOS.
REGISTRATION CODE:
XXXXXXXXXX
REGISTER AT http://vod.divx.com
10 alphanumeric characters
≥ ON: The VIERA Link “HDAVI Control” function is available (B 15).
≥ OFF
POWER OFF LINK
Select the desired power off link setting of this unit for VIERA Link
operation (B 15). (This works depending on the settings of the connected
VIERA Link “HDAVI Control” compatible equipment.)
≥ VIDEO/AUDIO
≥ VIDEO: When the TV is turned off, this unit will turn off except during the
: When the TV is turned off, this unit will turn off
automatically.
following conditions:
– audio playback ([CD] [MP3] [WMA])
– iPod/iPhone mode
– radio mode
– “AV”, “AUX”, “ARC” or “D-IN” mode (non-selected TV audio
setting for
VIERA Link
)
TV AUDIO
Select the TV audio input to work with the
≥ AUX
≥ ARC
≥ DIGITAL IN
≥ AV
VIERA Link
operations (B 15).
OTHERS menu
REGISTRATION [DivX]
Display the unit’s registration code.
≥ SHOW CODE
You need this registration code to purchase and play DivX Video-onDemand (VOD) content (B right).
This setting is only displayed until a DivX VOD content is played or after
this unit is deregistered.
DEREGISTRATION [DivX]
Display the unit’s deregistration code.
≥ SET
You need this deregistration code to cancel this unit’s registration
(B right).
This setting is only displayed after playing DivX VOD content for the first
time.
SLIDE SHOW TIME
Set the speed of the slideshow.
Factory preset: 3 SEC
≥ 1 SEC to 15 SEC (in 1-unit steps)
≥ 15 SEC to 60 SEC (in 5-unit steps)
≥ 60 SEC to 180 SEC (in 30-unit steps)
FL DIMMER
Change the brightness of the unit’s display.
BRIGHT
≥
≥ DIM: The display is dimmed.
≥ AUTO: The display is dimmed, but brightens when you perform
EASY SETUP
≥ SET (B 9)
DVD-VR/DATA
Select to play only DVD-VR or DATA format.
≥ DVD-VR
≥ DATA: To play the data files on DVD-R/-RW.
some operations.
: To play the video programs on DVD-R/-RW.
DivX information
ABOUT DIVX VIDEO:
DivX® is a digital video format created by DivX, Inc. This is an official DivX
Certified device that plays DivX video. Visit www.divx.com for more
information and software tools to convert your files into DivX video.
ABOUT DIVX VIDEO-ON-DEMAND:
This DivX Certified® device must be registered in order to play DivX
Video-on-Demand (VOD) content.
To generate the registration code, locate the DivX VOD section in the
device setup menu.
Go to vod.divx.com with this code to complete the registration process
and learn more about DivX VOD.
Display the unit’s registration code
(B left, “REGISTRATION” in OTHERS menu)
≥ After playing DivX VOD content for first time, the registration code is not
displayed.
≥ If you purchase DivX VOD content using a registration code different
from this unit’s code, you will not be able to play this content.
Cancel the unit’s registration
Select “SET” in “DEREGISTRATION” (B left) and follow the on-screen
instructions.
Use the deregistration code to cancel the registration in
http://vod.divx.com.
Regarding DivX content that can only be played a set
number of times
Some DivX VOD contents can only be played a set number of times.
When you play this content, the number of times already played and
initially playable number of times is displayed.
≥ The remaining number of plays decreases each time a programme is
played. However, when playing from the point where play was
previously stopped, the remaining number of plays does not decrease
due to the resume play function.
Displaying DivX subtitles text
You can display subtitles text on a DivX video disc with this unit.
This function has no relation to the subtitles specified in the DivX standard
specifications and has no clear standard.
Set “SUBTITLE” in Menu 1 (Disc/Play) (B 14)
Types of subtitles text file that can be displayed
Subtitles text that satisfy the following conditions can be displayed on this
unit.
≥ File format: MicroDVD, SubRip, or TMPlayer
≥ File extension: “.SRT”, “.srt”, “.SUB”, “.sub”, “.TXT”, or “.txt”
≥ File name: No more than 44 characters excluding the file extension
≥ The DivX video file and subtitles text file are inside the same folder, and
the file names are the same except for the file extensions.
≥ If there are more than one subtitles text files inside the same folder, they
are displayed in the following order of priority: “.srt”, “.sub”, “.txt”.
[Note]
≥ If the file name of the DivX video file is not displayed correctly on the
menu screen (the file name is displayed as “¢”), or the file size exceeds
256 KB, the subtitles text may not be displayed correctly.
≥ The subtitles text cannot be displayed during menu display or when
operations such as search are being performed.
≥ DivX video files that do not display “TEXT ON” do not contain subtitles
text. Subtitles text cannot be displayed.
≥ If the subtitles text are not displayed correctly, try changing the subtitle
text settings (B 17).
Getting StartedPlaying DiscsOther OperationsReference
SCREEN DIMMER
This is to prevent burn marks on the TV screen.
≥ OFF
≥ WAIT 5 MIN
: If there is no operation for 5 minutes, the picture turns
grey. The TV screen will resume when you perform some
operations. (This does not work during video and picture
playback.)
DEFAULTS
This returns all values in the MAIN menu to the default settings.
≥ RESET
The password screen is shown if “RATINGS” (B 17) is set. Please enter
the same password, then turn the unit off and on again.
ENGLISH
RQ TX111 1
19
19
Page 20
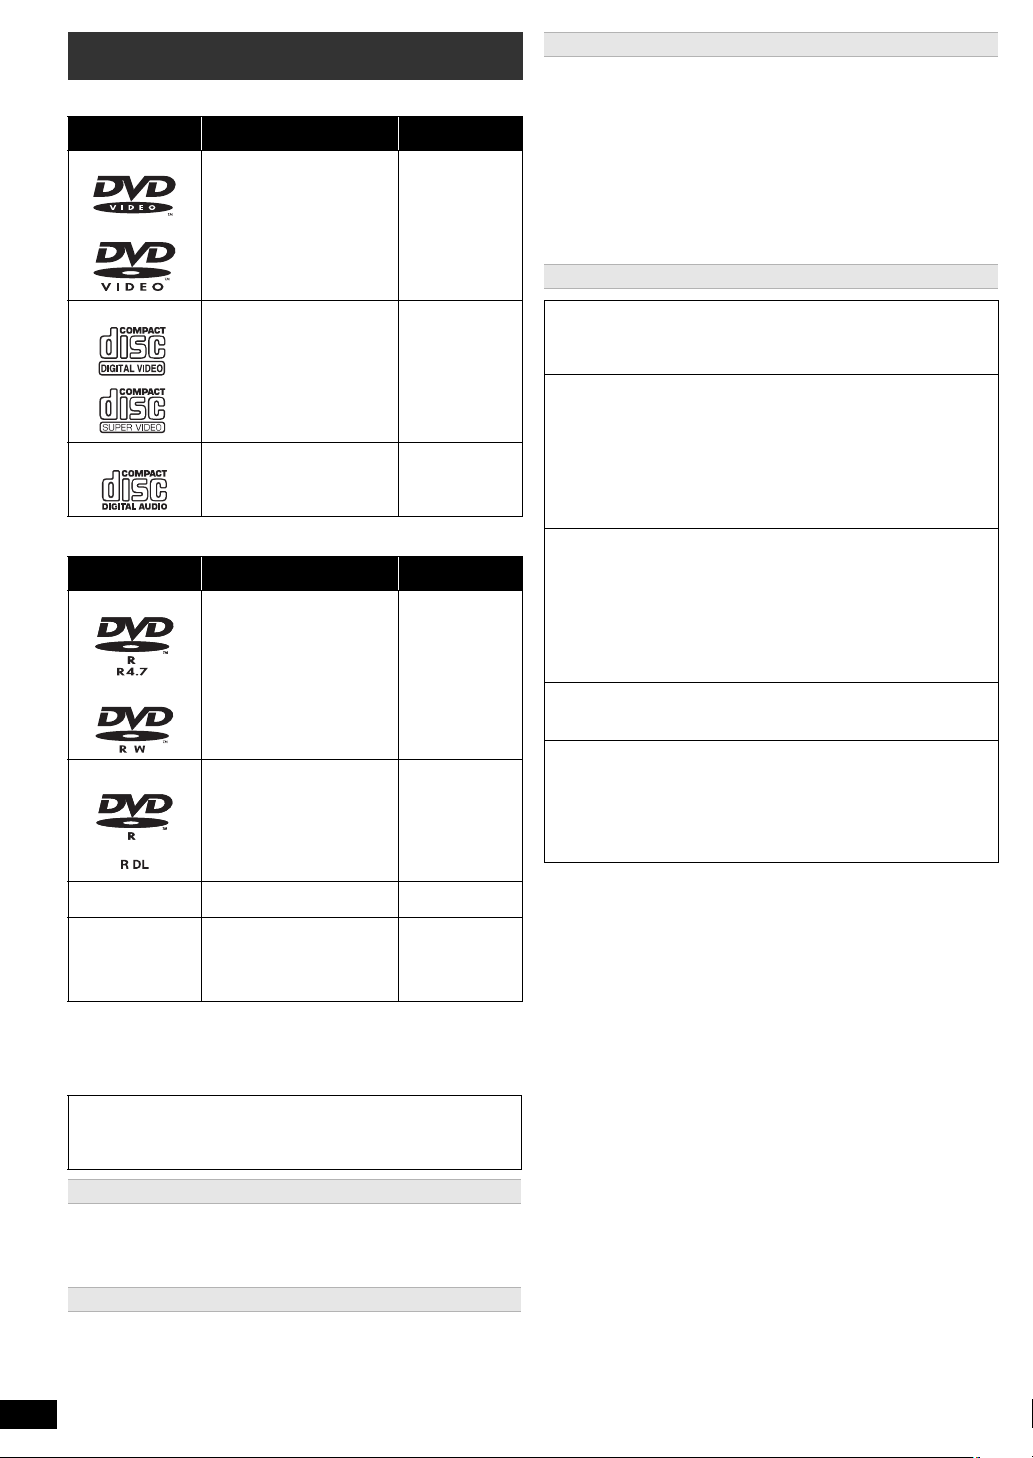
Discs that can be played
Commercial discs
Type of media/
Logo
DVD-Video High quality movie and
Getting StartedPlaying DiscsOther OperationsReference
Video CD Music discs with video
CD Music discs [CD]
Recorded discs
Type of media/
Logo
DVD-R/RW ≥ DVD-Video Format
DVD-R DL ≥ DVD-Video Format
rR/rRW/rRDL ≥ +VR (+R/+RW Video
CD-R/RW ≥ MP3 format
≥ Before playback, finalise the disc on the device it was recorded on.
≥ It may not be possible to play all the above-mentioned discs in some
cases due to the type of disc, the condition of the recording, the
recording method, or how the files were created (B right, Tips for
making data discs).
Note about using a DualDisc
The digital audio content side of a DualDisc does not meet the technical
specifications of the Compact Disc Digital Audio (CD-DA) format so
playback may not be possible.
Remarks Indicated as
music discs
Including SVCD
(Conforming to IEC62107)
Formats Indicated as
≥ Version 1.1 of the DVD
Video Recording Format
≥ MP3 format
≥ JPEG format
®
format
≥ DivX
≥ MPEG4 format
≥ Version 1.2 of the DVD
Video Recording Format
®
format
≥ DivX
Recording) Format
≥ JPEG format
≥ WMA format
®
format
≥ DivX
≥ MPEG4 format
[DVD-V]
[VCD]
[DVD-V]
[DVD-VR]
[MP3]
[JPEG]
[DivX]
[MPEG4]
[DVD-V]
[DVD-VR]
[DivX]
[DVD-V]
[MP3]
[JPEG]
[WMA]
[DivX]
[MPEG4]
Disc handling precautions
≥ Do not attach labels or stickers to discs. This may cause disc warping,
rendering it unusable.
≥ Do not write on the label side with a ball-point pen or other writing
instrument.
≥ Do not use record cleaning sprays, benzine, thinner, liquids which
prevent static electricity, or any other solvent.
≥ Do not use scratch-proof protectors or covers.
≥ Do not use the following discs:
– Discs with exposed adhesive from removed stickers or labels (rented
discs, etc.).
– Discs that are badly warped or cracked.
– Irregularly shaped discs, such as heart shapes.
Tips for making data discs
[WMA] (Extension: “.WMA”, “.wma”)
Disc: CD-R/RW
≥ Compatible compression rate: between 48 kbps and 320 kbps
≥ You cannot play WMA files that are copy-protected.
[MP3] (Extension: “.MP3”, “.mp3”)
Disc: DVD-R/RW, CD-R/RW
≥ This unit does not support ID3 tags.
≥ Sampling frequency and compression rate:
– DVD-R/RW: 11.02 kHz, 12 kHz, 22.05 kHz, 24 kHz (8 kbps to
160 kbps), 44.1 kHz and 48 kHz (32 kbps to 320 kbps)
– CD-R/RW: 8 kHz, 11.02 kHz, 12 kHz, 16 kHz, 22.05 kHz, 24 kHz
(8 kbps to 160 kbps), 32 kHz, 44.1 kHz and 48 kHz (32 kbps to
320 kbps)
[JPEG] (Extension: “.JPG”, “.jpg”, “.JPEG”, “.jpeg”)
Disc: DVD-R/RW, CD-R/RW
≥ JPEG files taken on a digital camera that conform to DCF Standard
(Design rule for Camera File system) Version 1.0 are displayed.
– Files that have been altered, edited or saved with computer picture
editing software may not be displayed.
≥ This unit cannot display moving pictures, MOTION JPEG and other
such formats, still pictures other than JPEG (e.g. TIFF), or play
pictures with attached audio.
[MPEG4] (Extension: “.ASF”, “.asf”)
Disc: DVD-R/RW, CD-R/RW
≥ The recording date may differ from that of the actual date.
[DivX] (Extension: “.DIVX”, “.divx”, “.AVI”, “.avi”)
Disc: DVD-R/R DL/RW, CD-R/RW
≥ DivX files greater than 2 GB or have no index may not be played
properly on this unit.
≥ This unit supports all resolutions up to maximum of 720k480
(NTSC)/720k576 (PAL).
≥ You can select up to 8 types of audio and subtitles on this unit.
≥ There may be differences in the display order on the menu screen and
computer screen.
≥ This unit cannot play files recorded using packet write.
DVD-R/RW
≥ Discs must conform to UDF bridge (UDF 1.02/ISO9660).
≥ This unit does not support multi-session. Only the default session is
played.
CD-R/RW
≥ Discs must conform to ISO9660 level 1 or 2 (except for extended
formats).
≥ This unit supports multi-session but if there are many sessions it takes
more time for play to start. Keep the number of sessions to a minimum
to avoid this.
Discs that cannot be played
Blu-ray, HD DVD, AVCHD discs, DVD-RW version 1.0, DVD-Audio,
DVD-ROM, CD-ROM, CDV, CD-G, SACD, Photo CD, DVD-RAM, and
“Chaoji VCD” available on the market including CVD, DVCD and SVCD
that do not conform to IEC62107.
Video systems
≥ This unit can play PAL and NTSC, but your TV must match the system
used on the disc.
≥ PAL discs cannot be correctly viewed on an NTSC TV.
≥ This unit can convert NTSC signals to PAL 60 for viewing on a PAL TV
RQ TX111 1
ENGLISH
(B 18, “NTSC DISC OUT” in VIDEO menu).
20
20
Page 21
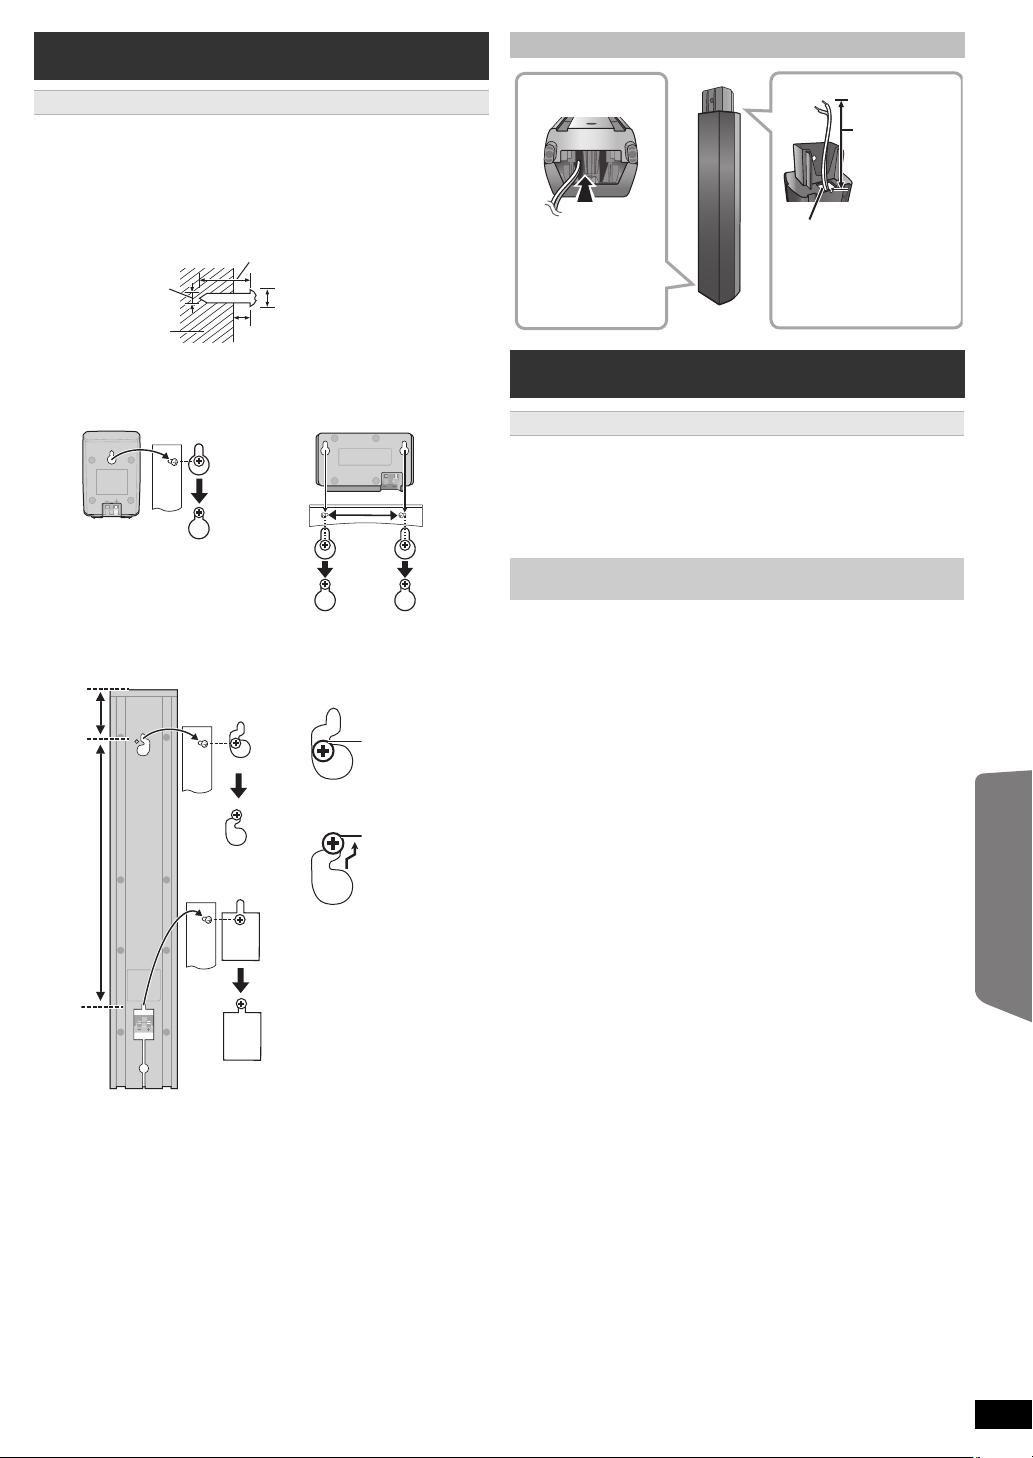
Speaker installation option
At least 30 mm
‰7.0 mm to 9.4 mm
Wall or pillar
3 mm to 5 mm
‰4.0 mm
[PT580] Surround speaker
Center speaker
72 mm
348.5 mm
DO
NOT
DO
e.g.
In this position,
the speaker will
likely fall if moved
to the left or right.
Move the
speaker so that
the screw is in
this position.
Insert the cable
from the bottom.
Pull out the cable
through the hole.
Leave about
120 mm.
Attaching to a wall
You can attach all of the speakers (except subwoofer) to a wall.
≥ The wall or pillar on which the speakers are to be attached should be
capable of supporting 10 kg per screw. Consult a qualified building
contractor when attaching the speakers to a wall. Improper attachment
may result in damage to the wall and speakers.
1 Drive a screw (not included) into the wall.
Reattaching the speaker cable
Getting StartedPlaying DiscsOther OperationsReference
Getting StartedPlaying DiscsOther Operations
2 Fit the speaker securely onto the screw(s) with the hole(s).
100 mm
[PT580] Front speaker
[PT880] Front and surround speakers
Attach to a wall without the base and the stand
Maintenance
Clean this unit with a soft, dry cloth
≥ Never use alcohol, paint thinner or benzine to clean this unit.
≥ Before using chemically treated cloth, carefully read the instructions that
came with the cloth.
Do not use commercially available lens cleaners as they may cause
malfunction. Cleaning of the lens is generally not necessary although
this depends on the operating environment.
Before moving the unit, ensure the disc tray is empty. Failure to
do so will risk severely damaging the disc and the unit.
ENGLISH
RQ TX111 1
21
21
Page 22

Troubleshooting guide
Before requesting service, make the following checks. If you are in doubt
about some of the check points, or if the solutions indicated in the
following guide do not solve the problem, consult your dealer for
instructions.
Power
No power.
Insert the AC mains lead securely. (B 8)
The unit is automatically switched to standby mode.
Getting StartedPlaying DiscsOther OperationsReference
The Sleep timer was working and had reached the set time limit. (B 4)
Power of this unit is turned off when the input for the TV is
changed.
This is a normal phenomenon when using VIERA Link “HDAVI Control 4
or later”. For details please read the operating instructions of the TV.
Unit displays
The display is dark.
Select “BRIGHT” in “FL DIMMER” in the OTHERS menu. (B 19)
“NO PLAY”
≥ You inserted a disc the unit cannot play; insert one it can. (B 20)
≥ You inserted a blank disc.
≥ You inserted a disc that has not been finalised.
“NO DISC”
≥ You have not inserted a disc; insert one.
≥ You have not inserted the disc correctly; insert it correctly. (B 12)
“OVER CURRENT ERROR”
The USB device is drawing too much power. Switch to “DVD/CD” mode,
remove the USB and turn the unit off.
“IPOD OVER CURRENT ERROR”
The iPod/iPhone is drawing too much power. Remove the iPod/iPhone,
and turn the unit off and on again.
“F61”
Check and correct the speaker cable connections. If this does not fix the
problem, consult the dealer. (B 7)
“F76”
There is a power supply problem. Consult the dealer.
“DVD U11”
Disc may be dirty. Wipe it clean.
“ERROR”
Incorrect operation performed. Read the instructions and try again.
“DVD H∑∑”
“DVD F∑∑∑”
∑ stands for a number.
≥ Trouble may have occurred. The numbers following “H” and “F” depend
on the status of the unit. Turn the unit off and then back on.
Alternatively, turn the unit off, disconnect the AC mains lead, and then
reconnect it.
≥ If the service numbers fail to clear, note the service number and contact
a qualified service person.
“U70∑”
∑ stands for a number. (The actual number following “U70” will depend on
the state of the main unit.)
≥ The HDMI connection acts unusually.
– The connected equipment is not HDMI-compatible.
– Please use HDMI cables that have the HDMI logo (as shown on the
cover).
– The HDMI cable is too long.
– The HDMI cable is damaged.
“REMOTE 1” or “REMOTE 2”
Match the modes on the main unit and remote control. Depending on the
number being displayed (“1” or “2”), press and hold [OK]9 and the
corresponding numbered button ([1] or [2]) for at least 2 seconds. (B 4)
“LOADING”
RQ TX111 1
ENGLISH
≥ The iPod/iPhone is not ready. Wait for this display to disappear.
≥ Disconnect the iPod/iPhone, and then reconnect it firmly. (B 16)
22
22
General operation
No response when any buttons are pressed.
≥ This unit cannot play discs other than the ones listed in these operating
instructions. (B 20)
≥ The unit may not be operating properly due to lightning, static electricity
or some other external factor. Turn the unit off and then back on.
Alternatively, turn the unit off, disconnect the AC mains lead, and then
reconnect it.
≥ Condensation has formed. Wait 1 to 2 hours for it to evaporate.
No response when remote control buttons are pressed.
≥ Check that the batteries are installed correctly. (B 8)
≥ The batteries are depleted. Replace them with new ones. (B 8)
≥ Aim the remote control at the remote control signal sensor and operate.
(B 4)
Other products respond to the remote control.
Change the remote control operating mode. (B 4)
Cannot display the START menu.
Remove the disc and then press [START]C again.
No picture or sound.
≥ Check the video or speaker connection. (B 7, 8)
≥ Check the power or input setting of the connected equipment and the
main unit.
≥ Check that the disc has something recorded on it.
You have forgotten your ratings password.
Reset all the settings to Factory Preset.
While stopped and “DVD/CD” is the source, press and hold [∫]9 (Stop)
on the main unit and [S10]3 on the remote control until “INITIALIZED”
disappears from the TV. Turn the unit off and on again.
All settings will return to the default values.
(This does not work during program and random modes, or when setup
menu or START menu is displayed.)
Some characters are not displayed correctly.
Characters other than English alphabet and Arabic numerals may not be
displayed correctly.
The VIERA Link “HDAVI Control” function does not
respond.
Depending on the condition of this unit or the connected equipment, it
may be necessary to repeat the same operation so that the function can
work correctly. (B 15)
The setting you made in “TV ASPECT” (B 18, VIDEO menu)
or “LANGUAGE” (B 18, DISPLAY menu) does not work.
The settings for “TV ASPECT”§1 and “LANGUAGE”§2 will automatically
follow the information from the TV. (B 9, EASY SETUP settings)
§1 When using VIERA Link “HDAVI Control” with “HDAVI Control 3 or
later” compatible TV
§2 When using VIERA Link “HDAVI Control” with “HDAVI Control 2 or
later” compatible TV
Page 23

Disc operation
It takes time before play starts.
≥ Play may take time to begin when an MP3 track has still picture data.
Even after the track starts, the correct play time will not be displayed.
This is normal. [MP3]
≥ This is normal on DivX video. [DivX]
A menu screen appears during skip or search. [VCD]
This is normal for Video CDs.
Playback control menu does not appear.
[VCD] with playback control
Press [∫ STOP]6 twice and then press [1 PLAY]6.
Program and Random play do not work. [DVD-V]
These functions do not work with some DVD-Videos.
Play does not start.
≥ This unit may not play WMA and MPEG4 that contains still picture data.
≥ If playing DivX VOD content, refer to the homepage where you
purchased the DivX VOD content. (Example: http://vod.divx.com) [DivX]
≥ If a disc contains CD-DA and other formats, proper playback may not be
possible.
No subtitles.
≥ Display the subtitles. (“SUBTITLE” in Menu 1) (B 14)
≥ Subtitles may not be displayed depending on the disc. [DivX]
Point B is automatically set.
The end of an item becomes point B when it is reached.
The Setup menu cannot be accessed.
Select “DVD/CD” as the source.
Sound
Sound is distorted.
≥ Noise may occur when playing WMA.
≥ When using the HDMI output, audio may not be output from other
terminals.
Effects do not work.
Some audio effects do not work or have less effect with some discs.
Humming is heard during play.
An AC mains lead or fluorescent light is near the main unit. Keep other
appliances and cables away from the main unit.
No sound.
≥ There may be a slight pause in sound when you change the play speed.
≥ If the input source is bitstream, set the sound setting to PCM on the
external equipment.
≥ Audio may not be output due to how files were created. [DivX]
No sound from the TV.
≥ If the TV is not ARC compatible and only the HDMI connection is used,
an extra audio connection is necessary. (B 8)
≥ Confirm the audio connection. Press [RADIO, EXT-IN]5 to select the
corresponding source. (B 8, 10)
≥ When using the HDMI connection, ensure that “AUDIO OUT” in the
HDMI menu is set to “ON”. (B 18)
No sound from the surround speakers.
Press [SURROUND]< to select “MULTI-CH”. (B 11)
Picture
The picture on the TV is not displayed correctly or
disappears.
≥ The unit and TV are using different video systems. Use a multi-system
or PAL TV.
≥ The system used on the disc does not match your TV.
– PAL discs cannot be correctly viewed on an NTSC TV.
– This unit can convert NTSC signals to PAL 60 for viewing on a PAL TV
(“NTSC DISC OUT” in VIDEO menu). (B 18)
≥ Ensure that the unit is connected directly to the TV, and is not
connected through a VCR. (B 8)
≥ Mobile telephone chargers can cause some disturbance.
≥ If you are using an indoor TV antenna, change to an outdoor antenna.
≥ The TV antenna wire is too close to the unit. Move it away from the unit.
≥ Change “SOURCE SELECT” in Menu 2. [DivX] (B 14)
≥ Reduce the number of connected devices.
≥ When using the HDMI AV OUT terminal, ensure that an incompatible
video output with the connected TV is not selected. Press and hold
[CANCEL]4 until the picture is displayed correctly. (The output will
return to “480p” or “576p”.) (B 14)
≥ Video images converted to 1920k1080 resolution may look different
from the true native 1080p full-HD sources. This is not a malfunction of
the main unit.
≥ When the HDMI cable is connected, there will be no RGB output from
the SCART (AV) terminal. If the SCART (AV) terminal is to be used,
remove the HDMI cable and turn this unit on/off again.
Picture size does not fit the screen.
≥ Change “TV ASPECT” in the VIDEO menu. (B 18)
≥ Use the TV to change the aspect.
≥ Change the zoom setting. (“ZOOM” in Menu 2) (B 14)
Menu is not displayed correctly.
Restore the zoom ratio to “NORMAL”. (“ZOOM” in Menu 2) (B 14)
Auto zoom function does not work well.
≥ Turn off TV’s zoom function.
≥ Zoom function may not work well, especially in dark scenes and may
not work depending on the type of disc.
When playing PAL disc, picture distorted.
Set “TRANSFER MODE” in Menu 2 to “AUTO”. (B 14)
After choosing “Home Cinema” in “Speaker Selection” with
the TV’s remote control, the TV’s input selection also
changes.
Disconnect the HDMI cable from the TV and reconnect it to a different
HDMI terminal.
iPod/iPhone operation
Cannot charge or operate.
≥ Check that the iPod/iPhone is connected firmly. (B 16)
≥ The battery of the iPod/iPhone is depleted. Charge the iPod/iPhone,
and then operate again.
Cannot display iPod/iPhone photos/videos on the TV.
≥ Ensure the video connection to the SCART (AV) terminal on this unit
and select “VIDEO” from “VIDEO OUT – SCART” in VIDEO menu.
(B 18)
≥ Operate the iPod/iPhone menu to make the appropriate photo/video
output settings for your TV. (Refer to operating instructions for your
iPod/iPhone.)
Getting StartedPlaying DiscsOther OperationsReference
Getting StartedPlaying DiscsOther Operations
ENGLISH
RQ TX111 1
23
23
Page 24
HDMI progressive video
There is ghosting when HDMI progressive output is on.
This problem is caused by the editing method or material used on
DVD-Video, but should be corrected if you use interlaced output. When
using the HDMI AV OUT terminal, set “VIDEO FORMAT” in Menu 4 to
“480i” or “576i”. Or, disable the HDMI AV OUT connection and use the
other video connection. (B 8, 14)
Radio
Distorted sound or noise is heard.
≥ Adjust the position of the FM antenna.
≥ Use an outdoor antenna. (B 7)
Getting StartedPlaying DiscsOther OperationsReference
A beat sound is heard.
Turn the TV off or move it away from the unit.
USB
The USB drive or its contents cannot be read.
≥ The USB drive format or its contents is/are not compatible with the
system. (B 17)
≥ The USB host function of this product may not work with some USB
devices.
≥ USB devices with storage capacity of more than 32 GB may not work in
some instances.
Slow operation of the USB device.
Large file size or high memory USB device takes longer time to read and
display on the TV.
TV displays
“/”
The operation is prohibited by the unit or disc.
“THIS DISC CANNOT BE PLAYED IN YOUR REGION.”
Only DVD-Video discs that include or have the same region number as
the one on the rear panel of this unit can be played. (B Cover page)
“No Video”
Depending on the connected iPod/iPhone, video menu may not be
available on the TV.
Select iPod/iPhone menu (iPod/iPhone LCD) mode (B 16) and operate
video playback from your iPod/iPhone menu.
Licenses
Manufactured under license from Dolby Laboratories.
Dolby, Pro Logic, and the double-D symbol are trademarks of Dolby
Laboratories.
Manufactured under license under U.S. Patent #’s: 5,451,942;
5,956,674; 5,974,380; 5,978,762; 6,487,535 & other U.S. and
worldwide patents issued & pending. DTS and the Symbol are
registered trademarks & DTS Digital Surround and the DTS logos are
trademarks of DTS, Inc. Product includes software. C DTS, Inc. All
Rights Reserved.
U.S. Patent Nos. 6,836,549; 6,381,747; 7,050,698; 6,516,132; and
5,583,936.
This product incorporates copyright protection technology that is
protected by U.S. patents and other intellectual property rights. Use of
this copyright protection technology must be authorized by
Macrovision, and is intended for home and other limited viewing uses
only unless otherwise authorized by Macrovision. Reverse
engineering or disassembly is prohibited.
HDMI, the HDMI Logo, and High-Definition Multimedia Interface are
trademarks or registered trademarks of HDMI Licensing LLC in the
United States and other countries.
TM
HDAVI Control
Windows Media and the Windows logo are trademarks or registered
trademarks of Microsoft Corporation in the United States and/or other
countries.
This product is protected by certain intellectual property rights of
Microsoft Corporation and third parties. Use or distribution of such
technology outside of this product is prohibited without a license from
Microsoft or an authorized Microsoft subsidiary and third parties.
This product is licensed under the MPEG-4 Visual patent portfolio
license for the personal and non-commercial use of a consumer for (i)
encoding video in compliance with the MPEG-4 Visual Standard
(“MPEG-4 Video”) and/or (ii) decoding MPEG-4 Video that was
encoded by a consumer engaged in a personal and non-commercial
activity and/or was obtained from a video provider licensed by MPEG
LA to provide MPEG-4 Video. No license is granted or shall be implied
for any other use. Additional information including that relating to
promotional, internal and commercial uses and licensing may be
obtained from MPEG LA, LLC. See http://www.mpegla.com
®
DivX
is a registered trademark of DivX, Inc., and is used under
license.
is a trademark of Panasonic Corporation.
.
24
ENGLISH
“Made for iPod” means that an electronic accessory has been
designed to connect specifically to iPod and has been certified by the
developer to meet Apple performance standards.
“Works with iPhone” means that an electronic accessory has been
designed to connect specifically to iPhone and has been certified by
the developer to meet Apple performance standards.
Apple is not responsible for the operation of this device or its
compliance with safety and regulatory standards.
iPod is a trademark of Apple Inc., registered in the U.S. and other
countries.
iPhone is a trademark of Apple Inc.
RQ TX111 1
24
Page 25

Specifications
AMPLIFIER SECTION
RMS Output Power: Dolby Digital Mode
Front Ch
Surround Ch
Center Ch
Subwoofer Ch
Total RMS Dolby Digital mode power 1000 W
DIN Output Power: Dolby Digital Mode
Front Ch
Surround Ch
Center Ch
Subwoofer Ch
Total DIN Dolby Digital mode power 590 W
FM TUNER, TERMINALS SECTION
Preset Memory FM 30 stations
Frequency Modulation (FM)
Frequency range 87.50 MHz to 108.00 MHz (50-kHz step)
Antenna terminals 75 ≠ (unbalanced)
Digital audio input
Optical digital input
Sampling frequency
USB Port
USB standard
Media file format support
USB device file system
USB Port power
Bit rate
DISC SECTION
Discs played (8 cm or 12 cm)
(1) DVD (DVD-Video, DivX
(2) DVD-R (DVD-Video, DVD-VR, MP3
§5, 6
)
DivX
(3) DVD-R DL (DVD-Video, DVD-VR, DivX
(4) DVD-RW (DVD-Video, DVD-VR, MP3
§5, 6
)
DivX
(5) iR/iRW (Video)
(6) iR DL (Video)
(7) CD, CD-R/RW (CD-DA, Video CD, SVCD
§1 Conforming to IEC62107
§2 MPEG-1 Layer 3, MPEG-2 Layer 3
§3 Windows Media Audio Ver.9.0 L3
§4 Exif Ver 2.1 JPEG Baseline files
§5 The total combined maximum number of recognizable audio,
§6 Plays DivX
§7 MPEG4 data recorded with Panasonic SD multi cameras or DVD
§4, 5
JPEG
, MPEG4
Not compatible with Multiple Bit Rate (MBR)
Picture resolution: between 160k120 and 6144k4096 pixels (Sub
sampling is 4:0:0, 4:2:0, 4:2:2 or 4:4:4). Extremely long and narrow
pictures may not be displayed.
picture and video contents and groups: 4000 audio, picture and
video contents and 255 groups. (Excluding Root folder)
video recorders
Conforming to SD VIDEO specifications (ASF standard)/MPEG4
(Simple Profile) video system/G.726 audio system
®
video.
Pick up
Wavelength (DVD/CD) 655/ 790 nm
Laser power CLASS 1M
Audio output (Disc)
Number of channels 5.1 ch (FL, FR, C, SL, SR, SW)
125 W per channel (3 ≠), 1 kHz, 10 % THD
125 W per channel (3 ≠), 1 kHz, 10 % THD
250 W per channel (6 ≠), 1 kHz, 10 % THD
250 W per channel (6 ≠), 100 Hz, 10 % THD
90 W per channel (3
90 W per channel (3
115 W per channel (6
115 W per channel (6
≠), 1 kHz, 1 % THD
≠), 1 kHz, 1 % THD
≠), 1 kHz, 1 % THD
≠), 100 Hz, 1 % THD
Optical terminal
32 kHz, 44.1 kHz, 48 kHz
USB 2.0 full speed
MP3 (¢.mp3)
WMA (¢.wma)
JPEG (¢.jpg, ¢.jpeg)
DivX (¢.divx, ¢.avi)
MPEG4 (¢.asf)
FAT12, FAT16, FAT3 2
Max. 500 mA
Up to 4 Mbps (DivX)
§5, 6
)
§5, 7
, DivX
§5, 6
§2, 5
)
, JPEG
§5, 6
§2, 5
)
, JPEG
§1
, MP3
§4, 5
§4, 5
, MPEG4
, MPEG4
§2, 5
, WMA
§5, 7
§3, 5
,
§5, 7
,
VIDEO SECTION
Video system PAL625/50, PAL525/60, NTSC
Composite video output
Output level
Terminal
SCART jack (1 system)
S-video output
Y output level
C output level
Terminal
PAL; 0.3 Vp-p (75 ≠)
NTSC; 0.286 Vp-p (75 ≠)
SCART jack (1 system)
RGB video output
R output level
G output level
B output level
Terminal
0.7 Vp-p (75 ≠)
0.7 Vp-p (75 ≠)
0.7 Vp-p (75 ≠)
SCART jack (1 system)
HDMI AV output
Terminal 19-pin type A connector
HDAVI Control This unit supports “HDAVI Control 5” function.
SPEAKER SECTION
[Front\speakers\SB-HF330]
Typ e
Speaker unit(s)
1 way, 1 speaker system (Bass reflex)
Impedance 3 ≠
Full range 6.5 cm Cone type
Output sound pressure
Frequency range
Dimensions (WtHtD)
85 Hz to 25 kHz (j16 dB)
95 Hz to 22 kHz (j10 dB)
100 mmk530 mmk78 mm
Mass
Full assembly with stand base
Dimensions (WtHtD) max
Dimensions (WtHtD) min
Mass
255 mmk1020 mmk255 mm
255 mmk550 mmk255 mm
[PT580] [Surround\speakers\SB-HS230]
Typ e
Speaker unit(s)
1 way, 1 speaker system (Bass reflex)
Impedance 3 ≠
Full range 6.5 cm Cone type
Output sound pressure
Frequency range
Dimensions (WtHtD)
Mass
,
[PT880] [Surround\speakers\SB-HS880]
Typ e
Speaker unit(s)
1 way, 1 speaker system (Bass reflex)
105 Hz to 25 kHz (j16 dB)
130 Hz to 22 kHz (j10 dB)
80 mmk118.5 mmk68 mm
Impedance 3 ≠
Full range 6.5 cm Cone type
Output sound pressure
Frequency range
Dimensions (WtHtD)
85 Hz to 25 kHz (j16 dB)
95 Hz to 22 kHz (j10 dB)
100 mmk530 mmk78 mm
Mass
Full assembly with stand base
Dimensions (WtHtD) max
Dimensions (WtHtD) min
Mass
255 mmk1020 mmk255 mm
255 mmk550 mmk255 mm
[Center\speaker\SB-HC230]
Typ e
Speaker unit(s)
1 way, 1 speaker system (Bass reflex)
Impedance 6 ≠
Full range 6.5 cm Cone type
Output sound pressure
Frequency range
Dimensions (WtHtD)
90 Hz to 25 kHz (j16 dB)
115 Hz to 22 kHz (j10 dB)
145 mmk85 mmk71.5 mm
Mass
1 Vp-p (75 ≠)
1 Vp-p (75 ≠)
Getting StartedPlaying DiscsOther OperationsReference
78 dB/W (1 m)
0.92 kg
2.3 kg
78 dB/W (1 m)
0.4 kg
78 dB/W (1 m)
0.92 kg
2.3 kg
79 dB/W (1 m)
0.6 kg
ENGLISH
RQ TX111 1
25
25
Page 26
[Subwoofer\SB-HW330]
Typ e
Speaker unit(s)
1. Woofer
2. Passive Radiator
Output sound pressure
Frequency range
Dimensions (WtHtD)
Mass
GENERAL
Power supply
Power consumption
Getting StartedPlaying DiscsOther OperationsReference
Dimensions (WtHtD)
Mass
Operating temperature range
Operating humidity range
Power consumption in standby mode approx. 0.1 W
[Note]
1 Specifications are subject to change without notice.
Mass and dimensions are approximate.
2 Total harmonic distortion is measured by a digital spectrum analyzer.
1 way, 1 speaker system (Kelton type)
16 cm Cone type
35 Hz to 180 Hz (j16 dB)
40 Hz to 160 Hz (j10 dB)
180.5 mmk322 mmk351 mm
AC 220 V to 240 V, 50 Hz
430 mmk54 mmk287 mm
35 % to 80 % RH (no condensation)
Main unit 2.8 kg
Impedance 6 ≠
25 cm
78 dB/W (1 m)
4.6 kg
Main unit 95 W
0 oC to r40 oC
Information for Users on Collection and Disposal of
Old Equipment and used Batteries
These symbols on the products, packaging,
and/or accompanying documents mean that
used electrical and electronic products and
batteries should not be mixed with general
household waste.
For proper treatment, recovery and recycling
of old products and used batteries, please
take them to applicable collection points, in
accordance with your national legislation and
the Directives 2002/96/EC and 2006/66/EC.
By disposing of these products and batteries
correctly, you will help to save valuable
resources and prevent any potential negative
effects on human health and the environment
which could otherwise arise from
inappropriate waste handling.
For more information about collection and
recycling of old products and batteries, please
contact your local municipality, your waste
disposal service or the point of sale where
you purchased the items.
Penalties may be applicable for incorrect
disposal of this waste, in accordance with
national legislation.
For business users in the European Union
If you wish to discard electrical and electronic
equipment, please contact your dealer or
supplier for further information.
Cd
[Information on Disposal in other
Countries outside the European Union]
These symbols are only valid in the European
Union. If you wish to discard these items,
please contact your local authorities or dealer
and ask for the correct method of disposal.
Note for the battery symbol (bottom two
symbol examples):
This symbol might be used in combination
with a chemical symbol. In this case it
complies with the requirement set by the
Directive for the chemical involved.
26
ENGLISH
RQ TX111 1
26
Page 27

Safety precautions
Placement
Set the unit up on an even surface away from direct sunlight, high
temperatures, high humidity, and excessive vibration. These conditions
can damage the cabinet and other components, thereby shortening the
unit’s service life.
Do not place heavy items on the unit.
Vol tage
Do not use high voltage power sources. This can overload the unit and
cause a fire.
Do not use a DC power source. Check the source carefully when setting
the unit up on a ship or other places where DC is used.
AC mains lead protection
Ensure the AC mains lead is connected correctly and not damaged. Poor
connection and lead damage can cause fire or electric shock. Do not pull,
bend, or place heavy items on the lead.
Grasp the plug firmly when unplugging the lead. Pulling the AC mains
lead can cause electric shock.
Do not handle the plug with wet hands. This can cause electric shock.
Foreign matter
Do not let metal objects fall inside the unit. This can cause electric shock
or malfunction.
Do not let liquids get into the unit. This can cause electric shock or
malfunction. If this occurs, immediately disconnect the unit from the
power supply and contact your dealer.
Do not spray insecticides onto or into the unit. They contain flammable
gases which can ignite if sprayed into the unit.
Service
Do not attempt to repair this unit by yourself. If sound is interrupted,
indicators fail to light, smoke appears, or any other problem that is not
covered in these instructions occurs, disconnect the AC mains lead and
contact your dealer or an authorized service center. Electric shock or
damage to the unit can occur if the unit is repaired, disassembled or
reconstructed by unqualified persons.
Extend operating life by disconnecting the unit from the power source if it
is not to be used for a long time.
Getting StartedPlaying DiscsOther OperationsReference
ENGLISH
RQ TX111 1
27
27
Page 28

Kontrolní referenční příručka
Abcházština: 6566
Afarština: 6565
Afrikánština: 6570
Albánština: 8381
Ameharština: 6577
Angličtina: 6978
Arabšitna: 6582
Arménština: 7289
Asamština: 6583
Ayamarština: 6589
Ázerbajdžánština: 6590
Barmština: 7789
Baskičtina: 6985
Baškirština: 6665
Běloruština: 6669
Bengali,
Bangladéština: 6678
Bhútani: 6890
Biharština: 6672
Bretonština: 6682
Bulharština: 6671
Čeština: 6783
Čínština: 9072
Dánština: 6865
Esperanto: 6979
Estonština: 6984
Faerština: 7079
Fidži: 7074
Finština: 7073
Francouzština: 7082
Frízština: 7089
Galicijština: 7176
Grónština: 7576
Gruzínština: 7565
Guarani: 7178
Gujarati: 7185
Hausa: 7265
Hebrejština: 7387
Hindština: 7273
Holandština: 7876
Chorvatština: 7282
Indonézština: 7378
Interlingua: 7365
Irština: 7165
Islandština: 7383
Italština: 7384
Japonština: 7465
Javánština: 7487
Jidiš: 7473
Joruba: 8979
Kambodžština: 7577
Kannadština: 7578
Kašmírština: 7583
Katalánština: 6765
Kazachština: 7575
Kešuánština: 8185
Kirgizština: 7589
Korejština: 7579
Korsičtina: 6779
Kurdština: 7585
Laoština: 7679
Latina: 7665
Lingala: 7678
Litevština: 7684
Lotyština: 7686
Maďarština: 7285
Makedonština: 7775
Malagajština: 7771
Malajamština: 7776
Malajština: 7783
Maltšina: 7784
Maorština: 7773
Marathi: 7782
Moldavština: 7779
Mongolština: 7778
Nauru: 7865
Němčina: 6869
Nepálština: 7869
Norština: 7879
Orijština: 7982
Pašto, pušto: 8083
Perština : 7065
Polšti na: 8076
Portugalština: 8084
Punjabi: 8065
Rétorománština: 8277
Rumunština: 8279
Ruština: 8285
Řečtina: 6976
Samojština: 8377
Sanskrt: 8365
Sindština: 8368
Singapurština: 8373
Skotská keltština: 7168
Slovenština: 8375
Slovinština: 8376
Somálština: 8379
Srbochorvatština: 8372
Srbština: 8382
Sundština: 8385
Swahilština: 8387
Šona: 8378
Španělština: 6983
Švédština: 8386
Tagalog: 8476
Tamilština: 8465
Tatarština: 8484
Ta ž ik : 8 4 7 1
Telugu: 8469
Thajština: 8472
Tibetština: 6679
Tigrijština: 8473
Tonžština: 8479
Turečtina: 8482
Turkménština: 8475
Tw i : 84 8 7
Ukrajinština: 8575
Urdština: 8582
Uzbečtina: 8590
Vel št ina : 6 789
Vietnamština: 8673
Volapuk: 8679
Wolfština: 8779
Xhosa: 8872
Zulština: 9085
Dálkový ovladač
1 Zapněte/Vypněte hlavní jednotku (B 9)
Getting StartedPlaying DiscsOther OperationsReference
2 Nastavte časovač usínání
Stiskněte a držte [SLEEP].
SLEEP 30 # SLEEP 60 # SLEEP 90 # SLEEP120
^-------------------------- OFF (Zrušte) (--------------------------}
≥ Za účelem potvrzení zbývající doby znovu stiskněte uvedené
tlačítko.
3 Zvolte kanály a čísla titulů apod. / Zadejte čísla (B 9, 12)
4 Zrušte (B 12)
5 Výběr zdroje
[DVD]: Zvolte disk jako zdro (B 12)
[iPod]: Zvolte iPod/iPhone jako zdroj (B 16)
[RADIO, EXT-IN]: Zvolte FM tuner nebo externí zdroj audia.
6 Základní operace pro přehrávání (B 12)
7 Zobrazit nabídku disku nebo přehrát seznam (B 12, 13)
8 Ukázat hlavní menu disku nebo programový seznam (B 12, 13)
Zvolte nebo potvrďte položky nabídky / Zobrazovat po okénkách (B12)
9
: Zvolte režim přehrávání / Nastavte režim opakování (B 12)
; Zvolte režim zvuku / Zvolte režim reproduktoru (B 11)
< Zvolte efekty prostorového ozvučení (B 11)
= Operace televize
Namiřte dálkový ovladač na televizi Panasonic a stiskněte tlačítko.
[Í]: Zapnout/Vypnout televizi
[AV]: Změňte režim video vstupu televize
[r, VOL, s]: Nastavte hlasitost televize
S některými výrobními typy nemusí tato operace správně fungovat.
> Nastavení hlasitosti hlavní jednotky
? Ztlumení zvuku
≥ Na displeji hlavní jednotky bliká “MUTE”, když je tato funkce aktivní.
≥ Pro zrušení tlačítko znovu stiskněte nebo nastavte hlasitost.
≥ Ztlumení se zruší, když jednotku přepnete na pohotovostní režim.
@ Ručně zvolte rozhlasové stanice (B 9)
A Zvolte předvolené rozhlasové stanice (B 9)
B Ukončete zobrazování na displeji
C Zobrazit menu START (B 10)
(B 9, 10)
FM #AV #AUX #ARC #D-IN #USB
^-----------------------------------------------------------}
D Zobrazení dat textových dat RDS / Zobrazení menu informací
zobrazovaných na displeji (B 9, 13)
E Návrat na předchozí obrazovku (B 12)
F Přepněte informace na displeji hlavní jednotky (B 12)
G Zapněte/Vypněte Režim prostorového ozvučení (B 11)
Jak předejít rušení s jiným zařízením Panasonic
Jiné zařízení audio/video Panasonic může začít fungovat, když jednotku
ovládáte pomocí dodaného dálkového ovladače.
Jednotku můžete provozovat v jiném režimu, když nastavíte provozní
režim dálkového ovladače na “REMOTE 2”.
Hlavní jednotka a dálkový ovladaè musí být nastaveny na stejný
režim.
1 Stiskněte [RADIO, EXT-IN]5 pro výběr “AUX”.
2 Stiskněte a držte [1]; na hlavní jednotce a [2] na dálkovém ovladači,
až displej hlavní jednotky zobrazí “REMOTE 2”.
3 Stiskněte a držte [OK]9 a [2] na dálkovém ovladači alespoň 2
sekundy.
Pro změnu režimu zpátky na “REMOTE 1”, zopakujte oba výše uvedené
kroky změnou čísla [2] na [1].
Hlavní jednotka
1 Tlačítko pohotovostního režimu/zapnutí (Í/I)
Stisknutím tohoto tlačítka se přístroj přepíná z provozního do
pohotovostního režimu a naopak. V pohotovostním režimu přístroj
spotřebovává malé množství elektrické energie.
2 Indikátor napájení
Svítí, když je zařízení zapnuto.
3 Připojte iPod/iPhone (B 16)
4 Nastavení hlasitosti hlavní jednotky
5 Otevřete/Zavřete přihrádku na disky (B 12)
6 Připojte přístroj USB (B 17)
7 Displej
“SRD” svítí během difuze zvuku z prostorových reproduktorů. (B 11 )
8 Čidlo signálu dálkového ovladače
9 Zastavení přehrávání
: Zvolte zdroj signálu
DVD/CD #USB #FM #AV #AUX #ARC #D-IN #IPOD
^------------------------------------------------------------------------------------------------}
; Přehrávat disky
Seznam jazykových kódù
RQ TX111 1
ČESKY
4
28
Page 29

OBSAH
Začínáme
Příslušenství . . . . . . . . . . . . . . . . . . . . . . . . . . . . . . . . . . . .2
Kontrolní referenční příručka . . . . . . . . . . . . . . . . . . . . . .4
Průvodce rychlým spuštěním
krok 1 Příprava reproduktorů . . . . . . . . . . . . . . . . . . 6
krok 2 Umístění . . . . . . . . . . . . . . . . . . . . . . . . . . . . . 7
krok 3 Přípojky . . . . . . . . . . . . . . . . . . . . . . . . . . . . . . 7
Připojení reproduktorů. . . . . . . . . . . . . . . . . . . . .7
Přípojky rádiové antény. . . . . . . . . . . . . . . . . . . .7
Audio a video připojení . . . . . . . . . . . . . . . . . . . .8
krok 4 Přípojka napájecího kabelu . . . . . . . . . . . . . . 8
krok 5 Příprava dálkového ovládání . . . . . . . . . . . . . 8
krok 6 EASY SETUP (SNADNÉ NASTAV.) . . . . . . . . 9
Poslech rádia . . . . . . . . . . . . . . . . . . . . . . . . . . . . . . . . . . .9
Automatická předvolba stanic. . . . . . . . . . . . . . . . . . . . . . . . 9
Poslech/potvrzení přednastavených kanálů . . . . . . . . . . . . . 9
Ruční vyladění . . . . . . . . . . . . . . . . . . . . . . . . . . . . . . . . . . . 9
Vysílání RDS . . . . . . . . . . . . . . . . . . . . . . . . . . . . . . . . . . . . 9
Používání menu START . . . . . . . . . . . . . . . . . . . . . . . . . .10
Výběr zdroje dálkovým ovladačem . . . . . . . . . . . . . . . . . . . 10
Poslech audia televizoru nebo jiného zařízení z
reproduktorů tohoto zařízení. . . . . . . . . . . . . . . . . . . .10
Užijte si zvukové efekty ze všech
reproduktorů
Působení prostorových zvukových efektů . . . . . . . .11
Zvolení zvukového režimu . . . . . . . . . . . . . . . . . . . . .11
Režim prostorového ozvučení “Whisper” . . . . . . . . .11
Ruční nastavení výkonu reproduktoru . . . . . . . . . . .11
Doladění úrovně reproduktoru během
přehrávání . . . . . . . . . . . . . . . . . . . . . . . . . . . . . . . . .11
Přehrávání disků
Základní přehrávání. . . . . . . . . . . . . . . . . . . . . . . . . . . . . 12
Další režimy přehrávání . . . . . . . . . . . . . . . . . . . . . . . . . 12
Opakovat přehrávání . . . . . . . . . . . . . . . . . . . . . . . . . . . . . 12
Programové a nahodilé přehrávání . . . . . . . . . . . . . . . . . . 12
Používání navigačních nabídek . . . . . . . . . . . . . . . . . . . 13
Přehrávání datových disků . . . . . . . . . . . . . . . . . . . . . . . . 13
Přehrávání disků DVD-R/-RW (DVD-VR) . . . . . . . . . . . . . 13
Používání nabídek na obrazovce . . . . . . . . . . . . . . . . . . 13
Další postupy ovládání
Použití ovládání VIERA Link “HDAVI ControlTM” . . . . . 15
Co to je VIERA Link “HDAVI Control” . . . . . . . . . . . . . . . . 15
Co lze ovládat funkcemi “HDAVI Control” . . . . . . . . . . . . . 15
Snadné ovládání s použitím dálkového ovládání VIERA
(pro “HDAVI Control 2 nebo novější”) . . . . . . . . . . . . . . . 15
Použití jiných zařízení . . . . . . . . . . . . . . . . . . . . . . . . . . . 16
Použití iPod/iPhone . . . . . . . . . . . . . . . . . . . . . . . . . . . . . . 16
Přehrávání z přístroje USB . . . . . . . . . . . . . . . . . . . . . . . . 17
Odkaz
Probíhá změna nastavení přehrávače. . . . . . . . . . . . . . 17
Informace DivX . . . . . . . . . . . . . . . . . . . . . . . . . . . . . . . . 19
Zobrazení textu titulků DivX. . . . . . . . . . . . . . . . . . . . . . . . 19
Disky, které je možno přehrávat . . . . . . . . . . . . . . . . . . 20
Volba instalace reproduktoru . . . . . . . . . . . . . . . . . . . . . 21
Údržba . . . . . . . . . . . . . . . . . . . . . . . . . . . . . . . . . . . . . . 21
Průvodce řešením problémů . . . . . . . . . . . . . . . . . . . . . 22
Licence . . . . . . . . . . . . . . . . . . . . . . . . . . . . . . . . . . . . . . 24
Specifikace. . . . . . . . . . . . . . . . . . . . . . . . . . . . . . . . . . . . 25
Bezpečnostní opatření . . . . . . . . . . . . . . . . . . . . . . . . . . 27
ZačínámePřehrávání disků
ovládání
Další postupy
Odkaz
POZOR!
V TOMTO VÝROBKU JE POUŽIT LASER.
POUŽÍVÁNÍ OVLÁDAČŮ, ÚPRAV NEBO VÝKONU POSTUPŮ
JINAK NEŽ JAK JE POPSÁNO V TOMTO NÁVODU, MŮŽE MÍT ZA
NÁSLEDEK NEBEZPEČNÉ OZÁŘENÍ.
NEOTVÍREJTE KRYTY A NEOPRAVUJTE SAMI. OPRAVY
PŘENECHTE KVALIFIKOVANÝM PRACOVNÍKŮM.
VAROVÁNÍ:
PRO SNÍŽENÍ RIZIKA OHNĚ, ELEKTRICKÉHO ŠOKU
NEBO POŠKOZENÍ VÝROBKU
≥NEVYSTAVUJTE PŘÍSTROJ DEŠTI A VLKHU, DBEJTE,
ABY NA NĚJ NEKAPALA A NESTŘÍKALA VODA, A
NESTAVTE NA NĚJ PŘEDMĚTY NAPLNĚNÉ VODOU,
NAPŘ. VÁZY.
≥POUŽÍVEJTE POUZE DOPORUČENÉ PŘÍSLUŠENSTVÍ.
≥NEODSTRAŇUJTE KRYT (NEBO ZADNÍ KRYT); ŽÁDNÉ
PRVKY UVNITŘ PŘÍSTROJE UŽIVATEL NEMŮŽE
OPRAVOVAT. SERVIS PŘENECHTE KVALIFIKOVANÝM
SERVISNÍM PRACOVNÍKŮM.
TENTO PŘÍSTROJ JE URČEN PRO POUŽITÍ V MÍRNÉM PODNEBÍ.
POZOR!
≥ TENTO PŘÍSTROJ NEINSTALUJTE ANI NEUMÍSŤUJTE NAPŘ.
DO KNIHOVNY, VESTAVĚNÉ SKŘÍNĚ NEBO JINÉHO
UZAVŘENÉHO PROSTORU. ZAJISTĚTE, ABY MĚL PŘÍSTROJ
DOBRÉ VĚTRÁNÍ. PRO VYLOUČENÍ RIZIKA ELEKTRICKÉHO
ŠOKU NEBO NEBEZPEČÍ POŽÁRU Z DŮVODU PŘEHŘÁTÍ
ZAJISTĚTE, ABY V BLÍZKOSTI VĚTRACÍCH OTVORŮ NEBYLY
ZÁVĚSY NEBO JINÉ TEXTILIE.
≥ DBEJTE, ABY VĚTRACÍ OTVORY PŘÍSTROJE NEZAKRÝVALY
NOVINY, UBRUSY, ZÁCLONY A PODOBNĚ.
≥ NEPOKLÁDEJTE NA PŘÍSTROJ ZDROJE OTEVŘENÉHO
OHNĚ, NAPŘ. ZAPÁLENÉ SVÍČKY.
≥ BATERIE ODEVZDÁVEJTE DO TŘÍDĚNÉHO ODPADU.
Výrobek může během používání přijímat rádiové rušení způsobené
mobilními telefony. Pokud se takové rušení projeví, je třeba zvětšit
vzdálenost mezi výrobkem a mobilním telefonem.
Zásuvka musí být v blízkosti zařízení a snadno dostupná.
Síťová zástrčka napájecí šňů
Pro úplné odpojení přístroje z hlavního přívodu AC vypojte zástrčku
elektrické šňůry ze zásuvky AC.
ry bude vždy pohotově k použití.
ČESKY
RQ TX111 1
5
29
Page 30
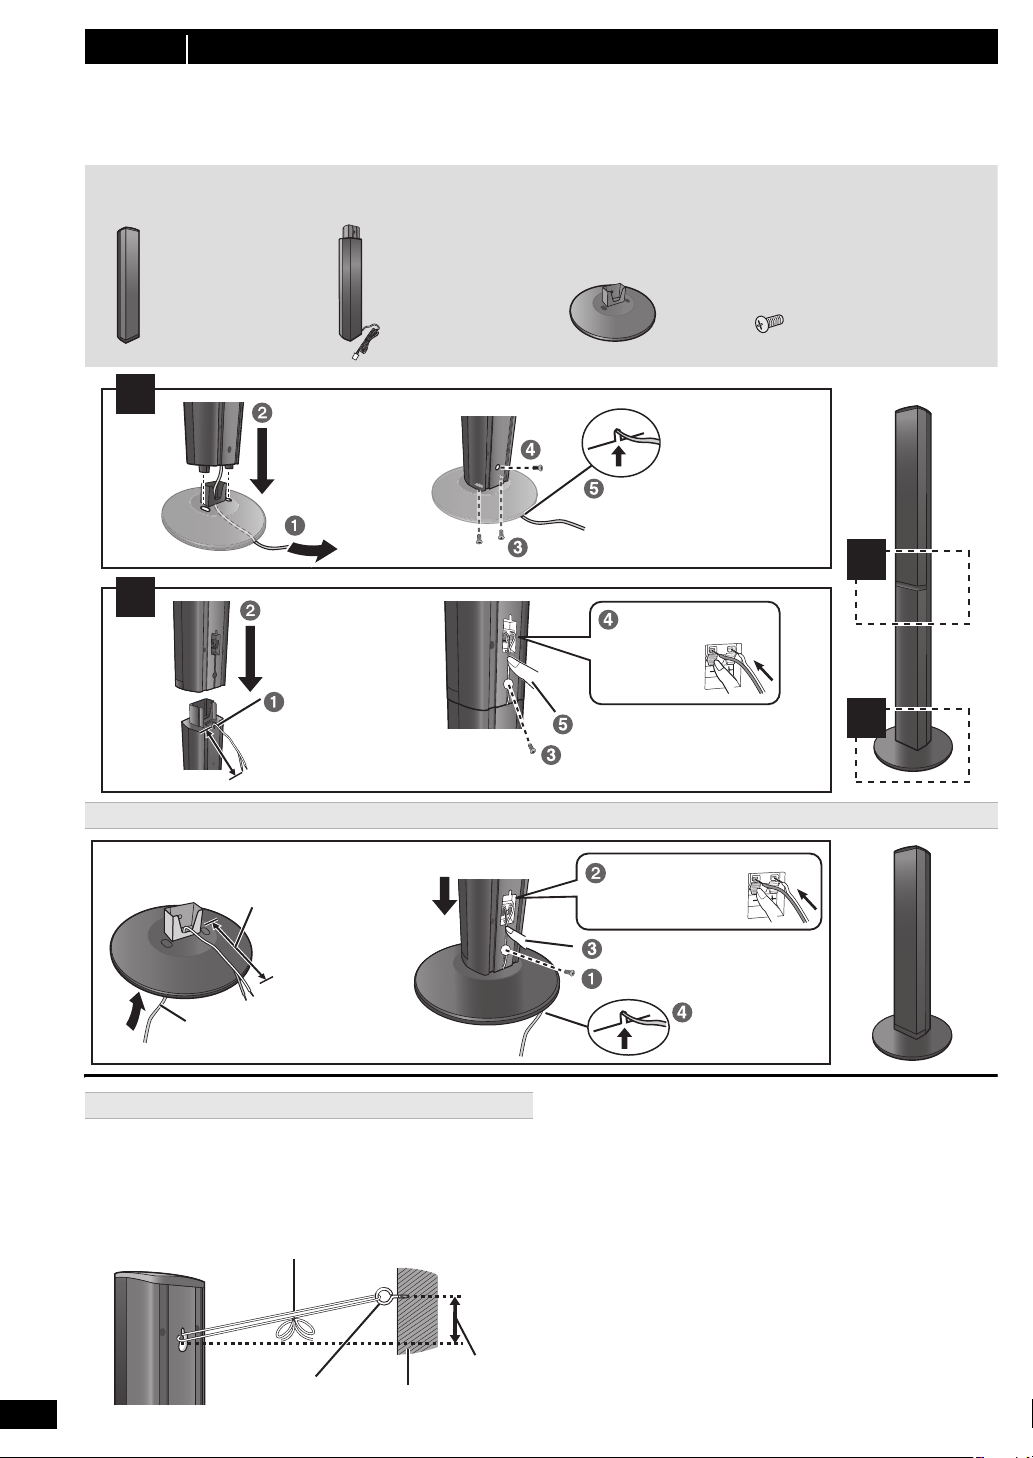
krok 1 Příprava reproduktorů
Před zahájením montáže, nastavení a připojení zkontrolujte, zda máte pohromadě všechny uvedené komponenty.
≥ Šrouby apod. umístěte z dosahu dětí, abyste předešli možnosti spolknutí.
≥ Chcete-li reproduktory umístit na stěnu, přečtěte si pokyny na straně 21.
2 Čelní reproduktory
2 Čelní reproduktory
2 Prostorové reproduktory
2 Stojany (s kabelem)
4 Stojany (s kabelem)
4 Základny
2 Základny
8 Šroubů
16 Šroubů
[PT580]
[PT880]
[PT580]
[PT880]
[PT580]
[PT880]
[PT580]
[PT880]
1
2
2
1
Zasunout do drážky.
Pevně utáhnout.
Umístěte kabel
mezi drážky.
Ponechte přibližně 120 mm.
Zatlačit do drážky.
Pevně utáhnout.
Vodi č zcela zasuňte.
i: Bílý
j: Modrý
kabel
Stiskněte!
Ponechte
přibližně
120 mm.
Můžete odstranit a použít kabel ze
stojanu. Informace o opakovaném
připojení kabelu naleznete na straně 21.
Zasunout do
drážky.
Zatlačit do drážky.
Pevně utáhnout.
Vodi č zcela zasuňte.
i: Bílý
j: Modrý
kabel
Stiskněte!
Protáhněte kabel reproduktoru přes
základnu.
Připevněte reproduktor.
Šňůra (není součástí dodávky)
Veďte od zdi k reproduktoru a pevně utáhněte.
Reproduktory (zadní)
Šroub s okem
(není součástí dodávky)
Přibližně
150 mm
Zeď
[PT580] Čelní reproduktory
[PT880] Čelní reproduktory a prostorové reproduktory
Příprava
≥ Aby se zabránilo poškození nebo poškrábání, rozložte si na plochu
měkkou textilií a na ní proveďte sestavení reproduktorů.
≥ Pro smontování použijte šroubovák se špičkou Phillips
(není součástí dodávky).
Možnost sestavení reproduktorů
Zajištění reproduktorů před pádem
≥ Budete potřebovat vhodné šroubovací uzávěry, přiměřené pro zdi či
sloupy, k nimž se mají upevnit.
≥ Ohledně správného postupu instalace reproduktorů na betonovou zeď
nebo povrch se poraďte s kvalifikovaným stavitelem, tak aby tyto
povrchy měly dostatečnou nosnost. Nesprávné připevnění může
poškodit zeď i reproduktory.
RQ TX111 1
ČESKY
6
30
Upozornění
≥ Nestavte se na základnu. Dávejte pozor, když jsou poblíž děti.
≥ Při manipulaci s reproduktorem přidržte stojan a podstavec.
Page 31

krok 2 Umístění
120°
60°
Centrální reproduktor
§2
Čelní reproduktor
(levý)
Subwoofer
§3
Prostorové
reproduktor (levý)
Prostorové
reproduktor (pravý)
Čelní
reproduktor
(pravý)
Hlavní jednotka
§1
Lepicí páska
Hlavní jednotka (zadní)
Pokojová anténa FM
(součást dodávky)
Tento konec antény
upevněte v místě s nejlepším
příjmem.
FM ANT
(75 )
Použijte venkovní anténu, je-li slabý rozhlasový příjem.
≥ Vypojte anténu, když se jednotka nepoužívá.
≥ Při bouřce nepoužívejte venkovní anténu.
Hlavní jednotka (zadní)
75 ≠ koaxiální
kabel
(není součástí
dodávky)
Venkovní anténa FM
(Použití televizní antény
(není součástí dodávky))
Anténa by měla být
nainstalována kvalifikovaným
technikem.
Způsob, jakým rozmístíte reproduktory, může ovlivnit basy i zvukové
pole.
Mějte na zřeteli následující body:
≥ Umístěte reproduktory na plochou bezpečnou základnu.
≥ Umístění reproduktorů příliš blízko podlahy, stěn a rohů místnosti
může mít za následek přílišné zvýraznění basů. Na stěny a okna
umístěte silné závěsy.
[Poznamka]
Pro zajištění dobrého větrání umístěte reproduktory alespoň 10 mm od
systému.
Příklad nastavení (“Prostorový zvuk (Doporučeno)”: Standardní
rozmístění zvuku)
Umístěte přední, středové a prostorové reproduktory do přibližně stejné
vzdálenosti od místa sezení. Úhly ve schématu jsou přibližné.
§1 Umístte tak, aby na všech stranách byl volný prostor minimáln 5 cm
pro zajištní dobrého vtrání.
§2 Reproduktor umístěte na regál nebo polici. Vibrace způsobené
reproduktorem mohou rušit obraz, je-li umístěn přímo na televizi.
§3Umístěte napravo nebo nalevo od televize, na zem nebo pevnou
polici, tak aby nevydával vibrace, do vzdálenosti asi 30 cm od
televize.
V závislosti na uspořádání místnosti byste mohli upřednostnit použití
všech reproduktorů vpředu (“Přední (Alternativa)”) (B 9, SNADNÉ
NASTAV. - hodnoty).
Poznámky ohledně požívání reproduktorů
≥Používejte pouze námi dodané reproduktory
Užívání jiných reproduktorů může jednotku poškodit a negativně
ovlivní kvalitu zvuku.
≥ Pokud budete mít zvuk při přehrávání příliš dlouho nastavený na
nejvyšší úrovně hlasitosti, můžete tím reproduktory poškodit a zkrátit
jejich životnost.
≥ Aby nedošlo k poškození, snižte hlasitost v následujících případech:
–Při přehrávání zkresleného zvuku.
– Když reproduktory zní ozvěnou z důvodu činnosti přehrávače, hluku
z vysílání FM nebo nepřetržitých signálů z oscilátoru, zkušebního
disku či elektronického přístroje.
–Při úpravě kvality zvuku.
– Když zapínáte nebo vypínáte jednotku.
Pokud se ve vaší televizi objeví nestejnoměrná barevnost
Středový reproduktor má být umístěn a používán v blízkosti televize,
avšak obraz může být ovlivněn některými televizními přijímači a
kombinacemi nastavení.
Pokud se to stane, vypněte televizi asi na 30 minut.
Funkce odmagnetizování televize by měla problém vyřešit. Pokud
přetrvává, přemístěte reproduktory dále od televize.
Upozornění
≥ Hlavní jednotka a dodané reproduktory se mají používat pouze
tak, jak je určeno v tomto nastavení. Jiné použití může vést k
poškození zesilovače a/nebo reproduktorů a rovněž může
vyvolat riziko vznícení. Pokud došlo ke škodě nebo jste
zaznamenali náhlý výkyv výkonu, obraťte se na
kvalifikovaného servisního praocovníka.
≥ Nepokoušejte se upevnit tyto reproduktory na stěnu jinými
způsoby než těmi, které jsou popsány v tomto návodu.
Upozornění
Nedotýkejte se síťového povrchu na přední straně reproduktoru. Držte
jej po stranách.
[PT880]
Když používáte volitelné bezdrátové
příslušenství Panasonic (SH-FX71), můžete si
dopřávat zvuk z prostorových reproduktorů
bezdrátově.
Podrobnosti si laskavě přečtěte v pokynech k
obsluze volitelného bezdrátového příslušenství
Panasonic.
krok 3 Přípojky
Před připojením vypněte veškeré zařízení a přečtěte si příslušné pokyny
k obsluze.
Připojte napájecí kabel, teprve až budou provedena
všechna ostatní připojení.
Připojení reproduktorů
1
Při umísťování reproduktorů věnujte pozornost typu reproduktoru a
barvě konektoru.
Hlavní jednotka (zadní)
Připojte k terminálům stejné barvy.
Jako pomůcku při zapojování kabelů je dobré používat samolepky
reproduktorových kabelů.
Reproduktory (zadní)
Zasuňte vedení důkladně (“na doraz”), ale přitom tak, abyste nepoškodili
jeho izolaci.
i: Bílý
j: Modrý kabel
≥ Dejte pozor, abyste nepřekřížili (nezkratovali) či neobrátili polaritu
kabelů reproduktorů – mohlo by dojít k jejich poškození.
Přípojky rádiové antény
2
Použití pokojové antény
FM ANT
(75 )
Použití venkovní antény
ZačínámePrůvodce rychlým spuštěním
ČESKY
RQ TX111 1
7
31
Page 32

Audio a video připojení
AV
AV1
Kabel SCART
§1
(není součástí dodávky)
Televizor
Hlavní jednotka
(zadní)
např. [PT580]
Do sít’ové zásuvky v domácnosti
Hlavní jednotka
(zadní)
Sít’ový kabel
(součást dodávky)
Zatlačte a zvedněte.
Nasaďte kryt zpět na místo.
Baterie vložte tak, aby póly (r a j) odpovídaly symbolům
vdálkovém ovladači.
3
Příklad základního nastavení
§1 Toto připojení vám rovněž umožňuje přehrávat zvuk z televize
přes váš systém domácího kina (B 10, Výběr zdroje dálkovým
ovladačem). Zvolte příslušný audio výstup (např. Monitor) na
televizním přijímači.
Pro zlepšení kvality obrazu můžete změnit výstup video signálu z
terminálu SCART (AV) tak, aby vyhovoval vašemu typu televize.
≥ Zvolte “S-VIDEO”, “RGB 1” nebo “RGB 2” z “VIDEO OUT – SCART” v
OBRAZ nabídka (B 18).
≥ Když jsou připojeny kabely HDMI i SCART, z terminálu SCART (AV)
nebude žádný výstup RGB.
Ostatní zapojení videa
[\\\\\\\\\\\HDMI\AV\OUT\\\\\\\\\]
Toto připojení zajišťuje nejlepší kvalitu obrazu.
Kabel HDMI (není součástí dodávky) z terminálu HDMI AV OUT na
hlavní jednotce zapojte do terminálu HDMI AV IN na své televizi.
≥ Když váš televizor není kompatibilní s ARC, zapojte audio
samostatně.
≥ Nastavte “PRIORITA VIDEA” na “ZAPNUT” (B 18, HDMI menu).
≥ Nastavte “FORMÁT OBRAZU” v Menu 4 (HDMI) (B 14).
VIERA Link “HDAVI Control”
Je-li vaše televize Panasonic kompatibilní s VIERA Link, můžete její
chod televize synchronizovat s provozem domácího kina a naopak
(B 15, Použití ovládání VIERA Link “HDAVI Control
ARC (Zpětný kanál audia)
Když je televizor kompatibilní s ARC, audio z televizoru může být
odesláno do tohoto zařízení prostřednictvím HDMI kabelu, aniž by bylo
třeba provést jeho samostatné zapojení.
≥ Podrobnější informace najdete v návodu k použití televizoru.
[Poznamka]
Používejte vysokorychlostní kabel vysokorychlostnÍ HDMI, na němž je
≥
logo HDMI, (jak je zobrazeno na krytu)
≥ Nelze použít kabely nekompatibilní s kabely HDMI.
≥ Doporučujeme používání kabelu HDMI Panasonic.
Doporučený díl číslo:
RP-CDHS15 (1,5 m), RP-CDHS30 (3,0 m), RP-CDHS50 (5,0 m), atd.
≥ Máte-li televizi s více terminály HDMI, zjistte prosím z návodu k
obsluze televize, ke kterému terminálu se pipojit.
Nerealizujte zapojení videa prostřednictvím videopřehrávače.
Mohlo by se stát, že z důvodu ochrany proti kopírování obraz nebude
zobrazen správně.
Ostatní zapojení audia
[\\\\\\DIGITAL\AUDIO\IN\OPTICAL\\\\\\]
Vpřípadě zapojení optického kabelu pro digitální audio
toto zařízení dekódovat audio Dolby Digital.
Zapojte optický kabel (není součástí dodávky) ze zásuvky DIGITAL
AUDIO IN OPTICAL na hlavním zařízení do zásuvky OPTICAL OUT
na vašem televizoru.
[Poznamka]
Po realizaci zapojení prostřednictvím optického kabelu pro digitální
audio nebo HDMI
pocházejícího z vašeho zařízení (B 10).
§2 Informace o nastaveních potřebných pro výstup audia najdete v
návodech k použití příslušných zařízení.
§3Prostřednictvím tohoto připojení lze přehrávat pouze audio typu
ČESKY
8
32
Dolby Digital a PCM.
[\\\\\\\\\AUX\\\\\\\\]
Toto zapojení použijte v případě když televizor není vybaven zásuvkou
OPTICAL OUT pro optický výstup nebo když zásuvka DIGITAL AUDIO
IN OPTICAL pro optický vstup digitálního audia na tomto zařízení je již
obsazena připojením STB.
Zapojte audiokabel (není součástí dodávky) ze zásuvky AUX na
hlavním zařízení do zásuvky AUDIO OUT na vašem televizoru.
RQ TX111 1
§2, 3
kabelu proveďte nastavení odpovídající typu audia
§2, 3
TM
.
”).
2, 3
§
bude moci
Zapojení Set Top Box (přijímač kabelové televize/satelitní
přijímač/přehrávač disků Blu-ray apod.)
Toto zapojení se používá, když si přejete přivést z výstupu vaší STB do
tohoto zařízení audio v podobě originálního prostorového zvuku.
Zapojte optický kabel pro digitální audio (není součástí dodávky)
vedoucí ze zásuvky DIGITAL AUDIO IN OPTICAL (VSTUP
OPTICKÉHO VEDENÍ DIGITÁLNÍHO AUDIA) na tomto zařízení do
zásuvky OPTICAL OUT (VÝSTUP OPTICKÉHO VEDENÍ) na vaší
STB.
≥ Když je zásuvka DIGITAL AUDIO IN OPTICAL již obsazena pro audio
televizoru, přepněte audio televizoru do zásuvky AUX s použitím
a.udiokabelu.
[Poznamka]
Vpřípadě, že máte k dispozici různé zdroje zvuku (jako přehrávač disků
Blu-ray, DVD rekordér, videopřehrávač apod.), připojte je k dostupným
vstupům na televizoru a výstup televizoru následně zapněte do zásuvky
SCART (AV), AUX, HDMI AV OUT nebo do zásuvky DIGITAL AUDIO IN
OPTICAL hlavního zařízení.
krok 4 Přípojka napájecího kabelu
AC IN
Šetření energií
Hlavní jednotka spotřebovává malé množství energie, i když je v
pohotovostním režimu “standby” (přibliž. 0,1 W). Pro šetření energií,
když se jednotka nebude delší dobu používat, ji vypojte z domácí
elektrické zásuvky.
Po zapojení hlavní jednotky bude zapotřebí resetovat některé položky
paměti.
[Poznamka]
Dodávaný napájecí kabel se používá pouze s hlavní jednotkou.
Nepoužívejte jej s jiným zařízením. Stejně tak nepoužívejte šňůry k
jiným zařízením s hlavní jednotkou.
krok 5 Příprava dálkového ovládání
Baterie
R6/LR6, AA
POZOR
V případě nesprávné výměny baterie hrozí nebezpečí výbuchu.
Vyměňujte pouze za stejný nebo rovnocenný typ, který doporučuje
výrobce.
Použité baterie likvidujte podle pokynů výrobce.
≥ Použijte alkalické nebo manganové baterie.
≥ Nezahřívat a nevystavovat ohni.
≥ Nenechávejte baterie dlouhou dobu v automobilu vystavenému
přímému slunečnímu záření, když jsou dveře a okna zavřená.
Nedìlejte následující:
≥ nesměšujte staré a nové baterie.
≥ nepoužívejte současně různé typy.
≥ nerozebírejte je a nezkratujte.
≥ nepokoušejte se dobíjet alkalické nebo manganové baterie.
≥ nepoužívejte baterie, jestliže mají odloupnutý kryt.
Nesprávné zacházení s bateriemi může způsobit únik elektrolytu, který
může vážně poškodit dálkový ovladač.
Vyjměte baterie z dálkového ovladače, pokud nebude delší dobu
používán. Uložte je na chladném tmavém místě.
Použití
Nasměrujte dálkové ovládání na snímač signálu dálkového ovládání na
zařízení (B 4) tak, aby signál nebyl přerušen překážkami.
Vzdálenost: V rozsahu přibližně 7 m
Úhel: Přibližně do 20° nahoru a dolů a přibližně do 30° doleva a doprava
Page 33

krok 6 EASY SETUP (SNADNÉ NASTAV.)
NASTAVIT
HLAVNÍ
DISK
OBRAZ
ZVUK
ZOBRAZENÍ
HDMI
DALŠÍ
RETURN
Nabídka
Obrazovka snadného nastavení vám pomůže provést
potřebná nastavení.
Příprava
Zapněte televizi a zvolte příslušný režim video vstupu (např. VIDEO 1,
AV 1, HDMI, atd.), který odpovídá připojení k této jednotce.
≥ Pro změnu režimu video vstupu televize si přečtěte pokyny v návodu
k obsluze vaší televize.
≥ Tento dálkový ovladač umí provádět některé základní operace na
televizním přístroji (B 4).
Stiskněte [Í]1 pro zapnutí jednotky.
1
≥ Když se obrazovka snadného nastavení objeví automaticky,
vynechte kroky 2 až 7.
Stiskněte [DVD]5 pro výběr “DVD/CD”.
2
Stiskněte [START]C pro zobrazení menu START.
3
Stisknutím [3, 4]9 vyberte “Nastavení” a
4
stiskněte [OK]9.
Stiskněte [3, 4]9 pro výběr “DALŠÍ” a stiskněte
5
[OK]9.
Stiskněte [3, 4]9 pro výběr “SNADNÉ NASTAV.” a
6
stiskněte [OK]9.
Stiskněte [OK]9 pro výběr “NASTAVIT”.
7
Stiskněte [3, 4]9 pro výběr “Ano” a stiskněte
8
[OK]9.
Postupujte podle pokynů na obrazovce a proveďte
9
nastavení s použitím [3, 4, 2, 1]9 a [OK]9.
(B níže, SNADNÉ NASTAV. - hodnoty)
Stisknutím [OK]9 ukončete SNADNÉ NASTAV..
10
SNADNÉ NASTAV. - hodnoty
≥Jazyk
Zvolte jazyk pro použití na obrazovce nabídky.
≥Poměr stran TV
Zvolte stranový poměr vhodný pro vaši televizi.
≥Uspořádání repro.
Zvolte režim “Prostorový zvuk (Doporučeno)” nebo režim “Přední
(Alternativa)” v souladu s vaším uspořádáním reproduktorů
(B 7, Umístění).
≥Kontrola reproduk.
Poslechněte si výstup reproduktorů pro potvrzení jejich připojení.
≥Výstup reproduk.
Nastavte prostorový zvuk pro výstup reproduktorů.
≥Funkce TV audio
Zvolte připojení audio vstupu z vaší televize.
Pro připojení AUX (B 8): Zvolte “AUX”.
Pro zapojení HDMI (B 8): Zvolte “ARC”.
Pro připojení DIGITAL AUDIO IN OPTICAL (B 8): Zvolte
“DIGITAL IN”.
Pro zapojení SCART (AV) (B 8): Zvolte “AV”.
Toto bude nastavení Funkce TV audio pro VIERA Link “HDAVI
Control”. (
[Poznamka]
≥ Je-li tato jednotka připojena ke kompatibilní televizi “HDAVI Control 3
nebo novější” s použitím kabelu HDMI, informace o jazyku nabídky a
stranovém poměru televize se vyhledají prostřednictvím VIERA Link.
≥ Je-li tato jednotka připojena ke kompatibilní televizi “HDAVI Control 2”
s použitím kabelu HDMI, informace o stranovém poměru televize se
vyhledají prostřednictvím VIERA Link.
≥ Nastavení v rámci SNADNÉ NASTAV. mohou být změněna také
v rámci nastavení přehrávače (např. jazyk, formát televizoru, audio
televizoru (B 17)).
B
15)
Poslech rádia
Automatická předvolba stanic
Lze nastavit až 30 stanic.
Stiskněte [RADIO, EXT-IN]5 pro výběr “FM”.
1
Stiskněte [MENU]7.
2
Pokaždé, když stisknete tlačítko:
LOWEST (nastaveno v továrně):
Začít automatickou předvolbu s nejnižší frekvencí.
CURRENT:
Začít automatickou předvolbu se současnou frekvencí.
§ Ohledně změny frekvence si přečtěte část “Ruční vyladění”
(B níže).
Stiskněte a držte [OK]9.
3
Uvolněte tlačítko, když se zobrazí “FM AUTO”.
Tuner začne předem nastavovat všechny stanice, které může
přijímat, do kanálů ve vzestupném pořadí.
≥ “SET OK” se zobrazí, když jsou stanice nastavené, a rádio se vyladí
na poslední předvolenou stanici.
≥ Vpřípadě neúspěšného automatického přednastavení dojde
k zobrazení hlášení “ERROR”. V takovém případě přednastavte
kanály manuálně (B níže).
Poslech/potvrzení přednastavených kanálů
Stiskněte [RADIO, EXT-IN]5 pro výběr “FM”.
1
Stiskněte číslovaná tlačítka pro výběr kanálu.
2
≥ Pro výběr čísla o 2 znacích
např. 12: [S10]3 B [1] B [2]
Nebo stiskněte [X, W]A.
≥ Nastavení FM se také ukáže na displeji televizního přijímače.
Je-li hluk nadměrný
Stiskněte a držte [PLAY MODE]: zobrazit “MONO”.
Pro zrušení tohoto režimu znovu stiskněte a držte toto tlačítko, až se
objeví “AUTO ST”.
≥ Režim se zruší také tehdy, když změníte frekvenci.
Ruční vyladění
Stiskněte [RADIO, EXT-IN]5 pro výběr “FM”.
1
Stiskněte [SEARCH6, SEARCH5]@ pro výběr
2
frekvence.
≥ Pro spuštění automatického ladění stiskněte a držte,
[SEARCH6, SEARCH5]@ dokud se frekvence nezačne
posouvat. Ladění se zastaví, když je nalezena stanice.
Ruční předvolba stanic
Je možno nastavit až 30 stanic.
1 Když posloucháte rozhlasové vysílání
Stiskněte [OK]9.
2 Když na displeji bliká frekvence
Stiskněte číslovaná tlačítka pro výběr kanálu.
≥ Pro výběr čísla o dvou znacích
např. 12: [S10]3 B [1] B [2]
Nebo stiskněte [X, W]A, a pak stiskněte [OK]9.
Předchozí uložená stanice se přepíše, když se v témže předvoleném
kanálu uloží jiná stanice.
Vysílání RDS
Jednotka umí zobrazit textová data přenášená rádiovým datovým
systémem (RDS), který funguje v ně
Pokud stanice, kterou posloucháte, vysílá signály RDS, na displeji se
rozsvítí “RDS”.
Když posloucháte rozhlasové vysílání
Stiskněte [FUNCTIONS]D pro zobrazení textových dat.
Pokaždé, když stisknete tlačítko:
PS: Programový servis
PTY: Typ programu
FREQ: Zobrazení frekvence
kterých oblastech.
§
ZačínámePrůvodce rychlým spuštěním
ČESKY
RQ TX111 1
9
33
Page 34

Zobrazení PTY (typ programu)
DVD/CD Domáсí kino
Výběr vstupu
Nastavení
Zvuk
DVD/CD Domácí kino
Výběr vstupu
Přehrávání disku
TOP MENU (DVD)
MENU (DVD)
Přehrávání/otevření nabídek
NEWS VARIED FINANCE COUNTRY
AFFAIRS POP M CHILDREN NATIONAL
INFO ROCK M SOCIAL A OLDIES
SPORT M.O.R. M
EDUCATE LIGHT M PHONE IN DOCUMENT
DRAMA CLASSICS TRAVEL TEST
CULTURE OTHER M LEISURE ALARM
SCIENCE WEATHER JAZZ
§“M.O.R. M”=Middle of the road music/hudba podle názvu písničky
[Poznamka]
Getting StartedPlaying DiscsOther OperationsReference
RDS displeje se nemusí zobrazit, když je slabý příjem.
§
RELIGION FOLK M
Používání menu START
Prostřednictvím menu START můžete zvolit zvukové efekty, požadovaný
zdroj, změnu nastavení, přístup k přehrávání/menu apod.
Stiskněte [START]C pro zobrazení menu START.
1
≥ Při použití VIERA Link “HDAVI Control” dojde při zobrazení menu
START také k zapnutí televizoru.
např.
Stiskněte [3, 4]9 pro výběr položky a stiskněte
2
[OK]9.
≥ Pro ukončení stiskněte [START]C.
Stiskněte [3, 4]9 k provedení nastavení a stiskněte
3
[OK]9.
Když je zvolen “Výběr vstupu”
Z nabídky si můžete vybrat žádaný zdroj.
≥ DVD/CD (B 12), RÁDIO FM (B 9), AV
§1
(B níže), DIGITAL IN
ARC
§1Kromě “AV”, “AUX”, “ARC” nebo “DIGITAL IN” se zobrazí také “(TV)”,
což bude informovat o nastavení audia pro VIERA Link “HDAVI
Control” (B 15).
§2Kromě “DIGITAL IN” dojde k zobrazení “(STB)”, což bude informovat
o nastavení STB audia pro VIERA Link “HDAVI Control” (B 15).
Když je zvoleno “Nastavení”
Můžete změnit nastavení pro toto zařízení. (B 17)
Když je zvolen “Zvuk”
Můžete si zvolit nastavení kvality zvuku (B 11, EQ (Ekvalizér)).
Ostatní volitelné položky
Zobrazené položky budou měnit v závislosti na médiu a na zdroji.
Když je vložen disk nebo je připojen přístroj USB, můžete si otevřít
přehrávání nebo nabídky z menu START.
např. [DVD-V]
Když se objeví ovládací panel na obrazovce
např. [DVD-V] (když je z menu START zvoleno “Přehrávání disku”)
Přehrávání můžete ovládat označenými ovladači.
§1, 2
Výběr zdroje dálkovým ovladačem
Stiskněte Pro výběr
[DVD]5 DVD/CD
[iPod]5 IPOD (B 16)
[RADIO,
EXT-IN]5
[Poznamka]
Potvrďte připojení audio do terminálu SCART (AV), AUX, HDMI AV OUT
nebo DIGITAL AUDIO IN OPTICAL na hlavní jednotce, když si vyberete
RQ TX111 1
ČESKY
odpovídající zdroje (B 8). Snižte hlasitost televize na minimum a poté
nastavte hlasitost hlavní jednotky.
10
34
Pokaždé, když stisknete tlačítko:
FM:
AV:
AUX:
ARC:
D-IN:
USB:
(B 9)
Pro audio vstup přes terminál SCART (AV).
Pro audio vstup přes terminál AUX.
Pro vstup audia prostřednictvím zásuvky
HDMI AV OUT.
Pro vstup audia prostřednictvím zásuvky
DIGITAL AUDIO IN OPTICAL. (B vpravo)
(B 17)
§1
(B níže), AUX§1 (B níže),
(B níže), USB (B 17), iPod (B 16)
Poslech audia televizoru nebo
jiného zařízení z reproduktorů
tohoto zařízení
Příprava
≥ Ujistěte se o existenci spojení mezi tímto zařízením a televizorem nebo
jiným zařízením. (B 8)
≥ Zapněte televizor a/nebo jiné zařízení.
Stisknutím [RADIO, EXT-IN]5 zvolte zdroj signálu, který je
použitý pro připojení tohoto zařízení k televizoru nebo
jinému zařízení.
≥ Ohledně změny efektů prostorového zvuku a režimu zvuku si přečtěte
část “Užijte si zvukové efekty ze všech reproduktorů” (B 11 )
≥ Je-li váš televizor kompatibilní s VIERA Link, přečtěte si “Použití
ovládání VIERA Link “HDAVI Control
souvisejících funkcí.
Nastavení vstupu pro digitální audio
Zvolte vhodný typ audia mezi zásuvkami DIGITAL AUDIO IN OPTICAL a
HDMI AV OUT na hlavním zařízení.
Je třeba provést nastavení “D-IN” a “ARC” prostřednictvím příslušného
voliče.
≥ Podtržené položky označují tovární nastavení.
Možná nastavení
Režim Nastavení
DUAL: (Pracuje pouze v případě Dolby Dual Mono)
DRC:
(Dynamic
Range
Compression)
PCM FIX: – ON
§3
:
STB
(CABLE/SAT
AUDIO)
Opakovaným stisknutím [RADIO, EXT-IN]5 zvolte
1
“D-IN” nebo “ARC”.
Proveďte volbu režimu stisknutím [PLAY MODE]: a
2
poté [3, 4]9.
Zatímco je zobrazen zvolený režim
3
Stiskněte [2, 1]9 a zvolte požadované nastavení.
§3 Pouze při volbě “D-IN”.
Při nastavování se ujistěte, že jste zvolili vstupní kanál zařízení (STB
apod.) na televizoru.
Zařízení musí být připojeno k televizoru od firmy Panasonic
prostřednictvím HDMI kabelu a k tomuto zařízení prostřednictvím
optického kabelu pro digitální audio.
≥Tato funkce nebude aktivní v případě volby “DIGITAL IN” v “Funkce
TV AUDIO” (B 19).
– MAIN+SAP
– MAIN
– SAP
“SAP” = Program sekundárního audia
≥ Nastavte režim PCM FIX na “OFF” za účelem
poslechu “MAIN” nebo “SAP” audia.
– ON
Slouží k dosažení jasnosti zvuku i při nízké hlasitosti
prostřednictvím komprese rozsahu nízké a vysoké
úrovně zvuku. Ideální pro pozdní noční sledování.
(Pracuje pouze při Dolby Digital)
– OFF
Je reprodukován plný dynamický rozsah signálu.
Tato volba se používá v případě příjmu signálů PCM.
–OFF
Tato volba se používá v případě příjmu signálů
Dolby Digital a PCM.
≥ Při příjmu skutečného 5.1-kanálového prostorového
zvuku zvolte “OFF”.
– SET
Tato volba se používá při nastavení přepnutí
hlavního zařízení na “D-IN”, když je na televizoru
zvolen vstupní kanál STB připojeného
prostřednictvím HDMI (B 15, Nastavení STB audia
pro VIERA Link “HDAVI Control”).
– OFF
Tato volba slouží ke zrušení tohoto nastavení.
TM
”” (B 15) ohledně dalších
(stereofonní zvuk)
Page 35

Užijte si zvukové efekty ze všech
např.
ZVUK-NASTAVENÍ REPRO. -TESTOVACÍ TÓN
REPRODUKTOR
LEVÝ
STŘED
PRAVÝ
PRAVÝ PROSTOROVÝ
VYVÁŽENÍ
− −
0dB
− −
0dB
reproduktorů
≥ Následující zvukové efekty nemusí být k dispozici nebo nemusí u
některých zdrojů fungovat.
≥ Při použití těchto zvukových efektů s některými zdroji může dojít ke
snížení kvality zvuku. Pokud se tak stane, vypněte zvukové efekty.
[Poznamka]
Pri zmene efektu prostorového zvuku, režimu šeptání do prostoru nebo
režimu zvuku bude nastavení zobrazeno na displeji televizoru, když je
zvolen jako zdroj “DVD/CD” nebo “USB” behem prehrávání video.
Působení prostorových zvukových efektů
Stiskněte [SURROUND]<.
Pokaždé, když stisknete tlačítko:
STANDARD:
Zvuk se vysílá tak, jak byl zaznamenán/zakódován. Výkon reproduktorů
se liší v závislosti na zdroji.
MULTI-CH:
Můžete si vychutnat zvuk z čelních reproduktorů stejně jako z
reproduktorů prostorového zvuku i v případě přehrávání 2-kanálového
zvuku.
MANUAL: (B níže)
Když je zobrazen “MANUAL”, stisknìte [2, 1]9 pro výbìr
dalších prostorových režimu.
Pokaždé, když stisknete [2, 1]9:
DOLBY PLII MOVIE
Vhodné pro filmový software nebo software nahraný v systému Dolby
Surround. (s výjimkou [DivX])
DOLBY PLII MUSIC
Přidává efekty kanálu 5.1 ke stereo zdrojům. (s výjimkou [DivX])
S.SRD
U stereofonních zdrojů si můžete vychutnat zvuk ze všech
reproduktorů.
STEREO
Zvuk bude pro jakýkoli zdroj vysílán pouze do předních reproduktorů a
subwooferu.
Doporučené režimy pro pravý požitek z audio nebo
stereo zdrojů televize při zapojení všech reproduktorů:
≥ DOLBY PLII MOVIE ≥ DOLBY PLII MUSIC ≥ S.SRD
Na displeji hlavní jednotky se rozsvítí “SRD”, když probíhá výstup z
prostorových reproduktorů.
Když je signál DTS nebo Dolby Digital, rovnž se zobrazí “/DTS” nebo
“/DOLBY DIGITAL” podle daného signálu.
Zvolení zvukového režimu
Stiskněte [SOUND]; pro výběr režimu zvuku.
1
Pokaždé, když stisknete tlačítko:
EQ: Ekvalizér
SUBW LVL: Úroveň Subwooferu
H.BASS: Harmonické basy
C.FOCUS: Zdůraznění středu
Během zobrazení zvoleného režimu stiskněte [2, 1]9
2
provedení nastavení.
Následují informace o nastavení podrobností jednotlivých zvukových
efektů.
EQ (Ekvalizér)
Můžete si zvolit nastavení kvality zvuku.
Pokaždé, když stisknete [2, 1]9:
FLAT: Zrušit (nepřidává se žádný efekt).
HEAVY: “Okoření” rockovou hudbu.
CLEAR: Projasní vyšší tóny.
SOFT: Pro hudební kulisu.
SUBW LVL (Úroveň basového reproduktoru)
Můžete upravit sílu basů. Jednotka automaticky zvolí
nejvhodnější nastavení podle typu zdroje přehrávání.
LEVEL 1 ,# LEVEL 2 ,# LEVEL 3 ,# LEVEL 4
^---------------------------------------------------------------------------J
≥ Vámi provedené nastavení bude zachováno a vyvoláno
pokaždé, když budete přehrávat stejný typ zdroje.
H.BASS (Harmonické basy)
Můžete provést obohacení nízkofrekvenčního zvuku tak, že bude
slyšet těžký basový zvuk i v případě, že akustika místnosti není
optimální.
ON ,------. OFF
≥ Vámi provedená nastavení jsou uložena a vyvolána při každém
použití stejného typu zdroje.
C.FOCUS (Zaměření na střed)
(Tento režim je účinný pouze v případě přehrávání audia,
které obsahuje zvuk středového kanálu, nebo při volbě
DOLBY PLII (B levý).)
Zvuk středového reproduktoru můžete nastavit tak, jako by
vycházel z televize.
ON,------.OFF
Režim prostorového ozvučení “Whisper”
Prostřednictvím tohoto režimu můžete obohatit efekt audia při nízké
hlasitosti. (Ideální pro pozdní noční sledování.)
Stiskněte [W.SRD]G.
Pokaždé, když stisknete tlačítko:
ON ,--. OFF
Ruční nastavení výkonu reproduktoru
Příprava
≥ Pro vyvolání obrazu zapněte televizní přijímač a zvolte příslušný režim
video vstupu.
≥ Stiskněte [r, VOL, s]> pro úpravu hlasitosti na normální úroveň
poslechu.
≥ Stisknutím [DVD]5 vyberte “
≥ Zvolte “TESTOVACÍ TÓN” z “NASTAVENÍ REPRO.” v ZVUK menu
(B 18).
Stiskněte [OK]9 pro zadání režimu zkušební zvuk.
1
Zkušební tón proběhne každým kanálem v následujícím pořadí.
LEVÝ, STŘED, PRAVÝ, PRAVÝ PROSTOROVÝ, LEVÝ
PROSTOROVÝ
Stiskněte [OK]9 a poté [3, 4]9 pro nastavení úrovně
2
reproduktorů pro každý reproduktor jednotlivě.
(STŘED, PRAVÝ PROSTOROVÝ, LEVÝ PROSTOROVÝ)
`
6 dB do i6 dB (Tovární nastavení: 0 dB)
DVD/CD”.
Doladění úrovně reproduktoru během přehrávání
(Tento režim je účinný při přehrávání audia s kanálem prostorového
zvuku nebo “SRD” v případě zobrazení prostorových světel na displeji
hlavního zařízení)
Stiskněte a držte [–CH SELECT]; pro výběr reproduktoru.
1
Během zobrazení kanálu reproduktorů stiskněte [–CH SELECT];.
L # C # R # RS # LS # SW
^--------------------------------------------------}
≥ Označení SW (basový reproduktor) bude zobrazeno i v případě, že
zdroj zvuku neobsahuje kanál pro basový reproduktor.
Během volby “L” nebo “R”.
2
Stisknutím [2, 1]9 dolaďte vyvážení čelního
reproduktoru.
Během volby “C”, “RS”, “LS” nebo “SW”.
3
Stiskněte [3]9 (zvýšení) nebo [4]9 (snížení) k nastavení
výkonu pro každý reproduktor.
ZačínámePlaying DiscsOther OperationsReference
ČESKY
RQ TX111 1
11
35
Page 36

Základní přehrávání
Štítek směrem nahoru
DVD-V PROGRAM
ZVOL TITUL TITUL KAPITOLU
TITUL 1
TITUL 2
TITUL 3
TITUL 4
1
2
3
4
5
NÁHODNÉ PŘEHR.DVD-V
ZVOL TITUL
TITUL 1
TITUL 2
TITUL 3
Další režimy přehrávání
Příprava
Pro vyvolání obrazu zapněte televizi a změňte její režim video vstupu
(např. VIDEO 1, AV 1, HDMI, apod.) který odpovídá připojení k této
jednotce.
Stiskněte [Í]1 pro zapnutí jednotky.
1
Stiskněte [DVD]5 pro výběr “DVD/CD”.
2
Stiskněte [< OPEN/CLOSE]5 pro vysunutí přihrádky na
3
disk.
Getting StartedPlaying DiscsOther OperationsReference
Zasuňte disk.
4
≥ Dvoustranné disky vkládejte tak, aby
etiketa strany, kterou chcete přehrávat,
byla nahoře.
Stiskněte [1 PLAY]6 pro spuštění přehrávání.
5
≥ Stisknutím [r, VOL, s]> dolaďte hlasitost.
[Poznamka]
≥ PŘI ZOBRAZENÍ MENU SE BUDOU DISKY I NADÁLE OTÁČET.
Po skončení stiskněte [∫ STOP]6 kvůli šetření motoru zařízení a
displeje televizoru.
≥ Celkový počet titulů se nemusí na iR/iRW řádně zobrazit.
Základní ovládače
Aktivace přehrávání dotekem (Pouze dálkový ovladač): [1 PLAY]6
(během pohotovostního reřimu)
Hlavní jednotka se automaticky zapne a začne přehrávat vložený disk.
Stop: [∫ STOP]6
Pozice se uloží do paměti, když je na obrazovce “POKRAČOVAT” .
≥ Stiskněte [1 PLAY]6 pro pokračování.
≥ Stiskněte [∫ STOP]6 znovu pro vymazání pozice.
Pauza: [; PAUSE]6
≥ Stiskněte [1 PLAY]6 pro restartování přehrávání.
Přeskočit: [SKIP:,SKIP9]6
Prohledávání: [SEARCH6, SEARCH5]6 (během přehrávání)
Pomalé přehrávání: [SEARCH6, SEARCH5]6
≥ Až 5 kroků.
≥ Stiskněte [1 PLAY]6 pro spuštění normálního přehrávání.
≥ [VCD] Pomalé přehrávání: Pouze dopředu.
≥ [MPEG4] [DivX]
Po jednotlivých okénkách: [2;, ;1]9 (během pauzy)
[DVD-VR] [DVD-V] [VCD]
≥ [DVD-VR] [VCD] Pouze dopředu.
Výběr položky na obrazovce: [3, 4, 2, 1, OK]9
[3, 4, 2, 1]9: Vyběr
[OK]9: Potvrdit
Zadejte číslo: Číslovaná tlačítka
[DVD-VR] [DVD-V] [VCD] [CD]
např. Pro výběr 12: [S10]3 B [1] B [2]
[VCD] s ovládáním přehrávání
Stiskněte [∫ STOP]6 pro zrušení funkce PBC a pak stiskněte číslovaná
tlačítka.
[DVD-V] Zobrazí hlavní nabídku disku: [TOP MENU]
[DVD-V] Zobrazí nabídku disku: [MENU]7
Návrat na předchozí obrazovku: [RETURN]E
[VCD] (s ovládáním přehrávání) Zobrazí nabídku disku: [RETURN]E
Displej hlavní jednotky: [FL DISPLAY]F
[DVD-VR] [DVD-V] [WMA] [MP3] [MPEG4] [DivX]
Zobrazení času
programu)
[JPEG]
,-.Číslo obsahu
SLIDE
RQ TX111 1
ČESKY
12
36
(během pauzy)
Pomalé přehrávání: Nefunguje.
8
,-. Zobrazení informací (např. [DVD-VR] Číslo
Opakovat přehrávání
Funguje pouze tehdy, když lze zobrazit uplynulý čas. Funguje také s
veškerým obsahem JPEG.
Během přehrávání zobrazte režim opakování stisknutím a
přidržením [–REPEAT]:.
Během zobrazení režimu opakování zvolte položku, která se má
opakovat, stisknutím [–REPEAT]:.
např. [DVD-V]
`TITUL ---. `KAP. ---. `VYPNOUT
^----------------------------------------------------b
Pro zrušení zvolte “VYPNOUT”.
Zobrazené položky se liší podle typu disku a režimu přehrávání.
Programové a nahodilé přehrávání
[DVD-V] [VCD] [CD] [WMA] [MP3] [JPEG] [MPEG4] [DivX]
Příprava
Během zastavení stiskněte [PLAY MODE]: pro výběr
režimu přehrávání.
Postupně se objeví obrazovka programového a nahodilého přehrávání.
Program ---------------------------------------) Nahodilé
^--- Obrazovky výstupu z programu (}
a nahodilého přehrávání
≥ [DVD-VR] Zvolte “DATOVÝ” v “DVD-VR/DATOVÝ” (B 19, DALŠÍ
nabídka) pro přehrávání obsahu MP3, JPEG, MPEG4 nebo DivX.
≥ Pokud se objeví obrazovka “MENU PŘEHRÁVÁNÍ”, zvolte “ZVUK/
OBRAZ” nebo “VIDEO” (B 13, S použitím MENU PŘEHRÁVÁNÍ), a
poté pokračujte ve výše uvedeném postupu.
≥ Pro disk s obsahem jak WMA/MP3 tak JPEG zvolte hudbu nebo
obrázky.
WMA/MP3: Zvolte “HUDEBNÍ PROGRAM” nebo “HUDBA NÁHODNĚ”.
JPEG: Zvolte “OBRAZOVÝ PROGRAM” nebo “OBRAZ NÁHODNĚ”.
≥ [DVD-V] Některé položky nelze přehrávat, i když jste je naprogramovali.
Přehrávání programu (až do 30 položek)
Stiskněte [3, 4]9 pro výběr položky a stiskněte
1
[OK]9.
např. [DVD-V]
≥ Opakujte tento krok pro naprogramování jiných položek.
≥ Pro návrat na předchozí obrazovku stiskněte [RETURN]E.
Stiskněte [1 PLAY]6 pro spuštění přehrávání.
2
Pro výběr všech položek
Stiskněte [3, 4]9 pro výběr “VŠE” a stiskněte [OK]9.
Pro vymazání zvoleného programu
1 Stiskněte [1]9 a pak stiskněte [3, 4]9 pro výběr programu.
2 Stisknìte [CANCEL]4.
Pro smazání celého programu
Stiskněte [1]9 několikrát pro výběr “VYMAZAT VŠE” a poté stiskněte
[OK]9.
Celý program se vymaže také tehdy, když se otevře disková přihrádka,
jednotka se vypne nebo je zvolen jiný zdroj.
Nahodilé přehrávání
(Pouze když jsou na disku skupiny nebo více titulů.)
1
Stiskněte [3, 4]9 pro výběr skupiny nebo titulu a
stiskněte [OK]9.
např. [DVD-V]
” označuje zvolenou položku. Zrušení volby se provádí
≥ “
*
opětovným stisknutím [OK]9.
Stiskněte [1 PLAY]6 pro spuštění přehrávání.
2
Page 37

Používání navigačních
WMA/MP3/JPEG
MPEG4/DivX
MENU PŘEHRÁVÁNÍ
ZVUK/OBRAZ
VIDEO
DATOVÝ DISK
ZÁKL.ADRESÁŘ
Perfume
Underwater
Fantasy planet
Starpersons1
Skupina (Složka):
Obsah (Soubor):
JPEG images G 1/ 1:C 3/ 9
Gruppenavn
Gruppe- og
indholdsnummer
PG
DATUM
DÉLKA
TITUL
1 0:16:02
10/11
LIVE CONCERT
02:15
2 0:38:25
12/05
AUTO ACTION
01:30
PL
DATUM
DÉLKA
TITUL
10:00:10
11/11
CITY PENGUIN
00:01
20:01:20
12/01
FOOTBALL
01:20
T
1
K1
1:ENG
3
1
VYPNOUT
HLEDAT TITUL
Současná položka
Název položky
např. Menu 1 (Disk/Přehrát) [DVD-V]
T
1:ENG
3
1
VYPNOUT
HLEDAT KAPITOLU
K1
1
Současné nastavení
např. Menu 1 (Disk/Přehrát) [DVD-V]
.0: Není prostorový zvuk
.1: Prostorový zvuk mono
.2: Prostorový zvuk stereo (vlevo/vpravo)
.1: Efekt nízké frekvence
(nezobrazí se, když není signál)
.1: Střed
.2: Vpředu vlevoiVpředu vpravo
.3: Vpředu vlevoiVpředu vpravoiStřed
např.
nabídek
Přehrávání datových disků
[WMA] [MP3] [JPEG] [MPEG4] [DivX]
[DVD-VR] Zvolte “DATOVÝ” v “DVD-VR/DATOVÝ” (B 19, DALŠÍ nabídka)
pro přehrávání obsahu MP3, JPEG, MPEG4 nebo DivX.
S použitím MENU PŘEHRÁVÁNÍ
“MENU PŘEHRÁVÁNÍ” se objeví obrazovka, když disk obsahuje jak
video (MPEG4/DivX) tak jiný formát (WMA/MP3/JPEG).
Stiskněte [3, 4]9 pro výběr “ZVUK/OBRAZ” nebo
“VIDEO” a stiskněte [OK]9.
≥ Pro spuštění přehrávání stiskněte [1 PLAY]6.
≥ Ohledně volby položky určené k přehrávání si přečtěte část “Přehrávání
od zvolené položky” (B níže).
Přehrávání od zvolené položky
Můžete si zvolit přehrávání od žádané položky během zobrazení
“DATOVÝ DISK” obrazovky.
např.
: WMA/MP3
: JPEG
: MPEG4/DivX
≥ Pro zobrazení/ukončení obrazovky stiskněte [MENU]7.
Stiskněte [3, 4]9 pro výběr položky a stiskněte [OK]9.
≥ Stiskněte [2, 1]9 pro přeskakování po jednotlivých stránkách.
≥ Pro návrat o 1 úroveň výš z aktuální složky stiskněte [RETURN]E.
≥ Maximum: 28 znaků pro název souboru/složky.
Přehrávání začne od zvoleného obsahu.
∫ [JPEG] Volba obrázku v nabídce miniatur
Během zobrazení snímku stiskněte [TOP MENU]8
1
provyvolání menu miniatur.
např.
Přehrávání seznamu nahrávek
Tento postup funguje, pouze když disk obsahuje seznam nahrávek.
Během zastavení stiskněte [PLAY LIST]7.
1
např.
Stiskněte
2
stiskněte [OK]9.
≥ Stiskněte [2, 1]9 pro přeskakování po jednotlivých stránkách.
[3, 4]9 pro výběr seznamu nahrávek a poté
Používání nabídek na
obrazovce
Stisknutím [FUNCTIONS]D zobrazte menu informací
1
zobrazovaných na displeji.
Pokaždé když stisknete tlačítko:
Menu 1 (Disk/Přehrát)
Menu 2 (Video)
Menu 3 (Audio)
Menu 4 (HDMI)
UKONČÍT
Stiskněte [3, 4, 2, 1]9 pro výběr položky a stiskněte
2
[OK]9.
Stiskněte [3, 4]9 k provedení nastavení a stisknte
3
[OK]9.
Zobrazené položky se liší podle typu disku.
Menu 1 (Disk/Přehrát)
HLEDAT STOPU, HLEDAT TITUL, HLEDAT OBSAH,
HLEDAT KAPITOLU, HLEDAT STRANU (Program Search –
Vyhledávání programu), HLEDAT PL
vyhledávání seznamu nahrávek)
Začít od specifické položky
≥ [VCD] Tento postup nefunguje, když používáte kontrolu přehrávání.
např. [DVD-V]: T2 K5
Pro výběr čísel pro datový disk
např. 123: [S10]3 B [1] B [2] B [3] B [OK]9
(Playlist Search –
Getting StartedPřehrávání diskůOther OperationsReference
Other Operations
Stiskněte [3, 4, 2, 1]9 pro výběr snímku a stiskněte
2
[OK]9.
≥ Stiskněte [SKIP:, SKIP 9]6 pro přeskakování po
jednotlivých stránkách.
Pro přechod k jiné skupině
1 Stiskněte [3]9 pro výběr názvu skupiny.
2 Stisknìte [2, 1]9 pro výbìr skupiny a stisknìte [OK]9.
Přehrávání disků DVD-R/-RW (DVD-VR)
[DVD-VR]
≥ Tituly se zobrazují, pouze když jsou nahrány na disk.
≥ Nemůžete editovat programy, přehrávat seznamy a tituly disků.
Přehrávání programů
Během zastavení stiskněte [DIRECT NAVIGATOR]8.
1
např.
Stiskněte [3, 4]9 pro výběr programu a stisknte
2
[OK]9.
≥ Stiskněte [2, 1]9 pro přeskakování po jednotlivých stránkách.
ZVUK
[DVD-V] [DivX] (s více zvukovými stopami)
Pro výběr zvukové stopy audio
[DVD-VR] [VCD]
Pro výběr “L”, “P”, “L+P” nebo “L P”
Vlastní operace závisí na disku. Podrobnosti si přečtěte v pokynech pro
používání disku.
Typ signálu/dat
LPCM/PPCM/ D/DTS/MP3/MPEG: Typ signálu
kHz (Vzorkovací kmitočet)/bit/ch (Počet kanálů)
3/2 .1ch
≥ [DivX] Když změníte audio na video-disku DivX, může chvíli trvat, než
začne přehrávání.
ČESKY
RQ TX111 1
13
37
Page 38

RYCHLOST PŘEHRÁV.
JPG
DATE
HDMI
[DVD-VR] [DVD-V]
Pro změnu rychlosti přehrávání
–z “k0.6” až “k1.4” (v krocích 0,1-jednotky)
≥ Stiskněte [1 PLAY]6 pro návrat k normálnímu přehrávání.
≥ Poté, co změníte rychlost
– Dolby Pro Logic II nemá žádný efekt.
– Audio výstup se přepne na 2-kanálové stereo.
– Vzorkovací kmitočet 96 kHz se převede na 48 kHz.
≥ Tato funkce nemusí fungovat u některých nahrávek disku.
REŽIM OPAKOVÁNÍ
Getting StartedPlaying DiscsOther OperationsReference
(B 12, Opakovat přehrávání)
Opakování
S výjimkou [JPEG] [MPEG4] [DivX] [DVD-VR] (Část statických snímků) [VCD]
(SVCD)
Stiskněte [OK]9 v bodech počátku a konce.
≥ Zvolte “VYPNOUT” pro zrušení.
A-B
(Pro opakování určené části)
TITULKY
[DVD-V] [DivX] (s více titulky) [VCD] (pouze SVCD)
Pro výběr jazyka titulků
≥ Na iR/iRW, může se ukázat číslo titulků, které nejsou zobrazeny.
[DVD-VR] (s informacemi o zapnutých/vypnutých titulcích)
Pro výběr “ZAPNUT” nebo “VYPNOUT”
≥ Tento postup s některými disky nemusí fungovat.
[DivX] (B 19, Zobrazení textu titulků DivX)
ÚHEL
[DVD-V] (s více úhly)
Pro výběr video úhlu
ZOBRAZENÍ DATA
[JPEG] Pro výběr “ZAPNUT” nebo “VYPNOUT” pro zobrazení data
snímku
Při přehrávání disků NTSC
AUTOMATIKA1:
AUTOMATIKA2:
VIDEO:
Automaticky zjistí obsah filmu a videa a vhodným
způsobem jej převede.
Kromě “AUTOMATIKA1” automaticky zjistí obsah
filmu s odlišnou rychlostí rámečků a vhodným
způsobem jej převede.
Zvolte, když je obsah videa zdeformován při použití
“AUTOMATIKA1” nebo “AUTOMATIKA2”.
ZVOLIT ZDROJ [DivX]
Když si zvolíte “AUTOMATIKA” je automaticky rozlišena a vysílána
metoda konstrukce obsahu DivX. Je-li obraz zdeformován, zvolte
“PROKLÁDÁNÍ” nebo “PROGRESIVNÍ”, podle toho, která metoda
konstrukce byla použita při záznamu obsahu na disk.
AUTO MATI KA , PROKLÁDÁNÍ, PROGRESIVNÍ
Menu 3 (Audio)
ZLEPŠENÍ DIALOGŮ
Aby byl dialog ve filmech zřetelnější
[DVD-V] (Dolby Digital, DTS, 3-kanál nebo vyšší, s dialogem
zaznamenaným ve středovém kanále)
[DivX] (Dolby Digital, 3-kanál nebo vyšší, s dialogem nahraným ve
středovém kanálu)
VYPNOUT, ZAPNUT
Menu 4 (HDMI)
STAV HDMI
Pro zobrazení informací HDMI
např.
HDMI --- INFORMACE
STAV PŘIPOJENÍ
AUDIO STOPA
MAX KANÁL
FORMÁT OBRAZU
PROSTOR BAREV
PŘIPOJENÝ
PCM
2ch
720p
YCbCr 4:4:4
OTOČIT
[JPEG] Pro otáčení snímku (během pauzy)
0,------. 90,------.180,------.270
^--------------------------------------------J
Menu 2 (Video)
REŽIM OBRAZU
NORMÁLNÍ
KINO1:
KINO2:
DYNAMICKÝ:
ANIMACE:
Vynáší plnost obsahu snímků a zvýrazňuje detaily v
tmavých scénách.
Zvyšuje ostrost snímků a detaily tmavých scén.
Zvyšuje kontrast pro větší působivost snímků.
Vhodné pro animaci.
ZVĚTŠENÍ
Pro výběr velikostí transfokátoru (zoomu)
NORMÁLNÍ, AUTOMATIKA (
k
2, k4
[DVD-VR] [DVD-V] [VCD] [MPEG4] [DivX]
≥ [JPEG]: během pauzy
REŽIM PŘENOSU
Pokud jste si vybrali “480p”/“576p”/“720p”/“1080p”
(“FORMÁT OBRAZU” v Menu 4 (HDMI)) zvolte metodu konverze tak,
aby progresivní výstup vyhovoval typu materiálu.
Nastavení se vrátí na “AUTOMATIKA” nebo “AUTOMATIKA1”, když je
≥
otevřena disková přihrádka, jednotka se vypne nebo je zvolen jiný zdroj.
Při přehrávání disků PAL
AUTOMATIKA:
VIDEO:
FILM:
RQ TX111 1
ČESKY
Automaticky zjistí obsah filmu a videa, a vhodným
způsobem jej převede.
Zvolte, když používáte “AUTOMATIKA” a obsah je
zdeformovaný.
Zvolte v případě, že okraje
filmového obsahu působí
roztřepeně nebo drsně, je-li zvoleno
“AUTOMATIKA”.
Avšak je-li obsah videa jak
znázorňuje obrázek napravo, zvolte “AUTOMATIKA”.
nebo
14
38
“1080i”
1 Stav připojení
2 Ukáže typ výstupního signálu.
(Když je zvoleno “VYPNUT” v “AUDIO VÝSTUP” (B18, HDMI menu),
“– – –” se zobrazí).
3 Ukáže počet audio kanálů.
4 (B níže), FORMÁT OBRAZU)
5 (B níže), PROSTOR BAREV)
HD ZDOKONALENÍ
Toto funguje pouze je-li připojení HDMI používáno s “PRIORITA VIDEA”
(B 18, HDMI menu) nastaveným na “ZAPNUT”.
Pro zostření “720p”, “1080i” a “1080p” kvality obrazu
VYPNOUT, 1 (nejslabší) až 3 (nejsilnější)
FORMÁT OBRAZU
Toto funguje pouze je-li připojení HDMI používáno s “PRIORITA VIDEA”
),
(B 18, HDMI menu) nastaveným na “ZAPNUT”.
Pro výběr nejvhodnější kvality obrazu pro vaši televizi
(Video nahrávky budou převedeny na video s vysokým rozlišením a
takto vysílány.)
§
480p/576p/720p/1080p (progresivní)
§
480i/576i/1080i (vrstvený)
≥ Je-li obraz zdeformován, stiskněte a držte [CANCEL]4, dokud se
obraz nezobrazí správně. (Výstup se vrátí do “480p”/“576p”.)
§ Zobrazená čísla záleží na tom, který disk se právě přehrává.
Zobrazí se jedno z výše uvedených čísel.
PROSTOR BAREV
Toto funguje pouze je-li připojení HDMI používáno s “PRIORITA VIDEA”
(B 18, HDMI menu) nastaveným na “ZAPNUT”.
Pro výběr vhodné barvy obrazu ve vaší televizi
YCbCr 4:2:2
YCbCr 4:4:4
RGB
≥ V případě kompatibility s vaším televizorem bude zobrazeno označení
”.
“
*
≥ Když je barva obrazu zkreslená, stiskněte a držte stisknuté
[CANCEL]4 až do jejího správného zobrazení.
Page 39

Použití ovládání VIERA Link
DVD/CD Domácí kino
Výběr vstupu
Přehrávání disku
TOP MENU (DVD)
MENU (DVD)
Přehrávání/otevření nabídek
“HDAVI ControlTM”
Co to je VIERA Link “HDAVI Control”
VIERA Link “HDAVI Control”
VIERA Link “HDAVI Control” je výhodná funkce, která nabízí připojené
operace této jednotky a televizi Panasonic (VIERA) v rámci “HDAVI
Control”. Této funkce můžete využít připojením zařízení kabelem HDMI.
Provozní podrobnosti vysvětluje návod k použití daného zařízení.
≥ VIERA Link “HDAVI Control”, na základě kontrolních funkcí zajištěných
HDMI, což je průmyslová norma s označením HDMI CEC (Consumer
Electronics Control), unikátní funkce, kterou jsme vyvinuli a začlenili do
našeho zařízení. Vzhledem k tomu nelze zaručit její fungování se
zařízením jiných výrobců, které podporuje HDMI CEC.
≥ Toto zařízení podporuje funkci “HDAVI Control 5”.
“HDAVI Control 5” představuje nejnovější standard (počínaje prosincem
2009) pro zařízení kompatibilní s ovládáními HDAVI od firmy
Panasonic. Tento standard je kompatibilní s konvenčními zařízeními
HDAVI od firmy Panasonic.
≥ Bližší informace si prosím vyhledejte v jednotlivých příručkách pro
zařízení jiných výrobců, která podporují funkci VIERA Link.
Televizor s funkcí “HDAVI Control 2 nebo novější” umožňuje realizaci
následující operace: Snadné ovládání s použitím dálkového ovládání
VIERA (pro “HDAVI Control 2 nebo novější”) (B vpravo).
Příprava
≥ Potvrďte provedení připojení HDMI (B 8).
≥ Nastavte “VIERA Link” na “ZAPNUT” (B 19, HDMI menu).
≥ Pro správné provedení a aktivaci tohoto p
zařízení kompatibilní s VIERA Link “HDAVI Control” a nastavte televizi
na odpovídající režim vstupu HDMI pro tuto jednotku.
Nastavení TV audio na VIERA Link “HDAVI Control”
Za účelem použití propojených operací zvolte “AV”, “AUX”, “ARC” nebo
“D-IN”.
Přečtěte si nastavení Funkce TV audio v SNADNÉ NASTAV. (B 9) nebo
“Funkce TV AUDIO” v nabídka HDMI (B 19).
Potvrďte zapojení audia do zásuvky SCART (AV) (pro “AV”), zásuvky
AUX (pro “AUX”), zásuvky HDMI AV OUT (pro “ARC”) nebo zásuvky
DIGITAL AUDIO IN OPTICAL (pro “D-IN”) (B 8).
Nastavení STB audia pro VIERA Link “HDAVI Control”
Zvolte “D-IN” za účelem použití propojených operací.
Ohledně nastavení STB si přečtěte část “Nastavení vstupu pro digitální
audio” (B 10).
Potvrďte připojení audia prostřednictvím zásuvky DIGITAL AUDIO IN
OPTICAL (pro “D-IN”) (B 8).
Kdykoliv se změní připojení nebo nastavení, potvrďte znovu výše
uvedené body.
§1 “AV”, “AUX”, “ARC” nebo “D-IN” (DIGITAL IN) pracuje v závislosti na
nastavení Funkce TV audio (B viz výše, Nastavení TV audio na
VIERA Link “HDAVI Control”).
“D-IN” (DIGITAL IN) pracuje v závislosti na nastavení STB audia
§2
(B viz výše, Nastavení STB audia pro VIERA Link “HDAVI Control”).
Co lze ovládat funkcemi “HDAVI Control”
Automatická synchronizace obrazu a zvuku
(K dispozici při použití VIERA Link “HDAVI Control” s televizorem
kompatibilním s “HDAVI Control 3 nebo novější”)
Tato funkce automaticky poskytuje synchronizovaný výstup audia a videa.
(Pracuje pouze v případě, že je zdrojem “DVD/CD”, “USB”, “AV”
§1
, “ARC”§1 nebo “D-IN”
“AUX”
≥ Při použití “DVD/CD” nebo “USB” v úloze zdroje nastavte “ČASOVÝ
POSUN” v OBRAZ nabídka
Přehrávání jedním dotykem
Můžete zapnout tuto jednotku a televizi a začít přehrávat disk jediným
stiskem tlačítka.
(Pouze dálkový ovladač)
Během úsporného režimu standby stiskněte [1 PLAY]6
pro spuštění přehrávání disku.
Reproduktory této jednotky se automaticky aktivují (B vpravo).
[Poznamka]
Může se stát, že přehrávání nebude okamžitě zobrazeno na televizoru. V
případě, že zmeškáte začáteční část přehrávání, vraťte se stisknutím
[SKIP:]6 nebo [SEARCH6]6 zpět na místo zahájení přehrávání.
§1, 2
.)
na “0 ms/AUTOMATIKA” (B 18).
řipojení zapněte veškeré
§1
,
Automatické přepínaní zdroje
(Propojení zapnutí)
Když se provádějí následující operace, televizor automaticky přepne
vstupní kanál a zobrazí odpovídající akci. Kromě toho v případě, že je
televizor vypnutý, se automaticky zapne.
–Při zahájení přehrávání na zařízení
–Při provedení operace, při které se používá strana displeje (např. menu
START)
≥ Při přepnutí vstupu televizoru na režim tuneru televizoru nebo na kanál
vstupu STB bude toto zařízení automaticky přepnuto na “AV”
§1
, “ARC”§1 nebo “D-IN”
“AUX”
funkce aktivní pouze v hudebním režimu iPod/iPhone , když
iPod/iPhone není připojen.)
≥ Když je tato jednotka v režimu “DVD/CD”, televize automaticky přepne
svůj vstupní režim na tuto jednotku.
≥ K automatickému přepnutí televizoru do režimu tuneru televizoru dojde,
když:
– Stiskněte [EXIT]
– Ukončete zobrazování menu START stisknutím [RETURN]
– zvolte “AV”
– dojde k zastavení přehrávání ([DVD-V] [VCD]) nebo k vypnutí tohoto
zařízení
§3 Tato funkce není aktivní během přehrávání nebo během režimu
obnovení činnosti, když je jako zdroj zvoleno “DVD/CD” nebo “USB”.
(V případě režimu “IPOD” bude tato funkce aktivní pouze
v hudebním režimu iPod/iPhone když iPod/iPhone není připojen.)
§4 Pouze po automatickém přepnutí televizoru do režimu vstupu HDMI
pro toto zařízení.
§3, 4
§1
, “AUX”§1, “ARC”§1 nebo “DIGITAL IN”§1 v menu START.
§4
§1, 2
. (V případě režimu “IPOD” bude tato
§1
§3, 4
,
.
Propojení vypnutí
Všechna připojená zařízení, kompatibilní s “HDAVI Control”, včetně
tohoto zařízení se automaticky vypnou, když vypnete televizor.
Pro pokračování audio přehrávání i s vypnutou televizí zvolte “VIDEO”
(B 19, “VYP. PŘES LINK” v nabídka HDMI).
[Poznamka]
Při stisknutí [Í]1 bude vypnuto pouze toto zařízení. Ostatní připojená
zařízení, kompatibilní s VIERA Link “HDAVI Control”, zůstanou zapnutá.
Bližší informace se dozvíte také v návodu k obsluze vaší televize.
Výběr reproduktorů
Pomocí nastavení nabídky televize si můžete zvolit, zda se audio bude
vysílat z reproduktorů této jednotky nebo z televizních reproduktorů.
Podrobnosti jsou vysvětleny v návodu k obsluze vaší televize.
Domácí kino
Reproduktory této jednotky jsou aktivní.
≥ Když jednotku zapnete, automaticky se aktivují její reproduktory.
≥ Když je tato jednotka v pohotovostním režimu, změna televizních
reproduktorů na reproduktory této jednotky v nabídce televize jednotku
automaticky zapne a zvolí “AV”
zdroj.
§1
, “AUX”§1, “ARC”§1 jako “D-IN”
§1, 2
jako
≥ Televizní reproduktory se automaticky ztlumí.
≥ Nastavení hlasitosti nemůžete ovládat pomocí tlačítka hlasitosti nebo
ztlumení dálkového ovladače televize. (Úroveň hlasitosti se zobrazí na
displeji hlavní jednotky.)
Můžete zrušit ztlumení zvuku také dálkovým ovladačem této jednotky (B4).
≥
≥ Když tuto jednotku vypnete, televizní reproduktory se automaticky
aktivují.
TV
Televizní reproduktory jsou aktivní.
≥ Hlasitost této jednotky je nastavena na “0”.
– Tato funkce funguje pouze když je “DVD/CD”, “USB”, “AV”§1, “AUX”§1,
§1
nebo “D-IN”
“ARC”
≥ Audio výstup je 2-kanálové audio.
Když přepínáte mezi reproduktory jednotky a televizními reproduktory,
televizní obrazovka může být několik vteřin prázdná.
§1, 2
zvoleno na této jednotce jako zdroj.
Snadné ovládání s použitím dálkového ovládání
VIERA (pro “HDAVI Control 2 nebo novější”)
Dálkovým ovladačem televize můžete ovládat nabídky přehrávání této
jednotky.
1 Zvolte menu provozu této jednotky pomocí nastavení nabídky televize.
(Podrobnosti vysvětluje návod k obsluze vaší televize.)
Obje ví se menu START.
např. [DVD-V]
Getting StartedPřehrávání disků
ovládání
Další postupy
Reference
Reference
ČESKY
RQ TX111 1
15
39
Page 40

≥ Menu START se může rovněž zobrazit použitím tlačítka na dálkovém
Dokovací adaptér
(není součástí dodávky)
iPod/iPhone
Dokovací stanice pro iPod/iPhone
Zatlačte
Hlavní jednotka
např.
iPod
Hudba
Domáсí kino
Seznamy skladeb
Umělci
Alba
iPod
Domácí kino
Hudba
Videa
Vše (zobrazení iPodu)
Výběr vstupu
Zvuk
Údaje o iPodu
iPod Domáсí kino
Good morning
Ronaldo
Happy days
3 / 20
2:43 -1:15
ovladači televize (např. [OPTION]).
– Když je jako zdroj zvolen “DVD/CD” nebo “USB”, funguje tento
postup pouze během režimu stop.
– To nefunguje, když se na televizním přijímači objeví obrazovka
přehrávání hudby iPod.
2 Zvolte požadovanou položku v menu START (B 10).
Když se objeví ovládací panel na obrazovce
např. [DVD-V] (když “Přehrávání disku” se zvolí z menu START.)
Při použití menu START v režimu “IPOD”
např.
Hudba: Zobrazí nabídku hudby.
Videa: Slouží k zobrazení menu videa.
Vše (zobrazení iPodu): Slouží k přepnutí na menu iPod/iPhone.
Údaje o iPodu: Zobrazení údajů iPod/iPhone.
Vychutnání hudby/videí
Přehrávání můžete ovládat pomocí označených ovládacích tlačítek.
Getting StartedPlaying DiscsOther OperationsReference
≥ Použitím tlačítka na dálkovém ovladači televize lze také zobrazit
ovládací panel na obrazovce (např. [OPTION]).
– Tato funkce pracuje pouze v režimu přehrávání a obnovení přehrávání
“DVD/CD” nebo “USB” nebo při zobrazení strany pro přehrávání
hudby z iPod-u na televizoru.
[Poznamka]
≥ V závislosti na menu nemohou být některé tlačítkové operace
prováděny dálkovým ovladačem televize.
≥ Na dálkovém ovladači televize nemůžete zadávat čísla číslovanými
tlačítky ([0] až [9]). Výběr seznamu nahrávek apod. proveďte dálkovým
ovladačem této jednotky.
Použití jiných zařízení
Přes váš systém domácího kina můžete přehrávat externí přistroj.
Použití iPod/iPhone
Prostřednictvím reproduktorů tohoto zařízení si můžete vychutnat hudbu
z iPod/iPhone nebo prohlížet videa/fotografie z iPod/iPhone na televizoru.
Příprava
≥ Prohlížení fotografií/videí z iPod/iPhone
– Ujistěte se o připojení videa prostřednictvím zásuvky SCART (AV) na
tomto zařízení a zvolte “VIDEO” z “VIDEO OUT – SCART” v OBRAZ
nabídka (B 18).
– Použijte menu iPod/iPhone za účelem vhodných nastavení výstupu
fotografií/videa pro váš televizor. (Přečtěte si související informace v
návodu k použití vašeho iPod/iPhone.)
≥ Pro vyvolání obrazu zapněte televizní přijímač a zvolte příslušný režim
video vstupu.
≥ Před připojením/odpojením iPod/iPhone vypněte hlavní zařízení nebo
ztlumte hlasitost hlavního zařízení na minimum.
Stiskněte # za účelem otevření víka dokovací stanice
1
pro iPod/iPhone.
Pevně připojte iPod/iPhone (není součástí dodávky).
2
≥ Připojte dokovací adaptér, který musí být dodán s vaším iPod/
iPhone, k dokovací stanici za účelem stabilního použití iPod/
iPhone.
V případě, že potřebujete adaptér, obraťte se na prodejce vašeho
iPod/iPhone.
Stisknutím [FUNCTIONS]D zvolte na televizoru menu
1
hudby nebo menu videa.
Stiskněte [3, 4]9 pro výběr položky a stiskněte
2
[OK]9.
≥ Stiskněte [2, 1]9 pro přeskakování po jednotlivých stránkách.
≥ Pro návrat na předchozí obrazovku stiskněte [RETURN]E.
Přehrávání začne od zvolené písně či videa.
např. obrazovka přehrávání hudby
Režim
Stav přehrávání
Skladba
Interpret
Album
§ Tyto ikony se zobrazí pouze v případě režimu hudby.
: Promíchání písní
: Promíchání alb
Základní ovládací tlačítka (Pouze pro hudbu a videa)
Tlačítko Funkce
[1 PLAY]6 Přehrávat
[∫ STOP]6, [; PA USE ]6 Zastavit
[SKIP:, SKIP 9]6 Přeskočit
(stiskněte a držte)
[SKIP:, SKIP 9]6
Další způsoby přehrávání
Režim promíchání
Stiskněte [PLAY MODE]: několikrát.
SONGS, ALBUMS, OFF
Režim opakování
Stiskněte a držte stisknuté [–REPEAT]: a poté stiskněte tlačítko víckrát v
průběhu pár sekund.
Během přehrávání hudby/video záznamu: ONE, ALL, OFF
[Poznamka]
≥ Režimy přehrávání hudby nastavené na iPod/iPhone zůstanou
zachovány i při připojení k hlavnímu zařízení. Změny provedené během
připojení iPod/iPhone k hlavnímu zařízení budou zachovány na iPod/
iPhone i po jeho odpojení.
≥ V případě přístupu na menu videa bude při odpojení iPod/iPhone od
hlavního zařízení na iPod/iPhone nastaven režim přehrávání směsí
videa na off.
Vychutnání fotografií
(Pouze pro přehrávání hudby)
náhodného
přehrávání
Režim opakování
Aktuální pozice
: Zopakovat 1 píseň
: Zopakovat všechno
Vyhledávat
Stisknutím [iPod]5 vyberte “IPOD”.
3
iPod/iPhone automaticky přepne na režim zobrazení na tomto
zařízení.
např.
Stisknutím [FUNCTIONS]D zvolte příslušné menu.
4
16
Pokaždé, když stisknete tlačítko:
RQ TX111 1
ČESKY
40
Menu hudby -----------------------------------------------) Menu videa
^--- Menu iPod/iPhone (LCD iPod/iPhone) (-}
Stisknutím [FUNCTIONS]D zvolte menu iPod/iPhone.
1
Zahajte automatické prohlížení na vašem iPod/iPhone.
2
Pro použití menu iPod/iPhone můžete využít také dálkové ovládání.
[3, 4]9:Pro přechod na položky nabídky.
[OK]9:Přejít na další nabídku.
[RETURN]E: Vrátit se na předchozí obrazovku.
Činnost dálkového ovládání u různých modelů iPod/iPhone se může
vzájemně lišit.
Během připojení iPod/iPhone
Nepřitlačujte ani nevytahujte váš iPod/iPhone s použitím velké síly.
Dobíjení baterie
≥ iPod/iPhone zahájí nabíjení bez ohledu na to, zda je toto zařízení
zapnuto nebo vypnuto.
≥ Během nabíjení “IPOD ¢” v pohotovostním režimu hlavního zařízení
bude na displeji hlavního zařízení zobrazeno “iPod/iPhone”.
≥ Zkontrolujte na iPod/iPhone, zda je jeho baterie plně nabitá.
≥ V případě, že jste nepoužívali váš iPod/iPhone delší dobu od
posledního nabíjení, a zůstal odpojen od hlavního zařízení, baterie
bude vystavena přirozenému opotřebování. (Po úplném nabití další
dodatečná nabíjení nebudou potřebná.)
Page 41

Kompatibilní iPod/iPhone (prosinec 2009)
USB
ZÁKL.ADRESÁŘ
Songs
Concert_01
Concert_02
Southern AI
NASTAVIT
HLAVNÍ
DISK
OBRAZ
ZVUK
ZOBRAZENÍ
HDMI
DALŠÍ
RETURN
Nabídka
NASTAVIT
RETURN
DISK
AKTUÁL.NASTAVENÍ
ZVUK
TITULKY
MENU
OMEZENÍ
HESLO
ANGLICKY
AUTOMATICKY
ANGLICKY
8 ŽÁDNÝ LIMIT
Zobrazení aktuálního nastavení níže
Položka
Nastavení
≥ iPhone 3GS (16GB, 32GB)
≥ iPhone 3G (8GB, 16GB)
≥ iPhone (4GB, 8GB, 16GB)
≥ iPod nano 5. generace (s videokamerou) (8GB, 16GB)
≥ iPod touch 2. generace (8GB, 16GB, 32GB, 64GB)
≥ iPod classic (120GB, 160GB (2009))
≥ iPod nano 4. generace (video) (8GB, 16GB)
≥ iPod classic (160GB (2007))
≥ iPod touch 1. generace (8GB, 16GB, 32GB)
≥ iPod nano 3. generace (video) (4GB, 8GB)
≥ iPod classic (80GB)
≥ iPod nano 2. generace (aluminum) (2GB, 4GB, 8GB)
≥ iPod 5. generace (video) (60GB, 80GB)
≥ iPod 5. generace (video) (30GB)
≥ iPod nano 1. generace (1GB, 2GB, 4GB)
≥ iPod 4. generace (barevná displej) (40GB, 60GB)
≥ iPod 4. generace (barevná displej) (20GB, 30GB)
≥ iPod 4. generace (40GB)
≥ iPod 4. generace (20GB)
≥ iPod mini (4GB, 6GB)
Kompatibilita závisí na verzi softwaru vašeho iPod/iPhone.
Použití vlastností iPod touch/iPhone
1 Stiskněte tlačítko “Home” na iPod touch/iPhone.
2 Zvolte vlastnosti, které si přejete použít iPod touch/iPhone na
dotykovém displeji.
Přehrávání z přístroje USB
Můžete se připojit a přehrávat zvukové stopy nebo soubory z přístrojů
USB typu “mass storage class” / třída velkokapacitní paměti
(B 25, USB Port).
Přístroje, které jsou definovány jako USB “mass storage class” / třída
velkokapacitní paměti:
–přístroje USB, které podporují pouze velkoobjemový přenos.
Příprava
≥ Před připojením jakéhokoli přístroje USB s velkokapacitní pamětí “mass
storage” k jednotce se ubezpečte, že data na ní uložená jsou
zálohována.
≥ Nedoporučuje se používat prodlužovací šňůru USB. Přístroj USB
připojený tímto kabelem nebude touto jednotkou rozpoznán.
Připojte USB zařízení (není součástí dodávky) k
1
USB portu ( 6).
Stisknutím [RADIO, EXT-IN]5 zvolte “USB”.
2
Objeví se obrazovka nabídky.
např.
≥ Když se objeví obrazovka “MENU PŘEHRÁVÁNÍ”, zvolte “ZVUK/
OBRAZ” nebo “VIDEO” stisknutím [3, 4]9 a poté [OK]9.
≥ Pro zobrazení/ukončení obrazovky stiskněte [MENU]7.
Stiskněte [3,4]9 pro výběr položky a stiskněte [OK]9.
3
≥ Stiskněte [2, 1]9 pro přeskakování po jednotlivých stránkách.
≥ Pro návrat o 1 úroveň výš z aktuální složky stiskněte [RETURN]E.
Přehrávání začne od zvoleného obsahu.
≥ Ostatní provozní funkce jsou podobné těm, které jsou popsány v části
“Přehrávání disků” (B 12 až 14).
[Poznamka]
≥ Maximum: 255 složek (s výjimkou kořenové složky), 4000 souborů,
28 znaků pro název souboru/složky.
≥ Při připojování čtečky multiportové karty USB bude zvolena jen jedna
paměťová karta. Zpravidla je to první vložená paměťová karta.
Probíhá změna nastavení
přehrávače
Stisknutím [DVD]5 vyberte “DVD/CD”.
1
Stisknutím [START]C zobrazte menu START.
2
Stisknutím [3, 4]9 vyberte “Nastavení” a stiskněte
3
[OK]9.
Stiskněte [3, 4]9 pro výběr menu a stiskněte [OK]9.
4
Stiskněte [3,4]9 pro výběr položky a stiskněte [OK]9.
5
Stiskněte [3, 4]9 k provedení nastavení a stiskněte
6
[OK]9.
≥ Pro návrat na předchozí obrazovku stiskněte [RETURN]E.
≥ Za účelem ukončení zobrazování na displeji stiskněte [START]C.
≥ Nastavení zůstávají beze změny, i když jednotku přepnete do
pohotovostního režimu.
≥ Podtržené položky jsou hodnoty továrních nastavení v následujících
nabídkách.
DISK nabídka
ZVUK
Vyberte jazyk audio záznamu.
≥ ANGLICKY
≥ RUSKY ≥ MAĎARSKY ≥ČESKY ≥ POLSKY
≥ ORIGINÁL
TITULKY
Zvolte jazyk podtitulků.
≥ AUTOMATICKY
≥ NĚMECKY ≥ RUSKY ≥ MAĎARSKY ≥ ČESKY
≥ POLSKY ≥ JINÝ – – – –
MENU
Zvolte jazyk nabídek na disku.
≥ ANGLICKY
≥ RUSKY ≥ MAĎARSKY ≥ ČESKY ≥ POLSKY
≥ JINÝ – – – –
§1 Je zvolen původní jazyk určený na disku.
§2Vložte příslušný kód ze seznamu jazykových kódů (B 4).
§3 Pokud není k dispozici jazyk zvolený pro “ZVUK”, objeví se v daném
jazyce titulky (je-li na disku k dispozici).
SUBTITLE TEXT [DivX]
Zvolte vhodnou položku v souladu s jazykem použitým pro text titulků
DivX (B 19)
≥ LATIN1 ≥LATIN2 ≥ CYRILLIC ≥TURKISH
Tato položka bude zobrazena pouze po přehrání souborů s testem titulků
(B 19) a v případě, že je “JAZYK” v ZOBRAZENÍ menu nastaveno na
“ENGLISH” (B 18).
OMEZENÍ
Nastavte úroveň hodnocení k omezení přehrávání DVD-Video.
Nastavení hodnocení (Když je zvolena úroveň 8)
≥ 0 ZAMKNI VŠE: Pro zabránění přehrávání disků bez úrovní hodnocení.
≥ 1 do 7
≥ 8 ŽÁDNÝ LIMIT
≥ FRANCOUZSKY ≥ŠPANĚLSKY ≥ NĚMECKY
§1
≥ JINÝ – – – –
§3
≥ ANGLICKY ≥ FRANCOUZSKY ≥ŠPANĚLSKY
§2
§2
≥ FRANCOUZSKY ≥ŠPANĚLSKY ≥ NĚMECKY
§2
Getting StartedPlaying Discs
ovládání
Další postupy
Odkaz
ČESKY
RQ TX111 1
17
41
Page 42

Když si zvolíte svou úroveň hodnocení (ratingu), objeví se obrazovka
Skutečná poloha reproduktorů
Ideální poloha reproduktorů
Primárni vzdálenost pro
poslech
Přibližné rozměry místnosti
Kružnice konstantní primární vzdálenosti pro poslech
hesla.
Postupujte podle pokynů na obrazovce.
Nezapomeňte vaše heslo.
Jestliže se do jednotky vloží disk DVD-Video přesahující úroveň
hodnocení (ratingu), objeví se obrazovka se zprávami.
Postupujte podle pokynů na obrazovce.
HESLO
Změňte heslo na “OMEZENÍ”.
≥ NASTAVENÍ
Pro změnu hodnocení (když je zvolena úroveň 0 až 7)
≥ ZMĚNIT: Postupujte podle pokynů na obrazovce.
OBRAZ nabídka
Getting StartedPlaying DiscsOther OperationsReference
POMĚR STRAN TV
Zvolte nastavení vyhovující vaší televizi.
: Širokoúhlá televize (16:9)
≥ 16:9
≥ 4:3PAN&SCAN: Televize s pravidelným stranovým
Strany širokoúhlého obrazu jsou seříznuty, tak aby
zaplnil obrazovku (pokud to disk nezakazuje).
poměrem (4:3)
≥ 4:3LETTERBOX: Obvyklý stranový poměr televize (4:3)
Širokoúhlý obraz se zobrazí ve stylu “schránka na
dopisy”.
ČASOVÝ POSUN
Při připojení k plazmové obrazovce upravte nastavení, jestliže si
všimnete, že audio není v souladu s videem.
≥ 0 ms/AUTOMATIKA
≥ 20 ms ≥ 40 ms ≥ 60 ms
≥ 80 ms ≥ 100 ms
Při používání televize kompatibilní VIERA Link “HDAVI Control” s
“HDAVI Control 3 nebo novìjší” (B 15), zvolte “0 ms/AUTOMATIKA”.
Audio a video se automaticky nastaví v synchronizaci.
NTSC DISK VÝST.
Vyberte vysílání PAL 60 nebo NTSC při přehrávání disků NTSC
(B 20, Video systémy).
≥ NTSC: Při připojení k televizi NTSC.
:Při připojení k televizi PAL.
≥ PA L60
MÓD STAT. OBRAZU
Určete typ zobrazeného obrazu při zastavení přehrávání (pauze).
≥ AUTOMATICKY
≥ PŮLSNÍMEK: Obraz není rozmazaný, ale kvalita obrazu je nižší.
≥ SNÍMEK: Celková kvalita je vysoká, ale obraz může působit jako
VIDEO OUT – SCART
Vyberte formát video signálu, který bude vysílán z terminálu SCART (AV).
≥ VIDEO
neostrý.
≥ S-VIDEO
≥ RGB 1: (Pouze je-li připojen k televizi kompatibilní s RGB)
Pokud si vždy přejete sledovat obraz z jednotky v signálu RGB, zvolte
tento režim. Televizní obrazovka se automaticky přepne na vysílání
obrazu z jednotky, když je tato zapnuta.
≥ RGB 2: (Pouze při připojení k televizi kompatibilní s RGB)
Když je selektor v režimu TV tuner a pokud je nastaven na “
televizní obrazovka se automaticky přepne na zobrazení z jednotky
pouze při přehrávání disku ([DVD-V] [DVD-VR] [VCD]) nebo když se díváte
na nabídku na obrazovce DVD/CD.
Když je selektor nastaven na “AV”, zobrazí se televizní obraz. U jiných
selektorů se zobrazí obraz z této jednotky.
ZVUK menu
Zvolte, aby vyhovoval typu zařízení, které jste připojili k terminálu HDMI
AV O UT.
Zvolte “BITSTREAM”, když zařízení umí dekódovat bitstream/proud bitů
(digitální forma dat 5.1-kanálu). Jinak zvolte “PCM”.
(Je-li bitstream vysílán do zařízení bez dekodéru, může dojít k vysílání
silného hluku a poškození vašich reproduktorů i sluchu.)
DOLBY DIGITAL
≥BITSTREAM ≥PCM
§
DTS
≥BITSTREAM
RQ TX111 1
ČESKY
18
42
§
MPEG
≥BITSTREAM ≥PCM
§
≥PCM
DVD/CD
§ Když je vysíláno audio z terminálu HDMI AV OUT a připojené
zařízení nepodporuje zvolenou položku, bude vlastní výstup záviset
na výkonu tohoto připojeného zařízení.
DYNAM. ROZSAH
≥ ZAPNUT: Nasta vení zvyšuje zřetelnost, i když je hlasitost nízká.
≥ VYPNUT
NASTAVENÍ REPRO.
Zvolte dobu zpoždění reproduktorů.
(Pouze středové a prostorové reproduktory)
Pro optimální poslech při zvuku 5.1-kanálu by měly být všechny
reproduktory s výjimkou subwooferu ve stejné vzdálenosti od místa
sezení.
Pokud musíte umístit středové nebo prostorové reproduktory blíže k
místu sezení, upravte dobu zpoždění tak, aby tento rozdíl kompenzovala.
Je-li některá vzdálenost a nebo b menší než c, najděte si rozdíl v
tabulce a změňte nastavení na doporučenou hodnotu.
≥ NASTAVENÍ:
Vhodné pro sledování v pozdních hodinách. (Funguje pouze
s Dolby Digital)
C
C
L
SW
:
R
:
:
LS
LS
RS
RS
a Centrální reproduktor b Prostorové reproduktor
Rozdíl (Přibliž.) Nastavení Rozdíl (Přibliž.) Nastavení
30 cm 1ms 150 cm 5ms
60 cm 2ms 300 cm 10ms
90 cm 3ms 450 cm 15ms
120 cm 4ms
150 cm 5ms
≥ ZPOŽDĚNÍ C (Zpoždění středového reproduktoru):
, 1ms, 2ms, 3ms, 4ms, 5ms
0ms
Zvolte dobu zpoždění pro váš středový reproduktor.
≥ ZPOŽDĚNÍ LS/RS (Levý prostorový/Pravý prostorový
reproduktor - zpoždění):
, 5ms, 10ms, 15ms
0ms
Zvolte dobu zpoždění pro prostorové reproduktory.
≥ TESTOVACÍ TÓN: NASTAVENÍ
Tato položka bude zobrazena pouze v případě volby “DVD/CD”.
Úroveň hlasitosti reproduktorů nastavte pomocí zkušebního tónu
(B 11, Ruční nastavení výkonu reproduktoru).
ZOBRAZENÍ menu
JAZYK
Vyberte jazyk pro pokyny na obrazovce.
≥ ENGLISH
≥ FRANÇAIS ≥ ESPAÑOL ≥ DEUTSCH
≥ PУCCKИЙ ≥MAGYAR ≥ ÇESKY ≥POLSKI
HDMI menu
”,
PRIORITA VIDEA
≥ ZAPNUT: Když používáte terminál HDMI AV OUT pro video výstup.
≥ VYPNUT:
AUDIO VÝSTUP
≥ ZAPNUT: Když audio výstup vychází z terminálu HDMI AV OUT.
≥ VYPNUT
RGB ROZSAH
Tento postup funguje pouze, když “PROSTOR BAREV” v Menu 4 (HDMI)
je nastavena na RGB (B 14).
≥ STANDARDNÍ
≥ ZDOKONALENÝ: Když černobílé snímky nejsou zřetelné.
Rozlišení z video výstupu z terminálu HDMI AV OUT se
optimalizuje podle potenciálu připojeného zařízení
(např. televize).
Když se zásuvka HDMI AV OUT nepoužívá pro výstup videa.
(V závislosti na možnostech připojeného zařízení se audio
výstup může lišit od audio nastavení hlavní jednotky.)
: Když audio výstup není z terminálu HDMI AV OUT. (Audio
se vysílá podle nastavení hlavní jednotky.)
Page 43

VIERA Link
10 alfanumerických znaků
DALŠÍ-REGISTRACE (DivX)
PRO PŘEHRÁVÁNÍ CHRÁNĚN. VIDEÍ DivX
MUSÍTE SVÉ ZAŘÍZENÍ ZAREGISTROVAT.
REGISTRAČNÍ KÓD:
XXXXXXXXXX
REGISTR.SE NA http://vod.divx.com
≥ ZAPNUT: Funkce VIERA Link “HDAVI Control” je k dispozici (B 15).
≥ VYPNUT
VYP. PŘES LINK
Zvolte žádané nastavení spojení “vypojení z napájení” této jednotky pro
operaci VIERA Link (B 15
VIERA Link “HDAVI Control” kompatibilního zařízení.)
≥ VIDEO/ZVUK
≥ VIDEO: Když se vypne televize, tato jednotka se vypne s výjimkou
Funkce TV AUDIO
Zvolte audio vstup televize tak, aby fungoval s operacemi VIERA Link
(B 15).
≥ AUX
≥ ARC
≥ DIGITAL IN
≥ AV
: Když se televize vypne, tato jednotka se vypne
automaticky.
následujících podmínek:
– audio přehrávání ([CD] [MP3] [WMA])
– Režim iPod/iPhone
– režim rádio
– Režim “AV”, “AUX”, “ARC” nebo “D-IN” (při nezvoleném
nastavení audia televizoru pro
)
. (Toto funguje podle nastavení připojeného
VIERA Link
)
DALŠÍ nabídka
REGISTRACE [DivX]
Zobrazení registračního kódu přístroje.
≥ UKAŽ KÓD
Tento registrační kód potřebujete pro nákup a přehrávání obsahu DivX
Video na požádání (VOD) (B vpravo).
Toto nastavení bude zobrazeno pouze během přehrávání obsahu DivX
VOD nebo po zrušení registrace tohoto zařízení.
ZRUŠENÍ REGISTR. [DivX]
Zobrazení kódu na zrušení registrace zařízení.
≥ NASTAVIT
Ke zrušení registrace tohoto zařízení potřebujete příslušný kód
(B vpravo).
Nastavení je zobrazováno pouze po prvním přehrání obsahu DivX
VOD.
INTERVAL PREZEN.
Nastavte rychlost promítání diapozitivů.
Tovární nastavení: 3 SEKUNDY
≥ 1 SEKUNDY na 15 SEKUNDY (v krocích 1-unit )
≥ 15 SEKUNDY na 60 SEKUNDY (v krocích 5-unit)
≥ 60 SEKUNDY na 180 SEKUNDY (v krocích 30-unit)
JAS DISPLEJE
Změňte jas displeje jednotky a indikátoru.
≥ JASNÝ
≥ ZTLUMENÝ: Displej je ztlumená.
≥ AUTOMATICKY:Displej je ztlumená, ale rozjasní se, když provádíte
SNADNÉ NASTAV.
≥ NASTAVIT (B 9)
DVD-VR/DATOVÝ
Zvolte pro přehrávání pouze formátů DVD-VR nebo DATOVÝ.
≥ DVD-VR
≥ DATOVÝ: Pro přehrávání datových souborů na DVD-R/-RW.
ZTLUMENÍ OBRAZ.
To má předcházet stopám zahoření / burn mark na obrazovce televizního
přijímače.
≥ VYPNUT
≥ Čekejte 5 min.
operace.
:Pro přehrávání video programů na DVD-R/-RW.
:Pokud po dobu 5 minut není žádná akce, obraz zešedne.
Televizní obrazovka se vrátí do normálního zobrazení,
když provedete nějaké operace.
(Toto nefunguje při přehrávání videa.)
Informace DivX
DIVX VIDEO:
DivX® představuje digitální formát videa vytvořený společností DivX, Inc.
Toto zařízení je oficálním výrobkem, certifikovaným společností DivX,
které slouží k přehrávání DivX videa. Podrobnější informace a softwarové
nástroje pro konverzi vašich souborů na DivX video najdete na
www.divx.com.
DIVX VIDEO-NA-PŘÁNÍ:
Za účelem přehrávání DivX videa na přání (VOD - Video-on-demand)
musí být toto zařízení certifikované DivX
Za účelem vytvoření registračního kódu vyhledejte část DivX VOD v
menu nastavení zařízení.
Za účelem dokončení procesu registrace a získání podrobnějších
informací o DivX VOD navštivte internetovou stránku vod.divx.com.
Vyvolejte registrační kód jednotky
(B levý, “REGISTRACE” v nabídce DALŠÍ)
≥ Po prvním přehrávání obsahu DivX VOD již registrační kód nebude
zobrazován.
≥ Když si zakoupíte obsah DivX VOD s použitím kódu odlišného od kódu
tohoto zařízení, nebudete moci tento obsah přehrávat.
Zrušení registrace zařízení
Zvolte “NASTAVIT” v “ZRUŠENÍ REGISTR.” (B levý) a postupujte dle
pokynù zobrazených na displeji.
Pro zrušení registrace na http://vod.divx.com použijte přílušný kód.
Pokud jde o obsah DivX, který lze přehrávat jen po
stanovený počet přehrávek
Některý obsah DivX VOD může být přehrán pouze tolikrát, kolikrát je
nastaveno. Při přehrávání obsahu tohoto druhu bude zobrazen také počet
dosavadních přehrání a počet původně možných přehrání.
≥ Zbývající počet možných přehrávání bude snížen při každém přehrání
programu. V každém případě však platí, že při přehrávání z bodu, ve
kterém bylo předtím přehrávání přerušeno, zbývající počet možných
přehrávání nebude snížen díky funkci obnovení přehrávání.
Zobrazení textu titulků DivX
Na tomto zařízení lze zobrazovat text titulků zaznamenaný na videodisky
DivX prostřednictvím tohoto zařízení.
Tato funkce nijak nesouvisí s titulky ve standardní specifikaci DivX a
nedisponuje žádným jasným standardem.
Nastavte “TITULKY” v Menu 1 (Disk/Přehrát) (B 14)
Typy textových souborů titulků, které lze zobrazit
Na této jednotce lze zobrazit texty titulků, které splňují následující
podmínky.
≥ Formát souboru: MicroDVD, SubRip nebo TMPlayer
≥ Přípona souboru: “.SRT”, “.srt”, “.SUB”, “.sub”, “.TXT” nebo “.txt”
≥ Název souboru: Maximálně 44 znaků bez přípony souboru
≥ Soubor DivX video a textový soubor titulků jsou ve stejné složce, a
názvy souborů jsou stejné, kromě jejich přípon.
≥ Pokud je v jedné složce více testových souborů s titulky, zobrazí se v
následujícím pořadí: “.srt”, “.sub”, “.txt”.
[Poznamka]
≥ Když se název video souboru DivX správně nezobrazí na obrazovce
nabídky (název souboru se zobrazí jako “¢”), nebo velikost souboru
přesáhne 256 KB, nemusí se titulky správně zobrazit.
≥ Texty titulků nelze zobrazit během přehrávání nabídky, nebo když se
provádějí operace jako např. vyhledávání.
≥ Videosoubory DivX, jež nezobrazují “ZAPNOUT TEXT”, titulky
neobsahují. Text titulků nemůže být zobrazen.
≥ Když text titulků není zobrazován správně, zkuste změnit nastavení
textu titulků (B 17).
®
zaregistrováno.
Getting StartedPlaying DiscsOther OperationsOdkaz
PŘEDNASTAVENÉ
Tím se vrátí všechny hodnoty v HLAVNÍ nabídce na základní nastavení.
≥ RESET
Objeví se obrazovka s heslem, jestliže se nastaví “OMEZENÍ” (B 17).
Zadejte prosím totéž heslo a pak jednotku vypněte a znovu zapněte.
ČESKY
RQ TX111 1
19
43
Page 44

Disky, které je možno
přehrávat
Komerční disky
Typ méd ia/
Logo
DVD-Video Vysoce kvalitní filmové a
Getting StartedPlaying DiscsOther OperationsReference
Video CD Hudební disky s video
CD Hudební disky
Nahrané disky
Typ méd ia/
Logo
DVD-R/RW ≥ DVD-Video Formát
DVD-R DL ≥ DVD-Video Formát
rR/rRW/rRDL ≥ Formát +VR (+R/+RW
CD-R/RW ≥ MP3 Formát
≥ Před přehráváním finalizujte disk na přístroji, na kterém byl nahrán.
≥ Může se ukázat, že v některých případech nebude možné všechny výše
uvedené disky přehrávat, a to vzhledem k typu disku, stavu nahrávky,
nahrávací metody nebo způsobu, jímž byly soubory vytvořeny
(B vpravo, Tipy pro vytváření datových disků).
Poznámka ohledně používání typu DualDisc
Strana digitálního audio obsahu typu DualDisc nesplňuje technické
specifikace formátu Compact Disc Digital Audio (CD-DA), proto není
úspěšné přehrávání zaručeno.
Disky, které nelze přehrávat
Disky Blu-ray, HD DVD, AVCHD, DVD-RW verze 1.0, DVD-Audio, DVDROM, CD-ROM, CDV, CD-G, SACD, Photo CD, DVD-RAM a “Chaoji
VCD” dostupné na trhu včetně CVD, DVCD a SVCD, které neodpovídají
normě IEC62107.
Video systémy
≥ Tato jednotka může přehrávat PAL a NTSC, ale vaše televize musí být
slučitelná se systémem na disku.
≥ PAL disky nelze správně prohlížet v televizi NTSC.
RQ TX111 1
ČESKY
≥ Tato jednotka umí převádět signály NTSC na PA L 60 pro prohlížení v
televizi PA L (B 18, “NTSC DISK VÝST.” v OBRAZ nabídka).
20
44
Poznámky Označeno jako
hudební disky
záznamy
Včetně SVCD
(Splňující IEC62107)
Formáty Označeno jako
≥ Verze 1.1 Formát
nahrávání DVD Video
≥ MP3 Formát
≥ JPEG Formát
®
Formát
≥ DivX
≥ MPEG4 Formát
≥ Verze 1.2 Formát
nahrávání DVD Video
Formát
®
Formát
≥ DivX
Video Nahrávání)
≥ JPEG Formát
≥ WMA Formát
®
Formát
≥ DivX
≥ MPEG4 Formát
[DVD-V]
[VCD]
[CD]
[DVD-V]
[DVD-VR]
[MP3]
[JPEG]
[DivX]
[MPEG4]
[DVD-V]
[DVD-VR]
[DivX]
[DVD-V]
[MP3]
[JPEG]
[WMA]
[DivX]
[MPEG4]
Důležitá upozornění ohledně nakládání s disky
≥ Nenalepujte na disky etikety a přelepky. Může to způsobit deformaci
disku a jeho další nepoužitelnost.
≥ Nepopisujte stranu s etiketou propisovací tužkou nebo jiným pisátkem.
≥ Nepoužívejte čistící spreje na desky, benzín, ředidlo, tekutiny, které ruší
statickou elektřinu, nebo jakékoli jiné rozpouštědlo.
≥ Nepoužívejte chránič
≥ Nepoužívejte následující disky:
– Disky s lepidlem na povrchu od odstraněných nálepek nebo etiket
(vypůjčené disky apod.).
– Disky, které jsou výrazně deformované nebo prasklé.
– Disky s nepravidelným tvarem, např. ve tvaru srdce.
Tipy pro vytváření datových disků
[WMA] (Přípona: “.WMA”, “.wma”)
Disk: CD-R/RW
≥ Kompatibilní rychlost komprese: mezi 48 kbps a 320 kbps
≥ Můžete přehrávat soubory WMA chráněné proti kopírování.
[MP3] (Přípona: “.MP3”, “.mp3”)
Disk: DVD-R/RW, CD-R/RW
≥ Tato jednotka nepodporuje visačky ID3.
≥ Vzorkovací kmitočet a rychlost komprese:
– DVD-R/RW: 11,02
160 kbps), 44,1 kHz a 48 kHz (32 kbps až 320 kbps)
– CD-R/RW: 8 kHz, 11,02 kHz, 12 kHz, 16 kHz, 22,05 kHz, 24 kHz
(8 kbps až 160 kbps), 32 kHz, 44,1 kHz a 48 kHz (32 kbps až
320 kbps)
[JPEG] (Přípona: “.JPG”, “.jpg”, “.JPEG”, “.jpeg”)
Disk: DVD-R/RW, CD-R/RW
≥ Zobrazí se soubory JPEG zaznamenané digitální kamerou, které
odpovídají normě DCF (Design rule for Camera File system)
verze 1.0.
– Soubory, které byly změněny, editovány nebo uloženy programem
editování snímků na počítači, se nemusí zobrazit.
≥ Tato jednotka nemůže zobrazit pohyblivé snímky MOTION JPEG a
jiné podobné formáty, statické snímky kromě formátu JPEG
(např. TIFF), nebo přehrávat obrázky s připojeným audio záznamem.
[MPEG4] (Přípona: “.ASF”, “.asf”)
Disk: DVD-R/RW, CD-R/RW
≥ Datum nahrávky se může lišit od skutečného data.
[DivX] (Přípona: “.DIVX”, “.divx”, “.AVI”, “.avi”)
Disk: DVD-R/R DL/RW, CD-R/RW
≥ DivX soubory větší než 2 GB nebo nemají žádný index se na této
jednotce nemusí správně přehrávat.
≥ Tato jednotka podporuje všechna rozlišení až do maxima 720k480
(NTSC)/720k576 (PAL).
≥ Na této jednotce si můžete zvolit až 8 typů audia a titulků.
≥ V pořadí zobrazení na obrazovce nabídky a obrazovce počítače mohou
být rozdíly.
≥ Tato jednotka nemůže přehrávat soubory zaznamenané paketovým
zápisem.
DVD-R/RW
≥ Disky musí splňovat UDF bridge (UDF 1.02/ISO9660).
≥ Tato jednotka nepodporuje multi-relace. Přehrává se pouze základní
relace.
CD-R/RW
≥ Disky musí splňovat úroveň ISO9660 1 nebo 2 (s výjimkou rozšířených
formátů).
≥ Tato jednotka podporuje multi-relaci, ale je-li relací mnoho, trvá déle,
než se spustí přehrávání. Abyste tomu předešli, udržujte minimální
počet relací.
e nebo obaly chránící proti poškrábání.
kHz
, 12
kHz
, 22,05
kHz
, 24 kHz (8 kbps až
Page 45

Volba instalace reproduktoru
Alespoň 30 mm
‰7,0 mm do 9,4 mm
Zeď nebo sloupek
3 mm do 5 mm
‰4,0 mm
[PT580] Reproduktor pro
prostorový zvuk
Středový reproduktor
72 mm
348,5 mm
NESPRÁVNÝ
NESPRÁVNÝ
POSTUP
např.
V této pozici
může reproduktor
spadnout, pokud
bude posunut
doleva nebo
doprava.
Posuňte
reproduktor tak,
aby byl šroub v
této pozici.
Zasuňte kabel ze
spodní části.
Vytáhněte kabel
přes otvor.
Ponechte
přibližně
120 mm.
Upevnění na stěnu
Všechny reproduktory (vyjma subwooferu) můžete připevnit na stěnu.
≥ Stěna nebo sloup, na něž se reproduktory mají připevnit, by měla unést
10 kg na jeden šroub. Ohledně instalování reproduktorů na zeď se
poraďte s kvalifikovaým stavitelem. Nevhodné připevnění může
poškodit zeď i reproduktory.
1Do stěny zafixujte šroub (není součástí dodávky).
Opětovné připojení kabelu reproduktoru
Getting StartedPlaying DiscsOther OperationsOdkaz
Getting StartedPlaying DiscsOther Operations
2Bezpečně reproduktor usaďte otvorem/y na šroub/y.
100 mm
[PT580] Čelní reproduktor
[PT880] Čelní reproduktory a reproduktory pro prostorový zvuk
Připevněte na zeď bez základny a stojanu
Údržba
Jednotku očistěte měkkým suchým hadříkem
≥ K čištění jednotky nikdy nepoužívejte alkohol, ředidlo na barvy nebo
benzín.
≥ Před použitím chemicky upravené čistící textilie si pozorně přečtěte
pokyny pro její použití.
Nepoužívejte komerčně dostupné čističe objektivů, mohou způsobit
selhání funkce. Čištění objektivu obecně není nutné, i když to záleží na
prostředí, v němž za
Než přemístíte jednotku, zkontrolujte, že disková přihrádka je
prázdná. Pokud tak neučiníte, vzniká riziko vážného poškození disku
a jednotky.
řízení provozujete.
ČESKY
RQ TX111 1
21
45
Page 46

Průvodce řešením problémů
Než požádáte o servis, proveďte následující kontroly. Máte-li ohledně
některých kontrolních bodů pochybnosti nebo řešení uvedená v
následujícím průvodci problém neřeší, obraťte se o radu na svého
prodejce.
Napájení
Odpojeno od zdroje.
Bezpečně připojte napájecí kabel. (B 8)
Jednotka se automaticky přepne do pohotovostního
režimu.
Getting StartedPlaying DiscsOther OperationsReference
Časovač usínání fungoval a dosáhl stanoveného časového limitu. (B 4)
K vypnutí napájení tohoto zařízení dojde při změně vstupu
na televizoru.
Jedná se o běžný jev při použití VIERA Link “HDAVI Control 4 nebo
novější”. Podrobnější informace najděte v návodu k použití televizoru.
Zobrazí se jednotka
Displej je tmavá.
Zvolte “JASNÝ” v “JAS DISPLEJE” v DALŠÍ nabídka. (B 19)
“NO PLAY”
≥ Vložili jste disk, který jednotka nemůže přehrávat; vložte jiný, který
může přehrávat. (B 20)
≥ Vložili jste prázdný disk.
≥ Vložili jste disk, který není finalizován.
“NO DISC”
≥ Nevložili jste disk; prosím vložte jej.
≥ Nevložili jste disk správně; vložte jej správně. (B 12)
“OVER CURRENT ERROR”
Přístroj USB spotřebovává příliš mnoho energie. Přepněte na režim
“DVD/CD”, vypojte USB a vypněte jednotku.
“IPOD OVER CURRENT ERROR”
iPod/iPhone odebírá příliš mnoho výkonu. Vyjměte iPod/iPhone a znovu
vypněte a zapněte zařízení.
“F61”
Zkontrolujte a opravte připojení kabelu reproduktoru. Pokud se tím
problém nevyřeší, obraťte se na prodejce. (B 7)
“F76”
Objevil se problém s napájením. Obraťte se na prodejce.
“DVD U11”
Disk může být ušpiněný. Je třeba jej otřít.
“ERROR”
Provedena nesprávná operace. Přečtěte si návod a zkuste to znovu.
“DVD H∑∑”
“DVD F∑∑∑”
∑ znamená číslo.
≥ Možná se jedná o problém. Čísla následující po “H” a “F” závisí na
stavu jednotky. Jednotku vypněte a pak znovu zapněte. Nebo ji můžete
vypnout, vypojit napájecí kabel a poté ji znovu zapojit.
≥ Pokud se čísla servisu nevymažou, poznamenejte si číslo servisu a
zkontaktujte kvalifikovaného servisního pracovníka.
Všeobecný provoz
Žádná odezva při stisku jakýchkoli tlačítek.
≥ Tato jednotka nemůže přehrávat jiné disky než ty, které jsou uvedeny v
tomto návodu k použití. (B 20)
≥ Jednotka nemusí správně fungovat, což může být způsobeno bleskem,
statickou elektřinou nebo nějakým jiným vnějším faktorem. Jednotku
vypněte a pak znovu zapněte. Nebo ji můžete vypnout, vypojit napájecí
kabel a poté ji znovu zapojit.
≥ Vytvořilo se orosení. Počkejte 1 až 2 hodiny, doku se neodpaří.
Žádná odezva, když se stisknou tlačítka dálkového
ovladače.
≥ Zkontrolujte, zda jsou baterie správně nainstalovány. (B 8)
≥ Baterie jsou vybité. Vyměňte je za nové. (B 8)
≥ Namiřte dálkový ovladač na čidlo signálu dálkového ovladače a
proveďte akci. (B 4)
Jiné výrobky reagují na dálkový ovladač.
Změňte provozní režim dálkového ovladače. (B 4)
Nelze zobrazit menu START.
Vyjměte disk a poté znovu stiskněte [START]C.
Žádný obraz nebo zvuk.
≥ Zkontrolujte připojení videa nebo reproduktoru. (B 7, 8)
≥ Zkontrolujte výkon nebo vstupní nastavení připojeného zařízení a hlavní
jednotky.
≥ Zkontrolujte, zda je na disku něco nahráno.
Zapomněli jste heslo svých hodnocení.
Přenastavte všechna nastavení na tovární hodnoty.
Během zastavení a když je zdroj “DVD/CD”, stiskněte a držte [∫]9 (Stop)
na hlavní jednotce a [S10]3 na dálkovém ovladači, dokud z televize
nezmizí “INITIALIZED”. Jednotku vypněte a znovu zapněte.
Všechna nastavení se vrátí na základní hodnoty.
(Tento postup nefunguje během režimů programu a nahodilého
přehrávání, nebo když je zobrazeno menu nastavení nebo START.)
Některé znaky nejsou správně zobrazeny.
Jiné znaky než latinská abeceda a arabské číslice se nemusí dobře
zobrazit.
Funkce VIERA Link “HDAVI Control” neodpovídá.
Podle stavu této jednotky nebo připojeného zařízení stejnou operaci
opakovat, tak aby funkce mohla správně pracovat. (B 15)
Nastavení, které jste provedli v “POMĚR STRAN TV” (B 18,
OBRAZ nabídka) nebo “JAZYK” (B 18, ZOBRAZENÍ menu)
nefunguje.
Nastavení pro “POMĚR STRAN TV”§1 a “JAZYK”§2 automaticky přejde k
informacím z televize. (B 9, SNADNÉ NASTAV. - hodnoty)
§1 Když používáte televizi kompatibilní VIERA Link “HDAVI Control” s
“HDAVI Control 3 nebo novější”
§2 Když používáte televizi kompatibilní VIERA Link “HDAVI Control” s
“HDAVI Control 2 nebo novější”
“U70∑”
∑ znamená číslo. (Skutečné číslo následující po “U70” bude záviset na
stavu hlavní jednotky.)
≥ Připojení HDMI se chová neobvykle.
–Připojené zařízení není kompatibilní s HDMI.
– Použijte prosím kabely HDMI, které mají logo HDMI (jak je vidíte na
obalu).
– Kabel HDMI je příliš dlouhý.
– Kabel HDMI je poškozený.
“REMOTE 1” nebo “REMOTE 2”
Sjednoťte režimy na hlavní jednotce a dálkovém ovladači. Podle toho,
jako číslo je zobrazeno (“1” nebo “2”), stiskněte a držte [OK]9 a
odpovídající číslované tlačítko ([1] nebo [2]) alespoň 2 sekundy. (B 4)
“LOADING”
≥ iPod/iPhone není připraven. Vyčkejte na ukončení daného zobrazení.
≥ Odpojte iPod/iPhone a poté jej znovu pevně připojte. (B 16)
RQ TX111 1
ČESKY
22
46
Page 47

Provoz disků
Trvá delší dobu, než začne přehrávání.
≥ Zahájení přehrávání může určitou dobu trvat, jestliže stopa MP3 stále
obsahuje data statických obrázků. Dokonce ještě po spuštění stopy se
nezobrazí správný přehrávací čas. To je normální. [MP3]
≥ To je u DivX videa normální. [DivX]
Během přeskočení nebo vyhledávání se objeví obrazovka
nabídky.
To je u Video CD disků normální.
[VCD]
Neobjeví se nabídka ovládání přehrávání.
[VCD] s ovládáním přehrávání
Stiskněte dvakrát [∫ STOP]6 a poté stiskněte [1 PLAY]6.
Programové a nahodilé přehrávání nefungují. [DVD-V]
Tyto funkce u některých DVD-Video záznamů nefungují.
Přehrávání se nespouští.
≥ Tato jednotka nemusí přehrávat WMA a MPEG4, která obsahují data
statických snímků.
≥ Jestliže přehráváte obsah DivX VOD, podívejte se na domovskou
stránku, kde jste obsah DivX VOD zakoupili. (Příklad: http://vod.divx.com)
[DivX]
≥ Jestliže disk obsahuje CD-DA a jiné formáty, je možné, že se nedocílí
řádného přehrávání.
Neobjevily se titulky.
≥ Vyvolejte titulky. (“TITULKY” v Menu 1) (B 14)
≥ V závislosti na disku je možné, že se titulky nezobrazí. [DivX]
Bod B se nastavuje automaticky.
Konec položky se stane bodem B, až jej bude dosaženo.
Nelze otevřít menu nastavení.
≥ Zvolte “DVD/CD” jako zdroj.
Zvuk
Zvuk je zkreslený.
≥ Při přehrávání WMA se může vyskytovat hluk.
≥ Když používáte výstup HDMI, audio se z jiných terminálů nemusí
vysílat.
Efekty nefungují.
Některé audio efekty nefungují nebo mají u některých disků menší efekt.
Během přehrávání je slyšet hučení.
V blízkosti hlavní jednotky se nachází napájecí kabel nebo zářivkové
světlo. Jiné spotřebiče a kabely umístěte dále od hlavní jednotky.
Neběží zvuk.
≥ Když změníte rychlost přehrávání, může dojít k nepatrnému přerušení
zvuku.
≥ Když je zdroj vstupu tvořen datovým tokem, nastavte na externím
zařízení zvuk na PCM.
≥ Způsob, jakým jsou vytvořeny soubory, může být příčinou toho, že se
nevysílá audio. [DivX]
Z televize nevychází žádný zvuk.
≥ Když televizor není kompatibilní s ARC a je použito pouze připojení
HDMI, je třeba provést samostatné připojení audia. (B 8)
≥ Potvrďte připojení audia. Stiskněte [RADIO, EXT-IN]5 za účelem volby
odpovídajícího zdroje. (B 8, 10)
≥ Když používáte připojení HDMI, nastavte “AUDIO VÝSTUP” v HDMI
menu na “ZAPNUT”. (B 18)
Obraz
Obraz na televizním přijímači se nezobrazuje správně nebo
mizí.
≥ Tato jednotka a televize používají různé video systémy. Použijte
multi-systém nebo PAL televizi.
≥ Systém použitý na disku se neslučuje s vaší televizí.
– Disky PAL není možné dobře sledovat v televizi NTSC.
– Tato jednotka umí převádět signály NTSC na PAL 60 pro sledování
televize PAL (“NTSC DISK VÝST.” v OBRAZ nabídka). (B 18)
≥ Zajistěte, aby jednotka byla připojena přímo k televizi a nikoli
prostřednictvím VCR. (B 8)
≥ Nabíječky mobilních telefonů mohou působit určité rušení.
≥ Používáte-li pokojovou anténu, přejděte na venkovní anténu.
≥ Drát televizní antény je příliš blízko u jednotky. Přemístěte jej o něco
dál.
≥ Změňte “ZVOLIT ZDROJ” v Menu 2. [DivX] (B 14)
≥ Snižte počet připojených zařízení.
≥ Když používáte terminál HDMI AV OUT, dejte pozor, aby nebyl zvolen
video výstup nepřijatelný v kombinaci s připojenou televizí. Stiskněte a
držte [CANCEL]4, dokud se obraz správně nezobrazí. (Výstup se vrátí
do “480p” nebo “576p”.) (B 14)
≥ Video snímky převedené na rozlišení 1920k1080 se mohou vzhledem
≥ Když je připojen kabel HDMI, nebude žádný výstup RGB z terminálu
Obraz se velikostí nevejde na obrazovku.
≥ Změňte “POMĚR STRAN TV” v OBRAZ nabídka. (B 18)
≥ S použitím televize změňte stranový poměr.
≥ Změňte nastavení transfokátoru. (“ZVĚTŠENÍ” v Menu 2) (B 14)
Menu není správně zobrazeno.
Obnovte poměr transfokátoru na “NORMÁLNÍ”. (“ZVĚTŠENÍ” v Menu 2)
(B 14)
Automatická funkce transfokátoru dobře nefunguje.
≥ Vypněte funkci transfokátoru televize.
≥ Funkce transfokátoru nemusí dobře fungovat, zejména v tmavých
Při přehrávání disku PAL obraz zdeformovaný.
Nastavte “REŽIM PŘENOSU” v Menu 2 na “AUTOMATIKA”. (B 14)
rných “nativních” zdrojů “true native” 1080p full-HD. Nejedná
lišit od vě
se o selhání funkce hlavní jednotky.
SCART (AV). Má-li se používat terminál SCART (AV), odpojte kabel
HDMI a jednotku zapněte a znovu vypněte.
scénách, a nemusí také fungovat v závislosti na typu disku.
Po provedení volby “Domácí kino” v “Výběr Reproduktorů”
prostřednictvím dálkového ovládání televizoru dojde také
ke změně volby vstupu televizoru.
Vypojte kabel HDMI z televize a zapojte znovu do jiného terminálu HDMI.
Použití iPod/iPhone
Nelze nabít ani provozovat.
≥ Zkontrolujte, zda je iPod/iPhone pevně připojený. (B 16)
≥ Baterie iPod/iPhone je vybitá. Nabijte ji iPod/iPhone a poté ji budete
moci znovu používat.
Není možné zobrazení fotografií/videí z iPod/iPhone na
televizoru.
≥
Ujistěte se o připojení do zásuvky SCART (AV) na tomto zařízení a zvolte
“VIDEO” z “VIDEO OUT – SCART” v
≥ Prostřednictvím iPod/iPhone proveďte vhodné nastavení výstupu
fotografií/videa pro váš televizor. (Postupujte dle návodu k použití
vašeho iPod/iPhone.)
OBRAZ nabídka
. (
B 18
)
Getting StartedPlaying DiscsOther OperationsOdkaz
Getting StartedPlaying DiscsOther Operations
Z prostorových reproduktorů nevychází zvuk.
Stisknutím [SURROUND]< vyberte “MULTI-CH”. (B 11)
ČESKY
RQ TX111 1
23
47
Page 48

HDMI progresivní video
Když je zapnuto HDMI nebo progresivní výstup, dochází k
násobnému zobrazení.
Tento problém je způsoben editační metodou nebo materiálem použitým
na DVD-Video, ale měl by být napraven, když použijete vrstvený výstup.
Při použití terminálu HDMI AV OUT nastavte “FORMÁT OBRAZU” v
Menu 4 na “480i” nebo “576i”. Nebo deaktivujte připojení HDMI AV OUT a
použijte jiné video připojení. (B 8, 14)
Rádio
Je slyšet zkreslený zvuk nebo hluk.
≥ Nastavte polohu antény FM.
≥ Použijte venkovní anténu. (B 7)
Getting StartedPlaying DiscsOther OperationsReference
Je slyšet tlučení/bušení.
Vypněte televizi nebo ji přesuňte dále od jednotky.
USB
Nelze načíst mechaniku USB nebo jeho obsah.
≥ Formát mechaniky USB nebo jeho obsah nejsou kompatibilní se
systémem. (B 17)
≥ Hostitelská funkce USB tohoto výrobku nemusí s některými přístroji
USB fungovat.
≥ Přístroje USB s kapacitou paměti více než 32 GB nemusí v některých
případech fungovat.
Pomalý chod přístroje USB.
Přístroj USB s rozsáhlým souborem nebo velkou pamětí se na televizním
přijímači načítá a zobrazuje delší dobu.
Zobrazí se televize
“/”
Operace je jednotkou nebo diskem zakázána.
“TENTO DISK NELZE PŘEHRÁT VE VAŠÍ OBLASTI.”
Mohou se přehrávat pouze DVD-Video disky, které obsahují nebo mají
stejné číslo regionu jako číslo na zadním panelu této jednotky. (B Titulní
strana)
“Zadne video”
V závislosti na připojeném iPod/iPhone se může stát, že menu videa na
televizoru nebude dostupné.
Zvolte menu iPod/iPhone (LCD iPod/iPhone) (B 16) a použijte menu pro
přehrávání na vašem iPod/iPhone.
Licence
Vyrobeno podle licence společnosti Dolby Laboratories.
Dolby, Pro Logic a symbol dvojitého písmene D jsou ochranné
známky společnosti Dolby Laboratories.
Vyrobeno v licenci podle patentů U.S.A. č: 5,451,942; 5,956,674;
5,974,380; 5,978,762; 6,487,535 a dalších patentů USA i světových
patentů ve stadiu schvalování i patentů již vydaných. DTS a symbol
jsou registrovanými ochrannými známkami, DTS Digital Surround a
loga DTS jsou ochrannými známkami společnosti DTS, Inc. Součástí
výrobku je i software. C DTS, Inc. Všechna práva vyhrazena.
Patent U.S.A. čís. 6 836 549; 6 381 747; 7 050 698; 6 516 132; a
5 583 936.
Tento výrobek obsahuje technologii ochrany autorských práv, která je
chráněna americkými patenty a dalšími právy duševního vlastnictví.
Použití této technologie ochrany autorských práv musí být povoleno
společností Macrovision. Není-li společností Macrovision povoleno
jinak, je tato technologie určena pouze pro domácí a jiné omezené
použití. Zpětná analýza a převod ze strojového kódu jsou zakázány.
HDMI, logo HDMI, a High-Definition Multimedia Interface
(Multimediální rozhraní s vysokým rozlišením) jsou ochrannými
známkami nebo registrovanými ochrannými známkami firmy HDMI
Licensing LLC ve Spojených státech a jiných zemích.
TM
HDAVI Control
Corporation.
Windows Media a logo Windows jsou ochranné známky nebo
registrované ochranné známky společnosti Microsoft Corporation ve
Spojených státech amerických a v dalších zemích.
Tento výrobek je chráněn určitými autorskými právy společnosti
Microsoft Corporation a třetích osob. Používání nebo distribuce této
technologie mimo tento výrobek bez udělené licence od společnosti
Microsoft nebo autorizované pobočky společnosti Microsoft a od
třetích osob je zakázáno.
Tento produkt je licencován patentovou licencí portfolia MPEG-4
Visual k osobnímu a nekomerčnímu používání spotřebitele ke (i)
kódování videa v souladu s normou MPEG-4 Visual Standard
(“MPEG-4 Video”) anebo k (ii) dekódování videa MPEG-4, které bylo
kódováno spotřebitelem zabývajícím se osobní a nekomerční činností
anebo které bylo získáno od poskytovatele videa s licencí od MPEG
LA k poskytování MPEG-4 videa. K žádnému jinému použití se
licence neposkytuje a nelze ani takové poskytnutí předpokládat. Další
informace včetně informací souvisejících s propagačním, interním
nebo komerčním používáním a udělováním licencí si lze vyžádat od
MPEG LA, LLC. Viz http://www.mpegla.com
®
DivX
je registrovaná obchodní značka společnosti DivX, Inc., a její
použití je licencováno.
®
is a registered trademark of DivX, Inc., and is used under
DivX
license.
je ochranná známka společnosti Panasonic
.
24
“Made for iPod” znamená, že dané elektronické příslušenství je
určeno pro připojení konkrétně k zařízení iPod a je vývojářskou firmou
certifikováno na výkonnostní normy Apple.
“Works with iPhone” znamená, že dané elektronické příslušenství
bylo navrženo specificky pro připojení k iPhone a bylo certifikováno
vývojářem jako zařízení, které splňuje výkonnostní standardy firmy
Apple.
Společnost Apple neodpovídá za provoz tohoto přístroje ani jeho
splnění bezpečnostních a zákonných norem.
iPod je obchodní značka společnosti Apple Inc., registrovaná ve
Spojených státech a dalších zemích.
iPhone je ochrannou známkou firmy Apple Inc.
RQ TX111 1
ČESKY
48
Page 49

Specifikace
Čelní reproduktory SB-HF330
Prostorové reproduktory SB-HS230
Prostorové reproduktory SB-HS880
Centrální reproduktor SB-HC230
SEKCE ZESILOVAČE
Výkon RMS: Dolby Digital Mode – Režim Dolby Digital
Přední kanál
Prostorový kanál
Středový kanál
Kanál subwooferu
Celkový výkon režimu RMS Dolby Digital 1000 W
Výkon DIN: Dolby Digital Mode – Režim Dolby Digital
Přední kanál
Prostorový kanál
Středový kanál
Kanál subwooferu
Celkový výstupní výkon DIN režimu Dolby Digital 590 W
FM TUNER, SEKCE TERMINÁLŮ
Předvolená paměť FM 30 stanice
Frekvenční Modulace (FM)
Frekvenční rozsah
Anténové terminály 75 ≠ (nevyrovnané)
Digitální audio vstup
Optický digitální vstup
Vzorkovací kmitočet
USB Port
Norma USB
Podpora formátu souborů médií
Systém souborů přístroje USB
Výkon portu USB
Bitová rychlost
SEKCE DISKY
Přehrané disky (8 cm nebo 12 cm)
(1) DVD (DVD-Video, DivX
(2) DVD-R (DVD-Video, DVD-VR, MP3
§5, 6
)
DivX
(3) DVD-R DL (DVD-Video, DVD-VR, DivX
(4) DVD-RW (DVD-Video, DVD-VR, MP3
§5, 6
)
DivX
(5) iR/iRW (Video)
(6) iR DL (Video)
(7) CD, CD-R/RW (CD-DA, Video CD, SVCD
§1Splňuje IEC62107
§2 MPEG-1 Layer 3, MPEG-2 Layer 3
§3 Windows Media Audio Verze 9.0 L3
§4 Soubory Exif Verze 2.1 JPEG Baseline
§5 Celkový sloučený maximální počet rozeznatelného obsahu
§6Přehrává DivX
§7 MPEG4 data zaznamenaná kamerami Panasonic SD multi nebo
§4, 5
JPEG
, MPEG4
Nekompatibilní s “Multiple Bit Rate” (MBR)
Rozlišení obrazu: Mezin 160k120 a 6144k4096 pixelů
(Podvzorkování je 4:0:0, 4:2:0, 4:2:2 nebo 4:4:4). Extrémně
dlouhé a úzké snímky se nemusí zobrazit.
položek audio, snímků a video a skupin: 4000 položek obsaho
audio, snímků a videos a 255 skupin. (Vyjma kořenové složky)
videorekordéry DVD
Splňující specifikace SD VIDEO (norma ASF)/MPEG4 (Simple
Profile) video systém/G.726 audio systém
®
videa.
Pick up/Naladit
Vlnová délka (DVD/CD) 655/ 790 nm
Výkon laseru CLASS 1M
Audio výstup (Disk)
Počet kanálů 5.1 k. (FL, FR, C, SL, SR, SW)
125 W na kanál (3 ≠), 1 kHz, 10 % THD
125 W na kanál (3 ≠),1kHz,10% THD
250 W na kanál (6 ≠), 1 kHz, 10 % THD
250 W na kanál (6 ≠), 100 Hz, 10 % THD
90 W na kanál (3 ≠), 1 kHz, 1 % THD
90 W na kanál (3 ≠), 1 kHz, 1 % THD
115 W na kanál (6 ≠), 1 kHz, 1 % THD
115 W na kanál (6 ≠), 100 Hz, 1 % THD
87,50 MHz do 108,00 MHz (50-kHz krok)
32 kHz, 44,1 kHz, 48 kHz
USB 2.0, plná rychlost
JPEG (¢.jpg, ¢.jpeg)
DivX (¢.divx, ¢.avi)
FAT12, FAT16, FAT3 2
Až do 4 Mbps (DivX)
§5, 6
)
§5, 7
, DivX
§5, 6
§2, 5
)
, JPEG
§5, 6
§2, 5
)
, JPEG
§1
, MP3
§4, 5
§4, 5
, MPEG4
§2, 5
Optický terminál
MP3 (¢.mp3)
WMA (¢.wma)
MPEG4 (¢.asf)
Max. 500 mA
§5, 7
,
§5, 7
, MPEG4
§3, 5
, WMA
,
SEKCE VIDEO
Video systém PAL625/50, PAL525/60, NTSC
Kompozitní výstup video
Úroveň výstupu
Terminál
Konektor SCART (1 systém)
S-video výstup
Y úroveň výstupu
C úroveň výstupu
Terminál
PAL; 0,3 Vp-p (75 ≠)
NTSC; 0,286 Vp-p (75 ≠)
Konektor SCART (1 systém)
Video výstup RGB
Rúroveň výstupu
Gúroveň výstupu
Búroveň výstupu
Terminál
Konektor SCART (1 systém)
0,7 Vp-p (75 ≠)
0,7 Vp-p (75 ≠)
0,7 Vp-p (75 ≠)
Výstup HDMI AV
Terminál 19-pinový konektor typu A
HDAVI Control Toto zařízení podporuje funkci “HDAVI Control 5”.
ČÁST REPRODUKTORY
Typ
Reproduktor/y
1-směrný, 1 systém reproduktorů (Basový reflex)
Impedance 3 ≠
Plný rozsah 6,5 cm Kuželový typ
Tlak zvuku na výstupu
Frekvenční rozsah
Rozměry (ŠtVtH)
Hmotnost
Kompletní sestava s podstavcovou
základnou
Rozměry (ŠtVtH) max
Rozměry (ŠtVtH) min
Hmotnost
85 Hz do 25 kHz (j16 dB)
95 Hz do 22 kHz (j10 dB)
100 mmk530 mmk78 mm
255 mmk1020 mmk255 mm
255 mmk550 mmk255 mm
[PT580]
Typ
Reproduktor/y
1-směrný, 1 systém reproduktorů (Basový reflex)
Impedance 3 ≠
Plný rozsah 6,5 cm Kuželový typ
Tlak zvuku na výstupu
Frekvenční rozsah
Rozměry (ŠtVtH)
Hmotnost
[PT880]
,
Typ
Reproduktor/y
1-směrný, 1 systém reproduktorů (Basový reflex)
105 Hz do 25 kHz (j16 dB)
130 Hz do 22 kHz (j10 dB)
80 mmk118,5 mmk68 mm
Impedance 3 ≠
Plný rozsah 6,5 cm Kuželový typ
Tlak zvuku na výstupu
Frekvenční rozsah
Rozměry (ŠtVtH)
Hmotnost
85 Hz do 25 kHz (j16 dB)
95 Hz do 22 kHz (j10 dB)
100 mmk530 mmk78 mm
Kompletní sestava s podstavcovou
základnou
Rozměry (ŠtVtH) max
Rozměry (ŠtVtH) min
255 mmk1020 mmk255 mm
255 mmk550 mmk255 mm
Hmotnost
Typ
Reproduktor/y
1-směrný, 1 systém reproduktorů (Basový reflex)
Impedance 6 ≠
Plný rozsah 6,5 cm Kuželový typ
Tlak zvuku na výstupu
Frekvenční rozsah
Rozměry (ŠtVtH)
Hmotnost
90 Hz do 25 kHz (j16 dB)
115 Hz do 22 kHz (j10 dB)
145 mmk85 mmk71,5 mm
1 Vp-p (75 ≠)
1 Vp-p (75 ≠)
Getting StartedPlaying DiscsOther OperationsOdkaz
78 dB/W (1 m)
0,92 kg
2,3 kg
78 dB/W (1 m)
0,4 kg
78 dB/W (1 m)
0,92 kg
2,3 kg
79 dB/W (1 m)
0,6 kg
ČESKY
RQ TX111 1
25
49
Page 50

[Subwoofer\SB-HW330]
Typ
Reproduktor/y
1. Woofer v plném rozsahu 16 cm Kuželový typ
2. Pasivní radiátor 25 cm
Tlak zvuku na výstupu
Frekvenční rozsah
Rozměry (ŠtVtH)
Hmotnost
VŠEOBECNÉ
Napájení
Spotřeba energie
Rozměry (ŠtVtH)
Hmotnost
Rozsah provozní teploty
Rozsah provozní vlhkosti
Spotřeba energie v pohotovostním režimu přibliž. 0,1 W
[Poznamka]
1 Specifikace se mohou měnit bez předchozího upozornění.
Hmotnost a rozměry jsou přibližné.
2 Celkové harmonické zkreslení se měří digitálním spektrálním
analyzátorem.
1-směrný, 1 systém reproduktorů (typ Kelton)
35 Hz do 180 Hz (j16 dB)
40 Hz do 160 Hz (j10 dB)
180,5 mmk322 mmk351 mm
AC 220 V do 240 V, 50 Hz
430 mmk54 mmk287 mm
35 % do 80 % RH (nezamlžuje se)
Impedance 6 ≠
78 dB/W (1 m)
Hlavní jednotky 95 W
Hlavní jednotky 2,8 kg
0 oC do r40 oC
4,6 kg
Informace pro spotřebitele o sběru a likvidaci
odpadu z elektrických a elektronických zařízení a
použitých baterií z domácností
Tyto symboly na výrobcích, obalech nebo v
průvodní dokumentaci znamenají, že použitá
elektrická a elektronická zařízení a baterie
nepatří do běžného domácího odpadu.
Správná likvidace, recyklace a opětovné
použití jsou možné jen pokud odevzdáte tato
zařízení a použité baterie na místech k tomu
určených, za což neplatíte žádné poplatky, v
souladu s platnými národnímu předpisy a se
Směrnicemi 2002/96/EU a 2006/66/EU.
Správnou likvidací přístrojů a baterií
pomůžete šetřit cenné suroviny a předcházet
možným negativním účinkům na lidské zdraví
a na přírodní prostředí, které jinak mohou
vzniknout při nesprávném zacházení s
odpady.
Další informace o sběru, likvidaci a recyklaci
starých přístrojů a použitých baterií Vám
poskytnou místní úřady, provozovny sběrných
dvorů nebo prodejna, ve které jste toto zboží
zakoupili.
Při nesprávné likvidaci odpadu vám hrozí
pokuta v souladu s národní legislativou a
místními předpisy.
Cd
Informace pro právnické osoby se sídlem
v zemích Evropské Unie (EU)
Pokud chcete likvidovat elektrická nebo
elektronická zařízení, obraťte se na prodejce
nebo dodavatele s žádostí o další informace.
[Informace o likvidaci v zemích mimo
Evropskou Unii (EU)]
Tyto symboly platí jen v zemích Evropské
unie. Pokud chcete likvidovat tento produkt,
obraťte se na místní úřady nebo prodejce a
informujte se o správném způsobu likvidace.
Poznámka k symbolu baterie (symboly
uprost
řed a dole):
Tento symbol může být použit v kombinaci s
chemickým symbolem. V tomto případě
splňuje tento symbol legislativní požadavky,
které jsou předepsány pro chemickou látku
obsaženou v baterii.
26
RQ TX111 1
ČESKY
50
Page 51

Bezpečnostní opatření
Umístění
Přístroj postavte na rovnou plochu mimo dosah přímého slunečního
záření, vysokých teplot, vysoké vlhkosti a nadměrných vibrací.
Působením takového prostředí by mohlo dojít k poškození skříňky a
dalších součástí přístroje s následným zkrácením životnosti zařízení.
Na přístroj nepokládejte těžké předměty.
Napětí
Nepoužívejte vysokonapět’ové zdroje. Mohlo by dojít k přetížení přístroje
a vzniku požáru.
Nepoužívejte stejnosměrné zdroje napětí. Při instalaci přístroje na lodi či
jiných místech se stejnosměrným proudem pečlivě zkontrolujte zdroj
napájení.
Zabezpečení sít’ové šňůry
Ujistěte se, zda je sít’ová šňůra správně zapojena a zda není poškozena.
Špatné zapojení a poškození kabelu může vyvolat požár nebo úraz
elektrickým proudem. Na kabel nepokládejte těžké předměty, neohýbejte
jej a netahejte za něj.
Při odpojování kabelu ze zásuvky jej pevně uchopte za zástrčku. Tahání
za sít’ovou šňůru může způsobit úraz elektrickým proudem.
Se zástrčkou nemanipulujte mokrýma rukama. Mohlo by dojít k úrazu
elektrickým proudem.
Cizí předměty
Zabraňte vniknutí či pádu kovových předmětů do přístroje. Mohlo by dojít
k úrazu elektrickým proudem nebo poruše.
Zabraňte vniknutí kapalin do přístroje. Mohlo by dojít k úrazu elektrickým
proudem nebo poruše. Jestliže k tomu přesto dojde, ihned odpojte přístroj
od napájení a obrat’te se na prodejce.
Do přístroje nevstřikujte insekticidy. Obsahují hořlavé plyny, jež mohou po
vstříknutí do přístroje vzplanout.
Servis
Nepokoušejte se přístroj opravovat sami. Jestliže se přerušil zvuk, nesvítí
indikátory, objevil se kouř nebo jiný problém, který není popsán v tomto
návodu k obsluze, odpojte sít’ovou šňůru a obrat’te se na prodejce nebo
autorizované servisní středisko. Při opravě, demontáži nebo montáži
přístroje nekvalifikovanými osobami může dojít k úrazu elektrickým
proudem nebo poškození přístroje.
Nehodláte-li přístroj delší dobu používat, odpojte jej od zdroje napájení –
prodloužíte tak jeho životnost.
Getting StartedPlaying DiscsOther OperationsOdkaz
ČESKY
RQ TX111 1
27
51
Page 52

Opis funkcji przycisków sterowniczych
Abchaski: 6566
Afarski: 6565
Afrikaans: 6570
Ajmara: 6589
Albański: 8381
Amherski: 6577
Angielski: 6978
Arabski: 6582
Asamski: 6583
Azerbejdżański: 6590
Bachtiarski: 6890
Baskijski: 6985
Baszkirski: 6665
Bengalski: 6678
Białoruski: 6669
Bihari: 6672
Birmański: 7789
Bretoński: 6682
Bułgarski: 6671
Czeski: 6783
Czitonga: 8479
Duński: 6865
Dutch: 7876
Esperanto: 6979
Estoński: 6984
Farelski: 707 9
Fidżi: 7074
Fiński: 7073
Francuski: 7082
Fryzyjski: 7089
Gaelicki (szkocki)
:7168
Galijski: 7176
Grecki: 6976
Grenlandzki: 7576
Gruziński: 7565
Guarani: 7178
Gudżarati: 7185
Hausa: 7265
Hebrajski: 7387
Hinduski: 7273
Hiszpański: 6983
Chiński: 9072
Chorwacki: 7282
Indonezyjski: 7378
Interlingua: 7365
Irlandzki: 7165
Islandzki: 7383
Japoński: 7465
Jawajski: 7487
Jidysz: 7473
Joruba: 8979
Kamobodżański:
7577
Kannarski: 7578
Kaszmirski: 7583
Kataloński: 6765
Kazachski: 7575
Keczua: 8185
Kirgiski: 7589
Koreański: 7579
Korsykański: 6779
Kurdyjski: 7585
Laotański: 7679
Lingala: 7678
Litewski: 7684
Łaciński: 7665
Łotewski: 7686
Macedoński: 7775
Malajalam: 7776
Malezyjski: 7783
Malgaski: 7771
Maltański: 7784
Maoryski: 7773
Marathi: 7782
Mołdawski: 7779
Mongolski: 7778
Nauru: 7865
Nepalski: 7869
Niemiecki: 6869
Norweski: 7879
Orija: 7982
Ormiański: 7289
Paszto: 8083
Pendżabski: 8065
Perski: 7065
Polski: 8076
Portugalski: 8084
Rosyjski: 8285
Retoromański: 8277
Rumuński: 8279
Samoański: 8377
Sanskryt: 8365
Serbski: 8382
Serbsko-chorwacki: 8372
Sindhi: 8368
Słowacki: 8375
Słoweński: 8376
Somalijski: 8379
Sundajski: 8385
Suahili: 8387
Syjamski: 8472
Syngaleski: 8373
Szona: 8378
Szwedzki: 8386
Tadżycki: 8471
Ta ga l sk i: 8 4 76
Ta mi l sk i : 84 6 5
Tatarski: 8484
Telugu: 8469
Tigrinia: 8473
Turecki: 8482
Tu rk m eń s ki : 8 4 75
Ty be t ań s ki : 6 67 9
Twi : 84 8 7
Ukraiński: 8575
Urdu: 8582
Uzbecki: 8590
Walijski: 6789
Węgierski: 7285
Wietnamski: 8673
Włoski: 7384
Wolof: 8779
Wolapik: 8679
Xhosa: 8872
Zulu: 9085
Pilot
1 Włącz/wyłącz urządzenie główne (B 9)
Getting StartedPlaying DiscsOther OperationsReference
2 Ustaw tajmer Trybu uśpienia
Wciśnij i przytrzymaj wciśnięty [SLEEP].
SLEEP 30 # SLEEP 60 # SLEEP 90 # SLEEP120
^-------------------------- OFF (Skasować) (-------------------}
≥ Aby potwierdzić pozostały czas, naciśnij ponownie przycisk.
3 Wybierz kanały i numery tytułów itp. / Wprowadź liczby (B 9, 12)
4 Skasować (B 12)
5 Wybór źródła
[DVD]: Wybierz płytę jako źródło (B 12)
[iPod]: Wybór iPod/iPhone jako źródła (B 16)
[RADIO, EXT-IN]: Wybór tunera FM lub zewnętrznego źródła
6 Podstawowe operacje dla odtwarzania (B 12)
7 Pokaż menu płyty lub playlistę (B 12, 13)
8 Pokaż górne menu płyty lub listę programów (B 12, 13)
9 Wybierz lub potwierdź elementy menu / Klatka po klatce (B 12)
: Wybór trybu odtwarzania / Ustawianie tryb powtarzania (B 12)
; Wybór trybu dźwięku / Wybór kanału głośnika (B 11 )
< Wybierz efekty dźwiękowe surround (B 11 )
= Działanie telewizora
Skieruj pilot zdalnego sterowania na telewizor Panasonic i naciśnij
przycisk.
[Í]: Włącz/wyłącz telewizor
[AV]: Zmień tryb wejścia wideo telewizora
[r, VOL, s]: Wyreguluj głośność telewizora
Ta funkcja może nie działa
> Wyreguluj głośność urządzenia głównego
? Wycisz dźwięk
≥ “MUTE” miga na wyświetlaczu urządzenia głównego, gdy
włączona jest ta funkcja.
≥ Aby skasować, naciśnij ponownie przycisk lub wyreguluj głośność.
≥ Wyciszanie jest skasowany gdy przełączasz urządzenie w stan
oczekiwania.
@ Wybierz ręcznie stacje radiowe (B 9)
A Wybór zaprogramowanych stacji radiowych (B 9)
B Wyjście z ekranu
C Pokaż menu START (B 10)
D Wyúwietlenie tekstu funkcji RDS / Wyúwietlenie menu ekranowego
(B 9, 13)
dźwięku. (B 9, 10)
FM #AV #
^-----------------------------------------------------------}
AUX #ARC #D-IN #USB
ć właściwie z niektórymi modelami.
List kodów języków
E Powróć do poprzedniego ekranu (B 12)
F Przełącz informację na wyświetlaczu urządzenia głównego (B 12)
G
Włącz/wyłącz Whisper-mode Surround (B 11)
Zapobieganie zakłóceniom z innym sprzętem Panasonic
Inne urządzenia audio/wideo Panasonic mogą zacząć działać, gdy
uruchamiasz to urządzenie przy pomocy dostarczonego pilota zdalnego
sterowania.
Można uruchamić to urządzenie w innym trybie, ustawiając tryb działania
pilota zdalnego sterowania na “REMOTE 2”.
Urządzenie główne i pilot zdalnego sterowania winny być ustawione
na ten sam tryb.
1Wciśnij [RADIO, EXT-IN]5 aby wybrać “AUX”.
2Wciśnij i przytrzymaj wciśnięty [1]; na urządzeniu głównym i [2] na
pilocie zdalnego sterowania do chwili, aż na wyświetlaczu urządzenia
głównego pokaże się “REMOTE 2”.
3Wciśnij i przytrzymaj wciśnięty przycisk [OK]9 i [2] na pilocie zdalnego
sterowania prze przynajmniej 2 sekundy.
Aby powrócić do trybu “REMOTE 1”, aby powtórzyć oba powyższe kroki,
naciskając [2] zamiast [1].
Główne urządzenie
1 Przełącznik gotowości/włączania (Í/I)
Naciśnij, aby przełączyć urządzenie z trybu pracy do stanu
gotowości lub odwrotnie. W trybie gotowości urządzenie też zużywa
niewielkie ilości energii.
2 Wskaünik zasilania
Wskaźnik zaświeci się, gdy urządzenie zostanie włączone.
3 Podłącz iPod/iPhone (B 16)
4 Regulacja głośności urządzenia głównego
5 Otwórz/Zamknij tacę płyt (B 12)
6 Podłącz USB urządzenie (B 17)
7 Wyświetlacz
Element “SRD” świeci się, kiedy dźwięk jest odtwarzany w
głośnikach typu surround. (
8 Czujnik sygnału zdalnego sterowania
9 Zatrzymanie odtwarzania
: Wybierz źródło
DVD/CD #USB #FM #AV #AUX #ARC #D-IN #IPOD
^------------------------------------------------------------------------------------------------}
; Odtwarzanie płyt
B 11)
RQ TX111 1
POLSKI
4
52
Page 53

SPIS TREŚCI
Czynności wstępne
Akcesoria . . . . . . . . . . . . . . . . . . . . . . . . . . . . . . . . . . . . . .2
Opis funkcji przycisków sterowniczych. . . . . . . . . . . . . .4
Skrócona instrukcja instalacji
krok 1 Przygotowanie głośników . . . . . . . . . . . . . . . 6
krok 2 Pozycjonowanie . . . . . . . . . . . . . . . . . . . . . . . 7
krok 3 Podłączenia. . . . . . . . . . . . . . . . . . . . . . . . . . . 7
Podłączenia głośnika. . . . . . . . . . . . . . . . . . . . . .7
Podłączenia anteny radiowej. . . . . . . . . . . . . . . .7
Podłączenia audio i wideo. . . . . . . . . . . . . . . . . .8
krok 4 Podłączenie przewodu sieciowego. . . . . . . . 8
krok 5 Przygotowanie pilota zdalnego
sterowania . . . . . . . . . . . . . . . . . . . . . . . . . . . . 8
krok 6 EASY SETUP (ŁATWE USTAWIENIA) . . . . . . 9
Słuchanie radia. . . . . . . . . . . . . . . . . . . . . . . . . . . . . . . . . .9
Automatyczne wstępne ustawienia stacji . . . . . . . . . . . . . . . 9
Słuchanie/potwierdzanie zaprogramowanych kanałów . . . . 9
Ręczne nastrajanie. . . . . . . . . . . . . . . . . . . . . . . . . . . . . . . . 9
Transmisja RDS . . . . . . . . . . . . . . . . . . . . . . . . . . . . . . . . . . 9
Korzystanie z menu START. . . . . . . . . . . . . . . . . . . . . . .10
Wybór źródła pilotem zdalnego sterowania . . . . . . . . . . . . 10
Słuchanie telewizji lub dźwięku z innego urządzenia
przez głośniki tego urządzenia . . . . . . . . . . . . . . . . . .10
Efekty dźwiękowe z wszystkich głośników
Korzystanie z efektów dźwiękowych surround. . . . .11
Wybór trybu dźwięku. . . . . . . . . . . . . . . . . . . . . . . . . .11
Tryb otaczającego szeptu
(Whisper-mode Surround) . . . . . . . . . . . . . . . . . . . .11
Regulacja ręczna poziomu wyjściowego
głośnika. . . . . . . . . . . . . . . . . . . . . . . . . . . . . . . . . . .11
Regulacja głośności podczas odtwarzania . . . . . . . .11
Odtwarzanie płyt
Podstawowe odtwarzanie . . . . . . . . . . . . . . . . . . . . . . . . 12
Inne tryby odtwarzania . . . . . . . . . . . . . . . . . . . . . . . . . . 12
Powtórz odtwarzanie . . . . . . . . . . . . . . . . . . . . . . . . . . . . . 12
Odtwarzanie programowe i losowe . . . . . . . . . . . . . . . . . . 12
Używanie menu nawigacji . . . . . . . . . . . . . . . . . . . . . . . 13
Odtwarzanie płyt danych . . . . . . . . . . . . . . . . . . . . . . . . . . 13
Odtwarzanie płyt DVD-R/-RW (DVD-VR) . . . . . . . . . . . . . 13
Używanie menu ekranowych . . . . . . . . . . . . . . . . . . . . . 13
Inne operacje
Przy użyciu VIERA Link “HDAVI ControlTM” . . . . . . . . . 15
Co to jest VIERA Link “HDAVI Control” . . . . . . . . . . . . . . . 15
Możliwości oferowane przez funkcje “HDAVI Control” . . . 15
Łatwe sterowanie tylko z pilotem VIERA
(dla funkcji “HDAVI Control 2 lub wersje późniejsze”). . . 15
Sterowanie innymi urządzeniami . . . . . . . . . . . . . . . . . . 16
Korzystanie z iPod/iPhone. . . . . . . . . . . . . . . . . . . . . . . . . 16
Odtwarzanie z urządzenia USB. . . . . . . . . . . . . . . . . . . . . 17
Informacje dodatkowe
Zmiana ustawień odtwarzacza . . . . . . . . . . . . . . . . . . . . 17
Informacja DivX . . . . . . . . . . . . . . . . . . . . . . . . . . . . . . . . 19
Wizualizacja tekstu napisów DivX . . . . . . . . . . . . . . . . . . . 19
Typy płyt, które można odtwarzać . . . . . . . . . . . . . . . . . 20
Opcja instalacji głośnika. . . . . . . . . . . . . . . . . . . . . . . . . 21
Konserwacja . . . . . . . . . . . . . . . . . . . . . . . . . . . . . . . . . . 21
Przewodnik poszukiwania niesprawności . . . . . . . . . . 22
Licencje . . . . . . . . . . . . . . . . . . . . . . . . . . . . . . . . . . . . . . 24
Specifikacje . . . . . . . . . . . . . . . . . . . . . . . . . . . . . . . . . . . 25
Zasady bezpieczeństwa . . . . . . . . . . . . . . . . . . . . . . . . . 27
Czynności wstępneOdtwarzanie płytInne operacje
UWAGA!
W TYM URZĄDZENIU ZNAJDUJE SIĘ LASER.
WYKONYWANIE REGULACJI INNYCH NIŻ OPISANE LUB
POSTĘPOWANIE W SPOSÓB NIEPRZEWIDZIANY W
INSTRUKCJI OBSŁUGI GROZI NIEBEZPIECZNYM
NAŚWIETLENIEM PROMIENIAMI LASERA.
PROSIMY NIE OTWIERAĆ OBUDOWY I NIE DOKONYWAĆ
NAPRAW SAMODZIELNIE. PROSIMY POWIERZYĆ NAPRAWY
KWALIFIKOWANEMU PERSONELOWI.
OSTRZEŻENIE
ABY OGRANICZYĆ NIEBEZPIECZEŃSTWO POŻARU,
PORAŻENIA PRĄDEM LUB USZKODZENIA
URZĄDZENIA,
≥NIE NALEŻY WYSTAWIAĆ URZĄDZENIA NA
DZIAŁANIE DESZCZU, WILGOCI, KAPANIE LUB
ZACHLAPANIE; PONADTO NA URZĄDZENIU NIE
NALEŻY USTAWIAĆ ŻADNYCH NACZYŃ
ZAWIERAJĄCYCH PŁYNY, TAKICH JAK WAZONY.
≥NALEŻY KORZYSTAĆ WYŁĄCZNIE Z ZALECANYCH
AKCESORIÓW.
≥NIE NALEŻY DEMONTOWAĆ OBUDOWY
URZĄDZENIA. WEWNĄTRZ URZĄDZENIA NIE
ZNAJDUJĄ SIĘ ELEMENTY NADAJĄCE SIĘ DO
SAMODZIELNEJ NAPRAWY. NAPRAWĘ URZĄDZENIA
NALEŻY ZLECIĆ WYKWALIFIKOWANYM
PRACOWNIKOM SERWISU.
URZĄDZENIE JEST PRZEZNACZONE DO UŻYWANIA W
KLIMACIE UMIARKOWANYM.
UWAGA!
≥ NINIEJSZEGO URZĄDZENIA NIE NALEŻY INSTALOWAĆ LUB
UMIESZCZAĆ W SZAFCE NA KSIĄŻKI, ZABUDOWANEJ
SZAFCE LUB INNEJ OGRANICZONEJ PRZESTRZENI, W CELU
ZAPEWNIENIA DOBREJ WENTYLACJI. NALEŻY UPEWNIĆ SIĘ,
ŻE ZASŁONY I INNE MATERIAŁY NIE ZASŁANIAJĄ OTWORÓW
WENTYLACYJNYCH TAK, ABY ZAPOBIEC RYZYKU
PORAŻENIA PRĄDEM LUB POŻARU W WYNIKU
PRZEGRZANIA.
≥ NIE ZASŁANIAJ OTWORÓW WENTYLACYJNYCH
URZĄDZENIA GAZETAMI, OBRUSAMI, ZASŁONAMI I
PODOBNYMI PRZEDMIOTAMI.
≥ NIE UMIESZCZAJ NA URZĄDZENIU ŹRÓDEŁ OTWARTEGO
OGNIA, TAKICH JAK ZAPALONE ŚWIECE.
≥ POZBYWAJ SIĘ ZUŻYTYCH BATERII W SPOSÓB
NIEZAGRAŻAJĄCY ŚRODOWISKU NATURALNEMU.
To urządzenie może odbierać zakłócenia wywołane użyciem telefonu
komórkowego. Jeżeli takie zakłócenia wystąpią, wskazane jest
zwiększenie odległości pomi
komórkowym.
Urządzenie powinno zostać umieszczone w pobliżu łatwo dostępnego
gniazda ściennego.
Wtyczka zasilania sieciowego powinna być łatwo dostępna.
Aby całkowicie odłączyć zasilanie urządzenia, należy odłączyć
przewód zasilania od gniazda zasilania.
ędzy urządzeniem a telefonem
Informacje
dodatkowe
POLSKI
RQ TX111 1
5
53
Page 54

krok 1 Przygotowanie głośników
Przed rozpoczęciem montażu, ustawieniem i podłączeniem, upewnij się, że masz do dyspozycji wszystkie podane części składowe.
≥ Trzymać śruby z dala od dzieci, aby nie dopuścić do ich połknięcia.
≥ Opcjonalny wspornik na ścianę pokazany jest na stronie 21.
2 Głośniki przednie
2 Głośniki przednie
2 Głośniki dźwięku
przestrzennego
2 Stojaki (z kablem)
4 Stojaki (z kablem)
4 Podstawy
2 Podstawy
8 Wkrętów
16 Wkrętów
[PT580]
[PT880]
[PT580]
[PT880]
[PT580]
[PT880]
[PT580]
[PT880]
1
2
2
1
Wsunąć w
wyżłobienie.
Mocno dokręcić.
Umieścić kabel
między występami.
Pozostawić około 120 mm.
Wcisnąć w wyżłobienie.
Mocno dokręcić.
Włóż kabel do końca.
i: Biały
j: Niebieski
przewód
Wciśnij!
Pozostawić
około 120 mm.
Kabel można wyciągnąć i używać
go prosto ze stojaka. Aby ponownie
przymocować kabel, należy przejść
na stronę 21.
Wsunąć w
wyżłobienie.
Wcisnąć w wyżłobienie.
Mocno dokręcić.
Włóż kabel do końca.
i: Biały
j: Niebieski przewód
Wciśnij!
Przeciągnij kabel głośnikowy
przez podstawę.
Przymocować głośnik.
Sznurek (nie jest częścią zestawu)
Przeciągnąć od ściany do głośnika i mocno związać.
Głośniki (tylne)
Wkręt z oczkiem
(nie jest częścią
zestawu)
Ok. 150 mm
Ściana
[PT580] Głośniki przednie
[PT880] Głośniki przednie i surround
Przygotowanie
≥ Aby uniknąć uszkodzenia lub zadrapań, rozłóż miękką tkaninę i
wykonaj montaż na niej.
≥ Do wykonania montażu używaj śrubokręta Philipsa krzyżakowy
(nie jest częścią zestawu).
Opcja zmontowania głośnika
Ochrona głośników przed upadkiem
≥ Będziesz potrzebował zaopatrzyć się w odpowiednie wkręty z
oczkiem, dostosowane go ścian lub kolumien, do których mają być
zamocowane.
≥ Zwróć się do wykwalifikowanego technika budowlanego w sprawie
odpowiedniej procedury wieszania przedmiotów na betonowej ścianie
lub powierzchni, która może nie być dostatecznie wytrzymała.
Nieprawidłowe przymocowanie może uszkodzić ścianę i głośniki.
Uwaga!
≥ Nie stawaj na podstawie. Zachowaj ostrożność, gdy w pobliżu są
dzieci.
≥ Podczas transportu głośnika należy przytrzymać części statywu i
podstawy.
RQ TX111 1
POLSKI
6
54
Page 55

krok 2 Pozycjonowanie
120°
60°
Głośnik centralny
§2
Głośniki przednie
(lewy)
Głośnik
niskotonowy
§3
Głośniki dźwięku
przestrzennego (lewy)
Głośniki dźwięku
przestrzennego (prawy)
Głośniki przednie
(prawy)
Główne urządzenie
§1
FM ANT
(75 )
Taśma klejąca
Główne urządzenie
(tylne)
Wewnętrzna antena radiowa
(jest częścią zestawu)
Umieść ten koniec anteny w
miejscu, gdzie odbierany jest
najlepszy sygnał.
FM ANT
(75 )
Używaj anteny zewnętrznej, jeżeli odbiór fal radiowych jest złej jakości.
≥ Odłącz antenę, gdy urządzenie nie jest używane.
≥ Nie należy używać anteny zewnętrznej podczas burzy z
wyłądowaniami elektrycznymi.
Główne urządzenie
(tylne)
Kabel
koncentryczny
75 ≠
(nie jest częścią
zestawu)
Zewnętrzna antena
radiowa
(Korzystanie z anteny
telewizyjnej
(nie jest częścią
zestawu))
Antena powinna być
zainstalowana przez
kwalifikowaną osobę.
Od ustawienia głośników mogą zależeć niskie tony i pole akustyczne.
Zwróć uwagę na następujące punkty:
≥ Ustaw głośniki na pewnej, płaskiej podstawie.
Jeżeli umieścisz głośniki za blisko podłogi, ścian, i kątów, może to dać
≥
efekt nadmiernie niskich tonów. Zasłoń ściany i okna grubymi kotarami.
[Uwaga]
Głośniki powinny znajdować się na odległości przynajmniej 10 mm od
systemu, by miały właściwą wentylację.
Przykład rozmieszczenia (“Układ przestrz. (Zalecane)”: Standardowe
rozmieszczenie przestrzenne)
Ustaw głośniki przedni, centralny i surround mniej więcej w jednakowej
odległości od pozycji siedzącego. Kąty na schemacie są przybliżone.
krok 3 Podłączenia
Wyłącz wszystkie urządzenia przed wykonaniem podłączenia i
przeczytaj odpowiednie instrukcje obsługi.
Nie włączaj przewodu sieciowego zanim wszystkie inne
podłączenia nie są w pełni wykonane.
Podłączenia głośnika
1
Podczas umiejscowniania głośników, należy zwrócić uwagę na typ
głośnika i kolor złącza.
Główne urządzenie (tylne)
Podłącz do złączy tego samego koloru.
Użycie etykietek kabli głośnika jest pomocne przy wykonywaniu
podłączenia kablowego.
Głośniki (tylne)
Wstaw przewód do oporu, uważając, by nie wstawić go poza izolację
przewodu.
i: Biały
j: Niebieski przewód
≥ Należy zachować ostrożność, aby nie krzyżować (zwierać) lub nie
zmieniać biegunów kabli głośników, ponieważ może to spowodować
uszkodzenie głośników.
Podłączenia anteny radiowej
2
Czynności wstępne
§1Należy zostawić minimum 5 cm przestrzeni z każdej strony dla
zapewnienia właściwej wentylacji.
§2 Ustaw na stelażu lub na półce. Wibracje powodowane przez głośnik
mogą przerwać obraz, jeżeli głośnik ustawiony jest bezpośrednio
na telewizorze.
§3 Ustaw na prawo lub na lewo od telewizora, na podłodze lub
wytrzymałej półce, aby nie powstawał
odłegłość około 30 cm od telewizora.
W zależności od układu pomieszczenia, można użyć wszystkich
głośników z przodu (“Układ przedni (Alternatywne)”) (B 9, Ustawienia
USTAW. PODSTAW.).
y wibracje. Pozostaw
Uwagi o używaniu głośnika
≥Używaj tylko dostarczonych głośników
Używanie innych głośników może uszkodzić urządzenie, i jakość
dźwięku na tym ucierpi.
≥ Odtwarzanie dźwięku na wysokiej głośności przez dłuższy okres
czasu może uszkodzić głośniki i skrócić ich żywotność.
≥ Aby uniknąć uszkodzenia, zmiejsz głośność w następujących
przypadkach:
– Przy odtwarzaniu dźwięku skażonego.
–Gdy dźwięk wychodzący z głośników odbija się z powodu
odtwarzacza, hałasu z radia FM, lub ciągłych sygnałów z oscylatora,
sprawdź płytę, lub przyrz
– Podczas regulacji jakości dźwięku.
– Podczas włączania lub wyłączania urządzenia.
Jeżeli pojawiają się nieregularne barwy w telewizorze
Centralny głośnik jest zaprojektowany do używania obok telewizora,
lecz w niektórych telewizorach i kombinacjach ustawień obraz może być
skażony.
Jeżeli zachodzi takie zjawisko, wyłącz telewizor na około 30 minut.
Funkcja demagnetyzacji telewizora powinna wyeliminować problem.
Jeżeli problem nie został usunięty, odsuń głośniki nieco dalej od
telewizora.
Uwaga!
≥ Urządzenie główne i dostarczone głośniki winny być używane
tylko w sposób taki, jak podany w tym schemacie.
Niezastosowanie się do tych zaleceń może doprowadzić do
uszkodzenia wzmacniacza i/lub the głośniki, i może
spowodować niebezpieczeństwo pożaru. Jeżeli nastąpiło
uszkodzenie lub jeżeli dostrzeżesz nagłe zmiany w pracy
urządzenia, Zwróć się do wykwalifikowanego technika
serwisowego.
≥ Nie próbuj przymocować głośników do ścian innym sposobem,
niż sposób opisany w tej książce instrukcji.
Uwaga!
Nie dotykaj przedniej siatki głośników. Trzymaj je za boczne ścianki.
[PT880]
ąd elektroniczny.
Możesz rozkoszować się dźwiękiem surround
z głośnika o połączeniu bezprzewodowym,
używając opcjonalne bezprzewodowe
wyposażenie Panasonic (SH-FX71).
Dokładne informacje podane są w instrukcji
obsługi opcjonalnego bezprzewodowego
wyposażenie Panasonic.
Używanie anteny wewnętrznej
Skrócona instrukcja instalacji
Używanie anteny zewnętrznej
POLSKI
RQ TX111 1
7
55
Page 56

Podłączenia audio i wideo
AV
AV1
Kabel SCART
§1
(nie jest częścią zestawu)
Tel ew izo r
Główne urządzenie
(tylne)
np. [PT580]
Do gniazdka elektrycznego
Główne urządzenie
(tylne)
Przewód zasilania
(jest częścią zestawu)
R6/LR6, AA
N
aciśnij i podnieś.
Założ pokrywę.
Włóż baterie ustawiając bieguny (
i i j
) zgodnie z oznaczeniami w
pilocie.
3
Przykład ustawienia podstawowego
§1 Takie podłączenie pozwala także odtwarzać audio TV przez
system kina domowego (B 10, Wybór źródła pilotem zdalnego
sterowania). Wybierz odpowiednie wyjście audio (np. Monitor)
w telewizorze.
Aby polepszyć jakość obrazu, można zmienić wyjście sygnału wideo ze
złącza SCART (AV), aby dostosować go do typu twojego telewizora.
≥ Wybierz “S-WIDEO”, “RGB 1” lub “RGB 2” z “WYJ WIDEO SCART” w
menu WIDEO (B 18).
≥ Gdy podłączone są oba kable HDMI i SCART, ze złącza SCART (AV)
nie będzie wyprowadzany sygnał RGB.
Inne podłączenie video
[\\\\\\\\\\\HDMI\AV\OUT\\\\\\\\\]
Dane podłączenie zabezpiecza optymalną jakość obrazu.
Należy podłączyć kabel HDMI (nie jest częścią zestawu), od
terminala HDMI AV OUT na jednostce głównej do terminala HDMI
AV IN w telewizorze.
≥ Jeśli telewizor nie jest kompatybilny z ARC, utwórz dodatkowe
połączenie audio.
≥ Ustaw “PRIORYTET WIDEO” na “WŁĄCZ.” (B 18, menu HDMI).
≥ Ustaw “FORMAT WIDEO” w Menu 4 (HDMI) (B 14).
VIERA Link “HDAVI Control”
Jeżeli twój Telewizor Panasonic jest kompatybilny z VIERA Link,
telewizor twój może pracować w synchronizacji z operacjami kina
domowego lub odwrotnie (B 15, Przy użyciu VIERA Link “HDAVI
TM
”).
Control
ARC (Kanał powrotnego dźwięku)
Jeśli telewizor jest kompatybilny z ARC, dźwięk z telewizora może być
wysłany do tego urządzenia przez kabel HDMI bez potrzeby tworzenia
połączenia audio.
≥ Więcej informacji znajduje się w instrukcji obsługi telewizora.
[Uwaga]
Należy używać kabli High Speed HDMI Cables z logo HDMI logo (jak
≥
pokazano na pokrywie)
≥ Nie można używać kabli niezgodnych z HDMI.
≥ Zalecamy używania kabla HDMI marki Panasonic.
Zalecany numer części:
RP-CDHS15 (1,5 m), RP-CDHS30 (3,0 m), RP-CDHS50 (5,0 m), itp.
≥ W telewizorach z więcej niż jednym terminalem HDMI należy
sprawdzić właściwe miejsce podłączenia kabla w instrukcji obsługi
telewizora.
Nie podłączaj sygnału video przez magnetowid.
Z powodu zabezpieczenia przed kopiowaniem obraz może być
wyświetlany nieprawidłowo.
Inne podłączenia audio
[\\\\\\DIGITAL\AUDIO\IN\OPTICAL\\\\\\]
Kiedy podłączony jest optyczny kabel cyfrowy
dekodować dźwięk Dolby Digital.
Podłącz kabel optyczny (nie jest częścią zestawu) z gniazda
DIGITAL AUDIO IN OPTICAL w głównym urządzeniu do gniazda
OPTICAL OUT w telewizorze.
[Uwaga]
Po połączeniu cyfrowym kablem optycznym audio lub HDMI
ustawienia do typu dźwięku odbieranego z zewnętrznego sprzętu
cyfrowego (B 10).
§2 Przeczytaj instrukcje obsługi odpowiednich urządzeń, aby zmienić
ustawienia wysyłania dźwięku.
§3Używając tego połączenia można tylko odtwarzać Dolby Digital i
PCM.
[\\\\\\\\\AUX\\\\\\\\]
Należy użyć tego złącza w przypadku, gdy telewizor nie jest
wyposażony w gniazdo OPTICAL OUT lub gdy gniazdo DIGITAL AUDIO
IN OPTICAL jest używane przez STB.
Należy podłączyć kabel audio (nie jest częścią zestawu), od AUX na
jednostce głównej do terminala AUDIO OUT w telewizorze.
RQ TX111 1
POLSKI
8
56
Połączenie urządzenia STB (dekoder telewizji kablowej/tuner
satelitarny/odtwarzacz płyt Blu-ray, itp.)
Użyj tego połączenia, aby odtwarzać w tym urządzeniu oryginalny
dźwięk przestrzenny z urządzenia STB, itp.
Podłącz cyfrowy kabel optyczny audio (nie jest on częścią
zestawu) ze złącza DIGITAL AUDIO IN OPTICAL w tym urządzeniu
do złącza OPTICAL OUT w urządzeniu STB.
≥ Jeśli złącze DIGITAL AUDIO IN OPTICAL jest używane do
podłączenia dźwięku telewizora, podłącz dźwięk telewizora do złącza
AUX używając kabla audio.
[Uwaga]
W przypadku różnych źródeł dźwięku (jak np. odtwarzacz Blu-ray,
nagrywarka DVD, magnetowid, itp.) podłącz je do dostępnych wejść w
telewizorze, a wyjście z telewizora powinno być podłączone do gniazda
SCART (AV), AUX, HDMI AV OUT lub DIGITAL AUDIO IN OPTICAL w
głównym urządzeniu.
krok 4 Podłączenie przewodu
sieciowego
AC IN
Oszczędzanie energii
Urządzenie główne zużywa pewną niewielką ilość energii, nawet kiedy
jest w trybie oczekiwania (około 0,1 W). Aby zaoszczędzić energię, gdy
urządzenie nie będze używane przez dłuższy czas, wyłącz je z wtyczki
ściennej.
Trzeba będzie zresetować pewne elementy pamięci po włączeniu
urządzenia głównego do sieci.
[Uwaga]
§2, 3
Dołączony do wyposażenia przewód sieciowy jest przeznaczony tylko
do użytku z urządzeniem głównym. Nie należy u
aparatami. Nie należy także używać z urządzeniem głównym kabli od
innych aparatów z urządzeniem głównym.
żywać go z innymi
krok 5 Przygotowanie pilota zdalnego
sterowania
Baterie
.
UWAGA
Istnieje niebezpieczeństwo wybuchu w przypadku, gdy baterie
§2, 3
, urządzenie może
§2, 3
dopasuj
zostaną nieprawidłowo założone. Baterie należy wymieniać na takie
same lub na baterie równorzędnego typu, zalecane przez producenta.
Zużytych baterii należy pozbywać się zgodnie z instrukcjami
producenta.
≥ Używaj baterii alkalicznych lub manganowych.
≥ Nie wystawiać baterii na działanie wysokiej temperatury lub ognia.
≥ Nie należy pozostawiać baterii we wnętrzu samochodu, gdzie będą
narażone na bezpośrednie dziaanie światła słonecznego przez
dłuższy czas, przy zamkniętych drzwiach i oknach.
Nie należy:
≥ mieszać starych i nowych baterii.
≥ używać różnych typów baterii jednocześnie.
≥ rozbierać i nie zwierać.
≥ próbować ponownie ładować baterii alkalicznych lub manganowych.
≥ używać baterii, na których jest zdarta zewnętrzna otoczka.
Nieprawidłowe manipulowanie baterii może spowodować wyciek
elektrolitu, który może poważnie uszkodzić pilot zdalnego sterowania.
Wyjmij baterie, jeżeli pilot zdalnego sterowania nie będzie używany
przez dłuższy czas. Przechowuj w chłodnym, ciemnym miejscu.
Używaj
Skieruj pilota na czujnik sygnałów pilota (B 4) unikając przeszkód.
Odległość: Do około. 7 m
Kąt: Do ok. 20° w górę i w dół i ok. 30° w lewo i w prawo
Page 57

krok 6 EASY SETUP
USTAW
GŁÓWNY
PŁYTA
WIDEO
AUDIO
WYŚWIETLACZ
HDMI
INNE
POWRÓT
Menu
(ŁATWE USTAWIENIA)
Ekran USTAW. PODSTAW. wspomaga cię przy
wykonywaniu niezbędnych ustawień.
Przygotowanie
Włącz telewizor i wybierz odpowiedni tryb wejścia wideo (np. WIDEO 1,
AV 1, HDMI, itp.), odpowiadający podłączeniu do tego urządzenia.
≥ Aby zmienić tryb wejścia wideo twojego telewizora, patrz instrukcje
obsługi TV.
≥ Ten pilot zdalnego sterowania może wykonywać pewne podstawowe
operacje TV (B 4).
Wciśnij [Í]1, aby włączyć urządzenie.
1
≥ Jeżeli ekran USTAW. PODSTAW. pojawi się automatycznie,
opuść kroki od 2 do 7.
Wciśnij [DVD]5, aby wybrać “DVD/CD”.
2
Wciśnij [START]C, aby wyświetlić menu START.
3
Wciśnij [3, 4]9, aby wybrać “Setup”, po czym
4
wciśnij [OK]9.
Wciśnij [3, 4]9, aby wybrać “INNE” i wciśnij
5
[OK]9.
Wciśnij [3, 4]9, aby wybrać “USTAW. PODSTAW.” i
6
wciśnij [OK]9.
Wciśnij [OK]9, aby wybrać “USTAW”.
7
Wciśnij [3, 4]9, aby wybrać “Tak” i wciśnij [OK]9.
8
Postępując zgodnie z komunikatami skonfiguruj
9
ustawienia przy pomocy [3, 4, 2, 1]9 i [OK]9.
(B poniżej, Ustawienia USTAW. PODSTAW.)
Wciśnij [OK]9, aby zakończyć USTAW. PODSTAW.
10
(szybką konfigurację).
Ustawienia USTAW. PODSTAW.
≥Język
Wybierz język, używany w menu ekranu.
≥Rozmiar ekranu
Wybierz format, aby dostosować twój telewizor.
≥Układ głośników
Wybierz tryb “Układ przestrz. (Zalecane)” lub “Układ przedni
(Alternatywne)” zgodnie z faktycznym ustawieniem głośników
(B 7, Pozycjonowanie).
≥Sprawdz. głośnik.
Posłuchaj dźwięk wychodzący z głośnika, by potwierdzić podłączenie
głośnika.
≥Wyj. głośnikowe.
Wykonaj ustawienia dźwięku Surround dla wyjściowego sygnału
głośnika.
≥TV audio
Wybierz podłączenie wejścia audio z twojego telewizora.
Dla podłączenia AUX (B 8): Wybierz “AUX”.
W przypadku połączenia HDMI (B 8): Wybierz “ARC”.
W przypadku połączenia DIGITAL AUDIO IN OPTICAL (B 8): Wybierz
“DIGITAL IN”.
W przypadku połączenia SCART (AV) (B 8): Wybierz “AV”.
Będzie to ustawienie TV audio dla VIERA Link “HDAVI Control”.
(B 15)
[Uwaga]
≥ Jeżeli to urządzenie jest podłączone do telewizora kompatybilnego z
“HDAVI Control 3 lub wersje późniejsze” przez kabel HDMI, język
menu i informację o formacie TV będzie odszukana przez VIERA Link.
≥ Jeżeli to urządzenie jest podłączone do telewizora kompatybilnego z
“HDAVI Control 2” przez kabel HDMI, informacja o języku menu
będzie odszukana przez VIERA Link.
≥ Elementy funkcji USTAW. PODSTAW. można także zmieniać w
ustawieniach odtwarzacza (np. język, współczynnik kształtu obrazu
telewizora, dźwięk telewizora (B 17)).
Słuchanie radia
Automatyczne wstępne ustawienia stacji
Można ustawić do 30 stacji.
Wciśnij [RADIO, EXT-IN]5, aby wybrać “FM”.
1
Wciśnij [MENU]7.
2
Za każdym razem, gdy naciskasz przycisk:
LOWEST (wstępne ustawienia fabryczne):
Aby rozpocząć automatyczne wstępne ustawienia na najniższej
częstotliwości.
CURRENT:
Aby rozpocząć automatyczne wstępne ustawienia na bieżącej
częstotliwości.
§ Aby zmienić częstotliwość, patrz “Ręczne nastrajanie”
(B poniżej).
Wciśnij i przytrzymaj [OK]9.
3
Puść przycisk, gdy zostanie wyświetlone “FM AUTO”.
Tuner zaczyna ustawiać wstępnie wszystkie stacje, które jest w
stanie odbierać w kanałach w porządku rosnącym.
≥ Zostanie wyświetlony komunikat “SET OK”, gdy wszystkie stacje
zostaną ustawione i radio nastroi się na ostatnio nastawioną
≥ Jeśli nie powiedzie się automatyczne ustawienie wstępne, zostanie
wyświetlony komunikat “ERROR”. Ręcznie dokonaj automatycznego
ustawiania stacji (B poniżej).
Słuchanie/potwierdzanie zaprogramowanych
kanałów
Wciśnij [RADIO, EXT-IN]5, aby wybrać “FM”.
1
Wciśnij numerowane przyciski, aby wybrać kanał.
2
≥ Aby wybrać liczę 2-cyfrową
np. 12: [S10]3 B [1] B [2]
W przeciwnym razie, naciśnij [
≥ Ustawienia FM są także pokazane na wyświetlaczu telewizora.
Jeżeli hałas jest nadmierny
Wciśnij i przytrzymaj wciśnięty [PLAY MODE]:, aby zostało
wyświetlone “MONO”.
Aby anulować tryb, wciśnij i przytrzymaj przycisk ponownie, aż wyświetli
się komunikat “AUTO ST”.
≥ Tryb będzie również skasowany, jeżeli zmienisz częstotliwość.
Ręczne nastrajanie
Wciśnij [RADIO, EXT-IN]5, aby wybrać “FM”.
1
Wciśnij [SEARCH6, SEARCH5]@, aby wybrać
2
częstotliwość.
≥ Aby rozpocząć automatyczne nastrajanie, wciśnij i przytrzymaj
wciśnięty [SEARCH6, SEARCH5]@ do chwili, aż zaczną się
przewijać wartości częstotliwości. Nastrajanie zatrzyma się po
odnalezieniu stacji.
Ręczne wstępne ustawienie stacji
Można ustawić do 30 stacji.
1 Podczas słuchania transmisji radiowej
Naciśnij [OK]9.
2 Podczas gdy na wyświetlaczu miga wartość częstotliwości
Naciśnij przyciski z cyframi, aby wybrać kanał.
≥ Aby wybrać liczbę 2-cyfrową
np. 12: [S10]3 B [1] B [2]
W przeciwnym razie, naciśnij [X, W]A, po czym naciśnij [OK]9.
Uprzednio zapisana stacja zostaje nadpisana, gdy w tym samym kanale
zostaje zapisana inna stacja.
Transmisja RDS
Urządzenie może wyświetlać dane tekstowe, nadawane przez system
danych radiowych (RDS), które są dostępne w niektórych strefach.
Jeżeli stacja, której słuchasz nadaje sygnały RDS, na wyświetlaczu
zapali się “RDS”.
Podczas słuchania transmisji radiowej
Naciśnij [FUNCTIONS]D aby wyświetlić dane tekstowe.
Za każdym razem, gdy naciskasz przycisk:
PS: Serwis programu
PTY: Typ programu
FREQ: Wyświetlenie Częstotliwości
§
stację.
X, W]A
.
Czynności wstępne
Skrócona instrukcja instalacji
POLSKI
RQ TX111 1
9
57
Page 58

Zostaje wyświetlone PTY
DVD/CD Kino domowe
Wybór wejścia
Setup
Dźwięk
DVD/CD Kino domowe
Wybór wejścia
Odtwarzanie płyty
TOP MENU (DVD)
MENU (DVD)
Dostęp do odtwarzania/menu
NEWS VARIED FINANCE COUNTRY
AFFAIRS POP M CHILDREN NATIONAL
INFO ROCK M SOCIAL A OLDIES
SPORT M.O.R. M
EDUCATE LIGHT M PHONE IN DOCUMENT
DRAMA CLASSICS TRAVEL TEST
CULTURE OTHER M LEISURE ALARM
SCIENCE WEATHER JAZZ
§“M.O.R.M”=Muzyka na trasie
[Uwaga]
Getting StartedPlaying DiscsOther OperationsReference
RDS wskazania na wyświetlaczu mogą nie pojawiać się, jeżeli odbiór jest
złej jakości.
§
RELIGION FOLK M
Korzystanie z menu START
Używając menu START można wybrać efekty dźwiękowe, wymagane
źródło, zmienić ustawienia, uzyskać dostęp do odtwarzania/menu, itp.
Wciśnij [START]C, aby wyświetlić menu START.
1
≥ Gdy używana jest funkcja VIERA Link “HDAVI Control”, telewizor
włączy się, gdy wyświetlane jest menu START.
np.
Wciśnij [3, 4]9, aby wybrać pozycję i wciśnij [OK]9.
2
≥ Aby wyjść, naciśnij [START]C.
Wciśnij [3, 4]9, aby zmienić ustawienia i wciśnij
3
[OK]9.
Gdy wybrany jest “Wybór wejścia”
Można wybrać żądane źródło z menu.
DVD/CD (B12), RADIO FM (B9), AV
≥
§
1
(Bponiżej), DIGITAL IN
ARC
§1 “(TV)” pojawi się obok “AV”, “AUX”, “ARC” lub “DIGITAL IN”
informując o ustawieniu dźwięku telewizora dla funkcji VIERA Link
“HDAVI Control” (B 15).
§2 “(STB)” pojawi się obok “DIGITAL IN”, informując o ustawieniach
dźwięku urządzenia STB dla funkcji VIERA Link “HDAVI Control”
(B 15).
Gdy wybrany został element “Setup”
Można zmienić ustawienia tego urządzenia. (B 17)
Gdy wybrany jest “Dźwięk”
Można wybrać ustawienia jakości dźwięku (B 11, EQ (Equalizer)).
Inne elementy, które można wybrać
Wyświetlane elementy zależą od wybranego nośnika i źródła sygnału.
Gdy włożona jest płyta lub podłączonejest urządzenie USB, można
również wejść do odtwarzania lub menu z menu START.
np. [DVD-V]
Gdy pojawia się ekranowy panel sterowniczy
np. [DVD-V] (gdy jest wybrany “Odtwarzanie płyty” z menu START)
Można włączyć odtwarzanie wskazanymi elementami sterowania.
Wybór źródła pilotem zdalnego sterowania
Wciśnij Aby wybrać
[DVD]5 DVD/CD
[iPod]5 IPOD (B 16)
[RADIO,
EXT-IN]5
RQ TX111 1
POLSKI
10
58
Za każdym razem, gdy naciskasz przycisk:
FM:
AV:
AUX:
ARC:
D-IN:
USB:
(B 9)
Dla sygnału wejściowego audio przez złącze
SCART (AV).
Do wejścia sygnału audio przez złącze AUX.
W przypadku odbioru dźwięku przez gniazdo
HDMI AV OUT.
W przypadku odbioru dźwięku przez gniazdo
DIGITAL AUDIO IN OPTICAL. (B z prawej)
(B 17)
§
1
(Bponiżej), AUX
§
1, 2
(Bponiżej), USB (B17), iPod (B16)
§
1
(Bponiżej),
[Uwaga]
Potwierdź podłączenie sygnału audio do złącza SCART (AV), AUX, HDMI
AV OUT lub DIGITAL AUDIO IN OPTICAL na urządzeniu głównym, gdy
wybierzesz odpowiednie źródł
minimum, a następnie wyreguluj głośność urządzenia głównego.
o (B 8). Ścisz głośność w telewizorze do
Słuchanie telewizji lub
dźwięku z innego urządzenia
przez głośniki tego urządzenia
Przygotowanie
≥ Sprawdź, czy gniazdo audio niniejszego urządzenia jest podłączone do
telewizora lub innego urządzenia. (B 8)
≥ Włącz telewizor lub/i inne urządzenie.
Naciśnij [RADIO, EXT-IN]5, aby wybrać źródło łączące
niniejsze urządzenie z telewizorem lub innym urządzeniem.
≥ Opis zmiany efektów dźwięku przestrzennego i trybu dźwięku znajduje
się w rozdziale “Efekty dźwiękowe z wszystkich głośników” (B 11 )
≥ Jeśli telewizor marki Panasonic obsługuje funkcję VIERA Link, w
rozdziale “Przy użyciu VIERA Link “HDAVI Control
się opis powiązanych funkcji.
Zmiana ustawień odbioru cyfrowego dźwięku
Wybierz odpowiedni typ dźwięku spośród gniazd DIGITAL AUDIO IN
OPTICAL i HDMI AV OUT na jednostce głównej.
Należy zmienić ustawienia dla elementu “D-IN” i “ARC”.
≥ Pozycje podkreślone są nastawieniami fabrycznymi.
Dostępne ustawienia
Tryb Nastawienie
DUAL: (Działa tylko z Dolby Dual Mono)
DRC:
(Dynamic
Range
Compression)
PCM FIX: – ON
§3
:
STB
(CABLE/SAT
AUDIO)
Naciśnij [RADIO, EXT-IN]5 kilka razy, aby wybrać “D-IN”
1
lub “ARC”.
Naciśnij [PLAY MODE]:, a następnie [3, 4]9, aby
2
wybrać tryb.
Gdy wyświetlany jest wybrany tryb
3
Naciśnij [2, 1]9 i wybierz nastawienie.
§3 Tylko gdy wybrano “D-IN”.
Należy wybrać kanał odbioru urządzenia (STB, itp.) w telewizorze,
aby zmienić to ustawienie.
Urządzenie musi być podłączone do telewizora Panasonic przez
kabel HDMI i do niniejszego urządzenia za pomocą optycznego
kabla cyfrowego audio.
≥Ta funkcja nie działa, jeśli wybrano “DIGITAL IN” w elemencie “TV
AUDIO” (B 19).
– MAIN+SAP
– MAIN
– SAP
“SAP” = program z pobocznym dźwiękiem
≥ Ustaw tryb PCM FIX na “OFF”, aby słuchać dźwięku
“MAIN” lub “SAP”.
– ON
Podwyższenie wyrazistości dźwięku nawet w
przypadku cichego dźwięku poprzez kompresję
najniższych i najwyższych zakresów dźwięku.
Przydatne do oglądania telewizji w nocy. (Działa
tylko z formatem Dolby Digital)
– OFF
Odtwarzany jest cały zakres dynamiczny sygnału.
Wybierz w przypadku odbierania tylko sygnału PCM.
– OFF
Wybierz ten element podczas odbierania sygnału
Dolby Digital i PCM.
≥ W przypadku odbioru dźwięku przestrzennego 5.1,
wybierz “OFF”.
– SET
Wybierz, gdy główne urządzenie jest przełączone na
“D-IN”, gdy w telewizorze wybrano kanał wejściowy
urządzenia STB podłączonego przez HDMI (B 15,
Ustawianie dźwięku urządzenia STB dla funkcji
VIERA Link “HDAVI Control”).
– OFF
Wybierz, aby anulować to ustawienie.
(dźwięk stereo)
TM
”” (B 15) znajduje
Page 59

Efekty dźwiękowe z wszystkich
np.
AUDIO-UST. GŁOŚNIKÓW-TEST DŹWIĘKU
GŁOŚNIK
LEWY
CENTRALNY
PRAWY
SURROUND PRAWY
POZIOM
− −
0dB
0dB
0dB
głośników
≥ Poniżej podane efekty dźwiękowe mogą nie być dostępne lub mogą nie
działać z niektórymi źródłami.
≥ Możesz dostrzec pogorszenie jakości dźwięku przy użyciu tych efektów
dźwiękowych z niektórymi źródłami. Jeżeli zachodzi takie zjawisko,
wyłącz efekty dźwiękowe.
[Uwaga]
Zmieniajac efekt dzwieku przestrzennego, cichego dzwieku
przestrzennego lub tryby dzwieku, ustawienie jest wyswietlane na ekranie
telewizora, jesli jako zródlo wybrano “DVD/CD” lub “USB” w czasie
odtwarzania wideo.
Korzystanie z efektów dźwiękowych surround
Wciśnij [SURROUND]<.
Za każdym razem, gdy naciskasz przycisk:
STANDARD:
Dźwięk jest wyprowadzany w taki sam sposób, w jaki był nagrany/
zakodowany. Wyjście głośnika zmienia się w zależności od źródła.
MULTI-CH:
Można słuchać dźwięku z przednich i przestrzennych głośników nawet
w przypadku odtwarzania 2-kanałowego dźwięku stereo.
MANUAL: (B poniżej)
Kiedy wyświetlony jest komunikat “MANUAL”, wciśnij
[2, 1]9, aby wybrać inne tryby dźwięku.
Za każdym razem, gdy naciskasz [2, 1]9:
DOLBY PLII MOVIE
Odpowiedni dla filmów lub video nagranych w systemie Dolby
Surround. (oprócz [DivX])
DOLBY PLII MUSIC
Dodaje efekty 5.1-kanałowe do źródeł stereo. (oprócz [DivX])
S.SRD
Można słuchać dźwięku ze wszystkich głośników używając źródeł
stereo.
STEREO
Dźwięk będzie wyprowadzony do przednich głośników, a tylko
subwoofer do jakiegokolwiek źródła.
Zalecane sposoby odsłuchu audio telewizora lub źródeł
stereo ze wszystkich głośników:
≥ DOLBY PLII MOVIE ≥ DOLBY PLII MUSIC ≥ S.SRD
Na wyświetlaczu urządzenia świeci się “SRD”, kiedy pojawia się sygnał
wyjściowy z głośników surround.
Zależnie od tego, czy sygnał jest DTS czy Dolby Digital, wyświetli się
odpowiednio komunikat “/DTS” lub “/DOLBY DIGITAL” .
Wybór trybu dźwięku
Wciśnij [SOUND];, aby wybrać tryb dźwięku.
1
Za każdym razem, gdy naciskasz przycisk:
EQ: Equalizer
SUBW LVL: Poziom Subwoofera
H.BASS: Harmoniczny bas
C.FOCUS: Skoncentrowanie na środku
Kiedy wyświetlany jest wybrany tryb, wciśnij [2, 1]9,
2
aby zmienić ustawienia.
W następujących punktach opisane są ustawienia szczegółów
każdego efektu dźwiękowego.
EQ (Equalizer)
Można wybrać ustawienia jakości dźwięku.
Za każdym razem, gdy naciskasz [2, 1]9:
FLAT: Skasuj (nie dodany jest żaden efekt).
HEAVY: Dodaje dynamiczności muzyce rock.
CLEAR: Rozjaśnia wysokie tony.
SOFT: Dla muzyki w tle.
SUBW LVL (Poziom Subwoofera)
Można wyregulować poziom niskich tonów. Urządzenie
automatycznie wybiera najodpowiedniejsze ustawienie w
zależności od typu źródła odtwarzania.
LEVEL 1 ,# LEVEL 2 ,# LEVEL 3 ,# LEVEL 4
^--------------------------------------------------------------------------J
≥ Wykonane ustawienie zostaje zachowane, i następnie
przywołane za każdym razem, kiedy odtwarzasz dźwięk z tego
samego źródła.
H.BASS (Harmoniczny bas)
Można wzmocnić dźwięk o niskiej częstotliwości, aby był czysto
odtwarzany, nawet jeśli akustyka pokoju na to nie pozwala.
ON ,------. OFF
≥ Dokonane ustawienie jest zapamiętywane i używane podczas
odtwarzania z tego samego źródła sygnału.
C.FOCUS (Skoncentrowanie na środku)
(Funkcja przydatna podczas odtwarzania dźwięku
zawierającego kanał środkowy lub gdy wybrano DOLBY PLII
(B lewy).)
Można upodobnić dźwięk centralnego głośnika do dźwięku
wychodzącego z telewizora.
ON,------.OFF
Tryb otaczającego szeptu
(Whisper-mode Surround)
Można ulepszyć efekt przestrzenny cichego dźwięku.
(Przydatne do oglądania telewizji w nocy.)
Wciśnij [W.SRD]G.
Za każdym razem, gdy naciskasz przycisk:
ON ,--. OFF
Regulacja ręczna poziomu wyjściowego głośnika
Przygotowanie
≥ Aby wyświetlić obraz, włącz TV i wybierz odpowiedni tryb wejścia
wideo.
≥ Naciśnij [r, VOL, s]>, aby wyregulować głośność do normalnego
poziomu odsłuchu.
≥ Naciśnij [DVD]5, aby wybrać “DVD/CD”.
≥ Wybierz “TEST DŹWIĘKU” z “UST. GŁOŚNIKÓW” w menu AUDIO
(B 18).
Wciśnij [OK]9, aby wybrać tryb testowania dźwięku.
1
Zostanie wyemitowany testowy ton do każdego kanału w
następującej kolejności.
LEWY, CENTRALNY, PRAWY, SURROUND PRAWY, SURROUND
LEWY
Wciśnij [OK]9, następnie [3, 4]9, aby wyregulować
2
poziom każdego głośnika. (CENTRALNY, SURROUND
PRAWY, SURROUND LEWY)
`
6dB do i6dB (Wstępne ustawienie fabryczne: 0 dB)
Regulacja głośności podczas odtwarzania
(Działa podczas odtwarzania dźwięku przestrzennego lub gdy na
wyświetlaczu głównego urządzenia pojawi się wskaźnik “SRD”)
Wciśnij i przytrzymaj wciśnięty [–CH SELECT];, aby wybrać
1
głośnik.
Gdy wyświetlony jest kanał głośnika, naciśnij [–CH SELECT];.
L # C # R # RS # LS # SW
^---------------------------------------------------}
≥ Wskaźnik SW (Głośnik niskotonowy) jest wyświetlany, nawet jeśli
źródło nie zawiera kanału niskotonowego.
Gdy wybrano “L” lub “R”.
2
Naciśnij [2, 1]9, aby ustawić balans przedniego
głośnika.
Gdy wybrano “C”, “RS”, “LS” lub “SW”.
3
Naciśnij [3]9 (zwiększenie) lub [4]9 (zmniejszenie), aby
wyregulować poziom dla każdego głośnika.
Czynności wstępnePlaying DiscsOther OperationsReference
POLSKI
RQ TX111 1
11
59
Page 60

Podstawowe odtwarzanie
Etykieta ku górze
PROGRAM DVD-V
WYBIERZ TYTUŁ TYTUŁU ROZDZ.
TYTUŁU 1
TYTUŁU 2
TYTUŁU 3
TYTUŁU 4
1
2
3
4
5
ODTW.LOSOWE DVD-V
WYBIERZ TYTUŁ
TYTUŁU 1
TYTUŁU 2
TYTUŁU 3
Inne tryby odtwarzania
Przygotowanie
Aby wyświetlić obraz, włącz telewizor i zmień w nim tryb wejścia wideo
(np. WIDEO 1, AV 1, HDMI, itp.), aby dopasować go do podłączenia do
tego urządzenia.
Naciśnij [Í]1, aby włączyć urządzenie.
1
Wciśnij [DVD]5, aby wybrać “DVD/CD”.
2
Wciśnij [< OPEN/CLOSE]5, aby otworzyć kieszeń.
3
Getting StartedPlaying DiscsOther OperationsReference
Włóż płytę.
4
≥ Wkładaj dwustronne płyty w taki sposób, by
etykietka strony, którą chcesz odtwarzać była
zwrócona do góry.
Wciśnij [1 PLAY]6, aby rozpocząć odtwarzanie.
5
≥ Naciśnij [r, VOL, s]>, aby wyregulować głośność.
[Uwaga]
≥ PŁYTA NADAL OBRACA SIĘ PODCZAS WYŚWIETLANIA MENU.
Naciśnij przycisk [∫ STOP]6 po zakończeniu, aby oszczędzić silnik
mechanizmu i ekran twojego telewizora.
≥ Na iR/iRW może nie być właściwie wyświetlona ogólna ilość tytułów.
Podstawowe funkcje
Jednorazowe odgrywanie (Tylko pilot zdalnego sterowania):
[1 PLAY]6 (podczas trybu oczekiwania)
Urządzenie główne automatycznie włącza się i zaczyna odtwarzać płytę
w tacy.
Zatrzymaj: [∫ STOP]6
Pozycja zostaje zapamiętana, gdy jest na ekranie jest wyświetlone
“PRZYWR. STOP”.
≥ Naciśnij [1 PLAY]6 aby wznowić odtwarzanie.
≥ Naciśnij ponownie [∫ STOP]6, aby skasować pozycję.
Pauza: [; PAUSE]6
≥ Naciśnij [1 PLAY]6 aby wznowić odtwarzanie.
Pomiń: [SKIP:, SKIP 9]6
Powtórz odtwarzanie
Działa to tylko wówczas, gdy może być wyświetlony czas odtwarzania,
który upłynął. Działa to także ze wszystkimi treściami JPEG.
Podczas odtwarzania naciśnij i przytrzymaj przycisk
[–REPEAT]:, aby wyświetlić tryb powtarzania.
Po wyświetleniu trybu powtarzania naciśnij [–REPEAT]:, aby wybrać
element do powtarzania.
np. [DVD-V]
`TYTUŁ ---. `ROZDZ ---. `WYŁĄCZONE
^--------------------------------------------------------b
Aby skasować, wybierz “WYŁĄCZONE”.
Pokazane elementy różnią się w zależności od typu płyty i trybu
odtwarzania.
Odtwarzanie programowe i losowe
[DVD-V] [VCD] [CD] [WMA] [MP3] [JPEG] [MPEG4] [DivX]
Przygotowanie
Po zatrzymaniu należy wcisnąć [PLAY MODE]:, aby
wybrać odtwarzanie.
Ekrany odtwarzania programowego i losowego pojawiają się kolejno.
Programowo ----------------------------------------------------------) Losowo
^--- Opuść ekrany programowego i losowego trybu (}
≥ [DVD-VR]
≥ Jeżeli pojawi się ekran “MENU ODTWARZANIA”, wybierz “DŹWIĘK/
≥ W płytach, na których znajduje się treść zarówno w formacie WMA/MP3
≥ [DVD-V] Pewnych elementów nie da się odtworzyć, nawet, jeżeli były
1
Wybierz “DANE” w “
odtwarzać treść płyt w formatach MP3, JPEG, MPEG4 lub DivX.
OBRAZ” lub “WIDEO” (B 13, Używanie MENU ODTWARZANIA), po
czym wykonaj powyższe wskazania.
jak i JPEG, wybierz treść płyty bądź muzyczną bądź obrazową.
WMA/MP3: Wybierz
LOSOWO”.
JPEG: Wybierz
one zaprogramowane.
Programowe odtwarzanie (do 30 elementów)
Wciśnij [3, 4]9, aby wybrać pozycję i wciśnij [OK]9.
np. [DVD-V]
“
PROGRAM WIZUALNY” lub “ZDJĘCIA LOSOWO”.
DVD-VR/DANE
“
PROGRAM MUZYCZNY” lub “MUZYKA
” (
B 19, menu INNE
) aby
Wyszukiwanie: [SEARCH6, SEARCH5]6 (w czasie odtwarzania)
Działanie w zwolnionym tempie: [SEARCH6, SEARCH5]6
(w czasie pauzy)
≥ Do 5 kroków.
≥ Naciśnij [1 PLAY]6, aby rozpocząć normalne odtwarzanie.
≥ [VCD] Działanie w zwolnionym tempie: Kierunek tylko do przodu.
≥ [MPEG4] [DivX]
Klatka po klatce: [2;, ;1]9 (w czasie pauzy)
[DVD-VR] [DVD-V] [VCD]
≥ [DVD-VR] [VCD] Kierunek tylko do przodu.
Wybór pozycji na ekranie: [3, 4, 2, 1, OK]9
[3, 4, 2, 1]9: Wybór
[OK]9: Potwierdź
Wpisz cyfrę: Numerowane przyciski
[DVD-VR] [DVD-V] [VCD] [CD]
np. Aby wybrać 12: [S10]3 B [1] B [2]
[VCD] ze sterowaniem odtwarzania
Naciśnij [∫ STOP]6, aby skasować funkcję PBC, po czym naciśnij
przyciski z cyframi.
[DVD-V] Pokazuje górne menu płyty: [TOP MENU]8
[DVD-V] Pokazuje menu płyty: [MENU]7
Powróć do poprzedniego ekranu: [RETURN]
[VCD]
Wyświetlacz urządzenia głównego: [FL DISPLAY]F
[DVD-VR] [DVD-V] [WMA] [MP3] [MPEG4] [DivX]
Wyświetlenie czasu
(np. [DVD-VR] Numer programu)
[JPEG]
SLIDE
RQ TX111 1
POLSKI
12
60
Działanie w zwolnionym tempie: Nie działa.
(ze sterowaniem odtwarzania)
,-. Wyświetlenie informacji
,-.Numer treści
Pokazuje menu płyty:
E
[RETURN]
≥ Powtórz ten krok, aby zaprogramować inne elementy.
≥ Aby powrócić do poprzedniego menu, naciśnij [RETURN]E.
Wciśnij [1 PLAY]6, aby rozpocząć odtwarzanie.
2
Aby wybrać wszystkie elementy
Naciśnij [3, 4]9, aby wybrać “WSZYSTKO” i naciśnij [OK]9.
Aby skasować wybrany program
1Naciśnij [1]9 po czym naciśnij [3, 4]9, aby wybrać program.
2Naciśnij [CANCEL]4.
Aby skasować cały program
Naciśnij [1]9 wiele razy, aby wybrać “KAS. WSZYST.”, po czym naciśnij
[OK]9.
Cały program zostaje także skasowany, przy otwarciu tacy płyt,
wyłączeniu urządzenia lub wybraniu innego źródła.
Odtwarzanie losowe
(Tylko, gdy płyta posiada wiele tytułów lub grup.)
1
Wciśnij [3, 4]9, aby wybrać grupę lub tytuł i wciśnij
[OK]9.
E
np. [DVD-V]
” oznacza wybrany element. Aby anulować wybór, naciśnij
≥ Znak “
*
ponownie [OK]9.
Wciśnij [1 PLAY]6, aby rozpocząć odtwarzanie.
2
Page 61

Używanie menu nawigacji
WMA/MP3/JPEG
MPEG4/DivX
MENU ODTWARZANIA
DŹWIĘK/OBRAZ
WIDEO
PŁYTA Z DANYMI
KAT. GŁÓWNY
Perfume
Underwater
Fantasy planet
Starpersons1
Grupa (Folder):
Treść (Plik):
JPEG images G 1/ 1:C 3/ 9
Gruppenavn
Gruppe- og
indholdsnummer
PG
DATA
DŁUGOŚĆ
TYTUŁ
1 0:16:02
10/11
LIVE CONCERT
02:15
2 0:38:25
12/05
AUTO ACTION
01:30
LO
DATA
DŁUGOŚĆ
TYTUŁ
10:00:10
11/11
CITY PENGUIN
00:01
20:01:20
12/01
FOOTBALL
01:20
T
1
R1
1:ENG
3
1
WYŁĄCZONE
SZUKANIE TYTUŁU
Bieżący element
Nazwa elementu
np. Menu 1 (Płyta/Odtwarzanie)
[DVD-V]
T
1:ENG
3
1
WYŁĄCZONE
SZUKANIE ROZDZ.
R1
1
Bieżące ustawienie
np. Menu 1 (Płyta/Odtwarzanie) [DVD-V]
.0: Nie ma dźwięku surround
.1: Surround monofoniczny
.2: Surround stereofoniczny (w lewo/w prawo)
.1: Efekt niskiej częstotliwości
(nie wyświetlony, jeżeli nie ma sygnału)
.1: Centralny
.2: Przedni lewyiPrzedni prawy
.3: Przedni lewyiPrzedni prawyiCentralny
np.
Odtwarzanie płyt danych
[WMA] [MP3] [JPEG] [MPEG4] [DivX]
[DVD-VR] Wybierz “DANE” w “DVD-VR/DANE” (B 19, menu INNE) aby
odtwarzać treści w formatach MP3, JPEG, MPEG4 lub DivX.
Odtwarzanie playlisty
Działa to tylko wówczas, gdy płyta zawiera playlistę.
Po zatrzymaniu wciśnij [PLAY LIST]7.
1
np.
Używanie MENU ODTWARZANIA
Gdy płyta zawiera zarówno formaty wideo (MPEG4/DivX) jak i inny format
(WMA/MP3/JPEG), pojawia się ekran “MENU ODTWARZANIA”.
Wciśnij [3, 4]9, aby wybrać “DŹWIĘK/OBRAZ” lub
“WIDEO” i wciśnij [OK]9.
≥ Aby rozpocząć odtwarzanie, naciśnij [1 PLAY]6.
≥ Aby wybrać element do odtwarzania, patrz “Odtwarzanie od wybranego
elementu” (B poniżej).
Odtwarzanie od wybranego elementu
Można wybrać do odtwarzania fragment, poczynając od żądanego
elementu, podczas gdy jest wyświetlony ekran “PŁYTA Z DANYMI”.
np.
: WMA/MP3
: JPEG
: MPEG4/DivX
≥ Aby wyświetlić/opuścić ekran, naciśnij [MENU]7.
Wciśnij [3, 4]9, aby wybrać pozycję i wciśnij [OK]9.
≥ Naciśnij [2, 1]9, aby pomijać stronę po stronie.
≥ Aby powrócić w górę o 1 poziom od bieżącego foldera, naciśnij
[RETURN]E.
≥ Maksimum: 28 znaków dla nazwy pliku/folderu.
Odtwarzanie rozpoczyna się od wybranej treści.
∫ [JPEG] Wybór obrazu w menu miniaturek
Kiedy wyświetlany jest obraz, wciśnij [TOP MENU]8, ay
1
wyświetlićmnpdręczne.
np.
Wciśnij [3, 4]9, aby wybrać listę odtwarzania i wciśnij
2
[OK]9.
≥ Naciśnij [2, 1]9, aby pomijać stronę po stronie.
Używanie menu ekranowych
Wciśnij [FUNCTIONS]D, aby wyświetlić menu na
1
ekranie.
Za każdym razem, gdy naciskasz przycisk:
Menu 1 (Płyta/Odtwarzanie)
Menu 2 (Wideo)
Menu 3 (Audio)
Menu 4 (HDMI)
Wyjście
Wciśnij [3, 4, 2, 1]9, aby wybrać pozycję i wciśnij
2
[OK]9.
Wciśnij [3, 4]9 , aby zmienić ustawienia i wciśnij
3
[OK]9.
Pokazane elementy są różne, w zależności od typu płyty.
Menu 1 (Płyta/Odtwarzanie)
SZUKANIE ŚCIEŻKI, SZUKANIE TYTUŁU, SZUKANIE
ZAWART., SZUKANIE ROZDZ., SZUKANIE PG (Program
Wyszukiwanie), SZUKANIE LO (Wyszukiwanie Playlisty)
Aby rozpocząć od określonego elementu
≥ [VCD] Funkcja nie działa, gdy używane jest sterowanie odtwarzaniem.
np. [DVD-V]: T2 R5
Aby wybrać numery z płyyt danych
np. 123: [S10]3 B [1] B [2] B [3] B [OK]9
Getting StartedOdtwarzanie płytOther OperationsReference
Other Operations
Wciśnij [3, 4, 2, 1]9, aby wybrać obraz i wciśnij
2
[OK]9.
≥ Naciśnij [SKIP:,SKIP9]6, aby pomijać stronę po stronie.
Aby przejść do innej grupy
1Naciśnij [3]9, aby wybrać nazwę grupy.
2Naciśnij [2, 1]9, aby wybrać grupę i naciśnij [OK]9.
Odtwarzanie płyt DVD-R/-RW (DVD-VR)
[DVD-VR]
≥ Pojawiają się tytuły tylko, jeżeli są one nagrane na płycie.
≥ Nie można edytować programów, playlist i tytułów płyt.
Odtwarzanie programów
Pozatrzymaniu wciśij [DIRECT NAVIGATOR]8.
1
np.
Wciśnij [3, 4]9, aby wybrać program i wciśnij [OK]9.
2
≥ Naciśnij [2, 1]9, aby pomijać stronę po stronie.
AUDIO
[DVD-V] [DivX] (z wielona ścieżkami dźwiękowymi)
Aby wybrać ścieżkę dźwiękową audio
[DVD-VR] [VCD]
Aby wybrać “L”, “P”, “L+P” lub “L P”
Rzeczywiste działanie jest zależne od płyty. Przeczytaj instrukcje
obsługi płyty odnośnie szczegółów.
Typ/data sygnału
LPCM/PPCM/ D/DTS/MP3/MPEG: Typ sygnału
kHz (Częstotliwość próbkowania)/bit/ch (Liczba kanałów)
3/2 .1ch
≥ [DivX] Odtwarzanie może nie rozpocząć się od razu, jeżeli zmieniłeś
audio na płytach wideo DivX.
POLSKI
RQ TX111 1
13
61
Page 62
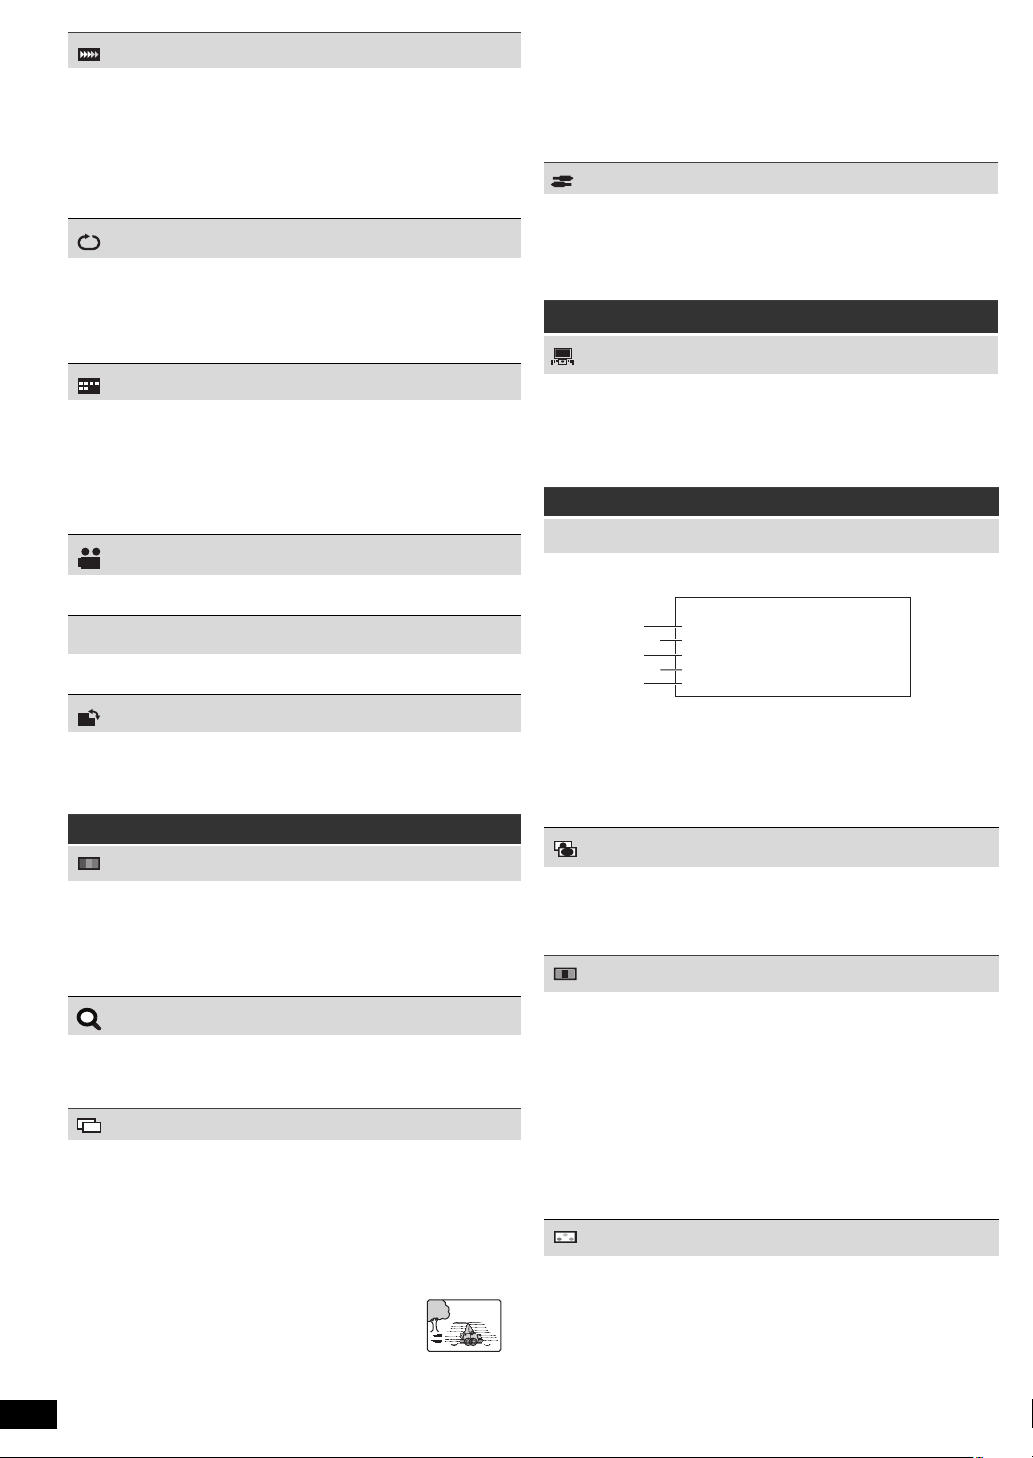
Getting StartedPlaying DiscsOther OperationsReference
JPG
DATE
HDMI
POLSKI
14
62
PRĘDKOŚĆ ODTW.
[DVD-VR] [DVD-V]
Aby zmienić prędkość odtwarzania
–od “k0.6” do “k1.4” (w krokach 0,1-jedn)
≥ Naciśnij [1 PLAY]6 aby powrócić do normalnego odtwarzania.
≥ Po zmianie prędkości
– Dolby Pro Logic II nie daje żadnego efektu.
–Wyjście audio przełącza się na 2-kanałowe stereo.
–Częstotliwość próbkowania 96 kHz przekształcona jest na 48 kHz.
≥ Funkcja ta może nie działać, w zależności od sposobu nagrania płyty.
TRYB POWTARZANIA
(B 12, Powtórz odtwarzanie)
A-B Powtórz (Aby powtórzyć określoną sekcję)
Oprócz [JPEG] [MPEG4] [DivX] [DVD-VR] (Część nieruchomego obrazu)
[VCD] (SVCD)
Naciśnij [OK]9 w punkcie początku i końca.
≥ Wybierz “WYŁĄCZONE” aby skasować.
NAPISY
[DVD-V] [DivX] (z wieloma napisami) [VCD] (Tylko SVCD)
Aby wybrać język napisów
≥ W iR/iRW, może być pokazany numer napisu zamiast
niewyświetlonych napisów.
[DVD-VR] (z informacją napisów włącz/wyłącz)
Aby wybrać “WŁĄCZ.” lub “WYŁĄCZONE”
≥ Funkcja ta może nie działać w zależności od płyty.
[DivX] (B 19, Wizualizacja tekstu napisów DivX)
KĄT
[DVD-V] (z wieloma kątami)
Aby wybrać kąt wideo
WYŚWIETLANIE DATY
[JPEG] Aby wybrać “WŁĄCZ.” lub “WYŁĄCZONE” dla wyświetlenia
daty obrazu
OBRÓT
[JPEG] Aby obrócić obraz (w czasie pauzy)
0,------. 90,------.180,------.270
^--------------------------------------------J
Menu 2 (Wideo)
TRYB OBRAZU
NORMALNE
KINO1:
KINO2:
DYNAMICZNE:
ANIMACJA:
POWIĘKSZENIE
Aby wybrać wielkość zoomu
NORMALNE, AUTO ([DVD-VR] [DVD-V] [VCD] [MPEG4] [DivX]), k2, k4
≥ [JPEG]: w czasie pauzy
TRYB PRZESYŁANIA
Jeżeli wybrałeś “480p”/“576p”/“720p”/“1080p” lub “1080i” (“FORMAT
WIDEO” w Menu 4 (HDMI)) wybierz metodę konwersji dla
progresywnego wyjścia, odpowiadające typowi materiału.
≥ Ustawienie powróci do “AUTO” lub “AUTO1” gdy zostanie otwarta taca
płyt, urządzenie zostanie wyłączone lub będzie wybrane inne źródło.
Przy odtwarzaniu płyt PAL
AUTO:
WIDEO:
FILM:
RQ TX111 1
Zmiękcza obrazy i uwypukla szczegóły w ciemnych
scenach.
Zaostrza obrazy i uwypukla szczegóły w ciemnych
scenach.
Uwydatnia kontrast dla mocnych obrazów.
Odpowiedni do animacji.
Automatycznie wykrywa treść filmu i wideo, i
konwertuje je odpowiednio.
Wybierz gdy używasz “AUTO”, i treść jest skażona.
Wybierz tę opcję, jeżeli skraje treści
filmu mają wygląd postrzępiony lub
nierówny, podczas gdy wybrana jest
opcja “AUTO”.
Jednakże, jeżeli treść wideo jest
zniekształcona, jak pokazane na ilustracji z prawej,
wówczas wybierz “AUTO”.
Przy odtwarzaniu płyt NTSC
AUTO1:
AUTO2:
WIDEO:
Automatycznie wykrywa treść filmu i wideo i konwertuje
je odpowiednio.
Dodatkowo do “AUTO1”, automatycznie wykrywa treść
filmu o różnej szybkości klatek i konwertuje je
odpowiednio.
Wybierz tę opcję, jeżeli treść wideo jest skażona przy
użyciu “AUTO1” lub “AUTO2”.
WYBÓR ŹRÓDŁA [DivX]
Gdy wybierasz “AUTO” metoda konstrukcji treści DivX jest
automatycznie rozpoznana i wyprowadzona. Jeżeli obraz jest skażony,
wybierz “Z PRZEPLOTEM” lub “PROGRESYWNY” w zależności od
tego, jaka metoda konstrukcji była użyta w procesie nagrywania treści
na płytę.
AUTO, Z PRZEPLOTEM, PROGRESYWNY
Menu 3 (Audio)
WZBOGAC. DIALOGÓW
Aby łepiej było słychać dialogi w filmie
[DVD-V] (Dolby Digital, DTS, 3-kanały lub więcej, z dialogami zapisanymi
w centralnym kanale)
[DivX] (Dolby Digital, 3-kanałowy lub więcej, z dialogiem nagranym w
centralnym kanale)
WYŁĄCZONE, WŁĄCZ.
Menu 4 (HDMI)
STATUS HDMI
Aby pokazać informację HDMI
np.
1 Stan podłączenia
2 Pokazuje typ wyjściowego sygnału.
(Gdy wybrane jest “WYŁĄCZ” w “WYJŚCIE AUDIO”, zostanie
wyświetlone (B 18, menu HDMI) “– – –”.)
3 Pokazuje ilość kanałów audio.
4 (B poniżej, FORMAT WIDEO)
5 (B poniżej, PRZESTRZ KOLORU)
WZBOGACANIE HD
Działa to, gdy podłączenie HDMI używane jest z funkcją “PRIORYTET
WIDEO” (B 18, menu HDMI), ustawioną na “WŁĄCZ.”.
Aby zaostrzyć “720p”, “1080i” i “1080p” jakość obrazu
WYŁĄCZONE, 1 (najsłabsza) do 3 (najsilniejsza)
FORMAT WIDEO
Działa to, gdy podłączenie HDMI używane jest z funkcją “PRIORYTET
WIDEO” (B 18, menu HDMI), ustawioną na “WŁĄCZ.”.
Aby wybrać jakość obrazu odpowiednią dla twego telewizora
(Nagrania wideo będą przekonwertowane w ten format i wyprowadzone
jako wideo o wysokiej rozdzielczości.)
§
480p/576p/720p/1080p (postępowe)
§
480i/576i/1080i (z przeplotem)
≥ Jeżeli obraz jest zniekształcony, wciśnij i przytrzymaj wciśnięty
[CANCEL]4 tak długo, aż obraz zostanie wyświetlone prawidłowo.
(Sygnał wyjściowy powróci do rozdzielczości “480p”/“576p”.)
§ Wyświetlone liczby zależą od odtwarzanej płyty. Zostanie
wyświetlona jedna z powyższych liczb.
PRZESTRZ KOLORU
Działa to, gdy podłączenie HDMI używane jest z funkcją “PRIORYTET
WIDEO” (B 18, menu HDMI), ustawioną na “WŁĄCZ.”.
Aby wybrać kolor obrazu odpowiedni do twego telewizora
YCbCr 4:2:2
YCbCr 4:4:4
RGB
≥ Znak “
≥ Jeśli obraz jest zniekształcony, naciśnij i przytrzymaj przycisk
” pojawi się, jeśli jest kompatybilny z telewizorem.
*
[CANCEL]4, aż obraz zostanie przywrócony do normalnego wyglądu.
HDMI --- INFORMACJA
STAN PODŁĄCZONY
STRUMIEŃ AUDIO
MAKS. KANAŁÓW
FORMAT WIDEO
PRZESTRZ KOLORU
PODŁĄCZ
PCM
2ch
720p
YCbCr 4:4:4
Page 63

Przy użyciu VIERA Link
DVD/CD Kino domowe
Wybór wejścia
Odtwarzanie płyty
TOP MENU (DVD)
MENU (DVD)
Dostęp do odtwarzania/menu
“HDAVI ControlTM”
Co to jest VIERA Link “HDAVI Control”
VIERA Link “HDAVI Control”
VIERA Link “HDAVI Control” jest dogodną funkcją, umożliwiającą
powiązane działania tego urządzenia, i telewizora Panasonic (VIERA)
sterowane przez “HDAVI Control”. Funkcji tej można używać, łącząc
aparaturę kablem HDMI. Odnośnie szczegółów działania, patrz instrukcje
obsługi dla podłączonych urządzeń.
≥ VIERA Link “HDAVI Control”, oparty o funkcje sterowania dostarczone
przez HDMI, przemysłowy standard znany pod nazwą HDMI CEC
(Consumer Electronics Control), jest unikalną funkcją, opracowaną i
dodaną przez naszą firmę. W związku z tym, nie może być
zagwarantowane jego współdziałanie z urządzeniami innych
producentów, obsługujących HDMI CEC.
≥ To u r z ądzenie obsługuje funkcję “HDAVI Control 5”.
“HDAVI Control 5” jest najnowszym standardem (aktualnym na
grudzień 2009 r.) dla urządzeń
Control. Ten standard jest kompatybilny z konwencjonalnymi
urządzeniami HDAVI firmy Panasonic.
≥ Patrz indywidualne książki instrukcji urządzeń innych producentów,
obsługujących funkcję VIERA Link.
Telewizor z funkcją “HDAVI Control 2 lub wersje późniejsze” umożliwia
następującą operację: Łatwe sterowanie tylko z pilotem VIERA (dla
funkcji “HDAVI Control 2 lub wersje późniejsze”) (B z prawej).
Przygotowanie
≥ Potwierdź, że podłączenie HDMI zostało wykonane (B 8).
≥ Ustaw “VIERA Link” do “WŁĄCZ.” (B 19, menu HDMI).
≥ Aby prawidłowo zakończyć i uaktywnić podłączenie, włącz wszystkie
urządzenia kompatybilne z VIERA Link “HDAVI Control” i ustaw
telewizor na odpowiedni tryb wejściowego sygnału HDMI dla tego
urządzenia.
Ustawienie audio telewizora na VIERA Link “HDAVI Control”
Wybierz “AV”, “AUX”, “ARC” lub “D-IN”
dziaaniami.
Przeczytaj informację o ustawieniu TV audio w elemencie USTAW.
PODSTAW. (B 9) lub “TV AUDIO” w menu HDMI (B 19).
Sprawdź podłączenie dźwięku do złącza SCART (AV) (dla “AV”), do
złącza AUX (dla “AUX”), HDMI AV OUT (dla “ARC”) lub do złącza
DIGITAL AUDIO IN OPTICAL (dla “D-IN”) (B 8).
Ustawianie dźwięku urządzenia STB dla funkcji VIERA Link “HDAVI
Control”
Wybierz “D-IN”, aby użyć połączonych operacji.
Przeczytaj informacje o konfiguracji STB w rozdziale “Zmiana ustawień
odbioru cyfrowego dźwięku” (B 10).
Sprawdź podłączenie dźwięku do gniazda DIGITAL AUDIO IN OPTICAL
(dla “D-IN”) (B 8).
Gdyby zostały zmieniowe podłączenie lub ustawienia, potwierdź
ponownie powyższe punkty.
§1 “AV”, “AUX”, “ARC” lub “D-IN” (DIGITAL IN) działa w zależności od
ustawienia TV audio (B powyżej, Ustawienie audio telewizora na
VIERA Link “HDAVI Control”).
“D-IN” (DIGITAL IN) działa w zależności od ustawienia dźwięku
§2
urządzenia STB (B powyżej, Ustawianie dźwięku urządzenia STB
dla funkcji VIERA Link “HDAVI Control”).
Możliwości oferowane przez funkcje “HDAVI
Control”
Automatyczna synchronizacja obrazu i dźwięku Lip Sync
(Dostępny, gdy używany jest VIERA Link “HDAVI Control” z
kompatybilnym telewizorem “HDAVI Control 3 lub wersje
późniejsze”)
Niniejsza funkcja automatycznie zapewnia zsynchronizowanie
odtwarzania dźwięku i obrazu. (Działa tylko, gdy źródłem jest “DVD/CD”,
“USB”, “AV”
≥ Podczas korzystania ze źródła “DVD/CD” lub “USB”, ustaw element
“OPÓŹNIENIE” w menu WIDEO na “0 ms/AUTO” (B 18).
Jednorazowe odgrywanie
Można włączyć to urządzenie i telewizor, po czym rozpocząć odtwarzanie
płyty jednym naciśnięciem przycisku.
(Tylko pilot zdalnego sterowania)
W trybie czuwania wciśnij [1 PLAY]6, aby odtwarzanie
płyty.
Głośniki tego urządzenia zostaną automatycznie włączone (B z prawej).
[Uwaga]
Odtwarzany obraz może pojawić się na telewizorze dopiero po pewnej
chwili. W przypadku ucięcia początku naciśnij [SKIP:]6 lub
[SEARCH6]6, aby odtworzyć od początku.
§1
, “AUX”§1, “ARC”§1 lub “D-IN”
firmy Panasonic zgodnych z HDAVI
celem pracy z powizanymi
§1, 2
.)
Automatyczne przełączanie sygnału wejściowego
(Wspólne włączanie zasilania)
Gdy będą wykonywane poniższe operacje, telewizor automatycznie
zostanie przełączony na kanał wejścia i będzie wyświetlać odpowiednią
czynność. Gdy telewizor jest wyłączony, zostanie automatycznie
włączony.
– Gdy urządzenie rozpoczęło odtwarzanie
– Gdy wykonano czynność używającą ekran (np. menu START)
≥ Po przełączeniu wejścia TV na tryb tunera TV lub kanał wejścia
urządzenia STB, urządzenie automatycznie przełączy się na “AV”
§1
, “ARC”§1 lub “D-IN”
“AUX”
tylko w trybie muzycznym urządzenia iPod/iPhone lub kiedy urządzenie
iPod/iPhone nie jest podłączone.)
≥ Gdy urządzenie to jest w trybie “DVD/CD”, telewizor automatycznie
przełączy swój tryb wejścia na to urządzenie.
≥ Telewizor zostanie automatycznie przełączony na tryb tunera TV w
następujących przypadkach:
–naciśnij
–naciśnij [RETURN], aby wyjść z menu START.
– z menu START wybierz “AV”§1, “AUX”§1, “ARC”§1 lub “DIGITAL IN”§1.
– zatrzymanie odtwarzania płyt ([DVD-V] [VCD]) olub wyłączenie
urządzenia.
§3 Ta funkcja nie działa podczas trybu odtwarzania lub wznawiania,
kiedy wybrano “DVD/CD” lub “USB” jako źródło. (Dla trybu “IPOD” ta
funkcja działa tylko w trybie muzycznym urządzenia iPod/iPhone lub
kiedy urządzenie iPod/iPhone nie jest podłączone.)
§4 Tylko w przypadku, gdy telewizor został automatycznie przełączony
na tryb wejścia HDMI dla tego urządzenia.
[EXIT].
§4
§3, 4
§1, 2
. (Dla trybu “IPOD”, ta funkcja działa
§3, 4
§1
,
Opcja Połączenia po wyłączeniu (Power off link)
Wszystkie podłączone urządzenia kompatybilne z funkcją “HDAVI
Control”, włącznie z niniejszym urządzeniem, zostaną wyłączone po
wyłączeniu telewizora.
Aby kontynuować odtwarzanie audio, nawet gdy telewizor jest wyłączony,
wybierz “WIDEO” (B 19, “LINK DO WYŁ. TV
[Uwaga]
Gdy naciskasz [Í]1, tylko to urządzenie wyłącza się. Inne podłączone
urządzenie, kompatybilne z VIERA Link “HDAVI Control” pozostaje
włączone.
Dokładniejsze szczegóły są podane również w instrukcji obsługi twego
telewizora.
”
w menu HDMI).
Wybór głośników
Można wybrać, czy audio będzie wyprowadzane z głośników tego
urządzenia lub głośników telewizora przy użyciu ustawień menu TV.
Odnośnie szczegółów, patrz instrukcje obsługi twojego telewizora.
Kino domowe
Głośniki tego urządzenia są włączone.
≥ Gdy włączasz to urządzenie, jego głośniki zostaną automatycznie
uaktywnione.
≥ Gdy niniejsze urządzenie jest w trybie gotowości, przełączenie
głośników telewizora na gło
spowoduje włączenie tego urządzenia i wybranie jako źródła “AV”
§1
, “ARC”§1 lub “D-IN”
“AUX”
≥ Głośniki telewizora są automatycznie wyciszone.
≥ Możesz sterować ustawieniem głośności, używając przycisk regulacji
głośności lub wyciszania na pilocie telewizora. (Poziom głośności
zostanie wyświetlony na wyświetlaczu urządzenia głównego.)
≥ Aby skasować wyciszanie, możesz użyć także pilota zdalnego
sterowania tego urządzenia (B 4).
≥ Jeżeli wyłączysz to urządzenie, głośniki telewizora zostaną
automatycznie włączone.
TV
Głośniki telewizora są włączone.
≥ Głośność tego urządzenia jest ustawiona na “0”.
– Funkcja ta działa tylko w przypadku, gdy jako źródło w tym urządzeniu
wybrano “DVD/CD”, “USB”, “AV”
śniki tego urządzenia w menu TV
§1, 2
.
§1
, “AUX”§1, “ARC”§1 lub “D-IN”
§1
§1, 2
,
.
≥ Wyjściowy sygnał audio jest 2-kanałowy.
Gdy wykonasz przełączenie z głośników tego urządzenia na głośniki
telewizora, ekran telewizora może wyłączyć obraz na kilka sekund.
Łatwe sterowanie tylko z pilotem VIERA (dla
funkcji “HDAVI Control 2 lub wersje późniejsze”)
Możesz sterować menu odtwarzania tego urządzenia pilotem telewizora.
1 Wybierz menu działania tego urządzenia używając menu ustawień TV.
(Odnośnie szczegółów, patrz instrukcje obsługi twojego telewizora.)
Zostanie wyświetlone menu START.
np. [DVD-V]
Getting StartedOdtwarzanie płytInne operacjeReference
Reference
POLSKI
RQ TX111 1
15
63
Page 64

≥ Menu START można wywołać także przyciskiem na pilocie
Adapter dokujący
(nie jest częścią
zestawu)
iPod/iPhone
Stacja dokująca dla
urządzenia iPod/iPhone
Naciśnij
Główne
urządzenie
np.
iPod
Muzyka
Kino domowe
Listy odtwarzani
Wykonawcy
Albumy
iPod
Kino domowe
Muzyka
Wideo
Wszystko (wyświetlacz iPod)
Wybór wejścia
Dźwięk
iPod-informacje
iPod
Kino domowe
Good morning
Ronaldo
Happy days
3 z 20
2:43 -1:15
Stan odtwarzania
Utwór
Artysta
Album
Obecna pozycja
Tryb odtwarzania
losowego
Tryb odtwarzania
wielokrotnego
telewizora (np. [OPTION]).
–Gdy jako źródło jest wybrany “DVD/CD” lub “USB”, funkcja ta działa
wyłącznie w czasie trybu zatrzymania.
– Funkcja ta nie dział
ekran odtwarzania urządzenia iPod.
2Wybierz żądany element w menu START (B 10).
Gdy pojawia się ekranowy panel sterowniczy
np. [DVD-V] (gdy “Odtwarzanie płyty” jest wybrany z menu START.)
a, gdy na ekranie telewizora jest widoczny
Gdy używasz menu START w trybie “IPOD”
np.
Muzyka: Pokazuje menu muzyki.
Wideo: Wyświetlanie menu video.
Wszystko (wyświetlacz iPod): Przełączanie na menu iPod/iPhone.
iPod-informacje: Wyświetlanie informacji o urządzeniu iPod/iPhone.
Słuchanie muzyki/oglądanie video
Można włączyć odtwarzanie przy pomocy następujących sterowań.
Getting StartedPlaying DiscsOther OperationsReference
≥ Ekranowy panel sterowniczy może być przywołany również używając
przycisku na pilocie telewizora (np. [OPTION]).
– Ta funkcja działa tylko podczas odtwarzania “DVD/CD” lub “USB” i
trybów wznawiania lub gdy na telewizorze jest widoczny ekran
odtwarzania muzyki z urządzenia iPod.
[Uwaga]
≥ W zależności od typu menu, nie można wykonać przyciskiem pewnych
operacji z pilota zdalnego sterowania telewizora.
≥ Nie można wprowadzać liczb przyciskami z cyframi na pilocie
telewizora ([0] do [9]). Używaj pilota zdalnego sterowania tego
urządzenia, aby wybrać playlistę itp.
Sterowanie innymi
urządzeniami
Możesz odgrywać utwory na zewnętrznym urządzeniu przez twój system
kina domowego.
Korzystanie z iPod/iPhone
Można słuchać muzyki z urządzenia iPod/iPhone przez głośniki tego
urządzenia lub przeglądać video/zdjęcia z urządzenia iPod/iPhone na
telewizorze.
Przygotowanie
≥ Aby oglą
≥ Aby wyświetlić obraz, włącz TV i wybierz odpowiedni tryb wejścia
≥ Przed podłączeniem/odłączeniem urządzenia iPod/iPhone, wyłącz
1
2
dać zdjęcia/video z urządzenia iPod/iPhone
– Sprawdź, czy połączenie obrazu zostało podłączone do gniazda
SCART (AV) w tym urządzeniu i wybierz “WIDEO” z “WYJ WIDEO
SCART” w menu WIDEO (B 18).
–Użyj menu w urządzeniu iPod/iPhone w celu zmiany ustawień
wyświetlania zdjęć/video na telewizorze. (Przeczytaj instrukcję
obsługi urządzenia iPod/iPhone.)
wideo.
główne urządzenie lub zmniejsz głośność głównego urządzenia na
minimum.
Naciśnij #, aby otworzyć stację dokującą dla urządzenia
iPod/iPhone.
Wsuń mocno urządzenie iPod/iPhone (nie jest częścią
zestawu).
≥ Podłącz adapter dokujący będący częścią zestawu urządzenia
iPod/iPhone do stacji dokującej, aby bezpiecznie korzystać z
urządzenia iPod/iPhone.
Jeśli potrzebujesz adaptera, skontaktuj się ze swoim sprzedawcą
iPod/iPhone.
Naciśnij przycisk [FUNCTIONS]D, aby wybrać menu
1
muzyki lub video w telewizorze.
Wciśnij [3, 4]9, aby wybrać pozycję i wciśnij [OK]9.
2
≥ Naciśnij [2, 1]9, aby pomijać stronę po stronie.
≥ Aby powrócić do poprzedniego ekranu, naciśnij [RETURN]E.
Odtwarzanie rozpoczyna się od wybranej piosenki lub wideo.
np. ekran odtwarzania muzyki
§ Te ikony pojawią się tylko w trybie muzyki.
: Przegrupowanie utworów
: Przegrupowanie albumów
Podstawowe sterowania (Tylko dla muzyki i wideo)
Przycisk Funkcja
[1 PLAY]6 Odtwarzanie
[∫ STOP]6, [; PA USE ]6 Pauza
[SKIP:, SKIP 9]6 Pomiń
(wciśnij i przytrzymaj wciśnięty)
[SKIP:, SKIP 9]6
Inne metody of odtwarzania
Tryb przegrupowania
Naciśnij [PLAY MODE]: wiele razy.
SONGS, ALBUMS, OFF
Tryb powtórzenia
Wciśnij i przytrzymaj przycisk [–REPEAT]: i naciśnij go ponownie kilka
razy w ciągu kilku sekund.
W czasie odtwarzania muzyki/wideo: ONE, ALL, OFF
[Uwaga]
≥ Tryb odtwarzania muzyki ustawiony w urządzeniu iPod/iPhone będzie
nadal używany po podłączeniu do głównego urządzenia. Zmiany w
urządzeniu iPod/iPhone, gdy jest ono podłączone do głównego
urządzenia, będą zachowane w urządzeniu iPod/iPhone po jego
odłączeniu.
≥ Jeśli było używane menu video, tryb losowego odtwarzania video w
urządzeniu iPod/iPhone zostanie ustawione na wartość off, gdy
urządzenie iPod/iPhone jest odłączone od głównego urządzenia.
Przeglądanie zdjęć
(Tylko dla odtwarzania muzyki)
: Powtórz 1 utwór
: Powtórz wszystko
Wyszukiwanie
3
4
RQ TX111 1
POLSKI
16
64
Naciśnij [iPod]5, aby wybrać “IPOD”.
Urządzenie iPod/iPhone automatycznie przełącza się na tryb
wyświetlania tego urządzenia.
np.
Naciśnij [FUNCTIONS]D, aby wybrać menu.
Za każdym razem, gdy naciskasz przycisk:
Menu muzyki ------------------------------------------------) Menu wideo
^--- Menu iPod/iPhone (iPod/iPhone LCD) (-}
Naciśnij [FUNCTIONS]D , aby wybrać menu iPod/
1
iPhone.
Odtwarzanie pokazu slajdów na urządzeniu iPod/
2
iPhone.
Można użyć pilota do sterowania menu urządzenia iPod/iPhone.
[3, 4]9: Do nawigacji pomiędzy elementami menu.
[OK]9: Aby przejść do następnego menu.
[RETURN]E: Aby powrócić do poprzedniego menu.
Działanie pilota może różnić się w zależności od używanego modelu
urządzenia iPod/iPhone.
Gdy urządzenie iPod/iPhone jest podłączone
Nie wciskaj i nie wyciągaj urządzenia iPod/iPhone z dużą siłą.
Doładowywanie baterii
≥ Urządzenie iPod/iPhone będzie się ładowało bez względu na to, czy
główne urządzenie jest włączone.
≥ Na wyświetlaczu głównego urządzenia będzie widoczny element
“IPOD ¢”, gdy urządzenie iPod/iPhone będzie się ładować w trybie
gotowości głównego urządzenia.
≥ Sprawdź urządzenie iPod/iPhone, aby zobaczyć stan naładowania
akumulatora.
Page 65

≥ Gdy urządzenie iPod/iPhone nie będzie używane przez dłuższy okres
USB
KAT. GŁÓWNY
Songs
Concert_01
Concert_02
Southern AI
Menu
USTAW
POWRÓT
PŁYTA
BIEŻĄCE NASTAWY
AUDIO
NAPISY
MENU
OGRANICZENIA
HASŁO
ANGIELSKI
AUTO
ANGIELSKI
8 BEZ OGRAN.
Wyświetla bieźące ustawienie
poniźszych pozycji
Element Ustawieni
czasu po zakończeniu ładowania, odłącz je z głównego urządzenia,
ponieważ jego akumulator zostanie wyładowany. (Gdy urządzenie
zostanie w pełni naładowane, nie nastąpi ponowne ładowanie.)
Kompatybilne modele urządzeń iPod/iPhone (Stan na grudzień 2009)
≥ iPhone 3GS (16GB, 32GB)
≥ iPhone 3G (8GB, 16GB)
≥ iPhone (4GB, 8GB, 16GB)
≥ iPod nano 5-j generacja (kamera wideo) (8GB, 16GB)
≥ iPod touch 2-j generacja (8GB, 16GB, 32GB, 64GB)
≥ iPod classic (120GB, 160GB (2009))
≥ iPod nano 4-j generacji (wideo) (8GB, 16GB)
≥ iPod classic (160GB (2007))
≥ iPod touch 1-j generacji (8GB, 16GB, 32GB)
≥ iPod nano 3-j generacji (wideo) (4GB, 8GB)
≥ iPod classic (80GB)
≥ iPod nano 2-j generacji (aluminum) (2GB, 4GB, 8GB)
≥ iPod 5-j generacji (wideo) (60GB, 80GB)
≥ iPod 5-j generacji (wideo) (30GB)
≥ iPod nano 1-j generacji (1GB, 2GB, 4GB)
≥ iPod 4-j generacji (kolorowy wyświetlacz) (40GB, 60GB)
≥ iPod 4-j generacji (kolorowy wyświetlacz) (20GB, 30GB)
≥ iPod 4-j generacji (40GB)
≥ iPod 4-j generacji (20GB)
≥ iPod mini (4GB, 6GB)
Zgodność zależy od wersji oprogramowania urządzenia iPod/iPhone.
Aby korzystać z funkcji urzą
1Naciśnij przycisk Home na urządzeniu iPod touch/iPhone.
dzenia iPod touch/iPhone
2 Wybierz funkcje urządzenia iPod touch/iPhone na ekranie dotykowym.
Odtwarzanie z urządzenia USB
Można podłączyć i odtwarzać ścieżki lub pliki z urządzeń USB klasy
pamięci masowej (B 25, Port USB).
Następujące urządzenia są określone jako urządzenia USB klasy pamięci
masowej:
–Urządzenia USB obsługujące tylko transfer masowy.
Przygotowanie
≥ Przed podłączeniem jakiegokolwiek urządzenia USB pamięci masowej
do tego urządzenia, upewnij się, że została wykonana zapasowa kopia
zapisanych tam danych.
≥ Nie zalecamy używania kabla przedłużacza USB. Urządzenie USB
podłączone kablem nie będzie rozpoznane przez to urządzenie.
Podłącz urządzenie USB (nie jest częścią zestawu) do
1
portu USB ( 6).
Naciśnij [RADIO, EXT-IN]5, aby wybrać “USB”.
2
Pojawia się ekran menu.
np.
≥ Jeżeli pojawia się ekran “MENU ODTWARZANIA”, wybierz
“DŹWIĘK/OBRAZ” lub “WIDEO”, naciskając [3, 4]9 a następnie
[OK]9.
≥ Aby wyświetlić/opuścić ekran, naciśnij [MENU]7.
Wciśnij [3, 4]9, aby wybrać pozycję i wciśnij [OK]9.
3
≥ Naciśnij [2, 1]9, aby pomijać stronę po stronie.
≥ Aby powrócić w górę o 1 poziom od bieżącego foldera, naciśnij
[RETURN]E.
Odtwarzanie rozpoczyna się od wybranej treści.
≥ Korzystanie z innych operacji jest podobne do opisów w rozdziale
“Odtwarzanie płyt” (B 12 do 14).
[Uwaga]
≥ Maksimum: 255 folderów (oprócz foldera głównego), 4000 plików, 28
znaków dla nazwy pliku/folderu.
≥ Będzie wybrana tylko jedna karta pamięci, gdy podłączamy czytnik
wieloportowych kart USB. Typowo, będzie to pierwsza włożona karta
pamięci.
Zmiana ustawień odtwarzacza
Naciśnij [DVD]5, aby wybrać “DVD/CD”.
1
Naciśnij [START]C, aby wyświetlić menu START.
2
Naciśnij [3,4]9, aby wybrać “Setup” i naciśnij [OK]9.
3
GŁÓWNY
PŁYTA
WIDEO
AUDIO
WYŚWIETLACZ
HDMI
INNE
USTAW
POWRÓT
Wciśnij [3, 4]9, aby wybrać menu i wciśnij [OK]9.
4
Wciśnij [3, 4]9, aby wybrać pozycję i wciśnij [OK]9.
5
Wciśnij [3, 4]9, aby zmienić ustawienie i wciśnij
6
[OK]9.
≥ Aby powrócić do poprzedniego ekranu, naciśnij [RETURN]E.
≥ Aby opuścić ekran [START]C.
≥ Ustawienia pozostaną nienaruszone, nawet jeżeli przełączysz
urządzenie na stan oczekiwania.
≥ Elementy podkreślone są ustawieniami fabrycznymi w następujących
menu.
menu PŁYTA
AUDIO
Wybierz język audio.
≥ ANGIELSKI
≥ ROSYJSKI ≥WĘGIERSKI ≥ CZESKI ≥POLSKI
≥ ORYGINALNY
NAPISY
Wybierz język napisów dialogowych.
§3
≥ AUTO
≥ NIEMIECKI ≥ ROSYJSKI ≥WĘGIERSKI ≥CZESKI
≥ POLSKI ≥ INNE – – – –
MENU
Wybierz język dla menu płyt.
≥ ANGIELSKI
≥ ROSYJSKI ≥ WĘGIERSKI ≥CZESKI ≥ POLSKI
≥ INNE – – – –
§1 Wybrany jest oryginalny język oznaczony na płycie.
§2 Wprowadź odpowiedni kod z listy kodów języków (B 4).
§3Jeżeli wybrany język dla “AUDIO” nie jest dostępny, napisy pojawią
się w tym języku (jeżeli jest on dostępny na płycie).
SUBTITLE TEXT [DivX]
Wybierz odpowiedni element zgodnie z językiem napisów DivX (B 19)
≥ LATIN1 ≥LATIN2 ≥ CYRILLIC ≥TURKISH
Ten element jest wyświetlany po odtworzeniu pliku z napisami (B 19) i
gdy element “JĘZYK” w menu WYŚWIETLACZ jest ustawiony na wartość
“ENGLISH” (B 18).
OGRANICZENIA
Ustaw poziom ograniczenia, aby ograniczyć odtwarzanie DVD-Video.
Ustawienia ograniczeń (Gdy wybrany jest poziom 8)
≥ 0 BLOK WSZYST: Aby uniemożliwić odtwarzanie płyt bez poziomów
ograniczenia.
≥ 1 do 7
≥ 8 BEZ OGRAN.
Gdy wybierasz twój poziom ograniczeń, pokazane jest hasło.
Wykonaj instrukcje podane na ekranie.
≥ FRANCUSKI ≥ HISZPAŃSKI ≥NIEMIECKI
§1
≥ INNE – – – –
§2
≥ ANGIELSKI ≥ FRANCUSKI ≥ HISZPAŃSKI
§2
≥ FRANCUSKI ≥ HISZPAŃSKI ≥ NIEMIECKI
§2
Getting StartedPlaying DiscsInne operacje
Informacje
dodatkowe
POLSKI
RQ TX111 1
17
65
Page 66

Nie zapomnij twego hasła.
Rzeczywiste umiejscowienie głośnika
Idealne umiejscowienie głośnika
Podstawowa odległość suchania
Przybliżone rozmiary pomieszczenia
Okrąg o promieniu równym
Jeżeli do urządzenia zostanie włożona płyta DVD-Video, przewyższająca
poziom ograniczenia, zostanie wyświetlony ekran z komunikatem.
Wykonaj instrukcje podane na ekranie.
HASŁO
Zmień hasło dla “OGRANICZENIA”.
≥ USTAWIENIE
Aby zmienić ograniczenia (Gdy wybrany jest poziom od 0 do 7)
≥ ZMIANA: Wykonaj instrukcje podane na ekranie.
menu WIDEO
ROZMIAR EKRANU
Wybierz ustawienie, aby dostosować twój telewizor.
: Telewizor szerokoekranowy (16:9)
≥ 16:9
Getting StartedPlaying DiscsOther OperationsReference
≥ 4:3PAN&SCAN: Telewizor normalnego formatu (4:3)
Boki obrazu szerokoekranowego są odcięte, a więc
wypełnia on ekran (jeżeli nie jesz to zabronione przez
ustawienia płyty).
≥ 4:3LETTERBOX: Telewizor normalnego
formatu (4:3)
Obraz szerokoekranowy jest pokazany w formacie
letterbox.
OPÓŹNIENIE
Gdy podłączony jest z wyświetlaczem plazmowym, dokonaj regulacji,
jeżeli zauważysz, że audio nie jest zsynchronizowane z obrazem.
≥ 0 ms/AUTO
≥ 20 ms ≥ 40 ms ≥ 60 ms
≥ 80 ms ≥ 100 ms
Gdy używasz VIERA Link “HDAVI Control” z telewizorem kompatybilnym
z “HDAVI Control 3 lub wersje późniejsze” (B 15), wybierz “0 ms/AUTO”.
Audio i video automatycznie zostaną zsynchronizowane.
WYJŚCIE NTSC
Wybierz sygnał wyjściowy PAL 60 lub NTSC przy odtwarzaniu płyt NTSC
(B 20, Systemy wideo).
≥ NTSC: Gdy podłączony jest do telewizora NTSC.
: Gdy podłączony jest do telewizora PAL.
≥ PA L60
TRYB NIERUCHOMY
Określ typ obrazu pokazanego w czasie pauzy.
≥ AUTO
≥ POLE: Obraz nie jest rozmazany, lecz jakość obrazu pogorszyła
≥ RAMKA: Ogólna jakość jest wysoka, lecz obraz może wyglądać
WYJ WIDEO SCART
Wybierz format sygnału wideo, który ma wychodzić ze złącza SCART
(AV).
≥ WIDEO
≥ S-WIDEO
≥ RGB 1: (Tylko gdy podłączony jest do telewizora kompatybilnego z
RGB)
Jeżeli zawsze będziesz chciał oglądać obraz z urządzenia w sygnale
RGB, wybierz ten tryb. Ekran telewizora automatycznie przełączy się,
aby wyświetlać obraz z tego urządzenia, gdy jest ono włączone.
≥ RGB 2: (Tylko gdy podłączony jest do telewizora kompatybilnego z
RGB)
Gdy urządzenie jest w trybie tunera TV, jeżeli przełącznik jest ustawiony na
“DVD/CD”, ekran telewizora automatycznie przełączy się, aby wyświetlać
obraz z urządzenia, tylko podczas odtwarzania płyty (
[VCD]) lub gdy ogłądasz menu ekranowe DVD/CD.
Obraz TV będzie wyświetlony, przełącznik jest ustawiony na “AV”. Z
innymi przełącznikami, obraz z tego urządzenia będzie wyświetlony.
się.
rozmazany.
[DVD-V] [DVD-VR]
menu AUDIO
Wybierz aby dosotosować do typu urządzenia, które podłączyłeś do
złącza HDMI AV OUT.
Wybierz “BITSTREAM”, jeżeli urządzenie może rozkodowywać strumień
bitowy (cyfrowa forma danych 5.1-kanałowych). W przeciwnym razie,
wybierz “PCM”.
(Jeżeli strumień bitowy jest przekazywany na urządzenie bez dekodera,
mogą być emitowane hałasy o wysokim poziomie i może to uszkodzić
twoje głośniki i słuch.)
DOLBY DIGITAL
≥BITSTREAM ≥PCM
§
DTS
≥BITSTREAM
§
MPEG
RQ TX111 1
POLSKI
≥BITSTREAM ≥PCM
18
66
§
≥PCM
§ Gdy audio jest wyprowadzane ze złącza HDMI AV OUT, a
podłączone urządzenie nie obsługuje elementu wybranego w menu,
rzeczywisty sygnał wyjściowy będzie uzależniony od charakterystyk
wydajności podłączonego urządzenia.
ZAKRES DYN.
≥ WŁĄCZ.:Reguluje for przejrzystość, nawet przy niskiej głośności.
≥ WYŁĄCZ
UST. GŁOŚNIKÓW
Wybierz czas zwłoki głośników.
(Tylko głośniki centralny i surround)
Dla optymalnego odsłuchu 5.1- kanałowego dźwięku, wszystkie głośniki,
oprócz subwoofera winny być na tej samej odległości od pozycji
słuchającego.
Jeżeli ustawiłeś głośniki centralne lub surround bliżej do pozycji
słuchającego, wyreguluj czas zwłoki, by skompensować różnicę.
Jeżeli bądź odległość a bądź b jest mniejsza niż c, znajdź różnicę w
tabeli i zmień ustawienia, wesdług wskazań.
≥ USTAWIENIA:
Przydatne dla oglądania telewizora późną nocą.
(Współpracuje tylko z Dolby Digital)
C
C
L
SW
:
R
:
:
LS
LS
a Głośnik centralny b
RS
RS
Głośnik dźwięku przestrzennego
Różnica (Około) Ustawienie Różnica (Około) Ustawienie
30 cm 1ms 150 cm 5ms
60 cm 2ms 300 cm 10ms
90 cm 3ms 450 cm 15ms
120 cm 4ms
150 cm 5ms
≥ OPÓŹNIENIE C (Czas zwłoki centralnego głośnika):
, 1ms, 2ms, 3ms, 4ms, 5ms
0ms
Wybierz czas zwłoki dla centralnego głośnika.
≥ OPÓŹNIENIE SUSR (Czas zwłoki prawego/lewego głośnika
surround): 0ms
Wybierz czas zwłoki dla głośnika Surround.
≥ TEST DŹWIĘKU: USTAWIENIE
Ta pozycja jest wyświetlana tylko po wybraniu elementu “DVD/CD”.
Użyj testowego tonu do regulacji poziomu głośnika
(B 11, Regulacja ręczna poziomu wyjściowego głośnika).
, 5ms, 10ms, 15ms
menu WYŚWIETLACZ
JĘZYK
Wybierz język komunikatów na ekranie.
≥ ENGLISH
≥ FRANÇAIS ≥ ESPAÑOL ≥ DEUTSCH
≥ PУCCKИЙ ≥MAGYAR ≥ ÇESKY ≥POLSKI
menu HDMI
PRIORYTET WIDEO
≥ WŁĄCZ.:Gdy używasz złącza HDMI AV OUT do wyprowadzenia
≥ WYŁĄCZ:
WYJŚCIE AUDIO
≥ WŁĄCZ.: Gdy sygnał audio wyprowadzany jest ze złącza HDMI AV
≥ WYŁĄCZ
ZAKRES RGB
Działa to tylko wówczas, gdy “PRZESTRZ KOLORU” w Menu 4 (HDMI)
jest ustawiona na RGB (B 14).
≥ STANDARDOWY
≥ WZBOGACONY: Gdy biało-czarne obrazy są niewyraźne.
sygnału wideo. Rozdzielczość sygnału wideo
wyprowadzanego ze złącza HDMI AV OUT jest
zoptymalizowana w zależności od możliwości
podłączonego urządzenia (np. TV).
Jeśli złącze
używane.
OUT. (W zależności od możliwości podłączonego
urządzenia, wyjściowy sygnał audio może być odmienny
od ustawień audio urządzenia głównego.)
: Gdy sygnał audio wyprowadzany jest nie ze złącza
HDMI AV OUT. (Sygna audio jest wyprowadzany na
podstawie ustawie urzdzenia gównego.)
HDMI AV OUT
dla wyjścia wideo nie jest
Page 67

VIERA Link
INNE-REJESTRACJA(DivX)
ABY ODTWARZAĆ CHRONIONE FILMY DivX
NALEŻY ZAREJESTR. SWOJE URZĄDZENIE
KOD REJESTRACYJNY:
XXXXXXXXXX
ZAREJESTRUJ NA http://vod.divx.com
10 znaków alfanumerycznych
≥ WŁĄCZ.: Funkcja VIERA Link “HDAVI Control” jest dostępna (B 15).
≥ WYŁĄCZ
LINK DO WYŁ. TV
Wybierz żądane ustawienie opcji Power off link tego urządzenia dla działania
VIERA Link
VIERA Link “HDAVI Control”
≥ WIDEO/AUDIO: Gdy telewizor jest wyłączony, to urządzenie wyłączy
≥ WIDEO: Gdy telewizor jest wyłączony, to urządzenie wyłączy się, za
TV AUDIO
Wybierz wejście sygnału audio w telewizorze, mające współpracować z
operacjami
≥ AUX
≥ ARC
≥ DIGITAL IN
≥ AV
(B 15)
. (Działa to w zależności od ustawień podłączonego
wyjątkiem następujących okoliczności:
– odtwarzanie audio ([CD] [MP3] [WMA])
– iPod/iPhone nagrywania
– tryb radio
– Tryb “AV”, “AUX”, “ARC” lub “D-IN” (niewybrane ustawienie
dźwięku telewizora dla funkcji
VIERA Link
kompatybilnego urządzenia.)
się automatycznie.
(B 15).
VIERA Link
)
menu INNE
REJESTRACJA [DivX]
Wyświetlanie kodu rejestracyjnego urządzenia.
≥ POKAŻ KOD
Kod rejestracyjny niezbędny do zakupu i odtwarzania materiałów DivX
Video-on-Demand (VOD) (B z prawej).
To ustawienie jest wyświetlane podczas odtwarzania treści DivX VOD
lub po wyrejestrowaniu urządzenia.
WYREJESTROWANIE [DivX]
Wyświetlanie kodu wyrejestrowania urządzenia.
≥ USTAW
Ten kod wyrejestrowania jest potrzebny do anulowania rejestracji tego
urządzenia (B z prawej).
To ustawienie jest wyświetlane tylko po pierwszym odtworzeniu treści
DivX VOD.
CZAS POK. SLAJD.
Ustaw prędkość pokazu slajdów.
Wstępne ustawienie fabryczne: 3 SEK.
≥ 1 SEK. do 15 SEK. (w krokach 1-jedn.)
≥ 15 SEK. do 60 SEK. (w krokach 5-jedn.)
≥ 60 SEK. do 180 SEK. (w krokach 30-jedn.)
ŚCIEMNIANIE FL
Zmień jaskrawość wyświetlacza i indykatora urządzenia.
≥ JASNY
≥ PRZYCIEMNIONY:Wyświetlacz jest przyciemniony.
≥ AUTO: Wyświetlacz jest przyciemniony, lecz rozjaśni się,
USTAW. PODSTAW.
≥ USTAW (B 9)
DVD-VR/DANE
Wybierz aby odtwarzać tylko format DVD-VR lub DANE.
≥ DVD-VR
≥ DANE: Aby odtwarzać pliki danych na DVD-R/-RW.
ŚCIEMN. EKRANU
Ma to na celu ochronę ekranu telewizora od wypalenia znaku.
≥ WYŁĄCZ
≥ CZAS WŁ. 5 MIN
DOMYŚLNE
Ta funkcja przywraca wszystkie wartości w głównym menu - MAIN – do
ustawień domyślnych.
≥ RESETUJ
: Aby odtwarzać programy wideo na DVD-R/-RW.
Ekran hasła jest pokazany, jeżeli ustawione jest “OGRANICZENIA”
(B 17). Wprowadź to same hasło, po czym wyłącz urządzenie i
ponownie włącz.
gdy wykonasz jakąkolwiek operację.
:Jeśli przez 5 minut nie zostanie wykonana żadna
operacja, obraz zmieni kolor na szary. Ekran
telewizora włączy się po wykonaniu dowolnej
czynności. (Ta funkcja nie będzie działać podczas
odtwarzania video i przeglądania zdjęć.)
Informacja DivX
INFORMACJE O PLIKACH WIDEO DIVX:
DivX® to cyfrowy format wideo utworzony przez DivX, Inc. Tylko
urządzenia posiadające oficjalny certyfikat DivX Certified mogą
odtwarzać pliki DivX. Dodatkowe informacje oraz narzędzia
programistyczne do konwertowania plików na format wideo DivX można
znaleźć na stronie www.divx.com.
INFORMACJE O DIVX VIDEO-ON-DEMAND:
To urządzenie DivX Certified® należy zarejestrować, aby umożliwić
odtwarzanie materiałów DivX Video-on-Demand (VOD).
Aby wygenerować kod rejestracyjny, znajdź sekcję DivX VOD w menu
ustawień urządzenia.
Wpisz kod na stronie vod.divx.com, aby dokończyć proces rejestracji i
dowiedzieć się więcej o DivX VOD.
Wyświetlenie kodu rejestracyjnego urządzenia
(B lewy, “REJESTRACJA” w menu INNE)
≥ Po odtworzeniu materiałów DivX VOD po raz pierwszy, kod
rejestracyjny nie jest wyświetlany.
≥ Jeżeli dokonasz zakupu materiału DivX VOD przy użyciu kodu
rejestracyjnego innego niż kod niniejszego urządzenia, nie będziesz
mógł odtworzyć tego materiału.
Anuluj rejestrację urządzenia
Wybierz “USTAW” w elemencie “WYREJESTROWANIE” (B lewy) i
wykonaj polecenia wyświetlane na ekranie.
Użyj kodu usuwania rejestracji, aby anulować rejestrację na stronie
http://vod.divx.com.
Informacja o treści DivX, możliwych do odtwarzania tylko
określoną ilość razy
Część materiałów DivX VOD może być odtwarzana tylko określoną liczbę
razy. Podczas odtwarzania takiego materiału, wyświetlana jest liczba
wykonanych odtworzeń, a na początku łączna liczba odtworzeń.
≥ Liczba pozostałych odtworzeń zmniejsza się po każdym odtworzeniu
programu. Jednak w razie odtwarzania od momentu zatrzymania, liczba
pozostałych odtworzeń nie zmniejsza się w związku z użyciem funkcji
wznowienia odtwarzania.
Wizualizacja tekstu napisów DivX
Niniejsze urządzenie pozwala wyświetlać napisy nagrane na płytę z video
DivX.
Funkcja ta nie ma nic wspólnego z napisami określonymi przez normę
DivX i nie podlega żadnym normom.
Ustaw “NAPISY” w menu Menu 1 (Płyta/Odtwarzanie) (B 14)
Typy plików tekstu napisów możliwe do wyświetlenia
Na tym urządzeniu może być wyświetlony tekst napisów, spełniający
następujące warunki.
≥ Format pliku: MicroDVD, SubRip, lub TMPlayer
Rozszerzenie pliku: “.SRT”, “.srt”, “.SUB”, “.sub”, “.TXT”, lub “.txt”
≥
≥ Nazwa pliku: Nie więcej niż 44 znaki, oprócz rozszerzenia pliku
≥ Plik wideo DivX i plik tekstu napisów znajdują się w tym samym
folderze, a nazwy plików są takie same, oprócz rozszerzenia pliku.
≥ Jeżeli w tym samym folderze znajduje się więcej niż jeden plik tekstu
napisów, są one wyświetlane w następującej kolejności, według
priorytetu: “.srt”, “.sub”, “.txt”.
[Uwaga]
≥ Jeżeli nazwa pliku wideo DivX nie jest wyświetlona prawidłowo na
ekranie menu (nazwa pliku zostanie wyświetlona jako “¢”), lub wielkość
pliku przekracza 256 KB, tekst napisów może nie być wyświetlony
prawidłowo.
≥ Tekst napisów nie może być wyświetlany podczas wyświetlania menu,
lub podczas takich operacji, jak na przykład wykonywanie
wyszukiwania.
≥ Pliki DivX video, w przypadku których nie jest wyświetlany napis
“TEKST WŁ.”, nie zawierają tekstu napisów. Nie można wyświetlić
tekstu napisów.
≥ Jeżeli tekst napisów nie jest wyś
ustawienia napisów (B 17).
wietlany prawidłowo, spróbuj zmienić
Getting StartedPlaying DiscsOther Operations
Informacje
dodatkowe
POLSKI
RQ TX111 1
19
67
Page 68

Typy płyt, które można odtwarzać
Płyty komercyjne
Typ urządzenia/
Logo
DVD-Video Płyty Kina wysokiej jakość i
płyty muzyczne
Getting StartedPlaying DiscsOther OperationsReference
Video CD Płyty muzyczne z wideo
CD Płyty muzyczne [CD]
Płyty nagrane
Typ urządzenia/
Logo
DVD-R/RW ≥ Format DVD-Video
DVD-R DL ≥ Format DVD-Video
rR/rRW/rRDL ≥ +VR (+R/+RW Video
CD-R/RW ≥ Format MP3
≥ Przed odtwarzaniem, należy sfinalizować dysk na urządzeniu, na
którym był nagrywany.
≥ W niektórch przypadkach może nie być możliwe odtwarzanie
wszystkich wyżej wymienionych płyt ze względu na typ płyty, warunki
nagrania, metodę nagrania, lub utworzenia plików (B z prawej,
Wskazówki dla tworzenia płyt danych).
Uwagi o używaniu płyt DualDisc
Strona treści cyfrowego audio płyty DualDisc nie jest zgodna z
technicznymi specyfikacjami formatu Compact Disc Digital Audio
(CD-DA), a więc odtwarzanie może nie być możliwe.
Płyty ta nie da się odtworzyć
Płyty Blu-ray, HD DVD, AVCHD, DVD-RW wersja 1.0, DVD-Audio,
DVD-ROM, CD-ROM, CDV, CD-G, SACD, Photo CD, DVD-RAM, i
“Chaoji VCD” dostępne na rynku, łącznie z CVD, DVCD i SVCD
niezgodnych ze standardem IEC62107.
Włącznie z SVCD
(Zgodnie z IEC62107)
≥ Wersja 1.1 DVD Video
≥ Format MP3
≥ Format JPEG
≥ Format DivX
≥ Format MPEG4
≥ Wersja 1.2 DVD Video
≥ Format DivX
≥ Format JPEG
≥ Format WMA
≥ Format DivX
≥ Format MPEG4
Uwagi Wskazany jako
Formaty Wskazany jako
Recording Format
®
Recording Format
Recording) Format
®
®
[DVD-V]
[VCD]
[DVD-V]
[DVD-VR]
[MP3]
[JPEG]
[DivX]
[MPEG4]
[DVD-V]
[DVD-VR]
[DivX]
[DVD-V]
[MP3]
[JPEG]
[WMA]
[DivX]
[MPEG4]
Środki ostrożności przy manipulowaniu płyt
≥ Nie naklejaj etykietek lub nalepek na płyty. Może to wypaczyć
przez co będzie ona nie do użycia.
≥ Nie pisz na stronie eykietki długopisem kulkowym lub innym
przyrządem do pisma.
≥ Nie używaj środków czyszczących w sprayu, benzyny, rozpuszczalnika,
płynów przeciwdziałających elektrycznym ładunkom statycznym, lub
wszelkich innych rozpuszczalników.
≥ Nie używaj środków ochronnych przed zadrapaniem lub okładek.
≥ Nie używaj następujących płyt:
–Płyty z pozostałościami kleju po odklejonych nalepkach lub
etykietkach (płyty z wypożyczalni, itp.).
–Płyty silnie wypaczone lub pęknięte.
–Płyty o nieregularnym obwodzie, jak na przykład w kształcie serca.
Wskazówki dla tworzenia płyt danych
[WMA] (Rozszerzenie: “.WMA”, “.wma”)
Płyta: CD-R/RW
≥ Kompatybilny stopień kompresji: od 48 kbps do 320 kbps
≥ Nie można odtwarzać plików WMA, mających ochronę przed
kopiowaniem.
[MP3] (Rozszerzenie: “.MP3”, “.mp3”)
Płyta: DVD-R/RW, CD-R/RW
≥ To u r z ądzenie nie obsługuje znaczników ID3 tag.
≥ Częstotliwość próbkowania i stopień kompresji:
– DVD-R/RW: 11,02 kHz, 12 kHz, 22,05 kHz, 24 kHz (8 kbps do
160 kbps), 44,1 kHz i 48 kHz (32 kbps do 320 kbps)
– CD-R/RW: 8 kHz, 11,02 kHz, 12 kHz, 16 kHz, 22,05 kHz, 24 kHz
(8 kbps do 160 kbps), 32 kHz, 44,1 kHz i 48 kHz (32 kbps do
320 kbps)
[JPEG] (Rozszerzenie: “.JPG”, “.jpg”, “.JPEG”, “.jpeg”)
Płyta: DVD-R/RW, CD-R/RW
≥ Pliki JPEG wykonane cyfrową kamerą, zgodną ze standardem DCF
(Design rule for Camera File system) wersji 1.0 są wyświetlane.
– Pliki zmienione, edytowane lub zachowane przez komputerowe
oprogramowanie edycji obrazów mogą nie być wyświetlane.
≥ Urządzenie to nie możpe wyświetlać filmów, MOTION JPEG i innych
poodbnych formatów, nieruchomych obrazów innych niż w formacie
JPEG (np. TIFF), lub odtwarzać obrazy z dołączonym audio.
[MPEG4] (Rozszerzenie: “.ASF”, “.asf”)
Płyta: DVD-R/RW, CD-R/RW
≥ Data zapisu mo
[DivX] (Rozszerzenie: “.DIVX”, “.divx”, “.AVI”, “.avi”)
Płyta: DVD-R/R DL/RW, CD-R/RW
≥ Pliki DivX większe niż 2 GB lub nie mające znacznika mogą nie być
odtwarzane właściwie na tym urządzeniu.
≥ To u r z ądzenie obsługuje wszystkie poziomy rozdzielczość do
maksimum 720k480 (NTSC)/720k576 (PAL).
≥ Na tym urządzeniu można wybrać do 8 typów audio i napisów.
≥ Mogą być różnice w kolejności on the menu ekranu wyświetlacza i
ekranu komputera.
≥ To u r z ądzenie nie może odtwarzać
zapisu pakietowego.
DVD-R/RW
≥ Płyty muszą być zgodne z formatem UDF bridge (UDF 1.02/ISO9660).
≥ To u r z ądzenie nie obsługuje zapisów wielosesyjnych. Odtwarzana jest
tylko sesja domyślna.
CD-R/RW
≥ Płyty muszą być zgodne z formatem ISO9660 poziom 1 lub 2 (oprócz
dla rozszerzonych formatów).
≥ To u r z ądzenie obsługuje zapisy wielosesyjne, ale jeżeli jest otwarte
wiele sesji potrzeba więcej czasu na rozpoczęcie odtwarzania. Aby tego
uniknąć, pozostaw minimalną ilość sesji.
że się różnić od daty aktualnej.
plików zapisanych przy użyciu
płytę,
Systemy wideo
≥ To u r z ądzenie może odtwarzać PAL i NTSC, lecz telewizor misu być
zgodny z systemem używanym na płycie.
≥ Płyty PAL nie będą widoczne prawidłowo na talewizorze NTSC.
≥ To u r z ądzenie jest w stanie konwertować sygnały NTSC na PAL 60 dla
oglądania ich na telewizorze PAL (B 18, “WYJŚCIE NTSC” w menu
RQ TX111 1
POLSKI
WIDEO).
20
68
Page 69

Opcja instalacji głośnika
Co najmniej 30 mm
‰7,0 mm do 9,4 mm
Ściana lub filar
3 mm do 5 mm
‰4,0 mm
[PT580] Głośniki dźwięku
przestrzennego
Głośnik centralny
72 mm
348,5 mm
źLE
DOBRZE
np.
W takim położeniu
głośnik
prawdopodobnie
spadnie, jeśli
zostanie
poruszony w lewo
lub w prawo.
Przesunąć
głośnik tak, by
śruba znalazła
się w takim
położeniu.
Kabel zakładać od
dołu.
Wyciągnąć kabel
przez otwró.
Pozostawić
około 120 mm.
Przymocowane do ściany
Można przymocować wszystkie głośniki (oprócz subwoofera) do ściany.
≥ Ściana lub kolumna, do której głośniki mają nyć przymocowane, winna
mieć nośność 10 kg na każdą śrubę. Zwróć się do wykwalifikowanego
technika budowlanego w celu przytwierdzenia głośników do ściany.
Nieprawidłowe przymocowanie może uszkodzić ścianę i głośniki.
1 Wkręć śrubę (nie jest częścią zestawu) do ściany.
Ponowne podłączenie kabla głośnika
Getting StartedPlaying DiscsOther Operations
Getting StartedPlaying DiscsOther Operations
2Przymocuj głośnik pewnie na śrubie (śrubach) w otworze
(otworach).
100 mm
[PT580] Głośnik przedni
[PT880] Głośniki przednie i przestrzenne
Przymocuj do ściany, bez podstawy i stojaka
Konserwacja
W żadnym wypadku nie należy używać do czyszczenia alkoholu,
rozpuszczalnika lub benzyny
≥ W żadnym wypadku nie należy używać do czyszczenia alkoholu,
rozpuszczalnika lub benzyny.
≥ Zanim u
Nie należy używać będących w handlu środków do czyszczenia
soczewek, gdyż mogą one spowodować niesprawność. Czyszczenie
soczewek zazwyczaj nie jest konieczne, lecz jest ono uzależnione od
warunków otoczenia, w którym pracuje aparatura.
żyjesz szmatek nasączonych chemicznymi środkami,
przyczytaj uważnie instrukcje dołączoną do nich.
Przed przemieszczaniem urządzenia, upewnij się, że taca płyt
jest pusta. Niezastosowanie się do tych zaleceń może spowodować
ryzyko poważnego uszkodzenia płyty i urządzenia.
Informacje
dodatkowe
POLSKI
RQ TX111 1
21
69
Page 70

Przewodnik poszukiwania
niesprawności
Przed zażądaniem naprawy serwisowej, wykonaj następujące kontrole.
Jeżeli masz wątpliwości co do pewnych punktów kontroli, lub podane w w
następującym przewodniku środki zaradcze nie rozwiązują problemu,
zwróć się do twego dealera z prośbą o instrukcje.
Zasilanie
Brak zasilania.
Włóż stabilnie przewód sieciowy. (B 8)
Getting StartedPlaying DiscsOther OperationsReference
Urządzenie zostanie automatycznie przełączone na tryb
oczekiwania.
Tajmer trybu uśpienia działał i osiągnął limit ustalonego czasu. (B 4)
Zasilanie urządzenia zostanie wyłączone, gdy źródło dla
telewizora zostanie zmienione.
Jest to normalne zjawisko podczas korzystania z funkcji VIERA Link
“HDAVI Control 4 lub wersje późniejsze”. Aby uzyskać więcej
szczegółów, przeczytaj instrukcję obsługi telewizora.
Wyświetlacze urządzenia
Wyświetlacz jest ciemny.
Wybierz “JASNY” w elemencie “ŚCIEMNIANIE FL” w menu INNE. (B 19)
“NO PLAY”
≥ Włożyłeś płytę, której urządzenie nie może odtworzyć; włóż płytę,
możliwą do odtwarzania. (B 20)
≥ Włożyłeś nie nagraną płytę.
≥ Włożyłeś płytę niesfinalizowaną.
“NO DISC”
≥ Nie włożyłeś płyty; włóż ją.
≥ Nie włożyłeś płyty prawidłowo; włóż ją prawidłowo. (B 12)
“OVER CURRENT ERROR”
Urządzenie USB pobiera za dużo mocy. Przełącz na tryb “DVD/CD”,
wyjmij urządzenie USB i wyłącz urządzenie.
“IPOD OVER CURRENT ERROR”
Urządzenie iPod/iPhone pobiera zbyt dużo prądu. Wyjmij urządzenie
iPod/iPhone, wyłącz urządzenie i ponownie je włącz.
“F61”
Sprawdź i skoryguj podłączenie kabla głośnika. Jeżeli nie usunie to
problemu, zwróć się do dealera. (B 7)
“F76”
Problem w zasilaniu. Zwróć się do dealera.
“DVD U11”
Płyta może być zabrudzona. Wytrzyj ją do czysta.
“ERROR”
Wykonana nieprawidłowa operacja. Przeczytaj instrukcje i ponów
operację.
“DVD H∑∑”
“DVD F∑∑∑”
∑ oznacza numer.
≥ Mogło nastąpić zakłócenie. Numery następujące po “H” i “F” zależą od
stanu urządzenia. Wyłącz urządzenie i powtórz operacje. W
przeciwnym razie, wyłącz urządzenie, odłącz przewód sieciowy, i
ponownie podłącz je.
≥ Jeżeli numery serwisowe nie skasują się, zapisz numer i zwróć się do
wykwalifikowanego specjalisty serwisu.
“U70∑”
∑ oznacza numer. (Rzeczywisty numer, następujący po “U70” zależy od
stanu urządzenia głównego.)
≥ Podłączenie HDMI działa w sposób nietypowy.
–Podłączony sprzęt nie jest kompatybilny ze standardem HDMI.
–Należy używać kabli HDMI, mających logo HDMI, (jak pokazane na
pokrywce).
– Kabel HDMI jest za długi.
– Kabel HDMI jest uszkodzony.
“REMOTE 1” lub “REMOTE 2”
Uzgodnij tryby na urządzeniu głównym i pilocie zdalnego sterowania. W
zależności od wyświetlonego numeru (“1” lub “2”), wciśnij i przytrzymaj
wciśnięty [OK]9 i odpowiedni przycisk z cyfrą ([1] lub [2]) przez
przynajmniej 2 sekund. (B 4)
“LOADING”
RQ TX111 1
POLSKI
≥ Urządzenie iPod/iPhone nie jest gotowe. Poczekaj na zniknięcie tego
komunikatu.
≥ Odłącz urządzenie iPod/iPhone i ponownie je podłącz do oporu. (B 16)
22
70
Ogólne warunki pracy
Urządzenie nie reaguje, gdy wciśnięty jest jakikolwiek
przycisk.
≥ To u r z ądzenie nie może odtwarzać płyt innych, niż wymienione w danej
instrukcji obsługi. (B 20)
≥ Urządzenie możpe nie pracować właściwie z powodu piorunu,
elektryczności statycznej lub innego zewnętrznego czynnika. Wyłącz
urządzenie i ponownie załącz. W przeciwnym razie, wyłącz urządzenie,
odłącz przewód sieciowy, i ponownie podłącz go.
≥ Utworzyła się skroplina. Odczekaj 1 do 2 godzin, by pozwolić jej
wyparować.
Urządzenie nie reaguje gdy wciskane są przyciski pilota
zdalnego sterowania.
≥ Sprawdź, czy baterie są włożone prawidłowo. (B 8)
≥ Baterie są wyczerpane. Wymień je na nowe. (B 8)
≥ Skieruj pilot zdalnego sterowania w stronę czujnika sygnału pilota i
włącz. (B 4)
Inne wyroby reagują na komendy pilota zdalnego
sterowania.
Zmień tryb działania pilota zdalnego sterowania. (B 4)
Nie można wyświetlić menu START.
Wyjmij płytę i ponownie naciśnij przycisk [START]C.
Nie ma obrazu lub dźwięku.
≥ Sprawdź wideo lub podłączenie głośnika. (B 7, 8)
≥ Sprawdź wejście zasilania lub ustawienie wejścia podłączonego
sprzętu i urządzenia głównego.
≥ Sprawdź, czy na płycie jest jakiś zapis.
Zapomniałeś swoje hasło ograniczeń.
Przywróć wszystkie ustawienia na wstępne ustawienie fabryczne.
Gdy odtwarzanie jest zatrzymane i “DVD/CD” jest źródłem, wciśnij i
przytrzymaj wciśnięty [∫]9 (Zatrzymanie) na urządzeniu głównym i
[S10]3 na pilocie zdalnego sterowania do momentu, aż napis
“INITIALIZED” zniknie z telewizora. Wyłącz urządzenie i ponownie włącz.
Wszystkie ustawienia powrócą do wartości domyślnych.
(Funkcja nie działa podczas trybu programowania i trybu losowego, lub
gdy wyświetlane jest menu ustawień lub menu START.)
Niektóre znaki nie są wyświetlane prawidłowo.
Znaki inne niż litery angielskiego alfabetu i arabskie cyfry mogą nie być
wyświetlone prawidłowo.
Funkcja VIERA Link “HDAVI Control” nie reaguje.
W zależności od stanu tego urządzenia i podłączonego sprzętu, może
zajść konieczność powtórzenia tych samych operacji, aby funkcja ta
działała prawidłowo. (B 15)
Ustawienie, które wykonałeś w “ROZMIAR EKRANU” (B 18,
menu WIDEO) lub “JĘZYK” (B 18, menu WYŚWIETLACZ)
nie działają.
Ustawienia dla “ROZMIAR EKRANU”§1 i “JĘZYK”§2 automatycznie
nastąpią po informacji z telewizora. (B 9, Ustawienia USTAW.
PODSTAW.)
§1Przy użyciu funkcji VIERA Link “HDAVI Control” z telewizorem
kompatybilnym z “HDAVI Control 3 lub wersje późniejsze”
§2Przy użyciu funkcji VIERA Link “HDAVI Control” z telewizorem
kompatybilnym z “HDAVI Control 2 lub wersje późniejsze”
Page 71

Działanie płyty
Zanim odtwarzanie rozpocznie się potrzebny jest pewien
czas.
≥ Odtwarzanie może rozpocząć się nie od razu, gdy ścieżka MP3 posiada
dane nieruchomego obrazu. Nawet po tym, gdy ścieżka rozpocznie się,
prawidłowy czas odtwarzania nie będzie wyświetlony. Jest to
normalnym zjawiskiem. [MP3]
≥ Jest to normalnym zjawiskiem na DivX video. [DivX]
Pojawia się menu ekranowe podczas operacji pominięcia
lub wyszukiwania.
Jest to normalnym zjawiskiem dla Video CD.
[VCD]
Menu funkcji sterowania odtwarzaniem nie pojawia się.
[VCD] ze sterowaniem odtwarzania
Naciśnij [∫ STOP]6 dwa razy po czym naciśnij [1 PLAY]6.
Odtwarzanie programowe i losowe nie działa. [DVD-V]
Funkcje te nie działają z niektórymi DVD-Video.
Odtwarzanie nie zaczyna się.
≥ To u r ządzenie może nie odtwarzać WMA i MPEG4 zawierających dane
nieruchomych obrazów.
≥ Jeżeli odtwarzasz treść DivX VOD, patrz domową stronę, na której
zakupiłeś treść DivX VOD. (Przykład: http://vod.divx.com) [DivX]
≥ Jeżeli płyta zawiera CD-DA i inne formaty, prawidłowe odtwarzanie
może nie być możliwe.
Nie ma napisów.
≥ Wyświetl napisy. (“NAPISY” w Menu 1) (B 14)
≥ Napisy mogą nie być wyświetlane, w zależności od płyty. [DivX]
Punkt B jest ustawiony automatycznie.
Koniec elementu staje się punktem B, gdy dochodzimy do niego.
Nie ma dostępu do menu Ustawień.
≥ Wybierz “DVD/CD” jako źródło.
Dźwięk
Dźwięk jest skażony.
≥ W czasie odtwarzania WMA mogą pojawić się szumy.
≥ Gdy używane jest wyjście HDMI, audio może nie być wyprowadzane z
innych złącz.
Efekty nie działają.
Niektóre efekty audio nie działają lub są mniej wyraziste na pewnych
płytach.
W czasie odtwarzania słyszy się buczenie.
Obok urządzenia głównego znajduje się przewód sieciowy lub lampa
fluorescentna. Oddalić inne urządzenia i kable od urządzenia głównego.
Nie ma dźwięku.
≥ Może być niewielka pauza w dźwięku, gdy zmieniasz prędkość
odtwarzania.
≥ Jeśli źródłem wyjściowym jest sygnał bitstream, w urządzeniu
zewnętrznym zmień dźwięk na PCM.
≥ Audio może nie być wyprowadzane ze względu na sposób, w jaki
utworzone są pliki. [DivX]
Nie ma dźwięku z telewizora.
≥ Jeśli telewizor nie jest kompatybilny z ARC i używane jest tylko
połączenie HDMI, potrzebne jest dodatkowe połączenie dźwięku. (B 8)
≥ Sprawdź podłączenie dźwięku. Naciśnij [RADIO, EXT-IN]5, aby
wybrać odpowiednie źródło. (B 8, 10)
≥ Gdy używasz podłączenie HDMI, upewnij się, że “WYJŚCIE AUDIO” w
menu HDMI jest ustawione na “WŁĄCZ.”. (B 18)
Brak dźwięku z głośników surround.
Naciśnij [SURROUND]<, aby wybrać “MULTI-CH”. (B 11 )
Obraz
Obraz w telewizorze nie jest wyświetlony prawidłowo lub
znika.
≥ Urządzenie i TV używają różnych systemów wideo. Użyj multi-systemu
lub PAL TV.
≥ System używany na płycie nie jest zgodny z twoim telewizorem.
– Nie można prawidłowo ogłądać płyt PAL na telewizorze NTSC.
– To urządzenie może konwertować sygnały NTSC na PAL 60 dla
oglądania na telewizorze PAL (“WYJŚCIE NTSC” w menu WIDEO).
(B 18)
≥ Upewnij się, że urządzenie jest podłączone bezpośrednio do telewizora,
i nie jest podłączone przez VCR. (B 8)
≥ Ładowarki telefonów komórkowych mogą spowodować pewne
zakłócenia.
≥ Jeżeli używasz wewnętrznej anteny telewizyjnej, zmień ją na antenę
zewnętrzną.
≥ Przewód anteny telewizyjnej jest zbyt blisko od urządzenia. Przemieść
go dalej od urzą
≥ Zmień “WYBÓR ŹRÓDŁA” w Menu 2. [DivX] (B 14)
≥ Zmniejsz ilość podłączonych urządzeń.
≥ Gdy używane jest złącze HDMI AV OUT, upewnij się, że wyjście wideo
niedopuszczalne z podłączonym telewizorem nie jest wybrane. Wciśnij i
przytrzymaj wciśnięty przycisk [CANCEL]4, dopóki obraz nie zostanie
wyświetlony prawidłowo. (Wyjście powróci do “480p” lub “576p”.)
(B 14)
≥ Obrazy wideo przekonwertowane na rozdzielczość 1920k1080 mogą
mieć inny wygląd, niż rzeczywiste autentyczne źródła 1080p full-HD.
Nie jest to usterką urządzenia głównego.
≥ Gdy kabel HDMI jest podłączony, nie będzie wyprowadzany sygnał
RGB ze złącza SCART (AV). Jeżeli ma być użyte złą
odłącz kabel HDMI i ponownie włącz/wyłącz to urządzenie.
Wielkość obrazu może nie być dopasowana do ekranu.
≥ Zmień “ROZMIAR EKRANU” w menu WIDEO. (B 18)
≥ Zmień format w telewizorze.
≥ Zmień ustawienie zoomu. (“POWIĘKSZENIE” w Menu 2) (B 14)
Menu nie jest wyświetlone prawidłowo.
Przywróć współczynnik zoomu na “NORMALNE”.
(“POWIĘKSZENIE” w Menu 2) (B 14)
Funkcja Automatycznego zoomu nie działa dobrze.
≥ Wyłącz funkcję zoomu w telewizorze.
≥ Funkcja zoomu może nie działać dobrze, szczególnie w ciemnych
scenach i może nie działać w zależności od typu płyty.
Przy odtwarzaniu płyt PAL, obraz jest zniekształcony.
Ustaw “TRYB PRZESYŁANIA” w Menu 2 na “AUTO”. (B 14)
dzenia.
cze SCART (AV),
Po wybraniu “Kino domowe” w “Wybór głośników” przy
pomocy pilota telewizora, zmienia się także wybór wejścia
telewizora.
Odłącz kabel HDMI od telewizora i podłącz go do innego złącza HDMI.
Operacje iPod/iPhone
Nie udaje się załadować lub uruchomić działanie.
≥ Sprawdź, czy urządzenie iPod/iPhone jest prawidłowo podłączone.
(B 16)
≥ Akumulator urządzenia iPod/iPhone jest wyładowany. Naładuj
urządzenie iPod/iPhone i spróbuj ponownie.
Nie można wyświetlić zdjęć/video z urządzenia iPod/iPhone
na telewizorze.
≥
Sprawdź, czy kabel obrazu jest podłączony do gniazda SCART (AV) w tym
urządzeniu i wybierz element “WIDEO” z elementu “WYJ WIDEO SCART”
w menu WIDEO. (
≥ Użyj menu iPod/iPhone do zmiany ustawień wyświetlania zdjęć/video
dla danego telewizora. (Przeczytaj instrukcję obsługi urządzenia iPod/
iPhone.)
B 18
)
Getting StartedPlaying DiscsOther Operations
Getting StartedPlaying DiscsOther Operations
Informacje
dodatkowe
POLSKI
RQ TX111 1
23
71
Page 72

HDMI lub wyjście progresywne wideo
Pojawia się efekt ghostingu, gdy jest włączone HDMI lub
wyjście progresywne.
Ten problem spowodowany jest metodo edytowania lub materiałem,
użytym w DVD-Video, ale można go wyeliminować, używając wyjście z
przeplotem. Gdy używasz złącza HDMI AV OUT, ustaw “FORMAT
WIDEO” w Menu 4 na “480i” lub “576i”. Albo wyłącz podłączenie HDMI
AV O UT i użyj innych podłączeń wideo. (B 8, 14)
Radio
Dźwięk jest skażony lub słychać hałasy.
≥ Wyreguluj pozycję anteny FM.
≥ Użyj anteny zewnętrznej. (B 7)
Getting StartedPlaying DiscsOther OperationsReference
Słychać dźwięk udarowy.
Wyłącz telewizor lub przesuń go dalej od urządzenia.
USB
Nie udaje się czytać napędu USB lub jego treści.
≥ Format napędu USB lub jego treści jest/są niezgodne z systemem.
(B 17)
≥ Funkcja USB host tego wyrobu może nie działać z niektórymi
urządzeniami USB.
≥ Urządzenia USB o pojemności ponad 32 GB może nie działać w
niektórych przypadkach.
Powolne działanie urządzenia USB.
Urządzenie USB z dużym rozmiarem plików lub o dużej pojemności
pamięci potrzebuje więcej czasu na odczytanie i wyświetlenie jego
zawartości w telewizorze.
Komunikaty wyświetlane w telewizorze
“/”
Działanie jest zabonione przez urządzenie lub płytę.
“PŁYTY NIE MOŻNA ODTWORZYĆ W TEJ STREFIE.”
Mogą być can odtwarzane tylko płyty DVD-Video, zawierające lub mające
numer regionu jednakowy z numerem na tylnym panelu tego urządzenia.
(B Strona okładki)
“Brak wideo”
W zależności od podłączonego urządzenia iPod/iPhone, menu video
może być niedostępne w telewizorze.
Wybierz menu iPod/iPhone tryb (iPod/iPhone LCD) (B 16) i uruchom
odtwarzanie video z menu urządzenia iPod/iPhone.
Licencje
Wyprodukowano na licencji firmy Dolby Laboratories.
Dolby, Pro Logic oraz symbol podwójnego D są znakami handlowymi
firmy Dolby Laboratories.
Wyprodukowano na opatentowanej licencji, numery patentów:
5,451,942; 5,956,674; 5,974,380; 5,978,762; 6,487,535 i inne
amerykańskie i światowe patenty w trakcie wydawania i już wydane.
DTS oraz Symbol są zarejestrowanymi znakami towarowymi oraz
logo DTS Digital Surround i DTS są znakami towarowymi DTS, Inc.
Produkt zawiera oprogramowanie. C DTS, Inc. Wszelkie prawa
zastrzeżone.
Patent U.S.A. Nos. 6,836,549; 6,381,747; 7,050,698; 6,516,132; i
5,583,936.
Ten produkt wykorzystuje technologię ochrony praw autorskich
chronioną patentami zarejestrowanymi w USA i innymi prawami
własności intelektualnej. Korzystanie z technologii ochrony praw
autorskich podlega wymogowi uzyskania zezwolenia od firmy
Macrovision i jest dozwolone tylko w przypadku zastosowań
domowych i innych ograniczonych sposobów użytkowania, chyba że
firma Macrovision wyraźnie zaznaczyła inaczej. Zabrania się inżynierii
wstecznej oraz demontażu urządzenia.
HDMI, logo HDMI oraz High-Definition Multimedia Interface są
znakami towarowymi lub zarejestrowanymi znakami towarowymi
HDMI Licensing LLC w Stanach Zjednoczonych i innych krajach.
HDAVI ControlTM jest znakiem handlowym
Windows Media i logo Windows są znakami handlowymi lub
zastrzeżonymi znakami handlowymi firmy Microsoft Corporation w
Stanach Zjednoczonych i/lub innych krajach.
Niniejszy wyrób jest chroniony określonymi prawami do własności
intelektualnej należącymi do Microsoft Corporation i osób trzecich.
Korzystanie i rozpowszechnianie takich technologii poza niniejszym
wyrobem bez licencji Microsoft lub autoryzowanych podmiotów
zależnych od Microsoft i osób trzecich jest zabronione.
Produkt ten jest objęty licencją MPEG-4 Visual (Patent Portfolio
License) dotyczącą prywatnego i niekomercyjnego użytku,
obejmującą (i) kodowanie obrazu zgodnie ze standardem MPEG-4
(“MPEG-4 Video”) i/lub (ii) dekodowanie materiału MPEG-4 Video,
który został zakodowany przez klienta prywatnie i niekomercyjnie
i/lub został otrzymany od dostawcy wideo, posiadającego licencję
MPEG LA na dostarczanie materiału MPEG-4 Video. Inne
użytkowanie nie jest objęte żadną wyrażonej ani dorozumianą
licencją. Dodatkowe informacje, w tym dotyczące użytku
promocyjnego, wewnętrznego i komercyjnego oraz licencjonowania
można otrzymać od MPEG LA, LLC. Zobacz http://www.mpegla.com
®
DivX
jest zarejestrowanym znakiem handlowym firmy DivX, Inc., i
użycie jego jest uwarunkowane licencją.
®
DivX
is a registered trademark of DivX, Inc., and is used under
license.
Panasonic Corporation.
.
24
POLSKI
“Made for iPod” oznacza, że niniejsze elektroniczne akcesorium
zostało zaprojektowane specjalnie w celu podłączenia go do iPod’a i
posiada certyfikat firmy - autora opracowania, zaświadczający jego
zgodność ze standardami eksploatacyjnymi firmy Apple.
Tekst “Works with iPhone” oznacza, że urządzenie elektroniczne
zostało specjalnie zaprojektowane do współpracy z urządzeniem
iPhone i spełnia normy wydajności firmy Apple.
Firma Apple nie ponosi odpowiedzialności za działanie tego
urządzenia, lub, że spełnia ono wymogi i normatywy prawne w
zakresie bezpieczeństwa.
iPod jest znakiem handlowym firmy Apple Inc., zarejestrowanym w
U.S.A i w innych krajach.
iPhone to znak towarowy firmy Apple Inc.
RQ TX111 1
72
Page 73

Specifikacje
Głośnik przedni SB-HF330
Głośniki dźwięku przestrzennego SB-HS230
Głośniki dźwięku przestrzennego SB-HS880
Głośnik centralny SB-HC230
SEKCJA WZMACNIACZA
Moc wyjściowa RMS: Tryb Dolby Digital
Przedni Kan.
Kan. Surround
Centralny Kan.
Kan. Subwoofera
Ogólna moc RMS trybu Dolby Digital 1000 W
Moc wyjściowa DIN: Tryb Dolby Digital
Przedni Kan.
Kan. Surround
Centralny Kan.
Kan. Subwoofera
Ogólna moc DIN trybu Dolby Digital 590 W
TUNER FM, SEKCJA ZŁĄCZ
Pamięć Preset Stacje FM 30
Modulacja częstotliwości (FM)
Zakres
częstotliwości 87,50 MHz do 108,00 MHz (50-kHz na krok)
Zaciski anteny 75 ≠ (niezbalansowany)
Cyfrowe wejście audio
Optyczne wejście cyfrowe
Częstotliwość próbkowania
Port USB
Standard USB
Wspierany format plików mediów
System plików USB
Zasilanie Portu USB
Szybkość transmisji
SEKCJA PŁYT
Odtwarzane płyty (8 cm lub 12 cm)
(1) DVD (DVD-Video, DivX
(2) DVD-R (DVD-Video, DVD-VR, MP3
§5, 6
)
DivX
(3) DVD-R DL (DVD-Video, DVD-VR, DivX
(4) DVD-RW (DVD-Video, DVD-VR, MP3
§5, 6
)
DivX
(5) iR/iRW (Video)
(6) iR DL (Video)
(7) CD, CD-R/RW (CD-DA, Video CD, SVCD
§1 Zgodnie z normą IEC62107
§2 MPEG-1 Layer 3, MPEG-2 Layer 3
§3 Windows Media Audio Ver.9.0 L3
§4 Pliki Exif Ver 2.1 JPEG Baseline
§5 Ogólna kombinowana maksymalna liczba rozpoznawalnych treści
§6 Odtwarza wideo DivX
§7 MPEG4 dane nagrane przy pomocy multi kamer Panasonic SD
§4, 5
, MPEG4
JPEG
Nie zgodny z zapisem Multiple Bit Rate (MBR)
Rozdzielczość obrazu: od 160k120 do 6144k4096 pixeli
(Pobranie podprób 4:0:0, 4:2:0, 4:2:2 lub 4:4:4). Obrazy
szzcególnie długie i wąskie mogą nie być wyświetlane.
audio, obrazów i wideo oraz grup: 4000 audio, obraz i treści wideo
i 255 grup. (Oprócz Foldera głównego)
lub DVD nagrywarek wideo
Zgodnie z normą SD VIDEO specifications (standard ASF)/
MPEG4 (Simple Profile) video system/G.726 audio system
Przystawka
Długość fali (DVD/CD) 655/790 nm
Moc lasera KLASA 1M
Wyprowadzanie audio (Płyta)
Liczba kanałów 5.1 kan. (FL, FR, C, SL, SR, SW)
125 W na każdy kanał (3 ≠), 1 kHz, 10 % THD
125 W na każdy kanał (3 ≠), 1 kHz, 10 % THD
250 W na każdy kanał (6 ≠), 1 kHz, 10 % THD
250 W na każdy kanał (6 ≠), 100 Hz, 10 % THD
90 W na każdy kanał (3 ≠), 1kHz, 1% THD
90 W na każdy kanał (3 ≠), 1kHz, 1% THD
115 W na k ażdy kanał (6 ≠), 1kHz, 1% THD
115 W na każdy kanał (6 ≠), 100 Hz, 1 % THD
Złącze optyczne
32 kHz, 44,1 kHz, 48 kHz
USB 2.0 full speed
MP3 (¢.mp3)
WMA (¢.wma)
JPEG (¢.jpg, ¢.jpeg)
DivX (¢.divx, ¢.avi)
MPEG4 (¢.asf)
FAT12, FAT16, FAT3 2
Maks. 500 mA
Do 4 Mbps (DivX)
§5, 6
)
§5, 7
, DivX
®
.
§5, 6
§2, 5
)
, JPEG
§5, 6
§2, 5
)
, JPEG
§1
, MP3
§4, 5
§4, 5
, MPEG4
, MPEG4
§2, 5
, WMA
§5, 7
§3, 5
,
§5, 7
,
SEKCJA WIDEO
System wideo PAL625/50, PAL525/60, NTSC
Wyjście wideo kompozytowe
Poziom sygnału wyjściowego
Złącze
Gniazdo SCART (1 system)
Wyjście S-video
Y poziom sygnału wyjściowego
C poziom sygnału wyjściowego
Złącze
PAL; 0,3 Vp-p (75 ≠)
NTSC; 0,286 Vp-p (75 ≠)
Gniazdo SCART (1 system)
Wyjście wideo RGB
R poziom sygnału wyjściowego
G poziom sygnału wyjściowego
B poziom sygnału wyjściowego
Złącze
Gniazdo SCART (1 system)
0,7 Vp-p (75 ≠)
0,7 Vp-p (75 ≠)
0,7 Vp-p (75 ≠)
Wyjście HDMI AV
Złącze Złącze 19-pin. typu A
HDAVI Control To u rządzenie obsługuje funkcję “HDAVI Control 5”.
SEKCJA GŁOŚNIKÓW
Typ
Głośnika (głośników)
1-ścież., 1 system głośnika (Bass reflex)
Impedancja 3 ≠
Pełnozakresowy 6,5 cm Typ stożkowy
Wyjściowe ciśnienie dźwięku
Zakres częstotliwości
Wymiary (Szer.tWys.tGłęb.)
Masa
Cały zestaw z podstawą stojącą
Wymiary (Szer.tWys.tGłęb.) maks.
Wymiary (Szer.tWys.tGłęb.) min.
85 Hz do 25 kHz (j16 dB)
95 Hz do 22 kHz (j10 dB)
100 mmk530 mmk78 mm
255 mmk1020 mmk255 mm
255 mmk550 mmk255 mm
Masa
[PT580]
Typ
Głośnika (głośników)
1-ścież., 1 system głośnika (Bass reflex)
Impedancja 3 ≠
Pełnozakresowy 6,5 cm Typ stożkowy
Wyjściowe ciśnienie dźwięku
Zakres częstotliwości
Wymiary (Szer.tWys.tGłęb.)
Masa
105 Hz do 25 kHz (j16 dB)
130 Hz do 22 kHz (j10 dB)
80 mmk118, 5 mmk68 mm
[PT880]
,
Typ
Głośnika (gło
śników)
1-ścież., 1 system głośnika (Bass reflex)
Impedancja 3 ≠
Pełnozakresowy 6,5 cm Typ stożkowy
Wyjściowe ciśnienie dźwięku
Zakres częstotliwości
Wymiary (Szer.tWys.tGłęb.)
Masa
Cały zestaw z podstawą stojącą
Wymiary (Szer.tWys.tGłęb.) maks.
Wymiary (Szer.tWys.tGłęb.) min.
85 Hz do 25 kHz (j16 dB)
95 Hz do 22 kHz (j10 dB)
100 mmk530 mmk78 mm
255 mmk1020 mmk255 mm
255 mmk550 mmk255 mm
Masa
Typ
Głośnika (głośników)
1-ścież., 1 system głośnika (Bass reflex)
Impedancja 6 ≠
Pełnozakresowy 6,5 cm Typ stożkowy
Wyjściowe ciśnienie dźwięku
Zakres częstotliwości
Wymiary (Szer.tWys.tGłęb.)
Masa
90 Hz do 25 kHz (j16 dB)
115 Hz do 22 kHz (j10 dB)
145 mmk85 mmk71,5 mm
1 Vp-p (75 ≠)
1 Vp-p (75 ≠)
78 dB/W (1 m)
0,92 kg
2,3 kg
78 dB/W (1 m)
0,4 kg
78 dB/W (1 m)
0,92 kg
2,3 kg
79 dB/W (1 m)
0,6 kg
Getting StartedPlaying DiscsOther Operations
Informacje
dodatkowe
POLSKI
RQ TX111 1
25
73
Page 74

Typ
Głośnik niskotonowy SB-HW330
Głośnika (głośników)
1. Pełny woofer
2. Obudowa z membran bierną
Wyjściowe ciśnienie dźwięku
Zakres częstotliwości
Wymiary (Szer.tWys.tGłęb.)
Masa
DANE OGÓLNE
Zasilanie
Pobierana moc
Wymiary (Szer.tWys.tGłęb.)
Getting StartedPlaying DiscsOther OperationsReference
Masa
Zakres temperatur działania
Zakres wilgotności działania
Pobierana moc w trybie oczekiwania około 0,1 W
[Uwaga]
1 Dane techniczne mogą podlegać zmianom bez uprzedzenia.
Masa i wymiary są przybliżone.
2Całkowite zniekształcenie harmoniczne mierzone jest przez cyfrowy
analizator widma.
1-ścież., 1 system głośnika (Typ Kelton)
35 Hz do 180 Hz (j16 dB)
40 Hz do 160 Hz (j10 dB)
180,5 mmk322 mmk351 mm
AC 220 V do 240 V, 50 Hz
430 mmk54 mmk287 mm
Główne urządzenie 2,8 kg
35 % do 80 % RH (bez skropliny)
Impedancja 6 ≠
16 cm Typ stożkowy
Główne urządzenie 95 W
25 cm
78 dB/W (1 m)
4,6 kg
0 oC do r40 oC
Informacja dla użytkowników o gromadzeniu i
pozbywaniu się zużytych urządzeń i baterii
Niniejsze symbole umieszczane na
produktach, opakowaniach i/lub w
dokumentacji towarzyszącej oznaczają, że
nie wolno mieszać zużytych urządzeń
elektrycznych i elektronicznych oraz baterii z
innymi odpadami domowymi.
W celu zapewnienia właściwego
przetwarzania, utylizacji oraz recyklingu
zużytych produktów i baterii, należy oddawać
je do wyznaczonych punktów gromadzenia
odpadów zgodnie z przepisami prawa
krajowego oraz postanowieniami Dyrektyw
2002/96/WE i 2006/66/WE.
Prawidłowe pozbywanie się w/w produktów i
baterii pomaga oszczędzać cenne zasoby
naturalne i zapobiegać potencjalnemu
negatywnemu wpływowi na zdrowie
człowieka oraz stan środowiska naturalnego,
który towarzyszy niewłaściwej gospodarce
odpadami.
Więcej informacji o zbiórce oraz recyklingu
zużytych produktów i baterii można otrzymać
od władz lokalnych, miejscowego
przedsiębiorstwa oczyszczania lub w punkcie
sprzedaży, w którym użytkownik nabył
przedmiotowe towary.
Za niewłaściwe pozbywanie się powyższych
odpadów mogą grozić
przepisami prawa krajowego.
kary przewidziane
Cd
Dotyczy użytkowników firmowych
działających na terenie Unii Europejskiej
Chcąc w odpowiedni sposób pozbyć się
urządzeń elektrycznych lub elektronicznych,
należy skontaktować się ze sprzedawcą lub
dostawcą, który udzieli dalszych informacji.
[Informacje o pozbywaniu się w/w
urządzeń w państwach trzecich]
Niniejsze symbole obowiązują wyłącznie na
terenie Unii Europejskiej. Chcąc pozbyć się
w/w urządzeń elektrycznych lub
elektronicznych, należy skontaktować się z
władzami lokalnymi lub sprzedawcą w
sprawie właściwego sposobu wyrzucania
tego rodzaju przedmiotów.
Dotyczy symbolu baterii (symbole
przykładowe):
Ten symbol może występować wraz z
symbolem pierwiastka chemicznego. W takim
przypadku spełnia on wymagania Dyrektywy
w sprawie okreś
lonego środka chemicznego.
RQ TX111 1
POLSKI
26
74
Page 75

Zasady bezpieczeństwa
Ustawienie urządzenia
Urządzenie należy ustawić na równej powierzchni, z dala od miejsc
bezpośrednio nasłonecznionych, w których panuje wysoka temperatura,
duża wilgotność lub występują nadmierne drgania. Takie warunki mogą
doprowadzić do uszkodzenia obudowy i innych podzespołów, a tym
samym skrócić okres eksploatacji urządzenia.
Na urządzeniu nie wolno umieszczać żadnych ciężkich przedmiotów.
Napięcie
Nie wolno stosować źródeł zasilania o wysokim napięciu. Można w ten
sposób doprowadzić do przeciążenia urządzenia i spowodować pożar.
Nie wolno stosować zasilania prądem stałym. Przed podłączeniem
urządzenia do zasilania na statku lub w innych miejscach, gdzie
występuje zasilanie prądem stałym, należy sprawdzić dokładnie
parametry źródła zasilania.
Ochrona przewodu zasilającego
Należy sprawdzić, czy przewód zasilają
nie jest uszkodzony. Złe podłączenie lub uszkodzenie przewodu może
być przyczyną pożaru lub porażenia prądem elektrycznym. Nie wolno
ciągnąć za przewód, zginać go ani kłaść na nim ciężkich przedmiotów.
Przy odłączaniu przewodu należy chwycić mocno za wtyczkę. Chwytanie
za przewód grozi porażeniem prądem.
Nie wolno dotykać wtyczki mokrymi rękoma. Grozi to porażeniem
prądem.
cy jest dobrze podłączony i czy
Obce przedmioty i substancje
Należy uważać, aby do wnętrza urządzenia nie dostały się metalowe
przedmioty. Mogą one być przyczyną porażenia prądem lub
nieprawidłowej pracy urządzenia.
Należy uważać, aby do środka urządzenia nie dostał
płynne. Mogą one być przyczyną porażenia prądem lub nieprawidłowej
pracy urządzenia. Jeżeli do tego dojdzie, należy natychmiast odłączyć
urządzenie od zasilania i skontaktować się ze sprzedawcą.
Nie wolno rozpylać na powierzchnię urządzenia lub do jego wnętrza
środków owadobójczych. Zawierają one bowiem palne gazy, które mogą
zapalić się, jeżeli środek dostanie się do wnętrza urządzenia.
y się substancje
Naprawa
Użytkownik nie powinien podejmować prób samodzielnej naprawy
urządzenia. Jeżeli dźwięk nie jest odtwarzany, wskaźniki nie są
podświetlone, pojawi się dym lub wystąpi problem, który nie został
omówiony w niniejszej instrukcji, należy odłączyć
skontaktować się ze sprzedawcą lub autoryzowanym punktem
serwisowym. W przypadku napraw, demontażu lub przeróbek
wykonywanych przez osoby niewykwalifikowane, może dojść do
porażenia prądem elektrycznym lub uszkodzenia urządzenia.
Okres eksploatacji urządzenia można wydłużyć odłączając je od
zasilania, jeżeli nie będzie używane przez dłuższy czas.
przewód zasilający i
Getting StartedPlaying DiscsOther Operations
Informacje
dodatkowe
POLSKI
RQ TX111 1
27
75
Page 76

Működtetési útmutató
Afar:
Afrikai: 6570
Ajmara: 6589
Albán: 8381
Amhara: 6577
Angol: 6978
Arab: 6582
Asszámi: 6583
Azerbajdzsáni: 6590
Bashkir: 6665
Baszk: 6985
Belorusz: 6669
Bengáli; Bangla:
Bihari: 6672
Bolgár: 6671
Breton: 6682
Burmai: 7789
Butáni: 6890
Cseh: 6783
Dán: 6865
Eszperantó:
Észt:
Faröeri: 7079
Fidzsi: 7074
Finn: 7073
Francia: 7082
Fríz: 7089
Galíciai: 7176
Görög: 6976
Grönlandi: 7576
Grúz: 7565
Guarani: 7178
Gudzsaráti: 7185
Hausza: 7265
Héber: 7387
Hindi: 7273
Holland: 7876
Horvát: 7282
Hosza: 8872
Indonéz: 7378
Interlingua: 7365
Ír: 7165
Izlandi: 7383
Japán: 7465
Jávai: 7487
Jiddis: 7473
Joruba: 8979
Kambodzsai:
Kanadai: 7578
Kasmír: 7583
Katalán: 6765
Kazah: 7575
Kecsua: 8185
Kínai: 9072
Kirgíz: 7589
Koreai: 7579
Korzikai: 6779
Kurd: 7585
Laoszi: 7679
Latin: 7665
Lengyel: 8076
Lett: 7686
Lingala: 7678
Litván: 7684
Madagaszkári: 7771
Magyar: 7285
Makedón: 7775
Maláj: 7783
Malajalam: 7776
Máltai: 7784
Maori: 7773
Marati: 7782
Moldáv: 7779
Mongol: 7778
Nauru: 7865
Német: 6869
Nepáli: 7869
Norvég: 7879
Olasz: 7384
Oriya: 7982
Orosz: 8285
Örmény: 7289
Pandzsábi: 8065
Pastu: 8083
Perzsa: 7065
Portugál: 8084
Rétoromán:
Román: 8279
Skót gael: 7168
Sona: 8378
Spanyol: 6983
Suahéli: 8387
Svéd: 8386
Szamoai: 8377
Szanszkrit: 8365
Szerb: 8382
Szerb-horvát: 8372
Szeszotó: 8385
Szindhi: 8368
Szingaléz: 8373
Szlovák: 8375
Szlovén: 8376
Szomáli: 8379
Tadzsik: 8471
Tagalog:
Tamil: 8465
Tatár: 8484
Telugu: 8469
Thai: 8472
Tibeti: 6679
Tigrinya: 8473
Tonga: 8479
Török: 8482
Tui: 8487
Türkmén: 8475
Ukrán: 8575
Urdu: 8582
Üzbég: 8590
Vietnámi: 8673
Volapük: 8679
Walesi: 6789
Wolof: 8779
Zulu: 9085
Abház:
8277
8476
6678
6565
6566
6979
6984
7577
Távvezérlő
1 Kapcsolja ki/be a készüléket (B 9)
Getting StartedPlaying DiscsOther OperationsReference
2 Sleep (alvás) időzítő
Nyomja meg az [SLEEP]-et.
SLEEP 30 # SLEEP 60 # SLEEP 90 # SLEEP120
^-------------------------- OFF (Töröl) (--------------------------}
≥ A fennmaradó idő megerősítéséhez nyomja meg újra a gombot.
3 Válassza ki a csatornákat és a címszámokat, stb. / Írjon be számokat
(B 9, 12)
4 Töröl (B 12)
5 Forrás kiválasztása
[DVD]: Forrásként jelölje ki a lemezt (B 12)
[iPod]: Válassza ki azt iPod/iPhone eszközt forrásnak (B 16)
[RADIO, EXT-IN]: Válassza ki az FM tunert vagy a külső hangforrást.
6 A lejátszáshoz szükséges alapműveletek (B 12)
7 Mutasson egy lemezmenüt vagy egy lejátszási listát (B 12, 13)
8 Mutasson egy lemezmenüt vagy egy program listát (B 12, 13)
9 Válassza ki, vagy erősítse meg a menüadatokat / Képről képre
(B 12)
: Válassza ki a lejátszási módot / Állítsa be az ismétlés módot (B 12)
;
Válassza ki a hang módot / Válassza ki a hangszóró csatornát (B11)
< Válassza ki a környező hangeffekteket (B 11)
= TV műveletek
Irányítsa a távirányítót a Panasonic TV-re és nyomja meg a gombot.
[Í]: Kapcsolja ki/be a TV-t
[AV]: Változtassa meg a TV videóbemeneti módot
[r, VOL, s]: Állítsa be a TV hangerejét
Egyes modellek esetében nem működhet.
> Állítsa be a főegység hangerejét
? Némítsa el a hangot
A “MUTE” villog a főegység kijelzőjén, ha a funció be van kapcsolva.
≥
≥
Visszavonáshoz nyomja meg újra a gombot, vagy állítsa be a hangerőt.
≥ A némítás kikapcsol, ha az egység készenléti állapotba kapcsol.
@ Válassza ki manuálisan a rádióállomásokat (B 9)
A Válassza ki az előre beállított rádióállomásokat (B 9)
B Lépjen ki a kijelzőből
C A START menü megjelenítése (B 10)
D RDS szövegadatok megjelenítése / Képernyőmenü¸ mutatása
(B 9, 13)
Nyelvi kódok listája
(B 9, 10)
FM #AV #AUX #ARC #D-IN #USB
^-----------------------------------------------------------}
E Előző kijelzőhöz történő visszatérés (B 12)
F Információkat jelenít meg a főegység kijelzőjén (B 12)
G Kapcsolja be/ki a Whisper-mode Surround funkciót (B 11 )
Más Panasonic készülékkel való interferencia elkerülése
Előfordulhat, hogy a távirányítót használva másik Panasonic készülék is
működésbe lép.
A távirányító “REMOTE 2” módban való használatával más üzemmódban
működtetheti a készüléket.
A főegységnek és a távirányítónak ugyanabban a módban kell
lennie.
1 Nyomja meg az [RADIO, EXT-IN]5 gombot az “AUX” kiválasztásához.
2 Tartsa lenyomva a [1]; et a főegységen és a [2]-őt a távirányítón,
míg a főegységen “REMOTE 2” látható.
3 Tartsa lenyomva az [OK]9-t és a [2]-őt a távirányítón legalább
2 másodpercig.
“REMOTE 1”-re való visszakapcsoláshoz ismételje meg a fenti két lépést
a [2]-es helyett [1]-est nyomva.
Készülék
1 Készenléti állapot/bekapcsolás (Í/I)
Nyomja meg a bekapcsológombot készenléti módból való
bakapcsoláshoz, vagy fordítva. A főegység még készenléti
állapotban is felhasznál egy kisebb mennyiségű energiát.
2 Bekapcsolás jelző
A készülék bekapcsolásakor világít az állapotjelző.
3 Csatlakoztassa az iPod/iPhone eszközt (B 16)
4 Állítsa be a főegység hangerejét
5 Nyissa ki/zárja be a lemeztálcát (B 12)
6 Csatlakoztassa az USB eszközt (B 17)
7 Megjelenítés
“SRD” világít, ha a hang a surround hangszórókon keresztül szól.
(B 11)
8 Távvezérlőjel-érzékelő
9 Lejátszás leállítása
: A forrás kiválasztása
DVD/CD #USB #FM #AV #AUX #ARC #D-IN #IPOD
^---------------------------------------------------------------------------------------------}
; Lemez lejátszása
RQ TX111 1
MAGYAR
4
76
Page 77

TARTALOMJEGYZÉK
Kezdeti lépések
Tartozékok . . . . . . . . . . . . . . . . . . . . . . . . . . . . . . . . . . . . .2
Működtetési útmutató . . . . . . . . . . . . . . . . . . . . . . . . . . . .4
Gyors ismertető
1 lépés A hangszórók előkészítése . . . . . . . . . . . . . . 6
2 lépés Elhelyezés . . . . . . . . . . . . . . . . . . . . . . . . . . . . 7
3 lépés Csatlakoztatások . . . . . . . . . . . . . . . . . . . . . . 7
Hangszórók csatlakoztatása . . . . . . . . . . . . . . . .7
Rádió antenna csatlakoztatások . . . . . . . . . . . . .7
Audio és video csatlakoztatások . . . . . . . . . . . . .8
4 lépés AC hálózati kábel csatlakozás. . . . . . . . . . . . 8
5 lépés A távirányító előkészítése . . . . . . . . . . . . . . . 8
6 lépés EASY SETUP (EGYSZERŰ BEÁLL.) . . . . . . . 9
Rádióhallgatás . . . . . . . . . . . . . . . . . . . . . . . . . . . . . . . . . .9
Állomások automatikus beállítása . . . . . . . . . . . . . . . . . . . . 9
Az előre beállított csatornák hallgatása/megerősítése . . . . .9
Kézi hangolás . . . . . . . . . . . . . . . . . . . . . . . . . . . . . . . . . . . . 9
RDS adás . . . . . . . . . . . . . . . . . . . . . . . . . . . . . . . . . . . . . . . 9
A START menü használata . . . . . . . . . . . . . . . . . . . . . . .10
A forrás kiválasztása a távirányítóval . . . . . . . . . . . . . . . . . 10
TV vagy más eszköz hallgatása a készülék
hangszóróin keresztül . . . . . . . . . . . . . . . . . . . . . . . . .10
Hangeffektek élvezete az összes hangszóróból
Háttér hangeffektek. . . . . . . . . . . . . . . . . . . . . . . . . . . 11
Hangmód kiválasztása . . . . . . . . . . . . . . . . . . . . . . . . .11
Whisper-mode (halk üzemmód) térhangzás . . . . . . . .11
A hangszóró teljesítményszintjének kézi
beállítása . . . . . . . . . . . . . . . . . . . . . . . . . . . . . . . . . . .11
A hangszóró hangerejének módosítása
lejátszás közben . . . . . . . . . . . . . . . . . . . . . . . . . . . . .11
Lemezek lejátszása
Alap lejátszás. . . . . . . . . . . . . . . . . . . . . . . . . . . . . . . . . . 12
Egyéb lejátszási módok . . . . . . . . . . . . . . . . . . . . . . . . . 12
Lejátszás megismétlése . . . . . . . . . . . . . . . . . . . . . . . . . . 12
Program és random lejátszás . . . . . . . . . . . . . . . . . . . . . . 12
Navigációs menük használata . . . . . . . . . . . . . . . . . . . . 13
Adatlemezek lejátszása. . . . . . . . . . . . . . . . . . . . . . . . . . . 13
DVD-R/-RW (DVD-VR) lemezek lejátszása . . . . . . . . . . . 13
Képernyőmenük használata . . . . . . . . . . . . . . . . . . . . . . 13
Egyéb műveletek
VIERA Link használata “HDAVI ControlTM”-al. . . . . . . . 15
Mit jelent a VIERA Link “HDAVI Control”. . . . . . . . . . . . . . 15
A “HDAVI Control” alkalmazási lehetőségei . . . . . . . . . . . 15
Egyszerű vezérlés VIERA távvezérlővel
(“HDAVI Control 2 vagy újabb” esetén) . . . . . . . . . . . . . . . 15
Egyéb eszközök kezelése . . . . . . . . . . . . . . . . . . . . . . . . 16
A iPod/iPhone használata . . . . . . . . . . . . . . . . . . . . . . . . . 16
Lejátszás USB-eszközről. . . . . . . . . . . . . . . . . . . . . . . . . . 17
Tájékoztató
A lejátszási beállítások megváltoztatása . . . . . . . . . . . 17
DivX tudnivalók . . . . . . . . . . . . . . . . . . . . . . . . . . . . . . . . 19
DivX feliratok megjelenítése . . . . . . . . . . . . . . . . . . . . . . . 19
Lejátszható lemezek . . . . . . . . . . . . . . . . . . . . . . . . . . . . 20
Hangszórók lehetséges felszerelése . . . . . . . . . . . . . . . 21
Karbantartás . . . . . . . . . . . . . . . . . . . . . . . . . . . . . . . . . . 21
Hibaelhárítási útmutató. . . . . . . . . . . . . . . . . . . . . . . . . . 22
Engedélyek. . . . . . . . . . . . . . . . . . . . . . . . . . . . . . . . . . . . 24
Műszaki jellemzők . . . . . . . . . . . . . . . . . . . . . . . . . . . . . . 25
Biztonsági óvintézkedések. . . . . . . . . . . . . . . . . . . . . . . 27
Kezdeti lépésekLemezek lejátszásaEgyéb műveletekTájékoztató
FIGYELEM!
A KÉSZÜLÉK CD-JÁTSZÓJA LÉZER SUGARAT ÁLLÍT ELŐ.
HA A KÉSZÜLÉKET MÁSKÉPPEN HASZNÁLJA ÉS KEZELI, MINT
AHOGY AZ A KEZELÉSI ÚTMUTATÓBAN LE VAN ÍRVA,
VESZÉLYES SUGÁRZÁS LÉPHET FEL.
NE TÁVOLÍTSA EL A KÉSZÜLÉK BURKOLATÁT, ÉS NE
PRÓBÁLJA JAVÍTANI. A JAVÍTÁST BÍZZA MEGFELELŐ
SZAKEMBERRE.
FIGYELEM:
A TŰZVESZÉLY, ÁRAMÜTÉS VAGY TERMÉKSÉRÜLÉS
KOCKÁZATÁNAK CSÖKKENTÉSE ÉRDEKÉBEN
≥TILOS A KÉSZÜLÉKET ESŐ, NEDVESSÉG, CSÖPÖGŐ
VAGY FELFRÖCCSENŐ FOLYADÉKOK HATÁSÁNAK
KITENNI, TOVÁBBÁ ÜGYELNI KELL ARRA, HOGY
FOLYADÉKKAL TELI TÁRGY (PL. VÁZA) NE
KERÜLJÖN A KÉSZÜLÉK TETEJÉRE.
≥CSAK JAVASOLT TARTOZÉKOKAT HASZNÁLJON.
≥TILOS A BURKOLAT (VAGY HÁTLAP) ELTÁVOLÍTÁSA;
A KÉSZÜLÉK BELSEJÉBEN NINCSENEK A
FELHASZNÁLÓ ÁLTAL BEÁLLÍTHATÓ ALKATRÉSZEK.
A JAVÍTÁST BÍZZA MEGFELELŐ SZAKSZERVIZRE.
EZT A KÉSZÜLÉKET MÉRSÉKELT ÉGHAJLATI
KÖRÜLMÉNYEKHEZ TERVEZTÉK.
ÓVINTÉZKEDÉSEK!
≥ TILOS A KÉSZÜLÉKET KÖNYVESPOLCON, BEÉPÍTETT
SZEKRÉNYBEN VAGY MÁS ZÁRT TÉRBEN FELÁLLÍTANI.
GONDOSKODNI KELL A KÉSZÜLÉK MEGFELELŐ
SZELLŐZÉSÉRŐL. A FELMELEGEDÉS MIATTI ÁRAMÜTÉSEK
VAGY TŰZESETEK ELKERÜLÉSE ÉRDEKÉBEN ÜGYELNI
KELL ARRA, HOGY A SZELLŐZŐNYÍLÁSOKAT NE FEDJÉK EL
FÜGGÖNYÖK VAGY EGYÉB ANYAGOK.
≥ TILOS A KÉSZÜLÉK SZELLŐZŐNYÍLÁSAIT ÚJSÁGGAL,
TERÍTŐVEL, FÜGGÖNNYEL VAGY MÁS HASONLÓ TÁRGGYAL
ELTAKARNI.
≥ TILOS A KÉSZÜLÉKRE NYÍLT LÁNGOT (PL. ÉGŐ GYERTYÁT)
HELYEZNI.
≥ A HASZNÁLT AKKUMULÁTORT KÖRNYEZETBARÁT MÓDON
KELL ELTÁVOLÍTANI.
Használat közben a készülék érzékeli a mobiltelefonok által okozott
rádióhullám-interferenciát. Kérjük, növelje a készülék és a
mobiltelefon közötti távolságot, ha nyilvánvaló, hogy a zavart a
mobiltelefon okozza.
A készüléket a hálózati csatlakozóaljzat közelében, könnyen
hozzáférhető helyre telepítse.
A hálózati kábel csatlakozódugója maradjon könnyen kezelhető.
Annak érdekében, hogy a készüléket teljesen le tudja választani a
hálózatról, húzza ki a hálózati kábel csatlakozóját a fali aljzatból.
MAGYAR
RQ TX111 1
5
77
Page 78

1. lépés A hangszórók előkészítése
Összeszerelés, beállítás és kapcsolódás előtt győződjön meg róla, hogy minden szükséges tartozék megvan.
≥ A csavarokat gyermekektől tartsa távol, nehogy lenyeljék őket.
≥ A falra rögzítés lehetőségeiről ld. a 21 oldalt.
2 db Első hangsugárzó
2 db Első hangsugárzó
2 db Háttér hangsugárzó
2 db Tartó (kábelekkel)
4 db Tartó (kábelekkel)
4 db Talp
2 db Talp
8 db Csavar
16 db Csavar
[PT580]
[PT880]
[PT580]
[PT880]
[PT580]
]
]
[PT880]
[PT580]]
[PT880]
1
2
2
1
Csúsztassa a kábelt a horonyba.
Húzza meg erősen.
Helyezze el a kábelt
a bordák között.
Hagyjon szabadon kb. 120 mm-t.
Nyomja a horonyba.
Húzza meg erősen.
Dugja be teljesen.
i: Fehér
j: Kék vonal
Nyomja!
Hagyjon szabadon kb.
120 mm-t.
Kiveheti (és használhatja külön is) a
kábelt a hangsugárzótartóból. A kábel
visszaszereléséhez, lásd a 21 oldalt.
Csúsztassa a
kábelt a horonyba.
Nyomja a horonyba.
Húzza meg erősen.
Dugja be teljesen.
i: Fehér
j: Kék vonal
Nyomja!
Fűzze át a hangsugárzó kábelt a
tartótalpon.
Rögzítse a hangsugárzót.
Zsineg (nem tartozék)
Fűzze át a menetes szemen és a hangsugárzón, és kösse meg szorosan.
Hangszórók (hátsó)
Menetes szem
(nem tartozék)
Kb. 150 mm
Fal
[PT580] Első hangsugárzó
[PT880] Első és háttér hangszórók
Előkészületek
≥ A károsodások és karcolások elkerülése érdekében terítsen le egy
puha ruhát és ott végezze az összeszerelést.
≥ Az összeszereléshez Phillips-head csavarhúzót használjon (nem
tartozék).
Hangszórók összeszerelésének lehetséges módja
A hangszórók leesésének megakadályozása
≥ Be kell szereznie a megfelelő méretű gyűrűscsavarokat, hogy
illeszkedjenek a falakhoz vagy az oszlopokhoz, amihez hozzá lesznek
erősítve.
≥ Kérjen tájékoztatást egy képesített építési vállalkozótól a megfelelő
eljárást illetően, ha olyan betonfalra vagy felületre szerel, ami
lehetséges, hogy nem nyújt elegendő támasztékot. A nem megfelelő
rögzítés károsíthatja a falat vagy a hangszórókat.
RQ TX111 1
MAGYAR
6
78
Vigyázat
≥ Ne álljon a tartólapra. Figyeljen oda, ha gyerekek vannak a közelben.
≥ A hangszóró szállításakor tartsa az állványt és az alapot.
Page 79

2. lépés Elhelyezés
120°
60°
Középcsatorna
hangsugárzó
§2
Első hangsugárzó
(bal)
Extra
mélysugárzó
§3
Háttér hangsugárzó
(bal)
Háttér
hangsugárzó
(jobb)
Első hangsugárzó
(jobb)
Készülék
§1
FM ANT
(75 )
Ragasztószalag
Készülék (hátsó)
FM szobaantenna
(tartozék)
Ott rögzítse az antennát,
ahol a legjobb a vétel.
FM ANT
(75 )
Használjon kültéri antennát, ha az rádió vétele gyenge.
≥ Csatlakoztassa le az antennát, mikor nem használja az egységet.
≥ Ne használja a kültéri antennát elektromos vihar esetén.
Készülék (hátsó)
75 ≠ koaxiális
kábel
(nem tartozék)
Kültéri URH (FM)
antenna (Használjon
televízióantennát
(nem tartozék))
Az antennát csak
szakképzett szerelő
telepítse.
A hangszórók elhelyezése befolyásolhatja a basszust és a hangmezőt.
Figyeljen az alábbiakra:
≥ Vízszintes és biztos alapra helyezze a hangszórókat.
≥ Ha túl közel helyezi a hangszórókat a földhöz, falakhoz, vagy a
helyiség sarkaihoz, a basszus erősebb lehet. Takarja le a falakat és az
ablakokat vastag függönyökkel.
[Megjegyzés]
A megfelelő szellőzés érdekében helyezze a hangszórókat legalább
10 mm-re a rendszertől.
Összeállítási példa (“Térhat. elrend. (Ajánlott)”: Standard surround
elrendezés)
Helyezze az első, középső és háttér hangszórókat körülbelül
ugyanolyan távolságra az ülőhelytől. A diagramon látható elhelyezési
szögek megközelítőleges értékek.
§1 A megfelelő szellőzés érdekében hagyjon legalább 5 cm szabad
helyet minden oldalon.
§2 Tegye egy fogasra vagy egy polcra. A hangszóró vibrálása
megzavarhatja a képet, ha közvetlenül a TV készülékre helyezik.
§3 Tegye a földre, a TV jobb vagy bal oldalán, vagy egy erős polcra,
hogy elkerülje a vibrációt. Hagyjon szabadon körülbelül 30 cm-t a
TV készüléktől.
A helyiség elrendezésétől függően előfordulhat, hogy Ön az összes
hangszórót elől szeretné használni (“Elsõ elrend. (Alternatív)”)
(B 9, EGYSZERŰ BEÁLL. beállítások).
3. lépés Csatlakoztatások
Csatlakoztatás előtt kapcsolja ki a berendezéseket, és olvassa el a
megfelelő használati utasításokat.
Ne csatlakoztassa az AC hálózati kábelt, míg az összes
többi csatlakozás nincs kész.
Hangszórók csatlakoztatása
1
Figyeljen a hangszóró típusára és a csatlakozó színére, amikor
elhelyezi a hangszórókat.
Készülék (hátsó)
Az azonos színű végeket kapcsolja össze.
Érdemes a hangszóró kábelének matricáit használnia, amikor összeköti
a kábeleket.
Hangszórók (hátsó)
Dugja be teljesen a kábelt, ügyelve arra, hogy annak csak a szigetelt
részét csatlakoztassa.
i: Fehér
j: Kék vonal
≥ Ügyeljen rá, hogy ne zárja rövidre és ne fordítsa meg a hangsugárzó
vezetékek polaritását, mert ez a hangsugárzók károsodását
okozhatja.
Rádió antenna csatlakoztatások
2
Beltéri antenna használata
Kezdeti lépésekGyors ismertető
Megjegyzések a hangszórók használatáról
≥Csak a tartozék hangszórókat használja
Eltérő hangszórók használata károsíthatja az egységet, és a
hangminőséget is rontja.
≥ Károsíthatja a hangszórókat és csökkentheti az élettartamukat a
tartós, nagy hangerőn történő lejátszás.
≥ Csökkentse a hangerőt a következő estekben, hogy elkerülje a
károsodást:
– A hangszórókból torz hang hallatszik.
– Ha a hangszórók visszhangosak a lemezjátszó, FM adás, valamint
az oszcillátorból, teszt lemezből vagy elektromos eszközből
származó folyamatos jelek miatt.
– Hangminőség beállításánál.
– Ha be- ill. kikapcsolja az egységet.
Ha szokatlan színeződés jelentkezik a TV készüléken
A középső hangszórót TV-készülékhez közeli használatra tervezték,
azonban a képminőséget befolyásolhatja bizonyos készülékeknél és
beállítás kombinációknál.
Ha ez előfordulna, kapcsolja ki a TV-készüléket körülbelül 30
percre.
A TV-készülék demagnetizáló funkciója általában megoldja a problémát.
Ha a probléma továbbra is fennáll, helyezze a hangszórókat távolabb a
TV-től.
Vigyázat
≥ A főegységet és a tartozék hangszórókat csak az itt látható
összeállításban használja. Ha nem így tesz, az az erősítő és/
vagy a hangszórók károsodásához vezethet és tűzveszélyt
okozhat. Kérje képzett szakember segítségét, ha károsodás
következett be, vagy ha hirtelen változást észlel a
teljesítményben.
Ne próbálja meg más módszerrel falra rögzíteni a hangszórókat,
≥
mint ahogyan ebben a használati utasításban szerepel.
Vigyázat
Ne érintse meg a hangszórók elülső borítását. Az oldalánál fogja meg.
[PT880]
Wireless élvezheti a háttér hangot egy
Panasonic vezeték nélküli készülék
használatával (SH-FX71).
A részletekért lásd a csatlakoztatható Panasonic
vezeték nélküli készülék használati útmutatóját.
A részletekért lásd a csatlakoztatható Panasonic
vezeték nélküli készülék használati útmutatóját.
Kültéri antenna használata
MAGYAR
RQ TX111 1
7
79
Page 80

Audio és video csatlakoztatások
AV
AV1
SCART-kábel
§1
(nem tartozék)
Televízió
Készülék (hátsó)
pl. [PT580]
Háztartási fali konnektorhoz
Készülék (hátsó)
Hálózati csatlakozókábel
(tartozék)
R6/LR6, AA
Nyomja be és emelje fel.
Helyezze vissza a fedőlapot.
Az elemeket úgy helyezze be, hogy a polaritás (i és j) egyezzen
meg a távvezérlőben levő elemekkel.
3
Példa az alapbeállításra
§1 Ez a kapcsolat lehetővé teszi a TV audio lejátszását a házimozi
rendszerén keresztül (B 10, A forrás kiválasztása a
távirányítóval). Válassza ki a megfelelő audio kimenetet
(pl. Monitor) a TV-n.
A képminőség javítása érdekében megváltoztathatja a SCART (AV)
csatlakozóból származó videojel kimenetét TV készülékének
megfelelően.
≥ Válassza a “S-VIDEÓ”-t, az “RGB 1”-et vagy az “RGB 2”-őt az
“VIDEÓ–KI SCART” VIDEÓ menü-ből (B 18).
≥ Ha a HDMI kábel és a SCART-kábel is csatlakoztatva van, a SCART
(AV) csatlakozóról nem érkeznek RGB kimenetek.
Egyéb videócsatlakoztatás
[\\\\\\\\\\\HDMI\AV\OUT\\\\\\\\\]
Ez a csatlakoztatás eredményezi a legjobb képminőséget.
Csatlakoztassa össze a főegység HDMI AV OUT csatlakozóját a TVn lévő HDMI AV IN csatlakozóval a HDMI kábel (nem tartozék)
segítségével.
≥ Nem ARC kompatibilis TV esetén végezze el a pótlólagos
hangcsatlakoztatást.
≥ Állítsa a “VIDEOPRIORITÁS”–t “BE” (B 18, HDMI menü) helyzetbe.
≥ Válassza a “VIDEOFORMÁTUM” pontot a 4. menü (HDMI) alatt
(B 14).
VIERA Link “HDAVI Control”
Ha a Panasonic TV-je VIERA Link kompatibilis, akkor a TV működését
szinkronizálhatja a házimoziéval illetve fordítva (B 15, VIERA Link
használata “HDAVI Control
ARC (Audio Return Channel)
ARC kompatibilis TV esetén a TV-ből érkező hangot pótlólagos
hangcsatlakoztatás nélkül lehet továbbítani a készülékbe a HDMI
kábelen keresztül.
≥ További részleteket a TV kezelési útmutatójában talál.
[Megjegyzés]
Használjon (a borítón látható) HDMI logóval ellátott High Speed HDMI
≥
kábeleket.
≥ Nem-HDMI-kompatibilis kábeleket nem lehet használni.
≥ Panasonic HDMI kábel használata javasolt.
Ajánlott részegységek:
RP-CDHS15 (1,5 m), RP-CDHS30 (3,0 m), RP-CDHS50 (5,0 m), stb.
≥ A több HDMI csatlakozóval rendelkező TV esetében olvassa el a TV
használati utasítását annak megállapításához, hogy melyik
csatlakozóra csatlakoztasson.
A videócsatlakoztatás ne a VCR közbeiktatásával történjen.
A másolásvédelem miatt ugyanis előfordulhat, hogy nem lesz megfelelő
a képek megjelenítése.
Egyéb hangcsatlakoztatások
[\\\\\\DIGITAL\AUDIO\IN\OPTICAL\\\\\\]
A digitális optikai audiókábel
képes a Dolby Digital hang dekódolására.
Az optikai kábellel (nem tartozék) a készülék DIGITAL AUDIO IN
OPTICAL aljzatát és a TV OPTICAL OUT aljzatát kell összekötni.
[Megjegyzés]
A digitális optikai audiókábel vagy HDMI
digitális berendezésből érkező hang típusa szerint végezze el a
beállításokat (B 10).
§2 A hangkimenet szükséges beállításaihoz tanulmányozza az adott
eszközök használati útmutatóját.
§3 Ezzel a csatlakozással csak Dolby Digital és PCM lejátszása
MAGYAR
8
80
lehetséges.
[\\\\\\\\\AUX\\\\\\\\]
Ezt a csatlakoztatást akkor alkalmazza, ha a TV-n nincs OPTICAL OUT
aljzat, vagy ha a készülék DIGITAL AUDIO IN OPTICAL aljzatát az STB
használja.
Az audiókábellel (nem tartozék) kösse össze a készülék AUX
aljzatát és a TV AUDIO OUT aljzatát.
RQ TX111 1
TM
”-al).
§2, 3
§2, 3
csatlakoztatása esetén a készülék
§2, 3
kábel bekötése után a
Set top box (kábel/műhold/Blu-ray lemez lejátszó stb.)
csatlakoztatása
Ezen a csatlakoztatáson keresztül továbbětható a készülékre az STB
stb. eredeti surround hangja.
A digitális optikai kábellel (nem tartozék) kösse össze a készûlék
DIGITAL AUDIO IN OPTICAL aljzatát és az STB OPTICAL OUT
aljzatát.
≥ Ha a DIGITAL AUDIO IN OPTICAL aljzat a TV hang miatt már foglalt,
akkor egy audiókábellel csatlakoztassa a TV hangot az AUX aljzathoz.
[Megjegyzés]
A különböző hangforrásokat (például Blu-ray lejátszó, DVD felvevő,
VCR stb.) a TV rendelkezésre álló bemeneteihez kell csatlakoztatni, a
TV kimenetet pedig a készülék SCART (AV), AUX, HDMI AV OUT vagy
DIGITAL AUDIO IN OPTICAL aljzatához kell kötni.
4. lépés AC hálózati kábel csatlakozás
AC IN
Energiatakarékosság
A főegység még készenléti üzemmódban is felhasznál egy kisebb
mennyiségű energiát (kb. 0,1 W). Energia megtakarítás céljából, ha
hosszabb ideig nem használja az egységet, húzza ki az AC hálózati
konnektorból.
Néhány memória egység újbóli beállítása válhat szükségessé a
főegység csatlakoztatása után.
[Megjegyzés]
A tartozék AC hálózati kábelt csak a főegységhez használja.
Ne használja más berendezéssel. Ne használjon más vezetékeket a
főegységhez.
5. lépés A távirányító előkészítése
Elemek
VIGYÁZAT
Robbanás veszély fordulhat elő, ha az elemeket nem megfelelően
helyezték be. Csak megegyező típusú, vagy megfelelő, a gyártó által
ajánlott elemmel cserélje ki.
A gyártó előírásai szerint járjon el a használt elemek
hulladékkezelésénél.
≥ Használjon alkáli vagy mangán elemeket.
≥ Ne melegítse, és ne tegye ki nyílt lángnak.
≥ Ne hagyja az eleme(ke)t hosszabb ideig közvetlen napsütésnek kitett
autóban zárt ajtókkal és ablakokkal.
Ne:
≥ keverje össze a régi és az új elemeket.
≥ használjon különböző típusú elemeket egyszerre.
≥ szerelje szét és ne zárja rövidre.
≥ próbálja meg újratölteni az alkáli és a mangán elemeket.
≥ használjon külsőleg sérült elemeket.
Az elemek nem megfelelő kezelése elektrolitos szivárgást okozhat, ami
súlyosan károsíthatja a távirányítót.
Távolítsa el az elemeket, ha hosszabb ideig nem használja a
távirányítót. Tárolja hűvös, napfénytől védett helyen.
Használat
Úgy irányítsa a távvezérlőjel-érzékelőre (B 4), hogy semmi ne legyen
útban.
Hatótávolság: Legfeljebb kb. 7 m
Szögtartomány: Legfeljebb kb. 20° fel és le, kb. 30° balra és jobbra
Page 81

6. lépés EASY SETUP
BEÁLLÍTÁS
FŐ
LEMEZ
VIDEÓ
AUDIÓ
MEGJELENÍTÉS
HDMI
EGYÉB
VISSZA
Menü
(EGYSZERŰ BEÁLL.)
A EGYSZERŰ BEÁLL. képernyő segít a szükséges
beállítások elvégzésében.
Előkészületek
Kapcsolja be a TV készülékét és válassza ki a megfelelő video
bemeneti módot (pl. VIDEÓ 1, AV 1, HDMI stb.) hogy megfeleljen az
egység kapcsolatainak.
≥ A TV video bemenet megváltoztatásához olvassa el a használati
útmutatót.
≥ A távirányító néhány alapvető TV műveletet is végre tud hajtani (B 4).
Nyomja meg a [Í]1 gombot az egység
1
bekapcsolásához.
≥ Amikor a EGYSZERŰ BEÁLL. képernyő automatikusan
megjelenik, ugorja át a 2-től 7-ig lépéseket.
Nyomja meg a [DVD]5 gombot a “DVD/CD”
2
kiválasztásához.
Nyomja meg a [START]C gombot a START menü
3
kijelzéséhez.
Nyomja meg a [3, 4]9 gombot a “Beállítások”
4
kiválasztásához, és nyomja meg az [OK]9 gombot.
Nyomja meg a [3, 4]9 gombot az “EGYÉB”
5
kiválasztásához, majd nyomja meg az [OK]9-t.
Nyomja meg a [3, 4]9 gombot az “EGYSZERŰ
6
BEÁLL.” kiválasztásához, majd nyomja meg az
[OK]9-t.
Nyomja meg a [OK]9 -t a “BEÁLLÍTÁS”
7
kiválasztásához.
Nyomja meg a [3, 4]9 gombot a “Igen”
8
kiválasztásához, majd nyomja meg az [OK]9-t.
Kövesse az üzeneteket, és végezze el a beállításokat
9
a [3, 4, 2, 1]9 gombbal, és az [OK]9-val.
(B lent, EGYSZERŰ BEÁLL. beállítások)
Nyomja meg az [OK]9 gombot a EGYSZERŰ BEÁLL.
10
befejezéséhez.
EGYSZERŰ BEÁLL. beállítások
≥Nyelv
Válassza ki a menü képernyő nyelvét.
≥TV képaránya
Válassza ki a TV készülékének megfelelő megjelenítést.
≥Hangszóró-elrend.
Válassza ki az “Térhat. elrend. (Ajánlott)” módot vagy a “Elsõ elrend.
(Alternatív)” módot a hangszórói elrendezésétől függően
(B 7, Elhelyezés).
≥Hangszóró ell.
Figyeljen a hangszórók teljesítményére, hogy meggyőződjön a
hangszórók kapcsolatáról.
≥Hangszóró kimenet
Végezze el a háttér hang beállítást a hangszóró teljesítményéhez.
≥TV audió
Válassza ki az audio bemeneti kapcsolatot a TV készüléken.
Az AUX csatlakozáshoz (B 8): Válassza az “AUX”-ot.
HDMI csatlakoztatáshoz (B 8): “ARC” kiválasztása.
DIGITAL AUDIO IN OPTICAL csatlakoztatáshoz (B 8): “DIGITAL IN”
kiválasztása.
SCART (AV) csatlakoztatáshoz (B 8): “AV” kiválasztása.
Ez lesz a TV audió beállítás a VIERA Link “HDAVI Control”-hoz.
(B 15)
[Megjegyzés]
≥ Ha az egység egy “HDAVI Control 3 vagy újabb verzió” kompatibilis
TV-hez HDMI kábellel van csatlakoztatva, a menü nyelve és a TV
megjelenési információját elő lehet hívni a VIERA Link-en keresztül.
≥ Ha az egység a “HDAVI Control 2” kompatibilis TV-hez HDMI kábellel
van csatlakoztatva, a menü nyelvi információját elő lehet hívni a
VIERA Link-en keresztül.
A EGYSZERŰ BEÁLL. beállítások módosítása a lejátszó beállításoknál
≥
is lehetséges (pl. nyelv, TV képerny és TV hang
(B
17)).
Rádióhallgatás
Állomások automatikus beállítása
Maximum 30 csatornát lehet beállítani.
Nyomja meg a [RADIO, EXT-IN]5 gombot az “FM”
1
kiválasztásához.
Nyomja meg a [MENU]7-t.
2
Minden alkalommal, mikor lenyomja a gombot:
LOWEST (LEGALACSONYABB) (gyári beállítás):
Az automatikus beállítás a legalacsonyabb frekvenciával kezdhető.
CURRENT (AKTUÁLIS):
Az automatikus beállítás az aktuális frekvenciával kezdhető.
§ A frekvencia megváltozatásához lásd “Kézi hangolás” (B lent).
Nyomja meg és tartsa lenyomva az [OK]9-t.
3
Engedje el a gombot, mikor a “FM AUTO” felirat megjelenik.
A kereső elkezdi az összes olyan csatornának a beállítását, amiket
fogni képes, növekvő sorrendben.
≥ “SET OK” jelenik meg, mikor az állomások beállítása kész és a rádió
az utolsóként beállított csatornára hangolódik.
≥ “ERROR” jelenik meg, ha az automatikus előbeállítás sikertelen.
Ilyenkor kézzel állítsa be a csatornákat (B lent).
Az előre beállított csatornák hallgatása/
megerősítése
Nyomja meg a [RADIO, EXT-IN]5 gombot az “FM”
1
kiválasztásához.
Nyomja meg a számgombokat egy csatorna
2
kiválasztásához.
≥ Kétszámjegyű szám kiválasztásá hoz
pl. 12: [S10]3 B [1] B [2]
Vagy nyomja le a [X, W]A gombokat.
≥ Az FM beállítás a TV képernyőn is látható.
Erős zaj esetén
Nyomja le és tartsa lenyomva a [PLAY MODE]: -ot hogy a “MONO”
felirat jelenjen meg.
Az üzemmód törléséhez ismét nyomja meg és tartsa lenyomva a
gombot, amíg meg nem jelenik az “AUTO ST” kijelzés.
≥ A beállítás a frekvencia beállításával is törlődik.
Kézi hangolás
Nyomja meg a [RADIO, EXT-IN]5 gombot az “FM”
1
kiválasztásához.
Nyomja meg a [SEARCH6, SEARCH5]@ gombot a
2
frekvencia kiválasztásához.
≥ Az automata hangolás elkezdéséhez nyomja le és tartsa
lenyomva a [SEARCH6, SEARCH5]@ gombot amíg a
készülék megkezdi a frekvencia keresését. A hangolás leáll, mikor
a készülék csatornát talál.
Állomások manuális beállítása
Maximum 30 csatornát lehet beállítani.
1 Rádióközvetítés hallgatása közben
Nyomja le a [OK]9-t.
2 Amíg a frekvencia villog a kijelzőn
Nyomja le a számgombokat a csatorna kiválasztásához.
≥ Kétszámjegyű szám kiválasztásához
pl. 12: [S10]3 B [1] B [2]
Vagy nyomja meg az [X, W]A gombot, majd a [OK]9 gombot.
A korábban mentett állomás törlődik, ha egy másik állomást ugyanazon
a csatornán tárol el.
RDS adás
Az egység képes megjeleníteni a rádió adatrendszerrel átvitt adatokat
(RDS), ami néhány területen elérhető.
Ha az éppen hallgatott állomás RDS jeleket továbbít, “RDS” jelenik meg
a kijelzőn.
Rádióközvetítés hallgatása közben
Nyomja le a [FUNCTIONS]D gombot a szöveges adat kijelzéséhez.
Minden alkalommal, mikor lenyomja a gombot:
PS: Program szerviz
PTY: Program típus
FREQ: Frekvencia kijelzés
§
Kezdeti lépésekGyors ismertető
MAGYAR
RQ TX111 1
9
81
Page 82

PTY kijelzése
DVD/CD Házimozi
Bemenet választás
Beállítások
Hang
DVD/CD Házimozi
Bemenet választás
Lemez lejátszása
TOP MENU (DVD)
MENU (DVD)
Lejátszás/belépés a menübe
NEWS VARIED FINANCE COUNTRY
AFFAIRS POP M CHILDREN NATIONAL
INFO ROCK M SOCIAL A OLDIES
SPORT M.O.R. M
EDUCATE LIGHT M PHONE IN DOCUMENT
DRAMA CLASSICS TRAVEL TEST
CULTURE OTHER M LEISURE ALARM
SCIENCE WEATHER JAZZ
§“M.O.R. M”=Middle of the road music (Utazás közben hallgatható zene)
[Megjegyzés]
Getting StartedPlaying DiscsOther OperationsReference
A RDS kijelzés lehet, hogy nem érhető el, ha rossz a vétel.
§
RELIGION FOLK M
A START menü használata
A START menüben kiválaszthatja a hangeffekteket, a kívánt forrást,
módosíthatja a beállításokat, hozzáférhet a lejátszáshoz/menükhöz stb.
Nyomja meg a [START]C gombot a START menü
1
kijelzéséhez.
≥ A VIERA Link “HDAVI Control” használata esetén a START menü
megjelenésekor a TV is bekapcsol.
pl.
Nyomja meg a [3, 4]9 gombot egy tétel
2
kiválasztásához, majd nyomja meg az [OK]9-t.
≥ Nyomja le a [START]C gombot a kilépéshez.
Nyomja meg a [3, 4]9 gombot a beállítás
3
elvégzéséhez, majd nyomja meg az [OK]9-t.
Ha a “Bemenet választás”-t választja
Kiválaszthatja a kívánt forrást a menüből.
≥ DVD/CD (B 12), FM RÁDIÓ (B 9), AV
§1
(B lent), DIGITAL IN
ARC
§1 “(TV)” jelenik meg az “AV”, “AUX”, “ARC” vagy “DIGITAL IN” mellett,
azt jelezve, hogy a TV hangbeállítása VIERA Link “HDAVI Control”
(B 15).
§2 “(STB)” jelenik meg a “DIGITAL IN” mellett, azt jelezve, hogy az STB
hangbeállítása VIERA Link “HDAVI Control” (B 15).
A “Beállítások”
Itt módosíthatók a készülék beállításai. (B 17)
Mikor a “Hang”-t választja
Kiválaszthatja a hangminőség beállításait
(B 11, EQ (Hangszínszabályozó)).
Egyéb választható tételek
A megjelenő tételek hordozótól és forrástól függően változnak.
Ha egy lemez töltődik vagy egy USB eszköz van csatlakoztatva, akkor is
elérheti a lejátszást vagy a menüket a START menüből.
pl. [DVD-V]
Mikor a képernyővezérlő panel megjelenik
pl. [DVD-V] (ha a “Lemez lejátszása”-et választja a START menüben)
Az alábbi vezérlőkkel irányíthatja a lejátszást.
kiválasztásakor
§1, 2
A forrás kiválasztása a távirányítóval
Nyomja meg Az alábbiak kiválasztásához
[DVD]5 DVD/CD
[iPod]5 IPOD (B 16)
[RADIO,
EXT-IN]5
RQ TX111 1
MAGYAR
10
82
Minden alkalommal, mikor lenyomja a gombot:
FM:
AV:
AUX:
ARC:
D-IN:
USB:
(B 9)
Audio bemenet a SCART (AV)
csatlakozóvégen keresztül.
Audio bemenet az AUX csatlakozóvégen
keresztül.
Hangbemenet a HDMI AV OUT aljzaton
keresztül.
Hangbemenet a DIGITAL AUDIO IN
OPTICAL aljzaton keresztül. (B jobb)
(B 17)
§1
(B lent), AUX§1 (B lent),
(B lent), USB (B 17), iPod (B 16)
[Megjegyzés]
Az adott források kiválasztásakor erősítse meg azt, hogy a hang a
készüléken található SCART (AV), AUX, HDMI AV OUT vagy DIGITAL
AUDIO IN OPTICAL aljzatba csatlakozik (B 8). Vegye le minimumra a TV
hangerejét, majd állítsa be a hangerőt a készüléken.
TV vagy más eszköz hallgatása a
készülék hangszóróin keresztül
Előkészületek
≥ Gondoskodjon a készülék és a TV vagy egyéb eszköz közötti
audiókapcsolat meglétéről. (B 8)
≥ Kapcsolja be a TV-t és/vagy egyéb eszközt.
A [RADIO, EXT-IN]5 megnyomásával válassza ki a készülék
és a TV vagy más eszköz összekötéséhez használandó
forrást.
≥ A surround hangeffektek és hangmód megváltoztatásához a
“Hangeffektek élvezete az összes hangszóróból” ad segítséget (B 11)
≥ VIERA Link kompatibilis Panasonic TV esetén az egyéb kapcsolódó
funkciók a “VIERA Link használata “HDAVI Control
részben találhatók.
A digitális hangbemenet beállításai
A kiválasztást a készülék DIGITAL AUDIO IN OPTICAL és HDMI AV OUT
aljzatából érkező hang típusa szerint kell elvégezni.
A “D-IN” és “ARC” választót kell beállítani.
≥ Az aláhúzások a gyári előbeállításokat jelentik.
Beállítási lehetőségek
Mód Beállítás
DUAL: (Csak Dolby Dual Mono esetén)
DRC:
(Dynamic
Range
Compression)
PCM FIX: – ON
§3
:
STB
(CABLE/SAT
AUDIO)
Nyomja meg többször a [RADIO, EXT-IN]5 gombot a
1
“D-IN” vagy “ARC” kiválasztásához.
Nyomja meg a [PLAY MODE]: gombot, majd a [3, 4]9
2
gombot a mód kiválasztásához.
A kiválasztott mód megjelenítése közben
3
Nyomja meg a [2, 1]9 gombot és válassza ki a kívánt
– MAIN+SAP
– MAIN
– SAP
“SAP” = Másodlagos Audió Program
≥ A “MAIN” vagy “SAP” hang hallgatásához állítsa a
PCM FIX módot “OFF” helyzetbe.
– ON
A hangos és a halk hangok közötti különbség
csökkentésével alacsony hangerő mellett is
biztosítja a hang tisztán érthetőségét. Éjszakai
filmnézéshez kényelmes megoldás. (Csak Dolby
Digital esetén.)
– OFF
A jel teljes dinamikus tartománya megmarad.
Akkor választandó, ha csak PCM jelek érkeznek.
– OFF
Akkor választandó, ha Dolby Digital és PCM jelek
érkeznek.
≥ Valós 5.1 csatornás hang érkezése esetén “OFF”
választandó.
– SET
Akkor választandó, ha beállítása szerint a készülék
“D-IN” állásba kapcsol, amikor egy HDMI útján
csatlakoztatott STB bemeneti csatornája kerül
kiválasztásra a TV-n (B 15, STB hang beállítása
VIERA Link “HDAVI Control” esetén).
– OFF
A beállítás elvetéséhez.
(sztereó hang)
beállítást.
§3 Csak “D-IN” kiválasztása esetén.
Fontos, hogy a beállítás végzésekor az eszköz (STB stb.) bemeneti
csatornája legyen kiválasztva a TV-n.
Az eszközt HDMI kábellel kell csatlakoztatni a Panasonic TV-hez, a
készülékhez pedig digitális optikai audiókábellel.
≥Ez a funkció nem müködik, ha “DIGITAL IN” van kiválasztva a “TV
AUDIÓ” pontnál (B 19).
TM
”-al” (B 15)
Page 83

Hangeffektek élvezete az összes
pl.
AUDIÓ-HANGSZ. BEÁLL. -TESZTHANG
HANGSZÓRÓ
BAL
KÖZÉP
JOBB
JOBB HÁTSÓ
VÁGÁS SZINT
− −
0dB
− −
0dB
hangszóróból
≥ A következő hangeffektusok esetleg nem diszponibilisek vagy nem
keltenek semmilyen hatást semmiféle hangforrással.
≥ A hangminőség romlását tapasztalhatja, ha ezeket a hangeffekteket
bizonyos hangforrásokkal használja. Ilyen esetben kapcsolja ki a
hangeffekteket.
[Megjegyzés]
A surround hangeffektus, a Whisper Surround vagy a hangmódok
módosításakor a beállítás megjelenik a TV képernyon, ha “DVD/CD” vagy
“USB” a kiválasztott forrás a videolejátszás közben.
Háttér hangeffektek
Nyomja meg a [SURROUND]<-ot.
Minden alkalommal, mikor lenyomja a gombot:
STANDARD:
Kimeneti hang, ahogy az felvételre/kódolásra került. A hangszóró
kimenet a forrástól függően változik.
MULTI-CH:
Az elülső hangszórókból érkező hangokat is ugyanúgy élvezheti, mint a
háttér hangszórókból érkezőket, 2-csatornás hangok vagy nem-háttér
hangok lejátszása esetén is.hátsó
MANUAL: (B lent)
A “MANUAL” kijelzése alatt nyomja meg a [2, 1]9
gombot más háttérhang módok kiválasztásához.
Minden alkalommal, mikor lenyomja a [2, 1]9 gombot:
DOLBY PLII MOVIE
A Dolby Surround szabvány szerint rögzített mozikhoz és videókhoz
(kivéve [DivX]).
DOLBY PLII MUSIC
5.1-csatornás effekteket ad a sztereo forrásokhoz. (kivéve [DivX])
S.SRD
A sztereó források hangja minden hangszóróból élvezheto.
STEREO
Minden hangforrás esetében a hang az elülső hangszórókon és a
mélysugárzón fog megszólalni.
Javasolt opciók TV audio- vagy sztereóforrások
hangszórókon történő lejátszására:
≥ DOLBY PLII MOVIE ≥ DOLBY PLII MUSIC ≥ S.SRD
Kigyullad az “SRD” a főegység kijelzőjén, amikor a háttér hangszórók
leadják a hangot.
Amikor a jel DTS vagy Dolby Digital, a “/DTS” vagy “/DOLBY DIGITAL”
szintén kijelzésre kerül.
Hangmód kiválasztása
Nyomja meg a [SOUND]; gombot egy hangzás mód
1
kiválasztásához.
Minden alkalommal, mikor lenyomja a gombot:
EQ: Hangszínszabályozó
SUBW LVL: Mélysugárzó Szint
H.BASS: Harmonikus Basszus
C.FOCUS: Közép Fókusz
A kiválasztott mód kijelzése közben nyomja meg a
2
[2, 1]9 gombot a beállítások elvégzéséhez.
A következőket vegye figyelembe az egyes hangeffektek
beállításánál.
EQ (Hangszínszabályozó)
Kiválaszthatja a hangminőség beállításait.
Minden alkalommal, mikor lenyomja [2, 1]9:
FLAT: Törlés (nincs hozzáadott effekt).
HEAVY: Rockzenéhez.
CLEAR: Tisztábban hallhatóak a magasabb hangok.
SOFT: Háttérzenéhez.
SUBW LVL (Mélynyomó Szint)
Beállíthatja a basszust. Az egység automatikusan kiválasztja a
legmegfelelőbb beállítást a lejátszási forrásnak megfelelően.
LEVEL 1 ,# LEVEL 2 ,# LEVEL 3 ,# LEVEL 4
^---------------------------------------------------------------------------J
≥ A beállítás mentve - minden alkalommal, mikor ugyanazt a
típusú forrást használja, újra előhívható.
H.BASS (Harmonikus Basszus)
Ezzel úgy javítható az alacsony frekvenciájú hang minősége,
hogy a mély basszusok is tisztán hallhatók még akkor is, ha a
helyiség akusztikája nem optimális.
ON ,------. OFF
≥ A készülék megőrzi a beállítást, és az ugyanabból a forrásból
történő lejátszáskor mindig ezt alkalmazza.
C.FOCUS (Közép Fókusz)
(Főleg a középső csatorna hangját tartalmazó audió
lejátszásakor, illetve DOLBY PLII (B bal) kiválasztásakor
hasznos.)
A középső hangszóró hangját úgy alakíthatja, mintha a TV
készülékből jönne.
ON,------.OFF
Whisper-mode (halk üzemmód) térhangzás
Ezzel kis hangerőnél is javítható a hanghatás. (Késő este különösen
hasznos.)
Nyomja meg a [W.SRD]G gombot.
Minden alkalommal, mikor lenyomja a gombot:
ON ,--. OFF
A hangszóró teljesítményszintjének kézi beállítása
Előkészületek
≥ Kapcsolja be a TV készülékét és válassza ki a megfelelő video bemenet
módot a kép megjelenítéséhez.
≥ Nyomja meg a [r, VOL, s]> gombot a hangerő normál szintjének
beállításához.
≥ Nyomja meg a [DVD]5 gombot a “
≥ Válassza a “TESZTHANG” a “HANGSZ. BEÁLL.”-ből az AUDIÓ
menü-be (B 18).
Nyomja meg az [OK]9-t a hangzásteszt módba való
1
belépéshez.
A teszt hangerő minden hangszórón lejátszásra kerül, a következő
sorrendben.
BAL, KÖZÉP, JOBB, JOBB HÁTSÓ, BAL HÁTSÓ
Nyomja meg az [OK]9-t, majd a [3, 4]9 gombot
2
minden egyes hangszóró szintjének beállításához.
(KÖZÉP, JOBB HÁTSÓ, BAL HÁTSÓ)
`6dB-től i6 dB-ig (Gyári beállítás: 0 dB)
DVD/CD” kiválasztásához.
A hangszóró hangerejének módosítása lejátszás
közben
(Főleg a surround csatorna hangját tartalmazó audió lejátszásakor, illetve
akkor hasznos ha “SRD” világít a készülék kijelzőjén)
Nyomja le és tartsa lenyomva a [–CH SELECT]; gombot
1
a hangszóró kiválasztásához.
Mialatt a hangszóró csatorna látható, nyomja le a [–CH SELECT];
gombot.
L # C # R # RS # LS # SW
^--------------------------------------------------}
≥ Akkor is megjelenik a SW (mélynyomó), ha a forrás nem tartalmaz
mélynyomó csatornát.
“L” vagy “R” kiválasztásakor.
2
Nyomja meg a [2, 1]9 gombot az elülső hangszóró
balansz beállításához.
“C”, “RS”, “LS” vagy “SW” kiválasztásakor.
3
Nyomja le a [3]9 (növelés) vagy [4]9 (csökkentés)
gombot az összes hangszóró hangerejének
beállításához.
Kezdeti lépésekPlaying DiscsOther OperationsReference
MAGYAR
RQ TX111 1
11
83
Page 84

Alap lejátszás
A címke felfelé nézzen
DVD-V PROGRAM
CÍM KIVÁL. CÍM SZÁM
CÍM 1
CÍM 2
CÍM 3
CÍM 4
1
2
3
4
5
DVD-V VÉLETLEN LEJ.
CÍM KIVÁL.
CÍM 1
CÍM 2
CÍM 3
Egyéb lejátszási módok
Előkészületek
A kép megjelenítéséhez kapcsolja be a TV készülékét és változtassa
meg a video bemeneti módot (pl. VIDEÓ 1, AV 1, HDMI, stb.) hogy
megfeleljen az egység kapcsolatainak.
Nyomja meg a [Í]1 gombot az egység
1
bekapcsolásához.
Nyomja meg az [DVD]5 gombot a “DVD/CD”
2
kiválasztásához.
A lemeztálca kinyitásához nyomja meg az
3
[< OPEN/CLOSE]5 gombot.
Getting StartedPlaying DiscsOther OperationsReference
Tegye be a lemezt.
4
≥ A kétoldalas lemezeket úgy tegye be, hogy
a lejátszani kívánt oldal felfelé nézzen.
A lejátszás elindításához nyomja meg a [1 PLAY]6
5
gombot.
≥ Nyomja meg a [r, VOL, s]> gombot a hangerő beállításához.
[Megjegyzés]
≥ A MENÜK KIJELZÉSE ALATT A LEMEZEK TOVÁBBFOROGNAK.
Ha befejezte, nyomja meg a [∫ STOP]6 gombot a készülék
motorjának és a TV képernyő kímélése érdekében.
≥ Lehetséges, hogy nem látszik a teljes címszám a iR/iRW-n.
Alap vezérlők
Egy érintős lejátszás (csak távirányító): [1 PLAY]6
(készenléti üzemmód során)
A főegység automatikusan bekapcsol és elkezdi a tartóban lévő lemez
lejátszását.
Leállítás: [∫ STOP]6
A megállítás helyét a készülék megjegyzi, miközben “STOP FOLYT.”
látható a képernyőn.
≥ Nyomja le a [1 PLAY]6 gombot a folytatáshoz.
≥ Nyomja le újra a [∫ STOP]6 gombot, hogy törölje a beállítást.
Szünet: [; PAUSE]6
≥ Nyomja le a [1 PLAY]6 gombot a lejátszás újbóli elindításához.
Átugorja: [SKIP:, SKIP 9]6
Lejátszás megismétlése
Csak akkor működik, ha az eltelt idő megjeleníthető. JPEG tartalommal is
működik.
Lejátszás közben tartsa lenyomva a [–REPEAT]:, gombot
az ismétlés mód megjelenítéséhez.
Az ismétlés mód megjelenítése közben nyomja meg a [–REPEAT]:
gombot az ismétlendő tétel kiválasztásához.
pl. [DVD-V]
`CÍM ---. `FEJ. ---. `KI
^--------------------------------------------b
A törléshez válassza az “KI”-ot.
A megjelenített elemek eltérőek lehetnek a lemez típusától és a lejátszási
módtól függően.
Program és random lejátszás
[DVD-V] [VCD] [CD] [WMA] [MP3] [JPEG] [MPEG4] [DivX]
Előkészületek
Leállított állapotban nyomja meg a [PLAY MODE]: gombot
a lejátszás mód kiválasztásához.
A program és a random lejátszás kijelzők egymást követően jelennek
meg.
Program -----------------------------------------------------------) Random
^--- Kilépés a program- és a random lejátszásból(}
≥ [DVD-VR] Válassza ki a “ADAT”-t a “DVD-VR/ADAT”-ban (B 19, EGYÉB
menü) a MP3, JPEG, MPEG4 vagy DivX tartalmak lejátszásához.
≥ Ha a “LEJÁTSZÁS MENÜ” kijelző látható, válassza a “HANG/KÉP”-t
vagy a “VIDEÓ”-t (B 13, A LEJÁTSZÁS MENÜ használata), majd a
fentiek szerint járjon el.
≥ Ha a lemez WMA/MP3 és JPEG tartalommal is rendelkezik, válassza ki
vagy a zene vagy a kép tartalmat.
WMA/MP3: Válassza a “ZENE PROGRAM” vagy a “VÉLETLEN ZENE”
opciót.
JPEG: Válassza a “KÉP PROGRAM” vagy a “VÉLETLEN KÉP” opciót.
≥ [DVD-V] Néhány elemet nem lehet lejátszani, abban az esetben sem, ha
beprogramozta.
Program lejátszás (maximum 30 tétel)
Egy tétel kiválasztásához nyomja meg a [3, 4]9
1
gombot, majd nyomja meg az [OK]9-t.
pl. [DVD-V]
Keresés: [SEARCH6, SEARCH5]6 (lejátszás közben)
Lassított keresés: [SEARCH6, SEARCH5]6 (szünet alatt)
≥ 5 lépésig.
≥ Nyomja le a [1 PLAY]6 gombot a normál lejátszás megkezdéséhez.
≥ [VCD] Lassított keresés: Csak előrefelé működik.
≥ [MPEG4] [DivX] Lassított keresés: Nem működik.
Képkockáról képkockára: [2;
[DVD-VR] [DVD-V] [VCD]
≥ [DVD-VR] [VCD] Csak előrefelé működik.
Képernyőn megjelenő elem kiválasztása: [3, 4, 2, 1, OK]9
[3, 4, 2, 1]9: Választ
[OK]9: Jóváhagy
Szám beírása: Számgombok
[DVD-VR] [DVD-V] [VCD] [CD]
pl. 12 kiválasztásához: [S10]3 B [1] B [2]
[VCD] lejátszás-vezérlővel
Nyomja le a [∫ STOP]6 gombot a PBC funkció törléséhez, majd
használja a számgombokat.
[DVD-V] A lemez főmenüjének megjelenítése: [TOP MENU]8
[DVD-V] Lemez menü megjelenítése: [MENU]7
Visszalépés az előző képernyőhöz: [RETURN]E
[VCD] (lejátszás-vezérlő
Főegység kijelzője: [FL DISPLAY]F
[DVD-VR] [DVD-V] [WMA] [MP3] [MPEG4] [DivX]
Idő kijelzés
[JPEG]
,-.Tartalom számok
SLIDE
RQ TX111 1
MAGYAR
12
84
, ;1]9 (szünet alatt)
vel) Lemez menü megjelenítése: [RETURN]E
,-. Információ kijelzés (pl. [DVD-VR] Program szám)
≥ Ismételje meg ezt a lépést egyéb tételek programozásához.
≥ Az előző kijelzőhöz történő visszalépéshez nyomja le a
[RETURN]E-t.
A lejátszás elindításához nyomja meg a [1 PLAY]6
2
gombot.
Az összes elem kijelöléséhez
Nyomja le a [3,4]9-t, a “MIND” kiválasztásához és nyomja le az [OK]9-t.
A kiválasztott program törléséhez
1 Nyomja le a [1]9, majd a [3,4]9 gombot a program kiválasztásához.
2 Nyomja le a [CANCEL]4-t.
Az egész program törléséhez
Nyomja le többször a [1]9 gombot, és válassza ki a “MINDEN TÖRÖL”-
t majd nyomja le az [OK]9-t.
Az egész program törlése kerül, ha a lemeztálcát kinyitja, az egységet
kikapcsolja vagy egy másik forrást választ ki.
Random lejátszás
(Csak ha a lemezen csoportok találhatók, vagy több cím is szerepel
1
rajta.)
Nyomja meg a [3, 4]9 gombot egy csoport vagy cím
kiválasztásához, majd nyomja meg az [OK]9-t.
pl. [DVD-V]
” jelöli a kiválasztott elemet. A kiválasztás visszavonásához,
≥ “
*
nyomja le az [OK]9-t még egyszer.
A lejátszás elindításához nyomja meg a [1 PLAY]6
2
gombot.
Page 85

Navigációs menük használata
WMA/MP3/JPEG
MPEG4/DivX
LEJÁTSZÁS MENÜ
HANG/KÉP
VIDEÓ
ADATLEMEZ
GYÖKÉR
Perfume
Underwater
Fantasy planet
Starpersons1
Csoport (Mappa):
Tar ta lom (Fájl):
JPEG images G 1/ 1:C 3/ 9
Csoport neve
Csoport és tartalom
száma
PG
DÁTUM
HOSSZ
CÍM
1 0:16:02
10/11
LIVE CONCERT
02:15
2 0:38:25
12/05
AUTO ACTION
01:30
PL
DÁTUM
HOSSZ
CÍM
10:00:10
11/11
CITY PENGUIN
00:01
20:01:20
12/01
FOOTBALL
01:20
T
1
C1
1:ENG
3
1
KI
CÍMKERESÉS
Jelenlegi tétel
Tétel neve
pl. 1. menü (Disc/Play) [DVD-V]
T
1:ENG
3
1
KI
FEJEZETKERESÉS
C1
1
Jelenlegi beállítás
pl. 1. menü (Disc/Play) [DVD-V]
0: Nincs háttérhangszóró
1: Mono surround (Mono háttér)
2: Sztereo háttér (bal/jobb)
.1: Alacsony frekvenciájú effekt
(nem jelenik meg ha nincs jel)
. 1: Közép
. 2: Bal elsőiJobb első
3: Bal elsőiJobb elsőiKözép
pl.
Adatlemezek lejátszása
[WMA] [MP3] [JPEG] [MPEG4] [DivX]
[DVD-VR] Válassza ki a “ADAT”-ban a “DVD-VR/ADAT”-t (B 19, EGYÉB
menü) a MP3, JPEG, MPEG4 vagy DivX tartalmak lejátszásához.
A LEJÁTSZÁS MENÜ használata
“LEJÁTSZÁS MENÜ” kijelző jelenik meg, ha a lemez tartalmaz video
(MPEG4/DivX) és más formátumokat (WMA/MP3/JPEG) is.
A lejátszási lista tételeinek lejátszása
Ez csak abban az esetben működik, ha lemez tartalmaz lejátszási listát.
Leállított állapotban nyomja meg a [PLAY LIST]7
1
gombot.
pl.
Nyomja meg a [3, 4]9 gombot a lejátszási lista
2
kiválasztásához, majd nyomja meg az [OK]9-t.
≥ Nyomja le a [2, 1]9 gombot az oldalankénti lapozáshoz.
Getting StartedLemezek lejátszásaOther OperationsReference
Nyomja meg a [3, 4]9 gombot az “HANG/KÉP” vagy
“VIDEÓ” kiválasztásához, majd nyomja meg az [OK]9-t.
≥ A lejátszás elkezdéséhez nyomja meg a [1 PLAY]6 gombot.
≥ A lejátszani kívánt tételek kiválasztásához lásd “A kiválasztott tételtől
kezdődő lejátszás” pontot (B lent).
A kiválasztott tételtől kezdődő lejátszás
Kiválaszthatja azt az elemet, ahhonnan a lejátszást el szeretné indítani,
mialatt a “ADATLEMEZ” képernyő látható.
pl.
: WMA/MP3
: JPEG
: MPEG4/DivX
≥ A képernyő megjelenítéséhez/kilépéshez nyomja le a [MENU]7
gombot.
Egy tétel kiválasztásához nyomja meg a [3, 4]9, majd
nyomja meg az [OK]9-t.
≥ Nyomja le a [2, 1]9 gombot az oldalankénti lapozáshoz.
≥ Az 1-es szintre való visszatéréshez a jelenlegi mappából, nyomja le a
[RETURN]E-t.
≥ Maximum: 28 karakter fájl/mappa neveknél.
A lejátszás a kiválasztott tartalomnál kezdődik.
∫ [JPEG] A kép kiválasztása a Thumbnail (Ikon)
menüben
A kép kijelzése közben nyomja meg a [TOP MENU]8
1
gombot a bélyegkép menü megjelenítéséhez.
pl.
Képernyőmenük használata
Nyomja meg a [FUNCTIONS]D gombot a képernyő-
1
menü megjelenítéséhez.
Minden alkalommal, mikor lenyomja a gombot:
1. menü (Disc/Play)
2. menü (Video)
3. menü (Audio)
4. menü (HDMI)
Kilépés
Nyomja meg a [3, 4, 2, 1]9 gombot a tétel
2
kiválasztásához, majd nyomja meg az [OK]9-t.
Nyomja meg a [3, 4]9 gombot a beállítások
3
elvégzéséhez, majd nyomja meg az [OK]9-t.
A megjelenített elemek eltérőek a lemez típusától függően.
1. menü (Disc/Play)
SZÁMKERESÉS, CÍMKERESÉS, TARTALOMKERESÉS,
FEJEZETKERESÉS, PG-KERESÉS
PL-KERESÉS (Lejátszási lista keresése)
Kezdés egy bizonyos elemtől
≥ [VCD] Ez nem működik, ha lejátszás-vezérlőt használ.
pl. [DVD-V] : T2 C5
Az adatlemez számok kiválasztásához
pl. 123: [S10]3 B [1] B [2] B [3] B [OK]9
(Program keresés)
,
Other Operations
Nyomja meg a [3, 4, 2, 1]9 gombot egy kép
2
kiválasztásához, majd nyomja meg az [OK]9-t.
≥ Nyomja le a [SKIP:, SKIP 9]6 gombot az oldalankénti
lapozáshoz.
Egy másik csoportba lépéshez
1 Nyomja le a [3]9 gombot a csoport nevének kiválasztásához.
2
Nyomja le a [
[OK]
2, 1]9
9
-t.
gombot a csoport kiválasztásához és nyomja le az
DVD-R/-RW (DVD-VR) lemezek lejátszása
[DVD-VR]
≥ Címek csak akkor jeleníthetők meg, ha a lemezen rögzítésre kerültek.
≥ A programok, lejátszási listák és a lemezcímek nem szerkeszthetők.
Programok lejátszása
Leállított állapotban nyomja meg a
1
[DIRECT NAVIGATOR]8 gombot.
pl.
Nyomja meg a [3, 4]9 gombot a program
2
kiválasztásához, majd nyomja meg az [OK]9-t.
≥ Nyomja le a [2, 1]9 gombot az oldalankénti lapozáshoz.
HANG
[DVD-V] [DivX] (többszörös hangsávval)
Az audio hangsáv kiválasztásához
[DVD-VR] [VCD]
A kiválasztáshoz nyomja le a “BAL”, “JOBB”, “B+J” vagy a “B J”
gombot
A végrehajtható műveletek a lemez típusától függnek. A részletekért
olvassa el a lemez útmutatóját.
Jeltípus/adat
LPCM/PPCM/ D/DTS/MP3/MPEG: Jeltípus
kHz (Mintavételi gyakoriság)/bit/ch (Csatornák száma)
3/2 .1ch
≥ [DivX] A lejátszás elkezdése több időbe telhet, ha kicseréli a DivX video
lemezen az audiot.
MAGYAR
RQ TX111 1
13
85
Page 86

Getting StartedPlaying DiscsOther OperationsReference
JPG
DATE
HDMI
MAGYAR
14
86
LEJ. SEBESSÉG
[DVD-VR] [DVD-V]
A lejátszási sebesség megváltoztatása
–“k0.6” -tól “k1.4” –ig (0,1-egységnyi lépésekben)
≥ Nyomja le a [1 PLAY]6-t a normál lejátszáshoz való visszatéréshez.
≥ A sebesség megváltoztatása után
– A Dolby Pro Logic II nincs hatással a sebességre.
– Az audio kimenet 2-csatornás sztereóra vált.
– A 96 kHz mintavételi gyakoriságát 48 kHz-é alakítják.
≥ Ez a funkció a lemezre rögzített anyagoktól függően, nem minden
esetben működik.
ISMÉTLÉSES MÓD
(B 12, Lejátszás megismétlése)
A-B Ismétlés (Egy bizonyos rész megismétléséhez)
Kivéve [JPEG] [MPEG4] [DivX] [DVD-VR] (Állókép) [VCD] (SVCD)
Nyomja le az [OK]9-t a kezdő és a befejező pontnál.
≥ Törléshez válassza az “KI”-ot.
FELIRAT
[DVD-V] [DivX] (több feliratsávval) [VCD] (csak SVCD)
A felirat nyelvének kiválasztása
≥ Az iR/iRW-n olyan feliratszám is látható, ami a kijelzőn nem
jeleníthető meg.
[DVD-VR] (felirat be/ki információval)
A kiválasztáshoz nyomja le az “BE” vagy “KI” gombot
≥ A lemeztől függően ez a funkció nem biztos, hogy működik.
[DivX] (B 19, DivX feliratok megjelenítése)
SZÖG
[DVD-V] (többféle szöggel)
Video nézési szögének kiválasztása
DÁTUM KIJELZÉSE
[JPEG] Az “BE” vagy “KI” kiválasztásához a képek dátumainak
megjelenítéséhez
FORDULAT
[JPEG] A képek elforgatásához (szünet alatt)
0,------. 90,------.180,------.270
^--------------------------------------------J
2. menü (Video)
KÉPI MÓD
NORMÁL
MOZI1:
MOZI2:
DINAMIKUS:
ANIMÁCIÓ:
Segítségével kiválaszthatja a zoom értékeit
NORMÁL, AUTO ([DVD-VR] [DVD-V] [VCD] [MPEG4] [DivX]), k2, k4
≥ [JPEG]: szünet alatt
ÁTVITELI MÓD
Ha a “480p”/“576p”/“720p”/“1080p”-t, vagy “1080i”-t választotta a
(“VIDEOFORMÁTUM” beállításnál a 4. menü (HDMI)-ben), akkor
válassza ki az átalakítási módot a progresszív kimenethez az anyag
típusának megfelelően.
≥ A beállítás visszaáll “AUTO” vagy “AUTO1” üzemmódba, ha a
lemeztálcát kinyitja, az egységet kikapcsolja vagy egy másik forrást
választ ki.
PAL lemezek lejátszásakor
AUTO:
VIDEÓ:
FILM:
RQ TX111 1
Lágyabbá teszi a képeket és kiemeli a részleteket a
sötét jelenetekben.
Élesíti a képeket és kiemeli a részleteket a sötét
jelenetekben.
Kiemeli a kontrasztot az erőteljes képeknél.
Animációhoz alkalmas.
NAGYÍTÁS
Automatikusan felismeri a film és video tartalmat, és
annak megfelelően alakítja át.
Válassza ki, ha “AUTO”-t használ és a tartalom torzult.
Válassza ezt, ha a film szélein lévő
tartalom recés vagy durva mikor a
“AUTO”–t választja.
Abban az esetben, ha a videotartalom
torzult, ahogy az illusztráció mutatja a
jobb oldalon, akkor válassza a “AUTO” beállítást.
NTSC lemezek lejátszásakor
AUTO1:
AUTO2:
VIDEÓ:
Automatikusan felismeri a film és video tartalmat, és
annak megfelelően alakítja át.
Az “AUTO1” mellett, automatikusan felismeri a
különböző képváltási frekvenciával rendelkező film
tartalmakat, és annak megfelelően alakítja át.
Válassza ki, ha a video tartalom torzult “AUTO1” vagy
“AUTO2” használatánál.
FORRÁS KIVÁL. [DivX]
Mikor az “AUTO”-t választja a DivX tartalmat létrehozó módszer
automatikusan megkülönböztetésre és kimenetre kerül. Ha a kép torz,
válassza az “VÁLTOTT SOROS”-t vagy a “SORKÖVETŐ” –et attól
függően, hogy milyen módszerrel rögzítette a tartalmat a lemezre.
AUTO, VÁLTOTT SOROS, SORKÖVETŐ
3. menü (Audio)
PÁRBESZ. FELERŐS.
Hogy a film párbeszédei könnyebben hallhatóak legyenek
[DVD-V] (Dolby Digital, DTS, 3 vagy több csatorna, a párbeszéd a
középső csatornán rögzítve)
[DivX] (Dolby Digital, 3 vagy több csatorna, a párbeszéd a középső
csatornán rögzítve)
KI, BE
4. menü (HDMI)
HDMI-ÁLLAPOT
HDMI információ megjelenítéséhez
pl.
1 Kapcsolódás állapota
2 A kimeneti jel típusát mutatja.
(Mikor az “KI”-ot választja az “HANG KI” (B 18, HDMI menü)-ben,
“– – –” jelenik meg az -ben.)
3 Az audio csatornák számát mutatja.
4 (B lent, VIDEOFORMÁTUM)
5 (B lent, SZÍNTÉR)
HD FELERŐSÍT
Ez akkor működik, mikor a HDMI kapcsolatot “VIDEOPRIORITÁS”
(B 18, HDMI menü)-val és “BE” beállítással használja.
A “720p”, “1080i” és a “1080p” képminőség kiélesítéséhez
KI, 1 (leggyengébbtől) a 3 (legerősebbig)
VIDEOFORMÁTUM
Ez akkor működik, mikor a HDMI kapcsolatot “VIDEOPRIORITÁS”
(B 18, HDMI menü)-val és “BE” beállítással használja.
A TV készülékének megfelelő képminőség kiválasztásához
(A video felvételek és a kimenet tömörítetlen (HD) videóvá lesznek
alakítva.)
§
480p/576p/720p/1080p (sorkövető)
§
480i/576i/1080i (váltott soros)
≥ Ha a kép torz, nyomja le és tartsa lenyomva a [CANCEL]4-t, míg a
képminőség helyreáll. (A kimenet vissza fog térni “480p”/“576p”-re.)
§ A számkijelzés az éppen lejátszott lemeztől függ. A fenti számok
egyike jelenik meg.
SZÍNTÉR
Ez akkor működik, mikor a HDMI kapcsolatot “VIDEOPRIORITÁS”
(B 18, HDMI menü)-val és “BE” beállítással használja.
A TV készülékének megfelelő színminőség kiválasztásához
YCbCr 4:2:2
YCbCr 4:4:4
RGB
” jelenik meg, ha kompatibilis az Ön TV-jével.
≥ “
*
≥ Hibás képszín esetén addig tartsa lenyomva a [CANCEL]4 gombot,
amíg a helyes képszín nem jelenik meg.
HDMI --- ADATOK
CSATLAKOZTATVA
HANG-ADATFOLYAM
MAX. CSATORNA
VIDEOFORMÁTUM
SZÍNTÉR
CSATLAKOZÁS
PCM
2ch
720p
YCbCr 4:4:4
Page 87

VIERA Link használata “HDAVI
DVD/CD Házimozi
Bemenet választás
Lemez lejátszása
TOP MENU (DVD)
MENU (DVD)
Lejátszás/belépés a menübe
ControlTM”-al
Mit jelent a VIERA Link “HDAVI Control”
VIERA Link “HDAVI Control”
A VIERA Link “HDAVI Control” egy hasznos funkció, ami az egység és a
Panasonic TV (VIERA) összehangolt működését biztosítja a “HDAVI
Control” segítségével. Ezt a funkciót akkor használhatja, ha a készüléket
HDMI kábellel kapcsolja össze. Lásd a használati útmutatót az
összekapcsolt készülékekről a működtetési részletekért.
≥ A VIERA Link használata “HDAVI Control”, a HDMI által biztosított
vezérlési funkciókon alapul, ami egy ipari szabvány, amely HDMI CEC
(Consumer Electronics Control)-ként ismert, ez egy egyedülálló funkció,
amely általunk került fejlesztésre és hozzáadásra. Ebből kifolyólag, nem
garantáltan működik más gyártók által kibocsátott olyan termékekkel,
melyek támogatják a HDMI CEC-et.
≥ A készülék támogatja a “HDAVI Control 5” funkciót.
A “HDAVI Control 5” a legújabb (2009. decemberi) szabvány a
Panasonic HDAVI Control kompatibilis berendezéseihez. Ez a
szabvány együttműködik a Panasonic eddigi HDAVI berendezéseivel.
≥ Lásd az egyéni használati utasításokat az egyéb gyártók termékeinek
VIERA Link-et támogató funkcióját illetően.
A “HDAVI Control 2 vagy újabb verzió” funkcióval rendelkező TV a
következő műveletet teszi lehetővé: Egyszerű vezérlés VIERA
távvezérlővel (“HDAVI Control 2 vagy újabb” esetén) (B jobb).
Előkészületek
≥ Győződjön meg róla, hogy a HDMI létrejött helyrejött (B 8).
≥ Állítsa a “VIERA Link”-et “BE”-ra (B 19, HDMI menü).
≥ A kapcsolat teljes és megfelelő létrehozásához kapcsolja be az összes
VIERA Link “HDAVI Control” kompatibilis eszköszt és állítsa be a TVkészüléket az egységnek megfelelő HDMI bemeneti módra.
A TV audio beállítása a VIERA Link “HDAVI Control”-hoz
Az “AV”, “AUX”, “ARC” vagy “D-IN” kiválasztása teszi lehetővé a kapcsolt
műveleteket.
Nézze meg a TV audió beállítást a EGYSZERŰ BEÁLL. (B 9) vagy a “TV
AUDIÓ” pontot a HDMI menüben (B 19).
A hang a SCART (AV) aljzathoz (“AV”), az AUX aljzathoz (“AUX”), a HDMI
AV OUT aljzathoz (“ARC”) vagy a DIGITAL AUDIO IN OPTICAL aljzathoz
(“D-IN”) legyen csatlakoztatva (B 8).
STB hang beállítása VIERA Link “HDAVI Control” esetén
A “D-IN” kiválasztása teszi lehetővé a kapcsolt mű
Nézze meg a STB beállítást a “A digitális hangbemenet beállításai”
részben (B 10).
A hang a DIGITAL AUDIO IN OPTICAL aljzathoz (“D-IN”) legyen
csatlakoztatva (B 8).
Amikor megváltoztatja a kapcsolatokat vagy beállításokat, újból hagyja
jóvá a fenti pontokat.
§1 Az “AV”, “AUX”, “ARC” vagy “D-IN” (DIGITAL IN) a TV audió
beállítástól függetlenül működik (B fent, A TV audio beállítása a
VIERA Link “HDAVI Control”-hoz).
A “D-IN” (DIGITAL IN) az STB hangbeállítástól függetlenül működik
§2
(B fent, STB hang beállítása VIERA Link “HDAVI Control” esetén).
A “HDAVI Control” alkalmazási lehetőségei
Auto lip sync funkció
(Ez a funkció hozzáférhető, ha VIERA Link “HDAVI Control”-t
használ “HDAVI Control 3 vagy újabb verzió” -val kompatibilis TV
készülékkel)
Ez a funkció automatikusan biztosítja az audió- és videókimenet
összehangolását. (Csak akkor működik, ha a forrás “DVD/CD”, “USB”,
§1
, “AUX”§1, “ARC”§1 vagy “D-IN”
“AV”
≥ Ha “DVD/CD”-t vagy “USB”-t használ forrásként, állítsa a “FUTAMIDŐ”
a VIDEÓ menüben “0 ms/AUTO”-ra (B 18).
Egyérintős lejátszás
Bekapcsolhatja ezt az egységet és a TV-készüléket és elkezdheti a lemez
lejátszását egyetlen gombnyomással.
(Csak távirányító)
Készenléti üzemmódban nyomja meg a [1 PLAY]6 gombot
a lemez lejátszásának elindításához.
Az egység hangszórói automatikusan aktiválódnak (B jobb).
[Megjegyzés]
A lejátszás lehet, hogy nem azonnal jelenik meg a TV képernyőjén. Ha
lemaradna a lejátszás kezdeti részéről, nyomja le a [SKIP:]6-et vagy
a [SEARCH6]6-et hogy visszatérjen oda, ahol a lejátszás elkezdődött.
§1, 2
veleteket.
.)
Auto bemenet kapcsolás
(Bekapcsolási kapcsolat)
Az alábbi műveletek elvégzésekor a TV automatikusan a bemeneti
csatornára vált és megjeleníti az adott műveletet. Emellett amikor a TV
kikapcsolt állapotban van, akkor a TV automatikusan bekapcsol.
– Amikor a készüléken elindul a lejátszás
– Amikor a kijelző képernyőt igénybe vevő művelet történik (pl. START
menü)
≥ Amikor Ön TV bemenetről TV tuner módra vagy STB bemeneti
csatornára vált, a készülék automatikusan vált az “AV”
§1
vagy “D-IN”
“ARC”
csak iPod/iPhone zene módban vagy akkor működik, ha az iPod/iPhone
nincs csatlakoztatva.)
≥ Ha az egység “DVD/CD” üzemmódban van, a TV automatikusan ennek
az egységnek a bemeneti módjára kapcsol.
≥ A TV automatikusan TV tuner módra vált, amikor:
–Ön megnyomja a [EXIT] gombot.
–Ön megnyomja a [RETURN] gombot a START menübõl való
kilépéshez.
–Ön megnyomja az “AV”§1, “AUX”§1, “ARC”§1 vagy “DIGITAL IN”§1
gombot a START menüből.
§3, 4
§1, 2
közül valamelyikre. (“IPOD” mód esetén ez
§3, 4
– a lejátszás megáll ([DVD-V] [VCD]) vagy a készülék kikapcsol.
§3 Ez nem működik lejátszá vagy visszaállítási módban, amikor
forrásként “DVD/CD” vagy “USB” van kiválasztva. (“IPOD” mód
esetén ez csak iPod/iPhone zene módban vagy akkor működik, ha
az iPod/iPhone nincs csatlakoztatva.)
§4 Csak miután a TV automatikusan a készülék HDMI bemeneti
módjára kapcsolt.
§1
, “AUX”§1,
§4
Kikapcsolás link
Minden “HDAVI Control” kompatibilis berendezés, tehát ez a készülék is,
automatikusan kikapcsol a TV kikapcsolásakor.
Az audio lejátszás folytatásához, abban az esetben is, ha a TV kikapcsolt
állapotban van, válassza a “VIDEÓ”–t (B 19, “VEZ. KIKAPCSOLÁS” a
HDMI menüben).
[Megjegyzés]
Ha lenyomja a [Í]1 gombot, csak ez az egység kapcsol ki. A többi
csatlakoztatott készülék, ami kompatibilis a VIERA Link “HDAVI Control”al, bekapcsolva marad.
Részletekért lásd a TV készülék használati útmutatóját.
Hangszóró kiválasztása
Kiválaszthatja, hogy az audio kimenet ennek az egységnek vagy a TV
készüléknek a hangszóróin keresztül történjen, a TV menü beállításainak
segítségével. Részletekért lásd a TV készülék használati útmutatóját.
Házimozi
Az egység hangszórói aktívak.
≥ Az egység bekapcsolásakor az egység hangszórói automatikusan
aktiválódnak.
≥ Ha a készülék készenléti módja esetén a TV menüben a TV
hangszórók helyett a készülék hangszórói kerülnek kiválasztásra, akkor
a készülék automatikusan bekapcsol és az “AV”
vagy “D-IN”
≥ A TV hangszóróit automatikusan lenémítja.
≥ A hangbeállításokat a távirányító volume (hang) illetve a mute (néma)
gombjaival szabályozhatja. (A hangerő szintje a főegység kijelzőjén
látható.)
≥ Az elnémítás törléséhez ennek az egységnek a távirányítóját is
használhatjal (B 4).
≥ Az egység kikapcsolásakor a TV hangszórói automatikusan
aktiválódnak.
TV
A TV hangszórói aktívak.
≥ Az egység hangereje “0”-ra van állítva.
– Ez a funkció csak akkor működik, ha a készüléken “DVD/CD”, “USB”,
≥ Az audio kimenet 2-csatornás audio.
Miközben az egység és a TV hangszórói között átvált, a TV képernyője
üres lehet néhány pillanatig.
§1, 2
valamelyikét választja ki forrásként.
§1
, “AUX”§1, “ARC”§1 vagy “D-IN”
“AV”
§1
, “AUX”§1, “ARC”§1
§1, 2
van kiválasztva forráként.
Egyszerű vezérlés VIERA távvezérlővel
(“HDAVI Control 2 vagy újabb” esetén)
Ennek az egységnek a lejátszási menüjét a TV távirányítójával is
vezérelheti.
1 Válassza ennek az egységnek a működtetési menüjét a TV menü
beállításait használva.
(Részletekért lásd a TV készülék használati útmutatóját.)
A START menü jelenik meg.
pl. [DVD-V]
Getting StartedLemezek lejátszásaEgyéb műveletekReference
Reference
MAGYAR
RQ TX111 1
15
87
Page 88

≥ A START menü a TV távirányító gombjának használatával is
Dokkoló adapter
(nem tartozék)
iPod/iPhone
iPod/iPhone dokkoló
Megnyomni
Készülék
pl.
iPod
Zene
Házimozi
Játéklisták
Előadók
Albumok
iPod
Házimozi
Zene
Videók
Mind (iPod kijelzés)
Bemenet választás
Hang
iPod tudnivalók
iPod
Házimozi
Good morning
Ronaldo
Happy days
3 / 20
2:43 -1:15
Eloado
A lejátszás helyzete
Dal
Album
Keverés üzemmód
Ismétlés üzemmód
Pillanatnyi pozíció
megjeleníthető (pl. [OPTION]).
– Ha “DVD/CD” vagy “USB” került kiválasztásra, mint forrás, akkor ez
– Addig nem működik, amíg a TV az iPod zenelejátszó képernyőt
2 Válassza ki a kívánt pontot a START menüben (B 10).
Mikor a képernyővezérlő panel megjelenik
pl. [DVD-V] (ha a “Lemez lejátszása”-et választja a START menüből.)
Az alábbi vezérlőkkel irányíthatja a lejátszást.
Getting StartedPlaying DiscsOther OperationsReference
≥ A képernyővezérlő panel is megjeleníthető a TV távirányító gombjainak
használatával (pl. [OPTION]).
– Ez csak “DVD/CD” vagy “USB” lejátszási és folytatási módokban
működik, illetve amíg a TV az iPod zenelejátszó képernyőt mutatja.
[Megjegyzés]
≥ A menütől függően, néhány funkció nem érhető el gombok
használatával a TV távirányítóján keresztül.
≥ Nem tud számokat bevinni a TV távirányítójának számozott billentyűivel
([0]-tól [9]-ig). Használja ennek az egységnek a távirányítóját a
lejátszási lista stb. kiválasztásához.
Egyéb eszközök kezelése
Külső eszközökről is indíthat lejátszást a házimozi rendszerén keresztül.
A iPod/iPhone használata
Ön iPod/iPhone zenét hallgathat a készülék hangszóróin keresztül, vagy
iPod/iPhone videókat/fotókat nézhet a TV képernyőjén.
Előkészületek
≥ iPod/iPhone fotók/videók nézegetése
– A videó csatlakoztatásához használja a készülék SCART (AV) aljzatát
és válassza a “VIDEÓ” lehetőséget a VIDEÓ menü “VIDEÓ–KI
SCART” pontnál (B 18).
– Az iPod/iPhone menüben végezze el a TV-hez megfelelő fotó/videó
kimeneti beállításokat. (A részleteket az iPod/iPhone használati
útmutatójában találja meg.)
≥ Kapcsolja be a TV készülékét és válassza ki a megfelelő video bemenet
módot a kép megjelenítéséhez.
≥ Az iPod/iPhone csatlakoztatása/lecsatlakoztatása előtt kapcsolja ki a
készüléket vagy vegye le minimumra a készülék hangját.
A # megnyomásával nyissa fel az iPod/iPhone dokkoló
1
fedelét.
Végezze el az iPod/iPhone (nem tartozék) stabil
2
csatlakoztatását.
≥ Az iPod/iPhone stabil használata érdekében használja az iPod/
iPhone tartozékaként járó dokkoló adaptert.
Ha adapterre van szüksége, forduljon iPod/iPhone kereskedőjéhez.
Nyomja meg az [iPod]5 gombot az “IPOD”
3
kiválasztásához.
Az iPod/iPhone automatikusan átvált a készülék megjelenítési
módjára.
pl.
Nyomja meg a [FUNCTIONS]D gombot a menü
4
kiválasztásához.
16
Minden alkalommal, mikor lenyomja a gombot:
RQ TX111 1
MAGYAR
88
csak leállított üzemmódban működik.
mutatja.
Zene menü -----------------------------------------------) Videó menü
^--- iPod/iPhone menü (iPod/iPhone LCD) (-}
Ha a START menüt használja “IPOD” üzemmódban
pl.
Zene: Megjeleníti a zenelejátszás menüt.
Videók: A videó menü mutatása.
Mind (iPod kijelzés): Váltás az iPod/iPhone menüre.
iPod tudnivalók: Az iPod/iPhone részletek megjelenítése.
Zene/videók lejátszása
A [FUNCTIONS]D gombbal válasszon zene vagy videó
1
menüt a TV-n.
Egy tétel kiválasztásához nyomja meg a [3, 4]9
2
gombot, majd nyomja meg az [OK]9-t.
≥ Nyomja le a [2, 1]9 gombot az oldalankénti lapozáshoz.
≥ Az előző kijelzőhöz való visszalépéshez nyomja le a [RETURN]E
gombot.
A lejátszás a kiválasztott dalnál vagy videónál kezdődik.
pl. zenelejátszás képernyő
§ Ezek az ikonok csak a zene módnál jelennek meg.
: Dal keverés
: Album keverés
Alap vezérlők (Csak zenéhez és videókhoz)
Gomb Funkció
[1 PLAY]6 Lejátszás
[∫ STOP]6, [; PA USE ]6 Szünet
[SKIP:, SKIP 9]6 Átugorja
(nyomja le és tartsa lenyomva)
[SKIP:, SKIP 9]6
Lejátszás egyéb lehetőségei
Keverés üzemmód
Nyomja meg többször a [PLAY MODE]: gombot.
SONGS, ALBUMS, OFF
Ismétlés mód
Tartsa lenyomva a [–REPEAT]: gombot, majd néhány másodpercen
belül többször is nyomja le.
A zene/videolejátszás közben: ONE, ALL, OFF
[Megjegyzés]
≥ A készülékhez csatlakoztatott állapotban megőrződnek az iPod/iPhone
eszközön beállított zenelejátszás módok. Az iPod/iPhone eszköz
készülékhez csatlakoztatott állapotában végzett módosítások a
lecsatlakoztatás után is megőrződnek az iPod/iPhone eszközön.
≥ A videó menübe való belépéskor az iPod/iPhone véletlenszerű
videólejátszás módja ki helyzetbe kerül, amikor megtörténik az iPod/
iPhone lecsatlakoztatása a készülékről.
Fényképek nézegetése
Nyomja meg a [FUNCTIONS]D gombot az iPod/iPhone
1
menü kiválasztásához.
Nézzen diabemutatót az iPod/iPhone eszközön.
2
A távvezérlővel kezelheti az iPod/iPhone menüt.
[3, 4]9: A menü elemek közti navigáláshoz.
[OK]9: A következő menübe lépéshez.
[RETURN]E:Az előző menühöz való visszatérésre.
A távvezérlő kezelése iPod/iPhone modelltől függően eltérő lehet.
Csatlakoztatott iPod/iPhone esetén
Tilos az iPod/iPhone eszközt nagy erővel előre és hátra nyomni vagy
húzni.
Az akkumulátor újratöltéséről
≥ Az iPod/iPhone attól függetlenül megkezdi a töltést, hogy a készülék
be- vagy kikapcsolt állapotban van-e.
≥ “IPOD ¢” látható a készülék kijelzőjén, amikor a készülék készenléti
helyzetében folyik az iPod/iPhone töltése.
≥ Az iPod/iPhone ellenőrzésével nézze meg, hogy teljesen feltöltött-e az
akkumulátor.
(Csak zenelejátszásra)
: 1 dal ismétlése
: Mindet ismétli
Keresés
Page 89

≥ Ha a feltöltés befejezése után nem használja hosszú ideig az iPod/
USB
GYÖKÉR
Songs
Concert_01
Concert_02
Southern AI
Menü
Az alábbi menüpontok jelenlegi beállításának megjelenítése
Menüpont Beállítás
iPhone eszközt, akkor csatlakoztassa azt le a készülékről, mert az
akkumulátor magától le fog merülni. (Az egyszeri teljes feltöltés után
nem történik újabb feltöltés.)
Kompatibilis iPod/iPhone (2009. decemberi állapot)
≥ iPhone 3GS (16GB, 32GB)
≥ iPhone 3G (8GB, 16GB)
≥ iPhone (4GB, 8GB, 16GB)
≥ iPod nano 5. generáció (video kamerával) (8GB, 16GB)
≥ iPod touch 2. generáció (8GB, 16GB, 32GB, 64GB)
≥ Klasszikus iPod (120GB, 160GB (2009))
≥ 4. generációs iPod nano (video) (8GB, 16GB)
≥ Klasszikus iPod (160GB (2007))
≥ Első generációs iPod touch (8GB, 16GB, 32GB)
≥ 3. generációs iPod nano (video) (4GB, 8GB)
≥ Klasszikus iPod (80GB)
≥ 2. generációs iPod nano (alumínium) (2GB, 4GB, 8GB)
≥ 5. generációs iPod (video) (60GB, 80GB)
≥ 5. generációs iPod (video) (30GB)
≥ Első generációs iPod nano (1GB, 2GB, 4GB)
≥ 4. generációs iPod (színes kijelző) (40GB, 60GB)
≥ 4. generációs iPod (színes kijelző) (20GB, 30GB)
≥ 4. generációs iPod (40GB)
≥ 4. generációs iPod (20GB)
≥ iPod mini (4GB, 6GB)
A kompatibilitás az iPod/iPhone eszköz szofterverziójától függ.
Az iPod touch/iPhone szolgáltatások használata
1 Nyomja meg a Home gombot az iPod touch/iPhone eszközön.
2 Az érintőképernyőn válassza ki a használni kívánt iPod touch/iPhone
szolgáltatásokat.
Lejátszás USB-eszközről
USB mass storage (háttértároló) eszközökről is csatlakozathat és
lejátszhat zenéket vagy fájlokat (B 25, USB port).
Az eszközök, melyek USB mass storage besorolás alá esnek:
– USB-eszközök, amelyek támogatják a bulk only átvitelt.
Előkészületek
≥ Mielőtt az USB mass storage eszközöket az egységhez csatlakoztatja,
győződjön meg róla, hogy a rajtuk tárolt adat támogatott.
≥ USB hosszabbító kábel használata nem javasolt. A kábelen keresztül
csatlakoztatott USB-eszközt nem ismeri fel az egység.
Csatlakoztassa az USB eszközt (nem tartozék) az
1
USB porthoz ( 6).
Nyomja meg az [RADIO, EXT-IN]5 gombot az “USB”
2
kiválasztásához.
A menü kijelzője megjelenik.
pl.
≥ Ha a “LEJÁTSZÁS MENÜ” kijelző látható, válassza a “HANG/KÉP”-
t vagy a “VIDEÓ”-t a [3, 4]9, majd az [OK]9 lenyomásával.
≥ A képernyő megjelenítéséhez/kilépéshez nyomja le a [MENU]7
gombot.
Egy tétel kiválasztásához nyomja meg a [3, 4]9
3
gombot, majd nyomja meg az [OK]9-t.
≥ Nyomja le a [2, 1]9 gombot az oldalankénti lapozáshoz.
≥ Az 1-es szintre való visszatéréshez a jelenlegi mappából, nyomja le
a [RETURN]E-t.
A lejátszás a kiválasztott tartalomnál kezdődik.
≥ Az egyéb üzemi funkciók hasonlóak a “Lemezek lejátszása” részben
szereplő funkciókhoz (B 12-től 14-ig).
[Megjegyzés]
≥ Maximum: 255 mappa (a gyökérkönyvtáratt leszámítva), 4000 fájl, 28
karakter a fájl/mappa nevéhez.
≥ Csak egy memóriakártyát fog kiválasztani, ha sokcsatornás USB
kártyaolvasót csatlakoztat. Általában az elsőként behelyezett
memóriakártyát.
A lejátszási beállítások
megváltoztatása
Nyomja meg a [DVD]5 gombot a “DVD/CD”
1
kiválasztásához.
Nyomja meg a [START]C gombot a START menü
2
kiválasztásához.
Nyomja meg a [3, 4]9 gombot a “Beállítások”
3
kiválasztásához, majd nyomja meg az [OK]9 gombot.
FŐ
LEMEZ
VIDEÓ
AUDIÓ
MEGJELENÍTÉS
HDMI
EGYÉB
BEÁLLÍTÁS
VISSZA
Nyomja meg a [3, 4]9 gombot a menü
4
kiválasztásához, majd nyomja meg az [OK]9-t.
LEMEZ
AKTUÁLIS BEÁLL.
AUDIÓ
FELIRAT
MENÜK
KORHATÁR
JELSZÓ
Nyomja meg a [3, 4]9 gombot a tétel
5
kiválasztásához, majd nyomja meg az [OK]9-t.
Nyomja meg a [3, 4]9 gombot a beállítások
6
elvégzéséhez, majd nyomja meg az [OK]9-t.
≥ Az előző kijelzőhöz való visszalépéshez nyomja le a [RETURN]E
gombot.
≥ A képernyőből való kilépéshez nyomja meg a [START]C gombot.
≥ A beállítás el lesz mentve, még akkor is ha készenléti módba kapcsolja
az egységet.
≥ Az aláhúzott egységek gyári beállítások a következő menükben.
LEMEZ menü
AUDIÓ
Válassza ki az audio nyelvét.
≥ ANGOL
≥ OROSZ ≥ MAGYAR ≥ CSEH ≥LENGYEL
≥ EREDETI
FELIRAT
Válassza ki a felirat nyelvét.
§3
≥ AUTO
≥ NÉMET ≥ OROSZ ≥ MAGYAR ≥CSEH
≥ LENGYEL ≥ EGYÉB – – – –
MENÜK
Válassz ki a lemez menü nyelvét.
≥ ANGOL
≥ OROSZ ≥ MAGYAR ≥ CSEH ≥LENGYEL
≥ EGYÉB – – – –
§1 A lemezen eredetileg kijelölt nyelv került kiválasztásra.
§2 Vigye be a megfelelő kódot a nyelveket kódoló llistáról (B 4).
§3 Ha az “AUDIÓ”-ra kiválasztott nyelv nem elérhető, a feliratok ezen a
nyelven jelennek meg (ha a lemezen elérhető).
SUBTITLE TEXT [DivX]
Válasszon ki egy megfelelő tételt a DivX feliratszöveghez használt nyelv
szerint (B 19)
≥ LATIN1 ≥LATIN2 ≥ CYRILLIC ≥TURKISH
Ez a tétel csak akkor jelenik meg, ha már megtörtént egy feliratszöveg fájl
lejátszása (B 19) és amikor a “NYELV” beállítása “ENGLISH” a
MEGJELENÍTÉS menüben (B 18).
KORHATÁR
Állítsa be a sebességet korlátozott DVD-Video lejátszásra.
Állítsa be a sebességet (Ha a 8-as sebességi fokozatot választja)
≥ 0 MIND ZÁROL: A sebességfokozat nélküli lemezek lejátszásának
≥ 1-től 7-ig
≥ 8 NINCS HATÁR
≥ FRANCIA ≥ SPANYOL ≥ NÉMET
§1
≥ EGYÉB – – – –
≥ ANGOL ≥ FRANCIA ≥ SPANYOL
≥ FRANCIA ≥ SPANYOL ≥ NÉMET
§2
megakadályozására.
BEÁLLÍTÁS
VISSZA
ANGOL
AUTO
ANGOL
8 NINCS HATÁR
§2
§2
Getting StartedPlaying DiscsEgyéb műveletekTájékoztató
MAGYAR
RQ TX111 1
17
89
Page 90

A sebességfokozatok kiválasztásánál egy jelszó-képernyő jelenik meg.
Hangsugárzó jelenlegi pozíciója
Ideális hangsugárzó pozíció
Elsődleges hallgatási
távolság
A szoba megközelítő mérete
Az adott hallgatási távolságot meghatározó kör
Kövesse a képernyőn látható utasításokat.
Jegyezze meg a jelszavát.
Egy üzenet-képernyő jelenik meg, ha a DVD-video lemez meghaladja az
egységbe épített sebességfokozatot.
Kövesse a képernyőn látható utasításokat.
JELSZÓ
Változtassa meg a jelszavat a “KORHATÁR”-re vonatkozóan.
≥ BEÁLLÍTÁS
A sebesség megváltoztatásához (Ha 0-tól 7-ig választja meg az értéket)
≥ MÓDOSÍTÁS: Kövesse a képernyőn látható utasításokat.
VIDEÓ menü
Getting StartedPlaying DiscsOther OperationsReference
TV KÉPARÁNYA
Válassza ki a TV készülékének megfelelő beállítást.
: Szélesvásznú TV (16:9)
≥ 16:9
≥ 4:3PAN&SCAN: Hagyományos képernyős TV (4:3)
A szélesvásznú kép oldalsó részeit levágják, hogy a
kép betöltse a képernyőt (ha a lemez engedi).
≥ 4:3LETTERBOX: Hagyományos képernyős TV (4:3)
Szélesvásznú képet letterbox (LB) módban mutatja.
§ Mikor az audio a HDMI AV OUT csatlakozóvégen keresztül hallható,
és a csatlakoztatott készülék nem támogatja a kiválasztott elemet, a
tényleges kimenet a csatlakoztatott készülék teljesítményétől függ.
DINAMIKUS TART.
≥ BE: Állítsa be a hang tisztaságát, még akkor is, ha halk a hangerő.
Kézenfekvő megoldás késő esti használatra. (Csak Dolby
Digital-al működik)
≥ KI
HANGSZ. BEÁLL.
Válassza ki a hangszórók késleltetési idejét.
(Csak közép és háttér hangszórók)
Az optimális 5.1-csatornás hangért, az összes hangszórónak, kivéve a
mélysugárzót, azonos távolságra kell lennie az ülőhelytől.
Ha a közép- vagy a háttér hangszórókat közelebb kell helyezni az
ülőhelyhez, a késleltetési időt igazítsa úgy, hogy ellensúlyozza a
különbséget.
C
C
L
SW
LS
LS
RS
RS
:
R
:
:
FUTAMIDŐ
Mikor Plazma kijelzővel kapcsolja össze, állítsa be, ha úgy látja, hogy az
audio és a video nincs szinkronban.
≥ 0 ms/AUTO
≥ 20 ms ≥ 40 ms ≥ 60 ms
≥ 80 ms ≥ 100 ms
Ha VIERA Link “HDAVI Control”-t használ “HDAVI Control 3 vagy újabb
verzió” kompatibilis TV-vel (B 15), válassza a “0 ms/AUTO”-t.
Az audio és a video automatikusan szinkronba lesz állítva.
NTSC LEMEZ KI
Válassza a PAL 60 vagy NTSC kimenetet, ha NTSC lemezt játszik le
(B 20, Video rendszerek).
≥ NTSC: Amikor NTSC TV-hez van kapcsolva.
: Amikor PAL TV-hez van kapcsolva.
≥ PA L60
KIMEREV. MÓD
Határozza meg a képtípust, ami megállításkor látszik.
≥ AUTO
≥ MEZŐ: A kép nem homályos, de a képminőség gyengébb.
≥ KERET: Az általános minőség jó, de a kép homályosnak tűnhet.
VIDEÓ–KI SCART
Válassza ki a SCART (AV) csatlakozókon kimenő videojel formátumát.
≥ VIDEÓ
≥ S-VIDEÓ
≥ RGB 1: (Csak ha RGB kompatibilis TV-hez van csatlakoztatva)
Ha a képet mindig az egység RGB jelén keresztül szeretné nézni,
válassza ezt az üzemmódot. A TV képernyő automatikusan a kép
megjelenítésre kapcsol, ha az egységet bekapcsolja.
≥ RGB 2: (Csak ha RGB kompatibilis TV-hez van csatlakoztatva)
Mikor a TV hangoló üzemmódban van és a választást a “
állította, a TV képernyő automatikusan megjeleníti a képet az egységről
a lemez visszajátszása során ([DVD-V] [DVD-VR] [VCD]) vagy mikor a
képernyőmenün a DVD/CD látható.
A TV képernyője látható, ha az “AV”-t választotta. Egyéb kiválasztási
módnál ennek az egységnek a képe látható.
AUDIÓ menü
Úgy válassza ki, hogy megfeleljen az eszköz típusának, amit a HDMI AV
OUT csatlakozóvéghez kapcsolt.
Válassza a “BITFOLYAM”-et ha a készülék dekódolni tudja a bitstream-et
(5.1-csatornás adat digitális formája). Más esetben válassza a “PCM”-et.
(Ha a bitstream a dekóder nélküli készülék kimenete, hangos zaj lehet
hallható, ami halláskárosodást okozhat, és a hangszórókat is
károsíthatja.)
DOLBY DIGITAL
≥BITFOLYAM ≥PCM
§
DTS
≥BITFOLYAM
§
MPEG
≥BITFOLYAM ≥PCM
RQ TX111 1
MAGYAR
§
≥PCM
18
90
DVD/CD
”-re
Ha a a vagy a b távolság kevesebb, mint c, a különbséget keresse
meg a táblázatban és változtassa meg az ajánlott beállítás szerint.
a Középcsatorna hangsugárzó b Háttér hangsugárzó
Különbség (Kb.) Beállítás Különbség (Kb.) Beállítás
30 cm 1ms 150 cm 5ms
60 cm 2ms 300 cm 10ms
90 cm 3ms 450 cm 15ms
120 cm 4ms
150 cm 5ms
≥ BEÁLLÍTÁSOK:
≥ C-ELTOLÁS (Közép késleltetés):
, 1ms, 2ms, 3ms, 4ms, 5ms
0ms
Válassza ki közép hangszórók késleltetési idejét.
≥ LS/RS ELTOLÁS (Bal háttér/Jobb háttér késés):
, 5ms, 10ms, 15ms
0ms
Válassza ki a háttér hangszórók késleltetési idejét.
≥ TESZTHANG: BEÁLLÍTÁS
Ez csak “DVD/CD” kiválasztásakor jelenik meg.
Használja a teszt hangot a hangerő beállításokhoz
(B 11, A hangszóró teljesítményszintjének kézi beállítása).
MEGJELENÍTÉS menü
NYELV
Válassza ki a nyelvet a képernyőn megjelenő feliratokhoz.
≥ ENGLISH
≥ FRANÇAIS ≥ ESPAÑOL ≥ DEUTSCH
≥ PУCCKИЙ ≥MAGYAR ≥ ÇESKY ≥POLSKI
HDMI menü
VIDEOPRIORITÁS
≥ BE: Mikor a HDMI AV OUT csatlakozóvéget használja video
kimenetként. A video kimenet felbontása a HDMI AV OUT
csatlakozóvégről a csatlakoztatott eszköz (pl. TV)
teljesítményétől függően optimalizálható.
≥ KI: Amikor a videókimenet nem a HDMI AV OUT aljzatról történik.
HANG KI
≥ BE: Ha az adio kimenet az HDMI AV OUT csatlakozóvégről
származik. (A csatlakoztatott eszköz teljesítményétől függően,
az audio kimenet különbözhet a főegység audio beállításaitól.)
: Ha az adio kimenet nem a HDMI AV OUT csatlakozóvégtől
≥ KI
származik. (Az audio kimenet a főegység beállításait követi.)
RGB TART.
Ez csak akkor működik, ha a “SZÍNTÉR”-t a 4. menü (HDMI)-ben RGB-re
állította (B 14).
≥ NORMÁL
≥ JAVÍTÁS: Ha a fekete és a fehér képek nem élesek.
Page 91

VIERA Link
EGYÉB−REGISZTRÁLÁS (DivX)
VÉDETT DivX VIDEÓK LEJÁTSZÁSÁHOZ
REGISZTRÁLNIA KELL A KÉSZÜLÉKET.
REGISZTRÁCIÓS KÓD:
XXXXXXXXXX
VÉGEZZE EL A REGISZTRÁCIÓT ITT
10 alfanumerikus karakter
≥ BE: A VIERA Link “HDAVI Control” funkció elérhető (B 15).
≥ KI
VEZ. KIKAPCSOLÁS
Válassza ki az egység kívánt kikapcsolási beállítását a VIERA Link
működéséhez (B 15). (Ez a VIERA Link “HDAVI Control”-on keresztül
csatlakoztatott kompatibilis eszköz beállításaitól függ.)
≥ VIDEÓ/HANG
≥ VIDEÓ: Ha a TV kikapcsolt állapotban van, ez az egység
TV AUDIÓ
Válasszon TV audio kimenetet, hogy a
(B 15).
≥ AUX
≥ ARC
≥ DIGITAL IN
≥ AV
: Ha a TV kikapcsolt állapotban van, ez az egység
automatikusan kikapcsol.
automatikusan kikapcsol, kivéve az alábbi körülmények esetén:
– audio lejátszás ([CD] [MP3] [WMA])
– Mód iPod/iPhone
– rádió üzemmód
– “AV”, “AUX”, “ARC” vagy “D-IN” mód (nem választott TV
hangbeállítás
VIERA Link
funkcióhoz)
VIERA Link
-el dolgozhasson
EGYÉB menü
REGISZTRÁLÁS [DivX]
A készülék regisztrációs kódjának megjelenítése.
≥ KÓD MUTATÁSA
Szüksége lesz erre a nyilvántartási kódra, hogy megvásárolja és
lejátszhassa a DivX Video-on-Demand (VOD) tartalmat (B jobb).
Ez a beállítás csak DivX VOD tartalom lejátszásakor vagy a készülék
deregisztrálása után jelenik meg.
REG. VISSZAVON. [DivX]
A készülék deregisztrációs kódjának megjelenítése.
≥ BEÁLLÍTÁS
A készülék regisztrációjának megszüntetéséhez erre a deregisztrációs
kódra van szükség(B jobb).
Ez a beállítás csak DivX VOD tartalom első alkalommal való lejátszása
után jelenik meg.
DIAVETÍTÉS IDEJE
Állítsa be a diavetítés sebességét.
Gyári beállítás: 3 MP
≥ 1 MP-tól 15 MP-ig (1-egységnyi lépésekben)
≥ 15 MP-tól 60 MP-ig (5-egységnyi lépésekben)
≥ 60 MP-tól 180 MP-ig (30-egységnyi lépésekben)
FÉNYERŐSZAB.
Megváltoztatja az egység kijelzőjének és jelzéseinek világosságát.
≥ VILÁGOS
≥ HALVÁNY:A kijelző tompított.
≥ AUTO: A kijelző elhomályosul, de újra kivilágosodik, ha műveleteket
EGYSZERŰ BEÁLL.
≥ BEÁLLÍTÁS (B 9)
DVD-VR/ADAT
Válassza ezt az opciót, ha csak DVD-VR vagy ADAT formátumot játszik
le.
≥ DVD-VR
≥ ADAT: DVD-R/-RW-n lévő adat fájlok lejátszása.
KÉPERNYŐKÍMÉLŐ
Ezzel megelőzheti az égésnyomokat TV képernyőjén.
≥ KI
≥ VÁRJON 5
PERCET:
ALAPBEÁLLÍTÁSOK
Visszaállítja az összes értéket a MAIN (főmenüben) az alapbeállításokra.
≥ VISSZAÁLLÍTÁS
A jelszó-képernyő megjelenik, ha beállította a “KORHATÁR”-et (B 17).
Írja be újra ugyanazt a jelszót, majd kapcsolja ki és be a készüléket.
hajt végre rajta.
: DVD-R/-RW-n lévő video programok lejátszása.
Ha 5 percig nem hajt végre semmilyen műveletet, a kép
szürkére változik. Az eredeti TV képernyő visszaáll, ha
valamilyen műveletet hajt végre. (Ez az opció nem
működik videolejátszás közben.)
DivX tudnivalók
A DIVX VIDEÓ:
A DivX® egy digitális videóformátum, amit a DivX, Inc. hozott létre. Ez egy
DivX videók lejátszására alkalmas, hivatalos DivX tanúsítású készülék. A
www.divx.com oldalon további információk és szoftvereszközök találhatók
a fájlok DivX videóra való konvertálásához.
A DIVX VIDEO-ON-DEMAND:
Ezt a DivX Certified® készüléket előbb regisztrálni kell ahhoz, hogy DivX
Video-on-Demand (VOD) tartalmat tudjon lejátszani.
A regisztrációs kódért keresse meg a DivX VOD részt a készülék
beállítási menüjében.
Ezzel a kóddal menjen a vod.divx.com oldalra, mert itt fejezheti be a
regisztrációs folyamatot és tudhat meg többet a DivX VOD
szolgáltatásról.
Megjeleníti az egység nyilvántartási számát
(B bal, “REGISZTRÁLÁS” EGYÉB menüben)
≥ A DivX VOD tartalom első alkalommal való lejátszása után a
regisztrációs kód nem jelenik meg.
≥ Ha Ön a készülékétől eltérő regisztrációs kód használatával vásárol
DivX VOD tartalmat, akkor az ilyen tartalmat nem fogja tudni lejátszani.
A készülék regisztrációjának törlése
Válassza a “BEÁLLÍTÁS” pontot a “REG. VISSZAVON.” lehetõségnél
(B bal) és kövesse a képernyõn látható utasításokat.
A http://vod.divx.com oldalon a regisztráció megszüntetése kóddal lehet a
regisztrációt törölni.
A csak néhány alkalommal lejátszható DivX tartalmat
illetően
Bizonyos DivX VOD tartalmak lejátszása csak meghatározott számú
alkalommal lehetséges. Az ilyen tartalom lejátszásakor megjelenik a már
megtörtént lejátszások és az eredetileg lehetséges lejátszások száma.
≥ A hátralevő lejátszások száma a műsor minden egyes lejátszásakor
csökken. Ha azonban a lejátszás az elozo lejátszásnál megállított
ponttól történik, akkor a lejátszás folytatása funkciónak köszönhetoen a
hátralevo lejátszások száma nem csökken.
DivX feliratok megjelenítése
Ezzel a készülékkel megjeleníthető a DivX videólemezek feliratszövege.
Ennek a funkciónak nincs köze a DivX szabvány specifikációjában
meghatározott feliratokhoz, és nincs egyértelmű szabványa.
Válassza a “FELIRAT” pontot a Menu 1 (Disc/Play) alatt (B 14)
Megjeleníthető felirattípusok
Azok a feliratok, amelyek eleget tesznek a következő feltételeknek
megjeleníthetők az egységen.
≥ Fájlformátum: MicroDVD, SubRip, vagy TMPlayer
≥ Fájl kiterjesztés: “.SRT”, “.srt”, “.SUB”, “.sub”, “.TXT”, vagy “.txt”
≥ Fájlnév: Nem több mint 44 karakter, a fájl kiterjesztéseken kívül
≥ A DivX video fájl és a feliratok ugyanabban a mappában vannak és a
fájl név ugyanaz, kivéve a kiterjesztéseket.
≥ Ha egynél több feliratfájl van ugyanabban a mappában, a következő
fontossági sorrendben jelennek meg: “.srt”, “.sub”, “.txt”.
[Megjegyzés]
≥ Ha a DivX videofájl fájlneve nem megfelelően jelenik meg a menü
képernyőn, (a fájlnév helyén “¢” jelenik meg) vagy a fájl mérete
meghaladja a 256 KB-ot, előfordulhat, hogy a felirat szövege nem
megfelelően jelenik meg.
≥ A felirat szövege nem jeleníthető meg a menü használata közben vagy
ha olyan műveleteket hajt végre, mint pl. a keresés.
≥ Nem tartalmaznak feliratszöveget azok a DivX videófájlok, amelyeknél
nem jelenik meg a “SZÖVEG BE” üzenet. A feliratszöveg megjelenítése
nem lehetséges.
≥ Ha a feliratszöveg nem megfelelően jelenik meg, próbáljon változtatni a
feliratszöveg beállításokon (B 17).
Getting StartedPlaying DiscsOther OperationsTájékoztató
MAGYAR
RQ TX111 1
19
91
Page 92

Lejátszható lemezek
Kereskedelmi forgalomban kapható lemezek
Hordozó típusa/
DVD-Video Kiváló minőségű mozi és
Getting StartedPlaying DiscsOther OperationsReference
Logó
Megjegyzés Jelzése
zene lemezek
[DVD-V]
A következőkre figyeljen a lemez használata közben
≥ Ne ragasszon címkéket vagy matricákat a lemezekre. Ez a lemez
elferdüléséhez és használhatatlanná válásához vezethet.
≥ Ne írjon a címkézési oldalra golyóstollal vagy más írószerrel.
≥ Ne használjon tisztító sprayeket, benzint, hígítót, vagy bármilyen más
oldószert, és olyan folyadékokat, amelyek gátolják a statikus
elektromosságot.
≥ Ne használjon karcolásgátló szereket, vagy borítót.
≥ Ne használja a következő lemezeket:
– Ha a lemez felülete ragad, eltávolított matrica vagy címke
következtében (kölcsönzött lemezek stb.).
–Erősen hajlott, vagy sérült lemezeket.
– Szabálytalan alakú, például szív alakú, lemezeket.
Adatlemez készítési tippek
Video CD Zenei lemezek videóval
CD Zenei lemezek [CD]
Írt lemezek
Hordozó típusa/
Logó
DVD-R/RW ≥ DVD-Video Formátum
DVD-R DL ≥ DVD-Video Formátum
rR/rRW/rRDL ≥ +VR (+R/+RW Video
CD-R/RW ≥ MP3 Formátum
≥ Lejátszás előtt véglegesítse a lemezt azon a készüléken, amelyen
rögzítette.
≥ Lehetséges, hogy nem tudja majd lejátszani az összes fent említett
lemezt, a lemez típusa, a felvétel körülményei, a felvétel módszere vagy
a fájl létrehozási módszere miatt (B jobb, Adatlemez készítési tippek).
Megjegyzés a DualDisc használatáról
A DualDisc digitális audio tartalommal rendelkező oldala nem felel meg
a Compact Disc Digital Audio (CD-DA) formátum technikai előírásainak,
ezért lehet, hogy nem lejátszható.
Lemezek, melyeket nem lehet lejátszani
A kereskedelemben kapható Blu-ray, HD DVD, AVCHD lemezek, DVDRW 1.0 verziója, DVD-Audio, DVD-ROM, CD-ROM, CDV, CD-G, SACD,
Photo CD, DVD-RAM, és “Chaoji VCD”, ideértve az IEC62107-t nem
kielégítő CVD, DVCD és SVCD lemezeket.
SVCD is (IEC62107-nek
megfelelően)
Formátumok Jelzése
≥ DVD Video Rögzítési
Formátum 1.1 Verziója
≥ MP3 Formátum
≥ JPEG Formátum
®
Formátum
≥ DivX
≥ MPEG4 Formátum
≥ DVD Video Rögzítési
Formátum 1.2 Verziója
®
Formátum
≥ DivX
Rögzítés) Formátum
≥ JPEG Formátum
≥ WMA Formátum
®
≥ DivX
Formátum
≥ MPEG4 Formátum
[VCD]
[DVD-V]
[DVD-VR]
[MP3]
[JPEG]
[DivX]
[MPEG4]
[DVD-V]
[DVD-VR]
[DivX]
[DVD-V]
[MP3]
[JPEG]
[WMA]
[DivX]
[MPEG4]
Kiterjesztés
[WMA] (
Lemez: CD-R/RW
≥ Kompatibilis tömörítési érték: 48 kbps és 320 kbps között
≥ Másolásvédett WMA fájlokat nem tud lejátszani.
Kiterjesztés
[MP3] (
Lemez: DVD-R/RW, CD-R/RW
≥ Az egység nem támogatja az ID3 tag-okat.
≥ Mintavételi gyakoriság és tömörítési érték:
– DVD-R/RW: 11,02 kHz, 12 kHz, 22,05 kHz, 24 kHz (8 kbps-től
160-ig kbps), 44,1 kHz és 48 kHz (32 kbps-től 320-ig kbps)
– CD-R/RW: 8 kHz, 11,02 kHz, 12 kHz, 16 kHz, 22,05 kHz, 24 kHz
(8 kbps-től 160-ig kbps), 32 kHz, 44,1 kHz és 48 kHz (32 kbps-től
320-ig kbps)
Kiterjesztés
[JPEG] (
Lemez: DVD-R/R DL/RW, CD-R/RW
≥ Olyan digitális fényképezőgépre rögzített JPEG fájlok jeleníthetők
meg, melyek megfelelnek a DCF Szabvány (Design rule for Camera
File system)1.0 verziójának.
– Számítógépes képszerkesztő szoftverrel megváltoztatott,
szerkesztett vagy mentett fájlok, lehet, hogy nem jeleníthetők meg.
≥ Ez az egység nem jelenít meg mozgóképet MOTION JPEG és más
hasonló formátumokat, JPEG-tő eltérő formátumú állóképeket
(pl. TIFF), és nem játszik le képeket csatolt hanggal.
Kiterjesztés
[MPEG4] (
Lemez: DVD-R/RW, CD-R/RW
≥ A rögzítés dátuma különbözhet a tényleges dátumtól.
Kiterjesztés
[DivX] (
Lemez: DVD-R/R DL/RW, CD-R/RW
≥ 2 GB-nál nagyobb, vagy index nélküli DivX fájlokat nem biztos, hogy
az egység tökéletesen lejátssza.
≥ Jelen egység 720k480 (NTSC)/720k576 (PAL)-ig minden felbontást
támogat.
≥ Az egységen 8 féle típusú hang és felirat közül választhat.
≥ A megjelenítés sorrendje a menüképernyőn és a számítógépen eltérő
lehet.
≥ Az egység nem játszik le kötegelt írással rögzített fájlokat.
DVD-R/RW
≥ A lemezeknek meg kell felelniük az UDF bridge-nek (UDF 1.02/
ISO9660).
≥ Az egység nem támogatja a többmenetes írást. Csak az
alapértelmezett szakaszt játssza le.
CD-R/RW
≥ A lemezeknek meg kell felelniük az ISO9660 1. vagy 2. szintjének
(a kiterjesztett formátumok kivételével).
≥ Az egység támogatja a többmenetes írást, de ha több szakasz is van, a
lejátszás megkezdése több időt vesz igénybe. Ennek elkerülése
érdekében minimalizálja a szakaszok számát.
: “.WMA”, “.wma”)
: “.MP3”, “.mp3”)
: “.JPG”, “.jpg”, “.JPEG”, “.jpeg”)
: “.ASF”, “.asf”)
: “.DIVX”, “.divx”, “.AVI”, “.avi”)
Video rendszerek
≥ Az egység le tudja játszani a PAL és az NTSC rendszerű videokat, de a
TV készülékének meg kell egyeznie a lemezen használt rendszerrel.
≥ A PAL lemezek az NTSC TV-n nem jeleníthetők meg tökéletesen.
≥ Az egység át tudja alakítani az NTSC jeleket PAL 60-á, PAL TV-n
történő lejátszáshoz (B 18, “NTSC LEMEZ KI” a VIDEÓ menüben).
RQ TX111 1
MAGYAR
20
92
Page 93

Hangszórók lehetséges
Legalább 30 mm
‰7,0 mm-től 9,4 mm-ig
Fal vagy oszlop
3 mm-től 5 mm-ig
‰4,0 mm
[PT580] Surround hangszóró
Center hangszóró
72 mm
348,5 mm
NE
TEGYE
ÍGY
FOGJA
pl.
Ebben a
pozícióban a
hangsugárzó
könnyen
leeshet, ha
elmozdul
jobbra vagy
balra.
Úgy mozgassa,
hogy a csavar
ebbe a
pozícióba
kerüljön.
A kábelt alulról
helyezze be.
Húzza ki a kábelt a
nyíláson át.
Hagyjon
szabadon kb.
120 mm-t.
felszerelése
Falra rögzítés
Az összes hangszórót rögzítheti a falra (kivéve a mélysugárzót).
≥ A falnak vagy az oszlopnak, amire a hangszórókat szereli, legalább
10 kg -nyi terhelésnek kell eleget tennie csavaronként. Kérjen
tájékoztatást egy építész szakembertől a hangszórók falra
szerelésénél. A nem megfelelő rögzítés károsíthatja a falat és a
hangszórókat.
1 Fúrjon egy csavart (nem tartozék) a falba.
2 Illessze a hangszórót biztonságosan a csavar(ok) hoz a lyuk(ak)
nál.
100 mm
A hangszóró kábel újracsatlakoztatása
Karbantartás
Az egységet puha, száraz ruhával tisztítsa
≥ Soha ne használjon alkoholt, festékhígítót vagy benzint az egység
tisztításához.
≥ Mielőtt vegykezelt törlőruhát használna, figyelmesen olvassa el annak
használati útmutatóját.
Ne használjon kereskedelemben kapható lencsetisztítókat, mert
meghibásodást okozhatnak. A lencse tisztítása általában szükségtelen,
bár ez függ a működtetési környezettől.
Mielőtt elmozdítja az egységet, győződjön meg róla, hogy a
lemeztálca üres. Ennek elmulasztása komoly mértékben károsíthatja
a lemezt és az egységet.
Getting StartedPlaying DiscsOther OperationsTájékoztató
Getting StartedPlaying DiscsOther Operations
[PT580] Első hangszórók
[PT880] Elülső és háttér hangszóró
Rögzítse a falhoz, a tartólap és az állvány nélkül
MAGYAR
RQ TX111 1
21
93
Page 94

Hibaelhárítási útmutató
Mielőtt szervizhez fordulna, végezze el a következő ellenőrzéseket. Ha
kétségei vannak valamelyik ellenőrzési pontot illetően, vagy ha a
következő útmutatóban leírt megoldások nem oldják meg a problémát,
vegye fel a kapcsolatot a forgalmazóval.
Áram
Nincs áram.
Dugja be az AC hálózati kábelt. (B 8)
A készülék automatikusan készenléti módba kapcsol.
A Sleep (alvás) üzemmód be volt kapcsolva, és elérte a megadott
Getting StartedPlaying DiscsOther OperationsReference
időkorlátot. (B 4)
A TV bemenet módosításakor kikapcsol a készülék
áramellátása.
Ez normál jelenségnek számít a VIERA Link “HDAVI Control 4 vagy újabb
verzió” használatakor. További részleteket a TV használati útmutatójában
talál.
A készülék kijelzői
A kijelző sötét.
Válassza a “VILÁGOS” -ot a “FÉNYERŐSZAB.”-ben, a EGYÉB
menüben. (B 19)
“NO PLAY”
≥ Olyan lemezt helyezett be, melyet a készülék nem tud lejátszani;
helyezzen be olyat, amely lejátszható. (B 20)
≥ Üres lemezt helyezett be.
≥ Lezáratlan lemezt helyezett be.
“NO DISC”
≥ Nem helyezett be lemezt; helyezzen be egyet.
≥ Nem helyesen helyezte be a lemezt; Helyezze be rendesen. (B 12)
“OVER CURRENT ERROR”
Az USB egység túl sok energiát fogyaszt. Kapcsoljon “DVD/CD” módba,
távolítsa el az USB-t, és kapcsolja ki a készüléket.
“IPOD OVER CURRENT ERROR”
Az iPod/iPhone túl sok áramot használ. Távolítsa el az iPod/iPhone
eszközt, majd a készüléket kapcsolja ki és ismét be.
“F61”
Ellenőrizze, és állítsa helyre a hangszórókábel csatlakozásait. Ha ez nem
oldja meg a problémát, vegye fel a kapcsolatot a forgalmazóval. (B 7)
“F76”
Probléma van az áramellátással. Vegye fel a kapcsolatot a forgalmazóval.
“DVD U11”
A lemez piszkos lehet. Törölje tisztára.
“ERROR”
Rossz műveletet hajtott végre. Olvassa el az utasításokat, és próbálja
meg újra.
“DVD H∑∑”
“DVD F∑∑∑”
A ∑ számot jelent.
≥ Üzemzavar léphetett fel. A “H”-t és az “F”-et követő számok a készülék
állapotától függenek. Kapcsolja ki, majd be a készüléket. Vagy
kapcsolja ki a készüléket, húzza ki az AC hálózati kábelt, majd
csatlakoztassa újra.
≥ Ha a szervizszámok nem tűnnek el, jegyezze fel azokat, és vegye fel a
kapcsolatot egy képzett szerelővel.
“U70∑”
A ∑ számot jelent. (Az “U70”-et követ valódi szám a fegység állapotától
függ.)
≥ A HDMI kapcsolat szokatlanul működik.
– A csatlakoztatott eszköz nem HDMI-kompatibilis.
– Kérjük, használjon HDMI kábeleket, melyeken szerepel a HDMI logó
(amely a borítón is látszik).
– A HDMI kábel túl hosszú.
– A HDMI kábel megsérült.
“REMOTE 1” vagy “REMOTE 2”
Egyeztesse össze a készüléken és a távirányítón található módokat. A
megjelenített számtól függően (“1” vagy “2”) tartsa nyomva az [OK]9-t és
a megfelelő számú gombot ([1]-as vagy [2]-es) legalább 2 másodpercig.
(B 4)
“LOADING”
≥ Az iPod/iPhone még nincs kész. Várjon, amíg eltűnik ez a kijelzés.
RQ TX111 1
MAGYAR
≥ Csatlakoztassa le, majd stabilan csatlakoztassa újra az iPod/iPhone
eszközt. (B 16)
22
94
Általános üzemeltetés
Semmi reakció bármelyik gomb megnyomásakor.
≥ Ez a készülék a használati útmutatóban leírtakon kívül nem játszik le
más lemezeket. (B 20)
≥ Előfordulhat, hogy a készülék villámlás, statikus elektromosság vagy
más külső tényező miatt nem működik tökéletesen. Kapcsolja ki, majd
be a készüléket. Vagy kapcsolja ki a készüléket, húzza ki a AC hálózati
kábelt, majd csatlakoztassa újra.
≥ Pára képződött. Várjon 1-2 órát, míg elpárolog.
Nincs reakció a távirányító gombjainak megnyomásakor.
≥ Ellenőrizze, hogy az elemek helyesen vannak-e behelyezve. (B 8)
≥ Az elemek lemerültek. Cserélje ki őket újakra. (B 8)
≥ Célozzon a távirányítóval a jelérzékelőre, és működtesse. (B 4)
Más termékek reagálnak a távirányítóra.
Változtassa meg a távirányító működtetési módját. (B 4)
Nem jeleníthető meg a START menü.
Vegye ki a lemezt, majd nyomja meg újra a [START]C gombot.
Nincs kép vagy hang.
≥ Ellenőrizze a videó- vagy hangszórókapcsolatot. (B 7, 8)
≥ Ellenőrizze a csatlakoztatott eszköz vagy a főegység áram- és beviteli
beállításait.
≥ Ellenőrizze, hogy a lemezre van-e rögzítve valami.
Elfelejtette a szabályozó jelszavát.
Állítsa vissza a gyári Alapbeállításokat.
Ha megállította, és “DVD/CD” a forrás, nyomja meg és tartsa nyomva a
[∫]9 (Leállítás)-ot a fegységen és [S10]3 a távirányítón, míg a
“INITIALIZED” (INICIALIZÁLT) eltűnik a TV-ről. Kapcsolja ki, majd be a
készüléket.
Minden beállítás visszaáll az alapértékekre.
(Ez program és random módokban, valamint a beállítás vagy a START
menü megjelenítésekor nem működik.)
Néhány karakter nem jeleníthető meg megfelelően.
Előfordulhat, hogy az angol ábécétől és arab számoktól eltérő karakterek
helytelenül jelennek meg.
A VIERA Link “HDAVI Control” funkció nem reagál.
A készülék vagy a csatlakoztatott eszközök állapotától függően szükség
lehet ugyanannak a műveletnek a megismétlésére, hogy a funkció
tökéletesen működjön. (B 15)
A beállítás, melyet a “TV KÉPARÁNYA” (B 18, VIDEÓ
menü)-ben, vagy a “NYELV”-ben hajtott végre, (B 18,
MEGJELENÍTÉS menü) nem működik.
A “TV KÉPARÁNYA”§1-ban és a “NYELV”§2-ben elvégzett beállítások
automatikusan követik a TV-től kapott információkat. (B 9, EGYSZERŰ
BEÁLL. beállítások)
§1 Amikor a VIERA Link “HDAVI Control”-t használja “HDAVI Control 3
vagy újabb verzió” kompatibilis TV-vel
§2 Amikor a VIERA Link “HDAVI Control”-t használja “HDAVI Control 2
vagy újabb verzió” kompatibilis TV-vel
Page 95

Lemez műveletek
A lejátszás megkezdése időbe telik.
≥ A lejátszás megkezdése több időbe telhet, ha egy MP3 számnak
képadatai is vannak. A helyes lejátszási idő még a szám elindulása
után sem jelenik meg. Ez normális. [MP3]
≥ Ez DivX videónál normális. [DivX]
Ugrásnál vagy keresésnél menüképernyő jelenik meg. [VCD]
Ez videó CD-knél normális.
Nem jelenik meg a Lejátszásvezérlő menü.
[VCD] playback ellenőrzéssel
Nyomja meg kétszer a [∫ STOP]6-t, majd nyomja meg a [1 PLAY]6-t.
Program és Random lejátszás nem működik. [DVD-V]
Ezek a funkciók néhány DVD-videóval nem működnek.
A lejátszás nem indul el.
≥ Előfordulhat, hogy ez a készülék nem játszik le WMA-t és MPEG4-et,
amely állóképadatokat tartalmaz.
≥ DivX VOD tartalom lejátszásakor hivatkozzon a weboldalra, ahonnan
azt vásárolta. (Példa: http://vod.divx.com) [DivX]
≥ Ha a lemez CD-DA és más formátumokat tartalmaz, előfordulhat, hogy
a tökéletes lejátszás nem lehetséges.
Nincs felirat.
≥ Jelenítse meg a feliratokat. (“FELIRAT” az 1. menüben) (B 14)
A lemeztől függően lehet, hogy a feliratok megjelenítése nem működik.
≥
A B pont automatikusan beállításra kerül.
Ha elérjük egy szakasz végét, akkor az lesz a B pont.
A Setup (Beállítás) menü nem elérhető.
≥ Forrásként jelölje ki a “DVD/CD”-t.
[DivX]
Hang
A hang torz.
≥ WMA lejátszása közben zaj jelentkezhet.
≥ Ha HDMI kimenetet használ, előfordulhat, hogy a hang más
csatlakozókon nem működik.
Nem működnek az effektek.
Néhány lemeznél bizonyos hangeffektek nem, vagy csak kevésbé
működnek.
Lejátszás alatt zúgás hallatszik.
A főegység mellett elektromos vezeték vagy fénycső van. Más
készülékeket és kábeleket tartson távol a főegységtől.
Nincs hang.
≥ Amikor a lejátszási sebességet megváltoztatja, egy kis szünet lehet a
hangban.
≥ Ha a bemeneti forrás bitstream, akkor a külső berendezésen PCM
legyen a hangbeállítás.
≥ A fájlok készítési módjának következtében előfordulhat, hogy nincs
hang. [DivX]
A TV-nek nincs hangja.
≥ Ha a TV nem ARC kompatibilis és csak a HDMI csatlakozás van
használatban, akkor pótlólagos hangcsatlakoztatásra van szükség.
(B 8)
≥ Ellenőrizze a hangcsatlakoztatást. Nyomja meg a [RADIO, EXT-IN]5
gombot a megfelelő forrás kiválasztásához. (B 8, 10)
≥ Ha HDMI kapcsolatot használ, győződjön meg róla, hogy a “HANG KI” a
HDMI menüben “BE”-ra van állítva. (B 18)
Nincs hang a háttér hangszórókból.
Nyomja meg a [SURROUND]< gombot a “MULTI-CH” kiválasztásához.
(B 11)
Kép
A TV-n lévő kép nem tökéletesen jelenik meg, vagy eltűnik.
≥ A készülék és a TV eltérő videórendszert használ. Használjon
multirendszerű vagy PAL TV-t.
≥ A lemezen használt rendszer nem illik össze a TV-vel.
– A PAL lemezek NTSC TV-n nem jeleníthetők meg tökéletesen.
– Ez a készülék képes a NTSC jeleket PAL 60-ná konvertálni, hogy
nézhető legyen PAL TV (“NTSC LEMEZ KI”-n a VIDEÓ menüben).
(B 18)
≥ Győződjön meg róla, hogy a készüléket közvetlenül a TV-hez
csatlakoztatta, és nem VCR-n keresztül. (B 8)
≥ Mobiltelefon-töltők némi zavart okozhatnak.
≥ Ha beltéri TV antennát használ, váltson kültérire.
≥ A TV antenna vezetéke túl közel van a készülékhez. Távolítsa el a
készülék közeléből.
≥ Változtassa meg a “FORRÁS KIVÁL.” a 2. menüben. [DivX] (B 14)
≥ Csökkentse a csatlakoztatott eszközök számát.
≥ Ha HDMI AV OUT csatlakozót használ, győződjön meg róla, hogy nem
a csatlakoztatott TV-vel összeegyeztethetetlen videókimenet van
kiválasztva. Tartsa lenyomva a [CANCEL]4-t, míg a kép rendesen meg
nem jelenik. (A kimenet vissza fog térni “480p”-ba, vagy “576p”-ba.)
(B 14)
≥ Az 1920k1080-as felbontásúra konvertált videóképek másképpen
nézhetnek ki, mint az eredeti 1080p-s full-HD források. Ez nem a
főegység meghibásodása.
≥ Ha a HDMI kábel csatlakoztatva van, a SCART (AV) csatlakozóról nem
érkeznek RGB kimenetek. Ha a SCART (AV) csatlakozóaljzatot
használja, távolítsa el a HDMI kábelt és kapcsolja ki, majd újra be az
egységet.
A képméret nem illeszkedik a képernyőhöz.
≥ Változtassa meg a “TV KÉPARÁNYA” -et a VIDEÓ menüben. (B 18)
≥ Használja a TV-t a képméret megváltoztatásához.
≥ Változtassa meg a zoom beállításokat. (“NAGYÍTÁS” a 2. menüben)
(B 14)
A menü helytelenül jelenik meg.
Állítsa vissza a zoom-arányt “NORMÁL”-ra. (“NAGYÍTÁS” a 2. menüben)
(B 14)
Az auto zoom funkció nem jól működik.
≥ Kapcsolja ki a TV zoom funkcióját.
≥ Előfordulhat, hogy a zoom funkció nem jól működik különösen sötét
jelenetek esetén, vagy a lemez típusától függően nem működik.
PAL lemez lejátszásakor a kép torz.
Állítsa a “ÁTVITELI MÓD”-ot “AUTO”-ra a 2. menüben. (B 14)
Miután a “Házimozi”-t választotta a “Hangszóró
kiválasztása”-ban a TV távirányítójával, a TV bemeneti
beállítása is megváltozik.
Húzza ki a HDMI kábelt a TV készülékből és csatlakoztassa egy másik
HDMI csatlakozóhoz.
iPod/iPhone kezelés
Nem tölt vagy nem működik.
≥ Nézze meg, hogy stabilan csatlakozik-e az iPod/iPhone. (B 16)
≥ Lemerült az iPod/iPhone akkumulátora. Az ismételt használat előtt
végezze el az iPod/iPhone feltöltését.
Az iPod/iPhone fotók/videók nem jeleníthetők meg a TV-n.
≥ A videó csatlakoztatásához használja a készülék SCART (AV) aljzatát
és válassza a “VIDEÓ” lehetőséget a VIDEÓ–KI SCART menü “VIDEÓ”
pontjánál. (B 18)
≥ Az iPod/iPhone menüben végezze el a TV-hez megfelelő fotó/videó
kimeneti beállításokat. (A részleteket az iPod/iPhone használati
útmutatójában találja meg.)
Getting StartedPlaying DiscsOther OperationsTájékoztató
Getting StartedPlaying DiscsOther Operations
MAGYAR
RQ TX111 1
23
95
Page 96

HDMI vagy progresszív video
Amikor a HDMI vagy a progresszív kimenet be van
kapcsolva, szellemhatás lép fel.
Ezt a problémát a DVD-Videó átal használt szerkesztő eljárás vagy anyag
okozza, de könnyen kijavítható, ha váltottsoros kimenetet használ. Ha
HDMI AV OUT csatlakozóaljzatot használ, állítsa a “480i”-re, vagy “576i”re a “VIDEOFORMÁTUM”-ot a 4. menüben. Vagy tiltsa le a HDMI AV
OUT kapcsolatot és használjon másik videókapcsolatot. (B 8, 14)
Rádió
Torz hang vagy zaj hallatszik.
≥ Állítsa be az FM antenna helyzetét.
≥ Használjon kültéri antennát. (B 7)
Getting StartedPlaying DiscsOther OperationsReference
Dobogás hallatszik.
Kapcsolja ki a TV-t, vagy vigye távolabb a készüléktől.
USB
Az USB meghajtó, vagy annak tartalma nem olvasható.
≥ Az USB meghajtó vagy annak tartalma nem kompatibilis a rendszerrel.
(B 17)
≥ Előfordulhat, hogy a készülék USB funkciója néhány USB eszközzel
nem működik.
≥ Előfordulhat, hogy a 32 GB-nál nagyobb tárolókapacitású USB
eszközök néhány esetben nem működnek.
Az USB eszköz lassan működik.
Nagyméretű fájl vagy nagymemóriájú USB eszköz olvasása és TV-n való
megjelenítése több időt vesz igénybe.
TV-s megjelenítések
“/”
A műveletet a készülék vagy a lemez letiltja.
“
EZ A LEMEZ NEM JÁTSZHATÓ LE EBBEN A RÉGIÓBAN.
Csak olyan DVD-Videó lemezek játszhatók le, amelyek régiószáma
megegyezik a készülék hátsó részén látható számmal. (B Borító)
“Nincs videó”
A csatlakoztatott iPod/iPhone eszköztől függően előfordulhat, hogy nem
jelenik meg videómenü a TV-n.
Válassza ki az iPod/iPhone menü (iPod/iPhone LCD) módot (B 16) és
kezelje a videólejátszást az iPod/iPhone menüből.
Engedélyek
A Dolby Laboratories engedélyével gyártva.
A Dolby, a Pro Logic és a dupla D jel a Dolby Laboratories bejegyzett
védjegye.
Készült licenc alapján a #’s: 5,451,942; 5,956,674; 5,974,380;
5,978,762; 6,487,535 számú USA szabadalom, valamint egyéb
megadott és függőben levő USA és nemzetközi szabadalmak
alapján. A DTS és a szimbólum a DTS, Inc. bejegyzett védjegyei, míg
a & DTS Digital Surround és a DTS logók a DTS, Inc. védjegyei. A
termék a szoftvert is magában foglalja. © DTS, Inc. Minden jog
fenntartva.
USA Szabadalmi törvények: 6,836,549; 6,381,747; 7,050,698;
6,516,132; és 5,583,936.
Ez a termék magába foglalja az USA szabadalmi törvényei és más, a
szellemi tulajdonra vonatkozó jogok által védett szerzői jogi védelmet.
Ezt a szerzői jogi védelmi technológiát a Macrovision engedélyezi, és
a csak otthoni és egyéb korlátozott vetítés engedélyezett, ha a
Macrovision másképp nem engedélyezi. Fordított szerelés vagy
szétszerelés tilos.
A HDMI, a HDMI logó és a High-Definition Multimedia Interface a
HDMI Licensing LLC védjegye, illetve az Egyesült Államokban és
más országokban bejegyzett védjegye.
TM
HDAVI Control
A Windows Media és a Windows logó a Microsoft Corporation USAban és/vagy más országokban bejegyzett védjegye.
Ezt a terméket a Microsoft Corporation és harmadik felek szellemi
”
tulajdonra vonatkozó jogai védik. E technológia ezen a terméken
kívüli használata vagy megosztása a Microsoft, vagy annak
leányvállalata, vagy bármely harmadik fél engedélye nélkül tilos.
Ez a termék egy fogyasztó személyes és nem kereskedelmi
használatára engedélyezett (i) videó kódolására az MPEG-4 Visual
Standard (“MPEG-4 Video”) megfelelően, és/vagy (ii) olyan MPEG-4
Videó dekódolására, mely a fogyasztó személyes és nem
kereskedelmi tevékenységének eredményeképpen lett kódolva, és/
vagy az MPEG LA által engedélyezett videószolgáltatótól jutott
hozzá. Más jellegű használatra engedély nem adható. További
tájékoztatás, beleértve a promóciós, belső és kereskedelmi
használatra vonatkozó információkat és engedélyeket, az MPEG LA,
LC-től kérhető. Lásd http://www.mpegla.com
A DivX
történik.
®
is a registered trademark of DivX, Inc., and is used under
DivX
license.
a Panasonic Corporation bejegyzett védjegye.
.
®
a DivX, Inc. bejegyzett védjegye, és használata engedéllyel
24
MAGYAR
A “Made for iPod” azt jelenti, hogy egy elektronikus tartozékot
terveztek kifejezetten iPod-ra csatlakoztatáshoz, és a fejlesztő
igazolást adott ki arra vonatkozólag, hogy az megfelel az Apple
teljesítményi szabványainak.
A “Works with iPhone” azt jelenti, hogy kifejezetten az iPhonehoz való
csatlakoztatás céljából történt meg egy elektronikus tartozék
kifejlesztése, ami a fejlesztő tanúsítványa szerint megfelel az Apple
teljesítményszabványoknak.
Az Apple nem vállal felelősséget ezen eszköz működéséért illetve
biztonsági és szabályozó szabványoknak való megfelelőségéért.
Az iPod az Apple Inc. védjegye, bejegyezve az USA-ban és más
országokban.
Az iPhone az Apple Inc. védjegye.
RQ TX111 1
96
Page 97

Műszaki jellemzők
Első hangsugárzók SB-HF330
Háttér hangszórók SB-HS230
Háttér hangszórók SB-HS880
Középcsatorna hangsugárzó SB-HC230
ERŐSÍTŐK
RMS Kimeneti Áram: Dolby Digital Mód
Első csatorna
Háttér csatorna
Középső csatorna
Mélysugárzó csatorna
Total RMS Dolby Digital Mód áramellátás 1000 W
DIN Kimeneti Áram: Dolby Digital Mód
Első csatorna
Háttér csatorna
Középső csatorna
Mélysugárzó csatorna
Total DIN Dolby Digital Mód áramellátás 590 W
FM HANGOLÓ, CSATLAKOZÓALJZATOK
Előre beállított memória FM 30 állomás
Frekvencia Moduláció (FM)
Frekvenciatartomány
Antennacsatlakozók 75 ≠ (nem kiegyensúlyozott)
Digitális audio bemenet
Optikai digitális bemenet
Mintavételi gyakoriság
USB port
USB szabvány
Médiafájl-formátum támogatás
USB-eszköz fájlrendszer
USB port áram
Bitráta
LEMEZEK
Lejátszott lemezek (8 cm vagy 12 cm)
(1) DVD (DVD-Video, DivX
(2) DVD-R (DVD-Video, DVD-VR, MP3
§5, 6
)
DivX
(3) DVD-R DL (DVD-Video, DVD-VR, DivX
(4) DVD-RW (DVD-Video, DVD-VR, MP3
§5, 6
)
DivX
(5) iR/iRW (Video)
(6) iR DL (Video)
(7) CD, CD-R/RW (CD-DA, Video CD, SVCD
§1 IEC62107-nek megfelelően
§2 MPEG-1 3 réteg, MPEG-2 3 réteg
§3 Windows Media Audio Ver.9.0 L3
§4 Exif Ver 2.1 JPEG Baseline fájlok
§5 A maximum felismerhető audio-, kép- és hangtartalom, valamint –
§6 Lejátssza a DivX
§7 Panasonic SD multi kamerákkal vagy DVD-felvevőkkel rögzített
§4, 5
, MPEG4
JPEG
Nem kompatibilis a Multiple Bit Rate-tel (MBR)
Képfelbontás: 160k120 és 6144k4096 pixel között (Az almintavétel 4:0:0, 4:2:0, 4:2:2 vagy 4:4:4). Előfordul, hogy a
különösen hosszú és keskeny képek nem jelenítődnek meg.
csoport száma összesen: 4000 audio-, kép- és videótartalom, és
255 csoport. (A Gyökérkönyvtár kivételével)
MPEG4 adatokat
Az SD VIDEO követelményeinek megfelelően (ASF szabvány)/
MPEG4 (Simple Profile) video rendszer/G.726 audio rendszer
Behangolás
Hullámhossz (DVD/CD) 655/ 790 nm
Lézerélesség 1M OSZTÁLY
Audiokimenetek (Lemez)
Csatornák száma 5.1 cs. (FL, FR, C, SL, SR, SW)
125 W csatornánként (3 ≠), 1 kHz, 10 % THD
125 W csatornánként (3 ≠), 1 kHz, 10 % THD
250 W csatornánként (6 ≠), 1 kHz, 10 % THD
250 W csatornánként (6 ≠), 100 Hz, 10 % THD
90 W csatornánként (3 ≠), 1 kHz, 1 % THD
90 W csatornánként (3 ≠), 1 kHz, 1 % THD
115 W csatornánként (6 ≠), 1 kHz, 1 % THD
115 W csatornánként (6 ≠), 100 Hz, 1 % THD
87,50 MHz-tõl 108,00 MHz-ig
(50-kHz-es lépésekben)
Optikai csatlakozó
32 kHz, 44,1 kHz, 48 kHz
Teljes sebességű USB 2.0
MP3 (¢.mp3)
WMA (¢.wma)
JPEG (¢.jpg, ¢.jpeg)
DivX (¢.divx, ¢.avi)
MPEG4 (¢.asf)
FAT12 , FAT16, FAT32
Max. 500 mA
Max. 4 Mbps (DivX)
§5, 6
)
§5, 7
®
videót.
, DivX
§5, 6
§2, 5
)
, JPEG
§5, 6
§2, 5
)
, JPEG
§1
, MP3
§4, 5
§4, 5
, MPEG4
, MPEG4
§2, 5
, WMA
§5, 7
§3, 5
§5, 7
,
,
,
VIDEO
Videórendszer PAL625/50, PAL525/60, NTSC
Összetett videókimenet
Kimeneti szint
Csatlakozóvég
SCART jack dugó (1 rendszer)
1 Vp-p (75 ≠)
S-video kimenet
Y kimeneti szint
C kimeneti szint
Csatlakozóvég
NTSC; 0,286 Vp-p (75 ≠)
SCART jack dugó (1 rendszer)
1 Vp-p (75 ≠)
PAL; 0,3 Vp-p (75 ≠)
RGB videókimenet
R kimeneti szint
G kimeneti szint
B kimeneti szint
Csatlakozóvég
SCART jack dugó (1 rendszer)
0,7 Vp-p (75 ≠)
0,7 Vp-p (75 ≠)
0,7 Vp-p (75 ≠)
HDMI AV kimenet
Csatlakozóvég 19 tűs A-típusú konnektor
HDAVI Control A készülék támogatja a “HDAVI Control 5” funkciót.
HANGSZÓRÓK
Típus
Hangszóró egység(ek)
1 irányú, 1 hangszórórendszer (
Basszus reflex
Impedancia 3 ≠
Teljes tartomány 6,5 cm kúp típus
Kimeneti hangnyomás
Frekvenciatartomány
Méretek (szélességtmagasságtmélység)
Tömeg
Teljesen összeszerelve álló alappal
Méretek
(szélességtmagasságtmélység) max
Méretek
(szélességtmagasságtmélység) min
Tömeg
85 Hz-től25kHz-ig(j16 dB)
95 Hz-től22kHz-ig(j10 dB)
100 mmk530 mmk78 mm
255 mmk1020 mmk255 mm
255 mmk550 mmk255 mm
78 dB/W (1 m)
0,92 kg
2,3 kg
[PT580]
Típus
Hangszóró egység(ek)
1 irányú, 1 hangszórórendszer (
Basszus reflex
Impedancia 3 ≠
Teljes tartomány 6,5 cm kúp típus
Kimeneti hangnyomás
Frekvenciatartomány
Méretek (szélességtmagasságtmélység)
Tömeg
105 Hz-től 25 kHz-ig (j16 dB)
130 Hz-től 22 kHz-ig (
80 mmk118,5 mmk68 mm
78 dB/W (1 m)
j
10 dB)
0,4 kg
[PT880]
Típus
Hangszóró egység(ek)
1 irányú, 1 hangszórórendszer (
Basszus reflex
Impedancia 3 ≠
Teljes tartomány 6,5 cm kúp típus
Kimeneti hangnyomás
Frekvenciatartomány
Méretek (szélességtmagasságtmélység)
Tömeg
Teljesen összeszerelve álló alappal
Méretek
(szélességtmagasságtmélység) max
Méretek
(szélességtmagasságtmélység) min
Tömeg
Típus
Hangszóró egység(ek)
1 irányú, 1 hangszórórendszer (
85 Hz-től 25 kHz-ig (j16 dB)
95 Hz-től 22 kHz-ig (j10 dB)
100 mmk530 mmk78 mm
255 mmk1020 mmk255 mm
255 mmk550 mmk255 mm
78 dB/W (1 m)
0,92 kg
2,3 kg
Basszus reflex
Impedancia 6 ≠
Teljes tartomány 6,5 cm kúp típus
Kimeneti hangnyomás
Frekvenciatartomány
Méretek
(szélességtmagasságtmélység)
Tömeg
90 Hz-től 25 kHz-ig (j16 dB)
115 Hz- től 22 kHz-ig (j10 dB)
145 mmk85 mmk71,5 mm
79 dB/W (1 m)
0,6 kg
Getting StartedPlaying DiscsOther OperationsTájékoztató
)
)
)
)
MAGYAR
RQ TX111 1
25
97
Page 98

Típus
Extra mélysugárzó SB-HW330
Cd
Hangszóró egység(ek)
1. Mélysugárzó
2. Passzív Sugárzóantenna
Kimeneti hangnyomás
Frekvenciatartomány
Méretek
(szélességtmagasságtmélység)
Tömeg
ÁLTALÁNOS
Áramellátás
Getting StartedPlaying DiscsOther OperationsReference
Áramfogyasztás
Méretek
(szélességtmagasságtmélység)
Tömeg
Működtetési hőmérséklet-tartomány
Működtetési páratartalom-tartomány
Áramfogyasztás készenléti módban kb. 0,1 W
[Megjegyzés]
1 A részletek figyelmeztetés nélkül megváltozhatnak.
A tömeg és a méret becsült érték.
2 A teljes harmóniatorzítást digitális színképelemzővel mértük.
1 irányú, 1 hangszórórendszer (Kelton típus)
35 Hz-től 180 Hz-ig (j16 dB)
40 Hz-től 160 Hz-ig (j10 dB)
180,5 mmk322 mmk351 mm
AC 220 V-től 240 V-ig, 50 Hz
430 mmk54 mmk287 mm
(nincs páralecsapódás)
Impedancia 6 ≠
16 cm kúp típus
Készülék: 2,8 kg
0 oC-től r40 oC-ig
35 %-től80%-igRH
25 cm
78 dB/W (1 m)
4,6 kg
Készülék: 95 W
Tájékoztatás felhasználók számára az
elhasználódott készülékek, szárazelemek és
akkumulátorok begyűjtéséről és ártalmatlanításáról
A termékeken, a csomagoláson és/vagy a
kísérő dokumentumokon szereplő
szimbólumok azt jelentik, hogy az
elhasználódott elektromos és elektronikus
termékeket, szárazelemeket és
akkumulátorokat az általános háztartási
hulladéktól külön kell kezelni.
Az elhasználódott készülékek, szárazelemek
és akkumulátorok megfelelő kezelése,
hasznosítása és újrafelhasználása céljából,
kérjük, hogy az ország törvényeinek, valamint
a 2002/96/EK és a 2006/66/EK irányelveknek
megfelelően juttassa el azokat a kijelölt
gyűjtőhelyekre.
E termékek, szárazelemek és akkumulátorok
előírásszerű ártalmatlanításával Ön
hozzájárul az értékes erőforrások
megóvásához, és megakadályozza az emberi
egészség és a környezet károsodását, amit
egyébként a hulladékok nem megfelelő
kezelése okozhat.
Az elhasználódott termékek, szárazelemek és
akkumulátorok begyűjtésével és
újrafelhasználásával kapcsolatban, kérjük,
érdeklődjön a helyi közösségénél, a területi
hulladékártalmatlanító szolgálatnál vagy
abban az üzletben, ahol a termékeket
vásárolta.
E hulladékok szabálytalan elhelyezését a
nemzeti jogszabályok büntethetik.
Az Európai Unió üzleti felhasználói
számára
Ha az elektromos vagy elektronikus
berendezésétől meg kíván szabadulni, kérjük,
további tájékoztatásért forduljon a
forgalmazójához vagy a szállítójához.
[Hulladékkezelési tájékoztató az Európai
Unión kívüli egyéb országokban]
Ezek a szimbólumok csak az Európai
Unióban érvényesek. Ha meg kíván
szabadulni a termékektől, kérjük, lépjen
kapcsolatba a helyi hatóságokkal vagy a
kereskedővel, és kérdezze meg őket a
hulladékelhelyezés megfelelő módjáról.
Megjegyzés a szárazelem- és akkumulátorszimbólummal kapcsolatban (a két alsó
szimbólumpélda):
Ezek a szimbólumok kémiai szimbólummal
együtt alkalmazhatók. Ebben az esetben
teljesíti az EU irányelvnek vegyi anyagra
vonatkozó követelményét.
RQ TX111 1
MAGYAR
26
98
Page 99

Biztonsági óvintézkedések
Elhelyezés
Az egységet egyenletes felületen állítsa fel, távol közvetlen napsütéstől,
magas hőmérséklettől, magas páratartalomtól és erős rázkódástól. Ezek
a körülmények károsíthatják a szekrényt és egyéb alkatrészeket,
rövidítve ezzel az egység élettartamát.
Ne helyezzen nehéz tárgyakat az egységre.
Feszültség
Ne használjon magas feszültségű áramforrásokat. Túlterhelheti az
egységet, és tüzet okozhat.
Ne használjon DC áramforrást. Alaposan ellenőrizze le az áramforrást a
készülék hajón, vagy egyéb olyan helyen történő összeszerelésénél, ahol
DC-t használnak.
AC hálózati kábel védelme
Győződjön meg róla, hogy az AC hálózati kábel helyesen csatlakozik és
nem sérült. A helytelen csatlakoztatás és a sérült vezeték tüzet vagy
elektromos sokkot okozhat. Ne húzza, hajlítsa, és ne helyezzen nehéz
tárgyakat a vezetékre.
Határozottan fogja meg a dugót, mikor kihúzza a vezetéket. Az AC
hálózati kábel rángatása elektromos sokkot okozhat.
Ne érjen a dugóhoz nedves kézzel. Elektromos sokkot okozhat.
Idegen anyag
Ügyeljen arra, hogy fémtárgyak ne kerüljenek az egység belsejébe.
Elektromos sokkot vagy meghibásodást okozhat.
Ügyeljen arra, hogy folyadék ne kerüljön az egység belsejébe.
Elektromos sokkot vagy meghibásodást okozhat. Ha ez bekövetkezne,
azonnal kapcsolja le az egységet az energiaforrásról és lépjen
kapcsolatba a márkakereskedővel.
Ne fújjon rovarölő szereket az egységre vagy az egységbe. Ezek éghető
gázokat tartalmaznak, amik meggyulladhatnak, ha az egységbe fújja
őket.
Szerviz
Ne próbálja meg saját maga megjavítani az egységet. Ha a hangforrás
megakad, a kijelzők nem világítanak, füstöt érzékel, vagy bármilyen olyan
probléma adódik, amit nem tartalmaz az utasítás, válassza le az AC
hálózati kábelt és lépjen kapcsolatba a márkakereskedővel vagy a
megfelelő szerviz központtal. Elektromos sokk vagy a készülék
károsodása következhet be, ha az egységet nem megfelelően képzett
szakember javítja, szereli szét vagy rakja össze.
Az élettartam meghosszabbítása céljából áramtalanítsa az egységet, ha
hosszabb ideig nem kívánja használni.
Getting StartedPlaying DiscsOther OperationsTájékoztató
MAGYAR
RQ TX111 1
27
99
Page 100

Getting StartedPlaying DiscsOther OperationsReference
28
RQ TX111 1
100
 Loading...