

Panasonic SCPT85 User Manual [en, cs, pl]
The illustration shows SC-PT70.
Obrázek představuje model SC-PT70.
Na rysunku przedstawiono model SC-PT70.
Operating Instructions
Návod k obsluze
Instrukcja obsługi
Használati útmutató
DVD Home Theater Sound System
Systém zvuku domácího kina s DVD pâehrávaçem
Zestaw kina domowego z odtwarzaczem DVD
DVD házimozi hangrendszer
Model No. / Model č. / Nr Modelu / Model No.SC-PT85
Dear customer
Thank you for purchasing this product. For optimum performance and
safety, please read these instructions carefully.
Before connecting, operating or adjusting this product, please read
the instructions completely.
Please keep this manual for future reference.
The illustrations shown may differ from your unit.
Vážený zákazníku
Děkujeme za zakoupení tohoto výrobku. Pro dosažení optimálního
výkonu a z bezpečnostních důvodu si pečlivě přečtěte tyto pokyny.
Před zapojením, obsluhou nebo nastavením tohoto výrobku si
přečtěte celý tento návod.
Návod uschovejte k pozdějšímu použití.
Uvedené ilustrace se mohou od vašeho přístroje lišit.
Szanowny Nabywco
Dziękujemy za zakupienie tego produktu. Aby zapewnić optymalną pracę
urządzenia i jego bezpieczną obsługę, należy dokładnie przeczytać
niniejszą instrukcję.
Przed podłączeniem, użytkowaniem lub regulacją produktu należy
przeczytać całą instrukcję obsługi.
Należy zachować tę instrukcję obsługi na przyszłość.
Urzdązenie pokazane na ilustracjach może się różnić od
zakupionego urządzenia.
Tisztelt Vásárló!
Köszönjük, hogy termékünket választotta. A biztonság és a készülék
optimális teljesítménye érdekében kérjük, hogy figyelmesen olvassa el a
használati útmutatót!
A készülék csatlakoztatása, üzembe helyezése és beállítása előtt
kérjük, figyelmesen olvassa végig a használati útmutatót.
Kérjük, őrizze meg ezt az útmutatót.
Az útmutatóban látható ábrák eltérhetnek az Ön készülékétől.
Region number/Číslo regionu/Numer regionu/Régiókód
The player plays DVD-Video marked with labels containing the
region number “2” or “ALL”.
Přehrávač přehrává disky DVD-Video označené štítky s číslem
regionu “2” nebo “ALL”.
Odtwarzacz obsługuje płyty DVD-Video z numerami regionów “2” lub
“ALL”.
A DVD lejátszó a megfelelő régiókóddal “2” vagy “ALL” jelzéssel
jelölt DVD-Video lemezeket játssza le.
Example/Příklad/Przykład/Például:
2
2 ALL
3
5
[EP]
RQTX1141-Z
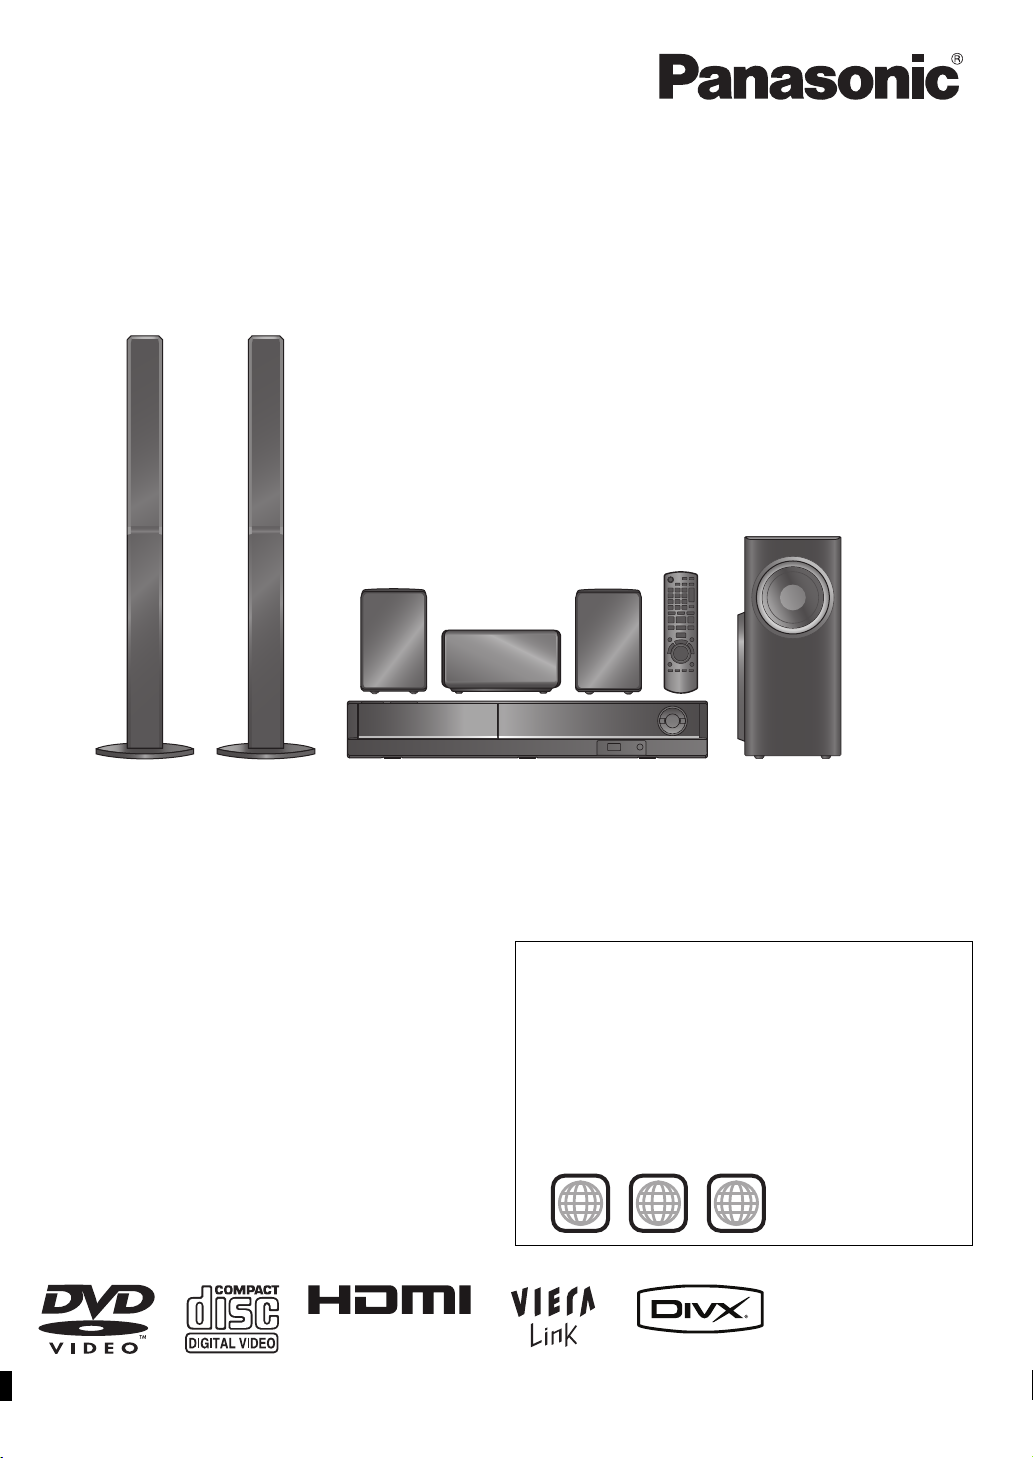
System/Systém/Zestaw/Rendszer SC-PT85
(Inside of product)
(Uvnitř přehrávače)
(Wewnątrz urządzenia)
(A készülék belsejében)
Main unit/Hlavní jednotka/Główne urządzenie/Készülék SA-PT85
Speaker system/
Reproduktorový systém/
System głośników/
Hangszóró rendszer
Subwoofer/Subwoofer/Głośnik niskotonowy/Extra mélysugárzó SB-HW70
Operations in these instructions are described mainly with the remote control, but you can perform the operations on the main unit if
the controls are the same.
Popis obsluhy v tomto návodu se týká především dálkového ovladače, avšak obsluhu lze provádět také pomocí ovládacích prvků
hlavní jednotky – jestliže jsou stejné jako na ovladači.
W instrukcji obsługi opisano głównie czynności wykonywane z poziomu pilota, można je jednak wykonać z poziomu urządzenia
głównego, jeżeli znajdujące się tam przyciski są takie same.
A használati útmutatóban ismertetett mûveletek fõleg a távvezérlõ használatára vonatkoznak, de ezeket a mûveleteket a készülék
kezelõszerveivel ugyanúgy elvégezheti.
Front speakers/Čelní reproduktory/Głośniki przednie/Első hangsugárzók SB-HF85
Center speaker/Centrální reproduktor/Głośnik centralny/
Középcsatorna hangsugárzó
Surround speakers/Prostorové reproduktory/
Głośniki dźwięku przestrzennego/Háttér hangsugárzók
SB-HC85
SB-HS85
Accessories/Příslušenství/Akcesoria/Tartozékok
Please check and identify the supplied accessories.
Zkontrolujte a odlište dodané příslušenství.
Sprawdź załączone akcesoria.
Kérjük, ellenőrizze és azonosítsa a mellékelt tartozékokat.
∏ 1 Remote control/Dálkový ovladač/Pilot/Távvezérlő
(N2QAYB000456)
∏ 2 Remote control batteries/Baterie dálkového ovladače/Baterie pilota/Elem a távvezérlőhöz
∏ 1 FM indoor antenna/Pokojová anténa FM/Wewnętrzna antena FM/URH szobaantenna
∏ 3 Speaker cables/Kabely reproduktorů/Kabel głośnikowe/Rövid kábel (középcsatorna hangsugárzóhoz)
∏ 1 AC mains lead/Sít’ový kabel/Przewód zasilania/Hálózati csatlakozókábel
∏ 1 Sheet of speaker cable stickers/Arch nálepek na kabely reproduktorů/Arkusze nalepek na kable głośnikowe/
Csomag címke a hangsugárzó kábelekhez
∏ 2 Speaker stands (with cable)/Stojany reproduktorů (s kabelem)/Stojaki głośników (z kablem)/Hangszóró tartók (kábelekkel)
∏ 2 Bases/Základny/Podstawy/Tartótalp
∏ 8 Screws/šroubů/Wkrętów/Csavar
RQTX1141
2
2
VOL
OPEN/CLOSE
MUSIC
PORT
PLAY MODE
1 2 3
4
5 6
TV
AV
VOL
VOL
7 809
REPEAT
DVD
SEARCH
SKIP
SURROUND
R
O
T
A
U
G
I
N
V
E
A
N
M
T
C
P
E
R
I
O
D
T
MENU
PLAY
LIST
SETUP W.SRD FL DISPLAY CANCEL
-
CH SELECT
RADIO
PLAY
SLOW
PAUSE
STOP
A
T
S
OK
10
R
T
-
SLEEP
EXT-IN
MUTE
SEARCH
SKIP
SOUND
F
U
N
C
T
I
O
N
S
RETURN
[Note] / [Poznamka] / [Uwaga] / [Megjegyzés]
The circled numbers indicated in the operating instructions (e.g. Press [Í]1.) correspond to the circled numbers in the above.
Zakroužkovaná čísla uvedená v návodu k obsluze (např. Stiskněte [Í]1.) odpovídají zakroužkovaným číslům viz výše.
Zakreślone cyfry zaznaczone w instrukcji obsługi (np. Wciśnij [Í]1.) odnoszą się do zakreślonych cyfr w tejże instrukcji.
A használati utasításban feltüntetett bekarikázott számok (pl. Nyomja meg az [Í]1.gombot) a fenti bekarikázott számoknak felelnek meg.
RQTX1141
3
3

Control reference guide
Abkhazian: 6566
Afar: 6565
Afrikaans: 6570
Albanian: 8381
Amharic: 6577
Arabic: 6582
Armenian: 7289
Assamese: 6583
Aymara: 6589
Azerbaijani: 6590
Bashkir: 6665
Basque: 6985
Bengali, Bangla: 6678
Bhutani: 6890
Bihari: 6672
Breton: 6682
Bulgarian: 6671
Burmese: 7789
Byelorussian: 6669
Cambodian: 7577
Catalan: 6765
Chinese: 9072
Corsican: 6779
Croatian: 7282
Czech: 6783
Danish: 6865
Dutch: 7876
English: 6978
Esperanto: 6979
Estonian: 6984
Faroese: 7079
Fiji: 7074
Finnish: 7073
French: 7082
Frisian: 7089
Galician: 7176
Georgian: 7565
German: 6869
Greek: 6976
Greenlandic: 7576
Guarani: 7178
Gujarati: 7185
Hausa: 7265
Hebrew: 7387
Hindi: 7273
Hungarian: 7285
Icelandic: 7383
Indonesian: 7378
Interlingua: 7365
Irish: 7165
Italian: 7384
Japanese: 7465
Javanese: 7487
Kannada: 7578
Kashmiri: 7583
Kazakh: 7575
Kirghiz: 7589
Korean: 7579
Kurdish: 7585
Laotian: 7679
Latin: 7665
Latvian, Lettish: 7686
Lingala: 7678
Lithuanian: 7684
Macedonian: 7775
Malagasy: 7771
Malay: 7783
Malayalam: 7776
Maltese: 7784
Maori: 7773
Marathi: 7782
Moldavian: 7779
Mongolian: 7778
Nauru: 7865
Nepali: 7869
Norwegian: 7879
Oriya: 7982
Pashto, Pushto: 8083
Persian: 7065
Polish: 8076
Por tu gu es e: 808 4
Punjabi: 8065
Quechua: 8185
Rhaeto-Romance:
8277
Romanian: 8279
Russian: 8285
Samoan: 8377
Sanskrit: 8365
Scots Gaelic: 7168
Serbian: 8382
Serbo-Croatian: 8372
Shona: 8378
Sindhi: 8368
Singhalese: 8373
Slovak: 8375
Slovenian: 8376
Somali: 8379
Spanish: 6983
Sundanese: 8385
Swahili: 8387
Swedish: 8386
Tagalog: 8476
Tajik: 8471
Ta mi l : 8 4 65
Ta ta r : 8 4 84
Te lu g u: 8 46 9
Thai: 8472
Tibetan: 6679
Tigrinya: 8473
Tonga: 8479
Tu rk i sh : 8 48 2
Tu rk m en : 84 75
Twi: 8487
Ukrainian: 8575
Urdu: 8582
Uzbek: 8590
Vietnamese: 8673
Volapük: 8679
Welsh: 6789
Wolof: 8779
Xhosa: 8872
Yiddish: 7473
Yoruba: 8979
Zulu: 9085
Remote control
Getting StartedPlaying DiscsOther OperationsReference
1 Turn the main unit on/off (B 9)
2 Select the play mode (B 12)
3 Select channels and title numbers etc. / Enter numbers (B 9, 12)
4 Set the repeat mode (B 12)
5 Basic operations for play (B 12)
6 Select preset radio stations (B 9)
7 Select surround sound effects (B 11)
8 Show a disc top menu or program list (B 12, 13)
9 Select or confirm menu items / Frame-by-frame (B 12)
: Show a disc menu or play list (B 12, 13)
; Show setup menu or select speaker channel (B 9, 11)
< Turn Whisper-mode Surround on/off (B 11)
= TV operations
Aim the remote control at the Panasonic TV and press the button.
[Í]: Turn the TV on/off
[AV]: Change the TV’s video input mode
[r, s]: Adjust the TV volume
This may not work properly with some models.
> Adjust the volume of the main unit
? Mute the sound
≥ “MUTE” flashes on the main unit’s display while the function is on.
≥ To cancel, press the button again or adjust the volume.
≥ Muting is cancelled when you switch the unit to standby.
@ Source select
[DVD]: Select disc as the source (B 9)
[RADIO]: Select FM tuner (B 9)
[EXT-IN]: Select external audio as the source (B 10)
USB # AV # AUX
§ “(TV)” will appear beside “AUX” or “D-IN”, indicating the TV audio
A Select radio stations manually (B 9)
B Select sound mode (B 11 )
C Show START menu (B 10)
D Show on-screen menu (B 13)
^-------------------------------------------------------------}
setting for VIERA Link “HDAVI Control” (B 15).
§
# D-IN§ # MUSIC P.
E Return to previous screen (B 12)
F Cancel (B 12)
G Switch information on the main unit’s display (B 12)
or
Set the Sleep timer
Press and hold [–SLEEP].
While the time is shown on the main unit’s display, press
[–SLEEP] repeatedly.
SLEEP 30 # SLEEP 60 # SLEEP 90 # SLEEP120
^-------------------------- OFF (Cancel) (--------------------------}
≥ To confirm the remaining time, press and hold the button again.
Avoiding interference with other Panasonic equipment
Other Panasonic audio/video equipment may start functioning when you
operate the unit using the supplied remote control.
You can operate this unit in another mode by setting the remote control
operating mode to “REMOTE 2”.
The main unit and remote control must be set to the same mode.
1 Press [EXT-IN]@ to select “AUX”.
2 Press and hold [1]9 on the main unit and [2] on the remote control
until the main unit’s display shows “REMOTE 2”.
3 Press and hold [OK]9 and [2] on the remote control for at least 2
seconds.
To change the mode back to “REMOTE 1”, repeat the steps above by
replacing [2] with [1].
Main unit
1 Standby/on switch (Í/I)
Press to switch the unit from on to standby mode or vice versa. In
standby mode, the unit is still consuming a small amount of power.
(B 12)
2 Open/Close the disc tray (B 12)
3 Remote control signal sensor
4 Display
5 Connect external music device (B 16)
6 Adjust the volume of the main unit
7 Connect USB device (B 16)
8 Stop playing
9 Play disc (B 12)
Language code list
RQTX1141
ENGLISH
4
4

TABLE OF CONTENTS
Getting Started
Accessories . . . . . . . . . . . . . . . . . . . . . . . . . . . . . . . . . . . .2
Control reference guide. . . . . . . . . . . . . . . . . . . . . . . . . . .4
Quick Start Guide
step 1 Preparing the speakers . . . . . . . . . . . . . . . . . 6
step 2 Positioning . . . . . . . . . . . . . . . . . . . . . . . . . . . 7
step 3 Connections . . . . . . . . . . . . . . . . . . . . . . . . . . 7
Speaker connections. . . . . . . . . . . . . . . . . . . . . .7
Radio antenna connections. . . . . . . . . . . . . . . . .7
Audio and video connections . . . . . . . . . . . . . . .8
step 4 AC mains lead connection. . . . . . . . . . . . . . . 8
step 5 Preparing the remote control . . . . . . . . . . . . 8
step 6 EASY SETUP . . . . . . . . . . . . . . . . . . . . . . . . . . 9
Listening to the radio. . . . . . . . . . . . . . . . . . . . . . . . . . . . .9
Presetting stations automatically . . . . . . . . . . . . . . . . . . . . .9
Listening/confirming the preset channels . . . . . . . . . . . . . . . 9
Manual tuning . . . . . . . . . . . . . . . . . . . . . . . . . . . . . . . . . . . . 9
Selecting the playback source . . . . . . . . . . . . . . . . . . . .10
Selecting the source from the START menu . . . . . . . . . . .10
Selecting the source by the remote control . . . . . . . . . . . . 10
Enjoying sound effects from all speakers
Enjoying surround sound effects. . . . . . . . . . . . . . . . 11
Selecting sound mode. . . . . . . . . . . . . . . . . . . . . . . . .11
Whisper-mode Surround . . . . . . . . . . . . . . . . . . . . . . .11
Adjusting the speaker output level manually . . . . . .11
Adjusting the balance of the front speakers. . . . . . .11
Playing Discs
Basic play. . . . . . . . . . . . . . . . . . . . . . . . . . . . . . . . . . . . . 12
Other modes of play . . . . . . . . . . . . . . . . . . . . . . . . . . . . 12
Repeat play . . . . . . . . . . . . . . . . . . . . . . . . . . . . . . . . . . . . 12
Program and Random play . . . . . . . . . . . . . . . . . . . . . . . . 12
Using navigation menus . . . . . . . . . . . . . . . . . . . . . . . . . 13
Playing data discs . . . . . . . . . . . . . . . . . . . . . . . . . . . . . . . 13
Playing DVD-R/ -RW (DVD-VR) discs . . . . . . . . . . . . . . . . 13
Using on-screen menus . . . . . . . . . . . . . . . . . . . . . . . . . 13
Other Operations
Using the VIERA Link “HDAVI ControlTM” . . . . . . . . . . . 15
One touch play . . . . . . . . . . . . . . . . . . . . . . . . . . . . . . . . . 15
Auto input switching. . . . . . . . . . . . . . . . . . . . . . . . . . . . . . 15
Power off link . . . . . . . . . . . . . . . . . . . . . . . . . . . . . . . . . . . 15
Speaker Selection . . . . . . . . . . . . . . . . . . . . . . . . . . . . . . . 15
VIERA Link Control only with TV’s remote control
(for “HDAVI Control 2 or later”) . . . . . . . . . . . . . . . . . . . . 16
Operating other devices . . . . . . . . . . . . . . . . . . . . . . . . . 16
Playing from an USB device . . . . . . . . . . . . . . . . . . . . . . . 16
Playing from MUSIC PORT . . . . . . . . . . . . . . . . . . . . . . . . 16
Reference
Changing the player settings . . . . . . . . . . . . . . . . . . . . . 17
DivX information . . . . . . . . . . . . . . . . . . . . . . . . . . . . . . . 19
Displaying DivX subtitles text . . . . . . . . . . . . . . . . . . . . . . 19
Licenses . . . . . . . . . . . . . . . . . . . . . . . . . . . . . . . . . . . . . . 19
Speaker installation option. . . . . . . . . . . . . . . . . . . . . . . 20
Maintenance. . . . . . . . . . . . . . . . . . . . . . . . . . . . . . . . . . . 20
Discs that can be played. . . . . . . . . . . . . . . . . . . . . . . . . 21
Specifications . . . . . . . . . . . . . . . . . . . . . . . . . . . . . . . . . 22
Troubleshooting guide . . . . . . . . . . . . . . . . . . . . . . . . . . 23
Safety precautions . . . . . . . . . . . . . . . . . . . . . . . . . . . . . 25
Getting StartedPlaying DiscsOther OperationsReference
CAUTION!
THIS PRODUCT UTILIZES A LASER.
USE OF CONTROLS OR ADJUSTMENTS OR PERFORMANCE OF
PROCEDURES OTHER THAN THOSE SPECIFIED HEREIN MAY
RESULT IN HAZARDOUS RADIATION EXPOSURE.
DO NOT OPEN COVERS AND DO NOT REPAIR YOURSELF.
REFER SERVICING TO QUALIFIED PERSONNEL.
WARNING:
TO REDUCE THE RISK OF FIRE, ELECTRIC SHOCK OR
PRODUCT DAMAGE,
≥DO NOT EXPOSE THIS APPARATUS TO RAIN,
MOISTURE, DRIPPING OR SPLASHING AND THAT NO
OBJECTS FILLED WITH LIQUIDS, SUCH AS VASES,
SHALL BE PLACED ON THE APPARATUS.
≥USE ONLY THE RECOMMENDED ACCESSORIES.
≥DO NOT REMOVE THE COVER (OR BACK); THERE
ARE NO USER SERVICEABLE PARTS INSIDE. REFER
SERVICING TO QUALIFIED SERVICE PERSONNEL.
THIS UNIT IS INTENDED FOR USE IN MODERATE CLIMATES.
CAUTION!
≥ DO NOT INSTALL OR PLACE THIS UNIT IN A BOOKCASE,
BUILT-IN CABINET OR IN ANOTHER CONFINED SPACE.
ENSURE THE UNIT IS WELL VENTILATED. TO PREVENT RISK
OF ELECTRIC SHOCK OR FIRE HAZARD DUE TO
OVERHEATING, ENSURE THAT CURTAINS AND ANY OTHER
MATERIALS DO NOT OBSTRUCT THE VENTILATION VENTS.
≥ DO NOT OBSTRUCT THE UNIT’S VENTILATION OPENINGS
WITH NEWSPAPERS, TABLECLOTHS, CURTAINS, AND
SIMILAR ITEMS.
≥ DO NOT PLACE SOURCES OF NAKED FLAMES, SUCH AS
LIGHTED CANDLES, ON THE UNIT.
≥ DISPOSE OF BATTERIES IN AN ENVIRONMENTALLY
FRIENDLY MANNER.
This product may receive radio interference caused by mobile
telephones during use. If such interference is apparent, please
increase separation between the product and the mobile telephone.
The socket outlet shall be installed near the equipment and easily
accessible.
The mains plug of the power supply cord shall remain readily
operable.
To completely disconnect this apparatus from the AC Mains,
disconnect the power supply cord plug from AC receptacle.
ENGLISH
RQTX1141
5
5
step 1 Preparing the speakers
Make sure you have all the indicated components before starting assembly, setup, and connection.
≥ Keep the screws out of reach of children to prevent swallowing.
≥ For optional wall mount, refer to page 20.
2 Front speakers 2 Stands (with cable) 2 Bases 8 Screws
1
2
2
1
Slide into the groove.
Tighten securely.
Position the cable
between the ridges.
Leave about 120 mm.
Press into the groove.
Tighten securely.
Insert the wire fully.
i: White
j: Blue line
Push!
Leave about
120 mm.
You can remove and use the
cable from the stand. To reattach
the cable, refer to page 20.
Slide into the
groove.
Press into the groove.
Tighten securely.
Insert the wire fully.
i: White
j: Blue line
Push!
Thread the speaker cable through
the base.
Attach the speaker.
String (not included)
Thread from the wall to the speaker and tie tightly.
Speaker (rear)
Screw eye
(not included)
Approx.
150 mm
Wall
Front speakers
Preparation
≥ To prevent damage or scratches, lay down a soft cloth to assemble speakers.
≥ For assembly, use a Phillips-head screwdriver (not included).
Speaker assembly option
Preventing the speakers from falling
≥ You will need to obtain the appropriate screw eyes to match the walls
or pillars to which they are going to be fastened.
≥ Consult a qualified housing contractor concerning the appropriate
procedure when attaching to a concrete wall or a surface that may not
have strong enough support. Improper attachment may result in
damage to the wall or speakers.
RQTX1141
ENGLISH
6
6
Caution
≥ Do not stand on the base. Be cautious when children are near.
≥ When carrying the speaker, hold the stand and base parts.
Getting Started
step 2 Positioning
120°
60°
Center speaker
§2
Front speaker
(left)
Subwoofer
§3
Surround
speaker (left)
Surround
speaker (right)
Front speaker
(right)
Main unit
§1
FM ANT
(75 )
Adhesive tape
Main unit (rear)
FM indoor antenna
(included)
Affix this end of the antenna
where reception is best.
FM ANT
(75 )
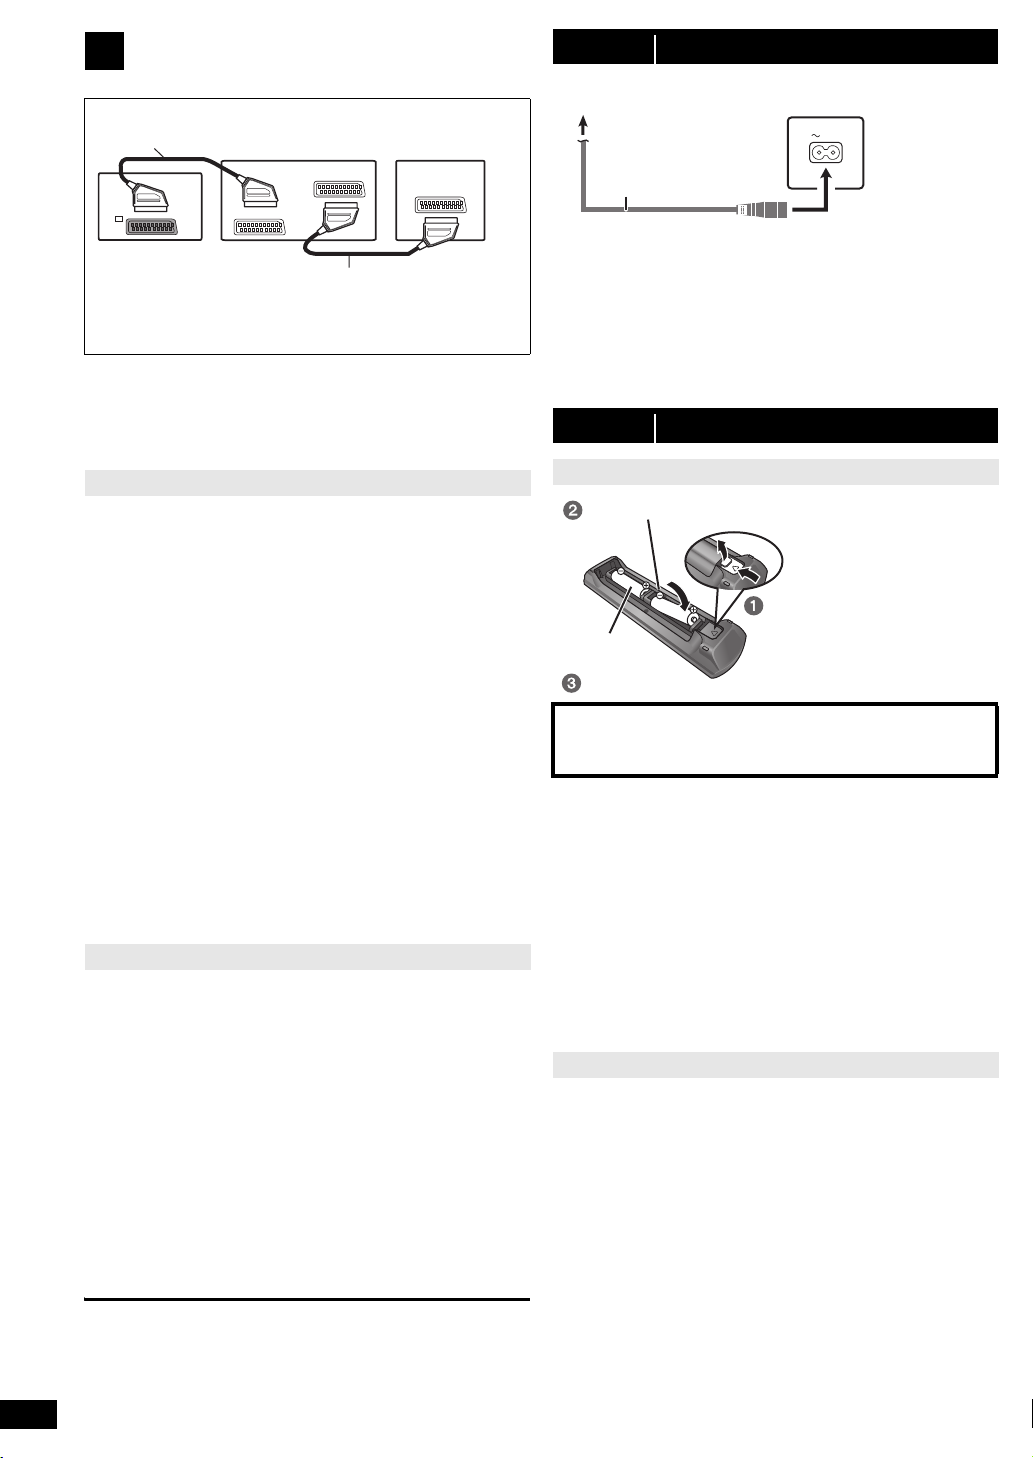
Use outdoor antenna if radio reception is poor.
≥ Disconnect the antenna when the unit is not in use.
≥ Do not use the outdoor antenna during an electrical storm.
Main unit
(rear)
75 ≠ coaxial
cable
(not included)
FM outdoor antenna
(Using a TV antenna
(not included))
The antenna should be
installed by a competent
technician.
How you set up your speakers can affect the bass and the sound field.
Note the following points:
≥ Place speakers on flat secure bases.
≥ Placing speakers too close to floors, walls, and corners can result in
excessive bass. Cover walls and windows with thick curtains.
[Note]
Keep your speakers at least 10 mm away from the system for proper
ventilation.
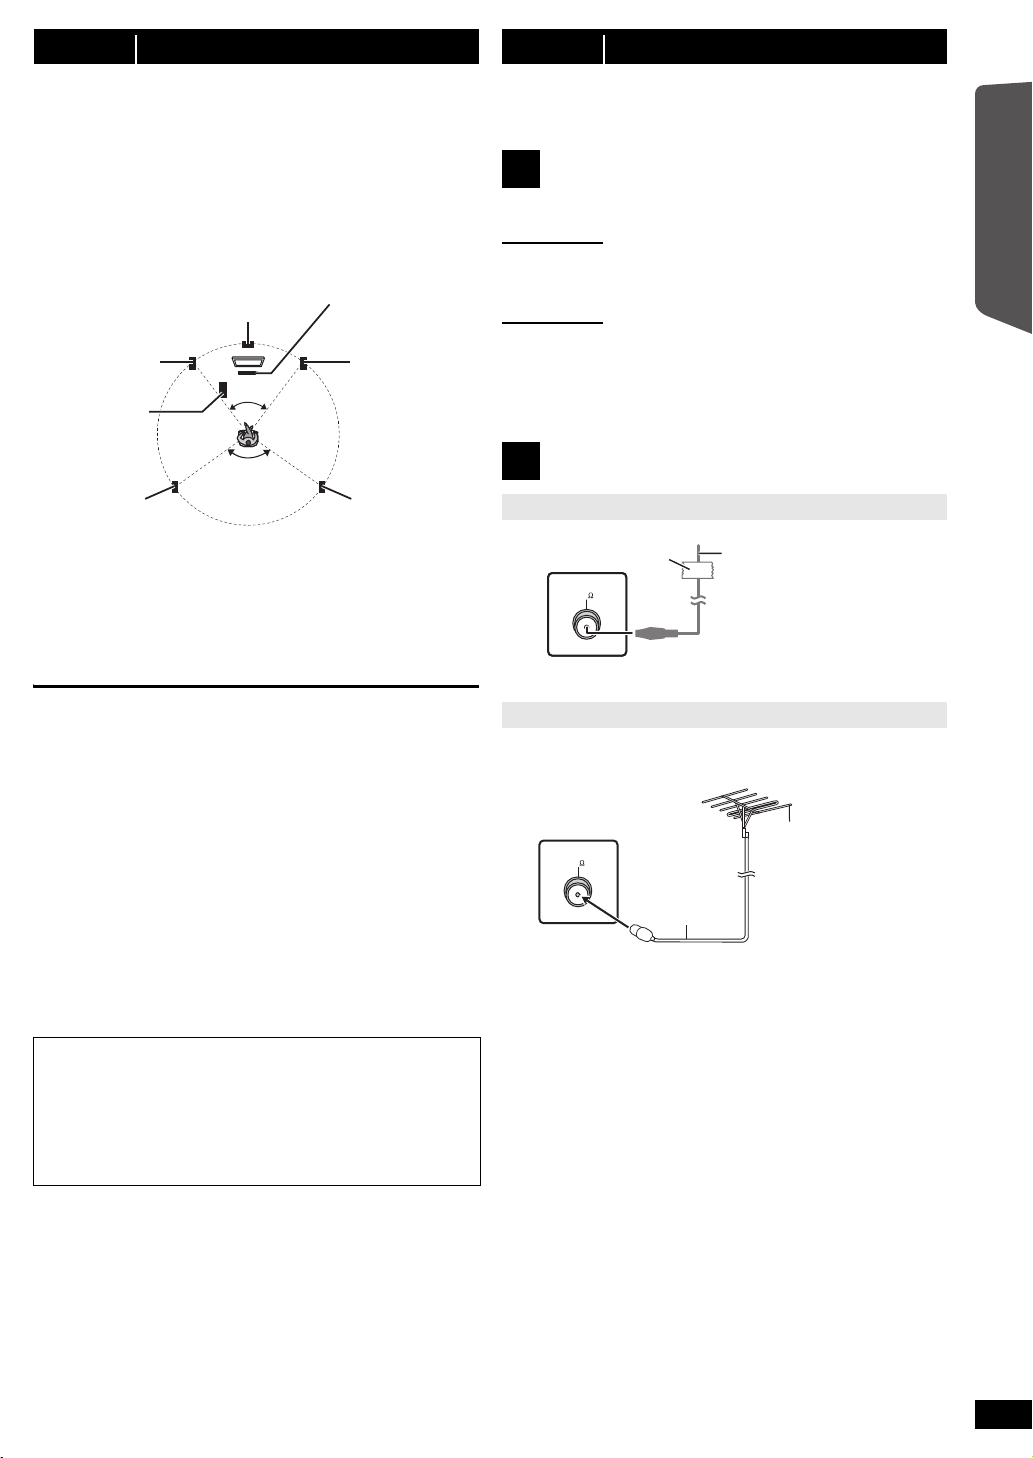
Setup example (Recommended: 5.1ch layout)
Place the front, center, and surround speakers at approximately the
same distance from the seating position. The angles in the diagram are
approximate.
§1 Position with at least 5 cm of space on all sides for proper
ventilation.
§2 Put on a rack or shelf. Vibration caused by the speaker can disrupt
the picture if it is placed directly on the TV.
§3 Place to the right or left of the TV, on the floor or a sturdy shelf so
that it will not cause vibration. Leave about 30 cm from the TV.
Depending on the room layout, you may like to use only the front
speakers and subwoofer for space saving (2.1ch layout).
step 3 Connections
Turn off all equipment before connection and read the appropriate
operating instructions.
Do not connect the AC mains lead until all other
connections are completed.
Speaker connections
1
Pay attention to the type of speaker and the connector colour when you
place the speakers.
Main unit (rear)
Connect to the terminals of the same colour.
Use of the speaker cable stickers is convenient when making cable
connections.
Speakers (rear)
Insert the wire fully, taking care not to insert beyond the wire insulation.
i: White
j: Blue line
≥ Be careful not to cross (short circuit) or reverse the polarity of the
speaker wires as doing so may damage the speakers.
Radio antenna connections
2
Using an indoor antenna
Quick Start Guide
Notes on speaker use
≥Use only supplied speakers
Using other speakers can damage the unit, and sound quality will be
negatively affected.
≥ You can damage your speakers and shorten their useful life if you play
sound at high levels over extended periods.
≥ Reduce the volume in the following cases to avoid damage:
– When playing distorted sound.
– When the speakers are reverberating due to a record player, noise
from FM broadcasts, or continuous signals from an oscillator, test
disc, or electronic instrument.
– When adjusting the sound quality.
– When turning the unit on or off.
If irregular colouring occurs on your TV
The center speaker is designed to be used close to a TV, but the picture
may be affected with some TVs and setup combinations.
If this occurs, turn the TV off for about 30 minutes.
The demagnetising function of the TV should correct the problem. If it
persists, move the speakers further away from the TV.
Caution
≥ The main unit and supplied speakers are to be used only as
indicated in this setup. Failure to do so may lead to damage to
the amplifier and/or the speakers, and may result in the risk of
fire. Consult a qualified service person if damage has occurred
or if you experience a sudden change in performance.
≥ Do not attempt to attach these speakers to walls using
methods other than those described in this manual.
Caution
Do not touch the front netted area of the speakers. Hold by the sides.
Using an outdoor antenna
ENGLISH
RQTX1141
7
7
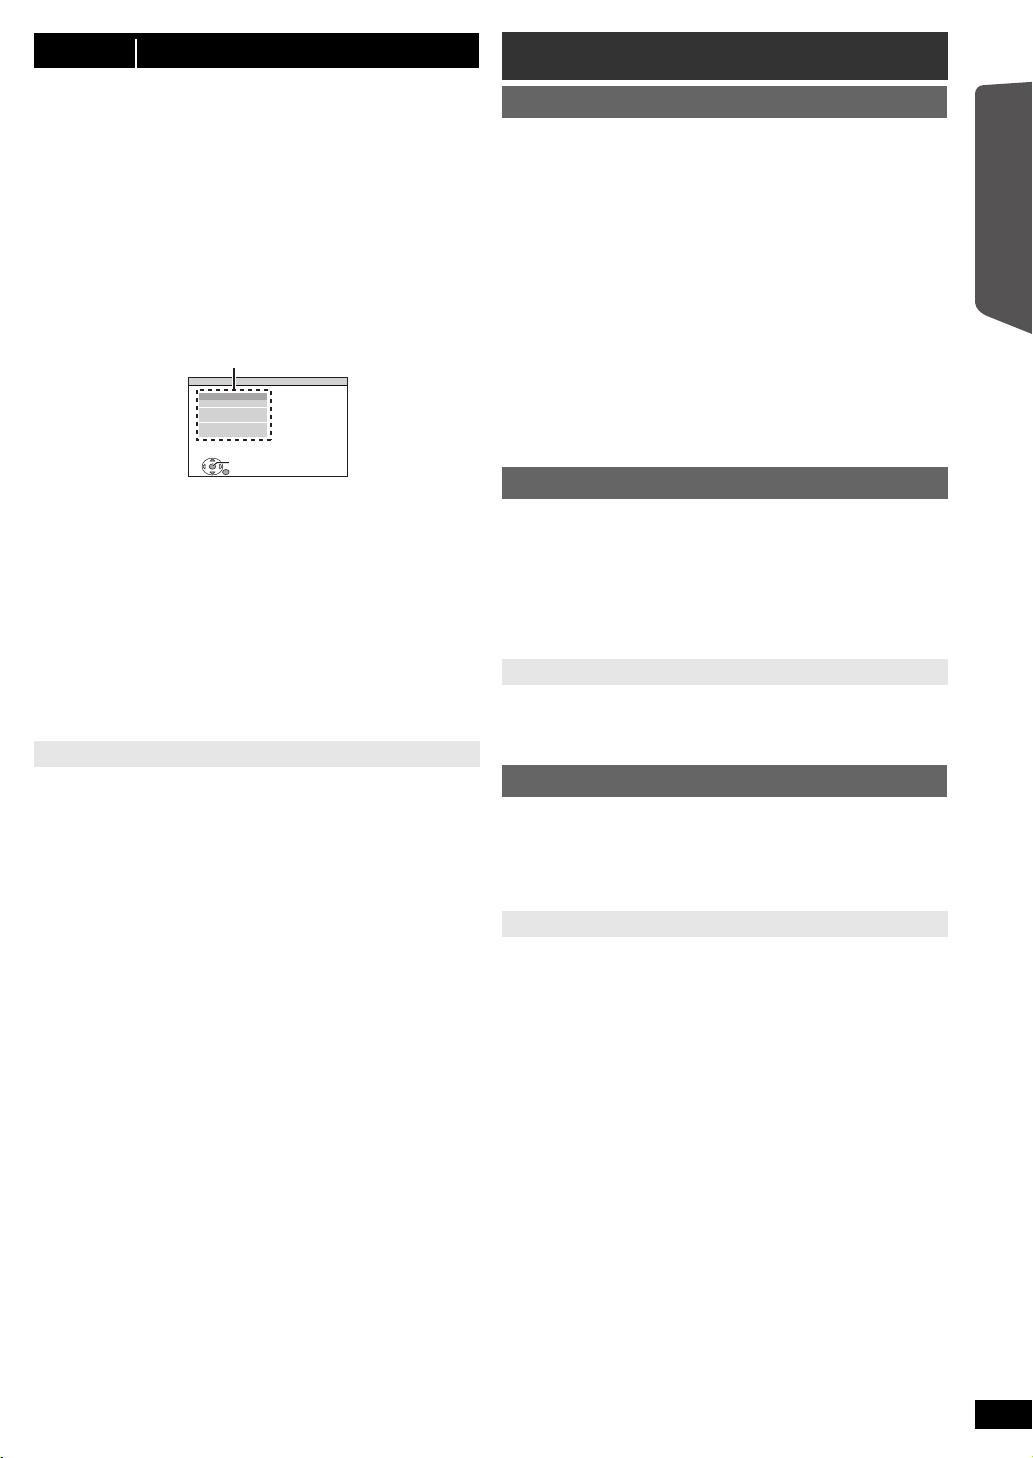
Audio and video connections
AV
AV OU T
AV1
AV2
SCART cable
§
(not included)
TV
Main unit (rear)
SCART cable (not included)
Set top box
(STB) or VCR
To household mains socket
Main unit (rear)
AC mains lead (included)
Press in and lift up.
Replace the cover.
Insert so the poles (r and j) match those in the remote control.
3
Basic setup example
§ This connection will also enable you to play TV audio through your
home theater system (B 10, Selecting the source by the remote
control). Select the appropriate audio out (e.g. Monitor) on the TV.
To improve picture quality, you can change the video signal output from
the SCART (AV) terminal to suit the type of TV you are using.
≥ Select “S-VIDEO”, “RGB 1” or “RGB 2” from “VIDEO OUT – SCART”
in VIDEO menu (B 17).
≥ When both the HDMI cable and SCART cable are connected, there
will be no RGB output from the SCART (AV) terminal.
Other video connection
[\\\\\\\\\\\HDMI\AV\OUT\\\\\\\\\]
This connection provides the best picture quality.
Connect the HDMI cable (not included) from the HDMI AV OUT
terminal on the main unit to the HDMI AV IN terminal on your TV.
≥ Set “VIDEO PRIORITY” to “ON” (B 18, HDMI menu).
≥ Set “VIDEO FORMAT” in Menu 4 (HDMI) (B 15).
VIERA Link “HDAVI Control”
If your Panasonic TV is VIERA Link compatible, you can operate your
TV synchronising with home theater operations or vice versa (B 15,
Using the VIERA Link “HDAVI Control
≥ Make the extra audio connection (B below) when you use
HDAVI Control” function.
“
[Note]
≥ Non-HDMI-compliant cables cannot be utilized.
≥ It is recommended that you use Panasonic’s HDMI cable.
Recommended part number:
RP-CDHS15 (1.5 m),RP-CDHS30 (3.0 m), RP-CDHS50 (5.0 m), etc.
≥ For TV with more than one HDMI terminal, refer to the operating
instructions for the TV to determine which terminal to connect to.
≥ Do not make the video connections through the VCR.
Due to copy guard protection, the picture may not be displayed
properly.
≥ Only one video connection is required. Choose one of the video
connections above depending on your TV.
Other audio connections
[\\\\\\OPTICAL\IN\\\\\\]
This is the preferred connection for best sound and true surround sound.
Connect the optical cable (not included) from the OPTICAL IN
terminal on the main unit to the OPTICAL OUT terminal on your TV.
This unit can decode the surround signals received from your TV, cable
or satellite STB. Refer to the operating instructions for the TV, cable or
satellite STB for the settings necessary to output its audio from the
digital audio output to your home theater system. Only Dolby Digital and
PCM can be played with this connection.
≥ After making this connection, make settings to suit the type of audio
from your digital equipment (B 10).
[\\\\\\\\\AUX\\\\\\\\]
This connection enables you to play audio from your TV, STB or VCR
through your home theater system (B 10, Selecting the source by the
remote control).
Connect the audio cable (not included) from the AUX terminal on
the main unit to the AUDIO OUT terminal on your TV.
ENGLISH
8
[Note]
If you have various sound sources (such as Blu-ray player, DVD
recorder, VCR, etc.), connect them to the available inputs on the TV and
the TV output should then be connected to the AUX or OPTICAL IN
terminal of the main unit.
RQTX1141
8
TM
”).
VIERA Link
step 4 AC mains lead connection
AC IN
Conserving power
The main unit consumes a small amount of power, even when it is in
standby mode (approx. 0.48 W). To save power when the unit is not to
be used for a long time, unplug it from the household mains socket.
You will need to reset some memory items after plugging in the main
unit.
[Note]
The included AC mains lead is for use with the main unit only.
Do not use it with other equipment. Also, do not use cords for other
equipment with the main unit.
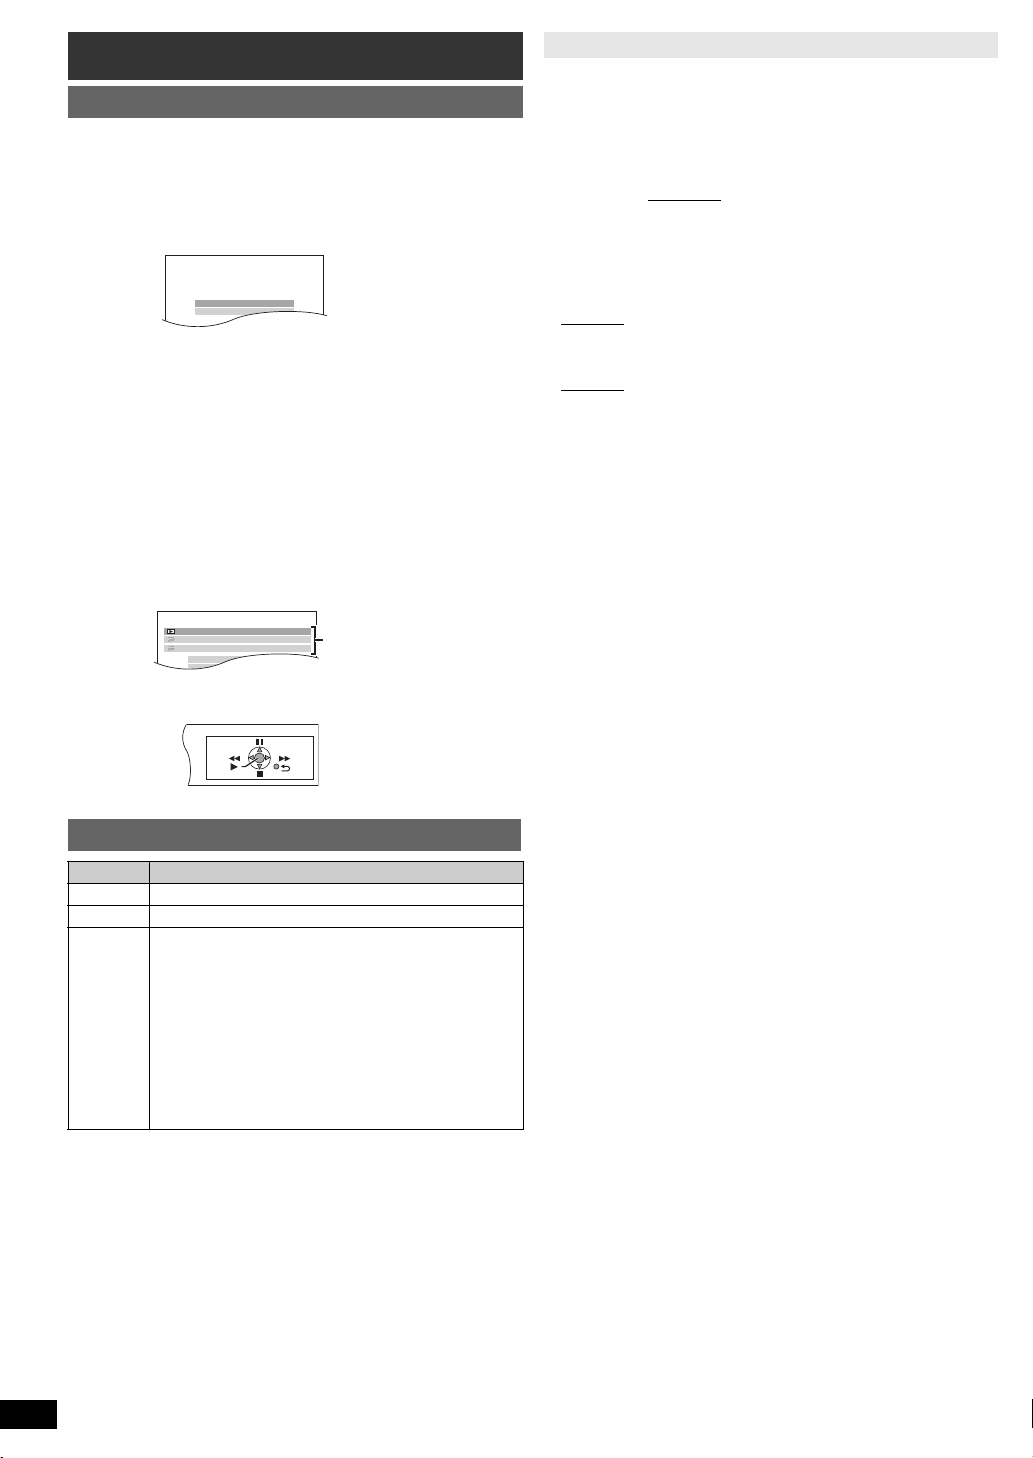
step 5 Preparing the remote control
Batteries
R6/LR6, AA
CAUTION
Danger of explosion if battery is incorrectly replaced. Replace only
with the same or equivalent type recommended by the manufacturer.
Dispose of used batteries according to the manufacturer’s instructions.
≥ Use alkaline or manganese batteries.
≥ Do not heat or expose to flame.
≥ Do not leave the battery(ies) in an automobile exposed to direct
sunlight for a long period of time with doors and windows closed.
Do not:
≥ mix old and new batteries.
≥ use different types of batteries at the same time.
≥ take apart or short circuit.
≥ attempt to recharge alkaline or manganese batteries.
≥ use batteries if the covering has been peeled off.
Mishandling of batteries can cause electrolyte leakage which can
severely damage the remote control.
Remove the batteries if the remote control is not going to be used for a
long period of time. Store in a cool, dark place.
Use
Aim at the remote control signal sensor (B 4), avoiding obstacles.
Distance: Within approx. 7 m
Angle: Within approx. 20° up and down, approx. 30° to the left and right
Getting Started
step 6 EASY SETUP
Menu
The EASY SETUP screen assists you in making necessary
settings.
Preparation
Turn on your TV and select the appropriate video input mode (e.g.
VIDEO 1, AV 1, HDMI, etc.) to suit the connections to this unit.
≥ To change your TV’s video input mode, refer to its operating
instructions.
≥ This remote control can perform some basic TV operations (B 4).
Press [Í]1 to turn on the unit.
1
≥ When the EASY SETUP screen appears automatically, skip steps
2 to 6.
Press [DVD]@ to select “DVD/CD”.
2
Press [SETUP]; to show the setup menu.
3
MAIN
DISC
VIDEO
AUDIO
DISPLAY
HDMI
OTHERS
SET
RETURN
Press [3, 4]9 to select “OTHERS” and press [OK]9.
4
Press [3, 4]9 to select “EASY SETUP” and press
5
[OK]9.
Press [OK]9 to select “SET”.
6
Press [3, 4]9 to select “Yes” and press [OK]9.
7
Follow the messages and make the settings with
8
[3, 4, 2, 1]9 and [OK]9.
(B below, EASY SETUP settings)
Press [OK]9 to finish EASY SETUP.
9
EASY SETUP settings
≥Language
Select the language used on menu screen.
≥TV aspect
Select the aspect to suit your TV.
≥Speakers position
Select “5.1ch layout” mode or “2.1ch layout” mode according to your
speaker layout (B 7, Positioning).
≥Speaker check
Listen to speaker output to confirm speaker connections.
≥Speaker output
Make surround sound setting for speaker output.
§Only when “5.1ch layout” mode is selected in “Speakers position”
above.
§
≥TV audio
Select the audio input connection from your TV.
For AUX connection (B 8): Select “AUX”.
For OPTICAL IN connection (B 8): Select “DIGITAL IN”.
This will be the TV audio setting for VIERA Link “HDAVI Control”. (B15)
[Note]
≥ If this unit is connected to a “HDAVI Control 3 or later” compatible TV
via HDMI cable, the menu language and TV aspect information will be
retrieved via VIERA Link.
≥ If this unit is connected to a “HDAVI Control 2” compatible TV via
HDMI cable, the menu language information will be retrieved via
VIERA Link.
≥ Settings in the EASY SETUP can also be changed in the player
settings (e.g. language, TV aspect and TV audio (B 17)).
EXIT : SETUP
Listening to the radio
Presetting stations automatically
Up to 30 stations can be set.
Press [RADIO]@ to select “FM”.
1
Press [MENU]:.
2
Each time you press the button:
LOWEST (factory preset):
To begin auto preset with the lowest frequency.
CURRENT:
To begin auto preset with the current frequency.
§ To change the frequency, refer to “Manual tuning” (B below).
Press and hold [OK]9.
3
Release the button when “FM AUTO” is displayed.
The tuner starts to preset all the stations it can receive into the
channels in ascending order.
≥ “SET OK” is displayed when the stations are set, and the radio tunes
to the last preset station.
≥ “ERROR” is displayed when automatic presetting is unsuccessful.
Preset the stations manually (B below).
Listening/confirming the preset channels
Press [RADIO]@ to select “FM”.
1
Press the numbered buttons to select a channel.
2
≥ To select a 2-digit number
e.g. 12: [S10]3 B [1] B [2]
Alternatively, press [X, W]6.
≥ The FM setting is also shown on the TV display.
If noise is excessive
Press and hold [PLAY MODE]2 to display “MONO”.
To cancel the mode, press and hold the button again until “AUTO ST” is
displayed.
≥ The mode is also cancelled when you change the frequency.
Manual tuning
Press [RADIO]@ to select “FM”.
1
Press [6, 5]A to select the frequency.
2
≥ To start automatic tuning, press and hold [6, 5]A until the
frequency starts scrolling. Tuning stops when a station is found.
Presetting stations manually
Up to 30 stations can be set.
1 While listening to the radio broadcast
Press [OK]9.
2 While the frequency is flashing on the display
Press the numbered buttons to select a channel.
≥ To select a 2-digit number
e.g. 12: [S10]3 B [1] B [2]
Alternatively, press [X, W]6, and then press [OK]9.
A station previously stored is overwritten when another station is stored
in the same channel preset.
§
Quick Start Guide
ENGLISH
RQTX1141
9
9
Selecting the playback source
DVD/CD Home Cinema
Input Selection
Sound
DVD/CD Home Cinema
Input Selection
Sound
Playback Disc
TOP MENU (DVD)
MENU (DVD)
Playback/menu access
Selecting the source from the START menu
You can select sound effects, desired source, or access playback/menus
by using the START menu.
Press [START]C to show the START menu.
1
This unit automatically turns on.
(The TV also turns on when using VIERA Link “HDAVI Control”. This
works only when in “DVD/CD” or “USB” mode without any disc/device
being loaded/connected.)
e.g.
Getting StartedPlaying DiscsOther OperationsReference
Press [3, 4]9 to select an item and press [OK]9.
2
≥ To exit, press [START]C.
Press [3, 4]9 to make the setting and press [OK]9.
3
When “Input Selection” is selected
You can select a desired source from the menu.
≥ DVD/CD (B 9), FM (B 9), AV (B below), AUX
§
(B below), USB (B 16), MUSIC PORT (B 16)
IN
§ “(TV)” will appear beside “AUX” or “DIGITAL IN”, indicating the TV
audio setting for VIERA Link “HDAVI Control” (B 15).
When “Sound” is selected
You can select sound quality settings (B 11, Equaliser).
When a disc is loaded or an USB device is connected, you can also
access playback or menus from the START menu.
e.g. [DVD-V]
§
(B below), DIGITAL
Making settings for digital audio input
Select to suit the type of audio from the OPTICAL IN terminal on the main
unit.
1 While in “D-IN” mode
Press [SETUP]; to select “MAIN/SAP”, “DRC” or “PCM FIX”.
2 While the selected mode is displayed
Press [3, 4]9 to make the setting.
MAIN/SAP mode (Only works with Dolby Dual Mono):
MAIN, SAP
§ “SAP” = Secondary Audio Program
§
, MAIN+SAP§ (stereo audio)
Dynamic Range Compression
DRC ON: Adjust for clarity even when the volume is low by
DRC OFF
compressing the range of the lowest sound level and the
highest sound level. Convenient for late night viewing.
(Only works with Dolby Digital)
: The full dynamic range of the signal is reproduced.
PCM FIX mode
PCM ON: Select when receiving only PCM signals.
PCM OFF
: Select when receiving Dolby Digital and PCM signals.
(When receiving true 5.1-channel surround sound, select “PCM OFF”.)
[Note]
≥ Audio that is input through the OPTICAL IN terminal is not output from
the HDMI terminal.
≥ Underlined items in the above paragraphs are factory settings.
When the on-screen control panel appears
e.g. [DVD-V] (when “Playback Disc” is selected from the START menu)
You can operate the playback with the indicated controls.
Selecting the source by the remote control
Press To select
[DVD]@ DVD/CD
[RADIO]@ FM
[EXT-IN]@ Each time you press the button:
USB: (B 16)
AV: For audio input through the SCART (AV)
AUX
D-IN
MUSIC P.: For audio input through MUSIC PORT. (B 16)
§ “(TV)” will appear beside “AUX” or “D-IN”, indicating the
TV audio setting for VIERA Link “HDAVI Control” (B 15).
[Note]
Confirm the audio connection to the SCART (AV), AUX or OPTICAL IN
terminal on the main unit when you select the corresponding sources
(B 8). Reduce the volume on the TV to its minimum, and then adjust the
volume of the main unit.
terminal.
§
: For audio input through the AUX terminal.
§
: For audio input through the
OPTICAL IN terminal. (B right)
RQTX1141
ENGLISH
10
10
Enjoying sound effects from all
e.g.
AUDIO-SPEAKER SETTINGS-TEST TONE
SPEAKER
LEFT
CENTER
RIGHT
SURROUND RIGHT
SURROUND LEFT
TRIM LEVEL
− −
0dB
− −
0dB
0dB
speakers
≥ The following sound effects may not be available or may have no effect
with some sources.
You may experience a reduction in sound quality when these sound effects
≥
are used with some sources. If this occurs, turn the sound effects off.
Enjoying surround sound effects
Press [SURROUND]7.
Each time you press the button:
For “5.1ch layout”
STANDARD:
Sound is output as it was recorded/encoded. Speaker output varies
depending on the source.
MULTI-CH:
You can enjoy sound from the front speakers, as well as the surround
speakers even when playing a 2-channel sound or non-surround sound.
MANUAL: (B below)
While “MANUAL” is displayed, press [2, 1]9 to select
other surround modes.
Each time you press [2, 1]9:
DOLBY PLII MOVIE
Suitable for movie software, or softwares recorded in Dolby Surround.
(except [DivX])
DOLBY PLII MUSIC
Adds 5.1-channel effects to stereo sources. (except [DivX])
S.SRD
You can enjoy sound from all speakers with stereo sources. (Surround
output will be in mono.)
STEREO
Sound will only be output to the front speakers and the subwoofer from
any source.
Recommended modes to enjoy TV audio or stereo
sources from all speakers:
≥ DOLBY PLII MOVIE ≥ DOLBY PLII MUSIC ≥ S.SRD
“SRD” lights in the main unit’s display when there is output from the
surround speakers.
For “2.1ch layout”
STANDARD:
Sound is output as it was recorded/encoded. Speaker output varies
depending on the source.
STEREO:
You can play any source in stereo. Surround sound effect is
unavailable.
A.SRD:
You can enjoy surround effect with any audio source.
When the signal is DTS or Dolby Digital, “/DTS” or “/DOLBY DIGITAL” will
also be displayed respectively.
§ Selected mode in “Speakers position” (B 9, EASY SETUP settings).
Selecting sound mode
Press [SOUND]B to select a sound mode.
1
Each time you press the button:
EQ: Equaliser
SUBW LVL: Subwoofer Level
C.FOCUS: Center Focus (Only when “5.1ch layout” mode is
While the selected mode is displayed, press [2, 1]9 to
2
make the settings.
Refer to the following for setting details of each sound effect.
Equaliser
You can select sound quality settings.
Each time you press [2, 1]9:
HEAVY: Adds punch to rock.
CLEAR: Clarifies higher sounds.
SOFT: For background music.
FLAT: Cancel (no effect is added).
§
mode
§
mode
selected in “Speakers position” (B 9, EASY SETUP
settings).)
Subwoofer level
You can adjust the amount of bass. The unit automatically selects
the most suitable setting according to the type of playback
source.
SUB W 1 ,# SUB W 2 ,# SUB W 3 ,# SUB W 4
^-------------------------------------------------------------------------------J
≥ The setting you make is retained and recalled every time you
play the same type of source.
Center Focus
(Effective when playing audio containing center channel
sound.)
You can make the sound of the center speaker seem like it is
coming from within the TV.
C.FOCUS ON,------.C.FOCUS OFF
Whisper-mode Surround
Except [DivX]
You can enhance the surround effect for low volume 5.1-channel sound.
(Convenient for late night viewing.)
Press [W.SRD]<.
Each time you press the button:
WHISPER-MODE SRD ON,--.WHISPER-MODE SRD OFF
Adjusting the speaker output level manually
(Only when “5.1ch layout” mode is selected in “Speakers position” (B 9,
EASY SETUP settings).)
Preparation
≥ To display the picture, turn on the TV and select the appropriate video
input mode.
≥ Press [r, s VOL]> to adjust the volume to normal listening level.
≥ Select “TEST TONE” from “SPEAKER SETTINGS” in AUDIO menu
(B 18).
Press [OK]9 to enter test tone mode.
1
Test tone will be output to each channel in the following order.
LEFT, CENTER, RIGHT, SURROUND RIGHT, SURROUND LEFT
Press [OK]9 then [3, 4]9 to adjust the speaker level
2
for each speaker. (CENTER, SURROUND RIGHT,
SURROUND LEFT)
`
6dB to i6 dB (Factory preset: 0 dB)
≥ To exit the screen, press [SETUP];.
To adjust speaker level during play
(Effective only when “5.1ch layout” mode is selected in “Speakers
position” (B 9, EASY SETUP settings) and playing 5.1-channel sound.)
1 Press and hold [–CH SELECT]; to select the speaker.
While the speaker channel is displayed, press [–CH SELECT];.
L# C# R# RS# LS# SW
^---------------------------------------------}
≥ You can adjust SW (Subwoofer) only if the disc includes a subwoofer
channel.
“S” appears on the main unit’s display when you have selected “S.SRD”
≥
B left, Enjoying surround sound effects
(
both surround speaker levels at the same time using
S: `6dB to i6dB
2 Press [3]9 (increase) or [4]9 (decrease) to adjust the speaker
level for each speaker.
C, RS, LS, SW: `6dB to i6dB
(L, R: Only the balance is adjustable.) (B below)
). In this case, you can adjust
[3, 4]9
.
Adjusting the balance of the front speakers
Press and hold [–CH SELECT]; to select “L” or “R”.
1
While “L” or “R” is selected, press [2, 1]9.
2
Getting Started
ENGLISH
RQTX1141
11
11
Basic play
Label facing up
DVD-V PROGRAM
SELECT TITLE
TITLE CHAPTER
TITLE 1
TITLE 2
TITLE 3
TITLE 4
1
2
3
4
5
6
DVD-V RANDOM
SELECT TITLE
TITLE 1
TITLE 2
TITLE 3
Other modes of play
Preparation
To display the picture, turn on your TV and change its video input mode
(e.g. VIDEO 1, AV 1, HDMI, etc.) to suit the connections to this unit.
Press [Í/I]1 or [Í]1 to turn on the unit.
1
Press [DVD]@ to select “DVD/CD”.
2
Press [< OPEN/CLOSE]2 to open the disc tray.
3
Load the disc.
Getting StartedPlaying DiscsOther OperationsReference
4
≥ Load double-sided discs so the label for the
side you want to play is facing up.
Press [1]9 or [1 PLAY]5 to start play.
5
≥ Press [r, s VOL]6/> to adjust the volume.
[Note]
≥ DISCS CONTINUE TO ROTATE WHILE MENUS ARE DISPLAYED.
Press [∫ STOP]5 when you finish to preserve the unit’s motor and your
TV screen.
≥ Total title number may not be displayed properly on iR/iRW.
≥ ABOUT DIVX VIDEO:
®
is a digital video format created by DivX, Inc. This is an official
DivX
DivX Certified device that plays DivX video.
Basic controls
One touch play (remote control only): [1 PLAY]5
(during standby mode)
The main unit automatically turns on and starts playing the disc in the
tray.
Stop: [∫ STOP]5
The position is memorised while “RESUME STOP” is on the screen.
≥ Press [1 PLAY]5 to resume.
≥ Press [∫ STOP]5 again to clear the position.
Pause: [; PAUS E]5
≥ Press [1 PLAY]5 to restart play.
Skip: [:, 9 SKIP]5
Search: [6, 5]5 (during play)
≥ Up to 5 steps.
≥ Press [1 PLAY]5 to start normal play.
Slow-motion: [6, 5]5 (during pause)
≥ [VCD] Slow-motion: Forward direction only.
≥ [MPEG4] [DivX] Slow-motion: Does not work.
Frame-by-frame: [2;, ;1]9 (during pause)
[DVD-VR] [DVD-V] [VCD]
≥ [DVD-VR] [VCD] Forward direction only.
On-screen item select: [
[3, 4, 2, 1]9: Select
[OK]9: Confirm
Enter number: Numbered buttons
[DVD-VR] [DVD-V] [VCD] [CD]
e.g. To select 12: [S10]3 B [1] B [2]
[VCD] with playback control
Press [∫ STOP]5 to cancel the PBC function, and then press the
numbered buttons.
3, 4, 2, 1, OK]9
Repeat play
This works only when the elapsed play time can be displayed. It also
works with all JPEG content.
During play, press [REPEAT]4 to select an item to be
repeated.
e.g. [DVD-V]
`TITLE ---. `CHAP. ---. `OFF
^----------------------------------------------------b
To cancel, select “OFF”.
Items shown differ depending on the type of disc and playback mode.
Program and Random play
[DVD-V] [VCD] [CD] [WMA] [MP3] [JPEG] [MPEG4] [DivX]
Preparation
While stopped, press [PLAY MODE]2 to select the play
mode.
Program and random playback screens appear sequentially.
Program ------------------------------------------) Random
^--- Exit program and random screens (}
≥ [DVD-VR] Select “DATA” in “DVD-VR/DATA” (B 18, OTHERS menu) to
play MP3, JPEG, MPEG4 or DivX contents.
≥ If “PLAYBACK MENU” screen appears, select “AUDIO/PICTURE” or
“VIDEO” (B 13, Using PLAYBACK MENU), then proceed with the
above.
≥ For a disc with both WMA/MP3 and JPEG contents, select either music
or picture contents.
WMA/MP3: Select “MUSIC PROGRAM” or “MUSIC RANDOM”.
JPEG: Select “PICTURE PROGRAM” or “PICTURE RANDOM”.
≥ [DVD-V] Some items cannot be played even if you have programmed
them.
Program play (up to 30 items)
Press [3, 4]9 to select an item and press [OK]9.
1
e.g. [DVD-V]
≥ Repeat this step to program other items.
≥ To return to the previous menu, press [RETURN]E.
Press [1 PLAY]5 to start play.
2
To select all the items
Press [3, 4]9 to select “ALL” and press [OK]9.
To clear the selected program
1Press [1]9 and then press [3, 4]9 to select the program.
2Press [CANCEL]F.
To clear the whole program
Press [1]9 several times to select “CLEAR ALL”, and then press [OK]9.
The whole program is also cleared when the disc tray is opened, the unit
is turned off or another source is selected.
Random play
(Only when the disc has groups or multiple titles.)
1
Press [3, 4]9 to select a group or title and press
[OK]9.
e.g. [DVD-V]
[DVD-V] Show a disc top menu: [TOP MENU]8
[DVD-V] Show a disc menu: [MENU]:
Return to previous screen: [RETURN]E
[VCD] (with playback control) Show a disc menu: [RETURN]E
Main unit display: [FL DISPLAY]G
[DVD-VR] [DVD-V] [WMA] [MP3] [MPEG4] [DivX]
RQTX1141
ENGLISH
12
12
Time display
[JPEG]
SLIDE
,-. Information display (e.g. [DVD-VR] Program number)
,-.Contents number
” represents selected. To deselect, press [OK]9 again.
≥ “
*
Press [1 PLAY]5 to start play.
2
Using navigation menus
PLAYBACK MENU
WMA/MP3/JPEG
MPEG4/DivX
AUDIO/PICTURE
VIDEO
DATA-DISC
ROOT
OK
RETURN
Perfume
Underwater
Fantasy planet
Starpersons1
Group (Folder):
Content (File):
JPEG images G 1/ 1:C 3/ 9
Group name
Group and content
number
PG
DATE
LENGTH
TITLE
1 0:16:02
10/11
LIVE CONCERT
02:15
2 0:38:25
12/05
AUTO ACTION
01:30
PL
DATE
LENGTH
TITLE
10:00:10
11/11
CITY PENGUIN
00:01
20:01:20
12/01
FOOTBALL
01:20
T
1
C1
1:ENG
3/2.1ch
1 :ENG
OFF
TITLE SEARCH
Current item
Item name
e.g. Menu 1 (Disc/Play) [DVD-V]
T
1
C 1
1:ENG
3/2.1ch
1 :ENG
OFF
CHAPTER SEARCH
Current setting
e.g. Menu 1 (Disc/Play) [DVD-V]
3/2 .1ch
.0: No surround
.1: Mono surround
.2: Stereo surround (left/right)
.1: Low frequency effect
(not displayed if there is no signal)
.1: Center
.2: Front leftiFront right
.3: Front leftiFront rightiCenter
e.g.
Playing data discs
[WMA] [MP3] [JPEG] [MPEG4] [DivX]
[DVD-VR] Select “DATA” in “DVD-VR/DATA” (B 18, OTHERS menu) to
play MP3, JPEG, MPEG4 or DivX contents.
Playing a play list
This works only when the disc contains a play list.
While stopped, press [PLAY LIST]:.
1
e.g.
Using PLAYBACK MENU
“PLAYBACK MENU” screen appears when the disc contains both video
(MPEG4/DivX) and other format (WMA/MP3/JPEG).
Press [3, 4]9 to select “AUDIO/PICTURE” or “VIDEO” and
press [OK]9.
≥ To start play, press [1 PLAY]5.
≥ To select an item to play, refer “Playing from the selected item”
(B below).
Playing from the selected item
You can select to play from your desired item while the “DATA-DISC”
screen is displayed.
e.g.
: WMA/MP3
: JPEG
: MPEG4/DivX
≥ To display/exit the screen, press [MENU]:.
Press [3, 4]9 to select an item and press [OK]9.
≥ Press [2, 1]9 to skip page by page.
≥ To return to 1 level up from the current folder, press [RETURN]E.
≥ Maximum: 28 characters for file/folder name.
Play starts from the selected content.
∫ [JPEG] Selecting the picture in Thumbnail menu
While picture is displayed, press [TOP MENU]8 to show
1
the thumbnail menu.
e.g.
≥ To exit the screen, press [PLAY LIST]:.
Press [3, 4]9 to select the play list and press [OK]9.
2
≥ Press [2, 1]9 to skip page by page.
Using on-screen menus
Press [FUNCTIONS]D to show the on-screen menu.
1
Each time you press the button:
Menu 1 (Disc/Play)
Menu 2 (Video)
Menu 3 (Audio)
Menu 4 (HDMI)
Exit
Press [3, 4, 2, 1]9 to select the item and press
2
[OK]9.
Press [3, 4]9 to make the settings and press [OK]9.
3
Press [RETURN]E to exit.
4
Items shown differ depending on the type of disc.
Menu 1 (Disc/Play)
TRACK SEARCH, TITLE SEARCH, CONTENT SEARCH,
CHAPTER SEARCH, PG SEARCH (Program Search),
PL SEARCH (Playlist Search)
To start from a specific item
≥ [VCD] This does not work when using playback control.
e.g. [DVD-V]: T2 C5
To select numbers for data disc
e.g. 123: [S10]3 B [1] B [2] B [3] B [OK]9
Getting StartedPlaying DiscsOther OperationsReference
Press [3, 4, 2, 1]9 to select a picture and press
2
[OK]9.
≥ Press [:, 9 SKIP]5 to skip page by page.
To go to other group
1 Press [3]9 to select the group name.
2 Press [2, 1]9 to select the group and press [OK]9.
Playing DVD-R/-RW (DVD-VR) discs
[DVD-VR]
≥ Titles appear only if the titles are recorded on the disc.
≥ You cannot edit programs, play lists and disc titles.
Playing the programs
While stopped, press [DIRECT NAVIGATOR]8.
1
e.g.
≥ To exit the screen, press [DIRECT NAVIGATOR]8.
Press [3, 4]9 to select the program and press [OK]9.
2
≥ Press [2, 1]9 to skip page by page.
AUDIO
[DVD-V] [DivX] (with multiple soundtracks)
To select audio soundtrack
[DVD-VR] [VCD]
To select “L”, “R”, “L+R” or “L R”
[DVD-V] (Karaoke disc)
To select “ON” or “OFF” for vocals
To select “OFF”, “V1”, “V2” or “V1+V2” for vocal selections
Actual operations depend on the disc. Read the disc’s instructions for
details.
Signal type/data
LPCM/PPCM/ D/DTS/MP3/MPEG: Signal type
kHz (Sampling frequency)/bit/ch (Number of channels)
≥ [DivX] It may take some time for play to start if you change the audio on
a DivX video disc.
ENGLISH
RQTX1141
13
13
PLAY SPEED
JPG
DATE
HDMI
HDMI --- INFORMATION
CONNECTED STATE
AUDIO STREAM
MAX CHANNEL
VIDEO FORMAT
COLOUR SPACE
CONNECTED
PCM
2ch
720p
YCbCr 4:4:4
[DVD-VR] [DVD-V]
To change play speed
– from “k0.6” to “k1.4” (in 0.1-unit steps)
≥ Press [1 PLAY]5 to return to normal play.
≥ After you change the speed
– Dolby Pro Logic II has no effect.
– Audio output switches to 2-channel stereo.
– Sampling frequency of 96 kHz is converted to 48 kHz.
≥ This function may not work depending on the disc’s recording.
Getting StartedPlaying DiscsOther OperationsReference
REPEAT MODE
(B 12, Repeat play)
A-B Repeat (To repeat a specified section)
Except [JPEG] [MPEG4] [DivX] [DVD-VR] (Still picture part) [VCD] (SVCD)
Press [OK]9 at the starting and ending points.
≥ Select “OFF” to cancel.
SUBTITLE
[DVD-V] [DivX] (with multiple subtitles) [VCD] (SVCD only)
To select subtitle language
≥ On iR/iRW, a subtitle number may be shown for subtitles that are
not displayed.
[DVD-VR] (with subtitle on/off information)
To select “ON” or “OFF”
≥ This may not work depending on the disc.
[DivX] (B 19, Displaying DivX subtitles text)
ANGLE
[DVD-V] (with multiple angles)
To select a video angle
TRANSFER MODE
If you have chosen “480p”/“576p”/“720p”/“1080p” (progressive), “1080i”
(interlaced) (“VIDEO FORMAT” in Menu 4 (HDMI)), select the method of
conversion for progressive output to suit the type of material.
≥ The setting will return to “AUTO” or “AUTO1” when the disc tray is
opened, the unit is turned off or another source is selected.
When playing PAL discs
AUTO:
VIDEO:
FILM:
Automatically detects the film and video content, and
appropriately converts it.
Select when using “AUTO”, and the content is distorted.
Select this if the edges of the film
content appear jagged or rough when
“AUTO” is selected.
However, if the video content is
distorted as shown in the illustration
to the right, then select “AUTO”.
When playing NTSC discs
AUTO1:
AUTO2:
VIDEO:
Automatically detects the film and video content, and
appropriately converts it.
In addition to “AUTO1”, automatically detects film
contents with different frame rates and appropriately
converts it.
Select if the video content is distorted when using
“AUTO1” or “AUTO2”.
SOURCE SELECT [DivX]
When you select “AUTO” the constructing method of the DivX contents
is automatically distinguished and output. If the picture is distorted,
select “INTERLACE” or “PROGRESSIVE” depending on which
constructing method was used when the contents were recorded to disc.
AUTO, INTERLACE, PROGRESSIVE
DATE DISPLAY
[JPEG] To select “ON” or “OFF” for picture’s date display
ROTATION
[JPEG] To rotate a picture (during pause)
0,------. 90,------.180,------.270
^--------------------------------------------J
Menu 2 (Video)
PICTURE MODE
NORMAL
CINEMA1:
CINEMA2:
DYNAMIC:
ANIMATION:
To select zoom sizes
NORMAL, AUTO (
≥ [JPEG]: during pause
Mellows images and enhances detail in dark scenes.
Sharpens images and enhances detail in dark scenes.
Enhances the contrast for powerful images.
Suitable for animation.
ZOOM
[DVD-VR] [DVD-V] [VCD]
), k2, k4
Menu 3 (Audio)
DIALOGUE ENHANCER
To make the dialogue in movies easier to hear
[DVD-V] (Dolby Digital, DTS, 3-channel or higher, with the dialogue
recorded in the center channel)
[DivX] (Dolby Digital, 3-channel or higher, with the dialogue recorded in
the center channel)
OFF, ON
Menu 4 (HDMI)
HDMI STATUS
To show HDMI information
e.g.
1 Connection status
2 Shows the output signal type.
(When “OFF” is selected in “AUDIO OUT” (B 18, HDMI menu),
“– – –” will be displayed.)
3 Shows the number of audio channels.
4 (B 15, VIDEO FORMAT)
5 (B 15, COLOUR SPACE)
HD ENHANCER
This works when the HDMI connection is being used with “VIDEO
PRIORITY” (B 18, HDMI menu) set to “ON”.
To sharpen the “720p”, “1080i” and “1080p” picture quality
OFF, 1 (weakest) to 3 (strongest)
14
RQTX1141
ENGLISH
14
VIDEO FORMAT
This works when the HDMI connection is being used with “VIDEO
PRIORITY” (B 18, HDMI menu) set to “ON”.
To select suitable picture quality with your TV
(Video recordings will be converted to, and output as, high-definition
video.)
§
480p/576p/720p/1080p (progressive)
§
480i/576i/1080i (interlaced)
≥ If the picture is distorted, press and hold [CANCEL]F until the picture
is displayed correctly. (The output will return to “480p”/“576p”.)
§ The numbers displayed depend on the disc being played. One of
the above numbers is displayed.
COLOUR SPACE
This works when the HDMI connection is being used with “VIDEO
PRIORITY” (B 18, HDMI menu) set to “ON”.
To select suitable picture colour with your TV
YCbCr 4:2:2
YCbCr 4:4:4
RGB
” mark will appear if compatible with your TV.
≥ An “
*
≥ If the picture colour is distorted, press and hold [CANCEL]F until the
picture colour is displayed correctly.
Using the VIERA Link “HDAVI
ControlTM”
VIERA Link “HDAVI Control”
VIERA Link “HDAVI Control” is a convenient function that offers linked
operations of this unit, and a Panasonic TV (VIERA) under “HDAVI
Control”. You can use this function by connecting the equipment with the
HDMI cable. See the operating instructions for connected equipment for
operational details.
≥ VIERA Link “HDAVI Control”, based on the control functions provided by
HDMI which is an industry standard known as HDMI CEC (Consumer
Electronics Control), is a unique function that we have developed and
added. As such, its operation with other manufacturers’ equipment that
supports HDMI CEC cannot be guaranteed.
≥ This unit supports “HDAVI Control 4” function.
“HDAVI Control 4” is the newest standard (current as of December,
2008) for Panasonic’s HDAVI Control compatible equipment. This
standard is compatible with Panasonic’s conventional HDAVI
equipment.
≥ Please refer to individual manuals for other manufacturers’ equipment
supporting VIERA Link function.
The TV with “HDAVI Control 2 or later” function enables the following
operation: VIERA Link Control only with TV’s remote control (for
“HDAVI Control 2 or later”) (B 16).
Preparation
≥ Confirm that the HDMI connection has been made (B 8).
≥ Set “VIERA Link” to “ON” (B 18, HDMI menu).
≥ To complete and activate the connection correctly, turn on all VIERA
Link “HDAVI Control” compatible equipment and set the TV to the
corresponding HDMI input mode for this unit.
Setting the TV audio for VIERA Link “HDAVI Control”
Select “AUX” or “DIGITAL IN” to work with the linked operations.
Refer to TV audio setting in EASY SETUP (B 9) or “TV AUDIO” in HDMI
menu (B 18).
Confirm the audio connection to the AUX terminal (for “AUX”) or
OPTICAL IN terminal (for “DIGITAL IN”) (B 8).
Whenever the connection or settings are changed, reconfirm the points
above.
§
“AUX” or “D-IN” (DIGITAL IN) works depending on the TV audio
setting (B above, Setting the TV audio for VIERA Link “HDAVI
Control”).
Auto lip sync
(Available when using VIERA Link “HDAVI Control” with
“HDAVI Control 3 or later” compatible TV)
This function automatically provides synchronised audio and video output.
(This works only when the source is “DVD/CD”, “USB”, “AUX”
≥ When using “DVD/CD” or “USB” as the source, set “TIME DELAY” in
VIDEO menu to “0 ms/AUTO” (B 17).
§
or “D-IN”§.)
One touch play
You can turn on this unit and the TV, and start playing the disc with a
single press of a button.
(Remote control only)
During standby mode, press [1 PLAY]5 to start disc
playback.
This unit’s speakers will be automatically activated (B below).
[Note]
Playback may not be immediately displayed on the TV. If you miss the
beginning portion of playback, press [:]5 or [6]5 to go back to
where playback started.
Auto input switching
≥ When you switch the TV input to TV tuner mode, this unit will
automatically switch to “AUX”
≥ When this unit is in “DVD/CD” mode, the TV will automatically switch its
input mode for this unit.
≥ When playback stops ([DVD-V] [VCD]) or when this unit turns off, the TV
will automatically return to TV tuner mode.
≥ When you select
START menu (B 10), the TV will automatically switch to TV tuner mode.
“AUX”§ or “
§
or “D-IN”§.
DIGITAL IN
Ӥ
from “Input Selection” in
Power off link
When the TV is turned off, this unit goes into standby mode automatically.
To continue audio playback even when the TV is turned off, select
“VIDEO” (B 18, “POWER OFF LINK” in HDMI menu).
[Note]
When you press [Í]1, only this unit turns off. Other connected
equipment compatible with VIERA Link “HDAVI Control” stays on.
For details, refer also to the operating instructions for your TV.
Speaker Selection
You can select whether audio is output from this unit’s speakers or the TV
speakers by using the TV menu settings. For details, refer to the
operating instructions for your TV.
Home Cinema
This unit’s speakers are active.
≥ When you turn on this unit, this unit’s speakers will be automatically
activated.
≥ When this unit is in standby mode, changing the TV speakers to this
unit’s speakers in the TV menu will automatically turn this unit on and
select “AUX”
≥ The TV speakers are automatically muted.
≥ You can control the volume setting using the volume or mute button on
the TV’s remote control. (The volume level is displayed on the main
unit’s display.)
≥ To cancel muting, you can also use this unit’s remote control (B 4).
≥ If you turn off this unit, TV speakers will be automatically activated.
TV
TV speakers are active.
≥ The volume of this unit is set to “0”.
– This function works only when “DVD/CD”, “USB”, “AUX”
selected as the source on this unit.
≥ Audio output is 2-channel audio.
When switching between this unit speakers and TV speakers, the TV
screen may be blank for several seconds.
§
or “D-IN”§ as the source.
§
or “D-IN”§ is
Playing DiscsOther Operations
ENGLISH
RQTX1141
15
15
VIERA Link Control only with TV’s remote control (for
DVD/CD Home Cinema
Input Selection
Sound
Playback Disc
TOP MENU (DVD)
MENU (DVD)
Playback/menu access
USB
ROOT
Songs
Concert_01
Concert_02
Southern AI
“HDAVI Control 2 or later”)
You can control the playback menus of this unit with the TV’s remote
control. When operating the TV’s remote control, refer to the below
illustration for operation buttons.
1 Select this unit’s operation menu by using the TV menu settings.
(For details, refer to the operating instructions for your TV.)
The START menu will be shown.
e.g. [DVD-V]
Getting StartedPlaying DiscsOther OperationsReference
≥ The START menu can also be shown by using a button on the TV’s
remote control (e.g. [OPTION]).
– When “DVD/CD” or “USB” is selected as the source, the TV’s
remote control works only during stop mode.
2 Select the desired item on the START menu (B 10).
When the on-screen control panel appears
e.g. [DVD-V] (when “Playback Disc” is selected from the START menu.)
You can operate the playback with the indicated controls.
≥ The on-screen control panel can also be shown by using a button on the
TV’s remote control (e.g. [OPTION]).
– This works only during “DVD/CD” or “USB” playback and resume
modes.
If the TV has automatically switched to the HDMI input mode for this
unit (B 15, Auto input switching)
The TV will automatically switch to TV tuner mode when:
– you press [EXIT] button on the TV’s remote control.
– you press [EXIT] or [RETURN] button on the TV’s remote control to exit
the START menu.
This does not work during playback or resume mode when “DVD/CD” or
“USB” is selected as the source.
[Note]
≥ Depending on the menu, some button operations cannot be performed
from the TV’s remote control.
≥ You cannot input numbers with the numbered buttons on the TV’s
remote control ([0] to [9]). Use this unit’s remote control to select the
play list etc.
Operating other devices
You can play an external device through your home theater system.
Playing from an USB device
You can connect and play tracks or files (B 22, USB Port) from USB
mass storage class devices.
Devices which are defined as USB mass storage class:
– USB devices that support bulk only transfer.
Preparation
≥ Before connecting any USB mass storage device to the unit, ensure
that the data stored therein has been backed up.
≥ It is not recommended to use a USB extension cable. The USB device
connected using the cable will not be recognised by this unit.
Connect the USB device (not included) to the
1
USB port ( 7).
Press [EXT-IN]@ to select “USB”.
2
The menu screen appears.
e.g.
≥ If “PLAYBACK MENU” screen appears, select “AUDIO/PICTURE”
or “VIDEO” by pressing [3, 4]9 and then [OK]9.
≥ To display/exit the screen, press [MENU]:.
Press [3, 4]9 to select an item and press [OK]9.
3
≥ Press [2, 1]9 to skip page by page.
≥ To return to 1 level up from the current folder, press [RETURN]E.
Play starts from the selected content.
≥ For other operating functions, they are similar to those described in
“Playing Discs” (B 12 to 15).
[Note]
≥ Maximum: 255 folders (excluding Root folder), 4000 files, 28 characters
for file/folder name.
≥ Only one memory card will be selected when connecting a multiport
USB card reader. Typically the first memory card inserted.
Playing from MUSIC PORT
The MUSIC PORT allows you to connect and enjoy music from an
external music device (e.g. MP3 player) through your home theater
system.
Preparation
≥ To avoid distorted sound, make sure that any equaliser function of your
external device is turned off.
≥ Reduce the volume of the main unit and external music device.
RQTX1141
ENGLISH
16
16
Connect the external music device (not included) to the
1
MUSIC PORT5.
Plug type: ‰3.5 mm stereo mini plug
Press [EXT-IN]@ to select “MUSIC P.”.
2
Adjust the volume on the external music device to a normal listening level,
and then adjust the volume of the main unit.
Changing the player settings
Menu
SET
RETURN
DISC
EXIT : SETUP
SETTING STATE
AUDIO
SUBTITLE
MENUS
RATINGS
PASSWORD
ENGLISH
AUTO
ENGLISH
8 NO LIMIT
Display the current setting
of the items below
Item Setting
Press [SETUP]; to show the setup menu.
1
MAIN
DISC
VIDEO
AUDIO
DISPLAY
HDMI
OTHERS
SET
RETURN
Press [3, 4]9 to select the menu and press [OK]9.
2
≥ To return to the previous screen, press [RETURN]E.
Press [3, 4]9 to select the item and press [OK]9.
3
Press [3, 4]9 to make the settings and press [OK]9.
4
Press [SETUP]; to exit.
5
≥ The settings remain intact even if you switch the unit to standby.
≥ Underlined items are the factory settings in the following menus.
DISC menu
AUDIO
Choose the audio language.
≥ ENGLISH
≥ RUSSIAN ≥HUNGARIAN ≥ CZECH ≥ POLISH
≥ ORIGINAL
SUBTITLE
Choose the subtitle language.
§3
≥ AUTO
≥ GERMAN ≥RUSSIAN ≥HUNGARIAN ≥ CZECH
≥ POLISH ≥OTHER – – – –
MENUS
Choose the language for disc menus.
≥ ENGLISH
≥ RUSSIAN ≥HUNGARIAN ≥ CZECH ≥ POLISH
≥ OTHER – – – –
§1 The original language designated on the disc is selected.
§2 Input the appropriate code from the language code list (B 4).
§3 If the language selected for “AUDIO” is not available, subtitles appear
in that language (if available on the disc).
RATINGS
Set a rating level to limit DVD-Video play.
Setting ratings (When level 8 is selected)
≥ 0 LOCK ALL: To prevent play of discs without rating levels.
≥ 1 to 7
≥ 8 NO LIMIT
When you select your ratings level, a password screen is shown.
Follow the on-screen instructions.
Do not forget your password.
A message screen will be shown if a DVD-Video disc exceeding the rating
level is inserted in the unit.
Follow the on-screen instructions.
PASSWORD
Change the password for “RATINGS”.
≥ SETTING
To change ratings (When level 0 to 7 is selected)
≥ CHANGE: Follow the on-screen instructions.
≥ FRENCH ≥ SPANISH ≥ GERMAN
§1
≥ OTHER – – – –
≥ ENGLISH ≥FRENCH ≥ SPANISH
≥ FRENCH ≥ SPANISH ≥ GERMAN
§2
EXIT : SETUP
§2
§2
VIDEO menu
TV ASPECT
Choose the setting to suit your TV.
: Widescreen TV (16:9)
≥ 16:9
≥ 4:3PAN&SCAN: Regular aspect TV (4:3)
The sides of the widescreen picture are cut off so it
fills the screen (unless prohibited by the disc).
≥ 4:3LETTERBOX: Regular aspect TV (4:3)
Widescreen picture is shown in the letterbox style.
TIME DELAY
When connected with a Plasma display, adjust if you notice the audio is
out of sync with the video.
≥ 0 ms/AUTO
≥ 20 ms ≥ 40 ms ≥ 60 ms
≥ 80 ms ≥ 100 ms
When using VIERA Link “HDAVI Control” with “HDAVI Control 3 or later”
compatible TV (B 15), select “0 ms/AUTO”.
Audio and video will automatically be set in sync.
NTSC DISC OUT
Choose PAL 60 or NTSC output when playing NTSC discs (B 21, Video
systems).
≥ NTSC: When connected to an NTSC TV.
: When connected to a PAL TV.
≥ PAL60
STILL MODE
Specify the type of picture shown when paused.
≥ AUTO
≥ FIELD: The picture is not blurred, but picture quality is lower.
≥ FRAME: Overall quality is high, but the picture may appear blurred.
VIDEO OUT – SCART
Choose the video signal format to be output from the SCART (AV)
terminal.
≥ VIDEO
≥ S-VIDEO
≥ RGB 1: (Only when connected to a RGB compatible TV)
If you always would like to view the picture from the unit in RGB signal,
select this mode. The TV screen will automatically switch to display the
picture from the unit when the unit is turned on.
≥ RGB 2: (Only when connected to a RGB compatible TV)
When in TV tuner mode, if the selector is set to “DVD/CD”, the TV screen
will automatically switch to display the picture from the unit only during disc
playback (
DVD/CD.
The TV picture will be displayed when the selector is set to “AV”. With
other selectors, the picture from this unit will be displayed.
[DVD-V] [DVD-VR] [VCD]
) or when viewing on-screen menu of
AUDIO menu
Select to suit the type of equipment you connected to the HDMI AV OUT
terminal.
Select “BITSTREAM” when the equipment can decode the bitstream
(digital form of 5.1-channel data). Otherwise, select “PCM”.
(If the bitstream is output to the equipment without a decoder, high levels
of noise can be output and may damage your speakers and hearing.)
DOLBY DIGITAL
≥BITSTREAM ≥PCM
§
DTS
≥BITSTREAM
§
MPEG
≥BITSTREAM ≥PCM
§ When audio is output from HDMI AV OUT terminal, and the
connected equipment does not support the item selected, the actual
output will depend on the performance of this connected equipment.
DYNAMIC RANGE
≥ ON: Adjusts for clarity even when the volume is low. Convenient for
late night viewing. (Only works with Dolby Digital)
≥ OFF
§
≥PCM
Other OperationsReference
ENGLISH
RQTX1141
17
17
SPEAKER SETTINGS
Actual speaker position
Ideal speaker position
Primary listening
distance
Approximate room dimensions
Circle of constant primary listening distance
Select the delay time of the speakers.
(Effective only when “5.1ch layout” mode is selected in “Speakers
position” (B 9, EASY SETUP settings) and playing 5.1-channel
sound.)
(Center and surround speakers only)
For optimum listening with 5.1-channel sound, all the speakers, except for
the subwoofer, should be the same distance from the seating position.
If you have to place the center or surround speakers closer to the seating
position, adjust the delay time to make up for the difference.
L
Getting StartedPlaying DiscsOther OperationsReference
C
C
SW
:
R
:
:
LS
LS
If either distance a or b is less than c, find the difference in the table
and change to the recommended setting.
RS
RS
a Center speaker b Surround speaker
Difference (Approx.) Setting Difference (Approx.) Setting
30 cm 1ms 150 cm 5ms
60 cm 2ms 300 cm 10ms
90 cm 3ms 450 cm 15ms
120 cm 4ms
150 cm 5ms
≥ SETTINGS:
≥ C DELAY (Center Delay):
0ms
, 1ms, 2ms, 3ms, 4ms, 5ms
Select the delay time for your center speaker.
≥ LS/RS DELAY (Left Surround/Right Surround Delay):
, 5ms, 10ms, 15ms
0ms
Select the delay time for your surround speakers.
≥ TEST TONE: SETTING
Use the test tone for speaker level adjustments (B 11 , Adju s tin g
the speaker output level manually).
DISPLAY menu
LANGUAGE
Choose the language for the on-screen messages.
≥ ENGLISH
≥ PУCCKИЙ ≥ MAGYAR ≥ ÇESKY ≥ POLSKI
≥ FRANÇAIS ≥ ESPAÑOL ≥ DEUTSCH
HDMI menu
VIDEO PRIORITY
≥ ON: When using the HDMI AV OUT terminal for video output. The
resolution of the video output from the HDMI AV OUT terminal is
optimised according to the capability of the connected
equipment (e.g. TV).
≥ OFF: When not using the HDMI AV OUT terminal for video output.
Video output will not depend on the connected equipment, but
on this unit.
AUDIO OUT
≥ ON: When audio output is from the HDMI AV OUT terminal.
(Depending on the capabilities of the connected equipment,
audio output may differ from the audio settings of the main unit.)
: When audio output is not from the HDMI AV OUT terminal. (The
≥ OFF
audio is output using the settings of the main unit.)
POWER OFF LINK
Select the desired power off link setting of this unit for VIERA Link
operation (B 15). (This works depending on the settings of the connected
VIERA Link “HDAVI Control” compatible equipment.)
≥ VIDEO/AUDIO
: When the TV is turned off, this unit will turn off
automatically.
≥ VIDEO: When the TV is turned off, this unit will turn off except during the
following conditions:
– audio playback ([CD] [MP3] [WMA])
– radio mode
– “AUX” or “D-IN” mode (non-selected TV audio setting for
VIERA Link
)
TV AUDIO
Select the TV audio input to work with the
≥ AUX
≥ DIGITAL IN
VIERA Link
operations (B 15).
OTHERS menu
REGISTRATION [DivX]
Display the unit’s registration code.
≥ SHOW CODE
You need this registration code to purchase and play DivX Video-onDemand (VOD) content (B 19).
JPEG TIME
Set the speed of the slideshow.
Factory preset: 3 SEC
≥ 1 SEC to 15 SEC (in 1-unit steps)
≥ 15 SEC to 60 SEC (in 5-unit steps)
≥ 60 SEC to 180 SEC (in 30-unit steps)
FL DIMMER
Change the brightness of the unit’s display.
≥
BRIGHT
≥ DIM: The display is dimmed.
≥ AUTO: The display is dimmed, but brightens when you perform
EASY SETUP
≥ SET (B 9)
DVD-VR/DATA
Select to play only DVD-VR or DATA format.
≥ DVD-VR
≥ DATA: To play the data files on DVD-R/-RW.
SCREEN DIMMER
This is to prevent burn marks on the TV screen.
≥ OFF
≥ WAIT 5 MIN
DEFAULTS
This returns all values in the MAIN menu to the default settings.
≥ RESET
The password screen is shown if “RATINGS” (B 17) is set. Please enter
the same password, then turn the unit off and on again.
some operations.
: To play the video programs on DVD-R/-RW.
: If there is no operation for 5 minutes, the picture turns
grey. The TV screen will resume when you perform some
operations. (This does not work during video playback.)
RGB RANGE
This works only when “COLOUR SPACE” in Menu 4 (HDMI) is set to RGB
(B 15).
≥ STANDARD
≥ ENHANCED: When the black and white images are not distinct.
VIERA Link
≥ ON: The VIERA Link “HDAVI Control” function is available (B 15).
RQTX1141
ENGLISH
≥ OFF
18
18
DivX information
OTHERS−REGISTRATION (DIVX)
DIVX (R) VIDEO ON DEMAND
YOUR REGISTRATION CODE IS
XXXXXXXX
TO LEARN MORE VISIT
www.divx.com/vod
8 alphanumeric characters
Licenses
ABOUT DIVX VIDEO-ON-DEMAND:
This DivX
Video-on-Demand (VOD) content.
First generate the DivX VOD registration code for your device and submit
it during the registration process. [Important: DivX VOD content is
protected by a DivX DRM (Digital Rights Management) system that
restricts playback to registered DivX Certified devices. If you try to play
DivX VOD content not authorized for your device, the message
“AUTHORIZATION ERROR” will be displayed and your content will not
play.]
Learn more at www.divx.com/vod.
®
Certified device must be registered in order to play DivX
Display the unit’s registration code
(B 18, “REGISTRATION” in OTHERS menu)
≥ We recommend that you make a note of this code for future reference.
≥ After playing DivX VOD content for the first time, another registration
code is then displayed in “REGISTRATION (DIVX)”. Do not use this
registration code to purchase DivX VOD content. If you use this code to
purchase DivX VOD content, and then play the content on this unit, you
will no longer be able to play any content that you purchased using the
previous code.
Regarding DivX content that can only be played a set
number of times
Some DivX VOD content can only be played a set number of times. When
you play this content, the remaining number of plays is displayed.
You cannot play this content when the number of remaining plays is zero.
(“RENTAL EXPIRED” is displayed.)
When playing this content
≥ The number of remaining plays is reduced by one if
– you press [Í]1 or [SETUP];.
– you press [∫ STOP]5.
– you press [:, 9 SKIP]5 or [6, 5 SEARCH]5 etc. and
arrive at another content.
Resume function (B 12, Stop: [∫ STOP]5) does not work.
Displaying DivX subtitles text
You can display subtitles text recorded onto the DivX video disc on this unit.
Depending on the methods used to create the file, the following functions
may not work, or the subtitles may not be displayed correctly.
1 During play, select “SUBTITLE” in Menu 1 (B 14).
2 Press [3, 4]9 to select “TEXT ON” and press [OK]9.
≥DivX video files that do not display “TEXT ON” do not contain
subtitles text. Subtitles text cannot be displayed.
≥If the subtitles text are not displayed correctly, try changing the
language settings (B below).
Subtitles text language settings
(Only when “LANGUAGE” in DISPLAY menu is set to “ENGLISH”
(B 18).)
1 During play, press [SETUP];.
2 Press [3, 4]9 to select “DISC” and press [OK]9.
3 Press [3, 4]9 to select “SUBTITLE TEXT” and press [OK]9.
4 Press [3, 4]9 to select “LATIN1”, “LATIN2” (factory setting),
“CYRILLIC” or “TURKISH” and press [OK]9.
≥To exit the screen, press [SETUP];.
Types of subtitles text file that can be displayed
Subtitles text that satisfy the following conditions can be displayed on this
unit.
≥ File format: MicroDVD, SubRip, or TMPlayer
≥ File extension: “.SRT”, “.srt”, “.SUB”, “.sub”, “.TXT”, or “.txt”
≥ File name: No more than 44 characters excluding the file extension
≥ The DivX video file and subtitles text file are inside the same folder, and
the file names are the same except for the file extensions.
≥ If there are more than one subtitles text files inside the same folder, they
are displayed in the following order of priority: “.srt”, “.sub”, “.txt”.
[Note]
≥ If the file name of the DivX video file is not displayed correctly on the
menu screen (the file name is displayed as “¢”), or the file size exceeds
256 KB, the subtitles text may not be displayed correctly.
≥ The subtitles text cannot be displayed during menu display or when
operations such as search are being performed.
Manufactured under license from Dolby Laboratories.
Dolby, Pro Logic, and the double-D symbol are trademarks of Dolby
Laboratories.
Manufactured under license under U.S. Patent #’s: 5,451,942;
5,956,674; 5,974,380; 5,978,762; 6,487,535 & other U.S. and
worldwide patents issued & pending. DTS and the Symbol are
registered trademarks & DTS Digital Surround and the DTS logos are
trademarks of DTS, Inc. Product includes software. C DTS, Inc. All
Rights Reserved.
U.S. Patent Nos. 6,836,549; 6,381,747; 7,050,698; 6,516,132; and
5,583,936.
This product incorporates copyright protection technology that is
protected by U.S. patents and other intellectual property rights. Use of
this copyright protection technology must be authorized by
Macrovision, and is intended for home and other limited viewing uses
only unless otherwise authorized by Macrovision. Reverse
engineering or disassembly is prohibited.
HDMI, the HDMI Logo, and High-Definition Multimedia Interface are
trademarks or registered trademarks of HDMI Licensing LLC in the
United States and other countries.
TM
HDAVI Control
Windows Media and the Windows logo are trademarks or registered
trademarks of Microsoft Corporation in the United States and/or other
countries.
This product is protected by certain intellectual property rights of
Microsoft Corporation and third parties. Use or distribution of such
technology outside of this product is prohibited without a license from
Microsoft or an authorized Microsoft subsidiary and third parties.
This product is licensed under the MPEG-4 Visual patent portfolio
license for the personal and non-commercial use of a consumer for (i)
encoding video in compliance with the MPEG-4 Visual Standard
(“MPEG-4 Video”) and/or (ii) decoding MPEG-4 Video that was
encoded by a consumer engaged in a personal and non-commercial
activity and/or was obtained from a video provider licensed by MPEG
LA to provide MPEG-4 Video. No license is granted or shall be implied
for any other use. Additional information including that relating to
promotional, internal and commercial uses and licensing may be
obtained from MPEG LA, LLC. See http://www.mpegla.com
Plays DivX
®
is a registered trademark of DivX, Inc., and is used under
DivX
license.
is a trademark of Panasonic Corporation.
®
video
.
Reference
ENGLISH
RQTX1141
19
19
Speaker installation option
At least 30 mm
‰7.0 mm to 9.4 mm
Wall or pillar
3 mm to 5 mm
‰4.0 mm
Surround speaker
Center speaker
100 mm
72 mm
348.5 mm
DO
NOT
DO
e.g.
In this position,
the speaker will
likely fall if moved
to the left or right.
Move the
speaker so that
the screw is in
this position.
Insert the cable
from the bottom.
Pull out the cable
through the hole.
Leave about
120 mm.
Attaching to a wall
You can attach all of the speakers (except subwoofer) to a wall.
≥ The wall or pillar on which the speakers are to be attached should be
capable of supporting 10 kg per screw. Consult a qualified building
contractor when attaching the speakers to a wall. Improper attachment
may result in damage to the wall and speakers.
1 Drive a screw (not included) into the wall.
Getting StartedPlaying DiscsOther OperationsReference
Reattaching the speaker cable
2 Fit the speaker securely onto the screw(s) with the hole(s).
Front speaker
Attach to a wall without the base and the stand
Maintenance
Clean this unit with a soft, dry cloth
≥ Never use alcohol, paint thinner or benzine to clean this unit.
≥ Before using chemically treated cloth, carefully read the instructions that
came with the cloth.
Do not use commercially available lens cleaners as they may cause
malfunction. Cleaning of the lens is generally not necessary although
this depends on the operating environment.
Before moving the unit, ensure the disc tray is empty. Failure to
do so will risk severely damaging the disc and the unit.
RQTX1141
ENGLISH
20
20
Discs that can be played
Commercial discs
Type of media/
Logo
DVD-Video High quality movie and
Video CD Music discs with video
CD Music discs [CD]
Recorded discs
Type of media/
Logo
DVD-R/RW ≥ DVD-Video Format
DVD-R DL ≥ DVD-Video Format
rR/rRW/rRDL ≥ +VR (+R/+RW Video
CD-R/RW ≥ MP3 format
≥ Before playback, finalise the disc on the device it was recorded on.
≥ It may not be possible to play all the above-mentioned discs in some
cases due to the type of disc, the condition of the recording, the
recording method, or how the files were created (B right, Tips for
making data discs).
Note about using a DualDisc
The digital audio content side of a DualDisc does not meet the technical
specifications of the Compact Disc Digital Audio (CD-DA) format so
playback may not be possible.
Remarks Indicated as
music discs
Including SVCD
(Conforming to IEC62107)
Formats Indicated as
≥ Version 1.1 of the DVD
Video Recording Format
≥ MP3 format
≥ JPEG format
®
format
≥ DivX
≥ MPEG4 format
≥ Version 1.2 of the DVD
Video Recording Format
®
format
≥ DivX
Recording) Format
≥ JPEG format
®
format
≥ DivX
≥ MPEG4 format
≥ WMA format
[DVD-V]
[VCD]
[DVD-V]
[DVD-VR]
[MP3]
[JPEG]
[DivX]
[MPEG4]
[DVD-V]
[DVD-VR]
[DivX]
[DVD-V]
[MP3]
[JPEG]
[DivX]
[MPEG4]
[WMA]
Disc handling precautions
≥ Do not attach labels or stickers to discs. This may cause disc warping,
rendering it unusable.
≥ Do not write on the label side with a ball-point pen or other writing
instrument.
≥ Do not use record cleaning sprays, benzine, thinner, liquids which
prevent static electricity, or any other solvent.
≥ Do not use scratch-proof protectors or covers.
≥ Do not use the following discs:
– Discs with exposed adhesive from removed stickers or labels (rented
discs, etc.).
– Discs that are badly warped or cracked.
– Irregularly shaped discs, such as heart shapes.
Tips for making data discs
[WMA] (Extension: “.WMA”, “.wma”)
Disc: CD-R/RW
≥ Compatible compression rate: between 48 kbps and 320 kbps
≥ You cannot play WMA files that are copy-protected.
[MP3] (Extension: “.MP3”, “.mp3”)
Disc: DVD-R/RW, CD-R/RW
≥ This unit does not support ID3 tags.
≥ Sampling frequency and compression rate:
– DVD-R/RW: 11.02
160 kbps), 44.1
– CD-R/RW: 8 kHz, 11.02 kHz, 12 kHz, 16 kHz, 22.05 kHz, 24 kHz
(8
kbps
to 160 kbps), 32 kHz, 44.1 kHz and 48 kHz (32
320 kbps)
[JPEG] (Extension: “.JPG”, “.jpg”, “.JPEG”, “.jpeg”)
Disc: DVD-R/RW, CD-R/RW
≥ JPEG files taken on a digital camera that conform to DCF Standard
(Design rule for Camera File system) Version 1.0 are displayed.
– Files that have been altered, edited or saved with computer picture
editing software may not be displayed.
≥ This unit cannot display moving pictures, MOTION JPEG and other
such formats, still pictures other than JPEG (e.g. TIFF), or play
pictures with attached audio.
[MPEG4] (Extension: “.ASF”, “.asf”)
Disc: DVD-R/RW, CD-R/RW
≥ The recording date may differ from that of the actual date.
[DivX] (Extension: “.DIVX”, “.divx”, “.AVI”, “.avi”)
Disc: DVD-R/R DL/RW, CD-R/RW
≥ DivX files greater than 2 GB or have no index may not be played
properly on this unit.
≥ This unit supports all resolutions up to maximum of 720k480
(NTSC)/720k576 (PAL).
≥ You can select up to 8 types of audio and subtitles on this unit.
≥ There may be differences in the display order on the menu screen and
computer screen.
≥ This unit cannot play files recorded using packet write.
DVD-R/RW
≥ Discs must conform to UDF bridge (UDF 1.02/ISO9660).
≥ This unit does not support multi-session. Only the default session is
played.
CD-R/RW
≥ Discs must conform to ISO9660 level 1 or 2 (except for extended
formats).
≥ This unit supports multi-session but if there are many sessions it takes
more time for play to start. Keep the number of sessions to a minimum
to avoid this.
kHz
kHz
and 48
, 12
kHz
, 22.05
kHz
(32 kbps to 320 kbps)
kHz
, 24 kHz (8 kbps to
kbps
to
Reference
Discs that cannot be played
Blu-ray, HD DVD, AVCHD discs, DVD-RW version 1.0, DVD-Audio,
DVD-ROM, CD-ROM, CDV, CD-G, SACD, Photo CD, DVD-RAM, and
“Chaoji VCD” available on the market including CVD, DVCD and SVCD
that do not conform to IEC62107.
Video systems
≥ This unit can play PAL and NTSC, but your TV must match the system
used on the disc.
≥ PAL discs cannot be correctly viewed on an NTSC TV.
≥ This unit can convert NTSC signals to PAL 60 for viewing on a PAL TV
(B 17, “NTSC DISC OUT” in VIDEO menu).
ENGLISH
RQTX1141
21
21

Specifications
AMPLIFIER SECTION
RMS Output Power: Dolby Digital Mode
Front Ch
Surround Ch
Center Ch
Subwoofer Ch
Total RMS Dolby Digital mode power 330 W
FM TUNER, TERMINALS SECTION
Preset Memory FM 30 stations
Getting StartedPlaying DiscsOther OperationsReference
Frequency Modulation (FM)
Frequency range 87.50 MHz to 108.00 MHz (50-kHz step)
Antenna terminals 75 ≠ (unbalanced)
Digital audio input
Optical digital input
Sampling frequency
USB Port
USB standard
Media file format support
USB device file system
USB Port power
Bit rate
Music Port (Front)
Sensitivity 100 mV, 6.8 k≠
Terminal Stereo, 3.5 mm jack
DISC SECTION
Discs played (8 cm or 12 cm)
(1) DVD (DVD-Video, DivX
(2) DVD-R (DVD-Video, DVD-VR, MP3
§5, 6
)
DivX
(3) DVD-R DL (DVD-Video, DVD-VR, DivX
(4) DVD-RW (DVD-Video, DVD-VR, MP3
§5, 6
)
DivX
(5) iR/iRW (Video)
(6) iR DL (Video)
(7) CD, CD-R/RW (CD-DA, Video CD, SVCD
§4, 5
, MPEG4
JPEG
§1 Conforming to IEC62107
§2 MPEG-1 Layer 3, MPEG-2 Layer 3
§3 Windows Media Audio Ver.9.0 L3
Not compatible with Multiple Bit Rate (MBR)
§4 Exif Ver 2.1 JPEG Baseline files
Picture resolution: between 160k120 and 6144k4096 pixels (Sub
sampling is 4:0:0, 4:2:0, 4:2:2 or 4:4:4). Extremely long and narrow
pictures may not be displayed.
§5 The total combined maximum number of recognizable audio,
picture and video contents and groups: 4000 audio, picture and
video contents and 255 groups. (Excluding Root folder)
§6 Plays DivX
§7 MPEG4 data recorded with Panasonic SD multi cameras or DVD
video recorders
Conforming to SD VIDEO specifications (ASF standard)/MPEG4
(Simple Profile) video system/G.726 audio system
®
video.
Pick up
Wavelength (DVD/CD) 655/ 790 nm
Laser power (DVD/CD) CLASS 1M/ CLASS 1M
Audio output (Disc)
Number of channels 5.1 ch (FL, FR, C, SL, SR, SW)
VIDEO SECTION
Video system PAL625/50, PAL525/60, NTSC
Composite video output
Output level
Terminal
S-video output
Y output level
C output level
Terminal
RQTX1141
ENGLISH
22
22
55 W per channel (5 ≠), 1 kHz, 10 % THD
55 W per channel (5 ≠), 1 kHz, 10 % THD
55 W per channel (5 ≠), 1 kHz, 10 % THD
55 W per channel (5 ≠), 100 Hz, 10 % THD
32 kHz, 44.1 kHz, 48 kHz
USB 2.0 full speed
JPEG (¢.jpg, ¢.jpeg)
DivX (¢.divx, ¢.avi)
FAT12, FAT16, FAT32
Up to 4 Mbps (DivX)
§5, 6
)
§5, 7
, DivX
§5, 6
§2, 5
)
, JPEG
§5, 6
§2, 5
)
, JPEG
§1
, MP3
§4, 5
§4, 5
§2, 5
, MPEG4
SCART jack (1 system)
PAL; 0.3 Vp-p (75 ≠)
NTSC; 0.286 Vp-p (75 ≠)
SCART jack (1 system)
Optical terminal
MP3 (¢.mp3)
WMA (¢.wma)
MPEG4 (¢.asf)
Max. 500 mA
§5, 7
,
§5, 7
, MPEG4
§3, 5
, WMA
,
1Vp-p (75≠)
1Vp-p (75≠)
RGB video output
R output level
G output level
B output level
Terminal
0.7 Vp-p (75 ≠)
0.7 Vp-p (75 ≠)
0.7 Vp-p (75 ≠)
SCART jack (1 system)
HDMI AV output
Terminal 19-pin type A connector
HDAVI Control This unit supports “HDAVI Control 4” function.
SPEAKER SECTION
[Front\speakers\SB-HF85]
Typ e
Speaker unit(s)
1 way, 1 speaker system (Bass reflex)
Impedance 5 ≠
Full range 6.5 cm Cone type
Output sound pressure
Frequency range
Dimensions (WtHtD)
Mass
80 Hz to 25 kHz (j16 dB)
90 Hz to 22 kHz (j10 dB)
100 mmk530 mmk78 mm
Full assembly with stand base
Dimensions (WtHtD) max
Dimensions (WtHtD) min
Mass
255 mmk1020 mmk255 mm
255 mmk550 mmk255 mm
[Surround\speakers\SB-HS85]
Typ e
Speaker unit(s)
1 way, 1 speaker system (Bass reflex)
Impedance 5 ≠
Full range 6.5 cm Cone type
Output sound pressure
Frequency range
Dimensions (WtHtD)
85 Hz to 25 kHz (j16 dB)
150 Hz to 22 kHz (j10 dB)
80 mmk118 .5 mm k68 mm
Mass
[Center\speaker\SB-HC85]
Typ e
Speaker unit(s)
1 way, 1 speaker system (Bass reflex)
Impedance 5 ≠
Full range 6.5 cm Cone type
Output sound pressure
Frequency range
Dimensions (WtHtD)
Mass
,
[Subwoofer\SB-HW70]
Typ e
Speaker unit(s)
1 way, 1 speaker system (Bass reflex)
80 Hz to 25 kHz (j16 dB)
130 Hz to 22 kHz (j10 dB)
145 mmk85 mmk71.5 mm
Impedance 5 ≠
Woofer 12 cm Cone type
Output sound pressure
Frequency range
Dimensions (WtHtD)
Mass
35 Hz to 350 Hz (j16 dB)
40 Hz to 200 Hz (
130 mmk278 mmk230 mm
GENERAL
Power supply
Power consumption
Dimensions (WtHtD)
Mass
Operating temperature range
Operating humidity range
35 % to 80 % RH (no condensation)
AC 220 V to 240 V, 50 Hz
360 mmk58 mmk239 mm
Main unit 47 W
Main unit 2.0 kg
Power consumption in standby mode approx. 0.48 W
[Note]
1 Specifications are subject to change without notice.
Mass and dimensions are approximate.
2 Total harmonic distortion is measured by a digital spectrum analyzer.
79 dB/W (1 m)
0.88 kg
2.3 kg
78 dB/W (1 m)
0.34 kg
79 dB/W (1 m)
0.44 kg
79 dB/W (1 m)
j10 dB)
2.2 kg
0 oC to r40 oC

Troubleshooting guide
Before requesting service, make the following checks. If you are in doubt
about some of the check points, or if the solutions indicated in the
following guide do not solve the problem, consult your dealer for
instructions.
Power
No power.
Insert the AC mains lead securely. (B 8)
The unit is automatically switched to standby mode.
The Sleep timer was working and had reached the set time limit. (B 4)
Power of this unit is turned off when the input for the TV is
changed.
This is a normal phenomenon when using VIERA Link “HDAVI Control 4”.
For details please read the operating instructions of the TV.
Unit displays
The display is dark.
Select “BRIGHT” in “FL DIMMER” in the OTHERS menu. (B 18)
“NO PLAY”
≥ You inserted a disc the unit cannot play; insert one it can. (B 21)
≥ You inserted a blank disc.
≥ You inserted a disc that has not been finalised.
“NO DISC”
≥ You have not inserted a disc; insert one.
≥ You have not inserted the disc correctly; insert it correctly. (B 12)
“OVER CURRENT ERROR”
The USB device is drawing too much power. Switch to “DVD/CD” mode,
remove the USB and turn the unit off.
“F61”
Check and correct the speaker cable connections. If this does not fix the
problem, consult the dealer. (B 7)
“F76”
There is a power supply problem. Consult the dealer.
“DVD U11”
Disc may be dirty. Wipe it clean.
“ERROR”
Incorrect operation performed. Read the instructions and try again.
“DVD H∑∑”
“DVD F∑∑∑”
∑ stands for a number.
≥ Trouble may have occurred. The numbers following “H” and “F” depend
on the status of the unit. Turn the unit off and then back on.
Alternatively, turn the unit off, disconnect the AC mains lead, and then
reconnect it.
≥ If the service numbers fail to clear, note the service number and contact
a qualified service person.
“U70∑”
∑ stands for a number. (The actual number following “U70” will depend on
the state of the main unit.)
≥ The HDMI connection acts unusually.
– The connected equipment is not HDMI-compatible.
– Please use HDMI cables that have the HDMI logo (as shown on the
cover).
– The HDMI cable is too long.
– The HDMI cable is damaged.
“REMOTE 1” or “REMOTE 2”
Match the modes on the main unit and remote control. Depending on the
number being displayed (“1” or “2”), press and hold [OK]9 and the
corresponding numbered button ([1] or [2]) for at least 2 seconds. (B 4)
General operation
No response when any buttons are pressed.
≥ This unit cannot play discs other than the ones listed in these operating
instructions. (B 21)
≥ The unit may not be operating properly due to lightning, static electricity
or some other external factor. Turn the unit off and then back on.
Alternatively, turn the unit off, disconnect the AC mains lead, and then
reconnect it.
≥ Condensation has formed. Wait 1 to 2 hours for it to evaporate.
No response when remote control buttons are pressed.
≥ Check that the batteries are installed correctly. (B 8)
≥ The batteries are depleted. Replace them with new ones. (B 8)
≥ Aim the remote control at the remote control signal sensor and operate.
(B 4)
Other products respond to the remote control.
Change the remote control operating mode. (B 4)
No picture or sound.
≥ Check the video or speaker connection. (B 7, 8)
≥ Check the power or input setting of the connected equipment and the
main unit.
≥ Check that the disc has something recorded on it.
You have forgotten your ratings password.
Reset all the settings to Factory Preset.
While stopped and “DVD/CD” is the source, press and hold [∫]8 (Stop)
on the main unit and [S10]3 on the remote control until “INITIALIZED”
disappears from the TV. Turn the unit off and on again.
All settings will return to the default values.
(This does not work during program and random modes, or when setup
menu or START menu is displayed.)
Some characters are not displayed correctly.
Characters other than English alphabet and Arabic numerals may not be
displayed correctly.
The VIERA Link “HDAVI Control” function does not
respond.
Depending on the condition of this unit or the connected equipment, it
may be necessary to repeat the same operation so that the function can
work correctly. (B 15)
The setting you made in “TV ASPECT” (B 17, VIDEO menu)
or “LANGUAGE” (B 18, DISPLAY menu) does not work.
The settings for “TV ASPECT”§1 and “LANGUAGE”§2 will automatically
follow the information from the TV. (B 9, EASY SETUP settings)
§1 When using VIERA Link “HDAVI Control” with “HDAVI Control 3 or
later” compatible TV
§2 When using VIERA Link “HDAVI Control” with “HDAVI Control 2 or
later” compatible TV
Disc operation
It takes time before play starts.
≥ Play may take time to begin when an MP3 track has still picture data.
Even after the track starts, the correct play time will not be displayed.
This is normal. [MP3]
≥ This is normal on DivX video. [DivX]
A menu screen appears during skip or search. [VCD]
This is normal for Video CDs.
Playback control menu does not appear.
[VCD] with playback control
Press [∫ STOP]5 twice and then press [1 PLAY]5.
Program and Random play do not work. [DVD-V]
These functions do not work with some DVD-Videos.
Play does not start.
≥ This unit may not play WMA and MPEG4 that contains still picture data.
≥ If playing DivX VOD content, refer to the homepage where you
purchased the DivX VOD content. (Example: www.divx.com/vod) [DivX]
≥ If a disc contains CD-DA and other formats, proper playback may not be
possible.
No subtitles.
≥ Display the subtitles. (“SUBTITLE” in Menu 1) (B 14)
≥ Subtitles may not be displayed depending on the disc. [DivX]
Point B is automatically set.
The end of an item becomes point B when it is reached.
The Setup menu cannot be accessed.
≥ Select “DVD/CD” as the source.
≥ Cancel Program and Random play. (B 12)
Reference
ENGLISH
RQTX1141
23
23

Sound
Sound is distorted.
≥ Noise may occur when playing WMA.
When using the HDMI output, audio may not be output from other terminals.
≥
Effects do not work.
Some audio effects do not work or have less effect with some discs.
Humming is heard during play.
An AC mains lead or fluorescent light is near the main unit. Keep other
appliances and cables away from the main unit.
No sound.
Getting StartedPlaying DiscsOther OperationsReference
≥ There may be a slight pause in sound when you change the play speed.
≥ Audio may not be output due to how files were created. [DivX]
≥ When using the HDMI connection, ensure that “AUDIO OUT” in the
HDMI menu is set to “ON”. (B 18)
≥ If the input source is bitstream, set the sound setting to PCM on the
external equipment.
No sound from the TV.
Confirm the audio connection. Press [EXT-IN]@ to select the
corresponding source. (B 8, 10)
No sound from the surround speakers.
Ensure “5.1ch layout” mode is selected in “Speakers position” (B 9,
EASY SETUP settings) and press [SURROUND]7 to select “MULTI-CH”.
(B 11 )
Picture
The picture on the TV is not displayed correctly or
disappears.
≥ The unit and TV are using different video systems. Use a multi-system
or PAL TV.
≥ The system used on the disc does not match your TV.
– PAL discs cannot be correctly viewed on an NTSC TV.
– This unit can convert NTSC signals to PAL 60 for viewing on a PAL TV
(“NTSC DISC OUT” in VIDEO menu). (B 17)
≥ Ensure that the unit is connected directly to the TV, and is not
connected through a VCR. (B 8)
≥ Mobile telephone chargers can cause some disturbance.
≥ If you are using an indoor TV antenna, change to an outdoor antenna.
≥ The TV antenna wire is too close to the unit. Move it away from the unit.
≥ Change “SOURCE SELECT” in Menu 2. [DivX] (B 14)
≥ Reduce the number of connected devices.
≥ When using the HDMI AV OUT terminal, ensure that an incompatible
video output with the connected TV is not selected. Press and hold
[CANCEL]F until the picture is displayed correctly. (The output will
return to “480p” or “576p”.) (B 15)
≥ Video images converted to 1920k1080 resolution may look different
from the true native 1080p full-HD sources. This is not a malfunction of
the main unit.
≥ When the HDMI cable is connected, there will be no RGB output from
the SCART (AV) terminal. If the SCART (AV) terminal is to be used,
remove the HDMI cable and turn this unit on/off again.
Picture stops. [DivX]
Picture may stop if the DivX files are greater than 2 GB.
Picture size does not fit the screen.
≥ Change “TV ASPECT” in the VIDEO menu. (B 17)
≥ Use the TV to change the aspect.
≥ Change the zoom setting. (“ZOOM” in Menu 2) (B 14)
Menu is not displayed correctly.
Restore the zoom ratio to “NORMAL”. (“ZOOM” in Menu 2) (B 14)
Auto zoom function does not work well.
≥ Turn off TV’s zoom function.
≥ Zoom function may not work well, especially in dark scenes and may
not work depending on the type of disc.
When playing PAL disc, picture distorted.
Set “TRANSFER MODE” in Menu 2 to “AUTO”. (B 14)
After choosing “Home Cinema” in “Speaker Selection” with
the TV’s remote control, the TV’s input selection also
changes.
Disconnect the HDMI cable from the TV and reconnect it to a different
HDMI terminal.
RQTX1141
ENGLISH
24
24
HDMI or progressive video
There is ghosting when HDMI or progressive output is on.
This problem is caused by the editing method or material used on DVDVideo, but should be corrected if you use interlaced output. When using
the HDMI AV OUT terminal, set “VIDEO FORMAT” in Menu 4 to “480i” or
“576i”. Or, disable the HDMI AV OUT connection and use other video
connections. (B 8, 15)
Radio
Distorted sound or noise is heard.
≥ Adjust the position of the FM antenna.
≥ Use an outdoor antenna. (B 7)
A beat sound is heard.
Turn the TV off or move it away from the unit.
USB
The USB drive or its contents cannot be read.
≥ The USB drive format or its contents is/are not compatible with the
system. (B 16)
≥ The USB host function of this product may not work with some USB
devices.
≥ USB devices with storage capacity of more than 32 GB may not work in
some instances.
Slow operation of the USB device.
Large file size or high memory USB device takes longer time to read and
display on the TV.
TV displays
“/”
The operation is prohibited by the unit or disc.
“THIS DISC CANNOT BE PLAYED IN YOUR REGION.”
Only DVD-Video discs that include or have the same region number as
the one on the rear panel of this unit can be played. (B Cover page)
“AUTHORIZATION ERROR” [DivX]
You are trying to play the DivX VOD content that was purchased with a
different registration code. You cannot play the content on this unit.
(B 19)
“RENTAL EXPIRED” [DivX]
The DivX VOD content has zero remaining plays. You cannot play it.
(B 19)
Safety precautions
Cd
Placement
Set the unit up on an even surface away from direct sunlight, high
temperatures, high humidity, and excessive vibration. These conditions
can damage the cabinet and other components, thereby shortening the
unit’s service life.
Do not place heavy items on the unit.
Vol tage
Do not use high voltage power sources. This can overload the unit and
cause a fire.
Do not use a DC power source. Check the source carefully when setting
the unit up on a ship or other places where DC is used.
AC mains lead protection
Ensure the AC mains lead is connected correctly and not damaged. Poor
connection and lead damage can cause fire or electric shock. Do not pull,
bend, or place heavy items on the lead.
Grasp the plug firmly when unplugging the lead. Pulling the AC mains
lead can cause electric shock.
Do not handle the plug with wet hands. This can cause electric shock.
Foreign matter
Do not let metal objects fall inside the unit. This can cause electric shock
or malfunction.
Do not let liquids get into the unit. This can cause electric shock or
malfunction. If this occurs, immediately disconnect the unit from the
power supply and contact your dealer.
Do not spray insecticides onto or into the unit. They contain flammable
gases which can ignite if sprayed into the unit.
Service
Do not attempt to repair this unit by yourself. If sound is interrupted,
indicators fail to light, smoke appears, or any other problem that is not
covered in these instructions occurs, disconnect the AC mains lead and
contact your dealer or an authorised service center. Electric shock or
damage to the unit can occur if the unit is repaired, disassembled or
reconstructed by unqualified persons.
Extend operating life by disconnecting the unit from the power source if it
is not to be used for a long time.
Information for Users on Collection and Disposal of Old Equipment and used Batteries
These symbols on the products, packaging,
and/or accompanying documents mean that
used electrical and electronic products and
batteries should not be mixed with general
household waste.
For proper treatment, recovery and recycling
of old products and used batteries, please
take them to applicable collection points, in
accordance with your national legislation and
the Directives 2002/96/EC and 2006/66/EC.
By disposing of these products and batteries
correctly, you will help to save valuable
resources and prevent any potential negative
effects on human health and the environment
which could otherwise arise from
inappropriate waste handling.
For more information about collection and
recycling of old products and batteries, please
contact your local municipality, your waste
disposal service or the point of sale where
you purchased the items.
Penalties may be applicable for incorrect
disposal of this waste, in accordance with
national legislation.
For business users in the European Union
If you wish to discard electrical and electronic
equipment, please contact your dealer or
supplier for further information.
[Information on Disposal in other Countries
outside the European Union]
These symbols are only valid in the European
Union. If you wish to discard these items,
please contact your local authorities or dealer
and ask for the correct method of disposal.
Note for the battery symbol (bottom two
symbol examples):
This symbol might be used in combination with
a chemical symbol. In this case it complies with
the requirement set by the Directive for the
chemical involved.
Getting StartedPlaying DiscsOther OperationsReference
ENGLISH
RQTX1141
25
25

Kontrolní referenční příručka
Abcházština: 6566
Afarština: 6565
Afrikánština: 6570
Albánština: 8381
Ameharština: 6577
Angličtina: 6978
Arabšitna: 6582
Arménština: 7289
Asamština: 6583
Ayamarština: 6589
Ázerbajdžánština: 6590
Barmština: 7789
Baskičtina: 6985
Baškirština: 6665
Běloruština: 6669
Bengali,
Bangladéština: 6678
Bhútani: 6890
Biharština: 6672
Bretonština: 6682
Bulharština: 6671
Čeština: 6783
Čínština: 9072
Dánština: 6865
Esperanto: 6979
Estonština: 6984
Faerština: 7079
Fidži: 7074
Finština: 7073
Francouzština: 7082
Frízština: 7089
Galicijština: 7176
Grónština: 7576
Gruzínština: 7565
Guarani: 7178
Gujarati: 7185
Hausa: 7265
Hebrejština: 7387
Hindština: 7273
Holandština: 7876
Chorvatština: 7282
Indonézština: 7378
Interlingua: 7365
Irština: 7165
Islandština: 7383
Italština: 7384
Japonština: 7465
Javánština: 7487
Jidiš: 7473
Joruba: 8979
Kambodžština: 7577
Kannadština: 7578
Kašmírština: 7583
Katalánština: 6765
Kazachština: 7575
Kešuánština: 8185
Kirgizština: 7589
Korejština: 7579
Korsičtina: 6779
Kurdština: 7585
Laoština: 7679
Latina: 7665
Lingala: 7678
Litevština: 7684
Lotyština: 7686
Maďarština: 7285
Makedonština: 7775
Malagajština: 7771
Malajamština: 7776
Malajština: 7783
Maltšina: 7784
Maorština: 7773
Marathi: 7782
Moldavština: 7779
Mongolština: 7778
Nauru: 7865
Němčina: 6869
Nepálština: 7869
Norština: 7879
Orijština: 7982
Pašto, pušto: 8083
Peršti na: 7065
Polština: 8076
Portugalština: 8084
Punjabi: 8065
Rétorománština: 8277
Rumunština: 8279
Ruština: 8285
Řečtina: 6976
Samojština: 8377
Sanskrt: 8365
Sindština: 8368
Singapurština: 8373
Skotská keltština: 7168
Slovenština: 8375
Slovinština: 8376
Somálština: 8379
Srbochorvatština: 8372
Srbština: 8382
Sundština: 8385
Swahilština: 8387
Šona: 8378
Španělština: 6983
Švédština: 8386
Tagalog: 8476
Tamilština: 8465
Tatarština: 8484
Ta ž ik : 8 4 7 1
Telugu: 8469
Thajština: 8472
Tibetština: 6679
Tigrijština: 8473
Tonžština: 8479
Turečtina: 8482
Turkménština: 8475
Tw i : 84 8 7
Ukrajinština: 8575
Urdština: 8582
Uzbečtina: 8590
Vel št ina : 6 789
Vietnamština: 8673
Volapuk: 8679
Wolfština: 8779
Xhosa: 8872
Zulština: 9085
Dálkový ovladač
Getting StartedPlaying DiscsOther OperationsReference
Zapněte/Vypněte hlavní jednotku (B 9)
1
Zvolte režim přehrávání (B 12)
2
Volba kanálů a čísel titulů apod. / Zadávání číselných hodnot (B9, 12)
3
Nastavte režim opakování (B 12)
4
Základní operace přehrávání (B 12)
5
Zvolte předvolené rozhlasové stanice (B 9)
6
Zvolte efekty prostorového ozvučení (B 11 )
7
Ukázat hlavní menu disku nebo programový seznam (B 12, 13)
8
Zvolte nebo potvrďte položky nabídky / Zobrazovat po okénkách
9
(B 12)
Zobrazit nabídku disku nebo přehrát seznam (B 12, 13)
:
Vyvolejte menu nastavení nebo zvolte kanál reproduktoru (B 9, 11)
;
Zapněte/Vypněte Režim prostorového ozvučení (B 11 )
<
Operace televize
=
Namiřte dálkový ovladač na televizi Panasonic a stiskněte tlačítko.
[Í]: Zapnout/Vypnout televizi
[AV]: Změňte režim video vstupu televize
[r, s]: Nastavte hlasitost televize
S některými výrobními typy nemusí tato operace správně fungovat.
Nastavte hlasitost hlavní jednotky
>
Ztlumení zvuku
?
≥ Na displeji hlavní jednotky bliká “MUTE”, když je tato funkce aktivní.
≥ Pro zrušení tlačítko znovu stiskněte nebo nastavte hlasitost.
≥ Ztlumení se zruší, když jednotku přepnete na pohotovostní režim.
Výbìr zdroje
@
[DVD]: Zvolte disk jako zdro (B 9)
[RADIO]: Zvolte FM tuner (B 9)
[EXT-IN]: Zvolte externí audio jako zdroj (B 10)
§
Ručně zvolte rozhlasové stanice (B 9)
A
Zvolte zvukový režim (B 11 )
B
Zobrazit START nabídku (B 10)
C
Zobrazit nabídku na obrazovce (B 13)
D
USB # AV # AUX
^-------------------------------------------------------------}
Kromě “AUX” nebo “D-IN” se zobrazí také “(TV)”, což bude informovat o
nastavení audia pro VIERA Link “HDAVI Control” (
§
# D-IN§ # MUSIC P.
Návrat na předchozí obrazovku (B 12)
E
Zrušte (B 12)
F
Přepněte informace na displeji hlavní jednotky (B 12)
G
nebo
Nastavte časovač usínání
Stiskněte a držte [–SLEEP].
Zatímco je na displeji hlavní jednotky zobrazen čas,
opakovaně stiskněte [–SLEEP].
SLEEP 30 # SLEEP 60 # SLEEP 90 # SLEEP120
^-------------------------- OFF (Zrušte) (--------------------------}
≥ Pro potvrzení zbývajícího času tlačítko znovu stiskněte a držte.
Jak předejít rušení s jiným zařízením Panasonic
Jiné zařízení audio/video Panasonic může začít fungovat, když jednotku
ovládáte pomocí dodaného dálkového ovladače.
Jednotku můžete provozovat v jiném režimu, když nastavíte provozní
režim dálkového ovladače na “REMOTE 2”.
Hlavní jednotka a dálkový ovladač musí být nastaveny na stejný režim.
1 Stiskněte [EXT-IN]@ pro výběr “AUX”.
2Stiskněte a držte [1]9 na hlavní jednotce a [2] na dálkovém ovladači, až
displej hlavní jednotky zobrazí “REMOTE 2”.
3Stiskněte a držte [OK]
Pro změnu režimu zpátky na “REMOTE 1”, zopakujte oba výše uvedené
kroky změnou čísla [2] na [1].
9
a [2] na dálkovém ovladači alespoň 2 sekundy.
Hlavní jednotka
Tlačítko pohotovostního režimu/zapnutí (Í/I)
1
Stisknutím tohoto tlačítka se přístroj přepíná
pohotovostního režimu a naopak. V pohotovostním režimu přístroj
spotřebovává malé množství elektrické energie. (B 12)
Otevřete/Zavřete přihrádku na disky (B 12)
2
Čidlo signálu dálkového ovladače
3
Displej
4
Pro připojení externího hudebního zařízení (B 16)
B
15).
5
Nastavení hlasitosti hlavní jednotky
6
Pro připojení USB zařízení (B 16)
7
Zastavení přehrávání
8
Přehrávat disky (B 12)
9
z provozního do
Seznam jazykových kódů
RQTX1141
ČESKY
4
26
OBSAH
Začínáme
Příslušenství . . . . . . . . . . . . . . . . . . . . . . . . . . . . . . . . . . . .2
Kontrolní referenční příručka . . . . . . . . . . . . . . . . . . . . . .4
Průvodce rychlým spuštěním
krok 1 Příprava reproduktorů . . . . . . . . . . . . . . . . . . 6
krok 2 Umístění . . . . . . . . . . . . . . . . . . . . . . . . . . . . . 7
krok 3 Přípojky . . . . . . . . . . . . . . . . . . . . . . . . . . . . . . 7
Připojení reproduktorů. . . . . . . . . . . . . . . . . . . . .7
Přípojky rádiové antény. . . . . . . . . . . . . . . . . . . .7
Audio a video připojení . . . . . . . . . . . . . . . . . . . .8
krok 4 Přípojka napájecího kabelu . . . . . . . . . . . . . . 8
krok 5 Příprava dálkového ovládání . . . . . . . . . . . . . 8
krok 6 EASY SETUP (SNADNÉ NASTAV.) . . . . . . . . 9
Poslech rádia . . . . . . . . . . . . . . . . . . . . . . . . . . . . . . . . . . .9
Automatická předvolba stanic. . . . . . . . . . . . . . . . . . . . . . . . 9
Poslech/potvrzení přednastavených kanálů . . . . . . . . . . . . . 9
Ruční vyladění . . . . . . . . . . . . . . . . . . . . . . . . . . . . . . . . . . . 9
Volba zdroje přehrávání. . . . . . . . . . . . . . . . . . . . . . . . . .10
Volba zdroje z menu START . . . . . . . . . . . . . . . . . . . . . . . 10
Výběr zdroje dálkovým ovladačem . . . . . . . . . . . . . . . . . . . 10
Užijte si zvukové efekty ze všech
reproduktorů
Působení prostorových zvukových efektů . . . . . . . .11
Zvolení zvukového režimu . . . . . . . . . . . . . . . . . . . . .11
Režim prostorového ozvučení “Whisper” . . . . . . . . .11
Ruční nastavení výkonu reproduktoru . . . . . . . . . . .11
Nastavení rovnováhy čelních reproduktorů . . . . . . .11
Přehrávání disků
Základní přehrávání. . . . . . . . . . . . . . . . . . . . . . . . . . . . . 12
Další režimy přehrávání . . . . . . . . . . . . . . . . . . . . . . . . . 12
Opakovat přehrávání . . . . . . . . . . . . . . . . . . . . . . . . . . . . . 12
Programové a nahodilé přehrávání . . . . . . . . . . . . . . . . . . 12
Používání navigačních nabídek . . . . . . . . . . . . . . . . . . . 13
Přehrávání datových disků . . . . . . . . . . . . . . . . . . . . . . . . 13
Přehrávání disků DVD-R/-RW (DVD-VR) . . . . . . . . . . . . . 13
Používání nabídek na obrazovce . . . . . . . . . . . . . . . . . . 13
Další postupy ovládání
Použití ovládání VIERA Link “HDAVI ControlTM” . . . . . 15
Přehrávání ovládané dotykem. . . . . . . . . . . . . . . . . . . . . . 15
Automatické přepínání vstupů . . . . . . . . . . . . . . . . . . . . . . 15
Spojení Power off “Vypnout napájení”. . . . . . . . . . . . . . . . 15
Výběr reproduktorů . . . . . . . . . . . . . . . . . . . . . . . . . . . . . . 15
VIERA Link Control pouze dálkovým ovladačem televize
(pro “HDAVI Control 2 nebo pozdější”) . . . . . . . . . . . . . . 16
Použití jiných zařízení . . . . . . . . . . . . . . . . . . . . . . . . . . . 16
Přehrávání z přístroje USB . . . . . . . . . . . . . . . . . . . . . . . . 16
Přehrávání z MUSIC PORT. . . . . . . . . . . . . . . . . . . . . . . . 16
Odkaz
Probíhá změna nastavení přehrávače. . . . . . . . . . . . . . 17
Informace DivX . . . . . . . . . . . . . . . . . . . . . . . . . . . . . . . . 19
Zobrazení textu titulků DivX. . . . . . . . . . . . . . . . . . . . . . . . 19
Licence . . . . . . . . . . . . . . . . . . . . . . . . . . . . . . . . . . . . . . . 19
Volba instalace reproduktoru . . . . . . . . . . . . . . . . . . . . . . 20
Údržba . . . . . . . . . . . . . . . . . . . . . . . . . . . . . . . . . . . . . . . 20
Disky, které je možno přehrávat . . . . . . . . . . . . . . . . . . 21
Specifikace. . . . . . . . . . . . . . . . . . . . . . . . . . . . . . . . . . . . 22
Průvodce řešením problémů . . . . . . . . . . . . . . . . . . . . . 23
Bezpečnostní opatření . . . . . . . . . . . . . . . . . . . . . . . . . . 25
ZačínámePřehrávání disků
ovládání
Další postupy
POZOR!
V TOMTO VÝROBKU JE POUŽIT LASER.
POUŽÍVÁNÍ OVLÁDAČŮ, ÚPRAV NEBO VÝKONU POSTUPŮ
JINAK NEŽ JAK JE POPSÁNO V TOMTO NÁVODU, MŮŽE MÍT ZA
NÁSLEDEK NEBEZPEČNÉ OZÁŘENÍ.
NEOTVÍREJTE KRYTY A NEOPRAVUJTE SAMI. OPRAVY
PŘENECHTE KVALIFIKOVANÝM PRACOVNÍKŮM.
VAROVÁNÍ:
PRO SNÍŽENÍ RIZIKA OHNĚ, ELEKTRICKÉHO ŠOKU
NEBO POŠKOZENÍ VÝROBKU
≥NEVYSTAVUJTE PŘÍSTROJ DEŠTI A VLKHU, DBEJTE,
ABY NA NĚJ NEKAPALA A NESTŘÍKALA VODA, A
NESTAVTE NA NĚJ PŘEDMĚTY NAPLNĚNÉ VODOU,
NAPŘ. VÁZY.
≥POUŽÍVEJTE POUZE DOPORUČENÉ PŘÍSLUŠENSTVÍ.
≥NEODSTRAŇUJTE KRYT (NEBO ZADNÍ KRYT); ŽÁDNÉ
PRVKY UVNITŘ PŘÍSTROJE UŽIVATEL NEMŮŽE
OPRAVOVAT. SERVIS PŘENECHTE KVALIFIKOVANÝM
SERVISNÍM PRACOVNÍKŮM.
TENTO PŘÍSTROJ JE URČEN PRO POUŽITÍ V MÍRNÉM PODNEBÍ.
POZOR!
≥ TENTO PŘÍSTROJ NEINSTALUJTE ANI NEUMÍSŤUJTE NAPŘ.
DO KNIHOVNY, VESTAVĚNÉ SKŘÍNĚ NEBO JINÉHO
UZAVŘENÉHO PROSTORU. ZAJISTĚTE, ABY MĚL PŘÍSTROJ
DOBRÉ VĚTRÁNÍ. PRO VYLOUČENÍ RIZIKA ELEKTRICKÉHO
ŠOKU NEBO NEBEZPEČÍ POŽÁRU Z DŮVODU PŘEHŘÁTÍ
ZAJISTĚTE, ABY V BLÍZKOSTI VĚTRACÍCH OTVORŮ NEBYLY
ZÁVĚSY NEBO JINÉ TEXTILIE.
≥ DBEJTE, ABY VĚTRACÍ OTVORY PŘÍSTROJE NEZAKRÝVALY
NOVINY, UBRUSY, ZÁCLONY A PODOBNĚ.
≥ NEPOKLÁDEJTE NA PŘÍSTROJ ZDROJE OTEVŘENÉHO
OHNĚ, NAPŘ. ZAPÁLENÉ SVÍČKY.
≥ BATERIE ODEVZDÁVEJTE DO TŘÍDĚNÉHO ODPADU.
Výrobek může během používání přijímat rádiové rušení způsobené
mobilními telefony. Pokud se takové rušení projeví, je třeba zvětšit
vzdálenost mezi výrobkem a mobilním telefonem.
Zásuvka musí být v blízkosti zařízení a snadno dostupná.
Síťová zástrčka napájecí šňů
Pro úplné odpojení přístroje z hlavního přívodu AC vypojte zástrčku
elektrické šňůry ze zásuvky AC.
ry bude vždy pohotově k použití.
RQTX1141
5
27
Odkaz
ČESKY
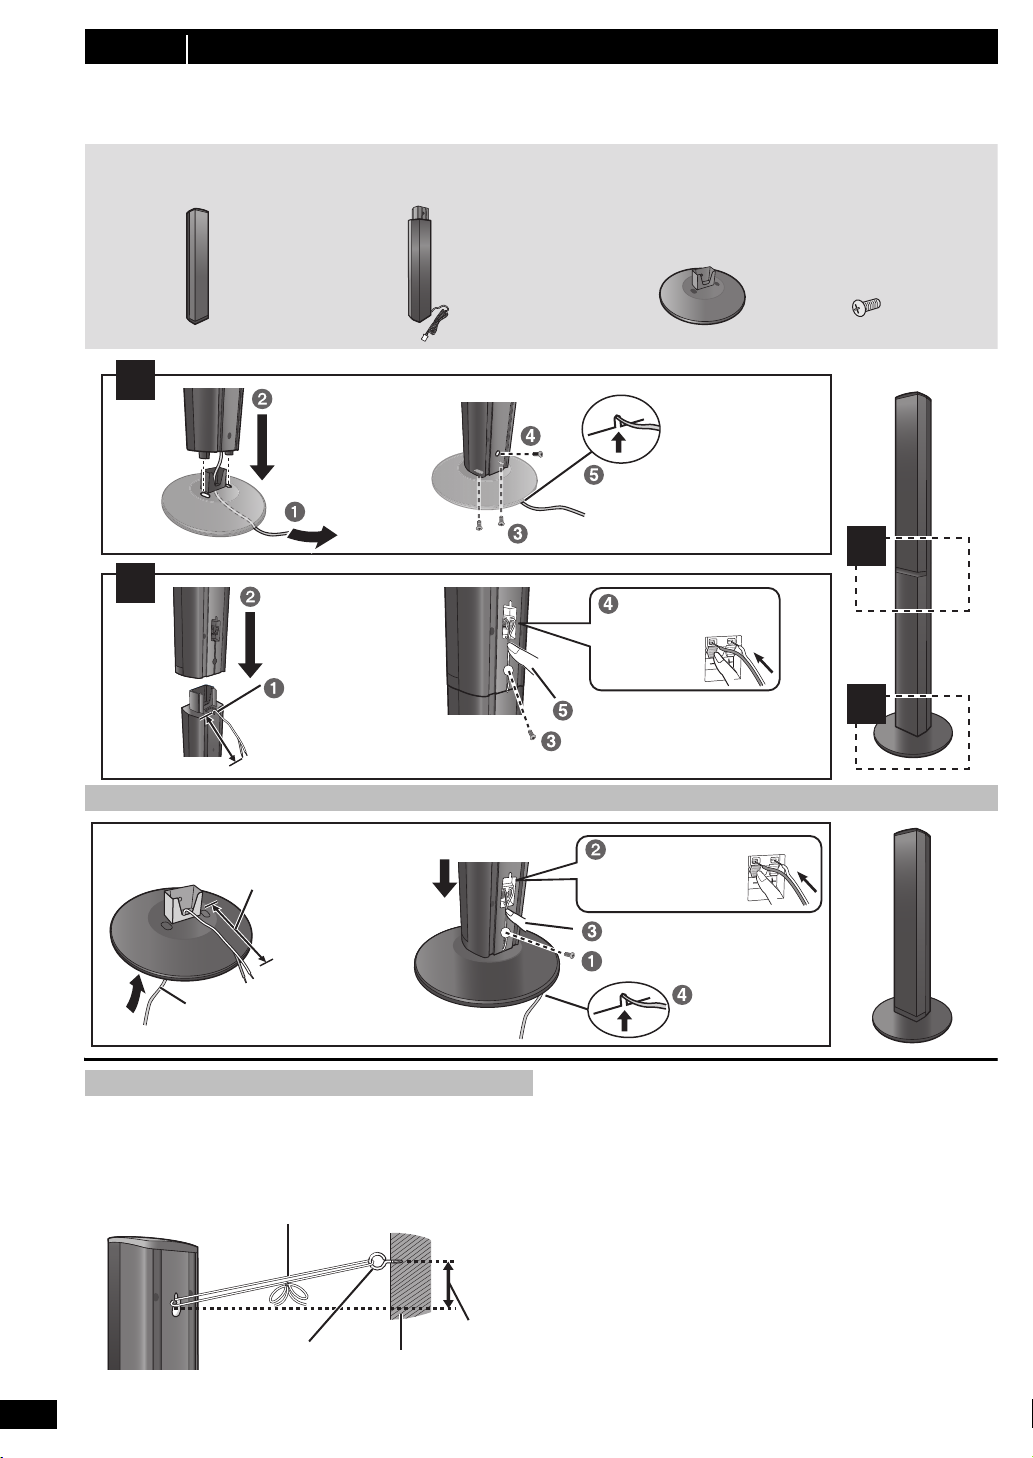
krok 1 Příprava reproduktorů
Před zahájením montáže, nastavení a připojení zkontrolujte, zda máte pohromadě všechny uvedené komponenty.
≥ Šrouby apod. umístěte z dosahu dětí, abyste předešli možnosti spolknutí.
≥ Chcete-li reproduktory umístit na stěnu, přečtěte si pokyny na straně 20.
2 Čelní reproduktory 2 Stojany (s kabelem) 2 Základny 8 Šroubů
1
2
2
1
Zasunout do drážky.
Pevně utáhnout.
Umístěte kabel
mezi drážky.
Ponechte přibližně 120 mm.
Zatlačit do drážky.
Pevně utáhnout.
Vodič zcela zasuňte.
i: Bílý
j: Modrý
kabel
Stiskněte!
Ponechte přibližně
120 mm.
Můžete vytáhnout kabel ze stojanu.
Při jeho opětovném navlékání
postupujte dle pokynů na straně 20.
Zasunout do
drážky.
Zatlaèit do drážky.
Pevně utáhnout.
Vodič zcela zasuňte.
i: Bílý
j: Modrý kabel
Stiskněte!
Protáhněte kabel reproduktoru přes
základnu.
Připevněte
reproduktor.
Šňůra (není součástí dodávky)
Veďte od zdi k reproduktoru a pevně utáhněte.
Reproduktory
(zadní)
Šroub s okem
(není součástí dodávky)
Přibližně
150 mm
Zeď
Čelní reproduktory
Příprava
≥ Aby se předešlo poškození nebo poškrábání, podložte pod ně před montáží měkký hadr.
≥ Při montáži použijte křížový šroubovák (není součástí dodávky).
Možnost sestavení reproduktorů
Zajištění reproduktorů před pádem
≥ Budete potřebovat vhodné šroubovací uzávěry, přiměřené pro zdi či
sloupy, k nimž se mají upevnit.
≥ Ohledně správného postupu instalace reproduktorů na betonovou zeď
nebo povrch se poraďte s kvalifikovaným stavitelem, tak aby tyto
povrchy měly dostatečnou nosnost. Nesprávné připevnění může
poškodit zeď i reproduktory.
RQTX1141
ČESKY
6
28
Upozornění
≥ Nestavte se na základnu. Dávejte pozor, když jsou poblíž děti.
≥ Při manipulaci s reproduktorem přidržte stojan a podstavec.
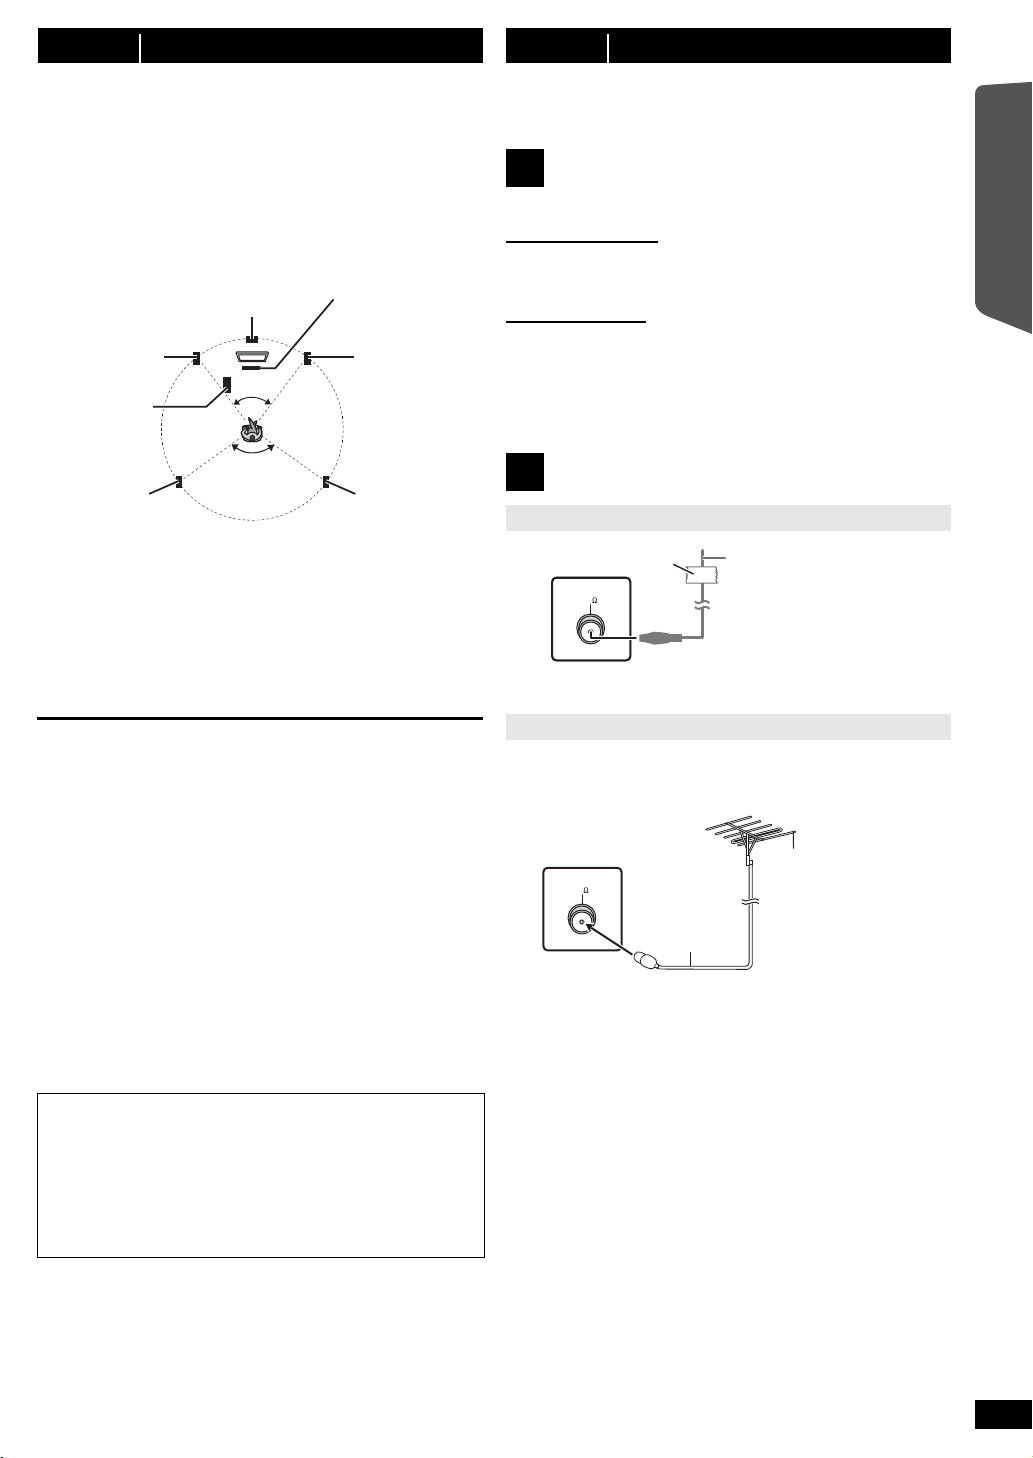
Začínáme
krok 2 Umístění
120°
60°
Centrální reproduktor
§2
Čelní
reproduktor
(levý)
Subwoofer
§3
Prostorové
reproduktor
(levý)
Prostorové
reproduktor
(pravý)
Čelní
reproduktor
(pravý)
Hlavní jednotka
§1
FM ANT
(75 )
Lepicí páska
Hlavní jednotka (zadní)
Pokojová anténa FM
(součást dodávky)
Tento konec antény
upevněte v místě s nejlepším
příjmem.
Použijte venkovní anténu, je-li slabý rozhlasový příjem.
≥ Vypojte anténu, když se jednotka nepoužívá.
≥ Při bouřce nepoužívejte venkovní anténu.
Hlavní
jednotka
(zadní)
75 ≠ koaxiální
kabel
(není součástí
dodávky)
Venkovní anténa FM
(Použití televizní antény
(není součástí
dodávky))
Anténa by měla být
nainstalována
kvalifikovaným
technikem.
Způsob, jakým rozmístíte reproduktory, může ovlivnit basy i zvukové pole.
Mějte na zřeteli následující body:
≥ Umístěte reproduktory na plochou bezpečnou základnu.
≥ Umístění reproduktorů příliš blízko podlahy, stěn a rohů místnosti
může mít za následek přílišné zvýraznění basů. Na stěny a okna
umístěte silné závěsy.
[Poznamka]
Pro zajištění dobrého větrání umístěte reproduktory alespoň 10 mm od
systému.
Příklad rozestavení reproduktorů (Doporueno: Uspořádání 5.1)
Umístěte přední, středové a prostorové reproduktory do přibližně stejné
vzdálenosti od místa sezení. Úhly ve schématu jsou přibližné.
§1 Umístte tak, aby na všech stranách byl volný prostor minimáln 5 cm
pro zajištní dobrého vtrání.
§2 Reproduktor umístěte na regál nebo polici. Vibrace způsobené
reproduktorem mohou rušit obraz, je-li umístěn přímo na televizi.
§3Umístěte napravo nebo nalevo od televize, na zem nebo pevnou
polici, tak aby nevydával vibrace, do vzdálenosti asi 30 cm od
televize.
Vzhledem k uspoádání pokoje je možné, že radji použijete pouze elní
reproduktory a subwoofer, ímž ušetíte místo (Uspořádání 2.1).
krok 3 Přípojky
Před připojením vypněte veškeré zařízení a přečtěte si příslušné pokyny
k obsluze.
Připojte napájecí kabel, teprve až budou provedena
všechna ostatní připojení.
Připojení reproduktorů
1
Při umísťování reproduktorů věnujte pozornost typu reproduktoru a
barvě konektoru.
Hlavní jednotka (zadní)
Připojte k terminálům stejné barvy.
Jako pomůcku při zapojování kabelů je dobré používat samolepky
reproduktorových kabelů.
Reproduktory (zadní)
Zasuňte vedení důkladně (“na doraz”), ale přitom tak, abyste nepoškodili
jeho izolaci.
i: Bílý
j: Modrý kabel
≥ Dejte pozor, abyste nepřekřížili (nezkratovali) či neobrátili polaritu
kabelů reproduktorů – mohlo by dojít k jejich poškození.
Přípojky rádiové antény
2
Použití pokojové antény
Průvodce rychlým spuštěním
Poznámky ohledně požívání reproduktorů
≥Používejte pouze námi dodané reproduktory
Užívání jiných reproduktorů může jednotku poškodit a negativně
ovlivní kvalitu zvuku.
≥ Pokud budete mít zvuk při přehrávání příliš dlouho nastavený na
nejvyšší úrovně hlasitosti, můžete tím reproduktory poškodit a zkrátit
jejich životnost.
≥ Aby nedošlo k poškození, snižte hlasitost v následujících případech:
–Při přehrávání zkresleného zvuku.
– Když reproduktory zní ozvěnou z důvodu činnosti přehrávače, hluku
z vysílání FM nebo nepřetržitých signálů z oscilátoru, zkušebního
disku či elektronického přístroje.
–Při úpravě kvality zvuku.
– Když zapínáte nebo vypínáte jednotku.
Pokud se ve vaší televizi objeví nestejnoměrná barevnost
Středový reproduktor má být umístěn a používán v blízkosti televize,
avšak obraz může být ovlivněn některými televizními přijímači a
kombinacemi nastavení.
Pokud se to stane, vypněte televizi asi na 30 minut.
Funkce odmagnetizování televize by měla problém vyřešit. Pokud
přetrvává, přemístěte reproduktory dále od televize.
Upozornění
≥ Hlavní jednotka a dodané reproduktory se mají používat pouze
tak, jak je určeno v tomto nastavení. Jiné použití může vést k
poškození zesilovače a/nebo reproduktorů a rovněž může
vyvolat riziko vznícení. Pokud došlo ke škodě nebo jste
zaznamenali náhlý výkyv výkonu, obraťte se na
kvalifikovaného servisního praocovníka.
≥ Nepokoušejte se upevnit tyto reproduktory na stěnu jinými
způsoby než těmi, které jsou popsány v tomto návodu.
Upozornění
Nedotýkejte se síťového povrchu na přední straně reproduktoru. Držte
jej po stranách.
Použití venkovní antény
FM ANT
(75 )
ČESKY
RQTX1141
7
29
 Loading...