

Page 1
EG
Thank you for purchasing this product.
Please read these instructions carefully before using this product, and save this
manual for future use.
Dziękujemy za zakupienie tego produktu.
Przed przystąpieniem do eksploatacji opisywanego produktu należy dokładnie
przeczytać niniejsze zalecenia i zachować instrukcję obsługi do wglądu.
Děkujeme za zakoupení tohoto výrobku.
Před použitím tohoto produktu si pečlivě přečtěte tyto pokyny a celý návod si uložte
pro pozdější použití.
Kiitos, että hankit tämän tuotteen.
Lue nämä ohjeet huolellisesti ennen tämän tuotteen käyttämistä ja säilytä tämä
käsikirja tulevaa tarvetta varten.
Operating Instructions
Instrukcja obsługi
Návod k obsluze
Käyttöohjeet
CD Stereo System
Zestaw stereo z CD
Stereosystém s CD
CD-stereojärjestelmä
Model No. SC-PMX9
VQT4Z21
Page 2
Do the procedures with the remote control. You can
also use the buttons on the main unit if they are the
ENGLISH
same.
Your system and the illustrations can look differently.
These operating instructions are applicable to the
following system.
System SC-PMX9
Main unit SA-PMX9
Speakers SB-PMX9
Safety precautions
WARNING!
Unit
• To reduce the risk of fire, electric shock or product damage,
- Do not expose this unit to rain, moisture, dripping or
splashing.
- Do not place objects filled with liquids, such as vases, on
this unit.
- Use only the recommended accessories.
- Do not remove covers.
- Do not repair this unit by yourself. Refer servicing to
qualified service personnel.
CAUTION!
Unit
• To reduce the risk of fire, electric shock or product damage,
- Do not install or place this unit in a bookcase, built-in
cabinet or in another confined space. Ensure this unit is
well ventilated.
- Do not obstruct this unit’s ventilation openings with
newspapers, tablecloths, curtains, and similar items.
- Do not place sources of naked flames, such as lighted
candles, on this unit.
• This unit is intended for use in moderate climates.
• The mains plug is the disconnecting device.
Install this unit so that the mains plug can be unplugged
from the socket outlet immediately.
• This unit may receive radio interference caused by mobile
VQT4Z21
telephones during use. If such interference occurs, please
increase separation between this unit and the mobile
telephone.
2
• This unit utilizes a laser. Use of controls or adjustments or
performance of procedures other than those specified
2
herein may result in hazardous radiation exposure.
Battery
• Do not break open or short-circuit the battery.
• Do not charge the alkaline or manganese battery.
• Do not use the battery if the cover has peeled off.
• Do not heat or expose to flame.
• Do not leave the battery(ies) in a car exposed to direct
sunlight for a long period of time with doors and windows
closed.
• Remove the battery if you do not use the remote control for
a long period of time. Keep in a cool, dark area.
• Danger of explosion if battery is incorrectly replaced.
Replace only with the type recommended by the
manufacturer.
• When disposing the batteries, please contact your local
authorities or dealer and ask for the correct method of disposal.
Android, Google Play and Chrome are trademarks of Google Inc.
DLNA, the DLNA Logo and DLNA CERTIFIED are trademarks,
service marks, or certification marks of the Digital Living Network
Alliance.
The Wi-Fi CERTIFIED Logo is a certification mark of the Wi-Fi
Alliance.
The Wi-Fi Protected Setup Mark is a mark of the Wi-Fi Alliance.
“Wi-Fi”, “Wi-Fi Protected Setup”, “WPA” and “WPA2” are marks or
registered marks of the Wi-Fi Alliance.
MPEG Layer-3 audio coding technology licensed from Fraunhofer
IIS and Thomson.
The Bluetooth® word mark and logos are owned by the Bluetooth
SIG, Inc. and any use of such marks by Panasonic Corporation is
under license.
Other trademarks and trade names are those of their respective
owners.
Windows is a trademark or a registered trademark of Microsoft
Corporation in the United States and other countries.
Table of contents
Safety precautions........................................... 2
Supplied accessories ......................................3
Maintenance ..................................................... 3
Preparing the remote control.......................... 3
Making the connections.................................. 3
Placement of speakers.................................... 4
Overview of controls .......................................4
Inserting media ................................................ 5
Media information............................................ 5
Network settings.............................................. 6
Using AirPlay with this system’s speakers... 9
Playing back music files on the DLNA server.....10
Bluetooth® operations ................................... 11
About Bluetooth
Media Playback operations........................... 12
Radio............................................................... 13
Clock and timers............................................ 13
Sound effects .................................................14
Using the auxiliary input ............................... 14
Others .............................................................14
Troubleshooting............................................. 16
Specifications ................................................ 18
“Made for iPod”, “Made for iPhone”, and “Made for iPad” mean
that an electronic accessory has been designed to connect
specifically to iPod, iPhone, or iPad, respectively, and has been
certified by the developer to meet Apple performance standards.
Apple is not responsible for the operation of this device or its
compliance with safety and regulatory standards.
Please note that the use of this accessory with iPod, iPhone, or
iPad may affect wireless performance.
AirPlay, the AirPlay logo, iPad, iPhone, iPod, iPod classic, iPod
nano, and iPod touch are trademarks of Apple Inc., registered in
the U.S. and other countries.
App Store is a service mark of Apple Inc.
®
........................................... 11
Page 3
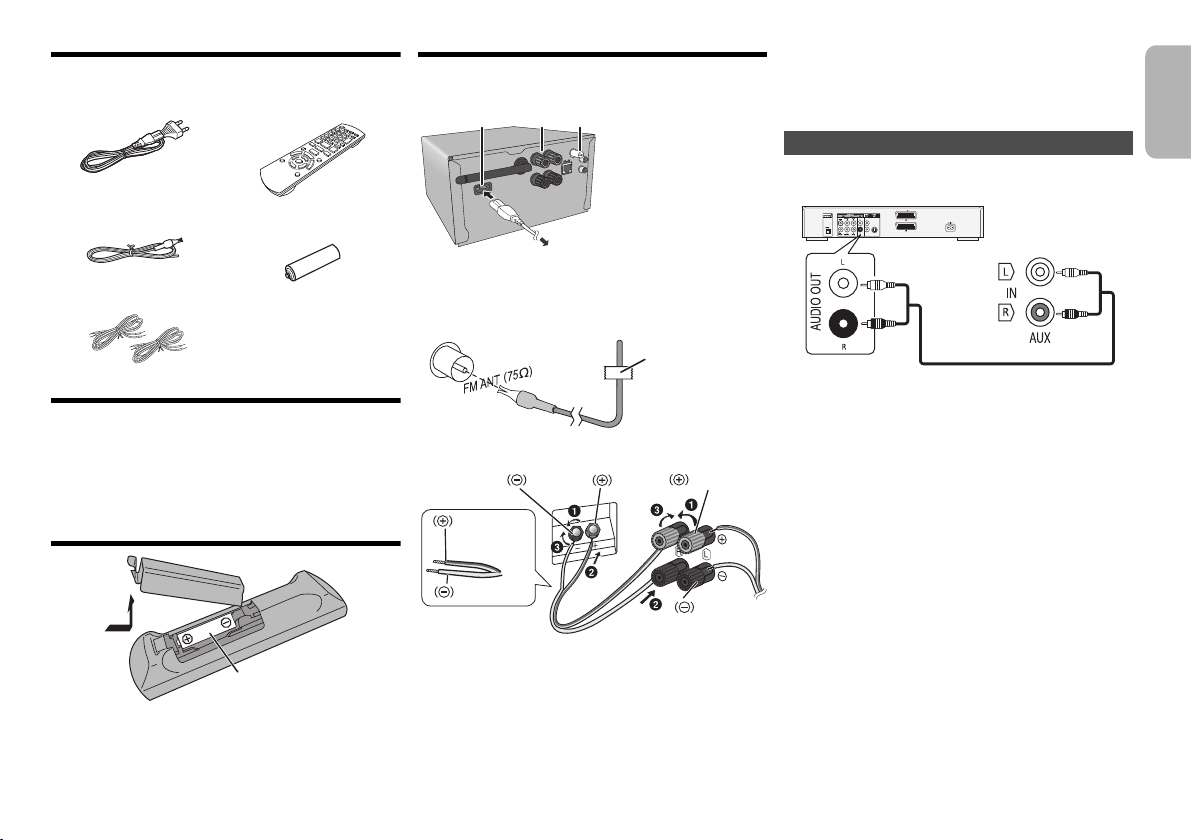
Supplied accessories
2
1
3
To household mains socket
Tape
(not supplied)
Black
Red
Black Red
Cable with
a red line
DVD player (not supplied)
Rear panel of
this main unit
Audio cable (not supplied)
Check and identify the supplied accessories.
1 x AC mains lead 1 x Remote control
(N2QAYB000896)
Making the connections
Connect the AC mains lead only after all the other
connections have been made.
2
3
1
Conserving power
The system consumes approximately 0.4 W when it is in standby
mode. Disconnect the power supply if you do not use the system.
Some settings will be lost after you disconnect the
system. You have to set them again.
Connecting other equipment
You can connect a VCR, DVD player etc.
ENGLISH
1 x FM indoor antenna 1 x Remote control
2 x Speaker cables
battery
Maintenance
• To clean the main unit, wipe with a soft, dry cloth.
• To clean the speakers, wipe with a fine-textured and
dry cloth such as a microfibre cleaning cloth.
• Never use alcohol, paint thinner or benzine to clean
this system.
• Before using chemically treated cloth, read the
instructions that came with the cloth carefully.
Preparing the remote control
• Use alkaline or manganese battery.
• Install the battery so that the poles (+ and –) align with
those in the remote control.
• Point the remote control at the remote control sensor,
away from obstacles, at a maximum range of 7 m
directly in front of the main unit, within an angle of
approximately 30° to the left and right.
R6/LR6, AA
1 Connect the FM indoor antenna.
Place the antenna where reception is best.
Use an FM outdoor antenna if radio reception is poor.
•
2 Connect the speakers.
Be careful not to cross (short-circuit) or reverse
the polarity of the speaker wires as doing so may
damage the speakers.
• Connect the cable with a red line to the red terminal
(r).
3 Connect the AC mains lead.
Do not use an AC mains lead with other equipment.
Note:
• Disconnect the AC mains lead before connection.
• Switch off all equipment and read the appropriate operating
instructions.
• Components and cables are sold separately.
• If you want to connect equipment other than those
described, refer to the audio dealer.
• Sound distortion can occur when you use an adaptor.
• For information on the connection of a LAN cable, refer to
page 6.
VQT4Z21
3
3
Page 4
Placement of speakers
Tweeter
17
18
21
22
23
6
11
5
OPEN/CLOSE
D.BASS
VOLUME
SELECTORCDiPod
BASS TREBLE
iPad
19
20
6
4
1
1
2
3
4
5
6
7
8
9
10
11
12
13
14
15
16
SETUP
SELECTOR
Top view
ENGLISH
Place the speakers so that the tweeter is on the inner
side. To prevent damage to the speakers, do not touch
the speaker cones if you remove the nets.
Use only the supplied speakers.
The combination of the main unit and speakers give the
best sound. You can cause damage to the system and
decrease the sound quality if you use other speakers.
Note:
• Keep your speakers more than 10 mm from the main unit
for ventilation.
• Put the speakers on a flat safe surface.
• These speakers do not have magnetic shielding. Do not
put them near TVs, PCs or other equipment easily
influenced by magnetism.
• When you play at high levels for a long period, it can cause
damage to the system and decrease the life of the system.
• Decrease the volume in these conditions to prevent
damage:
- When you play distorted sound.
- When you adjust the sound quality.
CAUTION!
• Use the speakers only with the recommended
system. If not, you can cause damage to the
amplifier and speakers and can cause a fire.
Consult an approved service personnel if damage
occurs or if there is a sudden apparent change in
performance.
• Do the procedures included in these instructions
when you attach the speakers.
VQT4Z21
4
4
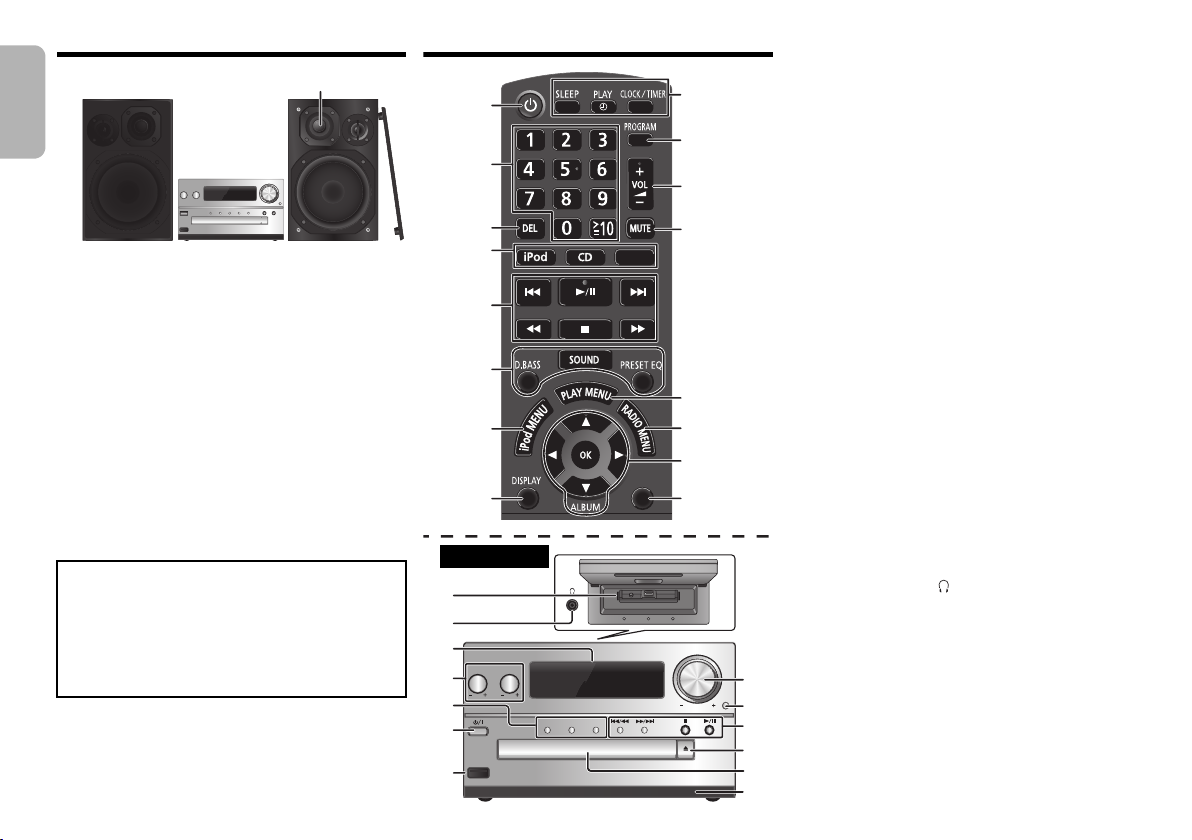
Overview of controls
1 Standby/on switch [Í], [Í/I]
Press to switch the unit from on to standby mode or
vice versa. In standby mode, the unit is still
consuming a small amount of power.
2 Numeric buttons [1 to 9, 0, S10]
To select a 2-digit number
Example: 16: [S10]
3 Delete a programmed track
4 Select audio source
[iPod]: “iPod_Dock” ,. “iPod_Port” / “USB”
[CD]: “CD”
[SELECTOR]:
----------------. “BLUETOOTH” -----------------. “FM”
“CD”
^-
“iPod_Port” / “USB” ( “iPod_Dock” ( “AUX”
5 Basic playback control
6 Select the sound effects
7 View the iPod menu
8 View content information
9 Clock and timer operation
10 Set the programme function
11 Adjust the volume of the system
12 Mute the sound of the system
Press the button again to cancel.
“MUTE” is also cancelled when you adjust the
volume or when you switch off the system.
13 Set the play menu item
14 Set the radio menu item
15 Select the option
16 Enter setup menu
17 “iPod_Dock” for iPod/iPhone
18 Headphones jack ( )
• Plug type: Ø 3.5 mm stereo (not supplied)
• Avoid listening for prolonged periods of time to
prevent hearing damage.
• Excessive sound pressure from earphones and
headphones can cause hearing loss.
• Listening at full volume for long periods may
damage the user’s ears.
19 Display panel
20 “iPod_Port” for iPod/iPhone/iPad and USB devices
21 Open or close the disc tray
22 Disc tray
23 Remote control sensor
> [1] > [6]
(b
Page 5
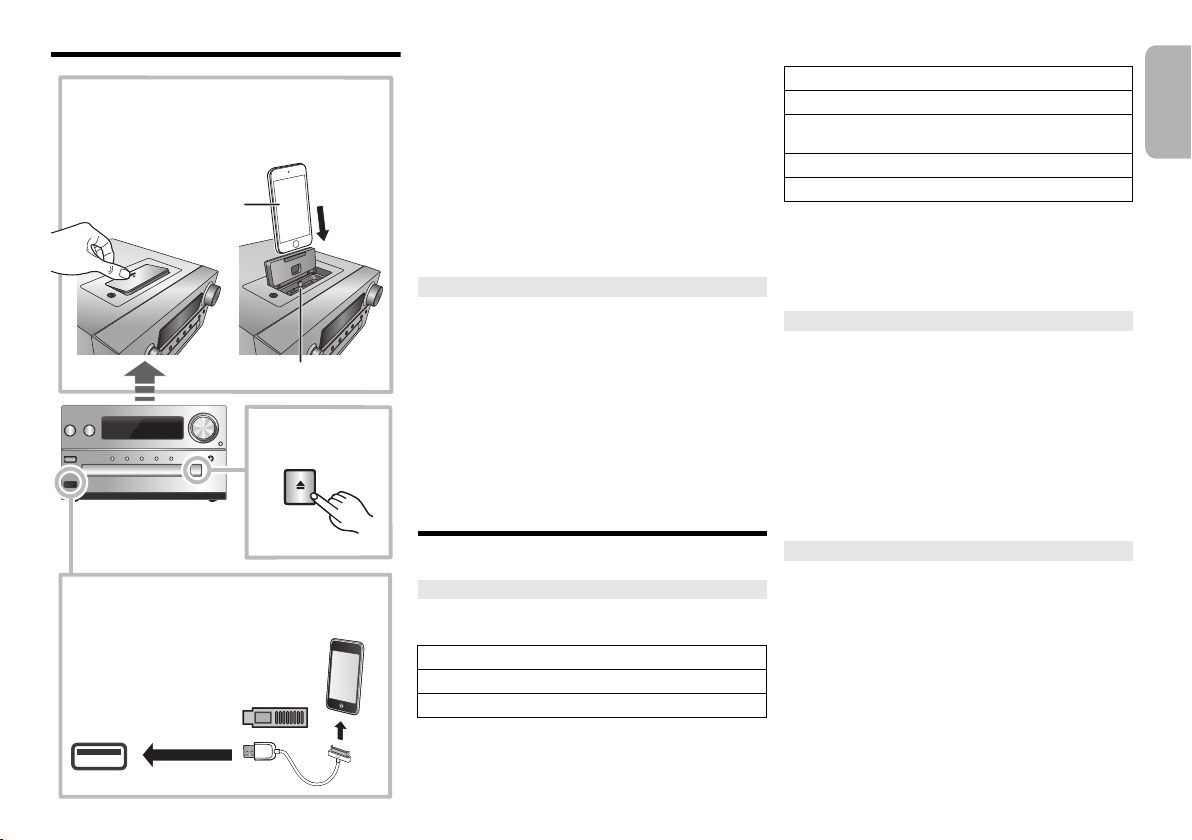
Inserting media
iPad
OPEN/CLOSE
iPod/iPhone
(not supplied)
Lightning connector
Select “iPod_Dock” as the source
Open the cover and connect an iPod/iPhone with
Lightning connector.
Select “iPod_Port” as the source
“USB” is displayed when a compatible
USB device is inserted.
• Do not connect the following models:
iPod classic, iPod [4th (colour display),
and 5th (video) generation], iPod nano
(1st generation)
Unexpected behaviour may occur.
Select “CD” as the
source
“iPod_Dock” (Using Lightning connector):
• Make sure that the iPod/iPhone is fully inserted and its
back is resting against the cushion pad.
• Make sure to remove the iPod/iPhone from its case.
• Make sure to align your iPod/iPhone with the
connector when inserting.
“iPod_Port”:
• Use the dedicated USB cable (not supplied) for iPod/
iPhone/iPad.
• Insert the USB device directly. Do not use any USB
extension cable.
• Before removing the USB device, select a source other
than “USB”.
Disc tray:
• Remove the CD only after it stops rotating.
Charging an iPod/iPhone/iPad
Charging starts when an iPod/iPhone/iPad is connected
to this system.
• During standby mode, charging will not start from the
“iPod_Port” connection, however it will start as usual
from the “iPod_Dock” connection.
- To charge from the “iPod_Port” connection, start the
charging before turning this unit to standby mode.
• See the iPod/iPhone/iPad display for its battery
charging status.
• Disconnect the iPod/iPhone/iPad if it is not used for an
extended period of time after charging is complete.
• Charging stops when the battery is fully charged. The
battery will deplete naturally.
Media information
• Please be aware that Panasonic accepts no
responsibility for the loss of data and/or information.
Compatible iPod/iPhone/iPad (as of January 2013)
Compatible with “iPod_Dock” connection
(Using Lightning connector)
iPod touch (5th generation)
iPod nano (7th generation)
iPhone 5
Compatible with “iPod_Port” connection
[Using dedicated USB cable (not supplied)]
iPod touch (1st, 2nd, 3rd, 4th, and 5th generation)
iPod nano (2nd, 3rd, 4th, 5th, 6th, and 7th generation)
iPhone 5 / iPhone 4S / iPhone 4 / iPhone 3GS /
iPhone 3G / iPhone
iPad (3rd, and 4th generation) / iPad 2 / iPad
iPad mini
Note:
• Compatibility depends on the software version. Update
your iPod/iPhone/iPad to the latest software before
using it with this unit.
• Read the User Guide of the iPod/iPhone/iPad for the
operating instructions.
Compatible USB devices
• USB devices that support bulk-only transfer.
Note:
• Files are defined as tracks and folders are defined as
albums.
• Track must have the extension “.mp3”, “.MP3”, “.flac” or
“.FLAC”.
• This system can access up to:
- 255 albums (including root folder)
- 2500 tracks
- 999 tracks in one album
• CBI (Control/Bulk/Interrupt) is not supported.
• Some files can fail to work because of the sector size.
• NTFS file system is not supported (only FAT16/FAT32 file
system is supported).
Compatible CD
• This system can play CD-R/RW with CD-DA or MP3
format content.
• Disc must conform to ISO9660 level 1 or 2 (except for
extended formats).
Note:
• Some CD-R/RW cannot be played because of the
condition of the recording.
• MP3 files are defined as tracks and folders are defined as
albums.
• This system can access up to:
- CD-DA: 99 tracks
- MP3: 999 tracks, 255 albums (including root folder) and
20 sessions
• Recordings will not necessarily be played in the order you
recorded them.
ENGLISH
VQT4Z21
5
5
Page 6
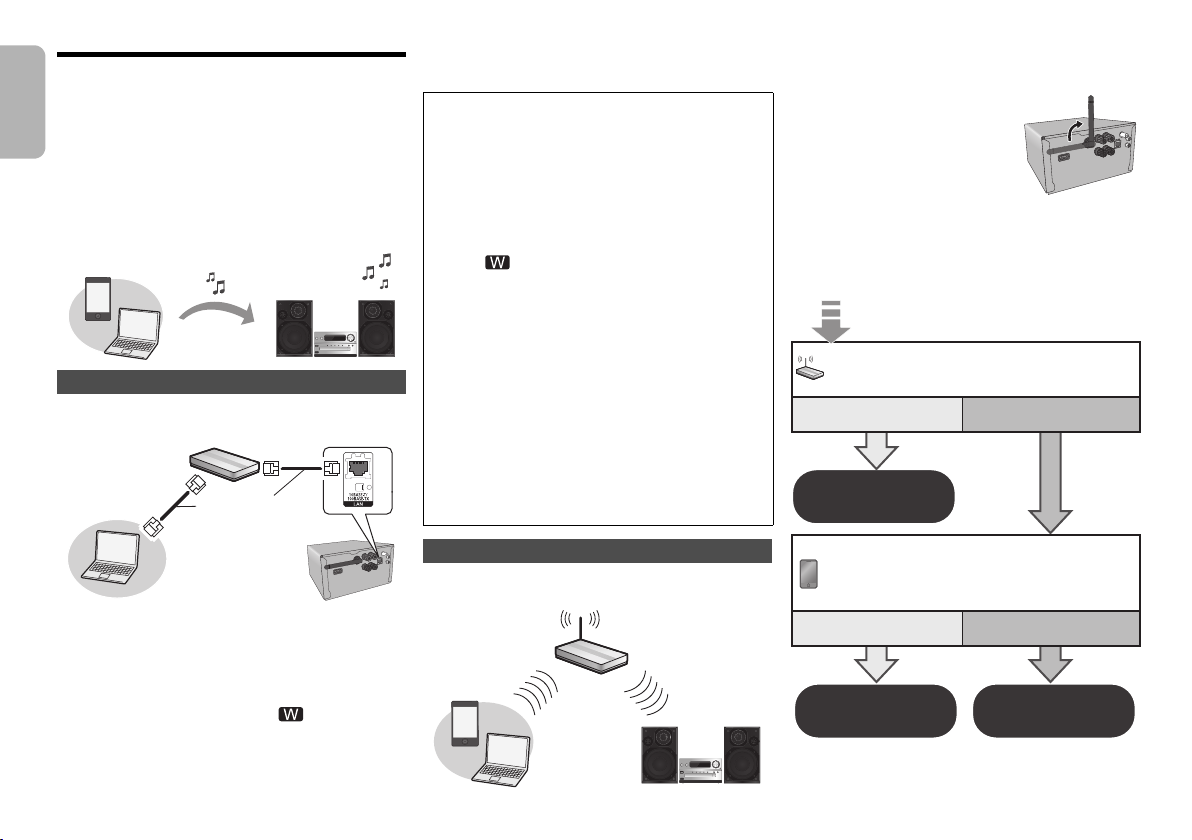
Network settings
LAN Cable
(not supplied)
Broadband router, etc.
e.g.,
Wireless router, etc.
e.g.,
Does your wireless network router support
WPS?
Yes
l
7,
“Method 1”
l 7,
“Method 2”
l 7,
“Method 3”
No / Do not know
Yes No
Are you using an
iPod touch/iPhone/iPad?
Is the iOS version 5.0 or later?
You can stream music from an iOS device (iPhone, iPod,
iPad), an Android™ device or a Mac/PC to this system’s
speakers by using the AirPlay or DLNA feature.
To use these features, this system must join the same
network as the AirPlay compatible device (> 9) or the
ENGLISH
DLNA compatible device.
• It is also possible to use AirPlay without a network router.
(> 10, “Directly streaming to this system (AirPlay)”)
• Switching between a wired LAN connection and a wireless
LAN connection may cause the connection settings to be
initialized. In that case, make the settings again.
• For a stable connection to the network, a wired LAN
connection is recommended.
Wired LAN connection
Normally, just connecting a LAN cable will complete the setup.
1 Connect the main unit to a broadband router, etc.
using LAN cable while the AC mains lead is
disconnected.
2 Connect the AC mains lead to the main unit and
turn this system on.
This unit is ready for use when “ ” is indicated on
VQT4Z21
the display.
• The LAN cable must be connected or disconnected
6
while the AC mains lead is disconnected.
• Use category 5 or above straight LAN cables (STP)
when connecting to peripheral devices.
6
• Inserting any cable other than a LAN cable in the LAN
port can damage the unit.
• When a LAN cable is connected, wireless settings will
be cancelled.
You can perform network-related settings individually.
jIf your home wireless network has been configured to
use specific IP Addresses, Subnet Mask, Default
Gateway, Primary DNS, etc.
jIf you want to change the name of this system that is
displayed as the AirPlay speakers or DLNA renderer.
1 Connect the main unit directly to your computer using
LAN cable while the AC mains lead is disconnected.
2 Connect the AC mains lead to the main unit and turn
this system on.
3After
“ ” is indicated on the display,
address for this unit. (
4 Press [SETUP] on the remote control repeatedly to
select “Net Setup” and then press [OK].
5 Press [SETUP] on the remote control repeatedly to
select “Manual” and then press [OK].
6 When “Setting” blinks on the display, start an Internet
browser on your computer and then type the IP address
for this unit checked in step 3 into the address field and
display the setup screen.*
7 Select and input the details.
8 Select “JOIN” to apply the settings.
9 The settings are completed when “Success” is displayed.
10 Turn off this unit and then disconnect the AC mains lead.
11 Perform “Wired LAN connection”. (> left)
* It may take a few minutes until the setup screen is
available to be displayed on the browser depending on
the environment.In that case, reload the browser.
>
15, “IP/MAC Address”)
check the IP
Wireless LAN connection
®
This system has built-in Wi-Fi
a wireless router.
and can be connected to
Preparation
• Place this system as close to the wireless network
router as possible.
• Disconnect the LAN cable.
• Point the antenna on the rear of
the main unit up as shown in the
figure.
• Do not perform the following:
- Tilting the antenna forward or
backwards when it is pointing up
- Applying too much force to the
antenna
- Carrying this unit by holding the antenna
1 Turn this system on.
2 Follow the chart below to choose the network
setting method.
Page 7
• If you want to perform wireless setting with your
Mac/PC, or you want to apply the advanced setting,
try “Method 4” on page 8.
• To cancel this setting in the middle, press [Í] to turn off this
system.
• Simultaneous use with other 2.4 GHz devices, such as
microwaves, cordless telephones, etc., may result in
connection interruptions.
• For up to date compatibility information on your wireless
network router refer to
http://panasonic.jp/support/global/cs/
(This site is in English only.)
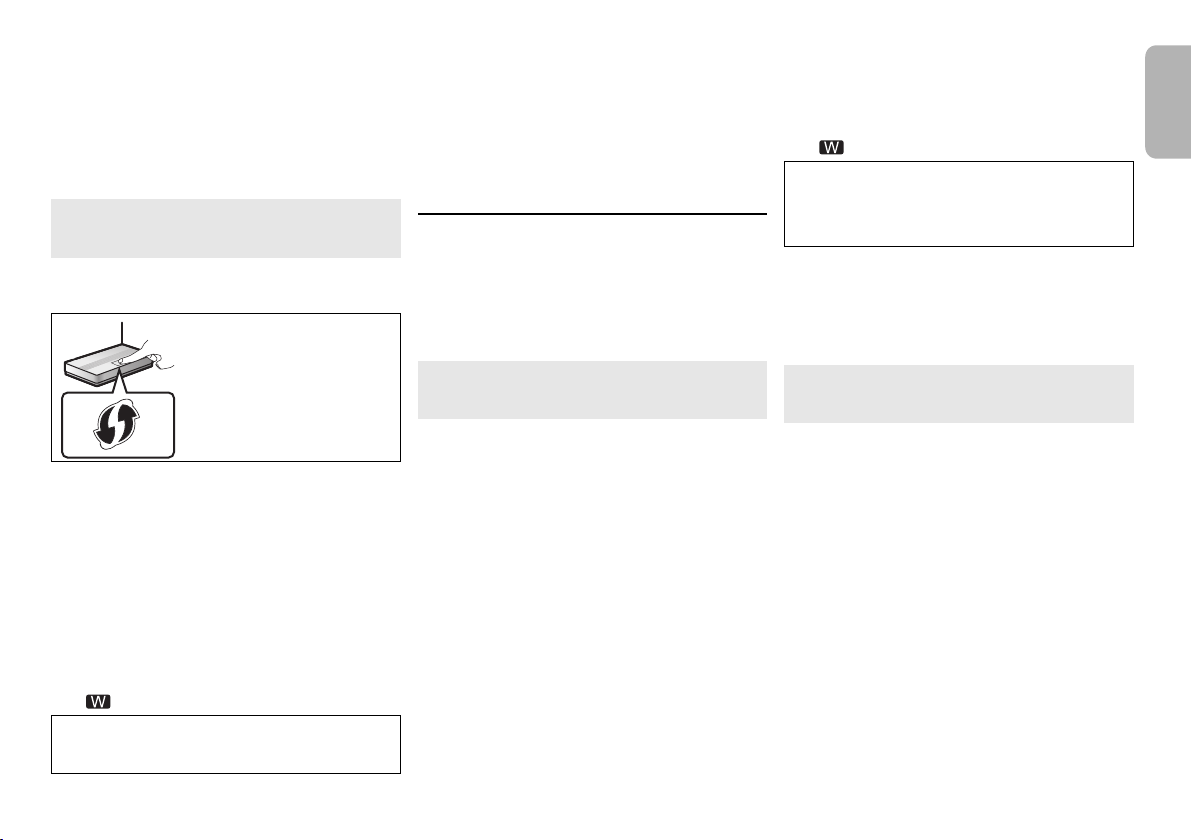
Method 1
If your wireless network router supports WPS
(Wi-Fi Protected Setup
TM
).
∫ Using the WPS Push Button Configuration
(PBC)
The WPS identifier mark
WPS Push Button Configuration
(PBC) compatible wireless
network router may have this
mark.
1 Press [SETUP] on the remote control repeatedly
to select “Net Setup” and then press [OK]. *1
“With iPod” is indicated on the display.
2 Press [SETUP] on the remote control repeatedly
to select “WPS Push” and then press [OK]. *1
“WPS” flashes on the display.
• Complete step 3 within 2 mins.
3 After “WPS” is indicated, press the WPS button
on the wireless network router.
4 The settings are completed when “Success” is
displayed.
“ ” is indicated on the display.
“Fail” may be displayed if the connection was not made
within the set time limit. Try the setting again. If “Fail” is
still displayed, try other methods on page 7 or 8.
5 Press [OK] on the remote control to exit the
setting.
• This system can also be set using the WPS PIN code.
(Before starting, refer to the wireless network router’s operating
instructions for details on how to enter the PIN code.)
1 Press [SETUP] on the remote control repeatedly to
select “Net Setup” and then press [OK]. *2
2 Press [SETUP] on the remote control repeatedly to
select “WPS PIN” and then press [OK]. *2
3 Enter the PIN code into the wireless network router.
*1 Replace with the following step.
Press and hold [D.BASS] on the main unit for 2 seconds
while pressing and holding [∫] on the main unit.
*2 Replace with the following steps.
1 Press and hold [D.BASS] on the main unit for 2 seconds
while pressing and holding [∫] on the main unit.
2 When “WPS” is indicated, press and hold [D.BASS] on
the main unit for 2 seconds while pressing and holding
[∫] on the main unit again.
Method 2
If you're using an iPod touch/iPhone/iPad.
(iOS version 5.0 or later.)
With this method you will share the wireless network
settings of your iPod touch/iPhone/iPad with this system.
• The following explanations are based on an iPhone.
1 Disconnect iPod/iPhone/iPad connected to the
main unit.
2 Connect the iPhone to your home wireless
network.
3 Connect the iPhone to the main unit.
4 Press [SETUP] on the remote control repeatedly
to select “Net Setup” and then press [OK].
“With iPod” is indicated on the display.
5 Unlock your iPhone and then press [OK] on the
remote control.
“Connecting Wi-Fi” is indicated on the display.
• If “Not Supported” or “Set Wi-Fi” is displayed, check
that the iPhone is connected to the wireless network
and try again from step 1.
6 A message will pop-up on your iPhone.
Allow the iPhone to share the wireless network
settings.*
1
7 The settings are completed when “Success” is
displayed.
“ ” is indicated on the display.
If “Fail” is displayed press [OK] and try the setting
again. If “Fail” is still displayed, try other methods on
page 7 or 8.
• If the iPhone was disconnected midway through, try
again without disconnecting it.
8 Press [OK] on the remote control to exit the
settings.
*1: Depending on the network environment or the wireless
network router settings, it may take more than 10 mins.
to complete the settings.
Method 3
Setting the network connection with the smartphone
app.
You can make the wireless network settings with the
app, “Panasonic Stereo System Network Setup” (for
free).
If you’re using an Android device, download the app at
Google Play™. If you’re using an iPod touch/iPhone/
iPad, download it at the App Store.
Preparation
• Connect your smartphone to your home wireless
network.
• Check the password for your home wireless network.
1 Press [SETUP] on the remote control repeatedly
to select “Net Setup” and then press [OK].
“With iPod” is indicated on the display.
2 Press [SETUP] on the remote control repeatedly
to select “Manual” and then press [OK].
“Setting” blinks on the display.
3 Start “Panasonic Stereo System Network Setup”
on your smartphone and follow the indications.
(Continued on the next page)
ENGLISH
VQT4Z21
7
7
Page 8
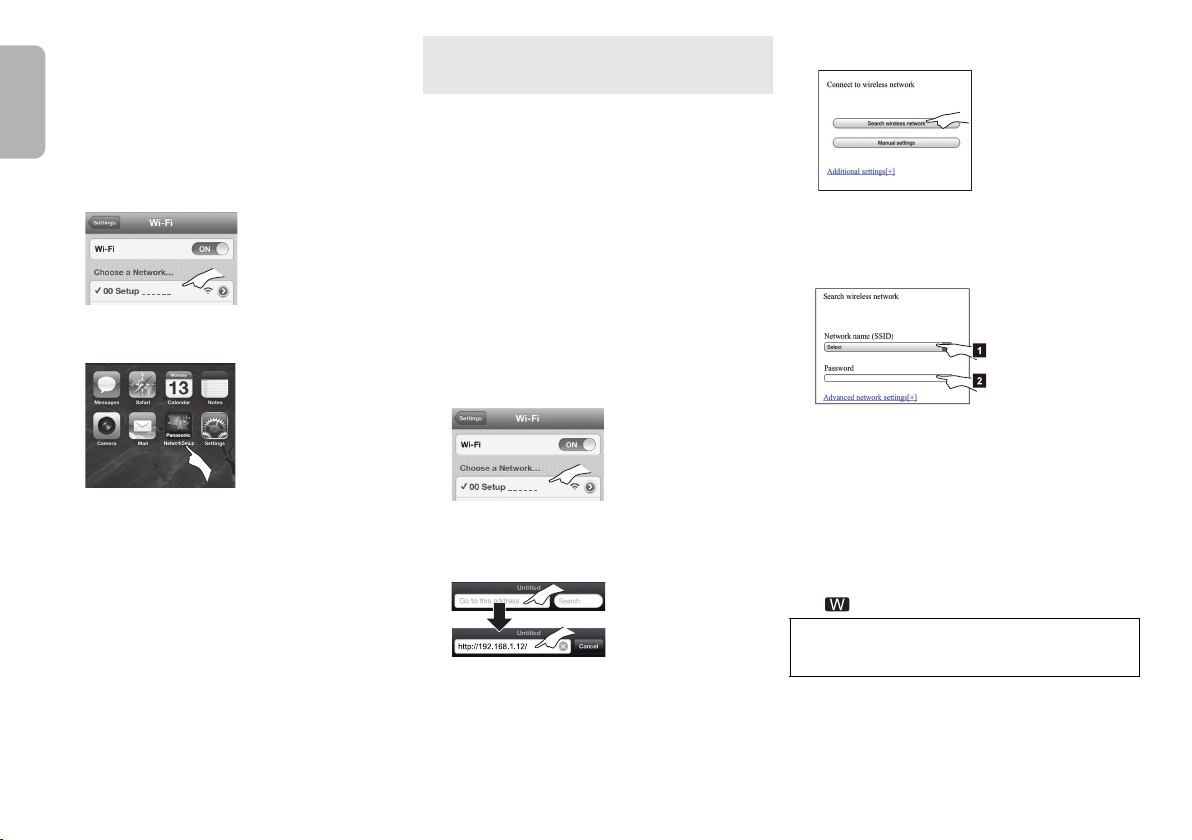
∫ Note for the iOS version
After step 3
1 Enter the password for the home wireless network
to which the iOS device is connected.
2 When a message instructing you to connect the iOS
device to this system is displayed, press the home
ENGLISH
button.
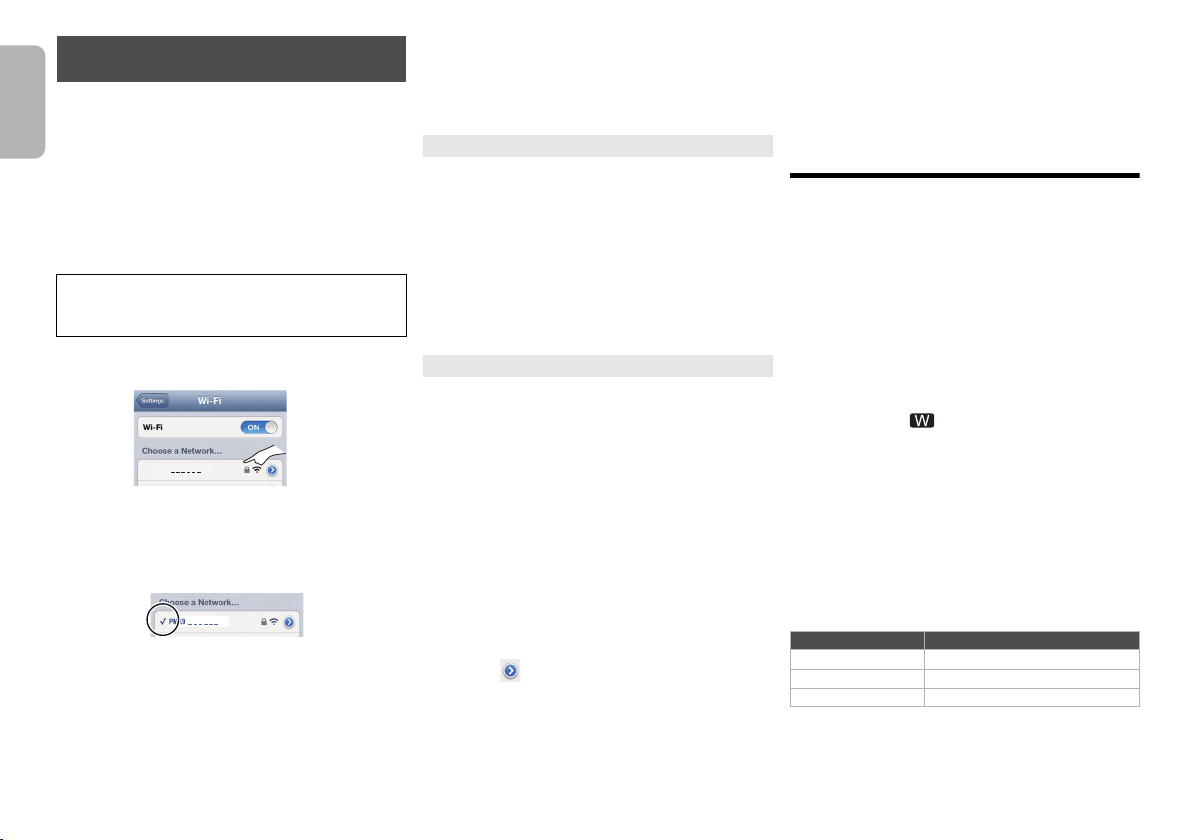
3 On the Wi-Fi network selection screen in “Settings”,
select “00 Setup _ _ _ _ _ _”.
• “ _ ” stands for a digit that is unique to each set.
4 When a message indicating the completion of the
connection to this system is displayed, restart the
app.
Method 4
Setting the network connection from an Internet
browser.
With this method, you will access this system’s wireless
network settings from the Internet browser of your
compatible device.
• The following explanations are based on an iPhone.
1 Press [SETUP] on the remote control repeatedly
to select “Net Setup” and then press [OK].
“With iPod” is indicated on the display.
2 Press [SETUP] on the remote control repeatedly
to select “Manual” and then press [OK].
“Setting” blinks on the display.
3 After “Setting” blinks, connect your compatible
device to this system’s wireless network named
“00 Setup _ _ _ _ _ _”.
• “ _ ” stands for a digit that is unique to each set.
• Make sure that DHCP is enabled for the network
setting on your compatible device.
5 Select “Search wireless network”.
6 Select and input the details.
• Check your home wireless network name (Network
name (SSID)) and password for this network. This can
often be found on the wireless network router itself.
5 When a message indicating the completion of the
Wi-Fi setup of this system is displayed, close the
app, and then check the operation of AirPlay, etc.
• “Panasonic Stereo System Network Setup” for Mac OS is
also available at the Mac App Store.
VQT4Z21
8
8
4 Start the Internet browser on your compatible
device and type “http://192.168.1.12/” into the
URL address field and display the page.
This system’s setup window is displayed.
• Examples of Internet browsers
iOS device/Mac : Safari
Android device : Google Chrome™
PC : Windows Internet Explorer
[1] Select your home wireless network
name.*
1
[2] Type the password.
7 Select “JOIN” to apply the settings.
• In the pop-up screen, select “OK” to continue.
• Select “Cancel” to return to the setup window.
8 The settings are completed when “Success” is
displayed.
“ ” is indicated on the display.
If “Fail” is displayed press [OK], check the wireless
network password and other settings and start again
from step 1.
9 Make sure to connect your compatible device
back to your home wireless network.
*1: If you have set your wireless network to be invisible,
select “BACK” and refer to “Alternative settings”. (> 9)
Page 9
Advanced network settings
PMX9
e.g.,
“Music” app.
iPhone iOS 6.0.1
PMX9
e.g.,
iTunes 11.0
• The below settings are the alternative or additional settings
for “Method 4”. (> 8)
Alternative settings
Instead of steps 5 and 6
Select “Manual settings”.
1 Type your home wireless network name into the
“Network name (SSID)” field.
2 Select the encryption method from the “Security
system” drop down list.
3 Type the password into the “Password” field and
then select “JOIN”.
Additional settings
If your home wireless network has been configured to
use specific IP Addresses, Subnet Mask, Default
Gateway, Primary DNS, etc.
Before step 7
Select “Advanced network settings”.
{.
Input the required addresses into each field and select “JOIN”.
• To change the settings back to DHCP, select “ON” from
the “DHCP” drop down list.
If you want to change the name of this system that
is displayed as the AirPlay speakers or DLNA
renderer.
Before step 5
Select “Additional settings”.
1 Select “Edit STEREO SYSTEM name”.
2 Type a new name into the
“STEREO SYSTEM name” field.
{. Only ASCII characters can be used.
3 Select “OK”.
4 If this system is already connected to your home
wireless network:
– Select “
Additional settings
If this system is not connected to your home
wireless network:
j Continue to step 5 of “Method 4”.
• Enable Java and Cookies in your browser settings.
”, and then select “
Exit
Using AirPlay with this system’s
speakers
Preparation
• Complete the network settings. (> 6)
• Connect the iOS device or Mac/PC to the same home
network as this system.
1 Turn this system on.
• Check that “ ” is indicated on the display.
• If it doesn’t be indicated, check the network
settings. (> 6)
2 iOS device: Start the “Music” (or iPod) app.
Mac/PC: Start “iTunes”.
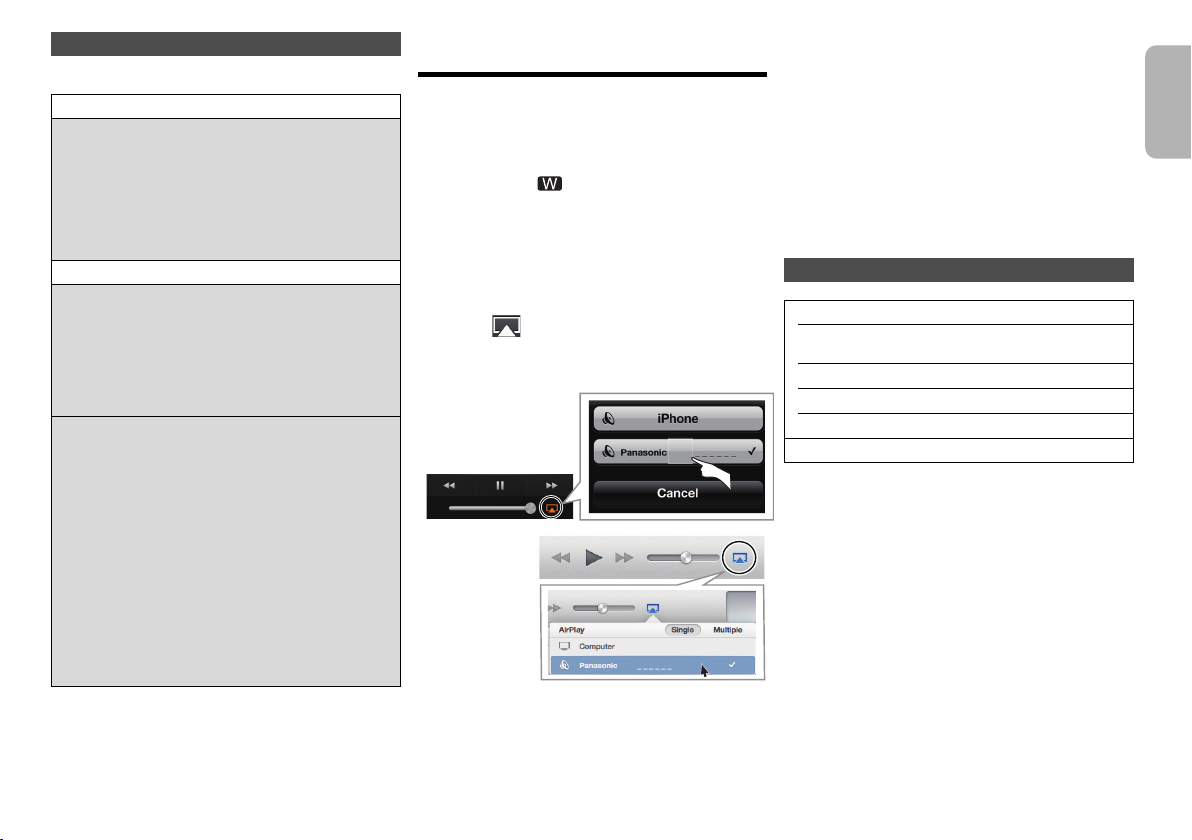
• If the Music app on your iOS device is used, select the
audio file you want to play.
3 Select “Panasonic PMX9 _ _ _ _ _ _”*
AirPlay icon.
{. Check the volume settings before starting the
playback. (When AirPlay is used for the first time, the
volume may be output at the maximum setting.)
”.
4 Start play.
• The playback will start with a slight delay.
• This system can be set to turn on automatically when this
system is selected as the output speakers.
(> 15, “Network standby”)
• Playback of other audio sources will stop and AirPlay
output will have priority.
1, 2
from the
• Volume changes on the iOS device or iTunes will be
applied to this system. (Refer to the iTunes Help for the
required settings in iTunes.)
• With some iOS and iTunes versions, it may not be possible
to restart the AirPlay playback if the selector is changed
(e.g., “CD”) or this system is turned off, during the AirPlay
playback.
In this case, select a different device from the AirPlay icon
of the Music App or iTunes and then re-select this system
as the output speakers.
• AirPlay will not work when playing back videos on iTunes.
*1: “ _ ” stands for a digit that is unique to each set.
*2: The name that is displayed for this system can be
changed from the “Edit STEREO SYSTEM name”
settings.
(>
left, "Advanced network settings")
Compatible AirPlay devices
iOS 4.3.3 or later
iPod touch
3rd, 4th, and 5th generation
iPhone 5 / iPhone 4S / iPhone 4 / iPhone 3GS
iPad (3rd, and 4th generation) / iPad 2 / iPad
iPad mini
iTunes 10.2.2 or later (Mac / PC)
(as of January 2013)
ENGLISH
VQT4Z21
9
9
Page 10
Directly streaming to this system
PMX9
(AirPlay)
With this function set to “On”, you can stream music from
the iOS device or Mac / PC (iTunes 10.2.2 or later) to
this system without the need of a network router.
ENGLISH
• Previous network settings will be deleted when this
function is set to “On”.
• The following explanations are based on an iPhone.
1 Press [SETUP] repeatedly to select “D.Connect”.
2 Press [2, 1] to select “On” and then press [OK].
3 Press [2, 1] to select “OK? Yes” and then press
[OK].
“PW _ _ _ _ _”*1 is displayed.
The 5 digits after “PW” is the password for this
network.
4 Connect your iPhone to this system’s wireless
network named “PMX9 _ _ _ _ _ _”*
5 Enter the password that is indicated on this
system’s display.
6 Once the iPhone is connected to this system’s
wireless network, the setup is competed.
7 Continue to step 2 of “Using AirPlay with this
system’s speakers”. (> 9)
• This setting is reset to “Off” when other network settings
are performed. (> 6)
VQT4Z21
• When “D.Connect” is set to “On”, this system will not be
connected to the Internet. It is not possible to update the
software or check the Wi-Fi signal strength.
10
• When AirPlay is not being used, disconnect the AirPlay
compatible device from this network.
10
• When using a computer on this network, make sure that all
the shared files are encrypted.
• This feature is only compatible with the “Open System”
authentication method. It is not compatible with “Shared
Key” authentication method.
*1: “ _ ” stands for a digit.
*2: “ _ ” stands for a digit that is unique to each set.
Display the password
The first time “D.Connect” is set to “On”, a password for
this system’s network is randomly created and
memorised in this system.
• This password is memorised until it is changed.
1 While “D.Connect” is set to “On”:
Press [SETUP] repeatedly to select “D.Connect”.
2 Press [2, 1] to select “On” and then press [OK].
3 The current password is displayed.
• The 5 digits after “PW” is the password for this
network.
4 Press any button to exit.
2
.
Change the password
1 While “D.Connect” is set to “Off”:
Press [SETUP] repeatedly to select “D.Connect”.
2 Press [2, 1] to select “Change PW” and then press
[OK].
3 Press [2, 1] to select “OK? Yes” and then press
[OK].
4 The new password is displayed.
• The 5 digits after “PW” is the new password for
this network.
5 Press any button to exit.
∫ Note about changing the password
After changing this system’s network password, if you
are not prompted to change the password on the other
devices, the following changes are required.
iOS device (iPod touch/iPhone/iPad)
• Before choosing this system’s network,
1
*
:
1 Select [ ] located beside this system’s wireless
network name.
2
Select “Forget this Network” and then select “Forget”.
3 Select this system’s wireless network and enter the
new password.
Mac/PC:
• If the computer has memorised the old password, be
sure to change the memorised password for this
system’s network to the new one.
• Refer to the devices’s operating instructions for details.
*1:
Steps are based on iOS 6.0.1.
Playing back music files on the
DLNA server
You can share music files stored in the DLNA Certified
media server (PC with Windows 7 installed, smartphone,
etc.) connected to your home network, and enjoy the
contents with this system’s speaker.
Preparation
• Complete the network settings. (> 6)
• Connect your device with DMC (Digital Media
Controller) compatible software installed to the same
home network as this system.
• Add the contents and folder to the libraries of the
Windows Media
– Playlist of Windows Media® Player can play back only
the contents that are stored in the libraries.
®
Player or the smartphone, etc.
1 Turn this system on.
• Check that “ ” is indicated on the display.
• If it doesn’t be indicated, check the network
settings. (> 6)
2 Operate the DMC compatible device and connect
to this system.
• The device name of this system will be displayed
as “Panasonic PMX9 _ _ _ _ _ _”*
• For details on how to use DMC compatible
devices, refer to the operating instructions of the
devices or the software.
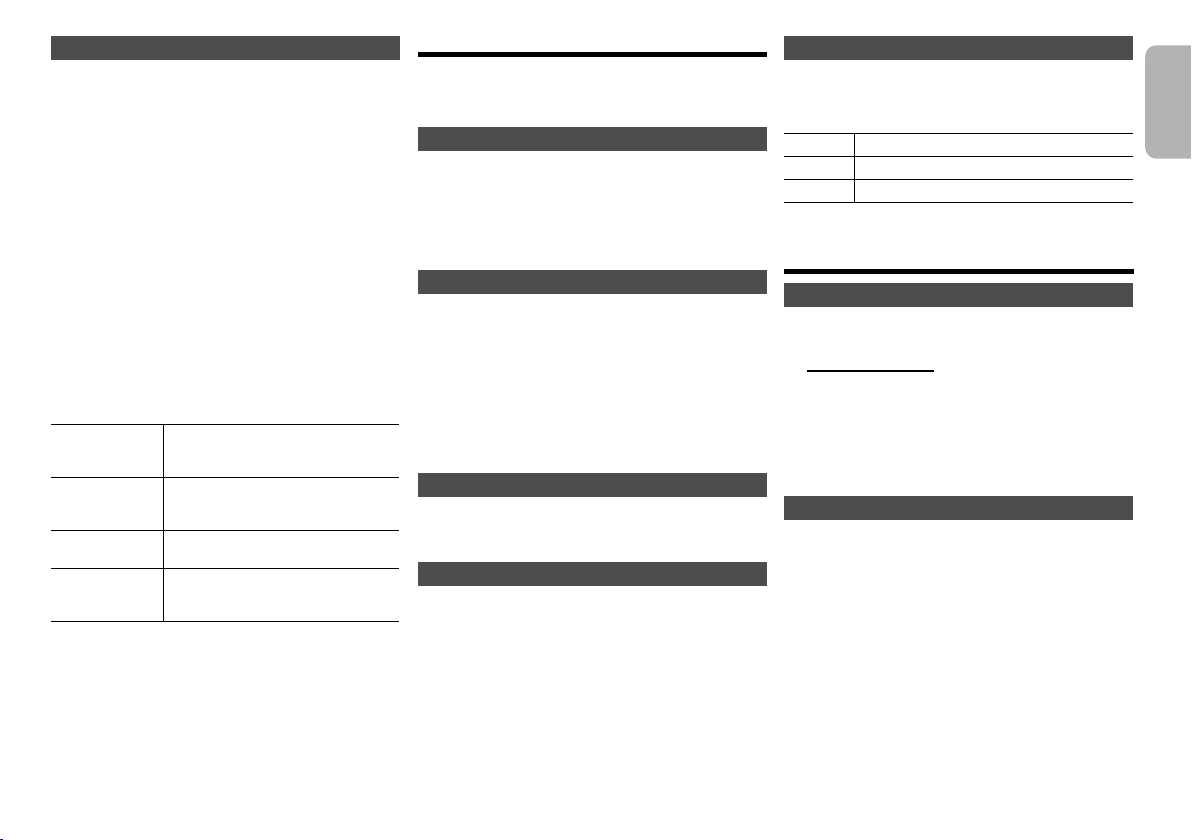
∫ Support format of DLNA client
File formats that are not supported by your DLNA server
cannot be played.
Audio codec Example of file extension
MP3 .mp3
WAV .w av
FLAC .flac
• Depending on the contents and the connected equipment,
playback may not be possible.
*1: “ _ ” stands for a digit that is unique to each set.
*2: The name that is displayed for this system can be
changed from the “Edit STEREO SYSTEM name”
settings. (
>
9, “Advanced network settings”)
1, 2
.
Page 11
Bluetooth® operations
By using the Bluetooth® connection, you can listen to the
sound from the Bluetooth
wirelessly.
Refer to the operating instructions of the Bluetooth
device for details.
Pairing Bluetooth® devices
Preparation
• Turn on the Bluetooth
the device near this system.
• If this system is already connected to a Bluetooth
device, disconnect it.
®
audio device from this system
®
®
feature of the device and place
®
1 Press [SELECTOR] repeatedly to select
“BLUETOOTH”.
If “Pairing” is indicated on the display, go to step 3.
2 Press [PLAY MENU] to select “New Device” and
then press [OK].
“Pairing” is indicated on the display.
3 Select “SC-PMX9” from the Bluetooth
Bluetooth
4 Start play on the Bluetooth
Note:
• If prompted for the passkey, input “0000”.
• You can register up to 8 devices with this system. If a 9th
device is paired, the device that has not been used for the
longest time will be replaced.
®
menu.
®
device.
®
device’s
Connecting a paired Bluetooth® device
Preparation
• Turn on the Bluetooth
the device near the speakers.
• If this system is already connected to a Bluetooth
device, disconnect it.
®
feature of the device and place
®
1 Press [SELECTOR] repeatedly to select
“BLUETOOTH”.
“Ready” is indicated on the display.
2 Select “SC-PMX9” from the Bluetooth
Bluetooth
The name of the connected device is indicated on
the display for 2 seconds.
3 Start play on the Bluetooth
®
menu.
®
device.
®
device’s
Note:
• This system can only be connected to one device at a time.
• When “BLUETOOTH” is selected as the source, this
system will automatically try and connect to the last
connected Bluetooth
• The Bluetooth
audio source (e.g., “CD”) is selected.
®
device.
®
device will be disconnected if a different
Bluetooth® transmission mode
You can change the transmission speed to prioritize
transmission quality or sound quality.
• The default setting is “Mode 1”.
• To enjoy a higher sound quality, select “Mode 2”.
Preparation
Press [SELECTOR] repeatedly to select “BLUETOOTH”.
•
• If a Bluetooth® device is already connected, disconnect
it.
1 Press [PLAY MENU] repeatedly to select
“Link Mode”.
2 Press [2, 1] to select the mode and then press
[OK].
Mode 1: Emphasis on connectivity
Mode 2: Emphasis on sound quality
Bluetooth® input level
If the sound input level of the Bluetooth
too low, change the input level setting.
Preparation
• Connect a Bluetooth
1
Press [PLAY MENU] repeatedly to select “Input Level”.
2
Press [
2, 1]
®
device.
to select the level and then press [OK].
“Level 0” ,. “Level i1” ,. “Level i2”
^--------------------------------------J
Note:
• Select “Level 0” if the sound is distorted.
Disconnecting a Bluetooth® device
1 While a Bluetooth
Press [PLAY MENU] to select “Disconnect?”.
2
Press [
2, 1]
[OK].
®
device is connected:
to select “OK? Yes” and then press
®
transmission is
About Bluetooth
Panasonic bears no responsibility for data and/or
information that is compromised during a
wireless transmission.
Frequency band used
• This system uses the 2.4 GHz frequency band.
Certification of this device
• This system conforms to frequency restrictions and
has received certification based on frequency laws.
Thus, a wireless permit is not necessary.
• The actions below are punishable by law in some
countries:
- Taking apart or modifying this system.
- Removing specification indications.
Restrictions of use
• Wireless transmission and/or usage with all Bluetooth
equipped devices is not guaranteed.
• All devices must conform to standards set by Bluetooth
SIG, Inc.
• Depending on the specifications and settings of a
device, it can fail to connect or some operations can be
different.
• This system supports Bluetooth
depending on the operating environment and/or
settings, this security is possibly not sufficient.
Transmit data wirelessly to this system with caution.
• This system cannot transmit data to a Bluetooth
device.
Range of use
• Use this device at a maximum range of 10 m.
The range can decrease depending on the
environment, obstacles or interference.
Interference from other devices
• This system may not function properly and troubles
such as noise and sound jumps may arise due to radio
wave interference if this system is located too close to
other Bluetooth
2.4 GHz band.
• This system may not function properly if radio waves
from a nearby broadcasting station, etc. is too strong.
Intended usage
• This system is for normal, general use only.
• Do not use this system near an equipment or in an
environment that is sensitive to radio frequency
interference (example: airports, hospitals, laboratories,
etc).
®
®
security features. But
®
devices or the devices that use the
®
®
ENGLISH
VQT4Z21
11
11
Page 12

Media Playback operations
The following marks indicate the availability of the
feature.
[CD]: CD audio in CD-DA format and a CD that
[iPod]: Compatible iPod/iPhone/iPad
ENGLISH
[USB]: USB devices containing MP3/FLAC files
[AirPlay] : When connected to an AirPlay compatible
[Bluetooth]:
Preparation
• Turn the unit on.
• Insert the media or connect the Bluetooth
• Press [CD], [iPod] or [SELECTOR] to select the audio
source.
contains MP3 files
device. (> 9)
Connected Bluetooth
®
device
Basic play [CD] [iPod] [USB] [AirPlay] [Bluetooth]
Play Press [1/;].
Stop Press [∫].
Pause Press [1/;].
Skip Press [:] or [9] to skip track.
Search
(Except [AirPlay])
[iPod]
View iPod menu
[iPod]
VQT4Z21
Select an item
•
[USB]
: A track being played back is
memorised, and “Resume” is
displayed. The playback position
returns to the beginning of the track.
• [USB]: Press [∫] two times to stop
the playback fully.
Press again to continue playback.
(main unit: [:/6] or [5/9])
[CD] [USB]: Press [3] or [4] to skip
the MP3/FLAC album.
During play or pause
Press and hold [6] or [5].
(main unit: [:/6] or [5/9])
• [iPod]: Backwards search is only
within the current track.
Press [iPod MENU].
Press [3, 4] and then press [OK].
12
12
®
device.
Note:
• Depending on the model (e.g., iPod nano 7th generation,
etc.), it may be necessary to select the album, artist, etc. on
the iPod/iPhone.
• Operation results may vary depending on the iPod/iPhone/
iPad models.
• Tracks can be selected by pressing the numeric buttons.
Viewing available information [CD] [USB]
[Bluetooth]
Press [DISPLAY].
eg. MP3 : Track : Album
Note:
• Maximum characters that can be shown:
approximately 32
• This system supports ver. 2.3 ID3 tags.
• Text data that the system does not support can show
differently.
TAG: ID3 tags
Play menu [CD] [USB] [AirPlay]*1
1 Press [PLAY MENU] to select “Repeat”,
“Random” or “PLAYMODE”.
2 Press [2, 1] and then press [OK] to select the
desired mode.
[CD] [USB] Repeat
Off Select to cancel repeat playback.
1-Track Only plays the selected track.
All All tracks are repeated.
[AirPlay] Repeat
Refer to the connected device to verify the selected
setting.
[CD] [USB] Random
On Plays the contents randomly.
Off Random playback is turned off.
[AirPlay] Shuffle
Refer to the connected device to verify the selected
setting.
[CD] (MP3) [USB] PLAYMODE
All Play all MP3/FLAC tracks.
1-Album Only plays the selected MP3/FLAC
Note:
• During random playback, you cannot skip to tracks which
have been played or press the numeric buttons.
• Playmode function does not work with “Programme
playback”.
• [CD]
:
The setting returns to the default “Off” when you open
the disc tray.
[AirPlay] : The applied settings will remain until it is
changed.
*1: [AirPlay] : Perform the settings during playback.
•“1TR, `” is displayed.
(Skip to the desired track.)
•“`” is displayed.
• “RND” is displayed.
• “RND” will not be displayed when
“1-Track” is selected.
album.
• “1ALBUM” is displayed.
Page 13
Programme playback [CD] [USB]
30min > 60min > 90min > 120min > Off
^-----------------------------------------------------------b
This function allows you to programme up to 24 tracks.
[CD] (CD-DA)
1 Press [PROGRAM] in the stop mode.
“PGM” is shown.
2 Press the numeric buttons to select the desired
track.
Do this step again to programme other tracks.
3 Press [1/;] to start playback.
[CD] (MP3), [USB]
1 Press [PROGRAM] in the stop mode.
“PGM” is shown.
2 Press [3, 4] to select the desired album.
3 Press [9] and then press the numeric buttons
to select the desired track.
4 Press [OK].
Do steps 2 through 4 again to programme other
tracks.
5 Press [1/;] to start playback.
Cancel
programme
mode
Check
programme
contents
Clear the last
track
Clear all
programmed
tracks
Note:
• The programme memory is cleared when you open the
disc tray.
Press [PROGRAM] in the stop
mode.
Press [:] or [9] when “PGM” is
shown in the stop mode.
Press [DEL] in the stop mode.
Press [∫] in the stop mode. “CLR
All” is shown. Within 5 seconds,
press [∫] again.
Radio
30 FM stations can be preset.
Preparation
Press [SELECTOR] repeatedly to select “FM”.
Automatic presetting
1 Press [RADIO MENU] to select “Auto Preset”.
2 Press [2, 1] to select “Lowest” or “Current”
frequency.
3 Press [OK] to start presetting.
To cancel, press [∫].
Manual tuning and presetting
1 Press [6] or [5] to tune in to the station.
To tune automatically, press and hold the button until
the frequency starts changing quickly.
2 Press [PROGRAM].
3 Press the numeric buttons to select a preset
number.
Do steps 1 through 3 again to preset more stations.
The new station replaces any station that occupies
the same preset number.
Selecting a preset station
Press the numeric buttons, [:] or [9] (main
unit: [:/6] or [5/9]) to select the preset
station.
Improving the sound quality
1 Press [RADIO MENU] repeatedly to select “FM
Mode”.
2 Press [2, 1] to select “Mono” and then press
[OK].
To cancel, select “Stereo”.
“Mono” is also cancelled when you change the
frequency.
To memorise the setting
Continue with steps 2 and 3 of “Manual tuning and
presetting”.
RDS broadcasting
This system can show the text data transmitted by the
radio data system (RDS) available in some areas.
Press [DISPLAY].
PS Programme service
PTY Programme type
FREQ Frequency
Note:
• RDS may not be available if reception is poor.
Clock and timers
Setting the clock
This is a 24-hour clock.
1 Press [CLOCK/TIMER] to select “CLOCK”.
2 Within 10 seconds, press [3, 4] to set the time.
3 Press [OK].
Press [CLOCK/TIMER] to show the clock for a few
seconds.
Note:
• Reset the clock regularly to maintain accuracy.
Sleep timer
The sleep timer switches off the system after the set
time.
Press [SLEEP] repeatedly to select the setting (in
minutes).
To cancel, select “Off”.
To show the remaining time
Press [SLEEP].
Note:
• The sleep timer can be used together with the play timer.
• The sleep timer always comes first. Be sure not to set an
overlap of timers.
ENGLISH
VQT4Z21
13
13
Page 14
Play timer
You can set the timer to come on at a certain time to
wake you up.
Preparation
Set the clock.
ENGLISH
1 Press [CLOCK/TIMER] repeatedly to select
“TIMER Adjust”.
2 Within 8 seconds, press [3, 4] to set the start
time.
3 Press [OK].
4 Do steps 2 and 3 again to set the end time.
To start the timer
1 Prepare the audio source you want to listen to
and set the volume.
2 Press [F, PLAY].
“F” is shown.
To cancel, press [F, PLAY] again.
The system must be switched off for the timer to
operate.
To check the settings
Press [CLOCK/TIMER] repeatedly to select “TIMER
Adjust”.
Note:
• The timer starts at a low volume and increases gradually to
the preset level.
• The timer comes on at the set time every day if the timer is
on.
• If you switch off the system and switch on again while a
timer is in operation, the timer will not stop at the end time.
VQT4Z21
14
14
Sound effects
Changing the sound quality
Press [SOUND] to select a sound effect.
1
2 Press [2, 1] to select the desired setting.
BASS
TREBLE
Surround “On Surround” or “Off Surround”
By main unit only
Turn [BASS] or [TREBLE] to adjust the level.
Preset EQ
Press [PRESET EQ] to select a setting.
Heavy Adds punch to rock
Soft For background music
Clear Clarifies higher frequencies
Vocal Adds gloss to vocal
Flat Cancels the sound effect
D.BASS
This function lets you enjoy a powerful bass effect.
Press [D.BASS] to select “On D.BASS” or “Off
D.BASS”.
-4 to +4
Using the auxiliary input
You can connect a VCR, DVD player etc. and listen to
the audio through this system.
Preparation
Connect the external equipment.
1 Press [SELECTOR] repeatedly to select “AUX”.
2 Play the external equipment.
Others
Decrease the brightness of the display panel
Press [SETUP] to select “Dimmer”.
1
2 Press [2, 1] to select “On” and then press [OK].
Note:
• To cancel, select “Off” in step 2.
Automatically switch off the system
This function switches off the system (except in radio
source) if you do not use the system for approximately
20 minutes.
1 Press [SETUP] repeatedly to select “Auto Off”.
2 Press [2, 1] to select “On” and then press [OK].
Note:
• To cancel, select “Off” in step 2.
• When connected to a Bluetooth
not work.
• If “Net Standby” is set to “On”, this function will also be set
to “On”. To change the setting, set “Net Standby” to “Off”.
(> 15)
Software update
Occasionally, Panasonic may release updated software
for this system that may add or improve the way a
feature operates. These updates are available free of
charge.
DO NOT DISCONNECT the AC mains lead while
one of the following messages is displayed.
– “Linking”, “Updating” or “%”
(“ ” stands for a number.)
• During the update process, no other operations can be
performed.
Preparation
• Turn this system on.
• Connect this system to the home network. (> 6)
– Make sure that the network is connected to the
Internet.
– If “D.Connect” is set to “On”, change the setting to
“Off” and connect this system to a network that is
connected to the Internet.
®
device, this function does
Page 15

1 Press [SETUP] repeatedly to select “SW Update”
and then press [OK].
2 Press [2, 1] to select “Update? Yes” and then
press [OK] to start the update.
• Select “Update? No” to cancel the update.
{. After the update has finished, “Success” is displayed.
3 Disconnect the AC mains lead and reconnect it
after 3 minutes.
• If there are no updates, “No Need” is displayed.
≥ Downloading will require several minutes. It may take
longer or may not work properly depending on the
connection environment.
∫ Checking the software version
1 Press [SETUP] repeatedly to select “SW Version” and then
press [OK].
{. The version of the installed software is displayed.
2 Press [OK] to exit.
Wi-Fi signal strength
To check the Wi-Fi signal strength where this system is
located.
Preparation
Connect this system to the wireless network. (> 6)
1 Press [SETUP] repeatedly to select “Signal
Level” and then press [OK].
• This system’s displays show “Level ”.
(“ ” stands for a number.)
2 Press [OK] to exit this display mode.
• It is recommended to have a signal strength of “3”. Change
the position or angle of your wireless network router or this
system if the indication is “2” or “1” and see if the
connection improves.
• If “Level 0” is displayed, this system cannot establish a link
with the wireless network router. (> 17)
• This function does not work when “D.Connect” is set to
“On”.
Wireless LAN setting
The wireless LAN function can be enabled or disabled.
1 Press [SETUP] repeatedly to select
“Wireless LAN” and then press [OK].
2 Press [2, 1] to select “On” or “Off” and then
press [OK].
• The factory preset is “On”.
Network standby
This system can turn on automatically from standby
mode when this system is selected as the AirPlay
speakers.
Preparation
Connect this system to the home network. (> 6)
1 Press [SETUP] repeatedly to select
“Net Standby” and then press [OK].
2 Press [2, 1] to select “On” and then press [OK].
• To cancel this function, select “Off” in step 2.
• The factory preset is “Off”. If this function is set to “On” the
standby power consumption will increase.
Wireless network name (SSID)
Display the name for the connected wireless network
(SSID).
1 Press [SETUP] repeatedly to select “Net Info”
and then press [OK].
“IP Addr.” is indicated on the display.
2 Press [SETUP] repeatedly to select “SSID” and
then press [OK].
3 Press [OK] to exit.
• If “No Connect” is displayed this system is not connected to
a wireless network.
• All letters are displayed as capital letters, and characters
that cannot be displayed are replaced with “
¢”.
IP/MAC Address
To check this system’s IP address or the Wi-Fi MAC
address.
1 Press [SETUP] repeatedly to select “Net Info”
and then press [OK].
“IP Addr.” is indicated on the display.
2 Press [SETUP] repeatedly to select “IP Addr.” or
“MAC Addr.” and then press [OK].
The IP address or the MAC address is partially
displayed.
3 Press [2, 1] on the remote control to show the
rest of the IP address or the MAC address.
• To exit the setting, wait 20 sec.
• The “ – ” displayed on the top or bottom left of the display
indicate the first and last units respectively.
ENGLISH
15
15
VQT4Z21
Page 16

Troubleshooting
Before requesting service, make the following checks. If
you are in doubt about some of the check points, or if the
solutions indicated do not solve the problem, consult
your dealer for instructions.
Do you have the latest software installed?
ENGLISH
• Occasionally, Panasonic may release updated
software for this system that may add or improve the
way a feature operates. (> 14)
Common problems
No operations can be done with the remote control.
• Examine that the battery is installed correctly.
Sound is distorted or no sound.
• Adjust the volume of the system.
• Switch off the system, determine and correct the cause, then
switch the system on again. It can be caused by straining of
the speakers through excessive volume or power, and when
using the system in a hot environment.
A “humming” sound can be heard during playback.
• An AC mains lead or fluorescent light is near the
cables. Keep other appliances and cords away from
the cables of this system.
Disc
Display not shown correctly.
Playback does not start.
• You have not put in the disc correctly. Put it in correctly.
• Disc is dirty. Clean the disc.
• Replace the disc if it is scratched, warped, or
non-standard.
There is condensation. Let the system dry for 1 to 2 hours.
•
Radio
Reception is poor or a beat sound is heard.
• Keep the antenna away from computers, TVs, other
cables and cords.
• Use an outdoor antenna.
• Switch off the TV or move it away from the system.
VQT4Z21
16
16
iPod/iPhone/iPad
You cannot switch on the iPod/iPhone/iPad.
• Examine that the battery of the iPod/iPhone/iPad is not
depleted.
• Switch off the iPod/iPhone/iPad and the system before
you connect the iPod/iPhone/iPad. Connect the iPod/
iPhone/iPad and try again.
No sound.
• Switch off the iPod/iPhone/iPad and remove from the
system. Connect the iPod/iPhone/iPad to the system
and switch it on and play it again.
iPod/iPhone/iPad does not charge.
• Examine the connection.
Charging an iPod/iPhone/iPad whose battery is depleted:
•
- When using the “iPod_Port” connection, turn this system
on. Do not turn this system off until the iPod/iPhone/iPad
becomes operational.
- When using the “iPod_Dock” connection, “Checking
Connection” will be displayed until the iPod/iPhone
becomes operational, but this system will have begun
charging.
USB
The USB device or the contents in it cannot be read.
• The format of the USB device or the contents in it is/
are not compatible with the system.
• USB devices with storage capacity of more than 32 GB
cannot work in some conditions.
Slow operation of the USB device.
• Large content size or large memory USB device takes
longer time to read.
The elapsed time shown is different from the actual
play time.
• Transfer the data to another USB device or backup the
data and reformat the USB device.
Bluetooth
Pairing cannot be done.
• Check the Bluetooth
The device cannot be connected.
• The pairing of the device was unsuccessful or the
registration has been replaced. Try pairing the device
again.
• This system might be connected to a different device.
Disconnect the other device and try pairing the device
again.
®
®
device condition.
The device is connected but audio cannot be heard
through this system.
• For some built-in Bluetooth
the audio output to “SC-PMX9” manually. Read the
operating instructions for the device for details.
The sound is interrupted.
• The device is out of the 10 m communication range.
Bring the Bluetooth
• Remove any obstacle between this system and the
device.
• Other devices that use the 2.4 GHz frequency band
(wireless router, microwaves, cordless phones, etc.)
are interfering. Bring the Bluetooth
this system and distance it from the other devices.
• Select “Mode 1” for stable communication. (> 11 )
®
devices, you have to set
®
device closer to this system.
®
device closer to
AirPlay operations
Cannot connect to the network.
• Confirm the network connection and settings. (> 6)
• Your wireless network might be set to be invisible. In
this case select “Manual settings” in “Method 4”. (> 9)
• This system cannot join a wireless network using WEP
security settings with the WPS methods (“Method 1”).
Use “Method 4” to join the wireless network. (> 8)
• Make sure that the multicast function on the wireless
network router is set to on (enabled).
• When “D.Connect” is used, if the password for
“D.Connect” has been changed connect the other
device to this system using the new password. (> 10)
• Check that “Wireless LAN” is set to “On”. (> 15)
Cannot connect to this system.
• Display the wireless network name that this system is
connected to and make sure that the device is
connected to the same network. (> 6, 15)
• If “Net Standby” is set to “Off”, the AirPlay compatible
device cannot be connected when this system is off.
• Turn off the Wi-Fi setting on the AirPlay compatible
device, set “Net Standby” to “Off” (> 15) and then turn
this system off and on. Reconnect the compatible
device to the Wi-Fi network and then select this system
as the AirPlay speakers again.
Page 17

My wireless network router is WPS PBC compatible,
but the pairing does not work.
• If the network is set to be invisible, the push button
configuration does not work. In this case, either make
the wireless network visible while you set up the
network for this system or use “Method 2”, “Method 3”
or “Method 4”. (> 7, 8)
Playback does not start.
The sound is interrupted.
• Try a wired LAN connection. (> 6)
• Simultaneous use with other 2.4 GHz devices, such as
microwaves, cordless telephones, etc., may result in
connection interruptions.
Increase the distance between this system and these
devices.
• Do not place this system inside a metal cabinet, for it
might block the Wi-Fi signal.
• Place this system closer to the wireless network router.
• If “D.Connect” is set to “On”, place the AirPlay
compatible device closer to the speakers.
• If several wireless devices are simultaneously using
the same wireless network as this system, try turning
off the other devices or reducing their wireless network
usage.
• If the playback stops, check the playback status on the
iOS device or iTunes.
• If play does not start (even though “ ” is displayed),
restart the wireless network router, turn the Wi-Fi
connection on the iOS device or Mac/PC off and on,
and then make sure that your home wireless network
is selected.
• With some iOS and iTunes versions, it may not be
possible to restart the AirPlay playback if the selector is
changed (e.g., “CD”) or this system is turned off, during
the AirPlay playback.
In this case, select a different device from the AirPlay
icon of the Music App or iTunes and then re-select this
system as the output speakers. (> 9)
Main unit displays
“--:--”
• You connected the AC mains lead for the first time or
there was a power failure recently. Set the clock.
“Adjust CLOCK”
• Clock is not set. Adjust the clock accordingly.
“Adjust TIMER”
• Play timer is not set. Adjust the play timer accordingly.
“Auto Off”
The unit has been left unused for about 20 minutes and will
•
shut down in a minute. Press any button to cancel it.
“CANNOT SET”
• Select an audio source other than “AirPlay”,
“BLUETOOTH” or “DLNA”.
“Checking Connection”
• The unit is checking the connected iPod/iPhone/iPad.
If this display keeps appearing, make sure that iPod/
iPhone/iPad is inserted correctly and try again.
“DL Error”
• The software download has failed. Press any button to
exit. Please try again later.
• The server cannot be found. Press any button to exit. Make
sure that the wireless network is connected to the Internet.
“Error”
• An incorrect operation was done. Read the instructions
and try again.
“F61” or “F76”
• There is a power supply problem.
“Fail”
• Updating or setting has failed. Read the instructions
and try again.
“iPod_Dock Over Current Error”
“iPod_Port Over Current Error”
• The iPod/iPhone/iPad or USB device is drawing too
much power. Remove the iPod/iPhone/iPad or USB
device. Switch the system off and on again.
“Level 0”
• There is no link between this system and the wireless
network router.
Try the following operations:
– Check that the wireless network router is turned on.
– Turn this system off and on again.
– Reset the wireless network settings. (> 6)
If the problem persists, consult your dealer.
“Level j”
• When “D.Connect” is set to “On” the Wi-Fi signal
strength cannot be checked. To check the Wi-Fi signal
strength from the wireless network router, set
“D.Connect” to “Off”. (> 10)
“Linking”
• This system is communicating with the wireless
network router to complete the network settings.
Depending on the wireless network router this process
may take a few minutes. Try moving this system closer
to the wireless network router.
“No Connect”
• This system cannot connect to the network.
Check the network connection. (> 6)
“No Device”
• The iPod/iPhone/iPad or USB device is not connected.
Examine the connection.
“No Disc”
• You have not put in a disc or put in a disc that the
system cannot play.
“No Play”
• Examine the content. You can only play supported
format.
• If there are more than 255 albums or folders (audio
and non-audio), some of the MP3/FLAC files in these
albums cannot be read and played. Transfer these
music albums to another USB device. Alternatively,
reformat the USB device and save these music albums
prior to saving the other non-audio folders.
“Not MP3/Error”
• An unsupported MP3 format. The system will skip that
track and play the next one.
“Not Supported”
• You have inserted an iPod/iPhone/iPad that cannot be
played.
• Switch off the iPod/iPhone/iPad and the system before
you connect the iPod/iPhone/iPad. Connect the iPod/
iPhone/iPad and try again.
• This message may be displayed when a wireless LAN
connection is made without unlocking the iPod/iPhone/
iPad. (> 7, “Method 2”)
“PGM Full”
• The number of programmed tracks is more than 24.
“Reading”
• The unit is checking the disc and USB device
information. After this display has disappeared, start
operating.
“Set Wi-Fi”
• The connected iPod touch/iPhone/iPad is not
connected to a wireless network. Connect it to a
wireless network and try again. (> 6)
“Wait”
• This is displayed, for example, when this unit is turned
off. (For up to 1 minute and 30 seconds)
ENGLISH
VQT4Z21
17
17
Page 18

Memory reset (initialisation)
Reset the memory when the following situations occur:
• There is no response when buttons are pressed.
• You want to clear and reset the memory contents.
1 Disconnect the AC mains lead.
ENGLISH
Wait 3 minutes before you continue with step 2.
2 While you press and hold [Í/I] on the main unit,
connect the AC mains lead again.
“- - - - - - - - - - - -” is shown.
3 Release [Í/I].
All the settings are set back to the factory preset.
It is necessary to set the memory items again.
Remote control code
When other Panasonic equipment responds to the
remote control of this system, change the remote control
code for this system.
To set the code to “Remote 2”
1 Press [CD] to select “CD”.
2 Press and hold [CD] on the main unit and [2] on
the remote control until “Remote 2” is shown.
3 Press and hold [OK] and [2] for a minimum of
4 seconds.
• The factory preset is “Remote 1”.
• To change the mode back to “Remote 1”, repeat the
steps above but replace the button pressed on the
remote control from [2] to [1].
VQT4Z21
18
18
Specifications
Amplifier section
RMS output power
Front Ch (both ch driven)
Total RMS power 120 W
Tuner section
Frequency modulation (FM)
Preset memory 30 stations
Frequency range
Antenna terminals 75 ™ (unbalanced)
Terminals section
“iPod_Port” connection
USB standard USB 2.0
Media file format support MP3 (*.mp3)
USB device file system FAT16, FAT32
ID3 Tag support v2.3
“iPod_Dock” connection
Headphones jack Stereo, Ø 3.5 mm jack
AUX input (rear) Pin jack
LAN port 10 Base-T/100 Base-TX
Disc section
Disc played (8 cm or 12 cm)
Pick up
Wavelength 790 nm (CD)
Laser power CLASS 1
NORSK
Bølgelengde 790 nm (CD)
Laserstyrke Ingen farlig stråling sendes ut
Audio output (Disc)
Number of channels 2 ch (FL, FR)
60 W per channel (3 ™), 1 kHz,
10% total harmonic distortion
87.50 MHz to 108.00 MHz (50 kHz step)
DCOUT 5V 2.1A (max)
, FLAC (*.flac)
DCOUT 5V 1.0A (max)
CD, CD-R/RW (CD-DA, MP3)
Speaker section
Speaker unit(s)
Woofer 14 cm cone type x 1
Tweeter 1.9 cm dome type x 1
Super tweeter 1.2 cm piezo type x 1
Impedance 3™
Dimensions (W x H x D) 161 mm x 238 mm x 264 mm
Mass Approx. 3.0 kg
Bluetooth® section
®
Bluetooth
Wireless equipment classification Class 2
Supported profiles A2DP
Frequency band 2.4 GHz band FH-SS
Driving distance 10 m Line of sight
system specification V3.0
Prospective communication distance
Measurement environment:
Measure in “Mode 1”
Temperature 25 oC / Height 1 m
Wi-Fi/AirPlay section
Wi-Fi
WLAN Standard IEEE802.11b/g
Frequency range 2.4 GHz band
Security WEP (64 bit/128 bit),
WPS version
Version 2.0 (WEP not support)
WPA
TM
, WPA2
Audio Support format (USB, DLNA)
MP3
Sampling frequency 32/44.1/48 kHz
Audio word size 16 bits
Channel count 2 ch
Bit-rate 8-320 kbps
FLAC
Sampling frequency
Audio word size 16.24 bits
Channel count 2 ch
WAV (DLNA only)
Sampling frequency
Audio word size 16.24 bits
Channel count 2 ch
32/44.1/48/88.2/96/176.4/192 kHz
32/44.1/48/88.2/96/176.4/192 kHz
TM
Page 19
General
Power supply AC 220 V to 240 V, 50 Hz
Power consumption 60 W
Dimensions (W x H x D) 210 mm x 120 mm x 266 mm
Mass Approx. 3.1 kg
Operating temperature range 0°C to +40°C
Operating humidity range
Power consumption in standby mode
When the iPod/iPhone/iPad is not charging)
(
Note:
• Specifications are subject to change without notice. Mass
and dimensions are approximate.
• Total harmonic distortion is measured by the digital
spectrum analyzer.
FLAC Decoder
Copyright (C) 2000,2001,2002,2003,2004,2005,2006,2007
Josh Coalson
Redistribution and use in source and binary forms, with or
without modification, are permitted provided that the following
conditions are met:
- Redistributions of source code must retain the above
copyright notice, this list of conditions and the following
disclaimer.
- Redistributions in binary form must reproduce the above
copyright notice, this list of conditions and the following
disclaimer in the documentation and/or other materials
provided with the distribution.
- Neither the name of the Xiph.org Foundation nor the
names of its contributors may be used to endorse or
promote products derived from this software without
specific prior written permission.
THIS SOFTWARE IS PROVIDED BY THE COPYRIGHT
HOLDERS AND CONTRIBUTORS “AS IS” AND ANY
EXPRESS OR IMPLIED WARRANTIES, INCLUDING, BUT
NOT LIMITED TO, THE IMPLIED WARRANTIES OF
MERCHANTABILITY AND FITNESS FOR A PARTICULAR
PURPOSE ARE DISCLAIMED. IN NO EVENT SHALL THE
FOUNDATION OR CONTRIBUTORS BE LIABLE FOR ANY
DIRECT, INDIRECT, INCIDENTAL, SPECIAL, EXEMPLARY,
OR CONSEQUENTIAL DAMAGES (INCLUDING, BUT NOT
LIMITED TO, PROCUREMENT OF SUBSTITUTE GOODS
OR SERVICES; LOSS OF USE, DATA, OR PROFITS; OR
BUSINESS INTERRUPTION) HOWEVER CAUSED AND
ON ANY THEORY OF LIABILITY, WHETHER IN
CONTRACT, STRICT LIABILITY, OR TORT (INCLUDING
NEGLIGENCE OR OTHERWISE) ARISING IN ANY WAY
OUT OF THE USE OF THIS SOFTWARE, EVEN IF
ADVISED OF THE POSSIBILITY OF SUCH DAMAGE.
35% to 80% RH (no condensation)
0.4 W (approximate)
Declaration of Conformity (DoC)
Hereby, “Panasonic Corporation” declares that this product
is in compliance with the essential requirements and other
relevant provisions of Directive 1999/5/EC.
Customers can download a copy of the original DoC to our
R&TTE products from our DoC server:
http://www.doc.panasonic.de
Contact to Authorised Representative:
Panasonic Marketing Europe GmbH,
Panasonic Testing Centre, Winsbergring 15, 22525
Hamburg, Germany
This product is intended for general consumer. (Category 3)
This product on purpose to connect to access point of 2.4 GHz
WLAN.
Disposal of Old Equipment and Batteries
Only for European Union and countries with
recycling systems
collection points in accordance with your national
legislation.
By disposing of them correctly, you will help to save
valuable resources and prevent any potential negative
effects on human health and the environment.
For more information about collection and recycling,
please contact your local municipality.
Penalties may be applicable for incorrect disposal of
this waste, in accordance with national legislation.
These symbols on the products,
packaging, and/or accompanying
documents mean that used electrical
and electronic products and batteries
must not be mixed with general
household waste.
For proper treatment, recovery and
recycling of old products and used
batteries, please take them to applicable
Note for the battery symbol (bottom
symbol):
This symbol might be used in
combination with a chemical symbol. In
this case it complies with the
requirement set by the Directive for the
chemical involved.
ENGLISH
VQT4Z21
19
19
Page 20
Opisane procedury należy wykonać za pomocą pilota
zdalnego sterowania. Można również użyć przycisków
na panelu przednim urządzenia, jeśli są identyczne.
Zakupione urządzenie może różnić się od
przedstawionego na ilustracjach.
Niniejsza instrukcja obsługi ma zastosowanie do
następującego zestawu.
Zestaw SC-PMX9
Urządzenie
główne
SA-PMX9
Głośniki SB-PMX9
Środki ostrożności
POLSKI
OSTRZEŻENIE!
Urządzenie
• Aby ograniczyć niebezpieczeństwo pożaru, porażenia
prądem lub uszkodzenia urządzenia,
- Nie należy wystawiać urządzenia na działanie deszczu,
wilgoci, kapanie lub zachlapanie.
- Na urządzeniu nie należy umieszczać żadnych
przedmiotów napełnionych płynami, np. dzbanków.
-Należy stosować tylko zalecane akcesoria.
- Nie zdejmować pokrywy.
-Użytkownik nie powinien podejmować się naprawy
urządzenia na własną rękę. Serwis należy zlecić w
autoryzowanym punkcie serwisowym.
UWAGA!
Urządzenie
• Aby ograniczyć niebezpieczeństwo pożaru, porażenia
prądem lub uszkodzenia urządzenia,
- Niniejszego urządzenia nie należy instalować lub umieszczać w
biblioteczce, wbudowanej szafce lub innej ograniczonej
przestrzeni. Należy zapewnić odpowiednią wentylację urządzenia.
-Nie zasłaniaj otworów wentylacyjnych urządzenia
gazetami, obrusami, zasłonami i podobnymi przedmiotami.
- Nie umieszczać na urządzeniu źródeł otwartego ognia,
jak np. zapalone świece.
•Urządzenie jest przeznaczone do używania w klimacie
umiarkowanym.
• Wtyczka zasilania umożliwia odłączenie urządzenia.
Zainstaluj to urządzenie w taki sposób, aby możliwe było
natychmiastowe odłączenie wtyczki zasilania od gniazda zasilania.
• To urządzenie może odbierać zakłócenia wywołane
VQT4Z21
użyciem telefonu komórkowego. Jeżeli takie zakłócenia
wystąpią, wskazane jest zwiększenie odległości pomiędzy
2
urządzeniem a telefonem komórkowym.
•Urządzenie wykorzystuje promień lasera. Sterowanie,
regulacje lub postępowanie w sposób tutaj nie określony
20
grozi niebezpiecznym naświetleniem promieniami lasera.
Bateria
• Nie wolno zwierać biegunów baterii ani jej rozbierać.
• Nie ładować baterii alkalicznych ani manganowych.
• Nie wolno używać baterii, z których została zdjęta warstwa
ochronna.
• Nie zbliżać baterii do źródeł ciepła lub ognia.
• Baterii nie należy pozostawiać przez dłuższy czas, w
pojeździe z zamkniętymi drzwiami i oknami, narażonym na
bezpośrednie promieniowanie słoneczne.
•Jeśli pilot ma nie być używany przez dłuższy czas, należy wyjąć z
niego baterię. Przechowywać w chłodnym, ciemnym miejscu.
• Istnieje niebezpieczeństwo wybuchu w przypadku, gdy
baterie zostaną nieprawidłowo założone. Baterie należy
wymieniać na takie same lub na baterie równorzędnego
typu, zalecane przez producenta.
•Zużyte baterie należy odpowiednio zutylizować. Właściwą
metodę powinny wskazać władze lokalne.
Android, Google Play oraz Chrome są znakami handlowymi firmy
Google Inc.
DLNA, the DLNA Logo and DLNA CERTIFIED are trademarks,
service marks, or certification marks of the Digital Living Network
Alliance.
Logo Wi-Fi CERTIFIED jest znakiem zgodności z normą Wi-Fi
Alliance.
Wi-Fi Protected Setup jest znakiem towarowym stowarzyszenia
Wi-Fi Alliance.
“Wi-Fi”, “Wi-Fi Protected Setup”, “WPA” i “WPA2” są znakami
towarowymi lub zastrzeżonymi znakami towarowymi
stowarzyszenia Wi-Fi Alliance.
Technologia kodowania dźwięku MPEG Layer-3 na licencji firmy
Fraunhofer IIS i Thomson.
Nazwa marki Bluetooth® i logotypy są własnością firmy Bluetooth
SIG, Inc. I wszelkie ich użycie przez firmę Panasonic Corporation
jest objęte licencją.
Pozostałe znaki towarowe i nazwy handlowe są własnością ich
posiadaczy.
Windows jest znakiem towarowym lub zarejestrowanym znakiem
towarowym firmy Microsoft Corporation w St anach Zjednoczonych
i w innych krajach.
Spis treści
Środki ostrożności .......................................... 2
Dostarczone wyposażenie .............................. 3
Konserwacja..................................................... 3
Przygotowanie pilota zdalnego sterowania
Podłączenie ......................................................3
Rozmieszczenie głośników............................. 4
Opis elementów sterowania ........................... 4
Wsadzanie nośników....................................... 5
Informacje o nośnikach................................... 5
Ustawienia sieci ............................................... 6
Używanie AirPlay z głośnikami systemu....... 9
Odtwarzanie plików muzycznych na serwerze DLNA.... 10
Operacje Bluetooth®...................................... 11
Informacje o Bluetooth
Operacje odtwarzania nośników ..................12
Radio............................................................... 13
Zegar i timer ...................................................13
Efekty dźwiękowe ..........................................14
Korzystanie z wejścia dodatkowego............ 14
Inne .................................................................14
Rozwiązywanie problemów .......................... 16
Dane techniczne ............................................ 18
“Made for iPod”, “Made for iPhone” oraz “Made for iPad” oznacza,
że urządzenie elektroniczne zostało specjalnie zaprojektowane do
współpracy odpowiednio z urządzeniem iPod, iPhone lub iPad i
spełnia normy wydajności firmy Apple.
Firma Apple nie jest odpowiedzialna za działanie tego urządzenia i
jego zgodność z normami bezpieczeństwa oraz innymi przepisami.
Używanie niniejszego urządzenia z urządzeniem iPod, iPhone lub
iPad może wpływać na wydajność pracy bezprzewodowej.
AirPlay, logo AirPlay, iPad, iPhone, iPod, iPod classic, iPod nano i
iPod touch są znakami towarowymi Apple Inc., zarejestrowanymi
w Stanach Zjednoczonych i innych krajach.
App Store jest znakiem usługowym firmy Apple Inc.
®
................................ 11
................. 3
Page 21
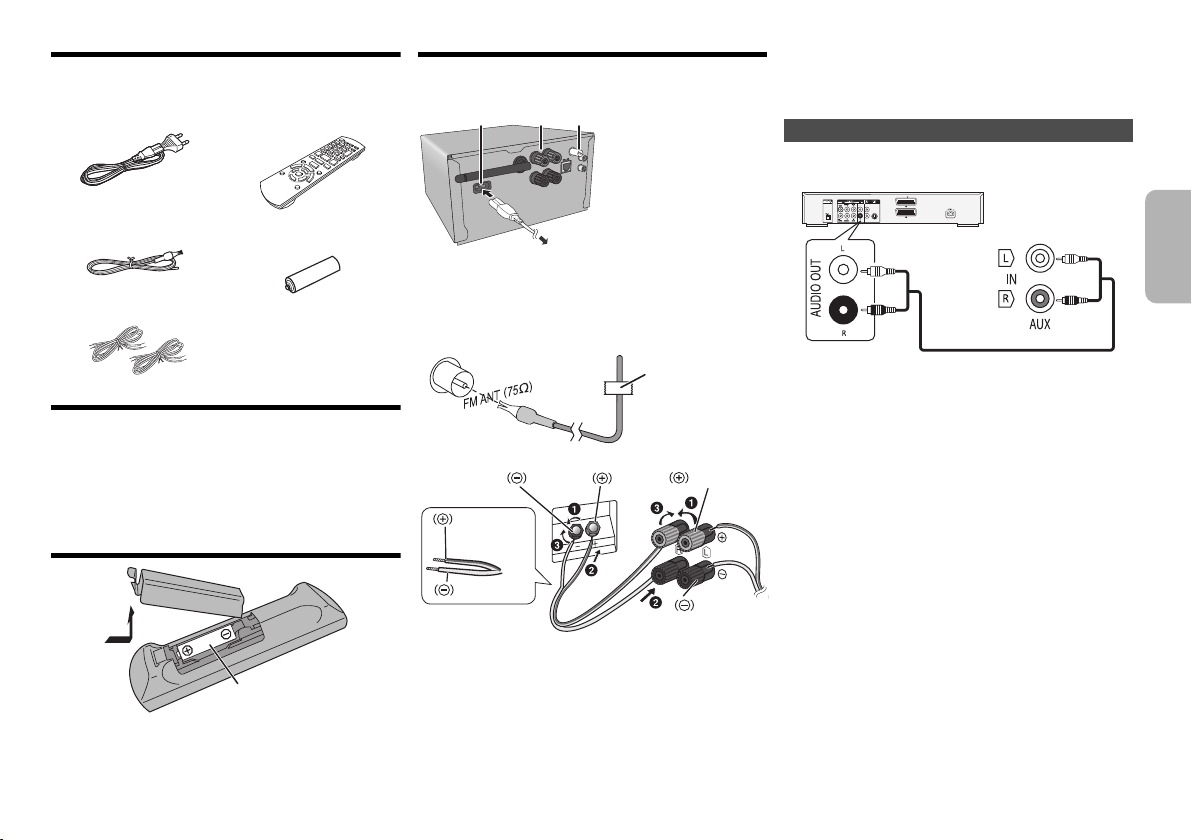
Dostarczone wyposażenie
R6/LR6, AA
2
1
3
Do domowego gniazdka zasilającego
Ta śma klejąca
(nie należy do
wyposażenia)
Czarny
Czerwony
Czarny
Czerwony
Kabel z
czerwoną
kreską
Odtwarzacz DVD (nie należy do wyposażenia)
Tylny panel
urządzenia głównego
Przewód audio (nie należy do wyposażenia)
Sprawdzić i znaleźć poszczególne elementy
dostarczonego wyposażenia.
1 x Przewód zasilania 1 x
1 x
Antena wewnętrzna FM
Pilot zdalnego sterowania
(N2QAYB000896)
1 x Bateria do pilota
zdalnego sterowania
Podłączenie
Nie należy podłączać przewodu zasilania przed
zakończeniem ustalania wszystkich innych połączeń.
2
3
1
Oszczędzanie energii
System zużywa około 0,4 W energii w trybie spoczynku. Gdy
system nie jest używany, należy go odłączać od zasilania.
Niektóre ustawienia zostaną utracone po odłączeniu
systemu. Trzeba będzie je wprowadzić ponownie.
Podłączanie innych urządzeń
Można podłączyć odtwarzacz VCR, DVD itp.
2 x Kable głośnikowe
Konserwacja
• Aby wyczyścić urządzenie główne, wytrzyj je miękką,
suchą ściereczką.
• Aby wyczyścić głośniki, wytrzyj je gładką i suchą
ściereczką, taką jak ściereczka z mikrofibry.
• Do czyszczenia urządzenia nie należy stosować
alkoholu, rozcieńczalnika ani benzyny.
• Przed użyciem chusteczki nasączonej środkiem chemicznym należy
zapoznać się z dołączoną do niej instrukcją.
Przygotowanie pilota zdalnego sterowania
•Należy stosować baterie alkaliczne lub manganowe.
•Załóż baterię tak, aby jej bieguny (+ i –) były zgodne z oznaczeniami
wewnątrz obudowy pilota zdalnego sterowania.
• Ustaw pilota w kierunku czujnika zdalnego sterowania, tak
aby nie było między nimi żadnych przeszkód, w odległości
nie większej niż 7 metrów od przedniej strony urządzenia,
pod kątem do ok. 30° w lewo lub prawo.
1 Podłącz antenę wewnętrzną FM.
Antenę należy zainstalować w miejscu zapewniającym
najlepszy odbiór.
•Jeśli odbiór sygnałów radiowych jest słaby, użyj
zewnętrznej anteny FM.
2 Podłącz głośniki.
Uważaj, aby nie krzyżować (zwierać) lub odwracać
polaryzacji przewodów głośnikowych, gdyż można
w ten sposób uszkodzić głośniki.
•Podłącz kabel z czerwoną kreską do czerwonego
wejścia (r).
3 Podłącz przewód zasilania.
Nie stosować przewodów zasilania, pochodzących z
innych urządzeń.
Uwaga:
• Przed podłączeniem urządzenia należy odłączyć przewód
zasilania.
•Wyłącz cały sprzęt i przeczytaj odpowiednie instrukcje
obsługi.
• Podzespoły i przewody są sprzedawane oddzielnie.
• Aby podłączyć urządzenia innego typu niż opisane w tej
instrukcji, skonsultuj się ze sprzedawcą.
• W przypadku korzystania z przejściówek, może dojść do
zniekształcenia dźwięku.
•Więcej informacji o podłączaniu kabla LAN znajduje się na
stronie 6.
POLSKI
VQT4Z21
3
21
Page 22
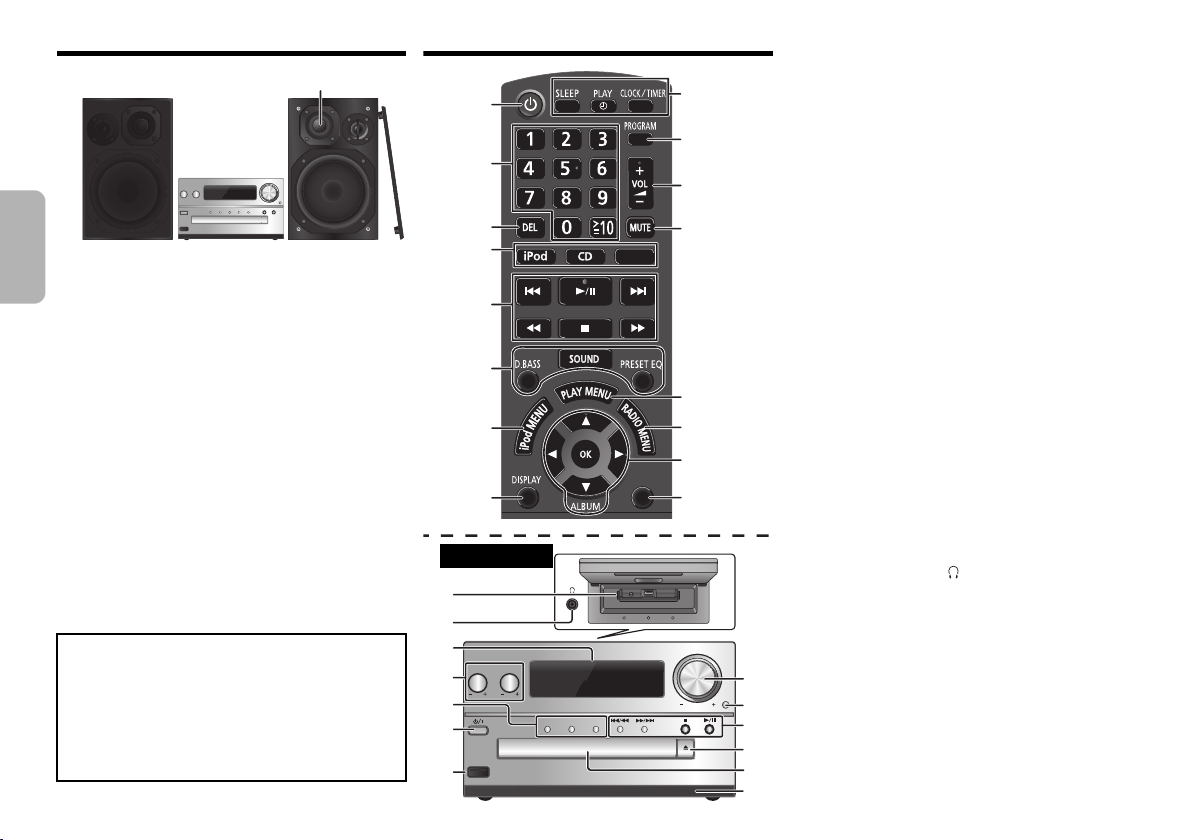
Rozmieszczenie głośników
Wysokotonowy
17
18
21
22
23
6
11
5
OPEN/CLOSE
D.BASS
VOLUME
SELECTORCDiPod
BASS TREBLE
iPad
19
20
6
4
1
1
2
3
4
5
6
7
8
9
10
11
12
13
14
15
16
SETUP
SELECTOR
Widok od góry
Ustaw kolumny w taki sposób, aby głośniki wysokotonowe były
skierowane do środka. W przypadku zdjęcia maskownic należy
POLSKI
uważać, żeby nie dotykać kopułek głośników, ponieważ może to
spowodować ich uszkodzenie.
Prosimy używać tylko zestawów głośnikowych
znajdujących się w wyposażeniu.
Najlepszą jakość dźwięku można uzyskać
poprzezstosowanie zestawów głośnikowych z
urządzeniem, do którego są przeznaczone. Użycie innych
zestawów głośnikowych grozi uszkodzeniem urządzenia i
pogorszeniem jakości dźwięku.
Uwaga:
• Aby zapewnić odpowiednią wentylację, należy zachować
przynajmniej 10 mm odstępu między zestawami
głośnikowymi a urządzeniem głównym.
• Zestawy głośnikowe należy ustawić na płaskim, stabilnym podłożu.
• Niniejsze zestawy głośnikowe nie mają ekranu magnetycznego. Nie
należy ich umieszczać w pobliżu odbiorników telewizyjnych,
komputerów ani innych urządzeń wrażliwych na oddziaływanie pola
magnetycznego.
•Długotrwałe odtwarzanie przy dużym poziomie głośności może
spowodować uszkodzenie systemu i skrócić jego żywotność.
• Aby uniknąć uszkodzenia urządzenia, w następujących
przypadkach należy zmniejszyć głośność:
- Podczas odtwarzania zniekształconych dźwięków.
- Podczas regulacji brzmienia dźwięku.
UWAGA!
• Zestawów głośnikowych należy używać wyłącznie z
zalecanym systemem. W przeciwnym wypadku może
dojść do uszkodzenia wzmacniacza,zestawów
głośnikowych i do pożaru.
W przypadku uszkodzenia urządzenia lub nagłej
zmiany wjakości odtwarzania należy zwrócić się po
VQT4Z21
radę do wykwalifikowanego specjalisty.
• W celu podłączenia zestawów głośnikowych należy
4
zastosować procedury opisane w niniejszej instrukcji.
22
Opis elementów sterowania
1 Przełącznik gotowości/włączania [Í], [Í/I]
Naciśnij ten przycisk, aby wyłączyć urządzenie (przełączyć je
w stan gotowości) lub włączyć je z powrotem. W stanie
gotowości urządzenie nadal pobiera pewną niewielką moc.
2 Przyciski numeryczne [1 do 9, 0, S10]
Aby wybrać 2-cyfrowy numer
Przykład: 16: [S10]
3 Usuwanie zaprogramowanej ścieżki
4 Wybór źródła dźwięku
[iPod]: “iPod_Dock” ,. “iPod_Port” / “USB”
[CD]: “CD”
[SELECTOR]:
> [1] > [6]
“CD” ----------------. “BLUETOOTH” ----------------. “FM”
^-
“iPod_Port” / “USB”
5 Podstawowe elementy sterowania odtwarzaniem
6 Wybór charakterystykę dźwięku
7 Wyświetlenie menu urządzenia iPod
8 Wyświetl zawartość
9 Funkcja zegara lub timera
10 Ustawianie funkcji programu
11 Regulacja głośności systemu
12 Wyciszanie dźwięku
Ponownie naciśnij przycisk, aby anulować wybór.
“MUTE” można wyłączyć również przez regulowanie
głośności lub wyłączając system.
13 Ustawienia elementów menu odtwarzania
14 Ustawienia elementów menu radia
15 Wybór opcji
16 Wyświetlanie menu ustawień
17 “iPod_Dock” dla iPod/iPhone
18 Gniazdo słuchawek ()
• Typ wtyku: o úrednicy Ø 3,5 mm, stereo
(nie naleýy do wyposaýenia)
•Należy unikać długot
zapobiec uszkodzeniu słuchu.
• Nadmierne ciśnienie akustyczne dźwięku
wydobywającego się ze słuchawek czy słuchawek
nagłownych może powodować utratę słuchu.
•Głośne słuchanie przez dłuższy okres czasu może
doprowadzić do uszkodzeń w uchu wewnętrznym.
19 Wyświetlacz
20 “iPod_Port” dla iPod/iPhone/iPad i urządzeń USB
21 Otwieranie lub zamykanie kieszeni napędu płyt
22 Kieszeń napędu płyt
23 Czujnik zdalnego sterowania
(
“iPod_Dock”
rwałego słuchania, aby
(
“AUX”
(b
Page 23
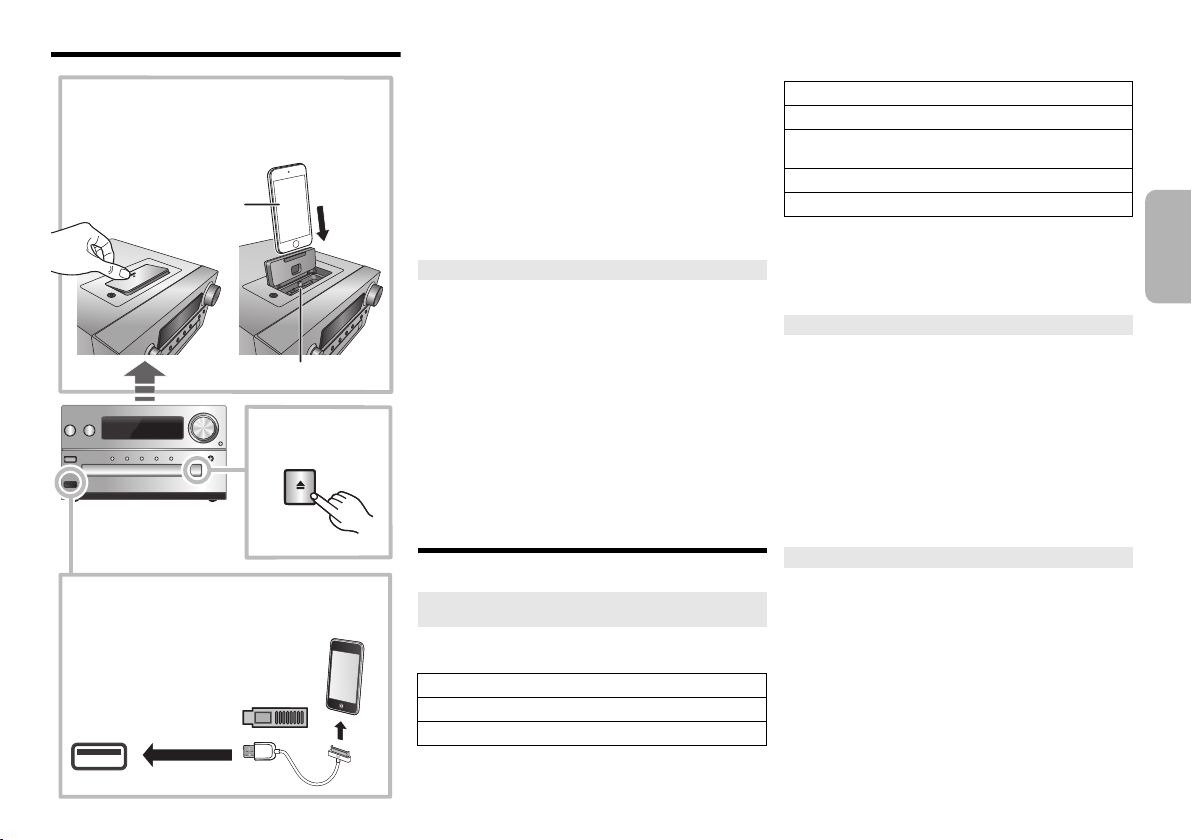
Wsadzanie nośników
iPad
OPEN/CLOSE
iPod/iPhone
(nie należy do
wyposażenia)
Złącze Lightning
Wybór “iPod_Dock” jako źródła
Otwórz pokrywę i podłącz urządzenie iPod/iPhone
poprzez złącze Lightning.
Wybór “iPod_Port” jako źródła
“USB” wyświetla się, gdy podłączono
kompatybilne USB urządzenie.
• Nie należy podłączać następujących
modeli urządzeń:
iPod classic, iPod [4. (wyświetlanie
kolorów) i 5. (video) generacji],
iPod nano (1. generacji)
Możliwe nieoczekiwane
działanie urządzenia.
Wybór “CD” jako
źródła
“iPod_Dock” (Przy korzystaniu ze złącza Lightning):
• Upewnij się, że iPod/iPhone jest wsadzony do końca i
że jego tylna część oparta jest o poduszeczkę.
•Pamiętaj o wyjęciu urządzenia iPod/iPhone z futerału.
•Zwróć uwagę na prawidłową pozycję urządzenia iPod/
iPhone przy podłączaniu do gniazda.
“iPod_Port”:
• Korzystając z urządzenia iPod/iPhone/iPad, używaj
dedykowanego kabla USB (
•Włóż urządzenie USB bezpośrednio. Nie używaj kabla
przedłużającego USB.
• Przed wyjęciem urządzenia USB wybierz źródło inne
USB
”.
niż “
Taca płyty:
• Wyjmuj płyty CD tylko kiedy przestaną się obracać.
nie należy do wyposażenia
).
Ładowanie iPod/iPhone/iPad
Ładowanie rozpocznie się kiedy iPod/iPhone/iPad
zostanie podłączony do systemu.
• Podczas pracy w trybie oczekiwania, ładowanie nie
zostanie rozpoczęte od połączenia “iPod_Port” rozpocznie się jak zwykle od połączenia “iPod_Dock”.
- Aby rozpocząć ładowanie od połączenia “iPod_Port”,
rozpocznij ładowanie przed przełączeniem urządzenia w
tryb oczekiwania.
•Stan ładowania akumulatora sprawdzić można na
wyświetlaczu urządzenia iPod/iPhone/iPad.
•Jeżeli urządzenie iPod/iPhone/iPad nie będzie
używane przez dłuższy czas, po ukończeniu
ładowania należy je odłączyć.
• Ładowanie zatrzyma się po całkowitym naładowaniu
baterii. Poziom naładowania będzie spadał w naturalny
sposób.
Informacje o nośnikach
•Należy mieć na uwadze, że firma Panasonic nie
ponosi odpowiedzialności za utratę danych.
Zgodne urządzenia iPod/iPhone/iPad (stan na
styczeń 2013)
Kompatybilne z połączeniem “iPod_Dock”
(Przy korzystaniu ze złącza Lightning)
iPod touch (5. generacji)
iPod nano (7. generacji)
iPhone 5
Kompatybilne z połączeniem “iPod_Port”
[Przy korzystaniu z dedykowanego kabla USB (nie
należy do wyposażenia)]
iPod touch (1., 2., 3., 4. i 5. generacji)
iPod nano (2., 3., 4., 5., 6. i 7. generacji)
iPhone 5 / iPhone 4S / iPhone 4 / iPhone 3GS /
iPhone 3G / iPhone
iPad (3. i 4. generacji) / iPad 2 / iPad
iPad mini
Uwaga:
• Zgodność zależy od wersji oprogramowania. Przed
użyciem w niniejszym urządzeniu zaktualizuj
oprogramowanie urządzenia iPod/iPhone/iPad.
•Należy zapoznać się z Instrukcją obsługi urządzenia
iPod/iPhone/iPad.
Obsługiwane urządzenia USB
•Urządzenia USB obsługujące protokół transferu Bulk-Only.
Uwaga:
•Pliki są zdefiniowane jako utwory i foldery są zdefiniowane jako album.
• Utwory powinny mieć rozszerzenie “.mp3”, “.MP3”, “.flac”
lub “.FLAC”.
•Urządzenie może odtwarzać do:
- 255 albumów (włącznie z folderem nadrzędnym)
- 2500 utworów
- 999 utworów w jednym albumie
• CBI (ang. Control/Bulk/Interrupt) nie jest obsługiwany.
• Niektóre pliki mogą nie być obsługiwane z powodu
wielkości sektora.
• System plików NTFS nie jest obsługiwany (obsługiwany
jest wyłącznie system plików FAT16/FAT32).
Obsługiwane płyty CD
• System pozwala na odtwarzanie plików w formacie
CD-DA lub MP3 z nośników CD-R/RW.
•Płyty muszą być zgodne z normą ISO9660 level 1 lub
2 (z wyjątkiem formatów z rozszerzeniem).
Uwaga:
• Niektóre płyty CD-R/RW mogą nie być odtwarzane z
powodu złego stanu nagrania.
• Pliki MP3 są zdefiniowane jako utwory i foldery są
zdefiniowane jako album.
•Urządzenie może odtwarzać do:
- CD-DA: 99 utworów
- MP3: 999 utworów, 255 albumów (z folderem
nadrzędnym włącznie) i 20 sesji
• Nagrania nie zawsze odtwarzane są w kolejności
nagrywania.
POLSKI
VQT4Z21
5
23
Page 24

Ustawienia sieci
Kabel LAN
(
nie należy do
wyposażenia
)
Router sieci szerokopasmowej, itp.
np.
Router bezprzewodowy itp.
np.
Czy Twój router sieci bezprzewodowej
obsługuje WPS?
Tak
l
7,
“Metoda 1”
l 7,
“Metoda 2”
l 7,
“Metoda 3”
Nie / Nie wiem
Tak Ni e
Czy korzystasz z urządzeń
iPod touch/iPhone/iPad?
Czy posiadasz wersję systemu iOS 5.0 lub
późniejszą?
Można przesyłać strumieniowo muzykę z urządzenia z
systemem iOS (iPhone, iPod, iPad), systemem
Android™ lub komputera Mac/PC do głośników tego
systemu za pomocą funkcji AirPlay lub DLNA.
Aby korzystać z tych funkcji, system musi być
podłączony do tej samej sieci, co urządzenie zgodne z
AirPlay (> 9) lub zgodne z DLNA.
•Możliwe jest również korzystanie z AirPlay bez routera
sieciowego. (> 10, “Bezpośrednie strumieniowanie do
systemu (AirPlay)”)
•Przełączenie pomiędzy przewodowym połączeniem LAN a
bezprzewodowym połączeniem LAN może spowodować
inicjalizację ustawień połączenia. W takim wypadku należy
wprowadzić ustawienia ponownie.
• W celu uzyskania stabilnego połączenia z siecią zaleca się
stosowanie przewodowego połączenia LAN.
POLSKI
Połączenie sieci przewodowej
Standardowo samo podłączenie kabla LAN
spowoduje zakończenie konfiguracji ustawień.
• Do podłączania urządzeń peryferyjnych należy używać
prostych kabli sieciowych (STP) kategorii 5 lub wyższej.
•Włożenie do złącza LAN jakichkolwiek innych kabli,
oprócz kabla LAN może uszkodzić urządzenie.
•Podłączenie kabla LAN spowoduje anulowanie
ustawień sieci bezprzewodowej.
Można zmieniać pojedyncze ustawienia sieciowe.
Jeśli domowa sieć bezprzewodowa została skonfigurowana
j
w celu stosowania konkretnych adresów IP, maski podsieci,
domyślnej bramki, podstawowego DNS itp.
jJeśli chcesz zmienić nazwę tego systemu,
wyświetlaną jako głośniki AirPlay lub urządzenie
renderujące DLNA.
1Podłącz urządzenie bezpośrednio do komputera przy pomocy
kabla LAN, przy odłączonym przewodzie zasilania.
2Podłącz przewód zasilania do urządzenia i uruchom system.
3
Po tym jak na wyświetlaczu pojawi się
sprawdzić adres IP urządzenia.
4Naciśnij kilkakrotnie [SETUP] na pilocie zdalnego sterowania,
aby wybrać “Net Setup”, a następnie naciśnij [OK].
5Naciśnij kilkakrotnie [SETUP] na pilocie, aby wybrać
“Manual”, a następnie naciśnij [OK].
6 Podczas, gdy “Setting” miga na wyświetlaczu, uruchom
przeglądarkę internetową na komputerze i w pasku
adresu wpisz adres IP urządzenia sprawdzony w kroku
3, a następnie wyświetl stronę konfiguracji.*
7 Wybierz i wprowadź szczegółowe ustawienia.
8 Wybierz “JOIN”, aby zastosować ustawienia.
9 Konfiguracja zostanie zakończona, gdy na ekranie
zostanie wyświetlone “Success”.
10 Wyłącz urządzenie główne i odłącz przewód zasilania.
11 Przeprowadź “Połączenie sieci przewodowej”. (> lewy)
*W zależności od otoczenia, może potrwać kilka minut zanim w
przeglądarce wyświetlona zostanie strona konfiguracji. W
takim wypadku, uruchom komputer ponownie.
“”,
(> 15, “Adres IP/MAC”)
należy
Przygotowanie
•Umieść system możliwie blisko routera sieci bezprzewodowej.
•Odłącz kabel LAN.
• Ustaw antenę znajdującą się z
tyłu urządzenia głównego w
sposób przedstawiony na
ilustracji.
• Nie należy:
- Przechylać anteny do przodu lub
tyłu kiedy jest skierowana do góry
-Używać siły do zmiany kierunku
ustawienia anteny
- Przenosić urządzenia, trzymając za antenę
1 Włącz system.
2 Wykonaj kroki opisane na poniższym diagramie i
wybierz metodę ustawienia sieci.
VQT4Z21
6
24
1
Podłącz urządzenie do routera szerokopasmowego lub
2 Podłącz przewód zasilania do urządzenia i
• Kabel LAN można podłączać lub odłączać tylko przy
podobnego urządzenia przy pomocy kabla LAN, przy
odłączonym przewodzie zasilania.
uruchom system.
Urządzenie jest gotowe do użycia, gdy na
wyświetlaczu pojawi się “”.
odłączonym przewodzie zasilania.
Połączenie sieci bezprzewodowej
System posiada wbudowany moduł Wi-Fi
podłączony do routera bezprzewodowego.
®
i może zostać
Page 25

•Jeżeli chcesz zmienić ustawienia połączenia
bezprzewodowego z komputerem Mac/PC lub
chcesz zmienić ustawienia zaawansowane,
spróbuj “Metoda 4” na stronie 8.
• Aby anulować to ustawienie, naciśnij [Í], aby wyłączyć system.
• Jednoczesne korzystanie z innych urządzeń pracujących w
paśmie częstotliwości 2,4 GHz (kuchenki mikrofalowe, telefony
bezprzewodowe) może powodować przerwy w połączeniu.
• Aktualne informacje na temat kompatybilności używanego
routera sieci bezprzewodowego można znaleźć na stronie
http://panasonic.jp/support/global/cs/
(strona w języku angielskim).
Metoda 1
Jeśli router sieci bezprzewodowej obsługuje WPS
(Wi-Fi Protected Setup
TM
).
∫ Korzystanie z funkcji WPS PBC
Znak rozpoczynania WPS
Router sieci bezprzewodowej
kompatybilny z funkcją WPS
PBC może mieć takie
oznaczenie.
1 Naciśnij kilkakrotnie [SETUP] na pilocie zdalnego
sterowania, aby wybrać “Net Setup”, a następnie
naciśnij [OK]. *1
“With iPod” jest wyświetlone na wyświetlaczu.
2 Naciśnij kilkakrotnie [SETUP] na pilocie zdalnego
sterowania, aby wybrać “WPS Push”, a
następnie naciśnij [OK]. *1
“WPS” miga na wyświetlaczu.
• Wykonaj krok 3 w ciągu 2 minut.
3 Po wyświetleniu “WPS”, naciśnij przycisk WPS
na routerze sieci bezprzewodowej.
4 Konfiguracja zostanie zakończona, gdy na
ekranie zostanie wyświetlone “Success”.
“” jest wyświetlone na wyświetlaczu.
“Fail” może się pojawić, jeżeli połączenie nie zostanie
nawiązane w ustawionym limicie czasowym. Jeżeli
dalej wyświetlone jest “Fail”, spróbuj innych metod
opisanych na stronie 7 lub 8.
5
Naciśnij przycisk [OK] na pilocie, aby wyjść z menu ustawień.
• System można również ustawić przy użyciu kodu PIN WPS.
(przed rozpoczęciem zapoznaj się z informacjami
szczegółowymi na temat sposobu wprowadzania kodu PIN,
zawartymi w instrukcji obsługi routera sieci bezprzewodowej).
1Naciśnij kilkakrotnie [SETUP] na pilocie zdalnego sterowania,
aby wybrać “Net Setup”, a następnie naciśnij [OK]. *2
2Naciśnij kilkakrotnie [SETUP] na pilocie zdalnego sterowania,
aby wybrać “WPS PIN”, a następnie naciśnij [OK]. *2
3 Wprowadź kod PIN do routera sieci bezprzewodowego.
*1 Zamiast tego wykonaj poniższy krok.
Naciśnij i przytrzymaj przez 2 sekundy przycisk [D.BASS] urządzenia,
przytrzymując jednocześnie przycisk [
*2 Zamiast tego wykonaj poniższy krok.
1
Naciśnij i przytrzymaj przez 2 sekundy przycisk [D.BASS]
urządzenia, przytrzymując jednocześnie przycisk [
urządzeniu głównym.
2 Kiedy wyświetlony zostanie komunikat “WPS” naciśnij i
przytrzymaj przez 2 sekundy przycisk [D.BASS], ponownie
przytrzymując jednocześnie przycisk [
∫
] na urządzeniu głównym.
∫
] urządzenia.
∫]
na
Metoda 2
Jeżeli korzystasz z urządzeń: iPod touch/iPhone/iPad.
(wersja systemu iOS 5.0 lub późniejsza)
Dzięki tej metodzie będziesz w stanie dzielić ustawienia sieci
bezprzewodowej swojego iPod touch/iPhone/iPada z systemem.
• W poniższych objaśnieniach wykorzystano telefon iPhone.
1 Odłącz urządzenia iPod/iPhone/iPad podłączone
do urządzenia głównego.
2 Podłącz iPhone do swojej domowej sieci
bezprzewodowej.
3 Podłącz iPhone do urządzenia głównego.
4 Naciśnij kilkakrotnie [SETUP] na pilocie zdalnego
sterowania, aby wybrać “Net Setup”, a następnie
naciśnij [OK].
“With iPod” jest wyświetlone na wyświetlaczu.
5 Odblokuj iPhone a następnie naciśnij przycisk
[OK] na pilocie.
“Connecting Wi-Fi” jest wyświetlone na wyświetlaczu.
•Jeżeli wyświetlone jest “Not Supported” lub “Set Wi-Fi”,
sprawdź, czy iPhone jest podłączone jest do sieci
bezprzewodowej i wykonaj ponownie czynności od kroku 1.
6 Wiadomość wyświetli się a Twoim iPhone.
Zezwól, by iPhone dzielił ustawienia sieci
bezprzewodowej.*
1
7 Konfiguracja zostanie zakończona, gdy na
ekranie zostanie wyświetlone “Success”.
“ ” jest wyświetlone na wyświetlaczu.
Jeżeli wyświetlone jest “Fail”, naciśnij [OK] i spróbuj
ponownie. Jeżeli dalej wyświetlone jest “Fail”, spróbuj
innych metod opisanych na stronie 7 lub 8.
•Jeżeli iPhone rozłączono w trakcie trwania procesu,
spróbuj ponownie bez przerywania połączenia.
8 Naciśnij przycisk [OK] na pilocie, aby wyjść z menu
ustawień.
*1: W zależności od środowiska sieciowego lub ustawień
routera sieci bezprzewodowej do ukończenia ustawień
może być potrzebne ponad 10 minut.
Metoda 3
Ustawianie połączenia sieciowego za pomocą
aplikacji na smartfony.
Można skonfigurować ustawienia sieci bezprzewodowej
za pomocą aplikacji “Panasonic Stereo System Network
Setup” (dostępna za darmo).
Jeśli używane jest urządzenie z systemem Android,
należy pobrać aplikację z serwisu Google Play™.
Natomiast w przypadku urządzeń iPod touch, iPhone lub
iPad należy ją pobrać z serwisu App Store.
Przygotowanie
•Podłącz smartfon do domowej sieci bezprzewodowej.
•Sprawdź hasło do domowej sieci bezprzewodowej.
1 Naciśnij kilkakrotnie [SETUP] na pilocie, aby
wybrać “Net Setup”, a następnie naciśnij [OK].
“With iPod” jest wyświetlone na wyświetlaczu.
2 Naciśnij kilkakrotnie [SETUP] na pilocie zdalnego
sterowania, aby wybrać “Manual”, a następnie
naciśnij [OK].
“Setting” miga na wyświetlaczu.
3 Uruchom aplikację “Panasonic Stereo System
Network Setup” na smartfonie i postępuj zgodnie
z instrukcjami wyświetlanymi na ekranie.
(Ciąg dalszy na następnej stronie)
POLSKI
VQT4Z21
7
25
Page 26

∫ Uwaga dla systemu iOS
Po wykonaniu kroku 3
1 Wprowadź hasło dla domowej sieci
bezprzewodowej, do której podłączone jest
urządzenie z systemem iOS.
2 Po wyświetleniu komunikatu o konieczności
podłączenia urządzenia iOS do tego systemu
naciśnij przycisk Home.
3 W ekranie wyboru sieci Wi-Fi w “Settings”, wybierz
“00 Setup _ _ _ _ _ _”.
• “ _ ” oznacza cyfrę unikalną dla każdego zestawu.
POLSKI
4 Gdy wyświetlony zostanie komunikat wskazujący na
zakończenie połączenia do tego systemu, wyłącz i
włącz ponownie aplikację.
Metoda 4
Konfiguracja połączenia sieciowego za pomocą
przeglądarki internetowej.
Metoda ta umożliwia dostęp do ustawień sieci
bezprzewodowej systemu za pośrednictwem
przeglądarki internetowej kompatybilnego urządzenia.
• W poniższych objaśnieniach wykorzystano telefon
iPhone.
1 Naciśnij kilkakrotnie [SETUP] na pilocie, aby
wybrać “Net Setup”, a następnie naciśnij [OK].
“With iPod” jest wyświetlone na wyświetlaczu.
2 Naciśnij kilkakrotnie [SETUP] na pilocie, aby
wybrać “Manual”, a następnie naciśnij [OK].
“Setting” miga na wyświetlaczu.
3 Gdy “Setting” miga na wyświetlaczu, podłącz
zgodne urządzenie do sieci bezprzewodowej
tego systemu (o nazwie “00 Setup _ _ _ _ _ _”).
• “ _ ” oznacza cyfrę unikalną dla każdego zestawu.
• Upewnij się, że protokół DHCP jest włączony dla
ustawienia sieci na kompatybilnym urządzeniu.
5 Wybierz “Search wireless network”.
6 Wybierz i wprowadź szczegółowe ustawienia.
• Sprawdź nazwę domowej sieci bezprzewodowej
(Network name (SSID)) oraz hasło dla tej sieci.
Informacje te są często umieszczane na routerze sieci
bezprzewodowej.
5 Gdy wyświetlony zostanie komunikat wskazujący na
zakończenie konfiguracji Wi-Fi systemu, zamknij
aplikację, a następnie sprawdź działanie AirPlay itp.
• “Panasonic Stereo System Network Setup” dla Mac OS
jest również dostępny w Mac App Store.
VQT4Z21
8
26
4 Uruchom przeglądarkę internetową na zgodnym
urządzeniu i wpisz “http://192.168.1.12/” w pasku
adresu URL, aby wyświetlić stronę.
Wyświetlone zostanie okno ustawień niniejszego
systemu.
•Przykłady przeglądarek internetowych
Urządzenie iOS/Mac: Safari
Urządzenie Android: Google Chrome™
Komputer PC: Windows Internet Explorer
[1] Wybierz nazwę domowej sieci
bezprzewodowej.*
1
[2] Wprowadź hasło.
7 Wybierz “JOIN”, aby zastosować ustawienia.
• Na ekranie wyskakującym wybierz “OK”, aby
kontynuować.
• Wybierz “Cancel”, aby powrócić do okna ustawień.
8 Konfiguracja zostanie zakończona, gdy na
ekranie zostanie wyświetlone “Success”.
“” jest wyświetlone na wyświetlaczu.
Jeśli pojawia się wskazanie “Fail”, naciśnij [OK].
Następnie sprawdź hasło sieci bezprzewodowej oraz
inne ustawienia i rozpocznij ponownie od kroku 1.
9
Upewnij się, że zgodne urządzenie zostało z powrotem
podłączone do domowej sieci bezprzewodowej.
*1: Jeśli sieć jest ustawiona jako niewidoczna, wybierz “BACK” i
zapoznaj się z rozdziałem “Alternatywne ustawienia”.
(> 9
)
Page 27

Zaawansowane ustawienia sieci
PMX9
np.
Aplikacja “Music”
iPhone iOS 6.0.1
PMX9
np. iTunes 11.0
• Poniższe ustawienia stanowią alternatywne lub dodatkowe
ustawienia dla “Metoda 4”. (> 8)
Alternatywne ustawienia
Zamiast kroków 5 i 6
Wybierz “Manual settings”.
1 Wprowadź nazwę domowej sieci
bezprzewodowej w polu “Network name (SSID)”.
2 Wybierz metodę szyfrowania z listy rozwijanej
“Security system”.
3 Wprowadź hasło w polu “Password”, a następnie
wybierz “JOIN”.
Dodatkowe ustawienia
Jeśli domowa sieć bezprzewodowa została skonfigurowana
w celu stosowania konkretnych adresów IP, maski podsieci,
domyślnej bramki, podstawowego DNS itp.
Przed wykonaniem kroku 7
Wybierz “Advanced network settings”.
{. Wprowadź wymagany adres w każdym z pól i wybierz
“JOIN”.
• Aby zmienić ustawienia z powrotem na DHCP, wybierz
“ON” z listy rozwijanej “DHCP”.
Jeśli chcesz zmienić nazwę tego systemu,
wyświetlaną jako głośniki AirPlay lub urządzenie
renderujące DLNA.
Przed wykonaniem kroku 5
Wybierz “Additional settings”.
1 Wybierz “Edit STEREO SYSTEM name”.
2 Wprowadź nową nazwę w polu
“STEREO SYSTEM name”.
{. Można wprowadzać wyłącznie znaki ASCII.
3 Wybierz “OK”.
4 Jeżeli system jest już podłączony do domowej
sieci bezprzewodowej:
– Wybierz “Additional settings”, a potem wybierz
“Exit”.
Jeżeli system nie jest podłączony do domowej
sieci bezprzewodowej:
j Przejdź do kroku 5. w “Metoda 4”.
•Włącz obsługę Java i ciasteczek w ustawieniach
przeglądarki.
Używanie AirPlay z głośnikami systemu
Przygotowanie
•Zakończ konfigurację sieci. (> 6)
•Podłącz urządzenie z systemem iOS lub komputer
Mac/PC do tej samej sieci domowej co system.
1 Włącz system.
• Sprawdź, czy na wyświetlaczu jest wyświetlone
“”.
•Jeżeli nie jest wyświetlone, sprawdź ustawienia
sieci. (> 6)
2 urządzenie iOS: Rozpocznij aplikację “Music”
(lub iPod)
Mac/PC: Rozpocznij “iTunes”.
•Jeśli używasz aplikacji Music w urządzeniu iOS,
wybierz plik audio, który chcesz odtworzyć.
3 Wybierz “Panasonic PMX9 _ _ _ _ _ _”*
AirPlay .
{. Przed rozpoczęciem odtwarzania sprawdź ustawienia
głośności (gdy funkcja AirPlay jest używana po raz
pierwszy, ustawienie głośności może być
maksymalne).
1, 2
z ikony
4 Rozpocznij odtwarzanie.
• Odtwarzanie rozpocznie się z niewielkim opóźnieniem.
•Można ustawić, aby system włączał się automatycznie po
wybraniu go jako głośników wyjściowych.
(> 15, “Sieciowy tryb gotowości”)
• Odtwarzanie z innych źródeł dźwięku zostanie wstrzymane
i pierwszeństwo będzie miało odtwarzanie AirPlay.
• Zmiany poziomu głośności w urządzeniu iOS lub iTunes
będą miały zastosowanie do systemu (informacje na temat
wymaganych ustawień w iTunes znajdują się w iTunes
Help).
• W niektórych wersjach urządzeń z systemem iOS i
programu iTunes, ponowne uruchomienie odtwarzania
AirPlay będzie niemożliwe, jeżeli podczas odtwarzania
AirPlay zmieniono ustawienie przełącznika (np. “CD”) lub
wyłączono zestaw.
W takim przypadku wybierz inne urządzenie, klikając ikonę
AirPlay w Music App lub w programie iTunes, a następnie
ponownie wybierz ten system jako głośniki wyjściowe.
• AirPlay nie działa podczas odtwarzania plików wideo w
iT
unes.
*1: “ _ ” oznacza cyfrę unikalną dla każdego zestawu.
*2: Nazwę wyświetlaną dla systemu można zmienić w
ustawieniach “Edit STEREO SYSTEM name”.
(>
lewy, "Zaawansowane ustawienia sieci")
Kompatybilne z urządzeniami z
funkcją AirPlay
iOS 4.3.3 lub nowszy
iPod touch
3., 4. i 5. generacji
iPhone 5 / iPhone 4S / iPhone 4 / iPhone 3GS
iPad (3. i 4. generacji) / iPad 2 / iPad
iPad mini
iTunes 10.2.2 lub nowszy (Mac/PC)
(stan na styczeń 2013)
POLSKI
VQT4Z21
9
27
Page 28

Bezpośrednie strumieniowanie do
systemu (AirPlay)
Dzięki ustawieniu tej funkcji jako “On”, możesz
strumieniować muzykę z urządzenia z systemem iOS
lub komputera Mac/PC (iTunes 10.2.2 lub nowsza) na
główne urządzenie, bez podłączania z pomocą routera
sieciowego.
• Poprzednie ustawienia sieci zostaną usunięte po
ustawieniu tej funkcji jako “On”.
• W poniższych objaśnieniach wykorzystano telefon
iPhone.
1
Naciśnij kilkakrotnie [SETUP], aby wybrać “D.Connect”.
2 Naciśnij [2, 1], aby wybrać “On”, a następnie
naciśnij [OK].
POLSKI
3 Naciśnij [2, 1], aby wybrać “OK? Yes”, a
następnie naciśnij [OK].
Wyświetli się “PW _ _ _ _ _”*1.
5 cyfr po “PW” stanowi hasło dla tej sieci.
4
Podłącz swojego iPhone do sieci bezprzewodowej
systemu o nazwie “PMX9 _ _ _ _ _ _”*
PMX9
5
Wprowadź hasło wyświetlone na wyświetlaczu systemu.
2
.
6 Po podłączeniu iPhone do sieci bezprzewodowej
systemu, konfiguracja jest zakończona.
7 Przejdź do kroku 2 w “Używanie AirPlay z
głośnikami systemu”. (> 9)
• Ustawienie zmienione zostanie ponownie na “Off”, podczas
konfiguracji innych ustawień sieci. (> 6)
VQT4Z21
• Kiedy “D.Connect” ustawione jest jako “On”, system nie
będzie podłączony do Internetu. Nie będzie możliwe
10
aktualizowanie oprogramowania lub sprawdzanie siły
sygnału Wi-Fi.
28
• Kiedy AirPlay nie jest używane, odłącz urządzenie
kompatybilne z AirPlay od sieci.
• Kiedy korzystasz w tej sieci z komputera, upewnij się, że
wszystkie dzielone pliki są szyfrowane.
• Funkcja ta jest kompatybilna wyłączenia z metodą
autentykacji
metodą autentykacji “Shared Key”.
*1: “ _ ” oznacza cyfrę.
*2: “ _ ” oznacza cyfrę unikalną dla każdego zestawu.
“
Open System”. Nie jest kompatybilna z
Wyświetl hasło
Podczas pierwszego ustawienia “D.Connect” jako “On”
hasło sieci systemu zostanie utworzone losowo i
zapisane w pamięci systemu.
•Hasło zostanie zapisane do czasu, aż zostanie zmienione.
1
Kiedy “D.Connect” jest ustawione jako “On”:
Naciśnij [SETUP] kilkakrotnie i wybierz “D.Connect”.
2 Naciśnij [2, 1], aby wybrać “On”, a następnie
naciśnij [OK].
3 Wyświetlone jest aktualne hasło.
• 5 cyfr po “PW” stanowi hasło dla tej sieci.
4 Naciśnij dowolny klawisz, aby wyjść.
Zmień hasło
1
Kiedy “D.Connect” jest ustawione jako “Off”:
Naciśnij [SETUP] kilkakrotnie i wybierz “D.Connect”.
2 Naciśnij [2, 1], aby wybrać “Change PW”, a
następnie naciśnij [OK].
3 Naciśnij [2, 1], aby wybrać “OK? Yes”, a następnie
naciśnij [OK].
4 Wyświetlone jest nowe hasło.
• 5 cyfr po “PW” stanowi nowe hasło dla tej sieci.
5 Naciśnij dowolny klawisz, aby wyjść.
∫ Informacje na temat zmiany hasła
Po zmianie hasła sieci systemu, jeżeli nie zostanie
wyświetlony monit o zmianę hasła na innych
urządzeniach, należy wprowadzić następujące zmiany.
Urządzenie z systemem iOS (iPod touch/iPhone/iPad)
• Przed wybraniem sieci systemu,
*
1 Wybierz [ ] znajdujące się obok nazwy sieci
bezprzewodowej systemu.
2
Wybierz “Forget this Network”, a potem wybierz “Forget”.
3 Wybierz sieć bezprzewodową systemu i wprowadź
nowe hasło.
Mac/PC:
•Jeżeli na komputerze zapisane zostało stare hasło, zmień
zapamiętane hasło sieci systemu na nowe hasło.
•Więcej informacji znajduje się w instrukcji obsługi urządzenia.
*1:Kroki opisane w oparciu o system iOS 6.0.1.
Odtwarzanie plików muzycznych na
serwerze DLNA
Można udostępniać pliki muzyczne przechowywane na
atestowanym serwerze multimedialnym DLNA
(komputer PC z zainstalowanym systemem Windows 7,
smartfon itd.) podłączonym do sieci domowej i słuchać
muzyki na głośnikach tego systemu.
Przygotowanie
•Zakończ konfigurację sieci. (> 6)
•Podłącz urządzenie z oprogramowaniem zgodnym z
DMC (Digital Media Controller) do tej samej sieci
domowej, co ten system.
• Dodaj zawartość i folder do bibliotek programu
Windows Media
– Lista odtwarzania programu Windows Media® Player może
odtwarzać tylko zawartość zapisaną w bibliotekach.
®
Player lub smartfonu itp.
1 Włącz system.
•Sprawdź, czy na wyświetlaczu jest wyświetlone
“”.
•Jeżeli nie jest wyświetlone, sprawdź ustawienia
sieci. (> 6)
2 Obsługując urządzenie zgodne z DMC, podłącz je
do tego systemu.
• Nazwa tego systemu będzie wyświetlana jako
“Panasonic PMX9 _ _ _ _ _ _”*
•Więcej informacji o korzystaniu z urządzenia
zgodnego z DMC znajduje się w instrukcji obsługi
urządzenia lub oprogramowania.
∫
Formaty obsługiwane przez klientów DLNA
Nie można odtwarzać plików zapisanych w formatach,
które nie są obsługiwane przez używany serwer DLNA.
1
:
Kodek audio Przykładowe rozszerzenie pliku
MP3 .mp3
WAV .wav
FLAC .flac
•W zależności od zawartości i podłączonego urządzenia,
odtwarzanie może być niemożliwe.
*1: “ _ ” oznacza cyfrę unikalną dla każdego zestawu.
*2: Nazwę wyświetlaną dla systemu można zmienić w
ustawieniach “Edit STEREO SYSTEM name”.
(
>
9, “Zaawansowane ustawienia sieci”)
1, 2
.
Page 29

Operacje Bluetooth
Za pomocą połączenia Bluetooth® możesz
bezprzewodowo odtwarzać dźwięk Bluetooth
urządzenia audio z użyciem tego systemu.
Więcej informacji znajduje się w instrukcji obsługi
urządzenia Bluetooth
®
®
z
®
.
Parowanie Bluetooth® urządzeń
Przygotowanie
•Włącz funkcję Bluetooth
blisko systemu.
•Jeżeli system jest już podłączony do urządzenia
1 Naciśnij kilkakrotnie [SELECTOR], aby wybrać
2 Naciśnij [PLAY MENU], aby wybrać “New Device”,
3 Wybierz “SC-PMX9” w menu Bluetooth
4
Uwaga:
•
•
®
Bluetooth
Jeżeli wyświetli się komunikat proszący o klucz, wprowadź “0000”.
Można zarejestrować maksymalnie 8 urządzeń w tym systemie.
W przypadku sparowania dziewiątego urządzenia, urządzenie,
które było najdłużej nieużywane, zostanie zastąpione.
, odłącz go.
“BLUETOOTH”.
Jeżeli na wyświetlaczy wyświetlone jest “Pairing”,
przejdź do kroku 3.
a następnie naciśnij [OK].
“Pairing” jest wyświetlone na wyświetlaczu.
urządzeniu Bluetooth
Rozpocznij odtwarzanie na urządzeniu Bluetooth®.
Podłączanie sparowane urządzenie Bluetooth
Przygotowanie
•Włącz funkcję Bluetooth® w urządzeniu i umieść
urządzenie w pobliżu głośników.
•Jeżeli system jest już podłączony do urządzenia
1 Naciśnij kilkakrotnie [SELECTOR], aby wybrać
2 Wybierz “SC-PMX9” w menu Bluetooth
3
®
Bluetooth
, odłącz go.
“BLUETOOTH”.
“Ready” jest wyświetlone na wyświetlaczu.
urządzeniu Bluetooth
Nazwa sparowanego urządzenia wyświetlana jest na
ekranie przez 2 sekundy.
Rozpocznij odtwarzanie na urządzeniu Bluetooth®.
®
urządzenia i połóż urządzenie
®
®
.
®
.
w
®
®
w
Uwaga:
• Do systemu można podłączać tylko jedno urządzenie
jednocześnie.
•Jeżeli wybrano “BLUETOOTH” jako źródło, system
automatycznie spróbuje się połączyć z ostatnim
podłączonym Bluetooth
•Urządzenie Bluetooth
zostanie inne źródło dźwięku (np. “CD”).
tryb transmisji Bluetooth
Możesz zmienić szybkość transmisji, aby ustawić priorytet
jakości transmisji lub jakości dźwięku.
•Domyślne ustawienie to “Mode 1”.
• Aby polepszyć jakoś dźwięku, wybierz “Mode 2”.
Przygotowanie
•
Naciśnij kilkakrotnie [SELECTOR], aby wybrać “BLUETOOTH”.
•
Jeżeli urządzenie Bluetooth® jest już podłączone, rozłącz je.
®
urządzeniem.
®
zostanie odłączone, jeśli wybrane
®
1 Naciśnij kilkakrotnie [PLAY MENU], aby wybrać
“Link Mode”.
2 Naciśnij [2, 1], aby wybrać tryb, a następnie
naciśnij [OK].
Mode 1: Nacisk na jakość połączenia
Mode 2: Nacisk na jakość dźwięku
Poziom sygnału wejściowego Bluetooth
Jeżeli poziom sygnału wyjściowego transmisji Bluetooth
jest zbyt niski, zmień ustawienie poziomu sygnału
wyjściowego.
Przygotowanie
•Podłącz urządzenie Bluetooth
1 Naciśnij kilkakrotnie [PLAY MENU], aby wybrać
“Input Level”.
2 Naciśnij [2, 1], aby wybrać poziom, a następnie
naciśnij [OK].
“Level 0”
,. “Level i1” ,. “Level i2”
®
.
^--------------------------------------J
Uwaga:
≥ Wybierz “Level 0”, jeżeli dźwięk jest zniekształcony.
Odłączanie urządzenia Bluetooth
1 Kiedy urządzenie Bluetooth
Naciśnij [PLAY MENU], aby wybrać “Disconnect?”.
2 Naciśnij [2, 1], aby wybrać “OK? Yes”, a
następnie naciśnij [OK].
®
jest podłączone:
®
®
Informacje o Bluetooth
Firma Panasonic nie ponosi odpowiedzialności za
narażenie danych na zagrożenia podczas transmisji
bezprzewodowej.
Stosowane pasmo częstotliwości
• System wykorzystuje pasmo częstotliwości 2,4 GHz.
Certyfikacja tego urządzenia
• Zestaw podlega ograniczeniom dotyczącym częstotliwości i
ma odpowiedni certyfikat wydany na podstawie odpowiednich
przepisów. Nie ma więc konieczności uzyskiwania pozwolenia
na transmisję bezprzewodową.
• Poniższe działania są ścigane przez prawo w niektórych
krajach:
-Rozkładanie na części lub modyfikacja systemu.
- Usuwanie informacji dotyczących specyfikacji.
Ograniczenia użytkowania
• Nie gwarantuje się możliwości transmisji
bezprzewodowej i/lub stosowania ze wszystkimi
urządzeniami z technologią Bluetooth
• Wszystkie urządzenia muszą być zgodne z normami
określonymi przez Bluetooth SIG, Inc.
•W zależności od specyfikacji i ustawień urządzenia,
podłączenie może nie być możliwe lub niektóre operacje
mogą się różnić.
•
Zestaw obsługuje technologię bezpieczeństwa Bluetooth®.
Jednak w zależności od środowiska, w którym działa, oraz/lub
ustawień, bezpieczeństwo to może nie być wystarczające.
®
Podczas bezprzewodowej transmisji danych do zestawu
należy zachować ostrożność.
• Zestaw nie może przesyłać danych do urządzenia
Zasięg stosowania
•Używaj urządzenia w odległości maksymalnie 10 m.
Zakłócenia powodowane przez inne urządzenia
• W wyniku zakłóceń powodowanych przez inne Bluetooth®
•System może nie działać prawidłowo, jeżeli fale radiowe
Przeznaczenie
• System przeznaczony jest do użytku ogólnego.
• Nie należy używać tego zestawu w pobliżu urządzeń lub
®
Bluetooth
Zasięg może się zmniejszyć w zależności od otoczenia,
przeszkód lub zakłóceń.
urządzenie lub urządzenia, które korzystają z pasma
częstotliwości 2,4 GHz, znajdujące się w pobliżu systemu,
system może nie działać prawidłowo i mogą wystąpić
problemy takie jak hałas oraz przeskakiwanie dźwięku.
emitowane przez pobliską stację nadawczą itp. są zbyt
silne.
w środowisku wrażliwym na zakłócenia radiowe (np.
lotniska, szpitale, laboratoria itp.).
.
®
®
.
POLSKI
VQT4Z21
11
29
Page 30

Operacje odtwarzania nośników
Poniższe oznaczenia wskazują dostępność funkcji.
[CD]
:
Płyty CD Audio w formacie CD-DA oraz
[iPod]
[USB]
[AirPlay]
[Bluetooth]
Przygotowanie
•Włącz urządzenie.
• Wsadź nośnik lub podłącz urządzenie Bluetooth
urządzenie.
•Naciśnij [CD], [iPod] lub [SELECTOR], aby wybrać
POLSKI
źródło dźwięku.
Odtwarzanie podstawowe [CD] [iPod] [USB]
[AirPlay] [Bluetooth]
Odtwarzanie
Zatrzymanie
Pauza
Pomijanie
Szukanie
(Oprócz
[iPod]
Wyświetlenie menu
VQT4Z21
urządzenia iPod
[iPod]
12
Wybór elementu
30
płyty CD zawierające pliki MP3
:
Kompatybilne modele urządzeń iPod/iPhone/iPad
:
Urządzenia USB zawierające pliki MP3/
FLAC
:
Po podłączeniu do urządzenia z
technologią AirPlay. (> 9)
:
Podłącz urządzenie Bluetooth
Naciśnij [1/;].
Naciśnij [∫].
• [USB]: Odtwarzana ścieżka jest
zapamiętywana i wyświetlany jest
komunikat “Resume”. Punkt
odtwarzania przywracany jest do
początku ścieżki.
• [USB]:
Naciśnij dwukrotnie przycisk [∫]
aby całkowicie zatrzymać odtwarzanie.
Naciśnij [1/;].
Naciśnij ponownie, aby kontynuować
odtwarzanie.
Naciśnij [:] lub [9], aby pominąć utwór.
(urządzenie główne: [:/6] lub [5/9])
[CD] [USB]: Naciśnij [3] lub [4], aby
pominąć album MP3/FLAC.
Podczas odtwarzania lub po naciśnięciu pauzy,
[AirPlay]
)
naciśnij i przytrzymaj
(urządzenie główne: [:/6] lub [5/9])
• [iPod]: Wyszukiwanie do tyłu odbywa
się wyłącznie w obrębie aktualnie
odtwarzanej ścieżki.
[6]
Naciśnij [iPod MENU].
Naciśnij [
3, 4]
, następnie naciśnij [OK].
®
lub
[5]
Uwaga:
•W zależności od modelu (np. iPod nano 7. generacji), konieczne może
być wybranie albumu, artysty itp. w urządzeniu iPod/iPhone.
• Sposób obsługi może być różny, w zależności od modelu
urządzenia iPod/iPhone/iPad.
• Wyboru utworów można dokonywać poprzez naciskanie
przycisków numerycznych.
Przeglądanie dostępnych informacji
[CD] [USB] [Bluetooth]
Naciśnij [DISPLAY].
np. MP3 : Ścieżka : Album
Uwaga:
®
• Maksymalna liczba wyświetlanych znaków: około 32
•Urządzenie obsługuje etykiety w formacie 2.3 ID3.
• Dane tekstowe nieobsługiwane przez system mogą być
wyświetlane odmiennie.
.
TAG: Znaczniki ID3
Menu odtwarzania [CD] [USB] [AirPlay]*1
1 Naciśnij [PLAY MENU], aby wybrać “Repeat”,
“Random” lub “PLAYMODE”.
2 Naciśnij [2, 1], następnie naciśnij [OK], aby
wybrać żądany tryb.
[CD] [USB] Repeat
Off
1-Track
All
[AirPlay] Repeat
Sprawdź podłączone urządzenie, aby zweryfikować wybrane ustawienie.
[CD] [USB] Random
On
Off
[AirPlay] Shuffle
Sprawdź podłączone urządzenie, aby zweryfikować
wybrane ustawienie.
[CD] (MP3) [USB] PLAYMODE
All
1-Album
Uwaga:
•
Podczas odtwarzania w losowej kolejności nie można przejść do utworów
poprzednio odtworzonych lub naciśnij przyciski numeryczne.
• Funkcja trybu odtwarzania ta nie działa z włączoną opcją
“Programowanie odtwarzania”.
• [CD]
:
Otwarcie tacy płyty spowoduje przywrócenie
domyślnego ustawienia “Off”.
[AirPlay] : Wykonane ustawienia pozostaną aktywne do
momentu ich zmiany.
*1: [AirPlay] : Wykonaj ustawienia podczas odtwarzania.
Wybierz, aby anulować powtarzanie
odtwarzania.
Odtwarzanie tylko wybranej ścieżki.
•Wyświetli się “1TR, `”.
(Przechodzenie do żądanej ścieżki.)
Wszystkie ścieżki są powtarzane.
•Wyświetli się “`”.
Losowe odtwarzanie zawartości.
•Wyświetli się “RND”.
• “RND” nie zostanie wyświetlone,
jeżeli wybrano “1-Track”.
Losowe odtwarzanie jest wyłączone.
Odtwarzanie wszystkich plików MP3/
FLAC.
Odtwarzanie tylko wybranego albumu
MP3/FLAC.
•Wyświetli się “1ALBUM”.
Page 31

Programowanie odtwarzania [CD] [USB]
30min > 60min > 90min > 120min > Off
^---------------------------------------------------------------b
Ta funkcja pozwala zaprogramować do 24 utworów.
[CD] (CD-DA)
1 Naciśnij [PROGRAM] w trybie zatrzymanym.
Wyświetlony zostanie symbol “PGM”.
2 Za pomocą odpowiednich przycisków
numerycznych wybierz żądany utwór.
Aby zaprogramować nowe utwory, należy powtórzyć ten krok.
3 Naciśnij [1/;] aby rozpocząć odtwarzanie.
[CD] (MP3), [USB]
1 Naciśnij [PROGRAM] w trybie zatrzymanym.
Wyświetlony zostanie symbol “PGM”.
2 Naciśnij [3, 4], aby wybrać album.
3
Naciśnij [9], następnie za pomocą odpowiednich
przycisków numerycznych wybierz żądany utwór.
4 Naciśnij [OK].
Aby zaprogramować nowe utwory należy powtórzyć kroki od 2 do 4.
5 Naciśnij [1/;] aby rozpocząć odtwarzanie.
Anulowanie
odtwarzania
zaprogramowanych
utworów
Sprawdzić
zawartość
programu
Usunąć ostatni
zaprogramowany
utwór
Usunąć wszystkie
zaprogramowane
utwory
Uwaga:
•Pamięć programu zostanie skasowana po otworzeniu podajnika płyt.
Naciśnij [PROGRAM] w trybie
zatrzymanym.
Naciśnij [:] lub [9] gdy w trybie
zatrzymania odtwarzania wyświetlany
jest komunikat “PGM”.
Naciśnij [DEL] w trybie zatrzymanym.
W trybie zatrzymania naciśnij [∫].
Wyświetlony zostanie symbol “CLR All”. W
ciągu 5 sekund naciśnij ponownie [
Radio
Można zaprogramować 30 stacji FM.
Przygotowanie
Naciśnij kilkakrotnie [SELECTOR], aby wybrać “FM”.
Automatyczne programowanie
1
Naciśnij [RADIO MENU], aby wybrać “Auto Preset”.
2 Naciśnij [2, 1], aby wybrać “Lowest” (najniższą)
lub “Current” (aktualną) częstotliwość.
3 Naciśnij [OK], aby rozpocząć programowanie.
Aby anulować, naciśnij [∫].
Ręczne strojenie i programowanie stacji
1 Naciśnij [6] lub [5], aby dostroić radio do
żądanej stacji.
Aby uruchomić automatyczne strojenie, należy nacisnąć i
przytrzymać ten przycisk, do momentu, gdy wyświetlana
częstotliwość zacznie szybko się zmieniać.
2 Naciśnij [PROGRAM].
3 Wybierz żądaną zaprogramowaną stację
przyciskiem numerycznym.
Aby zaprogramować więcej stacji, wykonaj ponownie
kroki od 1 do 3.
Nowa stacja zastąpi wcześniej zaprogramowaną
znajdującą się pod tym samym numerem.
Wybieranie zaprogramowanej stacji
Naciśnij przyciski numeryczne, [:] lub [9]
(urządzenie główne: [:/6] lub [5/9]) aby
wybrać zaprogramowaną stację.
∫
].
Poprawy brzmienia dźwięku
1 Naciśnij kilkakrotnie [RADIO MENU], aby wybrać
“FM Mode”.
2 Naciśnij [2, 1], aby wybrać “Mono” następnie
naciśnij [OK].
Aby anulować, wybierz “Stereo”.
Tryb “Mono” jest również anulowany z chwilą zmiany
częstotliwości.
Zapamiętanie nastawy
Kontynuuj kroki 2 i 3 z “Ręczne strojenie i programowanie stacji”.
Odbiór RDS
System ten może wyświetlać dane tekstowe nadawane przez
rozgłośnie radiowe (RDS) dostępne w niektórych rejonach.
Naciśnij [DISPLAY].
PS Nazwa stacji
PTY Typ programu
FREQ Częstotliwość
Uwaga:
• Informacje RDS mogą być niedostępne, jeżeli odbiór jest słaby.
Zegar i timer
Ustawianie zegara
Jest to zegar 24-godzinny.
1 Naciśnij [CLOCK/TIMER], aby wybrać “CLOCK”.
2
W ciągu 10 sekund naciśnij [3,4] aby ustawić czas.
3 Naciśnij [OK].
Aby wyświetlić zegar na kilka sekund, naciśnij
[CLOCK/TIMER].
Uwaga:
• Zegar należy regularnie nastawiać, aby zawsze była
ustawiona dokładna godzina.
Timer wyłączający
Timer wyłącza system po upływie ustawionego czasu.
Naciśnij [SLEEP] kilkakrotnie, aby wybrać
ustawienie (w minutach).
Aby anulować, wybierz “Off”.
Aby wyświetlić pozostały czas
Naciśnij [SLEEP].
Uwaga:
• Timer wyłączający system może być używany łącznie z
timerem odtwarzania.
• Timer wyłączający ma zawsze priorytet. Należy pamiętać,
aby czasy timerów się nie nakładały.
POLSKI
VQT4Z21
13
31
Page 32

Timer odtwarzania
Timer można ustawić w taki sposób, aby o określonej
godzinie urządzenie włączało się i budziło użytkownika.
Przygotowanie
Ustaw zegar.
1 Naciśnij kilkakrotnie [CLOCK/TIMER], aby
wybrać “TIMER Adjust”.
2 W ciągu 8 sekund naciśnij [3, 4], aby ustawić
czas rozpoczęcia.
3 Naciśnij [OK].
4
Powtórz kroki 2 i 3, aby ustawić godzinę zakończenia.
POLSKI
Aby uaktywnić timer
1 Przygotuj wybrane źródło audio, które chcesz
odtworzyć, i ustaw głośność.
2 Naciśnij [F, PLAY].
Wyświetlony zostanie symbol “F”.
Aby wyłączyć, ponownie naciśnij [F, PLAY].
Aby timer działał, system musi być wyłączone.
Aby sprawdzanie ustawień
Naciśnij kilkakrotnie [CLOCK/TIMER], aby wybrać
“TIMER Adjust”.
Uwaga:
• Timer rozpoczyna odtwarzanie z niskim poziomem
głośności, który stopniowo rośnie do ustawionego poziomu.
•Jeśli timer jest aktywny, zadziała codziennie o ustawionej
godzinie.
• W przypadku wyłączenia systemu i włączenia go ponownie
podczas pracy timera, timer nie zatrzyma się z chwilą
upływu ustawionego czasu.
VQT4Z21
14
32
Efekty dźwiękowe
Zmiana brzmienia dźwięku
Naciśnij [SOUND], aby wybrać żądany efekt
1
dźwiękowy.
2 Naciśnij [2, 1], aby wybrać żądane ustawienie.
BASS
TREBLE
Surround “On Surround” lub “Off Surround”
Tylko poprzez urządzenie główne
Przekręć pokrętło [BASS] lub [TREBLE], aby
wyregulować poziom.
Zaprogramowany korektor (Preset EQ)
Naciśnij [PRESET EQ], aby wybrać jedno z ustawień.
Heavy Poprawa brzmienia rocka
Soft Muzyka w tle
Clear Czystsze brzmienie wysokich
Vocal Poprawa brzmienia śpiewu
Flat Wyłącza efekt dźwiękowy
D.BASS
Funkcja ta pozwala cieszyć się potężnym basem.
Naciśnij [D.BASS], aby wybrać “On D.BASS” lub
“Off D.BASS”.
-4 do +4
częstotliwości
Korzystanie z wejścia dodatkowego
Umożliwia podłączenie i odsłuch zewnętrznych źródeł
dźwięku, takich jak VCR, DVD itp.
Przygotowanie
Podłącz urządzenie zewnętrzne.
1 Naciśnij kilkakrotnie [SELECTOR], aby wybrać
“AUX”.
2 Uruchom odtwarzanie w urządzeniu
zewnętrznym.
Inne
Zmniejszanie jasności panelu wyświetlania
Naciśnij [SETUP], aby wybrać “Dimmer”.
1
2 Naciśnij [2, 1], aby wybrać “On”, a następnie
naciśnij [OK].
Uwaga:
• Aby anulować, wybierz “Off” w kroku 2.
Automatyczne wyłączanie systemu
Funkcja ta pozwala automatycznie wyłączyć system (za
wyjątkiem ustawienia radia jako źródła), jeśli nie jest
używany przez około 20 minut.
1 Naciśnij kilkakrotnie [SETUP], aby wybrać
“Auto Off”.
2 Naciśnij [2, 1], aby wybrać “On”, a następnie
naciśnij [OK].
Uwaga:
• Aby anulować, wybierz “Off” w kroku 2.
•Po podłączeniu do Bluetooth
będzie działać.
•Jeżeli opcja“Net Standby” ustawiona jest na “On”, ta
funkcja będzie również ustawiona na “On”. Aby zmienić to
ustawienie, ustaw opcję “Net Standby” na “Off”. (> 15)
Aktualizacja oprogramowania
Co jakiś czas firma Panasonic może udostępnić
zaktualizowane oprogramowanie dla tego systemu,
które może ulepszyć istniejące funkcje lub dodać nowe
funkcje. Aktualizacje te są darmowe.
NIE ODŁĄCZAJ przewodu zasilania, gdy
wyświetlany jest jeden z poniższych komunikatów.
– “Linking”, “Updating” lub “%”
(“ ” oznacza numer.)
• Podczas trwania aktualizacji nie można wykonywać
żadnych operacji.
Przygotowanie
•Włącz system.
•Podłącz system do sieci domowej. (> 6)
–Sprawdź, czy sieć jest połączona z Internetem.
–Jeżeli “D.Connect” ustawione jest jako “On”, zmień
ustawienie na “Off” i podłącz system do sieci, która
podłączona jest do Internetu.
®
urządzenia, funkcja ta nie
Page 33

1 Naciśnij kilkakrotnie [SETUP], aby wybrać
“SW Update”, a następnie naciśnij [OK].
2 Naciśnij [2, 1], aby wybrać “Update? Yes”, a
następnie naciśnij [OK], aby rozpocząć
aktualizację.
• Wybierz “Update? No”, aby anulować aktualizację.
{. Po zakończeniu aktualizacji pojawi się komunikat
“Success”.
3 Odłącz przewód zasilania i podłącz go ponownie
po upływie 3 minut.
•Jeśli nie ma dostępnych aktualizacji, wyświetlone zostanie
“No Need”.
≥ Pobieranie potrwa kilka minut. Może potrwać dłużej
lub mogą wystąpić problemy w zależności od
połączenia.
∫ Sprawdzanie wersji oprogramowania
1Naciśnij kilkakrotnie [SETUP], aby wybrać “SW Version”, a
następnie naciśnij [OK].
{. Wyświetlona zostanie wersja zainstalowanego
oprogramowania.
2Naciśnij [OK], aby wyjść.
Siła sygnału Wi-Fi
Sprawdzanie siły sygnału Wi-Fi w miejscu instalacji
systemu.
Przygotowanie
Podłącz system do sieci bezprzewodowej. (> 6)
1 Naciśnij kilkakrotnie [SETUP], aby wybrać
“Signal Level”, a następnie naciśnij [OK].
•Na wyświetlaczach systemu pojawia się
wskazanie “Level ”.
(“ ” oznacza numer.)
2 Naciśnij [OK], aby wyłączyć ten tryb
wyświetlania.
Ustawienia bezprzewodowej sieci LAN
Funkcję bezprzewodowej sieci LAN można włączyć lub
wyłączyć.
1 Naciśnij kilkakrotnie [SETUP], aby wybrać
“Wireless LAN”, a następnie naciśnij [OK].
2 Naciśnij [2, 1], aby wybrać “On” lub “Off”, a
następnie naciśnij [OK].
• Ustawienie fabryczne to “On”.
Sieciowy tryb gotowości
System może włączać się automatycznie z trybu
gotowości, po wybraniu go jako głośników AirPlay.
Przygotowanie
Podłącz system do sieci domowej. (> 6)
1 Naciśnij kilkakrotnie [SETUP], aby wybrać
“Net Standby”, a następnie naciśnij [OK].
2 Naciśnij [2, 1], aby wybrać “On”, a następnie
naciśnij [OK].
•Aby wyłączyć tę funkcję, wybierz “Off” w kroku 2.
• Ustawienie fabryczne to “Off”. Gdy ta funkcja jest
ustawiona na “On”, zużycie energii w trybie gotowości
wzrośnie.
Nazwa sieci bezprzewodowej (SSID)
Wyświetl nazwę podłączonej sieci bezprzewodowej
(SSID).
1 Naciśnij kilkakrotnie [SETUP], aby wybrać
“Net Info”, a następnie naciśnij [OK].
“IP Addr.” jest wyświetlone na wyświetlaczu.
2 Naciśnij kilkakrotnie [SETUP], aby wybrać
“SSID”, a następnie naciśnij [OK].
3 Naciśnij [OK], aby wyjść.
•Jeżeli wyświetlone jest “No Connect”, system nie jest
podłączony do sieci bezprzewodowej.
• Wszystkie litery są wyświetlane jako litery drukowane, a
znaki, których nie można wyświetlić zastępowane są “
¢”.
Adres IP/MAC
Aby sprawdzić adres IP systemu lub adres MAC Wi-Fi.
1 Naciśnij kilkakrotnie [SETUP], aby wybrać
“Net Info”, a następnie naciśnij [OK].
“IP Addr.” jest wyświetlone na wyświetlaczu.
2 Naciśnij kilkakrotnie [SETUP], aby wybrać
“IP Addr.” lub “MAC Addr.”, a następnie naciśnij
[OK].
Adres IP lub adres MAC jest wyświetlany częściowo.
3 Naciśnij [2, 1] na pilocie zdalnego sterowania,
aby wyświetlić pozostały fragment adresu IP lub
adresu MAC.
•Aby wyjść z menu ustawień, zaczekaj 20 sekund.
• Wskazanie “ – ” wyświetlane w lewym górnym lub dolnym
rogu wyświetlacza oznacza odpowiednio pierwsze i
ostatnie urządzenie.
POLSKI
• Zalecana siła sygnału to “3”. Zmień lokalizację lub ułożenie
routera sieci bezprzewodowej, jeśli wyświetlacz systemu
wskazuje “2” lub “1”, i zobacz, czy połączenie się
poprawiło.
•Jeśli wyświetlone jest wskazanie “Level 0”, oznacza to, że
system nie może nawiązać połączenia z routerem sieci
bezprzewodowej. (> 17)
• Ta funkcja nie działa, kiedy “D.Connect” ustawione jest jako
“On”.
VQT4Z21
15
33
Page 34

Rozwiązywanie problemów
Przed oddaniem urządzenia do naprawy należy
przeprowadzić następujące kontrole. W przypadku
wątpliwości, co do niektórych punktów kontrolnych lub
jeśli podane rozwiązania nie eliminują problemu, należy
zwrócić się po wskazówki do sprzedawcy.
Czy zainstalowano najnowsze oprogramowanie?
•Co jakiś czas firma Panasonic może udostępnić
zaktualizowane oprogramowanie dla tego systemu, które
może ulepszyć istniejące funkcje lub dodać nowe. (> 14)
Typowe problemy
Nie działa pilot zdalnego sterowania.
• Sprawdź, czy bateria została prawidłowo włożona.
Dźwięk jest zniekształcony lub brak dźwięku.
POLSKI
• Regulacja głośności systemu.
•Wyłączyć urządzenie określić i usunąć przyczynę, następnie
włączyć urządzenie ponownie. Może to być spowodowane
przeciążeniem głośników wskutek nadmiernego poziomu
głośności, zbyt wysokiego zasilania lub użytkowania systemu
w warunkach, w których panuje zbyt wysoka temperatura.
Podczas odtwarzania słychać “buczenie”.
• Blisko urządzenia znajdują się przewody zasilania prądem
przemiennym lub oświetlenie fluorescencyjne. Utrzymywać
przewody zasilania tego urządzenia z dala od innych
urządzeń lub przewodów zasilających.
Płyty kompaktowe
Błędne informacje na wyświetlaczu.
Nie uruchamia się odtwarzanie.
•Płyta nie została włożona prawidłowo. Włóż prawidłowo płytę.
•Płyta jest zabrudzona. Wyczyść plytę.
•Użyj innej płyty, jeśli jest zarysowana, wygięta lub niestandardowa.
•Nastąpiło skroplenie pary wodnej. Odczekaj 1 do 2 godzin, aż
skroplona para wodna odparuje z systemu.
Radio
Słaba jakość dźwięku lub słyszalne dudniące zakłócenia.
•Odsuń antenę od urządzeń takich jak komputer, telewizor
oraz od innych kabli i przewodów.
•Użyj anteny zewnętrznej.
•Wyłącz telewizor lub odsuń go dalej od systemu.
VQT4Z21
16
34
iPod/iPhone/iPad
Nie można włączyć urządzenia iPod/iPhone/iPad.
• Sprawdź, czy akumulator urządzenia iPod/iPhone/iPad nie
jest rozładowany.
•Wyłącz urządzenie iPod/iPhone/iPad oraz system przed
podłączeniem urządzenia iPod/iPhone/iPad. Podłącz
urządzenie iPod/iPhone/iPad i spróbuj ponownie.
Brak dźwięku.
•Wyłącz urządzenie iPod/iPhone/iPad i odłącz od systemu.
Podłącz urządzenie iPod/iPhone/iPad do systemu, włącz
zasilanie i ponownie uruchom odtwarzanie.
Urządzenie iPod/iPhone/iPad nie ładuje się.
• Sprawdź zawartość.
• Ładowanie iPod/iPhone/iPad z wyczerpaną baterią:
-Jeśli używasz połączenia “iPod_Port”, włącz ten system. Nie
wyłączaj tego systemu dopóki iPod/iPhone/iPad nie będzie
gotowy do używania.
-Jeśli używasz połączenia “iPod_Dock”, wyświetlane będzie
“Checking Connection” dopóki iPod/iPhone nie będzie gotowy
do używania, ale system rozpocznie ładowanie.
USB
Nie można odczytać urządzenia USB lub jego zawartości.
• Format urządzenia USB lub jego zawartość nie jest
obsługiwana przez system.
• W niektórych przypadkach nie będą obsługiwane urządzenia
USB o pojemności większej niż 32 GB.
Powolne działanie urządzenia USB.
• Pliki o dużych rozmiarach lub urządzenia USB z dużą ilością
pamięci wymagają dłuższego czasu wczytywania.
Wyświetlany czas, który upłynął jest inny niż czas
rzeczywisty.
• Skopiuj dane do innego urządzenia USB lub utwórz kopię
zapasową danych i sformatuj urządzenia USB.
Bluetooth
Nie można przeprowadzić parowania.
• Sprawdź stan urządzenia Bluetooth®.
Nie można podłączyć urządzenia.
• Parowanie urządzenia się nie powiodło lub rejestracja została
zastąpiona nową. Spróbuj sparować urządzenie ponownie.
• System może być podłączony do innego urządzenia. Odłącz
inne urządzenie i spróbuj sparować urządzenie ponownie.
®
Urządzenie jest podłączone, ale dźwięk nie jest odtwarzany
z głośników zestawu.
•
W przypadku niektórych wbudowanych urządzeń Bluetooth®,
konieczne jest ręczne ustawienie odtwarzania dźwięku na
“SC-PMX9”. Szczegółowe informacje znajdują się w instrukcji
obsługi danego urządzenia.
Dźwięk jest przerywany.
•Urządzenie znajduje się poza zasięgiem komunikacji 10 m.
Umieść urządzenie Bluetooth
•Usuń wszelkie przeszkody występujące pomiędzy systemem
a urządzeniem.
•
Inne urządzenia korzystające z zakresu częstotliwości 2,4 GHz (router
bezprzewodowy, kuchenki mikrofalowe, telefony bezprzewodowe itp.)
mogą powodować zakłócenia.
systemu i upewnij się, że nie jest ono zbyt blisko innych
urządzeń.
• Wybierz “Mode 1” w celu zapewnienia stabilnej komunikacji.
(
>
11)
®
bliżej systemu.
Zbliż Bluetooth® urządzenie do
Operacje AirPlay
Nie można się połączyć z siecią.
•Sprawdź podłączenie sieciowe i ustawienia. (> 6)
•Sieć bezprzewodowa może być ustawiona, aby była
niewidoczna. W takim przypadku wybierz “Manual
settings” w “Metoda 4”. (> 9)
• System nie może łączyć się z siecią bezprzewodową z
zastosowaniem ustawień bezpieczeństwa WEP przy
użyciu metod WPS (“Metoda 1”). Zastosuj “Metoda 4”,
aby połączyć się z siecią bezprzewodową. (> 8)
• Upewnij się, że funkcja Multicast w routerze sieci
bezprzewodowej jest włączona.
•Kiedy używany jest “D.Connect”, jeżeli zmieniono hasło
dla “D.Connect”, podłącz inne urządzenie do systemu
wprowadzając nowe hasło. (> 10)
• Upewnij się, że opcja “Wireless LAN” jest ustawiona na
“On”. (> 15)
Nie można
•Wyświetl nazwę sieci bezprzewodowej, do której
•Jeśli “Net Standby” jest ustawiony na “Off”, nie można
•Wyłącz ustawienie Wi-Fi w kompatybilnym urządzeniu
się połączyć z systemem.
podłączone jest system i upewnij się, że urządzenie
podłączone jest do tej samej sieci. (> 6, 15)
podłączyć urządzenia kompatybilnego z funkcją AirPlay,
gdy system jest wyłączony.
AirPlay, ustaw “Net Standby” na “Off” (> 15), a następnie
wyłącz i włącz ponownie system. Podłącz ponownie
kompatybilne urządzenie do sieci Wi-Fi, a następnie
ponownie wybierz system jako głośniki AirPlay.
Page 35

Router sieci bezprzewodowej jest kompatybilny z
funkcją WPS PBC, ale parowanie nie działa.
•Jeśli sieć jest ustawiona jako niewidoczna, konfiguracja
przyciskowa (PBC) nie działa. W takiej sytuacji ustaw sieć
bezprzewodową jako widoczną podczas konfiguracji sieci
dla niniejszego systemu lub użyj “Metoda 2”, “Metoda 3”
lub “Metoda 4”. (> 7, 8)
Odtwarzanie się nie rozpoczyna.
Dźwięk jest przerywany.
•Sprawdź, czy działa przewodowe połączenie LAN. (> 6)
• Jednoczesne korzystanie z innych urządzeń pracujących
w paśmie częstotliwości 2,4 GHz (kuchenki mikrofalowe,
telefony bezprzewodowe) może powodować przerwy w
połączeniu.
Zwiększ odległość między systemem a tymi
urządzeniami.
• Nie systemu w metalowej szafce, ponieważ może ona
blokować sygnał Wi-Fi.
•Umieść system bliżej routera sieci bezprzewodowej.
•Jeżeli “D.Connect” ustawione jest jako “On”, połóż
urząd
zenie zgodne z AirPlay bliżej głośników.
•Jeśli z tej samej sieci bezprzewodowej korzysta nie tylko
ten system, ale też kilka innych urządzeń
bezprzewodowych, wyłącz inne urządzenia lub ogranicz
ich korzystanie z sieci bezprzewodowej.
•Jeżeli odtwarzanie się zatrzyma, sprawdź status
odtwarzania w urządzeniu iOS lub w iTunes.
•Jeżeli odtwarzanie się nie rozpoczyna (mimo faktu, że
jest wyświetlone “ ”), uruchom ponownie router
bezprzewodowy, wyłącz i włącz funkcję połączenia Wi-Fi
na urządzeniu iOS lub Mac/PC, a następnie upewnij się,
że wybrana została domowa sieć bezprzewodowa.
• Dla niektórych wersji systemu iOS i programu iTunes,
może nie być możliwe ponowne włączenie odtwarzania
AirPlay, jeżeli zmieniono selekcję (np. “CD”) lub
wyłączono system podczas odtwarzania AirPlay.
W takim przypadku należy wybrać inne urządzenie przy
pomocy ikony AirPlay w aplikacji Music App lub
programie iTunes i wybrać ponownie system jako głośniki
wyjściowe. (> 9)
Wyświetlacz urządzenia
“--:--”
•Do urządzenia po raz pierwszy podłączono przewód
zasilania lub niedawno wystąpiła przerwa w zasilaniu.
Ustaw zegar.
“Adjust CLOCK”
• Zegar nie jest ustawiony. Odpowiednio wyreguluj zegar.
“Adjust TIMER”
• Timer odtwarzania nie jest ustawiony. Odpowiednio
wyreguluj timer odtwarzania.
“Auto Off”
•Urządzenie nie było używane przez około 20 minut i za
minutę zostanie wyłączone. Naciśnij dowolny klawisz, aby
anulować.
“CANNOT SET”
• Wybierz źródło audio inne od “AirPlay” “BLUETOOTH” lub
“DLNA”.
“Checking Connection”
•Główne urządzenie sprawdza podłączone urządzenie
iPod/iPhone/iPad. Jeśli ten komunikat jest nadal
wyświetlany, sprawdź czy urządzenie iPod/iPhone/iPad
jest włożone prawidłowo i spróbuj ponownie.
“DL Error”
•Nie udało się pobrać oprogramowania. Naciśnij dowolny
przycisk, aby zakończyć. Spróbuj ponownie później.
•Nie można odnaleźć serwera. Naciśnij dowolny przycisk,
aby zakończyć. Upewnij się, że s
połączona z Internetem.
“Error”
• Wykonano niewłaściwą operację. Przeczytaj instrukcję i
spróbuj ponownie.
“F61” lub “F76”
• Wystąpił problem z zasilaniem.
“Fail”
• Aktualizacja lub ustawianie się nie powiodło. Zapoznaj się
z instrukcją i spróbuj ponownie.
“iPod_Dock Over Current Error”
“iPod_Port Over Current Error”
•Urządzenie iPod/iPhone/iPad lub urządzenie USB pobiera zbyt
dużo prądu. Odłącz urządzenie iPod/iPhone/iPad lub USB, po
czym wyłącz i włącz system ponownie.
“Level 0”
•Brak łącza między systemem i routerem sieci
bezprzewodowej.
Spróbuj wykonać następujące czynności:
–Upewnij się, że router sieci bezprzewodowej jest
włączony.
–Wyłącz system i włącz go ponownie.
– Zresetuj ustawienia sieci bezprzewodowej. (> 6)
Jeśli problem nie zniknie, skontaktuj się ze sprzedawcą.
“Level j”
• Kiedy “D.Connect” jest ustawione jako “On” nie można
sprawdzić siły sygnału Wi-Fi. Aby sprawdzić siłę sygnału
Wi-Fi routera bezprzewodowego, ustaw “D.Connect” jako
“Off”. (> 10)
“Linking”
• System komunikuje się z routerem sieci
bezprzewodowym, aby zakończyć konfigurację ustawień
sieciowych.
W zależności od routera sieci bezprzewodowego, proces
ten może zająć kilka minut. Spróbuj przysunąć system
bliżej routera sieci bezprzewodowego.
ieć bezprzewodowa jest
“No Connect”
• System nie może się połączyć z siecią.
Sprawdź połącz
“No Device”
•Urządzenie iPod/iPhone/iPad lub USB nie jest
podłączone. Sprawdź połączenie.
“No Disc”
•Nie włożono płyty lyb włożono płytę, której urządzenie nie
może odtworzyć.
“No Play”
•Sprawdź zawartość. Odtwarzać można wyłącznie utwory
o obsługiwanym formacie.
• W przypadku liczby albumów lub folderów większej niż 255
(audio lub nie audio) niektóre z plików w formacie MP3/FLAC nie
zostaną odczytane oraz odtworzone. W takim przypadku należy
dokonać transferu tych muzycznych albumów do innego
urządzenia USB. Można również dokonać formatowania
urządzenia USB, i zapisać te muzyczne albumy w innych
folderach, niezawierających plików audio.
“Not MP3/Error”
•Nieobsługiwany format MP3. Urządzenie pominie ten
utwór i odtworzy następny.
“Not Supported”
•Wsunięto iPod/iPhone/iPad, którego nie można
odtworzyć.
•Wyłącz urządzenie iPod/iPhone/iPad oraz system przed
podłączeniem urządzenia iPod/iPhone/iPad. Podłącz
urządzenie iPod/iPhone/iPad i spróbuj ponownie.
• Ten komunikat może zostać wyświetlony po nawiązaniu
bezprzewodowego połączenia LAN bez odblokowania
urządzenia iPod/iPhone/iPad. (> 7, “Metoda 2”)
“PGM Full”
• Liczba zaprogramowanych ścieżek jest większa niż 24.
“Reading”
•Urządzenie sprawa informacje o płycie kompaktowej i
urządzeniu USB. Gdy zniknie to wskazanie, rozpocznij
obsługę.
“Set Wi-Fi”
•Podłączony iPod touch/iPhone/iPad nie jest podłączony
do sieci bezprzewodowej. Podłącz urządzenie do sieci
bezprzewodowej i spróbuj ponownie. (> 6)
“Wait”
• Ten komunikat jest wyświetlany np. wtedy, kiedy
urządzenie zostaje wyłączone. (maksymalnie przez 1
minutę i 30 sekund)
enie sieciowe. (> 6)
POLSKI
VQT4Z21
17
35
Page 36

Resetowanie pamięci systemu
(inicjalizacja)
W przypadku wystąpienia poniższych objawów należy
zresetować pamięć urządzenia:
• Brak reakcji po naciśnięciu przycisków.
•Chęć wyczyszczenia i wyzerowania zawartości
pamięci.
1 Odłącz przewód zasilania.
Odczekaj 3 minuty przed przejściem do kroku 2.
2 Naciskając i przytrzymując [Í/I] na urządzeniu
głównym, podłącz ponownie przewód zasilania.
Wyświetlony zostanie symbol “- - - - - - - - - - - -”.
3 Zwolnij [Í/I].
POLSKI
Przywrócone zostaną wszystkie ustawiania
fabryczne.
Konieczne będzie ponowne zaprogramowanie
pamięci.
Kod zdalnego sterowania
Jeśli na pilota zdalnego sterowania tego systemu
reagują inne urządzenia firmy Panasonic, należy zmienić
kod zdalnego sterowania dla tego systemu.
Aby zmienić kod na “Remote 2”
1 Naciśnij [CD] , aby wybrać “CD”.
2 Naciśnij i przytrzymaj [CD] na urządzeniu i [2] na
pilocie zdalnego sterowania tak długo, aż
wyświetlony zostanie komunikat “Remote 2”.
3 Naciśnij i przytrzymaj [OK] i [2] przynajmniej
przez 4 sekundy.
• Ustawienie fabryczne to “Remote 1”.
•Aby zmienić z powrotem tryb na “Remote 1”, powtórz
powyższe kroki, zastępując przycisk, który należy
nacisnąć na pilocie: [2] na [1].
VQT4Z21
18
36
Dane techniczne
Sekcja wzmacniacza
Moc wyjściowa RMS
Kanał przedni (przy użyciu obu kanałów)
Całkowita moc RMS 120 W
10% całkowitego zniekształcenia harmonicznego
Sekcja tunera
Modulacja częstotliwościowa (FM)
Programowanie stacji 30 stacji
Zakres częstotliwości
87,50 MHz do 108,00 MHz (w krokach co 50 kHz)
Gniazda antenowe 75 ™ (niezrównoważone)
Sekcja złączy
Połączenie “iPod_Port”
Standard USB USB 2.0
Obsługiwane formaty plików multimedialnych
System plików urządzenia USB FAT16, FAT32
Obsługa tagów ID3 v2.3
Połączenie “iPod_Dock”
Gniazdo słuchawkowe Stereo, wtyk Ø 3,5 mm
Gniazdo AUX (tył) Wtyk jack
Port LAN 10 Base-T/100 Base-TX
Sekcja odtwarzacza płyt CD
Odtwarzane płyty (8 cm lub 12 cm)
Przechwytywanie
Długość fali 790 nm (CD)
Moc lasera CLASS 1
Wyjście audio (płyta)
Liczba kanałów 2 kanały (FL, FR)
60 W na kanał (3™), 1 kHz,
DC OUT 5 V 2,1 A (maks.)
MP3 (*.mp3)
DC OUT 5 V 1,0 A (maks.)
CD, CD-R/RW (CD-DA, MP3)
, FLAC (*.flac)
Zestawy głośnikowe
Głośnik
Niskotonowy 14 cm stożkowy x 1
Wysokotonowy 1,9 cm głośnik kopułowy x 1
Urządzenie do tonów najwyższych
Impedancja 3 ™
Wymiary (szer. x wys. x głęb.)
Masa Około3,0 kg
Sekcja Bluetooth
Bluetooth
Klasa sprzętu bezprzewodowego Klasa 2
Obsługiwane profile A2DP
Pasmo częstotliwości 2,4 GHz FH-SS
Zasięg 10 m w linii widzenia
®
specyfikacja systemu V3.0
Szacowany zasięg komunikacji
Środowisko pomiarowe:
Miary w “Mode 1”
1,2 cm piezzoelektryczny x 1
161 mm x 238 mm x 264 mm
®
Temperatura 25 oC, wysokość 1m
Sekcja Wi-Fi/AirPlay
Wi-Fi
Standard WLAN IEEE802.11b/g
Zakres częstotliwości
Zabezpieczenie WEP (64 bit/128 bit),
Wersja WPS
Wersja 2.0 (bez obsługi WEP)
Pasmo 2,4 GHz
WPATM, WPA2
Obsługiwane formaty audio (USB, DLNA)
MP3
Częstotliwość próbkowania 32/44,1/48 kHz
Rozmiar słowa próbki 16 bitów
Liczba kanałów 2 kanały
Przepływność (Bit-rate) 8-320 kbps
FLAC
Częstotliwość próbkowania
Rozmiar słowa próbki 16,24 bity
Liczba kanałów 2 kanały
WAV (tylko DLNA)
Częstotliwość próbkowania
Rozmiar słowa próbki 16,24 bity
Liczba kanałów 2 kanały
32/44,1/48/88,2/96/176,4/192 kHz
32/44,1/48/88,2/96/176,4/192 kHz
TM
Page 37

Dane ogólne
Zasilanie Prąd przemienny 220 V do 240 V, 50 Hz
Pobór mocy 60 W
Wymiary (szer. x wys. x głęb.)
Masa Około 3,1 kg
Zakres temperatur roboczych 0°C do +40°C
Zakres wilgotności roboczych
Pobór mocy w trybie gotowości
(Kiedy iPod/iPhone/iPad nie jest ładowany)
Uwaga:
• Dane techniczne mogą ulec zmianie bez powiadomienia.
Masa i wymiary podane są w przybliżeniu.
•Wartość całkowitych zniekształceń harmonicznych została
zmierzona przy użyciu cyfrowego analizatora widma.
FLAC Decoder
Copyright (C) 2000,2001,2002,2003,2004,2005,2006,2007
Josh Coalson
Redistribution and use in source and binary forms, with or
without modification, are permitted provided that the following
conditions are met:
- Redistributions of source code must retain the above
copyright notice, this list of conditions and the following
disclaimer.
- Redistributions in binary form must reproduce the above
copyright notice, this list of conditions and the following
disclaimer in the documentation and/or other materials
provided with the distribution.
- Neither the name of the Xiph.org Foundation nor the
names of its contributors may be used to endorse or
promote products derived from this software without
specific prior written permission.
THIS SOFTWARE IS PROVIDED BY THE COPYRIGHT
HOLDERS AND CONTRIBUTORS “AS IS” AND ANY
EXPRESS OR IMPLIED WARRANTIES, INCLUDING, BUT
NOT LIMITED TO, THE IMPLIED WARRANTIES OF
MERCHANTABILITY AND FITNESS FOR A PARTICULAR
PURPOSE ARE DISCLAIMED. IN NO EVENT SHALL THE
FOUNDATION OR CONTRIBUTORS BE LIABLE FOR ANY
DIRECT, INDIRECT, INCIDENTAL, SPECIAL, EXEMPLARY,
OR CONSEQUENTIAL DAMAGES (INCLUDING, BUT NOT
LIMITED TO, PROCUREMENT OF SUBSTITUTE GOODS
OR SERVICES; LOSS OF USE, DATA, OR PROFITS; OR
BUSINESS INTERRUPTION) HOWEVER CAUSED AND
ON ANY THEORY OF LIABILITY, WHETHER IN
CONTRACT, STRICT LIABILITY, OR TORT (INCLUDING
NEGLIGENCE OR OTHERWISE) ARISING IN ANY WAY
OUT OF THE USE OF THIS SOFTWARE, EVEN IF
ADVISED OF THE POSSIBILITY OF SUCH DAMAGE.
210 mm x 120 mm x 266 mm
35% do 80% RH (bez kondensacji)
0,4 W (około)
Deklaracja zgodności
Niniejszym “Panasonic Corporation” deklaruje, że ten
produkt jest zgodny z istotnymi wymaganiami i innymi
odnośnymi postanowieniami dyrektywy 1999/5/WE.
Klienci mogą pobrać oryginalną deklarację zgodności
naszych produktów z serwera deklaracji zgodności:
http://www.doc.panasonic.de
Kontakt się z autoryzowanym przedstawicielem:
Panasonic Marketing Europe GmbH,
Panasonic Testing Centre, Winsbergring 15, 22525
Hamburg, Niemcy
Ten produkt jest przeznaczony dla użytkownika ogólnego.
(Kategoria 3)
Niniejszy produkt jest przeznaczony do podłączenia do
punktu dostępowego 2,4 GHz WLAN.
Pozbywanie się zużytych urządzeń elektrycznych i
elektronicznych oraz baterii.
Dotyczy wyłącznie obszaru Unii Europejskiej oraz
krajów posiadających systemy zbiórki i recyklingu.
zużytych urządzeń elektrycznych i elektronicznych oraz
zużytych baterii, należy oddawać je do wyznaczonych
punktów gromadzenia odpadów zgodnie z przepisami
prawa krajowego.
Poprzez prawidłowe pozbywanie się zużytych
urządzeń elektrycznych i elektronicznych oraz zużytych
baterii pomagasz oszczędzać cenne zasoby naturalne
oraz zapobiegać potencjalnemu negatywnemu
wpływowi na zdrowie człowieka oraz na stan
środowiska naturalnego.
W celu uzyskania informacji o zbiórce oraz recyklingu
zużytych urządzeń elektrycznych i elektronicznych oraz
baterii prosimy o kontakt z władzami lokalnymi.
Za niewłaściwe pozbywanie się tych odpadów mogą
ozić kary przewidziane przepisami prawa krajowego.
gr
Niniejsze symbole umieszczane na
produktach, opakowaniach i/lub w
dokumentacji towarzyszącej oznaczają,
że nie wolno mieszać zużytych
urządzeń elektrycznych i
elektronicznych oraz baterii z innymi
odpadami domowymi/komunalnymi.
W celu zapewnienia właściwego
przetwarzania, utylizacji oraz recyklingu
Dotyczy symbolu baterii (symbol
poniżej):
Ten symbol może występować wraz z
symbolem pierwiastka chemicznego. W
takim przypadku wymagania Dyrektywy
w sprawie określonego środka
chemicznego są spełnione.
POLSKI
VQT4Z21
19
37
Page 38

Ovládejte dálkovým ovladačem. Jsou-li stejné,
můžete rovněž použít tlačítka na hlavním přístroji.
Váš systém a obrázky se mohou lišit.
Tento návod k obsluze platí pro následující systém.
Systém SC-PMX9
Hlavní přístroj
Reproduktory
SA-PMX9
SB-PMX9
Bezpečnostní upozornění
UPOZORNĚNÍ!
Přístroj
• Abyste snížili nebezpečí vzniku požáru, úrazu elektrickým
proudem nebo poškození přístroje:
- Nevystavujte tento přístroj dešti, nadměrné vlhkosti,
kapající vodě a postříkání.
-Na přístroj by neměly být umisžovány žádné objekty
naplněné vodou, jako jsou například vázy.
- Používejte pouze doporučené příslušenství.
- Neodstraňujte kryt přístroje.
- Nepokoušejte se přístroj opravit sami. Opravy
přenechejte kvalifikovaným pracovníkům servisu.
ČESKY
POZOR!
Přístroj
• Abyste snížili nebezpečí vzniku požáru, úrazu elektrickým
proudem nebo poškození přístroje:
- Abyste zajistili dobré ventilační podmínky, nikdy
neinstalujte tento přístroj v knihovně, vestavěné skříni
nebo jiném uzavřeném prostoru.
- Neblokujte ventilační otvory přístroje novinami, ubrusy,
závěsy a jinými materiály.
- Nepokládejte zdroje otevřeného ohně, jako například
hořící svíčky, na přístroj.
• Tento přístroj je konstruován pro použití v mírném klimatu.
• Rozpojovacím zařízením je síťová zásuvka.
Nainstalujte toto zařízení tak, aby bylo možno síťovou
zásuvku okamžitě odpojit ze sítě.
• Tento přístroj může být během používání rušen rádiovou
interferencí, která je způsobena mobilním telefonem.
Jestliže k takovéto interferenci dojde, zajistěte větší
vzdálenost mezi tímto přístrojem a mobilním telefonem.
• Tento přístroj pracuje s laserovým paprskem. Při
nesprávném použití ovládacích prvků, stejně jako při
provádění jiných postupů, než které jsou popsány v tomto
VQT4Z21
návodu, může dojít k nebezpečnému vyzařová
2
38
Baterie
• Nerozebírejte ani nezkratujte baterie.
• Nedobíjejte alkalické nebo manganové baterie.
• Nepoužívejte baterie, u nichž se loupe obal.
• Nevystavujte baterie teplu nebo ohni.
• Nenechávejte baterie v automobilu vystavené přímému
slunečnímu světlu po delší dobu, když jsou zavřené dveře
a okna.
• Jestliže dálkové ovládání nebudete používat delší dobu,
vyjměte z něj baterie. Skladujte na chladném a tmavém místě.
•V případě nesprávné výměny baterie hrozí nebezpečí výbuchu.
Vyměňujte pouze za typ baterie, který doporučuje výrobce.
•Při likvidaci baterií se obražte na místní úřady nebo na
prodejce a informujte se o správném způsobu likvidace.
Android, Google Play a Chrome jsou ochranné známky
společnosti Google Inc.
DLNA, the DLNA Logo and DLNA CERTIFIED are trademarks,
service marks, or certification marks of the Digital Living Network
Alliance.
Logo Wi-Fi CERTIFIED je certifikační značka asociace Wi-Fi
Alliance.
Známka Wi-Fi Protected Setup je známkou společnosti Wi-Fi
Alliance.
“Wi-Fi”, “Wi-Fi Protected Setup”, “WPA” a “WPA2” jsou známkami
nebo registrovanými známkami společnosti Wi-Fi Alliance.
Technologie kódování zvuku MPEG Layer-3 licencovaná
společnostmi Fraunhofer IIS a Thomson.
Slovní označení a loga Bluetooth® jsou majetkem společnosti
Bluetooth SIG, Inc. a veškeré jejich používání společností
Panasonic Corporation se řídí licenčními podmínkami.
Ostatní obchodní značky a názvy jsou majetkem příslušných majitelů.
Windows je ochrannou známkou nebo registrovanou ochrannou
známkou společnosti Microsoft Corporation ve Spojených státech
a v jiných zemích.
ní.
Obsah
Bezpečnostní upozornění ............................... 2
Dodávané příslušenství .................................. 3
Údržba............................................................... 3
Příprava dálkového ovladače .........................3
Provedení zapojení ..........................................3
Umístění reprosoustavy.................................. 4
Přehled ovládání .............................................. 4
Vkládání médií.................................................. 5
Informace o médiích........................................ 5
Nastavení sítě................................................... 6
Použití AirPlay s reproduktory tohoto systému ....9
Přehrávání hudebních souborů na serveru
DLNA............................................................... 10
Operace Bluetooth
O zařízení Bluetooth
Činnosti přehrávání médií............................. 12
Rádio............................................................... 13
Hodiny a časovače ........................................ 13
Zvukové efekty............................................... 14
Použití externího zvukového vstupu ........... 14
Další ................................................................14
Odstraňování závad.......................................16
Specifikace ..................................................... 18
“Made for iPod”, “Made for iPhone” a “Made for iPad” znamenají,
že elektronické příslušenství bylo navrženo pro připojení
konkrétně k zařízení iPod, iPhone nebo iPad a bylo certifikováno
vývojářem, aby splňovalo funkční normy společnosti Apple.
Firma Apple neodpovídá za činnost tohoto zařízení ani za jeho
kompatibilitu s bezpečnostními a upravujícími předpisy.
Vez měte prosím na vědomí, že použití tohoto příslušenství se
zařízením iPod, iPhone nebo iPad může ovlivnit bezdrátový výkon.
AirPlay, logo AirPlay, iPad, iPhone, iPod, iPod classic, iPod nano,
a iPod touch jsou obchodními známkami společnosti Apple Inc.,
zaregistrovanými v U.S.A. a v jiných zemích.
App Store je ochranná známka služby společnosti Apple Inc.
®
....................................... 11
®
.................................... 11
Page 39

Dodávané příslušenství
22
11
33
Do sížové zásuvky
Páska (není v
příslušenství)
Černá
Červená
Černá
Červená
Kabel s
červenou
značkou
DVD přehrávač (není v příslušenství)
Zadní panel
hlavní jednotky
Zvukový kabel (není v příslušenství)
Zkontrolujte si dodávané příslušenství.
1 x kabel sížového
napájení (AC)
1 x dálkové ovládání
(N2QAYB000896)
Provedení zapojení
Přívodní kabel připojte až po dokončení všech
ostatních zapojení.
Napájení
Systém v pohotovostním režimu spotřebuje přibližně
0,4 W. Jestliže systém nepoužíváte, napájení odpojte.
Po odpojení systému budou některá nastavení ztracena.
Musíte je nastavit znovu.
Připojení jiného zařízení
Můžete připojit VCR, DVD přehrávač atd.
1 x FM pokojová anténa
2 x reproduktorové
kabely
1 x baterie dálkového ovládání
Údržba
•K čištění povrchu hlavního zařízení používejte měkký suchý hadřík.
• Chcete-li očistit reproduktory, otřete je jemným suchým
hadříkem jako je například čisticí hadřík z mikrovláken.
• Nikdy nepoužívejte k čištění systému líh, ředidlo nebo technický benzín.
•Před použitím chemicky impregnovaného hadříku si
přečtěte instrukce přiložené k hadříku.
Příprava dálkového ovladače
R6/LR6, AA
• Použijte alkalické nebo manganové baterie.
• Vložte baterii tak, aby se póly (+ a –) shodovaly s těmi v
dálkovém ovladači.
•Namiřte dálkové ovládání na snímač dálkového ovládání.
Mezi ovládáním a snímačem by neměly být žádné
překážky a jejich vzájemná vzdálenost by neměla překročit
7 m. Používejte dálkové ovládání z místa přímo před
hlavním zařízením, s maximální odchylkou přibližně
30°doleva či doprava.
1 Zapojte FM pokojovou anténu.
Umístěte anténu na místo s nejlepším příjmem signálu.
• Pokud je příjem signálu špatný, použijte venkovní
anténu FM.
2 Zapojte reproduktory.
Dejte pozor, abyste nepřekřížili (nezkratovali) či
neobrátili polaritu kabelů reproduktorů – mohlo
bydojít k jejich poškození.
•Připojte kabel s červenou značkou k červenému
konektoru (r).
3 Zapojte kabel sížového napájení (AC).
Nepoužívejte kabely sížového napájení (AC) z jiných
zařízení.
Poznámka:
•Před připojením odpojte přívodní kabel.
• Vypněte všechna zařízení a přečtěte si příslušný návod k
obsluze.
• Komponenty a kabely se prodávají samostatně.
• Chcete-li připojit zařízení jiné než popsané, obražte se na
prodejce.
•Při použití adaptéru může dojít ke zkreslení zvuku.
• Informace o připojení síťového kabelu naleznete na straně 6.
ČESKY
VQT4Z21
3
39
Page 40

Umístění reprosoustavy
Výškový
17
18
21
22
23
6
11
5
OPEN/CLOSE
D.BASS
VOLUME
SELECTORCDiPod
BASS TREBLE
iPad
19
20
6
4
1
1
2
3
4
5
6
7
8
9
10
11
12
13
14
15
16
SETUP
SELECTOR
Pohled shora
Umístěte reproduktory tak, aby byl super výškový reproduktor
na vnitřní straně. Aby nedošlo k poškození reproduktorů,
nedotýkejte se otvorů reproduktorů, když odstraníte kryty.
Používejte pouze reproduktory dodávané s přístrojem.
Kombinace hlavního přístroje a reproduktorů poskytuje
nejlepší zvuk. Jestliže použijete jiné reproduktory,
můžete systém poškodit a snížit kvalitu zvuku.
Poznámka:
• Reproduktory umístěte dále než 10 mm od hlavního
přístroje, kvůli ventilaci.
ČESKY
• Reproduktory umístěte na rovný bezpečný povrch.
• Tyto reproduktory nemají magnetické stínění. Neumisžujte
je do blízkosti TV, PC nebo jiného zařízení snadno
ovlivnitelného magnetismem.
• Dlouhodobé přehrávání při vysoké hlasitosti může systém
poškodit a snížit jeho životnost.
• Proto snižte hlasitost, abyste předešli poškození systému:
- Je-li zvuk zkreslený.
-Při nastavování kvality zvuku.
POZOR!
• Reproduktory používejte pouze s
doporučovaným systémem. Jinak, můžete
poškodit zesilovač a reproduktory a způsobit tak
požář.
Kontaktujtekvalifikovaného servisního
pracovníka, pokud došlo k poškození nebo pokud
vnímáte zjevnou změnu ve výkonu přístroje.
•Při připojování reproduktorů postupujte podle
zde uvedených pokynů.
VQT4Z21
4
40
Přehled ovládání
1Tlačítko přepnutí do pohotovostního režimu/
zapnutí [Í], [Í/I]
Stisknutím tohoto tlačítka se přístroj zapíná z pohotovostního
režimu, nebo naopak vypíná. V pohotovostním režímu přístroj stále
spotřebovává malé množství el. proudu.
2 Číselná tlačítka [1 až 9, 0, S10]
Volba 2 ciferného čísla
Příklad: 16: [S10]
3 Smazání naprogramované stopy
4 Volba zdroje zvuku
[iPod]: “iPod_Dock” ,. “iPod_Port” / “USB”
[CD]: “CD”
[SELECTOR]:
“CD” ----------------. “BLUETOOTH” -----------------. “FM”
^-
“iPod_Port” / “USB” ( “iPod_Dock” ( “AUX”
5 Základní přehrávání
6 Volba zvukových efektů
7 Zobrazení nabídky iPod
8 Zobrazení obsahových informací
9 Nastavení hodin a časovače
10 Nastavení programové funkce
11 Nastavení hlasitosti systému
12 Ztlumení zvuku systému
Stiskněte tlačítko znovu pro zrušení funkce.
Funkce ztlumení “MUTE” se rovněž zruší, když
změníte hlastitost nebo když systém vypnete.
13 Otevření nabídky přehrávání
14 Otevření nabídky rádia
15 Volba možnosti
16 Vstup do menu nastavení
17 “iPod_Dock” pro iPod/iPhone
18 Konektor pro sluchátka ( )
• Typ konektoru: stereofonní, souosý o průměru
Ø 3,5 mm (není v příslušenství)
• Dlouhodobý poslech může způsobit poškození sluchu.
•Příliš hlasitá reprodukce ze sluchátek může
způsobit ztrátu sluchu.
• Dlouhodobý poslech na maximální hlasitost může
poškodit sluch uživatele.
19 Panel displeje
20 “iPod_Port” pro iPod/iPhone/iPad a zařízení USB
21 Otevření/zavření zásuvky disku
22 Zásuvka na disk
23 Snímač dálkového ovladače
> [1] > [6]
(b
Page 41

Vkládání médií
iPad
OPEN/CLOSE
iPod/iPhone
(není v
příslušenství)
Konektor Lightning
Zvolte “iPod_Dock” jako zdroj
Otevřete kryt a připojte konektorem iPod/iPhone
Lightning.
Zvolte “iPod_Port” jako zdroj
“USB” se zobrazí při zasunutí
kompatibilního USB zařízení.
•Nepřipojujte následující modely:
iPod classic, iPod [4. (barevný displej)
a 5. (video) tvorba],
iPod nano (1. generace)
Může dojít k neočekávanému chování.
Zvolte “CD” jako
zdroj
“iPod_Dock” (Použití konektoru Lightning):
• Ujistěte se, že je zařízení iPod/iPhone plně zasunuto a
jeho zadní strana leží proti polstrované podložce.
• Nezapomeňte vyjmout zařízení iPod/iPhone z obalu.
•Při vkládání dejte pozor na zarovnání vašeho iPod/
iPhone s konektorem.
“iPod_Port”:
• Použijte specifický USB kabel (není v příslušenství)
pro iPod/iPhone/iPad.
•Zasuňte USB zařízení přímo. Nepoužívejte žádný USB
prodlužovací kabel.
•Před odpojením USB zařízení zvolte jiný zdroj než
USB
”.
“
Zásuvka disku:
• Disk CD odebírejte, až když se přestane otáčet.
Nabíjení zařízení iPod/iPhone/iPad
Nabíjení začne po připojení zařízení iPod/iPhone/iPad k
tomuto systému.
• V pohotovostním režimu nebude nabíjení zahájeno z
připojení “iPod_Port”, ale bude spuštěno jako obvykle
z připojení “iPod_Dock”.
- Chcete-li zahájit nabíjení z připojení “iPod_Port”, spusťte
nabíjení před přepnutím tohoto zařízení do
pohotovostního režimu.
• Stav nabíjení baterie je zobrazen na displeji iPod/
iPhone/iPad.
• Po úplném nabití, pokud není iPod/iPhone/iPad
používán po delší dobu, odpojte jej.
• Nabíjení se zastaví, když je baterie plně nabitá. Baterie
se vyčerpá přirozeně.
Informace o médiích
•Upozorňujeme, že společnost Panasonic nepřijímá
žádnou odpovědnost za ztrátu dat a/nebo informací.
Kompatibilní zařízení iPod/iPhone/iPad (k lednu
2013)
Kompatibilní s připojením “iPod_Dock”
(Použití konektoru Lightning)
iPod touch (5. generace)
iPod nano (7. generace)
iPhone 5
Kompatibilní s připojením “iPod_Port”
[Použití specifického USB kabelu (není v příslušenství)]
iPod touch (1., 2., 3., 4. a 5. generace)
iPod nano (2., 3., 4., 5., 6. a 7. generace)
iPhone 5 / iPhone 4S / iPhone 4 / iPhone 3GS /
iPhone 3G / iPhone
iPad (3. a 4. generace) / iPad 2 / iPad
iPad mini
Poznámka:
• Kompatibilita závisí na verzi softwaru. Před použitím
tohoto zařízení aktualizujte zařízení iPod/iPhone/iPad
nejnovějším softwarem.
• Návod k obsluze naleznete v Uživatelské příručce
iPod/iPhone/iPad.
Kompatibilní USB zařízení
•USB zařízení, která podporují pouze hromadný přenos.
Poznámka:
• Soubory jsou definovány jako skladby a složky jsou
definovány jako alba.
• Skladba musí mít příponu “.mp3”, “.MP3”, “.flac” nebo
“.FLAC”.
• Tento systém umí rozpoznat až:
- 255 alb (včetně kořenové složky)
- 2500 skladeb
- 999 skladeb na album
•Přenos CBI (v angličtině, Control/Bulk/Interrupt) není podporován.
•Některé soubory mohou selhat kvůli velikosti sektoru.
• Systém souborů NTFS není podporován (podporován je
pouze systém FAT16/FAT32).
Kompatibilní CD
• Tento systém umožňuje přehrávat CD-R/RW
zaznamenané ve formátu CD-DA nebo MP3.
• Disk musí být v souladu s ISO9660, úroveň 1 nebo 2 (s
výjimkou rozšířených formátů).
Poznámka:
•Některé disky CD-R/RW nelze přehrávat kvůli stavu
nahrávky.
• MP3 soubory jsou definovány jako skladby a složky jsou
definovány jako alba.
• Tento systém umí rozpoznat až:
- CD-DA: 99 skladeb
- MP3: 999 skladeb, 255 alb (včetně kořenové složky) a 20
relací
• Nahrávky nemusí být přehrávány v pořadí, v jakém byly
pořízeny.
ČESKY
VQT4Z21
5
41
Page 42

Nastavení sítě
Síťový kabel
(není v
příslušenství)
Širokopásmový směrovač apod.
např.
Bezdrátový směrovač apod.
např.
Podporuje váš směrovač bezdrátové sítě
technologii WPS?
Ano
l
7,
“Způsob 1”
l 7,
“Způsob 2”
l 7,
“Způsob 3”
Ne / Nevím
Ano Ne
Používáte zařízení
iPod touch/iPhone/iPad?
Je systém iOS ve verzi 5.0 nebo novější?
Hudbu ze zařízení se systémem iOS (iPhone, iPod,
iPad), se systémem Android™ nebo z počítače Mac/PC
můžete streamovat do reproduktorů tohoto systému
pomocí funkce AirPlay nebo DLNA.
Chcete-li tyto funkce využívat, musí být tento systém
připojen ke stejné bezdrátové síti, k níž je připojeno
zařízení kompatibilní s AirPlay (> 9) nebo s DLNA.
• Funkci AirPlay lze používat i bez síťového směrovače.
(> 10, “Přímé streamování do tohoto systému (AirPlay)”)
•Při přepnutí z kabelového připojení k místní síti na bezdrátové
může dojít k obnovení výchozích nastavení připojení k síti. V
takovém případě proveďte nastavení připojení k síti znovu.
• Pro stabilní připojení k síti je doporučeno připojení pomocí
místní sítě.
Připojení ke kabelové místní síti
ČESKY
Nastavení sítě se obvykle provede pouhým
připojením síťového kabelu.
•K připojení periferních zařízení použijte přímé síťové
kabely (STP) kategorie 5 nebo vyšší.
•Připojení jakéhokoli jiného kabelu kromě kabelu LAN v
terminálu LAN může jednotku poškodit.
• Když je připojen síťový kabel, jsou nastavení
bezdrátového připojení zrušena.
Nastavení související se sítí lze provést jednotlivě.
jJestliže je vaše domácí bezdrátová síť konfigurována
na použití s konkrétními IP adresami, maskou
podsítě, výchozí bránou, primárním DNS atd.
Jestliže chcete změnit název tohoto systému zobrazený
j
jako reproduktory AirPlay nebo renderer DLNA.
1Připojte hlavní zařízení přímo k počítači pomocí síťového
kabelu. Přívodní kabel při tom musí být odpojen.
2Připojte přívodní kabel k hlavnímu zařízení a zapněte tento
systém.
3
Poté, co se na displeji zobrazí symbol
adresu IP tohoto zařízení.
4 Opakovaným stisknutím tlačítka [SETUP] na dálkovém
ovládání vyberte položku “Net Setup” a pak stiskněte tlačítko
[OK].
5 Na dálkovém ovládání opakovaným stiskem tlačítka [SETUP]
zvolte “Manual” a poté stiskněte [OK].
6 Když na displeji zabliká text “Setting”, spusťte na
počítači internetový prohlížeč, do pole pro adresu URL
zadejte adresu IP tohoto zařízení zjištěnou v kroku 3 a
zobrazte stránku nastavení.*
7 Vyberte a zadejte podrobnosti.
8 Aplikujte změny nastavení výběrem položky “JOIN”.
9 Nastavení je dokončeno, když se zobrazí zpráva “Success”.
10 Vypněte toto zařízení a poté odpojte přívodní kabel.
11 P rov eďte postup “Připojení ke kabelové místní síti”. (
* Zobrazení stránky nastavení v prohlížeči může v
některých systémech trvat několik minut. V takovém
případě obnovte zobrazení stránky.
(>15, “IP/MAC adresa”)
“”,
zkontrolujte
>
levý)
Příprava
•Umístěte tento systém co nejblíže k bezdrátovému
síťovému směrovači.
• Odpojte síťový kabel.
• Upravte orientaci antény na
zadním panelu hlavního zařízení
podle ilustrace.
• Neprovádějte následující
činnosti:
-Naklánění antény dopředu či dozadu
když směřuje nahoru
- Vyvíjení nadměrné síly na anténu
-Přenášení tohoto zařízení drženého za anténu
1 Zapněte tento systém.
2 Podle tabulky níže vyberte metodu nastavení sítě.
1
2 Připojte přívodní kabel k hlavnímu zařízení a
VQT4Z21
6
•Síťový kabel je nutné připojovat a odpojovat, pouze
když je přívodní kabel odpojen.
42
Připojte hlavní zařízení k širokopásmovému směrovači
nebo podobnému zařízení pomocí síťového kabelu.
Přívodní kabel při tom musí být odpojen.
zapněte tento systém.
Toto zařízení je připraveno k použití, když se na
displeji zobrazí symbol “ ”.
Bezdrátové připojení k síti
Tento systém má vestavěnou funkci Wi-Fi
připojen k bezdrátovému směrovači.
®
a může být
Page 43

• Pokud chcete provést bezdrátové nastavení s
vaším počítačem Mac/PC nebo pokud chcete
použít pokročilé nastavení, postupuje podle části
“Způsob 4” na straně 8.
• Pokud chcete zrušit toto nastavení, vypněte systém
stisknutím [Í].
•Současné použití s jinými zařízeními 2,4 GHz, jako jsou
mikrovlnné trouby, bezdrátové telefony apod. může mít za
následek přerušení připojení.
• Pro aktuální informace o kompatibilitě vašeho směrovače
bezdrátové sítě navštivte stránku
http://panasonic.jp/support/global/cs/
(Stránka je pouze v anglickém jazyce.)
Způsob 1
Jestliže váš bezdrátový síťový směrovač podporuje
technologii WPS (Wi-Fi Protected Setup
∫
Použití konfigurace WPS stiskem jediného
TM
).
tlačítka (WPS Push Button Configuration (PBC))
Identifikační značka WPS
Směrovač bezdrátové sítě
kompatibilní s technologií WPS
Push Button Configuration
(PBC) je označen tímto
symbolem.
1 Opakovaným stisknutím tlačítka [SETUP] na
dálkovém ovládání vyberte položku “Net Setup”
a pak stiskněte tlačítko [OK]. *1
Na displeji zařízení je zobrazen symbol “With iPod”.
2 Opakovaným stisknutím tlačítka [SETUP] na
dálkovém ovládání vyberte položku “WPS Push”
a pak stiskněte tlačítko [OK]. *1
Na displeji bliká “WPS”.
• Do 2 minut proveďte krok 3.
3 Po zobrazení nápisu “WPS” stiskněte tlačítko
WPS na směrovači bezdrátové sítě.
4
Nastavení je dokončeno, když se zobrazí zpráva “Success”.
Na displeji zařízení je zobrazen symbol “ ”.
Pokud není připojení dokončeno ve stanoveném
časovém limitu, může se zobrazit “Fail”. Zkuste
nastavení znovu. Pokud je stále zobrazen nápis “Fail”,
zkuste ostatní metody popsané na straně 7 nebo 8.
5 Stisknutím tlačítka [OK] na dálkovém ovládání
opusťte nastavení.
• Systém lze nastavit rovněž za použití WPS PIN kódu.
(Předtím, než začnete, si v návodu k použití bezdrátového
síťového směrovače přečtěte pokyny, jak zadat PIN kód.)
1 Opakovaným stisknutím tlačítka [SETUP] na dálkovém
ovládání vyberte položku “Net Setup” a pak stiskněte
tlačítko [OK]. *2
2 Opakovaným stisknutím tlačítka [SETUP] na dálkovém
ovládání vyberte položku “WPS PIN” a pak stiskněte
tlačítko [OK]. *2
3 Zadejte PIN kód do směrovače bezdrátové sítě.
*1 Namísto toho proveďte následující krok.
Stiskněte a přidržte tlačítko [D.BASS] na tomto zařízení po
dobu 2 sekund, zatímco současně držíte stisknuté tlačítko
[
∫]
na hlavním zařízení.
*2 Namísto toho proveďte následující krok.
1
Stiskněte a přidržte tlačítko [D.BASS] na tomto zařízení po
dobu 2 sekund, zatímco současně držíte stisknuté tlačítko
[
∫]
na hlavním zařízení.
2 When “WPS” is indicated, press and hold [D.BASS] on
the main unit for 2 seconds while pressing and holding
[∫] on the main unit again.
Způsob 2
Pokud používáte zařízení iPod touch/iPhone/iPad.
(Systém iOS ve verzi 5.0 nebo novější.)
Pomocí této metody budete sdílet nastavení bezdrátové sítě
vašeho zařízení iPod touch/iPhone/iPad s tímto systémem.
• Následující vysvětlení jsou založena na přístroji iPhone.
1 Odpojte iPod/iPhone/iPad připojené k hlavnímu
zařízení.
2
Připojte zařízení iPhone k vaší domácí bezdrátové síti.
3 Připojte zařízení iPhone k hlavnímu zařízení.
4 Opakovaným stisknutím tlačítka [SETUP] na
dálkovém ovládání vyberte položku “Net Setup”
a pak stiskněte tlačítko [OK].
Na displeji zařízení je zobrazen symbol “With iPod”.
5 Odemkněte iPhone a poté stiskněte tlačítko [OK]
na dálkovém ovládání.
Na displeji zařízení je zobrazen text “Connecting
Wi-Fi”.
• Pokud se zobrazí nápis “Not Supported” nebo “Set
Wi-Fi”, zkontrolujte, zda je připojeno zařízení iPhone k
bezdrátové síti a postup opakujte od kroku 1.
6 V zařízení iPhone se zobrazí zpráva.
Povolit zařízení iPhone sdílení nastavení
bezdrátové sítě.*
7
Nastavení je dokončeno, když se zobrazí zpráva “Success”.
Na displeji zařízení je zobrazen symbol “ ”.
Pokud se zobrazí zpráva “Fail”, stiskněte tlačítko [OK]
a zkuste nastavení opakovat. Pokud je stále zobrazen
nápis “Fail”, zkuste ostatní metody popsané na straně
7 nebo 8.
• Pokud dojde k odpojení zařízení iPhone uprostřed
postupu, zkuste před odpojením postup opakovat.
1
8 Stisknutím tlačítka [OK] na dálkovém ovládání
opusťte nastavení.
*1: V závislosti na nastavení prostředí sítě nebo směrovače
bezdrátové sítě může dokončení nastavení vyžadovat
více než 10 minut.
Způsob 3
Navázání síťového připojení pomocí aplikace pro
smartphone.
Nastavení bezdrátové sítě lze provést pomocí aplikace
“Panasonic Stereo System Network Setup” (zdarma).
Pokud používáte zařízení se systémem Android, stáhněte si
příslušnou aplikaci z webu Google Play™. Pokud používáte
iPod touch/iPhone/iPad, stáhněte si ji z webu App Store.
Příprava
•Připojte smartphone k domácí bezdrátové síti.
• Zkontrolujte heslo pro domácí bezdrátovou síť.
1 Na dálkovém ovládání opakovaným stiskem
tlačítka [SETUP] zvolte “Net Setup” a poté
stiskněte [OK].
Na displeji zařízení je zobrazen symbol “With iPod”.
2 Opakovaným stisknutím tlačítka [SETUP] na
dálkovém ovládání vyberte položku “Manual” a
pak stiskněte tlačítko [OK].
Na displeji bliká text “Setting”.
3 Spusťte ve smartphonu aplikaci “Panasonic
Stereo System Network Setup” a postupujte
podle pokynů.
(Pokračování na další straně)
ČESKY
VQT4Z21
7
43
Page 44

∫ Poznámka pro verzi iOS
Po kroku 3
1 Zadejte heslo pro domácí bezdrátovou síť, ke které
za zařízení iOS připojeno.
2 Po zobrazení pokynu pro připojení zařízení s
operačním systémem iOS k tomuto systému
stiskněte tlačítko domů.
3 Na obrazovce výběru Wi-Fi sítě v “Settings” vyberte
“00 Setup _ _ _ _ _ _”.
• “ _ ” označuje číslici, která je jedinečná pro každé
nastavení.
4 Poté, co se zobrazí zpráva o dokončení připojení k
tomuto systému, restartujte aplikaci.
ČESKY
5 Poté, co se zobrazí zpráva o dokončení nastavení
Wi-Fi na tomto systému, ukončete aplikaci a poté
zkontrolujte funkci AirPlay atd.
• V Mac App Store je také k dispozici “Panasonic Stereo
System Network Setup” pro Mac OS.
Způsob 4
Nastavení síťového připojení z prohlížeče sítě
Internet.
Tímto způsobem můžete do nastavení bezdrátové sítě
systému vstoupit z internetového prohlížeče ve vašem
kompatibilním zařízení.
• Následující vysvětlení jsou založena na přístroji
iPhone.
1 Na dálkovém ovládání opakovaným stiskem
tlačítka [SETUP] zvolte “Net Setup” a poté
stiskněte [OK].
Na displeji zařízení je zobrazen symbol “With iPod”.
2 Na dálkovém ovládání opakovaným stiskem
tlačítka [SETUP] zvolte “Manual” a poté stiskněte
[OK].
Na displeji bliká text “Setting”.
3 Poté co zabliká text “Setting”, připojte
kompatibilní zařízení k bezdrátové síti tohoto
systému s názvem “00 Setup _ _ _ _ _ _”.
• “ _ ” označuje číslici, která je jedinečná pro každé
nastavení.
• Ujistěte se, že je na vašem kompatibilním zařízení
aktivováno DHCP pro nastavení sítě.
4 V kompatibilním zařízení spusťte internetový
prohlížeč, do pole pro adresu URL zadejte
“http://192.168.1.12/” a zobrazte stránku.
5 Zvolte “Search wireless network”.
6 Zvolte a vložte podrobnosti.
• Zkontrolujte název vaší domácí bezdrátové sítě
(Network name (SSID)) a heslo pro tuto síť. To lze
často nalézt na samotném směrovači bezdrátové sítě.
[1] Zvolte název domácí bezdrátové sítě.*
1
[2] Zadejte heslo.
7 Pro použití nastavení zvolte “JOIN”.
• Pro pokračování zvolte ve vyskakovacím okně “OK”.
• Pro návrat do okna nastavení zvolte “Cancel”.
8 Nastavení je dokončeno, když se zobrazí zpráva
“Success”.
Na displeji zařízení je zobrazen symbol “ ”.
Pokud se zobrazí nápis “Fail” stiskněte tlačítko [OK],
zkontrolujte heslo bezdrátové sítě a další nastavení a
začněte znovu od kroku 1.
9 Kompatibilní zařízení je nutné připojit zpět k vaší
domácí bezdrátové síti.
VQT4Z21
8
44
Zobrazí se okno nastavení systému.
•Příklady prohlížečů Internetu
Zařízení se systémem iOS/Mac: Safari
Zařízení se systémem Android: Google Chrome™
PC: Windows Internet Explorer
*1: Jestliže je bezdrátová síť nastavena jako neviditelná, zvolte
“BACK” a přečtěte si postup “Alternativní nastavení”
. (> 9
)
Page 45

Rozšířené nastavení sítě
PMX9
např.
aplikace “Music”
iPhone iOS 6.0.1
PMX9
např. iTunes 11.0
• Nastavení níže jsou alternativní nebo dodatečná nastavení
pro “Způsob 4”. (> 8)
Alternativní nastavení
Namísto kroků 5 a 6
Zvolte “Manual settings”.
1 Zadejte název domácí bezdrátové sítě do pole
“Network name (SSID)”.
2 Zvolte metodu šifrování z rozevíracího seznamu
“Security system”.
3 Zadejte heslo do pole “Password” a poté zvolte
“JOIN”.
Doplňující nastavení
Jestliže je vaše domácí bezdrátová síť konfigurována
na použití s konkrétními IP adresami, maskou podsítě,
výchozí bránou, primárním DNS atd.
Před krokem 7
Zvolte “Advanced network settings”.
{.
Do každého pole zadejte požadované adresy a zvolte “JOIN”.
•Pro změnu nastavení zpět na DHCP zvolte “ON” z
rozevíracího seznamu “DHCP”.
Jestliže chcete změnit název tohoto systému
zobrazený jako reproduktory AirPlay nebo
renderer DLNA.
Před krokem 5
Zvolte “Additional settings”.
1 Zvolte “Edit STEREO SYSTEM name”.
2 Do pole
“STEREO SYSTEM name” zadejte nový název.
{. Lze použít pouze ASCII znaky.
3 Zvolte “OK”.
4 Pokud je tento systém již připojen k vaší domácí
bezdrátové síti:
– Vyberte možnost “Additional settings” a pak
vyberte položku “Exit”.
Pokud není tento systém připojen k vaší domácí
bezdrátové síti:
j Pokračujte na krok 5 z části “Způsob 4”.
• V nastavení vašeho prohlížeče povolte aplikaci Java a
cookies.
Použití AirPlay s reproduktory
tohoto systému
Příprava
• Dokončete nastavení sítě. (> 6)
•Připojte zařízení iOS nebo systém Mac/PC ke stejné
domácí síti, k níž je připojen tento systém.
1 Zapněte tento systém.
• Na displeji zařízení je zobrazen symbol “ ”.
• Pokud se nezobrazí, zkontrolujte nastavení sítě.
(> 6)
2 Zařízení iOS: Spusťte aplikaci “Music” (nebo
iPod).
Mac/PC: Spustit “iTunes”.
• Pokud používáte aplikaci Music na vašem zařízení
iOS, vyberte hudební soubor, který chcete přehrát.
3
Vyberte možnost “Panasonic PMX9 _ _ _ _ _ _”*
ikoně AirPlay .
{. Před spuštěním přehrávání zkontrolujte nastavení
hlasitosti. (Pokud používáte AirPlay poprvé, hlasitost
může být nastavena na nejvyšší úroveň.)
1, 2
4 Spuštění přehrávání.
•Přehrávání začne s mírným opožděním.
• Pokud je systém vybrán jako výstupní reproduktory, lze
nastavit jeho automatické zapnutí.
(> 15, “Síťový pohotovostní režim”)
•Přehrávání ostatních zdrojů zvuku bude zastaveno a
přednost bude mít výstup z AirPlay.
•Změny hlasitosti na zařízení iOS nebo iTunes se projeví v
tomto systému. (Požadovaná nastavení jsou uvedena v
části iTunes v nápovědě iTunes Help.)
•V některých verzích iOS a iTunes nemusí být možné
restartovat přehrávání AirPlay, pokud došlo ke změně
polohy voliče (např. “CD”) nebo je tento systém vypnut v
průběhu přehrávání AirPlay.
V takovém případě vyberte jiné zařízení z ikony AirPlay
aplikace Music nebo iTunes a poté znovu vyberte tento
systém jako výstupní reproduktory.
•Při přehrávání videí v iTunes nebude AirPlay fungovat.
*1: “ _ ” označuje číslici, která je jedinečná pro každé
nastavení.
*2: Název zobrazovaný na systému lze změnit z nastavení
“Edit STEREO SYSTEM name”.
(> levý, "Rozšířené nastavení sítě")
Kompatibilní se zařízeními AirPlay
v
iOS 4.3.3 nebo vyšší verze
iPod touch
3., 4. a 5. generace
iPhone 5 / iPhone 4S / iPhone 4 / iPhone 3GS
iPad (3. a 4. generace) / iPad 2 / iPad
iPad mini
iTunes 10.2.2 nebo vyšší verze (Mac / PC)
(k lednu 2013)
ČESKY
VQT4Z21
9
45
Page 46

Přímé streamování do tohoto systému
PMX9
(AirPlay)
Když je tato funkce nastavena na hodnotu “On”, můžete
provádět streaming hudby ze zařízení iOS nebo Mac /
PC (iTunes 10.2.2 nebo vyšší verze) do tohoto zařízení
bez potřeby síťového směrovače.
• Pokud je tato funkce nastavena na “On”, předchozí
nastavení sítě se odstraní.
• Následující vysvětlení jsou založena na přístroji iPhone.
1 Opakovaným stisknutím tlačítka [SETUP] vyberte
možnost “D.Connect”.
2 Stisknutím [2, 1] zvolte “On” a poté stiskněte
[OK].
3 Stisknutím [2, 1] zvolte “OK? Yes” a poté
stiskněte [OK].
Bude zobrazeno hlášení “PW _ _ _ _ _”*1.
5 číslic za “PW” představují heslo této sítě.
4 Připojte vaše zařízení iPhone k bezdrátové síti
této sítě s názvem “PMX9 _ _ _ _ _ _”*
ČESKY
5 Zadejte heslo, které je uvedeno na displeji tohoto
systému.
6 Po připojení zařízení iPhone k bezdrátové síti
tohoto systému je nastavení dokončeno.
7 Pokračujte do kroku 2 z “Použití AirPlay s
reproduktory tohoto systému”. (> 9)
• Toto nastavení bude obnoveno na hodnotu “Off” po
VQT4Z21
provedení dalších nastavení sítě. (> 6)
• Pokud je možnost “D.Connect” nastavena na hodnotu
10
“On”, nebude tento systém připojen k síti Internet. Software
nelze aktualizovat nebo zkontrolovat sílu signálu sítě Wi-Fi.
• Pokud se nepoužívá AirPlay, odpojte AirPlay kompatibilní
46
zařízení od této sítě.
• Pokud na této síti používáte počítač, zkontrolujte, že jsou
všechny sdílené soubory zakódovány.
• Tato funkce je kompatibilní pouze s metodou ověřování
“Open System”. Není kompatibilní s metodou ověřování
“Shared Key”.
*1: “ _ ” zastupuje číslici.
*2: “ _ ” označuje číslici, která je jedinečná pro každé
nastavení.
Zobrazit heslo
Při prvním nastavení funkce “D.Connect” na hodnotu
“On” je vytvořeno náhodné heslo pro síť tohoto systému
a uloženo v paměti systému.
• Toto heslo bude uloženo, dokud nedojde k jeho změně.
1 Pokud je možnost “D.Connect” nastavena na hodnotu
“On”:
Stiskněte tlačítko [SETUP] opakovaně a vyberte
možnost “D.Connect”.
2 Stisknutím [2, 1] zvolte “On” a poté stiskněte [OK].
3 Zobrazí se aktuální heslo.
•5 číslic za “PW” představují heslo této sítě.
4 Pro odchod stiskněte jakékoliv tlačítko.
2
.
Změnit heslo
1 Pokud je možnost “D.Connect” nastavena na hodnotu
“Off”:
Stiskněte tlačítko [SETUP] opakovaně a vyberte
možnost “D.Connect”.
2 Stisknutím [2, 1] zvolte “Change PW” a poté
stiskněte [OK].
3
Stisknutím [2,1] zvolte “OK? Yes” a poté stiskněte [OK].
4 Zobrazilo se nové heslo.
•5 číslic za “PW” představuje nové heslo do této sítě.
5 Pro odchod stiskněte jakékoliv tlačítko.
∫ Poznámka o změnách hesla
Pokud nebudete po změně hesla sítě systému vyzváni
ke změně hesla na dalších zařízeních, je nutné provést
následující změny.
Zařízení iOS (iPod touch/iPhone/iPad)*1:
•Před výběrem sítě tohoto systému:
1 Vyberte položku [ ] nacházející se pod názvem
bezdrátové sítě systému.
2 Vyberte možnost “Forget this Network” a pak vyberte
položku “Forget”.
3 Vyberte bezdrátovou síť tohoto systému a zadejte
nové heslo.
Mac/PC:
• Pokud si váš počítač zapamatoval staré heslo, musíte
změnit uložené heslo sítě tohoto systému na nové.
• Podrobnosti naleznete v návodu k obsluze zařízení.
*1: Kroky jsou založené na systému iOS 6.0.1.
Přehrávání hudebních souborů na
serveru DLNA
Je možné sdílet hudební soubory uložené na DLNA
certifikovaném mediálním serveru (počítač se systéme
Windows 7, chytrý telefon apod.) připojeném k vaší
domácí síti a poslouchat obsah z reproduktoru tohoto
systému.
Příprava
• Dokončete nastavení sítě. (> 6)
•Připojte zařízení s nainstalovaným softwarem
kompatibilním s ovladačem DMC (Digital Media
Controller) ke stejné domácí síti jako tento systém.
•Přidejte obsah a adresář do knihoven přehrávače
Windows Media
– Seznam stop programu Windows Media® Player
přehrává pouze obsah uložený v knihovnách.
®
Player nebo do smartphonu atd.
1 Zapněte tento systém.
• Na displeji zařízení je zobrazen symbol “ ”.
• Pokud se nezobrazí, zkontrolujte nastavení sítě. (>6)
2 Spusťte zařízení kompatibilní s DMC a připojte
ho k tomuto přístroji.
• Název tohoto systému se zobrazí jako
“Panasonic PMX9 _ _ _ _ _ _”*
• Podrobné informace o používání zařízení
kompatibilních s DMC naleznete v návodu k
obsluze zařízení nebo softwaru.
∫ Podporované formáty klienta DLNA
Formáty souborů, které nejsou podporovány serverem
DLNA nelze přehrát.
Zvukový kodek Příklad přípony souboru
MP3 .mp3
WAV .w av
FLAC .flac
• V závislosti na obsahu a připojeném vybavení nemusí být
přehrávání možné.
*1: “ _ ” označuje číslici, která je jedinečná pro každé
nastavení.
*2: Název zobrazovaný na systému lze změnit z nastavení
“Edit STEREO SYSTEM name”.
(> 9, “Rozšířené nastavení sítě”)
1, 2
.
Page 47

Operace Bluetooth
Použitím připojení Bluetooth® můžete na tomto systému
bezdrátově poslouchat zvuk ze zvukového zařízení
®
Bluetooth
Podrobnosti o zařízení Bluetooth
obsluze.
.
®
®
naleznete v návodu k
Párování Bluetooth® zařízení
Příprava
•Na zařízení zapněte funkci Bluetooth
zařízení poblíž tohoto systému.
• Pokud je tento systém již připojen k zařízení Bluetooth
odpojte ho.
1 Opakovaným stisknutím tlačítka [SELECTOR]
vyberte možnost “BLUETOOTH”.
Pokud je zařízení “Pairing” uvedeno na displeji,
přejděte ke kroku 3.
2 Stisknutím [PLAY MENU] zvolte “New Device” a
poté stiskněte [OK].
Na displeji se objeví nápis “Pairing”.
3 Zvolte “SC-PMX9” z menu Bluetooth
Bluetooth
®
.
4 Spusťte přehrávání na zařízení Bluetooth
Poznámka:
• Pokud budete vyzváni k zadání hesla, zadejte hodnotu “0000”.
• S tímto systémem můžete registrovat až 8 zařízení. Pokud je
spárováno 9. zařízení, bude nahrazeno zařízení, které se
nepoužívalo po nejdelší dobu.
®
a umístěte
®
zařízení
®
.
Připojování spárovaného zařízení
Bluetooth
Příprava
•Na zařízení zapněte funkci Bluetooth® a umístěte
zařízení do blízkosti reproduktorů.
• Pokud je tento systém již připojen k zařízení Bluetooth®,
odpojte ho.
1 Opakovaným stisknutím tlačítka [SELECTOR]
vyberte možnost “BLUETOOTH”.
Na displeji se objeví nápis “Ready”.
2 Zvolte “SC-PMX9” z menu Bluetooth
Bluetooth
Název připojeného zařízení je uveden na displeji po
dobu 2 sekund.
3 Spusťte přehrávání na zařízení Bluetooth
®
®
®
.
zařízení
®
.
Poznámka:
• Tento systém může být najednou kontaktován pouze
jedním zařízením.
• Pokud je jako zdroj vybrána možnost “BLUETOOTH”, tento
systém se automaticky pokusí a připojí k poslednímu
připojenému Bluetooth
• Pokud je vybrán jiný zdroj audia, (např. “CD”), zařízení
Bluetooth
®
bude odpojeno.
Režim vysílání Bluetooth
Rychlost přenosu můžete změnit změnou priorit kvality
přenosu nebo zvuku.
•Přednastavená hodnota je “Mode 1”.
• Pokud chcete lepší kvalitu zvuku, vyberte položku “Mode 2”.
®
,
Příprava
• Opakovaným stisknutím tlačítka [SELECTOR] vyberte
možnost “BLUETOOTH”.
• Pokud je již zařízení Bluetooth
1 Opakovaným stisknutím tlačítka [PLAY MENU]
vyberte možnost “Link Mode”.
2 Pro volbu režimu stiskněte možnost [2, 1] a pak
stiskněte tlačítko [OK].
Mode 1: Důraz na konektivitu
Mode 2: Důraz na kvalitu zvuku
Úroveň vstupu Bluetooth
Pokud je úroveň hlasitosti přenosu Bluetooth
změňte nastavení úrovně vstupu.
Příprava
•Připojte zařízení Bluetooth
1 Opakovaným stisknutím tlačítka [PLAY MENU]
vyberte možnost “Input Level”.
2 Pro volbu úrovně stiskněte možnost [2, 1] a pak
stiskněte tlačítko [OK].
“Level 0”
®
zařízení.
®
®
připojeno, odpojte ho.
®
®
.
,. “Level i1” ,. “Level i2”
^-----------------------------------------J
Poznámka:
• Je-li zvuk zkreslený, zvolte “Level 0”.
Odpojení zařízení Bluetooth
1 Po připojení zařízení Bluetooth
Stiskněte tlačítko [PLAY MENU] a vyberte možnost
“Disconnect?”.
®
®
:
2 Stisknutím [2, 1] zvolte “OK? Yes” a poté
stiskněte [OK].
®
příliš nízká,
O zařízení Bluetooth
Společnost Panasonic nenese žádnou
odpovědnost za data a/nebo informace prozrazené
během bezdrátového přenosu.
Používané kmitočtové pásmo
• Tento systém využívá frekvenční pásmo 2,4 GHz.
Certifikace zařízení
• Tento systém vyhovuje kmitočtovým omezením a je
certifikován na základě telekomunikačních zákonů,
takže povolení k bezdrátovému provozu není nutné.
• Níže uvedené činnosti jsou v některých státech podle
zákona trestné:
- Rozebírání nebo pozměňování tohoto systému.
-Odstranění označení uvádějících technické specifikace.
Omezení použití
• Bezdrátový přenos a používání všech zařízení
vybavených technologií Bluetooth
• Všechna zařízení musí být v souladu se standardy
Bluetooth SIG, Inc.
• V závislosti na specifikacích a nastavení zařízení může
dojít k selhání spojení či odlišnému provedení operací.
• Tento systém podporuje funkce zabezpečení Bluetooth®. V
závislosti na prostředí provozu a/nebo nastavení však toto
zabezpečení nemusí dostačovat. Data bezdrátově
přenášená do tohoto systému přenášejte s opatrností.
• Tento systém neumožňuje přenos dat do zařízení
Dosah použití
•Toto zařízení používejte v maximálním dosahu 10 m.
Rušení způsobené jinými zařízeními
• Tento systém nemusí fungovat správně a může
• Systém nemusí správně fungovat, pokud jsou radiové
Určené použití
•Systém je určeno pro normální obecné používání.
• Nepoužívejte tento systém poblíž citlivých zařízení či v
®
Bluetooth
Rozsah se může snížit vlivem okolního prostředí,
překážek nebo rušení.
docházet k problémům jako šum a přeskakování zvuku z
důvodu rušení radiovými vlnami, pokud se systém
nachází příliš blízko dalším zařízením Bluetooth
zařízením, která využívají pásmo 2,4 GHz.
vlny z blízké vysílací stanice apod. příliš silné.
prostředí citlivém na rušení rádiové frekvence (např.:
letiště, nemocnice, laboratoře atd.).
.
®
®
nejsou zaručeny.
®
nebo
ČESKY
VQT4Z21
11
47
Page 48

Činnosti přehrávání médií
Následující značky označují dostupnost funkce.
[CD]: Audio CD ve formátu CD-DA a CD obsahující
[iPod]: Kompatibilní iPod/iPhone/iPad
[USB]:USB zařízení obsahující soubory MP3/FLAC
[AirPlay] :
[Bluetooth]:
Příprava
• Zapnutí přístroje.
• Vložte médium nebo připojte zařízení Bluetooth
• Stisknutím [CD], [iPod] nebo [SELECTOR] zvolte zdroj zvuku.
soubory MP3
Při připojení zařízení kompatibilního s AirPlay. (>9)
Připojené zařízení Bluetooth
®
Základní přehrávání [CD] [iPod] [USB] [AirPlay]
[Bluetooth]
Přehrávání Stiskněte [1/;].
Zastavení Stiskněte [∫].
ČESKY
Pauza při
přehrávání
Přeskočení Stisknutím [:] nebo [9] můžete
Vyhledávání
(S výjimkou
[AirPlay])
[iPod]
Zobrazení
nabídky iPod
[iPod]
Výběr položku
VQT4Z21
• [USB]: Přehrávaná stopa je uložena a
je zobrazen text “Resume”. Bod
přehrávání se vrátí na začátek stopy.
• [USB]: Dvojím stisknutím tlačítka [∫]
vyberte zvuk.
Stiskněte [1/;].
Pro pokračování přehrávání stiskněte znovu.
přeskočit skladbu.
(hlavní přístroj:
[CD] [USB]: Stiskněte [3] nebo [4] pro
přeskočení alba MP3/FLAC.
Během přehrávání nebo pozastavení
Stiskněte a podržte tlačítko [
(hlavní přístroj:
• [iPod]: Vyhledávání vzad probíhá
pouze v rámci aktuální stopy.
Stiskněte [iPod MENU].
Stiskněte [3, 4] a potom stiskněte
[OK].
[:/6]
[:/6]
nebo
6
nebo
12
48
®
.
[5/9]
] nebo [5].
[5/9]
Poznámka:
• V závislosti na modelu (např. iPod nano 7. generace apod.)
může být potřebné zvolit album, interpreta apod. na iPod/
iPhone.
• V závislosti na modelech iPod/iPhone/iPad se přehrávání
může lišit.
• Stopy lze vybrat stisknutím číselných tlačítek.
Zobrazení dostupných informací [CD]
[USB] [Bluetooth]
Stiskněte [DISPLAY].
např. MP3 : Skladba : Album
Poznámka:
• Maximální počet znaků, které lze zobrazit: přibližně 32
• Tento systém podporuje verzi 2.3 ID3 tagů.
• Textové údaje, které systém nepodporuje, se mohou zobrazit
odlišně.
)
)
TAG: ID3 tagů
Menu pro přehrávání [CD] [USB] [AirPlay]*1
1 Stisknutím [PLAY MENU] zvolte “Repeat”,
“Random” nebo “PLAYMODE”.
2 Pro výběr požadovaného režimu stiskněte
[2, 1] a potom [OK].
[CD] [USB] Repeat
Off Proveďte uvedenou volbu za účelem
1-Track Přehraje pouze zvolenou stopu.
All Všechny skladby budou zopakovány.
[AirPlay] Repeat
Při kontrole zvoleného nastavení vycházejte z připojeného
zařízení.
[CD] [USB] Random
On Náhodně přehraje obsah.
Off Náhodné přehrávání je vypnuté.
[AirPlay] Shuffle
Při kontrole zvoleného nastavení vycházejte z připojeného
zařízení.
[CD] (MP3) [USB] PLAYMODE
All Přehrajte všechny skladby ve formátu
1-Album Přehraje pouze zvolené album MP3/
Poznámka:
•Během náhodného přehrávání nelze přeskočit na již přehrané
skladby nebo stiskněte číselná tlačítka.
• Tyto režimy přehrávání nefungují s “Programované
přehrávání”.
• [CD]
:
Když otevřete zásuvku disku, nastavení se vrátí na
výchozí “Off”.
[AirPlay]
: Aplikovaná nastavení zůstanou v platnosti až do změny.
*1:
[AirPlay]
zrušení opakovaného přehrávání.
• Bude zobrazeno hlášení “1TR, `”.
(Slouží k přeskočení požadované
skladby.)
• Bude zobrazeno hlášení “`”.
• Bude zobrazeno hlášení “RND”.
• “RND” nebude zobrazeno v případě
volby “1-Track”.
MP3/FLAC.
FLAC.
• “1ALBUM” je zobrazeno.
: Slouží k provedení nastavení během přehrávání.
Page 49

Programované přehrávání [CD] [USB]
30min > 60min > 90min > 120min > Off
^--------------------------------------------------------------b
Tato funkce umožňuje naprogramovat až 24 skladeb.
[CD] (CD-DA)
1
Stiskněte [PROGRAM], když neprobíhá přehrávání.
Zobrazí se “PGM”.
2 Pro výběr požadované skladby stiskněte číselná
tlačítka.
Opakujte tento krok pro naprogramování dalších skladeb.
3 Stiskněte [1/;] pro zahájení přehrávání.
[CD] (MP3), [USB]
1
Stiskněte [PROGRAM], když neprobíhá přehrávání.
Zobrazí se “PGM”.
2 Stiskněte [3, 4] pro výběr požadovaného alba.
3 Pro výběr požadované skladby stiskněte [9] a
potom numerická tlačítka.
4 Stiskněte [OK].
Pro naprogramování ostatních skladeb opakujte kroky 2 až 4.
5 Stiskněte [1/;] pro zahájení přehrávání.
Zrušení
programovacíhorežimu
Kontrola
programovýchobsahů
Smazání poslední
skladby
Smazání všech
naprogramovaných
skladeb
Poznámka:
•Paměž programu se vymaže po otevření zásuvky disku.
Stiskněte [PROGRAM], když
neprobíhá přehrávání.
Stiskněte [:] nebo [9] při
zobrazeném “PGM”, když neprobíhá
přehrávání.
Stiskněte [DEL] v režimu zastavení.
Stiskněte [∫], když neprobíhá
přehrávání. Zobrazí se “CLR All”.
Během 5 sekund stiskněte znovu [
Rádio
Lze přednastavit 30 FM stanic.
Příprava
Opakovaným stisknutím tlačítka [SELECTOR]
vyberte možnost “FM”.
Automatická předvolba
1 Stiskněte [RADIO MENU] pro výběr “Auto
Preset”.
2 Stiskněte [2, 1] pro výběr “Lowest” (nejnižší)
nebo “Current” (aktuální) frekvence.
3 Stiskněte [OK] pro zahájení ukládání předvoleb.
Pro zrušeni stiskněte [∫].
Ručni ladění a předvolby
1 Stiskněte [6] nebo [5]pro naladění
požadované stanice.
Pro automatické ladění tlačítko stiskněte a přidržte,
dokud se frekvence nezačne rychle měnit.
2 Stiskněte [PROGRAM].
3 Pro výběr čísla předvolby stiskněte numerická
tlačítka.
Pro nastavení dalších stanic zopakujte kroky 1 až 3.
Stanici, která má stejné číslo předvolby nahradí nová
stanice.
Vol ba předvolené stanice
∫
].
Stiskněte numerická tlačítka [:] nebo [9]
(hlavní přístroj: [:/6] nebo [5/9]) pro
výběr předvolby stanice.
Zlepšení kvality zvuku
1 Opakovaným stisknutím tlačítka [RADIO MENU]
vyberte možnost “FM Mode”.
2 Stiskněte [2, 1] pro výber “Mono” a potom
stiskněte [OK].
Pro zrušení vyberte “Stereo”.
“Mono” se při změně frekvence rovněž zruší.
Uložení nastavení
Pokračujte kroky 2 a 3 v kapitole “Ruční ladění a
předvolby”.
RDS vysílání
Tento systém zobrazuje textové údaje přenášené
rádiovým datovým systémem (RDS), který je v určitých
oblastech k dispozici.
Stiskněte [DISPLAY].
PS Programový servis
PTY Typ programu
FREQ Frekvence
Poznámka:
• Funkce RDS nemusí být dostupná, pokud bude příjem
signálu slabý.
Hodiny a časovače
Nastavení hodin
Přístroj ukazuje čas ve formátu 24 hodin.
1 Stiskněte [CLOCK/TIMER] pro výber “CLOCK”.
2 Během 10 sekund, stiskněte [3, 4] pro
nastavení času.
3 Stiskněte [OK].
Pro zobrazení hodin na pár sekund stiskněte
[CLOCK/TIMER].
Poznámka:
• Pro zachování přesného času pravidelně kontrolujte
přesnost času.
Časovač vypnutí
Časovač vypnutí vypne systém po uplynutí nastavené
doby.
Nastavte opakovaným stisknutím tlačítka [SLEEP] (v
minutách).
Pro zrušení vyberte “Off”.
Zobrazení zbývajícího času
Stiskněte [SLEEP].
Poznámka:
• Časovač vypnutí lze používat společně s časovačem
přehrávání.
• Časovač vypnutí má vždy přednost. Dávejte pozor, aby se
nastavení časovačů nepřekrývala.
ČESKY
VQT4Z21
13
49
Page 50

Časovač přehrávání
Můžete nastavit časovač, který zajistí zapnutí v určitou
dobu jako budík.
Příprava
Nastavte hodiny.
1 Opakovaným stisknutím tlačítka [CLOCK/TIMER]
vyberte možnost “TIMER Adjust”.
2 Během 8 sekund, stiskněte [3, 4] pro
nastaveníčasu zapnutí.
3 Stiskněte [OK].
4 Pro nastavení konečného času opakujte kroky 2
a 3.
Spuštění časovače
1 Připravte zdroj zvuku, který chcete poslouchat, a
nastavte hlasitost.
2 Stiskněte [F, PLAY].
Zobrazí se “F”.
Stiskněte znovu [F, PLAY] pro zrušení.
Systém musí být vypnutý, aby se časovač aktivoval.
ČESKY
Kontrola nastavení
Opakovaným stisknutím tlačítka [CLOCK/TIMER]
vyberte možnost “TIMER Adjust”.
Poznámka:
• Časovač spustí přehrávání s nízkou hlasitostí, která se
bude postupně zvyšovat na nastavenou úroveň.
• Časovač se spustí každý den ve stejný čas, pokud je
zapnutý.
• Jestliže systém vypnete a znovu zapnete během doby, kdy
je časovač spuštěný, časovač se v době ukončení
nezastaví.
VQT4Z21
14
50
Zvukové efekty
Změna kvality zvuku
Pro výběr zvukového efektu stiskněte [SOUND].
1
2 Stiskněte [2, 1] pro výběr požadovaného
nastavení.
BASS
TREBLE
Surround “On Surround” nebo “Off Surround”
Pouze pomocí hlavního přístroje
Otočením voliče [BASS] nebo [TREBLE]
nastavíteúroveň basů nebo výšek.
-4 až +4
Předvolba EQ (Preset EQ)
Pro výběr nastavení stiskněte [PRESET EQ]
Heavy Zdůrazní rockovou hudbu
Soft Pro hudební kulisu
Clear Zvýrazní vyšší frekvence
Vocal Zvýrazní zpěv
Flat Zruší zvukový efekt
D.BASS
Tato funkce vás nechá vychutnat si basové efekty.
Stiskněte [D.BASS] pro výběr “On D.BASS” nebo
“Off D.BASS”.
Použití externího zvukového vstupu
Můžete připojit VCR, DVD přehrávač atd. a
prostřednictvím tohoto systému poslouchat zvuk.
Příprava
Připojte externí zařízení.
1 Opakovaným stisknutím tlačítka [SELECTOR]
vyberte možnost “AUX”.
2 Spusžte přehrávání externího zařízení.
Další
Snížení jasu panelu displeje
Stiskněte [SETUP] pro výběr “Dimmer”.
1
2 Stisknutím tlačítka [2, 1] vyberte “On” a pak
stiskněte [OK].
Poznámka:
• Pro zrušení zvolte v kroku 2 “Off”.
Automatické vypnutí systému
Pokud systém nepoužíváte asi po dobu 20 minut, tato
funkce systém vypne (s výjimkou rádia).
1 Opakovaným stisknutím tlačítka [SETUP] vyberte
možnost “Auto Off”.
2 Stisknutím tlačítka [2, 1] vyberte “On” a pak
stiskněte [OK].
Poznámka:
• Pro zrušení zvolte v kroku 2 “Off”.
•Při připojení k zařízení Bluetooth
• Je-li funkce “Net Standby” nastavena na “On”, bude tato
funkce také nastavena na “On”. Chcete-li změnit
nastavení, nastavte funkci “Net Standby” na “Off”. (> 15)
Aktualizace softwaru
Příležitostně může firma Panasonic vydat aktualizovaný
software pro tento systém, který může obohatit nebo
zlepšit činnost jednotlivých funkcí. Tyto aktualizace jsou
k dispozici bezplatně.
NEODPOJUJTE napájecí kabel, pokud je
zobrazeno jedno z následujících hlášení.
– “Linking”, “Updating” nebo “%”
(“ ” označuje nějaké číslo.)
•Během procesu aktualizace nelze provádět žádné další
operace.
Příprava
• Zapněte tento systém.
•Připojte tento systém k domácí síti. (> 6)
– Ujistěte se, že je síť připojena k Internetu.
– Pokud je položka “D.Connect” nastavena na
hodnotu “On”, změňte nastavení na “Off” a připojte
systém k síti, která je připojena k Internetu.
®
tato funkce nefunguje.
Page 51

1 Opakovaným stisknutím tlačítka [SETUP] vyberte
položku “SW Update” a pak stiskněte tlačítko
[OK].
2 Pro zahájení aktualizace stiskněte [2, 1], zvolte
“Update? Yes” a poté stiskněte [OK].
• Zrušte aktualizaci volbou “Update? No”.
{. Po dokončení aktualizace se zobrazí “Success”.
3 Odpojte přívodní kabel a po 3 minutách jej opět
připojte.
• Pokud nejsou k dispozici žádné aktualizace, zobrazí se
“No Need”.
≥ Stahování bude trvat několik minut. V závislosti na
prostředí připojení může stahování trvat déle nebo
nemusí pracovat správně.
∫ Ověření verze softwaru
1 Opakovaným stisknutím tlačítka [SETUP] vyberte možnost
“SW Version” a poté stiskněte [OK].
{. Zobrazí se nainstalovaná verze softwaru.
2 Vystupte stiskem [OK].
Síla signálu Wi-Fi
Ověření síly signálu Wi-Fi v místě umístění systému.
Příprava
Připojte tento systém k bezdrátové síti. (> 6)
1 Opakovaným stisknutím tlačítka [SETUP] vyberte
možnost “Signal Level” a poté stiskněte [OK].
• Tento displej systému zobrazí “Level ”.
(“ ” nahrazuje číslo.)
2 Pro výstup z režimu zobrazení stiskněte [OK].
• Doporučuje se síla signálu alespoň “3”. Pokud je síla
signálu
“2” nebo “1”, změňte pozici či úhel bezdrátového
síťového směrovače nebo systému a zjistěte, zda se
kvalita signálu zlepší.
• Pokud se zobrazí “Level 0”, znamená to, že se tomuto
systému nedaří vytvořit spojení s bezdrátovým síťovým
směrovačem. (> 17)
• Tato funkce nepracuje, pokud je možnost “D.Connect”
nastavena na hodnotu “On”.
Nastavení bezdrátové místní sítě
Funkci bezdrátové místní sítě lze aktivovat nebo
deaktivovat.
1 Opakovaným stisknutím tlačítka [SETUP] vyberte
možnost “Wireless LAN” a poté stiskněte [OK].
2 Stisknutím tlačítka [2, 1] vyberte “On” nebo
“Off” a poté stiskněte [OK].
• Nastavení z výrobního závodu je “On”.
Síťový pohotovostní režim
Pokud je systém vybrán za reproduktory AirPlay, lze jej
automaticky zapnout z pohotovostního režimu.
Příprava
Připojte tento systém k domácí síti. (> 6)
1 Opakovaným stisknutím tlačítka [SETUP] vyberte
možnost “Net Standby” a poté stiskněte [OK].
2 Stisknutím [2, 1] zvolte “On” a poté stiskněte
[OK].
• Pro zrušení této funkce zvolte v kroku 2 “Off”.
• Nastavení z výrobního závodu je “Off”. Je-li tato funkce
nastavena na “On”, spotřeba elektrické energie v
pohotovostním režimu se zvýší.
Název bezdrátové sítě (SSID)
Zobrazte název připojené bezdrátové sítě (SSID).
1 Opakovaným stisknutím tlačítka [SETUP] vyberte
položku “Net Info” a pak stiskněte tlačítko [OK].
Na displeji zařízení je zobrazen symbol “IP Addr.”.
2 Opakovaným stisknutím tlačítka [SETUP] vyberte
položku “SSID” a pak stiskněte tlačítko [OK].
3 Vystupte stiskem [OK].
• Pokud se na tomto systému zobrazí nápis “No Connect”
není systém připojen k bezdrátové síti.
• Všechna písmena se zobrazí jako velká písmena a znaky,
které nelze zobrazit, budou nahrazeny “
¢”.
IP/MAC adresa
Chcete-li zkontrolovat IP adresu nebo Wi-Fi MAC adresu
tohoto systému.
1 Opakovaným stisknutím tlačítka [SETUP] vyberte
položku “Net Info” a pak stiskněte tlačítko [OK].
Na displeji zařízení je zobrazen symbol “IP Addr.”.
2 Opakovaným stisknutím tlačítka [SETUP] vyberte
položku “IP Addr.” nebo “MAC Addr.” a pak
stiskněte tlačítko [OK].
Zobrazí se část adresy IP nebo adresy MAC.
3 Stiskem tlačítka [2, 1] na dálkovém ovládání
zobrazte zbývající část adresy IP nebo adresy
MAC.
• Pro opuštění nastavení počkejte 20 s.
• “ – ” zobrazené v levé horní či spodní části displeje
zobrazuje první a poslední zařízení.
ČESKY
VQT4Z21
15
51
Page 52

Odstraňování závad
Před žádostí o opravu proveďte následující kontroly.
Nerozumíte-li některému z popisovaných postupů, nebo
pokud uvedený postup problém nevyřeší, poraďte se s
prodejcem.
Máte nainstalován nejnovější software?
•Občas může společnost Panasonic vydat
aktualizovaný software pro tento systém, který může
systému přidat funkce či zlepšit fungování stávajících
funkcí. (> 14)
Běžné problémy
S dálkovým ovladačem nelze provést žádnou operaci.
• Zkontrolujte, zda jsou baterie vloženy správně.
Zvuk je nevyvážený nebo se neozývá žádný zvuk.
• Upravte hlasitost systému.
•Vypněte systém, zjistěte a odstraňte příčinu a poté systém
znovu zapněte. Může to být způsobeno přetěžováním
reproduktorů nadměrnou hlasitostí nebo výkonem a
používáním systému v prostředí s příliš vysokou teplotou.
Během přehrávání je slyšet hučení.
• V blízkosti přístroje je vedení sížového napájení (AC)
nebo zářivkové osvětlení. Udržujte jiná zařízení a kabely
ČESKY
v dostatečné vzdálenosti od kabelu tohoto systému.
Disk
Displej nezobrazuje správně.
Přehrávání se nespustí.
• Disk jste nevložili správně. Vložte ho správně.
• Disk je špinavý. Vyčistěte disk.
•Vyměňte disk, pokud je poškrábaný, zdeformovaný
nebo nestandardní.
• Došlo ke kondenzaci. Nechte systém vyschnout po
dobu 1 až 2 hodin.
Rádio
Slabý příjem nebo je slyšet dunění.
•Umístěte anténu dále od počítačů, televizorů,
ostatních kabelů a šňůr.
• Použijte venkovní anténu.
•Vypněte televizor nebo ho přemístěte dále od systému.
VQT4Z21
16
52
iPod/iPhone/iPad
Pokud nemůžete zapnout iPod/iPhone/iPad.
• Zkontrolujte, zda není baterie iPod/iPhone/iPad vybitá.
•Před připojením iPod/iPhone/iPad vypněte iPod/iPhone/
iPad a systém. Připojte iPod/iPhone/iPad a zkuste znovu.
Nehraje zvuk.
•Vypněte iPod/iPhone/iPad a odeberte jej od systému.
Připojte iPod/iPhone/iPad k systému, zapněte jej a
přehrajte znovu.
iPod/iPhone/iPad se nenabíjí.
• Zkontrolujte připojení.
• Nabíjení zařízení iPod/iPhone/iPad, jehož baterie je vybitá:
- Pokud používáte připojení “iPod_Port”, zapněte tento
systém. Nevypínejte tento systém, dokud nebude
zařízení iPod/iPhone/iPad provozuschopné.
- Pokud používáte připojení “iPod_Dock”, po dobu nabíjení
iPod/iPhone bude zobrazeno “Checking Connection”.
Znamená to ale, že systém začal nabíjet.
USB
Nelze přečíst zařízení USB nebo jeho obsah.
• Formát zařízení USB nebo jeho obsah není
kompatibilní se systémem.
•Zařízení USB s kapacitou vyšší než 32 GB není za
určitých podmínek podporováno.
Pomalá činnost USB zařízení.
• Velké soubory nebo zařízení USB s velkou kapacitou
se mohou načítat delší dobu.
Zobrazený uplynulý čas se liší od skutečné doby
přehrávání.
• Data zkopírujte na jiné paměžové zařízení USB nebo
je zazálohujte a zařízení USB zformátujte.
Bluetooth
Párování nelze provést.
• Zkontrolujte stav zařízení Bluetooth
Nelze se spojit se zařízením.
• Spárování se zařízením nebylo úspěšné nebo došlo k
nahrazení registrace. Zkuste spárování se zařízením
znovu.
• Systém může být připojen k jinému zařízení. Odpojte
jiné zařízení a zkuste spárování se zařízením znovu.
®
®
.
Zařízení je připojeno, ze systému však není slyšet zvuk.
•U některých zabudovaných Bluetooth® zařízení musíte
výstup zvuku “SC-PMX9” nastavit ručně. Pro podrobné
informace si přečtěte návod k obsluze daného zařízení.
Zvuk je přerušovaný.
•Zařízení se nachází mimo komunikační rozsah 10 m.
Přeneste zařízení Bluetooth
•Odstraňte jakékoliv překážky mezi tímto systémem a
zařízením.
• Další zařízení, která používají frekvenční pásmo
2,4 GHz (bezdrátový směrovač, mikrovlnné trouby,
bezdrátové telefony apod.) způsobují rušení. Přeneste
zařízení Bluetooth
jeho vzdálenost od ostatních zařízení.
• Pro stabilní komunikaci zvolte “Mode 1”. (> 11 )
®
blíže k systému.
®
blíže k tomuto systému a zvětšete
Operace AirPlay
Nelze se připojit k síti.
•Potvrďte síťové připojení a nastavení. (> 6)
• Bezdrátová síť může být nastavena jako neviditelná. V
takovém případě vyberte v “Způsob 4” možnost
“Manual settings”. (> 9)
• Tento systém nelze k bezdrátové síti využívající
nastavení zabezpečení WEP připojit metodou WPS
(“Způsob 1”). Pro připojení k bezdrátové síti použijte
“Způsob 4”. (> 8)
• Ujistěte se, že je na bezdrátovém síťovém směrovači
zapnuta a povolena funkce multicast.
• Pokud se používá “D.Connect” a pokud se změnilo
heslo pro “D.Connect”, připojte druhé zařízení s
použitím nového hesla. (> 10)
• Ujistěte se, že funkce “Wireless LAN” je nastavena na
“On”. (> 15)
Nelze se připojit k tomuto systému.
• Zobrazte název bezdrátové sítě, ke které je tento
systém připojen a ujistěte se, že je zařízení připojeno
ke stejné síti. (> 6, 15)
• Pokud je “Net Standby” nastaveno na “Off”,
kompatibilní zařízení AirPlay nelze připoji
systém vypnut.
• Vypněte nastavení Wi-Fi na kompatibilním zařízení
AirPlay, nastavte “Net Standby” na “Off” (> 15) a
potom vypněte a zapněte tento systém. Znovu připojte
kompatibilní zařízení k Wi-Fi síti a poté vyberte tento
systém znovu jako AirPlay reproduktory.
t, když je
Page 53

Bezdrátový síťový směrovač je kompatibilní s
technologií WPS PBC, ale párování nefunguje.
• Pokud je síť nastavena tak, aby byla viditelná, stisknutí
tlačítka konfigurace nefunguje. V takovém případě buď
vytvořte bezdrátovou síť viditelnou při nastavování sítě
pro tento systém případně použijte “Způsob 2”,
“Způsob 3” nebo “Způsob 4”. (> 7, 8)
Přehrávání se nespustí.
Zvuk je přerušovaný.
• Vyzkoušejte kabelové připojení k síti. (> 6)
•Současné použití s jinými zařízeními 2,4 GHz, jako
jsou mikrovlnné trouby, bezdrátové telefony apod.
může mít za následek přerušení připojení.
Zvyšte vzdálenost mezi tímto systémem a zařízeními
uvedeného druhu.
•Neumísťujte tento systém do kovové skříně, protože
by tím mohlo docházet k blokování signálu Wi-Fi.
•Umístěte tento systém blíže k bezdrátovému
směrovači sítě.
• Pokud je možnost “D.Connect” nastavena na hodnotu
“On”, umístěte zařízení kompatibilní s AirPlay blíže k
reproduktoru.
•V případě, že více bezdrátových zaří
stejnou bezdrátovou síť jako tento systém, zkuste
vypnout ostatní zařízení nebo omezit jejich používání
sítě.
• Když dojde k zastavení přehrávání, zkontrolujte stav
přehrávání na zařízení iOS nebo na iTunes.
• Pokud se nespustí přehrávání (přestože je zobrazen
symbol “ ”), restartujte bezdrátový síťový
směrovač, vypněte a zapněte připojení Wi-Fi na
zařízení se systémem iOS nebo na počítači Mac/PC a
poté se ujistěte, že je zvolena vaše domácí bezdrátová
síť.
•V některých verzích iOS a iTunes nemusí být možné
restartovat přehrávání AirPlay, pokud došlo ke změně
polohy voliče (např. “CD”) nebo je tento systém vypnut
v průběhu přehrávání AirPlay.
V takovém případě vyberte jiné zařízení z ikony
AirPlay aplikace Music nebo iTunes a poté znovu
vyberte tento systém jako výstupní reproduktory. (> 9)
zení používá
Displej hlavního přístroje
“--:--”
• Poprvé jste zapojili kabel sížového napájení (AC) nebo
nedávno došlo k výpadku elektrického proudu.
Nastavte hodiny.
“Adjust CLOCK”
• Hodiny nejsou nastaveny. Nastavte hodiny.
“Adjust TIMER”
• Časovač přehrávání není nastaven. Nastavte časovač přehrávání.
“Auto Off”
•Zařízení nebylo po dobu cca 20 minut použito a za minutu
se proto vypne. Pro zrušení stiskněte jakékoli tlačítko.
“CANNOT SET”
• Vyberte jiný zdroj zvuku, než je “AirPlay”,
“BLUETOOTH” nebo “DLNA”.
“Checking Connection”
•Zařízení kontroluje připojený iPod/iPhone/iPad. Pokud
se tato zpráva stále zobrazuje, ujistěte se, že je iPod/
iPhone/iPad vložen správně a zkuste to znovu.
“DL Error”
• Stahování softwaru bylo ukončeno neúspěšně. Pro odchod
stiskněte jakékoliv tlačítko. Zkuste znovu později.
• Server nelze nalézt. Pro odchod stiskněte jakékoliv tlačítko.
Ujistěte se, že je bezdrátová síť připojena k internetu.
“Error”
• Byla provedena nesprávná operace. Přečtěte si
instrukce a zkuste to znovu.
“F61” nebo “F76”
• Nastal problem s napájením.
“Fail”
• Aktualizace či nastavení se nezdařilo. Přečtěte si
instrukce a zopakujte postup.
“iPod_Dock Over Current Error”
“iPod_Port Over Current Error”
• iPod/iPhone/iPad nebo zařízení USB odebírá příliš
mnoho příkonu. Odeberte iPod/iPhone/iPad nebo
zařízení USB a znovu vypněte a zapněte systém.
“Level 0”
• Mezi tímto systémem a bezdrátovým síťovým
směrovačem není navázáno spojení.
Zkuste následující kroky:
– Zkontrolujte, zda je bezdrátový síťový směrovač zapnutý.
– Systém vypněte a znovu zapněte.
– Resetujte nastavení bezdrátové sítě. (> 6)
Pokud problém přetrvává, obraťte se na prodejce.
“Level j”
• Když je “D.Connect” nastaveno na “On” nelze zkontrolovat sílu
Wi-Fi signálu. Sílu signálu zkontrolujte tak, že na bezdrátovém
směrovači nastavíte “D.Connect” na “Off”. (
“Linking”
• Tento systém komunikuje se bezdrátovým směrovačem sítě
za účelem dokončení nastavení bezdrátové sítě.
V závislosti na bezdrátovém směrovači sítě může tento
proces zabrat několik minut. Pokuste se posunout toto
systém blíže ke směrovači bezdrátové sítě.
>
10)
“No Connect”
• Tento systém nelze připojit k síti.
Zkontrolujte síťové připojení. (> 6)
“No Device”
• iPod/iPhone/iPad nebo zařízení USB není připojeno.
Zkontrolujte připojení.
“No Disc”
• Nevložili jste disk nebo jste vložili disk, který systém
nemůže přehrát.
“No Play”
• Zkontrolujte obsah. Můžete přehrávat pouze
podporovaný formát.
• Pokud je zde více než 255 alb nebo složek (zvukových
i nezvukových), nemusí být možné některé MP3/FLAC
soubory na těchto albech načíst a přehrát. Přeneste
tato hudební alba na jiné zařízení USB. Alternativně
přeformátujte USB zařízení a uložte tato hudební alba
před uložením jiných složek, které neobsahují zvuk.
“Not MP3/Error”
• Nepodporovaný formát MP3. Systém danou skladbu
přeskočí a přehraje další.
“Not Supported”
• Vložili jste zařízení iPod/iPhone/iPad, které nelze
spustit.
•Před připojením iPod/iPhone/iPad vypněte iPod/
iPhone/iPad a systém. Připojte iPod/iPhone/iPad a
zkuste znovu.
• Tato zpráva se může zobrazit, když je navázáno
spojení s bezdrátovou místní sítí aniž by iPod, iPhone
nebo iPad byly odemknuty. (> 7, “Zpùsob 2”)
“PGM Full”
•Počet naprogramovaných skladeb je více než 24.
“Reading”
•Zařízení kontroluje informace z disku a zařízení USB.
o zmizení této zprávy zařízení zahájí činnost.
P
“Set Wi-Fi”
•Připojené zařízení iPod touch/iPhone/iPad není
připojeno k bezdrátové síti. Připojte ho k bezdrátové
síti a zkuste to znovu. (> 6)
“Wait”
• Toto se zobrazí například když je toto zařízení vypnuté.
(po dobu až 1 minuty a 30 sekund)
ČESKY
VQT4Z21
17
53
Page 54

Resetování paměti (inicializace)
Dojde-li k následujícím situacím, resetujte paměž:
• Stisknutí tlačítek nevyvolá žádnou odezvu.
• Chcete vymazat a resetovat obsah paměti.
1 Odpojte kabel sížového napájení (AC).
Počkejte 3 minuty, než přejdete ke kroku 2.
2 Při stisknutém [Í/I] na hlavním přístroji
připojtekabel sížového napájení (AC) zpět.
Zobrazí se “- - - - - - - - - - - -”.
3 Uvolněte [Í/I].
Všechna nastavení se vrátí na původní tovární
nastavení.
Je třeba znovu nastavit položky paměti.
Kód dálkového ovladače
Když další zařízení Panasonic reaguje na dálkový
ovladač tohoto systému, změňte kód ovladače pro tento
systém.
Nastavení kódu na “Remote 2”
1 Stisknutím [CD] vyberte “CD”.
2 Stiskněte a přidržte [CD] na hlavním přístroji a [2]
ČESKY
na dálkovém ovladači, dokud se nezobrazí
“Remote 2”.
3 Stiskněte a přidržte [OK] a [2] nejméně na
4 sekundy.
• Nastavení z výrobního závodu je “Remote 1”.
• Chcete-li změnit režim zpět na hodnotu “Remote 1”,
opakujte kroky výše, ale nahraďte tlačítko stisknutí na
dálkovém ovládání z tlačítka [2] na možnost [1].
VQT4Z21
18
54
Specifikace
Zesilovač
Výstupní výkon RMS
Přední kanál (oba kanály napájeny)
Celkový výkon RMS 120 W
10% celkového harmonického zkreslení
Tun er
Frekvenční modulace (FM)
Kapacita paměti 30 stanic
Frekvenční rozsah
Anténní konektor 75 ™ (nesymetrický)
87,50 MHz až 108,00 MHz (50 kHz/krok)
Vstup
Zapojení “iPod_Port”
Norma USB USB 2.0
Podporované formáty souborů médií
Systém souborů USB zařízení
Podpora ID3 tagů v2.3
Zapojení “iPod_Dock”
Zásuvka pro sluchátka Konektor stereo, Ø 3,5 mm
Vstup AUX (zadní) koncovka typu jack
Port LAN 10 Base-T/100 Base-TX
Disk
Přehrávaný disk (8 cm nebo 12 cm)
Čtení
Vlnová délka 790 nm (CD)
Výkon laseru CLASS 1
Audio výstup (disk)
Počet kanálů 2 kanály (FL, FR)
60 W na kanál (3 ™), 1 kHz,
DC OUT 5 V 2,1 A (max)
MP3 (*.mp3)
DC OUT 5 V 1,0 A (max)
CD, CD-R/RW (CD-DA, MP3)
, FLAC (*.flac)
FAT16, FAT32
Reproduktory
Reproduktor(y)
Hloubkový reproduktor 14 cm kónický x 1
Výškový 1,9 cm klenbový x 1
Super výškový 1,2 cm typu piezo x 1
Impedance 3 ™
Rozměry (Š x V x H) 161 mm x 238 mm x 264 mm
Hmotnost Přibl. 3,0 kg
Oddíl Bluetooth
Specifikace systému Bluetooth
Klasifikace bezdrátového zařízení Třída 2
Podporované profily A2DP
Frekvenční pásmo FH-SS v pásmu 2,4 GHz
Dosah 10 m přímá viditelnost
Předpokládaný dosah komunikace
Prostředí při měření:
Měření v “Mode 1”
®
®
Teplota 25 oC / výška 1 m
V3.0
Oddíl Wi-Fi/AirPlay
Wi-Fi
WLAN Standard IEEE802.11b/g
Frekvenční rozsah Pásmo 2,4 GHz
Zabezpečení WEP (64 bitů/128 bitů),
Verze WP S
Verze 2.0 (nepodporuje WEP)
WPA
TM
, WPA2
Podporované formáty zvuku (USB, DLNA)
MP3
Vzorkovací frekvence 32 / 44,1 / 48 kHz
Délka slova pro zvuk 16 bitů
Počet kanálů 2kan.
Datový tok 8–320 kb/s
FLAC
Vzorkovací frekvence
Délka slova pro zvuk 16.24 bitů
Počet kanálů 2 kan.
WAV (pouze DLNA)
Vzorkovací frekvence
Délka slova pro zvuk 16.24 bitů
Počet kanálů 2 kan.
32 / 44,1 / 48 / 88,2 / 96 / 176,4 / 192 kHz
32 / 44,1 / 48 / 88,2 / 96 / 176,4 / 192 kHz
TM
Page 55

Všeobecně
Napájení AC 220 V až 240 V, 50 Hz
Spotřeba 60 W
Rozměry (Š x V x H) 210 mm x 120 mm x 266 mm
Hmotnost Přibl. 3,1 kg
Rozsah provozních teplot 0°C až +40°C
Rozsah provozní vlhkosti
Spotřeba v pohotovostním režimu
Když se iPod/iPhone/iPad nenabíjí)
(
Poznámka:
• Technické údaje podléhají změnám bez předchozího
upozornění. Hmotnost a rozměry jsou přibližné.
• Celkové harmonické zkreslení je měřeno digitálním
spektrálním analyzátorem.
FLAC Decoder
Copyright (C) 2000,2001,2002,2003,2004,2005,2006,2007
Josh Coalson
Redistribution and use in source and binary forms, with or
without modification, are permitted provided that the following
conditions are met:
- Redistributions of source code must retain the above
copyright notice, this list of conditions and the following
disclaimer.
- Redistributions in binary form must reproduce the above
copyright notice, this list of conditions and the following
disclaimer in the documentation and/or other materials
provided with the distribution.
- Neither the name of the Xiph.org Foundation nor the
names of its contributors may be used to endorse or
promote products derived from this software without
specific prior written permission.
THIS SOFTWARE IS PROVIDED BY THE COPYRIGHT
HOLDERS AND CONTRIBUTORS “AS IS” AND ANY
EXPRESS OR IMPLIED WARRANTIES, INCLUDING, BUT
NOT LIMITED TO, THE IMPLIED WARRANTIES OF
MERCHANTABILITY AND FITNESS FOR A PARTICULAR
PURPOSE ARE DISCLAIMED. IN NO EVENT SHALL THE
FOUNDATION OR CONTRIBUTORS BE LIABLE FOR ANY
DIRECT, INDIRECT, INCIDENTAL, SPECIAL, EXEMPLARY,
OR CONSEQUENTIAL DAMAGES (INCLUDING, BUT NOT
LIMITED TO, PROCUREMENT OF SUBSTITUTE GOODS
OR SERVICES; LOSS OF USE, DATA, OR PROFITS; OR
BUSINESS INTERRUPTION) HOWEVER CAUSED AND
ON ANY THEORY OF LIABILITY, WHETHER IN
CONTRACT, STRICT LIABILITY, OR TORT (INCLUDING
NEGLIGENCE OR OTHERWISE) ARISING IN ANY WAY
OUT OF THE USE OF THIS SOFTWARE, EVEN IF
ADVISED OF THE POSSIBILITY OF SUCH DAMAGE.
35% až 80% relativní (bez kondenzace)
0,4 W (přibližně)
Prohlášení o shodě
Společnost “Panasonic Corporation” tímto prohlašuje, že
tento výrobek je ve shodě se základními požadavky a
dalšími příslušnými ustanoveními směrnice 1999/5/EC.
Zákazníci si mohou stáhnout kopii originálu prohlášení o
shodě pro naše produkty R&TTE z našeho serveru:
http://www.doc.panasonic.de
Oprávněný zástupce:
Panasonic Marketing Europe GmbH,
Panasonic Testing Centre, Winsbergring 15, 22525
Hamburg, Německo
Tento produkt je určen pro běžného zákazníka.
(Kategorie 3)
Tento výrobek slouží pro účely připojení přístupového bodu
bezdrátové sítě 2,4 GHz.
Likvidace použitých zařízení a baterií
Jen pro státy Evropské unie a země s fungujícím
systémem recyklace a zpracování odpadu.
Tyto symboly na výrobcích, jejich
obalech a v doprovodné dokumentaci
upozorňují na to, že se použitá
elektrická a elektronická zařízení,
včetně baterií, nesmějí likvidovat jako
běžný komunální odpad.
Aby byla zajištěna správná likvidace a
recyklace použitých výrobků a baterií,
legislativou na příslušných sběrných místech.
Správnou likvidací přispějete k úspoře cenných
přírodních zdrojů a předejdete možným negativním
dopadům na lidské zdraví a životní prostředí.
O další podrobnosti o sběru a recyklaci odpadu
požádejte místní úřady.
Při nesprávné likvidaci tohoto druhu odpadu se
vystavujete postihu podle národní legislativy.
odevzdávejte je v souladu s národní
Poznámka k symbolu baterie (značka
pod symbolem):
Tento symbol může být použitý v
kombinaci s chemickou značkou.
Takový případ je souladu s požadavky
směrnice pro chemické látky.
ČESKY
VQT4Z21
19
55
Page 56

Suorita toiminnot kaukosäätimellä. Voit myös
käyttää pääyksikön painikkeita, jos ne ovat samat.
Oma järjestelmäsi voi näyttää erilaiselta kuin kuvissa esitetty.
Nämä käyttöohjeet koskevat seuraavaa järjestelmää.
Järjestelmä SC-PMX9
Pääyksikkö SA-PMX9
Kaiuttimet SB-PMX9
Turvallisuustoimet
VAROITUS!
Laite
• Vähennä tulipalon, sähköiskun tai laitteiston
vahingoittumisen vaaraa:
- Tätä laitetta ei saa altistaa sateelle, kosteudelle, roiskeille
tai tippuville nesteille.
- Älä aseta laitteen päälle nestettä sisältäviä esineitä,
kuten maljakoita.
- Käytä vain suositeltuja lisävarusteita.
- Älä avaa laitteen koteloa.
- Älä korjaa laitetta itse. Anna huolto pätevän
huoltohenkilön tehtäväksi.
HUOMIO!
Laite
• Vähennä tulipalon, sähköiskun tai laitteiston
vahingoittumisen vaaraa:
- Älä asenna tai laita tätä laitetta kabinettityyppiseen
kirjakaappiin tai muuhun suljettuun tilaan, jotta tuuletus
onnistuisi.
- Älä peitä laitteen tuuletusaukkoja sanomalehdellä,
pöytäliinalla, verholla tai muulla vastaavalla esineellä.
- Älä aseta palavaa kynttilää tai muuta avotulen lähdettä
SUOMI
laitteen päälle.
• Tämä laite on tarkoitettu käytettäväksi leudossa ilmastossa.
• Pistoketta käytetään virrankatkaisulaitteena.
Asenna yksikkö siten, että pistoke voidaan irrottaa nopeasti
pistorasiasta.
• Tämä laite saattaa olla altis matkapuhelinten käytön aikana
aiheuttamille radiohäiriöille. Jos häiriöitä esiintyy, siirrä laite
kauemmas matkapuhelimesta.
• Tämä on laserlaite. Muiden kuin tässä määritettyjen
hallinta- tai säätötoimintojen käyttö tai toimenpiteiden
suoritus saattaa aiheuttaa vaarallisen altistumisen säteilylle.
VQT4Z21
2
56
Paristo
• Älä avaa paristoa tai saata sitä oikosulkuun.
• Älä lataa alkaali- tai mangaaniparistoa.
• Älä käytä paristoa, jos sen päällinen on irronnut.
• Älä kuumenna tai altista avotulelle.
• Älä jätä paristoja suorassa auringonpaisteessa olevaan
autoon, jonka ovet ja ikkunat ovat pitkään suljettuina.
• Poista paristo, jos et käytä kaukosäädintä pitkään aikaan.
Säilytä viileässä, pimeässä tilassa.
• Pariston virheellinen vaihto saattaa aiheuttaa räjähdysvaaran.
Korvaa se vain valmistajan suosittelemilla paristotyypeillä.
• Kun hävität paristoja, ota yhteys paikallisiin viranomaisiin
tai jälleenmyyjään ja kysy heiltä oikea hävitystapa.
Android, Google Play ja Chrome ovat tavaramerkkejä, jotka
omistaa Google Inc.
DLNA, the DLNA Logo and DLNA CERTIFIED are trademarks,
service marks, or certification marks of the Digital Living Network
Alliance.
Wi-Fi CERTIFIED -logo on laatumerkki, jonka omistaa Wi-Fi
Alliance.
Wi-Fi Protected Setup -tavaramerkin omistaa Wi-Fi Alliance.
“Wi-Fi”, “Wi-Fi Protected Setup”, “WPA” ja “WPA2” ovat
rekisteröityjä tavaramerkkejä, jotka omistaa Wi-Fi Alliance.
MPEG Layer-3 äänen pakkausmenetelmän käyttöoikeudet
omistaa Fraunhofer IIS ja Thomson.
Bluetooth® sanamerkin ja logot omistaa Bluetooth SIG, Inc. ja
Panasonic Corporation käyttää niitä merkkejä
käyttöoikeussopimuksella.
Muut tavaramerkit ja kauppanimet kuuluvat vastaaville omistajille.
Windows on tavaramerkki tai rekisteröity tavaramerkki, jonka
omistaa Microsoft Corporation Yhdysvalloissa ja muissa maissa.
Sisällysluettelo
Turvallisuustoimet........................................... 2
Toimitetut lisävarusteet................................... 3
Ylläpito.............................................................. 3
Kaukosäätimen valmistelu.............................. 3
Liitäntöjen tekeminen...................................... 3
Kaiutinten sijoittelu .........................................4
Hallintatoimintojen yleiskatsaus .................... 4
Tietovälineen laittaminen................................ 5
Tietoja tietovälineistä ......................................5
Verkkoasetukset ..............................................6
Toiminnon AirPlay käyttö tämän järjestelmän
kaiuttimilla ............................................................9
Musiikkitiedostojen toisto DLNA-palvelimelta....10
Bluetooth
Tietoja toiminnosta Bluetooth®..................... 11
Tietovälineiden toistotoimenpiteet............... 12
Radio............................................................... 13
Kello ja ajastukset .........................................13
Äänitehosteet .................................................14
Lisätulon käyttö .............................................14
Muita tietoja.................................................... 14
Vianmääritys ..................................................16
Tekniset tiedot................................................18
“Made for iPod”, “Made for iPhone” ja “Made for iPad” tarkoittavat,
että elektroninen varuste on suunniteltu liitettäväksi erityisesti
iPod-, iPhone- tai iPad-laitteeseen vastaavasti, ja että kehittäjä on
sertifioinut sen Applen toimintavaatimusten mukaiseksi.
Apple ei ole vastuussa tämän laitteen toimenpiteistä tai sen
vaatimustenmukaisuudesta turvallisuusstandardien ja lakien kanssa.
Muista, että tämän varusteen käyttö iPod-, iPhone- tai
iPad-laitteen kanssa saattaa vaikuttaa langattomaan toimintaan.
AirPlay, AirPlay-logo, iPad, iPhone, iPod, iPod classic, iPod nano
ja iPod touch ovat tavaramerkkejä, jotka omistaa Apple Inc.,
rekisteröity Yhdysvalloissa ja muissa maissa.
App Store on palvelumerkki, jonka omistaa Apple Inc.
®
-toimenpiteet ...................................... 11
Page 57

Toimitetut lisävarusteet
22
11
33
Verkkovirtapistorasiaan
Te ip p i
(ei toimiteta)
Musta
Punainen
Musta
Punainen
Johto
punaisella
johtimella
DVD-soitin (ei toimiteta)
Pääyksikön
takapaneeli
Äänikaapeli (ei toimiteta)
Tarkista toimitetut lisävarusteet.
1 x vaihtovirtajohto 1 x kaukosäädin
(N2QAYB000896)
Liitäntöjen tekeminen
Liitä verkkokaapeli vasta sitten, kun kaikki muut
liitännät on suoritettu.
Virran säästäminen
Järjestelmä kuluttaa noin 0,4 W valmiustilassa. Irrota
virtalähde, kun järjestelmä ei ole käytössä.
Jotkut asetukset menetetään, kun irrotat laitteen. Sinun
on asetettava ne uudelleen.
Toisen laitteen liittäminen
Voit liittää videonauhurin, DVD-soittimen, ym.
1 x FM-sisäantenni 1 x kaukosäätimen
2 x kaiutinjohdot
paristo
Ylläpito
• Puhdista päälaite pyyhkimällä pehmeällä, kuivalla liinalla.
• Kaiuttimien puhdistamiseksi pyyhi hienopintaisella ja
kuivalla liinalla kuten mikrokuituliinalla.
• Älä koskaan käytä alkoholia, tinneriä tai bensiiniä
järjestelmän puhdistukseen.
• Ennen kemiallisesti käsiteltyjen liinojen käyttöä lue
huolellisesti liinan mukana tulevat ohjeet.
Kaukosäätimen valmistelu
• Käytä alkaali- tai mangaaniparistoa.
• Aseta paristo siten, että navat (+ ja –) ovat
kaukosäätimen merkintöjen mukaisesti.
• Osoita kaukosäätimellä kaukana esteistä olevaa
kaukosäätimen anturia enintään 7 m etäisyydeltä
suoraan päälaitteen edestä ja enimmäiskulman
vasemmalle ja oikealle ollessa noin 30°.
R6/LR6, AA
1 Liitä FM-sisäantenni.
Sijoita antenni paikkaan, jossa vastaanotto on paras.
• Käytä FM-ulkoantennia, jos radiovastaanotto on
heikkoa.
2 Liitä kaiuttimet.
Ole varovainen, ettet kytke ristiin (oikosulje) tai
käännä kaiutinjohtojen polaarisuutta, sillä se voi
vahingoittaa kaiuttimia.
• Yhdistä punaisella johtimella varustettu johto
punaiseen liittimeen (r).
3 Liitä vaihtovirtajohto.
Älä käytä muille laitteille tarkoitettuja vaihtovirtajohtoja.
Huomautus:
• Irrota verkkokaapeli ennen liittämistä.
• Kytke pois päältä kaikki laitteet ja lue asianmukaiset
käyttöohjeet.
• Osat ja johdot myydään erikseen.
• Jos haluat liittää muita kuin tässä kuvattuja laitteita, kysy
neuvoa audiolaitemyyjältä.
• Sovitinta käytettäessä voi esiintyä äänen vääristymistä.
• Jos haluat lisätietoja lähiverkkokaapelin yhdistämisestä,
katso sivua 6.
SUOMI
VQT4Z21
3
57
Page 58

Kaiutinten sijoittelu
Diskantti
17
18
21
22
23
6
11
5
OPEN/CLOSE
D.BASS
VOLUME
SELECTORCDiPod
BASS TREBLE
iPad
19
20
6
4
1
1
2
3
4
5
6
7
8
9
10
11
12
13
14
15
16
SETUP
SELECTOR
Näkymä
yläpuolelta
Sijoita kaiuttimet siten, että diskanttikaiutin on
sisäpuolella. Kaiuttimien vahingoittumisen estämiseksi
älä kosketa kaiuttimen kartioita, jos poistat suojaverkot.
Käytä vain mukana toimitettuja kaiuttimia.
Pääyksikön ja näiden kaiuttimien yhdistelmä tuottaa
parhaan äänenlaadun. Muiden kaiuttimien käyttö saattaa
vahingoittaa järjestelmää ja alentaa äänenlaatua.
Huomautus:
• Pidä kaiuttimet yli 10 mm:n päässä pääyksiköstä
ilmanvaihdon takaamiseksi.
• Aseta kaiuttimet tasaiselle, vakaalle alustalle.
• Näissä kaiuttimissa ei ole magneettisuojausta. Älä sijoita niitä
televisioiden, tietokoneiden tai muiden sellaisten laitteiden
läheisyyteen, joihin magneettikenttä vaikuttaa helposti.
• Pitkän aikaa suurella äänenvoimakkuudella toistaminen saattaa
vahingoittaa järjestelmää ja lyhentää laitteen käyttöikää.
• Alenna äänenvoimakkuutta seuraavissa tilanteissa
vahingon välttämiseksi:
- Kun kuulet vääristynyttä ääntä.
- Kun säädät äänenlaatua.
SUOMI
HUOMIO!
• Käytä kaiuttimia vain suositellun järjestelmän
kanssa. Jos et tee näin, saatat vahingoittaa
vahvistinta ja kaiuttimia, ja aiheuttaa tulipalon.
Pyydä apua hyväksytyltä huoltohenkilöltä, jos laite
vahingoittuu tai jos sen toiminta muuttuu äkillisesti.
• Suorita näiden ohjeiden toimenpiteet, kun liität
kaiuttimet.
VQT4Z21
4
58
Hallintatoimintojen yleiskatsaus
1 Valmiustila-/virtakytkin [Í], [Í/I]
Painamalla kytkintä voit siirtää laitteen valmiustilaan tai palauttaa
sen valmiustilasta. Painamalla kytkintä voit siirtää laitteen
valmiustilaan tai palauttaa sen valmiustilasta.
2 Numeronäppäimet [1 – 9, 0, S10]
Kaksinumeroisen luvun valitseminen
Esimerkki: 16: [S10] > [1] > [6]
3 Poistaa ohjelmoidun raidan
4 Valitse äänilähde
[iPod]: “iPod_Dock” ,. “iPod_Port” / “USB”
[CD]: “CD”
[SELECTOR]:
----------------. “BLUETOOTH” -----------------. “FM”
“CD”
^-
“iPod_Port” / “USB” ( “iPod_Dock” ( “AUX”
5 Perustoistotoiminnot
6 Valitsee äänitehosteet
7 Näyttää iPod-valikon
8 Näyttää sisältötiedot
9 Kellon ja ajastimen käyttö
10 Asettaa ohjelmointitoiminnon
11 Säätää järjestelmän äänenvoimakkuutta
12 Vaimentaa järjestelmän äänen
Peruuta painamalla painiketta uudelleen.
“MUTE” peruuntuu myös, kun äänenvoimakkuutta
säädetään tai laite sammutetaan.
13 Asettaa toistovalikkokohdanm
14 Asettaa radiovalikkokohdan
15 Valitsee asetuksen
16 Siirry asetusvalikkoon
17 “iPod_Dock” iPod/iPhone-laitteelle
18 Kuulokeliitäntä ( )
• Pistoketyyppi: Ø 3,5 mm:n stereo (ei toimiteta)
• Vältä pitkäaikaista kuulokkeilla kuuntelua
kuulovaurioiden estämiseksi.
• Liiallinen äänenpaine korvanapeista tai kuulokkeista
saattaa aiheuttaa kuulon heikkenemistä.
• Pitkäaikainen täydellä äänenvoimakkuudella
kuuntelu saattaa vahingoittaa käyttäjän korvia.
19 Näyttöpaneeli
20 “iPod_Port” iPod/iPhone/iPad- ja USB-laitteille
21 Avaa tai sulkee levykelkan
22 Levykelkka
23 Kaukosäätimen tunnistin
(b
Page 59

Tietovälineen laittaminen
iPad
OPEN/CLOSE
iPod/iPhone
(ei toimiteta)
Lightning-liitin
Valitse “iPod_Dock” lähteeksi
Avaa suojus ja yhdistä iPod/iPhone
Lightning-liittimellä.
Valitse “iPod_Port” lähteeksi
“USB” tulee näkyviin, kun laitetaan
yhteensopiva USB-laite.
• Älä yhdistä seuraavia malleja:
iPod classic, iPod [4. (värinäyttö) ja
5. (video) sukupolvi],
iPod nano (1. sukupolvi)
Voi tapahtua jotain odottamatonta.
Valitse “CD”
lähteeksi
“iPod_Dock” (Käytettäessä Lightning-liitintä):
• Varmista, että iPod/iPhone on laitettu kunnolla ja sen
takaosa osoittaa pehmustettua tukea kohti.
• Varmista, että poistat iPod/iPhone-laitteen sen
kotelosta.
• Varmista, että linjaat iPod/iPhone-laitteen liittimen
suuntaisesti laitettaessa.
“iPod_Port”:
• Käytä erityistä iPod/iPhone/iPad-laitteelle tarkoitettua
USB-kaapelia (ei toimiteta).
• Työnnä USB-laite suoraan. Älä käytä
USB-jatkokaapelia.
• Ennen USB-laitteen poistamista valitse jokin muu
lähde kuin “
Levykelkka:
• Poista CD vasta sitten, kun se lakkaa pyörimästä.
USB
”.
iPod/iPhone/iPad-laitteen lataaminen
Lataaminen alkaa, kun iPod/iPhone/iPad yhdistetään
tähän järjestelmään.
• Valmiustilan aikana lataaminen ei käynnisty
“iPod_Port” yhteydestä, sen sijaan se käynnistyy
normaalisti “iPod_Dock” yhteydestä.
- Jos haluat ladata “iPod_Port” yhteydestä, käynnistä
lataus ennen kuin kytket tämän laitteen valmiustilaan.
• Katso iPod/iPhone/iPad-laitteen näytöltä akun
latauksen tila.
• Latauksen päätyttyä irrota iPod/iPhone/iPad, jos sitä ei
käytetä pitkään aikaan.
• Lataus päättyy, kun akku on täysin ladattu. Akku
tyhjenee itsestään.
Tietoja tietovälineistä
• Muista, että Panasonic ei vastaa mistään datatietojen
ja/tai muiden tietojen häviämisestä.
Yhteensopiva iPod/iPhone/iPad (tilanne
tammikuussa 2013)
Yhteensopiva “iPod_Dock” yhteyden kanssa
(Käytettäessä Lightning-liitintä)
iPod touch (5. sukupolvi)
iPod nano (7. sukupolvi)
iPhone 5
Yhteensopiva “iPod_Port” yhteyden kanssa
[Käytettäessä erityistä USB-kaapelia (ei toimiteta)]
iPod touch (1., 2., 3., 4. ja 5. sukupolvi)
iPod nano (2., 3., 4., 5., 6. ja 7. sukupolvi)
iPhone 5 / iPhone 4S / iPhone 4 / iPhone 3GS /
iPhone 3G / iPhone
iPad (3. ja 4. sukupolvi) / iPad 2 / iPad
iPad mini
Huomautus:
• Yhteensopivuus riippuu ohjelmiston versiosta. Päivitä
iPod/iPhone/iPad viimeisimpään ohjelmistoon ennen
sen käyttöä tämän laitteen kanssa.
• Lue käyttöohjeet iPod/iPhone/iPad-laitteen käyttäjän
oppaasta.
Yhteensopivat USB-laitteet
• USB-laitteet, jotka tukevat vain bulk-siirtoa.
Huomaa:
• Tiedostot näytetään raitoina ja kansiot näytetään
albumeina.
• Raidan tiedostopäätteen on oltava “.mp3”, “.MP3”, “.flac” tai
“.FLAC”.
• Tämä järjestelmä pystyy käsittelemään enintään:
- 255 albumia (mukaan lukien juurikansion)
- 2500 raitaa
- 999 raitaa yhdessä albumissa
• CBI-standardia (englanniksi Control/Bulk/Interrupt) eitueta.
• Jotkin tiedostot eivät ehkä toimi sektorikoon vuoksi.
• NTFS-tiedostojärjestelmää ei tueta (vain FAT16/
FAT32-tiedostojärjestelmää tuetaan).
Yhteensopiva CD
• Tämä järjestelmä voi toistaa CD-R/RW-levyjä CD-DAtai MP3-muotoisen sisällön kanssa.
• Levyn on oltava yhdenmukainen standardin ISO9660
tason 1 tai tason 2 kanssa (laajennettuja muotoja
lukuun ottamatta).
Huomaa:
• Joitakin CD-R/RW-levyjä ei voida toistaa tallennusmuodosta johtuen.
• MP3-tiedostot näytetään raitoina ja kansiot näytetään albumeina.
• Tämä järjestelmä pystyy käsittelemään enintään:
- CD-DA: 99 raitaa
- MP3: 999 raitaa, 255 albumia (mukaan lukien
juurikansion) sekä 20 istuntoa
• Tallenteita ei välttämättä toisteta samassa järjestyksessä
kuin ne on tallennettu.
SUOMI
VQT4Z21
5
59
Page 60

Verkkoasetukset
Lähiverkkokaapeli
(ei toimiteta)
Laajakaistareititin, jne.
esim.
Langaton reititin, jne.
esim.
Tukeeko langattoman verkon reititin toimintoa
WPS?
Kyllä
l 7,
“Menetelmä 1”
l 7,
“Menetelmä 2”
l 7,
“Menetelmä 3”
Ei / En tiedä
Kyllä Ei
Onko käyttämäsi laite
iPod touch/iPhone/iPad?
Onko iOS-versio 5.0 vai uudempi?
Voit suoratoistaa musiikkia iOS-laitteesta (iPhone, iPod,
iPad), Android™-laitteesta tai Mac/PC-tietokoneesta
tämän järjestelmän kaiuttimiin käyttämällä
AirPlay-toimintoa tai DLNA-ominaisuutta.
Näiden ominaisuuksien käyttämiseksi tämä järjestelmä
on liitettävä samaan verkkoon kuin AirPlay-yhteensopiva
laite (> 9) tai DLNA-yhteensopiva laite.
• Toimintoa AirPlay voidaan käyttää myös ilman verkkoreititintä.
(
>
10, “Suora suoratoisto tähän järjestelmään (AirPlay)”)
• Langallisen ja langattoman lähiverkon välillä siirtyminen voi
aiheuttaa yhteysasetusten alustuksen. Kyseisessä
tapauksessa suorita asetukset uudelleen.
• Jotta saadaan vakaa yhteys verkkoon, suositellaan
käyttämään langallista lähiverkkoyhteyttä.
Langallinen lähiverkkoyhteys
Tavallisesti riittää, että liitetään lähiverkkokaapeli
asetusten loppuun saattamiseksi.
SUOMI
• Minkä tahansa muun kuin lähiverkkokaapelin liittäminen
lähiverkkoliittimeen saattaa vahingoittaa laitteen.
• Kun lähiverkkokaapeli yhdistetään, langattomat
asetukset peruutetaan.
Voit suorittaa verkkoon liittyvät asetukset erikseen.
jJos langaton kotiverkko on konfiguroitu käyttämään
erityisiä IP-osoitteita, aliverkon peitettä,
oletusyhdyskäytävää, ensisijaista DNS:ä, jne.
Jos haluat muuttaa tämän järjestelmä nimen, joka
j
näytetään AirPlay kaiuttimina tai DLNA-tulkkina (Renderer).
1 Yhdistä päälaite suoraan tietokoneeseen
lähiverkkokaapelilla, kun verkkokaapeli on kytketty irti.
2 Liitä verkkokaapeli päälaitteeseen ja kytke tämä
järjestelmä päälle.
3 Sen jälkeen kun näytöllä näytetään
laitteen IP-osoite. (
4 Paina [SETUP] kaukosäätimellä toistuvasti valitaksesi
“Net Setup” ja paina sitten [OK].
5 Paina [SETUP] kaukosäätimellä toistuvasti valitaksesi
“Manual” ja paina sitten [OK].
6 Kun “Setting” vilkkuu näytöllä, käynnistä Internet-selain
tietokoneessasi ja kirjoita sitten tämän laitteen IP-osoite
vaiheessa 3 osoitekenttään ja näytä asetusnäyttö.*
7 Valitse ja syötä tarvittavat tiedot.
8 Valitse “JOIN” asetusten soveltamiseksi.
9 Asetukset on suoritettu loppuun, kun näytetään “Success”.
10 Kytke tämä laite pois päältä ja irrota sitten sähkön verkkokaapeli.
11 Suorita “Langallinen lähiverkkoyhteys”. (> vasemmalle)
* Ympäristöstä riippuen saattaa kestää muutamia
minuutteja ennen kuin asetusnäyttö on saatavilla
selaimessa näytettäväksi. Kyseisessä tapauksessa
lataa selain uudelleen.
>
15, “IP/MAC-osoite”)
“”,
tarkista tämän
Langaton lähiverkkoyhteys
Tässä järjestelmässä on sisäinen Wi-Fi® ja se voidaan
yhdistää langattomaan reitittimeen.
Valmistelu
• Sijoita tämä järjestelmä mahdollisimman lähelle
langattoman verkon reititintä.
• Irrota lähiverkkokaapeli.
• Suuntaa antenni päälaitteen
takana kuten osoitetaan kuvassa.
• Älä tee seuraavaa:
- Antennin kallistaminen eteen- tai
taaksepäin sen osoittaessa ylös.
- Antennin käsitteleminen liian
voimallisesti.
- Tämän laitteen kantaminen
antennista kiinni pitäen.
1 Kytke tämä järjestelmä päälle.
2 Noudata alla olevaa kaaviota valitaksesi
verkkoasetusmenetelmä.
1 Yhdistä päälaite laajakaistareitittimeen, ym.
lähiverkkokaapelilla, kun verkkokaapeli on
kytketty irti.
2 Liitä verkkokaapeli päälaitteeseen ja kytke tämä
järjestelmä päälle.
VQT4Z21
Tämä laite on käyttövalmis, kun näytöllä näytetään “ ”.
• Lähiverkkokaapeli on liitettävä ja irrotettava sähkön
6
verkkokaapeli irrotettuna.
• Käytä luokan 5 tai ylempiä suoria lähiverkkokaapeleita
60
(STP), kun liitetään oheislaitteisiin.
Page 61

• Jos haluat suorittaa langattoman asetuksen Mac/
PC-tietokoneella tai jos haluat soveltaa edistynyttä
asetusta, kokeile kohtaa “Menetelmä 4” sivulla 8.
• Tämän asetuksen peruuttamiseksi kesken kaiken paina
[Í] tämän järjestelmän sammuttamiseksi.
• Samanaikainen käyttö muiden 2,4 GHz:n laitteiden kanssa
kuten mikrouunit, langattomat puhelimet jne. voi aiheuttaa
yhteyskatkoksia.
• Päivitettyjen yhteensopivuustietojen saamiseksi
langattoman verkon reitittimestä katso
http://panasonic.jp/support/global/cs/
(Tämä sivusto on ainoastaan englanniksi.)
Menetelmä 1
Jos langaton verkkoreititin tukee toimintoa WPS
(Wi-Fi Protected Setup
TM
).
∫ WPS Push Button Configuration (PBC) -
painikekonfigurointi
WPS-tunnistemerkki
WPS Push Button Configuration
(PBC) -yhteensopivassa
langattoman verkon reitittimessä
saattaa olla tämä merkki.
1 Paina [SETUP] kaukosäätimellä toistuvasti
valitaksesi “Net Setup” ja paina sitten [OK]. *1
“With iPod” osoitetaan näytöllä.
2 Paina [SETUP] kaukosäätimellä toistuvasti
valitaksesi “WPS Push” ja paina sitten [OK]. *1
“WPS” vilkkuu näytöllä.
• Suorita vaihe 3 loppuun 2 minuutissa.
3
Sen jälkeen kun osoitetaan “WPS”, paina
WPS-painiketta langattoman verkon reitittimessä.
4 Asetukset on suoritettu loppuun, kun näytetään
“Success”.
“ ” osoitetaan näytöllä.
“Fail” saatetaan näyttää, jos yhteyttä ei saada luotua
asetetun aikarajan kuluessa. Suorita asetus uudelleen.
Jos näytetään edelleen “Fail”, kokeile muita
menetelmiä sivulla 7 tai 8.
5 Paina [OK] kaukosäätimessä poistuaksesi
asetuksesta.
• Tämä järjestelmä voidaan asettaa myös käyttämällä
WPS:n PIN-koodia.
(Ennen aloittamista katso langattoman verkon reitittimen
käyttöohjeista tarkat tiedot siitä, miten PIN-koodi syötetään.)
1 Paina [SETUP] kaukosäätimellä toistuvasti valitaksesi
“Net Setup” ja paina sitten [OK]. *2
2 Paina [SETUP] kaukosäätimellä toistuvasti valitaksesi
“WPS PIN” ja paina sitten [OK]. *2
3 Syötä PIN-koodi langattoman verkon reitittimeen.
*1 Korvaa seuraavalla vaiheella.
Paina ja pidä painettuna [D.BASS] tässä laitteessa 2
sekuntia, kun painetaan jatkuvasti kohtaa [
päälaitteessa.
*2 Korvaa seuraavalla vaiheella.
1
Paina ja pidä painettuna [D.BASS] tässä laitteessa 2
sekuntia, kun painetaan jatkuvasti kohtaa [
päälaitteessa.
2 Kun osoitetaan “WPS”, paina ja pidä painettuna
[D.BASS] tässä laitteessa 2 sekuntia, kun painetaan
jatkuvasti kohtaa [∫] tässä laitteessa uudelleen.
∫]
∫]
Menetelmä 2
Jos käyttämäsi laite on iPod touch/iPhone/iPad.
(iOS-versio 5.0 tai uudempi)
Tällä menetelmällä jaat iPod touch/iPhone/iPad-laitteesi
langattomat verkkoasetukset tämän järjestelmän
kanssa.
• Seuraavat selitykset pohjautuvat iPhone-laitteeseen.
1 Kytke irti kaikki päälaitteeseen yhdistetyt iPod/
iPhone/iPad-laitteet.
2 Yhdistä iPhone kodin langattomaan verkkoon.
3 Yhdistä iPhone päälaitteeseen.
4 Paina [SETUP] kaukosäätimellä toistuvasti
valitaksesi “Net Setup” ja paina sitten [OK].
“With iPod” osoitetaan näytöllä.
5 Vapauta iPhonen lukitus ja paina sitten [OK]
kaukosäätimessä.
“Connecting Wi-Fi” osoitetaan näytöllä.
• Jos näytetään “Not Supported” tai “Set Wi-Fi”, tarkista,
että iPhone on yhdistetty langattomaan verkkoon ja
yritä uudelleen vaiheesta 1.
6 Viesti ponnahtaa iPhoneen.
Salli iPhonen jakaa langattoman verkon
asetukset.*
1
7 Asetukset on suoritettu loppuun, kun näytetään
“Success”.
“ ” osoitetaan näytöllä.
Jos näytetään “Fail”, paina [OK] ja yritä asetusta
uudelleen. Jos näytetään edelleen “Fail”, kokeile muita
menetelmiä sivulla 7 tai 8.
• Jos iPhone kytketään irti kesken kaiken, yritä uudelleen
kytkemättä sitä irti.
8 Paina [OK] kaukosäätimessä poistuaksesi
asetuksista.
*1: Verkkoympäristöstä tai langattoman verkkoreitittimen
asetuksista riippuen asetusten loppuun saattaminen voi
kestää enemmän kuin 10 minuuttia.
Menetelmä 3
Verkkoyhteyden asettaminen älypuhelinsovelluksella.
Voit suorittaa langattomat verkkoasetukset sovelluksella
“Panasonic Stereo System Network Setup” (ilmainen).
Jos käytät Android-laitetta, lataa sovellus palvelusta
Google Play™. Jos käytät iPod touch/iPhone/
iPad-laitetta, lataa se App Storesta.
Valm istelu
• Yhdistä älypuhelin kodin langattomaan verkkoon.
• Tarkista kodin langattoman verkon salasana.
1 Paina [SETUP] kaukosäätimellä toistuvasti
valitaksesi “Net Setup” ja paina sitten [OK].
“With iPod” osoitetaan näytöllä.
2 Paina [SETUP] kaukosäätimellä toistuvasti
valitaksesi “Manual” ja paina sitten [OK].
“Setting” vilkkuu näytöllä.
3 Käynnistä “Panasonic Stereo System Network
Setup” älypuhelimessa ja noudata ohjeita.
(Jatkuu seuraavalla sivulla)
SUOMI
VQT4Z21
7
61
Page 62

∫ Huomautus iOS-versiolle
Vaiheen 3 jälkeen
1 Syötä kodin langattoman verkon salasana, johon
iOS-laite on yhdistetty.
2 Kun näytetään viesti, jossa neuvotaan yhdistämään
iOS-laite tähän järjestelmään, paina
aloituspainiketta.
3 Wi-Fi-verkon valintaruudulla kohdassa “Settings”
valitse “00 Setup _ _ _ _ _ _”.
• “ _ ” tarkoittaa numeroa, joka on yksikäsitteinen
kullekin sarjalle.
4 Kun näytetään viesti, jossa ilmoitetaan yhteyden
tähän järjestelmään olevan valmis, käynnistä
sovellus uudelleen.
5 Kun näytetään viesti, jossa ilmoitetaan tämän
järjestelmän Wi-Fi-asetuksen olevan valmis, sulje
sovellus ja tarkista sitten, että toiminto AirPlay ym.
SUOMI
toimii.
• “Panasonic Stereo System Network Setup” myös
käyttöjärjestelmälle Mac OS on saatavilla Mac App
Storesta.
Menetelmä 4
Verkkoyhteyden asetus Internet-selaimesta.
Tämän menetelmän avulla voit siirtyä tämän
järjestelmän langattoman verkon asetuksiin
yhteensopivan laitteen verkkoselaimen kautta.
• Seuraavat selitykset pohjautuvat iPhone-laitteeseen.
1 Paina [SETUP] kaukosäätimellä toistuvasti
valitaksesi “Net Setup” ja paina sitten [OK].
“With iPod” osoitetaan näytöllä.
2 Paina [SETUP] kaukosäätimellä toistuvasti
valitaksesi “Manual” ja paina sitten [OK].
“Setting” vilkkuu näytöllä.
3 Kohdan “Setting” vilkkumisen jälkeen yhdistä
yhteensopiva laite tämän järjestelmän
langattomaan verkkoon nimeltä “00 Setup _ _ _ _
_ _”.
• “ _ ” tarkoittaa numeroa, joka on yksikäsitteinen kullekin
sarjalle.
• Varmista, että DHCP on kytketty käyttöön
yhteensopivan laitteen verkkoasetuksia varten.
4 Käynnistä Internet-selain yhteensopivassa
laitteessa ja kirjoita “http://192.168.1.12/”
URL-osoitekenttään ja näytä sivu.
5 Valitse “Search wireless network”.
6 Valitse ja syötä tarvittavat tiedot.
• Tarkista langattoman kotiverkon nimi (Network name
(SSID)) ja salasana kyseiselle verkolle. Tämä voidaan
usein löytää suoraan langattoman verkon reitittimestä.
[1] Val its e langattoman kotiverkon nimi.*
1
[2] Kirjoita salasana.
7 Valitse “JOIN” asetusten soveltamiseksi.
• Ponnahdusnäytöllä valitse “OK” jatkaaksesi.
• Valitse “Cancel” palataksesi asetusikkunaan.
8 Asetukset on suoritettu loppuun, kun näytetään
“Success”.
“ ” osoitetaan näytöllä.
Jos näytetään “Fail”, paina [OK], tarkista langattoman
yhteyden salasana sekä muut asetukset ja aloita
uudelleen vaiheesta 1.
Näytetään tämän järjestelmän asetusikkuna.
• Esimerkkejä Internet-selaimista
VQT4Z21
8
62
iOS-laite/Mac : Safari
Android-laite: Google Chrome™
PC : Windows Internet Explorer
9 Varmista, että liität yhteensopivan laitteen
takaisin kodin langattomaan verkkoon.
*1: Jos olet asettanut langattoman verkon näkymättömäksi,
valitse “BACK” ja katso kohtaa “Vaihtoehtoiset
asetukset”. (> 9)
Page 63

Edistyneet verkkoasetukset
PMX9
esim.
“Music” sov.
iPhone iOS 6.0.1
PMX9
esim.
iTunes 11.0
• Alla kuvattavat asetukset ovat vaihtoehto tai lisäasetukset
kohdalle “Menetelmä 4”. (> 8)
Vaihtoehtoiset asetukset
Vaiheiden 5 ja 6 tilalla
Valitse “Manual settings”.
1 Kirjoita langattoman kotiverkon nimi kenttään
“Network name (SSID)”.
2 Valitse salausmenetelmä “Security
system”-pudotusvalikon luettelosta.
3 Kirjoita salasana “Password”-kenttään ja valitse
sitten “JOIN”.
Lisäasetukset
Jos langaton kotiverkko on konfiguroitu käyttämään
erityisiä IP-osoitteita, aliverkon peitettä,
oletusyhdyskäytävää, ensisijaista DNS:ä, jne.
Ennen vaihetta 7
Valitse “Advanced network settings”.
{.
Syötä tarvittavat osoitteet kuhunkin kenttään ja valitse “JOIN”.
• Muuttaaksesi asetukset takaisin DHCP-protokollaan,
valitse kohta “ON” luettelosta “DHCP”-pudotusvalikossa.
Jos haluat muuttaa tämän järjestelmä nimen, joka
näytetään AirPlay kaiuttimina tai DLNA-tulkkina
(Renderer).
Ennen vaihetta 5
Valitse “Additional settings”.
1 Valitse “Edit STEREO SYSTEM name”.
2 Kirjoita uusi nimi kenttään
“STEREO SYSTEM name”.
{. Voidaan käyttää ainoastaan ASCII-merkkejä.
3 Valitse “OK”.
4 Jos tämä järjestelmä on jo yhdistetty kodin
langattomaan verkkoon:
– Valitse “Additional settings” ja valitse sitten
“Exit”.
Jos tätä järjestelmää ei ole yhdistetty kodin
langattomaan verkkoon:
j Jatka vaiheeseen 5 kohdassa “Menetelmä 4”.
• Kytke päälle Java ja evästeet selaimen asetuksissa.
Toiminnon AirPlay käyttö tämän
järjestelmän kaiuttimilla
Valmi stel u
• Suorita loppuun verkkoasetukset. (> 6)
• Yhdistä iOS-laite tai Mac/PC samaan kodin verkkoon
kuin tämä järjestelmä.
1 Kytke tämä järjestelmä päälle.
• Tarkista, että näytöllä näkyy “ ”.
• Jos sitä ei näytetä, tarkista verkkoasetukset.
(> 6)
2 iOS-laite: Käynnistä “Music” (tai iPod) sovellus.
Mac/PC: Käynnistä “iTunes”.
• Jos käytetään Music-sovellusta iOS-laitteessa, valitse
äänitiedosto, jonka haluat toistaa.
3 Valitse “Panasonic PMX9 _ _ _ _ _ _”*
kuvakkeesta AirPlay .
{. Tarkista äänenvoimakkuuden asetus ennen toiston
käynnistämistä. (Kun käytetään toimintoa AirPlay
ensimmäisen kerran, äänenvoimakkuus saattaa olla
enimmäisasetuksessa.)
1, 2
4 Käynnistä toisto.
• Toisto käynnistyy pienellä viiveellä.
• Tämä järjestelmä voidaan asettaa kytkeytymään päälle
automaattisesti, kun valitaan tämä järjestelmä valitaan
lähetyskaiuttimiksi. (> 15, “Verkon valmiustila”)
• Muiden äänilähteiden toisto pysäytetään ja AirPlay-lähetys
saa etusijan.
• Äänenvoimakkuus muuttuu iOS-laitteessa tai
iTunes-ohjelmaa sovelletaan tähän järjestelmään. (Katso
kohdasta iTunes Help tarvittavat asetukset ohjelmalle
iTunes.)
• Joidenkin iOS- ja iTunes-versioiden kanssa AirPlay-toistoa
ei mahdollisesti voida käynnistää uudelleen, jos valitsin
muutetaan (esim. “CD”) tai tämä järjestelmä kytketään pois
päältä AirPlay-toiston aikana.
Kyseisessä tapauksessa valitse eri laite
AirPlay-kuvakkeesta musiikkisovelluksessa tai iTunesissa
ja valitse sitten tämä järjestelmä uudelleen
lähetyskaiuttimiksi.
• AirPlay ei toimi, kun toistetaan videoita iTunesin avulla.
*1: “ _ ” tarkoittaa numeroa, joka on yksikäsitteinen kullekin
sarjalle.
*2: Tälle järjestelmälle näytettävä nimi voidaan muuttaa
asetuksista “Edit STEREO SYSTEM name”.
(>
vasemmalle, "Edistyneet verkkoasetukset")
Yhteensopivat AirPlay-laitteet
iOS 4.3.3 tai uudempi
iPod touch
3., 4. ja 5. sukupolvi
iPhone 5 / iPhone 4S / iPhone 4 / iPhone 3GS
iPad (3. ja 4. sukupolvi) / iPad 2 / iPad
iPad mini
iTunes 10.2.2 tai uudempi (Mac / PC)
(tilanne tammikuussa 2013)
SUOMI
VQT4Z21
9
63
Page 64

Suora suoratoisto tähän järjestelmään
PMX9
(AirPlay)
Tämä toiminto asennossa “On” voit suoratoistaa
musiikkia iOS-laitteesta tai Mac/PC-tietokoneesta
(iTunes 10.2.2 tai uudempi) tähän järjestelmään ilman,
että tarvitset verkkoreititintä.
• Aiemmat verkkoasetukset poistetaan, kun tämä
toiminto asetetaan asentoon “On”.
• Seuraavat selitykset pohjautuvat iPhone-laitteeseen.
1
Paina [SETUP] toistuvasti valitaksesi “D.Connect”.
2 Paina [2, 1] valitaksesi “On” ja paina sitten
[OK].
3 Paina [2, 1] valitaksesi “OK? Yes” ja paina
sitten [OK].
“PW _ _ _ _ _”*1 tulee näkyviin.
5 numeroa “PW”:n jälkeen on tämän verkon salasana.
4 Yhdistä iPhone tämän järjestelmän langattomaan
verkkoon, jonka nimi on “PMX9 _ _ _ _ _ _”*
5 Syötä salasana, joka osoitetaan tämän
järjestelmän näytöllä.
SUOMI
6 Kun iPhone on yhdistetty tämän järjestelmän
langattomaan verkkoon, asetus on valmis.
7
Jatka vaiheeseen 2 kohdassa “Toiminnon AirPlay
käyttö tämän järjestelmän kaiuttimilla”. (
• Tämä asetus nollataan asentoon “Off”, kun suoritetaan
muu verkkoasetus. (> 6)
VQT4Z21
• Kun “D.Connect” asetetaan asentoon “On”, tätä
järjestelmää ei yhdistetä Internetiin. Ei voida päivittä
ohjelmistoa tai tarkistaa Wi-Fi-signaalin voimakkuutta.
10
• Kun AirPlay-toimintoa ei käytetä, kytke
AirPlay-yhteensopiva laite irti tästä verkosta.
64
• Kun tietokonetta käytetään tässä verkossa, varmista, että
kaikki jaetut tiedostot on salattu.
• Tämä ominaisuus on yhteensopiva ainoastaan avoimen
järjestelmän “Open System” autentikointimenetelmän
kanssa. Se ei ole yhteensopiva jaetun avaimen “Shared
Key” autentikointimenetelmän kanssa.
*1: “ _ ” tarkoittaa yhtä numeroa.
*2: “ _ ” tarkoittaa numeroa, joka on yksikäsitteinen kullekin
sarjalle.
Näytä salasana
Kun “D.Connect” asetetaan ensimmäisen kerran
asentoon “On”, luodaan satunnainen salasana tämän
järjestelmän verkolle ja se tallennetaan tähän
järjestelmään.
• Tämä salasana pysyy muistissa, kunnes se muutetaan.
1 Kohta “D.Connect” asennossa “On”:
Paina [SETUP] toistuvasti valitaksesi “D.Connect”.
2 Paina [2, 1] valitaksesi “On” ja paina sitten [OK].
3 Näytetään tämänhetkinen salasana .
• 5 numeroa “PW”:n jälkeen on tämän verkon salasana.
4 Paina mitä tahansa painiketta poistuaksesi.
2
Muuta salasana
.
1 Kohta “D.Connect” asennossa “Off”:
Paina [SETUP] toistuvasti valitaksesi “D.Connect”.
2 Paina [2, 1] valitaksesi “Change PW” ja paina
sitten [OK].
3 Paina [2, 1] valitaksesi “OK? Yes” ja paina sitten
[OK].
4 Näytetään uusi salasana .
• 5 numeroa “PW”:n jälkeen on tämän verkon uusi
salasana.
5 Paina mitä tahansa painiketta poistuaksesi.
∫ Huomautuksia salasanan muuttamisesta
Tämän järjestelmän verkon salasanan muuttamisen
jälkeen, jos sinua ei kehoteta muuttamaan salasanaa
muissa laitteissa, vaaditaan seuraavat toimenpiteet.
iOS-laite (iPod touch/iPhone/iPad)
>
9)
• Ennen tämän järjestelmän verkon valintaa,
1 Valitse [ ], joka sijaitsee tämän järjestelmän
langattoman verkon nimen vieressä.
1
*
:
2 Valitse “Forget this Network” ja valitse sitten
“Forget”.
3 Valitse tämän järjestelmän langaton verkko ja syötä
uusi salasana.
Mac/PC:
• Jos tietokoneeseen on tallennettu vanha salasana,
muista vaihtaa tämän järjestelmän verkkoa varten
tallennettu salasana uuteen.
• Katso laitteen käyttöohjeista tarkempia tietoja.
*1:
Vaiheet pohjautuvat iOS-versioon 6.0.1.
Musiikkitiedostojen toisto
DLNA-palvelimelta
Voit jakaa musiikkitiedostoja, jotka on tallennettu
kotiverkkoon yhdistetylle DLNA-sertifioidulle
mediapalvelimelle (tietokone käyttöjärjestelmällä
Windows 7, älypuhelin, ym.), ja nauttia sisällöistä tämän
järjestelmän kaiuttimien kautta.
Valmistelu
• Suorita loppuun verkkoasetukset. (> 6)
• Yhdistä laitteesi, johon on asennettu DMC (Digital
Media Controller) yhteensopiva ohjelmisto, samaan
kotiverkkoon kuin tämä järjestelmä.
• Lisää sisällöt ja kansio Windows Media
-ohjelman tai älypuhelimen ym. kirjastoihin.
– Ohjelman Windows Media® Player toistoluettelo voi toistaa
ainoastaan sisältöjä, jotka varastoidaan tiedostokirjastoihin.
®
Player
1 Kytke tämä järjestelmä päälle.
• Tarkista, että näytöllä näkyy “ ”.
• Jos sitä ei näytetä, tarkista verkkoasetukset. (>6)
2 Käsittele DMC-yhteensopivaa laitetta ja yhdistä
se tähän järjestelmään.
• Tämän järjestelmän laitenimi näytetään
seuraavasti “Panasonic PMX9 _ _ _ _ _ _”*
• Jos haluat lisätietoja DMC-yhteensopivien
laitteiden käytöstä, katso laitteiden tai
ohjelmistojen käyttöohjeita.
∫ DLNA-asiakkaan tukemat muodot
Ei voida toistaa tiedostomuotoja, joita käytetty DLNA-palvelin ei tue.
Äänen pakkaus
MP3 .mp3
WAV .w av
FLAC .flac
• Sisällöstä ja liitetystä laitteistosta riippuen toisto ei
mahdollisesti onnistu.
*1: “ _ ” tarkoittaa numeroa, joka on yksikäsitteinen kullekin
sarjalle.
*2: Tälle järjestelmälle näytettävä nimi voidaan muuttaa
asetuksista “Edit STEREO SYSTEM name”.
(
>
9, “Edistyneet verkkoasetukset”)
Esimerkki tiedostopäätteestä
1, 2
.
Page 65

Bluetooth®-toimenpiteet
Käyttämällä Bluetooth®-yhteyttä voit kuunnella
®
Bluetooth
langattomasti.
Katso Bluetooth®-laitteen käyttöohjeista tarkempia tietoja.
-audiolaitteen ääntä tästä järjestelmästä
Bluetooth®-laitteiden paritus
Valmistelu
• Kytke päälle laitteen Bluetooth
laite tämän järjestelmän lähelle.
• Jos tämä järjestelmä on jo yhdistetty
Bluetooth
®
-laitteeseen, kytke se irti.
®
-ominaisuus ja sijoita
1 Paina kohtaa [SELECTOR] toistuvasti valitaksesi
“BLUETOOTH”.
Jos näytöllä osoitetaan “Pairing”, siirry vaiheeseen 3.
2 Paina [PLAY MENU] valitaksesi “New Device” ja
paina sitten [OK].
“Pairing” osoitetaan näytöllä.
3 Valitse “SC-PMX9” Bluetooth
Bluetooth
®
-valikosta.
4 Käynnistä toisto Bluetooth
Huomautus:
• Jos pyydetään tunnuslukua, syötä “0000”.
• Voit rekisteröidä jopa 8 laitetta tähän järjestelmään. Jos
paritetaan 9. laite, korvataan pisimpään käyttämättömänä
ollut laite.
®
-laitteen
®
-laitteessa.
Paritetun Bluetooth®-laitteen
yhdistäminen
Valmistelu
• Kytke Bluetooth
laite tämän kaiuttimien lähelle.
• Jos tämä järjestelmä on jo yhdistetty
Bluetooth
®
-ominaisuus päälle laitteessa ja sijoita
®
-laitteeseen, kytke se irti.
1 Paina kohtaa [SELECTOR] toistuvasti valitaksesi
“BLUETOOTH”.
“Ready” osoitetaan näytöllä.
2 Valitse “SC-PMX9” Bluetooth
Bluetooth
Yhdistetyn laitteen nimi osoitetaan näytöllä noin
2 sekuntia.
®
-valikosta.
3 Käynnistä toisto Bluetooth
®
-laitteen
®
-laitteessa.
Huomautus:
• Tämä järjestelmä voidaan yhdistää ainoastaan yhteen
laitteeseen kerrallaan.
• Kun valitaan kohta “BLUETOOTH” lähteeksi, tämä
järjestelmä yrittää ja yhdistää automaattisesti viimeksi
yhdistettyyn Bluetooth
•
Bluetooth®-laite kytketään irti, jos valitaan eri äänilähde (esim. “CD”).
®
-laitteeseen.
Bluetooth®-lähetyksen tila
Voit vaihtaa tiedonsiirtonopeutta, jotta asetetaan
etusijalle tiedonsiirron laatu tai äänen laatu.
• Oletusasetus on “Mode 1”.
• Nauttiaksesi paremmasta äänenlaadusta, valitse
“Mode 2”.
Valmi stel u
• Paina kohtaa [SELECTOR] toistuvasti valitaksesi
“BLUETOOTH”.
• Jos Bluetooth
®
-laite on jo yhdistetty, kytke se irti.
1 Paina [PLAY MENU] toistuvasti valitaksesi
“Link Mode”.
2 Paina [2, 1] valitaksesi tila ja paina sitten [OK].
Mode 1: Korostus liitettävyydessä
Mode 2: Korostus äänen laadussa
Bluetooth® in tulotaso
Jos äänen tulotaso Bluetooth
alhainen, muuta tulotason asetusta.
Valmi stel u
• Bluetooth
®
-laitteen yhdistäminen.
®
-lähetyksessä on liian
1 Paina [PLAY MENU] toistuvasti valitaksesi “Input
Level”.
2 Paina [2, 1] valitaksesi taso ja paina sitten [OK].
“Level 0”
,. “Level i1” ,. “Level i2”
^-------------------------------------J
Huomautus:
• Valitse “Level 0”, jos ääni on vääristynyt.
Bluetooth®-laitteen irti kytkeminen
1 Samalla kun Bluetooth
Paina [PLAY MENU] valitaksesi “Disconnect?”.
®
-laite on yhdistetty:
2 Paina [2, 1] valitaksesi “OK? Yes” ja paina
sitten [OK].
-toiminnon
®
-laitteita tai
®
Tietoja toiminnosta Bluetooth
Panasonic ei kanna mitään vastuuta
datatiedoista ja/tai muista tiedoista, jotka
vaarantuvat langattoman lähetyksen aikana.
Käytetty taajuuskaista
• Tämä järjestelmä käyttää 2,4 GHz:n taajuuskaistaa.
Laitteen sertifiointi
• Tämä järjestelmä on taajuuden rajoituksia koskevien
vaatimusten mukainen ja se on sertifioitu taajuutta
koskevien lakien mukaisesti. Täten ei tarvita
langatonta lupaa.
Alla olevat toimenpiteet ovat rangaistavia joissain maissa:
•
- Tämän järjestelmän purkaminen tai muokkaaminen.
- Teknisiä tietoja koskevien osoitusten poistaminen.
Käytön rajoitukset
• Langatonta lähetystä ja/tai käytettävyyttä kaikkien
• Kaikkien laitteiden on oltava yhtiön Bluetooth SIG, Inc.
• Laitteen asetuksista ja teknisistä tiedoista riippuen sitä
• Tämä järjestelmä tukee Bluetooth
• Tämä järjestelmä ei voi lähettää tietoja
Käyttöalue
• Käytä tätä laitetta enintään 10 m:n alueella. Alue voi
Häiriöt muista laitteista
• Tämä järjestelmä ei mahdollisesti toimi kunnolla ja
• Tämä järjestelmä ei mahdollisesti toimi kunnolla, jos
Suunniteltu käyttö
• Tämä järjestelmä on tarkoitettu ainoastaan tavalliseen
• Älä käytä tätä järjestelmää lähellä laitteistoa tai
®
Bluetooth
-toiminnollisten laitteiden kanssa ei taata.
määrittelemien standardien mukaisia.
ei mahdollisesti voida yhdistää tai jotkut toimenpiteet
ovat erilaisia.
turvallisuusominaisuuksia. Kuitenkin
käyttöympäristöstä ja/tai asetuksista riippuen tämä
suoja ei mahdollisesti ole riittävä. Lähetä tietoja
langattomasti tähän järjestelmään varovasti.
®
Bluetooth
-laitteeseen.
®
pienentyä ympäristön, esteiden tai häiriöiden vuoksi.
esiintyy ongelmia kuten kohinaa ja äänen vaihteluita
radioaaltohäiriöiden vuoksi, jos tämä järjestelmä
sijoitetaan liian lähelle muita Bluetooth
laitteita, jotka käyttävät 2,4 GHz:n kaistaa.
läheisen lähetysaseman ym. radioaallot ovat liian
voimakkaita.
käyttöön.
ympäristössä, joka on herkkä radiotaajuuksisille häiriöille
(esimerkiksi lentokentät, sairaalat, laboratoriot, jne.).
SUOMI
VQT4Z21
11
65
Page 66

Tietovälineiden toistotoimenpiteet
Seuraavat merkit osoittavat, että ominaisuus on
käytettävissä.
[CD]: Audio-CD muodossa CD-DA ja CD, joka
[iPod]: Yhteensopiva iPod/iPhone/iPad
[USB]: USB-laitteet, jotka sisältävät MP3/FLAC
[AirPlay] : Kun liitetään AirPlay -yhteensopivaan
[Bluetooth]:
Valmistelu
• Kytke yksikkö päälle.
• Laita tietoväline tai yhdistä Bluetooth
Paina [CD], [iPod] tai [SELECTOR] äänilähteen valitsemiseksi.
•
Perustoisto [CD] [iPod] [USB] [AirPlay] [Bluetooth]
Toi sta Paina [1/;].
Stop Paina [∫].
Tau ko Paina [1/;].
Ohita Paina [:] tai [9] raidan
SUOMI
Hae
(Lukuun ottamatta
[iPod]
Näytä
VQT4Z21
iPod-valikko
[iPod]
12
Valitse kohde
66
sisältää MP3-tiedostoja
tiedostoja
laitteeseen. (> 9)
Yhdistetty Bluetooth
[AirPlay]
)
®
-laite
®
-laite.
• [USB]: Toistettava raita on tallennettu
muistiin ja näytetään “Resume”.
Toistoasento palautuu raidan
alkuun.
• [USB]: Paina [∫] kaksi kertaa toiston
pysäyttämiseksi kokonaan.
Paina uudelleen toiston jatkamiseksi.
ohittamiseksi.
(pääyksikössä:
[CD] [USB]: Paina [3] tai [4]
ohittaaksesi MP3/FLAC albumi.
Toiston tai taukotilan aikana
Paina ja pidä painettuna [
(pääyksikössä:
• [iPod]: Taaksepäin haku tapahtuu
ainoastaan tämänhetkisen raidan
sisällä.
Paina [iPod MENU].
Paina [3, 4] ja paina sitten [OK].
[:/6]
[:/6]
tai
[5/9]
6
] tai [5].
tai
[5/9]
Huomautus:
• Mallista riippuen (esim. iPod nano 7. sukupolvi, ym.) saatetaan
joutua valitsemaan albumi, esittäjä, jne. iPod/iPhone-laitteessa.
• Toimenpiteen tulokset voivat vaihdella iPod/iPhone/
iPad-mallin mukaan.
• Raidat voidaan valita painamalla numeropainikkeita.
Saatavilla olevien tietojen katselu [CD]
[USB] [Bluetooth]
Paina [DISPLAY].
Esim. MP3 : Raita : Albumi
Huomautus:
• Näytettävien merkkien enimmäismäärä: noin 32
• Tämä järjestelmä tukee versioiden ja 2.3 ID3-tunnisteita.
• Tekstitiedot, joita järjestelmä ei tue, saattavat näkyä eri tavalla.
)
)
TAG: ID3-tunnisteet
Toistovalikko [CD] [USB] [AirPlay]*1
1 Paina [PLAY MENU] valitaksesi “Repeat”,
“Random” tai “PLAYMODE”.
2
Valitse haluttu tila painamalla [2,1] ja sitten [OK].
[CD] [USB]
Off
1-Track Toistaa ainoastaan valitun raidan.
All Toistetaan kaikki raidat.
[AirPlay] Repeat
Katso liitettyä laitetta tarkistaaksesi, valittu asetus.
[CD] [USB] Random
On Toistaa sisällöt satunnaisesti.
Off
[AirPlay] Shuffle
Katso liitettyä laitetta tarkistaaksesi, valittu asetus.
[CD] (MP3) [USB] PLAYMODE
All Toista kaikki MP3/FLAC raidat.
1-Album Toistaa ainoastaan valitun MP3/FLAC
Huomautus:
• Satunnaistoiston aikana et voi siirtyä raitoihin, jotka on jo
• Playmode-toiminto ei toimi “Ohjelmoi toisto” -toiminnon kanssa.
• [CD]
*1: [AirPlay] : Suorita asetukset toiston aikana.
Repeat
Valitse peruuttaaksesi jatkuvan toiston.
•“1TR, `” tulee näkyviin.
(Ohita haluttuun raitaan.)
•“`” tulee näkyviin.
• “RND” tulee näkyviin.
• “RND” ei tule näkyviin, kun valitaan
“1-Track”.
Satunnaistoisto on kytketty pois käytöstä.
albumin.
• “1ALBUM” tulee näkyviin.
toistettu, tai painaa numeropainikkeita.
:
Asetus palautuu oletukseen “Off”, kun avaat
levykelkan.
[AirPlay]
: Sovelletut asetukset pysyvät, kunnes ne muutetaan.
Page 67

Ohjelmoi toisto [CD] [USB]
30min > 60min > 90min > 120min > Off
^---------------------------------------------------------------b
Tämän toiminnon avulla voit ohjelmoida enintään 24 raidan
toiston.
[CD] (CD-DA)
1 Paina [PROGRAM]-painiketta toiston ollessa
pysäytettynä.
“PGM” tulee näyttöön.
2 Valitse haluamasi raita painamalla
numeropainikkeita.
Toista tämä vaihe muiden raitojen ohjelmoimiseksi.
3 Aloita toisto painamalla [1/;].
[CD] (MP3), [USB]
1 Paina [PROGRAM]-painiketta toiston ollessa
pysäytettynä.
“PGM” tulee näyttöön.
2 Valitse haluamasi albumi painamalla [3, 4].
3 Valitse haluamasi raita painamalla [9] ja sitten
numeropainikkeita.
4 Paina [OK].
Toista vaiheet 2 – 4 muiden raitojen ohjelmoimiseksi.
5 Aloita toisto painamalla [1/;].
ohjelmointitila Paina [PROGRAM]-painiketta toiston
Tar kis ta
ohjelmoinnin
sisältö
Tyhjennä
viimeinen raita
Tyhjennä kaikki
ohjelmoidut
raidat
Huomautus:
• Ohjelmointimuisti tyhjennetään, kun levykelkka avataan.
ollessa pysäytettynä.
Paina [:] tai [9], kun näytössä
näkyy “PGM” pysäytystilassa.
Paina [DEL]-painiketta toiston ollessa
pysäytettynä.
Paina [∫]-painiketta toiston ollessa
pysäytettynä. “CLR All” tulee
näyttöön. Paina viiden sekunnin
kuluessa [∫]-painiketta uudelleen.
Radio
Voidaan esiasettaa 30 FM-asemaa.
Valmi stelu
Paina kohtaa [SELECTOR] toistuvasti valitaksesi
“FM”.
Automaattinen esiasetus
1 Valitse “Auto Preset” painamalla [RADIO MENU].
2 Valitse taajuudeksi “Lowest” (alhaisin) tai
“Current” (nykyinen) painamalla [2, 1].
3 Aloita esiasetusten teko painamalla [OK].
Peruuta painamalla [∫].
Manuaalinen viritys ja esiasetukset
1 Viritä asema painamalla [6] tai
[5]-painiketta.
Aloita automaattinen viritys pitämällä painiketta
painettuna, kunnes taajuus alkaa vaihtua nopeasti.
2 Paina [PROGRAM].
3 Valitse esiasetusnumero painamalla
numeropainikkeita.
Suorita vaiheet 1 – 3 uudelleen, jos haluat asettaa
muita asemia.
Uusi asema korvaa aiemmin samalle
esiasetusnumerolle tallennetun aseman.
Esiasetetun aseman valitseminen
Valitse esiasetettu asema painamalla
numeropainikkeita, [:] tai [9] (pääyksikössä:
[:/6] tai [5/9]).
Äänenlaadun parantaminen
1 Paina kohtaa [RADIO MENU] toistuvasti
valitaksesi “FM Mode”.
2 Valitse “Mono” painamalla [2, 1] ja paina sitten
[OK].
Peruuta valitsemalla “Stereo”.
“Mono”-asetus peruutetaan myös, jos vaihdat taajuutta.
Asetuksen tallennus
Jatka suorittamalla vaiheet 2 ja 3 kohdassa
“Manuaalinen viritys ja esiasetukset”.
RDS-lähetys
Tämä järjestelmä pystyy näyttämään
radiotietojärjestelmän (RDS) joillakin alueilla lähettämät
tekstitiedot.
Paina [DISPLAY].
PS Ohjelmapalvelu
PTY Ohjelman tyyppi
FREQ Taajuus
Huomautus:
• RDS ei ehkä ole käytettävissä, jos vastaanotto on heikkoa.
Kello ja ajastukset
Kellon asettaminen
Tämä on 24-tuntinen kello.
1 Valitse “CLOCK” painamalla [CLOCK/TIMER].
2 Aseta aika painamalla 10 sekunnin kuluessa
[3, 4].
3 Paina [OK].
Paina [CLOCK/TIMER]-painiketta kellon näyttämiseksi
muutaman sekunnin ajan.
Huomautus:
• Aseta kellonaika usein, jotta se säilyy tarkkana.
Uniajastin
Uniajastin sammuttaa järjestelmän asetetun ajan
kuluttua.
Paina [SLEEP] toistuvasti valitaksesi asetuksen
(minuuteissa).
Peruuta valitsemalla “Off”.
Jäljellä olevan ajan näyttäminen
Paina [SLEEP].
Huomautus:
• Uniajastinta voidaan käyttää yhdessä toistoajastimen
kanssa.
• Uniajastin on aina etusijalla. Varmista, ettet aseta ajastimia
päällekkäisiksi ajoiksi.
SUOMI
VQT4Z21
13
67
Page 68

Toiston ajastin
Voit asettaa ajastimen käynnistymään tiettyyn aikaan ja
herättämään sinut.
Valmistelu
Aseta kellonaika.
1 Paina kohtaa [CLOCK/TIMER] toistuvasti
valitaksesi “TIMER Adjust”.
2 Aseta aloitusaika painamalla 8 sekunnin
kuluessa [3, 4].
3 Paina [OK].
4 Suorita vaiheet 2 ja 3 uudelleen ja aseta
lopetusaika.
Ajastimen käynnistys
1 Valmistele äänilähde, jota haluat kuunnella ja
aseta äänenvoimakkuus.
2 Paina [F, PLAY].
“F” tulee näyttöön.
Peruuta painamalla [F, PLAY]-painiketta uudelleen.
Järjestelmä on sammutettava, jotta ajastin toimisi.
Asetusten tarkistaminen
Paina kohtaa [CLOCK/TIMER] toistuvasti valitaksesi
“TIMER Adjust”.
Huomautus:
• Ajastin aloittaa toiston matalalla äänenvoimakkuudella ja
lisää äänenvoimakkuutta vähitellen asetettuun tasoon.
• Ajastin käynnistyy asetettuun aikaan päivittäin, jos ajastin
on käytössä.
• Jos sammutat järjestelmän ja käynnistät sen uudelleen
SUOMI
ajastimen ollessa käynnissä, ajastin ei lopeta toistoa
lopetusaikaan.
VQT4Z21
14
68
Äänitehosteet
Äänenlaadun muuttaminen
Valitse äänitehoste painamalla [SOUND].
1
2 Valitse haluamasi asetus painamalla [2, 1].
BASS
TREBLE
Surround “On Surround” tai “Off Surround”
Vain pääyksikössä
Käännä [BASS]- tai [TREBLE]-säädintä tason
säätämiseksi.
Preset EQ
Valitse asetus painamalla [PRESET EQ]-painiketta.
Heavy Lisää potkua rock-musiikkiin
Soft Taustamusiikille
Clear Kirkastaa korkeampia taajuuksia
Vocal Lisää hohtoa lauluun
Flat Peruuttaa äänitehosteen
D.BASS
Tämän asetuksen avulla voit nauttia tehokkaasta
bassoefektistä.
Valitse “On D.BASS” tai “Off D.BASS” painamalla
[D.BASS]-painiketta.
-4 — +4
Lisätulon käyttö
Voit liittää laitteeseen videonauhurin, DVD-soittimen, jne.
ja kuunnella sen ääntä tämän järjestelmän kautta.
Valmistelu
Yhdistä ulkoinen laite.
1 Paina kohtaa [SELECTOR] toistuvasti valitaksesi
“AUX”.
2 Toista ääntä ulkoisilla laitteilla.
Muita tietoja
Vähennä näyttöpaneelin kirkkaus
Valitse “Dimmer” painamalla [SETUP].
1
2 Paina kohtaa [2, 1] valitaksesi “On” ja paina
sitten kohtaa [OK].
Huomautus:
• Peruuttaaksesi valitse “Off” vaiheessa 2.
Sammuta järjestelmä automaattisesti
Tämä toiminto sammuttaa järjestelmän (radiolähdettä
lukuun ottamatta), jos et käytä järjestelmää noin
20 minuuttiin.
1 Paina kohtaa [SETUP] toistuvasti valitaksesi
“Auto Off”.
2 Paina kohtaa [2, 1] valitaksesi “On” ja paina
sitten kohtaa [OK].
Huomautus:
• Peruuttaaksesi valitse “Off” vaiheessa 2.
• Kun yhdistetään Bluetooth
ole käytettävissä.
• Jos “Net Standby” asetetaan asentoon “On”, tämä toiminto
asetetaan myös asentoon “On”. Asetuksen muuttamiseksi
aseta “Net Standby” asentoon “Off”. (> 15)
Ohjelmiston päivitys
Ajoittain Panasonic julkaisee tälle järjestelmälle
päivitetyn ohjelmiston, joka voi lisätä tai parantaa
joidenkin ominaisuuksien toimintaa. Nämä päivitykset
ovat saatavilla ilmaiseksi.
ÄLÄ IRROTA verkkokaapelia silloin, kun näytetään
yksi seuraavista viesteistä.
– “Linking”, “Updating” tai “%”
(“ ” tarkoittaa numeroa.)
• Päivitysprosessin aikana ei voida suorittaa muita
toimenpiteitä.
Valmistelu
• Kytke tämä järjestelmä päälle.
• Yhdistä tämä järjestelmä kotiverkkoon. (> 6)
– Varmista, että verkko on kytketty Internetiin.
– Jos “D.Connect” on asetettu asentoon “On”, muuta
asetus asentoon “Off” ja yhdistä tämä järjestelmä
verkkoon, joka on yhdistetty Internetiin.
®
-laitteeseen, tämä toiminto ei
Page 69

1 Paina [SETUP] toistuvasti valitaksesi
“SW Update” ja paina sitten [OK].
2 Paina [2, 1] valitaksesi “Update? Yes” ja paina
sitten [OK] päivityksen aloittamiseksi.
• Valitse “Update? No” päivityksen peruuttamiseksi.
{. Päivityksen lopettamisen jälkeen, näytetään
“Success”.
3 Irrota verkkokaapeli ja liitä se takaisin 3 minuutin
kuluttua.
• Jos päivityksiä ei ole, näytetään “No Need”.
≥ Lataaminen kestää useita minuutteja. Se saattaa
kestää kauemman tai se ei mahdollisesti toimi
kunnolla riippuen yhteyden olosuhteista.
∫ Ohjelmiston version tarkistus
1 Paina [SETUP] toistuvasti valitaksesi “SW Version” ja
paina sitten [OK].
{. Näytetään asennetun ohjelmiston versio.
2 Paina [OK] poistuaksesi.
Wi-Fi-signaalin voimakkuus
Wi-Fi-signaalin voimakkuuden tarkistaminen paikassa,
johon järjestelmä on sijoitettu.
Valmistelu
Yhdistä tämä järjestelmä langattomaan verkkoon. (> 6)
1 Paina [SETUP] toistuvasti valitaksesi “Signal
Level” ja paina sitten [OK].
• Tämän järjestelmän näytöllä näkyy “Level ”.
(“ ” tarkoittaa numeroa.)
2 Paina [OK] poistuaksesi tästä näyttötilasta.
• Suositellaan, että signaalin voimakkuuden tulisi olla “3”.
Muuta langattoman verkon reitittimen tai tämän
järjestelmän asentoa tai kulmaa, jos osoitin on “2” tai “1” ja
tarkista paraneeko yhteys.
• Jos näytetään “Level 0”, tämä järjestelmä ei saa luotua
linkkiä langattomaan reitittimeen. (> 17)
• Tämä toiminto ei toimi, kun “D.Connect” asetetaan
asentoon “On”.
Langaton lähiverkkoasetus
Langaton lähiverkkotoiminto voidaan kytkeä käyttöön tai
pois käytöstä.
1 Paina [SETUP] toistuvasti valitaksesi
“Wireless LAN” ja paina sitten [OK].
2 Paina [2, 1] valitaksesi “On” tai “Off” ja paina
sitten [OK].
• Tehdasasetus on “On”.
Verkon valmiustila
Tämä järjestelmä voi kytkeytyä automaattisesti päälle
valmiustilasta, kun tämä järjestelmä valitaan
AirPlay-kaiuttimiksi.
Valmistelu
Yhdistä tämä järjestelmä kotiverkkoon. (> 6)
1 Paina [SETUP] toistuvasti valitaksesi
“Net Standby” ja paina sitten [OK].
2 Paina [2, 1] valitaksesi “On” ja paina sitten
[OK].
• Tämän toiminnon peruuttamiseksi valitse “Off” vaiheessa 2.
• Tehdasasetus on “Off”. Jos tämä toiminto asetetaan
asentoon “On”, valmiustilan virrankulutus lisääntyy.
Langattoman verkon nimi (SSID)
Näytä yhdistetyn langattoman verkon nimi (SSID).
1 Paina [SETUP] toistuvasti valitaksesi “Net Info”
ja paina sitten [OK].
“IP Addr.” osoitetaan näytöllä.
2 Paina [SETUP] toistuvasti valitaksesi “SSID” ja
paina sitten [OK].
3 Paina [OK] poistuaksesi.
• Jos näytetään “No Connect”, tätä järjestelmää ei ole
yhdistetty langattomaan verkkoon.
• Kaikki kirjaimet näytetään isoina kirjaimina ja merkit, joita ei
voida näyttää, korvataan merkinnällä “
¢”.
IP/MAC-osoite
Tarkistaaksesi tämän järjestelmän IP-osoitteen tai Wi-Fi
MAC osoitteen.
1 Paina [SETUP] toistuvasti valitaksesi “Net Info”
ja paina sitten [OK].
“IP Addr.” osoitetaan näytöllä.
2 Paina [SETUP] toistuvasti valitaksesi “IP Addr.”
tai “MAC Addr.” ja paina sitten [OK].
IP-osoite tai MAC-osoite näytetään osittain.
3 Paina [2, 1] kaukosäätimessä näyttääksesi
loput IP-osoitteesta tai MAC-osoitteesta.
• Poistuaksesi asetuksesta odota 20 sekuntia.
• Kohdan “ – ” näyttäminen näytön ylhäällä tai alhaalla
osoittaa ensimmäistä ja viimeistä laitetta vastaavasti.
SUOMI
15
69
VQT4Z21
Page 70

Vianmääritys
Tee seuraavat tarkistukset ennen kuin pyydät huoltoa. Jos
et ole varma joistakin tarkistettavista kohdista, tai jos
annetut ratkaisut eivät ratkaise ongelmaa, pyydä
jälleenmyyjältä ohjeita.
Onko viimeisin ohjelmisto asennettu?
• Ajoittain Panasonic julkaisee tälle järjestelmälle
päivitetyn ohjelmiston, joka voi lisätä tai parantaa
joidenkin ominaisuuksien toimintaa. (> 14)
Yleisiä ongelmia
Mitään toimintoja ei voi suorittaa kaukosäätimellä.
• Tarkista, että paristo on asetettu oikein.
Ääni on vääristynyt tai ääntä ei kuulu.
• Säädä järjestelmän äänenvoimakkuutta.
• Sammuta järjestelmä, määritä ja korjaa ongelman syy
ja käynnistä järjestelmä uudelleen. Ongelma voi johtua
kaiutinten toimimisesta äärirajoilla, kun
äänenvoimakkuus tai teho on liian suuri, sekä kun
järjestelmää käytetään kuumassa ympäristössä.
Toiston aikana kuuluu “hurinaa”.
• Vaihtovirtajohto tai loistevalolamppu on johtojen
lähellä. Pidä muut laitteet ja johdot erillään tämän
järjestelmän johdoista.
Levy
Näyttö ei näy oikein.
Toisto ei ala.
• Et asettanut levyä oikein laitteeseen. Aseta se oikein.
• Levy on likainen. Puhdista levy.
• Vaihda levy, jos se on naarmuuntunut, vääntynyt tai se
ei ole standardin mukainen.
• Laitteessa on tiivistynyttä kosteutta. Anna järjestelmän
SUOMI
kuivua 1 – 2 tuntia.
Radio
Vastaanotto on heikkoa tai kuuluu hakkaava ääni.
• Pidä antenni kaukana tietokoneista, televisioista,
muista johdoista ja kaapeleista.
• Käytä ulkoantennia.
• Sammuta televisio tai siirrä se kauemmaksi
järjestelmästä.
VQT4Z21
16
70
iPod/iPhone/iPad
Et voi kytkeä päälle iPod/iPhone/iPad-laitetta.
• Tarkista, ettei iPod/iPhone/iPad-laitteen akku ole
tyhjentynyt.
• Sammuta iPod/iPhone/iPad ja järjestelmä ennen kuin
yhdistät iPod/iPhone/iPad-laitteen. Yhdistä iPod/
iPhone/iPad ja yritä uudelleen.
Ei ääntä.
• Sammuta iPod/iPhone/iPad ja poista järjestelmästä.
Yhdistä iPod/iPhone/iPad järjestelmään, kytke päälle
ja toista uudelleen.
iPod/iPhone/iPad ei lataudu.
• Tarkista liitäntä.
• Miten ladata iPod/iPhone/iPad, jonka akku on
tyhjentynyt:
- Kun käytetään “iPod_Port” -yhteyttä, kytke tämä
järjestelmä päälle. Älä kytke tätä järjestelmää pois päältä
ennen kuin iPod/iPhone/iPad on toimintakunnossa.
- Kun käytetään “iPod_Dock” -yhteyttä, näytetään “Checking
Connection”, kunnes iPod/iPhone on toimintakunnossa,
mutta tämä järjestelmä on aloittanut lataamisen.
USB
USB-laitetta tai sen sisältöä ei voi lukea.
• USB-laitteen tai sen sisällön muoto ei ole yhteensopiva
järjestelmän kanssa.
• USB-laitteet, joiden tallennuskapasiteetti on yli 32 GB,
eivät toimi kaikissa olosuhteissa.
USB-laite toimii hitaasti.
• Suurikokoisen sisällön tai suurikapasiteettisen USB
laitteen luku kestää pidempään.
Näytetty kulunut aika ei ole sama kuin todellinen
toistoaika.
• Siirrä tiedot toiseen USB-laitteeseen tai varmuuskopioi
tiedot ja alusta USB-laite uudelleen.
Bluetooth
Ei voida suorittaa laitteiden paritusta.
• Tarkista Bluetooth
Laitetta ei voida liittää.
• Laitteen paritus ei onnistunut tai rekisteröinti on
korvattu. Yritä parittaa laite uudelleen.
• Tämä järjestelmä on mahdollisesti liitetty eri
laitteeseen. Irrota toinen laite ja yritä parittaa laite
uudelleen.
®
®
-laitteen tila.
Laite on liitetty, mutta ääntä ei voida kuulla tämän
järjestelmän kautta.
• Joillekin sisäisille Bluetooth
asettaa äänilähtö asentoon “SC-PMX9” manuaalisesti.
Katso laitteen käyttöohjeita, jos haluat tarkempia
tietoja.
Ääni keskeytyy.
• Laite on 10 m:n viestintäalueen ulkopuolella. Tuo
Bluetooth
Poista mahdolliset esteet tämän järjestelmän ja laitteen väliltä.
•
• Taajuuskaistaa 2,4 GHz käyttävät muut laitteet
(langaton reititin, mikroaaltouuni, langaton puhelin,
ym.) häiritsevät. Siirrä Bluetooth
järjestelmää ja siirrä se kauemmaksi muista laitteista.
• Valitse “Mode 1” vakaata viestintää varten. (> 11 )
®
-laite lähemmäksi tätä järjestelmää.
®
-laitteille sinun tulee
®
-laite lähemmäksi tätä
AirPlay-toimenpiteet
Ei voida yhdistää verkkoon.
• Tarkista verkkoyhteys ja asetukset. (> 6)
• Langaton verkko on mahdollisesti asetettu
näkymättömäksi. Kyseisessä tapauksessa valitse
“Manual settings” kohdassa “Menetelmä 4”. (> 9)
• Tämä järjestelmä ei voi liittyä langattomaan verkkoon
WEP-suojausasetuksia käyttäen WPS-menetelmällä
(“Menetelmä 1”). Käytä kohtaa “Menetelmä 4”
liittyäksesi langattomaan verkkoon. (> 8)
• Varmista, että ryhmälähetystoiminto langattomassa
verkossa on asetettu päälle (käytössä).
• Kun käytetään toimintoa “D.Connect”, jos toiminnon
“D.Connect” salasana on vaihdettu, yhdistä toinen laite
tähän järjestelmään uudella salasanalla. (> 10)
• Tarkista, että “Wireless LAN” on asetettu asentoon
“On”. (> 15)
Ei voida yhdistää tähän järjestelmään.
• Näytä langattoman verkon nimi, johon tämä
järjestelmä on yhdistetty, ja varmista, että laite on
yhdistetty samaan verkkoon. (> 6, 15)
• Jos “Net Standby” asetetaan asentoon “Off”,
AirPlay-yhteensopivaa laitetta ei voida liittää, kun tämä
järjestelmä on pois päältä.
• Kytke Wi-Fi-asetus pois päältä
AirPlay-yhteensopivassa laitteessa, aseta
“Net Standby” asentoon “Off” (> 15) ja sitten kytke
tämä järjestelmä pois päältä ja päälle. Liitä
yhteensopiva laite uudelleen Wi-Fi-verkkoon ja valitse
sitten tämä järjestelmä AirPlay-kaiuttimiksi uudelleen.
Page 71

Langaton verkkoreititin on WPS PBC -yhteensopiva,
mutta paritus ei toimi.
• Jos verkko on asetettu näkymättömäksi,
painikekonfigurointi ei mahdollisesti toimi. Kyseisessä
tapauksessa joko tee langaton verkko näkyväksi tämän
järjestelmän verkkoasetusten aikana tai käytä kohtaa
“Menetelmä 2”, “Menetelmä 3” tai “Menetelmä 4”. (
Toisto ei käynnisty.
Ääni keskeytyy.
• Kokeile langallista lähiverkkoyhteyttä. (> 6)
• Samanaikainen käyttö muiden 2,4 GHz:n laitteiden
kanssa kuten mikrouunit, langattomat puhelimet jne.
voi aiheuttaa yhteyskatkoksia.
Lisää etäisyyttä tämän järjestelmän ja kyseisten
laitteiden välillä.
• Älä sijoita tätä järjestelmää metallikaappiin, koska se
saattaa estää Wi-Fi-signaalin kulun.
• Sijoita tämä järjestelmä lähemmäksi langattoman
verkon reititintä.
• Jos “D.Connect” asetetaan asentoon “On”, sijoita
AirPlay yhteensopiva laite lähemmäksi kaiuttimia.
• Jos useat langattomat laitteet käyttävät samaa
langatonta verkkoa tämän järjestelmän kanssa
samanaikaisesti, kokeile sammuttaa muut laitteet tai
vähentää niiden langattoman verkon käyttöä.
• Jos toisto pysähtyy, tarkista toiston tila iOS-laitteesta
tai iTunes-ohjelmasta.
• Jos toisto ei käynnisty (vaikka näytetään “ ”),
käynnistä langaton verkkoreititin uudelleen, kytke
Wi-Fi-yhteys iOS-laitteessa tai Mac/PC-tietokoneessa
pois päältä ja päälle sekä varmista sitten, että valitaan
kodin langaton verkko.
• Joidenkin iOS- ja iTunes-versioiden kanssa
AirPlay-toistoa ei mahdollisesti voida käynnistää
uudelleen, jos valitsin muutetaan (esim. “CD”) tai tämä
järjestelmä kytketään pois päältä AirPlay-toiston
aikana.
Kyseisessä tapauksessa valitse eri laite
AirPlay-kuvakkeesta musiikkisovelluksessa tai
iTunesissa ja valitse sitten tämä järjestelmä uudelleen
lähetyskaiuttimiksi. (> 9)
>
7, 8)
Pääyksikön näytöt
“--:--”
• Olet liittänyt vaihtovirtajohdon ensimmäistä kertaa tai
virta on katkennut hiljattain. Aseta kellonaika.
“Adjust CLOCK”
• Kelloa ei ole asetettu. Aseta kello asianmukaisesti.
“Adjust TIMER”
• Toistoajastinta ei ole asetettu. Aseta toistoajastin
asianmukaisesti.
“Auto Off”
• Laite on ollut käyttämättä noin 20 minuuttia ja se
sammutetaan noin minuutissa. Paina mitä tahansa
painiketta peruuttaaksesi.
“CANNOT SET”
• Valitse äänilähde, joka on muu kuin “AirPlay”,
“BLUETOOTH” tai “DLNA”.
“Checking Connection”
• Laite on tarkistamassa liitettyä iPod/iPhone/
iPad-laitetta. Jos tämä näyttö tulee edelleen näkyviin,
varmista, että iPod/iPhone/iPad on laitettu oikein ja
yritä uudelleen.
“DL Error”
• Ohjelmiston lataus epäonnistui. Paina mitä tahansa
painiketta poistuaksesi. Yritä uudelleen myöhemmin.
• Palvelinta ei löydetä. Paina mitä tahansa painiketta
poistuaksesi. Varmista, että langaton verkko on liitetty
Internetiin.
“Error”
• Virheellinen toiminto suoritettiin. Lue ohjeet ja yritä
uudelleen.
“F61” tai “F76”
• Virtalähteessä on ongelma.
“Fail”
• Päivitys tai asetus on epäonnistunut. Lue käyttöohjeet
ja yritä uudelleen.
“iPod_Dock Over Current Error”
“iPod_Port Over Current Error”
• iPod/iPhone/iPad tai USB-laite käyttää liian paljon tehoa.
Poista iPod/iPhone/iPad tai USB-laite. Sammuta tämä
järjestelmä ja kytke se päälle uudelleen.
“Level 0”
• Tämän järjestelmän ja langattoman verkon reitittimen
välillä ei ole linkkiä.
Kokeile seuraavia toimenpiteitä.
– Tarkista, että langaton verkkosovitin on kytketty päälle.
– Kytke tämä järjestelmä pois päältä ja päälle uudelleen.
– Resetoi langattoman verkon asetukset. (> 6)
Jos ongelma jatkuu, ota yhteyttä jälleenmyyjään.
“Level j”
• Kun “D.Connect” asetetaan asentoon “On”, Wi-Fi-signaalin
voimakkuutta ei voida tarkistaa. Tarkistaaksesi
Wi-Fi-signaalin voimakkuuden langattoman verkon
reitittimestä, aseta “D.Connect” asentoon “Off”. (
“Linking”
• Tämä järjestelmä kommunikoi langattoman verkon reitittimen
kanssa verkkoasetusten loppuun saattamiseksi.
Langattoman verkon reitittimestä riippuen tämä prosessi voi
kestää muutamia minuutteja. Yritä sijoittaa tämä järjestelmä
lähemmäksi langattoman verkon reititintä.
>
10)
“No Connect”
• Tämä järjestelmä ei voi yhdistää verkkoon.
Tarkista verkkoliitäntä. (> 6)
“No Device”
• iPod/iPhone/iPad tai USB-laite ei ole liitettynä.
Tarkista liitäntä.
“No Disc”
• Et ole asettanut levyä tai olet asettanut levyn, jota
järjestelmä ei voi toistaa.
“No Play”
• Tarkista sisältö. Voit toistaa vain tuettuja muotoja.
• Jos albumeja tai kansioita on yli 255 (oli niissä
äänitiedostoja tai ei), joitakin MP3/FLAC tiedostoja
näissä kansioissa ei voida lukea ja toistaa. Siirrä nämä
musiikkialbumit toiseen USB-laitteeseen.
Vaihtoehtoisesti voit alustaa USB-laitteen uudelleen ja
tallentaa musiikkialbumit ennen muita kansioita, jotka
eivät sisällä äänitiedostoja.
“Not MP3/Error”
• MP3-muoto, jota ei tueta. Järjestelmä ohittaa raidan ja
toistaa seuraavan raidan.
“Not Supported”
• Laitoit iPod/iPhone/iPad-laitteen, jota ei voida toistaa.
• Sammuta iPod/iPhone/iPad ja järjestelmä ennen kuin
yhdistät iPod/iPhone/iPad-laitteen. Yhdistä iPod/
iPhone/iPad ja yritä uudelleen.
• Tämä viesti voidaan näyttää, kun langaton
lähiverkkoyhteys suoritetaan ilman, että vapautetaan
iPod/iPhone/iPad-laitteen lukitus. (> 7, “Menetelmä
2”)
“PGM Full”
• Ohjelmoituja raitoja on enemmän kuin 24.
“Reading”
• Laite on tarkistamassa levyn ja USB-laitteen tietoja.
Kun tämä näyttö häviää, käynnistä toiminta.
“Set Wi-Fi”
• Yhdistettyä iPod touch/iPhone/iPad-laitetta ei ole
yhdistetty langattomaan verkkoon. Yhdistä se
langattomaan verkkoon ja yritä uudelleen. (> 6)
“Wait”
• Esimerkiksi näytetään tämä, kun tämä laite
sammutetaan. (Noin 1 minuutin ja 30 sekunnin ajan)
SUOMI
VQT4Z21
17
71
Page 72

Muistin tyhjennys (alustus)
Tyhjennä muisti seuraavissa tilanteissa:
• Painikkeita painettaessa ei tapahdu mitään.
• Haluat tyhjentää muistin sisällön.
1 Irrota vaihtovirtajohto.
Odota kolme minuuttia ennen kuin jatkat vaiheeseen 2.
2 Liitä vaihtovirtajohto laitteeseen samalla, kun
pidät pääyksikön [Í/I]-painiketta painettuna.
“- - - - - - - - - - - -” tulee näyttöön.
3 Vapauta [Í/I].
Kaikki asetukset palautetaan tehdasasetuksiin.
Muistiasetukset on tehtävä uudelleen.
Kaukosäädinkoodi
Jos muut Panasonic-laitteet häiriintyvät järjestelmän
kaukosäätimen käytöstä, vaihda kaukosäätimen koodi
tälle järjestelmälle.
Koodin vaihtaminen asetukseen “Remote 2”
1 Paina [CD] valitaksesi “CD”.
2 Pidä pääyksikön [CD]-painiketta ja
kaukosäätimen [2]-painiketta painettuna, kunnes
näyttöön tulee “Remote 2”.
3 Pidä [OK]- ja [2]-painiketta painettuna vähintään
4 sekuntia.
• Tehdasasetus on “Remote 1”.
• Muuttaaksesi tilan takaisin asentoon “Remote 1”, toista
yllä kuvatut vaiheet, mutta vaihda kaukosäätimessä
painettava painike [2] painikkeeksi [1].
SUOMI
VQT4Z21
18
72
Tekniset tiedot
Vahvistinosa
RMS-lähtöteho
Etukanava (molempia kanavia vahvistetaan)
RMS-kokonaisteho 120 W
Viritinosa
Taajuusmodulaatio (FM)
Esiasetettu muisti 30 asemaa
Taajuusalue
87,50 MHz sitä 108,00 MHz (50 kHz:n askel)
Antenniliitännät 75 ™ (tasapainottamaton)
Liitäntäosa
“iPod_Port”-yhteys
USB-standardi USB 2.0
Mediatiedostojen tuki
USB-laitteen tiedostojärjestelmä
ID3-tunnistetuki v2.3
“iPod_Dock”-yhteys
Kuulokejakki Stereo, Ø 3,5 mm:n jakki
AUX-tulo (takana) Jakki
Lähiverkkoportti 10 Base-T/100 Base-TX
Levyosa
Toistettavat levyt (8 cm tai 12 cm)
Lukupää
Aallonpituush 790 nm (CD)
Laserteho CLASS 1
Äänilähtö (Levy)
Kanavien määrä 2 kanavaa (FL, FR)
60 W /kanava (3 ™), 1 kHz,
10 %:n harmoninen kokonaissärö
DCOUT 5V 2,1A (max)
MP3 (*.mp3)
DCOUT 5V 1,0A (max)
CD, CD-R/RW (CD-DA, MP3)
, FLAC (*.flac)
FAT16, FAT32
Kaiutinosa
Kaiutinyksiköt
Woofer 14 cm:n kartiotyyppinen kaiutin x 1
Diskantti 1,9 cm:n kupumainen kaiutin x 1
Superdiskantti 1,2 cm:n pietsokaiutin x 1
Impedanssi 3™
Mitat (L x K x S) 161 mm x 238 mm x 264 mm
Massa Noin 3,0 kg
Bluetooth®-osasto
®
Bluetooth
Langattoman laitteiston luokittelu Luokka 2
Tuetut profiilit A2DP
Taajuuskaista 2,4 GHz:n taajuus FH-SS
Toimintaetäisyys 10 m näköetäisyydellä
-järjestelmän tiedot V3.0
Eteensuuntautuva viestintäetäisyys
Mittausympäristö:
Mittaa tilassa “Mode 1”
Lämpötila 25 oC / Korkeus 1 m
Wi-Fi/AirPlay osasto
Wi-Fi
Langattoman
lähiverkon (WLAN)
standardi
Taajuusalue 2,4 GHz:n kaista
Suojaus WEP (64 bittiä/128 bittiä),
WPS-versio
Versio 2.0 (WEP ei tuettu)
IEEE802.11b/g
TM
, WPA2
WPA
Äänen tuettu muoto (USB, DLNA)
MP3
Näytetaajuus 32/44,1/48 kHz
Äänen sanapituus 16 bittiä
Kanavamäärä 2 -kanav.
Bittinopeus 8-320 kbps
FLAC
Näytetaajuus
Äänen sanapituus 16,24 bittiä
Kanavamäärä 2-kanav.
WAV (ainoastaan DLNA )
Näytetaajuus
Äänen sanapituus 16,24 bittiä
Kanavamäärä 2-kanav.
32/44,1/48/88,2/96/176,4/192 kHz
32/44,1/48/88,2/96/176,4/192 kHz
TM
Page 73

Yleistä
Virtalähde AC 220 V sitä 240 V, 50 Hz
Virrankulutus 60 W
Mitat (L x K x S) 210 mm x 120 mm x 266 mm
Massa Noin 3,1 kg
Käyttöympäristön lämpötila-alue 0°C sitä +40°C
Käyttöympäristön kosteusalue
Virrankulutus valmiustilassa
(Kun iPod/iPhone/iPad ei ole lataamassa)
Huomautus:
• Tekniset tiedot voivat muuttua ilman eri ilmoitusta. Massa ja
mitat ovat likimääräisiä arvoja.
• Harmoninen kokonaissärö on mitattu digitaalisella
spektrianalysaattorilla.
FLAC Decoder
Copyright (C) 2000,2001,2002,2003,2004,2005,2006,2007
Josh Coalson
Redistribution and use in source and binary forms, with or
without modification, are permitted provided that the following
conditions are met:
- Redistributions of source code must retain the above
copyright notice, this list of conditions and the following
disclaimer.
- Redistributions in binary form must reproduce the above
copyright notice, this list of conditions and the following
disclaimer in the documentation and/or other materials
provided with the distribution.
- Neither the name of the Xiph.org Foundation nor the
names of its contributors may be used to endorse or
promote products derived from this software without
specific prior written permission.
THIS SOFTWARE IS PROVIDED BY THE COPYRIGHT
HOLDERS AND CONTRIBUTORS “AS IS” AND ANY
EXPRESS OR IMPLIED WARRANTIES, INCLUDING, BUT
NOT LIMITED TO, THE IMPLIED WARRANTIES OF
MERCHANTABILITY AND FITNESS FOR A PARTICULAR
PURPOSE ARE DISCLAIMED. IN NO EVENT SHALL THE
FOUNDATION OR CONTRIBUTORS BE LIABLE FOR ANY
DIRECT, INDIRECT, INCIDENTAL, SPECIAL, EXEMPLARY,
OR CONSEQUENTIAL DAMAGES (INCLUDING, BUT NOT
LIMITED TO, PROCUREMENT OF SUBSTITUTE GOODS
OR SERVICES; LOSS OF USE, DATA, OR PROFITS; OR
BUSINESS INTERRUPTION) HOWEVER CAUSED AND
ON ANY THEORY OF LIABILITY, WHETHER IN
CONTRACT, STRICT LIABILITY, OR TORT (INCLUDING
NEGLIGENCE OR OTHERWISE) ARISING IN ANY WAY
OUT OF THE USE OF THIS SOFTWARE, EVEN IF
ADVISED OF THE POSSIBILITY OF SUCH DAMAGE.
35 % sitä 80 % suht. kosteus (ei tiivistyvä)
0,4 W (noin)
Vakuutus vaatimustenmukaisuudesta (DoC)
“Panasonic Corporation” vakuuttaa, että tämä tuote on
yhdenmukainen direktiiviin 1999/5/EC keskeisten
vaatimusten sekä sen muiden merkityksellisten määräysten
kanssa.
Asiakkaat voivat ladata alkuperäisen DoC:n kopion
R&TTE-tuotteillemme DoC-palvelimelta:
http://www.doc.panasonic.de
Valtuutetun edustajan yhteystiedot:
Panasonic Marketing Europe GmbH,
Panasonic Testing Centre, Winsbergring 15, 22525
Hamburg, Saksa
Tämä tuote on tarkoitettu tavallisille kuluttajille. (Luokka 3)
Tämä tuote on tarkoitettu liitettäväksi 2,4 GHz:n
WLAN-liityntäpisteeseen.
Vanhojen laitteiden ja akkujen hävittäminen
Ainoastaan Euroopan yhteisölle ja maille
kierrätysjärjestelmien kanssa
ole hyvä ja toimita nämä tuotteet asianmukaiseen
keräyspisteeseen kansallisen lainsäädännön
mukaisesti.
Niiden moitteeton hävittäminen auttaa säästämään
arvokkaita resursseja ja se ehkäisee ihmisten
terveyteen sekä ympäristöön vaikuttavia
haittavaikutuksia.
Jos haluat lisätietoja keräämisestä ja kierrätyksestä,
ota yhteyttä paikallisiin viranomaisiin.
Tämän romun virheellinen hävittäminen voi johtaa
rangaistustuomioon kansallisen lainsäädännön
mukaisesti.
Nämä tuotteessa, pakkauksessa ja/tai
sen mukana toimitettavissa asiakirjoissa
olevat tunnukset tarkoittavat sitä, että
käytettyjä sähkö- ja elektroniikkalaitteita
sekä akkuja/paristoja ei saa laittaa
tavallisen kotitalousjätteen sekaan.
Vanhojen tuotteiden ja akkujen/
paristojen kunnollista käsittelyä,
uudelleenkäyttöä ja kierrätystä varten
Huomautus akun/pariston tunnusta
varten (alla oleva tunnus):
Tätä tunnusta saatetaan käyttää
yhdessä kemiallisen tunnuksen kanssa.
Tässä tapauksessa se täyttää direktiivin
asettamat vaatimukset kyseessä
olevalle kemialliselle aineelle.
SUOMI
VQT4Z21
19
73
Page 74

Ελληνικά
Δήλωση συμμόρφωσης (DoC)
Με την παρούσα, η “Panasonic Corporation” δηλώνει ότι το
προϊόν αυτό είναι σύμφωνο με τις βασικές απαιτήσεις και άλλες
σχετικές διατάξεις της οδηγίας 1999/5/ΕC.
Οι πελάτες μπορούν να κατεβάσουν ένα αντίγραφο του
πρωτοτύπου DoC για τα R&TTE προϊόντα μας από τον DoC
server μας:
http://www.doc.panasonic.de
Στοιχεία επικοινωνίας Eξουσιοδοτημένου Aντιπροσώπου:
Panasonic Marketing Europe GmbH,
Panasonic Testing Centre, Winsbergring 15, 22525 Hamburg,
Γερμανία
Αυτό το προϊόν προορίζεται για καταναλωτές. (Κατηγορία 3)
Το προϊόν προορίζεται για σύνδεη σε ασύρματο δίκτυο WLAN
2,4 GHz.
Português
Declaração de Conformidade (DoC)
Com o presente documento, a “Panasonic Corporation” declara
que este produto é conforme os requisitos específicos e demais
especificações referentes à Directriz 1999/5/EC.
Os clientes podem baixar uma cópia da declaração de
conformidade (DoC) para nossos produtos R&TTE do Server
DoC:
http://www.doc.panasonic.de
Contacte o representante autorizado:
Panasonic Marketing Europe GmbH,
Panasonic Testing Centre, Winsbergring 15, 22525 Hamburg,
Alemanha
Este produto destina-se ao consumador geral. (Categoria 3)
Este produto foi concebido para ligação a uma conexão WLAN de
2,4 GHz.
Lietuviškai
Atitikties deklaracija (AD)
Bendrovė “Panasonic Corporation” patvirtina, kad šis gaminys
tenkina direktyvos 1999/5/EB esminius reikalavimus ir kitas
taikytinas nuostatas.
Mūsų R&TTE gaminių originalios atitikties deklaracijos kopiją
klientai gali atsisiųsti iš mūsų AD serverio:
http://www.doc.panasonic.de
Įgaliotojo atstovo adresas:
“Panasonic Marketing Europe GmbH”,
Panasonic Testing Centre, Winsbergring 15, 22525 Hamburg,
Vokietija.
Šis gaminys skirtas bendrajam vartojimui. (3 kategorija.)
Šis gaminys yra skirtas prisijungti prie 2,4 GHz WLAN.
Slovensko
Izjava o skladnosti (DoC)
S pričujočo izjavo podjetje “Panasonic Corporation” izjavlja, da so
svoji izdelki skladni s poglavitnimi zahtevami in drugimi
odgovarjajočimi predpisi direktive 1999/5/ES.
Stranka lahko naloži izvod izvirnega DoC o naših izdelkih R&TTE
s strežnika DoC:
http://www.doc.panasonic.de
Pooblaščeni zastopnik:
Panasonic Marketing Europe GmbH,
Panasonic Testing Centre, Winsbergring 15, 22525 Hamburg,
Nemčija
Izdelek je namenjen splošni uporabi. (Razred 3)
Ta izdelek je namenjen za povezavo z dostopno točko 2,4 GHz
WLAN.
Slovensky
Vyhlásenie o zhode (DoC)
“Panasonic Corporation” týmto prehlasuje, že tento výrobok je v
zhode so základnými požiadavkami a ďalšími príslušnými
ustanoveniami smernice 1999/5/ES.
Zákazníci si môžu stiahnuť kópiu pôvodného DoC na naše
R&TTE výrobky z nášho servera DoC:
http://www.doc.panasonic.de
Kontakt na splnomocneného zástupcu:
Panasonic Marketing Europe GmbH,
Panasonic Testing Centre, Winsbergring 15, 22525 Hamburg,
Nemecko
Tento produkt je určený pre všeobecného spotrebiteľa. (Kategória
3)
Tento výrobok slúži na pripojenie prístupového bodu bezdrôtovej
siete 2,4 GHz.
Norsk
Samsvarserklæring (DoC)
“Panasonic Corporation” erklærer at utstyret er i samsvar med de
grunnleggende krav og øvrige relevante krav i direktiv 1999/5/EF.
Kundene kan laste ned en kopi av den originale
samsvarserklæringen (DoC) for vårt R&TTE utstyr fra vår DoC
server:
http://www.doc.panasonic.de
Kontakt vår autoriserte representant:
Panasonic Marketing Europe GmbH,
Panasonic Testing Centre, Winsbergring 15, 22525 Hamburg,
Tyskland
Utstyret er beregnet på den vanlige forbruker (klasse 3).
Dette produktet er beregnet for tilkobling til et tilgangspunkt på
2,4 GHz WLAN.
VQT4Z21
74
Page 75

Eesti keel
Vastavusdeklaratsioon (DoC)
“Panasonic Corporation” kinnitab käesolevaga, et see toode on
vastavuses põhiliste nõuete ja muude direktiivi 1999/5/EÜ
asjakohaste sätetega.
Kliendid saavad koopia meie R&TTE toodetele kehtiva
originaalvastavusdeklaratsiooni koopia alla laadida meie
DoC-serverist:
http://www.doc.panasonic.de
Võtke ühendust volitatud esindajaga:
Panasonic Marketing Europe GmbH,
Panasonic Testing Centre, Winsbergring 15, 22525 Hamburg,
Germany
See toode on mõeldud tavakasutajale. (III kategooria)
See toode on mõeldud 2,4 GHz WLAN-pääsupunktiga ühenduse
loomiseks.
Latviski
Atbilstības deklarācija (DoC)
Kompānija “Panasonic Corporation” ar šo paziņo, ka šis
izstrādājums atbilst būtiskām prasībām un citām saistošām
Direktīvas 1999/5/EK prasībām.
Pircēji var lejupielādēt oriģinālo DoC kopiju mūsu R&TTE
izstrādājumos no mūsu DoC servera:
http://www.doc.panasonic.de
Lūdzam sazināties ar pilnvaroto parstāvi
Panasonic Marketing Europe GmbH,
Panasonic Testing Centre, Winsbergring 15, 22525
Hamburg, Germany
Šis izstrādājums ir paredzēts parastam patērētājam. (3. kategorija)
Šo izstrādājumu ir paredzēts savienot ar 2,4 GHz WLAN piekļuves
punktu.
Български
Декларация за съответствие (DoC)
“Panasonic Corporation” декларира, че този продукт
съответства на съществените изисквания и другите
приложими разпоредби на Директива 1999/5/EC.
Потребителите могат да свалят копие от оригиналните DoC
към нашите продуктите от типа R&TTE от сървъра, на който
се съхраняват DoC:
http://www.doc.panasonic.de
За контакт с оторизиран представител:
Panasonic Marketing Europe GmbH,
Panasonic Testing Centre, Winsbergring 15, 22525 Hamburg,
Германия
Тоз и продукт е предназначен за обща употреба. (Категория 3)
Тов а изделие е предназначено за свързване с точка на достъп
на 2,4 ГХц безжична локална мрежа.
Român
Declaraţie de Conformitate (DoC)
Prin prezenta, societatea “Panasonic Corporation” declară că
produsul este conform cu cerinţele esenţiale şi cu alte norme
corespunzătoare Directivei 1999/5/EC.
Clienţii pot descărca o copie a DoC-ului original al produselor
noastre R&TTE de la adressa noastră DoC din Internet:
http://www.doc.panasonic.de
Contact la Reprezentanţa autorizată:
Panasonic Marketing Europe GmbH,
Panasonic Testing Centre, Winsbergring 15, 22525 Hamburg,
Germania
Acest produs a fost proiectat pentru clientela generală.
(Categoria 3)
Acest produs a fost conceput cu scopul de a se conecta la un
punct de acces de 2,4 GHz WLAN.
Magyar
Megfelelőségi Nyilatkozat (DoC)
Ezennel a , “Panasonic Corporation” kijelenti, hogy a jelen termék
kielégíti az 1999/5/EK Irányelv létfontosságú követelményeit és
más vonatkozó rendelkezéseit.
A vásárlók letölthetik az R&TTE termékek eredeti DoC másolatát
a DoC szerverünkről:
http://www.doc.panasonic.de
Forduljon a hivatalos márkaképviselethez:
Panasonic Marketing Europe GmbH,
Panasonic Testing Centre, Winsbergring 15, 22525 Hamburg,
Németország
A terméket általános fogyasztóknak szánták. (3-as kategória)
A termék 2,4 GHz-es WLAN hozzáférési ponthoz való
kapcsolódásra van tervezve.
Hrvatski
Deklaracija o podobnosti (DoC)
Ovime, “Panasonic Corporation” izjavljuje da je ovaj proizvod
udovoljava osnovnim zahtjevima i ostalim relevantnim uvjetima
Smjernice 1999/5/EC.
Kupci mogu preuzeti kopiju originalne DoC za naše R&TTE
proizvode s našeg DoC poslužitelja:
http://www.doc.panasonic.de
Kontakti u Europskoj uniji:
Panasonic Marketing Europe GmbH,
Panasonic Testing Centre, Winsbergring 15, 22525 Hamburg,
Njemačka
Ovaj proizvod je namijenjen za opću potrošnju. (kategorija 3)
2,4 GHz.
Ovaj proizvod se povezuje na pristupne toθke be iθne mre e od
VQT4Z21
75
Page 76

Web Site: http://panasonic.net
Panasonic Corporation 2013
Panasonic Corporation
Manufactured by:
Importer:
Panasonic Corporation Kadoma, Osaka, Japan
Panasonic Marketing Europe GmbH
Panasonic Testing Centre
Winsbergring 15, 22525 Hamburg, Germany
EU
NORSK
ADVARSEL!
Produkt
• For å redusere faren for brann, elektrisk støt eller
skade på apparatet:
- Dette apparatet må ikke utsettes for regn, fuktighet,
drypp eller sprut.
- Ikke plasser objekter som er fylt med væske, som
vaser, på apparatet.
- Bruk kun anbefalt tilbehør.
- Fjern ikke deksler.
- Dette apparatet må ikke repareres på egen hånd.
Overlat servicearbeider til kvalifisert
servicepersonell.
FORSIKTIG!
Produkt
• For å redusere faren for brann, elektrisk støt eller
skade på apparatet:
- Ikke plasser apparatet i en bokhylle, et innebygget
kabinett eller et annet lukket sted. Pass på at
apparatet er godt ventilert.
- Apparatets ventilasjonsåpninger må ikke dekkes til
med aviser, duker, gardiner eller lignende.
- Plasser ikke åpen ild, slik som levende lys, oppå
apparatet.
• Dette apparatet er beregnet til bruk under moderate
klimaforhold.
• Nettstøpselet er trukket ut fra denne enheten.
Installer denne enheten slik at nettstøpselet
umiddelbart kan trekkes fra stikkontakten.
• Dette apparatet anvender en laser. Betjening av
kontroller, justeringer eller andre inngrep enn de som
er beskrevet i denne bruksanvisning, kan føre til farlig
bestråling.
VQT4Z21
F0313QK0
 Loading...