

Panasonic SCHTE180EG User Manual [en, es, cs, pl]
Operating Instructions
printing
Instrukcja obsługi
Návod k obsluze
Instrucciones de funcionamiento
Bruksanvisning
Betjeningsvejledning
Home Theater Audio System
Zestaw audio do kina domowego
Sestava pro domácí kino
Sistema de Cine en Casa
Audiosystem för Hemmabio
Lydsystem til hjemmebiograf
Model No. SC-HTE180
Thank you for purchasing this product.
For optimum performance and safety, please read these instructions carefully.
Please keep this manual for future reference.
Dziękujemy za zakupienie tego produktu.
Proszę dokładnie zapoznać się z tą instrukcją obsługi, aby jak najlepiej wykorzystać to urządzenie i zapewnić jego
bezpieczne użytkowanie.
Prosimy o zachowanie niniejszej instrukcji obsługi.
Děkujeme za zakoupení tohoto výrobku.
Pro dosažení optimálního výkonu a z bezpečnostních důvodu si pečlivě přečtěte tyto pokyny.
Uschovejte si prosím tento návod k obsluze.
Muchísimas gracias por haber adquirido este aparato.
Lea con atención estas instrucciones para obtener las máximas prestaciones y seguridad.
Guarde este manual para su consulta en el futuro.
Tack för valet av denna apparat.
Läs igenom bruksanvisningen noga för bästa resultat och för säkerhets skull.
Spara denna bruksanvisning.
Tak fordi du har valgt dette produkt.
Læs venligst denne betjeningsvejledning omhyggeligt, således at optimal ydelse og sikkerhed opnås.
Gem vejledningen til senere brug.
EG
RQT9939-Z

Do the procedures with the remote control. You can
printing
also use the buttons on the main unit if they are the
same.
Your system and the illustrations can look differently.
Safety precautions
WARNING!
Unit
• To reduce the risk of fire, electric shock or product
damage,
– Do not expose this unit to rain, moisture, dripping or
splashing.
– Do not place objects filled with liquids, such as
vases, on this unit.
– Use only the recommended accessories.
– Do not remove covers.
– Do not repair this unit by yourself. Refer servicing to
qualified service personnel.
AC mains lead
• To reduce the risk of fire, electric shock or product
damage,
– Make sure that the power supply voltage
corresponds to the voltage printed on this unit.
– Insert the mains plug fully into the socket outlet.
– Do not pull, bend, or place heavy items on the lead.
– Do not handle the plug with wet hands.
– Hold onto the mains plug body when disconnecting
the plug.
– Do not use a damaged mains plug or socket outlet.
• The mains plug is the disconnecting device. Install this
unit so that the mains plug can be unplugged from the
socket outlet immediately.
Battery
• Risk of fire, explosion and burns. Do not recharge,
disassemble, heat above 60°C or incinerate.
• Keep the Button-Type battery out of the reach of
children. Never put Button-Type battery in mouth. If
swallowed call your doctor.
CAUTION!
Unit
• To reduce the risk of fire, electric shock or product
damage,
– Do not install or place this unit in a bookcase, built-in
cabinet or in another confined space. Ensure this
unit is well ventilated.
– Do not obstruct this unit’s ventilation openings with
newspapers, tablecloths, curtains, and similar items.
– Do not place sources of naked flames, such as
lighted candles, on this unit.
• This unit is intended for use in moderate climates.
• This unit may receive radio interference caused by
mobile telephones during use. If such interference
occurs, please increase separation between this unit
and the mobile telephone.
• Do not touch the bottom of the unit. It might be hot
when you use it for a long period.
Battery
• Danger of explosion if battery is incorrectly replaced.
Replace only with the type recommended by the
manufacturer.
• When disposing the batteries, please contact your
local authorities or dealer and ask for the correct
method of disposal.
• Do not heat or expose to flame.
• Do not leave the battery(ies) in a car exposed to direct
sunlight for a long period of time with doors and
windows closed.
• Remove the battery if you do not use the remote
control for a long period of time. Keep in a cool, dark
area.
Supplied accessories
Check and identify the supplied accessories.
1 AC mains lead
1 Remote control (with a battery)
(N2QAYC000098)
RQT9939
2
2

Table of contents
ENGLISH
printing
Safety precautions . . . . . . . . . . . . . . . . . . . . . . . . . 2
Supplied accessories . . . . . . . . . . . . . . . . . . . . . . . 2
Licenses. . . . . . . . . . . . . . . . . . . . . . . . . . . . . . . . . . 3
About Bluetooth®. . . . . . . . . . . . . . . . . . . . . . . . . . . 4
Placement . . . . . . . . . . . . . . . . . . . . . . . . . . . . . . . . 4
Preparing the remote control . . . . . . . . . . . . . . . . . 4
Overview of controls . . . . . . . . . . . . . . . . . . . . . . . . 5
Making the connections . . . . . . . . . . . . . . . . . . . . . 6
Basic control . . . . . . . . . . . . . . . . . . . . . . . . . . . . . . 9
3D sound . . . . . . . . . . . . . . . . . . . . . . . . . . . . . . . . . 9
Sound menu. . . . . . . . . . . . . . . . . . . . . . . . . . . . . . . 9
Setup Menu . . . . . . . . . . . . . . . . . . . . . . . . . . . . . . 10
Linked operations with the TV (VIERA Link™
“HDAVI Control™”) . . . . . . . . . . . . . . . . . . . . . . . . 11
Troubleshooting . . . . . . . . . . . . . . . . . . . . . . . . . . 12
Maintenance . . . . . . . . . . . . . . . . . . . . . . . . . . . . . 13
Specifications . . . . . . . . . . . . . . . . . . . . . . . . . . . . 14
Licenses
Manufactured under license from Dolby Laboratories.
Dolby, Pro Logic, and the double-D symbol are
trademarks of Dolby Laboratories.
Manufactured under license under U.S. Patent Nos:
5,956,674; 5,974,380; 6,487,535 & other U.S. and
worldwide patents issued & pending.
DTS, the Symbol, & DTS and the Symbol together are
registered trademarks & DTS Digital Surround and the
DTS logos are trademarks of DTS, Inc. Product includes
software.
© DTS, Inc. All Rights Reserved.
HDMI, the HDMI Logo, and High-Definition Multimedia
Interface are trademarks or registered trademarks of
HDMI Licensing LLC in the United States and other
countries.
HDAVI Control™ is a trademark of Panasonic
Corporation.
The Bluetooth
Bluetooth SIG, Inc. and any use of such marks by
Panasonic Corporation is under license. Other
trademarks and trade names are those of their
respective owners.
Google Play and Android are trademarks of Google Inc.
®
word mark and logos are owned by the
About Bluetooth
Panasonic bears no responsibility for data and/or
information that can possibly be compromised during a
wireless transmission.
Frequency band
• This system uses the 2.4 GHz frequency band.
Certification
• This system conforms to the frequency restrictions and
has received certification based on frequency laws.
Thus, a wireless permit is not necessary.
• The actions below are punishable by law:
– Taking apart or modifying the main unit.
– Removing specification indications.
Restrictions of use
• Wireless transmission and/or usage with all Bluetooth
equipped devices is not guaranteed.
• All devices must conform to standards set by
Bluetooth SIG, Inc.
• Depending on the specifications and settings of a
device, it can fail to connect or some operations can be
different.
• This system supports Bluetooth
depending on the operating environment and/or
settings, this security is possibly not sufficient.
Transmit data wirelessly to this system with caution.
• This system cannot transmit data to a Bluetooth
device.
Range of use
• Use this device at a maximum range of 10 m.
• The range can decrease depending on the
environment, obstacles or interference.
Interference from other devices
• This system may not function properly and troubles
such as noise and sound jumps may arise due to radio
wave interference if this unit is located too close to
other Bluetooth
2.4 GHz band.
• This system may not function properly if radio waves
from a nearby broadcasting station, etc. is too strong.
Intended usage
• This system is for normal, general use only.
• Do not use this system near an equipment or in an
environment that is sensitive to radio frequency
interference (example: airports, hospitals, laboratories,
etc.).
®
devices or the devices that use the
®
®
security features. But
®
®
RQT9939
3
3
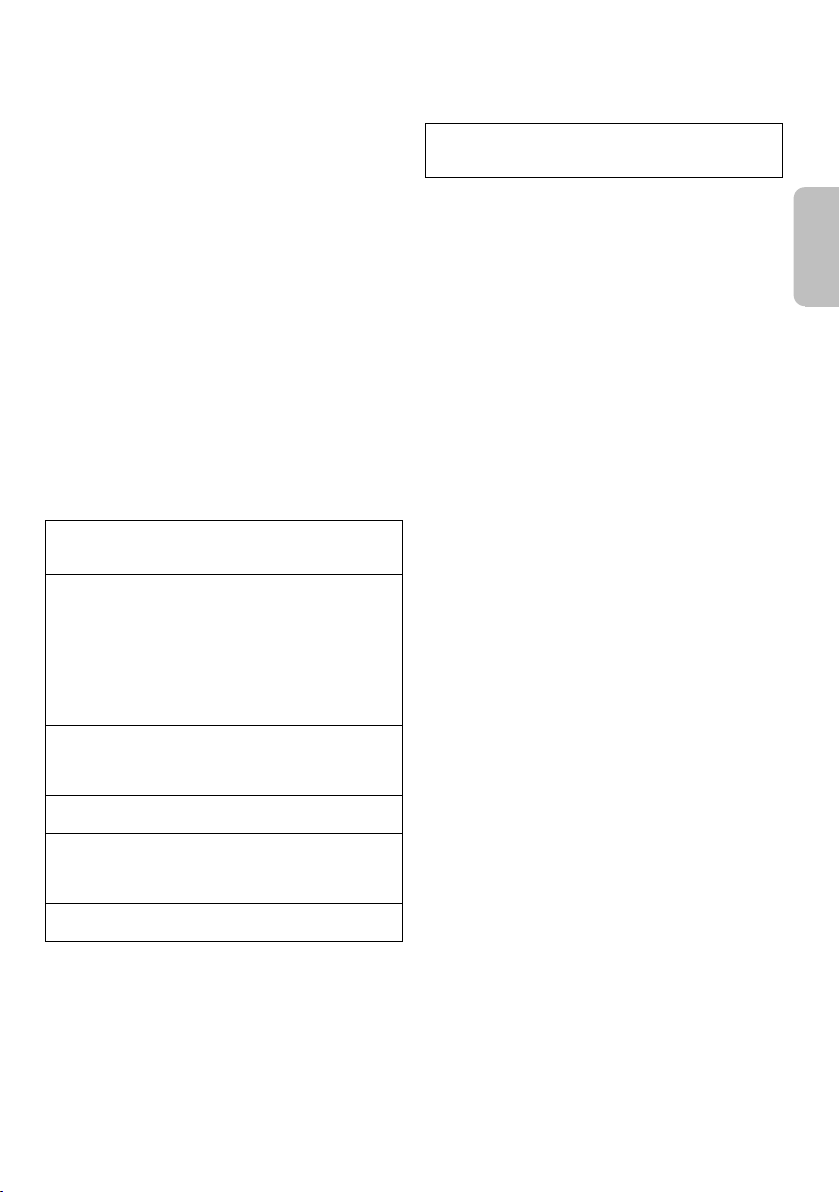
Placement
700 mm
365 mm
Insulation
sheet
printing
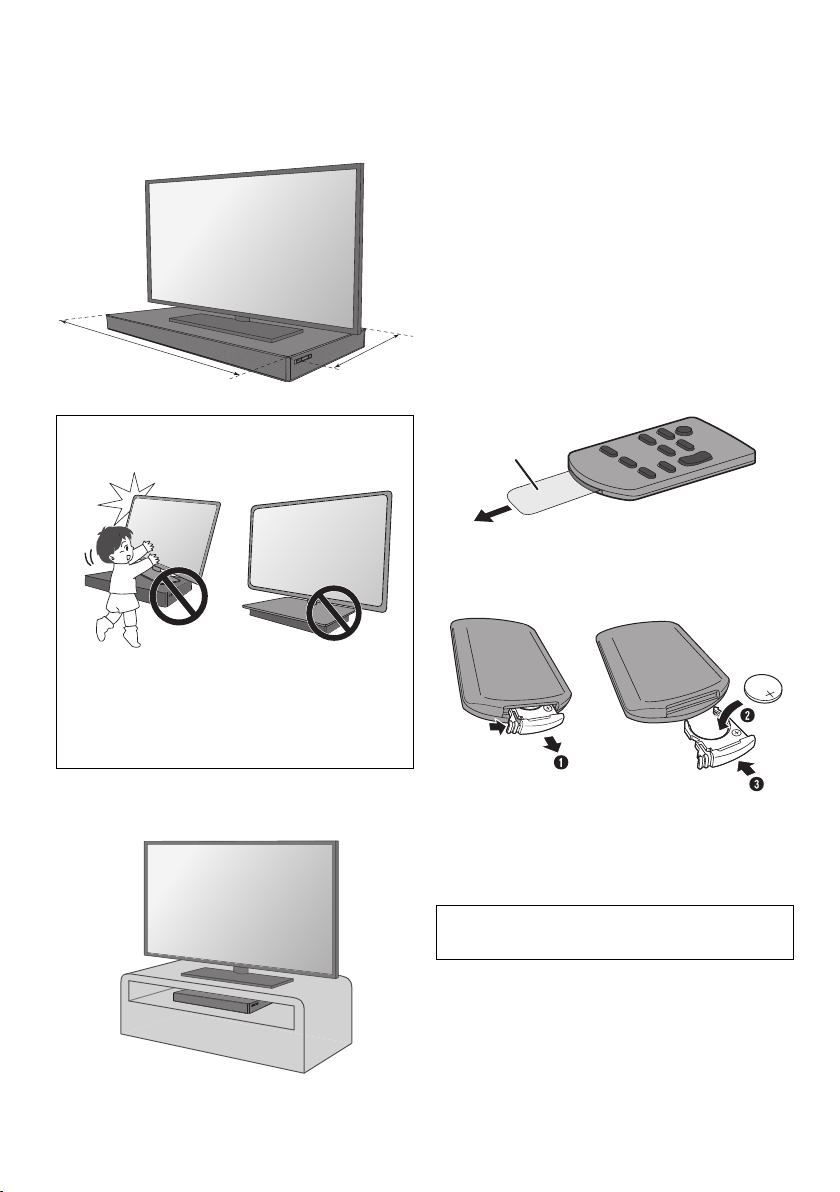
When the TV is less than 50 kg, and the pedestal of the
TV is within 700 mm (width) by 365 mm (depth), you can
put the TV on top of the system.
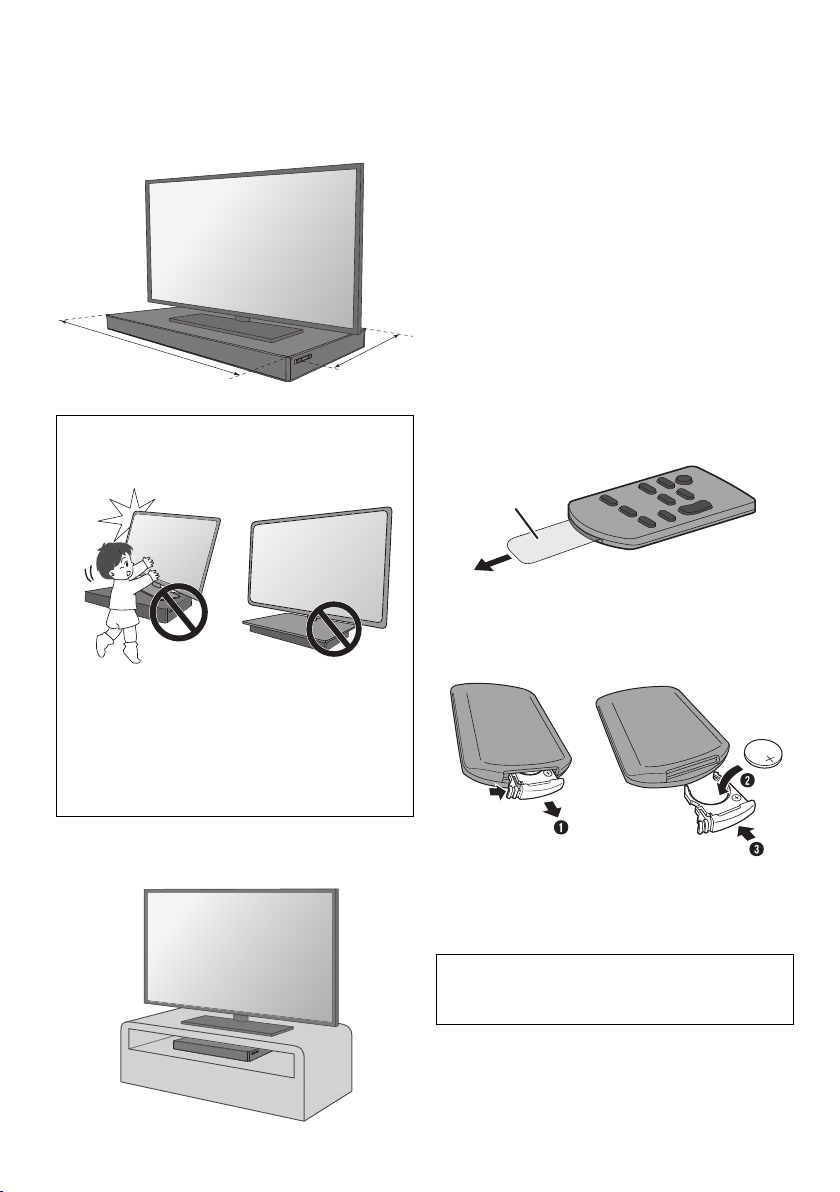
CAUTION!
• Keep the TV within the surface of the system. Be
careful not to tip over the TV as it can cause injury.
Note:
• Do not put the system in a metal cabinet.
• Keep other 2.4 GHz frequency band electronic devices
such as wireless router, cordless phone, etc. at least 2 m
away from this system to avoid wireless interference.
• If irregular colouring occurs on the TV, switch off the TV for
30 minutes. If the demagnetising of the TV does not correct
the problem, increase the distance between this system
and the TV.
• Keep magnetised items away. Magnetised cards, watches,
etc., can be damaged if put too near to the system.
Preparing the remote control
█ Before using
Remove the insulation sheet.
█ Replacing the battery
Replace with a new battery (CR2025 lithium battery).
• Install the anti-tip device for your TV. For installation
details, refer to the operating instruction for the TV. If
your TV does not come with an anti-tip device,
consult your dealer.
• Moving the TV on the surface of the system can
scratch the surface of the system. Lift the TV when
you need to move it.
Otherwise, put the system at the right side
(recommended) of the TV or in a rack.
RQT9939
4
4
1 While pressing the stopper, pull out the battery
holder.
2 Insert a new battery with the (+) side facing up.
3 Push the battery holder back fully.
CAUTION!
Keep the button-type battery out of reach of children to
prevent swallowing.
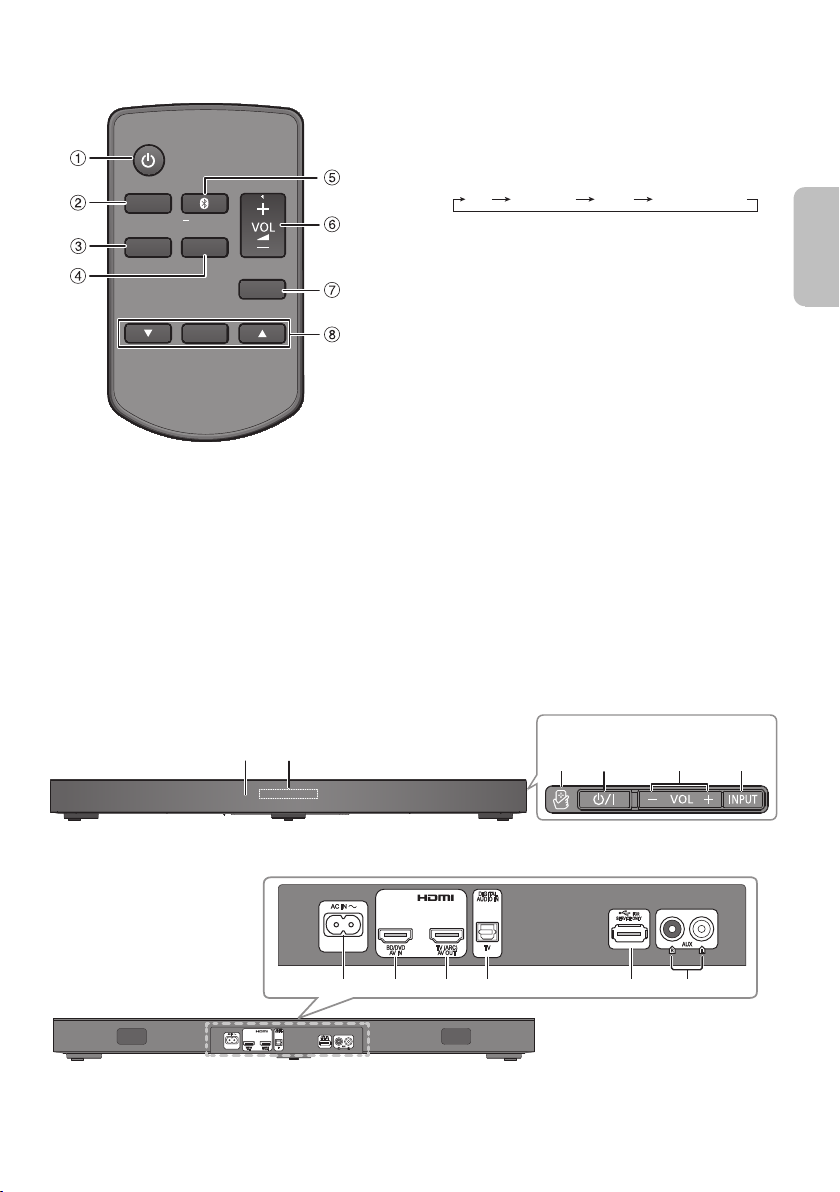
Overview of controls
MUTE
SETUP
INPUT
SOUND
OK
PAIRING
TV BD/DVD
BLUETOOTH
AUX
IJ
BFAK
Front panel
Side view
LMNO P Q
Rear panel
ENGLISH
printing
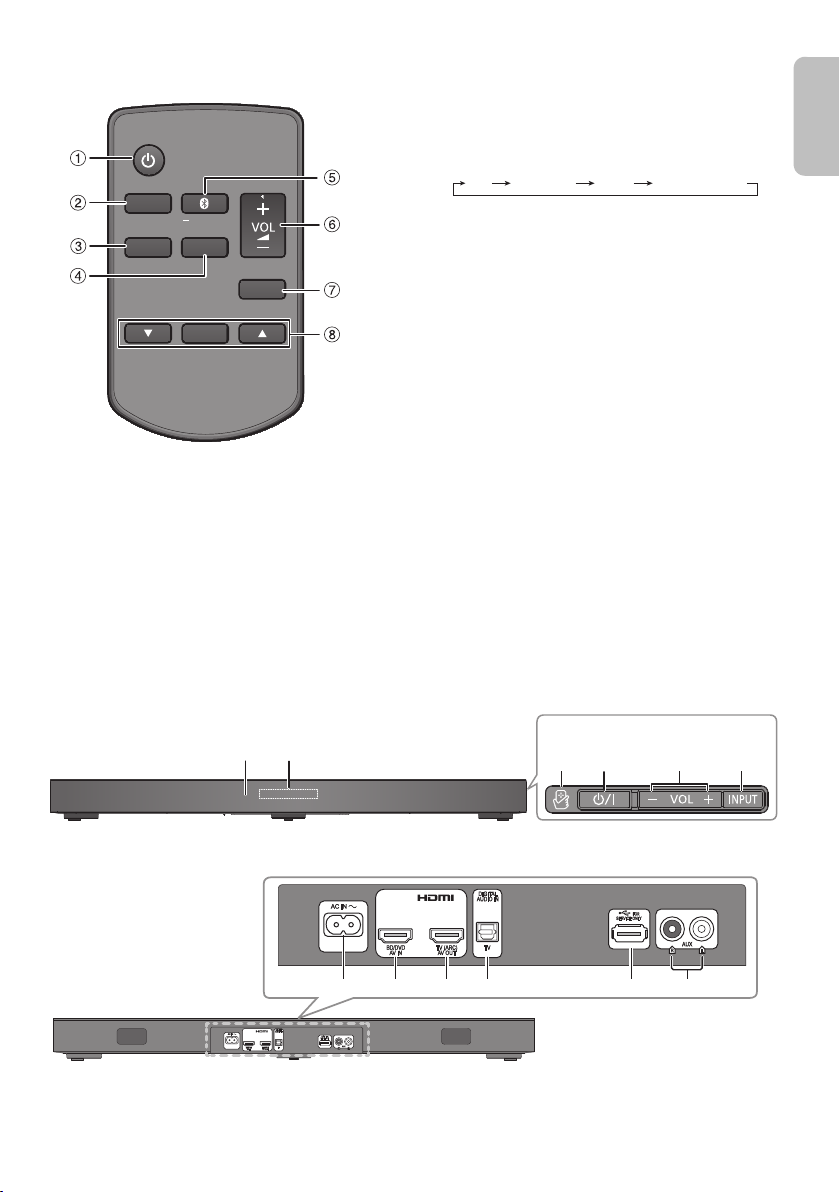
A Standby/on switch [`], [1]
Press to switch the unit from on to standby mode or
vice versa. In standby mode, the unit is still
consuming a small amount of power.
B Select input source
C View setup menu
D View sound menu
E Select Bluetooth
Start Bluetooth
®
mode
®
pairing mode
F Adjust the volume of the system
G Mute the sound of the system
To cancel, press the button again.
“MUTE” is also cancelled when you adjust the volume
or when you switch off the system.
H Select and confirm the option
I Remote control sensor
Distance: Within approximately 7 m
Angle: Approximately 20° up and down, 30° left and
right
J Display panel
K NFC touch area
L AC IN terminal
M HDMI IN terminal (BD/DVD)
N HDMI OUT terminal (ARC compatible)
O DIGITAL AUDIO IN (TV) terminal
P USB port (for service use only)
Q AUX IN terminal
RQT9939
5
5
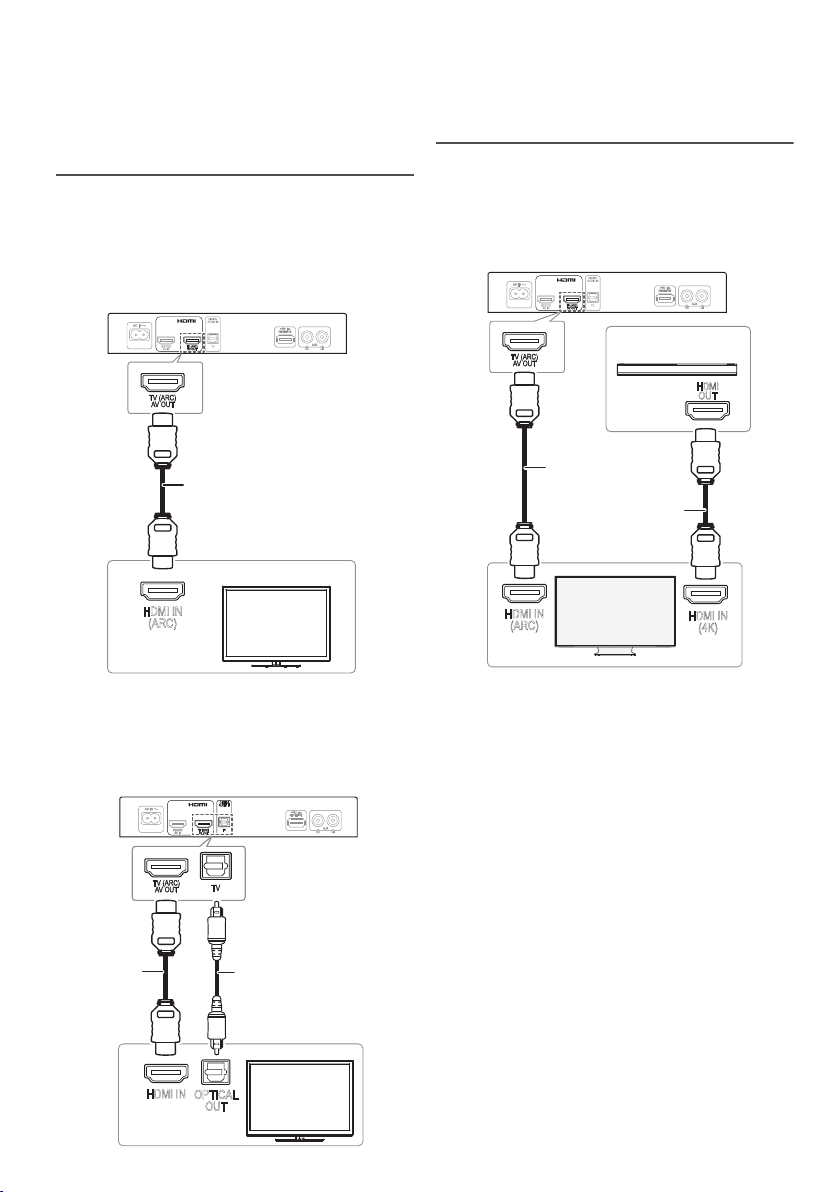
Making the connections
HDMI IN
(ARC)
HDMI cable
HDMI IN
OPTICAL
OUT
Optical digital audio
cable
HDMI
cable
HDMI IN
(ARC)
HDMI IN
(4K)
HDMI
OUT
e.g., Blu-ray Disc
player
HDMI cable*
HDMI cable
4K Ultra HD TV
printing
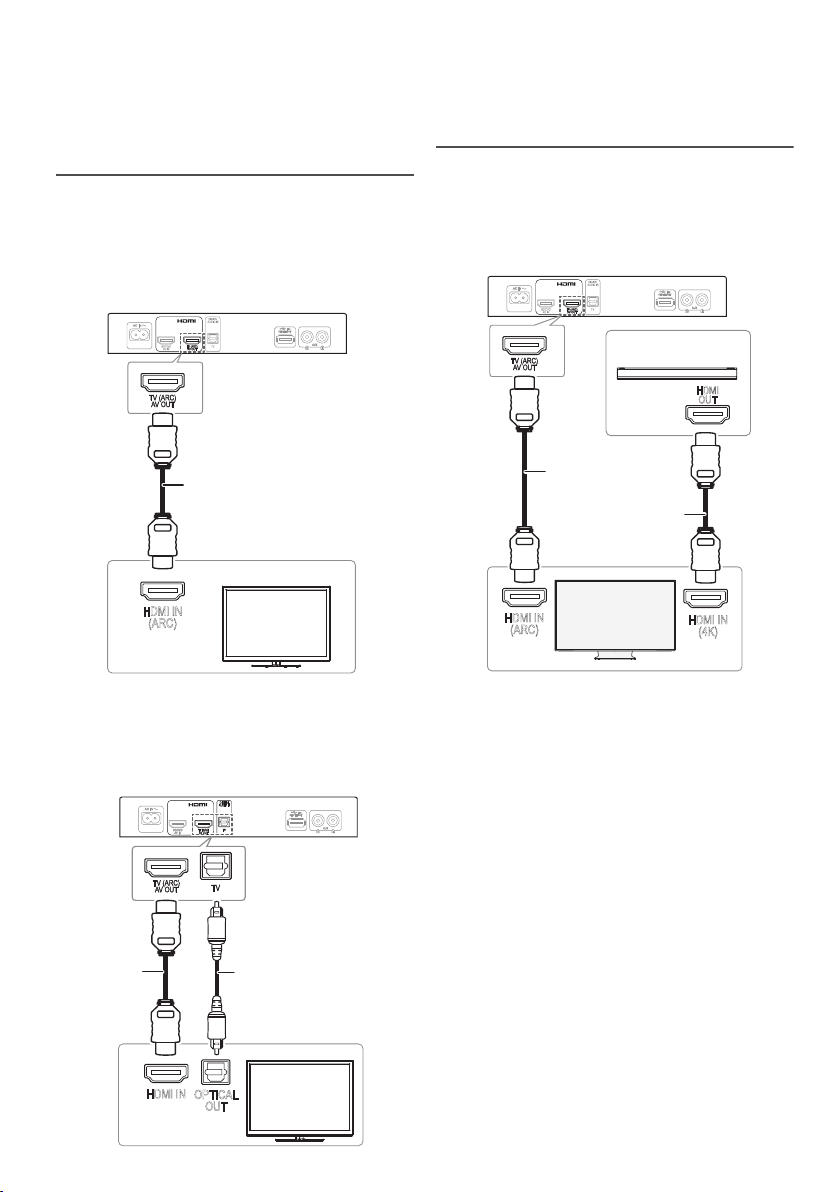
Switch off all equipment before connection.
Components and cables are sold separately.
Connect the AC mains lead only after all the other
connections have been made.
Connecting the TV
█ Connect an ARC compatible TV
Connect to the ARC compatible terminal of the TV with
an ARC compatible high speed HDMI cable.
Note:
The HDMI connection supports VIERA Link
when connected with a Panasonic TV (Z“Linked
operations with the TV (VIERA Link™ “HDAVI
Control™”)”
).
“HDAVI Control”
Connecting a 4K Ultra HD TV
The system cannot pass-through the 4K video signal of a
4K compatible equipment to a 4K Ultra HD TV. However,
you can connect the system to a 4K Ultra HD TV to enjoy
the 4K content.
ARC (Audio Return Channel)
ARC is an HDMI function that lets you enjoy both sound
and TV pictures with one HDMI cable.
█ Connect a non-ARC compatible TV
RQT9939
6
6
* Make sure to connect the HDMI cable to ARC
compatible terminals.
Note:
• Refer to the operating instructions of the 4K Ultra HD TV
(VIERA) and the 4K/60p compatible equipment for setup
and for playing the 4K content.
• To enjoy multi-channel output from this system, set the
audio output of other equipment to Bitstream.
• The audio signal input to this system is up to 5.1 channels.
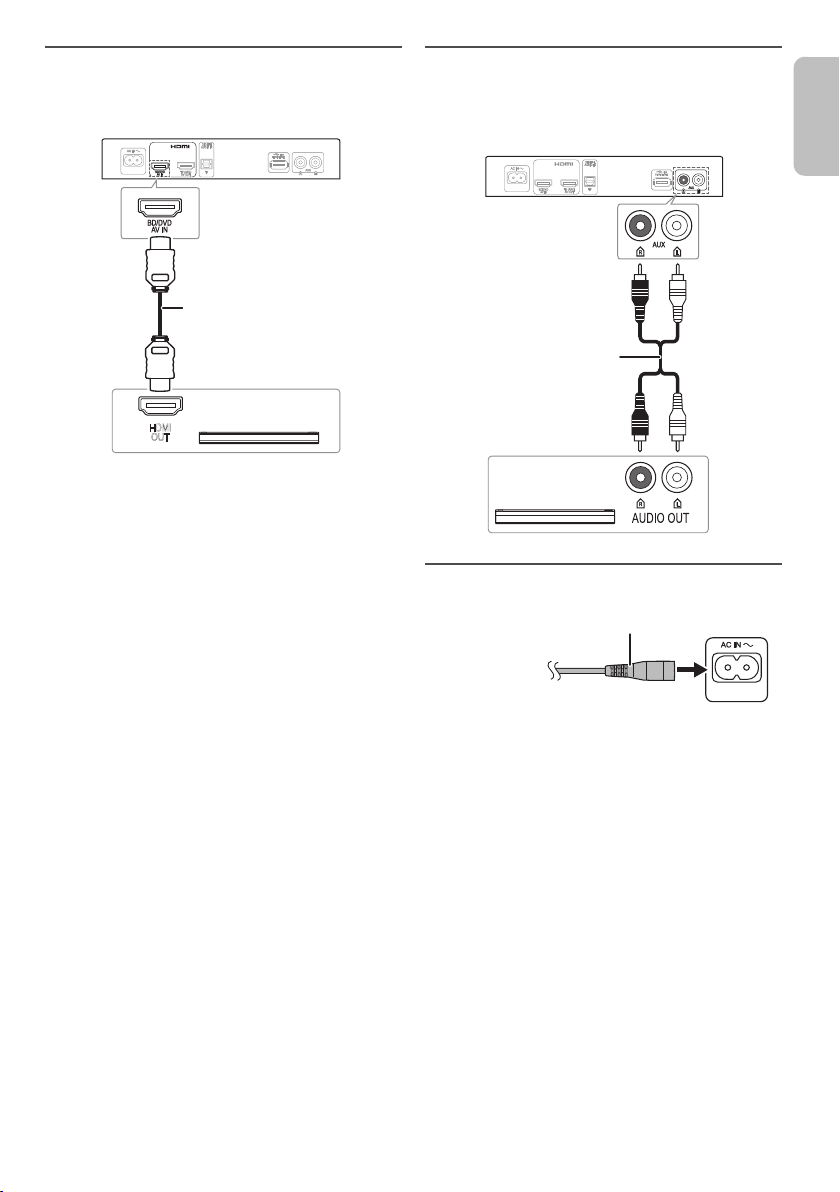
Connecting an HDMI compatible device
HDMI
OUT
HDMI cable
e.g., Blu-ray Disc
player
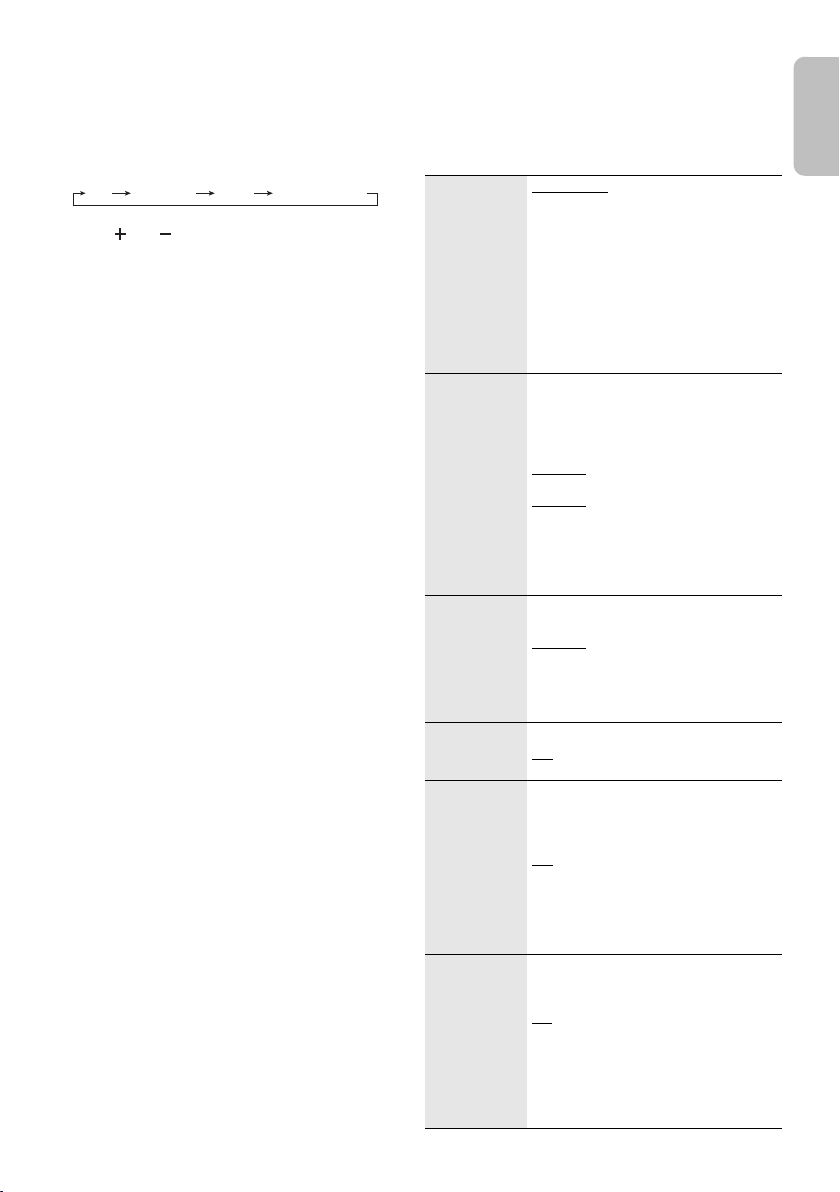
Audio cable
e.g., Set-top box
To household
mains socket
AC mains lead (supplied)
ENGLISH
printing
You can connect a Blu-ray Disc player, DVD player, etc.
and listen to the audio through this system.
HDMI standby pass-through
In standby mode, the audio and/or video signal from the
connected device can be sent to the connected TV. No
sound will be output from this system.
3D compatibility
The system can pass through the 3D video signal of a 3D
compatible Blu-ray Disc player to a FULL HD 3D TV.
Note:
Refer to the operating instructions of the device for video and
audio signal output settings.
Connecting other equipment (AUX)
You can connect other equipment such as Blu-ray Disc
player, DVD player, game console, set-top box, etc. and
listen to the audio through this system.
Connecting the AC mains lead
Do not use an AC mains lead from other equipment.
Conserving power
The system consumes a small amount of power
(Z“Specifications”) when it is in standby mode.
Disconnect the power supply if you do not use the
system.
RQT9939
7
7

Bluetooth® connection
printing
You can connect and play an audio device wirelessly
through Bluetooth
Preparation
• Switch on the Bluetooth
the device near the system.
• Press [`] to switch on the system.
█ Pairing a device
®
.
®
feature of the device and put
1 Press [ ] to select “BLUETOOTH”.
If “PAIRING” is shown, continue with step 3.
2 Press and hold [ ] until “PAIRING” is shown.
3 Select “SC-HTE180” from the Bluetooth
the device.
If prompted for a passkey, input “0000”.
The device connects with this system automatically
after pairing is complete.
The name of the connected device is shown for a few
seconds.
Note:
• A device must be paired to connect.
• You can pair up to 8 devices with this system.
If a 9th device is paired, the device that has not been used
for the longest time will be replaced.
█ Connecting a paired device
Preparation
If this system is connected to a Bluetooth
disconnect it (Zsee below).
1 Press [ ] to enter Bluetooth
“BLUETOOTH READY” is shown.
®
mode.
2 Select “SC-HTE180” from the Bluetooth
the device.
The name of the connected device is shown for a few
seconds.
Disconnecting a device
Press and hold [ ] until “BLUETOOTH READY” is
shown.
Note:
• The system can only connect to one device at a time.
• When “BLUETOOTH” is selected as the source, this
system will automatically try to connect to the last
connected device.
• The Bluetooth
select another source.
®
device will be disconnected when you
®
menu of
®
device,
®
menu of
█ One-Touch Connection (NFC)
For NFC-compatible Android™ devices only
When you touch an NFC (Near Field
Communication)-compatible Bluetooth
NFC touch-area of this system, this system will
automatically switch on, pair and connect to the
Bluetooth
About NFC
NFC (Near Field Communication) is a short-range
wireless technology that allows communication between
NFC enabled devices with a touch.
Preparation
• Download and install the free Android app “Panasonic
• Switch on “NFC” on your device.
®
device.
Music Streaming” on Google Play™.
®
device on the
1 Start the “Panasonic Music Streaming” app.
The application screen is shown. Follow the
instructions to complete the settings.
Make sure to use the latest version of the app.
2 Touch and hold your device on the NFC touch area
of this system [ ] until the Bluetooth
done.
- The device will beep.
- A pop-up window is shown on the device.
- The name of the connected device is shown on the
system.
Once the registration and connection of the
Bluetooth
®
device is complete, move the device away
from the unit.
3 Start playback on your Bluetooth
Connecting another device
While connected, you can connect to another Bluetooth
device by simply touching and holding it on the NFC
touch area of this system. The previous device will be
disconnected automatically.
®
connection is
®
device.
®
RQT9939
8
8
Basic control
TV BD/DVD
BLUETOOTH
AUX
VOL
ENGLISH
printing
Sound menu
Preparation
Switch on the TV and/or connected device.
1 Press [`] to switch on the system.
2 Press [INPUT] repeatedly to select the source.
3 Press [ ] to adjust the volume of the
system.
Volume range: 0 to 100
When “BLUETOOTH” is selected as the source
Select this system as the output speaker from the menu
of the connected Bluetooth
When “BD/DVD” is selected as the source
On the TV, select the corresponding input of the TV that
is connected to this system.
®
device.
3D sound
This system is enhanced with various 3D sound effects.
®
• Dolby
Virtual Speaker
This effect provide a surround sound effect similar to
5.1ch.
• 3D Surround effect
Adding to the Dolby Virtual Speaker effect, Panasonic
has applied his own sound field controlling technology
to expand the sound field forwards, backwards,
upwards and downwards, providing a sound with
depth and force that better matches 3D images.
• Clear-mode dialogue
Sports commentary and dialogues from TV dramas are
heard as if the sound is coming from the TV, giving the
feeling that the sound and the image are one.
Also, the dialogue will stand out from the other sounds
during normal volume playback and when the volume
is lowered for night time viewing.
Note:
Refer to Sound menu on changing the sound effects:
• Dolby Virtual Speaker effect is ON except in STEREO
mode.
• To cancel the Dolby Virtual Speaker and 3D Surround
effect, set
• To cancel the 3D Surround and Clear-mode dialogue
effects, set
“SOUND MODE” to “STEREO”.
“3D CLR DIALOG” to “OFF”.
1 Press [SOUND] repeatedly to select the sound
effect.
2 Press [R, T] repeatedly to select the desired
setting and then press [OK].
SOUND
MODE
SUBWOOFER You can adjust the amount of bass.
DIALOG Adjust the dialogue level.
H.BASS Enhance the harmonic bass effect.
3D CLR
DIALOG
DUAL AUDIO Sets the preferred audio channel mode
STANDARD: Best suited for dramas
and comedy shows.
STADIUM: Produces a realistic sound
for live sports broadcasts.
MUSIC: Enhance the sound of musical
instruments and songs.
CINEMA: Produces three-dimensional
sound unique to movies.
NEWS: Enhance the voice of news and
sports commentaries.
STEREO: Play any source of sound in
stereo.
This system automatically selects the
most suitable setting according to the
type of playback source.
LEVEL 1
: Default for 2 channel audio
LEVEL 2
source
: Default for multi-channel
LEVEL 3
audio source
LEVEL 4
The setting you make is retained and
recalled every time you play the same
type of source.
LEVEL 1
LEVEL 2
LEVEL 3
LEVEL 4
“DIALOG” is not shown when “3D CLR
DIALOG” is set to “OFF”.
ON
OFF
The 3D Clear Mode Dialogue feature
creates a sound field similar to the
sound coming from a TV screen and
makes dialogues clearer.
: 3D Surround, Clear-mode
ON
dialogue and Dolby Virtual Speaker
effect
OFF: Dolby Virtual Speaker effect
The setting is set back to “ON” every
time you switch on the system.
when there are two audio modes
received by the unit.
: Main
M1
M2: Secondary
M1+M2: Main + secondary
This effect only works if the audio
output of the TV or player is set to
“Bitstream” and “Dolby Dual Mono” is
available in the sound source.
RQT9939
9
9
AGC Auto gain control prevents sudden loud
printing
LOW VOL
MODE
Note:
The default setting is underlined. Changed settings will be
kept until it is changed again, unless otherwise indicated.
sound by reducing the sound level
automatically when the input is too
high.
ON
OFF
Enhance the dialog in low volume
condition.
ON
OFF
Select “OFF” to cancel this effect if the
dialog does not sound natural in low
volume condition.
Audio format
You can view the current audio format.
Press and hold [SOUND] for a minimum of 4 seconds.
DOLBY
DIGITAL
DTS DTS is the audio source.
PCM MULTI Linear pulse-code modulation is the
PCM 2 channel pulse-code modulation is
ANALOG Analog is the audio source.
SBC Sub-band Coding is the audio source.
Dolby Digital is the audio source.
audio source.
the audio source.
(Bluetooth
®
mode only)
Setup Menu
1 Press [SETUP] repeatedly to select the setup item.
2 Press [R, T] repeatedly to select the desired
setting and then press [OK].
DIMMER Dims the display panel after
AUTO POWER
DOWN
VOL
LIMITATION
BLUETOOTH
STANDBY
LINK MODE Change the Bluetooth® connection
VIERA LINK Switch on the VIERA Link function.
Note:
The default setting is underlined. Changed settings will be
kept until it is changed again, unless otherwise indicated.
5 seconds of inactivity.
ON
OFF
The system automatically switches off
if there is no audio input and when you
do not use it for 20 minutes.
ON
OFF
Sets the volume limit to 50 when you
switch on the system although the
volume is set to above 50 before it is
switched off.
ON
OFF
This function allows you to connect a
paired Bluetooth
system is in standby mode.
ON
OFF
The system will switch on
automatically when you connect a
paired Bluetooth
link mode to suit the connection type.
Make sure to disconnect the current
connected device (“BLUETOOTH
READY” is shown).
MODE 1: Emphasis on connectivity.
MODE 2
ON
OFF
Select “OFF” when your HDAVI
Control device does not work
correctly with this system. ARC will be
disabled. Connect an optical digital
audio cable.
Switch off all connected devices and
then switch them on again after
changing the setting.
®
device when this
®
device.
: Emphasis on sound quality.
RQT9939
10
10

Linked operations with the TV (VIERA Link™ “HDAVI Control™”)
ENGLISH
printing
What is VIERA Link “HDAVI Control”?
VIERA Link “HDAVI Control” is a convenient function
that offers linked operations of this system, and a
Panasonic TV (VIERA) under “HDAVI Control”.
You can use this function by connecting the
equipment with an HDMI cable. See the operating
instructions for connected equipment for operational
details.
Preparation
A Confirm that the HDMI connection has been made.
B Set the “HDAVI Control” operations on the connected
equipment (e.g., TV).
C For the optimal “HDAVI Control” operations change
the following settings on the connected TV.*
– Set the default speaker settings to this system.*
– Set the speaker selection settings to this system.
1
2
D Turn on all “HDAVI Control” compatible equipment
and select the TV’s input for this system so that the
“HDAVI Control” function works properly.
E If a device is connected to the HDMI IN terminal, start
play to check that the picture is shown on the TV
correctly.
When the connection or settings are changed, repeat
this procedure.
1
The availability and function of the settings may vary
*
depending on the TV. Refer to the operating
instructions for the TV for details.
2
If the TV has a default speaker setting within the VIERA
*
Link setting items, choosing this system as the default
speaker will automatically change the speaker
selection to this system.
Note:
• VIERA Link “HDAVI Control”, based on the control
functions provided by HDMI which is an industry standard
known as HDMI CEC (Consumer Electronics Control), is a
unique function that we have developed and added. As
such, its operation with other manufacturers’ equipment
that supports HDMI CEC cannot be guaranteed.
• This unit supports “HDAVI Control 5” function. “HDAVI
Control 5” is the standard for Panasonic’s HDAVI Control
compatible equipment. This standard is compatible with
Panasonic’s conventional HDAVI equipment.
• Refer to individual manuals for other manufacturers’
equipment supporting VIERA Link function.
What you can do with VIERA Link “HDAVI
Control”
To make sure that the audio is output from this system,
turn the main unit on by using the TV’s remote control
and selecting home cinema from the speaker menu of
VIERA Link menu.
The availability and function of the settings may vary
depending on the TV. Refer to the operating instructions
for the TV for details.
█ Speaker control
You can select whether audio output is from this system
or the TV speakers by using the TV menu settings.
Home cinema
This system is active.
• When the main unit is in standby mode, changing the
TV speakers to this system in the VIERA Link menu will
automatically turn the main unit on.
• You can control the volume setting of this system using
the volume or mute button on the TV remote control.
• If you turn off the main unit, TV speakers will be
automatically activated.
• Audio will automatically be output from this system if
the TV is compatible to VIERA Link “HDAVI Control 4”
or later.
TV
TV speakers are active.
• The volume of this system is set to minimum.
█ Automatic input switching
When the following operations are performed, the main
unit will automatically change the input to the
corresponding source.
• When play starts on an HDMI connected device.*
• When the TV input or the TV channel is changed.
3
*
If the speaker output setting on the TV is set to this
system, the TV and the main unit turn on automatically
(Power on link).
█ Power off link
When the TV is turned off, the main unit also turns off
automatically. (This function does not work when
Bluetooth
®
is the source.)
3
█ Automatic lip-sync function
(For HDAVI Control 3 or later)
Delay between audio and video is automatically adjusted
by adding time-lag to the audio output, enabling you to
enjoy smooth audio for the picture.
Note:
The delay information is automatically set if the TV is
compatible to VIERA Link “HDAVI Control 3” or later and the
VIERA Link is set to on.
11
11
RQT9939

Troubleshooting
printing
Before requesting service, make the following checks. If
you are in doubt about some of the check points, or if the
solutions indicated do not solve the problem, consult
your dealer for instructions.
█ Common problems
No sound.
• Check the connections.
• Change the cables if the connections are correct.
• Increase the volume of the system.
• Check the audio output settings on the connected device.
• Switch off the connected device and then switch it on
again.
• The system may be overheated. Switch off the system.
Wait a few moments for system to cool down then switch
the system on again. Lower the volume to prevent
overheating.
• Switch off the system, disconnect the HDMI cable and
connect it again, and then switch the system on again.
• If the system is connected to the TV with an HDMI cable
only, make sure that the HDMI terminal of the TV is labelled
“HDMI (ARC)”. If not, connect an optical digital audio cable.
• If the system is connected to a Panasonic TV, try switching
on this system by using the remote control of the TV.
No operations can be done with the remote control.
• Remove the insulation sheet before you use the remote
control for the first time.
• Examine that the battery is installed correctly.
• The battery is weak. Replace it with a new one.
• Set the remote control code again after replacing the
battery.
• Change the code of the remote control to match the code
shown on the main unit when they do not match
(Z“Remote control code”).
The system automatically switched to standby mode.
• You have switch on the “AUTO POWER DOWN” feature.
The system automatically switches off if there is no audio
input and when you do not use it for 20 minutes.
• You have switch the speaker control to TV’s speakers. This
is a feature of VIERA Link (HDAVI Control 4 or later). Refer
to the operating instruction for the TV for its power saving
feature.
█ HDMI
This system does not operate correctly.
• Check the HDMI connections.
• Switch off the system, disconnect the AC mains lead,
disconnect the HDMI cable and connect it again.
VIERA Link related operations no longer function
correctly.
• Check the VIERA Link setting on the connected devices.
• Check the “VIERA LINK” setting of this system (Z“Setup
Menu”).
• When the HDMI connections are changed, after a power
failure or after the AC mains lead has been removed, VIERA
Link operations may not function properly.
– Switch on all the devices that are connected to the TV
with an HDMI cable and then switch on the TV.
– Switch off the VIERA Link settings of the TV and then
switch it on again. For details refer to the operating
instructions for the TV.
– While the system and the TV are connected with an
HDMI cable, switch on the TV, disconnect the AC mains
lead of this system and then connect it again.
The first few seconds of audio cannot be heard when
using the HDMI connection.
• This can occur during DVD-Video chapter playback.
Change the digital audio output setting on the connected
device from “Bitstream” to “PCM”.
When operating an HDMI compatible device of a
different brand, the system reacts in an unwanted
manner.
• HDAVI Control commands can use a different signal
depending on the device. In this case, set “VIERA LINK” to
“OFF” (Z“Setup Menu”).
RQT9939
12
12

█ Bluetooth
ENGLISH
printing
Pairing cannot be done.
• Check the Bluetooth® device condition.
• The device is out of the 10 m communication range. Move
the device nearer to the system.
The device cannot be connected.
• The pairing of the device was unsuccessful. Do pairing
again.
• The pairing of the device has been replaced. Do pairing
again.
• This system might be connected to a different device.
Disconnect the other device and try pairing the device
again.
The device is connected but audio cannot be heard
through the system.
• For some built-in Bluetooth® devices, you have to set the
audio output to “SC-HTE180” manually. Read the
operating instructions of the device for details.
Sound from the device is interrupted.
• The device is out of the 10 m communication range. Move
the device nearer to the system.
• Remove any obstacle between the system and the device.
• Other devices that use the 2.4 GHz frequency band
(wireless router, microwaves, cordless phones, etc.) are
interfering. Move the device nearer to the system and
distance it from the other devices.
• Select “MODE 1” for stable communication.
The one-touch connection (NFC) is not working.
• Make sure the NFC feature of the NFC-compatible device
is switched on. Touch and hold the device to the NFC
touch-area of this system again.
Playback image and sound are not synchronised.
• Restart the playback app of the device.
®
█ Main unit displays
“F61”
• There is a problem with the amplifier of the system.
• Disconnect the AC mains lead and consult the dealer.
F70 HDMI”
“
• Check HDMI connection.
• Switch off the system and then switch it on again.
• Disconnect the HDMI cable.
“
F76”
• There is a problem with the power supply.
• Disconnect the AC mains lead and consult the dealer.
System memory reset
Reset the memory when the following situations occur:
• There is no response when buttons are pressed.
• You want to clear and reset the memory contents.
1 While the system is switched on, press and hold
[1] on the main unit for a minimum of 4 seconds.
“RESET” is shown.
2 Release [1].
3 Switch off the system and then switch it on again.
All the settings are set back to the factory preset.
Note:
The remote control code will set back to “REMOTE 1” after
memory reset, refer “Remote control code” on how to change
to “REMOTE 2”.
Remote control code
When other Panasonic equipment responds to the
remote control of this system, change the remote control
code for this system.
Preparation
• Switch off all other Panasonic products.
• Switch on this system.
• Aim the remote control at the remote control sensor of
this system.
█ To set the code to “REMOTE 2”
Press and hold [MUTE] and [OK] for a minimum of
4seconds.
“REMOTE 2” is shown.
█ To set the code to “REMOTE 1”
Press and hold [MUTE] and [T] for a minimum of
4seconds.
“REMOTE 1” is shown.
Maintenance
To clean this system, wipe with a soft, dry cloth.
• Never use alcohol, paint thinner or benzine to clean this
system.
• Before using chemically treated cloth, read the
instructions that came with the cloth carefully.
13
13
RQT9939

Specifications
printing
█ Amplifier section
RMS output power: Dolby Digital mode
Front Ch 30 W per channel (6 Ω), 1 kHz, 10% THD
Subwoofer Ch
Total RMS Dolby Digital mode power 120 W
60 W per channel (3 Ω), 100 Hz, 10% THD
█ Terminals section
HDAVI Control
HDMI AV input
HDMI AV output
Digital audio input
Analog audio input
USB port For service use only
█ Bluetooth
Version Bluetooth® Ver. 3.0
Class Class 2
Supported profiles A2DP
Operating frequency 2402 MHz to 2480 MHz
Operation distance 10 m line of sight
This unit supports “HDAVI Control 5” function
Input connector Type A (19 pin)
Output connector Type A (19 pin)
Optical digital input Optical terminal
Sampling frequency 32 kHz, 44.1 kHz, 48 kHz
Audio format
Audio input Pin jack (1 system)
Dolby Digital, DTS Digital Surround, LPCM
®
section
88.2 kHz, 96 kHz (only LPCM)
█ Speaker section
Front speaker (built-in)
Type 1 way, 1 speaker system (bass reflex)
Speaker unit(s)
Full range 3.8 cm x 9 cm cone type x 2
Subwoofer (built-in)
Type 1 way, 2 speaker system (bass reflex)
Speaker unit(s)
Woofer 8 cm cone type x 2
█ General
Power supply AC 220 V to 240 V, 50 Hz
Power consumption 27 W
Dimensions (W x H x D) 700 mm x 60 mm x 365 mm
Mass 4.5 kg
Maximum loading weight 50 kg
Operating temperature range 0°C to +40°C
Operating humidity range
Power consumption in standby mode
(With “BLUETOOTH STANDBY” set to “OFF”)
Note:
• Specifications are subject to change without notice.
Mass and dimensions are approximate.
• Total harmonic distortion is measured by the digital
spectrum analyzer.
20% to 80% RH (no condensation)
0.25 W (approximate)
RQT9939
14
14

Declaration of Conformity (DoC)
ENGLISH
printing
Hereby, “Panasonic Corporation” declares that this
product is in compliance with the essential requirements
and other relevant provisions of Directive 1999/5/EC.
Customers can download a copy of the original DoC to
our R&TTE products from our DoC Server:
http://www.doc.panasonic.de
Contact to Authorised Representative: Panasonic
Marketing Europe GmbH, Panasonic Testing Centre,
Winsbergring 15, 22525 Hamburg, Germany
This product is intended for general consumer.
(Category 3)
Slovensko
Izjava o skladnosti (DoC)
S pričujočo izjavo podjetje “
izjavlja, da so svoji izdelki skladni s poglavitnimi
zahtevami in drugimi odgovarjajočimi predpisi direktive
1999/5/ES.
Stranka lahko naloži izvod izvirnega DoC o naših izdelkih
R&TTE s strežnika DoC:
http://www.doc.panasonic.de
Pooblaščeni zastopnik: Panasonic Marketing Europe
GmbH, Panasonic Testing Centre, Winsbergring 15,
22525 Hamburg, Nemčija
Izdelek je namenjen splošni uporabi. (Razred 3)
Panasonic Corporation
”
Ελληνικά
∆ήλωση συμμόρφωσης (DoC)
Με την παρούσα, η “Panasonic Corporation” δηλώνει ότι
το προϊόν αυτό είναι σύμφωνο με τις βασικές απαιτήσεις
και άλλες σχετικές διατάξεις της οδηγίας 1999/5/EC.
Οι πελάτες μπορούν να κατεβάσουν ένα αντίγραφο
τουπρωτοτύπου DoC για τα R&TTE προϊόντα μας από
τον DoC server μας:
http://www.doc.panasonic.de
Στοιχεία επικοινωνίας Eξουσιοδοτημένου Aντιπροσώπου:
Panasonic Marketing Europe GmbH, Panasonic Testing
Centre, Winsbergring 15, 22525 Hamburg, Γερμανία
Αυτό το προϊόν προορίζεται για καταναλωτές. (Κατηγορία 3)
Português
Declaração de Conformidade (DoC)
Com o presente documento, a “Panasonic Corporation”
declara que este produto é conforme os requisitos
específicos e demais especificações referentes à
Directriz 1999/5/EC.
Os clientes podem baixar uma cópia da declaração de
conformidade (DoC) para nossos produtos R&TTE do
Server DoC:
http://www.doc.panasonic.de
Contacte o representante autorizado: Panasonic
Marketing Europe GmbH, Panasonic Testing Centre,
Winsbergring 15, 22525 Hamburg, Alemanha
Este produto destina-se ao consumador geral. (Categoria 3)
Lietuviškai
Atitikties deklaracija (AD)
Bendrovė “Panasonic Corporation” patvirtina, kad šis
gaminys tenkina direktyvos 1999/5/EB esminius
reikalavimus ir kitas taikytinas nuostatas.
Mūsų R&TTE gaminių originalios atitikties deklaracijos
kopiją klientai gali atsisiųsti iš mūsų AD serverio:
http://www.doc.panasonic.de
Įgaliotojo atstovo adresas: “Panasonic Marketing Europe
GmbH”, Panasonic Testing Centre, Winsbergring 15,
22525 Hamburg, Vokietija
Šis gaminys skirtas bendrajam vartojimui. (3 kategorija)
Slovensky
Vyhlásenie o zhode (DoC)
“Panasonic Corporation” týmto prehlasuje, že tento
výrobok je v zhode so základnými požiadavkami a ďalšími
príslušnými ustanoveniami smernice 1999/5/ES.
Zákazníci si môžu stiahnuť kópiu pôvodného DoC na
naše R&TTE výrobky z nášho servera DoC:
http://www.doc.panasonic.de
Kontakt na splnomocneného zástupcu: Panasonic
Marketing Europe GmbH, Panasonic Testing Centre,
Winsbergring 15, 22525 Hamburg, Nemecko
Tento produkt je určený pre všeobecného spotrebiteľa.
(Kategória 3)
Norsk
Samsvarserklæring (DoC)
“Panasonic Corporation” erklærer at utstyret er i samsvar
med de grunnleggende krav og øvrige relevante krav i
direktiv 1999/5/EF.
Kundene kan laste ned en kopi av den
originalesamsvarserklæringen (DoC) for vårt R&TTE
utstyr fra vår DoC server:
http://www.doc.panasonic.de
Kontakt vår autoriserte representant: Panasonic
Marketing Europe GmbH, Panasonic Testing Centre,
Winsbergring 15, 22525 Hamburg, Tyskland
Utstyret er beregnet på den vanlige forbruker. (Klasse 3)
Eesti keel
Vastavusdeklaratsioon (DoC)
“Panasonic Corporation” kinnitab käesolevaga, et see
toode on vastavuses põhiliste nõuete ja muude direktiivi
1999/5/EÜ asjakohaste sätetega.
Kliendid saavad koopia meie R&TTE toodetele kehtiva
originaalvastavusdeklaratsiooni koopia alla laadida meie
DoC serverist:
http://www.doc.panasonic.de
Võtke ühendust volitatud esindajaga: Panasonic
Marketing Europe GmbH, Panasonic Testing Centre,
Winsbergring 15, 22525 Hamburg, Germany
See toode on mõeldud tavakasutajale. (III kategooria)
15
15
RQT9939

Latviski
printing
Atbilstības deklarācija (DoC)
Kompānija “Panasonic Corporation” ar šo paziņo, ka šis
izstrādājums atbilst būtiskām prasībām un citām
saistošām Direktīvas 1999/5/EK prasībām.
Pircēji var lejupielādēt oriģinālo DoC kopiju mūsu R&TTE
izstrādājumos no mūsu DoC servera:
http://www.doc.panasonic.de
Lūdzam sazināties ar pilnvaroto parstāvi: Panasonic
Marketing Europe GmbH, Panasonic Testing Centre,
Winsbergring 15, 22525 Hamburg, Germany
Šis izstrādājums ir paredzēts parastam patērētājam.
(3. kategorija)
Hrvatski
Deklaracija o podobnosti (DoC)
Ovime, “
Panasonic Corporation
proizvod udovoljava osnovnim zahtjevima i ostalim
relevantnim uvjetima Smjernice 1999/5/EC.
Kupci mogu preuzeti kopiju originalne DoC za naše
R&TTE proizvode s našeg DoC poslužitelja:
http://www.doc.panasonic.de
Obratite se ovlaštenom predstavniku: Panasonic
Marketing Europe GmbH, Panasonic Testing Centre,
Winsbergring 15, 22525 Hamburg, Njemačka
Ovaj proizvod je namijenjen za opću potrošnju.
(Kategorija 3)
” izjavljuje da je ovaj
Български
Декларация за съответствие (DoC)
“Panasonic Corporation” декларира, че този продукт
съответства на същес
приложими разпоредби на Директива 1999/5/EC.
Потребителите могат да свалят копие от оригиналните
DoC към нашите продуктите от типа R&TTE от
сървъра, на който се съхраняват DoC:
http://www.doc.panasonic.de
За контакт с оторизиран представител: Panasonic
Marketing Europe GmbH, Panasonic Testing Centre,
Winsbergring 15, 22525 Hamburg, Германия
Този продукт е предназначен за обща употреба.
(Категория 3)
Român
Declaraţie de Conformitate (DoC)
Prin prezenta, societatea “Panasonic Corporation”
declară că produsul este conform cu cerinţele esenţiale şi
e
norme corespunzătoare Directivei 1999/5/EC.
cu alt
Clienţii pot descărca o copie a DoC-ului original al
produselor noastre R&TTE de la adressa noastră DoC din
Internet:
http://www.doc.panasonic.de
Contact la Reprezentanţa autorizată: Panasonic
Marketing Europe GmbH, Panasonic Testing Centre,
Winsbergring 15, 22525 Hamburg, Germania
Acest produs a fost proiectat pentru clientela generală.
(Categoria 3)
Magyar
Megfelelőségi Nyilatkozat (DoC)
Ezennel a, “Panasonic Corporation” kijelenti, hogy a jelen
termék kielégíti az 1999/5/EK Irányelv létfontosságú
követelményeit és más vonatkozó rendelkezéseit.
A vásárlók letölthetik az R&TTE termékek eredeti DoC
másolatát a DoC szerverünkről:
http://www.doc.panasonic.de
Forduljon a hivatalos márkaképviselethez: Panasonic
Marketing Europe GmbH, Panasonic Testing Centre,
Winsbergring 15, 22525 Hamburg, Németország
A terméket általános fogyasztóknak szánták.
(3-as kategória)
RQT9939
16
16
твените и
зисквания и другите
Türkçe
Uygunluk Beyanı (DoC)
“Panasonic Corporation” işbu belge ile bu ürünün
1999/5/EC sayılı Direktif'in temel gereklerine ve diğer ilgili
hükümlerine uygun olduğunu beyan etmektedir.
Müşterilerimiz R&TTE ürünlerimizle ilgili orijinal DoC
belgesinin bir kopyasını DoC sunucumuzdan indirebilir:
http://www.doc.panasonic.de
Yetkili Temsilci ile temasa geçin: Panasonic Marketing
Europe GmbH, Panasonic Testing Centre, Winsbergring
15, 22525 Hamburg, Germany
İşbu ürün genel tüketicilere yöneliktir. (Kategori 3)
Disposal of Old Equipment and Batteries
printing
Only for European Union and countries with
recycling systems
These symbols on the products, packaging,
and/or accompanying documents mean that
used electrical and electronic products and
batteries must not be mixed with general
household waste.
For proper treatment, recovery and recycling
of old products and used batteries, please
take them to applicable collection points in
accordance with your national legislation.
By disposing of them correctly, you will help
to save valuable resources and prevent any
potential negative effects on human health
and the environment.
For more information about collection and
recycling, please contact your local
municipality.
Penalties may be applicable for incorrect
disposal of this waste, in accordance with
national legislation.
Note for the battery symbol (bottom
symbol):
This symbol might be used in combination
with a chemical symbol. In this case it
complies with the requirement set by the
Directive for the chemical involved.
17
17
RQT9939

Opisane procedury należy wykonać za pomocą pilota
printing
zdalnego sterowania. Można również użyć przycisków
na panelu przednim urządzenia, jeśli są identyczne.
Zakupione urządzenie może różnić się od
przedstawionego na ilustracjach.
Środki ostrożności
OSTRZEŻENIE!
Urządzenie
• Aby ograniczyć niebezpieczeństwo pożaru, porażenia
prądem lub uszkodzenia urządzenia,
– Nie należy wystawiać urządzenia na działanie deszczu,
wilgoci, kapanie lub zachlapanie.
– Na urządzeniu nie należy umieszczać żadnych
przedmiotów napełnionych płynami, np. dzbanków.
– Należy stosować tylko zalecane akcesoria.
– Nie zdejmować pokrywy.
– Użytkownik nie powinien podejmować się naprawy
urządzenia na własną rękę. Serwis należy zlecić w
autoryzowanym punkcie serwisowym.
Przewód zasilania
• Aby ograniczyć niebezpieczeństwo pożaru, porażenia
prądem lub uszkodzenia urządzenia,
– Należy upewnić się, że wartość napięcia źródła
zasilania odpowiada wartości napięcia umieszczonej na
urządzeniu.
– Wtyczkę sieci zasilającej należy całkowicie umieścić
w gniazdku elektrycznym.
– Nie wolno ciągnąć za przewód, zginać go ani kłaść na
nim ciężkich przedmiotów.
– Nie wolno dotykać wtyczki mokrymi rękoma.
– Podczas odłączania wtyczki sieci zasilającej należy
trzymać za korpus wtyczki.
– Nie wolno korzystać z uszkodzonych wtyczek lub
gniazdek elektrycznych.
• Wtyczka przewodu sieciowego umożliwia odłączenie
zasilania urządzenia. Urządzenie należy zamontować w
sposób umożliwiający szybkie wyjęcie wtyczki z gniazda
zasilania.
Bateria
• Ryzyko pożaru, wybuchu oraz poparzeń. Nie należy
ładować, rozbierać na części, podgrzewać do
temperatury przekraczającej 60°C lub doprowadzać do
spalenia.
• Należy trzymać baterię guzikową poza zasięgiem dzieci.
Nigdy nie należy wkładać baterii guzikowej do buzi. W
razie połknięcia należy skontaktować się z lekarzem.
UWAGA!
Urządzenie
• Aby ograniczyć niebezpieczeństwo pożaru, porażenia
prądem lub uszkodzenia urządzenia,
– Niniejszego urządzenia nie należy instalować lub
umieszczać w biblioteczce, wbudowanej szafce lub
innej ograniczonej przestrzeni. Należy zapewnić
odpowiednią wentylację urządzenia.
– Nie zasłaniaj otworów wentylacyjnych urządzenia
gazetami, obrusami, zasłonami i podobnymi
przedmiotami.
– Nie umieszczać na urządzeniu źródeł otwartego ognia,
jak np. zapalone świece.
• Urządzenie jest przeznaczone do używania w klimacie
umiarkowanym.
• To urządzenie może odbierać zakłócenia wywołane
użyciem telefonu komórkowego. Jeżeli takie zakłócenia
wystąpią, wskazane jest zwiększenie odległości pomiędzy
urządzeniem a telefonem komórkowym.
• Nie dotykać spodu urządzenia. W przypadku
długotrwałego używania może się ono rozgrzać.
Bateria
• Istnieje niebezpieczeństwo wybuchu w przypadku, gdy
baterie zostaną nieprawidłowo założone. Baterie należy
wymieniać na takie same lub na baterie równorzędnego
typu, zalecane przez producenta.
• Zużyte baterie należy odpowiednio zutylizować. Właściwą
metodę powinny wskazać władze lokalne.
• Nie zbliżać baterii do źródeł ciepła lub ognia.
• Baterii nie należy pozostawiać przez dłuższy czas, w
pojeździe z zamkniętymi drzwiami i oknami, narażonym
na bezpośrednie promieniowanie słoneczne.
• Jeśli pilot ma nie być używany przez dłuższy czas, należy
wyjąć z niego baterię. Przechowywać w chłodnym,
ciemnym miejscu.
Dostarczone wyposażenie
Sprawdzić i znaleźć poszczególne elementy dostarczonego
wyposażenia.
1 Przewód zasilania
1 Pilot zdalnego sterowania (z baterią)
(N2QAYC000098)
RQT9939
2
18
Spis treści
POLSKI
printing
Środki ostrożności . . . . . . . . . . . . . . . . . . . . . . . . . . . . 2
Dostarczone wyposażenie . . . . . . . . . . . . . . . . . . . . . . 2
Licencje . . . . . . . . . . . . . . . . . . . . . . . . . . . . . . . . . . . . . 3
Informacje o technologii Bluetooth® . . . . . . . . . . . . . . 3
Ustawienie urządzenia . . . . . . . . . . . . . . . . . . . . . . . . . 4
Przygotowanie pilota zdalnego sterowania. . . . . . . . . 4
Opis elementów sterowania. . . . . . . . . . . . . . . . . . . . . 5
Podłączenie. . . . . . . . . . . . . . . . . . . . . . . . . . . . . . . . . . 6
Sterowanie podstawowe . . . . . . . . . . . . . . . . . . . . . . . 9
Dźwięk 3D . . . . . . . . . . . . . . . . . . . . . . . . . . . . . . . . . . . 9
Menu dźwięku . . . . . . . . . . . . . . . . . . . . . . . . . . . . . . . . 9
Menu konfiguracji . . . . . . . . . . . . . . . . . . . . . . . . . . . . 10
Wykonywanie operacji po podłączeniu do telewizora
(VIERA Link™ „HDAVI Control™”) . . . . . . . . . . . . . . . 11
Rozwiązywanie problemów . . . . . . . . . . . . . . . . . . . . 12
Konserwacja . . . . . . . . . . . . . . . . . . . . . . . . . . . . . . . . 13
Dane techniczne . . . . . . . . . . . . . . . . . . . . . . . . . . . . . 14
Licencje
Wytwarzane na licencji firmy Dolby Laboratories.
Dolby, Pro Logic i symbol podwójnego D są znakami
towarowymi Dolby Laboratories.
Wytwarzane na licencji objętej patentami amerykańskimi
nr: Przyznane i oczekujące na przyznanie patenty
amerykańskie oraz ogólnoświatowe 5,956,674; 5,974,380;
6,487,535 i inne.
DTS, symbol oraz nazwa DTS i symbol są zastrzeżonymi
znakami towarowymi, a DTS Digital Surround oraz logo
DTS są znakami towarowymi firmy DTS, Inc. Produkt
obejmuje oprogramowanie.
© DTS, Inc. Wszelkie prawa zastrzeżone.
HDMI, logo HDMI oraz High-Definition Multimedia
Interface są znakami towarowymi lub zastrzeżonymi
znakami towarowymi firmy HDMI Licensing LLC w
Stanach Zjednoczonych i innych krajach.
HDAVI Control™ jest znakiem towarowym firmy Panasonic
Corporation.
Znak ze słowem i logo Bluetooth
Bluetooth SIG, Inc., a firma Panasonic Corporation używa
ich na mocy licencji. Inne znaki handlowe i nazwy
handlowe są własnością odpowiednich posiadaczy.
Google Play i Android są znakami towarowymi firmy
Google Inc.
®
są własnością firmy
Informacje o technologii
Bluetooth
Firma Panasonic nie ponosi odpowiedzialności za dane
i informacje, które mogą zostać ujawnione podczas
transmisji bezprzewodowej.
Pasmo częstotliwości
• System korzysta z pasma częstotliwości 2,4 GHz.
Certyfikacja
• Niniejszy system jest zgodny z ograniczeniami
częstotliwości i otrzymał certyfikat na podstawie
przepisów dotyczących częstotliwości. W związku z tym
pozwolenie na transmisję bezprzewodową nie jest
konieczne.
• Wykonywanie poniższych czynności jest karalne na mocy
prawa:
– Demontaż lub modyfikowanie urządzenia głównego.
– Usuwanie etykiet z danymi technicznymi.
Ograniczenia użytkowania
• Nie ma gwarancji, że sprzęt będzie współpracował ze
wszystkimi urządzeniami Bluetooth
bezprzewodowa za ich pomocą będzie możliwa.
• Wszystkie urządzenia muszą być zgodne z normami
wyznaczonymi przez firmę Bluetooth SIG, Inc.
• W zależności od danych technicznych urządzenia oraz
dostępnych możliwości konfiguracji nawiązanie
połączenia może nie być możliwe lub mogą istnieć
różnice w zakresie wykonywania niektórych operacji.
• System obsługuje funkcje bezpieczeństwa zgodnie ze
standardem Bluetooth
użytkowania lub ustawień te zabezpieczenia mogą być
niewystarczające. Należy zachować ostrożność podczas
bezprzewodowej transmisji danych do systemu.
• System nie oferuje możliwości transmisji danych do
urządzenia Bluetooth
Zasięg użytkowania
• Maksymalny zasięg użytkowania urządzenia to 10 m.
• Zasięg może zmniejszyć się w zależności od warunków
otoczenia, istniejących przeszkód i zakłóceń.
Zakłócenia powodowane przez inne urządzenia
• System może nie działać poprawnie lub mogą
występować problemy, takie jak skoki dźwięku i głośności
powodowane zakłóceniami fal radiowych, jeśli urządzenie
znajdzie się zbyt blisko innych urządzeń Bluetooth
sprzętu korzystającego z pasma 2,4 GHz.
• System może nie działać poprawnie, jeśli sygnał radiowy
np. z pobliskich stacji nadawczych jest zbyt silny.
Przeznaczenie
• System jest przeznaczony tylko do ogólnego użytku
w normalnych warunkach.
• Nie należy używać urządzenia w pobliżu sprzętu lub
miejsc wykazujących wrażliwość na zakłócenia
częstotliwości radiowej (na przykład: lotnisk, szpitali,
laboratoriów, itd.).
®
®
ani że transmisja
®
. Jednak zależnie od środowiska
®
.
®
lub
RQT9939
3
19
Ustawienie urządzenia
700 mm
365 mm
Powłoka
izolacyjną
printing
Jeśli telewizor waży mniej niż 50 kg, a jego podstawa mieści
się w zakresie 700 mm (szerokość) na 365 mm (głębokość),
możesz postawić go na szczycie systemu.
UWAGA!
• Utrzymuj telewizor na powierzchni systemu. Należy
uważać, aby nie przewrócić telewizora, ponieważ może
to spowodować obrażenia ciała.
• Należy zamontować urządzenie zapobiegające
przewracaniu się telewizora. Aby uzyskać szczegółowe
informacje dotyczące instalacji, należy zapoznać się z
instrukcją obsługi telewizora. Jeśli telewizor nie jest
wyposażony w urządzenie zapobiegające przewracaniu
się, skonsultuj się z dystrybutorem.
• Przesunięcie telewizora na powierzchni systemu może
spowodować zarysowanie jego powierzchni. Jeśli
konieczne jest przemieszczenie telewizora, podnieś go.
Można również umieścić system na prawo od telewizora
(zalecane) lub na półce.
Uwaga:
• Nie umieszczaj systemu w metalowej szafce.
• Inne urządzenia elektroniczne, używające pasma
częstotliwości 2,4 GHz, takie jak router bezprzewodowy,
telefon bezprzewodowy, itp. powinny się znajdować w
odległości co najmniej 2 m od systemu, aby uniknąć zakłóceń.
• Jeśli na telewizorze występują nieregularne kolory, wyłącz go
na 30 minut. Jeśli demagnetyzacja telewizora nie rozwiązuje
problemu, zwiększ odległość między nim a systemem.
• Nie trzymaj w pobliżu namagnesowanych przedmiotów.
Namagnesowane karty, zegarki itp. mogą ulec uszkodzeniu w
przypadku umieszczenia zbyt blisko systemu.
Przygotowanie pilota zdalnego
sterowania
█ Przed rozpoczęciem użytkowania
Zdjąć powłokę izolacyjną.
█ Wymiana baterii
Baterie należy wymieniać wyłącznie na nowe (baterie litowe
CR2025).
1
Naciskając zaczep blokady, wyjąć obsadę baterii.
2
Umieścić nową baterię stroną z symbolem (+) do góry.
3
Wsunąć obsadę baterii do oporu.
UWAGA!
Baterię guzikową należy przechowywać w miejscu
niedostępnym dla dzieci, aby nie dopuścić do jej
połknięcia.
RQT9939
4
20
Opis elementów sterowania
MUTE
SETUP
INPUT
SOUND
OK
PAIRING
TV BD/DVD
BLUETOOTH
AUX
IJ
BFAK
Przedni panel
Widok z boku
LMNO P Q
Tylny panel
POLSKI
printing
A
Przełącznik „STANDBY/ON” [`], [1]
Naciśnij ten przycisk, aby wyłączyć urządzenie
(przełączyć je w stan gotowości) lub włączyć je z
powrotem. W stanie gotowości urządzenie nadal
pobiera pewną niewielką moc.
B
Wybierz źródło wejściowe
C
Wyświetl menu konfiguracji
D
Wyświetl menu dźwięku
E
Wybierz tryb Bluetooth
Uruchom tryb parowania Bluetooth
F
Regulacja głośności systemu
G
Wyciszanie dźwięku
Ponownie naciśnij przycisk, aby anulować wybór.
„MUTE” można wyłączyć również przez regulowanie
głośności lub wyłączając system.
H
Wybierz i potwierdź opcję
I
Czujnik zdalnego sterowania
Odległość: W granicach około 7 m
Kąt: W przybliżeniu 20° w pionie, 30° w poziomie
J
Wyświetlacz
K
Obszar dotykowy NFC
L
Złącze AC IN
M
Złącze HDMI IN (BD/DVD)
N
Złącze HDMI OUT (zgodne z funkcją ARC)
O
Złącze DIGITAL AUDIO IN (TV)
P
Gniazdo USB (wyłącznie do użytku serwisowego)
Q
Złącze AUX IN
®
®
RQT9939
5
21
Podłączenie
HDMI IN
(ARC)
Kabel HDMI
HDMI IN
OPTICAL
OUT
Optyczny cyfrowy
kabel audio
Kabel
HDMI
HDMI IN
(ARC)
HDMI IN
(4K)
HDMI
OUT
np. odtwarzacz
dysków Blu-ray
Kabel HDMI*
Kabel HDMI
Telewizora 4K
Ultra HD
printing
Przed podłączeniem wyłącz cały sprzęt.
Podzespoły i przewody są sprzedawane oddzielnie.
Przewód zasilania podłaczyć do gniazdka sieciowego
dopiero po wykonaniu wszystkich pozostałych połączeń.
Podłączanie telewizora
█ Podłącz telewizor zgodny z funkcją ARC
Podłącz do zgodnego z funkcją ARC złącza telewizora ze
zgodnym z funkcją ARC kablem HDMI o wysokiej prędkości.
Uwaga:
Połączenie HDMI obsługuje funkcję „HDAVI Control” przez
funkcję VIERA Link w trakcie łączenia z telewizorem Panasonic
(
Z
„Wykonywanie operacji po podłączeniu do telewizora (VIERA
Link™ „HDAVI Control™”)”).
Połączenia do telewizora 4K Ultra HD
Ten system nie może przesyłać sygnału wideo 4K urządzeń
zgodnych z 4K do telewizora 4K Ultra HD. Jednak system
można podłączyć do telewizora 4K Ultra HD w celu
oglądania treści 4K.
ARC (Audio Return Channel, kanał powrotny dźwięku)
ARC to funkcja interfejsu HDMI, umożliwiająca korzystanie z
dźwięku i obrazu w jednym kablu HDMI.
█ Podłącz telewizor niezgodny z funkcją ARC
RQT9939
6
22
* Upewnij się, że kabel USB został podłączony do złącza
zgodnego z funkcją ARC.
Uwaga:
• Aby uzyskać informacje dotyczące konfiguracji i odtwarzania
treści 4K, patrz instrukcje obsługi telewizora 4K Ultra HD
(VIERA) i urządzenia zgodnego z 4K/60p.
• Aby słuchać wielokanałowego dźwięku z tego systemu, ustaw
wyjście audio innego urządzenia na Bitstream.
• Ten system może odbierać sygnał wejściowy audio o
maksymalnej liczbie 5.1 kanałów.

Podłączanie urządzenia zgodnego z
HDMI
OUT
Kabel HDMI
np. odtwarzacz
dysków Blu-ray
Przewód audio
np. przystawka STB
Do domowego
gniazdka
zasilającego
Przewód zasilania (w zestawie)
POLSKI
printing
interfejsem HDMI
Można podłączyć odtwarzacz dysków Blu-ray, odtwarzacz
DVD itp. i odsłuchiwać dźwięk za pomocą systemu.
Przesyłanie przez złącze HDMI w trybie spoczynku
W trybie spoczynku sygnał audio i/lub wideo z
podłączonego urządzenia może być wysyłany do
podłączonego telewizora. Ten system nie będzie emitował
dźwięku.
Zgodność 3D
System może przesyłać sygnał wideo 3D zgodnego
odtwarzacza dysków Blu-ray na telewizor FULL HD 3D.
Uwaga:
Aby poznać ustawienia wyjścia sygnału wideo i audio, patrz
instrukcje obsługi urządzenia.
Podłączanie innego sprzętu (AUX)
Można podłączyć inne urządzenia, takie jak odtwarzacz
Blu-ray, odtwarzacz DVD, konsolę do gier, przystawkę STB
itp. i odsłuchiwać dźwięk za pomocą systemu.
Podłączanie przewodu zasilania
Nie stosować przewodów zasilania, pochodzących z innych
urządzeń.
Oszczędzanie energii
System pozostając w trybie spoczynku zużywa małą moc
Z
„Dane techniczne”). Gdy system nie jest używany, należy
(
go odłączać od zasilania.
RQT9939
7
23

Połączenie Bluetooth
printing
Można podłączyć urządzenie audio bezprzewodowo za
pomocą funkcji Bluetooth
Przygotowanie
• Włącz funkcję Bluetooth® urządzenia i umieść je w pobliżu
systemu.
`
• Naciśnij [
], aby wyłączyć system.
®
®
i odtwarzać na nim.
█ Parowanie urządzenia
1
Naciśnij [ ], aby wybrać „BLUETOOTH”.
W przypadku wyświetlenia komunikatu „PAIRING”
przejdź do kroku 3.
2
Naciśnij i przytrzymaj [ ] do chwili wyświetlenia
komunikatu „PAIRING”.
3
Wybierz w menu Bluetooth® urządzenia opcję
„SC-HTE180”.
W przypadku wyświetlenia monitu o hasło wprowadź
„0000”.
Urządzenie łączy się automatycznie z tym systemem po
zakończeniu parowania.
Nazwa podłączonego urządzenia jest wyświetlona przez
kilka sekund.
Uwaga:
• W celu podłączenia urządzenie należy sparować.
• Z systemem można sparować do 8 urządzeń.
W przypadku sparowania dziewiątego urządzenia to, które
najdłużej nie było używane zostanie zastąpione.
█ Podłączanie sparowanego urządzenia
Przygotowanie
Jeśli system jest podłączony do urządzenia Bluetooth®,
odłącz go (
1
2
Rozłączanie urządzenia
Naciśnij i przytrzymaj [ ] do chwili wyświetlenia
komunikatu „BLUETOOTH READY”.
Uwaga:
• System może połączyć się z tylko jednym urządzeniem w
• W przypadku wybrania jako źródła „BLUETOOTH” system
• Urządzenie Bluetooth
Z
patrz niżej).
Naciśnij [ ], aby wejść do trybu Bluetooth®.
Wyświetlony zostanie symbol „BLUETOOTH READY”.
Wybierz w menu Bluetooth® urządzenia opcję
„SC-HTE180”.
Nazwa podłączonego urządzenia jest wyświetlona przez
kilka sekund.
danym momencie.
automatycznie próbuje połączyć się z ostatnim podłączonym
urządzeniem.
innego urządzenia.
®
zostanie odłączone po wybraniu
█ Połączenie po jednym dotknięciu (NFC)
Tylko dla urządzeń z systemem Android™ zgodnych z
NFC
Po dotknięciu obszaru dotykowego NFC (Near Field
Communication, komunikacja bliskiego zasięgu) systemu
przez zgodne z NFC urządzenie Bluetooth
automatycznie włączy się, sparuje i połączy się z
urządzeniem Bluetooth
Informacje o NFC
NFC (Near Field Communication, komunikacja bliskiego
zasięgu) to technologia bezprzewodowa krótkiego zasięgu,
umożliwiająca komunikację między urządzeniami z tą
funkcją po zetknięciu.
Przygotowanie
• Pobierz i zainstaluj bezpłatną aplikację systemu Android
„Panasonic Music Streaming” z serwisu Google Play™.
• Włącz funkcję „NFC” na swoim urządzeniu.
1
Uruchom aplikację „Panasonic Music Streaming”.
Wyświetlany jest ekran aplikacji. Postępuj według
instrukcji, aby wprowadzić ustawienia.
Należy upewnić się, że używana jest najnowsza wersja
aplikacji.
2
Dotknij i przytrzymaj urządzenie w obszarze
dotykowym NFC systemu [ ] do chwili nawiązania
połączenia Bluetooth
- Urządzenie wyemituje sygnał dźwiękowy.
- Na urządzeniu zostanie wyświetlone okno
wyskakujące.
- W systemie zostanie wyświetlona nazwa
podłączonego urządzenia.
Po zakończeniu rejestracji i podłączenia urządzenia
Bluetooth
3
Rozpocznij odtwarzanie na urządzeniu Bluetooth®.
Podłączanie innego urządzenia
Po połączeniu się można nawiązać połączenie z innym
urządzeniem Bluetooth
w obszarze dotykowym NFC. Poprzednie urządzenie
zostanie automatycznie odłączone.
®
.
®
.
®
przenieś urządzenie z dala od jednostki.
®
przez dotknięcie i przytrzymanie go
®
system
RQT9939
8
24
Sterowanie podstawowe
TV BD/DVD
BLUETOOTH
AUX
VOL
POLSKI
printing
Menu dźwięku
Przygotowanie
Włącz telewizor i/lub podłączone urządzenie.
1
Naciśnij [`], aby wyłączyć system.
2
Naciśnij [INPUT] wielokrotnie, aby wybrać źródło.
3
Naciśnij [ ], aby wyregulować głośność
systemu.
Zakres głośności: 0 do 100
Gdy jako źródło wybrano „BLUETOOTH”
Wybierz system jako głośnik zewnętrzny w menu
podłączonego urządzenia Bluetooth
Gdy jako źródło wybrano „BD/DVD”
Na telewizorze wybierz odpowiednie wejście odbiornika
podłączonego do systemu.
®
.
Dźwięk 3D
System został wzbogacony o szereg efektów dźwięku 3D.
•
Dolby® Virtual Speaker
Efekt ten zapewnia efekty dźwięku przestrzennego
podobne do trybu 5.1-kanałowego.
Efekt 3D Surround
•
Rozszerzając efekt Dolby Virtual Speaker, firma
Panasonic zastosowała własną technologię „sound field
control” w celu rozszerzenia pola w kierunku do przodu,
do tyłu, w górę i w dół, zapewniając dźwięk o głębi i
natężeniu lepiej odpowiadającym obrazom 3D.
Tryb wyraźnego dialogu
•
Komentarze sportowe i dialogi seriali telewizyjnych są
słyszane tak, jakby dobiegały z telewizora, stwarzając
wrażenie, że dźwięk i obraz stanowią jedną całość.
Ponadto dialogi zostają uwydatnione w stosunku do
innych dźwięków podczas odtwarzania z normalną
głośnością oraz gdy poziom głośności zostanie
zmniejszony, podczas oglądania nocą.
Uwaga:
Aby zmienić efekty dźwiękowe, przejdź do Menu dźwięku:
• Efekt Dolby Virtual Speaker jest włączony z wyjątkiem trybu
STEREO.
• Aby anulować efekt Dolby Virtual Speaker i 3D Surround w
funkcji „SOUND MODE” wybierz opcję „STEREO”.
• Aby anulować efekty 3D Surround oraz Clear-mode dialogue,
dla funkcji „3D CLR DIALOG” ustaw opcję „OFF”.
1
Naciśnij [SOUND] wielokrotnie, aby wybrać efekt
dźwiękowy.
2
Naciśnij [R, T] wielokrotnie, aby wybrać żądane
ustawienia, a następnie naciśnij [OK].
SOUND MODE
SUBWOOFER Można regulować poziom niskich tonów.
DIALOG Dostosuj poziom dialogu.
H.BASS Wzmocnienie efektu harmonicznego
3D CLR
DIALOG
STANDARD
filmów obyczajowych i programów
komediowych.
STADIUM
dla transmisji sportowych na żywo.
MUSIC
muzycznych i utworów.
CINEMA
trójwymiarowy dźwięk dla filmów.
NEWS
informacji i komentarzy sportowych.
STEREO
dźwięku stereo.
System automatycznie wybiera
najbardziej odpowiednie ustawienie
zgodnie z typem odtwarzanego źródła.
LEVEL 1
LEVEL 2
źródła dźwięku
LEVEL 3
wielokanałowego źródła dźwięku
LEVEL 4
Wybrane ustawienie zostaje zapisane i
odczytywane za każdym razem, gdy
odtwarzany jest ten sam typ źródła.
LEVEL 1
LEVEL 2
LEVEL 3
LEVEL 4
Komunikat „DIALOG” nie jest
wyświetlany gdy opcja „3D CLR
DIALOG” jest ustawiona na „OFF”.
basu.
ON
OFF
Funkcja trybu czystych dialogów 3D
tworzy pole dźwięku podobne do
pochodzącego z ekranu telewizora i
zwiększa klarowność dialogów.
ON
dialogów i Dolby Virtual Speaker
OFF
Po każdym włączeniu systemu
ustawienie przyjmie ponownie wartość
„ON”.
: Najlepiej dostosowane do
: Zapewnia realistyczny dźwięk
: Poprawa dźwięku instrumentów
: Zapewnia niepowtarzalny
: Poprawa wyrazistości głosu
: Odtwórz dowolne źródło
: Domyślnie dla 2-kanałowego
: Domyślnie dla
: Efekty 3D Surround, trybu czystych
: Efekt Dolby Virtual Speaker
RQT9939
9
25
DUAL AUDIO Ustawia preferowany tryb kanału audio,
printing
AGC Sterowanie wzmocnieniem dźwięku
LOW VOL
MODE
Uwaga:
Ustawienie domyślne jest podkreślone. Zmienione ustawienia
zostaną, jeśli nie jest wskazane inaczej, utrzymane do czasu
kolejnej ich zmiany.
jeśli jednostka odbiera dwa tryby audio.
M1
: Główny
M2
: Pomocniczy
M1+M2
: Główny + pomocniczy
Ten efekt działa wyłącznie jeśli wyjście
audio telewizora lub odtwarzacza jest
ustawione na „Bitstream”, a w źródle
dźwięku dostępny jest tryb „Dolby Dual
Mono”.
zapobiega występowaniu nagłych
głośnych dźwięków przez automatyczne
zmniejszenie poziomu dźwięku gdy
sygnał wejściowy stanie się zbyt wysoki.
ON
OFF
Zwiększenie głośności dialogu w
warunkach słabego dźwięku.
ON
OFF
Wybierz „OFF”, aby anulować ten efekt
jeśli dialog nie brzmi naturalnie w
warunkach niskiej głośności.
Format dźwięku
Można wyświetlić bieżący format dźwięku.
Naciśnij i przytrzymaj [SOUND] przynajmniej przez
4 sekundy.
DOLBY
DIGITAL
DTS Źródłem dźwięku jest DTS.
PCM MULTI Liniowa modulacja kodowo-impulsowa
PCM Dwukanałowa modulacja
ANALOG Źródło dźwięku jest analogowe.
SBC Źródłem dźwięku jest kodowanie
Źródłem dźwięku jest Dolby Digital.
w źródle dźwięku.
kodowo-impulsowa w źródle dźwięku.
subpasmowe.
(tylko tryb Bluetooth
®
)
Menu konfiguracji
1
Naciśnij [SETUP] wielokrotnie, aby wybrać pozycję
konfiguracji.
2
Naciśnij [R, T] wielokrotnie, aby wybrać żądane
ustawienia, a następnie naciśnij [OK].
DIMMER Przyciemnia panel wyświetlacza po
AUTO POWER
DOWN
VOL
LIMITATION
BLUETOOTH
STANDBY
LINK MODE Zmień tryb połączenia Bluetooth®, aby
VIERA LINK Włącz funkcję VIERA Link.
Uwaga:
Ustawienie domyślne jest podkreślone. Zmienione ustawienia
zostaną, jeśli nie jest wskazane inaczej, utrzymane do czasu
kolejnej ich zmiany.
5 sekundach nieaktywności.
ON
OFF
System automatycznie wyłącza się w
przypadku braku wejścia audio i jeśli nie
jest używany przez 20 minut.
ON
OFF
Ustawia podczas włączania systemu
wartość graniczną głośności na 50,
mimo że przed wyłączeniem była
ustawiona na ponad 50.
ON
OFF
Ta funkcja umożliwia podłączenie
sparowanego urządzenia Bluetooth
gdy system jest w trybie spoczynku.
ON
OFF
System włączy się automatycznie po
podłączeniu sparowanego urządzenia
®
Bluetooth
dostosować do rodzaju połączenia.
Sprawdź, czy podłączone urządzenie
zostało odłączone (wyświetlany jest
komunikat „BLUETOOTH READY”).
MODE 1:
połączenia.
MODE 2:
dźwięku.
ON
OFF
Wybierz „OFF”, jeśli funkcja HDAVI
Control nie działa prawidłowo z tym
systemem. Funkcja ARC zostanie
wyłączona. Podłącz optyczny cyfrowy
kabel audio.
Wyłącz wszystkie podłączone
urządzenia, a następnie po zmianie
ustawienia włącz je ponownie.
.
Nacisk położony na możliwość
Nacisk położony na jakość
®
RQT9939
10
26

Wykonywanie operacji po podłączeniu do telewizora (VIERA
POLSKI
printing
Link™ „HDAVI Control™”)
Czym jest funkcja VIERA Link „HDAVI Control”?
VIERA Link „HDAVI Control” jest praktyczną funkcją,
która umożliwia współpracę systemu z telewizorami
Panasonic (VIERA) z wykorzystaniem standardu „HDAVI
Control”.
Z funkcji tej można skorzystać po podłączeniu sprzętu
za pomocą kabla HDMI. Szczegóły dotyczące obsługi
znajdują się w instrukcjach obsługi podłączonych
urządzeń.
Przygotowanie
A
Upewnij się, że połączenie HDMI zostało nawiązane.
B
Skonfiguruj działanie funkcji „HDAVI Control”
w podłączonych urządzeniach (np. telewizorze).
C
Aby uzyskać optymalne działanie funkcji „HDAVI
Control”, zmień następujące ustawienia podłączonego
telewizora.*
– Skonfiguruj w systemie domyślne ustawienia
– W ustawieniach wyboru głośników wybierz to
D
Włącz wszystkie urządzenia zgodne ze standardem
„HDAVI Control” i wybierz w systemie telewizor jako
źródło sygnału, aby zapewnić poprawne działanie funkcji
„HDAVI Control”.
E
Jeśli urządzenie jest podłączone za pomocą złącza
HDMI IN, rozpocznij odtwarzanie, aby sprawdzić, czy
obraz na ekranie telewizora jest wyświetlany
prawidłowo.
W przypadku zmiany połączenia lub ustawień należy
powtórzyć powyższą procedurę.
*1 Dostępność i działanie odpowiednich ustawień może
różnić się w zależności od modelu telewizora. Szczegółowe
informacje znajdują się w instrukcji obsługi telewizora.
2
*
Jeśli w elementach ustawień funkcji VIERA Link telewizora
dostępne jest domyślne ustawienie głośników, wybranie
urządzenia jako głośnika domyślnego spowoduje
automatyczną zmianę wyboru głośników w systemie.
Uwaga:
• Funkcja VIERA Link „HDAVI Control” korzysta z funkcji
sterowania przez interfejs HDMI, czyli normę branżową znaną
jako HDMI CEC (ang. Consumer Electronics Control) i jest
opracowaną przez nas unikatową funkcją, w którą
wyposażyliśmy sprzęt. W związku z tym nie można
zagwarantować jej współdziałania z urządzeniami innych
producentów obsługujących normę HDMI CEC.
• Urządzenie obsługuje funkcję „HDAVI Control 5”. „HDAVI
Control 5” jest standardem używanym w urządzeniach
zgodnych ze standardem HDAVI Control firmy Panasonic. Ten
standard jest obsługiwany przez tradycyjne urządzenia firmy
Panasonic zgodne ze standardem HDAVI.
• Informacje na temat obsługi funkcji VIERA Link przez
urządzenia innych producentów znajdują się w instrukcjach
obsługi tych urządzeń.
głośników.*
urządzenie.
1
2
Co umożliwia funkcja VIERA Link „HDAVI
Control”
Aby upewnić się, że dźwięk będzie generowany z systemu,
należy włączyć główne urządzenie za pomocą pilota
telewizora i wybrać kino domowe z menu głośników w menu
funkcji VIERA Link.
Dostępność i działanie odpowiednich ustawień może różnić
się w zależności od modelu telewizora. Szczegółowe
informacje znajdują się w instrukcji obsługi telewizora.
█ Obsługa głośników
Używając ustawień w menu telewizora, można
zadecydować, czy dźwięk będzie generowany z systemu
czy z głośników telewizora.
Kino domowe
System jest włączony.
• Gdy główne urządzenie znajduje się w trybie gotowości,
wybranie systemu zamiast głośników telewizora w menu
funkcji VIERA Link automatycznie włącza urządzenie
główne.
• Używając przycisku głośności lub wyciszenia na pilocie
telewizora, można kontrolować ustawienia głośności
systemu.
• Jeżeli urządzenie główne zostanie wyłączone,
automatycznie włączone zostają głośniki telewizora.
• Dźwięk będzie automatycznie generowany z systemu,
jeśli telewizor jest zgodny ze standardem VIERA Link
„HDAVI Control 4” lub nowszym.
Telewizor
Głośniki telewizora są włączone.
• Ustawienie głośności w systemie ma wartość minimalną.
█ Automatyczne przełączanie sygnału
wejściowego
Po wykonaniu następujących czynności urządzenie główne
automatycznie zmieni sygnał wejściowy na ten pochodzący
z odpowiedniego źródła.
• Rozpoczęcie odtwarzania na podłączonym urządzeniu
obsługującym standard HDMI.*
• Zmiana sygnału lub kanału telewizora.
3
*
Jeśli skonfigurowano telewizor tak, aby dźwięk
z głośników był generowany przez system, telewizor
i urządzenie główne są uruchamiane automatycznie
(funkcja Power on link (Jednoczesne włączenie)).
3
█ Funkcja Power off link (Jednoczesne
wyłączenie)
Gdy telewizor zostaje wyłączony, główne urządzenie jest
również automatycznie wyłączane. (Ta funkcja nie działa,
gdy źródłem jest urządzenie Bluetooth
█ Automatyczna funkcja Lip-Sync
(Tylko urządzenia zgodne ze standardem HDAVI Control 3
lub nowszym)
Opóźnienie między dźwiękiem a obrazem jest
dostosowywane automatycznie poprzez dodanie zwłoki
czasowej do sygnału dźwiękowego, dzięki czemu dźwięk
jest zsynchronizowany z obrazem.
Uwaga:
Informacje o opóźnieniu zostają skonfigurowane automatycznie,
jeśli telewizor jest zgodny ze standardem VIERA Link „HDAVI
Control 3” lub nowszym oraz funkcja VIERA Link jest włączona.
®
.)
RQT9939
11
27
 Loading...