


 Loading...
Operating Instructions
Microwave Oven
Models NN-S512
NN-S522
Before operating this oven, please read these instructions completely.

Warranty & Service
Panasonic Canada Inc.
5770 Ambler Drive, Mississauga, Ontario L4W 2T3
PANASONIC PRODUCT – LIMITED WARRANTY
Panasonic Canada Inc. warrants this product to be free from defects in material and workmanship and agrees to remedy any such defect for a period as stated below from the date of original purchase.
Microwave Oven: |
Two (2) years, parts and labour (Carry-in Service). Additional three (3) year warranty |
|
on the magnetron (parts only, labour extra). |
|
In-home Service applies to convection, over-the-range and stainless steel ovens. |
(labour to install or remove the product is not warranted)
In-home Service will be carried out only to locations accessible by roads and within 50 km of an authorized Panasonic service facility.
LIMITATIONS AND EXCLUSIONS
This warranty does not apply to products purchased outside Canada or to any product which has been improperly installed, subjected to usage for which the product was not designed, misused or abused, damaged during shipping, or which has been altered or repaired in any way that affects the reliability or detracts from the performance, nor does it cover any product which is used commercially. Dry cell batteries are also excluded from coverage under this warranty.
This warranty is extended to the original end user purchaser only. A purchase receipt or other proof of date of original purchase is required before warranty service is performed.
THIS EXPRESS, LIMITED WARRANTY IS IN LIEU OF ALL OTHER WARRANTIES, EXPRESS OR IMPLIED, EXCLUDING ANY IMPLIED WARRANTIES OF MERCHANTABILITY OR FITNESS FOR A PARTICULAR PURPOSE.
IN NO EVENT WILL PANASONIC CANADA INC. BE LIABLE FOR ANY SPECIAL, INDIRECT OR CONSEQUENTIAL DAMAGES.
In certain instances, some jurisdictions do not allow the exclusion or limitation of incidental or consequential damages, or the exclusion of implied warranties, so the above limitations and exclusions may not be applicable.
WARRANTY SERVICE
For product operation and information assistance, please contact your Dealer or our Customer Care Centre at: Telephone #: (905) 624-5505 Fax #: (905) 238-2360 Web: www.panasonic.ca
For product repairs, please contact one of the following:
•Your Dealer who will inform you of an authorized Servicentre nearest you.
•Our Customer Care Centre at (905) 624-5505 or www.panasonic.ca
•A Panasonic Factory Servicentre listed below:
Richmond, British Columbia |
Calgary, Alberta |
Mississauga, Ontario |
Lachine, Québec |
||||
Panasonic Canada Inc. |
Panasonic Canada Inc. |
Panasonic Canada Inc. |
Panasonic Canada Inc. |
||||
12111 Riverside Way |
6835-8th St. N. E. |
5770 Ambler Dr. |
3075, rue Louis A. Amos |
||||
Richmond, BC V6W 1K8 |
Calgary, AB T2E 7H7 |
Mississauga, ON L4W 2T3 |
Lachine, QC H8T 1C4 |
||||
Tel: (604) |
278-4211 |
Tel: (403) |
295-3955 |
Tel: (905) |
624-8447 |
Tel: |
(514) 633-8684 |
Fax: (604) |
278-5627 |
Fax: (403) |
274-5493 |
Fax: (905) |
238-2418 |
Fax: |
(514) 633-8020 |
IF YOU SHIP THE PRODUCT TO A SERVICENTRE
Carefully pack and send prepaid, adequately insured and preferably in the original carton. Include details of the defect claimed, and proof of date of original purchase.
- 1 -

Important Safety Instructions
Your microwave oven is a cooking device and you should use as much care as you use with a stove or any cooking device. When using this electric appliance, basic safety precautions should be followed, including the following:
WARNING— To reduce the risk of burns, electric shock, fire, injury to persons or exposure to excessive microwave energy:
1.Read all instructions before using the appliance.
2.Read and follow the specific PRECAUTIONS TO AVOID
POSSIBLE EXPOSURE TO EXCESSIVE MICROWAVE ENERGY, found on back of front cover.
3.This appliance must be grounded. Connect only to a properly grounded outlet. See “GROUNDING INSTRUCTIONS” found on page 3.
4.Install or locate this appliance only in accordance with the provided installation instructions.
5.Some products such as whole eggs and sealed containers— for example, closed glass jars— may explode and should not be heated in this oven.
6.Use this appliance only for its intended use as described in this manual. Do not use corrosive chemicals or vapours in this appliance. This type of oven is specifically designed to heat or cook food. It is not designed for industrial or laboratory use.
7.Do not allow children to use this appliance, unless closely supervised by an adult.
8.Do not operate this appliance if it has a damaged cord or plug, if it is not working properly, or if it has been damaged or dropped.
9.This appliance should be serviced only by qualified service personnel. Contact the nearest authorized servicentre for examination, repair or adjustment.
10.Do not cover or block any openings on this appliance.
11.Do not store or use this appliance outdoors. Do not use this product near water— for example, near a kitchen sink, in a wet basement, or near a swimming pool, etc.
12.Do not immerse the cord or plug in water.
13.Keep the cord away from heated surfaces.
14.Do not let the cord hang over the edge of a table or counter.
15.When cleaning surfaces of the door and oven that come together when closing the door, use only mild, non-abrasive soaps or detergents applied with a sponge or soft cloth.
16.To reduce the risk of fire in the oven cavity:
(a)Do not overcook food. Carefully attend the appliance if paper, plastic, or other combustible materials are placed inside the oven to facilitate cooking.
(b)Remove wire twist-ties from paper or plastic bags before placing the bag in the oven.
(c)If materials inside the oven should ignite, keep the oven door closed, turn the oven off, and disconnect the power cord, or shut off the power at the fuse or circuit breaker panel.
(d)Do not use the cavity for storage purposes. Do not leave paper products, cooking utensils, or food in the cavity when not in use.
17.Liquids, such as water, coffee, or tea are able to be overheated beyond the boiling point without appearing to be boiling due to surface tension of the liquid. Visible bubbling or boiling when the container is removed from the microwave oven is not always present. THIS COULD RESULT IN VERY HOT LIQUIDS SUDDENLY BOILING OVER WHEN A SPOON OR OTHER UTENSIL IS INSERTED INTO THE LIQUID. To reduce the risk of injury to persons:
(a)Do not overheat the liquid.
(b)Stir the liquid both before and halfway through heating it.
(c)Do not use straight-sided containers with narrow necks.
(d)After heating, allow the container to stand in the microwave oven for a short time before removing it.
(e)Use extreme care when inserting a spoon or other utensil into the container.
General Use
1.DO NOT tamper with, or make any adjustments or repairs to, the door, control panel housing, safety interlock switches or any other part of the oven. DO NOT remove the outer panel from the oven. Repairs should only be done by qualified service personnel.
2.DO NOT operate the microwave when the oven is empty. The microwave energy will reflect continuously throughout the oven causing overheating, if no food or water is present to absorb energy.
3.DO NOT use this oven to heat chemicals or other non-food products.
4.DO NOT dry clothes, newspapers or other materials in the oven. They may catch on fire.
5.DO NOT use recycled paper products unless the paper product is labelled as safe for microwave oven use. Recycled paper products may contain impurities which may cause sparks and/or fires when used.
6.DO NOT use newspapers or paper bags for cooking.
7.DO NOT hit or strike the control panel. Damage to the controls may occur.
8.DO NOT store flammable materials next to, on top of, or in the oven. These could be fire hazards.
9.POT HOLDERS should always be used when removing containers from the oven. Heat is transferred from the hot food to the cooking container and from the cooking container to the Glass Tray. The glass tray can be very hot after removing a cooking container from the oven.
Save These Instructions
- 2 -

Installation and Grounding Instructions
Examine Your Oven
Unpack oven, remove all packing material, and examine the oven for any damages such as dents, broken door latches or cracks in the door. Notify dealer immediately if oven is damaged. DO NOT install if oven is damaged.
Wiring Requirements
1.The oven must be operated on a SEPARATE CIRCUIT. No other appliance should share the circuit with the microwave oven. If it does, the branch circuit fuse may blow or the circuit breaker may trip, or the food may take longer to cook than the times recommended in this manual.
Placement of Oven
1.Oven must be placed on a flat, stable surface. For proper operation, the oven must have sufficient air flow. Allow 8 cm (3”) of space on both sides of the oven and 2.5 cm (1”) of space on top of oven.
a.DO NOT block air vents.
If they are blocked during operation, the oven may be overheated and damaged.
When using any cloth over the oven, the air intake and exhaust should not be blocked.
Allow proper space on back and both sides of oven.
b.DO NOT place oven near a hot damp surface such as a gas or electric range, or dishwasher.
c.DO NOT operate oven when room humidity is too high.
2.This oven was manufactured for household use only.
Installation for Trim Kit
1.This oven is designed for installation into a wall cabinet by using the proper trim kit (NN-TK529WAPH) available from a local Panasonic dealer. Follow all installation instructions packed with the kit.
2.DO NOT block air vents. If they are blocked during operation, the oven may overheat. If the oven overheats, a thermal safety device will turn the oven off. The oven will remain inoperable until it has cooled.
3.This oven was manufactured for household use only.
Grounding Instructions
This appliance must be grounded. In the event of an electrical short circuit, grounding reduces the risk of electric shock by providing an escape wire for the electric current. This appliance is equipped with a cord having a grounding wire with a grounding plug. The plug must be plugged into an outlet that is properly installed and grounded.
WARNING— Improper use of the grounding plug can result in a risk of electric shock. Consult a qualified electrician or service person if the grounding instructions are not completely understood, or if doubt exists as to whether the appliance is properly grounded. If it is necessary to use an extension cord, use only a three wire extension cord that has a three blade grounding plug, and a three slot receptacle that will accept the plug on the appliance. The marked rating of the extension cord should be equal to, or greater than, the electrical rating of the appliance.
2.The VOLTAGE used must be the same as specified on this microwave oven (120 V, 60 Hz). Using a higher voltage is dangerous and may result in a fire or another accident causing oven damage. Using a lower voltage will cause slow cooking. Panasonic is NOT responsible for any damages resulting from the use of the oven with any voltage other than specified.
3.The oven must be plugged into at least a 15 AMP, 120 VOLT, 60 Hz GROUNDED OUTLET. Where a standard two-prong outlet is encountered, it is the personal
responsibility and obligation of the consumer to have it replaced with a properly grounded three-prong outlet.
Glass Tray
1.DO NOT operate the oven without the Roller Ring and the Glass Tray in place.
2.Only use the Glass Tray specifically designed for this oven. Do not substitute any other glass tray.
3.If the Glass Tray is hot, allow to cool before cleaning or placing in water.
4.DO NOT cook directly on the Glass Tray. Always place food in a microwave-safe dish, or on a rack set in a microwave-safe dish.
5.If the food or utensil on the Glass Tray touches oven walls, causing the tray to stop moving, the tray will automatically rotate in the opposite direction. This is normal.
6.The Glass Tray can turn in either direction.
Roller Ring
1.The Roller Ring and oven floor should be cleaned frequently to prevent excessive noise.
2.The Roller Ring must always be used for cooking along with the Glass Tray.
3.Always replace the Roller Ring and the Glass Tray in their proper positions.
- 3 -

Care of your Microwave Oven
1.Turn the oven off before cleaning. Make sure parts are cool.
2.Keep the inside of the oven clean. When food spatters or spilled liquids adhere to oven walls, wipe with a damp cloth. Mild detergent or liquid cleansers may be used if the oven gets very dirty.
The use of harsh detergent or abrasives is not recommended.
3.The outside oven surfaces should be cleaned with a damp cloth. To prevent damage to the operating parts inside the oven, water should not be allowed to seep into the ventilation openings.
4.Clean Control Panel with a soft, dry cloth. Do not use harsh detergents, abrasives or paper towelling. When cleaning the control panel, leave oven door open to prevent oven from accidentally turning on. After cleaning, press Stop/Reset Pad to return to time-of-day.
5.Steam will be given off when cooking food and collect on the
oven walls and door. During conditions of high humidity, steam may occur on the outside of the oven and in no way indicates malfunction of the unit. Wipe dry with a soft cloth.
6.It is occasionally necessary to remove the glass tray for cleaning. Wash the tray in warm sudsy water or in a dishwasher.
7.The roller ring and oven cavity floor should be cleaned regularly to avoid excessive noise. Simply wipe the bottom surface of the oven with mild detergent, water or window cleaner and dry. The roller ring may be washed in mild sudsy water or dishwasher. Cooking vapours collect during repeated use, but in no way affect the bottom surface or roller rings wheels. When removing the roller ring from the cavity floor for cleaning, be sure to replace in the proper position.
8.Daily cleaning will prevent the accumulation of odours and soil.
Safety Precautions
Utensils
1.MICROWAVE BROWNING DISHES or GRILLS are designed for microwave cooking only. Preheating times vary depending on the size of the browning dish and food being cooked. Always follow instructions provided by the browning dish or grill manufacturer.
DO NOT PREHEAT BROWNING DISH MORE THAN 6 MINUTES in microwave.
2.METAL CONTAINERS or dishes with metallic trim should not be used. Arcing ( sparking ) may occur.
3.METAL TWIST-TIES should not be used in the microwave oven, arcing will occur.
4.DO NOT use SEALED JARS or NARROW NECK bottles for cooking or reheating. They may shatter.
5.DO NOT use CONVENTIONAL THERMOMETERS in the microwave oven. They may cause arcing.
6.Remove PLASTIC STORE WRAPS, before cooking or defrosting in the oven.
7.If an oven cooking bag is used, prepare according to package directions. Do not use wire twist-tie to close bag. Instead use plastic tie, a piece of cotton string or a strip cut from the open end of the bag. Make six 1 cm (1/2” )
slits by closure. Place oven cooking bag in a dish slightly larger than the food being cooked.
8.When using foil, skewers, rack or utensils made of metal in the oven, allow at least 2.5 cm ( 1” ) of space between metal material and interior oven walls. If arcing occurs remove metal material (skewers, etc.) and/or transfer to a non-metallic container.
9.Do not use paper towels or cloths which contain a synthetic fiber woven into them, such as nylon. The synthetic fiber may cause the towel or cloth to ignite. Use paper toweling under supervision.
Food
1.Do not use your oven for home canning or the heating of any closed jar. Pressure will build up and the jar may explode. In addition, the microwave oven cannot maintain the food at the proper canning temperature. Improperly canned food may spoil and be dangerous to consume.
2.Small quantities of food or foods with low moisture content can dry out, burn or catch on fire when overheated. If a fire occurs, turn oven off and leave oven door closed.
Disconnect the power cord or shut off power at the fuse or circuit breaker panel.
3.Popcorn can be popped in a suitable, microwaveable corn popper using manufacturer’s directions OR prepackaged bags of microwave popcorn can be used with the preset Popcorn Pad program. Treat bag according to package directions.
4.Do not attempt to deep fry in your microwave oven. Temperature cannot be controlled and fat will erupt. Many microwave utensils cannot withstand the temperatures of heated oil, resulting in shattering or melting.
5.Do not boil eggs in their shell. Pressure will build up and the eggs will explode.
6.Potatoes, apples, egg yolks and whites, whole squash and sausages are examples of foods with nonporous skins. This type of food must be pierced before cooking, to prevent bursting.
7.Use fresh potatoes, and cook until just done. The potatoes will still feel soft to the touch, but firm when pierced with a fork. Overcooking causes dehydration and may cause a fire.
8.Heat only 1 frozen dinner or entree in the oven at a time. If dinner or entree is heated in a foil tray, leave at least 2.5 cm ( 1” ) of space between foil tray and oven walls.
9.Drying meats, fruits, vegetables and herbs is not recommended .
10.Do not use the oven for any reason other than the preparation of food.
11.Do not leave oven unattended.
- 4 -

Feature Diagram
NN-S512 |
|
NN-S522 |
|
||
d |
g j |
a b |
d |
g j |
a b |
i |
|
|
i |
|
|
|
|
|
|
|
|
|
|
|
e |
|
e |
|
|
|
|
|
|
h |
|
|
h |
|
|
|
d |
|
|
|
|
c |
f |
c |
d |
f |
|
|
|
|
|||
aExternal Air Vents
bInternal Air Vents
cDoor Safety Lock System
dExhaust Air Vents
eControl Panel
Oven Light:
f Identification Plate
gGlass Tray
hRoller Ring
i |
Heat & Vapour Barrier Film (do not remove) |
j |
Cover (do not remove) |
Oven Light turns on only while cooking and will not turn on when oven door is opened.
Control Panel
NN-S512 |
NN-S522 |
|
|
|
|
|
|
|
(1)
(2)
(7)
(3)
(8)
(9)
(10)
(4)
(11)
(5) 


 (12)
(12)
(6)
(1)Display Window
(2)Inverter Turbo Defrost Pad ( page 7)
(3)Popcorn Pad ( page 7)
(4)Number Pads
(5)Timer Pad ( page 9)
(6)Clock Pad ( page 6)
(7)Auto Reheat Pad ( page 8)
(8)Inverter Auto Cooking Pad ( page 8)
(9)Power Level Pad ( page 6)
(10)Quick Min Pad ( page 9)
(1) |
|
|
|
oz |
|
|
|
|
lb |
|
|
|
|
|
k |
|
|
|
|
|
|
|
|
(2) |
|
|
Inverter |
Auto |
|
(3) |
|
|
(7) |
||
Popcorn |
|
Turbo |
Reheat |
||
|
|
Defrost |
(1- 4 servings) |
||
|
|
|
(lb/k ) |
|
|
|
Inverter Auto Cooking |
|
|||
|
Oatmeal |
Beverages |
Bacon |
(8) |
|
|
(slice) |
||||
|
|
|
|
||
|
Fresh |
|
Frozen |
Potatoes |
|
|
Vegetables |
Vegetables |
|
||
|
|
|
|||
|
1 |
2 |
3 |
Power |
(9) |
|
Level |
||||
|
(10 Levels) |
||||
|
4 |
5 |
6 |
Quick |
(10) |
(4) |
Min |
||||
7 |
8 |
9 |
|
(11) |
|
|
Start |
||||
(5) |
Timer |
0 |
Clock |
Stop / |
(12) |
(6) |
Reset |
||||
|
|
|
|
|
|
(11)Start Pad
One tap allows oven to begin functioning. If door is opened or Stop/Reset Pad is pressed once during oven operation, Start Pad must again be pressed to restart oven.
(12)Stop/Reset Pad
Before cooking: One tap clears your instruction. During cooking: One tap temporarily stops the cooking
process. Another tap cancels all your instructions and time of day or colon appears in the Display Window.
- 5 -
Controls and Operating Procedures
Before using your oven choose Metric or Imperial
This oven can be set to operate with either Metric or Imperial weights. We strongly recommend thet you choose the Metric, as all purchased items such as meat, poultry, fish, frozen, canned and prepared foods are labelled with Metric weights but not all have Imperial weights. You need only enter the number on the package.
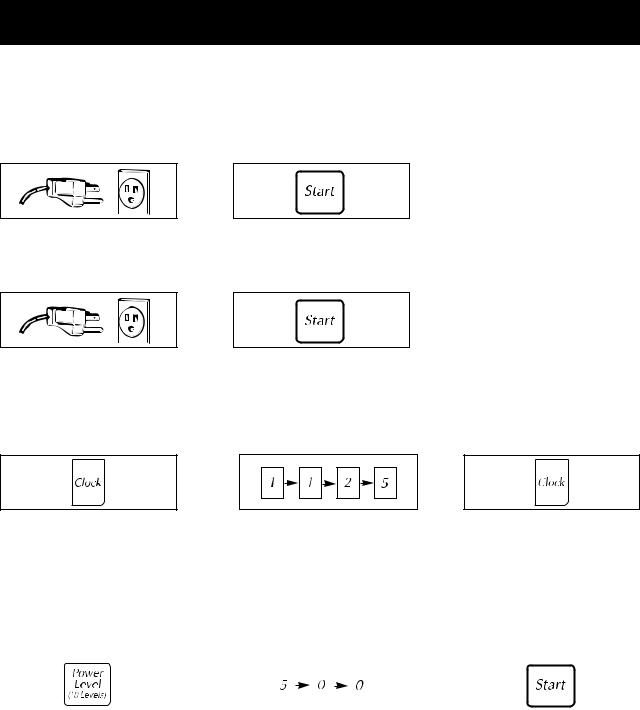
To Set the Metric or Imperial System:
To Choose Metric:
1. Plug in oven.
To Choose Imperial:
1. Plug in oven.
2. Press Start Pad once, "g/kg" shows in display.
2. Press Start Pad twice, "oz/lb" shows in display.
• To change from one system to another unplug oven and reprogram.
To Set Clock:
•Oven will accept Metric weights in grams and kilograms for Inverter Turbo Defrost and Popcorn.
•Oven will accept Imperial weights in ounces, pounds and tenths of a pound for Inverter Turbo Defrost and Popcorn.
1. Press Clock Set Pad. |
2. Enter time of day by pressing |
|
Number Pads. |
|
e.g. 11:25 AM or PM |
•To change time or reset clock, repeat steps 1 to 3 above.
•When power is interrupted and has resumed, a colon will show in the display.
•Clock does not need to be set for oven to operate.
To Cook / Defrost by Power and Time: (Manual Operation)
3.Press Clock Set Pad.
Time selected will show in the display.
|
|
|
|
|
|
|
|
|
|
|
|
|
|
|
|
|
|
|
|
|
|
|
|
|
|
|
|
|
|
|
|
|
1. Press Power Level Pad until |
|
2. Set required cooking time by |
|
3. Press Start Pad. |
||||||
desired cooking power shows |
|
pressing Number Pads. |
|
|
||||||
in display. (see page 10) |
|
e.g. 5:00 minutes |
|
|
||||||
•When selecting P10 Power as the first stage, you can start from step 2.
•To set 2 or 3 programs in a row.
e.g. |
P3 (MED-LOW) 10.00 min. |
|
P7 (MED-HIGH) 3.00 min. |
|
P1 (LOW) 7.00 min. |
START |
|
Stage 1 |
|
Stage 2 |
Stage 3 |
||
• To defrost use P3 (MED-LOW). |
|
|
|
|
|
|
- 6 -

Operating Procedures
Using Timed Cook Programs
These are pretimed for an average quantity of food. Local power fluctuations and personal tastes are not taken into account. Should you prefer food cooked differently, use power and time, as directed in the cooking guide section, other recipe sources or package directions. (See "To Use Auto Cook Pads" on page 8.)
To Use Inverter Turbo Defrost:
Use to defrost meat, poultry or seafood by using the weight on the package. Place food on microwave safe roasting rack in an appropriately sized dish.
1. Press Inverter Turbo Defrost Pad. |
2. Enter weight using |
3. Press Start Pad. |
|
number pad. |
|
|
e.g.: 1.5 kg or 1.5 lbs |
|
•Halfway through defrosting, beep sounds. Turn over, rearrange foods, remove defrost areas or shield with aluminum foil.
•The recommended maximum weight of meat is 1.8 kg (4 lb); poultry, 2.7 kg (6 lb) and seafood, 1.4 kg (3 lb).
•The weight for Inverter Turbo Defrost can be programmed up to 3 kg (6 lb).
•Power and time may be programmed after Inverter Turbo Defrost.
•If you are using the Imperial system, be sure to convert oz to decimal equivalent, i.e., 8 oz = .5 lb, 4 oz = .25 lb etc.
To Use Popcorn:
|
|
|
|
|
|
|
|
|
|
|
|
|
or |
|
|
|
|
|
|
|
|
|
|
|
|
|
|
|
|
|
|
|
|
|
|
|
|
|
|
|
|
|
|
|
|
|
|
|
|
|
|
|
|
1. Press Popcorn Pad until the |
|
2. optional* |
|
|
|
|
3. Press Start Pad. |
|
desired weight appears on the |
|
|
|
|
|
|
|
After Several seconds, |
Display Window. |
|
|
|
|
|
|
|
Cooking time appears and |
|
|
|
|
|
|
|
|
begins to count down. |
NOTES:
1.Popcorn packages should be at room temperature.
2.Place bag in oven according to manufacturer’s directions.
3.Pop one bag at a time.
4.After popping, allow bag to cool. Carefully open bag away from face and body, since popcorn and steam are extremely hot.
5.NEVER leave the oven unattended when popping popcorn. Stop the oven when popping slows to 2 to 3 seconds between pops. Overcooking may cause scorching.
6.Do not reheat unpopped kernels or reuse bag.
7.With the many varieties of microwave popcorn available in the marketplace, it may be necessary for you to move the popcorn container to the outer edge of the glass tray to obtain the best cooking results.
REMARKS: When popping multiple bags one right after the other,
the cooking times may vary slightly. This does not affect the popping results. To maintain the cooking quality for many brands of microwave popcorn available in the market, some preset weights have the same cooking time.
*To Use More/Less
Popcorn serving
Press |
Weight |
once |
3.5 oz. |
twice |
3.0 oz. |
3 times |
2.85 oz. |
4 times |
2.65 oz. |
5 times |
1.75 oz. |
|
|
When using popcorn pad, the weight may not be the same as the options offered.
By using the number pad 1 or 0, the programs can be adjusted to cook for a heavier or lighter weight.
Press 1 for More: |
Press 0 for Less: |
||||
|
|
1 tap = More+ |
|
|
1 tap = Less- |
|
|
|
|
||
|
|
2 taps = More++ |
|
|
2 taps = Less-- |
Press |
Press |
||||
- 7 -
Operating Procedures
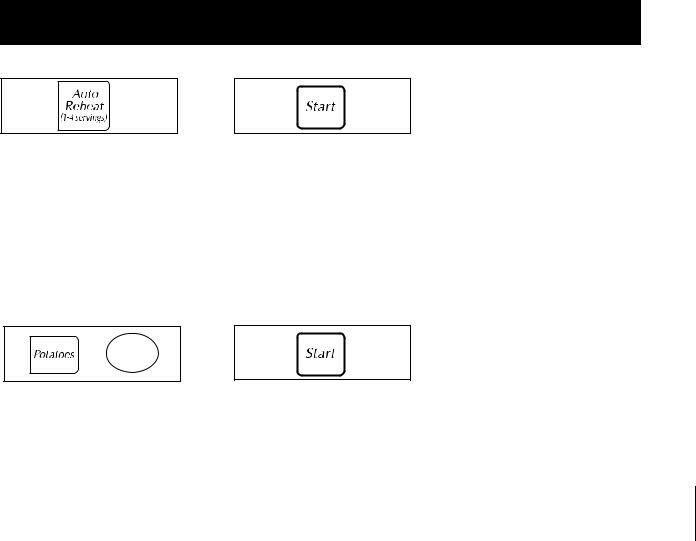
To Use Auto Reheat:
1. Press Auto Reheat Pad until the |
2. Press Start Pad. |
desired number of servings (1-4) |
|
appears on the Display Window. |
|
|
|
Type of Food |
Quantity |
|
|
Plate of Food |
Usually 3-4 servings |
Meat, Poultry |
1 piece 120 g (4 oz) |
Casseroles |
220 g (8 oz) |
Soup, Gravy, Sauce |
250 mL (1 cup) |
|
|
To Use AUTO COOK Pads:
This feature allows you to cook most of your favourite foods without setting power and time.
e.g.
or Potatoes
1. Press until the desired |
2. Press Start Pad. |
|||
serving/weight appears |
|
Cooking time will appear on the |
||
on the Display Window. |
|
Display Window and begin to |
||
|
|
|
count down. |
|
|
|
|
|
|
|
|
|
|
|
Category |
|
Serving/Weight |
Instructions |
|
|
|
|
|
|
1. Oatmeal |
|
0.5, 1 cup |
Place inside a microwave-safe serving bowl with no cover. Follow |
|
|
manufacturers’ directions for preparation of quick oatmeal. |
|||
|
|
|
||
|
|
|
|
|
2. Beverages |
|
1, 2 cups |
Use a microwave-safe coffee cup. Heated liquids can erupt if not mixed with |
|
|
air. Do not heat liquids in your microwave oven without stirring first. |
|||
|
|
|
||
|
|
|
|
|
3. Bacon (slice) |
|
4 slices (3.2-4 oz.) |
Place slices of bacon on a microwave-safe dish. Cover with paper towel. |
|
|
(90-110 g) |
If bacon is not cooked to your liking, continue to heat by manually adding |
||
|
|
|||
|
6 slices (4.8-5.8 oz.) |
more time. |
||
|
|
(135-165 g) |
|
|
|
10 slices (8.1-9.5 oz.) |
|
||
|
|
(230-270 g) |
|
|
|
14 slices (11.6-13 oz.) |
|
||
|
|
(330-370 g) |
|
|
|
|
|
|
|
4. Fresh Vegetables |
|
4, 8, 12, 16 oz |
All pieces should be the same size. Add a small amount of water and cover |
|
(110, 225, 340, 450 g) |
loosely with a lid or vented plastic wrap. |
|||
|
||||
|
|
|
|
|
5. Frozen Vegetables |
|
6, 10, 16 oz |
Follow manufacturers’ directions. Do not salt until after cooking. Not suitable |
|
|
(170, 300, 450 g) |
for vegetables in butter or sauce. |
||
|
|
|||
|
|
|
|
|
6. Potatoes |
|
1, 2, 3, 4 pieces |
Pierce each potato with a fork 6 times spacing around surface. Place potato or |
|
|
(170-225 g each) |
potatoes around the edge of paper-towel-lined glass tray (Turntable), at least |
||
|
|
1 inch (2.5 cm) apart. Do not cover. Let stand 5 minutes to complete cooking. |
||
|
|
|
||
- 8 -
Operating Procedures
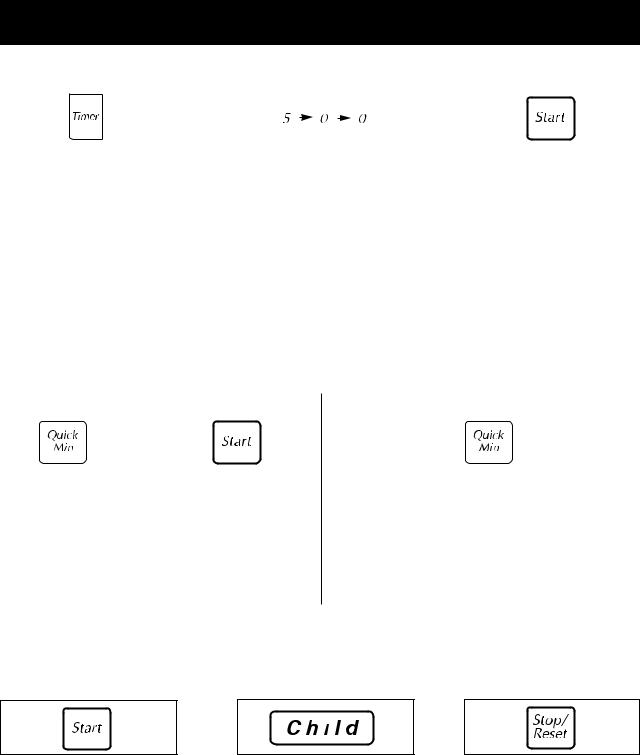
To Set Timer: (To use as a kitchen timer)
|
|
|
|
|
|
|
|
|
|
|
|
|
|
|
|
|
|
|
|
|
|
|
|
|
|
|
|
|
|
|
|
|
1. Press Timer Pad . |
2. Enter length of time for count |
|
3. Press Start Pad. |
|||||||
|
|
down. |
|
Time will count down without |
||||||
|
|
e.g. 5:00 minutes |
|
oven operating. |
||||||
• To delay the start of cooking for 20 minutes:
e.g. |
TIMER 20 min. |
|
P10 (HIGH) |
5 min. |
|
P6 (MED) 20 min. |
START |
|
Delay Start |
|
Stage 1 |
|
|
Stage 2 |
|
• For standing time of 7 minutes after a cooking program of 1-2 stages:
e.g. |
P3 (MED-LOW) 25 min. |
|
TIMER 7 min. |
START |
|
Cook Program |
|
Standing Time |
|
To Use Quick Min Function:
This feature allows you to set cooking times easily, instead of using Number Pads, or to add extra cooking time.
To Set Cooking Time:
1. Press Quick Min Pad |
2. Press Start Pad. |
to set cooking time |
Cooking will start on |
(up to 10 minutes). |
P10 (HIGH) power. |
•To use other power levels, select the desired power level before setting the cooking time.
•If you use Quick Min Pad to set your cooking time, you cannot use Number Pads to set more time or to change the cooking time. However, you can add more time with Quick Min Pad during cooking.
To Add Extra Cooking Time during cooking:
Press Quick Min Pad to add extra cooking time (up to 10 taps) during cooking.
•Cooking time changes to include extra time and continues to count down on the Display Window.
•Extra time can be added during any of the cooking stages.
To Use Child Safety Lock Control
Using this system will make the oven controls inoperable; however, the door will open. You can set the Child Lock when the display shows a colon or the time of day.
1. Press Start Pad three times.
Time of day will disappear and "Child" will appear on the Display Window. Actual time will not be lost.
2.To cancel "Child" press Stop/Reset Pad three times. Colon or time of day will reappear on the Display Window.
- 9 -
Loading...