

Panasonic KX-TVP200E User Manual

Voice Processing System
Panasonic
TVP200
VOICE PROCESSING SYSTEM KX-TVP200
UBSCRIBER'S
S
UIDE
Please read before using.
G
MODEL
KX-TVP200E

Introduction
The Panasonic Voice Processing System (VPS) provides you with powerful, convenient ways to manage your voice communications and increase your productivity
through your voice mailbox. As the owner of a VPS mailbox, or Subscriber, you can:
•send a message to one or many people inside or outside of your office
•transfer messages (with your annotation) to another VPS Subscriber
•take messages when you are on the phone or unavailable
•receive your messages from any touch-tone telephone
•be notified by extension message waiting lamp, telephone or beeper (radio
pager) of messages waiting
•screen your calls
•automate the handling of callers
•and more...
This guide is your reference to using and optimizing your VPS mailbox.
NOTE:
• This Subscriber's Guide does not show complete model numbers that indicate the
country where your models should be used. The model number of your unit is found
on the label affixed to the unit.
MODEL NO. – – – – – – – –
(label)
73/23/EEC
89/336/EEC
92/31/EEC
93/68/EEC
i
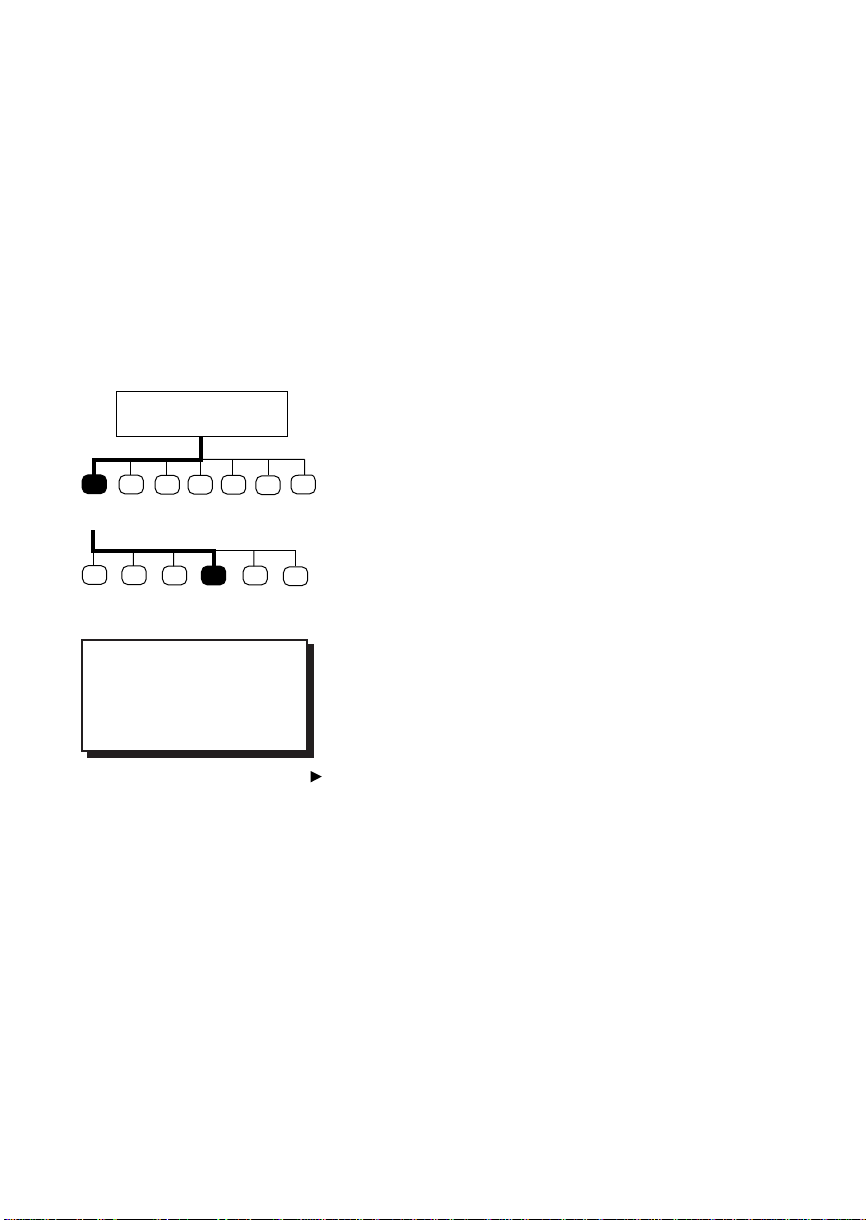
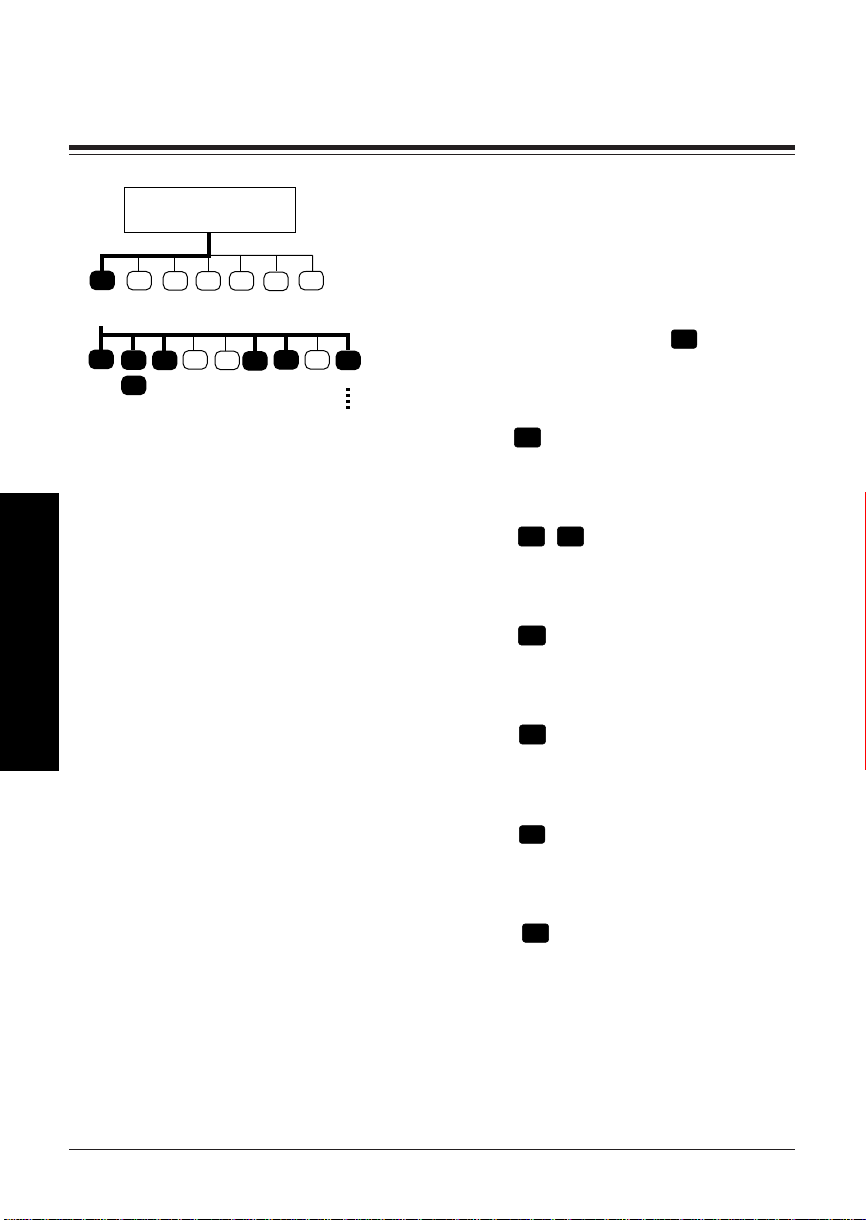
■ How to Use this Manual
This Subscriber’s Guide explains the Voice Processing System’s (VPS) operations by
touch tone telephone for Subscribers.
Each operation consists of a description, a diagram, tips and some notes. During
operations, the VPS plays voice prompts telling you what to do at each step though
they do not appear in this guide except for Voice Mail Service Entry.
Description
Describes the operation with the telephone keys to be
pressed step by step.
Subscriber's
Main Command Menu
Diagram
A diagram is provided for each function on the
lefthand of the text. It will help you understand how
1 2
Receive
Message
3
5
4
6
the operation goes on in the tree-structured VPS
*
menu. You will know other options you can choose in
a certain step. It will also help you to perform your
desired operation faster if you press the outlined keys
12
Repeat
3
Erase Reply Transfer Help
Next
Tip
Step 3 —
You can call the message
sender by pressing [1].
7
4
in a row along the bold line.
0
Tip
Tips framed in a square are used to make you aware of
alternate options available at a particular step.
Note
This symbol describes additional information or useful advice about each feature.
Once you become familiar with operating the VPS, use the Quick Reference Section,
which appears at the end of this guide.
ii

■ Terms to Know
The following words are used in this guide.
Subscriber The owner of a VPS mailbox. The System Manager can create
a mailbox for you.
System Manager The System Manager is the person who manages and maintains
the VPS to make it work efficiently. He controls mailbox creating and authorizes some of the features.
Caller A caller is any person who is connected to a VPS service
other than a Subscriber or the System Manager.
iii

■ Getting Started
— Required Numbers
Get the following information before you begin the operation.
(1) Telephone Number Directly Connected to Voice Mail Service
If your VPS does not have one, call any extension number connected to the VPS
and press [#] [6] (Service Access Command).
(2) Your Mailbox Number
Usually, the same number as your extension number. Check with your System
Manager to be sure.
(3) The System Manager’s Phone Number
In case you need his or her help or need to change certain mailbox settings.
— Basic Steps
You need to know your mailbox number to use this guide.
If you are going into your mailbox for the first time, read Chapter 5 “Mailbox Setup”
first. You need to customize it before sending or receiving messages. Especially, it is
important to identify yourself as the owner of the mailbox by setting the following.
• Recording Personal Greetings (See page 5-7)
• Recording Your Name (See page 5-9)
• Changing Your Password (See page 5-8)
Then customize it as it suits you by setting the additional features as appropriate.
• Setting the Call Transfer Status (See page 5-2)
• Setting the Incomplete Call Handling Status (See page 5-4)
• Message Waiting Lamp Notification Setting (See page 5-13)
• Setting Notification by Calling (See page 5-14)
...
Once you complete your setting, find your desired operation from the titles, then call
the VPS.
iv

Table of Contents
Chapter 1 Using Your Mailbox and the VPS
Opening Your Mailbox (Mailbox Log in) ......................................... 1-2
Accessing VPS Services ...................................................................... 1-3
Chapter 2 Receiving Messages
Receiving Messages............................................................................. 2-2
Message Playback Options ................................................................ 2-3
Replying to Messages ......................................................................... 2-5
Message Transfer ................................................................................ 2-6
Erasing Messages ................................................................................ 2-7
Receiving Message Waiting Notification .......................................... 2-8
Live Call Screening ............................................................................. 2-9
Recording a Two-Way Conversation .............................................. 2-10
Chapter 3 Sending Messages
Delivering Messages to Other Subscribers ...................................... 3-2
Checking Mailbox Distribution......................................................... 3-3
Setting up an External Message Delivery List................................. 3 -4
Sending External Delivery Messages ................................................ 3-6
Checking and Setting External Message Delivery Status............... 3 -7
Chapter 4 Caller Handling
Recording Messages (for any caller)................................................. 4-2
Recording Messages (from a rotary phone)..................................... 4-3
Receiving External Delivery Messages ............................................. 4- 4
Replying to External Delivery Messages .......................................... 4-5
v

Chapter 5 Mailbox Setup
Setting the Call Transfer Status
(Call Block/Call Screening/Intercom Paging/Beeper Access)........ 5-2
Setting up a Covering Extension....................................................... 5-3
Setting the Incomplete Call Handling Status ................................... 5-4
Setting the Message Reception Mode ............................................... 5-6
Recording Personal Greetings........................................................... 5-7
Changing Your Password................................................................... 5-8
Recording Your Name ........................................................................ 5-9
Entry of Personal Group Distribution Lists .................................. 5-10
Recording the Names of Personal Group Distribution Lists ....... 5-11
Deleting from Personal Group Distribution Lists ......................... 5-12
Message Waiting Lamp Notification Setting.................................. 5-13
Setting Notification by Calling ........................................................ 5-14
Setting Answer Lengths for the Interview Mailbox ...................... 5-16
Recording Questions for the Interview Mailbox ........................... 5-17
Erasing Questions from the Interview Mailbox ............................ 5-18
vi

Chapter 1 Using Your Mailbox and the VPS
This chapter tells you how to enter Subscriber Service and other services
provided by the VPS.
Using Your Mailbox and the VPS
Contents
Opening Your Mailbox (Mailbox Log in) ......................................... 1-2
Accessing VPS Services ...................................................................... 1-3
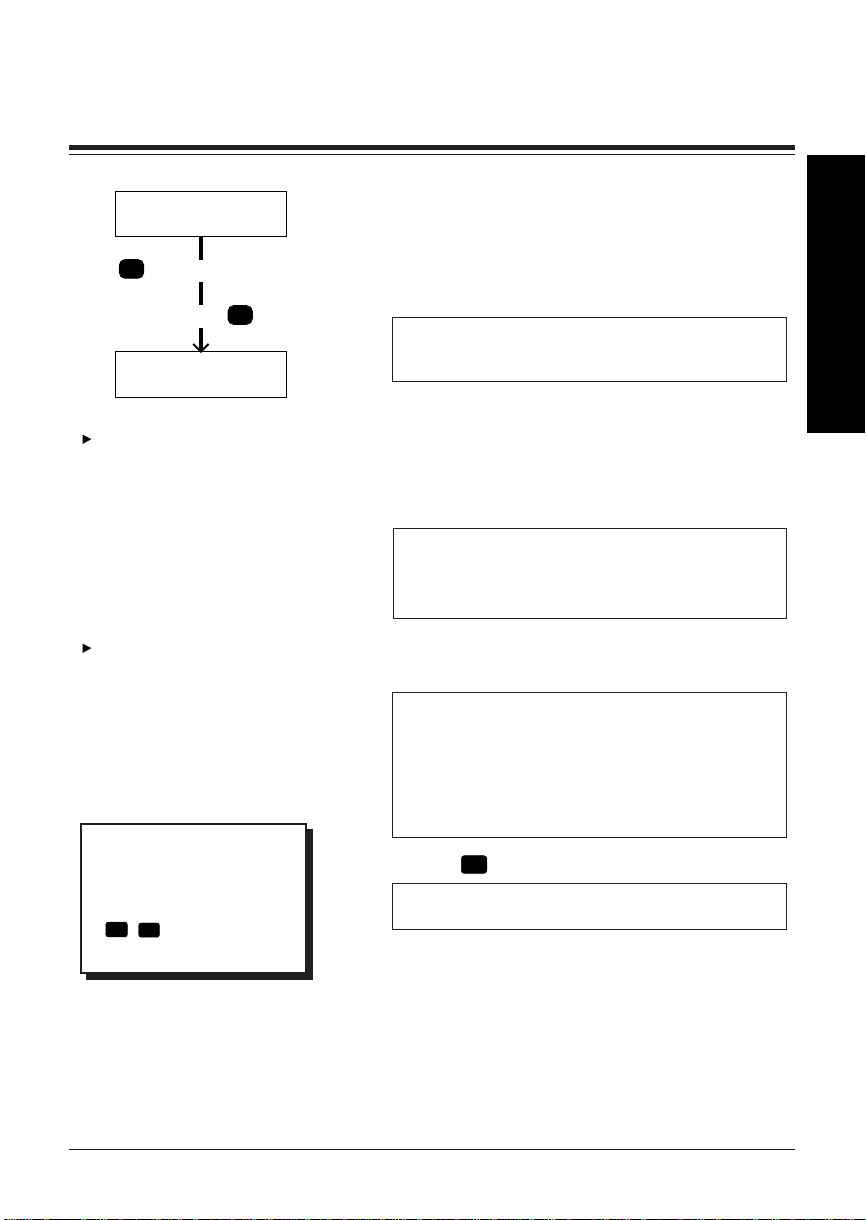
Opening Your Mailbox (Mailbox Log in)
Using Your Mailbox and the VPS
Call VPS
Mailbox No.
+
*
Password +
Subscriber's
Main Command Menu
If you just want to record a
message in someone else’s
mailbox, you do not have to
use this procedure.
See the following topic in
Chapter 4.
• Recording Messages (for
any caller)
• Recording Messages (from a
rotary phone)
If your company is using a
Panasonic KX-TD series telephone system, you can directly
access your mailbox just by
dialing the number of the V.M.
Service, depending upon System Programming. Check with
your System Manager.
#
Tip
Step 1 —
If no ports are assigned to
Voice Mail Service, press
#
6 after calling the
VPS.
To access Subscriber Services, you must open your
mailbox first. Follow the operation below.
1 Dial an extension number which is connected
to the Voice Mail Service.
Good morning/Good afternoon/Good evening
Welcome to the Voice Processing System.
If the system is equipped with multiple languages (up to three languages), you will hear
a selection prompt as follows.
(ex.)
For English, press [7].
For French, press [8].
For Chinese, press [9].
2 If you hear the above prompt, press the
number of the appropriate language.
Please enter your party’s mailbox number.
To enter by name, press [#] and [1].
If you are using a rotary telephone, stay on
the line.
To call the operator, press [0].
3 Press
Enter your password, followed by [#].
, then enter your mailbox number.
*
4 Enter the password if you have one.
You are now in the main command menu.
1-2
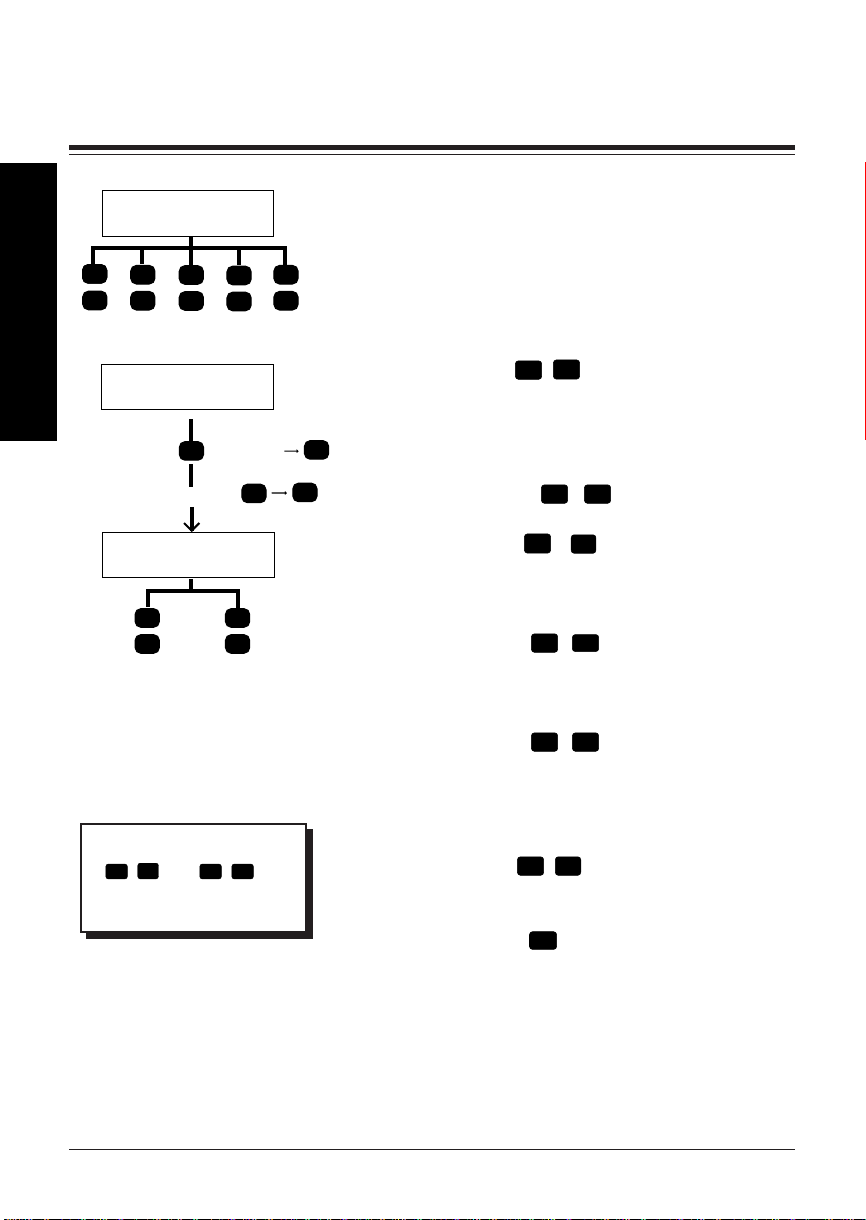
Accessing VPS Services
Call VPS
#
#
13
Voice Mail Service
Using Your Mailbox and the VPS
Subscriber's Service
#
6
+Mailbox No
*
Password+
##
57
#
#
9
8
#
In VPS operation, the following functions are available whenever the system is providing voice prompts.
Press the appropriate key to receive your
desired option (Service Access Commands).
Dialing by Name
If you press # 1, you can call the desired
extension or mailbox by entering first 3 or 4
letters of the person’s last name.
Retry
*
Retry
*
Department Dialing
If you press # 3, you can call the
intended extension and mailbox by pressing
1
one digit (
–9) according to the
Department Dialing Menu.
Voice Mail Service
If you press # 6, you can access the
Voice Mail Service.
Call Transfer
If you press # 8, you can access the
Automated Attendant Service and call your
desired extension.
Tip
#
5 and # 7 are
valid only for Subscriber
Service.
1-3
Exit the Menu
If you press # 9, you can exit the VPS.
Back up
If you press *, you can retry to enter a
mailbox number, a password and also an
extension number while you are in the call
transfer status. In addition, you can move
back to a previous menu in the main command menu.

Accessing VPS Services
Log in
If you press # 5, you can reselect a mailbox while you are in the main command
menu.
Restart
If you press # 7, you can be back in the
initial main command menu.
Using Your Mailbox and the VPS
1-4

Chapter 2 Receiving Messages
This chapter tells you how to access and manage received messages: Replying
immediately, transferring messages with or without an additional comment, and
replaying messages.
Receiving Messages
Receiving Messages............................................................................ 2-2
Message Playback Options ............................................................... 2- 3
Replying to Messages ........................................................................ 2-5
Message Transfer ............................................................................... 2-6
Erasing Messages............................................................................... 2-7
Receiving Message Waiting Notification ......................................... 2-8
Live Call Screening ............................................................................ 2-9
Recording a Two-Way Conversation ............................................... 2-10
Contents
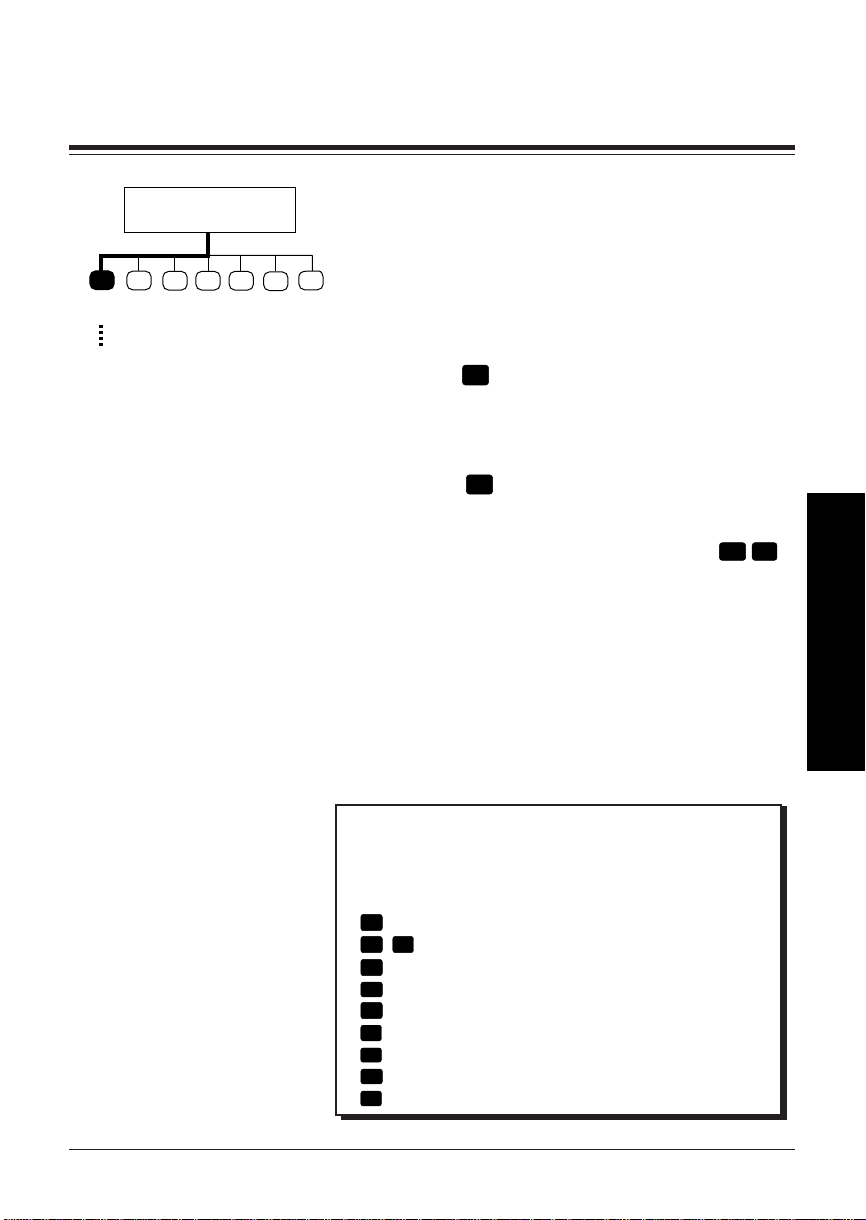
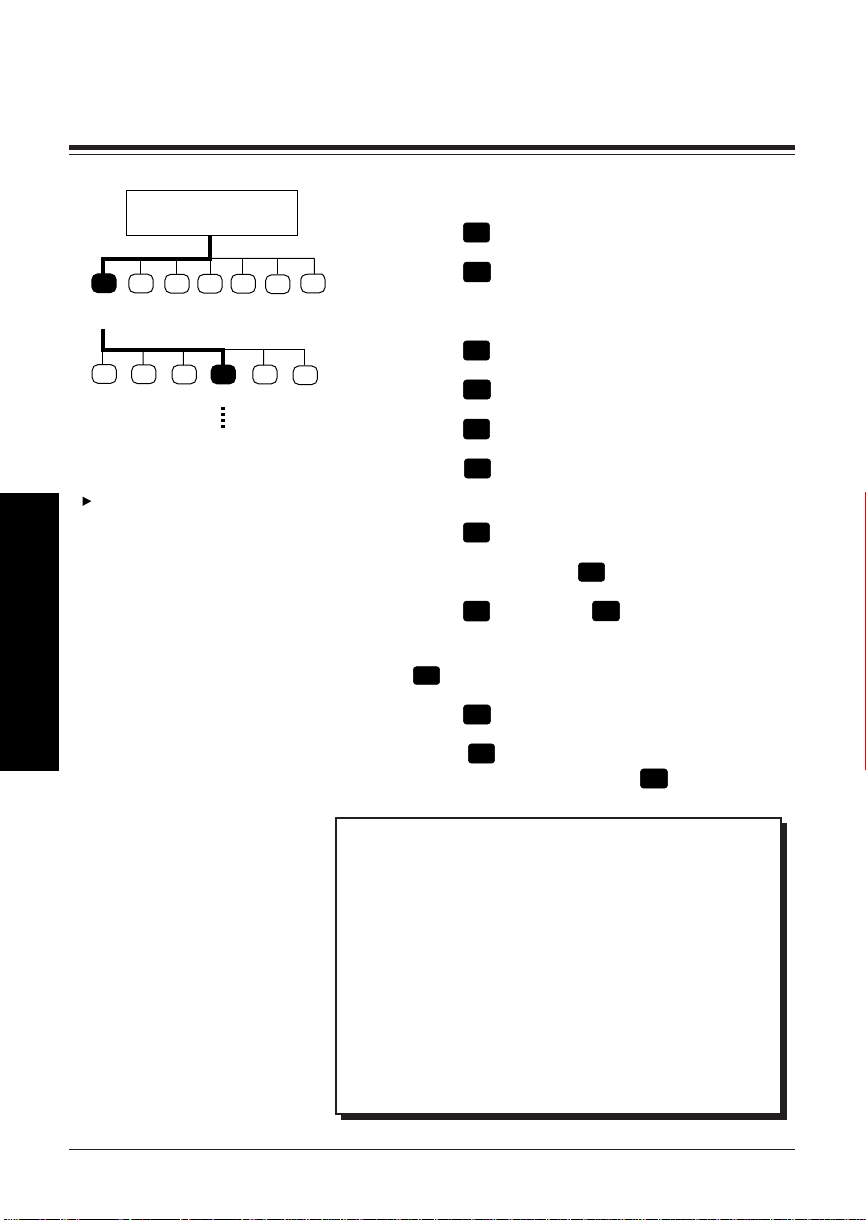
Receiving Messages
Subscriber's
Main Command Menu
1 2
Receive
Message
Go to
Step 3
3
The VPS plays new messages and saved messages in
your mailbox with the information of the message
sender and the recorded date respectively.
5
4
6
*
1 Log in the main command menu.
•The VPS tells you the number of messages.
2 Press
1
to use the Receive Message menu.
•The VPS tells you the number of messages.
Then it plays the messages.
3 Press
0
to listen to the whole menu (for
Help).
Receiving Messages
9
#
•You can end your call by pressing
.
Tip
Step 3 —
You do not have to listen to the whole menu if you do not
wish to.
1
Repeat this message
1 1
Play the previous message
2
Play the next message
3
Erase this message
4
Reply
5
Rewind
6
Fast forward
7
Transfer
8
Message scan
2-2
Message Playback Options
Subscriber's
Main Command Menu
1 2
Receive
Message
1
Repeat
Receiving Messages
3
1
1
Previous
3
2
Next Erase Reply Rewind Fast
4
While receiving messages, several message playback
options are available for efficient receiving.
5
6
1-2 Same as Receiving Messages.
*
3 Press the appropriate key to receive your
desired option. If you choose
6 7
4
5
forward
8
Transfer Scan
Go to
Step 4
next step.
Repeating Messages
If you press 1, you can listen to the current
message again.
Replaying the Previous Message
If you press 1 1 while receiving a message, you can listen to the previous message.
Playing the Next Message
If you press 2 while receiving a message,
you can listen to the next message.
Rewinding Messages
If you press 5 while receiving a message,
you can listen to it again.
, go to the
8
2-3
Fast Forwarding Messages
If you press 6 while receiving a message,
you can fast forward it to the end.
Scanning Messages
If you press 8, you can listen to the first
four seconds of each message.

Message Playback Options
4 Messages are scanned one at a time.
If you press
message.
If you press
sage.
If you press
sage.
Note
Option
Second time will erase the message.
3
is available only once.
1
, you will hear the previous
2
, you will hear the next mes-
3
, you will hear the entire mes-
Tip
Step 3 —
You can receive the whole menu by pressing [0] for Help.
Receiving Messages
2-4
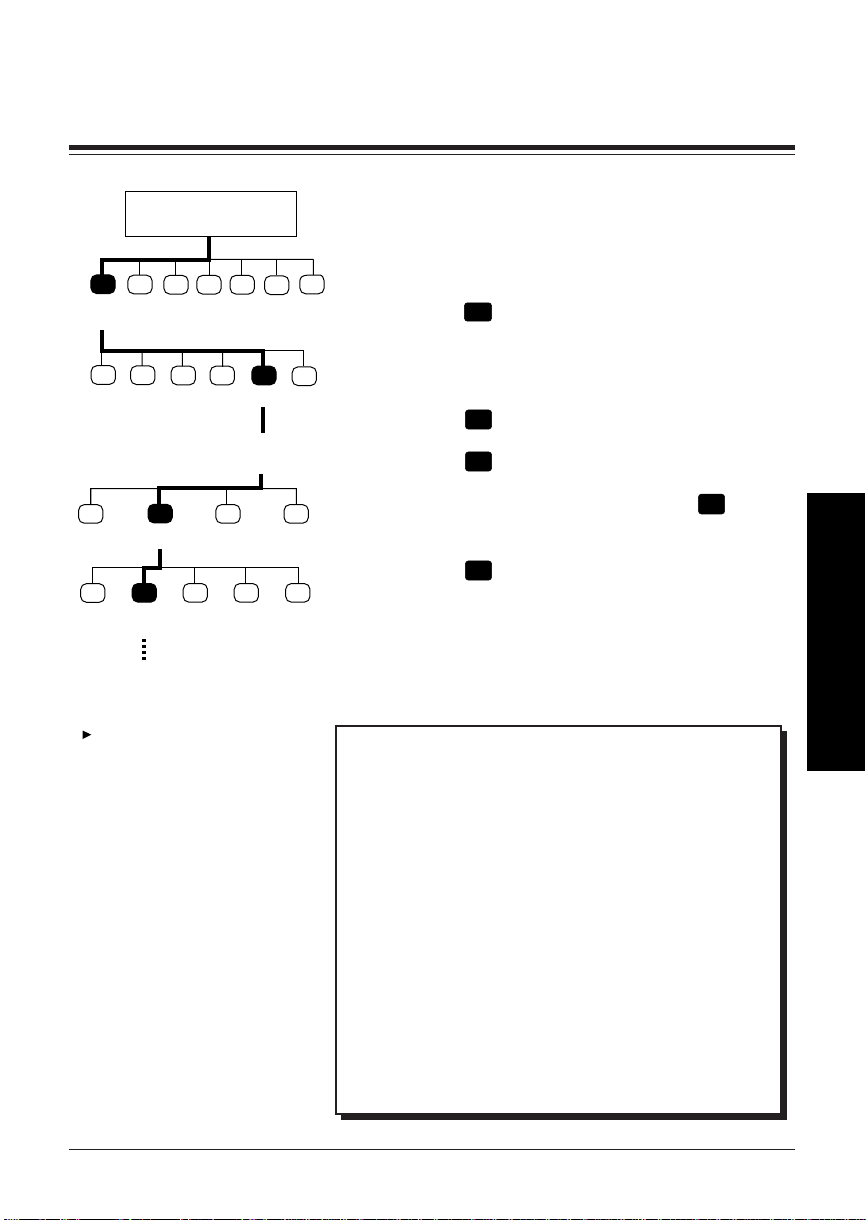
Replying to Messages
Subscriber's
Main Command Menu
1 2
Receive
Message
12
Repeat
This feature is available only
when the message has been
delivered from a Subscriber
using his mailbox, i.e.,
Message Transfer and Message
Delivery. Otherwise, you will
hear this prompt: “Sorry, you
cannot reply. The message
sender is unknown.”
Receiving Messages
3
3
Erase Reply Transfer Help
Next
4
4
Go to
Step 4
1-2 Same as Receiving Messages.
3 Press
5
6
*
4 Press
4
to reply to the message.
2
to record a message.
5 Record your message at the tone.
6 Press
7
0
7 Press
8 Press
9 Press
private status.
10 Press
11 Enter the time and
12 Press
1
to end recording.
2
to accept.
1
to set delivery time.
1
to specify the delivery time or the
1
to specify the delivery time.
.
#
1
for AM or 2 for PM.
13 Enter the date (the day of the month) and
#
.
14 Press
15 Press
message. Otherwise, press
2
to accept.
1
to set this message to a private
2
.
2-5
Tip
Step 4 —
You can call the message sender by pressing [1].
Step 6 —
You can pause/restart recording by pressing [2].
Step 9 —
You can make your reply immediate by pressing [2].
You will skip to step 15.
Step 11 —
If you press [0] for help here, “For example, to enter 5
o’clock press [5] and [#] or 5 : 15 press [5], [1], [5] and
[#]”.
Message Transfer
Subscriber's
Main Command Menu
1 2
Receive
Message
12
Repeat
1
Change
1
Transfer
If the message has been
assigned as private, you cannot
transfer it to other mailboxes.
3
3
Erase Replay Transfer Help
Next
2
Accept
2 3 4
Transfer
W. Comment
Go to
Step 7
Add
M.B.
4
4
Mailbox No.
3
Repeat
M.B. Info.
Review
Mailing
5
XXXX
List
7
6
Cancel
Transfer
This function allows you to transfer messages to other
mailboxes.
1-2 Same as Receiving Messages.
*
3 Press
to use the Message Transfer menu.
7
4 Enter the mailbox number of the intended
0
*
*
Cancel
Tansfer
recipient.
5 Press
6 Press
2
to accept.
2
to record a comment.
7 State your comment and press
recording.
8 Press
Step 4 —
You can enter by name by pressing [#] [1] first. Also, you
can specify a Personal Group Distribution List or a System
Group Distribution List by entering the number followed
by [#].
Step 6 —
You can transfer the message without comment by pressing [1].
You can add the mailbox number by pressing [3].
You can review the mailing list by pressing [4].
You can cancel message transfer by pressing [
Step 7 —
You can press [2] to pause/restart recording.
Step 8 —
You can press [3] to change your comment.
You can press [1] to review your comment.
2
if the comment is acceptable.
Tip
*
].
1
to end
Receiving Messages
2-6
 Loading...