

Panasonic KX-TSC14W, KX-TSC14B User Manual

Integrated Telephone System
Operating Instructions
Model No. KX-TSC14B
KX-TSC14W
Pulse-or-tone dialing capability
Preparation Basic Operation Advanced Operation Useful Information
KX-TSC14W
Caller ID Compatible
PLEASE READ BEFORE USE AND SAVE.
Panasonic World Wide Web address: http://www.panasonic.com
for customers in the USA or Puerto Rico
2 LINE

Before Initial Use
Please read IMPORTANT SAFETY
INSTRUCTIONS on pages 48–49 before use.
Read and understand all instructions.
Thank you for purchasing your new Panasonic
integrated telephone.
Caller ID and Call Waiting Service, where available, are telephone
company services. After subscribing to Caller ID, this phone will display
a caller’s name and phone number. Call Waiting Caller ID, which
displays a second caller’s name and phone number while the user is
on another call, requires a subscription to both Caller ID and Call
Waiting.
Attach your purchase receipt here.
For your future reference
Serial No. Date of purchase
(found on the bottom of the unit)
Name and address of dealer
2

Accessories (included) To order, call 1-800-332-5368.
∑ AC Adaptor . . . . . . . . . . . . one
(p. 8)
Order No. KX-TCA1-G
∑ 4-Wire Telephone Line Cord
with Green Plugs . . . . . . . . one
(p. 9, 10)
∑ 2-Wire Telephone Line Cord
with Transparent Plugs. . . . one
(p. 10)
∑ Handset . . . . . . . . . . . . . . . one
(p. 8)
Order No. PQJXE0401Z (Black)
PQJXE0211Z (White)
∑ Handset Cord. . . . . . . . . . . one
(p. 8)
Order No. PQJA10126X (Black)
PQJA10126Z (White)
3

Contents
Preparation
Location of Controls . . . . . . . . . . . . . . . . . . . . . . . . . . . . . . . . . 16
Display . . . . . . . . . . . . . . . . . . . . . . . . . . . . . . . . . . . . . . . . . . . . 17
Settings. . . . . . . . . . . . . . . . . . . . . . . . . . . . . . . . . . . . . . . . . . . . 18
Connecting the Handset/AC Adaptor . . . . . . . . . . . . . . . . . . . . . 18
Connecting the Telephone Line Cord . . . . . . . . . . . . . . . . . . . . . 9
Connecting a Communication Device . . . . . . . . . . . . . . . . . . . . 11
Setting the LCD Contrast . . . . . . . . . . . . . . . . . . . . . . . . . . . . . 12
Selecting the Dialing Mode . . . . . . . . . . . . . . . . . . . . . . . . . . . . 13
Selecting the Line Mode . . . . . . . . . . . . . . . . . . . . . . . . . . . . . . 14
Programming Summary of Preparations . . . . . . . . . . . . . . . . . . 15
Time and Date Adjustment . . . . . . . . . . . . . . . . . . . . . . . . . . . . 16
Selecting the Ringer Volume. . . . . . . . . . . . . . . . . . . . . . . . . . . 18
Basic Operation
Making Calls. . . . . . . . . . . . . . . . . . . . . . . . . . . . . . . . . . . . . . . . 19
Answering Calls . . . . . . . . . . . . . . . . . . . . . . . . . . . . . . . . . . . . . 21
Advanced Operation
Using the Other Line During a Conversation . . . . . . . . . . . . . . 22
Conference Call . . . . . . . . . . . . . . . . . . . . . . . . . . . . . . . . . . . . . 23
Caller ID Service . . . . . . . . . . . . . . . . . . . . . . . . . . . . . . . . . . . . . 24
Using the Caller List. . . . . . . . . . . . . . . . . . . . . . . . . . . . . . . . . . 26
Viewing the Caller List. . . . . . . . . . . . . . . . . . . . . . . . . . . . . . . . 26
Calling Back from the Caller List . . . . . . . . . . . . . . . . . . . . . . . . 28
Editing a Caller’s Phone Number. . . . . . . . . . . . . . . . . . . . . . . . 29
Storing Caller List Phone Number
in the Speed Dialer Memory . . . . . . . . . . . . . . . . . . . . . . . . . 30
Erasing Caller List Information . . . . . . . . . . . . . . . . . . . . . . . . . 31
Speed Dialer . . . . . . . . . . . . . . . . . . . . . . . . . . . . . . . . . . . . . . . . 32
Storing Phone Numbers in the Speed Dialer Memory . . . . . . . . 32
Dialing a Stored Number. . . . . . . . . . . . . . . . . . . . . . . . . . . . . . 33
Voice Mail Service . . . . . . . . . . . . . . . . . . . . . . . . . . . . . . . . . . . 34
Storing an Access Number in Your Voice Mail . . . . . . . . . . . . . 35
Setting the Voice Mail Tone . . . . . . . . . . . . . . . . . . . . . . . . . . . 36
Listening to Voice Mail Message(s). . . . . . . . . . . . . . . . . . . . . . 37
4

Special Features. . . . . . . . . . . . . . . . . . . . . . . . . . . . . . . . . . . . . 38
For Call Waiting Service Users . . . . . . . . . . . . . . . . . . . . . . . . . 38
FLASH Button. . . . . . . . . . . . . . . . . . . . . . . . . . . . . . . . . . . . . . 39
Temporary Tone Dialing
(For Rotary or Pulse Service Users) . . . . . . . . . . . . . . . . . . . 40
How to Use the PAUSE Button
(For Analog PBX Line/Long Distance Service Users) . . . . . . . 40
Line Selection . . . . . . . . . . . . . . . . . . . . . . . . . . . . . . . . . . . . . . 41
Incoming Call Tone. . . . . . . . . . . . . . . . . . . . . . . . . . . . . . . . . . 42
Useful Information
Using an Optional Headset . . . . . . . . . . . . . . . . . . . . . . . . . . . . 43
Connecting an Optional Headset to the Unit . . . . . . . . . . . . . . . 43
Making/Answering Calls . . . . . . . . . . . . . . . . . . . . . . . . . . . . . . 44
Wall Mounting. . . . . . . . . . . . . . . . . . . . . . . . . . . . . . . . . . . . . . . 45
Before Requesting Help. . . . . . . . . . . . . . . . . . . . . . . . . . . . . . . 46
Important Safety Instructions . . . . . . . . . . . . . . . . . . . . . . . . . . 48
FCC and Other Information . . . . . . . . . . . . . . . . . . . . . . . . . . . . 50
Preparation Basic Operation Advanced Operation Useful Information
5
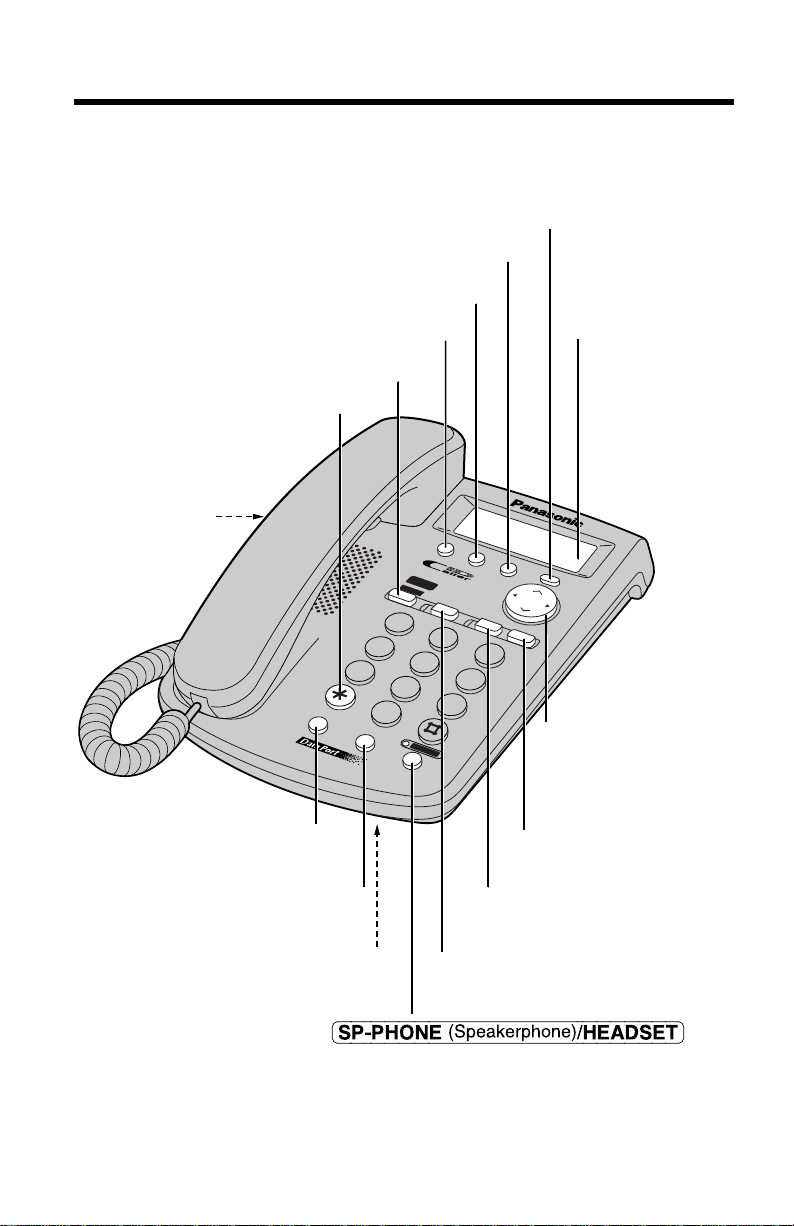
Location of Controls
Display (p. 7)
(FUNCTION/EXIT) Button (p. 15, 26)
(CLEAR) Button (p. 31)
(VOICE\MAIL) Button (p. 34)
(TONE) Button (p. 40)
(CONF) (Conference) Button (p. 23)
Headset Jack
(p. 43)
MIC (Microphone) (p. 19)
Button and Indicator (p. 19, 44)
Navigator Key
((^), (_), (fi),
(fl) OK/EDIT)
(p. 15, 26)
(AUTO) Button (p. 30, 32, 33)
(REDIAL/PAUSE) Button
(p. 20, 40)
(FLASH/CALLWAIT) Button
(p. 38, 39)
(HOLD) Button
(p. 20, 22)
(LINE\1) Button and Indicator
(p. 19, 20, 22)
(LINE\2/DATA) Button and
Indicator (p. 19, 20, 22)
ABC DEF
JKL
GHI MNO
TUV
PQRS
WXYZ
OPER
3
6
9
2
5
8
0
FLASH/CALLWAIT
HEADSET
MIC
SP-PHONE
REDIAL/PAUSE
TONE
FUNCTION
EXIT
CLEAR
AUTO
VOICE MAIL
OK
/
EDIT
LINE
1
HOLD
LINE
2
/
DATA
CONF
2
LINE
LOUD/
SEARCH
1
4
7
6
Display
12:34AM5/21
10 NEW CALLS
In the standby mode, the display
shows the current time and date,
and the number of new calls.
12:00AM1/1
NO ITEMS STORED
If the display continuously shows
“12:00AM1/1” or “0:00 1/1”, the
clock needs adjusting (p. 16, 17).
11:50AM11/24
0-000-01-06-35
During a conversation, the display
shows the length of the call (Ex.
1 hour, 6 minutes and 35 seconds).
10:50AM11/23
LINE 2
1-123-456-7890
JOHN SMITH
When a call is received, the display
shows the caller’s number, name
and the called line after the first
ring.
10:50AM11/23 x3
10 NEW CALLS
The display shows the voice mail
message(s) is/are received.
Ex. Handset volume level: 4
11:50AM11/24
0-000-00-00-12
∑∑∑∑
Ex. Speaker volume level: 8
11:50AM11/24
0-000-00-00-12
∑∑∑∑∑∑∑∑
The display shows the volume
level.
You can select:
—4 levels (1–4) while using the
handset (p. 20).
—12 levels (1–12) while using the
speakerphone (p. 20).
11:50AM11/24
____
NO ITEMS STORED
The Caller List is empty.
11:50AM11/24 x3
LINE 1
1-111-444-7777
TINA ROBINSON
This is a display from the Caller
List.
The display shows:
—the time and date of the last call
(Ex. Nov. 24, 11:50 AM),
—the number of times called (Ex.
3 times),
—the caller information is new and
has not been viewed (“ ” is
displayed),
—the called line,
—the caller’s number and
—the caller’s name.
Preparation
7
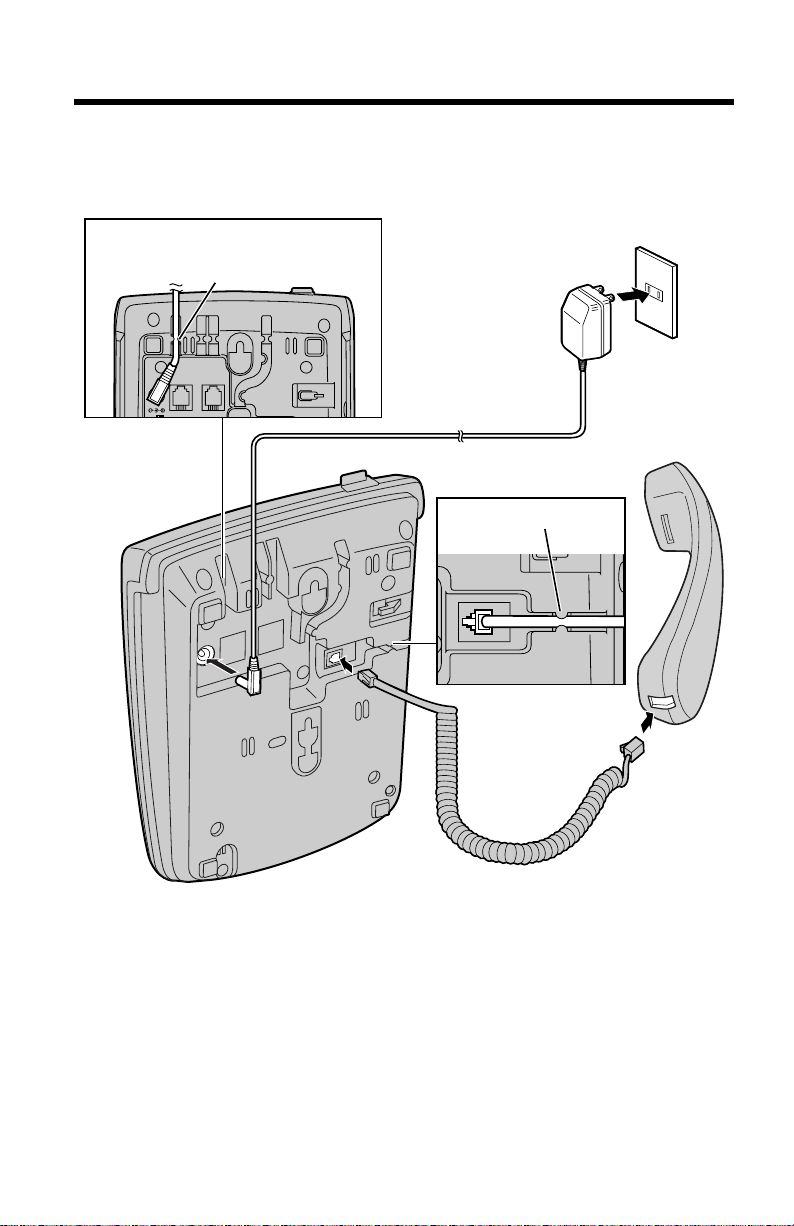
Settings
Handset Cord
Handset
Power Outlet
(AC 120 V, 60 Hz)
AC Adaptor
Fasten the AC adaptor cord to
prevent it from being disconnected.
Hook
Hook
Connecting the Handset/AC Adaptor
≥USE ONLY WITH Panasonic AC ADAPTOR KX-TCA1 (Order No. KX-TCA1-G).
≥Use only a Panasonic Handset for the KX-TSC14B or KX-TSC14W.
≥The AC adaptor must remain connected at all times. (It is normal for the adaptor
to feel warm during use.)
≥During a power failure the unit will work as a standard telephone on the Line 1,
but the following features will not work.
—Caller ID services
—speakerphone
—line indicators
—LCD display
TO HANDSET
8
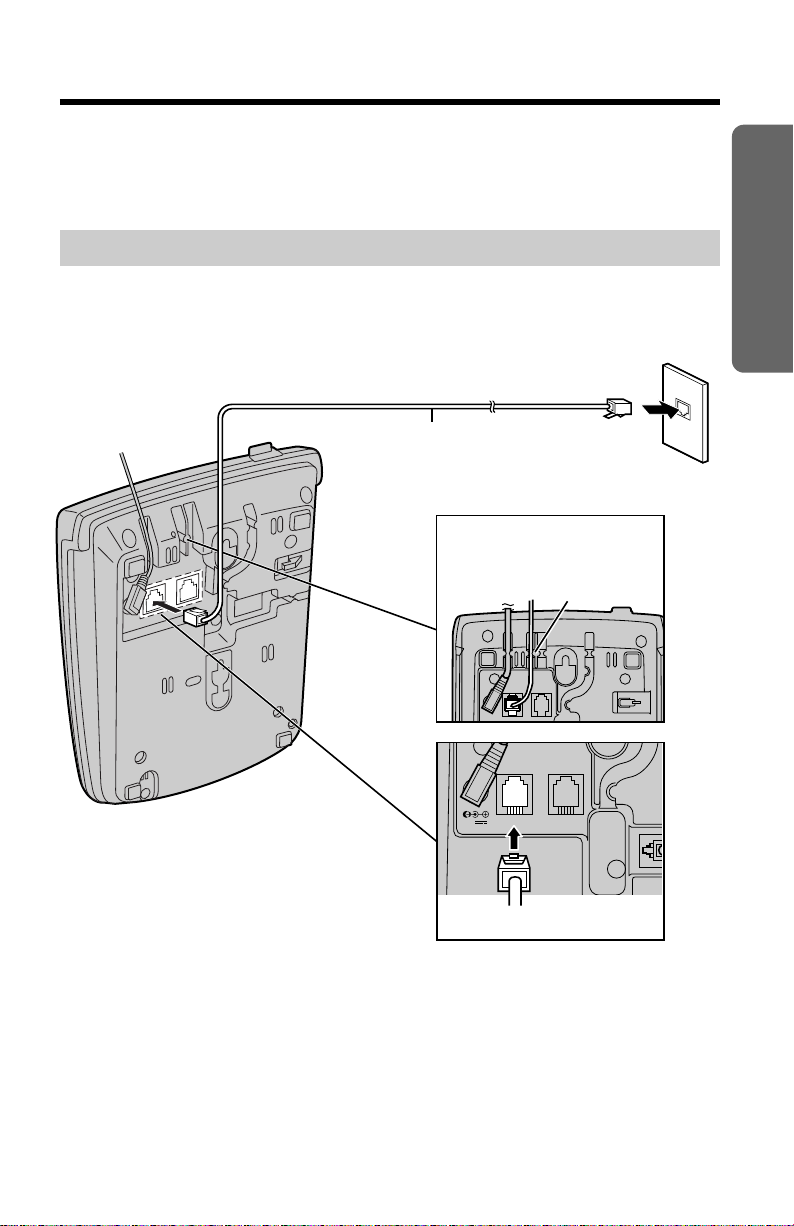
Connecting the Telephone Line Cord
4-Wire Telephone Line Cord
with GREEN Plugs
Two-Line
Telephone Jack
(RJ14C)
GREEN plug
Fasten the telephone line
cord to prevent it from
being disconnected.
Hook
Connect the telephone line cord(s) to the unit as follows.
To connect a two-line telephone jack
“
Preparation
LINE 1/2
9V
LINE 1/2
9V
LINE2/DATA
LINE2/DATA
9
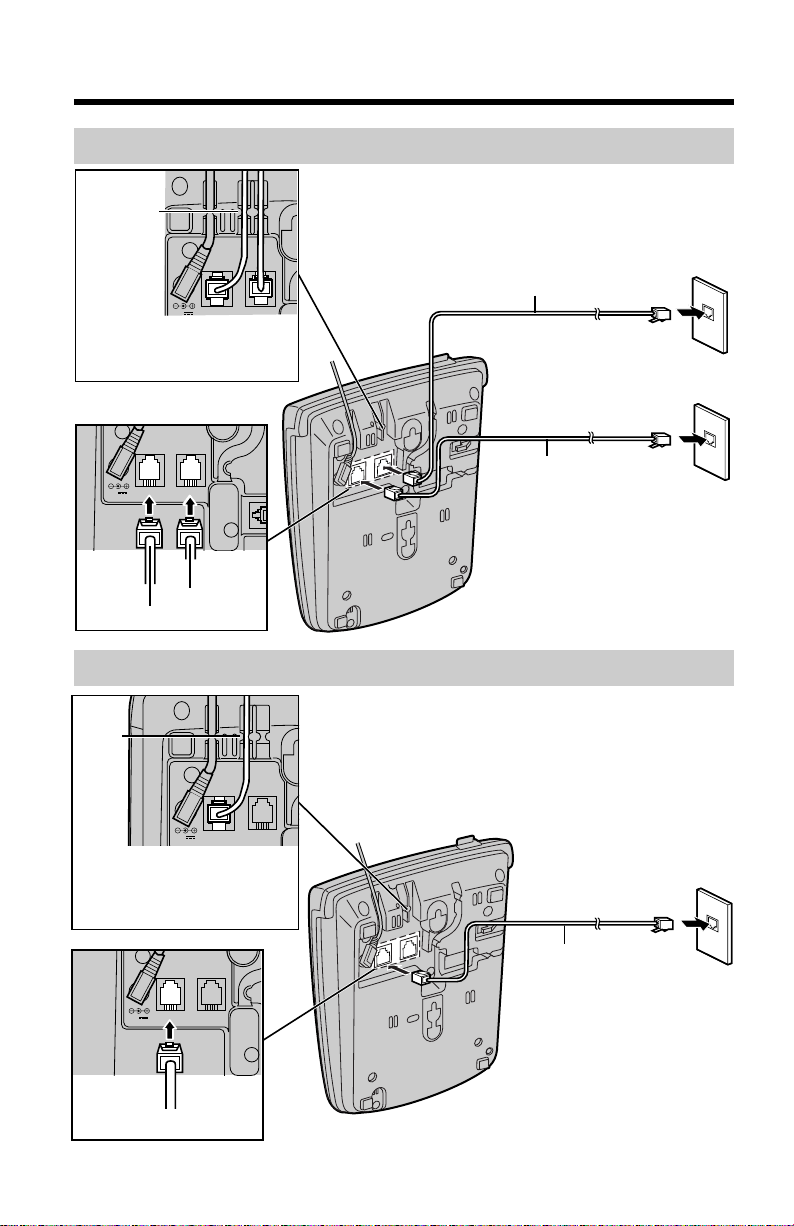
“
Single-Line
Telephone Jack
(RJ11C)
LINE 2
LINE 1
GREEN plug
LINE2/DATA
LINE 1/2
9V
4-Wire Telephone Line Cord
with GREEN Plugs
Hooks
Fasten the telephone line
cords to prevent them
from being disconnected.
2-Wire Telephone
Line Cord with
TRANSPARENT Plugs
TRANSPARENT
plug
Single-Line
Telephone Jack
(RJ11C)
2-Wire Telephone
Line Cord with
TRANSPARENT Plugs
TRANSPARENT
plug
Fasten the telephone line
cord to prevent it from
being disconnected.
Settings
To connect two single-line telephone jacks
LINE2/DATA
LINE 1/2
9V
If you use the unit only as a single-line telephone
Hook
9V
LINE 1/2
9V
≥For this connection, you can only use LINE 1.
10
LINE 1/2
LINE2/DATA
LINE2/DATA
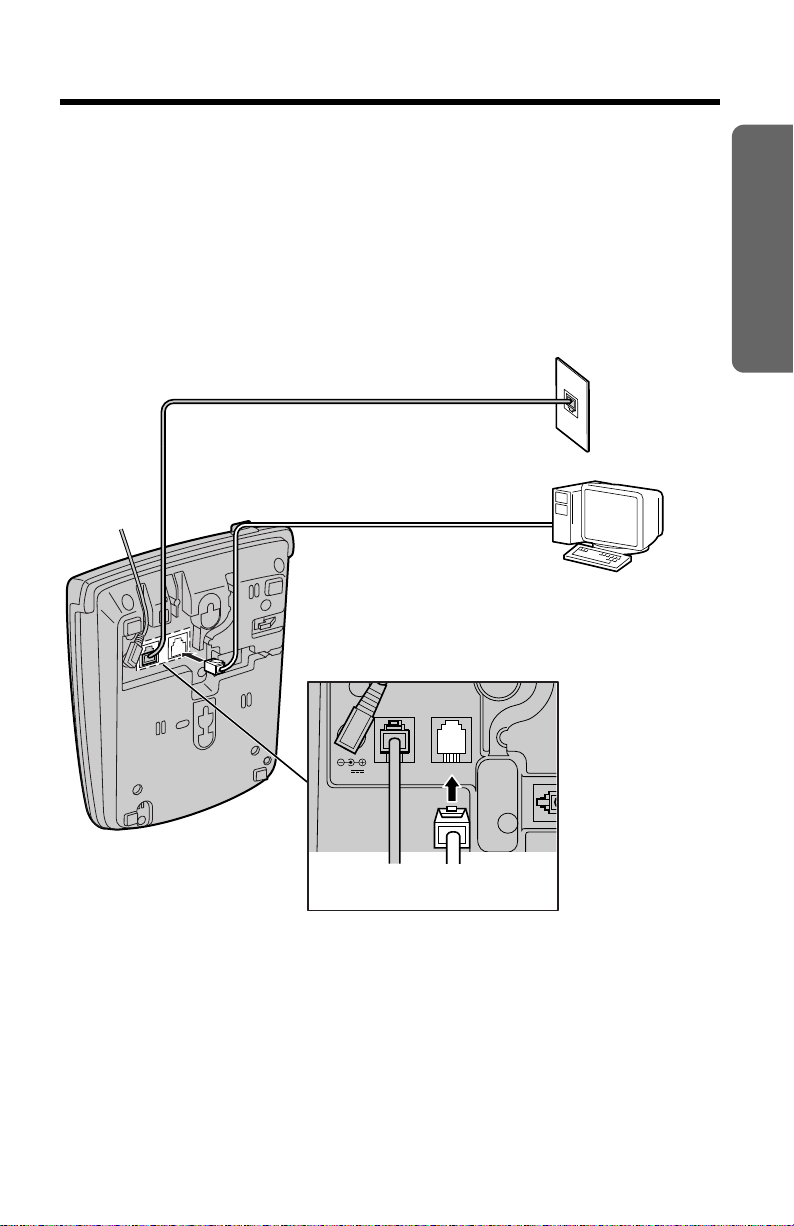
“
≥Computer
≥Modem
≥Fax
≥Answering Machine
2-Wire Telephone Line Cord
with TRANSPARENT Plugs
4-Wire Telephone Line
Cord with GREEN Plugs
TRANSPARENT
plug
Two-Line
Telephone Jack
(RJ14C)
Connecting a Communication Device
After connecting the telephone line cord to a two-line telephone jack, you
can connect a communication device (computer, modem, fax, answering
machine, etc.) through this unit using the LINE 2/DATA jack (—Data
Port).
Preparation
≥If the LINE 2/DATA indicator lights, the communication device is in use. Use
LINE 1 to make a call. Otherwise the communication device may not operate
properly.
9V
LINE2/DATA
LINE 1/2
11

“
Settings
Setting the LCD Contrast
You can select the LCD contrast level from 1 to 6 by programming. Your
phone comes from the factory set to 3.
Make sure that the handset is on the cradle, the AC adaptor is
connected and the SP-PHONE/HEADSET indicator light is off.
Press (FUNCTION/EXIT).
1
Press (_) or (^) repeatedly until “LCD
2
CONTRAST ?” is displayed.
Press (fl) OK/EDIT.
3
≥The current setting is displayed.
Press (_) or (^) to select the desired
4
LCD contrast level.
≥Each time you press (_) or (^), the level
will change on the display.
Press (fl) OK/EDIT.
5
≥The display will return to step 2. To return
to the standby mode, press
(FUNCTION/EXIT) or wait for 60
seconds.
9:30PM12/27
SAVE AUTO# ?
9:30PM12/27
LCD CONTRAST ?
9:30PM12/27
∑∑∑
___
12

“
Selecting the Dialing Mode
You can select the dialing mode by programming. If you have touch tone
service, set to “TONE”. If rotary or pulse service is used, set to “PULSE”.
Your phone comes from the factory set to “TONE”.
Make sure that the handset is on the cradle, the AC adaptor is
connected and the SP-PHONE/HEADSET indicator light is off.
Preparation
Press (FUNCTION/EXIT).
11:50AM11/24
1
SAVE AUTO# ?
Press (_) or (^) repeatedly until “SET
2
DIAL MODE ?” is displayed.
Press (fl) OK/EDIT.
11:50AM11/24
SET DIAL MODE ?
11:50AM11/24
3
TONE 1=SAVE
Press (_) or (^) to select “TONE” or
4
“PULSE”.
Press (fl) OK/EDIT (SAVE key).
5
≥A beep sounds.
≥The display will return to step 2. To return
to the standby mode, press
(FUNCTION/EXIT) or wait for
60 seconds.
≥You can exit the programming mode any time by pressing (FUNCTION/EXIT).
13
“
Settings
Selecting the Line Mode
If a line is connected to a low voltage system such as a PBX, set to “B”. If
not, the line indicator will not operate properly. Both lines are preset to
“A”.
Make sure that the handset is on the cradle, the AC adaptor is
connected and the SP-PHONE/HEADSET indicator light is off.
Press (FUNCTION/EXIT).
1
Press (_) or (^) repeatedly until “SET
2
LINE MODE ?” is displayed.
Press (fl) OK/EDIT.
3
Press (_) or (^) to select the desired
4
line, “LINE1” or “LINE2”.
Press (fl) OK/EDIT (NEXT key).
5
Press (_) or (^) to select the desired
6
line mode.
Press (fl) OK/EDIT (SAVE key).
7
≥A beep sounds.
≥The display will return to step 2. To
program the other line, start from step 3.
To return to the standby mode, press
(FUNCTION/EXIT) or wait for
60 seconds.
11:50AM11/24
SAVE AUTO# ?
11:50AM11/24
SET LINE MODE ?
11:50AM11/24
LINE 1
LINE1 1=NEXT
11:50AM11/24
LINE 1
LINE2 1=NEXT
11:50AM11/24
LINE 1
A
1
=SAVE
≥You can exit the programming mode any time by pressing (FUNCTION/EXIT).
14
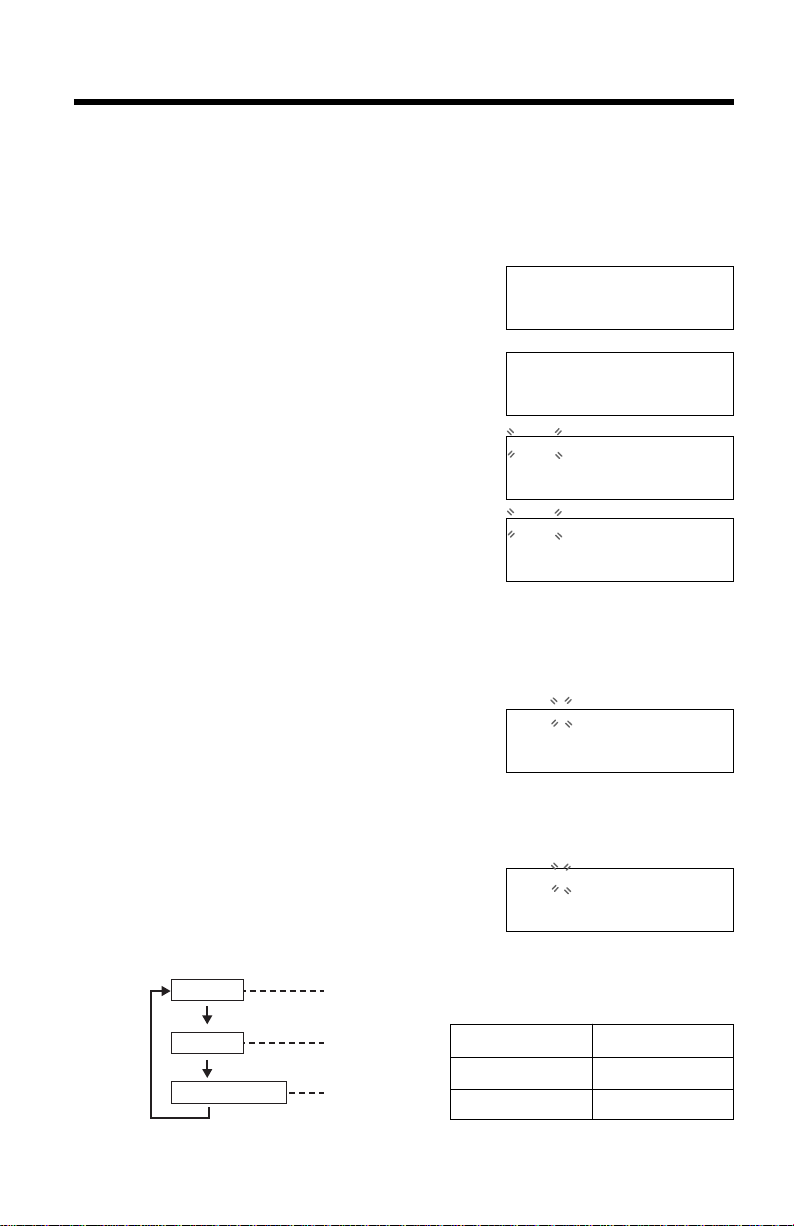
Programming Summary of Preparations
You can program the following functions. The display shows the
programming instructions. See the corresponding pages for function
details.
Make sure that the handset is on the cradle, the AC adaptor is
connected and the SP-PHONE/HEADSET indicator light is off.
Press (FUNCTION/EXIT).
Press (_) or (^) repeatedly until the desired function is displayed.
≥To store phone numbers in the speed dialer memory, see page 32.
≥To adjust the time and date, see page 16.
≥To store a voice mail access number, see page 35.
≥To set the voice mail tone, see page 36.
≥To change the line selection, see page 41.
≥To select the dialing mode, see page 13.
≥To turn on/off the incoming call tone, see page 42.
≥To select the flash time, see page 39.
≥To select the ringer volume, see page 18.
≥To select the line mode, see page 14.
≥To change the LCD contrast setting, see page 12.
“
Preparation
Press (fl) OK/EDIT to go to the next step.
≥You can exit the programming mode any time by pressing (FUNCTION/EXIT).
15
“
Display
AM
PM
Military time
(Blank display)
Option
AM
PM
Settings
Time and Date Adjustment
You can select AM/PM or military time by programming.
Make sure that the handset is on the cradle, the AC adaptor is
connected and the SP-PHONE/HEADSET indicator light is off.
Press (FUNCTION/EXIT).
1
Press (_) or (^) repeatedly until “SET
2
CLOCK ?” is displayed.
Press (fl) OK/EDIT.
3
Enter the current time (hour and
4
minute) using a 4-digit number.
(Ex. To set 9:30, enter “0930”.)
≥For AM/PM setting:Enter numbers
between 0100 and 1259.
For military time: Enter numbers
between 0000 and 2359.
Press (fl) OK/EDIT.
5
≥If numbers between 0000 and 0059, or
1300 and 2359 are entered, the time
will automatically be set using the
military time. Skip steps 6 and 7 and go
to step 8.
12:00AM1/1
SAVE AUTO# ?
12:00AM1/1
SET CLOCK ?
12:00AM01/01
0000
ENTER TIME
09:30AM01/01
0000
ENTER TIME
09:30AM01/01
0000
#=AM/PM
Press (#) to select “AM”, “PM” or
6
military time.
(Ex. You select “PM”.)
≥Each time you press (#), the selection will change on the display.
16
09:30PM01/01
0000
#=AM/PM
AM/PM Military Time
12:00AM–11:59
12:00PM–11:59
AM
PM
0:00–11:59
12:00–23:59
 Loading...