


EY7840

Operating Instructions
Bedienungsanleitung
Instructions d’utilisation
Istruzioni per l’uso
Gebruiksaanwijzing
Manual de instrucciones
Brugsvejledning
Driftsföreskrifter
Bruksanvisning
Käyttöohjeet
Before operating this unit, please read these instructions completely and save this manual for future use.
Vor Inbetriebnahme des Gerätes die Betriebsanleitung bitte gründlich durchlesen und diese Broschüre zum späteren Nachschlagen sorgfältig aufbewahren.
Lire entièrement les instructions suivantes avant de faire fonctionner l’appareil et conserver ce mode d’emploi à des fins de consultation ultérieure.
Prima di usare questo apparecchio, leggere completamente queste istruzioni e conservare il manuale per usi futuri.
Lees deze gebruiksaanwijzing aandachtig door voor u het apparaat in gebruik neemt en bewaar de gebruiksaanwijzing voor eventuele naslag.
Antes de usar este aparato por primera vez, lea todas las instrucciones de este manual y guarde el manual para poderlo consultar en el futuro.
Gennemlæs denne betjeningsvejledning før brugen og gem den til fremtidig brug.
Läs igenom hela bruksanvisningen innan produkten tas i bruk. Spara bruksanvisningen för senare användning.
Før enheten tas i bruk, vennligst les disse alle anvisningene og oppbevar bruksanvisningen for senere bruk.
Lue ohjeet huolella ennen laitteen käyttöönottoa ja säilytä tämä käyttöohje tallessa tulevaa tarvetta varten.
Cordless Rotary Hammer Drill & Driver
Akku-Hammerbohren & Schrauber
Perceuse/Visseuse rotative à percussion sans fil
Trapano avvitatore a percussione rotante senza filo
Draadloze klopboormachine & schroevendraaier
Destornillador y martillo de taladro rotatorio sin cables
Akku roterende hammerbor & skruertrækker
Sladdlös borrhammare & skruvdragare med variabel hastighet
Ledningløs roterende slagdrill og skrutrekker
Ladattava poravasara & porakone/ruuvinväännin
Model No: EY78A1 / EY7840
- 2 -
Index/Index/Index/Indice/Index/Indice/Indeks/Index/Indeks/Hakemisto
English: Page 9
Deutsch: Seite 23
Français: Page 38
Italiano: Pagina 52
Nederlands: Bladzijde 65
Español: Página 80
Dansk: Side 93
Svenska: Sid 107
Norsk: Side 120
Suomi: Sivu 133
FUNCTIONAL DESCRIPTION
FUNKTIONSBESCHREIBUNG
DESCRIPTION DES FONCTIONS
DESCRIZIONE DELLE FUNZIONI
FUNCTIEBESCHRIJVING
DESCRIPCIÓN FUNCIONAL
BESKRIVELSE AF FUNKTIONERNE
FUNKTIONSBESKRIVNING
FUNKSJONSBESKRIVELSE
TOIMINTAKUVAUS
- 3 -
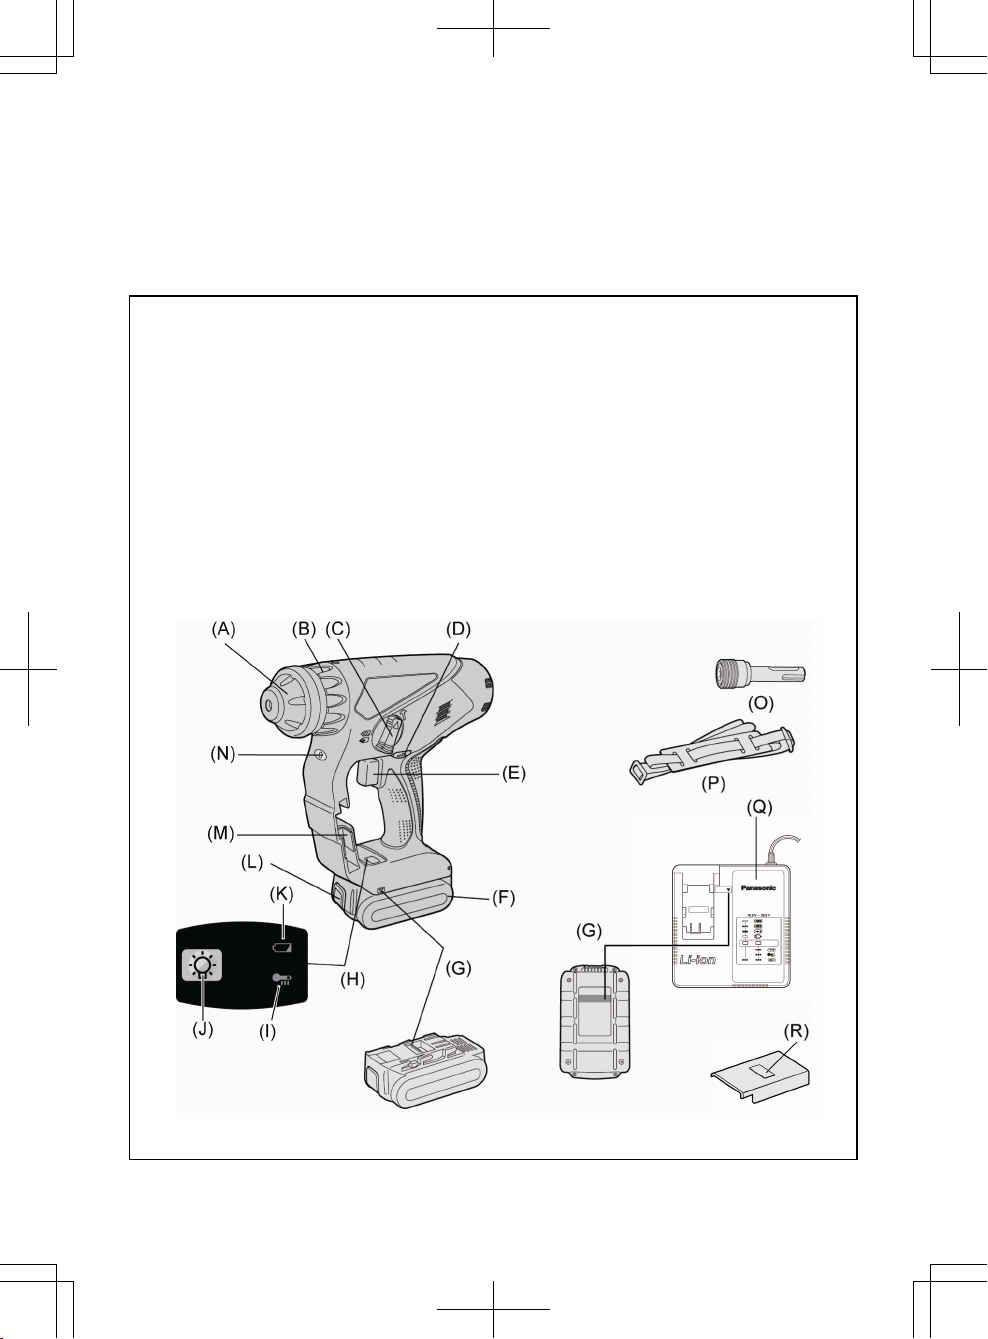
(A)
Chuck
Futter
Mandrin
Mandrino
Boorkop
Portabroca
Borepatron
Chuck
Chuck
Kiinnit
y
slaite
(B)
Clutch handle
Kupplungsring
Poignée de l’embrayage
Impugnatura frizione
Koppelingshandgreep
Mango de embrague
Koblinghåndtag
Kopplingshandtag
Koblingshåndtak
K
y
tkimen kahva
(C)
Hammering/drilling switching leve
r
Zum Umschalten zwischen normalem Bohren und Schlagbohren
Commutateur martelage/perforation
Leva di commutazione martellatura/perforazione
Keuzehendel normaal boren/klopboren
Palanca de conmutación de martillo/taladro
Hamrings/borings omskiftningsgreb
Omkopplare mellan slagborr/vanlig borr
Slag/bor omskifter
Vasaran/
p
oran kytkentävipu
(D)
Forward/Reverse leve
r
Rechts/Linkslauf Schalter
Levier d’inversion marche avant-marche arrière
Leva di avanzamento/inversione
Voorwaarts/achterwaarts-hendel
Palanca de avance/inversión
Greb til forlæns/baglæns retning
Riktningsomkopplare
Forover/Revers bryter
Eteen
p
äin/taaksepäin vipu
(E)
Variable speed control trigge
r
Betriebsschalter
Gâchette de commande de vitesse
Grilletto di controllo velocità variable
Startschakelaar variabele snelheid
Disparador del control de velocided variable
Kontroludløser for variabel hastighed
Steglös varvtalsreglerare
Hovedbryter, trinnløs
No
p
eudensäätökytkin
(F)
Battery pack
Akku
Batterie autonome
Pacco batteria
Accu
Batería
Batteripakning
Batteri
Batteripakke
Akku
(G)
Alignment marks
Ausrichtmarkierungen
Marques d’alignement
Marcature allineamento
Uitlijntekens
Marcas de alineación
Flugtemærker
Anpassningsmärken
Opprettingsmerke
Sovitusmerkit
(H)
Control panel
Bedienfeld
Panneau de commande
Pannello di controllo
Bedieningspaneel
Panel de controle
Kontrolpanel
Kontrollpanel
Kontrollpanel
Säätö
p
aneeli
(I)
Overheat warning lamp (battery)
Überhitzungs-Warnlampe (Akku)
Témoin d’avertissement de surchauffe (batterie)
Spia avvertenza surriscaldamento (batteria)
Oververhitting-waarschuwingslampje (accu)
Luz de advertencia de sobrecalentamiento (batería)
Advarselslamp til overophedning (batteri)
Varningslampa för överhettning (batteri)
Varsellampe for overoppheting (batteri)
Ylikuumenemisen varoituslam
ppu (
akku
)
(J)
LED light on/off button
LED-Leuchten-EIN/AUS-Taste
Bouton Marche/Arrêt de la lumière DEL
Tasto di accensione e spegnimento della luce LED
Aan/uit-toets (ON/OFF) voor LED-lampje
Botón ON/OFF de luz LED
TÆND/SLUK-knap til LED-lys
Strömbrytare för LED-ljus
PÅ/AV-knapp for LED-lys
LED-valon k
y
tkin/katkaisupainike
(K)
Battery low warning lamp
Akkuladungs-Warnlampe
Témoin d’avertissement de batterie basse
Spia avvertenza batteria scarica
Waarschuwingslampje voor lage accuspanning
Luz de aviso de baja carga de batería
Advarselslampes batterieffekt lav
Varningslampa för svagt batteri
Varsellampe for at batteriet er for lavt
Alhaisen akku
j
ännitteen varoituslamppu
(L)
Battery pack release button
Akku-Entriegelungsknopf
Bouton de libération de batterie autonome
Tasto di rilascio pacco batteria
Accu-ontgrendeltoets
Botón de liberación de batería
Udløserknap til batteripakning
Frigöringsknapp för batteri
Utløserknapp for batteripakke
A
kkupaketin irrotuspainike
(M)
Bit adapter holder
Einsatzadapterhalter
Porte-adaptateur de mèche
Adattatore di portabit
Bitadapterhouder
Soporte de adaptador de broca
Boradapterholder
Hållare för verktygsspetsadapter
Holderstykke for bit-tilpasningsstykke
Te
r
än sovittimen pidin
(N)
LED light
LED-Leuchte
Lumière DEL
Luce LED
LED-lampje
Luz indicadora
LED-lys
LED-ljus
LED-lys
LED-valo
- 4 -
(O)
Bit adapter (EY9HX403E)
Einsatzadapter (EY9HX403E)
Adaptateur de mèche (EY9HX403E)
Portabit (EY9HX403E)
Bitadapter (EY9HX403E)
Adaptador de broca (EY9HX403E)
Boradapter (EY9HX403E)
Verktygsspetsadapter (EY9HX403E)
Bitholderen (EY9HX403E)
Bitsi ada
p
teri (EY9HX403E
)
(P)
Shoulder strap
Schulterriemen
Dragonne
Cinghia da spalla
Schouderriem
Correa al hombro
Skulderrem
Axelrem
Skulderbelte
Olkahihna
(Q)
Battery charger
Ladegerät
Chargeur de batterie
Caricabatterie
Acculader
Cargador de batería
Batterioplader
Batteriladdare
Batterilader
Akkulaturi
(R)
Pack cove
r
Akkuabdeckung
Couvercle de la batterie autonome
Coperchio pacco
Accudeksel
Cubierta de batería
Pakningsdæksel
Batteriskydd
Pakkedeksel
Akkukotelon kansi

- 5 -
Terminals
Anschlüsse
Bornes
Terminali
Aansluitpunten
Terminales
Terminaler
Poler
Ender
Liittimet
Pack cover
Akkuabdeckung
Couvercle de la batterie autonome
Coperchio pacco
Accudeksel
Cubierta de batería
Pakningsdæksel
Batteriskydd
Pakkedeksel
Akkukotelon kansi
label
Schild
rouge
rossa
label
rojo
etikette
dekal
etikett
merkki
Recommendations for use / Gebrauchsempfehlungen / Recommandations concernant l’utilisation /
Precauzioni d’uso / Aanbevelingen voor gebruik / Recomendaciones par el uso / Anbefalinger for
brugen / Rekommendationer för användning / Anbefalt bruk / Käyttösuositukset
Be sure to use the Pack cover
• When the battery pack is not being used, store the battery in a way that foreign substances such as dust and
water etc. do not contaminate the terminals. Be sure to attach the battery pack cover to protect the battery
terminals.
• When charging the battery pack, confirm that the terminals on the battery charger are free of foreign
substances such as dust and water etc. Clean the terminals before charging the battery pack if any foreign
substances are found on the terminals.
The life of the battery pack terminals may be affected by foreign substances such as dust and water etc.
during operation.
CAUTION: To protect the motor or battery, be sure to note the following when carrying out this operation.
• If the motor or battery becomes hot, the protection function will be activated and the motor or battery will stop
operating.
The overheat warning lamp on the control panel illuminates or flashes when this feature is active.
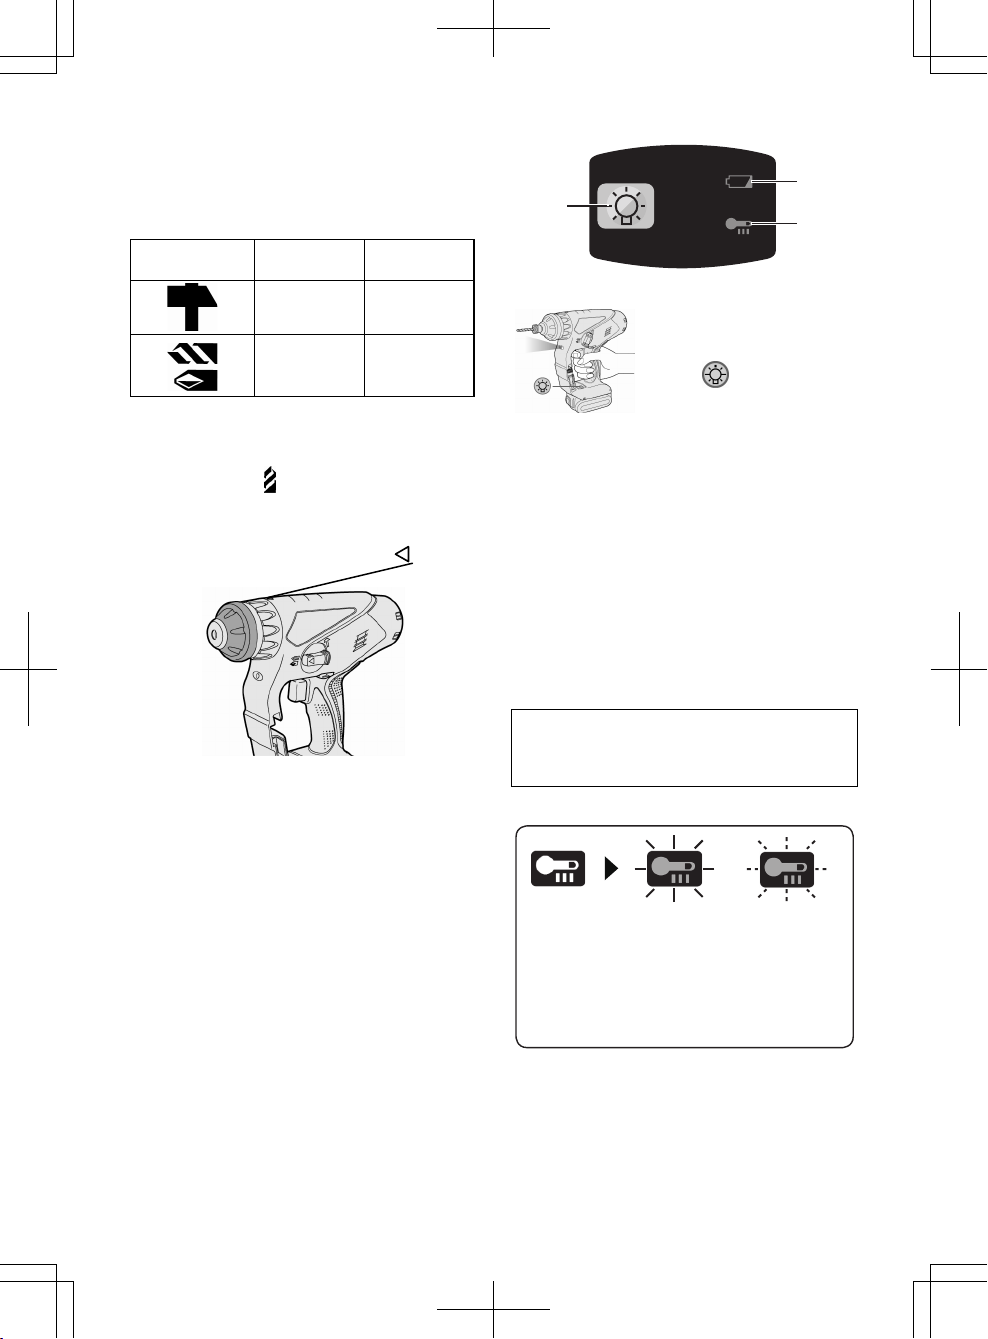
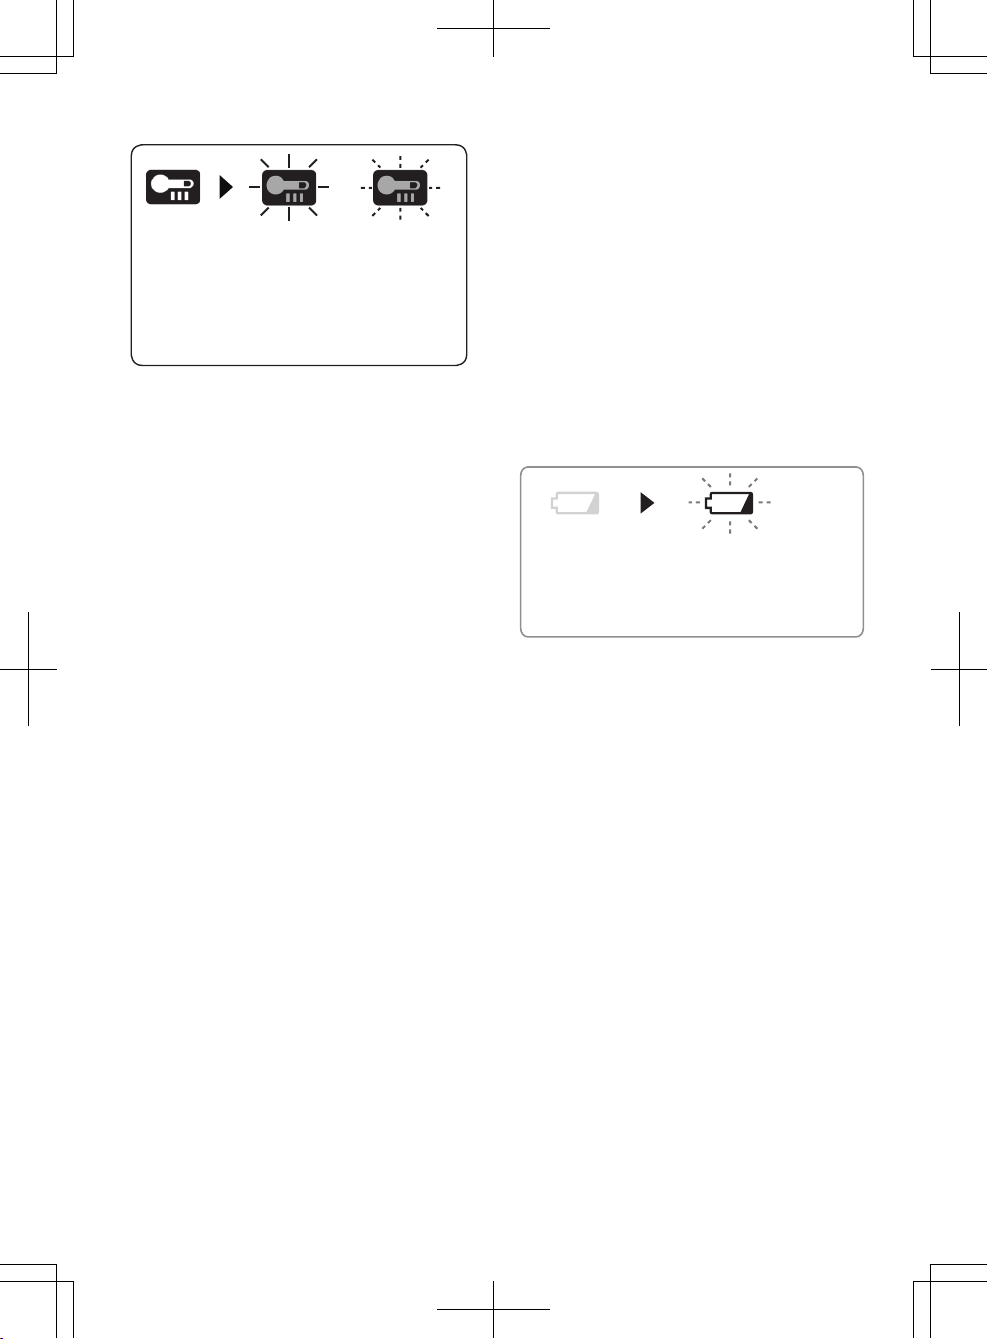
For safe use
• The battery pack is designed to be installed by proceeding two steps for safety. Make sure the battery pack is
installed properly to the main body before use.
• If the battery pack is not inserted firmly when the switch is switched on, the overheat warning lamp and the
battery low warning lamp will flash to indicate that safe operation is not possible, and the bit will not rotate
normally. Insert the battery pack into the body of the tool until the red label disappears.
Unbedingt die Akkuschutzkappe verwenden
• Wenn der Akku nicht benutzt wird, bewahren Sie ihn so auf, dass die Kontakte nicht durch Fremdstoffe, wie z.
B. Staub und Wasser usw., verschmutzt werden. Bringen Sie unbedingt die Akkuschutzkappe zum Schutz der
Kontakte an.
• Achten Sie beim Laden des Akkus darauf, dass die Kontakte am Ladegerät frei von Fremdstoffen, wie z. B.
Staub und Wasser usw., sind. Reinigen Sie die Kontakte vor dem Laden des Akkus, falls Fremdstoffe auf den
Kontakten vorhanden sind.
Die Lebensdauer der Akkukontakte kann durch Anhaften von Fremdstoffen, wie z. B. Staub und Wasser usw.,
während des Betriebs beeinträchtigt werden.
VORSICHT: Zum Schutz des Motors und des Akkus müssen beim Betrieb die folgenden Punkte beachtet
werden.
• Bei einer Motor- oder Akkuüberhitzung spricht die Schutzschaltung an, um den Betrieb des Motors bzw.
des Akkus zu unterbrechen. Die Überhitzungswarnleuchte auf dem Bedienungsfeld leuchtet oder blinkt bei
aktivierter Funktion.
Für den sicheren Gebrauch
• Der Akku ist aus Sicherheitsgründen so entworfen, dass er in zwei Schritten eingesetzt werden muss.
Vergewissern Sie sich vor der Inbetriebnahme der Maschine, dass der Akku ordnungsgemäß in diese
eingesetzt ist.
• Wenn der Akku nicht fest eingesetzt ist, blinken die Überhitzungs-Warnlampe und die Akkuladungs-Warnlampe
und das Gerät dreht den Bohrer nicht wie üblich, um darauf hinzuweisen, dass das Gerät nicht betriebssicher
arbeitet, selbst wenn ein Schalter ausgelöst wird. Schieben Sie den Akku soweit in das Gerät hinein, bis das
rote Schild verschwindet.
GB
D
- 6 -
Veillez à utiliser le couvercle de la batterie autonome
• Lorsque le couvercle de la batterie autonome n’est pas utilisé, rangez la batterie de façon à ce qu’aucun corps
étranger comme de la poussière et de l’eau ne contamine les bornes. Veillez à fixer le couvercle de la batterie
autonome afin de protéger les bornes de la batterie.
• Lors de la charge de la batterie autonome, assurez-vous que les bornes du chargeur de batterie sont libres de
tout corps étranger comme de la poussière et de l’eau, etc. Nettoyez les bornes avant de charger la batterie
autonome si des corps étrangers se trouvent sur les bornes.
La durée de vie des bornes de la batterie autonome peut être affectée par des corps étrangers comme de la
poussière et de l’eau, etc. pendant le fonctionnement.
MISE EN GARDE: Pour protéger le moteur ou la batterie, veillez à bien noter les points suivants lorsque
vous effectuez cette opération.
• Si le moteur ou la batterie deviennent chauds, la fonction de protection sera activée et le moteur ou la batterie
cesseront de fonctionner. Le témoin d'avertissement de surchauffe s'allume ou clignote sur le panneau de
commande lorsque cette caractéristique est active.
Pour un usage sans risque
• La batterie est conçue pour être installée en procédant en deux étapes pour des raisons de sécurité. Assurezvous que la batterie est mise en place correctement avant d'utiliser l'outil.
• Lorsque la batterie autonome n'est pas fermement insérée, le témoin d'avertissement de surchauffe et le témoin
d’avertissement de batterie basse clignotent et la machine ne fait pas tourner la mèche comme habituellement
pour nous signaler que la machine ne fonctionne pas en toute sécurité même si un interrupteur a été enclenché.
Insérez la batterie autonome dans le corps de l'outil jusqu'à ce que l'indicateur rouge disparaisse.
F
Assicurarsi di usare il coperchio del pacco batteria
• Quando il pacco batteria non viene usato, conservare la batteria in modo che sostanze estranee, quali
polvere, acqua, ecc non contaminino i terminali. Assicurarsi di applicare il coperchio al pacco batteria per
proteggere i terminali della batteria.
• Quando il pacco batteria viene caricato, assicurarsi che i terminali sul caricabatteria siano privi di sostanze
estranee, quali polvere, acqua, ecc. Pulire i terminali prima di caricare il pacco batteria, qualora vengano
trovate sostanze estranee sui terminali.
La durata dei terminali del pacco batteria può essere influenzata da sostanze estranee, quali polvere, acqua,
ecc. durante il funzionamento.
PRECAUZIONE:
Per proteggere il motore o la batteria, tenere presente quanto segue nell'esecuzione del lavoro.
• Se il motore o la batteria si scurriscaldano verrà attivata la funzione di protezione, che comporta l'arresto
del motore o della batteria. Quando questa funzione è attiva, sul pannello di controllo lampeggia la spia di
avvertenza da surriscaldamento.
Per un utilizzo sicuro
• Il pacco batteria è stato ideato per essere installato tramite una procedura a due fasi per motivi di sicurezza.
Prima dell'uso, verificare che il pacco batteria sia inserito correttamente nel corpo principale.
• Quando il pacco batteria non è ben inserito, la spia avvertenza surriscaldamento e la spia avvertenza batteria
scarica lampeggiano e l'apparecchio non fa ruotare la punta come di consueto per avvertire l'utente che
l'utensile non sta funzionando in modo sicuro anche se l'interruttore è bloccato. Inserire il pacco batteria
nell'alloggiamento dell'utensile fino alla scomparsa dell'etichetta rossa.
Zorg ervoor het accudeksel te gebruiken
• Wanneer de accu niet wordt gebruikt, de accu op een zodanige manier bewaren dat vreemde bestanddelen
zoals stof en water, enz. de aansluitingen niet kunnen verontreinigen.
• Kijk bij het laden van de accu of de aansluitingen op de acculader vrij zijn van vreemde bestanddelen zoals
stof en water, enz. Reinig de aansluitingen als u vreemde bestanddelen op de aansluitingen aantreft.
De levensduur van de accu-aansluitingen kan tijdens gebruik nadelig beïnvloed worden door vreemde
bestanddelen zoals stof en water, enz.
OPGELET: Let bij het gebruik van het gereedschap op deze wijze op het volgende om de motor en de accu
te beschermen.
• Als de motor of de accu oververhit raakt, wordt de beveiligingsfunctie geactiveerd en zal de motor of de accu
stoppen met werken. Het oververhittingwaarschuwingslampje op het bedieningspaneel brandt of knippert
wanneer deze beveiligingsfunctie is geactiveerd.
Voor een veilig gebruik
• Het aanbrengen van de accu moet om veiligheidsredenen in twee stappen worden uitgevoerd. Zorg dat de
accu vóór gebruik goed op het gereedschap is bevestigd.
• Als de accuset niet goed is bevestigd, gaan het oververhitting-waarschuwingslampje (accu/motor) en
het waarschuwingslampje voor lage accuspanning knipperen en draait de bit niet op het apparaat, zoals
gebruikelijk. Dit is een waarschuwing dat het apparaat niet op veilige wijze kan worden gebruikt, zelfs niet als
een schakelaar wordt bediend. Plaats de accu in het gereedschap totdat het rode label verdwijnt.
I
NL
- 7 -
Asegúrese de utilizar la cubierta de la caja de batería
• Cuando no utilice la caja de batería, guarde la batería de tal forma que las materias extrañas tales como polvo
y agua, etc. ensucien los terminales. Asegúrese de colocar la cubierta de la caja de batería de tal forma de
proteger los terminales de la batería.
• Cuando cargue la caja de batería, confirme que los terminales en el cargador de batería estén libres de
materias extrañas tales como polvo y agua, etc. Limpie los terminales antes de cargar la caja de batería si hay
materias extrañas en los terminales.
La vida de los terminales de la caja de batería puede verse afectada por materias extrañas tales como polo y
agua, etc. durante su funcionamiento.
PRECAUCIÓN: Para proteger el motor o la batería, asegúrese de observar lo siguiente cuando efectúe
esta operación.
• Si el motor o la batería se calienta, se activará la función de protección y el motor o la batería dejará de
funcionar. La lámpara de advertencia de sobrecalentamiento en el panel de control se ilumina o destella
cuando esta característica está activada.
Para un uso más seguro
• La batería está diseñada para instalarse siguiendo dos pasos por motivos de seguridad.
Compruebe que la batería está instalada correctamente en el cuerpo principal antes de utilizar la herramienta.
• Si la batería no ha quedado bien introducida, la luz de advertencia de sobrecalentamiento y la luz de aviso de
baja carga de batería parpadearán, y la broca no girará del modo habitual para alertar al operario de que la
máquina no funcionará de manera segura si se acciona algún interruptor. Introduzca la batería en el cuerpo de
la herramienta hasta que el indicador rojo desaparezca.
E
Sørg for at anvende batteripakningsdækslet
• Når batteripakningen ikke anvendes, skal batteriet opbevares således, at uvedkommende substanser,
som for eksempel støv og vand etc., ikke kan komme til at forurene terminalerne. Sørg for at sætte
batteripakningsdækslet på for at beskytte batteriterminalerne.
• Når du oplader batteripakningen, skal du bekræfte at terminalerne på batteriopladeren er fri for
uvedkommende substanser, som for eksempel støv og vand etc. Rengør terminalerne inden du oplader
batteripakningen, hvis uvedkommende substanser observeres på terminalerne.
Levetiden for batteripakningens terminaler kan påvirkes af uvedkommende substanser, som for eksempel støv
og vand etc., under brugen.
FORSIGTIG: For at beskytte motoren og batteriet, skal man være opmærksom på følgende, når denne
operation udføres.
• Hvis motoren eller batteriet bliver varme, vil beskyttelseskredsløbet blive aktiveret og motoren eller batteriet vil
holde op med at fungere. Advarselslampen til overophedning på kontrolpanelet lyser eller blinker, når denne
egenskab er aktiveret.
For sikker brug
• Batteripakken er beregnet til at blive installeret ved at følge en fremgangsmåde med to trin for sikkerheden skyld.
Kontroller, at batteripakningen er korrekt installeret i hoveddelen før brug.
• Når batteripakningen ikke er isat korrekt, vil advarselslampe til overophedning og advarselslampen
batterieffekt lav blinke, og maskinen vil ikke dreje boret som sædvanligt, for at lade os vide at maskinen ikke
arbejder sikkert, selv om der trykkes på kontakter. Indsæt batteripakken i selve værktøjet, indtil den røde
etikette forsvinder.
Se till att använda batteriskyddet
• När batteriet inte används bör det förvaras på ett sätt som gör att främmande ämnen, såsom damm eller
vatten, inte kan hamna på batteripolerna. Var noga med att skydda batteripolerna genom att sätta på
batteriskyddet.
• Kontrollera vid laddning av batteriet att polerna på batteriladdaren är fria från främmande ämnen, såsom
damm eller vatten. Rengör polerna innan batteriet laddas, om något främmande ämne återfinns på polerna.
Batteripolernas livslängd kan vid drift påverkas av främmande ämnen, såsom damm eller vatten.
VIKTIGT: För att skydda motorn och batteriet, skall du komma ihåg följande vid denna användning.
• Om motorn eller batteriet överhettas, aktiveras skyddsfunktionen och då slutar motorn eller batteriet att
fungera. Varningslampan för överhettning på kontrollpanelen lyser eller blinkar när denna funktion har
aktiverats.
För säker användning
• Batteriet ska monteras genom vidta två säkerhetsåtgärder.
Kontrollera att batteriet är ordentligt monterat på verktyget före användning.
• När batteriet inte är ordentligt monterat kommer varningslamporna för överhettning och svagt batteri att blinka
och borrspetsen roterar inte vilket talar om att maskinen inte är säker även om en brytare aktiveras. För in
batteriet i verktyget tills du inte längre kan se den röda dekalen.
DK
S
- 8 -
Ikke glem å bruke batteripakkedekselet
• Når batteripakken ikke er i bruk, legg batteriet på et sted der fremmedlegemer så som støv eller vann ikke
forurenser batteripolene. Ikke glem å bruke batteripakkedekselet for å beskytte batteripolene.
• Ved oppladning av batteripakken, kontroller at polene på batteriladeren er fri for fremmedlegemer så som støv
eller vann. Rens polene før du lader opp batteripakken hvis du finner fremmedlegemer på polene.
Batteripakkepolenes levetid kan bli påvirket av fremmedlegemer så som støv eller vann mens de er i bruk.
FORSIKTIG: For å beskytte motoren eller batteriet, pass på følgende når dette arbeidet utføres.
• Hvis motoren eller batteriet blir opphetet vil beskyttelsesfunksjonen tre i funksjon og motoren eller batteriet
slutter å virke. Varsellampen for overoppheting på kontrollpanelet vil lyse eller blinke når denne funksjonen er
aktiv.
For trygg og sikker bruk
• Batteripakken skal installers i henhold til en to-trinns sikkerhetsforanstaltning.
Sørge for at batteripakken er korrekt installert i verktøyet før bruk.
• Når batteripakken ikke er satt inn korrekt, lyser varsellampen for overoppheting (motor/batteri). Drillen roterer
ikke bit-en som normalt og gjør dette for å indikere at drillen ikke fungerer på trygt og sikkert vis.
Sett inn batteripakken i verktøyet inntil den røde etiketten forsvinner.
N
Käytä aina akkukantta
atsiuM .äimittiil aakil tävie .enj isev ,ylöp netuk teenia taareiv ätte ,niin nööliäs ukka enap ,ätetyäk ie aukka nuK •
panna akkukansi paikalleen suojaamaan akkuliittimiä.
soJ .ättev iat äylöp netuk atienia atiareiv elo ie ässimittiil nirutalukka ätte
,atsimrav ,naatadal ukka nuK •
liittimistä löytyy vieraita aineita, puhdista liittimet ennen akun lataamista.
Akkuliittimissä käytön aikana olevat vieraat aineet kuten pöly ja vesi saattavat heikentää akun käyttöikää.
TÄRKEÄ HUOMAUTUS: Moottorin tai akun suojaamiseksi ota huomion seuraavat seikat, kun suoritat tätä
toimenpidettä.
.atsamimiot aakkal ukka iat irottoom aj yytsinnyäk otnimiotajous
,eenemuuk ukka iat irottoom soJ •
Säätöpaneelin ylikuumenemisen varoitusvalo palaa tai vilkkuu, kun tämä toiminto on käynnissä.
Turvallisen käytön takaamiseksi
.neekläj neetipnemiot naveksok attuusillavrut nedhak iskavattennesa utletinnuus no ukkA •
Varmista ennen käyttöä, että akku on kiinnitetty kunnolla perusrunkoon.
uppmalsut
iorav neettinnäjukka nesiahla aj uppmalsutiorav nesimenemuukily ,allonnuk ätetinniik ie aukka soJ •
vilkkuvat ja kone ei pyöritä kärkeä tavalliseen tapaan osoituksena siitä, että koneen toiminta ei ole turvallista,
vaikka kytkin katkaistaisiin. Työnnä akku työkalun runkoon niin, että punainen merkki katoaa näkyvistä.
SF

- 9 -
Original instructions: English Translation of the original instructions: Other
languages
I. INTENDED USE
This tool is a Rotary Hammer for
drilling in concrete. In addition, the
has a “rotation only mode” without
hammering. The mode is suitable for
drilling and screw-fastening.
Read “Safety Instructions” booklet
and the following before using.
II. ADDITIONAL
SAFETY RULES
1)
Wear ear protection.
Exposure to
noise can cause hearing loss.
Use auxiliary handle (support
handle) supplied with the tool.
Loss of control can cause personal
injury.
2)
Hold power tools by insulated
gripping surfaces when performing an operation where the
cutting tool may contact hidden
wiring;
contact with a “live” wire
will make exposed metal parts of
the tool “live” and shock the operator.
3) Wear a dust mask, if the work
causes dust.
4) Be aware that this tool is always
in an operating condition, since it
does not have to be plugged into
an electrical outlet.
5) If the bit becomes jammed, immediately turn the main switch off
to prevent an overload which can
damage the battery pack or motor. Use reverse motion to loosen
jammed bits.
6) Do not operate the Forward/Reverse
lever when the main switch is on. The
battery will discharge rapidly and
damage to the unit may occur.
7) Use only a dry, soft cloth for
wiping the unit. Do not use a damp
cloth, thinner, benzine, or other
volatile solvents for cleaning.
8) When storing or carrying the tool, set
the Forward/Reverse lever to the
center position (switch lock).
9) Do not strain the tool by holding the
speed control trigger halfway (speed
control mode) so that the motor
stops. The protection circuit will activate and may prevent speed control operation. If this happens, release the speed control trigger and
squeeze again for normal operation.
- 10 -
10) Be careful not to get dust inside the
chuck.
11) Do not touch the rotating parts to
avoid injury.
12) Do not continue to use the tool for
a long time. Stop using the tool
from time to time to avoid that the
temperature of the motor rises too
high.
13) Do not drop the tool.
14) Do not put the tool on the place
where the chuck is depressed. The
bit may come off from the chuck
and fall down when the chuck is
depressed. It may cause injuries.
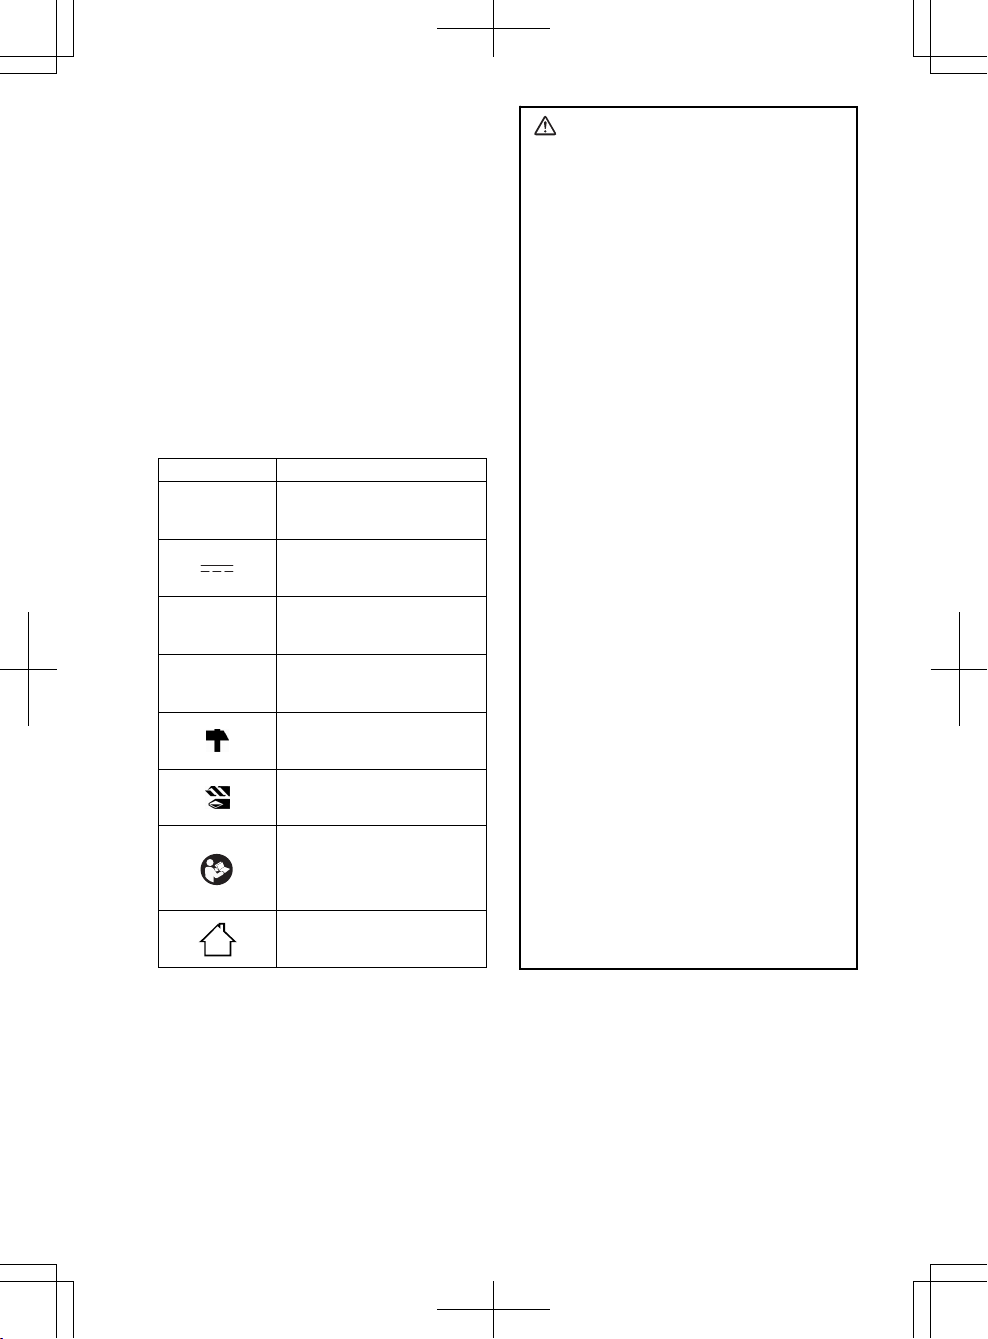
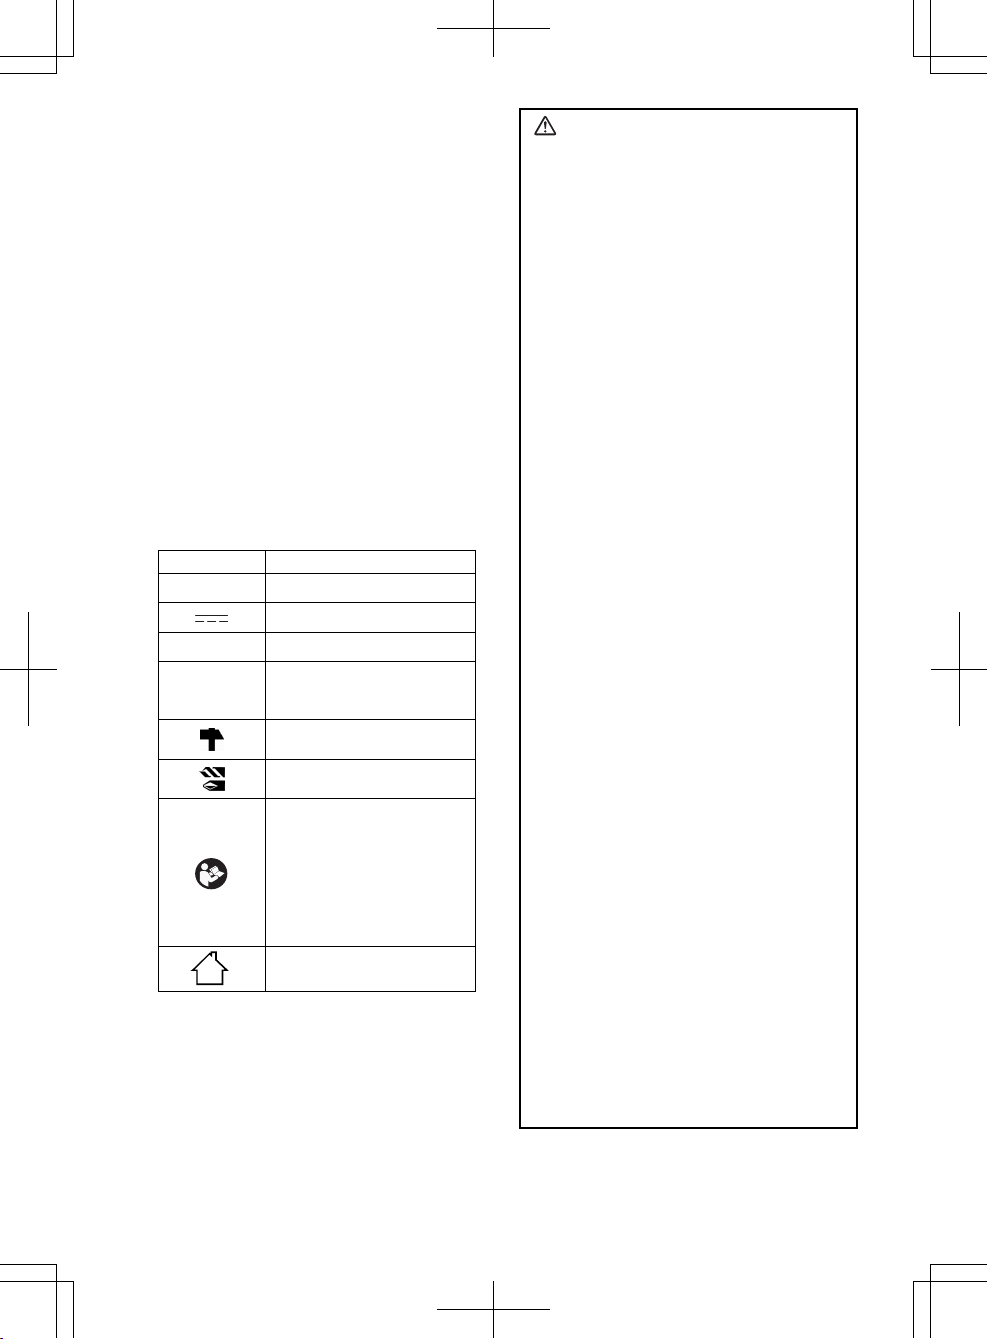
Symbol meaning
V Volts
Direct current
n0
No load speed
…min
-1
Revolutions or
reciprocation per minutes
Rotation with hammering
Rotation only
To reduce the risk of
injury, user must read
and understand instruc-
tion manual.
For indoor use only.
WARNING:
• Do not use other than the
Panasonic battery packs that are
designed for use with this
rechargeable tool.
•Panasonic is not responsible for
any damage or accident caused
by the use of the recycled battery
pack and the counterfeit battery
pack.
• Do not dispose of the battery pack
in a fire, or expose it to excessive
heat.
• Do not drive the likes of nails into
the battery pack, subject it to
shocks, dismantle it, or attempt to
modify it.
• Do not allow metal objects to
touch the battery pack terminals.
• Do not carry or store the battery
pack in the same container as
nails or similar metal objects.
• Do not charge the battery pack in
a high-temperature location, such
as next to a fire or in direct
sunlight. Otherwise, the battery
may overheat, catch fire, or explode.
• Never use other than the dedicated charger to charge the battery pack. Otherwise, the battery
may leak, overheat, or explode.
• After removing the battery pack
from the tool or the charger, always reattach the pack cover.
Otherwise, the battery contacts
could be shorted, leading to a risk
of fire.
•When the Battery Pack Has Deteriorated, Replace It with a New
One. Continued use of a damaged battery pack may result in
heat generation, ignition or battery rupture.
- 11 -
Bit
holder
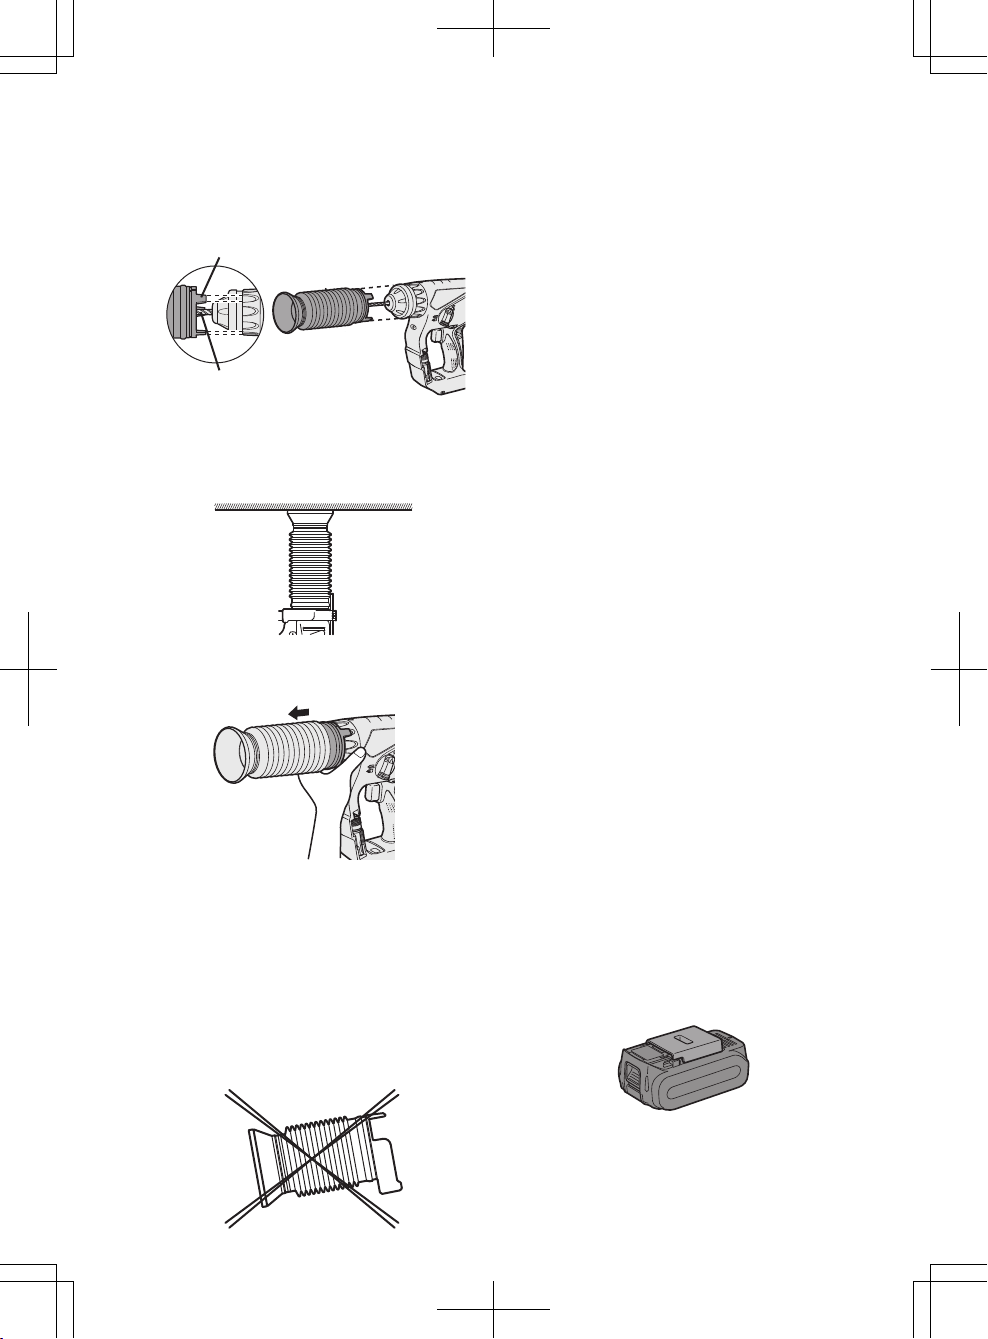
III. ASSEMBLY
CAUTION:
Use of a concrete drill bit larger
than the recommended size may
cause damage to the tool.
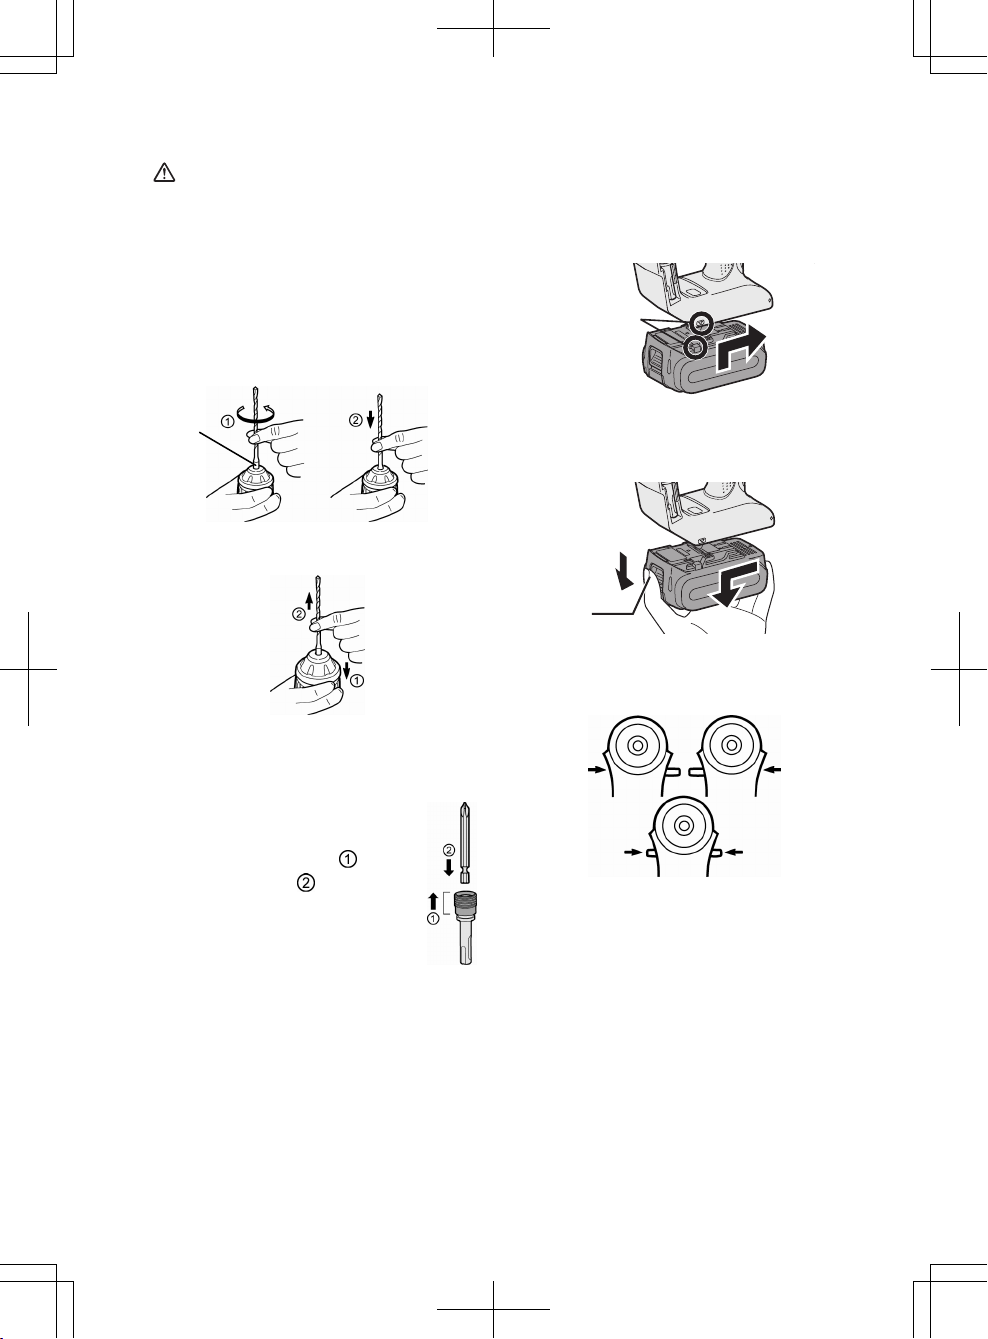
1. To insert the bit
1-1. Insert a bit into the mounting hole,
and turn it slightly to locate an engaged position.
1-2. At the engaged position, push the
bit as far as it goes. Make sure that
the bit is fixed by pulling it.
2. To remove the bit
2-1. Depress the chuck and pull the bit.
Bit adapter
Use a bit adapter (O) and bit.
1. Remove the bit adapter
from the bit adapter holder
on the main unit.
2. Pull the bit holder. (
)
3. Insert the bit. (
)
4. Make sure the bit is inserted
firmly by pulling it lightly.
5. Insert the bit adapter into the
mounting hole and turn to
locate an engaged position.
6. At the engaged position, push in as
far as it goes.
• Make sure it does not move by
pulling it lightly.
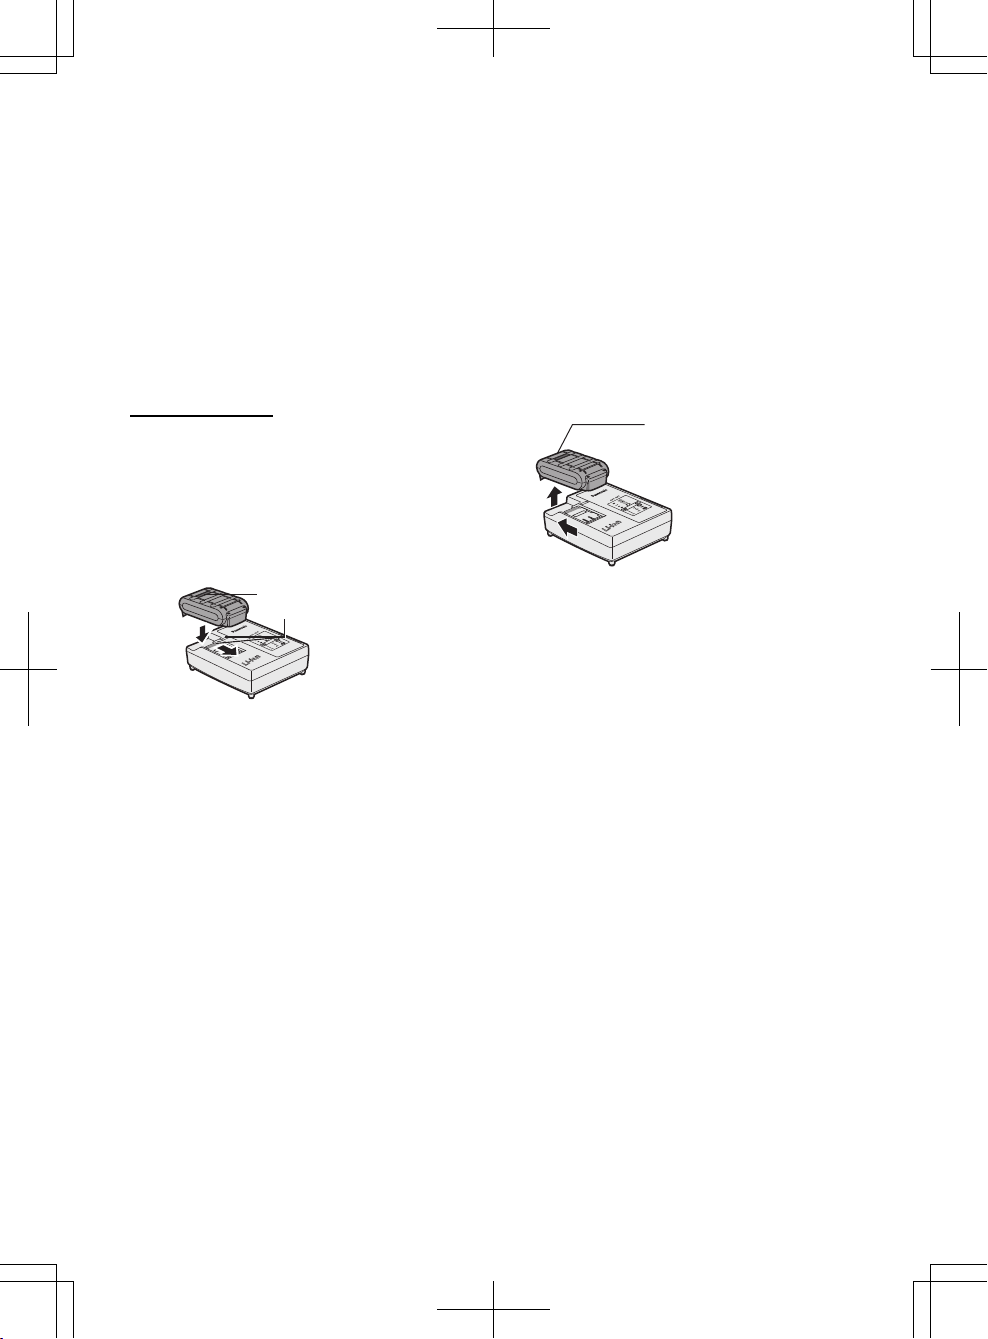
Attaching or Removing Battery Pack
1. To connect the battery pack:
Line up the alignment marks and attach
the battery pack.
• Slide the battery pack until it locks
into position.
2. To remove the battery pack:
Pull the button from the front to release
the battery pack.
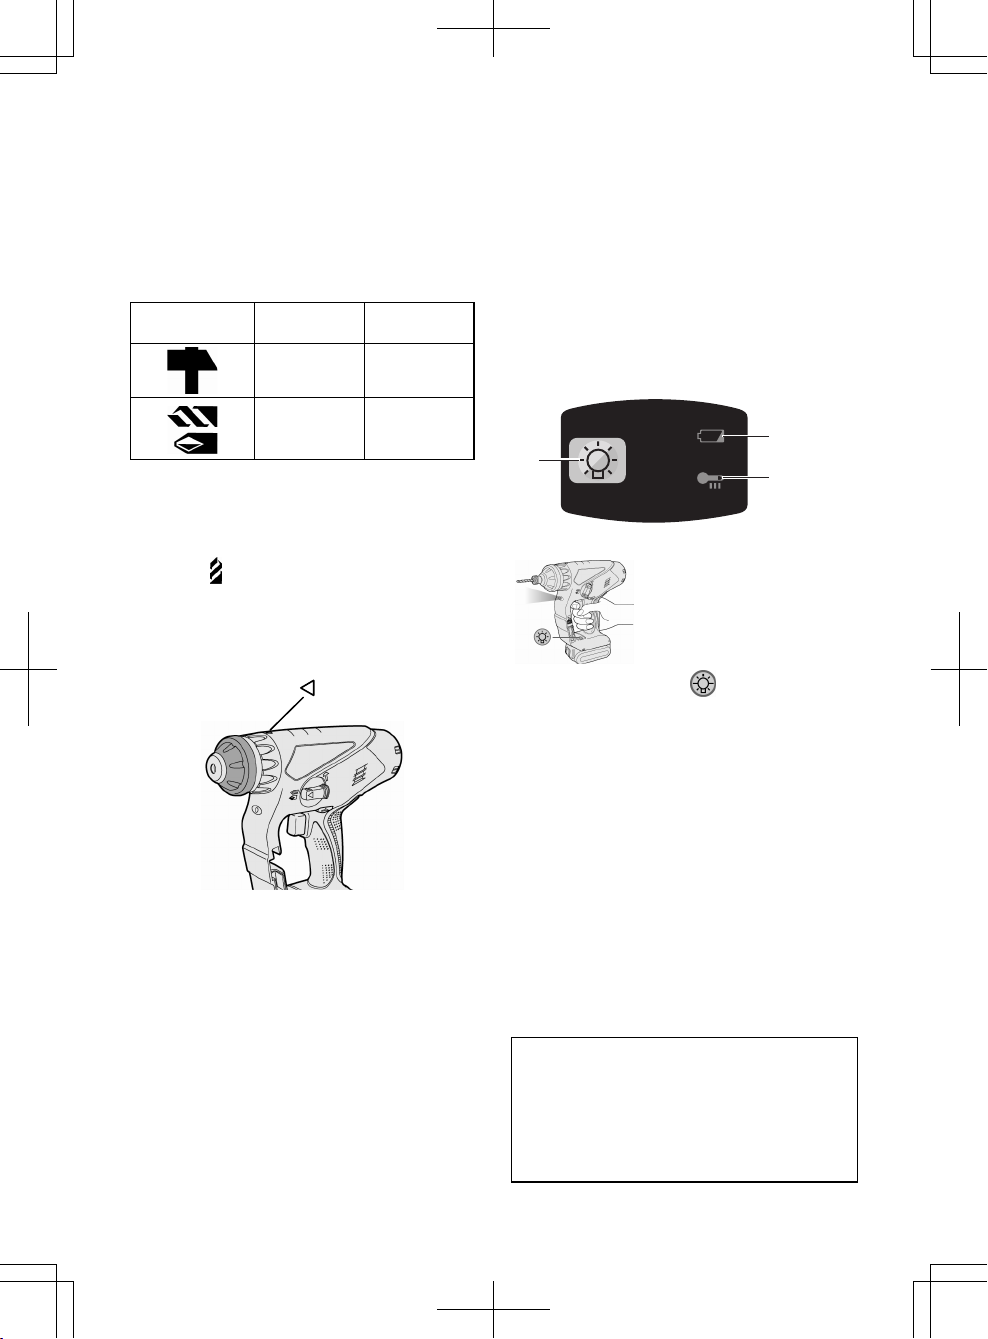
IV. OPERATION
Forward/Reverse Lever
• Be sure to set the lever in the center to lock it after use.
• Operate the Forward/Reverse lever
after the motor rotation is completely stopped.
Forward Reverse
Lock
SDS PLUS type
shank
Alignment marks
Button
- 12 -
Hammering/Drilling Switching
Lever
NOTE: Operate the mode change after
the motor rotation is completely
stopped.
Position of
switching lever
Action mode Operation
Rotation with
hammering
Concrete
Drilling,
Block Drillin
g
Rotation only
Screw
Fastening,
Drilling
Clutch Torque Setting
Adjust the torque to one of the 5 clutch
settings or “
” position.
CAUTION:
Test the setting before actual operation.
Set the scale at this mark ( ).
Variable Speed Control Trigger
To set the center of a hole, pull the
trigger slightly to start the drill rotation
slowly.
The more the speed control trigger is
pulled, the higher the speed becomes.
CAUTION:
When operating the tool by pulling the
trigger, there may be a momentary lag
before rotation starts. This does not
signal a malfunction.
• This lag occurs as the tool’s circuitry starts up when the trigger is
pulled for the first time after installing a new battery pack or after the
tool has not been used for at least 1
minute (or at least 5 minutes when
the LED is on). Rotation will start
without any lag during second and
subsequent operations.
Control Panel
(1)
(3)
(2)
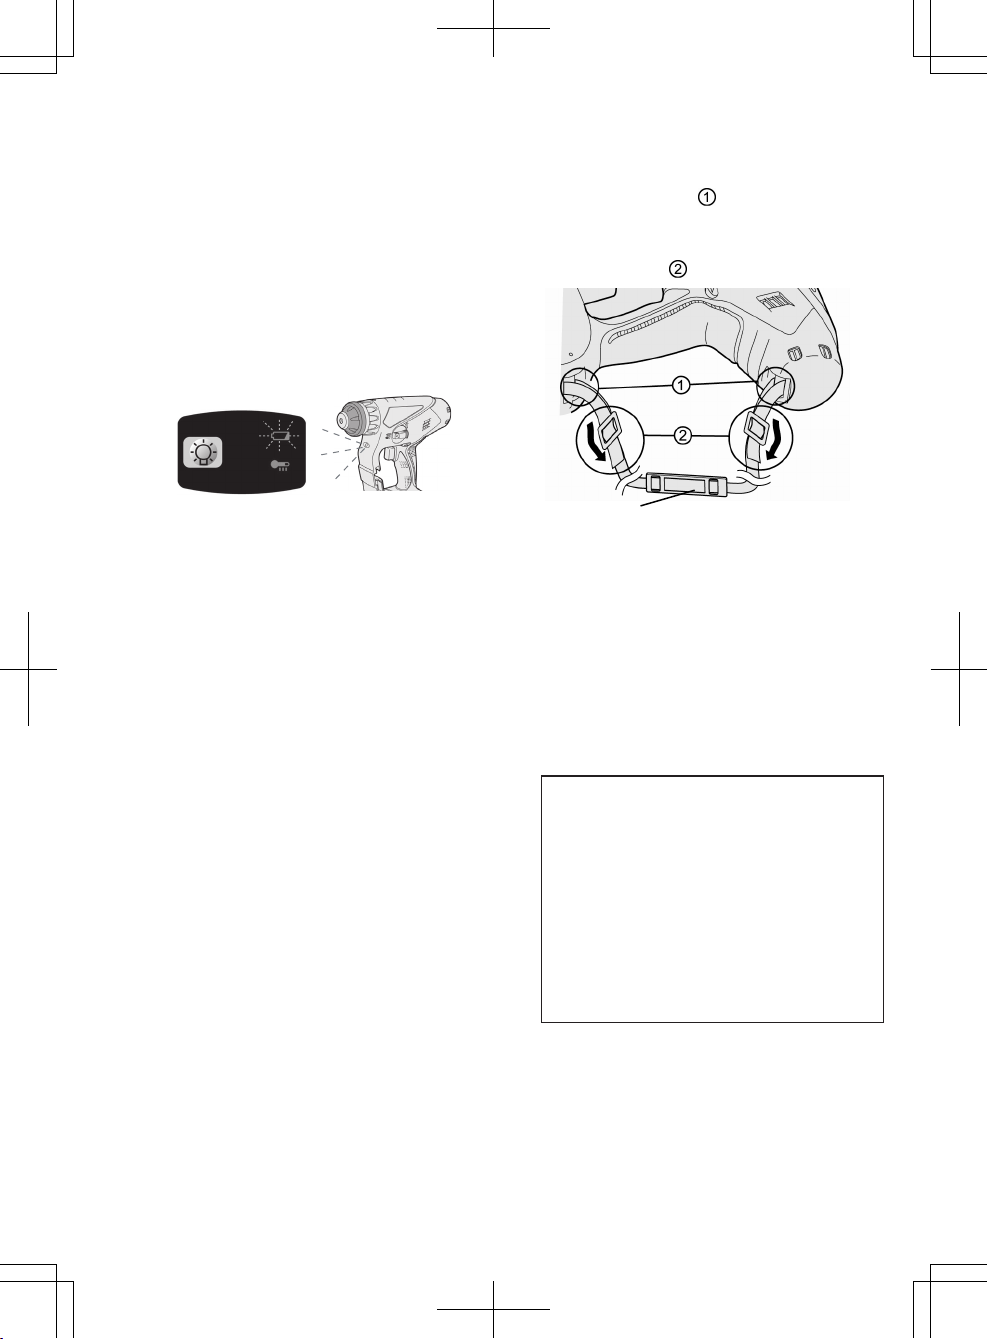
(1) LED light
Before the use of LED
light, always pull the
power switch once.
Press
the LED light
on button.
The light illuminates with
very low current, and it
does not adversely affect
the performance of the
tool during use or its
battery capacity.
CAUTION:
• The built-in LED light is designed to
illuminate the small work area
temporarily.
•
Do not use it as a substitute for a
regular flashlight, since it does not
have enough brightness.
•
LED light turns off when the tool
has not been used for 5 minutes.
C
aution :DO
NOT STARE INTO BEAM
.
Use of controls or adjustments or performance
of procedures other than those specified herein
may result in hazardous radiation exposure.
(2) Overheat warning lamp
Off
(normal
operation)
Illuminated:
Overheat
(motor)
Flashing:
Overheat
(battery)
Indicates operation has
been halted due to motor
or battery overheating.
To protect the motor or battery, be
sure to note the following when carrying out this operation.
●
If the motor or battery becomes hot,
the protection function will be
activated and the motor or battery
will stop operating. The overheat
warning lamp on the control
panel
- 13 -
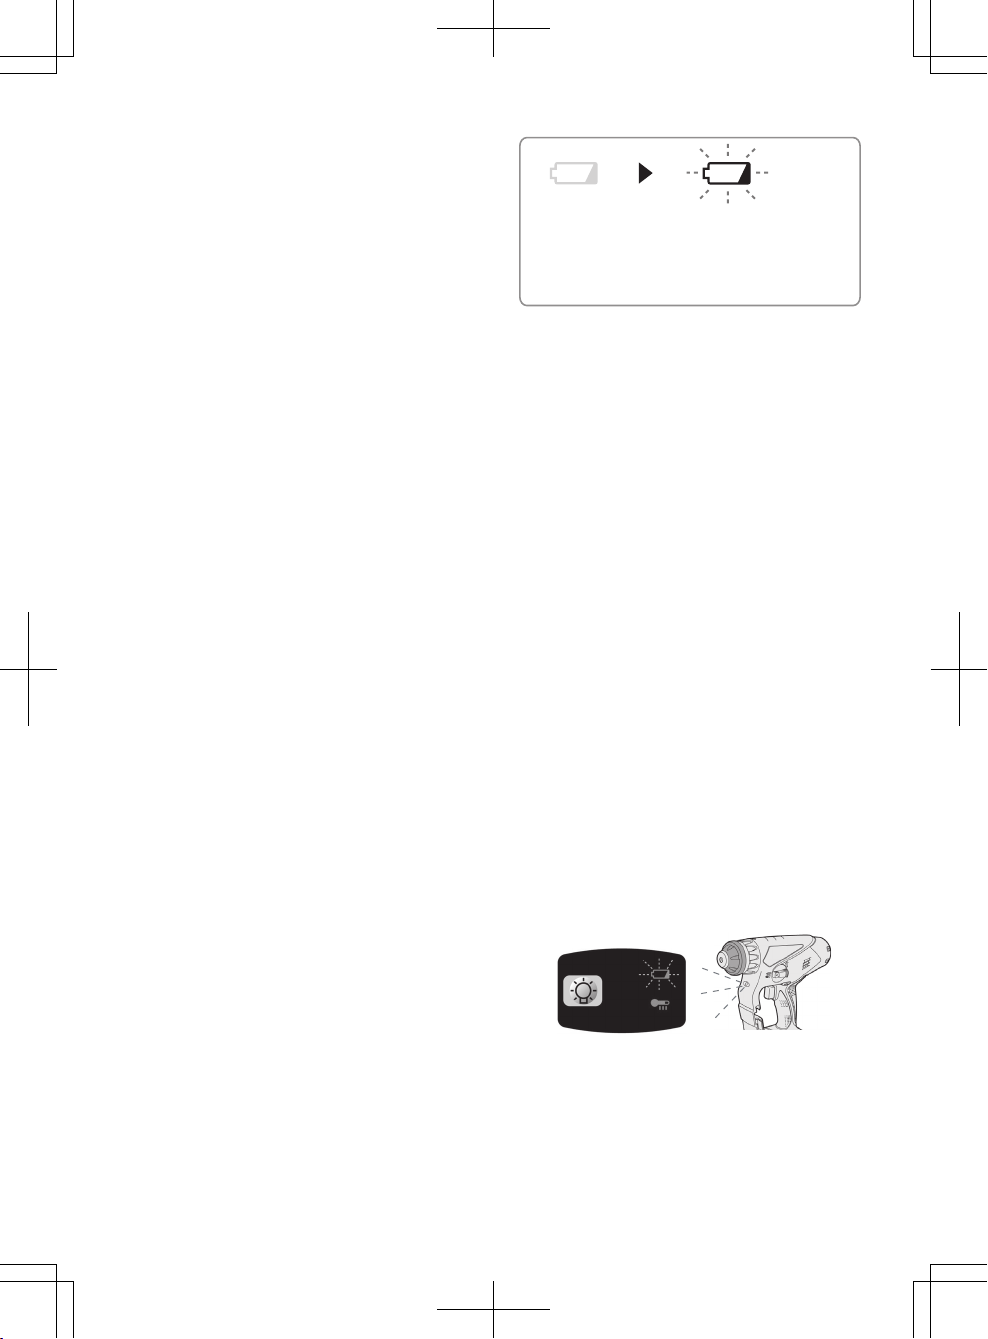
(3) Battery low warning lamp
Excessive (complete) discharging of
lithium ion batteries shortens their
service life dramatically. The driver
includes a battery protection feature
designed to prevent excessive discharging of the battery pack.
• The battery protection feature ac-
tivates immediately before the
battery loses its charge, causing
the battery low warning lamp to
flash.
• If you notice the battery low warn-
ing lamp flashing, charge the battery pack immediately.
•
If it is started with too little battery
power remaining, the tool may stop
operating without the battery low
warning lamp flashing first. This
indicates that there is too little battery power remaining to use the
tool, and the battery pack should
be charged before further use.
• If the tool is subject to a sudden
load during use that causes the
motor to lock up, the overdischarge
prevention sensor may be triggered, and the battery low warning
lamp may flash. The lamp will stop
flashing once you address the
cause of the motor’s locking up and
cycle the trigger.
•
The battery protection feature may
activate when a high load is abruptly placed on the motor, even if
ample battery charge remains. In
this case, both the battery low
warning lamp and LED light will
flash.
(EY78A1)
Off
(normal
operation)
Flashing
(No charge)
Battery protection
feature active
illuminates or flashes when this
feature is active.
●
If the overheating protection
feature activates, allow the
tool to cool thoroughly (at
least 30 minutes). The tool is
ready for use when the overheat
warning lamp goes out.
●
Avoid using the tool in a way that
causes the overheating protection feature to activate repeatedly.
●
If the tool is operated continuously
under high-load conditions or if it is
used in hot-temperature conditions
(such as during summer), the
overheating protection feature may
activate frequently.
●
If the tool is used in coldtemperature conditions (such as
during winter) or if it is frequently
stopped during use, the overheating protection feature may not
activate.
●
The performance of the EY9L42
deteriorates significantly at and
below 10°C due to work conditions
and other factors.
●
The ambient temperature range is
between 0°C (32°F) and 40°C
(104°F). If the battery pack is used
when the battery temperature is
below 0°C (32°F), the tool may fail
to function properly.
●
Use the charger at temperatures
between 0°C and 40°C, and
charge the battery at a temperature similar to that of the battery
itself. (There should be no more
than a 15°C difference between
the temperatures of the battery
and the charging location.)
- 14 -
• If both the battery low warning lamp
and LED light flash, reduce the force
with which you are pushing on the
driver or, if using a drill driver, adjust
the speed switch to a lower setting.
(EY78A1)
Installing the Shoulder Strap
CAUTION:
• Install the shoulder strap firmly
to the main unit of the tool and
check the length of the strap
before use.
•
Check the condition of the strap
and do not use if it is cut or torn
etc.
There is a risk of injury or damage if used while improperly installed.
• Please wear the shoulder strap
securely on the shoulder.
There is a risk of injury or dam-
age if it is accidentally dropped.
1. Pass the strap through the strap
holders. ( )
2. Pass the strap through the buckles
and adjust the length. (
)
• The shoulder strap can be adjusted
according to the individual.
• Adjust the shoulder pad to the
shoulder.
• Pull the shoulder strap to make sure
it is firmly attached to the main unit of
the tool.
Shoulder pad
(Available as an optional accessory)
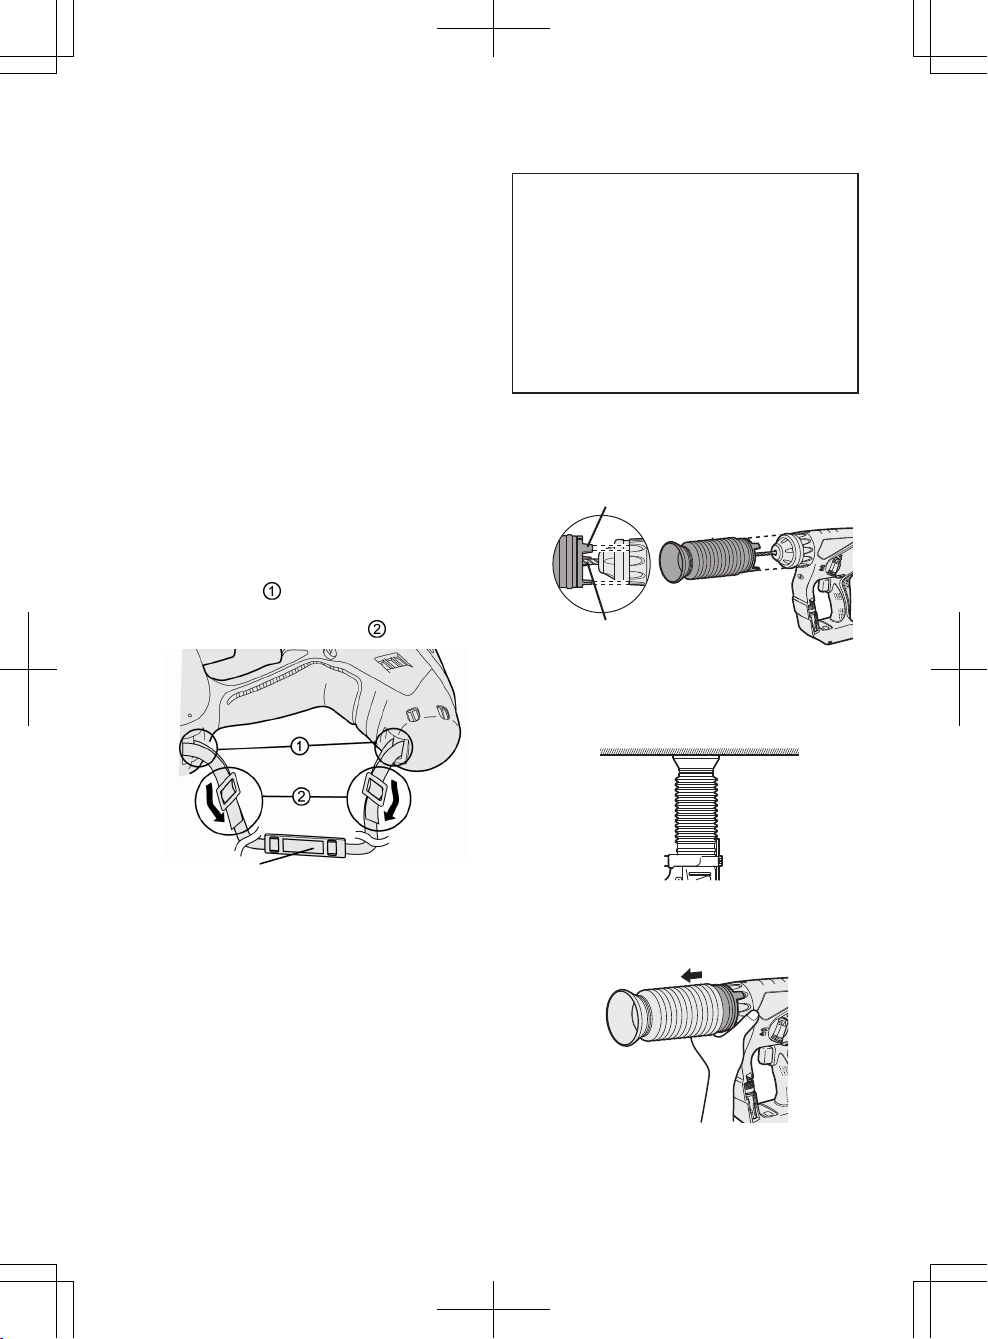
Dust Collection Cup (EY9X005E)
* Drill bits of which diameter is 20 mm
above cannot be inserted through
dust collection cup.
* Do not use the tool for cutting other
than concrete, mortar and other ceramic materials. If used for cutting metal
materials, the dust collection cup may
be damaged by the metal chip heat.
1. Install a drill bit.
2. Pass the drill bit through A and fix
the cup at B by matching with the
shape of the cluch handle.
A
Operation
Keep the dust collection cup in close
contact with the wall surface during
operation.
Removal
Hold the base of the dust collection
cup for removal.
Base
Please remove after thoroughly getting rid of the dust in the dust collection cup.
* Do not use this tool with any drill bit
which is shorter than 130 mm in length.
B
- 15 -
[Battery Pack]
For Appropriate Use of
Battery pack
• For optimum battery life, store the Liion battery pack following use without
charging it.
• When charging the battery pack,
confirm that the terminals on the
battery charger are free of foreign
substances such as dust and water
etc. Clean the terminals before
charging the battery pack if any foreign substances are found on the
terminals.
The life of the battery pack terminals
may be affected by foreign substances such as dust and water etc.
during operation.
• When battery pack is not in use,
keep it away from other metal objects
like: paper clips, coins, keys, nails,
screws, or other small metal objects
that can make a connection from one
terminal to another.
Shorting the battery terminals together
may cause sparks, burns or a fire.
• When operating the battery pack,
make sure the work place is well ventilated.
• When the battery pack is removed
from the main body of the tool, replace
the battery pack cover immediately in
order to prevent dust or dirt from contaminating the battery terminals and
causing a short circuit.
Battery Pack Life
The rechargeable batteries have a
limited life. If the operation time becomes extremely short after recharging, replace the battery pack with a
new one.
Battery Recycling
ATTENTION:
For environmental protection and
recycling of materials, be sure that
it is disposed of at an officially assigned location, if there is one in
your country.
[Battery Charger]
Charging
Cautions
• If the temperature of the battery
pack falls approximately below
−10°C (14°F), charging will automatically stop to prevent degradation of the battery.
• The ambient temperature range is between 0°C (32°F) and 40°C (104°F).
If the battery pack is used when the
battery temperature is below 0°C
(32°F), the tool may fail to function
properly.
• Use the charger at temperatures between 0°C and 40°C, and charge the
battery at a temperature similar to that
of the battery itself. (There should be
no more than a 15°C difference between the temperatures of the battery
and the charging location.)
• When charging a cool battery pack
(below 0°C (32°F)) in a warm place,
leave the battery pack at the place
and wait for more than one hour to
warm up the battery to the level of
the ambient temperature.
• Cool down the charger when
charging more than two battery
packs consecutively.
• Do not insert your fingers into contact
hole, when holding charger or any
other occasions.
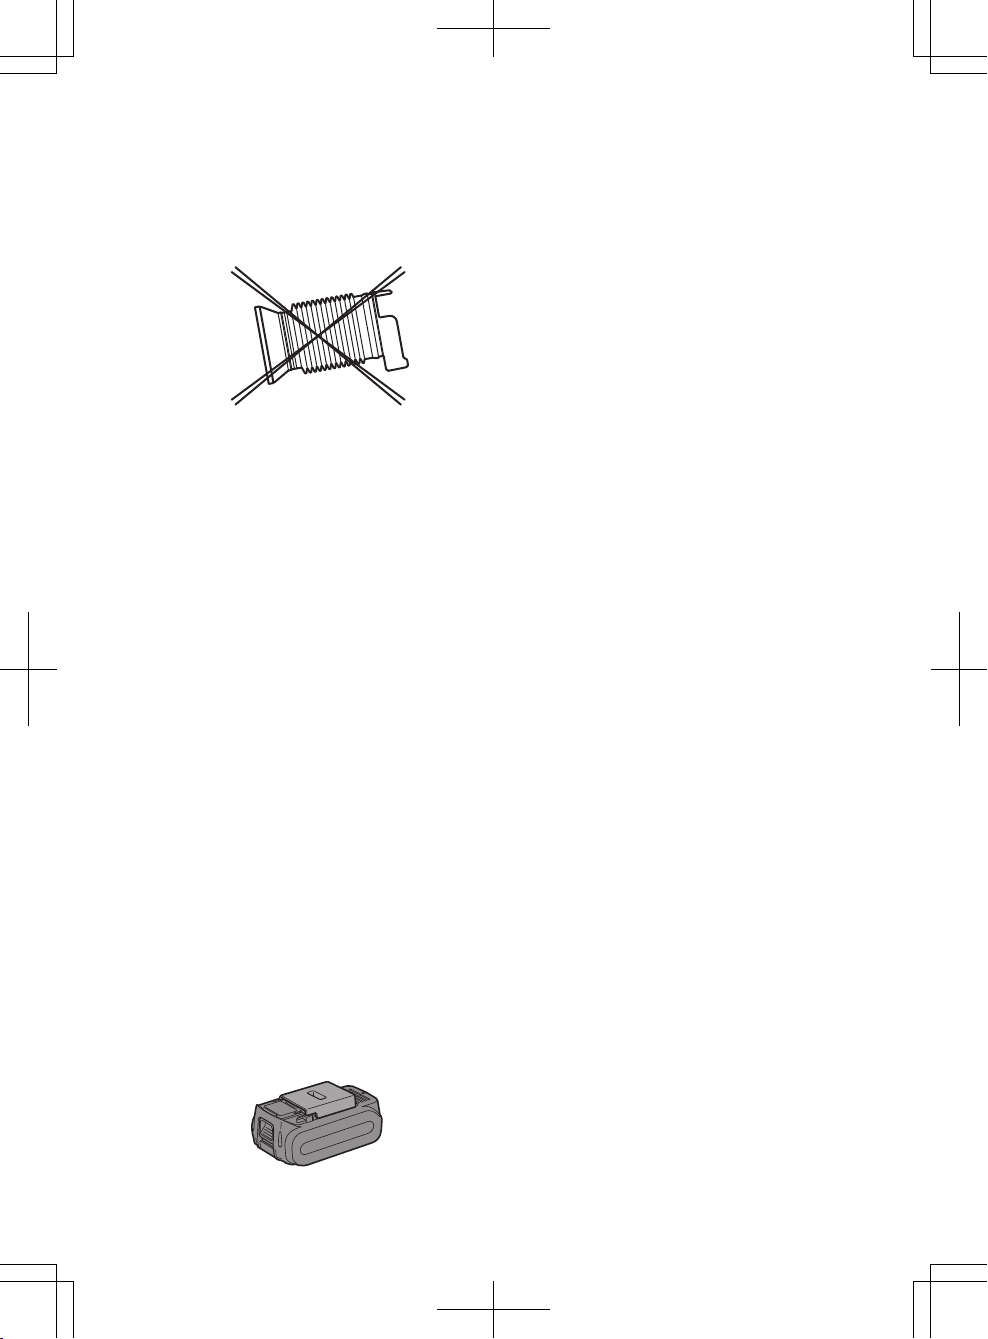
Storage
Do not store the dust collection cup
in a compressed position. If kept in
a compressed position, it may be
impossible to return to the original
shape.
- 16 -
CAUTION:
To prevent the risk of fire or damage to the battery charger.
• Do not use power source from an
engine generator.
• Do not cover vent holes on the
charger and the battery pack.
• Unplug the charger when not in
use.
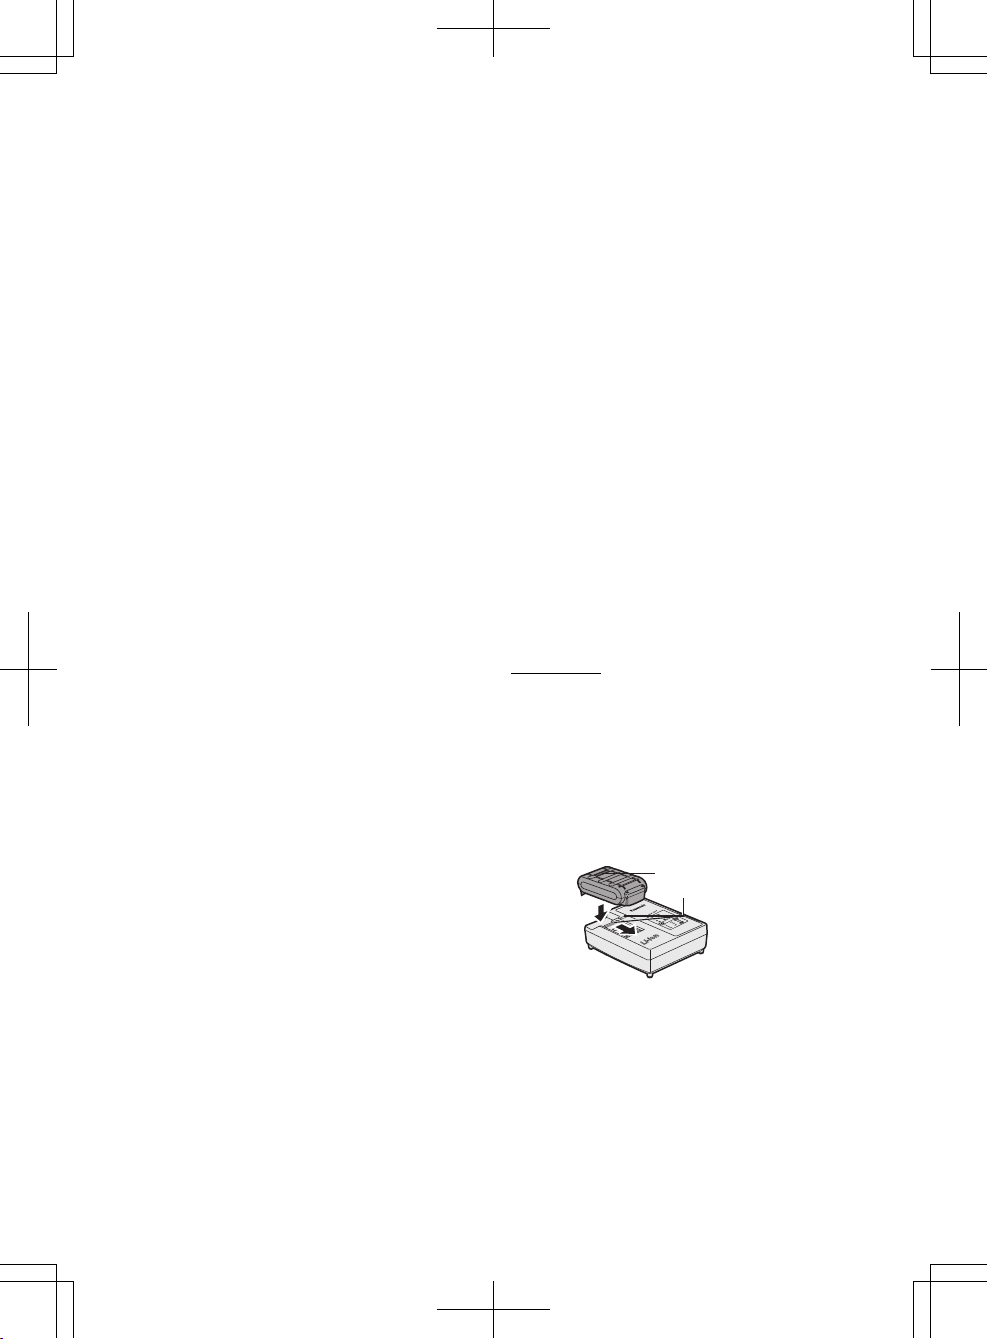
Li-ion Battery Pack
NOTE:
Your battery pack is not fully charged
at the time of purchase. Be sure to
charge the battery before use.
Battery charger
1. Plug the charger into the AC outlet.
2. Insert the battery pack firmly into the
charger.
1. Line up the alignment marks and
place the battery onto the dock on
the charger.
2. Slide forward in the direction of the
arrow.
3. During charging, the charging lamp
will be lit.
When charging is completed, an internal electronic switch will automatically be triggered to prevent
overcharging.
• Charging will not start if the battery
pack is warm (for example, immediately after heavy-duty operation).
The orange standby lamp will be
flashing until the battery cools
down.
Charging will then begin automat-
ically.
4. The charge lamp (green) will flash
slowly once the battery is approximately 80% charged.
5. When charging is completed, the charging lamp in green color will turn off.
6. If the temperature of the batter pack is
0°C or less, charging takes longer to
fully charge the battery pack than the
standard charging time.
Even when the battery is fully charged, it
will have approximately 50% of the
power of a fully charged battery at normal operating temperature.
7. Consult an authorized dealer if the
charging lamp (green) does not turn
off.
8. If a fully charged battery pack is in-
serted into the charger again, the
charging lamp lights up. After several
minutes, the charging lamp in green
color will turn off.
9. Remove the battery pack while thebat-
tery pack release button is held up.
Battery pack
release button
Alignment marks
- 17 -
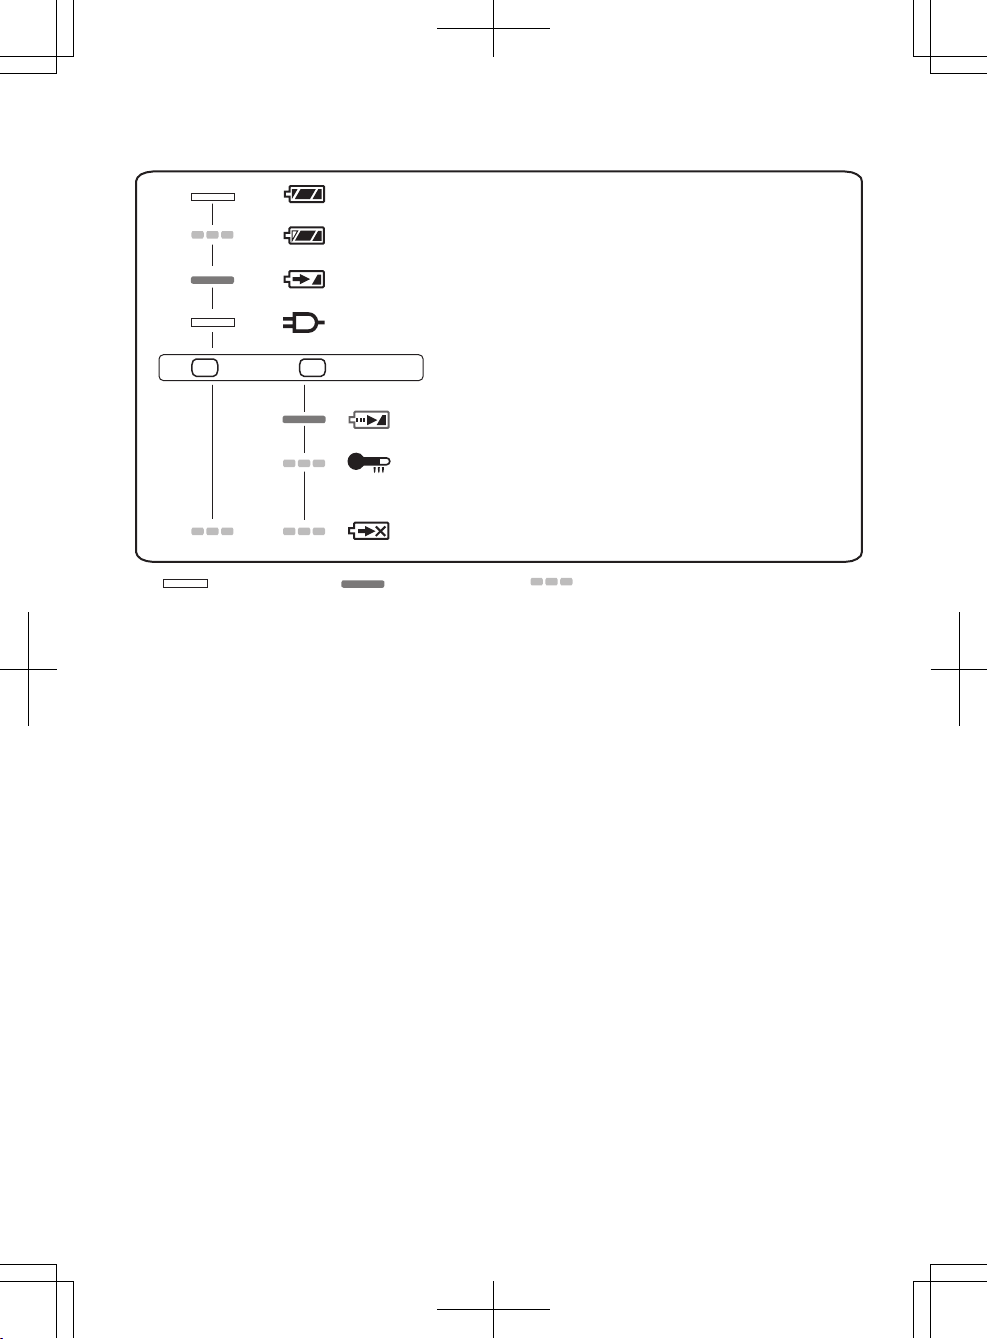
Charging is completed. (Full charge.)
Battery is approximately 80% charged.
Now charging.
Charger is plugged into the AC outlet. Ready to charge.
Charging Status Lamp.
Left: green Right: orange will be displayed.
Battery pack is cool.
The battery pack is being charged slowly to reduce the load on the battery.
Battery pack is warm.
Charging will begin when temperature of battery pack drops. If the temperature of the
battery pack is -10° or less, the charging status lamp (orange) will also start flashing .
Charging will begin when the temperature of the battery pack goes up"
Charging is not possible. Clogged with dust or malfunction of the battery pack.
Turn off
Lit Flashing
(Green) (Orange)
LAMP INDICATIONS
- 18 -
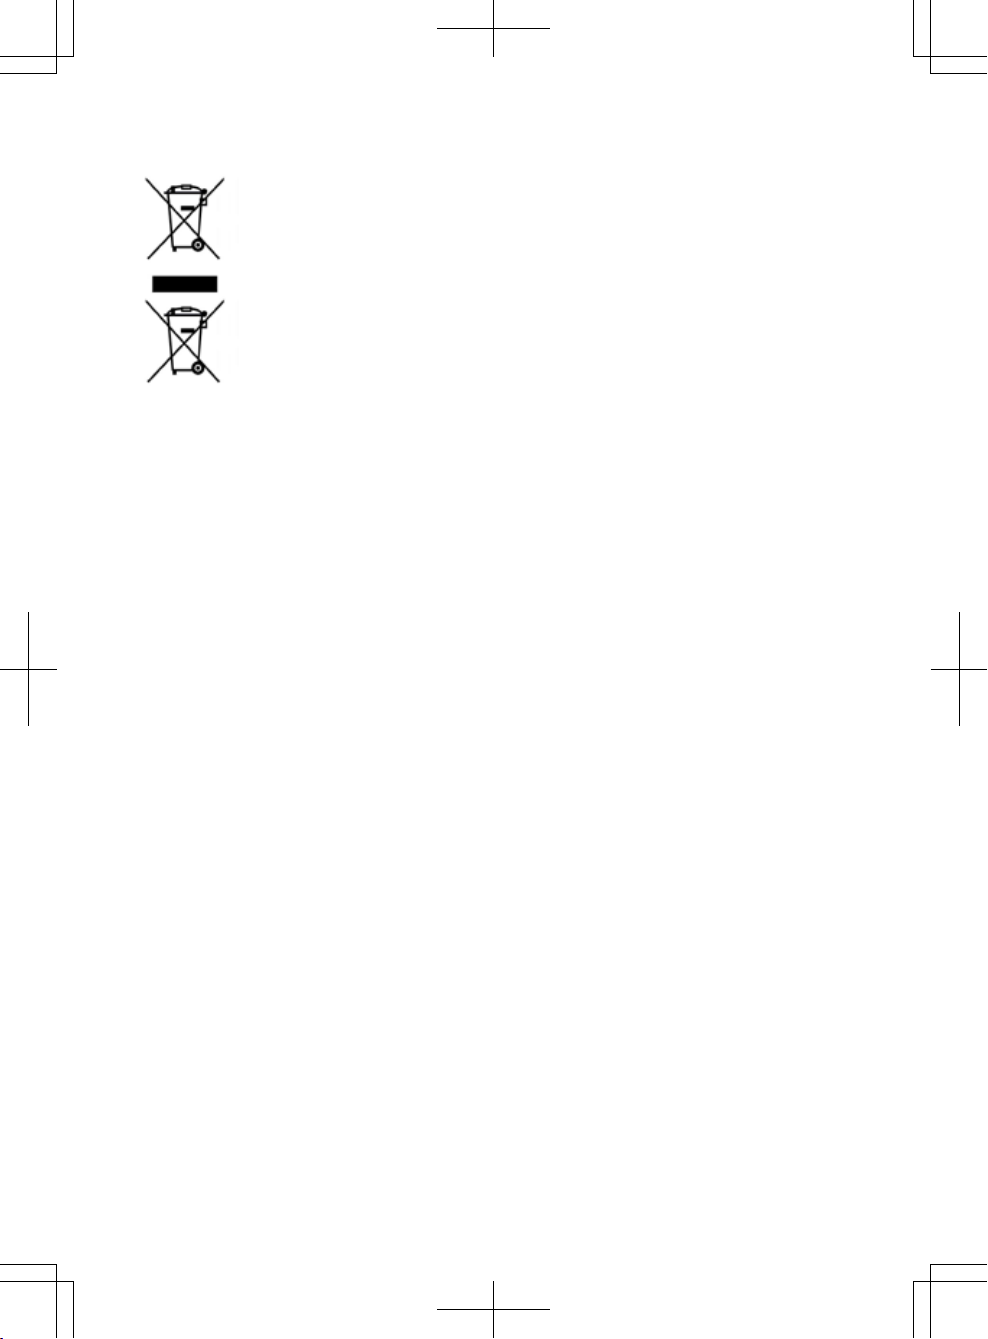
Information for Users on Collection and Disposal of Old
Equipment and used Batteries
These symbols on the products, packaging, and/or accompanying
documents mean that used electrical and electronic products and
batteries should not be mixed with general household waste.
For proper treatment, recovery and recycling of old products and used
batteries, please take them to applicable collection points, in accordance
with your national legislation and the Directives 2002/96/EC and
2006/66/EC.
By disposing of these products and batteries correctly, you will help to
save valuable resources and prevent any potential negative effects on
human health and the environment which could otherwise arise from
inappropriate waste handling.
For more information about collection and recycling of old products and
batteries, please contact your local municipality, your waste disposal
service or the point of sale where you purchased the items.
Penalties may be applicable for incorrect disposal of this waste, in
accordance with national legislation.
For business users in the European Union
If you wish to discard electrical and electronic equipment, please contact your
dealer or supplier for further information.
[Information on Disposal in other Countries outside the European Union]
These symbols are only valid in the European Union. If you wish to discard these
items, please contact your local authorities or dealer and ask for the correct method
of disposal.
Note for the battery symbol (bottom two symbol examples):
This symbol might be used in combination with a chemical symbol. In this case it
complies with the requirement set by the Directive for the chemical involved.

- 19 -
V. MAINTENANCE
• U
se only a dry, soft cloth for wiping the unit. Do not use a damp cloth, thinner, ben-
zine, or other volatile solvents for cleaning.
• In the event that the inside of the tool or battery pack is exposed to water, drain and
allow to
dry as soon as possible. Carefully remove any dust or iron filings that col-lect
inside the tool. If you experience any problems operating the tool, consult with a repair
shop.
VI. ACCESSORIES
CAUTION:
To prevent the risk of injury, only use accessory or attachment for its stated purpose.
Bit adapter (included)
•EY9HX403E
Drill chuck (Optional accessory)
•EY9HX400E
Use with wood drill bit or metal drill bit with shank of 1.5 mm to 13 mm diameter.
Do not use the drill chuck in “Rotation with hammering mode” (
). Use in "Rotation
with hammering mode" may cause break of chuck or bit and result in injury.
Hammer chuck (Optional accessory)
•EY9HX401E
Use with concrete drill bit, wood drill bit or metal drill bit with straight shank of 2.5 mm
to 13 mm diameter.
Do not use the hammer chuck with wood drill bit or metal drill bit in “Rotation with
hammering mode” ( ). Use in “Rotation with hammering mode” may cause break
of bit and result in injury.
If you need any assistance for more details regarding these accessories, ask your
local service center.
VII. USAGE SUGGESTION
1. If there isn’t enough force pushing down on the bit, the tool may not be able to
blow in hammering mode.
This is to prevent the hammering mode from operating with no load. Press down
harder on the bit to engage the tool and cause it to blow.
2. In winter or in other situations where the temperature of the unit is low (5°C (41°F)
or below), the blow of the hammering mode may be weaker than normal at the beginning stage.
This is because the grease becomes stiffer in low temperatures, increasing friction.
If this should happen, operating hammering mode with no load for approximately
30 seconds and repeat this 3 times. This will restore its blowing power.
- 20 -
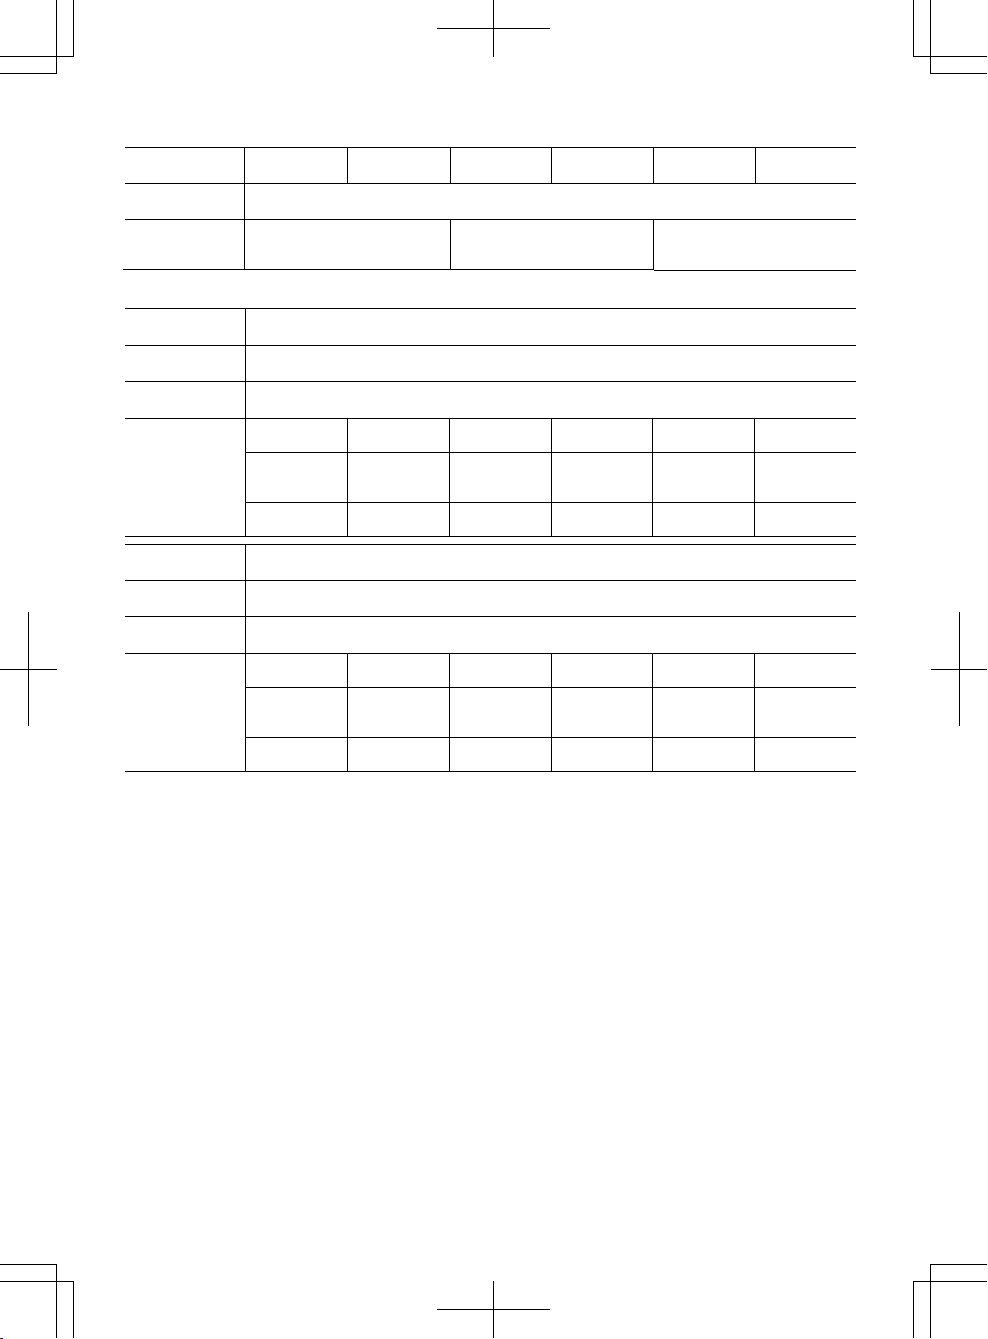
VIII. SPECIFICATIONS
MAIN UNIT
Model EY7840 EY78A1
Motor voltage
14.4 V DC 14.4 V DC 18 V DC
Maximum drilling
diameter
Concrete
16.5 mm
For work that can be completed with one battery pack
(
12.5 mm - 16.5 mm)
Steel
13 mm
Wood 18 mm
Speed at no load(RPM) 0~1000 rpm 0~1250 rpm
Blows rate per minute(BPM) 3800 bpm 3800 bpm 4750 bpm
Weight
(
with battery pack:EY9L44
)
2.45 kg 2.45 kg -
Weight
(
with battery pack:EY9L45
)
2.45 kg 2.45 kg -
Weight
(
with battery pack:EY9L50
)
- - 2.6 Kg
Weight
(
with battery pack:EY9L51
)
- - 2.6 Kg
Overall length
249 mm
Noise,Vibration
See the included sheet
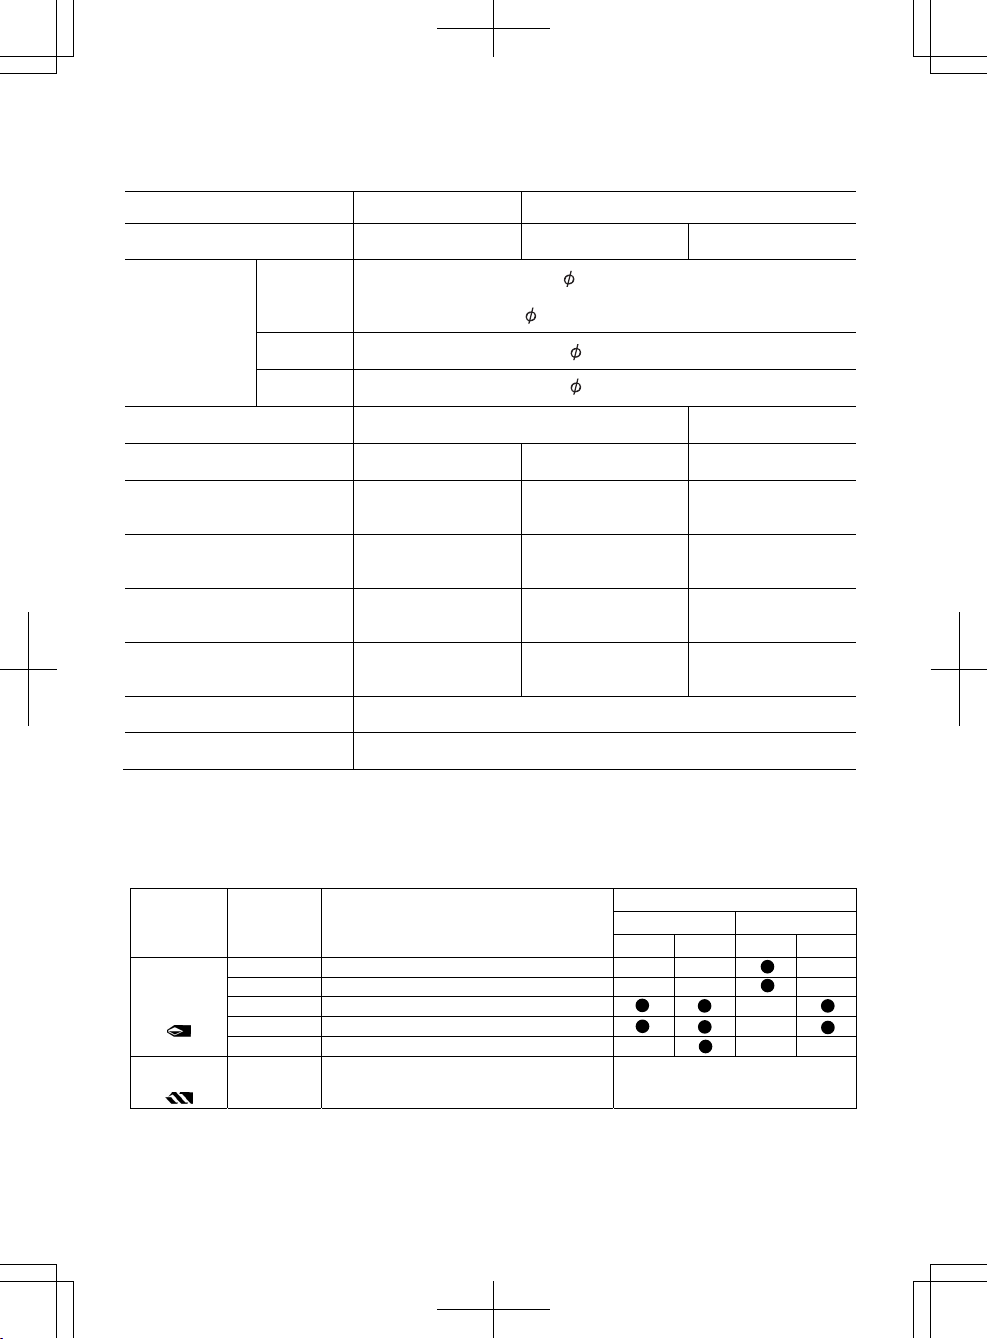
GUIDELINE TABLE
• Select the torque for fastening screws with the clutch handle.
• Guide for the selection of torque
Depending on the job, adjustments are possible in five levels by approximately 1 N·m (10
kgf-cm) increments.
Setting Torque
n
r
Bl
k
(A) (B) (A) (B)
Fastening
Screws
1 A
pp
roximately 1.5 N·m (15 kgf-cm
)
2 Approximately 2.5 N·m (25 kgf-cm
)
3 Approximately 3.4 N·m (35 kgf-cm
)
4 Approximately 4.4 N·m (45 kgf-cm
)
5 Approximately 5.4 N·m (55 kgf-cm
)
Drilling
Holes
(Drill Mark)
Approximately 14.4 V: 12.5 N·m (127 kgf-cm)
18 V: 13.5 N·m (138 k
g
f-cm)
Drilling holes in wood and metal
(A) For fastening screws into plastic anchor which requires dia. 6.0 mm prehole in the concrete.
(B) For directly fastening screws into concrete (like topcon) with dia. 3.5 mm prehole.
NOTE: This is only a rough guide. Required torque is different depending on the
shape, material, and application of the screws.
Set according to the work environment of the site.
- 21 -
BATTERY PACK
Model
EY9L41 EY9L42 EY9L44
EY9L45 EY9L50 EY9L51
Storage battery
Li-ion Battery
Battery voltage
14.4 V DC
(
3.6 V x 4 cells
)
14.4 V DC
(
3.6 V x 8 cells
)
18 V DC
(
3.6 V x 10 cells)
BATTERY CHARGER
Model
EY0L81
Electrical rating
See the rating plate on the bottom of the charge
r
Weight
0.93 kg
Charging time
EY9L41 EY9L42 EY9L44 EY9L45 EY9L50 EY9L51
Usable:
45 min
Usable:
30 min
Usable:
50 min
Usable:
65 min
Usable:
50 min
Usable:
65 min
Full: 60 min Full: 35 min Full: 65 min Full: 80 min Full: 65 min Full: 80 min
Model
EY0L82
Electrical rating
See the rating plate on the bottom of the charge
r
Weight
0.93 kg
Charging time
EY9L41 EY9L42 EY9L44 EY9L45 EY9L50 EY9L51
Usable:
35 min
Usable:
30 min
Usable:
40 min
Usable:
50 min
Usable:
40 min
Usable:
55 min
Full: 50 min Full: 35 min Full: 55 min Full: 60 min Full: 55 min Full: 70 min
NOTE: This chart may include models that are not available in your area.
Please refer to the latest general catalogue.
NOTE: For the dealer name and address, please see the included warranty card.
- 22 -
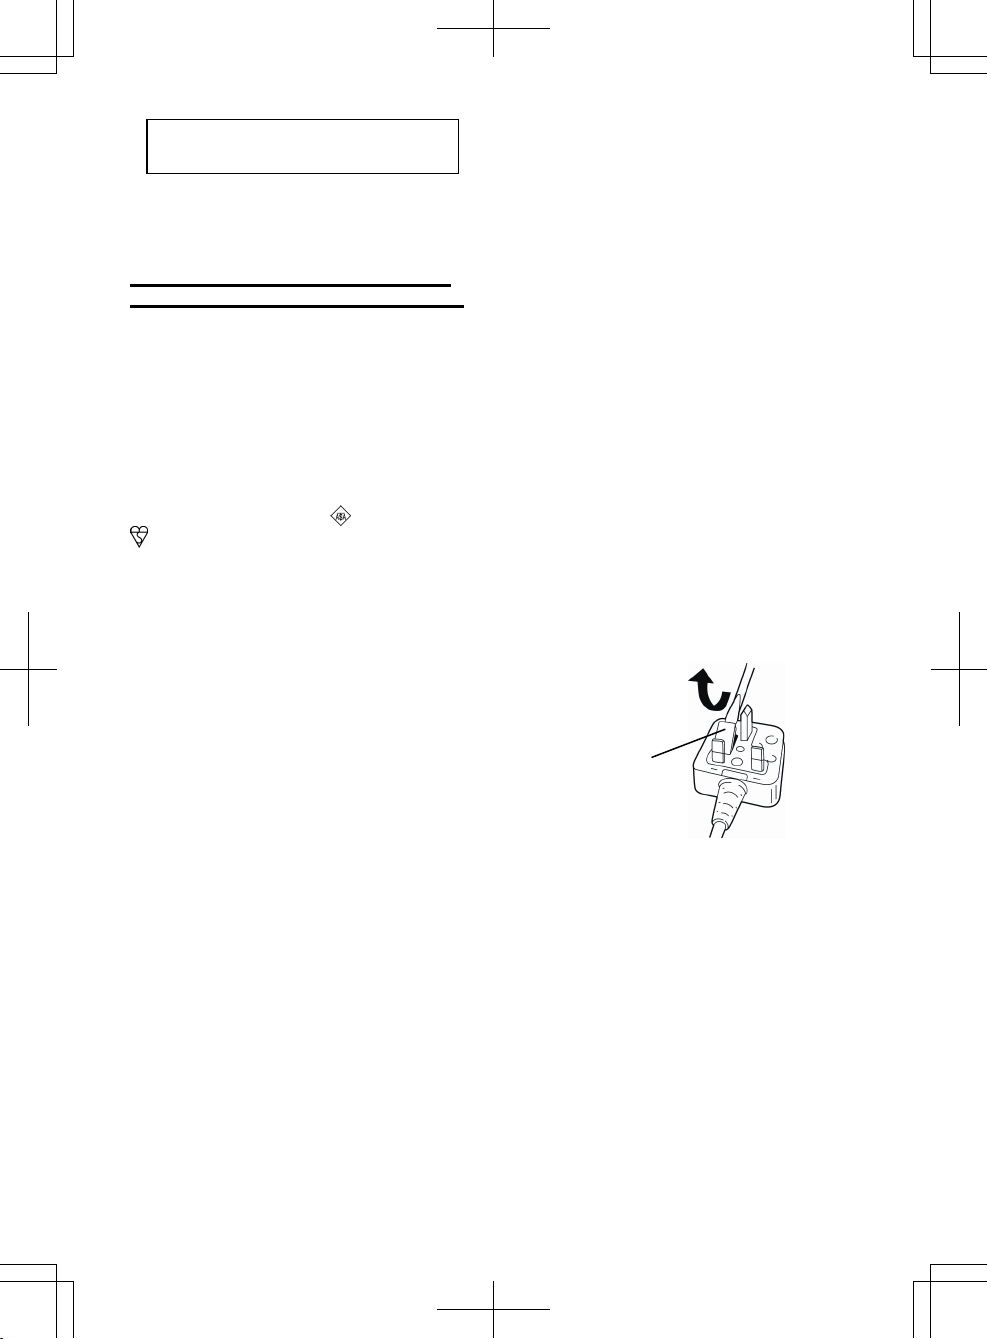
IX.
ELECTRICAL PLUG
INFORMATION
FOR YOUR SAFETY PLEASE READ
THE FOLLOWING TEXT CAREFULLY
This appliance is supplied with a moulded
three pin mains plug for your safety and
convenience.
A 5 amp fuse is fitted in this plug.
Should the fuse need to be replaced please
ensure that the replacement fuse has a rating of 5 amp and that it is approved by ASTA
or BSI to BS1362.
Check for the ASTA mark
or the BSI mark
on the body of the fuse.
If the plug contains a removable fuse cover
you must ensure that it is refitted when the
fuse is replaced.
If you lose the fuse cover the plug must not
be used until a replacement cover is obtained.
A replacement fuse cover can be purchased
from your local Panasonic Dealer.
IF THE FITTED MOULDED PLUG IS UNSUITABLE FOR THE SOCKET OUTLET IN
YOUR HOME THEN THE FUSE SHOULD
BE REMOVED AND THE PLUG CUT OFF
AND DISPOSED OF SAFELY.
THERE IS A DANGER OF SEVERE ELECTRICAL SHOCK IF THE CUT OFF PLUG IS
INSERTED INTO ANY 13 AMP SOCKET.
If a new plug is to be fitted please observe
the wiring code as shown below.
If in any doubt please consult a qualified
electrician.
IMPORTANT:
The wires in this mains lead
are coloured in accordance
with the following code:
Blue: Neutral
Brown: Live
As the colours of the wire in the mains lead
of this appliance may not correspond with
the coloured markings identifying the terminals in your plug, proceed as follows.
The wire which is coloured BLUE must be
connected to the terminal in the plug which
is marked with the letter N or coloured
BLACK.
The wire which is coloured BROWN must be
connected to the terminal in the plug which is
marked with the letter L or coloured RED.
Under no circumstances should either of
these wires be connected to the earth terminal of the three pin plug, marked with the
letter E or the Earth Symbol .
How to replace the fuse:
Open the fuse
compartment with a screwdriver and replace
the fuse and fuse cover if it is removable.
ONLY FOR U. K.
Fuse Cover

- 23 -
Original-Anleitung: Englisch
Übersetzung der Original-Anleitung:
Andere Sprachen
I.
BESTIMMUNGSGEMÄßE
VERWENDUNG DER
MASCHINE
Dieses Gerät ist ein Bohrhammer für das
Bohren in Beton. Zusätzlich verfügt das
Gerät aber auch über einen “Nur-Bohren-Modus”, bei dem kein Schlagen erfolgt.
Dieser Modus eignet sich für das Bohren
und zum Befestigen von Schrauben.
Lesen Sie bitte vor der ersten Inbetriebnahme dieses Geräts das separate Handbuch “Sicherheitsmaßregeln” sorgfältig durch.
II.
WEITERE WICHTIGE
SICHERHEITSREGELN
1)
Tragen Sie einen Gehörschutz.
Lärmeinwirkung kann zu Gehörverlust führen.
Verwenden Sie den mit dem
Werkzeug gelieferten Zusatzgriff
(Haltegriff).
Verlust der Kontrolle
kann Verletzungen verursachen.
2)
Halten Sie Elektrowerkzeuge an
den isolierten Griffflächen, wenn
Sie eine Arbeit durchführen, bei
der die Maschine auf verborgene
Kabel treffen könnte;
bei Kontakt
mit stromführenden Kabeln werden
die freiliegenden Metallteile der
Maschine ebenfalls stromführend
und der Benutzer erleidet einen
elektrischen Schlag.
3) Tragen Sie eine Staubmaske, falls
bei der Arbeit Staub anfällt.
4)
Denken Sie daran, dass das Werkzeug ständig betriebsbereit ist, da
es nicht an die Steckdose angeschlossen werden muss.
5)
Wenn der Bohrer sich festfrisst, sofort den Auslösehebel freigeben, da
das Akkupack und der Motor bei
Überlastung der Maschine beschädigt werden können. Zum Lösen
des Bohrers auf Linkslauf schalten.
6) Betätigen Sie den Rechts/Linkslauf
Schalter nicht, wenn der Betriebsschalter eingeschaltet ist. Der Akku
entlädt sich sonst schnell, und das
Gerät kann beschädigt werden.
7) Das Gerät nur mit einem trockenen, weichen Lappen abwischen.
Verwenden Sie zum Reinigen keine feuchten Lappen oder flüchtigen Lösungsmittel wie Farbverdünner oder Benzin.
8) Stellen Sie den Rechts/Linkslauf
Schalter zum Lagern oder Tragen
des Werkzeugs auf die Mittelstellung (Schaltersperre).
9) Das Gerät wird überbeansprucht,
wenn Sie den Betriebsschalter in
halb eingeschobener Stellung halten (aktive Drehzahlregulierung)
und den Motor abwürgen.
Hierdurch spricht die Schutzschal-
- 24 -
tung an, die die Drehzahlregulierung
außer Funktion setzt. In solchen
Fällen den Betriebsschalter freigeben und erneut ziehen, damit das
Gerät wieder normal arbeitet.
10) Darauf achten, dass kein Staub in
das Futter gerät.
11) Wegen Verletzungsgefahr bei laufender Maschine keine sich drehenden Teile berühren!
12)
Die Maschine nicht über längere
Zeit ununterbrochen laufen lassen,
sondern von Zeit zu Zeit stoppen,
damit der Motor sich abkühlen kann.
13) Die Maschine nicht fallenlassen!
14) ACHTUNG! Achten Sie darauf,
dass Sie das SDS-Spannfutter
nicht versehentlich aufstützen. Das
SDS-Werkzeug wird dann vom
Futter gelöst und fällt nach unten
aus der Maschine. Dies kann Verletzungen zur Folge haben.
Symbol Bedeutung
V
Volt
Gleichstrom
n0
Drehzahl ohne Last
…min
-1
Umdrehungen oder Hin- und
Herbewegungen pro Minute
Schlagbohren
Drehbewegung
Zur Verminderung der
Verletzungsgefahr
muss die
Bedienungsanleitung
gründlich gelesen
werden.
Nur für Inneneinsatz.
WARNUNG:
• Verwenden Sie nur die
Panasonic-Akkus, die für den
Einsatz mit dieser
Akku-Maschine ausgelegt sind.
• Panasonic übernimmt keine
Verantwortung für etwaige
Schäden oder Unfälle, die durch
den Gebrauch von recycelten und
gefälschten Akkus verursacht
werden.
• Werfen Sie den Akku nicht ins
Feuer, und setzen Sie ihn auch
keiner übermäßigen Wärme aus.
• Unterlassen Sie das Einschlagen
von Nägeln in den Akku sowie
Erschüttern, Zerlegen oder
Abändern des Akkus.
• Achten Sie darauf, dass keine
Metallgegenstände mit den
Kontakten des Akkus in
Berührung kommen.
• Unterlassen Sie das Tragen oder
Aufbewahren des Akkus
zusammen mit Nägeln oder
ähnlichen Metallgegenständen im
selben Behälter.
• Laden Sie den Akku nicht an
einem heißen Ort, wie z. B. in der
Nähe eines Feuers oder in
direktem Sonnenlicht.
Anderenfalls kann der Akku
überhitzen, Feuer fangen oder
explodieren.
• Verwenden Sie nur das
zugehörige Ladegerät zum Laden
des Akkus. Anderenfalls kann der
Akku auslaufen, überhitzen oder
explodieren.
• Nachdem Sie den Akku von der
Maschine oder dem Ladegerät
abgenommen haben, bringen Sie
stets die Akkuabdeckung wieder
an. Anderenfalls könnten die
Akkukontakte kurzgeschlossen
werden, was zu einem Brand
führen kann.
• Wenn der Akku schwach
geworden ist, ersetzen Sie ihn
durch einen neuen. Fortgesetzter
Gebrauch eines beschä-digten
Akkus kann zu Wärmeerzeugung,
Entzündung oder Bruch führen.

- 25 -
III. ZUSAMMENBAU
VORSICHT:
Die Verwendung eines Betonbohrers,
der größer als die empfohlene Größe
ist, kann eine Beschädigung des
Geräts verursachen.
1. Einführen des Einsatzes
1-1. Stecken Sie einen Bohrer in die
Montageöffnung und drehen Sie ihn
leicht, um ihn in der Einrastposition
zu fixieren.
1-2. Drücken Sie den Bohrer in der Ein-
rastposition so tief wie möglich hinein.
Ziehen Sie am Bohrer und überzeugen Sie sich davon, dass er richtig
fest sitzt.
2. Entfernen des Einsatzes
2-1. Drücken Sie auf das Spanfutter und
ziehen Sie am Bohrer.
Einsatzadapter
Verwenden Sie den Einsatzadapter
(O) und einen Einsatz.
1. Nehmen Sie den Einsatzadapter aus dem
Einsatzadapterhalter
an der Haupteinheit
heraus.
2. Ziehen Sie am Einsatzhalter. (
)
3. Führen Sie den Einsatz
ein. (
)
4. Vergewissern Sie sich durch leichtes
Ziehen, dass der Einsatz fest sitzt.
5. Führen Sie das Futter in die Halterung
ein und drehen Sie es, um eine Einrastposition zu finden.
6. Drücken Sie den Einsatzadapter an
der Einrastposition bis zum
Anschlag hinein.
• Vergewissern Sie sich durch
leichtes Ziehen, dass er sich
nicht bewegt.
Anbringen oder Abnehmen
des Akkus
1. Zum Anschließen des Akkus:
Die Ausrichtmarkierungen aufeinander ausrichten, und den Akku
anbringen.
• Den Akku einschieben, bis er ei-
nrastet
.
2. Zum Entfernen des Akkus:
Die Taste von vorne ziehen, um die
Batteriepackung zu lösen.
IV. BETRIEB
Rechts/Linkslaufumschalter
• Den Hebel nach dem Gebrauch des
Werkzeugs unbedingt auf Mitte
(Verriegelung) stellen.
• Betätigen Sie den Rechts/Linkslaufumschalter erst, wenn die
Motordrehung vollständig zum
Stillstand gekommen ist.
Rechtslauf Linkslauf
Verriegeln
Schaft des Typs
SDS PLUS
Einsatz
halter
Knopf
Ausrichtmarkierungen
- 26 -
Zum Umschalten zwischen
normalem Bohren und Hammerbohren
HINWEIS: Nehmen Sie den Be-
triebsartenwechsel erst
dann vor, wenn die
Motordrehung vollständig
zum Stillstand gekommen ist.
Position des
Umschalthebels
Betriebsart Operation
Schlagbohren
Betonbohren,
Blockbohren
Bohren/
Schrauben
Schraube
anziehen,
Bohren
Einstellung des
Kupplungsdrehmoments
Stellen Sie das Drehmoment auf eine
der 5 Kupplungsstufen oder die Position „
“ ein.
VORSICHT:
Prüfen Sie die Einstellung vor der
eigentli-chen Inbetriebnahme.
Stellen Sie die Skala auf diese
Markierung ( ) ein.
Elektronikschater
Um die Mitte eines Lochs anzubohren,
drücken Sie den Ein-Aus-Schalter leicht,
damit die Bohrdrehung langsam startet.
Je weiter der Elektronikschalter hineingedrückt wird, desto höher wird die
Drehzahl
.
VORSICHT:
Wird die Maschine durch Betätigen
des Auslösers gestartet, kann eine
kurzzeitige Verzögerung auftreten,
bevor die Drehung beginnt. Dies ist
kein Anzeichen für eine
Funktionsstörung.
• Diese Verzögerung tritt beim
Hochfahren der Schaltkreise der
Maschine auf, wenn der Auslöser
zum ersten Mal nach dem Einsetzen
eines neuen Akkus betätigt wird,
oder nachdem die Maschine
mindestens 1 Minute lang nicht
benutzt worden ist (oder mindestens
5 Minuten bei leuchtender LED). Bei
der zweiten und jeder weiteren
Betätigung läuft die Maschine ohne
Verzögerung an.
Bedienfeld
(1)
(3)
(2)
(1) LED-Leuchte
Betätigen Sie vor der
Benutzung der
LEDLeuchte einmal den
Ein-Aus-Schalter.
Drücken Sie die
LED-Leuchten-Einschaltt
aste
.
Die Leuchte benötigt nur
sehr wenig Strom und
beeinträchtigt nicht die
Leistung der Maschine
oder die Akkukapazität
während der Benutzung.
VORSICHT:
• Die eingebaute LED dient zur
vorübergehenden Beleuchtung des
kleinen Arbeitsbereichs.
• Benutzen Sie sie nicht als Ersatz
für eine reguläre Taschenlampe,
weil sie nicht hell genug ist.
• Die LED-Leuchte schaltet sich aus,
wenn die Maschine 5 Minuten lang
nicht benutzt wird.
Vorsicht:
SEHEN SIE NICHT IN DEN STRAHL.
Die Benutzung von Bedienelementen oder
Einstellungen, oder die Durchführung von
Vorgängen, die hier nicht beschrieben sind,
kann zu gefährlicher Strahlungsfreisetzung
führen.
- 27 -
(2) Überhitzungs-Warnlampe
Aus
(normaler
Betrieb)
Leuchten:
Überhitzung
(motor)
Blinken:
Überhitzung
(akku)
Zeigt an, dass der
Betrieb wegen Motoroder
Akkuüberhitzung
Zum Schutz des Motors und des Akkus
müssen beim Betrieb die folgenden
Punkte beachtet werden.
●
Bei einer Motor- oder Akkuüberhitzung spricht die Schutzschaltung an,
um den Betrieb des Motors bzw. Des
Akkus zu unterbrechen. Die Überhitzungswarnleuchte auf dem Bedienungsfeld leuchtet oder blinkt bei
aktivierter Funktion.
●
Falls die Überhitzungs-Schutzfunktion
aktiviert wird, lassen Sie das Tool
gründlich abkühlen (mindestens 30
Minuten). Das Tool ist wieder einsatzbereit, wenn die ÜberhitzungsWarnlampe erlischt.
●
Verwenden Sie das Tool so, dass die
Überhitzungs-Schutzfunktion nicht
wiederholt aktiviert wird.
●
Falls das Werkzeug kontinuierlich
unter starker Belastung oder bei
hoher Umgebungstemperatur im
Sommer verwendet wird, kann die
Überhitzungs-Schutzfunktion öfters
ansprechen.
●
Falls das Werkzeug bei niedriger
Umgebungstemperatur im Winter
oder jeweils nur kurzzeitig verwendet
wird, spricht die ÜberhitzungsSchutzfunktion nicht an.
●
Infolge der Arbeitsbedingungen und
anderer Faktoren nimmt die Leistung
des EY9L42 bei einer Temperatur
von 10 °C und darunter stark ab.
●
Der Umgebungstemperaturbereich
liegt zwischen 0°C und 40°C. Wenn
der Akku bei einer Akkutemperatur
unter 0°C benutzt wird, funktioniert
die Maschine möglicherweise nicht
einwandfrei.
●
Verwenden Sie das Ladegerät bei
Temperaturen zwischen 0°C und 40°C.
Die Temperatur während des Ladevorgangs sollte in etwa der Temperatur
des Akkus selbst entsprechen. (Die
Temperaturabweichung zwischen Akku
und der Ladeumgebung sollte nicht
mehr als 15°C betragen.)
(3) Akkuladungs-Warnlampe
Übermäßiges (vollständiges) Entla-den
von Li-Ion-Akkus führt zu einer erheblichen Verkürzung ihrer Lebensdauer.
Der Schrauber ist mit einer Akkuschutzfunktion ausgestattet, die
übermäßiges Entladen des Akkus verhindert.
• Die Akkuschutzfunktion wird unmittelbar vor der Erschöpfung des
Akkus aktiviert und bewirkt Blinken
der Akkuladungs-Warnlampe.
• Wenn Sie bemerken, dass die Ak-
kuladungs-Warnlampe blinkt, laden
Sie den Akku unverzüglich auf.
• Wird die Maschine bei zu geringer
Akku-Restladung gestartet, kann
sie stehen bleiben, ohne dass
zuvor die Akkuladungs-Warnlampe
blinkt. Dies zeigt an, dass zu wenig
Akku-Restladung für den Betrieb
der Maschine vorhanden ist. Daher
sollte der Akku vor weiterem
Gebrauch aufgeladen werden.
• Wird die Maschine während des
A
us
(normaler
Betrieb)
Blinken
(Keine Ladung)
A
kkuschutzfunktion
aktiv
- 28 -
Betriebs einer plötzlichen Last
ausgesetzt, die Blockieren des
Motors verursacht, kann der
Tiefentladungs-Schutzsensor
ausgelöst werden, so dass eventuell
die Akkuladungs-Warnlampe blinkt.
Die Lampe hört auf zu blinken,
sobald die Ursache der
Motorblockierung behoben und der
Auslöser betätigt wird.
•
Die Akkuschutzfunktion kann aktiviert werden,
wenn der Motor plötzlich stark belastet wird,
selbst wenn noch genügend Akkurestladung
vorhanden ist. In diesem Fall blinken die
Akkuladungs Warnlampe und die
LED-Leuchte.
(EY78A1)
•
Falls sowohl die Akkuladungs-Warnlampe
als auch die LED-Leuchte blinkt,
verringern Sie die Kraft, mit der Sie den
Schrauber andrücken, oder, falls Sie
einen Bohrschrauber verwenden, stellen
Sie den Drehzahl-Wahlschalter auf eine
niedrigere Drehzahl ein.
(EY78A1)
Anbringen des Schulterriemens
VORSICHT:
• Befestigen Sie den Schulterriemen
einwandfrei an der Haupteinheit des
Werkzeugs, und prüfen Sie seine
Länge vor der Benutzung.
• Prüfen Sie den Zustand des Riemens, und benutzen Sie ihn nicht,
wenn er Schnitte oder Risse usw.
aufweist.
Bei unsachgemäßer Anbringung
besteht die Gefahr von Verletzungen oder Sachbeschädigung.
• Bitte tragen Sie den Schulterriemen
sicher auf der Schulter.
Bei versehentlichem Herunterfallen
besteht die Gefahr von Verletzungen
oder Sachbeschädigung.
1. Führen Sie den Riemen durch die
Riemenhalter. (
)
2. Führen Sie den Riemen durch die
Schnallen, und stellen Sie seine
Länge ein. (
)
• Der Schulterriemen kann auf jede
Einzelperson eingestellt werden.
• Richten Sie das Schulterpolster auf
die Schulter aus.
• Ziehen Sie am Schulterriemen, um
sich zu vergewissern, dass er einwandfrei an der Haupteinheit des
Werkzeugs angebracht ist.
Schulterpolste
r
Staubsammelbehälter (EY9X005E)
(Als Sonderzubehör erhältlich)
*
*
Bohrer mit einem Durchmesser von mehr
Benutzen Sie dieses Gerät nicht mit Bohrmeißel die kürzer als 130 mm sind.
als 20 mm können nicht durch die Staubsammelmanschette eingeführt werden.
*
Verwenden Sie den Staubsammelbehälter
nicht zum Bearbeiten anderer Materialien
als Beton, Mörtel und anderem Keramikmaterial. Wenn der Staubsammelbehälter
z.B. bei der Bearbeitung von Metall eingesetzt wird, kann der Behälter durch die
heißen Metallspäne beschädigt werden.
- 29 -
[Akku]
Für richtigen Gebrauch
des Akkus
• Um eine möglichst lange Lebensdauer
des Li-Ion-Akkus zu erzielen, lagern
Sie ihn nach dem Gebrauch, ohne ihn
aufzuladen.
• Achten Sie beim Laden des Akkus
darauf, dass die Kontakte am Ladegerät
frei von Fremdstoffen, wie z. B. Staub
und Wasser usw., sind. Reinigen Sie
die Kontakte vor dem Laden des Akkus,
falls Fremdstoffe auf den Kontakten vorhanden sind.
Die Lebensdauer der Akkukontakte kann
durch Anhaften von Fremdstoffen, wie z.
B. Staub und Wasser usw., während des
Betriebs beeinträchtigt werden.
• Wenn Sie den Akku nicht benutzen,
halten Sie ihn von Metallgegenständen
fern: Büroklammern, Münzen, Schlüssel,
Nägel, Schrauben oder andere kleine
Metallgegenstände können die Kontakte
kurzschließen.
Das Kurzschließen der Akkukontakte
kann Funken, Verbrennungen oder einen
Brand verursachen.
• Sorgen Sie bei Benutzung des Akkus für
ausreichende Belüftung des Arbeitsplatzes.
•
Wenn der Akku vom Werkzeug-Haupt-teil
abgenommen wird, ist die Akkuabdeckung
sofort anzubringen, um zu verhüten, dass die
Akkukontakte durch Staub oder Schmutz
verunreinigt werden und ein Kurzschluss
verur-sacht wird.
Ausbau
Halten Sie den Staubsammelbehälter
zum Ausbauen an der Basis fest.
Bitte abnehmen, nachdem der Staub
in der Staubsammelschale gründlich
entfernt worden ist.
Lagerung
Lagern Sie den Staubsammelbehälter nicht in zusammengedrücktem Zustand. Wird er in zusammengedrücktem Zustand gelagert, kann er womöglich nicht mehr seine ursprüngliche Form annehmen.
Betrieb
Achten Sie darauf, dass der Staubsammelbehälter während des Bohrens
eng an die Wand gepreßt wird.
1. Setzen Sie einen Bohrer ein.
2.
A
B
Basis
Führen Sie den Bohrer durch das Teil
A, und befestigen Sie den Behälter
unter Anpassung an die Form des
Kupplungsrings am Teil B.
- 30 -
Lebensdauer des Akkus
Der Akku hat nur eine begrenzte
Le-bensdauer. Wenn auch nach einer
ordnungsgemäßen Ladung die Betriebszeit extrem kurz ist, muss der
Akku erneuert werden.
Batterie-Recycling
ACHTUNG:
Um Umweltschutz und Material-Recycling
zu gewährleisten, müs-
sen Sie die Batterie
zur örtlichen
Entsorgungsstelle bringen, falls
eine
solche in Ihrem Land vorhanden ist.
[Ladegerät]
Laden
VORSICHT
• Falls die Temperatur des Akkus unter etwa
–10°C abfällt, wird der Ladevorgang
automatisch abgebrochen, um eine
Verschlechterung des Akkus zu verhüten.
• Der Umgebungstemperaturbereich liegt
zwischen 0°C und 40°C.
Wenn der Akku bei einer Akkutemperatur unter
0°C benutzt wird, funktioniert die Maschine
möglicherweise nicht einwandfrei.
• Verwenden Sie das Ladegerät bei Temperaturen zwischen 0°C und 40°C. Die
Temperatur während des Ladevorgangs
sollte in etwa der Temperatur des Akkus
selbst entsprechen. (Die Temperaturabweichung zwischen Akku und der
Ladeumgebung sollte nicht mehr als 15°C
betragen.)
• Wenn ein kalter Akku (von etwa 0°C
oder weniger) in einem warmen Raum
aufgeladen werden soll, lassen Sie
den Akku für mindestens eine Stunde
in dem Raum und laden Sie ihn auf,
wenn er sich auf Raumtemperatur
erwärmt hat.
•
Den Akku abkühlen lassen, wenn er
mehr als 2× hintereinander aufgeladen
wurde.
• Stecken Sie Ihre Finger nicht in die
Kontaktöffnung, um das Ladegerät
festzuhalten oder bei anderen Gelegenheiten.
VORSICHT:
Um die Gefahr eines Brandes oder
Schadens am Ladegerät zu verhindern.
•
Keinen Motorgenerator als Spannungsquelle benutzen.
•
Decken Sie die Entlüftungsöffnun-gen
des Ladegerätes und den Akku nicht ab.
•
Trennen Sie das Ladegerät vom
Stromnetz, wenn es nicht benutzt wird.
Li-Ion-Akku
HINWEIS:
Beim Kauf ist Ihr Akku nicht voll
auf-geladen. Laden Sie daher den
Akku vor Gebrauch auf.
Ladegerät
1. Ladegerät an Wandsteckdose anschließen.
2. Akku fest in das Ladegerät schieben.
1 Die Ausrichtmarkierungen ausrich-
ten, und den Akku in den Schacht
des Ladegerätes einsetzen.
2
In Pfeilrichtung nach vorn schieben.
Ausrichtmarkierungen
3. Während des Ladens leuchtet die
Lade-kontrolllampe.
Mit Erreichen der vollen Ladung
spricht automatisch eine interne, elektronische Schaltung an, die ein
Überladen verhindert.
 Loading...