

Page 1
Инструкция по эксплуатации
(Бытового назначения)
(Побутового призначення)
(Тұрмыстық)
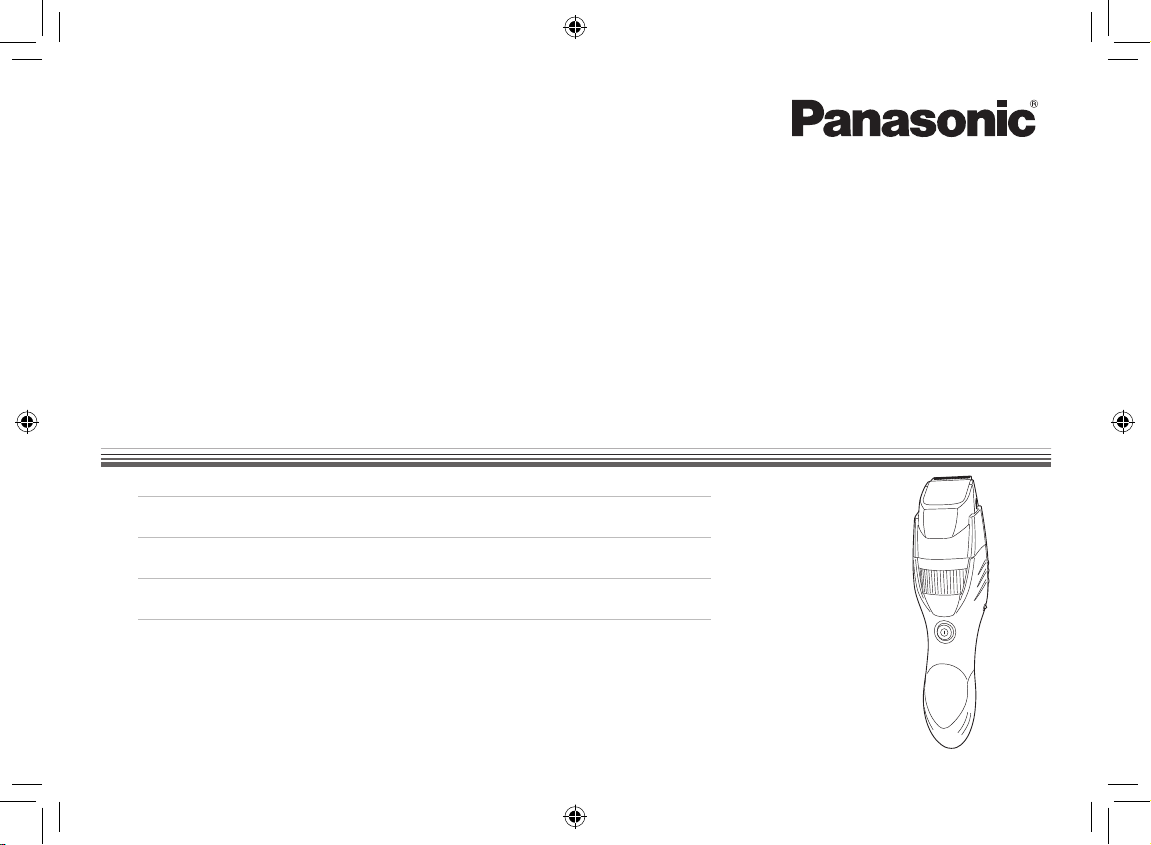
Триммер для бороды/волос с возможностью работы от аккумулятора
(Household)
Тример для бороди/волосся з можливістю роботи від акумулятора
Аккумулятордан жұмыс істеу мүмкіндігі бар шаш/cақал алу триммері
Rechargeable Beard/Hair Trimmer
English 2
Русский 10
Українська 18
Қазақша 27
Before operating this unit, please read these instructions completely and save them for future use.
Прежде чем использовать этот прибор, внимательно прочитайте данную инструкцию и сохраните её для
дальнейшего использования.
Перш ніж починати користуватись цим приладом, уважно прочитайте дані інструкції та збережіть їх для подальшого
використання.
Осы құралды пайдаланар алдында осы нұсқауларды мұқият оқып шығыңыз және оларды болашақта қолдануға
сақтап қойыңыз.
Operating Instructions
Інструкція з експлуатації
Пайдалану нұсқаулары
Model No.
Модель №
Модель №
ER‑GB40
Үлгі №
ER-GB40_CIS.indb 1 2013/02/26 15:31:56
Page 2

Thank you for choosing a Panasonic trimmer. Please read
English
all instructions before use.
Important
This trimmer has a built‑in rechargeable battery. Do not throw into
fire, apply heat, or charge, use, or leave in a high temperature
environment.
► Before use
This WET/DRY trimmer can be used for wet trimming or for dry
trimming. You can use this watertight trimmer in the shower and
clean with water. The following symbol means suitable for use in
a bath or shower.
► Using the trimmer
• Check that the blades are not damaged or deformed before
use.
• Terminate usage when there is an abnormality or failure.
• Turn off the appliance before changing the trimming length or
removing the comb attachment.
• Before and after each use, apply oil at the places marked with
arrows. (See page 8.)
• The appliance should not be used on animals.
• Do not press the blade against the skin.
• Do not use the trimmer for any purpose other than trimming.
2
• This appliance is not intended for use by persons (including
children) with reduced physical, sensory or mental capabilities,
or lack of experience and knowledge, unless they have been
given supervision or instruction concerning use of the
appliance by a person responsible for their safety. Children
should be supervised to ensure that they do not play with the
appliance.
► Charging the trimmer
• Never use the AC adaptor in the bathroom or shower room.
• Use the dedicated AC adaptor (RE7‑69) only. Do not use the
dedicated AC adaptor to charge other appliances.
• Charge the appliance in a location where it will not be exposed
to direct sunlight or other heat sources, at temperatures of
0 °C to 35 °C.
• Plug in the AC adaptor into a household outlet where there is
no moisture and handle it with dry hands.
• The trimmer may become warm during use and charging.
However, this is not a malfunction.
• Hold the plug when disconnecting it from the household outlet.
If you tug on the power cord, you may damage it.
• Do not use the trimmer if the power cord or the AC adaptor is
worn, or if the plug does not fit snugly in the outlet.
• Do not damage or deform the power cord. Do not place heavy
objects on the power cord or trap it between objects.
• The supply cord cannot be replaced. If the cord is damaged,
the AC adaptor should be scrapped.
► Cleaning the trimmer
Warning
Disconnect the plug from the household outlet before
cleaning to prevent electric shock.
• The housing should not be taken apart as this can affect the
watertight construction of the appliance.
• If you clean the trimmer with water, do not use salt water or
hot water. Do not soak the trimmer in water for a long period of
time.
ER-GB40_CIS.indb 2 2013/02/26 15:31:57
Page 3

• Clean the housing only with a soft cloth slightly dampened
with tap water or soapy tap water. Do not use thinner, benzine,
alcohol or other chemicals.
• Do not wash the AC adaptor with water.
• Clean the power plug regularly to remove any dust or dirt.
► Storing the trimmer
• Store the trimmer in a place with low humidity after use.
• Do not store the trimmer where it will be exposed to direct
sunlight or other heat sources.
• Remove the trimmer from the AC adaptor when storing it.
• Do not bend the power cord or wrap it around the AC adaptor.
• Store the AC adaptor in a dry area where it is protected from
damage.
• Keep the oil away from children.
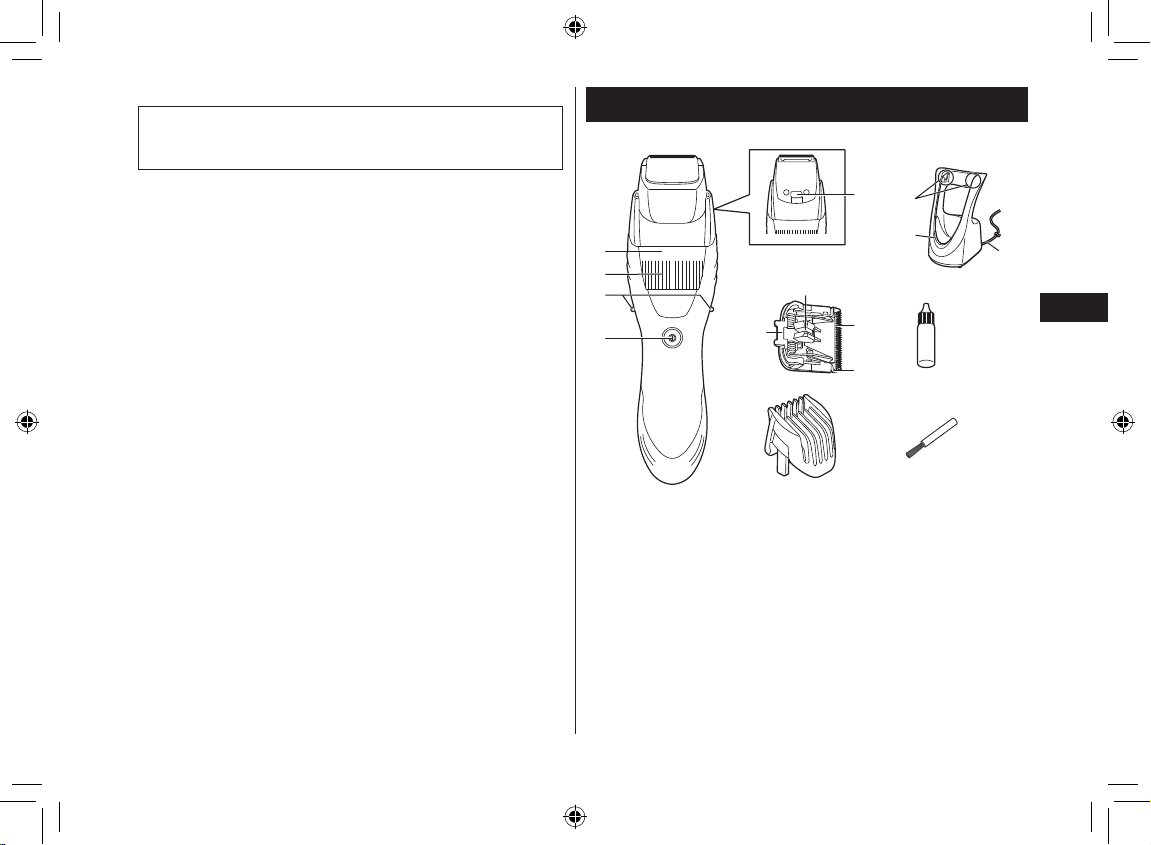
Parts identification
English
A Main body
1 Trimming height indicator
2 Dial (Height adjustment
control)
3 Side terminals
4 Power switch
5 Water inlet
B Blade block
6 Cleaning lever
7 Moving blade
8 Stationary blade
9 Mounting hook
C Comb attachment
(1 mm to 10 mm)
D AC adaptor (RE7‑69)
Charging terminals
Charge indicator lamp
Power cord
E Oil
F Cleaning brush
3
ER-GB40_CIS.indb 3 2013/02/26 15:31:57
Page 4
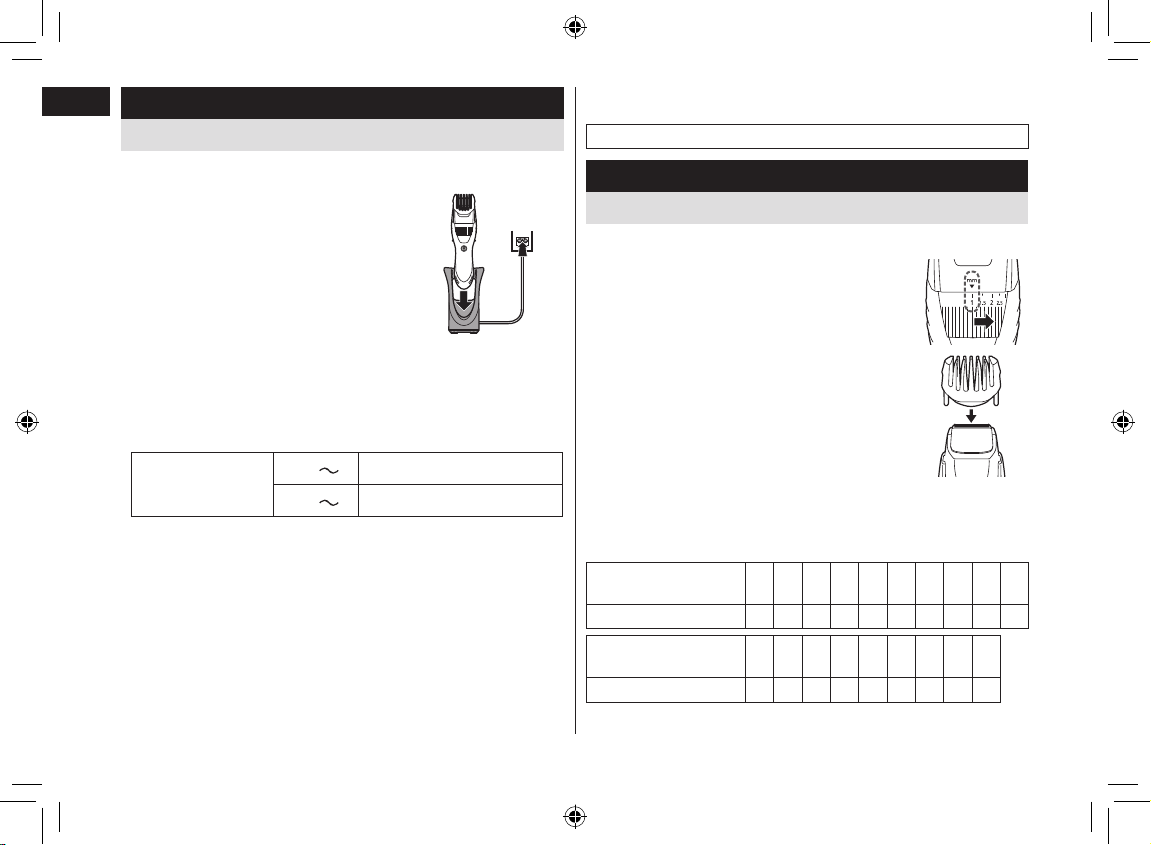
Charge
English
Charging the trimmer
Perform the following steps to charge the trimmer if it seems to
lose the speed.
Turn off the trimmer and insert
1
1
it in the AC adaptor until it
clicks as illustrated.
• The trimmer will not charge unless the
side terminals are in contact with the
charging terminals.
• Wipe off any water droplets on the side
terminals.
• If you charge the trimmer with power switch turned on, it will start
working when you remove from the AC adaptor.
Put the plug into a household outlet.
2
2
The charge indicator lamp glows red.
• Charging time differs depending on the rated voltage.
Charging time
• When charging the trimmer for the first time or when it has not
been in use for more than 6 months, the charge indicator lamp
may not glow for a few minutes, or the operating time may
shorten. Please charge it for more than 18 hours in such cases.
Disconnect the plug after charging is completed.
3
3
• To keep charging the battery will not affect battery performance.
• Recommended ambient temperature for charging is 0 ‑ 35 °C.
The battery may not charge properly or not at all under extreme
low or high temperatures.
• The charge indicator lamp glows and stays on until the plug is
disconnected from a household outlet.
4
220 V
230 V
Approx. 10 hours
Approx. 8 hours
1
• A full charge supplies enough power for approximately
50 minutes of use.
You cannot operate the trimmer while charging.
Use
Using the comb attachment
Make sure that the trimmer is turned off.
2
Turn the dial to the “1” position.
1
1
Mount the comb attachment to the
2
2
main body until it clicks.
Turn the dial to move the comb attachment to
3
3
the desired trimming length (between 1 mm
and 10 mm).
Trimming length (mm)
(estimate)
Indicator 1 1.5 2 2.5 3 3.5 4 4.5 5 5.5
Trimming length (mm)
(estimate)
Indicator 6 6.5 7 7.5 8 8.5 9 9.5 10
• Actual hair length will be a little longer than the height you set.
1 1.5 2 2.5 3 3.5 4 4.5 5 5.5
6 6.5 7 7.5 8 8.5 9 9.5 10
ER-GB40_CIS.indb 4 2013/02/26 15:31:57
Page 5

Use
Using the trimmer
Make sure there is no damage to the blade.
We recommend using the trimmer in an ambient temperature
range of 0 ‑ 35 °C. If used outside this range, the appliance may
stop operating.
► Trimming without the comb attachment
Shaping your moustache
■ Above the lips
Place the trimmer at a right angle to your
skin with the power switch facing upwards
and trim around your moustache.
English
Dry trimming
► Trimming with the comb attachment
Do not use with shaving creams applied or when the beard is wet.
Press the power switch to turn off the trimmer.
1
1
Mount the attachment and adjust the dial.
2
2
(See page 4.)
Press the power switch to turn on
3
3
the trimmer.
Hold the trimmer with the power
4
4
switch facing downward, and cut
the beard by moving the trimmer
back against the flow of the beard.
• Hair trimmings may collect inside the
attachment when a large volume of beard
is cut, so discard hair trimmings after each
use.
ER-GB40_CIS.indb 5 2013/02/26 15:31:57
To round out the shape, trim around your
moustache by holding the main body
sideways.
■ Trimming the edge of beard
Cut your beard gradually with the power
switch facing your skin, taking care not to
cut too much.
Shaping your sideburns
Place the trimmer at a right angle to your skin
and cut your sideburns.
5
Page 6

Shaping the hair around your ears
English
Trim the hair around your ears by holding the
main body sideways.
Press the power switch to turn on
3
3
the trimmer.
Cutting your vellus hair
Cut your vellus hair slowly, moving upward
from the bottom with the power switch facing
your skin.
• Trimming your beard or moustache without an attachment will
trim hair length to approx. 0.5 mm.
Wet trimming
► Trimming without the comb attachment
Cut your beard or vellus hair with water or face‑wash cleanser on
your face.
Wet trimming will decrease the friction, allowing a smooth touch.
Wet trimming is recommended to trim a fuller beard to a length of
0.5 mm without an attachment.
Remove the comb attachment.
1
1
Apply water, soap, etc., to your face.
2
2
6
Cut your beard slowly, moving
4
4
upward from the bottom with the
power switch facing your skin.
Notes
• Do not use any shaving creams as these may cause a
decrease in cutting performance due to scoring of the blades.
• Make sure to rinse the main body with water and apply the oil
to the blades after wet trimming.
ER-GB40_CIS.indb 6 2013/02/26 15:31:58
Page 7
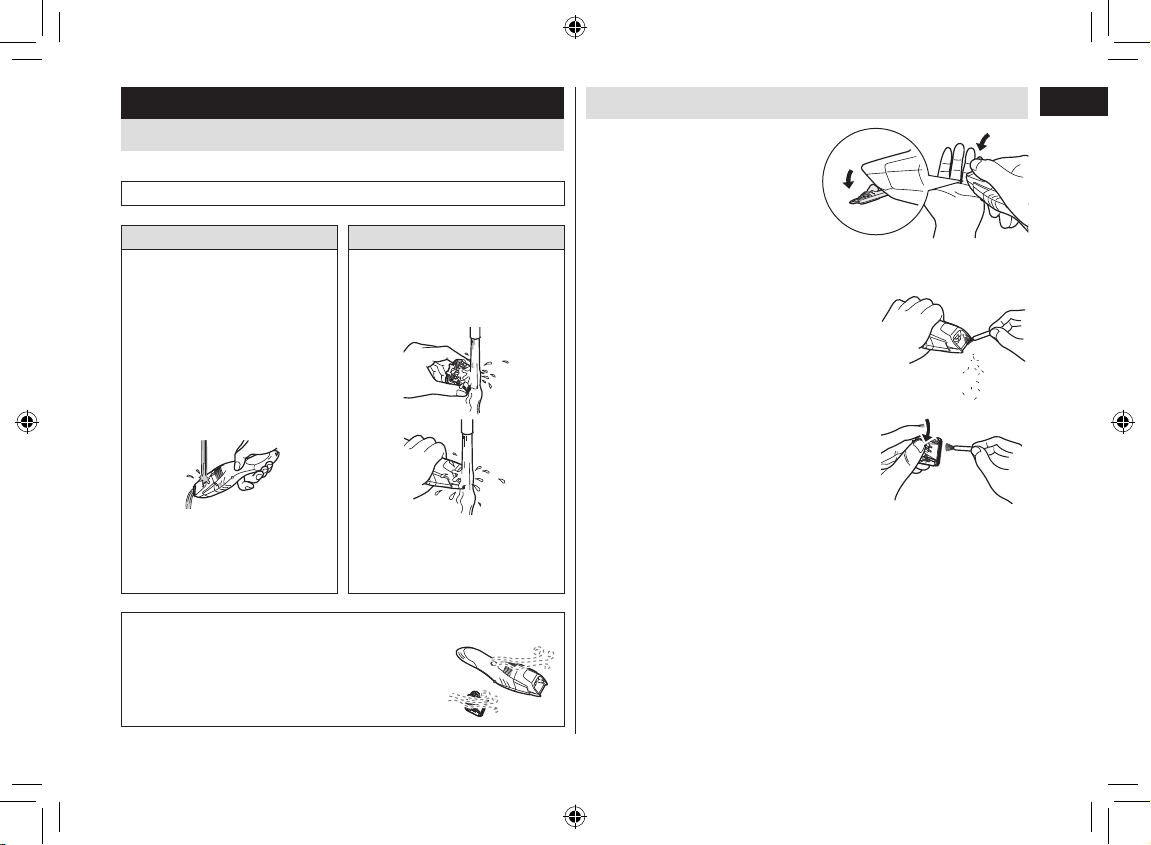
Clean
Cleaning the trimmer
It is recommended to clean at every use.
1. Remove the trimmer from the AC adaptor.
2. Remove the comb
attachment and turn the
trimmer on.
3. Run water down the water
inlet at the back of the main
body, rinse thoroughly for
approximately 20 seconds,
and then turn the trimmer
off.
▼ ▼
To remove light dirt For heavy dirt
2. Remove the comb
attachment and blade.
3. Clean the trimmer and the
blade with running water.
Cleaning with the brush
1. Remove the trimmer from the
AC adaptor.
• Make sure that the trimmer is
turned off.
2. Remove the comb attachment.
3. Hold the main body, place your
thumb against the blades and
then push them away from the
main body.
4. Brush off any hair trimmings from the
main body and from around the blade.
5. Brush any hair trimmings out from
between the stationary blade and the
moving blade while pressing down the
cleaning lever to raise the moving blade.
English
• Rinse with water and
shake up and down
several times to remove
the water.
▼ ▼
4. Wipe off the water with a towel and let it
dry naturally.
• It will dry faster with the blade removed.
5. Apply the oil to the blade after drying.
6. Attach the comb attachment and blade
to the trimmer.
• Rinse with water and
shake up and down
several times to remove
the water.
4
6. Apply the oil to the blade.
7. Attach the comb attachment and blade to the trimmer.
7
ER-GB40_CIS.indb 7 2013/02/26 15:31:58
Page 8

Lubrication
English
Apply the oil to the trimmer
before and after each use.
Apply a drop of the oil to the
points indicated by the arrows.
Remounting the blade
Fit the mounting hook into the
blade mounting on the trimmer
and then push in until you hear
a click.
► Blade life
Blade life varies according to the frequency and length of use of
the trimmer.
For example, the blade life is approximately 3 years when using
the trimmer for 5 minutes 10 times a month. Replace the blades if
cutting efficiency reduces substantially despite proper
maintenance.
► Battery life
Battery life will vary according to the frequency and length of use.
If the battery is charged once every 2 weeks, the service life will
be approximately 3 years.
• It is recommended that the trimmer be recharged at least every 6
months even when not in regular use because the charge will
drain from the battery and its service life may be shortened.
8
Removing the built-in rechargeable battery
Remove the built‑in rechargeable battery before disposing of the
trimmer. Please make sure that the battery is disposed of at an
officially designated location if there is one. Do not dismantle or
replace the battery so that you can use the trimmer again. This
could cause fire or an electric shock.
Please contact an authorised service center.
• Remove the trimmer from the AC adaptor when removing the
battery.
• Perform steps 1 to and lift the battery, and then remove it.
• Please take care not to short‑circuit the battery.
For environmental protection and recycling of materials
This trimmer contains a Nickel‑Metal Hydride battery.
Please make sure that the battery is disposed of at an officially
assigned location, if there is one in your country.
ER-GB40_CIS.indb 8 2013/02/26 15:31:58
Page 9

Specifications
Power source See the name plate on the AC adaptor.
Motor voltage
Charging time
This product is intended for household use only.
1.2 V
220 V
230 V
Approx. 10 hours
Approx. 8 hours
English
9
ER-GB40_CIS.indb 9 2013/02/26 15:31:59
Page 10
Благодарим Вас за выбор триммера Panasonic. Перед
использованием прочитайте полностью все инструкции.
Важная информация
Данный триммер оснащен встроенным аккумулятором. Не бросайте
в огонь, не нагревайте, а также не заряжайте, не используйте и не
оставляйте прибор в месте с высокой температурой.
►
Перед использованием
Данный триммер можно использовать для стрижки сухих или
мокрых волос. Триммер является водонепроницаемым и его
можно использовать в душе и чистить в воде. Следующий символ
Русский
означает, что данное устройство можно использовать в ванной
комнате или в душе.
►
Использование триммера
•
Каждый раз перед началом стрижки проверяйте лезвия на
предмет деформации или повреждений.
•
Немедленно прекратите использование прибора в случае
нарушения работы или неисправности.
•
Отключите прибор, перед тем как регулировать длину стрижки
или снять насадку.
•
Каждый раз перед началом и по окончании стрижки наносите
масло на участки, отмеченные стрелками. (См. страницу 16.)
•
Запрещается использовать триммер для стрижки шерсти
животных.
•
Не прижимайте лезвие к коже.
•
Используйте триммер только по назначению - для стрижки волос.
•
Это устройство не предназначено для использования людьми
(включая детей) с ограниченными физическими, сенсорными или
умственными способностями или лицами без соответствующих
знаний и опыта. Использование устройства такими людьми
допускается только под наблюдением лица, отвечающего за их
безопасность, и при условии предоставления с его стороны
чётких инструкций по работе с устройством. Необходимо
следить, чтобы дети не играли с устройством.
►
Зарядка триммера
•
Ни в коем случае не используйте адаптер сети переменного тока
в ванной комнате или в душевой.
•
Используйте только специальный адаптер сети переменного тока
(RE7-69). Не используйте специальный адаптер сети
переменного тока для зарядки других устройств.
•
Не производите зарядку аккумулятора в местах, подверженных
воздействию прямых солнечных лучей и других источников
тепла, а также при температуре ниже 0 °C или выше 35 °C.
•
Вставьте адаптер в бытовую розетку. Убедитесь в отсутствии
влаги и не прикасайтесь к нему мокрыми руками.
•
Триммер может нагреваться во время использования и зарядки.
Однако это не является неисправностью.
•
Выключая штепсельную вилку из розетки, держитесь за вилку. Не
тяните за шнур электропитания, так как это может повредить его.
•
Не используйте триммер, если сетевой шнур или адаптер сети
переменного тока имеют видимые повреждения, а также, если
электрическая вилка неплотно входит в розетку.
•
Не повреждайте и не деформируйте электрический провод. Не
ставьте тяжелые предметы на электрический провод и не
зажимайте его между ними.
•
Шнур питания не подлежит замене. В случае повреждения шнура
адаптер сети переменного тока необходимо утилизировать.
10
ER-GB40_CIS.indb 10 2013/02/26 15:31:59
Page 11
►
Очистка триммера
Предостережение
Перед очисткой отсоединяйте штепсельную вилку от
электрической розетки, чтобы избежать поражения током.
•
Не следует снимать защитный корпус, так как это может
нарушить водонепроницаемые свойства прибора.
•
При очистке триммера в воде не используйте солёную или
горячую воду. Не оставляйте триммер погруженным в воду на
длительное время.
•
Чистите корпус только мягкой тканью, слегка смоченной
водопроводной водой или слабым мыльным раствором. Не
используйте растворитель, бензин, спирт и другие химические
вещества.
•
Не мойте адаптер сети переменного тока водой.
•
Выполняйте регулярную очистку вилки сетевого адаптера от
грязи и пыли.
►
Хранение триммера
•
После использования храните триммер в сухом месте.
•
Не храните триммер в местах, где он будет подвергаться
воздействию прямых солнечных лучей или других источников
тепла.
•
Снимайте триммер с адаптера сети переменного тока при
хранении.
•
Не перегибайте шнур и не наматывайте его на адаптер сети
переменного тока.
•
Храните адаптер в сухом надёжном месте, где будет
гарантирована его целостность.
•
Храните смазочное масло в недоступном для детей месте.
Детали устройства
A
Корпус
1
Индикатор высоты стрижки
2 Поворотный переключатель
длины стрижки (Управление
регулировкой высоты)
3
Боковые контакты
4
Выключатель питания
5
Отверстие для входа воды
B
Блок лезвий
6
Рычаг для очистки
7
Рабочее лезвие
8
Неподвижное лезвие
9
Крепежный зацеп
C
Насадка-гребень
(от 1 мм до 10 мм)
D
Адаптер сети переменного
тока (RE7-69)
Разъемы для зарядки
Индикатор зарядки
Шнур электропитания
E
Смазочное масло
F
Чистящая щёточка
Русский
11
ER-GB40_CIS.indb 11 2013/02/26 15:31:59
Page 12

Зарядка
Зарядка триммера
Если триммер стал медленнее работать, выполните следующие шаги
для его зарядки.
Выключите триммер и вставьте его
1
1
в адаптер сети переменного тока до
щелчка, как показано на рисунке.
•
Триммер не будет заряжаться, если боковые
контакты не соприкоснутся с разъемами для
зарядки.
Русский
•
Тщательно вытрите капельки воды с
боковых контактов.
•
Если заряжать триммер с включенным выключателем питания, то
при снятии его с адаптера сети переменного тока он начнет работать.
Включите штепсельную вилку в электрическую розетку.
2
2
Индикатор режима зарядки загорается красным.
•
Время зарядки различается в зависимости от номинального напряжения.
Время зарядки
•
При первой зарядке триммера или если он не использовался
дольше 6 месяцев, индикатор зарядки может не светиться несколько
минут, либо может уменьшится время автономной работы. Если это
происходит, оставьте триммер заряжаться в течение более 18 часов.
Отсоедините штепсельную вилку по окончании зарядки.
3
3
•
Продолжение зарядки батареи не скажется на ее работоспособности.
•
Рекомендованная температура воздуха во время зарядки
составляет 0 °С - 35 °С. При выполнении зарядки при очень низких
или очень высоких температурах аккумулятор может зарядиться не
полностью или вовсе не зарядиться.
12
220 В
230 В
Прибл. 10 часов
Прибл. 8 часов
1
•
Индикатор режима зарядки загорается и продолжает гореть до тех пор,
пока штепсельная вилка не будет выключена из электрической розетки.
•
Полный заряд аккумулятора обеспечивает приблизительно 50
минут непрерывной работы.
Во время зарядки использование триммера невозможно.
Использование
Использование насадки-гребня
2
Убедитесь, что триммер выключен.
Поверните поворотный
1
1
переключатель длины стрижки в
положение “1”.
Установите насадку-гребень на
2
2
корпус до щелчка.
Поверните поворотный переключатель длины
3
3
стрижки для настройки насадки-гребня на
желаемую длину стрижки (от 1 мм до 10 мм).
Высота стрижки (мм)
(ожидаемая)
Индикатор 1 1.5 2 2.5 3 3.5 4 4.5 5 5.5
Высота стрижки (мм)
(ожидаемая)
Индикатор 6 6.5 7 7.5 8 8.5 9 9.5 10
1 1,5 2 2,5 3 3,5 4 4,5 5 5,5
6 6,5 7 7,5 8 8,5 9 9,5 10
ER-GB40_CIS.indb 12 2013/02/26 15:31:59
Page 13

•
Действительная длина стрижки будет немного больше значения,
указанного на насадке.
Использование
Использование триммера
Убедитесь, что лезвие не повреждено.
Мы рекомендуем использовать триммер при температуре
окружающей среды от 0 до 35 °C. При использовании вне этого
диапазона устройство может отключиться.
Сухая стрижка
►
Стрижка с помощью насадки-гребня
Не используйте с нанесенными кремами для бритья или при влажных
волосах.
Нажмите выключатель питания для выключения
1
1
триммера.
Установите насадку и отрегулируйте поворотный
2
2
переключатель длины стрижки. (См. страницу 12.)
Нажмите выключатель питания для
3
3
включения триммера.
Удерживайте триммер выключателем
4
4
питания вниз, и состригите волосы,
перемещая триммер против
направления роста волос.
•
При стрижке большого количества волос
состриженные волосы могут собираться
внутри насадки, поэтому вычищайте
состриженные волосы после каждого
использования.
►
Стрижка без использования насадки-гребня
Подравнивание усов
■
Над губами
Расположите триммер под нужным углом,
обратив выключателем питания вверх, и
подравняйте усы.
Для закругления формы подравнивайте усы,
удерживая корпус боком.
■
Подстригание концов волос
Подстригите волосы понемногу, обратив
выключатель питания по направлению к
коже и следя, чтобы не состричь слишком
много.
Русский
13
ER-GB40_CIS.indb 13 2013/02/26 15:31:59
Page 14

Подравнивание бакенбард
Расположите триммер под нужным углом и
подравняйте бакенбарды.
Придание формы волосам вокруг ушей
Подстригите волосы вокруг ушей, удерживая
корпус боком.
Русский
Стрижка пушкового волоса
Состригите пушковый волос медленно,
движениями снизу вверх, обратив выключатель
питания по направлению к коже.
•
Стрижка волос, бороды или усов без использования насадки-гребня
оставляет волоски длиной примерно 0,5 мм.
Влажная стрижка
►
Стрижка без использования насадки-гребня
Постригите бороду, усы или пушковый волос, нанеся на лицо воду
или очищающий крем для умывания.
Влажная стрижка уменьшает трение, делая касание более мягким.
Влажная стрижка рекомендуется для стрижки густой бороды до
длины 0,5 мм без использования гребня-насадки.
Снимите насадку-гребень.
1
1
Нанесите воду, мыло и т.п. на лицо.
2
2
Нажмите выключатель питания для
3
3
включения триммера.
Состригите волосы медленно,
4
4
движениями снизу вверх, обратив
выключатель питания по
направлению к коже.
Примечания
•
Не используйте никакие кремы для бритья, поскольку они могут
снизить эффективность стрижки вследствие повреждения лезвий.
•
После влажной стрижки обязательно ополосните корпус водой и
нанесите масло на лезвия.
14
ER-GB40_CIS.indb 14 2013/02/26 15:32:00
Page 15

Чистка
Очистка триммера
Рекомендуется очищать триммер при каждом использовании.
1. Снимите триммер с адаптера сети переменного тока.
Удаление незначительных
2. Снимите насадку-гребень и
включите триммер.
3. Направьте поток воды в
отверстие для входа воды
сзади корпуса, тщательно
промойте в течение около 20
секунд, затем выключите
триммер.
•
Сполосните водой и
встряхните вверх-вниз
несколько раз для
удаления воды.
4.
Вытрите воду полотенцем и оставьте
триммер высохнуть естественным образом.
•
Он высохнет быстрее при снятом лезвии.
5. Смажьте лезвие маслом после высыхания.
6. Установите насадку-гребень и лезвие на
триммер.
▼ ▼
загрязнений
▼ ▼
Удаление значительных
2. Снимите насадку-гребень и
лезвие.
3. Очистите триммер и лезвие
под струей воды.
•
Сполосните водой и
встряхните вверх-вниз
несколько раз для
удаления воды.
загрязнений
4
Очистка с помощью щетки
1. Снимите триммер с адаптера
сети переменного тока.
•
Убедитесь, что триммер
выключен.
2. Снимите насадку-гребень.
3. Держа корпус триммера,
выдвиньте лезвия большим
пальцем.
4. Очистите корпус и лезвия от
состриженных волосков.
5. Удалите волоски между неподвижным и
рабочим лезвиями. Для этого нажмите на
рычаг очистки, чтобы поднять рабочее
лезвие.
6. Смажьте лезвие маслом.
7. Установите насадку-гребень и лезвие на триммер.
Русский
15
ER-GB40_CIS.indb 15 2013/02/26 15:32:00
Page 16

Смазка
Производите смазку триммера
каждый раз до и после
использования.
Нанесите несколько капель
смазочного масла в места,
отмеченные на рисунке
стрелкой.
Русский
Установка лезвия на место
Поместите крепёжный зацеп в
держатель блока лезвий на
триммере и вставьте его до
щелчка.
►
Срок годности лезвия
Срок годности лезвия зависит от частоты и продолжительности
использования триммера.
Например, при использовании триммера около 10 раз в месяц по 5
минут срок годности лезвия составит приблизительно 3 года.
Заменяйте лезвия, если эффективность работы значительно
снижается, несмотря на должное обслуживание.
►
Срок эксплуатации аккумулятора
Срок эксплуатации аккумулятора зависит от частоты и
продолжительности использования. Если аккумулятор заряжается
раз в 2 недели, то срок его службы составит около 3 лет.
•
Рекомендуется заряжать триммер по крайней мере раз в 6 месяцев,
даже если он используется нерегулярно, так как это предотвратит
полную разрядку аккумулятора и продлит срок его службы.
16
Извлечение встроенного аккумулятора
Прежде чем утилизировать триммер, извлеките из него встроенный
аккумулятор. Пожалуйста, проследите за тем, чтобы утилизация
аккумулятора была выполнена в официальном пункте приёма, при
наличии такового в вашем городе. Не разбирайте и не заменяйте
аккумулятор с целью продолжения использования триммера. Это
может привести к возгоранию или поражению электрическим током.
Обратитесь в уполномоченный сервисный центр.
•
При извлечении аккумулятора снимите триммер с адаптера сети
переменного тока.
•
Выполните шаги с 1 по , затем приподнимите и извлеките
аккумулятор.
•
Соблюдайте осторожность и не допускайте короткого замыкания
аккумулятора.
ER-GB40_CIS.indb 16 2013/02/26 15:32:01
Page 17

Page 18

Дякуємо за вибір тримера від Panasonic. Перед використанням
ознайомтеся зі всіма інструкціями.
Важлива інформація
Цей тример обладнаний вбудованим акумулятором. Його не можна
кидати у вогонь, нагрівати, заряджати, використовувати або залишати
його у місці з високою температурою.
►
Перед використанням
Даний тример можна використовувати для стрижки сухого або
мокрого волосся. Тример є водонепроникним і його можна
використовувати в душі та очищувати у воді. Наступний символ
означає, що даний пристрій можна використовувати у ванній
кімнаті або душі.
►
Використання тримера
•
Перш ніж використовувати машинку для стрижки волосся,
переконайтеся в тому, що її леза не пошкоджені та не
деформовані.
•
Припиніть користуватися приладом, якщо він неправильно
Українська
функціонує або зламався.
•
Вимикайте апарат перед зміною довжини обрізання або
вийманням насадки.
•
Перед і після кожного використання нанесіть на деталі, позначені
стрілками, оливу. (Див. стор. 24.)
•
Не використовуйте пристрій для стрижки тварин.
•
Не притискайте машинку для стрижки волосся до шкіри.
•
Не використовуйте тример для інших цілей, окрім стрижки.
18
•
Забороняється користуватися даним пристроєм особам
(включаючи дітей) з обмеженими фізичними та розумовими
здібностями, а також особам з браком досвіду, окрім як під
наглядом або після інструктажу щодо використання даного
пристрою, проведеного особами, відповідальними за їх безпеку.
Слідкуйте, щоб діти не гралися пристроєм.
►
Зарядка тримера
•
В жодному разі не використовуйте адаптер змінного струму у
ванній або в душі.
•
Використовуйте тільки спеціальний адаптер змінного струму
(RE7-69). Не використовуйте цей адаптер змінного струму для
зарядження інших пристроїв.
•
Не заряджайте акумулятори під прямим сонячним промінням та
поблизу інших джерел тепла або при температурі нижчій за 0 °C
або вищій за 35 °C.
•
Підключайте адаптер тільки у побутову розетку сухими руками та
у місці з нормальною вологістю.
•
Під час використання і зарядження тример може нагріватися. Це
не є ознакою несправності.
•
Вимикаючи штепсельну вилку з розетки, тримайтеся за вилку. Не
тягніть за шнур живлення, оскільки це може пошкодити його.
•
Не користуйтесь тримером, якщо шнур живлення або адаптер
змінного струму мають пошкодження, або якщо електрична вилка
не щільно входить в розетку.
•
Не пошкоджуйте і не деформуйте шнур живлення. Не розміщуйте
на кабелі живлення важкі предмети та не затискайте його між
іншими предметами.
•
Шнур живлення не підлягає заміні. У разі пошкодження шнура,
адаптер змінного струму необхідно утилізувати.
►
Очищення тримера
Увага!
Перед очищенням, щоб уникнути ураження струмом,
вимикайте штепсельну вилку з розетки.
•
Не слід знімати захисний корпус, бо це може порушити
герметичність пристрою.
ER-GB40_CIS.indb 18 2013/02/26 15:32:01
Page 19

•
При очищенні тримера у воді, не використовуйте солону або
гарячу воду. Не занурюйте надовго тример у воду.
•
Очищуйте корпус машинки тільки м’якою ганчіркою, злегка
зволоженою проточною водою або водою з милом. Не
використовуйте розчинник, бензин, спирт або інші хімічні
речовини.
•
Не мийте адаптер змінного струму водою.
•
Регулярно очищуйте шнур живлення для усунення з нього пилу
та бруду.
►
Зберігання тримера
•
Після використання зберігайте тример у місці з низькою
вологістю повітря.
•
Не зберігайте тример під прямим сонячним промінням або
поблизу інших джерел тепла.
•
При зберіганні знімайте тример з адаптера змінного струму.
•
Не перегинайте шнур живлення та не намотуйте його на адаптер
змінного струму.
•
Зберігайте адаптер в сухому місці, де він не пошкодиться.
•
Зберігайте оливу у недоступному для дітей місці.
Будова апарата
A
Корпус
1
Індикатор висоти стрижки
2
Поворотний перемикач
(регулятор висоти стрижки)
3
Бокові контакти
4
Вимикач живлення
5
Отвір для входу води
B
Блок лез
6
Важіль для чищення
7
Рухоме лезо
8
Нерухоме лезо
9
Монтажний гачок
C
Насадка-гребінець
(від 1 мм до 10 мм)
D
Адаптер змінного струму
(RE7-69)
Роз’єми для заряджання
Індикатор стану
зарядження
Шнур живлення
E
Олива
F
Щіточка для чищення
Українська
19
ER-GB40_CIS.indb 19 2013/02/26 15:32:01
Page 20

Зарядження
Зарядка тримера
Якщо тример почав працювати повільніше, виконайте наступні кроки,
щоб зарядити його.
Вимкніть тример і вставте його в
1
1
адаптер змінного струму до
клацання, як показано на малюнку.
•
Тример не заряджатиметься, якщо бокові
контакти не будуть контактувати з роз’ємами
для заряджання.
•
Ретельно витріть краплі води з бокових контактів.
•
Якщо заряджати тример з увімкненим вимикачем живлення, то при
зніманні з адаптера змінного струму він почне працювати.
Включіть штепсельну вилку в електричну розетку.
2
2
Індикатор режиму зарядки засвітиться червоним.
•
Час зарядження може змінюватися в залежності від номінальної напруги.
Час зарядження
•
Під час першого зарядження тримера, або якщо ним не
Українська
користувалися більше 6 місяців, індикатор стану зарядження може
не світитись протягом кількох хвилин, або може зменшитися час
автономної роботи. Якщо це трапилось, залиште його заряджатись
протягом більш ніж 18 годин.
Після завершення зарядження від’єднайте
3
3
штепсельну вилку.
•
Продовження зарядження батареї не вплине на працездатність батареї.
•
Рекомендована температура повітря під час зарядження становить
0-35 °С. У разі зарядження при дуже низьких або дуже високих
температурах акумулятор може зарядитися не повністю або зовсім
не зарядитися.
20
220 В
230 В
Прибл. 10 годин
Прибл. 8 годин
1
•
Індикатор режиму зарядки засвітиться та продовжуватиме світитися,
доки штепсельну вилку не буде вимкнено з електричної розетки.
•
Повністю заряджений акумулятор забезпечує безперервну роботу
пристрою протягом приблизно 50 хвилин.
Не можна користуватися тримером під час зарядження.
Використання
Використання насадки-гребінця
2
Переконайтеся, що тример вимкнено.
Установіть поворотний перемикач в
1
1
положення “1”.
Установіть насадку-гребінець на
2
2
корпус і натисніть до клацання.
Поверніть поворотний перемикач, щоб перемістити
3
3
насадку-гребінець у положення, що відповідає
необхідній висоті стрижки (від 1 мм до 10 мм).
Висота стрижки (мм)
(приблизно)
Індикатор 1 1.5 2 2.5 3 3.5 4 4.5 5 5.5
Висота стрижки (мм)
(приблизно)
Індикатор 6 6.5 7 7.5 8 8.5 9 9.5 10
1 1,5 2 2,5 3 3,5 4 4,5 5 5,5
6 6,5 7 7,5 8 8,5 9 9,5 10
ER-GB40_CIS.indb 20 2013/02/26 15:32:02
Page 21

•
Фактична довжина підстриженого волосся буде трохи більшою, ніж
та висота, яку ви встановите на машинці.
Використання
Використання тримера
Перевірте, що лезо не має пошкодження.
Рекомендується використовувати тример в діапазоні температур
навколишнього середовища від 0 до 35 °C. При використанні поза
цим діапазоном прилад може вимкнутися.
Суха стрижка
►
Стрижка з використанням насадки-гребінця
Не використовуйте цей режим з нанесеним, на обличчя, кремом для
гоління або коли волосся вологе.
Натисніть вимикач живлення, щоб вимкнути
1
1
тример.
Встановіть насадку та відрегулюйте висоту
2
2
стрижки. (Див. стор. 20.)
Натисніть вимикач живлення, щоб
3
3
увімкнути тример.
Тримайте тример вимикачем
4
4
живлення вниз і підстригайте
бороду, переміщаючи тример у
напрямку проти росту волосся.
•
Під час підстригання великої кількості волосся
зрізане волосся може накопичуватися
всередині насадки-гребінця, тому чистьте
насадку після кожного використання.
►
Стрижка без використання насадки-гребінця
Формування вусів
■
Над губами
Розташуйте тример під потрібним кутом до
шкіри вимикачем живлення догори і
підрівняйте вуса.
Щоб скруглити форму, під час підстригання
лінії вусів тримайте тример боком.
■
Підстригання контуру бороди
Поступово підрізайте бороду, тримаючи
пристрій вимикачем живлення до шкіри і
слідкуйте, щоб не зрізати забагато волосся.
Українська
21
ER-GB40_CIS.indb 21 2013/02/26 15:32:02
Page 22

Підрізання бачків
Розташуйте тример під потрібним кутом до
шкіри та підріжте бачки.
Формування лінії волосся за вухами
Підріжте волосся за вухами, тримаючи тример
боком.
Підрізання пушкового волосся
Повільно підріжте пушкове волосся, тримаючи
тример вимикачем живлення до шкіри і
переміщуючи його знизу вгору.
•
Під час підстригання без насадки-гребінця волосся та борода
Українська
підстригаються до довжини приблизно 0,5 мм.
Волога стрижка
►
Стрижка без використання насадки-гребінця
Підстригання бороди або пушкового волосся по вологому обличчю
або з використанням засобу для вмивання.
Волога стрижка зменшує тертя, забезпечуючи гладкість дотику.
Вологу стрижку рекомендовано для підстригання густої бороди до
довжини 0,5 мм без використання насадки-гребінця.
Зніміть насадку-гребінець.
1
1
Нанесіть на обличчя воду або засіб для
2
2
вмивання.
Натисніть вимикач живлення, щоб
3
3
увімкнути тример.
Повільно підріжте бороду, тримаючи
4
4
тример вимикачем живлення до
шкіри і переміщуючи його знизу
вгору.
Примітки
•
Не використовуйте креми для гоління. Це може призвести до
погіршення роботи пристрою через пошкодження лез.
•
Після вологої стрижки обов’язково промийте корпус водою і
нанесіть на леза оливу.
22
ER-GB40_CIS.indb 22 2013/02/26 15:32:02
Page 23

Чищення
Очищення тримера
Рекомендовано чистити пристрій після кожного використання.
1. Зніміть тример з адаптера змінного струму.
Видалення незначного
2. Зніміть насадку-гребінець і
увімкніть тример.
Потримайте пристрій під
3.
проточною водою таким
чином, щоб вода потрапляла в
отвір для входу води на задній
панелі корпусу, впродовж
приблизно 20 секунд, після
чого вимкніть тример.
•
Сполосніть водою та
струсіть угору-вниз кілька
разів, щоб видалити воду.
4. Витріть воду рушником і залиште пристрій
висихати.
•
Якщо зняти леза, пристрій висохне швидше.
5. Після висихання нанесіть на леза оливу.
6. Установіть насадку-гребінець і леза на
тример.
▼ ▼
засмічення
▼ ▼
Видалення значного засмічення
2. Зніміть насадку-гребінець і
леза.
3. Промийте тример і леза під
проточною водою.
•
Сполосніть водою та
струсіть угору-вниз кілька
разів, щоб видалити воду.
4
Чищення за допомогою щітки
1. Зніміть тример з адаптера
змінного струму.
•
Переконайтеся, що тример
вимкнено.
2. Зніміть насадку-гребінець.
3. Тримаючи тример за корпус,
розташуйте великий палець на
лезах, а тоді натисніть на них,
щоб вийняти їх із корпуса.
4. Очистіть корпус та ділянку навколо лез від
волосся.
5. Натисніть на важіль для чищення, щоб
підняти рухоме лезо, а тоді очистіть від
волосся ділянку між рухомим та
нерухомим лезами.
6. Нанесіть на леза оливу.
7. Установіть насадку-гребінець і леза на тример.
Українська
23
ER-GB40_CIS.indb 23 2013/02/26 15:32:03
Page 24

Змащування
Наносіть оливу на тример
кожного разу перед та після його
використання.
Нанесіть одну краплю оливи на
ділянки, позначені на малюнку
стрілочками.
Встановлення лез
Розташуйте фіксатор у тримачі
блока для лез та натисніть до
клацання.
•
Рекомендується заряджати тример хоча б один раз на 6 місяців,
навіть якщо він не використовується регулярно. Це дозволить
уникнути повного розрядження акумулятора та подовжить строк
його служби.
Виймання вбудованого акумулятора
Перед тим, як викидати тример, витягніть з нього вбудований
акумулятор. Утилізуйте акумулятор у спеціально призначених для
цього місцях. Не розбирайте та не замінюйте акумулятор для
продовження користування тримером. Це може призвести до
виникнення пожежі або ураження електричним струмом.
Зверніться до авторизованого сервісного центру.
•
Перед вийманням акумулятора зніміть тример з адаптера змінного
струму.
•
Виконайте кроки від 1 до , підніміть акумулятор, а тоді вийміть
його.
•
Будьте обережні, не закоротіть акумулятор.
►
Ресурс лез
Ресурс лез залежить від частоти та тривалості використання
тримера.
Українська
Наприклад, ресурс лез становить приблизно 3 роки при використанні
тримера упродовж 5 хвилин 10 раз на місяць. Замініть леза, якщо ви
помітите, що їх підрізальні характеристики погіршились, незважаючи
на належне технічне обслуговування.
►
Термін експлуатації акумулятора
Термін експлуатації акумулятора залежить від частоти та тривалості
користування. Якщо акумулятор заряджається раз на 2 тижні, то
строк його служби становитиме приблизно 3 роки.
24
ER-GB40_CIS.indb 24 2013/02/26 15:32:03
Page 25

Відомості про утилізацію відпрацьованого електричного та електронного
обладнання
Даний виріб не слід утилізувати разом із побутовими відходами. Для
належної його утилізації слід звертатися до підприємств, які займаються
збором та переробкою відпрацьованого електричного та електронного
обладнання. Інформацію про такі підприємства ви можете отримати в
урядових органах та/або органах місцевого самоврядування.
Належна утилізація виробу допоможе зберегти цінні ресурси і
запобігти потенційному негативному впливу на здоров'я людей та
стан навколишнього середовища, який може мати місце внаслідок
некоректної утилізації відходів.
Page 26

Дата виготовлення адаптера змінного струму (рік, місяць,
день) вказана на його зворотній стороні.
X XX XX
день
Грудень-12
рік (остання цифра номера року ) –
Декларацію про відповідність Технічним регламентам, діючим
в Україні, можна переглянути на http://service.panasonic.ua у
розділі «Технічне регулювання»
Імпортер:
ТОВ «ПАНАСОНІК УКРАЇНА ЛТД»
провулок Охтирський, будинок 7, місто Київ, 03022, Україна
Українська
26
ER-GB40_CIS.indb 26 2013/02/26 15:32:03
Page 27

Panasonic қырқатын құралын таңдағаныңыз үшін рахмет.
Пайдаланбас бұрын барлық нұсқауларды оқыңыз.
Маңызды
Бұл қырқатын құрал ішінде зарядталатын батарея орнатылған. Оны
өртке тастамаңыз, қыздырмаңыз, сондай-ақ жоғары қысымды ортада
зарядтамаңыз, пайдаланбаңыз немесе қалдырмаңыз.
►
Пайдаланбас бұрын
Бұл ЫЛҒАЛ/ҚҰРҒАҚ қырқатын құралды ылғал күйде немесе құрғақ
күйде қырқу үшін қолдануға болады. Осы су өткізбейтін қырқатын
құралды душта қолданып, суда тазалауға болады. Келесі таңба
ваннада немесе душта қолдануға болатынын білдіреді.
►
Қырқатын құралды пайдалану
•
Пайдаланар алдында ұстара жүзінің сынбағанын тексеріңіз.
•
Қалыпты жұмыстан ауытқу немесе небір қателік болған кезде
қолдануды тоқтатыңыз.
•
Шаш қию биіктігін өзгерту немесе тарақ саптамасын алып
тастаудан бұрын құралды өшіріңіз.
•
Әр пайдаланудан алдын және кейін көрсеткілермен белгіленген
жерлерді майлаңыз. (33-бетті қараңыз.)
•
Құралды жануарлардың жүнін қырқу үшін пайдалануға
болмайды.
•
Ұстараның жүзін теріге күшпен баспаңыз.
•
Қырқатын құралды қырқудан басқа мақсатта пайдаланбаңыз.
•
Бұл құралды денелік, сенсорлық немесе ақыл-ой қабілеті
шектеулі, сондай-ақ тиісті білімі мен тәжірибесі жоқ адамдардың
(балаларды қосқанда) пайдалануына тиым салынған. Мұндай
адамдардың құралды қолдануына олардың қауіпсіздігіне жауапты
тұлғалардың бақылауымен және құралды пайдалану жөніндегі
анық нұсқаулар берілгеннен кейін ғана қолдануына болады.
Балалардың құралмен ойнамауын қадағалау қажет.
►
Қырқатын құралды зарядтау
•
Айнымалы тоқ адаптерін ешқашан да ванна бөлмесінде немесе
душта қолданбаңыз.
•
Тек арнайы айнымалы тоқ адаптерін (RE7-69) қолданыңыз.
Арнайы айнымалы тоқ адаптерін басқа құрылғыларды зарядтау
үшін қолданбаңыз.
•
Аталмыш құрылғыны қызымы 0 °C-ден 35 °C-ге шейін болып
тікелей күн сәулесі түспейтін жерде не жылу көзі жоқ жерде
зарядтаңыз.
•
Айнымалы ток адаптерін тұрмыстық ток желісіне қосқанда,
ылғалдың жоқтығын тексеріңіз. Ұстараны су қолмен ұстамаңыз.
•
Пайдалану немесе заряд алу кезінде қырқатын құрал қызып кетуі
мүмкін. Бірақ бұл зақым емес.
•
Айырды электр ұяшығынан ажыратқан кезде оны ұстап тұрыңыз.
Егер электр желісі сымынан тартсаңыз, ол зақымдалуы мүмкін.
•
Егер желі сымы немесе айнымалы тоқ адаптері зақымдалған
болса немесе айыр электр ұяшыққа толығымен жақсылап
жалғанбаса, қырқатын құралды пайдаланбаңыз.
•
Электр сым желісіне зақым келтіруге немесе бұзуға болмайды.
Электр сымының үстіне ауыр зат қоймаңыз немесе оны
заттардың арасында қыспаңыз.
•
Сымы зақымдалған жағдайда айнымалы тоқ адаптері жойылу
керек.
Қазақша
27
ER-GB40_CIS.indb 27 2013/02/26 15:32:04
Page 28

►
Қырқатын құралды тазалау
Ескерту
Тазалаудан бұрын тоқ соғу қауіпінің алдын алу үшін айырды
электр ұяшығынан ажыратыңыз.
•
Корпусты бөлшектеуге болмайды, себебі ол құралдың су
өткізбейтін қабілеттілігін бұзуы мүмкін.
•
Қырқатын құралды сумен тазалағанда, тұзды немесе ыстық суды
пайдаланбаңыз. Қырқатын құралды ұзақ уақытқа суға батырып
қалдырмаңыз.
•
Құрылғының сыртқы корпусын құбыр суына немесе сабынды суға
суланған жұмсақ матамен тазалаңыз. Еріткіш, бензин, алкоголь
не басқа химиялық заттарды пайдаланбаңыз.
•
Айнымалы тоқ адаптерін сумен жумаңыз.
•
Тоқ ашасын шаң мен кірден уақтылы тазартып тұрыңыз.
►
Қырқатын құралды сақтау
•
Пайдаланғаннан кейін қырқатын құралды құрғақ жерде сақтаңыз.
•
Қырқатын құралды тікелей күн сәулесі түсетін жерде немесе
жылу көздеріне жақын жерде сақтамаңыз.
•
Қырқатын құралды сақтаған кезде оны айнымалы тоқ
адаптерінен ажыратыңыз.
•
Сымды бүкпеңіз әрі оны айнымалы тоқ адаптеріне орамаңыз.
•
Айнымалы ток адаптерін зақымданудан қорғалған және құрғақ
жерде сақтаңыз.
•
Майды балалардың қолы жетпейтін жерде сақтаңыз.
Қазақша
Құрылғы бөлшектері
A
Құрылғы корпусы
1 Қырқу биіктігінің индикаторы
2
Қырқу биіктігін реттегіші
(Ұзындығын реттеуды
басқару элементі)
3
Шеткі контактілер
4
Тоқ қосқыш
5
Су кірісі
B
Алмас қондырғысы
6
Тазалау ілмегі
7
Жылжымалы алмас
8
Жылжымайтын алмас
9
Бекіту ілмегі
C
Тарақ саптама
(1 мм-ден 10 мм-ге шейін)
D
Айнымалы тоқ адаптері
(RE7-69)
Зарядтау контактілері
Зарядтау индикаторы
Электр сым желісі
E
Май
F
Тазалағыш қылсүрткі
28
ER-GB40_CIS.indb 28 2013/02/26 15:32:04
Page 29

Зарядтау
Қырқатын құралды зарядтау
Егер қырқатын құрал жылдамдығы төмендеген болып көрінсе, оны
зарядтау үшін мына қадамдарды орындаңыз.
Қырқатын құралды сөндіріп оны
1
1
айнымалы тоқ адаптеріне суретте
көрсетілгендей мықтап салыңыз.
•
Қырқатын құрал шеткі контактілер зарядтау
контактілеріне тимесе зарядталмайды.
•
Шеткі контактілерде су тамшылары қалған
болса, оларды сүртіп алыңыз.
•
Егер қырқатын құралды тоқ қосқышы қосылып тұрғанда зарядтасаңыз,
айнымалы тоқ адаптерінен алған кезде ол жұмыс істей бастайды.
Айырды розеткаға қосыңыз.
2
2
Зарядтаудың көрсеткіш шамы қызыл түспен жанады.
•
Зарядтау уақыты кернеуге байланысты әр түрлі болады.
Қуаттау уақыты
•
Қырқатын құралды алғашқы рет зарядтаған кезде немесе ол 6
айдан астам қолданылмаса, зарядтау индикаторы бірнеше минут
жанбауы немесе жұмыс уақыты азаюы мүмкін. Мұндай жағдайда,
оны 18 сағаттан аса зарядтаңыз.
Зарядтау аяқталғаннан кейін айырды ажыратыңыз.
3
3
•
Батареяны зарядтауды жалғастыру оның өнімділігіне әсер етпейді.
•
Қуаттауға ұсынылған қоршаған орта температурасы - 0 °С - 35 °С құрау
керек. Аса төмен немесе аса жоғары температурада қуаттағанда,
аккумулятор толығымен қуатталмай, немесе мүлде қуатталмауы мүмкін.
•
Зарядтаудың көрсеткіш шамы жанады да, айыр розеткадан
ажыратылғанша жанып тұрады.
220 В
230 В
Шамамен 10 сағат
Шамамен 8 сағат
1
2
•
Аккумулятордың толық заряды үздіксіз жұмыс істегенде шамамен
50 минут.
Зарядтау кезінде қырқатын құралды пайдалану мүмкін емес.
Пайдалану
Тарақ саптамасын пайдалану
Қырқатын құрал сөндірулі болуын қамтамасыз етіңіз.
Қырқу биіктігін реттегішін “1” күйіне
1
1
бұраңыз.
Тарақ саптамасын құрылғы
2
2
корпусына мықтап салыңыз.
Қырқу биіктігін реттегішін бұрап тарақ
3
3
саптамасын керекті қырқу ұзындығына
жылжытыңыз (1 мм мен 10 мм арасында).
Қырқу биіктігі (мм)
(шамамен)
Индикатор 1 1.5 2 2.5 3 3.5 4 4.5 5 5.5
Қырқу биіктігі (мм)
(шамамен)
Индикатор 6 6.5 7 7.5 8 8.5 9 9.5 10
•
Нақты қиылатын шаш ұзындығы сіз орнатқан ұзындықтан сәл асады.
1 1,5 2 2,5 3 3,5 4 4,5 5 5,5
6 6,5 7 7,5 8 8,5 9 9,5 10
Қазақша
29
ER-GB40_CIS.indb 29 2013/02/26 15:32:04
Page 30

Пайдалану
Қырқатын құралды пайдалану
Алмаста ешбір зақымның жоғын тексеріңіз.
Қырқатын құралды 0 - 35 °C ауқымындағы температурада
пайдаланған жөн. Бұл ауқымнан тыс температурада құрылғы жұмыс
істемей қалуы мүмкін.
Құрғақ қырқу
►
Тарақ саптамасымен шаш қырқу
Қырыну кремдері жағылған немесе сақал су болған жағдайларда
пайдаланбаңыз.
Тоқ қосқышына басып қырқатын құралды
1
1
сөндіріңіз.
Саптаманы орнатып, қырқу биіктігін келтіріңіз.
2
2
(29-бетті қараңыз.)
Тоқ қосқышына басып қырқатын
3
3
құралды қосыңыз.
Қазақша
Қырқатын құралды тоқ қосқышымен
4
4
бетін төменге қаратып ұстап
сақалды қырқатын құралды сақал
өсу бағдарына кері қарай
жылжытып қырқыңыз.
•
Көп сақал қырқылса саптама ішінде
қырқылған шаштар жиналуы мүмкін, сол үшін
әр пайдаланудан соң қырқылған шаштарды
алып тастаңыз.
►
Тарақ саптамасынсыз шаш қырқу
Мұртты пішімдеу
■
Ерін үстінен
Қырқатын құралды теріге дұрыс бұрышта
тоқ қосқышын бетін жоғары қарай орнатып
мұрт айналасында қырқыңыз.
Пішінді жұмырландыру үшін құрылғы
корпусын бір жағынан ұстап мұрт
айналасында қырқыңыз.
■
Сақал ұшін қырқу
Сақалды аз-аздап тоқ қосқышын бетін теріге
қаратып қырқыңыз, аса көп қырқпаңыз.
30
ER-GB40_CIS.indb 30 2013/02/26 15:32:04
Page 31

Самай шашыңызды кескіндеңіз
Тегістеуішті теріңізге тік бұрышта орнатып,
самай шаштарыңызды қиыңыз.
Құлақтар айналасында шашты пішімдеу
Құлақтар айналасында құрылғы корпусын бір
жақтан ұстап қырқыңыз.
Үлпе түкті қырқу
Үлпе түкті ақырын, төменнен жоғары қарай тоқ
қосқышын теріге қаратып қырқыңыз.
•
Сақалды немесе мұртты саптамасыз қырқу шашты шамамен 0,5 мм
ұзындығында қалдырады.
Сулы қырыну
►
Тарақ саптамасынсыз шаш қырқу
Сақалды немесе үлпе түкті сулы немесе тазалағыш жағылған бетте
қырқыңыз.
Сулы қырқу үйкелісті азайтып тегіс жанасуды жаратады.
Сулы қырқу толық сақалды 0,5 мм ұзындықта саптамасыз алу үшін
ұсынылады.
Тарақ-саптаманы алып тастаңыз.
1
1
Бетіңізге су, сабын, тағы сол сияқтылар жағыңыз.
2
2
Тоқ қосқышына басып қырқатын
3
3
құралды қосыңыз.
Сақалды ақырын, төменнен жоғары
4
4
қарай тоқ қосқышын теріге қаратып
қырқыңыз.
Ескертпелер
•
Ешбір қырыну кремдерін пайдаланбаңыз, себебі алмас кептелуі
арқылы қырқу орындалуы төменделеді.
•
Құрылғы корпусын сумен шайқап сулы қырынудан соң
алмастарды майлаңыз.
Қазақша
31
ER-GB40_CIS.indb 31 2013/02/26 15:32:04
Page 32

Тазалау
Қырқатын құралды тазалау
Әрбір пайдаланудан соң тазалау ұсынылады.
1. Қырқатын құралды айнымалы тоқ адаптерінен ажыратыңыз.
2. Тарақ саптамасын шешіп
қырқатын құралды қосыңыз.
3. Суды құрылғы корпусінің
арқасындағы су кірісіне
ағызып, шамамен 20 секунд
шайқаңыз, сосын қырқатын
құралды сөндіріңіз.
▼ ▼
Аз ластанған болса Қатты ластанған болса
2. Тарақ саптамасымен
алмасты алып тастаңыз.
3. Қырқатын құралды және
алмасты ағып жатқан сумен
тазалаңыз.
Щеткамен тазалау
1. Қырқатын құралды айнымалы
тоқ адаптерінен ажыратыңыз.
•
Қырқатын құрал сөндірулі
болуын қамтамасыз етіңіз.
2. Тарақ-саптаманы алып
тастаңыз.
3. Құрылғы корпусын ұстап тұрып,
бас бармақпен алмасты басып,
оны негізгі бөліктен итеріп
шығарыңыз.
4. Құрылғы корпусындағы және алмас
айналасындағы барлық қиылған шашты
қылсүрткімен алып тастаңыз.
•
Сумен шайып, суды шығару
үшін төмен және жоғары
қарай бірнеше мәрте
сілкіңіз.
Қазақша
4. Суды шүберекпен сұртіп тастап оны табиғи
кептірңіз.
•
Алмас шешілген болса тезірек кебеді.
5. Кептіруден соң алмасты майлаңыз.
6. Тарақ саптамасын және алмасты
қырқатын құралға қосыңыз.
▼ ▼
•
Сумен шайып, суды шығару
үшін төмен және жоғары
қарай бірнеше мәрте сілкіңіз.
4
5. Тазалау ілмегін басып, жылжымалы
алмасты көтеріңіз де, тұрақты алмас пен
жылжымалы алмастың арасынан шашты
қылсүрткімен тазалаңыз.
6. Алмасты майлаңыз.
7. Тарақ саптамасын және алмасты қырқатын құралға қосыңыз.
32
ER-GB40_CIS.indb 32 2013/02/26 15:32:05
Page 33

Майлау
Әрбір қолданудан бұрын және
қолданғаннан кейін қырқатын
құралды майлаңыз.
Суретте көрсеткіштермен
белгіленген жерлерге майды
тамшылаңыз.
Алмасты қайта орнату
Бекіту ілмегін қырқатын
құралдағы алмас қондырғысына
орнатыңыз да, сырт еткен дыбыс
естілгенше итеріңіз.
►
Алмастың қолданылу мерзімі
Қырқатын құралды пайдалану жиілігі мен ұзақтығына байланысты
алмастың қолданылу мерзімі әртүрлі болады.
Мысалы, тегістеуішті айына 10 рет 5 минуттан қолданған жүздің
жарамдылық мерзімі 3 жыл болады. Егер қырқу тиімділігі төмендесе,
дұрыс сақталғанына қарамастан жүздерді тиісінше ауыстырыңыз.
►
Аккумулятордың қызмет көрсету мерзімі
Батареяны пайдалану мерзімі оны қолдану жиілігі мен уақытына
байланысты әртүрлі болады. Батарея 2 аптада бір рет зарядталса,
қолдану мерзімі шамамен 3 жыл болады.
•
Қырқатын құрал жиі қолданылмаса да, оны кемінде 6 ай сайын бір
рет зарядтап тұрыңыз, өйткені батареяда қуат таусылып қалады
және қолдану мерзімі қысқаруы мүмкін.
Ішіне орналатылған аккумуляторды алу
Қырқатын құралды қолданыстан шығарар алдында ішінде орнатылған
зарядталатын батареяны шығарыңыз. Батареяның өкілетті мекемеде
(ондай мекеме болған жағдайда) жойылғанына көз жеткізіңіз.
Қырқатын құралды қайта пайдалану үшін батареяны бөлшектемеңіз
немесе алмастырмаңыз. Бұл нәтижеде өртке немесе қысқа
тұйықталуға әкеліп соғуы мүмкін.
Өкілетті қызмет көрсету орталығына хабарласыңыз.
•
Қырқатын құралды аккумултярды алған кезде айнымалы тоқ
адаптерінен ажыратыңыз.
• 1-
қадамдарды орындап, батареяны көтеріп, оны құралдан
шығарып алып тастаңыз.
•
Батареяны қысқа тұйықтамауға назар аударыңыз.
Қазақша
33
ER-GB40_CIS.indb 33 2013/02/26 15:32:05
Page 34

Page 35

Page 36

http://www.panasonic.com
Panasonic Corporation 2012-2019
ER9210GB4085201 S0712-70319
 Loading...