

Page 1
DP2000/2500
Network Printing
Setup Guide
Page 2

Disclaimer
Whilst every care has been taken in producing this guide, however, it’s accuracy
cannot be guaranteed. If you do find any errors or omissions please email your
comments to document.support@panasonic.co.uk.
Panasonic Business Systems do not accept any responsibility for any loss, disruption
or damage to your data or your computer systems, which may occur by using this
guide or programs, mentioned in it.
By using this guide you accept the above conditions.
If you are in any doubt concerning the contents of this guide please
consult your network Administrator at once before proceeding.
Please read this guide thoroughly before proceeding with any installation.
2
Acknowledgements
Windows is a trademark of the Microsoft Corporation.
30/05/02 Document Systems Support V1.0
Page 3

Index
Page Topic
4 Introduction
5 Peer to Peer printing in Windows 95/98/Me
9 Peer to Peer printing in Windows NT4/2000
15 Server Set-Up in Windows NT4/2000
21 Client Set-Up for Server based printing in Windows
95/98/Me/NT4/2000
27 Printer Driver Overview (GDI)
29 Driver Overview (PCL6)
30 Network Glossary
3
********************
30/05/02 Document Systems Support V1.0
Page 4

Introduction
The network interface card in the DP series works only with the TCP/IP protocol (the
same protocol used by the Internet). This protocol must be loaded on your desktop
PC and/or Server for network printing to work.
If you are not currently running this protocol it can be added to your system from
your Windows CD, please consult your Windows documentation for further
information.
The DP series also requires a static TCP/IP address. If your Server is using DHCP
you will need to give an address outside the DHCP scope or if it is within the scope a
reservation must be added. Please consult your Network Administrator if you are
unsure if your network uses DHCP or not.
The network interface card in the DP series has a RJ45 connection only. If you have
any other type of connector please refer to your network administrator for
assistance.
4
The network interface card also auto-detects your network speed, either 10 or 100
megabits per second.
30/05/02 Document Systems Support V1.0
Page 5

Windows 95/98/Me
Peer to Peer Printing
You can print to your DP series unit from the above operating systems without the
need of a Server. You can also use this method of printing even if you have a Server
but would prefer to print directly to your DP unit.
Stage 1
What you will need
Your DP unit will need an TCP/IP address e.g. 192.168.10.1, a sub-net mask e.g.
255.255.255.0 and a gateway address e.g. 192.168.10.100. Your network
administrator may need to give you these addresses.
5
Once you have these addresses you will need to input these into the DP unit. Follow
these instructions to input these settings.
1. With the unit turned on press the “function” key located on the dashboard at
the top towards the right.
2. Use the arrow button (DP2500) or the toggle button (DP2000) to select page
2 of the menu.
3. Scroll down to “Key operator code”
4. Input “000” then either OK or SET (if this code is incorrect consult your
Dealer)
5. Scroll down until you see “TCP/IP Address”
6. Input the information as requested. Remember to use the full three digit
number for the address e.g. if the address for one segment is “10” input
“010”. If you make a mistake, use the “clear” button to erase your entry.
Repeat the above for the Sub-Net Mask and Gateway.
7. After you have entered the address remember to press the “set/OK” button to
register your entry.
8. After entering all of the information press the “reset” button to get back to
the main menu then switch the unit off and then back on for the changes to
take effect.
9. You can check to see if your settings have been accepted by going back into
the menu’s previously mentioned.
10. In case of difficulty your Dealer can test the unit using an engineering mode,
please ask them for assistance.
30/05/02 Document Systems Support V1.0
Page 6

Stage 2
What Next?
Now you have programmed your DP unit you now need to install the printer driver
on your PC.
Follow these instructions to add the DP unit as a printer. You will need the CD-ROM
that came with your DP unit. This contains the printer driver and the program that’s
needed to enable peer to peer printing.
You can download the latest printer driver from our Web Site at the following link:
http://www.panasonic.co.jp/mgcs/download/index.html
1. Place the CD-ROM into your computer drive; the disk will auto run and display
a menu, you can read the manual from here or simply close this window to
proceed.
2. Open Windows Explorer and browse to the following folder:
6
E:\english\lpr (Where E: is the letter of your CD ROM drive)
3. Double click on the file “Setup.exe”
4. Follow the instructions on the screen to install this program. You will need to
re-boot your system after this program has installed.
5. After re-booting your system, leave the CD-ROM in your drive and proceed as
follows.
6. Click on “start” the “settings” then “printers”
7. Double click on “add printer”
8. Choose “next”
9. Click “local printer”
10. Then choose “have disk”
11. Browse your CD-ROM drive and scroll down to the printer driver folder which
can be found at e:\english\driver\win9x (where “e:\” is the letter of your
CD ROM drive).
12. Click “OK”.
13. Click “OK”.
14. Choose your DP unit model’s number.
15. When you get the port menu choose “LPT1” – we will alter this later for
network printing.
16. Windows will now install the driver files.
17. When finished you should end up with a printer icon in your printer’s folder.
Do a right hand mouse click and highlight “properties” this will then bring up
a menu.
30/05/02 Document Systems Support V1.0
Page 7
18. We now need to configure the driver to work with your DP unit. You will only
need to do this once.
19. Click on “device options”
20. Select the accessories you have fitted to your DP unit.
21. Click on “paper/layout” and make sure the default is set to A4
22. Now go to the details tab
23. You will see here which port your copier is set to print to, we will now change
this to a network port.
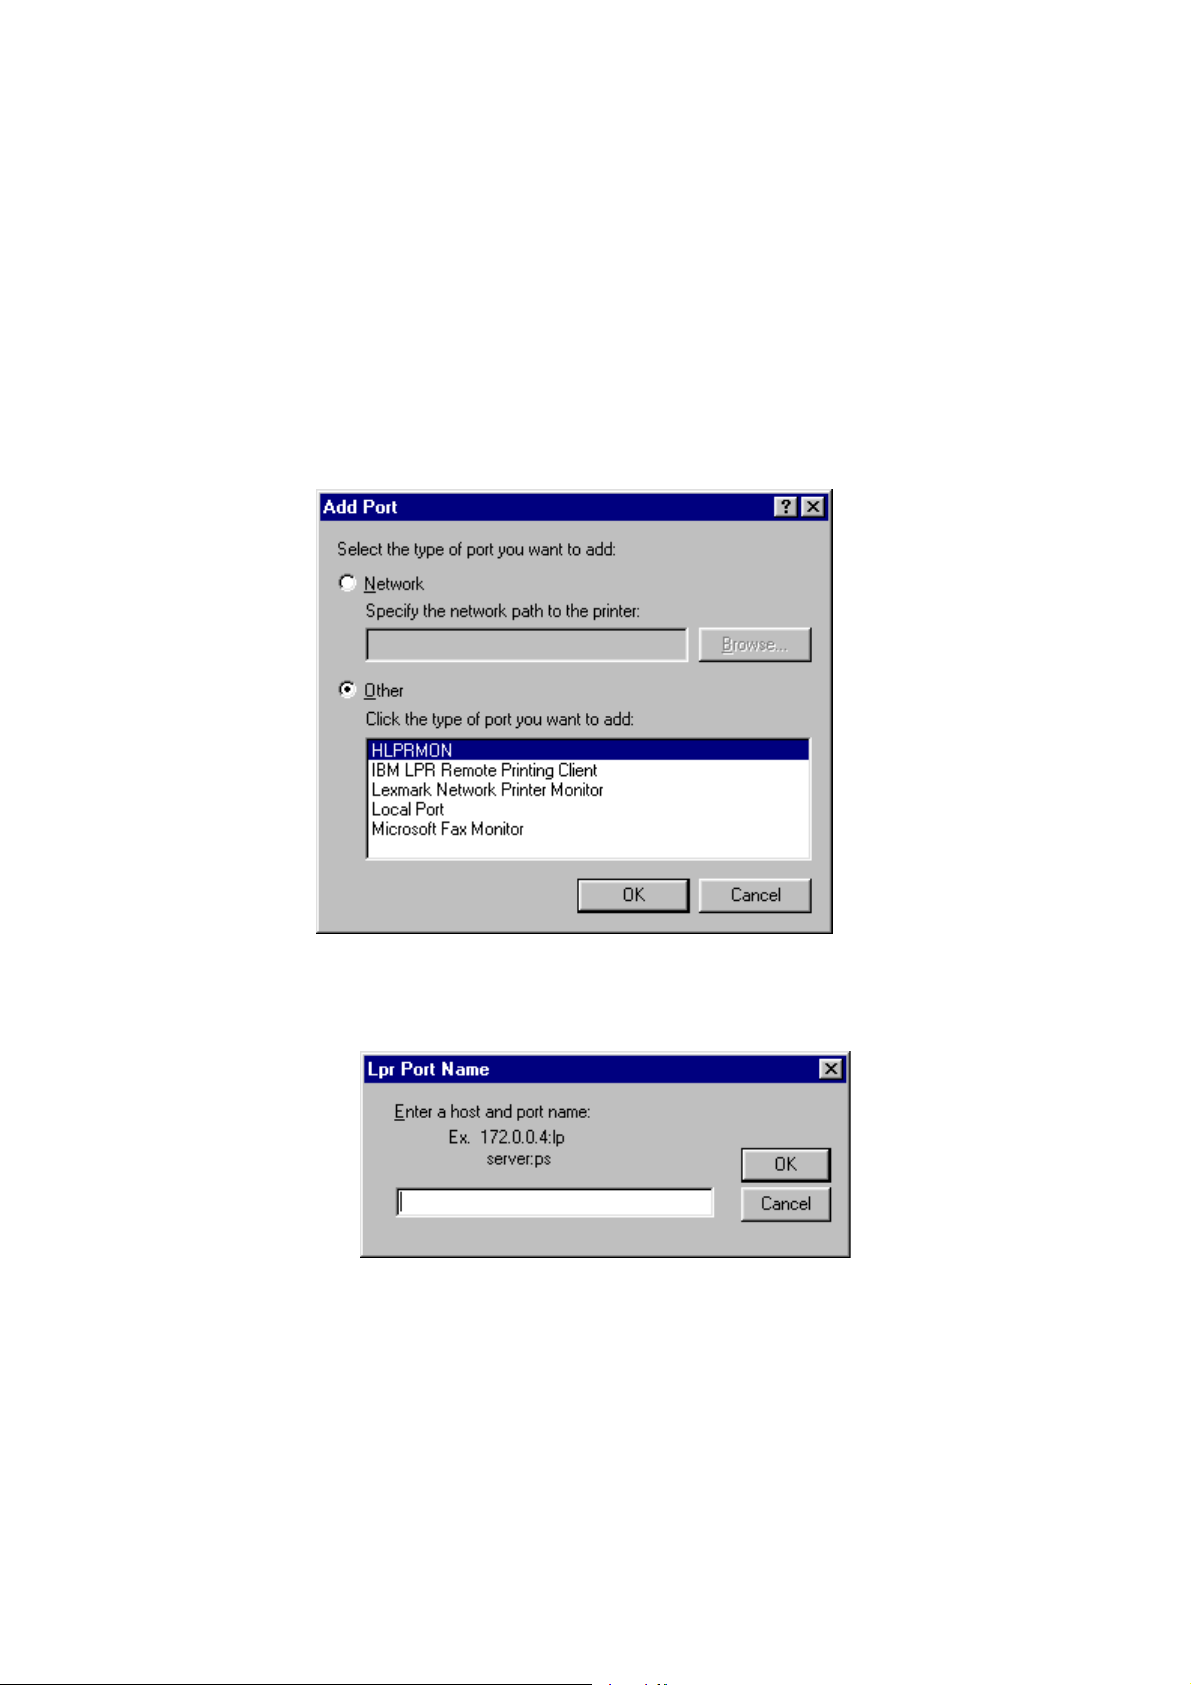
24. Click on “add port”
25. You should now get a menu that looks like this.
7
26. Click on “other” and select the top menu choice “HLPRMON”, you should get a
menu like this.
30/05/02 Document Systems Support V1.0
Page 8

27. Enter the TCP/IP address of the copier then type a colon: and then lp
(lowercase no spaces). Just like in the example shown below:
28. Now click on the “general” tab and choose “print a test page”
29. The DP unit should produce a standard test page confirming that everything
has been set up. It will also display a list of the files used.
Stage 3
Operating Instructions
8
30. For comprehensive operating instructions, please refer to the manual, which
can be found on the CD that came with your unit.
Problems?
No Network Connection
1. Check the obvious things; is the unit switched on and “on-line” (the on-line light
should be on, if it isn’t press the “Printer” key on the left side of the copier
dashboard and then press “on-line”. The copier should bleep to confirm.
2. Check the cable connections and if possible use a known good cable and
network port.
3. Have you programmed the IP address of the copier, Sub-Net and Gateway
correctly? Please refer to the start of the installation procedure to double-check
this.
4. Even if you don’t have a Gateway, an address must be inputted. Choose a spare
IP address for the Gateway if required.
5. Have you properly configured the LPR port on your PC? Again, refer to the start
of this guide to check this.
6. Where you plug the network cable into the back of the copier, do you have a
green “link light” showing. If not try an alternative network port. If you do not
get a green link light, please contact your Dealer for further assistance.
30/05/02 Document Systems Support V1.0
Page 9

7. If you do have a green “link light”, try to “ping” the network card in the copier
by typing the following from a DOS prompt on your PC:
Ping 192.168.10.1
(Please substitute the IP address with the correct address you are using)
8. If you get a “reply” then you have a network connection. Double check numbers
1 through 5 and if necessary, re-install the LPR software and print driver.
9. If you do not get a “reply” contact your Dealer for further assistance.
Print Driver Issues
1. If the copier “bleeps” and doesn’t print anything, check the defaults of the
printer driver especially the default paper size. Make sure this is set to A4.
2. Have you got “security print” enabled? Again, double-check the defaults and
make sure the driver is configured correctly.
3. If your unit picks paper from a different tray than selected, check within your
application software for the correct page defaults and these will usually override
the printer driver settings.
4. The latest printer drivers can be downloaded from the following Web Site.
9
http://www.panasonic.co.jp/mgcs/download/index.html
30/05/02 Document Systems Support V1.0
Page 10

10
Windows NT4/2000
Peer to Peer Printing
You can print to your DP series unit from the above operating systems without the
need of a Server. You can also use this method of printing even if you have a Server
but would prefer to print directly to your DP unit. You may need to have
Administrator access rights to perform the following operations, please consult with
your Network Administrator if you are unsure.
Stage 1
What you will need
Your DP unit will need a TCP/IP address e.g. 192.168.10.1, a sub-net mask e.g.
255.255.255.0 and a gateway address e.g. 192.168.10.100. Your network
administrator may need to give you these addresses. Your PC will also need to have
TCP/IP printing services installed, this is built in to Windows 2000 but not in NT4 so
you may need to load this from your Windows CD ROM. Please consult your
Windows documentation for further information.
Once you have these addresses you will need to input these into the DP unit. Follow
these instructions to input these settings.
1. With the unit turned on press the “function” key located on the dashboard at the
top towards the right.
2. Use the arrow button (DP2500) or the toggle button (DP2000) to select page 2
of the menu.
3. Scroll down to “Key operator code”
4. Input “000” then either OK or SET (if this code is incorrect consult your Dealer)
5. Scroll down until you see “TCP/IP Address”
6. Input the information as requested. Remember to use the full three digit number
for the address e.g. if the address for one segment is “10” input “010”. If you
make a mistake, use the “clear” button to erase your entry. Repeat the above
and the Sub-Net Mask and Gateway.
7. After you have entered the address remember to press the “set” button to
register your entry.
8. After entering all of the information press the “reset” button to get back to the
main menu then switch the unit off and then on for the changes to take effect.
9. You can check to see if your settings have been accepted by going back into the
menu’s previously mentioned.
30/05/02 Document Systems Support V1.0
Page 11

11
10. In case of difficulty your Dealer can test the unit using an engineering mode,
please ask them for assistance.
Stage 2
What Next?
Now you have programmed your DP unit you now need to install the printer driver
on your PC.
Follow these instructions to add the DP unit as a printer. You will need the CD-ROM
that came with your DP unit.
You can download the latest printer driver from our Web site at the following link:
http://www.panasonic.co.jp/mgcs/download/index.html
Windows NT4 – For Windows 2000 skip to No 50
11. Place the CD-ROM into your computer drive; the disk will auto run and display
a menu, you can read the manual from here or simply close this window.
12. Open up your Printers folder and click on “Add printer”.
13. Make sure the radio button for “My Computer” is checked then click “next”.
14. Now click on “Add port”.
15. Now choose “LPR” port
16. Now choose “New port” as shown below.
30/05/02 Document Systems Support V1.0
Page 12
12
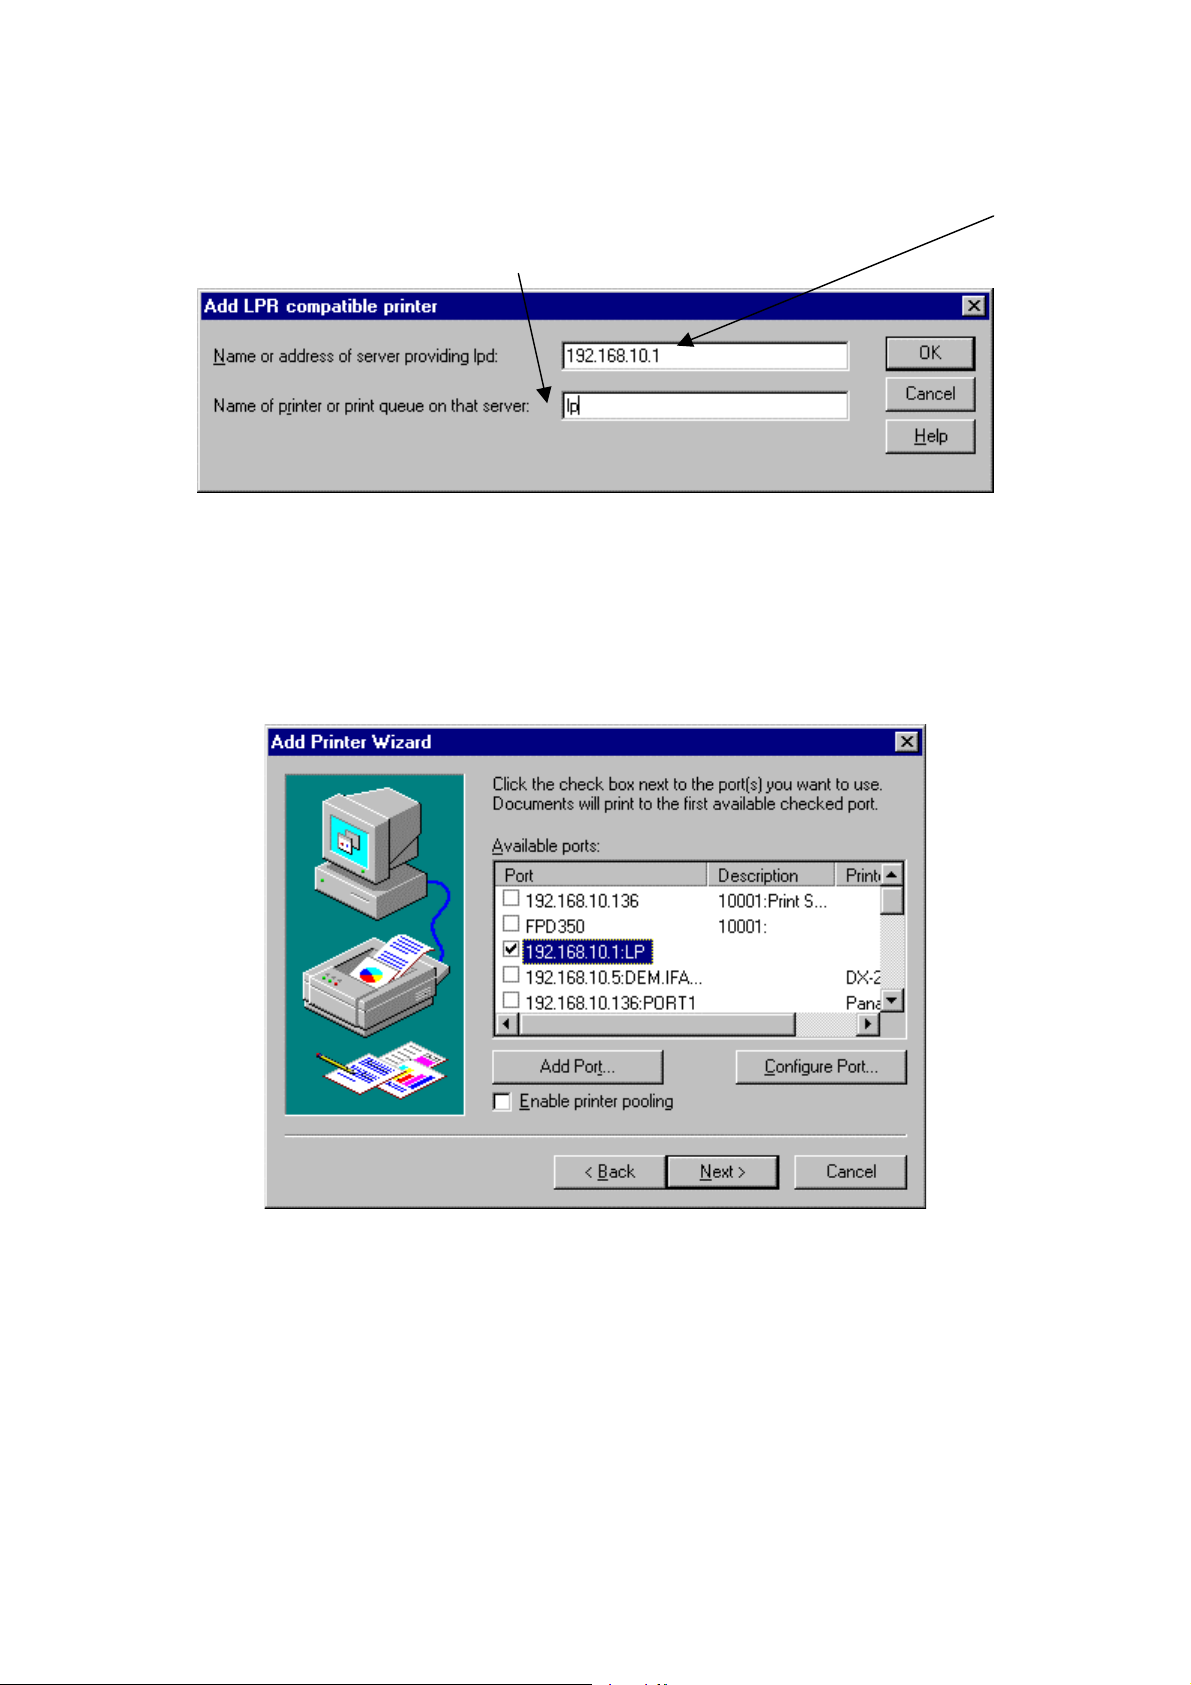
17. In the top window where it says name or address of server providing LPD,
enter the IP address of the copier separated by a dot
18. In the bottom window enter “lp” for the queue name.
19. Click “OK”
20. NT will now go and look for this port so make sure the copier is switched on
and connected to the network.
21. Now escape out of this until you get back to the main screen where you
should have a window that looks like this.
22. Now click “Next”
23. Now choose “Have disk”
24. Browse the CD-ROM to the driver folder, which can be found at
e:\english\driver\nt4 where “e:\” is the letter of your CD ROM drive.
25. Click “OK”.
26. Then “Next” and give the printer a name.
27. Click “Next”
30/05/02 Document Systems Support V1.0
Page 13
13
28. Now choose if you wish to share this printer with other users. We recommend
that you do not share the printer; if other users wish to print to the copier,
repeat this procedure for each PC.
29. Click “Next”.
30. Click “Yes” to produce a test page.
31. Click “Finish”.
32. A test page should now be printed out.
33. When finished you should end up with a printer icon in your printer’s folder.
Do a right hand mouse click and highlight “properties” this will then bring up
a menu.
34. We now need to configure the driver to work with your DP unit. You will only
need to do this once.
35. Click on “device options”
36. Select the accessories you have fitted to your DP unit.
37. Repeat this procedure and choose “document defaults” this time and make
sure that the paper size is set to A4.
38. Click on “paper/layout” and make sure the default is set to A4
39. Click “OK” to finish.
Windows 2000
40. Place the CD-ROM into your computer drive; the disk will auto run and display
a menu, you can read the manual from here or simply close this window.
41. Open up your Printers folder and click on “Add printer”.
42. This will now start the printer wizard.
43. Click “Next”
44. Select “Local printer”
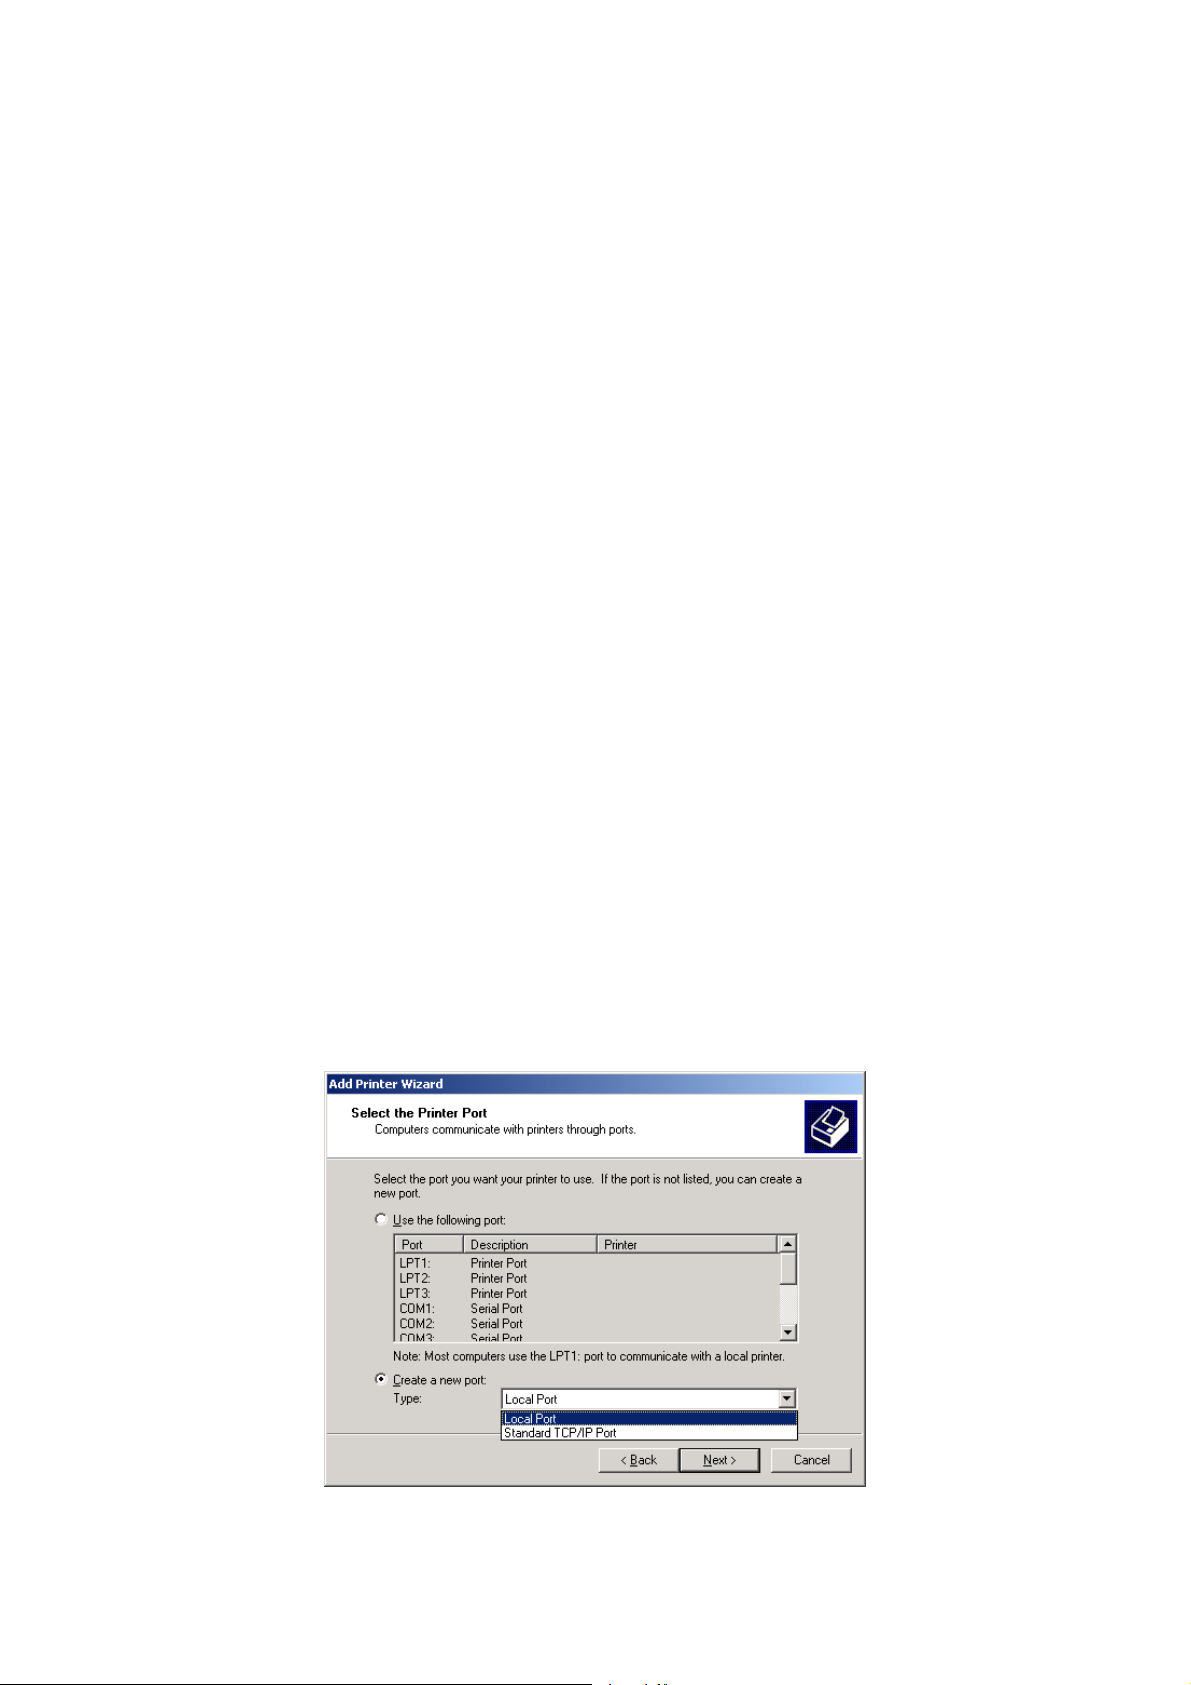
45. Select “Create new port”
46. Choose “Standard TCP/IP Port” from the pull-down menu as shown below.
30/05/02 Document Systems Support V1.0
Page 14
47. This now starts another wizard.
48. Click “Next”
49. Now enter the IP address of the copier separated by a dot.
14
50. Click “Next”
51. On the next menu choose ”Custom” and click on “Settings”
52. On this menu make sure the protocol selected is “LPR” and the queue name
should be set to “lp”. Also tick the box that says “enable byte counting” then
click OK.
30/05/02 Document Systems Support V1.0
Page 15

15
53. Click “Next”
54. The wizard will now display your chosen settings, click “Finish” to save.
55. You should now have an icon in your printer folder, do a right hand mouse
click over the icon and select “Printing preferences”.
56. Make sure the paper is set to A4.
57. You can alter other defaults using this menu if you wish.
58. Repeat this mouse click again and now choose “Properties”
59. Go to the tab “Device options”
60. Here you need to input what accessories etc you have on your unit. When you
have finished click “Apply” then “OK”.
Stage 3
Operating Instructions
61. For comprehensive operating instructions, please refer to the manual, which
can be found on the CD that came with your unit.
30/05/02 Document Systems Support V1.0
Page 16

Problems?
No Network Connection
1. Check the obvious things; is the unit switched on and “on-line” (the on-line light
should be on, if it isn’t press the “Printer” key on the left side of the copier
dashboard and then press “on-line”. The copier should bleep to confirm.
2. Check the cable connections and if possible use a known good cable and
network port.
3. Have you programmed the IP address of the copier, Sub-Net and Gateway
correctly? Please refer to the start of the installation procedure to double-check
this.
4. Even if you don’t have a Gateway, an address must be inputted. Choose a spare
IP address for the Gateway if required.
5. Have you properly configured the LPR port on your PC? Again, refer to the start
of this guide to check this.
6. Where you plug the network cable into the back of the copier, do you have a
green “link light” showing. If not try an alternative network port. If you do not
get a green link light, please contact your Dealer for further assistance.
7. If you do have a green “link light”, try to “ping” the network card in the copier
by typing the following from a DOS prompt on your PC:
16
Ping 192.168.10.1
(Please substitute the IP address with the correct address you are using)
8. If you get a “reply” then you have a network connection. Double check numbers
1 through 5 and if necessary, re-install the LPR software and print driver.
9. If you do not get a “reply” contact your Dealer for further assistance.
Print Driver Issues
10. If the copier “bleeps” and doesn’t print anything, check the defaults of the
printer driver especially the default paper size. Make sure this is set to A4.
11. Have you got “security print” enabled? Again, double-check the defaults and
make sure the driver is configured correctly.
12. If your unit picks paper from a different tray than selected, check within your
application software for the correct page defaults and these will usually override
the printer driver settings.
13. The latest printer drivers can be downloaded from the following Web Site.
14. If your DP unit prints only part pages, check that you have “enable byte
counting” in the Port settings of your computer.
http://www.panasonic.co.jp/mgcs/download/index.html
30/05/02 Document Systems Support V1.0
Page 17

17
Windows NT4/2000
Server Based Printing – Server Set-Up
Important Note
In order for you to proceed with this installation you will need “Administrator Rights”
on the Server. Please consult with your Network Administrator if you need
assistance.
Stage 1
What you will need
Your DP unit will need an TCP/IP address e.g. 192.168.10.1, a sub-net mask e.g.
255.255.255.0 and a gateway address e.g. 192.168.10.100. Your network
administrator may need to give you these addresses. Your PC will also need to have
TCP/IP printing services installed, this is built in to Windows 2000 but not in NT4 so
you may need to load this from your Windows CD ROM. Please consult your
Windows documentation for further information.
Once you have these addresses you will need to input these into the DP unit. Follow
these instructions to input these settings.
1. With the unit turned on press the “function” key located on the dashboard at the
top towards the right.
2. Use the arrow button (DP2500) or the toggle button (DP2000) to select page 2
of the menu.
3. Scroll down to “Key operator code”. Input “000” then either OK or SET (if this
code is incorrect consult your Dealer)
4. Scroll down until you see “TCP/IP Address”
5. Input the information as requested. Remember to use the full three digit number
for the address e.g. if the address for one segment is “10” input “010”. If you
make a mistake, use the “clear” button to erase your entry. Repeat the above
for the Sub-Net Mask and Gateway.
6. After you have entered the address remember to press the “set” button to
register your entry.
7. After entering all of the information press the “reset” button to get back to the
main menu then switch the unit off and then on for the changes to take effect.
30/05/02 Document Systems Support V1.0
Page 18

18
8. You can check to see if your settings have been accepted by going back into the
menu’s previously mentioned.
9. In case of difficulty your Dealer can test the unit using an engineering mode,
please ask them for assistance.
Stage 2
What Next?
Now you have programmed your DP unit you now need to install the printer driver
on your PC.
Follow these instructions to add the DP unit as a printer. You will need the CD-ROM
that came with your DP unit.
You can download the latest printer driver from our Web site at the following link:
http://www.panasonic.co.jp/mgcs/download/index.html
Windows NT4 – For Windows 2000 skip to No 34
1. Place the CD-ROM into your computer drive; the disk will auto run and display
a menu, you can read the manual from here or simply close this window.
2. Open up your Printers folder and click on “Add printer”.
3. Make sure the radio button for “My Computer” is checked then click “next”.
4. Now click on “Add port”.
5. Now choose “LPR” port
6. Now choose “New port” as shown below.
30/05/02 Document Systems Support V1.0
Page 19

19
11. In the top window where is says name or address of server providing LPD,
enter the IP address of the copier separated by a dot
12. In the bottom window enter “lp” for the queue name.
13. Click “OK”
14. NT will now go and look for this port so make sure the copier is switched on
and connected to the network.
15. Now escape out of this until you get back to the main screen where you
should have a window that looks like this.
16. Now click “Next”
17. Now choose “Have disk”
18. Browse the CD-ROM to the driver folder which can be found at
e:\english\driver\nt4 where “e:\” is the letter of your CD-ROM drive.
19. Click “OK”.
20. Then “Next” and give the printer a name.
21. Click “Next”
30/05/02 Document Systems Support V1.0
Page 20

20
22. Choose to share this printer with other users and also highlight any other
operating systems you wish to have drivers loaded for e.g. Windows 95. NT
will prompt you for the location of the additional driver files at a later stage.
23. Click “Next”.
24. Click “Yes” to produce a test page.
25. Click “Finish”.
26. A test page should now be printed out.
27. When finished you should end up with a printer icon in your printer’s folder.
Do a right hand mouse click and highlight “properties” this will then bring up
a menu.
28. We now need to configure the driver to work with your DP unit. You will only
need to do this once.
29. Click on “device options”
30. Select the accessories you have fitted to your DP unit.
31. Repeat this procedure and choose “document defaults” this time and make
sure that the paper size is set to A4.
32. Click on “paper/layout” and make sure the default is set to A4
33. Click “OK” to finish.
Windows 2000
34. Place the CD-ROM into your computer drive; the disk will auto run and display
a menu, you can read the manual from here or simply close this window.
35. Open up your Printers folder and click on “Add printer”.
36. This will now start the printer wizard.
37. Click “Next”
38. Select “Local printer”
39. Select “Create new port”
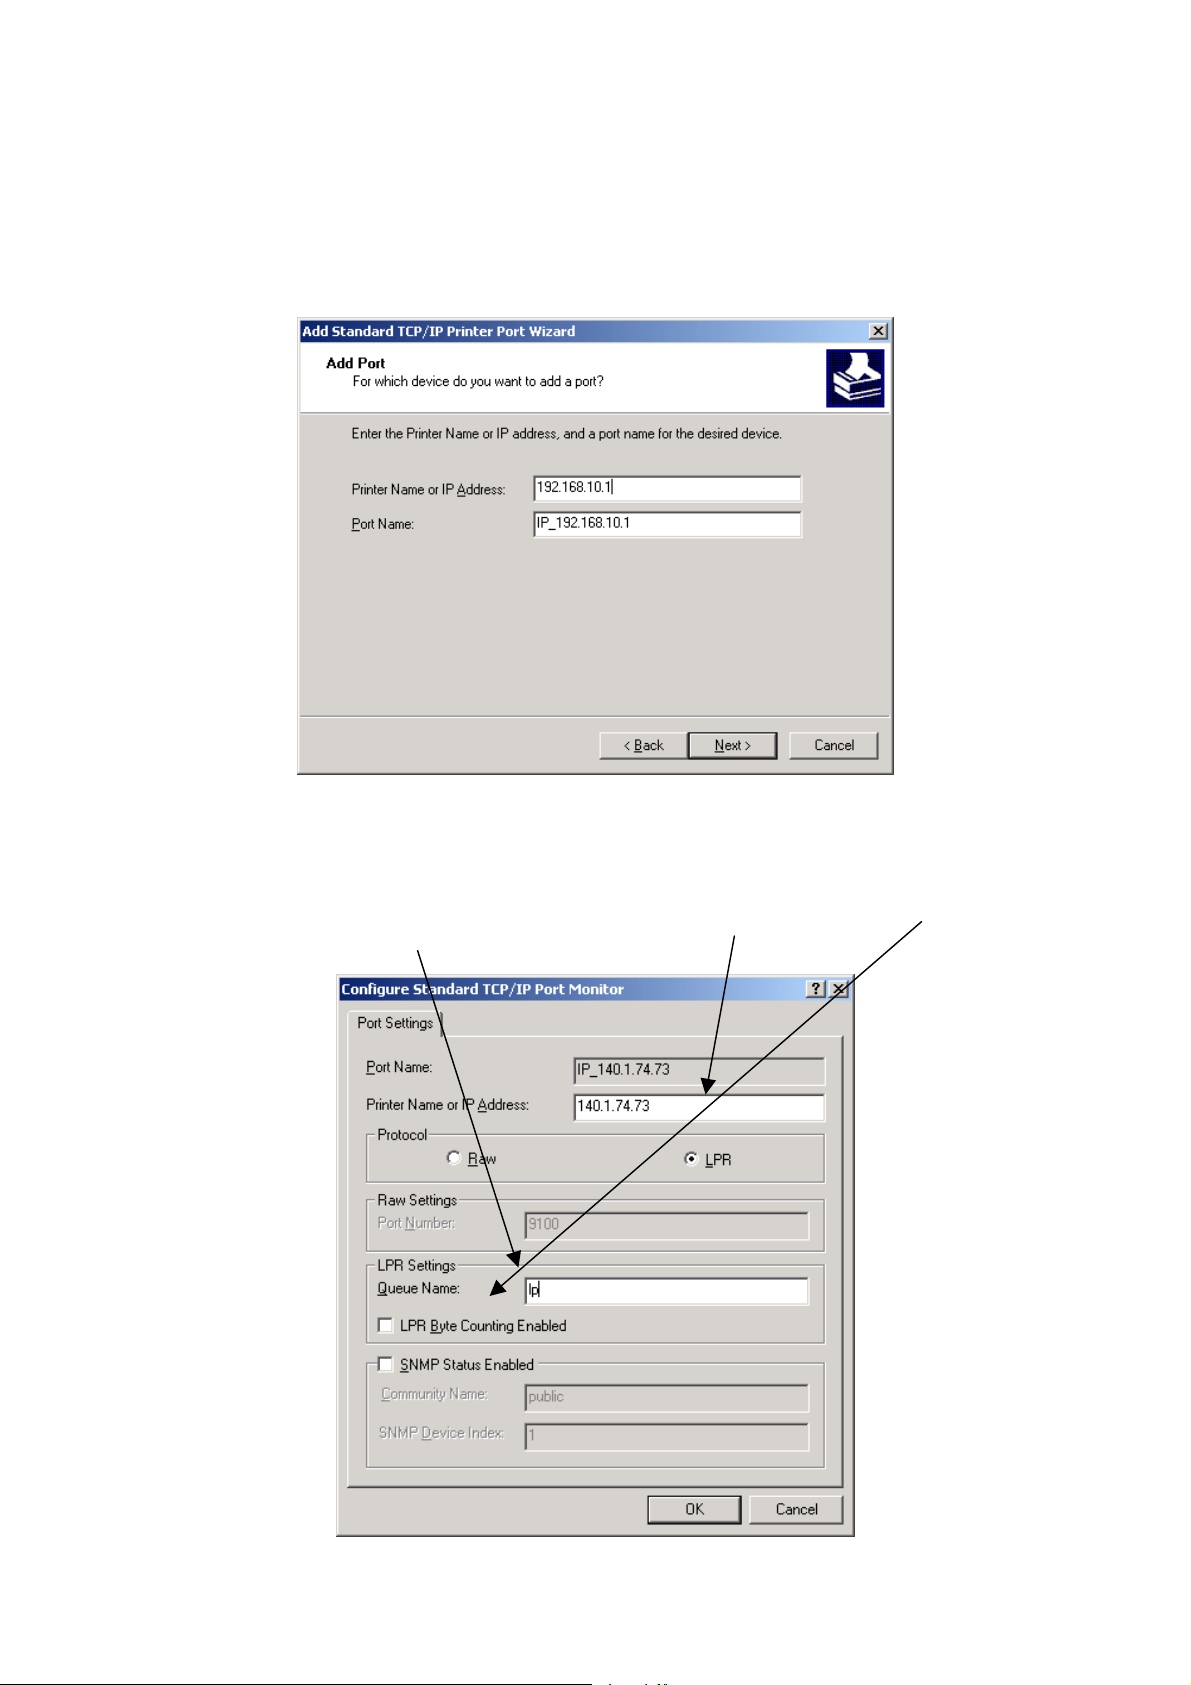
40. Choose “Standard TCP/IP Port” from the pull-down menu as shown below.
41. This now starts another wizard.
30/05/02 Document Systems Support V1.0
Page 21

42. Click “Next”
43. Now enter the IP address of the copier separated by a dot.
21
44. Click “Next”
45. On the next menu choose ”Custom” and click on “Settings”
46. On this menu make sure the protocol selected is “LPR” and the queue name
should be set to “lp”. Also tick the box that says “enable byte counting”, then
click OK.
30/05/02 Document Systems Support V1.0
Page 22

22
47. Click “Next”
48. The wizard will now display your chosen settings, click “Finish” to save.
49. You should now have an icon in your printer folder, do a right hand mouse
click over the icon and select “Printing preferences”.
50. Make sure the paper is set to A4.
51. You can alter other defaults using this menu if you wish.
52. Repeat this mouse click again and now choose “Properties”
53. Go to the tab “Device options”
54. Here you need to input what accessories etc you have on your unit. When you
have finished click “Apply” then “OK”.
Stage 3
Operating Instructions
For comprehensive operating instructions, please refer to the manual, which can be
found on the CD that came with your unit.
30/05/02 Document Systems Support V1.0
Page 23

Problems?
No Network Connection
1. Check the obvious things; is the unit switched on and “on-line” (the on-line light
should be on, if it isn’t press the “Printer” key on the left side of the copier
dashboard and then press “on-line”. The copier should bleep to confirm.
2. Check the cable connections and if possible use a known good cable and
network port.
3. Have you programmed the IP address of the copier, Sub-Net and Gateway
correctly? Please refer to the start of the installation procedure to double-check
this.
4. Even if you don’t have a Gateway, an address must be inputted. Choose a spare
IP address for the Gateway if required.
5. Have you properly configured the LPR port on your PC? Again, refer to the start
of this guide to check this.
6. Where you plug the network cable into the back of the copier, do you have a
green “link light” showing. If not try an alternative network port. If you do not
get a green link light, please contact your Dealer for further assistance.
7. If you do have a green “link light”, try to “ping” the network card in the copier
by typing the following from a DOS prompt on your PC:
23
Ping 192.168.10.1
(Please substitute the IP address with the correct address you are using)
8. If you get a “reply” then you have a network connection. Double check numbers
1 through 5 and if necessary, re-install the LPR software and print driver.
9. If you do not get a “reply” contact your Dealer for further assistance.
Print Driver Issues
10. If the copier “bleeps” and doesn’t print anything, check the defaults of the
printer driver especially the default paper size. Make sure this is set to A4.
11. Have you got “security print” enabled? Again, double-check the defaults and
make sure the driver is configured correctly.
12. If your unit picks paper from a different tray than selected, check within your
application software for the correct page defaults and these will usually override
the printer driver settings.
13. The latest printer drivers can be downloaded from the following Web Site.
14. If your DP unit prints part pages, make sure you have selected “enable byte
counting” in the Port settings of your computer.
http://www.panasonic.co.jp/mgcs/download/index.html
30/05/02 Document Systems Support V1.0
Page 24

24
Windows 95/98/Me/NT4/2000
Server Based Printing – Client PC’s
Important Note
Before proceeding, please make sure that the printer driver has been installed onto
your Server. For instructions on how to do this, see the appropriate section for your
Server operating system.
Stage 1
1. From your PC double click on “Network Neighbourhood”; this should give you a
list of the computers currently on your network.
2. Locate the icon for your server and then double click on it.
3. You should be able to see a printer icon for the DP copier.
4. Double click on the icon, Windows will then ask you if you wish to use this
resource and prompt you to install the relevant files.
5. Click on “Yes” and your Server will download the appropriate files to your PC.
6. Once you have done this open your Printers folder and you should see an icon
for the DP unit.
7. Do a right hand mouse click and choose “Properties”. Go to the tab “Device
Options”. Here you need to input what accessories etc you have on your unit.
Make sure the paper size is set to A4. For NT4 and 2000 users see the note
below regarding document defaults.
8. When you have finished click “Apply” then “OK”.
30/05/02 Document Systems Support V1.0
Page 25

25
NT4 and 2000 only
9. Repeat the right hand mouse click over the printer icon and go to “Document
defaults” and make sure the paper size is set to A4 then click “OK”. Also check
the Port settings of your computer to make sure that “enable byte counting” is
switched on..
Operating Instructions
10. For comprehensive operating instructions, please refer to the manual, which can
be found on the CD that came with your unit.
Problems?
No Network Connection
1. Check the obvious things; is the unit switched on and “on-line” (the on-line light
should be on, if it isn’t press the “Printer” key on the left side of the copier
dashboard and then press “on-line”. The copier should bleep to confirm.
2. Check the cable connections and if possible use a known good cable and
network port.
3. Have you programmed the IP address of the copier, Sub-Net and Gateway
correctly? Please refer to the start of the installation procedure to double-check
this.
4. Even if you don’t have a Gateway, an address must be inputted. Choose a spare
IP address for the Gateway if required.
5. Have you properly configured the LPR port on your PC? Again, refer to the start
of this guide to check this.
6. Where you plug the network cable into the back of the copier, do you have a
green “link light” showing. If not try an alternative network port. If you do not
get a green link light, please contact your Dealer for further assistance.
7. If you do have a green “link light”, try to “ping” the network card in the copier
by typing the following from a DOS prompt on your PC:
Ping 192.168.10.1
(Please substitute the IP address with the correct address you are using)
8. If you get a “reply” then you have a network connection. Double check numbers
1 through 5 and if necessary, re-install the LPR software and print driver.
9. If you do not get a “reply” contact your Dealer for further assistance.
30/05/02 Document Systems Support V1.0
Page 26

26
Print Driver Issues
10. If the copier “bleep’s” and doesn’t print anything, check the defaults of the
printer driver especially the default paper size. Make sure this is set to A4.
11. Have you got “security print” enabled? Again, double-check the defaults and
make sure the driver is configured correctly.
12. If your unit picks paper from a different tray than selected, check within your
application software for the correct page defaults and these will usually override
the printer driver settings.
13. The latest printer drivers can be downloaded from the following Web Site.
14. If your unit prints part pages, check to make sure that “enable byte counting” is
switched on – this only applies to Windows 2000.
http://www.panasonic.co.jp/mgcs/download/index.html
30/05/02 Document Systems Support V1.0
Page 27

GDI Printer Driver Overview
Windows 95/98/Me/NT4/2000
Paper Source
Selection
27
Auto Paper
Size Detection
Zoom N into 1
feature
30/05/02 Document Systems Support V1.0
Page 28

28
Sort and
Duplex
Menu’s
Output Tray
Selection
Security Print
Option + Unit
Configuration
30/05/02 Document Systems Support V1.0
Page 29

PCL6 Printer Driver Overview
Windows 95/98/Me/NT4/2000
29
Paper Source
Selection
Enlarge/Reduce
Option
Combine
Pages
onto 1
Page
30/05/02 Document Systems Support V1.0
Page 30

Sort and
Duplex
Menu’s
30
Output Tray Selection + Staple
Feature (requires finisher)
Image Overlay
(10 per user)
30/05/02 Document Systems Support V1.0
Page 31

31
Network Glossary
AC15:
A type of connection used to transmit data or voice across long distances,
used to provide WAN connections from site to site.
BACKBONE:
A high capacity network linking networks of a lower capacity, like LAN's
BRIDGE:
A device linking 2 LANs or LAN segments passing traffic over a port to port
connection. A bridge operates at the MAC (Media Access Control) level
(see M) independently of the protocols used by each LAN
BROWSER:
These are software packages used for accessing HTML (Hypertext Mark-up
Language) encoded documents from the Internet WWW (World Wide
Web)
BUFFER:
A temporary data store used to compensate for the timing differences
between sending and receiving machines.
BUS TOPOLOGY:
A type of network in which all the nodes (workstations, clients, printers
etc.) are connected in line to a single cable with 2 distinct ends. Each node
is aware of all the transactions on the network but will only respond to the
instructions that carry the correct address for that node. See
CLIENT SERVER WORKING:
The division of an application in two parts, the FRONT END client, which
could by a PC on a desk and the BACK END server which would be running
the network operating systems and containing the data that is to be
shared between all the users on the network.
TABLE 1
30/05/02 Document Systems Support V1.0
Page 32

32
CLOSED USER GROUP: (CUG)
A subgroup of users on a network who can connect and communicate with
each other. One or more members of the CUG can have access to the wider
network.
Co-Axial Cable aka co-ax:
This is a cable consisting of an inner core and an outer braid separated by
a layer of insulation.
CODEC:
Short for ENCODER-DECODER. A device, which converts analogue signals
to digital signals that, will be used on a digital network & visa versa.
DELTA TOPOLOGY:
A type of network that has no central site. See
DISTRIBUTED COMPUTING / WORKING:
An arrangement where the processing power of a network is distributed
between all the PC's on a network, rather than being centralised in a
server or main frame.
DISTRIBUTED PROCESSING:
The way that information is shared between the PC's on a network. In a
way, the computers share the work between them.
DUPLEX CIRCUIT:
A
FULL DUPLEX CIRCUIT
A HALF DUPLEX
one time. Also see
ENTERPRISE NETWORK:
circuit, can only send or receive data in one direction at
SIMPLEX
can transmit and receive data at the same time,
TABLE 1
A term used for a private network linking sites and individuals within 1
organisation. This can take the form of certain WAN's.
30/05/02 Document Systems Support V1.0
Page 33

33
ETHERNET:
This is the most widely used form of LAN transmission. (IEEE 802.3
standard). It is based on a BUS TOPOLOGY and runs over twisted pair, coax or fibre-optics.
There are a number of variants to ETHERNET, common ones are:
nn BASE x
T
for Un-Shielded twisted pair or F for Fibre-Optic etc. Therefore,
F
network would indicate a
See
FIBRE-OPTICS:
A medium to transmit encoded digital data as pulses of light.
FILE SERVER:
A computer connected to a network, which runs the operating system and
contains the shared files that are to be accessed by members of the
network.
FRONT END:
This term was originally used to define the 'client' part of a 'client-server'
application, that requests service from the 'server' or 'BACK END'. Now, it
is more often used to describe the user interface of an application or
service.
, where nn is the speed, in, Mbits/s and x is the medium used e.g.
100Mbits/s
transimission using
Fibre-Optic
TABLE 2
100 BASE
cable.
GATEWAY:
An interface between two networks or systems.
GUI: (Graphical User Interface)
GDI: (Graphic Display Interface)
This is a term for the display of information on the users screen that gives
access to operating systems such as windows.
HOST:
An intelligent device connected to a network.
30/05/02 Document Systems Support V1.0
Page 34

34
HTML: (Hypertext Mark-up Language)
This is the common language for encoding documents for inclusion on the
WWW (World Wide Web). HTML notation is interpreted by browser
software in order to display the desired document.
HTTP: (Hypertext Transfer Protocol)
A form of communication language used by the sites on the WWW (World
Wide Web).
HUB:
This is normally the centre of a network or cabling system using
TOPOLOGY
HYBRID NETWORK:
This is a type of network that uses different topologies and access
methods.
HYPERTEXT: (AKA Hypermedia)
This is a way of delivering documents so that non-sequential links can be
set up between them.
IAP: (Internet Access Provider)
IP: (Internet Protocol)
The part of the TCP/IP that covers addressing information to allow the
transportation of data across the Internet.
ISDN: (Integrated Services Digital Network)
.
STAR
This is a digital service, which will travel over various mediums. It allows
simultaneous transmission of voice, data and video over a common
network gateway or interface.
LAN: (Local Area Network)
A Computer network normally located within one building or site. The
computers on the network are known as Clients or Workstations. Some
applications may have a central unit used to control the workstations, this
is often referred to as the Server. There are many types of network,
descriptions of these can be found in this glossary.
30/05/02 Document Systems Support V1.0
Page 35

35
MAC: (Media Access Control)
MESHED NEWTORK:
A network in which every node is connected to every other node.
MODEM: (Modulator - Demodulator)
A device which converts digital signals to analogue signals suitable for
transmission onto an analogue network.
MULTIPLEXER:
A piece of equipment which enables the transmission of a number of
channels at the same time over a single circuit. Most use data correction
and compression.
NETWORK ARCHITECTURE:
The complete design of equipment, protocols, topology and transmission
links of a network, and the way this design is implemented.
NETWORK TOPOLOGY:
This is the physical configuration of a network, how the nodes are
arranged in relation to each other. Here are some examples:
TABLE 1
30/05/02 Document Systems Support V1.0
Page 36

36
NODE:
A node is any point on a network where the transmission paths are
interconnected. On a LAN, a node will usually be a workstation or client,
on a WAN, a node could be a whole site normally connected via routers
and private connections.
NOS: (Network Operating System)
The operating system that runs on a server.
PAP: (Password Access Protocol)
This is a method of verifying a user on a network.
PARALLEL INTERFACE:
This is a common type of interface that connects computers and printers
together, developed by CENTRONICS it uses a 36 pin connector.
PCMCIA: (Personal Computer Memory Card International Association)
This is the organisation, which sets out the standard for the interface
cards used in computers, mobile phones etc. They are usually used to
provide MODEM connections, Extra Memory and Network features.
PORT:
The interface on which other computers, equipment or network items are
connected.
PROTOCOL:
A set of standards that apply to an application or service shared on a
network.
RF:
Radio Frequency, a general term used for
induced into data cables that can cause corruption in data traffic on a
network, See
STP
‘electrical noise’
that can be
RAID: (Redundant Array of Inexpensive Disks)
This is a range of disks that run in parallel but appear to the user as 1
large disk. The data is spread across the disks.
30/05/02 Document Systems Support V1.0
Page 37

37
REPEATER(S):
An amplifier that extends the standard length of cable in a transmission
path, it compensates for distortion and signal attenuation.
RING TOPOLOGY:
A type of network where the workstations are connected, via repeaters in
one single uni-directional loop. See
RIP: (Routing Information Protocol)
This is a protocol for routing traffic through LAN's. This is often used to
connect colour copiers to networks.
ROUTER:
A router is a network connection device. Routers can support most
protocols (As referred to in this document). The primary function is to find
routes between networks and provide network management capability.
TABLE 1
SERIAL INTERFACE:
This interface uses data which is sent bit by bit in a single path.
SERVER:
Is a computer on a network that runs the network operating system (NOS)
and holds the files and resources that are to be shared between users on
the network.
SESSION:
This is the term for a 'live' link between 2 or more devices. It is the link
that is currently in use.
SIMPLEX CIRCUIT:
This circuit differs from the Full Duplex circuit, it will only send data in
1(one) direction at a time.
SQL: (Structured Query Language)
This is a language defined to give all the users on a system a standard way
to read and write data to a database.
30/05/02 Document Systems Support V1.0
Page 38

38
STAR TOPOLOGY:
A type of network in which all the nodes are connected to a central hub,
which functions as a multiplexer and switching node. See TABLE 1
SWITCHED NETWORK:
This is a type of network that can be shared among many users, each of
them being able to communicate with each other.
SYNCHRONIOUS TRANSMISSION:
Data transmission that has a timing pulse inserted on the transmission
path. This allows digital signals to be transmitted without embedded
timing bits, which increases the bandwidth available for traffic.
STP: (Shielded Twisted Pair)
A type of cable using, usually 8, coloured wires twisted in pairs and is
shielded against RF noise.
TCP: (Transmission Control Protocol)
This is the 'Transport layer', connection orientated, end to end protocol
that forms the first part of the TCP/IP suite (See below). The software
that uses TCP is usually found in the operating system.
TCP/IP: (Transmission Control Protocol / Internet Protocol)
This is a collection of protocols based on the ones used by the US defence
department and are now widely used in private networking and the
Internet.
TELNET:
A protocol which governs the exchange of Character Orientated data,
allowing a terminal to communicate with a remote host.
TERMINAL ADAPTOR:
A device which converts from one protocol to another, to allow a computer
using one protocol to connect to a computer using a different protocol.
30/05/02 Document Systems Support V1.0
Page 39

39
TOKEN PASSING:
This is a method of controlling access to a network using a special data
packet called a TOKEN from node to node. When all the stations are idle,
the TOKEN is labelled as '
a '
free
' TOKEN, then changes the token to '
packet immediately behind it. When the station for which the information
was for has removed it from the network, the TOKEN is then released.
With TOKEN PASSING, workstations or applications can be assigned
priorities, either giving them preferential claim on a circulating TOKEN, or
defining the amount of data they can transmit when they receive a
TOKEN. (See
TOKEN RING:
A network type using a RING TOPOLOGY and TOKEN PASSING to control
access.
Token Ring
free
)
'. A station wishing to transmit data waits for
busy
' and transmits a data
TREE TOPOLOGY:
A network consisting of a branching cable with no closed loops. The TREE
layout begins at a point known as the 'HEAD END' and continues to a
series of POINT to POINT links. See
TWISTED PAIR:
Cable that is made up of 2(two) insulated copper wires arranged in a
regular helix shape. Each wire pair acts as a single communication link. A
typical cable consists of a
number of these pairs of wires. Basic Twisted Pair is sometimes known as
Unshielded Twisted Pair (UTP).
UNI: (User Network Interface)
The demarcation point between a LAN and a public data network (WAN)
UNIX:
This is a powerful multitasking operating system for computers running
complex applications.
TABLE 1
UPS: (Uninterruptable Power Supply)
A device that will keep up a computer system or any other electrical
device for a period of time in the event of a power failure.
30/05/02 Document Systems Support V1.0
Page 40

40
UTP: (Unshielded Twisted Pair)
A type of cable using, usually 8, coloured wires twisted in pairs but has no
shielding against RF noise.
WAN: (Wide Area Network)
A connection, or series of connections or other LAN's that are located in
different locations, even different countries, but act as a single network.
These are normally connected via modem or Private network links, AC15
for example.
TABLE 2
NETWORK
TYPE
TRANSMISSION
SPEED
MEDIA
10 BASE T 10Mbits per second Twisted Pair Cable
10 BASE 2
10Mbits per second Co-Ax Thin
Ethernet
10 BASE 5
10Mbits per second Co-Ax Thick
Ethernet
100 BASE T
100Mbits per
Twisted Pair Cable
second
30/05/02 Document Systems Support V1.0
Page 41

NOTES
41
30/05/02 Document Systems Support V1.0
Page 42

NOTES
42
30/05/02 Document Systems Support V1.0
Page 43

NOTES
43
30/05/02 Document Systems Support V1.0
Page 44

44
30/05/02 Document Systems Support V1.0
 Loading...