

Page 1
English
Digital Copier
Operating Instructions (For Internet Fax)
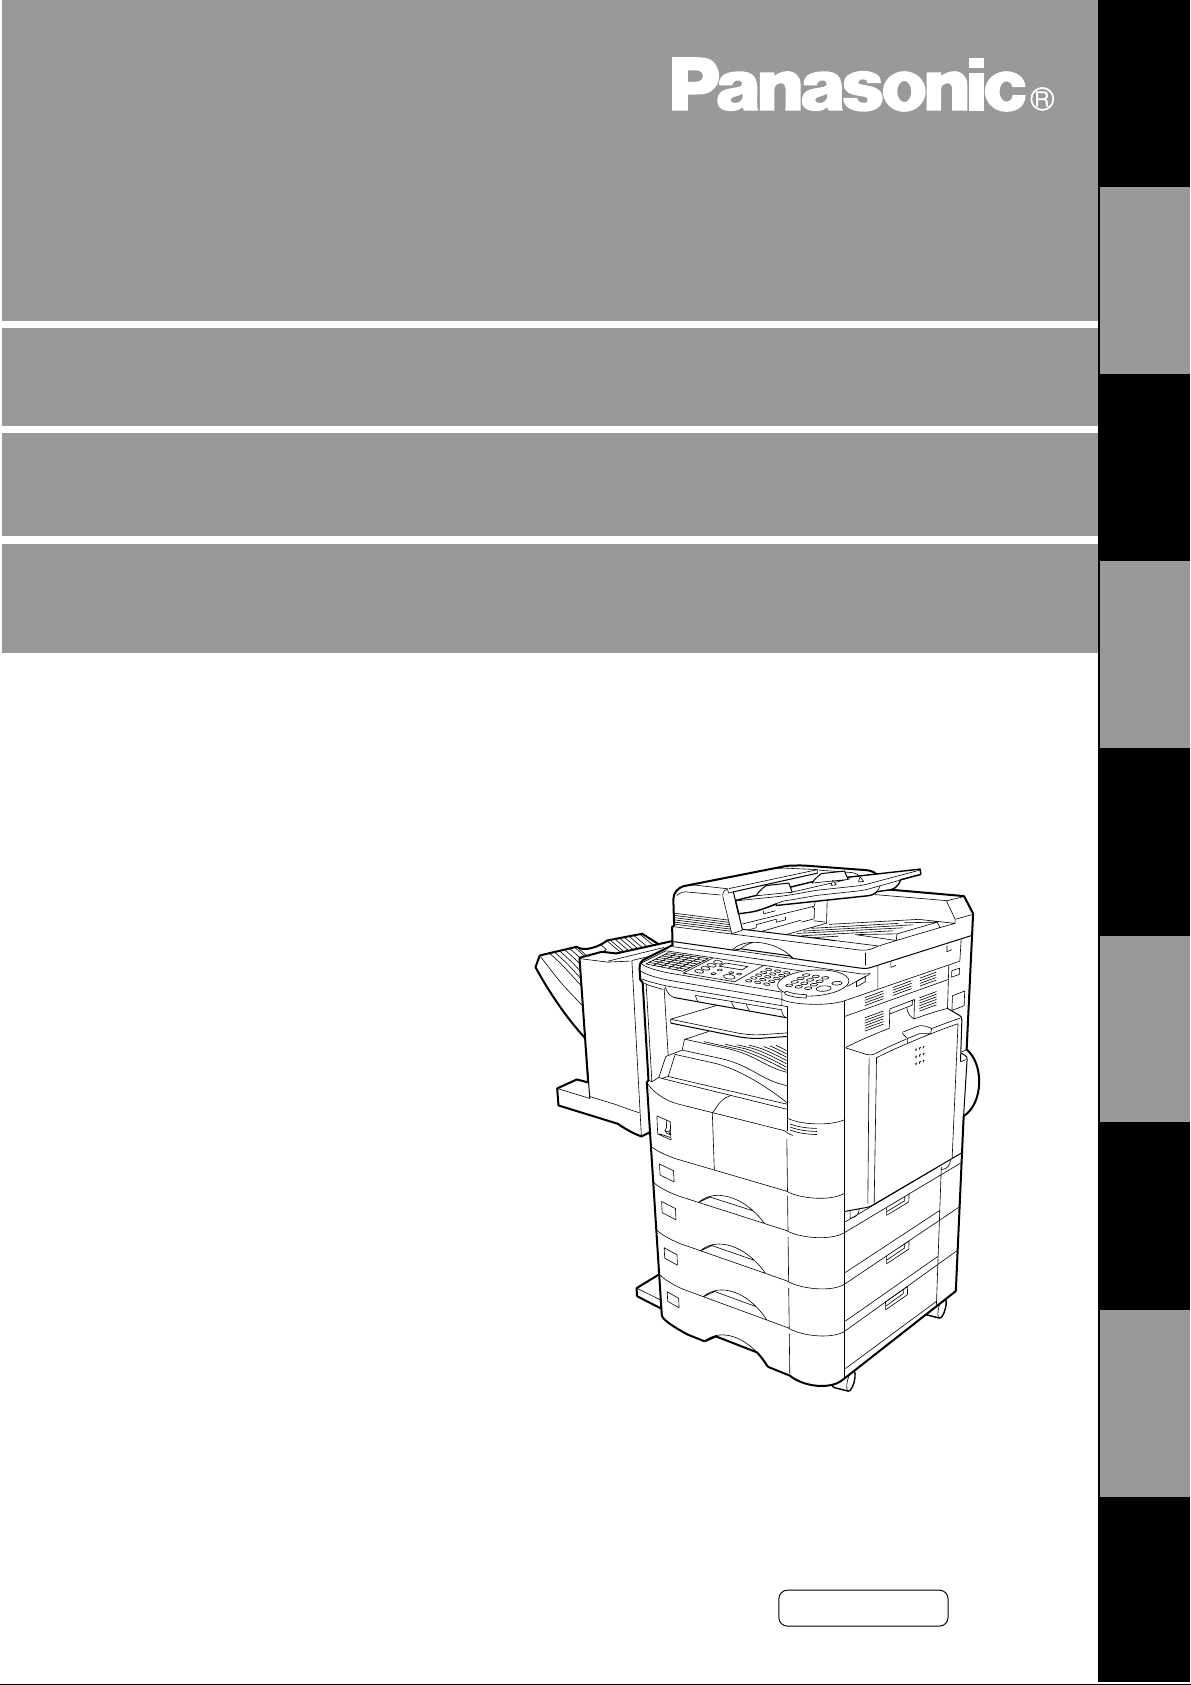
DP-2000
Options
DA-AR250/AS200/DS200/DS210/FG230/FG231/FK200/FK210/FS200/MD200
D A-NE200/PC 200/PC2 10/SM08B/SM16B /SM28B /UC200/XN 200/XT200; UE-410 047/410048 /403171
GETTING TO
KNOW YOUR
MACHINE
INSTALLING
YOUR MACHINE
PROGRAMMING
YOUR MACHINE
BASIC
OPERATIONS
ADVANCED
FEATURES
NETWORK
FEATURES
PRINTOUT
JOURNALS AND
PROBLEM
SOLVING
LISTS
Before operating this equipment, please read
these instructions completely and keep these
operating instructions for future reference.
APPENDIX
Page 2
IMPORTANT INFORMATION
When requesting infor mation, supplies or ser vice, always refer to the model and ser ial number of your
machine. The model and serial number plate (Main Name Plate) is located on the ma chine as shown
below. For your convenience, space is provided below to record information you may need in the future for
reference or troubleshooting.
Model No. Serial
Date of Purchase
Dealer
Address
Telephone Number ( ) –
Supplies Telephone Number ( ) –
Service Telephone Number ( ) –
For the total system to work properly via LAN, certain information and additional parameters must be set. Please
contact your network administrator for the required information and connection to the LAN.
User Information
Company Name:
Address:
Dept.:
City: State: Zip Code:
Tel. No.: Fax No.:
Internet Parameters
IP Address:
Subnet Mask:
SMTP Server Name: or SMTP Server IP Address:
Default Router IP Address:
Email Address:
DNS Server IP Address:
POP Server Name: or POP Server IP Address:
POP User Name:
POP Passw ord :
Host Name:
(for security, do not write it in - but keep it in a safe place)
(See page 26)
Model and Serial Number
Copyright © 2000 by Ma tsu sh ita G raphic Comm uni ca tion Systems, Inc.
All rights reserved. Unauthorized copy ing and distribution is a v iol ati on
of law. Printed in Japan.
The contents of these Operating Instructions are subject to change
without notice.
Page 3

Table of Contents
Getting to Know Your Machine
Safety Information
Function Key
Control Panel
Pre Installation Information
Internet Communication Features
Important Information
Connecting the LAN Cables
..................................................................................................................................... 6
.............................................................................................................................................. 9
............................................................................................................................................. 10
...................................................................................................................... 12
■
Setup as SMTP mail server ........................................................................... 13
■
Setup as POP3 Client .................................................................................... 14
■
Internet Fax Transmission ............................................................................. 17
■
Internet Mail Reception .................................................................................. 17
■
Inbound Routing ............................................................................................ 18
■
Fax Forward ................................................................................................... 19
■
Network Scanner ........................................................................................... 19
■
Network Printer .............................................................................................. 20
■
Relayed Transmission ................................................................................... 21
............................................................................................................................... 22
■
Differences between Internet Fax and Regular Fax ...................................... 22
■
Transmitted Document Confirmation .............................. ...... ....... ...... ....... ..... 22
■
DP-2000 Cannot Make a Phone Call via LAN ............................................... 22
■
Dual Port Communication .............................................................................. 22
■
Transmission Resolution ............................................................................... 22
■
Internet Mail Reception .................................................................................. 22
■
Sending Document Size via LAN ................................................................... 23
■
Sending a Document to a PC via LAN ........................................................... 23
■
Internet Relayed Transmission ...................................................................... 23
..................................................................................................................... 24
........................................................................................................... 17
Installing Your Mac hine
User Parameters
Setting the Internet Parameters
Programming or Retrieving Parameters via Email
........................................................................................................................................ 25
■
Setting the User (Internet) Parameters .......................................................... 25
■
■
■
■
■
■
■
■
■
■
■
■
............................................................................................................... 26
Setting the User Parameters for the LAN Interface ....................................... 26
................................................................................. 27
Using Email to Program or Retrieve Parameters ........................................... 27
Using a PC to Input the Internet Parameters Remotely ................................. 27
To Input the Internet Parameters for the First Time ....................................... 28
To Retrieve the Internet Parameters for Backup ........................................... 30
To Edit the Retrieved or Backup Internet Parameters File ............................ 32
Using a PC to Update the Auto Dialer Remotely ........................................... 35
Deleting the Entire Auto Dialer ...................................................................... 36
To Program One-Touch/ABBR. No. for the First Time .................................. 37
To Retrieve One-Touch/ABBR. No. Data for Backup .................................... 39
To Edit the Retrieved or Backup One-Touch/ABBR. No. Data File ............... 41
Using Email to Retrieve the Journal .............................................................. 43
Programming Your Machine
Programming Email Address and Telephone Numbers
■
Programming the Auto Dialer ........................................................................ 45
■
Editing or Erasing the Auto Dialing Number / Email Address ........................ 49
Programming Email Address and Telephone Numbers
Customizing Your Machine
■
Printing a Directory Sheet .............................................................................. 52
....................................................................................................................... 53
■
Setting the Fax Parameters ........................................................................... 53
■
Fax Parameter Table .................................................................................... 54
......................................................................... 45
......................................................................... 52
3
Page 4

Table of Contents
Basic Operations
Sending Documents via LAN
Receiving Documents via LAN
■ Manual Emai l Addressi ng
■ One-Touch Email Addressing ......... ...... ........................................................ 64
■ Abbreviated Email Addressing ..................................................................... 65
■ Directory Search Dialing ............................................................................... 66
■ Multi-Station Transmission (Broadcasting) ................................................... 68
■ Selectable Domains ...................................................................................... 70
■ Internet Fax Ledger Size Document Transmission ....................................... 72
■ Returned Email ............................................................................................. 74
■ Using a Mailing List ....................................................................................... 75
■ Internet Fax Received on a PC ..................................................................... 76
■ Receiving Email from a POP Server ............................................................. 78
■ Setting the POP Parameters ......................................................................... 78
■ Unattended Reception from the POP Server ................................................ 81
■ Manual Reception from the POP Server ....................................................... 81
Advanced Features
Program Keys
Sender Selection
Subject Line Entry
Inbound Routing
Fax Forward
Ifax Return Receipt
............................................................................................................................................ 83
■ Entering an Email Address ............................................................................ 83
■ Entering a Telephone Number ...................................................................... 84
■ Setting for Group Dialing ............................................................................... 85
■ Setting the POP Access Key ......................................................................... 86
■ Using the POP Access Key ........................................................................... 87
■ Changing or Erasing the Program Key Settings ........................................... 88
....................................................................................................................................... 89
■ General Description ...................................................................................... 89
■ Setting the Sender Selection ......................................................................... 89
■ Sending Document with Sender Selection .................................................... 91
■ Printing the Sender Selection List ................................................................. 92
.................................................................................................................................... 93
■ General Description ...................................................................................... 93
■ Sending Email with Subject Line Entry ......................................................... 93
....................................................................................................................................... 95
■ Setting the Routing Parameters .................................................................... 95
■ Entering One-Touch/Abbreviated Dialing Numbers for Inbound Routing ..... 97
............................................................................................................................................... 99
■ Setting Fax Forward ...................................................................................... 99
................................................................................................................................... 100
................................................................................................................... 61
.............................................................................. 62
................................................................................................................ 76
4
Network Features
Network Scanner
Network Printer
Relayed Transmission
....................................................................................................................................... 101
......................................................................................................................................... 102
.............................................................................................................................. 103
■ General Description ...................................................................................... 103
■ Relay Network ............................................................................................... 104
■ Setting up your DP-2000 as an Internet Relay Station ................................. 106
■ Setting Up Your Machine for Relayed Transmission .................................... 107
■ Programming the End Receiving Station into your Auto Dialer ..................... 107
■ Sending Documents via Internet Relay ......................................................... 109
■ To a Location That Has a Pre-programmed Relay Station ........................... 109
■ To a Location That Does Not Have a Pre-programmed Relay Station ......... 111
■ Sending Document(s) from a PC to a G3 Fax Machine ................................ 113
■ Printouts and Reports ..................... ...... ....... ....................................... ...... .... 115
Page 5

Printout Journals and Lists
Table of Contents
Journals and Lists
.................................................................................................................................... 117
■ Transaction Journal ....................................................................................... 117
■ Communication Journal (COMM. JOURNAL) ............................................... 121
■ One-Touch/Abbreviated and Direc tor y Sear ch List .................. ....... ...... ....... . 124
■ Program List ................... ....... ...... ....... ...... ...... ....... ........................................ 127
■ FAX Parameter List ....................................................................................... 128
Problem Solving
Troubleshooting
........................................................................................................................................ 131
■ Information Codes ......................................................................................... 131
■ Email ABBR Programming Errors ................................................................. 132
■ Error Message Sent to the Sender ................................................................ 132
■ Internet FAX Return Receipt Errors Messages ............................................. 132
Appendix
Specifications
Glossary
Index
........................................................................................................................................................... 138
............................................................................................................................................ 133
..................................................................................................................................................... 134
5
Page 6
Getting to Know Your Machine
Safety Information
!
WARNING
• TO PREVENT FIRE OR SHOCK, DO NOT EXPOSE THIS PRODUCT TO RAIN OR ANY TYPE OF
MOISTURE.
• TO MINIMIZE THE POSSIBILITY OF SHOCK OR DAMAGE TO THE MACHINE, IT MUST BE PROPERLY
GROUNDED.
• THIS PRODUCT COMPLIES WITH FDA RADIATION PERFORMANCE STANDARDS, 21 CFR SUB-CHAPTER J.
CAUTION: USE OF CONTROLS, ADJUSTMENTS OR PERFORMANCE PROCEDURES OTHER THAN THOSE
SPECIFIED HEREIN MAY RESULT IN HAZARDOUS RADIATION EXPOSURE.
• WHEN YOU OPERATE THIS EQUIPMENT, THE SOCKET-OUTLET SHOULD BE NEAR THE EQUIPMENT
AND BE EASILY ACCESSIBLE.
• MAKE SURE THAT THE MACHINE IS INSTALLED IN A SPACIOUS OR WELL VENTILATED ROOM SO AS
NOT TO INCREASE THE AMOUNT OF OZONE IN THE AIR. SINCE OZONE IS HEAVIER THAN AIR, IT IS
RECOMMENDED THAT AIR AT FLOOR LEVEL BE VENTILATED.
denotes a potential hazard that could result in serious injury or death.
6
DANGER-Invisible and hazardous laser
radiation when open and interlocks defeated.
AVOID DIRECT EXPOSURE TO BEAM.
A TTENTION-Rayonnement laser invisible
dangereux en cas d'ouverture et
lorsque la sécurité est neutralisée.
EXPOSITION DANGEREUSE A U FAISCEAU.
VORSICHT-Unsichtbare Laserstrahlung.
wenn Abdeckung geöffnet und
Sicherheitsverriegelung überbrückt.
NICHT DEM STRAHL AUSSETZEN.
FBE8998A
Page 7

Safety Information
GETTING TO KNOW YOUR MACHINE
GETTING TO
KNOW YOUR
MACHINE
CAUTION
!
• THIS PRODUCT CONTAINS A LITHIUM BATTERY. DANGER OF EXPLOSION IF BATTERY IS
INCORRECTLY REPLACED.
REPLACE ONLY WITH THE SAME OR EQUIVALENT TYPE. DISPOSE OF USED BATTERIES ACCORDING
TO THE INSTRUCTIONS OF YOUR LOCAL SOLID WASTE OFFICIALS.
• TO REDUCE THE RISK OF SHOCK OR FIRE, USE ONLY NO. 26 AWG OR LARGER TELEPHONE LINE
CABLE.
• DISCONNECT ALL POWER TO THE MACHINE BEFORE COVER(S) ARE REMOVED. REPLACE THE
COVER(S) BEFORE THE UNIT IS RE-ENERGIZED.
IMPORTANT SAFETY INSTRUCTIONS
!
When using your telephone equipment, basic safety precautions should always be followed to reduce the risk of
fire, electric shock and injury to persons, including the following:
• DO NOT USE THIS PRODUCT NEAR WATER, FOR EXAMPLE, NEAR A BATH TUB, W A SH BOWL, KITCHEN
SINK OR LAUNDRY TUB, IN A WET BASEMENT OR NEAR A SWIMMING POOL.
• AVOID USING A TELEPHONE (OTHER THAN A CORDLESS TYPE) DURING AN ELECTRICAL STORM.
THERE MAY BE A REMOTE RISK OF ELECTRIC SHOCK FROM LIGHTNING.
• DO NOT USE THE TELEPHONE TO REPORT A GAS LEAK IN THE VICINITY OF THE LEAK.
denotes hazards that could result in minor injury or damage to the machine.
• USE ONLY THE POWER CORD AND BATTERIES INDICATED IN THIS MANUAL. DO NOT DISPOSE OF
BATTERIES IN A FIRE, THEY MAY EXPLODE. CHECK WITH LOCAL CODES FOR POSSIBLE SPECIAL
DISPOSAL INSTRUCTIONS.
7
Page 8
GETTING TO KNOW Y OUR MACHINE
Safety Information
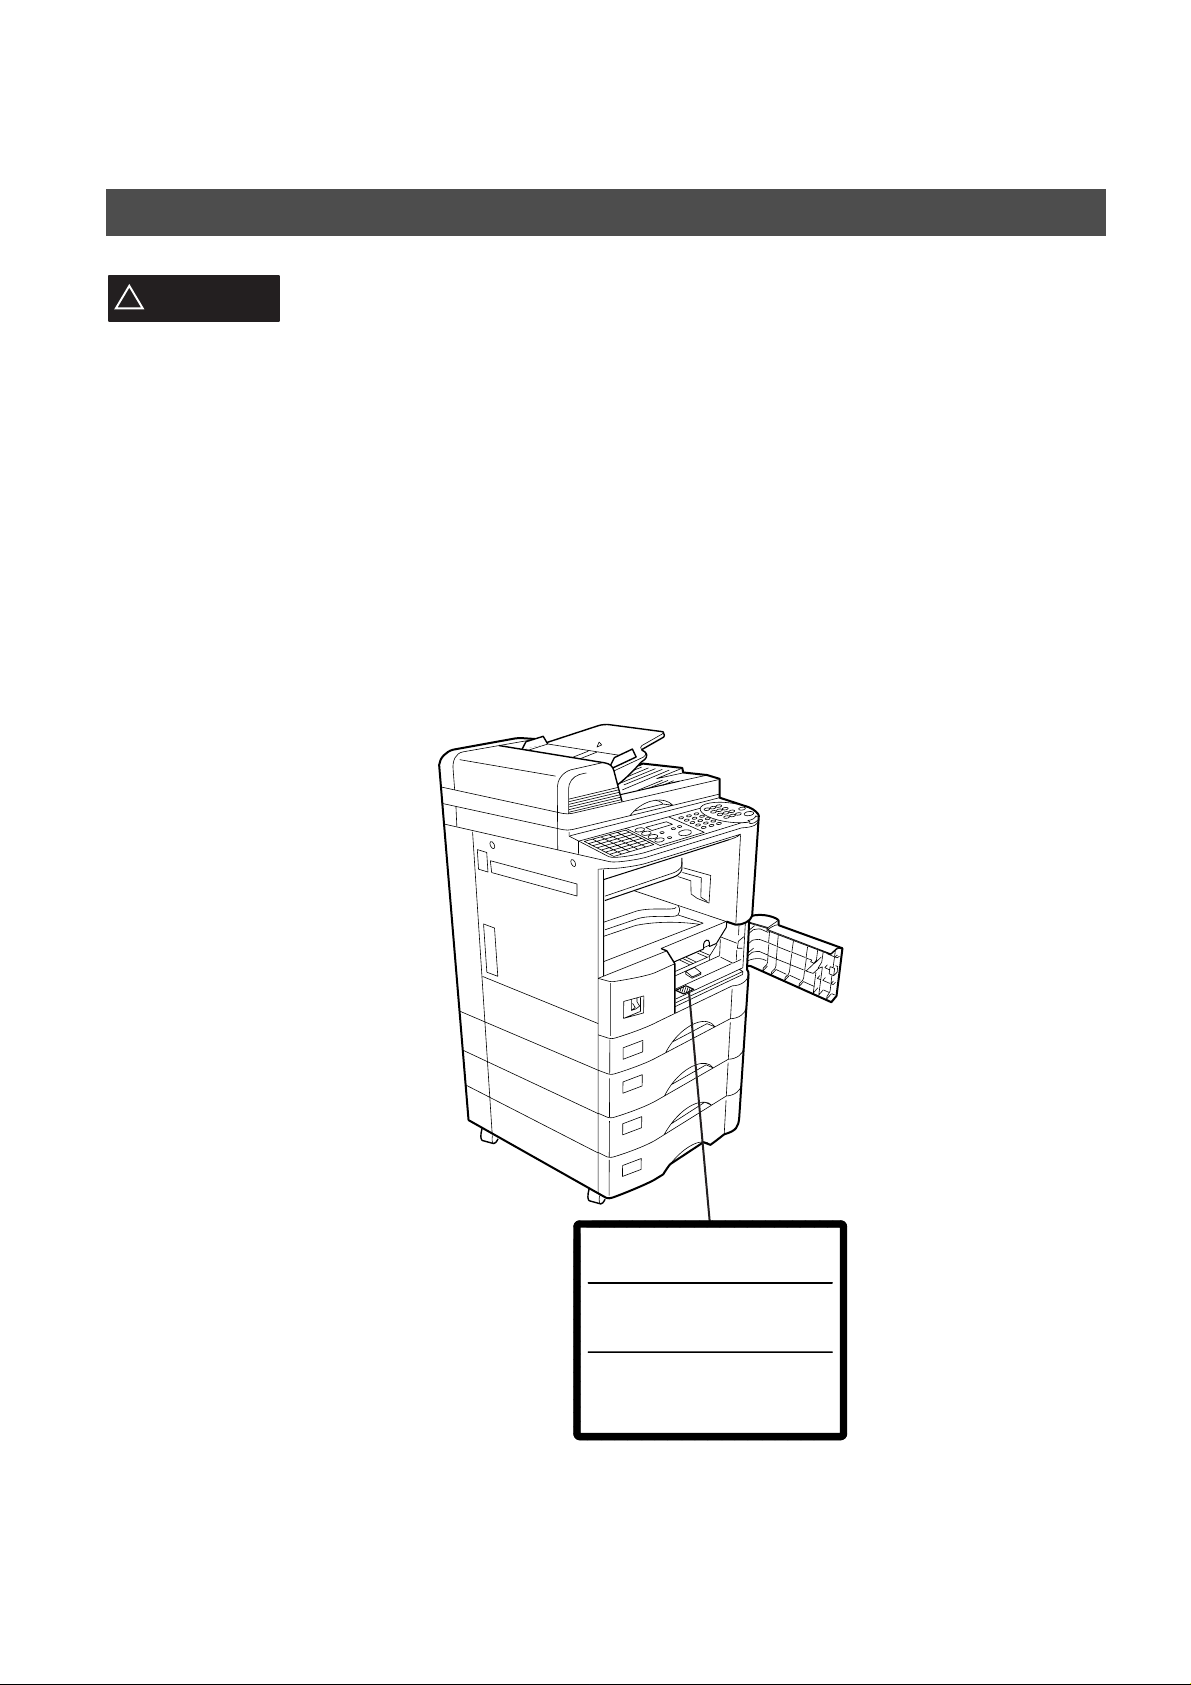
CAUTION
!
denotes hazards that could result in minor injury or damage to the machine.
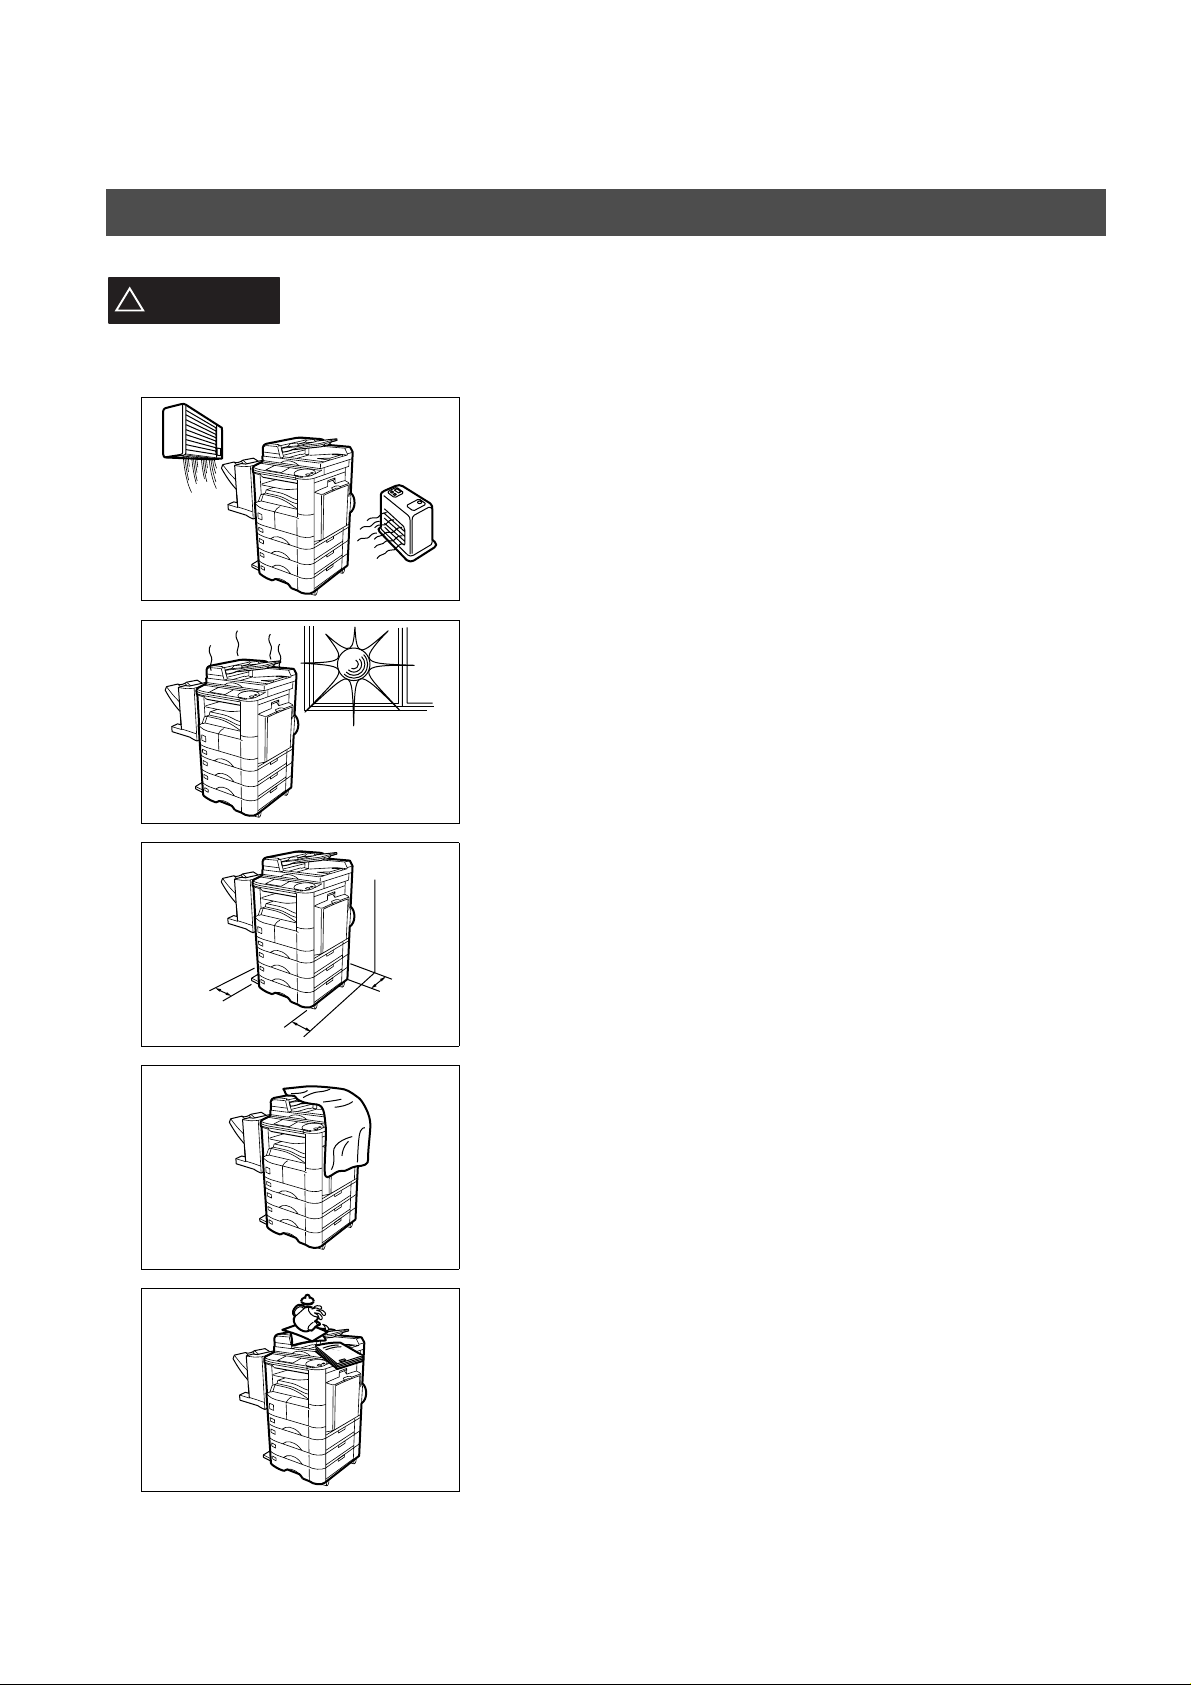
Do not install the machine near heating or an air conditioning unit.
Avoid exposure to direct sunlight.
Install the machine on a flat surface, leave at least 4 inches (10 cm) of
space between the machine and other objects.
8
Do not block the ventilation openings.
Do not place heavy objects or spill liquids on the machine.
Page 9
Function Key
GETTING TO KNOW YOUR MACHINE
GETTING TO
KNOW YOUR
MACHINE
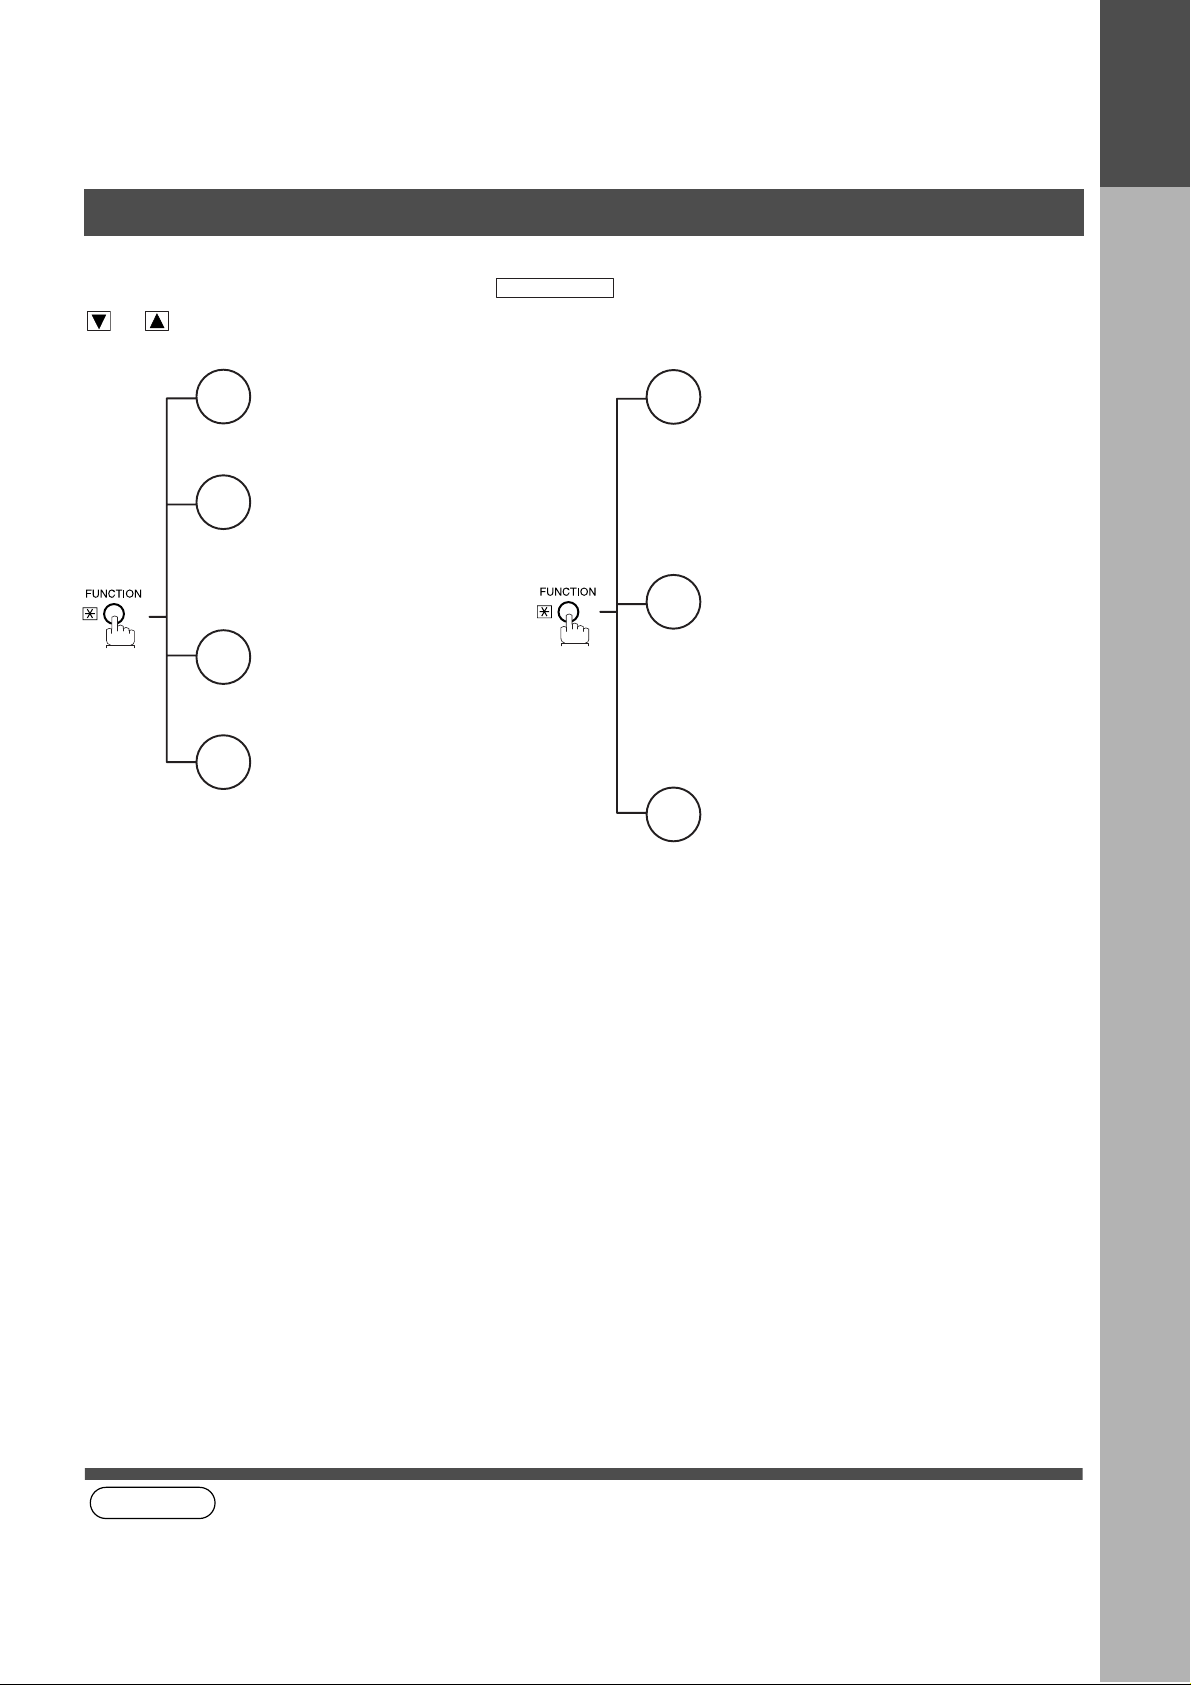
Any function ca n be s ta rted by fi rs t p re ss in g and then e nt er t he function numb er, or by pressi ng
or scroll key repeatedly until the desired function appears on the display.
Deferred Communication
1
1 = XMT
2 = Polling
3 = Advanced Communication
Advanced Communication
2
2 = Confidential Communication
4 = Sub-Address XMT
5 = LAN Relay XMT
Polling
3
1 = Polling
2 = Polled
Printout
6
1 = Journal (Print/View)
2 = One-Touch/Abbreviated/
Directory Search List
3 = Program List
4 = Fax Parameter List
5 = Not used
6 = Individual XMT Journal
7 = Directory Sheet
FUNCTION
Set Mode
7
1 = User Parameters
• Date & Time
• Logo
• Character ID
• ID Number (Fax Telephone Number)
2 = One-Touch/Abbreviated Numbers
3 = Program Keys
4 = Fax Parameters
Select Mode
8
1 = Communication Journal = OFF/ON/INC
2 = Duplex Scan = OFF/ON
3 = Cover Sheet = OFF/ON
4 = Password-XMT = OFF/ON (See Note 1)
5 = RCV to Memory = OFF/ON/PRINT
8 = LEDGER EMAIL XMT
(LEDGER ➝ B4 Reduction)
Edit File Mode
9
1 = File List (Print/View)
2 = Change Time/Station
3 = Delete File
4 = Print File
5 = Add Document
6 = Retry Incomplet e File
(see Note 1)
NOTE
1. If Fax Parameter is not preset to a Valid positio n, which enable s you to use the fun ction, the displ ay will not show
the function.
9
Page 10
GETTING TO KNOW Y OUR MACHINE
REDIAL/
PAUSE
ABBR
FLASH/
SUB-ADDR
SET
ORIGINAL COPY
SIZE SIZE
MONITOR
ON LINE
ON LINE
DATA
2SIDED
COPY
1SIDED
COPY
FAX
PRINTER
MULTI-SIZE FEED
RESOLUTION LINE SELECT
EENERGY SAVER
DP-2000
INTERRUPT
FUNCTION
COPY
SORT
STAPLE
SHIFT
OUTPUT
TRAY
DIRECTORY
SEARCH
PAPER
TRAY
LIGHTER DARKER
ZOOM/VOL
PHOTO
TEXT/
PHOTO
TEXT
INTERNET
P1
z
P2 P3
SPACE@
S-FINEFINE
P4
SYMBOLS
P5
CAPS
16
u
17
v
18
w
19
x
20
y
11
p
12
q
13
r
14
s
15
t
06
k
07
l
08
m
09
n
10
o
01
f
02
g
03
h
04
i
05
j
abcde
OHP
MEMORY IN
STAMP
COPIED
M2
MEM XMT
BLANK
2 in 1 BOOK EDGE MARGIN
2PAGE
COPY
M1
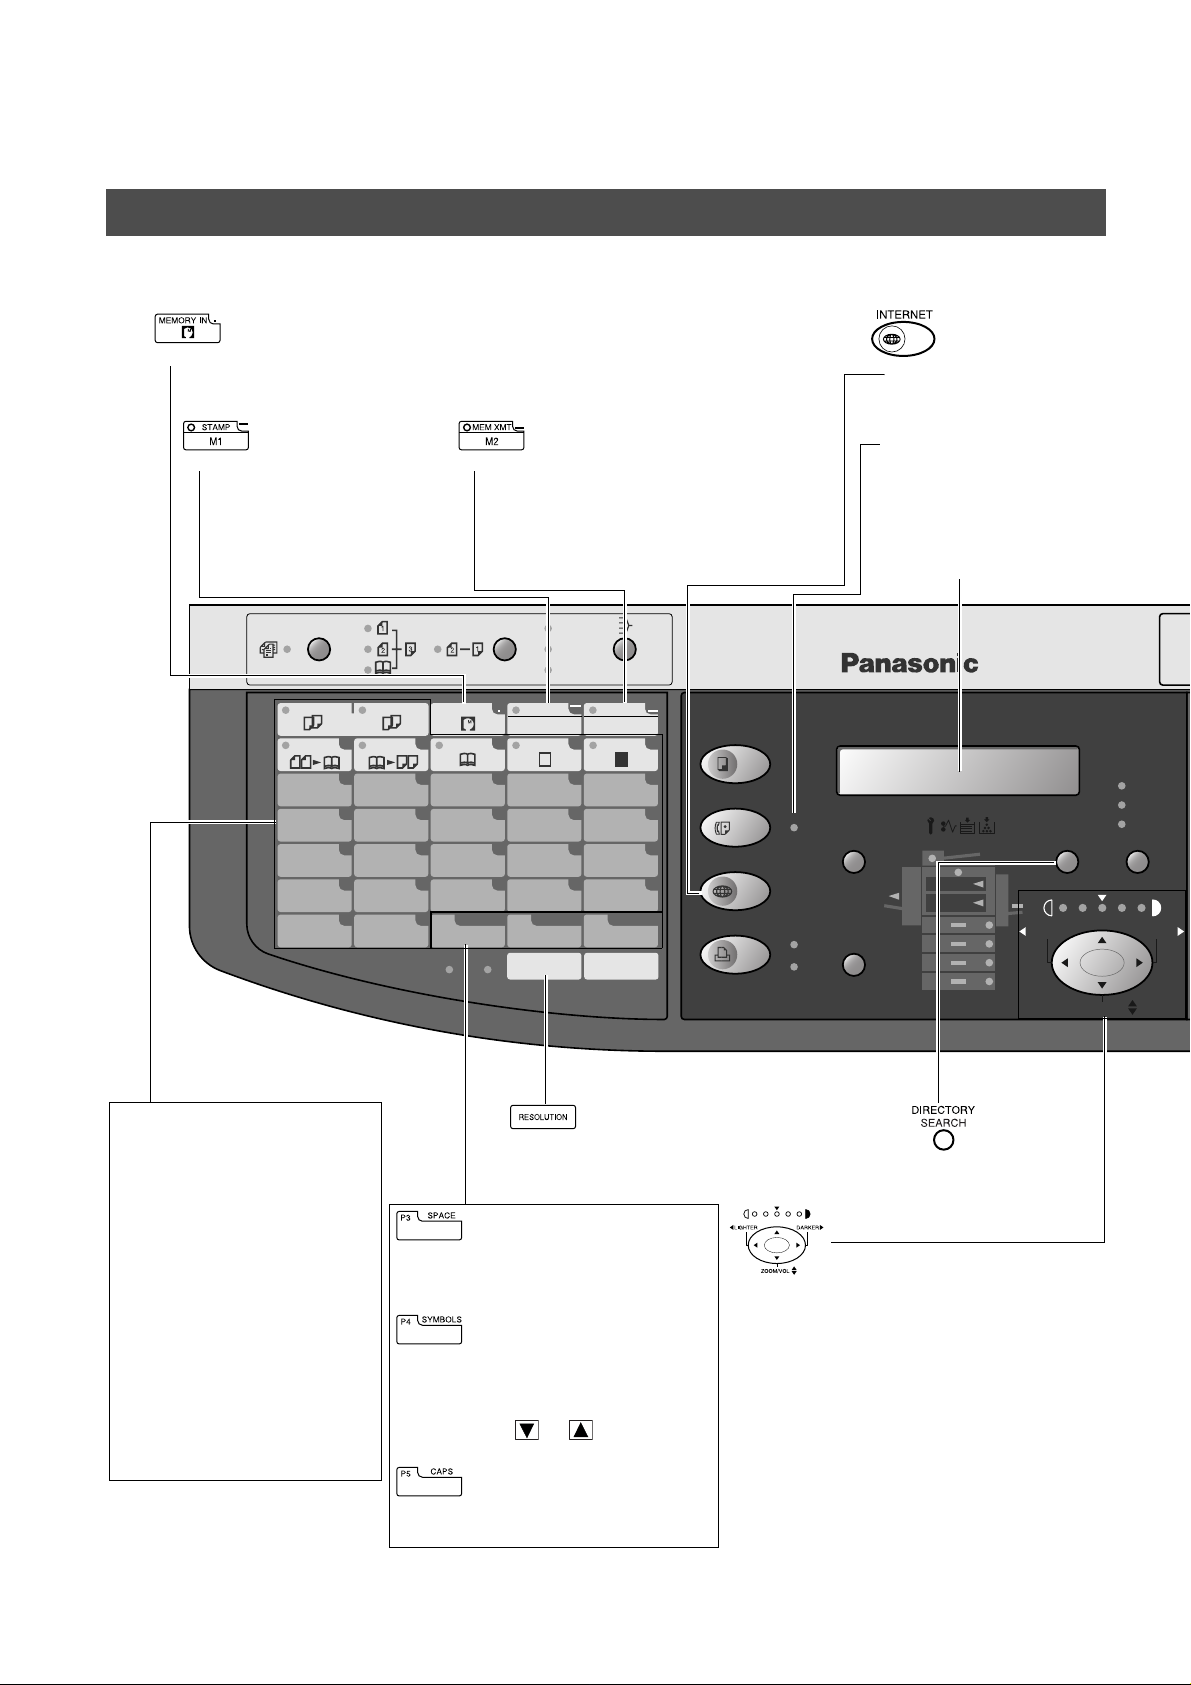
Control Panel
• Used to store a job in memory (See Operating Instructions For Copier, page 25).
Also used to enter “.” (period) while entering LOGO , ch aracter ID, station name and
network settings such as email address, IP address, etc...
• Used to turn the verification
stamp ON or OFF.
Also used to enter “-” (dash)
while entering LOGO,
character ID, station name,
etc...
• Used to select either memory or direct
communication.
Regardless of setting, Internet Fax jobs are
always stored into memory first.
Also used to en ter “_” (underscore) whi le e nterin g
LOGO, character ID, station name, etc...
• Used to select the
INTERNET mode.
ON LINE Indicator
Blinks : When se nding or
receiving faxes.
LCD Display
Indicates date and time, or
the current operation.
One-Touch Keys (01-20)
• Used for One-Touch Dialing.
(See page 64)
Program Keys (P1-P5)
• Used to record long dialing
procedures or Group Dialing
Number keys .
(See page 83 to 88)
Characte r Keys
• One-Touch Keys and
Program Keys also serve as
character and symbol input
keys which are used to
record your LOGO , character
ID and station name. The
character key template is
printed on the panel under
the directo ry sheet cover.
10
• Used to insert a space while
entering LOGO, character ID and
station name.
• Used to enter a symbol (, ’ & ( ) : + /
% Å å Ä ä Ö ö Ü ü È è É é Æ æ Ñ)
for LOGO, character ID and station
name. Use or to select the
symbols.
• Used to switch between upper and
lower character set.
• Used to set Standard,
Fine, Super-Fine.
• Used to search for
a station name.
(See page 66)
Used for the following:
• Adjust the CONTRAST.
• Adjust the monitor and ringer volume.
• Move the cu rsor while entering nu mbers and
characters.
• Search the station name for Directory
Search Dialing.
• Confirm the entered station for multi-station
communication.
• Select functions.
• Confirm the current communication modes
(e.g. Page number, ID, Dialed Telephone
number or Email address, File number)
when the unit is ON LINE.
Page 11
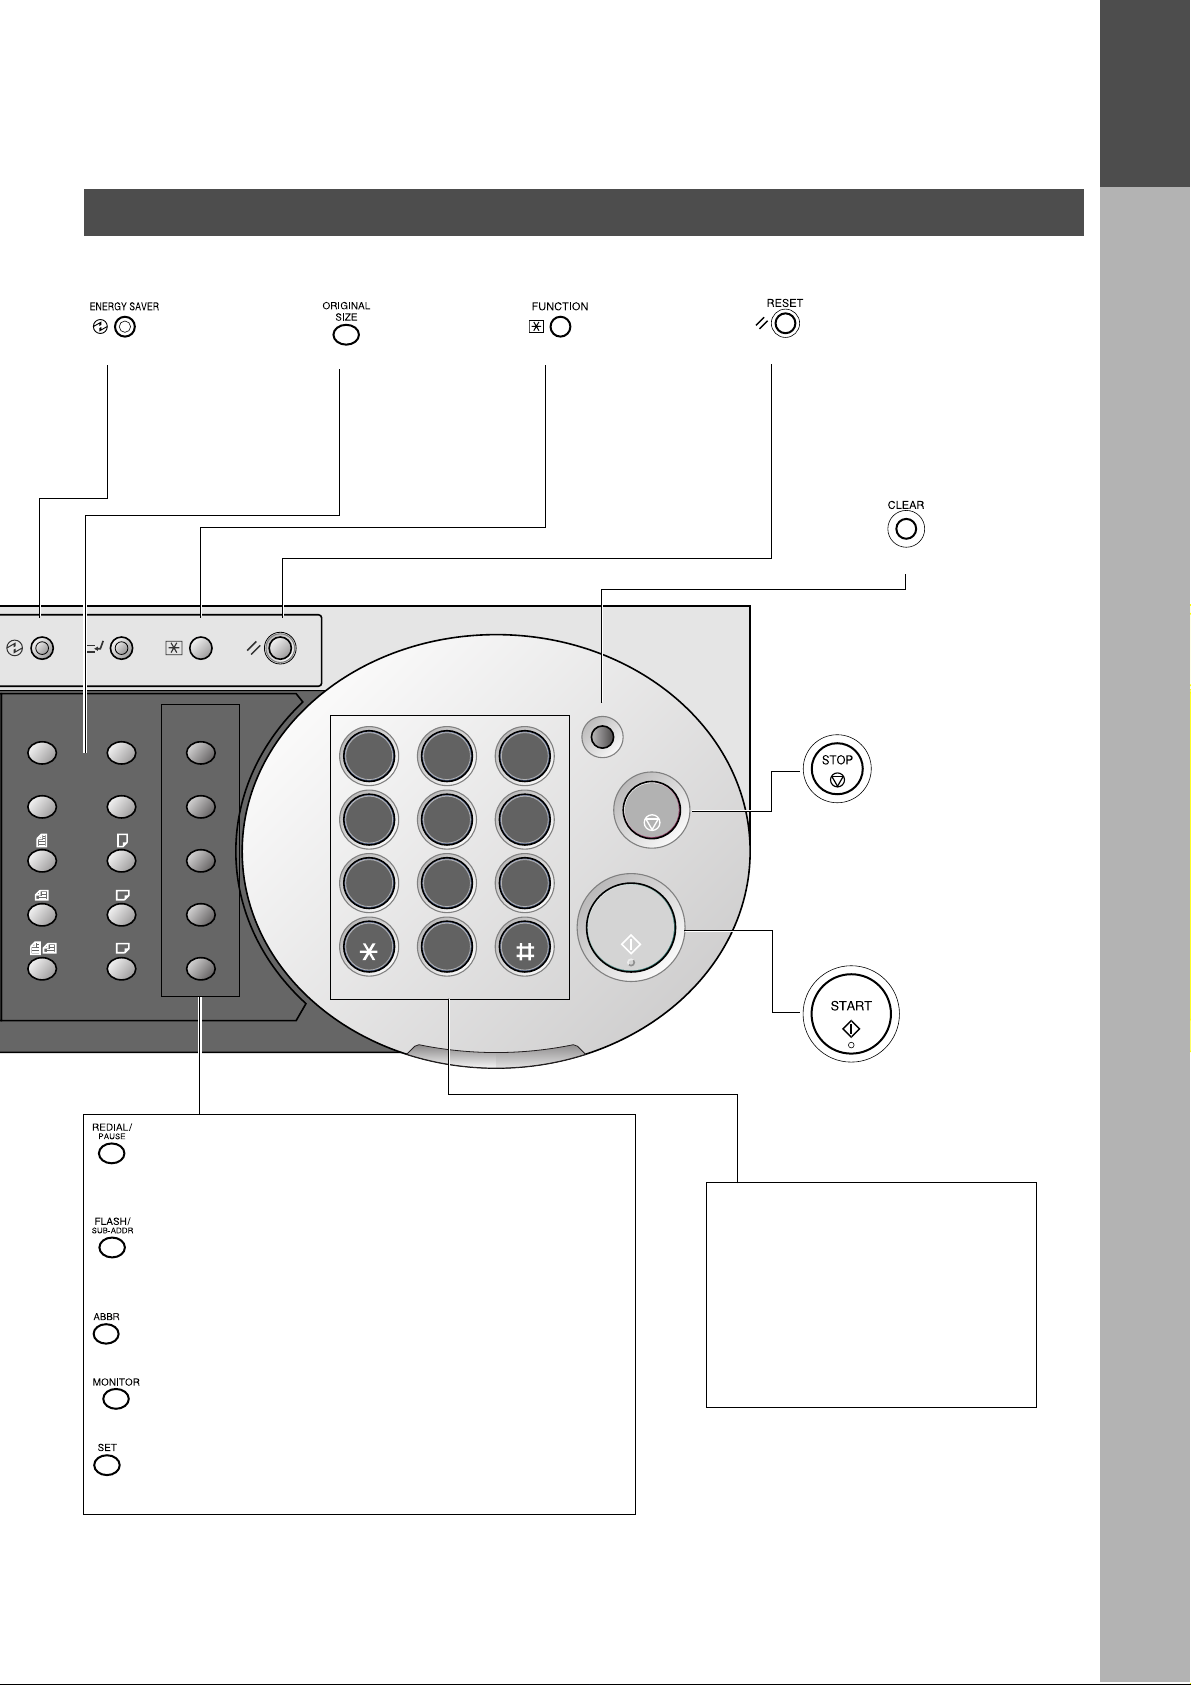
ENERGY SAVER
Control Panel
[8]
Power save
• Used to switch the
machine into energy
saving mode.
For more details, see
page 24 of the O per a ti ng
Instructions (For Copier.)
INTERRUPT
FUNCTION
RESET
• Used to select the
original size
manually.
GETTING TO KNOW YOUR MACHINE
• Used to start or select
the function and subfunctions. These
functions are
explain ed in deta il on
page 9.
• Use this button when
resetting all the
previously set functions.
• Use this button when
correcting entered
numbers or
characters.
GETTING TO
KNOW YOUR
MACHINE
ORIGINAL COPY
SIZE SIZE
LEDGER
LEGAL
LETTER
LETTER
INVOICE
• Used to enter a pause when recording or dialing a telephone
number, or to redial the last dialed number.
• Used to separate the Sub-Address from the telephone number
when dialing, or to access some features of your PBX.
• Used to start Abbreviated Dialing. (See page 65)
REDIAL/
PAUSE
FLASH/
SUB-ADDR
ABBR
MONITOR
SET
ABC
1 2 3
GHI
JKL
4 5 6
PQRS
TUV
7 8 9
0
TONE
ALARM ACTIVE
DEF
MNO
WXYZ
CLEAR
STOP
• Press this button when
you want to stop the
communication,
registration operation, or
audible tone.
START
• Press this button to start
fax transmission or
Internet communication
and manual fax reception.
Keypad
• Used for manual number dialing,
recording phone numbers, an d
numerical entries.
Tone key
• Used to temporarily change the Fa x
dialing method to Tone when Pulse
mode is set.
• Also can be used to enter a period
"." during IP Address programming.
• Used to st art On -Hook Dialing.
• Used to set operations.
11
Page 12

GETTING TO KNOW Y OUR MACHINE
Pre Installation Information
Before setting up the DP-2000 on your network, please read this entire section to be familiar with its functions.
The DP-2000 is able to perform the following when connected to a 10Base- T/100Base-TX Ether net LAN (local
area network):
• Send paper-based information as an Internet Email.
• Receive and print an Internet Email automatically.
• Forward received G3 fax message or Email au tom atically to the preprogramme d Email a ddres s or r egular G 3
fax machine (see "Fax Forward" on pages 99).
• Rout e re ce ived G3 fax message auto mati ca ll y to th e sen der - sp ecifi ed E mai l add r ess or G3 fax machine usi ng
ITU-T SUB-Address (see "Inbound Routing" on pages 95 to 98).
• Route received G3 fax messages automatically to the preprogrammed Email address or G3 fax machine using
the sender’s fax ID code (see "Inbound Routing" on pages 95 to 98).
• Relay an Internet Email to a G3 fax machine via regular fax transmission (see "Relayed Transmission" on
pages 103 to 116).
• Network scanning and printing.
To utilize the above functions, the DP-2000 needs to be set up properly on your network. Please contact your
network administrator for actual network setup.
Copy the Pre-installation Information form found at the end of this section on page 15, record the MAC
Address on the form and as k your network administrator to c omplete the remainin g information on the form.
The MAC Address of your DP-2000 can be found on the 2nd page of the Fax Paramete r List printout (press
FUNCTION
The DP-2000 can be set up as either
different functions are available as follows.
Sending paper-based information as an Internet Email Yes Yes
Receive and print an Internet Email automatically Yes Yes
Receive and print an Internet Email manually No Yes
Forward received G3 fax message or Email automatically Yes Yes
Route received G3 fax message automatically Yes Yes
Relay an Internet Email to G3 fax machine Yes No
6 4
SET
). (see Note 1) (see Note 2) (see Note 3) (see Note 4)
SMTP mail server
Function SMTP Server Setup POP3 Client Setup
POP3 client
or
. Dependent on the typ e of setup,
12
NOTE
1. To function as SMTP mail server, the DP-2000’s email address must include its unique Host name within your
company domain. Th is unique Host na me must be registe red within your netwo rk’s DNS (Domain Name System)
server. Example: DP-2000@fax01.panasonic.com
2. Automatically refers to immediate SMTP transfer or immediate POP3 retrieval. Manually refers to manual
retrieval of mail when configured as POP3 client.
3. The DP-2000 will recei ve, p rint , forward o r relay emails in text mess age fo rmat and TI FF-F imag e file attac hment
only.
4. Dynamic Host Configuration Protocol (DHCP) is not supported.
Page 13

GETTING TO KNOW YOUR MACHINE
Pre Installation Information
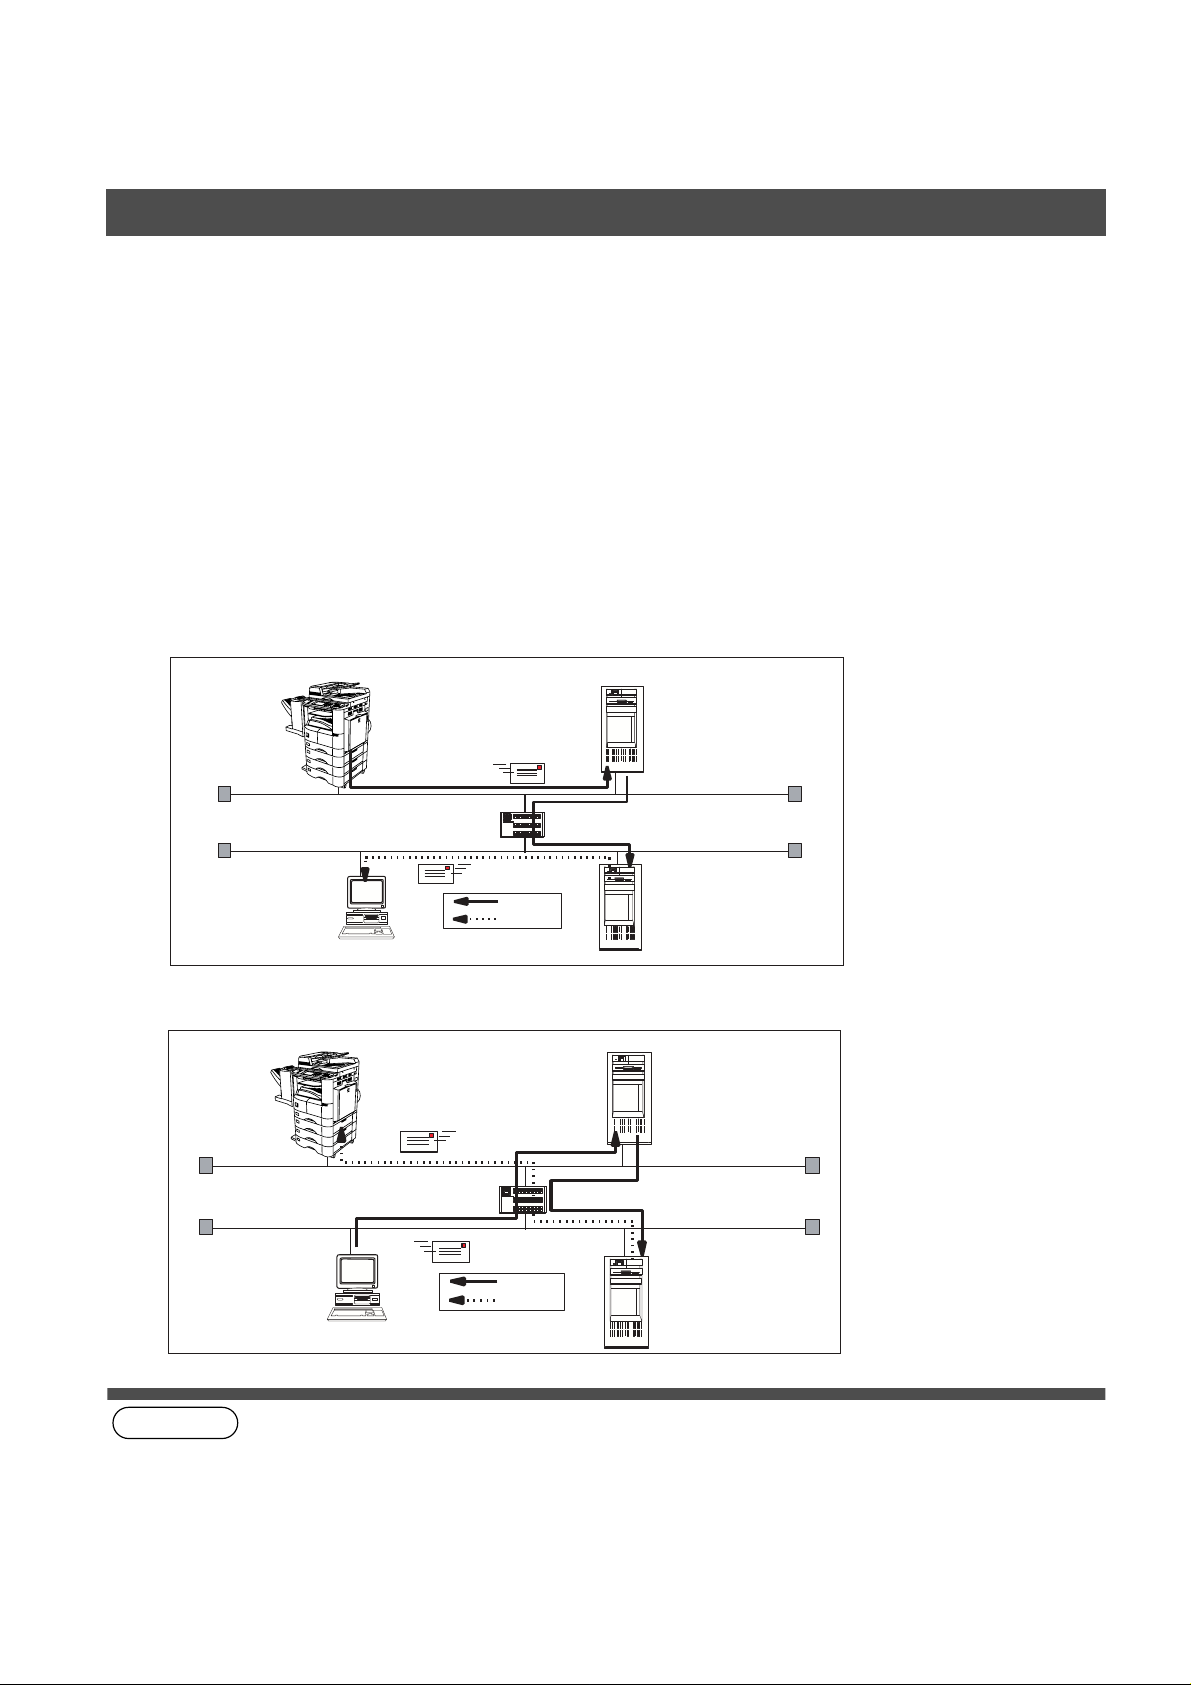
Setup as SMTP mail server
To install the DP-2000 as SMTP mail server, the f ollowing network parameters need to be programmed on your
network and on the DP-2000.
• IP Address of the DNS Server (if not available, see Note)
• IP Address of the DP-2000
• Subnet Mask of the DP-2000
• Name or IP Address of the Default SMTP mail server
• IP Address of the Default Router
• Email Address of the DP-2000 (see Note)
• Host Name
Email Transmission (from the DP-2000 to a PC) (see Note 1) (see Note 2) (see Note 3)
ifaxuser@fax01.panasonic.com
SMTP01.panasonic.com
(SMTP Mail Server)
GETTING TO
KNOW YOUR
MACHINE
(Router)
SMTP
POP3
popuser001@panasonic.com
Email reception (from a PC to the DP-2000)
ifaxuser@fax01.panasonic.com
(Router)
SMTP
popuser001@panasonic.com
POP02.panasonic.com
(POP Server)
SMTP01.panasonic.com
(SMTP Mail Server)
NOTE
1. To function as SMTP mail server, the DP-2000’s email address must include its unique Host name within your
company domain. This unique Host name mu st be registered within your network ’s DNS (Domain Name Syste m)
server. Example: DP-2000@fax01.panasonic.com
2. By default the machine requires the IP Address of the DNS Server and prompts you to enter the SMTP Server
Name. If the DNS Server is not available, change the Fax Parameter No. 161 (DNS SERVER) to "1:Invalid".
Then the machine will prompt you to enter the IP Address of the SMTP Server.
3. Dynamic Host Configuration Protocol (DHCP) is not supported.
13
Page 14
GETTING TO KNOW Y OUR MACHINE
Pre Installation Information
Setup as POP3 Client
To install the DP -2000 as POP3 Client, the following network parameters need to be programmed on your
network.
• IP Address of the DNS Server (if not available, see Note 2)
• IP Address of the DP-2000
• Subnet Mask of the DP-2000
• Name or IP Address of the Default SMTP mail server
• IP Address of the Default Router
• POP Server Name or IP Address
• POP User Account Name
• POP Password
• Email Address of the DP-2000 (see Note 1)
(see Note 1) (see Note 2)
Email transmission (from the DP-2000 to a PC)
ifaxuser@fax01.panasonic.com
SMTP01.panasonic.com
(SMTP Mail Server)
(Router)
SMTP
POP3
popuser001@panasonic.com
Email reception (from a PC to the DP-2000)
ifaxuser@panasonic.com
(Router)
SMTP
POP3
popuser001@panasonic.com
POP02.panasonic.com
(POP Server)
SMTP01.panasonic.com
(SMTP Mail Server)
POP02.panasonic.com
(POP Server)
14
NOTE
1. The email address format can be the same as your regular email address. If your email address is
popuser001@panasonic.com, the DP-2000’s email address can be DP-2000@panasonic.com.
2. By default the machine re quires th e IP Addre ss of the DN S Server and pro mpts you to enter t he SMTP and POP
Server Names. If the DNS Server is not available, change the Fax Parameter No. 161 (DNS SERVER) to
"1:Invalid". Then the machine will prompt you to enter the IP Address of the SMTP and POP Servers.
Page 15

GETTING TO KNOW YOUR MACHINE
Pre Installation Information
For the total system to work properly via LAN, certain information and additional parameters must be set. Please
contact your network administrator for the required information and connection to the LAN.
Important:
Company Name
Address
Dept.
City State Zip Code
Tel. No. Fax No.
(see Note 1) (see Note 2) (see Note 3) (see Note 4)
(1)
IP Address:
(2)
Subnet Mask:
(3)
*SMTP Server Name:
(4)
Default Router IP Address:
(5)
Email Address:
(6)
DNS Server IP Address:
(7)
POP Server Name:
(8)
POP User Name:
(9)
POP Password:
(10)
Host Name:
(11) Default Subject:
(12) Default Domain:
1. 6.
2. 7.
3. 8.
4. 9.
5. 10.
(14) Remote Password:
(15) Relay X MT Password:
(16) Manager’s Email Address:
1. 6.
2. 7.
3. 8.
4. 9.
5. 10.
Make a cop y of this page an d ask the Net w ork Administr ator to comp lete th e req uired information. After its
returned, transfer the inf ormation to the back side of the front cov er f or futu re refer ence and trouble shooting.
User Information
Internet Parameters (See page 26)
or
*SMTP Server IP Address:
or
*POP Server IP Address:
(13) Selectable Domains:
(17) Relay Domains (Domains Authorized for Relay Transmission):
GETTING TO
KNOW YOUR
MACHINE
NOTE
1. Items in Bold, depict information obtained from you Network Administrator.
2. By default the machine requires the IP Address of the DNS Server and prompts you to enter the SMTP and POP
Server Names (items 3 and 7 above). If the DNS Server is not available, change the Fax Parameter No. 161 (DNS
SERVER) to "1:Invalid". Then the machine will prompt you to enter the IP Address of the SMTP and POP Servers.
3. If required, the MAC Address of the DP-2000 can be obtained from the 2nd page of the Fax Parameter List
printout, by pressing
4. Dynamic Host Configuration Protocol (DHCP) is not supported.
Continued on the next page...
FUNCTION
6
4
SET
.
15
Page 16

GETTING TO KNOW Y OUR MACHINE
4
SET
Pre Installation Information
Explanation of Contents
MAC Address
(1) IP Address : The Internet Protocol (IP) address assigned to your machine.
(2) Subnet Mask : The Subnet Mask number.
(3) SMTP Server Name or SMTP
Server IP Address
(4) Default Router IP Address : The Default Router’s IP Address.
(5) Email Address : The email address assigned to your machine. (Up to 60 characters)
(6) DNS Server IP Address : The IP address of the DNS Server.
(7) POP Server Name or POP
Server IP Address
(8) POP User Name : POP User Name. (Up to 40 characters)
(9) POP Password : POP Password. (Up to 10 characters)
(10) Host Name : The name assigned to your DP-2000. (Up to 60 characters)
(11) Default Subject : The information to be added to the Subject Line for all outgoing emails. (Up to
(12) Default Domain : Spec if y th e D om ai n Nam e (u p to 50 cha racters) to be added to freq uen tly us ed
(13) Selectable Domains : Enter up to 10 Domain Names that can be selected during manual email
: MAC Address from the 2nd page of the Fax Parameter List printout (press
FUNCTION
: The SMTP Server Name (up to 60 characters). The SMTP Server IP Address.
: The POP Server Name. (Up to 60 characters) The POP Server IP Address.
40 characters)
or incomplete outgoing email addresses (i.e. @yourcompany.com).
addressing. (Up to 30 characters)
6
).
(14) Remote Password : Enter a security password (up to 10 characters) to allow Remote Programming
of the Internet Parameters and Auto Dialer or the retrieval of the Journal via
email.
(15) Relay XMT Pass w ord : Ente r a pass wo rd to provide network secu rity to your Rel a y Station (f or G3 rela y
purposes). (Up to 10 characters)
(16) Manager’s Email Address : Enter yo u Department Manager’s email address for notification of all Internet
relayed transmissions for supervision and cost control purposes. (Up to 60
characters)
(17) Relay Domain (01 to 10) : Enter up to 10 Domain Names that are authorized to access your Internet Fax
for Relayed Transmission Request. (Up to 30 characters)
Relay Domain, a.k.a. Domain Name in the DX-1000/2000.
(see Note 1)
NOTE
1. All IP Addresses consist of 4 parts separated by dots (i.e. 165.113.245.2).
16
Page 17
GETTING TO KNOW YOUR MACHINE
Internet Communication Feat ures
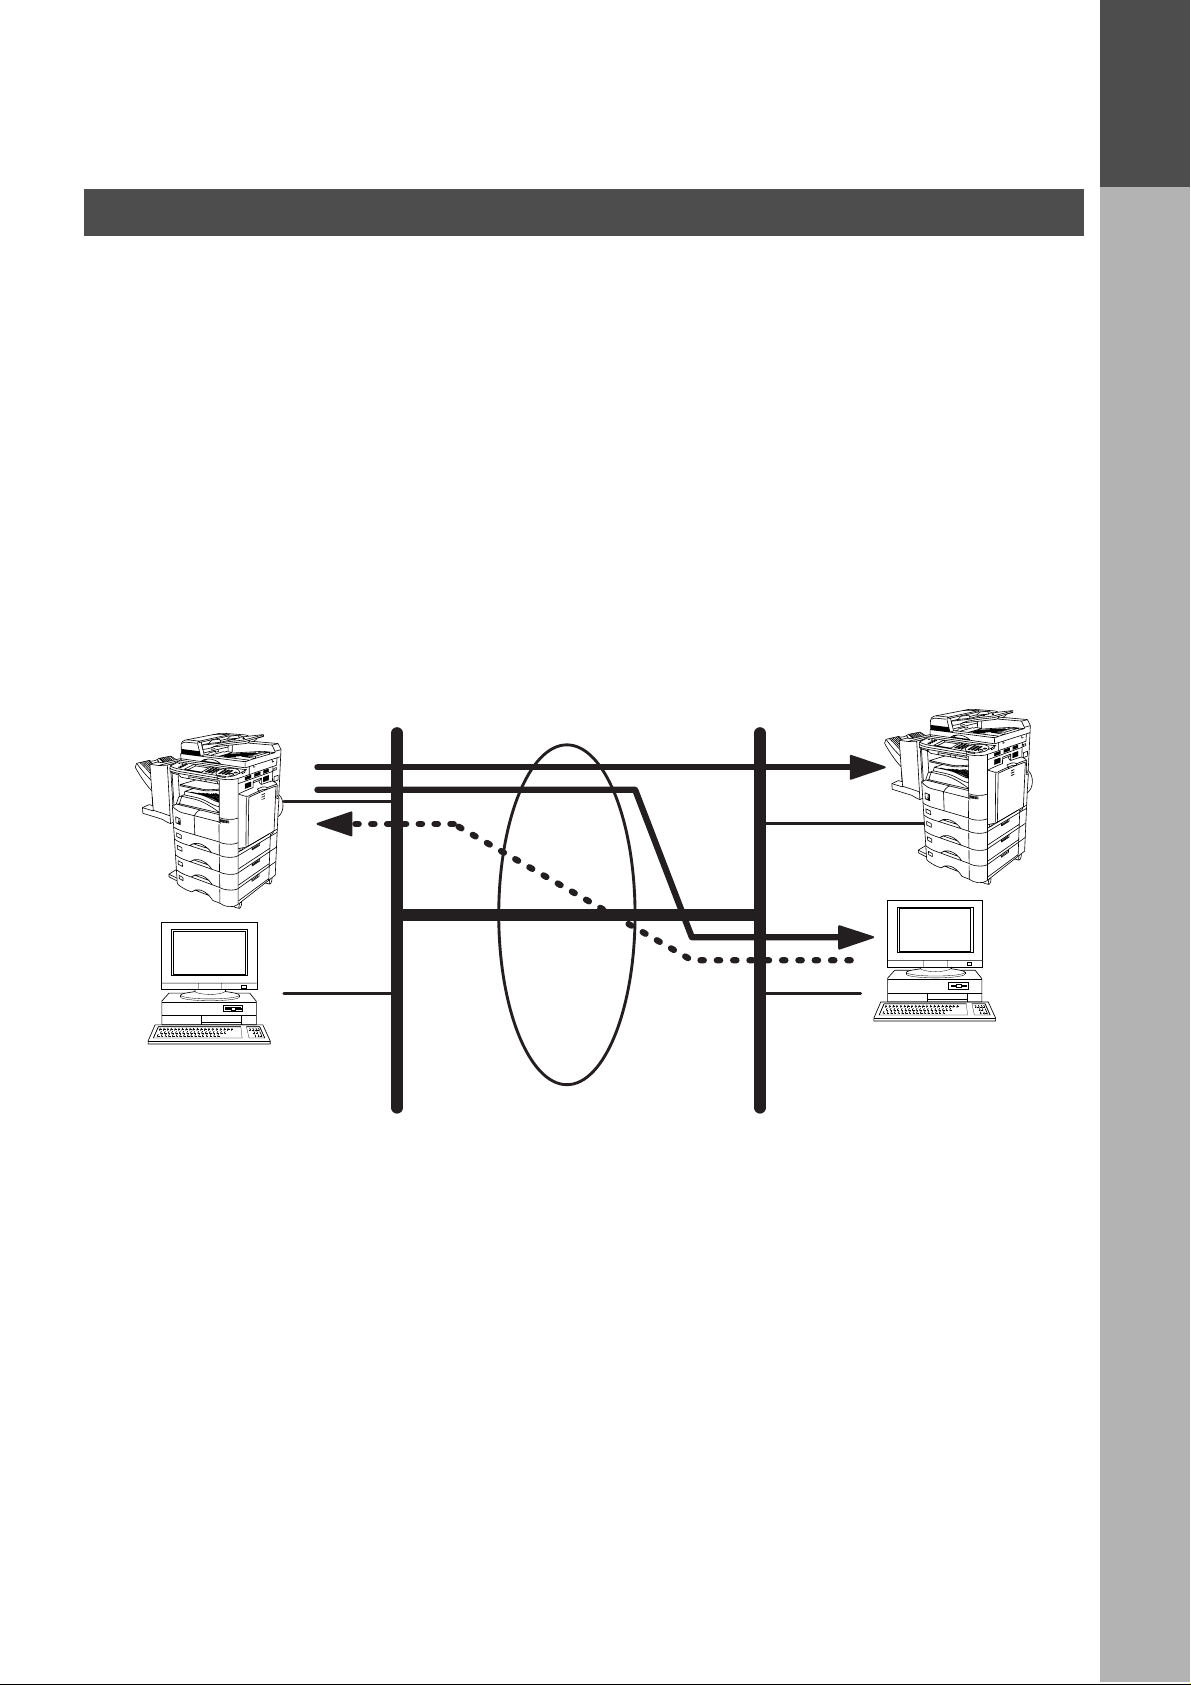
Internet Fax Transmission
The DP-2000 allows you to transmit documents over the Internet to another Internet Fax or a PC. The
document is first scanned and converted into a TIFF-F formatted image file, and then transmitted to the remote
location as an attachment file to an email using MIME encoding.
The email system a t the receiving end must s upport MIM E. Otherwise, the attachment file will be detached
and lost.
When you send an email mess age to someone, the DP-2000 us es Simple Mail Trans fer Protocol (SMTP) to
transfer your outgoing mail to your SMTP mail ser ver, which in turn uses SMTP to send your mail to the
Internet.
Internet Mail Reception
The DP-2000 all ows you to rece ive and pr i nt a P C transm itted email autom atica lly or ma nually, depending on
its setup configurati on. However, if th e received email incl udes file attach ment in a format other than TI FF-F,
such as Word, Excel, Power Point, the DP-2000 prints an error message instead.
GETTING TO
KNOW YOUR
MACHINE
Internet Fax
PC
LAN LAN
Internet Fax
Internet Fax
Transmission
Internet
Internet Mail
Reception
PC
17
Page 18

GETTING TO KNOW Y OUR MACHINE
Internet Communication Features
Inbound Routing
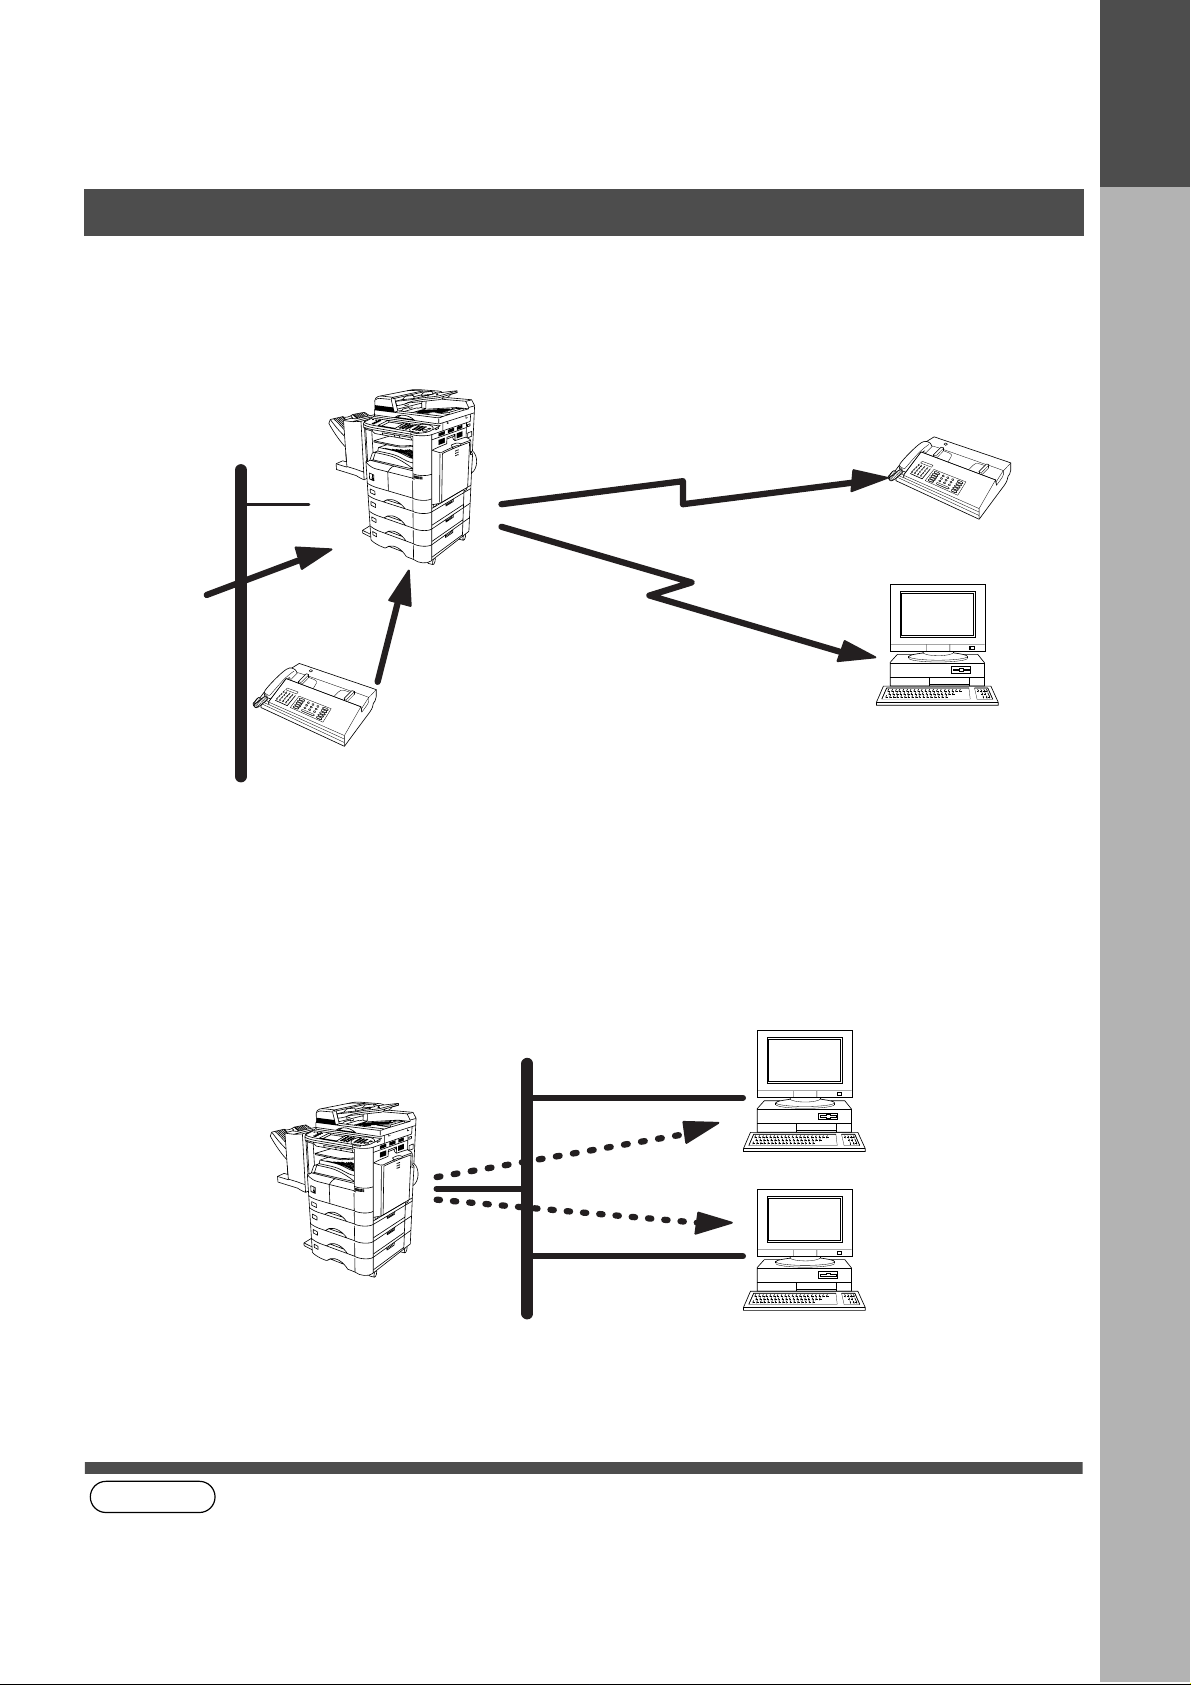
Using the Inbound Routing feature, the DP-2000 can route document s received from a G3 fax machine to
email address(s) or to Internet Fax machine(s) connected to a LAN as an email, as well a s to other G3 fax
machine(s) over the telephone line.
When an incoming Inter net Fa x, email or a regular fax document is received, the DP-2000, checks for the
following:
1. First, the DP-2000 c hecks whether a sub-address is included. If it i s, it will look for a sub-address matc h
within its auto dialer and will route the documents to the corresponding sta tions email address(s) and/or
telephone number(s).
2. If no sub-address is specified, then the DP-2000 tr ies to match the originat ing fax machine’s Numeric ID
(TSI) with the TSI routin g within its auto dial er and will route the docu ments to the correspo nding stations
email address(s) and/or telephone number(s).
Fax Reception
G3 Fax
(see Note 1) (see Note 2)
Internet Fax
Email
Transfer to
a G3 Fax
LAN
Internet Fax
PC
G3 Fax
18
NOTE
1. If the originating fax machine does not support the above sub-address function, sub-address destination(s)
cannot be selected.
2. The DP-2000 will allow you to register the same sub-address number for an email address and a telephone
number.
Page 19
GETTING TO KNOW YOUR MACHINE
Internet Communication Feat ures
Fax Forward
The DP-2000 is capable of transferring all received Internet email or regular G3 fax documents to a preprogrammed G3 fax or a PC destination.
Internet Fax
GETTING TO
KNOW YOUR
MACHINE
LAN
Email
Transfer to a PC
G3 Fax
Transfer to a G3 Fax
or
G3 Fax
PC
Network Scanner
The DP-2000 can be utilized as a network scanner by simply transmitting an image to a PC as TIFF-F
attachment to an email.
This feature was enhanced with an addition of a new Fax Parameter No. 164 (IFAX XMT HEADER), giving you
a selection of whether to include the he ader when s ending a doc ument to an a ddressee in the same Dom ain
as specified in the Default Domain parameter. (See Note 1)
(see Note 1)
NOTE
1. When sending to a Domain oth er than as sp ecifi ed in the De fault Dom ain param eter, the header will be includ ed
LAN
Internet Fax
PC
PC
regardless of the selection.
19
Page 20
GETTING TO KNOW Y OUR MACHINE
Internet Communication Features
Network Printer
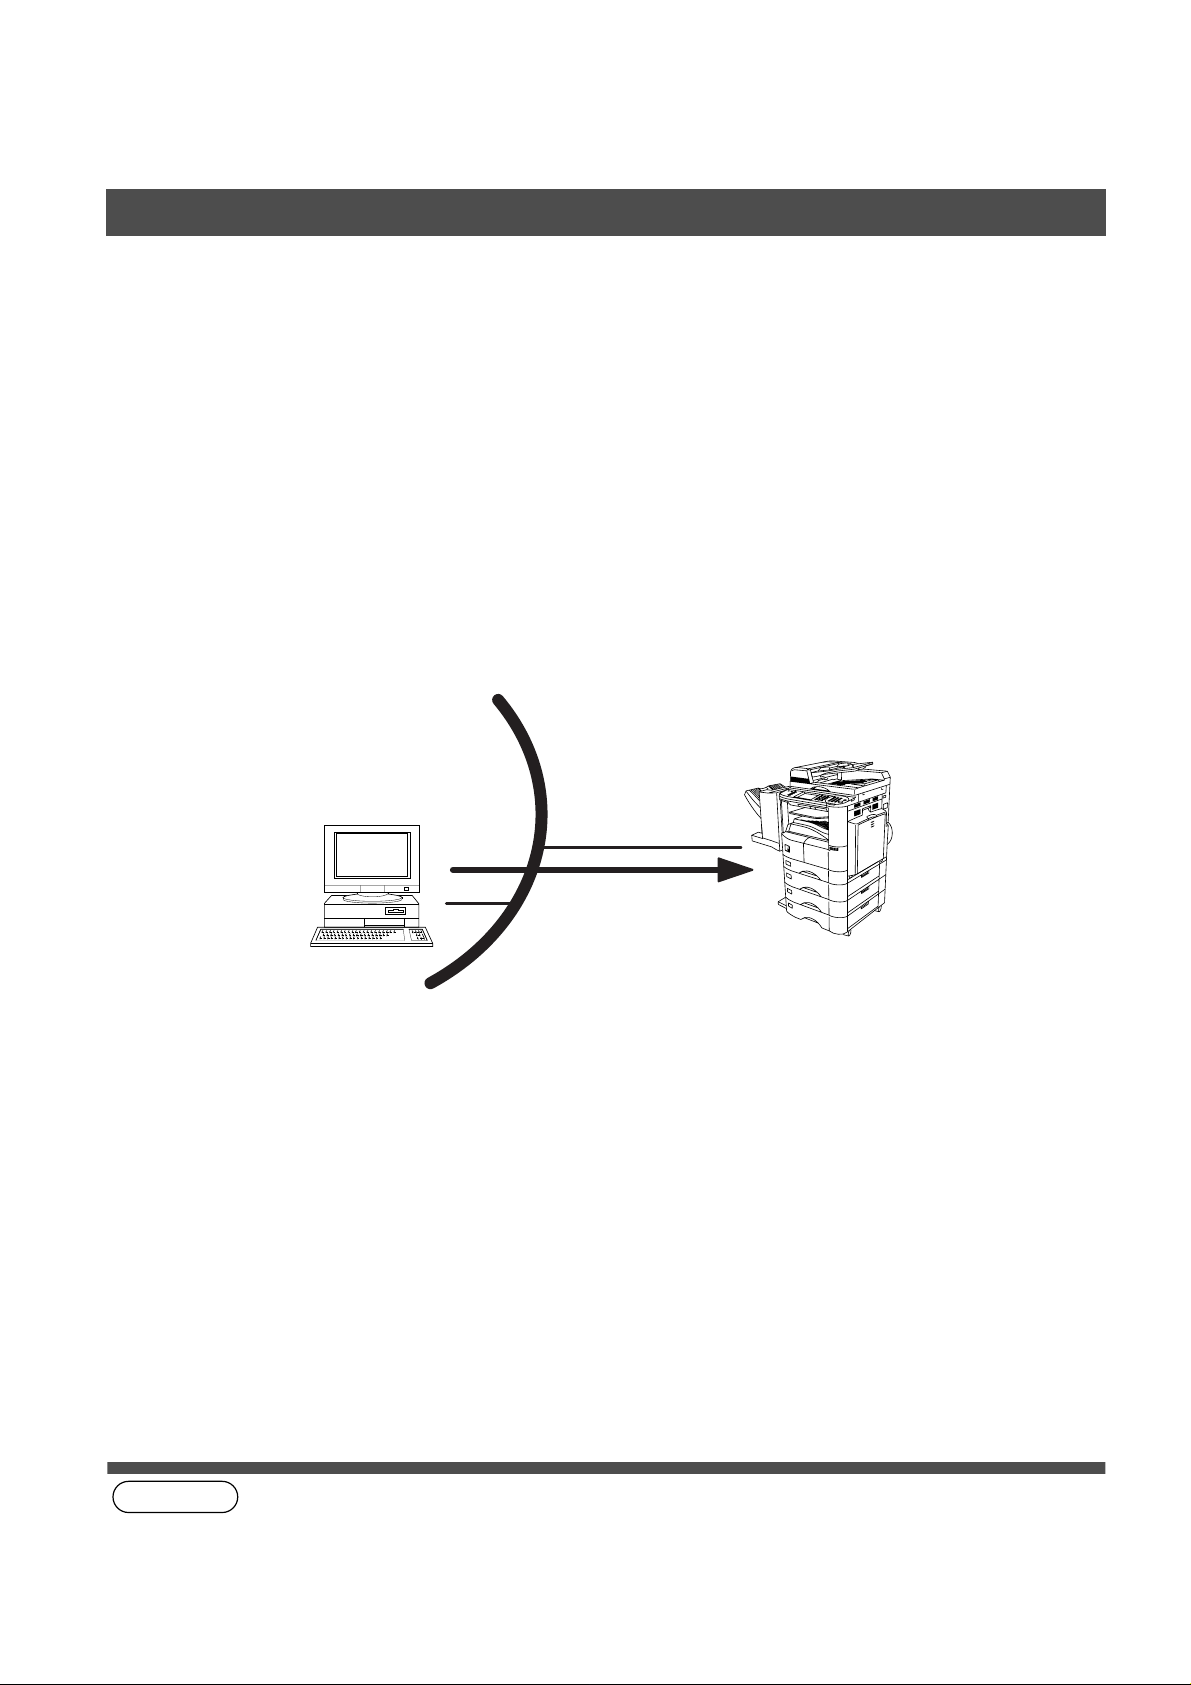
The DP-2000 can be utili zed as a network printer by simply s en din g th e d oc ume nts cre ated on your PC us i ng
various software applications to the DP-2000 via TCP/IP protocol.
There a two parts to setting up the DP-2000 as a network printer. Part 1 requires you to download the software
(printer driver and LPR) from the web site listed below.
The second part requires you to install and configure the software on your PC to work with the DP-2000. (See
the web site for details about the printer driver installation and operation.)
You can download the Panasonic’s printer driver and LPR monitor from any of the following URL addresses:
http://www.panasonic.co.jp/mgcs/internetfax/
http://www.panasonic.com/internetfax
(see Note 1)
LAN
Internet Fax
Print
PC
20
NOTE
1. The IP Address, Subnet Mask and Default Router IP Address (TCP/IP Gateway Address) must be programmed
on the DP-2000 to use as a Network Printer.
Page 21
GETTING TO KNOW YOUR MACHINE
Internet Communication Feat ures
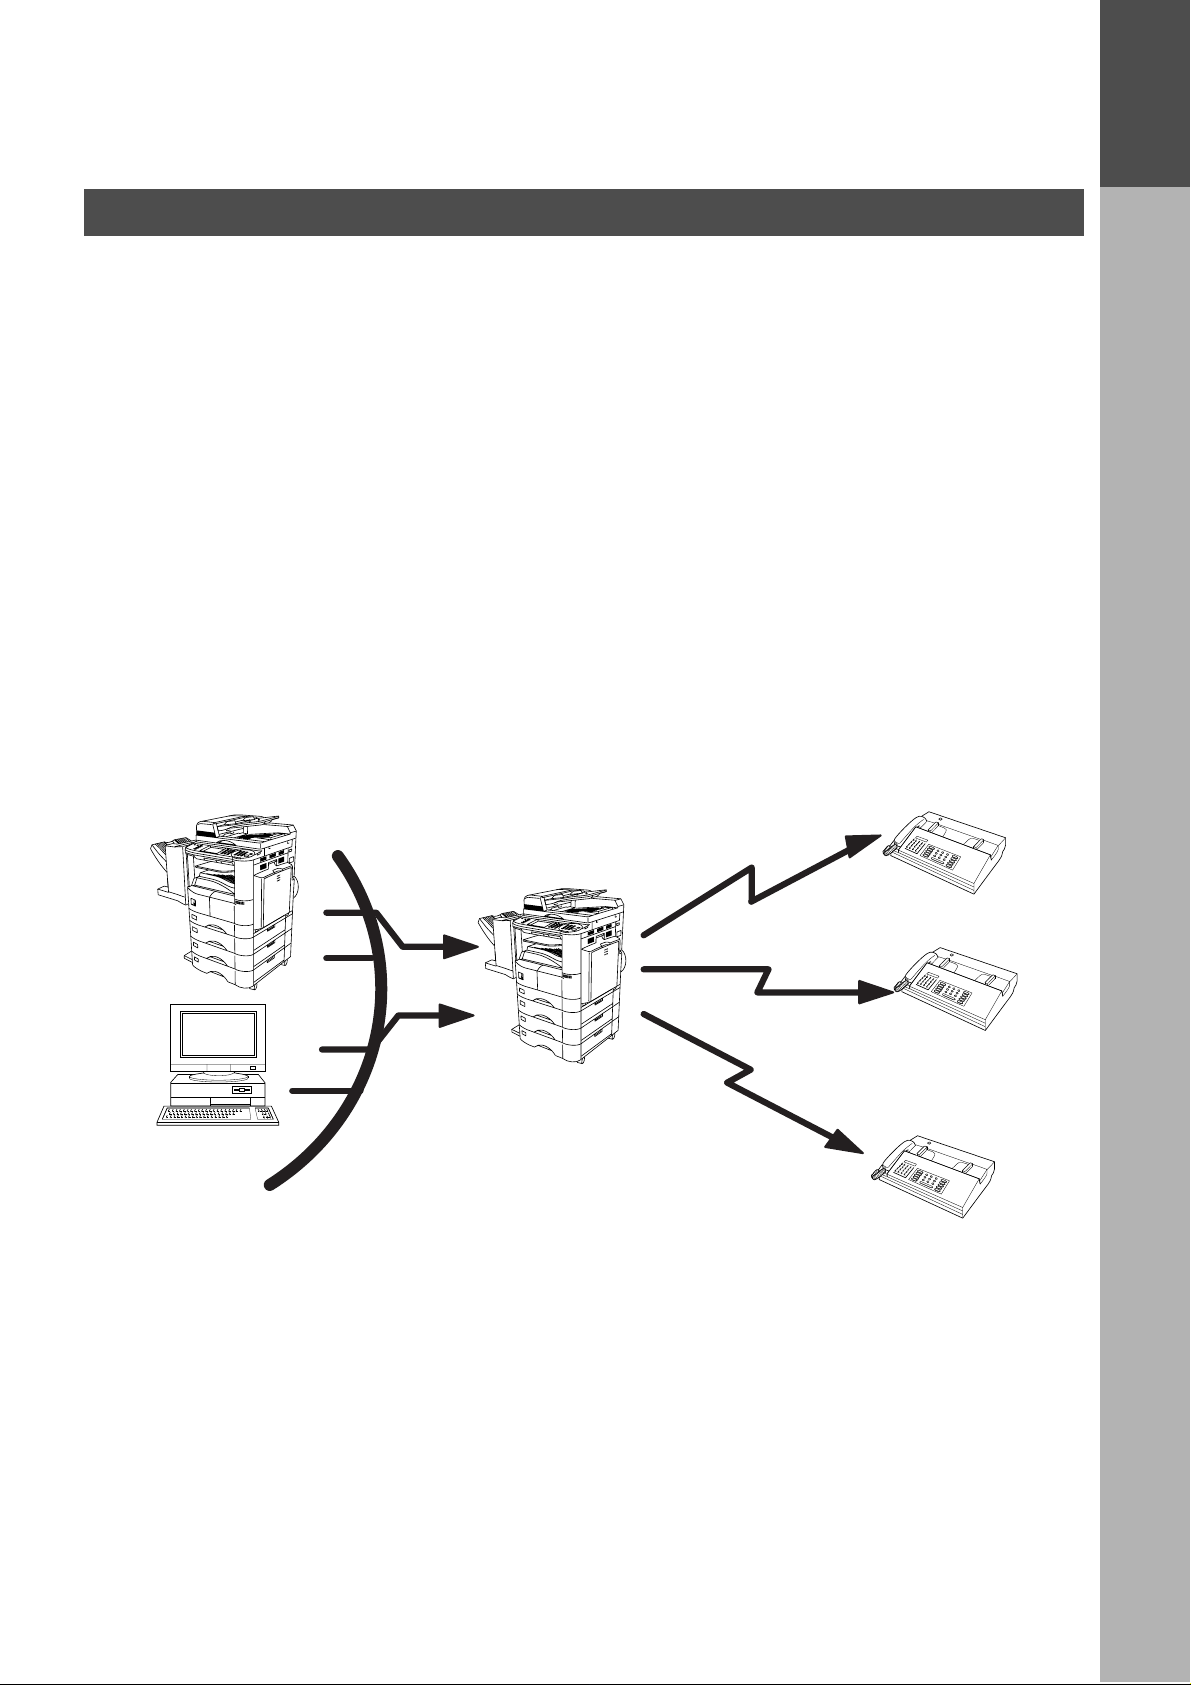
Relayed Transmission
The DP-2000 allows you to transmit an email r eceived from an Internet Fax or PC connected to the LAN to
multiple fax machines via a telephone line. You can attach files with the TIFF-F format to this email.
Using the Sub-address specified by the originating fax machine, the DP-2000 can then route the received
documents to the remote DP-2000 via an email, which can then re lay these documents to final destinations
where the final recipient is a regular G3 fax machine.
The DP-2000 also allows you to convert a data file from various application programs such as spreadsheet into
a TIFF-F format file and then transmit this file attached to an email.
To convert applications into a TIFF-F formatted file, however, requires you to first download the software
(printer driver) from the web site listed below. The second part requires you to install the software on your PC.
(See the web site for details about the printer driver installation and operation.)
You can download the Panasonic’s printer driver from any of the following URL addresses:
http://www.panasonic.co.jp/mgcs/internetfax/
GETTING TO
KNOW YOUR
MACHINE
http://www.panasonic.com/internetfax
Internet Fax
LAN
Email
PC
Transfer to a G3 Fax
Internet Fax
G3 Fax
Transfer to a G3 Fax
G3 Fax
Transfer to
a G3 Fax
G3 Fax
21
Page 22

GETTING TO KNOW Y OUR MACHINE
Important Information
The DP-2000 uses the same communic ation protocol s as email: the Simp le Mail Transfer Protocol ( SMTP). The
differences from a standard G3 fax communication using the Public Telephone Network (PSTN) are as follows.
Differences between Internet Fax and Regular Fax
A regular Fax machine goes off-hook, dials, and the phone network completes a circuit over phone lines to the
receiving fax. You pay for the circuit. The two faxes negotiate a connection, synchronize and exchange image
data.
The Internet Fax works like an email, the image data is broken down into packets and transmitted through your
Local Area Networ k (LAN) to the Inter net or Intranet instead of using a telephone company ’s n etwork, thus
saving you long distance costs.
Transmitted Document Confirmation
1. The DP-2000 does not directly connect to the final destination, but rather connects to a Mail Server via LAN.
Therefore, if a document cannot be correctly transmitted due to an error, the erroneous mail may be
returned from the Mail Server to the DP-2000.
2. The erroneous mail may take a long time to return (20 to 30 minutes) depending on the destination location,
traffic on the network or LAN system configuration.
3. Depending on the Mail Server, it is also possible that erroneous mail is not retu rned at all. Therefore, when
transmitting impor tant o r time sensiti ve documents, it is recomm ended that you follow up with a telepho ne
call to confirm reception.
4. Documents cannot be transmitted correctly if the destination Mail Ser ver does not conform to the MIME
protocol. Erroneous mail may not be returned depending on the Mail Server.
DP-2000 Cannot Make a Phone Call via LAN
The DP-2000 can only make a phone call using a regular telephone line (PSTN).
Dual Port Communication
The DP-2000’s dual port cap ability, allows s imultaneous G3 Fax Communication over regular teleph one line
(PSTN) and LAN Communication.
Transmission Resolution
In view of PC transmission, the factory de fault setting for the resolution is set to FINE mode. If requir ed, this
setting can be changed to Normal.
Internet Mail Reception
1. The DP-2000 can rec eive text email from a PC and print ANSI characters. It will pr int a "" symbol if an
unrecognized character is received.
2. Received email font and character size are fixed and cannot be changed.
3. Text email will be printed at about 72 lines per page. It is recommended that you use A4/Letter size
recording paper.
4. If the received text email includes a file attachment in a format other than TIFF-F, such as Wo rd, Excel,
Power Point, the DP-2000 prints an error message instead.
22
5. If the received email inc ludes attached T IFF-F formatted im age files, the text and TIFF-F for matted image
file will be printed on separate pages.
Page 23

GETTING TO KNOW YOUR MACHINE
Important Information
Sending Document Size via LAN
When transmitting via LAN, the transmitter is incapable of identifying the receiver’s recording paper size
capability, and thus it will not reduce the document size. Therefore, when transmitting via LAN, it is
recommended that you use only A4/Le tter size documen ts. If a Ledger/B4 s ize document is transmitted and
the receiver is only able to print A4/Letter size, the communication will fail when the Fax Parameter No. 141
(LAN XMT REDUCTION) is set to "1:Invalid" or the Select Mode "LEDGER EMAIL XMT" is set to "On".
Sending a Document to a PC via LAN
When transmitting a docume nt to an email address, the following instructions are sent as text me ssage in
addition to the TIFF-F formatted image file.
An Image data in TI FF-F forma t has b een attach ed to thi s email . You can downloa d th e TIFF- F Image V iewer
from the following URL addresses:
http://www.panasonic.co.jp/mgcs/internetfax/
http://www.panasonic.com/internetfax/
GETTING TO
KNOW YOUR
MACHINE
Internet Relayed Transmission
To prevent unauthorized stations fr om accessing your Relay Station for Internet Relayed Transmission, you
must set up your Network security . Enter a Relay Station Name, which is concealed from the final destinations
and a Manager’s Email Address for notification of all Internet Relayed Transmissions.
23
Page 24

GETTING TO KNOW Y OUR MACHINE
Connecting the LAN Cables
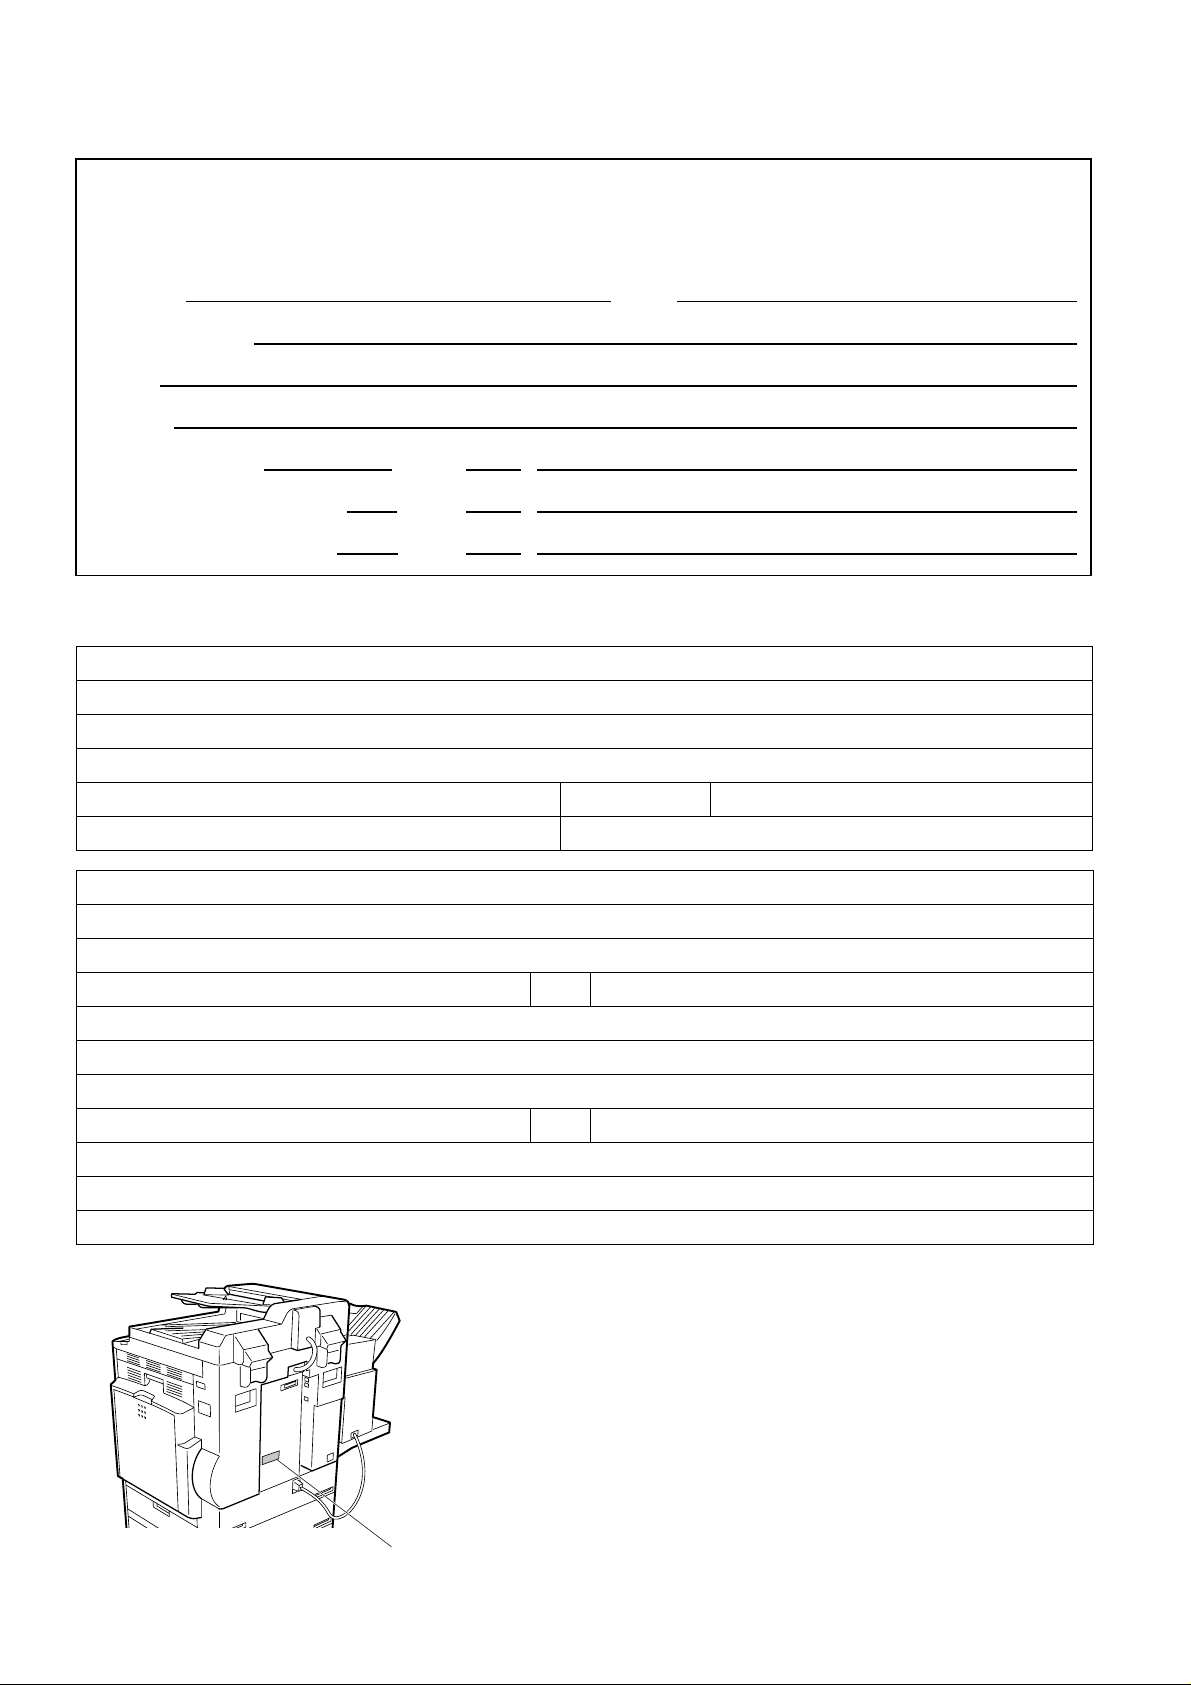
ACTIVITY Lamp
Blinks when there is data traffic on the LAN.
LINK Lamp
Illuminates when connected to the LAN. Lamp will
not turn ON if LAN cable is defective (contains
breaks).
LAN Connection Jack
(10Base-T/100Base-TX)
LAN Cable
(10Base-T/100Base-TX Cable)
Insert the plug until a click is heard.
(LAN cable is not included with the product.)
Purchase a Category 5 Cable, compliant with
EIA/TIA 568-A-5 standard.
Ethernet-Token-Ring
Bridge
(Optional Order
No. UE-204006)
10Base-T/100Base-TX Ethernet Hub
Ethernet LAN
(10Base-T/100Base-TX)
Cable (Not included)
24
Page 25

Installing Your Machine
SET MODE (1-4)
ENTER NO. OR
∨ ∧
1:USER PARAME TER S?
PRESS SET TO SELECT
IP ADDRESS
❚
IP ADDRESS
123.178.240.3
❚
SUBNET MASK
❚
CLEAR
User Parameters
Setting the User (Internet) Parameters
See Operating Instructions (For Facsimile) if you wish to set the basic settings (User Parameters).
Before starting, you will need a co mpl ete d copy of page 15 (Pre Instal la tio n Infor mat ion ). For your machine to
be able to operate on the Network proper ly, the following five (5) Basic Parameters must be pre-programmed
into the machine.
• IP Address
• Subnet Mask
• SMTP Server Name or IP Address
• Default Router IP Address
• Emai l Add r ess
Make sure that the Internet lamp is ON. If not, press to select the "INTERNET MODE".
1
2
INSTALLING
YOUR MACHINE
3
4
repeatedly until display shows;
Enter the IP Address using the keypad. Press or
to enter the period ".". (See Note 4)
Ex:
1 2 3 1 7 8 2 4 0
3
5
To continue setting other parameters, or press to
return to standby.
(see Note 1) (see Note 2) (see Note 3) (see Note 4)
NOTE
1. To scroll the display to desired User Parameter in Step 3, press or .
2. The above IP Address fields require an entry to continue. If you wish to erase any of the above IP Addresses
(leave it Blank ) and contin ue to the next step , press , then enter "0.0.0 .0" an d pres s . Other
IP Addresses do not require an entry to continue, just press and press to proceed.
3. If the DNS Server is not available, change the setting of the Fax Parameter No. 161 (DNS Server) to "Invalid",
then enter the IP Address instead.
4. For convenience, y ou ca n us e to enter a period "." while p rogra mm in g IP Addre sses on ly . O the rw is e is
used to enter an asterisk in other condition.
STOP
CLEAR
SET
SET
25
Page 26

INSTALLING YOUR MACHINE
Setting the Internet Parameters
Setting the User Parameters for the LAN Interface
Depending on how the DP-2000 wi ll be configured to co mmunicate on the LAN, the appr opriate parameters
listed in the table below must be stored first. (See pages 12 to 16)
Parameter Comments
1 DATE & TIME Current Date and Time.
2 LOGO Up to 25 characters & digits.
3 CHARACTER ID Up to 16 characters & digits.
4 ID NO. Your Fax Telephone Number. (Up to 20 digits)
5 TIME ZONE The Time Zone is required as part of the Email header information when
sending In ternet faxes.
6 (MAC ADDRESS) Hardware Address ha rd-coded into the DP-20 00. (If required, can be obtained
from the 2nd page of the Fax Parameter List printout, by pressing.
[FUNCTION] [6] [4] [SET])
7* IP ADDRESS IP Address assigned to your DP-2000.
8* SUBNET MASK Subnet Mask assigned by the Network Administrator.
9* SMTP SERVER NAME The name of the SMTP Mail Server. (Up to 60 characters)
10* SMTP SERVER IP ADDR IP Address of the SMTP Mail Server.
11* DEF. ROUTER IP ADDR IP Address of your Default Router.
12* EMAIL ADDRESS The Email Address assigned to your DP-2000 for sending and receiving. (Up
to 60 characters)
13* DNS SERVER IP ADDRESS IP Address of the DNS Server. If the DNS Server is not available, change the
setting of the Fax Pa r am ete r No. 161 (DNS Server) to "In valid", then enter the
IP Address instead.
14*
POP SERVER NAME
15* POP SERVER IP ADDR IP Address of the POP Mail Server.
16* POP USER NAME User Name assigned to your DP-2000. (Up to 40 characters)
17* POP PASSWORD Password assigned to your DP-2000. (Up to 10 characters)
18* HOST NAME The Host Name assigned to your DP-2000. (Up to 60 characters)
19 DEFAULT SUBJECT The default information to be added to the Subject Line for all outgoing Email
20 DEFAULT DOMAIN When the outgoing email address is incomplete by SMTP standards, the
21 SELECTABLE DOMAINS (01) ~
(10)
22 REMOTE PASSWORD This is a security password that allows Remote Programming of the Internet
23 RELAY XMT PASSWORD A password that provides Network security for your Relay Station (used
24 MANAGER’S EMAIL ADDR Department Manager’s Email Address for notification of all Internet relayed
25 RELAY DOMAIN (01) ~ (10) Enter up to 10 Domain Name(s) that have been authorized to access your
* Contact your Network Administrator for this Information.
Name of the POP Mail Server.
(up to 40 characters). To manually input this information before transmission,
change the Fax Parameter No. 159 (SUBJECT LINE ENTRY) to "2:Valid".
Frequently Sent Domain specified here will be automatically added to the
email address. This feature is also useful as a shortcut when manually
entering email addresses to a frequently used Domain. (Up to 50 characters)
Enter up to 10 Domain Names that can be selected after the Domain "@" key
is pressed using the "\/ or /\" key during Manual email addressing. (Up to 30
characters)
Param eters a nd Auto Dialer or the retrieval of the J ournal via a n Email . (Up to
10 characters)
exclusively for G3 relay purposes). (Up to 10 characters)
transmission s f or sup ervision and cost con trol purposes. (Up to 60 c hara cters)
Internet Fax for Relayed XMT Request. (Up to 30 characters)
Relay Domain, a.k.a. Domain Name in the DX-1000/2000.
26
Page 27

INSTALLING YOUR MACHINE
Programming or Retrieving Parameters via Email
Using Email to Program or Retrieve Parameters
This feature is a powerful tool, which provides a convenient and easy way of retrieving or programming Internet
Parameters, One-Touch, ABBR Dialing Numbers, Program keys and Journal retrieval from your PC by sending
a text email message to the DP-2000.
Using your email application’s "Subject:" line as a command-input field, you can request the DP-2000 to
perform the following commands:
"Subject:" Line Command Function
1 #set parameters(password)# Programs the Internet Parameters
2 #get parameters(password)# Retrieves the Internet Parameters
3 #set abbr(password)# Programs the Auto Dialer
4 #get abbr(password)# Retrieves the Auto Dialer Data
5 #get jnl(password)# Retrieves the current Journal data
Where: "set" is used to program the data
"get" is used to retrieve the data
"parameters" represents Internet Parameters
"abbr" represents Auto Dialer
"jnl" represents Journal
"password" is the Remote Password programmed in the DP-2000’s User P ara meters
(i.e. 123456789). Must be enclosed within the parenthesis "( )".
The command must be enclosed within the hash (#) signs.
Using a PC to Input the Internet Parameters Remotely
INSTALLING
YOUR MACHINE
This feature provides a convenient and an eas y way to input the Internet Parameters right from your PC by
sending a text email message to the DP-2000.
The following parameters can b e input remotely via a PC. The other paramete rs must be entered from the
machine in the User Parameters. (See page 26).
- Sender Selection (up to 24 User Names, see page 89)
- Default Domain
- Selectable Domains (up to 10 additional Domain Names)
- Remote Password
- Manager’s Email Address
-Relay XMT Password
- Relay Domain (up to 10 Domain Names authorized for Relay XMT Request)
The DP-2000 interprets the command that you enter in the "Subject" line of your email message and performs
one of the following functions, it Retrieves or Stores data into the Internet Parameters (User Parameters).
The two types of commands that can be entered in the "Subject" line of your email:
1) To Store data, type :
2) To Retrieve data, type :
#set parameters(password)#
#get parameters(123456789)#
:where the "password" is the Remote Password
progra mm e d i n the DP-2000’s User Parameters (i.e.
123456789).
You can enter the Inter net Param eters shown above
with this command the first time. However, if these
fields already cont ain data, do not us e this command
as the existing information will be deleted and
overwritten. Use the Retrieve command below
instead, refer to pages 30 to 34.
(see Note 1)
NOTE
1. To activate this feature, change the Fax Parameter No. 158 (PC REMOTE UPDATE) to "Valid". (See page 58)
27
Page 28
INSTALLING YOUR MACHINE
Programming or Retrieving Parameters via Email
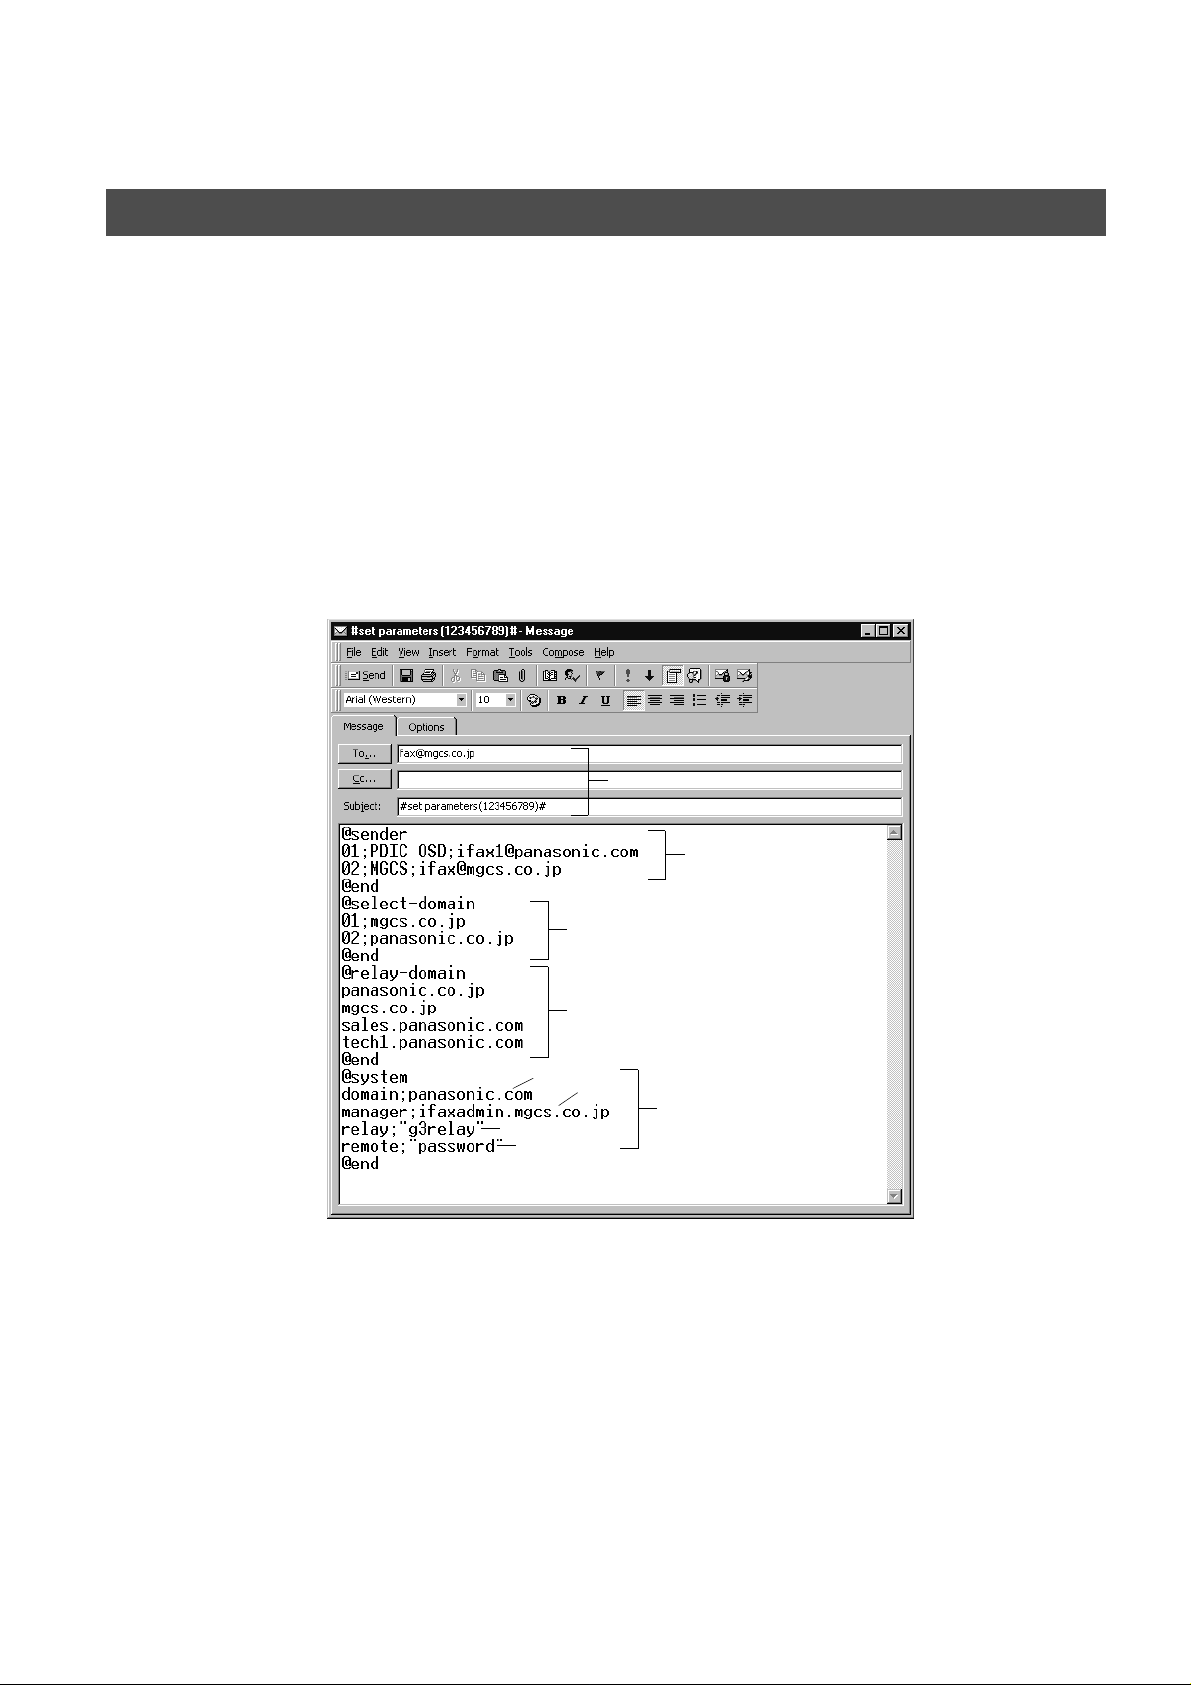
To Input the Internet Parameters for the First Time
Create a script in th e message body of a plain text email and send it to the DP-2000’s email address. The
"Subject" line of the email must be as follows:
#set parameter s( pass w or d )#
Important
The script sample to input the Internet Parameters is shown below.
: Do not use the above command if these fields already contain data, the
: where the "password" is the Remote Password programmed in the DP-2000’s
User Parameters. For security, always input a Remote Password in the User
Parameters. [If it was not programmed, signify with "()" (i.e. #set parameters()#)
and assign one now].
existing information will be deleted and overwritten. Retr ieve and backup the
existing data onto your PC first by following the procedures for Retrieving and
Editing the Internet Parameters on pages 30 to 34.
(1)
(2)
(3)
(c)
(d)
(a)
(4)
(b)
(5)
28
Page 29

INSTALLING YOUR MACHINE
Programming or Retrieving Parameters via Email
Explanation of Contents (see Note 1) (see Note 2)
(1) To : The DP-2000’s email address
From : This field is normally not visible when creating new email message(s). It is your default
email address (email application), for retrieving the Internet Parameters and for error
message notification.
(Can be programmed with the configuration tool of your email program.)
Subject : To Store data, type: #set parameters(password)#
INSTALLING
YOUR MACHINE
(2) @sender to @end : Defines the Sender information to be set in section (2) between @sender to @end block.
(3) @select-domain to @end : Defines the Selectable Domains to be set in section (3) between @select-domain to
(4) @relay-domain to @end : Defines the Domain Names to be set in section (4) between @relay-domain to @end
(5) @system to @end : Defines the Internet Parameters to be set in section (5) between @system to @end block.
Register up to 24 User Names and their Email Addresses for the Sender Selection feature
(See page 89).
Separate each data field with a semicolon (;). (If the remaining fields are to remain blank,
insert a semicolon (;) for each blank field)
The data string for each Sender Selection should be defined within a single line.
The syntax is: <Sender Selection Number>;<User Name>;<Email Address>
(a) 01 to 24: Indicates the Sender Selection Numbers
(b) User Name (25-characters maximum)
(c) Email Address (60-characters maximum)
@end block. Register up to 10 Domain Names that can be selected during manual email
addressing. (30-characters maximum)
The syntax is: <Number>;<Domain>
block. Register up to 10 Domain Names that have been authorized to access your
Internet Fax for Relayed XMT Request. (30-characters maximum)
Register the following Internet Parameters.
(a) Default Domain (30-characters maximum).
The syntax is: domain; <Default domain name>
(b) Manager’s Email Address (60-characters maximum).
The syntax is: manager; <Manager’s Email Address>
(c) Relay XMT Password (10-characters maximum).
The syntax is: relay; <Relay XMT Password>. Quotation marks " " enclosing the
password, are required, as shown in the example above.
(d) Remote Password (10-characters maximum).
The syntax is: remote; <Remote Password>. Quotation marks " " enclosing the
password, are required, as shown in the example above.
NOTE
1. The machine cannot be programmed via email while it is communicating or printing.
2. Some email applica t io ns a uto ma tic all y i ns ert a lin e fe ed in the middle of a line w hen the num be r of c hara ct ers in
a line exceed a specific number. Turn "Off" the automatic line feed, or define the number of characters per line
to prevent a line feed, or the data will be ignored.
29
Page 30
INSTALLING YOUR MACHINE
Programming or Retrieving Parameters via Email
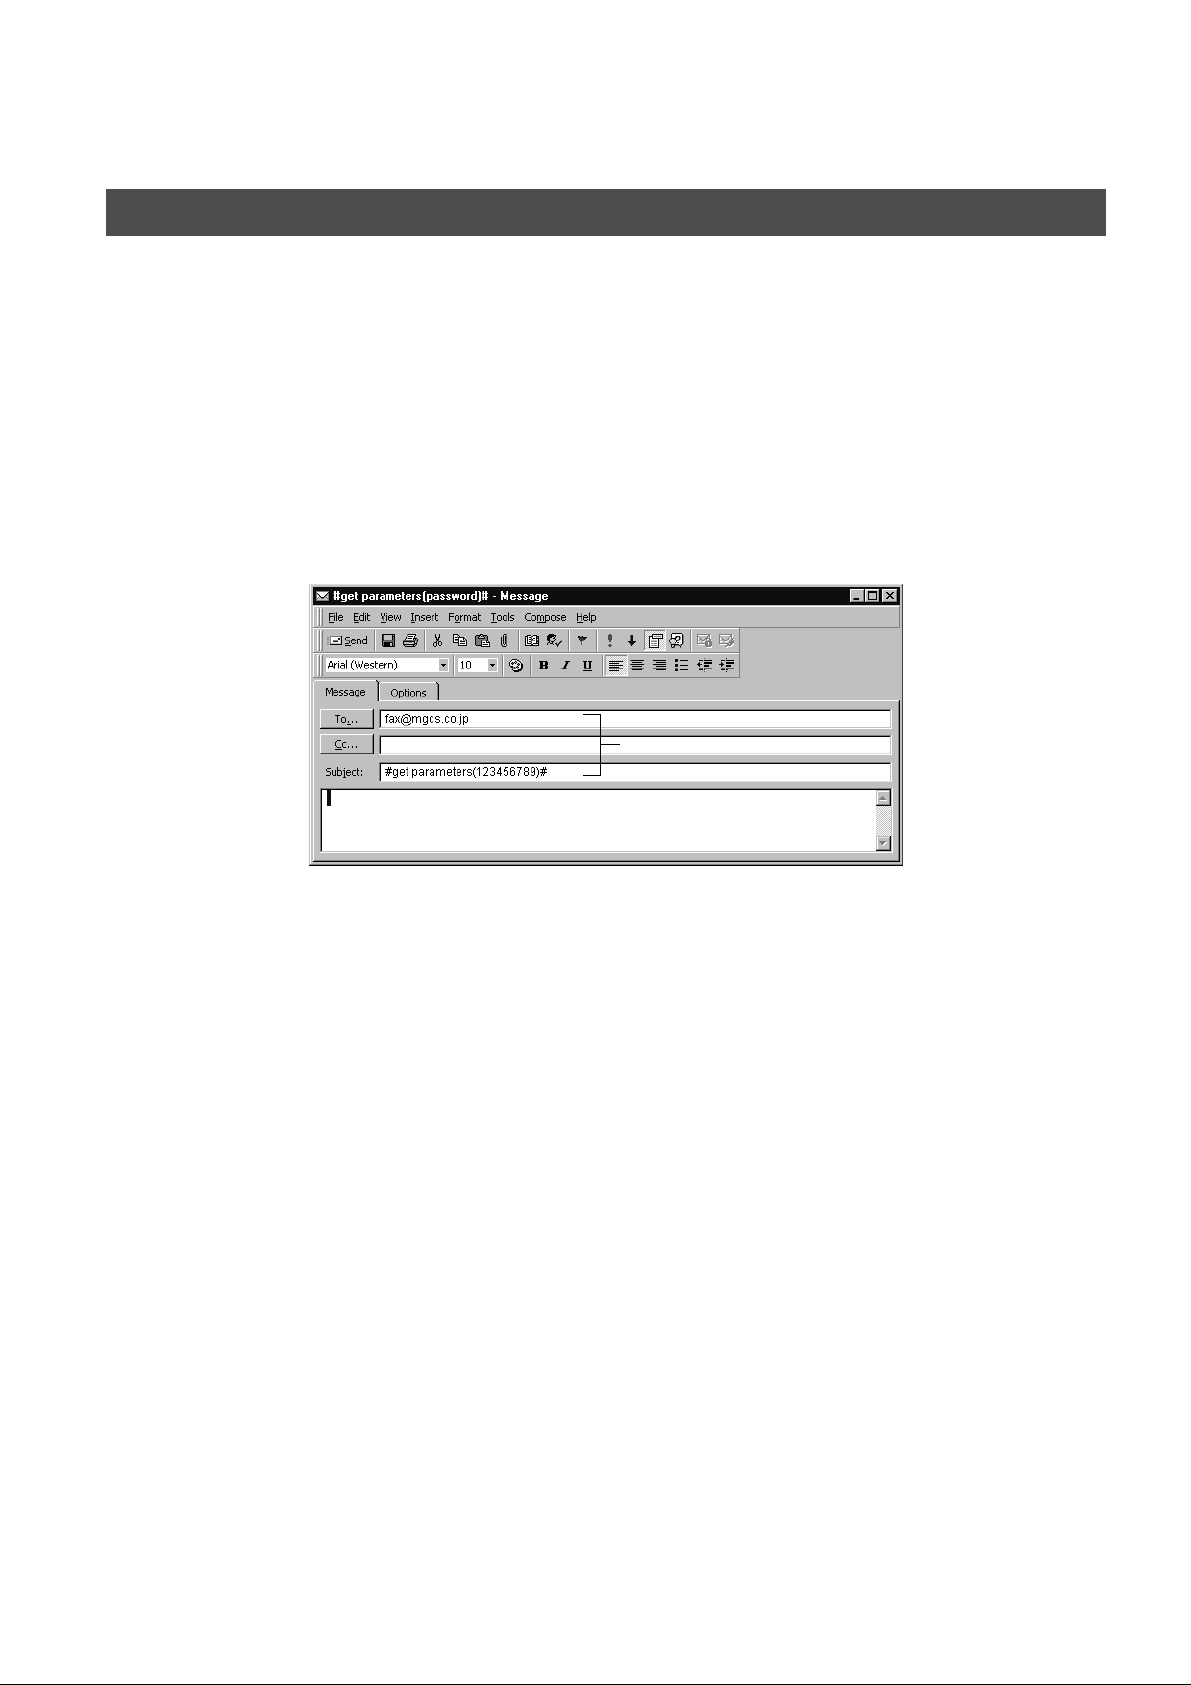
To Retrieve the Internet Parameters for Backup
To retrieve the existing Internet Parameters, send a plain t ext email to the DP-2000’s email address with the
following command in the "Subject" line:
#get parameters(password)#
Retrieving the Internet Parameters Sample
(1) To : The DP-2000’s email address.
From : This field is normally not visible when creating new email message(s). It is your default
Subject : To Retrieve data, type: #get parameters(password)#
: where the "password" is the Remote Password programmed in the DP-2000’s
User Parameters (i.e. 123456789). For security, always input a Remote
Password in the User Parameters. If it was not programmed, s ignify with "() "
(i.e. #get parameters()#).
Make sure that the CC..., Bcc... lines and the body o f the email message is
Blank.
(1)
email address (email application), for retrieving the Internet Parameters and for error
message notification.
(Can be programmed with the configuration tool of your email program.)
30
Page 31

INSTALLING YOUR MACHINE
Programming or Retrieving Parameters via Email
After receivin g the email m essage r equesting t he Inter net Parameters, the DP-2000 sends back an email to the
address specified in the "From:" line with the Internet Parameters in the body of the email.
DP-2000 Internet Parameters Email Sample
(1)
INSTALLING
YOUR MACHINE
(2)
(3)
(4)
(5)
(1) To : Your email address that was used to retrieve the Internet Parameters.
From : The DP-2000’s email address.
Subject : DP-2000 System Parameter List
(2) @sender to @end : Defines up to 24 User Names and their Email Addresses programmed in the DP-2000 for
(3) @select-domain to @end : Defines up to 10 alternate Domain Names programmed in the DP-2000 for the Selectable
(4) @relay-domain to @end : Defines up to 10 Domain Names programmed in the DP-2000 that have been authorized
(5) @system to @end : Defines the following Internet Parameters programmed in the DP-2000 in section (5)
the Sender Selection in section (2) between @sender to @end block.
Domains in section (3) between @select-domain to @end block.
to access your Internet Fax for Relayed XMT Request in section (4) between @relaydomain to @end block.
between @system to @end block.
(a) Default Domain
(b) Manager’s Email Address
(c) Relay XMT Password
(d) Remote Password
31
Page 32

INSTALLING YOUR MACHINE
Programming or Retrieving Parameters via Email
To Edit the Retrieved or Backup Internet Parameters File
After receiving the DP-2000 email with the Internet Parameters, store the email file as text (.txt) on your PC for
backup purposes.
To change or update the Internet Parameters, follow the steps below:
1. Create a New Email Messa ge, fill out the "To" and "From" Address line and the Subject l ine inform ation for
section (1) below:
To : The DP-2000’s email address.
From : This field is normally not vis ible when creating new email message( s). It is your default email
address, for retrieving the Internet Parameters and for error message notification.
Subject : To Store data, type: #set parameters(password)#
2. Open the backup, Internet Parameter text file. Copy the body text and paste it on the body of the newly
created email message.
3. Delete any headers that may be present in the body of the email, as unsupported data will be rejected. The
information following the "#" sign is ignored by the DP-2000.
4. Edit a parameter and/or add additional Sender Name(s) or Domain Name(s).
5. When finished, use the "File/Save as..." command and save the updated file with ".txt" extension as a
backup.
6. Send the email message to the DP-2000 to update the Internet Parameters.
32
Page 33

INSTALLING YOUR MACHINE
Programming or Retrieving Parameters via Email
DP-2000 Internet Parameters Email Sample
(1)
(6)
[Delete this header bef ore sending email.]
INSTALLING
YOUR MACHINE
(3)
(4)
(2)
(5)
Continued on the next page...
33
Page 34

INSTALLING YOUR MACHINE
Programming or Retrieving Parameters via Email
Explanation of Contents
(1) To : The DP-2000’s email address
From : This field is normally not visible when creating new email message(s). It is your default
Subject : To Store data, type: #set parameters(password)#
(2) @sender to @end : Defines the Sender information to be set in section (2) between @sender to @end block.
(3) @select-domain to @end : Defines the Selectable Domains to be set in section (3) between @select-domain to
(4) @relay-domain to @end : Defines the Domain Names to be set in section (4) between @domain to @end block.
(5) @system to @end : Defines the Internet Par ameters to be set in section (5) between @system to @end block.
email address (email application), for retrieving the Internet Parameters and for error
message notification.
(Can be programmed with the configuration tool of your email program.)
Edit, Delete or Register up to 24 User Names and their Email Addresses for the Sender
Selection feature. (See page 89)
Separate each data field with a semicolon (;). (If the remaining fields are to remain blank,
insert a semicolon (;) for each blank field)
The data string for each Sender Selection should be defined within a single line. The
syntax is:
<Sender Selection Number>;<User Name>;<Email Address>
(a) 01 to 24: Indicates the Sender Selection Numbers
(b) User Name (25-characters maximum)
(c) Email Address (60-characters maximum)
@end block. Register up to 10 alternate Domain Names that can be selected during
manual email addressing. (30-characters maximum)
The syntax is: <Number>;<Domain>
Register up to 10 the Domain Names that have been authorized to access your Internet
Fax for Relayed XMT Request. (30-characters maximum)
Register the following Internet Parameters.
(a) Default Domain (30-characters maximum).
The syntax is: domain; <Default domain name>
(b) Manager’s Email Address (60-characters maximum).
The syntax is: manager; <Manager’s Email Address>
(c) Relay XMT Password (10-characters maximum. The syntax is: relay; <Relay XMT
Password>. Quotation marks " " enclosing the password, are required, as shown in
the example above)
(d) Remote Password (10-characters maximum. The syntax is: remote; <Remote
Password>. Quotation marks " " enclosing the password, are required, as shown in
the example above)
(Notice that for the above example, we have changed the Manager’s Email Address,
Relay XMT Password and the Remote Password)
(6) : This header must be deleted before the email is sent to the DP-2000 for reprogramming
of Internet Parameters.
The information following the "#" sign is ignored by the DP-2000, therefore, you can leave
it as is or delete it if you wish.
34
Page 35

INSTALLING YOUR MACHINE
Programming or Retrieving Parameters via Email
Using a PC to Update the Auto Dialer Remotely
This feature provides a convenient and an easy way to Update, Backup or Restor e the Phone Book dialing
numbers right from your PC by sending a text email message to the DP-2000.
The DP-2000 interprets the command that you enter in the "Subject" line of your email message and performs
one of the following functions, it Retrieves or Stores data into the Auto Dialer (Phone Book).
The two types of commands that can be entered in the "Subject" line of your email:
INSTALLING
YOUR MACHINE
1) To Store data, type :
2) To Retrieve data, type :
(see Note 1)
#set abbr(password)#
: where the pass word is the R emote P a ssw ord p rogr ammed i n
the DP-2000’s User Parameters (i.e. 123456789). You can
program any known unused Auto Dialer loca tion(s) with this
command for the first time, without having to Retrieve the
Phone Book data first. If the desired Auto Dialer location
already contains data, the DP-2000 will overwrite the
existing data, therefore, we recommend that you use the
Retrieve command below instead. To edit existing Auto
Dialer locations, refer to pages 41 to 42.
#get abbr(123456789)#
NOTE
1. To activate this feature, change the Fax Parameter No. 158 (PC REMOTE UPDATE) to "Valid".
(See page 58).
35
Page 36

INSTALLING YOUR MACHINE
Programming or Retrieving Parameters via Email
Deleting the Entire Auto Dialer
If you wish to delete the entire Auto Dialer data in the DP-2000, type the following command in the body of the
email message:
@command
delete
@end
This command can als o be inser ted before the @begin to @end block, to erase the e ntire Auto Dialer data
first, then reprogramming it with new data.
This method will also pr event the "Overwrite Warning Mes sage" that is sent back from the DP-2000, when the
current Auto Dialer station is overwritten.
To erase the entire Auto Dialer data, type the following command in the "Subject" line of your email:
#set abbr(password)#
: where the password is the Remote Password programmed in the DP-2000’s User
Parameters. Retrieve and backup the existing data onto your PC fi rst by following
the procedures for Retrieving and Editing on pages 39 to 42.
36
Page 37

INSTALLING YOUR MACHINE
Programming or Retrieving Parameters via Email
To Program One-Touch/ABBR. No. for the First Time
Create a script i n the message body of a plain text email a nd send it to the DP-2000’s email address.The
"Subject" line of the email must be as follows:
INSTALLING
YOUR MACHINE
#set abbr(password)#:
where the "password" is the Remote Password programmed in the DP-2000’s User
Parameters.
The script sample to program the One-Touch/ABBR. No. for the first time is shown in the illustration below:
First Time Remote Programming of One-Touch/ABBR. No. Sample
(1)
(a)
(b)
(a)
(d)
(h)
(c)
(b) (c)
(e)
(f)
(g)
(d) (e)
(2)
(f)
(3)
Continued on the next page...
37
Page 38

INSTALLING YOUR MACHINE
Programming or Retrieving Parameters via Email
Explanation of Contents (see Note 1) (see Note 2) (see Note 3) (see Note 4)
(1) To : The DP-2000’s email address.
From : This field is normally not visible when creating new email message(s). It is your default email address
Subject : To Store data, type: #set abbr(password)#
(2) @begin to @end block : Defines the data to be set into Phone Book between @begin to @end block.
(email application), for retrieving the Phone Book data and for error message notification.
(It can be programmed with the configuration tool of your email program)
: To Retrieve data, type: #get abbr(password)#
Separate each data field with a semicolon (;). (If the remaining fields are to remain blank, insert a
semicolon (;) for each blank field)
The data string for each station should be defined within a single line.
(a) Entry-number: One-Touch, ABBR. No. or Program Keys to be programmed
001 to 175: indicates ABBR. No.s 001 to 175 (175 stations maximum)
1001 to 1020: indicates One-Touch numbers from 01 to 20
2001 to 2005: indicates Program Key s (P1 to P5 programmed as One-Touch dialing number)
(b) Station-name: Name of the station being programmed (15 alpha-numeric characters maximum)
(c) Station-address: email address or telephone number of the station being programmed
(d) Routing-subaddress: sub-address to be used for routing (20-digit maximum)
(e) Routing-id-number: TSI to be used for routing (20-digit maximum)
(f) The End Receiving Station’s telephone number is entered after the hash sign (#)
(3) @program to @end : Defines the data to be set into Program Keys as a Group Key or POP Access Key between @program to
@end block.
(a) Pr ogram Key: P01 - P05
(b) Station-name as a Group Key: Name of the station being programmed (15 alpha-numeric characters
maximum)
(c) GROUP: The syntax used to set the Program Key as a Group Key
(d) Entry-number: One-Touch, ABBR. No. or Program Keys to be programmed
001 to 175: indicates ABBR. No.s 001 to 175 (175 stations maximum)
1001 to 1020: indicates One-Touch numbers from 01 to 20
2001 to 2005: indicates Program Key s (P1 to P5 programmed as One-Touch dialing number)
(e) POP: The syntax used to set the Program Key as a POP Access Key
(f) POP User-name: Name of the station being programmed (40 alpha-numeric characters maximum)
(g) POP Password: POP Password (10 alpha-numeric characters maximum)
(h) Set whether the emails on the POP Server are deleted after retrieving the emails.
NOTE
1. If a POP user account is programmed into the P1 to P5 program keys, the data programmed for this key cannot
be deleted, even when the delete command is specified.
2. The email address and the telephone number cannot be programmed via email when:
• One-Touch Number has been used for communication reservation.
• Received documents are stored in the image data memory of the machine.
• While the machine is communicating or printing.
3. When the email address and telep hon e num be r are programmed via email, a program result email is sent bac k .
4. Some email applications au tom ati cal ly ins ert a li ne fe ed in th e m idd le o f a l ine w hen a nu mb er of c ha r ac ters in a
line exceed a specific number. Turn Off the automatic line feed, or define a number of characters per line to
prevent a line feed, or the data will be ignored.
38
Page 39

INSTALLING YOUR MACHINE
Programming or Retrieving Parameters via Email
To Retrieve One-Touch/ABBR. No. Data for Backup
To retrieve the existing auto dialer data, send a plain text email to the DP-2000’s email address with the
following command in the "Subject" line:
INSTALLING
YOUR MACHINE
#get abbr(password)#
Make sure that the Cc, Bcc lines and the body of the email message is Blank.
Retrieving One-Touch/ABBR. No. Data Sample
: where the "password" is the Remote Password programmed in the DP-2000’s
User Parameters (i.e. 123456789)
(1)
To : The DP-2000’s email address.
From : This field is normally not visible when creating new email message(s). It is your default email address (email
application), for retrieving the One-Touch/ABBR. No. data and for error message notification.
(It can be programmed with the configuration tool of your email program.)
Subject : To Retrieve data, type: #get abbr(password)#
39
Page 40

INSTALLING YOUR MACHINE
Programming or Retrieving Parameters via Email
After receiving the email m essage reque sting the existing auto dia ler data, the DP- 2000 sends back an email
to the address specified in the "From:" line with the auto dialer information in the body of the email.
DP-2000 Auto Dialer Email Sample
(1)
(2)
(3)
(1) To : Your email address that was used to retrieve the Auto Dialer data.
From : The DP-2000’s email address.
Subject : ONE-TOUCH ABBR. List
(2) @begin to @end block : Defines One-Touch Keys, Abbreviated Dialing Numbers and Program Keys stored as a One-Touch Key
(3) @program to @end : Defines Program Keys stored as a Group Key or POP Access Key programmed in the DP-2000 in section
programmed in the DP-2000 in section (2) between @begin to @end block.
(3) between @program to @end block.
40
Page 41

INSTALLING YOUR MACHINE
Programming or Retrieving Parameters via Email
To Edit the Retrieved or Backup One-Touch/ABBR. No. Data File
After receiving the DP-20 00 email with the auto dialer data, s tore the email file as text (.txt) on your PC for
backup purposes.
To change or update the auto dialer, follow the steps below:
1. Create a New Email Mess age, fill out the "To" and "From " Address line and the Subjec t line infor mation for
section (1) below:
To : The DP-2000’s email address.
From : This field is normally not visible when creating new email message(s). It is your default email
address, for retrieving the One-Touch/ABBR. No. data and for error message notification.
Subject : To Store data, type: #set abbr(password)#
2. Open the backup, auto dialer text file. Copy the body text and paste it on the body of the newly created
email message.
3. Delete any headers that may be present in the body of the email, as unsupported data will be rejected.
The information following the "#" sign is ignored by the DP-2000.
4. Edit and/or add additional One-Touch/ABBR. No. stations.
5. When finished, use the "File/Save as..." command and save the updated file with ".txt" extension as a
backup.
6. Send the email message to the DP-2000 to update the auto dialer.
INSTALLING
YOUR MACHINE
DP-2000 Auto Dialer Email Sample
(b)
(c)
(b)
(f)
(g)
(a)
(a)
(d)
(h)
(1)
[Delete this header before sending email]
(d)
(f)
(4)
(c)
(e)
(3)
(5)
(e)
(2)
Continued on the next page...
41
Page 42

INSTALLING YOUR MACHINE
Programming or Retrieving Parameters via Email
Explanation of Contents
(1) To : The DP-2000’s email address.
From : This field is normally not visible when creating new email message(s). It is your default email
Subject : To Store data, type: #set abbr(password)#
(2) @begin to @end block: : Defines the One-Touch Keys, Abbreviated Dialing Numbers and Program Keys stored as a One-
(3) @program to @end block: : Defines the Program Keys stored as a Group Key or POP Access Key to be set in section (4)
address, for retrieving the One-Touch ABBR. No. data and for error message notification.
(Can be programmed with the configuration tool of your email program.)
Touch Key to be set in section (3) between @begin to @end block. Edit, Delete or Register the
information.
Separate each data field with a semicolon (;). (If the remaining fields are to remain blank, insert
a semicolon (;) for each blank field)
The data string for each station should be defined within a single line. The syntax is:
<Entry-number>;<Station-name>;<Station-address>;<Routing-subaddress>; < Rout ing-idnumber>
(a) E ntry-number: One-Touch, ABBR. No. or Program Keys to be programmed
001 to 175: indicates ABBR. No.s 001 to 175 (175 stations maximum)
1001 to 1020: indicates One-Touch numbers from 01 to 20
2001 to 2005: indicates Program Keys (P1 to P5 programmed as One-Touch dialing number)
(b) S tation-nam e: Name of the station being programmed (15 alpha-numeric characters
maximum)
(c)Station-address: email address or telephone number of the station being programmed
(d)Routing-subaddress: sub-address to be used for routing (20-digit maximum)
(e)Routing-id-number: TSI to be used for routing (20-digit maximum)
(f) The End Receiving Station’s telephone number is entered after the hash sign (#)
between @program to @end block.
Edit, Delete or Register the information.
(a)Program Key: P01 - P05
(b)Station-name as a Group Key: Name of the station being programmed (15 alpha-
numeric characters maximum)
(c)GROUP: The syntax used to set the Program Key as a Group Key
(d)Entry-number: One-Touch, ABBR. No. to be programmed
001 to 175: indicates ABBR. No.s 001 to 175 (175 stations maximum)
1001 to 1020: indicates One-Touch numbers from 01 to 20
2001 to 2005: indicates Program Keys (P1 to P5 programmed as One-Touch dialing number)
(e)POP: The syntax used to set the Program Key as a POP Access Key
(f) PO P User-na me: Name of the POP user account (40 alpha-numer ic characters maximum)
(g)POP Password: POP Password (10 alpha-numeric characters maximum)
(h)Set whether the emails on the POP Server are deleted after retrieving the emails.
(4) These 2 One-Touch/ABBR. No. stations were added to the list.
(5) This header must be deleted before the email is sent to the DP-2000 for reprogramming of One-Touch/ABBR. No..
The information following the "#" sign is ignored by the DP-2000, therefore, you can leave it as is or delete it if you wish.
42
Page 43

INSTALLING YOUR MACHINE
Programmin g or Retrie ving P aramet ers vi a Email
Using Email to Retrieve the Journal
To retrieve the existing Journal data, send an email to the DP-2000’s email address with the following
command in the "Subject" line:
#get jnl(password)#
The Journal will be send back to the originating station’s email address.
After receiving the jo urnal, use a fixed width font (i.e. Cour ier), in order to alig n the received journ al’s contents
on the PC.
A separate email messa ge is sent by the DP-20 00, an "Inter net Fax Return Receipt" to the Manager’s email
address programmed in the User Parameters, informing of the Journal transfer.
(see Note 1)
: where the password is, the Remote Password programmed in the DP-2000’s User
Parameters (i.e. 123456789).
INSTALLING
YOUR MACHINE
NOTE
1. To activate this feature, change the Fax Parameter No. 158 (PC REMOTE UPDATE) to "Valid". (See page 58)
43
Page 44

INSTALLING YOUR MACHINE
This page is intentionally left blank.
44
Page 45

Programming Your Machine
SET MODE (1-4)
ENTER NO. OR
∨ ∧
1:ONE-TOUCH
2:ABBR NO.
ONE-TOUCH< >
PRESS ONE-TOUCH
<01>
E
NTER EMAIL ADDRESS
<01>
E
NTER TEL. NO.
3
<01>
abc@panasonic.com
❚
<01>
9-555 1234
❚
Programming Email Address and Telephone Numbers
Programming the Auto Dialer
One-Touch and Abbreviated dialing / em ail address ing are two fast ways of dialing ful l telephone numbers or
email addresses. To us e these dialin g or addre ssing met hods, you must first store the tele phone numbers or
email addresses into the Auto Dialer.
To program the One-Touch key, follow the steps below
Make sure that the INTERNET lamp is ON. If not, press to select the "INTERNET MODE".
1
PROGRAMMING
YOUR MACHINE
2
3
4
5
Ex:
To change the input mode (between "ENTER EMAIL
ADDRESS" and "ENTER TEL. NO."), press or .
Enter the email address using character keys (up to 60
characters).
a n a s o n i c
Ex:
or
b c
a
c
p
o m
or
or
Continued on the next page...Continued on the next page...
Enter the telephone number
(up to 36 digits including pauses and spaces).
Ex:
9
PAUSE
5 5 5
SPACE
1 2
4
45
Page 46

PROGRAMMING YOUR MACHINE
Programming Email Address and Telephone Numbers
6
<01> ENTER NAME
abc@panasonic.com
or
<01> ENTER NAME
9-555 1234
7
8
Enter the station name using character keys
(up to 15 characters).
Ex:
To record another number, repeat step 4 to 8.
To return to standby, press .
A L E S
S
SPACE
E P TD
STOP
<01> SALES DE PT
abc@panasonic.com
<01> SALES DE PT
9-555 1234
ONE-TOUCH< >
PRESS ONE-TOUCH
❚
or
❚
46
Page 47

PROGRAMMING YOUR MACHINE
SET MODE (1-4)
ENTER NO. OR
∨ ∧
1:ONE-TOUCH
2:ABBR NO.
ABBR[
❚
]
ENTER ABBR NO.
[022]
E
NTER EMAIL ADDRESS
[022]
E
NTER TEL. NO.
3
[022]
abc@panasonic.com
❚
[022]
9-555 2345
❚
Programming Email Address and Telephone Numbers
To program the ABBR. dialing number or email address
Make sure that the INTERNET lamp is ON. If not, press to select the "INTERNET MODE".
1
2
3
4
Ex:
0 2 2
To change the input mode (between "ENTER EMAIL
ADDRESS" and "ENTER TEL. NO."), press or .
(001 to 175, up to 175 stations)
or
PROGRAMMING
YOUR MACHINE
5
Continued on the next page...
Enter the email address using character keys (up to 60
characters).
a n a s o n i c
o m
5 5 5
p
SPACE
1 2
4
Ex:
or
Enter the telephone number
(up to 36 digits including pauses and spaces).
Ex:
a
9
b c
c
PAUSE
or
47
Page 48

PROGRAMMING YOUR MACHINE
Programming Email Address and Telephone Numbers
6
[022]ENTER NAME
abc@panasonic.com
or
[022]ENTER NAME
9-555 2345
Enter the station name using character keys
7
(up to 15 characters).
Ex:
A C C O U N T I N G
8
To record another number, repeat step 4 to 8.
To return to standby, press .
(see Note 1) (see Note 2) (see Note 3)
STOP
[022]ACCOUNTING
abc@panasonic.com
[022]ACCOUNTING
9-555 2345
❚
ABBR[
ENTER ABBR NO.
]
❚
or
❚
48
NOTE
1. If you require a special access number to get an outside line, enter it first and then press .
A hyphen "-" is displayed for pause.
2. Use or to enter a space between the numbers to make it easier to read.
3. If you are using Pulse dialing and you wish to change to Tone dialing in the middle of dialing, press
SPACE
(represented by a "/"). The dialing method will be changed from Pulse to Tone after dialing the digit "/".
Ex : 9 PAUSE TONE 5551234
MONITOR
PAUSE
TONE
Page 49

PROGRAMMING YOUR MACHINE
1:ONE-TOUCH
2:ABBR NO.
ONE-TOUCH< >
PRESS ONE-TOUCH
<01> SALES DE PT
abc@panasonic.com
<01> SALES DE PT
9-555 1234
<01> SALES DE PT
E
NTER EMAIL ADDRESS
<01> SALES DE PT
E
NTER TEL. NO.
Programming Email Address and Telephone Numbers
Editing or Erasing the Auto Dialing Number / Email Address
If you have to change or erase any of the One -Touc h/Abbreviated dialing numbers or e mail add resses, follow
the steps below.
To edit One-Touch/ABBR dialing number or email address
Make sure that the INTERNET lamp is ON. If not, press to select the "INTERNET MODE".
1
Select 1 for One-Touch dialing number / email address.
2
Select 2 for ABBR dialing number / email address.
PROGRAMMING
YOUR MACHINE
3
4
5
Ex:
1
Enter the station you wish to change.
Ex:
To change the input mode (between "ENTER EMAIL
ADDRESS" and "ENTER TEL. NO."), press or .
or
or
Continued on the next page...
49
Page 50

PROGRAMMING YOUR MACHINE
2
Programming Email Address and Telephone Numbers
6
7
8
Enter a new email address. (See Note 1 and 2.)
a n a s o n i c
o m
5 5 5
p
SPACE
1
3 4
y
z
x
Ex:
c
or
Enter a new telephone number. (See Note 1 and 2.)
Ex:
9
PAUSE
<01> SALES DE PT
xyz@panasonic.com
or
<01> SALES DE PT
9-555 3456
<01> SALES DEPT
xyz@panasonic.com
<01> ENTER NAME
xyz@panasonic.com
<01> ENTER NAME
9-555 3456
❚
or
❚
9
(see Note 1)
(see Note 2)
NOTE
1. If you make a mistake, use or to move the cursor beyond the incorrect number/character, press
2. If the One-Touch/Abbreviated dialing number / email address has been used for a communication reservation,
Enter a new station name. (See Note 1).
Ex:
P A N A F A X
To return to standby, press .
CLEAR
the settings cannot be changed or erased until the communication has finished.
then re-enter the new number/character.
STOP
<01> PANAFAX
xyz@panasonic.com
<01> PANAFAX
9-555 3456
ONE-TOUCH< >
PRESS ONE-TOUCH
❚
or
❚
50
Page 51

PROGRAMMING YOUR MACHINE
1:ONE-TOUCH
2:ABBR NO.
ONE-TOUCH< >
PRESS ONE-TCH OR
∨ ∧
<01> SALES DE PT
abc@panasonic.com
<01> SALES DE PT
9-555 1234
<01> SALES DE PT
E
NTER EMAIL ADDRESS
<01> SALES DE PT
E
NTER TEL. NO.
ONE-TOUCH< >
PRESS ONE-TCH OR
∨ ∧
Programming Email Address and Telephone Numbers
To erase the One-Touch/ABBR. dialing number or email address
1
2
3
4
5
Select for One-Touch dialing number / email address.
Select for ABBR. dialing number / email address.
Ex:
Enter the station you wish to erase.
Ex:
To return to standby, press .
1
2
1
STOP
or
or
PROGRAMMING
YOUR MACHINE
(see Note 1)
NOTE
1. If the One-Touch/Abbreviated dialing number / email address has been used for a communication reservation,
the settings cannot be changed or erased until the communication has finished.
51
Page 52

PROGRAMMING YOUR MACHINE
Programming Email Address and Telephone Numbers
Printing a Directory Sheet
After programming the Auto Diale r, you can print o ut the di r ec tory sheet wh ic h in cl ude s the f ir st 12 c ha racter s
of each station name. C ut along the dotted line and place it over the One-Touch keys under the Director y
Sheet Cover. To print a directory sheet, follow the steps below.
Make sure that the INTERNET lamp is ON. If not, press to select the "INTERNET MODE".
PRINT OUT (1-7)
1
2
Your machine prints the directory sheet.
****************** -DIRECTORY SHEET- ******************* DATE JAN-12-2001 ***** TIME 15:00 *****
dotted line
ENTER NO. OR
* PRINTING *
DIRECTORY SHEET
∨ ∧
01 (Email) 02 (Email) 03 04 (Email) 05
SALES DEPT ENG. DEPT ACCT. DEPT EXPORT DEPT
06 07 08 09 10
11 12 13 14 15
16 17 18 19 20
P1 (POP) P2 P3 P4 P5
*
*
*
*
PANASONIC ********************************************* -HEAD OFFICE - ****** - 201 555 1212- *******
dspd-pop
*
Directory Sheet Cover
52
Page 53

PROGRAMMING YOUR MACHINE
SET MODE (1-4)
ENTER NO. OR
∨ ∧
FAX PARAMETER(1-164)
NO.=
❚
FAX PARAMETER(1-164)
NO.=004
04 STAMP(HOME)
1:OFF
04 STAMP(HOME)
2:ON
05 MEMORY(HOME)
2:ON
Customizing Your Mac h ine
Your facsimile machine has a variety of adj ustable Fax Parameters. These parameters, listed in the Parameter
Table, are preset for you and do not need to be changed. If you do want to make a change, read the table
carefully. Some parameters, such as the Resolution, Contrast, and Verification Stamp parameters, can be
temporarily chan ged by simple key operation just before a transmission is made. When the transmission ends,
however, these parameters return to their preset values (Home position). Other parameters can only be changed
by the procedure described below.
Setting the Fax Parameters
Make sure that the INTERNET lamp is ON. If not, press to select the "INTERNET MODE".
1
2
PROGRAMMING
YOUR MACHINE
Enter Fax Parameter number from the Parameter Table.
3
(See page 54 to 59)
Ex:
0 0 4
4
Enter the new setting value.
5
Ex:
for
2
6
To set another parameter, press to return to step 3
or press to return to standby.
(see Note 1) (see Note 2)
for
ON
STOP
STAMP
CLEAR
NOTE
1. To scroll the Fax Parameters in Step 2 or 4, press or .
2. To print a Fax Parameter List, see page 128.
53
Page 54

PROGRAMMING YOUR MACHINE
Customizing Your Machine
Fax Parameter Table
No. Parameter
001
002
003 ORIGINAL *1 Text Setting the home position for the ORIGINAL.
004
005 MEMORY 1 Off Setting the home position for the MEMORY.
006 DIALING METHOD
CONTRAST
RESOLUTION
STAMP
Setting
Number
1 Lightest Setting the home position for the CONTRAST.
2 Lighter
3Normal
4Darker
5Darkest
*1 Standard Setting the home position for the RESOLUTION.
2Fine
3S-Fine
2 Text/Photo
3 Photo
*1 Off
2On
*2 On
1Pulse
*2 Tone
Setting Comments
Setting the home position of the STAMP.
To select the stamp function when the document is stored in
memory, see Fax Parameter No. 28.
Selecting the dialing method.
(Select Line-1 or Line-2 first, if you have the 2nd G3 Fax
Communication Port Kit installed)
007 HEADER PRINT *1 Inside Selecting the printing position of the header.
2 Outside
3No Print
008 HEADER FORMAT *1 Logo, ID No. Selecting the header format.
2From To
009 RCV'D TIME PRINT *1 Invalid Selecting whether the machine prints the received date & time,
2 Valid
010 KEY/BUZZER VOLUME 1 Off Selecting the volume of the Key/Buzzer tone.
*2 Soft
3 Medium
4 Loud
012
COMM. JOURNAL
1 O ff Selecting the home position for the printing mode of the COMM.
2Always
*3 Inc. Only
Inside
Outside
No Print
remote ID, percentage of reduction and page number on the
bottom of each received page.
Journal Off/Always/INC.
Off
Always
Inc. Only
: Inside TX copy area.
: Outside TX copy area .
: Header does not printed.
: Does not print
: Always prints
: Prints only when communication has failed.
54
Page 55

Customizing Your Machine
PROGRAMMING YOUR MACHINE
No. Parameter
013 AUTO JOURNAL PRINT 1 Invalid Selecting whether the machine prints the journal automatically
014 FILE ACCEPTANCE
REPORT
017
022 SUBSTITUTE RCV 1 Invalid Selecting whether the machine receives to memory when the
024 PRINT REDUCTION 1 Fixed Selecting the print reduction mode.
025 REDUCTION RATIO 70 70% Selecting the fixed print reduction ratio from 70% to 100%. This
026
RECEIVE MODE
POLLING PASSWORD
Setting
Number
*2 Valid
*1 Invalid Selecting whether the machine prints the file acceptance journal.
2Valid
1 Manual Setting the reception mode to automatic or manual.
*2 Auto
*2 Valid
*2 Auto
---- ----
100 100%
Setting Comments
after every 100 transactions.
If you set this parameter to valid, a report will print after the
document is stored into memory.
recording paper runs out, toner runs out or the recording paper is
jammed.
: Reduce received document according to setting of
Fixed
Auto
parameter functions only when the fixed print reduction is selected
on Fax Parameter No. 24.
(----) Setting a 4-digit password for secured polling.
Parameter No. 25.
: Reduce received document according to the length of
received originals.
PROGRAMMING
YOUR MACHINE
027 POLLED FILE SAVE *1 Invalid Selecting whether the machine retains the polled document(s) in
2Valid
028
031 INCOMPLETE FILE
033 XMT REDUCTION 1 Invalid Selecting whether the machine performs reduction when the
036 RING PATTERN
037 RCV TO MEMORY
038 ACCESS CODE
STAMP AT MEM. XMT
SAVE
DETECT (DRD)
(See Note 2)
1 Invalid Selecting whether the machine stamps the originals when storing
*2 Valid
*1 Invalid Selecting whether the machine retains the document in memory if
2Valid
*2 Valid
*1 Invalid A ll ring patterns.
2 Valid Select a ring pattern for automatic answering.
(----)
(----)
memory even after the document(s) is polled once.
into memory.
(depending on the Stamp setting on the Control Panel)
it is not successfully transmitted.
transmitting original is wider than the recording paper used at the
receiving machine.
(Select Line-1 or Line-2 first, if you have the 2nd G3 Fax
Communication Port Kit installed)
1: A
2: B
3: C
4: D
Enter a 4-digit password for printing the received document(s) in
memory by using F8-5 (RCV TO MEMORY).
When F8-5 (RCV TO MEMORY) is set to ON, this parameter is not
selectable on the LCD display.
Enter a 4-digit Access Code to secure the machine from
unauthorized use.
Standard ring pattern.
Double ring pattern.
Triple ring pattern (Short-Short-Long).
All other triple ring patterns, except the type C
described above.
Continued on the next page...
55
Page 56

PROGRAMMING YOUR MACHINE
Customizing Your Machine
No. Parameter
039 PIN CO DE ACCESS *1 None Selecting the access method (P refix or Suffix) to dial a number
042 CONF. POLLED FILE
043 PASSWORD-XMT *1 Off Setting a 4-digit XMT-Password and selecting whether the
044 PASSWORD-RCV *1 Off Setting a 4-digit RCV-Password and selecting whether the
046 SELECT RCV *1 Invalid Selecting whether the machine performs selective reception.
052 DIAGNOSTIC
053 SUB-ADDRESS
054 FAX FORWARD *1 Invalid Selecting whether the machine performs FAX Forwarding to the
056
SAVE
PASSWO RD
PASSWO RD
COVER SHEET
Setting
Number
2Suffix
3Prefix
*1 Invalid Selecting whether the m achine saves the confidential polled file
2 Valid
2On
2On
2 Valid
2 Valid
*1 Off Setting the home position for the Cover Sheet parameter in the
2On
Setting Comments
with PIN Code.
even after the file is polled once.
machine performs and checks the XMT-Password of the receiving
station when transmitting.
machine performs and checks the RCV-Password of the
transmitting station when receiving.
(----)
(----)
Setting the password for Remote Diagnostic Mode. Please ask
your Panasonic Aut horized Dealer for details.
Setting a 20-digit password for secured sub-address
communication.
specified destination.
Select Mode.
063 PC-FAX RCV MODE
077 DEPARTMENT CODE *1 Invalid Selecting whether the machine performs the Department Code
078 ROTATION XMT 1 Invalid Selecting whether the machine performs rotation transmission.
082
085 FAX OUTPUT TRAY *1 Inner 1 Selecting the Output Tray home position for received document(s).
[See Note 3]
QUICK MEMORY XMT
*1 Print Selecting how the machine will execute the receiving Fax
2 Upload & Print
3 Upload
2 Valid
*2 Valid
1 Invalid Selecting whether the machine performs Quick Memory
*2 Valid
2 Inner 2
3 Outer
document(s).
Print
Upload & Print
Upload
operation.
Transmission.
: Stores all documents into memory first before dialing the
Invalid
: Starts dialing the telephone number immediately after
Valid
Inner 1
: Received document(s) exit to the Upper Output Tray
Inner 2
: Print the received document(s).
: Print the received document(s) and upload it’s
file.
: Upload the received document file.
telephone number.
storing the first page.
: Received document(s) exit to the Bottom Output Tray.
(Blue).
56
Page 57

Customizing Your Machine
PROGRAMMING YOUR MACHINE
No. Parameter
088 LINE SELECTION
[See Note 4]
089 LIST OUTPUT TRAY *1 Inner 1 Selecting the Output Tray home position for List printout.
095 DUPLEX PRINT *1 Invalid Selecting whether the machine performs duplex print.
097 SPECIAL TR AY
No.1 - 3
099 MEMORY SIZE
(Flash Memory)
140 LAN RELAY XMT
REQUEST
141 LAN XMT REDUCTION
142 RELAY XMT
(a.k.a. LAN RELAY
STATION on UF-770i)
143 RELAY XMT REPORT
Setting
Number
*1 Auto Setting the home position for the Telephone Line selection.
2Line-1
3Line-2
2 Inner 2
3 Outer
2Valid
*1 None Select up to 3 Special Trays that will not be used for printing
2 Tray 1
3 Tray 2
4 Tray 3
5 Tray 4
- - Displays the amount of base and optional memory installed.
*1 Invalid Selecting whether the machine performs LAN Relay XMT
2Valid
*1 Invalid
2Valid
1 Invalid Selecting whether the machine accepts and performs G3 relayed
*2 Valid
1Off
*2 Always
3 Inc. Only
Setting Comments
:Selects the available telephone line for transmission
Auto
automatically.
:Selects t his as the default telephone line, unless manually
Line-1
selecting an alternate phone line.
:Selects t his as the default telephone line, unless manually
Line-2
selecting an alternate phone line.
: The List printout exits to the Bottom Output Tray.
Inner 1
: The List printout exits to the Upper Output Tray (Blue).
Inner 2
received faxes (4-Tray configuration). One Tray must always be
available for receiving Faxes.
(You can specify one Tray (1 ~ 4) for each selection No. 1, No. 2
and/or No. 3)
(Base Memory + Optional Memor y)
Request.
Selecting whether to automatically reduce from LEDGER / B4 to
A4, when LEDGER / B4 documents are transmitted via LAN.
: No reduction
Invalid
: Automatic reduction from LEDGER / B4 to A4
Valid
transmission. (Relay Station Functions)
Setting how the COMM. Journal for relayed transmission is sent to
the originator.
Off
Always
Inc.Only
:Don’t send.
: Always send.
: Send only if communication has failed.
PROGRAMMING
YOUR MACHINE
144 E MA IL CHARACTER
SET
145 SE NDER SE LECT IO N *1 Invalid Selecting a pre-programmed sender’s name and email address
146 P O P TIME R -- 0 to 60 min. Setting the time inter val for the machine to check for email on the
147 A UTO POP R CV
(See Note 3)
1 Japanese Selecting the Character Set when receiving or sending email text.
*2 English
2Valid
3 *3 min.
1 Invalid S electing whether the machine automatically downloads an email
*2 Valid
before each transmission.
POP Server.
(0 = Does not check the POP Server for email. )
from the POP Server.
Continued on the next page...
57
Page 58

PROGRAMMING YOUR MACHINE
Customizing Your Machine
No. Parameter
148 DELETE POP RCV
EMAIL
149 DELETE POP ERR
EMAIL
150 IFAX RETURN RECEIPT 1 Invalid Selecting whether to send a return receipt when receiving from
151 EMAIL HEADER
FORMAT
152 SUB-ADDRESS
ROUTING
153 TSI ROUTING
154 ROUTING HEADER
FORMAT
Setting
Number
1 Invalid Selecting whether the email will be deleted automatically after
*2 Valid
*1 Invalid Selecting whether to delete the email that includes an
2 Valid
*2 Valid
1All
*2
3 Off
*1 Invalid Selecting whether to automatically route a received fax or email
2 Valid
*1 Invalid
2 Valid
*1 Originator
2 Relay Station
Setting Comments
retrieval from the POP Server.
incompatible file attachment from the POP Server.
another Panafax Internet Fax.
Selecting the header information to print when an email is
received. (Normally used for Troubleshooting. It shows the path of
Subject/From/
To
the email transmission before arriving at the DP-2000.)
using ITU-T sub-address.
Selecting whether to route a received fax to a telephone number or
an email address preprogrammed in Phone Book using the
originating fax’s Numeric ID (TSI frame information).
Selecting the type of email header to be included in the "From"
field of each routed faxes.
Originator
Relay Station
: The originating fax machine’s TSI will appear in
the "From" field of the routed email.
: The routing station’s email address will appear in
the "From" field of the routed email.
155 PRINT ROUTED
DOCUMENT
156 PRINT FORWARDED
DOCUMENT
157 TRANSACTION
JOURNAL
158 PC REMOTE
UPDATE
159 SUB JE CT LINE ENTRY *1 Invalid Selecting whether the "Subject" line can be programmed during
160 DEFAULT DOMAIN 1 Invalid Selecting whether the machine accepts to insert the Default
161 DNS SERVER 1 Invalid Selecting whether to use the DNS Server for the Internet
*1 Inc. only Selecting whether a received fax to be routed is always printed or
2Always
*1 Inc. only Selecting whether a memory received fax or email to be forwarded
2Always
*1 Invalid Selecting whether the machine sends a transaction journal to the
2 Valid
*1 Invalid
2 Valid
2 Valid
*2 Valid
*2 Valid
only when the routing operation fails.
is always printed or only when forwarding is incomplete.
pre-programmed email address.
Selecting whether the machine will accept commands from an
email application, to:
(a) Program the Internet Parameters
(b) Program the Auto Dialer
(c) Allow retrieval of the Journal
each transmission.
Domain when entering Manual Number Dialing.
communication.
58
Page 59

Customizing Your Machine
PROGRAMMING YOUR MACHINE
No. Parameter
162 TIFF VIEWER URL
163 ROUTING HEADER *1 Invalid Selecting whether to add the Header Print information of the
164 IFAX XMT HEADER
(Email only)
Setting
Number
1 None
*2 English
3
2Valid
*1 Included
2 Not included
Setting Comments
English
+Japanese
Selecting whether to include the URL address in the email
message body.
Routing Station on the top edge of each routed pages.
Selecting whether to include the header when sending a document
to an addressee in the same Domain as specified in the Default
Domain parameter. (This is useful when using the machine to scan
documents back to your PC)
Note:
When sending to a Domain other than as specified in the
Default Domain parameter, the header will be included
regardless of the selection.
(see Note 1)
(see Note 2) (see Note 3) (see Note 4)
PROGRAMMING
YOUR MACHINE
NOTE
1. Setting number marked with an asterisk (*) indicates the factory standard setting.
2. This parameter supports an optional telephone service "Distinctive Ring Service" provided by your local
telephone compa ny. It allow s up to 4 dif ferent te lephon e num bers to be ass igned on a s ingle teleph one li ne wi th
a distinctive ring for each telephone number. By selecting the appropriate ring pattern associated with the
telephone number assigned for your fax machine. It can differentiate and answer the incoming call on the fax
number. All other calls on the other telephone numbers will not be answered. This optional service from your
local phone company is also called Custom Ringing, Distinctive Ringing, Ident-a-call, Ident-a-ring, Personalized
Ringing, RingMaster, RingMate, Selective Ringing, Smart Ring or something similar. Check with your local
telephone company on the availability of this service in your area.
3. This parameter is available only when the Parallel Port Interface Kit is installed.
4. This parameter is available only when the G3 Communication Port Option is installed.
59
Page 60

PROGRAMMING YOUR MACHINE
This page is intentionally left blank.
60
Page 61

Basic Operations
Sending Docu m en ts v ia LA N
Document(s) can be sent via LAN to a single or multiple email addresses. The following Email Addressing
methods can be selected:
• Manual Email Addressing
• One-Touch Email Addressing
• Abbreviated Email Addressing
• Directory Search Email Addressing
• Multiple Station Email Addressing
The Memor y Transmission mode i s aut omatic ally sele cted by your machin e if an ema il a ddress is regis tered into
the chosen One-Touch key(s), Program key(s), or Abbreviated Number key(s).
The document is always stored into memory first, then the machine starts to send the email message.
Direct Transmis sion, Voice Mode Transmission, and Rediali ng features are not available for sending documents
via LAN.
BASIC
OPERATIONS
61
Page 62

BASIC OPERATIONS
ENTER STATION(S)
THEN PRESS START 00%
❚
ENTER EMAIL ADDRESS
abc@panasonic.com
abc
abc@mgcs.com
Sending Documents via LAN
Manual Email Addres si ng
Make sure that the INTERNET lamp is ON. If not, press to select the "INTERNET MODE".
1
a
Place original(s) face up on the ADF.
or
1
b
Place a book or an original face down on the
Platen Glass.
2
To choose Manual Email Addressing mode.
3
3
3
Enter the full email address using the Character keys (up to
60 characters).
a
Ex:
If you make a mistake, press to erase the
character then reenter the correct character.
Enter the User portion of the email address and press
b
the Default Domain preprogrammed in the User (Internet)
Parameters. (i.e. will add "panasonic.com" to the email
address)
If you want to send to a different Domain, enter the first part
c
of an email address, press and use the or
key to display domain names in the Selectable Domains List.
Choose the desired domain and press . (See Note
3 and page 70)
a
SET
b c
o m
c
. The machine will complete the email address with
a n a s o n i c
p
CLEAR
START
62
Page 63

* STORE * NO.001
PAGES=001 01%
* STORE * COMPLET ED
TOTAL PAGES= 005 2 5%
ON LINE * MEM.M XT *
ID:abc@panasonic.com
Sending Docu m en ts v ia LA N
4
The document(s) is stored into memory with a file
number.Then connects to the LAN and starts sending the
email message.
(see Note 1) (see Note 2) (see Note 3)
BASIC OPERATIONS
BASIC
OPERATIONS
NOTE
1. If your machine sou nds an al arm (pi -pi-p i) i n Step 2 above, this ind ica tes th at th e D i ale r is Ful l (m ore tha n 7 0 fu ll
email addresses are entered or 70 transmission reservations including G3 communication have been already
reserved).
2. If the transmission cannot be completed for any reason, the email may be returned undelivered; otherwise no
reply will be printed.
3. For the machine to perform the email address comp letion the Fax Parame ter No. 160 (DEFAULT DOMAIN ) must
be set to "Valid" and the DEFAULT DOMAIN must be preprogrammed in the User (Internet) Parameters. (See
page 26.)
63
Page 64

BASIC OPERATIONS
ENTER STATION(S)
THEN PRESS START 00%
<01>(Station name)
abc@panasonic.com
❚
<01>(Station name)
5551234
* STORE * NO.0 01
PAGES=001 01%
* STORE * COMPLETED
TOTAL PAGES= 005 2 5%
ON LINE * MEM.XMT *
ID:(Station name)
Sending Documents via LAN
One-Touch Email Addressing
One-Touch diali ng / addressing is a fast way of dialing full telephone numbe rs or email addresses. To use
these dialing or addressing methods, you must first store the telephone numbers or email addresses into OneTouch keys. (See page 45)
Make sure that the INTERNET lamp is ON. If not, press to select the "INTERNET MODE".
1
a
Place original(s) face up on the ADF.
or
1
b
Platen Glass.
Press a One-Touch key (01-20).
2
Ex:
If a telephone number is stored into the One-Touch key,
the display shows:
3
The document(s) is stored into memory with a file number.
Then connects to the LAN and starts sending the email
message.
(see Note 1) (see Note 2)
Place a book or an original face down on the
NOTE
64
1. If your machine sounds an alarm (pi-pi-pi) in Step 2 above, this indicates that the Dialer is Full (more than 70
transmission reservations including G3 communication have been already reserved).
2. If the transmission cannot be completed for any reason, the email may be returned undeliveredl; otherwise no
reply will be printed.
Page 65

BASIC OPERATIONS
ENTER STATION(S)
THEN PRESS START 00%
[100](Station name)
xyz@panasonic.com
❚
[100](Station name)
5553456
* STORE * NO.0 01
PAGES=001 01%
* STORE * COMPLETED
TOTAL PAGES= 005 2 5%
ON LINE * MEM.XMT *
ID:(Station name)
Sending Docu m en ts v ia LA N
Abbreviated Email Addressing
Abbreviated dialing / addressi ng is a fast way of dialing full telephone numbers o r email addresses. To u se
these dialing or addres sing methods, you must first store the telephone number s or email addre sses into the
Auto Dialer with a 3-digit abbreviated code. (See page 48)
Make sure that the INTERNET lamp is ON. If not, press to select the "INTERNET MODE".
1
a
Place original(s) face up on the ADF.
or
1
b
BASIC
OPERATIONS
2
3
Place a book or an original face down on the
Platen Glass.
Press and then enter a 3-digit code (001 to 175).
Ex:
If a telephone number is stored into the ABBR station, the
display shows:
The document(s) is stored into memory with a file number.
Then connects to the LAN and starts sending the email
message.
ABBR
(see Note 1) (see Note 2)
NOTE
1. If your machine sounds an alarm (pi-pi-pi) in Step 2 above, this indicates that the Dialer is Full (more than 70
2. If the transmission cannot be completed for any reason, the email may be returned undelivered; otherwise no
transmission reservations including G3 communication have been already reserved).
reply will be printed.
65
Page 66

BASIC OPERATIONS
ENTER STATION(S)
THEN PRESS START 00%
ENTER LETTER(S)
❚
❚
ENTER EMAIL ADDRESS
ENTER LETTER(S)
PANA
❚
X
xyz@panasonic.com
[100] PANASONIC
xyz@panasonic.com
X
xyz@panasonic.com
Sending Documents via LAN
Directory Searc h Dialing
When sending via LA N, the Directory Search fun ction allows you to dial a full email address or telephone
number by searching for the station name or email address entered in the Auto Dialer.
Make sure that the INTERNET lamp is ON. If not, press to select the "INTERNET MODE".
1
a
Place original(s) face up on the ADF.
or
1
b
Place a book or an original face down on the
Platen Glass.
2
2
3
3
4
a
or
b
Enter the full or part of a station name using the Character
keys. (See page 10)
a
Ex:
If you make a mistake, press to erase the
character and then re-enter the correct character.
or
Enter the full or part of an email address using the Character
keys.
b
Ex:
repeatedly until display shows the station name and
telephone number / email address you want to send to.
To search for the station name.
to search for email address.
A N A
P
to search for XYZ@PANASONIC.COM
X
SET
or
to search for
CLEAR
PANASONIC
or
66
Page 67

* STORE * NO.0 01
PAGES=001 01%
* STORE * COMPLETED
TOTAL PAGES= 005 2 5%
ON LINE * MEM.XMT *
ID:PANASONIC
Sending Docu m en ts v ia LA N
5
The document(s) is stored into memory with a file number.
Then connects to the LAN and starts sending the email
message.
(see Note 1) (see Note 2)
BASIC OPERATIONS
BASIC
OPERATIONS
NOTE
1. If your machine sounds an alarm (pi-pi-pi) in Step 2 above, this indicates that the Dialer is Full (more than 70
2. If the transmission cannot be completed for any reason, the email may be returned undelivered; otherwise no
transmission reservations including G3 communication have been already reserved).
reply will be printed.
67
Page 68

BASIC OPERATIONS
ENTER STATION(S)
THEN PRESS START 00%
<01>(Station name)
abc@panasonic.com
❚
[100](Station name)
xyz@panasonic.com
❚
2 STN(S) ARE SET
ADD MORE OR START
Sending Documents via LAN
Multi-Station Transmission (Broadcasting)
You can store the document(s) into memory and then send to multiple stations (up to 270 addresses) via LAN.
Make sure that the INTERNET lamp is ON. If not, press to select the "INTERNET MODE".
1
a
Place original(s) face up on the ADF.
or
1
b
Place a book or an original face down on the
Platen Glass.
2
Enter the email addresses by any combination of the
following methods:
• One-Touch Dialing
• Abbreviated Dialing
• Directory Search Dialing, press after each
email address is entered.
• Manual Number Dialing, press after each
station is entered (up to 70 addresses).
Ex:
If you want to confirm the number of stations you have
entered, press .
SET
SET
SET
68
Page 69

* STORE * NO.001
PAGES=001 01%
* STORE * COMPLETED
TOTAL PAGE=0 05 25%
ON LINE * MEM.XMT *
ID:abc@panasonic.com
Sending Docu m en ts v ia LA N
3
The document(s) is stored into memory with a file number.
Then connects to the LAN and starts sending the email
message.
(see Note 1) (see Note 2) (see Note 3)
BASIC OPERATIONS
BASIC
OPERATIONS
NOTE
1. If your machine sou nds an al arm (pi -pi-p i) i n Step 2 above, this ind ica tes th at th e D i ale r is Ful l (m ore tha n 7 0 fu ll
2. If the transmission cannot be completed for any reason, the email may be returned undelivered; otherwise no
3. The unit will accept a combination of email addresses and PSTN dialing numbers.
email addresses are entered or 70 transmission reservations including G3 communication have been already
reserved).
reply will be printed.
69
Page 70

BASIC OPERATIONS
ENTER STATION(S)
THEN PRESS START 00%
❚
ENTER EMAIL ADDRESS
sales@
panasonic.com
sales@panasonic.com
❚
Sending Documents via LAN
Selectable Domains
Using the Selectable Domains feature speeds th e proc ess of comp leting the em ail add ress by attaching oft en
used Domain Names.
• Advance registration of up t o 10 often used, domain names into the "Selectable Doma ins" list is require d.
(See page 26)
Ex:
To send an email to the Sales Department of Panasonic "sales@panasonic.com" using the
"panasonic.com" domain that has been pre-registered in the Selectable Domains list, follow the steps
below:
Make sure that the INTERNET lamp is ON. If not, press to select the "INTERNET MODE".
1
a
Place original(s) face up on the ADF.
or
1
2
3
4
b
Place a book or an original face down on the
Platen Glass.
To choose Manual Email Addressing mode.
Enter the User portion of the email address using the
Character keys.
A L E S
S
Ex:
(Note: The "@" symbol indicates to the machine that a
Domain Name will follow)
or key repeatedly until the desired Selectable Domain
Name is displayed on the LCD.
Ex:
panasonic.com
5
70
Press to add the displayed Domain Name to the User
portion of the email address. (If you make a mistake selecting
the Domain Name, simply press the or key followed by
SET
SET
to replace the selected Domain Name)
Page 71

1 STN(S) ARE SET
ADD MORE OR START
Receiving Documents via LAN
BASIC OPERATIONS
Press to specify other destinations.
SET
6
or
7
The document(s) is stored into memory with a file number.
(See Note 2)
Then connects to the LAN and starts sending the email
message.
(see Note 1) (see Note 2)
BASIC
OPERATIONS
NOTE
1. If the desired Domain Name is not found, press to exit the Selectable Domains List.
2. If the Fax Parameter No. 145 (SEN DER SELECTIO N) setting is on "Valid" , the Sender Selec tion scree n appears
CLEAR
after pressing in step 7 above. Select the sender to be added to the "From:" field on the email and
press to start storing the document(s). The factory default setting for this parameter is on "Invalid".
START
START
71
Page 72

BASIC OPERATIONS
SELECT MODE (1-8)
ENTER NO. OR
∨ ∧
LEDGER EMAIL XMT=OFF
1:OFF 2:ON
LEDGER EMAIL XM T=O N
1:OFF 2:ON
Receiving Documents via LAN
Internet Fax Ledger Size Document Transmission
When transmitting via LAN, the transmitter is incapable of identifying the receiver's recording paper size
capability, and thus it will not reduce the doc ument size during transmission. Ther efore, it is recommended
that you send only A4/Le tter size document s for LAN transmission. If a Ledger s ize document is transmitted
and the receiver is only able to print A4/Letter size documents, the communication will fail when the temporary
setting "07 LEDGER EMAIL XMT" of the Select Mode is set to its default position (ON).
To send without reduction, follow the steps below.
Make sure that the INTERNET lamp is ON. If not, press to select the "INTERNET MODE".
1
a
Place original(s) face up on the ADF.
1
2
3
4
or
b
Place a book or an original face down on the Platen
Glass.
72
Page 73

<01> (Station name)
panasonic.usa@panas
Receiving Documents via LAN
Dial by any combination of the following methods:
5
• One-Touch Dialing
• Abbreviated Dialing
• Directory Search Dialing, press after each
email address is entered.
• Manual Number Dialing, press after each
station is entered (up to 70 addresses).
Ex:
6
The document(s) is stored into memory with a file number.
The machine then connects to the LAN and transmits the Ledger
size document(s).
(After the docume nt (s ) a re se nt , t he "LE DGE R EM AI L XMT"
Select Mode will automatically return to the preset position (ON)).
SET
SET
BASIC OPERATIONS
BASIC
OPERATIONS
To send with reduction, follow the steps below.
Repeat steps 1 to 6, except in step 4, set the "LEDGER EMAIL XMT" setting to "OFF" position.
When the Select Mode "LEDG ER E MAI L XMT" set ting is set to the " OFF" posi ti on, the transmis s ion reduction
is according to the setting of Fax Parameter No. 141 (LAN XMT REDUCTION). (See the Table below)
(see Note 1)
LEDGER EMAIL XMT = ON : Transmits actual document size (without reduction).
LEDGER EMAIL XMT = OFF : Reduces LEDGER size document to B4 size or to A4/Letter before
transmission. (According to the Fax Parameter No. 141 (LAN XMT
REDUCTION) setting, see Table below)
Document Size Transmission
LEDGER EMAIL XMT = OFF
Document Size
LEDGER LEDGER B4 A4/Letter
B4 B4 B4 A4/Letter
A4/Letter A4/Letter A4/Letter A4/Letter
LEDGER EMAIL XMT = ON
Fax Parameter No. 141
(LAN XMT REDUCTION)
set to "Invalid"
Fax Parameter No. 141
(LAN XMT REDUCTION)
set to "Valid"
NOTE
1. Factory default setting for Fax Parameter No. 141 (LAN XMT REDUCTION) is "Invalid".
73
Page 74

BASIC OPERATIONS
Receiving Documents via LAN
Returned Email
When using the Internet communication mode, a failure report will print automatically for each transaction if the
email is returned undelivered by the mail server. The printout will consist of the undelivered message contents
supplied by the mail server and a portion of the first page’s image for that particular transaction.
Failure Report Sample (User unknown)
74
Page 75

BASIC OPERATIONS
Receiving Documents via LAN
Using a Mailing List
Using a Mailing List stored in the mail server simplifies the process of enterin g multiple locations and allows
you to send to an unlimited number of email addresses with one easy operation.
Ask your Network System administrator for information on how to utilize the Mailing List.
BASIC
OPERATIONS
75
Page 76

BASIC OPERATIONS
Receiving Documents via LAN
The DP-2000 offers you a choice to receive Fax documents unattended (by default) or manually over regular
telephone lines.
The DP-2000 also offers the same choic e to receive and print Inter net email messages via LAN una ttended or
manually when subscr ibing to a POP mail server. Howeve r, when the DP-2000 is configured to receive email
using SMTP protocol, the email can only be received and printed unattended.
Internet Fax Received on a PC
Figure 1: Outlook Express Inbox Sample
76
The "Subject" column in the above example shows samples of email messages received on a PC from the
DP-2000, and Internet FAX.
®
For your reference, the above example is from Outlook Express Inbox running under Microsoft
®
95
. If you are using a different email application software, please refer to your application’s User Manual.
Windows
Page 77

Receiving Documents via LAN
Figure 2: Internet Fax Received on a PC
BASIC OPERATIONS
BASIC
OPERATIONS
®
For your reference, the above example is from Windows Messaging running under Microsoft
To run the Viewer, please refer to your application’s User Manual. The attached file is com posed of TI FF-F
(Tagged Image File Form at with Modified Hoffman coded image) . TIFF Viewers come in many flavors, a
majority of TIFF Viewers will op en and view this file, however, a handful of Viewers may not support this
format.
You can download the TIFF-F Image Viewer into your PC from the following URL addresses:
http://www.panasonic.co.jp/mgcs/internetfax/
http://www.panasonic.com/internetfax/
License agreement of Panasonic’s TIFF-F Image Viewer application
You must carefully read the license agreement before installing the TIFF-F Image Viewer application on your
PC. If you do not agree to all the ter ms of this agreement, do not use the software and destroy all of the
copies thereof.
You must assum e full resp onsibil ity for selection of the software and its operation/n on-operation a nd results
obtained therefrom.
Windows 95®.
77
Page 78

BASIC OPERATIONS
SET MODE (1-4)
ENTER NO. OR
∨ ∧
FAX PARAMETER(1-164)
2:ABBR NO.
146 POP TIMER
3 MIN. (0-60)
146 POP TIMER
5 MIN. (0-60)
Receiving Documents via LAN
Receiving Email from a POP Server
The DP-2000 offers a choice to receive and print Internet email messages vi a LA N unatt ende d or manually when
subscribing to a POP mail server.
Setting the POP Parameters
Set the parameters pertinent to the POP server (Fax Parameters Nos. 146 to 149).
No. 146 (POP TIMER): Enter the interval to check and retrieve email from the POP server (0 to 60 minutes).
If "0 minutes" is entered, the POP server is not checked for mail.
No. 147 (AUTO POP RCV): When there is mail to be retrieved from the POP server, the DP-2000 will retrieve it
and print the email unattended. If this parameter is set to "1:Invalid", the machine will not retrieve it, but
displays the number of mails on the POP server.
No. 148 (DEL POP RCV MAIL): Select whether the email is deleted from the POP server after it is retrieved by
the DP-2000.
No. 149 (DEL POP ERR MAIL): Select whether to delete the email from the POP server when the file
attachment format is not supported.
To set the above POP parameters, follow the steps below
Make sure that the INTERNET lamp is ON. If not, press to select the "INTERNET MODE".
.
1
2
3
Enter the desired download interval (0 to 60 minutes).
4
Ex:
0 5
for 5 minutes.
78
If you make a mistake, press to erase th e digit
and then re-enter the correct value.
CLEAR
Page 79

147 AUTO POP RCV
2:VALID
147 AUTO POP RCV
2:VALID
148 DEL POP RCV MAIL
2:VALID
148 DEL POP RCV MAIL
2:VALID
149 DEL POP ERR MAIL
1:INVALID
149 DEL POP ERR MAIL
1:INVALID
150 IFAX RET RECEIPT
1:INVALID
Receiving Documents via LAN
5
for "INVALID"
1
6
or
for "VALID"
2
7
for "INVALID"
1
8
or
BASIC OPERATIONS
BASIC
OPERATIONS
for "VALID"
2
9
for "INVALID"
1
10
or
for "VALID"
2
11
Continued on the next page...
79
Page 80

BASIC OPERATIONS
Receiving Documents via LAN
12
(see Note 1) (see Note 2)
80
NOTE
1. When an unsupported file attachment is received, an error message is printed to inform you that the file
attachment could not be printed.
2. When Fax Parameter No. 148 (DEL POP RCV MAIL) and/or Fax Parameter No. 149 (DE L POP ERR MAIL) are
set to 1:Invalid, email with errors will not be erased. This will allow you to retrieve this email from your PC later.
Furthermore, if these Fax Parameters are set to "1:Invalid", you will need to delete mails from the POP server
periodically. POP servers a llocate a certain am ount of s pace per a ccount an d if mail is not de leted regul arly, your
mail box will overflow and new incoming mail will be rejected.
Either retrieve these mails from your PC or set the Fax Parameters to "2:Valid" triggering your DP-2000 to
receive, print and dele te al l th e m ail s from the POP server. This pro ced ure , how e ve r, m igh t ca us e m ail tha t had
been printed before to print again.
Page 81

BASIC OPERATIONS
1 NEW MA IL (S )
JAN-12-2001 17:15
< NEW MAIL(S)>
JAN-12-2001 17:15
00%
JAN-12-2001 17:15
< NEW MAIL(S)>
NO NEW MAIL
1 NEW MA IL (S )
ON LINE *RCV*
ID:abc@panasonic.com
Receiving Documents via LAN
Unattended Reception from the POP Server
When the Fax Parameter No. 146 (POP TIMER) is set to a value between 1 and 60 minutes, and Fax
Parameter No. 147 (AUTO POP RCV) is set to "2:Valid", the machine will query the POP server at the
specified inter val for new mail.
Any mail on the POP server is retrieved and printed unattended.
When the Fax Parameter No. 146 (POP TIMER) is set to "0", the machine will not q uer y the POP ser ver and
the mail is not retrieved automatically. With this setting, mail must be retrieved manually from the POP server .
When the Fax Parameter No. 147 (AUTO POP RCV) is set to "1:Invalid", the machine will quer y the POP
server for new mail at the interval spe cifie d by Fax Parameter No. 146. If new mail has arrived at POP server,
the machine will not retrieve it, but displays the number of mails on the POP server. (see Note 1) (see Note 2)
Manual Reception from the POP Server
BASIC
OPERATIONS
To receive manually from the POP server, follow the steps below:
Make sure that the INTERNET lamp is ON. If not, press to select the "INTERNET MODE".
1
or
If the POP server has not received any new mail, the
2
3
following message is displayed.
If POP server received new mail, the machine will display
the number of mails on the server, then receive and print
the email.
NOTE
1. If you program a user name and password in the Program key, you can receive mail from the POP server using
2. The number of emails that can be retrieved during a single operation is 20. Even if POP server has more than
a user name other than the name set as the user parameter.
20 emails, only 2 0 will be dis played on the machine . After retriev ing the first 20 emails, rep eat the proce dure from
beginning to ensure all emails were retrieved from the POP server.
81
Page 82

BASIC OPERATIONS
This page is intentionally left blank.
82
Page 83

Advanced Features
PROGRAM (1-5 )
ENTER NO. OR
∨ ∧
PROGRAM[P ]
PRESS PROGRAM KEY
PROGRAM[P1] NAME
ENTER NAME
[P1]PROG.A
E
NTER EMAIL ADDRESS
[P1]PROG.A
abc@panasonic.com
❚
PROGRAM[P ]
PRESS PROGRAM KEY
Program Keys
You r fax machine has spe cial Program Keys (P1 to P5). These keys are useful if you frequentl y need to se nd to
the same group of station s. You can use these keys to store an additi onal One -Touch key or a One-Touch group
key.
Entering an Email Address
Once you program an email addr ess in the Program Keys (P1 to P5), you can speci fy the station simply by
pressing the associated Program Key.
Make sure that the INTERNET lamp is ON. If not, press to select the "INTERNET MODE".
1
2
3
4
5
Ex:
Enter the station name (up to 15 characters) by using the
Character keys. (See page 10)
Ex: PROG.A and
Enter the email address using the Character keys (up to
60 characters).
Ex:
b c
a
c
o m
SET
a n a s o n i c
p
ADVANCED
FEATURES
6
You can now set other Program Keys by repeating the
procedures from Step 3, or return to standby by pressing
STOP
.
83
Page 84

ADVANCED FEATURES
PROGRAM (1-5 )
ENTER NO. OR
∨ ∧
PROGRAM[P ]
PRESS PROGRAM KEY
PROGRAM[P1] NAME
ENTER NAME
[P1]PROG.A
E
NTER TEL. NO.
2
[P1]PROG.A
9-555 1234
❚
PROGRAM[P ]
PRESS PROGRAM KEY
Program Keys
Entering a Telephone Number
Once you program a telephone number in th e Program Keys (P1 to P5), you can specify the sta tion si mply by
pressing the associated Program Key.
Make sure that the FAX lamp is ON. If not, press to select the "FAX MODE".
1
2
3
4
5
6
Ex:
Enter the station name (up to 15 characters) by using the
Character keys. (See page 10)
Ex:
PROG.A and
Enter a telephone number (up to 36 digits including
pauses and spaces).
Ex:
You can now set other Program Keys by repeating the
procedures from Step 3, or return to standby by pressing
STOP
9
PAUSE
.
SET
5 5 5
SPACE
1
3 4
84
Page 85

ADVANCED FEATURES
PROGRAM (1-5 )
ENTER NO. OR
∨ ∧
PROGRAM[P ]
PRESS PROGRAM KEY
PROGRAM[P1] NAME
ENTER NAME
ENTER STATION(S)
THEN PRESS ST AR T
<05> (Station name)
abc@panasonic.com
[100](Station name)
5553456
PROGRAM[P ]
PRESS PROGRAM KEY
Program Keys
Setting for Group Dialing
Once you program group dialing stations into the Program Keys (P1 to P5), you can specify multi-station
transmission (broad casting) to multiple l ocations (mixed, G3 Fax and Email Address ) simply by pressing the
associated Program Key.
Make sure that the INTERNET lamp is ON. If not, press to select the "INTERNET MODE".
1
2
3
4
5
6
Ex:
Enter the station name (up to 15 characters) by using the
Character keys. (See page 10)
Ex:
PROG.A and
Enter the station numbers by using One-Touch Key or
ABBR
Ex:
You may use the or keys to review the entered
station(s) before going to next step. If you find an error,
press to erase the displayed station.
and 3-digit code.
and
CLEAR
SET
ADVANCED
FEATURES
You can now set other Program Keys by repeating the
procedures from Step 3, or return to standby by pressing
STOP
.
85
Page 86

ADVANCED FEATURES
PROGRAM (1-5 )
ENTER NO. OR
∨ ∧
PROGRAM[P ]
PRESS PROGRAM KEY
POP USER NAME
❚
POP USER NAME
kate
❚
POP PASSWORD
❚
POP PASSWORD
pana123
❚
DELETE EMAIL NO.=1
1:NO 2:YES
PROGRAM[P ]
PRESS PROGRAM KEY
Program Keys
Setting the POP Access Key
This function allows others to share the DP-2000 to retrieve their emails from the POP server by
preprogramming their POP User Na mes and POP Passwords into the Program Keys (P1 to P5). They will be
able to retrieve their emails by simply pressing the associated Program Key. (See Note 1)
Make sure that the INTERNET lamp is ON. If not, press to select the "INTERNET MODE".
1
2
3
4
5
6
Ex:
Enter a POP User Name (up to 40 characters) using the
Character keys and press .
Ex:
Enter a POP Password (up to 10 characters) using the
Character keys and press .
Ex:
1
or
2
You can now set other Program Keys by repeating the
procedures from Step 3, or return to standby by pressing
a t e
k
a n a
p
to leave messages on server after retrieval
to delete messages on server after retrieval
STOP
.
and
1 2 3
SET
and
SET
SET
SET
(see Note 1)
NOTE
86
1. If security is a concern and to prevent unauthorized personnel from retrieving your email from the POP server,
when programming the Prog ram K ey, leav e th e POP Password field "Blank". By leaving it "Blank", the ma ch ine
will prompt you to enter the POP Password when the Program Key is pressed to retrieve mail.
Page 87

ADVANCED FEATURES
POP RCV USER NAME
kate
NO NEW MAIL
1 NEW MA IL (S )
ON LINE *RCV*
ID:abc@panasonic.com
Program Keys
Using the POP Access Key (see Note 1)
To retrieve your Email from the POP Server by using the Program Key, follow the procedure below.
Make sure that the INTERNET lamp is ON. If not, press to select the "INTERNET MODE".
Press the Program key programmed for POP Access Key.
1
Ex:
If the POP User Name is not entered in the Program Key,
enter the POP User Name (up to 40 characters).
2
3
4
If the POP Password is not entered in the Program Ke y,
enter the POP Password (up to 10 characters) and press
START
If the POP server has not received any new mail, the
following message is displayed.
If POP server received new mail, the machine will display
the number of mails on the server, then receive and print
the email.
.
ADVANCED
FEATURES
NOTE
1. The number of emai ls that c an be retri eved dur ing a si ngle opera tion is 20. Even i f the POP server has m ore than
20 emails, only 20 will b e displa yed on the mach ine. After retrieving the firs t 20 emails , repeat the pro cedure from
the beginning to ensure all emails were retrieved from the POP server.
87
Page 88

ADVANCED FEATURES
PROGRAM (1-5 )
ENTER NO. OR
∨ ∧
PROGRAM[P ]
PRESS PROGRAM KEY
PROGRAM[P1]
DELETE? 1:YES 2:NO.
* DELETING *
PROGRAM[P1]
PROGRAM[P ]
PRESS PROGRAM KEY
Program Keys
Changing or Erasing the Program Key Settings
To change the settings in a Program Key, follow the procedure on setting a Program Key on pages 83 to 87.
• Start time or station(s) for deferred transmission
• Station(s) for normal polling
• Start time or station(s) for deferred polling
• Station(s) for group dialing
• Telephone number / email address and station name for One-Touch key
To erase the settings in a Program Key
Make sure that the INTERNET lamp is ON. If not, press to select the "INTERNET MODE".
1
2
3
4
5
Press the Program key you want to erase.
Ex:
You can now erase other Program Keys by repeating the
procedures from Step 3, or return to standby by pressing
STOP
.
88
Page 89

ADVANCED FEATURES
SET MODE (1-4)
ENTER NO. OR
∨ ∧
FAX PARAMETER(1-164)
NO.=
❚
145 SENDER SELECTION
1:INVALID
145 SENDER SELECTION
2:VALID
SENDER SELECT ION
ENTER NO. OR
∨ ∧
ENTER USER NAME
12
❚
ENTER USER NAME
12 PANASONIC SALES
❚
Sender Selection
General Description
This operation allows the user to select one of the 25 preset User Names and Email Addresses before a
transmission. The selec ted Use r Nam es is printed on the Header of each page sent and on the COMM. Journal.
When sending email, the selected user name and/or email address appears in the "From:" field of the email
message.
Setting the Sender Selection
Make sure that the INTERNET lamp is ON. If not, press to select the "INTERNET MODE".
1
2
3
4
5
6
Enter the Sender Selection number.
Ex:
1 2
(01 to 24)
ADVANCED
FEATURES
7
Continued on the next page...
Enter your User Name (max. 25 characters and digits) by
using character keys. (See page 10)
Ex:
A N A S O N I C
P
A L E S
S
and
SPACE
SET
(See Note 1)
89
Page 90

ADVANCED FEATURES
ENTER EMAIL ADDRESS
12
❚
ENTER EMAIL ADDRESS
12 abc@panasonic.com
ENTER USER NAME
13
❚
Sender Selection
Enter an email address to be printed on the "From" field of
8
the email message (max. 60 characters).
Ex:
b c
a
o m
c
9
To record another User Name, repeat step 6 to 9. To
return to standby, press .
(see Note 1)
a n a s o n i c
p
STOP
NOTE
90
1. Use to copy the default User Name that was programmed in the User Parameters. You can add the
COPY
department name following the default User Name.
Page 91

ADVANCED FEATURES
ENTER STATION(S)
THEN PRESS START 00%
SELECT SENDER (00-24)
ENTER NO. OR
∨ ∧
12 PANASONIC SALES
abc@panasonic.com
Sender Selection
Sending Document with Sender Selection
Make sure that the INTERNET lamp is ON. If not, press to select the "INTERNET MODE".
1
a
Place original(s) face up on the ADF.
or
1
b
Place a book or an original face down on the
Platen Glass.
2
3
4
5
Enter email address or telephone number.
Enter a number or use or to select the User Name
that you want to use. (See Note 2)
Ex:
1 2
The document is sent as an email message with the
selected user name and/or email address appearing in
the "From" field of the email message.
ADVANCED
FEATURES
(see Note 1) (see Note 2)
NOTE
1. The Sender Selection function cannot be used in the Voice Dialing Mode for ordinary transmission.
2. If you do no sel ec t a Use r Nam e i n t he ste p 4 , th e u nit se lec ts th e d efau lt User Name (00) that was pro gram m ed
in the User Parameters for ordinary transmission.
91
Page 92

ADVANCED FEATURES
PRINT OUT (1- 7)
ENTER NO. OR
∨ ∧
* PRINTING *
FAX PARAMETER LIST
Sender Selection
Printing the Sender Selection List
The Sender Selection List can be printed out following the Fax Parameter List.
To enable the printing of the Sender Selection List, cha nge the setting of Fax Parameter No. 145 (SENDER
SELECTION) to "Valid". (See page 89)
Make sure that the INTERNET lamp is ON. If not, press to select the "INTERNET MODE".
1
2
Sample Sender Selection List (Prints following the Fax Parameter List)
*************** -FAX PARAMETER LIST- ***************** DATE JAN-12-2001 ***** TIME 15:00 ***P.02
SENDER SELECTION LIST
(1) (2) (3)
NO. USER NAME EMAIL ADDRESS
01 Panafax Sales sales@panasonic.com
02 Panafax Service service@panasonic.com
03 Panafax Accounting account@panasonic.com
24 Panafax Engineering engneering@panasonic.com
-PANASONIC ************************************ -HEAD OFFICE - ***** - 201 555 1212- *********
Explanation of Contents
(1) Sender Selection Number : 01-24
(2) User Name : Up to 25 characters
(3) Email Address : Up to 60 characters
92
Page 93

ADVANCED FEATURES
ENTER STATION(S)
THEN PRESS START 00%
<01>(Station name)
abc@panasonic.com
❚
ENTER SUBJECT OR
PRESS START TO SEND
Subject Line Entr y
General Description
The DP-2000 will autom atically add the Default Subject information th at was entered dur ing the User Parameter
setup, to the Subject Line of all outgoing emails.
If you would like for the machine to prompt you for the Subject before each email transmission, chang e the Fax
Parameter No. 159 (SUBJECT LINE ENTRY) to "2:Valid".
Sending Email with Subject Line Entry
Make sure that the INTERNET lamp is ON. If not, press to select the "INTERNET MODE".
1
a
Place original(s) face up on the ADF.
1
2
3
or
b
Place a book or an original face down on the Platen
Glass.
Enter email addresses by any combination of the following
methods:
• One-Touch Dialing
• Abbreviated Dialing
• Directory Search Dialing, press after each
email address is entered.
• Manual Number Dialing, press after each
station is entered (up to 70 addresses).
Ex:
SET
SET
ADVANCED
FEATURES
Continued on the next page...
93
Page 94

ADVANCED FEATURES
SUBJECT
FAX from Mr. Jon es
* STORE * NO.0 01
PAGES=001 01%
* STORE * COMPLETED
PAGES=001 10%
ON LINE * MEM.XMT *
ID:(Station name)
Subject Line Entry
Enter the Subject (max. 40 characters and digits) by using
4
the Character keys. (See pag e 10) To use the Default
Subject pre-programmed in the User Parameter, just press
START
.
5
(see Note 1)
Ex:
F A X
f r om
P5 CAPS
The documen t(s) is s tor ed int o me mory with a fi le n umbe r.
Then connects to the LAN and starts sending the email
message.
P3 SPACE
P3 SPACE
P5 CAPS
MEMORY IN
rM
J
P5 CAPS
P5 CAPS
P5 CAPS
P3 SPACE
o n e s
NOTE
94
1. If no default subject is programmed, the message is shown as "IMAGE from Internet FAX" for the subject.
Page 95

ADVANCED FEATURES
SET MODE (1-4)
ENTER NO. OR
∨ ∧
FAX PARAMETER(1-164)
NO.=
❚
152 SUB-ADDR ROUTING
1:INVALID
152 SUB-ADDR ROUTING
1:INVALID
152 SUB-ADDR ROUTING
2:VALID
153 TSI ROUTING
1:INVALID
Inbound Routing
Setting the Routing Parameters
The DP-2000 can r oute documents received from a G3 fax machine to ema il address(s) or to Inter net Fax
machine(s) connected to a LAN as an email, as well as to other G3 fax machine(s) over the telephone line.
To use this feature, the Fax Parameter No. 152 "SUB-ADDRESS ROUTING" and/or No. 153 "TSI ROUTING"
must be set to "2:Valid".
No. 152 SUB-ADDRESS ROUTING: Set this parameter to perform an ITU-T sub-address query within its auto
dialer and to route the received document(s) to the corresponding stations email address(s) or telephone
number(s).
No. 153 TSI ROUTING: Set this parameter to perform a Numeric ID (TSI fram e information) quer y within its
auto dialer and to route the rece ived document( s) to the corr es pon din g sta tio ns emai l addres s (s) or teleph one
number(s).
No. 154 ROUTING HEADER FORMAT: Use this parameter to select the type of email header to be included in
the "From" field of each routed faxes. (Default setting is "1:Originator")
Originator : The originating fax machine’s TSI will appear in the "From" field of the routed email.
Relay Station : The routing station’s email address will appear in the "From" field of the routed email.
No. 155 PRINT ROUTED DOCUMENT : Set this parameter to select whether a received fax to be routed is
always printed on the DP-2000 or only when the routing operation fails.
To set the above Inbound Routing parameters, follow the steps below.
Make sure that the INTERNET lamp is ON. If not, press to select the "INTERNET MODE".
1
2
3
for "INVALID"
1
4
or
ADVANCED
FEATURES
5
Continued on the next page...
for "VALID"
2
95
Page 96

ADVANCED FEATURES
153 TSI ROUTING
1:INVALID
153 TSI ROUTING
2:VALID
154 ROUTE HEADER FMT
1:ORIGINATOR
154 ROUTE HEADER FMT
1:ORIGINATOR
154 ROUTE HEADER FMT
2:RELAY STATION
155 PRINT ROUTED DOC
1:INC. ONLY
155 PRINT ROUTED DOC
1:INC. ONLY
155 PRINT ROUTED DOC
2:ALWAYS
156 PRT FORWARD DOC
1:INC. ONLY
156 PRT FORWARD DOC
1:INC. ONLY
156 PRT FORWARD DOC
2:ALWAYS
Inbound Routing
for "INVALID"
1
6
or
for "VALID"
2
7
for "ORIGINATOR"
1
8
or
for "RELAY STATION"
2
9
10
11
12
13
for "INC. ONLY"
1
or
for "ALWAYS"
2
for "INC. ONLY"
1
or
for "ALWAYS"
2
96
Page 97

ADVANCED FEATURES
1:ONE-TOUCH
2:ABBR NO.
ONE-TOUCH< >
PRESS ONE-TOUCH
<01>
E
NTER EMAIL ADDRESS
<01>
E
NTER TEL. NO.
<01>
abc@panasonic.com
❚
<01>
55512342762
❚
<01> ENTER NAME
abc@panasonic.com
<01> ENTER NAME
55512342762
<01> SALES DE PT
❚
abc@panasonic.com
<01> SALES DE PT
❚
55512342762
Inbound Routing
Entering One-Touch/Abbreviated Dialing Numbers for Inbound Routing
If the Inbound Routing param eters are set, an ITU-T sub-add ress and/or originato r’s Numeric ID (TSI frame
information) can be programmed with each email address in One-Touc h, Abbreviated numbers or Program
Keys. (See page 18)
Make sure that the INTERNET lamp is ON. If not, press to select the "INTERNET MODE".
1
Select 1 for One-Touch dialing number / email address.
2
Select 2 for ABBR dialing number / email address.
Ex:
1
3
4
5
Ex:
To change the input mode (between "ENTER EMAIL
ADDRESS" and "ENTER TEL. NO."), press or .
Enter an email address (up to 60 characters) or a
telephone number (up to 36 digits).
or
or
or
ADVANCED
FEATURES
6
Continued on the next page...
Enter the station name using the Characte r keys
(up to 15 characters).
A L E S
S
Ex:
SPACE
E P TD
or
97
Page 98

ADVANCED FEATURES
ROUTING: SUB-ADDRESS
❚
ROUTING: SUB-ADDRESS
1234567
ROUTING: TSI
❚
ROUTING: TSI
1234567
ONE-TOUCH< >
PRESS ONE-TOUCH
Inbound Routing
7
Enter the sub-address (up to 20 characters) and press
8
9
SET
Enter a Numeric ID (TSI) (up to 20 characters) and press
SET
To return to stanby, press .
.
.
STOP
(see Note 1)
NOTE
98
1. "+" and "SPACE" entries in the "ROUTING: TSI" field are ignored by the receiving machine.
Page 99

ADVANCED FEATURES
SET MODE (1-4)
ENTER NO. OR
∨ ∧
FAX PARAMETER(1-164)
NO.=
❚
54 FAX FORW AR D
1:INVALID
54 FAX FORW AR D
2:VALID
54 FAX FORW AR D
ENTER STATION
<01> (Station name)
5551234
[100] (Station name)
xyz@panasonic.com
SEP-12-1999 15:00
< FAX FORWARD >
Fax Forward
Setting Fax Forward
This feature allows all incoming faxes or emails to be forwarded to the station registered in the one-touch or
abbreviated dialing number. Once the faxes or emails are received in the memory , the machine will forward the
received document(s) to the telephone number or the email address registered in the one-touch or abbreviated
dialing number.
This function is convenient when you would like to receive faxes or emails in another place (i. e. your home) at
night or during a holiday.
Make sure that the INTERNET lamp is ON. If not, press to select the "INTERNET MODE".
First register the destination telephone number or email
1
address into the one-touch or abbreviated dialing number.
(See pages 45 to 48)
2
3
4
5
6
Enter the station to forward the received faxes or emails to,
7
by assigning a one-touch key or an abbreviated dialing
number.
Ex:
ABBR
1 0 0
8
(see Note 1) (see Note 2) (see Note 3):
ADVANCED
FEATURES
NOTE
1. When the Fax Forward feat ure is set, the assig ned one-touc h or the abbr eviated dia ling number wi ll be restrict ed
2. If the communication to transfer a received fax or email fails, the received fax or email will print out and then is
3. It is not possible to receive a document if the memory of your machine overflows or is about 95% used.
from editing. Please c han ge this func tio n to " I nv ali d" when y ou w ou ld li ke to edi t the tele phone number or email
address.
erased from memory. If the Fax Parameter No . 156 (PRT FORWARD. DOC) is se t to "Alway s", the received fa x
or email will print even when the transmission is successful.
99
Page 100

ADVANCED FEATURES
SET MODE (1-4)
ENTER NO. OR
∨ ∧
FAX PARAMETER(1-164)
NO.=
❚
150 IFAX RET RECEIPT
2:VALID
150 IFAX RET RECEIPT
1:INVALID
Ifax Return Receipt
The DP-2000 automatica lly sends an I fax Return Receipt to th e sender confi rming email reception from another
Panasonic Internet Fax.
To disable this feature, follow the steps below.
Make sure that the INTERNET lamp is ON. If not, press to select the "INTERNET MODE".
1
2
3
4
5
(see Note 1)
for "INVALID"
NOTE
100
1. The DP-2000 sends the Ifax Return Receipt only when receiving from another Panasonic brand Internet Fax. It
will not confirm email sent from a PC. (The default setting for this parameter is "2:VALID".)
 Loading...