

Page 1

Panasonic
DVD VIDEO RECORDER
____________
upefstlr^ InstiUdtorg
Mfc; DMR-T3040
__
_____
V « V’-f a
fU^OT> nuiTrlter ^uppofi^ t>v
BHG«II IILIHIIIHI .m UIIDOOlllll III l>Q llll\A84 3IIII 9M|IM](I
w;irn"'iin
v l^uil umII mIiIL iImu iryTmii lu^k^ wMfl I
•A(i“
KnitWi^
1»
w
mtB9. Q*’
l*miirrn<WkMi
idCrriNK
m
fItlU «.Ultiji.l
m
Dear customer
V«' '■ l?n--"^'3ajai %i zsUiiuliii ^kiCMiiu
MM milt«/ mmij» tsaii mtuMiMMr'udiMH isitfMii'«'
*inli $ ■iiHHMlim fflWirlUMfM MlMIIIni Ihui |TMIM ntM"»M»n
Uie^ Umiiutliiliiu f^qt^lUtm^ H|||t iii>-iiiAl Ip liiimll ml
DCOOCe
T/u'^rrsmv carl bBiibunaunimQ^ /q,
RQT6&37-P
Page 2

•o
£
V.
S
(A
ÇJï
.c
£
O
C5
CAUTION!
THIS PRODUCT UTILIZES A LASER.
USE OF CONTROLS OR ADJUSTMENTS OR
PERFORMANCE OF PROCEDURES OTHER THAN
THOSE SPECIFIED HEREIN MAY RESULT IN
HAZARDOUS RADIATION EXPOSURE.
DO NOT OPEN COVERS AND DO NOT REPAIR
YOURSELF. REFER SERVICING TO QUALIFIED
PERSONNEL.
WARNING:
TO REDUCE THE RISK OF FIRE, ELECTRIC
SHOCK OR PRODUCT DAMAGE, DO NOT
EXPOSE THIS APPARATUS TO RAIN,
MOISTURE, DRIPPING OR SPLASHING AND
THAT NO OBJECTS FILLED WITH LIQUIDS,
SUCH AS VASES, SHALL BE PLACED ON
THE APPARATUS.
CAUTION
RISK OF ELECTRIC SHOCK
DO NOT OPEN
CAUTION: TO REDUCE THE RISK OF ELECTRIC
SHOCK, DO NOT REMOVE SCREWS.
NO USER-SERVICEABLE PARTS
INSIDE.
REFER SERVICING TO QUALIFIED
SERVICE PERSONNEL.
A
FCC Note:
This equipment has been tested and found to comply with the
limits for a Class B digital device, pursuant to Part 15 of the
FCC Rules. These limits are designed to provide reasonable
protection against harmful interference in a residential instal
lation. This equipment generates, uses, and can radiate radio
frequency energy and, if not installed and used in accor
dance with the instructions, may cause harmful interference
to radio communications. However, there is no guarantee that
interference will not occur in a particular installation. If this
equipment does cause harmful interference to radio or televi
sion reception, which can be determined by turning the
equipment off and on, the user is encouraged to try to correct
the interference by one or more of the following measures:
• Reorient or relocate the receiving antenna.
• Increase the separation between the equipment and
receiver.
• Connect the equipment into an outlet on a circuit different
from that to which the receiver is connected.
• Consult the dealer or an experienced radio/TV technician
for help.
FCC Caution: To assure continued compliance, follow the
attached installation instructions and use only shielded inter
face cables when connecting to peripheral devices.
Any changes or modifications not expressly approved by the
party responsible for compliance could void the user’s author
ity to operate this equipment.
This device complies with Part 15 of the FCC Rules. Opera
tion is subject to the following two conditions: (1) This device
may not cause harmful interference, and (2) this device must
accept any interference received, including interference that
may cause undesired operation.
- V6SU AND PfASeU LASER (UOUTION WHEN om.
Avon DWEC7 EXPOSURE TO etAM. (FDA J1 CFR)
The lightning flash with arrowhead symbol, within
an equilateral triangle, is intended to alert the user
to the presence of uninsulated “dangerous voltage”
within the product's enclosure that may be of suffi
cient magnitude to constitute a risk of electric shock
A
A
to persons.
The exclamation point within an equilateral triangle
is intended to alert the user to the presence of
important operating and maintenance (servicing)
instructions in the literature accompanying the ap
pliance.
Accessories
Please check and identify the supplied accessories. Use numbers indicated in parentheses when asking for replacement parts.
To order accessories contact 1-800~633-9626.
Q 1 Remote control
(EUR7615KF0)
Q 1 Audio/Video cable □
(VJA0788)
2 Batteries
□
for remote control
1 75 Q coaxial cable
(VJA1091)
VAKI - AVArrAC;^ OtCT AITTMA MAxyvU JA HÂKYtÛTÔN
tJ^RVrELYLLE. ALÎ KATÍD SATEESEEN.
VARMMQ - STWXï OCH OSVNUC LASERSTpÀLNMQ MÂR OEtWA DEL
AR O^AD, eETRAKTA EJ STRALEK__ __ _ ___ ___ ___ ___ ___
{ EKSPONERmC FOH STRAlEN.
l WCHT KM STRAHL AUSSET2EN.
S ■ 'ZZtH<L/-mXT.
□ 1 AC power supply cord
1 BNC-RCA adaptor plug □
□
set (K2RB063E0002)
(Inside of product)
(VJA0488)
1 Cleaning cloth
for cleaning the mirror sec
tion on the front of the unit
(RFE0088-1)
HQT6637
The included AC power supply cord is for use with this unit only. Do not use it with other equipment.
Page 3

IMPORTANT SAFETY INSTRUCTIONS
Read these operating instructions carefully before using the unit. Follow the safety instructions on the unit and the applicable safety instructions
listed below. Keep these operating instructions handy for future reference. '
Read these instructions. 10)
1)
Keep these instructions.
2)
Heed all warnings.
3)
Follow all instructions. 11)
4)
Do not use this apparatus near water. 12)
5)
Clean only with dry cloth.
6)
Do not block any ventilation openings. Install in accordance
7)
with the manufacturer's instructions.
Do not install near any heat sources such as radiators, heat
8)
registers, stoves, or other apparatus (including amplifiers) that 13)
produce heat.
Do not defeat the safety purpose of the polarized or grounding- 14)
9)
type plug. A polarized plug has two blades with one wider than
the other. A grounding-type plug has two blades and a third
grounding prong. The wide blade or the third prong are provided
for your safety. If the provided plug does not fit into your outlet,
consult an electrician for replacement of the obsolete outlet.
Protect the power cord from being walked on or pinched partic
ularly at plugs, convenience receptacles, and the point where
they exit from the apparatus.
Only use attachments/accessories specified by the manufacturer.
Use only with the cart, stand, tripod, bracket,
or table specified by the manufacturer, or sold
with the apparatus. When a cart is used, use
caution when moving the cart/apparatus
combination to avoid injury from tip-over.
Unplug this apparatus during lightning storms
or when unused for long periods of time.
Refer all servicing to qualified service personnel. Servicing is
required when the apparatus has been damaged in any way,
such as power-supply cord or plug is damaged, liquid has been
spilled or objects have fallen into the apparatus, the apparatus
has been exposed to rain or moisture, does not operate nor
mally, or has been dropped.
■o
ê
s
O)
.C
q>
C3
This unit has an internal hard disk capable of recording and
playback (referred to hereon as HDD).
In order to prevent damage to the HDD or to hard disk con
tents, the recording of noise or interruption of normal func
tioning, you are advised to take the following precautions
when installing or using the unit:
• Do not expose to vibration or rough treatment.
• Do not place in an enclosed area so that the rear cooling fan
and the cooling vents on the side are covered up.
• Do not place in an area where the changes in temperature are
extreme. Sudden, extreme changes in temperature may cause con
densation (-»below). Using the unit when there is condensation inside
will damage the HDD and may lead to breakdown. Use of the unit in
areas subject to temperature changes of more than 20 degrees an
hour is not recommended.
• Do not place in areas with high humidity.
• Do not place the unit in any orientation other than horizontal.
• Do not disconnect the AC plug from the household AC outlet
while the unit is on, shut off the electricity supply to the area in
which the unit is installed or move the unit while it is on.
-►If moving the unit, first turn the power “OFF’* and remove
the AC plug from the household AC outlet. Wait 2 minutes
before moving.
• Press [(1), DVD POWER] and confirm that “BYE" disap
pears from the display.
■ Conditions contributing to the occurrence of condensation
In any of the cases listed below, allow the unit to adjust to the room tem
perature by leaving it for approximately 2 hours with the power on. ,
• When the room is steamy or the humidity is high
• If there is a sudden change in temperature, for example:
■+The unit is moved from a cold to a warm place or vice versa.
-►A heater is used to warm the area up quickly in winter or an
air conditioner is used to coot the area quickly in summer.
-►The air from an air conditioner flows directly onto the unit
(please take action to ensure this does not happen).
■ In the event of a power failure
If a power failure occurs, contents in the process of playback/
recording as well as already recorded, saved or dubbed HDD
contents may be damaged.
■ Safeguards against accidental loss
Data may be lost if the HDD suffers damage. Any contents you
wish to keep permanently should be dubbed or transferred to
DVD-RAM or DVD-R.
The HDD in this unit reserves a part of the storage space for use
as a system management area.
In order to maximize the efficacy of recording using
this unit, a variable bit rate recording system is used.
This system may sometimes show the amount of
time remaining for recording as being more or less
than the amount of time remaining.
• If the remaining time is insufficient, erase any unwanted pro
grams to create enough space before starting recording.
• When erasing programs, you should aim to create ample space
on the storage media for the intended program. This is
because the time available for recording may not increase in
exact proportion to the time represented by the programs you
erase.
Do not place the unit
on amplifiers or equip
ment that may become
hot.
The heat can damage the unit.
CAUTION!
DO NOT INSTALL, OR PLACE THIS UNIT, IN A BOOKCASE,
BUILT-IN CABINET OR IN ANOTHER CONFINED SPACE.
ENSURE THE UNIT IS WELL VENTILATED. TO PREVENT
RISK OF ELECTRIC SHOCK OR FIRE HAZARD DUE TO
OVERHEATING, ENSURE THAT CURTAINS AND ANY OTHER
MATERIALS DO NOT OBSTRUCT THE VENTILATION VENTS.
DO NOT PLACE THIS APPARATUS INTO AN AUDIO RACK,
BOOK SHELF OR SIMILAR LOCATION BECAUSE OF HEAT
FROM THIS APPARATUS.
DO NOT BLOCK ANY OF THE VENTILATION OPENINGS.
INSTALL IN ACCORDANCE WITH THE MANUFACTURER’S
INSTRUCTIONS.
Note to CATV system installer:
This reminder is provided to call the CATV system installer's
attention to Article 820-40 of the NEC that provides guidelines for
proper grounding and, in particular, specifies that the cable
ground shall be connected to the grounding system of the build
ing, as close to the point of cable entry as practical.
Before moving the unit, ensure the disc tray is empty.
Failure to do so will risk severely damaging the disc and №e unit.
RQT6637
Page 4

Features
This unit allows recording of high quality video on HDD
and DVD-RAM, the compact and durable digital media
with fast random access. This media also out performs
past tape formats in ease of operation.
■ Maximum 52 hours on HDD (Hard Disk Drive) {-»page 19)
■O
This model is installed with a high capacity 40 GB hard disk capable
£
of recording a maximum of 52 hours (6 hours continuously). The
a
U)
same functions are available with HDD as with DVD-RAM and edit-
O)
ing/recording of visual data from hard disk to DVD-RAM/R is easy-
c
to-perform.
£
o
C3
■ DV Automatic Recording (-»page 31)
Simply connect a digital video camera using a single cable and you
can organize your DV tapes into play lists on the HDD or DVD-RAM.
(You cannot connect a personal computer to the unit.)
■ Auto Renewal Recording (-»page 36)
If you record a program onto HDD repeatedly everyday or every
week using timer recording, the unit will record the new program
over the old one.
■ Relief Recording (-»page 35)
\A/hen timer recording to DVD-RAM or DVD-R, the unit will compare
the remaining space on the disc and the time necessary for record
ing. If space is insufficient the unit will record the program to HDD
instead (there is no relief recording function the other way, i.e. from
HDD to DVD-RAM or DVD-R).
■ Enjoy still pictures (JPEG) (^pages 25 and 46—49)
• It is possible to display still pictures (-^page 9) taken with a digital
camera either in a list or one by one.
• It is possible to save still pictures from a PC card onto DVD-RAM
(also onto HDD).
• You may alter the print settings (DPOF) for still pictures from a PC
card.
■ Watch a program while you are recording it
(-»page 21) Rf?Pi
Chasing play
You can watch a program from the start while you are still recording it.
Simultaneous rec and play
You can record a program while watching one you recorded previ
ously.
Time Slip
• You can jump back to review a piece of action you missed while
recording by pressing the time slip button (can be set between 1
minute and 999 minutes with HDD, 1 minute and 360 minutes with
DVD-RAM in units of one minute.)
• During playback. It is possible to jump an amount of time (specified
by you) to the scene you wish to view.
■ Maximum 12 hours on DVD-RAM
• Using a double sided, 9.4 GB DVD-RAM allows you to record a
maximum of 12 hours (6 hours continuously).
• When using a 4.7 GB DVD-RAM or a DVD-R, you can get 1 hour
recording using the XP high picture quality mode, 2 hours with the
regular SP mode, 4 hours with the tong LP mode, and 6 hours with
the extra long EP mode.
• You can also use the FR (Flexible Recording) mode to fit record
ings efficiently onto the available space on the disc (-»page 19).
■ Make your own DVD-Video
• Finalizing a DVD-R that has been recorded on produces an origi
nal DVD-Video in accordance with DVD-Video standards
(-»page 8).
• In addition to DVD-Video movie software, this unit can also play
other types of discs including audio CDs and Video CDs. This
means that this unit has the potential to play a central role in your
home entertainment, from high-end home theater through to CD
playback.
■ Exceptional sound and picture quality when
recording
• Audio is recorded using Dolby Digital stereo, enabling high quality
sound recordings. When recording in XP mode it is possible to use
LPCM (2 channel) to achieve sound recordings of even higher
quality.
• The encoder system used for recording is called “Hybrid VBR” and
allows high quality recordings.
■ Progressive Scan
By connecting the component video terminal of this unit to a pro
gressive scan television, it is possible to enjoy the high quality pic
ture rendered by the progressive scan function.
■ Fast access to the program you want to watch
(-»page 26) nrsra KTna
Use the Direct Navigator to find a program you have recorded and
start play.
■ Editing your recording niiTn
• It is possible to divide up a recorded program (-»page 40).
• Use play lists (^page 27) to select your favorite scenes and
rearrange them to play in any order you like.
■ The FUNCTIONS window shows you most of the
features you can use (-»page 53)
The FUNCTIONS window has most of the features and functions
you are likely to use regularly. Just select the icon for the operation
you want to perform.
Explanatory notes
Symbols used in these operating instructions Operation
■ Troubleshooting
031 is used to indicate ways to fix potential problems.
■ Discs you can use
The features you can use with the different types of discs are
indicated as follows.
HDD ■ RAM ■ DVD-R ■ DVD-V
Hard Disk DVD-RAM DVD-R
For your reference
• filTOn indicates DVD-R that have not yet been finalized
(-»page 38). DVD-R that have been finalized can use the same
features as DVD-Video. (Refer to features indicated ¡¡¡¡¡Si )
• Functions that can use the PC card (-»page 9) are indicated by
RQT6637
DVD-Video Audio CD Video CD
VCD
• These operating instructions describe operations mainly using the
remote control.
• The explanations herein are given on the basis that the connecting
up {-•pages 11 and 55-59) and settings have already been carried
out as prescribed in this manual.
Displays
The displays shown in these instructions are examples only. Actual
displays depend on the disc or card and the operations you are per
forming.
Should the AC power supply cord come loose by
accident or for any other reason the power supply is
cut off while recording or editing is taking piace, the
contents of the HDD or disc may be lost.
Page 5

Table of contents
Getting started
Accessories....................................................................................2
tMPORTANT SAFETY INSTRUCTIONS........................................3
Features..........................................................................................4
Explanatory notes..........................................................................4
Control reference guide
................................................................
Disc information.............................................................................8
PC card............................................................................................9
Still pictures (JPEG)
Disc handling
......................................................................
...............................................................................
10
Setting up
STEP 1 The remote control.........................................................10
STEP 2 Antenna and television connections
STEP 3 Setting the channels and clock
STEP 4 VCR Plus+ guide channel settings
Channel Caption
..............................................................................
............................
.....................................
...............................
11
12
14
15
STEP 5 Selecting TV screen type................................................16
STEP 6 Television operation
......................................................
17
Recording
Recording television programs..................................................18
Inserting discs..................................................................................18
Notes on recording...........................................................................19
Watching the television while recording...........................................20
Flexible Recording
—recording the best quality pictures in a set time......................20
One Touch Recording—Specify a time to stop recording
...............
20
Playing while you are recording................................................21
Playing from the beginning of the program you are recording
—Chasing play...........................................................................21
Simultaneous rec and play..............................................................21
Reviewing the recorded images while recording
—Time Slip.................................................................................21
Playing back
Playing discs..........................................................................................22
When a menu screen appears on the television
Starting play from where you stopped it
—Resume Function.................................................................. 23
Skipping programs and commercials....................................................24
Skipping............................................................................................24
Starting play from a selected program, title,
chapter, or track..........................................................................24
Selecting an amount of time to skip—Time Slip
Skipping a minute forward—CM Skip..............................................24
Playing still pictures (JPEG)..................................................................25
Using the Direct Navigator.....................................................................26
To erase a program that is being played back
Playing play lists....................................................................................27
Playing play lists...............................................................................27
Playing play list scenes....................................................................27
To erase a play list or a play list scene during playback..................27
Other methods of play
Marking positions directly—MARKER
Using on-screen menus to mark positions
Program play....................................................................................29
Random play....................................................................................29
Fast forward and rewind—SEARCH
Slow-motion play..............................................................................29
To play DVD-R recorded on this unit on other players
Changing audio.................................................................................... 30
...........................................................................
.............................................
...............................................
.............................
..............................
................................
......................................
....................
23
24
26
28
28
28
29
29
Dubbing
Recording from an external device............................................31
Recording from a video cassette recorder
DV Automatic Recording (DV AUTO REC).....................................31
Dubbing programs or play list....................................................32
6
One Touch Dubbing (HDD -♦ DVD) .
Timer recording
9
Timer recording..........................................................■
Using VCR Plus-F codes to make timer recordings
Manually programming timer recordings
Auto Renewal Recording.................................................................36
Check programs...............................................................................36
Change or delete the program.........................................................37
......................................
..............................................
...............
........................
.........................................
31
33
34
34
35
■O
a
CO
£
0)
O
Editing
HDD, Disc setting.........................................................................38
Editing programs.........................................................................40
Editing play lists
..........................................................................
42
Creating play lists........................................................................44
Entering text.................................................................................45
Editing still pictures (JPEG)
.....................................................
46
Advanced operation
Using on-screen menus.........................................................................50
Common procedures........................................................................50
Disc menu........................................................................................50
Play menu........................................................................................51
Audio menu
Video menu......................................................................................52
Using the FUNCTIONS window............................................................53
On-screen displays................................................................................54
Changing the information displayed
Display examples (HDD)
Home Theater........................................................................................55
Connecting a cable TV box/satellite receiver
Connecting an amplifier or system component
Connecting other video equipment..................................................58
Other antenna connections
Other antenna connection to the unit...............................................59
Other antenna connection from the unit to the television
Changing the unit’s settings
Summary of settings
Common procedures........................................................................62
Entering a password (Ratings)
Digital Audio Output.........................................................................62
Audio channel for DV input..............................................................63
Changing the remote control code...................................................... 64
.....................................................................................
................................................
.................................................................
..................................
...............................
...................................................................
................
..................................................................
........................................................................
........................................................
51
54
54
56
57
59
59
60
60
62
Reference
Glossary
Error messages
Troubleshooting guide................................................................67
Maintenance.................................................................................69
Limited Warranty.........................................................................70
Specifications..............................................................................71
Product Service...........................................................................71
Index................................................................................Back cover
.......................................................................................
...........................................................................
65
66
Page 6
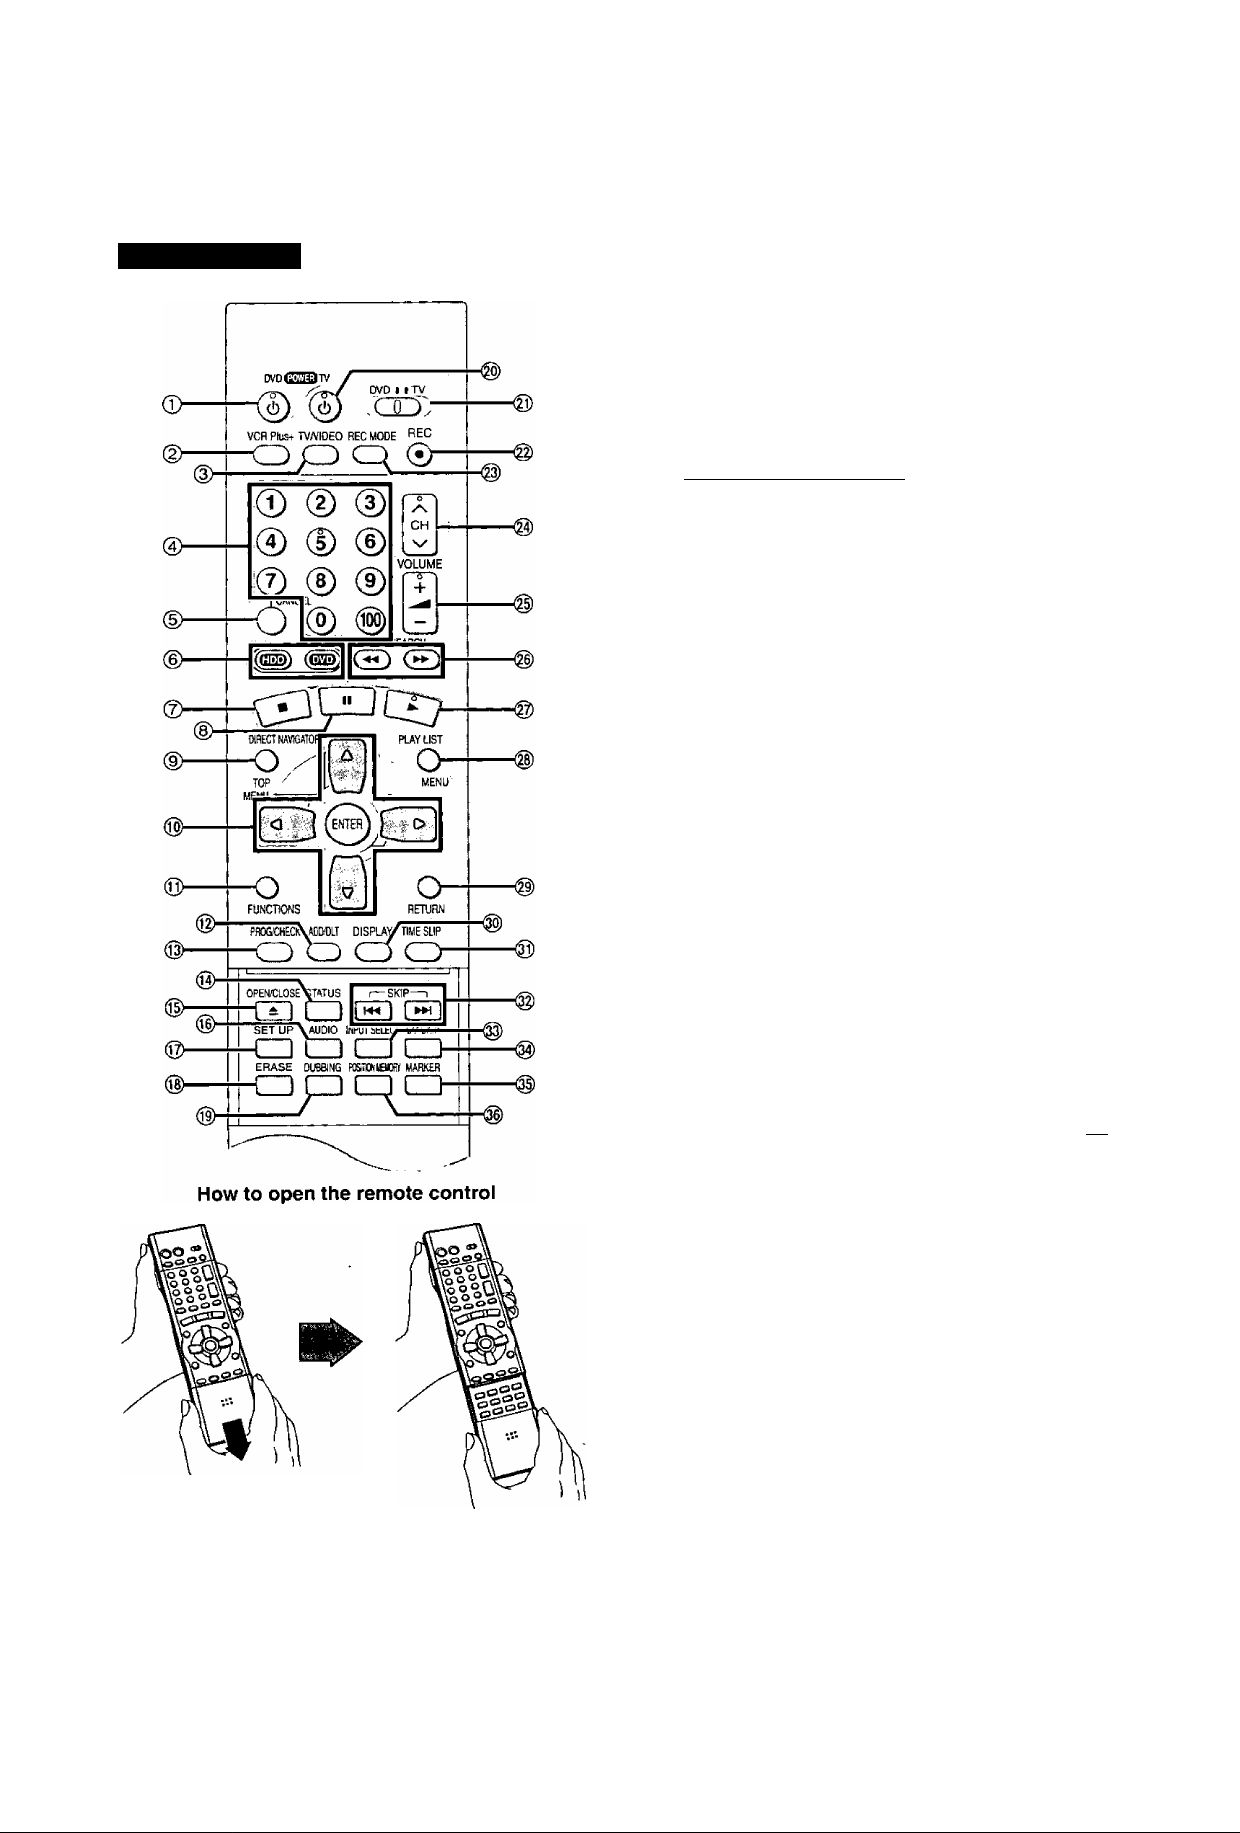
Control reference guide
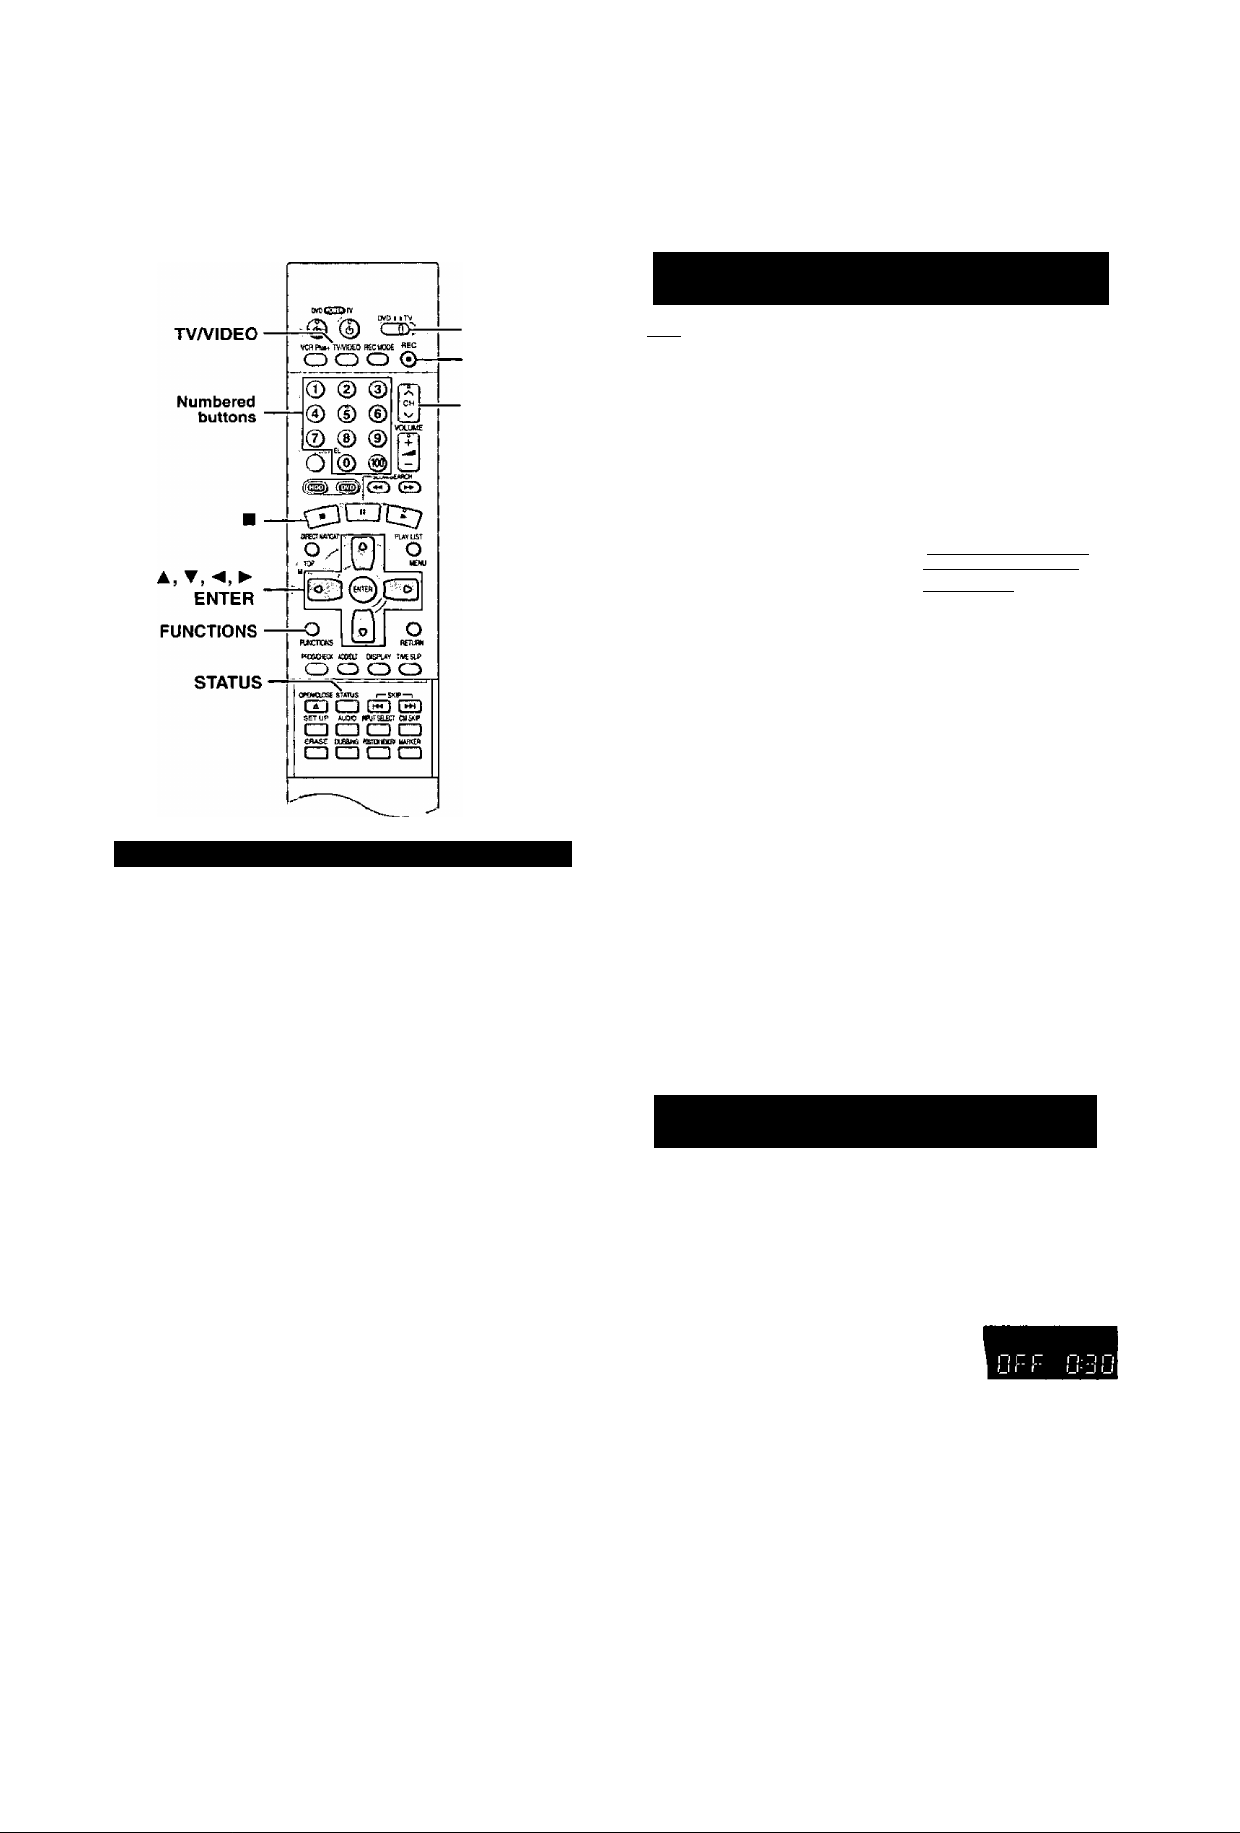
Remote control
a
a
<0
CD
c
£
Q>
Hold both sides of the remote control’s cover to open it. {You can
also open it by pressing on the center of it and sliding it down.)
® POWER button (<i), DVD CESZSil)
Press to switch the unit from on to standby mode or vice versa.
In standby mode, the unit is still consuming a small amount of
power.
@ VCR PIUS+ button (VCR Ptus+)
@ Television input mode selector (TVWIDEO)
® Numbered buttons (1-9, 0,100)
•See also DVD/TV switch (@).
•When selecting a title, chapter, track, program, or play list
rnXl rn*PI gfftil fvCD I
e.g., V: [0]-+[5]
“15": t1]-»[5]
•When selecting a hard disk item, a page of play list scene, or a
still picture
e.g., “5"; [0] -♦ [0] -► [5]
“15": [0]->[1]-»[5]
•When selecting a television channel
e.g., “5": [0][5]
“15"; [1]-»[5]
© Cancel button (CANCEL)........................................................14
© Drive select buttons (HDD, DVD)...........................................19
© Stop button (■)
© Pause button (II)......................................................................19
© Top menu and Direct Navigator button
® Cursor buttons (A, ▼, ■<, P')/Enter button (ENTER)
© Functions button (FUNCTIONS)
© Manual channel adding and deleting button
@ Manual programming and check button
® On-screen display button (STATUS).....................................54
© Disc tray open/close button (^ OPEN/CLOSE)
© Audio button (AUDIO).............................................................30
® Setup button (SET UP)............................................................12
@ Program/play list/still picture erase button
® Dubbing button (DUBBING)...................................................33
® TV power on/otf button (Cl), TV)
© DVD/TV switch (DVD, TV).......................................................17
@ Recording button (• REC)......................................................19
@ Recording mode button (REC MODE)
@ Channel buttons for recorder and TV (a v, CH).............17,19
@ TV volume buttons (-1—, VOLUME)
@ Slow/search buttons (◄•^, ►► SLOW/SEARCH)
@ Play button (►).......................................................................23
@ Menu and Play List burton (MENU, PLAY LIST)............23, 27
@ Return button (RETURN).......................................................12
© Display button (DISPLAY)
® Time slip button (TIME SLIP).................................................21
® Skip buttons (K4. SKIP)..........................................................24
® Input select button (INPUT SELECT)....................................31
® One-minute skip button (CM SKIP)
® Marker button (MARKER).......................................................28
® Position memory button (POSITION MEMORY)
“115": [100]-»[I]-» [5]
........................................................................
(TOP MENU, DIRECT NAVIGATOR)
(ADD/DLT)
(PROG/CHECK)......................................................................35
(ERASE)
•When selecting the receiving channel on this unit using channel button {@) and numbered buttons (®) \T^
or inputting using numbered buttons (@), make sure
you switch [DVD, TV] to “DVD".
•When selecting the receiving channel for the television using
channel button ((g)) and numbered buttons (@), make sure you
switch [DVD, TV] to “TV”.
..............................................................................
........................
..............................................25, 26, 27
........................................
............................................
............................................
....................................................
.......................................
........................
...............................
....................
............................
.................................
.....................................
23, 26
...........
..............
..................
50
12
34
17
19
12
53
13
19
17
19
17
29
24
23
RQT6637
Page 7

Main unit
Controls such as O function the same as the buttons on the remote control.
■o
§
s
w>
O)
.C
32
Q)
C3
® Remote control signal sensor............................................... 10
PC card slot (PC CARD)........................................................25
(g) Card eject button (EJECT)
@ Disc tray..................................................................................18
® HDD record lamp.....................................................................18
® DVD record lamp.....................................................................18
....................................................
25
The unit’s display
Center circle (e.g., DVD-RAM)
Rotating (REC):recording
Stopped (REC):recording paused
Rotating (REC, PLAY):
Chasing play or simultaneous
rec and play is in progress
L2 input terminals (L2)..........................................................58
DV input terminal (DV INPUT)...............................................58
Display
Channel buttons for recorder (v a, CH)
Skip/Slow/Search buttons ►►/►w)
Rotating (PLAY);playing
Stopped (PLAY):play paused
“PLAY” fiashes:
the resume function (->page 23)
is working
..............................
...........
24, 29
19
O Timer recording display
On; When timer recording is on standby (->page 34)
Flashes: When the unit couldn't go to timer recording standby
O Disc type
0 The display mode of the main display section
TITLE: Title number
CHAP: Chapter number
TRACK: Track number
PG: Program number
PL: Play list number
O Recording mode (-kpage 19)
O DVD indicator
Fiashes; When you press [c!3, DVD POWER] to turn the unit off
until it actually turns off
O Card indicator
On: When a PC card is set in the unit (^page 25)
Flashes; When a PC card is being read/written to
© Dubbing direction indicator
O Channel
O Main display section
Recording and play counter, and other miscellaneous messages
A half mirror is used for the unit display so the display may occasion
ally be difficult to see depending on surrounding conditions.
nQT6637
Page 8

Disc information
Discs you can use for recording and play
■O
£
is
(0
cn
о
C3
DVD-RAM
4.7GB/9.4GB, 12 cm (5")
2.8 GB, 8 cm (3")
• This unit is not compatible with:
- 12*cm (5"), 2.6- and 5.2-GB DVD-RAM
- 3.95- and 4.7-GB DVD-R lor Authoring
- DVD-RAM not recorded following the Video Recording Standard
- Unfinalized DVD-R recorded on other equipment
• This unit is compatible with the Content Protection for Recordable
Media (CPRM-»page 65) system so you can record broadcasts
that allow one copy, such as some CATV broadcasts, onto 4.7 GB/
9.4 GB DVD-RAM (these are CPRM compatible). It is not possible
to record onto DVD-R or 2.8-GB DVD-RAM.
• We recommend using Panasonic discs as they have been
confirmed to be compatible with this unit. Other discs may not
perform correctly.
• Do not allow the disc to become dirty or scratched. Fingerprints,
dirt, dust, scratches or deposits of cigarette smoke on the
recording surface may make it impossible to use the disc for
recording.
• Discs with programs recorded in PAL already cannot be recorded
on using this unit.
RAM
RAM4.7
DVD-R
4.7 GB for General Ver. 2.0
DVD-RAM
R
R4.7
Play-only discs
video"
DVD-Video
• The producer of the material can control how DVD-Video and
Video CDs are played. This means that you may not be able to
control play of a disc with some operations described in these
operating instructions. Read the disc's instructions carefully.
• This unit can play CD-DA (digital audio) and Video CD format
(Video CD Format 2.0 or above), audio CD-R and CD-RW that
have been finalized upon completion of recording.
It may not be able to play some CD-R or CD-RW due to the
condition of the recording.
• This unit cannot record onto CD-R or CD-RW.
DIGITAL AUDIO
Audio CD
DVD-Video
»Audio format
Dolby Digital (-»page 65)
□□ I Dolby]
DIGITAL
DIGITAL
SURROUND
This unit can play Dolby Digital in stereo (2
channels). Connect an amplifier with a builtin Dolby Digital decoder to enjoy surround
sound.
DTS Digital Surround (-«page 65)
Connect this unit to equipment that has a
DTS decoder to enjoy DVDs with this mark.
IDIGITAL VIOEOl
Video CD
• DVD-RAM recorded on this unit may not be compatible with
other DVD players, including some Panasonic piayers. Con
sult the manual for the player to determine compatibiiity with
these DVD-RAM disc.
• This unit is compatible with both non-cartridge and cartridge
DVD-RAM, but the write-protect tabs on cartridge-type discs give
better protection to your recordings.
• Picture aspect ratios, regular 4:3 or widescreen 16:9, are recorded
as they are received.
DVD-R
• In order to play a DVD-R recorded using this unit on another
playback source, the disc must first be finalized (-^page 38).
• Once a DVD-R is finalized, it becomes DVD-Video.
• You can record onto the available space on the disc and perform
editing functions, such as giving titles to discs and programs and
erasing programs before finalizing.
• When programming is erased from a DVD-R, that space does not
become available. Once an area on a DVD-R is recorded on, that
area is no longer available for recording, whether the recording is
erased or not.
• It takes about 30 seconds for the unit to complete recording
management information after recording finishes.
• This unit optimizes the DVD-R for each recording. Optimizing is
carried out when you start recording after inserting the disc or
turning on the unit. Recording onto the disc may become
impossible if optimizing is carried out too many times.
• Play may be impossible in some cases due the condition of the
recording.
• The video is recorded in a 4:3 aspect irrespective of the video sig
nal input.
Discs that cannot be played
• DVD-Video with a region number other than "1" or “ALL"
• Some DVD-RAM (-Heft) »Some DVD-R (-Heft) •PAL discs
• DVD-ROM «DVD-RW »DVD-Audio »-^RW »CD-ROM «CDV
• CD-G »Photo CD »CVD »SVCD »SACD «MV-Disc «PD
• Divx Video Disc, etc.
Protection
You can protect the contents of your discs in the following ways.
• Cartridge-protect:
With the write-protect tab in the protect
position, you cannot record to, edit, or erase
from the disc. (Type 1, 2, and 4 cartridge
discs)
• Disc-protect (->page 38)
• Program-protect (^page 40)
The manufacturer accepts no responsibility and offers no
compensation for loss of recorded or edited material due
to a problem with the HDD or disc, and accepts no respon
sibility and offers no compensation for any subsequent
damage caused by such loss.
Examples of causes of such losses are:
• A disc recorded and edited with this unit is played in a DVD
recorder or computer disc drive manufactured by another
company.
• A disc used as described above and then played again in this
unit.
• A disc recorded and edited with a DVD recorder or computer
disc drive manufactured by another company is played in this
unit.
JoPl
[3
ROT6637
Page 9
PC card
PC cards capable of displaying and sav
ing
• SD Memory Card*
• Multi Media Card*
• Compact Flash*
• Smart Media*
• Memory Stick*
• ATA Flash PC card
'A PC card adapter conforming to PC card standards is necessary.
• Compatible with: FAT 12 or FAT 16 (-»page 65)
• This unit is compatible with Type II PC cards. Do not insert any
other type of PC card.
• This unit is not compatible with card type hard disks (Microdrives
etc).
• Use this unit to format a PC card when using for the first time
(-•page 48). Note that the PC card may no longer be usable on
other equipment once formatted on this unit.
• This unit operates in accordance with the Digital Print Order
Format (-•DPOF, page 65). (PC card only)
• Only use the memory cards recommended above.
Still pictures (JPEG) [!||
• This unit is compatible with DCF* based, still picture (JPEG) files
recorded using a digital camera.
"Design rule for Camera File system: unified standard established
by Japan Electronics and Information Technology Industries
Association (JEITA).
• Picture definition;
Compatible in the range 320 x 240 - 6144 x 4096 (sub sampling
is 4:2:2 or 4:2:0)
• This unit can handle a maximum of 300 folders (including header
folders) and 3,000 files. Files and folders with numbers which
exceed the maximum cannot be displayed, copied or erased.
• This unit displays only still pictures conforming to DCF standards
and JPEG still pictures. It cannot display moving pictures,
MOTION JPEG and other such formats, still pictures other than
JPEG (i.e. TIFF) or play associated sound.
• When there are a lot of folders and files, it may take a long time to
display copy or erase.
• Folder titles that were input on equipment other than this unit may
not be displayed properly.
• When saving still pictures on HDD, it is recommended that you
copy them to the PC card or DVD-RAM also. (->page 46).
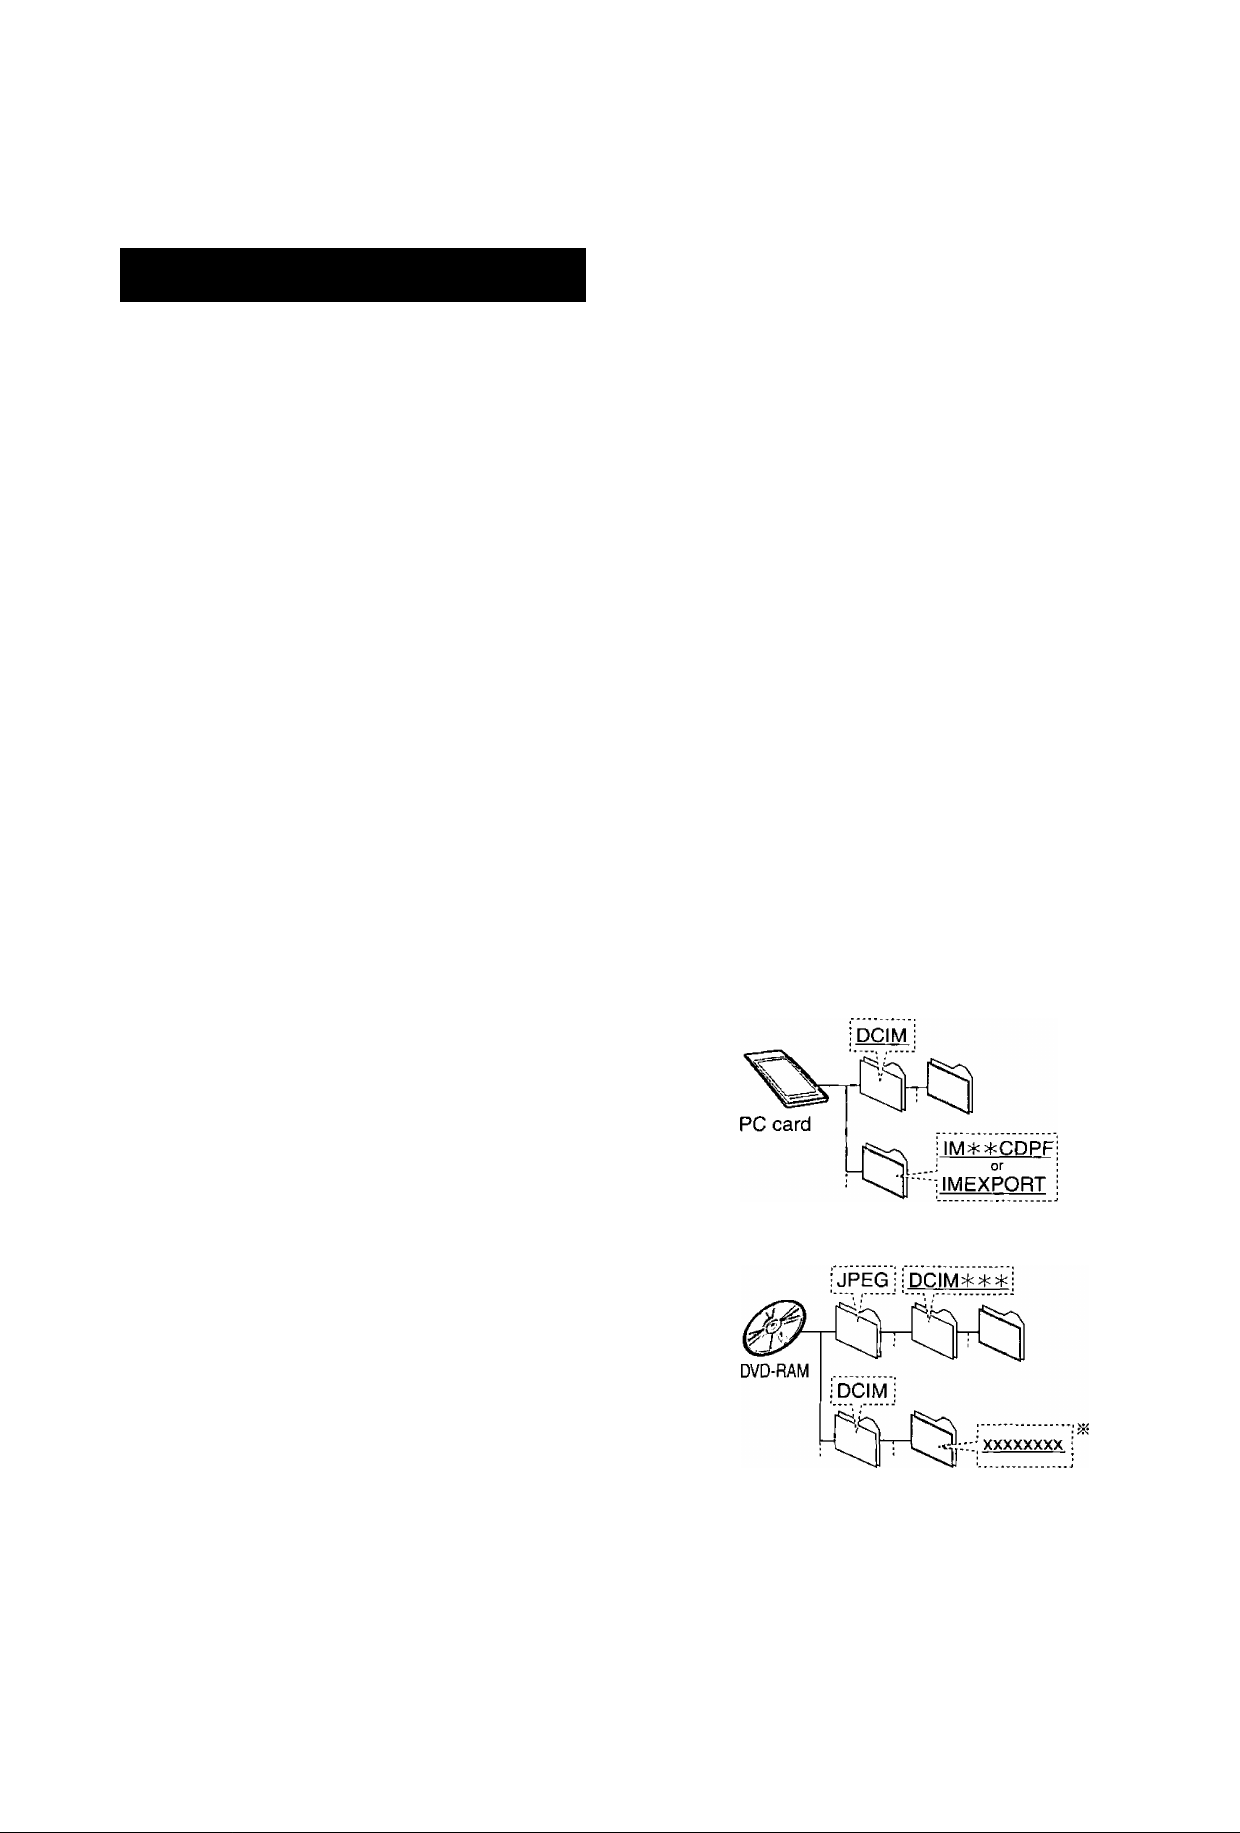
Folders that can be displayed/saved
■
§
!S
CO
t:
Ql
О
■ Regarding Write Protect
For cards that come provided with a write protect switch, if the
switch is on it will not be possible to write, erase or format the card.
■ The card indicator (^23) in the display
Please carry out insertion and removal of the PC card after
turning the unit off.
The indicator flashes when the data is being written to or read from
the card. Do not turn off the power or remove the card at such a
time. Should you do so, the unit may malfunction or the contents of
the card may be damaged.
Still pictures (denoted as Filename : xxxxxxxx.JPG) saved in folders
( ) as shown below can be displayed/saved.
Folders (including the still pictures inside those folders) below the
compatible folder cannot be displayed or saved.
: Compatible folder
: Upper level folder
^ Numbers
X X : Letters
• PC card
• DVD-RAM
• You may select any underlined folder for display, (-»page 46).
• Copying cannot be carried out to folders (^i) made on other
equipment (->page 46),
• The folder cannot be displayed if the numbers are all “0" (e.g,, DCIM
000 etc). ,
ROT6637
Page 10
0)t3
с о
lë
со «>
g
■
Disc handling
Do not use irregularly shaped discs, such as heart-shaped.
{These can damage the unit.)
■ How to hold a disc
Do not touch the recorded surface.
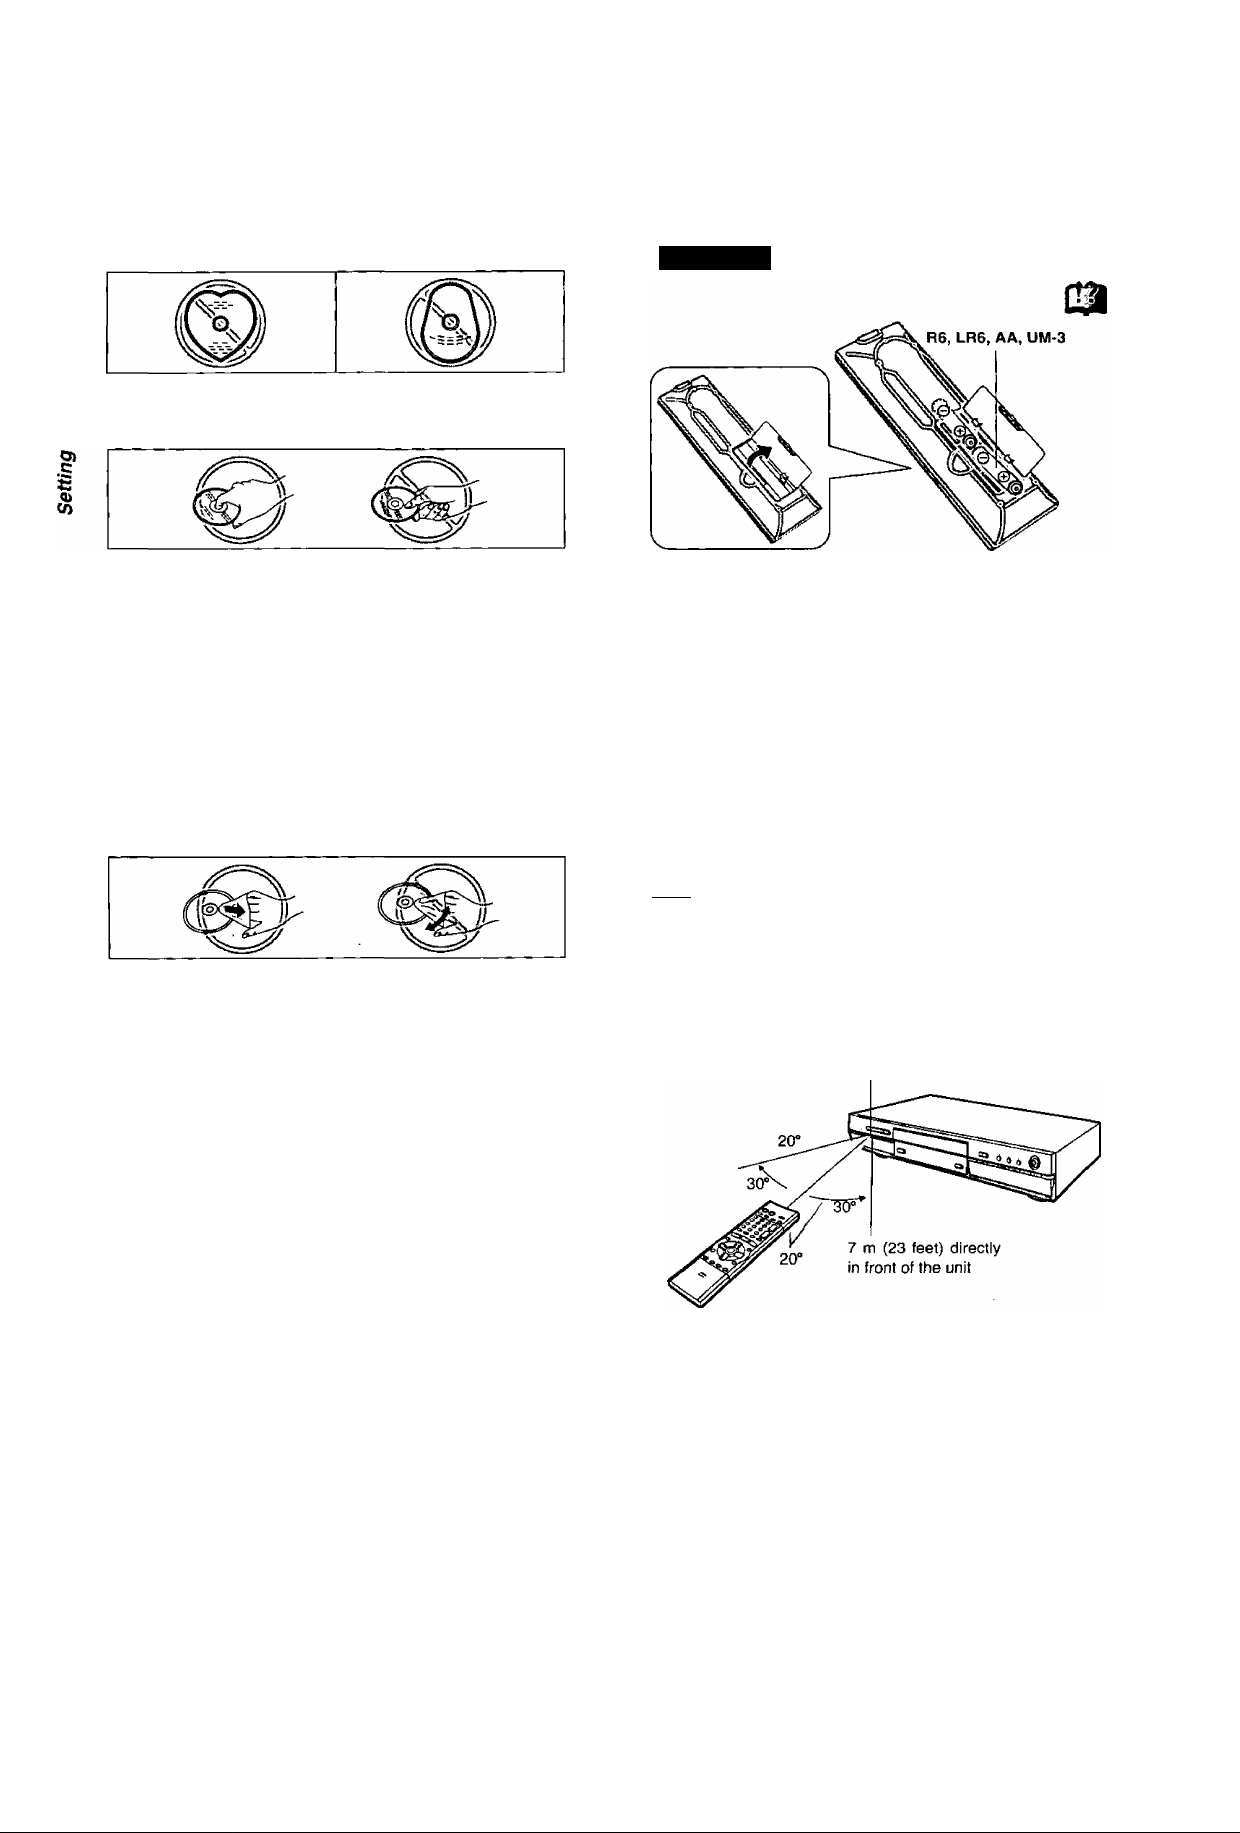
STEP 1 The remote control
Batteries
If there is dirt or condensation on the disc
Moisture may condense on discs after they are brought inside
from the cold.
DVD-RAM and DVD-R
Clean only with the DVD-RAM/PD disc cleaner available as an
optional accessory, part number LF-K200DCA1.
Do not use cleaners or cloths for CDs to clean DVD-RAM and
DVD-R.
DVD-Video, CD, Video CD
\A/ipe with a damp cloth and then wipe dry.
■ Handling precautions
• Do not write on the label side with a ball-point pen or other writ
ing instrument.
• Do not use record cleaning sprays, benzine, thinner, static elec
tricity prevention liquids or any other solvent.
• Do not attach labels or stickers to discs. (Do not use discs with
exposed adhesive from tape or left over peeled-off stickers.)
• Do not use scratch-proof protectors or covers.
• Do not use discs printed with label printers available on the mar
ket.
• Do not use discs that are badly warped or cracked.
• Insert so the poles (+ and -) match those in the remote control.
• Do not use rechargeable type batteries.
Do not:
• mix old and new batteries.
• use different types at the same time.
• heat or expose to flame.
• take apart or short circuit.
• attempt to recharge alkaline or manganese batteries.
• use batteries if the covering has been peeled off.
Mishandling of batteries can cause electrolyte leakage which,can
damage items the fluid contacts and may cause a fire.
Remove if the remote control is not going to be used for a long
period of time. Store in a cool, dark place.
ива
If you cannot operate the unit or television using the remote con
trol after changing the batteries, please re-enter the codes
(television->page 17, main unit ->page 64).
Remote control signal sensor
■ Do not place or store discs in the following
places
• Locations exposed to direct sunlight
• Humid or dusty locations
• Locations directly exposed to a heat vent or heating appliance
Aim at the sensor avoiding obstacles, at a maximum range of 7 m
(23 feet) directly in front of the unit.
Page 11
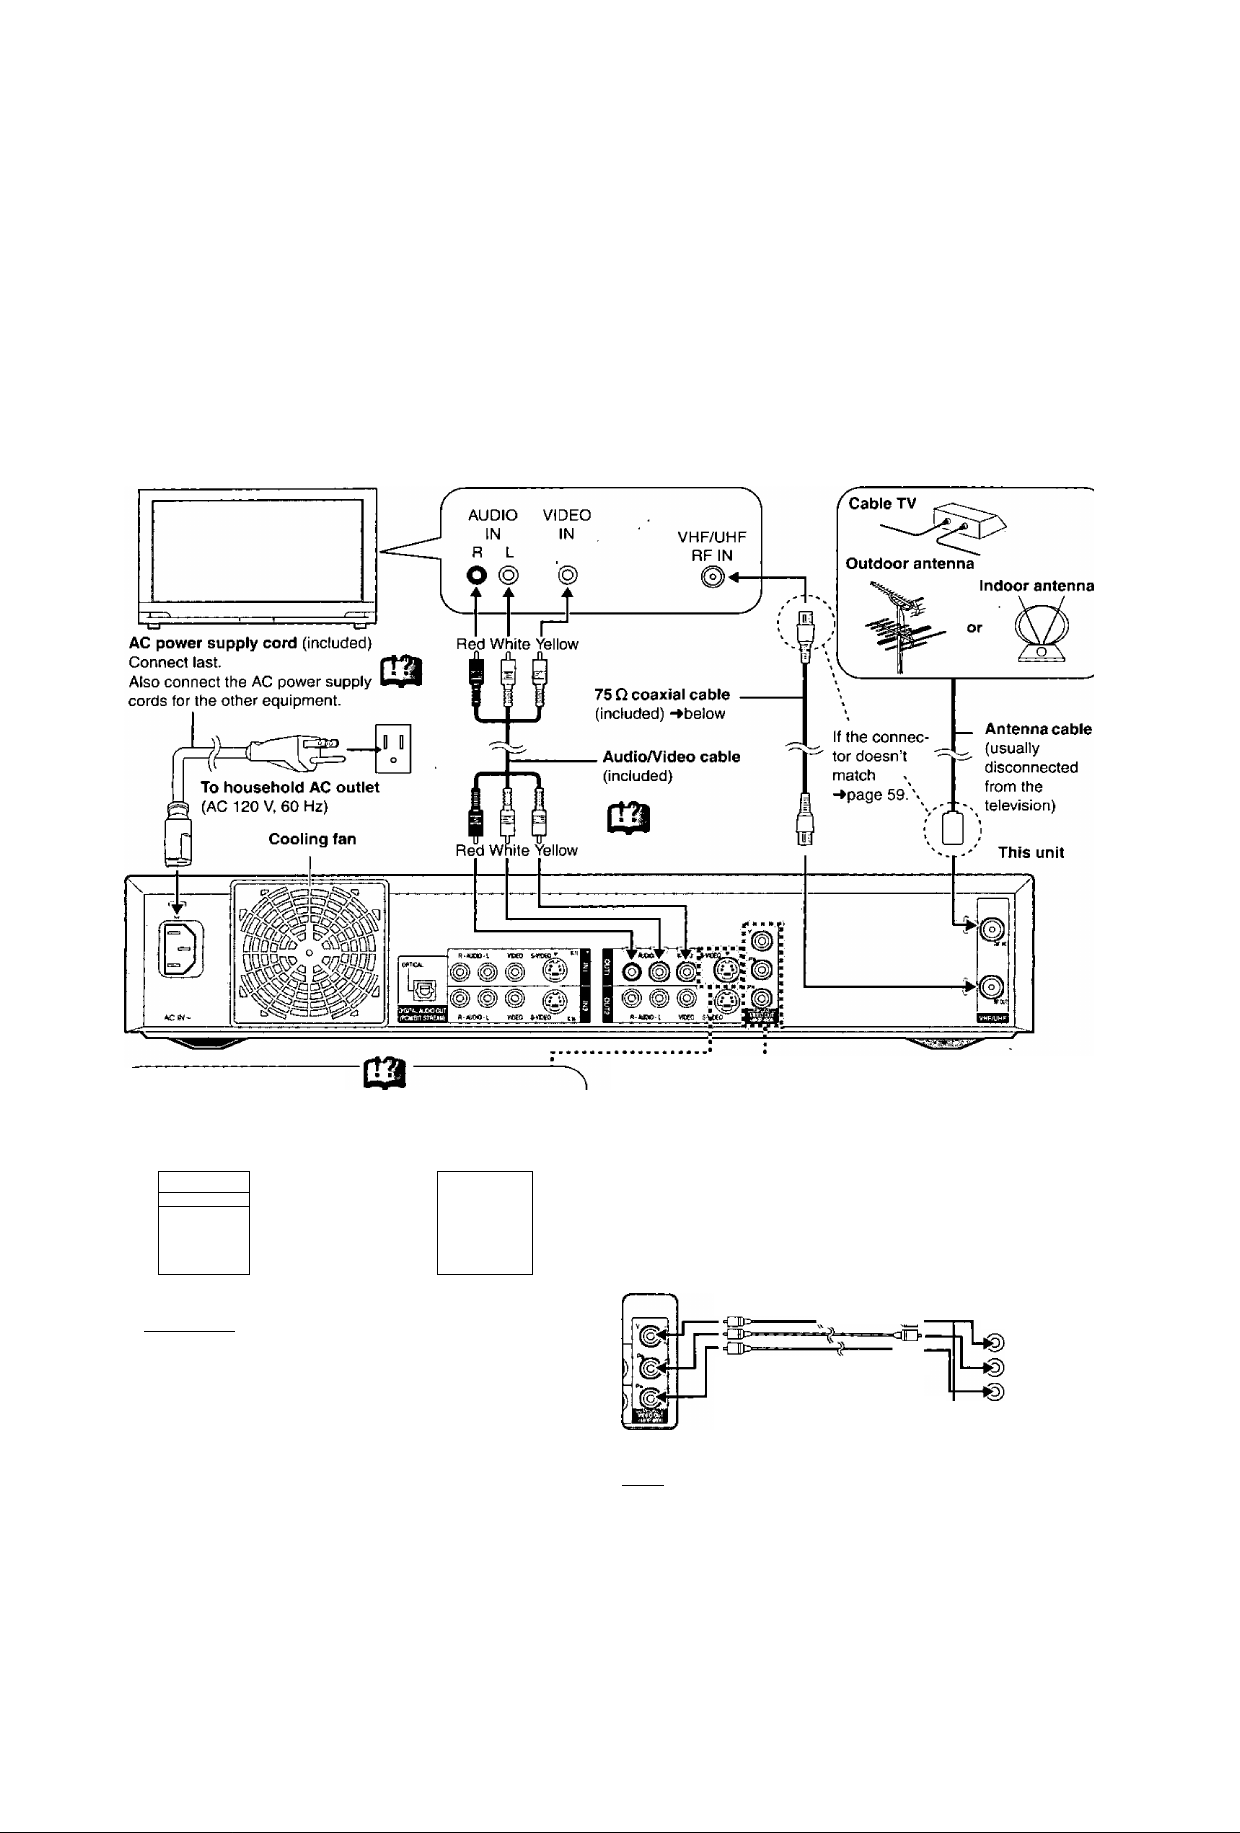
STEP 2
Antenna and television connections
Preparation
• Refer to the television’s operating instructions.
• Turn the television off and disconnect its AC power supply cord.
To enjoy sound through other audio equipment
You can output digital signals from this unit’s DIGITAL AUDIO OUT
terminal, enabling you to enjoy the powerful surround effects found
on discs recorded with Dolby Digital or DTS. Connect an amplifier
with built-in decoders. See page 57 for connection examples.
To enjoy CATV (-+page 56)
(You need to subscribe to a cable TV or satellite TV service to enjoy
viewing their programming.)
Television
To enjoy progressive video
• Connect to the component video (480P) input terminals on a televi
sion compatible with this unit’s copy guard system. (Video will not be
displayed correctly if connected to an incompatible television.)
• Set “TV Type" to "480P” in STEP 5 Selecting TV screen type
(->page 16).
• When playing back, select Video in the on-screen menu and set
‘Transfer’’ according to the type of material being played
(-►page 52).
For your reference
All Panasonic televisions that have 480P input terminals are com
patible. Consult the manufacturer if you have another brand of tele
vision.
To the antenna
§
,c
£
Ü)
S-VIDEO OUT terminal
The S-VIDEO OUT terminal achieves a more vivid picture
than the VIDEO OUT terminal by separating the chromi
nance (C) and luminance (Y) signais. (Actual results
depend on the television.) Television
S-VIDE0,JL.
I [
[* * ) 1
V
___:____
When making this connection, ensure you connect the
audio cables to the corresponding audio input terminals on
the television.
_
________________________________________
S video cable
(not included)
[ S VIDEO
IN
“► è
75 Q coaxial cable
• The signal from the antenna passes through this unit and along
the 75 Q coaxial cable to the television even when this unit is
turned off. You don’t have to connect the antenna to the television.
• The picture and sound signal from this unit does not go through
the 75 n coaxial cable to the television. Make sure you connect
one of the following terminals on this unit to the television: the
AUDIOAfIDEO terminal, the S-VIDEO OUT terminal or the COM
PONENT VIDEO OUT terminal. If the television has none of these
terminals, consult your local dealer.
Conserving power
This unit consumes a small amount of power, even when it is turned
off (approx. 3.3 W). To save power when the unit is not to be used
for a tong time, unplug it from the household AC outlet.
/"COMPONENT VIDEO OUT terminal ^
These terminals can be used for either interlace or progressive output
and provide a purer picture than the S-VIDEO OUT terminal.
Connection using these terminals outputs the color difference
signals (Pe/Pfi) and luminance signal (Y) separately in order to
achieve high fidelity in reproducing colors.
• The description of the component video input terminals
depends on the television or monitor (e.g. Y/Pe/P«, Y/B-Y/R-Y,
Y/Cb/Ch). Connect to terminals of the same color.
Video cable
(not included)
<D-
If using a BNC cable, use the
BNC-RCA adaptor plug
(included) on the unit terminals.
When making this connection, ensure you connect the audio
cables to the corresponding audio input terminals on the tele-
Vyision.________________________________________________,
Television
COMPONENT
VIDEO IN
Y
Pb
Pr
Do not connect the unit through a video
cassette recorder
Video signals fed through video cassette recorders will be
affected by copyright protection systems and the picture
will not be shown correctly on the television.
Page 12
%
Oi
c
£
Q)
O)
STEP 3 Setting the channels and clock
wc^ZZ>Tv
c!),
DVD POWER
ENTER
SET UP
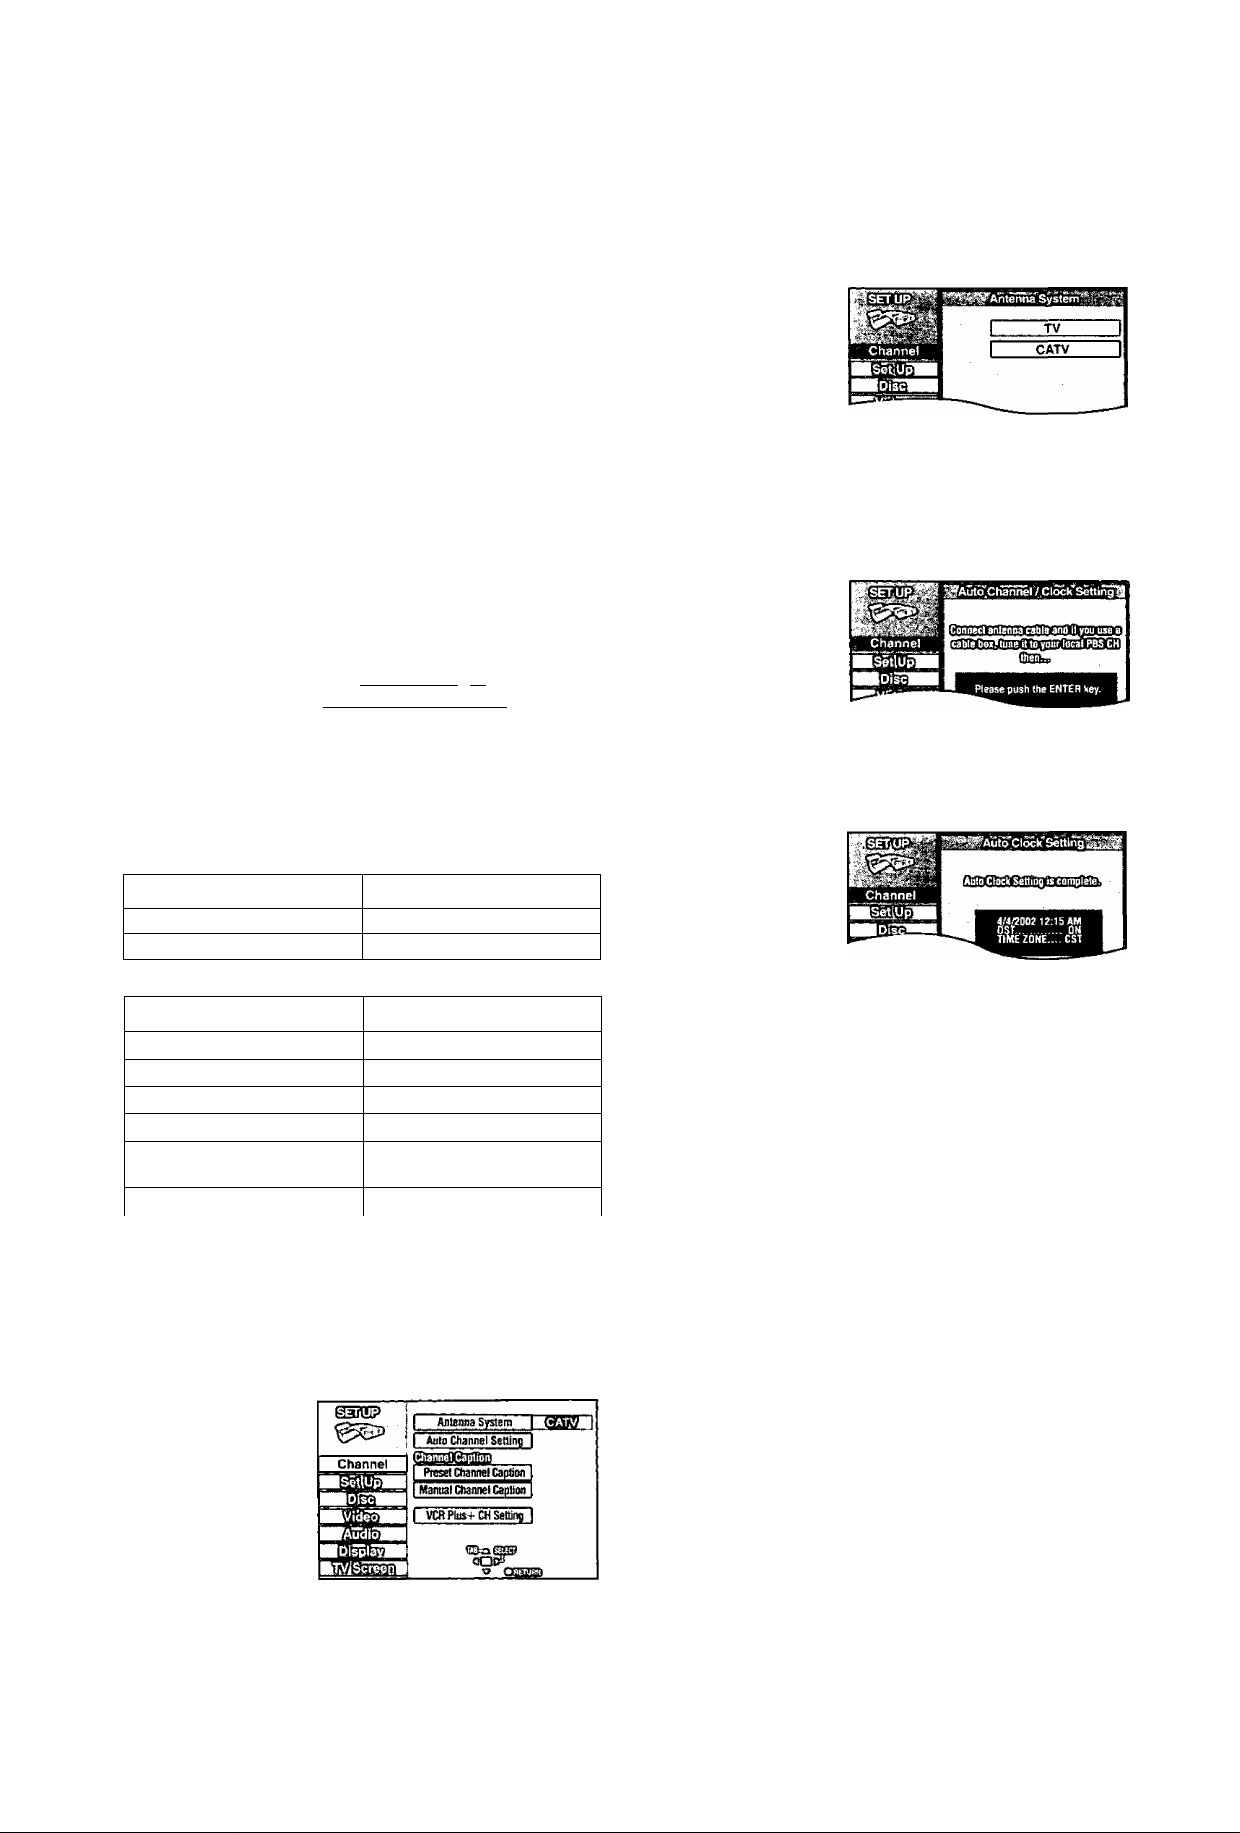
In accordance with the Antenna System (TV or CATV) setting,
channels will be set as shown in the tables below.
• TV Mode
Band
VHF 2-13
UHF 14-69
-0 © m
W» Pka. TV.™eO BEC WCE '’EC
Q Q O Q
0 ® 0 pn
® ® ® £J
* _ _ WXUME
® ® ® m
'rCMca I
o ® ® LJ
PL>VLiST
wt;:w!iGir
o
0
o
TWCIOG
WJC«H liMU £MSPUW liMESUP
[£^
0
O
MENU
O
o-
<1ETU№
RETURN
o o o o
__
■ 5THTUS j:—Stqp^
dD CD El (HJ
5FIUB wag wvTSBro oiSM>
~l
_
1 CD CD I J
ERASE aj№W
Air
4
Press [▲, T] to select “Antenna Sys
tem” and press [ENTER].
Press [ A, T ] to select “TV” or “CATV” and press [ENTER].
TV: TV broadcast (2CH-69CH)
CATV: CATV broadcast (1CH-125CH)
Press [A, T] to select “Auto Channel Setting” and press [ENTER].
Press [ENTER].
Auto setting starts. This takes a few minutes. (To stop auto
channel setting, press [RETURN].)
if you have not set the clock, the unit will carry out Auto Clock
Setting. The time is displayed when finished.
• CATV Mode
Band
VHF 2-13
CATV LOW BAND
CATV MID/SUPER BAND
CATV HYPER BAND
ULTRA BAND
SPECIAL CATV CHANNEL
Cable
95-99
14-36
37-65
66-94
100-125
1
Preparation
• Confirm that the antenna is connected correctly.
• Turn on the television and select the appropriate video input to
suit the connections to this unit.
1 Press [(!), DVD POWER] to turn the
unit on.
2 Press [SET UP] to show the menus.
8 Press [ENTER] to end the setting.
• After carrying out Auto Channel Setting, make sure you re-set
VCR Plus+ guide channel (^page 14) and Channel Caption
(-»page 15).
Notes on Auto Clock Setting
• If you connect the unit through a cable TV box or DSS receiver
(-^page 56) and the Auto Channel Setting is not able to find a
local PBS station, the Auto Clock Setting will not work properly. If
there is no local PBS channel in your area, set the clock manually.
• DST, Daylight Saving Time, shows the summertime setting.
• TIME ZONE shows the time difference from Greenwich meantime
(GMT).
EST=GMT-5, CST=GMT-6, MST=GMT-7, PST=GMT-8,
AST=GMT—9, HST=GMT—10, For other areas; xx hr
To return to the previous screen
Press [RETURN].
When you are finished
Press [SET UP].
If the unit couldn’t set the clock automatically
Refer to page 13, “Manual Clock Setting”, step 4.
If the clock is an hour slower or faster
Refer to page 13, “Time Zone Adjust".
If unnecessary channels are set or necessary channels are not set
Refer to page 13, “Adding and deleting channels".
Press [A,T] to select “Channel” and press [►].
Page 13
Numbered
buttons
ENTER
ADD/DLT
SET UP
WD*^[3jJTV
(о)/'©
VCB ft». Tvweo R6C uoC£
О О О ©
® ® ®
® ® ®
Л V,CH
Ql #
RETURN
Ff)lX№№ ЛСОСИТ DtSPWY
ytscioai S7WUS f—sKy^
f [ 1 Lw i Lw]
БГГМР М1СЮ IWTSEUCT atSKiP
-CD CD CD CD
£n*se gjaws loamitiii wt«iB
CD CD CD CD
Q Q
DST (Daylight Saving Time): ON or OFF
If you select “ON", the clock is advanced one hour starting
at 2 a.m, on the first Sunday in April and ending at 2 a.m.
on the last Sunday in October
TIME ZONE:
EST-—»CST»—»MST-^PST-^AST»—>HST
(-5) (-6) (-7) (-8) (-9) (-10)
t_______________________________________f
Press [ENTER].
The “Set Up" screen reappears and the clock starts.
идя
When you change the time zone, the recording times for programs
recorded before the time zone was changed also change to corre
spond to the new time zone.
Time Zone Adjust
Adjust the time zone (—1 or -M) if it was not set correctly with auto
clock setting.
You cannot change this setting if you set the clock manually.
1
Press [SET UP] to show the menus.
2
Press [A, ▼] to select “Set Up” and
press [►].
Press [A, T] to select “Time Zone
Adjust” and press [ENTER].
&
O)
c
Ql
CO
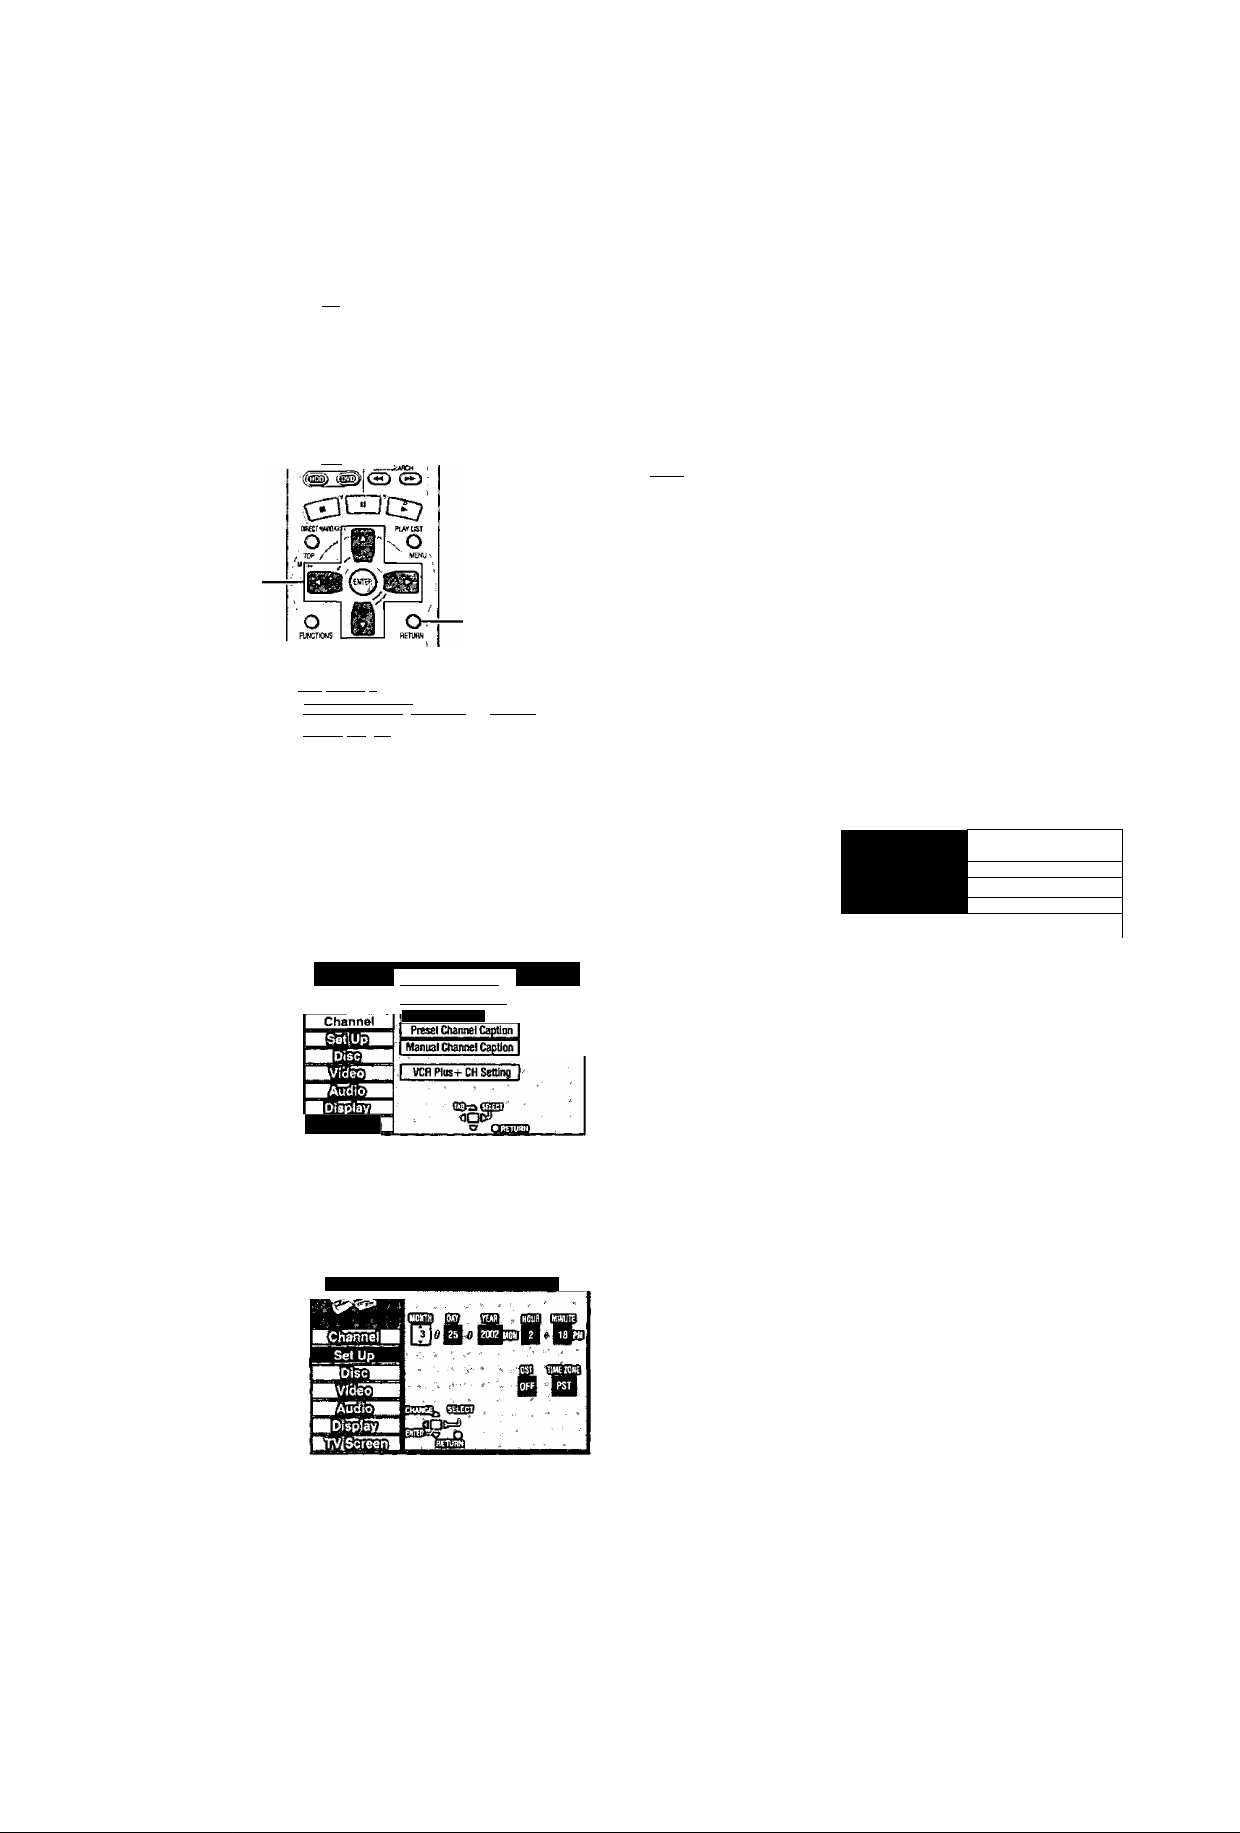
Manual Clock Setting
If an error occurs when carrying out Auto Clock Setting, you may
set the time using the following method:
1 Press [SET UP] to show the menus.
■ :SET.UP;*- ■ ,
■, I: ? I ^KEHSESSS^B Vc AT
I Antenna System
Г ftuto Channel SetUng"
Ctisnnel^CaptiDn
KryiScre^
2
Press [A, T] to select “Set Up” and
press [►].
Press [A, ▼] to select “Manual Clock
3
Setting” and press [ENTER].
SiETUP.,:. Г ^i‘Martua|Clock''Settmg;
Press [◄, ►] to select the item you
want to change and press [A, T] to
change the setting.
MONTHS
-----
>DAY«
-----
t—»TIME ZONE-*—»DST^i—»MINUTE
>YEAR<—^HOUR (12-hour display)
! -1 1
Mcha^'M H
Press [A, T] to select “-1”, “0”,
1 0 1
1 +1 I
or
“+1” and press [ENTER].
The “Set Up" screen reappears.
To return to the previous screen
Press [RETURN].
When you are finished
Press [SET UP).
Adding and deleting channels
While this unit is receiving the antenna signal (but not during
recording):
1
Press the numbered buttons to select
a channel.
Example: “5”: [0] -► [5] Unit’s display
• You can also use [л v, CH]
“15”: [1]-f[5]
“115”:[100]->[1]-»[5]
Ш
when you are going to delete a channel.
Press [ADD/DLT].
The channel is deleted if it was set or added if it was not set.
For example
(йаЕю^ошшр
Repeat steps 1 and 2 as necessary.
-BQT6637
Page 14
О)
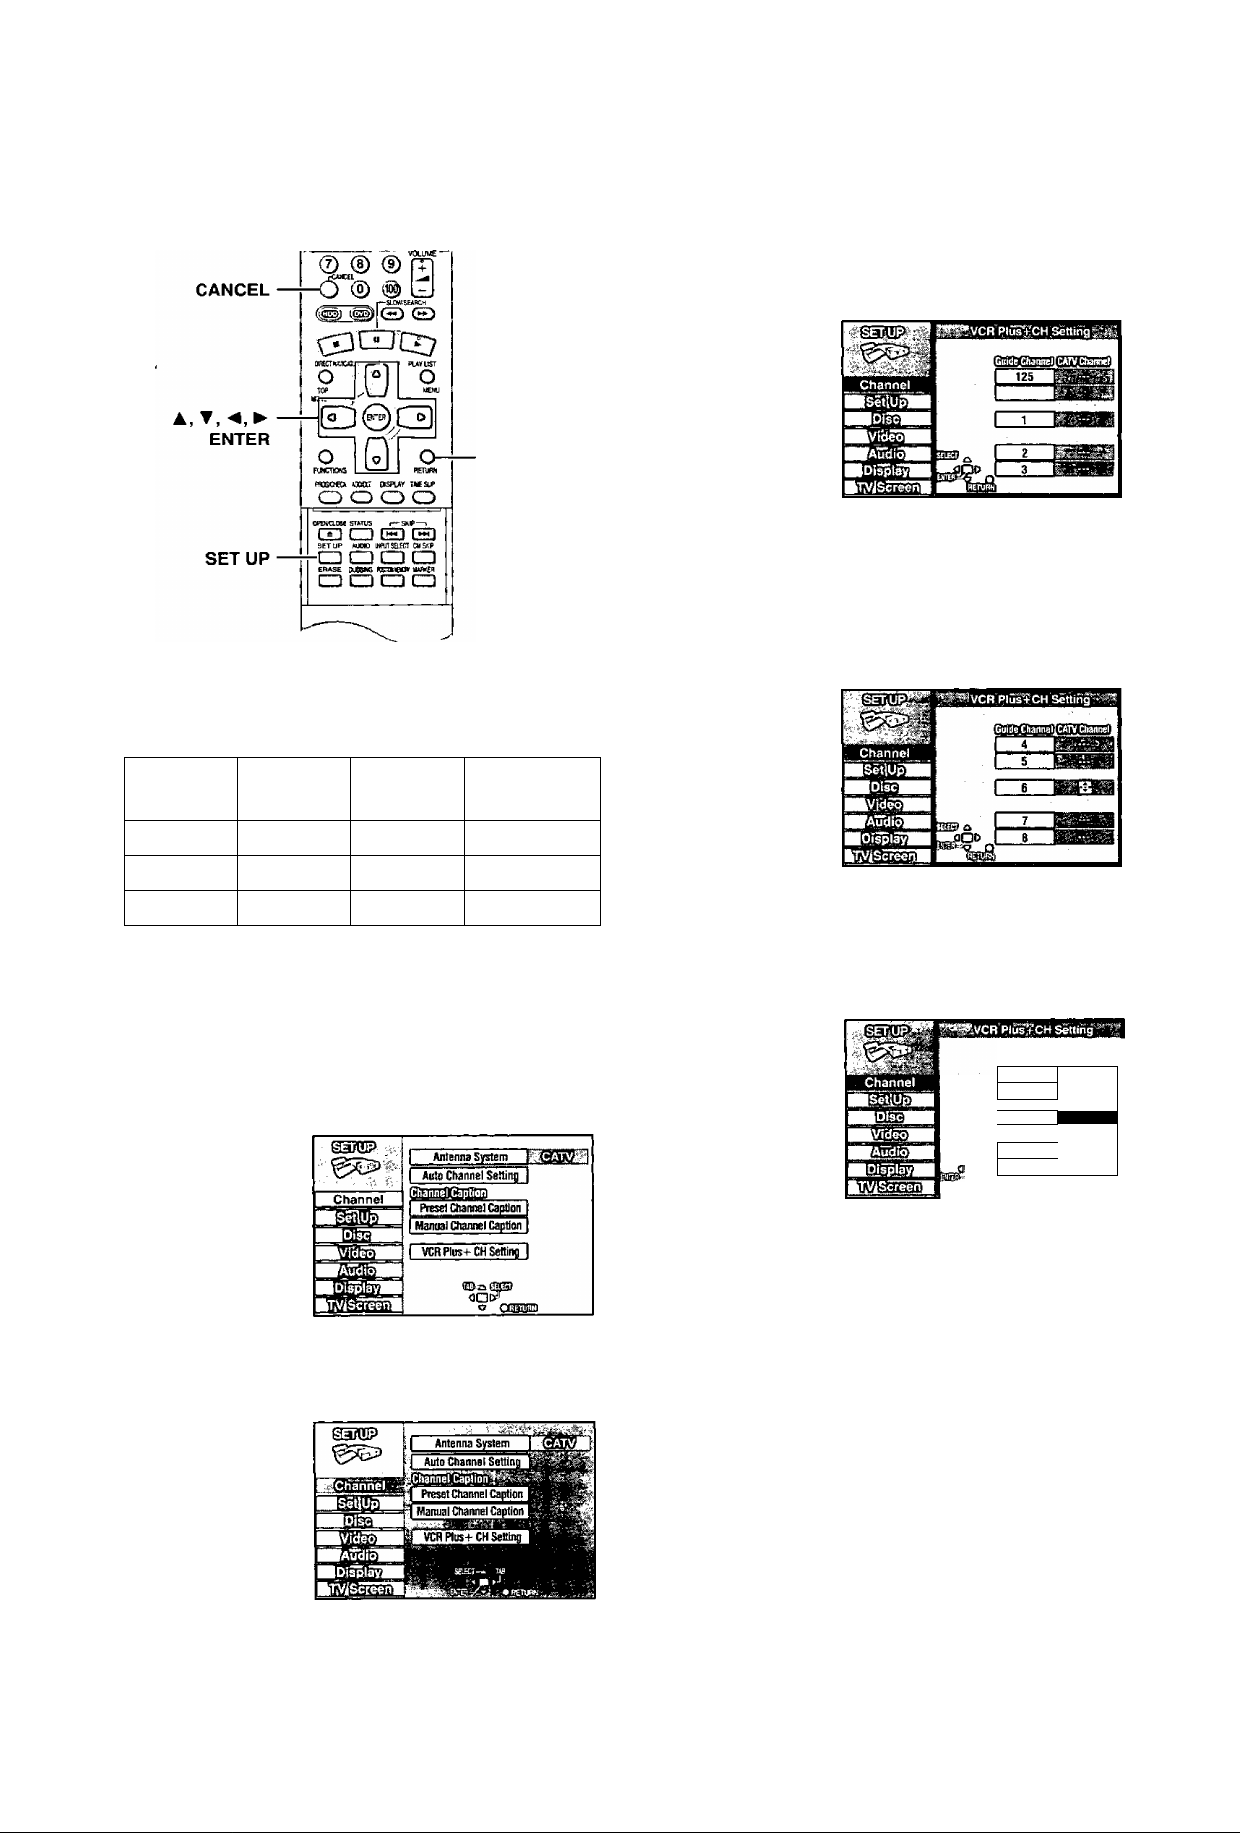
STEP 4 VCR Plus+ guide channel
settings (t?l
3 Press [A, T] to select “VCR Plus+
CH Setting” and press [ENTER].
e.g., when the current antenna system is CATV.
RETURN
о
Press [A, T] to select the guide
channel you want to set and press
[►]■
When selecting the guide channel, press and hold [A, T] to
Set these guide channels so you can use VCR Plus+ codes for
timer recording. Before starting the settings, prepare a chart show
ing the channels, station names, and guide channels.
e.g..
scroll the screen up and down.
Station
name
CBS 04 04
HBO 33 15
Nickelodeon 38 20
Look up the guide channels Write down all the stations you
for the stations in magazines, can receive.
Q The guide channel and channel numbers correspond so you do
not have to change the setting.
Ф In step 5, enter channel 15 next to Guide Channel 33.
0 In step 5. enter channel 20 next to Guide Channel 38.
Guide
channel
Channel
number
-►o
-»0
-»©
1 Press [SET UP] to show the menus.
Press [A, T] to select the channel
corresponding to the guide channel
and press [<].
4
5
1 6 1
7
223? Ci
To delete a number, press [CANCEL].
Repeat steps 4 and 5 as necessary.
1Ж1Ш
ММЦЙ
8
Press [ENTER].
The “Channel” screen reappears.
HQT6637>
2 Press [A, T] to select “Channel” and
press [►].
To return to the previous screen
Press [RETURN].
When you are finished
Press [SET UP].
VCR Plus4- and PlusCode are registered trademarks of Gemstar Development Corporation. The VCR Plus-l- system is manu
factured under license from Gemstar Development Corporation,
Pats. 5,307,173; 5,335,079; 4,908,713; 4,751,578; and
4,706,121
Page 15
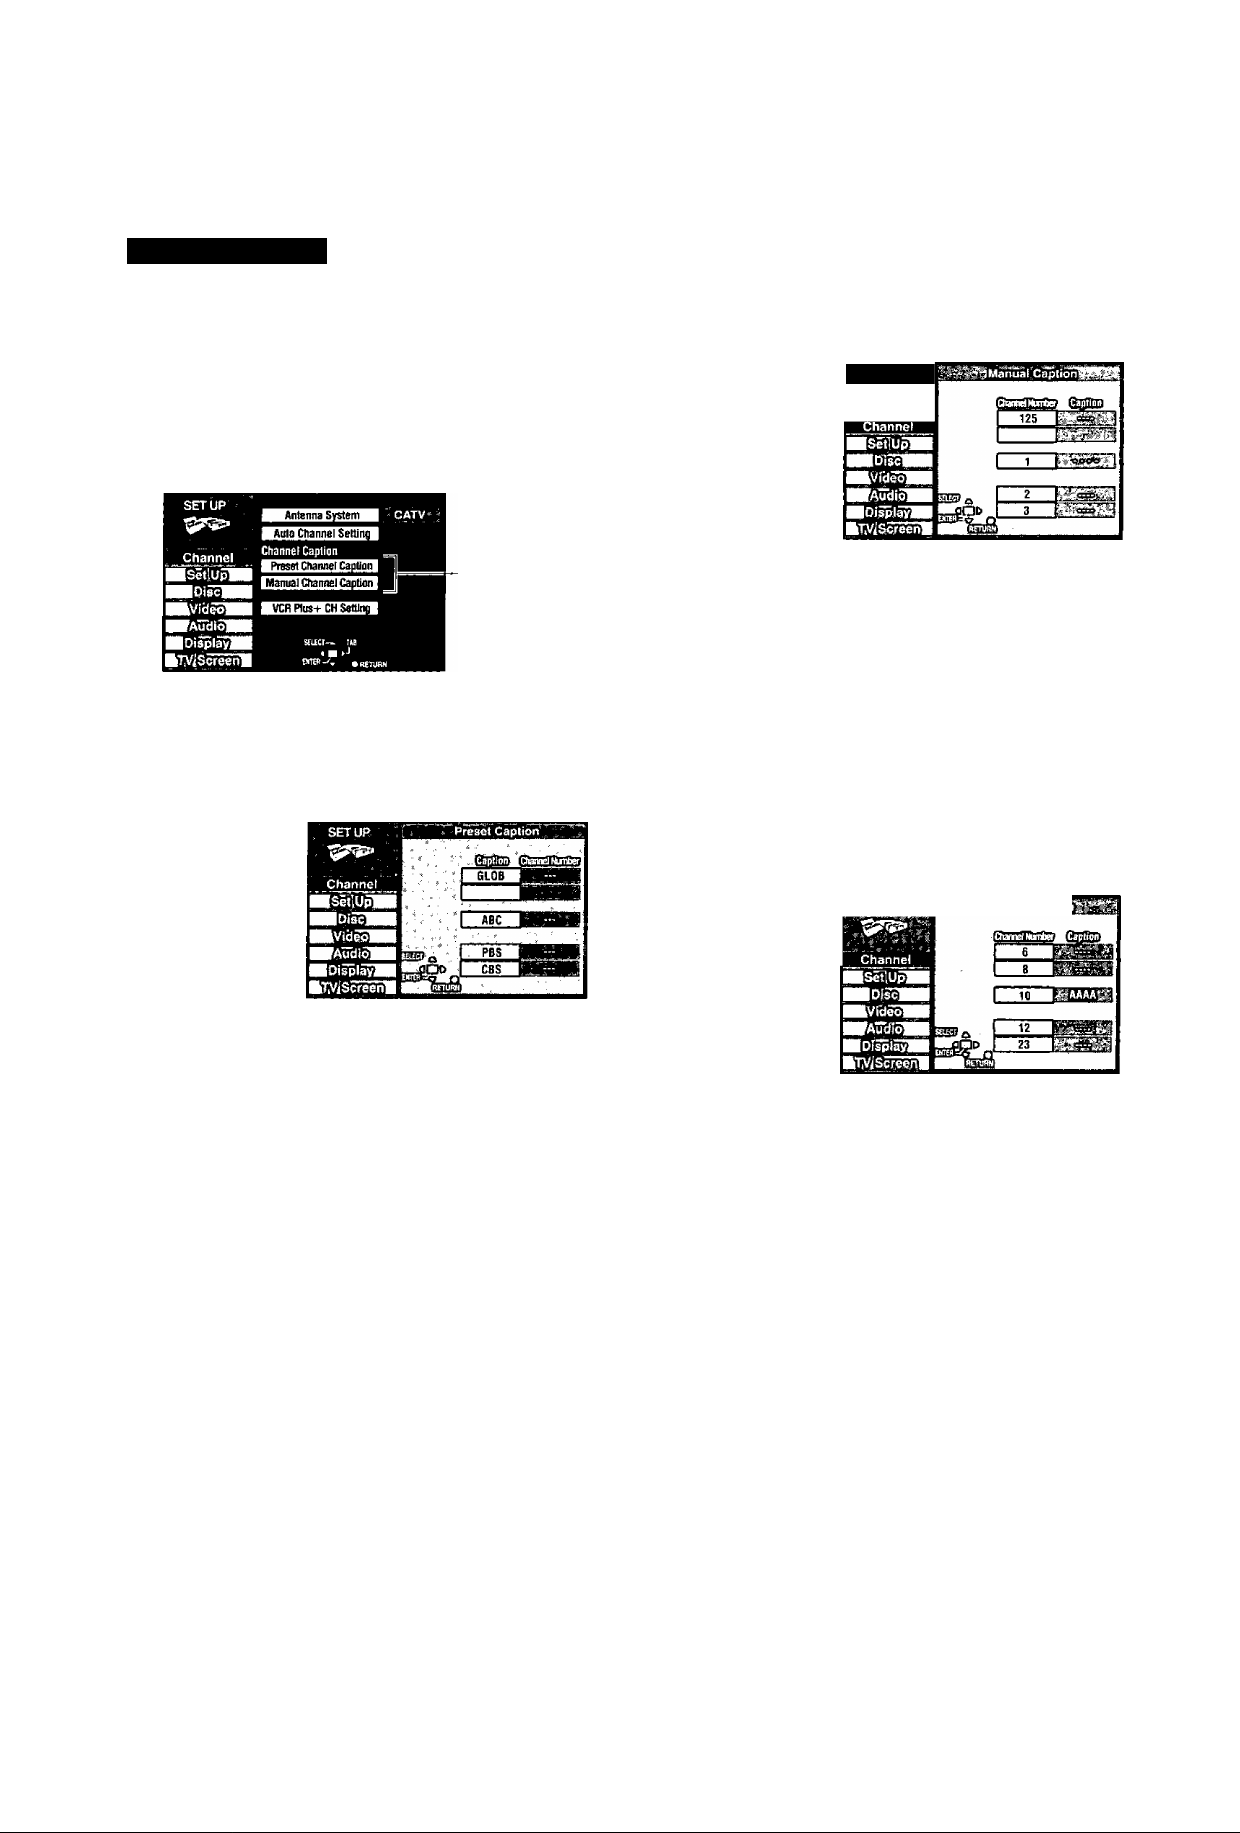
Channel Caption
Manual Channel Caption
You can give stations captions. You can use the Preset Captions, or
manually enter new ones yourself.
The captions you enter are displayed when the channel is dis
played and in the Direct Navigator screen.
Press [SET UP] to show the menus.
1
2
Press [A, ▼] to select “Channel” and
press [^].
Proceed with
the steps
described
below.
Preset Channel Caption
Press [A, T] to iselect “Preset Chan
nel Caption” and press [ENTER].
Press [A, T] to select “Manual Chan
nel Caption” and press [ENTER].
Press [A, T] to select the channel
and then press [^].
• Channels are not displayed if they do hot contain a station
or if preset captions have been added.
Press [A, T] to select the first char
acter and then press [►].
• You can choose from the following characters:
A-Z, 0-9, -, &,!, /, (space)
• To delete the caption, press [CANCEL].
• Repeat step 5 to enter the other characters.
Press [◄, ►] to return to the Channel
Number column when you are fin
ished.
I
§•
D>
C
(0
Press [A, ▼] to select the caption
and then press [^].
You can choose from the following captions.
ABC, PBS, CBS, CNN, FOX, ESPN, NBC, HBO, A&E, AMC,
FAM, MAX, MTV, SHOW, TBS, USA, TNT, CBC, UPN, CTV,
WB, TSN, DSC, GLOB
• The screen scrolls a page at a time if you press and hold
[A,V],
Press [A, ▼] to select the channel
corresponding to the caption and
then press [◄].
• Channels are not displayed if they do not contain a station
or if captions have been added manually.
• To delete the channel number, press [CANCEL].
• Repeat steps 4 and 5 as necessary.
Press [ENTER].
The “Channel" screen reappears.
Repeat steps 4, 5, and 6 as necessary.
7 Press [ENTER].
The “Channel" screen reappears.
To return to the previous screen
Press [RETURN],
When you are finished
Press [SET UP).
.RQT6637
Page 16
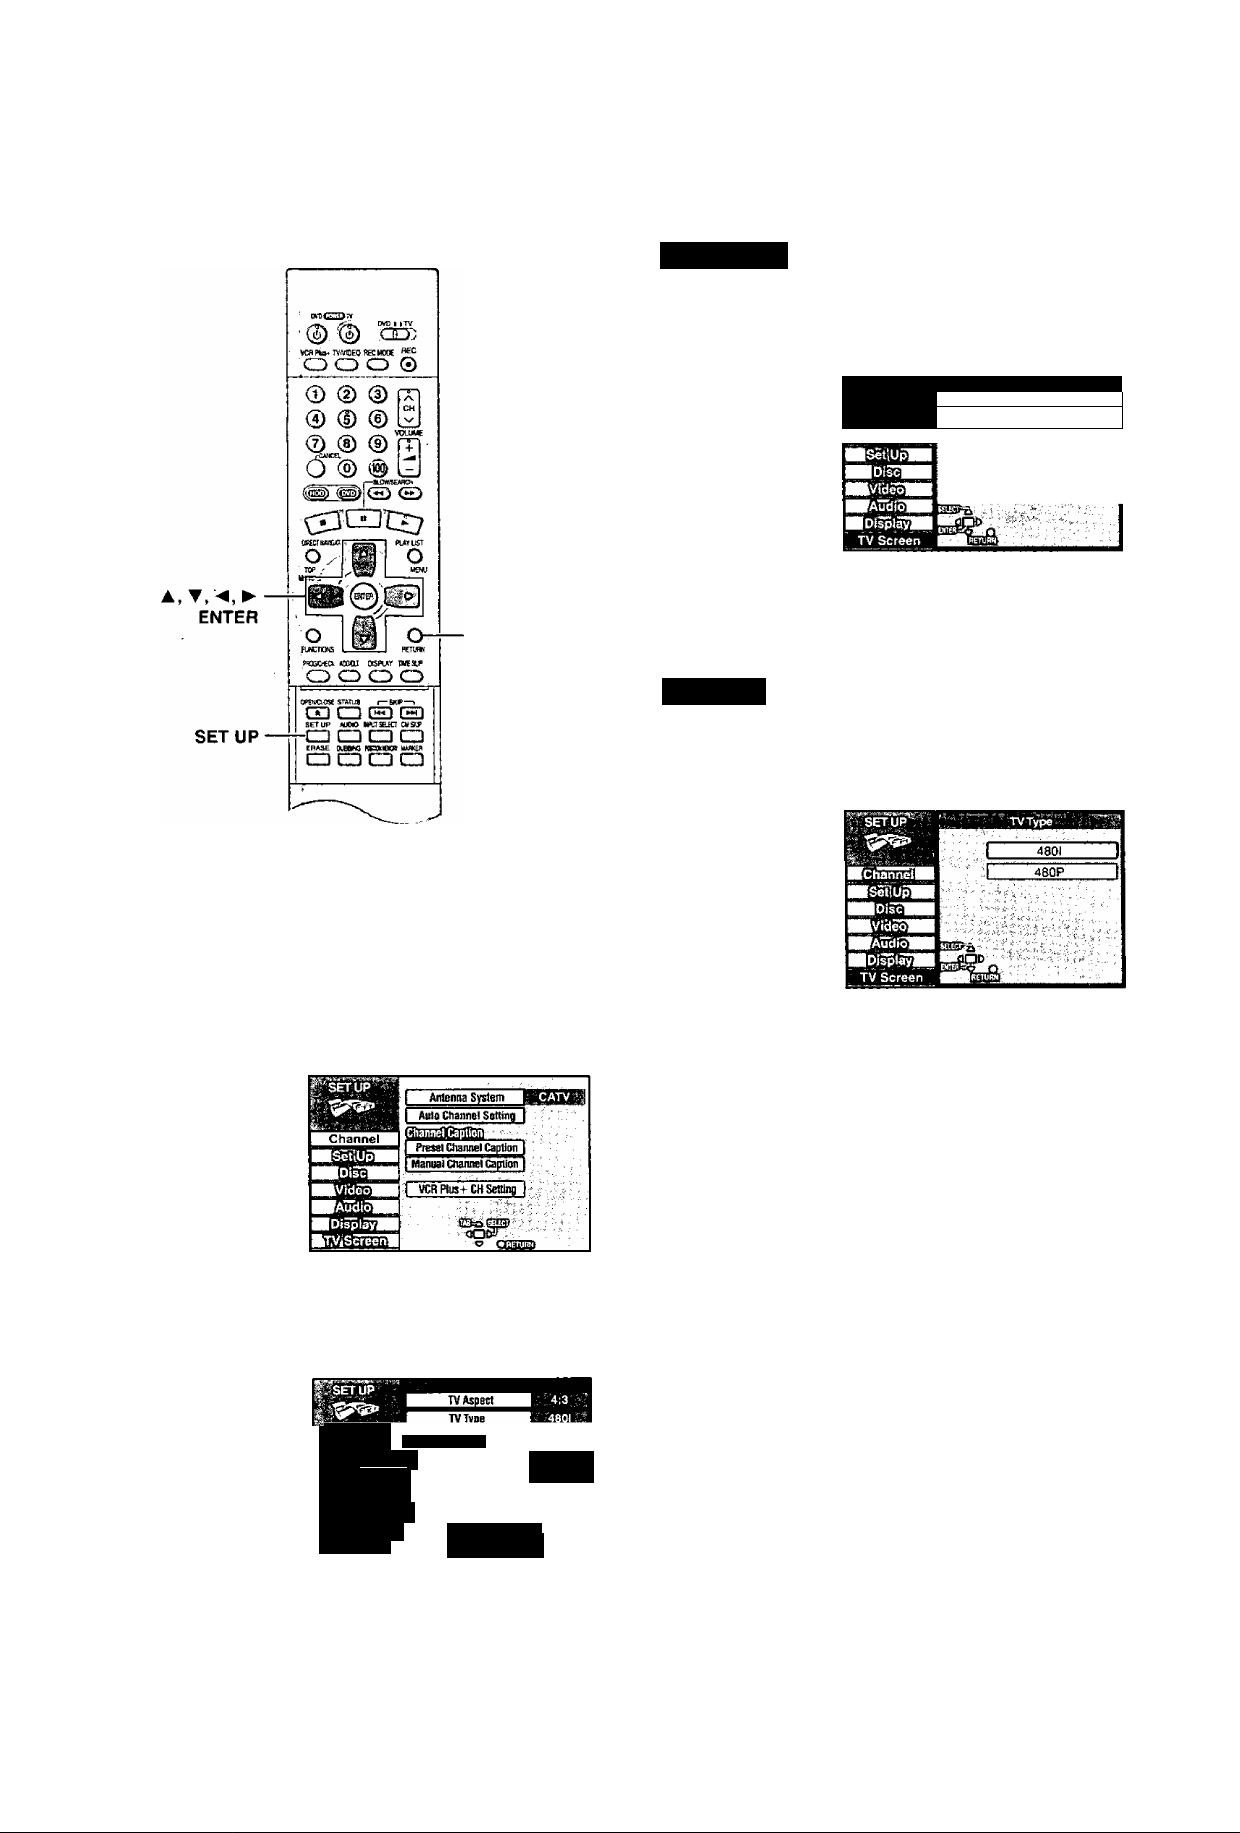
STEP 5 Selecting TV screen type
TV Aspect
O)
c
£
d>
O)
RETURN
Change the settings if you:
• Connect the unit to a widescreen 16:9 aspect television.
-►Set “TV Aspect” to “16:9".
• Connect the unit through the COMPONENT VIDEO OUT
terminals {-►page 11) to a television compatible with progressive
video signals (480P),
-♦Set ‘TV Type" to “480P".
Press [ A, ▼ ] to select “TV
Aspect” and press [ENTER].
? SETUP '
■ ■ ■■
' •••TV Aspect •.' ' '•
1
_______
A=3. 1
4 Press [A, V] to select “16:9” and
press [ENTER],
TV Type
3 Press [A, ▼] to select “TV Type” and
press [ENTER].
3
1 Press [SET UP] to show the menus.
Press [A, T] to select “TV Screen”
and press [►].
MChannell
pSetlUpM
■VicteoS
IpAu^ioVI
Abi^tayll
TV Screen
TV mode(4:3)
SElfCt-,. til
•RETTJBft
I PanfiScatl:
i Letlerb6i( ‘
4 Press [A, T] to select “480P” and
press [ENTER].
• When playing back, select Video in the on-screen menu
and set ‘Transfer” according to the type of material being
played {-►page 52),
To return to the previous screen
Press [RETURN].
When you are finished
Press [SET UP],
■ Regarding Progressive Television Picture
Progressive image aspect (height to width ratio) is set at a standard
16:9. DVD-Video which has been set at 16:9 will be displayed
correctly. However, 4:3 video material {-► below) will be stretched to
the right and left when displayed.
To view the picture at the right aspect
• For televisions that allow the aspect of progressive images to be
adjusted, use the function provided on the television and adjust
as necessary.
• For televisions which do not allow the aspect of progressive
images to be adjusted, please turn OFF “Progressive"
(-►page 52).
4:3 video nnaterials are usually found
• In general television broadcasts (excluding some wide picture
broadcasts) and any pictures from discs that recorded such
programs.
• In DVDs with an aspect ratio of 4:3 indicated on the jacket.
• DVD-R or Video CD pictures
Page 17
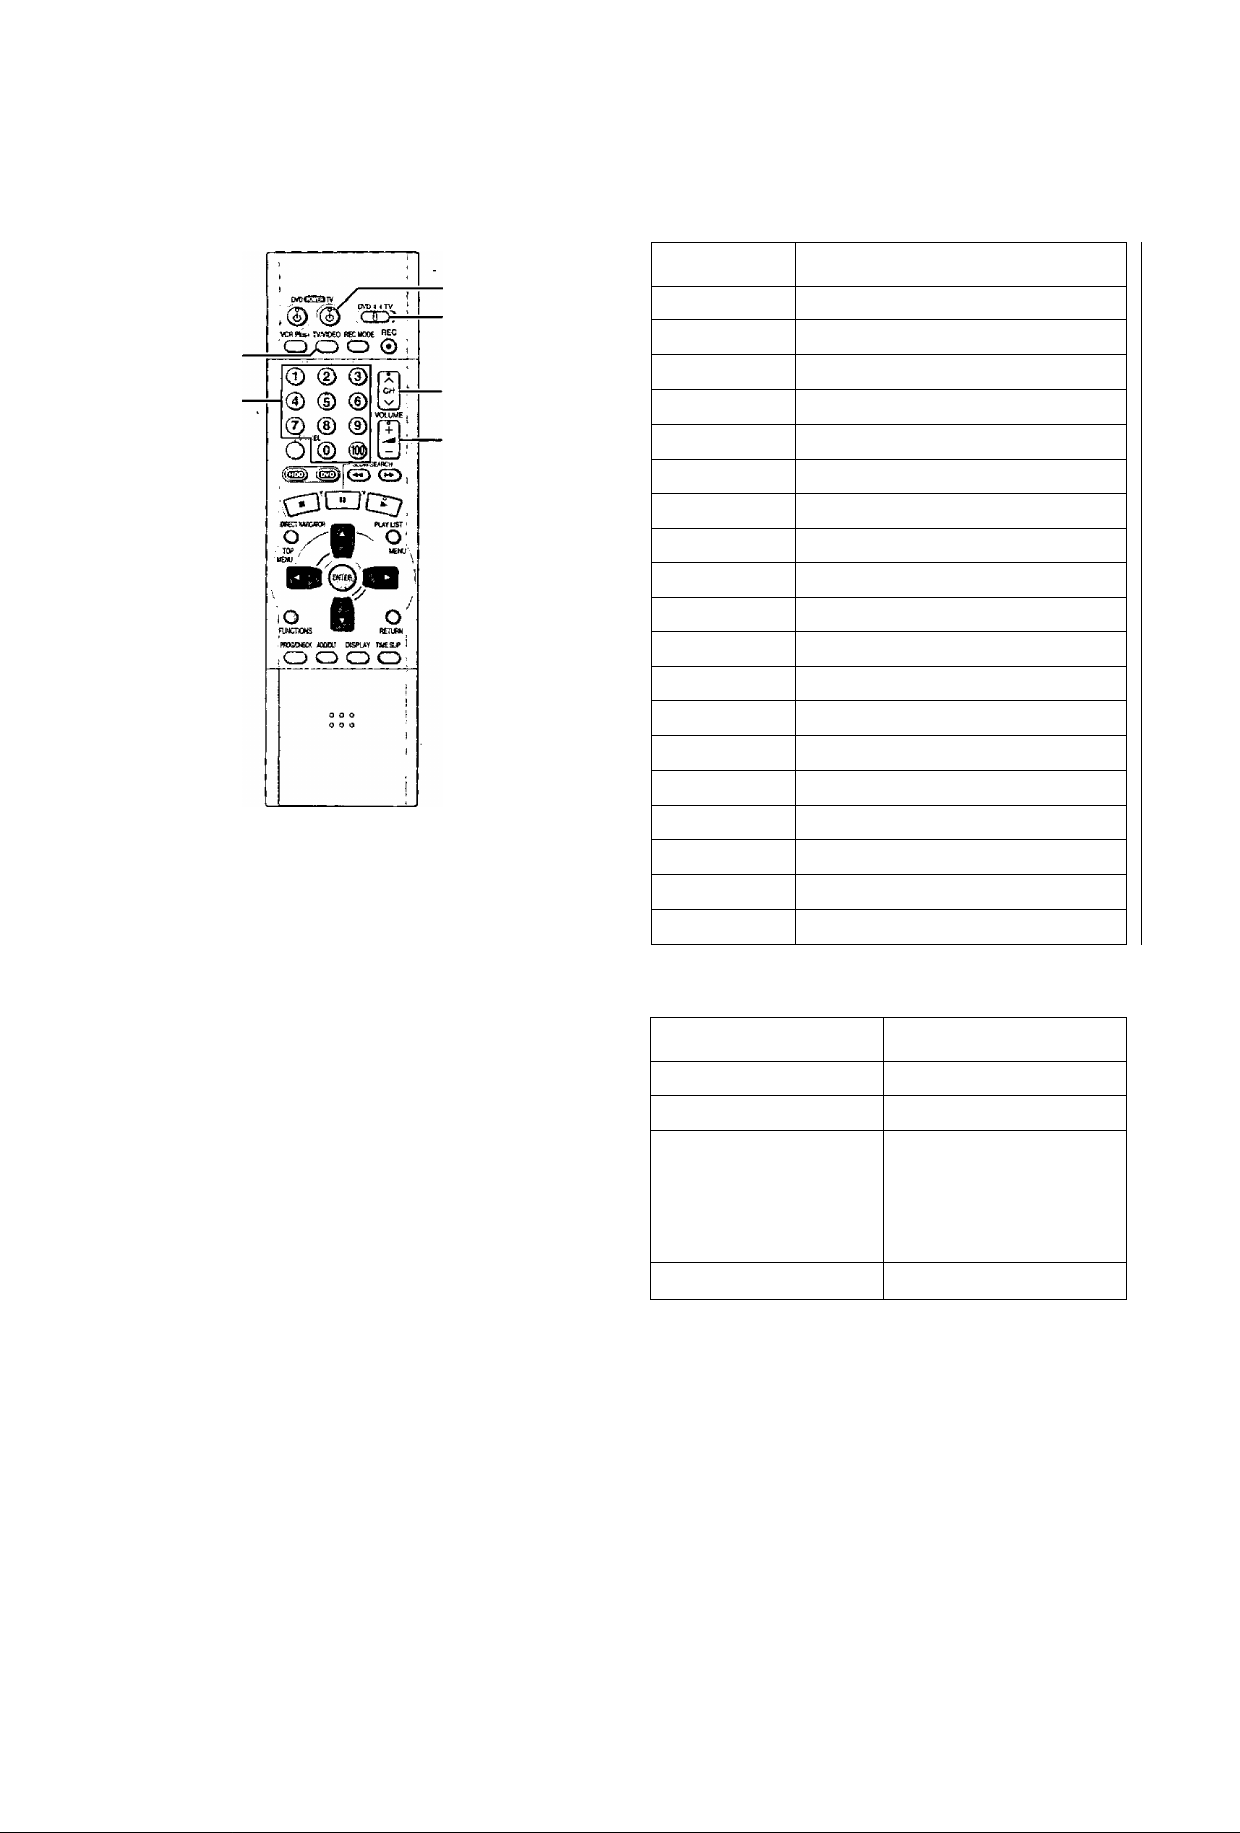
STEP 6 Television operation
Ò, POWER TV
DVD, TV
TV/VIDEO
Numbered
buttons
A V , CH
+ -, VOLUME
You can control televisions by entering the remote control code.
1 Refer to the chart right for the code
for your television.
2 Press and hold [ct), POWER TV] and
enter the two-digit code with the
numbered buttons.
• e,g„ 01, press [0] [1].
• Test by turning on the television and changing channels.
Repeat the procedure until you find the code that allows
correct operation.
Code No.
01 Panasonic/National QUASAR
02
03
04 ZENITH
05
06 SHARP
07 SHARP
08 SONY
09 TOSHIBA
10
11 JVC
12 HITACHI
13 MITSUBISHI
14
15
16
17
18
19
Panasonic/National QUASAR
MAGNAVOX SYLVANIA PHILIPS (RC-5)
THOMSON RCA GE
SANYO FISHER
SAMSUNG
GOLDSTAR/LG
GOLDSTAR/LG
GOLDSTAR/LG
SAMSUNG
SAMSUNG
Manufacturer
■ Operation
Point the remote control at the television.
Operation
On and off
Video input mode
[Cl>, POWER TV]
[TVA/IDEO]
Button
I
è
t:
(U
CO
• If your television brand is not listed or if the code listed for your
television does not allow control of your television, this remote
control is rot compatible with your television,
• This remote control works with most recently manufactured
televisions, but may not be able to control older models.
Channels
Volume
(Switch [DVD, TV] to‘TV".)
[a V, CH]
or
Numbered buttons
e.g.,
Channel “5”: [0] [5]
[+ VOLUME]
:RQT6637
Page 18
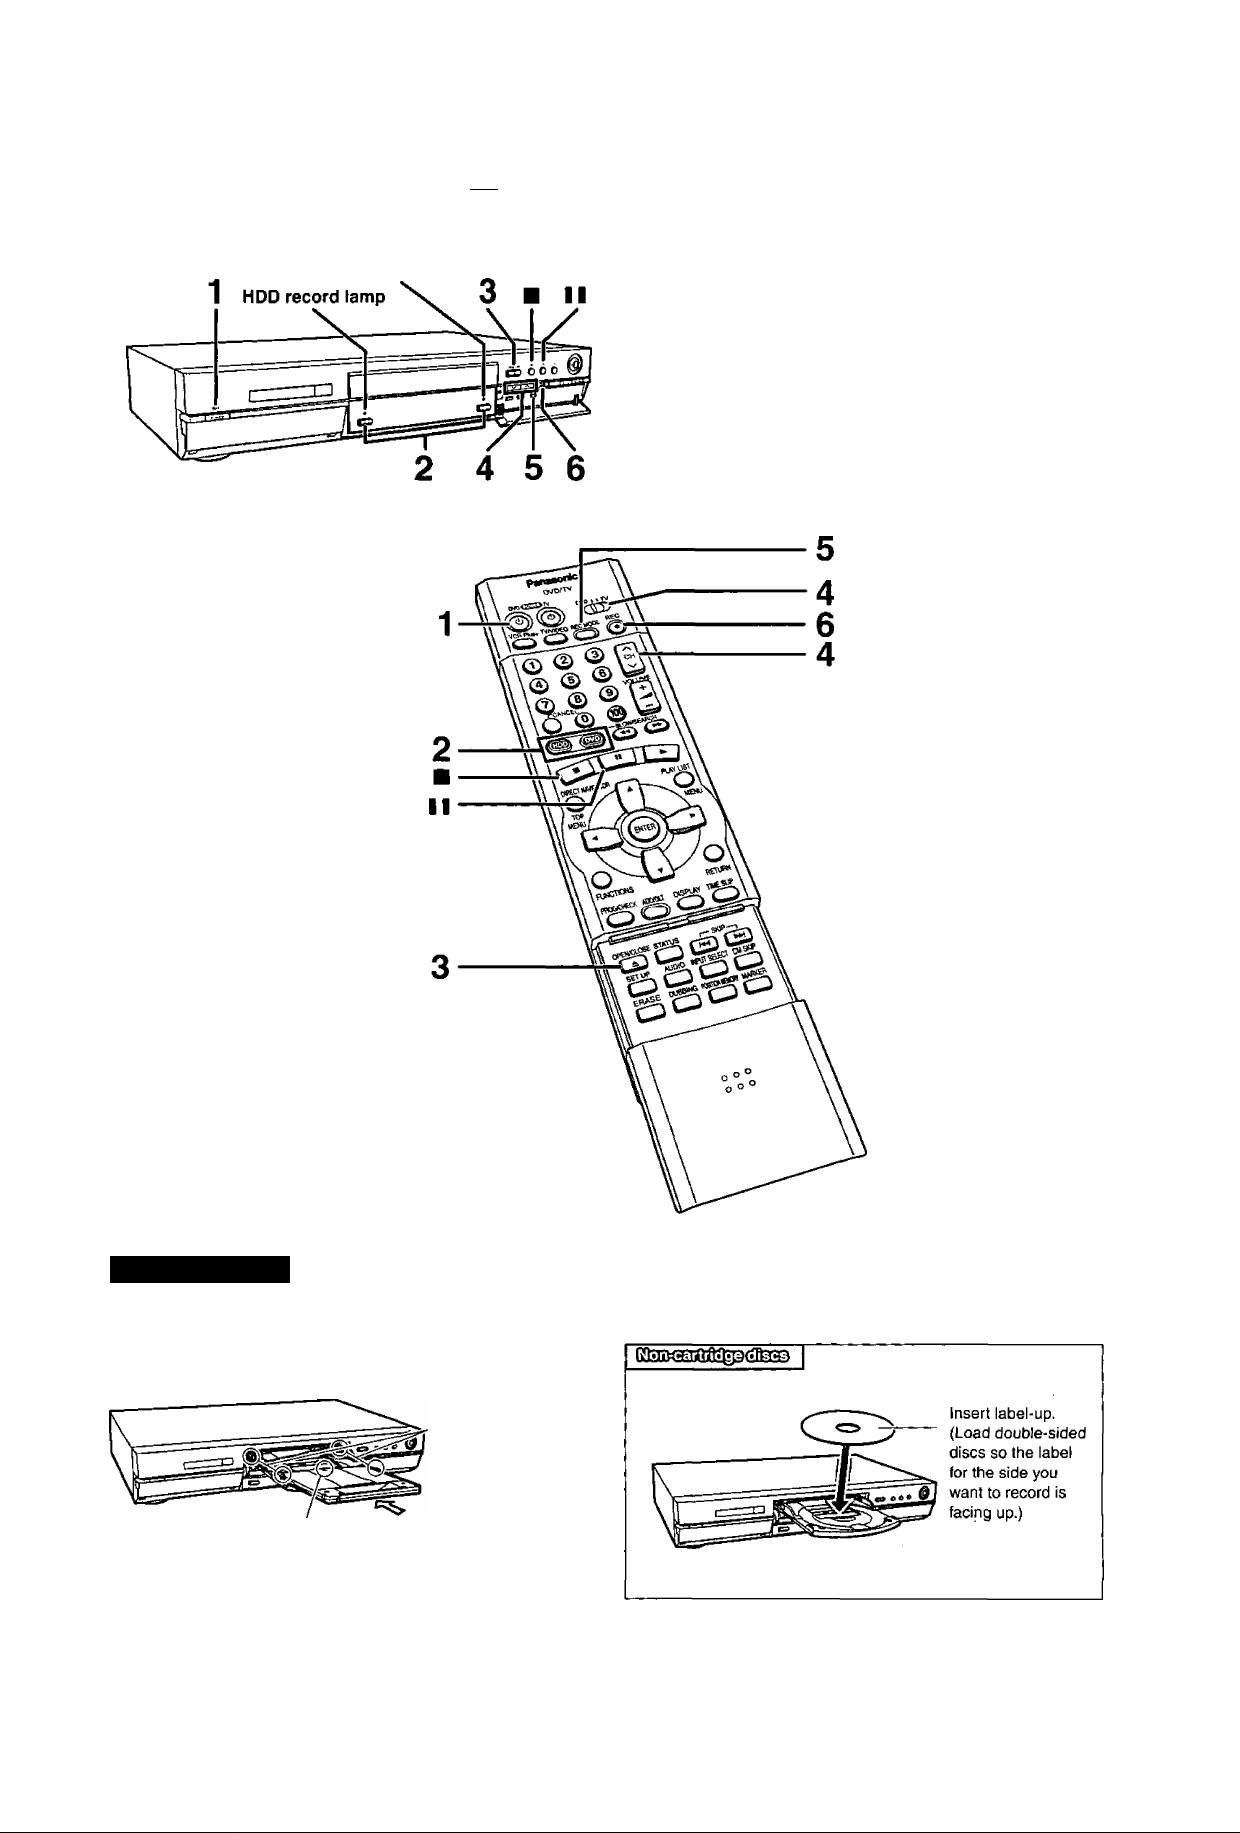
Recording television programs{t^
s
o
u
s.
ROT6637
Inserting discs
Insert inside the
tray's guides.
Insert label-up with the arrow facing in. (Load double-sided discs
so the label for the side you want to record is facing up.)
• When using 8 cm (3") DVD-RAM, remove the disc from the
cartridge and insert it, making sure you align it with the groove.
' If Disc Protection (-♦page 38) or Cartridge Protection (-»page 8) is activated, deactivate the protection to record. EQU
Page 19
CQil ii£jij l^iQ
Subsequent to page 20, reference is made to steps 1-3 only
where necessary.
1
Press [c!)j DVD POWER] to turn the
unit on.
Press [HDD] or [DVD] to select the
2
recording drive (-►Drive, page 65).
The HDD or DVD button lights up on the unit. 1^^
• It is not possible to record to both HDD (Hard Disk Drive)
and DVD drive simultaneously.
If you selected the DVD drive
Press [A, OPEN/CLOSE] to open the
tray and insert a disc.
• Press the button again to close the tray.
• It is not possible to record continuously from one side of a
double sided disc to the other. You will need to eject the disc
and turn it over.
• If you put a disc in while the HDD is selected, the DVD but
ton on the unit will flash while the unit reads the disc.
Ensure [DVD, TV] is switched to
“DVD” and press [a v, CH] to select
the channel.
e,g.,when you select
channel 4
Press [REC MODE]
e.g.,when you select "XP”
to select the record
ing mode.
Select "XP”, “SP", “LP”, or “EP" (-► right).
• To record sound using LPCM (possible only in XP mode):
Select “LPCM" in “Audio Mode for XP Recording" (the pic
ture quality may go down slightly), (-»page 61)
Press [#, REC] to start recording.
The HDD or DVD record lamp oh the main unit lights up.
dvd-fam XP
П-Л n n t
U LI U.U I
Program information (e.g., time and date) is registered in the
program list (-►page 26).
• To enable playback your DVD-R on compatible equipment, it
is necessary to finalize it (-►page 38).
To pause recording
Press [II]. Press again to restart recording.
To stop recording
Press [■].
You can record while the unit is on standby for timer recording,
but once the time for the timer recording to begin is reached,
any recording taking place will stop and the timer recording will
begin.
гтта
• Recording will take place on open space in the HDD or on disc.
Data will not be overwritten.
• It is possible to watch playback from one drive while recording
from another (editing is not possible).
• if there is no space left on the recording drive, you will need to
erase unwanted programs (in the case of HDD and DVD-RAM) or
use a new disc (^ “Erase Program”, page 40).
• You cannot change the channel or recording mode during record
ing. You can change them while recording is paused, but the mate
rial is recorded as a separate program.
• You can record up to 250 programs on HDD, 99 on one disc.
(1 program may be recorded continuously for a maximum of 6 hours).
• When using a DVD-RAM for the first time with this unit, format it to
ensure accurate recording (’♦“Format”, page 38).
»There are limitations when recording to DVD-R (-►page 8).
► When recording MTS sound onto DVD-R or recording using
LPCM, only one of either the main channel or the sub channel can
be recorded. Select at “Select MTS for DVD-R or LPCM"
(-►page 61).
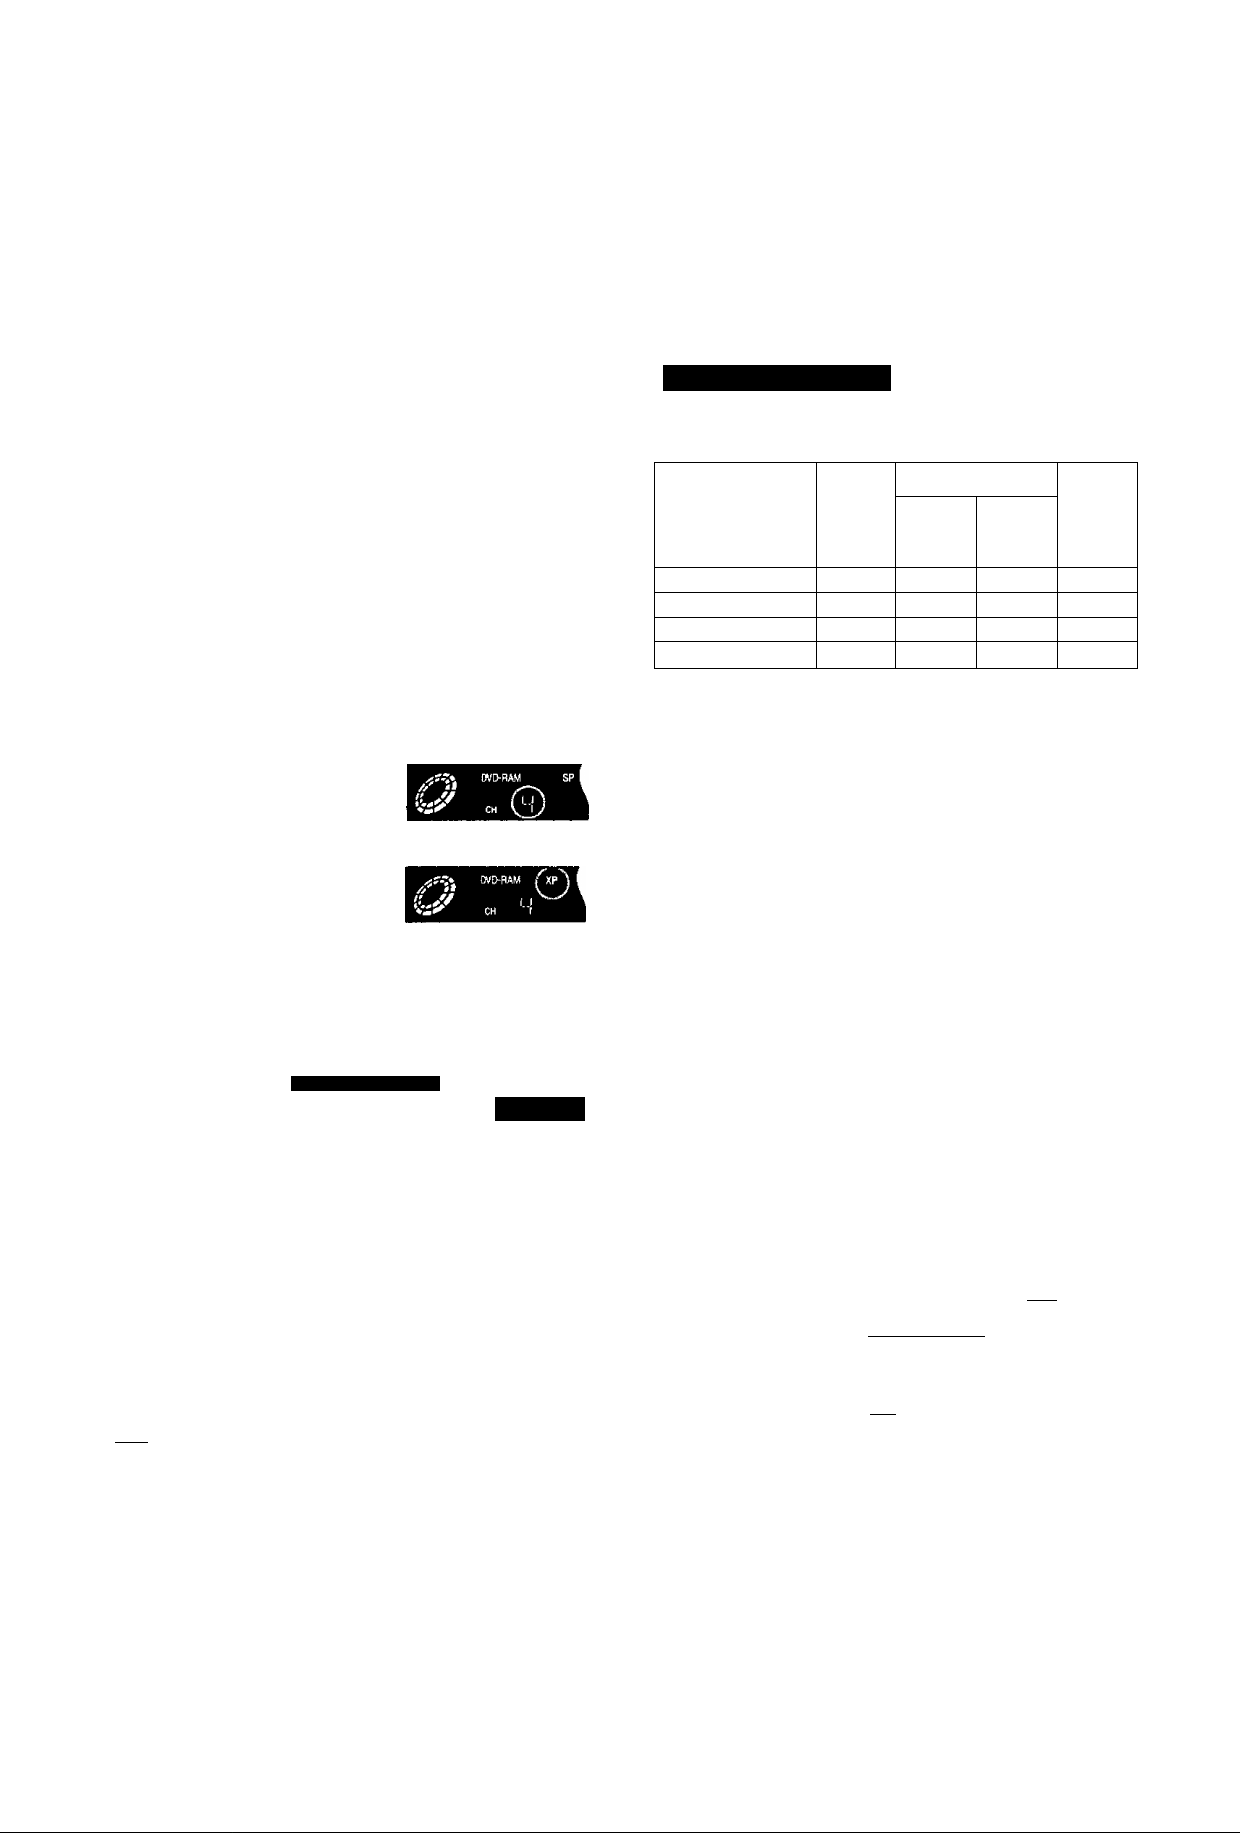
Notes on recording
Recording modes and approximate recording
times in hours
Storage Media DVD-RAM
8
оизз
шш
DVD-R
(4.7 GB)
4
СЕИ^
HDD
Mode
XP (High quality) 8.5
SP (Normal)
LP (Long play)
EP (Extra long play) 52 6 12 6
• FR (Flexible Recording Mode) can be set when using timer
recording or when dubbing.
-When carrying out timer recording or flexible recording to
HDD.
FR automatically adjusts the recording mode to enable the pro
gram to fit exactly into the space of an unused DVD-RAM/R (4.7
GB).
-When carrying out timer recording or flexible recording to
DVD-RAM/R.
FR compares the length of the program to be recorded with the
available space on the disc. Based on this, it automatically
selects the recording mode that will fit the program most accu
rately into the remaining space while maintaining the best possi
ble picture quality. For example, when recording a 90-minute
program onto a new DVD-RAM disc, FR automatically selects a
recording rate between “XP” and “SP”.
-When dubbing
The unit automatically adjusts the recording mode during dub
bing so that the program fits into the space available while main
taining as closely as possible the original picture quality.
• If there are still pictures stored in the selected drive, recording
times may vary from those given in the table above.
(40 GB)
17 2 4 2
34 4
Single
sided
(4.7 GB)
Double-
sided
(9.4 GB)
1 2 1
■ Recording/Dubbing/Transferring of a program
This unit incorporates copyright protection technology for recording
equipment known as CPRM (-►page 65). With some programs
recording, dubbing and/or transferring may not be possible.
Recording limit
No recording limit
Usable Media
Ш:]
ШШ Пьвф i!Tt!il
ШШ ■ [щф X"™'
Recording limited
to one time
Recording
not possible
^ Can be dubbed to HDD but cannot be played back.
Transfer: this is when a program is moved to another storage
media. The original program will be erased.
nitiii
You cannot record on DVD-R.
You cannot record/dub
on any media.
o>
c
t
о
u
tc
RQT6637
Page 20
Recording television programs
Flexible Recording—recording the best
quality pictures in a set time
■
■a
o
u
cc
DVD, TV
•, REC
A v,CH
Watching the television while recording
■:nm
The unit calculates a recording rate that enables the recording to fit
in the time you set (within the remaining time on the HDD or disc)
and with the best possible picture quality.
1 While stopped
Press [FUNCTIONS].
The FUNCTIONS window appears (-»page 53).
Press [A, ► ]
to select “FLEXI
BLE REC” and
then [ENTER].
^FLEXIBLE REC
Press [◄, ►] to select “Hour” or
“Min.” and press [A, ▼] to change the
recording time.
To start recording
Press [A, T, ◄, ►] to select “Start”
and press [ENTER].
Recording starts.
FLEXIBLE REC
Record on FR mode
Maximum rectime 1 Hour 23 Min.
rSeTtaTrectime I 1 Hour23Min.|
I Start 11 C^cel 1
Pictures being recorded are unaffected.
© Switch [DVD, TV] to “TV”.
© Press [TV/VIDEO] to change the television's input mode to
. “TV”.
@ Press [a V, CH] to change channels.
• You can also select the channel with the numbered buttons
e.g., “5"; [0] [5]
“15”: [1]->[5]
“115": [100]->[1]->[5]
it may not be possible to record to the finish of the program if the
remaining time doesn't allow.
For your reference
• Press [STATUS] during recording to show the remaining time.
• It is not possible to change channel or recording mode while Flexi
ble Recording is paused.
• Recording time reduces if you repeatedly pause recording.
• The time setting is possible up to 6 hours.
One Touch Recording—Specify a time
to stop recording
This is a simple way of specifying a time to stop recording when you
are in a hurry or before you go to bed. You can set the time up to 4
hours in advance.
During recording
Press [•, REC] to select the recording time.
Each time you press the button: e.g.,
0:30 1:00 1:30
(Counter) ■<—
To cancel
During recording, press
(Recording continues.)
For your reference
• Press [STATUS] to show the time remaining until recording fin
ishes.
• This does not work during timer recordings or while using Flexible
Recording (-► above).
• Recording stops and the set time is cleared if you press [■].
• The set time is cleared if you change the recording mode or chan
nel while recording is paused.
- 2:00
4:00 ^
3:00
REC] until the counter appears.
Page 21

Playing while you are recording
A,
ENTER
Simultaneous rec and play
ПОЗ
You can play a program previously recorded.
1 During recording
Press [DIRECT NAVIGATOR].
The program list (-•page 26) appears.
2 Press [A, T] to select a program and
press [ENTER].
e.g., while recording program 2 (sport)
* •
I
C
О
u
0)
oc
TIME SLIP
Playing from the beginning of the pro
gram you are recording—Chasing play
During recording
Press [►] (PLAY^
Play starts from the beginning of the program being recorded.
e.g.,
while recording program 2 (sport)
О
You are recording a sports
program (2) and you want to
watch it from the beginning.
• Sound is not output while fast-forwarding.
• Play cannot be started until at least 2 seconds after recording
starts.
• You cannot catch up to the point currently being recorded using
fast-forward. If you wish to view-the program as it is being
recorded, press [■] to stop play.
The same sports program is
played back from the begin
ning. (Recording continues.)
You want to watch the movie
you recorded yesterday (pro
gram 1)
• Sound is not output while fast-forwarding.
• You cannot edit programs {-^page 40) during simultaneous rec
and play.
being recorded.
Reviewing the recorded images white
recording—Time Slip
You can play the program being recorded to check that it is being recorded
correctly. You can also check parts that were recorded previously.
1
During recording
Press nriWIE SLIP].
• Images from 30
seconds previous are
displayed. You will hear
the playback audio.
Within 5 seconds
Press [A, T] to enter the time and
press [ENTER].
• PressfA, Vltoalterin
one-minute units. Press
and hold [A, T] to alter
in 10-minute units.
RTiTil:
maximum 999 minutes
maximum 360 minutes
e.g.. Go back 5 minutes
To stop play and recording
© Press [■]. (Play stops.)
Wait 2 seconds.
<2) Press [■]. (Recording stops.)
•To stop timer recording, press
seconds.
], then [ENTER] within 5
The playback display is shown on the full screen after 5 seconds.
Г!ЯЯ
The recording and play images cannot be shown at the same time if
you set ‘TV Type" to “480P” (->page 16).
Page 22

IS
•S
O)
.c
„I*
Playing discs
Regarding the HDD (Hard Disk Drive)
When using this unit for the 'first time, the
HDD has nothing recorded on it. You must
record a program etc to the HDD before you
can enjoy playback.
ENTER
1
Numbered buttons
TOP MENU
II
Auto power-off
The unit switches to standby after about 6 hours in the stop mode. You can turn this feature off or change the time to 2 hours (-
I Up—Off Timer).
page 60, Set
Page 23

I!R»1 rmi FWïia lAWi H71 rvCDl
Subsequent to Resume Function (•+ right), reference is
made to steps 1-3 only where necessary.
When a menu screen appears on the television
¡■yj,yj I vco ;
1
Press [c!), DVD POWER] to turn the unit on.
2
Press [HDD] or [DVD] to select the
playback drive Drive, page 65). fî^
The HDD or DVD button lights up on the unit.
• It is not possible to playback both HDD {Hard Disk Drive)
and DVD drive simultaneously.
If you selected the DVD drive
Press [^, OPEN/CLOSE] to open the
tray and insert a disc (-»page is).
• Press the button again to close the tray.
• Insert label-up. (Load double-sided discs so the label for the
side you want to play is facing up.)
• It is not possible to play continuously from one side of a
double-sided disc to the other. You will need to eject the disc
and turn it over.
• When using 8 cm (3") DVD-RAM, remove the disc from the
cartridge and insert it, making sure you align it with the
groove.
• If you put a disc in while the HDD is selected, the DVD but
ton on the unit will flash while the unit reads the disc.
• If Cartridge Protection is activated (-»page 8), pressing
OPEN/CLOSE] will cause playback to begin automatically.
Press [►] (PLAY).
The unit takes some time to read the disc
before play starts.
• If the resume function (-»right) is not
active, playback will begin from the most
recently recorded program.
• If you want to play the beginning of the disc (e.g., the first
program, chapter or title), select “PLAY FROM TOP” in the
FUNCTIONS window (^page 53).
To stop play
Press [■] (When “PLAY” flashes Resume Function,
• The screen saver on the right may
appear when you stop play. Press [■]
again and you can use this unit's tuner to
watch television.
To pause play
Press [11].
Press again to restart play
una
• If you select another drive while playback is in progress, playback
will be stopped. If using DVD-Video, the contents of the menu
screen may be returned to their initial state.
• If a disc is loaded and DVD drive is selected, the unit will come on
and play will start when you press [►] (PLAY).
• When you play a disc with an audio-only track, the video from the
previous disc may continue to be shown on the television.
• Actual sound levels for DVD-Video are lower compared to televi
sion broadcast or playback of other discs. To avoid a sudden
increase in volume level when switching from DVD-Video, reduce
the volume setting before playing other sources or switching to
television broadcast.
right).
[VC^
Switch [DVD, TV] to "DVD” and
Press the numbered buttons (0,1
e.g., “5”: [0]-» [5]
“15": [1]-»[5]
-9) to select an item.
Press [A, ▼, to select an item and press
[ENTER].
• You may also be able to use the numbered buttons (0, 1-9) to
select an item.
Other buttons used to operate menus
Read the disc’s instructions for further details about operation.
[►»] [►►/►«]: Shows the next menu.
[«^] [W-</-*^]: Shows the previous menu.
[RETURN]: Shows the menu screen. |VCD|
[TOP MENU]: Shows the first menu screen.
[MENU]: Shows the menu screen. |¡2E53
• Discs continue to rotate while menus are displayed. Press [■]
when you have finished viewing to preserve the unit’s motor and
your television screen.
• If “(S)” appears on the television, the operation is prohibited by
the unit or disc.
• Functions available vary from disc to disc.
Starting play from where you stopped it
—Resume Function
nitig rnn itiTitiii fïpn&q fvcp]
(When the elapsed play time is displayed)
1
During play
Press [■].
The unit memorizes the position.
2
While “PLAY” is flashing on the display
Press [►] (PLAY).
Play starts from where you stopped it.
To cancel the resume function
Press [■] until “PLAY” goes out.
(The position is also cleared when you turn the unit off. When the
DVD drive is selected, the position is cleared if you open the disc
tray.)
To start play from a memorized position after turning the unit off
Press [POSITION MEMORY] during play.
(The message “Position Memorized” appears on the television.)
Now when you press [►] (PLAY) after switching the unit to standby
and back on, play starts from the memorized position and the posi
tion is cleared.
For your reference
If you press [■] before switching the unit to standby after pressing
[POSITION MEMORY] to memorize a position, play will resume
from the position you pressed [■] when you press [►] (PLAY).
liMiBTi [ycp]
• The position is memorized when you press [POSITION MEMORY]
and cleared when you open the disc tray.
s
.c
0.
O)
I
• Positions recorded by pressing [POSITION MEMORY] remain
memorized even after the disc tray is opened.
• You cannot mark positions if the disc is write-protected, I
Page 24

1§
•S
O)
C
Skipping programs and commercials
Starting play from a selected program, title, chapter, or track
RTiin ГТШ r»Vi*Vt | vcD |
During play or while stopped
Press the numbered buttons to select the item.
e.g., "5”: [0] -► [5] e.g., “5”: [0] -► [0] -► [5]
"15”: [1]->[5] “15”: [0]-> [1 ]-» [5]
идя
• This may not work with some discs.
• This works only when stopped with some discs (the screen saver
is on the television).
TIME SLIP
CM SKIP
Skipping
r*Vi»Vi t»rni [VCDI
You can skip to the beginning of tracks (CD and Video CD) and
chapters (DVD-Video) and restart play from there.
On HDD, DVD-RAM and DVD-R, you can skip to the start of a pro
gram or to a marker (-f page 28) and start play from there.
During play or while paused
Press [ \« ] or [ ].
• Press or [►►/►w] on the main unit.
[!◄◄] backward
[►W] [►►/►w]: forward
Each press increases the number of skips.
1 VCD I
Play position
Twice Once
Chapter/track Chapt
----
ti^]
1233 ЕПД ОЛДЗ
Twice Once
Program Pro
^
For your reference
Pressing [h4^] or [►►!] [►►/►M] while the playback
' control feature on Video CDs (^page 65) is working may take you to
a menu screen.
RQT6637
Once
Twice
Í .. _ .Л
зг/track Ctiapter/track
[►И]
[►►/►►il
Play position Marker
Once Twice I Three tin
/ V V Л
Program |
[MH] —►
[►►/►►I]
. —
jram
_____
Selecting an amount of time to skip— Time Slip
■:i44 liMJji
1 During play
Press [TIME SLIP].
2 Within 5 seconds
Press [▲, ▼] to enter the time and
then press [ENTER].
e.g., Go back 5 minutes
Press to alter in one-minute units. Press and hold to alter in
10-minute units (can be set between 1 minute and 999 min
utes with HDD, 1 minute and 360 minutes with DVD-RAM/-R
in units of one minute).
Skipping a minute forward—CM Skip
Q33 EQ2I
During play
Press [CM SKIP].
Play restarts from approximately a minute later,
npia
• If the start of the next program is within one minute of the point you
skipped from, play restarts from the beginning of that program.
• Since the length of commercials varies, this feature may not skip
commercials accurately.
Page 25

Playing still pictures (JPEG)
Inserting/Removing the PC card
Carry out insertion/removal of the PC card after turning the
unit off.
When the card indicator in the unit display is flashing, the card is being
read from or written to. Do not turn off the power or remove the card.
Such action may result in malfunction or loss of the card's contents.
Inserting the card
Hold the edge of the card
and insert until firmly hom^
Do not press directly
on the memory card
Terminal connections
facing into the unit
The labeled side
facing upwards
Removing the card
• If using the adaptor, remove the adaptor and card together.
• If the eject button does not come out
To remove the PC card, press the card in once more and then
repeat steps 0~0'
• It is not possible to open the disc tray while the still pictures
screen is displayed.
While stopped
1
Press [FUNCTIONS].
The FUNCTIONS window appears (-♦page 53).
2
Press [Aj T, ◄, ►] to select
“JPEG” and press [ENTER].
Select the still picture foider for display.
3
© Press [A, T] to select “INPUT’and press [ENTER].
(A list of the folders in the drive appears.)
(D Press [◄] and [A, ▼] to select the drive and press [►],
@ Press [A, T] to select the folder and press [ENTER].
Align to
match the mark
JPEG
Displaying still pictures (Album Display)
You can display a list of still pictures or display pictures one by one
from any folder existing on the PC card, HDD or DVD-RAM.
4 Press [A, T] to select “Album” and
press [ENTER].
A list of the still pictures in the folder appears.
To display still pictures one by one
Press [A, ▼, ◄, ►] to select a
still picture and then [ENTER].
• If there are more than 10 still
pictures, press (A, T, ◄, ►jto
select “Next" and press
[ENTER]. Select “Prev.” to move
back.
• You can also select a page of
still pictures with the numbered
buttons.
e.g.,“5’’;[0]->[0]-»[5] “15”: [0]
To stop still picture display
Press [RETURN]. (The still picture list containing the picture you first
selected will be displayed.)
To select the next or previous still picture
While in still picture display, press [◄, ►].
[◄]: previous still picture [►]: next still picture
• The still picture changes every time the button is pressed.
To display still pictures one by one with constant
interval (Slide Show)
The still pictures in the folder will be displayed one by one with a
constant interval. The display timing can be altered in units of 1 sec
ond.
I INPUT "too'IMi'' 1
JPEG
ALBUM
S3 21 ss
mccT
A
nn -> [5]
4 Press [A, T] to select “Slide Show”
and press [ENTER], s
The still pictures in the folder appear in numerical order.
To change the display timing
© After step 3 at left, press [A, ▼] to select “Settings” and press
[ENTER].
@ Press (A, ▼] to select “Slide Show”.
© Press ["4, ►] to select the desired timing between still pictures
(0 - 30 seconds) (in base units of 1 second).
@ Press [ENTER].
To stop slide show
Press [RETURN]. (Menu screen appears.)
To select the next or previous still picture
While in still picture display, press [◄, ►].
[◄]: previous still picture [►]; next still picture
• The still picture changes every time the button is pressed.
To erase still pictures
(Still pictures are erased irretrievably by this procedure.)
While in still picture display
© Press [ERASE].
@ Select “Erase" and press [ENTER].
To rotate the picture
While in stiii picture display
© Press [ENTER].
© Press[A, T]to select “Rotate RIGHT” or “Rotate LEFT’and
press [ENTER],
• The still picture as a whole is rotated.
• Rotation information will not be stored.
To display information about the still pictures
While in still picture display, press [ENTER].
(Date, “folder number” - “file number” and number of still pictures
are displayed.)
To give a folder a title
After step 3 on the left column, you can input a folder title
(->page 45, “Entering text"):
• Titles input using this unit will not be displayed on other equip
ment.
Ac
0
■Q
01
C
I
Q.
RQT6637
Page 26

Using the Direct Navigator
About the program list
Write-protected ---------------------------
Displayed when you have protected
the program.
Copy-protected ---------------------------
Displayed when you have recorded a
program that has copy protection,
from CATV broadcasts, for example.
Unable to play
Displayed if you cannot play the program.
Currently recording
Displayed when the program
is being recorded.
---------------------------------
-------------------------
-aoosCJElM
u
-S
Oi
,c
I
Q.
i:MAi HM»a:i
A list of programs is created as you record them. You can use this
list to find programs to watch.
Press [DIRECT NAVIGATOR],
1
The highlighted program plays in the background.
ENTER
RETURN
And more...
: Programs that have been rerouted to the HDD i:i«f»i {-
Relief Recording, page 35)
e
: Programs that allow one copy E33
To erase a program that is being played
back
Since the program and any play lists next page) created
from it are erased irretrievably by this procedure, you
should be certain you wish to erase before carrying it out.
1 During play
Press [ERASE].
A confirmation screen will be displayed.
2 Press [ M ] to select “Erase” and press
[ENTER].
Select “Cancel" and press [ENTER] to cancel.
una
• it is not possible to erase the program when you are carrying out
simultaneous rec and play (->page 21).
• The amount of space remaining on the disc does not increase
even if you erase programs. [¡033
2 Press [A , T] to select the program
and press [ENTER].
• You can also select programs with the numbered buttons,
e.g., i:!»]»!
“5": [0] -> [0] -k [5]
“15": [01^[1]-»[5]
“5": [0] -► [5]
Play of the images that were playing in the background con
tinues.
To stop play
Press [■].
To clear the program list
Press [RETURN],
RQT6637
Page 27

Playing play lists
,®/® :'$!)
vcn Pto, TVAiWO nECtICCE
o o o ©
Numbered
buttons
d) @ d)
0 <D <D
© ® ©
o ® ®
PLAY LIST
Playing play list scenes
1
While stopped
Press [PLAY LIST].
2
Press [A, T] to select the play list
that contains the scene you want to
play and press [> ].
PLAY U$T
ita r“
fflL
SI Scenes |
ENTER
nreocK i£co: exsplav im&jp
RETURN
■o o o o,
OPFwoLwe ewue
m f t nsi Cwi
SET UP uxna MVTSEiici aiaF
ERASE
owst oseKs piroaot siBigi
-QQ □ CD
{¡¡¡¡¡] |iQ2|
Create play lists first (-»page 44).
Playing play lists
1 While stopped
Press [PLAY LIST].
The play list appears.
E3I^ ^ E21f^i9
r T5|
2 Press [A, T] to select the play list
and press [ENTER].
• You can also select play lists by entering a 2-digit number
with the numbered buttons.
e.g./5”: [0][5]
“15”: [1]-M5]
All the scenes in the play list are played.
To stop play list play
Press [■]. (The play list appears.)
To clear the play list
Press [RETURN].
Press [A, ▼] to select
‘Play Scenes’
and press [ENTER].
The scene list appears.
1 12123 «j03 0
put LIST
bilMiTIililB
551
aa^O
4 Press [A, T, ◄ , ►] to select the
scene and press [ENTER].
The scene you select is played.
To show scene 10 and later
Press [A, ▼, ◄, ►] to select “Next" and press [ENTER].
• You can also select a page of scenes by entering a 3-digit
number with the numbered buttons.
. e.g.,“5": [0]-» [0]-► [5]
“15”:[0]->[1]-^[5j
To stop scene play
Press [■]. (The scene list appears.)
To clear the scene list
Press [RETURN].
To erase a play list or a play list scene
during playback
1
While playing back a play list or play list scene
Press [ERASE]
A confirmation screen will be displayed.
“Erase/Cancel” or “Yes/No” will be
displayed. Select “Erase” or “Yes”
and press [ENTER].
Select “Cancel” or “No” and press [ENTER] to cancel.
•g
s
.c
0.
O)
ROT6637
Page 28

»
0
CQ
•Q
01
c
I'
a.
other methods of play
►►
►
RETURN
DISPLAY
MARKER
Using on-screen menus to mark
positions
Displaying the marker icon
1 During play
Press [DISPLAY].
The on-screen menus appear, (e.g., DVD-RAM)
Sound treck
I Viprnriwa
SubttHe
Audio channel
Press [A, T] to select the “Play” and
press [►].
A-B reoeat 1
Fteoeat play
Marker
Press [A, ▼] to select “Marker” and
press [^] to highlight the first
asterisk (^).
cQsi uiiiiflj ggiifvc^
warn ■ »i.i.mffin'.TM
ci3ai
oa
ED
Ksa
ЕВЯ ижжжжжжжи
You can mark positions by pressing [MARKER], Also use on-screen
menus to mark, recall, and clear positions.
i:ra:j пи»д:1
Mark up to 999 positions. The unit records the markers directly onto
the disc and they remain intact even if you remove the disc.
rararatrafvcDi
Mark up to 5 positions. The markers clear when you open the disc
tray.
Marking positions directly—MARKER
During play
Press [MARKER].
One marker is added.
Unit’s display
h >1 n n I
I I M I ' I
Marking positions
Press [ <, ^] to select an asterisk (>k) and
press [ENTER].
One marker is added.
When marking positions 11 and above
® Press [◄,►] to highlight “1-10”.
@ Press [A, T] to select “11-20".
You can select the next group of
10 when the current group is full.
® Press [►].
The first asterisk is highlighted.
@ Press [ENTER] to mark a position.
Playing from a marked position
Press [M , ^] to select a marker number
and press [ENTER].
Play starts from the marked position.
Clearing markers
Press [◄, ►] to select a marker number
and press [CANCEL].
An asterisk replaces the number and the position is cleared.
идя
• You cannot use this feature if:
-the disc’s elapsed play time is not shown in the display.
-you are using a play list, imiti 1:мд|
-when Disc Protection (-»page 38) or Cartridge Protection
(^page 8) is activated. ГШ1
To clear the on-screen menus
Press [RETURN].
• Subtitles around markers may fail to appear.
• Markers are cleared when you finalize DVD-R.
• Markers on HDD, DVD-RAM and DVD-R are ordered by time, so
marker numbers can change when you add and delete them.
Page 29

Program play
You can select up to 100 tracks to play in the order you choose.
Preparation
Press [DVD] to select DVD drive.
Random play
gg^fvcDi
The unit plays the tracks on a disc in random order.
Preparation
Press [DVD] to select DVD drive.
While stopped
Press [FUNCTIONS].
The FUNCTIONS window appears (->page 53).
Press [A, ▼, ◄, ►] to select “PRO
GRAM PLAY’’ and press [ENTER].
PROGRAM PLAY
Press the numbered buttons to select
the track.
e.g.,“5"; [0]
. “15": [1]
Repeat step 3 to select other tracks.
• You can also use the cursor buttons to select tracks.
©Press [ENTER], then press [▲, ▼] to select the track.
Select “ALL’ to enter all tracks on the disc.
@ Press [ENTER],
[5]
[5]
PROGflAM PLAY
SElfCT^
i-
ffituS«
Choose e UbcK then press EffTER.
No. Trsck Time
o r
PUY
Total time ot the program
4 Press [►] (PLAY).
Play starts in the programmed sequence.
...
Pto"-1
I Clear f
I All Clear I
While stopped
Press [FUNCTIONS].
The FUNCTIONS window appears (-»page 53).
Press [A, T, ◄, ►] to select “RAN
DOM PLAY” and press [ENTER].
RANDOM PLAYBACK
RANDOM PLAY
Press PLAY lo start.
PUIY
V O
RnURR
3 Press [►] (PLAY).
To cancel random play
© Press [■] until the random play screen appears.
@ Press [RETURN].
Fast forward and rewind—SEARCH
KaivcDi
During play
Press [◄◄] or [►►].
• Press and hold or [►►/>
[◄◄], Backward
[►►], [►►/►w]: Forward
• The speed increases up to 5 steps.
• Press [►] (PLAY) to restart play.
• Audio will be heard during search. You can turn this audio off if you
want to (-P page 61, Audio—Audio during Search).
on the main unit.
-Q
.C
Q.
■5
s'
m
O)
To move to the page before or after the one shown
Press or [►►].
To clear the programmed tracks one by one
© Press[A, Tjto select the track you want to clear.
@ Press [CANCEL].
Alternatively, press [▲, ▼, <, ►] to select “Clear” and press
[ENTER],
To clear the whole program
Press [A, T, ◄, ►] to select “All Clear” and press [ENTER],
• The whole program is also cleared when you turn the unit off, open
the disc tray or change the selected drive to HDD.
To exit the program mode
© Press [■] during play until the program play screen is displayed.
@ Press [RETURN],
Slow-motion play
ciii3 mi EQaa [iois]
While paused
Press [◄◄] or [►►].
• Press and hold [t^/-* *^] or [►►/►►!] on the main unit.
[◄◄], [w^/-^^]: Backward (does not work with Video CDs)
[►►], [►►/►w]: Forward
• The speed increases up to 5 steps.
• Press [►] (PLAY) to restart play.
To play DVD-R recorded on this unit on other players
You can play DVD-R on other compatible DVD players by finalizing
them on this unit (->page 38). The disc title (-^page 38) and the pro
gram titles (-►page 40) will appear as menus.
RQT6637
Page 30

Changing audio 3
■ While playing HDD or DVD-RAM
LR^L^R
t
_______
• If you have recorded an SAP broadcast by pressing [AUDIO] to
1
_.Dy(>:RAM_
select SAP
MAIN SAP
AUDIO
О
CQ
•Q
ITTrn rnn iiWi'Pl I VCD I
О)
You can change the audio being received or played.
,C
During reception or play
I*
Press [AUDIO].
How the type changes depends on when you press the button.
■ When receiving MTS audio (Multi-channel Tele
vision Sound Stereo) or recording through the
DV input terminal
stereo
Depending on the type of television broadcast and sound selected,
received and recorded sound is as follows;
Televisioni^.
broadcast
SAP Mono
t____
_________
I
Audio
selected
Stereo
+SAP
Mono
-i-SAP
Stereo
Stereo SAP Mono
Main
audio
(Stereo)*'
Main
audio
(Monaural)
Stereo*’ Stereo*' Monaural
Secondary
audio program
(SAP)*^
Secondary
audio program
(SAP)*^
Mono Monaural Monaural
Select “Mono” if reception is poor during a stereo broadcast.
If recorded in this mode, main audio is also recorded. Consequently
it is possible to choose between MAIN and SAP when playing back.
e.g., “Stereo" is selected
---------
audio
(Monaural)
audio
(Monaural)
Monaural
1 -
Main
Main
For your reference
You can change the audio for the images being played with simulta
neous rec and play and Time Slip.
■ While playing DVD-R
You cannot change audio type.
■ While playing DVD-Video
You can change the audio channel number each time you press the
button. This allows you to change things like the soundtrack language.
Sound track
e.g., English is the selected language.
The language is switched to French.
■ While playing Video CD
LR->-L->R
t
_______
If you cannot change the audio type when you have used only an
optical digital cable for connection, set “Dolby Digital” to “PCM”
(^page 62). Alternatively, you may connect to an amplifier with an
audio/video cable and change the input on the amplifier to suit the
connection.
I
_ D J
e.g., “L R” is selected
“((" appears when the unit
is receiving the type of
audio you selected.
• If you alter the sound setting during recording, the sound wilt be
altered in the recording itself also.
• It will not be possible to alter the sound by pressing [AUDIO] in the
following cases:
- When the DVD drive is selected and a DVD-R is in the disc tray.
- When recording mode is XP and LPCM has been selected in
the SETUP menu, Audio Mode for XP Recording (->page 61).
• You cannot change audio type while recording with DVD-R or record
ing on DVD-RAM with LPCM sound. You can use the SETUP menus
to select which audio type of an SAP broadcast is recorded, either
___ • When recording through the DV input terminal, the unit records the
“Main" or "SAP" (-+page 61, Audio—Select MTS for DVD-R or LPCM).
audio data as is from the tape, irrespective of the type you select
with [AUDIO] (•♦page 61, “Select Audio CH for DV input”).
Page 31

Recording from an external device
PUP erra TV
tVD ( ( TV
:aD)
(51® ®
. . I—aow-'SÉAACH
®®[CE) (E>
•, REC
A v,CH
REC MODE
'vCB PH»* rv.VIDEO PEC HOCE
o ©-
0 (D (D
■0 0®
C33’cn^
T'^^51 KAYllST
Wv o
ENTER
FUNCTIONS
.raoMW OÍU DBPwr TtMisup,
o o o
cppicj^ai 5TÍTUS I—iKjp—I
SETuf *uoio wrseey^gw
t I CD < 11 I
- ' mneatmmER
'^.CZ3'
Recording from a video cassette recorder
Preparation
• Connect a video cassette recorder to this unit’s input terminals
(^page 58).
• Connect DV equipment through the D'V input terminal for better
results. Before connecting, turn this unit and the equipment to be
connected off. After connecting, turn the DV equipment on before
turning the unit on.
1
While stopped
Press [INPUT SELECT] to select the
input channel for the equipment you
have connected.
Select L1,L2, L3 or DV.
• You can also select the input channel by pressing [a v,
CH].
Press [REC MODE] to select the
recording mode (XP, SP, LP or EP).
Start play on the other equipment.
3
4
Press [•, REC] at the point you want
to start recording.
Recording starts.
To skip unwanted parts
Press [I I] to pause recording. (Press again to restart recording.)
To stop recording
Press [■].
INPUT SELECT
DV Automatic Recording (DV AUTO REC)
RTiitl l:WT,l
If you connect a DV equipment (e.g.. Digital Video Camera) to the
DV input terminal on the front of the unit (-»page 58) and record,
automatic generation of programs and play lists is possible.
Preparation
• Turn off this unit and the equipment to be connected. Only turn the
power on again after connecting the equipment to the DV input ter
minal {-»page 58, Q).
• Pause play of the DV equipment at the point you want recording to
start.
1
While stopped
Press [REC MODE] to select the
recording mode (XP, SP, LP or EP).
2
Press [FUNCTIONS].
The FUNCTIONS window appears (-»page 53).
Press [A, T, ◄, ►] to select “DV
3
AUTO REC” and then [ENTER].
DV AUTO REC screen appears. p—
(The DV equipment pauses automatically if it mim
was playing.)
-------------
DV AUTO REC
Press [◄, ►] to select
“Rec” and then [ENTER].
Recording starts.
To Stop recording
Press [■].
When recording finishes
The confirmation screen appears. Press [ENTER] to finish DV auto
recording.
una
• If recording does not begin or is interrupted, check the
connections and settings of the equipment.
• It is not possible to carry out Chasing play or Simultaneous rec
and play of the program that are being recorded.
• The DV equipment name may not be shown correctly.
• if “Cannot detect DV connection” is displayed on the television,
turn the DV equipment off and on once again.
• You cannot start recording until the images from the DV equipment
appear on the television,
• Do not operate the DV equipment during recording, as this will
cause recording to stop.
• Recording may not be performed as desired if the time codes on
the tape in the DV equipment are not successive.
• During copying, a marker is automatically assigned to points in the
original recording where recording was stopped or paused.
• The date and time information on the tape of the DV equipment
will not be recorded.
• Depending on the equipment, the DV Automatic Recording may
not operate properly.
• The audio recorded is the audio selected at “Select Audio CH for
DV input” (-»page 61).
■
•Q
•Q
Zi
Cl
• If flexible recording (->page 20) is used instead of steps 2 and 4, set
tings can be made so that recording continues to the end of the video.
• In the case of some DV equipment (e.g., Digital Video Camera),
pictures and sound may not be received properly.
• The audio recorded through the DV input terminal is the audio
selected at “Select Audio CH for DV input” {-»page 61),
Almost all videos and DVD software on sale have been
treated to prevent illegal copying. Any software that has
been so treated cannot be recorded using this unit.
RQT6637
Page 32

Dubbing programs or play list
------
® (D ®
0 (D ®
il® 0 0
O
(E>
Numbered
buttons"
HDD
Select items for dubbing.
©Press [A, T] to select the dub
bing list table and press [ENTER].
Dubbing List appears.
■
t
■Q
■Q
3
a
PUWLlST
xO
'Oy
■ ICP /
ENTER
FUNCTIONS
fflOGOCa mu DQPUty 7HC9LP
o o o o
L I [ *■ 1 L>*< I
SETUP MJOK> INPUTSOiCT
t I r~i o o
gtmws hjo«» HM>g»
t i [ 1 L I
RETURN
DUBBING-
• It is possible to dub a program or play list to another drive.
• Dubbing a play list will create a program.
• You can dub a maximum of 250 programs to HDD and 99 pro
grams to DVD-RAM or DVD-R.
Preparation
Press [HDD] to select HDD drive.
• You can select the kind of picture display using “Dubbing Aspecf
(-►page 61).
• When dubbing SAP broadcast using a recording mode other than
“High Speed”, the kind of sound may be selected at “Select Dub
bing Audio to DVD-RAM”(->page 61).
When dubbing SAP broadcast to DVD-R or dubbing sound using
LPCM, the setting at “Select MTS for DVD-R or LPCM” is given
priority (-kpage 61).
1 While stopped
Press [FUNCTIONS].
The FUNCTIONS window appears (-»page 53).
2 Press [ A, ▼, ◄, ► ] to select
“DUBBING” and press [ENTER].
DUBBING
e.g., Dubbing from HDD to DVD-RAM
@ Press [A, T] to select “—and press [ENTER].
Dubbing select screen appears.
@ Press [-4, ►] to select “Select Programs” or “Select Play Lists”.
® Press [A, T] to select the program or play list for dubbing
and press [ENTER],
• Repeat steps 4-@ to 4-© to register more than one.
(Check that the dubbing list “Amount” does not exceed the
“Remain" indicated).
• You can also select the program or play list with the num
bered buttons (0, 1-9).
e.g., HDD programs or Play lists
“5”: [0] -► [0] -► [5]
“15": [0]-k[1]->[5]
DVD-RAM programs
“5”: [0] -► [5]
©Press [RETURN].
“15": [1]->[5]
Return to step 2.
Select the recording mode.
©Press [A, ▼] to select “Rec Mode” and press [ENTER].
©Press [A, T] to select the recording mode and press
[ENTER].
Dubbing
direction
HDD -► RAM
HDD -► DVD-R
RAM -► HDD
"'Cannot be selected for programs with recording limit or play list.
"^Cannot be selected for play list.
High
Speed
0*2
Recording mode
XP
SP
o o O O O
X
o o o o O
X X X X X
LP EP FR
0 While the screen in step 2 is displayed
Press [A, ▼] to select “Start dub
bing” and press [ENTER].
The confirmation screen will be displayed.
Press [◄, ►] to select “Yes" and press [ENTER] to start dubbing.
Dubbing list table
Select the dubbing direction.
©While selecting “Dubbing direction"
Press [ENTER].
©Press [A, ▼] to select the dubbing direction and press
[ENTER].
To stop dubbing
Press and hold [RETURN] for 3 seconds.
• Stopping dubbing in High Speed mode partway through will cancel the
recording and any data recorded up to that point will be lost. In all other
recording modes, if dubbing is stopped partway through, the part
recorded up to that point will be recorded as one complete program.
To add or remove from the dubbing list
While the Dubbing List (-♦ step 4-©) is displayed
© Press [A, T] to select the dubbing list and press [►].
© Press [A, ▼] to select an item and press [ENTER],
• If you select “Add”, carry out steps 4-© and 4-@. Addition will
take place above the program selected in step ©.
• If you select “Erase" or “Erase AN”, a confirmation screen will be
displayed. Press [■<, ►] to select “Yes” or “No" and press
[ENTER] (Return to Dubbing List),
Page 33

• The contents o1 dubbing lists will remain in the memory even after
the power has been turned off. In the case of the DVD drive, the
contents are erased if [A] is pressed. However, note that if pro
grams and play lists are erased, all the dubbing lists will also be
erased.
• It is not possible to activate timer recording during dubbing.
• Even if you select a higher picture quality recording mode than
that of the dubbing source, it will not be possible to obtain picture
quality better than the dubbing source (although selection may be
effective in combating loss in picture quality during recording).
• When dubbing a program, playlists made from that program will
not be dubbed.
• The program settings (protect, etc) are reproduced in the dubbed
material. (If you select a recording mode other than “High Speed”,
markers are not reproduced).
• Still pictures in programs and play lists (displayed with an in
the Dubbing select screen) cannot be dubbed.
Recording Limits
Some programs may not be recordable or may have limits on num
ber of times they can be dubbed. Refer to the table below for details
about storage media and associated limits.
] Recording limit
No recording limit
Usabie Media for dubbing/transferring |
CEia ^ g
•
f=T^ nrsig
Recording limited
to one time
^ Can be dubbed to HDD but cannot be played back.
• If a program with recording limitations is dubbed from HDD to
DVD-RAM, the program is transferred (i.e. it is moved to another
storage media). The original program (including play list scenes
made from that program) are erased. When a program with
recording limitations enters a dubbing list, “ (Transfer) is
displayed and a message screen is displayed when dubbing.
• Programs with recording limitations and play lists cannot be regis
tered on the same dubbing list.
• Play lists made from programs with recording limitations cannot be
dubbed.
CEO] m
^
You cannot record on DVD-R.
One Touch Dubbing (HDD DVD)
Programs and play lists currently being played back on HDD can
simultaneously be dubbed to DVD-RAM or DVD-R.
Preparation
Press [HDD] to select HDD drive.
1 During play or while paused
Press [DUBBING].
The confirmation screen appears.
Press [◄, ►] to select “Yes” and press [ENTER].
To stop dubbing
Press and hold [RETURN] for 3 seconds.
• Stopping dubbing in High Speed mode partway through will cancel
the recording and any data recorded up to that point will be lost. In
all other recording modes, if dubbing is stopped partway through,
the part recorded up to that point will be recorded as one complete
program.
• This function works while either the program list or play list screen
is being displayed.
• Usually, dubbing takes place using “High Speed" mode for DVD-
RAM or the recording mode of the dubbing source for OVO-R.
However, with the following exceptions the recording mode is
changed automatically to “FR":
— when the program will not fit onto the disc if recorded using the
recording mode of the dubbing source.
— when dubbing play lists.
• It is not possible to activate timer recording during dubbing.
• Programs with recording limitations (including play lists made from
those programs) cannot be dubbed.
.C
-5
-Q
Q
3
HQT6637
Page 34

Timer recording
Press [ENTER].
The timer recording setting screen appears. Confirm the pro
gram and make corrections if necessary using [A, T, ◄, ►].
• To select the recording drive
© Press [◄, ►] to select “DRIVE”.
@ Press [A, ▼] to select “HDD" or “DVD".
• To change the recording mode
Press [REG MODE].
• To enter the title of the program
Press [◄, ►] to select “Enter Title” {♦page 45) and press
[ENTER].
• The current re
cording mode
(shown on the
unit’s display) is
■, <!H"l-lijjl lFilL , ;.
(g* ■ .
0=0
automatically
selected.
Preparation
• Ensure the dock (and guide channels for VCR Plus+ recording,
page 14) are set correctly.
• Cancel Disc Protection {-♦page 38) or Cartridge Protection
§
(-»page 8) if they are currently set.
o
o
£
Using VCR Plus+ codes to make timer recordings
E
Entering VCR Plus+ codes is an easy way of programming the unit
for recording. You can find these codes in newspapers and maga
zines. You can enter up to 32 programs up to a month in advance.
1 Press [VCR Plus+].
2 Press the numbered buttons to enter
the VCR PIUS+ code.
Press [-^] to move back to correct a digit.
V When you press [ENTER]
The timer recording list appears.
01 19 UlMim S:10PII SP n&atfe
OPign
Displayed if the recording can fit in the remaining space on
the HDD or disc.
Repeat steps 1-3 to program other recordings.
4 Press [RETURN].
The timer recording list disappears and the unit enters Timer
Recording standby mode (“[3" appears on the unit display).
• The unit is not off. To save power, turn the unit off by press
ing [c!), DVD POWER].
rna
• The actual time recorded may be longer than the program itself
when television programs are recorded using VCR Plus-i-.
• If the recording mode is not selected, the default setting will be the
setting on the unit at the time of setting timer recording (except for
when “XP” is selected, in which case the recording will be made in
“FR”).
• “Invalid Entry” is displayed when you enter the wrong code.
Reenter the code.
• “All timer programs are occupied.” appears if there are already 32
programs.
Oiw Timtf Prggrjni ''i
-
Page 35

Manually programming timer recordings
You can enter up to 32 programs up to a month in advance. Each
daily or weekly program is counted as one program.
Press [ENTER] when you have fin
ished programming the timer.
The timer recording list reappears.
1 Press [PROG/CHECK].
The timer recording list appears.
A line that is ready ■
for programming is
highlighted.
i.a n 64 MC VitniE tfflIPM MMPW iP rsfaatte
- WwTItmrPrWriiir
2 Press [ENTER].
The timer recording setting screen appears.
Press [►] to move through the items and change the items with [A, ▼].
• The current settings are shown each time you press [►].
• You may use the numbered buttons to enter the CHANNEL,
DATE, ON (Start Time), and OFF (Finish Time).
...-giB'.'-.cga-'^Esa
• CHANNEL (Channel number and caption)
• DATE
Current date
SUN-SAT^MON-SAT-»MON-FRI-*
WEEKLY SUN
• ON (Start time)/OFF (Finish time)
The time increases or decreases in 30-minute increments it
you hold the button.
• MODE (Recording mode -^page 19)
SP—XP—FR—EP—LP (—Return to SP)
• DRIVE
HDD — ► DVD
•RENEW
(Only when you set daily or weekly recording onto HDD
^page 36, Auto Renewal Recording)
ON^—>OFF
• Enter Title
Select “Enter Title” using
page 45).
------
»■the day before one month latere
-----
vWEEKLY SAT (—Return to Current date)
►] and press [ENTER] (->
ii ESSll.
Bans:. .
‘Q1 3fIETUE 1:IKIPMii:00PM S?
• Press [▲, T] to select “New Timer Program" and repeat
steps 2- 4 to program other recordings.
nutec t/aruE 2:311« 3:oopm SP ^(W
Nn itoier Prwjiii k—/
Displayed if the
recording can fit in
the remaining
space on the disc.
Press [PROG/CHECK] or [RETURN].
The timer recording list disappears and the unit enters Timer
Recording standby mode (“El” appears on the unit display).
The unit is not off. To save power, turn the unit off by pressing
[Cb, DVD POWER].
Notes on timer programming
V.
To cancel the unit from recording standby
Cancel all the timer recording programs using [CANCEL]
(-►page 37).
To stop recording when recording has already begun
While the recording drive is selected
Press [■], then [ENTER] within 5 seconds.
(Recording stops.)
• The remaining time displayed is based on the current recording
mode.
• Scheduled timer recordings will be activated even if playback
or other recording is already taking place.
• When recording more than one program in a row, for HDD and
DVD-RAM the first few seconds, and for DVD-R about the first
30 seconds of all programs from the second one onwards will
not be recorded.
• Timer recording will not be activated if editing or dubbing is
being carried out.
• If you set DST (Daylight Saving Time) to ON when manually
setting the clock (^page 13), timer recording may not work
when summer switches to winter and vice versa,
• When timer recording starts, the record lamp (-^page 7, Main
unit) lights, even if the unit is oft.
Relief Recording
When the recording drive is set to "DVD" for timer recording, the
unit will automatically evaluate if the program will fit onto the disc
before beginning recording. If the program will not fit then the
recording drive will be altered to “HDD” automatically.
• If the time remaining on the HDD is insufficient, as much of the
program as possible will be recorded onto the HDD.
• If there is no disc in the tray or the disc cannot be recorded on,
the recording drive will be altered to HDD.
• The recording mode will not be altered.
• The Direct Navigator shows which programs were reliefrecorded (-►page 26).
■
O)
c
Page 36

Timer recording
Check programs
1 Press [PROG/CHECK].
The timer recording list appears.
RETURN
?
o
u
2Ì
u
Auto Renewal Recording
s
If you record a program onto HDD repeatedly everyday or every
week using timer recording, the unit will record the new program
over the old one.
This function can be used only when weekly recording or
daily recording is selected for “DATE”.
While the timer recording list {->page 35, step 4) is displayed
Press [A, T] to select the program
and then [ENTER].
01 M MC WEEIIUnit tMPII ifflIPH Sr i? ->M1
02H«C 3;«niE iJOPH 3:WPH SP
Kaw timti Prooram
2 Press [<, ►] to select
“RENEW”.
3 Press [A, T] to select “ON” and then
[ENTER].
The timer recording list reappears.
• 01 MABC
®.0t 64 ABC SUN-SAT
® 03 64 ABC3/26 TUE2:30 AM 3:30 AMSP 0«e[^
□ <04 64 ABC
® '06 :64 ABC
® ,06 :64 ABC3/25 MON.10:00 AM11:00 AM
snsi.
3/26 TUE12:10 PM 1:22 PM
2:30PM 2:4DPM
9:COAM10:ODAM
3/25 MON
3/25 MONMAM 9:00AM
Hew TItnet Program
.........
1
SP
SP ^
SP '
Press ENTER orVCRPIusrlo
Store new program.
Enable
LP rS
LP ->3/31
Icon explanations
©The times overlap those in another program.
• This program is currently recording.
©The disc was full or the maximum number of programs or
scenes was reached so the program failed to record.
^ The material was copy-prohibited so it was not recorded.
©The program failed to record for some other reason.
•Programs that failed to record are displayed gray. They
are automatically deleted from the timer recording list at
4:00 AM on the second day after recording was sched
uled.
^Auto Renewal Recording indicator
The program will be automatically recorded over in
succession.
Relief Recording indicator
Programs that have been rerouted to the HDD because of
insufficient space.
Recording drive indicator
HDD g OVD
Message displayed in the CHECK line
Some of the information shown in the CHECK line may not be
correct while you are recording.
Enable: ' Displayed if the recording can fit in the remaining
space on the disc.
^ (Date): For recordings made daily or weekly, the display
will show until when recordings can be made (up
to a maximum of one month from the present time)
!: It may not be possible to record because there is
based on the time remaining on the disc.
no more space left on both HDD and DVD-RAM/R.
2 Press [PROG/CHECK] or [RETURN].
• If a program set for Auto Renewal Recording is protected, the program
will not be overwritten. Instead the program set for recording will be
. saved as a separate program, and this program wiN be the one to be
overwritten when the next Auto Renewal Recording takes place.
• When play back is taking place from the HDD, auto renewal
recording will not be carried out. The program supposed to be auto
renewal recorded will be recorded as a separate program.
• Play list scenes made from programs that were set for Auto
Renewal Recording are erased along with auto renewal.
• When there is not enough space on the HDD, the program may not
be recorded completely (even if repeating a renewal recording).
RQT6637
Page 37

Change or delete the program
1
Press [PROG/CHECK],
The timer recording list appears.
Press [A,T] to select the program.
2
• You may also select programs by inputting a 2-digit number
using the numbered buttons.
• Press [◄, ►] to move to the page preceding or following the
one on display.
Press [CANCEL] or [ADD/DLT] to
delete,
You cannot delete programs that are currently recording.
or press [ENTER] to change.
The timer recording setting screen appears.
If you pressed [ENTER] in step 3,
Move through the items with [◄, ►] and change the settings with [A, ▼ ] and press [ENTER].
Press [PROG/CHECK] or [RETURN].
• A Timer recording that is taking place in a recording mode other
than “FR" may have its end time altered.
• Even if the power is off you can still view timer recording informa
tion by pressing [PROG/CHECK],
* •
O
o
a;
.e
Page 38

HDD, Disc setting
Operation
Preparation
Press [HDD] or [DVD] to select the drive.
Enter Title
I
O)
,c
A
§
While stopped
Press [FUNCTIONS].
Press [A, T, ◄, ►] to
select “DISC SETTING”
and press [ENTER].
V e.g., DVD-RAM
Pfog# 7 Ffm 0:42(SP}
CEE>
OfM TgUriMvk ID
1 EntMTHI* I
[ Dl«c Prot^ctign
1 EfftM BÏI program» |
aiKi
1 Formvt 1
Press [A, ▼] to select
the item and press
[ENTER].
МСЯ Pta. TWBeO ПЕС WCE >5?
о о о 0
Ф @ CD
Ф Ф (D
(!) CD CD
(5® ®
HDD, DVD
ENTER
FUNCTIONS
Dtspwir msjf
To stop set up process
Press [RETURN],
• You can also use [A, T, ◄, ►] to
select “Cancel” or “No" and press
[ENTER].
o— RETURN
RETUm
DISC SETTING
You can enter up to 64 characters
(DVD-RAM) or 40 characters
(DVD-R).
®-0
tmcT^
Entering text ^ page 45
[disc Protection
Setup disc piowcticn.
If set, this will protect the disc from
accidental erasure.
Erase all programs
1233IÌQ5I
All programs and play lists
created from them will be erased
irretrievably when you use this
procedure. Check carefully
before proceeding.
ГТЯЯ
Cancel Disc Protection (-
current y set.
above) or Cartridge Protection (-» page 8) if they are
I Yea i j No“
Erase all programs
All programs and Play Uste will
be erased.
Format
l!lelil
Erase the entire contents on the
HDD.
Some DVD-RAM are unformatted.
Format them before using them in
this unit. Formatting also allows you
to erase the entire contents of a
disc.
If the disc is dirty, clean it with the recommended cleaner (-
formatting.
Formatting the disc will erass all contents.
This will takeappraximatetyl minute.
Is It OK to start formatting the disc?
: c
e.g., DVD-RAM
page 10) before
DVD-R Menu Screen
lsrjaa;f
Prior to finalizing, you can select
the background (9 kinds) that will
be displayed as the DVD Video top
menu aTer finalizing.
Finalize
This will ta):e approximately 10 minutes,
You can play DVD-R on compatible
DVD players by finalizing them on
this unit, effectively making them
into DVD-Video.
For your reference
• You can only finalize DVD-R recorded on this unit,
• You cannot record or perform editing such as giving titles and erasing
programs on DVD-R that have been finalized.
• The markers you entered (-» page 28) will be lost.
is It OK to start Itnalfzing uie disc?
RQT6637
Page 39

►
Press [^] to set (or cancel) disc
protection and press [ENTER].
►
Press [◄] to\ Press [◄] to
select “Yes” \ select “Start”
and press / and press
[ENTER]. ^ [ENTER].
rrsna
• Cancel Disc Protection page 38) or Cartridge Protection (-♦ page 8) if they are currently
set, l:rJAl
* If you enter a long title, only part of it is shown in the menu screen after finalization.
Prog# 7 I free 0;42{SP)
cxe
Uo«d 0:56 jTotatl4vk 1Q
DSC SETTWG .
qp
I En t*r Title [
\ *I1 p reqramfl |
jascT
I I
All programs and play lists are erased.
• Computer data or still pictures (JPEG) cannot be erased.
• The contents on the disc are erased even if you have set program protection.
The lock symbol appears closed
when the disc is write-protected.
O)
.c
Press [◄] to\ Press [◄] to
select “Yes” N select “Start’
and press a ^ and press
[ENTER]. ^ [ENTER].
Formatting erases all contents on the disc,
including computer data or still pictures.
Check carefully before proceeding.
►
Press [A, ▼, ◄, ►] to select the
background and press [ENTER].
Press [◄] to\ Press [◄] to
select “Yes” N
and press /
[ENTER]. ^ [ENTER].
I select “Start”
' and press
Formatting starts.
Do not turn the unit off or disconnect the AC power supply cord while the message
“Formatting the disc” is on the television. This can render the disc unusable. A message
appears when formatting is finished. Press [ENTER] to complete the procedure.
• Formatting takes up to a maximum of 70 minutes (DVD-RAM) or 1 minute (HDD),
• The contents on the disc are erased when you format it even if you have set program or disc
protection, nrji'j
• The disc cannot be formatted if Cartridge Protection is activated (-► page 8).
• It may not be possible to use a disc on this unit if you cannot format it. irwiM
• Formatting cannot be performed on DVD-R or CD-R/RW.
To stop formatting irrjjii
Press [RETURN].
You can cancel formatting if it takes more than 2 minutes. The disc must be reformatted if you
do this.
The DISC SETTING menu screen reappears.
Finalizing starts.
Do not turn the unit off or disconnect the AC power supply cord while the message
“Finalizing the disc” is on the television. This will render the disc unusable. Finalizing
takes up to 15 minutes. A message appears when finalizing is finished. Press [ENTER] to
complete the procedure.
After finalizing...
The video and audio is recorded according to the DVD-Video specifications, and your very
own DVD-Video is created.
• Programs longer than 5 minutes are divided into about five-minute chapters.
• These DVD-R can be played on other Panasonic DVD players, but this is not guaranteed.
Play may not be possible due to the player you are using, the DVD-R, or the condition of the
recording. Play the disc using this unit if you experience problems with other equipment.
Visit Panasonic’s homepage for more information about DVDs.
http://www.panasonic.com/broadcast
s
Page 40

Editing programs
I
Erase Program
■:p»]h 1:мл1
All programs and play lists
created from them will be erased
irretrievably when you use this
procedure. Check carefully
before proceeding.
Ёгаза PfOaram
Rtmiirtirtg RacontingTlfii« 10 ; Sf*1
CormpoDdng PLAY LIST «i Mo bi ertstd.
Enter Title
You can enter up to 64 characters
(HDD, DVD-RAM) or 44 characters
(DVD-R).
Entering text -» page 45
Properties
», j TS
Ы шгшлг
Clt
Program information (e.g., time and
date) is shown.
,c
A
§
Protection
1223 UiLj
If set, this will protect the program
from accidental erasure.
г
Up Ргоргмп Proi^tton.
1
MniO'b
Protection
l( No
; Vokt^tSPl
—J
1
To clear the program list
Press [RETURN].
To stop set up process
Press [RETURN].
• You can also use [A, T, ◄, ►] to select
“Cancel" or “No" and press [ENTER].
For your reference
You can only access “Properties" if Disc
Protection (-» page 38) or Cartridge
Protection (-► page 8) is activated. Deacti
vate the protection to access other items.
Shorten Segment
The program segment, and play
list scenes created from it, are
erased irretrievably when you use
this procedure. Check carefully
before proceeding.
Divide Program
nTiTn iiTJiTl
Select a point at which to divide the
program into two.
You must be sure you wish to
divide a program because once a
program has been divided, it
cannot be returned to its original
form.
e.g., DVD-RAM
siirTljljMEl End 1
e.g., DVD-RAM
Page 41

The program is erased.
Press [◄] to
select “Erase” and
press [ENTER].
Press [◄] to set (or
cancel) protection
and press [ENTER].
Press [ENTER] at
the start point of
the section you
want to erase.
CE®
The lock symbol
appears when the
program is writeprotected.
i End 1
'The disc’s available recording time may not increase after
erasing short programs.
I Computer data cannot be erased.
'The available recording time on DVD-R does not increase when
you erase programs.
• Cancel Disc Protection {-» page 38) or Cartridge Protection page 8) it
they are currently set.
• The full title is shown in the Properties screen, but if you enter a long title,
only part of it is shown in the program list.
• If you enter a long title, only part of it is shown in the menu screen after
finalization. hm»b:i
Press [ENTER] at
the end point of the
section you want to
1
i-vii siiirt 1
inPBTti! '
! Niïn
MES*
£nd
erase.
■
O)
c
S
Press [A, T] to select “Next” and press [ENTER], then press [◄] to
select “Erase” and press [ENTER].
Repeat to enter other sections.
• Use search and slow-motion to find the start and end points.
• Play pauses if the end of the program is reached during this procedure.
• You may not be able to specify points within 3 seconds of each other.
• You cannot specify an end point before a start point, or a start point after an end
point.
• You cannot specify points on still pictures in the program.
• The disc’s available recording time may not increase after erasing short segments.
Bi»l ja PWMfam
Unta ynu dindi Sit dugnni,
n will ait he raslDrad u Sta arlgliiil.
I'" Iftfhie'
..........
Press [ENTER] at the'
point you want to
divide the program.
To change the division point
below
Press [A, ▼] to
select “Exit”
and press
[ENTER].
To confirm the division point
Press [A, V] to select “Preview” and press [ENTER].
(Play will begin from a point 10 seconds prior to and
after the division point.)
To change the division point
Press [A, ▼] to select “Divide” and press [ENTER]
at the point you want to change.
• The divided programs retain the title of the original program. They also retain
the CPRM property (-» page 65) of the original.
• A minute portion of the recording directly preceding the division point may be lost.
• It is not possible to carry out Divide Program in the following cases:
-when the program is extremely short.
- when the total number of programs is more than 250 (HDD) or 99 (DVD-RAM).
1 j ~ ¿¡nell I
c
Press [◄] to
select “Erase”
and press
[ENTER].
The program is divided.
Press [◄] to select
“Divide” and press
[ENTER].
RQT6637
Page 42

Editing play lists
Operation
Preparation
Press [HDD] or [DVD] to select the drive.
While stopped
Press [PLAY LIST].
e.g., DVD-RAM
Press [▲,▼]№ select the
list.
• To create a new list, select
“
-----
"and press [ENTER]
(-• page 44),
Press [►] so the
submenu appears.
Press [A, T] to select the
item and press [ENTER].
Play Scenes
page 27, Playing play list scenes
Edit Scenes
^ OlMMijr
CEE)
1 LMm
FUYUST
Scene9
StfactPisi
m Hi HU
1 iPn>. 1 Mi;wi 1 H(ii> 1
• Press [A, T, ◄, ►] to select “Next" and press [ENTER] to show
scene 10 and later.
• You can also select a page of scenes by entering a 3-digit number
with the numbered buttons.
e.g.:‘'5”: [0][0][5]
“IS”: [0]-»[1]->[5]
• HDD or one disc can have a maximum of 99 play list and 999 scenes.
These limits may be reduced under some conditions.
Press [◄, ►] to select the
item (Add, Move, Re-edit
or Erase) and press
[ENTER].
® ® @
Numbered
buttons
HDD, DVD
A,Y, <►
® ® ®
® ®
GD GD
PLAY LIST
RETURN
To clear the play list or scene list
screen
Press [RETURN],
To stop set up process
Press [RETURN],
• You can also use [▲, T, ◄, ►] to
select “Cancel" or “No" and press
[ENTER],
For your reference
You can only access “Play Scenes" and
“Properties" if Disc Protection (-► page
38) or Cartridge Protection page 8)
is activated. Deactivate the protection to
access other items, umi
PL Copy
mjm Eon
m
eawPUTUST
Copy ait PUY LIST?
t Cow i C
<3i
PL Erase
m
Ehm Blit PUT LIST?
I I 1 Cintii
UTT[I?V Oinwi
Enter Title
nRg
You can enter up to 64 characters.
The full title is shown in the
Properties screen, but if you enter a
long title, only part of it is shown in
the play list screen.
Entering text page 45
Press [■<] to select
“Copy” and press
[ENTER].
The copied play list appears at the
bottom of the iist.
Press [^] to select
“Erase” and press
[ENTER].
The play list is erased.
Once a play list has been erased,
it is irretrievable. Check carefully
before proceeding.
I rSETl
RQT6637
Properties
Play list information (e.g., time and
date) is shown.
[olcwaur
Page 43

Add (maximum 999 scenes)
Press
to select
where you want to
add the scene and
press [ENTER].
Press [ A, T] to select “Next” and press [ENTER]. (Repeat to add other scenes.)
Move
Repeat to move other scenes.
Press [ENTER]
at the start point
of the scene.
Press [ENTER] \
at the end point ^
of the scene.
The scene is moved.
Press [A, T] to
select “Exit”
and press
[ENTER].
The new scene is
inserted before the
highlighted scene.
Re-edit
Press [A, T,^,^]
to select the scene
and press [ENTER].
Press [A, T] to select “Prev.” or “Next” and press [ENTER]. (Repeat to re-edit other scenes.)
Press [ENTER]
at the start point
of the scene.
Erase
• The selected scene is
erased from the play list.
• The play list itself is
erased if you erase all the
scenes in it.
Once a scene has
been erased, it is
irretrievable. Check
carefully before
proceeding.
Press
[A,T,^,^]to
select the scene
and press
[ENTER].
Repeat to erase other scenes.
• Use search and slow-motion to find the start and end
points.
• You cannot specify an end point before a start point, or a
start point after an end point.
• You may not be able to specify points within 3 seconds of
each other.
• Play pauses if the end of the last program is reached
during this procedure.
►
Press [◄] to
select “Yes”
and press
[ENTER],
• You cannot edit still picture images.
• Depending on the state of recording, the actual number of
play lists or scenes that can be recorded may be
less than that specified in this manual.
• The picture illustration on the right may be
shown in the HDD play list scene display. This
picture illustration indicates pictures that are
permitted to be recorded only once.
Press [A, ▼]
to select “Exit’
and press
[ENTER].
The re-edited
scene replaces
the old one.
Oi
.C
§
Page 44

Creating play lists
1 While stopped
Press [PLAY LIST].
® 'W)
wfltte.Tvveeo («1COI
o o o ©
,0 @ <D
'0 0 0
;0 0
©0 0 © m
f-cwca I
(J0 0 □
_
___________ p-<UX«A«tW
QffinFwriùer
i©.
/ TOP /
itirrré^
i
Or
o
PLAY LIST
ENTER
t
Ê3 É
o-
Rm«M
o
FltCIiCFfi
prasofCK OMtr DtSPv^v THC&f
;o o o o
opaciDst SttTijs
m o
SgT UP lÉIJOtO jTvlgÆ!'"JgT
1 11 I CD CD
ËBASg ouaflwQ mraaoi litfogB
CD CD CD CD
irmirfTTi
I
Specify start and end points to create scenes, then specify the order
§
in which they are to be played. These scenes are not recorded sep
arately so this doesn’t use much capacity.
You can create a maximum of 99 play lists and 999 scenes on a
DVD-RAM and HDD.
RETURN
2 Press [A, T] to select
press [ENTER],
PLAV UST
Ht, t»Ti .T0T«i aw
j II t nS) llin I ISEf WitgaaiDcC
n BZI l:S1SK'Dtnouut_
□CZMZDC3!:
nDCiiatzit
3 Press [ENTER] at the start point.
HDD: The location of the
whole program's start point
DVD-RAM: The location of
the whole disc’s start point
4 Press [ENTER] at the end point.
___
and
ÏÏIIE _
□>
To specify another scene
Select “Next” and press [ENTER], then repeat steps 3 and 4,
5 Press [A, T] to select “Exit” and
press [ENTER].
The play list screen appears.
To clear the play list screen
Press [RETURN].
To stop partway through
Press [RETURN].
For your reference
• You cannot create or edit play lists if the disc is protected.
• You cannot specify an end point before a start point, or a start
point after an end point.
• You may not be able to specify points within 3 seconds of each
other.
• Use search and slow-motion to find the start and end points.
• Play pauses if the end of the last program on the disc is reached
during this procedure.
• Depending on the state of recording, the actual number of play
lists that can be recorded may be less than that specified in this
manual.
• Pressing [^44], [►►I] in step 3 and 4 allows you to select pro
grams in the same drive.
RQT6637
Page 45

Entering text
After the titling screen appears
1
Press [A, T, ◄, ►] to select the
character and press [ENTER].
Title field: shows the text you have entered
Enter Title
[H0Q
000
00
00
00
00
This page shows how to enter text for:
• Disc titles (->page 38)
• Program titles for timer recording (-»pages 34 and 35)
• Program titles (-»page 40)
• Play list titles (-»page 42)
• Folder titles of still pictures (-»page 25)
If you give a title to a program when setting timer recording, it will
become easier to find the program when using Direct Navigator.
8000
SELECT
ENTER
Repeat step 1 to enter other characters.
O
RETURN
00000
□0000
0-
0
Press [■].
The title is entered and the screen disappears.
• You can also finish entering the title by selecting “SET” and
pressing [ENTER],
Using the numbered buttons to enter characters
e.g., entering the letter “R”
® Press [71 to move to the
7th row.
@ Press [7] twice to high
light “R”.
(3) Press [ENTER].
• You can enter a space by
pressing [100] and then
[ENTER].
0
0
0
C3l
.c
in
§
To erase a character
® Press [A, T, ►] to select the character you want to
erase in the title field.
(D Press [11].
You can also erase characters by selecting “ERASE" and press
ing [ENTER],
rna
If Disc Protection (-»page 38) or Cartridge Protection (-»page 8) is
activated, you cannot enter the title. Deactivate the protection before
entering the title.
HQT6637
Page 46

Editing stiii pictures (JPEG)
Operation
.1“
While stopped
Press [FUNCTIONS].
Press [A, to
select “JPEG” and press
[ENTER].
e.g., PC card: First page
ItlPUT I PCcTd 10O.PAHA j
JPEG
II copy gf PC cird
KT^il
Press [A, ▼] to select
the item and press
[ENTER].
To select a folder other than the
one currently being displayed,
first highlight “INPUT and press
[ENTER],
INPUT
You can select the folder for
editing.
Album
Displaying still pictures (Album Display) page 25
Slide Show
To display still pictures one by one with constant interval (Slide Show) -¥ page 25
Copy
You can copy the whole folder or
selected still pictures to PC card,
HDD or DVD-RAM.
(maximum of 300 folders, 3000
files)
• When there is no folder in the copying drive, a new folder will be created.
• When there is a folder in the copying drive, copying will continue from the last of the
existing still pictures.
• When copying a folder, any files in the folder besides the still pictures are also copied.
• Folders tower than the folder to be copied will not be copied.
• If the space on the copying drive runs out or the number of files/folders to be copied
exceeds the maximum, copying will stop partway through.
• If no title has been entered for the folder at the copying drive, the title from the copying
source will be entered. It is recommended that the title is entered at the copying source.
• After copying, it may take some time to download the copying source information.
• Print (DPOF) number setting (-♦ page 48) is not transferred.
RETURN
ROT6637
To insert/remove the PC card
H page 25)
When the card indicator in the unit display
is flashing, the card is being read from or
written to. Do not turn off the power or
remove the card. Such action may result in
malfunction or loss of the card's contents.
To stop set up process
Press [RETURN].
• You can also use [A, T, ◄, ►] to select
“Cancel" or “No" and press [ENTER],
You can only access “INPUT, “Album" and
“Slide Show” if the PC card is set to Write
Protect fwjnd -¥ page 9) or if Disc
Protection (EEI page 38) or Cartridge
Protection is activated (0EJ| ^ page 8).
Deactivate the protection to access other
items.
All copy of PC card
You can copy the whole contents of
the PC card to HDD or DVD-RAM.
(maximum of 300 folders, 3000
files)
• A new folder will be created in the copying drive.
• Any files in the folder besides the still pictures are also copied.
• Folders lower than the folder to be copied will not be copied.
• If the space on the copying drive runs out or the number of files/folders to be copied
exceeds the maximum, copying will stop partway through.
• After copying, it may take some time to download the copying source information.
• Print (DPOF) number setting page 48) is not transferred.
AUCOPYOPPCCABD
Copy tran iPCcmt
Ccw»° .№b~7TÌi
Copy all JPEG trom PC
( MeofTf " I t Ctnal Ì
Erase, Protect, Print (DPOF) -► page 48
Settings -> page 25, “To change the display timing”
page 48, “PC card Format"
Page 47

►
Press [◄] and\ Press [A,Vito
[A,T] to select H select still picture’s
the drive and /folder and press
press [►]. ^ [ENTER].
• "Picture" and “Files" refer to numbers inside the
folder selected. Lower files are not included.
• If there is more than one upper folder, pressing
[ ]. [ ] will switch between them [-f page 9,
“Folders that can be disptayed/saved" (underlined
section)].
Press [A, T, <, ►] to seiect a^
folder or still picture and press
[ENTER]. (See below)
A check mark appears on
the Stitt picture.
• Repeat this if you select more than one
still picture.
To select still pictures one by one
Press [A, ▼, ◄, ►] to select a still picture and press
[ENTER]. (A check mark appears on the still picture.)
To select all the still pictures in the folder
Press [A, ▼, to select “Folder” and press [ENTER].
(A check mark appears on the folder’s name; check marks
inputted separately will be erased.)
Press[A,T,^,^]\
\ to select “Copy” ^
/ and press [ENTER].
A confirmation screen
appears.
To enter the folder’s title
Press [►] to select “Folder Title” and press [ENTER],
(-► Entering text, page 45)
• You can enter up to 36 characters.
• Folder titles entered using this unit will only be displayed using
this unit. Folders entered using this unit are written to the
TITLE.DVD file.
• If there is not enough space for the entry or if the limit for the
number of files has been exceeded (-► Still pictures, page 9),
the title cannot be entered.
Select the
\ copying
^ drive.
{-¥ below)
\ Press[A,T,"<
®\1 to select “Copy
) and press [ENTER].
Copying still pictures
begins.
A
To erase check marks
Press [A, ▼, ◄, ►] to select the folder or still picture with the
check mark and press [ENTER],
To select the copying drive
While the confirmation screen is displayed
1. Press [A, V] to select “Destination" and press [ENTER],
2. Press [◄] and [A, T] to select the drive.
3. Press [►] and [A, V] to select the folder and press [ENTER].
• Some folders cannot be copied to [-► page 9, “Folders that can be
displayed/saved” (indicated by ^)],
►]
Press ['^, ^] to select
“HDD” or “DVD”.
Still pictures are copied but non-compatible files and folders will not copied.
(•^ page 9, "Folders that can be displayed/saved").
\ Press [A, ▼, ◄, ►] to select
^ ^ copy” and press [ENTER].
All stilt pictures are copied, and ALL COPY
screen reappears.
All
RQT6637
Page 48

Editing stili pictures (JPEG)
Operation
.с
While stopped
Press [FUNCTIONS].
• “INPUT”, “Copy” and “All copy of PC card” page 46
• “Album” -♦ page 25, Displaying still pictures (Album Display)
• “Slide Show” ^ page 25, To display still pictures one by one
with constant interval (Slide Show)
Press [A, to
select “JPEG” and press
[ENTER].
e.g., PC card: Second page
JPEG
№Ш
iPCfflIBt ioo.pwaI
Erase
You can erase whole folders or
selected still pictures.
• When you erase folders, files other than still pictures in the folder are also
erased.
• Folders lower than the folder to be erased will not be erased.
• To erase files other than still pictures, select the folder containing the file and
erase.
Press [A, T] to select
the item and press
[ENTER].
To select a folder other than the
О)
one currently being displayed,
first highlight “INPUT’ and press
[ENTER] {-► page 46).
Protect
Milil'il RTTil liMTJ
You can set protection for whole
folders or for individual still pictures.
®4î>
(tptf
INPUT jk:d»id
i
Prey. I 1/1 ) Next ► |
-
-----------
—^
О
D
JiïUST
О
ENTER ^
FUNCTIONS
FlACTtONS
Q— RETURN
РШЙН
TtMEai
To insert/remove the PC card
(-» page 25)
When the CARD indicator in the unit
display is flashing, the card is being read
from or written to. Do not turn off the power
or remove the card. Such action may result
in malfunction or loss of the card’s
contents.
To stop set up process
Press [RETURN],
• You can also use [▲, T, ◄, ►] to select
“Cancel" or “No" and press [ENTER].
You can only access “Slide Show” in
“Settings" if the PC card is set to Write
Protect (0233 ^ page 9) or if Disc
Protection fnm -♦ page 38) or Cartridge
Protection is activated -» page 8).
Deactivate the protection to access other
items.
Print (DPOF)
^033
{ JPEG
1 INPUT iPCcdKf
[ WIUMl 1
Ш ИША Ì
! S.1UP !
You can select a whole folder or
individual pictures for printing and
specify the number of prints to be
made (maximum 999 files).
<10^
о
wrm
1 i Prev. [ 1 M
S9I
{ Next P 1
• Settings cannot be made for folders and files not in accordance with DCF standards.
• Print settings (DPOF) made using this unit may not be viewable on other equipment.
• Settings cannot be made if there is no remaining space on the PC card.
• All settings made on other equipment, except the number of prints, will be canceled.
Slide Show
Settings
To display still pictures one by one
with constant interval (Slide Show)
-► page 25
You can erase all still
pictures in the PC card.
Page 49

Once activated, material
cannot be returned to its
original form, including
protected stilt pictures.
Check carefully before
proceeding.
Press [▲, T, ◄, ►] to select a
still picture and press [ENTER].
A check mark appears on
the still picture.
I Repeat this if you erase more than one still
picture.
Press [A, ▼, ►]
to seiect “Erase”
^and press [ENTER].
A confirmation screen
appears.
Press [◄] to select
“Erase” and press
[ENTER].
Selected still pictures are
erased, and the still
picture select screen
reappears.
To select ail the still pictures in the folder
Press [▲, T, ◄, ►] to select “Folder” and press [ENTER],
(A check mark appears on the folder’s name; check marks
inputted separately will be erased.)
W
Press [A, ▼, <, ^] to select a still picture and
press [ENTER].
A check mark appears on the still picture.
• Repeat this if you set protection of more than one still picture.
To select all the still pictures in the folder
Press [A, T, ◄, ►] to select “Folder” and press [ENTER].
(A check mark appears on the folder’s name; check marks
inputted separately wilt be erased.)
Press [A,T,^,^] to select a
still picture and press [ENTER].
A check mark appears on the
still picture. I
• Repeat this if you print more than one still
picture.
To select all the still pictures in the folder
Press[A, ▼, ◄,►] to select “Whole” and press [ENTER].
(A check mark appears on the folder’s name; check marks
inputted separately will be erased.)
Press [A, T, ◄, ►] \l Press [◄,►] toNJ to select “Set” and
to select “Set Up” ) set number of \ [ENTER],
and press [ENTER]. / print (0 to 9). / The DPOF mark
To erase check marks
Press [A, T, ◄, ►] to select the folder or still picture with the check
mark and press [ENTER].
Press [◄] to select
“Yes” and press
Press [A, ▼, ◄, ►] to
select “Set Up” or
“Cancel” and press
[ENTER].
To erase check marks
Press[A, ▼, ◄, ►]to select the folder or still picture with the check
mark and press [ENTER].
V n . . . , Press [A, T, ◄, ►]
To change print (DPOF) settings
1. Press [A, ▼, ◄, ►] to select “Whole” or a still picture with the DPOF
mark and press (ENTER).
2. Press [A, T, ◄, ►] to select “Set Up” and press [ENTER].
3. Press i-^. ►] to change the print setting
• The print setting will be canceled if you set the number of print to “0"
4. Press [A, T, ◄, ►] to select “Set” and press [ENTER].
[ENTER].
The lock symbol appears
' on the still picture when
the still picture is
protected.
appears if you set
one or more
pictures to print.
DPOF
O)
.C
Once activated, recorded
contents (including protected
still pictures and computer
data) will be completely erased.
Check carefully before
proceeding.
Press [◄] to
select “Yes’
and press
[ENTER].
Press [-^l to
^ select “Start” and
press [ENTER].
Format begins.
The cards formatted on this unit may not be usable
on other equipment.
RQT6637
Page 50

Using on-screen menus
Disc menu
Not available when playing CDs.
e.g., DVD-RAM
RETURN
DISPLAY
Common procedures
1 Press [DISPLAY],
c
.o
a
?
Q)
&
tl
8
c
I
e.9. DVD-RAM
[ Dis<T
Audio I»
T T
Menu Item Setting
2
Press [A, ▼] to select the menu and
Sound track
Audio channel
■|>1«|.т{яжд.1ям
T
press [►].
Press [ A, T] to select the item and
3
press [►].
4
Press [A, ▼] to select the setting.
To return to the previous screen
Press [RETURN],
When you are finished
Press [DISPLAY],
For your reference
• The screens depend on the disc contents.
• Depending on the condition of the unit (playing, stopped, etc.) and
disc contents, there are some items that you cannot select or
change.
Item
Soundtrack language
See Q below.
Audio attribute ПНЯ ПИЛ ГИИЛ
See !□ below.
Sound track
Subtitle
Angle Angle number
Audio channel
PBC
Q Soundtrack/Subtitle language
ENG: English SVE: Swedish
FRA: French
DEU: German
ITA: Italian
ESP: Spanish
NLD: Dutch
Q Audio attributes
LPCM/DDDigital/DTS/MPEG: Signal type
k {kHz):Sampling frequency
b (bit):Number of bits
ch (channel);Numberof channels
e.g., 3/2 ДсЬ
For your reference
• When playing back recordings of SAP broadcasts, “1+1 ch” will be
displayed.
• You can only select subtitles, soundtracks, and angles if they are
recorded on thè disc.
• Some discs allow changes to soundtracks, subtitles, and angles
only by using the disc’s menus.
• If the subtitles overlap closed captions recorded on discs, turn the
subtitles off.
Karaoke vocals, on and off
(Karaoke only)
Solo: ON-OFF
Duet: OFF<—.V1+V2-^—.VI ^—.V2
H
_____________________
Subtitle language
See Q below.
Subtitle on/off ПНЯ 1:ил1 ии>в:а
Playback control on/off [VCPI
Indicates whether menu play (playback con
trol) is on or off.
NOR: Norwegian
DAN; Danish
POR; Portuguese VIE: Vietnamese
RUS: Russian THA: Thai
JPN: Japanese *: Others
^ch
.1; Subwoofer signal (not displayed if there
is no subwoofer signal)
No surround
Mono surround
Stereo surround (left/right)
Center
Front left+Front right
Front left+Front right-i-Center
Content
t
|vcD| (->page 30)
CHI: Chinese
KOR: Korean
MAL: Malay
Page 51

Play menu
e.g., DVD-RAM
[ Play
IVideo'i;:;;::;'
[Aj^r^ea^
I Repeat play
Item
A-B repeat
Repeat play
Marker
Play mode
Content Remarks
П1ЛЛ ПГШ видя UVitVi
You can repeat a section between points A and В
within a program or title.
[ENTER] (start point) -♦ [ENTER] (finish point)
To cancel: [ENTER]
Each time you press [A, T]:
PRG: Program Chapter
ALL Title
PL: Play list OFF
(СНаСШ!) ШГуср]
OFF Track
To cancel: Select “OFF”.
■ ИИ1ДТД wtl | VCD1
(-►page 28)
rraiivc^
......
: Normal play
Program Play {^page 29)
Random Play (-»page 29)
ALL
OFF
• A-B repeat does not work if the disc’s elapsed play time is not
shown on the unit’s display.
• The unit automatically determines the end of a program/title
as point B when the end of the program/title is reached.
• Some subtitles recorded around point A or B may fail to
appear.
• This does not work while playing a play list.
• [DUBBING] or [ERASE] does not work while in repeat play
mode.
• You cannot use repeat play to repeat an entire DVD-Video.
• Repeat play does not work if the disc’s elapsed play time is
not shown on the unit’s display.
• [DUBBING] or [ERASE] does not work while in repeat play
mode.
If the Video CD has playback control
on the television), press the num
bered buttons to select a track
(-►page 24).
(2) Select the repeat mode.
—
—
C
p
•SS
г
Q)
&
Audio menu
Not available when playing CDs and Video CDs,
e.g., OVD-Video
'DiscVV't'
Item
v.s.s.
Dialog
Enhancer
■:nm i:hUl ■»rjtaTi
(Only with Dolby Digital with 2 or more channels)
Enjoy a surround-like effect if you are using two front
speakers only. The effect is broadened and sound
seems to come from virtual speakers on either side if
the disc has surround signals recorded on it.
Natural <—>Emphasist—>OFF
T t
(Dolby Digital, 3-channel or over only, including a cen
ter channel)
The volume of the center channel is raised to make
dialog easier to hear.
ON-OFF
Content Remarks
• Turn off the surround effects on the other equipment.
• V.S.S. will not work, or will have less effect, with some discs.
• Turn V.S.S. off if it causes distortion.
CH
—
u
c
§
■O
RQT6637
Page 52

Using on-screen menus
Video menu
Not available when playing CDs.
птялппт1гдтаппиддгуср1
.. Audio
Item Content
Picture Normal
Soft: Soft picture with fewer video arti
facts
Fine: Details are sharper
Cinema: Mellows movies, enhances detail in
dark scenes.
User: You can make further adjustments.
See below.
MPEG-DNR (When any item other than “User” is
selected)
You can turn the recommended - settings for 3D NR, block NR, and
mosquito NR on and off.
ON*—»OFF
■ When “User” is selected
Select “Detail picture adjustment”.
{“User-> [◄]-► [¥]-► [ENTER])
When you have set “TV Type” to “480P” in SETUP (-►page 16)
Picture.——
MPEG-DN R
Proqresstve Transfer
Item Content
Progressive ON: Enables progressive output
OFF: Disables progressive output
3
Transfer* Select the method of conversion for progres
sive output to suit the type of material being
played (-►page 65, Film and video).
Autol (normal): For film material
Auto2: For film material (the same as
Autol, but able to convert 30frame-per-second progressive
video.)
Video: For video material
Only applicable in cases where the “Progressive" function is ON.
Contrast
Briqhtness
Sharpness
Color
Page 1/2 of “Detail picture adjustment'
2
0>
?
u
■O
Contrast
&
Brightness Brightens the picture (0 to -f-15).
c
s
Sharpness Adjust the sharpness of the edges of the ver
Color Adjusts the shade of the picture's color (-7
Press [ENTER] to enter the setting.
Press [▲] or [▼] until page 2/2 appears.
Page 2/2 of “Detaii picture adjustment”
Gamma
Increases the contrast between light and
dark parts of the picture (-7 to +7).
tical lines (-6 to 4-6).
to +7).
Increases the brightness of the center
rariges to improve detail and contrast in dark
scenes (0 to -i-5).
3D NR
Block NR
Mosquito NR
Press [ENTER] to enter the setting.
Reduces overall noise (0 to -t-4).
Smoothes block noise (0 to -i-3)..
Reduces the smudging that appears around
contrasting sections of the picture (0 to -t-3).
Page 53

Using the FUNCTIONS window
RETURN
CEa nna EMa EOin E3
By using the function window you may access the main functions
quickly and easily.
1 While stopped
Press [FUNCTIONS].
e.g., DVD-RAM
1 DS/D-RAM
1 DISC PROTECrrON OFF
Icon
1 CARTRIDGE PROTECT OFF
ÍQP
1 msc SETTING □IREDT NAVIGATOR
1
1 TIMER RECORIHNG
X3cr
CREATE PLAY LIST
Pt AY
pcc,“
[ SET DP
\4^0
! ^ JPEG DV AUTO REG
PLAY FROM TOP
-♦page 38, HDD, Disc setting
-♦page 34, Timer recording
-►page 62, Changing the unit’s settings
-►page 25, Playing still pictures (JPEG)
-►page 46, Editing still pictures (JPEG)
^page 26, Using the Direct Navigator
-♦page 40, Editing programs
-^page 22, Playing discs
Play will begin with the oldest program
on the disc (Program 1).
■■vjia'i
Play will avoid playing the introductory
parts and begin playing the contents
immediately. (The performance of this
function varies from disc to disc.)
•♦page 31, DV Automatic Recording
-♦page 44, Creating play lists
-♦page 27, Playing play lists
-►page 42, Editing play lists
-►page 20, Flexible Recording—
recording the best quality pictures in a
set time
-^page 23, When a menu screen
appears on the television
^page 29, Program play
-►page 29, Random play
^page 32, Dubbing programs or play list
^FLEXIBLE REG
Refer to
PLAYLIST
FUNCTIONS
sarcT
2 Press [A, ▼, ◄, ►] to select an item.
Refer to the relevant pages for details.
DISC SETTING
TIMER
RECORDING
SET UP
JPEG
DIRECT
NAVIGATOR
RESUME PLAY
PLAY
PLAY FROM TOP
DV AUTO REC
CREATE PLAY
LIST
PLAY LIST
FLEXIBLE REC
TOP MENU
MENU
PROGRAM
PLAY
RANDOM PLAY
DUBBING
Functions displayed depend on the type of disc.
• Some items will be grayed out and cannot be selected if;
- the disc is write protected
- the disc is not formatted
- there is nothing recorded on the disc.
C
.o
Í5
Q)
&
O
0
c
1
3 Press [ENTER].
Your selection is entered and the FUNCTIONS window disap
pears. If the operation requires further selections, another
screen appears.
To clear the FUNCTIONS window
Press [RETURN].
ROT6637
Page 54

un-screen displays
STATUS
Changing the information displayed
Displays appear on the television when you operate the
unit to let you know what operation was performed and
what condition the unit is in.
• You can change the setting in the SETUP menu so these displays
do not appear automatically (-»page 61, Display—Status Mes
sages).
Press [STATUS].
The display changes each time you press the button,
e.g., HDD
.o
A
?
■D
■«I
V)
c
2
%
u
c
2
Display examples (HDD)
0HDD/Disc indication
® Audio type (-►page 30)
<p @
=6/8 10 : 15 AM Remain 2 : 34
m PRG2rr^1:12J2'^FR*HHHH^
■ PRGll 0:00.04 SP ■f'**
® ©
f) ■
Shows the selected audio type,
• During reception
StereoiStereo is selected
Mono; Monaural is selected
SAP: Secondary audio program is
selected (“{(" appears when the
type you have selected is actually
being received.)
• During play
LR, R, L: a stereo program is recorded
MAIN, SAPian SAP program is recorded
© The current date and time
© Recording mode
© Available recording time and
recording mode
J
i
No display
©Current recording or play status/input channel and
caption (if entered)
REC: Recording
DV AUTO REC: Recording DV AUTO REC
PAUSE: Recording paused
PLAY: Playing II; Playing paused
Rewinding Fast forwarding
-•(; Reverse slow-motion i*-; Slow-motion
® HDD recording/DVD recording:
the recording drive is indicated
Tray open/closed: indicates the status of the disc tray
when the HDD drive is selected
© Elapsed recording time
© Elapsed play time of a program
playing
® Play position
© Approximate volume of
recording
ROT6637
© Video bit-rate when recording
@ Recording mode
or l/P/B display when paused
(^page 65)
The method of calculating bit-rate for recording and playing is different so
there may be differences in the figures displayed. (Values are approximate.)
® Video bit-rate when piaying
© Bit-rate dispiay*
Show as Mbps (Mega-bytes
per seconds) during play and
recording, or kbit (kilobytes)
while paused.
Page 55

Home Theater
Refer to the relevant pages for details.
Enjoying CATV/Satellite broadcasts
What you want to do
Enjoying CATV/Sat
ellite broadcasts
How to do it
Connect a cable TV box or
satellite receiver.
Enjoying more powerful sound
Enjoying 5.1channel surround
Digital connection
Connect to an amplifier with
built-in decoders.
sound with Dolby
Digital and DTS
^ 00 0
Reference
pages
56
57
□
Settings
Reference
pages
Tune to channels correctly. 12
Change the necessary
settings on the equipment you
have connected.
SETUP—Audio—
Digital Audio Output
• Set PCM Down Conversion
to suit the equipment.
• Set Dolby Digital and DTS to
suit the equipment.
Change speaker settings on
the amplifier.
—
62
C
.o
•Sz
Analog connection
Connect to an analog
amplifier or system • Set PCM Down Conversion
component. to Off,
Digital connection
Connect to a digital
amplifier or system • Set PCM Down Conversion
component. to suit the equipment.
Other uses
Record to digital recording equipment or cassette deck {-►page 57)
Record from a video cassette recorder (^page 58)
U.S. patent Nos. 4,631,603, 4,577,216, 4,819,098, and
4,907,093.
This product incorporates copyright protection technology that is
protected by U.S. patents and other intellectual property rights.
Use of this copyright protection technology must be authorized
by Macrovision, and is intended for home and other limited con
sumer uses only unless otherwise authorized by Macrovision.
Reverse engineering or disassembly is prohibited.
57
□
57
□
Manufactured under license from Dolby Laboratories.
“Dolb/’p “Pro Logic” and the double-D symbol are trademarks of
Dolby Laboratories.
“DTS", “DTS Digital Surround” and “DTS Digital Out" are regis
tered trademarks of Digital Theater Systems, Inc.
SETUP—Audio— 62
Digital Audio Output
SETUP—Audio— 62
Digital Audio Output
• Set Dolby Digital to PCM.
• Set DTS to Off.
I
'O
Q)
0
c
1
ROT6637
Page 56

Home Theater
• The equipment connections described are examples.
• Peripheral equipment and optional cables sold separately unless otherwise indicated,
• Before connection, turn off all equipment and read the appropriate operating instructions.
• The signal from the cable TV box or satellite receiver passes through this unit to the television even when this unit is turned off.
Connecting a cable TV box/satellite receiver
You need to subscribe to a cable TV or satellite TV service, to enjoy viewing their programming. rfOtB
• Consult your service provider regarding appropriate cable box or satellite receiver.
• Select the applicable input on your television to view the output from your cable box or satellite receiver, Channel 3 or 4 if connected
via antenna (RF), or the applicable video input on the television is connected using the audio and video connections.
c
.o
s
0)
&
u
c
2
■O
One cable TV box/satellite receiver
AUDIO VIDEO >
R L RFIN
О ® © ©◄ч
Audio/Video cable (included)
75 О coaxial cable
red white yellow
(included)
IN IN VHF/UHF
Two cable TV boxes
You can record and vjew both scrambled and unscrambled channels
if connections are made as shown in the diagram below.
To household
home satellite system
(Dishnetwork/DSS) jack
идя
When a home satellite system (Dishnetwork/DSS) is connected,
auto tuning and auto clock setting may not operate properly. Set the
clock manually (->page 13).
You cannot
• view channels other than the one selected when recording.
• do a timer recording unless the channel is first selected on the
cable TV box or DSS receiver.
HQT6637
• view channels other than the one selected when recording.
• do a timer recording unless the channel is first selected on the
cable TV box.
Page 57

Connecting an amplifier or system component
This model can play Dolby Digital, but only in two channels. This model does not have a DTS decoder. You must connect a unit with a
Dolby Digital or DTS decoder to enjoy surround sound. (T^
Recording to digital recording equipment or cassette deck
Digital recording
You can record the digital signal directly to digital recording equip
ment Connection H above).
• With DVD, the following conditions must be met: © the disc
doesn’t have protection preventing digital recording, and © the
recording equipment can handle signals with a sampling fre
quency of 48 kHz.
• You cannot record DTS signals.
When recording DVDs, make the following settings.
V.S.S.:OFF (->page51)
PCM Down Conversion: On (->page 62)
Dolby Digital; PCM (-►page 62)
DTS: Off (-►page 62)
•
Analog recording
You can record to a cassette deck or other recording equipment (^
Connection H above).
There are no limitations on recording analog signals as there are
with digital signals.
.0
iz
*0
s
C
2
■O
c
2
Q)
&
Page 58

Home Theater
Connecting other video equipment
OH
Connecting to the L2 input terminals on the front of
the unit Q
yellow white red
c
.o
Q)
&
?
О
c
§
■O
Other video equipment
Connect to the video and audio output terminals.
By using the S video cabie instead of the yeilow video cable you
may make recordings of higher picture quality.
• If the audio output of the other equipment is monaural, connect to
L/MONO. (Both left and right channels are recorded when
connected through L/MONO.)
• The DV input on this unit is for use with DV equipment only.
• When DV equipment is connected, it is not possible to operate the
unit from the other equipment.
• Only one piece of DV equipment (e.g„ Digital Video Camera) can
be connected to the unit via the DV input terminal.
• The picture compression system of the DV equipment you have
connected may differ from that used in this unit. In such cases,
dubbing from these equipments will not be possible.
i i i
VIDEO L R
OUT audio
© 0
ni IT
Connecting to the input terminals on the rear of the
unit, L1 and L3 □
Other video equipment
Connect to the video and audio output terminals,
• By using the S video cable instead of the yellow video cable you
may make recordings of higher picture quality.
идя
If audio output on the other equipment is monaural, use a stereo-
monaural conversion cable (not included).
Page 59

other antenna connections
other antenna connection to the unit
Use one of the following connections to suit the antenna lead.
■ A single twin lead
300-75 fi transformer
(not included)
Twin lead
300 Q cable
A twin lead and a coaxial cable
from the antenna
Other antenna connection from the unit to the television
Use one of the following connections to suit the antenna terminals
on your television. Refer to the television’s operating instructions,
■ A twin lead and coaxial plug terminal
A twin lead terminal
I Two twin leads
from the antenna
• If your television has both lead and coaxial VHF terminals, use the
lead connection to minimize signal loss.
Two twin lead terminals
VHF/UHF band separator
(not included)
75 O coaxial cable
Multiple antenna terminals
• Connect to one of the terminals, then change the television’s
setting as necessary.
c
.o
2
0)
&
■O
8
c
2
T3
Page 60

Changing the unit’s settings
Summary of settings
This chart shows the initial settings for this unit. See page 62 for details on menu operation.
• Underlined items are the factory presets.
Tabs
Channel
Set Up
c
.o
2
o
&
Disc
o
c
2
■O
Video
Continued on next page
Antenna System {-►page 12)
Select to suit the type of antenna you are using. Channels are
set corresponding to the antenna system you select.
Auto Channel Setting (-»page 12)
The unit sets the channels automatically.
Preset Channel Caption (-►page 15)
You can give preset captions to the channels.
Manual Channel Caption (^page 15)
You can set channel captions manually.
VCR Plus+ CH Setting (-►page 14)
Set the guide channels for use with VCR Plus+ timer recording.
Off Timer
Select how long the unit remains on when it is not being used.
Remote Control Code (-►page 64)
To avoid operating equipment other than the one intended
(when more than one remote controlled item is in the same
area), change the remote control code.
Auto Clock Setting (-►page 12)
The unit adjusts the clock automatically. (“Auto Channel Set
ting" also starts if channels haven’t been set.)
Manual Clock Setting (-►page 13)
You can adjust the clock.
Time Zone Adjust (-►page 13)
Adjust the time zone if it was not set correctly after auto clock
setting. This appears only after auto clock setting is complete.
Re-initialize Setting
This returns all values in the SETUP menus, except for the
clock, channel settings, ratings level, and display language, to
the default settings.
Audio
Choose the audio language.
Subtitle
Choose the subtitle language.
Menus
Choose the language for disc menus.
Ratings (-►page 62)
Set a ratings level to limit DVD-Video play. The password
screen is shown when you select levels 0 to 7.
3-D Y/C Separation
Turn 3-D Y/C separation on or off.
Hybrid VBR Resolution
Switch between automatic and fixed hybrid VBR resolution
when recording.
Still Mode
Select the type of picture shown when you pause play.
Menus Options
Some discs start in
a certain language
despite any
changes you make
here.
•TV «CATV
• 2 hr «eJii »Off
3
• Set Code 1 «Set Code 2 «Set Code 3
• -1 «Q *-t-1
•Yes •No
• English •French •Spanish
•Original: The original language of each disc will be selected.
•Other =k*=k*;!nput a code {-►page 63).
•Automatic: If the lanauaoe selected for “Audio" is not available, subtitles of that language will automatically
appear if available on that disc.
• English »French »Spanish »Other
• English »French »Soanish »Other
Setting ratings (When level 8 is selected)
8 No Limit: All DVD-Video can be played.
1 to 7: Prohibits play of DVD-Video with corresponding ratings
recorded on them.
0 Lock All: Prohibits play of all DVD-Video.
Changing ratings (When level 0-7 is selected)
• Unlock Recorder »Change Password
•Change Level »Temporary Unlock
•On: Reduces noise for recording by separating the luminance
(Y) and color (C) signals received from the television station,
•Off: Reduces the ghosting that occurs when recording fast mov
ing images.
•Automatic: The unit automaticallv switches resolution rates durina
recording. The unit reduces block noise, which occurs dur
ing MPEG compression, by selecting the optimum rate.
• Fixed: The resolution rate is fixed to ensure the resolution
rate is not reduced.
•Automatic
• Field: Less blurred field stills are shown. Select if jittering
occurs when “Automatic" is selected.
• Frame: Sharper frame stills are shown. Select if small text or fine pat
terns cannot be seen clearly when “Automatic" is selected.
Page 61

Tabs
Video
Audio
Display
TV
Screen
Menus
Seamless Play
Turn seamless play on or off on discs with play lists.
• Seamless Play does not effect programs that have been
recorded with LPCM sound.
Dubbing Aspect
You may set the aspect ratio for a picture to be viewed on a
4:3 television. Setting information is shown on the recording
drive {Setting cannot be made in High Speed mode).
Audio during Search ■:)»]»! | vco|
Choose whether to have sound during the first ievei of fast-forward.
D. Range Compression (Dolby Digital only)
Change the dynamic range for late night viewing.
Select MTS for DVD-R or LPCM {-»page 30)
Select whether to record the main or secondary audio type
(SAP) when recording to DVD-R or when recording using
LPCM sound (“Audio Mode for XP Recording"
Select Dubbing Audio to DVD-RAM
You can select the kind of sound when dubbing to DVD-RAM.
Select Audio CH for DV input (-»page 63)
You can select the kind of sound when recording from the
unit’s DV terminal.
Audio Mode for XP Recording
Choose the audio type when recording with XP mode.
• Sound recordings made using LPCM require more information
than usual. Consequently the picture quality of LPCM record
ings may be less than that of normal XP mode recordings.
Digital Audio Output (-»page 62)
PCM Down Conversion
Dolby Digital
DTS
Status Messages
Choose whether to show on-screen messages automatically.
Language of Display Message
Choose the language for these menus and the on-screen
messages.
Blue Background
Select “Off” if you do not want to have the unit show the blue
background when reception is weak.
FL Display
Changes the brightness of the unit’s display.
TV Aspect (-»page 16)
Choose the setting to suit your television.
TV Type {-»page 16)
Choose “480P” to enable progressive output.
4:3 TV Settings for DVD-Video
Select how DVD-Video widescreen picture is shown on a 4:3
standard aspect television.
4:3 TV Settings for DVD-RAM
Select how DVD-RAM widescreen picture is shown on a 4:3
standard aspect television.
-♦ below).
Options
•On: The scenes in play lists are played seamlessly. This may
cause shifting of the points where scenes change. Some
play lists cannot be played seamlessly.
•Off: The points where scenes in play lists change are played
accurately but the picture may freeze for a moment.
• Squeeze: Full screen disolav
The picture will appear stretched in the vertical plane.
• Letterbox; A black bands will appear across the top and bottom
of the screen display
•Qa »Off
•On •Off
• Main •SAP
QM
• Main + SAP •Main •SAP
(Available in all modes apart from High Speed mode when dub
bing programs.)
• Stereo 1 •Stereo 2 •Mix
• Dolby Digital (-»page 65) *LPCM (-»page 65)
•On •Qif
• Bitstream •PCM
• Bitstream •Off
•Automatic •Off
oji
• English •Français
•On •Off
01
•Bright •Dim
• Dim during Play; The display dims during play and when
the unit is turned off.
•Automatic: The display dims during play and goes off
completely when the unit is turned off (the power
consumed will be 0.6 W). If you press a button the
display will brighten briefly.
•4;3 *16:9
•4301 •480P
• Pan & Scan (-»page 65):
Video recorded for a widescreen is played as Pan & ft^
Scan (unless prohibited by the producer of the disc).
• Letterbox (-»page 65):
Video recorded for a widescreen is played in the letterbox style.
•4:3: Programs played as recorded. rVlm
• Pan & Scan: Video recorded for a widescreen is played
as Pan & Scan.
• Letterbox: Video recorded for a widescreen is played in the
letterbox style.
.O
■â
5
0)
6
ï
O
c
s
■O
c
RQT6637
Page 62

Changing the unit’s settings
Entering a password (Ratings)
Numbered
buttons
CANCEL
ENTER
SETUP
Connmon procedures
See page 60 for menu and option details.
g 1
2
0
While stopped
Press [SET UP] to show the nrienus.
&
1
I
*o
CD®
VCftPbf miCED nECUCCE
o o o ©
Cl) CD @
CD CD ®
0 JD ®
^•CDt^
WKiHMun
nWCTCKS
IKMXOSE STJiTwS (—4x^—1
SET UP jjJDlQ rfing>ECT CtiSKff
-r~i CD O CD
RjtYUST
Ox
O
«eoo; DtsruT
o o o o
CI3 O £E3 CE)
ETvise ¡Mete «ncnw» luagu
t I [ i r~l r~l
L ""
O
RETURN
i»w»yj
The password screen is shown when you select levels 0 to 7.
1. Input a 4-digit password with the numbered buttons.
• If you enter a wrong number, press [CANCEL] to erase it.
2. Press [ENTER],
•The lock symbol appears closed to show the rating is locked
• Do not forget your password.
3. Press [ENTER] to confirm the 4 digits.
If you insert a DVD-Video that exceeds the ratings limit you set, a
message appears on the television.
Follow the on-screen instructions.
(3
Digital Audio Output
Change the settings when you have connected equipment through
this unit’s DIGITAL AUDIO OUT terminal {^page 57, Q).
Select the “Audio" tab and then “Digital Audio Output’’ by
following “Common procedures” left) to set up “PCM Down
Conversion”, “Dolby Digital” and “DTS”.
PCM Down Conversion
Select how to output audio with a sampling frequency of 96 kHz.
Select “On" if the equipment you connect cannot process signals
with a sampling frequency of 96 kHz,
• Select “Off” if you use analog connect irrespective of the type of
equipment.
Off {Factory preset):
Output as 96 kHz. There is no output if the disc has copy protection.
Select “On” in this case.
On:
Converted to 48 kHz for output.
□
Tabs Menus Options
Press [A, ▼] to select the menu’s tab
2
and press [^].
Press [A, T] to select the menu and
3
press [ENTER].
Press [A, ▼] to select the option and
4
press [ENTER].
The screen now shows the menu again,
• Some items require different operations. Read the following
explanations.
To return to the previous screen
Press [RETURN].
When you are finished
Press [SET UP],
•
Dolby Digital and DTS
m
Bitstream (Factory preset for Dolby Digital):
Select if the equipment you connected can decode the signal.
PCM:
Select if the equipment you connected cannot decode Dolby Digital
signal.
Off (Factory preset for DTS):
Select if the equipment you connected cannot decode DTS signal.
IMPORTANT
If the equipment you connected cannot decode the signal, the
setting must be changed to PCM or Off. If not, signals the
equipment cannot process will be output by this unit, causing
high levels of noise which can damage your hearing and the
speakers.
Page 63

Audio channel for DV input
Stereo 1 : Records sound (LI, R1) when DV recording is taking
Stereo 2 ; Records added sound such as narration (L2, R2)
MIX ;Records both Stereo 1 and Stereo 2.
place.
subsequent to original recording.
• L1+L2 are recorded in L and R1+R2 are recorded in R,
except for SAR In the case of SAP, Stereo 1 is recorded
when recording to DVD-R or if recording in LPCM.
Details of recording are given in “Select MTS for DVD-R
or LPCM" on page 61.
Language code list input me code
Abkhazian: 6566
Afar:
Afrikaans:
Albanian: 8381
Ameharic:
Arabic:
Armenian: 7289
Assamese: 6583 Esperanto: 6979
Aymara: 6588
Azerbaijani: 6590 Faroese:
Bashkir: 6665
Basque:
Bengali: Bangla:6678
Bhutan!: 6890
Bihari:
Breton: 6682
Bulgarian: 6671
Burmese;
Byelorussian:
Cambodian;
Catalan;
____________
Chinese: 9072 Hausa:
Corsican; 6779
6565
6570 Croatian:
Czech; 6783
6577 Danish: 6865
Dutch: 7876
6582
Engiish: 6978 Interlingua: 7365
Estonian: 6984 Italian:
Fiji: 7074
Finnish: 7073 Kainnada:
6985
French: 7082
Frisian: 7089
6672 Galician: 7176
Georgian: 7565
German: 6869
Greek: 6976
7789
Greenlandic:
6669
7577
Guarani:
Gujarati; 7185
6765
7282
7079 Japanese:
7576
7178
with numbered buttons.
Lithuanian:
7265
Hebrew: 7387
Hindi;
Hungarian: 7285 Malay:
Icelandic: 7383
Indonesian: 7378 Maltese:
Irish: 7165
Javanese:
Kashmiri:
Kazakh;
Kirghiz: 7589
Korean; 7579
Kurdish:
Laotian: 7679 Portuguese:
Latin: 7665
Latvian, Lettish; 7686
Ungala: 7678
Macedonian: 7775 Russian: 8285 Thai: 8472
Malagasy: 7771 Samoan: 8377 Tibetan; 6679
7273
Malayalam: 7776 Scots Gaelic; 7168
Maori:
Marathi:
7384 Moldavian: 7779
Mongolian:
7465
7487 Nauru:
7578 Nepali:
Norwegian: 7879 Somali: 8379 Volapük:
7583
7575 Oriya:
Pashto, Pushto: 8083
Persian; 7065
Polish; 8076 Swedish:
7585
Punjabi:
Quechua:
Rhaeto-Romanoe:8277 Tatar; 8484
----------
7684 Romanian: 8279 Telugu: 8469
7783 Sanskrit; 8365 Tigrinya: 8473
7784 Serbian; 8382 Turkish:
Serbo-Croatian: 8372 Turkmen:
7773
7782
Shona: 8378 Twi: 8487
Sindhi:
7778 Singhalese;
Slovak;
7865
7869 Slovenian;
7982 Spanish:
Sundanese: 8385 Wolof:
Swahili: 8387
8084 Tagalog; 8476
8065
Tajik;
8185
Tamil:
Tonga:
8368 Ukrainian:
8373 Urdu: 8582
Uzbek:
8375
8376
Vietnamese: 8673
6983 Welsh:
Xhosa: 8872
8386 Yiddish:
Yoruba:
8471
Zulu:
8465
8479
8482
8475
8575
8590
8679
6789
8779
7473
8979
9085
______
o
&
?
0
c
1
\
^
HQT6637
Page 64

Changing the remote control code
1 Press [SET UP] to show the menus.
Numbered
buttons
ENTER
SETUP
owcgaiv
d)/^ oii)
vwi>to.Tvfiteo BKMoot >*c
o o o ©
(D ® CD
0 ® (D l£f
® (i)
O® ® G
_
_____
I—sLcoretMic«
<E>
,^;czjct7
O
FUtiUST
.O
iSHl .
i
0>
m
O
wM
FlMCTtONS I WCT I
O O Q 0‘
OfWXOSt ST«ru8 (—SnP^
ERASE DUBSNQ WWIttF WU«£R
DISPLAY nCSlP
Q3 a CE3 iH)
SETUP Mjcio ipuisaeci oi^
-a
QQ fZD
□ CD CDa
A, ▼, ◄. I
ENTER
Antenna
Auto Ctiannel Setting
Channei^Captior}
^^^^tCtanne^Cagtlon
Manual Ctennel Caption
VCRPIUS+
2 Press [▲, T] to select “Set Up” and
press [►].
3 Press [A, ▼] to select “Remote Con
trol Code” and press [ENTER].
4 Press [A, T] to select the code (1, 2,
or 3) and press [ENTER].
The remote control code on the unit has been set.
5 While pressing [ENTER] on the
remote control, press the numbered
button ([1], [2] or [3]) corresponding
to the code you selected in step 4.
The remote control code on the remote control has been set.
6 Press [SET UP]
If the unit doesn’t respond, you have entered the wrong code.
Repeat step 5 to enter the correct code.
c
.o
Hz
2
0)
&
?
Most of the DVD recorders and players manufactured by Panasonic
u
c
use the same remote control system. If you have more than one
2
piece of equipment placed in proximity to each other, they may all
respond to the signal. If this occurs, you will have to alter the code
on the unit as well as on the remote control (the two must match)
using the following procedure,
• Use “1", the factory set code, under normal circumstances.
iJHa
The following display appears on the unit’s display if its code and the
remote control’s code are different. Change the remote control’s
code to suit the unit. The display disappears after about 5 seconds.
I III'
l_ II I '
I
The unit's remote control code
• You can also set the unit’s code without using the remote control.
® Press [FUNCTIONS] on the unit,
® Press [A, ▼, to select “SET UP" and press [ENTER].
(D Carry out procedure 2-4 above.
® Press [RETURN],
G r (''( n T r
I ' IJ I I U f L
RQT6637
Page 65

Glossary
Bitstream
This is the digital form of multi-channel audio data (e.g„ 5.1 chan
nel) before it is decoded into its various channels.
CPRM (Content Protection for Recordable Media)
CPRM is the copyright protection technology that is used to protect
broadcasts that are allowed to be recorded only once (e.g. some
CATV broadcasts).
Decoder
A decoder restores the coded audio signals on DVDs to normal.
This is called decoding.
Dolby Digital
This is a method of coding digital signals developed by Dolby Labo
ratories. Apart from stereo (2-channel) audio, these signals can also
be multi-channel audio. A large amount of audio information can be
recorded on one disc using this method.
This unit is set to record using Dolby Digital in all recording modes
except for XP mode, where you may choose Dolby Digital or LPCM.
Dolby Pro Logic
A surround system where a 4-channel audio track is recorded as 2
channels and then is restored to 4 channels for play. The surround
channel is monaural and can reproduce up to 7 kHz.
DPOF (Digital Print Order Format)
DPOF is the standard printing format for still picture data. It is used
at a photo studio to print out the still picture data taken with a digital
camera etc. or when you print out using a domestic printer.
Drive
In the instance of this unit, this refers to the hard disk (HDD) and
DVD. These perform the reading and writing of data. Select them by
pressing the drive select buttons ([HDD] or [DVD]).
DTS (Digital Theater Systems)
This surround system is used in many movie theaters around the
world. There is good separation between the channels, so realistic
sound effects are possible.
Dynamic range
Dynamic range is the difference between the lowest level of sound
that can be heard above the noise of the equipment and the highest
level of sound before distortion occurs.
FAT (File Allocation Table)
The FAT12 (12-bit file allocation table) and FAT16 (16-bit file alloca
tion table) systems this unit is compatible with are file systems used
widely in computers around the world.
Hard disk drive (HDD)
This is a mass data storage device used in computers etc. A disk
with a surface that has been treated with magnetic fluid is spun and
a magnetic head is brought in close proximity to facilitate the read
ing and writing of large amounts of data at high speed.
Interlace and progressive output
NTSC, the video signal standard, has 480 interlaced (i) scan lines,
whereas progressive scanning uses twice the number of scan lines.
This is called 480p. The video signals output from this unit’s COM
PONENT VIDEO OUT terminals (Y, Pb, Pr) allow you to enjoy
higher quality pictures than if the signals were output from the
VIDEO OUT terminal or S-VIDEO OUT terminal.
I/P/B
MPEG 2, the video compression standard adopted for use with
DVD-Video, codes frames using these 3 picture types.
I: Intra coded picture
This picture has the best quality and is the best to use when
adjusting the picture.
P: Predictive coded picture
This picture is calculated based on past I- or P-pictures.
B: Bidirectionally-predictive coded picture
This picture is calculated by comparing past and future I- and
P-pictures so it has the lowest volume of information.
JPEG (Joint Photographic Experts Group)
This is a system used for compressing/decoding color still pictures,
if you select JPEG as the storage system on digital cameras etc.,
the data will be compressed to 1/10-1/100 of its original size. The
special quality of this standard is that there is little deterioration in
picture quality in comparison to the degree of compression.
Linear PCM (pulse code modulation)
These are uncompressed digital signals. This unit outputs linear
PCM sound in 2 channels from the DIGITAL AUDIO OUT terminal.
LPCM sound is available when recording in XP mode.
Pa n&Sca n/Letterbox
In general, DVD-Video are produced with the intention that they be
viewed on a widescreen television with an aspect ratio of 16:9. This
means you can view most material with the intended aspect ratio on
a widescreen television.
Material with this ratio will not fit onto a standard television with an
aspect ratio of 4:3. Two styles of picture, “Pan&Scan” and “Letter
box”, deal with this problem.
Pan&Scan: The sides are cut off so the picture
fills the screen.
0)
o
c
£
£
0)
oc
Film and video
DVD-Videos are recorded using either film or video. Usually, film is
recorded at 24 frames per second, the rate movies are filmed at,
while video is recorded at 30 frames per second.
Frame still and field still
Frames are the still pictures that go together to make a moving pic
ture. There are about 30 frames shown each second.
One frame is made up of two fields. A regular television shows these
fields one after the other to create frames.
A still is shown when you pause a moving picture. A frame still is
made up of two alternating fields, so the picture may appear blurred,
but overall quality is high.
A field still is not blurred, but it has only half the information of a
frame still so picture quality is lower.
Letterbox: Black bands appear at the top and
bottom of the picture so the picture
itself appears in an aspect ratio of
16:9.
Playback control (PBC)
If a Video CD has playback control, you can select scenes and infor
mation with menus.
RQT6637
Page 66

Error messages
On the television
No disc.
This is non-recordable disc.
This disc is not formatted
properly.
Please format the disc in
DISC SETTING’ to record.
This disc cannot be read.
Please check write protect
tab on the disc.
Contents of this disc are
protected.
Cannot finish recording
completely.
Cannot record.
HDD is full.
Disc is full.
Cannot dub from this disc.
Please set clock. • The clock is not set. Set the clock.
This disc may not be played
in your region.
Your selection exceeds the
recorder's rating limit.
Cannot play back on this unit.
No PC CARD
No valid PC card
0)
u
c
No DVD-RAM disc ' DVD-RAM is not loaded.
s;
ct
Please check write protect
tab.
No folder
Cannot write.
Finalizing is necessary for
compatible playback.
• You haven't inserted a disc. Correctly insert a disc that this unit can use.
• The disc is upside down. If it is a single-sided disc, insert it so the label is facing up.
• The unit cannot record on the disc you inserted. The unit cannot record onto finalized DVD-R,
DVD-Video, CDs, or video CDs. Insert a DVD-RAM or unfinatized DVD-R.
• You inserted an unformatted DVD-RAM. Format the disc with this unit.
* You inserted an incompatible disc. Insert a compatible disc.
*The write-protect tab on the cartridge is set to PROTECT.
Use a ballpoint pen or similar to release the write protection.
• The program is write-protected. Cancel the protection with the Direct Navigator.
• The disc is write-protected. Cancel Disc Protection with DISC SETTING.
• The program was copy-guarded.
• No space left on HDD, DVD-RAM or DVD-R.
• The connection from the externa! device (DV equipment etc.) was lost during recording.
• Recording was not completed for some other reason.
'The disc is scratched. Use another disc.
* The disc is dirty.
'You inserted an incompatible disc. Insert a compatible disc.
• No space left on HDD, DVD-RAM or DVD-R.
-♦ Create space by erasing any unwanted programs, i:!»]»! i:rji'ii
^ Use a new disc, iihvii
^ Erase any unwanted files {still pictures).
• You may record up to 300 folders and 3000 files (still pictures) using this unit.
'Dubbing prohibited disc in tray.^ Dubbing to the HDD is not possible.
'You tried to play a disc with a region number different from this unit’s region number. This unit can
only play discs with the region numbers compatible with this unit (1, All, or including the number 1).
► A ratings level has been set for DVD-Video with this unit.
Unlock the unit with “Ratings" in “Disc” in the SETUP menu.
'You tried to playback incompatible pictures (TIFF images and MOTION JPEG cannot be played back).
'The PC card is not inserted. If this message is displayed with a compatible PC card already
inserted, turn off the power, remove and then re-insert the card.
'The PC card format does not match.
'The PC card inserted is not compatible.
' DVD-RAM is not formatted.
(Even if this message is displayed, it may sometimes be possible to playback moving picture parts.)
' Release the protection on the PC card.
' Release the protection on the DVD-RAM.
'There is no compatible folder in this unit.
► The PC card is currently protected ^ Release the write protection.
► There is no space remaining. Erase any unwanted files (still pictures).
► To enable playback of your DVD-R on compatible equipment, it is necessary to finalize it.
Page
8
18
8
38
40
38
10
8
__________________
38, 40
48
12, 13
Cover
page
62
25
38
9
8,38
9
48
38
On the unit’s display
U11
NO DISC
U14
GM
U99 • The unit fails to operate properly.
CHK REMOTE
RECOVER
• The disc is dirty or badly scratched.
-Clean the disc if it is dirty.
-The disc cannot be played if it is scratched and this display doesn’t disappear.
• You have inserted a disc the unit cannot play or record on.
- Insert a disc the unit can play or record on.
• Cleaning has been carried out using DVD-RAM/PD lens cleaner.
• The unit is hot.
• The remote control and main unit are using different codes.
Cleaning is finished. Press OPEN/CLOSE] and remove the disc cleaner from the disc tray
-The unit switches to standby automatically for safety reasons and you cannot operate it. Wait for
about 30 minutes for the service number to disappear.
- Select a position with good ventilation when installing the unit.
- Do not block the cooling fan on the rear of the unit.
- Press [c!), DVD POWER] to switch the unit to standby. Now press [(!), DVD POWER] again to turn
the unit on.
- Change the code on the remote control or main unit.
• If there is a power failure or the AC plug was disconnected while the power was on.
The unit is carrying out its recovery process. Wait until the message disappears.
10
8
—
—
64
—
Page 67

Troubleshooting guide
Before requesting service, make the below checks. If you are in doubt about some of the check points, or if the remedies indicated in the chart do
not solve the problem, look up http://www.panasonic.com/broadcast for further assistance.
Possible solutions are indicated with
” on the relative pages in these instructions.
Power
No power.
The unit switches to the
standby mode.
Operation
The unit is on but cannot be
operated.
Picture
• When progressive output is on, refer also to the section listed under “Progressive video" below.
The images from this unit do
not appear on the television.
Insert the AC power supply cord securely into a known active AC outlet.
• This is a power saving feature. You can turn it oft if you would prefer (Set Up—Off Timer—Off).
Press [(1), DVD POWER] to turn the unit on.
• One of the unit’s safety devices may have activated. Press [c!), DVD POWER] to turn the unit
on.
• Some operations may be prohibited by the disc.
• Recording drive or playback drive have not been selected properly.
• The unit is hot (“U14” appears on the display). Wait for “U14” to disappear.
• One of the unit’s safety devices may have activated.
Reset the unit as follows:
1. Press [<ij, DVD POWER] to switch the unit to standby.
if the unit doesn’t switch to standby, press and hold [Cl), DVD POWER] for about 10 seconds.
The unit is forcibly switched to standby.
Alternatively, disconnect the AC power supply cord, wait one minute, then reconnect it.
2, Press [Cb, DVD POWER] to turn the unit on.
• Make sure that the television is connected to the AUDIO/VIDEO terminal, S-VIDEO OUT termi
nal or COMPONENT VIDEO OUT terminal on this unit.
• Make sure that the television's input setting (e.g., VIDEO 1) is correct
• When using this unit for the first time, the HDD has nothing recorded on it. You must record a
program etc. to the HDD before you can enjoy playback.
• You have set “TV Type” to “480P” in the SETUP menus, but the television isn’t compatible with
progressive signals. Press and hold [■] and [II] on the unit at the same time for about 5
seconds. The setting will change to interlace.
Page
11
60
19, 23
66
11
18
Television reception worsens
after connecting the unit.
Screen size is wrong.
On>screen messages do not
appear.
The blue background does
not appear.
There is ghosting.
Progressive video
There is ghosting when pro
gressive output is on.
There is no apparent change
in picture quality when
adjusted with the Video menu
in the on-screen menus.
• This can occur because the signals are being divided between the unit and the television. It can
be solved by using a signal booster, available from audio-visual suppliers. Consult your dealer
if reception does not improve.
• Due to inherent characteristics of the HDD, the picture may occasionally be disturbed. This is
normal.
• Check the settings on your television.
• Check the settings for ‘TV Aspect”, “4:3 TV Settings for DVD-Video” or “4:3 TV Settings for
DVD-RAM” in the TV Screen SETUP menus.
• Go to Display in the SETUP menus and select “Automatic” for “Status Messages”.
• Press [STATUS] to show the on-screen messages constantly.
• Go to Display in the SETUP menus and select “On” for “Blue Background".
• Change the settings for "3D NR", “Block NR”, and "Mosquito NR" to “0" or turn “MPEG-DNR” off
with the on-screen menus.
• Select "Video" in the on-screen menu and set “Progressive" to “OFF". This problem is caused
by the editing method or material used on DVD, but should be corrected if you use interlace
output.
• The effect is less perceivable with some types of video.
—
16, 61
61
54
61
52
52
U
c
a ;
*
.S!
Qc
Q)
ROT6637
Page 68

Troubleshooting guide
Sound
No sound.
Low volume.
Distorted sound. • Turn V.S.S. off if it causes distortion.
Cannot hear the desired
audio type.
Cannot switch audio during
stereo or SAP broadcasts. using audio cables (analog connection).
Play
Play fails to start even when
[►] (PLAY) is pressed.
Play starts but then stops • The disc is dirty. Clean it.
immediately.
A title or chapter doesn't play
when it is selected.
Picture distorted during • Some distortion is normal.
search.
Alternative soundtrack and
subtitles cannot be selected. • You may have to use the disc’s menus to select languages.
No subtitles.
Angle cannot be changed.
You have forgotten your rat-
Qi
o
c
£
ings password.
Displays
• Check the connections. Check the input mode on the amplifier if you have connected one.
• Press [AUDIO] to select the desired audio type.
• Go to Audio in the SETUP menus and choose the correct setting with “Seiect MTS for DVD-R
or LPCM”.
• If you are recording a television program and change the drive, you cannot change the audio
on that drive. The audio will be the type selected for recording.
• You have used digital connection. Set "Dolby Digital” to “PCM" or connect to other equipment 57, 62
• You cannot change the audio type when using DVD-R or with LPCM recordings.
• Insert the disc correctly with the label facing up.
• This unit cannot play discs other than DVD-RAM, DVD-R, DVD-Video, Video CD, and CD.
• The disc may be badly scratched.
• You inserted a blank DVD-RAM or DVD-R.
• Some titles and chapters on DVD-Video are not played when you have changed the ratings
level.
• The languages are not recorded on the disc.
• Subtitles are not recorded on the disc.
• Turn the subtitles on.
• This function depends on software availability. Angles can only be changed during scenes
where different angles are recorded.
• Return the ratings setting to “8”. Press [DVD] and then OPEN/CLOSEj. While the disc tray
is open, press and hold and [►►/►W] on the main unit at the same time for 5 or
more seconds.
11,
56-58
51
30
61
30
—
18
8
10
—
•—
62
_
_
23
_
50
—
—
The display is dim. • Go to Display in the SETUP menus and change the display's brightness with “FL Display".
“12:00” is flashing on the
unit’s display.
The displayed recording time
and actual recording time dif
fer.
Remote control
The remote control doesn’t
work.
Cannot operate the televt-
Sion. • [DVD, TV] is not switched to “TV”. Switch to TV” when selecting the receiving channel for the
• The clock is not set. Go to Set Up in the SETUP menus and set the clock with "Clock settings". 12, 13
• Displayed recording time is calculated based on the number of frames recorded per second.
This number is subject to minute variation. When the recording time is long the cumulative
effect of these small differences may result in the slight variation you may sometimes find
between displayed recording time and actual recording time. This is normal.
• [DVD, TV] is not switched to “DVD”. Switch to “DVD” when operating this unit.
• The remote control and main unit are using different codes. Change the code on the remote
control or main unit.
• The batteries are depleted. Replace them with new ones.
• Point the remote control at the remote control sensor on the main unit.
• Remove obstacles from between the remote control and main unit.
• Change manufacturer code. Some televisions cannot be operated even if you change the code.
television.
61
6
64
10
10
—
17
6
Page 69

Possible solutions are indicated with “
" on the relative pages in these instructions.
CM
Recording and timer recording
Cannot record.
VCR Plus+ programming
does not work properly.
Timer recording does not
work properly.
The timer program remains
even after recording finishes.
Timer recording does not stop
even when [■] is pressed.
The available recording time
doesn’t increase even after
erasing recordings on the disc.
A part or whole of a recorded
program has been lost.
• You haven’t inserted a disc or the disc you inserted cannot be recorded on. Insert a disc the
unit can record onto.
• The disc is unformatted. Format the disc so this unit can record on it.
• The disc is protected with the whle-protect tab. Use a ballpoint pen or similar to release the
write protection.
• Some programs have limitations on the number of times they can be recorded.
• The disc is protected with DISC SETTING. Cancel Disc Protection.
• The HDD or the disc is full or nearly full. Erase unneeded programs or use another disc,
• You cannot record on finalized DVD-R discs.
• The guide channels are incorrect. Go to Channel in the SETUP menus and correct them with
“VCR Plus-I- CH Setting”.
• The clock is wrong. Go to Set Up in the SETUP menus and correct it with “Clock settings".
• The timer program is incorrect. Correct the program.
• Different timer program times overlap.
• The clock is wrong. Go to Set Up in the SETUP menus and correct it with “Clock settings’’.
• Timer recording will not be activated during operations that cannot be interrupted such as for-
matting, dubbing, some types of editing of still pictures etc.
• The program remains if you select a daily or weekly setting.
• Press [■] and then [ENTER] within 5 seconds. Recording stops.
• As this unit is unable to erase data written to DVD-RAM with a computer, the available recording time does not increase. The data will be erased if you reformat the disc.
• If the disc is dirty, wipe with the DVD-RAM/PD disc cleaner (optional) before formatting.
• If there is a power tailure or the plug is disconnected from the household AC outlet while
recording or editing, the program may be lost or the HDD/disc may become unusable.
^ We cannot offer any guarantee regarding lost programs or discs. You will have to format (for
HDD, DVD-RAM) or use a new disc.
Page
8
38
8
38
40
14
12, 13
37
—
12, 13
—
35
—
38
10
38
Still pictures (JPEG)
The contents of the PC card
cannot be read.
Copying, erasing and setting
protection takes a long time.
The tray won’t open/close.
The PC card cannot be removed.
Timer recording began in the
middle of editing a still picture.
Discs make sounds as they rotate. This does not indicate a malfunction.
The precision parts in this unit are readily affected by the environment, especially temperature, humidity, and dust. Cigarette smoke
also can cause malfunction or breakdown.
If the front panel half mirror is dirty, wipe with the included cleaning cloth. If any other parts apart from the front panel are dirty, wipe
with a soft, dry cloth.
• Never use alcohol, paint thinner or benzine to clean this unit
• Before using chemically treated cloth, read the instructions that came with the cloth carefully.
Observe the following points to ensure continued listening and viewing pleasure.
Dust and dirt may adhere to the unit’s lens over time, making it impossible to record or play discs.
Use DVD-RAM/PD lens cleaner (LF-K123LCA1) every 1 to 4 months, depending on frequency of use and the operating environment.
Read the lens cleaner's instructions carefully before use.
• The PC card format is not compatible with the unit,
^ Format using FAT 12 or FAT 16 with other equipment or format the PC card with this unit.
• The unit tried to display still picture files that were in a folder level that is not compatible.
• The still picture file is not JPEG.
This unit displays still pictures (JPEG) that are in accordance with DCF standard.
• Turn off and then turn on the unit again.
• When there are a lot of folders and files, it may sometimes take a few hours.
• When repeating copying or erasing, it may sometimes take a long time. Format the disc or PC card. 38, 48
• The tray cannot be opened or closed while the stilt pictures are played back and editing screen
is being displayed. Press [RETURN] a few times to clear the screen.
• Make sure the PC card is slotted home firmly before attempting to remove. 25
• If it comes to the time scheduled for timer recording, the recording may start even though you
are editing.
48
9
9
—
—
Q>
U
C
£
£
tS
RQT6637
Page 70

Limited Warranty
Panasonic Broadcast & Television Systems Company,
Unit company of Matsushita Electric Corporation of
America
One Panasonic Way
Secaucus, NJ 07094
PANASONIC DVD RECORDER
Panasonic Broadcast & Television Systems Company or
Panasonic Sales Company (collectively referred to as “the
Warrantor") will repair this product and all included accesso
ries with new or refurbished parts, free of charge in the USA
or Puerto Rico, from the date of the original purchase in the
event of a defect in materials or workmanship as follows:
Parts—New or rebuilt parts in exchange for defective parts
for one (1) year from the date of original purchase.
Labor—Carry-in or mail-in service for one (1) year from the
date of original purchase.
Batteries—(If included) New rechargeable batteries in
exchange for defective rechargeable batteries for ten (10)
days from the date of original purchase. Non-rechargeabte
batteries are not warranted.
4.7 DVD-RAM Disc—(If included) New 4.7 DVD-RAM Disc
in exchange for defective disc for ten (10) days from the date
of original purchase.
Carry-in or mail-in service in the USA may be obtained dur
ing the warranty period by contacting Panasonic Broadcast
& Television Systems Company Factory Servicenter listed in
the Service Directory or call toll free 1-800-526-6610 to
locate an authorized Servicenter.
Carry-in or mail-in service in Puerto Rico can be obtained
during the warranty period by calling local service center at
Si
787-750-5135.
c
S
This warranty is extended only to the original purchaser. A
Æî
purchase receipt or other proof of date of original purchase
Sc
will be required before warranty service is rendered.
Panasonic Saies Company, Division of Matsushita Electric of Puerto Rico, Inc.
Ave. 65 de Infantería, Km.9.5
San Gabriel Industrial Park
Carolina, Puerto Rico 00985
Limited Warranty
This warranty only covers failures due to defects in materials
or workmanship, which occur during normal use. The war
ranty does not cover damage which occurs in shipment, or
failures which are caused by products not supplied by the
warrantor, or failures which result from accident, misuse,
abuse, neglect, mishandling, misapplication, alteration, mod
ification, faulty installation, set-up adjustments, improper
antenna, inadequate signal, pickup, maladjustment of con
sumer controls, improper operation, power line surge,
improper voltage supply, lightning damage, or service by
anyone other than a DVD Recorder authorized repair facility,
or damage that is attributable to acts of God.
LIMITS AND EXCLUSIONS
There are no express warranties except as listed above.
THE WARRANTOR SHALL NOT BE LIABLE FOR INCI
DENTAL OR CONSEQUENTIAL DAMAGES (INCLUDING,
WITHOUT LIMITATION, DAMAGE TO DISCS) RESULTING
FROM THE USE OF THIS PRODUCT, OR ARISING OUT
OF ANY BREACH OF THE WARRANTY. ALL EXPRESS
AND IMPLIED WARRANTIES, INCLUDING THE WARRAN
TIES OF MERCHANTABILITY AND FITNESS FOR PAR
TICULAR PURPOSE, ARE LIMITED TO THE APPLICABLE
WARRANTY PERIOD SET FORTH ABOVE.
Some states do not allow the exclusion or limitation of inci
dental or consequential damages, or limitations on how long
an implied warranty lasts, so the above exclusions or limita
tions may not apply to you.
This warranty gives you specific legal rights and you may
also have other rights, which vary from state to state.
R0T6637
Regional Service Offices
Central
1707N. Randall Rd.
Elgin, IL 60123
847-468-5254 Suwanee, GA 30024
Southern
1225 Northbrook Pkwy
Suite 170
770-338-6858
if you have a problem with this product that is not han
dled to your satisfaction, then write the Consumer
Affairs Department at the Company address indicated
above.
Northeast
50 Meadowstand Pkwy
Secaucus, NJ 07094
201 -348-7975 323-436-3507
3330 Cahuenga Blvd. West
Los Angeles, CA 90068
Western
Page 71

;:>peciTicaTions
Recording system: DVD video recording standards
Hard disk drive capacity: 40 GB
Opticai pick-up:
Recordable discs:
Recording time (1):
Recording time (2):
Discs played:
Video system
TV system:
Recording system; MPEG2 (Hybrid VBR)
Input: LINE (pin jack), 1.0 Vp-p; 75 Q
Output: LINE (pin jack), 1.0 Vp-p; 75 O
Component video output (480P/480i):
Antenna reception input:
(DVD-RAM),
DVD video standards (DVD-R)
System with 1 lens, 2 integration units
(662 nm wavelength for DVDs, 790 nm
wavelength for CDs)
12 cm 4.7 GB DVD-RAM discs
12 cm 9.4 GB DVD-RAM discs
8 cm 2.8 GB DVD-RAM discs
12 cm 4.7 GB DVD-R discs
(for General Ver. 2,0)
Max. 6 hours (using 4.7 GB disc)
XP: 1 hour SP: 2 hours
LP: 4 hours EP: 6 hours
Max. 52 hours (using Hard disk drive)
XP: 8.5 hours SP: 17 hours
LP: 34 hours EP: 52 hours
12 cm 4.7 GB DVD-RAM discs
12 cm 9.4 GB DVD-RAM discs
8 cm 2.8 GB DVD-RAM discs
12 cm 4.7 GB DVD-R discs
(for General Ver. 2.0)
DVD-VIDEO discs
CD-Audio discs (CD-DA)
Video CD discs
CD-R/CD-RW discs
(CD-DA, Video CD formatted discs)
NTSC system, 525 lines, 60 fields
S connector Y; 1.0 Vp-p; 75 O
C: 0.286 Vp-p; 75 O
S connector Y: 1,0 Vp-p; 75 Q
C: 0.286 Vp-p; 75 Q
Y: 1.0 Vp-p; 75 Q
Pb: 0.7 Vp-p; 75 Q
Pr: 0.7 Vp-p; 75 G
TV Channel: 2ch-69ch, 75 G
CATV Channel; 1ch-125ch, 75 G
Audio system
Recording system: Dolby Digital (XP/SP/LP/EP)
Input:
Output:
Number of channels:Recording; 2 channels
Other input/output connectors:
Operating temperature range:
Operating humidity range:
Clock unit: Quartz-controlled 12-hour digital display
LASER Specification
Class I LASER Product
Wavelength: 775-815 nm 655-666 nm
Laser power: No hazardous radiation is emitted with the
DV input: IEEE 1394 Standard, 4 pin
PC card slot: PC Card Type II
Compatible media: A PC Card adaptor conforming to PC Card
Format:
Image format:
Number of pixels:
Thawing time:
Power supply:
Power consumption:
Dimensions:
Mass:
Power consumption in standby mode: approx. 3.3 W
LINEAR PCM (XP mode only)
LINE (pin jack)
Reference input: 309 mVrms
FS:2Vrms(1 kHz, 0 dB)
Input impedance: 47 kG
LINE (pin jack)
Reference output: 309 mVrms
FS: 2 Vrms (1 kHz, 0 dB)
Output impedance: 1 kG
(Load impedance: 10 kG)
Playback; 2 channels
Digital audio optical output connector
(PCM, Dolby Digital, DTS)
5"C-40 “C (41 °F-104 °F)
10 %-80 % RH (no condensation)
safety protection
Standards
ATA Flash PC Card
PC Card adaptor (SD Memory Card, Multi
Media Card, Compact Flash, Smart Media,
Memory Stick)
FAT12 or FAT16
JPEG conforming to DCF (Design rule for
Camera File system)
DPOF compatible
320 X 240 to 6144 x 4096
(sub sampling; 4:2:2 or 4:2:0)
Approx. 7 sec. (2 M pixels)
AC 120 V, 60 Hz
36 W
Approx, 430 (W)x79 (H)x306 (D) mm
[Approx.16'V,6"(W)X3%"(H)X 12V,e"(D)l
(excluding protrusions)
Approx. 4.5 kg (9.9 lbs)
8
c
2
£
Product Service
1. Damage requiring servici
fied service personnel if:
(a) The AC power supply cord or AC adaptor has been damaged; or
(b) Objects or liquids have gotten into the unit; or
(c) The unit has been exposed to rain; or
(d) The unit does not operate normally or exhibits a marked change
in performance; or
(e) The unit has been dropped or the cabinet damaged.
2. Servicing—Do not attempt to service the unit beyond that
described in these operating instructions. Refer all other servicing
to authorized servicing personnel.
The unit should be serviced by quali- 3. Replacement parts—When parts need replacing ensure the ser
Specifications are subject to change without notice.
Mass and dimensions are approximate.
vicer uses parts specified by the manufacturer or parts that have
the same characteristics as the original parts. Unauthorized substi
tutes may result in fire, electric shock, or other hazards.
4. Safety check—After repairs or service, ask the servicer to perform
safety checks to confirm that the unit is in proper working condition.
HQT6637
Page 72

Index
A-B repeat......................................................................51
All copy of PC card
.......................................................
46
Angle..............................................................................50
Antenna system
............................................................
12
Audio attribute...............................................................50
Auto Renewal Recording..............................................36
Block NR .......................................................................52
Brightness
.....................................................................
52
Channel Caption ...........................................................15
Channel Setting........................................................12-13
Chasing play
................................................................
21
Cleaning
disc .............................................................................................10
lens ............................................................................................69
main unit.....................................................................................69
Clock setting
...........................................................
12-13
CM Skip..........................................................................24
Color...............................................................................52
Connection
amplifier, system component
antenna.......................................................................................59
antenna, television ....................................................................11
cable TV box, satellite receiver
video equipment ........................................................................58
Contrast
......................................................................
....................................................
..................................................
52
57
56
Copy...............................................................................46
CPRM system
...............................................................
65
Dialog Enhancer...........................................................51
Direct Navigator........................................................26, 40
Divide Program..............................................................40
DPOF..............................................................................48
Dubbing
DV Automatic Recording (DV AUTO REC)
DVD-R Menu Screen
Edit Scenes
.........................................................................
.................
.....................................................
...................................................................
32
31
38
42
Enter Title
disc..............................................................................................38
folder...........................................................................................47
play list
.....................................................................................
program.......................................................................................34, 40
42
Erase
alt programs ...............................................................................38
play list ..................................................................................27, 42
play list scene
program........................................................................................26, 40
.......................................................................
27, 42
Finalize...........................................................................38
Flexible Recording (FR) ...........................................19, 20
Format
Hard Disk ...................................................................................38
DVD-RAM...................................................................................38
PC card.......................................................................................48
FUNCTIONS window
.....................................................
53
Gamma ..........................................................................52
Language code list........................................................63
LPCM ...................................................................... 61,65
Marker ...........................................................................28
Mosquito NrI
.................................................................
52
MPEG-DNR . ..................................................................52
One Touch Recording...................................................20
On-screen display
.........................................................
54
On-screen menu............................................................50
PC card..............................................................................9, 25
PCM Down Conversion.................................................62
PLAY FROM TOP...........................................................53
Piaylist
........
.......................................................
27, 42, 44
Position memory function............................................23
Program play
Progressive '
................................................................
......................................................
11, 16, 52
29
Properties
play list........................................................................................42
program ....
.................................................................................40
Protection
cartridge . ....................................................................................8
disc
............
program .1...................................................................................40
.................................................................................38
Random piay..................................................................29
Ratings password
.....................................................
62, 68
Recording mode............................................................19
Re-initialize Setting.......................................................60
Relief Recording............................................................35
Repeat play....................................................................51
Resume function...........................................................23
Seamiess Play
..........................'....................................
61
SETUP menu..................................................................60
Sharpness ................................................................... 52
Shorten Segment...........................................................40
Simultaneous rec and play
..........................................
21
Sound track....................................................................50
Still pictures (JPEG)
......................................
9, 25, 46, 48
Subtitie......................................................................... 50
Time Slip
....................................................................
21, 24
Timer recording........................................................34-37
Transfer .........................................................................52
TV Aspect.......................................................................16
TV Type
..........................................................................
16
VCR Plus-k
guide channel
timer recording............................................................................34
............................................................................
14
V.S.S............:..................................................................51
3D NR
..........
...................................................................52
User memo:
DATE OF PURCHASE
nPAI PR NAMP
nPAI PR AnnRPSS
TPI PPHnNP NIIMRPR
All Other names, company names, product names, etc. in these
instructions are the trademarks or registered trademarks of their
respective corporations.
Panasonic Broadcast & Television Systems Company,
Unit company of Matsushita Electric Corporation
of America
One Panasonic Way
Secaucus, NJ 07094
©2002 Matsushita Electric Industrial Co., Ltd.
Printed in Japan
The model number and serial number of this product can be
found on either the back or the bottom of the unit.
Please note them in the space provided below and keep for
future reference.
MODFI NIJMRFR DMR-T3040
SERIAL NUMBER
Panasonic Sales Company,
Division of Matsushita Electric of Puerto Rico, Inc.
Ave. 65 de Infantería, Km. 9.5
San Gabriel Industrial Park
Carolina, Puerto Rico 00985
©
RQT6637-P
F0802YU0
 Loading...