

Panasonic CQ-VX2200W User Manual
R
INTEGRATED CD/CASSETTE RECEIVER WITH DSP
CQ-VX2200W
Operating Instructions
¡Please read these instructions carefully before using this product and keep this manual for future reference.
SKIP
ST
DISC
REP
R
SCAN
TPS
LOC
EQ
B NR
SPACE
POSI
MTL
DISP SPACE
123456
REMOTE
REVERSE
SOURCE
OPEN
OPEN
S·A
D·M
REPEAT
REPEAT
DSP SPACEDISPLAY CLOCK
SEL S·A
TUNE
TRACK
SCANRANDOM
CQ-VX2200
INTEGRATED CD/CASSETTE RECEIVER WITH DSP
MTL B NR TPS SKIP
MUTE
VOL
AUTO·P
S·ANALYZER
PWR
H
u
m
an
E
q
u
a
liz
er
FM■ DISC
AM45DISC
AM45DISC

2
CQ-VX2200W
CAUTION:
THIS PRODUCT IS A CLASS I LASER PRODUCT.
USE OF CONTROLS OR ADJUSTMENTS OR
PERFORMANCE OF PROCEDURES OTHER
THAN THOSE SPECIFIED HEREIN MAY RESULT
IN HAZARDOUS RADIATION EXPOSURE.
DO NOT OPEN COVERS AND DO NOT REPAIR
YOURSELF. REFER SERVICING TO QUALIFIED
PERSONNEL.
WARNING:
TO REDUCE THE RISK OF FIRE OR ELECTRIC
SHOCK, DO NOT EXPOSE THIS PRODUCT TO
RAIN OR MOISTURE.
TO REDUCE THE RISK OF FIRE OR ELECTRIC
SHOCK, AND ANNOYING INTERFERENCE, USE
ONLY THE INCLUDED COMPONENTS.
Laser products:
Wave length: 780 nm
Laser power: No hazardous radiation is emitted
with safety protection.
E
N
G
L
I
S
H
Safety Information
Contents
Page
Safety Information ......................................... 2
Use This Product Safely ................................ 8
Components ................................................... 8
Remote Control .............................................. 10
Name of Controls and Functions .................. 11
Power and Basic Operations ........................ 12
Radio Basics .................................................. 14
CD Player Basics ........................................... 16
Cassette Tape Player Basics ........................ 18
CD Changer Control ...................................... 20
Sound Space and Useful Functions ............ 22
Sound Setting ................................................ 26
Other Setting .................................................. 30
Installation Guide ........................................... 32
Electrical Connections ................................... 36
Troubleshooting ............................................. 39
Maintenance ................................................... 44
Specifications ................................................. 45

8
CQ-VX2200W
E
N
G
L
I
S
H
Panasonic welcomes you to our ever growing family of electronic product owners. We know that this
product will bring you many hours of enjoyment. Our reputation is built on precise electronic and mechanical engineering, manufactured with carefully selected components and assembled by people who take
pride in their work. Once you discover the quality, reliability, and value we have built into this product, you
too will be proud to be a member of our family.
When Driving
Keep the volume level low enough to be aware of road
and traffic conditions.
When Washing Your Car
Do not expose the product, including the speakers, CDs
and tapes to water or excessive moisture. This could
cause electrical shorts, fire, or other damage.
When Parked
Parking in direct sunlight can produce very high temperatures inside your car. Give the interior a chance to cool
down before switching the unit on.
Use the Proper Power Supply
This product is designed to operate with a 12 V DC, negative ground battery system.
Disc Mechanism
Do not insert coins or any small objects. Keep screwdrivers and other metallic objects away from the disc
mechanism and disc.
Tape Mechanism
Keep magnets, screwdrivers or other metallic objects
away from the tape mechanism and tape head to prevent
poor performance or malfunctions.
Use Authorized Service Centers
This product is made of precision parts. Do not attempt
to disassemble or adjust any parts. For repair, please
consult your nearest authorized Panasonic Service
Center.
For Installation
The product should be installed in a horizontal position
with the front end up at a convenient angle, but not more
than 30˚.
❏ Use This Product Safely
❏ Components
¡Operating instructions. . . . . . . . . . . . . . . . . . . . . . . . . 1
¡Installation hardware . . . . . . . . . . . . 1 set (a page 32)
¡Power connector. . . . . . . . . . . . . . . . . . . . . . . . . . . . . 1
¡Remote Control Unit . . . . . . . . . . . . . . . . . . . . . . . . . . 1
¡Lithium battery (CR2025) . . . . . . . . . . . . . . . . . . . . . . 1
10
CQ-VX2200W
1
E
N
G
L
I
S
H
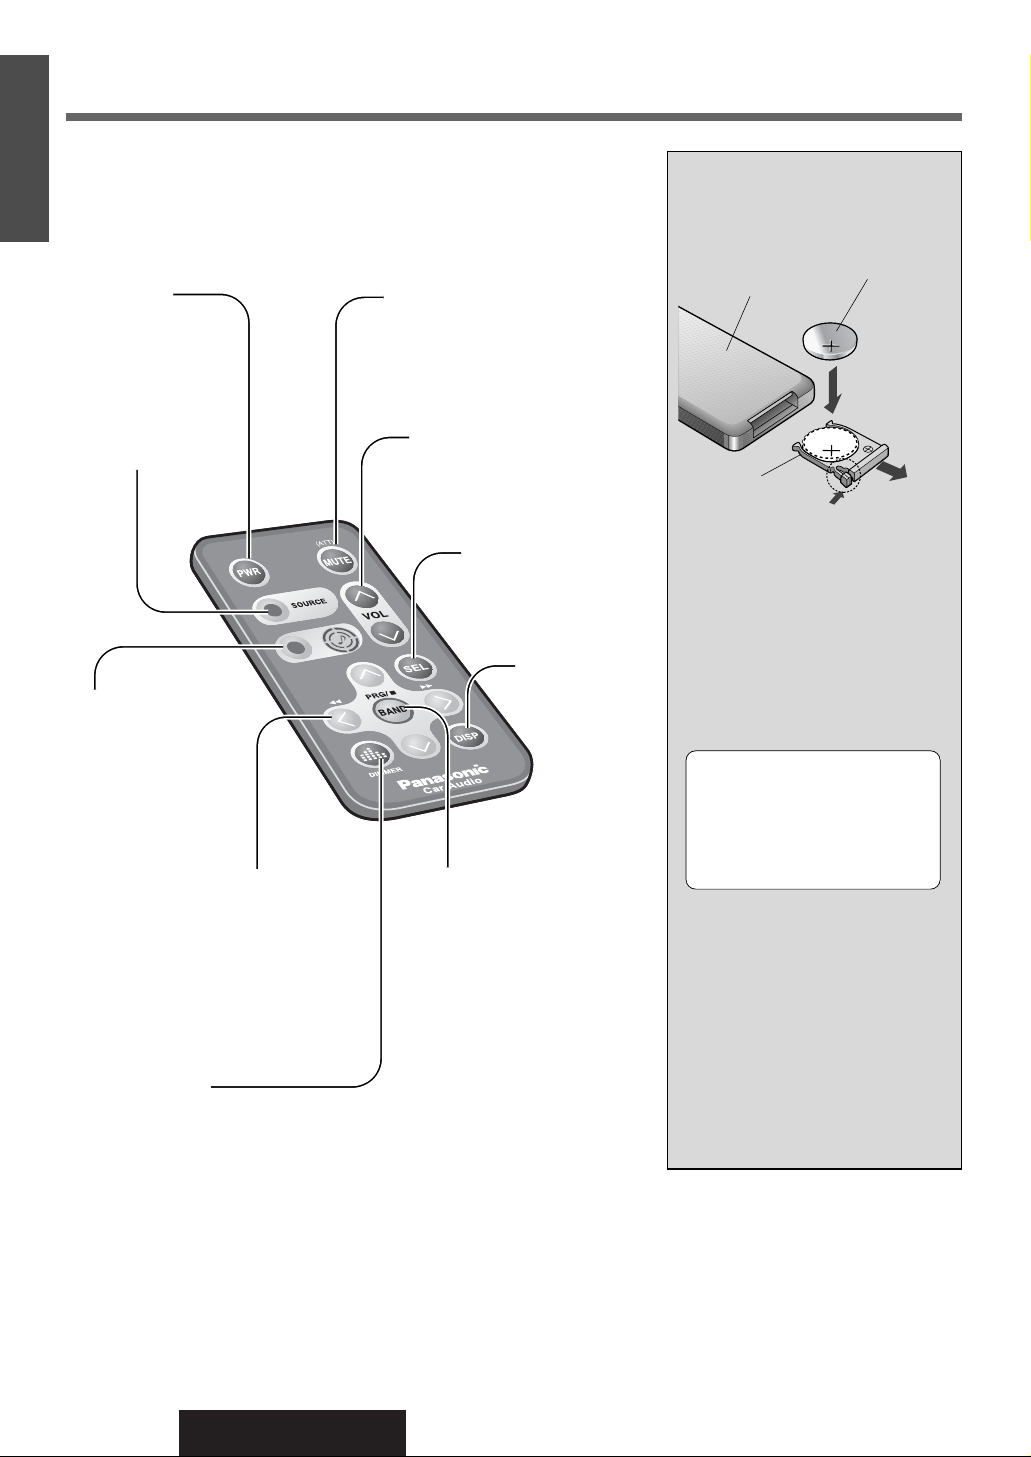
Remote Control
¡Do not disassemble or short
the battery. Do not throw a battery into a fire.
¡Keep batteries away from chil-
dren to avoid the risk of accidents.
¡Be careful to observe proper
local disposal rules when you
dispose of batteries.
Caution: Improper use of batteries may cause overheating,
an explosion, ignition, resulting
in injury or a fire. Battery leakage may damage the unit.
¡Battery Type:
Panasonic lithium battery
(CR2025)
¡Battery Life:
Approximately 6 months with
normal use (at room temperature)
Battery Installation
Back side
Lithium battery
(+ side face up)
Battery holder
q While pushing
w Pull
e Install the
battery
Control Reference Guide
Point the remote control unit at the main unit’s sensor (REMOTE).
PWR (Power)
¡Power ON/OFF
MUTE / ATT (Attenuator)
¡Mute the sound temporarily
¡Decrease the volume to 1/10
VOL (Volume)
¡Adjust volume
SEL (Select)
¡Select the setting item
¡Change MONO/LOCAL
DISP (Display)
¡Change display
BAND
¡Change band
¡Auto preset memory
PRG (Program)
¡Reverse the tape play
side
■ (Stop)
¡Stop the tape rewind or
fast forward
Spectrum Analyzer
¡Change Spectrum Analyzer pattern
¡Arrange Spectrum Analyzer
DIMMER
¡Change the dimmer level
SPACE
¡Change sound space
SOURCE
¡Change source
][ (TUNE) / 1 2 (TRACK)
¡Change frequency
¡Change track
¡Select / Adjust the item
}{(DISC)
¡Change disc
¡Select / Adjust the item
DISP SPACE
123456
REMOTE
REVERSE
SOURCE
OPEN
OPEN
S·A
D·M
REPEAT
REPEAT
DSP SPACEDISPLAY CLOCK
SEL S·A
TUNE
TRACK
SCANRANDOM
CQ-VX2200
INTEGRATED CD/CASSETTE RECEIVER WITH DSP
MTL B NR TPS SKIP
MUTE
VOL
AUTO·P
S·ANALYZER
PWR
Human
Equalizer
FM■ DISC
AM45DISC
AM45DISC
SKIP
ST
DISC
REP
R
SCAN
TPS
LOC
EQ
B NR
SPACE
POSI
MTL
11
CQ-VX2200W
2
E
N
G
L
I
S
H
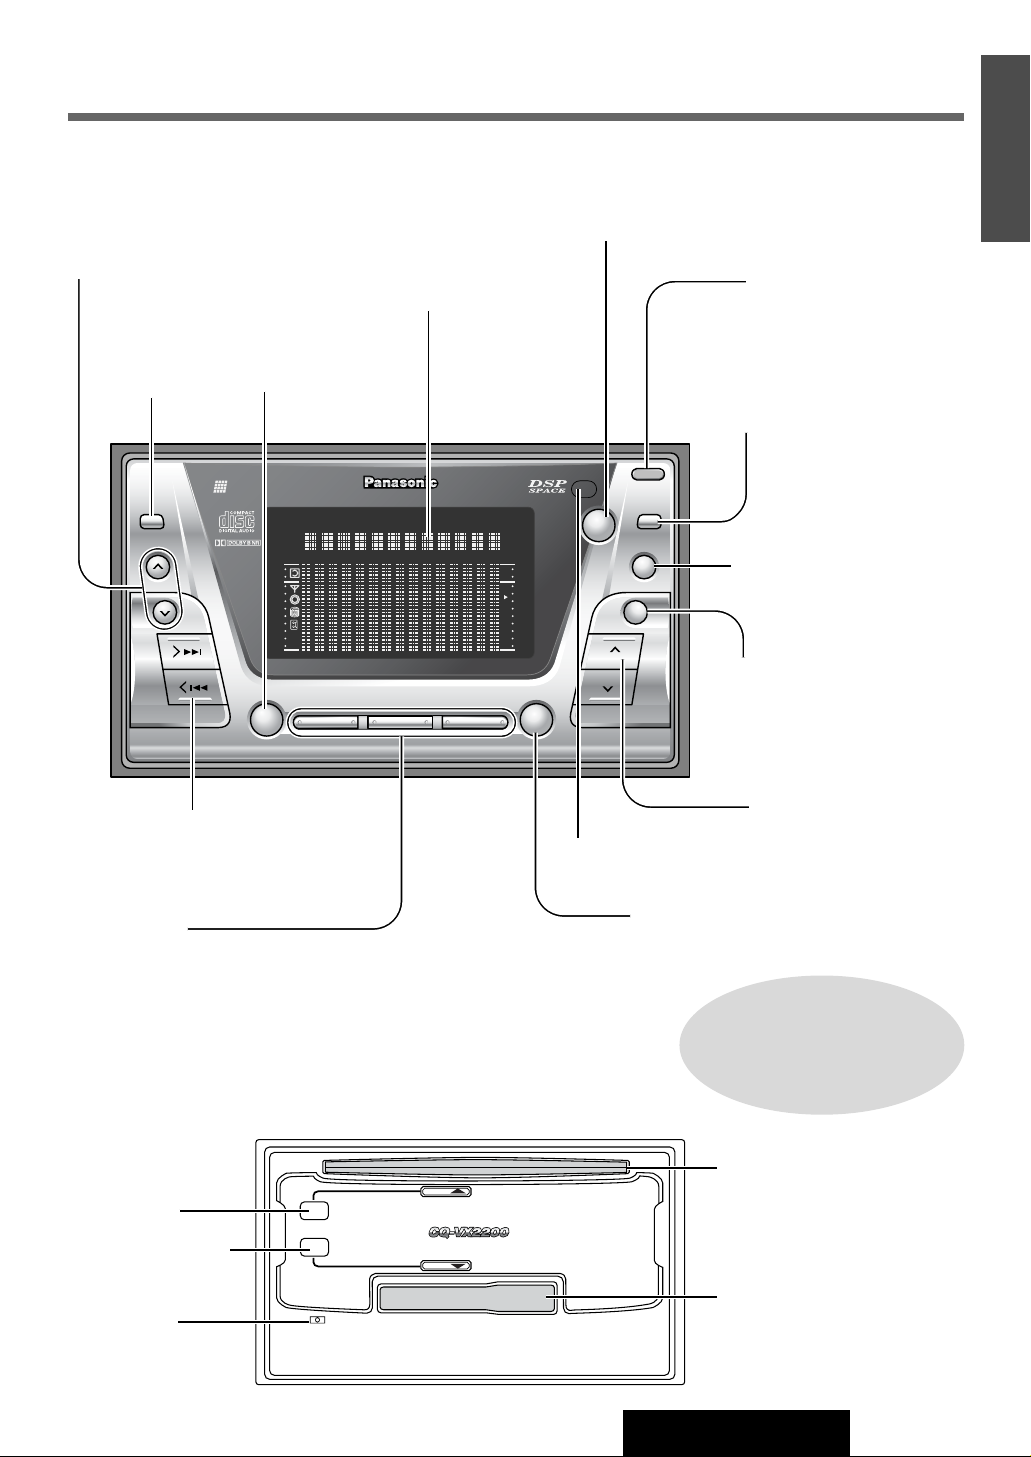
CD EJECT
CST EJECT
CD IN
CST IN
LARGE FLUORESCENT DISPLAY ■
41W x 4CH AMPLIFIER ■
15 BAND SPECTRUM ANALYZER ■
FLIP DOWN PANEL ■
INTEGRATED CD/CASSETTE RECEIVER WITH DSP
u
u
RESET
CD Slot
Cassette Tape Slot
Reset Switch
CST (Cassette tape)
u (Eject)
CD u (Eject)
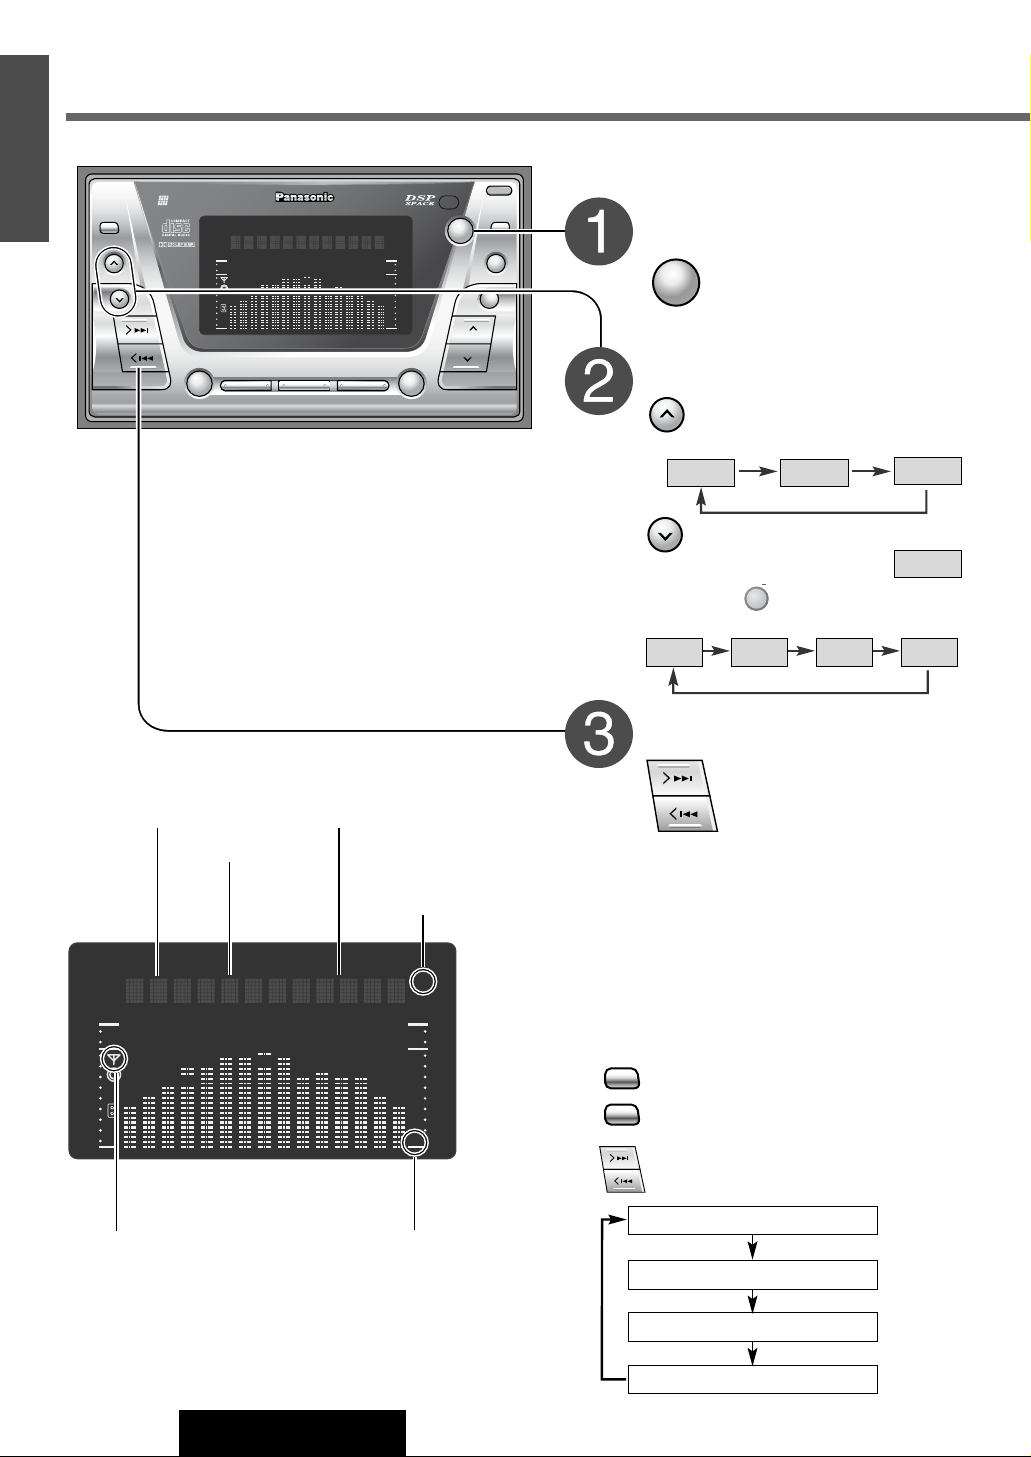
Name of Controls and Functions
][ (TUNE) / s d (TRACK)
¡Change frequency
¡Change track
¡Select / Adjust the item
SPACE
¡Change sound space
REMOTE
(Remote control sensor)
SEL (Select)
¡Select the setting
item
DISP (Display)
¡Change display
Display (VFD)
S•A (Spectrum Analyzer)
¡Change Spectrum Analyzer pattern
¡Arrange Spectrum Analyzer
OPEN
¡Open the panel
PWR (Power) / SOURCE
¡Power ON/OFF
¡Change source
D•M (Direct Memory)
¡Recall the direct memory
¡Memorize the frequency
MUTE / ATT (Attenuator)
AUTO•P (Auto Preset Memory)
¡Mute the sound temporarily
¡Decrease the volume to 1/10
¡Auto preset memory
}{(DISC)
¡Change band
¡Change tape side
¡Change disc
¡Select / Adjust the item
VOL (Volume)
¡Adjust volume
1 to 6
¡Preset memory / Recall preset memory
¡Memorize GEQ level adjustment / Recall GEQ level adjustment
¡Random ....... [4]
¡Scan ............. [5]
¡Repeat .......... [6]
For details about terminals
on the rear of the unit, please
see "Electrical Connections"
(a page 37)
Behind the Front Panel
12
CQ-VX2200W
3
E
N
G
L
I
S
H
DISP SPACE
123456
REMOTE
REVERSE
SOURCE
OPEN
OPEN
S·A
D·M
REPEAT
REPEAT
DSP SPACEDISPLAY CLOCK
SEL S·A
TUNE
TRACK
SCANRANDOM
CQ-VX2200
INTEGRATED CD/CASSETTE RECEIVER WITH DSP
MTL B NR TPS SKIP
MUTE
VOL
AUTO·P
S·ANALYZER
PWR
H
um
an
Equalizer
FM■ DISC
AM45DISC
AM45DISC
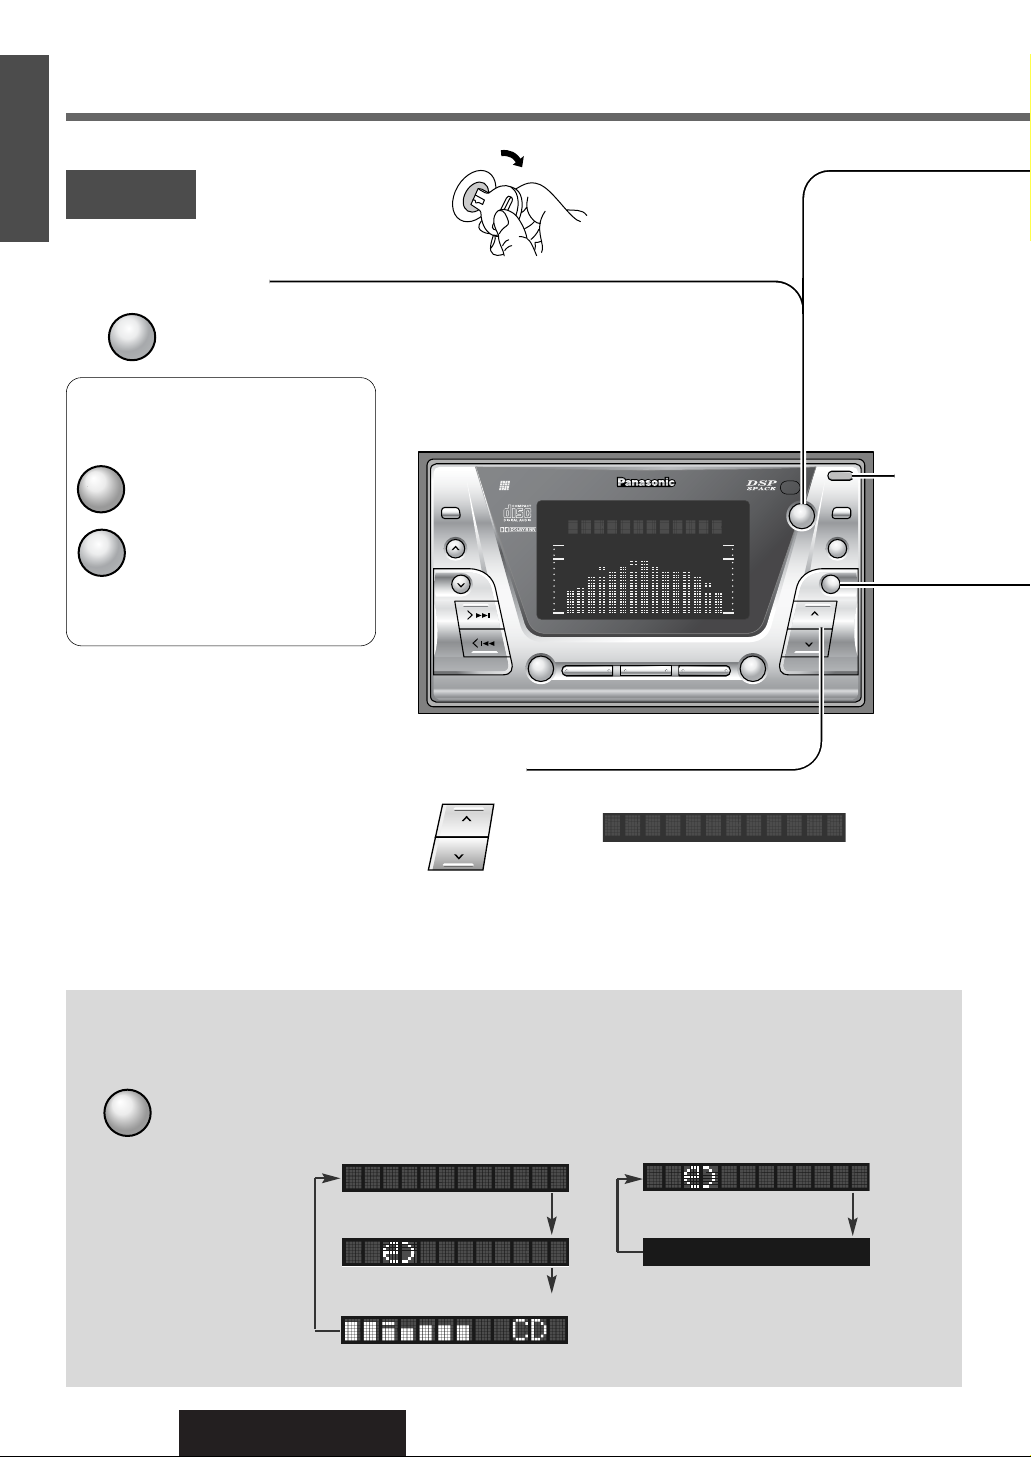
VOLUME 20
Volume
Power on : Press
Power off : Press again and hold
Power On / Off
: Press
Setting Range : 0 to 40
¡ACC
¡ON
Turn the key in the ignition until
the accessory indicator lights.
Preparation
SOURCE
PWR
DISP
¡The sound level for each source is stored in memory.
(For radio, one volume setting for AM, one volume
setting for all FMs.)
OPEN
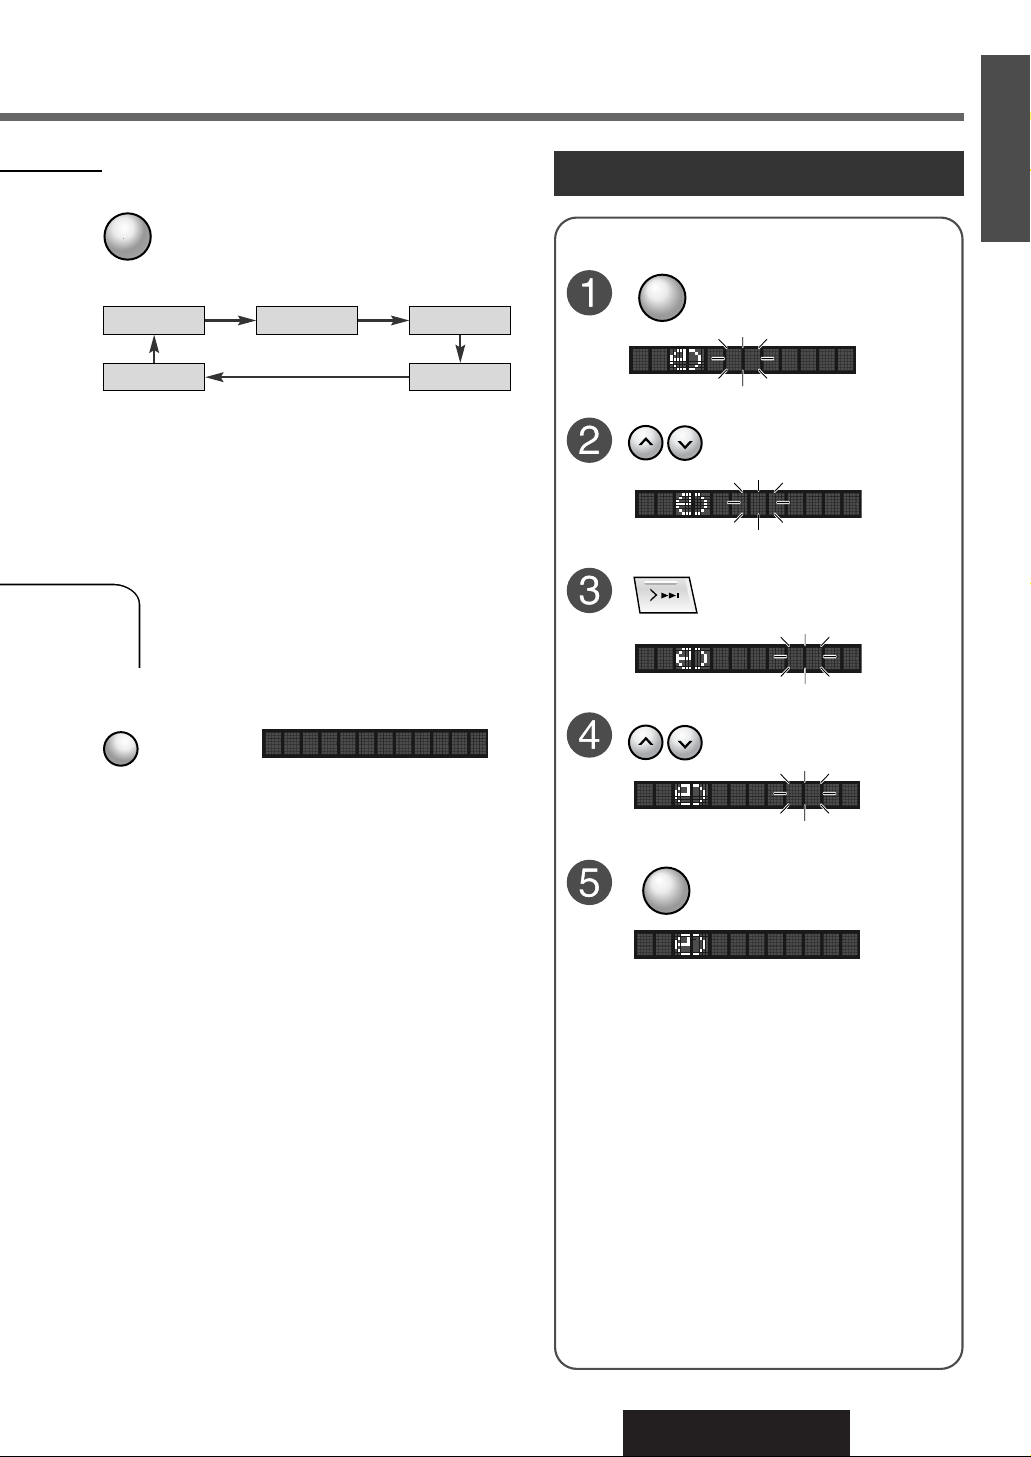
Display Change
: Press
DISP
When Power is Off
Example: CD Mode
Clock display
Display off
Clock display
Dot Spectrum Analyzer display
Track number/Track playing time
Power and Basic Operations
¡When you use this unit for the first
time, a demonstration message
appears on the display.
: Press to cancel this display
SOURCE
: Press and hold for more than
1 second when turning
power on to display a
demonstration message
again
Press 2
times
VOLUME 20
CD 01 0’37
8:15
8:15
13
CQ-VX2200W
1
E
N
G
L
I
S
H
4
Decreasing volume range depends on setting.
(MUTE/ATT setting a page 30)
¡MUTE : No sound (Default)
¡ATT: Decrease the volume to 1/10 of previous level.
TUNER CD
TAPE
AUXILIARY CHANGER
Mode Selection
Note: Skipping “AUXILIARY” can be set. (a page 30)
Mute / ATT (Attenuator)
: Press to select
Clock Setting
: Press to move to
minute
: Press and hold for
more than 2 seconds
: Press to adjust hour
: Press to adjust minute
12:00
8:00
8:00
8:15
8:15
DISP
DISPLAY CLOCK
DISP
DISPLAY CLOCK
(When a CD is
in the player.)
(When a tape is
in the player.)
(When a changer with
a magazine loaded is
connected.)
(When AUX-IN
setting is ON.)
: Press
(Press again to cancel)
MUTE
: Press to set
Notes:
¡If clock is not adjusted, “ADJUST” will be appear.
¡The 12-hour system is used for the clock.
¡The clock is not adjustable when power is off.
SOURCE
MUTE ON
: Press to determine the
AM band
DISP SPACE
123456
REMOTE
REVERSE
SOURCE
OPEN
OPEN
S·A
D·M
REPEAT
REPEAT
DSP SPACEDISPLAY CLOCK
SEL S·A
TUNE
TRACK
SCANRANDOM
CQ-VX2200
INTEGRATED CD/CASSETTE RECEIVER WITH DSP
MTL B NR TPS SKIP
MUTE
VOL
AUTO·P
S·ANALYZER
PWR
H
um
an
E
qualizer
FM■ DISC
AM45DISC
AM45DISC
ST
LOC
FM1-1 87.50
14
CQ-VX2200W
5
E
N
G
L
I
S
H
ST
LOC
FM1-1 87.50
FM1 FM2
FM3
AM
Mono / Local selection
MONO OFF/LOCAL OFF
MONO: Reduce noise during a weak FM broadcast.
LOCAL: Searching stops at a strong signal only.
MONO ON/LOCAL OFF
MONO ON/LOCAL ON
MONO OFF/LOCAL ON
q :Press and hold for more than 2 seconds.
w :Press to select MONO/LOCAL
e :Press to change the display as follows.
SEL
SEL
FM1 FM2 FM3 AM
Radio Basics
: Press to select the radio
mode
: Press to select an FM
band
: Higher frequency
: Lower frequency
Press and hold for more than 0.5 seconds
then release.
Seeking will start.
Band
Frequency
FM Stereo Indicator
lights while FM stereo
broadcast is received.
LOCAL Indicator
lights while in LOCAL
mode.
Preset Number
When in Radio Mode
Mode Selection
Band
Tuning
Note: Press when using the remote
control
BAND
PRG/
SOURCE

15
CQ-VX2200W
1
E
N
G
L
I
S
H
6
Select a band and frequency (step q, w and e on the
previous page)
Preset Station Setting
Up to 6 stations each can be saved in the FM1, FM2, FM3 and AM preset station memories.
Select a band (step q and w on the previous page)
Select a band (step q and w on the previous page)
Preset
Station
Calling
Auto Preset
Memory
Automatically save
strong stations in the
preset memory.
Manual
Preset
Memory
Manually save a station
in the preset memory.
AUTO·P
Note: New stations are overwritten on existing saved stations after following this procedure.
: Press and hold for more than 2 seconds
¡The
6 strongest available stations will be automatically saved
in the memory under preset numbers
1 to 6.
¡Once set, the preset stations are sequentially scanned for 5
seconds each.
to :Press to select the station.
6
1
Blinks once
Blinks
to :Press to select the station.
6
1
to : Press and hold for more than 2 seconds
6
1
¡The display blinks once, and a
receiving station is saved in
the memory.
FM1-1 87.50
MUTE
FM1-2 102.70
R
ESET
CD
EJEC
T
MD
EJECT
u
u
M
D
IN
INTEGRATED CD/CASSETTE RECEIVER WITH DSP
VX2200
DISP SPACE
123456
REMOTE
REVERSE
SOURCE
OPEN
OPEN
S·A
D·M
REPEAT
REPEAT
DSP SPACEDISPLAY CLOCK
SEL S·A
TUNE
TRACK
SCANRANDOM
CQ-VX2200
INTEGRATED CD/CASSETTE RECEIVER WITH DSP
MTL B NR TPS SKIP
MUTE
VOL
AUTO·P
S·ANALYZER
PWR
H
um
an
E
qualizer
FM■ DISC
AM45DISC
AM45DISC
REP
R
SCAN
MTL
CD 01 0’37
16
CQ-VX2200W
7
E
N
G
L
I
S
H
REP
R
SCAN
MTL
CD 01 0’37
If lights, a CD has been already loaded.
: Press to open the panel
¡Insert the disc and playback will start.
Close the front panel manually.
OPEN
OPEN
When a CD is inside
(Blinks during CD play)
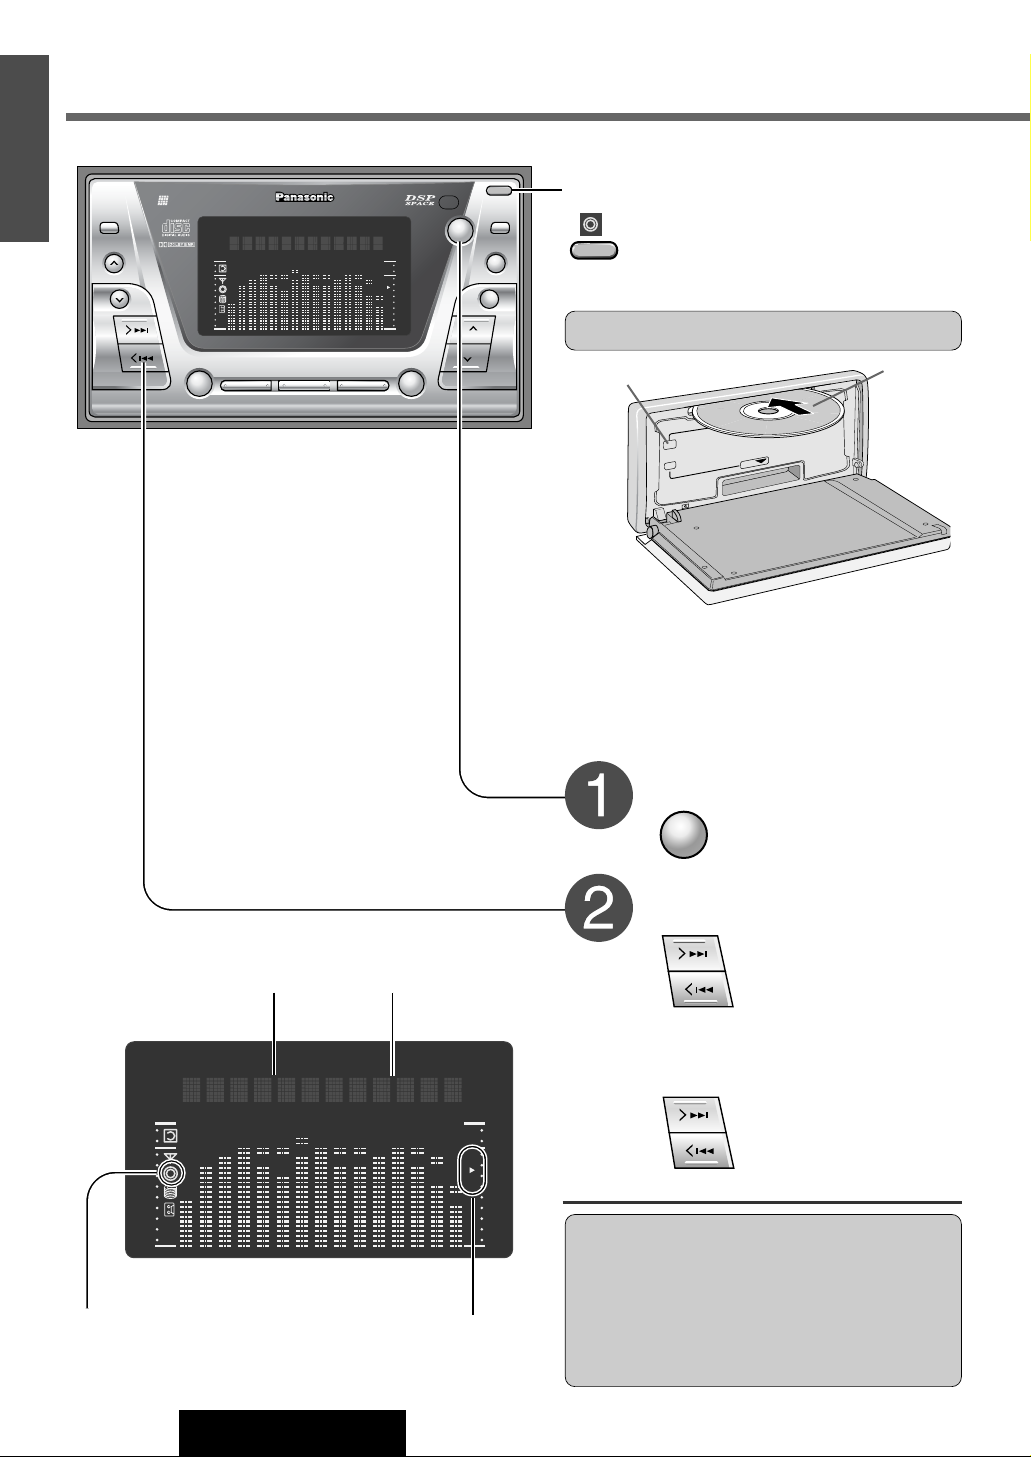
CD Player Basics
SOURCE
Disc Insert / Eject
CD u (Eject) Button
Label Side
Mode Selection
: Press to select the CD
mode
: Next track
Press and hold
: Beginning of the current track/
Previous track (Press twice)
Track Selection
Fast Forward / Reverse
: Fast forward
: Fast reverse
¡Release to resume the regular CD play.
Track Number
Play Time
Repeat, Random and
Scan Indicator
Cautions:
¡Do not use irregularly shaped CDs.
¡To avoid damaging the front panel, do not push it
down or place objects on it while it is open.
¡Do not pinch your finger or hand in the front
panel. Do not insert foreign matter into the disc
and cassette tape slots.
Notes:
¡Loading a CD when the power is off allows the
power to be turned on.
¡Ejecting the CD when the unit is in the CD mode
allows the power to be turned off.
When a CD is in the player
Caution: Only 12 cm CD is available for this unit.
17
CQ-VX2200W
1
E
N
G
L
I
S
H
8
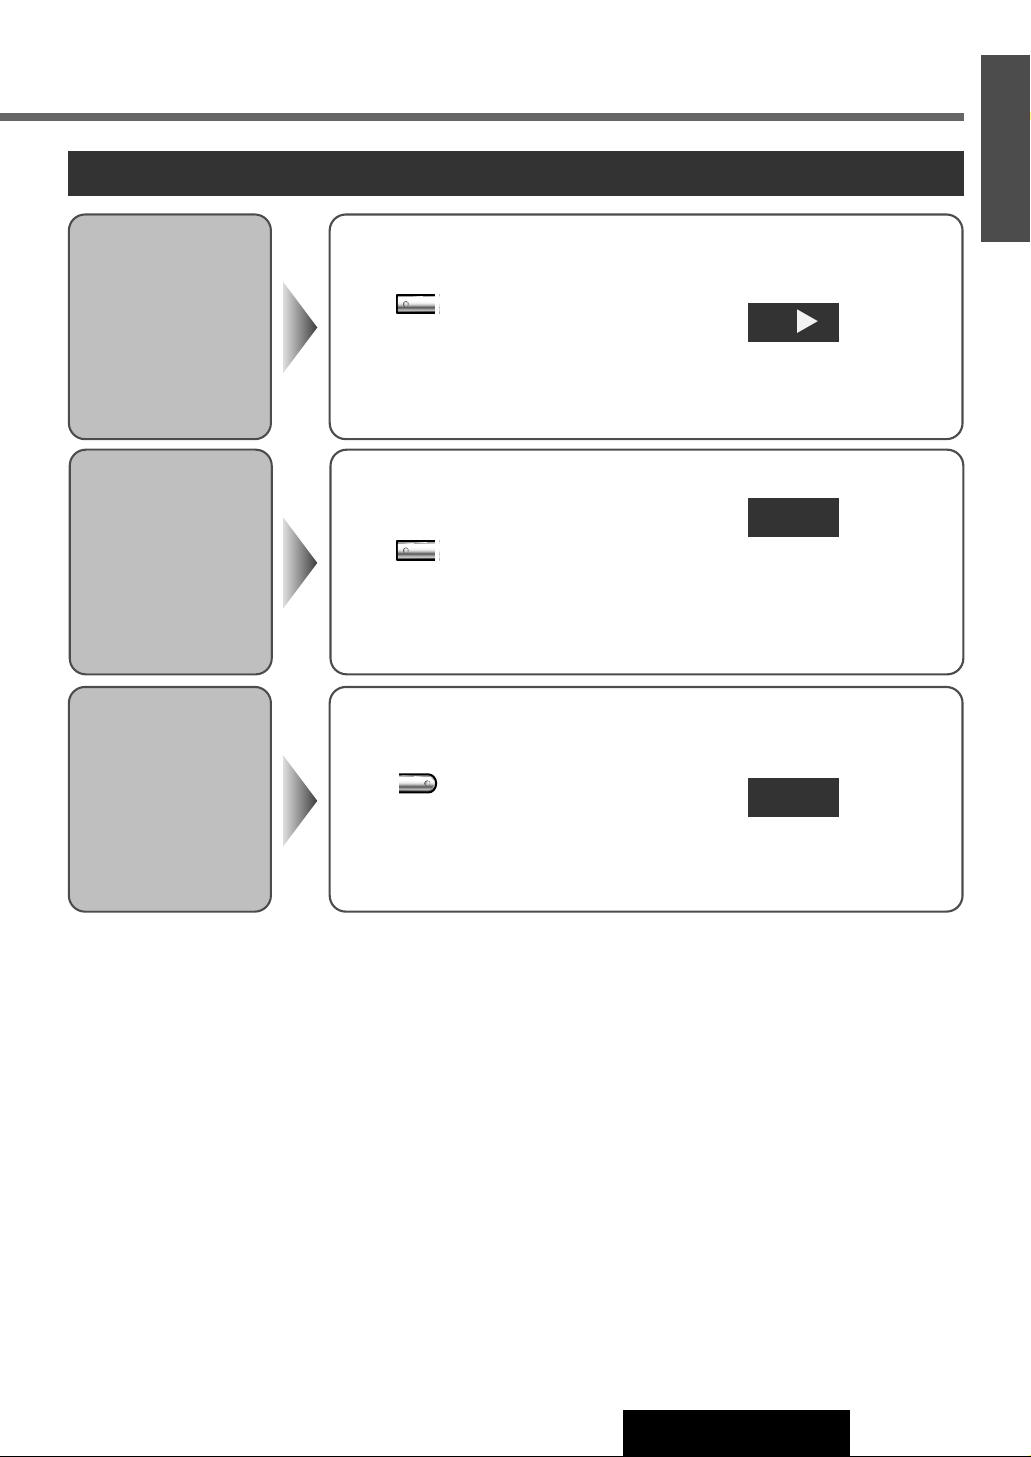
Various Way of Listening
Random Play
Scan Play
Repeat Play
: Press
(Press again to cancel)
5
: Press
(Press again to cancel)
5
SCAN
: Press
(Press again to cancel)
6
REPEAT
Lights
Lights
Lights
¡After playing 10 seconds of all
tracks, the scan play is finished and
the starting position goes to the
beginning of the first played track.
Notes on CD-R Disc
A playable CD-R disc is only a CD-R disc on which sound was recorded.
¡Some recorded CD-R discs by using CD recorder are not playable because of their characteristic, or scratches or dirt on
the discs.
¡You can not play a CD-R disc that has not been finalized.
¡A CD-RW disc is not playable.
¡MP3 file, video CD, CD-ROM and CD-EX disc are not playable.
¡Be sure to observe the handling instructions of CD-R disc.
¡Do not apply a disc that has a label printed by a commercially available label printer.
All the available tracks are played in random sequence.
The first 10 seconds of each track play in sequence.
Repeat the current selection.
RANDOM
R
SCAN
REP
CD EJECT
M
D
E
J
E
C
T
u
u
MD IN
INTEGRATED CD/CASSETTE RECEIVER WITH DSP
VX2200
CD IN
RESET
18
CQ-VX2200W
9
E
N
G
L
I
S
H
DISP SPACE
123456
REMOTE
REVERSE
SOURCE
OPEN
OPEN
S·A
D·M
REPEAT
REPEAT
DSP SPACEDISPLAY CLOCK
SEL S·A
TUNE
TRACK
SCANRANDOM
CQ-VX2200
INTEGRATED CD/CASSETTE RECEIVER WITH DSP
MTL B NR TPS SKIP
MUTE
VOL
AUTO·P
S·ANALYZER
PWR
H
um
an
E
qualizer
FM■ DISC
AM45DISC
AM45DISC
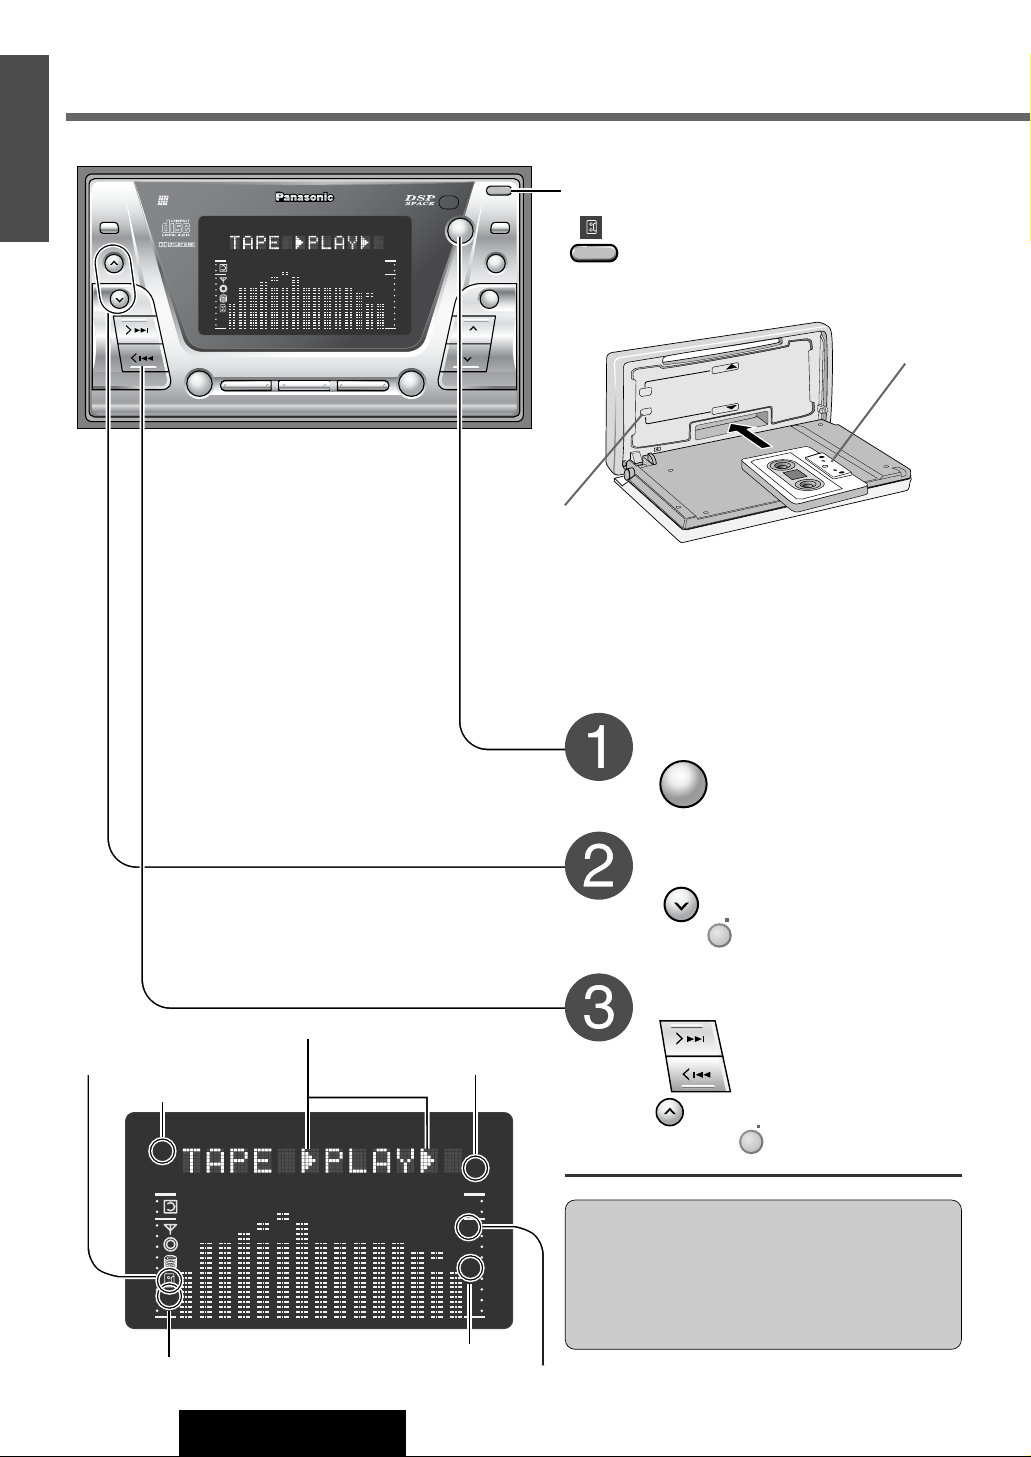
When a Cassette tape is in the player
Cassette Tape Player Basics
SKIP
REP
TPS
B NR
MTL
Tape Insert / Eject
If lights, a tape has been already loaded.
: Press to open the panel
¡Insert the tape and playback will start.
Close the front panel manually.
OPEN
OPEN
Tape u (Eject) Button
Exposed side
SOURCE
Mode Selection
: Press to select the cas-
sette tape mode
: Fast Forward
: Rewind
Fast Forward / Rewind
Play Side Change
Cautions:
¡To avoid damaging the front panel, do not push it
down or place objects on it while it is open.
¡Do not pinch your finger or hand in the front
panel. Do not insert foreign matter into the disc
and cassette tape slots.
Notes:
¡Loading a tape when the power is off allows the
power to be turned on.
¡Ejecting the tape when the unit is in the Cassette
tape mode allows the power to be turned off.
Metal Tape Indicator
TPS Indicator
Dolby B NR Indicator
When a Cassette tape is inside
(Blinks during Cassette tape play)
Skip Indicator
Playside (s: Top side, t: Bottom side)
SKIP
REP
TPS
B NR
MTL
: Press to reverse
(Press for remote control)
BAND
PRG/
: Press to resume the tape play
(Press for remote control)
BAND
PRG/
Repeat Indicator
 Loading...