

Panasonic AG-HPX255EJ Operating Instructions Manual

M0612MO1043 -FJ
ENGLISH
VQT4K99A-1 (E)
Register now!!
http://panasonic.biz/sav/pass_e/
This product is eligible for the
P2HD 5 Year Warranty
Repair Program.
Operating Instructions
Vol.2
Memory Card Camera-Recorder
Model No.
Note that Operation Instructions Vol. 2 describes advanced
operations of the Memory Card Camera-Recorder.
For instructions on basic operations of the Memory Card
Camera-Recorder, refer to Operating Instructions Vol. 1 (printed
documents) contained in the supplied CD-ROM.
2
Before operating this product, please read the instructions carefully and save
this manual for future use.
USO RESTRITO
® ® ®
® ® ®
Note concerning illustrations in these instructions
References
Terminology
USO RESTRITO

Contents
Read this first!
Outline of operations
Before use
Operating precautions
Precaution for use
Accessories
Optional units
Description of parts
Description of parts
Preparation
Charging the battery
Power sources
Adjusting the hand strap
Attaching the shoulder strap
Detaching and attaching the lens hood
Detaching and attaching the lens cap
Fitting the eye cup
The remote control
Turn on/off the camera-recorder
Setting the calendar
Charging the built-in battery
Menu
Basic operations of setup menus
Setup menu structure
Reference
Specifications
USO RESTRITO
Contents (continued)
Shooting
............................................................ 6
Tally lamp............................................................. 9
Basic shooting operations ............................... 10
Using SD/SDHC memory cards........................ 16
Using the zoom function...................................18
Shooting in progressive mode......................... 20
Recording with Variable Frame Rate (VFR)..... 21
Shooting in manual mode.................................28
Adjusting the white balance and black
balance ........................................................... 32
Shooting techniques for different targets....... 35
Using special recording modes .......................43
Adjusting the shutter speed............................. 49
Switching audio input .......................................52
................. 56
Using time data..................................................61
USO RESTRITO
Nonlinear editing with P2 card (PC mode: USB
device) .......................................................... 107
Using a hard disk drive (PC mode: USB
host)..............................................................109
Displays
Screen displays ............................................... 117
Menu
Setup menu list................................................129
Reference
Before calling for service................................ 152
unit................................................................ 155
Cleaning ...........................................................156
Storage precautions........................................157
How to handle data recorded on P2 cards.... 158
Checkpoints for using memory cards........... 159
Information on software for this product...... 160
Recording format list ......................................161
Cautions in using the Extension Control
Unit ...............................................................162
Index ................................................................. 163
Playback
Basic playback operations ...............................74
Thumbnail operations....................................... 75
Useful playback functions................................ 99
Editing
Connecting external units .............................. 101
Connections to the DVCPRO/DV
connector ..................................................... 105
USO RESTRITO
·
·
·
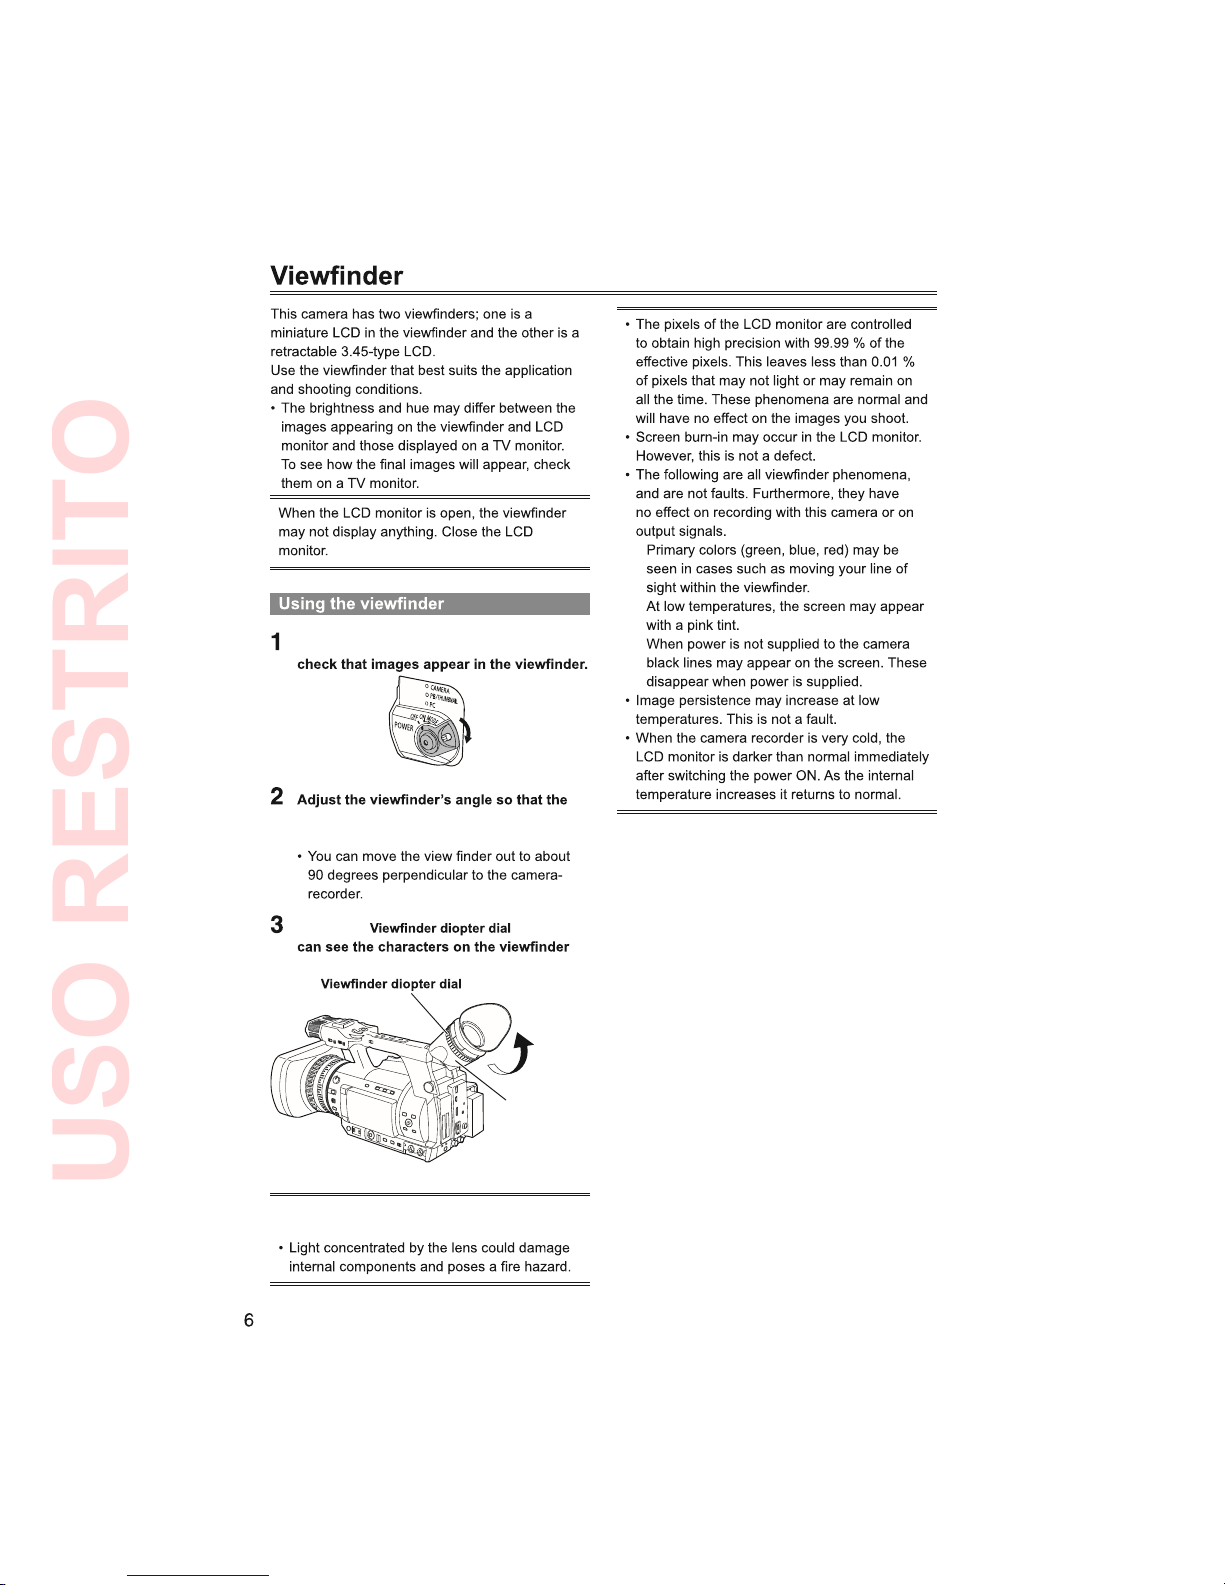
Set the POWER/MODE switch to ON and
screen is positioned where it is easiest to
see.
Adjust the so that you
screen clearly.
Eye piece
Do not point the eye piece at the sun or other
strong light source.
USO RESTRITO
Using the LCD monitor
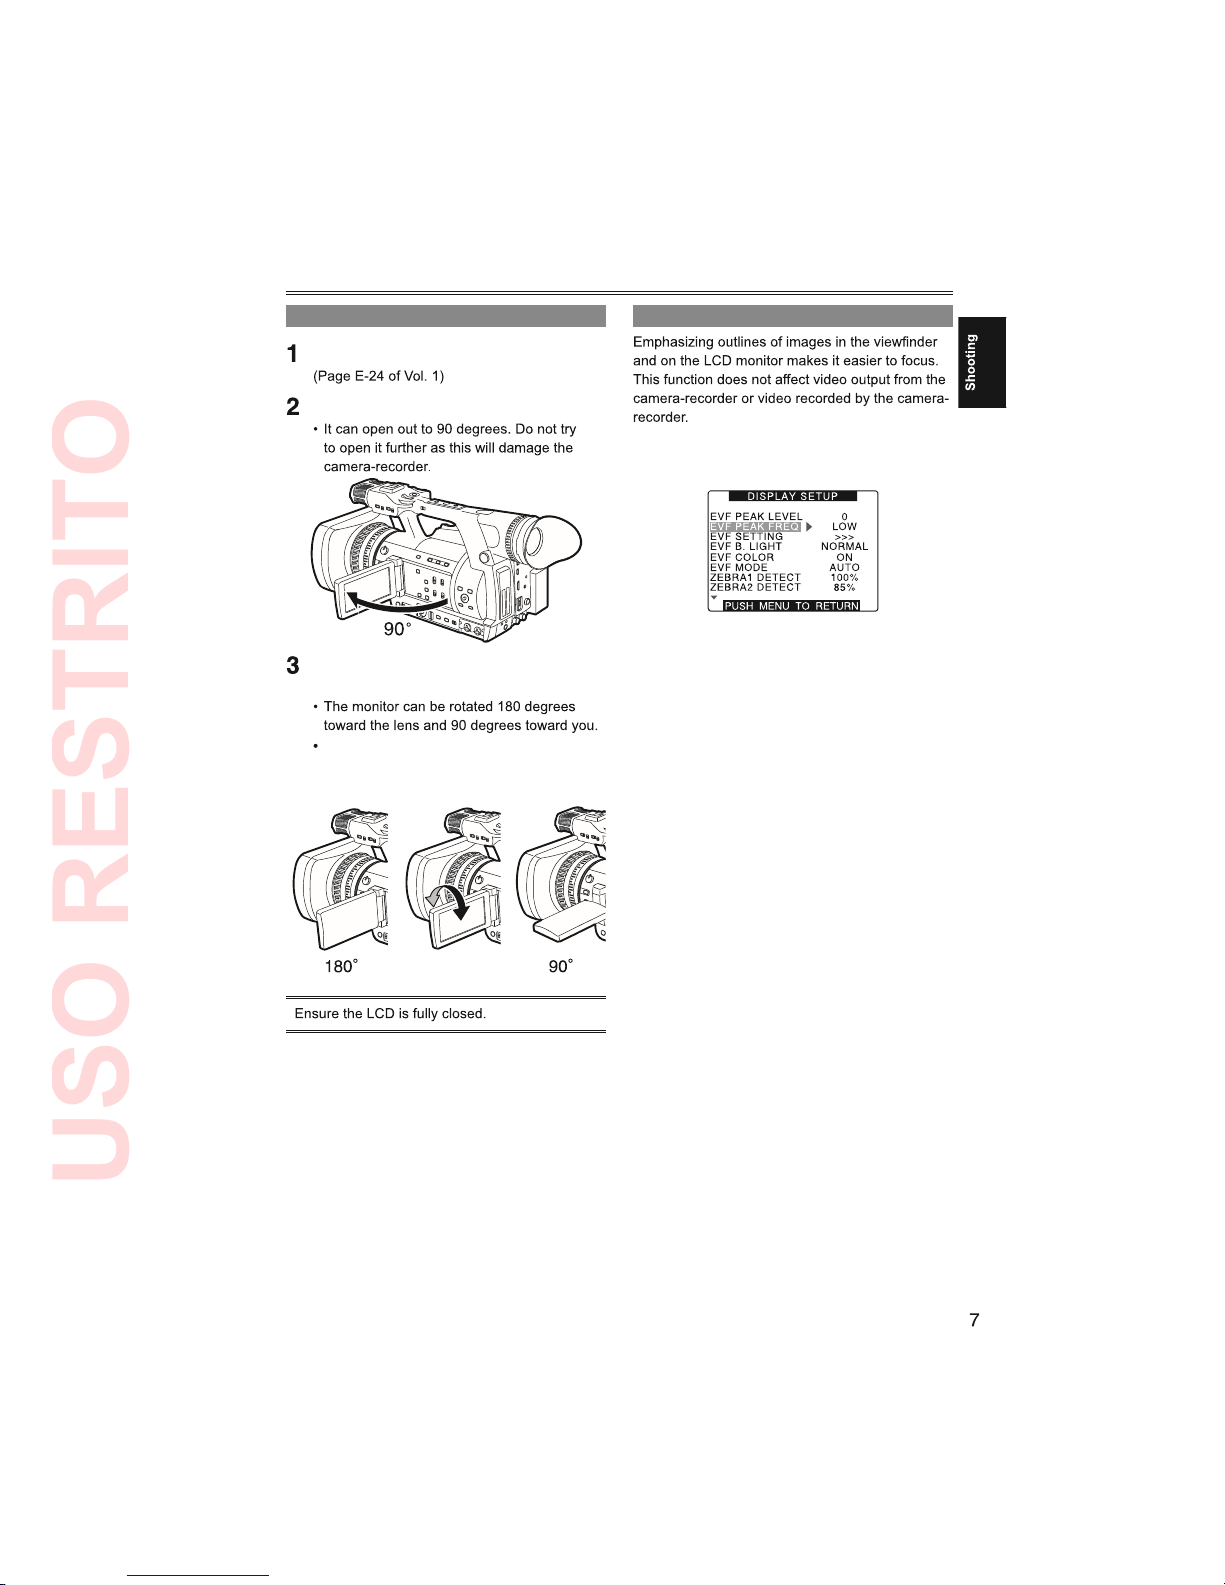
Set the POWER/MODE switch to ON.
Open the LCD monitor.
Position the LCD monitor where it is easiest
to see.
Do not apply unnecessary force to the
open LCD. This can damage the camerarecorder.
Emphasizing Image Outlines
Adjust EVF PEAK LEVEL and EVF PEAK FREQ
in the DISPLAY SETUP screen.
USO RESTRITO
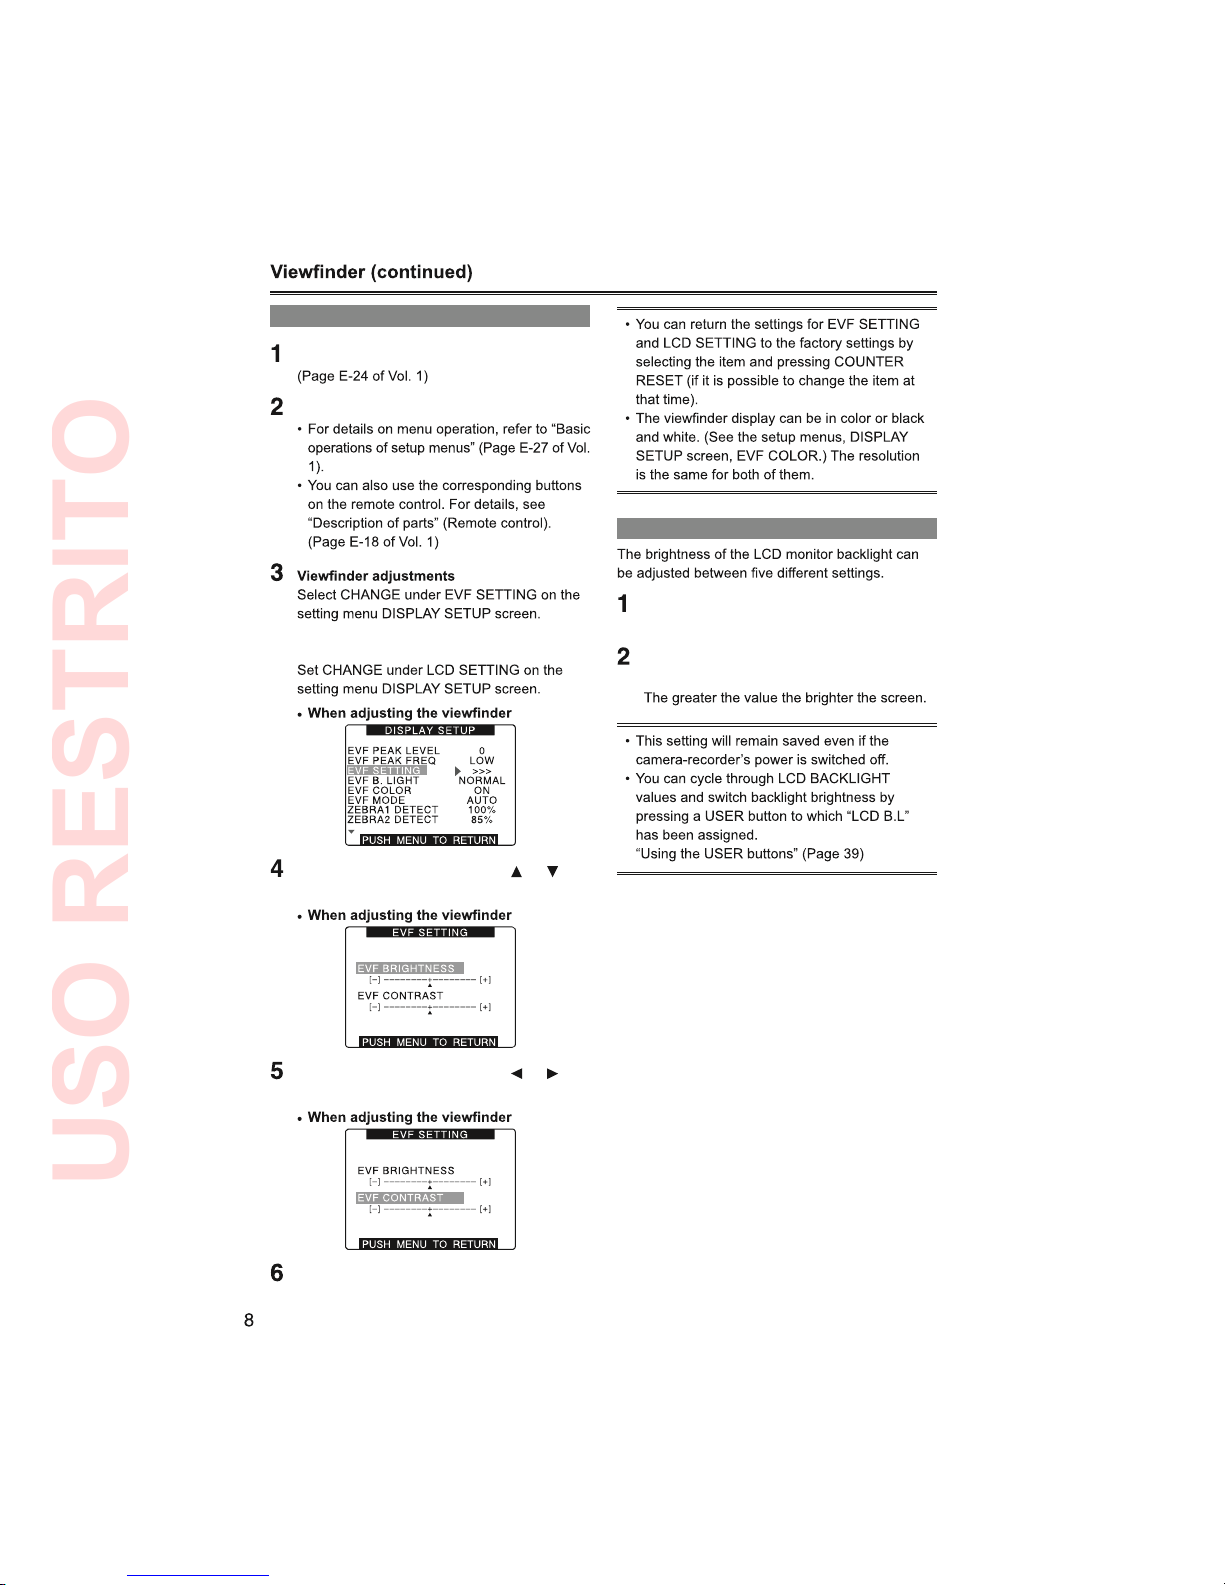
Adjusting the screen display
Set the POWER/MODE switch to ON.
Press the MENU button.
LCD monitor adjustments
Push the Operation lever in the or
direction to select the item.
Push the Operation lever in the or
direction to make adjustment.
Press MENU three times to exit the menus.
Changing backlight brightness
Select LCD BACKLIGHT from the setup
menu DISPLAY SETUP screen.
Select and set a value in the range of +1 to
–3.
USO RESTRITO
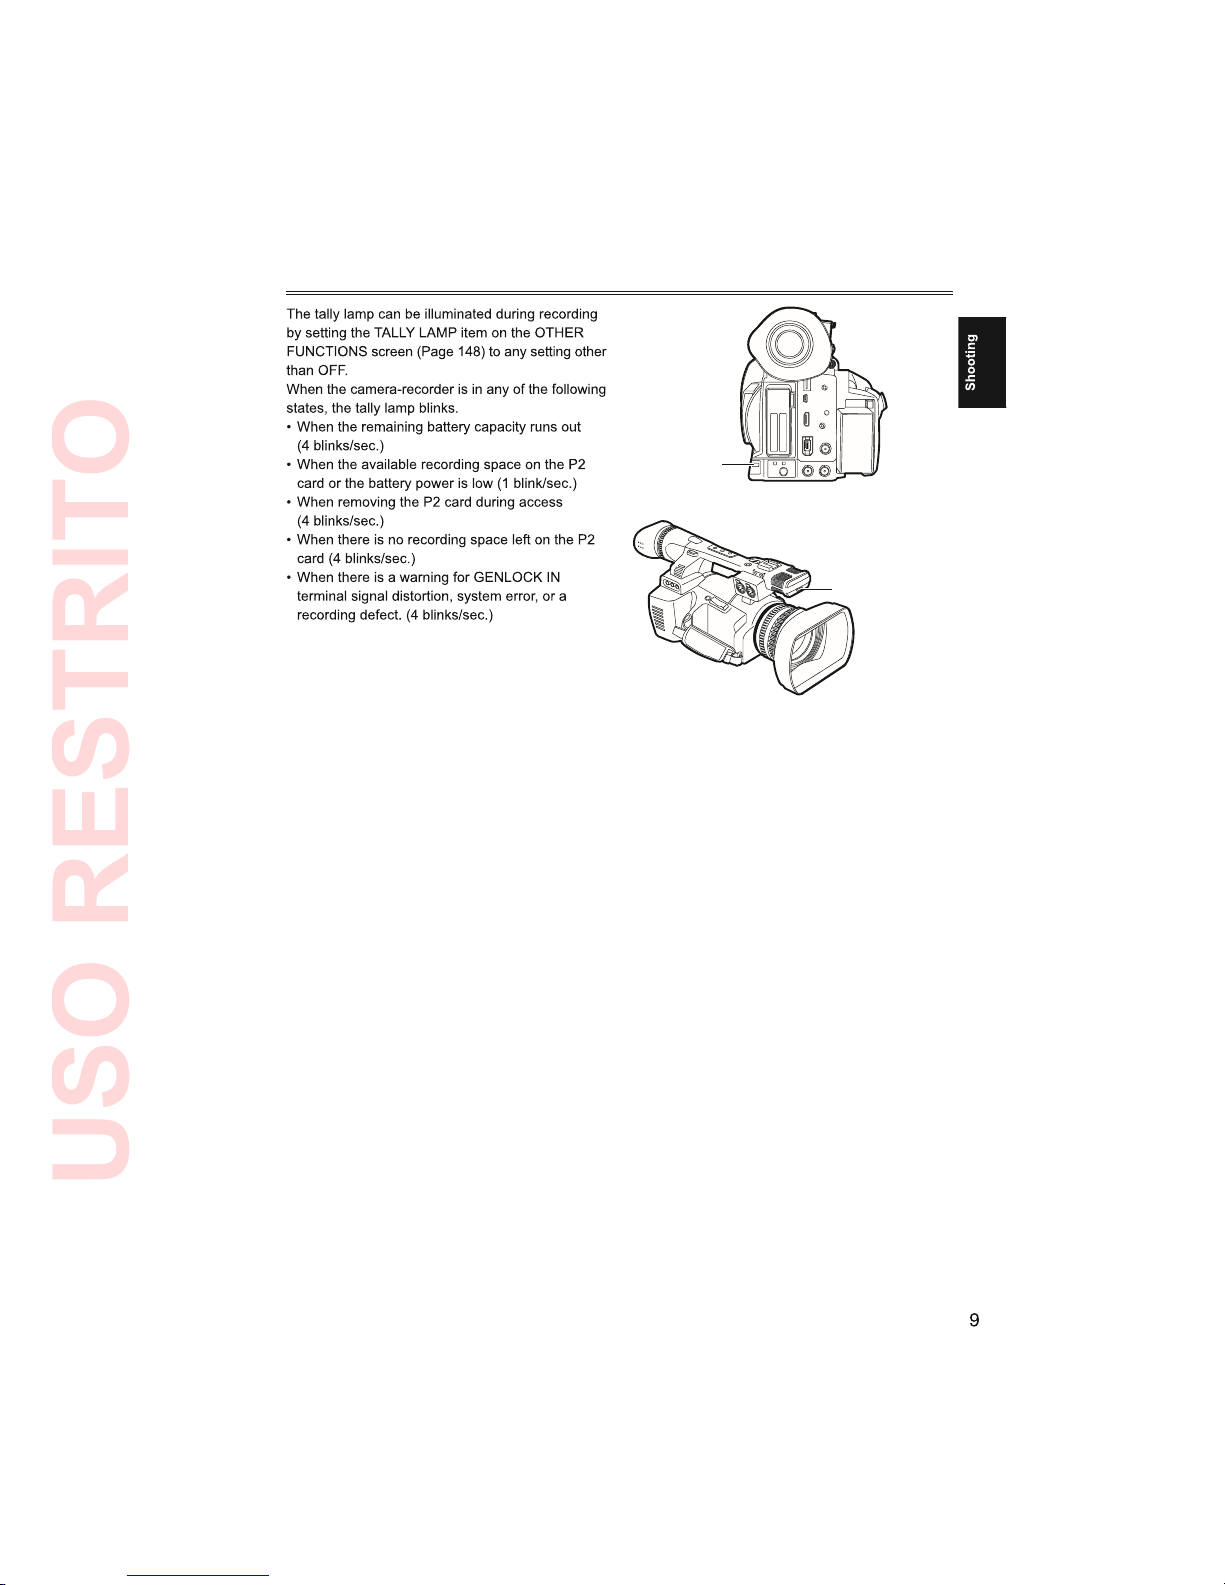
Tally lamp
Tally lamp
(Front)
Tally lamp
(Rear)
USO RESTRITO

Basic shooting operations
Preparing to shoot
Set the POWER/MODE switch to ON.
Push the OPEN lever of the P2 card slot
cover downward ( ) and slide to open ( ).
Insert the P2 card securely in the card slot.
Raise the P2 card eject button to the
direction of the arrow, and close the P2
card/SD memory card slot cover.
Lock release button
POWER/MODE
switch
Shooting in auto mode
Set the POWER/MODE switch to ON.
Switch the AUTO/MANUAL switch to AUTO
to select auto mode.
Press the START/STOP button (Red) to start
shooting.
Mode lamp
(CAMERA)
AUTO/MANUAL
switch
START/STOP
button
(handle side)
POWER/MODE
switch
Lock release button
USO RESTRITO

USO RESTRITO

P2 card access lamps
CAMERA/PB/PC (USB HOST) mode
Lights green:
Blinks green (slow):
Lights orange:
Blinks orange:
Blinks orange (fast):
Both lamps blink orange:
Off:
PC (USB DEVICE) mode
Blinks orange:
Off:
P2 card access lamp
Protecting against a possible erasure
Write-protect switch
REC CHECK button
Note that a backup recording performed on
a backup device connected to the DVCPRO/
DV or SDI OUT connector will also record
video played back using the REC CHECK
function.
In one-clip recording mode, the beginning
of a clip is not used as the start position for
playback after returning as far as possible
with the REC CHECK function or starting
playback while recording is paused.
Instead, playback starts from the start point
of the most recent recording operation.
Basic shooting operations (continued)
USO RESTRITO
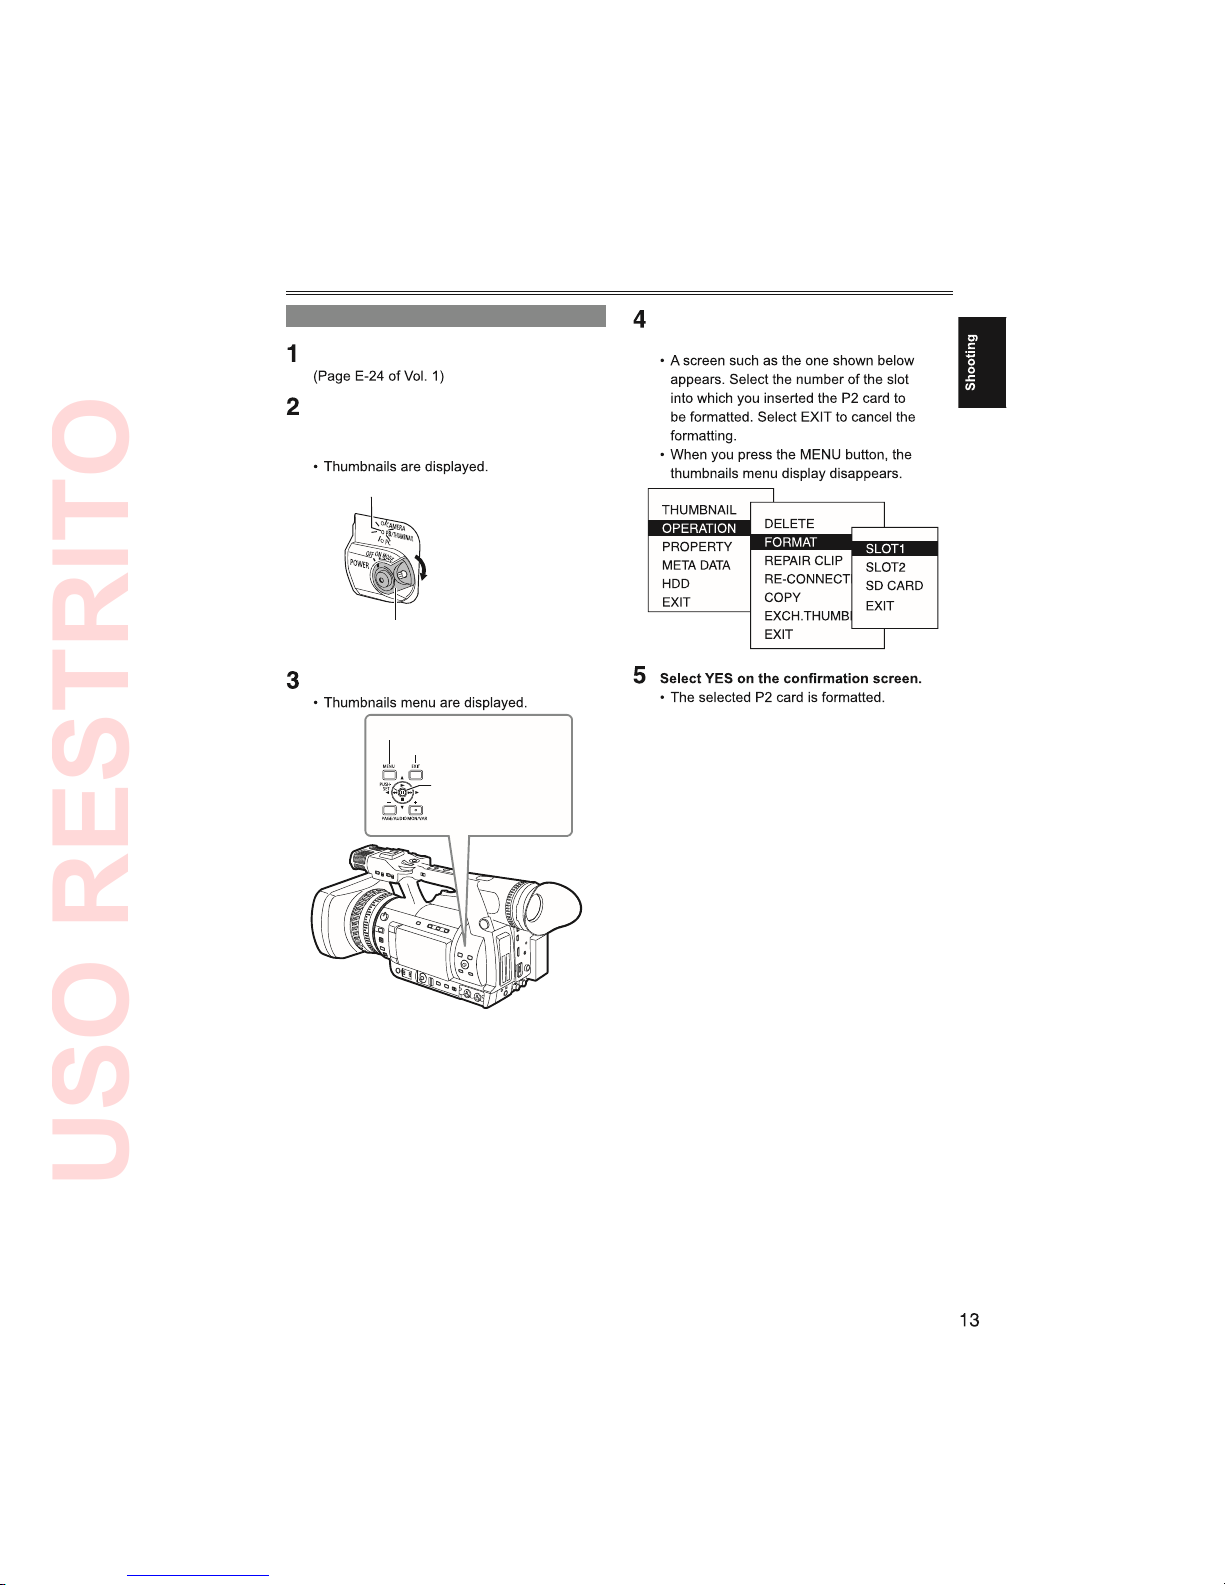
Formatting P2 cards
Set the POWER/MODE switch to ON.
Turn the POWER/MODE switch to set to PB/
THUMBNAIL mode (PB/THUMBNAIL lamp
illuminates).
Mode lamp (PB/THUMBNAIL)
POWER/MODE switch
Press the MENU button.
Operation lever
EXIT button
MENU button
On the thumbnails menu, select
OPERATION and then FORMAT. (Page 91)
USO RESTRITO
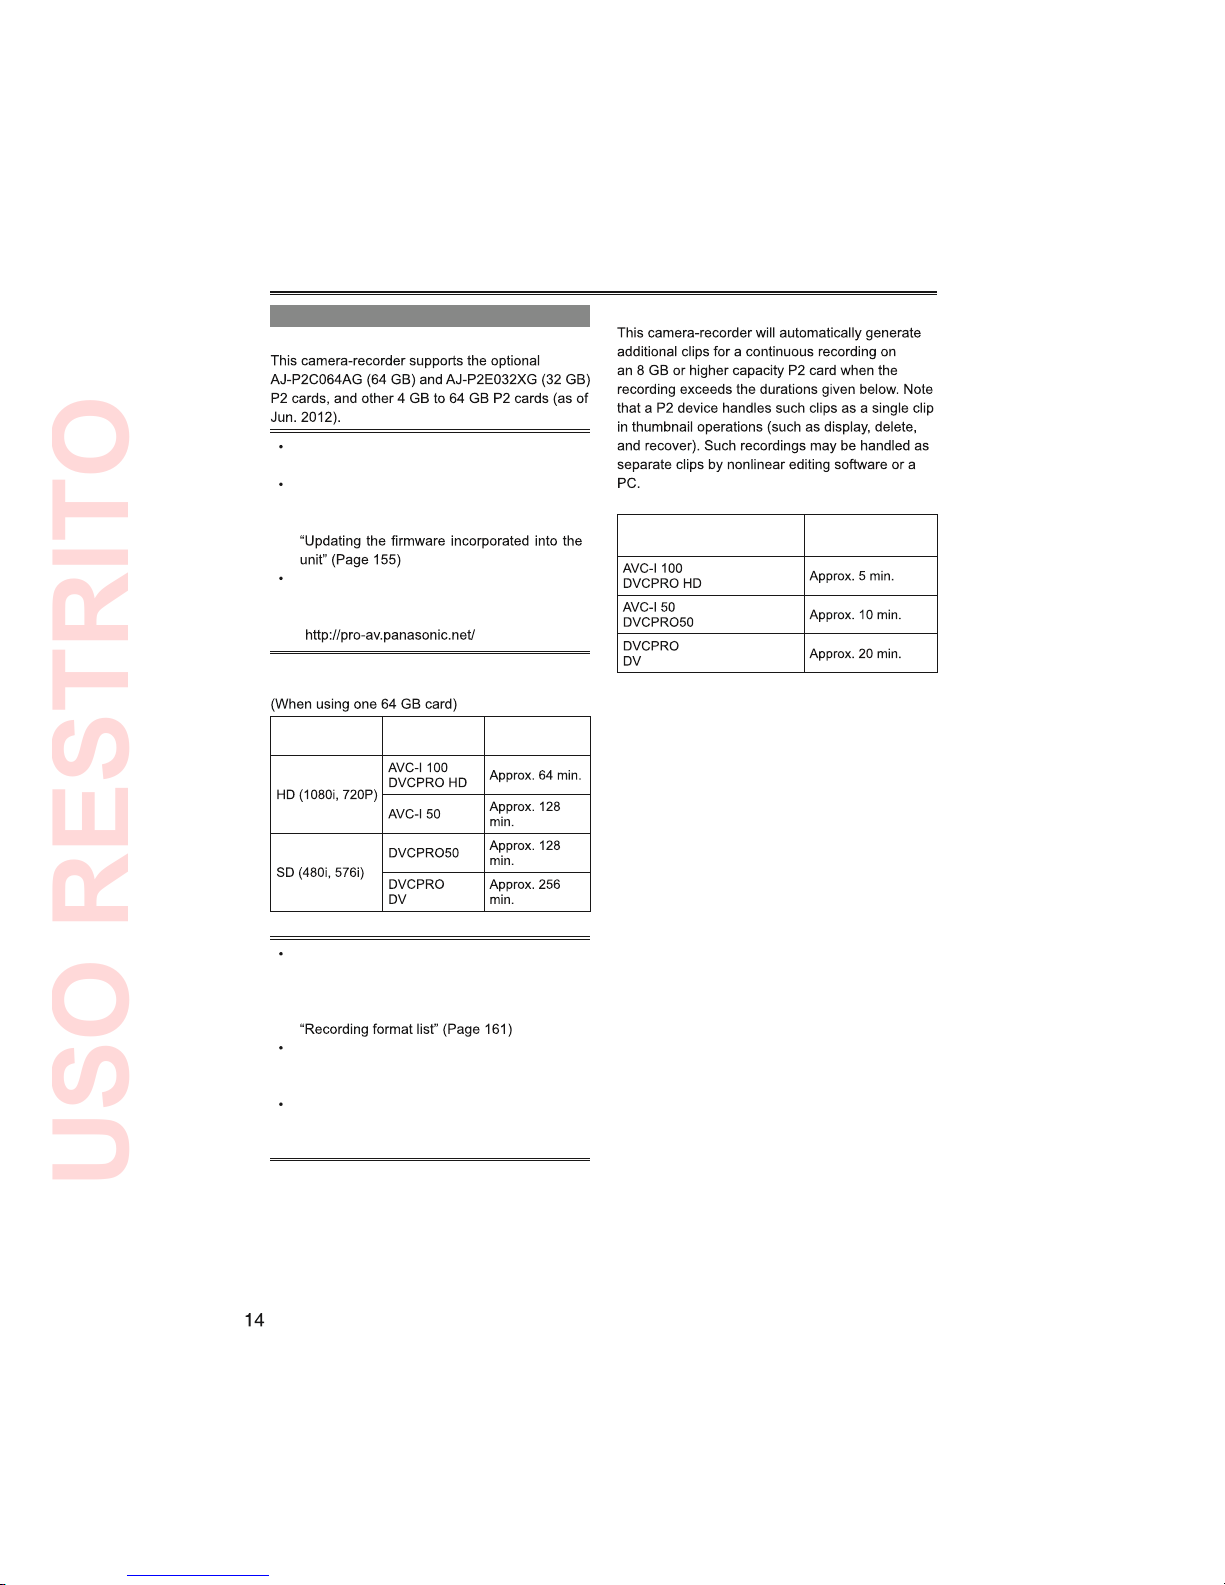
Splitting clips recorded on P2 cards
Recording format
(excluding Native format)
Continuous
recording time
P2 card recording times
P2 cards available to the AG-HPX255EJ
This unit cannot use AJ-P2C002SG (2 GB)
cards.
Depending on the type of P2 card used, you
may need to update the camera-recorder
driver.
·
For the latest information not available in
the Operating Instructions, visit the support
desk at the following website.
P2 card recording times
System mode
Recording
format (codec)
Recording time
The above recording time is for normal
recording. Recording in native mode
will extend recording time depending on
system mode.
·
Use of 32 GB, 16 GB and 8 GB P2 cards
will provide 1/2, 1/4 and 1/8, respectively of
above recording times.
The indicated capacities include a
management area so the total area available
for recording is somewhat smaller.
Basic shooting operations (continued)
USO RESTRITO
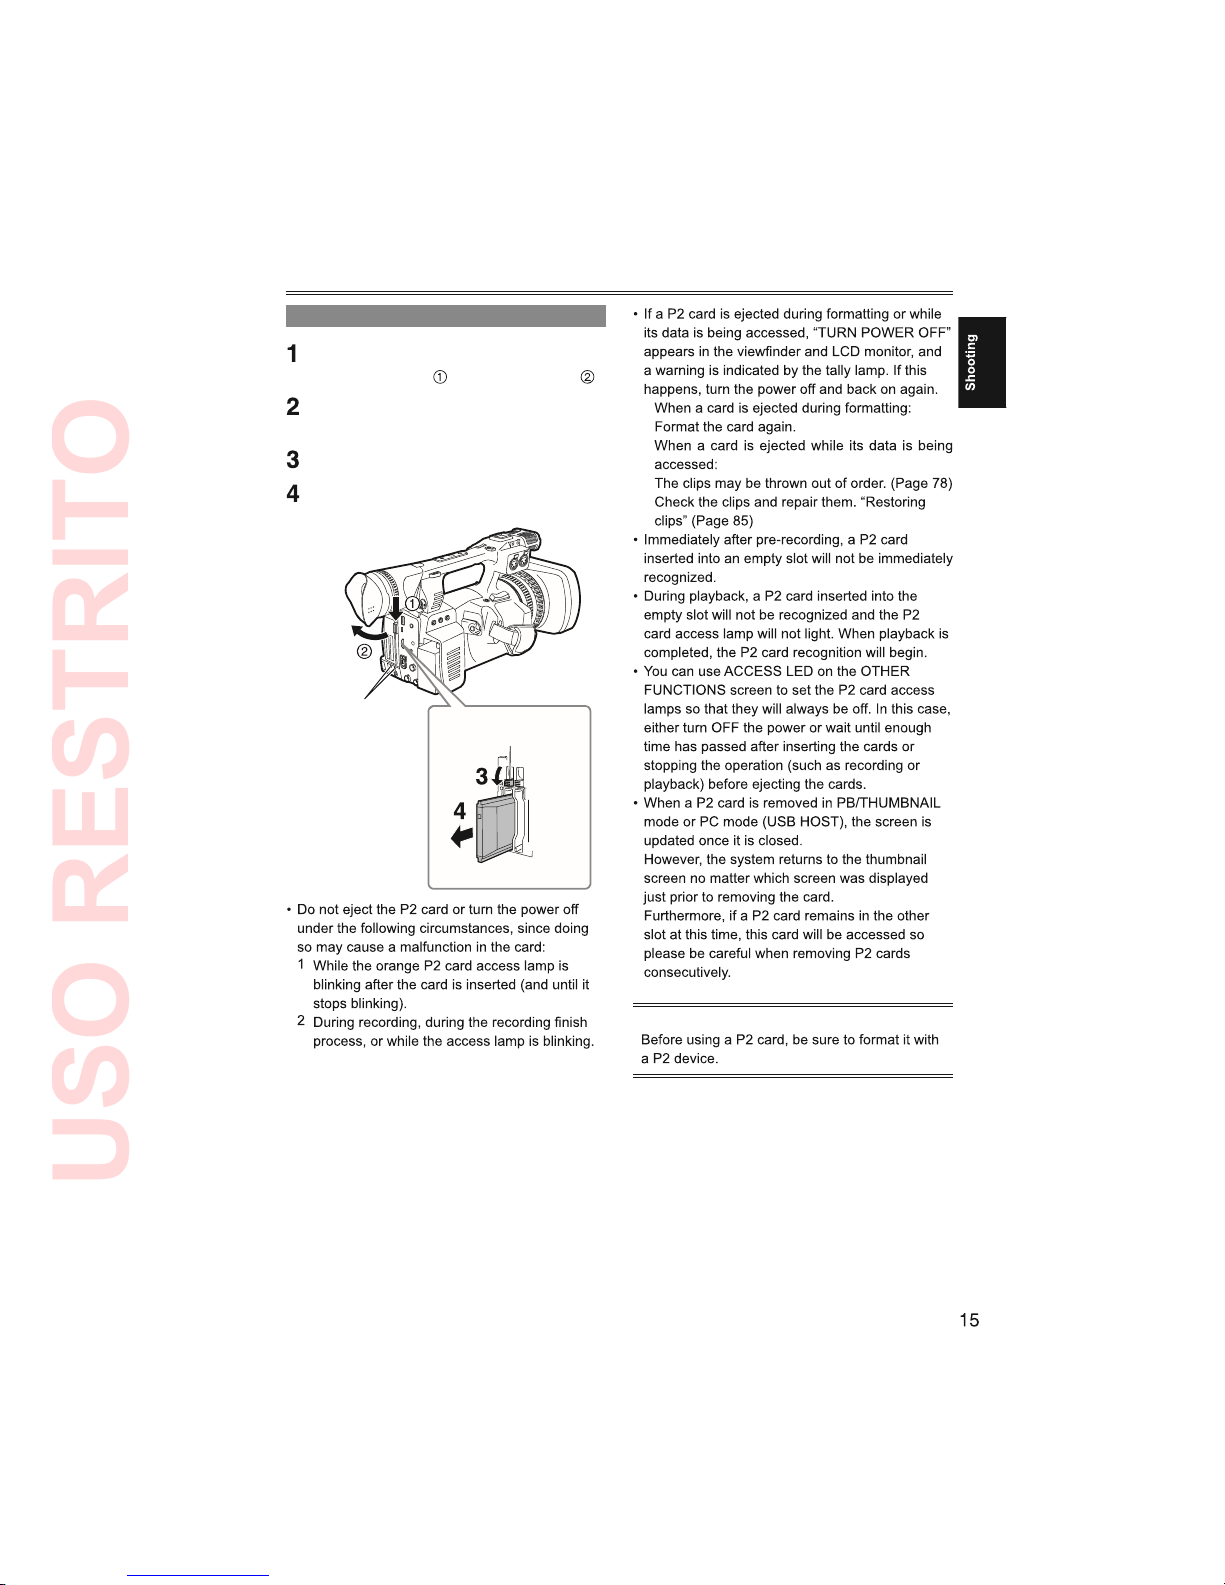
Remove the P2 card
Push the OPEN lever of the P2 card slot
cover downward ( ) and slide to open ( ).
Check that the P2 card access lamp is not
blinking orange.
Push the P2 card eject button and press it.
Remove the P2 card.
P2 card access
lamp
P2 card eject button
·
·
Cautions in using P2 cards
USO RESTRITO
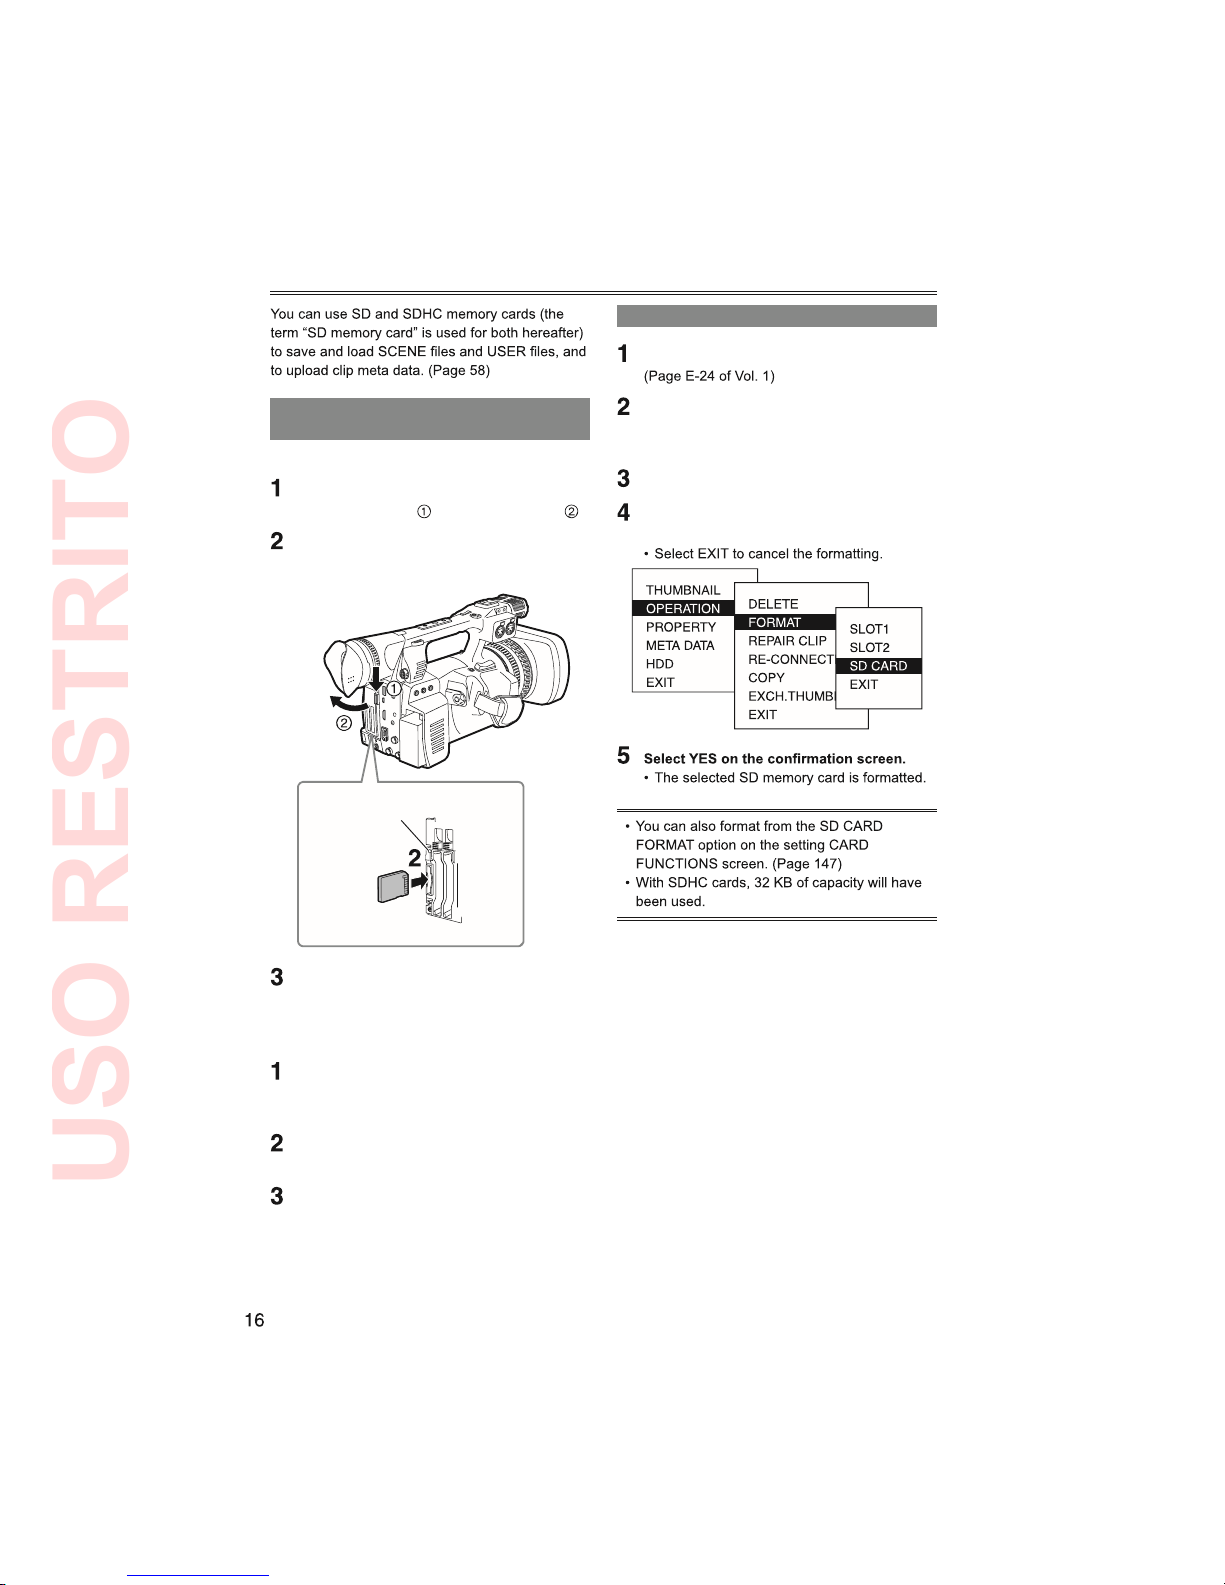
Installing and removing the SD
memory card
Installation
Push the OPEN lever of the P2 card slot
cover downward ( ) and slide to open ( ).
Insert the card while making sure it is
oriented in the proper direction.
Access lamp
Close the P2 card/SD memory card slot
cover.
Removal
Open the P2 card/SD memory card slot
cover, and check that the access lamp is
not lit.
Press the card further into the unit, grasp
the card, and then remove.
Close the P2 card/SD memory card slot
cover.
Formatting SD memory card
Set the POWER/MODE switch to ON.
Turn the POWER/MODE switch to set to PB/
THUMBNAIL mode (PB/THUMBNAIL lamp
illuminates).
Press the MENU button.
On the thumbnail menu, select OPERATION,
FORMAT and then SD CARD. (Page 91)
Using SD/SDHC memory cards
USO RESTRITO
Cautions in using SD memory cards
SD (from 8MB to 2GB)
SDHC (from 4 GB to 32 GB)
·
Exposed to high temperatures/humidities;
·
Exposed to water droplets; or
·
Electrically charged.
USO RESTRITO
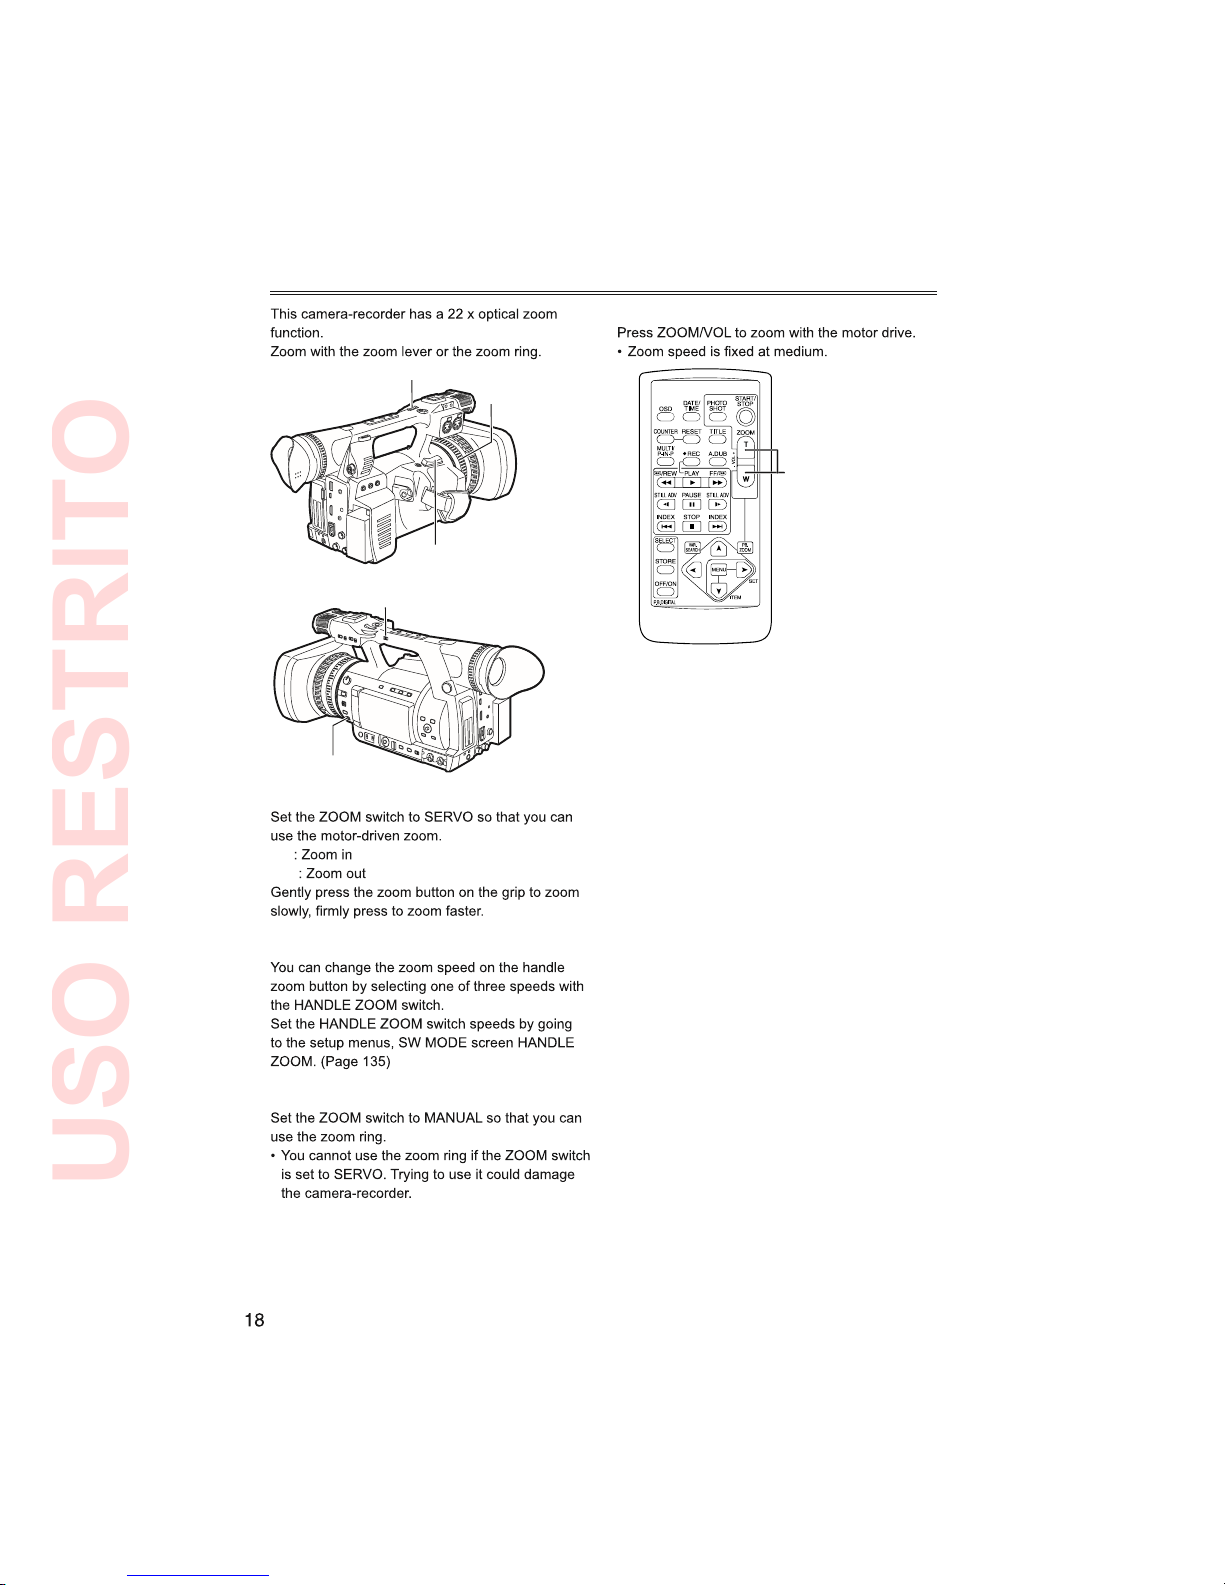
Using the zoom function
Zoom lever (handle side)
Zoom ring
Zoom lever (grip side)
ZOOM switch
HANDLE ZOOM switch
Zoom lever
T
W
Zoom lever (handle side)
Zoom ring
On the remote control
ZOOM/VOL button
USO RESTRITO
Digital zoom function
Please take note of the following points
regarding use of the digital zoom function.
USO RESTRITO

Shooting in progressive mode
In 24P/24PA, 24PN (native recording) and in
30PN/25PN (native recording) at 720P, the
camera starts recording in 5-frame, 4-frame
and 2-frame segments, respectively. For
this reason, to continue recording clips in
a system mode using a different recording
segmentation may break the continuity of
the time code.
The camera uses internal memory for
recording, when recording starts as soon
as a P2 card is inserted or the camera is
powered up. In this situation, recording
cannot be stopped until P2 card recognition
ends.
To check P2 card status, press the DISP/
MODE CHK button and check the row for
LCD monitor.
An editing system that supports 24PA
(2:3:3:2 advanced pulldown) will enable
editing with less quality loss than 24P (2:3
pulldown).
Record at standard 24P if a 24PA
compatible editing system will not be used.
Standard recording
(pull-down recording)
Camera-recorder
capture
(1080/24P over 60i)
2:3 pull-down
recording
Native recording
Camera-recorder
capture (1080/24PN)
2:3 pull-down
Recording
Camera-recorder
capture (720/24PN)
2:3 pull-down
Recording
Active frame
USO RESTRITO
Recording with Variable Frame Rate (VFR)
Native VFR recording
In 1080i or 720P mode, set REC FORMAT on
the setting menu SYSTEM SETUP screen to
AVC-I 100/24PN (or 30PN, 25PN).
In the SCENE FILE screen, set the menu
option VFR to ON and the menu option
FRAME RATE to suit shooting purposes.
You can also change the frame rate using
the SHTR/F.RATE dial.
Press the START/STOP button.
Note the following about native VFR
recording.
Pre-recording, loop recording, interval
recording, one-shot recording, and one-clip
recording are not available.
1394 output is not available during
recording and recording standby.
Changing Scene Dial position during
recording does not change VFR on and off
position.
Sound cannot be recorded.
*1
At this time, no audio is output and
“ ” is displayed over the audio level
meter. “VFR ON, NO AUDIO RECORDING”
is also displayed when recording starts.
The time code is locked to Rec Run
(R-RUN).
*1
Thumbnail screens are created 1 frame
later than video recorded on a P2 card, but
this is not a malfunction.
The screen may be distorted when
changing the FRAME RATE setting.
or less.
Furthermore, AGC, auto iris, auto focus,
and ATW do not function and must be
operated manually.
Red, blue, or green points may appear on
the screen when the frame rate is low. This
is not a fault.
USO RESTRITO
Standard VFR recording
(pulldown recording)
In 1080i or 720P mode, set REC FORMAT on
the setting menu SYSTEM SETUP screen to
AVC-I 100/60i (60P) (or 50i, 50P).
In the SCENE FILE screen, set the menu
option VFR to ON and the menu option
FRAME RATE to suit shooting purposes.
You can also change the frame rate using
the SHTR/F.RATE dial.
Press the START/STOP button.
( (
(
( )
( ) (
Recording with Variable Frame Rate (VFR) (continued)
With AVC-Intra or DVCPRO HD in 1080i,
clips are recorded as 60i, 60P (50i, 50P)
with pull down information not recorded.
Audio playback is disabled when a frame
rate converter is used to extract active
frames for over and under-cranking.
Note the following about standard VFR
recording.
Pre-recording, loop recording, interval
recording, one-shot recording, and one-clip
recording are not available.
1394 output is available during recording
and recording standby, but not in AVC Intra
mode.
Changing Scene Dial position during
recording does not change VFR on and off
position.
Sound is recorded.
The screen may be distorted when
changing the FRAME RATE setting.
or less.
Furthermore, AGC, auto iris and ATW do not
function and must be operated manually.
Red, blue, or green points may appear on
the screen when the frame rate is low. This
is not a fault.
USO RESTRITO
Using progressive mode and VFR recording function
SYSTEM MODE settings
Recording frame rate
SYSTEM MODE Other settings
USO RESTRITO
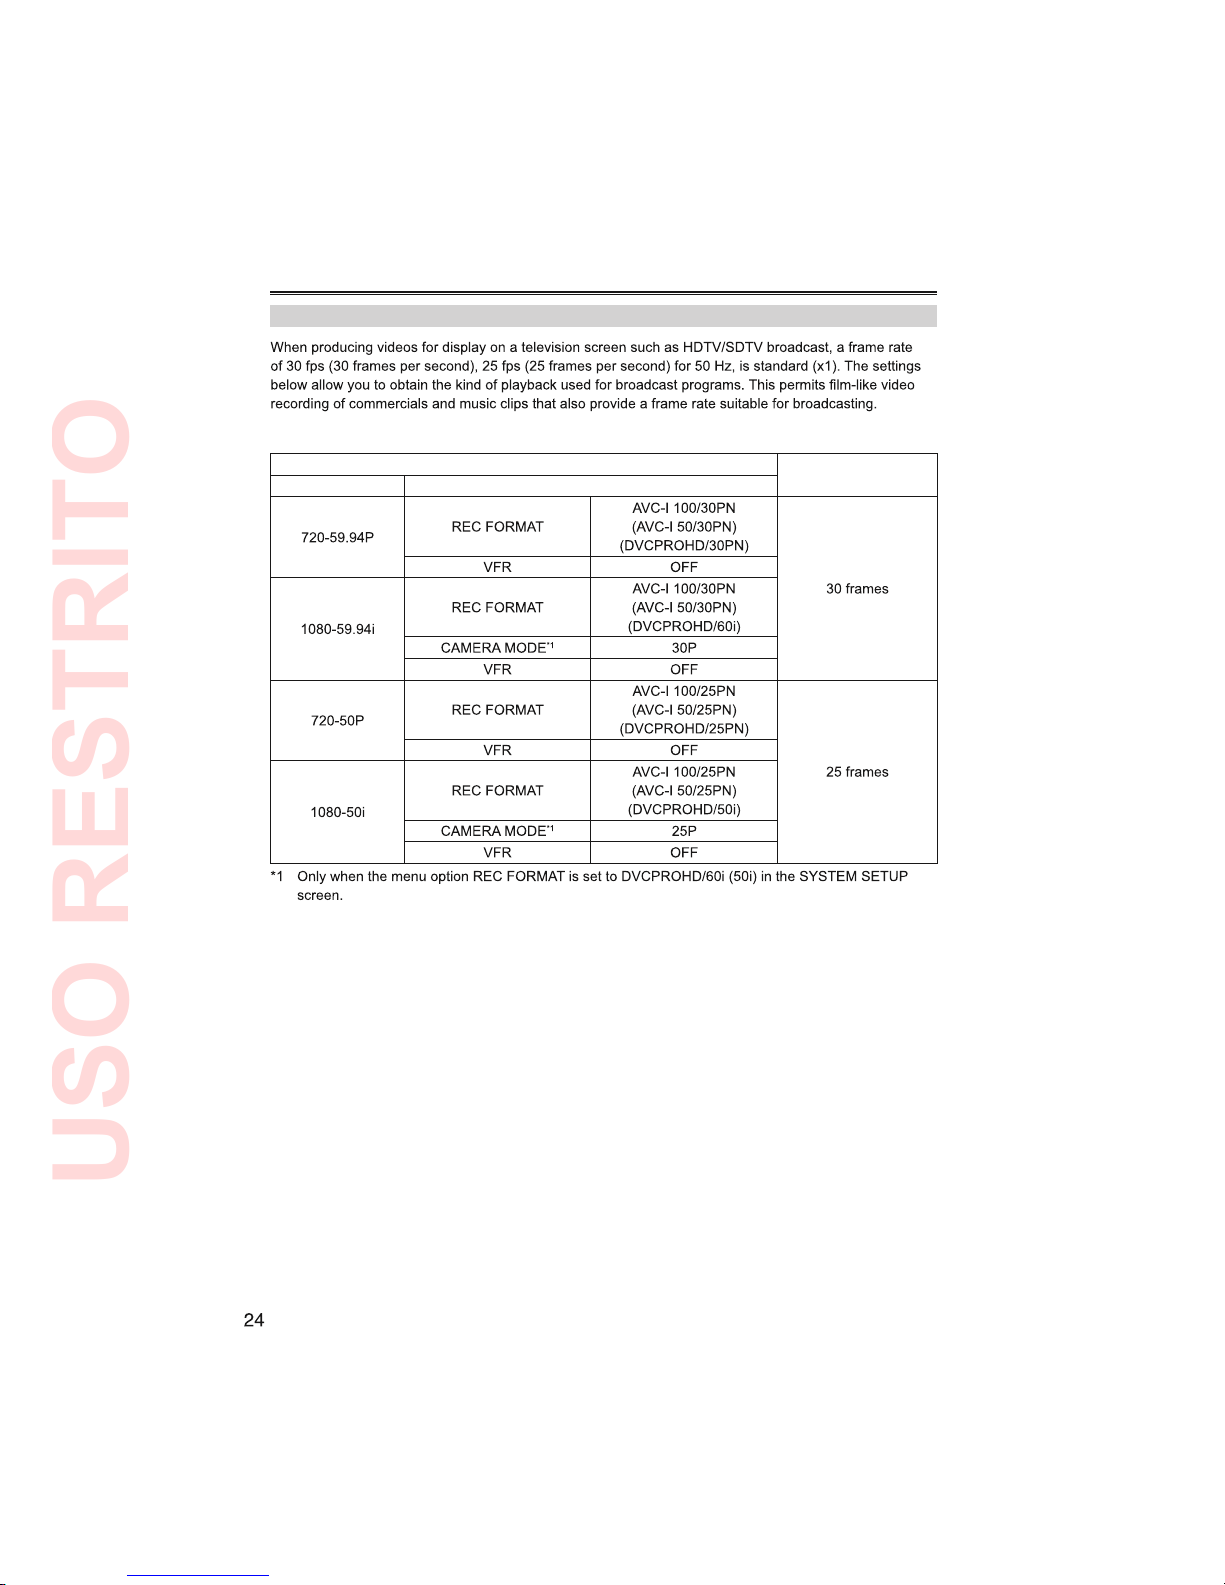
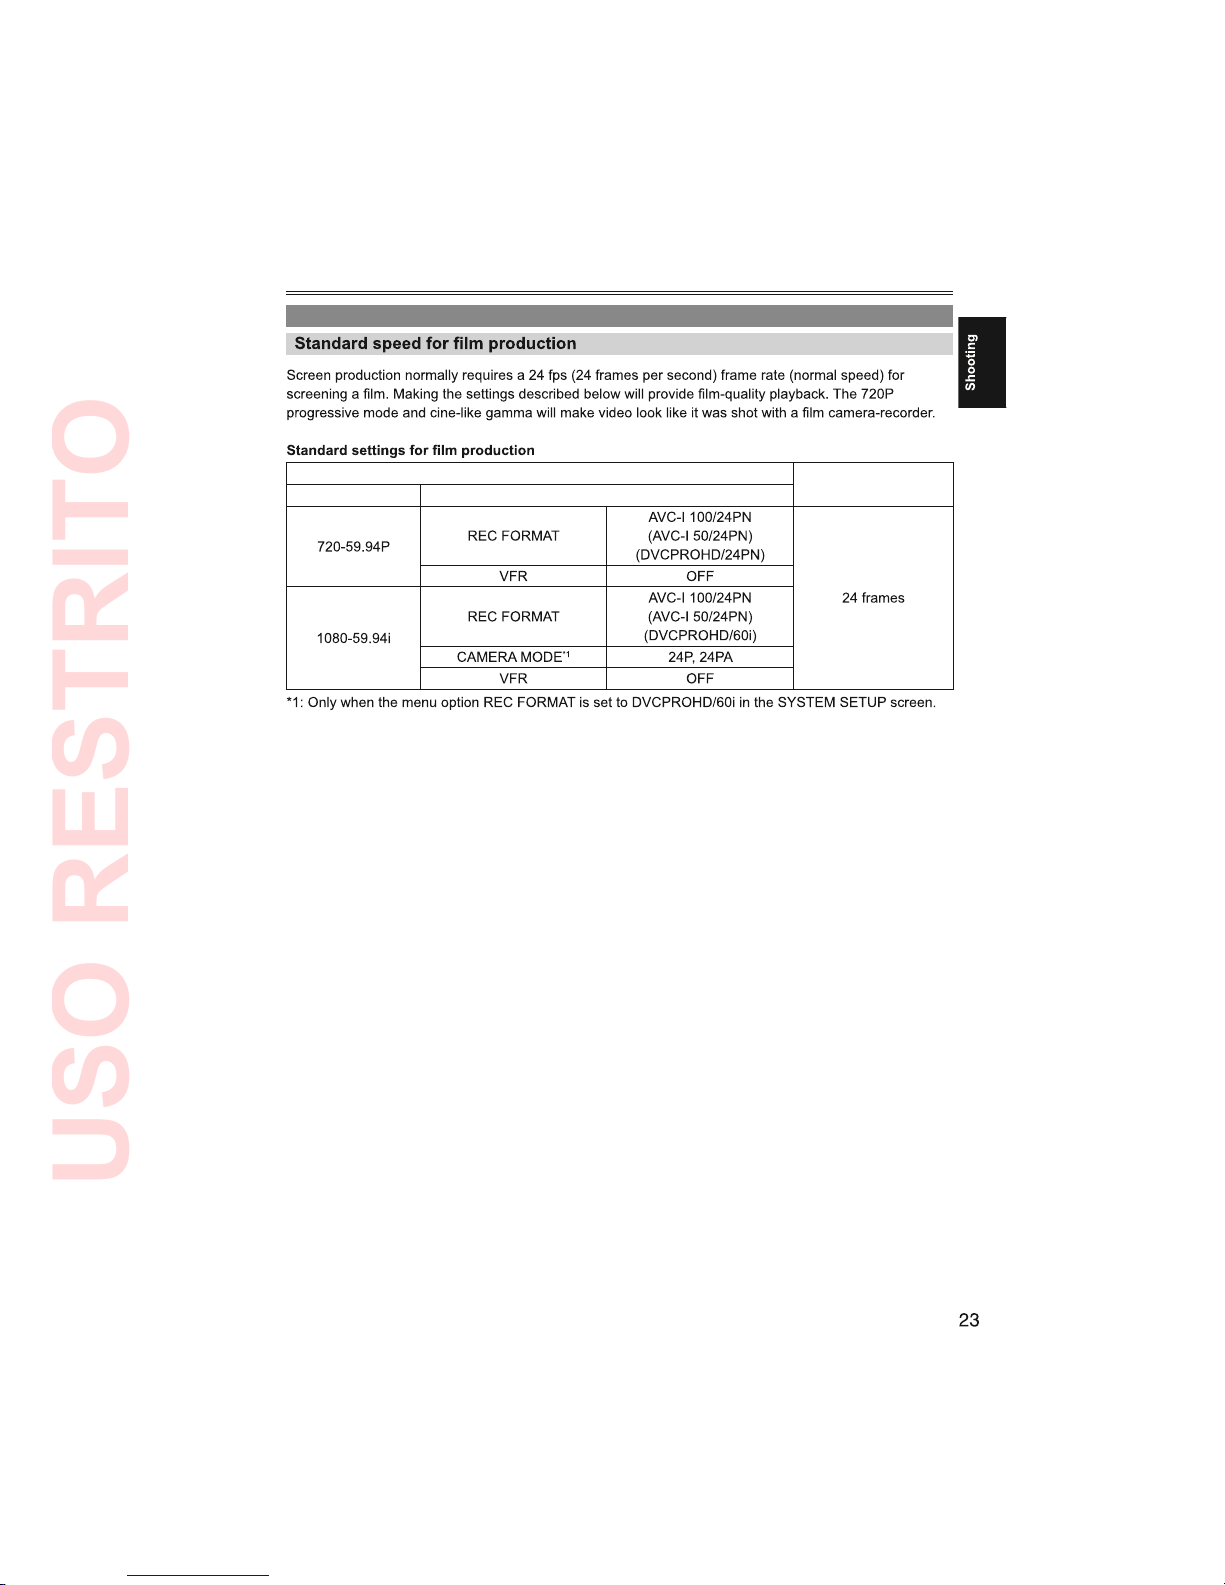
Recording with Variable Frame Rate (VFR) (continued)
Shooting at standard speed for producing commercials and TV programs
Standard settings for producing commercials and dramas
SYETEM MODE settings
Recording frame rate
SYSTEM MODE Other settings
USO RESTRITO
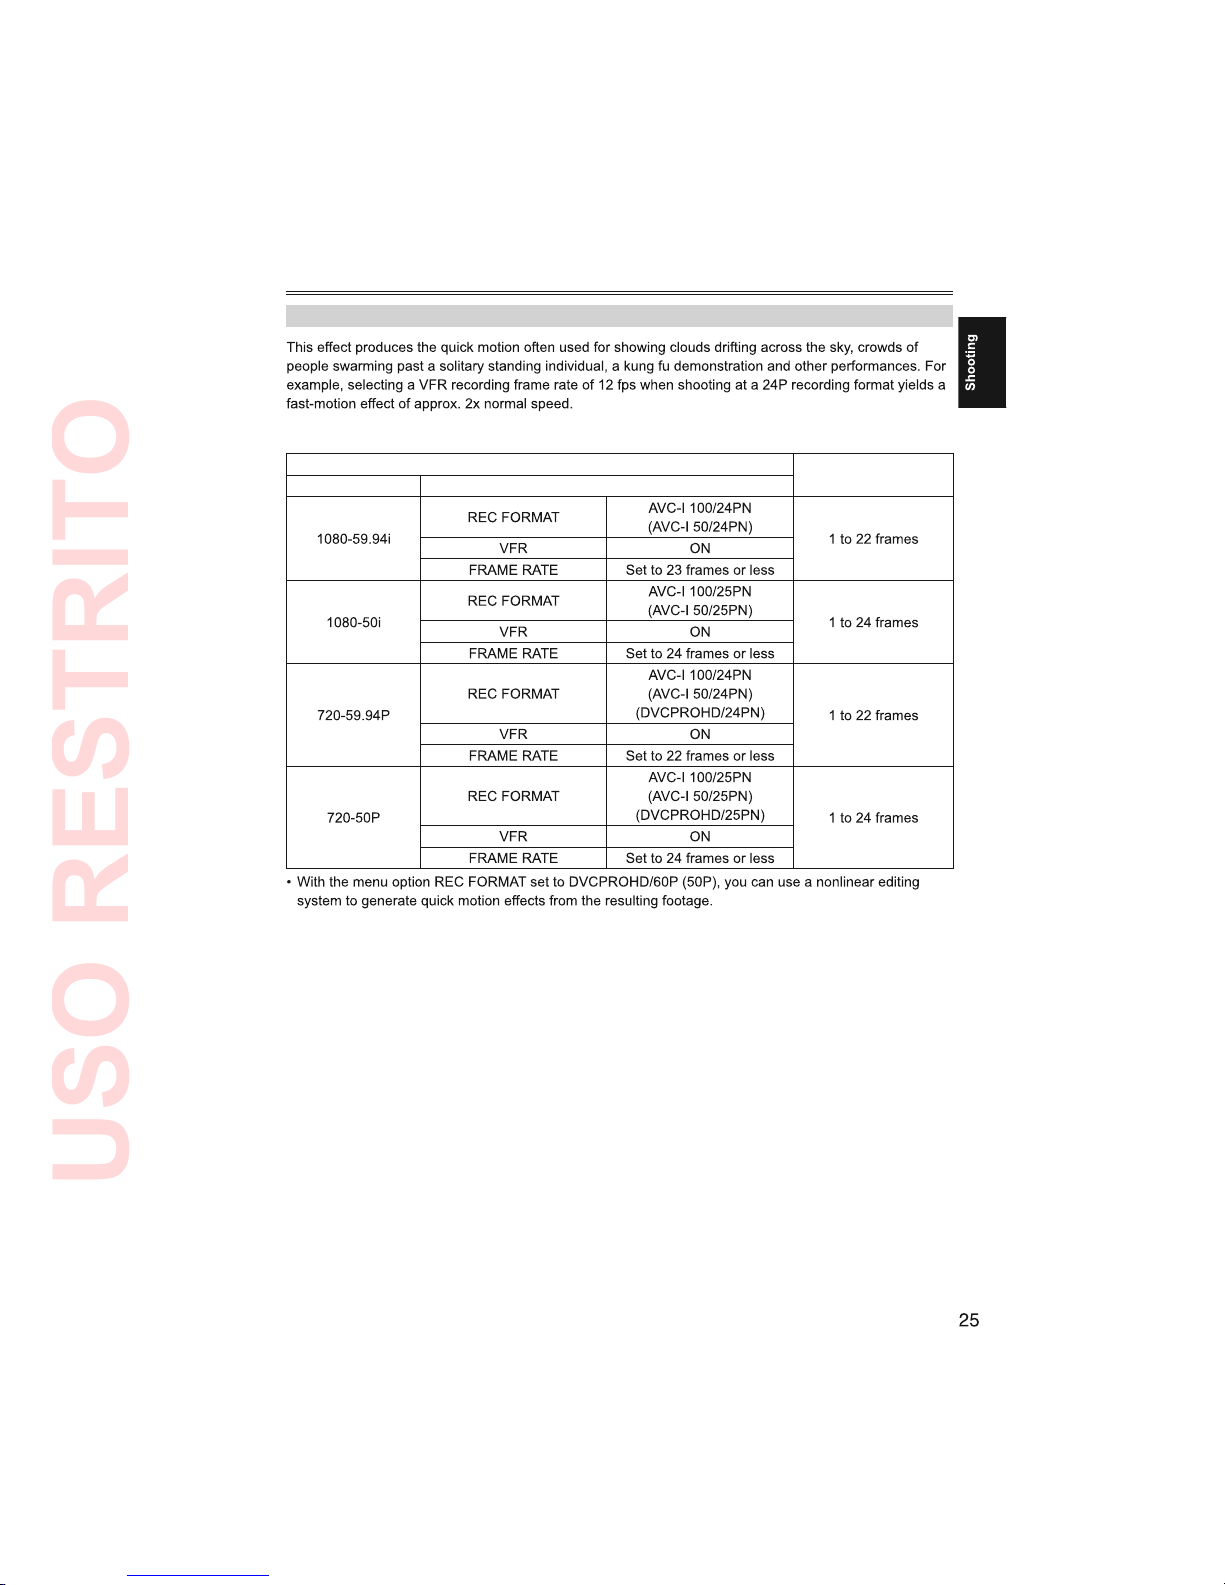
Undercranking effects
Standard setup for undercranking effects
SYSTEM MODE settings
Recording frame rate
SYSTEM MODE Other settings
USO RESTRITO
Recording with Variable Frame Rate (VFR) (continued)
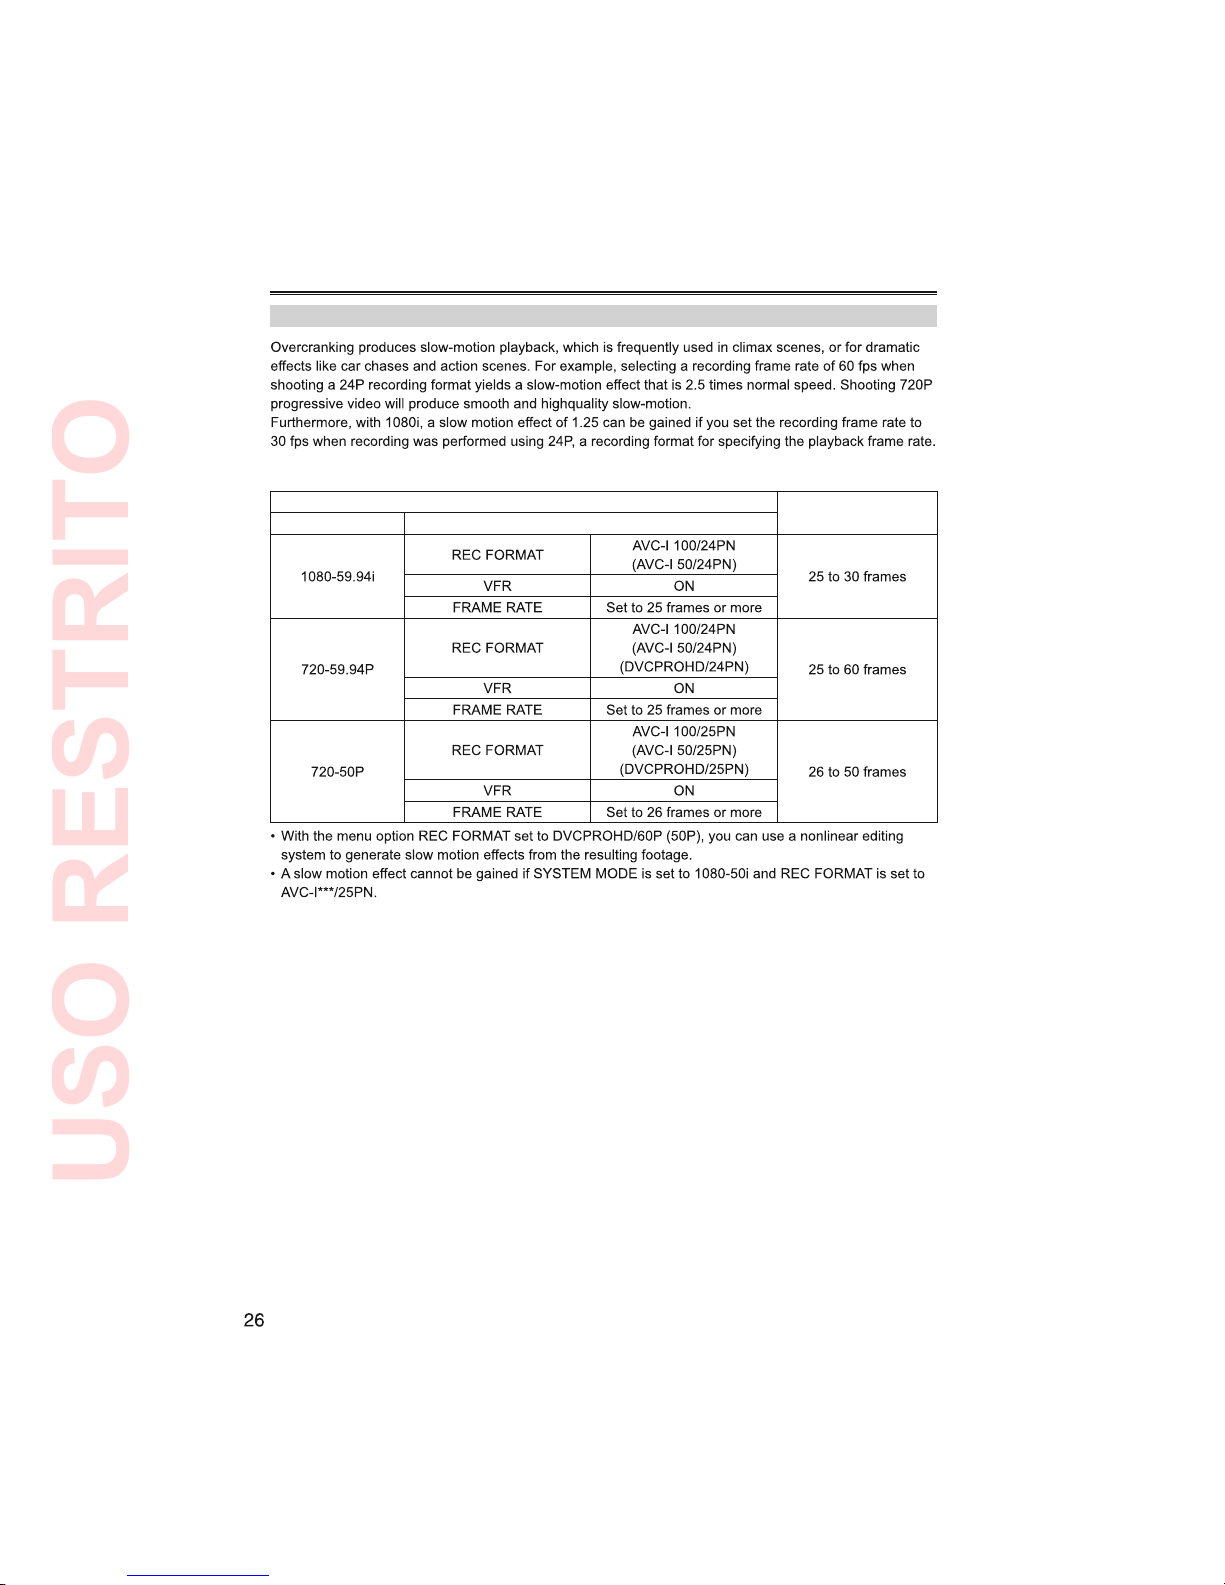
Overcranking effects
Standard setup for overcranking effects
SYSTEM MODE setup
Recording frame rate
SYSTEM MODE Other settings
USO RESTRITO

Flow effect shooting
Set SYSTEM MODE on the setting menu
SYSTEM SETUP screen to 1080-59.94i (50i),
REC FORMAT to AVC-I 100 (50)/60i (50i) or
DVCPRO HD/60i (50i), and VFR to ON.
Press the START/STOP button.
notes
·
·
USO RESTRITO
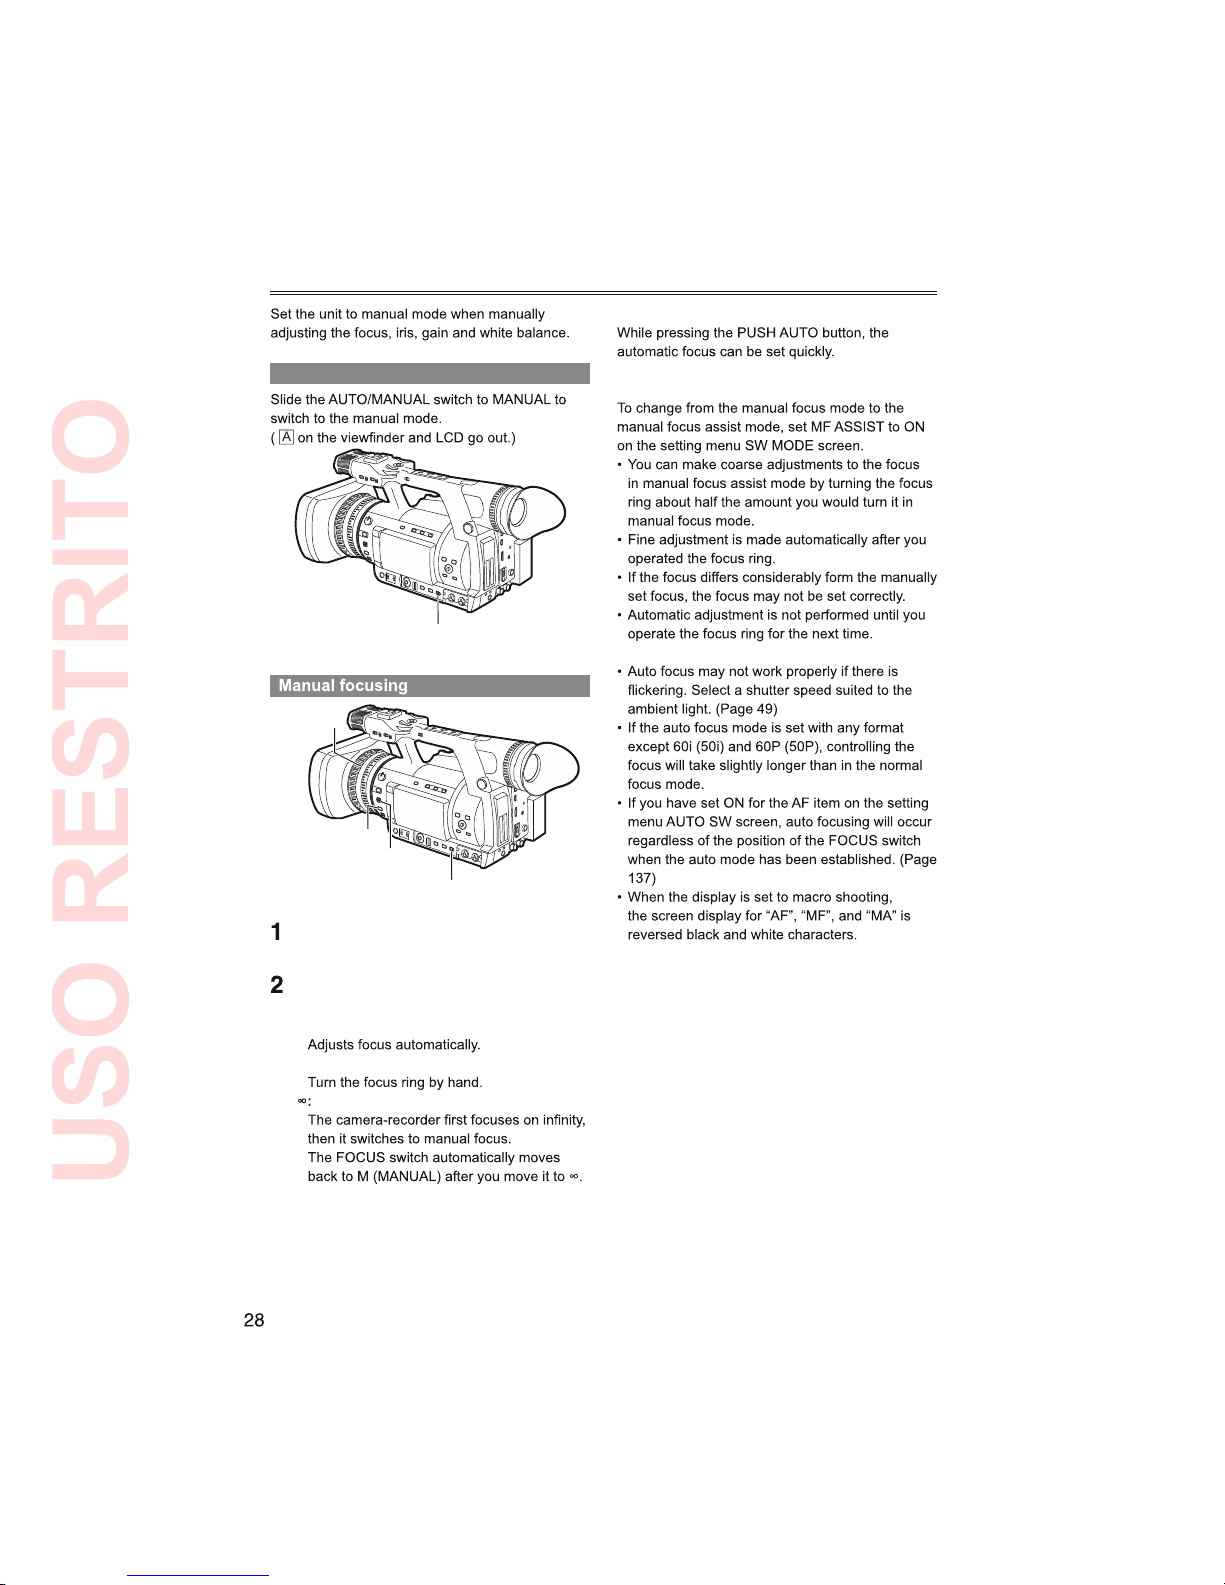
Shooting in manual mode
PUSH AUTO button
Switching to manual focus assist mode
Switching to manual mode
A
AUTO/MANUAL switch
AUTO/MANUAL switch
PUSH AUTO
button
Focus ring
FOCUS switch
Use the AUTO/MANUAL switch to switch to
manual mode.
Use the FOCUS switch to choose how to
control focusing.
A (AUTO): (Auto focus mode)
M (MANUAL): (Manual focus mode)
USO RESTRITO
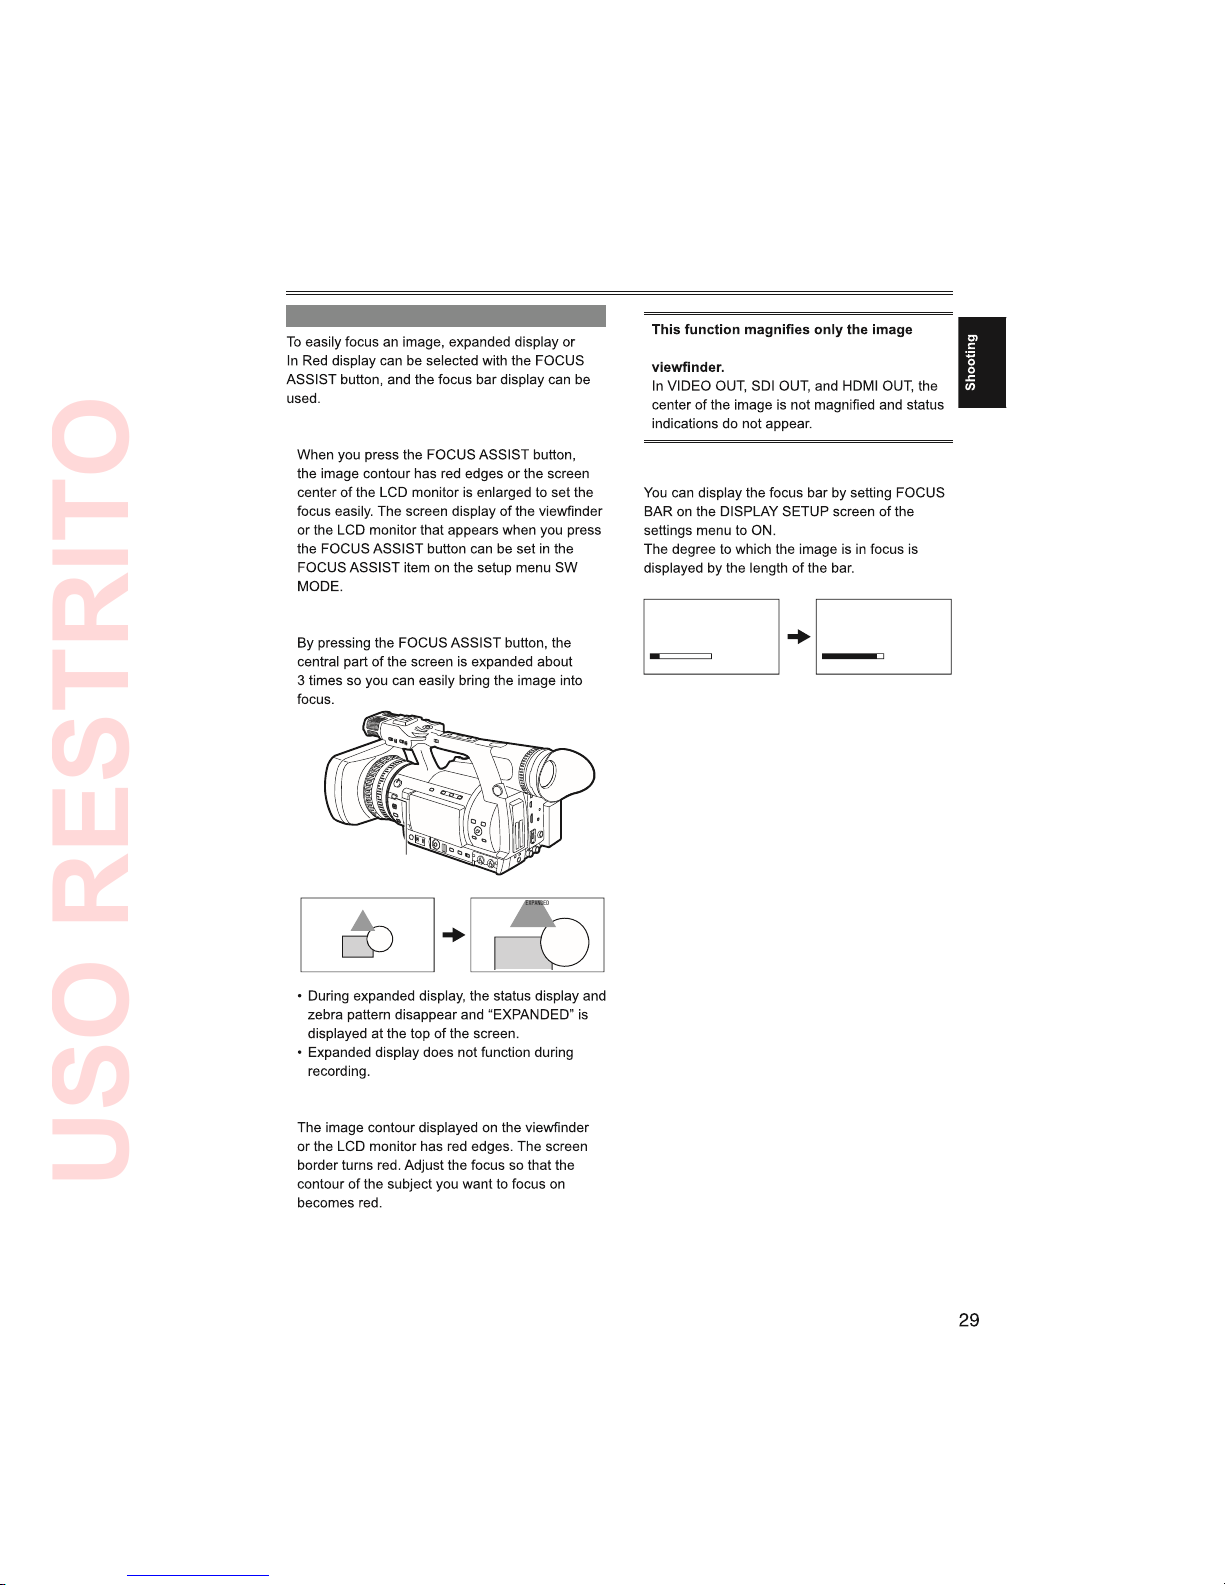
Using focus assist function
FOCUS ASSIST button
Using expanded display (EXPAND):
FOCUS ASSIST button
EXPANDED
Focus in red (IN RED):
at the center of the LCD monitor and
Displaying the focus bar (FOCUS BAR):
When the image is
not in focus
As the image comes
into focus, the bar
extends rightward
USO RESTRITO
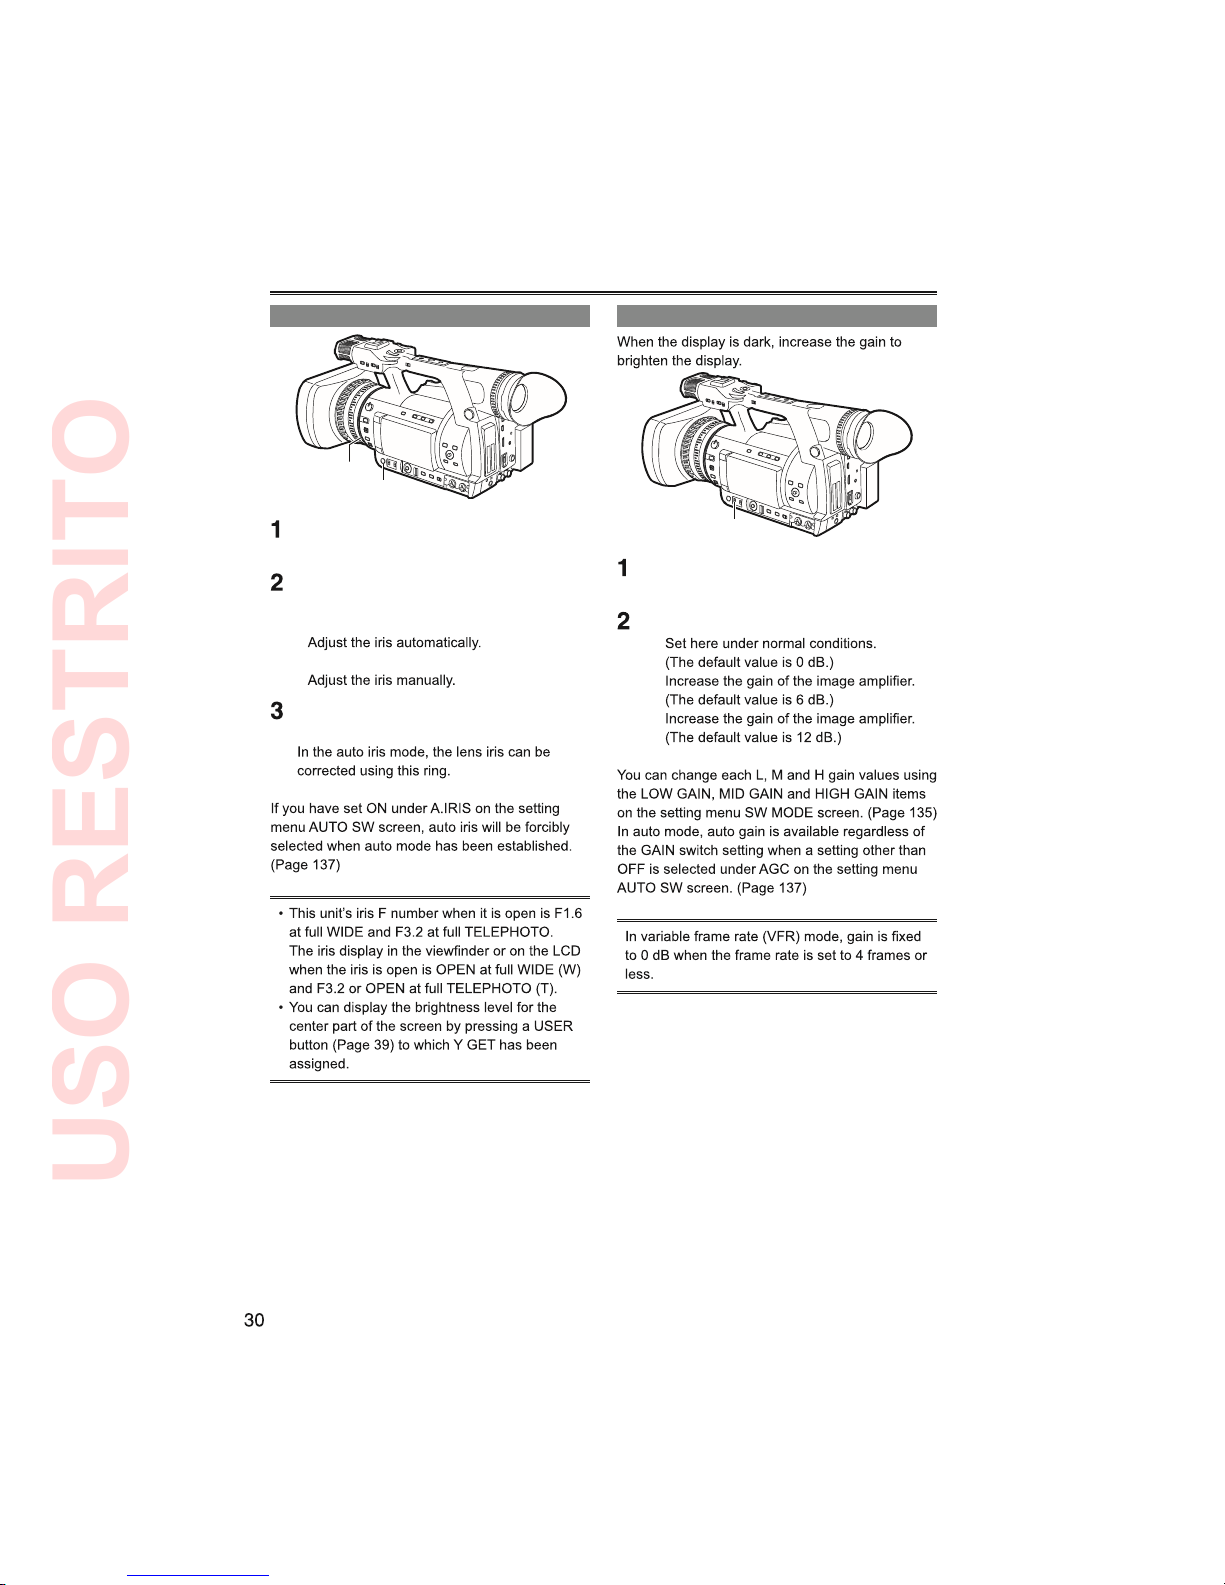
Shooting in manual mode (continued)
Iris adjustments
IRIS ring
IRIS button
Use the AUTO/MANUAL switch to switch to
the manual mode. (Page 28)
Press the IRIS button to switch how to
adjust the aperture of lens.
AUTO IRIS:
MANUAL IRIS:
Turn the IRIS ring to adjust the aperture of
lens when in the manual iris mode.
Adjusting the gain
GAIN switch
Use the AUTO/MANUAL switch to switch to
the manual mode. (Page 28)
Switch the gain with the GAIN switch.
L:
M:
H:
USO RESTRITO
 Loading...