

Panasonic ag-hmc70 operating instructions
Operating Instructions
Memory Card Camera-Recorder
Model No. AG-HMC70P
Before operating this product, please read the insructions carefully and save this manual for future use.
F0308S0 -F
Printed in Japan
ENGLISH
VQT1Q93

Read this first!
The lightning flash with arrowhead
symbol, within an equilateral
CAUTION
RISK OF ELECTRIC SHOCK
DO NOT OPEN
CAUTION:
TO REDUCE THE RISK OF ELECTRIC SHOCK,
DO NOT REMOVE COVER (OR BACK).
NO USER-SERVICEABLE PARTS INSIDE.
REFER SERVICING TO QUALIFIED SERVICE
PERSONNEL.
triangle, is intended to alert the user
to the presence of uninsulated
“dangerous voltage” within the
product’s enclosure that may be of
sufficient magnitude to constitute a
risk of electric shock to persons.
The exclamation point within an
equilateral triangle is intended to
alert the user to the presence of
important operation and
maintenance (service) instructions
in the literature accompanying the
appliance.
WARNING:
≥TO REDUCE THE RISK OF FIRE OR SHOCK HAZARD, DO NOT EXPOSE THIS EQUIPMENT
TO RAIN OR MOISTURE.
≥TO REDUCE THE RISK OF FIRE OR SHOCK HAZARD, KEEP THIS EQUIPMENT AWAY
FROM ALL LIQUIDS. USE AND STORE ONLY IN LOCATIONS WHICH ARE NOT EXPOSED
TO THE RISK OF DRIPPING OR SPLASHING LIQUIDS, AND DO NOT PLACE ANY LIQUID
CONTAINERS ON TOP OF THE EQUIPMENT.
CAUTION:
TO REDUCE THE RISK OF FIRE OR SHOCK HAZARD AND ANNOYING INTERFERENCE,
USE THE RECOMMENDED ACCESSORIES ONLY.
CAUTION:
In order to maintain adequate ventilation, do not install or place this unit in a bookcase,
built-in cabinet or any other confined space. To prevent risk of electric shock or fire hazard
due to overheating, ensure that curtains and any other materials do not obstruct the
ventilation.
CAUTION:
Excessive sound pressure from earphones and headphones cause hearing loss.
CAUTION:
Do not jar, swing, or shake the unit by its handle while the conversion lens or another
accessory is attached.
Due to the added weight of the conversion lens, any strong jolt to the handle may damage
the unit or result in personal injury.
indicates safety information.
2
AC Adapter
The rating plate is on the underside of the AC Adapter.
Disconnect the AC mains plug from the AC mains socket when not in use.
CAUTION:
Danger of explosion or fire if battery is mistreated.
For Battery Pack
≥Replace only with same or specified type.
≥Do not disassemble or dispose of in fire.
≥Do not store in temperatures over 60 °C (140 °F).
≥Do not leave the battery in an automobile exposed to direct sunlight for a long period of time with
doors and windows closed.
≥Use specified charger.
For Battery of Remote Controller
≥Replace battery with part No. CR2025 only.
≥Do not recharge the battery.
≥Do not disassemble or dispose of in fire.
≥Do not store in temperatures over 60 °C (140 °F).
CAUTION:
The mains plug of the power supply cord shall remain readily operable.
The AC receptacle (mains socket outlet) shall be installed near the equipment and shall be
easily accessible. To completely disconnect this equipment from the AC mains, disconnect
the mains plug from the AC receptacle.
CAUTION:
Do not leave the unit in direct contact with the skin for long periods of time when in use.
Low temperature burn injuries may be suffered if the high temperature parts of this unit are
in direct contact with the skin for long periods of time.
When using the equipment for long periods of time, make use of the tripod.
CAUTION:
Do not lift the unit by its handle while the tripod is attached. When the tripod is attached, its
weight will also affect the unit’s handle, possibly causing the handle to break and hurting
the user. To carry the unit while the tripod is attached, take hold of the tripod.
NOTIFICATION (Canada)
This class B digital apparatus complies with Canadian ICES-003.
Cet appareil numéique de la classe B est conforme à la norme NMB-003 du Canada.
indicates safety information.
IMPORTANT
“Unauthorized recording of copyrighted television programs, video tapes and other materials may
infringe the right of copyright owners and be contrary to copyright laws.”
3

Declaration of Conformity
Model Number: AG-HMC70P
Trade Name: PANASONIC
Responsible Party: Panasonic Corporation of North America
Support contact: Panasonic Broadcast & Television Systems Company 1-800-524-1448
This device complies with Part 15 of FCC Rules.
Operation is subject to the following two conditions:
(1) This device may not cause harmful interference, and (2) this device must accept any
interference received, including interference that may cause undesired operation.
FCC Note:
This equipment has been tested and found to comply with the limits for a class B digital device,
pursuant to Part 15 of the FCC Rules. These limits are designed to provide reasonable protection
against harmful interference in a residential installation. This equipment generates, uses, and can
radiate radio frequency energy and, if not installed and used in accordance with the instruction
manual, may cause harmful interference to radio communications. However, there is no guarantee
that interference will not occur in a particular installation. If this equipment does cause harmful
interference to radio or television reception, which can be determined by turning the equipment off
and on, the user is encouraged to try to correct the interference by one or more of the following
measures:
≥Reorient or relocate the receiving antenna.
≥Increase the separation between the equipment and receiver.
≥Connect the equipment into an outlet on a circuit different from that to which the receiver is
connected.
≥Consult the dealer or an experienced radio/TV technician for help.
≥The user may find the booklet “Something About Interference” available from FCC local regional
offices helpful.
Warning :
To assure continued FCC emission limit compliance, follow the attached installation instructions
and the user must use only shielded interface cables when connecting to host computer or
peripheral devices. Also any unauthorized changes or modifications to this equipment could Void
the user’s authority to operate this device.
One Panasonic Way, Secaucus, NJ 07094
indicates safety information.
A lithium ion/polymer battery that is recyclable powers the product you have
purchased. Please call 1-800-8-BATTERY for information on how to recycle this
battery.
<For USA-California Only>
This product contains a CR Coin Cell Lithium Battery which contains Perchlorate Material —
handling may apply.
See www.dtsc.ca.gov/hazardouswaste/perchlorate
4
special

IMPORTANT SAFETY INSTRUCTIONS
Read these operating instructions carefully before using the unit. Follow the safety instructions on the
unit and the applicable safety instructions listed below. Keep these operating instructions handy for
future reference.
1) Read these instructions.
2) Keep these instructions.
3) Heed all warnings.
4) Follow all instructions.
5) Do not use this apparatus near water.
6) Clean only with dry cloth.
7) Do not block any ventilation openings. Install in accordance with the manufacturer’s instructions.
8) Do not install near any heat sources such as radiators, heat registers, stoves, or other apparatus
(including amplifiers) that produce heat.
9) Do not defeat the safety purpose of the polarized or grounding-type plug. A polarized plug has two
blades with one wider than the other. A grounding-type plug has two blades and a third grounding
prong. The wide blade or the third prong are provided for your safety. If the provided plug does not
fit into your outlet, consult an electrician for replacement of the obsolete outlet.
10) Protect the power cord from being walked on or pinched particularly at plugs, convenience
receptacles, and the point where they exit from the apparatus.
11) Only use attachments/accessories specified by the manufacturer.
12) Use only with the cart, stand, tripod, bracket, or the table specified by the
manufacturer, or sold with the apparatus. When a cart is used, use caution
when moving the cart/apparatus combination to avoid injury from tip-over.
13) Unplug this apparatus during lightning storms or when unused for long periods
of time.
14) Refer all servicing to qualified service personnel. Servicing is required when the apparatus has
been damaged in any way, such as power-supply cord or plug is damaged, liquid has been spilled
or objects have fallen into the apparatus, the apparatus has been exposed to rain or moisture, does
not operate normally, or has been dropped.
S3125A
5

Precautions
USE & LOCATION
WARNING
≥AS WITH ANY SMALL OBJECT, SD CARDS
CAN BE SWALLOWED BY YOUNG
CHILDREN. DO NOT ALLOW CHILDREN TO
HANDLE THE SD CARD.
CAUTION
≥DO NOT AIM YOUR CAMERA AT THE SUN
OR OTHER BRIGHT OBJECTS
≥DO NOT LEAVE THE CAMERA WITH THE
EVF AIMED DIRECTLY AT THE SUN AS
THIS MAY CAUSE DAMAGE TO THE
INTERNAL PARTS OF THE EVF
≥DO NOT EXPOSE YOUR CAMERA TO
EXTENDED HIGH TEMPERATURE ... Such
as, in direct sunlight, inside a closed car, next
to a heater, etc... This action could permanently
damage the internal parts of your camera.
≥AVOID SUDDEN CHANGES IN
TEMPERATURE ... If the unit is suddenly
moved from a cold place to a warm place,
moisture may form on the SD card and inside
the unit.
≥DO NOT LEAVE YOUR CAMERA OR THE
POWER SUPPLY TURNED ON WHEN NOT
IN USE.
CARE
≥TO CLEAN YOUR CAMERA ... Do not use
strong or abrasive detergents when cleaning
your camera body.
≥TO PROTECT THE LENS ... Do not touch the
surface of the lens with your hand. Use a
commercial camera lens solution and lens
paper when cleaning the lens. Improper
cleaning can scratch the lens coating.
≥TO PROTECT THE FINISH OF YOUR
CAMERA ... Before handling your camera,
make sure your hands and face are free from
any chemical products, such as suntan lotion,
as it may damage the finish.
6

ª Indemnity concerning recording
content
The manufacturer shall in no event be liable for
the loss of recordings due to malfunction or
defect of this unit, its accessories or recordable
media.
IMPORTANT
ª Carefully observe copyright laws
Whatever you have recorded and created can
be used for your personal entertainment only.
Under copyright laws, other materials cannot
be used without obtaining permission from
the holders of the copyrights.
ª Cards that you can use with this
unit
SD Memory Card and SDHC Memory Card
For the purposes of these operating instructions,
the following cards are referred to as “the SD
card”.
SD Memory Card
SDHC Memory Card
≥SDHC Logo is a trademark.
≥miniSD Logo is a trademark.
≥“AVCHD” and the “AVCHD” logo are
trademarks of Matsushita Electric Industrial
Co., Ltd. and Sony Corporation.
≥Manufactured under license from Dolby
Laboratories.
Dolby and the double-D symbol are trademarks
of Dolby Laboratories.
≥HDMI, the HDMI Logo and the High-Definition
Multimedia Interface are the registered
trademarks or trademarks of HDMI Licensing
LLC.
≥LEICA is a registered trademark of Leica
Microsystems IR GmbH and DICOMAR is a
registered trademark of Leica Camera AG.
≥Microsoft
registered trademarks or trademarks of the
Microsoft Corporation in the United States and/
or other countries.
≥Microsoft product screen shot(s) reprinted with
permission from Microsoft Corporation.
≥IBM and PC/AT are registered trademarks of
International Business Machines Corporation of
the U.S.
®
, Windows® and DirectX® are either
®
, Pentium® and Celeron® are the
≥Intel
registered trademarks or trademarks of the
Intel Corporation in the United States and other
countries.
≥Other names of systems and products
mentioned in these instructions are usually the
registered trademarks or trademarks of the
manufacturers who developed the system or
product concerned.
≥This product is licensed under the AVC patent
portfolio license for the personal and noncommercial use of a consumer to (i) encode
video in compliance with the AVC Standard
(“AVC Video”) and/or (ii) decode AVC Video
that was encoded by a consumer engaged in a
personal and non-commercial activity and/or
was obtained from a video provider licensed to
provide AVC Video. No license is granted or
shall be implied for any other use. Additional
information may be obtained from MPEG LA,
LLC. See http://www.mpegla.com
≥When any data are recorded on SD memory
cards using this product and these cards are
distributed to end users for commercial
purposes, a separate license agreement with
MPEG-LA is required. The end user used
herein means a person or an organization
handling the content for personal use.
.
7

Contents
Read this first!........................................2
Recording
Before using
Features of Memory Card Camera
Recorder............................................14
Accessories..........................................17
Parts identification and handling .......18
Using the LCD monitor........................24
Using the finder....................................24
Using the remote control.....................25
Cards that you can use
with this unit......................................27
Setup
Charging the battery............................29
Inserting/removing the battery ...........30
Charging time and recordable time.... 31
Connecting to the AC outlet................32
Selecting a mode
(Turning the unit on/off)...................33
Inserting/removing an SD card........... 34
How to use the cursor button .............35
Using the menu screen........................39
Setting date and time...........................41
Adjusting LCD monitor/finder.............42
Recording motion pictures .................44
Recording modes/recordable time
available for the motion picture ......46
Recording still pictures (JPEG) .......... 47
Picture Quality/Approximate Number
of Recordable Pictures on
an SD Card ........................................ 51
Various recording functions ............... 52
Zoom in/out function ................................ 52
Recording yourself................................... 53
Backlight compensation function ............. 54
Fade in/fade out function ......................... 54
Image stabilizer function .......................... 55
Guide line function ................................... 56
Zebra display ........................................... 56
Color bar .................................................. 57
Input Audio Selection............................... 58
Use the external microphone or audio
devices connected to the XLR terminal.
Audio Recording Level ............................. 60
.. 59
Manual recording functions................ 61
Scene mode............................................. 61
Manual focus adjustment ......................... 62
White balance.......................................... 63
Manual shutter speed
/aperture adjustment ............................ 64
Playback
Motion picture playback...................... 66
Playing back motion pictures by date ...... 69
Repeat playback ...................................... 70
Resuming the previous playback ............. 70
Still picture (JPEG) playback.............. 71
8

Contents
Editing
Editing scenes......................................73
Deleting scenes........................................73
Protecting scenes.....................................74
Editing still pictures.............................75
Deleting still pictures ................................ 75
Protecting still pictures .............................76
DPOF setting............................................77
Card management
Formatting ............................................78
Formatting an SD card .............................78
With other products
With a TV...............................................79
Dubbing images onto a connected
DVD recorder or video device .........85
With a printer (PictBridge)...................86
With a computer
Before using with a computer.............88
What you can do with a computer ............88
Contents on provided CD-ROM
(“HD Writer 2.5E for HDC”)...................89
End User License Agreement ..................90
Operating environment.............................91
Installation ............................................94
Installing HD Writer Ver2.5.......................94
Reading the operating instructions of
the software applications......................95
Software application uninstallation ...........95
Connection and recognition ...............96
Connection and recognition procedures...96
About the computer display......................97
To disconnect USB cable safely...............98
Verifying the unit is correctly recognized
by the computer....................................98
Using HD Writer Ver2.5........................99
If using Macintosh..............................101
Others
Menus and Indications ......................102
Menu list................................................. 102
Menus related to [ADVANCED]
and [SETUP] ...................................... 104
Indications.............................................. 105
Messages............................................... 107
Functions that cannot be used
simultaneously.................................... 110
Troubleshooting.................................111
Explanation of terms..........................118
Specifications.....................................120
Index....................................................123
9

Cautions for use
About this unit
The unit and the SD card become warm during
use. This is not a malfunction.
Keep this unit as far away as possible from
electromagnetic equipment (such as
microwave ovens, TVs, video games etc.).
≥If you use this unit on top of or near a TV, the
pictures and sound on this unit may be
disrupted by electromagnetic wave radiation.
≥Do not use this unit near cell phones because
doing so may result in noise adversely affecting
the pictures and sound.
≥Recorded data may be damaged, or pictures
may be distorted, by strong magnetic fields
created by speakers or large motors.
≥Electromagnetic wave radiation generated by
microprocessors may adversely affect this unit,
disturbing the pictures and sound.
≥If this unit is adversely affected by
electromagnetic equipment and stops
functioning properly, turn the unit off and
remove the battery or disconnect AC adaptor.
Then reinsert the battery or reconnect the AC
adaptor and turn the unit on.
When you use the unit in a sandy or dusty
place such as a beach, do not let sand or fine
dust get into the body and terminals of the unit.
Also, keep the unit away from sea water.
≥Sand or dust may damage the unit. (Care
should be taken when inserting and removing a
card.)
≥If sea water splashes onto the unit, wipe off the
water with a well wrung cloth. Then wipe the
unit again with a dry cloth.
When carrying the unit, do not drop or bump it.
≥A strong impact can break the unit’s casing,
causing it to malfunction.
Do not use benzine, paint thinner or alcohol
for cleaning the unit.
≥Before cleaning, detach the battery or pull out
the AC cable from the AC outlet.
≥The camera body may be discolored and the
surface finish may peel off.
≥Wipe the unit with a soft dry cloth to remove
dust and fingerprints. To remove stubborn
stains, thoroughly wring a cloth that has been
soaked in a neutral detergent diluted with water
and wipe the unit with it. Afterwards, wipe it
with a dry cloth.
≥When you use a chemical dust cloth, follow the
instructions that came with the cloth.
Do not use this unit near radio transmitters or
high-voltage lines.
≥If you record near radio transmitters or
high-voltage lines, the recorded pictures and
sound may be adversely affected.
Make sure to use the supplied cords and
cables. If you use optional accessories, use
the cords and the cables supplied with them.
Do not extend the cords and the cables.
Do not spray insecticides or volatile
chemicals onto the unit.
≥If the unit is sprayed with such chemicals, its
body may be marred and the surface finish may
peel off.
≥Do not leave rubber or plastic products in
contact with the unit for a long time.
10
Do not use the unit for surveillance purposes, etc.
≥If you use the unit for a long time, heat will build
up inside it and this may cause a malfunction.
When you are not going to use the unit for an
extended time
≥When storing the unit in a cupboard or cabinet,
it is recommended that you place a desiccant
(silica gel) in with it.
Caution regarding laser beams
≥The CCD may be damaged if it is subjected to
light from a laser beam.When using the
camera-recorder in locations where laser
irradiation equipment is used, be careful not to
allow the laser beam to shine directly on the
lens.

Mounting the camera-recorder on a tripod
≥The tripod mounting hole is 5.5 mm deep. Do
not force the tripod screw beyond this
depth.You can damage the camera-recorder if
you use any screw other than 1/4-20UNC.
(l 23)
About the battery
The battery used in this unit is a rechargeable
lithium-ion battery. It is susceptible to humidity
and temperature and the effect increases the
more the temperature rises or falls. In cold areas,
the full charge indication may not appear or the
low battery indication may appear about
5 minutes after starting use. At high
temperatures, the protection function may be
triggered, making it impossible to use the unit.
Be sure to detach the battery after use.
≥If the battery is left attached, a minute amount
of current continues to flow even if the unit’s
power is off. Keeping the unit in this state may
result in over discharge of the battery. This may
result in you not being able to use the battery
even after it is charged.
≥The battery should be stored in the vinyl bag so
metal does not come into contact with the
terminals.
≥The battery should be stored in a cool place
free from humidity, with as constant
temperature as possible. (Recommended
temperature: 15 °C to 25 °C (59 °F to 77 °F),
Recommended humidity: 40% to 60%)
≥Extremely high temperatures or low
temperatures will shorten the life of the battery.
≥If the battery is kept in high-temperature,
high-humidity, or oily-smoky places, the
terminals may rust and cause malfunctions.
≥To store the battery for a long period of time,
we recommend you charge it once every year
and store it again after you have completely
used up the charged capacity.
≥Dust and other matter attached to the battery
terminals should be removed.
Prepare spare batteries when going out for
recording.
≥Prepare batteries enough to last for 3 to 4 times
the period during you want to record pictures in.
In cold places such as a ski resort, the period
during which you can record pictures is
shortened.
≥When you travel, do not forget to bring an AC
adaptor so that you can recharge the batteries
at your destination.
If you drop the battery accidentally, check to
see if the terminals are damaged.
≥Attaching a battery with damaged terminals can
damage the unit or AC adaptor.
Do not throw old battery into fire.
≥Heating a battery or throwing it into a fire may
result in an explosion.
If the operating time is very short even after
the battery has been recharged, the battery
has worn out. Please purchase a new battery.
About the AC adaptor
≥If the temperature of the battery is extremely
high or extremely low, charging may take time
or the battery may not be charged.
≥If the charging lamp keeps flashing, make sure
that the terminals of the battery or the AC
adaptor are not exposed to dirt, foreign objects
or dust, then reconnect them properly.
Disconnect the AC cable from the AC outlet
when you remove dirt, foreign objects or dust
on the terminals of the battery or the AC
adaptor.
If the charging lamp is still flashing, something
may be wrong with the battery or AC adaptor.
Contact your dealer.
≥If you use the AC adaptor near a radio, radio
reception may be disturbed. Keep the AC
adaptor 1 m (3.3 feet) or more away from the
radio.
≥When using the AC adaptor, it may generate
whirring sounds. However, this is normal.
≥After use, be sure to disconnect the AC
adaptor. (If it is left connected, a minute amount
of current is consumed.)
≥Always keep the electrodes of the AC adaptor
and battery clean.
Put this unit near the outlet to make it easy
for the interrupting device (plug) to reach it.
11
About the SD card
≥The memory capacity indicated on the label of
an SD card is the total of the capacity for
copyright protection and management and the
capacity which can be used on the unit, a
computer etc.
≥During prolonged use, the unit’s surfaces and
the SD card will heat up slightly. This is normal.
Extremely high precision technology is
employed to produce the LCD Monitor screen
featuring a total of approximately 251,000
pixels. The result is more than 99.99%
effective pixels with a mere 0.01% of the
pixels inactive or always lit. However, this is
not a malfunction and does not affect the
recorded picture.
Always set the mode dial to OFF when
inserting or removing an SD card.
While this unit accesses the SD card (while
or is being displayed/the access
lamp is lit), do not remove the SD card,
operate the mode dial, turn off the power or
shake or impact the unit.
About the miniSD Card
≥Be sure to insert miniSD Cards in the dedicated
card adaptor before use. Inserting a card in this
unit without the adaptor may damage the unit
or the card.
≥Do not insert an empty card adaptor in this unit.
Do not leave the adaptor in this unit while
inserting or removing miniSD Cards. This may
cause the unit to malfunction.
LCD monitor
≥When the LCD monitor gets dirty, wipe it with a
dry soft cloth.
≥In a place with drastic temperature changes,
condensation may form on the LCD monitor.
Wipe it with soft dry cloth.
≥When the unit has become very cold, for
example due to storage in a cold area, its LCD
monitor will be slightly darker than usual
immediately after the power is turned on. The
normal brightness will be restored when the
unit’s internal temperature rises.
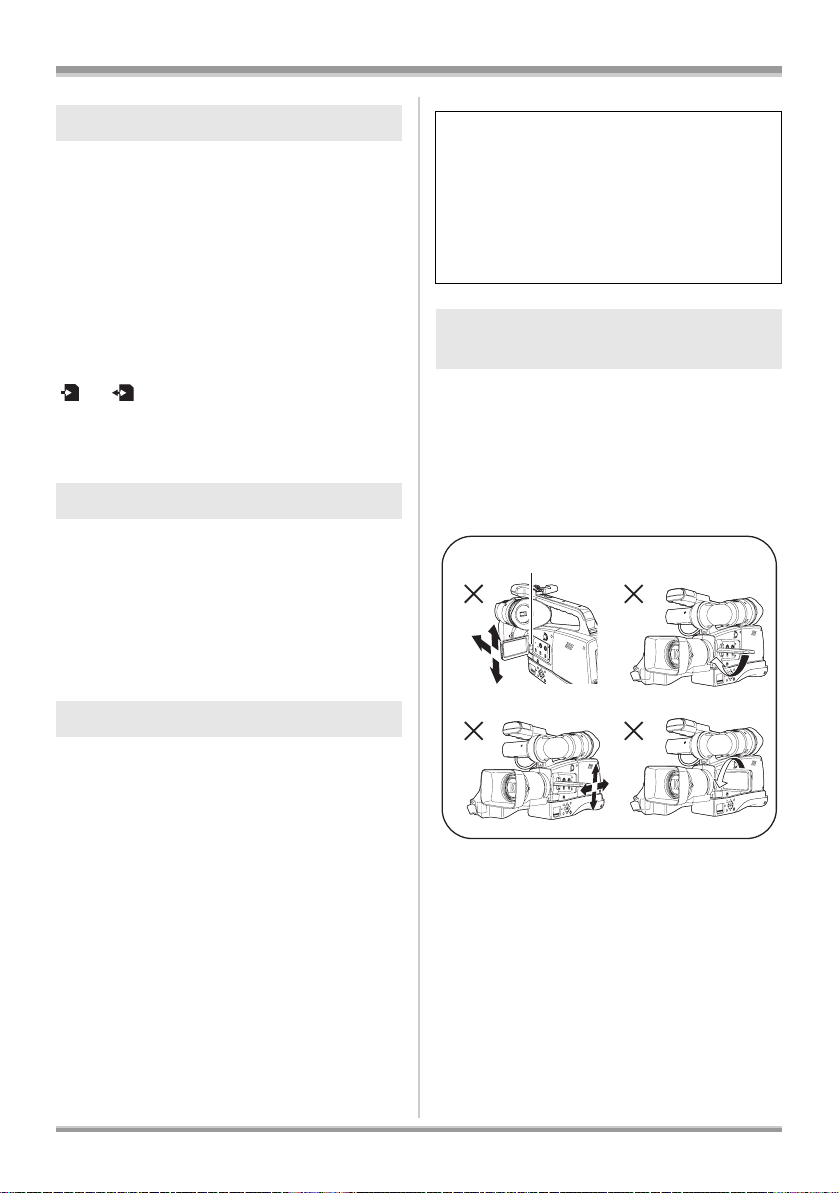
Precaution when using an LCD
monitor
When using an LCD monitor, do not apply
excessive pressure to the hinge connecting the
monitor to the unit, as shown in the illustrations
below.
Doing so may damage these parts.
Wrong
Hinge Area
12

About condensation
When condensation forms on the unit, the lens
will cloud up and the unit may not work properly.
Make every effort to ensure that condensation
does not form. If it does form, take the actions
described below.
Causes of condensation
Condensation takes place when the ambient
temperature or humidity is changed as
follows.
≥When this unit is brought inside from the cold
(e.g. a ski slope) to a warm room.
≥When this unit is moved from an
air-conditioned car to outside.
≥When a cold room has been warmed up
quickly.
≥When cool wind from an air conditioner is
directly blown onto this unit.
≥After summer afternoon showers of rain.
≥When this unit is in a very humid place where
the air is thick with steam. (e.g. a heated
swimming pool)
When this unit is taken to a location with a
significant temperature difference such as
from a cold place to a hot place.
If, for example, you have used this unit for
recording on a ski slope and are taking it into a
heated room, place the unit inside a plastic bag,
remove as much of the air from inside the bag as
possible, then seal the bag. Leave the unit for
about an hour in the room so the temperature of
the unit is close to the ambient temperature of
the room, then use it.
What to do with the lens is fogged
up.
Remove the battery or AC adaptor and leave the
unit for about 1 hour. When the unit becomes
close to the ambient temperature, the fog
disappears naturally.
13
Before using
Before using
Features of Memory Card Camera Recorder
Very clear high definition pictures
This unit is an AVCHD format video camera for recording highly detailed high definition images on an
SD card.
You can watch images in high-resolution HD video if you connect this unit and a high definition TV and
then play back the images. (l 79)
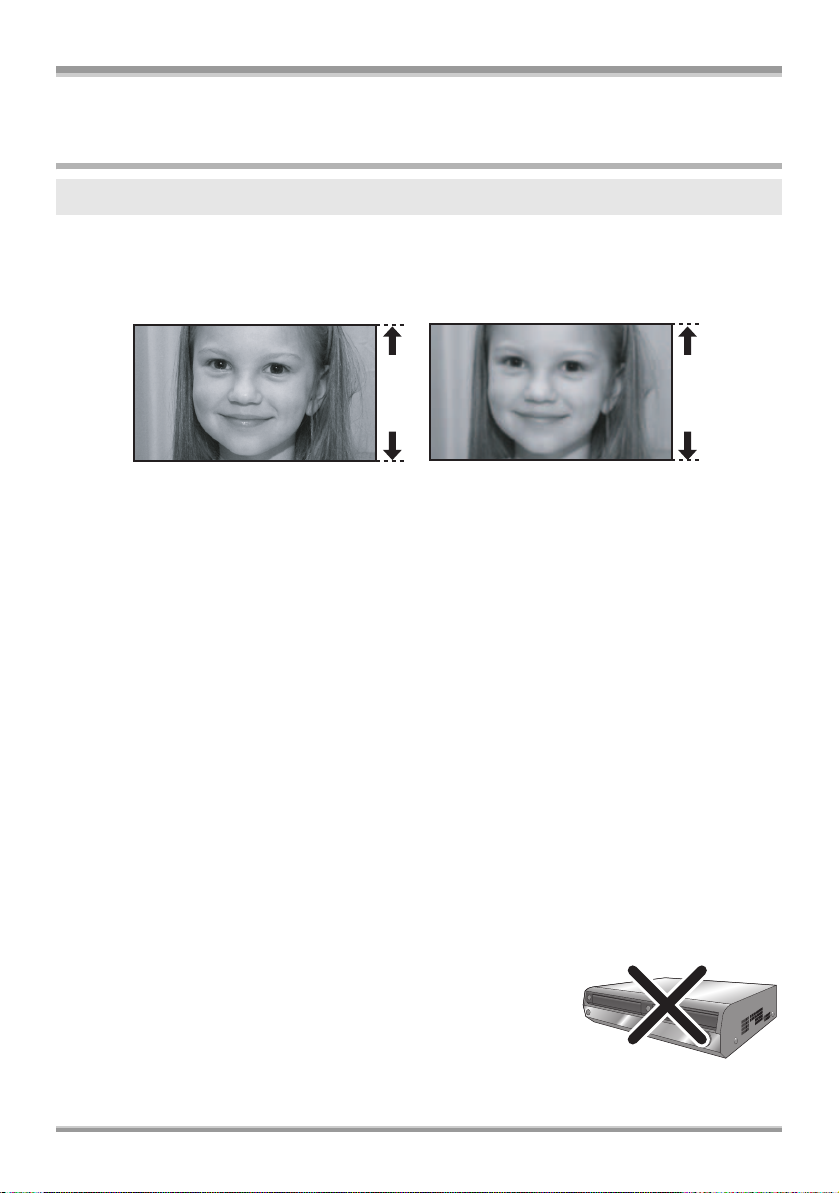
A B
A High definition images (1440k1080)
Number of available scan lines 1080
B Standard images (720k480)
Number of available scan lines 480
High definition images
≥High definition images have more than approximately 2 times the number of available scan lines and
more than 4 times the number of pixels compared with standard images.
≥The still pictures above are images for explanation purposes.
ª What is the AVCHD?
This is a format for recording and playing back highly detailed high definition images.
Images are recorded based on the MPEG-4 AVC/H.264 codec for compressing images and audio is
recorded in Dolby Digital.
About the SDHC Memory Card and the compatibility of the recorded motion pictures
About the SDHC Memory Card (Be careful about the following.)
≥It is not compatible with devices other than those that support SDHC.
≥If you use the SDHC Memory Card in another device, use a device that is SDHC compatible. (l 27)
About the compatibility of the recorded motion pictures
≥They are not compatible with devices other than those that support the AVCHD. Refer to the
operating instructions of the device for details.
≥The recorded motion pictures cannot be played back in a device that is not compatible (does not
support the AVCHD).
≥There are some cases where the recorded motion pictures cannot be played back, even if the device
supports the AVCHD. In such cases, play the recorded motion picture with this unit instead.
Existing DVD recorders and DVD players that do not support the
AVCHD
14
Before using
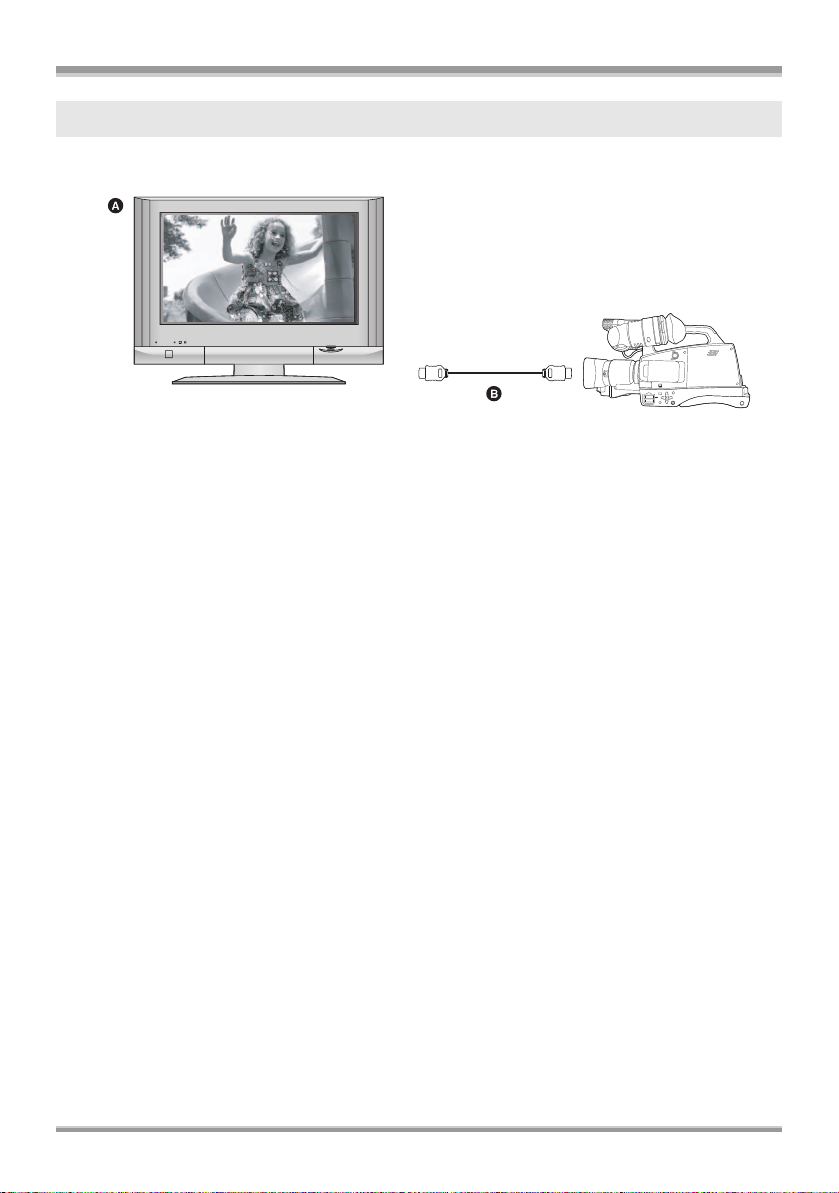
Watching high definition images
If you connect this unit and a high definition TV with a HDMI cable (optional) and then play back the
pictures, you can enjoy watching them in high definition.
A High definition TV
B HDMI cable (optional)
≥If you connect this unit to a TV that does not support high definition, the images will be standard
quality.
ª When connecting to a TV that does not have a HDMI terminal
Connecting with the component video cable and the AV cable
Connecting with the video cable and the audio cable.
≥The pictures cannot be played in high definition when using the AV cable. They will be played back in
widescreen standard definition.
15
Before using
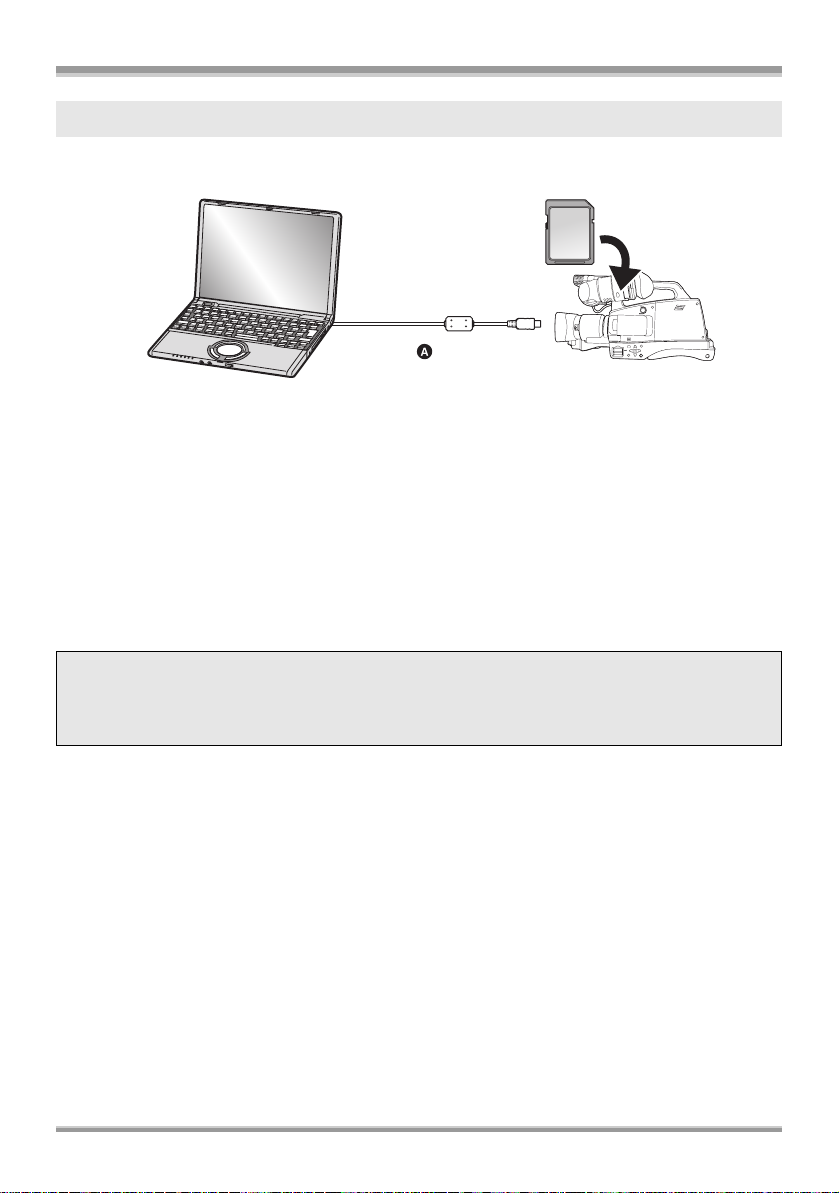
Saving the data on the SD card
When the SD card is full or to prevent the data from being deleted, use the supplied software
(HD Writer Ver2.5) to copy the data on the SD card to the hard disk of the computer.
A USB cable (optional)
ª What you can do with HD Writer
[Copy to PC]
You can copy motion picture data and still picture data on an SD card to the hard disk of the computer.
[Write data to media]
You can copy motion picture data from the hard disk of the computer to an SD card or a DVD disc.
[Copy between media]
You can copy motion picture data from an SD card to a DVD disc or from a DVD disc to an SD card.
[Easy editing]
You can easily edit (split, merge, delete etc.) motion picture data that was copied to the hard disk of the
computer.
≥For details on how to use the software application, read the PDF operating instructions.
Important note
Do not insert a disc created with the supplied HD Writer Ver2.5 in a device that does not
support the AVCHD format. It may no longer be possible to eject it. Also, the disc cannot be
played back on devices that do not support the AVCHD format.
16
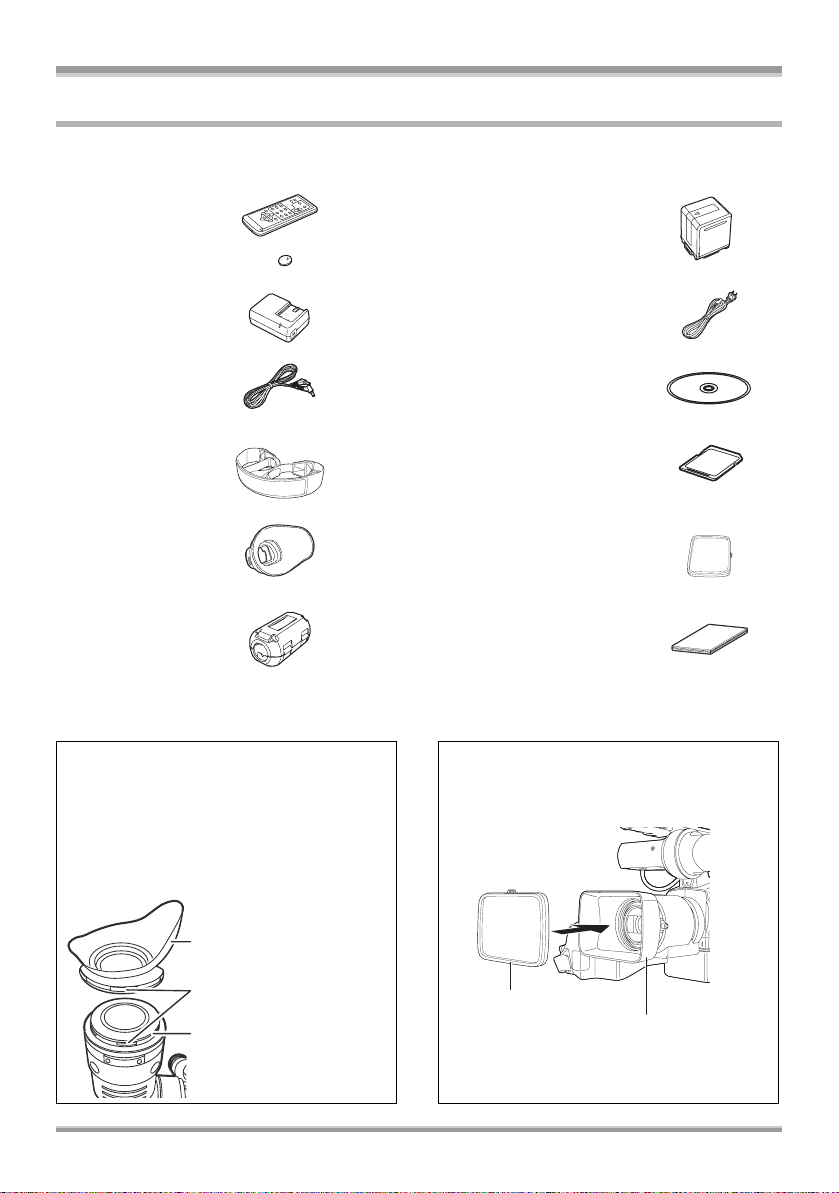
Accessories
Check the accessories before using this unit.
≥Product numbers correct as of January 2008
Before using
Remote control
Button-type battery
CR2025
AC adaptor
VW-AD20
DC cable CD-ROM k 2
Shoulder belt SD memory card (2GB)
Eye cup Lens hood cap
Ferrite core Operating instructions
≥Please refer to Page 80 for the ferrite core fitting method.
Attaching the eye cup
To attach the eye cup, align the projections on
the eye cup holder and eye cup, and fit the
holder and eye cup together.
≥Turning the eye cup after attaching it to its
holder may cause the holder to become
disengaged.
Battery pack
VW-VBG260
AC cable
≥Operating instructions
≥HD Writer 2.5E for HDC
Attaching the Lens Hood Cap
The lens can be covered by attaching the lens
hood cap provided to the lens hood.
Eye cup
Projection
Eye cup
holder
Lens hood cap
Lens hood
17
Before using
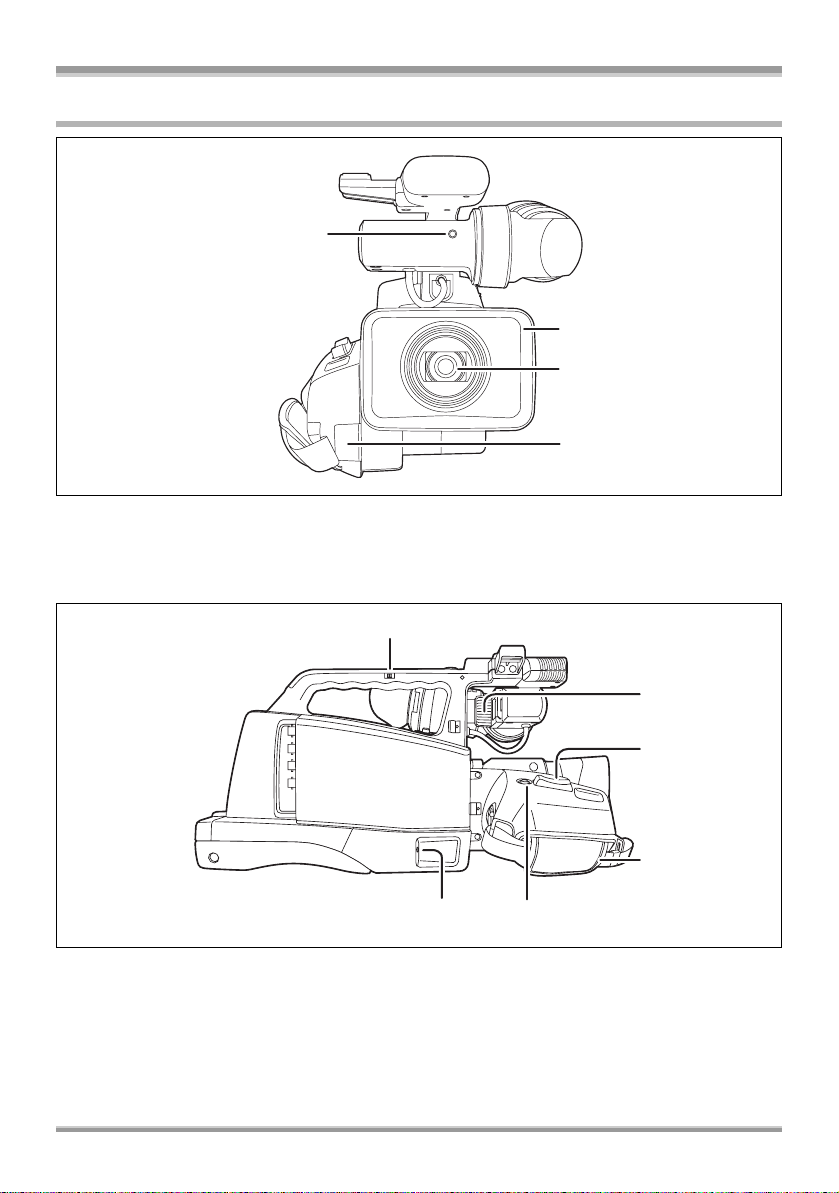
Parts identification and handling
1
1) Recording lamp (front) (l 104)
2) Lens hood (l 23)
3) Lens (LEICA DICOMAR)
4) White balance sensor/remote control sensor (l 26, 64)
2
3
4
5
6
7
10
8
5) HANDLE ZOOM Switch [HANDLE ZOOM] (l 52)
6) Lock ring (l 24)
7) Grip zoom button [W/T] (l 52)
8) External microphone input connector (l 58)
9) Photoshot button (l 47)
10) Grip belt (l 22)
≥The jack cover and cable holder have not been included in illustrations in this manual.
18
9
Before using
11
12
19
18
19
20
21 22
20 21
13
14
23
24
26
25
14 15
15
17
16
28
27
16
17
18
22
23
24
25
27
26
11) Lens hood screw (l 23)
12) LCD monitor (l 24)
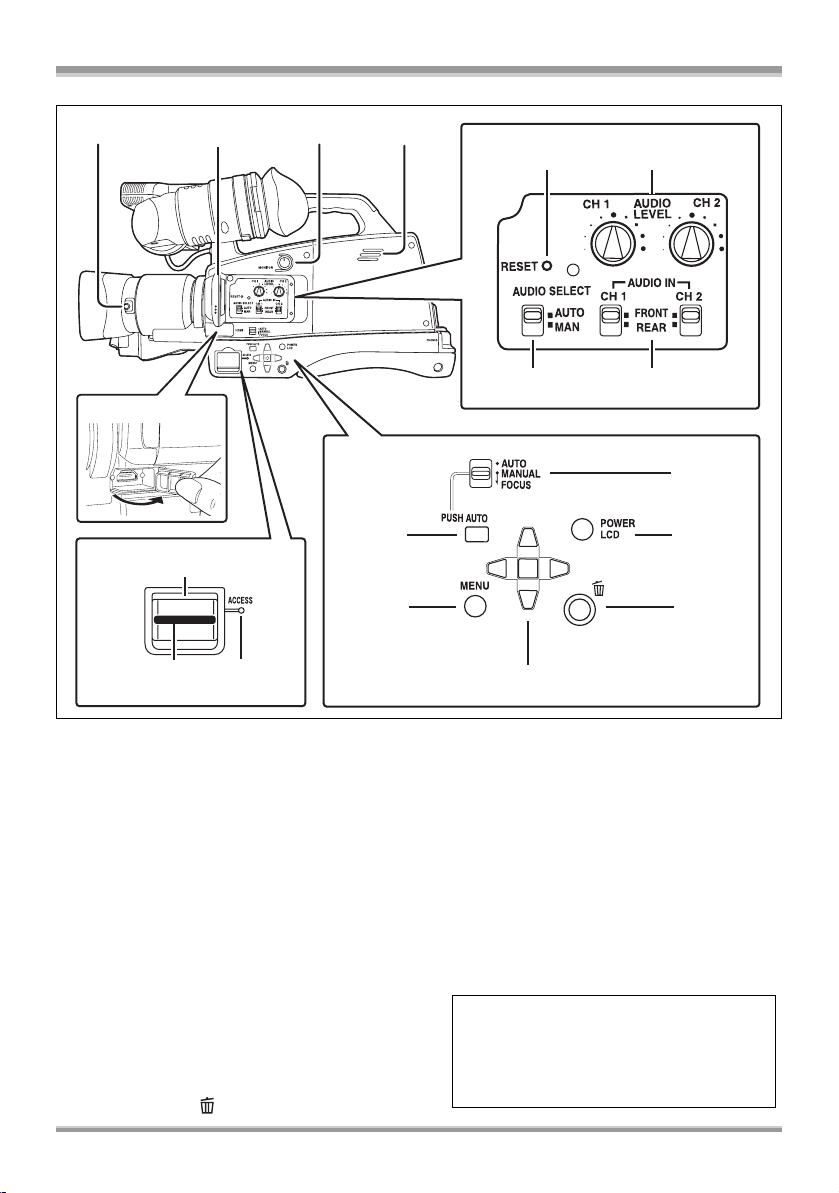
13) MONITOR LEVEL Knob
[MONITOR LEVEL] (l 68)
14) Speaker (l 68)
15) Reset button [RESET] (l 115)
16) AUDIO LEVEL Knob[AUDIO LEVEL]
(l 60)
17) AUDIO SELECT Switch [AUDIO SELECT]
(l 60)
18) AUDIO IN Switch [AUDIO IN] (l 58,59)
19) HDMI terminal [HDMI] (l 80)
20) Card slot cover (l 34)
21) Card slot (l 34)
22) Card access lamp [ACCESS] (l 34)
23) Mode select switch
[AUTO/MANUAL/FOCUS] (l 38, 61)
24) PUSH AUTO Button [PUSH AUTO] (l 62)
25) Power LCD button [POWER LCD] (l 42)
26) Menu button [MENU] (l 39)
27) Delete button [ ] (l 73, 75)
28) Cursor button (l 35)
Due to limitations in LCD production
technology, there may be some tiny bright
or dark spots on the LCD monitor screen.
However, this is not a malfunction and
does not affect the recorded picture.
19
Before using
29
33
34
31 32
30
38 39 40
35 36 37 41 42 43
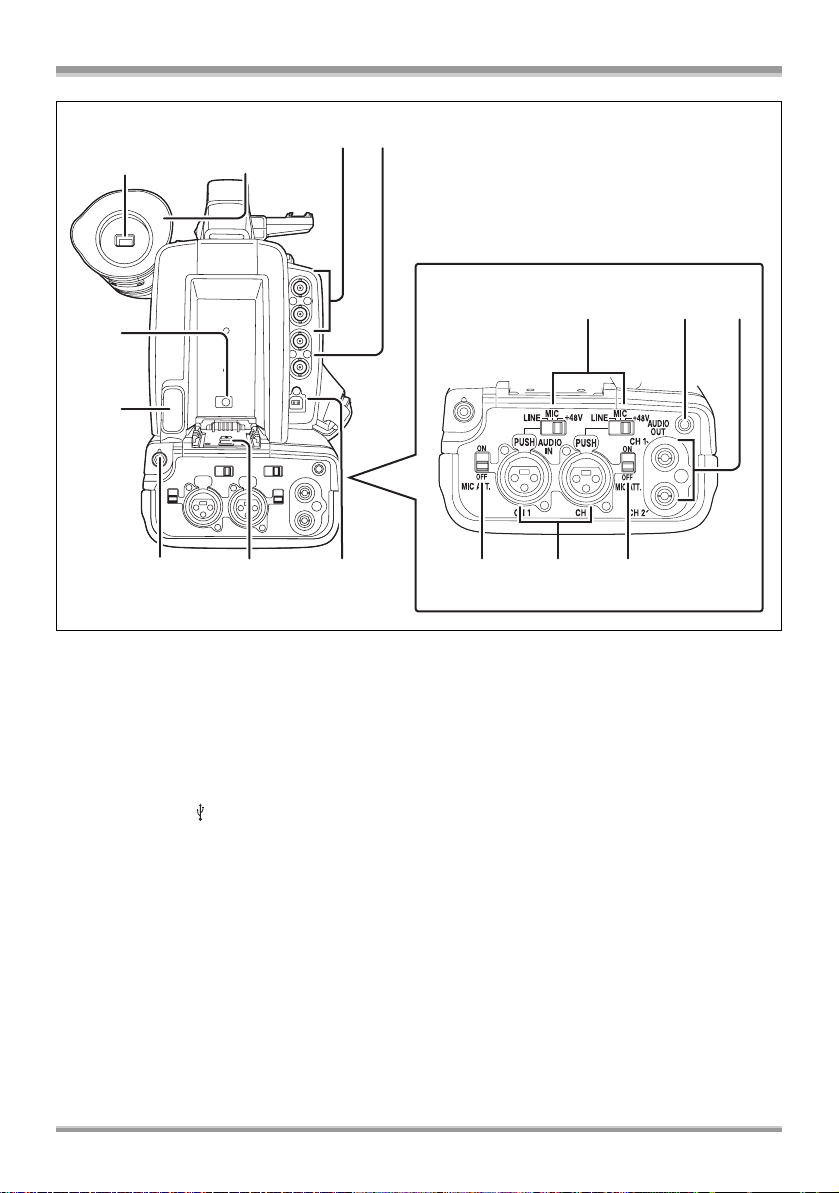
29) Viewfinder (l 42)
30) Eye cup (l 17)
31) Component Connectors (Y, P
32) Video Output Connector (BNC) (l 84)
33) DC input terminal [DC IN 7.3V] (l 32)
34) Battery Removal Button (l 30)
35) Headphone Connector [PHONE] (Mini jack) (l 68)
36) Battery Installation Slot (l 30)
37) USB terminal [ ] (l 86, 96)
38) Input Level Selection Switches (CH1/CH2) (l 59)
39) Recording lamp (rear) (l 104)
40) Audio Output Connectors (CH1/CH2) (l 82,84,85)
41) Microphone Attenuation Switch (CH1) (l 59)
42) Audio XLR Input Connector (l 59)
43) Microphone Attenuation Switch (CH2) (l 59)
≥The jack cover and cable holder have not been included in illustrations in this manual.
B, PR/BNC) (l 82)
20
Before using
46
47
48
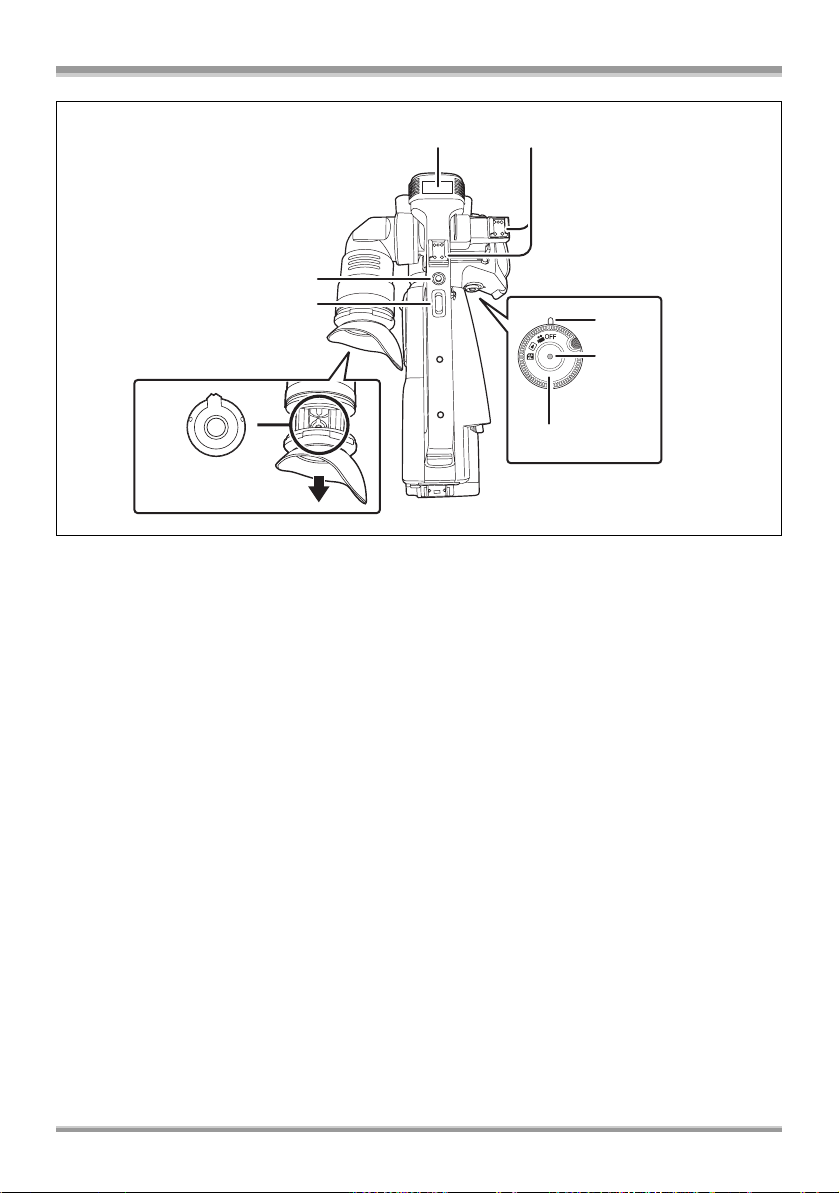
44) Internal microphones (l 58)
45) Accessory shoe
≥You can fit a microphone (optional), etc.
46) Handle Recording Start/Stop Button (l 44)
47) Handle Zoom Button [W/T] (l 52)
48) Visibility Adjustment Lever (l 43)
49) Status indicator (l 33)
50) Recording Start/Stop Button (l 44)
51) Mode dial (l 33)
44
45
49
50
51
21

Before using
Using grip belt
Adjust the length of the grip belt so that it fits your
hand, and hold it properly.
1 Open the belt cover and loosen
the belt.
2 Work your hand through the grip
belt and fasten the belt.
≥Slip your hand through the belt as far as it
goes so that your fingers will grip the
rubber area firmly.
≥Tighten up the belt so that your hand
remains firmly in place.
Shoulder belt installation hole
This is for installing the shoulder belt and
carrying the camera on your neck or shoulder.
1 Thread the belt through the
shoulder belt installation hole A.
≥Thread the belt through the fastener after
threading through the shoulder belt
installation hole. At least 2 cm of the belt
must extend from the fastener.
2 Install the belt on the other
shoulder belt installation hole.
≥When loosening the belt, please take care so
that the belt does not come away from the grip
belt stopper A.
Correct
Incorrect
22
Before using
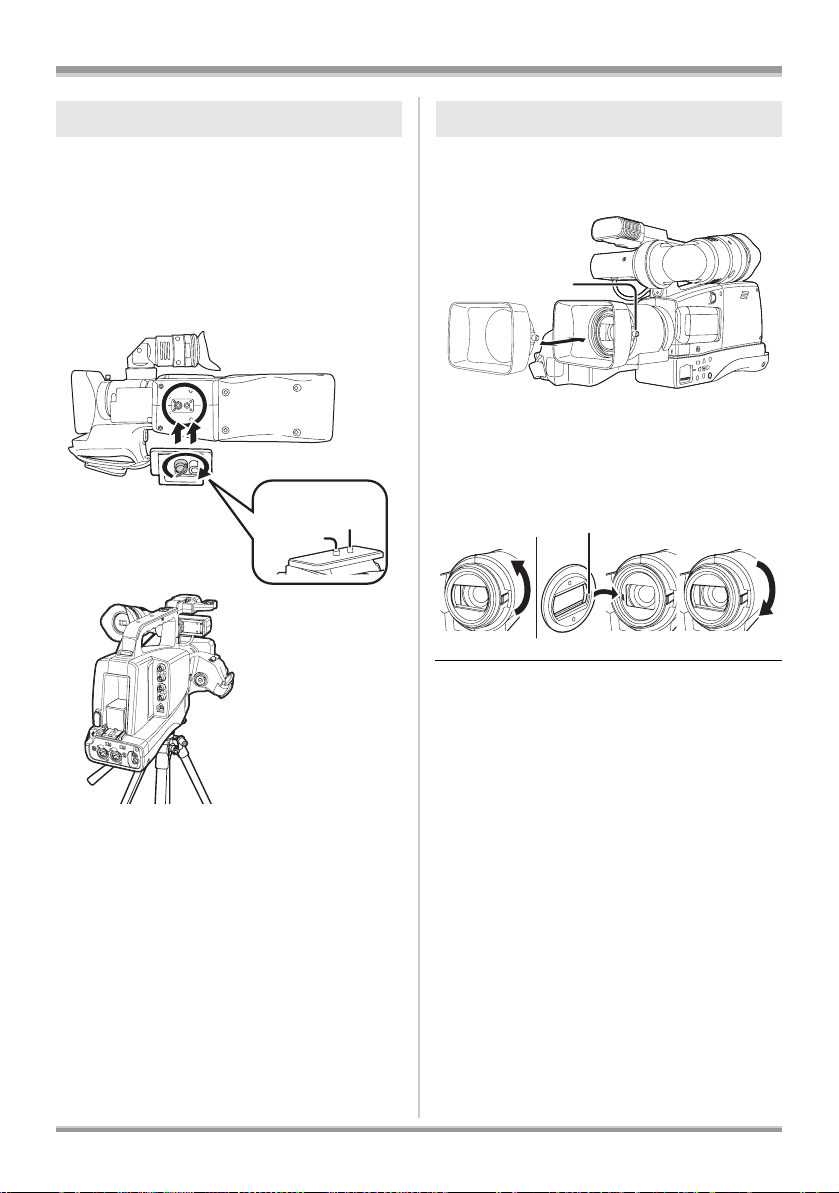
Tripod receptacle
The tripod receptacle is a hole used to mount a
tripod for the unit. (For details on mounting the
tripod, refer to the operating instructions for the
tripod.)
≥Responsible for the ISO 1222 (1/4 inch)
≥The tripod mounting hole is 5.5 mm deep. Do
not force the tripod screw beyond this
depth.You can damage the camera-recorder if
you use any screw other than 1/4-20UNC.
A Camera base
B Screw for mounting the unit
C Tripod pin
≥You can perform operations easily using the
remote control when the tripod is used. (l 25)
Lens Hood Piece
ª Installing the lens hood
Tighten (loosen) the lens hood screw A to install
(remove) the lens hood.
ª Installing the lens hood piece
Rotate the lens hood piece counter-clockwise A
to remove it. In order to attach it, place into slot
B, and then rotate it clockwise C.
≥Install the ND filter or the MC protector of the
Filter kit VW-LF43N (optional) on the front side
of the lens hood piece. Do not install anything
else (except for the lens cap). (For details, refer
to the operation manual of the filter kit.)
≥Install the tele-conversion lens VW-T4314H
(optional) or the wide-conversion lens
VW-W4307H (optional) after removing the lens
hood piece. (Do not install it on the front side of
the lens hood piece.) (For details, refer to the
operation manual of the tele-conversion lens/
wide-conversion lens.)
≥It is possible to install the ND filter and the
tele-conversion lens one over the other.
However, when the zoom is set to W, four
corners on the screen may be darker
(vignetting), thus it is not recommended.
23
Before using
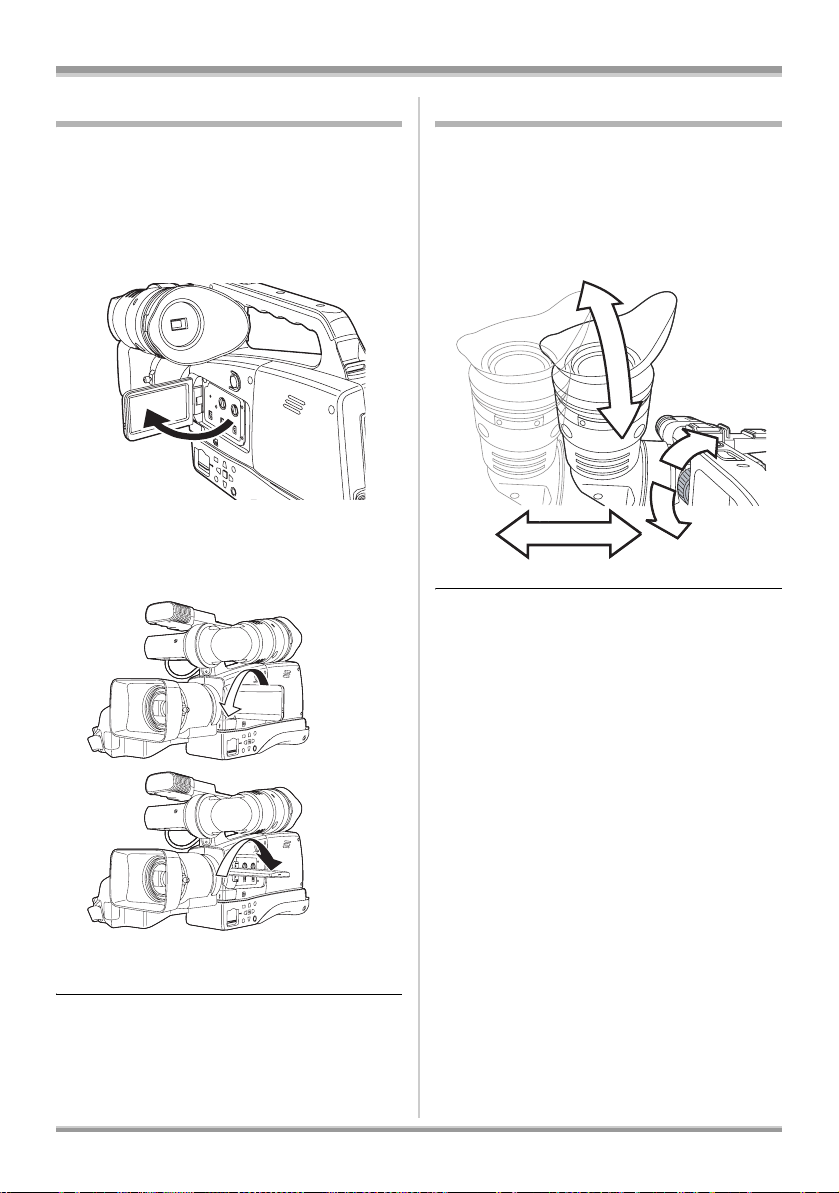
Using the LCD monitor
You can record the image while viewing it on the
LCD monitor.
1 Place your finger on LCD monitor
open latch and pull the LCD
monitor out in the direction of the
arrow.
≥It can open up to 90o.
2 Adjust the angle of the LCD
monitor as desired.
Using the finder
1 Adjust the angle.
2 Loosen the lock ring.
3 Adjust the horizontal position.
4 Tighten the lock ring
1
4
4
2
2
3
3
≥Brightness of the finder can be adjusted.
(l 42)
≥It can be rotated 180° towards the lens A
and 90° towards the opposite direction B.
≥The brightness of the LCD monitor can be
adjusted. (l 42)
≥The unit may be damaged or fail if the LCD
monitor is forcibly opened or rotated.
24
Before using
0
A
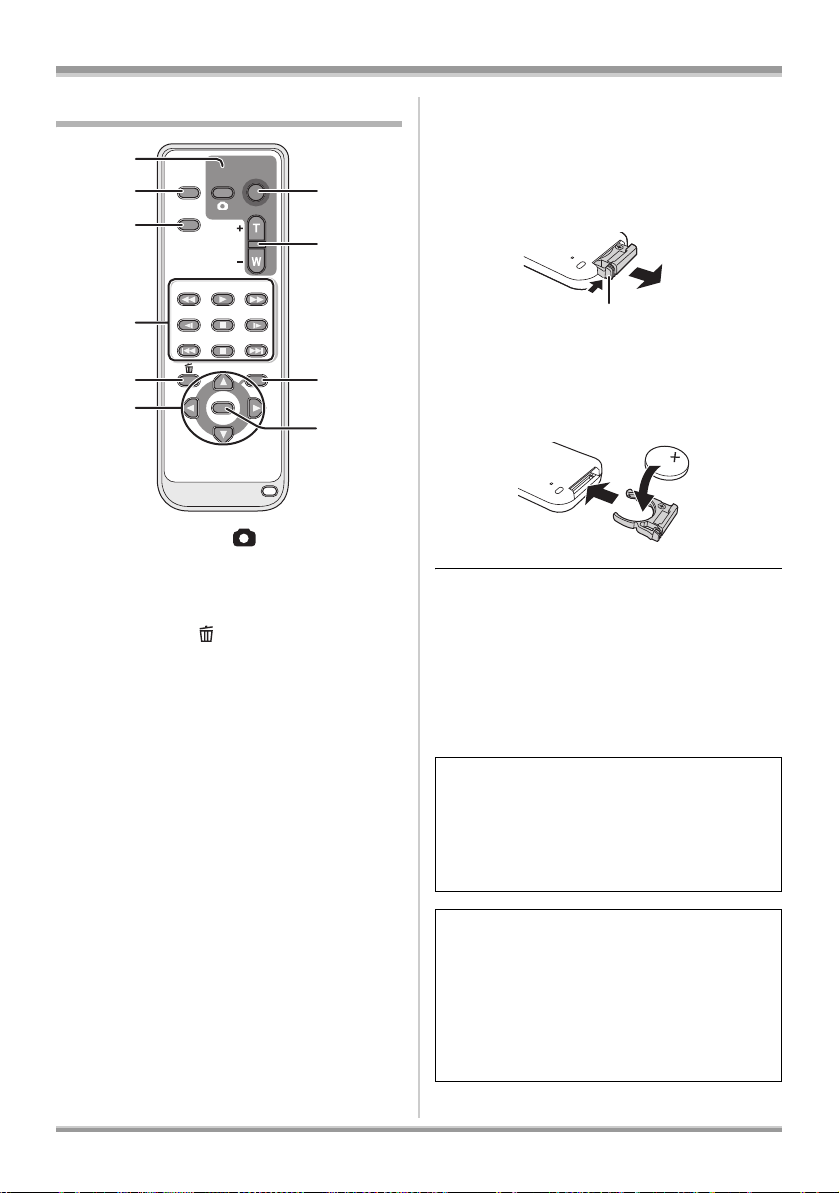
Using the remote control
1
2
3
4
EXT
DISPLAY
DATE/
TIME
SEARCH
STILL ADV STILL ADV
5
6
1) Photoshot button [ ]*
2) On-screen display button [EXT DISPLAY]
(l 79)
3) Date/time button [DATE/TIME] (l 41)
4) Playback operation buttons (l 66, 67, 68)
5) Delete button [ ]*
6) Direction buttons [3,4,2,1] (l 40)
7) Recording start/stop button [START/
STOP]*
8) Zoom buttons [ZOOM]*
≥Volume cannot be adjusted.
Use the MONITOR LEVEL knob on the
main unit.
9) Menu button [MENU]* (l 40)
10) Enter button [ENTER] (l 40)
* means that these buttons function in the
same manner as the corresponding
buttons on the unit.
START/
PHOTO
STOP
SHOT
ZOOM
VOL
PLAY
SEARCH
PAU S E
STOPSKIP SKIP
MENU
ENTER
7
8
9
1
ª Install a button-type battery
Install the supplied button-type battery in the
remote control before using it.
1 While pressing the stopper A,
pull out the battery holder.
2 Set the button-type battery with
its (i) mark facing upward and
then put the battery holder back
in place.
Concerning the button-type battery
≥When the button-type battery runs down,
replace it with a new battery (part number:
CR2025). The battery should normally last
about 1 year, however this depends on how
frequently the unit is used.
≥Keep the button-type battery out of the reach of
children.
CAUTION
Danger of explosion if battery is incorrectly
replaced. Replace only with the same or
equivalent type recommended by the
manufacturer. Dispose of used batteries
according to the manufacturer’s instructions.
Replace battery with Panasonic PART NO.
CR2025 only. Use of another battery may
present a risk of fire or explosion.
Caution: Battery may explode if mistreated.
Dispose of used battery promptly. Keep away
from children.
Do not recharge, disassemble or dispose of in
fire.
25
Before using
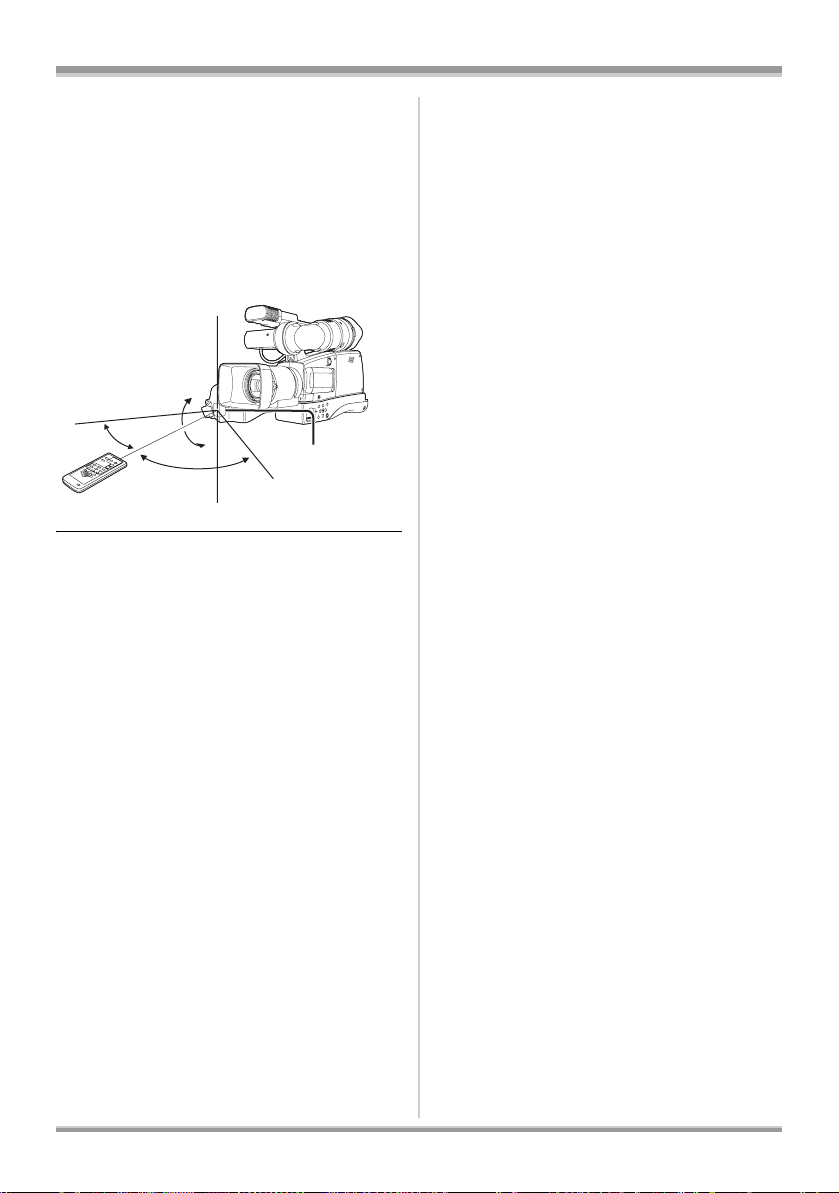
ª Remote control usable range
The distance between the remote control and the
unit’s remote control sensor A: Within approx.
5m
Angle: Approximately 10° upward,
approximately 15° downward,
approximately 15° leftward,
or approximately 75° rightward
10°
15°
≥The remote control is intended for indoor
operation. Outdoors or under strong light, the
unit may not operate properly even within the
usable ranges.
≥Please take care so that the grip belt does not
hide the remote controller receiver sensor.
15°
75°
26
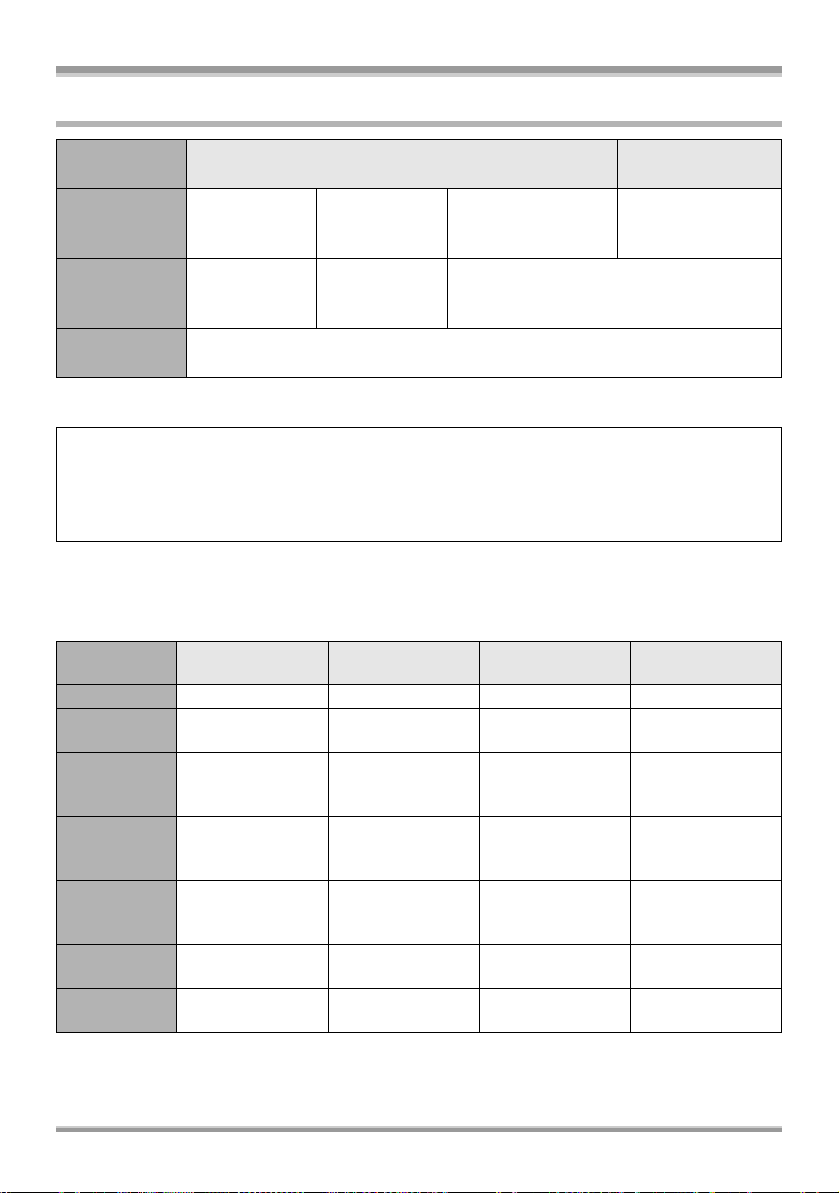
Cards that you can use with this unit
Before using
Card type SD Memory Card
Capacity 8MB, 16MB
Motion picture
recording
Still picture
recording
¢The recording may suddenly stop during motion picture recording depending on the SD card you use.
(l 45)
This unit (an SDHC compatible device) is compatible with both SD Memory Cards and SDHC
Memory Cards. You can use SDHC Memory Cards on devices that are compatible with them.
However, you cannot use SDHC Memory Cards on devices that are only compatible with SD
Memory Cards. (When using an SDHC Memory Card on another device, always read the operating
instructions of that device.)
Cannot be
used.
32 MB, 64 MB,
128 MB
Cannot be
guaranteed in
operation.¢
256 MB, 512 MB,
1GB, 2GB
Refer to “About SD cards that you can use
for motion picture recording”.
Can be used.
SDHC Memory
Card
4GB
8GB
16 GB
ª About SD cards that you can use for motion picture recording
We recommend using SD Memory cards and SDHC Memory cards conforming to Class 2 or higher of
the SD Speed Class Rating or the following SD cards made by Panasonic for motion picture recording.
≥Product numbers correct as of January 2008
Card type
256 MB — RP-SDH256¢ ——
512 MB
1GB
2GB
4GB ———
8GB ———
16 GB ———
¢No longer made.
≥SD or SDHC cards other than those above are not supported.
(The recording may suddenly stop during motion picture recording.)
Pro High Speed
SD Memory Card
RP-SDK512¢
RP-SDV512
RP-SDK01G¢
RP-SDV01G
RP-SDK02G¢
RP-SDV02G
Super High Speed
SD Memory Card
RP-SDH512¢ RP-SDR512 —
RP-SDH01G¢
—
High Speed
SD Memory Card
RP-SDQ01G¢
RP-SDR01G¢
RP-SDM01G
RP-SDQ02G¢
RP-SDR02G¢
RP-SDM02G
SDHC Memory
RP-SDR04G¢
RP-SDM04G
RP-SDV04G
RP-SDM08G
RP-SDV08G
RP-SDM16G
RP-SDV16G
Card
—
—
27
Before using
≥Check the support site below for the most
recent information on SD / SDHC memory
cards usable in this unit.
https://eww.pavc.panasonic.co.jp/pro-av/
≥For the purposes of these operating
instructions, SD Memory Card and SDHC
Memory Card are referred to as the “SD card”.
≥This unit supports SD Memory Cards formatted
in FAT12 system and FAT16 system based on
SD Memory Card Specifications and SDHC
Memory Cards formatted in FAT32 system.
≥If you wish to use memory cards with a
capacity greater than 4 GB, then only SDHC
memory cards can be used.
≥4 GB (or more) Memory Cards that do not have
the SDHC logo are not based on SD Memory
Card Specifications.
≥Use this unit to format SD cards. If an SD card
is formatted on other products (such as a
computer), the time spent for recording may
become longer and you may not be able to use
the SD card. (l 78)
(If you formatted SD cards on personal
computers, etc., then format them on this
unit again.)
≥When the write-protect switch A on SD Card is
locked, no recording, deletion or editing will be
possible on the card.
ª (SD Speed Class
Rating Class 2)
This indicates a Class 2 rating in the high speed
standards (SD Speed Class) stipulated by the
SD Card Association for high speed writing
between SD compatible products and SD
Memory cards.
If you use a Class 2 card compatible with the SD
Speed Class in an SD compatible product, you
can obtain stable recording by using an SD card
conformed with Class 2 or more.
ª Handling precautions
≥Do not expose the terminals of the card to
water, garbage or dust.
≥Do not place in the following areas:
– In direct sunlight.
– In very dusty or humid areas.
– Near a heater.
– Locations susceptible to significant
difference in temperature (condensation can
occur).
– Where static electricity or electromagnetic
waves occur.
≥To protect cards, return them to their cases
when you are not using them.
A
4
≥Keep the Memory Card out of reach of children
to prevent swallowing.
≥A MultiMediaCard cannot be used on this unit.
28
Setup
Setup
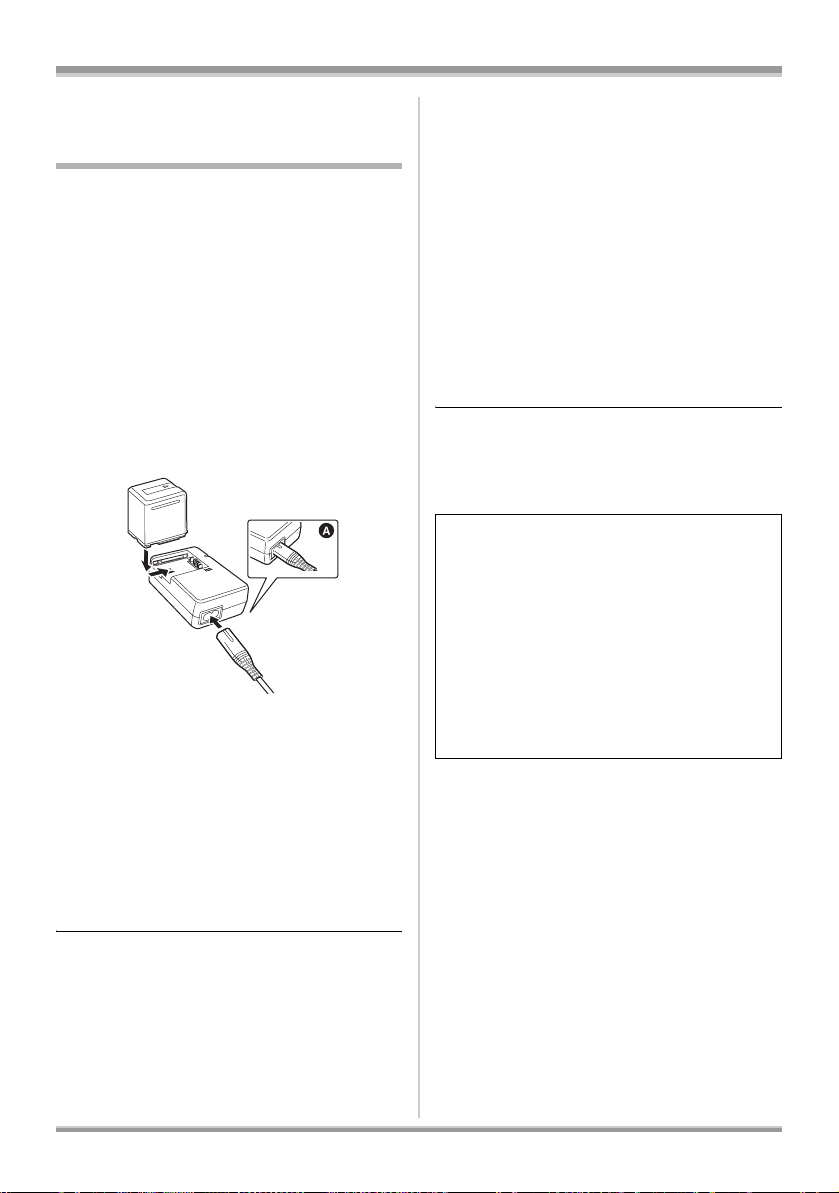
Charging the battery
When this unit is purchased, the battery is not
charged. Charge the battery before using this
unit.
≥Connect the battery to an AC adaptor to
recharge it.
The battery cannot be recharged by simply
inserting it into the unit.
≥If the DC cable is connected to the AC
adaptor, then the battery will not charge.
Remove the DC cable from the AC adaptor.
≥The Panasonic battery that can be used
with this unit are VW-VBG260 and VW-VBG6
(product numbers correct as of January
2008). Other Panasonic batteries will not
work. (l 31)
1 Connect the AC cable to the AC
adaptor and the AC outlet.
≥Remove the DC cable beforehand.
2 Put the battery on the battery
mount by aligning the mark, and
then securely plug it in.
≥The output plug of the AC cable is not
completely connected to the AC adaptor
jack. As shown in A, there is a gap.
ª Charging lamp
Lights up: Charging
Goes off: Charging completed
Flashing: Make sure that the terminals of the
battery or the AC adaptor are not
exposed to dirt, foreign objects or
dust, then reconnect them properly.
Disconnect the AC cable from the AC
outlet when you remove dirt, foreign
objects or dust on the terminals of the
battery or the AC adaptor.
If the charging lamp is still flashing,
something may be wrong with the
battery or AC adaptor. Contact your
dealer.
≥Battery charging time (l 31)
≥We recommend using Panasonic batteries.
≥If you use other batteries, we cannot guarantee
the quality of this product.
CAUTION:
This apparatus can be operated at a
voltage in the range of 110 – 240 V AC.
Voltages other than 120 V are not
intended for U.S.A. and Canada.
Operation at a voltage other than 120 V
AC may require the use of a different AC
plug. Please contact either a local or
foreign Panasonic authorized service
center for assistance in selecting an
alternate AC plug.
29
Setup
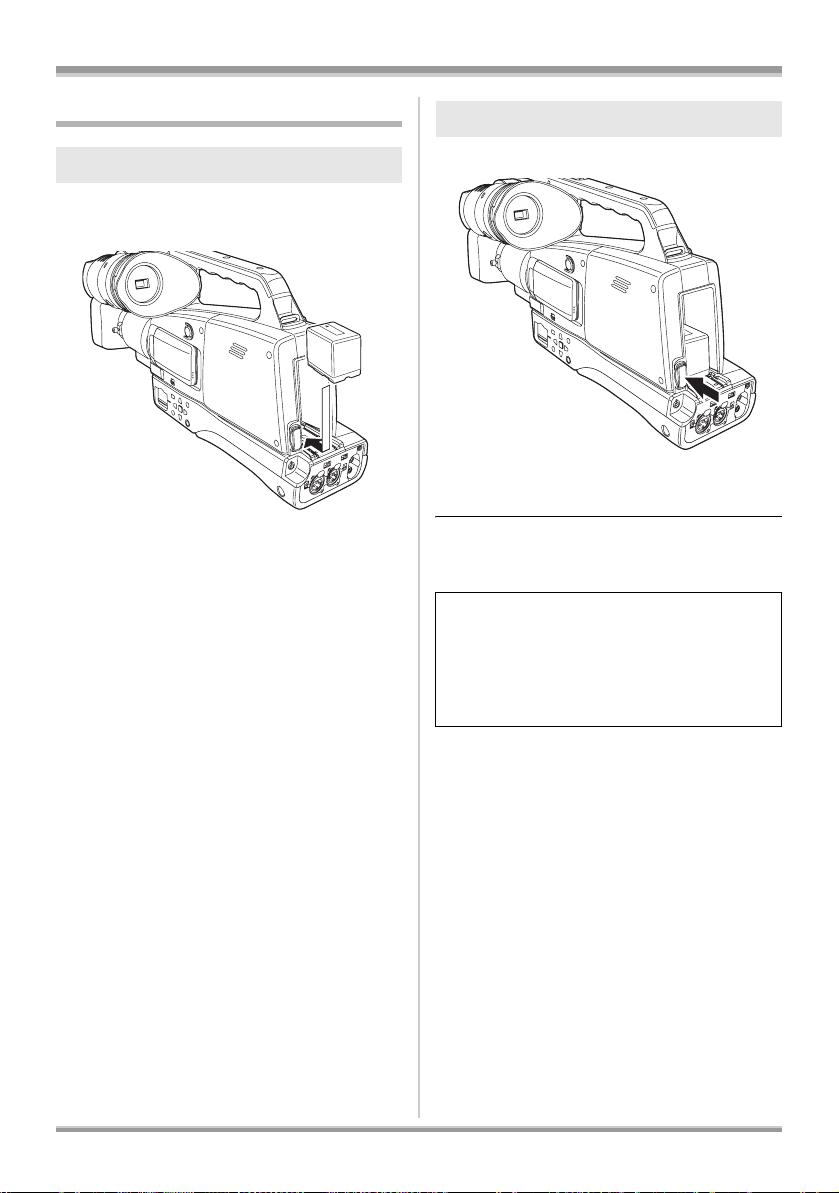
Inserting/removing the battery
Inserting the battery
Mount the battery from the top, and
insert it until the audible click.
Removing the battery
Press the battery removal button.
≥The lock can be released and the battery
removed.
≥Be sure to set the mode dial to OFF and check
that the status indicator is off before removing
the battery.
CAUTION
Danger of explosion if battery is incorrectly
replaced. Replace only with the same or
equivalent type recommended by the
manufacturer. Dispose of used batteries
according to the manufacturer’s instructions.
30
 Loading...