


 Loading...
Table of Contents
Contents of the box |
4 |
Setup |
5 |
Insert the SIM card |
5 |
Insert the battery |
6 |
Insert a memory card |
7 |
Complete the setup |
8 |
Navigation |
9 |
Wake up the touchscreen and turn it off |
9 |
Highlight and select items |
10 |
Select menu items |
10 |
Use the keyboard |
11 |
Open applications |
13 |
Your phone |
14 |
Open the Phone application |
14 |
Turn your phone on and off |
14 |
Make and receive calls |
15 |
Set up voicemail |
16 |
What can I do when I’m on a call? |
16 |
Your Push To Talk application |
18 |
Set up Push To Talk |
18 |
Add a PTT contact |
19 |
Make a PTT call |
20 |
Your messages |
21 |
Messaging |
21 |
Instant Messaging |
22 |
i

Your web browser |
23 |
||
Browse the web |
23 |
||
Shop at AT&T Mall |
24 |
||
Explore AT&T Music |
24 |
||
Your email |
25 |
||
Choose email options |
25 |
||
Set up a personal email account with Xpress Mail |
25 |
||
Set up corporate email |
27 |
||
Create and send email in Xpress Mail |
28 |
||
Your contacts and calendar |
29 |
||
Contacts |
29 |
||
Calendar |
31 |
||
Synchronization |
32 |
||
Why synchronize information? |
32 |
||
Synchronize for the first time |
32 |
||
Your music, pictures, and videos |
34 |
||
Listen to music |
34 |
||
Take pictures and videos |
36 |
||
Troubleshooting |
38 |
||
Tips and tricks |
40 |
||
Keyboard |
40 |
||
Phone |
40 |
||
Data |
41 |
||
Typing |
|
|
41 |
|
|
|
|
ii
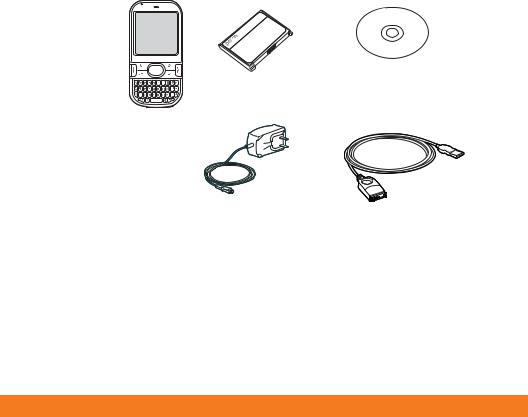
Contents of the box
Smart device and hardware
Tip
Missingsomething? Need help? Call
AT&T customer service: 1-800-331-
0500 or call 611
from your Centro.
Rechargeable battery
Palm® Centro™ smart device
AC charger
CD
You must install the software from this CD even if you already have Palm® Desktop software installed on your computer
USB sync cable
Documentation and software
•Getting Started Guide (this guide)
•Getting Started CD, which includes the following:
•Palm® Desktop software or a link to this software
•Link to instructions on how to get bonus software from My Centro
•User Guide
•Palm warranty and end user license agreement
4

Setup
Insert the SIM card
1. Press the battery door near the top and slide the battery door downward to remove it from your Palm® Centro™ smart device.
2. If the battery is installed, remove it.
3. Remove the stylus to make it easier to install the
Stylus
SIM card. Replace it after you finish these steps.
4. Insert the straight end of the SIM card into the SIM card holder so that the notch is on the right and the metal contacts face down.
5. Push the SIM card forward until it fits into place.
6. Replace the battery door.
5

Insert the battery
1.Remove the battery door.
2.Align the metal contacts on the battery that came with your Centro with the contacts inside the battery compartment.
3.Insert the battery into the compartment at a 45-degree angle, and then press it into place.
4. Slide the battery door onto the back of your Centro until it clicks into place.
Your Centro screen wakes up, and setup begins automatically.
Battery contacts
 Centro contacts
6

Insert a memory card
The card slot on your Centro enables you to add microSD memory cards (sold separately) to expand the storage capacity of your device. The card slot has a push-push mechanism: push in gently to insert a card; push in gently to remove it.
1.Remove the battery door from your Centro.
2.Open the door of the card slot.
3.Position your Centro with the screen facing you, and hold the memory card with the
printed side facing you. The notch on the memory card should be in the upper-right corner, next to the IR port.
4.Insert the memory card into the card slot until you feel the card lock into place.
5.Close the door of the card slot and replace the battery door.
7
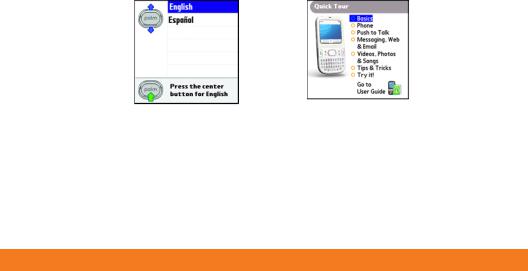
Complete the setup
1.Select the language you want to use.
2.Follow the onscreen instructions to set the date and time.
Note: If you want your Centro to obtain the date, time, and time zone from the local network, accept the default setting on the Date & Time screen.
3.When the setup is complete, press Applications  and select
Quick Tour  .
.
4.Recommended: Review the Basics and Phone sections of the Quick Tour before using your Centro.
8

Navigation
Wake up the touchscreen and turn it off
The phone and the touchscreen of your Palm® Centro™ smart device can be turned off and on separately. When you wake up the touchscreen and leave the phone off, you can still manage your calendar, play music files, or write email offline.
When you take your Centro out of the box and turn it on for the first time, the phone is already on. You just need to wake up the touchscreen.
1.Press and release
Power/End  to wake up the
touchscreen.
2.Press Center  to turn off Keyguard.
3.Press and release
Power/End  to turn off the
touchscreen and lock the keyboard.
To move around the touchscreen, use the 5-way navigator, or tap items on the touchscreen with the stylus.
Center |
Up |
Applications |
|
|
|
|
|
Power/End |
Left |
|
Right |
Down 
Tip
You can set how long the touchscreen stays on. Press
Applications, select Preferences, select Power, and then adjust the
Auto-off after setting.
9
Tip
Most menu items have a shortcut. To use a menu shortcut, press
Menu + the shortcut letter. For example, in Calendar, you can press Menu + D to delete an event.
Highlight and select items
The highlight identifies which item is affected by your next action. Use Left  , Right
  , Up
, Up  , and
, and
Down  on the 5-way to move the highlight from one item to another. The highlight can take two forms: a border glow around an entire screen, an onscreen button, or a pick list; and light text on a dark background.
After highlighting an item, you can select (activate) it by pressing Center  or by tapping it with the stylus. When an entire screen is highlighted, press Center
  to move the highlight to the first item on the screen.
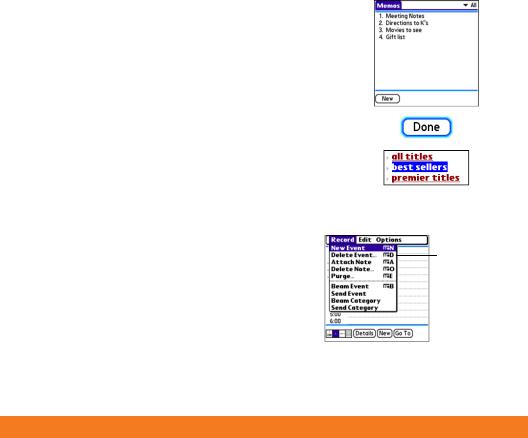
Select menu items
Many applications have menus to give you access to additional features. These menus are usually hidden from view, but they appear when you press Menu  .
.
1.Press Menu  to display an application’s menus.
2.Press Right  and Left
  to switch between menus.
Menu shortcut letter
10
3.Press Up  and Down
  to highlight a menu item.
4.Press Center  to select the menu item, or press Menu
  to close the menu and cancel your selection.
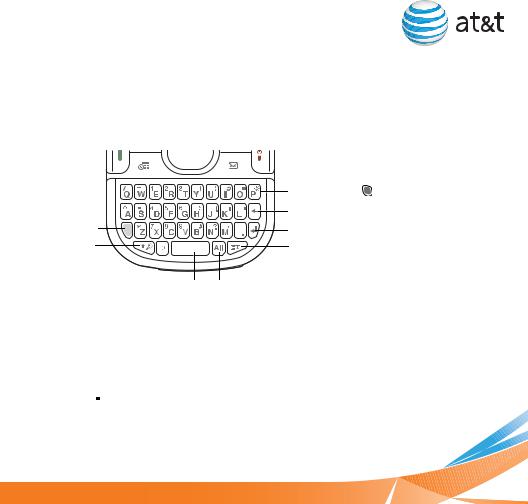
Use the keyboard
|
Backlight (Option |
+ P) |
|
Backspace |
|
Option |
Return |
|
Shift/Find |
Menu |
|
Space |
Alt |
|
Enter lowercase and uppercase letters
•To enter lowercase letters, press the key you want.
•To enter an uppercase letter, press Shift/Find  and then press a letter key. There’s no need to hold Shift/Find
  while entering the letter.
•To turn Caps Lock on, press Shift/Find  twice. The following symbol appears:
  . To turn Caps Lock off, press Shift/Find
  once.
once.
11
Did You Know?
Some application views have Option Lock turned on automatically, such as the Dial Pad in the Phone application. In this case, you do not need to press Option to enter numbers.
Tip
Alternate characters are grouped by their similarity to the base key. For example, the alternate characters for the E key are É, È, Ë, and Ê. You can find a complete table of the alternate keys in the
User Guide on the Getting Started CD.
Enter numbers, punctuation, and symbols |
|
|
|
|
Numbers, punctuation, and symbols appear above the |
Symbol |
|
|
|
|
|
|||
letters on the keys. To enter these characters, do one of |
Letter |
|
|
|
|
|
|
||
the following: |
|
|
|
|
•Press Option  and then press the key with the character—no need to hold Option
  while pressing the second key.
•To turn Option Lock on, press Option  twice. The following symbol appears:
  . To turn Option Lock off, press Option
  once.
once.
Enter accented characters
1.Enter the character that corresponds to the character you want. For example, press E if you want É.
2.Press Alt  .
.
3.In the pop-up list, highlight the character you want, and then press Center  to select the highlighted character.
Enter an underscore and other symbols
To enter characters such as an underscore (_), a bullet (•), a backslash (\), a percent symbol (%), and an equal sign (=), press Alt  by itself after a space or at the beginning or end of a line.
For example, to enter an underscore, press Alt  after a space or at the beginning or end of a line, and then select the underscore character on the pop-up list of alternate characters. Remember to delete the space before the underscore.
12
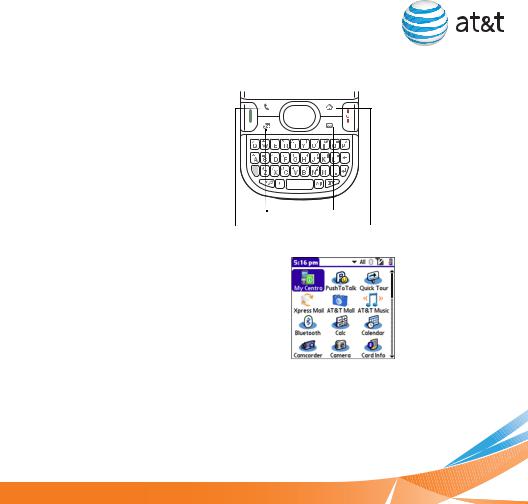
Open applications
When you open an application, you automatically close the application you were previously using and save any information you created in that app.
Use the quick buttons
The front of your Centro has three quick buttons that open applications. The fourth button opens Applications View.
Calendar
Phone
Use Applications View
You can access all available applications through Applications View.
1.Press Applications  .
.
2.Use the 5-way  to highlight the application you want to use.
3.Press Center  to open the selected application.
Messaging
Applications
Tip
In Applications View, you can enter the first few letters of an application name to highlight it. For example, if you press P,
you highlight Phone; if you quickly press PR, you highlight Prefs. If you pause and then press R, you highlight the first application that starts with R.
Did You Know?
You can cycle through various categories of applications by pressing
Applications repeatedly.
13

Your phone
Tip
Don’t remember your mobile phone number? To find your phone number, press Phone, press Menu, select Options, and then select Phone Info.
Open the Phone application
Press Phone  to open the Phone application. The Phone application has five tabs so you can navigate among its features.
Dial Pad 

 Call Log
Main
Favorites Contacts
Turn your phone on and off
When your phone is on, it is connected to the AT&T network (provided you’re in a coverage area) so that you can make and receive phone calls and use wireless services.
1. Press Power/End to wake up the |
Signal-strength icon |
|
touchscreen. |
|
|
2. Press and hold Power/End  to turn on your phone.
You know your phone is on and that you’re inside a coverage area when you see AT&T and the signalstrength  icon at the top of the Phone app.
3. Press and hold Power/End  again to turn off your phone.
You know your phone is off when you see Phone Off at the top of the Phone app.
14
Loading...