

Page 1

Welcome .................................................................................. 3
Thank you for choosing Verizon Wireless........................ 3
The basics ................................................................................ 5
Overview: The Palm
®
Centro™smartphone...................... 6
Turning your smartphone on/off .................................... 9
Making, receiving, and ending calls ............................... 10
Adjusting ringer volume and ringtones .......................... 13
Setting up and accessing voicemail ................................ 14
What are all those icons?................................................ 15
Using a phone headset ................................................... 17
Managing personal information..................................... 19
Locking your smartphone and info ................................. 25
Turning all sounds on and off ......................................... 26
Performing a soft reset ................................................... 27
Where to learn more ...................................................... 27
Assistance ................................................................................ 29
May we help you?........................................................... 30
EZ Move® (if you move) .................................................. 35
Loss or theft.................................................................... 35
Toll-free calls and emergency services............................ 35
Fraud prevention ............................................................ 36
Assistive communication devices ................................... 36
Mobile entertainment .............................................................. 37
Your email ...................................................................... 38
Messaging ...................................................................... 39
Web browser .................................................................. 41
Optional services ...................................................................... 43
Safety and protection ..................................................... 44
Wireless device protection.............................................. 44
TABLE OF CONTENTS
Page 2

Voice services.................................................................. 44
International services ..................................................... 44
Other products and services............................................ 45
More information .................................................................... 47
TABLE OF CONTENTS
Important safety and legal information .................................... 57
Page 3
Welcome
Thank you for choosing Verizon Wireless
You’re now connected to the power of America’s most reliable wireless network. This
guide helps you understand your new Palm®Centro™ smartphone and all the things
you can do with it, so let’s get started.
User Guide
For more detailed information about your smartphone, refer to th e
can be found on the Getting Star ted CD that came with your smartphone.
, which
pg
3
Page 4
NOTES
pg
4
Page 5
.............................
The basics
•
Overview: The Palm®Centro™smartphone
•
Turning your smartphone on/off
•
Making, receiving, and ending calls
•
Adjusting ringer volume and ringtones
•
Setting up and accessing voicemail
•
Using a phone headset
•
Managing personal information
•
Locking your smartphone and info
•
Turning all sounds on and off
•
Performing a soft reset
•
Where to learn more
THE BASICS
pg
5
Page 6
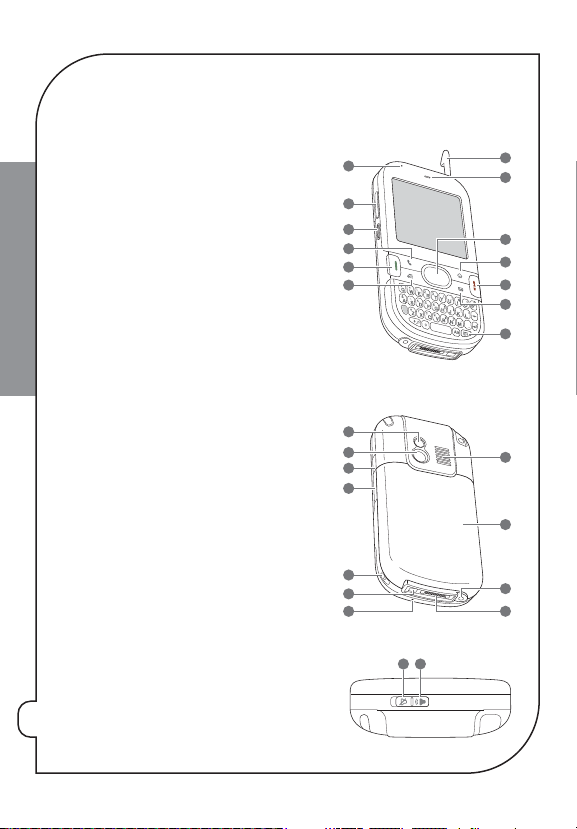
Overview: The Palm®Centro™smartphone
3
4
5
1
6
7
2
8
9
10
11
1
Charge indicator light
2
Vol ume b utto n
3
Side button
4
Phone
5
Send (for making calls)
6
THE BASICS
pg
6
Calendar
7
Stylus
8
Earpiece
9
5-way navigator and Center button
10
Applications
11
Power /End
12
Wireless Sync (email application)
13
Menu
1
Self-portrait mirror
2
Camera lens
3
IR (infrared ) port
4
Expansion card slot (for microSD cards)
5
Lanyard connector
6
Power connector
7
Microphone
8
Speaker
9
Battery door
10
Headset jack
11
Sync connector
1
Sound Off
2
Sound On (as shown)
1
2
3
4
5
6
21
7
8
9
10
11
12
13
Page 7
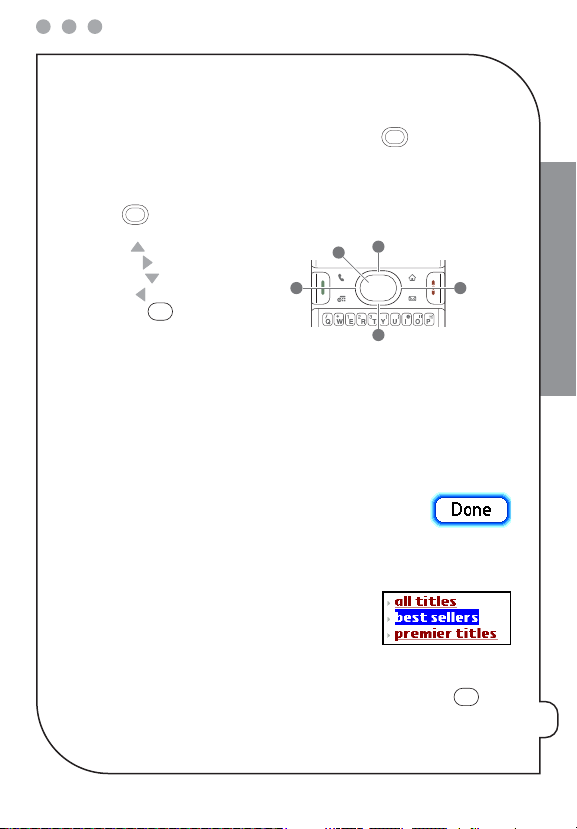
Moving around the screen
5
3
4 2
1
To move around the screen, you can use the 5-way navigator for one-handed
navigation, or you can tap items on the screen with the stylus. With use, you’ll find your
own favorite way to scroll, highlight, and select items.
The 5-way includes the following buttons:
1
Up
2
Right
3
Down
4
Left
5Center
Highlighting and selecting items
On most screens, one item—a button, a list entry, or a check box—is highlighted by
default. The highlight identifies which item is affected by your next action. Use the
5-way to move the highlight from one item to another before opening or selecting it.
The highlight can take one of two forms, depending on what is highlighted:
Border glow
: When an entire screen, onscreen button (such as OK
or Cancel), or a pick list is highlighted, a glow appears around its
border. If an entire screen is highlighted, the glow appears at the
top and bottom of the screen only.
Colored background
: When a phone number, text, an
email address, a web link, or an item is highlighted, the
item is displayed as white text against a colored
background.
After highlighting an item, you c an select or activate it by pressing
tapping the item with the stylus.
Center
or by
THE BASICS
pg
7
Page 8
Highlighting text
*
•
Tap and drag the stylus across the text you want to highlight.
•
To highlight a word, double-tap it.
•
To highlight a paragraph, triple-tap it.
THE BASICS
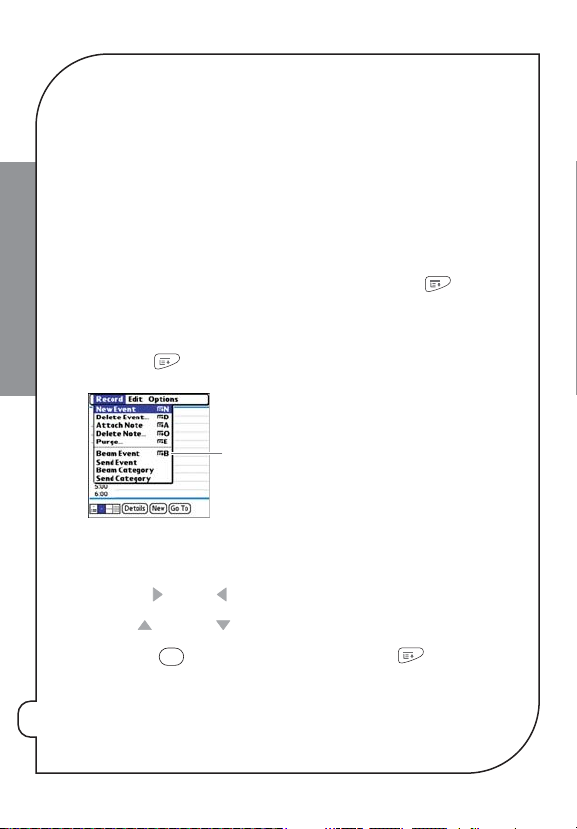
Selecting menu items
: You can use the stylus to highlight text on the screen.
Many applications have menus to give you access to additional features. These menus
are usually hidden from view, but they appear when you press
Menu
most out of your smartphone, it’s a good idea to familiarize yourself with the
additional features available through the various application menus.
1:
Press
Menu
to display an application’s menus.
*
Menu shortcut
2:
Press
Right
and
Left
to switch between menus.
3:
Press Up and
4:
Press
Center
Down
to highlight a menu item.
to select the menu item, or press
Menu
to close the
menu and cancel your selection.
. To get the
pg
8
Page 9
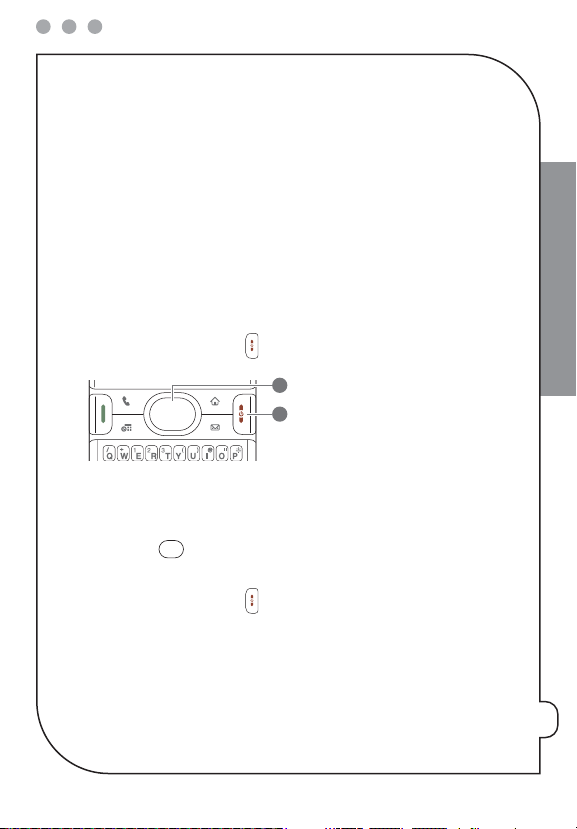
Turning your smartphone on/off
1
2
NOTE: We us e t he t erm smartphone to describe your device and its physical attributes, and phone to describe the feature
®
Centro™ smartphone that enables you to connect to the Verizon Wireless network.
of your Palm
You can turn on your smartphone screen and your phone independently. For example,
the smartphone screen can be off while the phone is turned on, or the smartphone
screen can be on while the phone is off. You can also have both the smartphone screen
and the phone turned on or off at the same time.
Waking up the screen
When your smartphone screen is off, you need to wake up the screen.
1:
Press and release
1
Center
2
Power /End
2:
Press
Center
and off, see “Locking your keyboard (Keyguard)” on page 25.
3:
Press and release
NOTE: To conserve battery power, the screen turns off after a period of inactivity. To change the time interval, go to
Applications, select Preferences, and then select Power. Select the Auto-off afte r pick list, and then change the time
interval.
Power/End
to wake up the screen.
to turn off Keyguard. For more info about turning Keyguard on
Power/End
to turn off the screen.
THE BASICS
pg
9
Page 10
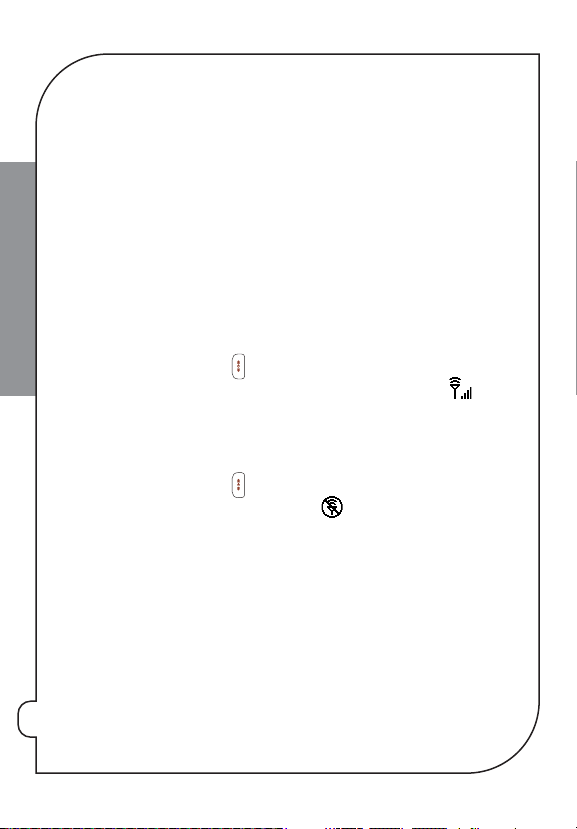
Turning your phone on and off
When your phone is on, it is connected to the network (provided you are in a coverage
area) so that you can make and receive phone calls and use wireless services, such as
email, messaging, and the web browser. During initial setup, your phone is on by
default, so you can use wireless services right away.
THE BASICS
If you turn off your phone, you can still use the organizer features such as Contacts and
Calendar, as well as the media features, such as the Pocket Tunes™ Deluxe music
application and Pics&Videos. This is sometimes referred to as
flight mode
for airplane flights and maximizing battery life.
1:
Wake u p th e scr een .
2:
Press and hold
locates a signal, the words
Power/End
to turn on your phone. When your smar tphone
Veri zon Wir eless
and the signal-s trength icon
appear at the top of the screen, indicating that you can use the phone and
Internet features (if supported by the local network). If you’re outside a coverage
No Service
area,
3:
Press and hold
off, the words
appears in the upper-left corner of the screen.
Power/End
Phone Off
again to turn off your phone. When your phone is
and the phone-off icon appear at the top of the
Phone application screen and your smartphone is not connected to a ny mobile
network. You can still use the nonwireless features of your smartphone, such as
Contacts, Calendar, Tasks, and Memos.
Making, receiving, and ending calls
Your smartphone offers several options for making, answering, and ending phone
calls. As you become familiar with your smartphone, you’ll discover which method you
prefer.
and is ideal
pg
10
Page 11
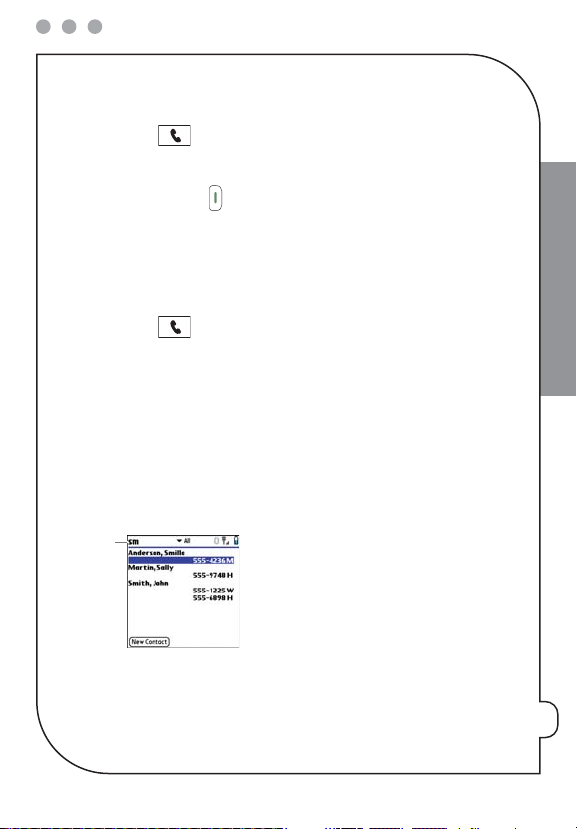
Dialing using the onscreen Dial Pad
*
1:
Press
Phone
.
2:
Enter the phone number by tapping the onscreen Dial Pad with the stylus.
3:
Tap
Dial
or press
Send
to make the call.
Dialing by contact name
You need to have names and numbers in your contact list before you can dial a call by
using a contact name (see the
User Guide
for information about adding contact names
and information).
1:
Press
Phone
.
2:
Select the
Contact s
favorite button.
3:
Using the keyboard, just start entering one of the following for the contact you
want to call:
•
First name (JOH for John)
•
Last name (SMI for Smith)
•
First initial and last name (JSM for John Smith)
*
Text appears here as you enter it
THE BASICS
pg
11
Page 12
4:
Highlight the number you want to dial.
5:
Press
Send
to make the call.
NOTE: To restart your search, press Backspace to delete letters you’ve entered. Or select Cancel to return to the
Main View.
Tip: Your smartphone comes with several predefined speed-dial favorite buttons, but you can also create your own
THE BASICS
favorites. Press Phone, press Down to access Favorites, and then use the 5-way to highlight and select a speed-dial favorite
button.
Receiving calls
To receive calls, your phone must be on. This is different from having only the screen
turned on (see “Turning your phone on and off” on page 10). When your phone is off,
your calls go to voicemail.
To answer a call, do one of the following:
•
Press
Send
.
•
Using the
5-way
or the stylus, select the onscreen
•
Press the headset button (if the headset is attached).
Answer
To ignore a call, do one of the following:
•
Send the call to voicemail:
•
Send the caller a text message:
Press
Power/ End
Select
Ignore with Text
or select
Ignore
. This option sends the call
to voicemail and opens a text message addressed to the caller.
Tip: When a second call (call waiting) comes in, you hear a call waiting tone and see the Call Waiting dialog box. Select
Send to put the first call on hold and answer the second, or press Power/End to hang up the first call then select Answer to
answer the second call. After answering a second call, select Swap to switch between the original call and the second call.
NOTE: When two calls are active and you press Power/End, you hang up both calls. To return to the first call, wait for the
person on the second call to hang up.
pg
12
button.
.
Page 13
Using speakerphone
Turn on the speakerphone when you want to talk hands-free or let other people listen
to the conversation. When the speakerphone is on, you can take the smartphone away
from your ear and use other features during a call. For example, you can check your
calendar or look up contact info.
•
To turn speakerphone on
•
To turn speakerphone off
, tap the
, tap
Cancel Spkr
Speakerphone
.
icon on the smartphone screen.
Ending a call
When you are finished with your call, do one of the following to end it:
•
Press
Power/End
•
Select
•
Press the button on the headset (if the headset is attached).
Hang Up All
.
.
Adjusting ringer volume and ringtones
When a call is not in progress and music is not playing, press the
side of your smartphone to adjust the ringer volume, and then press the
confirm your selection.
There are two ways to silence the phone’s ringer. Silencing the ringer doesn’t ignore or
answer the call, it just silences the sound of the ringer. To silence the ringer volume, do
one of the following:
•
Press any key on your smartphone except
5-way
•
Slide the
.
Ringer switch
to
Sound Off
Send
,
to immediately silence all system sounds,
including the ringer.
NOTE: When you silence the ringer, you can either answer the call or let it ring through to voicemail.
Power/End
Volu me
, or the
button on the
Side
button to
THE BASICS
pg
13
Page 14
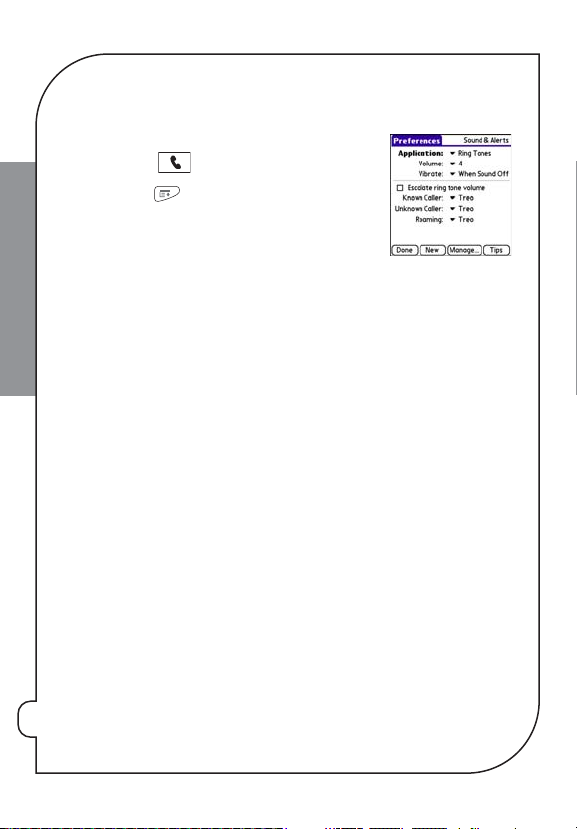
Changing ringtones
Selecting ringtones
1:
Press
Phone
.
2:
Press
Menu
.
3:
Select
Options
THE BASICS
4:
5:
6:
Select the
.
Ton es
Select the
Select the
and then select
Application
Volu me
pick list and then select the volume level.
Vibrate
pick list and then select when you want your smar tphone to
Sound Preferences
pick list and then select
.
Ring
vibrate upon an incoming call.
7:
(Optional) Uncheck the
Escalate ring tone volume
box if you want the ring to
play at the same volume level regardless of how long it rings. When this box is
checked, the ring volume begins softly and then increases the longer it rings.
8:
Select a ringtone from the pick list to identify each of the following:
Known Caller:
Unknown Caller:
An incoming call from someone in your Contacts or Favorites.
An incoming call from someone identified by caller ID who is
not in your Contacts or Favorites.
9:
Select
Done
.
NOTE: You can also record sounds and use them as ringtones. Select Manage on the Sound Preferences screen. To record a
sound, select New. To play a sound, select it and press Center on the 5-way. Select Done twice.
Setting up and accessing voicemail
Your Verizon Wireless service includes voicemail. Keep in mind that airtime and other
charges apply when using voicemail from your smartphone.
pg
14
Page 15
Setting up voicemail
1:
Press
Phone
.
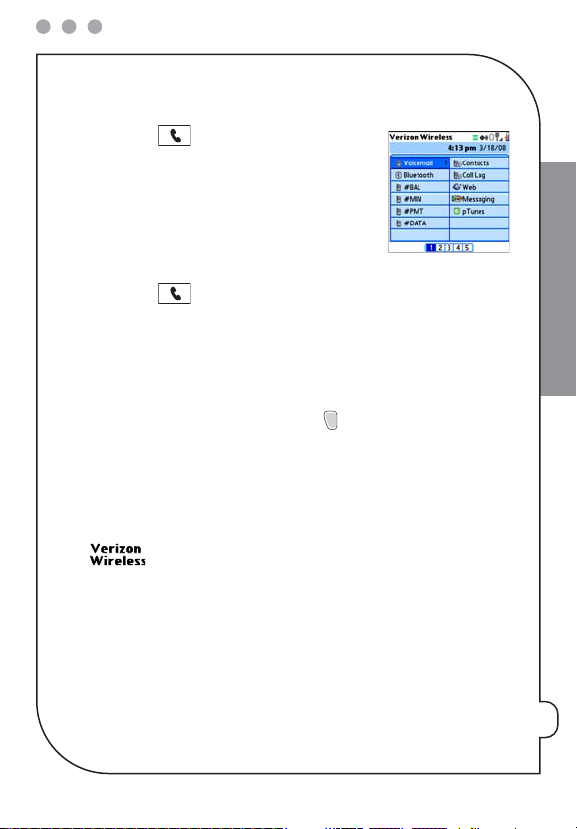
2:
Press and hold 1 or select the
Voicemail
favorite
button to call the Verizon Wireless automate d
voicemail system.
3:
Follow the voice prompts to set up your voicemail.
Listening to voicemail messages
1:
Press
Phone
.
2:
Press and hold 1 or select the
Voicemail
favorite button to call the voicemail
system.
3:
Enter your voicemail password using the keyboard, or select
User Guid e
defined this option (see the
Remember, you do not need to press
for information on defining extra digits).
Option
to enter numbers, *, or # when
Extra Digits
if you
responding to voicemail prompts.
What are all those icons?
You can monitor the status of several items using icons in the title bar in the Phone
application:
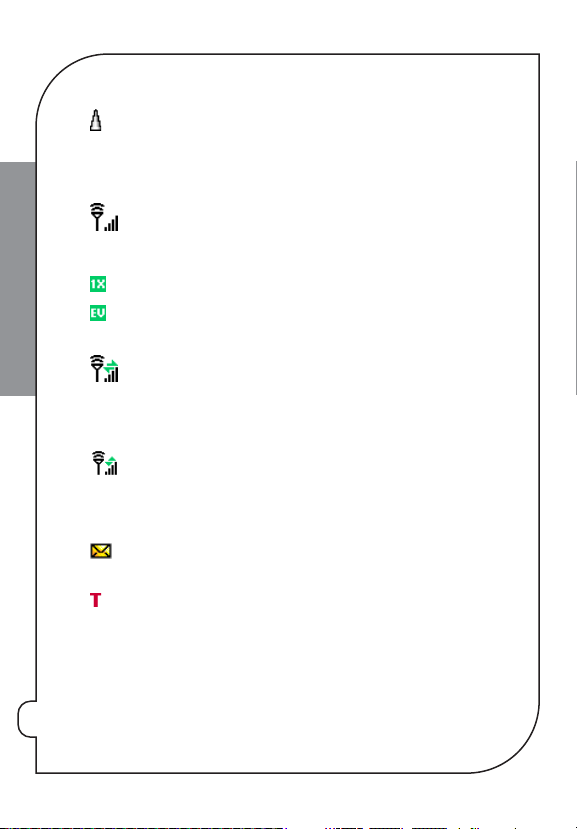
Your phone is on and you are in a Verizon Wireless coverage area. If you
are outside a coverage area,
Roaming
appears instead. No Service means that there is no coverage
No Service, Extended Network
at all, and Roaming means that another wireless service provider’s
network is available. When you turn off your phone,
appears.
Phone Off
, or
THE BASICS
pg
15
Page 16
THE BASICS
You are outside a Verizon Wireless coverage area and are roaming on
another wireless service provider’s network. This icon appears in
Roaming
addition to the word
. The icon may flash if the provider is
not on the Verizon Wireless preferred roaming list.
Your phone is on. The bars display the signal strength. The stronger the
signal, the more bars that appear. If you are outside a coverage area,
no bars appear.
You are in an area that supports NationalAccess (1xRTT) data services.
You are in an area that supports BroadbandAccess (EVDO) data
services.
Your phone is on and a 1xRTT data connection is active. You can still
make calls, but you cannot answer calls (incoming calls go to
voicemail). When you make a call the data transmission is
automatically interrupted.
Your phone is on and a BroadbandAccess data connection is active. You
can still make or answer calls. When you make or answer a call, the
data transmission is automatically interrupted, and then it resumes
when you end the call.
You have new voicemail messages. You can select this icon to retrieve
your messages.
TTY/TDD Mode is active. Use this mode to communicate by telephone
if you are deaf or hard of hearing or if you have speech or language
disabilities.
pg
16
Page 17
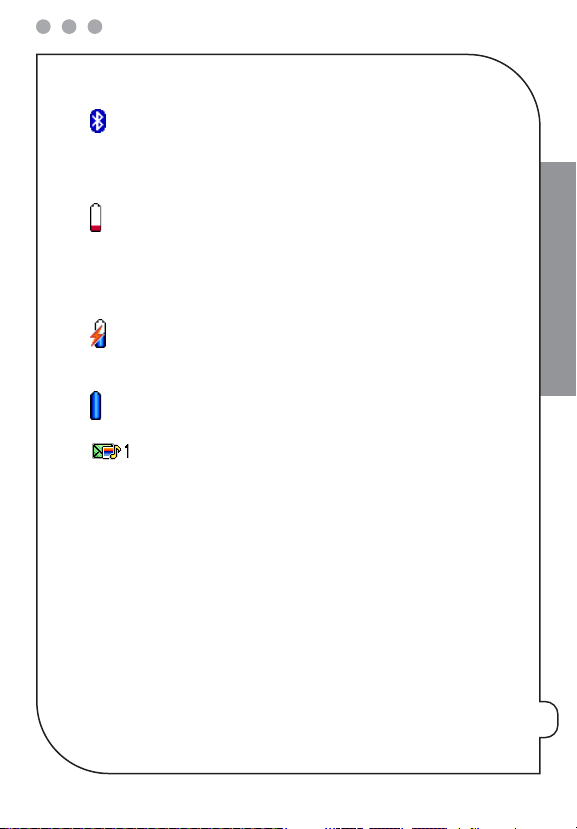
®
The Bluetooth
wireless technology icon appears in gray when this
feature is off, in blue when this feature is on, and in white with a blue
“B” when your smartphone is communicating with another Bluetooth
device.
The battery is partially drained. When the battery drains to 20 percent
of its capacity, the icon changes from blue to red. At 10 percent of its
capacity, you begin to receive warning messages, and at 5 percent of
its capacity, the smartphone beeps (if the Ringer switch is set to Sound
On) and the icon changes from red to clear.
The battery is being charged. The lightning bolt turns from red to
green when the battery is fully charged and your smartphone remains
connected to the charger.
The battery is fully charged and your smartphone is not connected to
the charger.
You have new text or multimedia messages. The numbers next to the
icon indicate the number of unread messages in your Inbox. You can
select this icon to retrieve your messages.
Using a phone headset
You can connect a phone headset for hands-free operation. If you need to use your
phone while driving and this is permitted in your area, we recommend using a phone
headset or a hands-free car kit (sold separately).
After you set up a partnership with a Bluetooth hands-free device, you can
communicate with that device whenever it is turned on and within range. Bluetooth
range is up to 30 feet (10 meters) in optimum environmental conditions. Performance
and range may be reduced by physical obstacles, radio interference from nearby
electronic equipment, and other factors.
THE BASICS
pg
17
Page 18
NOTE: Partnership is also know as paired relationship, pairing, trusted device, and trusted pair.
For a list of compatible hands-free devices, go to
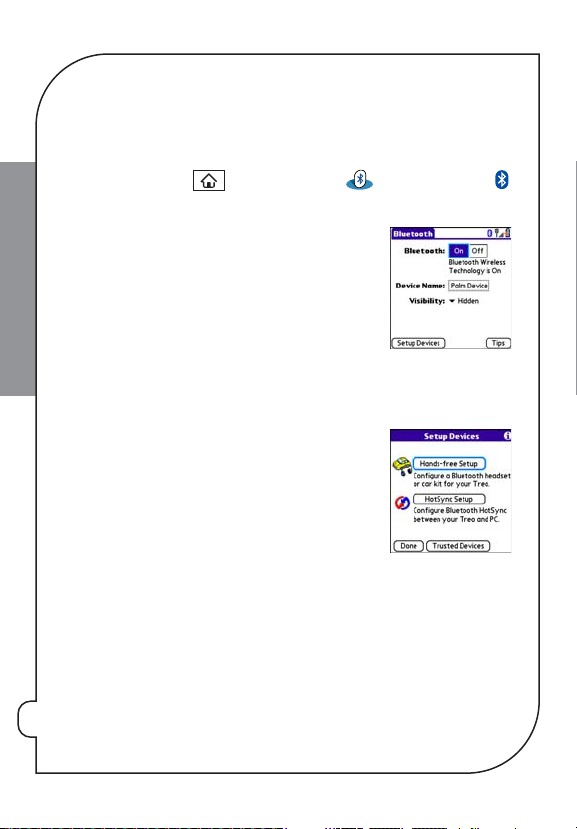
1:
Press
Applications
and select
palm.com/centroverizon-support
Bluetooth
, or tap the
icon in the title bar.
2:
Select
THE BASICS
Bluetooth On
NOTE: The Bluetooth icon changes from gray to blue to let you know that Bluetooth
technology is turned on.
3:
(Optional) Enter a device name that identifies your
.
smartphone when it is discovered by other Bluetooth
devices.
NOTE: Use the same device name for all your Bluetooth connections. If you change the device name, you need to re-create
any partnerships you already created.
4:
Prepare your hands-free device to accept a connection
from another Bluetooth device. See the documentation
that came with your hands-free device for instructions.
5:
Select
Setup Devices
6:
Select
Hands-free Setup
7:
Follow the onscreen instructions to create a partn ership
.
.
with the specific hands-free device. When prompted, enter a passkey.
IMPORTANT: Some hands-free devices have a predefined passkey. If your device has a predefined passkey, you can find it
in the documentation for that device. Other devices provide a screen where you enter a passkey that you make up. In either
case, you must use the same passkey on both your smartphone and your hands-free device. We recommend that where
possible, you make up a passkey o f 16 alphanumeric character s (letters and numerals only) to improve the security of your
smartphone. The longer the passkey, the more difficult it is for the passkey to be deciphered.
pg
18
Bluetooth
.
Page 19
8:
After you finish setting up the device, select
Done
to return to Trusted Devices
View.
NOTE: For some car kits, you need to initiate a Bluetooth connection from your smartphone to complete the partnership
process. To do this, highlight the car kit in Trusted Devices View, press Menu, and select Connect.
9:
(Optional) Enable advanced hands-free features by pressing the
multifunction
button (MFB) on the hands-free device.
You can tell the connection is successful when you see a light blue headset icon in the
title bar of the Phone application. You can now use your smartphone with the
Bluetooth hands-free device.
NOTE: If you have both a Bluetooth headset and a car kit, the last one you connected becomes the active device. To switch
between the headset and car kit, turn off the active device before you try to connect to the other device.
Managing personal information
Synchronizing information—basics
Synchronizing means that you can enter or change information on your smartphone or
on your computer and then synchronize to automatically update the information in
both places, so there’s no need to enter the information twice. We strongly recommend
that you synchronize your smartphone freq uently to keep your information up-to-date
(and backed up) in both locations.
The info from all the following applications is updated by default each time you sync
your smartphone with your desktop software:
THE BASICS
pg
19
Page 20
Windows users:
*
To sync your info, you must install Palm® Desktop software from the
Getting Started CD that came with your smartphone—even if you sync with Outlook
(sold separately) or another third-party application. See the
User Guide
How each application syncs depends on your computer type and the desktop software
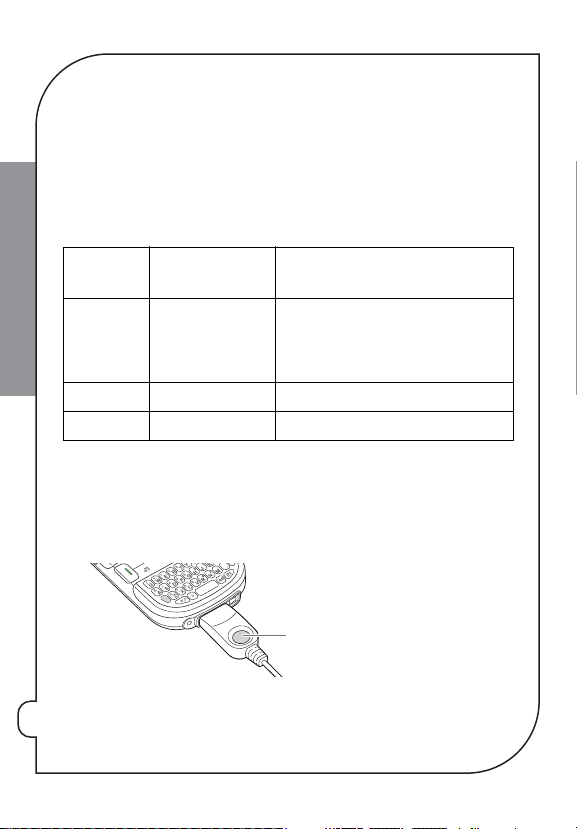
you are using, as follows:
THE BASICS
Computer
Type
Windo ws Micro soft Ou tlook
Windows Palm Desktop All apps sync with Palm Desktop.
Mac Palm Desktop All apps sync with Palm Desktop.
NOTE: You can customize which applications synchronize. See the User Guide for information.
1:
Connect your smartphone to your computer (see the
2:
Press the
Desktop
software type
(sold separately)
sync button
What syncs and where
Calendar, Contacts, Memos, and Tasks sync
with Outlook.
Pics&Videos syncs with Palm Desktop.
User Guid e
on the sync cable.
for info.
for instructions).
*
pg
20
Sync butto n
Page 21
Messages appear on both your smartphone and on your computer indicating that
synchronization is in progress.
3:
Wait until you see the message on your smartphone that the HotSync operation is
complete; then disconnect the sync cable.
Contacts—Adding a contact
NOTE: If you have several contacts to enter, it’s more efficient to use the included Palm®Desktop software or Microsoft
®
Outlook
(sold separately) on your computer and then synchronize your Palm®Centro™ smartphone with your computer. For
more information, see “Synchronizing information—basics” on page 19.
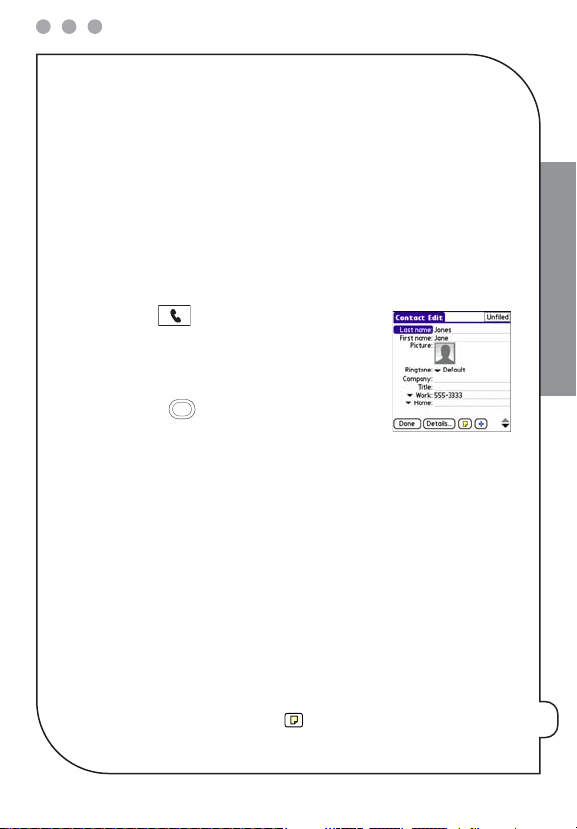
1:
Press
Phone
.
2:
Select the
Contact s
favorite button.
3:
Select
4:
Use the
New Contact
5-way
.
to move between fields as you
enter information.
5:
(Optional) Do any of the following:
Add a caller ID photo:
•
Select
Camera
Select the
Picture
box, and then do one of the following:
to take a picture and add it to this contact when you save the
picture (camera version only).
•
Select
Photos
to add an existing picture to this contact.
Add a caller ID ringtone:
Select the
Ringtone
pick list and select a ringtone from
the list to give incoming calls from this contact a distinctive ring.
Place the entry in a category or mark it private:
Guide
for more info.)
Add a note to an entry:
Select
Note
.
Select
Details
. (See the
User
THE BASICS
pg
21
Page 22
Display additional fields for this contact:
6:
(Optiona l) Many field s on the Contact Edit screen have a rrows next to th eir names,
indicating pick lists from which you can select a different name. For example, if
you want to list a person’s home phone number in the first field, highlight
THE BASICS
7:
, and select
After you enter all the information, select
Home
.
press
Left
Calendar—Displaying your calendar
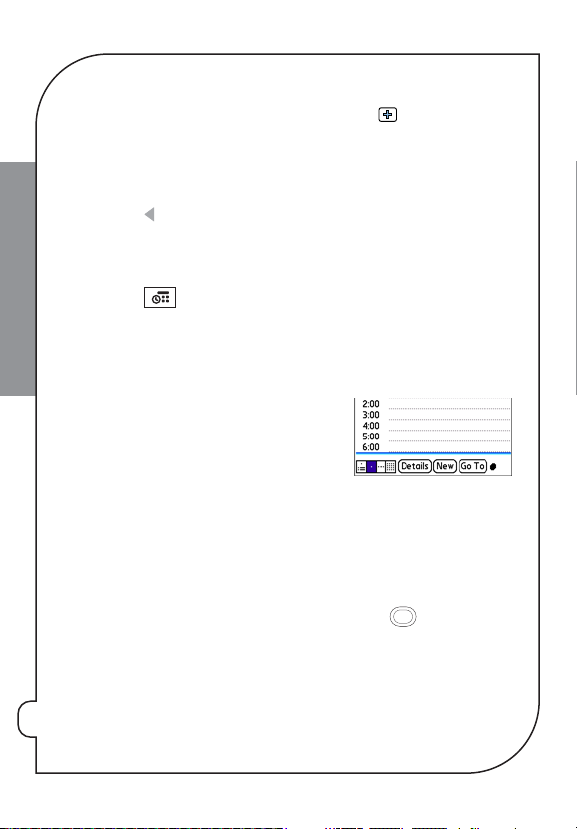
Press Calendar repeatedly to cycle through the various views:
•
Agenda View:
Shows your daily schedule and any items on your Tasks list that are
overdue or due today. If there’s room, Agenda View also shows your schedule for the
next dates that have events scheduled.
•
Day View:
Shows your daily schedule one day at a
time.
•
Week View:
Shows your schedule for an entire
week. The time frames are based on the Start Time
and End Time settings in Calen dar Preferences.
•
Month View:
•
Yea r Vie w:
the
Shows your schedule for a whole month.
Shows your schedule for an entire year. From any Calendar view, open
Options
menu and select
Yea r Vie w
.
From any Calendar view (except Agenda View), use the
another day, week, month, or year (based on the current view).
From any Calendar view (except Agenda View), select
from the calendar.
pg
22
Select
Done
Plus
.
.
5-way
to move to
Go To
, and then select a date
Work
,
Page 23
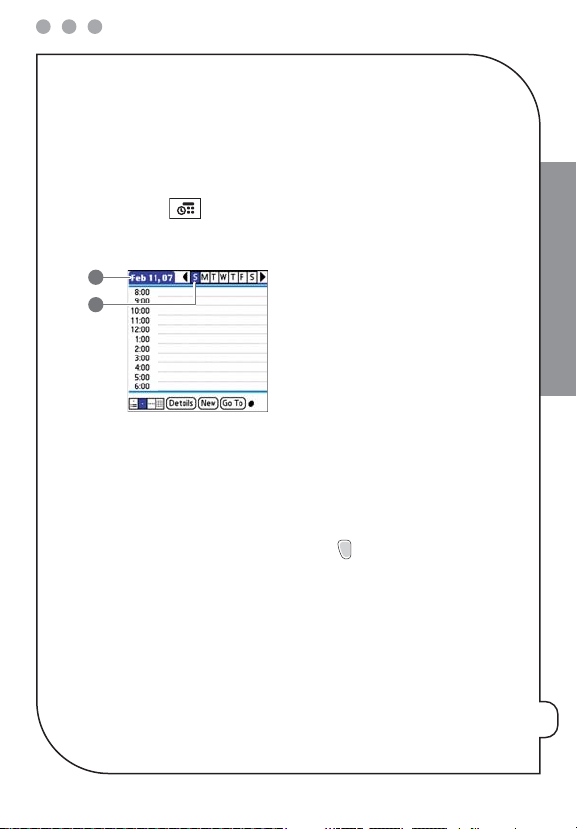
Calendar—Creating an event
1
2
NOTE: If you have several appointments to enter, it’s more efficient to use the included PalmDesktop software or Microsoft
Outlook (sold separately) on your computer and then synchronize the info on your smartphone with the info on your
computer. For more information, see “Synchronizing information—basics” on page 19.
1:
Press Calendar until Day View appears.
2:
Select
Go To
and then select the desired day.
1
Selected date
2
Selected day
3:
Select
New.
4:
Using the keyboard, enter a starting hour and minute for the event. For example,
Option
enter 545 for 5:45. (Remember to press
5:
Select the
End Time
box and enter the ending hour and minute for the event.
6:
(Optional) To assign a time zone to the event, select the
before entering numbers.)
select a city in the time zone you want.
7:
Select OK.
8:
Enter a description for the event.
Time Zone
pick list and
THE BASICS
pg
23
Page 24
NOTE: To automatically assign a time zone to your events, open the Options menu, select Preferences, and check the
New events use time zones box. All your new events will be assigned to your local time zone (existing events aren’t
affected), and you can change the time zone setting for individual events.
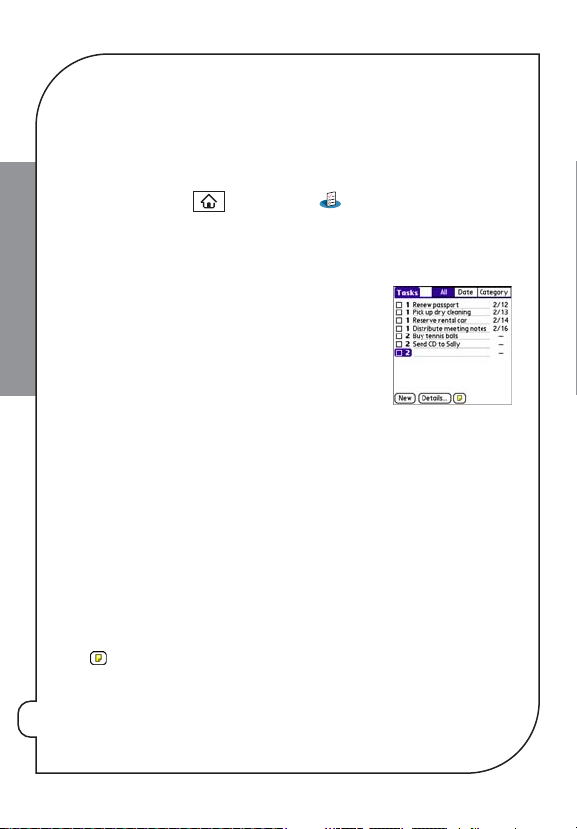
Tasks—Adding a task
Press
1:
2:
THE BASICS
3:
4:
Applications
Select
New
Enter a description of the task. The text can be longer than one line.
(Optional) To enter details for a task, select the task
and select
to create a new task.
Tas ks
.
description, and then select Details. Set any of the
following:
Priority:
Select the priority number for this task (1 is
most important).
Category:
Assign the task to a specific category.
Due Date:
Select the
Due Date
pick list and select a due date for the task.
Alarm:
Set an alarm for this task.
Repeat:
Indicate whether the task occurs at regular intervals and how often it
repeats. When you check off a repeating task, the next instance of this task
automatically appears in your task list.
Private:
Check this box to mark this task private. See the
User Guid e
information.
: Sel ect th is butt on to ent er addit ional t ext tha t you want to asso ciate wi th the
task.
5:
pg
Select OK.
24
for additional
Page 25
Locking your smartphone and info
NOTE: In addition to the locking features described here, you can also lock your phone, your smartphone, and individual
entries. See the User Guide for details.
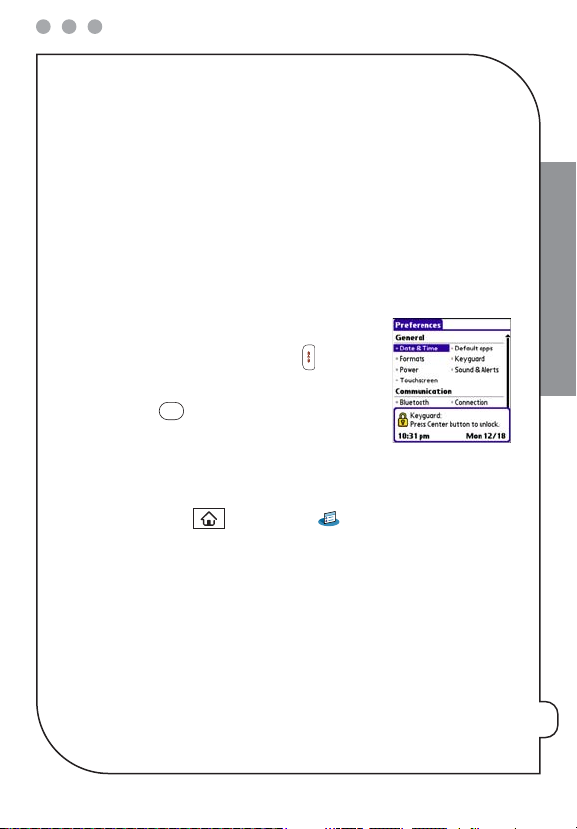
Locking your keyboard (Keyguard)
The Keyguard feature locks the keyboard so that you don’t accidentally press buttons or
activate items on the screen while your smartphone is in a pocket or bag.
By default, Keyguard turns on whenever the screen is off. Each time you wake up the
screen, you must turn off Keyguard to unlock the keyboard and use your smartphone.
To turn off Keyguard, do the following:
1:
When the screen is off, press
the screen.
2:
Press
Center
to turn off Keyguard.
You can change how quickly Keyguard turns on, or you can
disable this feature altogether. To change the Keyguard
settings, do the following:
1:
Press
Applications
2:
Select
Keyguard
.
3:
Select the
Auto-Keyguard
•
Select how quickly you want Keyguard to turn on.
•
Select
Disable
4:
Select
Done
.
Power/End
and select
to wake up
Prefs
.
pick list, and then do one of the following:
to completely disable the Keyguard feature.
THE BASICS
pg
25
Page 26
Locking your screen
You can set your smartphone to automatically lock the screen’s touch-sensitive features
in certain situations.
1:
Press
2:
THE BASICS
3:
Applications
Select
Keyguard
Check one of the following boxes:
Incoming calls received:
the
5-way
to answer the call or
On a call:
and select
Prefs
.
.
Disables the screen when the phone rings. You must use
to select the onscreen Answer and Ignore buttons, or press
Power/ End
to ignore the call.
Disables the screen after you answer a call. You must use the
to select the onscreen buttons during the call. Use this setting to avoid
accidentally pressing onscreen buttons while you’re holding your smartphone
near your ear to speak.
4:
Select
Done
.
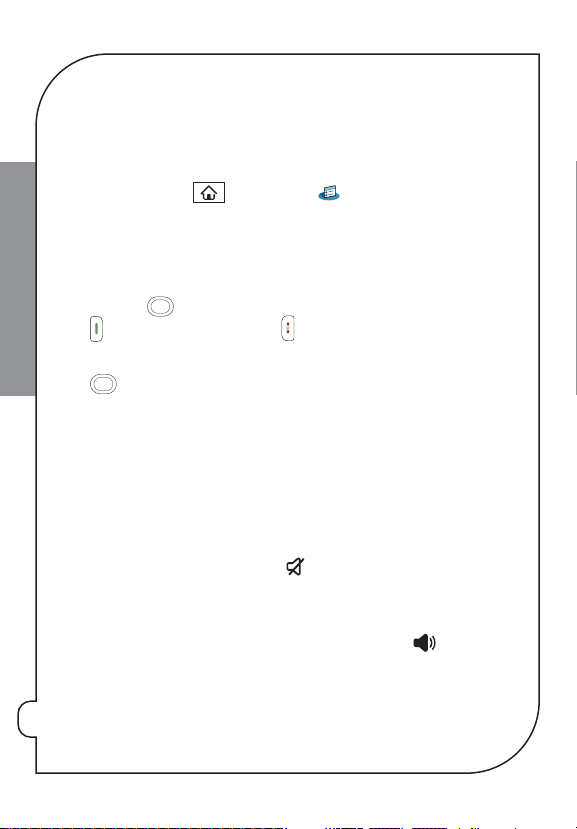
Turning all sounds on and off
You can immediately silence all alerts, ringtones, music, and system sounds by sliding
the Ringer switch to Sound Off. This does not mute the audio during a phone call.
1:
Slide the
Ringer
switch to
Sound Off
. Your smartphone vibrates once to let
you know that sounds are turned off (see “Over view: The
®
Centro™smartphone” on page 6 for an illustration).
Palm
2:
To hear all sounds again, slide the
sound settings are restored.
Ringer
switch to
Sound On
Send
5-way
. Any previous
pg
26
Page 27
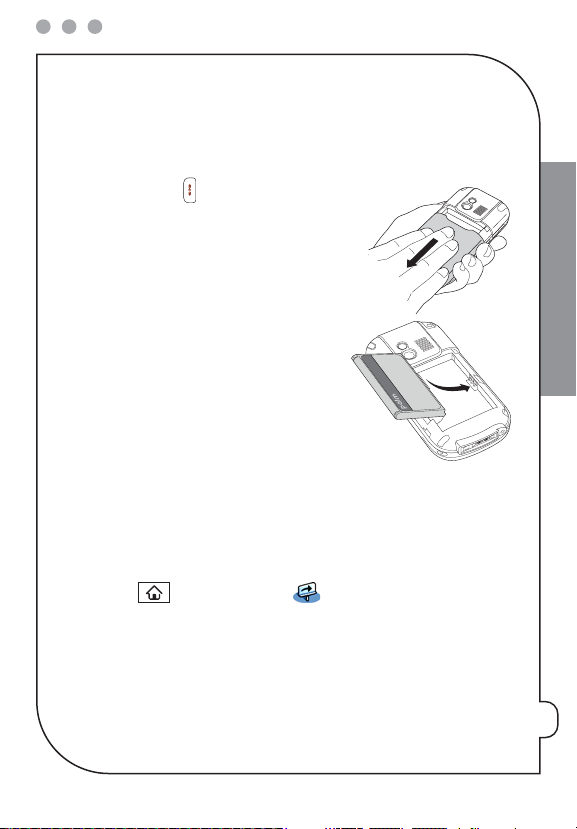
Performing a soft reset
If your smartphone is not responding or you have trouble synchronizing with your
computer, a soft reset may help. All your info is retained when you perform a soft reset.
1:
Press
2:
Power/ End
Slide the
to turn off the screen.
battery door
downward to remove it
from your smartphone.
3:
Remove the battery from the battery
compartment.
4:
Align the metal contacts on the battery with the
contacts inside the battery compartment, insert
the battery, and then press it into place.
5:
Slide the
battery door
onto the back of your
smartphone until it clicks into place.
NOTE: If the phone and Bluetooth signals were on before a reset, these
signals automatically turn on after the reset.
Where to learn more
For a quick introduction
Quick Tour:
already installed on your smartphone, and you can open it anytime. Press
Applications
While using your smartphone
User Guide:
including descriptions of advanced features not included in this guide. You can find the
User Guid e
•
The Quick Tour introduces you to many of your smartphone’s features. It is
and select
The
User Guide
Quick Tour
.
provides complete information on using your smartphone,
in the following locations:
On the Getting Started CD.
THE BASICS
pg
27
Page 28
•
On your computer, go to:
•
On your smartphone, press
Support
the
tab, and then select
Interactive User Guide:
set up features (such as voicemail and email), and perform common tasks. To view this
THE BASICS
guide, go to
Tips:
www.verizonwireless.com/multimedia/mim/palm_centro
Many of the built-in applications include helpful tips for getting the most out of
your smartphone. To view these tips, open an application, press
Options
, and then select
Tips:
Many dialog boxes have a Tips icon in the upper-right corner. Select the
palm.com/centroverizon-support
Applications
, select
User Guid e
.
.
My Centro
Walks you through how to move around on your smartphone,
Menu
Tips
.
icon to learn about the tasks you can perform in that dialog box.
Online support from Palm:
information, go to
For up-to-date downloads, troubleshooting, and support
palm.com/centroverizon-support
.
If you need more information
Vista u sers:
Windows Vista, visit
Books:
(look in the computer section), or visit
Online forums:
about topics you may find nowhere else. Visit
For information on using your smartphone and desktop software with
www.palm.com/windowsvista
.
Many books on Palm OS® devices are available in local or online book retailers
palm.com/centroverizon-support
Consult online user discussion groups to swap information and learn
palm.com/centroverizon-support
details.
Customer service from Verizon Wireless:
For questions about your mobile account or
features, contact Verizon Wireless customer service, billing, and technical support at
pg
800-922-0204.
28
, select
.
, select
Tips
.
for
Page 29

.............................
Assistance
•
May we help you?
•
EZ Move® (if you move)
•
Loss or theft
•
Toll-free calls and emergency services
•
Fraud prevention
•
Assistive communication devices
pg
29
ASSISTANCE
Page 30
May we help you?
Online assistance
Main website: verizonwireless.com
Other helpful websites and information:
verizonwireless.com/welcome
ASSISTANCE
pg
•
Information on your wireless device, coverage, Calling Plan, billing and
payment information
•
FAQs, interactive demos for your wireless device and how to read your bill
•
My Account registration for online account management
verizonwireless.com/myaccount
Use My Account to:
•
Check your balance, minutes or make payments
•
Add or remove features
•
Reset Voice Mail passwords and more
The My Account Advantage
Get these added benefits for registering for My Account:
•
You’ll receive free Back-Up Assistant so you never have to worry about losing
your wireless device contact list.
As a My Account member, Back-Up Assistant will let you automatically regain a
copy of your saved wireless device numbers to a secure website, so they’re
always available if you lose or upgrade your wireless device.
•
You can get a new wireless device every year with Annual Upgrade.
30
Sign up for a 2-year agreement on a Calling Plan of at least $34.99 and you can
Page 31
purchase a new wireless device at its promotional price through My Account
every year with a 2-year renewal (upgrade fee applies).
•
If you’re using more minutes than your Calling Plan includes, we’ll let you know
with Minute Check.
Minute Check will periodically notify you through My Account if you’re
exceeding your plan allowance and let you know of other Calling Plan options
that may save you money.
See verizonwireless.com/myaccount for details. Back-Up Assistant, Annual Upgrade and Minute Check are available for
accounts with up to 10 lines that are enrolled in My Account.
verizonwireless.com/data
•
Demos and tutorials on products and services
•
Online technical support for products and services
Customer Service assistance
Customer Service Representatives are also available at your local Verizon Wireless
Communications Store during normal business hours. For Customer Service, call
1-800-922-0204 (toll-free in the U.S., 6am–11pm).
Our Worry Free Guarantee® to you
You’ll enjoy America’s best, most reliable wireless network.
•
•
You can change your calling plan at any time.
As your needs change, you can change to any current calling plan. You won’t pay any
additional fees and you won’t have to extend your contract.
•
If you ever have a problem, it becomes our problem the first time you call.
No run-around, no hassles. If your issue can’t be resolved during the course of your
first call, we’ll get back to you with an answer.
pg
31
ASSISTANCE
Page 32
•
Your satisfaction is guaranteed with our Test Drive program.
Now you can Test Drive our network; make calls and even try out a cool new device.
Every device you purchase from Verizon Wireless comes with a 30-day satisfaction
guarantee. And if you don’t love us, take your number to someone else within 30
days. You won’t have to pay an early termination fee, and we’ll pay for any calls
you’ve made.
ASSISTANCE
•
You can get a free phone every two years with New Every Two®.
Sign up for a calling plan of at least $34.99 and qualify for a free phone after two
years, with a two-year renewal. Or choose to apply your New Every Two credit
towards th e purchase of a more expensive p hone.
Test Drive: Credit/refund for activation, plan access & voice overage charges only. America’s Choice or select data plan req’d.
Customer must pay all other charges, incl. taxes, surcharges, and separately-billed data & download charges. Early
termination fee applies unless device is returned. Some plans are only available with specific equipment. Acceptance of a
promotion may require a new 1- or 2-year agreement.
How to sign up for New Every Two
If you maintain service on a Calling Plan of $34.99 or higher and fulfill your 2-year
term, you will qualify for a free wireless device. If your Calling Plan monthly access is
$79.99 or higher for the entire 3 months prior to completing your New Every Two
wireless device upgrade, you will get up to $100 toward the purchase of that wireless
device. If your Calling Plan monthly access was between $34.99 and $79.99 at any time
during the 3 months prior to completing your New Every Two wireless device upgrade,
you will get up to $50 toward the purchase of that wireless device. When completing
your New Every Two upgrade, you will need to renew your agreement for another two
years on a calling plan with a monthly access of $34.99 or higher. Upgrading your
wireless device at a discounted price, including exercising your Annual Upgrade option,
will re-start your eligibility for New Every Two.
See the More Information s ection in the back of this guide for additional conditions.
pg
32
Page 33
Address or account changes
It’s important that we have your most current information so we’re able to reach you
for any reason. There are 3 ways to update your information:
Online
Go to
verizonwireless.com/contactus
1:
Select the appropriate choice from the drop-down menu in the Send an E-mail
and follow these instructions:
section.
2:
Fill out the online form.
3:
Select “Topic” and “Subtopic” from the drop-down menu.
4:
Hit “Send” to submit e-mail.
U.S. Mail
Use the change-of-address form on the back of your bill.
Tel ep ho ne
Call Customer Service at 1-800-922-0204 from any phone (toll-free in the
U.S.) or *611 and Send from your smartphone (airtime-free).
Billing options
Your service comes with a streamlined bill that you’ll receive each month at no
additional cost. Your bill includes all applicable charges, but will not contain any call
details (e.g., date, time and wireless number called).
Detailed billing
Call details are available for free online at verizonwireless.com under My Account. A
monthly fee applies to receive call details on your paper bill.
ASSISTANCE
pg
33
Page 34
Going paperless
You have the option of eliminating your paper bill and receiving bill notification via
e-mail. To eliminate your paper statement, or to make manual or automatic bill
payments, register for My Account at verizonwireless.com/myaccount and then select
the quick link under the Billing tab for “Go Paperless.”
Payin g your b ill
ASSISTANCE
Verizon Wireless gives you several convenient options to pay and manage your
monthly bill. Some of those options are:
•
At
verizonwireless.com/myaccount
: Make one-time or recurring payments using
your debit card, credit card, ATM card, electronic check/ACH or enroll in our Auto Pay
Program.
•
With the Auto Pay Program: Allows you to choose to have automatic payment
deductions taken from your bank account. To enroll, you can fill out the back of your
remittance slip and mail it in, call 1-866-868-3882, or log on to
verizonwireless.com/myaccount
•
By calling from your wireless device: Dial #768 and follow prompts to enter your
.
payment information.
•
Using My Account from your wireless device: Make a one-time payment by credit
card, de bit card and/or electro nic check di rectly from yo ur wireless device as long as
your wireless device is Mobile Web 2.0.-capable.* To make a payment, simply launch
your web browser, select “VZW SERVICES,” then “My Account.” If you don’t subscribe
to Mobile Web 2.0, you will see an option to view My Account for free once you
launch the browser.
* See the User Guide for details.
pg
34
Page 35
•
Home banking: Verizon Wireless and CheckFree® have teamed together to give you
the opt ion to pay you r wireless b ill online at your choic e of more tha n 1,700 fina ncial
services locations across the Internet. You will be able to schedule payments using a
designated bank account and arrange for monthly bill payments via your preferred
home-banking service provider.
•
Check payment via mail: Allows you to mail in a personal or business check, along
with the remittance slip and envelope provided with your billing statement.
•
In person: Payments can be made at your local Verizon Wireless Communications
Store using our Bill Payment Kiosks.
EZ Move® (if you move)
When you arrive in your new city, do one of the following:
•
Visit a Verizon Wireless Communications Store.
•
Call 1-877-316-1747 from a phone other than the one you want to move.
•
Go to verizonwireless.com and log in to My Account. Under the My Bill tab, select
“Account Profile,” click on the “EZ Move” quick link and follow the instructions.
Loss or theft
If your wireless device is lost or stolen, please contact Customer Service at
1-800-922-0204 to suspend your service. If your wireless device is malfunctioning,
please bring it to a Verizon Wireless Communications Store.
Toll-free calls and emergency services
Calls to 800, 855, 866, 877 and 888 numbers are toll-free, but airtime charges do apply.
Calls to Verizon Wireless Customer Service and emergency calls (911) are toll- and
airtime-free.
ASSISTANCE
pg
35
Page 36
Fraud prevention
Verizon Wireless wants to protect your privacy and works hard to prevent unauthorized
phone usage or fraud. Wireless numbers and calls are capable of being intercepted by
someone with specialized equipment. We use antifraud technology to make fraudulent
calling very difficult, particularly on digital calls.
•
ASSISTANCE
Report a lost or stolen wireless device to the police and Verizon Wireless
immediately.
•
Never leave your wireless device unattended, especially in your office or car.
•
When not in use, lock the wireless device using your lock code.
•
Review your bill and report any suspicious calling activity. If we conclude that the
calls are fraudulent, you will not be held responsible for the charges.
•
Record your wireless device’s electronic serial number in the back of this guide and
keep it safe.
•
Have your wireless device serviced only at a Verizon Wireless Communications Store
or by an Authorized Agent, retailer, manufacturer’s service center or other repair
center.
Assistive communication devices
TTY (Text Telephony) and TDD (Telecommunications Device for the Deaf) allow
individuals who are deaf, hard of hearing, or have speech or language disabilities to
communicate by telephone.
When a user types his or her conversation on a TTY keyboard, it is transmitted as tones
through the telephone. Tones are received by the other person’s TT Y, translated into
text and displayed on the screen. In order to use the TTY network, you must have a
TTY-compatible phone and be in the TTY mode to place or receive calls. Note that most
digital wireless devices are TTY-compatible.
pg
36
Page 37
.............................
Mobile entertainment
•
You r em ail
•
Messaging
•
Web browser
MOBILE ENTERTAINMENT
pg
37
Page 38
Your email
You r Pal m®Centro™ smartphone includes the Wireless Sync application from Verizon
Wireless. Wireless Sync from Verizon Wireless delivers your personal or business email
right to your wireless device. There’s no need to create a new email address; just use
the one you already have. Wireless Sync also updates your wireless device with your
MOBILE ENTERTAINMENT
Contacts, Calendar, Tasks, and Notes.
Wireless Sync is intended for:
•
Internet email users who have a POP3 or IMAP account through providers such as
Verizon, Comcast, AOL, and Earthlink. This setup is done entirely on your
smartphone.
•
Corporate email users with an email account hosted by their company. After you
perform the setup on your smartphone, you must install software on a computer
that’s connected to your corporate network.
If you use web-based email (for example, G mail), remember that you can also use your
smartphone’s web browser to send and receive email.
NOTE: You must activate data services on your Verizon Wi reless account before you can use email or web services on your
smartphone. Smartphones require a 5MB or unlimited data plan.
To get more information on Wireless Sync and to learn how to install the software and
send and receive mail, see the documentation at the following location:
http://www.wirelesssync.vzw.com
How do I get started?
Before getting started, make sure you have the following:
•
An email address and email account password.
•
Your smartphone and phone number.
pg
38
.
Page 39
•
An internet connection on your smartphone.
•
If you are a corporate email user, you must have a computer at work that is
connected to your company’s mail server (for instance, a Microsoft Exchange Server
or Lotus Domino). Additionally, you must have your login information (user name
and password) for your company network.
For additional information, refer to the included pocket guide about Wireless Sync, or
go to www.wirelesssync.vzw.com.
Messaging
You can use the Messaging application to exchange tex t messages (SMS) and
multimedia messages (MMS) with other devices and email addresses that support
these forms of messaging. Before you use your smar tphone to send or receive
messages, refer to your service plan for pricing and availability of messaging services.
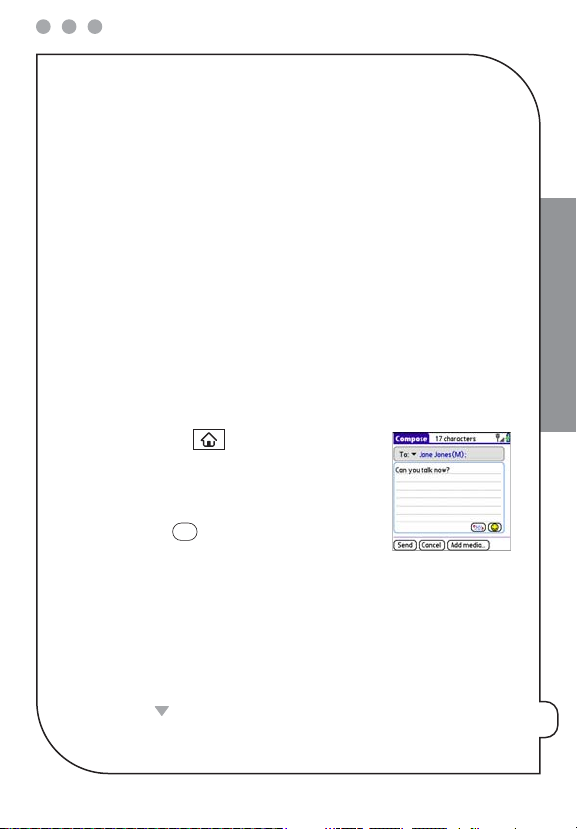
Creating and sending a text message
Press
Applications
1:
2:
Select
New
3:
Select the To field to address the message:
•
Press
the list of recent addresses, select it from the list.
•
If the recipient is in your Contacts list, enter the first initial and last name (no
spaces), and then select the recipient’s phone number or email address,
depending on where you want to send the message.
•
If the recipient’s name isn’t in the list of recent addresses or your Contacts list,
enter the mobile number, email address, or a Verizon Wireless alias.
4:
Press
Down
and select
Messaging
.
Center
. If the recipient’s name appears in
to jump to the body o f the message.
.
MOBILE ENTERTAINMENT
pg
39
Page 40
5:
Enter your message or select
QuickText
to inser t predefined phrases. To
insert emoticons, select .
6:
(Optional) Press
Menu
and select
High Priority
from the
mark the message as urgent.
7:
Select
Send
MOBILE ENTERTAINMENT
NOTE: If you see numbers when you expect to see letters (or the other way around), you need to turn Option Lock on by
pressing Option twice or turn it off by pressing Option once.
.
Creating and sending a multimedia (MMS) message
1:
Press
Applications
2:
Select
New
3:
Select the To field to address the message:
•
Press
and select
Messaging
.
.
Center
. If the recipient’s name appears in the list of recent
addresses, select it from the list.
•
If the recipient is in your Contacts list, enter the first initial and last name (no
spaces), and then select the recipient’s phone number or email address,
depending on where you want to send the message.
•
If the recipient’s name isn’t in the list of recent addresses or your Contacts list,
enter the mobile number, email address, or a Verizon Wireless alias.
4:
Press
Down
to jump to the body o f the message.
5:
Enter your message or select
QuickText
to inser t predefined phrases. To
insert emoticons, select .
6:
(Optional) Press
Menu
and select
High Priority
from the
mark the message as urgent.
pg
40
Compose
Compose
menu to
menu to
Page 41
7:
Select
Add Media
to add a picture, video, voice memo, or ringtone to the
message. Select the type of media, then the item, and then OK.
8:
Select
Send
.
Web browser
The web browser on your smartphone provides quick and easy access to web pages.
You can view most sites you use on your computer, including those with security and
advanced features, such as JavaScript, SSL strong encryption, cookies, and frames. To
browse the web, you must activate data services from Verizon Wireless.
Viewing a web page
Press
Phone
1:
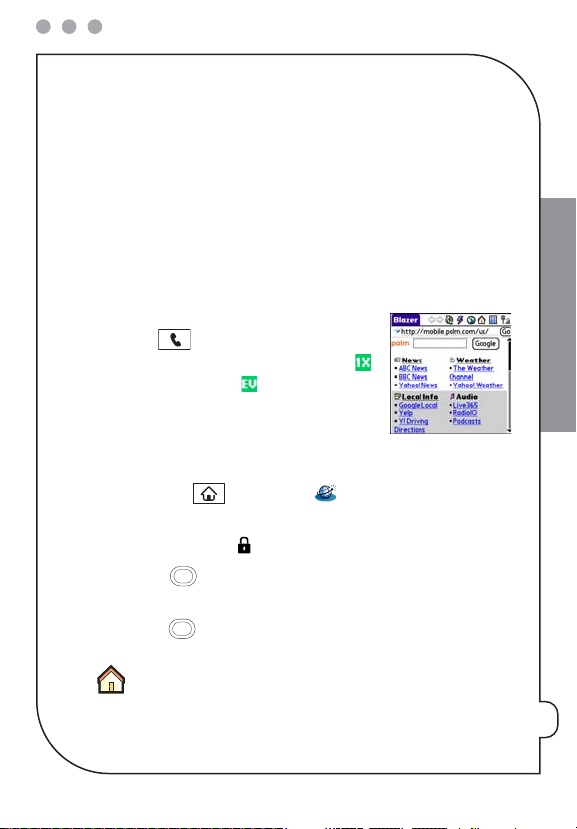
available. You should see either the NationalAccess
icon or the BroadbandAccess icon in the title bar.
If you do not see a NationalAccess or BroadbandAccess
icon, data services are not available in your current
location and you cannot connect to the Internet.
2:
Press
3:
Enter a web page address (URL) in the
to a secure web page, a lock appears in the
4:
Use the
specific things you can do on a web page, refer to the
5:
Use the
and confirm that data services are
Applications
and select
Web
Address Bar
.
and select Go. If you browse
Address Bar
5-way
to navigate within the web page. For information about
User Guid e
5-way
to access any of the following icons in the title bar:
Goes to your home page.
.
.
MOBILE ENTERTAINMENT
pg
41
Page 42
Opens a dialog box where you can enter a web address you want
to go to or view a list of recently viewed web pages.
Goes back in order through pages you viewed.
MOBILE ENTERTAINMENT
Goes forward in order through pages you viewed.
Refreshes the page with the latest content from the website.
Opens a list where you can select Fast Mode (no images or style
sheets) or Normal Mode (with images and style sheets).
pg
42
Page 43
...........................
Optional services
•
Safety and protection
•
Wireless device protection
•
Voice services
•
International services
•
Other products and services
OPTIONAL SERVICES
pg
43
Page 44
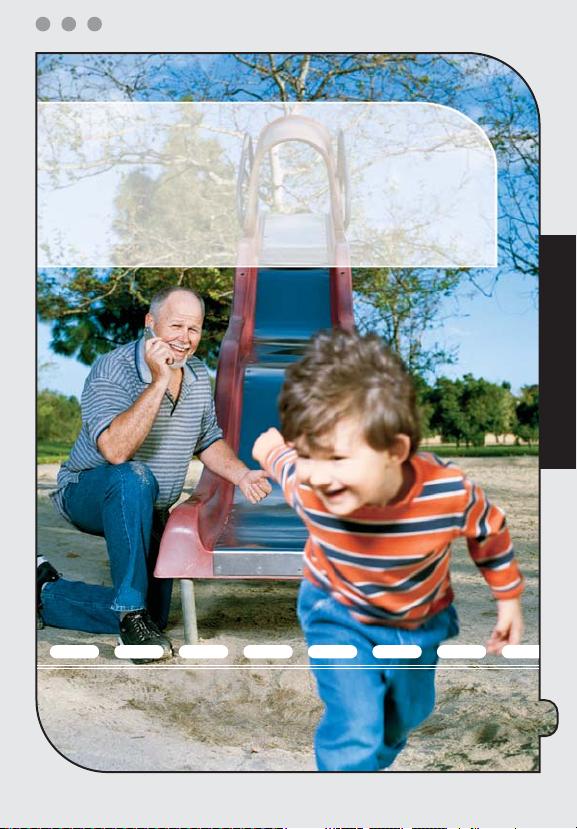
Work wirelessly. Protect your wireless device against damage, or even more
importantly, protect yourself on the road. You can find it all in Verizon Wireless plan
enhancements. Call 1-800-922-0204 or speak to your Verizon Wireless Sales
Representative to find out more. Or just visit verizonwireless.com.
Safety and protection
Roadside Assistance:
services anywhere in the United States and Canada, 24 hours a day, 365 days a year,
OPTIONAL SERVICES
even outside the Verizon Wireless network area.
Roadside Assistance can provide you with emergency roadside
Wireless device protection
Receive total protection for your wireless device and limited accessories. If your
wireless device is lost, stolen, damaged or malfunctioning — you’re covered. Just
choose a service plan that’s right for you (must be added within 15 days of activation or
upgrade):
•
Total Equipment Coverage
•
Wirel ess Dev ice Prot ection
•
Extended Warranty
NOTE: Insurance offered by third-part y providers.
Voice services
Enhanced Voice Mail:
your calls, store more messages or even receive faxes for printing.
Turn your wireless device into your office assistant. Forward
International services
International Long Distance Value Plan:
reduced rates when making calls to over 65 international locations.
pg
44
Global Phone:
Global Phone lets you enjoy wireless service in over 100 countries.
For a monthly access charge, enjoy
Page 45
Global Rental:
For the less frequent international traveler, Verizon Wireless
customers can quickly and easily rent a wireless device for use while they are traveling
abroad.
International (CDMA) Roaming:
At home or abroad, use your wireless device in over
20 countries.
For more information:
Visit verizonwireless.com/international.
Other products and services
Whether it’s business or personal, Verizon Wireless offers a variety of wireless solutions
for your notebooks, Personal Digital Assistants (PDAs) and/or Smartphones.
Office Message Alert:
TXT Alert is sent to your wireless device.
Wireless Sync®:
to your wireless device. With support for both corporate and POP3/IMAP e-mail, you
have no need to create a new e-mail address – just use the one you already have.
BroadbandAccess Connect:
Internet using your wireless device while traveling.
When a Voice Mail is left on your office phone’s Voice Mail, a
Delivers your personal or business e-mail, calendar, contact and task
Allows you to connect your notebook computer to the
OPTIONAL SERVICES
pg
45
Page 46
OPTIONAL SERVICES
pg
46
Page 47
pg
47
MORE INFORMATION
More
information
Page 48
How wireless works
Your wireless service is different from your home or business phone service. On a
Send
wireless device, you must press
to alert the network to connect your call. Unlike
the calls you make on a home or business phone, wireless communications travel over
the air and can react to the environment. Rain, snow, fog, falling leaves, water,
mountains, canyons and even buildings may affect service. All wireless service is
subject to “dead zones,” or no-coverage areas.
MORE INFORMATION
Verizon Wireless network technology
Verizon Wireless offers CDMA (Code Division Multiple Access) digital network
technology to most of its customers. CDMA digital technology offers many benefits
compared to analog, such as less static, enhanced voice clarity, increased privacy and
longer battery l ife. A CDMA digital phone is necessary to subscr ibe to our digital
service. Verizon Wireless only sells digital wireless devices that are E911 compatible
and either all-digital or tri-mode, which means you may use analog or CDMA digital
services on different f requencies.
Worry Free Guarantee®
Subject to the Customer Agreement and Calling Plan. Please read and understand
them before activating. Verizon Wireless calling areas, rates, coverage, agreements,
provisions, business practices, procedures and policies are subject to change as
specified in the Customer Agreement. Our liability is significantly limited.
Certain conditions and restrictions apply. Best network claim based on our reliability
studies. See
verizonwireless.com/bestnetwork
for details.
New Every Two®
You must retain the same wireless device for 24 months in order to receive the full
advantages of this program. If you choose to replace your device at a discounted price,
you will forfeit your benefits and be automatically re-enrolled if you meet the
pg
48
Page 49
requirements of the program. If you enrolled in the program on or after 11/25/02, you
must take advantage of the New Every Two offer within 6 months after becoming
eligible; otherwise, you may be charged full retail price to upgrade your current
wireless device. Discount amount will be applied toward the 2-year Customer
Agreement retail price. Secondary Family SharePlan® lines are not eligible to
participate in the program.
The New Every Two discount cannot exceed the price of the wireless device after
mail-in rebates. If your 2-year Customer Agreement with a digital Calling Plan of
$34.99 or higher began on or after 6/02/03, you were automatically enrolled in the
program. Customers who began their 2-year agreements on or after 4/01/00 on a
digital Calling Plan of $35.00 or higher were also automatically enrolled in the
program. If you enrolled in the program prior to 2/05/06 and continued to meet the
requirements of the program, you will be eligible for a free wireless device up to $100,
or a credit of up to $100 toward a more expensive wireless dev ice, when you be come
eligible for your next New Every Two upgrade (after which time you will be enrolled in
the $50/$100 New Every Two program described in the brochure). New Every Two
discount amounts and Calling Plan tiers subject to change at Verizon Wireless’ sole
discretion.
Security Deposit
You may have been asked to leave a security deposit at the time you activated your
wireless service. You are eligible to receive your security deposit back at the end of
1 year of uninterrupted service, or upon termination of your contract. You will
automatically be refunded your deposit after 1 year, including interest, provided that
you have kept your account in “good standing” (this means that you paid your bill
continuously for 1 year in a timely manner). This refund may take up to 3 billing cycles
to be processed. Should you be disconnected at any time during the first year for lack of
payment, you forfeit any interest accrued during that t ime frame. If you terminate y our
MORE INFORMATION
pg
49
Page 50
service, but have not paid your final bill, the deposit will be applied to your account,
and you will receive any remaining funds. If your service is terminated after the initial
15-day Worry Free Guarantee™ period but before the end of your minimum term, your
deposit will be applied against the $175 early termination fee in addition to any
outstanding balance before a check is processed.
Federal Communications Commission (FCC) rules and regulations
The FCC requires that wireless devices be operated in accordance with FCC rules and
MORE INFORMATION
regulations and under supervision of the licensee. Severe punishment can result from
failure to comply with the following regulations:
•
No person shall knowingly utter or transmit any false or fraudulent signal or distress
communication.
•
No person shall willfully or maliciously interfere with, or cause interference to, any
radio communication or signal.
•
It is unlawful to “listen in” on conversations intended for others or to divulge any
information thereby obtained.
•
No person shall utter any obscene, indecent or profane language by means of radio
communication.
National Do Not Call Registry
Protect yourself from unwanted calls with the National Do Not Call Registry program.
•
FCC regulations prohibit telemarketers from using automated dialers to call wireless
numbers.
•
Personal wireless device users can add their wireless numbers to the National Do Not
Call Registry.
•
The federal government does not maintain a national wireless device registry.
pg
50
Page 51
You can register by either of the following methods:
By wireless device:
Online at: w ww.donotcall.gov
1-888-382-1222 from the wireless number you wish to register.
.
Your registration becomes effective within 31 days of signing up and is ac tive for 5
years. There is no cutoff date or deadline for registering.
NOTE: Business-to-business calls are not covered under the Registry. For more detailed information, please go to
www.fcc.gov.
Radio Frequency Emissions
Your wireless device, which contains a radio transmitter and receiver, emits radio
frequency energy during use. The following consumer info rmation addresses
commonly asked questions about the health effects of wireless devices.
Are wireless devices safe?
Scientific research on the subject of wireless devices and radio frequency (RF) energy
has been conducted worldwide for many years, and continues. In the United States, the
Food and Drug Administration (FDA) and the Federal Communications Commission
(FCC) set policies and procedures for wireless devices. The FDA and the FCC have created
a joint website, “Cell Phone Facts — Consumer Information on Wireless Phones,”
which states that “[t]he available scientific evidence does not show that any health
problems are associated with using wireless phones,” while noting that “[t]here is no
proof, however, that wireless phones are absolutely safe.” You can access the joint
FDA/FCC website at
http://ww w.fda.gov/cel lphones
.You can also contact the FDA
toll-free at 1-888-463-6332 or 1-888-INFO-FDA.
In June 2000, the FDA entered into a cooperative research and development agreement
through which additional scientific research will be conducted. The FCC issued its own
website publication stating that “[t]here is no scientific evidence to date that proves
MORE INFORMATION
pg
51
Page 52
that wireless phone usage can lead to cancer or a variety of other problems, including
headaches, dizziness or memory loss.” This publication is available at
http://www.fcc.gov/cgb/consumer facts/mobilephone.html
or through the FCC at
1-888-225-5322 or at 1-888-CALL-FCC.
What does Specific Absorption Rate (SAR) mean?
In 1996, the FCC, working with the FDA, the U.S. Environmental Protection Agency
(EPA) and other agencies, established RF exposure safety guidelines for wireless
MORE INFORMATION
devices in the United States. Before a wireless device model is available for sale to the
public, it must be tested by the manufacturer and certified to the FCC that it does not
exceed limits established by the FCC.
One of these limits is expressed as a Specific Absorption Rate, or “SAR”. SAR is a
measure of the rate of absorption of RF energy in the body. Tests for SAR are conducted
with the wireless device transmitting at its highest power level in all tested frequency
bands. Since 1996, the FCC has required that the SAR of handheld wireless devices not
exceed 1.6 watts per kilogram, averaged over one gram of tissue. Although the SAR is
determined at the highest power level, the actual SAR value of a wireless device while
operating can be less than the reported SAR value. This is because the SAR value may
vary from call to call, depending on factors such as proximity to a cell site, the
proximity of the wireless device to the body while in use and the use of hands-free
devices.
For more information about SARs, see the FCC’s OET Bulletins 56 and 65 at
http://www.fcc.gov/Bureaus/Engineering_Technology/Documents/bulletins
http://www.fcc.gov/oet/fccid
, or visit the Cellular Telecommunications Industry
Association (CTIA) website at
http://www.ctia.org/wireless_consumers/health_and_safety
to contact the manufac turer of your wireless device.
pg
52
,
. You may also wish
Page 53
Can I minimize my RF exposure?
If you are concerned about RF, there are several simple steps you can take to minimize
your RF exposure. You can, of course, reduce your talk time. You can place more
distance between your body and the source of the RF, as the exposure level drops off
dramatically with distance. The FDA/FCC website states that “[h]ands-free kits can be
used with wireless devices for convenience and comfort. These systems reduce
absorption of RF energy in the head because the phone, which is a source of the RF
emissions, will not be placed against the head. On the other hand, if the phone is
mounted against the waist or other part of the body during use, then that part of the
body will absorb more RF energy. Wireless phones marketed in the U.S. are required to
meet safety requirements regardless of whether they are used against the head or
against the body. Either configuration should result in compliance with the safety
limit.”
Also, if you use your wireless device while in a car, you can use a wireless device with an
antenna on the outside of the vehicle. You should also read and follow your wireless
device manufacturer’s instructions for the safe operation of your wireless device.
Do wireless devices pose any special risks to children?
The FDA and FCC joint website states that “[t]he scientific evidence does not show a
danger to users of wireless phones, including children.” The FDA/FCC website further
states that “[s]ome groups sponsored by other national governments have advised
that children be discouraged from using wireless phones at all. For example, the
government in the United Kingdom [“UK”] distributed leaflets containing such a
recommendation in December 2000. [The UK] noted that no evidence exists that using
a wireless phone causes brain tumors or other ill effects. [The UK’s] recommendation to
limit wireless phone use by children was strictly precautionary; it was not based on
scientific evidence that any health hazard exists.”
MORE INFORMATION
pg
53
Page 54
A copy of the UK’s leaflet is available at
http://www.dh.gov.uk
(search “Mobile”), or
you can write to NRPB, Chilton, Didcot, Oxon OX11 0RQ, United Kingdom. Parents who
wish to reduce their children’s RF exposure may choose to restrict their children’s
wireless device use.
Where can I obtain further information?
For further information, see the following additional resources (websites current as of
April 2005).
MORE INFORMATION
U.S. Food and Drug Administration
FDA Consumer Magazine, November–December 2000
Telephone: 1-888-INFO-FDA
http://www.fda.gov/fdac/features/2000/600_ phone.html
American National Standards Institute
1819 L Street, N.W., Suite 600, Washington, D.C. 20036
Telephone: 1-202-293-8020
http://www.ansi.org
PREVENTION OF HEARING LOSS
Caution: Avoid potential hearing loss
Prolonged exposure to loud sounds (including music) is the most common cause of
preventable hearing loss. Some scientific research suggests that using portable audio
devices, such as portable music players and cellular telephones, at high volume
settings for long durations may lead to permanent noise-induced hearing loss. This
includes the use of headphones (including headsets, earbuds and Bluetooth® or other
wireless devices). Exposure to very loud sound has also been associated in some studies
with tinnitus (a ringing in the ear), hypersensitivity to sound and distorted hearing.
Individual susceptibility to noise-induced hearing loss and other potential hearing
problems varies.
pg
54
Page 55
The amount of sound produced by a portable audio device varies depending on the
nature of the sound, the device, the device settings and the headphones. You should
follow some commonsense recommendation s when using any portable audio device:
•
Set the volume in a quiet environment and select the lowest volume at which you
can hear adequately.
•
When using headphones, tur n the volume down if you cannot hear the people
speaking near you or if th e person sitting next to you can hear what you are li stening
to.
•
Do not turn the volume up to block out noisy surroundings. If you choose to listen to
your portable device in a noisy environment, use noise-cancelling headphones to
block out background environmental noise.
•
Limit the amount of time you listen. As the volume increases, less time is required
before your hearing could be affected.
•
Avoid using headphones after exposure to extremely loud noises, such as rock
concerts, that might cause temporary hearing loss. Temporary hearing loss might
cause unsafe volumes to sound normal.
•
Do not listen at any volume that causes you discomfort. If you experience ringing in
your ears, hear muffled speech or experience any temporar y hearing difficulty after
listening to your portable audio device, discontinue use and consult your doctor.
You can obtain additional information on this subject from the following sources:
American Academy of Audiology
11730 Plaza American Drive, Suite 300
Reston, VA 20190
Voice: (800) 222-2336
Email: [email protected]
Internet:
www.audiology.org
MORE INFORMATION
pg
55
Page 56
National Institute on Deafness and Other Communication Disorders
National Institutes of Health
31 Center Drive, MSC 2320
Bethesda, MD USA 20892-2320
Voice: (301) 496-7243
Email: [email protected]
Internet:
http://www.nidcd.nih.gov/health/hearing
MORE INFORMATION
National Institute for Occupational Safety and Health
Hubert H. Humphrey Bldg.
200 Independence Ave., SW
Washington, DC 20201
Voice: 1-800-35-NIOSH (1-800-356-4674)
Internet:
http://www.cdc.gov/niosh/topics/noise/default.html
Implantable Medical Devices
A minimum separation of six (6) inches should be maintained between a wireless
phone and an implantable medical device, such as a pacemaker or implantable
cardioverter defibrillator, to avoid potential interference with the device. Persons who
have such devices:
•
Should ALWAYS keep the wireless phone more than six (6) inches from their
implantable medical device when the wireless phone is turned ON;
•
Should not carry the wireless phone in a breast pocket;
•
Should use the ear opposite the implantable medical device to minimize the
potential for interference;
•
Should turn the wireless phone OFF immediately if there is any reason to suspect
that interference is taking place; and
•
Should read and follow the directions from the manufacturer of your implantable
pg
56
medical device.
Page 57
If you have any questions about using your wireless phone with such a device, consult
your health care provider.
For additional information, see
www.fcc.gov/cellphones/
.
Drive responsibly
•
If you choose to talk while driving, always use a hands-free device. Make sure your
hands-free device is on and working before driving.
•
Do not dial or look up phone numbers when driving. Use the voice-activated feature
on your wireless device.
•
Using a wireless device while driving may increase your risk of distraction, whether
or not you use a hands-free device. To eliminate this risk, consider turning your
wireless device off and allowing calls to go to Voice Mail.
Important safety and legal information
Static Electricity, ESD, and Your Palm® Device
Electrostatic discharge (ESD) can cause damage to electronic devices if discharged into the device, so you should take steps
to avoid such an occurrence. Do not touch the battery contacts.
Operational Warnings
IMPORTANT INFORMATION ON SAFE AND EFFICIENT OPERATION. Read this information before using your integrated
multi-service portable radio.
For the safe and efficient operation of your radio, observe these guidelines:
Potentially explosive atmospheres: Turn off your smartphone when you are in any areas with a potentially explosive
atmosphere, such as fueling areas (gas or petrol stations, below deck on boats) storage facilities for fuel or chemicals,
blasting areas and areas near electrical blasting caps, and areas where there are chemicals or particles (such as metal
powders, grains and dust) in the air.
Interference to medical and personal Electronic Devices: Most but not all electronic equipment is shielded from RF
signals and certain electronic equipment may not be shielded against the RF signals from your smartphone.
MORE INFORMATION
pg
57
Page 58
Other Medical Devices, Hospitals: If you use any ot her personal medical device, consult the manufacturer of your device
to determine if it is adequately shielded from external RF energy. Your physician may be able to assist you in obtaining this
information. Turn your smartphone OFF in health care f acilities when any regulations posted in these areas instruct you to
do so. Hospitals or health care facilities may be using equipment that could be sensitive to external RF energy.
Repetitive Motion Injuries: When using the keyboard or playing games on your smartphone, you may experience
discomfort in your neck, shoulders, hands, arms, or other parts of the body. To avoid any injury, such as tendonitis, carpal
tunnel syndrome, or other musculoskeletal disorder, make sure to take necessary breaks from use, take longer rests (such as
several hours) if discomfort or tiring begins, and see a doctor if discomfort persists. To minimize the risk of Repetitive Motion
Injuries, when texting or playing games with your phone:
• Do not grip the phone too tightly.
MORE INFORMATION
• Press the buttons lightly.
• Make use of the special features in the handset that minimize the numb er of buttons which have to be pressed, such as
message templates and predictive text.
• Take lots of breaks to stretch and relax.
Blackouts and Seizures: Blinking lights, such a s those experienced with television or playing video games, may cause
some people to experience blackout or seizure, even if never experienced before. In the event a smartphone user should
experience any disorientation, loss of awareness, convulsion, eye or muscle twitching or other involuntary movements, stop
use immediately and consult a doctor. Individuals with personal or family history of such events should consult a doctor
before using the device. To limit the possibility of such symptoms, wherever possible every hour take a minimum of 15
minutes, use in a well lighted area, view the screen from the farthest distance and avoid exposure to blinking lights if you
are tired.
Operating Machinery: Do not use your smar tphone while operating machinery. Full attention must be g iven to operating
the machinery in order to reduce the risk of an accident.
Aircraft: While in aircraft, follow all instructions regarding the operation of your smar tphone. Use of your smartphone
while on board an aircraft must be done in accordance in compliance with airline instruc tions and regulations.
Vehicles with Air Bags: Your smartphone should not be placed in a position that would affect the operation of air bag
deployment or in a position that, should the air bag inflate, could propel the smartphone. Air bags inflate with great force
and care should be taken to protect within a vehicle that has air bags. Do not place a phone in the area over an air bag or in
the air bag deployment area. Store the phone safely before driving the vehicle.
Small children: Do not leave your smartpho ne and its accessories within the reach of small children or allow them to play
with it. They could hurt themselves or others, or could accidentally damage the smartphon e. Your smartphone contains
small parts with sharp edges that may cause an injury or which could become detached and create a choking hazard.
pg
58
Page 59
Product Handling & Safety: You alone are responsible for how you use your smartphone and any consequences of its use.
You must always switch off your smartphone wherever the use of a phone is prohibited. Use of your smartphone is subject
to safety measures designed to protect users and their environment.
Electrostatic Discharge (ESD)
Electrostatic discharge (ESD) can cause damage to electronic devices if discharged into the device, so you should take steps
to avoid such an occurrence. Do not touch the smartphone’s battery contacts.
Description of ESD: Static electricity is an electrical charge cau sed by the buildup of excess electrons on the surface of a
material. To most people, static electricity and ESD are nothing more than annoyances. For example, after walking over a
carpet while scuffing your feet, building up electrons on your body, you may get a shock—the discharge event—when you
touch a metal doorknob. This little shock discharges the built-up static electrici ty.
ESD-susceptible equipment: Even a small amount of ESD can harm circuitry, so when working with electronic devices,
take measures to help protect your electronic devices, including your Palm™ hand held, from ESD harm. While Palm has built
protections against ESD into its products, ESD unfortunately exists and, unless neutralized, could build up to levels that
could harm your equipment. Any electronic device th at contains an external entry point for plugging in anything from
cables to docking stations is susceptible to entry of ESD. Devices that you carry with you, such as your smar tphone, build up
ESD in a unique way because the static ele ctricity that may have built up on your body is automatic ally passed to the device.
Then, when the device is connected to anothe r device such as a docking station, a discharge event can occur.
Precautions against ESD: Make sure to discharge any built-up static electricity from yourself and your electronic devices
before touching an electronic device or connecting one device to another. The recommendation from Palm is that you take
this precaution before connecting your handhe ld to your computer, placing the handheld in a cradle, or connecting it to any
other device. You can do this in many ways, including the following:
• Ground yourself when you’re holding your mobile device by simultaneously touching a metal sur face that is at earth
ground.
• For example, if your computer has a metal case and is plugged into a standard three-prong grounded outlet, touching
the case should discharge the ESD on your body.
• Increase the relative humidity of your environment.
• Install ESD-specific prevention items, such as grounding mats.
Conditions that enhance ESD occurrences: Conditions that can contribute to the buildup of static electricity in the
environment include the following:
• Low relative humidity.
• Material type (The type of material gathering the charge. For example, synthetics are more prone to static buildup than
natural fibers like cotton.)
MORE INFORMATION
pg
59
Page 60
• The rapidity with which you touch, con nect, or disconnect electronic devices.
While you should always take appropriate precautions to discharge static electricity, if you are in an environment wh ere you
notice ESD events you may want to take extra precautions to protect your elec tronic equipment against ESD.
MORE INFORMATION
pg
60
Page 61
NOTES
pg
61
Page 62
NOTES
pg
62
 Loading...