


 Loading...
Sprint PCS® Service
Sprint PCS VisionSM Smart Device Treo™ 650 by palm
www.sprint.com
© Sprint Nextel. All rights reserved. No reproduction in whole or in part without prior written approval. Sprint, the "Going
Forward" logo and other trademarks are trademarks of Sprint Nextel.
Printed in the U.S.A.
PN: 406-10149-03
CI_Treo650_080705

Table of Contents |
|
Welcome to Sprint . . . . . . . . . . . . . . . . . . . . . . . . . . . . . . . . . . . . . . . . . . . . . . . . . . |
. i |
How to Use This Guide . . . . . . . . . . . . . . . . . . . . . . . . . . . . . . . . . . . . . . . . . . . . . . . |
.ii |
Where to Learn More . . . . . . . . . . . . . . . . . . . . . . . . . . . . . . . . . . . . . . . . . . . . . . . . |
iii |
Section 1: Getting Started . . . . . . . . . . . . . . . . . . . . . . . . . . . . . . . . . . . . . . . . . . . . . |
1 |
1A. Setting Up Your Sprint PCS VisionSM Smart Device Treo™ 650 by Palm®
Software Installation CD . . . . . . . . . . . . . . . . . . . . . . . . . . . . . . . . . . . . . . . . . . . . . . 3
What You Need . . . . . . . . . . . . . . . . . . . . . . . . . . . . . . . . . . . . . . . . . . . . . . . . . . . . . . . . . . . . . . . . . . . . . |
. . 4 |
Inserting the Battery . . . . . . . . . . . . . . . . . . . . . . . . . . . . . . . . . . . . . . . . . . . . . . . . . . . . . . . . . . . . . . . . |
. . 5 |
Charging the Battery . . . . . . . . . . . . . . . . . . . . . . . . . . . . . . . . . . . . . . . . . . . . . . . . . . . . . . . . . . . . . . . . . |
. 6 |
1B. Setting Up Service . . . . . . . . . . . . . . . . . . . . . . . . . . . . . . . . . . . . . . . . . . . . . . . . . . |
11 |
Getting Started With Sprint PCS Service . . . . . . . . . . . . . . . . . . . . . . . . . . . . . . . . . . . . . . . . . . . . . . |
12 |
Setting Up Your Voicemail . . . . . . . . . . . . . . . . . . . . . . . . . . . . . . . . . . . . . . . . . . . . . . . . . . . . . . . . . . . . |
13 |
Sprint PCS Account Passwords . . . . . . . . . . . . . . . . . . . . . . . . . . . . . . . . . . . . . . . . . . . . . . . . . . . . . . . . |
14 |
Getting Help . . . . . . . . . . . . . . . . . . . . . . . . . . . . . . . . . . . . . . . . . . . . . . . . . . . . . . . . . . . . . . . . . . . . . . . . . |
15 |
1C. Connecting to Your Computer . . . . . . . . . . . . . . . . . . . . . . . . . . . . . . . . . . . . . . . . |
19 |
Preparing Your Computer . . . . . . . . . . . . . . . . . . . . . . . . . . . . . . . . . . . . . . . . . . . . . . . . . . . . . . . . . . . . |
20 |
Connecting Your Treo 650 to Your Computer . . . . . . . . . . . . . . . . . . . . . . . . . . . . . . . . . . . . . . . . . . |
22 |
Installing the Synchronization Software on Your Computer . . . . . . . . . . . . . . . . . . . . . . . . . . . |
24 |
Section 2: Your Sprint PCS Vision Smart Device . . . . . . . . . . . . . . . . . . . . . . . . .27
2A. Learning the Basics . . . . . . . . . . . . . . . . . . . . . . . . . . . . . . . . . . . . . . . . . . . . . . . . . 29
Your New Sprint PCS Vision Smart Device . . . . . . . . . . . . . . . . . . . . . . . . . . . . . . . . . . . . . . . . . . . . .30
Turning Your Device’s Phone On and Off . . . . . . . . . . . . . . . . . . . . . . . . . . . . . . . . . . . . . . . . . . . . . .35
Moving Around the Treo 650 Screen . . . . . . . . . . . . . . . . . . . . . . . . . . . . . . . . . . . . . . . . . . . . . . . . . .37
Using the Keyboard . . . . . . . . . . . . . . . . . . . . . . . . . . . . . . . . . . . . . . . . . . . . . . . . . . . . . . . . . . . . . . . . . .42
Opening Applications . . . . . . . . . . . . . . . . . . . . . . . . . . . . . . . . . . . . . . . . . . . . . . . . . . . . . . . . . . . . . . . .47
2B. Using Your Device’s Phone Features . . . . . . . . . . . . . . . . . . . . . . . . . . . . . . . . . . 51
Making Calls . . . . . . . . . . . . . . . . . . . . . . . . . . . . . . . . . . . . . . . . . . . . . . . . . . . . . . . . . . . . . . . . . . . . . . . . .52 Receiving Calls . . . . . . . . . . . . . . . . . . . . . . . . . . . . . . . . . . . . . . . . . . . . . . . . . . . . . . . . . . . . . . . . . . . . . . .57 Signal Strength and Phone Status . . . . . . . . . . . . . . . . . . . . . . . . . . . . . . . . . . . . . . . . . . . . . . . . . . . .59 Managing Active Calls . . . . . . . . . . . . . . . . . . . . . . . . . . . . . . . . . . . . . . . . . . . . . . . . . . . . . . . . . . . . . . . .62 Controlling Your Roaming Experience . . . . . . . . . . . . . . . . . . . . . . . . . . . . . . . . . . . . . . . . . . . . . . . .66 Internal Phone Book . . . . . . . . . . . . . . . . . . . . . . . . . . . . . . . . . . . . . . . . . . . . . . . . . . . . . . . . . . . . . . . . .67 Defining Favorite Buttons . . . . . . . . . . . . . . . . . . . . . . . . . . . . . . . . . . . . . . . . . . . . . . . . . . . . . . . . . . . .71 Using a Phone Headset . . . . . . . . . . . . . . . . . . . . . . . . . . . . . . . . . . . . . . . . . . . . . . . . . . . . . . . . . . . . . . .75 Connecting to Devices With Bluetooth® Wireless Technology . . . . . . . . . . . . . . . . . . . . . . . . .77 Using Dial-up Networking on Your Treo 650 . . . . . . . . . . . . . . . . . . . . . . . . . . . . . . . . . . . . . . . . . .82
2C. Using Your Device’s Organizer Features . . . . . . . . . . . . . . . . . . . . . . . . . . . . . . . 87
Calendar . . . . . . . . . . . . . . . . . . . . . . . . . . . . . . . . . . . . . . . . . . . . . . . . . . . . . . . . . . . . . . . . . . . . . . . . . . . . .88 Tasks . . . . . . . . . . . . . . . . . . . . . . . . . . . . . . . . . . . . . . . . . . . . . . . . . . . . . . . . . . . . . . . . . . . . . . . . . . . . . . . .99 Memos . . . . . . . . . . . . . . . . . . . . . . . . . . . . . . . . . . . . . . . . . . . . . . . . . . . . . . . . . . . . . . . . . . . . . . . . . . . . .103 Listening to Music . . . . . . . . . . . . . . . . . . . . . . . . . . . . . . . . . . . . . . . . . . . . . . . . . . . . . . . . . . . . . . . . . .104 World Clock . . . . . . . . . . . . . . . . . . . . . . . . . . . . . . . . . . . . . . . . . . . . . . . . . . . . . . . . . . . . . . . . . . . . . . . . .111 Calculator . . . . . . . . . . . . . . . . . . . . . . . . . . . . . . . . . . . . . . . . . . . . . . . . . . . . . . . . . . . . . . . . . . . . . . . . . .114 Looking Up Contacts and Other Information . . . . . . . . . . . . . . . . . . . . . . . . . . . . . . . . . . . . . . . . .117 Beaming Information . . . . . . . . . . . . . . . . . . . . . . . . . . . . . . . . . . . . . . . . . . . . . . . . . . . . . . . . . . . . . . .120
2D. Managing Applications . . . . . . . . . . . . . . . . . . . . . . . . . . . . . . . . . . . . . . . . . . . . . 123
Synchronizing Contacts and Other Information . . . . . . . . . . . . . . . . . . . . . . . . . . . . . . . . . . . . . .124
Installing Applications . . . . . . . . . . . . . . . . . . . . . . . . . . . . . . . . . . . . . . . . . . . . . . . . . . . . . . . . . . . . . .127
Removing Applications . . . . . . . . . . . . . . . . . . . . . . . . . . . . . . . . . . . . . . . . . . . . . . . . . . . . . . . . . . . . . .130
Viewing Application Information . . . . . . . . . . . . . . . . . . . . . . . . . . . . . . . . . . . . . . . . . . . . . . . . . . . .132
Using Expansion Cards . . . . . . . . . . . . . . . . . . . . . . . . . . . . . . . . . . . . . . . . . . . . . . . . . . . . . . . . . . . . . .133
2E. Customizing Your Device . . . . . . . . . . . . . . . . . . . . . . . . . . . . . . . . . . . . . . . . . . . 139
Phone Settings . . . . . . . . . . . . . . . . . . . . . . . . . . . . . . . . . . . . . . . . . . . . . . . . . . . . . . . . . . . . . . . . . . . . . .140 System Sound Settings . . . . . . . . . . . . . . . . . . . . . . . . . . . . . . . . . . . . . . . . . . . . . . . . . . . . . . . . . . . . . .145 Display and Appearance . . . . . . . . . . . . . . . . . . . . . . . . . . . . . . . . . . . . . . . . . . . . . . . . . . . . . . . . . . . . .147 Applications Settings . . . . . . . . . . . . . . . . . . . . . . . . . . . . . . . . . . . . . . . . . . . . . . . . . . . . . . . . . . . . . . . .149 Button Settings . . . . . . . . . . . . . . . . . . . . . . . . . . . . . . . . . . . . . . . . . . . . . . . . . . . . . . . . . . . . . . . . . . . . .151 Date and Time Settings . . . . . . . . . . . . . . . . . . . . . . . . . . . . . . . . . . . . . . . . . . . . . . . . . . . . . . . . . . . . .153 Power Preferences . . . . . . . . . . . . . . . . . . . . . . . . . . . . . . . . . . . . . . . . . . . . . . . . . . . . . . . . . . . . . . . . . .155 Locking Your Device and Information . . . . . . . . . . . . . . . . . . . . . . . . . . . . . . . . . . . . . . . . . . . . . . . .156 Additional Features . . . . . . . . . . . . . . . . . . . . . . . . . . . . . . . . . . . . . . . . . . . . . . . . . . . . . . . . . . . . . . . . .163 Accessories for Your Device . . . . . . . . . . . . . . . . . . . . . . . . . . . . . . . . . . . . . . . . . . . . . . . . . . . . . . . . . .165
Section 3: Sprint PCS Service Features . . . . . . . . . . . . . . . . . . . . . . . . . . . . . . . 167
3A. Sprint PCS Service Features—The Basics . . . . . . . . . . . . . . . . . . . . . . . . . . . . . . 169
Using Voicemail . . . . . . . . . . . . . . . . . . . . . . . . . . . . . . . . . . . . . . . . . . . . . . . . . . . . . . . . . . . . . . . . . . . .170
Call Waiting . . . . . . . . . . . . . . . . . . . . . . . . . . . . . . . . . . . . . . . . . . . . . . . . . . . . . . . . . . . . . . . . . . . . . . . .172
Call Forwarding . . . . . . . . . . . . . . . . . . . . . . . . . . . . . . . . . . . . . . . . . . . . . . . . . . . . . . . . . . . . . . . . . . . . .173
Three-Way Calling . . . . . . . . . . . . . . . . . . . . . . . . . . . . . . . . . . . . . . . . . . . . . . . . . . . . . . . . . . . . . . . . . .174
Sprint PCS Voice CommandSM . . . . . . . . . . . . . . . . . . . . . . . . . . . . . . . . . . . . . . . . . . . . . . . . . . . . . . . .175
TTY Use With Sprint PCS Service . . . . . . . . . . . . . . . . . . . . . . . . . . . . . . . . . . . . . . . . . . . . . . . . . . . . .176
3B. Sprint PCS VisionSM—The Basics . . . . . . . . . . . . . . . . . . . . . . . . . . . . . . . . . . . . 179
Getting Started With Sprint PCS Vision . . . . . . . . . . . . . . . . . . . . . . . . . . . . . . . . . . . . . . . . . . . . . |
.180 |
Sprint PCS Vision Features . . . . . . . . . . . . . . . . . . . . . . . . . . . . . . . . . . . . . . . . . . . . . . . . . . . . . . . . . . . |
181 |
Accessing Sprint PCS Vision . . . . . . . . . . . . . . . . . . . . . . . . . . . . . . . . . . . . . . . . . . . . . . . . . . . . . . . . . |
183 |
3C. Sending and Receiving Email . . . . . . . . . . . . . . . . . . . . . . . . . . . . . . . . . . . . . . . . 185
Setting Up an Account . . . . . . . . . . . . . . . . . . . . . . . . . . . . . . . . . . . . . . . . . . . . . . . . . . . . . . . . . . . . . . |
186 |
Creating and Sending Messages . . . . . . . . . . . . . . . . . . . . . . . . . . . . . . . . . . . . . . . . . . . . . . . . . . . . . |
191 |
Receiving and Viewing Messages . . . . . . . . . . . . . . . . . . . . . . . . . . . . . . . . . . . . . . . . . . . . . . . . . . . . |
195 |
Managing Your Messages . . . . . . . . . . . . . . . . . . . . . . . . . . . . . . . . . . . . . . . . . . . . . . . . . . . . . . . . . . . |
197 |
Customizing Your Email Settings . . . . . . . . . . . . . . . . . . . . . . . . . . . . . . . . . . . . . . . . . . . . . . . . . . . . |
199 |
Working With Microsoft Exchange ActiveSync® . . . . . . . . . . . . . . . . . . . . . . . . . . . . . . . . . . . . . . |
204 |
Sprint PCS Business ConnectionSM Personal Edition . . . . . . . . . . . . . . . . . . . . . . . . . . . . . . . . . . . |
205 |
3D. Messaging . . . . . . . . . . . . . . . . . . . . . . . . . . . . . . . . . . . . . . . . . . . . . . . . . . . . . . . . 207
Creating and Sending Messages . . . . . . . . . . . . . . . . . . . . . . . . . . . . . . . . . . . . . . . . . . . . . . . . . . . . .208
Receiving Messages . . . . . . . . . . . . . . . . . . . . . . . . . . . . . . . . . . . . . . . . . . . . . . . . . . . . . . . . . . . . . . . . .213
Chatting With Messaging . . . . . . . . . . . . . . . . . . . . . . . . . . . . . . . . . . . . . . . . . . . . . . . . . . . . . . . . . . .215
Managing Your Messages . . . . . . . . . . . . . . . . . . . . . . . . . . . . . . . . . . . . . . . . . . . . . . . . . . . . . . . . . . .216
Customizing Your Messaging Settings . . . . . . . . . . . . . . . . . . . . . . . . . . . . . . . . . . . . . . . . . . . . . . .218
3E. Browsing the Web . . . . . . . . . . . . . . . . . . . . . . . . . . . . . . . . . . . . . . . . . . . . . . . . . 221
Viewing Web Pages . . . . . . . . . . . . . . . . . . . . . . . . . . . . . . . . . . . . . . . . . . . . . . . . . . . . . . . . . . . . . . . . .222
Working With Bookmarks . . . . . . . . . . . . . . . . . . . . . . . . . . . . . . . . . . . . . . . . . . . . . . . . . . . . . . . . . . .227
Customizing Your Web Browser Settings . . . . . . . . . . . . . . . . . . . . . . . . . . . . . . . . . . . . . . . . . . . .230
3F. Using Your Device’s Built-in Camera . . . . . . . . . . . . . . . . . . . . . . . . . . . . . . . . . 233
Taking Pictures and Videos . . . . . . . . . . . . . . . . . . . . . . . . . . . . . . . . . . . . . . . . . . . . . . . . . . . . . . . . . .234
Viewing Pictures and Videos . . . . . . . . . . . . . . . . . . . . . . . . . . . . . . . . . . . . . . . . . . . . . . . . . . . . . . . |
.238 |
Organizing Pictures and Videos . . . . . . . . . . . . . . . . . . . . . . . . . . . . . . . . . . . . . . . . . . . . . . . . . . . . . . |
240 |
Customizing Your Camera Settings . . . . . . . . . . . . . . . . . . . . . . . . . . . . . . . . . . . . . . . . . . . . . . . . . . |
242 |
Using Your Online Album . . . . . . . . . . . . . . . . . . . . . . . . . . . . . . . . . . . . . . . . . . . . . . . . . . . . . . . . . . . |
244 |
Viewing Pictures and Videos on Your Computer . . . . . . . . . . . . . . . . . . . . . . . . . . . . . . . . . . . . . . |
246 |
Section 4: Help . . . . . . . . . . . . . . . . . . . . . . . . . . . . . . . . . . . . . . . . . . . . . . . . . . . . 247
4A. Help . . . . . . . . . . . . . . . . . . . . . . . . . . . . . . . . . . . . . . . . . . . . . . . . . . . . . . . . . . . . . . 249
Getting Help . . . . . . . . . . . . . . . . . . . . . . . . . . . . . . . . . . . . . . . . . . . . . . . . . . . . . . . . . . . . . . . . . . . . . . . .250 Upgrading from Another Palm Powered Device . . . . . . . . . . . . . . . . . . . . . . . . . . . . . . . . . . . . . .251 Resetting Your Treo 650 . . . . . . . . . . . . . . . . . . . . . . . . . . . . . . . . . . . . . . . . . . . . . . . . . . . . . . . . . . . . .258 Replacing the Battery . . . . . . . . . . . . . . . . . . . . . . . . . . . . . . . . . . . . . . . . . . . . . . . . . . . . . . . . . . . . . . .261 Troubleshooting . . . . . . . . . . . . . . . . . . . . . . . . . . . . . . . . . . . . . . . . . . . . . . . . . . . . . . . . . . . . . . . . . . . .263 Errors . . . . . . . . . . . . . . . . . . . . . . . . . . . . . . . . . . . . . . . . . . . . . . . . . . . . . . . . . . . . . . . . . . . . . . . . . . . . . . .283 Making Room On Your Treo 650 . . . . . . . . . . . . . . . . . . . . . . . . . . . . . . . . . . . . . . . . . . . . . . . . . . . . .285 Voice Quality . . . . . . . . . . . . . . . . . . . . . . . . . . . . . . . . . . . . . . . . . . . . . . . . . . . . . . . . . . . . . . . . . . . . . . .286
4B. Glossary . . . . . . . . . . . . . . . . . . . . . . . . . . . . . . . . . . . . . . . . . . . . . . . . . . . . . . . . . . 287
Section 5: Safety and Terms and Conditions . . . . . . . . . . . . . . . . . . . . . . . . . . 291
5A. Safety . . . . . . . . . . . . . . . . . . . . . . . . . . . . . . . . . . . . . . . . . . . . . . . . . . . . . . . . . . . . 293
Getting the Most Out of Your Reception . . . . . . . . . . . . . . . . . . . . . . . . . . . . . . . . . . . . . . . . . . . . .294 Maintaining Safe Use of and Access to Your Device . . . . . . . . . . . . . . . . . . . . . . . . . . . . . . . . . . .296 Caring for the Battery . . . . . . . . . . . . . . . . . . . . . . . . . . . . . . . . . . . . . . . . . . . . . . . . . . . . . . . . . . . . . . .299 Acknowledging Special Precautions and the FCC Notice . . . . . . . . . . . . . . . . . . . . . . . . . . . . . .301 Consumer Information on Wireless Phones . . . . . . . . . . . . . . . . . . . . . . . . . . . . . . . . . . . . . . . . . .304 Using Your Phone with a Hearing Aid Device . . . . . . . . . . . . . . . . . . . . . . . . . . . . . . . . . . . . . . . . .324
Owner’s Record . . . . . . . . . . . . . . . . . . . . . . . . . . . . . . . . . . . . . . . . . . . . . . . . . . . . . . . . . . . . . . . . . . . . |
.326 |
User’s Guide Proprietary Notice . . . . . . . . . . . . . . . . . . . . . . . . . . . . . . . . . . . . . . . . . . . . . . . . . . . . . |
327 |
5B. Terms and Conditions . . . . . . . . . . . . . . . . . . . . . . . . . . . . . . . . . . . . . . . . . . . . . . 329
Terms and Conditions of Services . . . . . . . . . . . . . . . . . . . . . . . . . . . . . . . . . . . . . . . . . . . . . . . . . . . .330
Specifications . . . . . . . . . . . . . . . . . . . . . . . . . . . . . . . . . . . . . . . . . . . . . . . . . . . . . . . . . . . . . . . . . . . . . . .341
Index . . . . . . . . . . . . . . . . . . . . . . . . . . . . . . . . . . . . . . . . . . . . . . . . . . . . . . . . . . . . . 343

Welcome to Sprint
We are committed to bringing you the best wireless technology available. With Sprint, all your services work the same wherever you go on the network. We built our network right from the start, so no matter where you are on the network, all your services – whether it’s Voicemail, Caller ID, email, or Picture Mail – will work the same.
This guide will familiarize you with our technology and your new Sprint PCS Vision Smart Device through simple, easy-to-follow instructions. Go to Section 1: Getting Started to set up your new device and Sprint PCS Service, then get ready to explore all the advanced features of your Sprint PCS VisionSM Smart Device Treo™ 650 by Palm.
Welcome and thank you for choosing Sprint.
i

How to Use This Guide
We know you’re eager to start using your device right away, and the sections of this guide are designed to help you do just that.
Section 1: Getting Started guides you through setting up your new Sprint PCS Vision Smart Device, your Sprint PCS Service, and your computer.
Section 2: Your Sprint PCS Vision Smart Device shows you the basics of your device and service with quick, easy-to-follow instructions. This section also guides you through using the built-in, full-featured, Palm Powered™ organizer that gives you instant access to your Calendar, Tasks, Memos, RealPlayer®, Calculator, and more.
Section 3: Sprint PCS Service Features shows you how to use the Sprint PCS service features, such as voicemail, call waiting, and call forwarding, as well as the how to use Sprint PCS Vision features, including Sprint PCS Picture MailSM, Web browsing, Messaging, and email.
Section 4: Help answers frequently asked questions and shows you what to do if something goes wrong. It also includes a helpful glossary of terms.
Section 5: Safety and Terms and Conditions outlines recommended safety and maintenance guidelines and displays the terms and conditions of your Sprint PCS Service and your device warranty information.
ii
Where to Learn More
A quick introduction to your new Treo 650:
Quick Tour  teaches you how to use many features of your Treo 650. It is already installed on your Treo device and you can open it any time (see “Opening the Quick Tour” on page 250).
Additional Tips and Shortcuts for Keyboard Navigation provides a list of timesaving shortcuts, tips, and tricks. This handy booklet is included in the box with your Treo 650.
While using your Treo 650:
Tips for getting the most out of your Treo 650 are available in many of the built-
in applications. To view these tips, open an application, open the menus  , select Options, and then select Tips.
Information is available in many dialog boxes that have a Tips icon  in the
upper-right corner. Select the Tips icon  to learn about the tasks you can perform in that dialog box.
If you need more information:
Books on Palm OS® devices, such as “Now You Know Treo,” are available at local or online book retailers (look in the computers section), or visit www.palm.com.
iii
Online forums let you consult online user discussion groups to swap information and learn about areas you may not find elsewhere. Visit www.palm.com for details.
Sprint Customer Service is where you go with questions about your mobile account or Sprint PCS Service and to contact Sprint for the latest information and help. Visit www.sprint.com for instant access to new Sprint PCS Service features and information.
iv

Section 1
Getting Started
2

Section 1A
Setting Up Your Sprint PCS VisionSM Smart Device
Treo™ 650 by Palm® Software Installation CD
In This Section
What You Need
Inserting the Battery
Charging the Battery
Software Up Setting
|
|
|
|
Section 1A: Setting Up Software |
3 |

What You Need
You should have received all of the following components in the Treo 650 box:
Hardware
Treo handset
AC adapter charger
USB sync cable
Headset
Sprint® charger adapter
Documentation
Before You Start Using Your Sprint PCS Vision Smart Device
User’s Guide (this book)
Additional Tips & Shortcuts for Keyboard Navigation
Software
Palm Software Installation CD (includes desktop synchronization software and bonus software for your device)
Other
As you work through the instructions in this section, you’ll also need the following items:
An electrical outlet
The computer with which you will synchronize your personal information
4 |
Section 1A: Setting Up Software |

Inserting the Battery
1.Press the Battery Door Release button and slide the battery door downward to remove it from your Treo 650.
2.Align the metal contacts on the battery with the contacts inside the battery compartment.
3.Insert the battery into the compartment at a 45 degree angle, and then press it into place.
4.Slide the battery door onto the back of the device until it clicks into place.
5.When the Welcome screen appears, follow the onscreen instructions to set up your Treo 650.
Battery Door Release |
Battery |
|
Contacts |
||
|
Phone
Contacts
Notch
Software Up Setting
Section 1A: Setting Up Software |
5 |
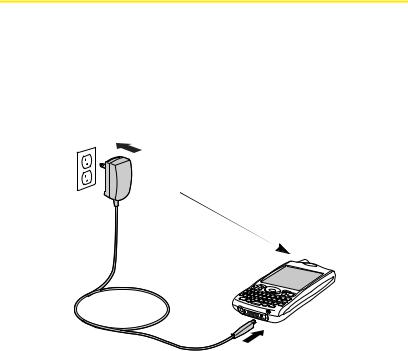
Charging the Battery
You must charge your Treo 650 fully before using it. It may not turn on at all when you first remove it from the box.
1.Plug the AC charger into a wall outlet.
2.Connect the charger cable to the bottom of the Treo device. Make sure the arrow on the connector is facing up, towards your Treo screen.
3.Wait for the indicator light to turn solid green. This may take up to four hours.
Indicator Light
6 |
Section 1A: Setting Up Software |

Important: It is vital that you use only Sprint-approved AC adapter chargers, car chargers, and replacement batteries. Use of unauthorized accessories could damage your device and invalidate your warranty.
Check the indicator light to make sure your Treo 650 is charging. If the battery is fully drained, it may take a few moments for the indicator light to turn on while charging. When your Treo 650 is connected to a power source, the indicator light glows solid (versus flashing), and the color of the light indicates the following:
Red indicator light: battery is charging.
Green indicator light: battery is fully charged.
Indicator light off: battery is not charging. Check the cable connection and the outlet to which it is connected.
After you set up your Treo, the onscreen battery icon displays power status:
Full battery icon  : battery is charged.
Partial battery icon  : battery has some power but is not fully charged.
Empty battery icon  : battery needs charging immediately.
Red lightning bolt  : battery is charging.
Green lightning bolt  : battery is fully charged.
Using a Sprint Charger Adapter
If the connector on your Sprint-approved 1 Amp AC charger or vehicle charger doesn’t fit into the connector on the bottom of your Treo device, use the included Sprint charger adapter.
Software Up Setting
Section 1A: Setting Up Software |
7 |
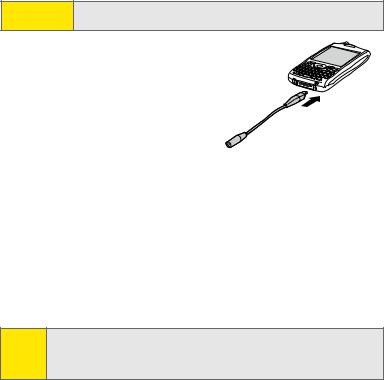
Warning: Use only with 1 Amp AC adapters distributd by Sprint for Treo 650. Using any unapproved AC adapter may destroy the AC adapter and cause fire.
1. Plug the charger to a power source.
2. Connect the Sprint charger adapter to the bottom of the Treo 650.
3. Connect the charger cable to the
Sprint charger adapter.
Sprint charger adapter
4. Charge your Treo 650 as described earlier.
Battery life
Battery life depends on individual use. Consumption factors include signal strength, speakerphone use, and whether calls are data or voice calls.
When your device’s phone is on, the Treo battery provides up to 4.5 hours of talk time on the Sprint PCS 1900 MHz band. Talk time is slightly lower when roaming on the cellular 800 MHz band.
If the battery drains to the point where your Treo 650 doesn’t turn on, the Treo device stores your information safely until you recharge the battery. To avoid draining the battery, we recommend that you charge and synchronize your
Treo 650 every day, especially if you use the wireless features of your device often.
Note: Using your device’s phone has an effect on the battery life. You can extend the battery life by turning off your device’s phone while using the organizer features. In any case, regular charging is recommended for optimal performance.
8 |
Section 1A: Setting Up Software |
Maximizing battery life
You can increase the life of your Treo 650 battery by following a few easy guidelines. Remember that battery life depends on how you use your Treo device.
Charge your Treo 650 whenever you’re at your desk, or charge it overnight each day. The Lithium Ion (Li-Ion) battery has a much longer useful life when it is topped off frequently, rather than charging it after it is fully drained.
The wireless features of your Treo 650 (phone, email, messaging, and Web) consume more power than its organizer features. However, if you spend a lot of time using the camera (if included), games, media players, eBooks, or other Palm OS® applications, keep an eye on the battery level and charge when necessary.
If you don’t plan to use the wireless features on your Treo 650 for awhile, you may want to turn off your device (see “Turning Your Device’s Phone On and Off” on page 35). You can forward calls to a different number or let all calls be picked up by voicemail (see “Call Forwarding” on page 173).
As with any mobile phone, if you are in an area with no wireless coverage, your Treo 650 searches for a signal, which consumes power. If you cannot move to an area of better coverage, you may wish to temporarily turn off your device’s phone (see “Turning Your Device’s Phone On and Off” on page 35).
Turn down the screen brightness (see “Adjusting the Brightness” on page 147).
Decrease the Auto-off setting in Power Preferences (see “Power Preferences” on page 155). This turns off your screen automatically after a shorter period of inactivity.
Software Up Setting
Section 1A: Setting Up Software |
9 |
10 |
Section 1A: Setting Up Software |

Section 1B
Setting Up Service
In This Section
Getting Started With Sprint PCS Service
Setting Up Your Voicemail
Sprint PCS Account Passwords
Getting Help
Setting up service on your new Sprint PCS VisionSM Smart Device Treo™ 650 is quick and easy. This section walks you through the necessary steps to unlock your device, set up your voicemail, establish passwords, and contact Sprint for assistance with your Sprint PCS Service.
Service Up Setting
Section 1B: Setting Up Service |
11 |

Getting Started With Sprint PCS Service
Determining if Your Device’s Phone is Already Activated
If you received your device in the mail or purchased it at a Sprint Store, it probably has already been activated. All you need to do is unlock it.
If your phone is not activated, please call Sprint at 1-888-211-4PCS (4727).
Unlocking Your Device
To unlock your device, follow these easy steps:
1.Press and hold the Power/End button  to turn the phone on.
2.Press Center.
3.Enter your four-digit lock code. (For security purposes, the code is not visible as you type.)
Note: If you can’t recall your lock code, try using the last four digits of either your Social Security number or Sprint PCS Phone Number or try 0000. If none of these work, call Sprint Customer Service at 1-888-211-4PCS (4727).
12 |
Section 1B: Setting Up Service |

Setting Up Your Voicemail
All unanswered calls to your Sprint PCS Vision Phone are automatically transferred to your voicemail, even if your phone is in use or turned off. Therefore, you will want to set up your voicemail and personal greeting as soon as your device’s phone is activated.
To set up your voicemail:
1.Press and hold  .
.
2.Follow the system prompts to:
Create your password
Record your greeting
Record your name announcement
Choose whether or not to activate Skip Pass Code (a feature that lets
you access your voicemail simply by pressing and holding  , bypassing the need for you to enter your password)
Note: The voicemail setup process may vary in certain Affiliate areas.
For more information about using your voicemail, see “Using Voicemail” on page 170.
Service Up Setting
Section 1B: Setting Up Service |
13 |

Sprint PCS Account Passwords
As a Sprint PCS customer, you enjoy unlimited access to your personal account information, your voicemail account, and your Sprint PCS Vision account. To ensure that no one else has access to your information, you will need to create passwords to protect your privacy.
Account Password
If you are the account owner, you'll have an account password to sign on to www.sprint.com and to use when calling Sprint Customer Service. Your default account password is the last four digits of your Social Security number. If you are not the account owner (if someone else pays for your Sprint PCS Service), you can get a sub-account password at www.sprint.com.
Voicemail Password
You'll create your voicemail password when you set up your voicemail. See “Setting Up Your Voicemail” on page 13 for more information on your voicemail password.
Sprint PCS Vision Password
If you have a Sprint PCS Vision Phone, you can set up a Sprint PCS Vision Password. This optional password may be used to authorize purchase of Premium Services content and to protect personal information on multi-phone accounts.
For more information or to change your passwords, sign on to www.sprint.com or call Sprint Customer Service at 1-888-211-4PCS (4727).
14 |
Section 1B: Setting Up Service |

Getting Help
Visit Our Website
You can get up-to-date information on Sprint PCS Services and Options by signing onto our Website at www.sprint.com.
When you visit us online, you can
Review coverage maps
Learn how to use voicemail
Access your account information
Purchase accessories
Add additional options to your service plan
Check out frequently asked questions
And more
Reaching Sprint Customer Service
You can reach Sprint Customer Service many different ways:
Dial *  , and then press Phone/Send
  on your Sprint PCS Phone
Sign on to your account at www.sprint.com
Call us toll-free at 1-888-211-4727 (Consumer customers), –or–
1-888-788-4727 (Business customers)
Write to us at Sprint Customer Service, P.O. Box 8077, London, KY 40742
Service Up Setting
Section 1B: Setting Up Service |
15 |

Receiving Automated Invoicing Information
For your convenience, your phone gives you access to invoicing information on your Sprint PCS Account. This information includes balance due, payment received, invoicing cycle, and the number of minutes used since your last invoicing cycle. (Normal airtime usage will apply.)
To access automated invoicing information:
Press *  , and then press Phone/Send
  .
.
Note: This service may not be available in all Affiliate areas.
Sprint PCS Directory Assistance
You have access to a variety of services and information through Sprint PCS Directory Assistance, including residential, business, and government listings; assistance with local or long-distance calls; movie listings; and hotel, restaurant, shopping, and major local event information. There is a per-call charge and you will be billed for airtime.
To call Sprint PCS Directory Assistance:
Press 

 , and then press Phone/Send
  .
.
Sprint PCS Operator Services
Sprint PCS Operator Services provides assistance when placing collect calls or when placing calls billed to a local telephone calling card or third party.
16 |
Section 1B: Setting Up Service |

To access Sprint PCS Operator Services:
Press 0 , and then press Phone/Send  .
.
For more information or to see the latest in products and services, visit us online at www.sprint.com.
Note: Sprint PCS Operator Services may not be available in all Affiliate areas.
Service Up Setting
Section 1B: Setting Up Service |
17 |
18 |
Section 1B: Setting Up Service |
Loading...