

Page 1
Smart Glasses
EI-10
Instruction Manual
Thank you for purchasing this Olympus product.
To ensure your safety, please read this instruction manual
before use, and keep it handy for future reference.
Page 2

Table of Contents
Table of Contents ................................................ 02
Warnings and Precautions ................................. 03
Warnings 04
Precautions 07
Precautions for using wireless
functions (Bluetooth, Wireless LAN) 09
Before Use ........................................................... 11
Unpacking the box contents 11
Names and functions of components 12
Charging the batteries 13
Inserting and replacing batteries 14
How to Wear the Device ..................................... 15
Basic Operations ................................................. 16
Turning On/O the Power .................................. 17
Turning on the power 17
Turning o the power 17
Sleep mode 17
Turning on/o the display 18
Connection to Computer.................................... 31
Connecting to computer via Micro-USB cable 31
Internal storage folders 32
QR Code Operations ........................................... 33
QR Code Generator 33
Wireless LAN settings 34
Other operations 35
Troubleshooting ................................................. 36
Frequently Asked Questions ............................. 37
Development Environment ............................... 39
Specications ...................................................... 40
Optional Accessaries
Trademarks / Third Party Software ................... 43
(sold separately)
................ 41
Home Screen ....................................................... 20
Displayed information 20
Operation procedure 21
Initial Applications ............................................. 22
Image Viewer 22
Video Player 22
Camera 23
Video Recorder 24
Function Checker 25
QR Code Settings 29
Brightness 29
Settings 30
02
Page 3

Warnings and Precautions
• The Olympus EyeTrek is designed as a hands-free business solution through a head
mounted display that can facilitate communications between parties, display real time
information, record or playback audio and video content, and use various applications that
can improve work eciencies in a commercial or industrial environment. Use this product
only for the intended purpose.
• The EyeTrek visual display should be used only with safety glasses, prescription glasses, or
other eye protection that will prevent the EyeTrek visual display from coming into contact
with the user’s eye. Use only the enclosed attachments to secure the visual display to the
glasses or eye protection you are wearing. Do not focus so much on the visual display that
you become distracted from your surroundings. If you have any questions about how to
use the product safely, contact Olympus customer support.
• This device is not intended to be used in the performance of critical activities requiring
continuous connectivity involving health and safety, including but not limited to
emergency healthcare, war time applications and processes, or crisis management.
• This device should not be used as a primary source to hold and save data.
• Reprinting a part of or entire section of this manual without permission is prohibited.
• Screens and illustrations used in this manual are only the images. Therefore, they may be
dierent from actual screens or products.
• The contents of this manual are subject to be revised without a prior notice.
• READ ALL INSTRUCTIONS, WARNINGS, AND PRECAUTIONS BEFORE USING THIS PRODUCT.
AFTER READING, KEEP THESE MATERIALS FOR LATER REFERENCE.
03
Page 4

Warnings
▎
PRODUCT USERS
• Do not use if you are under 16 years of age.
• Do not use if you are in poor physical condition.
• Do not use if you have heart disease, high blood pressure, or other heart problems.
• Do not use if you are tired or have diculty sleeping.
• Do not use under the inuence of drugs or alcohol.
• Do not use if you have a history of photosensitivity.
• Do not use if you have a visual eld disorder, alignment disorder, or eye movement disorder.
• Do not use if you have ever experienced convulsive or epileptic ts.
• Do not use if you have ever experienced a stroke, vertigo, migraines, or mental disorder.
• Do not use if you have ever experienced loss of consciousness from light ashes or oscillations.
• Do not use if you are pregnant.
• Do not use if you have personal medical devices such as an implanted pacemaker,
debrillator, or hearing aids.
USE CONDITIONS FOR THE PRODUCT
• If you wear safety glasses, helmet, or other protective equipment, the product may not t
securely. Do not use this product if it prevents you from properly wearing protective
equipment such as safety glasses, hard hats, helmets, dust masks, or respirators. If you
cannot nd safety equipment that can be worn and used properly along with the product,
do not use this product.
• Use of the product can obscure your vision, aect your balance, and increase your reaction
time. Do not allow product use to distract you. Before wearing or using, conrm that the
surrounding environment is safe. Do not wear or use the product near physical obstacles
or fragile objects.
• Do not use in any setting in which there is a risk of falling, such as on a bus or train, or in
any other setting in which you cannot safely use the product.
• Do not use while operating work-related equipment such as forklifts, cranes, or tractors.
• Do not use while operating personal transportation devices such as automobiles,
motorcycles, bicycles, skateboards, or hoverboards.
• Do not use this product if you may encounter sudden or unexpected movements.
04
Page 5

• Do not look at the sun or other strong lights while using this product.
• Do not use this product continuously for more than one hour without taking a 10-minute
break.
• Do not use this device at an excessive volume. Otherwise, hearing loss can occur and you
may not be able to hear important sounds around you, such as alarms, horns, and sirens.
USE ENVIRONMENT WARNINGS
• Do not use product anywhere where the use of such devices are prohibited.
• Do not operate the product in temperatures below 5 °C(41 °F) or above 35 °C(95 °F).
• Do not store the product in temperatures below 0 °C(32 °F) or above 40 °C(104 °F).
• Do not operate or store the product in locations with high humidity or excessive dust.
• Do not use in storm conditions involving thunder or lightning.
• Other electronic systems and devices may operate in the same frequency range as this
product. These include, but are not limited to, microwave ovens, household appliances,
medical and scientic instruments, and RFID equipment. Do not use near medical devices
or any other electrical equipment that may be adversely aected by the radiofrequency
emissions of the product. Please see “FCC Notice” below for further details on FCC
compliance.
PRODUCT CARE WARNINGS
• Do not leave this product in a closed automobile or in other places under direct sunlight
for extended periods of time.
• Do not immerse product in water or otherwise allow product to get wet. Do not use or
leave the product in very moist or humid places. Do not use the product if it has
condensation or if your hands are wet.
• Do not attempt to disassemble, repair, or modify the product. Attempts to do so may
cause malfunctions, re, electrical shock, personal injury, and product damage. Contact
Olympus customer support for any needed repairs.
05
Page 6

BATTERY USE AND CARE
• The product contains a lithium battery. To prevent battery leaks or damage, carefully
follow all instructions regarding the use and charging of batteries. Lithium batteries
contain potentially toxic materials. Never attempt to disassemble or modify a battery in
any way.
• Use only the battery, battery charger, and AC adapter provided with the product. Using a
battery, battery charger, or AC adapter other than those provided may result in charging
failures, product malfunction, re, damage, explosions, or battery leaks.
• Use the battery charger with the specied power source and voltage. Unplug the battery
charger when not in use. Do not use the battery charger if the power cord is damaged or
broken.
• Do not charge the battery near any place at which ammable items are stored, such as a
gas station. Prior to visiting such places, remove the battery from the device.
• Do not overcharge batteries. If the battery does not recharge within 3 hours, stop charging
and remove the battery from the device.
• Do not store battery where it will be exposed to direct sunlight or subjected to high
temperatures.
• Do not allow battery to come into contact with any metal objects such as jewelry, pins,
fasteners, keys, etc. Doing so may cause a short circuit that will result in overheating,
burning, re, or explosions.
• Do not use a battery that is deformed, swelling, leaking, wet, or has a strange odor. Doing
so may result in overheating, burning, bursting, or re.
• If the liquid inside of the battery touches the skin or clothing, immediately rinse with water.
If the liquid gets into the eyes, ush with water and see a doctor immediately.
• Do not dispose of batteries in re.
• Keep the battery and small parts out of reach of children. Should a child swallow a battery
or a small part, see a doctor immediately.
• This symbol [crossed-out wheeled bin Directive 2006/66/EC Annex II] indicates
separate collection of waste batteries in the EU countries.
Please do not throw the batteries into the domestic refuse.
Please use the return and collection systems available in your country for the
disposal of the waste batteries.
• Please recycle OLYMPUS batteries to help save our planet's resources.
When you throw away dead batteries, be sure to cover their +, -, T, and always observe
local laws and regulations.
06
Page 7

PRECAUTIONS
▎
EYEWEAR
• Always wear the product with safety glasses, prescription glasses, or other eye protection
to prevent the eye from coming into contact with the product’s viewer. Otherwise, a
sudden impact may cause the product to strike and injure the eye. Use the enclosed
attachments to secure the visual display to your glasses or eye protection before use.
• If you wear bifocals, trifocals, or progressive lenses, or if you have had laser eye surgery,
consult your eye doctor before using this product.
• If you wear contact lenses that are designed to allow one eye to see close up and the other
eye to see far away, consult your eye doctor before using this product.
• Do not overly widen the headband when wearing and removing the headband. Do not
allow the display unit to touch your eye when wearing and removing the display unit.
OTHER USAGE PRECAUTIONS
• Always be sure you can see the screen and entire image clearly during use. Do not use the
device when the image cannot be properly focused, or the image does not appear clear
and stable, or if you cannot see the whole image clearly.
• The screen of the device partially blocks one eye. Remove the device if you need to see
with both eyes or if the device interferes in any way with your safety.
• If the product causes your skin to feel irritated or uncomfortable, remove the product from
your head and consult a dermatologist.
• Avoid extended use of the product. If during use you encounter eye pain or eye fatigue,
blurry vision, double vision, nausea, headache, or dizziness, neck or shoulder pain, fatigue,
anxiety, or discomfort, discontinue use and rest until you recover. Do not walk, move
around, or operate equipment or a vehicle until these symptoms go away.
• If during use or charging the product emits smoke, strange odors, or sounds, or generates
excessive heat, discontinue use, unplug the charger and Power Pack Adaptor, and contact
Olympus customer support.
07
Page 8

CONNECTIONS, APPLICATIONS AND DATA UPLOADS
• Do not connect, upload or install any connection site, applications or data onto this
product where the safety and security of such connection, application or data has not been
provided, approved or authorized by Olympus.
• Please use this product only after ensuring that your system maintains safety and total
system reliability.
08
Page 9

Precautions for using wireless functions (Bluetooth, Wireless LAN)
FCC Notice
• This device has been tested and found to comply with the limits for a Class B digital device,
pursuant to part 15 of the FCC Rules.
• These limits are designed to provide reasonable protection against harmful interference in
a residential installation.
• This device generates, uses and can radiate radio frequency energy and, if not installed and
used in accordance with the instructions, may cause harmful interference to radio
communications.
• However, there is no guarantee that interference will not occur in a particular installation.
• If this device does cause harmful interference to radio or television reception, which can be
determined by turning the device o and on, the user is encouraged to try to correct the
interference by one or more of the following measures:
a. Reorient or relocate the receiving antenna.
b. Increase the separation between the device and receiver.
c. Connect the device into an outlet on a circuit dierent from that to which the receiver
is connected.
d. Consult the dealer or an experienced radio/TV technician for help.
e. To connect the device to USB enabled personal computer, use the enclosed ferrite
cores.
FCC/IC Caution
• Changes or modications not expressly approved by the party responsible for compliance
could void the user’s authority to operate the device.
• This transmitter must not be co-located or operated in conjunction with any other antenna
or transmitter.
• The available scientic evidence does not show that any health problems are associated
with using low power wireless devices.
09
Page 10

• There is no proof, however, that these low power wireless devices are absolutely safe.
• Low power Wireless devices emit low levels of radio frequency (RF) energy in the
microwave range while being used.
• Whereas high levels of RF can produce health eects (by heating tissue), exposure of
low-level RF that does not produce heating eects causes no known adverse health eects.
• Many studies of low-level RF exposures have not found any biological eects.
• Some studies have suggested that some biological eects might occur, but such ndings
have not been conrmed by additional research.
• EI-10 has been tested and found to comply with FCC/IC radiation exposure limits set forth
for an uncontrolled environment and meets the FCC radio frequency (RF) Exposure
Guidelines and RSS-102 of the IC radio frequency (RF) Exposure rules.
• The Wireless LAN (IEEE 802.11a/n) of this product uses 5 GHz bands. By the Radio Law,
outdoor use of the 5.2 GHz band and the 5.3 GHz band is prohibited. The channels used by
this product are as follows:
- 5.2 GHz band : 36, 40, 44, 48
- 5.3 GHz band : 52, 56, 60, 64
- 5.6 GHz band : 100, 104, 108, 112, 116, 120, 124, 128, 132, 136, 140
For customers in the United States
Declaration of Conformity
Model Number : EI-10
Trade Name : OLYMPUS
Responsible Party : OLYMPUS AMERICA INC.
Address : 3500 Corporate Parkway, P.O. Box 610, Center Valley,
PA 18034-0610, U.S.A.
Telephone Number : 484-896-5000
Tested To Comply With FCC Standards
FOR HOME OR OFFICE USE
This device complies with Part 15 of the FCC rules and Industry Canada's licence-exempt
RSSs. Operation is subject to the following two conditions:
(1) This device may not cause harmful interference.
(2) This device must accept any interference received, including interference that may
cause undesired operation.
10
Page 11
Before Use
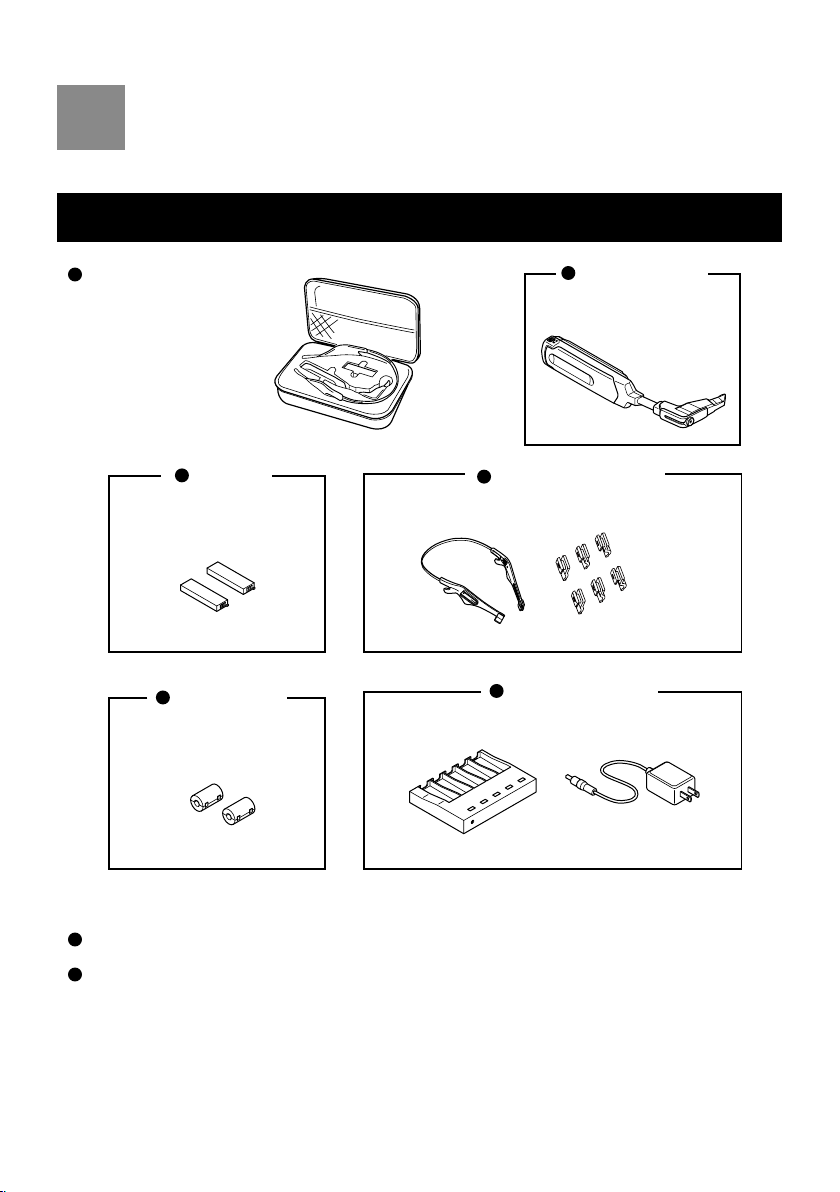
Unpacking the box contents
Protection case
Battery
WHB-001 x2
Ferrite Core
Smart Glasses
EI -10
Headband & Clips
EI-HB1
Small x2
Midium x2
Large x2
Battery Charger
(EI-CH1) (UN312-0520)
EI-CS1
Instruction manual
Warranty card
11
Page 12
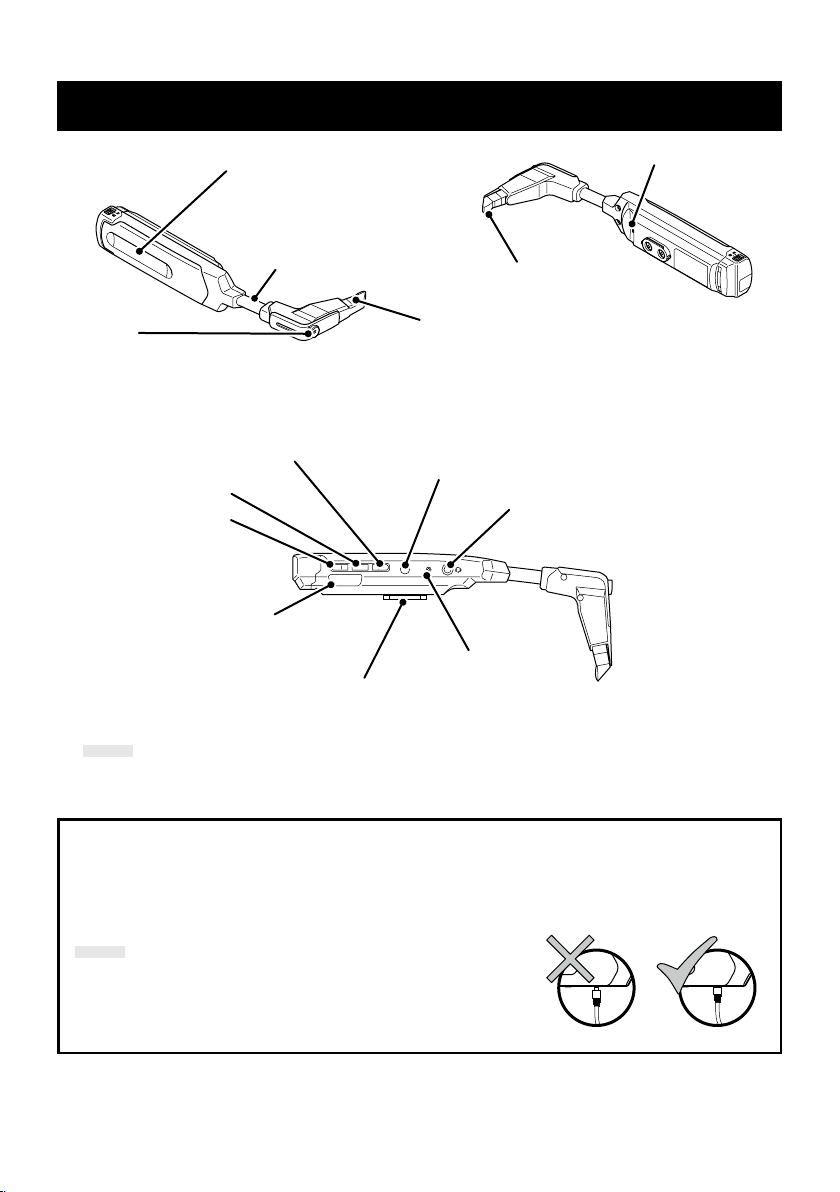
Names and functions of components
Camera
takes pictures and videos.
Button❶
shows the home screen.
Button❷
Button❸
operate dierently
depending on the
application.
Micro-USB port
for connection via
Micro-USB cable.
NOTE
Button and sensor functionality vary depending on the application.
•
• ”Hold down a button" means to release after pressing and holding the button for
approximately 2 seconds.
Touch sensor
allows for touch operation.
Flexible arm
adjusts display position.
USB
Connector
locks the device to the
headband holder.
Microphone
Display
shows the screen.
Prism
Power button
turns on the power, turns on/o
sleep mode and other modes.
4-pole mini jack
for connecting devices such as
headsets or earphones.
Power LED
indicates the current
status of the device.
Voice functions
This device is not equipped with a speaker. In order to play back voice, connect the earphone or a headset
to the 4-pole mini jack. In addition, to have two-way communication through the device, connect the
headset.
NOTE
When connecting an earphone or a headset to the 4-pole mini jack,
make sure that the connected unit is fully inserted. If not, interference
may occur.
12
Page 13
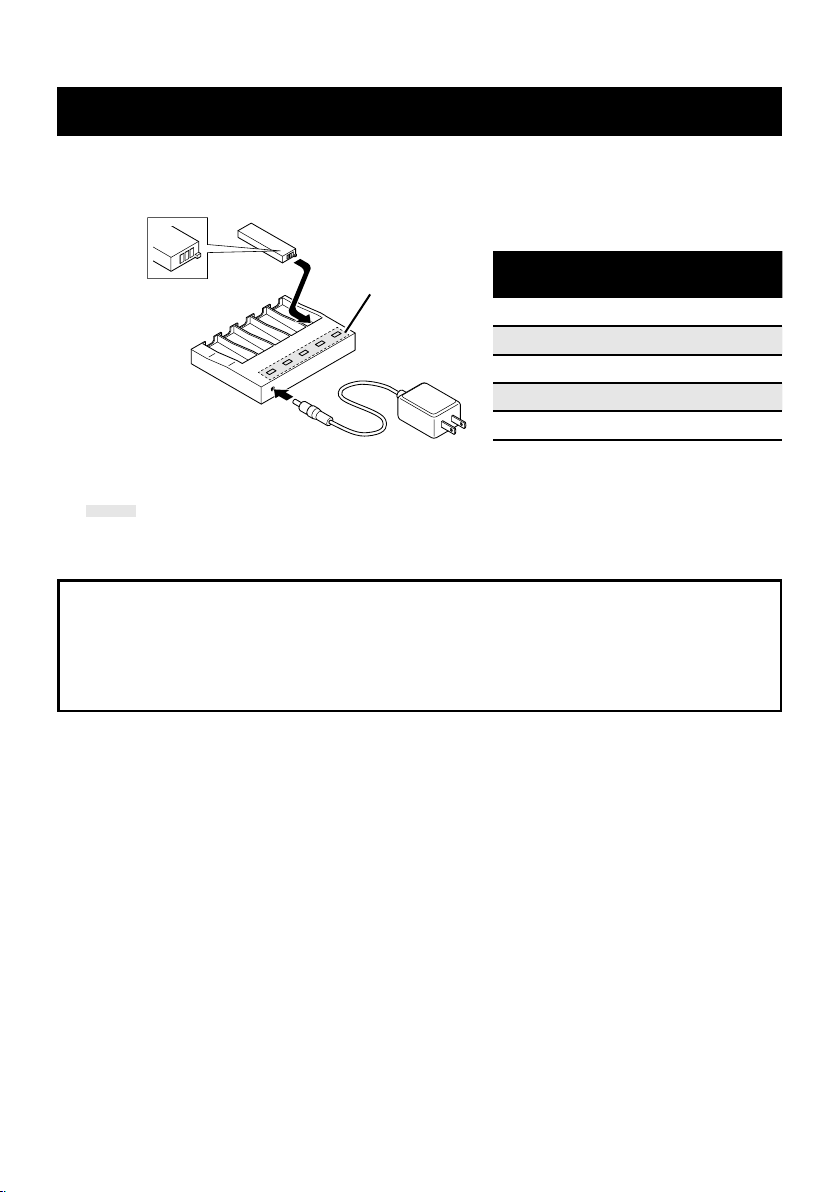
Charging the batteries
Fully charge the battery prior to rst use, and recharge the battery when it is drained.
Charging the battery for the rst time will take approximately 2.5 hours.
Battery charge indicator
Charging state
No battery inserted Not lit
Charging Green light
Charging complete Blinking green light
Temperature over range
Abnormal charge Red light
Charge indicator
LED state
Blinking red light
Be careful with the
battery direction.
Insert the plug into an outlet.
NOTE
• The LED may blink red when a battery is inserted into the charger. If this happens, remove the
battery, wait for several minutes and insert again.
• If a fully charged battery is inserted into the charger, the LED may not turn on.
Charge indicator
LED
Battery Maintenance
If the battery terminal becomes dirty, clean with a soft, dry cloth. Getting nger oil, sweat, or dust on the
terminal may prevent proper charging. Do not use organic solvents (benzene, thinner, and like), acids, or
alkalis.
This product cannot be charged internally via the Micro-USB port. Please use the external battery charger.
The plug-in type AC adapter (UN312-0520) shall be correctly mounted to a plug socket perpendicularly.
13
Page 14
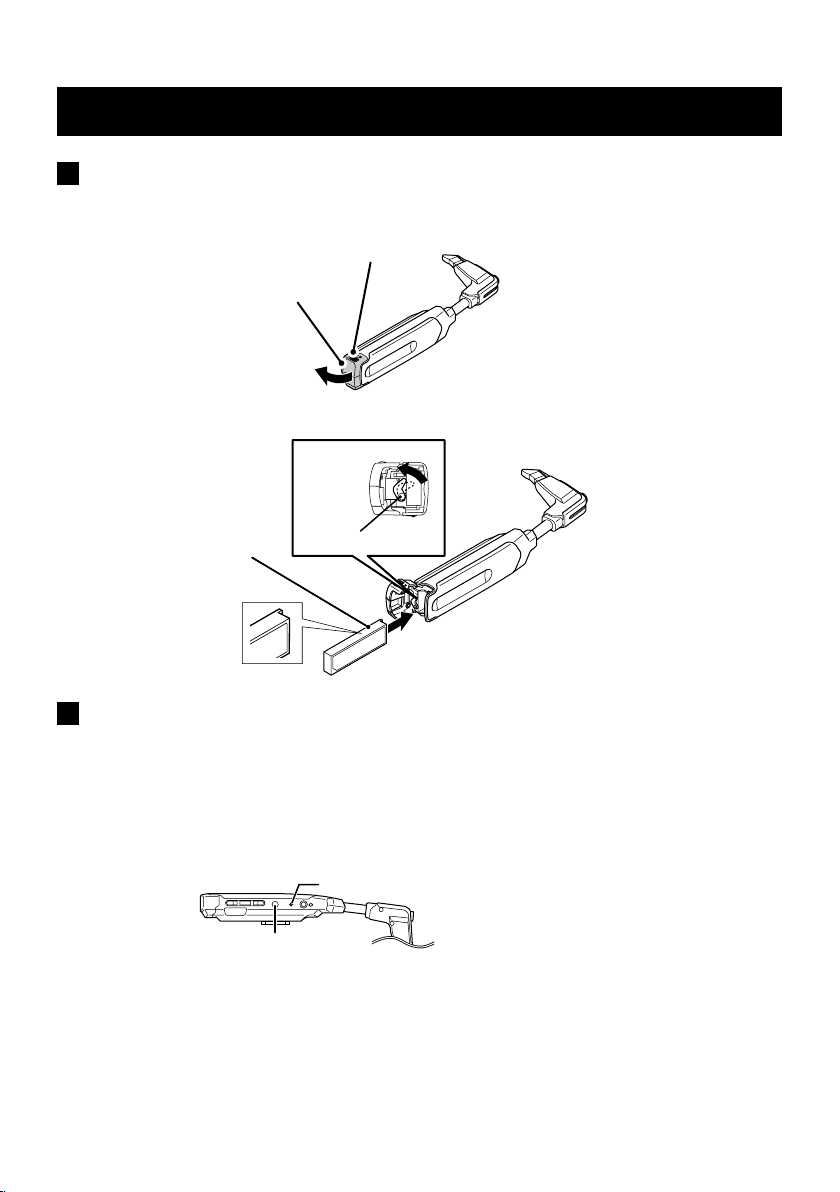
Inserting and replacing batteries
USB
Insert
1. Move down the lock and open the cover.
Lock
Cover
2. Move the battery stopper and insert the battery.
Battery
Be careful with the
battery direction.
Battery stopper
Replace (Hot swap)
The battery can be replaced without turning o the power.
1. Hold down the power button for approximately 2 seconds.
2. The power LED starts blinking. After a few seconds, it switches to the slow blinking state
with intervals of approximately 2 seconds.
Power LED
Hold down the button
3. Remove the battery. Then within 10 seconds, insert the charged battery. When the hot
swapping succeeds, the power LED starts blinking in 2-second intervals again. If the hot
swapping fails, the power LED turns o.
4. Press the power button.
Resume the paused application from where it is stopped.
14
Page 15

How to Wear the Device
Always wear the device with safety glasses,
Warning
Use the provided headband.
Connector
1. Slide the device connector to insert it into the headband holder.
2. While wearing the glasses, attach the clip to the temple of the glasses.
prescription glasses, or other eye protection.
Otherwise, an injury may cause such as by hurting the eye by
the display.
Ear hook
Regarding clip size (Small, Medium, Large)
Clips can be replaced to t the width of the
temples. They can be used oriented either
inward or outward.
Holder
Clip
3. Adjust display position.
Do not bend Flexible arm forcedly.
Bending Flexible arm may cause squeakiness, but it is not a malfunction.
This product is designed assuming that it will be attached to the right-side holder
of the headband. Attachment to the left-side holder is possible, however, the
headset of a separately sold accessory cannot be used, and the screen may not
appear correctly in some applications which do not support rotation of the screen,
thus use this product after confirmation.
15
Page 16

Basic Operations
The user can operate this device intuitively by using the touch sensor.
When a user is wearing gloves, the touch sensor does not respond.
Examples of major operations
• Swipe from back to front
• Display the applications sequentially (counterclockwise order) on the
Home screen.
• Display the next image.
• Play back the next video.
• Swipe from front to back
• Zoom in the displayed image/video in Camera and Video Recorder.
• Display the applications sequentially (clockwise order) on the Home
screen.
• Display the previous image.
• Play back the previous video.
• Zoom out the displayed image/video in Camera and Video Recorder.
• Two-nger swipe from back to front
• Zoom in the displayed image/video in Camera and Video Recorder with large
steps.
• Two-nger swipe from front to back
• Zoom out the displayed image/video in Camera and Video Recorder
with large steps.
• Single tap
Single
• Play/stop the video in Video Player.
• Double tap
Double
• Start-up of the application.
• Holding down. (To release after touching the touch sensor for approximately 2 seconds.)
• Return the zoom in Camera and Video Recorder.
approximately 2 seconds
16
Page 17

Turning On/Off the Power
USB
USB
USB
Turning on the power
Press the power button.
The power LED turns on, and the startup screen appears on the display.
Power LED
Press
*Note that holding down the button does not turn on the power.
*After ashing of the power LED, it takes about 20 seconds until the screen appears.
Turning off the power
To turn o the power, remove the battery.
1. Hold down the power button for approximately 2 seconds.
The power LED starts blinking. After a few seconds, it switches to the slow blinking state
with intervals of approximately 2 seconds.
Power LED
Hold down the button
2. Then remove the battery.
*Hold down the power button for longer than 7 seconds for forcing a shutdown.
Sleep mode
In the sleep mode, the display turns black, which disables unintended touch operation. In addition,
the battery power will be conserved when using this mode while the operation is in pause.
Hold down the power button for approximately 2 seconds.
The power LED starts blinking. After a few seconds, it switches to the slow blinking state with
intervals of approximately 2 seconds.
Power LED
Hold down the button
The power LED continues blinking while in the sleep mode.
Pressing the power button again releases the sleep mode.
17
Page 18

Turning on/off the display
USB
The display can be switched between on/o.
Even when the display is o, the application is continuously running. Therefore, consumption
of the battery power continues. To save the power, shift to the sleep mode.
Press the power button.
The display turns o.
Press
Pressing the power button again recovers the display.
18
Page 19

• About the display
Due to the characteristics of the material used in the OLED panel, permanent burn-in or
reduction in brightness may occur.
For the OLED display used in this product, continuously displaying static images in the
same position on the screen or repeatedly displaying the same image may cause
irreversible burn-in.
Performing the operations detailed in 1 to 3 below reduces the risk of burn-in.
1. Do not display the same image for a long time.
Be careful not to continuously display the same image, such as a static image, a
temporarily halted video or continuously running the same software without any
operations.
2. Turn o the display when not in use.
When not in use or when display is unnecessary, turning o the screen and putting
the screen to sleep are recommended.
3. Do not unnecessarily increase the brightness of the display.
Keeping the necessary mild brightness of the screen is recommended.
• About use in a high-temperature environment
Continuous use in a high-temperature environment, due to the structure of the OLED
display and characteristics of the materials, may cause an afterimage, burn-in, a stain, a
line and reduction of brightness.
Since there is a danger of faster degradation of the display panel, avoid continuous use
and storage in a high-temperature and high-humidity environment, such as in a sealed
space and near an air conditioner. Especially, leaving this product inside an automobile
where direct sunshine increases the temperature therein and near a heating appliance
may result in uneven screen brightness causing a variation to be seen.
In addition, avoid using with a sudden temperature change, since it results in dew
condensation inside the product causing degradation of the display.
• About bright spots and dark spots
The display of this product is manufactured with a very high accuracy technique,
however, dark spots (black spot, lack of a pixel) and constantly lit bright spots (red,
blue, green) may exist. Further, depending on the viewing angle, streaks may be seen.
Due to the characteristics of the display, these phenomena may occur after long-term
use. These phenomena are due to the structure of the display and not malfunctions.
Please use this product with an understanding of these facts.
• Other precautions
* Do not press or pull strongly, scratch, or place an object on the prism especially the
surface of the display. It results in malfunctions of the screen or causes failure.
* Leaving the display facing the sunlight may result in damage of the screen. Please
be careful especially when placing the product near windows or in outdoors.
19
Page 20

Home Screen
On this screen, applications can be selected and started both by touching and by
operating buttons.
Displayed information
②③
①
① Battery
Icon Battery Level
Over 50%
20% or more and less than 50%
Less than 20%
20
② Wireless LAN
③ Bluetooth
Icon Signal strength
Strong
Weak
Poor
no display
Wireless LAN ON
disconnected
Wireless LAN OFF
Icon Bluetooth status
ON
OFF
Page 21

USB
Operation procedure
USB
Selecting application
Swipe on the touch sensor, or press the button ❷, ❸.
OR
Applications are displayed in the following order.
QR Code Settings
Press
Starting up the application
1. Display the application to be started using the procedure above.
2. Double tap on the touch sensor, or hold down the button
seconds.
Double
OR
Hold down
❷, ❸ for approximately 2
21
Page 22

Initial Applications
Image Viewer
This application displays the image les stored in the internal storage of the device.
In order to save image les to the internal storage, see "Connection to Computer"(P31).
Folder used
Supported file formats
:OLYMPUS/Photo
:jpg
█ Operation procedure
Touch operation Button operation
Display the next image
Display the previous image
Exit the application
Swipe from back to front
Swipe from front to back
-
Press the button ❷
Press the button ❸
Press the button
❶
Video Player
This application plays back the movie les stored in the internal storage of the device.
In order to save movie les to the internal storage, see"Connection to Computer"(P31).
To play back the voice, connect the earphone or headset to the 4-pole mini jack.
Folder used
Supported file formats
:OLYMPUS/Video
:mp4
█ Operation procedure
Play the next movie
Play the previous movie
Pause/Play
Exit the application
22
Touch operation Button operation
Swipe from back to front
Swipe from front to back
Single tap -
-
Press the button ❷
Press the button ❸
Press the button
❶
Page 23

Camera
This application captures still images. The captured still images will be stored in the internal
storage of the device.
Folder used
:OLYMPUS/Photo
Capture file formats
Capture size
:1600px × 1200px
█ Operation procedure
Touch operation Button operation
Zoom in*
Zoom out*
Exposure Compensation
(±5steps)
Capture still image
Exit the application
* Two-nger swipe allows for zooming with larger steps.
* Holding down the touch sensor resets the zoom.
Swipe from back to front -
Swipe from front to back -
-
-
-
:jpg
Press the button ❸
Press the button ❷
Press the button
❶
23
Page 24

Video Recorder
This application records movies. The captured movies will be stored in the internal storage of
the device.
Folder used :OLYMPUS/Video
Record le format :mp4
Record size :1280px × 720px
Encoder :H.264
Frame rate :20FPS
Maximum recording time at one time : Up to 29 minutes 59 seconds.
█ Operation procedure
Touch operation Button operation
Zoom in*
Zoom out*
Exposure Compensation
(±5steps)
Start/Stop record
Exit the application
* Two-nger swipe allows for zooming with larger steps.
* Holding down the touch sensor resets the zoom.
Swipe from back to front -
Swipe from front to back -
-
-
-
Press the button ❸
Press the button ❷
Press the button
❶
24
Page 25

Function Checker
This application checks the operation of this device, determining whether the basic functions
work properly or not.
To check the voice function, connect the earphone or headset to the 4-pole mini jack.
Operation procedure
Touch operation Button operation
Move to the next check item
Move to the previous check item
Exit the application
Check results
The check results from [1:WLAN] to [10:SCREEN
Checking basic functions
[Status Information]
Allows for conrming the device OS and status.
-
-
-
BRIGHTNESS] are displayed with
Note that all items are displayed as at the biginning.
Press the button ❸
Press the button ❷
Press the button
❶
and
.
: Check is completed without problems.
: Check is incomplete, or a problem was found.
OS version
Firmware version
Remaining battery
Battery status
(discharging/charging/not charging/full)
Battery health
(good/overheat/voltage/dead)
CPU, Battery temperature (Celsius)
(The last digit indicates 0.1 degrees.)
Voltage
25
Page 26

[1:WLAN]
Checks if a Wireless LAN connection can be established properly.
When Wireless LAN is ON:
The check is conducted automatically. If no problem is found, the screen displays [Wireless LAN [OK]],
and the check result at the top of the screen changes to
.
If the check is not conducted automatically, hold down the button
When Wireless LAN is OFF:
The Wireless LAN function is automatically turned ON. Then hold down the button
If no problem is found, the screen displays [Wireless LAN [OK]], and the check result at the top of the
screen changes to
.
❸.
❸.
[2:BLUETOOTH]
Checks if a Bluetooth
When
Bluetooth
The check is conducted automatically. If no problem is found, the screen displays [Bluetooth [OK]],
and the check result at the top of the screen changes to
If the check is not conducted automatically, hold down the button
When
Bluetooth
The Bluetooth function is automatically turned ON. If no problem is found, the screen displays
[Bluetooth [OK]], and the check result at the top of the screen changes to
If the check is not conducted automatically, hold down the button
® connection can be established properly.
is ON:
.
❸.
is OFF:
.
❸.
[3:TOUCH SENSOR]
Checks if the touch sensor operates properly.
Touch the touch sensor with one nger, and then two ngers. If the sensor value changes between
one-nger and two-ngers, the check result at the top of the screen changes to .
If the value does not change, restart the device and check again.
26
Sensor value
Number of detected ngers
Page 27

[4:ACCELEROMETER]
Checks if acceleration is measured properly.
If the sensor value changes, the check result at the top of the screen changes to . If the value does
not change, restart the device and check again.
[5:GYROSCOPE]
Checks if angle and angular velocity are measured properly.
If the sensor value changes, the check result at the top of the screen changes to . If the value does
not change, restart the device and check again.
[6:MAGNETICFIELD]
Checks if magnetic eld is measured properly.
If the sensor value changes, the check result at the top of the screen changes to . If the value does
not change, restart the device and check again.
[7:CAMERA]
Checks if the camera operates properly.
The camera (barcode reader) will start up automatically.
Read a barcode or QR code.
If the data can be read properly, the check result at the top of the screen changes to
.
[8:MICROPHONE]
Checks if the microphone operates properly.
Input any voice into the device's microphone during the countdown.
Countdown
If the recording is completed properly, the check result at the top of the screen changes to
• When the headset is connected, microphone on this product is disabled.
NOTE
.
27
Page 28

[9:SOUND]
Checks the recorded voice.
Connect the earphone or headset to the 4-pole mini jack. The voice recorded in [8:MICROPHONE] is
played back repeatedly. If the voice is played back properly, the check result at the top of the screen
changes to .
To check the sound quality such as clarity or noise involvement, users should check the actual sound
by listening to the voice.
[10:SCREEN BRIGHTNESS]
Checks if the screen brightness can be adjusted properly.
Swipe the touch sensor. If the brightness can be changed, the check result at the top of the screen
changes to .
Once all checks are complete, conrm that all of the check results at the top of the screen are .
28
Page 29

QR Code Settings
This application reads QR codes.
Reading the QR codes created by the dedicated "QR Code Generator" (P33) allows for setting
Wireless LAN connection and other various operations.
QR Code Settings
█ Operation procedure
Starting the application automatically starts up the camera.
Adjust the camera position so that the QR code ts in the screen. The reading of the QR code
then starts automatically.
Touch operation Button operation
Touch operation Button operation
Exit the application
Exit the application
-
- Press the button
Press the button
Brightness
Adjust the screen brightness. Brightness can be adjusted in 8 steps.
█ Operation procedure
Touch operation Button operation
Increase brightness
Decrease brightness
Exit the application
Swipe from back to front
Swipe from front to back
-
Press the button ❷
Press the button ❸
Press the button
❶
❶
29
Page 30

Settings
This application allows users to check and change the network setting, device setting,
personal setting, account setting, and system setting.
NOTE
When text input is required during the settings, connect the USB converter (OTG)
•
and connect the mouse via USB. Clicking on the text eld with the mouse displays
a software keyboard. It is possible with a Bluetooth mouse, too.
Operation procedure
Move cursor to the next
Move cursor to the previous
Conrm
Back to the previous screen
Move cursor to the right
Move cursor to the left
Exit the application
Touch operation Button operation
Swipe from back to front -
Swipe from front to back -
Double tap -
-
Two-finger swipe from back to front -
Two-finger swipe from front to back -
-
Press the button ❸
Press the button
❶
30
Page 31

Connection to Computer
USB
Connecting this device with a computer via a Micro-USB cable allows for transferring
the data in the device's internal storage to the computer. Data backup or deletion can
be performed in this mode. Furthermore, by saving movie/image les in the specied
initial application folders, the movie/image can be shown on the device.
Connecting to computer via Micro-USB cable
The following are the operation systems of the computers that can be connected.
• Microsoft® Windows Vista® SP2
• Microsoft® Windows® 7 SP1
• Microsoft® Windows® 8/8.1
• Microsoft® Windows® 10
• Mac OS X v10.8 - 10.11, mac OS v10.12
For Macintosh computers,
Download the "Android File Transfer" from the following website and install it to the computer.
https://www.android.com/filetransfer/
1. Connect the device with the computer via a Micro-USB cable (when the device is ON).
The power is ON.
USB
Use the enclosed ferrite cores.
If the device is connected to the computer for the rst time, the device driver software is
automatically installed on the computer. Wait until the installation is completed.
Once the installation is complete, the device is recognized as a portable device on the
computer.
31
Page 32

NOTE
1. Conrm that no data is being transferred, and then remove the Micro-USB cable.
• If the device driver contained in the EyeTrek development environment kit
(P.39) is not installed on the computer, it is impossible to install the driver
properly. Even so, the device can be used continuously since users can access
the internal storage via Media Transfer Protocol (MTP).
Internal storage folders
The following are the folders used in the initial applications.
OLYMPUS/Photo
OLYMPUS/Video
In [Image Viewer] the image le to be displayed is saved.
In [Camera] the image le is saved.
In [Video Player] the video to be played is saved.
In [Video Recorder] the video le is saved.
32
Page 33

QR Code Operations
Reading QR codes via this device allows for Wireless LAN connection, application
startup, and other various operations.
QR Code Generator
This application generates QR codes. Install the application to the Android™ device
(smartphone or tablet).
QR Code Generator can be downloaded from the website.
Read the QR code below with an Android device and access to the download site.
http://www.getolympus.com/support
Generating QR codes by [QR Code Generator] and reading them through [QR Code Settings]
(P.29) can easily set/start the following items.
1. Wireless LAN Settings (SSID and Password)
2. Website (URL)
3. Display an Image (File Path)
4. Display Multiple Images (Folder Path)
5. Playback a Video (File Path)
6. Run an Application (Package Name)
7. Date & Time Setup
33
Page 34

Wireless LAN settings
Reading the QR code generated by [QR Code Generator] allows for completing Wireless LAN
settings.
1. Run [QR Code Generator] on the Android device.
2. Select [1. Wireless LAN Settings].
3. Enter the [SSID] and [Password].
4. Tap [Generate QR Code].
(The QR code is generated.)
5. Read the QR code using the [QR Code Settings] on the device.
When the device completes Wireless LAN settings properly, the Wireless LAN icon is displayed
at the top right of the screen.
34
Page 35

Other operations
Reading the QR code generated by [QR Code Generator] allows for browsing websites, image and
movie les on the device, as well as starting up the application.
1. Run [QR Code Generator] on the Android device.
2. Select the item from the menu.
3. Enter the URL of the website or the path to the image le or movie le to be browsed in
the internal storage.
4. Tap [Generate QR Code] to genrate the QR code.
5. Read the QR code with the [QR Code Settings] on the device.
35
Page 36

Troubleshooting
If this product does not work as intended and you are unsure of what to do,
refer to the information below to x the problem(s).
Symptom Action
The device cannot be
turned ON.
The screen is not displayed
when the power is ON.
The battery does not last
long.
The lamp on the battery
charger blinks red.
The battery charge does
not complete.
Check if the screen is displayed by
pressing the power button.
Holding down the button does not
turn on the power.
If the screen is not displayed, replace
the battery with one fully charged,
and press the power button.
The display may be turned OFF.
Press the power button.
Replace with a fully-charged battery
or use Power Pack Adaptor
separately sold.
An abnormal temperature has been
detected. Remove the battery from
the charger, wait for a while, and
insert it to the charger again.
Stop using the battery and replace it
with a new one.
Reference
page
P.14
P.17
P.18
P.14
P.41
P.13
P.41
The battery life is getting
shorter.
36
Replace the battery when the usable
time gets shorter.
P.41
Page 37

Frequently Asked Questions
Question Answer
Tell me how to
connect to the
internet.
How do I enter
characters?
Is the camera equipped
with a shake correction
function?
Is it possible to use
the device for long
period of time
without replacing
battery?
I'd like to wear the
device on my left side.
Reading QR codes allows for connecting a Wireless LAN.
For details, see "QR Code Operations"(P33).
Connect a USB converter(OTG) to the device, and connect
the mouse via USB. By clicking on the input area on the
display (e.g. browser address bar), users can enter
characters using the mouse on the software keyboard.
It is possible with a Bluetooth mouse, too.
No shake correction function is provided.
The device can be used for long period of time with
Power Pack Adaptor (sold separately).
Even so, it is recommended to take a 10 minute break
each hour since staring at the screen for long period
causes fatigue.
Attachment to the left-side holder of the headband
enables use on the left eye side, however, the headset of a
separately sold accessory cannot be used, and the screen
may not appear correctly in some applications which do
not support rotation of the screen, thus use this product
after conrmation.
37
Page 38

Question Answer
• Perform updating with “Olympus EyeTrek
Utility”.
I'd like to update
the rmware.
Download the complete development
environment followed by installing
“Olympus EyeTrek Utility” on your PC. For
details, refer to the explanation in the
development environment.
Reference
page
P.39
I'd like to check the
rmware version.
I'd like to install an
independently
developed
application.
It can be checked in [Status Information]
of the [Function Checker].
• Perform installation with “Olympus
EyeTrek Utility”.
Download the complete development
environment followed by referring to the
explanation of “Olympus EyeTrek Utility”.
P.25
P.39
38
Page 39

Development Environment
The entire set of the development environment for this device is provided on our web
site.
When setting the device or customizing the applications, conrm the user policy rst.
Then download the necessary sources from the following web site.
Note that we do not support or guarantee the safety of les or applications developed
using this environment. Also note that the environment specications may be changed
or deleted without notice.
Development Environment
http://www.getolympus.com/support
HOW TO RESTORE TO FACTORY SETTINGS
Olympus EyeTrek Utility (EyeTrek development support application for Windows®) allows users
to restore the device to its factory settings.
To install the Olympus EyeTrek Utility to the computer, read through the contained in the
development environment kit.
39
Page 40

Specifications
Device
Model No. EI-10
Display panel OLED
Display resolution nHD+ ( 640×400 )
Field of view Diagonal 13 deg. (approx.)
CPU TI OMAP 4470
OS Android 4.2.2
RAM (main memory) 1GB
ROM (user memory) 8GB
Sensor 3-axis accelerometer, 3-axis gyro, 3-axis magnetic eld
Camera 1992 x 1216 pixels (eective pixels)
Physical buttons 4 buttons (including power button), touch sensor
Audio input / output 16bit monaural microphone, 4-pole mini jack
Bluetooth 4.1 ( A2DP / AVRCP / SPP / H ID
Bluetooth®
Wireless LAN
USB port Micro-B
Weight (approx.) 66 g (including battery)
Operation environment
(Including accessories)
Storage environment
(Including accessories)
Supported frequency band: 2402MHz-2480MHz
Max. ou tput: 4.0mW
Bluetoo th low energy is not su pported
IEEE 802.11 a/b/g/n
Supported frequency band:2412MHz-2452MHz, 5150MHz-5250MHz, 5250MHz-5350MHz, 54705725MHz
Max. output: 8.9mW
Temperature: 5°C(41°F) - 35°C(95°F), Humidity: 30 - 90% (no dew condensation)
Temperature: 0°C(32°F) - 40°C(104°F), Humidity: 10 - 90% (no dew condensation)
Battery
Model No. WHB-001
Battery type Li-ion polymer
Battery life (approx.) 30-60min.* depending on the application(s)
Battery voltage / power DC 3.7V / 1.1Wh
Battery capacity 300mAh
AC adapter for battery charger
Model No. UN312-0520
Rated input AC 100-240V, 50/60Hz
,
Rated output DC5V
2.0A
Battery charger
Model No. EI-CH1
Rated input DC5V, 2.0A
,
Rated output DC4.2V
* Product specications may change without notice.
* For the latest specications, please visit our website.
0.75A ( When 5 batteries are
)
charged )
40
Page 41

Optional Accessaries
█
(sold separately)
Power Pack Adaptor
EI-PC1
Battery 5 Pack
EI-BT5
Protective Eyewear with Mount
EI -OG1
USB-AC adapter
F-5AC
Headset with Mic
EI-HS1
Power Pack Adaptor
Remove the lid of the cover while paying attention not to pinch the Power Pack Adaptor cable.
Insert the Power Pack Adaptor and connect the USB terminal to the USB-AC adapter, etc.
Power Pack Adaptor
Lid
USB terminal
* More than 5V /1.5A are required for the output of the USB-AC adapter.
* The plug-in type USB-AC adapter F-5AC shall be correctly mounted to a plug socket perpendicularly.
USB-AC adapter
41
Page 42

Protective Eyewear with Mount
Slide the device connector to insert it into the Protective Eyewear with Mount, as shown
below.
Connector
Mount
42
Page 43

Trademarks / Third Party Software
• EyeTrek INSIGHT is a registered trademark of OLYMPUS CORPORATION.
• QR codes are registered trademarks of Denso Wave Incorporated.
• The
Bluetooth
and any use of such marks by OLYMPUS CORPORATION is under license.
• Microsoft®, Windows®, Windows Vista® are either registered trademarks or trademarks of
Microsoft Corporation in the United States and/or other countries.
• Google and Android are trademarks of Google Inc.
• Mac, OS X are trademarks of Apple Inc., registered in the U.S. and other countries.
• All rights not specied in this manual belong to their owners.
This product is licensed under the avc patent portfolio license for the personal and
noncommercial use of a consumer to (i) encode video in compliance with the avc standard
(“avc video”) and/or (ii) decode avc video that was encoded by a consumer engaged in a
personal and non-commercial activity and/or was obtained from a video provider licensed
to provide avc video. No license is granted or shall be implied for any other use.
Additional information may be obtained from MPEG LA, L.L.C.
See http://www.mpegla.com
® word mark and logos are registered trademarks owned by Bluetooth SIG,Inc.,
The software in this product may include third party software. Any third party software is
subject to the terms and conditions, imposed by the owners or licensers of that software,
under which software is provided to you.
Those terms and other third party software notices, if any, may be found in legal
information in this device or the software notice PDF le in the site of development
environment.
Setting > about Phone > Legal information
http://www.getolympus.com/support
43
Page 44

3500 Corporate Parkway, P.O.Box 610, Center Valley, PA 18034-0610, U.S.A. Tel. 484-896-5000
Technical Support (U.S.A. / Canada)
24/7 online automated help :
http://www.olympusamerica.com/support
Phone customer support :
Tel. 1-800-260-1625 (Toll-free)
Our phone customer support is available from
9 am to 9 pm (Monday to Friday) ET
http://olympusamerica.com/contactus
Olympus software updates can be obtained at:
http://www.olympusamerica.com/support
WP244701 Ver.1.0
Printed in Japan
44
©2017
 Loading...