

Page 1

INSTRUCTIONS
EVIS EXERA XENON LIGHT SOURCE
OLYMPUS CLV-160
Page 2

Page 3

Contents
Contents
Labels and Symbols ..................................................................... 1
Important Information — Please Read Before Use.................... 3
Intended use ............................................................................................ 3
Instruction manual .................................................................................... 3
User qualifications..................................................................................... 4
Instrument compatibility ........................................................................... 4
Repair and modification ........................................................................... 4
Signal words.............................................................................................. 5
Dangers, warnings and cautions .............................................................. 5
Chapter 1 Checking the Package Contents............................ 8
Chapter 2 Light Source Nomenclature.................................... 9
2.1 Front panel...................................................................................... 9
2.2 Rear and side panels ...................................................................... 11
Chapter 3 Installation and Connection ................................... 13
3.1 Installation of equipment ................................................................. 13
3.2 Connection of the EVIS EXERA video system center or EVIS video
system center.................................................................................. 15
3.3 Connection of an endoscope .......................................................... 16
3.4 Connection of the OES video system ............................................. 16
3.5 Installation of the water container ................................................... 17
3.6 Connection to an AC mains power supply ...................................... 18
Chapter 4 Inspection ................................................................ 19
4.1 Inspection of the power supply ....................................................... 19
4.2 Checking the lamp life..................................................................... 21
4.3 Inspection of the filter function ........................................................ 22
4.4 Inspection of air and water feeding ................................................. 24
4.5 Inspection of the examination light.................................................. 25
4.6 Inspection of the light decreasing function...................................... 26
4.7 Inspection of transillumination function ........................................... 27
4.8 Inspection of brightness adjustment ............................................... 28
EVIS EXERA XENON LIGHT SOURCE CLV-160
i
Page 4

Contents
Chapter 5 Operation.................................................................. 31
5.1 Igniting the lamp.............................................................................. 33
5.2 Brightness adjustment .................................................................... 33
5.3 Using the filter function ................................................................... 35
5.4 Using the transillumination function ................................................ 38
5.5 Adjusting air/water pressure............................................................ 39
5.6 Turning the light source OFF .......................................................... 39
Chapter 6 Lamp Replacement.................................................. 40
6.1 Lamp life ......................................................................................... 40
6.2 Replacement of the examination (xenon) lamp............................... 40
Chapter 7 Care, Storage and Disposal .................................... 48
7.1 Care ................................................................................................ 48
7.2 Storage ........................................................................................... 49
7.3 Disposal .......................................................................................... 49
Chapter 8 Troubleshooting ...................................................... 50
8.1 Troubleshooting guide .................................................................... 50
8.2 Returning the light source for repair................................................ 54
Appendix........................................................................................ 55
System chart ............................................................................................ 55
Operating environment.............................................................................. 59
Transportation and storage environment ................................................. 59
Specifications ............................................................................................ 60
ii
EVIS EXERA XENON LIGHT SOURCE CLV-160
Page 5

Labels and Symbols
Safety-related labels and symbols are attached to the light source at the
locations shown below. If labels or symbols are missing or illegible, contact
Olympus.
Rear side
Electrical rating
Labels and Symbols
Refer to instructions.
Equipotential Terminal
Serial number plate
Warns that the inside is
extremely hot immediately
after the lamp is turned off.
Fuse rating
Refer to instructions.
EVIS EXERA XENON LIGHT SOURCE CLV-160
1
Page 6
Labels and Symbols
Back cover of this instruction manual
Manufacturer
Authorized representative in the European
Community
2
EVIS EXERA XENON LIGHT SOURCE CLV-160
Page 7
Important Information — Please Read Before Use
Important Information — Please Read
Before Use
Intended use
This light source has been designed to be used with Olympus endoscopes, and
ancillary equipment for observation, diagnosis, endoscopic treatment and
recording of image data.
Do not use this light source for any purpose other than its intended use.
Instruction manual
This instruction manual contains essential information on using this light source
safely and effectively. Before use, thoroughly review this manual and the
manuals of all equipment which will be used during the procedure and use the
equipment as instructed.
Keep this and all related instruction manuals in a safe, accessible location.
If you have any questions or comments about any information in this manual,
please contact Olympus.
Terms used in this manual
OES video converter, OES video system:
The OES video converter and OES video system are devices that
convert endoscope images from a fiberscope into monitor images.
EVIS video system center:
The EVIS video system center is a device that converts signals from a
videoscope or OES video converter into monitor images.
Mobile workstation:
The mobile workstation is a special trolley on which this light source is
placed and used for endoscopic diagnosis and treatment.
EVIS EXERA XENON LIGHT SOURCE CLV-160
3
Page 8

Important Information — Please Read Before Use
User qualifications
The operator of this light source must be a physician or medical personnel under
the supervision of a physician and must have received sufficient training in
clinical endoscopic technique. This manual, therefore, does not explain or
discuss clinical endoscopic procedures.
Instrument compatibility
Refer to the “System chart” in the Appendix to confirm that this light source is
compatible with the ancillary equipment being used. Using incompatible
equipment can result in patient injury or equipment damage.
Repair and modification
Aside from the examination lamp and the fuses, this light source does not
contain any user-serviceable parts. Do not disassemble, modify or attempt to
repair it; patient or user injury and/or equipment damage can result.
Some problems that appear to be malfunctions may be correctable by referring
to Chapter 8, “Troubleshooting”. If the problem cannot be resolved using the
information in Chapter 8, contact Olympus.
4
EVIS EXERA XENON LIGHT SOURCE CLV-160
Page 9

Signal words
Important Information — Please Read Before Use
The following signal words are used throughout this manual:
Indicates an imminently hazardous situation which, if not
avoided, will result in death or serious injury.
Indicates a potentially hazardous situation which, if not
avoided, could result in death or serious injury.
Indicates a potentially hazardous situation which, if not
avoided, may result in minor or moderate injury. It may also
be used to alert against unsafe practices or potential
equipment damage.
Indicates additional helpful information.
Dangers, warnings and cautions
Follow the dangers, warnings and cautions given below when handling this light
source. This information is to be supplemented by the dangers, warnings and
cautions given in each chapter.
• As a TYPE BF applied part, this light source must never be
applied directly to the heart and must not be used in
procedures involving cardiac observation or surgery.
Leakage current from the TYPE BF applied part may be
dangerous and cause ventricular fibrillation or otherwise
seriously affect the cardiac function of the patient.
Accordingly, always adhere to the following points:
− Never apply the endoscope connected to this light source
to the heart or any area near the heart.
− Never allow an endo-therapy accessory or another
endoscope applied to or near the heart to come in contact
with an endoscope connected to this light source.
EVIS EXERA XENON LIGHT SOURCE CLV-160
5
Page 10
Important Information — Please Read Before Use
• Strictly observe the following precautions. Failure to do so
• Never install and operate the light source in locations where:
may place the patient and medical personnel in danger of an
electrical shock.
− When the light source is used to examine a patient, do not
allow metal parts of the endoscope or its accessories to
touch metal parts of other system components. Such
contact may cause unintended current flow to the patient.
− Keep liquids away from all electrical equipment. If fluids
are spilled on or into the unit, stop operation of the light
source at once and contact Olympus.
− Do not prepare, inspect or use this light source with wet
hands.
− The concentration of oxygen is high.
− Flammable anesthetics are present in the atmosphere.
Otherwise, explosion or fire may result because this light
source is not designed to be explosion-proof.
• Do not touch the light guide of the endoscope connector
immediately after removing it from the light source because it
is extremely hot. Operator or patient injury can result.
• Do not look directly into the distal end of the endoscope or
the output socket of this light source while the examination
lamp is ignited. The intense light may cause eye injury.
• To be prepared in case of a light source failure, always have
another light source available for immediate use.
• Xenon light sources produce significant heat due to the high
intensity light required for endoscopic procedures and can
cause a fire if brought into contact with flammable material.
To avoid this, make sure that the distal ends of the light guide
cable and endoscope do not touch drapes or other
flammable material. Also, make sure that light emitted from
the cable and scope is not directed toward a drape or other
flammable material. Turn OFF the light source whenever it is
not being used.
• The system should be establish with equipment complied
with relevant EMC standards for safety reason.
• Equipment which do not comply with EMC standard may
cause interference and its function or performance may be
affected.
6
EVIS EXERA XENON LIGHT SOURCE CLV-160
Page 11
Important Information — Please Read Before Use
• Portable or mobile phones may influence the medical
electrical equipment by their emitting energy.
• Do not use a pointed or hard object to press the switches on
the front panel. This may damage the switches.
• To avoid breaking electric contacts and causing a
malfunction:
− Do not touch the electric contacts of the light source
output socket.
− Do not subject any connector to excessive force.
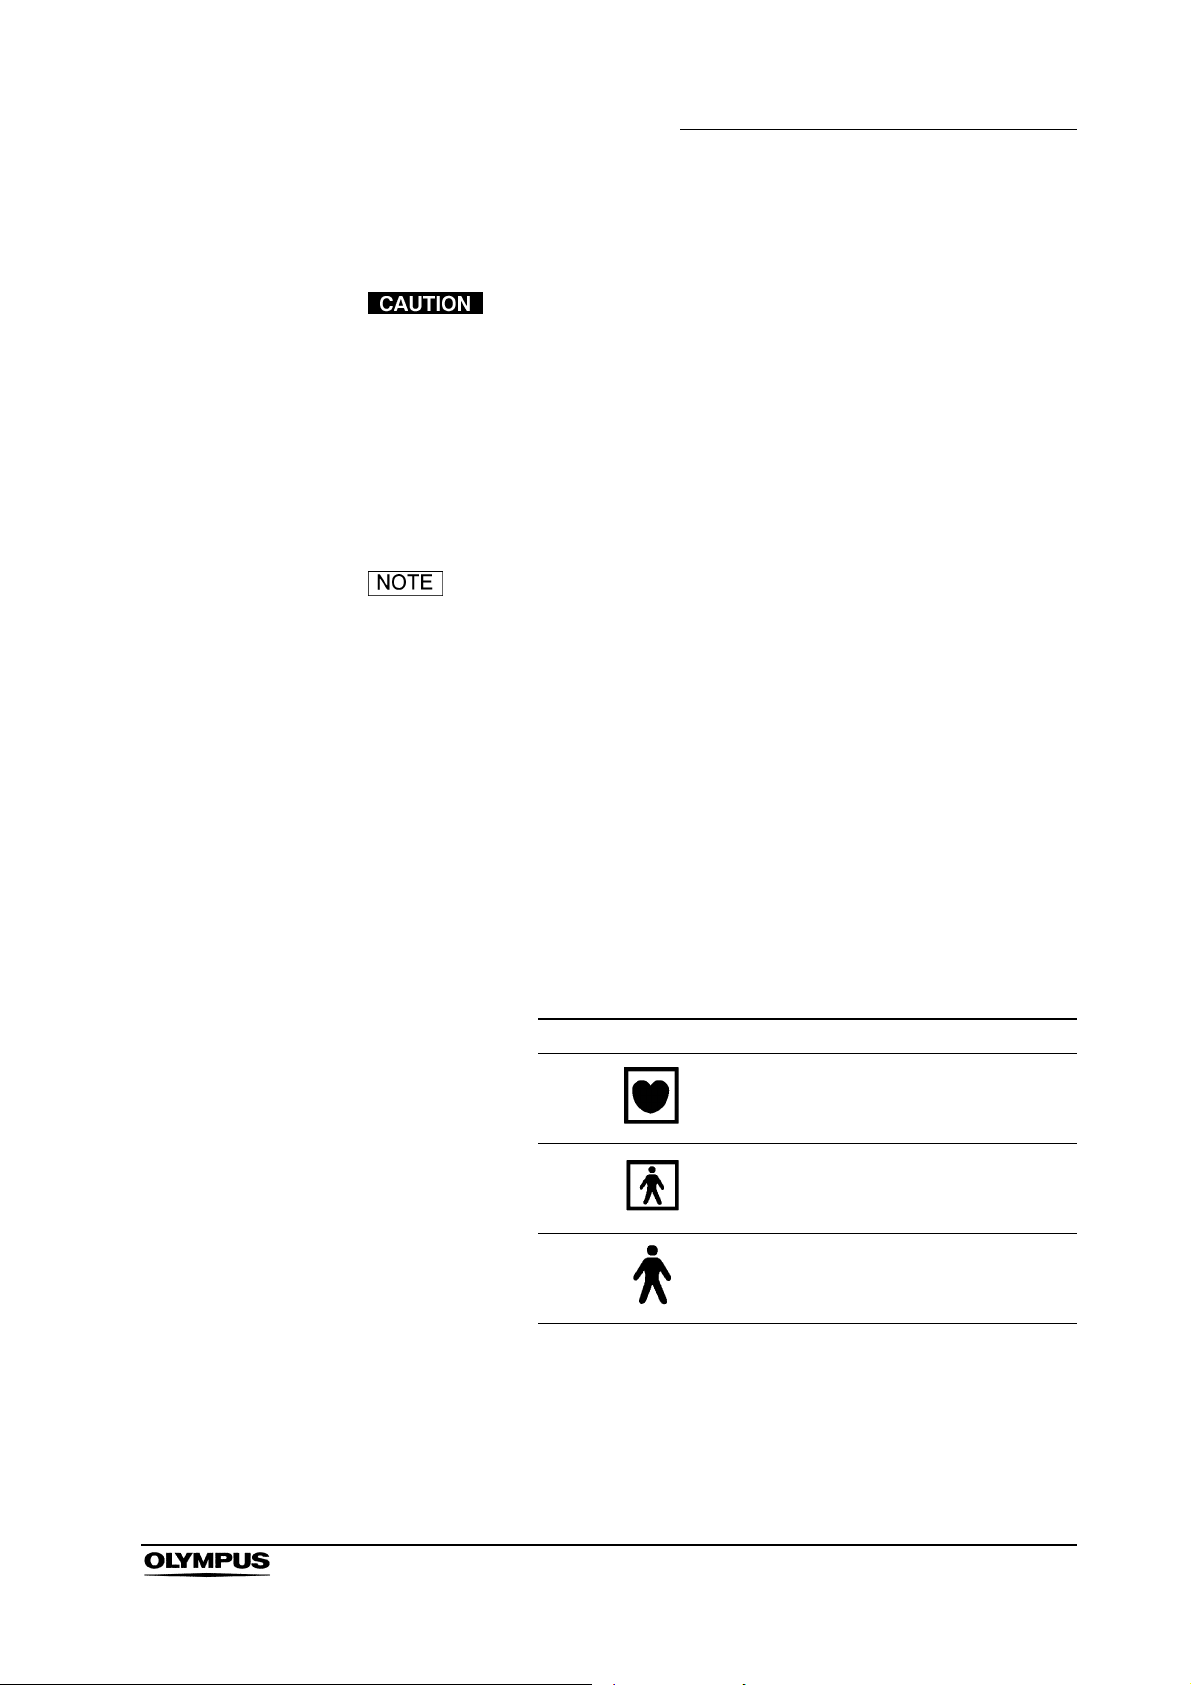
As defined by the international safety standard
(IEC 60601-1:1988), medical electrical equipment is
classified into the following types: TYPE CF applied part (the
instrument can safely be applied to any part of the body,
including the heart), and TYPE B/BF applied part (the
instrument can safely be applied to any organ except the
heart). The part of the body a videoscope or electrosurgical
accessory can safely be applied to depends on the
classification of the equipment to which the instruments are
connected. Before beginning the procedure, check the
current leakage classification type of each instrument to be
used for the procedure. Classification types are clearly
specified on the instruments and in the instruments’
instruction manuals.
Symbol Classification
EVIS EXERA XENON LIGHT SOURCE CLV-160
TYPE CF applied part
TYPE BF applied part
TYPE BF applied part
7
Page 12

Chapter 1 Checking the Package Contents
Chapter 1 Checking the Package
Contents
Match all items in the package with the components shown below. Inspect each
item for damage. If the light source is damaged, a component is missing or you
have any questions, do not use the light source; immediately contact Olympus.
Light source (CLV-160)
Light control cable (MH-966) Foot holder (MAJ-878) Spare fuse (MAJ-892)
Power cord Instruction manual
8
EVIS EXERA XENON LIGHT SOURCE CLV-160
Page 13
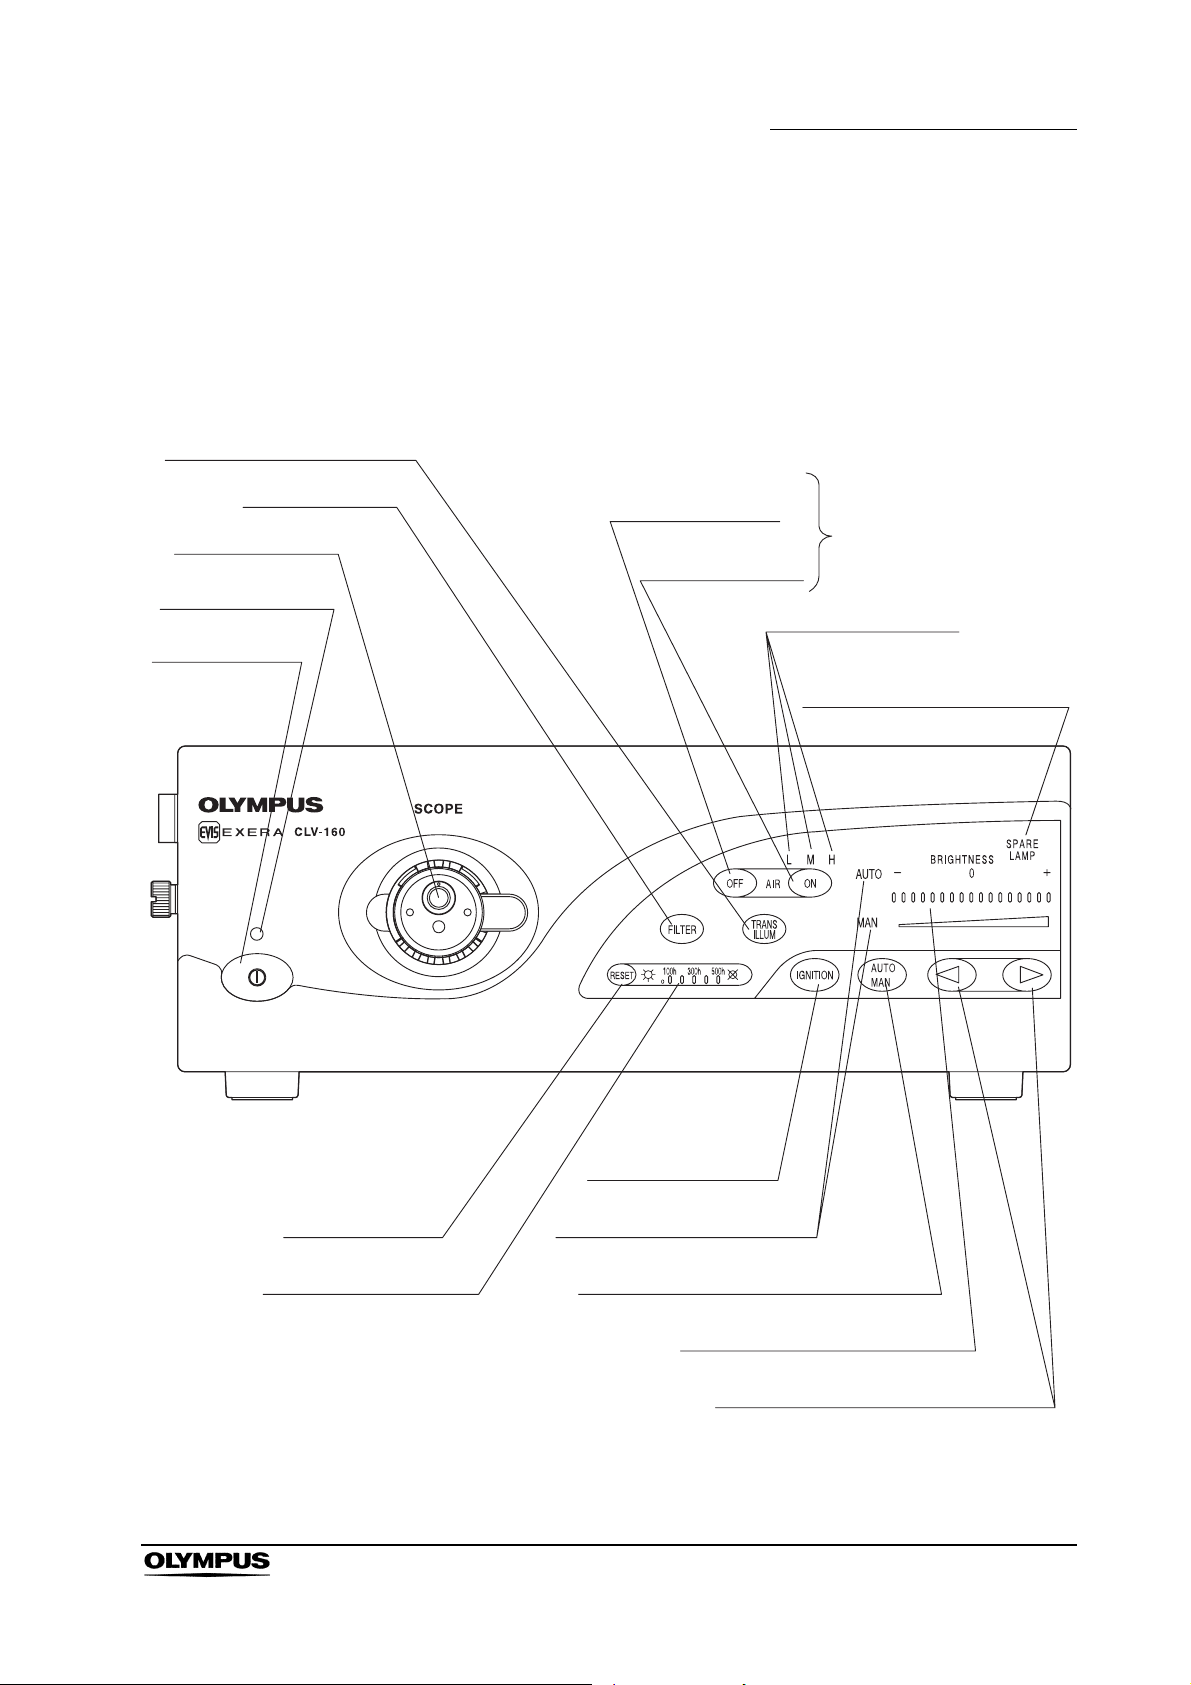
Chapter 2 Light Source Nomenclature
Chapter 2 Light Source Nomenclature
2.1 Front panel
5. Transillumination switch
4. Filter switch
3. Output socket
2. Power indicator
1. Power switch
Airflow regulator
OFF switch
Airflow regulator
ON switch
6. Airflow regulator
switches
7. Airflow indicators
8. Emergency lamp indicator
13. Lamp ignition
switch
15. Reset switch
14. Lamp life indicator
EVIS EXERA XENON LIGHT SOURCE CLV-160
12. Auto/manual indicators
11. Auto/manual brightness selector
10. Brightness level indicators
9. Brightness adjustment switches
9
Page 14

Chapter 2 Light Source Nomenclature
1. Power switch
Pressing the power switch in until its stops turns the light source ON. When
the power is ON, the power indicator above the power switch is lit. To turn
the light source OFF, press the power switch once again.
2. Power indicator
The power indicator is lit when the power is ON.
3. Output socket
This socket provides light, electrical signals and air to the endoscope.
4. Filter switch
When a special-purpose filter is installed, pressing this switch changes
between normal observation mode and filter mode.
5. Transillumination switch
When pressing this switch, light emitted from the endoscope’s distal end
becomes brighter for 7 seconds, then returns automatically to its original
brightness level.
6. Airflow regulator switches
With these switches, the pressure of the air being fed from the endoscope
can be controlled.
7. Airflow indicators
These indicators display the current airflow regulator setting (“L”, “M”, or “H”)
when the airflow regulator “ON” switch is pressed.
8. Emergency lamp indicator
This indicator is lit when the emergency lamp (halogen) is in use, and
blinking when emergency lamp (halogen) is disconnected or not mounted.
9. Brightness adjustment switches
These switches are pressed to adjust the brightness level.
10. Brightness level indicators
These indicators display the current brightness level.
11. Auto/manual brightness selector
This selector is pressed to select automatic or manual brightness control.
12. Auto/manual indicator
This indicator displays the brightness selector setting (“auto” or “manual”).
13. Lamp ignition switch
This switch is pressed to turn ON the examination (xenon) lamp.
10
14. Lamp life indicator
This indicator displays the total working hours of the examination (xenon)
lamp.
15. Reset switch
After replacing the examination (xenon) lamp, the lamp life indicator is reset
by pressing this switch for more than 3 seconds.
EVIS EXERA XENON LIGHT SOURCE CLV-160
Page 15

2.2 Rear and side panels
2. AUX connector
AC mains inlet
1. Light control connector
Chapter 2 Light Source Nomenclature
3. Fuse holders
4. Water container
holder
5. Potential equalization
terminal
6. Lamp cover
Rear foot
Ventilation grills
Rear panel
7. Filter disk
Left side
EVIS EXERA XENON LIGHT SOURCE CLV-160
11
Page 16

Chapter 2 Light Source Nomenclature
1. Light control connector
This connector is receptacle for the light control cable to connect the light
source to the EVIS EXERA video system center or the EVIS video system
center.
2. AUX connector
This connector is receptacle for the light control cable to connect the light
source to the OES video system.
3. Fuse holders
The fuses are mounted here.
4. Water container holder
This holder is used for the installation of the water container.
5. Potential equalization terminal
For safety purposes, this terminal is connected to a potential equalization
busbar of the electrical installation.
6. Lamp cover
This cover is removed to replace the examination lamp and a
special-purpose filter.
7. Filter disk
This disk is hold a special-purpose filter when necessary.
12
EVIS EXERA XENON LIGHT SOURCE CLV-160
Page 17

Chapter 3 Installation and Connection
Chapter 3 Installation and Connection
• Turn OFF all system components before connecting them.
Otherwise, equipment damage can result.
• Use appropriate cables only. Otherwise, equipment damage
or malfunction can result.
• Use the light source under the conditions described in the
“Operating environments” and the “Specifications” in the
Appendix only. Otherwise, improper performance,
compromised safety and/or equipment damage may result.
Prepare the light source and compatible equipment (shown in the “System chart”
in the Appendix) before each use, and refer to the instruction manuals of each
system component. Install and connect the equipment as follows:
3.1 Installation of equipment
• Do not place any equipment other than the EVIS video
system center or OES video system on the top of the light
source. Otherwise, equipment damage can result.
• Keep the ventilation grills of the light source clear. Blockage
can cause overheating and equipment damage.
• Place the light source on a stable level surface, using the foot
holder (MAJ-878).
• If no mobile workstation (WM-30, WM-N60) is used, confirm
that the light source does not exceed the allowed maximum
load of the installation site.
EVIS EXERA XENON LIGHT SOURCE CLV-160
13
Page 18

Chapter 3 Installation and Connection
Installation on the mobile workstation
1. Place the mobile workstation on a level surface. Lock the caster brakes as
shown in Figure 3.1.
Figure 3.1
Brake caster Brake release
Caster
2. Install the shelf of the mobile workstation as described in the mobile
workstation’s instruction manual.
3. Using the pattern sheet as a template on the mobile workstation, position
the foot holders at the four corners.
4. Peel the paper from the bottom of the foot holders and gently place them in
position as shown in Figure 3.2.
Pattern sheet
Foot holder
Peel off
Figure 3.2
14
EVIS EXERA XENON LIGHT SOURCE CLV-160
Page 19

Chapter 3 Installation and Connection
5. Once in position, press the foot holders firmly in place.
6. Place the light source on the mobile workstation so that the feet rest in the
foot holders (see Figure 3.3).
Video system center
Light source
(CLV-160)
Figure 3.3
Installation in another location
When installing the light source in another location, adhere the foot holders as
described above.
3.2 Connection of the EVIS EXERA video system center or EVIS video system center
Prepare an EVIS EXERA video system center or an EVIS video system center
when using a videoscope or an OES video converter.
Connect the light control cable that comes with the EVIS EXERA video system
center or the EVIS video system center to the light control connector (see Figure
3.4).
Light control connector
Figure 3.4
EVIS EXERA XENON LIGHT SOURCE CLV-160
15
Page 20

Chapter 3 Installation and Connection
3.3 Connection of an endoscope
Before connecting the endoscope’s light guide connector to
the light source, make sure that it is perfectly dry. If the
endoscope’s light guide connector is wet (after disinfecting,
for example), wipe and dry the exterior as described in the
endoscope’s reprocessing manual. Otherwise, electrical
shock or equipment damage can result.
Insert the light guide connector into the output socket on the front panel of the
light source until it clicks into place (see Figure 3.5).
Figure 3.5
3.4 Connection of the OES video system
• Set the auto/manual brightness selector to “AUTO” to
prevent burns caused by close observation. So the
brightness is adjusted automatically. If using manual
brightness adjustment, set the brightness to the middle or
lower level and never observe close to mucous membranes
for a long time.
• When using rigidscope, set the auto/manual brightness
selector to “AUTO” to prevent burns caused by close
observation. So the brightness is adjusted automatically. If
using manual brightness adjustment, set the brightness to
the middle or lower level and never observe close to mucous
membranes for a long time.
16
EVIS EXERA XENON LIGHT SOURCE CLV-160
Page 21

Chapter 3 Installation and Connection
To view a fiberscope’s image on a video monitor, prepare an OES video system,
such as the OTV-S6.
Connect the light control cable supplied with the OES video system to the AUX
connector (see Figure 3.6).
AUX connector
Figure 3.6
3.5 Installation of the water container
When using an endoscope where water can be fed via the light source, prepare
the water container as shown in the “System chart” in the Appendix. Install the
water container in the water container holder on the left side of the light source
(see Figure 3.7).
Figure 3.7
EVIS EXERA XENON LIGHT SOURCE CLV-160
17
Page 22

Chapter 3 Installation and Connection
3.6 Connection to an AC mains power supply
Connect the power plug of the power cord directly to a
grounded wall mains outlet. If the light source is not
grounded properly, it can cause an electric shock and/or fire.
• Do not allow the power cord to become wet. A wet power
cord may cause electrical shock.
• Make sure that the wall mains outlet to which the light source
is connected has a higher capacity than the total power
consumption of all connected equipment (including this light
source). If the capacity is inadequate, fire can result or the
circuit breaker may trip and turn OFF the light source and all
other light sources connected to it.
• Do not bend, pull or twist the power cord. Electrical shock,
equipment damage or fire can result.
When combined with the mobile workstation (WM-30), do not
connect the power cord of the light source to the secondary
outlet on the workstation. Connect the power cord directly to
a wall mains outlet. Otherwise the system may malfunction or
the supplied voltage will be insufficient.
1. Confirm that the light source is OFF.
2. Connect the power cord to the AC mains inlet and to a wall mains outlet.
18
EVIS EXERA XENON LIGHT SOURCE CLV-160
Page 23

Chapter 4 Inspection
Before each case, inspect this light source as instructed
below. Inspect other equipment to be used with this light
source as instructed in their respective instruction manuals.
Should the slightest irregularity be suspected, do not use the
light source and see Chapter 8, “Troubleshooting”. If the
irregularity is still suspected after consulting Chapter 8,
contact Olympus. Damage or irregularity may compromise
patient or user safety and may result in more severe
equipment damage.
Prepare this light source and other equipment (shown in the “System chart” in
the Appendix) to be used with this light source for each particular case. Refer to
respective instruction manuals for each piece of equipment.
Chapter 4 Inspection
4.1 Inspection of the power supply
Press the power switch once to turn ON the light source. Confirm that the power
indicator is lit (see Figure 4.1).
Power indicator
Power switch
Figure 4.1
EVIS EXERA XENON LIGHT SOURCE CLV-160
19
Page 24

Chapter 4 Inspection
If the power fails to come on
If the power fails to come on, inspect the system as follows:
1. Confirm that the power cord is connected securely to the wall mains outlet
and to the AC mains inlet on the light source.
2. Confirm that the lamp cover is completely closed. For safety, the light
source cannot be turned ON unless the lamp cover is completely closed.
3. Confirm that the fuses have not blown. If the fuses have blown, replace
them with new ones according to the following procedures.
• Turn the light source OFF and remove the power cord from
the wall mains outlet before replacing the fuses with new
ones. Otherwise, electric shock may result.
• When changing fuses, use only MAJ-892 (6.35 × 31.8 mm).
Otherwise, fire or equipment damage can result.
• If the power fails to come ON after replacing the fuses with
new ones, immediately turn the light source OFF. Remove
the power cord from the wall mains outlet and contact
Olympus. Equipment damage or malfunction may have
occurred and fire or electric shock can result.
4. Turn the light source OFF and disconnect the power cord from the wall
mains outlet.
5. Turn the knob of the fuse holder counterclockwise about 90°, then pull it out
straight (see Figure 4.2).
Knobs
Fuse holders
20
Figure 4.2
EVIS EXERA XENON LIGHT SOURCE CLV-160
Page 25

Chapter 4 Inspection
6. Inspect the fuses (see Figure 4.3). Even if only one fuse has blown, always
replace both of them.
Knob
Fuse replacement
Figure 4.3
Fuse
7. Push the knob into the fuse holder. When fully pushed, turn the knob
clockwise until it stops.
8. Reconnect the power cord and press the power switch. Confirm that the
power indicator is lit.
If the emergency lamp indicator is lit
If the emergency lamp indicator is lit immediately after the light source is turned
ON, it is highly likely that the installed emergency lamp is burned out or out of
order, contact Olympus.
4.2 Checking the lamp life
Check the lamp life indicator.
The total working hours of the examination lamp are displayed by this lamp
life indicator.
If the “500 h” indicator is lit (see Figure 4.4), replace the examination lamp
with a new one as described in Chapter 6, “Lamp Replacement”.
The examination lamp should be replaced as soon as it
appears to darken, even if the “500 h” indicator is not yet lit.
EVIS EXERA XENON LIGHT SOURCE CLV-160
21
Page 26

Chapter 4 Inspection
Lamp life indicator
500h
Figure 4.4
4.3 Inspection of the filter function
The filter function makes it possible to place a filter of your choice in the light
path for special applications. For instructions on selecting and installing a
special-purpose filter, see Section 5.3, “Using the filter function”.
• Do not use the filter function when no filter is installed in the
filter disk. Confirm that the frame of a special-purpose filter is
pushed into the filter disk as far as possible. Otherwise,
equipment damage can occur, or light emitted from the distal
end of the endoscope can cause burns.
• While inspecting the filter function, do not touch anything
inside the lamp chamber. The lamp cover and everything
inside is extremely hot and may cause burns.
Do not touch the emergency lamp, reflector or filter. Natural
skin moisture from your fingers can cause cracks and
damage the light source.
• When switching the light source ON, the filter function is
automatically set to normal observation mode (the filter
switch is not lit).
22
• The color of the filter’s frame for the special purpose filter is
silver.
• In the factory, the metal board is set instead of the filter in the
filter’s frame.
EVIS EXERA XENON LIGHT SOURCE CLV-160
Page 27

Chapter 4 Inspection
1. When the light source is already ON, set the filter function to normal
observation mode.
2. Turn the light source OFF and disconnect the power cord from the wall
mains outlet.
3. Remove the lamp cover and confirm that a special-purpose filter is installed
in the filter disk (see Figure 4.5).
Lamp cover
Lamp chamber
Filter disk
Figure 4.5
If the filter is loose, reinstall it as instructed in Section 5.3, “Using the filter
function”.
4. Close the lamp cover securely. Then reconnect the power cord and turn the
light source ON.
5. Press the filter switch (see Figure 4.6) to activate the filter mode. A beep is
heard and the filter switch lights.
Filter switch
Figure 4.6
6. Press the filter switch once again. The filter function returns to the normal
observation mode and the filter switch is not lit.
EVIS EXERA XENON LIGHT SOURCE CLV-160
23
Page 28

Chapter 4 Inspection
4.4 Inspection of air and water feeding
When using a water container to feed water from the endoscope, inspect the air
and water feeding functions as follows.
1. Confirm that one of the airflow indicators (“L”, “M”, and “H”) is lit. If no
indicator is lit, press the airflow regulator ON switch once. Then confirm that
a beep is heard and one of indicators (“L”, “M”, and “H”) is lit (see Figure
4.7).
• When the light source is turned OFF, the airflow regulator
setting is automatically stored and recalled when the light
source is ON again.
• The airflow regulator has been set to OFF before shipment.
Press the airflow regulator ON switch once to set the airflow
regulator to “L”.
Airflow indicators
Airflow regulator
OFF switch
Airflow regulator
ON switch
Figure 4.7
2. With the airflow regulator set to “L”, “M” or “H”, immerse the distal end of the
connected endoscope in sterile water and operate the endoscope’s air
feeding function as described in the endoscope’s instruction manual.
24
EVIS EXERA XENON LIGHT SOURCE CLV-160
Page 29

Chapter 4 Inspection
Check the following functions:
• Air bubbles are emitted from the air/water nozzle at the distal end of the
endoscope.
• When the air bubbles are emitted, pressing the airflow regulator OFF
switch stops the air bubbles.
• When restarting, the setting of the airflow regulator is the same as
before the airflow regulator OFF switch is pressed; the emission of air
bubbles is resumed.
• Pressing the airflow regulator ON switch again increases the air
pressure and the airflow indicator moves to the next level (level “H” is
followed by level “L”).
3. Remove the distal end of the endoscope from the sterile water and operate
the endoscope’s water feeding function as described in the endoscope’s
instruction manual. Confirm that the amount of water emitted from the
air/water nozzle at the distal end of the endoscope corresponds to the
setting of the air flow regulator.
4.5 Inspection of the examination light
Do not look directly into the distal end of the endoscope or
the output socket of the light source when they are emitting
light. Eye damage may result.
Press the lamp ignition switch. Confirm that the white examination light is
emitted from the distal end of the endoscope as shown in Figure 4.8.
Distal end of endoscope
Examination light
Figure 4.8
EVIS EXERA XENON LIGHT SOURCE CLV-160
25
Page 30

Chapter 4 Inspection
1. Press the lamp ignition switch once. The ignition operation is repeated
automatically for up to about 5 seconds until the examination (xenon) lamp
ignites. If ignition fails, the light source automatically switches to the
emergency (halogen) lamp and the emergency lamp indicator is lit. If this
happens, turn the light source OFF and ON again. Then press the lamp
ignition switch.
2. If ignition of the examination (xenon) lamp fails, install a new lamp as
described in Chapter 6, “Lamp Replacement”.
4.6 Inspection of the light decreasing function
Do not look directly into the distal end of the endoscope or
the output socket of the light source when they are emitting
light. Eye damage may result.
The light decreasing mechanism is a safety feature designed to prevent light
from being emitted when not necessary, for example when no endoscope is
connected. Inspect this function as follows:
1. Disconnect the endoscope while it is emitting light. Confirm that no intense
light is emitted from the output socket of the light source by holding a
suitable object to the light.
2. Reconnect the endoscope to the output socket and confirm that light is
emitted from the distal end of the endoscope following the procedure as
described in Section 4.5, “Inspection of the examination light”.
26
EVIS EXERA XENON LIGHT SOURCE CLV-160
Page 31

4.7 Inspection of transillumination function
When using a fiberscope without video or TV systems, do not
use the transillumination function while looking into the
eyepiece of the endoscope. Using this function sets the
examination light to maximum, and eye damage can result.
The transillumination function allows to externally confirm the endoscope’s
position in the patient’s body due to more intense examination light emitted from
the endoscope’s distal end. Inspect this function as follows.
Press the transillumination switch and confirm that:
• A beep is heard
• The transillumination indicator on the front panel blinks.
• Brightness is set to maximum for manual brightness control.
Chapter 4 Inspection
• Brightness control remains switched to manual even if the auto/manual
brightness selector is pressed.
• After 7 seconds, the light returns to its original brightness.
Distal end of
endoscope
Figure 4.9
Pressing the transillumination switch while the
transillumination function is activated cancels the function
and restores the previous setting.
EVIS EXERA XENON LIGHT SOURCE CLV-160
27
Page 32

Chapter 4 Inspection
4.8 Inspection of brightness adjustment
When using the fiberscope without video or TV systems, set
the auto/manual brightness selector to “MAN.”. Setting to
“AUTO” changes the examination light to maximum, and eye
damage can result.
Selecting automatic or manual brightness control
When selecting a brightness control mode, confirm that the corresponding
indicator lights up when pressing the auto/manual brightness selector (see
Figure 4.10) and a beep is heard.
Figure 4.10
Auto/manual indicators
Auto/manual brightness selector
28
EVIS EXERA XENON LIGHT SOURCE CLV-160
Page 33

Chapter 4 Inspection
Automatic brightness adjustment
Before disconnecting the video system from the endoscope,
always select manual brightness control and set the
brightness to minimum. If the video system is disconnected
while the brightness adjustment is set to automatic,
examination light may change to maximum and eye damage
can result.
1. Press the auto/manual brightness selector to select “AUTO”.
2. Point the distal end of the endoscope at a suitable object and vary the
distance between 5 and 60 mm (see Figure 4.11). Confirm that the light
being emitted from the distal end varies with the distance.
Figure 4.11
3. Hold the distal end of the endoscope at a distance between 30 and 40 mm
to the object and press the brightness adjustment switches (“ ” or “ ”).
Confirm the following:
• Each time either of the brightness adjustment switches is pressed, a
beep is heard and the brightness level increases or decreases
accordingly. The present brightness level is indicated and the indicator
moves one level up or down.
• When either of the brightness adjustment switches is pressed down
continuously, successive beeps are heard and one of the brightness
level indicator moves continuously.
EVIS EXERA XENON LIGHT SOURCE CLV-160
29
Page 34

Chapter 4 Inspection
Brightness level indicators
Brightness adjustment switches
Figure 4.12
Manual brightness adjustment
When using manual brightness adjustment, always set the
brightness to the minimum level necessary to complete the
examination. If the light is too bright, eye damage or burns
can result.
1. Press the auto/manual brightness selector to select “MAN.”.
2. Press the brightness adjustment switches (“ ” or “ ”) and confirm the
following (see Figure 4.13):
• Each time either of the brightness adjustment switches is pressed, a
beep is heard and the brightness level increases or decreases
accordingly. The brightness level indicators also increase or decrease.
• When either of the brightness adjustment switches is pressed down
continuously, successive beeps are heard and the level indicator
increases or decreases continuously.
Brightness level indicators
Brightness adjustment switches
30
Figure 4.13
EVIS EXERA XENON LIGHT SOURCE CLV-160
Page 35

Chapter 5 Operation
The operator of this light source must be a physician or medical personnel under
the supervision of a physician and must have received sufficient training in
clinical endoscopic technique. This manual, therefore, does not explain or
discuss clinical endoscopic procedures. It only describes basic operation and
precautions related to the operation of this light source.
• Wear personal protective equipment to guard against
dangerous chemicals and potentially infectious material.
During operation, wear appropriate personal protective
equipment, such as eye wear, face mask, moisture-resistant
clothing and chemical-resistant gloves that fit properly and
are long enough so that your skin is not exposed.
Chapter 5 Operation
• If the examination lamp does not ignite or go off with blinking
the brightness level indicators, immediately stop using the
light source and withdraw the endoscope from the patient
slowly as described in the endoscope’s instruction manual.
And then, contact Olympus.
• Anytime you suspect an abnormality in a light source
function, stop the examination immediately. Take action
according to the procedures described below. Using a
defective light source may cause injury.
− If the image on the monitor becomes completely white or
black when the automatic brightness adjustment is
selected, the automatic brightness adjustment may be
malfunctioning. In this case, set the auto/manual
brightness selector to “MAN.” and adjust the brightness
manually. Withdraw the endoscope from the patient
slowly as described in the endoscope’s instruction
manual.
− If the examination lamp fails and the emergency lamp
lights, withdraw the endoscope from the patient slowly as
described in the endoscope’s instruction manual.
− The emergency lamp provides only the absolute minimum
of light needed to keep operating in an emergency, so do
not use the emergency lamp for operation unless
absolutely necessary.
EVIS EXERA XENON LIGHT SOURCE CLV-160
31
Page 36

Chapter 5 Operation
− If any other abnormality occurs or is suspected, stop
using the equipment and immediately withdraw the
endoscope from the patient slowly as described in the
endoscope’s instruction manual. Then refer to the
instructions in Chapter 8, “Troubleshooting”. If the
problems cannot be resolved by the remedial action as
described in Chapter 8, do not use this light source on a
patient again and immediately contact Olympus.
• Whenever possible, do not leave the endoscope illuminated
before and/or after an examination. Continued illumination
will cause the distal end of the endoscope to become hot and
could cause operator and/or patient burns.
• Turn the video system center ON to operate the light
source’s auto-brightness function. When the video system
center is OFF, it cannot operate the light source’s
auto-brightness function, and the light intensity is set to the
maximum level. In this case, the distal end of the endoscope
can become hot and could cause operator and/or patient
burns.
• Do not use the light source in a location exposed to strong
electromagnetic radiation (e.g., near microwave medical
treatment equipment, short wave medical treatment
equipment. MRI equipment or radio). Brightness fluctuation
can occur.
• It is recommended to use only Olympus high frequency
electrosurgical equipment with this unit. Non-Olympus
equipment can cause interference on the monitor display or a
loss of the endoscopic image.
Set the brightness of the light source to the minimum
necessary to perform the procedure safely. If the endoscope
is used for a prolonged period at or near maximum light
intensity, vapor like smoke may be observed in the
endoscopic image. This is caused by the evaporation of
organic material (remaining blood, moisture of stool and so
on) due to heat generated by the light guide near the light
guide lens. If this vapor continues to interfere with the
examination, remove the endoscope, wipe the distal end of
the endoscope with a lint-free cloth moistened with 70% ethyl
or isopropyl alcohol, reinsert the endoscope and continue the
examination.
32
EVIS EXERA XENON LIGHT SOURCE CLV-160
Page 37

5.1 Igniting the lamp
1. Confirm that the endoscope is connected to the output socket, and press the
power switch (see Figure 5.1).
Power switch
Chapter 5 Operation
Output socket
2.
1.
Lamp ignition
switch
Figure 5.1
2. Press the lamp ignition switch to ignite the examination lamp.
5.2 Brightness adjustment
• When using the fiberscope without a video system, set the
auto/manual brightness selector to “MAN.”. Setting to
“AUTO” changes the examination light to maximum, and eye
damage can result.
• When using in combination with an OES video system, set
the auto/manual brightness selector to “AUTO” to prevent
burns caused by close observation. So the brightness is
adjusted automatically. If using manual brightness
adjustment, set the brightness to the middle or lower level
and never observe close to mucous membranes for a long
time.
• When using rigidscope with an OES video system, set the
auto/manual brightness selector to “AUTO” to prevent burns
caused by close observation. So the brightness is adjusted
automatically. If using manual brightness adjustment, set the
brightness to the middle or lower level and never observe
close to mucous membranes for a long time.
EVIS EXERA XENON LIGHT SOURCE CLV-160
33
Page 38

Chapter 5 Operation
Operating the automatic brightness adjustment
Adjust the brightness of the video monitor.
Before disconnecting the video system from the endoscope,
always select manual brightness adjustment and set the
brightness to minimum. If the video system is disconnected
while the brightness adjustment is set to automatic,
examination light may change to maximum and eye damage
or burns can result.
1. Press the auto/manual brightness selector to select automatic brightness
adjustment.
2. Press either of the brightness adjustment switches (“ ” or “ ”) to set the
brightness to a level suitable for observation. The standard setting is “0”
(see Figure 5.2).
Brightness level indicators
Brightness adjustment switches
Figure 5.2
• Depending on the endoscopic system being used and the part being
observed, the standard setting may be too bright or too dark. In this
case, adjust the brightness as needed. This can also be done during
observation, if necessary.
• Pressing either of the brightness adjustment switches (“ ” or “ ”)
once moves the level one step; pressing the switch continuously moves
the level continuously.
34
EVIS EXERA XENON LIGHT SOURCE CLV-160
Page 39

Operating the manual brightness adjustment
• When using manual brightness adjustment, always set the
brightness to the minimum level necessary to complete the
examination. If the brightness is set higher than necessary,
eye damage or burns can result.
• When using a fiberscope without a video system, do not use
the transillumination function while looking into the eyepiece
of the endoscope. Using this function when the examination
light is set to maximum, and eye damage can result.
1. Press the auto/manual brightness selector to select manual brightness
adjustment.
2. Press either of the brightness adjustment switches (“ ” or “ ”) to set the
brightness to a level suitable for observation (see Figure 5.3).
Chapter 5 Operation
Figure 5.3
Pressing either of the brightness adjustment switches (“ ” or “ ”) once
increases or decreases the level one step; pressing the switch continuously
increases or decreases the level continuously.
5.3 Using the filter function
Do not use the filter function without a special-purpose filter
installed in the filter disk. Otherwise, equipment damage can
occur or light emitted from the distal end of the endoscope
can cause burns.
Brightness level indicators
Brightness adjustment switches
EVIS EXERA XENON LIGHT SOURCE CLV-160
35
Page 40

Chapter 5 Operation
Installing a special-purpose filter
Use the filter function only when a special-purpose filter is
installed. If the special-purpose filter is used for normal
observation, the correct color or brightness cannot be
obtained.
A special-purpose filter of your choice can be mounted on the filter disk, which is
then placed in the light path.
• Before installing a special-purpose filter, contact Olympus to
confirm its compatibility. If an inappropriate filter is used,
equipment damage and/or fire can result.
• Install a special-purpose filter as described below. If the
special-purpose filter becomes detached, electric shock can
occur.
• If the filter falls into the light source, turn it OFF immediately,
disconnect the power cord and contact Olympus. If the light
source is used with the filter left inside of it, an electric shock
and/or fire may result.
Do not touch the emergency lamp, reflector or filter. Natural
skin moisture from your fingers can cause cracks and
damage the light source.
The color of the filter’s frame for the special purpose filter is
silver.
1. When the light source is turned ON, confirm that the filter switch is not lit. If
the filter switch is lit, press the filter switch to go back to normal observation
mode.
2. If the lamp was in use immediately, the lamp chamber is extremely hot. Cool
the chamber down by turning the light source OFF and ON again. This
activates the built-in fan. Do not press the lamp ignition switch.
36
3. Turn the light source OFF and disconnect the power cord.
4. Remove the lamp cover.
EVIS EXERA XENON LIGHT SOURCE CLV-160
Page 41

Chapter 5 Operation
5. Align the filter’s frame installed a special-purpose filter with the groove in the
filter disk, and push the filter’s frame into the filter disk until it locks (see
Figure 5.4).
Lamp cover
Filter’s frame
Special-purpose filter
Figure 5.4
Filter disk
6. Close the lamp cover securely.
7. Turn the light source ON and press the filter switch to enable the filter mode.
Filter switch
Figure 5.5
EVIS EXERA XENON LIGHT SOURCE CLV-160
37
Page 42

Chapter 5 Operation
5.4 Using the transillumination function
• Do not use the transillumination function unless absolutely
necessary. Otherwise, eye damage or burns can result.
• When using a fiberscope without video or TV systems, do not
use the transillumination function while looking into the
eyepiece of the endoscope. Using this function sets the
examination light to maximum, and eye damage can result.
When the transillumination function is used in a darkened room, the more
intense examination light emitted from the endoscope makes it possible to
externally confirm the position of the endoscope inside the patient’s body.
1. Press the transillumination switch. The brightness adjustment automatically
changes to maximum for manual brightness control (see Figure 5.6).
Transillumination switch
Figure 5.6
2. After 7 seconds, the brightness returns to its original level.
To stop transillumination before 7 seconds have passed, press the
transillumination switch again. The original setting will be restored.
In some areas of the patient, the transillumination function
may not be sufficient to confirm the endoscope’s position.
38
EVIS EXERA XENON LIGHT SOURCE CLV-160
Page 43

5.5 Adjusting air/water pressure
1. Confirm that one of the airflow indicators (“L”, “M”, or “H”) is lit. If no indicator
is lit, press the airflow regulator ON switch to set the airflow regulator to “L”,
“M” or “H”.
The standard air pressure is “H”.
Airflow indicators
Chapter 5 Operation
Airflow regulator
switches
Figure 5.7
2. Change the air pressure according to the technique or the patient’s
condition.
3. Feed water or air as described in the endoscope’s instruction manual.
4. Pressing the airflow regulator OFF switch stops air feeding from the light
source.
When the airflow regulator OFF switch is pressed, the airflow
regulator setting is automatically stored and recalled when
the airflow regulator ON switch is pressed again.
5.6 Turning the light source OFF
1. Press the power switch to turn the light source OFF.
2. If the light source is not to be used for an extended period of time,
disconnect the power cord.
The light source is OFF when the power indicator is not lit.
EVIS EXERA XENON LIGHT SOURCE CLV-160
39
Page 44

Chapter 6 Lamp Replacement
Chapter 6 Lamp Replacement
6.1 Lamp life
When the lamp life indicator “500 h” is lit, replace the examination (xenon) lamp
as instructed below. Although the lamp brightness from the distal end of the
endoscope depends on the part being observed, the lamp should be replaced as
soon as the lamp appears darker than normal, even if the lamp life indicator
“500 h” is not yet lit.
• The lamp life indicator displays the total working hours of the
examination (xenon) lamp (e.g. “500 h” means about
500 hours).
• The examination lamp can be replaced by the user as
described in Section 6.2.
• The emergency lamp cannot be replaced by the user. If the
emergency lamp has burned out or is out of order, contact
Olympus.
6.2 Replacement of the examination (xenon) lamp
• Do not touch anything inside the lamp chamber. The lamp
chamber is extremely hot immediately after the lamp is
turned OFF.
• When replacing the lamp, do not leave any objects (such as
a cloth) inside the lamp chamber. Fire and/or equipment
damage can result.
• Store the hexagon wrench securely on the back side of the
lamp cover. If the wrench falls inside the light source, turn
OFF the light source immediately, disconnect the power cord
and contact Olympus. If the light source is used while the
wrench is detached inside the light source, equipment
damage and/or electrical shock can result.
40
EVIS EXERA XENON LIGHT SOURCE CLV-160
Page 45

Chapter 6 Lamp Replacement
• Never install a lamp that has not been approved by Olympus.
The use of a non-approved lamp can cause damage to the
light source and ancillary equipment, malfunction or fire.
• Do not apply shock, excessive force or scratches to the lamp.
It could break the glass and/or shorten the lamp life due to
the high internal pressure of the lamp.
• When disposing of the used lamp, make sure to cut the
projection part on the “+” side of the examination lamp by
using a nipper and discharge the internal gas (see Figure
6.1). Otherwise, the glass could break due to the high
internal pressure of the lamp.
• When cutting the projection part on the “+” side of the
examination lamp, wear appropriate protection equipment all
the time and be sure to cover the lamp with cloth. Otherwise,
the projection part could scatter in all direction and cause
injury to people around. The protective equipment may
include eye wear, face mask and gloves.
Projection part
Pin
Figure 6.1
Examination lamp
• Do not touch the glass surface of the lamp, filter or reflector.
Natural skin moisture from your fingers can cause cracks and
damage the light source.
• Handle the lamp carefully. Otherwise, the lamp may be
damaged, resulting in equipment failure.
• When replacing the examination lamp, use a clean lint-free
cloth to wipe off residual heat compound from the heat sink. If
the heat compound is not wiped off completely, the lamp’s
heat efficiency will be impaired and the examination lamp life
will be shortened significantly.
EVIS EXERA XENON LIGHT SOURCE CLV-160
41
Page 46

Chapter 6 Lamp Replacement
To replace the examination lamp, follow the procedure given below. Use the
examination lamp MD-631 only.
To order a new examination lamp, contact Olympus.
1. Turn the light source OFF and disconnect the power cord.
2. If the lamp was in use immediately, the lamp chamber is extremely hot. Cool
the lamp chamber down by turning the light source OFF and ON again. This
activates the built-in fan. Do not press the lamp ignition switch.
3. Remove the lamp cover on the side of the light source. After making sure
the interior has cooled down, remove the hexagon wrench from the rear of
the lamp cover (see Figure 6.2).
Hexagon wrench
Lamp cover
Knob (B)
Figure 6.2
Knob (A)
4. Turn knob (A) counterclockwise by 90° to loosen it. Then loosen knob (B) in
the same manner.
5. Holding the knobs or projections of the heat sinks, remove the examination
lamp with heat sinks (A) and (B) attached (see Figure 6.3).
42
EVIS EXERA XENON LIGHT SOURCE CLV-160
Page 47

Heat sink (A)
Heat sink (B)
Knob (B)
Figure 6.3
Chapter 6 Lamp Replacement
Insertion groove
Knob (A)
6. Using the hexagon wrench, loosen the three bolts on heat sink (B) (on the
“+” side of the examination lamp or heat sink (B)) and remove heat sink (B)
from the examination lamp (see Figure 6.4).
Heat sink (B)
Bolts
Back of heat sink (B)
Examination
lamp
Clamp
Front of heat sink (A)
Figure 6.4
7. Remove the clamp of heat sink (A) and pull out the examination lamp.
8. Using a clean lint-free cloth, wipe off any residual heat compound from the
heat sink.
EVIS EXERA XENON LIGHT SOURCE CLV-160
Heat sink (A)
43
Page 48

Chapter 6 Lamp Replacement
10. Using your finger, apply the heat compound evenly over the outer
11. Insert the “–” side of the examination lamp (see Figure 6.5) into heat sink (A)
9. Hold the new examination lamp without touching the glass surface.
• Do not apply the heat compound to the glass surface and the
ceramic part of the examination lamp. If any compound gets
on the glass surface, wipe it off with a clean lint-free cloth.
• Apply enough heat compound. If not enough heat compound
is applied, the heat can cause lamp ignition failures.
circumference (see the cross-hatched area in Figure 6.5) on the “–” side of
the new examination lamp (the metal portion on the light emitting side).
until it stops.
Examination lamp
Pin
Heat compound
Figure 6.5
Match the examination lamp and heat sink pin positions, then
press them tightly together. Otherwise a decrease in the light
output can result.
Ceramic part
12. Apply heat compound to the end surface (see the cross hatched area in
Figure 6.5) on the “+” side of the examination lamp in the same manner.
13. Insert the “+” side of the examination lamp (see Figure 6.5) into heat sink (B)
and tighten the three bolts firmly with the hexagon wrench.
44
Install the heat sink securely in the light source and tighten
the knobs securely. Otherwise, a decrease in light output can
result.
EVIS EXERA XENON LIGHT SOURCE CLV-160
Page 49

Chapter 6 Lamp Replacement
14. Make sure that the undersides of the heat sinks (A) and (B) are flat, and
close the clamp of heat sink (A).
15. Turn the knobs of heat sinks (A) and (B) to the horizontal position, and insert
the heat sinks all the way into the lamp chamber along the insertion
grooves.
Insertion groove
Heat sink (A)
Heat sink (B)
Knob (B)
Knob (A)
Figure 6.6
Lamp chamber
16. First secure heat sink (B) by turning knob (B) clockwise by 90°, then secure
heat sink (A) by turning the knob (A) clockwise by 90°.
17. Store the hexagon wrench back on the rear of the lamp cover. Then close
the lamp cover securely (see Figure 6.7).
Hexagon wrench
Lamp cover
Knob (B)
Figure 6.7
EVIS EXERA XENON LIGHT SOURCE CLV-160
Knob (A)
45
Page 50

Chapter 6 Lamp Replacement
18. Turn ON the light source. Then press the reset switch for at least 3 seconds
until all lamp life indicators are OFF.
Lamp life indicators
Reset switch
Figure 6.8
If the light source is to be used immediately, proceed with the inspection of
the light source as described in Chapter 4, “Inspection”.
46
EVIS EXERA XENON LIGHT SOURCE CLV-160
Page 51

Chapter 6 Lamp Replacement
EVIS EXERA XENON LIGHT SOURCE CLV-160
47
Page 52

Chapter 7 Care, Storage and Disposal
Chapter 7 Care, Storage and Disposal
7.1 Care
• After wiping with a piece of moistened gauze, dry the light
source thoroughly before using it again. If it is used while still
wet, there is the risk of an electrical shock.
• When cleaning the light source, always wear appropriate
personal protection equipment. Blood, mucous and other
potentially infectious material adhering to the light source
could pose an infection control risk.
• Do not clean the output socket, other connectors or the AC
mains inlet. Cleaning them can deform or corrode the
contacts, causing damage to the light source.
• Do not autoclave or gas sterilize the light source. These
methods will damage it.
• Do not wipe the external surface with hard or abrasive wiping
material. The surface will be scratched.
If the light source is soiled, perform the following cleaning procedure immediately
after use. If cleaning is delayed, residual organic debris will begin to solidify, and
it may be difficult to effectively clean the light source. The light source should
also be cleaned routinely.
1. Turn the light source OFF and disconnect the power cord.
2. To remove dust, dirt and non-patient debris, wipe the light source using a
soft, lint-free cloth moistened with 70% ethyl or isopropyl alcohol.
3. If the light source is soiled with blood or other potentially infectious
materials, first wipe off all gross debris using detergent and then
decontaminate its surface using a lint-free cloth moistened with 70% ethyl or
isopropyl alcohol. The light source is compatible with 70% ethyl or isopropyl
alcohol.
48
4. Make sure that the light source is completely dry before use.
EVIS EXERA XENON LIGHT SOURCE CLV-160
Page 53

7.2 Storage
Chapter 7 Care, Storage and Disposal
Do not store the light source in a location exposed to direct
sunlight, X-rays, radioactivity or strong electromagnetic
radiation (e.g., near microwave medical treatment
equipment, short-wave medical treatment equipment, MRI
equipment or radio). Damage to the light source may result.
1. Turn the light source OFF and disconnect the power cord.
2. Disconnect all ancillary equipment connected to the light source.
3. Store the equipment at room temperature in the horizontal position in a
clean, dry and stable location.
7.3 Disposal
When disposing of this equipment or any of its components (e.g., lamps, fuses or
filters), follow all applicable national and local laws and guidelines.
EVIS EXERA XENON LIGHT SOURCE CLV-160
49
Page 54

Chapter 8 Troubleshooting
Chapter 8 Troubleshooting
If the light source is visibly damaged, does not function as expected or is found
to have irregularities during the inspection as described in Chapter 3,
“Installation and Connection” and Chapter 4, “Inspection”, do not use the light
source. Contact Olympus.
Some problems that appear to be malfunctions may be correctable by referring
to Section 8.1, “Troubleshooting guide”. If the problem cannot be resolved by the
described remedial action, stop using the light source and send it to Olympus for
repair.
Olympus does not repair accessory parts. If an accessory part becomes
damaged, contact Olympus to purchase a replacement.
Never use the light source if an abnormality is suspected.
The patient can be fatally or seriously injured.
8.1 Troubleshooting guide
Irregularity
description
The endoscope
cannot be
connected to the
light source.
The power fails to
come ON.
The endoscope is not compatible with
this light source.
The power cord is not connected. Connect the power
The power switch is not turned ON. Turn the power switch
The lamp cover is not closed. Close the lamp cover
The fuses have blown. Replace both fuses
Possible cause Solution
Connect an
endoscope that is
listed in the “System
chart” in the Appendix.
cord to a hospital
grade outlet.
ON.
securely.
with new ones as
described in Section
4.1, page 19.
50
EVIS EXERA XENON LIGHT SOURCE CLV-160
Page 55

Chapter 8 Troubleshooting
Irregularity
description
The examination
lamp does not
ignite.
The examination
lamp does not
ignite, and the
emergency lamp
indicator (red) is lit.
Possible cause Solution
The examination lamp has not been
ignited yet.
The examination lamp is not installed. Install an examination
The examination lamp is not installed
correctly.
The examination lamp is broken. Replace the
The examination lamp is not installed. Install an examination
The examination lamp is not installed
correctly.
Press the lamp Ignition
switch.
lamp as described in
Section 6.2, page 40.
Reinstall the
examination lamp as
described in Section
6.2, page 40.
examination lamp with
a new one as
described in Section
6.2, page 40.
lamp as described in
Section 6.2, page 40.
Reinstall the
examination lamp as
described in Section
6.2, page 40.
The examination
lamp does not
ignite, and a beep is
heard.
No light is emitted
from the
endoscope.
The brightness
level does not
change even when
the brightness
control switches are
pressed.
The examination lamp is broken. Replace the
examination lamp with
a new one as
described in Section
6.2, page 40.
The temperature of the light source is
too high.
The endoscope is not connected to the
output socket.
The level is set to the minimum or
maximum.
Turn OFF the light
source and conform
that the ventilation
grills are not covered.
Allow the light source
to cool down, then turn
it ON again.
Connect the
endoscope to the
output socket securely
as described in
Section 3.3, page 16.
(The level cannot be
set above or below
these limits.)
EVIS EXERA XENON LIGHT SOURCE CLV-160
51
Page 56

Chapter 8 Troubleshooting
Irregularity
description
The field of view
and the image are
too dark or too
bright.
Possible cause Solution
The examination lamp is old. Replace the
examination lamp with
a new one as
described in Section
6.2, page 40.
The emergency lamp is active. Replace the
examination lamp with
a new one as
described in Section
6.2, page 40.
The endoscope is not connected to the
output socket.
The filter mode is activated.
(The filter switch is lit.)
The brightness level is unsuitable. Adjust the brightness
Transillumination is activated.
(The transillumination switch is lit.)
When automatic
brightness control
is intended:
The brightness
control is still set to
manual.
The connections
and ancillary
equipment are
incomplete or a
component has a
malfunction.
Connect the
endoscope to the
output socket securely
as described in
Section 3.3, page 16.
Press the filter switch
to change to the
normal observation
mode.
to a suitable level as
described in Section
5.2, page 33.
Wait for automatic
restoration (about for
7 seconds).
Set the brightness
control to automatic as
described in Section
5.2, page 33.
Confirm that the
ancillary equipment is
connected and
functioning correctly.
Refer to the
corresponding
instruction manuals.
52
When manual
brightness control
is intended:
The brightness
control is still set to
automatic.
EVIS EXERA XENON LIGHT SOURCE CLV-160
Set the brightness
control to manual as
described in Section
5.2, page 33.
Page 57

Chapter 8 Troubleshooting
Irregularity
description
The field of view
and image color are
poor.
When using an
OES endoscope,
the field of view
suddenly alternates
between dark and
bright.
The air/water
feeding function
does not operate.
Possible cause Solution
The emergency lamp is active. Replace the
examination lamp with
a new one as
described in Section
6.2, page 40.
The filter mode is activated.
(The filter switch is lit.)
The brightness control is set to
automatic.
The air/water feeding function is not
being operated.
The endoscope is not connected to the
output socket.
Press the filter switch
to change to the
normal observation
mode.
Set the brightness
control to manual as
described in Section
5.2, page 33.
Operate the air/water
feeding function as
described in Section
5.5, page 39.
Connect the
endoscope to the
output socket securely
as described in
Section 3.3, page 16.
EVIS EXERA XENON LIGHT SOURCE CLV-160
53
Page 58

Chapter 8 Troubleshooting
8.2 Returning the light source for repair
Olympus is not liable for any injury or damage which occurs
as a result of repairs attempted by non-Olympus personnel.
When returning the light source for repair, contact Olympus. With the light
source, include a description of the malfunction or damage and the name and
telephone number of the individual at your location who is most familiar with the
problem. Include a repair purchase order.
If a light source accessory (e.g., examination lamp, spare
fuse, foot holder, power cord, light control cable) needs to be
replaced, contact Olympus to purchase a new accessory.
54
EVIS EXERA XENON LIGHT SOURCE CLV-160
Page 59

Appendix
System chart
Appendix
The recommended combinations of equipment and accessories that can be
used with this light source are listed below. New products released after the
introduction of this light source may also be compatible for use in combination
with this light source. For further details, contact Olympus.
If combinations of equipment other than those shown below
are used, the full responsibility is assumed by the medical
treatment facility.
EVIS EXERA XENON LIGHT SOURCE CLV-160
55
Page 60

Appendix
EVIS system chart
Video monitor
(OEV203, 202, 201)
(OEV143, 142, 141)
Keyboard
EVIS video system center
(CV-140)
EVIS EXERA video system center
(CV-160)
Videoscope cable EXERA
Videoscope cable
(See the next page.)
OES video converter
(OVC-140, 100)
Videoscope
(See the next page.)
Water container
(See the next page.)
Light control cable
(MH-966)
EVIS EXERA
xenon light source
(CLV-160)
56
Fiberscope
(OES 40, 30, 20, 10 series)
Water container
(See the next page.)
EVIS EXERA XENON LIGHT SOURCE CLV-160
Mobile workstation
(WM-30, WM-N60)
Page 61

Videoscope cable EXERA/videoscope cable
Appendix
EVIS EXERA video system center/
EVIS video system center
CV-160
CV-140
{ applicable – not applicable
Water container
Endoscope
EVIS EXERA 160 series
EVIS 140 series
EVIS 100, 130 series
OES 40 series
OES 10, 20, 30 series
MAJ-901 MAJ-902 MH-884 MH-970 MD-431 MA-995
{{{{ ––
{{{{ ––
––––{{
{{{{ ––
––––{{
{ applicable – not applicable
Videoscope cable EXERA/Videoscope cable
MAJ-843 MH-976 MD-148
{{{
– {{
Water container
EVIS EXERA XENON LIGHT SOURCE CLV-160
57
Page 62

Appendix
OES system chart
Video monitor
(OEV203, 202, 201)
(OEV143, 142, 141)
Mobile workstation
(WM-30, WM-N60)
OES videosystem
(OTV-S6)
Videoadapter
(A10-T1/T2)
Fiberscope
(See below.)
Water container
(See below.)
Light control cable (MAJ-586)
EVIS EXERA
xenon light source
(CLV-160)
Endoscope
OES 40 series
OES 10, 20, 30 series
58
Water container
Water container
MAJ-901 MAJ-902 MH-884 MH-970 MD-431 MA-995
{{{{ ––
––––{{
{ applicable – not applicable
EVIS EXERA XENON LIGHT SOURCE CLV-160
Page 63

Operating environment
Appendix
Operating
environment
Ambient
temperature
Relative humidity 30 – 85%
Air pressure 700 – 1060 hPa
10 – 40°C (50 – 104°F)
(0.7 – 1.1 kgf/cm
(10.2 – 15.4 psia)
Transportation and storage environment
Transportation and
storage environment
Ambient
temperature
Relative humidity 10 – 90%
Atmospheric
pressure
–25 to +85°C
(–13 to +185°F)
700 – 1060 hPa
2
)
EVIS EXERA XENON LIGHT SOURCE CLV-160
59
Page 64

Appendix
Specifications
Item Specification
Power supply Voltage 100 – 120 V AC
Power fluctuation Within ±10%
Frequency 50/60 Hz
Frequency
fluctuation
Input current 5A
Fuse rating 8A, 250V
Fuse size 6.35 × 31.8 mm
Size Dimensions 385 (W) × 145 (H) × 490 (D) mm
Weight 15 kg
Illumination Examination lamp Xenon short-arc lamp (ozone-free)
Average lamp life Approximately 500 hours of continuous
Within ±1Hz
(maximum)
300 W
use (With intermittent use, the lamp life
may vary slightly.)
Ignition method Switching regulator
Brightness
adjustment
Cooling Forced-air cooling
Color conversion Possible by using exchangeable filter
Emergency lamp Halogen lamp (without mirror) 12 V
Average emergency
lamp life
Light-path diaphragm control
100 W
Approximately 100 hours
60
EVIS EXERA XENON LIGHT SOURCE CLV-160
Page 65

Item Specification
Appendix
Automatic
brightness
control
Air feeding Pump Diaphragm type pump
Water feeding Method Air pressurization or detachable water
Indicators on
front panel
Setting memory Settings (except filter setting) are stored
Classification
(Electro-medical
equipment)
Automatic
brightness control
method
Automatic exposure 17 steps
Pressure switching 4-level available
Emergency lamp It reports absence of emergency lamp,
Filter It identifies a special-purpose filter
Type of protection
against electric
shock
Degree of protection
against electric
shock of applied part
Degree or protection
against explosion
Servo-diaphragm method
(off, low, mid, high)
container
disconnection and use of emergency
lamp.
setting.
even when the light source is OFF.
Class I
TYPE BF applied part
NOTE: The applied part as classification
types are not marked is the
TYPE BF applied part.
Use prohibited in flammable
environment.
EMC This device complies with the EMC
Year of
manufacture
7012345
EVIS EXERA XENON LIGHT SOURCE CLV-160
requirements of IEC 60601-1-2:1993
Emission: Class B of CISPR 11:1997
The year of manufacture is given in the
second digit of the serial number.
61
Page 66

Page 67

©2000 OLYMPUS MEDICAL SYSTEMS CORP. All rights reserved.
No part of this publication may be reproduced or distributed without the
express written permission of OLYMPUS MEDICAL SYSTEMS CORP.
OLYMPUS is a registered trademark of OLYMPUS CORPORATION.
Trademarks, product names, logos, or trade names used in this
document are generally registered trademarks or trademarks of each
company.
Page 68

Manufactured by
2951 Ishikawa-cho, Hachioji-shi, Tokyo 192-8507, Japan
Fax: (042)646-2429 Telephone: (042)642-2111
Distributed by
3500 Corporate Parkway, P.O. Box 610 Center Valley, PA
Fax: (484)896-7128 Telephone: (484)896-5000
One Corporate Drive, Orangeburg, N.Y. 10962, U.S.A.
Fax: (845)398-9444 Telephone: (845)398-9400
5301 Blue Lagoon Drive, Suite 290 Miami, FL 33126-2097, U.S.A.
Fax: (305)261-4421 Telephone: (305)266-2332
(Premises/Goods delivery) Wendenstrasse 14-18, 20097 Hamburg, Germany
(Letters) Postfach 10 49 08, 20034 Hamburg, Germany Telephone: (040)237730
KeyMed House, Stock Road, Southend-on-Sea, Essex SS2 5QH, United Kingdom
Fax: (01702)465677 Telephone: (01702)616333
117071, Moscow, Malaya Kaluzhskaya 19, bld. 1, fl.2, Russia
Fax: (095)958-2277 Telephone: (095)958-2245
Room 1202, NCI Tower, A21 Jianguomenwai Avenue Chaoyang
Fax: (10)6569-3545 Telephone: (10)6569-3535
18034-0610, U.S.A.
District Beijing 100022 PRC
GC7033 11
8F, Hyundai Marines Bldg., 646-1, Yeoksam-Dong, Kangnam-Gu, Seoul 135-080 Korea
Fax: (02)6255-3499 Telephone: (02)1544-3200
491B, River Valley Road #12-01/04, Valley Point Office Tower, Singapore 248373
Fax: 6834-2438 Telephone: 6834-0010
31 Gilby Road, Mount Waverley, VIC., 3149, Australia
Fax: (03)9543-1350 Telephone: (03)9265-5400
Printed in Japan 20070606 *0000
 Loading...