

Page 1

C-70 ZOOM / C-7000 ZOOM
D. REPAIR PROCEDURE
[1] TROUBLESHOOTING GUIDE .................................................................................. D-2
[2] CONFIRMATION AND UPDATE OF THE FIRMWARE ............................................. D-3
[3] HOW TO REMOVE THE BACK COVER UNIT ......................................................... D-4
[4] HOW TO SELECT THE PARALLAX SPACER .........................................................D-5
Ver. 1D-1
Page 2
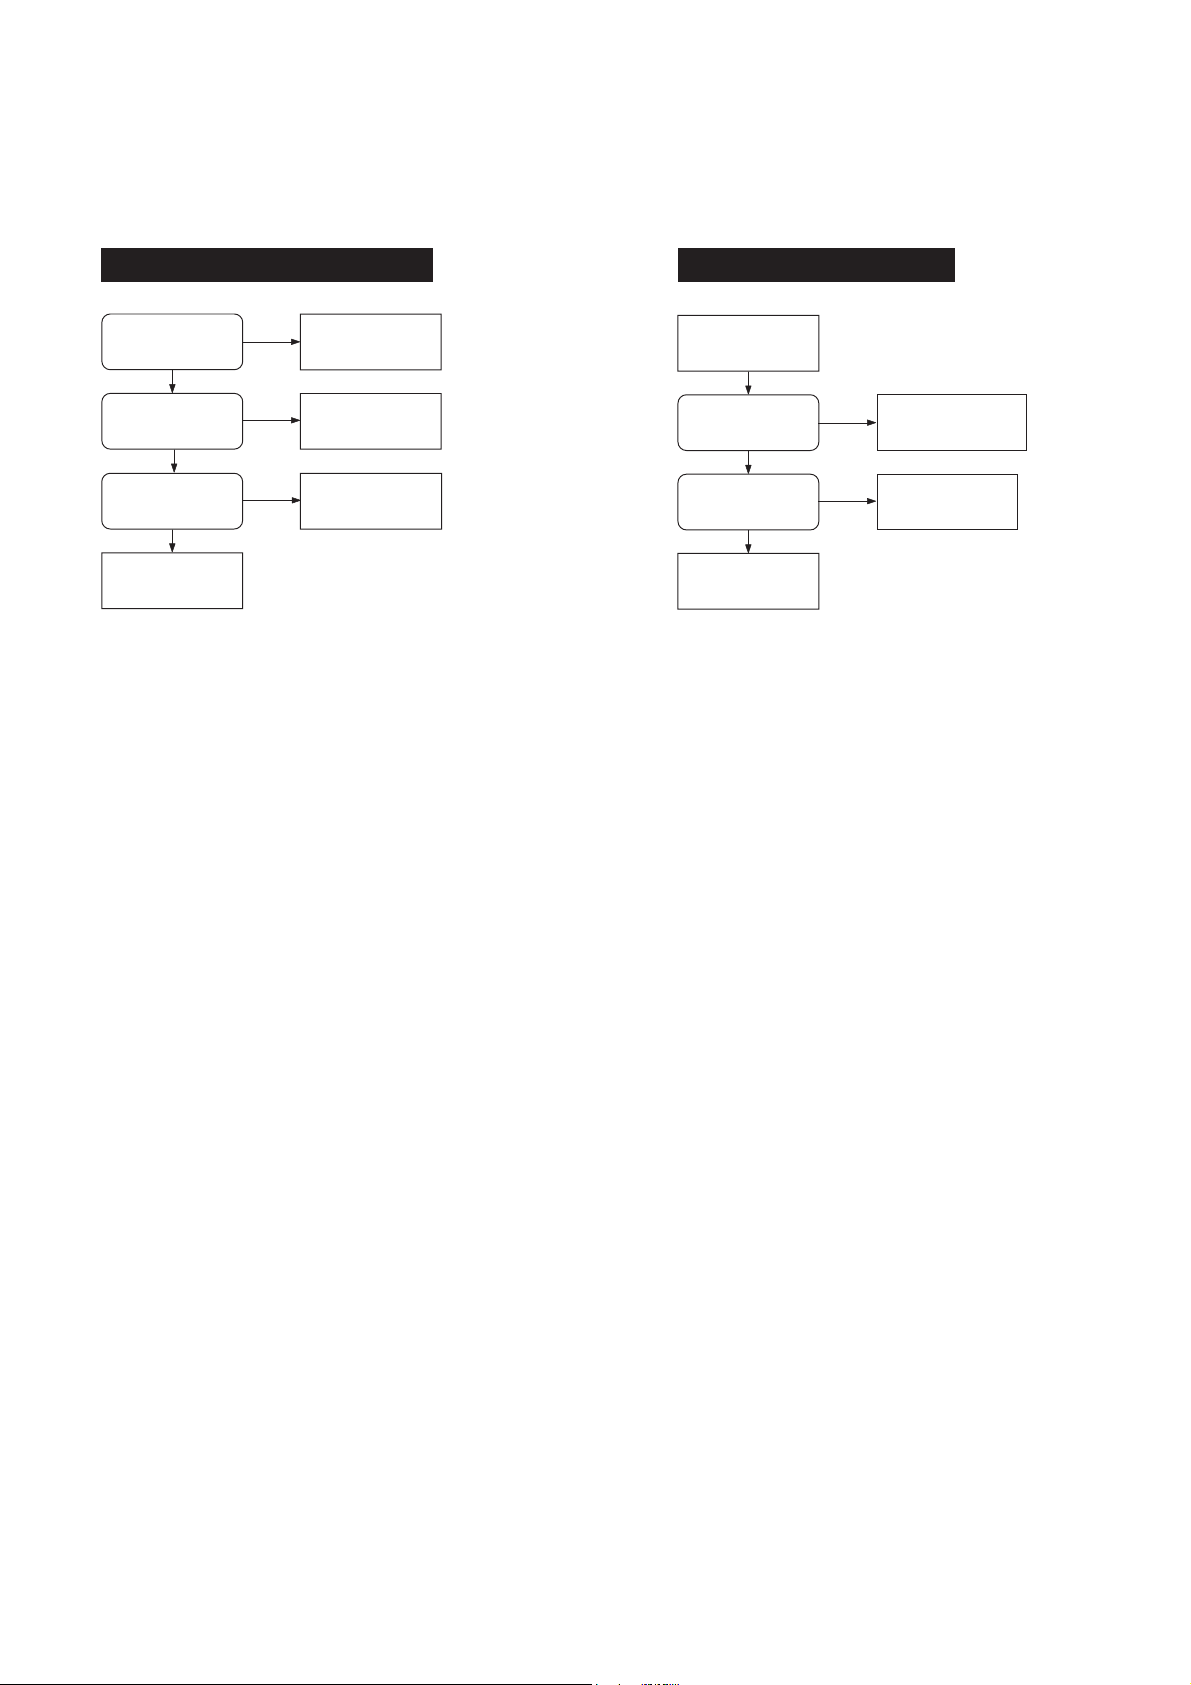
[1] TROUBLESHOOTING GUIDE
D. REPAIR PROCEDURE C-70 ZOOM / C-7000 ZOOM
POWER LOSS INOPERTIVE
D6501-2 (TB2)
(AL 3.2 V)
HIGH
CN653-3 (TB2)
(SCAN IN 3F)
PULSE INPUT
YES
CL106 (CP1) (MCLK)
48 MHz
OSCILLATION
YES
CHECK IC301 (CP1)
LOW
CHECK CN651-12
CHECK FPC include
NO
POWER SW, CN651,
NO
CHECK CP1, PW1
(TB2), FPC
CN652, D6503
TAKING INOPERATIVE
PUSH SHUTTER
BUTTON
CN653-11, 12 (TB2)
(SCAN IN 2E, 3E)
PULSE INPUT
YES
CL106 (CP1) (MCLK)
48 MHz
OSCILLATION
YES
CHECK IC301 (CP1)
NO
NO
CHECK FPC include
SHUTTER SW, CN651,
CN652, D6503, D6507
CHECK CP1, PW1
D-2
Ver. 1
Page 3

C-70 ZOOM / C-7000 ZOOM
D. REPAIR PROCEDURE
[2] CONFIRMATION AND UPDATE OF THE FIRMWARE
How To Confirm firmware
1. Rename the binary data of the latest firmware with "firmware.bin".
Create a folder "Firmware" in the xD-Picture Card which was formatted on C-70 ZOOM / C-7000 ZOOM,
and save the binary data "firmware.bin" into the folder "Firmware".
2. Camera is operated by AC adapter. (Do not operate with battery.)
Insert the F/W card for C-70 ZOOM / C-7000 ZOOM and turn the camera on at play mode.
3. Monitor shows F/W version and inquiry of F/W rewriting.
Please confirm at this time.
How To Update Firmware
1. Rename the binary data of the latest firmware with "firmware.bin".
Create a folder "Firmware" in the xD-Picture Card which was formatted on C-70 ZOOM / C-7000 ZOOM,
and save the binary data "firmware.bin" into the folder "Firmware".
2. Camera is operated by AC a dapter.(Do not operate with battery.)
Insert the F/W card for C-70 ZOOM / C-7000 ZOOM and turn the camera on at play mode.
3. Monitor shows F/W version and inquiry of F/W rewriting.
Then select "YES" (Character is changed green) and press "OK", rewriting of F/W is started automatically.
4. During the rewriting it is showed "EXCHANING" on monitor.
It will take about 2 minutes but please do not operate any key and turn off power.
It might have damaged camera body and F/W.
5. When the rewriting is done, monitor is showed as same as procedure 3.
Then confirm new version of F/W (example: V756-79) and turn off power after selecting "NO".
(The discrimination of countermeasure is not showed due to confirm easily.)
Ver. 1
D-3
Page 4

D. REPAIR PROCEDURE C-70 ZOOM / C-7000 ZOOM
[3] HOW TO REMOVE THE BACK COVER UNIT
(1) Pull up slightly the back cover unit to release the stand. (Don't remove it completely)
(2) Push the Multi-connector in.
(3) Remove the back cover carefully. (Don't remove forcibly)
Caution : The FPC CP1-TB-2 may be damaged, if the back cover is removed from another side
(the speker side). Be sure to remove it in the above procedure.
Notice : Do not touch the finder screw.
D-4
Ver. 1
Page 5

C-70 ZOOM / C-7000 ZOOM
D. REPAIR PROCEDURE
[4] HOW TO SELECT THE PARALLAX SPACER
Read the last one digit on the finder-assy, and use the parallax spacer of the same number.
If the number of the finder-assy is six or more, pile plural parallax spacer.
(Ex) Case of 6
* Two Parallax Spacer 3.
* Parallax Spacer 1 and Parallax Spacer 5.
* Parallax Spacer 2 and Parallax Spacer 4.
Any combination is OK.
Ver. 1
D-5
 Loading...