

Olympus C-3000 - 3.2MP Digital Camera Control Manual
76
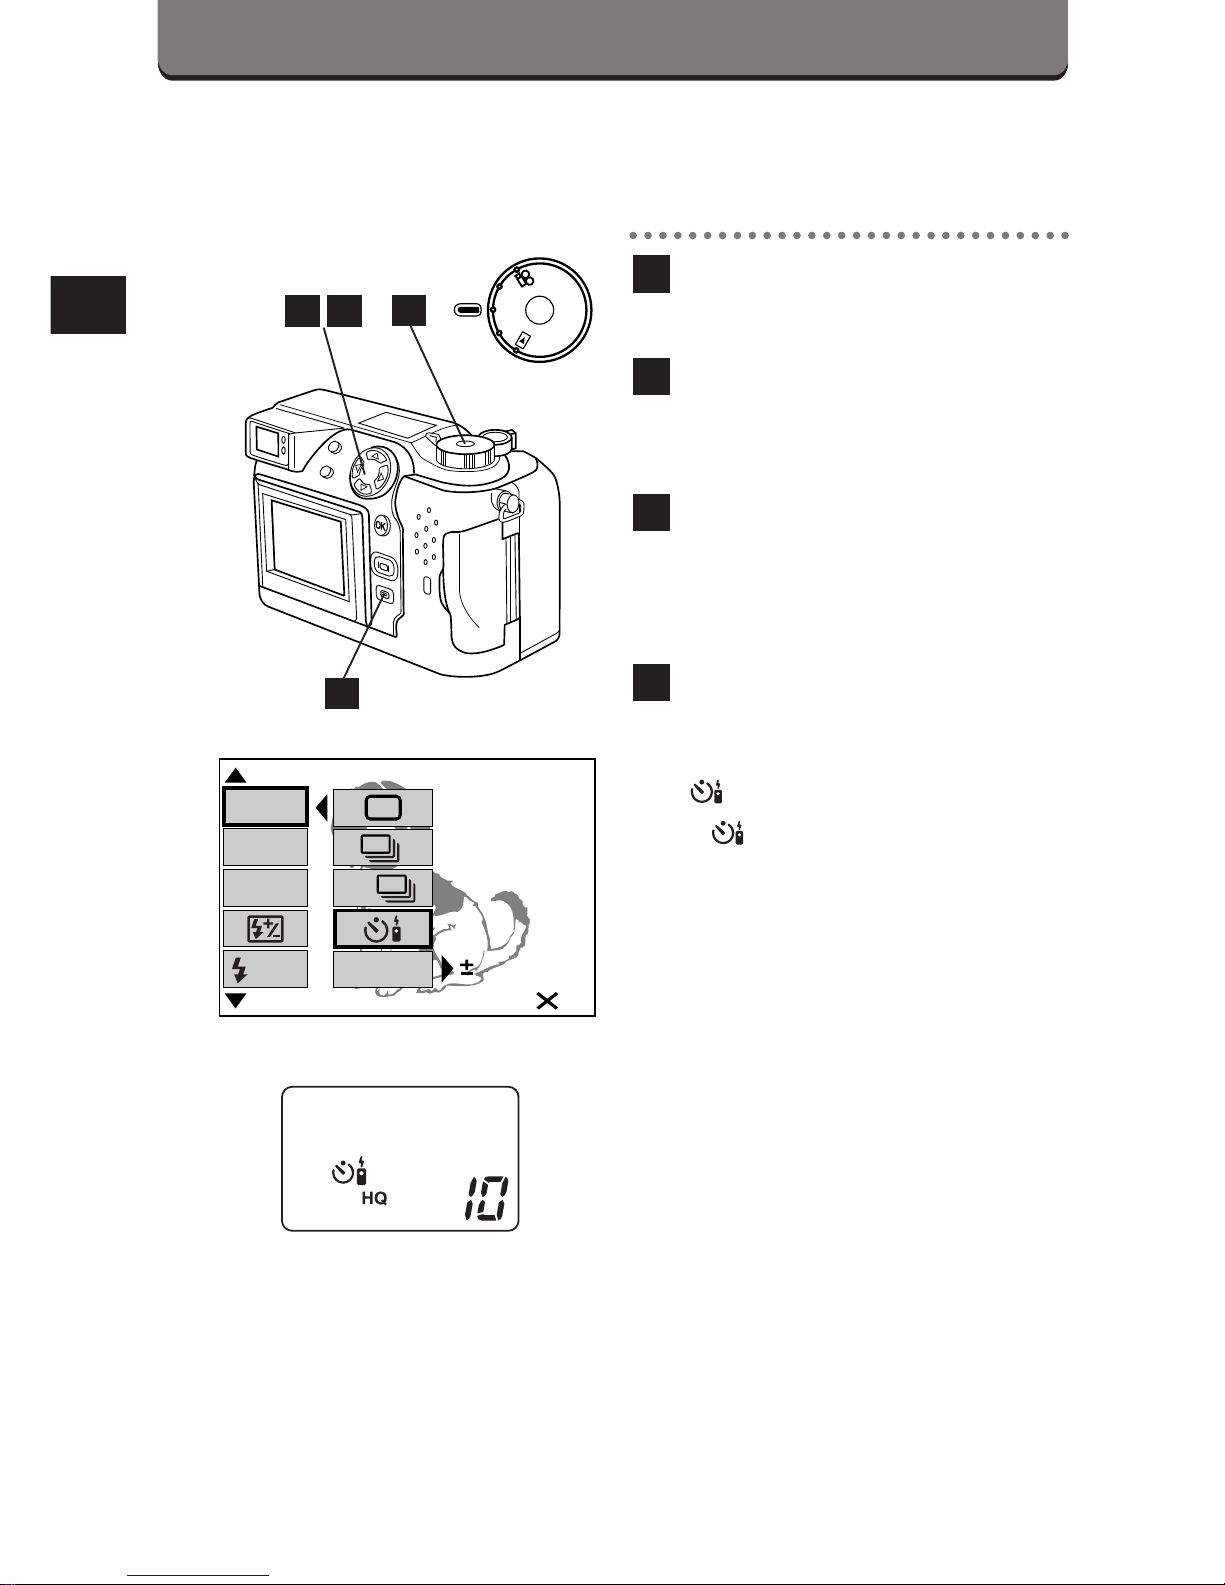
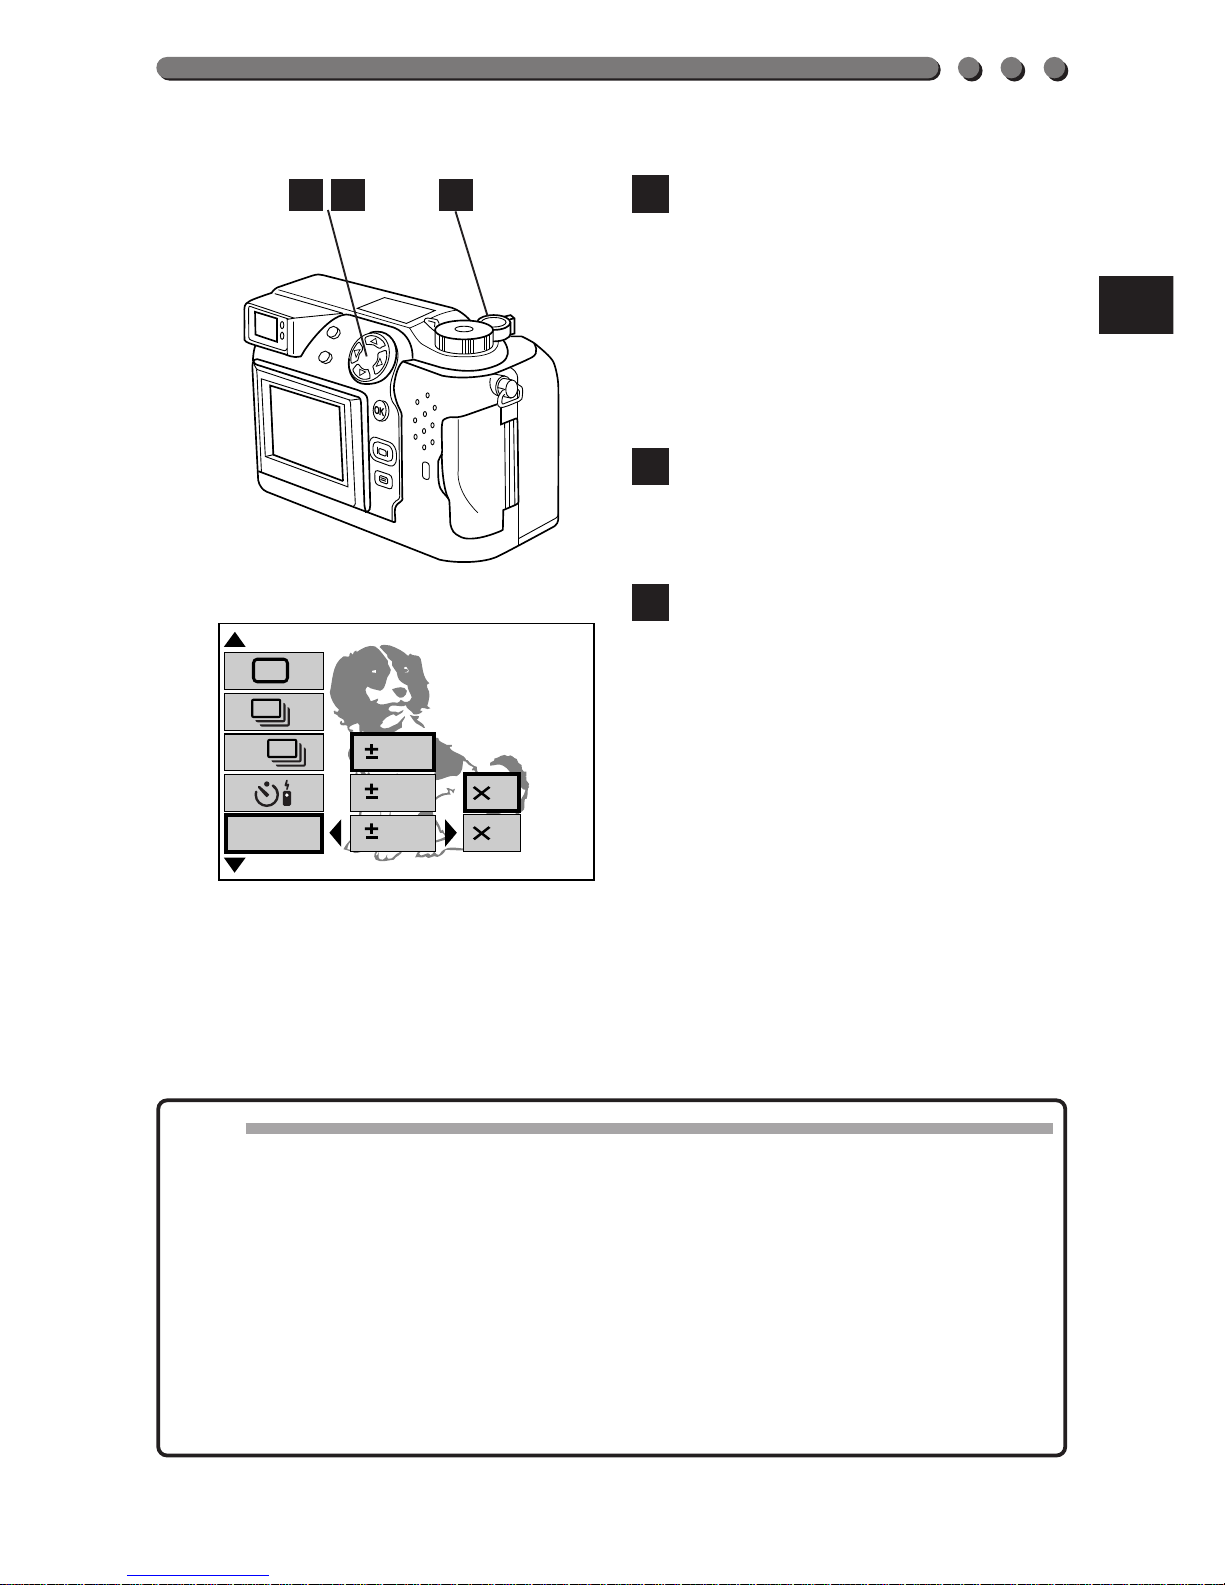
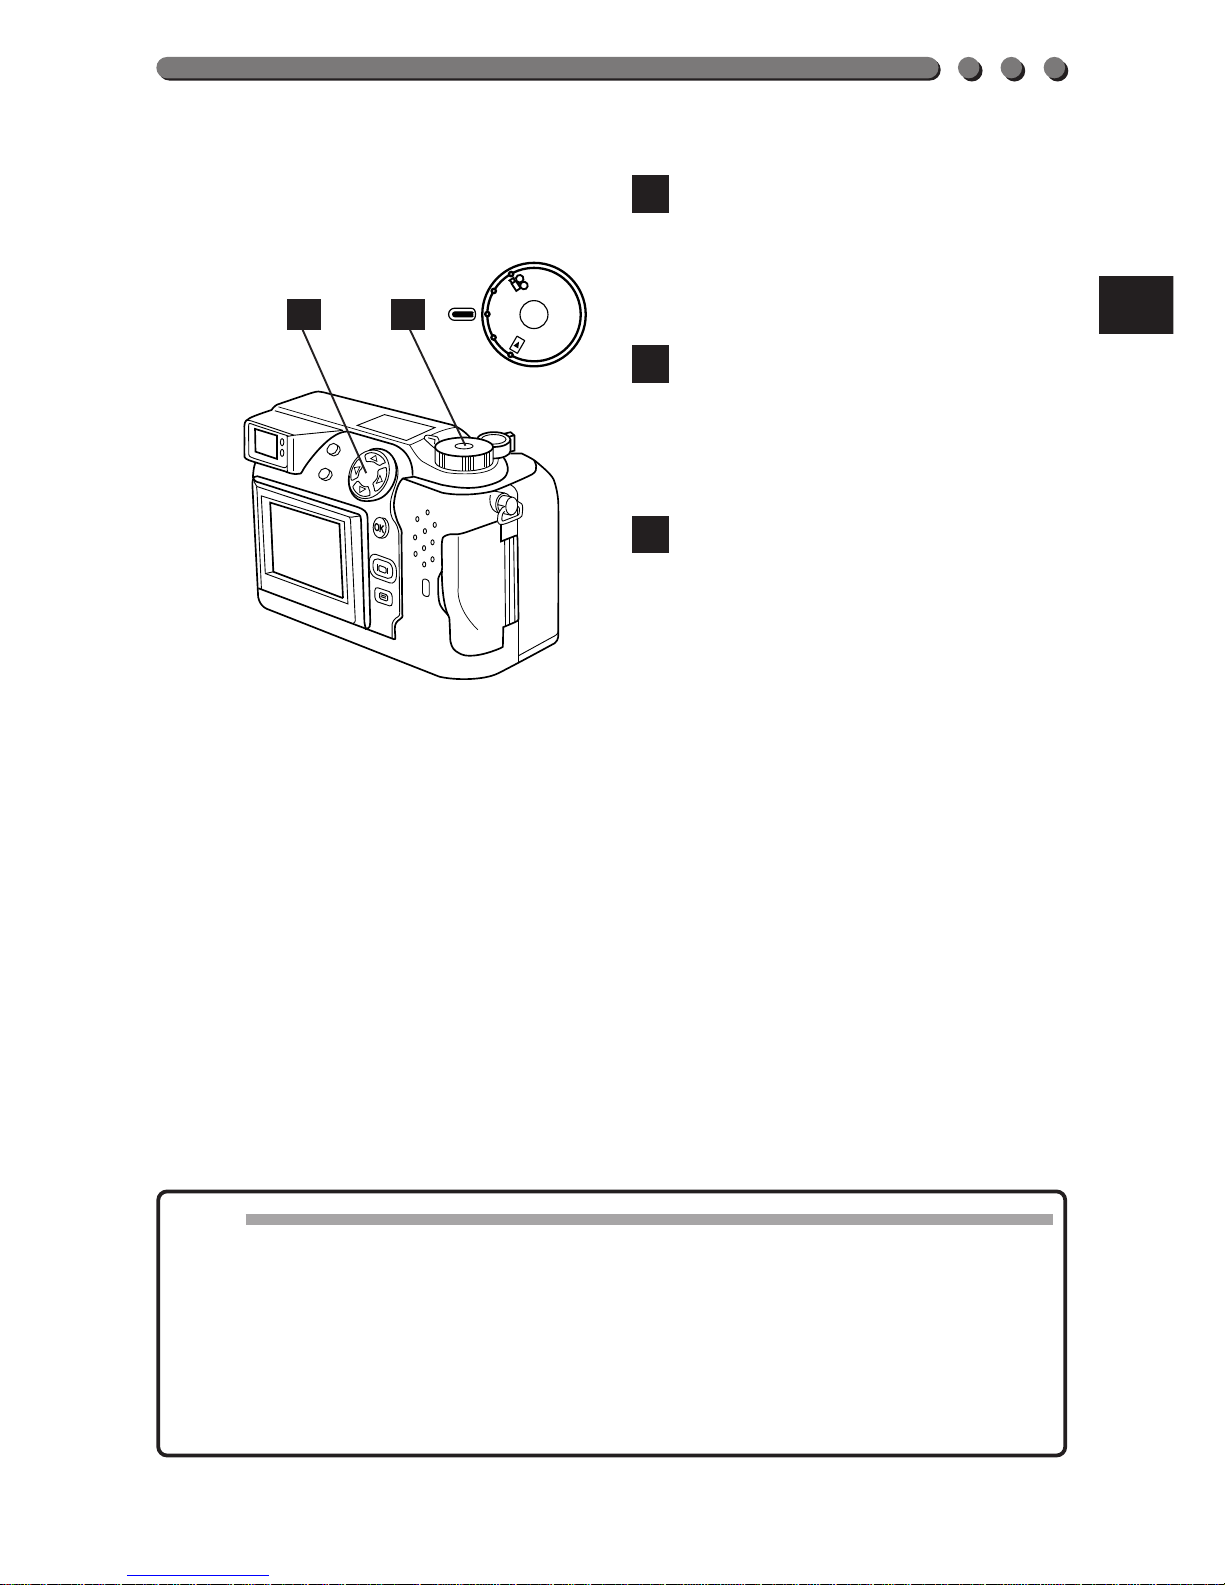
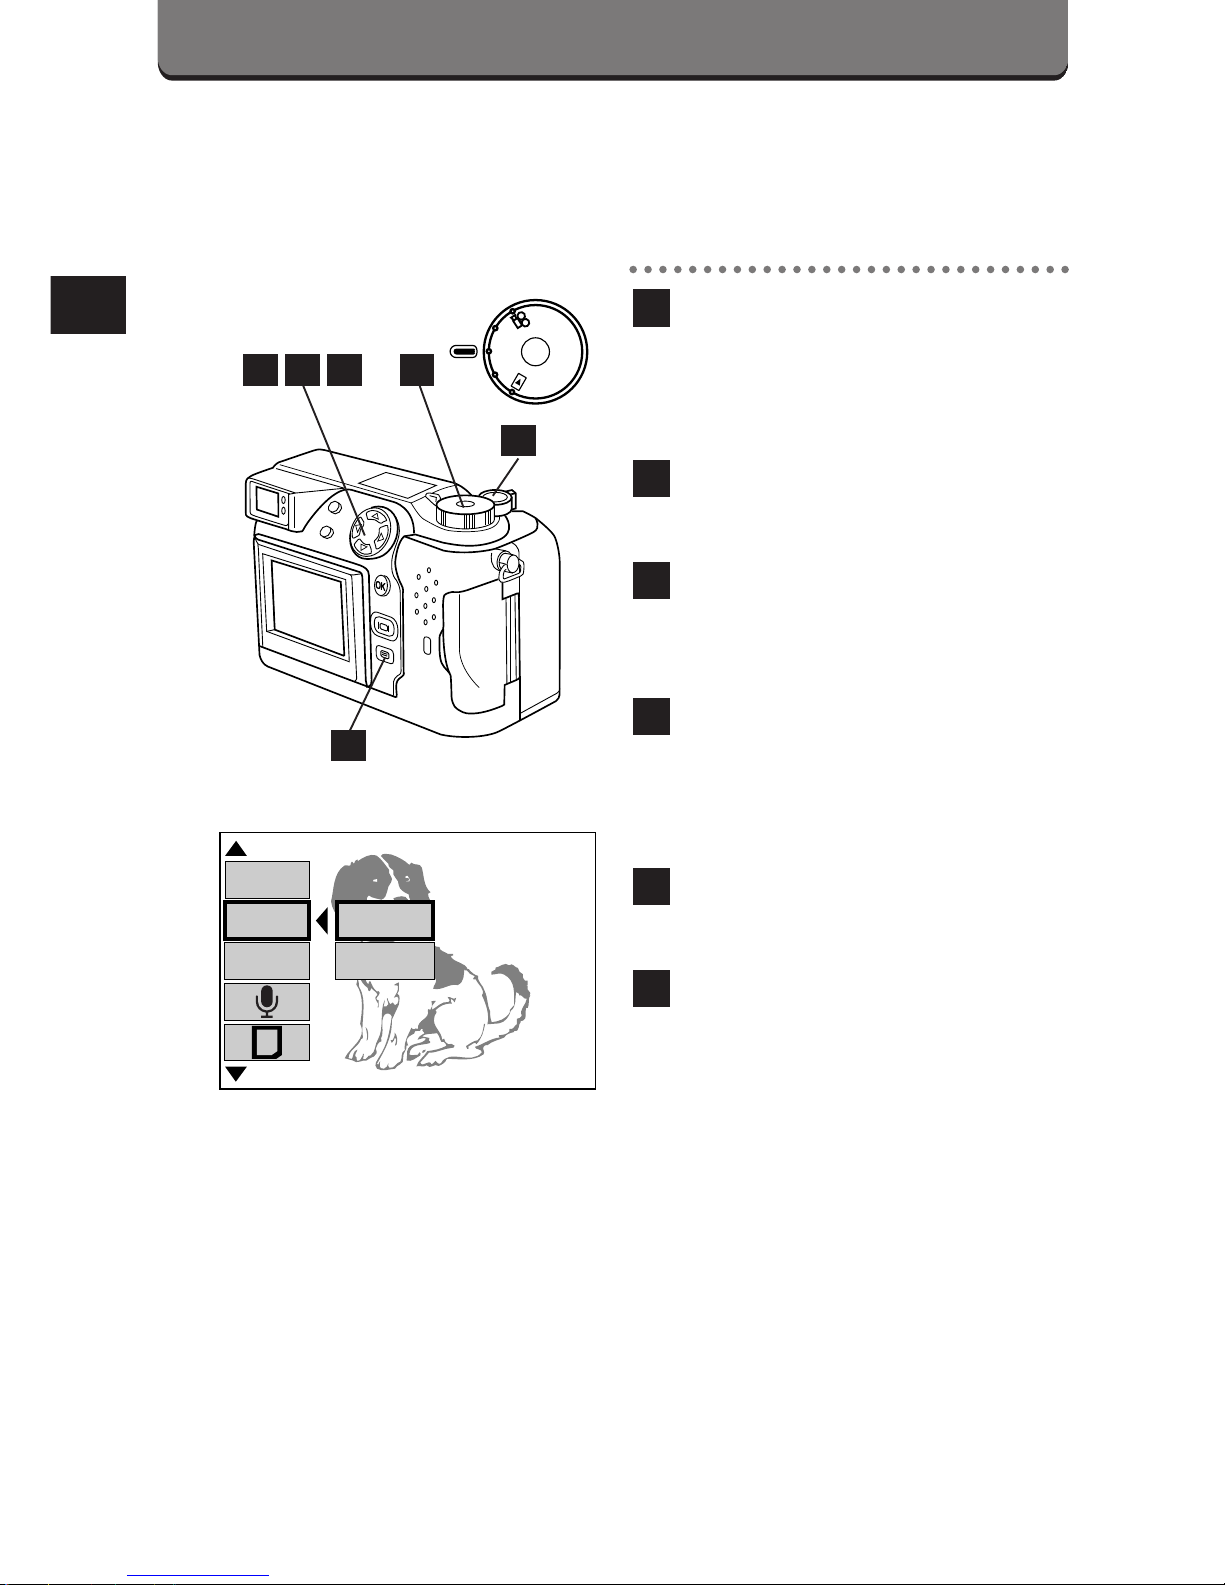
SELFTIMER/REMOTE CONTROL
Use a tripod to hold the camera securely.
Set the Mode dial to P or A/S/M.
Press the Menu button to
display the Menu.
Press the top/bottom arrows
on the Jog dial to select
DRIVE.
Press the right arrow on the
Jog dial, then press the
top/bottom arrows to select
.
• appears on the control
panel.
4
3
2
1
P
O
W
E
R
/
M
O
D
E
D
I
A
L
P
A/S/M
OFF
BKT
[
1/3
]
AF
1.0
F2.8 1/800 +2.0 P
3
DRIVE
SLOW
ISO
WB
Control panel
2
43
1
77
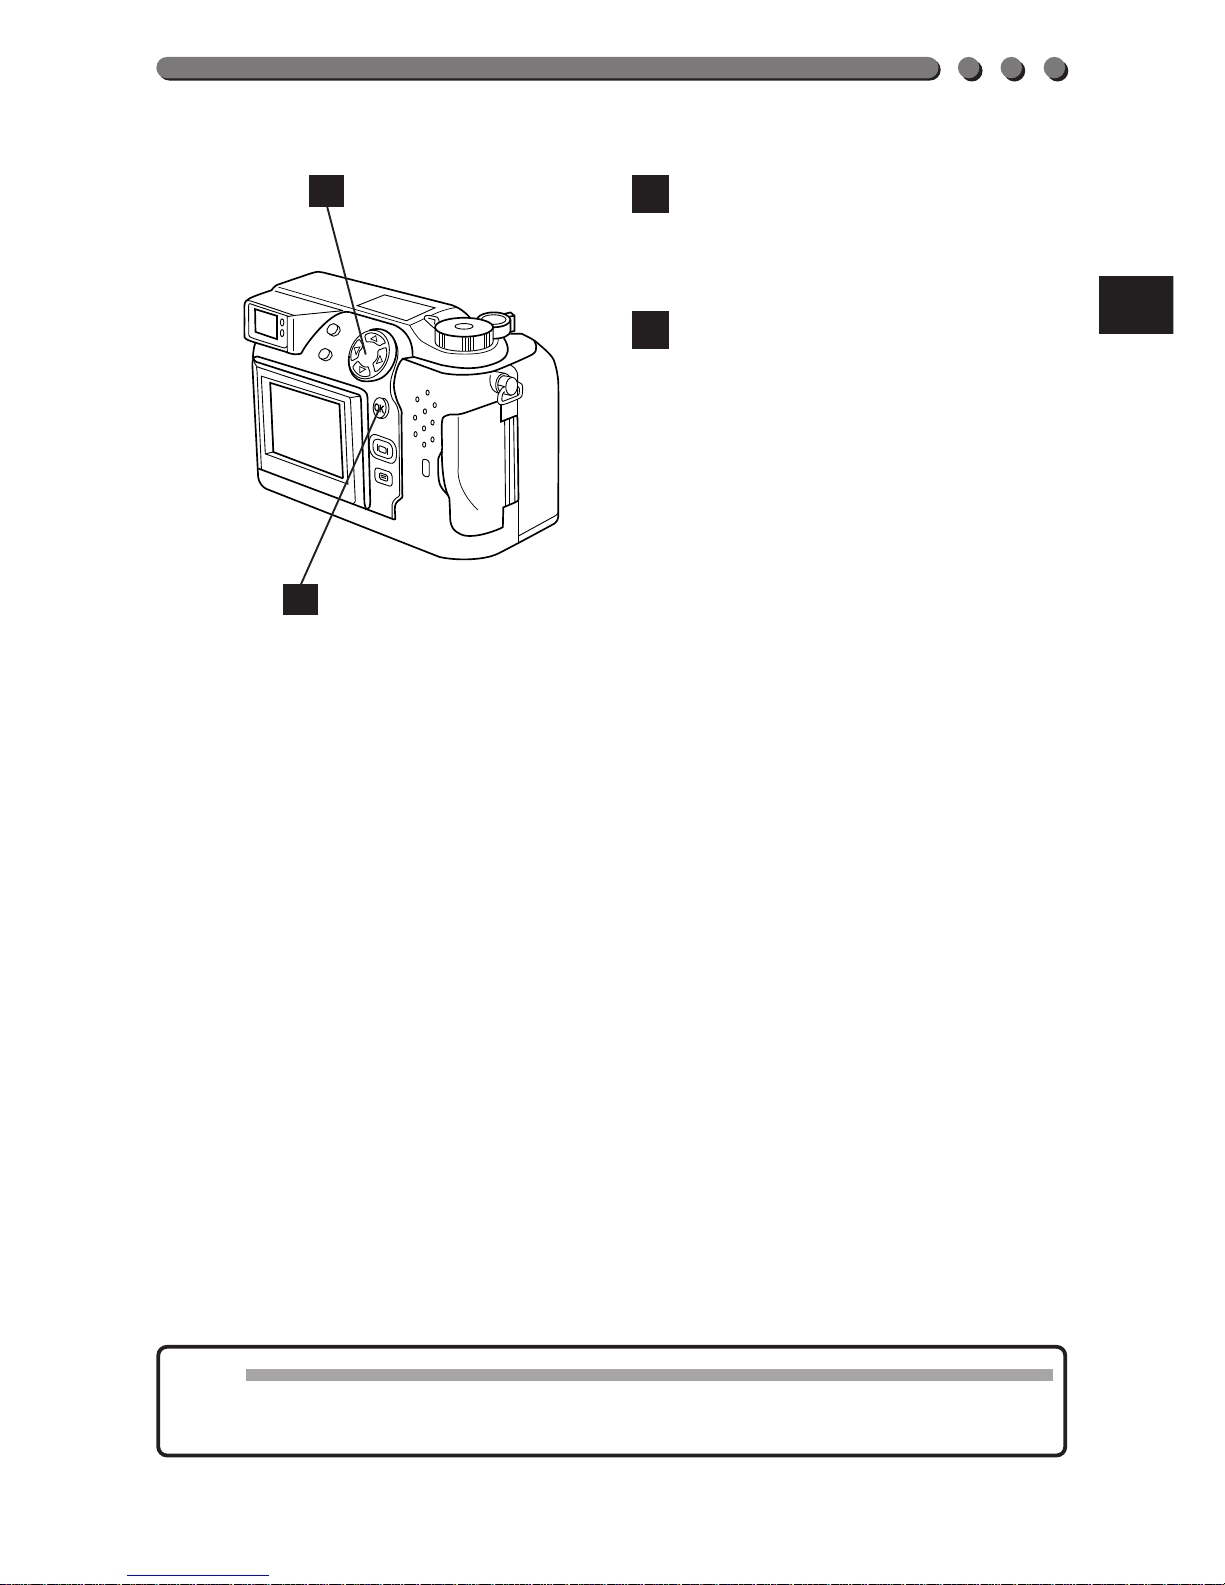
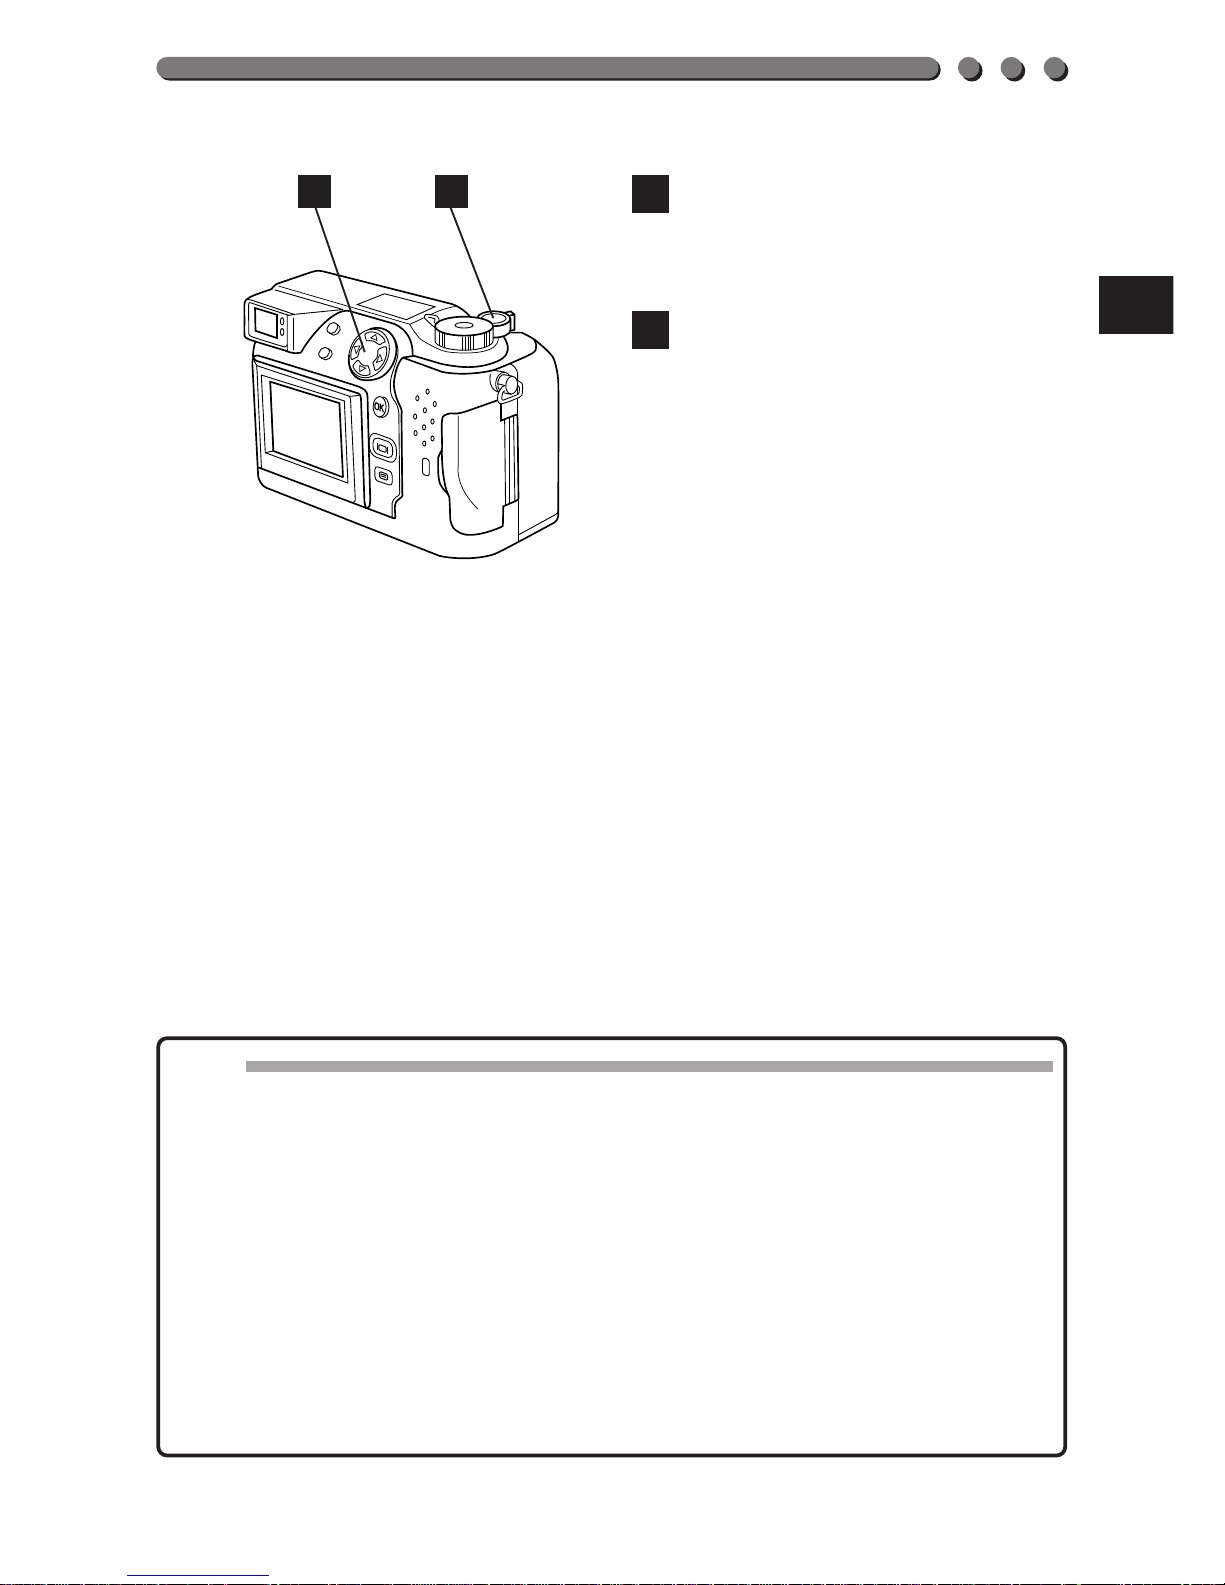
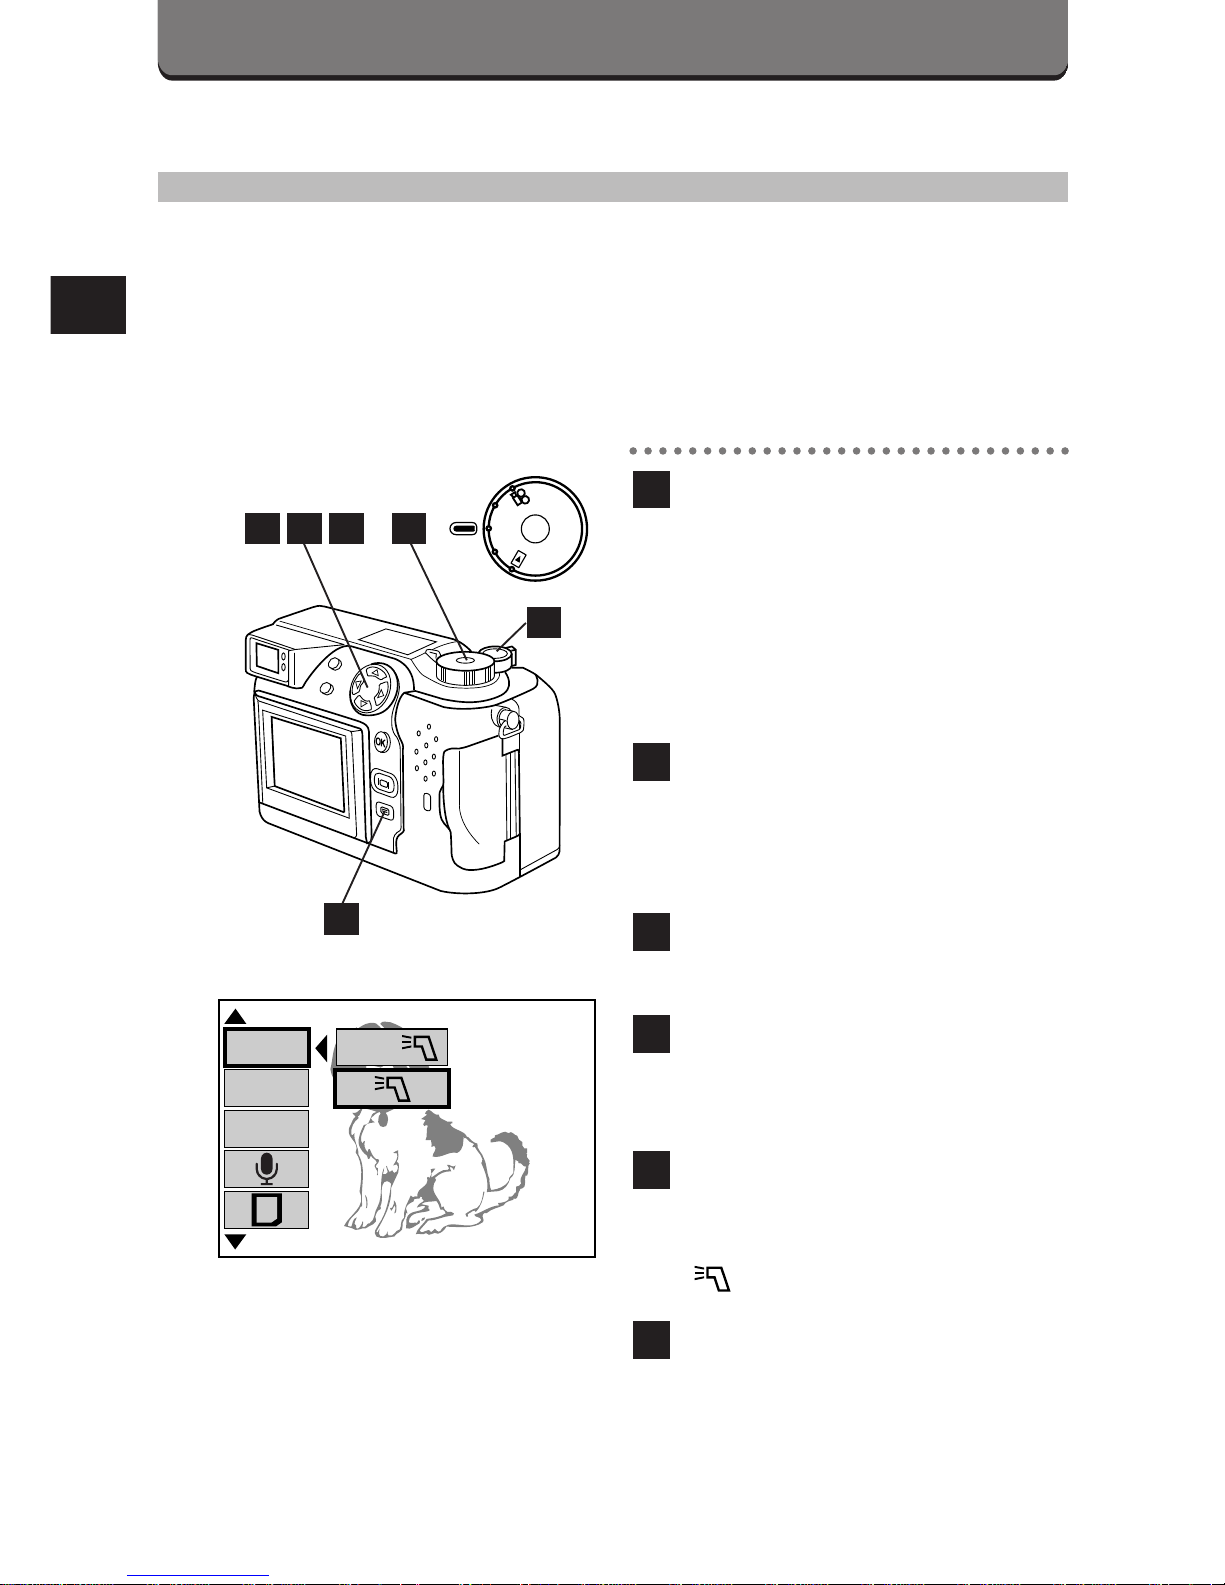
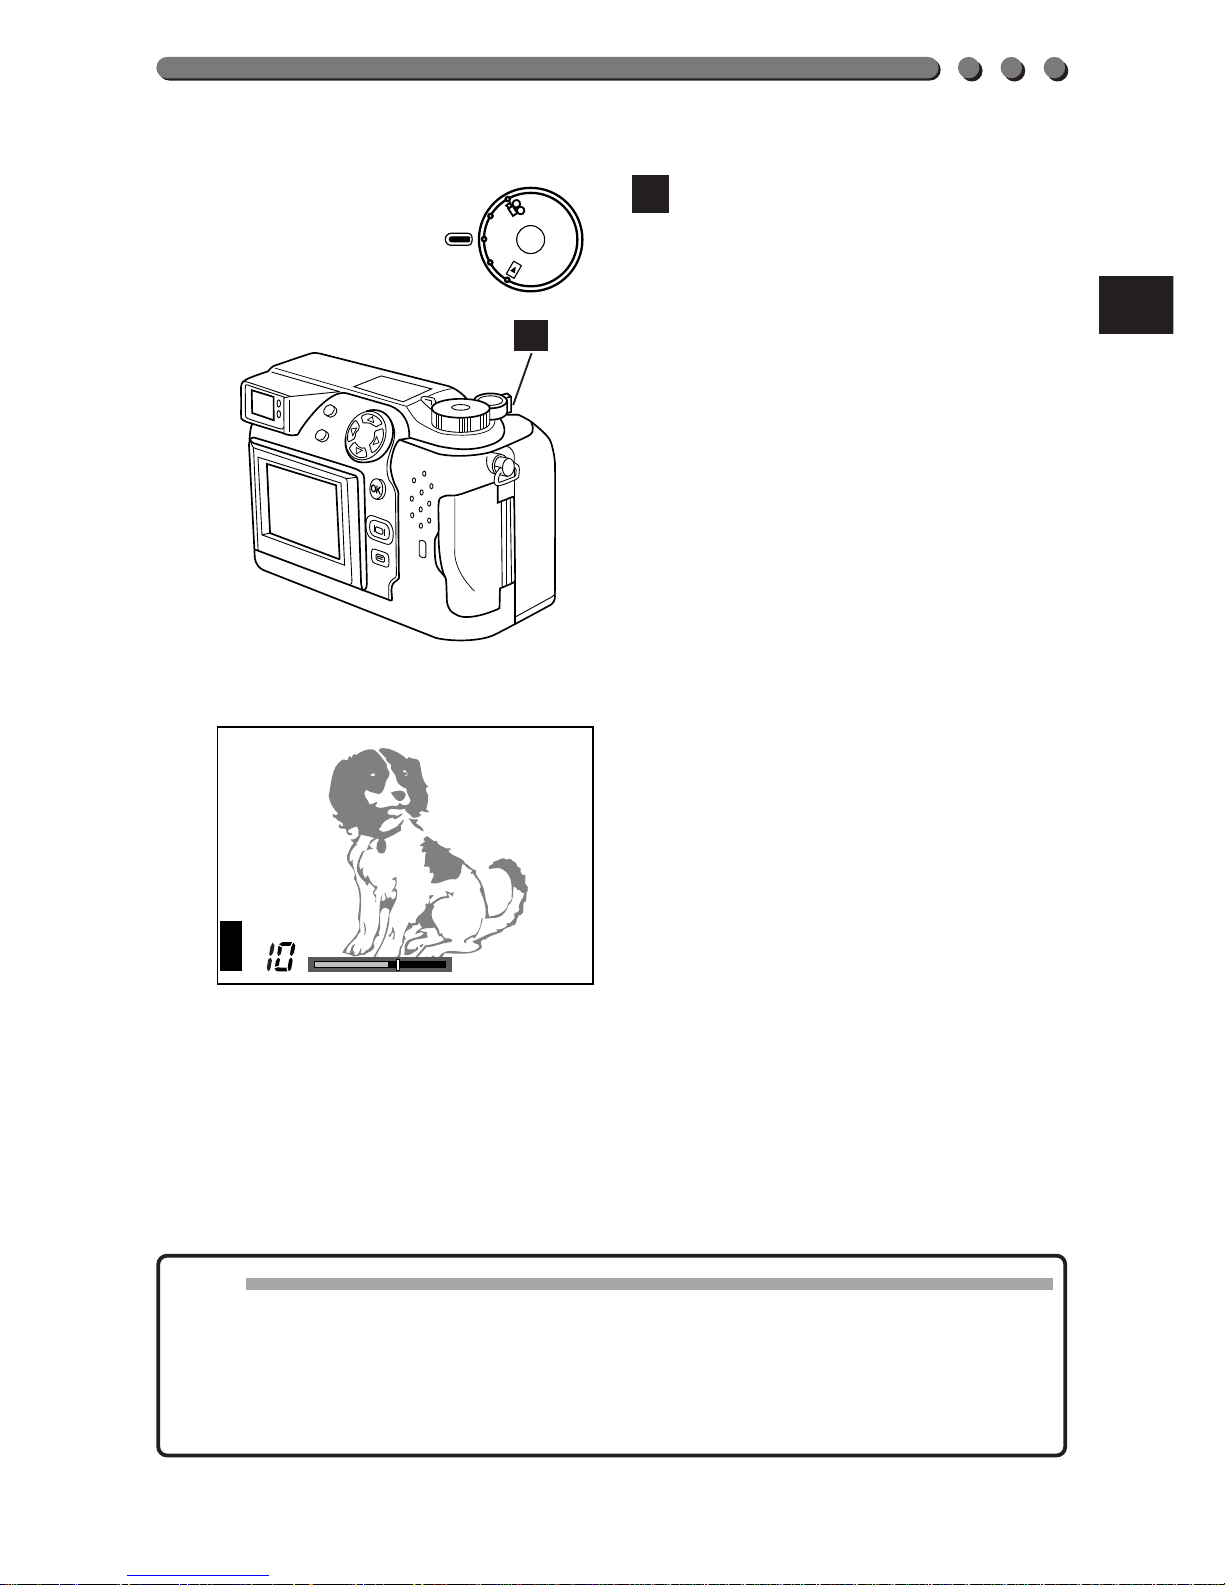
Press the left arrow on the
Jog dial to confirm the setting.
Press the OK button to save
the setting and cancel the
Menu.
• Pictures can also be taken
without pressing the OK
button. (P. 78/79)
6
5
Note:
• Unless OFF is selected in All Reset, the setting will be canceled when the
power is turned off. (p. 194)
5
6
78
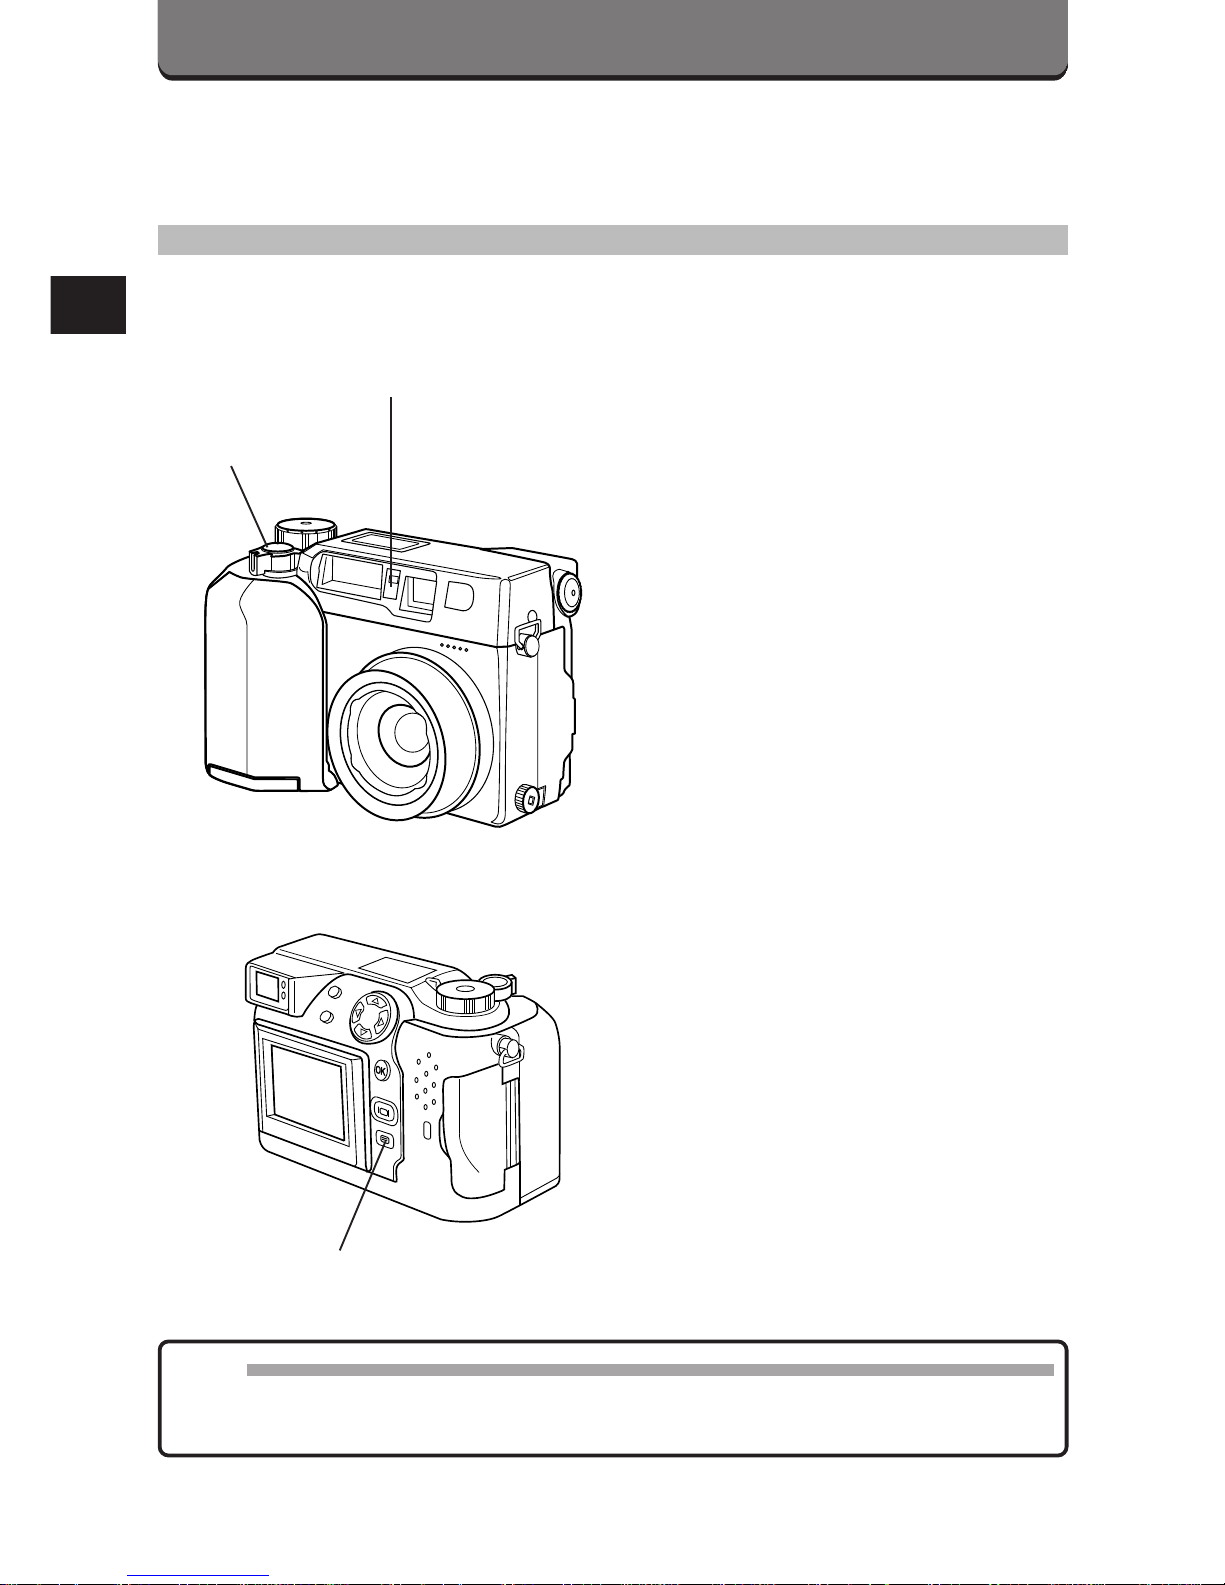
TAKING A PICTURE USING THE
SELFTIMER
When the shutter is released, the
Selftimer/Remote control signal
lights for approx. 10 seconds then
blinks for approx. 2 seconds
before the picture is taken.
To stop the activated selftimer,
press the Menu button.
Selftimer/Remote control signal
Shutter release
button
Menu button
Note:
• The Selftimer/Remote control mode will be canceled after a picture is
taken using the Selftimer.
SELFTIMER/REMOTE CONTROL
(Cont.)

79
TAKING A PICTURE USING THE REMOTE
CONTROL
Compose the picture, aim the
remote control at the Remote
control window on the
camera, then press the
Shutter release button on the
remote control to take a
picture.
• The Selftimer/Remote control
signal blinks for approx. 3
seconds before the picture is
taken. If the signal does not
blink when the Shutter release
button is pressed, move closer
to the camera and press it
again. The signal does not
light when there is frequency
interference. In such a case,
change the frequency
according to the remote
control instructions.
• See page 124 for using the
Remote control in the Display
mode.
15°
15°
9.8ft
9.8ft
16.4ft
Remote control window
Selftimer/Remote
control signal
Note:
• The Selftimer/Remote control mode will remain after a picture is taken
using the Remote control.
• The working distance may be reduced in brightly lit areas, such as under
direct sunlight.
• Do not subject the Remote control window to bright light.
• When the remote control is not operated for approx. 3 minutes, the
Selftimer/Remote control mode will be canceled.
80
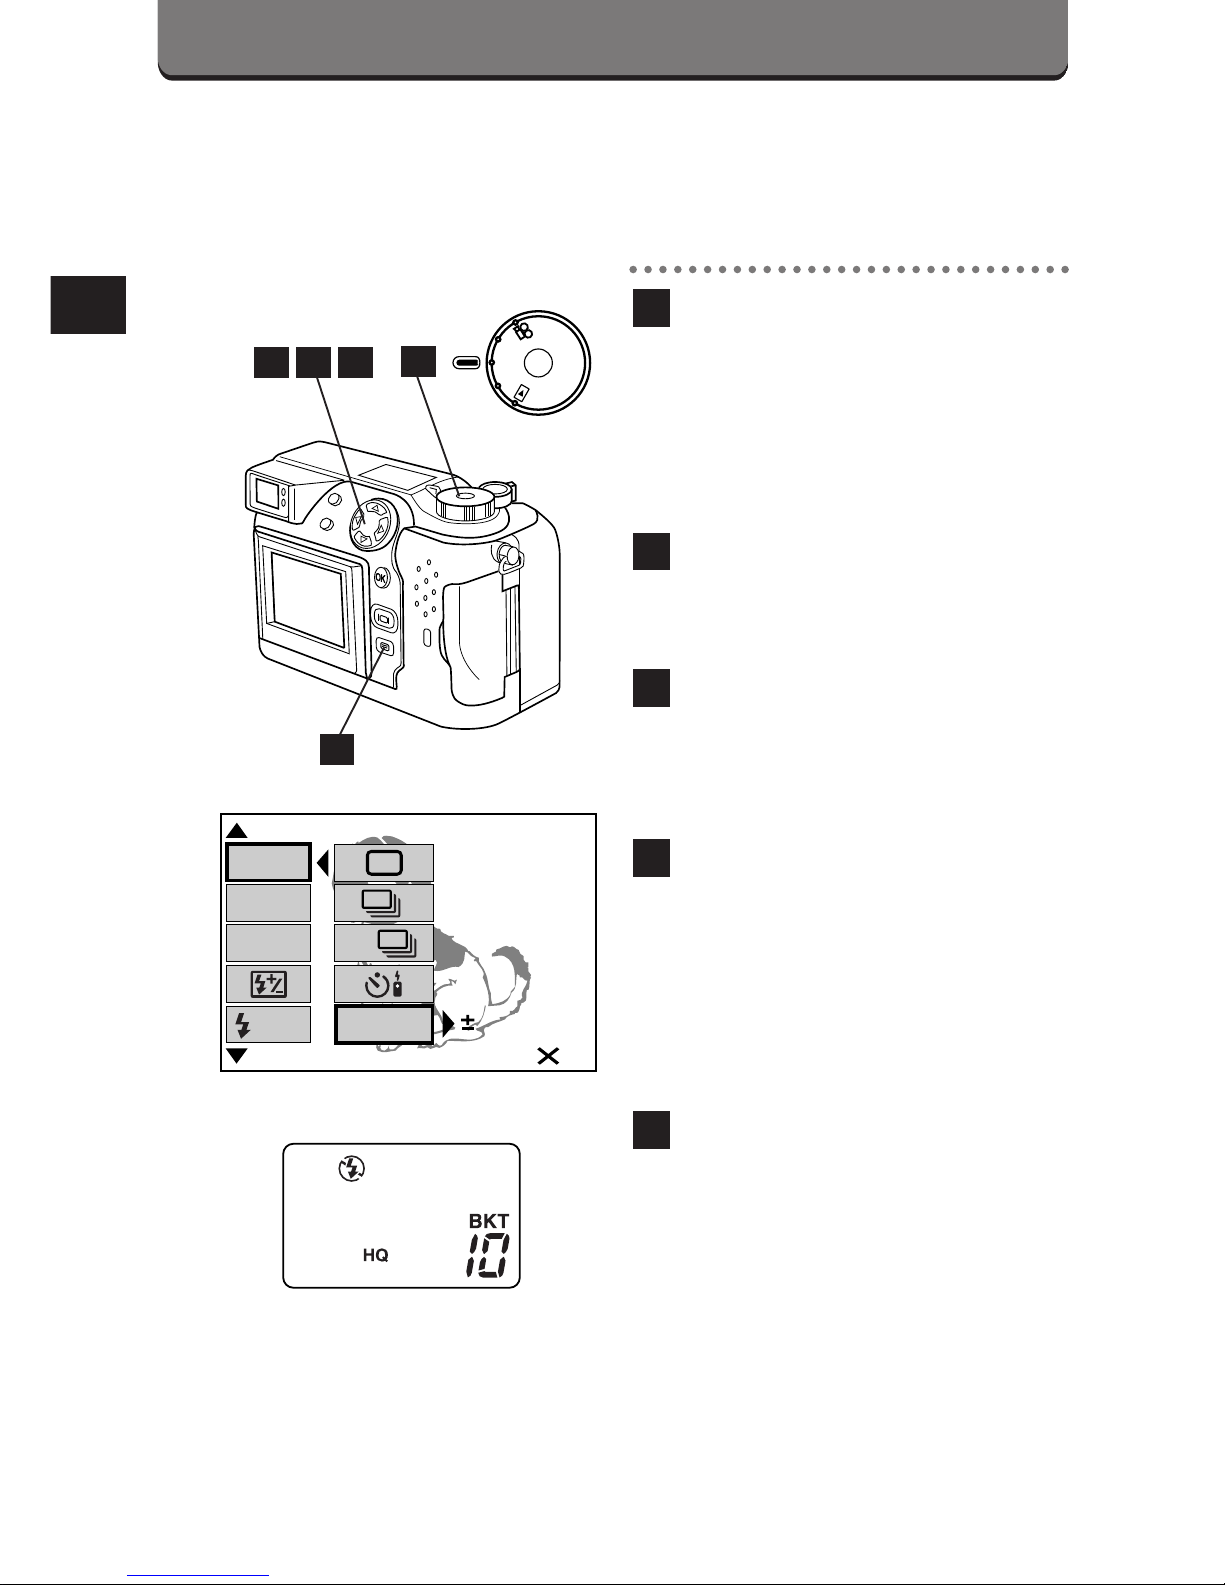
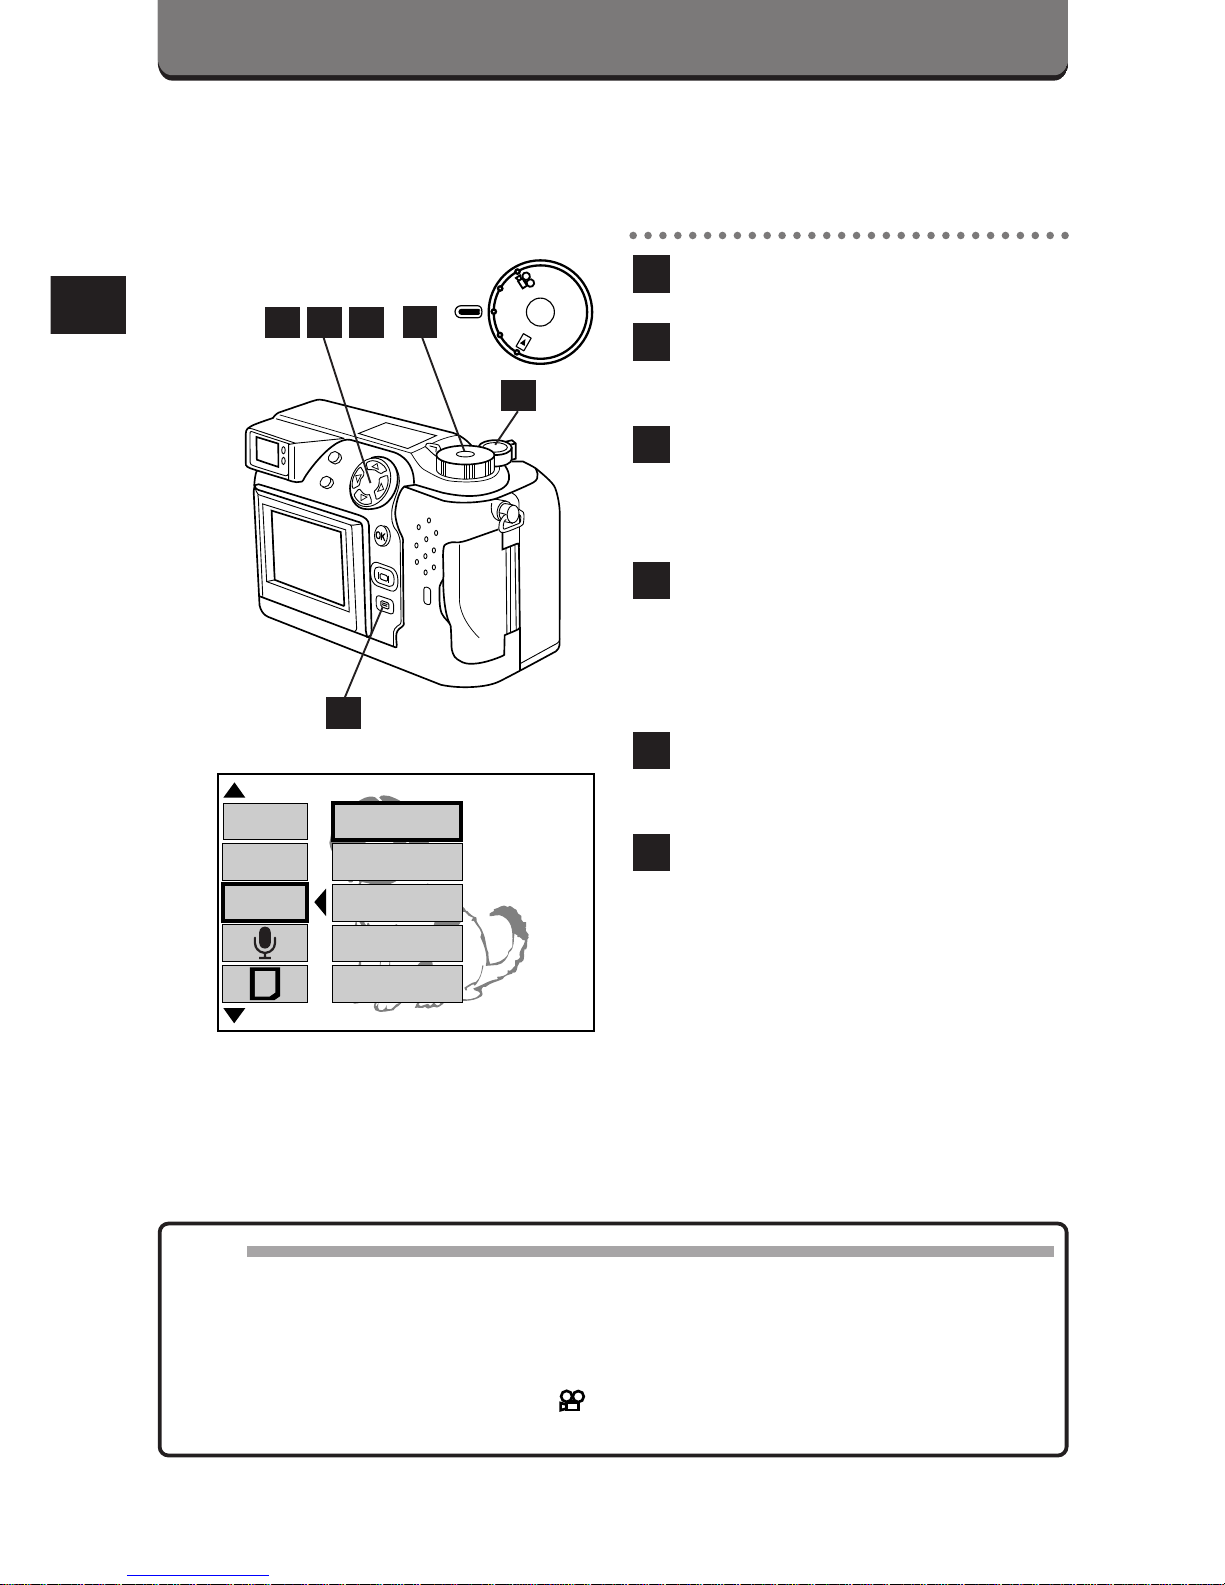
AUTO BRACKET
Images will be recorded sequentially with different exposures. You can
select frames to store by erasing unwanted frames.
Set the Mode dial to P or A/S/M .
• For A/S/M, the Shutter priority
mode or Aperture priority
mode must be selected.
(p. 107)
Press the Menu button to
display the Menu.
Press the top/bottom arrows
on the Jog dial to select
DRIVE.
Press the right arrow on the
Jog dial, then press the
top/bottom arrows to select
BKT.
• BKT appears on the control
panel.
Press the right arrow on the
Jog dial, then press the
top/bottom arrows to select
the range.
5
4
3
2
1
P
O
W
E
R
/
M
O
D
E
D
I
A
L
P
A/S/M
OFF
BKT
[
1/3
]
AF
1.0
F2.8 1/800 +2.0 P
3
DRIVE
SLOW
ISO
WB
Control panel
2
543
1
81
Press the right arrow on the
Jog dial, then press the
top/bottom arrows to select
the number of pictures.
• You may only be able to select
[X3] depending on the recording
mode.
Press the left arrow on the
Jog dial to confirm the setting.
If you take a picture without
pressing the OK button, the
setting will be valid until the
Menu is canceled.
• Press the OK button to save
the setting and cancel the
Menu.
8
7
6
BKT
[
1/3
]
AF
0.3
F2.8 1/800 +2.0 P
0.6
1.0
3
5
76 8
Note:
• The focus and white balance will be measured for the first frame.
• Not available in the Manual mode.
• The exposure level will be divided evenly within the selected range and
the number of pictures.
• Unless OFF is selected in All Reset, the setting will be canceled when the
power is turned off. (p. 194)
• This mode cannot be used in the TIFF/SHQ recording mode.
• When the Shutter release button is released, picture taking finishes.
• If there is not enough room left in memory for the number of pictures
taken with Bracketing, it will not be possible to take the next picture.
82
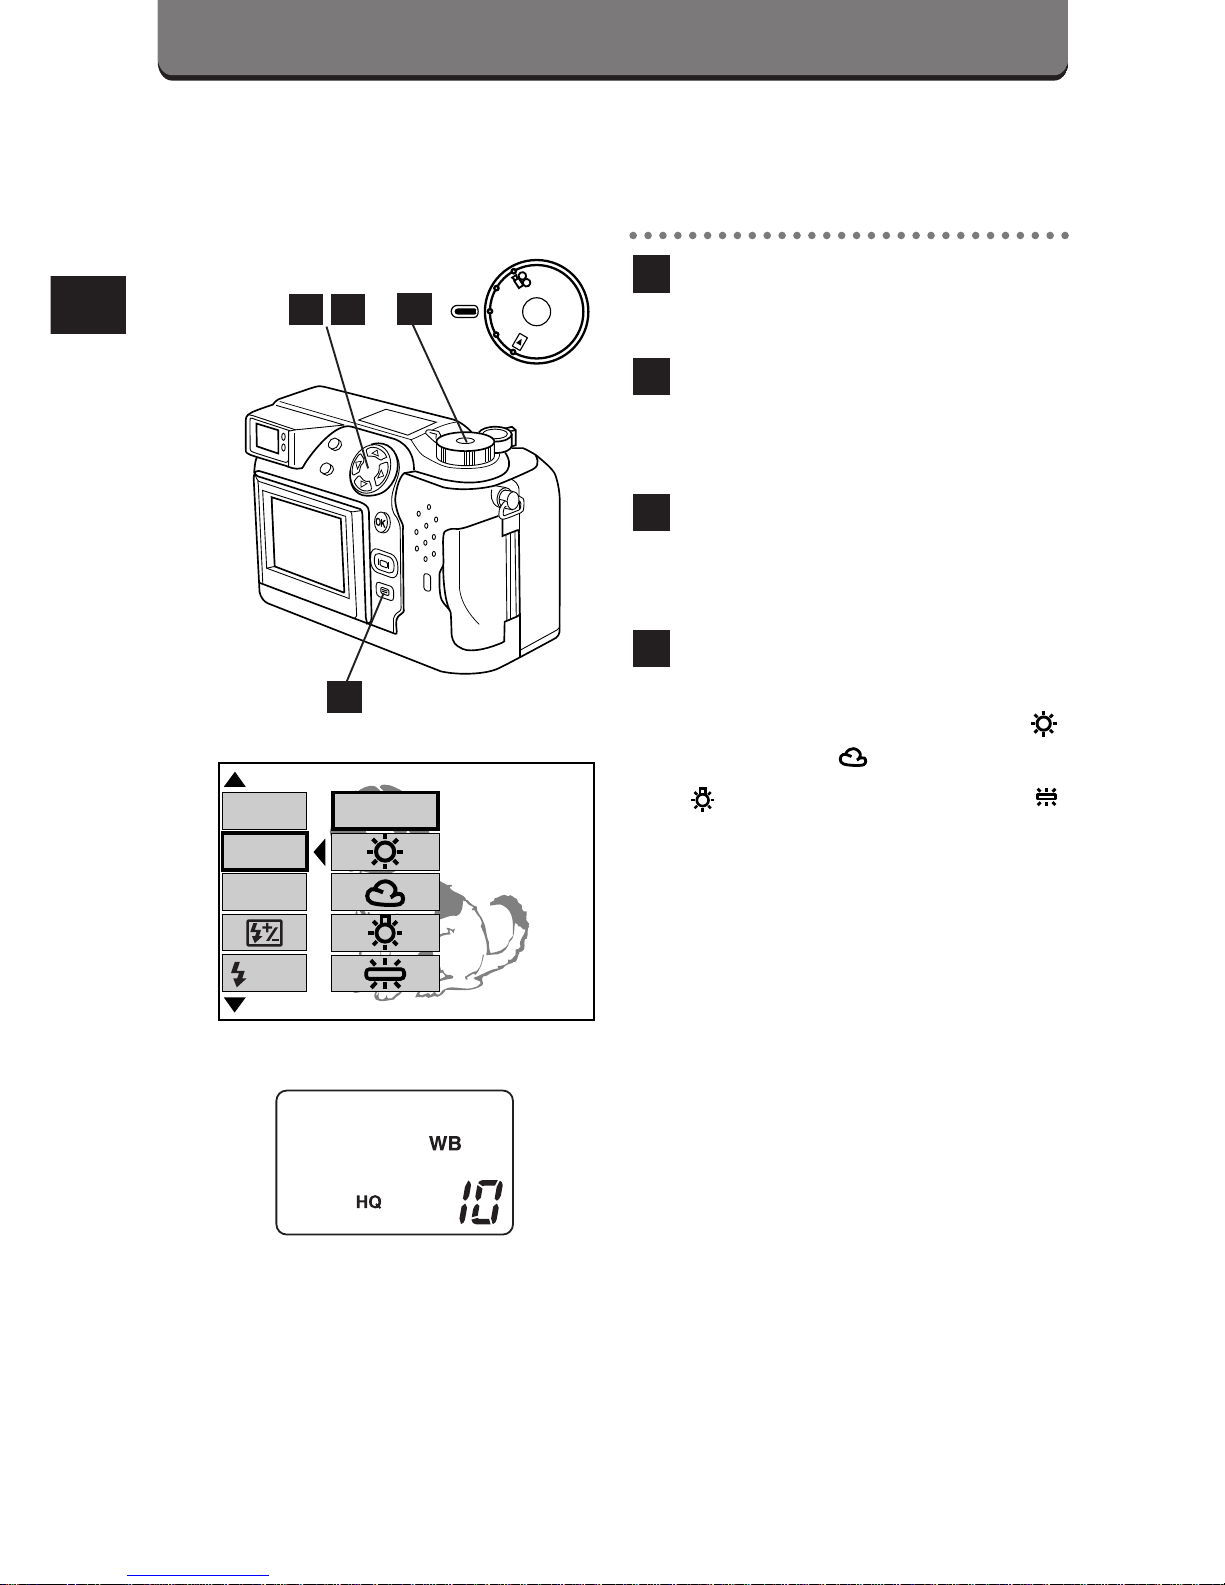
WHITE BALANCE
You can select the white balance according to the light source.
Set the Mode dial to P or A/S/M.
Press the Menu button to
display the Menu.
Press the top/bottom arrows
on the Jog dial to select WB.
Press the right arrow on the Jog
dial, then press the top/bottom
arrows to select AUTO,
(Daylight), (Overcast),
(Tungsten light) or
(Fluorescent).
• WB appears on the control
panel when a setting other
than AUTO is selected.
4
3
2
1
P
O
W
E
R
/
M
O
D
E
D
I
A
L
P
A/S/M
OFF
[
1/3
]
F2.8 1/800 +2.0 P
AUTO
DRIVE
SLOW
ISO
WB
Control panel
2
43
1

83
Press the left arrow on the
Jog dial to confirm the setting.
If you take a picture without
pressing the OK button, the
setting will be valid until the
Menu is canceled.
• Press the OK button to save
the setting and cancel the
Menu.
6
5
5 6
Note:
• Select AUTO in normal situations.
• The Manual white balance may not work under special lighting.
• Unless OFF is selected in All Reset, the setting will be canceled and reset
to auto when the power is turned off. (p. 194)
• Confirm results in the Display mode.
84
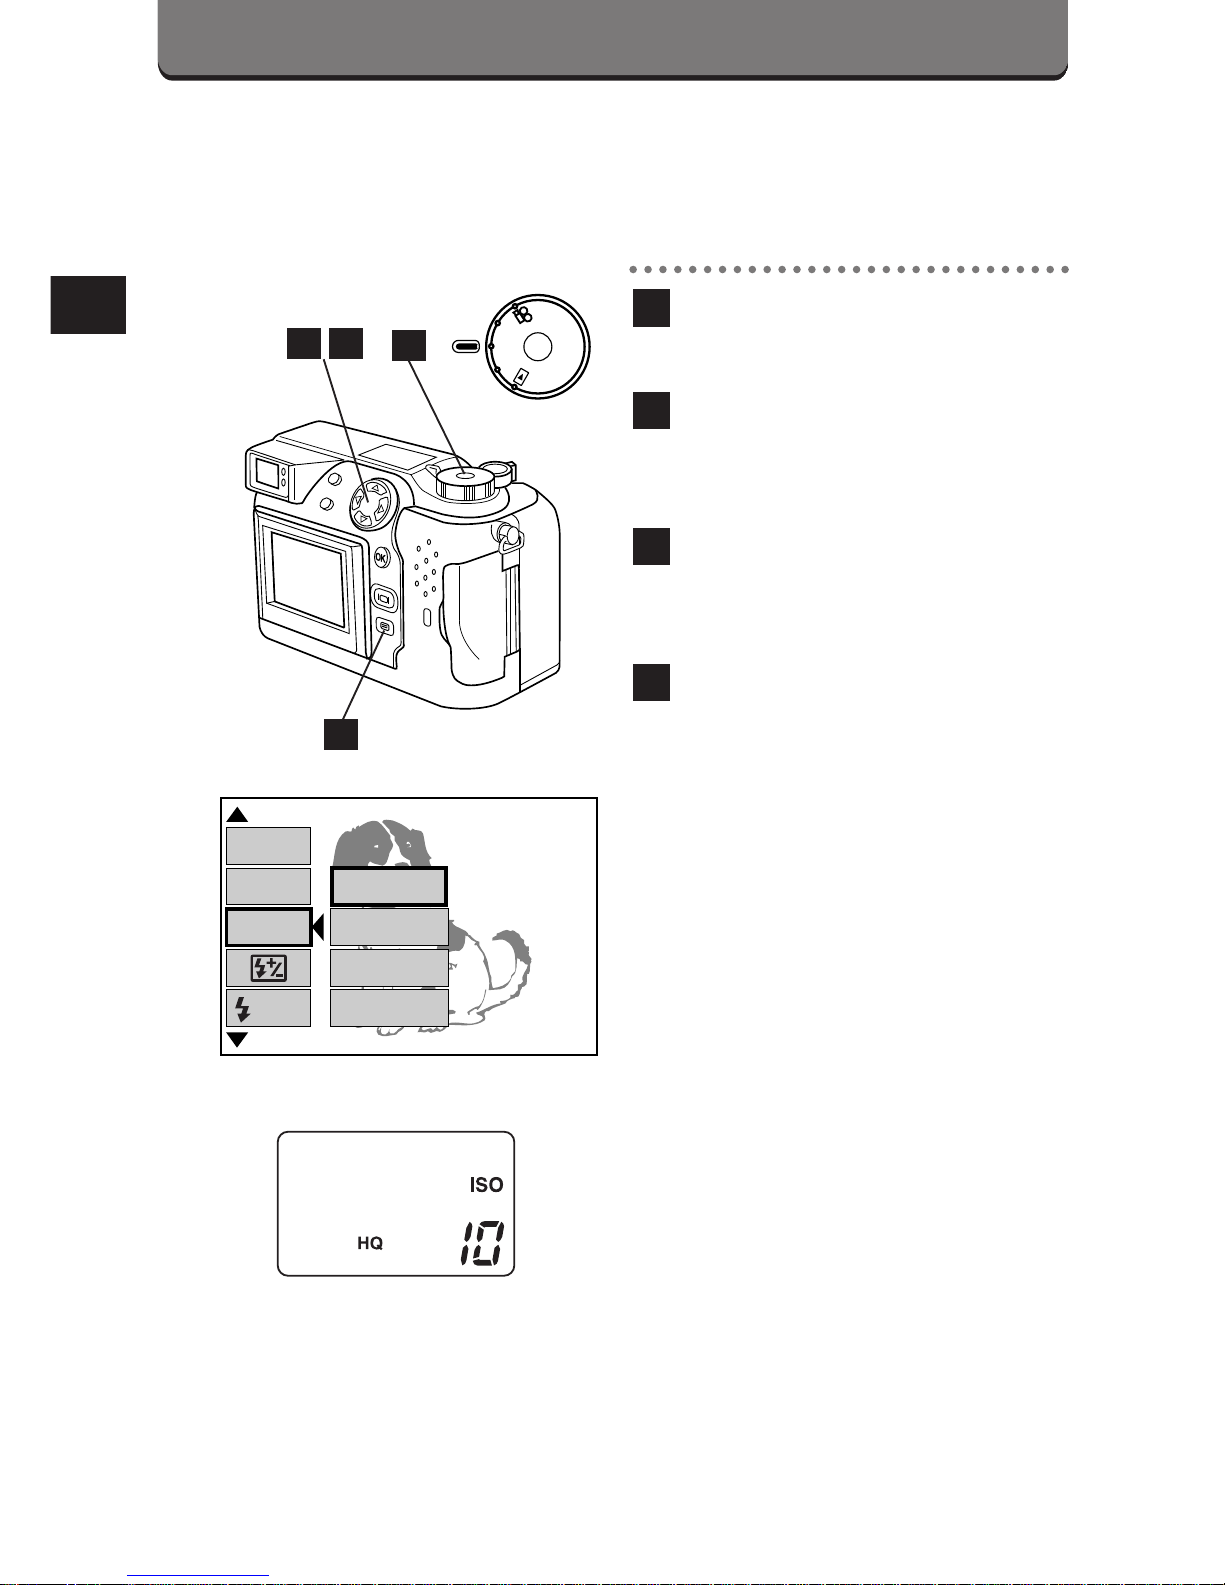
ISO
You can select the sensitivity from AUTO, as well as approx. 100, 200
and 400.
Set the Mode dial to P.
Press the Menu button to
display the Menu.
Press the top/bottom arrows
on the Jog dial to select ISO.
Press the right arrow on the
Jog dial, then press the
top/bottom arrows to select
the sensitivity.
• ISO appears on the control
panel when a setting other
than auto is selected.
4
3
2
1
P
O
W
E
R
/
M
O
D
E
D
I
A
L
P
A/S/M
OFF
[
2/3
]
200
400
100
AUTO
F2.8 1/800 +2.0 P
DRIVE
SLOW
ISO
WB
Control panel
2
43
1
85
Press the left arrow on the
Jog dial to confirm the setting.
If you take a picture without
pressing the OK button, the
setting will be valid until the
Menu is canceled.
• Press the OK button to save
the setting and cancel the
Menu.
• With A/S/M, it is possible to
select 100, 200 or 400.
6
5
65
Note:
• Unless OFF is selected in All Reset, the setting will be canceled and reset
to auto when the power is turned off. (p. 194)
• When set to AUTO, it will be changed to 100 when the Mode dial is set to
A/S/M.
• Pictures will appear grainy when the ISO is high.
• When AUTO is selected, the ISO is automatically set high in low-light
situations when the flash is not used, to prevent blurring from camera
movement.
• The sensitivity scale is based on the one used for picture film, but the
numbers are for reference only.
• The higher the ISO, the faster the shutter speed that can be used and the
lower the amount of light required.
86
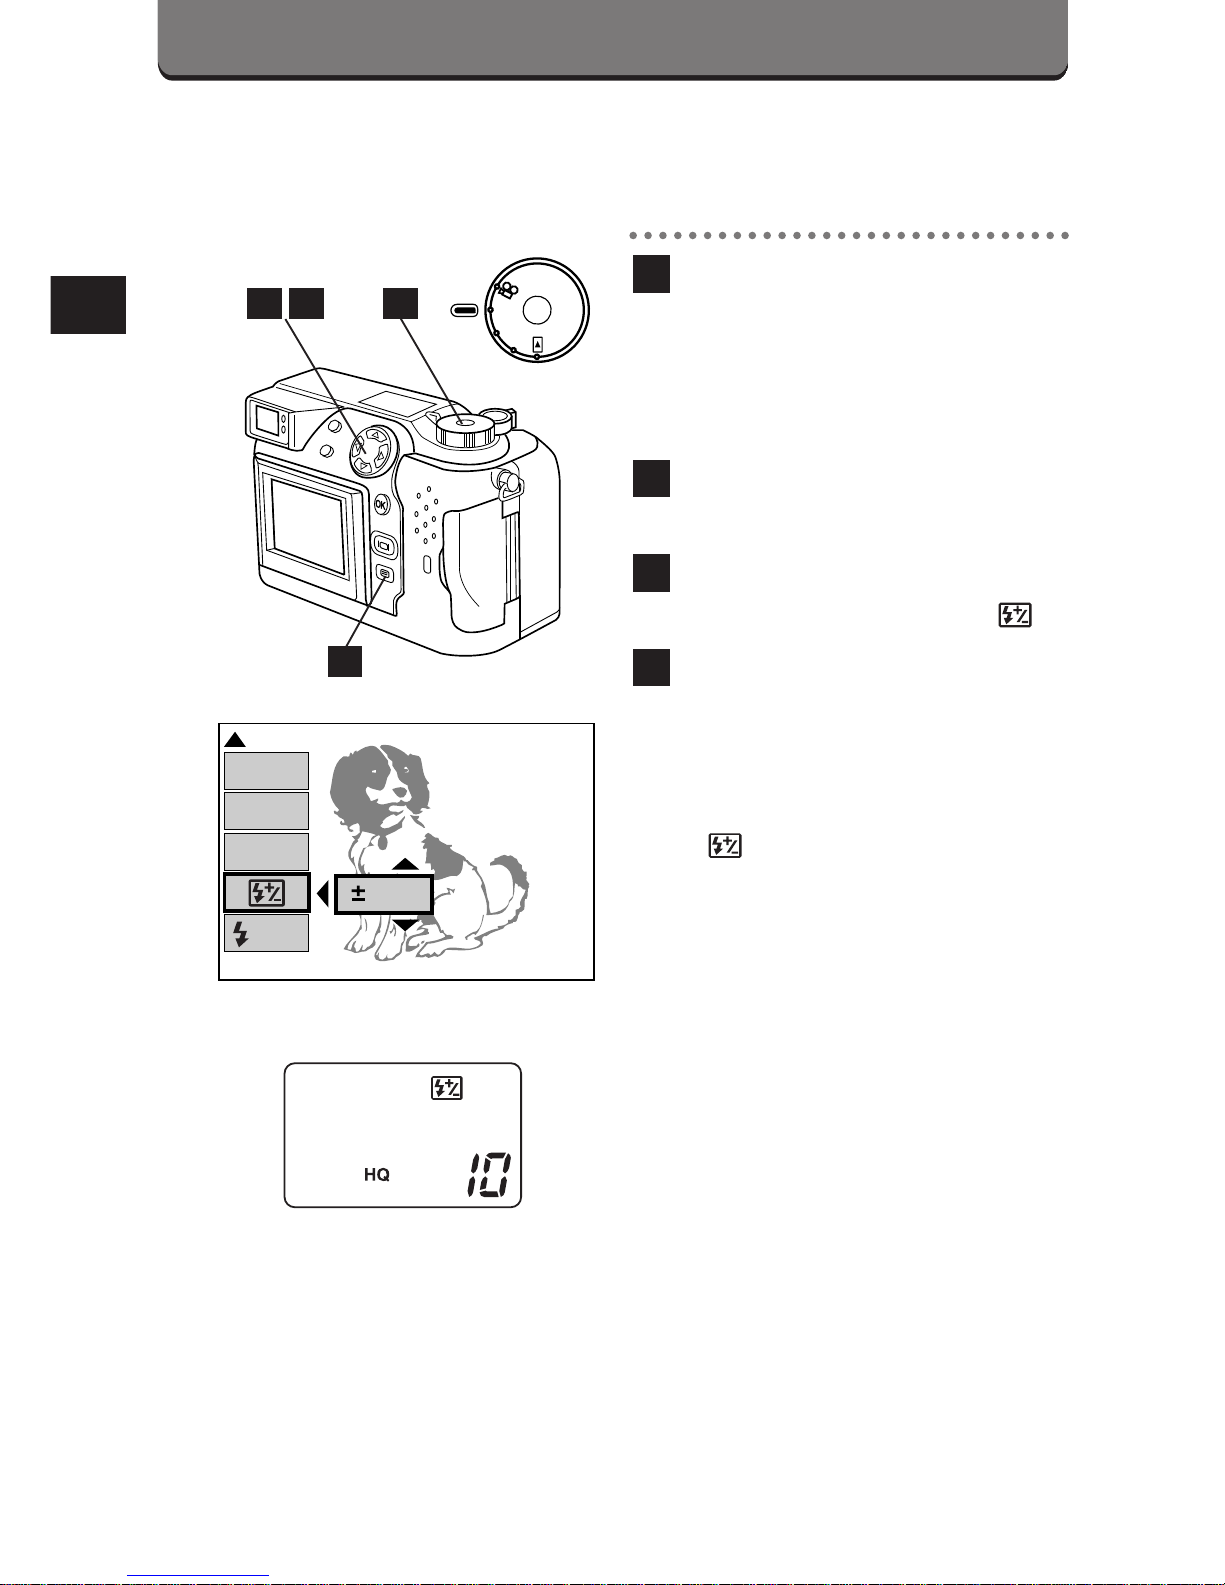
FLASH CORRECTION
This corrects the amount of light emitted from the flash when it fires.
Set the Mode dial to P or A/S/M .
• For A/S/M, the Shutter priority
mode or Aperture priority
mode must be selected. (p.
107)
Press the Menu button to
display the Menu.
Press the top/bottom arrows
on the Jog dial to select .
Press the right arrow on the
Jog dial, then press the
top/bottom arrows to select
the amount of flash exposure
correction.
• appears on the control
panel.
• Each time the top arrow is
pressed, the exposure is
corrected by a +1/3 EV step
and each time the bottom
arrow is pressed, the exposure
is corrected by a –1/3 EV step.
Correction can be made within
a range of ±2 EV.
4
3
2
1
P
A/S/M
OFF
P
O
W
E
R
/
M
O
D
E
D
I
A
L
[
1/3
]
F2.8 1/800 +2.0 P
0
DRIVE
SLOW
ISO
WB
2
43
1
Control panel

87
Press the left arrow on the
Jog dial to confirm the setting.
If you take a picture without
pressing the OK button, the
setting will be valid until the
Menu is canceled.
• Press the OK button to save
the setting and cancel the
Menu.
6
5
Note:
• If the FL-40 extension flash is set to TTL-AUTO and it is used
simultaneously with the main flash, correction is made for the amount of
light emitted from both flashes.
• If the FL-40 extension flash is set to MANUAL and it is used
simultaneously with the main flash, correction is made only for the
amount of light emitted by the main flash.
• If the shutter speed is fast, the resulting flash light correction effect may
not be sufficient.
5 6
88
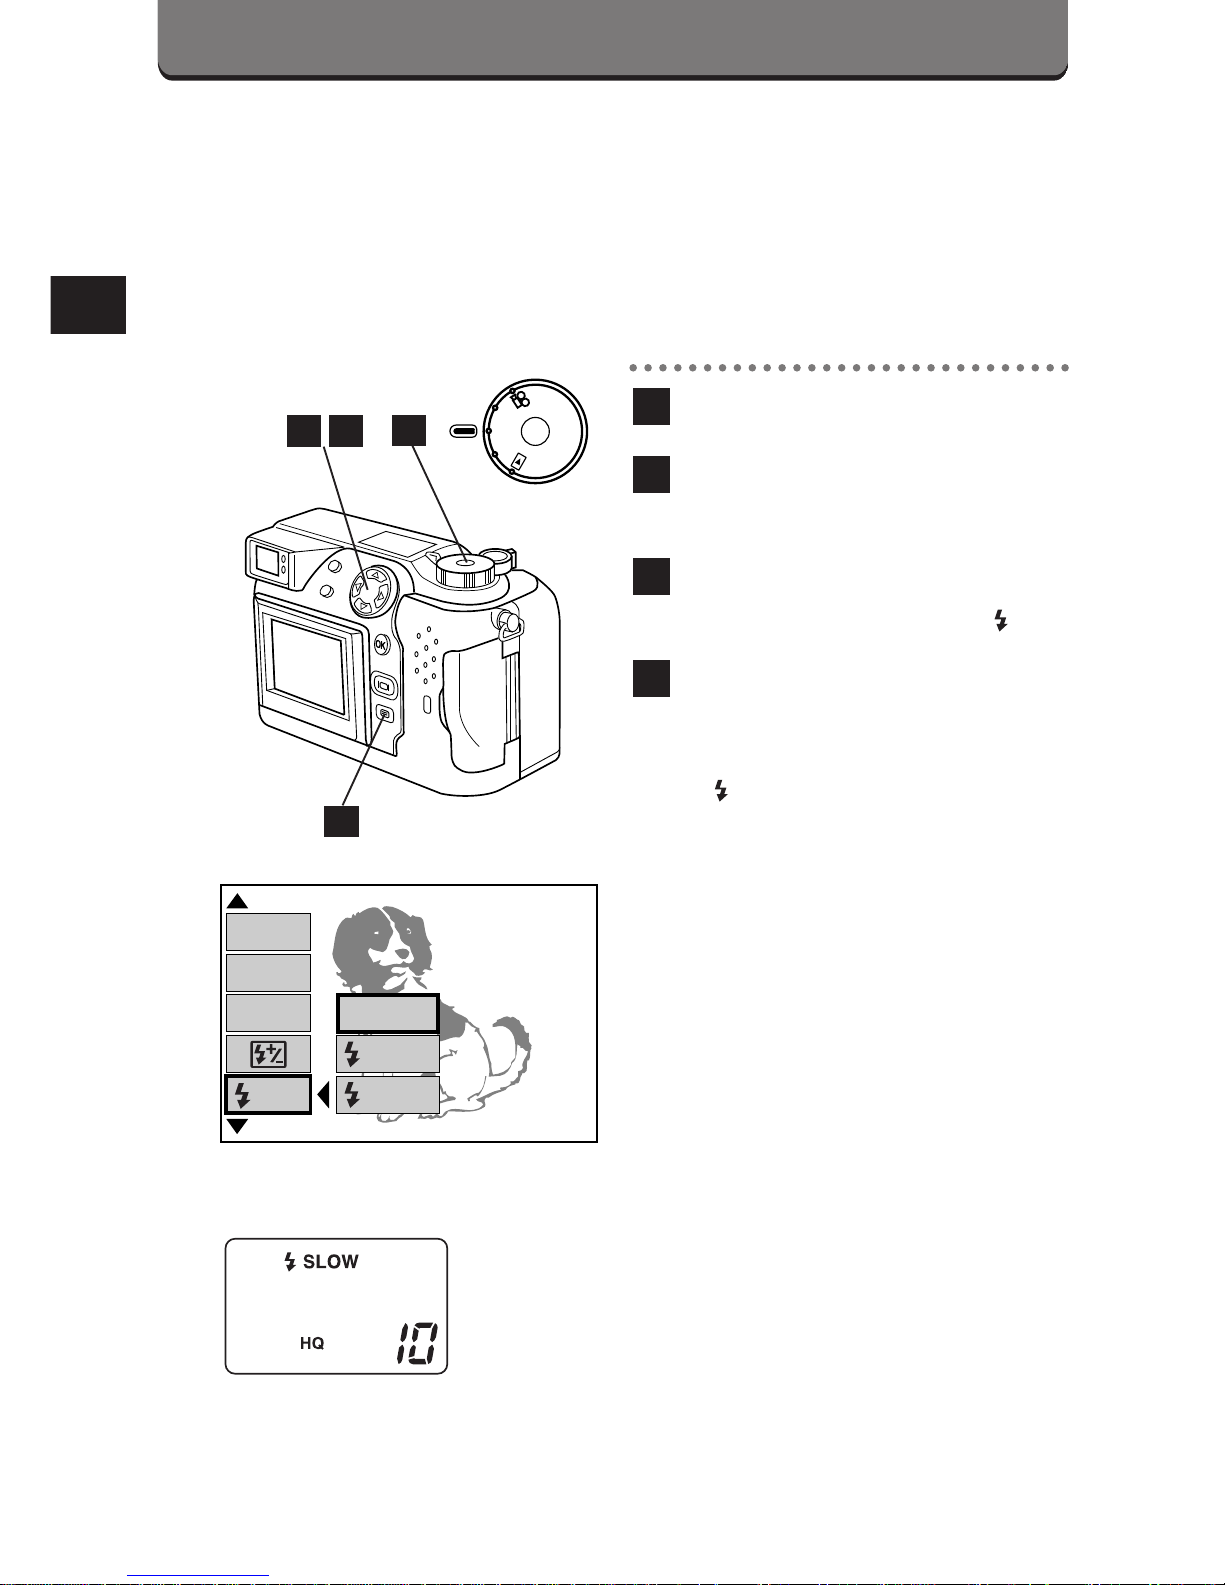
SLOW SHUTTER
SYNCHRONIZATION FLASH MODE
You can set the flash to fire during the first or second half of a slow
shutter speed’s release duration. It is especially great for taking
photographs of night views.
Set the Mode dial to P or A/S/M.
Press the Menu button to
display the Menu.
Press the top/bottom arrows
on the Jog dial to select .
Press the right arrow on the
Jog dial, then press the top/
bottom arrows to select 1 or 2.
• appears on the control
panel.
• Select 1 for capturing images
at the beginning of the shutter
release duration. The taillights
of a moving car will have a
forward streak.
• Select 2 for capturing images
at the end of the shutter
release duration. The taillights
of a moving car will have a
receding streak.
• When 2 is selected, the flash
will fire a pre-flash before the
regular flash.
SLOW
4
SLOW
3
2
1
P
O
W
E
R
/
M
O
D
E
D
I
A
L
P
A/S/M
OFF
OFF
[
1/3
]
F2.8 1/800 +2.0 P
SLOW
1
SLOW
2
DRIVE
SLOW
ISO
WB
Control panel
2
43
1
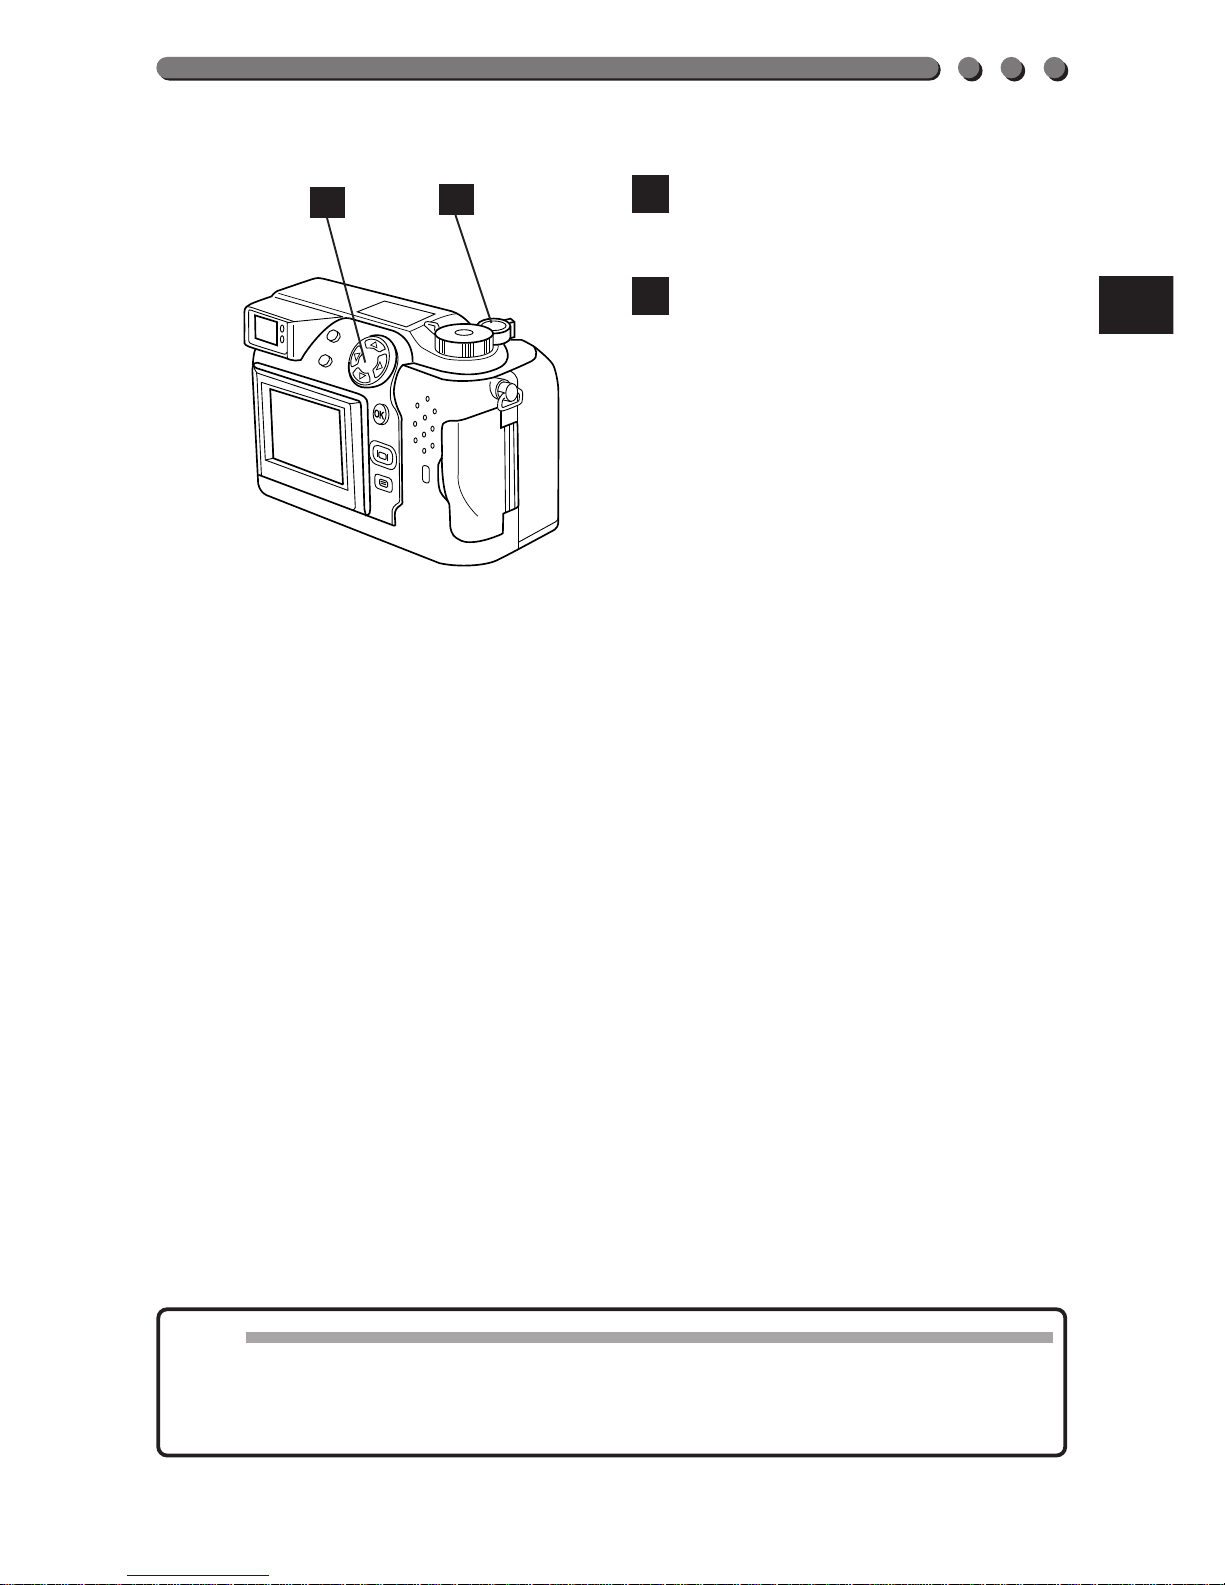
89
Press the left arrow on the
Jog dial to confirm the setting.
If you take a picture without
pressing the OK button, the
setting will be valid until the
Menu is canceled.
• Press the OK button to save
the setting and cancel the
Menu.
6
5
5
6
Note:
• This mode can be used with both the main flash and an extension flash.
• Unless OFF is selected in All Reset, the setting will be canceled and reset
to off when the power is turned off. (p. 194)
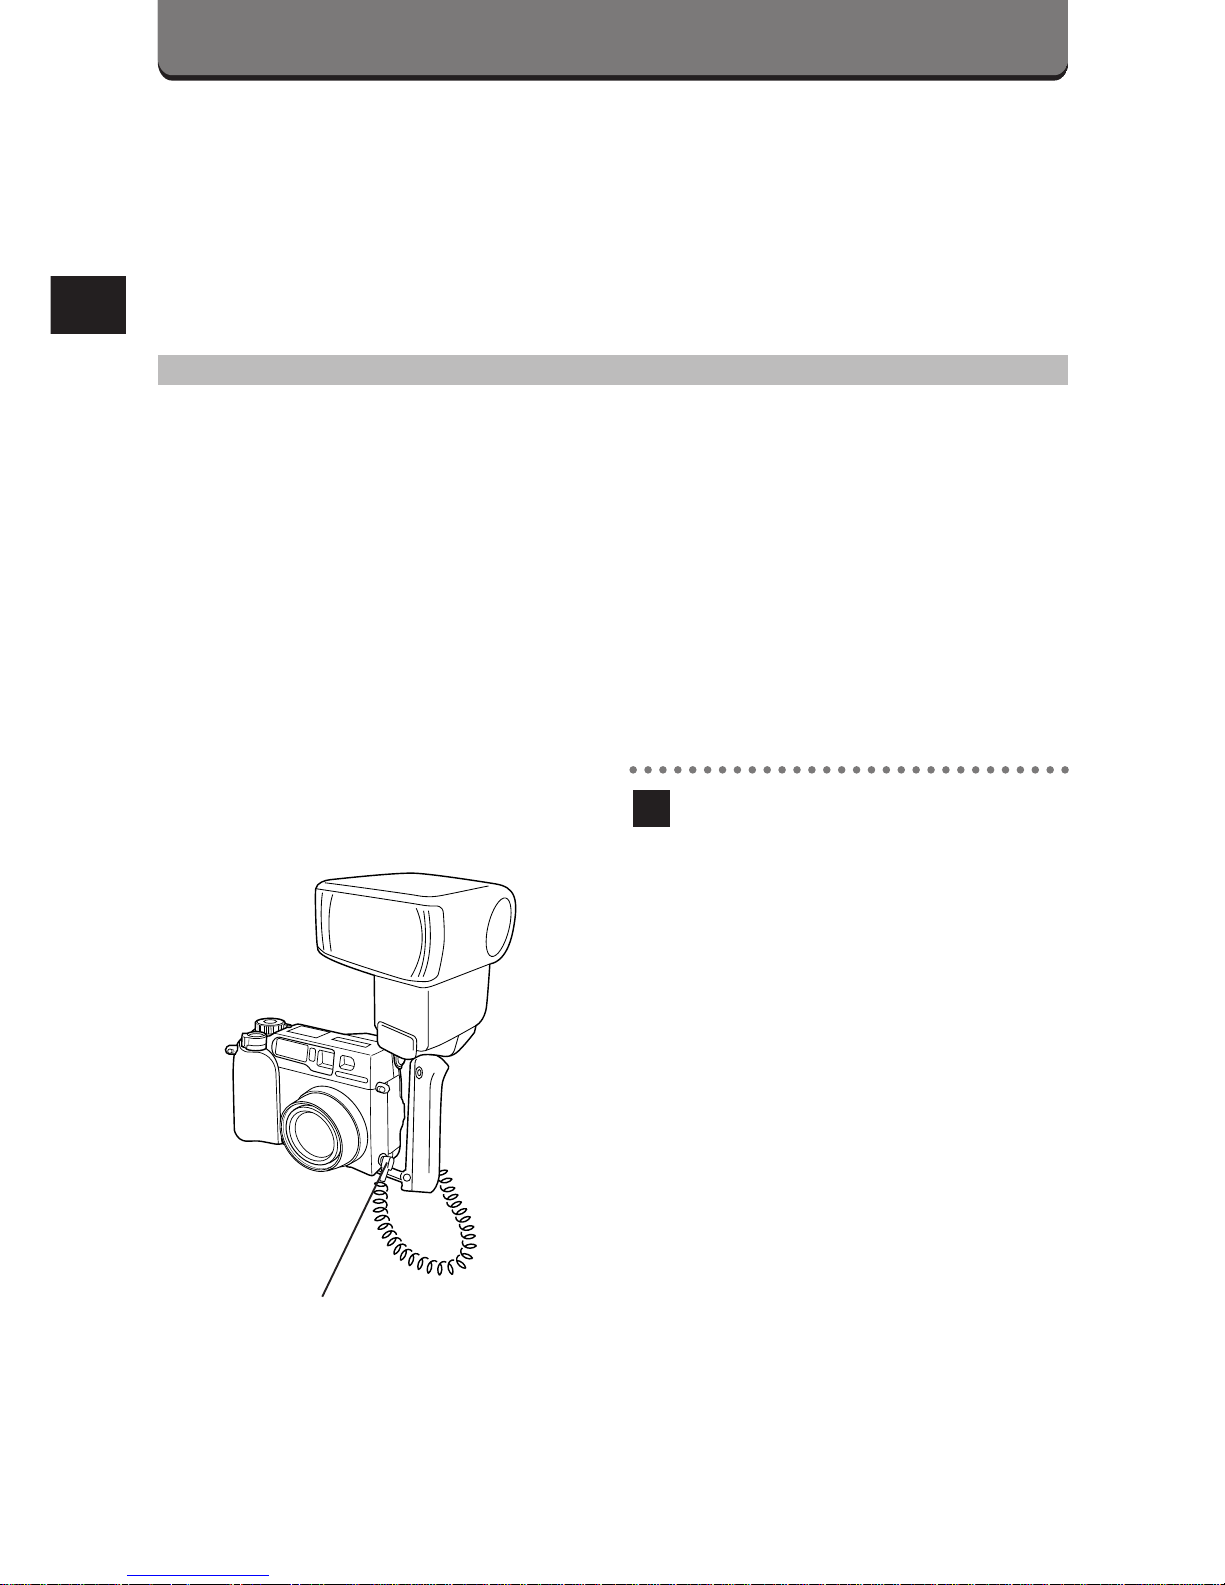
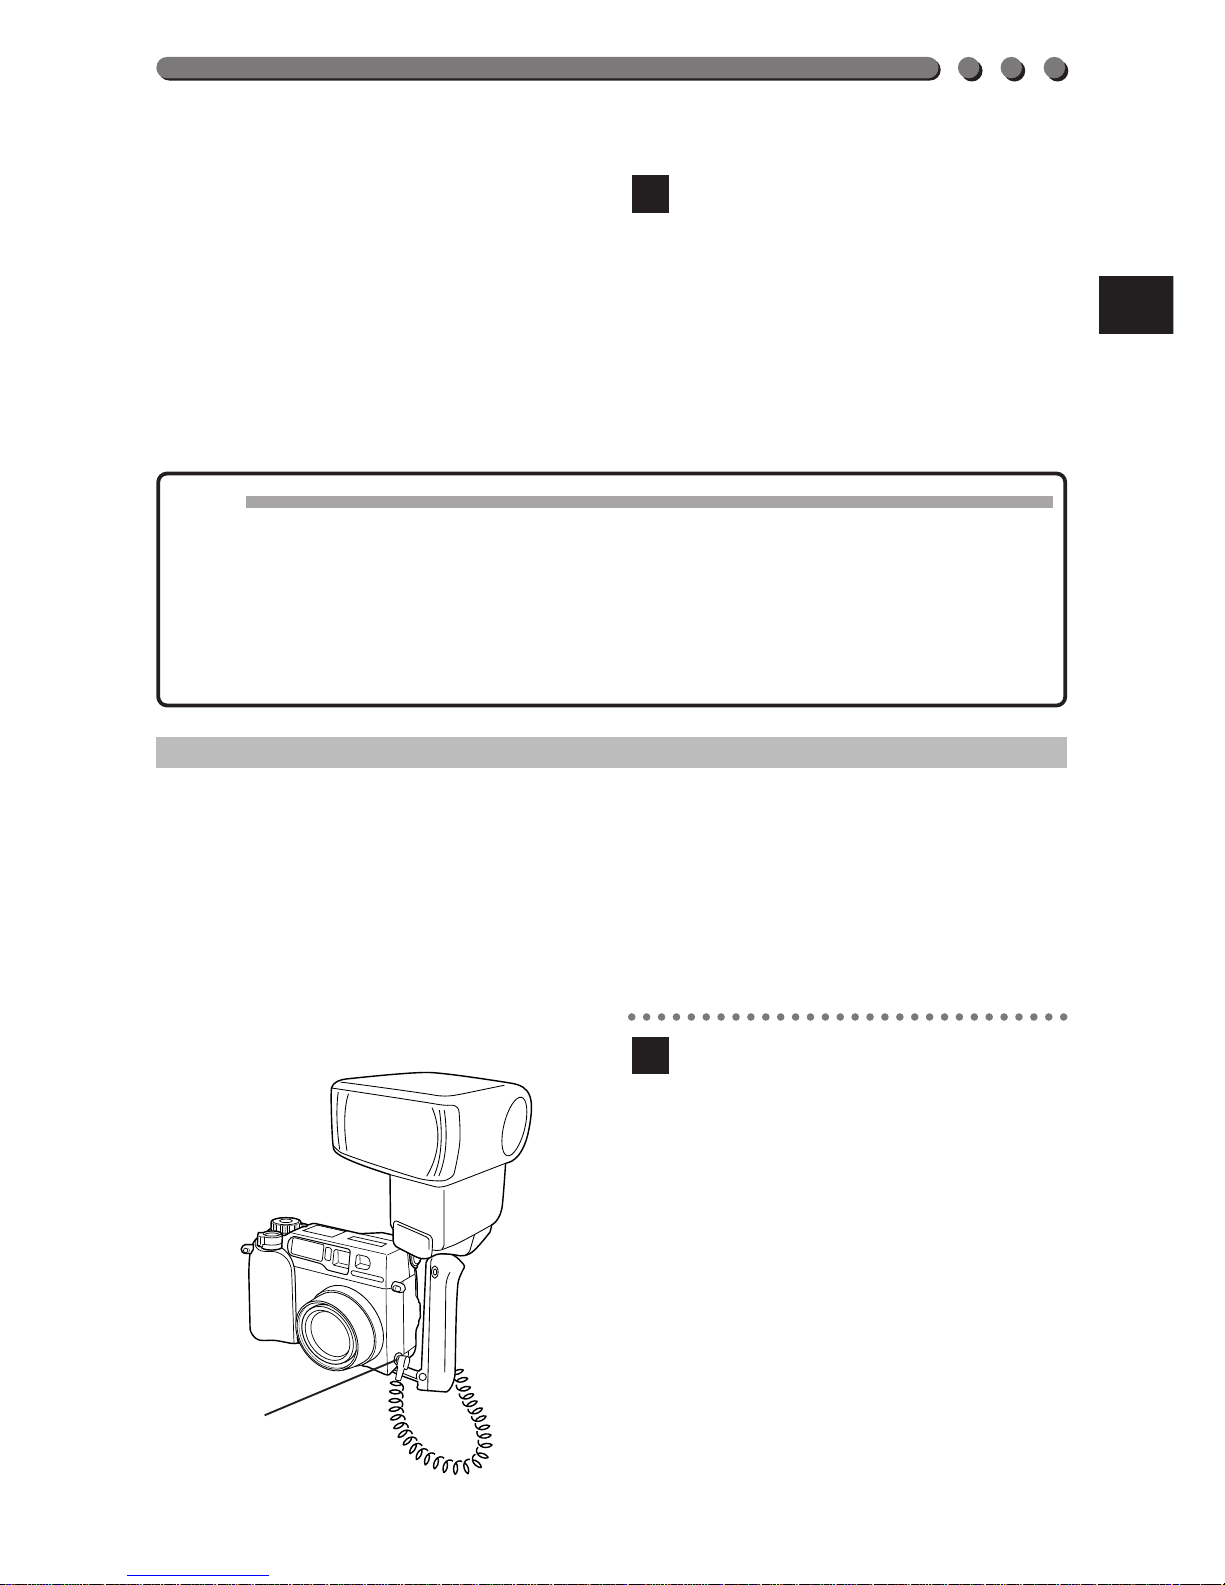
90
The FL-40 extension flash (optional) can be used to take various kinds of
flash photographs, either by itself or together with the main flash. To
connect the extension flash to the camera, the exclusive grip (optional)
and bracket cable (optional) are required.
TAKING PHOTOGRAPHS USING THE FL-40
EXTENSION FLASH
If the extension flash is used, the flash mode and exposure
compensation are detected automatically, allowing the main flash and
extension flash to function together.
Using the two flashes together enables more sophisticated lighting, such
as using the extension flash for bounce lighting and the main flash for
front lighting. The default setting is to have the extension flash and main
flash work together.
Mount the FL-40 extension
flash on the exclusive grip,
then fasten it to the camera’s
tripod hole and connect the
exclusive grip and the
camera’s extension flash
connection terminal using the
exclusive bracket cable.
• The extension flash connector
cover on the camera is a screw
type. Unscrew and remove it to
connect the exclusive bracket
cable.
1
EXTENSION FLASH PHOTOGRAPHY
Extension flash
connection terminal
91
Set the camera’s mode dial to
P or A/S/M.
• With A/S/M, the LCD monitor
will turn on automatically.
Turn on the extension flash
unit’s power.
• The extension flash is set to
the TTL-AUTO mode.
Select the camera’s flash
mode.
• Auto-Flash, Red-Eye Reducing
Flash, Fill-In Flash and Off
modes are available. (p.64)
4
3
2
Note:
• Slow synchro can be set. (p. 88)
• When taking close-up pictures, they may be overexposed. Use the main
flash.
• If both the main flash and the FL-40 are used for flash photography, the
main flash is used as the compensating light source, so if the amount of
light from the FL-40 is insufficient (beyond its working range), the photo
may be underexposed.
P
O
W
E
R
/
M
O
D
E
D
I
A
L
P
A/S/M
OFF
4 2
92
EXTENSION FLASH PHOTOGRAPHY (Cont.)
TAKING PHOTOGRAPHS WITH THE FL-40
EXTENSION FLASH ONLY
You can use the extension flash only or use the main flash and extension
flash together. If you are using the extension flash, the main flash can be
set so that it will not fire in order to prevent the camera’s batteries from
running down.
Mount the FL-40 extension
flash on the exclusive grip,
then fasten it to the camera’s
tripod hole and connect the
exclusive bracket cable to the
camera’s extension flash
connection terminal.
Set the camera’s mode dial to
P, or A/S/M.
• With A/S/M, the LCD monitor
will turn on automatically.
Press the Menu button to
display the Menu.
Press the top/bottom arrows
on the Jog dial to select
FLASH.
Pressing the right arrow on
the Jog dial, the press the
top/bottom arrows to select
.
Press the left arrow on the
Jog dial to confirm the setting.
6
5
4
3
2
1
P
O
W
E
R
/
M
O
D
E
D
I
A
L
P
A/S/M
OFF
3
654 2
[
2/3
]
F2.8 1/800 +2.0 P
IN+
FLASH
DIGITAL
ZOOM
FUNCTION
7
93
If a picture is taken without
pressing the OK button, the
setting will remain in effect
until the Menu button is
pressed again.
• Press the OK button to save
the setting and cancel the
Menu.
TAKING PHOTOGRAPHS WITH ANOTHER
BRAND OF EXTENSION FLASH
Another brand of extension flash can also be used with the exclusive grip
and bracket cable. However, it can only be operated in the Auto mode.
For details about the conditions in which an extension flash may be
used, see “Other brands of extension flash that can be used”. (p. 95)
Mount the extension flash on
the exclusive grip, then fasten
it to the camera’s tripod hole
and connect the exclusive
bracket cable to the camera’s
extension flash connection
terminal.
1
7
Note:
• Unless OFF is selected in All Reset, the setting will be canceled and reset
to the default when the power is turned off. (p. 194)
• The extension flash may occasionally fire by mistake.
• Be sure to use the exclusive grip and bracket cable to make connections
between the FL-40 and the camera. If another method is used, the FL-40
will only function as an ordinary extension flash.
Extension flash
connection terminal
94
EXTENSION FLASH PHOTOGRAPHY (Cont.)
Set the camera’s Mode dial to
A/S/M.
• The LCD monitor turns on
automactically.
In the Menu screen, set the
A/S/M mode to A (Aperture
priority mode) or M (Manual
mode). (p. 107)
Turn the extension flash unit’s
power on.
Set the Light Adjustment
mode for the extension flash
unit. For more details, see the
user’s manual for the flash
unit.
5
4
3
2
P
O
W
E
R
/
M
O
D
E
D
I
A
L
P
A/S/M
OFF
3 2
A
S
M
[
3/3
]
F2.8 1/800 +2.0 P
A/S/M
MODE
CARD
SETUP
MODE
SETUP
Note:
• If you are using another brand of extension flash, it cannot be used without the
main flash.
• The camera’s flash mode has no effect on the extension flash. It will fire even
when the camera’s flash mode is set to Off.
• Before using another brand of flash unit, take care concerning the following
points.
• Some flashes available on the market operate with a high voltage synchro
terminal. If such a flash unit is used, it may not function normally. Contact the
manufacturer of the flash you are using concerning the specifications of the
flash’s synchro terminal.
• Some flashes available on the market have the polarity of the synchro
terminals reversed. In this case, even if the flash is connected, it will not fire.
Contact the manufacturer of the flash for more information.
• Confirm in advance that the flash unit you are using is synchronized with the
camera.
• If a flash unit or other accessory with additional communications functions is
used, it may not only fail to function normally, but may also cause damage to
the camera’s circuitry. Do not use such a device.
• It is recommended that the Olympus FL-40 extension flash be used with this
camera.

95
Other brands of extension flash that can be used.
When selecting an extension flash, use products which meet the
following basic conditions.
(1) Exposures when using an extension flash require that adjustments
be made on the extension flash unit.
If an extension flash is used in the Auto mode, matched it with the F
value and ISO sensitivity settings on the camera.
(2) Even if the auto F value and ISO sensitivity of the extension flash are
set to the same conditions as those on the camera, depending on the
photographic conditions, it is possible that the correct exposure may
not be obtained anyway. In such a case, adjust the auto F value or
ISO value on extension flash unit or calculate the distance in the
manual mode and use it that way. However, generally, the auto F
value and ISO value can only be adjusted 1 step and beyond that,
exposure compensation cannot be made. (Exposure compensation in
the camera is made invalid in extension flash photography.)
(3) Use a flash which is capable of covering an illumination angle for a
35 mm or larger lens when calculated for 32 mm film. However, in
close-up photography with the lens on the wide setting, the bottom of
the image may not expose correctly. The ideal is to have a wide
angle adapter to fit on the flash and spread the illumination angle so
it is wider.
(4) Use a flash unit with a flash time of 1/200 sec. or less when using the
flash at full strength. For devices with a long flash time, such as a
ring flash, a portion of the light emitted will not contribute to the
exposure.
(5) If a flash unit or other accessory with additional communications
functions other than the FL-40 is used, it may not only fail to function
normally, but may also cause damage to the camera’s circuitry. Do
not use such a device.
96
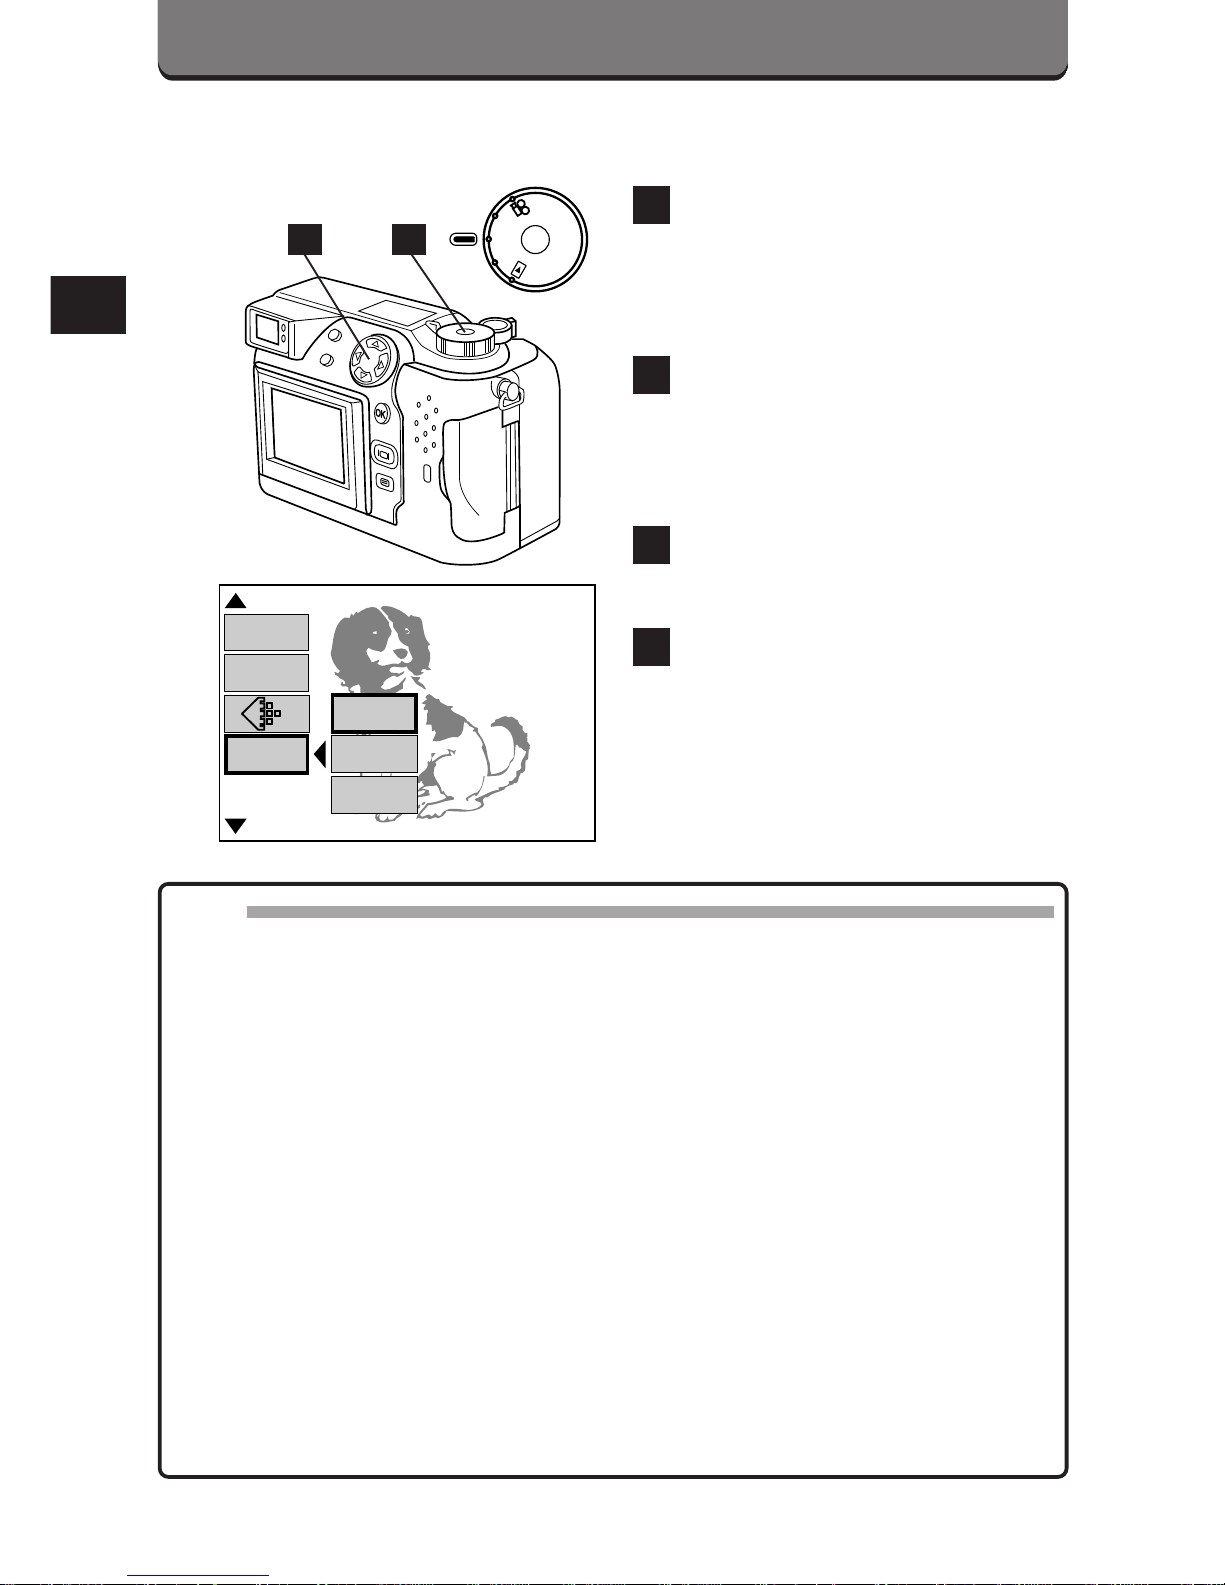
DIGITAL ZOOM MODE
When used with the 3X optical zoom, you can take an approx. 7.5X
zoom photograph.
Set the Mode dial to P or A/S/M.
• When P is selected, press the
LCD monitor ON/OFF button
to turn on the LCD monitor.
Press the Menu button to
display the Menu.
Press the top/bottom arrows
on the Jog dial to select
DIGITAL ZOOM.
Press the right arrow on the
Jog dial, then press the
top/bottom arrows to select
ON.
Press the left arrow on the
Jog dial to confirm the setting.
If you take a picture without
pressing the OK button, the
setting will be valid until the
Menu is canceled.
• Press the OK button to save
the setting and cancel the
Menu.
6
5
4
3
2
1
P
O
W
E
R
/
M
O
D
E
D
I
A
L
P
A/S/M
OFF
[
2/3
]
F2.8 1/800 +2.0 P
OFF
ON
FLASH
DIGITAL
ZOOM
FUNCTION
543
6
1
2
97
Turn the zoom lever toward T
to display an enlarged
subject.
• The zoom bar will be displayed
on the LCD monitor. The white
area of the bar indicates
optical zoom, and the red area
indicates digital zoom.
• The mode is canceled when
the LCD monitor is turned off.
7
Note:
• Unless OFF is selected in All Reset, the setting will be canceled and reset
to 1X when the power is turned off. (p. 194)
• The setting will be canceled and reset to 1X when the LCD monitor is
turned off.
• Images may be grainy in this mode.
P F2.8 1/800 +2.0
W
T
P
O
W
E
R
/
M
O
D
E
D
I
A
L
P
A/S/M
OFF
7
98
PICTURE EFFECTS
You can select from four picture effects.
Set the Mode dial to P or A/S/M.
Press the Menu button to
display the Menu.
Press the top/bottom arrows
on the Jog dial to select
FUNCTION.
Press the right arrow on the
Jog dial, then press the
top/bottom arrows to select
the desired picture effect.
Press the left arrow on the
Jog dial to confirm the setting.
If you take a picture without
pressing the OK button, the
setting will be valid until the
Menu is canceled.
• Press the OK button to save
the setting and cancel the
Menu.
• The LCD monitor stays on
while recording with picture
effects.
6
5
4
3
2
1
P
O
W
E
R
/
M
O
D
E
D
I
A
L
P
A/S/M
OFF
[
2/3
]
F2.8 1/800 +2.0 P
BLACK&WHITE
SEPIA
OFF
WHITE BOARD
BLACK BOARD
FLASH
DIGITAL
ZOOM
FUNCTION
Note:
• When letters cannot be recorded clearly with WHITE BOARD or BLACK
BOARD selected, use exposure compensation. (p. 63)
• Unless OFF is selected in All Reset, the setting will be canceled and reset
to off when the power is turned off. (p. 194)
• When the Mode dial is set to , WHITE BOARD and BLACK BOARD
will be reset to off.
2
543
1
6
 Loading...