

Page 1
ENGLISH
C-2 Zoom
FRANÇAIS
D-520 ZOOM
DEUTSCH
C-220 ZOOM
ESPAÑOL
Page 2
CONTENTS/TABLE DES MATIÉRES/INHALT/CONTENIDO/
ENGLISH . . . . . . . . . . . . . . . . . . . . . . . . . . . . . . . . . . . . . .2
FRANÇAIS. . . . . . . . . . . . . . . . . . . . . . . . . . . . . . . . . . . . 38
DEUTSCH . . . . . . . . . . . . . . . . . . . . . . . . . . . . . . . . . . . . 74
ESPAÑOL . . . . . . . . . . . . . . . . . . . . . . . . . . . . . . . . . . . 110
En
. . . . . . . . . . . . . . . . . . . . . . . . . . . . . . . . . . . . . . . . . 146
CONTENTS
GETTING STARTED . . . . . . . . . . . . . . . . . . . . . . . . . . . . 4
MENU FUNCTIONS . . . . . . . . . . . . . . . . . . . . . . . . . . . . 12
SHOOTING BASICS . . . . . . . . . . . . . . . . . . . . . . . . . . . 18
SELECTING THE IMAGE QUALITY (RECORD MODE) 23
PLAYBACK . . . . . . . . . . . . . . . . . . . . . . . . . . . . . . . . . . 25
PRINT SETTINGS . . . . . . . . . . . . . . . . . . . . . . . . . . . . . 30
DOWNLOADING PICTURES TO A COMPUTER . . . . . 31
OPTIONAL ACCESSORIES . . . . . . . . . . . . . . . . . . . . . 33
ERROR CODES . . . . . . . . . . . . . . . . . . . . . . . . . . . . . . . 34
SPECIFICATIONS . . . . . . . . . . . . . . . . . . . . . . . . . . . . . 36
These instructions are only for quick reference. For more details
on the functions described here, refer to the “Reference Manual”
on CD-ROM.
2 En
Page 3

For customers in Europe
“CE” mark indicates that this product complies with the European
requirements for safety, health, environment and customer
protection. “CE” mark cameras are intended for sales in Europe.
For customers in North and South America
For customers in USA
Declaration of Conformity
Model Number : C-2 Zoom/D-520 ZOOM/C-220 ZOOM
Trade Name : OLYMPUS
Responsible Party : Olympus America Inc.
Address : 2 Corporate Center Drive, Melville, New York
Telephone Number: 631-844-5000
Tested To Comply With FCC Standards
FOR HOME OR OFFICE USE
This device complies with Part 15 of the FCC rules. Operation is subject to
the following two conditions:
(1) This device may not cause harmful interference.
(2) This device must accept any interference received, including interference
that may cause undesired operation.
11747-3157 U.S.A.
For customers in Canada
This Class B digital apparatus meets all requirements of the Canadian
Interference-Causing Equipment Regulations.
Trademarks
• IBM is a registered trademark of International Business Machines Corporation.
• Microsoft and Windows are registered trademarks of Microsoft Corporation.
• Macintosh is a trademark of Apple Computer Inc.
• All other company and product names are registered trademarks and/or
trademarks of their respective owners.
• The standards for camera file systems referred to in this manual are the “Design
Rule for Camera File System/DCF” standards stipulated by the Japan Electronics
and Information Technology Industries Association (JEITA).
En
En 3
Page 4
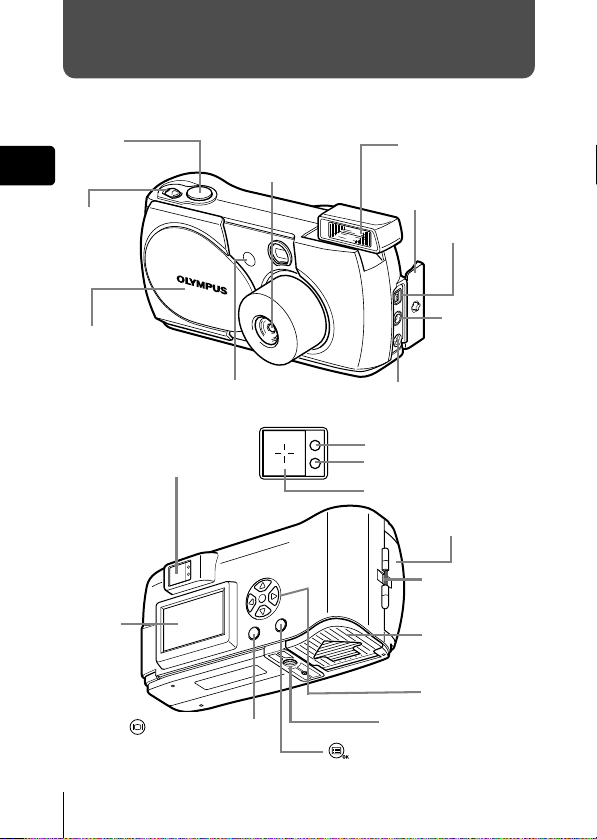
GETTING STARTED
J NAMES OF PARTS
Shutter
button
En
Zoom
lever
Lens barrier
Turns the camera on and
off in the shooting mode.
Viewfinder
Lens
Extends automatically when
you open the lens barrier.
Self-timer lamp
Flash
Pops up when you
open the lens barrier.
Connector cover
USB connector
VIDEO
OUT jack
DC-IN jack
Orange lamp
Green lamp
AF target mark
Card cover
Strap eyelet
Monitor
4 En
(Monitor) button
Turns the camera on and
off in the playback mode.
Battery
compartment
cover
Arrow pad
Tripod socket
(OK/Menu) button
Page 5
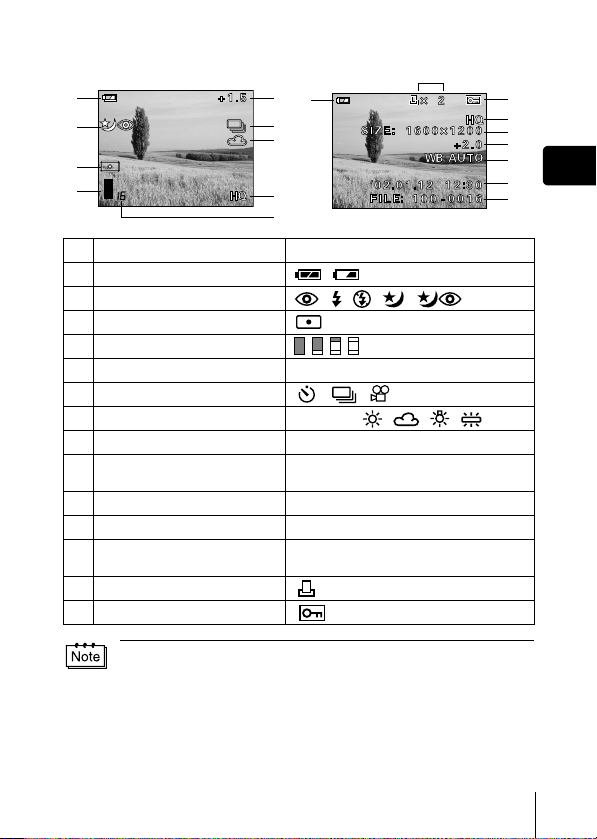
J MONITOR INDICATIONS
Shooting mode Playback mode
1
2
3
4
Item Indication
Battery check ,
1
Flash , , , ,
2
Spot metering
3
Memory gauge
4
Exposure compensation -2.0, -1.5, -1.0, -0.5, +0.5, +1.0, +1.5, +2.0
5
Self-timer/Drive , ,
6
White balance WB AUTO, , , ,
7
Record mode SHQ, HQ, SQ1, SQ2
8
Number of storable still
9
pictures/Seconds remaining
Number of pixels 1600 × 1200, 1024 × 768, 640 × 480
10
Date and time '02.01.12 12:30
11
File number, Frame number/
12
Playing time
Print reservation, Number of prints
13
Protect
14
5
1
6
7
8
9
16/16"
100-0016, 16/16"
× 2
13
14
8
10
5
7
En
11
12
You can view shooting information details of the recorded picture in the
playback mode.
En 5
Page 6
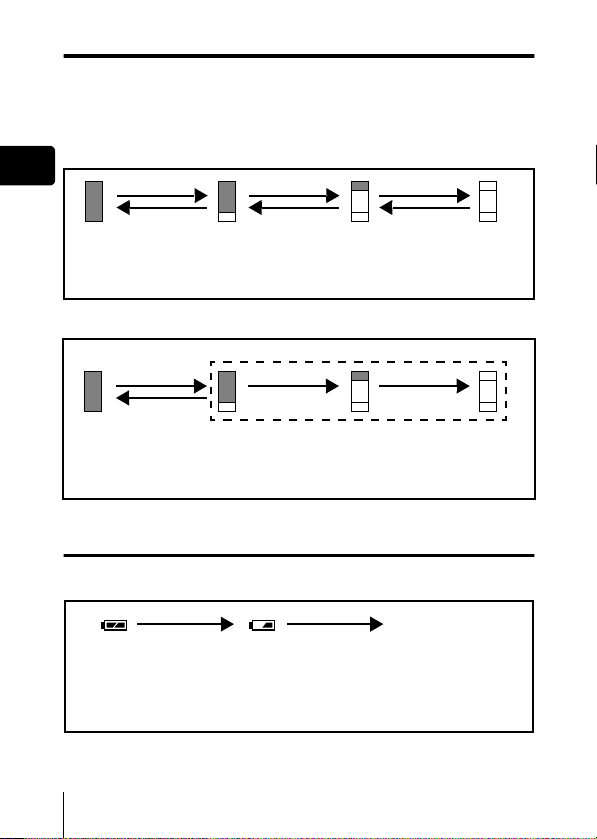
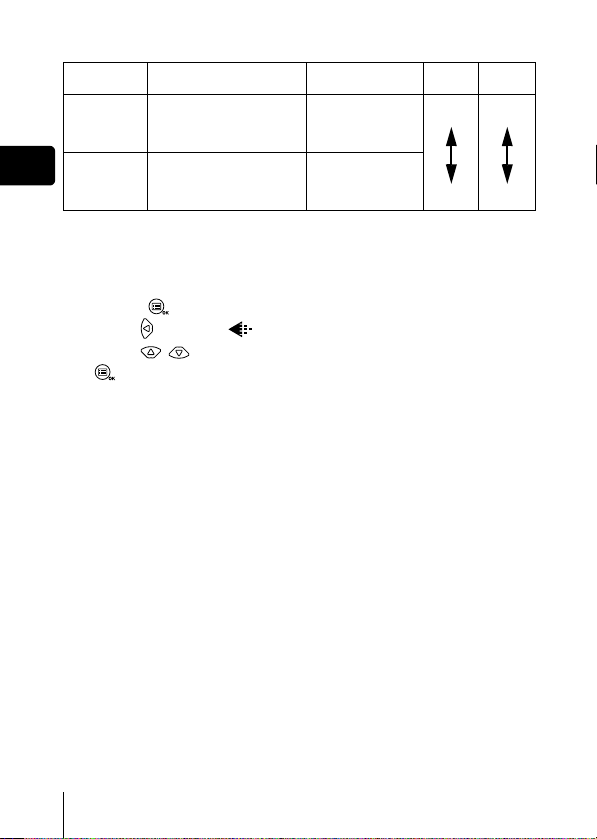
Memory gauge
The memory gauge lights up when you take a picture. While the gauge is lit,
the camera is storing the picture on the card. The memory gauge indication
changes as shown below depending on the shooting status. When the
memory gauge is full, wait a few moments before taking the next shot.
When taking still pictures
En
Shoot Shoot Shoot
Before
shooting
(Gauge is
off)
One picture
taken
(Lit)
More than
two taken
(Lit)
Wait
No more pictures
can be taken
(Fully Lit)
When recording movies
If you continue shooting
Shoot
Wait
Before shooting
(Gauge is off)
During shooting (Lit)
• Shooting is not possible until the lit area goes off completely.
• Movie recording ends automatically when the memory gauge
is full.
Battery check
If the remaining battery power is low, the battery check indication on the
monitor changes as follows while the camera is turned on.
Lights up (Green) Blinks (Red)
Remaining power
level: high
Remaining power level: low
Replace with a new battery.
No indication
Green lamp and Orange
lamp on the right of the
viewfinder blink
Remaining power level:
exhausted
6 En
Page 7
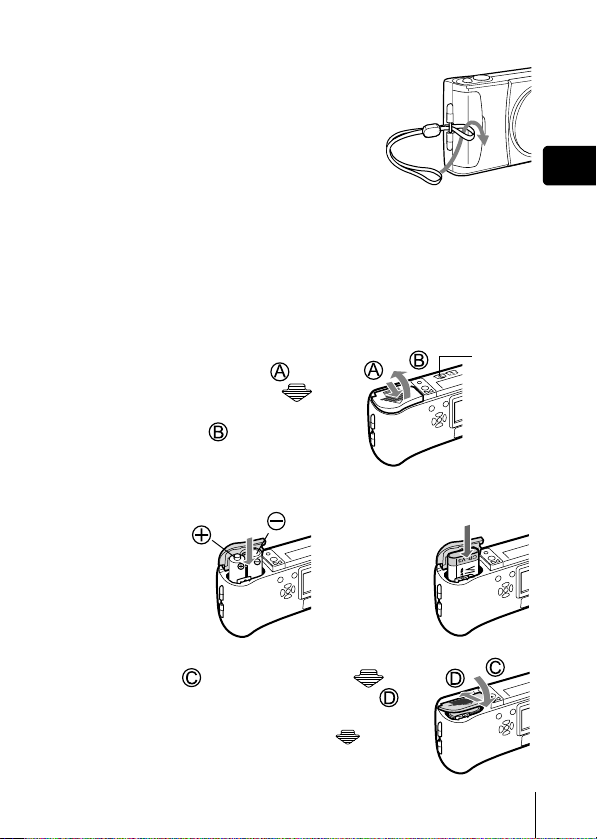
J ATTACHING THE STRAP
1
Thread the short end of the strap
through the strap eyelet.
2
Thread the long end of the strap
through the loop that has already gone
through the eyelet.
3
Pull the strap tight, making sure that it
is securely fastened and does not
come loose.
J LOADING THE BATTERIES
1
Make sure that:
• The monitor is off.
• The lens barrier is closed.
• The lamp on the right of the viewfinder is off.
2
Slide the battery compartment
cover in the direction of (the
direction indicated by the
mark on the cover), and lift it up in
the direction of .
3
Insert the batteries, making sure
that they are correctly oriented as shown in the illustration.
When using
AA (R6)
batteries
When using
a lithium
battery pack
En
Battery
insertion
direction
mark
4
Close the battery compartment cover in the
direction of . While pressing the
mark, slide the cover in the direction of .
If the battery compartment cover will not close
easily, do not force it. Try pressing the mark
with both hands.
En 7
Page 8
AA (R6) alkaline batteries
The number of pictures that you can store in the camera may vary
considerably with AA batteries, depending on the battery manufacturer,
camera shooting conditions, etc. Use this type of battery only when you have
no other choices available. Turn off the monitor whenever possible to save
power.
En
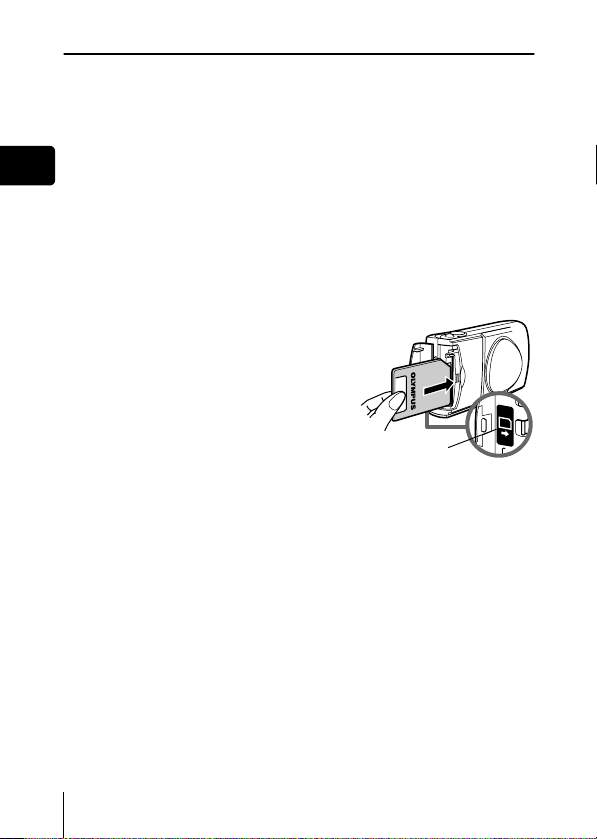
J
INSERTING THE CARD (SmartMedia)
The pictures you have taken are stored on the card.
1
Make sure that:
• The monitor is off.
• The lens barrier is closed.
• The lamp on the right of the viewfinder is off.
2
Open the card cover.
3
Insert the card as far as it will go in
the direction shown in the
illustration.
There is an arrow inside the card cover,
indicating the direction in which the card
should be inserted.
4
Close the card cover securely until
it clicks.
Card insertion
direction mark
8 En
Page 9
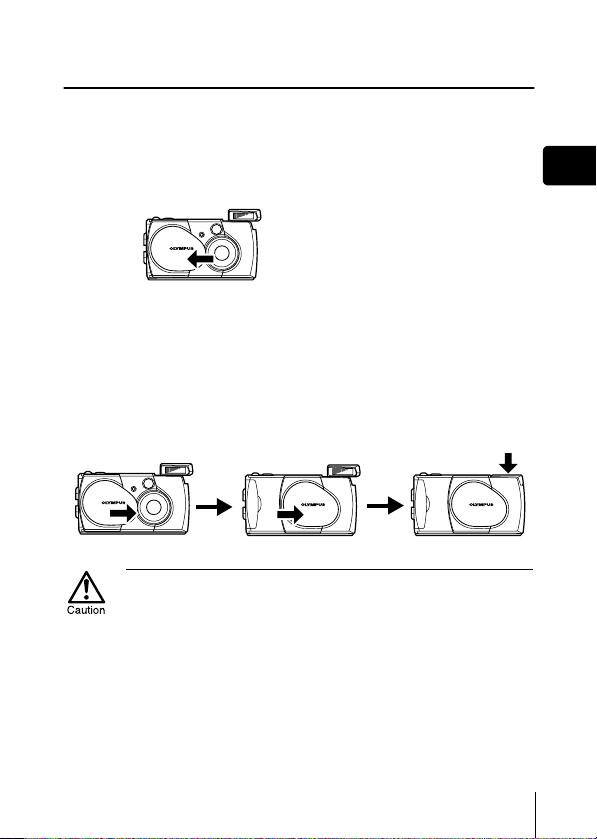
J TURNING THE POWER ON/OFF
When shooting pictures
Power on: Open the lens barrier.
The camera turns on in the shooting mode. The lens extends
and the flash pops up.
If the lens does not extend, the lens barrier is not fully open.
Open the lens barrier until it clicks.
If the date and time have reverted to the
factory default settings, Y/M/D appears
on the monitor.
Power off: Close the lens barrier slightly until it just touches the lens
barrier.
The lens barrier stops just before it touches the lens and the lens
retracts. Wait until the lens is fully retracted before closing the
lens barrier completely.
The camera turns off. (The monitor also turns off.)
Press the flash down manually until it locks in place.
Do not push the lens barrier forcefully against the lens as this may damage
the lens or cause it to malfunction.
En
En 9
Page 10

When playing back pictures
Power on: Press the (monitor) button with the lens barrier closed.
The camera turns on in the playback mode. The monitor turns
on and the last picture taken is displayed.
En
(monitor) button
Power off: Press the (monitor).
The monitor and the camera turn off.
(monitor) button
Never open the card cover, remove the card or the batteries, or connect or
disconnect the AC adapter while the camera is turned on. Doing so could
destroy all data on the card. Destroyed data cannot be restored. When
changing the card, be sure to turn the camera off before opening the card
cover.
10 En
Page 11
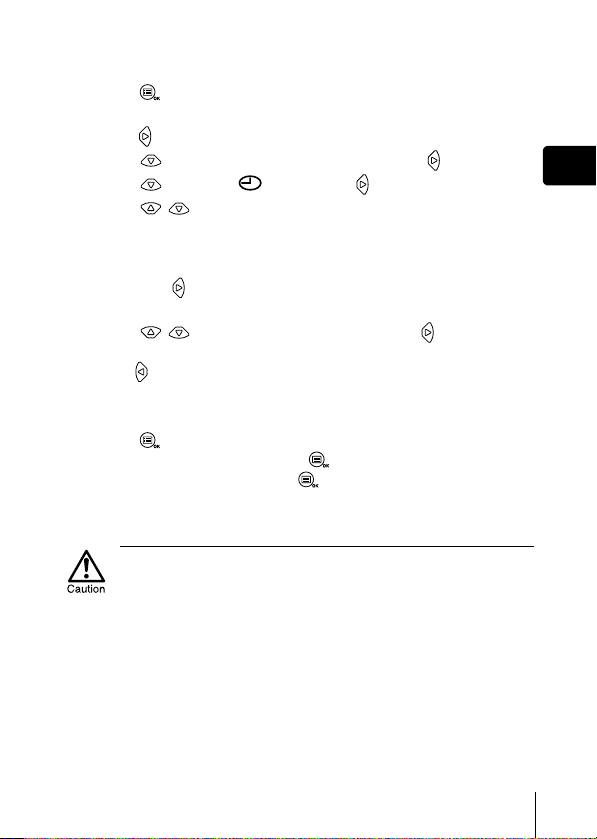
J SETTING THE DATE AND TIME
1
Open the lens barrier.
2
Press .
The shooting mode top menu is displayed.
3
Press on the arrow pad to select MODE MENU.
4
Press to select the SETUP tab, then press .
5
Press to select , then press .
6
Press to select one of the following date formats:
(Year/Month/Day)
Y-M-D
(Month/Day/Year)
M-D-Y
(Day/Month/Year)
D-M-Y
Then press .
The cursor moves to the next setting field.
7
Press to set the first field, then press to move to
the next field.
Press to move back to the previous setting field.
8
Repeat the above steps until the date and time are completely
set.
9
Press .
For a more accurate setting, press when the clock hits 00 seconds.
The clock starts when you press .
10
Close the lens barrier.
The camera turns off.
If the camera is left for about 1 hour with the batteries removed, or if the
battery power is exhausted, the date and time settings may be canceled or
become incorrect. Before taking important pictures, check that the date and
time settings are correct.
En
En 11
Page 12
MENU FUNCTIONS
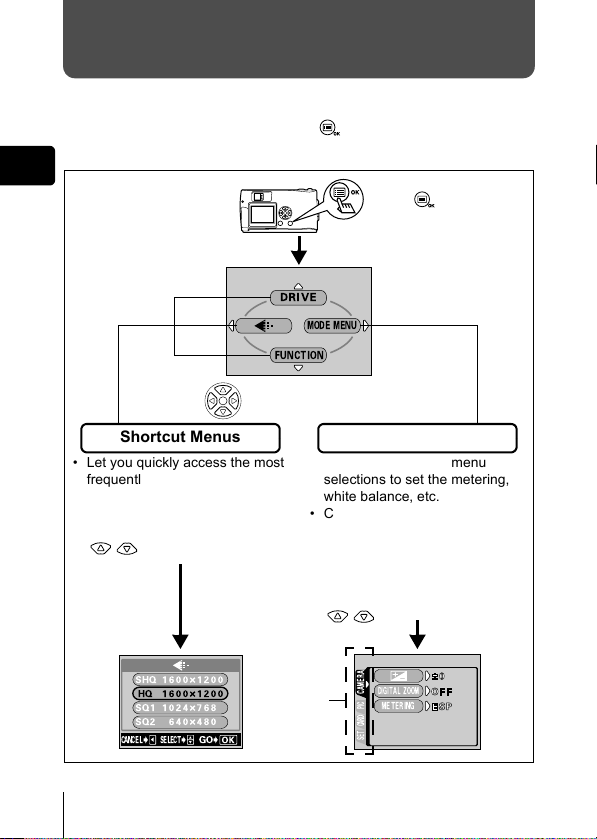
J USING THE MENUS AND TABS
When you turn on the camera and press , the top menu is displayed on
the monitor. The functions of this camera are set from the menus. This
chapter explains how the menus work, using the shooting mode screens.
En
Press .
The top menu is displayed.
DRIVE
MODE MENU
FUNCtION
Select each menu using
the arrow pad.
Shortcut Menus
• Let you quickly access the most
frequently used menu settings.
• Display operational buttons at
the bottom of the screen, and let
you select items by pressing
.
• Lets you access the menu
• Categorizes the settings into 4
• Displays the CAMERA,
Mode Menu
selections to set the metering,
white balance, etc.
tabs.
PICTURE, CARD and SETUP
tabs. Select the desired tab on
the left of the screen by pressing
.
12 En
SHQ 1600*1200
HQ 1600*1200
SQ1 1024*768
SQ2 640*480
CANCELGOSELECt
Tabs
CAMERA
DIGItAL ZOOM
MEtERING
CARDSEt PIC
Page 13
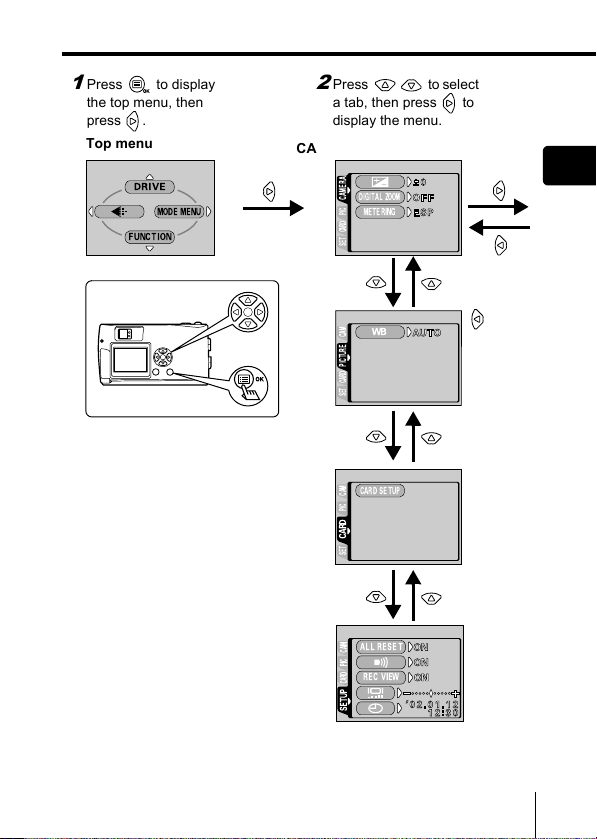
How to use the menus
Press to display
1
the top menu, then
press
.
Top menu
DRIVE
MODE MENU
FUNCtION
Press to select
2
a tab, then press to
display the menu.
CAMERA tab
CAMERA
DIGItAL ZOOM
MEtERING
CARDSEt PIC
PICTURE tab
WB
CAM
PICtURE
CARDSEt
CARD tab
CARD SEtUP
CAM
PIC
CARD
SEt
SETUP tab
ALL RESEt
REC VIEW
En
To return
to select a
tab, press
.
En 13
Page 14
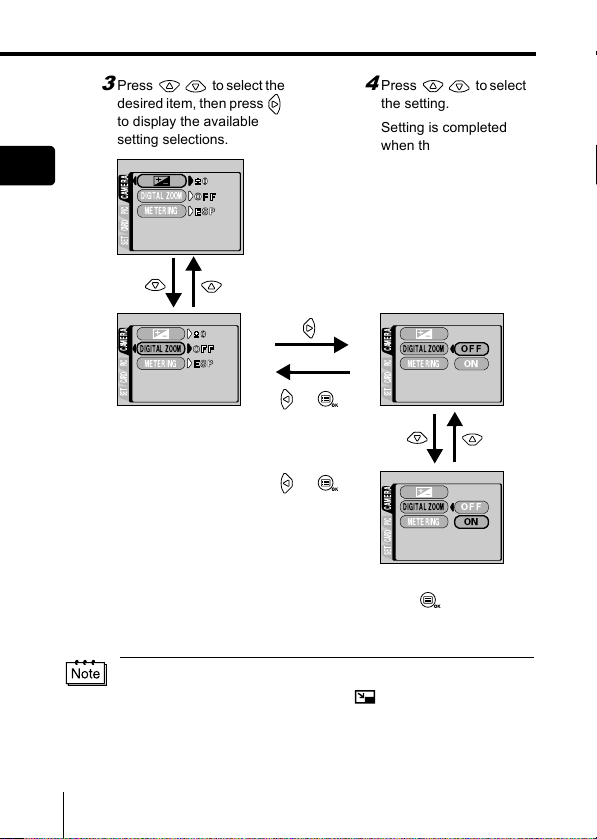
En
Press to select the
3
desired item, then press
to display the available
setting selections.
CAMERA
DIGItAL ZOOM
MEtERING
CARDSEt PIC
Press to select
4
the setting.
Setting is completed
when the setting has
been selected.
14 En
CAMERA
DIGItAL ZOOM
MEtERING
CARDSEt PIC
CAMERA
DIGItAL ZOOM
MEtERING
CARDSEt PIC
OFF
ON
or
The green frame
moves to the
selected item.
To return to
select an
item, press
or .
CAMERA
CARDSEt PIC
DIGItAL ZOOM
MEtERING
OFF
ON
To close the menu,
press twice.
• Not all items can be selected depending on the status of the camera and the
settings performed. For example, when the movie mode is selected, you
cannot select SEPIA, BLACK&WHITE or in the EDIT tab category.
• By pressing the shutter button to take a picture while the menu is displayed,
you can take pictures with the currently selected settings.
• If you want to save the settings after the camera is turned off, set All Reset
to OFF.
Page 15
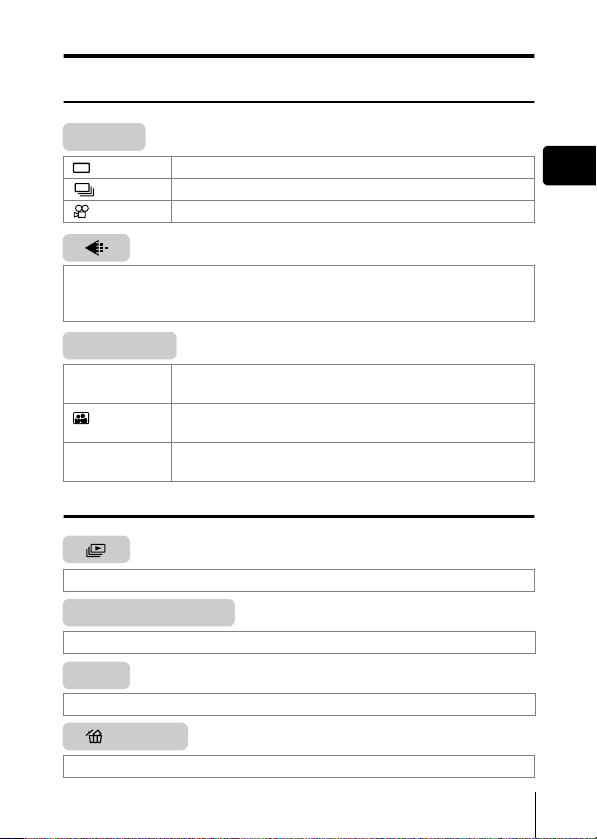
Shortcut menus
Shooting mode
DRIVE
Lets you shoot one frame at a time (normal shooting).
Lets you shoot pictures in succession.
Lets you shoot movies.
Lets you select the resolution and the image quality of the image.
Still picture : SHQ, HQ, SQ1 and SQ2
Movie : HQ, SQ
FUNCTION
2 IN 1
PANORAMA
Playback mode
Displays all recorded pictures in slide-show fashion.
MOVIE PLAYBACK
Plays back a movie.
Lets you combine two still pictures taken in succession
into one picture.
Self-portrait mode:
Lets you take a picture of yourself while holding the camera.
Allows panorama pictures to be taken with Olympus
CAMEDIA-brand SmartMedia cards.
En
INFO
Displays all the shooting information on the monitor.
ERASE
Erases a selected picture.
En 15
Page 16
Mode menus
Mode menu functions are categorized into 4 tabs. Use to select a
tab and display the respective functions.
These instructions are only for quick reference. For more details on
the functions described here, refer to the “Reference Manual” on
CD-ROM.
En
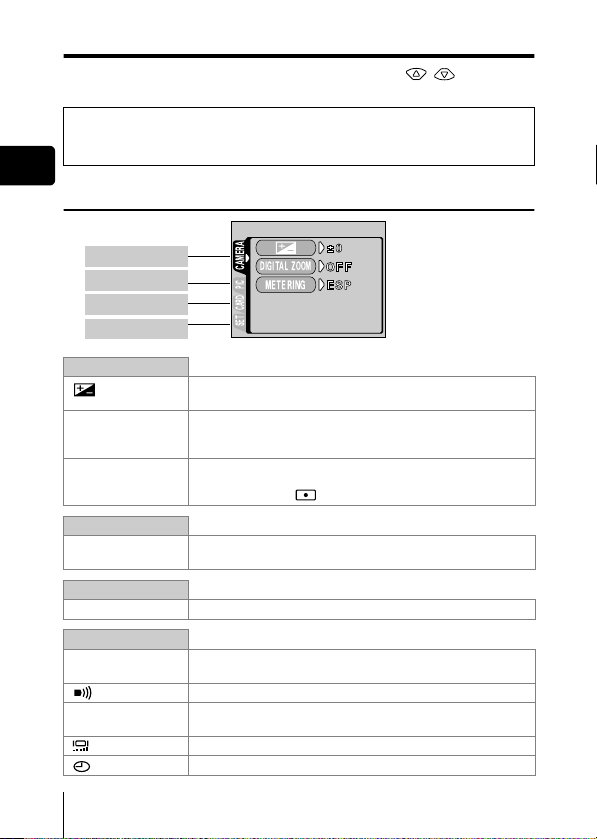
Shooting mode
CAMERA tab
PICTURE tab
CARD tab
CAMERA
DIGItAL ZOOM
MEtERING
CARDSEt PIC
SETUP tab
CAMERA tab
DIGITAL ZOOM
METERING
PICTURE tab
WB
CARD tab
CARD SETUP Formats a card.
SETUP tab
ALL RESET
Turns the beep sound (used for warnings, etc.) on and off.
REC VIEW
Adjusts the brightness of the monitor.
Sets the date and time.
Adjusts the brightness of the image (Exposure
compensation).
Extends the maximum optical zoom, making possible up to
approximately 5x zoom shooting with the digital zoom
function.
Selects the area of the image that will be used to determine
exposure or image brightness from the two available
settings: ESP or (spot metering).
Sets the appropriate white balance according to the light
source.
Selects whether to save the current camera settings when
you turn off the power.
Selects whether to display pictures on the monitor while
saving them.
16 En
Page 17
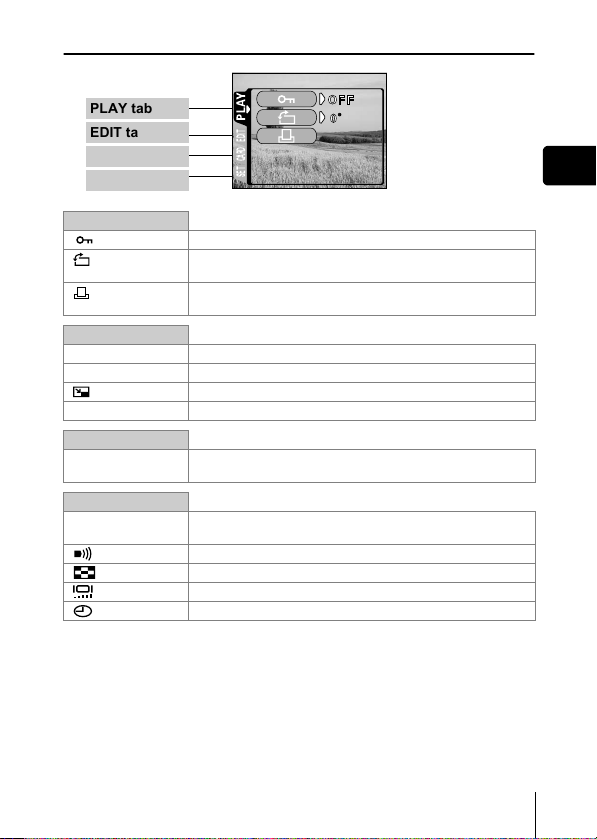
Playback mode
PLAY tab
PLAY
EDIT tab
CARD tab
CARDSEt EDIt
SETUP tab
PLAY tab
Protects pictures from accidental erasure.
EDIT tab
BLACK & WHITE Creates black and white pictures.
SEPIA Creates sepia-toned pictures.
Makes the file size smaller.
INDEX Creates an index picture of a movie in 9 frames.
CARD tab
CARD SETUP
SETUP tab
ALL RESET
Rotates pictures 90 degrees clockwise or counterclockwise.
Stores printing information on the card required for DPOF
printers.
Formats a card.
Erases all image data stored on the card.
Selects whether to save the current camera settings when
you turn off the power.
Turns the beep sound (used for warnings, etc.) on and off.
Selects the number of frames in the index display.
Adjusts the brightness of the monitor.
Sets the date and time.
En
En 17
Page 18

SHOOTING BASICS
J TAKING STILL PICTURES
You can take still pictures using either the viewfinder or the monitor. Both
methods are easy as all you have to do is to press the shutter button.
En
Taking still pictures using the viewfinder
1
Open the lens barrier.
Slide the lens barrier open until it clicks.
The flash pops up and the lens extends.
2
Position the AF target mark over the subject in the viewfinder.
When the distance from the camera to the subject is less than 0.5 m/
1.6 ft, select the macro mode.
3
Press the shutter button gently (halfway).
The green lamp on the right of the viewfinder lights up when the focus
and exposure are locked. At this time the sound of the focusing
mechanism can be heard from inside the camera, but no picture is
being taken.
4
Press the shutter button all the way (fully).
The camera takes the picture.
Taking still pictures using the monitor
1
Open the lens barrier.
Slide the lens barrier open until it clicks.
The flash pops up and the lens extends.
2
Press .
The monitor turns on.
3
Determine the image composition while observing your
subject on the monitor.
4
Take the picture by following the same procedure as for
shooting using the viewfinder.
Press the shutter button all the way (fully) to take the picture.
When you want to take pictures with the monitor off, press again.
Never open the card cover, remove the batteries or disconnect the AC adapter
while the orange lamp is blinking. Doing so could destroy stored pictures and
prevent storage of pictures you have just taken.
18 En
Page 19
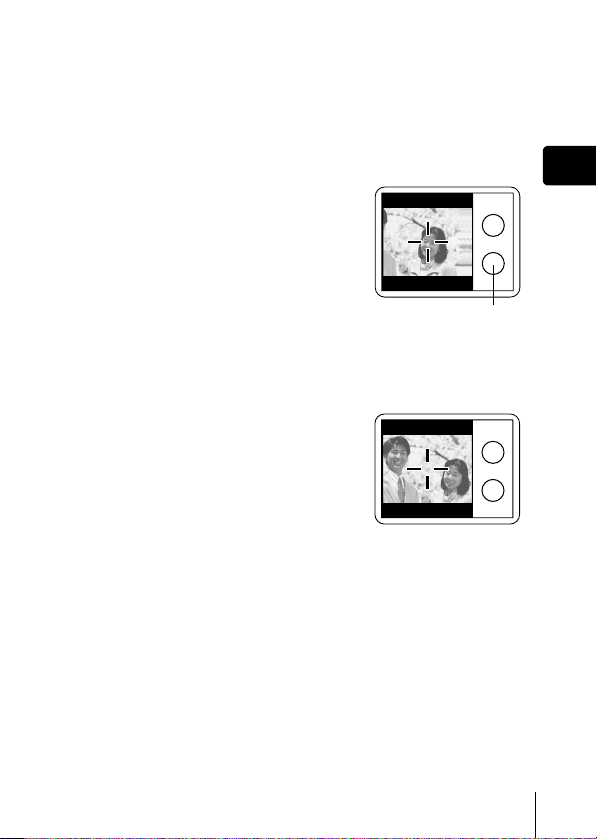
J
IF CORRECT FOCUS CANNOT BE OBTAINED (FOCUS LOCK)
When the subject you want to focus on is not in the center of the frame and
you cannot position the AF target mark on it, you can focus the camera on
another point at roughly the same distance (focus lock) and take the picture
as explained below.
1
Open the lens barrier.
The camera turns on in the shooting mode.
2
Look into the viewfinder and position
the AF target mark on the subject.
When shooting a hard-to-focus subject or a
fast-moving subject, point the camera at an
object about the same distance away as
the subject.
Green lamp
3
Half-press the shutter button until the
green lamp on the right of the viewfinder illuminates steady.
The focus and exposure are locked when the green lamp lights up.
4
Keeping the shutter button pressed
halfway, recompose your shot in the
viewfinder.
5
Press the shutter button fully.
En
En 19
Page 20
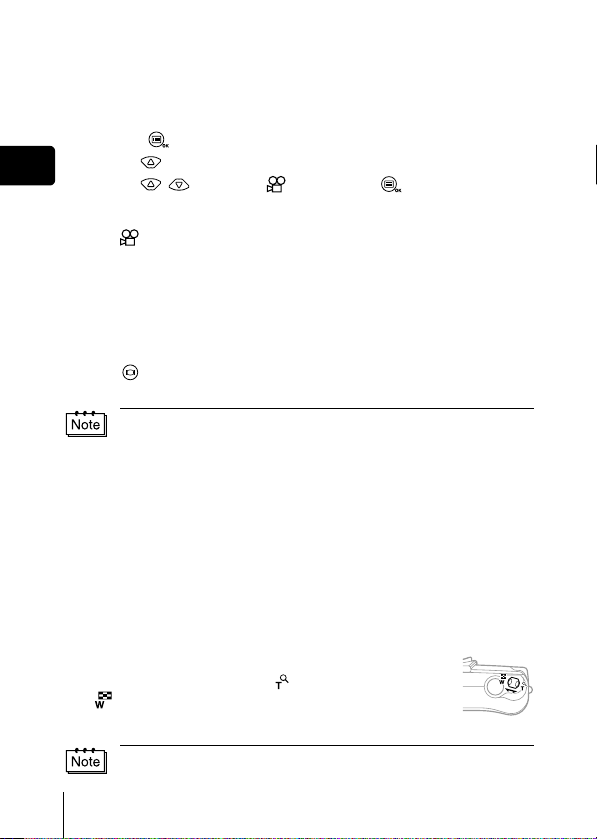
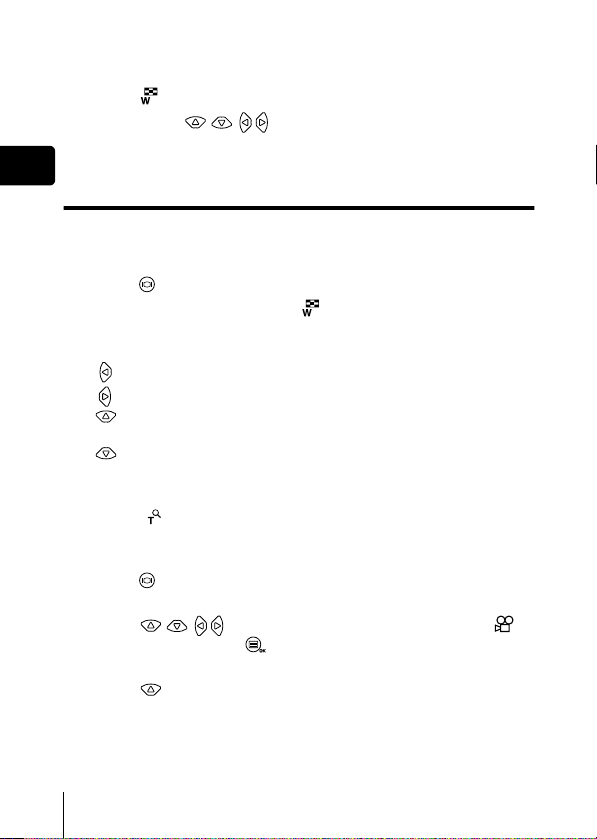
J RECORDING MOVIES
You can record movies with this camera. Recorded movies can be played
back or stored separately as still pictures using the index function.
1
Display the top menu in the shooting mode.
• Open the lens barrier.
• Press .
2
En
Press to select DRIVE.
3
Press to select , then press .
Movie recording is set and the menu is closed.
The total recordable time depending on the card memory capacity and
the
mark are displayed on the monitor.
4
Record the movie while observing your subject on the
monitor.
Press the shutter button fully to start recording. When you press the
shutter button, the number of seconds remaining for one record is
displayed. Press the shutter button fully again to stop recording.
To cancel movie mode
Press .
The monitor turns off and the movie mode is canceled.
• During movie recording, the flash and optical zoom are disabled.
• It takes longer to store movies than still pictures.
• The seconds remaining varies depending on the record mode and the
amount of space available on the card.
• You cannot record movies with sound.
J
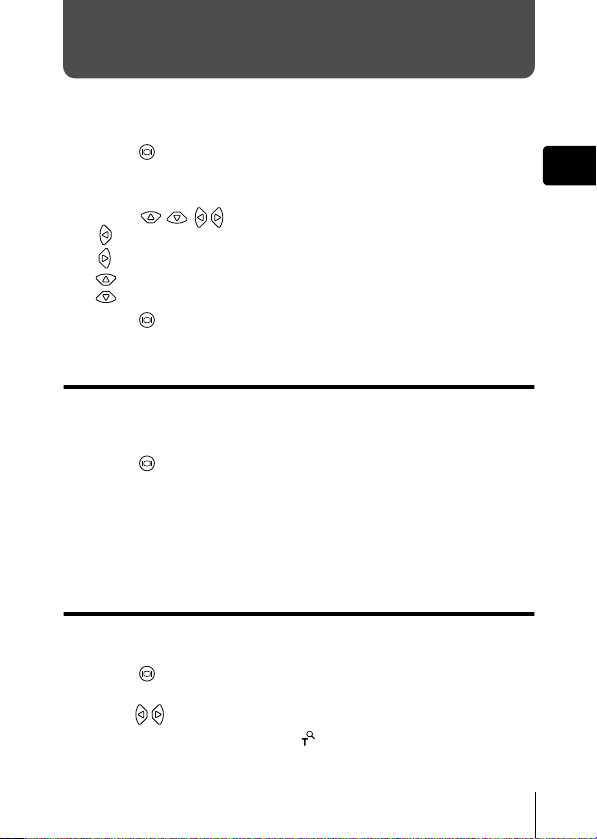
ZOOMING IN ON A SUBJECT (OPTICAL ZOOM)
Telephoto and wide-angle shooting are possible at 3x magnification using the
optical zoom (equivalent to 38 mm -114 mm on a 35mm camera). By combining
the 3x optical zoom with the 2.5x digital zoom, you can obtain zoom
magnification of approximately 7.5x (equivalent to 38 mm - 285 mm on a 35 mm
camera). When the record mode is set to SQ2, the 5x digital zoom is available.
1
Open the lens barrier.
The camera turns on in the shooting mode.
2
Slide the zoom lever while looking in the viewfinder.
Press the zoom lever toward to zoom in, and toward
to zoom out.
3
Take the picture while looking in the viewfinder.
Pictures taken with the digital zoom may appear grainy.
20 En
Page 21
J
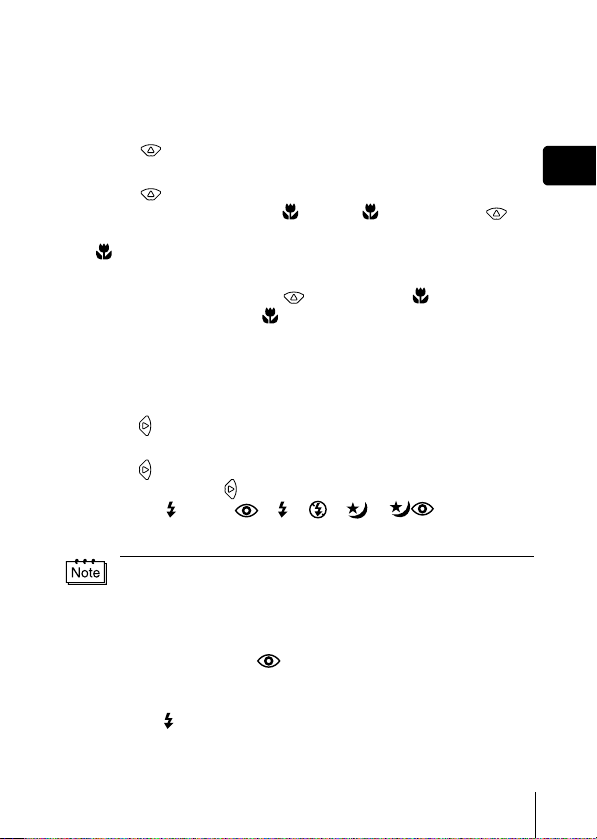
TAKING CLOSE-UP PICTURES (MACRO MODE)
The macro mode allows you to shoot a subject at a distance of 0.2 - 0.5 m/
0.7 - 1.6 ft.
1
Open the lens barrier.
The camera turns on in the shooting mode.
2
Press .
The monitor turns on and the current macro setting is displayed.
3
Press while the current macro setting is displayed.
The setting changes between ON and OFF each time is
pressed. When the macro mode is selected, the macro mode indicator
is displayed.
4
Take the picture while observing your subject on the monitor.
To cancel macro mode, press repeatedly until OFF appears.
The macro mode indicator disappears.
J USING THE FLASH
1
Open the lens barrier.
The camera turns on in the shooting mode.
2
Press .
The current flash setting is displayed.
3
Press while the current flash setting is displayed.
Each time you press , the flash mode is switched in the following
sequence: AUTO - - - - - .
4
Take the picture.
The flash working range is approximately 2.5 m/8.2 ft.
Auto-flash (No indication)
The flash fires automatically in low light or backlight conditions.
Red-eye reduction flash ( )
The red-eye reduction flash mode reduces this phenomenon by emitting preflashes before firing the regular flash.
Fill-in flash ( )
The flash always fires every time the shutter button is released.
En
En 21
Page 22
Flash off ( )
The flash does not fire even in low light conditions.
Night scene ( )
Use this mode when shooting a subject against a night background.
Night scene with red-eye reduction ( )
Use this mode when shooting a portrait against a night background to reduce
the red-eye phenomenon.
En
J USING THE SELF-TIMER
This function is useful for taking pictures with yourself included in the
photograph. Fix the camera securely on a tripod for self-timer shooting.
1
Open the lens barrier.
The camera turns on in the shooting mode.
2
Press .
The monitor turns on and current self-timer setting is displayed.
3
Press while the current self-timer setting is displayed.
The setting changes between ON and OFF each time is
pressed.
4
Press the shutter button fully.
The self-timer lamp lights up for approximately 10 seconds, then starts
blinking. After blinking for 2 seconds with beep sound, the picture is
taken.
22 En
Page 23
SELECTING THE IMAGE QUALITY (RECORD MODE)
Choose the best record mode for your purposes (printing, editing on a
computer, website editing, etc.).
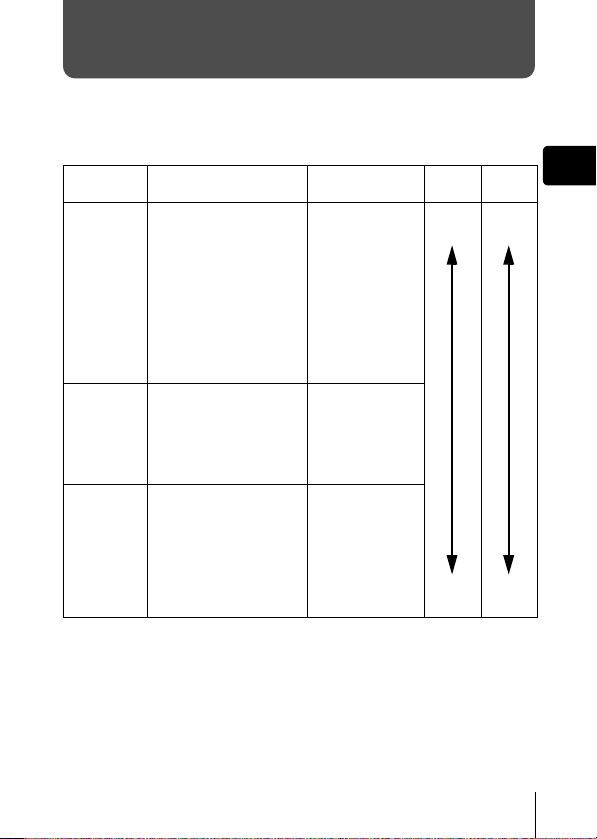
Still picture record modes
Record mode Description
• Use this mode when you
want to print out an image
with high quality or on large
SHQ
(Super High
Quality)
HQ
(High Quality)
(Standard
Quality)
paper such as A4 (8.3" ×
11.7"/21 cm × 29.7 cm), or
you want to process images
on a PC.
•The image quality is higher,
but the number of storable
images is fewer. It takes
longer to store the images.
• Use this mode when you
want to edit images on a PC
or print them out on
postcard size paper.
• This mode is the factory
default setting.
• Use this mode when you
want to attach images to email or simply view them on
SQ
a PC.
•This is the standard quality
mode, and the number of
storable images is
increased.
Resolution
(No. of pixels)
1600 × 1200 pixels* More
1600 × 1200 pixels*
1024× 768 pixels* in
SQ1 mode
640 × 480 pixels* in
SQ2 mode
Quality File size
clear
Normal Smaller
En
Larger
En 23
Page 24
Movie record modes
Record mode Description
You can record continuously
HQ
(High Quality)
En
(Standard
Quality)
* Pixels are the unit used to express the resolution.
1
for 15 seconds at a time.
You can record continuously
SQ
for 60 seconds at a time.
Display the top menu in the shooting mode.
• Open the lens barrier.
• Press .
2
Press to select .
3
Press to select one of the record modes, then press
.
The record modes for still pictures are SHQ, HQ, SQ1 and SQ2; and for
movies are HQ and SQ.
The record mode is set and the menu is closed.
4
Take the picture.
Resolution
(No. of pixels)
320 × 240 pixels* More
160 × 120 pixels*
Quality Fil e size
Clearer
Normal Smaller
Larger
24 En
Page 25
PLAYBACK
J PLAYING BACK STILL PICTURES
You can play back pictures one by one on the monitor.
1
Press with the lens barrier closed.
The monitor turns on and displays the last picture taken. (Single-frame
playback)
2
Press .
: Displays the previous picture.
: Displays the next picture.
Jumps to the picture 10 frames behind.
:
: Jumps to the picture 10 frames ahead.
3
Press to cancel playback.
The monitor and camera turn off.
Quick View (Double-click playback)
This function lets you play back pictures during shooting with the lens barrier
open. It is useful when you want to check shooting results and resume
shooting quickly.
1
Press twice quickly (double-click) in the shooting mode.
The camera immediately enters the playback mode and displays the
last picture taken. (Single-frame playback)
2
Press the shutter button gently (halfway).
The camera returns to the shooting mode and you can resume
shooting.
Close-up playback
Pictures displayed on the monitor can be enlarged 1.5, 2, 2.5 or 3 times. This
function is useful when you want to check the details of a picture.
1
Press with the lens barrier closed.
The monitor turns on and displays the last picture taken.
Press to select the picture you want to enlarge.
2
Press the zoom lever toward .
En
En 25
Page 26
The picture is magnified 1.5 times. The magnification increases each
time the zoom lever is pressed.
To return the picture to the original size (1x), press the zoom lever
toward .
while the enlarged picture is
En
3
By pressing
displayed, you can scroll the picture in the desired direction,
enabling you to view a different section.
Index display
This function lets you show several pictures at the same time on the monitor.
It is useful for quickly finding the picture you want to view. The number of
pictures shown can be 4, 9 or 16.
1
Press with the lens barrier closed.
2
Press the zoom lever toward to enter the index display
mode.
3
Use the arrow pad to select a frame.
: Moves to the previous frame.
: Moves to the next frame.
: Jumps to the previous index display (the frames before the top
left frame).
: Jumps to the next index display (the frames following the bottom
right frame).
4
To return to single-frame playback, press the zoom lever
toward .
J PLAYING BACK MOVIES
1
Press with the lens barrier closed.
The monitor turns on.
2
Press to display the desired picture with a
indicator, then press .
The top menu is displayed.
3
Press to select MOVIE PLAYBACK.
The movie is played back after the orange lamp on the right of the
viewfinder blinks and the movie data is downloaded to the camera.
When the movie reaches the end, the display returns automatically to
the beginning of the movie.
26 En
Page 27
4
Press .
The MOVIE PLAYBACK menu is displayed.
PLAYBACK : Plays back the entire movie again.
FRAME BY FRAME: Plays back the movie manually one frame at a
EXIT : Leaves the movie playback mode.
5
Press to select the desired operation, then press .
time.
Operations when FRAME BY FRAME is selected
: Displays the first frame of the movie.
: Displays the last frame of the movie.
: Displays the next frame. The movie can be displayed
continuously by holding the button down.
: Displays the previous frame. The movie can be displayed
continuously in reverse by holding the button down.
: Displays the MOVIE PLAYBACK menu.
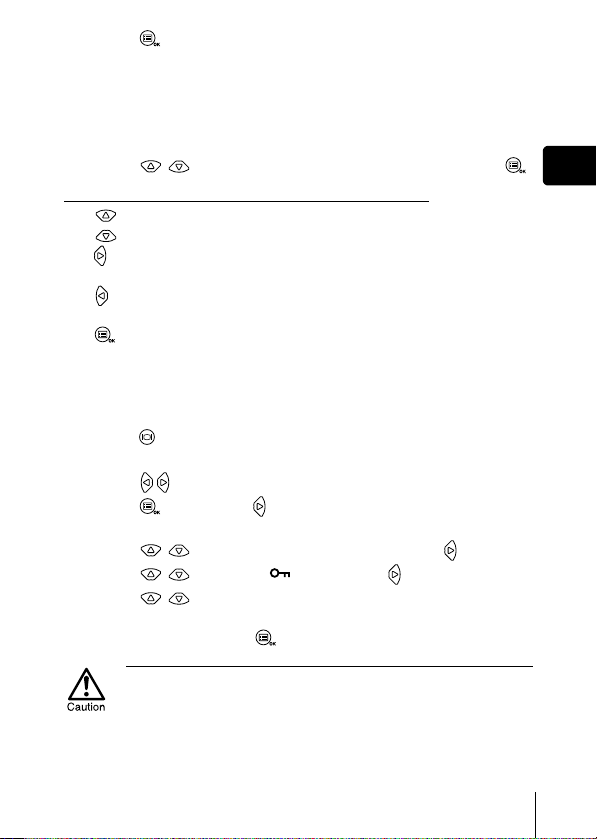
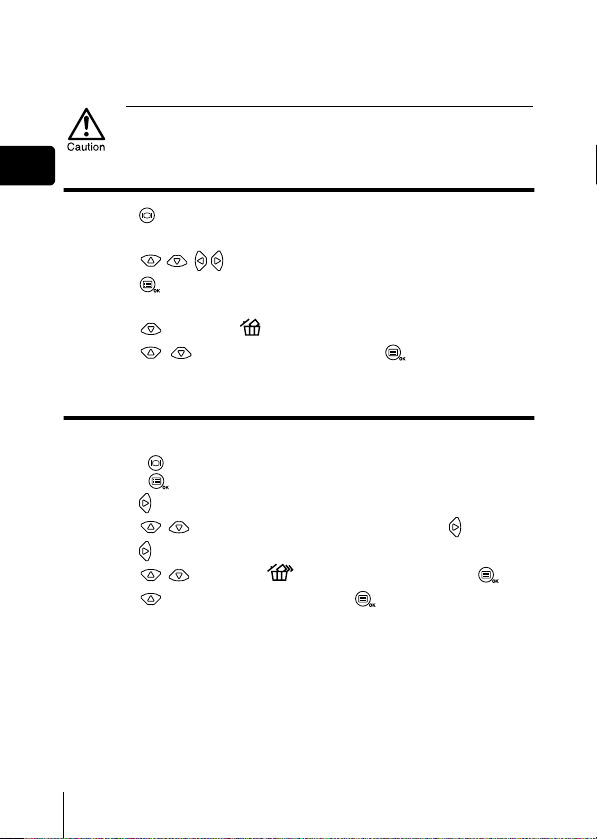
J PROTECTING PICTURES (PROTECT)
You are recommended to protect important pictures to avoid accidentally
erasing them.
1
Press with the lens barrier closed.
The monitor turns on.
2
Press to select the picture you want to protect.
3
Press , then press .
The mode menu is displayed.
4
Press to select the PLAY tab, then press .
5
Press to select , then press .
6
Press to select ON.
The selected picture is protected.
To close the menu, press twice.
En
Protected pictures cannot be erased by the single-frame/all-frame erase
function, but they can be all erased with the format function.
En 27
Page 28
J ERASING PICTURES
Recorded pictures can also be erased. This can be done either one frame at
a time or all the pictures in the card.
Once erased, pictures cannot be restored. Check each picture before erasing
to avoid accidentally erasing pictures you want to keep.
En
Single-frame erase
1
Press with the lens barrier closed.
The monitor turns on.
2
Press to select the picture you want to erase.
3
Press .
The top menu is displayed.
4
Press to select ERASE.
5
Press to select YES, then press .
The picture is erased and the menu is closed.
All-frame erase
1
Display the top menu in the playback mode.
• Press with the lens barrier closed.
• Press .
2
Press to select MODE MENU.
3
Press to select the CARD tab, then press .
4
Press .
5
Press to select ALL ERASE, then press .
6
Press to select YES, then press .
All the pictures are erased.
28 En
Page 29
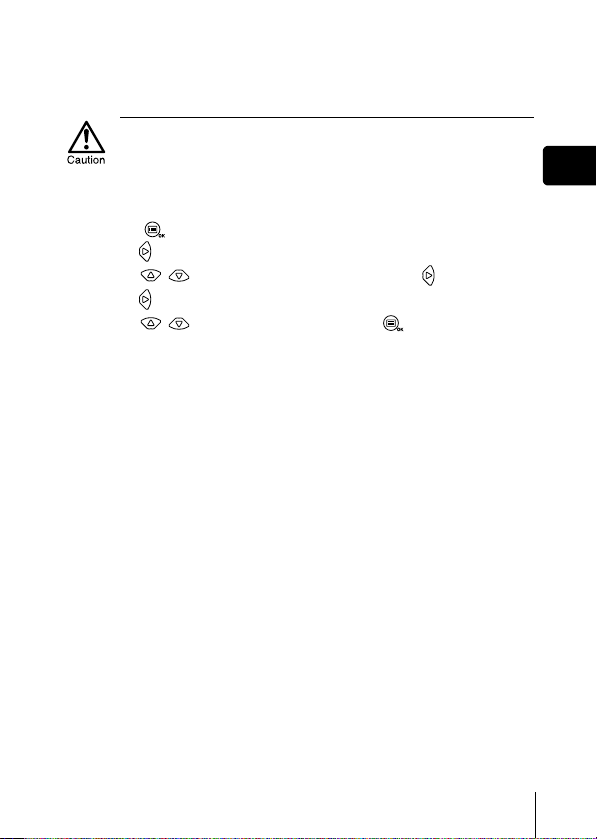
J FORMATTING
This function lets you format a card. Formatting prepares cards to receive
data. Before using non-Olympus cards or cards which have been formatted
on a PC, you must format them with this camera.
All existing data, including protected data is erased when the card is
formatted. Once erased, pictures cannot be restored, so make sure that you
do not erase important data.
1
Display the top menu in the shooting mode.
• Open the lens barrier.
• Press .
2
Press to select MODE MENU.
3
Press to select CARD tab, then press .
4
Press .
5
Press to select YES, then press .
En
En 29
Page 30
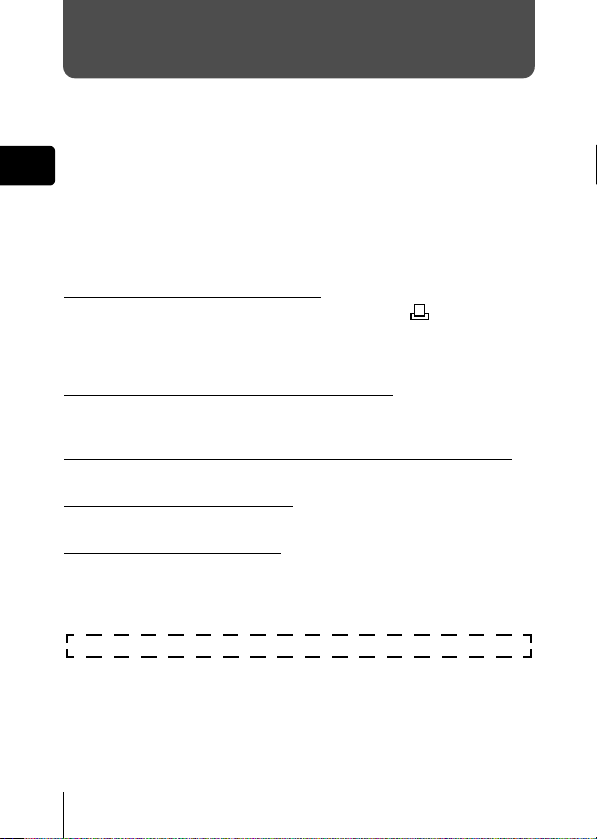
PRINT SETTINGS
By specifying the desired number of prints of each picture on the card and
whether or not the date and time are to be printed, you can print out the
desired pictures according to the print reservation data with a DPOFcompatible printer or at a DPOF photo lab.
En
What is DPOF?
DPOF is short for Digital Print Order Format. DPOF is a format used to record
automatic print information from cameras.
By specifying which pictures are to be printed, the pictures can be printed
easily by DPOF-compatible printing service labs or on a personal DPOFcompatible printer.
Confirm the print reservation data
If print reservation data is already stored on the card, the PRINT ORDER
SETTING screen appears, giving you the choice of resetting the data or
keeping it. If there is no print reservation data, this screen does not appear
and you can proceed to the next operation.
Select single-frame or all-frame reservation
Select whether you want to specify the number of prints for a selected frame,
or if you want one print of all the frames.
Set the number of prints (only for single-frame reservation)
Display the frame to be printed and set the desired number of prints.
Set the date/time printing data
You can include the shooting date or time on the print.
Confirm the reservation data
Check the number of ordered frames, the total number of prints, and the date/
time printing data.
For more details, refer to the “Reference Manual” on CD-ROM.
30 En
Page 31

DOWNLOADING PICTURES TO A COMPUTER
By connecting the camera to a computer with the provided USB cable,
images on a card can be transferred to the computer. Some OS’s (operating
systems) may need a special setup before connecting to the camera for the
first time. Follow the chart below. For details of the procedures in the chart,
refer to the “Reference Manual” on the software CD.
Identifying the OS
En
Windows 98/
98 SE (Second Edition)
Installing the USB
driver for Windows 98
Windows Me/2000/XP
Mac OS 9.0 - 9.1/
OSX (10.0)
Connecting the camera to the computer using the provided USB cable
Confirming the computer recognizes the camera
Downloading image files
Disconnecting the USB cable
Even if your computer has a USB connector, data transfer may not function
correctly if you are using one of the operating systems listed below or if you have
an add-on USB connector (extension card, etc.).
• Windows 95/NT 4.0
• Windows 98/98 SE upgrade from Windows 95
• Mac OS 8.6 or lower (except Mac OS 8.6 equipped with USB MASS Storage
Support 1.3.5 installed at the factory)
• Data transfer is not guaranteed on a home-built PC system or PCs with no factory
installed OS.
• You can view images using: graphics applications that support the JPEG file
format (Paint Shop Pro, Photoshop, etc.); Internet browsers (Netscape
Communicator, Microsoft Internet Explorer, etc.); CAMEDIA Master
software; or other software. For details on using commercial graphics
applications, refer to their instruction manuals.
• QuickTime is needed for playing back movies. QuickTime is included on the
provided software CD.
En 31
Page 32

• If you want to process images, make sure to download them to your
computer first. Depending on the software, image files may be destroyed if
the images are processed (rotated, etc.) while they are on the card.
J FOR OTHER OS USERS
Users running other OS cannot use the provided USB cable to connect the
camera directly to a computer.
Windows 95 Windows NT Mac OS before OS 9
You can download images directly to your computer using an optional floppy
En
disk adapter or PC card adapter.
Does your computer have a USB interface?
Is there a port marked on your computer?
No
No
Does your computer have a built-in PC card slot?
Yes
Is your OS one of
the following?
• Windows 98
• Windows 2000
• Windows Me
• Windows XP
•Mac OS 9/X
Connect the camera directly to
Yes
your computer using the
provided USB
cable.
Use the optional USB
SmartMedia reader/writer.
*Not compatible with Mac OS X.
Depending on the model, you
can download the driver from the
Olympus website. For details,
visit our website.
No
Yes
Does your computer have a built-in floppy disk drive?
No
Yes
Consult your nearest Olympus representative.
Use the optional PC card
adapter.
*Not supported by Windows
NT4.0 or lower.
Use the optional FlashPath
floppy disk adapter.
For more details, refer to the “Reference Manual” on CD-ROM.
32 En
Page 33

OPTIONAL ACCESSORIES
• Camera case
As of February 2002
• P-400 and P-200 photo printers for Olympus digital cameras
• AC adapter
• Standard SmartMedia card (8/16/32/64/128MB)
• Floppy disk adapter
• PC card adapter
• Olympus-brand removable media reader/writer
• NiMH battery
• NiMH battery charger
• CR-V3 long life lithium batteries
Visit the Olympus home page for the latest information on optional items.
http://www.olympus.com/
En
En 33
Page 34

En
ERROR CODES
Monitor Possible cause Corrective action
NO CARD
CARD ERROR
WRItE-PROtECt
CARD FULL
NO PICtURE
PICtURE ERROR
The card is not inserted, or
it cannot be recognized.
Cannot record, play back
or erase pictures on this
card.
Writing to the card is
prohibited.
There is no empty space
on the card, so no more
pictures can be taken.
There is no empty space
on the card, so it cannot
record new information
such as print reservation
data and other functions.
There are no pictures on
the card.
The selected picture
cannot be played back on
this camera.
The card cover is open. Close the card cover.
Insert a card, or reinsert the card
correctly.
Wipe the gold contacts with a piece of
cleaning paper (commercially
available) and insert the card again. If
the problem is still not corrected,
format the card. If the card cannot be
formatted, this card cannot be used.
If you are taking pictures, remove the
write-protect seal attached to the card.
For more details, refer to the provided
instruction manual for the card.
Replace the card or erase unwanted
pictures. Before erasing, download
important images to a PC.
Replace the card or erase unwanted
pictures. Before erasing, download
important images to a PC.
The card contains no pictures. Record
pictures.
Use image processing software on a
PC to view it. If that cannot be done,
the image file is partially damaged.
34 En
CARD-COVER OPEN
Page 35

CARD SEtUP
SELECt
POWER OFF
The card is not formatted. Format the card.
FORMAt
GO
En
En 35
Page 36

SPECIFICATIONS
Product type Digital camera (for shooting and displaying)
Recording system
En
Still Digital recording, JPEG (in accordance with
Movie QuickTime Motion JPEG support
Memory SmartMedia (4 MB - 128 MB)
Recording image
resolution
No. of storable
pictures
(When an 8 MB card is
used)
No. of effective pixels 2,000,000 pixels
Image pickup device 1/3.2" CCD solid-state image pickup, 2,110,000
Lens Olympus lens 5 - 15 mm, f 2.8/4.9, 8 elements in 7
Photometric system Digital ESP metering
Aperture f 2.8, f 4.9
Shutter speed 1/2 to 1/1000 sec. (Night scene mode: 1 sec.)
Shooting range 0.5 m to (1.6 ft to ) (normal)
Viewfinder Optical real image viewfinder (with AF target mark)
Monitor 1.5" TFT color LCD display, 114,000 pixels
Flash charging time Approx. 9 sec.
Outer connector
Automatic calendar
system
Design rule for Camera File system (DCF)), Digital
Print Order Format (DPOF)
*All cards except 2 MB and 5 V.
1600 × 1200 pixels (SHQ/HQ)
1024 × 768 pixels (SQ1)
640 × 480 pixels (SQ2)
Approx. 5 frames (SHQ)
Approx. 16 frames (HQ)
Approx. 29 frames (SQ1)
Approx. 49 frames (SQ2)
pixels (gross)
groups (equivalent to 38 mm to 114 mm lens on 35
mm camera)
∞∞
0.2 m to 0.5 m (0.7 ft to 1.6 ft) (macro mode)
DC-IN jack, USB connector (mini - B)
Up to 2099
36 En
Page 37

Operating environment
Temperature 0°C to 40°C (32°F to 104°F) (operation)
-20°C to 60°C (-4°F to 140°F) (storage)
Humidity 30% to 90% (operation)
10% to 90% (storage)
Power supply Two AA (R6) alkaline batteries, lithium batteries,
NiMH batteries or NiCd batteries
Or a lithium CR-V3 battery pack
Or AC adapter (optional)
* Manganese (zinc-carbon) batteries cannot be
used.
Dimensions 112 mm (W) × 62 mm (H) × 35 mm (D)
(4.4" × 2.4" × 1.4")
(excluding protrusions)
Weight 175 g (0.4 lb) (without batteries or card)
SPECIFICATIONS ARE SUBJECT TO CHANGE WITHOUT ANY NOTICE
OR OBLIGATION ON THE PART OF THE MANUFACTURER.
En
En 37
Page 38

TABLE DES MATIÈRES
GUIDE RAPIDE DE DÉMARRAGE . . . . . . . . . . . . . . . . 40
FONCTIONS DES MENUS . . . . . . . . . . . . . . . . . . . . . . 48
PRINCIPES DE BASE DE LA PRISE DE VUE . . . . . . . 54
SÉLECTION DE LA QUALITÉ ET DE LA TAILLE DE
L’IMAGE (MODE D’ENREGISTREMENT). . . . . . . . . . . 59
Fr
AFFICHAGE . . . . . . . . . . . . . . . . . . . . . . . . . . . . . . . . . . 61
RÉGLAGES D’IMPRESSION. . . . . . . . . . . . . . . . . . . . . 66
TRANSFERT DES PHOTOS VERS UN ORDINATEUR 67
ACCESSOIRES EN OPTION . . . . . . . . . . . . . . . . . . . . . 69
CODES D’ERREUR . . . . . . . . . . . . . . . . . . . . . . . . . . . . 70
FICHE TECHNIQUE . . . . . . . . . . . . . . . . . . . . . . . . . . . . 72
Ces instructions sont seulement un guide de référence rapide.
Pour plus de détails sur les fonctions décrites ici, se référer au
“Manuel de référence” sur le CD-ROM.
38 Fr
Page 39

Pour les utilisateurs en Europe
La marque “CE” indique que ce produit est conforme avec les
exigences européennes en matière de sécurité, santé,
environnement et protection du consommateur. Les appareils
photo marqués “CE” sont prévus pour la vente en Europe.
Pour les consommateurs des Amériques du Nord et du Sud
Pour les utilisateurs aux États-Unis
Déclaration de conformité
Modèle numéro : C-2 Zoom/D-520 ZOOM/C-220 ZOOM
Nom de marque : OLYMPUS
Organisme responsable : Olympus America Inc.
Adresse : 2 Corporate Center Drive, Melville, New York
Numéro de téléphone : 631-844-5000
Testé pour être en conformité avec la réglementation FCC
POUR L’UTILISATION À LA MAISON OU AU BUREAU
Cet appareil satisfait aux termes de la partie 15 des directives FCC. Son
utilisation est soumise aux deux conditions suivantes:
(1) Cet appareil ne doit pas causer de brouillage radioélectrique.
(2) Cet appareil doit pouvoir résister à toutes les interférences, y compris
celles susceptibles d’entraver son bon fonctionnement.
11747-3157 U.S.A.
Pour les utilisateurs au Canada
Cet appareil numérique de la catégorie B est conforme à la législation
canadienne sur les appareils générateurs de parasites.
Marques commerciales
• IBM est une marque déposée de la firme Internationale Business Machines
Corporation.
• Microsoft et Windows sont des marques déposées de la firme Microsoft
Corporation.
• Macintosh est une marque de Apple Computer Inc.
• Tous les autres noms de sociétés et appellations de produits sont des marques
déposées et/ou des marques de fabrique des propriétaires respectifs.
• Le standard pour les systèmes de fichier d’appareil photo indiqué dans ce manuel
est le standard “Design Rule for Camera File System/DCF” stipulé par
l’association JEITA (Japan Electronics and Information Technology Industries
Association).
Fr
Fr 39
Page 40

GUIDE RAPIDE DE DÉMARRAGE
J NOMENCLATURE DES PIÈCES
Déclencheur
Levier
Fr
de zoom
Capot de
protection d’objectif
Permet d’activer ou
désactiver le mode de
prise de vues de l’appareil.
Écran
ACL
Touche (Écran ACL)
Permet d’activer ou
désactiver le mode affichage
de l’appareil.
Viseur
Objectifs
Se met en place automatiquement
lorsque vous ouvrez le capot de
protection d’objectif.
Voyant du retardateur
Embase filetée de trépied
Touche (OK/Menu)
Flash
Se met en place
lorsque vous ouvrez
le capot de protection
d’objectif.
Couvercle de
connecteur
Connecteur
USB
Prise de
sortie VIDEO
(VIDEO OUT)
Prise d’entrée CC
(DC-IN)
Voyant orange
Voyant vert
Repères de mise au
point automatique
Couvercle du
logement de carte
Œillet de
courroie
Couvercle du
compartiment
des piles
Molette de
défilement
40 Fr
Page 41

J INDICATIONS CONCERNANT L’ÉCRAN
ACL
Mode affichageMode de prise de vue
1
2
3
4
Elément Indication
Contrôle des piles ,
1
Flash , , , ,
2
Mesure ponctuelle
3
Bloc mémoire
4
Compensation d’exposition
5
Retardateur/Drive , ,
6
Balance des blancs WB AUTO, , , ,
7
Mode d’enregistrement SHQ, HQ, SQ1, SQ2
8
Nombre d’images fixes
9
enregistrables/secondes restantes
Nombre de pixels 1600 × 1200, 1024 × 768, 640 × 480
10
Date et heure '02.01.12 12:30
11
Numéro de fichier, numéro
12
d’image/temps d’exécution
Réservation d’impression,
13
nombre d’impressions
Protection
14
Vous pouvez visualiser les informations détaillées de l’image enregistrée en
mode de lecture.
5
1
6
7
8
9
-2.0, -1.5, -1.0, -0.5, +0.5, +1.0, +1.5, +2.0
16/16"
100-0016, 16/16"
× 2
13
14
8
10
5
7
11
Fr
12
Fr 41
Page 42

Bloc mémoire
Le bloc de mémoire s’allume lors de la prise de vue. Lorsque le bloc est
allumé, l’appareil enregistre la vue sur la carte. Le bloc change d’aspect en
fonction du statut de prise de vue, comme l’indique l’illustration ci-dessous.
Lorsque le bloc de mémoire affiche plein, attendez quelques instants avant la
prochaine prise de vue.
Prise de vue fixe
Prise de vue Prise de vue Prise de vue
Fr
(Le bloc mémoire
Avant la prise de
vue
est éteint)
Une vue est
prise
(Allumé)
Plusieurs
vues sont
(Allumé)
prises
Attente
Aucune vue
supplémentaire ne
peut être prise
(Complètement
allumé)
Enregistrement de film
Si vous continuez d’enregistrer
Prise de vue
Attente
Avant la prise de
vue
(Le bloc mémoire
est éteint)
Pendant la prise de vue (Allumé)
• Vous ne pouvez rien faire tant que le bloc n’est pas
complètement éteint.
• L’enregistrement du film s’arrête automatiquement lorsque le
bloc mémoire affiche plein.
Contrôle des piles
Si les piles sont faibles, le voyant de contrôle des piles sur l’écran change
comme suit tandis que l’alimentation de l’appareil est en marche.
Aucune indication
Voyant allumé (Vert) Clignote (Rouge)
Énergie restante:
élevée
Énergie restante: faible
Remplacez la pile.
42 Fr
Le voyant vert et le voyant
orange à droite du viseur
clignotent
Énergie restante: épuisée
Page 43

J FIXATION DE LA COURROIE
1
Passez la courroie dans l’œillet de
courroie.
2
Passez le reste de la courroie dans la
boucle qui est déjà passée par l’œillet.
3
Tirez fermement sur la courroie, et
vérifiez qu’elle est solidement attachée
et qu’elle ne va pas se détacher.
J MISE EN PLACE DES PILES
1
Assurez-vous que :
• L’écran ACL s’éteint.
• Le capot de protection d’objectif est fermé.
• Le voyant à droite du viseur est éteint.
2
Faites glisser le couvercle du
compartiment des piles vers (la
direction indiquée par la marque
figurant sur le couvercle), et
soulevez-le .
3
Introduisez les piles, en prenant
garde de les placer dans le bon
sens, comme l’indique l’illustration.
Si vous
utilisez des
piles AA
(R6)
Si vous
utilisez des
piles au
lithium
Indications
d’insertion
des piles
Fr
4
Fermez le couvercle du compartiment des
piles en direction de . Faites coulisser le
couvercle vers tout en appuyant sur
.
Si le couvercle du compartiment des piles ne ferme
pas bien, ne forcez pas. Essayez d’appuyer
simultanément sur .
Fr 43
Page 44

Piles alcalines AA (R6)
Le nombre de vues que vous pouvez mémoriser dans l’appareil photo risque
de varier considérablement avec des piles AA, selon le fabricant des piles,
les conditions de prise de vues de l’appareil, etc. Utiliser ce type de pile
uniquement lorsque vous n’avez pas d’autres choix disponibles. Economisez
de l’énergie en désactivant l’écran ACL lorsque c’est possible.
J INTRODUCTION DE LA CARTE
(SmartMedia)
Fr
Les photos que vous avez prises sont enregistrées sur la carte.
1
Assurez-vous que :
• L’écran ACL s’éteint.
• Le capot de protection d’objectif est fermé.
• Le voyant à droite du viseur est éteint.
2
Ouvrez le couvercle de logement de carte.
3
Introduisez la carte aussi
profondément que possible dans le
sens indiqué sur l’illustration.
Il y a une flèche à l’intérieur de la
couverture de carte, indiquant la
direction dans laquelle la carte devrait
être insérée.
4
Faites glisser le capot de
protection jusqu’à ce qu’il se
bloque avec un déclic.
Indications
d’insertion
de la carte
44 Fr
Page 45

J MISE SOUS/HORS TENSION
Lors de la prise de vue
Mise sous tension : Ouvrez le capot de protection d’objectif.
L’appareil passe en mode de prise de vues. L’objectif
et le flash se mettent en place.
Si l’objectif ne sort pas, le capot de protection
d’objectif n’est pas complètement ouvert. Faites
glisser le capot de protection jusqu’à ce qu’il se
bloque avec un déclic.
Si l’heure et la date sont revenues à leur
réglage par défaut de sortie d’usine, Y/M/
D apparaissent sur l’écran ACL.
Mise hors tension : Fermez le capot de protection d’objectif
doucement jusqu’à ce qu’il touche juste le capot
de protection d’objectif.
Le capot de protection de l’objectif s’arrête juste avant
de toucher l’objectif et ce dernier se rétracte. Attendez
que l’objectif soit complètement rentré avant de
fermer complètement le capot de protection d’objectif.
L’appareil est mis hors tension. (L’écran ACL s’éteint
également.)
Appuyez sur le flash avec la main jusqu’à ce qu’il se
verrouille en position.
Fr
Ne forcez pas la fermeture du capot de protection d’objectif lorsque l’objectif
est sorti, vous risqueriez de l’endommager.
Fr 45
Page 46

Lors de l’affichage de vues
Mise sous tension : Appuyez sur la touche (Écran ACL) avec le
capot de protection d’objectif fermé.
L’appareil passe en mode affichage. L’écran ACL
s’allume et affiche la dernière vue prise.
Fr
touche (Écran ACL)
Mise hors tension : Appuyez sur la touche (Écran ACL).
L’écran ACL et l’appareil photo s’éteignent.
touche (Écran ACL)
Ne jamais ouvrir le couvercle du logement de carte, retirer la carte ou les
piles, déconnecter ou reconnecter l’adaptateur secteur tandis que l’appareil
est sous tension. Toutes les données de la carte risqueraient d’être détruites
sans possibilité de restauration. Lorsque vous changez la carte, assurezvous que l’appareil est hors tension avant d’ouvrir de couvercle du logement
de carte.
46 Fr
Page 47

J RÉGLAGE DE LA DATE ET DE L’HEURE
1
Ouvrez le capot de protection d’objectif.
2
Appuyez sur .
Le menu principal du mode de prise de vue s’affiche.
3
Appuyez sur de la molette de défilement pour sélectionner
MODE MENU.
4
Appuyez sur pour sélectionner la languette SETUP, puis
appuyez sur .
5
Appuyez sur pour sélectionner , puis appuyez sur .
6
Appuyez sur pour sélectionner un des formats de
date suivants :
Y-M-D (Année/Mois/Jour)
M-D-Y (Mois/Jour/Année)
D-M-Y (Jour/Mois/Année)
Appuyez ensuite sur .
Le curseur se déplace vers la première zone.
7
Appuyez sur pour régler la première zone, puis
appuyez sur pour passer à la zone suivante.
Pour revenir au réglage précédent, appuyez sur .
8
Répétez la procédure jusqu’à ce que la date et l’heure soient
réglées complètement.
9
Appuyez sur .
Pour un réglage plus précis, appuyez sur lors d’un passage par 00
seconde. L’horloge démarre lorsque vous appuyez sur .
10
Refermez la protection d’objectif.
L’appareil s’éteint.
Si vous laissez l’appareil pendant 1 heure sans les piles, ou si les piles sont
épuisées, il se peut que les réglages de date et d’heure soient annulés ou
deviennent incorrects. Avant de prendre des photos importantes, vérifiez que
le réglage de la date et de l’heure est correct.
Fr
Fr 47
Page 48

FONCTIONS DES MENUS
J
UTILISATION DES MENUS ET DES LANGUETTES
Lorsque vous mettez l’appareil sous tension et que vous appuyez sur , le
menu principal s’affiche à l’écran. C’est à partir des menus que vous réglez
chacune des fonctions de l’appareil. Ce chapitre explique le fonctionnement
des menus, à partir des écrans du mode de prise de vues.
Fr
Menus Raccourcis
• Permet d’accéder rapidement
aux réglages de menu les plus
fréquemment utilisés.
• Affiche les touches d’exécution
en bas de l’écran et vous permet
de sélectionner des éléments à
l’aide de .
DRIVE
MODE MENU
FUNCtION
Sélectionnez chaque menu en
utilisant la molette de défilement.
• Permet d’accéder aux options de
• Classe les réglages en quarte
• Affiche les languettes CAMERA,
Appuyez sur .
Le menu principal s’affiche.
Menu mode
menu permettant de définir les
mesures, la balance des blancs,
etc.
languettes.
PICTURE, CARD et SETUP.
Sélectionnez la languette
désirée à gauche de l’écran en
appuyant sur .
48 Fr
SHQ 1600*1200
HQ 1600*1200
SQ1 1024*768
SQ2 640*480
CANCELGOSELECt
Languettes
CAMERA
DIGItAL ZOOM
MEtERING
CARDSEt PIC
Page 49

Utilisation des menus
1
Appuyez sur pour
afficher le menu principal,
puis appuyez sur .
Menu principal
DRIVE
MODE MENU
FUNCtION
2
Appuyez sur pour
sélectionner une languette,
puis appuyez sur pour
afficher le menu.
Languette CAMERA
CAMERA
DIGItAL ZOOM
MEtERING
CARDSEt PIC
Languette PICTURE
WB
CAM
PICtURE
CARDSEt
Languette CARD
CARD SEtUP
CAM
PIC
CARD
SEt
Languette SETUP
ALL RESEt
REC VIEW
Fr
Pour
repasser à
sélectionner
une
languette,
appuyez sur
.
Fr 49
Page 50

Fr
3
Appuyez sur pour
sélectionner l’élément
désiré, puis appuyez sur
pour afficher les réglages de
sélection disponibles.
CAMERA
DIGItAL ZOOM
MEtERING
CARDSEt PIC
4
Appuyez sur
pour sélectionner
l’élément.
Le réglage est terminé
lorsque l’élément a été
sélectionné.
50 Fr
CAMERA
DIGItAL ZOOM
MEtERING
CARDSEt PIC
CAMERA
DIGItAL ZOOM
MEtERING
CARDSEt PIC
OFF
ON
ou
L’encadré vert passe à
l’élément sélectionné.
Pour repasser à
sélectionner un
élément,
appuyez sur
ou .
CAMERA
DIGItAL ZOOM
MEtERING
CARDSEt PIC
OFF
ON
Pour fermer le menu,
appuyez deux fois sur .
• Selon le statut de l’appareil et les réglages en cours, vous ne pouvez pas
sélectionner tous les éléments. Par exemple, si le mode d’enregistrement
de film est sélectionné, vous ne pouvez pas sélectionner SEPIA,
BLACK&WHITE ou dans la catégorie de l’onglet EDIT.
• Si vous appuyez sur le déclencheur pour prendre une photo tandis que le
menu est affiché, la photo sera prise avec les réglages en cours de
sélection.
• Si vous voulez enregistrer les réglages une fois que l’appareil est éteint,
réglez la remise à zéro complète sur OFF.
Page 51

Menus Raccourcis
Mode de prise de vue
DRIVE
Permet de prendre une série de photos à la suite.
Permet de prendre un film.
Vous permet de sélectionner la résolution et la qualité de l’image.
Vue fixe : SHQ, HQ, SQ1, SQ2
Film : HQ, SQ
FUNCTION
2 IN 1
PANORAMA
Mode affichage
Affiche toutes les images sous forme d’un diaporama.
MOVIE PLAYBACK
Affiche un film.
Permet de prendre une photo à la fois (prise de vue
normale).
Permet d’associer deux images fixes à la suite en une
seule image.
Mode d’autoportrait :
Vous permet de prendre une vue de vous-même tout en
tenant l’appareil.
Permet de prendre des vues panoramiques avec des
cartes SmartMedia de marque Olympus CAMEDIA.
Fr
INFO
Affiche toutes les informations de prise de vue sur l’écran ACL.
ERASE
Supprime une photo sélectionnée.
Fr 51
Page 52

Menus mode
Les fonctions du menu mode sont réparties en 4 languettes. Utilisez
pour sélectionner une languette et d’afficher les fonctions respectives.
Ces instructions sont seulement un guide de référence rapide.
Pour plus de détails sur les fonctions décrites ici, se référer au
“Manuel de référence” sur le CD-ROM.
Mode de prise de vue
Fr
Languette CAMERA
Languette PICTURE
Languette CARD
CAMERA
CARDSEt PIC
Languette SETUP
Languette CAMERA
DIGITAL ZOOM
METERING
Languette PICTURE
WB
Languette CARD
CARD SETUP Formatage de carte.
Languette SETUP
ALL RESET
REC VIEW
Ajuste la luminosité de l’écran ACL.
Règle la date et l’heure.
Ajuste la luminosité de la photo (compensation d’exposition).
Sort le zoom optique au maximum, ce qui permet une prise
de vue avec un rapprochement d’environ 5x avec la fonction
zoom numérique.
Sélectionne la zone de l’image qui va servir de référence pour
déterminer l’exposition ou la luminosité de l’image pour les
deux réglages disponibles : ESP ou (mesure ponctuelle).
Règle la balance des blancs appropriée selon la source de
lumière.
Détermine si les réglages courants de l’appareil sont gardés
ou non lorsque vous coupez l’alimentation.
Active ou désactive les signaux sonores (utilisés pour les
avertissements, etc.).
Sélectionne si les images sont affichées ou non sur l’écran
ACL pendant l’enregistrement.
52 Fr
DIGItAL ZOOM
MEtERING
Page 53

Mode affichage
Languette PLAY
Languette EDIT
Languette CARD
PLAY
CARDSEt EDIt
Languette SETUP
Languette PLAY
Protège les images d’une suppression accidentelle.
Languette EDIT
BLACK & WHITE Crée des images en noir et blanc.
SEPIA Crée des images couleur sépia.
Réduit la taille du fichier.
INDEX Crée une image index d’un film en 9 vues fixes.
Languette CARD
CARD SETUP
Languette SETUP
ALL RESET
Fait pivoter les images de 90
d’une montre ou dans l’autre sens.
Mémorise sur la carte des informations d’impression
nécessaires pour les imprimantes DPOF.
Formatage de carte.
Supprime toutes les données d’images stockées sur la carte.
Détermine si les réglages courants de l’appareil sont gardés
ou non lorsque vous coupez l’alimentation.
Active et désactive les signaux sonores (utilisés pour les
avertissements, etc.).
Sélectionne le nombre de vues dans l’affichage d’index.
Ajuste la luminosité de l’écran ACL.
Règle la date et l’heure.
dans le sens des aiguilles
°
Fr
Fr 53
Page 54

PRINCIPES DE BASE DE LA PRISE DE VUE
J PRISE DE VUE FIXE
Vous pouvez effectuer des prises de vue fixe soit à l’aide du viseur, soit à
l’aide de l’écran ACL. Les deux méthodes sont simples, il vous suffit
d’appuyer sur le déclencheur.
Prise de vue fixe à l’aide du viseur
Fr
1
Ouvrez le capot de protection d’objectif.
Faites glisser le capot de protection jusqu’à ce qu’il se bloque avec un déclic.
L’objectif et le flash se mettent en place.
2
Placez les repères de mise au point apparaissant dans le
viseur autour du sujet.
Lorsque l’appareil se trouve à moins de 50 cm du sujet photographié,
sélectionnez le mode gros plan.
3
Appuyer doucement sur le déclencheur jusqu’à mi-course.
Le voyant vert à droite du viseur s'allume lorsque la mise au point et
l’exposition sont mémorisées. A ce stade, vous entendez le bruit du
mécanisme de mise au point à l’intérieur de l’appareil, mais aucune
photo n’est prise.
4
Enfoncez complètement sur le déclencheur.
L’appareil photo enregistre la prise de vue.
Prise de vue fixe à l’aide de l’écran ACL
1
Ouvrez le capot de protection d’objectif.
Faites glisser le capot de protection jusqu’à ce qu’il se bloque avec un déclic.
L’objectif et le flash se mettent en place.
2
Appuyez sur .
L’écran ACL s’allume.
3
Déterminez la composition de votre image en observant votre
sujet dans l’écran ACL.
4
Procédez de la même façon que pour la prise de vue à l’aide
du viseur pour prendre la photo.
Enfoncez complètement le déclencheur pour effectuer la prise de vue.
Lorsque vous souhaitez prendre des photos à l’aide de l’écran ACL,
appuyez à nouveau sur .
Ne jamais ouvrir le couvercle du logement de carte, retirer les piles ou
déconnecter l’adaptateur secteur tandis que le voyant orange clignote. Vous
risqueriez de détruire des vues enregistrées et empêcher la mémorisation des
vues que vous venez juste de prendre.
54 Fr
Page 55

J AUCUNE MISE AU POINT SATISFAISANTE
NE PEUT ÊTRE OBTENUE
(MÉMORISATION DE LA MISE AU POINT)
Lorsque le sujet sur lequel vous voulez effectuer la mise au point n’est pas au
centre du cadre et que vous ne parvenez pas à placer les repères de mise au
point autour de lui, vous pouvez effectuer la mise au point sur quelque chose
d’autre qui se trouve plus ou moins à la même distance (mémorisation de la
mise au point) et prendre la photo selon la procédure détaillée ci-dessous.
1
Ouvrez le capot de protection d’objectif.
L’appareil passe en mode de prise de vues.
2
Placez les repères de mise au point
apparaissant dans le viseur autour
du sujet.
Lorsque vous prenez un photo un sujet sur
lequel il est difficile d’effectuer la mise au
point ou un sujet en mouvement, visez un
sujet placée à peu près à la même
distance.
3
Enfoncez à moitié le déclencheur jusqu’à ce que le voyant vert
à droite du viseur s’allume de manière constante.
Lorsque la mise au point et l’exposition sont mémorisées, le voyant vert
s’allume.
4
Tout en maintenant le déclencheur à
moitié enfoncé, recomposez votre
vue dans le viseur.
Voyant vert
Fr
5
Enfoncez complètement le déclencheur.
Fr 55
Page 56

J ENREGISTREMENT DE FILMS
Vous pouvez enregistrer des films avec cet appareil. Les films enregistrés
peuvent être affichés ou enregistrés séparément en tant qu’images fixes, à
l’aide de la fonction index.
1
Affichez le menu principal en mode de prise de vue.
• Ouvrez le capot de protection d’objectif.
• Appuyez sur .
2
Appuyez sur pour sélectionner DRIVE.
3
Fr
Appuyez sur pour sélectionner , puis appuyez sur
.
L’enregistrement de film est réglé et le menu est fermé.
Le temps total d’enregistrement en fonction de la capacité de la carte de
mémoire et la marque s’affichent à l’écran ACL.
4
Enregistrez le film en observant votre sujet dans l’écran ACL.
Appuyez complètement sur le déclencheur pour commencer
l’enregistrement et le nombre de secondes restantes d’un
enregistrement s’affiche. Appuyez de nouveau complètement sur le
déclencheur pour arrêter l’enregistrement.
Pour annuler le mode film
Appuyez sur .
L’écran ACL s’éteint et le mode film est annulé.
• Le mode film ou vidéo est annulé lorsque vous fermez le capot de protection
d’objectif.
• En mode d’enregistrement de film, le flash est désactivé. Pour effectuer un
enregistrement avec agrandissement, réglez la fonction de zoom numérique
sur ON.
• L’enregistrement est plus long pour les films que pour les vues fixes.
• Le nombre de secondes restantes varie selon le mode d’enregistrement,
selon que vous enregistrez sur une carte et selon l’espace disponible sur la
carte.
• Vous ne pouvez pas enregistrer de film avec son.
J ZOOM AVANT SUR UN SUJET (ZOOM
OPTIQUE)
La prise de vue au téléobjectif/grand angle est possible jusqu’à un
agrandissement par 3 avec le zoom optique (équivalent à 38 mm-114 mm sur
un appareil photo 35 mm). En combinant le zoom optique 3x avec le zoom
numérique 2,5x, vous obtenez un taux d’agrandissement d’environ 7,5 fois
(équivalent à 38 mm-285 mm sur un appareil photo 35 mm). Si le mode
d’enregistrement est réglé sur SQ2, le zoom numérique 5x est disponible.
1
Ouvrez le capot de protection d’objectif.
L’appareil passe en mode de prise de vues.
56 Fr
Page 57

2
Faites glisser le levier de zoom en regardant dans
le viseur.
Appuyer sur le levier de zoom vers pour un zoom
avant et vers pour un zoom arrière.
3
Prenez la photo en regardant dans le viseur.
Les vues prises avec le zoom numérique peuvent avoir du grain.
J PRISE DE VUE GROS PLAN (MODE GROS
PLAN)
Le mode gros plan vous permet de photographier un sujet à une distance de
20 à 50 cm du sujet.
1
Ouvrez le capot de protection d’objectif.
L’appareil passe en mode de prise de vues.
2
Appuyez sur .
Le réglage actuel du mode gros plan est affiché.
3
Appuyez sur pendant que le réglage actuel du mode gros
plan est affiché.
Le mode gros plan passe de ON à OFF à chaque pression de
. Lorsque le mode gros plan est sélectionné, l’indicateur de mode
gros plan est affiché.
4
Prenez la photo en observant votre sujet dans l’écran.
Pour annuler le mode gros plan, appuyez sur plusieurs fois jusqu’à
ce que l’indication OFF apparaisse. L’indicateur de mode gros plan
disparaît.
J UTILISATION DU FLASH
1
Ouvrez le capot de protection d’objectif.
L’appareil passe en mode de prise de vue.
2
Appuyez sur .
L’écran ACL s’allume et le réglage actuel du flash est affiché.
3
Appuyez sur pendant que le réglage actuel du flash est
affiché.
A chaque pression de , le mode flash passe par les états
suivants : AUTO - - - - - .
4
Prenez la photo.
Fr
Fr 57
Page 58

La portée du flash est approximativement 2,5 mètres.
Flash automatique (pas d’indication)
Le flash se déclenche automatiquement en situations de faible éclairage ou
de contre-jour.
Flash atténuant l’effet “yeux rouges” ( )
Ce mode atténue sensiblement l’effet “yeux rouges” en émettant une série de
pré-éclairs avant de déclencher l’éclair principal.
Flash d’appoint ( )
Fr
Le flash se déclenche après chaque pression du déclencheur.
Flash débrayé ( )
Le flash ne se déclenche pas même dans des situations de faible éclairage.
Prise de vue de nuit ( )
Utilisez ce mode pour prendre un sujet de nuit.
Prise de vue de nuit avec atténuation de l’effet “yeux rouges”
()
Utilisez ce mode lorsque vous prenez un portrait de nuit et que vous
souhaitez atténuer l’effet “yeux rouges”.
J UTILISATION DU RETARDATEUR
Cette fonction est utile lorsque la personne qui prend la photo veut figurer sur
la vue. Pour la prise de vue avec retardateur, fixez solidement l’appareil sur
un trépied.
1
Ouvrez le capot de protection d’objectif.
L’appareil passe en mode de prise de vue.
2
Appuyez sur .
L’écran ACL s’allume et le réglage actuel du retardateur est affiché.
3
Appuyez sur pendant que le réglage du retardateur est
affiché.
Le réglage passe de ON à OFF à chaque pression de .
4
Enfoncez complètement le déclencheur.
Le voyant du retardateur s’allume pendant environ 10 secondes, puis il
se met à clignoter. Quand il a clignoté pendant 2 secondes avec une
tonalité d’avertissement, la vue est prise.
58 Fr
Page 59

SÉLECTION DE LA QUALITÉ ET DE LA TAILLE DE L’IMAGE (MODE D’ENREGISTREMENT)
Choisissez le mode d’enregistrement correspondant le mieux à vos besoins
(impression, montage sur un ordinateur, montage sur site Web, etc.).
Modes d’enregistrement de vue fixe
Mode
d’enregistrement
SHQ
(Très haute
qualité)
HQ
(Haute qualité)
SQ
(Qualité
standard)
Description
•Utilisez ce mode lorsque
vous souhaitez imprimer
une image avec une bonne
qualité ou sur un grand
format de papier, tel que le
A4 (21 cm × 29,7 cm) ou si
vous voulez traiter des
images sur un ordinateur.
•La qualité de l’image est
supérieure, mais
cependant, vous pouvez en
stocker moins. Et
l’enregistrement de l’image
prend plus de temps.
•Utilisez ce mode pour des
images que vous souhaitez
éditer sur un ordinateur ou
imprimer au format carte
postale.
•Ce mode est le réglage par
défaut à la sortie d’usine.
•Utilisez ce mode pour des
images que vous souhaitez
joindre à un courrier
électronique ou simplement
afficher à l’aide d’un
ordinateur.
•Il s’agit du mode de qualité
standard, ainsi le nombre
d’images que vous pouvez
enregistrer augmente.
Résolution
(Nombre de pixels)
1600 × 1200 pixels* Plus
1600 × 1200 pixels*
1024×768 pixels* en
mode SQ1
640×480 pixels* en
mode SQ2
Qualité
claire
Normale Plus
Taille de
fichier
Plus
grande
petite
Fr
Fr 59
Page 60

Modes d’enregistrement vidéo
Mode
d’enregistrement
HQ
(Haute qualité)
SQ
(Qualité
Fr
standard)
* Le pixel est l’unité utilisée pour exprimer la résolution.
1
Affichez le menu principal du mode de prise de vue.
Description
Vous pouvez enregistrer des
séquences de 15 secondes à
la fois.
Vous pouvez enregistrer des
séquences de 60 secondes à
la fois.
• Ouvrez le capot de protection d’objectif.
• Appuyez sur .
2
Appuyez sur pour sélectionner .
3
Appuyez sur pour sélectionner un des modes
d’enregistrement, puis appuyez sur .
Les modes d’enregistrement des images fixes sont SHQ, HQ, SQ1 et
SQ2 ; pour les films, vous avez le choix entre HQ et SQ.
Le mode d’enregistrement est réglé et le menu se referme.
4
Procédez à la prise de vue.
Résolution
(Nombre de
pixels)
320 × 240 pixels* Plus
160 × 120 pixels*
Qualité
claire
Normale
Taille de
fichier
Plus
grande
Plus petite
60 Fr
Page 61

AFFICHAGE
J AFFICHAGE DE VUES FIXES
Vous pouvez afficher les vues une par une sur l’écran ACL.
1
Appuyez sur avec le capot de protection d’objectif fermé.
L’écran ACL s’allume et affiche la dernière vue prise. (Affichage d’une
seule vue)
2
Appuyez sur .
: Affiche la vue précédente.
: Affiche la vue suivante.
: Saute à la vue 10 images en arrière.
: Saute à la vue 10 images en avant.
3
Appuyez sur pour annuler l’affichage.
L’écran ACL et l’appareil photo s’éteignent.
Contrôle rapide (Double cliquer pour visualiser)
Cette fonction vous permet de visualiser des images tandis que vous êtes en
prise de vue avec le capot de protection d’objectif ouvert. C’est utile lorsque
vous voulez vérifier rapidement les résultats de la prise de vue avant de
continuer.
1
Appuyez rapidement deux fois sur en mode de prise de vue.
L’appareil se met immédiatement en mode affichage et affiche la
dernière vue prise. (Affichage d’une seule vue)
2
Appuyez doucement sur le déclencheur jusqu’à mi-course.
L’appareil revient en mode de prise de vue et vous pouvez
recommencer les prises de vue.
Affichage gros plan
Les vues affichées sur l’écran ACL peuvent être agrandies à de 1,5, 2, 2,5 ou
3 fois. C’est utile lorsque vous voulez vérifier rapidement les détails d’une
image.
1
Appuyez sur avec le capot de protection d’objectif fermé.
L’écran ACL s’allume et affiche la dernière vue prise.
Appuyez sur
agrandir.
pour sélectionner la photo que vous voulez
Fr
Fr 61
Page 62

2
Appuyez sur le levier de zoom vers .
L’image est agrandie à 1,5 fois. L’agrandissement augmente à chaque
pression du levier de zoom.
Pour revenir à la taille réelle de l’image (1x), appuyez sur le levier de
zoom vers .
3
En appuyant sur tandis que l’image est affichée
en format agrandi, vous pouvez faire défiler l’image dans la
direction souhaitée, ce qui vous permet de visualiser les
Fr
différentes parties de l’image.
Affichage d’index
Cette fonction vous permet d’afficher plusieurs vues à la fois sur l’écran ACL.
C’est utile pour retrouver rapidement l’image que vous voulez visualiser.
Vous pouvez afficher 4, 9 ou 16 images.
1
Appuyez sur avec le capot de protection d’objectif fermé.
2
Appuyez sur le levier de zoom vers pour passer en mode
affichage d’index.
3
Utiliser la molette de défilement pour sélectionner une vue.
: Passe à la vue précédente.
: Passe à la vue suivante.
: Saute à l’affichage d’index précédent (les vues avant celle du
coin supérieur gauche).
: Saute à l’affichage d’index suivant (les vues suivant celle du
coin inférieur droit).
4
Pour revenir à l’affichage d’une seule vue, appuyez sur le
levier de zoom vers .
J AFFICHAGE DE FILMS
1
Appuyez sur avec le capot de protection d’objectif fermé.
L’écran ACL s’allume.
2
Appuyez sur pour afficher l’image souhaitée
comportant un indicateur puis appuyez sur .
Le menu principal s’affiche.
3
Appuyez sur pour sélectionner MOVIE PLAYBACK.
Le film est visionné une fois que le voyant orange situé à droite du
viseur clignote et que les données vidéos sont téléchargées dans
62 Fr
Page 63

l’appareil. Lorsque l’affichage du film est terminé, l’affichage revient
automatiquement au début du film.
4
Appuyez sur .
Le menu MOVIE PLAYBACK est affiché.
PLAYBACK : Affiche de nouveau tout le film.
FRAME BY FRAME : Affiche le film manuellement une image à la fois.
EXIT : Quitte le mode MOVIE PLAYBACK.
5
Appuyez sur pour sélectionner l’opération désirée,
puis appuyez sur .
Opérations disponibles lorsque vous avez sélectionné FRAME
BY FRAME (Image par image)
: Affiche la première image du film.
: Affiche la dernière image du film.
: Affiche l’image suivante. Le film peut être affiché en continu en
maintenant la touche enfoncée.
: Affiche l’image précédente. Le film peut être affiché en continu
en marche arrière en maintenant la touche enfoncée.
: Affiche le menu MOVIE PLAYBACK (Affichage du film).
J PROTECTION DES VUES (PROTECTION)
Il est conseillé de protéger les vues importantes pour éviter de les effacer
accidentellement.
1
Appuyez sur avec le capot de protection d’objectif fermé.
L’écran ACL s’allume.
2
Appuyez sur pour sélectionner la photo que vous voulez
protéger.
3
Appuyez sur , puis sur .
Le MODE MENU s’affiche.
4
Appuyez sur pour sélectionner la languette PLAY,
puis appuyez sur .
5
Appuyez sur pour sélectionner , puis appuyez
sur .
6
Appuyez sur pour sélectionner ON.
La vue sélectionnée est alors protégée.
Pour fermer le menu, appuyez deux fois sur .
Fr
Fr 63
Page 64

Les vues protégées ne peuvent être effacées ni avec la fonction effacement
de toutes les vues ni avec la fonction effacement d’une seule vue, mais elles
peuvent être effacées avec la fonction formatage.
J EFFACEMENT DE VUES
Des vues enregistrées peuvent également être effacées. Il est possible
d’effacer une vue ou toutes les vues à la fois sur la carte.
Une fois effacées, les vues ne peuvent pas être restituées. Vérifiez chaque
Fr
vue avant de les effacer pour éviter toute suppression accidentelle.
Effacement d’une seule vue
1
Appuyez sur avec le capot de protection d’objectif fermé.
L’écran ACL s’allume.
2
Appuyez sur pour sélectionner la photo que
vous voulez effacer.
3
Appuyez sur .
Le menu principal s’affiche.
4
Appuyez sur pour sélectionner ERASE.
5
Appuyez sur pour sélectionner YES, puis appuyez
sur .
La vue est effacée et le menu est fermé.
Effacement de toutes les vues
1
Affichez le menu principal du mode affichage.
• Appuyez sur avec le capot de protection d’objectif fermé.
• Appuyez sur .
2
Appuyez sur pour sélectionner MODE MENU.
3
Appuyez sur pour sélectionner la languette CARD,
puis appuyez sur .
4
Appuyez sur .
5
Appuyez sur pour sélectionner ALL ERASE,
puis appuyez sur .
64 Fr
Page 65

6
Appuyez sur pour sélectionner YES, puis appuyez sur
.
Toutes les vues sont effacées.
J FORMATAGE ( )
Cette fonction vous permet de formater des cartes. Le formatage prépare les
cartes à recevoir des données. Avant d’utiliser des cartes d’une marque autre
que Olympus ou des cartes qui ont été formatées sur un ordinateur, vous
devez les formater avec l’appareil photo.
Toutes les données existantes enregistrées sur la carte, qu’elles soient
protégées ou non, sont effacées lorsque la carte ou la mémoire interne est
formatée. Une fois effacées, les vues ne peuvent être restaurées, prenez donc
garde de n’effacer aucune donnée importante.
1
Affichez le menu principal en mode de prise de vue.
• Ouvrez le capot de protection d’objectif.
• Appuyez sur .
2
Appuyez sur pour sélectionner le MODE MENU.
3
Appuyez sur pour sélectionner la languette CARD,
puis appuyez sur .
4
Appuyez sur .
5
Appuyez sur pour sélectionner YES, puis appuyez sur
.
Fr
Fr 65
Page 66

RÉGLAGES D’IMPRESSION
En indiquant le nombre d'impression de chaque vue sur la carte et en
précisant si vous voulez que la date et l’heure apparaissent, vous pouvez
imprimer les vues souhaitées selon les données de réservation d'impression
avec une imprimante compatible DPOF ou dans un laboratoire qui prend en
charge le système DPOF.
Que signifie DPOF ?
DPOF est un sigle correspondant à Digital Print Order Format (Format de
Fr
commande de tirage numérique). Il s’agit d’un format utilisé pour enregistrer
automatiquement les informations d’impression à partir des appareils
numériques.
En spécifiant les vues à imprimer, ces dernières peuvent être imprimées
facilement par des laboratoires de tirage compatibles DPOF ou sur une
imprimante personnelle compatible DPOF.
Confirmez les données de réservation d’impression
Si des données de réservation d’impression sont déjà enregistrées sur la
carte, l’écran PRINT ORDER SETTING apparaît vous donnant le choix
entre l’effacement ou la conservation de ces données. S’il n’existe aucune
donnée de réservation d’impression, cet écran n’apparaît pas et vous pouvez
ignorer l’étape suivante.
Sélection de réservation pour une seule vue ou toutes les vues
Choisissez si vous voulez préciser le nombre d’impressions souhaité pour
une vue sélectionnée, ou si vous voulez une impression de toutes les vues.
Détermination du nombre d’impression (pour une seule vue uniquement)
Affichez les images à imprimer et spécifiez le nombre d’impression souhaité.
Réglage des données d’impression de date et d’heure
Vous pouvez faire apparaître la date et l’heure de la prise de vue sur
l’impression.
Confirmez les données de réservation
Vérifiez le nombre d’images que vous voulez imprimer, le nombre total
d’impression et les données d’impression de la date et de l’heure.
66 Fr
Pour plus de détails, se référer au “Manuel de référence”
sur le CD-ROM.
Page 67

TRANSFERT DES PHOTOS VERS UN ORDINATEUR
En raccordant l’appareil photo à un ordinateur avec le câble USB fourni, vous
pouvez transférer des images d’une carte vers l’ordinateur. Certains
systèmes d’exploitation peuvent nécessiter un réglage spécial avant le
premier branchement de l’appareil. Suivre le schéma ci-dessous. Pour plus
de détails sur les procédures décrites dans le tableau, se référer au “Manuel
de référence” sur le logiciel CD.
Identification du système d’exploitation
Fr
Windows 98/
98 SE (Second Edition)
Installation du pilote
USB pour Windows 98
Windows Me/2000/XP
Mac OS 9.0 - 9.1/
OS X (10.0)
Raccordement de l’appareil photo à un ordinateur en utilisant le câble USB
Confirmation que l’ordinateur reconnaît l’appareil photo
Téléchargement de fichiers d’image
Retrait du câble USB
Même si votre ordinateur dispose d’un connecteur USB, le transfert de données
peut ne pas fonctionner correctement si vous utilisez l’un des systèmes
d’exploitation indiqués ci-dessous ou si vous avez un connecteur USB additionnel
(carte d’extension, etc.).
• Windows 95/NT 4.0
• Windows 98/98 SE actualisé à partir de Windows 95
• Mac OS 8.6 ou inférieur (sauf Mac OS 8.6 avec USB MASS Storage Support
1.3.5 installés en usine)
• Le transfert de données n’est pas garanti sur un système d’ordinateur construit à
la maison ou sur un ordinateur sans système d’exploitation installé en usine.
• Vous pouvez visionner des images en utilisant : des applications graphiques
qui supportent le format de fichier JPEG (Paint Shop Pro, Photoshop, etc.);
des navigateurs Internet (Netscape Communicator, Microsoft Internet
Explorer, etc.); CAMEDIA Master; ou d’autres logiciels. Pour des détails sur
l’utilisation des applications graphiques disponibles dans le commerce,
reportez-vous à leurs manuels d’utilisations.
• QuickTime est nécessaire pour visionner des films. QuickTime figure sur le
CD fourni.
Fr 67
Page 68

• Si vous voulez éditer des images, vous devez d’abord les télécharger sur
votre ordinateur. Avec certains types de logiciels, les fichiers d’image
peuvent être détruits si vous tentez d’éditer (faire pivoter, etc.) alors qu’ils
sont toujours sur la carte.
J
TÉLÉCHARGEMENT DES FICHIERS D’IMAGE À L’AIDE D’AUTRES SYSTÈMES
D’EXPLOITATION (Pour les utilisateurs d’autres systèmes d’exploitation)
Les utilisateurs d’autres systèmes d’exploitation ne peuvent pas connecter
l’appareil photo directement à l’ordinateur.
Windows 95 Windows NT Mac OS avant OS 9
Vous pouvez télécharger des images directement vers votre ordinateur en
Fr
utilisant la carte ou un adaptateur de disquette (en option) ou un adaptateur
de carte PC (en option).
Votre ordinateur possède-t-il une interface USB ?
Existe-t-il un port avec la marque sur votre ordinateur ?
Non
Non
Votre ordinateur possède-t-il un logement de carte PC intégré ?
Non
Votre ordinateur possède-t-il un lecteur de disquette intégré ?
Non
Oui
Votre système
d’exploitation figure-t-il
parmi les suivants ?
•Windows 98
•Windows 2000
•Windows Me
•Windows XP
•Mac OS 9/X
Oui
Oui
Connectez l’appareil photo
Oui
directement à l’ordinateur à
l’aide du câble
USB.
Utilisez le lecteur/graveur
SmartMedia USB.
*Non compatible avec Mac OS X.
Selon le modèle, vous pouvez
télécharger un pilote du site Web
Olympus.
Pour les détails, visitez notre site Web.
Utilisez l’adaptateur de carte
PC en option.
*Non supporté avec Windows
NT4.0 et les systèmes inférieurs.
Utilisez l’adaptateur de
disquette FlashPath en
option.
Adressez-vous au représentant Olympus le plus près de chez vous.
Pour plus de détails, se référer au “Manuel de référence”
sur le CD-ROM.
68 Fr
Page 69

ACCESSOIRES EN OPTION
• Étui souple d’appareil photo
En février 2002
• Imprimantes photo P-400 et P-200 pour les appareils photo numériques de
la marque Olympus
• Adaptateur secteur
• Carte Smartmedia standard (8/16/32/64/128 Mo)
• Adaptateur de disquette
• Adaptateur de PC Card
• Unité de lecture/écriture de support amovible de marque Olympus
• Batteries NiMH
• Chargeur de batterie NiMH
• Piles au lithium CR-V3 de longue durée
Visitez le site Olympus pour plus informations sur les accessoires en
option.
http://www.olympus.com/
Fr
Fr 69
Page 70

CODES D’ERREUR
Écran ACL Cause possible Solution
Fr
NO CARD
CARD ERROR
WRItE-PROtECt
CARD FULL
NO PICtURE
PICtURE ERROR
Aucune carte n’a été
insérée ou vous avez
inséré une carte qui n’est
pas reconnue.
Impossible d’enregistrer,
afficher ou supprimer des
vues sur cette carte.
Il est interdit d’écrire sur la
carte.
Il n’y a plus d’espace libre
sur la carte, vous ne
pouvez plus prendre de
photos.
Il n’y a plus d’espace libre
sur la carte, par
conséquent, il n’est plus
possible d’enregistrer
d’informations telles que
les réservations
d’impression ou autres
fonctions.
Il n’y a aucune vue sur la
carte.
La vue sélectionnée ne
peut être affichée à l’écran
de l’appareil photo.
Insérez une carte ou réinsérez la carte
correctement.
Essuyez les pièces de contacts dorées
avec un morceau de papier de
nettoyage (disponible dans le
commerce) et insérez à nouveau la
carte. Si le problème persiste,
formatez la carte. Si la carte ne peut
pas être formatée, vous ne pouvez pas
l’utiliser.
Si vous prenez des photos, retirez le
sceau de protection contre l’écriture
appliqué sur la carte. Pour plus de
détails, reportez-vous aux instructions
accompagnant la carte.
Remplacez la carte ou effacez une
partie des photos. Avant de les effacer,
téléchargez les images importantes
sur un ordinateur.
Remplacez la carte ou effacez une
partie des photos. Avant de les effacer,
téléchargez les images importantes
sur un ordinateur.
La carte ne contient aucune vue.
Enregistrez des vues.
Utilisez un logiciel de traitement
d’image pour l’afficher. Si vous n’y
parvenez pas, il se peut que le fichier
image soit en partie endommagé.
70 Fr
Page 71

CARD-COVER OPEN
CARD SEtUP
POWER OFF
FORMAt
SELECt
GO
Le couvercle du logement
de carte est ouvert.
La carte n’est pas
formatée.
Fermez le couvercle du logement de
carte.
Formatez la carte.
Fr
Fr 71
Page 72

FICHE TECHNIQUE
Type d’appareil Appareil photo numérique (prise de vue et
Système
d’enregistrement
Fixe Enregistrement numérique, JPEG (selon
Fr
Vidéo Prise en charge de QuickTime Motion JPEG
Mémoire SmartMedia (4 Mo – 128 Mo)
Résolutions d’image
d’enregistrement
Nombre de vues
enregistrables
(Avec une carte de 8
Mo)
Nombre de pixels
effectifs
Capteur d’image Capteur CCD de 1/3,2" à 2.110.000 pixels (brut)
Objectif Objectif Olympus de 5-15 mm, f2,8/4,9, 8
Système de mesure Mesure ESP numérique
Ouverture f2,8, f4,9
Vitesse d’obturation 1/2 à 1/1000 secondes
Portée de prise de vue 0,5 m à (normal)
Viseur Viseur optique à image réelle
Écran ACL Écran d’affichage couleur à cristaux liquides TFT
affichage)
le système Design rule for Camera File (DCF),
Digital Print Order Format (DPOF).
*Toutes les cartes à l’exception de 2 Mo et 5V.
1600 × 1200 pixels (SHQ/HQ)
1024 × 768 pixels (SQ1)
640 × 480 pixels (SQ2)
5 vues environ (SHQ)
16 vues environ (HQ)
29 vues environ (SQ1)
49 vues environ (SQ2)
2.000.000 pixels
éléments en 7 groupes (équivalent à un objectif de
38 mm à 114 mm sur un appareil de 35 mm)
(mode de prise de vue de nuit : 1 sec.)
∞
0,2 à 0,5 m (mode gros plan)
(avec repères de mise au point automatique)
de 1,5", 114.000 pixels
72 Fr
Page 73

Temps de chargement
du flash
Connecteur externe
Système de calendrier
automatique
Conditions de
fonctionnement
Température 0°C à 40°C (fonctionnement)
Humidité 30% à 90% (fonctionnement)
Alimentation Quatre piles alcalines AA (R6), piles au lithium,
Dimensions 112 mm (L) × 62 mm (H) × 35 mm (P)
Poids 175 g (sans piles ni carte)
Caractéristiques modifiables sans préavis ni obligations de la part du
fabricant.
Approximativement 9 sec.
Prise d’entrée CC (DC IN), connecteur USB (mini B), prise de sortie VIDEO (VIDEO OUT)
Jusqu’à l’an 2099
-20°C à 60°C (stockage)
10% à 90% (stockage)
batteries NiMH ou NiCd.
Ou une batterie au lithium CR-V3
Ou un adaptateur secteur (option).
* Les piles zinc-carbone (manganèse) ne peuvent
pas être utilisées.
(sans les protubêrances)
Fr
Fr 73
Page 74

INHALT
ERSTE SCHRITTE . . . . . . . . . . . . . . . . . . . . . . . . . . . . . 76
MENÜFUNKTIONEN . . . . . . . . . . . . . . . . . . . . . . . . . . . 84
GRUNDSÄTZLICHE AUFNAHMEFUNKTIONEN . . . . . 90
BILDQUALITÄT UND -GRÖßE AUSWÄHLEN
(AUFNAHMEMODUS) . . . . . . . . . . . . . . . . . . . . . . . . . . 95
WIEDERGABE . . . . . . . . . . . . . . . . . . . . . . . . . . . . . . . . 97
DRUCKBEZOGENE EINSTELLUNGEN . . . . . . . . . . . 102
De
HERUNTERLADEN VON BILDERN AUF IHREN
COMPUTER . . . . . . . . . . . . . . . . . . . . . . . . . . . . . . . . . 103
SONDERZUBEHÖR. . . . . . . . . . . . . . . . . . . . . . . . . . . 105
FEHLERMELDUNGEN . . . . . . . . . . . . . . . . . . . . . . . . 106
TECHNISCHE DATEN . . . . . . . . . . . . . . . . . . . . . . . . . 108
Diese Anweisungen gelten ausschließlich für die Kurzanleitung.
Wenn Sie ausführlichere Anleitungen zu den hier beschriebenen
Funktionen wünschen, lesen Sie bitte das auf der CD-ROM
befindliche „Referenzhandbuch“.
74 De
Page 75

Für Kunden in Europa
Das (CE)-Zeichen bestätigt, dass dieses Produkt mit den
europäischen Bestimmungen für Sicherheit, Gesundheit,
Umweltschutz und Personenschutz übereinstimmt. Mit dem (CE)Zeichen versehene Kameras sind für den europäischen Markt
bestimmt.
Für Kunden in Nord- und Südamerika
Für Kunden in den USA
Betriebserlaubnis
Modell-Nummer : C-2 Zoom/D-520 ZOOM/C-220 ZOOM
Markenname : OLYMPUS
Verantwortlicher Hersteller : OLYMPUS AMERICA INC.
Anschrift : 2 Corporate Center Drive, Melville, New York
Telefonnummer : 631-844-5000
Auf Übereinstimmung mit den FCC-Bestimmungen geprüft.
FÜR DEN HEIM- UND BÜROGEBRAUCH
Dieses Gerät erfüllt die Auflagen unter Abschnitt 15 der FCC-Bestimmungen.
Das Betreiben dieses Geräts ist zulässig, wenn die nachfolgend genannten
Auflagen erfüllt werden:
(1) Von diesem Gerät dürfen keine schädlichen Störeinstreuungen
ausgehen.
(2) Dieses Gerät muss die Einwirkung von Störeinstreuungen zulassen. Dies
schließt Störeinstreuungen ein, welche Beeinträchtigungen der
Funktionsweise oder Betriebsstörungen verursachen können.
11747-3157, USA.
Für Kunden in Kanada
Dieses digitale Gerät der Klasse B erfüllt alle Anforderungen der kanadischen
Vorschriften für Geräte, die Störeinstreuungen verursachen.
Warenzeichen
• IBM ist ein eingetragenes Warenzeichen der International Business Machines
Corporation.
• Microsoft und Windows sind eingetragene Warenzeichen der Microsoft
Corporation.
• Macintosh ist ein Warenzeichen der Apple Computer Inc.
• Alle weiteren Firmen- und Produkteigennamen sind eingetragene Warenzeichen/
Handelsmarken der jeweiligen Rechteinhaber.
• Die Bilddatenverwaltung dieser Kamera unterstützt die DCF-Norm „Design Rule
for Camera File System“ der JEITA (Japan Electronics and Information
Technology Industries Association).
De
De 75
Page 76

ERSTE SCHRITTE
J BESCHREIBUNG DER TEILE
Auslöser
ZoomRegler
De
Objektivschutzschieber
Schaltet die Kamera im
Aufnahmemodus ein und aus.
Sucher
Objektiv
Wird beim Öffnen des
Objektivschutzschiebers
automatisch ausgeschoben.
Selbstauslösermodus-LED
Blitz
Wird beim Öffnen des
Objektivschutzschiebers automatisch
herausgeschoben.
Buchsenabdeckung
USB-Anschluss
VIDEO
OUT
Buchse
Gleichspannungseingang
Orangefarbene Sucher-LED
Grüne Sucher-LED
AF-Markierung
Kartenfachabdeckung
Trageriemenöse
LCDMonitor
(LCD-Monitor)-Taste
Schaltet die Kamera im
Wiedergabemodus ein und aus.
76 De
Batteriefachdeckel
Pfeiltaste
Stativgewinde
(OK/Menü)-Taste
Page 77

J LCD-MONITOR-ANZEIGEN
Aufnahmemodus Wiedergabemodus
1
2
3
4
5
1
6
7
8
9
13
14
8
10
5
7
11
12
Funktion Anzeigesymbole
Batterieladezustand ,
1
Blitz , , , ,
2
Spotmessung
3
Speichersegmentanzeige
4
Belichtungskorrektur -2.0, -1.5, -1.0, -0.5, +0.5, +1.0, +1.5, +2.0
5
Selbstauslöser/Auslösemodus
6
Weißabgleich WB AUTO, , , ,
7
Bildaufnahmemodus SHQ, HQ, SQ1, SQ2
8
Anzahl der noch verfügbaren
9
Einzelaufnahmen/Sekunden
Anzahl der Pixel 1.600 × 1.200, 1.024 × 768, 640 × 480
10
Datum und Zeit '02.01.12 12:30
11
Dateinummer, Bildnummer/
12
Spielzeit
Druckvorauswahl, Anzahl der
13
Ausdrucke
Schreibschutz
14
Im Wiedergabemodus können Sie die Einzelheiten zu den
Aufnahmeinformationen des aufgenommenen Bildes einsehen.
,,
16/16"
100-0016, 16/16"
× 2
De
De 77
Page 78

Speichersegmentanzeige
Die Speichersegmentanzeige leuchtet, wenn Sie eine Aufnahme tätigen.
Während die Anzeige leuchtet, wird die Aufnahme auf der Karte gespeichert.
Die Speichersegmentanzeige ändert sich wie nachfolgend gezeigt je nach
Aufnahmestatus. Wenn die Speichersegmentanzeige vollständig leuchtet,
warten Sie bitte einen Moment, bis Sie die nächste Aufnahme tätigen.
Beim Erstellen von Einzelaufnahmen
Aufnehmen Aufnehmen Aufnehmen
Warten
In diesem Fall sind
Aufnahmen möglich
(Leuchtet vollständig)
De
Vor der
Aufnahme
(Anzeige ist
aus)
Nach einer
Aufnahme
(Leuchtet)
Nach mehr
als zwei
Aufnahmen
(Leuchtet)
Bei der Movie-Aufnahme
Wenn Sie die Aufnahme fortsetzen
Aufnehmen
Warten
Vor der
Aufnahme
(Anzeige ist aus)
Während der Aufnahme (Leuchtet)
• Die Aufnahme ist erst möglich, wenn der leuchtende Bereich
vollständig erloschen ist.
• Die Movie-Aufnahme endet automatisch, wenn die
Speichersegmentanzeige vollständig leuchtet.
Batterieladezustand
Ist die verbleibende Batterieleistung gering, verändert sich die
Batteriezustandsanzeige wie folgt, während die Kamera eingeschaltet ist.
Keine Anzeige
Leuchtet auf (grün) Blinkt (rot)
Verbleibende
Batterieleistung:
hoch
Verbleibende
Batterieleistung: niedrig
Neue Batterien einlegen.
78 De
Die grüne LED und die
rechts im Sucher
angeordnete
orangefarbene LED
blinken
Verbleibende
Batterieleistung: erschöpft
Neue Batterien einlegen.
keine weiteren
Page 79

J ANBRINGEN DES TRAGERIEMENS
1
Führen Sie das kurze Ende des
Trageriemens durch die Öse.
2
Den Trageriemen durch die Schlaufe
führen, die bereits durch die Öse
gefädelt wurde.
3
Ziehen Sie den Riemen straff und
achten Sie darauf, dass er sicher
befestigt ist und sich nicht lösen kann.
J EINLEGEN DER BATTERIEN
1
Vergewissern Sie sich stets, dass:
• Der LCD-Monitor ausgeschaltet ist.
• Der Objektivschutzschieber geschlossen ist.
• Die rechts im Sucher angeordnete LED nicht leuchtet.
2
Schieben Sie den
Batteriefachdeckel in Richtung
(die Richtung, die durch die
Markierung auf dem Deckel
vorgegeben ist) und heben Sie ihn
in Richtung an.
3
Legen Sie die Batterien wie in der
Abbildung gezeigt mit der richtigen Polarität ein.
Bei
Verwendung
von AA (R6)
Batterien
Bei
Verwendung
einer LithiumBlockbatterie
De
Markierung
für die
Einlegerichtung
der
Batterien
4
Schließen Sie den Batteriefachdeckel in
Richtung . Während Sie auf die
Markierung drücken, schieben Sie den
Deckel in Richtung .
Wenden Sie keine Gewalt an, falls sich das
Batteriefach nicht ordnungsgemäß schließen lässt.
Versuchen Sie, mit beiden Händen auf zu
drücken.
De 79
Page 80

AA (R6) Alkalibatterien
Beachten Sie, dass bei der Verwendung von AA Batterien die Anzahl der
verfügbaren Aufnahmen je nach Batteriehersteller, Aufnahmebedingungen
etc. stark schwanken kann. Verwenden Sie solche Batterien nur in
Ausnahmefällen. Lassen Sie den LCD-Monitor nach Möglichkeit
ausgeschaltet, um Batteriestrom zu sparen.
J
EINLEGEN EINER KARTE (SmartMedia)
Die von Ihnen erstellten Aufnahmen werden auf der Karte abgelegt.
1
Vergewissern Sie sich stets, dass:
• Der LCD-Monitor ausgeschaltet ist.
De
• Der Objektivschutzschieber geschlossen ist.
• Die rechts im Sucher angeordnete LED nicht leuchtet.
2
Die Kartenfachabdeckung öffnen.
3
Die Karte wie in der Abbildung
gezeigt in die richtige Richtung
einschieben.
Eine Pfeilmarkierung auf der Innenseite
der Kartenfachabdeckung gibt die
Einschubrichtung der Karte vor.
4
Die Kartenfachabdeckung so
schließen, dass ein Klick zu hören
ist.
Richtungsmarkierung
für das Einführen der
Karte
80 De
Page 81

J EIN- UND AUSSCHALTEN DER KAMERA
Beim Aufnehmen
Einschalten: Den Objektivschutzschieber öffnen.
Die Kamera wird im Aufnahmemodus eingeschaltet. Das
Objektiv und der Blitz werden ausgeschoben.
Falls das Objektiv nicht ausgeschoben wird, ist der
Objektivschutzschieber nicht vollständig geöffnet. Schieben
Sie den Objektivschutzschieber auf, bis er mit einem
Klickgeräusch einrastet.
Falls die Einstellungen für Datum und
Zeit auf die werkseitigen
Grundeinstellungen zurückgesetzt
wurden, erscheint Y/M/D auf dem LCDMonitor.
Ausschalten: Schließen Sie den Objektivschutzschieber vorsichtig, bis
er das Objektiv beinahe berührt.
Der Objektivschutzschieber bleibt stehen, kurz bevor er an
das Objektiv anstösst und das Objektiv wird eingeschoben.
Warten Sie, bis das Objektiv vollständig eingeschoben wurde
und schließen Sie dann den Objektivschutzschieber
vollständig.
Die Kamera wird ausgeschaltet. (Der LCD-Monitor wird
ebenfalls ausgeschaltet.)
Drücken Sie den Blitz mit der Hand herunter, bis er einrastet.
De
Schieben Sie den Objektivschutzschieber nicht mit Gewalt gegen das
Objektiv, da dies zu Fehlfunktionen oder Objektivschäden führen kann.
De 81
Page 82

Bei der Bildwiedergabe
Einschalten: Bei geschlossenem Objektivschutzschieber die Taste
(LCD-Monitor) drücken.
Die Kamera wird im Wiedergabemodus eingeschaltet. Der
LCD-Monitor schaltet sich ein und zeigt die zuletzt erstellte
Aufnahme.
De
Ausschalten: Die Taste (LCD-Monitor) drücken.
Der LCD-Monitor und die Kamera schalten sich ab.
Taste (LCD-Monitor)
Während die Kamera eingeschaltet ist, niemals das Netzteil
anschließen oder abtrennen, die Kartenfachabdeckung öffnen oder die
Karte oder die Batterien entfernen. Anderenfalls können alle auf der
Karte gespeicherten Daten unwiederbringlich verloren gehen. Schalten
Sie die Kamera beim Wechseln der Karte ab, bevor Sie die
Kartenfachabdeckung öffnen.
82 De
Taste (LCD-Monitor)
Page 83

J EINSTELLEN VON DATUM UND ZEIT
1
Den Objektivschutzschieber öffnen.
2
drücken.
Das Hauptmenü für den Aufnahmemodus wird angezeigt.
3
Drücken Sie auf die Pfeiltaste und wählen Sie MODE
MENU.
4
Drücken Sie und wählen Sie den Menüanzeiger SETUP.
Drücken Sie anschließend auf .
5
Drücken Sie und wählen Sie . Drücken Sie
anschließend auf .
6
Drücken Sie und wählen Sie eines der nachfolgenden
Datumsformate:
Y-M-D (Jahr/Monat/Tag)
M-D-Y (Monat/Tag/Jahr)
D-M-Y (Tag/Monat/Jahr)
Anschließend drücken.
Der Cursor springt zum ersten Einstellungsfeld.
7
Drücken Sie zum Einstellen des ersten Feldes und
anschließend , um zum nächsten Feld zu gelangen.
Drücken Sie , um zur vorherigen Feldeinstellung zu gelangen.
8
Diese Bedienungsschritte wiederholen, bis Datum und Zeit
vollständig eingestellt sind.
9
drücken.
Zur sekundengenauen Zeitmessung zur vollen Minute (00
Sekunden) drücken. Die Zeitmessung wird beim Drücken aktiviert.
10
Schließen Sie den Objektivschutzschieber.
Die Kamera schaltet sich ab.
Wird die Kamera für eine Stunde ohne Batterien liegen gelassen oder sind
die Batterien erschöpft, kann es sein, dass die Datums- und Zeitangaben
gelöscht oder geändert werden. Prüfen Sie daher vor dem Aufnehmen, ob
die Werte für Zeit und Datum noch korrekt sind.
De
De 83
Page 84

MENÜFUNKTIONEN
J
VERWENDEN DER MENÜS UND MENÜANZEIGER
Wenn Sie die Kamera einschalten und drücken, erscheint das
Hauptmenü auf dem LCD-Monitor. Die Funktionen der Kamera werden über
diese Menüs eingestellt. Dieses Kapitel erklärt Ihnen anhand von
Screenshots, wie diese Menüs funktionieren.
drücken.
De
Auswechselbare
Menüfunktionen
• Damit können Sie schnell auf die
am häufigsten verwendeten
Menüeinstellungen zugreifen.
• Zeigt Funktionstasten am unteren
Bildschirmrand an und ermöglicht
Ihnen die Funktionsauswahl mit
.
SHQ 1600*1200
HQ 1600*1200
SQ1 1024*768
SQ2 640*480
CANCELGOSELECt
84 De
Das Hauptmenü wird angezeigt.
DRIVE
MODE MENU
FUNCtION
Wählen Sie die einzelnen
Menüs mit der Pfeiltaste aus.
Das MODE Menü
• Damit können Sie auf die Menüauswahl
für das Einstellen der Messwerte, des
Weißabgleichs, usw. zugreifen.
• Unterteilt die Einstellungen in 4
Menüanzeiger.
• Öffnet die Menüanzeiger CAMERA,
PICTURE, CARD und SETUP.
Wählen Sie den gewünschten
Menüanzeiger, indem Sie im linken
Bildschirmbereich auf
drücken.
CAMERA
Menüanzeiger
DIGItAL ZOOM
MEtERING
CARDSEt PIC
Page 85

Verwenden der Menüs
1
Drücken Sie , um das
Hauptmenü anzuzeigen
und anschließend .
Hauptmenü Menüanzeiger CAMERA
2
Drücken Sie , um einen
Menüanzeiger auszuwählen und
anschließend , um das Menü
anzuzeigen.
DRIVE
MODE MENU
FUNCtION
CAMERA
DIGItAL ZOOM
MEtERING
CARDSEt PIC
Menüanzeiger
PICTURE
CAM
PICtURE
CARDSEt
Menüanzeiger
CARD
CARD SEtUP
CAM
PIC
CARD
SEt
Menüanzeiger
SETUP
ALL RESEt
REC VIEW
Um wieder
De
einen
Menüanzeiger
WB
auszuwählen,
drücken Sie
.
De 85
Page 86

De
3
Drücken Sie , um die
gewünschte Funktion
auszuwählen und anschließend
, um die verfügbare
Einstellungsauswahl anzuzeigen.
CAMERA
DIGItAL ZOOM
MEtERING
CARDSEt PIC
4
Drücken Sie ,
um die Einstellung
auszuwählen.
Die Einstellung wird
übernommen, sobald
diese ausgewählt
wurde.
86 De
CAMERA
DIGItAL ZOOM
MEtERING
CARDSEt PIC
Der grüne
Begrenzungsrahmen
bewegt sich zur
gewählten Option.
oder
Um wieder eine
Funktion
auszuwählen,
drücken Sie
oder .
CAMERA
DIGItAL ZOOM
MEtERING
CARDSEt PIC
CAMERA
DIGItAL ZOOM
MEtERING
CARDSEt PIC
OFF
ON
OFF
ON
Um das Menü zu
schließen, drücken Sie
zweimal.
• Je nach Kamerastatus und der betreffenden Einstellung können nicht
alle Optionen gewählt werden. Wenn beispielsweise der
Aufnahmemodus ausgewählt wurde, können Sie im Menüanzeiger EDIT
weder SEPIA, BLACK&WHITE noch auswählen.
• Um eine Aufnahme mit den derzeit ausgewählten Einstellungen zu
tätigen, drücken Sie den Auslöser, während das Menü angezeigt wird.
• Wenn Sie die Einstellungen auch nach dem Abschalten der Kamera
beibehalten möchten, wählen Sie für die Option Gesamtrückstellung die
Einstellung OFF.
Page 87

Auswechselbare Menüfunktionen
Aufnahmemodus
DRIVE
Ermöglicht Einzelaufnahmen (Normalaufnahmemodus).
Ermöglicht Mehrfachaufnahmen direkt hintereinander.
Ermöglicht die Aufnahme von kurzen Filmsequenzen.
Damit können Sie die Auflösung und die Qualität der Einzelaufnahme
auswählen.
Einzelaufnahme : SHQ, HQ, SQ1, SQ2
Movie-Aufnahme : HQ, SQ
FUNCTION
2 IN 1
PANORAMA
Wiedergabemodus
Zeigt alle Bilder als Diashow an.
MOVIE PLAYBACK
Spielt ein Movie ab.
INFO
Zeigt alle Aufnahmeinformationen auf dem LCD-Monitor an.
ERASE
Löscht eine ausgewählte Aufnahme.
Mit dieser Funktion können Sie zwei nacheinander erstellte
Aufnahmen zu einer Einzelaufnahme zusammenfügen.
Eigenporträt-Aufnahmemodus:
Die fotografierende Person kann sich mit von
handgehaltener Kamera selber aufnehmen.
Bei der Verwendung von Olympus CAMEDIA SmartMediaKarten können Panoramaaufnahmen angefertigt werden.
De
De 87
Page 88

Die MODE Menüs
Die MODE Menü-Funktionen unterteilen sich in 4 Menüanzeiger. Verwenden
Sie zum Auswählen eines Menüanzeigers und zum Anzeigen der
entsprechenden Funktionen.
Diese Anweisungen gelten ausschließlich für die Kurzanleitung.
Wenn Sie ausführlichere Anleitungen zu den hier beschriebenen
Funktionen wünschen, lesen Sie bitte das auf der CD-ROM
befindliche „Referenzhandbuch“.
Aufnahmemodus
De
Menüanzeiger CAMERA
Menüanzeiger PICTURE
Menüanzeiger CARD
Menüanzeiger SETUP
Menüanzeiger
DIGITAL ZOOM
METERING
Menüanzeiger
WB
Menüanzeiger
CARD SETUP Formatiert eine Karte.
Menüanzeiger
ALL RESET
REC VIEW
Zur LCD-Monitor-Helligkeitseinstellung.
CAMERA
Reguliert die Bildhelligkeit (Belichtungskorrektur).
Schaltet den Warnton ein und aus.
Zur Einstellung von Datum und Zeit.
Erweitert die maximale optische Zoomvergrößerung und
ermöglicht mit der Digitalzoom-Funktion Aufnahmen bei
ca. 5facher Vergrößerung.
Wählt den Bildbereich, der für die Ermittlung der Belichtungsstärke
oder Bildhelligkeit verwendet wird, entsprechend den zwei
möglichen Einstellungen: ESP oder (Spotmessung).
PICTURE
Zur Wahl des passenden Weißabgleichs entsprechend
der Lichtquelle.
CARD
SETUP
Zur Wahl des Gesamtrückstellstatus der Funktionen bei
Kameraausschaltung.
Legt fest, ob Aufnahmen beim Speichern auf dem LCDMonitor angezeigt werden.
88 De
CAMERA
DIGItAL ZOOM
MEtERING
CARDSEt PIC
Page 89

Wiedergabemodus
Menüanzeiger PLAY
PLAY
Menüanzeiger EDIT
Menüanzeiger CARD
CARDSEt EDIt
Menüanzeiger SETUP
Menüanzeiger
Menüanzeiger
BLACK & WHITE Ermöglicht Schwarz/Weiß-Aufnahmen.
SEPIA Ermöglicht Aufnahmen mit Sepia-Ton.
INDEX Erzeugt für ein Movie einen Index in 9 Bildern.
Menüanzeiger
CARD SETUP
Menüanzeiger
ALL RESET
PLAY
Schützt Aufnahmen vor einem versehentlichen Löschen.
Dreht die Aufnahmen um 90 Grad nach rechts oder links.
Verringert die Dateigröße.
Speichert die für DPOF-Drucker erforderlichen
Druckinformationen auf der Karte.
EDIT
CARD
Formatiert eine Karte.
Löscht alle auf der Karte gespeicherten Daten.
SETUP
Zur Wahl des Gesamtrückstellstatus der Funktionen bei
Kameraausschaltung.
Schaltet den Warnton ein und aus.
Zur Wahl der Bildzahl bei der Indexwiedergabe.
Zur LCD-Monitor-Helligkeitseinstellung.
Zur Einstellung von Datum und Zeit.
De
De 89
Page 90

GRUNDSÄTZLICHE AUFNAHMEFUNKTIONEN
J EINZELBILDAUFNAHME
Für Einzelbildaufnahmen können Sie entweder den Sucher oder den LCDMonitor verwenden. Beide Methoden sind einfach, denn Sie müssen dabei
lediglich auf den Auslöser drücken.
Einzelbildaufnahme bei Verwendung des Suchers
1
Den Objektivschutzschieber öffnen.
Schieben Sie den Objektivschutzschieber auf, bis er mit einem
De
Klickgeräusch einrastet.
Das Objektiv und der Blitz werden ausgeschoben.
2
Richten Sie die Markierung im Sucher auf das Motiv.
Ist das Motiv weniger als 0,5 m von der Kamera entfernt, wählen Sie
den Nahaufnahmemodus.
3
Den Auslöser ruckfrei halb nach unten drücken.
Wenn die Schärfe und die Belichtungsstärke gespeichert sind, leuchtet
die rechts im Sucher angeordnete grüne LED. Dabei kann aus dem
Inneren der Kamera ein Geräusch des Fokusierungs-Mechanismus zu
hören sein, obwohl keine Aufnahme erstellt wird.
4
Drücken Sie den Auslöser aus der halb gedrückten Position
vollständig nach unten.
Die Kamera stellt die Aufnahme her.
Einzelbildaufnahme bei Verwendung des LCD-Monitors
1
Den Objektivschutzschieber öffnen.
Schieben Sie den Objektivschutzschieber auf, bis er mit einem
Klickgeräusch einrastet.
Das Objektiv und der Blitz werden ausgeschoben.
2
drücken.
Der LCD-Monitor wird automatisch eingeschaltet.
3
Bestimmen Sie die Bildkomposition, während Sie Ihr Motiv im
LCD-Monitor betrachten.
4
Tätigen Sie die Aufnahme, indem Sie dieselbe Methode wie
beim Sucher verwenden.
Drücken Sie den Auslöser aus der halb gedrückten Position vollständig
nach unten, um die Aufnahme zu erstellen.
Wenn Sie Aufnahmen mit abgeschaltetem LCD-Monitor erstellen
möchten, drücken Sie noch einmal .
90 De
Page 91

J
Niemals die Kartenfachabdeckung öffnen, die Batterien entfernen oder
das Netzteil abtrennen, während die orangefarbene LED blinkt.
Anderenfalls können Ihre gespeicherten Aufnahmen unwiederbringlich
verloren gehen, oder die gerade erstellte Aufnahme wird nicht
gespeichert.
WENN DIE RICHTIGE BILDSCHÄRFE NICHT
ERZIELT WERDEN KANN (SCHÄRFESPEICHER)
Wenn sich das scharfzustellende Motiv nicht im Mittelpunkt des
Aufnahmebereichs befindet und Sie die Markierung nicht darauf richten
können, lässt sich die Kamera auf einen anderen Punkt richten, der ungefähr
genauso weit entfernt ist (Schärfespeicher) und die Aufnahme wie
nachfolgend beschrieben erstellen.
1
Den Objektivschutzschieber öffnen.
Die Kamera wird im Aufnahmemodus eingeschaltet.
2
Schauen Sie in den Sucher und
richten Sie die AF-Markierung auf
das Motiv.
Wenn Sie ein Motiv aufnehmen möchten,
das sich schwer scharfstellen lässt oder
das sich schnell bewegt, richten Sie die
Kamera auf ein Motiv, das genauso weit
von der Kamera entfernt ist.
3
Drücken Sie den Auslöser halb nach unten, bis die rechts im
Sucher angeordnete grüne LED permanent leuchtet.
Wenn die grüne LED aufleuchtet, sind die Schärfe und die
Belichtungsstärke gespeichert.
4
Richten Sie die Kamera nun bei halb
gedrücktem Auslöser wieder mit dem
Sucher auf das gewünschte Motiv.
Grüne Sucher-LED
De
5
Drücken Sie den Auslöser aus der
halb gedrückten Position vollständig nach unten.
De 91
Page 92

J MOVIE-AUFNAHME
Mit dieser Kamera können Sie sowohl Einzelbilder als auch kurze
Filmsequenzen aufzeichnen. Mit der Indexfunktion können Movies auch als
Einzelbilder gespeichert und wiedergegeben werden.
1
Öffnet das Hauptmenü im Aufnahmemodus.
• Den Objektivschutzschieber öffnen.
• drücken.
2
Drücken Sie und wählen Sie DRIVE.
3
Drücken Sie und wählen Sie . Drücken Sie
anschließend auf .
Die Movie-Aufnahme wird vorbereitet und das Menü geschlossen.
De
Die verbleibende Gesamtaufnahmezeit wird in Abhängigkeit von der
Kartenspeicherkapazität und dem Symbol auf dem LCD-Monitor
angezeigt.
4
Nehmen Sie das Movie auf, während Sie Ihr Motiv im LCDMonitor betrachten.
Drücken Sie den Auslöser vollständig, um die Aufnahme zu starten.
Beim Drücken des Auslösers wird die Anzahl der verbleibenden
Sekunden für diese Aufnahme angezeigt. Drücken Sie den Auslöser
erneut vollständig nach unten, um die Aufnahme zu beenden.
Wenn Sie den Movie-Modus beenden möchten.
Drücken Sie .
Der LCD-Monitor schaltet sich ab, und der Movie-Modus wird beendet.
• Während der Movie-Aufnahme sind der Blitz und der optischer Zoom nicht
verfügbar.
• Das Abspeichern von Bildern dauert hier länger als bei Einzelbildern.
• Die Anzahl der verbleibenden Sekunden hängt vom Aufnahmemodus
und von dem auf der Karte verfügbaren Speicherplatz ab.
• Sie können keine Movies mit Ton aufnehmen.
J
EINZOOMEN DES MOTIVS (OPTISCHER ZOOM)
Mit dem optischen Zoom sind Telezoom- und Weitwinkelzoom-Aufnahmen
bei dreifacher Vergrößerung möglich (entspricht 38 mm - 114 mm bei einer
35 mm Kamera). Durch die Kombination des 3fach optischen Zooms mit dem
2,5fach-Digitalzoom lassen sich bis zu 7,5fache Zoom-Vergrößerungen
erzielen (entspricht 38 mm - 285 mm bei einer 35 mm Kamera). Wenn der
Aufnahmemodus auf SQ2 eingestellt wird, lässt sich der 5fach-Digitalzoom
nutzen.
1
Den Objektivschutzschieber öffnen.
Die Kamera wird im Aufnahmemodus eingeschaltet.
92 De
Page 93

2
Betätigen Sie den Zoom-Regler, während Sie in
den Sucher schauen.
Schieben Sie den Zoomregler zum Einzoomen in
Richtung und zum Auszoomen in Richtung .
3
Erstellen Sie die Aufnahme, während Sie in den Sucher
schauen.
Bei Verwendung des Digitalzooms kann das Bild grobkörnig wirken.
J NAHAUFNAHMEN ANFERTIGEN
(NAHAUFNAHMEMODUS)
Mit dem Nahaufnahmemodus können Sie ein Motiv in einer Entfernung
zwischen 0,2 - 0,5 m aufnehmen.
1
Den Objektivschutzschieber öffnen.
Die Kamera wird im Aufnahmemodus eingeschaltet.
2
drücken.
Der LCD-Monitor schaltet sich ein und die derzeitige Einstellung für den
Nahaufnahmemodus wird angezeigt.
3
Drücken Sie , während die aktuell gewählte
Nahaufnahmeeinstellung angezeigt wird.
Die Einstellung wechselt immer dann zwischen ON und OFF,
wenn Sie drücken. Wenn der Nahaufnahmemodus ausgewählt ist,
erscheint die Anzeige für den Nahaufnahmemodus.
4
Nehmen Sie das Bild auf, während Sie Ihr Motiv im LCDMonitor betrachten.
Um den Nahaufnahmemodus zu beenden, drücken Sie wiederholt auf
, bis OFF angezeigt wird. Die Anzeige für den
Nahaufnahmemodus erlischt.
J BLITZPROGRAMMWAHL
1
Den Objektivschutzschieber öffnen.
Der LCD-Monitor schaltet sich ein und die Kamera wird im
Aufnahmemodus eingeschaltet.
2
drücken.
Der LCD-Monitor schaltet sich ein und die aktuell gewählte
Blitzeinstellung wird angezeigt.
3
Drücken Sie , während die aktuell gewählte Blitzeinstellung
angezeigt wird.
De
De 93
Page 94

Jedes Mal, wenn Sie drücken, ändert sich der Blitzmodus in
folgender Reihenfolge: AUTO - - - - - .
4
Aufnahme tätigen.
Die Reichweite des Blitzes beträgt ungefähr 2,5 m.
Automatische Blitzabgabe (Keine Anzeige)
Bei niedriger Umgebungshelligkeit oder starkem Gegenlicht löst der Blitz
automatisch aus.
Blitz mit Rote-Augen-Effekt-Reduzierung ( )
Der Blitz mit Rote-Augen-Effekt-Reduzierung mindert dieses Phänomen,
indem er vor dem eigentlichen Blitz mehrere Vorblitze aussendet.
De
Aufhellblitz ( )
Der Blitz löst immer dann aus, wenn der Auslöser gedrückt wird.
Zwangsabgeschalteter Blitz ( )
Die Blitzabgabe unterbleibt auch bei unzureichender Umgebungshelligkeit.
Nachtaufnahme ( )
Verwenden Sie diesen Modus, wenn Sie ein Motiv gegen den Nachthimmel
aufnehmen.
Nachtaufnahme mit Reduzierung des Rote-Augen-Effekts ( )
Verwenden Sie diesen Modus, wenn Sie ein Porträt gegen den Nachthimmel
aufnehmen und dabei den Rote-Augen-Effekt reduzieren wollen.
J DEN SELBSTAUSLÖSER VERWENDEN
Diese Funktion ist dann hilfreich, wenn Sie selbst auf einer Aufnahme
erscheinen möchten. Befestigen Sie die Kamera dabei stets auf einem Stativ.
1
Den Objektivschutzschieber öffnen.
Die Kamera wird im Aufnahmemodus eingeschaltet.
2
drücken.
Der LCD-Monitor schaltet sich ein und die derzeit gewählte Einstellung
für den Selbstauslösermodus wird angezeigt.
3
Drücken Sie auf , während die derzeit gewählte
Einstellung für den Selbstauslösermodus angezeigt wird.
Die Einstellung ändert sich jeweils auf ON oder OFF, wenn
gedrückt wird.
4
Den Auslöser vollständig nach unten drücken.
Die Selbstauslöser-LED leuchtet für ca. 10 Sekunden und wechselt
dann auf ein Blinksignal. Nach 2 Sekunden Blinken mit Piepton wird die
Aufnahme erstellt.
94 De
Page 95

BILDQUALITÄT UND -GRÖßE AUSWÄHLEN
(AUFNAHMEMODUS)
Wählen Sie den Bildaufnahmemodus, der für die spätere Verwendung Ihrer
Aufnahmen (zum Ausdrucken, zur Bildbearbeitung mittels Personal
Computer oder Webpage-Gestaltung etc.) am besten geeignet ist.
Aufnahmemodi für Einzelaufnahmen
Bildaufnahme-
Modus
SHQ
(Super High
Quality)
HQ
(High Quality)
SQ
(Standard
Quality)
Beschreibung
•Verwenden Sie diesen Modus,
wenn Sie ein Bild in hoher Qualität
auf ein großes Papierformat wie
beispielsweise A4 (21 cm ×
29,7 cm) ausdrucken oder auf
einem Personal Computer
weiterverarbeiten möchten.
•Die Bildqualität ist dann höher,
aber es können dadurch weniger
Bilder gespeichert werden. Das
Abspeichern der Bilder dauert
länger.
•Verwenden Sie diesen Modus,
wenn Sie Bilder auf einem
Personal Computer
weiterbearbeiten oder auf Papier
im Postkartenformat drucken
möchten.
•Dieser Modus ist werkseitig
voreingestellt.
•Verwenden Sie diesen Modus,
wenn Sie Bilder als E-Mail-Anhang
versenden oder einfach nur auf
einem Personal Computer
betrachten möchten.
•Dieser Modus ermöglicht
Aufnahmen in Standard-Qualität
und erhöht so die Anzahl der
aufnehmbaren Bilder.
Bildauflösung
(Anzahl der Pixel)
1.600 × 1.200
Pixel*
1.600 × 1.200
Pixel*
1.024 × 768
Pixel* im
Modus SQ1
640 × 480
Pixel* im
Modus SQ2
Qualität
Dateigröße
Schärfer Größer
Normal Kleiner
De
De 95
Page 96

Movie-Aufnahmemodi
Bildaufnahme-
Modus
HQ
(High Quality)
SQ
(Standard
Quality)
*Pixel ist eine Einheit zur Beschreibung der Bildauflösung.
1
De
Öffnet das Hauptmenü im Aufnahmemodus.
• Den Objektivschutzschieber öffnen.
Beschreibung
Sie können jeweils
15 Sekunden am Stück
aufnehmen.
Sie können jeweils
60 Sekunden am Stück
aufnehmen.
• drücken.
2
Drücken Sie und wählen Sie .
3
Drücken Sie und wählen Sie einen der
Aufnahmemodi. Drücken Sie anschließend .
Die Aufnahmemodi für Einzelaufnahmen sind SHQ, HQ, SQ1 und SQ2
sowie HQ und SQ für Movie-Aufnahmen.
Der Aufnahmemodus wird eingestellt und das Menü geschlossen.
4
Aufnahme tätigen.
Bildauflösung
(Anzahl der Pixel)
320 × 240 Pixel* Schärfer Großer
160 × 120 Pixel*
Qualität
Dateigröße
Normal Kleiner
96 De
Page 97

WIEDERGABE
J EINZELBILDWIEDERGABE
Sie können sich Bilder einzeln auf dem LCD-Monitor ansehen.
1
Bei geschlossenem Objektivschutzschieber drücken.
Der LCD-Monitor schaltet sich ein und zeigt die zuletzt erstellte
Aufnahme. (Wiedergabe eines Bildes)
2
3
Drücken Sie , um die Wiedergabe abzubrechen.
Der LCD-Monitor und die Kamera schalten sich ab.
Schnellwiedergabe (Doppelklick-Wiedergabe)
Mit dieser Funktion können Sie Aufnahmen im Aufnahmemodus bei
geöffnetem Objektivschutzschieber wiedergeben. Diese Funktion ist nützlich,
wenn Sie Ihre Aufnahmen kurz überprüfen und schnell wieder in den
Aufnahmemodus zurückkehren möchten.
1
Drücken Sie im Aufnahmemodus zweimal kurz hintereinander
(Doppelklick).
Die Kamera aktiviert dadurch sofort den Wiedergabemodus und zeigt
die zuletzt erstellte Aufnahme an. (Wiedergabe eines Bildes)
2
Den Auslöser ruckfrei halb nach unten drücken.
Die Kamera kehrt in den Aufnahmemodus zurück, so dass Sie weitere
Aufnahmen erstellen können.
Wiedergabe mit Ausschnittsvergrößerung
Die auf dem LCD-Monitor dargestellten Bilder lassen sich um das 1,5, 2, 2,5
oder 3fache vergrößern. Diese Funktion ist nützlich, wenn Sie bestimmte
Details einer Aufnahme näher untersuchen möchten.
1
Bei geschlossenem Objektivschutzschieber drücken.
Der LCD-Monitor schaltet sich ein und zeigt die zuletzt erstellte Aufnahme.
Drücken Sie und wählen Sie das zu vergrößernde Bild aus.
drücken.
: Wiedergabe des vorherigen Bildes.
: Wiedergabe des nächsten Bildes.
: Wiedergabesprung um 10 Bilder rückwärts.
: Wiedergabesprung um 10 Bilder vorwärts.
De
De 97
Page 98

2
Schieben Sie den Zoom-Regler in Richtung .
Das Bild wird im das 1,5fache vergrößert. Die Vergrößerung wird
jeweils durch das Betätigen des Zoom-Reglers weiter verstärkt.
Um das Bild wieder in Normalgröße (1x) darzustellen, schieben Sie den
Zoom-Regler in Richtung .
3
Durch das Drücken von während der Anzeige
des vergrößerten Bildes können Sie das Bild in die von Ihnen
gewünschte Richtung bewegen, so dass Sie sich den jeweils
gewünschten Bildbereich ansehen können.
Indexwiedergabe
Mit dieser Funktion können Sie gleichzeitig mehrere Bilder auf dem LCD-
De
Monitor anzeigen. Diese Funktion ist nützlich, wenn Sie ein gewünschtes Bild
schnell auffinden möchten. Die Anzahl der anzeigbaren Bilder beträgt dabei
wahlweise 4, 9 oder 16.
1
Bei geschlossenem Objektivschutzschieber drücken.
2
Schieben Sie den Zoom-Regler in Richtung , um den IndexWiedergabemodus zu aktivieren.
3
Verwenden Sie die Pfeiltasten für die Bildauswahl.
: Führt zum vorherigen Bild.
: Führt zum nächsten Bild.
: Wechselt auf die vorherige Indextafel (Bilder vor dem links oben
gezeigten Bild).
: Wechsel auf die nächste Indextafel (Bilder nach dem rechts
unten gezeigten Bild).
4
Um zur Einzelbildwiedergabe zurückzukehren, schieben Sie
den Zoom-Regler in Richtung .
J MOVIE WIEDERGABE
1
Bei geschlossenem Objektivschutzschieber drücken.
Der LCD-Monitor wird automatisch eingeschaltet.
2
Drücken Sie und lassen Sie sich das
gewünschte Bild mit der Anzeige darstellen. Drücken Sie
anschließend .
Das Hauptmenü wird angezeigt.
98 De
Page 99

3
Drücken Sie und wählen Sie MOVIE PLAYBACK.
Die Movie Wiedergabe beginnt, wenn die rechts im Sucher
angeordnete orangefarbene LED blinkt und die Movie-Daten in die
Kamera geladen wurden. Wenn der Film vollständig abgespielt ist, kehrt
die Kamera automatisch zum Anfang des Films zurück.
4
drücken.
Das MOVIE PLAYBACK-Menü wird gezeigt.
PLAYBACK : Erneute Wiedergabe der gewählten Movie-
FRAME BY FRAME : Bild-für-Bild-Wiedergabe der gewählten Movie-
EXIT : Beendet den MOVIE PLAYBACK-modus.
5
Drücken Sie und wählen Sie die gewünschte
Funktion. Drücken Sie anschließend .
Aufnahme.
Aufnahme.
Funktionen im Modus FRAME BY FRAME (Bild-für-Bild-Wiedergabe)
: Zeigt das erste Bild des Movies an.
: Zeigt das letzte Bild des Movies an.
: Wiedergabe des nächsten Bildes. Die Taste gedrückt halten, um
die Movie-Bilder durchgehend zu zeigen.
: Wiedergabe des vorherigen Bildes. Die Taste gedrückt halten,
um die Movie-Bilder durchgehend rücklaufend zu zeigen.
: Ruft das MOVIE PLAYBACK-Menü auf.
J BILDER VOR DEM LÖSCHEN SCHÜTZEN
Wichtige Bilder sollten Sie vor dem Löschen schützen, damit diese nicht
versehentlich gelöscht werden.
1
Bei geschlossenem Objektivschutzschieber drücken.
Der LCD-Monitor schaltet sich ein.
2
Drücken Sie und wählen Sie das zu schützende Bild aus.
3
Drücken Sie und drücken Sie anschließend auf .
Das MODE-Menü wird angezeigt.
4
Drücken Sie und wählen Sie den Menüanzeiger PLAY.
Drücken Sie anschließend auf .
5
Drücken Sie und wählen Sie . Drücken Sie
anschließend auf .
De
De 99
Page 100

6
Drücken Sie und wählen Sie ON.
Das ausgewählte Bild wird vor dem Löschen geschützt.
Um das Menü zu schließen, drücken Sie zweimal.
Vor dem Löschen geschützte Bilder können nicht mit der Funktion Einzelbild/
Alle Bilder löschen entfernt werden, sondern nur mit der
Formatierungsfunktion.
J BILDLÖSCHUNG
Auch gespeicherte Bilder können gelöscht werden. Sie können entweder von
Ihnen ausgewählte Bilder einzeln oder alle Bilder einer Karte auf einmal löschen.
De
Löschung einzelner Bilder
1
2
3
4
5
Löschung aller Bilder
Die Bilddaten gelöschter Bilder gehen unwiderruflich verloren. Überprüfen
Sie daher vor dem Löschen noch einmal jedes Bild dahingehend, ob Sie
dieses wirklich endgültig löschen möchten.
Bei geschlossenem Objektivschutzschieber drücken.
Der LCD-Monitor wird automatisch eingeschaltet.
Drücken Sie und wählen Sie das zu löschende
Bild aus.
drücken.
Das Hauptmenü wird angezeigt.
Drücken Sie und wählen Sie ERASE.
Drücken Sie und wählen Sie YES. Drücken Sie
anschließend auf .
Das Bild wird gelöscht und das Menü geschlossen.
1
2
3
4
100 De
Öffnet das Hauptmenü im Wiedergabemodus.
• Bei geschlossenem Objektivschutzschieber drücken.
• drücken.
Drücken Sie und wählen Sie MODE MENU.
Drücken Sie und wählen Sie den Menüanzeiger CARD.
Drücken Sie anschließend auf .
Drücken Sie .
 Loading...