

Page 1

User’s Guide for Nokia 2280
Page 2

The wireless phone described in this guide is approved for use in CDMA networks.
LEGAL INFORMATION
Copyright ©2003 Nokia. All rights reserved.
Nokia, Nokia Connecting People, Nokia 2280, the Nokia Original Accessories logos,
Snake II, Space Impact II, and Bumper are trademarks or registered trademarks of Nokia
Corporation.
trademarks or tradenames of their respective owners.
US Patent No 5818437 and other pending patents.
T9 text input software Copyright ©1999-2003. Tegic Communications, Inc. All rights
reserved.
The information in this user guide was written for the Nokia 2280 phone. Nokia
operates a policy of on-going development. Nokia reserves the right to make changes
and improvements to any of the products described in this document without prior
notice.
UNDER NO CIRCUMSTANCES SHALL NOKIA BE RESPONSIBLE FOR ANY LOSS OF DATA
OR INCOME OR ANY SPECIAL, INCIDENTAL, AND CONSEQUENTIAL OR INDIRECT
DAMAGES HOWSOEVER CAUSED.
All other product and company names mentioned herein may be
Includes RSA BSAFE cryptographic or security protocol software from RSA
Security.
Java is a trademark of Sun Microsystems, Inc.
THE CONTENTS OF THIS DOCUMENT ARE PROVIDED “AS IS.” EXCEPT AS REQUIRED BY
APPLICABLE LAW, NO WARRANTIES OF ANY KIND, EITHER EXPRESS OR IMPLIED,
INCLUDING, BUT NOT LIMITED TO, THE IMPLIED WARRANTIES OF MERCHANTABILITY
AND FITNESS FOR A PARTICULAR PURPOSE, ARE MADE IN RELATION TO THE ACCURACY
AND RELIABILITY OR CONTENTS OF THIS DOCUMENT. NOKIA RESERVES THE RIGHT TO
REVISE THIS DOCUMENT OR WITHDRAW IT AT ANY TIME WITHOUT PRIOR NOTICE.
ii Copyright © 2004 Nokia. All rights reserved.
Page 3

Table of contents
1 For your safety . . . . . . . . . . . . 1
Quick guide . . . . . . . . . . . . . . . . 3
Menu . . . . . . . . . . . . . . . . . . . . . . 4
2 Welcome. . . . . . . . . . . . . . . . . 5
Get the most out of this guide . 5
Understand wireless network
services . . . . . . . . . . . . . . . . . . . 6
3 About your phone . . . . . . . . . . 7
About the antennas . . . . . . . . . . 8
About the battery . . . . . . . . . . . . 8
Switch your phone on or off . . 10
Check the Start screen . . . . . . . 10
Use the selection keys . . . . . . . 11
use the scroll keys. . . . . . . . . . . 11
Learn about the keys . . . . . . . . 12
Make and answer calls. . . . . . . 12
Review phone symbols . . . . . . . 13
Memory use. . . . . . . . . . . . . . . . 14
View your phone help system . 14
Browse phone menus . . . . . . . . 14
Menu and menu shortcuts. . . . 16
Phone book menu . . . . . . . . . . . 19
4 Phone setup . . . . . . . . . . . . . 20
Learn about the HDB-4 and
HS-5 headset . . . . . . . . . . . . . 20
5 Text entry . . . . . . . . . . . . . . . 21
Enter letters and numbers . . . . 21
Write using ABC and
123 modes . . . . . . . . . . . . . . . 22
Write with predictive text . . . . 24
Tips for predictive text . . . . . . . 25
6 Phone book. . . . . . . . . . . . . . 27
Saving contacts and numbers . 27
Recall contacts and numbers. . 27
Use phone book menus . . . . . . 28
Edit a name or number. . . . . . . 28
Add a number to a phone
book entry. . . . . . . . . . . . . . . . 29
Delete stored and numbers . . . 30
Add other information to
a phone book entry . . . . . . . . 30
Use caller groups . . . . . . . . . . . 31
Check memory status . . . . . . . . 31
7 Call register . . . . . . . . . . . . . 32
Check missed or received
calls, or dialled numbers . . . . 32
Delete recent call lists . . . . . . . 33
Use call timers . . . . . . . . . . . . . 34
Turn on a current call timer. . . 34
Clear call timers . . . . . . . . . . . . 34
Data timers (Data/fax and
Minibrowser) . . . . . . . . . . . . . 35
8 Voice mailbox. . . . . . . . . . . . 36
Store your voice mailbox
number . . . . . . . . . . . . . . . . . . 36
Set greetings . . . . . . . . . . . . . . . 36
Listen to your voice
messages. . . . . . . . . . . . . . . . . 36
9 Text messages . . . . . . . . . . . 38
Write a text message . . . . . . . . 38
Use message templates . . . . . . 40
Learn about e-mail text
messages. . . . . . . . . . . . . . . . . 40
Receive text messages . . . . . . . 41
Respond to a text message . . . 42
Reply to a message. . . . . . . . . . 42
Delete messages . . . . . . . . . . . . 43
Message settings . . . . . . . . . . . 45
Organise text messages
using folders. . . . . . . . . . . . . . 45
Copyright © 2004 Nokia. All rights reserved. i
Page 4

10 Personalisation . . . . . . . . . . 46
Learn about profiles . . . . . . . . . 46
Select a different profile . . . . . 46
Customise a profile. . . . . . . . . . 46
Rename profiles . . . . . . . . . . . . 48
Download a ringing tone . . . . . 49
Set the display language . . . . . 49
Set the clock . . . . . . . . . . . . . . . 49
Customise the Welcome
screen . . . . . . . . . . . . . . . . . . . 51
Learn about voice commands . 51
11 Advanced features . . . . . . . . 53
View in-call options . . . . . . . . . 53
Use call Divert. . . . . . . . . . . . . . 53
Use call waiting . . . . . . . . . . . . 55
Send own caller ID when
calling . . . . . . . . . . . . . . . . . . . 55
Use automatic redial . . . . . . . . 56
Calling card . . . . . . . . . . . . . . . . 56
Voice dialling. . . . . . . . . . . . . . . 57
Speed dialling . . . . . . . . . . . . . . 59
Learn about Caller Groups . . . . 60
Use Touch tones . . . . . . . . . . . . 61
Link phone book entries . . . . . . 63
Learn about Voice Recorder . . . 63
12Security and System settings 65
Lock keypad (Keyguard) . . . . . . 65
Security code. . . . . . . . . . . . . . . 66
Phone lock. . . . . . . . . . . . . . . . . 66
Call restrictions. . . . . . . . . . . . . 68
Automatic update of service . . 69
Learn about system selection . 69
13Organiser . . . . . . . . . . . . . . . 71
Use the alarm clock . . . . . . . . . 71
Calendar. . . . . . . . . . . . . . . . . . . 72
Calculator . . . . . . . . . . . . . . . . . 74
Stopwatch . . . . . . . . . . . . . . . . . 75
14Games . . . . . . . . . . . . . . . . . 77
15 Your phone and other
devices. . . . . . . . . . . . . . . . . 78
PC Connectivity. . . . . . . . . . . . . 78
16 Minibrowser . . . . . . . . . . . . 79
Understand browsing sessions
and indicators. . . . . . . . . . . . . 79
Launching the minibrowser . . . 79
Minibrowser menu . . . . . . . . . . 80
Navigate in the minibrowser . . 81
Links. . . . . . . . . . . . . . . . . . . . . . 81
Bookmarks. . . . . . . . . . . . . . . . . 82
Receive messages using
the minibrowser . . . . . . . . . . . 82
End the minibrowser session . . 83
Disable minibrowser
confirmations . . . . . . . . . . . . . 83
17Reference information . . . . . 84
Use accessories safely . . . . . . . 84
Important safety information . 85
Certification information
(SAR) . . . . . . . . . . . . . . . . . . . . 87
Care and maintenance . . . . . . . 88
Mobile enhancements . . . . . . . 89
Battery information . . . . . . . . . 89
Chargers and other
accessories . . . . . . . . . . . . . . . 90
Nokia Xpress-on™ color
covers . . . . . . . . . . . . . . . . . . . 93
Index . . . . . . . . . . . . . . . . . 97
ii Copyright © 2004 Nokia. All rights reserved.
Page 5

1 For your safety
For your safety
Read these simple guidelines. Breaking
the rules may be dangerous or illegal.
Further detailed information is given in
this manual.
SWITCH OFF WHERE PROHIBITED
Do not switch on the phone
when wireless phone use is
prohibited or when it may cause
interference or danger.
ROAD SAFETY COMES FIRST
Don't use a hand-held phone
while driving.
INTERFERENCE
All wireless phones may get
interference, which could affect
performance.
SWITCH OFF IN HOSPITALS
Follow any regulations or rules.
Switch the phone off near
medical equipment.
SWITCH OFF IN AIRCRAFT
Wireless devices can cause
interference in aircraft.
SWITCH OFF WHEN REFUELING
Don't use the phone at a
refueling point. Don't use near
fuel or chemicals.
SWITCH OFF NEAR BLASTING
Don't use the phone where
blasting is in progress. Observe
restrictions, and follow any
regulations or rules.
USE SENSIBLY
Use only in the normal position.
Don't touch the antenna
unnecessarily.
QUALIFIED SERVICE
Only qualified personnel may
install or repair phone
equipment.
ACCESSORIES AND BATTERIES
Use only approved accessories
and batteries. Do not connect
incompatible products.
WATER-RESISTANCE
Your wireless phone is not
water-resistant. Keep it dry.
BACKUP COPIES
Remember to make backup
copies of all important data.
CONNECTING TO OTHER DEVICES
When connecting to any other
device, read its user guide for
detailed safety instructions. Do
not connect incompatible
products.
CALLING
Ensure the phone is switched on
and in service. Enter the phone
number, including the area code,
then press the Send key. To end
a call, press the End key. To
answer a call, press the Send
key.
Copyright © 2004 Nokia. All rights reserved. 1
Page 6

For your safety
EMERGENCY CALLS
Ensure the phone is switched on
and in service. Press the End key
as many times as needed (for
example, to exit a call, to exit a
menu) to clear the display. Enter
the emergency number, then
press the Send key. Give your
location. Do not end the call
until told to do so.
2 Copyright © 2004 Nokia. All rights reserved.
Page 7

For your safety
• QUICK GUIDE
1
Make a call Enter a phone number, and press the Send key.
Answer a call Press the Send key or Answer.
Answer a call with
Press the Send key or Answer.
call waiting
End a call Press the End key.
Ignore a call Press Silence when your phone rings.
Redial Press the Send key twice.
Adjust call volume Press the up scroll key or the down scroll key.
Use the in-call menu While in a call, press the left selection key to select
Options.
Use speed dialling Press and hold any key 2-9.
Save a name and number Enter a number, press the left selection key to select
Options, and select Save. Enter a name and press OK.
Recall a name/number Press Contacts, select Search. Enter first character of
Recall a name/number
during a call
name and press
Press Options, scroll New call, press Select, press Search,
and enter the first letter of the name to find.
Search.
Check voice mail Press and hold 1 OR dial your voice mailbox number.
Send a text message Press Menu 01-1-1. Add recipient’s phone number, then
press
Options. Scroll to Enter text, then press Select. Enter
the message text, press Options, and select Send.
Send an e-mail message Press Menu 01-1-1. Add recipient’s e-mail address, press
Options. Scroll to Enter text, then press Select. Enter the
message text, then press Options, and select Send.
Read new message Press Show.
Reply to a message Press Options, select Reply, then select a reply option.
Reply to an e-mail
message
Send a business card
(SMS)
Write the reply, press
Press Options, select Reply, then select a reply option.
Write the reply, press
Recall a name from the phone book. Press Details, press
Options, select Send bus. card, then select Via text msg.
Options, and select Send.
Options, and select Send.
Enter the recipient’s number or press Search to retrieve a
number from the phone book. Press
OK.
1 For information about phone keys, see “About your phone” on page 7.
Copyright © 2004 Nokia. All rights reserved. 3
Page 8

For your safety
•MENU
1 MESSAGES
Text messages . . . . . . . . . . . . . 01-1
Create message . . . . . . . . 01-1-1
Inbox. . . . . . . . . . . . . . . . . 01-1-2
Outbox . . . . . . . . . . . . . . . 01-1-3
Archive . . . . . . . . . . . . . . . 01-1-4
Templates . . . . . . . . . . . . . 01-1-5
My folders . . . . . . . . . . . . 01-1-6
Delete messages . . . . . . . 01-1-7
Message settings . . . . . . . 01-1-8
Voice messages . . . . . . . . . . . 01-2
Minibrowser messages . . . . . 01-3
2 CALL REGISTER
Missed calls . . . . . . . . . . . . . . . 2-1
Received calls . . . . . . . . . . . . . 2-2
Dialled numbers. . . . . . . . . . . . 2-3
Delete recent call lists . . . . . . 2-4
Call timers . . . . . . . . . . . . . . . . 2-5
Data/fax calls. . . . . . . . . . . . . . 2-6
Minibrowser calls . . . . . . . . . . 2-7
3 PROFILES
General. . . . . . . . . . . . . . . . . . . 3-1
Silent . . . . . . . . . . . . . . . . . . 3-2
Meeting . . . . . . . . . . . . . . . . . . 3-3
Outdoor . . . . . . . . . . . . . . . . . . 3-4
Pager . . . . . . . . . . . . . . . . . . 3-5
4 SETTINGS
Call settings. . . . . . . . . . . . . . . 4-1
Phone settings. . . . . . . . . . . . . 4-2
Time settings . . . . . . . . . . . . .. . 4-3
Accessory settings. . . . . . . . . . 4-4
Security settings . . . . . . . . . . . 4-5
Network services . . . . . . . . . . . 4-6
System . . . . . . . . . . . . . . . . . . . 4-7
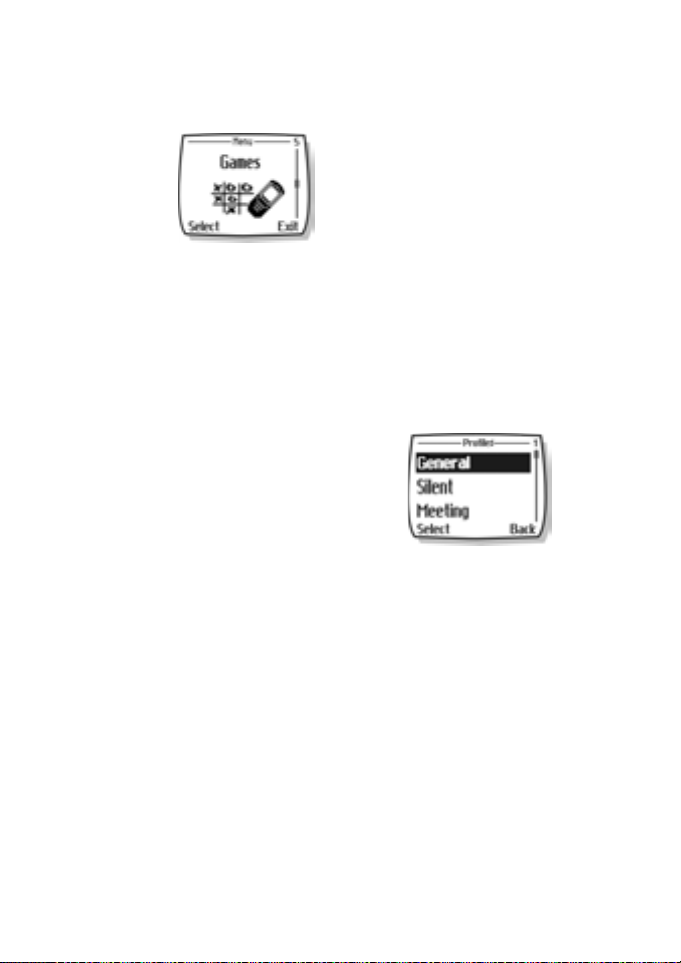
5 GAMES
Select game . . . . . . . . . . . . . . . 5-1
Snake II. . . . . . . . . . . . . . . . . 5-1-1
Space Impact II . . . . . . . . 5-1-2
Bumper. . . . . . . . . . . . . . . 5-1-3
Settings . . . . . . . . . . . . . . . . 5-2
6 VOICE
Voice tags. . . . . . . . . . . . . . . . . 6-1
Voice commands . . . . . . . . . . . 6-2
Profiles . . . . . . . . . . . . . . . . . 6-2-1
Voice mailbox . . . . . . . . . 6-2-2
Recorder . . . . . . . . . . . . . . 6-2-3
Call register . . . . . . . . . . . 6-2-4
Voice recorder . . . . . . . . . . . . . 6-3
Record . . . . . . . . . . . . . . . . . 6-3-1
Recordings list . . . . . . . . . 6-3-2
7 MINIBROWSER
8 ORGANISER
Alarm clock . . . . . . . . . . . . . . . 8-1
Calendar. . . . . . . . . . . . . . . . . . 8-2
Calculator . . . . . . . . . . . . . . . . 8-3
Stopwatch . . . . . . . . . . . . . . . . 8-4
9 APPLICATIONS
Select app. . . . . . . . . . . . . . . . . 9-1
App. downloads . . . . . . . . . . . . 9-2
Memory . . . . . . . . . . . . . . . . . . 9-3
10 KEYGUARD
4 Copyright © 2004 Nokia. All rights reserved.
Page 9
2Welcome
Welcome
Congratulations on the purchase of your
Nokia mobile phone-a new tool for the
mobile information society.
Nokia recommends that you read this
chapter before you use your new phone.
You will find useful information about:
• How to use this guide
• How to understand network services
• GET THE MOST OUT OF
THIS GUIDE
The tips that follow can help you use this
guide efficiently as you learn to use your
phone.
Understand the terms
This guide uses certain terms for certain
actions.
• Press means to briefly press then
release a key. For example,
Press 0 means to press the zero key.
• Press Menu means to press the
selection key that is below the word
Menu on the phone screen.
• Press and hold means to press and
hold a key for two to three seconds
(depending on the feature you are
using), then release the key.
•Use the selection keys to choose an
option on a menu.
• Highlighted means that an option
displayed on the screen is enclosed
in a dark bar. Choices you make with
the two selection keys act on the
highlighted option.
Observe text conventions
This user guide provides text clues to
make instructions easy to follow.
Convention What it means
bold Indicates one of the
following items:
• The word or phrase
appears on the
phone’s screen.
• Special text such as
Notes and Warnings.
bold and
blue
blue and
italic
italic Italics indicate emphasis.
Indicates the text is an
address on the World
Wide Web.
A definition for the word
or phrase appears in the
terms list (glossary) near
the end of the user guide.
Pay close attention to
any information in
italics.
Copyright © 2004 Nokia. All rights reserved. 5
Page 10

Welcome
Follow graphic clues
This user guide provides graphic clues
(icons) to alert you to important
information.
Tip: Information about a
shortcut or another way to do
something.
Note: Explanations about a
feature or an important concept.
Important: Critical information
about a feature.
Caution! Help to avoid
information loss.
Warning! Helps to avoid personal
injury, damage to the phone, or
property damage.
• UNDERSTAND WIRELESS NETWORK SERVICES
Your service provider’s wireless network
may be equipped to provide special
features or functions for use with your
Nokia phone. These features are called
network services, and may include some
of the following:
• Voice mail and voice privacy
• Call waiting, call divert, and caller ID
• Text messages
• Ability to block or send your own
caller ID
• News and information services
• Selected Internet access services
Sign up with a service provider
Before you can take advantage of your
service provider’s network services, you
must sign up with a service provider and
subscribe to their services. Your service
provider will make available descriptions
of its services and instructions for using
them.
Contact your service provider regarding
your service needs.
6 Copyright © 2004 Nokia. All rights reserved.
Page 11
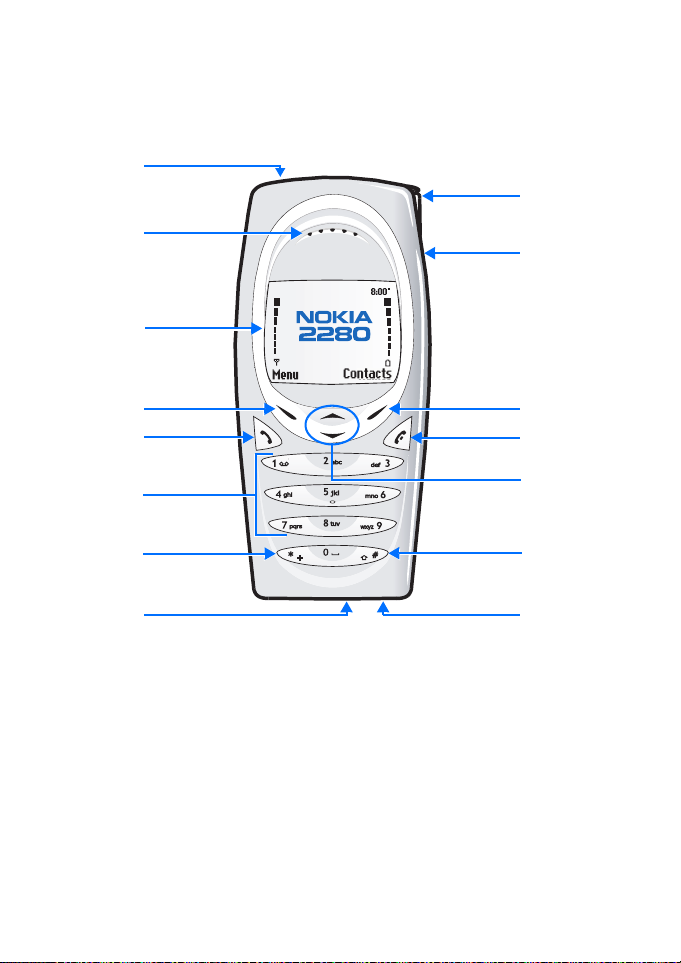
3 About your phone
Power key
Earpiece
Screen
About your phone
Whip antenna
2.5 mm headset jack
Left
selection key
Send key
Number keys
Star key
Connection port
Copyright © 2004 Nokia. All rights reserved. 7
Right
selection key
End key
2-way scroll key
Pound key
Microphone
Page 12
About your phone
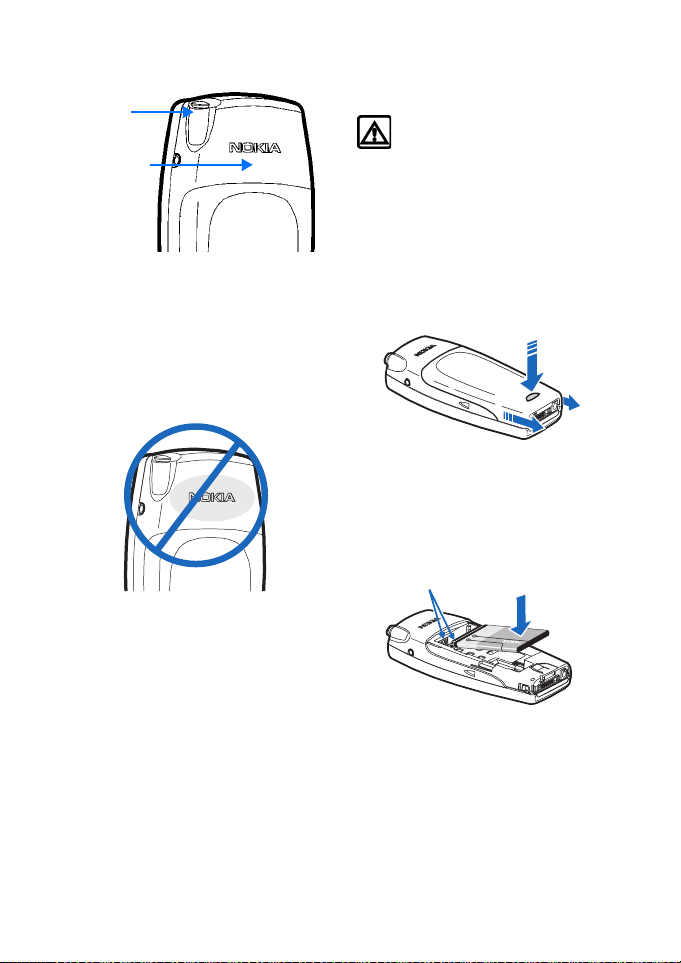
• ABOUT THE ANTENNAS
Whip
antenna
Internal
a
antenn
Your phone is equipped with two
antennas. The internal antenna is always
active. The whip antenna is activated
when the whip antenna is fully extended.
As with any other radio transmitting
device, do not touch either of the
antennas unnecessarily when the phone
is switched on. Contact with the antenna
affects call quality and may cause the
phone to operate at a higher power level
than otherwise needed. Not touching the
antenna area during a phone call
optimises the antenna performance and
the talk time of your phone.
While in a call, hold the phone to your
ear, placing your finger tips at the midcenter of the back cover, below the
antenna area on the back of your phone.
two
• ABOUT THE BATTERY
Install the battery
Warning! Use only the BL-5C
battery in this Nokia phone.
If your dealer has already
installed the battery, please see
“Charge the battery” on page 9.
1 Remove the back cover of the phone
by pressing and holding the release
button while sliding the cover
downward toward the bottom of the
phone. Set the back cover aside.
2 Place the battery in the
compartment with the label side
facing down and the metal contacts
aligned with the contact prongs.
Metal contacts
3 Snap the battery into place.
8 Copyright © 2004 Nokia. All rights reserved.
Page 13
About your phone
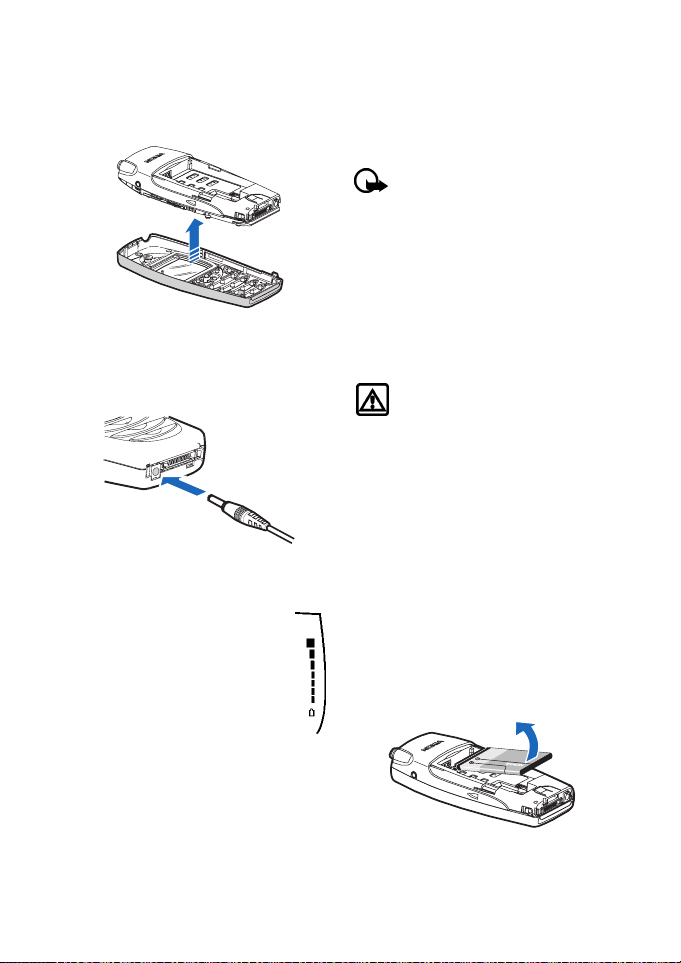
4 Replace the cover by placing it into
the slots on the back of the phone,
and sliding the cover upward until it
is in place.
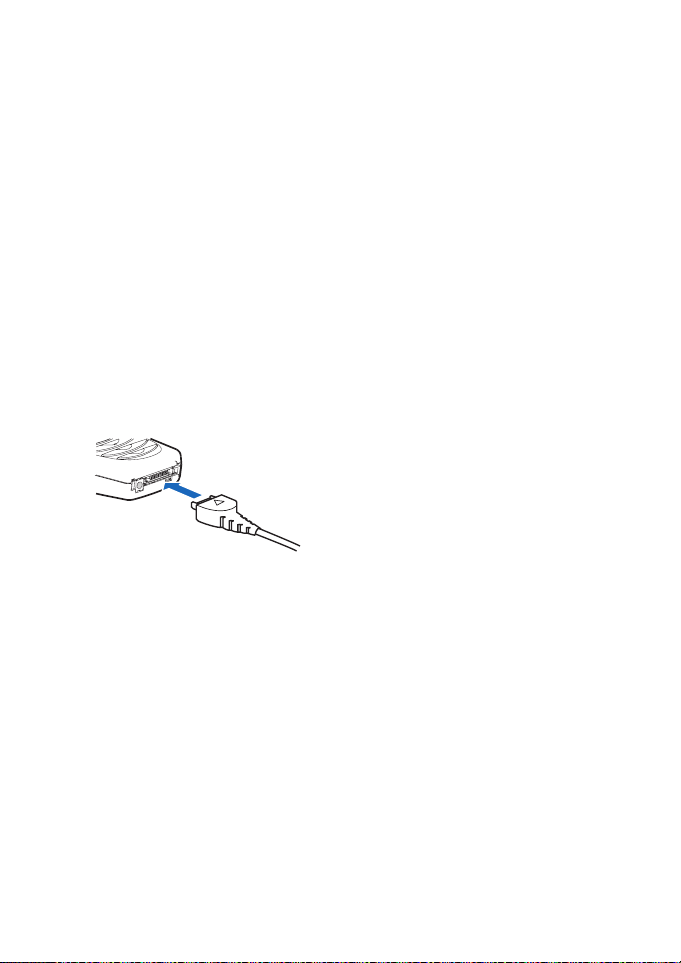
Charge the battery
Follow these guidelines to charge the
battery.
1 Connect the charger to an ac wall
outlet.
2 With your phone on or off,
connect the lead from the
charger to the charging port
located on the bottom of
the phone.
The battery indicator bar
appears on the screen and
starts to scroll up after a few
seconds. With the phone off, only
the battery indicator bar will appear.
3 Disconnect the charger from the
phone and ac outlet when the
battery is fully charged.
After the indicator bar stops scrolling,
the battery is almost fully charged, and is
fully charged after an additional hour
(approximately). The message Battery
Full is displayed.
Note: For best performance,
charge the battery for 24 hours
before you first use the phone.
The charging time depends on
the charger and battery you use.
Do not leave the battery
connected to a charger for more
than 72 hours, since prolonged
charging could shorten its lifetime.
Remove the battery
Warning! Use only your hands to
remove the battery. Do not
puncture, burn or use any objects
that may damage the phone or
the battery. Please recycle the
battery, or dispose off properly.
You will need to remove the existing
battery if you want to install a new
battery. Make sure the phone has been
turned off for 10 seconds.
1 Remove the back cover of the phone
as shown in step 1 on page 8.
2 Place your index finger in the space
at the bottom of the battery, and
press toward the top of the phone.
3 Take out the battery.
Copyright © 2004 Nokia. All rights reserved. 9
Page 14
About your phone
Card slot
RUIM card slot
There is an open slot under the battery.
Do not place any objects in this slot. This
product does not support RUIM cards.
Important battery information
• Recharge your battery only with a
charger approved by Nokia.
• You can switch the phone on and
use it for calls while the battery is
charging.
• If the battery is totally empty, it may
take a few minutes for the battery
indicator to appear on the screen.
• If you switch the phone on when
charging is complete, the message
Battery full is displayed
momentarily.
• Charging time depends on the
charger and battery used. Please see
“Battery information” on page 89,
for more information.
• If the battery has become
completely empty, you may need to
recharge it for a few minutes before
you can make or receive calls.
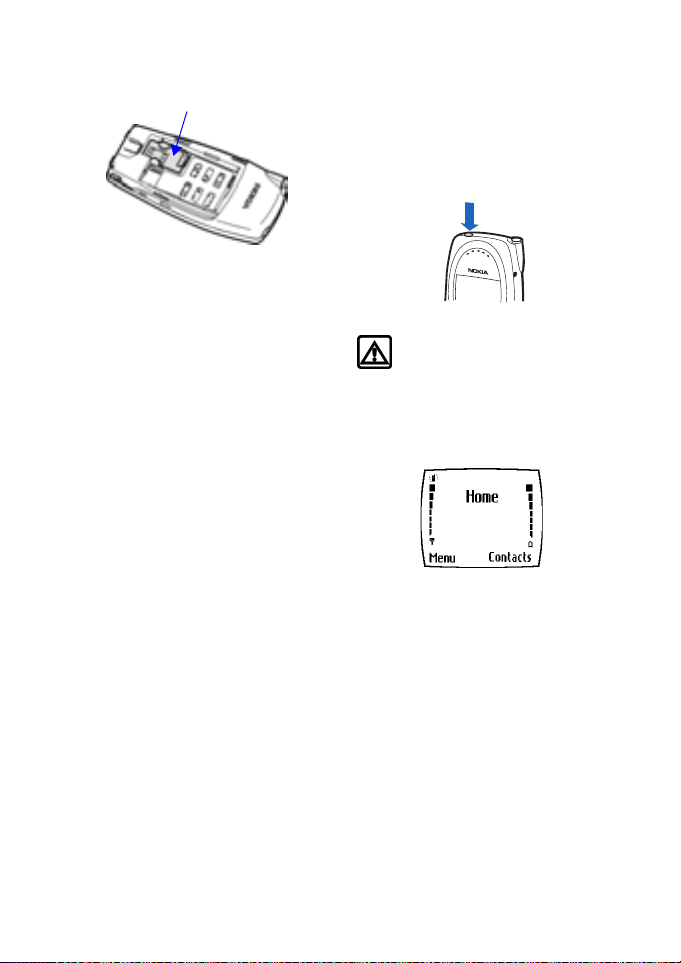
• SWITCH YOUR PHONE ON OR OFF
To switch your phone on or off, press and
hold the power key (located on the top of
the phone) for two seconds.
Power key
Warning! Do not switch on the
phone when wireless phone use
is prohibited or when it may
cause interference or danger.
• CHECK THE START SCREEN
The Start screen refers to the phone
display when no calls are in progress, and
there are currently no menu or phone
book entries displayed.
You can easily return to the Start screen
from any location (other than an active
call) simply by pressing the End key. Keep
in mind that any numbers that you were
entering at the time will be lost.
However, text messages will be saved.
10 Copyright © 2004 Nokia. All rights reserved.
Page 15
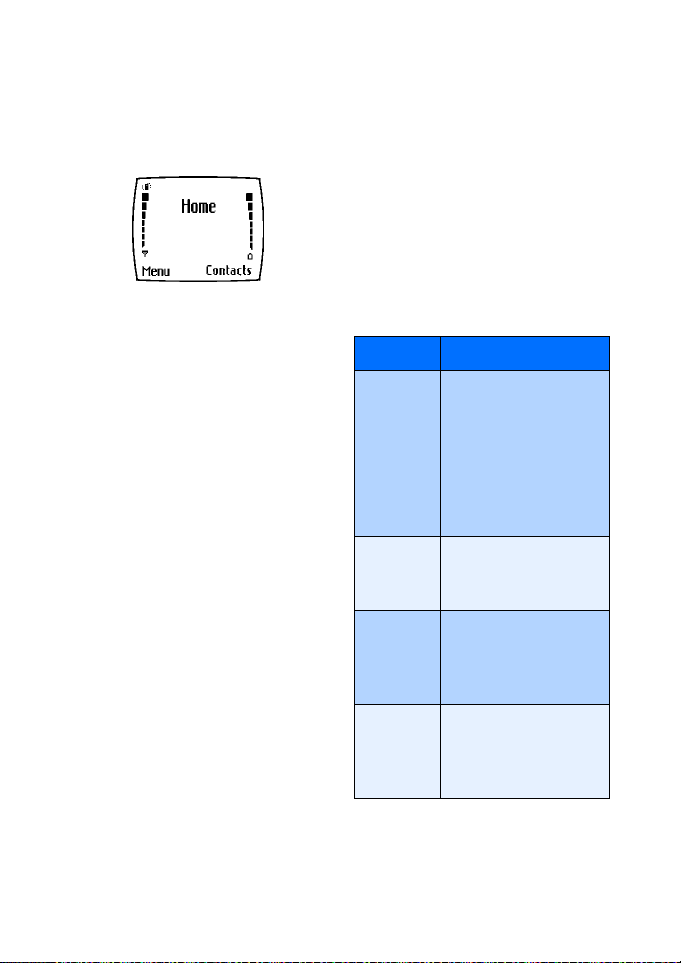
About your phone
The table on the following page describes
the status indicators and icons found on
the Start screen:
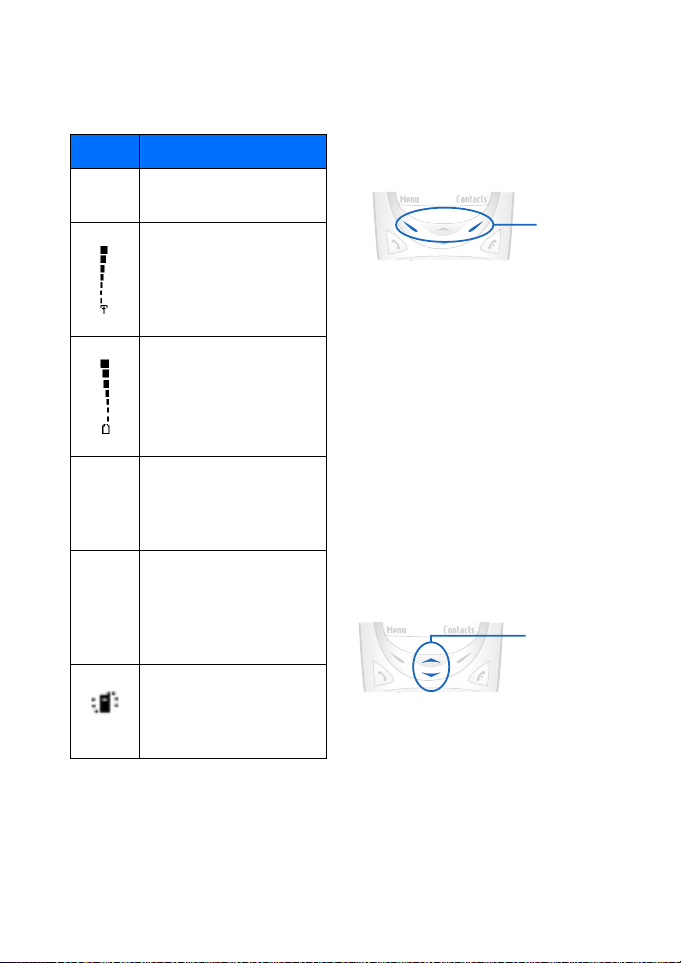
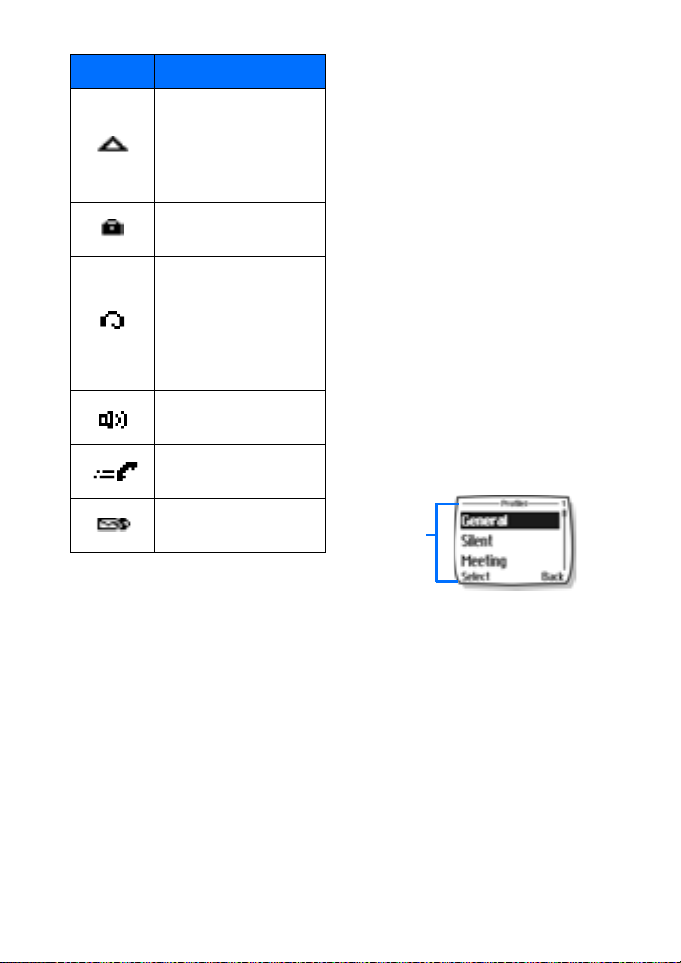
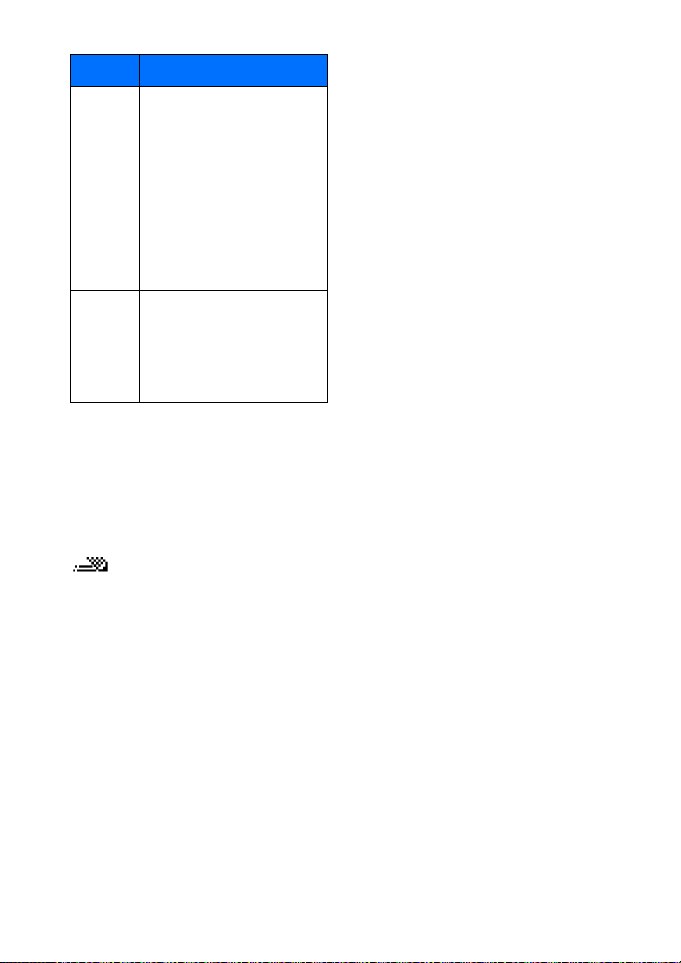
Element Description
Your service provider’s
Home
name.
Shows the signal strength
of the wireless network
where you are. The higher
the bar, the stronger the
signal.
Shows the battery charge
level.
The higher the bar, the
higher the power level in
the battery.
The entry point for your
phone menu. Press the left
Menu
selection key to view the
menu options.
The entry point for the
phone book menu. Press
Contacts
right selection key to view
the phone book menu
options.
Icon appears in upper left
corner of screen, indicating
that the vibrator is
activated.
• USE THE SELECTION KEYS
Note the two selection keys beneath the
screen. The function of these keys is
determined by the word shown above
them on the screen.
Selection
keys
For example, pressing the left selection
key when the word Menu appears above
it shows the first of many menus. Scroll
through the menus using the scroll keys.
Likewise, pressing the right selection key
when Contacts appears above it displays
the phone book menu.
• USE THE SCROLL KEYS
Note the two scroll keys in the center of
the phone, beneath the screen. The
function of these keys is to scroll through
the different menus and lists within the
phone.
Scroll keys
Copyright © 2004 Nokia. All rights reserved. 11
Page 16
About your phone
• LEARN ABOUT THE KEYS
The following table contains a summary
of how the various keys on your phone
work.
Key Description
Call: Press the Send key to
make a call to the name or
number shown on the screen
or to answer a call. Pressing
this key when not in a call (or
when not in the menu or
phone book) displays a list of
recently dialled numbers.
End: Press the End key to
end a call, to silence the ring
from an incoming call, or to
exit the phone book or
menus completely. Used as
Back key in Minibrowser.
Number: Use keys 1 through
0 to enter numbers and
1
through
letters. Press and hold 1 to
dial your voice mailbox. Press
0
and hold 0 to launch the
minibrowser.
# key: Press the # key to
change case of text, or to
#
enable or disable predictive
text input.
* key: Press the * key to enter
special characters (for
example, punctuation) or
*/+
access special characters
menu.
• MAKE AND ANSWER CALLS
Use the following table as a quick
reference for making and answering
calls:
Task Instructions
Make a
call
Answer a
call
End a call Press the End key to
Silence a
call
Keyguard To avoid accidental calls,
1 Enter the number using
the keypad (include area
code as needed).
2 Press the Send key. 3 Hold the phone as you
would any other
telephone, with the ear
piece over your ear and
the microphone near
your mouth.
When your phone rings,
press the Send key.
terminate the active call.
Press the End key or press
the right selection key to
select Silence, when you
do not want to answer a
call, but still want to
silence the ringer.
select Menu, then scroll up
once, and press Select. You
could also press Menu,
then press the */+ key
(within three seconds) to
lock your keypad. This
activates the Keyguard
feature.
12 Copyright © 2004 Nokia. All rights reserved.
Page 17
About your phone
Task Instructions
Unlock
keypad
When the keypad is locked,
select Unlock, then press
the */+ key (within three
seconds). This deactivates
the Keyguard feature.
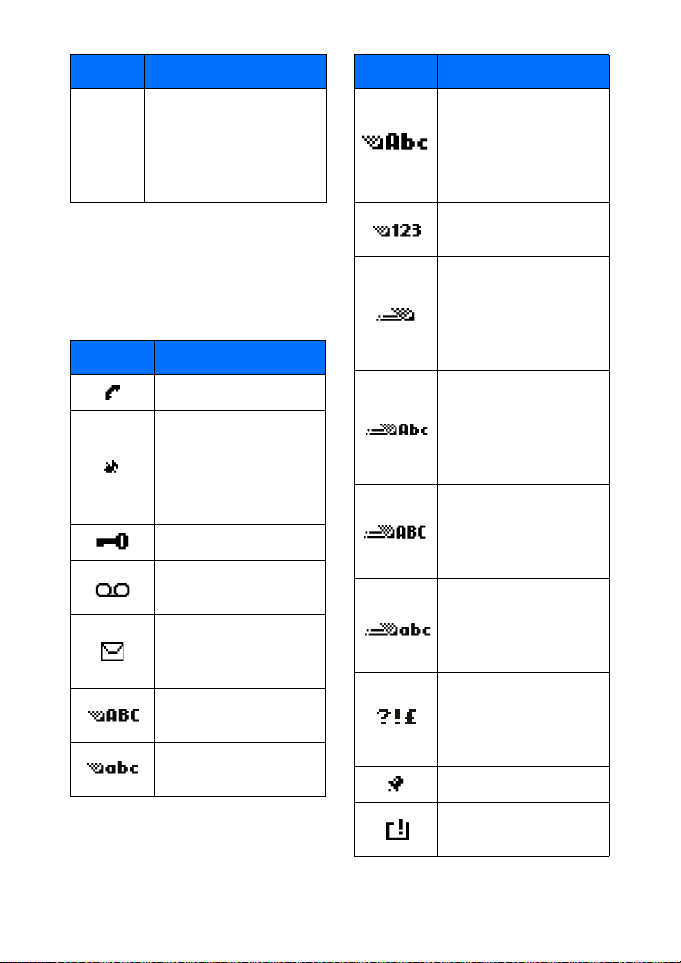
• REVIEW PHONE SYMBOLS
The following is a collection of the
various indicators and icons you may see
on your phone.
Symbol Description
A call is in progress.
You have selected the
Silent profile (silencing
your phone ringer, keypad
tones, warning tones,
etc.)
Keyguard is active
You have one or more
voice messages waiting.
You have one or more
unread text messages
waiting.
Letters you enter appear
as uppercase (ALL CAPS).
Letters you enter appear
in lowercase.
Symbol Description
Letters you enter appear
in sentence case (first
word in sentence
capitalised) or title case
(in phone book).
Characters you enter
appear as numbers.
Predictive text mode is
active. Predictive text
feature available for
Calendar and for text
messages.
Predictive text mode
activated. Characters you
enter appear in sentence
case (only first word in
sentence capitalised).
Predictive text mode
activated. Characters you
enter appear as
uppercase letters.
Predictive text mode
activated. Characters you
enter appear as lowercase
letters.
Insert symbol mode, used
to enter special characters
such as punctuation
marks.
The alarm clock is set.
Indicates that a reminder
has expired.
Copyright © 2004 Nokia. All rights reserved. 13
Page 18
About your phone
Symbol Description
Indicates you are
roaming. For more
information on roaming,
see “View Roaming
options” on page 70.
Indicates call over a
secure connection.
Indicates that a headset
is connected (either
through the 2.5 mm jack
or to the accessory
connector located at the
bottom of phone).
Indicates phone is in
handsfree car kit.
Indicates a connection to
high-speed data network.
Indicates you have a
minibrowser message.
• MEMORY USE
If your use of Calendar notes takes all of
the shared memory, your phone may
display a message saying Memory full. To
proceed, you must delete some of the
information or entries from Calendar
Notes to make additional memory space
available.
For example, entering 75 calendar notes
may consume significant shared memory.
• VIEW YOUR PHONE HELP SYSTEM
Your phone provides brief descriptions of
all menu options. To view any of the help
texts:
1 Scroll to a menu or submenu option. 2 Wait about 15 seconds.
A short message appears, describing
the option and what it does.
3 Select More, by pressing the left
select key to view more feature
details.
ENABLE/DISABLE HELP SYSTEM
Press Menu 4-2-5 (Settings > Phone
settings > Help text activation) to turn
the phone’s help system on or off.
• BROWSE PHONE MENUS
Menu
items
Your phone’s menu system displays
choices you can make to change settings
on your phone or gives you access to
various phone features. Your phone has
10 menus, plus the phone book menu
(Contacts). Each menu can contain
several levels of submenus.
You can use menus and submenus in two
ways: by scrolling or by using a shortcut.
14 Copyright © 2004 Nokia. All rights reserved.
Page 19
About your phone
Check the menu number, header line, and scroll bar
A header line appears at the top of your
1 Header line
2 Menu number
3 Scroll bar
with tab
screen when in the phone book or while
navigating the menus. The header line
provides you with a reminder of the
phone book entry or the menu or
submenu with which you are working.
A scroll bar appears on the right side of
the screen when you scroll through the
main menu. A tab on the bar gives you a
visual indication of your relative position
in the menu structure.
The menu number is located at the top of
the scroll bar.
1
Scroll through menus
1 At the Start screen, press Menu,
then scroll through the menus using
the up and down scroll key.
2 Press Settings, Select, or OK,
pressing the selection key for the
option you want.
3 Use the scroll and selection keys to
navigate the submenus.
Press the End key to return to the
Start screen.
SCROLLING TIPS
• You can scroll up and down to find
some of the most frequently used
2
3
submenu options.
• You can return to the previous menu
level by pressing Back.
• To exit a menu and return to the
Start screen, press the End key.
• Some menus may not appear. Ask
your service provider for details.
Learn about menu shortcuts
Menus and options are numbered so that
you can jump directly to the most
frequently used option. The numbers
appear in the top right corner of the
screen and show your location in the
menu.
USE A SHORTCUT
Example: To turn on Automatic redial:
1 Press Menu. 2 Within three seconds, press 4-1-2-1
(Settings > Call settings >
Automatic redial > On).
Copyright © 2004 Nokia. All rights reserved. 15
Page 20

About your phone
• MENU AND MENU SHORTCUTS
MESSAGES. . . . . . . . . . . . . . . . . . . . 1
Text messages . . . . . . . . . . . . . . . 01-1
Create message
(Text/Numeric Page). . . . . 01-1-1
Text . . . . . . . . . . . . . . 01-1-1-1
Numeric page . . . . . . 01-1-1-2
Inbox . . . . . . . . . . . . . . . . . . 01-1-2
Outbox . . . . . . . . . . . . . . . . 01-1-3
Archive . . . . . . . . . . . . . . . . 01-1-4
Templates . . . . . . . . . . . . . . 01-1-5
My folders. . . . . . . . . . . . . . 01-1-6
Delete messages. . . . . . . . . 01-1-7
All read . . . . . . . . . . . 01-1-7-1
Inbox . . . . . . . . . . . . . 01-1-7-2
Outbox . . . . . . . . . . . . 01-1-7-3
Archive. . . . . . . . . . . . 01-1-7-4
Message settings . . . . . . . . 01-1-8
Sending options . . . . 01-1-8-1
Other settings . . . . . . 01-1-8-2
Voice messages1 . . . . . . . . . . . . . 01-2
Listen to voice messages . . 01-2-1
View details of last
voice mail . . . . . . . . . . . . . 01-2-2
Voice mailbox number . . . . 01-2-3
Clear voice mail icon . . . . . 01-2-4
Minibrowser messages . . . . . . . . 01-3
CALL REGISTER . . . . . . . . . . . . . . . . 2
Missed calls . . . . . . . . . . . . . . . . . . 2-1
Received calls . . . . . . . . . . . . . . . . 2-2
Dialled numbers. . . . . . . . . . . . . . . 2-3
Delete recent call lists. . . . . . . . . . 2-4
All . . . . . . . . . . . . . . . . . . . . . 2-4-1
Missed. . . . . . . . . . . . . . . . . . 2-4-2
Received . . . . . . . . . . . . . . . . 2-4-3
Dialled . . . . . . . . . . . . . . . . . . 2-4-4
Call Timers . . . . . . . . . . . . . . . . . . . 2-5
Duration of last call. . . . . . . 2-5-1
Show call time
on display. . . . . . . . 2-5-1-1
Duration of dialled calls . . . 2-5-2
Duration of received calls . . 2-5-3
Duration of all calls. . . . . . . 2-5-4
Life timer . . . . . . . . . . . . . . . 2-5-5
Clear timers . . . . . . . . . . . . . 2-5-6
Data/fax calls . . . . . . . . . . . . . . . . 2-6
Last sent data/fax . . . . . . . . 2-6-1
Last received data/fax . . . . . 2-6-2
All sent data/fax . . . . . . . . . 2-6-3
All received data/fax . . . . . . 2-6-4
Duration of last
data/fax call . . . . . . . . . . . . 2-6-5
Duration of all
data/fax calls . . . . . . . . . . . 2-6-6
Clear all data/fax registers . 2-6-7
Minibrowser . . . . . . . . . . . . . . . . . 2-7
Last sent browser data . . . . 2-7-1
Last received browser data . 2-7-2
All sent browser data . . . . . 2-7-3
All received browser data . . 2-7-4
Last browser session . . . . . . 2-7-5
All browser sessions . . . . . . 2-7-6
Clear all browser logs . . . . . 2-7-7
PROFILES . . . . . . . . . . . . . . . . . . . . . 3
General . . . . . . . . . . . . . . . . . . . . . 3-1
Select . . . . . . . . . . . . . . . . . . 3-1-1
Personalise2 . . . . . . . . . . . . . 3-1-2
Ringing options. . . . 3-1-2-1
Ringing tone . . . . . . 3-1-2-2
Ringing volume . . . . 3-1-2-3
Vibrating alert. . . . . 3-1-2-4
1 Menu option may vary, based on your service provider’s requirements.
2 Customise options for Silent, Meeting, Outdoor, and Pager profiles are identical to those of the
General profile
16 Copyright © 2004 Nokia. All rights reserved.
Page 21

About your phone
Message alert tone. . 3-1-2-5
Keypad tones. . . . . . 3-1-2-6
Warning tones. . . . . 3-1-2-7
Alert for . . . . . . . . . . 3-1-2-8
Profile name1 . . . . . 3-1-2-9
Timed. . . . . . . . . . . . . . . . . . . 3-1-3
Silent . . . . . . . . . . . . . . . . . . . . . . . 3-2
Meeting . . . . . . . . . . . . . . . . . . . . . 3-3
Outdoor . . . . . . . . . . . . . . . . . . . . . 3-4
Pager. . . . . . . . . . . . . . . . . . . . . . . . 3-5
SETTINGS . . . . . . . . . . . . . . . . . . . . . 4
Call settings . . . . . . . . . . . . . . . . . . 4-1
Anykey answer . . . . . . . . . . . 4-1-1
Automatic redial . . . . . . . . . 4-1-2
Speed dialling. . . . . . . . . . . . 4-1-3
Auto-update of service2 . . . 4-1-4
Minibrowser confirmation . . 4-1-5
None . . . . . . . . . . . . 4-1-5-1
On connection. . . . . 4-1-5-2
On exit . . . . . . . . . . . 4-1-5-3
Both . . . . . . . . . . . . . 4-1-5-4
Calling card. . . . . . . . . . . . . . 4-1-6
None . . . . . . . . . . . . 4-1-6-1
Card A . . . . . . . . . . . 4-1-6-2
Card B . . . . . . . . . . . 4-1-6-3
Card C . . . . . . . . . . . 4-1-6-4
Card D . . . . . . . . . . . 4-1-6-5
Data/fax calls . . . . . . . . . . . . 4-1-7
Phone settings . . . . . . . . . . . . . . . . 4-2
Language . . . . . . . . . . . . . . . 4-2-1
Touch tones . . . . . . . . . . . . . 4-2-2
Manual touch
tones . . . . . . . . . . . 4-2-2-1
Touch tone length. . 4-2-2-2
Welcome note . . . . . . . . . . . 4-2-3
Banner3 . . . . . . . . . . . . . . . . 4-2-4
Help text activation. . . . . . . 4-2-5
Restore factory settings . . . 4-2-6
Time settings . . . . . . . . . . . . . . . . . 4-3
Clock. . . . . . . . . . . . . . . . . . . 4-3-1
Show-Hide clock. . . 4-3-1-1
Set the time. . . . . . . 4-3-1-2
Time format. . . . . . . 4-3-1-3
Date . . . . . . . . . . . . . . . . . . . 4-3-2
Auto update of date
& time. . . . . . . . . . . . . . . . . 4-3-3
On. . . . . . . . . . . . . . . 4-3-3-1
Confirm first . . . . . . 4-3-3-2
Off . . . . . . . . . . . . . . 4-3-3-3
Accessory settings4. . . . . . . . . . . . 4-4
Handsfree . . . . . . . . . . . . . . . 4-4-1
Default profile. . . . . 4-4-1-1
Automatic answer . . 4-4-1-2
Lights . . . . . . . . . . . . 4-4-1-3
Headset . . . . . . . . . . . . . . . . 4-4-2
Default profile. . . . . 4-4-2-1
Automatic answer. . 4-4-2-2
Loopset . . . . . . . . . . . . . . . . . 4-4-3
Use loopset . . . . . . . 4-4-3-1
Default profile. . . . . 4-4-3-2
Automatic answer. . 4-4-3-3
Security settings . . . . . . . . . . . . . . 4-5
Call restrictions . . . . . . . . . . 4-5-1
Restrict outgoing
calls . . . . . . . . . . . . 4-5-1-1
Restrict incoming
calls . . . . . . . . . . . . 4-5-1-2
1 General profile cannot be renamed.
2 Menu option may not be visible, based on your service provider’s requirements.
3 This function can be used only if it is supported by your network operator or service provider.
Please contact your service provider for more information.
4 Accessory settings does not appear in the menu until an accessory has been connected to the
phone.
Copyright © 2004 Nokia. All rights reserved. 17
Page 22

About your phone
Access codes. . . . . . . . . . . . . 4-5-2
Phone lock . . . . . . . . 4-5-2-1
Allowed number when
phone locked . . . . . 4-5-2-2
Change lock code . . 4-5-2-3
Change security
code . . . . . . . . . . . . 4-5-2-4
Network services1 . . . . . . . . . . . . . 4-6
Voice privacy. . . . . . . . . . . . . 4-6-1
Call divert . . . . . . . . . . . . . . . 4-6-2
Divert all calls . . . . . 4-6-2-1
Divert if busy. . . . . . 4-6-2-2
Divert if not
answered . . . . . . . . 4-6-2-3
Divert all
data/fax calls. . . . . 4-6-2-4
Cancel all call
diverting. . . . . . . . . 4-6-2-5
Call waiting . . . . . . . . . . . . . 4-6-3
Send own caller ID
when calling . . . . . . . . . . . . 4-6-4
Yes . . . . . . . . . . . . . . 4-6-4-1
No. . . . . . . . . . . . . . . 4-6-4-2
Network feature setting . . . 4-6-5
Own number selection. . . . . 4-6-6
System2 . . . . . . . . . . . . . . . . . . . . . 4-7
Roaming options . . . . . . . . . 4-7-1
Mode . . . . . . . . . . . . . . . . . . . 4-7-2
GAMES . . . . . . . . . . . . . . . . . . . . . . 5
Select game . . . . . . . . . . . . . . . . . . 5-1
Snake II . . . . . . . . . . . . . . . . . 5-1-1
Space impact II. . . . . . . . . . . 5-1-2
Bumper . . . . . . . . . . . . . . . . . 5-1-3
Settings . . . . . . . . . . . . . . . . . . . . . 5-2
Game sounds . . . . . . . . . . . . 5-2-1
Game lights . . . . . . . . . . . . . 5-2-2
Shakes . . . . . . . . . . . . . . . . . . 5-2-3
VOICE. . . . . . . . . . . . . . . . . . . . . . . . 6
Voice tags . . . . . . . . . . . . . . . . . . . 6-1
Add voice tag3. . . . . . . . . . . 6-1-1
Playback. . . . . . . . . . 6-1-1-1
Change. . . . . . . . . . . 6-1-1-2
Delete. . . . . . . . . . . . 6-1-1-3
Voice commands . . . . . . . . . . . . . . 6-2
Profiles . . . . . . . . . . . . . . . . . 6-2-1
General . . . . . . . . . . 6-2-1-1
Silent . . . . . . . . . . . . 6-2-1-2
Meeting . . . . . . . . . . 6-2-1-3
Outdoor . . . . . . . . . . 6-2-1-4
Pager . . . . . . . . . . . . 6-2-1-5
Voice mailbox. . . . . . . . . . . . 6-2-2
Call voice mailbox . . 6-2-2-1
Recorder . . . . . . . . . . . . . . . . 6-2-3
Record . . . . . . . . . . . 6-2-3-1
Call register . . . . . . . . . . . . . 6-2-4
Missed calls . . . . . . . 6-2-4-1
Received calls . . . . . 6-2-4-2
Voice recorder . . . . . . . . . . . . . . . . 6-3
Record . . . . . . . . . . . . . . . . . 6-3-1
Recordings list . . . . . . . . . . . 6-3-2
Playback. . . . . . . . . . 6-3-2-1
Delete. . . . . . . . . . . . 6-3-2-2
Edit title. . . . . . . . . . 6-3-2-3
Alarm/Add alarm. . . 6-3-2-4
MINIBROWSER. . . . . . . . . . . . . . . . . 7
ORGANISER . . . . . . . . . . . . . . . . . . . 8
Alarm clock . . . . . . . . . . . . . . . . . . 8-1
Calendar. . . . . . . . . . . . . . . . . . . . . 8-2
View day. . . . . . . . . . . . . . . . 8-2-1
View . . . . . . . . . . . . . 8-2-1-1
Make a note . . . . . . 8-2-1-2
Delete. . . . . . . . . . . . 8-2-1-3
Edit. . . . . . . . . . . . . . 8-2-1-4
1 Network services menu options are visible only after entering the correct services code.
2 Menu options may vary. Check with your service provider.
3 Voice command options for Profiles, Voice mailbox, and Call register are the same as Voice tag
options.
18 Copyright © 2004 Nokia. All rights reserved.
Page 23
About your phone
Move . . . . . . . . . . . . 8-2-1-5
Repeat . . . . . . . . . . . 8-2-1-6
Go to date . . . . . . . . 8-2-1-7
Send note . . . . . . . . 8-2-1-8
Copy . . . . . . . . . . . . . 8-2-1-9
Settings . . . . . . . . . 8-2-1-10
Make a note . . . . . . . . . . . . . 8-2-2
Go to date. . . . . . . . . . . . . . . 8-2-3
Settings. . . . . . . . . . . . . . . . . 8-2-4
Set the date. . . . . . . 8-2-4-1
Set the time. . . . . . . 8-2-4-2
Date format. . . . . . . 8-2-4-3
Date separator. . . . . 8-2-4-4
Time format. . . . . . . 8-2-4-5
Week starts . . . . . . . 8-2-4-6
Auto delete . . . . . . . 8-2-4-7
Calculator. . . . . . . . . . . . . . . . . . . . 8-3
Stopwatch . . . . . . . . . . . . . . . . . . . 8-4
Continue . . . . . . . . . . . . . . . . 8-4-1
Show last time . . . . . . . . . . . 8-4-2
Split timing. . . . . . . . . . . . . . 8-4-3
Lap timing. . . . . . . . . . . . . . . 8-4-4
View times . . . . . . . . . . . . . . 8-4-5
Delete times . . . . . . . . . . . . . 8-4-6
APPLICATIONS . . . . . . . . . . . . . . . . . 9
KEYGUARD. . . . . . . . . . . . . . . . . . . 10
Important: Some menu
shortcuts may not be available.
This list serves as a more detailed
list of your phone menu
structure, as well as a list of
shortcuts.
• PHONE BOOK MENU
From the Start screen, press Contacts.
The following phone book options are
available (see table on following page):
Menu Menu (cont.)
Search
Add new
Edit name
Delete
One by one
Delete all
Add number
Settings
Scrolling view
Name list
Name+number
Memory status
Speed dials
View number
Change
Delete
Voice tags
Playback
Change
Delete
a. Menu options for VIP, Friends, Business, and
Other are identical to Family options.
Own number
Caller groups
a
Family
Group name
Group ringing
tone
Group logo
On
Off
View
Group members
Remove
name
Add name
VIP
Friends
Business
Other
Copyright © 2004 Nokia. All rights reserved. 19
Page 24
Phone setup
4 Phone setup
Now that you’ve had a chance to learn
about some of the basic functions and
features of your phone, you may want to
explore a few options to improve the way
you use your phone.
• LEARN ABOUT THE HDB-4 AND HS-5 HEADSET
Your sales package may include the HDB4 or HS-5 headset. Each headset offers
you convenient handsfree
communications with the phone.
Connect the headset
Before using the headset:
1 Plug the headset jack into the
bottom of your phone.
2 Wrap the device around ear.
Use the headset
You can make, answer, and end calls as
usual with the headset connected. The
headset fits over your ear and the
microphone hangs at the side of your
head. When using this headset you can
speak at a normal volume.
You can use the headset’s button to
answer or end a call, as well as activate
voice dialling or voice commands.
You can also use the Send key or the End
key to answer and end calls.
Adjust the volume
Change the phone ear piece volume, to
make the caller’s voice louder or softer.
Adjustments to the volume can only be
made during a call by pressing the up or
down scroll key.
20 Copyright © 2004 Nokia. All rights reserved.
Page 25
5 Text entry
Text entry
Warning! Do not switch on the
phone when wireless phone use
is prohibited or when it may
cause interference or danger.
You can enter letters, numbers, and
special characters using the phone
keypad when working with the phone
book, calendar, text messaging, or while
browsing the Internet. This section
provides detailed instructions for the two
text entry methods, that is, traditional
text entry and predictive text input.
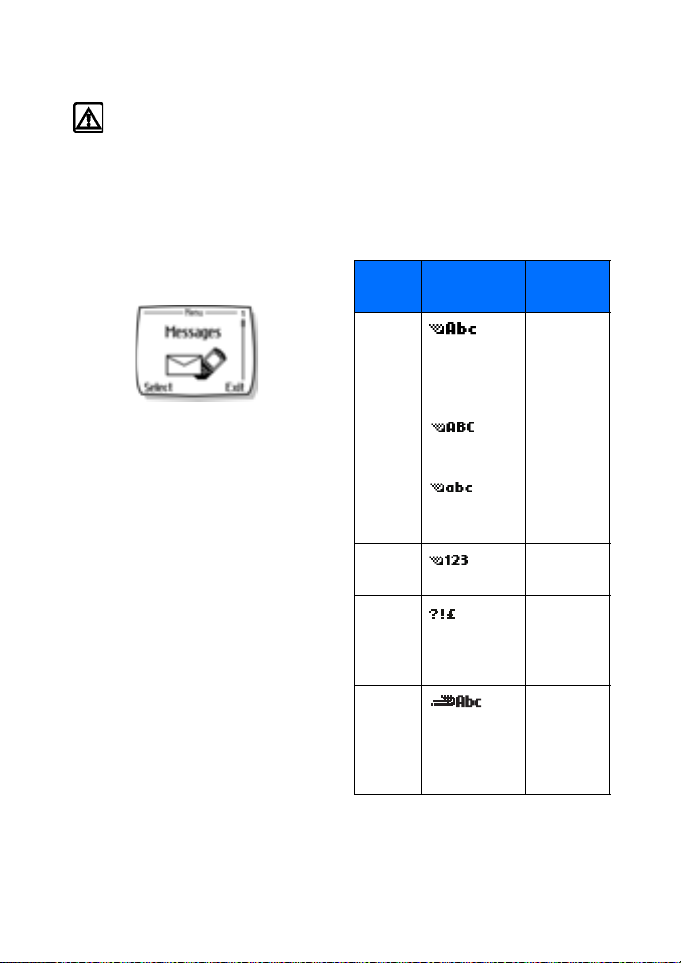
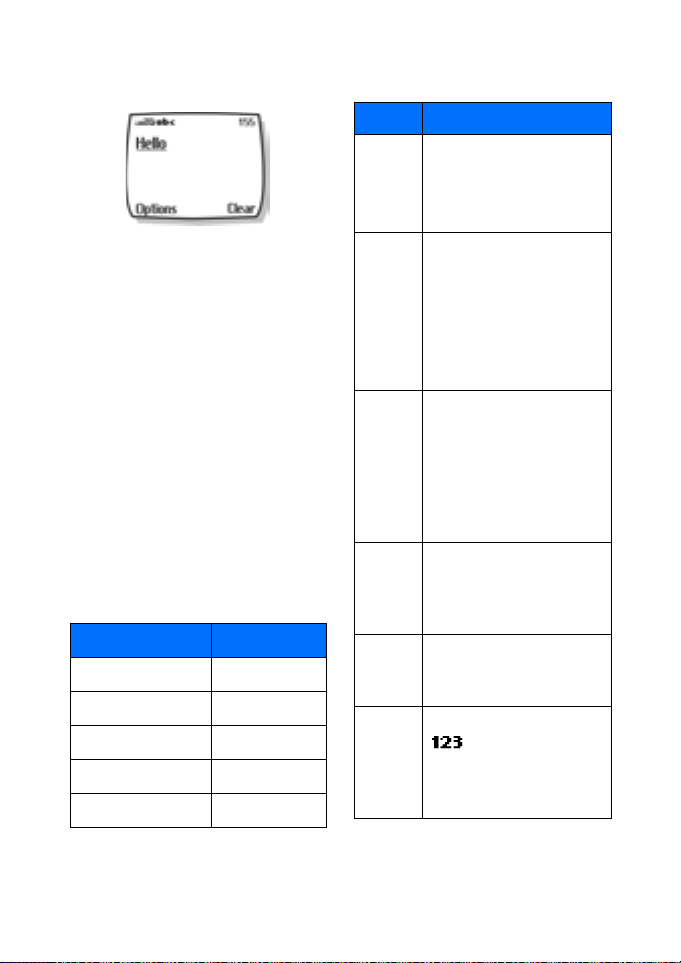
• ENTER LETTERS AND NUMBERS
You have four modes available for
entering information, based on the type
of data you’re entering (phone book,
organiser notes or text messages):
Mode
ABC -
123 -
Special
characters
Predictive
text
The phone
shows
sentence case or
title case (first
letter
capitalised)
all uppercase
letters
all lowercase
letters
number entry.
- special
characters list
in combination
with ABC mode
indicators.
Use for
Entering
contacts,
numbers or
addresses in
phone book.
Entering
calendar
notes.
Write a text
message.
Enter
numbers.
Enter
punctuation
or special
characters.
Write SMS
text
messages or
calendar
notes.
Copyright © 2004 Nokia. All rights reserved. 21
Page 26
Text entry
• WRITE USING ABC AND 123 MODES
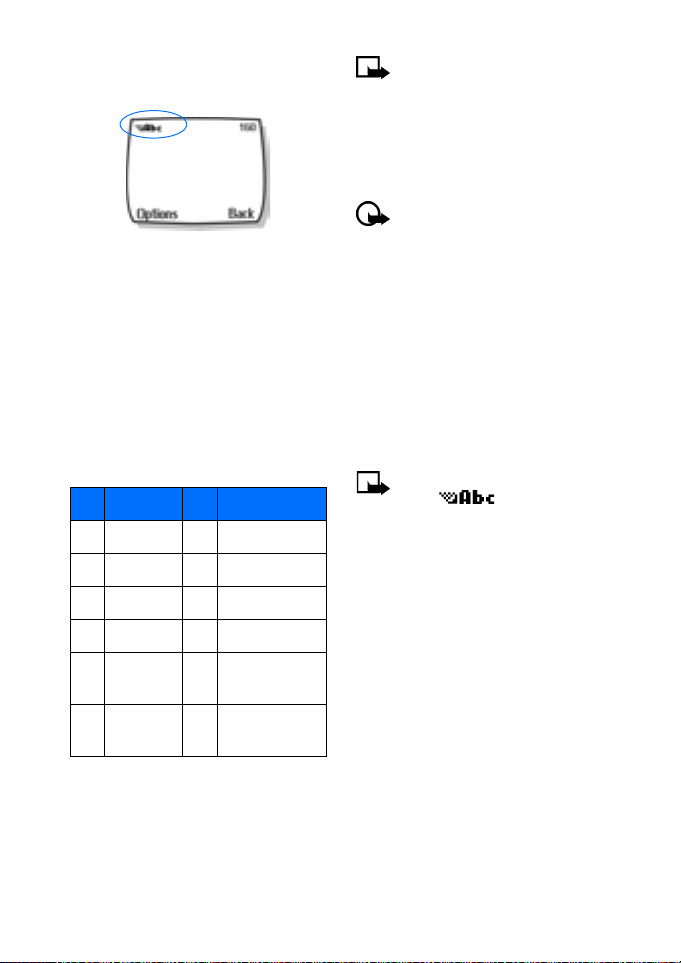
A status indicator in the upper left corner
of your screen indicates the mode you are
in whenever you are entering
information into your phone book,
calendar, or text messaging. Pressing #
will change these modes.
Enter letters
The following table contains a list of the
characters displayed when entering text
and numbers from your keypad:
Key Characters Key Characters
1 . , @?!-1 7 P Q R S 7
2 A B C 2 8 T U V 8
3 D E F 3 9 W X Y Z 9
4 G H I 4 0 Space, 0, return
5 J K L 5 */+ Special
characters menu
6 M N O 6 # Changes letter
case or mode.
Pressing a key repeatedly cycles you
through all of that key’s options. To enter
a letter, press the appropriate key
repeatedly until the desired letter
appears. Continue this process until the
word or name is completed.
Note: If the next letter in the
word you are entering is on the
same key, wait two to three
seconds for the cursor to
advance, then enter the new
letter, or press 0 to advance the
cursor.
Important: Phone language
settings may affect the
characters associated with the
phone keypad.
For example: to enter the name “Albert”:
Press 2 A
Press 5-5-5 l
Press 2-2 b
Press 3-3 e
Press 7-7-7 r
Press 8 t
Note: Default mode is sentence
case
letter of a name or sentence is
automatically capitalised. Phone
book default mode is title caseeach word is capitalised.
where the first
OTHER OPTIONS
• Delete mistakes-If you make a
mistake, press Clear to delete one
character to the left. Press and hold
the Clear key to speed up the erasing
process.
• Enter a space-When you have
completed entering a word or name,
press 0 to enter a space before the
next word.
22 Copyright © 2004 Nokia. All rights reserved.
Page 27
Text entry
• Change letter case-Press # to
switch between the various text
entry modes or from uppercase and
lowercase letters.
• To start a new line-Press 0 three
times.
Enter numbers
Your phone automatically switches to
123 mode when entering a number into
your phone book or entering a number in
text messaging. When in ABC mode, you
can insert numbers using any of the
following methods:
• Press and hold the # key for two
seconds to switch to 123 mode, then
press the desired number keys.
• Press and hold # again to return to
ABC mode.
• Press and hold the desired number
key until the number appears on the
display.
• Press the desired key repeatedly
until the desired number appears.
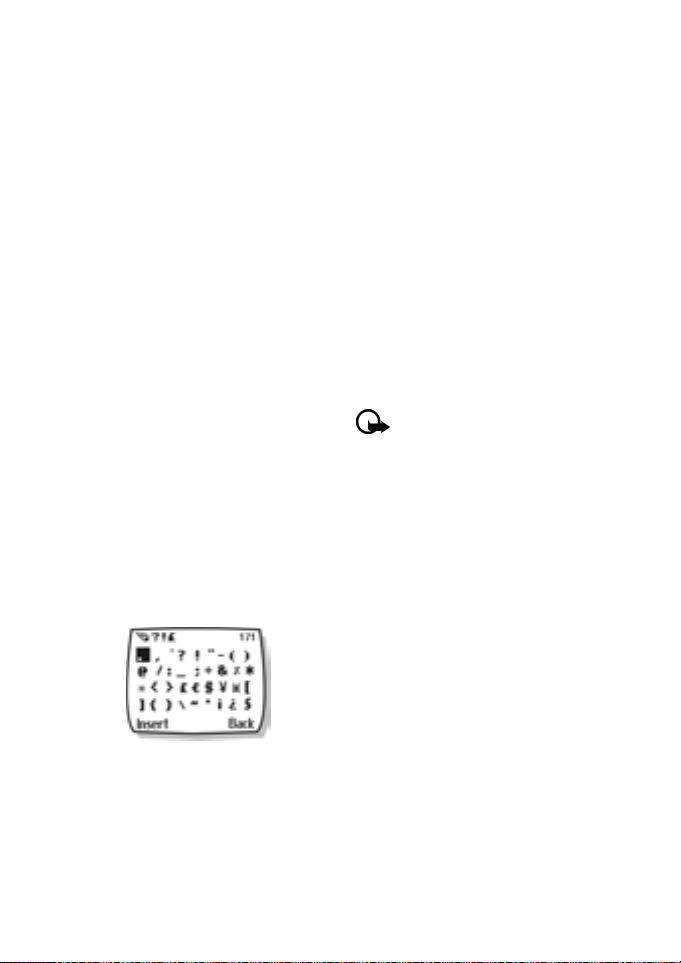
Enter punctuation or other characters
You can enter punctuation, specials
characters, and symbols while writing
text messages, entering notes in the
Organiser, creating phone book entries,
or browsing the Internet. The illustration
shows a sample of the available
characters.
ENTER PUNCTUATION OR SPECIAL CHARACTERS
Depending on the type of text you are
entering, you can add punctuation or
special characters by doing any of the
following:
• Press 1 repeatedly while in ABC
mode to cycle through some of the
most common punctuation marks
and special characters.
• Press */+ to activate the special
characters list. A screen appears
displaying the available special
characters.
• Use the scroll keys to highlight the
desired character, then press Select.
Important: Some networks may
not support all languagedependent characters.
Use special characters in phone numbers
You can enter certain special characters
as a part of the phone numbers you save
to the phone book. Pressing */+ repeatedly
cycles through the four special
characters available when saving a
phone number.
* Sends command strings to the
network. Contact your service
provider for more information.
+ Links a speed dialling location to the
number currently being entered.
p Creates a pause that occurs when
the phone dials a number. Numbers
entered to the right of this special
character are automatically sent as
touch tones after a 2.5-second pause.
w Causes the phone to wait for you to
press Send.
Copyright © 2004 Nokia. All rights reserved. 23
Page 28
Text entry
• WRITE WITH PREDICTIVE TEXT
A quick way to enter text is using a highly
compressed database (or dictionary) of
common words that tries to anticipate
the word as you enter it.
You can use predictive text input when
you:
• Write or reply to a text message
• Create a note in the calendar
• Enter text while using the
minibrowser
Watching predictive text guess a word
can be confusing, so you should disregard
the screen until all characters have been
entered.
Example: To write “Nokia”:
What you press What you see
Press 6 - N O
Press 6 - o On
Press 5 - k Onl
Press 4 - i Onli
Press 2 - a Nokia
KEYS AND TOOLS FOR PREDICTIVE TEXT
Key Description
2 - 9 Text entry. Press each key
only once per letter.
Press and hold the key to
enter the number.
If the underlined word is not
the word you intended, press
this key repeatedly until the
word you want appears.
*/+
Press and hold this key to
display a list of punctuation
and special characters.
Spell If the word entered is not
recognised or if you have
pressed */+ to search for a
word, then Spell appears
above the left selection key.
Press Spell, enter the desired
word, then press Save.
Clear Press once to delete the
character to the left of the
cursor. Press and hold to
delete characters faster.
0 Press once to accept the
word and add a space. Press
and hold to enter a zero.
Press and hold to enter
mode. Enter the
desired number, then press
##
and hold again to return to
predictive text.
24 Copyright © 2004 Nokia. All rights reserved.
Page 29
Text entry
Key Description
Press once to add a period.
Press 1 repeatedly to view
other punctuation marks.
Press once to add a
punctuation mark that
11
predictive text converts to
an apostrophe.
Press and hold to enter the
numeral 1.
Press to switch between
sentence case, lowercase, or
uppercase modes or to
#
switch to the above modes
without predictive text.
Turn on predictive text input
You can turn on predictive text input
from the Options menu while writing a
text message. Once enabled, predictive
text is available to all features that
support it.
in the upper left corner of the
screen indicates predictive text is active.
ENABLE PREDICTIVE TEXT (QUICK METHOD)
While creating a new text message or
calendar note, press and hold the
Options key for two seconds.
The message T9 prediction on is
displayed and the English language
dictionary is enabled (or the most
recently selected dictionary).
ENABLE PREDICTIVE TEXT (AND SELECT DICTIONARY)
While creating a new text message:
1 Press Options, scroll to Predictive
text, and press Select.
2 Scroll to the dictionary you want (for
example, English), then press Select.
The message T9 prediction on is displayed.
The dictionary in the language is enabled.
Turn off predictive text input
While creating a new text message, press
and hold the Options key for two seconds.
1 Press Options, scroll to Predictive
text, and press Select.
2 Scroll to Prediction off, then press
Select.
• TIPS FOR PREDICTIVE TEXT
Check a word
When you have finished writing a word
and the word is correct as shown:
Press 0 to confirm the word, enter a
space, and continue by writing the next
word.
OR
Insert a punctuation mark, then press 0
for a new sentence.
If the displayed word is not correct:
• Press */+ repeatedly until the word
you want appears.
•Press 0 to confirm your choice and
continue.
OR
• Press Options, scroll to Matches,
then press Select. Scroll to the
correct word and press Use.
Copyright © 2004 Nokia. All rights reserved. 25
Page 30

Text entry
• Press 0 to confirm the word and
enter a space.
Tip: When you enter
punctuation at the end of a
sentence, the phone switches to
sentence case. The first letter of
the next word automatically
appears in uppercase.
ADD A WORD TO THE DICTIONARY
When the word you intended to write is
not in the dictionary or when you are
using */+ to cycle through the available
matches, the left selection key becomes
Spell.
1 Select Spell and enter the word
using standard text entry.
2 Press Save to insert the correct word
and save it to the dictionary.
INSERT NUMBERS AND SYMBOLS
The procedure for entering numbers with
predictive text and standard text entry is
the same. Please see “Enter numbers” on
page 23.
The procedure for entering symbols with
predictive text and standard text entry is
the same. Please see “Enter punctuation
or other characters” on page 23.
WRITE COMPOUND WORDS
1 Write the first part of the compound
word, then press the down scroll key
to accept that part.
2 Write the last part of the compound
word.
3 Press 0 to enter the word.
26 Copyright © 2004 Nokia. All rights reserved.
Page 31

6 Phone book
Phone book
Warning! Do not switch on the
phone when wireless phone use
is prohibited or when it may
cause interference or danger.
You can save up to 250 entries (contacts
and associated numbers) in your phone
book. Phone memory can store multiple
numbers for each name (home, business,
mobile, etc.), as well as text information
(postal address, e-mail address, or note).
Note: The amount of detail
stored for each entry may affect
the total number of entries
available.
memory space with other
features. For more information,
see “Memory use” on page 14.
This feature shares
• SAVING CONTACTS AND NUMBERS
There are several ways to save contacts
and numbers in your phone book.
Instructions for the two most common
ways are as follows:
SAVE A NUMBER AND NAME (USING PHONE BOOK MENU)
1 Press Contacts. 2 Scroll to Add new and press Select.
3 Enter the name and press OK. 4 Enter the area code (as necessary)
and phone number, then press OK.
SAVE A NUMBER AND NAME (QUICK SAVE)
1 Enter the phone number using the
keypad.
2 Press the left selection key two
times (Options > Save).
3 Enter a name and press OK. 4 Press Done to return to the Start
screen.
Tip: Press and hold the Options
selection key for two seconds
after entering the number to
store the number only.
• RECALL CONTACTS AND NUMBERS
There are several ways to recall phone
book entries. Once you locate the desired
name and number from the phone book,
you can perform any of the following
tasks: call the number, edit or add
information to the selected phone book
entry, or delete the entry.
From the Start screen, recall a phone
book entry as follows:
• Press up or down scroll keys to
display the list of phone book
entries.
• Press repeatedly to scroll through
the list of contacts.
Copyright © 2004 Nokia. All rights reserved. 27
Page 32

Phone book
Tip: When viewing the list of
contacts, enter the first few
letters of the desired entry. The
phone book automatically jumps
to that section of the phone
book.
• Press Contacts, select Search, enter
the first few letters of the entry, then
press Search.
• USE PHONE BOOK MENUS
The phone book has several menu options
from which you can choose. These
options appear when you press Contacts.
Use the scroll keys to scroll to the option
you want.
Option Function
Search Search for a specific
phone book entry.
Add new Add a new contact to
Edit name Edit the name of a phone
Delete Delete phone book
Add
number
Settings Display a list of phone
Speed
dialling
your phone book.
book entry.
entries one by one or all
at once.
Add a phone number to
an existing contact.
book options, including
phone book memory
status and scrolling view.
Assign phone book
entries to any of the 8
speed dialling locations.
Option Function
Voice tags Create and manage voice
tags for voice dialling.
Own
number
Caller
groups
Displays your phone
numbers.
Organise phone book
entries into groups and
categories and assign
special ringing tones and
graphics to the group.
Display the phone book
Phone book information can be displayed
in two different ways:
• Name list-Entries displayed as a list
of names
• Name+number-Name and default
number displayed
When viewing the phone book, use the
up or down scroll keys to scroll through
the phone book entries.
Change phone book view
1 Press Contacts, scroll to Settings,
then press Select.
2 Select Scrolling view, then scroll to
the view option you want.
3 Press Select to confirm your choice.
• EDIT A NAME OR NUMBER
You can edit a phone book entry at any
time.
1 Locate the phone book entry you
wish to edit.
2 Press Details, then press Options.
28 Copyright © 2004 Nokia. All rights reserved.
Page 33

Phone book
3 Scroll to Edit name or Edit number
and press Select.
4 Edit the name or number, then press
OK.
• ADD A NUMBER TO A PHONE BOOK ENTRY
There are several ways to add additional
numbers to an existing phone book entry
(name). Phone memory book can store up
to two numbers per name.
Once you choose to add a number, you
can assign one of the following number
types for the additional numbers:
General, Mobile, Home, Work, or Fax.
From the phone book
1 Press Contacts, scroll to Add
number, then press Select.
2 Scroll to the entry you wish to
modify, then press Add number.
3 Scroll to the type of number you are
adding (General, Mobile, Home,
Work, or Fax) then press Select.
4 Enter the number and press OK.
From the Start screen
1 Enter the phone number using the
keypad, then press Options.
2 Scroll to Add to name, then press
Select.
3 Scroll to the desired phone book
entry, then press Add number.
4 Scroll to the desired number type
and press Select.
By recalling the name
1 Locate the phone book entry you
wish to edit.
2 Press Details, then select an entry
and press Options again.
3 Scroll to Add number, then press
Select.
4 Scroll to the desired number type
and press Select.
5 Enter the number and press OK.
Change the number type
Every time you create a new phone book
entry, your phone automatically assigns
the General number type to the new
number. You can use a phone book entry
Options menu to change the number
type for any of the phone numbers. For
example, change a number type from
Work to Home.
1 Recall the name from the phone
book.
2 Press Details, then scroll to highlight
the number you want to modify.
3 Press Options, scroll to Change type,
then press Select.
4 Scroll to the number type you want,
then press Select.
Important: If you plan on using
Nokia PC Suite to synchronise
your phone book and your PC
PIM (Personal Information
Manager) application, make sure
all phone numbers are assigned
the correct number type. PC Sync
uses this information to
synchronise contacts correctly
between phone and PC.
Copyright © 2004 Nokia. All rights reserved. 29
Page 34

Phone book
Learn about default number
If a phone book entry (name) contains
multiple numbers, the number entered
when the phone book entry was created
is designated as the default number.
When you highlight a phone book entry
and press the Send key, your phone dials
the default number.
Consider designating the number you
dial most often (for phone book entries
containing multiple numbers per name)
as the default number.
CHANGE DEFAULT NUMBER
Any phone number can be designated as
the default number.
1 Recall the phone book entry you
want to modify.
2 Press Details, then scroll to the
number you want to set as the
default number.
3 Press Options, scroll to Set as
default, then press Select.
• DELETE STORED AND NUMBERS
You can delete a number from a phone
book entry, delete all details of a contact,
or delete the entire contents of your
phone book. Once you delete
information, it cannot be recovered.
DELETE A NUMBER
1 Recall the phone book entry you
want to modify.
2 Press Details, then scroll to the
number you want to delete.
3 Press Options, scroll to Delete
number, then press Select, then OK.
DELETE ENTIRE PHONE BOOK ENTRY
1 Highlight the phone book entry you
want to delete, then press Details.
2 Press Options. Scroll to Delete, press
Select.
3 Press OK to delete the phone book
entry (including all details).
DELETE THE ENTIRE PHONE BOOK
1 Press Contacts, scroll to Delete, then
press Select.
2 Scroll to Delete all and press Select. 3 When you see the message Are you
sure?, press OK.
4 Enter your security code, then press
OK.
For more information on the security
code, see “Security code” on page
66.
• ADD OTHER INFORMATION TO A PHONE BOOK ENTRY
Once you have created a contact, you can
add an e-mail address, a mailing address,
or a note to that contact.
Note: Text information can only
be added to existing contacts.
For example, you cannot create a
new contact with only an e-mail
address.
1 Recall the phone book entry you
want to modify.
2 Press Details, then press Options
again.
3 Scroll to Add detail, then press
Select.
30 Copyright © 2004 Nokia. All rights reserved.
Page 35

Phone book
4 Scroll to the type of information you
would like to add (E-mail, Street
addr., etc.), then press Select.
5 Enter the information, then press
OK.
6 Press the End key to return to the
Start screen.
• USE CALLER GROUPS
Your phone allows you to group phone
book entries with similar attributes into
caller groups. The five default caller
groups are Family, VIP, Friends, Business,
and Other. Each group has two attributes
which can be defined by the user: Group
Name and Group Tone.
Assign phone number to a caller group
1 Recall the desired phone book entry,
then press Details.
2 Scroll to the desired phone number,
then press Options.
3 Scroll to Caller groups, then press
Select.
4 Scroll to the desired caller group (for
example, Family), then press Select.
Edit caller group options
You can edit various aspects of a caller
group.
SETTING A RINGING TONE AND GRAPHIC FOR A CALLER GROUP
1 Press Contacts. 2 Scroll to Caller groups and press
Select.
3 Scroll to one of the caller groups
and press Select.
4 Scroll to one of the following
functions and press Select.
• Rename group-Enter the new name
for the caller group and press OK.
• Group ringing tone-Scroll to the
desired tone and press OK. Default is
the tone selected for the currently
selected profile.
• Group logo-Choose to turn the
group logo on or off for the selected
caller group.
• Group members-Press Select to
view group members. To add or
remove a member, press Options,
then select Add name or Remove
name.
Note: If you selected Send
graphic, enter the recipient’s
phone number or recall it from
phone book and press OK. Check
with your service provider for
availability of this feature.
• CHECK MEMORY STATUS
You can check the percentage of phone
memory that is dedicated to the phone
book, that is in use, and the percentage
that remains available.
1 Press Contacts. 2 Scroll to Settings, then press Select. 3 Scroll to Memory status and press
Select.
Copyright © 2004 Nokia. All rights reserved. 31
Page 36

Call register
7Call register
Warning! Do not switch on the
phone when wireless phone use
is prohibited or when it may
cause interference or danger.
Your phone keeps a register (record) of
call-related information including phone
numbers and call times. The call register
keeps track of:
• Missed calls
• Received calls
• Dialled numbers
• Time spent on calls
• Time spent on digital data, fax or
minibrowser calls
• Amount of data transferred during
data, fax or minibrowser calls
REQUIREMENTS
Before your phone can register missed or
received calls properly:
1 You must have a subscription to
caller ID service.
2 Your phone must be turned on and in
a digital service area.
3 The caller must not have caller ID
blocked.
4 Your phone time and date must be
set.
Note: If the incoming call has
caller ID blocked, the number
cannot be recorded in the call
register. If you try to view the call
register, the message No new
numbers is displayed.
• CHECK MISSED OR RECEIVED CALLS, OR DIALLED NUMBERS
Your phone records information about
the 60 most recently missed, received,
and dialled numbers (20 entries for each
type of call). To view call register entries:
1 Press Menu 2 (Call register), then
scroll to the desired call type
(Missed calls, Received calls, or
Dialled numbers), then press Select.
2 Use up and down scroll keys to scroll
to the desired call register entry type
(missed, received, or dialled
numbers), then press Options.
Note: If the phone number
recorded by the call register
matches a number stored in your
phone book, the name of the
phone book entry is displayed.
32 Copyright © 2004 Nokia. All rights reserved.
Page 37

Call register
View call register options
The table below contains a list of options
available for all call register entries.
Option Description
Shows the time when the
Time of call
Send
message
View
number
Edit
number
Save
Delete
Call
call was missed, received
or dialled.
Allows you to write and
send a text message to
numbers listed in the call
register.
Displays the phone
number when call
register entry matches a
number found in your
phone book.
Allows you to use the
number shown on the
screen.
Saves the number in your
phone book.
Removes the number
from the call register.
Redials the displayed
number.
Use call register shortcuts
MISSED CALLS
When you miss a call(s), the message
Missed calls appears on your phone’s
screen, along with the number of calls
missed.
Important: You are notified of
missed calls only if your phone
was turned on and you are in a
digital service area.
Note: If you chose the Divert if
not answered option in Call
divert, your phone treats these
diverted calls as missed calls.
DIALLED NUMBERS
You can view the list of dialled numbers
without having to access the Call
register menu. From the Start screen:
1 Press the Send key. The most
recently dialled call is displayed.
2 Use up scroll or down scroll key to
view the other call register entries.
3 Press the Send key again to redial
the number displayed, or press
Options to work with the selected
call register entry.
Tip: To redial the last number,
press the Send key twice.
• DELETE RECENT CALL LISTS
Your phone’s Call register uses call lists
to store numbers of incoming, outgoing,
and missed calls. Use the Delete call
registers menu to delete the register of
phone numbers dialled, received, or
missed.
The All option clears all numbers in all
lists, whereas the other options clear only
the numbers associated with that list.
Copyright © 2004 Nokia. All rights reserved. 33
Page 38

Call register
Caution! This operation cannot
be undone. Clearing the Dialled
numbers call list clears the list of
dialled numbers accessed by
pressing the Send key.
1 Press Menu 2-4 (Call register >
Delete call registers).
2 Use the up or down scroll keys to
highlight the desired option: All,
Missed, Dialled or Received.
3 Press Select to confirm your
selection.
• USE CALL TIMERS
Your phone uses call timers to track the
amount of time you spend on each call.
You can review phone use by checking
the call timers.
Important: The actual time
invoiced for calls by your service
provider may vary, depending
upon network features, billing
round-off, and so forth.
ACCESS THE VARIOUS CALL TIMERS:
1 Press Menu 2-5 (Call register > Call
timers).
2 Use up or down scroll keys to scroll
through the following options:
Option Description
Duration of
received calls
Duration of
all calls
Life timer
Clear timers
Displays total time for all
incoming calls.
Displays sum total for all
incoming and outgoing
calls.
Shows the time used for
all calls for the life of
your phone. This option
cannot be reset.
Clears (deletes) all call
timers except Life timer.
• TURN ON A CURRENT CALL TIMER
Your phone can display a call timer
showing elapsed time of the current call.
When the call is completed, the timer
displays the call length.
1 Press Menu 2-5-1-1 (Call register
> Call timers > Dur atio n of last cal l
> Show call time on display).
2 Scroll to On and press OK.
Tip: After a call has ended, press
any key on your phone to clear
the current call time from the
screen.
Option Description
Duration of
last call
Duration of
dialled calls
Displays elapsed time of
the last call you made.
Displays total time for all
outgoing calls.
• CLEAR CALL TIMERS
1 Press Menu 2-5-6 (Call register >
Call timers > Clear timers).
2 The Security code field appears. 3 Enter your security code and press OK.
34 Copyright © 2004 Nokia. All rights reserved.
Page 39

Call register
Caution! This action cannot be
undone.
Tip: If using call timers to log the
amount of time spent on calls,
you may want to record the
information from the call timers
before you clear them.
• DATA TIMERS (DATA/FAX AND MINIBROWSER)
The call register records and displays the
length of digital data/fax calls, as well as
meters the amount of data transferred
during data/fax calls. The call register
also records this same information when
you use the Minibrowser to access the
wireless Internet.
Access data-related call timer
• For data/fax call timers, press Menu
2-6 (Call register > Data/fax calls)
• For minibrowser call timers, press
Menu 2-7 (Call register >
Minibrowser calls)
Data-related call timer options
The following call timer options are
available for data/fax and browser calls:
• Last sent (or received) data/faxamount of data displayed in
kilobytes (kB)
• All sent (or received) data/faxamount of data displayed in
kilobytes
• Duration of last data/fax calllength of time spent on last data/fax
call.
• Duration of all data/fax callsrunning total of all calls.
• Clear all data/fax registers-clears
all timers and data/fax registers.
Minibrowser timer options
The available options for the minibrowser
call timers are similar to those listed
above for data/fax calls.
Copyright © 2004 Nokia. All rights reserved. 35
Page 40

Voice mailbox
8 Voice mailbox
Warning! Do not switch on the
phone when wireless phone use
is prohibited or when it may
cause interference or danger.
Voice mail is a feature that enables those
who call you to leave a voice message in
the event you are unable to answer your
phone. When using your phone in
conjunction with your service provider’s
voice mail system, you can retrieve your
messages at any time.
• STORE YOUR VOICE MAILBOX NUMBER
Before you can retrieve any voice
messages, you need to store your voice
mailbox number in your phone:
1 Press Menu 01-2-3 (Messages >
Voice messages > Voice mailbox
number).
2 Enter your voice mailbox phone
number, then press OK.
Your voice mailbox number can be
up to 32 digits long.
Note: If your phone number
changes, you may need to reenter your voice mailbox number.
Tip: You can store your voice
mailbox password and/or PIN
number as a part of your voice
mailbox number. For more
information, see “Save touch
tones as a phone book entry” on
page 62.
• SET GREETINGS
Voice greetings may vary in different
wireless systems. If you need information
about how to record your greeting,
contact your service provider.
• LISTEN TO YOUR VOICE MESSAGES
Note: There are various ways to
retrieve your messages,
depending on your service
provider. Call your service
provider if you have any
questions.
LISTEN TO MESSAGES WHEN NOTIFIED
If your phone plays an alert tone and
New voice message is displayed, press
Listen and follow the prompts. If you
want to rather listen to your messages
later, press Exit.
36 Copyright © 2004 Nokia. All rights reserved.
Page 41

LISTEN TO MESSAGES LATER
From the Start screen, press and hold 1
for two seconds.
OR
Press Menu 01-2-1 (Messages > Voice
messages > Listen to voice messages).
Calling voice mailbox appears on the
screen. Follow the audio prompts from
the voice mail system to review your
messages.
Voice mailbox
Copyright © 2004 Nokia. All rights reserved. 37
Page 42

Text messages
9 Text messages
Warning! Do not switch on the
phone when wireless phone use is
prohibited or when it may cause
interference or danger.
You can use the Messages menu (Menu
1) and Short Message Service (SMS) to
read, write, and send text messages to
another phone in your network. You may
also be able to use the minibrowser email feature to send text messages to
phones in other networks.
Important: When sending SMS
messages, your phone may
display Message sent (where
service is available). This is an
indication that the message has
been sent by your phone to the
SMS network. This is not an
indication that the message has
been received at the intended
destination. For more details
about SMS services, check with
your service provider.
Note: This function can be used
only if it is supported by service
provider. Only devices that offer
compatible e-mail features can
receive and display messages. It
may require a separate
subscription.
• WRITE A TEXT MESSAGE
You can use the Messages menu to
cr eat e a nd se nd te xt me ss ag es to an ot he r
mobile phone in your network, or to
another mobile phone in another
network, or to an e-mail recipient. You
can also save a draft of your message in
the Outbox folder for later use.
Create and send a text message
Important: Use this method
when sending a message to
recipients in the same wireless
network. If the recipient has a
different service provider, you
may need to send the message as
an e-mail (see “Create and send
an e-mail message” on page 41).
1 From the Start screen, press Menu,
then press Select.
2 Select Text messages, then select
Create message.
3 Select either Text (up to 160
characters) or Numeric page
(message consists of phone number
only).
Note: The ability to send a
numerical page may be
dependent on your wireless
network. Please contact your
service provider for more
information on text messaging in
your area.
4 Scroll to Add number, then press
Select.
38 Copyright © 2004 Nokia. All rights reserved.
Page 43
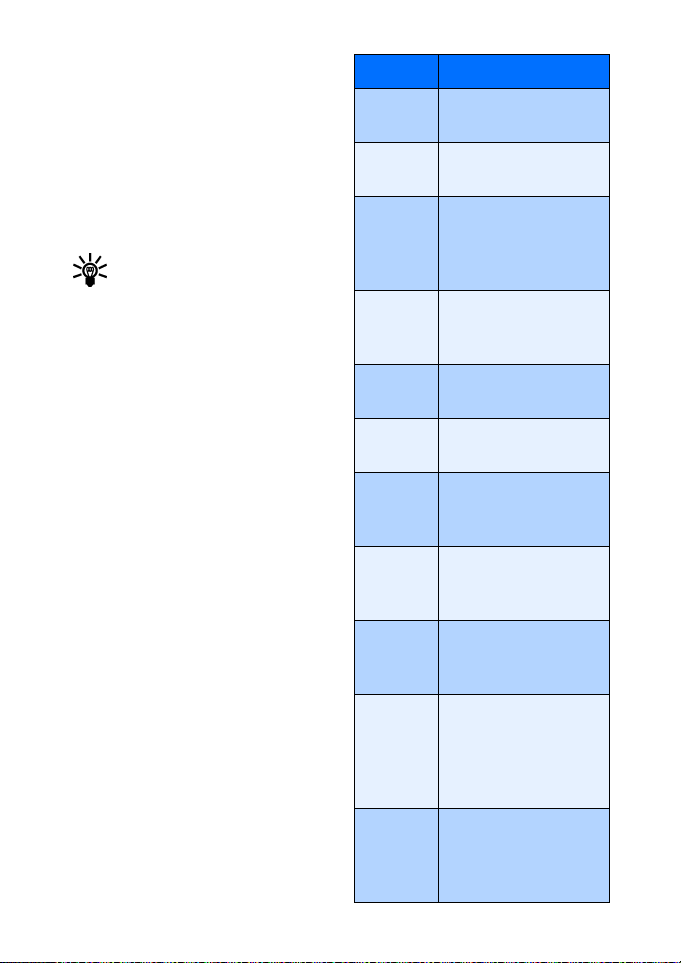
Text messages
5 Enter the phone number of the
recipient, then press OK.
OR
Press Search, highlight the desired
number stored in your phone book,
then press Select.
6 Press Options, scroll to Edit
message, then press Select.
7 Enter your message.
Tip: Since the network limits the
number of characters in a
message, a character counter
appears in the upper right-hand
corner of your phone display. This
phone supports 160 character
SMS messages.
8 To send the message, press Options,
then select Send.
USE OTHER OPTIONS
You may use the following as a shortcut
for sending a new text message:
1 Enter the recipient’s phone number,
then press Options.
2 Scroll to Send message, then press
Select.
Continue the creation process as
described.
View message options
The table below lists several options
available while creating a text message.
To view these options, press Options at
the text entry screen.
Option Description
Send
List
recipients
Settings
Save
message
Clear text
Exit editor
Insert
contact
Insert
number
Use
template
Insert
picture
Sends the current text
message to the recipients
Adds or removes
recipients to the message
Marks a message as
urgent, to request a
delivery receipt or to
specify a callback number
Saves the current
message to the desired
folder
Clears the screen of all
text and characters
Returns to the Messages
menu
Inserts a phone book
entry into the text
message
Inserts a number or a
phone book number into
the text message
Adds text from a
template to the current
message
Inserts a picture into your
message. Once a picture
has been added, you can
change or delete it from
the message.
Insert
word, Edit
word
Inserts a word not found
in the dictionary or edit a
word then add it to the
dictionary
Copyright © 2004 Nokia. All rights reserved. 39
Page 44
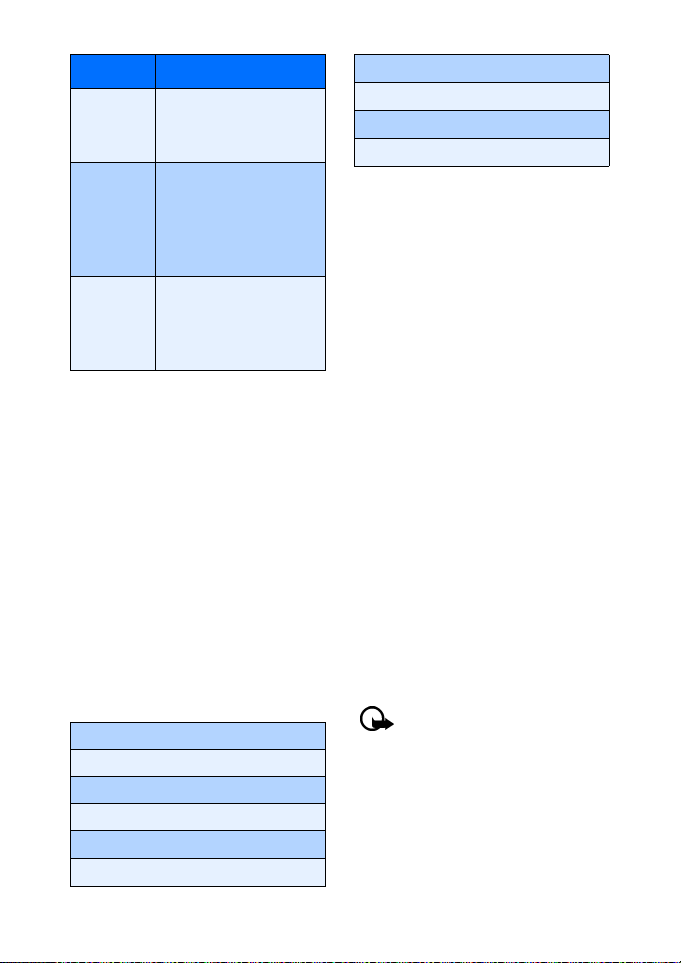
Text messages
Option Description
Insert
symbol
Predictive
text
Matches
Enters punctuation or
special characters into
the current text message.
Enables or disables
predictive text entry.
Also used to select
language of dictionary
used
Displays a list of other
options for the word
currently displayed by
predictive text
• USE MESSAGE TEMPLATES
Templates are short, prewritten messages
which can be recalled and inserted into
new text messages when you’re short on
time.
1 Create a new text message as
described in steps 1-6 in the section,
“Create and send a text message” on
page 38.
2 Instead of entering your own
message, press Options, scroll to Use
template, then press Select.
3 Scroll to one of the available
templates:
1. Please call
2. I'm in a meeting. Call me after
3. I'm late and will be there in
4. Where are you? Can we talk?
5. I'm busy. I'll call you later
6. Let's meet today
7. Thanks for your help
8. Congratulations
9. Sorry, I can't help you on this
10. I will be arriving at
4 Press Select to enter the text into
your new message.
5 Complete the process described
earlier to send your message.
You can also create a new message while
browsing the Templates folder.
1 Press Menu 01-1-5 (Messages >
Text messages > Templates).
2 Scroll to the desired template, then
press Select.
3 Press Options, then select Edit to
modify the message or Use number
to select a recipient.
4 From the message options list, select
Send to send your message.
• LEARN ABOUT E-MAIL TEXT MESSAGES
You can also use the Messages menu to
write and send text messages to a
person’s Internet or corporate e-mail
account or to phones in other networks.
Important: The message can
contain up to 160 characters.
However, the length of your
message is affected by the
length of the e-mail address to
which you are sending the
message. A lengthy e-mail
address will lessen the amount
of available characters you can
place in the message.
40 Copyright © 2004 Nokia. All rights reserved.
Page 45

Text messages
Create and send an e-mail message
Use the same procedure for creating and
sending e-mail messages as found in the
section, “Write a text message” on
page 38. However, select Add e-mail,
then enter the e-mail address (or press
Search and recall an e-mail address
stored in your phone book).
Messages to phones in other networks
Most service providers now have the
ability to route e-mail messages to your
phone (appearing as text messages). The
following are just a few examples of how
your phone e-mail address may appear:
2135551234@myserviceprovider
.com
username@serviceprovider.com
2135551234@mobile.myservicep
rovider.com
It can be difficult to send messages to
phones outside your service provider’s
network using traditional text
messaging. However, it is possible to send
a text message as an e-mail to phones
outside your service provider’s network
(provided the recipient’s phone is capable
of receiving e-mail text messages).
Follow the instructions, “Write a text
message” on page 38 but select Add
e-mail. Enter the e-mail address
associated with the recipient’s phone
number (or press Search and recall the
e-mail address stored in your phone
book).
Important: This feature may
require subscription to special
services. Please check with your
service provider for more
information and for the e-mail
address assigned to your phone.
• RECEIVE TEXT MESSAGES
When you receive a text message, the
indicator and the text: (#)
Message(s) received appears on the
screen (where # is the number of new
messages received).
1 Press Show to read the message or
Exit to view it later.
2 While reading the message, press
Options to view the list of message
options, then press Select to choose
the desired option.
Note: If multiple messages have
been received, then Show
appears on the phone screen and
must be selected in order to view
the list of received messages. You
must scroll to the message on
the list which you want to read
and press Select.
READ MESSAGES LATER
1 Press Menu, select the Messages
menu, then Text messages.
2 Scroll to Inbox, then press Select. 3 Scroll to the desired message, then
press Select to read the message.
Copyright © 2004 Nokia. All rights reserved. 41
Page 46

Text messages
Note: The icon in front of
the message header indicates the
message has not been read.
in front of the message title
indicates you have already
viewed the message.
• RESPOND TO A TEXT MESSAGE
You have several options when reading a
text message. Pressing Options displays
the following list of choices:
Option Description
Delete Deletes the current
message.
Reply Reply to the current
message.
Use
number
Forward Forwards current message
Save
message
Rename Renames existing message
Edit Edits message before
Captures phone number in
the message (or from the
message sender) with the
option to Save (as new
phone book entry), Add to
name, Send message, or
Call
to another user
Saves current message to
Archive folder
title as seen in the
message list
saving or forwarding
Option Description
Use Web
link
Save
address
Captures the URL in the
message and allows you to
go directly to that site
(through the minibrowser)
or to save it as a bookmark
Captures an e-mail
address in the message (or
the sender of an e-mail
text message)
Note: Some of these options
may not be visible. For example,
Use Web link appears only when
a URL is present in an SMS
message.
• REPLY TO A MESSAGE
You can reply to a text message either by
a traditional text message or by an email message. The origin of the message
or the sender’s wireless network affects
how you reply to the incoming message.
Reply using SMS
1 While viewing a message, press
Options.
2 Scroll to Reply and press Select. 3 Scroll to one of the following reply
types and press Select:
• Empty screen-gives you an empty
text buffer
• Original text-includes original
message in the reply message
• Template-allows you to select a
template from the Templates folder
42 Copyright © 2004 Nokia. All rights reserved.
Page 47

Text messages
• Standard answer templates
(including: Yes; No; OK; Thank you;
Congrats; Happy birthday; I love
you too; Hugs and kisses; Sorry;
Sorry, I’m late.)
4 After you write your reply, press
Options, then select Send.
A copy of all sent messages (up to the
memory limit) remain in your Outbox,
unless you turn this feature off in
Message settings.
Press Back to return to the Messages
menu, or press the End key to return to
the Start screen.
Reply to an e-mail message
Use the methods described above for
replying to SMS messages sent from an
e-mail address.
Note: If the incoming e-mail
message is improperly formatted,
you may be required to re-enter
the e-mail address. Press
Options, then select List
recipients, then select Add
e-mail to re-enter the e-mail
address.
• DELETE MESSAGES
You have several options for erasing
individual messages or erasing the
contents of an entire folder. You may
need to delete older or unwanted
messages in order to free up phone
memory for new messages.
Learn about delete options
The Messages menu has an option that
allows you to delete the entire contents
of your folders as described below.
• All read-deletes all read messages
from all folders (unread messages in
Inbox remain intact).
• Inbox-deletes read messages in this
folder (unread messages remain
intact).
• Outbox-deletes all messages in this
folder.
• Archive-deletes all messages in this
folder.
Erase messages in the message folders
1 At the Start screen, press Menu 01-
1-8 (Messages > Text messages >
Delete messages).
2 Highlight the folder whose contents
you want deleted and press OK.
3 Enter your security code (if
prompted) and press OK.
Erasing individual text messages
1 From the Inbox, Outbox, or Archive
folder, highlight the message you
wish to delete.
2 Press Options, scroll to Delete, and
press Select.
3 Press OK to confirm your choice.
Copyright © 2004 Nokia. All rights reserved. 43
Page 48

Text messages
Forward a message
You can forward any incoming text
messages, whether they were sent as
traditional text messages or as e-mail
messages. You can forward a message to
a single user or to a list of users.
Tip: When forwarding a message
to multiple users, your recipient
list can contain both phone
numbers and e-mail addresses.
1 While viewing a message, press
Options.
2 Scroll to Forward and press Select. 3 Select Add e-mail or Add number,
then address the message.
For multiple recipients, press
Options again, then add additional
e-mail addresses or phone numbers.
4 Press Options, scroll to Send, then
press OK.
If you want to edit the forwarded
message, select Edit message from the
options menu prior to sending the
message.
View message settings
You can assign several settings to the
text messages (new messages, replies, or
forwarded messages). The following
settings are available from the message
Options menu:
• Urgent sends the message marked
urgent and appears in recipient’s
Inbox with higher priority than other
messages.
• Deliv. note lets you know when your
message has been delivered.
• Callback no. includes your number
(or a number that you enter or recall
from the phone book) in the body of
the message.
ASSIGN MESSAGE OPTIONS
1 After entering text, press Options. 2 Scroll to Settings and press Select. 3 Scroll to the desired setting, then
press Mark.
4 Press Done, then press Yes to save
changes to your message.
5 Scroll to Send, then press Select (or
select a different menu option).
Learn about message memory
Messages are stored in the following
locations:
• Inbox stores new messages and read
messages.
• Outbox saves copies of all sent
messages or messages waiting to be
sent (in the event the network is
temporarily unavailable).
• Archive used to file read messages
and sent messages for long term
storage.
• My folders used to store usercreated personalised folders where
messages can be saved.
A blinking icon indicates the text
message memory is full. Before you can
receive, save, or send any new messages,
you must delete older messages from your
Inbox, Outbox, Archive or the My folders
folder.
44 Copyright © 2004 Nokia. All rights reserved.
Page 49

Text messages
• MESSAGE SETTINGS
Specify several settings that affect the
overall way your phone handles text
messaging. Use Menu 01-1-9
(Messages > Text messages > Message
settings) to configure the following:
• Send settings-used to specify
normal or urgent priority, request
delivery note, or specify that a
callback number be sent
automatically.
• Other settings-used to specify the
font size in which messages will be
displayed. Also used to configure
how your phone automatically
handles incoming messages when
your Inbox or Outbox are full, and
saves copies of sent messages
automatically.
• ORGANISE TEXT MESSAGES USING FOLDERS
You have several options for storing and
organizing your text messages. The
following pages explain further about the
various folder options.
WORK WITH MESSAGES SAVED IN THE OUTBOX
1 From the Text messages menu, scroll
to Outbox and press Select.
2 Scroll to the desired message, then
press Select.
3 Press Options, then press Resend (or
Edit if the message was a saved
draft).
From this point, you have several options,
including:
• Select Enter text and continue
working with the message.
• Scroll to Add e-mail or Add number
to add additional recipients.
• Scroll to Send, then press Select to
send the message.
Note: If a message is saved from
the Outbox to another folder,
then the options are the same as
if the message were still in the
Outbox.
• Inbox-Text messages you receive
remain stored in your Inbox until
you delete them or move them to
the Archive folder.
• Outbox-Messages that cannot be
sent immediately can be saved so
you can come back to it later. Your
phone stores the message in the
Outbox.
If you try to send a text message and the
network is unavailable, the outgoing
message will be saved in the Outbox.
Copyright © 2004 Nokia. All rights reserved. 45
Page 50

Personalisation
10 Personalisation
Warning! Do not switch on the
phone when wireless phone use
is prohibited or when it may
cause interference or danger.
• LEARN ABOUT PROFILES
A profile refers to a group of settings you
can use to customise the way your phone
works. You can use the existing profiles
or you can customise a profile to suit
your own preferences. Some of the items
you can customise are:
• Ringing options and vibrating alert
• Ringing tones and ringing volume
• Keypad and message alert tones
• Warning tones
Your phone comes with five profiles:
General (default setting), Silent,
Meeting, Outdoor, and Pager.
• SELECT A DIFFERENT PROFILE
QUICK METHOD
1 Press the power key briefly. 2 Use the up and down scroll keys to
scroll to the profile you want to use.
3 Press Select to select a profile.
USE PROFILES MENU
1 Press Menu 3 (Profiles). 2 Scroll to the profile you want to use,
then press Select.
3 Press Select again to choose the
highlighted profile.
• CUSTOMISE A PROFILE
1 Press Menu 3 (Profiles). 2 Scroll to the profile you want to
customise, then press Select.
3 Scroll to Personalise, then press
Select.
The following sections describe each of
the options you can customise.
Set ringing options
You can choose the way your phone rings
to notify you of incoming calls. This
setting does not affect text message alert
tones.
1 From a profile Personalise menu,
scroll to call alert, then press Select.
2 Scroll to one of the ringing options
described below, then press Select.
46 Copyright © 2004 Nokia. All rights reserved.
Page 51

Personalisation
Option Description
Ringing The phone rings normally.
Ascending Ringing volume begins
softly, then increases in
volume if the phone is not
answered.
Ring once The phone rings once to
indicate an incoming call.
Beep once The phone beeps once to
indicate an incoming call.
Off The phone makes no
sound.
Set a ringing tone
A ringing tone is the melody your phone
plays when you receive a call. You can set
the ringing tone to a specific sound
effect, or to a melody to personalise how
the phone rings. Your phone has 35 tones
pre-loaded and you can store up to 10
more downloaded ringing tones. For
more information, see “Download a
ringing tone” on page 49.
Important: The Silent or Beep
once ringing option disables any
melody you may chose. To hear a
ringing tone while editing a
profile, make sure one of the
other ringing options is selected.
1 From a profile Personalise menu,
scroll to Ringing tone and press
Select.
2 Scroll through the options and
listen. When you hear the ringing
tone you want to use, press Select.
Set ringing volume
You can set the default ringing volume
for incoming voice calls and message
alert tones. There are five different levels
of volume.
1 From a profile Personalise menu,
scroll to Ringing volume and press
Select.
2 Scroll to an option and listen. When
you hear the ringing volume you
want to use, press Select.
Set a vibrating alert
Your phone has the ability to vibrate,
indicating an incoming call (in addition
to playing a ringing tone). Enabling a
vibrating alert while selecting the Silent
ringing option causes your phone to
vibrate only on incoming calls.
1 From the selected profile’s
Personali se menu, scroll to
Vibrating alert and press Select.
2 Scroll to On and press Select.
Important: The phone does not
vibrate when it is connected to
or placed in any charging device.
Set message alert tone
Several message alert tone options are
available to indicate incoming text
messages.
1 From the selected profile Personalise
menu, scroll to Message alert tone
and press Select.
2 Scroll through the options and
listen. When you hear the message
alert tone you want to use, press
Select.
Copyright © 2004 Nokia. All rights reserved. 47
Page 52

Personalisation
Set keypad tones
Use the Keypad tones option to set the
volume of the tones heard when pressing
your phone keys.
1 From the selected profile’s
Personalise menu, scroll to Keypad
tones and press Select.
2 Scroll to one of the levels and press
Select.
Important: If you choose Off, no
keypad tones are heard. The
Silent profile automatically
turns keypad tones off.
Set warning tones
You can customise the way your phone
plays warning tones. Warning tones
include the tones played when there is an
error, during confirmations, when a
battery is low, and when you need to
recharge the battery.
1 From the selected profile’s
Personalise menu, scroll to Warning
tones and press Select.
2 Scroll to On and press Select.
If you do not want to use warning tones,
you can turn them off by scrolling to Off
and pressing Select.
• RENAME PROFILES
You can rename any of the profiles
except Normal. You may want to use
your own name for one of the profiles.
When you select this profile, your name
appears on the Start screen.
1 Press Menu 3 (Profiles). 2 Scroll to the desired profile and
press Select.
3 Select Personalise, scroll to Profile
name, and press Select.
4 Enter the new name and press OK.
Note: You cannot rename the
General profile.
Select and customise an accessory profile
Note: You must have an
accessory (such as a loopset)
attached to your phone prior to
selecting the Accessory settings
menu.
To select and customise profiles for use
with the headset, handsfree device
(carkit), or loopset:
1 Press Menu 4-4 (Settings >
Accessory settings).
2 Scroll to Headset or Loopset and
press Select.
IF YOU SELECTED HEADSET
The Default profile and Automatic
answer options are your available choice.
• Default profile-Choose the profile
you wish to be automatically
activated when your phone is
connected to a carkit.
• Automatic answer-Calls are
answered automatically after one
ring when connected to a car kit.
Scroll to On or Off and press Select.
• Lights-Choose to keep the phone
lights always on, or to shut off
automatically after several seconds.
Scroll to On or Automatic and press
Select.
48 Copyright © 2004 Nokia. All rights reserved.
Page 53

Personalisation
IF YOU SELECTED LOOPSET
The Default profile and Automatic
answer options are available. Please refer
to see “If you selected Headset” on page
48, for a description of these options. In
addition, the following option is
available:
Use loopset-Enables use of the LPS-4
mobile inductive loopset. Scroll to Yes or
No and press Select.
• DOWNLOAD A RINGING TONE
Your phone has 35 predefined ringing
tones and can store up to 10 new ringing
tones (sent from an Internet Web site as
an SMS or created or downloaded using
Nokia PC Suite).
Play, save, or delete a ringing tone
Once your phone receives a new ringing
tone, the phone displays the message
Ringing tone received.
1 Press Options, then choose
Playback, Save, or Delete.
2 Press OK.
If you choose to save the new ringing
tone, it becomes part of the ringing tone
list available to you when you customise
a profile (see “Customise a profile” on
page 46).
Use PC Composer
You can use Nokia PC Suite PC Composer
to create new ringing tones and send
them to your phone using the DKU-5
cable (available as an optional
accessory). For more information, please
refer to the Nokia PC Suite User Guide
and PC/PDA Connectivity Guide.
Receive ringing tones from Minibrowser
You may also receive ringing tones from
the Internet while in a minibrowser
session. To save your tone, follow the
on-screen prompts. Please see
“Minibrowser” on page 79, for more
information and availability of this
service.
• SET THE DISPLAY LANGUAGE
You can set your phone to display
information in different languages.
Your possible choices are English and
Hindi.
1 Press Menu 4-2-1 (Settings >
Phone settings > Language).
2 Scroll to the language you want to
use and press Select.
• SET THE CLOCK
Your phone contains a real-time clock
that can be set two different ways: the
clock can use the time and date
information provided by the wireless
system, or it can be set manually.
The clock will display the current time
and date on the Start screen. You can
also choose to hide the clock if you
prefer. Please see “Display or hide the
clock” on page 50.
Copyright © 2004 Nokia. All rights reserved. 49
Page 54

Personalisation
Note: Your phone also has an
alarm clock.See “Use the alarm
clock” on page 71, for more
information.
By default, the clock gets its information
from the wireless network. If you wish to
override the network clock, do the
following:
Manually setting the clock
1 Press Menu 4-3-1 (Settings > Time
settings > Clock).
2 Scroll to Set the time, then press
Select.
3 Enter the current time, then press OK.
For example, to enter 7:30, enter
0730.
4 Scroll to am or pm, then press
Select.
Selecting time format
1 Press Menu 4-3-1 (Settings > Time
settings > Clock).
2 Scroll to Time format, then press
Select.
3 Scroll to either 24-hour or am/pm,
then press Select.
Allow the network to set the clock
1 Press Menu 4-3-3 (Settings > Time
settings > Auto update of date and
time).
2 Scroll to On (or Confirm first), then
press Select.
Important: If you use the Auto
update of date and time option
while outside your digital
network, you may be prompted
to enter your own time manually
(see “Manually setting the clock”
on page 50). Network time will
replace the time and date you set
once you re-enter your digital
network.
Note: If your battery has been
removed or has drained outside
the digital network, you may be
prompted to enter your own time
(once the battery is replaced/
recharged, and you are still
outside of the digital network).
Display or hide the clock
1 Press Menu 4-3-1 (Settings > Time
settings > Clock).
Depending on the current settings,
either Hide clock or Show clock is
highlighted.
2 Press Select for Hide clock or Show
clock.
50 Copyright © 2004 Nokia. All rights reserved.
Page 55

Personalisation
• CUSTOMISE THE WELCOME SCREEN
You can set your phone to display a brief
message each time you switch on your
phone. The message can include your
name or a reminder and can be up to 44
characters long.
Create a startup message
1 Press Menu 4-2-3 (Settings >
Phone settings > Welcome note).
2 Enter the text of the startup
message (using traditional text
entry).
3 Press Options, then select Save.
•LEARN ABOUT VOICE COMMANDS
The voice command feature provides
handsfree operation of certain menu
options and commands. Just like voice
dialling, you must create a voice “tag” for
the commands you want to use (please
read “Assign a voice tag to a phone
number” on page 58 for detailed
information on voice tags).
The following table lists menu options for
use with voice commands:
Option Description
Profiles Switch between the
available profiles
(General, Silent,
Meeting, Outdoor, and
Pager).
Voice
mailbox
Recorder Start recording a memo.
Call register Access the Call register
Access your voice
messages.
menu.
Create a voice tag for a menu option
Important: Please see
“Important notes about voice
tags” on page 58 for more
information on creating voice
tags.
1 Press Menu 6-2 (Voice > Voice
commands).
2 Scroll to the menu option you wish
to tag, then press Select.
3 Press Options, then select Add
command.
4 Press Start. 5 After the tone sounds, speak the
voice tag clearly into the
microphone.
The phone replays, then saves the
recorded tag. The
next to commands which have voice
tags assigned.
icon appears
Copyright © 2004 Nokia. All rights reserved. 51
Page 56

Personalisation
Use a voice command
Warning! Do not use voice
command in an emergency
situation. In emergencies, stress
causes changes in your voice,
which may keep the phone from
recognising your voice command.
1 At the Start screen, press and hold
Contacts for one to two seconds.
A tone is heard and Please speak
now is displayed.
2 After the tone, clearly speak the voice
tag that you recorded previously into
the microphone.
The only other option for initiating a
voice command is to press the headset
button momentarily at the Start screen.
The alert tones plays through the
headset. Speak the voice tag into the
headset microphone. The voice tag will
playback through the headset to confirm
your choice.
Work with voice tags
You can listen to an existing voice tag (in
case you forgot what you recorded),
rerecord a voice tag, or delete an existing
tag.
1 Press Menu 6-2 (Voice > Voice
commands) then press Select.
2 Scroll to the menu option you wish
to tag, then press Select.
3 Press Options, scroll to either
Playback, Change, or Delete, and
press Select.
4 If you chose Change, press Start to
record again.
The new tag that is recorded
replaces the old information.
52 Copyright © 2004 Nokia. All rights reserved.
Page 57

11 Advanced features
Advanced features
Warning! Do not switch on the
phone when wireless phone use
is prohibited or when it may
cause interference or danger.
Note: Some in-call options are
network services features. Please
contact your service provider for
information and availability.
This chapter describes advanced calling
features such as call waiting, and the use
of calling cards for calls. Not all the
features described here are available in
all wireless network systems.
• VIEW IN-CALL OPTIONS
Your phone allows you to use a number
of features during a call. These features
are known as in-call options.
You cannot use all these options at all
times. This section tells you when you
can use a certain option.
1 To access an option during a call,
press Options.
2 Scroll to one of the following
options, then press Select:
Option Description
Mute/End
mute
Disables or enables the
microphone. If mute has
already been selected,
End mute is displayed.
These options affect any
accessories connected to
the phone (headset, car
kit).
Option Description
New call Initiates a new call while
in a call (call waiting and
three-way calling).
End all
calls
Touch
tones
Contacts Views the phone book.
Menu Display the main menu.
Ends all active calls (call
waiting or three-way
calling).
Manually enters a touch
tone string (series of
tones) or search for a
string in your phone.
Press Exit to close the
phone book.
• USE CALL DIVERT
When you use Call divert, your network
redirects incoming calls to another phone
number. Using this feature helps to
prevent missing important phone calls.
Important: Call divert is a
network-dependent feature and
may not work the same in all
networks. Contact your service
provider for availability.
Copyright © 2004 Nokia. All rights reserved. 53
Page 58

Advanced features
Learn about call divert feature codes
Your network requires separate codes for
activating and cancelling the various
types of call divert. Your service provider
can provide you with the necessary
feature codes for these network services.
Once you store these feature codes in
your phone, they are sent automatically
to the network when you select one of
the call divert options from your phone
menu.
Your phone can store the following types
of feature codes:
Feature code
type
Divert all calls Diverts all incoming
Divert if busy Diverts incoming
Divert if not
answered
Divert if out of
reach
Cancel all call
divert
Description
calls to the number
you specify.
calls when you are in
a call.
Diverts incoming
calls to another
number when you are
unable to answer.
Diverts incoming
calls to another
number when you are
out of the network or
when the phone is
switched off.
Cancels any and all
call divert options
you may have set.
Store a feature code
1 Press Menu 4-6-5 (Settings >
Network services > Network
feature setting).
The Feature code field appears after
a few seconds.
2 Enter the feature code your service
provider gave you (for example, *90
for activating Divert if busy), then
press OK.
3 Press Select when Call divert is
displayed.
4 Scroll to the type of diverting that
matches the feature code you
entered (for example, Divert if
busy), then press Select.
5 Select Activate.
The Activate feature code is now stored
in your phone, and you are returned to
the Feature code field.
Continue entering other feature codes
(for example, *306 to cancel Divert if
busy), or press the End key to return to
the Start screen.
Important: Once you enter
diverta network feature code
successfully, the feature
becomes visible in the Network
services menu, but will not work
until activated through Menu 4-
6-2 (Settings > Network
services > Call divert).
Activate/cancel call divert
After you store the correct feature codes,
you can activate (or cancel) call divert as
follows:
54 Copyright © 2004 Nokia. All rights reserved.
Page 59

Advanced features
1 Press Menu 4-6-2 (Settings >
Network services > Call divert).
2 Scroll to the desired call divert
option, then press Select.
3 Highlight Activate and press Select. 4 Enter the number to which you want
your calls diverted (or press Search
to recall a number from the phone
book), and press OK.
Your phone calls the network to
activate (or cancel) the feature you
have requested. The network sends a
confirmation note when the feature
has been activated (or cancelled)
successfully.
• USE CALL WAITING
This network service lets you receive an
incoming call when you are already in a
call. When you receive an incoming call,
your phone displays the caller’s phone
number (or the caller’s entry in your
phone book). The phone also beeps,
notifying you of the incoming call.
Answering a waiting call
Press the Send key (or press Answer) to
place the current active call on hold
automatically and answer the new call.
Switch between the two calls
Accepting the waiting call puts your first
caller on hold. To put the second caller on
hold and reconnect with the first caller,
press the Send key.
End the active call
To end the active call, simply allow the
other party to hang up; the call on hold
then becomes the active call.
OR
1 Press the End key to terminate the
active call.
2 The network redials your phone with
the call on hold.
Answer this as you would any
normal incoming call.
3 Three-way Calling
Please contact Reliance for details
about this feature.
• SEND OWN CALLER ID WHEN CALLING
This feature allows you to block caller ID
when you call someone (your number will
not be displayed on their caller ID). This
feature may only be effective when
calling a number equipped with caller ID.
Note: This feature is available
only when supported by the
wireless network.
Important: This feature works on
a call-by-call basis. You must
enable this feature each time
you want to block the sending of
your own number to the
recipient’s caller ID.
Store the feature codes
Before you can use the Send own caller
ID when calling feature, you must store
the feature codes for activating this
feature. Once the code is stored in your
phone, it is sent automatically to the
network when you select this option
from your phone’s menu.
Copyright © 2004 Nokia. All rights reserved. 55
Page 60

Advanced features
1 Press Menu 4-6-5 (Settings >
Network services > Network
feature setting).
The Feature code field appears after
a few seconds.
2 Enter the feature code your service
provider gave you (for example, *67
for activating Send own caller ID
when calling), then press OK.
3 Scroll to Send own caller ID when
calling and press select.
4 Select No to assign the activation
code.
Place a call without sending your number
1 Press Menu 4-6-4 (Settings >
Network services > Send own caller
ID when calling).
2 Scroll to No, then press Select. 3 Enter the desired phone number,
then press OK
OR
Press Search to recall a phone
number from the phone book.
The phone automatically inserts the
feature code into the dialling string and
dials the phone number. The person you
are calling cannot see your phone
number on their caller ID.
• USE AUTOMATIC REDIAL
There are times when you may not be
able to place a call, for example, due to
the high traffic volume on the wireless
network. When the wireless network is
busy or unavailable, Automatic redial
instructs your phone to retry the call.
ACTIVATE AUTOMATIC REDIAL
1 Press Menu 4-1-2 (Settings > Call
settings > Automatic redial).
2 Scroll to On and press Select.
If the system is busy, your phone makes
three additional call attempts. If you
want to stop the automatic redial
process before the last attempt, press the
End key.
Important: This feature does not
automatically retry a number
when the number you are calling
is busy.
• CALLING CARD
If you wish to use a calling card for long
distance calls, you can first save your
calling card information into your phone.
Your phone is equipped to handle up to
four calling cards.
Saving calling card information
1 Press Menu 4-1-6 (Settings > Call
settings > Calling card).
2 Enter your security code, then press
OK.
3 Scroll to one of the four memory
locations, then press Options.
4 Scroll to Edit, then press OK. 5 Select Dialling sequence. 6 Scroll to one of the three sequence
types as described in the following
table, then press Select.
56 Copyright © 2004 Nokia. All rights reserved.
Page 61

Advanced features
Dialling
sequence
Access number
+ phone number
+ card number
Access number
+ card number
+ phone number
Prefix
+ phone number
+ card number
Use for cards that
require you to:
Dial 1-600 access
number, then phone
number, then card
number (+ PIN if
required)
Dial 1-600 access
number, then card
number (+ PIN if
required), then phone
number
Dial the prefix (any
numbers that must
precede the phone
number) and phone
number you want to
dial, then card
number (+ PIN if
required)
7 Enter the required information
(access number or prefix and card
number).
8 Press OK to confirm your entries. 9 Press OK to save your changes. 10 Scroll to Card name, then press
Select.
11 Enter the card name, then press OK.
Note: This procedure might not
work with all calling cards.
Please look at the back of your
calling card or contact your long
distance company for more
information.
Choosing a calling card to use
Use Menu 4-1-6 (Settings > Call
settings > Calling card) to select a
calling card to use. You will be required
to enter your security code.
Making calling card calls
After you have saved your calling card
information in your phone, you can make
a call using your calling card.
1 Enter the phone number, including
any prefix (such as 0 or 1) that your
calling card may require when you
make a calling card call.
See your calling card for
instructions.
2 Press and hold the Send key for a
few seconds until your phone
displays Card call.
3 Your phone displays Wait for tone,
then press OK.
4 When you hear the tone or system
message, press OK.
5 Your phone displays Wait for tone,
press OK again.
6 When you hear the tone or system
message, press OK.
•VOICE DIALLING
You can dial up to 25 stored phone book
numbers using the voice dialling feature.
Before you can place a call using voice
dialling, you must first assign a voice tag
to the number. Before using voice
dialling, note that:
• Voice tags are not language
dependent. They are dependent on
the speaker's voice.
Copyright © 2004 Nokia. All rights reserved. 57
Page 62

Advanced features
• Voice tags are sensitive to
background noise. Record them and
make calls in a quiet environment.
• When recording a voice tag or
making a call by saying a voice tag,
hold the phone in the normal
position near to your ear.
• Very short are not accepted. Use
long and avoid similar for different
numbers.
Important: You must say the
name exactly as you said it when
you recorded it. This may be
difficult in, for example, a noisy
environment or during an
emergency, so you should not
rely solely upon voice dialling in
all circumstances.
Assign a voice tag to a phone number
You must record a voice tag (up to two
seconds) for a phone number before you
can use the voice dialling feature to dial it.
ADD A VOICE TAG TO A PHONE BOOK ENTRY
1 At the Start screen, press up scroll or
down scroll keys.
2 Scroll to the desired phone book
entry, and press Details.
3 Scroll to the phone number you
want to tag and press Options.
4 Scroll to Add voice tag and press
Select.
The phone displays Press Start, then
speak after the tone.
5 Press Start and after the tone, speak
the voice tag clearly into the
microphone.
Note: Your phone informs you if
the recording is not successful.
Press OK to try again or Back to
return to phone book.
The message Voice tag saved is displayed
upon completion of the recording process.
icon next to a phone number
The
denotes that a voice tag exists for this
number.
IMPORTANT NOTES ABOUT VOICE TAGS
• The recording process stops
automatically; pressing Quit aborts
the recording attempt.
• Voice tags are sensitive to
background noise. Record tags or
use voice dialling in a quiet
environment.
• Unique tags are recognised more
accurately. Consider using first and
last name or first name, last name,
and number type when tagging a
number.
Example: "John Smith, work."
• Avoid pauses or silence as you record
the voice tag.
• If the voice tag memory is full, the
phone displays Delete an existing
voice tag? Press OK, scroll to locate
a tag to delete, then press Delete.
• Deleting a phone number deletes
any associated voice tags.
Warning! Do not use a voice tag
for dialling emergency numbers.
In emergencies, stress causes
changes in your voice, which may
keep the phone from recognising
your voice command.
58 Copyright © 2004 Nokia. All rights reserved.
Page 63

Advanced features
Dialling a number using voice dialling
Note: You must say the name
exactly as you said it when you
recorded it.
1 At the Start screen, press and hold
Contacts for two seconds.
A tone is heard and Please speak
now is displayed.
2 After the tone, clearly speak the voice
tag that you recorded previously into
the microphone.
Note: If the voice tag is not
recognised by the phone or if you
fail to speak a tag within three
seconds after the tone, the
message Name not recognised is
displayed, and you are returned to
the Start screen.
3 When the voice tag is recognised,
The phone book entry will be
displayed on the screen for three
seconds
AND
The voice tag is replayed (through
the ear piece).
After three seconds, the number is
dialled.
The only other option for initiating voice
dialling is to press the headset button
momentarily at the Start screen. The alert
tones play through the headset.
Speak the voice tag into the headset
microphone. The voice tag will playback
through the headset to confirm your
choice.
Work with voice tags
You can listen to an existing voice tag (in
case you forgot what you recorded),
rerecord a voice tag, or delete an existing
tag.
1 At the Start screen, press Contacts. 2 Scroll to Voice tags, then press
Select.
Note: This option displays a list
of only those names and
numbers that have been
assigned a voice tag.
3 Scroll to the phone number voice tag
you want to edit, then press
Options.
4 Scroll to either Playback, Change, or
Delete, and press Select.
5 If you chose Change, press Start to
begin rerecording.
The new tag that is recorded
replaces the old information.
• SPEED DIALLING
When a phone number is assigned to one
of the Speed dialling locations (2-9), you
can call the phone number in either of
the following ways:
• Press the number key that
corresponds to a Speed dialling
location and press the Send key.
• Press and hold the number key that
corresponds to a Speed dialling
location until the call is initiated.
1 is preassigned to dial your voice
mailbox number and cannot be
reassigned.
Copyright © 2004 Nokia. All rights reserved. 59
Page 64

Advanced features
Set up speed dialling
If you want to assign a number to one of
the number keys (2-9), do the following:
1 Press Contacts. 2 Scroll to Speed dialling and press
Select.
3 Scroll to the desired number key (2-
9), and press Assign.
Note: If a phone number is
already assigned to a key, the
phone book entry name is
displayed and the left selection
key is Options.
4 Enter the phone number manually,
or press Search to locate a phone
book entry. Select the desired name
or entry from the phone book. If
more than one number is stored for
that entry, scroll to the desired
number and press Select.
Speed dialling options
You can change or delete (clear) numbers
assigned to Speed dialling or view the
number assigned to a key from the speed
dialling menu.
1 Press Contacts. 2 Scroll to Speed dialling and press
Select.
3 Scroll to a key that is assigned a
number, then press Options.
4 Scroll to either View number,
Change, or Delete, then press Select.
• LEARN ABOUT CALLER GROUPS
You can group phone book entries using
one of the existing categories (Family,
VIP, Friends, Business, and Other). Each
group has its own unique ringing tone
and logo.
When you receive a call from a number
assigned to a caller group, the ringing
tone for that caller group is used, and the
caller group’s logo is displayed on the
screen. This feature can help you identify
incoming calls more quickly.
ADD A NUMBER TO A CALLER GROUP
1 At the Start screen, press the up or
down scroll keys.
2 Scroll to the desired phone book
entry, and press Details.
3 Scroll to the phone number you
want to use and press Options.
4 Scroll to Caller groups, and press
Select.
5 Scroll to the desired caller group (for
example, Friends), and press Select.
SELECT A RINGING TONE AND GRAPHIC FOR A CALLER GROUP
1 Press Contacts. 2 Scroll to Caller groups and press
Select.
3 Scroll to one of the caller groups
and press Select.
4 Scroll to one of the options on the
following page and press Select:
60 Copyright © 2004 Nokia. All rights reserved.
Page 65

Advanced features
Option Description
Rename
group
Group
ringing tone
Group logo Views, activates or
Group
members
Renames the selected
caller group.
Selects a ringing tone for
this group. Scroll
through list of ringing
tones, then press OK.
deactivates the group
logo.
Assigns other phone
book entries to the
selected caller group.
•USE TOUCH TONES
Warning: If you send touch
tones while in analog mode, be
careful not to send confidential
information.
Touch tones (sometimes known as DTMF
tones) are those tones produced when
you press the keys on your phone keypad.
You can use touch tones for many
automated dial-up services such as
banking and airlines, or for entering your
voice mailbox number and password.
Touch tones are sent during an active
call. You can send them manually from
your phone keypad, or send them
automatically by saving them in your
phone.
Set manual touch tone options
You may customise the way your phone
sends the touch tones for optimum
performance with the system you are
calling.
SET TOUCH TONE TYPE
1 Press Menu 4-2-2-1 (Settings >
Phone settings > Touch tones >
Manual touch tones).
2 Select one of the following options,
then press Select:
Option Description
Continuous Tone sounds for as long as
you press and hold a key.
Fixed Sends tones of the
duration you specify in
the Touch tone length
option.
Off Turns off tones. No tones
are sent when you press a
key.
SET FIXED TOUCH TONE LENGTH
You can also specify touch tone length
when using the Fixed option.
1 Press Menu 4-2-2-2 (Settings >
Phone settings > Touch tones >
Touch tone length).
2 Scroll to Short (1/10 seconds) or Long
(1/2 seconds), then press Select.
Copyright © 2004 Nokia. All rights reserved. 61
Page 66

Advanced features
Send a touch tone string manually
Before you begin, make sure that Manual
touch tones is not set to Off.
1 During a call to the automated
service, press Options, scroll to
Touch tones, and press Select.
2 Enter the touch tone string from
your phone keypad as required by
the service you are calling, then
press Tones.
Send touch tone string from phone book
You can save a touch tone string as a
separate phone book entry, then recall
and send the string using the in-call
menu option Touch tones.
SAVE TOUCH TONES AS A PHONE BOOK ENTRY
Save the touch tone string (including any
pause or wait characters that may be
required) to a new entry in the phone
book. For more information on saving
and number to your phone book see
“Saving contacts and numbers” on page
27.
RECALL A TOUCH TONE STRING FROM THE PHONE BOOK
1 During a call to the automated
service, press Options, scroll to
Touch tones, and press Select.
2 Press Search, scroll to the touch
tone string entry in your phone book,
then press OK.
3 Press Tones to send the touch tones.
Store a touch tone string with phone number
You can store touch tone strings (for
example, voice mailbox number and PIN
code) as a part of a phone book entry.
Once the string is stored, it is sent
automatically (instead of entering the
touch tones from the keypad).
1 Enter the phone number of the
automated service.
2 Use the */+ key to enter a w or p
after the number.
• w (wait)-The phone waits for you to
press Send. When you press Send,
the phone sends the touch tone
string you’ve saved.
• p (pause)-The phone pauses for 2.5
seconds, then automatically sends
the touch tone string you have
saved.
3 Enter the touch tone string after the
w or p characters as required by the
service.
Example: 214-555-
1234w1234#p5678#
4 Save this phone book entry as you
normally would.
Once the touch tone string is stored with
the phone number, you can now call the
number and have the touch tone strings
sent automatically.
62 Copyright © 2004 Nokia. All rights reserved.
Page 67

Advanced features
• LINK PHONE BOOK ENTRIES
This feature allows you to store a phone
number in one phone book location and
link it to another phone book entry.
For example, linking the phone number of
an automated service (for example,
automated banking service) with a touch
tone string entry in your phone book (for
example, account and PIN numbers)
automatically recalls and sends the touch
tone string when you call the service.
USE LINKING OPTIONS
1 Store the touch tone string into your
phone book.
2 Assign the phone book entry with
the touch tones to a speed dialling
location (for example, location 3).
For more information on
speed dialling, see “Speed dialling”
on page 59.
3 Edit the automated service’s phone
number by adding +n to the end of
the phone number (where n is the
speed dialling location).
Example: 214-555-1234+3
4 Press OK to save your changes. 5 Dial the automated service’s number
from your phone book. Your phone
automatically sends the touch tones
when the call connects.
Important: You may need to
enter a pause (p) before the + in
order to account for delays in the
automated system answering
your call (for example,
214-555-1234p+3).
• LEARN ABOUT VOICE RECORDER
Voice recorder allows you to record
audio memos and store them in your
phone. Use this feature to record things
such as phone numbers and personal
memos. Total time available for all
memos is one minute (up to 60 seconds).
Maximum length of a single message is
one minute (up to 60 seconds).
The maximum number and length of
remaining memos depends on how much
memory is still available. A countdown
timer is displayed while recording and
shows remaining record time.
Record a memo
1 Press Menu 6-3-1 (Voice > Voice
recorder > Record).
2 After the tone, begin recording your
memo; when you finish recording,
press Stop.
3 Enter the subject of the voice memo,
then press OK.
NOTES
• Press Back (instead of entering a
subject) to discard the memo
without saving.
• Pressing OK without entering a
subject to assign the default name
(Recording) to the memo.
Copyright © 2004 Nokia. All rights reserved. 63
Page 68

Advanced features
Work with recorded memos
To view a list of recorded memos:
1 Press Menu 6-3-2 (Voice > Voice
recorder > Recordings list).
2 Scroll through the list of memos,
then press Options.
The following options are available:
Option Description
Playback Plays back the selected
Delete Deletes selected voice
Edit title Edits the subject of the
Add alarm/
Alarm
message through the
earpiece (phone or
headset).
memo.
memo, or renames the
memo.
Adds (edits, or removes) a
reminder alarm for the
memo.
Notes about voice recorder
• An incoming call interrupts voice
memo playback. When the call is
complete, the phone returns to the
Options menu for the selected voice
memo.
• An incoming call stops voice memo
recording. The recorded memo is
automatically saved with the default
name.
• You can enter numbers from the
keypad during memo playback (For
example, when voice memo contains
a phone number). Pressing the Send
key interrupts voice memo playback
and places the call.
64 Copyright © 2004 Nokia. All rights reserved.
Page 69

Security and System settings
12 Security and System settings
Warning! Do not switch on the
phone when wireless phone use is
prohibited or when it may cause
interference or danger.
Your phone has a variety of security
features that help prevent some of the
following:
• Placing accidental or unintentional
calls
• Unauthorised use of your phone
• Placing and accepting calls from
certain phone numbers
• Accidental erasing of information or
restoring factory settings
• LOCK KEYPAD (KEYGUARD)
With keypad lock (Keyguard) you can
temporarily lock your phone keypad and
prevent the accidental placing of calls or
pressing of the keypad (for example,
when the phone is in your pocket or in
your purse).
Activate/deactivate Keyguard
Press Menu 10 or press Menu followed
by */+ (within three seconds) to activate
Keyguard. It is possible to answer a call,
even though Keyguard is activated. Press
the Send key to answer the call. When
the call has ended, the keypad remains
locked.
Important: appears at the
top of the display. The left
softkey is also labeled Unlock.
UNLOCK KEYPAD
Press Unlock followed by */+ (within
three seconds) to deactivate Keyguard
and unlock your phone keypad.
Important: When the phone is
locked, calls may be possible to
the emergency number
programmed into your phone (for
example, 100 or other official
emergency number).
Copyright © 2004 Nokia. All rights reserved. 65
Page 70

Security and System settings
• SECURITY CODE
Your phone prompts you for a five-digit
security code for certain features and
commands. Access is granted only after
the correct security code has been
entered successfully. The default security
code is 12345. It is recommended that
you change this code at once, write it
down, and store it in a safe place away
from your phone.
Important: When entering your
security code, ***** is
displayed on the screen to keep
others from viewing your code.
Correct entry errors
You can delete the last entered digit by
pressing Clear (or by pressing and holding
Clear to delete all the digits more quickly).
Enter the correct code or press Back to
exit. If you enter an incorrect security
code, Code error will appear five times in
a row, and your phone will not accept any
entries for the next five minutes.
Change your security code
1 Press Menu 4-5-2-4 (Settings >
Security settings > Access codes >
Change security code) and press
Select.
2 Enter the existing (or default)
security code and press OK.
3 Enter the new five-digit security
code and press OK.
4 Reenter the new five-digit security
code for verification, then press OK.
Your phone displays the confirmation
message Security code changed.
Important: If you change your
security code and do not
remember the new code, contact
your service provider. Once you
change your security code, the
default code is no longer valid.
•PHONE LOCK
This feature protects your phone from
unauthorised outgoing calls or
unauthorised access to information
stored in the phone. When phone lock is
activated, Phone locked is displayed
each time you turn your phone on or off.
After pressing either Contacts or Menu,
you must enter your lock code. Once your
lock code has been accepted, your phone
will function normally.
Important: Call not allowed is
displayed if you attempt to place
a call while phone is locked.
Important: When the phone is
locked, calls may be possible to
the emergency number
programmed into your phone (for
example, 100 or other official
emergency number).
66 Copyright © 2004 Nokia. All rights reserved.
Page 71

Security and System settings
Learn about the lock code
In addition to a security code, your phone
also has a lock code. You will need the
lock code to activate and deactivate the
phone lock feature, or to change your
lock code.
The default lock code is 1234. If you
enter an incorrect lock code five times in
a row,
your phone will prompt you for the
security code (see page 66).
CHANGE YOUR LOCK CODE
1 Enter Menu 4-5-2-3 (Settings >
Security settings > Access codes >
Change lock code) and press Select.
2 Enter the current (or default) lock
code and press OK.
3 Enter the new lock code and press
OK.
4 Reenter the new lock code for
verification, then press OK.
Important: When you change
your lock code, make sure you
store it in a safe place, away
from your phone. Avoid entering
access codes similar to
emergency numbers to prevent
accidental emergency calls.
Activating and deactivating phone lock
1 Press Menu 4-5-2-1 (Settings >
Security settings > Access codes >
Phone lock).
2 Enter the lock code, then press OK. 3 Scroll to On or Off, then press
Select.
4 Turn your phone off and back on to
complete the phone lock activation
(or deactivation).
Answer a call with phone lock on
Press the Send key or Answer.
Allowed number when phone locked
When phone lock is on, the only outgoing
calls that can be made are to the
following numbers:
• The emergency number programmed
into your phone (for example, 100 or
other official emergency number).
• The number stored in the Allowed
number when phone locked
location.
Store the unlocked phone number
1 Press Menu 4-5-2-2 (Settings >
Security settings > Access codes >
Allowed number when phone
locked).
2 Enter the lock code and press OK. 3 Enter the phone number (or press
Search and recall the number from
the phone book), then press Select.
Calling the allowed phone number
At the Start screen, press up scroll or
down scroll key. The number is displayed.
Press the Send key to place the call.
Important: Phone lock must be
activated to use this feature.
Copyright © 2004 Nokia. All rights reserved. 67
Page 72

Security and System settings
• CALL RESTRICTIONS
This feature allows you to restrict
incoming and outgoing calls. You can
restrict all calls or create a custom list of
numbers to restrict.
Learn about restriction options
When you select either Restrict outgoing
calls or Restrict incoming calls from the
Security settings options, your options
are as follows:
• Select-Used to display a list of all
available restricted numbers. Select
those numbers you want to restrict
from this screen.
• Add restriction-Used to create your
own list of restricted numbers
Once you have added at least one
restriction to either the outgoing or
incoming calls list, the following options
become visible:
• Edit- Used to edit an existing
outgoing call restriction
• Delete-Used to delete call
restrictions from the list
Important: When calls are
restricted, calls may be possible
to the emergency number
programmed into your phone (for
example, 100 or other official
emergency number).
Adding a call restriction
You can add up to 15 restrictions for
outgoing calls and 15 restrictions for
incoming calls. The maximum number of
characters you can enter for each
restriction is 15.
1 Press Menu 4-5-1 (Settings >
Security settings > Call
restrictions).
2 Enter the security code and press OK. 3 Select either Restrict outgoing calls
or Restrict incoming calls.
4 Scroll to Add restriction and press
Select.
5 Enter the number string you wish to
restrict and press OK.
For example:
• If you wish to restrict all calls that
begin with 1, enter 1.
• If you wish to restrict all calls that
begin with 1972, enter 1972.
• If you wish to restrict all calls that
begin with 214, enter 214.
6 Enter a name to identify this
restriction, or just press OK.
Note: When creating a new
restriction, that restriction is
automatically selected (enabled)
at the time it is saved.
Select call restrictions
1 Press Menu 4-5-1 (Settings >
Security settings > Call
restrictions).
2 Enter your security code and press
OK.
3 Scroll to Restrict outgoing calls or
Restrict incoming calls and press
Select.
4 Scroll to Select and press Select. 5 Scroll to each restriction you wish to
use and press Mark; press Unmark
to deactivate existing restrictions.
68 Copyright © 2004 Nokia. All rights reserved.
Page 73

Security and System settings
6 Press Done, then press Yes to save
the changes you have made.
Edit call restrictions
You can edit the name or number of an
entry in the call restrictions list.
1 Press Menu 4-5-1 (Settings >
Security settings > Call
restrictions).
2 Enter your security code and press
Select.
3 Scroll to Restrict outgoing calls or
Restrict incoming calls and press
Select.
4 Scroll to Edit and press Select. 5 Scroll to the restriction you wish to
edit, then press OK.
Note: If no name has been
entered for a restriction, the
restricted number will be
displayed.
6 Edit the number (as needed), then
press OK.
7 Edit the name (as needed), then
press OK.
Erasing call restrictions
You may want to delete a restriction that
is no longer needed.
1 Press Menu 4-5-1 (Settings >
Security settings > Call
restrictions).
2 Enter your security code and press
OK.
3 Scroll to Restrict outgoing calls or
Restrict incoming calls and press
Select.
4 Scroll to Delete and press Select. 5 Scroll to the restriction you wish to
delete, then press OK.
6 Press OK again to delete restriction.
• AUTOMATIC UPDATE OF SERVICE
Your phone is capable of receiving
updates to wireless services sent to your
phone by your service provider. Use Menu
4-1-4 (Settings > Call settings > Autoupdate of service) to turn this feature on
or off.
• LEARN ABOUT SYSTEM SELECTION
The System menu Menu 4-7 (Settings >
System) allows you to customise the way
your phone chooses a system in which to
operate while you are within or outside
of your primary or home system.
Your phone is set to search for the most
cost-effective system. If your phone
cannot find a preferred system, it selects
a system automatically based on the
option you choose in the System menu.
Important: Before selecting an
item in the System menu,
contact your service provider to
find out how your selection will
affect your service charges.
Copyright © 2004 Nokia. All rights reserved. 69
Page 74

Security and System settings
View Roaming options
The menu options you see in your phone
are based on your service provider’s
network. Their network determines which
options actually appear in the phone
menu. The following is a description of
the options that may appear in your
phone:
Option Description
Home only You can make and receive
Automatic Your phone automatically
calls in your home area
only. While roaming, No
Service appears and you
cannot make or receive
calls.
selects the best available
system.
70 Copyright © 2004 Nokia. All rights reserved.
Page 75
13 Organiser
Organiser
Your phone has a calendar, alarm clock,
stopwatch, and contact database—
everything you need in an organiser or
personal digital assistant.
• USE THE ALARM CLOCK
Your phone alarm clock can be set to
sound an alarm at a time you specify. The
alarm clock uses the clock time format
(12-hour or 24-hour format). The
icon, displayed on the Start screen,
indicates that an alarm is set. The alarm
clock will work, regardless if the phone is
on or off.
Important: The alarm clock
works in conjunction with your
phone clock. Make sure the time
and date are correct before using
this feature.
Set the alarm
1 Press Menu 8-1 (Organiser > Alarm
clock), then press Select.
2 Enter the alarm time, then press OK. 3 Select am or pm, then press OK.
Respond to an alarm
At the time of the alarm, the phone
sounds an alert tone, displays an
animated message, and flashes its lights.
Pressing Stop or the End key stops the
alarm from sounding, and returns you to
the Start screen.
SNOOZING
There are several ways you can enable
the Snooze feature:
1 Press the Snooze selection key. 2 Press any key (except the End key). 3 Allow the alarm to sound for one
minute.
Once snooze is enabled, the alarm will
sound again in 10 minutes.
Alarm when phone power is off
If the alarm time is reached while the
phone is switched off, the phone
switches itself on and starts sounding the
alarm tone. If you press Stop, the phone
asks whether you want to activate the
phone for calls. Press No to switch off the
phone or Yes to make and receive calls.
Warning! Do not press Yes when
wireless phone use is prohibited
or when it may cause
interference or danger.
Alarm clock notes
• The alarm clock volume is
determined by current volume and
tone settings.
• If you have selected the Silent or
Beep once ringing tone, the alarm
clock beeps once.
Copyright © 2004 Nokia. All rights reserved. 71
Page 76

Organiser
•CALENDAR
Warning! Your phone must be
switched on to use the calendar
feature. Do not switch on the
phone when wireless phone use
is prohibited or when it may
cause interference or danger.
You can use your phone calendar to
record notes to remind you of
appointments such as meetings, phone
calls, birthdays, or general reminders.
Alarms can also be set to notify you of your
appointments or notes.
You can also use the DKU-5 cable in
conjunction with Nokia PC Suite to
synchronise your PIM application
calendar with your phone calendar,
keeping you up-to-date when you are
away from you office or PC.
Calendar Options menu
The calendar Options menu displays a list
of calendar options: View day, Make a
note, Go to date, and the calendar
Settings menu.
Learn about Calendar views
WEEK LIST
From the Organiser menu, scroll to
Calendar, and press Select. Use the week
list to view four weeks at a glance.
When you view the calendar, notice that
today’s date is highlighted. Use the scroll
keys to move to a different date.
•Use 2 to scroll up.
•Use 8 to scroll down.
•Use 4 to scroll left.
•Use 6 to scroll right.
• Use the left selection key to view the
Options for that day.
Day view
From the week list, scroll to the desired
day. Press Options, then select View day.
The day view allows you to scroll through
the notes made for the selected day.
The Options list for day view includes:
• View the highlighted note.
• Make a note - create a new note for
the selected day.
• Delete, Edit, Move, or Repeat the
highlighted note (every day, every
week, biweekly, every month or
every year).
• Go to date - jump to a specific date.
• Copy - allows you to copy the note
to another day
• Send note - provides various options
for sending the current note (via
SMS. Please check for available in
your network)
72 Copyright © 2004 Nokia. All rights reserved.
Page 77

Organiser
• Settings - allows you to set the date,
time, date format, time format and
week format for the calendar. The
Auto delete setting allows you to
delete old notes after a specified
period of time. However, repeat notes
(for example, birthday or anniversary
notes) will not be deleted.
NOTE VIEW
From the day view, scroll to the desired
note. Press Options, scroll to View, and
press Select. The details of the selected
note are displayed.
The Options list for note view include:
• Delete, Edit, Move, or Repeat the
current note (every day, every week,
biweekly or every year).
• Copy - allows you to copy the note
to another day.
• Settings - allows you to set the date,
time, date format, date separator,
time format and week format for the
calendar. The Auto delete setting
allows you to delete old notes after
a specified period of time. However,
repeat notes (for example, birthday or
anniversary notes) will not be
deleted.
Add a calendar note
Note: Predictive text input is
available for Calendar notes.
1 From the day list view, scroll to the
desired day and press Options.
2 Select Make a note. 3 Scroll to one of the following note
types and press Select:
• Meeting - Enter the note (or press
Options, then Find to recall a name
from the phone book) and press
Select. Enter the time and press OK.
• Call - Enter the desired phone
number (or press Options then Find
to recall it from phone book) and
press Select. Enter the time and
press OK.
• Birthday - Enter the person’s name
(or press Options then Find to recall
it from phone book) and press
Select. Press Options then Save and
enter date of birth and year
(optional). Press OK.
• Memo - Enter the note. Press
Options then select Save. Enter a
date for the memo, then press OK.
• Reminder - Enter the note. Press
Options then Save.
4 Scroll to the desired alarm option
(With tone, No alarm, or Silent),
then press Select.
The presence of an alarm is indicated by
when you view the notes.
WHEN THE ALARM SOUNDS FOR A NOTE
The phone flashes its lights, beeps, and
displays the note. When a Call note is
displayed, you can call the number by
pressing the Send key.
To stop the alarm, press Exit or the End
key.
Copyright © 2004 Nokia. All rights reserved. 73
Page 78

Organiser
• CALCULATOR
You can use your phone calculator to
add, subtract, multiply, or divide numbers
and convert currencies.
Warning! Your phone must be
switched on to use this function.
Do not switch the phone on when
wireless phone use is prohibited
or when it may cause
interference or danger.
Use the calculator
1 From the Organiser menu, scroll to
Calculator, and press Select.
2 Enter the first number in the
calculation (press # for decimal
point).
3 To add, press */+ once (+ appears); to
subtract, press */+ twice
( - ); to multiply, press */+ three
times ( * ); to divide, press */+ four
times ( / ).
4 You can also press Options, scroll to
Add, Subtract, Multiply, Divide,
Square, or Square root, and press
Select.
5 Enter the second number.
Repeat steps 3 and 4 as many times
as necessary.
Note: A subtotal is shown after
you enter the next operant (+, -,
*, or /).
6 For a total, press Options twice. 7 To start a new calculation, press and
hold Clear for two seconds.
Note: This calculator has limited
accuracy and rounding errors
may occur, especially in long
divisions.
Convert currency
You can use the calculator to first set the
exchange rate and then to calculate the
exchange value.
SET THE EXCHANGE RATE
1 Press Menu 8-3 (Organiser >
Calculator), and then press Options.
2 Use the up scroll or down scroll key
to scroll to Exchange rate and press
Select.
3 Select the exchange rate: Foreign
units converted to home units or
Home units converted to foreign
units.
4 Press Select.
The exchange rate box opens, with
the number 1.
5 Enter the appropriate number and
press OK.
The number 1 is overwritten by the
number you entered. To enter a
decimal point, press #.
6 Press OK.
The Exchange rate saved message
appears.
CALCULATE CURRENCY USING THE EXCHANGE RATE
1 Press Menu 8-3 (Menu > Organiser
> Calculator).
2 Enter the number of units for the
exchange rate.
74 Copyright © 2004 Nokia. All rights reserved.
Page 79

Organiser
3 Press Options and scroll to To home
or To foreign.
• To home converts foreign units of
currency to home units using the
exchange rate you entered.
• To foreign converts home units of
currency to foreign units using the
exchange rate you entered.
4 Press OK.
CALCULATE CURRENCY USING THE EXCHANGE RATE
1 Press Menu 8-3 (Menu > Organiser
> Calculator).
2 Enter the number of units for the
exchange rate.
3 Press Options and scroll to To home
or To foreign.
• To home converts foreign units of
currency to home units using the
exchange rate you entered.
• To foreign converts home units of
currency to foreign units using the
exchange rate you entered. Press
OK.
•STOPWATCH
You can use your phone Stopwatch
feature to time an event in hours,
minutes and seconds. The event time can
be saved, viewed, or deleted.
Warning! Your phone must be
switched on to use this function.
Do not switch the phone on when
wireless phone use is prohibited
or when it may cause
interference or danger.
Important: Using the stopwatch
consumes the battery and the
operating time of the phone will
be reduced. Be careful not to let
it run in the background when
performing other operations
with your phone.
Time an event using split timing
The split time function allows you to
measure the total time for an event, yet
allows you to capture the elapsed time at
various intervals. To measure split time:
1 From the Organiser menu, scroll to
Stopwatch and press Select.
2 Scroll to Split timing, then press
Select.
3 Press Start.
The running time appears on the
display.
Once the split timer has started, you can:
• Press Split to display the split time
while the timer continues to display
elapsed time.
• Press Stop to stop the timer and
view the total elapsed time.
If you continue pressing Split, the most
recent split time appears at the top of the
list of split times. You can scroll to review
previous times.
Time an event using lap timing
The lap time function allows you to
measure the amount of time it takes to
complete a cycle or lap. To measure lap
time:
Copyright © 2004 Nokia. All rights reserved. 75
Page 80

Organiser
1 From the Organiser menu, scroll to
Stopwatch and press Select.
2 Scroll to Lap timing, then press
Select.
3 Press Start.
The running time appears on the
display.
Once the lap timer has started, you can:
• Press Stop to stop the timer and
view the elapsed time.
• Press Lap to display the lap time; the
timer restarts from zero.
If you continue pressing Lap, the most
recent lap time appears at the top of the
list of lap times. You can scroll to review
previous times.
Press Stop to stop the timer. The final lap
time is displayed.
View timing options
Once you have stopped timing an event
(using lap or split), you have the option to
save the information, reset the
stopwatch, or continue timing (split
timing only).
While stopwatch is running, press Stop,
then press Options. Select one of the
following:
Choose other stopwatch options
You can choose the following options
from the Stopwatch menu.
Option Description
Continue Allows you to re-display
active timer (for example,
if you receive a call while
the timer is still running).
Show last
time
View times Allows you to view the list
Delete
times
1 Press Menu 8-4-1 (Organiser >
Stopwatch > Continue).
2 Press Select.
Allows you to view the
last measured time.
of saved times.
Allows you to delete the
saved times. You can
delete the saved times
one by one or all at once.
Note: If you receive a call while
using the stopwatch, the timer
continues running in the
background. After ending the
call, you can redisplay the timer
by doing the following:
• Save - saves the current timing data.
Enter a name, then press OK.
• Reset clears the current timing data
and resets the timer.
• Start restarts the split timer from
the point the timer was stopped.
76 Copyright © 2004 Nokia. All rights reserved.
Page 81

14 Games
Games
Warning! Your phone must be
switched on to use this function.
Do not switch the phone on when
wireless phone use is prohibited
or when it may cause
interference or danger.
You can use your phone not only for
communication but also for some serious
fun. Your phone offers you four games
from which to choose.
•In Snake II, you feed the snake with
as many goodies as possible. The
longer the snake’s tail grows, the
higher your score is.
•In Space Impact II, you try to destroy
the falling asteroids before they
destroy you.
•In Bumper, you can play an exciting
game of pinball. Increase your score
by keeping the ball on the table
using the flippers.
Game control
Your phone supports two-way scrolling
while playing the games:
•Use the 2 key to scroll up.
•Use the 8 key to scroll down.
•Use the 4 key to scroll left.
•Use the 6 key to scroll right.
Start a new game
1 Press Menu 5-1 (Games > Select
game), scroll to the desired game,
and press Select.
2 Choose an option and press Select.
LEARN ABOUT GAME OPTIONS
Use the option Instructions to learn how
to play the game. With the option Level
you can choose the difficulty level of the
game.
In Snake II you can pause the game by
pressing either selection key and resume
a paused game with Continue. Use Top
score (available in some games) to check
the high score in your phone.
Game settings
The following settings are available for
all games:
Option Description
Game sounds Turns game sound
effects On or Off.
Game lights Turns screen lights On
or Off during game play
only.
Shakes Turns game vibrating
effects On or Off.
Copyright © 2004 Nokia. All rights reserved. 77
Page 82

Your phone and other devices
15 Your phone and other devices
Your phone is capable of interacting
with, or connecting to a computer using
the DKU-5 USB cable.
Your phone can exchange information
with other desktop and laptop PCs. Your
phone can also function as a wireless
modem when connected to PCs.
Warning! Your phone must be
switched on to use this function.
Do not switch the phone on when
wireless phone use is prohibited
or when it may cause
interference or danger.
• PC CONNECTIVITY
You can make a serial connection
between your Nokia phone and
compatible PC using the DKU-5 USB
cable. This cable is available for purchase
as an optional accessory, or may be
included in your sales package.
Once your phone and PC are connected,
you can access phone information from
your PC, or use your phone as a wireless
modem for digital data/fax calls.
Important: Digital data services
(including IS95, IS2000, 2G and
3G packet data) are networkdependent features and may
require a subscription to these
services. Please check with your
service provider for the
availability of digital data
services.
Nokia PC Suite
Once your phone is connected to your PC,
you can use the various components of
Nokia PC Suite to perform the following
functions:
• Make a backup copy of the data in
your phone (Content Copier).
• Edit phone book and numbers,
profiles, and settings using your PC
keyboard (Phone Editor).
• Synchronise your phone book and
reminders with Personal Information
Manager (PIM) applications such as
Microsoft Outlook, Outlook Express,
and Lotus Organizer (PC Sync).
Please refer to the document Nokia PC
Suite User Guide and PC/PDA
Connectivity Guide for installation and
setup instructions.
Modem setup
You can use your Nokia phone as a
modem with your laptop computer or
handheld device, giving you access to the
Internet (for e-mail and Web browsing)
or corporate networks wherever you are.
For more information on modem setup
for PCs and handheld devices, please
refer to the Nokia PC Suite User Guide
and PC/PDA Connectivity Guide.
Download software
PC Suite, the PC Suite/PC connectivity
user guide, and all related software is
provided to you free of charge. These
items can be downloaded from the US
mobile phone products section at:
http://www.nokia.com/us
78 Copyright © 2004 Nokia. All rights reserved.
Page 83

16 Minibrowser
Minibrowser
The minibrowser feature allows you to
access special mobile Internet content
designed specifically for viewing from
your mobile phone. You can use your
minibrowser to view news, get weather
reports, check flight times, access
financial information, download new
ringing tones or graphics, etc. The
browser menu allows you to save
addresses of Web sites as bookmarks, so
you can return to your favorite sites
quickly and easily.
Warning! Your phone must be
switched on to use this function.
Do not switch the phone on when
wireless phone use is prohibited
or when it may cause
interference or danger.
Important: This feature is
available only if your service
provider’s network supports
mobile Internet access. Your
service provider may also require
that you subscribe to this
additional service. For more
information, contact your service
provider.
• UNDERSTAND BROWSING SESSIONS AND INDICATORS
When you launch the minibrowser, two
icons appear on the screen:
Minibrowser icon (you are in a
minibrowser session)
High-speed data icon (you are
being billed accordingly)
The minibrowser disconnects you from
the network after a period of inactivity.
This is normal and is designed to
minimise your bill. You may find, however,
that you are billed for several network
connections within a single session.
When the minibrowser disconnects from
the network, only the browser icon
remains. While browsing, you can still
access pages stored in memory without
being connected to the Internet.
However, if you navigate to a page that is
not stored in memory, a new connection
is established and you will be billed
accordingly.
• LAUNCHING THE MINIBROWSER
The first time you launch the
minibrowser, you go through a security
setup process that takes three to five
minutes (follow the on-screen prompts).
Copyright © 2004 Nokia. All rights reserved. 79
Page 84

Minibrowser
1 Press Menu, scroll to Minibrowser,
then press Connect.
A message appears, reminding you
that you may be billed for the
connection time. (You can disable
this message. See “Disable
minibrowser confirmations” on
page 83.)
2 Press Yes.
Home Page
1 News
2 Yahoo
3 Weather
4 Finance
5 Web site
After a few seconds, the Home Page
appears. Your menu may vary
according to your service provider.
You can also launch the minibrowser by
pressing and holding the 0 key from the
Start screen.
END A BROWSING SESSION
To end a minibrowser session, press and
hold the End key.
• MINIBROWSER MENU
While browsing, press and release the
power key to display the minibrowser
menu:
Option Description
Reload Reloads information for
current page
Option Description
Bookmarks Displays a list of
bookmarks you’ve saved.
Bookmark
site
Version Displays information
Advanced Displays a several
Downloads View or access
Exit
browser
Switch off! Turns the phone off.
Save a bookmark for the
current page.
about the minibrowser’s
software version and
developers
advanced browser
options.
downloaded ringing tones
Exits the minibrowser and
ends your browsing
session.
ABOUT WEB PAGE CONTENT
The following items may appear on web
pages:
• Menu choices may appear as a
numbered list.
• Hyperlinks appear as underlined
text.
• Input fields (for text or numbers) appear as [...].
• Standard text (for reading only)
requires no action.
Home Returns you to the Home
page.
80 Copyright © 2004 Nokia. All rights reserved.
Page 85

Minibrowser
• NAVIGATE IN THE MINIBROWSER
SCROLL THROUGH THE MENUS AND CONTENTS OF A PAGE
Press the up scroll or down scroll key to
scroll through menus or the contents of a
page (contents may not fit on one
screen). To scroll quickly, press and hold
the scroll key.
Important: There is no “circular
scrolling” in minibrowser menus
or pages. In other words, when
you get to the end of a list or a
body of text, the minibrowser
does not automatically return
you to the top of the list to begin
scrolling again.
GO BACK (PREVIOUS PAGE)
To go back to a previous page, press the
End key.
GO TO THE HOME PAGE
• Press the End key repeatedly to
move back through previously
viewed pages until the Home Page
appears.
OR
• Press the power key to display the
minibrowser menu, scroll to Home,
then press OK.
SELECT OR OPEN AN ITEM (FOR EXAMPLE, A LINK)
• Press the appropriate number key on
your phone’s keypad (if the item on
the page is numbered).
OR
• Scroll to the item, then press the
appropriate selection key (for
example, to select or open a link).
SELECTION KEYS
To navigate to different screens or select
special functions, use the selection keys.
The function of each selection key can
change with each page and depends on
each highlighted item.
Left selection key usually selects the
highlighted item, but its function may
change depending on what you are doing.
Right selection key usually selects a
secondary option or displays a menu of
secondary options.
•LINKS
Links usually appear as items in a
numbered list. Depending on its type,
when activated, a link will do the
following:
• Take you to another page or site.
• Make a phone call (some sites
support this feature).
When you make the call, the browser
connection terminates and the page you
were viewing is stored in memory. When
you end the call, the page you were
viewing is displayed again and you can
continue browsing.
ACTIVATE/SELECT A LINK
1 Scroll to highlight the desired link. 2 Press the appropriate selection key.
If the link is a phone number, in
some cases, you can also press the
Send key to make the call.
Copyright © 2004 Nokia. All rights reserved. 81
Page 86

Minibrowser
• BOOKMARKS
You can create a bookmark for a page so
that you can quickly return to that page
later. You may also be able to create
bookmarks using your personal account
at your service provider’s web site.
BOOKMARK A PAGE
1 Go to the page for which you want
to set a bookmark.
2 Press the power key to access the
minibrowser menu.
3 Scroll to Bookmark page, then press
Select.
A message may appear asking you to
confirm this action.
GO TO A BOOKMARKED PAGE
1 From the Home Page, scroll to
Bookmarks, then press OK.
A list of your bookmarks appears.
2 Scroll to the bookmark you want to
use, then press Select.
Tip: The first ten bookmarks are
assigned to keys 1-0. Press and
hold the number associated with
the desired bookmark to go to
the bookmarked site at any time
during a browser session. This
feature shares memory space
with other features. For more
information, see “Memory use”
on page 14.
• RECEIVE MESSAGES USING THE MINIBROWSER
Using your service provider, you may be
able to receive text messages using the
minibrowser. Unlike SMS text messages,
minibrowser messages are not stored in
the phone and must be accessed through
the minibrowser homepage.
Notification of new minibrowser messages
When a new minibrowser message is
received, the
status bar. Depending on the message
priority, you may also hear an alert tone
and/or see New message from: displayed
on your screen.
• If you receive the message while
browsing, press View to read the
message or Skip, allowing you to
view the message later.
• If you receive the message while
phone is idle, press Connect to
launch the browser and view the
message, or press Back to return to
the Start screen.
You can use the Minibrowser messages
menu Menu 01-3 (Messages >
Minibrowser messages) to read your
messages at a later time.
icon appears in the
Web links in minibrowser messages
You can receive minibrowser messages
containing Web links. If you receive a
message containing a link, select Use
Web link from the message Options
menu to open the link and go to the
Web site.
82 Copyright © 2004 Nokia. All rights reserved.
Page 87

Minibrowser
You can also receive Web links in
standard SMS messages. Selecting Use
Web link from the message Options
menu launches the minibrowser and
takes you to the link Web site.
• END THE MINIBROWSER SESSION
• Press and hold the End key.
OR
• Press the power key, scroll to Exit
Minibrowser, then press OK.
• DISABLE MINIBROWSER CONFIRMATIONS
You can specify whether or not you want
your phone to display messages when you
begin or end a browser session.
To modify minibrowser confirmations
settings:
1 Press Menu 4-1-5 (Settings > Call
settings > Minibrowser
confirmation). The following four
options will appear:
Option Description
On
connection
On exit Phone asks you to
Phone asks you to
confirm your awareness
to possible charges
incurred for Internet
access.
confirm your wish to end
browsing.
2 Scroll to the appropriate option,
then press OK.
Tip: To prevent unintentional
exiting of the minibrowser
session, select either the Both or
On exit options. This ensures
that a confirmation message
appears before exiting.
3 Press and hold the End key to end
the minibrowser session without
confirmation (regardless of the
minibrowser confirmation setting).
Option Description
Both Confirmation required
before connecting to the
Internet, and before you
terminate a browser
session.
None No confirmation notes
are displayed.
Copyright © 2004 Nokia. All rights reserved. 83
Page 88

Reference information
17 Reference information
• USE ACCESSORIES SAFELY
This section provides information about
the phone batteries, accessories, and
chargers. Be aware that the information
in this section is subject to change as the
batteries, chargers, and accessories
change.
This phone is intended for use when
supplied with power from an ACP-7,
ACP-8, ACP-12, or LCH-9 charger. Other
usage could invalidate any approval
given to this apparatus and may be
dangerous.
Warning! When you purchase
batteries, chargers, and
accessories for your phone, use
only batteries, chargers, and
accessories that have received
approval from Nokia. The use of
any other type may invalidate
any approval or warranty
applying to the phone, and
could also be dangerous. For
availability of approved
batteries, chargers, and
accessories, check with your
service provider.
Note: For information on how to
charge and recharge your battery,
please see “Charge the battery”
on page 9.
When the battery is fully charged, the
indicator will tell you that the battery is
fully charged.
When you are not using a charger,
disconnect it from the power source. Do
not leave the battery connected to a
charger for more than 72 hours, since
prolonged maintenance charging could
shorten its lifetime. If left unused, a fullycharged battery will discharge over time.
Temperature extremes can affect the
ability of your battery to charge.
Therefore, allow it to cool down or warm
up before trying to charge it.
When the battery is running out of power
and your phone only has a few minutes of
talk time remaining, a warning tone
sounds and the Battery low message
appears briefly. When no more talk or
standby time is left, a warning tone is
sounded and the phone switches itself off.
Leaving the battery in hot or cold places,
such as in a closed car in summer or
winter conditions, will reduce the
capacity and lifetime of the battery.
Always try to keep the battery between
59°F and 77°F (15°C and 25°C). A phone
with a hot or cold battery may not work
temporarily, even when the battery is
fully charged. Battery performance is
particularly limited in temperatures
below freezing.
Do not dispose of batteries in a fire!
Warning! Use only your hands to
remove the battery. Do not
puncture, burn or use any objects
that may damage the phone or
the battery. Please recycle the
battery, or dispose of properly.
84 Copyright © 2004 Nokia. All rights reserved.
Page 89

Reference information
• IMPORTANT SAFETY INFORMATION
This section provides additional safety
information. A brief overview of safety
can be found in the section.
Traffic Safety
Do not use a handheld telephone while
driving a vehicle. Always secure the
phone in its holder; do not place the
phone on the passenger seat or where it
can break loose in a collision or sudden
stop.
Remember road safety always comes
first!
Operating environment
Remember to follow any special
regulations in force in any area and
always switch off your phone whenever it
is forbidden to use it, or when it may
cause interference or danger.
Use the phone only in its normal
operating positions.
Electronic devices
Most modern electronic equipment is
shielded from radio frequency (RF)
signals. However, certain electronic
equipment may not be shielded against
the RF signals from your wireless phone.
PACEMAKERS
Pacemaker manufacturers recommend
that a minimum separation of at least 6
inches (approximately 20 cm) be
maintained between a handheld wireless
phone and a pacemaker to avoid
potential interference with the
pacemaker. These recommendations are
consistent with the independent research
by and recommendations of Wireless
Technology Research. Persons with
pacemakers:
• Should always keep the phone more
than 6 inches (20 cm) from their
pacemaker when the phone is
switched on.
• Should not carry the phone in a
breast pocket.
• Should use the ear opposite the
pacemaker to minimise the potential
for interference.
• Switch off the phone immediately if
you have any reason to suspect that
interference is taking place.
HEARING AIDS
Some digital wireless phones may
interfere with some hearing aids. In the
event of such interference, you may want
to consult your service provider.
Other medical devices
Operation of any radio transmitting
equipment, including cellular phones,
may interfere with the functionality of
inadequately protected medical devices.
Consult a physician or the manufacturer
of the medical device to determine if they
are adequately shielded from external RF
energy or if you have any questions.
Switch off your phone in health care
facilities when any regulations posted in
these areas instruct you to do so.
Hospitals or health care facilities may be
using equipment that could be sensitive
to external RF energy.
Copyright © 2004 Nokia. All rights reserved. 85
Page 90

Reference information
Vehicles
RF signals may affect improperly
installed or inadequately shielded
electronic systems in motor vehicles (for
example, electronic fuel injection
systems, electronic antiskid/antilock
braking systems, electronic speed control
systems, air bag systems). Check with the
manufacturer or its representative
regarding your vehicle. You should also
consult the manufacturer of any
equipment that has been added to your
vehicle.
POSTED FACILITIES
Switch your phone off in any facility
where posted notices so require.
Potentially explosive atmospheres
Switch off your phone when in any area
with a potentially explosive atmosphere
and obey all signs and instructions.
Sparks in such areas could cause an
explosion or fire resulting in property
and/or bodily injury or even death.
Users are advised to switch off the phone
when at a refuelling point (service
station). Users are reminded of the need
to observe restrictions on the use of radio
equipment in fuel depots (fuel storage
and distribution areas), chemical plants,
or where blasting operations are in
progress.
Areas with a potentially explosive
atmosphere are often but not always
clearly marked. They include below deck
on boats; chemical transfer or storage
facilities; vehicles using liquefied
petroleum gas (such as propane or
butane); areas where the air contains
chemicals or particles, such as grain,
dust, or metal powders; and any other
area where you would normally be
advised to turn off your vehicle engine.
Vehicles
Only qualified personnel should service
the phone or install the phone in a
vehicle. Faulty installation or service may
be dangerous and may invalidate any
warranty which may apply to the unit.
Check regularly that all wireless phone
equipment in your vehicle is mounted
and operating properly.
Do not store or carry flammable liquids,
gases or explosive materials in the same
compartment as the phone, its parts or
accessories.
For vehicles equipped with an air bag,
remember that an air bag inflates with
great force. Do not place objects,
including both installed or portable
wireless equipment in the area over the
air bag or in the air bag deployment area.
If in-vehicle wireless equipment is
improperly installed and the air bag
inflates, serious injury could result.
FCC regulations prohibit using your
phone while in the air. Switch off your
phone before boarding an aircraft. The
use of wireless telephones in an aircraft
may be dangerous to the operation of the
aircraft, disrupt the wireless telephone
network, and may be illegal.
Failure to observe these instructions may
lead to suspension or denial of telephone
services to the offender, legal action or
both.
86 Copyright © 2004 Nokia. All rights reserved.
Page 91

Reference information
Emergency calls
Important: This phone, like any
wireless phone, operates using
radio signals, wireless, and
landline networks as well as userprogrammed functions. Because
of this, connections in all
conditions cannot be guaranteed.
Therefore you should never rely
solely upon any wireless phone
for essential communications (for
example, medical emergencies).
Emergency calls may not be possible on
all wireless phone networks or when
certain network services and/or phone
features are in use. Check with local
service providers.
Make an Emergency Call
1 If the phone is not on, switch it on. 2 Press the End key as many times as
needed (for example, to exit a call, to
exit a menu, etc.) to clear the display
and ready the phone for calls.
3 Enter the emergency number for
your present location (for example,
100 or any other official emergency
number—emergency numbers vary
by location).
4 Press the Send key.
• If certain features are in use, you
may first need to turn those features
off before you can make an
emergency call. Consult this user
guide and your service provider.
• When making an emergency call,
remember to give all the necessary
information as accurately as
possible. Remember that your
wireless phone may be the only
means of communication at the
scene of an accident. Do not end the
call until given permission to do so.
• CERTIFICATION INFORMATION (SAR)
THIS MODEL PHONE MEETS
REQUIREMENTS FOR EXPOSURE TO
RADIO WAVES
Your mobile phone is a radio transmitter
and receiver. It is designed and
manufactured not to exceed the limits
for exposure to radio frequency (RF)
recommended by international
guidelines (ICNIRP). These limits are part
of comprehensive guidelines and
establish permitted levels of RF energy
for the general population. The guidelines
were developed by independent scientific
organisations through periodic and
thorough evaluation of scientific studies.
The guidelines include a substantial
safety margin designed to assure the
safety of all persons, regardless of age
and health.
The exposure standard for mobile phones
employs a unit of measurement known as
the Specific Absorption Rate, or SAR. The
SAR limit stated in the international
guidelines is 2.0 W/kg*. Tests for SAR are
conducted using standard operating
positions with the phone transmitting at
its highest certified power level in all
tested frequency bands. Although the
SAR is determined at the highest
certified power level, the actual SAR of
the phone while operating can be well
below the maximum value. This is
because the phone is designed to operate
at multiple power levels so as to use only
Copyright © 2004 Nokia. All rights reserved. 87
Page 92

Reference information
the power required to reach the network.
In general, the closer you are to a base
station, the lower the power output of
the phone.
The highest SAR value for this model
phone when tested for use at the ear is
0.77 W/kg. While there may be
differences between the SAR levels of
various phones and at various positions,
they all meet the relevant international
guidelines for RF exposure.
* The SAR limit for mobile phones used by
the public is 2.0 watts/kilogram (W/kg)
averaged over ten grams of body tissue.
The guidelines incorporate a substantial
margin of safety to give additional
protection for the public and to account
for any variations in measurements. SAR
values may vary depending on national
reporting requirements and the network
band. For SAR information in other
regions please look under product
information at www.nokia.com.
• CARE AND MAINTENANCE
Your phone is a product of superior
design and craftsmanship and should be
treated with care. The suggestions below
will help you to fulfill any warranty
obligations and to enjoy this product for
many years:
• Keep the phone and all its parts and
accessories out of the reach of small
children.
• Keep the phone dry. Precipitation,
humidity and all types of liquids or
moisture can contain minerals that
will corrode electronic circuits.
• Do not use or store the phone in
dusty, dirty areas. Its moving parts
can be damaged.
• Do not store the phone in hot areas.
High temperatures can shorten the
life of electronic devices, damage
batteries, and warp or melt certain
plastics.
• Do not store the phone in cold areas.
When it warms up (to its normal
temperature), moisture can form
inside and may damage electronic
circuit boards.
• Do not attempt to open the phone
except to remove or change front
and back covers. Nonexpert
handling may damage it.
• Do not drop, knock, or shake the
phone. Rough handling can break
internal circuit boards.
• Do not use harsh chemicals,
cleaning solvents, or strong
detergents to clean the phone.
• Do not paint the phone. Paint can
clog the moving parts and prevent
proper operation.
• Use only the supplied or an approved
replacement antenna. Unauthorised
antennas, modifications, or
attachments could damage the
phone and may violate regulations
governing radio devices.
All of the above suggestions apply
equally to your phone, battery, charger or
any accessory. If any of them are not
working properly, take them to your
nearest qualified service facility. The
personnel there will assist you, and if
necessary, arrange for service.
88 Copyright © 2004 Nokia. All rights reserved.
Page 93

Reference information
•MOBILE ENHANCE MENTS
If you want to
enhance your
phone’s functionality, a range of
accessories is available for you. You can
select any of these items to help
accommodate your specific
communication needs. For availability of
these and other accessories, contact your
service provider.
A FEW PRACTICAL RULES FOR ACCESSORY OPERATION
• Keep all accessories out of the reach
of small children.
• When you disconnect the power
cord of any accessory, grasp and pull
the plug, not the cord.
• Check regularly that any vehicleinstalled accessories are mounted
and are operating properly.
• Installation of any complex car
accessories must be made by
qualified personnel only.
• Use only batteries, chargers, and
accessories that have been approved
by Nokia. The use of any other types
could invalidate any approval or
warranty applying to the phone and
could be dangerous. Refer to “Use
accessories safely” on page 84 for
important battery usage
information.
• BATTERY INFORMATION
Note: The phone has a lithium
ion (Li-Ion) battery. Dispose of
batteries according to local
regulations (for example,
recycling). Do not dispose as
household waste.
This section provides information about
the phone battery. Be aware that the
information in this section is subject to
change.
The tables shown in this section provide
information about the battery that is
available for your phone, charging times
with the Standard Travel Charger (ACP-
7), the talk and standby times. Consult
your service provider for more
information.
Charging Times
Charging times for the BL-5C Li-ion
Battery (850 mA) are approximate:
Battery option: ACP-7 ACP-12
BL-5C Li-ion 3 hrs 1 hr 15 min
Standby and Talk Times
Mode Talk time Standby time
Digital Up to 3 hrs
and 30 min
Up to 12 days
Copyright © 2004 Nokia. All rights reserved. 89
Page 94

Reference information
Note: Battery talk and standby
times are estimates only and
depend on signal strength,
network conditions, features
used, battery age and condition
(including the effect of charging
habits), temperatures to which
battery is exposed, use in digital
mode, and many other factors.
Please note that the amount of
time a phone is used for calls will
affect its standby time. Likewise,
the amount of time that the
phone is turned on and in standby
mode will affect its talk time.
Charging and Discharging
Your phone is powered by a rechargeable
battery.
Note that full performance of a new
battery is achieved only after two or
three complete charge and discharge
cycles!
The battery can be charged and
discharged hundreds of times but it will
eventually wear out. When the operating
time (talk-time and standby time) is
noticeably shorter than normal, it is time
to buy a new battery.
Use only batteries approved by the phone
manufacturer and recharge your battery
only with the chargers approved by the
manufacturer. Unplug the charger when
not in use. Do not leave the battery
connected to a charger for longer than
72 hours, since overcharging may
shorten its lifetime. If left unused, a fully
charged battery will discharge over time.
Temperature extremes can affect the
ability of your battery to charge. Battery
will not charge at temperatures above
140°F (60°C).
• CHARGERS AND OTHER ACCESSORIES
Check the model number of any charger
before use with this device. This device is
intended for use when supplied with
power from the devices listed on the
following pages.
Warning! Use only batteries,
chargers, and accessories
approved by Nokia for use with
this particular phone model. The
use of any other types may
invalidate any approval or
warranty applying to the phone
and may be dangerous.
For availability of approved accessories,
please check with your dealer.
When you disconnect the power cord of
any accessory, grasp and pull the plug,
not the cord.
Standard Charger (ACP-7)
This is a lightweight and durable ac
charger.
90 Copyright © 2004 Nokia. All rights reserved.
Page 95

Reference information
To use the standard travel charger, plug it
into a standard ac wall outlet and
connect the lead from the charger to the
base of your phone.
Note: If the battery is completely
empty, you cannot use the phone
until it has enough charge to
operate.
Rapid Travel Charger (ACP-8)
This is a lightweight and durable ac
charger. Calls can be made during
charging, even with a fully discharged
battery.
To use the Multi-voltage Charger (ACP-
8), plug it into a standard ac wall outlet,
and connect the lead from the charger to
the base of your phone.
The charger can also be used together
with the optional desktop charging
stand. Approximate charging times for
discharged batteries are shown in
“Charging Times” on page 89.
Travel Charger (ACP-12)
This is a lightweight and durable ac
charger. To use the standard travel
charger, plug it into a standard ac wall
outlet and connect the lead from the
charger to the base of your phone.
Rapid Mobile Charger (LCH-9)
You can charge your phone’s battery
from your vehicle battery by using the
rapid mobile charger.
Calls are possible during charging. A
green light indicates that the charger is
ready for charging (when not charging).
The battery charging times are the same
as those for the multi-voltage charger
(ACP-8).
The input voltage range is from 11 to 32
V-dc, negative grounding. Avoid
prolonged charging with the Rapid Mobile
Charger (LCH-9) when the car engine is
not running; this could cause your car
battery to drain. Note also, that in some
cars, the cigarette lighter plug is not
provided with electricity if the ignition is
not switched on.
Copyright © 2004 Nokia. All rights reserved. 91
Page 96

Reference information
Headset (HDB-4)
Small and lightweight, the Boom Headset
fits over the ear. This headset has
excellent audio quality with the
microphone and speaker integrated into
the unit The Boom Headset provides
basic handsfree functionality with an
answer/end button.
See “Learn about the HDB-4 and HS-5
headset” on page 20, for more
information.
Headset (HS-5)
See “Learn about the HDB-4 and HS-5
headset” on page 20, for more
information.
Connectivity Adapter Cable (DKU-5)
Easy and convenient connection to your
PC or laptop computer for wireless
modem functionality. DKU-5 is a USB
cable that can be used with Nokia PC
Suite and the DCV-15 Desktop charger
with PC Sync.
DCV-15 Desktop charger
Used together with the standard travel
charger or the rapid travel charger, the
Small and lightweight, this headset fits
over the ear. This headset has excellent
audio quality with the microphone and
speaker integrated into the unit The
headset provides basic handsfree
functionality with an answer/end button.
DCV-15 desktop charger allows you to
charge your phone in an upright position,
so that you have a clear view of the
phone screen.
92 Copyright © 2004 Nokia. All rights reserved.
Page 97

Reference information
Loopset (LPS-4)
With the Nokia Loopset, people who use
a T-coil equipped hearing aid have the
freedom to talk on a digital mobile
phone. The loopset goes around your
neck so it can be worn comfortably and
discreetly.
BHF-1 Basic Car Kit
The BHF-1 Basic Car Kit offers a headrest
handsfree option with an ergonomic
design and easy installation.
Mobile Holder (MBC-17)
• NOKIA XPRESS-ON™ COLOR COVERS
The Xpress-on cover is available in
several fashion colors. Xpress-on covers
may be purchased from your authorised
Nokia dealer.
Warning! Before changing the
cover, always switch off the
power and disconnect the phone
from the charger or any other
device. Always store and use the
phone with the covers attached.
REMOVE THE BACK COVER
Switch off the power. Disconnect the
phone from the charger or any other
device.
1 Push the release button on the back
cover.
2 Slide the cover downward and lift
off.
REMOVE THE FRONT COVER
Holds phone securely in place while
driving or during charging. Can be used
with Rapid Cigarette Lighter Charger
(LCH-9). This holder is used in the Car Kit
(CARK-142) and can be used with BHF-1
Basic Handsfree Carkit.
Copyright © 2004 Nokia. All rights reserved. 93
Page 98

Reference information
1 With the phone face down or up,
grab the top of the front cover.
2 Gently pry the front cover away from
the phone and lift the cover off the
phone.
Warning! When the front cover
is off the phone, be careful not to
damage the phone screen face or
the rubber gasket around it.
REPLACE THE FRONT COVER
1 Align the keypad with the proper
openings in the front cover.
2 Gently push the front cover into the
phone until it clicks into place.
REPLACE THE BACK COVER
1 Insert the two catches of the back
cover in the corresponding slots in
the phone.
2 Slide the cover towards the bottom
of the phone until it locks into place.
94 Copyright © 2004 Nokia. All rights reserved.
Page 99

Index
A
ABC and 123 modes 22
access codes
lock code 67
security code 66
accessories
battery 89
data cable 92
Connectivity Adapter Cable (DKU-5) 92
loopset lps-4 93
mobile holder 93
accessory
cigarette lighter charger 91
headset kit 92
standard travel charger 90
activate
automatic redial 56
call divert 53, 54
TTY/TDD 48
adjust the volume 20
advanced calling features 53
antenna
contact with 8
location 8
automatic redial 56
Automatic update of service 69
B
battery
charging 9
important information 10
indicator 9
installing 8
prolonged charging 84
removal 9
battery low indication 84
C
cable
connecting to a PC 78
calculator 74
using 74
calendar
alarms 73
day view 72
make a note 73
note types 73
note view 73
set the date 73
week list view 72
call divert 54
activate 54
cancel 54
feature codes 54
call restrictions 68
adding 68
editing 69
erasing 69
selecting 68
call timers
clearing 34
turning on 34
call waiting 55
answer a new call 55
switch between calls 55
caller groups 31
assign a number 31
edit options 31
calls
answer a call 12
call waiting 55
end a call 12
ignoring 3
make a call 12
phone lock 67
redial last 3
reject a call 12
Speed dialling 59
certification information 87
change letter case 23
characters, entering 23
charge the battery 9
95Copyright © 2004 Nokia. All rights reserved.
Page 100

clock
automatic settings 50
displaying the clock 50
hiding the clock 50
set the time 49
time format 50
color covers 93
connecting to a PC 78
Content Copier (PC Suite) 78
convert currency 74
currency
calculating 74, 75
D
data cable 92
Data call timers 35
Data Synchronization (PC Sync) 78
default number, specifying 30
dialed calls, checking 32
dictionary, add words 26
Digital Data 78
display language 49
download a ringing tone 49
Download software 78
dynamic memory 14
E
edit a name or number 28
e-mail 40
emergency calls 87
enter
characters 23
numbers 23
punctuation 23
enter a space 22
enter letters 22
entering letters and numbers 22
Entering text
change letter case 23
enter a space 22
erase
mistakes 22
erase mistakes 22
erase names or numbers 29
G
games 77
starting 77
H
headset
connect 20
setup 20
use 20
Headset Kit 92
help 14
I
icons 6
in-call options 53
K
keyguard 65
keypad
about 12
lock 65
keypad tones, setting 48
keys, selection 11
L
language setting 49
letters, entering 22
lock code 67
changing 67
lock keypad 65
loopset
description 93
M
memory status, checking 31
menu
shortcuts 16
menu number and scroll bar 15
menu shortcuts 16
menu tips 15
menus, phone 14
message alert tone, setting 47
Copyright © 2004 Nokia. All rights reserved.96
 Loading...