

Nikon COOLPIX P1, COOLPIX P2 quick start guide
En
DIGITAL CAMERA
Quick Start Guide
Supports
wireless LAN!
Transfer pictures
wirelessly to
a computer!
Check the Package
Contents
Take Pictures
Install Software
(on CD)
Preparing to Use Wireless Transfer Mode
Using a USB Connection
Transfer and Display
Pictures
P. 2
P. 4
P. 13
P. 24
P. 26

Check the Package Contents
Check that you have all the items listed below.
L
I
T
H
I
U
M
I
O
N
B
A
T
T
E
R
Y
C
M
H
A
H
R
-
G
6
E
R
2
COOLPIX P1/P2
digital camera
EN-EL8 rechargeable
Li-ion battery (with terminal cover)
MH-62 battery charger
(with power cable)
UC-E6 USB interface cableCamera strap EG-CP14 Audio/Video cable
Warranty
Quick Start Guide
(this guide)
Nikon Guide to Digital Photography
with the COOLPIX P1/COOLPIX P2
Warranty
PictureProject Reference Manual CDWireless Camera Setup Utility/
PictureProject Installer CD
• SD memory card is not contained.
Use Only Nikon Brand Electronic Accessories
Nikon COOLPIX cameras are designed to the highest standards and include complex electronic
circuitry. Only Nikon brand electronic accessories (including battery chargers, batteries, AC adapters, and Speedlights) certified by Nikon specifically for use with this Nikon digital camera are engineered and proven to operate within the operational and safety requirements of this electronic
circuitry.
THE USE OF NON-NIKON ELECTRONIC ACCESSORIES COULD DAMAGE THE CAMERA AND MAY
VOID YOUR
the Nikon holographic seal* could interfere with normal operation of the camera or result in the
batteries overheating, igniting, rupturing, or leaking.
For more information about Nikon brand accessories, contact a local authorized Nikon dealer.
* Holographic seal: Identifies this device as an authentic Nikon product.
NIKON WARRANTY. The use of third-party rechargeable Li-ion batteries not bearing
2
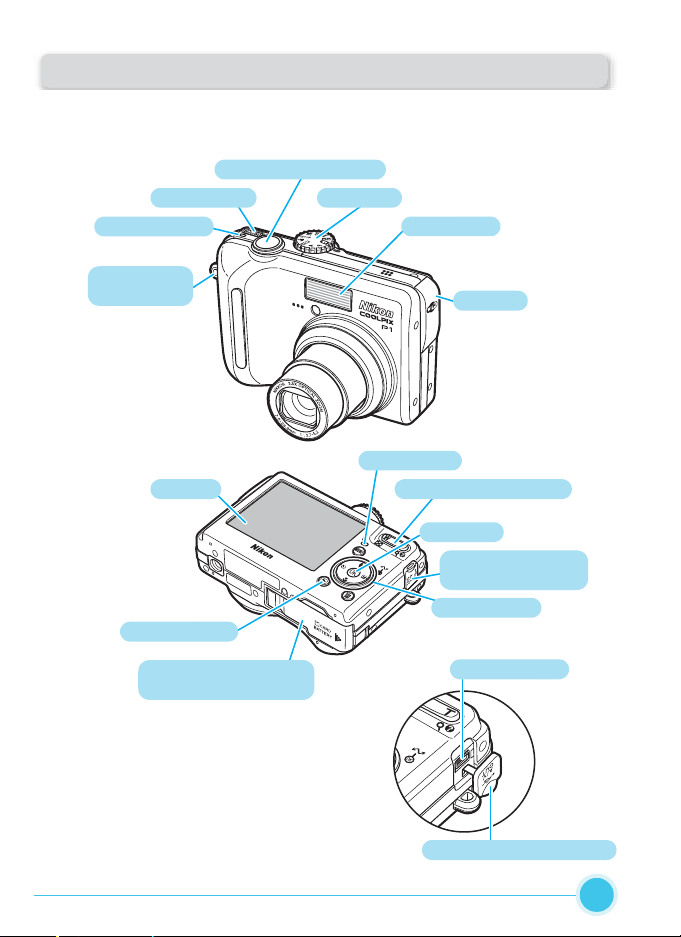
Parts of the Camera
The main parts of the COOLPIX P1/P2 are shown below.
For more information, see pages 2 and 3 in the Nikon Guide to Digital Pho-
tography.
Shutter-release button
Power switch
Power-on lamp
Eyelet for
camera strap
Monitor
Play i button
Mode Dial
Built-in flash
Antenna
Red (C) lamp
Zoom (j/kl) buttons
d button
Interface connector
cover
Multi selector
Battery-chamber/
Memory card slot cover
USB connector
Interface connector cover
3
Take Pictures
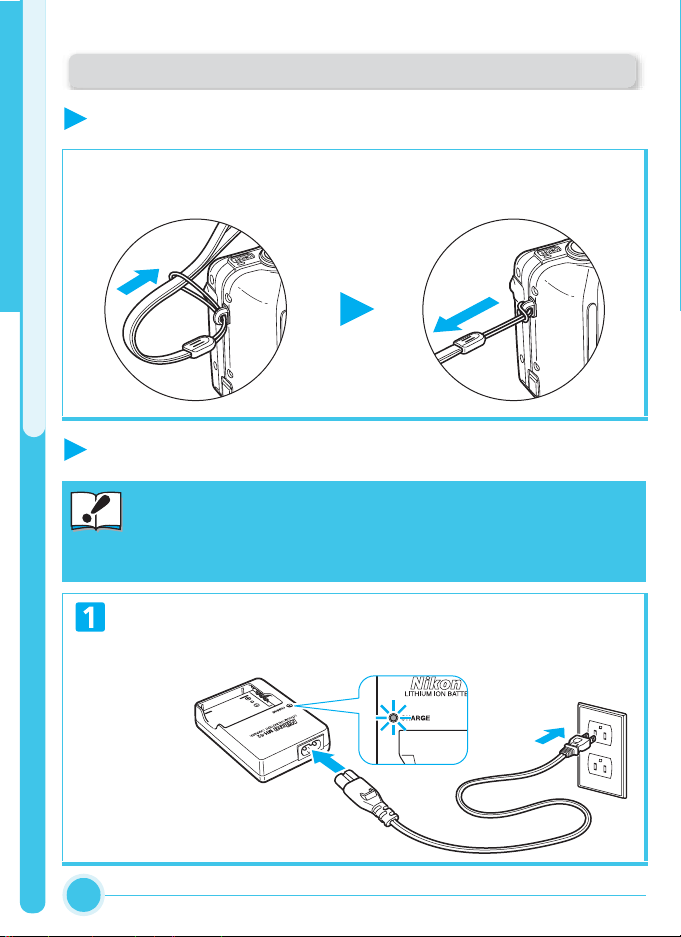
Step 1 Attach the camera strap
Attach the camera strap securely to the eyelet on the camera body as shown below.
Take Pictures
Step 2 Charge the battery
Read Battery Warnings
Read and follow the battery warnings and notices on pages ii - vii and
152 in the Nikon Guide to Digital Photography, together with any
Important
warnings and instructions supplied by the battery manufacturer.
Connect the power cable to the MH-62 battery charger (1) and insert
the wall plug into a power outlet (2). The CHARGE lamp will light to
show that the charger is on (3).
3
2
1
4
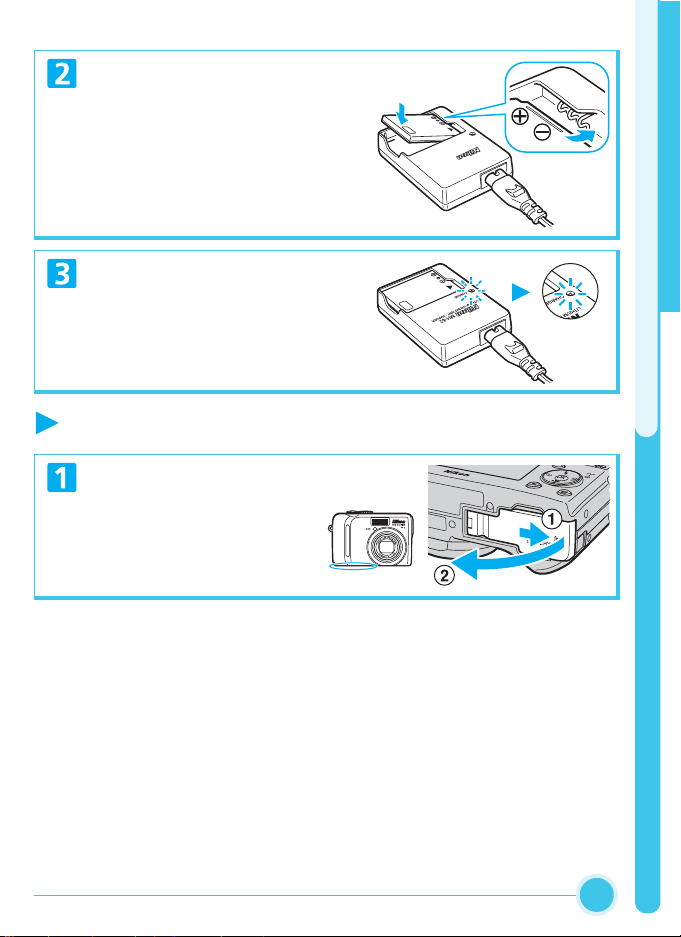
Remove the terminal cover from ENEL8 and insert the battery into the
MH-62. Charging will begin immediately.
The CHARGE lamp will start to blink.
Charging is complete when the
CHARGE lamp stops blinking.
About two hours are required to
charge a fully depleted battery.
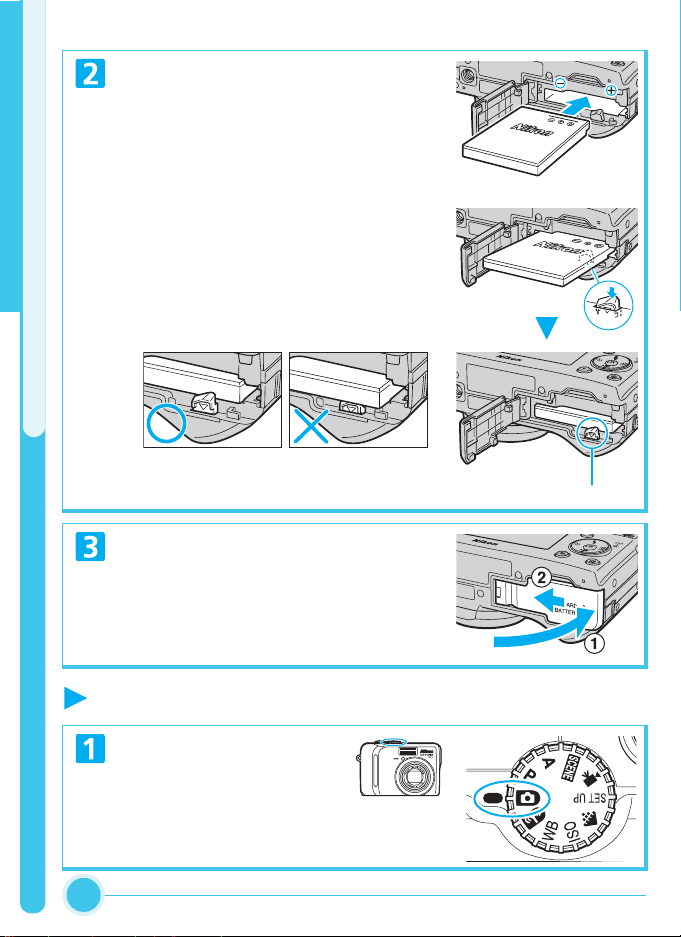
Step 3 Insert the battery
Open the battery-chamber/memory card slot
cover
• Slide the cover in the direc-
tion shown in (1) until it
stops and open the cover
(2).
CHA
R
G
E
L
ITHIUM IO
N
B
AT
T
E
R
Y CHAR
M
H
-
G
6
E
R
2
Take Pictures
5
Take Pictures
Insert the battery
• Insert the battery as shown in the label at the
entrance to the battery chamber, making
sure the positive “+” and negative “–” terminals are in the correct orientation.
Inserting the battery upside down or
backwards could damage the camera.
Check to be sure the battery is in the correct orientation.
• The orange battery latch is pushed aside as
the battery is inserted. The latch will close
when the battery is fully inserted.
• Make sure that the battery latch is secured
over the battery and that the battery is set.
Battery Latch
Close the battery-chamber/memory card slot
cover
• Close the cover (1) and slide it in until it
latches (2).
• Ensure the cover is closed firmly.
Step 4 Turn the camera on
Rotate the mode dial to X
6
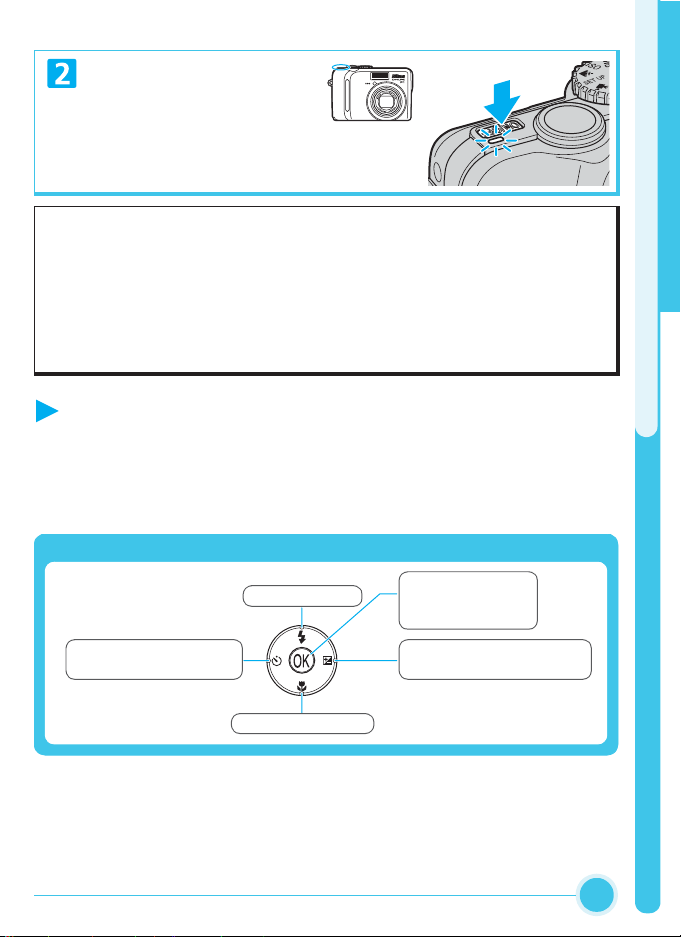
Turn the camera on
Auto Power Off (Standby Mode)
If no operations are performed for one minute (default setting), the monitor will
turn off automatically and the camera will enter Standby mode to reduce the drain
on the battery. The camera will be reactivated from Standby mode when you:
• Press the power switch
• Press the shutter-release button halfway
For more information on Auto power off, see page 15 in the Nikon Guide to Digital
Photography.
Step 5 Choose a language and set the
clock
The first time the camera is turned on, a language-selection dialog will be displayed in the monitor. Follow the steps below to choose a language and set
the time and date.
The multi selector is used to navigate through the camera menus.
Move cursor up.
Return to previous menu
or move cursor left.
Press d to make
selection or display
sub-menu.
Display sub-menu or move
cursor right.
Take Pictures
Move cursor down.
7
Confirm
Cancel
Cancel
Set time and date?
Back
HOME TIME ZONE
Back
HOME TIME ZONE
DATE
DATE
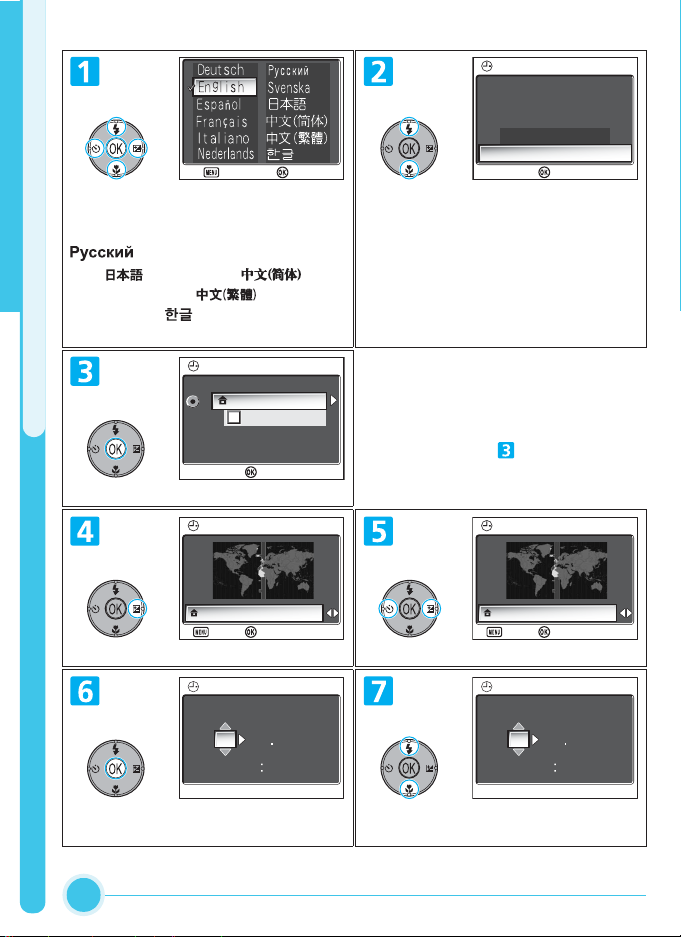
Highlight Deutsch (German), English,
Español (Spanish), Français (French),
Italiano (Italian), Nederlands (Dutch),
(Russian), Svenska (Swedish), (Japanese), (Simplified Chinese), (Traditional
Chinese) or (Korean) and press
d.
TIME ZONE
OK
London, Casablanca
DaylightSaving
Take Pictures
TIME ZONE menu displayed.*
HOME TIME ZONE
Confirm
Confirm
DATE
Set time and date?
No
Yes
Confirm
Confirmation dialog displayed.
Highlight Yes.
* To turn daylight saving time on or off,
press multi selector down to highlight
DaylightSaving and press d. When
DaylightSaving is checked, time will
automatically be advanced one hour.
To return to Step , press multi selector up to highlight current time zone.
HOME TIME ZONE
London, Casablanca
Back
Confirm
London, Casablanca
Back
Display map of world time zones. Select home time zone.
DATE
MDY
0 9
0 1
2005
0 0 0 0
Display DATE menu. Edit Day (order of Day, Month, and
Year may differ in some areas).
DATE
0 1
0 0 0 0
8
Confirm
MDY
0 9
2005
DATE
DATE
DATE
DATE
NORM
14
1/60
F2.7
AUTO
NORM
14
1/60
F2.7
AUTO
NORMNORM
1414
MDY
0 9
0 1
2005
0 0 0 0
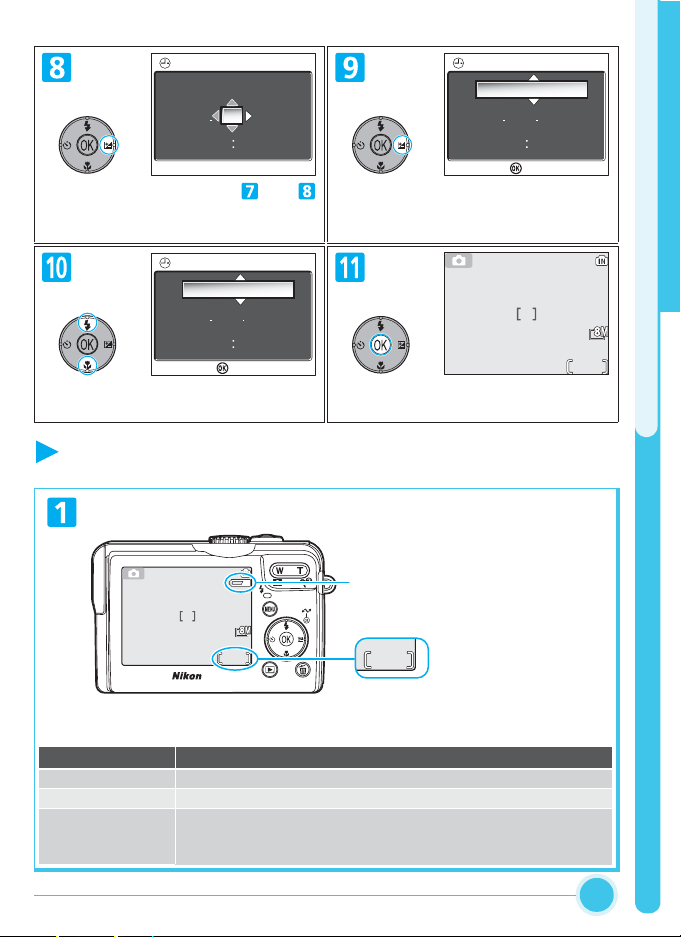
Select Month. Repeat steps and
to edit Month, Year, hour, and minutes.
DATE
DMY
0 1
1 2
2005
1 3 0 0
Confirm
Choose order in which Day, Month,
and Year will be displayed.
DATE
MDY
1 2
0 1
2005
1 3 0 0
Confirm
Highlight D M Y.
NORM
1/60
AUTO
F2.7
14
Exit to mode currently selected with
the mode dial.
Step 6 Take pictures
Check the indicators in the monitor.
1/60
AUTO
The battery level is shown in the monitor as follows:
Display Description
NO ICON Battery fully charged.
w Low battery. If flash fires, monitor turns off while flash recharges.
WARNING!!
BATTERY
EXHAUSTED
NORM
F2.7
14
Replace with fully charged battery.
Take Pictures
Battery level indicator
Shown when the battery is low.
Number of
exposures
remaining
9
Storing Pictures
NORM
14
1/60
F2.7
AUTO
NORM
1/60
F2.7
AUTO
14
Pictures will be stored in the camera’s internal memory (capacity: about 32 MB
for COOLPIX P1/16 MB for COOLPIX P2) unless a Secure Digital (SD) memory
card is inserted in the camera, in which case pictures will be stored on the card.
For information on inserting a memory card, see the Nikon Guide to Digital Pho-
tography (see pages 12 - 13).
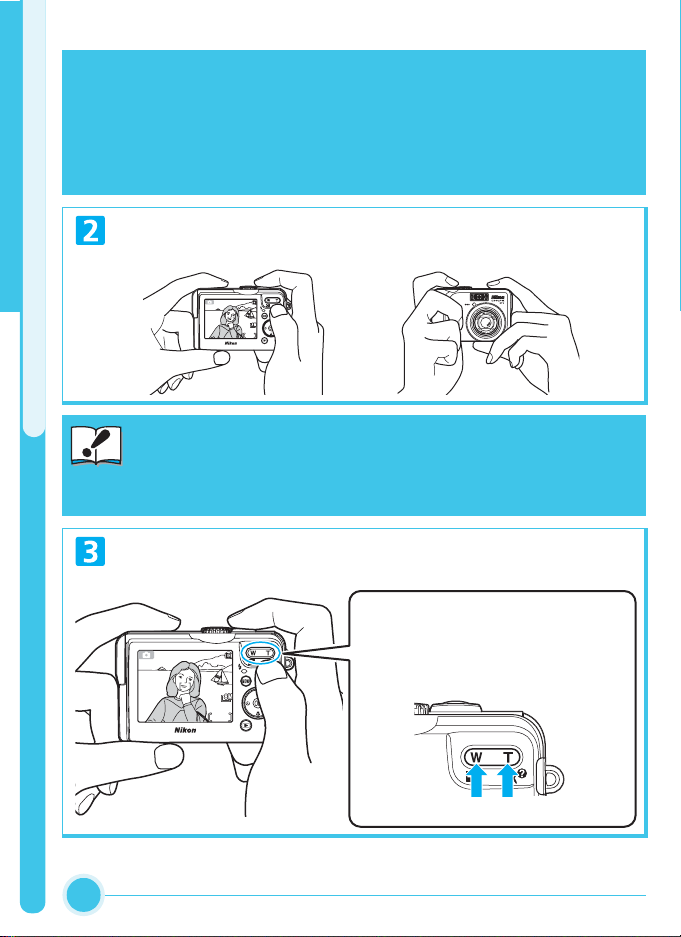
Ready the camera.
• Hold the camera steadily in both hands.
NORM
1/60
F2.7
AUTO
14
Take Pictures
Important
10
Don’t Block the Shot
To avoid dark or partially obscured pictures, keep your fingers and
other objects away from the lens, flash window, AF-assist Illuminator,
microphone, and antenna.
Frame the subject.
• Frame the subject in the center of the monitor.
Zoom Buttons
Press W to zoom out, increasing the area visible in the frame.
Press T to zoom in on your subject so that it
fills a larger area of the frame.
NORM
1/60
F2.7
AUTO
14
Zoom out Zoom in
 Loading...