


NIDEK
OPHTHALMIC YAG LASER SYSTEM
Model YC-1600
SERVICE MANUAL
XYC14*RDA001E/E Total pages: 105 2005.3.3

|
|
|
|
|
|
|
|
|
|
|
|
|
|
|
|
|
|
|
|
|
|
|
|
|
HEAD OFFICE |
: 34-14, Maehama, Hiroishi-cho, Gamagori, Aichi 443-0038, Japan |
||||||
|
|
|
||||||||
|
|
|
|
|
|
|
|
Telephone: (0533) 67-6611 |
||
|
|
|
|
|
|
|
|
Facsimile: (0533) 67-6610 |
||
|
|
|
TOKYO OFFICE |
: 6th Floor, Takahashi Bldg., No.2, 3-chome, Kanda-jinboucho |
||||||
|
|
|
(International Div.) |
Chiyoda-ku, Tokyo 101-0051, Japan |
||||||
|
|
|
|
|
|
|
|
Telephone: (03) 3288-0571 |
||
|
|
|
|
|
|
|
|
Facsimile: (03) 3288-0570 |
||
|
|
|
|
|
|
|
|
Telex: 2226647 NIDEK J |
||
|
|
|
NIDEK INCORPORATED |
: 47651 Westinghouse Drive Fremont, California 94539, U. S. A. |
||||||
|
|
|
|
|
|
|
|
Telephone: (510) 226-5700 |
||
|
|
|
|
|
|
|
|
Facsimile: (510) 226-5750 |
||
|
|
|
NIDEK SOCIETE ANONYME |
: Europarc 13, rue Auguste Perret, 94042 CRETEIL, France |
||||||
|
|
|
(Représentant Autorisé) |
Telephone: (01) 49 80 97 97 |
||||||
|
|
|
|
|
|
|
|
Facsimile: (01) 49 80 32 08 |
||
Printed in JAPAN

§1
§2
§3
§4
Table of Contents
INTRODUCTIONS ...................................................................................................... |
1-1 |
1.1 Before using this manual.............................................................................................. |
1-1 |
1.2 Before repairing.......................................................................................................... |
1-1 |
1.3 Handling and repairing of the laser head ...................................................................... |
1-1 |
1.4 Handling and repairing of the board and wiring ............................................................ |
1-1 |
CAUTIONS ................................................................................................................... |
2-1 |
|
2.1 |
Cautions in laser emission ........................................................................................ |
2-1 |
2.2 |
Handling of the laser head ........................................................................................ |
2-1 |
2.3 |
Boards for repair ....................................................................................................... |
2-1 |
2.4 |
Cautions in checking connectors .............................................................................. |
2-1 |
2.5 |
Cautions in disconnecting cords ............................................................................... |
2-2 |
2.6 |
Cautions in soldering cords ...................................................................................... |
2-2 |
2.7 |
Cautions in using the energy meter for the YAG laser ............................................. |
2-2 |
TROUBLESHOOTING .............................................................................................. |
3-1 |
|
SUB TROUBLESHOOTING...................................................................................... |
4-1 |
|
4.1 |
The pilot lamp does not light.................................................................................... |
4-1 |
4.2 |
Both fixation lamp and backlight of the control panel do not light ......................... |
4-2 |
4.3 |
Only fixation lamp does not light ............................................................................. |
4-3 |
4.4 |
Only backlight of the control panel does not light ................................................... |
4-3 |
4.5 |
The error display appears ......................................................................................... |
4-4 |
|
4.5.1 Error 1 appears ................................................................................................ |
4-4 |
|
4.5.2 Error 4 appears ................................................................................................ |
4-4 |
|
4.5.3 Error 5 appears ................................................................................................ |
4-5 |
|
4.5.4 Error 7 appears ................................................................................................ |
4-6 |
|
4.5.5 Error 10 appears .............................................................................................. |
4-8 |
|
4.5.6 Error 12 appears .............................................................................................. |
4-9 |
|
4.5.7 Error 13 appears .............................................................................................. |
4-9 |
|
4.5.8 Error 14 appears ............................................................................................ |
4-10 |
|
4.5.9 Error 15 appears ............................................................................................ |
4-11 |
|
4.5.10 Error 30 appears .......................................................................................... |
4-12 |
|
4.5.11 Error 31 appears .......................................................................................... |
4-13 |
|
4.5.12 Error 50 appears .......................................................................................... |
4-14 |
|
4.5.13 Error 51 appears .......................................................................................... |
4-14 |
|
4.5.14 Error 52 appears .......................................................................................... |
4-15 |
|
4.5.15 Error 53 appears .......................................................................................... |
4-15 |
|
4.5.16 Error 54 appears .......................................................................................... |
4-16 |
|
4.5.17 Error 90 appears .......................................................................................... |
4-16 |
4.6 The illumination light is not projected ......................................................................... |
4-17 |
|

4.7 The focusing rod looks like shifting when the PD is adjusted ...................................... |
4-18 |
|
4.8 The illumination light is shifted from the center of |
|
|
|
Microscopic visual field when the magnification is 10× ...................................... |
4-18 |
4.9 The focusing rod cannot be seen clearly ................................................................ |
4-18 |
|
4.10 |
There are some spots in the illumination light ..................................................... |
4-19 |
4.11 The illumination light is not focused on the focusing rod .................................... |
4-19 |
|
4.12 |
The position of illumination light on the focusing rod is not normal .................. |
4-19 |
4.13 |
The illumination light does not go out even if the Brightness |
|
|
control is turned fully counterclockwise ............................................................. |
4-19 |
4.14 |
The slit image tilts when turning it to the vertical position .................................. |
4-20 |
4.15 |
The slit does not fully close or open..................................................................... |
4-20 |
4.16 |
The position where the slit closes is shifted from the center ............................... |
4-20 |
4.17 |
Coarse movement to back and forth is not smooth .............................................. |
4-21 |
4.18 |
Coarse movement to right and left is not smooth................................................. |
4-21 |
4.19 |
Fine movement to back and forth, and to right and left is not smooth................. |
4-22 |
4.20 |
Vertical movement is not smooth ......................................................................... |
4-22 |
4.21 |
Aiming beam is not emitted ................................................................................. |
4-23 |
4.22 The STATUS indicator for READY mode does not light .................................... |
4-23 |
|
4.23 |
The position of burnt pattern is not same to the projected position |
|
|
of the aiming beam ............................................................................................. |
4-23 |
4.24 |
There is an unevenness in the burnt pattern ......................................................... |
4-24 |
4.25 |
Setting of the number of pulses cannot be changed ............................................. |
4-25 |
4.26 |
Counter display cannot be reset to “0” ................................................................. |
4-25 |
4.27 |
The measured energy of YAG laser beam is not normal ...................................... |
4-26 |
4.28 |
The system does not stop with the Emergency stop switch ................................. |
4-26 |
§5 REPAIR ......................................................................................................................... |
5-1 |
|
5.1 Removing covers ...................................................................................................... |
5-1 |
|
5.1.1 Right cover ..................................................................................................... |
5-1 |
|
5.1.2 Left cover ......................................................................................................... |
5-2 |
|
5.1.3 Bottom cover of the microscope arm ................................................................. |
5-2 |
|
5.1.4 Cover of the microscope arm ............................................................................ |
5-2 |
|
5.1.5 Front cover ...................................................................................................... |
5-3 |
|
5.1.6 SL cover B ....................................................................................................... |
5-3 |
|
5.1.7 SL cover A ....................................................................................................... |
5-3 |
|
5.1.8 Switch box ....................................................................................................... |
5-4 |
|
5.1.9 Right cover of the lamp housing ......................................................................... |
5-4 |
|
5.1.10 Left cover of the lamp housing ......................................................................... |
5-5 |
|
5.1.11 Cover of the aiming adjustment part ................................................................. |
5-5 |
|
5.2 Check and replacement of fuses.................................................................................. |
5-5 |
|
5.3 Voltage check for wall outlet ....................................................................................... |
5-6 |
|
5.4 Replacement of key control switch .............................................................................. |
5-6 |
|
5.5 Replacement of the pilot lamp ..................................................................................... |
5-6 |
|
5.6 Replacement of the Emergency stop switch ................................................................. |
5-7 |
|
5.7 Replacement of the fixation lampASSY ...................................................................... |
5-7 |
|
5.8 Replacement of the switching power supply................................................................. |
5-8 |
|
5.9 Replacement of the master board ................................................................................ |
5-8 |
|
5.10 Replacement of the focus ASSY ............................................................................... |
5-9 |
|

5.11 Replacement of the display board ASSY ................................................................. |
5-10 |
5.12 Replacement of theYAG laser unit .......................................................................... |
5-10 |
5.13 Replacement of the energy monitorASSY............................................................... |
5-12 |
5.14 Replacement of the rack ......................................................................................... |
5-12 |
5.15 Replacement of the wheel shaft ............................................................................... |
5-13 |
5.16 Replacement of the plate......................................................................................... |
5-13 |
5.17 Replacement of the YAG shutterASSY................................................................... |
5-14 |
5.18 Replacement of the aiming shutterASSY................................................................. |
5-14 |
5.19 Replacement of the YL cable ASSY........................................................................ |
5-15 |
5.20 Replacement of the YL power supply board ............................................................ |
5-15 |
5.21 Replacement of the illuminationASSY..................................................................... |
5-16 |
5.22 Replacement of the vertical driving axel of the chin support ...................................... |
5-17 |
§6 VERIFICATION AND ADJUSTMENT ........................................................................ |
6-1 |
6.1Adjustment of the microscope and binocular tube ........................................................ |
6-1 |
6.1.1 Check of the optical axis of microscope ............................................................ |
6-1 |
6.1.2Adjustment of the optical axis with the binocular tube ......................................... |
6-1 |
6.1.3Adjustment of the prism holder position ............................................................. |
6-2 |
6.1.4Adjustment of the optical axis with the microscope head .................................... |
6-3 |
6.2Adjustment of the illumination part ............................................................................... |
6-4 |
6.2.1 Cleaning of the optical system for illumination ..................................................... |
6-4 |
6.2.2 Cleaning of the filters ......................................................................................... |
6-5 |
6.2.3 Cleaning of the slit ............................................................................................. |
6-5 |
6.2.4Adjustment of the focus of illumination ............................................................... |
6-6 |
6.2.5 Illumination focus adjustment for the prism head |
|
without tilting mechanism .............................................................................. |
6-7 |
6.2.6 Illumination focus adjustment for the prism head |
|
with tilting mechanism .................................................................................... |
6-7 |
6.2.7 Check of the optical axis of illumination........................................................ |
6-9 |
6.2.8 Adjustment of the optical axis of illumination (horizontal) ........................... |
6-9 |
6.2.9 Adjustment of the optical axis for prism head |
|
with tilting mechanism (vertical) .......................................................................... |
6-9 |
6.2.10Adjustment of the optical axis for prism head |
|
with tilting mechanism (vertical) ...................................................................... |
6-10 |
6.2.11Adjustment of the vertical position of slit ........................................................ |
6-11 |
6.2.12Adjustment of the closing of slit ..................................................................... |
6-12 |
6.2.13 Check and adjustment of the horizontal slit image ........................................... |
6-13 |
6.2.14 Check and adjustment of the vertical slit image .............................................. |
6-15 |
6.2.15Adjustment of the slit shutter position (horizontal) ........................................... |
6-15 |
6.2.16Adjustment of the slit shutter position (vertical) ............................................... |
6-16 |
6.3Adjustment of the aiming beam.................................................................................. |
6-17 |
6.3.1 Fixing the aiming shutter plate .......................................................................... |
6-17 |
6.3.2 Check of the sensor for aiming shutter ............................................................. |
6-18 |
6.3.3Adjustment of the optical axis of aiming beam .................................................. |
6-19 |
6.3.4 Focus adjustment of the aiming beam .............................................................. |
6-19 |
6.3.5Adjustment of the optical axis of two-point aiming beams ................................. |
6-19 |
6.3.6Adjustment of the aiming energy ...................................................................... |
6-20 |
6.3.7Adjustment of the maximum energy ................................................................. |
6-21 |
6.3.8Adjustment of the minimum energy .................................................................. |
6-21 |

§7 §8
6.4Adjustment of the YAG laser ..................................................................................... |
6-22 |
6.4.1Adjustment of the YAG shutter ........................................................................ |
6-22 |
6.4.2 Check of the sensor for YAG shutter ............................................................... |
6-23 |
6.4.3Adjustment of the indicated and measured values of PFN voltage ..................... |
6-23 |
6.4.4 Adjustment of the PFN voltage ....................................................................... |
6-25 |
6.4.5Adjustment of the mirror holder 3 and optical axis of |
|
YAG laser head .............................................................................................. |
6-27 |
6.4.6 Adjustment of the focusASSY ........................................................................ |
6-27 |
6.4.7Adjustment of the D mirrorASSY |
|
(aligning the YAG laser beam to the aiming beam) ............................................ |
6-28 |
6.4.8Adjustment of the focus of YAG laser .............................................................. |
6-28 |
6.4.9Adjustment of the focus shift ............................................................................ |
6-29 |
6.4.10Adjustment of the YAG laser energy .............................................................. |
6-30 |
6.5 Other adjustments .................................................................................................... |
6-35 |
6.5.1Adjustment of the smoothness of vertical movement ......................................... |
6-35 |
6.6Adjustment of indicated energy from outside of the device and settable function.......... |
6-36 |
6.6.1Adjustment of indicated energy ofYAG laser ................................................... |
6-36 |
6.6.1.1 Gain adjustment ................................................................................. |
6-36 |
6.6.1.2 Offset adjsutment ............................................................................... |
6-36 |
6.6.2Adjustment of aiming energy .................................................................................. |
6-36 |
6.6.2.1Aiminggainadjsutment ....................................................................... |
6-36 |
6.6.2.2Aiming offset adjustment..................................................................... |
6-36 |
6.6.3 Release of tilting lens-barrel (option) control .................................................... |
6-37 |
WIRING DIAGRAM ................................................................................................... |
7-1 |
ERROR CODE LIST ................................................................................................... |
8-1 |
8.1 Error code list ............................................................................................................ |
8-1 |
8.2 Dip switch list ............................................................................................................. |
8-2 |
8.3 Other indications ........................................................................................................ |
8-3 |
§9 SYSTEM PARAMETER LIST .................................................................................... |
9-1 |
9.1 Changing and setting of the parameters........................................................................ |
9-1 |
9.2 Original setting of the system parameters ..................................................................... |
9-2 |
9.3 Contents of parameters............................................................................................... |
9-3 |
§10 LIST OF PARTS TO BE REPLACED ...................................................................... |
10-1 |
|
10.1 |
Consumables ........................................................................................................ |
10-1 |
10.2 |
Parts to be repaired and replaced .......................................................................... |
10-1 |
§11 TOOLS, MEASUREMENT DEVICE, SOLVENT AND JIGS ............................... |
11-1 |
|
11.1 Tools ...................................................................................................................... |
11-1 |
|
11.2 Measurement device ............................................................................................... |
11-1 |
|
11.3 Solvent ................................................................................................................... |
11-1 |
|
11.4 Jigs......................................................................................................................... |
11-1 |
|
11.5 Others .................................................................................................................... |
11-1 |
|

XYC14*RDA001E/E
§1 INTRODUCTION
1.1 Before using this manual
•This service manual is for the OPHTHALMIC YAG LASER SYSTEM YC-1600.
•Be sure to use this manual after understanding the operator’s manual for the OPHTHALMIC YAG LASER SYSTEM YC-1600 thoroughly.
•This manual is subject to change without notice for improvement. Since the Technical Bulletin will be released every time significant changes are made to the system, refer to the Technical Bulletin together with this manual.
1.2 Before repairing
•Be sure not to lose or drop the removed screws inside the system.
•Apply a threadlocker to the screws which have been loosened and tightened again.
•Refer to the wiring diagram of the YC-1600 when repairing (see 7.1).
1.3 Handling and repairing of the laser head
•Be sure to turn OFF the power of the system when handling the laser head.
•Be sure to return the laser head to NIDEK for repair. Never disassemble, adjust and repair the laser head.
NIDEK assumes no responsibility if the laser head is disassembled, adjusted and repaired.
1.4 Handling and repairing of the board and wiring
•Be sure to turn OFF the power of the system when handling and repairing the board and wiring.
[WARNING]
Since Nd:YAG laser is an invisible infrared ray, it may cause the hazardous exposure to radiation if the system is improperly handled and operated.
[CAUTION]
Be sure not to expose yourself to the laser beam at a place where the laser beam passes through or is emitted when handling and repairing.
[CAUTION]
Be sure to use the safety goggles for the Nd:YAG laser.
1 - 1

XYC14*RDA001E/E
[CAUTION]
Never look straight at the Nd:YAG laser even if the safety goggles are used.
[CAUTION]
Never touch the optical parts such as mirrors and lens directly.
[CAUTION]
Never emit the laser beam to the skin.
[CAUTION]
Pay attention not to get an electric shock when unavoidably opening covers to check or repair the electrical parts.
1 - 2

|
XYC14*RDA001E/E |
|
|
|
|
§2 CAUTIONS |
|
|
|
2.1 Cautions in laser emission |
|
• Never emit the laser beam to personnel or things. |
|
• Never touch the high voltage part (shown with |
mark) when emitting the laser beam since |
there is a fear of an electric shock. |
|
• Be sure not to drop metallic parts such as tools and screws into the laser system.
2.2 Handling of the laser head
• Never disassemble or repair the laser head.
Return the laser head to NIDEK if the repair is necessary.
2.3 Boards for repair
• The IC8 (EEPROM) on the MASTER BOARD which is supplied by NIDEK has already been placed in the initial state. The setting values memorized in each EEPROM become optimum for each system’s performance. As a result, the setting values may be varied according to each system.
If using a new board, remove the IC8 (EEPROM) from the old one and attach it to a new one.
2.4 Cautions in checking connectors
• Visually check the connecting condition of connectors.
If the connector is almost disconnected, securely reconnect it.
• Verify the conditions of the contact pins and contacts.
• Cleaning of the contact pins
Clean the contacts with a spray which restores electrical continuity to them when dust or oil makes them dirty.
• Verify the condition of the contact pins and contacts.
Disconnect the connectors and verify each cord by pulling a cord with the force approx. 1 kgf.
If the contact pin is removed, raise the hook of the pin using the precise screwdriver, and insert it into the connector.
2 - 1

XYC14*RDA001E/E
2.5 Cautions in disconnecting cords
• If the heat-shrinkable tube covers the cord, remove it using nippers or knife.
• Use the soldering iron to remove the soldered parts.
• Remove the old solder adhered to the cord or terminal with the soldering iron.
2.6 Cautions in soldering cords
• If the cord was covered by the heat-shrinkable tube, run the cord through the tube.
• Solder the cords to bundle them before soldering the cord.
• Put the heat-shrinkable tube on the soldered part and constrict it using a heat gun.
2.7 Cautions in using the energy meter for the YAG laser
•According to the energy meter to be used, the necessity of the dispersion lens, which is attached to the objective lens at the time of the energy measurement, is varied.
Refer to the table below when measuring the energy.
Energy meter |
Dispersion lens |
MODEL-365 |
Necessary |
MODEL PHDX50 |
Unnecessary |
•There is a fear that the detector of the energy meter is damaged if the excessive energy density is applied to the photoreceptor of the detector.
Be sure to maximize the spot size of the aiming beam on the photoreceptor as possible so that the YAG laser never come into focus on the photoreceptor.
2 - 2

XYC14*RDA001E/E
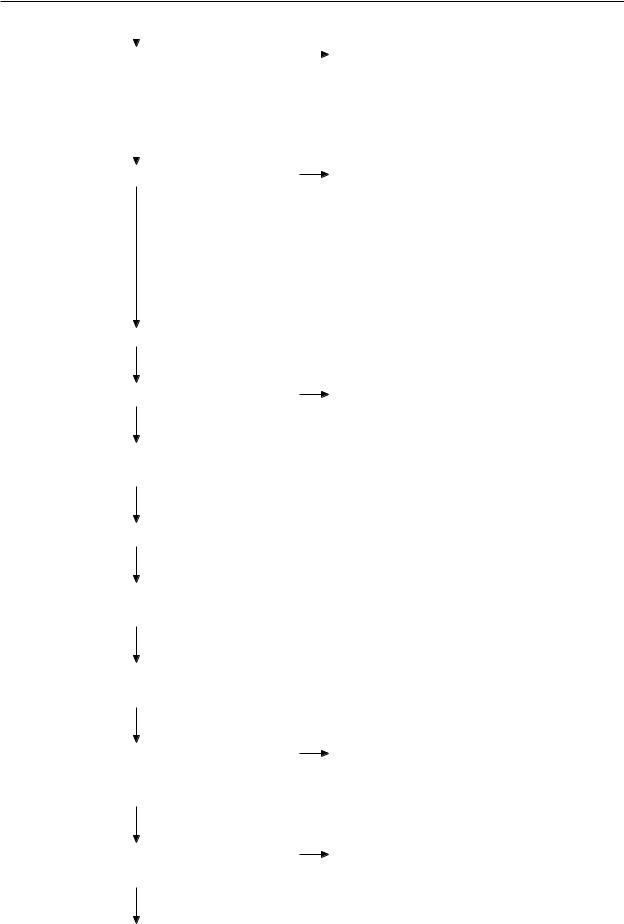
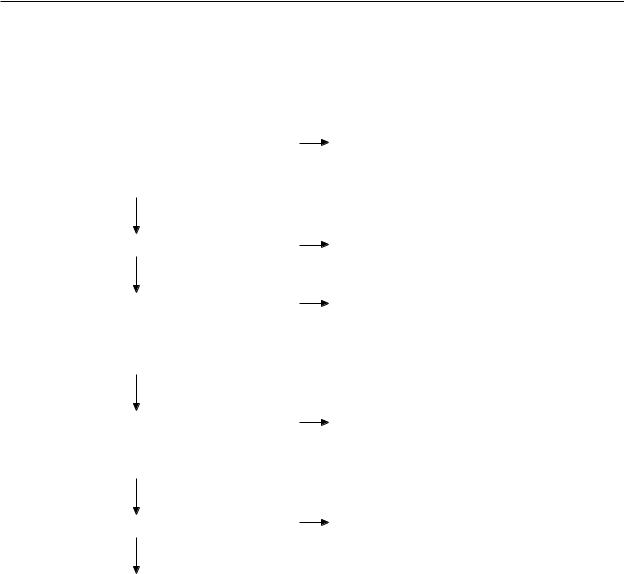
§3 TROUBLESHOOTING
Plug the power cord to the wall outlet.
N
Does the pilot lamp light?
Y
Insert the key and turn to the ON ( ) position.
N
Do the fixation lamp and backlight of the control panel light?
Y
Y
Does the error display appear?
N
N
Remove the cap and insert the focusing rod. Istheilluminationlightprojectedonthefocusing
rod?
Y
Adjust the dioptric power of the eyepieces.
Adjust the PD of the microscope.
N
Is the condition of the optical system of the microscope normal?
Y
Is the condition of the illumination normal? |
N |
|
Y
4.1 The pilot lamp does not light
4.2Both fixation lamp and backlight of the control panel do not light
4.3Only fixation lamp does not light
4.4Only backlight of the control panel does not light
4.5The error display appears
4.6The illumination light is not projected
4.7The focusing rod looks like shifting when the PD is adjusted
4.8The center of illumination light is shifted
from the center of Microscopic visual field when the magnification is 10×
4.9The focusing rod cannot be seen clearly
4.10There are some spots in the illumination light
4.11The illumination light is not focused on the focusing rod
4.12The position of illumination light on the focusing rod is not normal
4.13The illumination light does not go out even if the Brightness control is turned fully counterclockwise
3 - 1
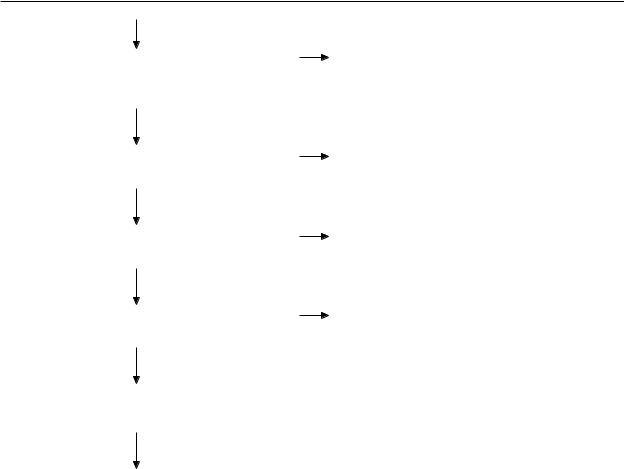
XYC14*RDA001E/E
|
|
N |
4.14 The slit image tilts when turning it to |
|
Is the condition of the slit normal? |
||||
|
||||
|
|
|
the vertical position |
|
|
|
|
||
|
|
|
4.15 The slit does not fully close or open |
|
|
Y |
|
4.16 The position where the slit closes shifts |
|
|
|
|
from the center |
|
|
|
|
|
|
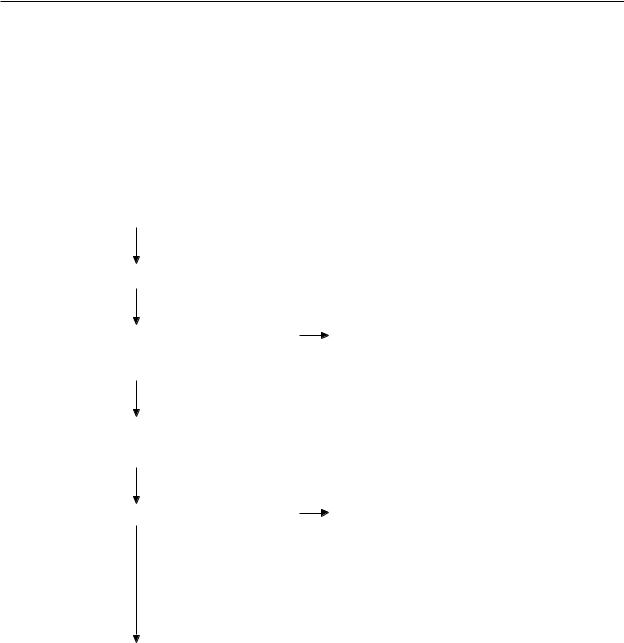
Is the movement of the slit lamp normal?
Y
Reduce the light amount of the slit lamp.
Can the aiming beam be seen?
Y
Remove the focusing rod and attach the cap.
Stick the burn paper to the head rest.
Turn the Energy control to set the output energy to minimum.
Turn the YAG Focus shift control to “0” position.
Do the STATUS indicator for STANDBY mode go off and the one for READY mode light when the STATUS switch is pressed?
Y
Is the YAG laser beam emitted normally when the trigger switch is pressed?
Y
N
N
N
N
4.17Coarse movement to back and forth is not smooth
4.18Coarse movement to right and left is not smooth
4.19Fine movement to back and forth, and to right and left is not smooth
4.20Vertical movement is not smooth
4.21Aiming beam is not emitted
4.22The STATUS indicator for READY mode does not light
4.5 The error display appears
4.23The position of burnt pattern is not same to the projected position of the aiming beam
4.24There is an unevenness in the burnt pattern
3 - 2
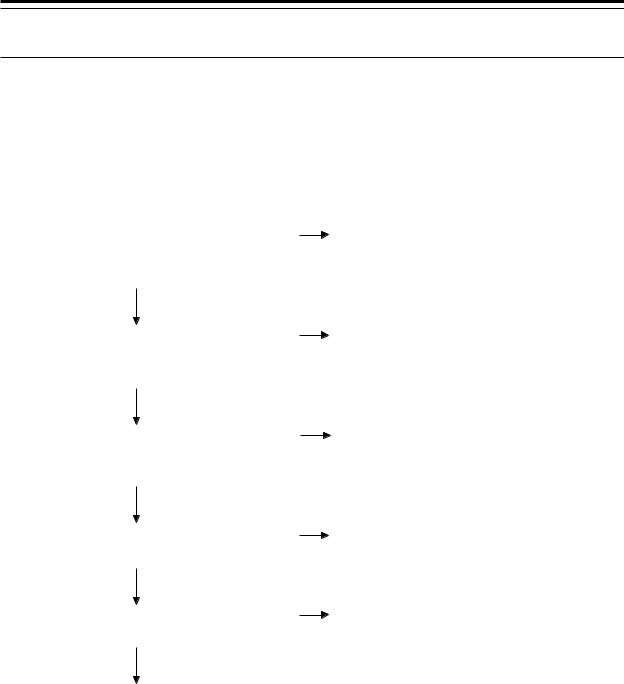
XYC14*RDA001E/E
Can the setting of the number of pulses be changed when the Burst switch is pressed?
Y
Is the counter reset to “0” when the Reset switch is pressed?
Y
Is the energy of the emitted YAG laser beam normal?
Y
Does the system stop when the Emergency stop switch is pressed?
Y
Turn the key switch to OFF ( ) position and pull out the key.
End
N
N
N
N
4.25Setting of the number of pulses can not be changed
4.26Counter display cannot be reset to “0”
4.27The measured energy of YAG laser beam is not normal
4.28The system does not stop with the Emergency stop switch
3 - 3

XYC14*RDA001E/E
3 - 4
XYC14*RDA001E/E
§4 SUB TROUBLESHOOTING
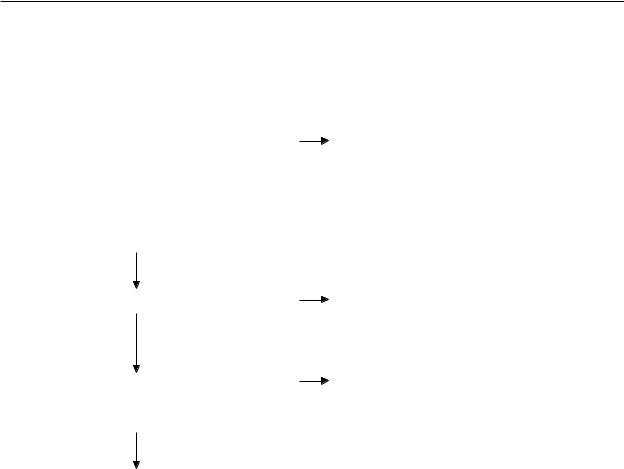
4.1 The pilot lamp does not light
This trouble may be caused by the break of fuses in the switch box, failure of the switching power supply, and connection failure of connectors.
Is there continuity in F1 and F2 fuses in the switch box?
(See 5.2.)
Y
Is the required voltage applied to the wall outlet?
(See 5.3.)
Y
Is the voltage between 1(-) and 2 (+) of P2 in the switching power supply DC +12V?
Y
Is the voltage between 1 (+) and 2 (-) of P501 on the key switch board DC +12V?
Y
Is the voltage between 5 (+) and 6 (-) of P502 on the key switch board DC +12V?
Y
Failure of the pilot lamp. Replace it with a new one. (See 5.5.)
N
Replace fuses. (See 5.2.)
N
Secure the required voltage. (See 5.3.)
N
Replace the switching power supply. (See 5.8.)
N
Connection failure of the cable of P501 or connector. Check the continuity and repair the failed part.
N
Connection failure inside the key switch board.
Replace the key switch board with a new one. (See 5.4.)
4 - 1
XYC14*RDA001E/E
4.2 Both fixation lamp and backlight of the control panel do not light
This trouble may be caused by the connection failure of connectors.
Is there no continuity between 2nd and 4th/ 5th pin on the key switch when the key switch is turned OFF?
Is there continuity between 2nd and 4th/5th pin on the key switch when the key switch is turned ON?
Y
Is the Emergency stop switch normal?
Y
Disconnect P3 of the remote connector.
Is there continuity between 3rd and 4th pin of P3?
Y
N
N
N
Failure of the key switch.
Replace the key switch board with a new one. (See 5.4.)
Replace the Emergency stop switch with a new one.
(See 5.6.)
Connection failure between 3rd and 4th pins of P3 of the remote connector.
Repair the failed part.
Reconnect connectors P501, P502, and P503 on the key switch board and P3 of the remote connector.
4 - 2

XYC14*RDA001E/E
4.3 Only fixation lamp does not light
This trouble may be caused by the connection failure of connectors.
Is the voltage between 1 (+) and 2 (-) of P503 on the key switch board DC +12V?
Y
Remove the fixation lamp ASSY.
Is the voltage between 1 (+) and 2 (-) of P1 DC +12V?
Y
Replace the fixation lamp ASSY. (See 5.7.)
N
Connection failure inside the key switch board.
Replace the key switch board with a new one. (See 5.4.)
N
Connection failure of the cable between P503 and J13, between P13 and P1, or connectors. Check the continuity and repair the failed part.
4.4 Only backlight of the control panel does not light
This trouble may be caused by the connection failure of connectors or failure of the master board.
Are the following connections proper?
•P113 and P106 on the master board
•J201 on the display board, P501 on the key switch board
•J5 of the external connector
Y
Is the voltage between 1 (+) and 3 (-) of P113 on the master board DC +12V?
Y
Is the voltage between 1 (+) and 2 (-) of P110 on the master board DC +5V?
Y
Replace the display board ASSY with a new one.
(See 5.11.)
N
N
N
Reconnect the connectors.
Break in the cable or connection failure between PJ5 on the key switch board and PJ113 on the master board.
Check the continuity and repair the failed part.
Replace the master board with a new one. (See 5.9.)
4 - 3

XYC14*RDA001E/E
4.5 The error display appears
4.5.1 Error 1 appears
Error 1 appears when the temperature inside the YAG laser head becomes 45 ºC or more.
Turn the key switch to the OFF position and remove the right and left covers.
Set it aside for 30 minutes for cooling.
Is the resistance across TS1 on the master |
Y |
Failure of TS1. |
|
|
|||
board infinity? |
|
Replace the master board with a new one. |
|
|
N |
|
(See 5.9.) |
|
|
||
|
|
|
|
|
|
|
|
Replace the master board with a new one. |
|
|
|
(See 5.9.) |
|
|
|
4.5.2 Error 4 appears
Error 4 appears when the malfunction occurs to the contents of EEPROM.
Initialize the EEPROM. (See 9.2.)
Reset the followings;
•Aiming energy
•PFN voltage
•Focus of the YAG laser
•YAG laser energy
(See 6.3.6, 6.4.3, 6.4.6, 6.4.10.)
4 - 4
XYC14*RDA001E/E
4.5.3 Error 5 appears
Error 5 appears when the YAG shutter does not open or close automatically. The cause may be the failure of the detection sensor of the YAG shutter.
Does the YAG shutter open when the system is in the READY state and close in the STANDBY state?
Y
Is the YAG shutter caught in cables?
N
Are the voltage between 5 (+) and 7 (-) of P102 on the master board DC +5V, and between 6 (+) and 7 (-) DC +0V when the shutter close?
Y
Is the detection sensor (photo-interrupter) normal?
(See 6.4.1.)
Y
Is the rotary solenoid fixed firmly?
N
Adjust the YAG shutter ASSY. (See 6.4.1.)
N
Y
N
N
Y
Failure of the rotary solenoid.
Replace the YAG shutter ASSY with a new one.
(See 5.17.)
Repair the part where the YAG shutter plate is caught in.
Failure of the IC1 on the master board. Replace the master board with a new one. (See 5.9.)
Failure of the detection sensor.
Replace the YAG shutter ASSY with a new one.
(See 5.17.)
Fix the rotary solenoid. (Refer to 5.17.)
4 - 5

XYC14*RDA001E/E
4.5.4 Error 7 appears
Error 7 appears in the case where the aiming shutter does not open automatically when the aiming laser is ON or it does not close when the aiming laser is OFF.
The cause may be the failure of the detection sensor of the aiming shutter or the solenoid for the aiming shutter.
• The aiming shutter does not open automatically when the aiming laser is ON.
Is the aiming shutter plate placed in the open |
N |
Is the voltage between 1 (+) and 2 (-) of |
|||||
|
|||||||
position? |
|
P103 on the master board DC +10V or |
|||||
|
|
|
more? |
|
N |
||
|
|
|
|
||||
|
|
|
|
|
|
||
|
|
|
|
|
|
||
|
|
|
|
Y |
Failure of the IC2 on the master |
||
|
|
|
|
board. |
|||
|
|
|
|
|
|||
|
|
|
|
|
Replace the master board with a |
||
|
|
|
|
|
new one. |
||
|
Y |
|
|
|
(See 5.9.) |
||
|
|
|
|
|
|||
|
|
|
Failure of the solenoid. |
||||
|
|
|
Replace the aiming shutter ASSY with a new |
||||
|
|
|
one. |
|
|
||
|
|
|
(See 5.18.) |
||||
|
|
N |
|
|
|
|
|
Is the voltage between 4 (+) and 7 (-) of P103 |
Adjust the position of the detection sensor |
||||||
|
|||||||
on the master board DC 0V? |
|
(photo-interrupter). |
|||||
|
Y |
|
(See 6.3.1.) |
||||
|
|
||||||
|
|
|
|
|
|
||
|
|
|
|
|
|
|
|
Failure of the IC1 on the master board. |
|
|
|
|
|
||
Replace the master board with a new one. |
|
|
|
|
|
||
(Refer 5.9.) |
|
|
|
|
|
||
4 - 6
XYC14*RDA001E/E
• The aiming shutter does not close automatically when the aiming laser is OFF.
Is the aiming shutter plate placed in the close position?
Y
Is the voltage between 4 (+) and 7 (-) of P103 on the master board DC +5V?
Y
Failure of the IC1 on the master board. Replace the master board with a new one. (Refer 5.9.)
N
Is the voltage between 1 (+) and 2 (-) of P103 on the master board DC 0V or
more?
N
YFailure of the IC2 on the master board.
Replace the master board with a new one.
(See 5.9.)
Failure of the rotary solenoid.
Replace the aiming shutter ASSY with a new one.
(See 5.18.)
N
Adjust the position of the detection sensor (photo-interrupter).
(See 6.3.1.)
4 - 7
XYC14*RDA001E/E
4.5.5 Error 10 appears
Error 10 appears when the number of emitted YAG laser beams is less than the set number of pulses.
The cause may be that the PFN voltage is too low.
Set 7 of the SW1 on display board ASSY to OFF (upper position). The number of pulses appears on the counter display.
Emit the YAG laser 10 shots.
Is “4” (number of pulses) displayed on the pulse number display more than 8 times?
N
Adjust the PFN voltage. (See 6.4.3.)
Does Error 10 appear?
N
Y
Failure of the master board.
Replace the master board with a new one. (See 5.9.)
Y
If “4” is not displayed more than 8 times in 10 times even though the PFN voltage is raised to 440V (max.), the YAG laser head fails.
Replace the YAG laser unit with a new one. (See 5.12.)
End
4 - 8

XYC14*RDA001E/E
4.5.6 Error 12 appears
Error 12 appears when the number of pulses of the YAG laser is over the intended number.
Replace the YL power supply board with a new one. (See 5.20.)
4.5.7 Error 13 appears
Error 13 appears when the YAG laser is emitted even though the trigger switch is not pressed.
The cause may be the malfunction by the noise.
Use the system away from the devices which may cause the noise.
4 - 9
XYC14*RDA001E/E
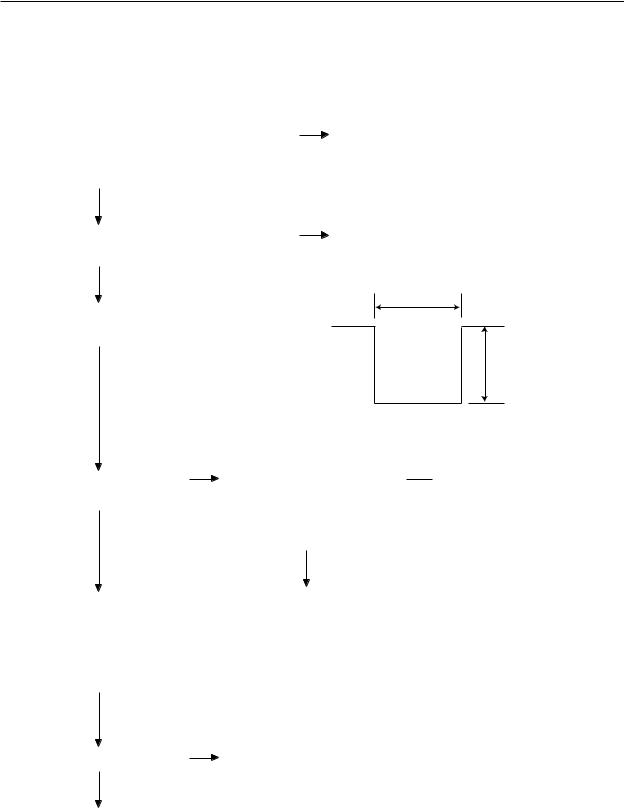
4.5.8 Error 14 appears
Error 14 appears when the flash lamp does not light.
Remove the covers.
Does the flash lamp light when the trigger switch is ON or at the time of the test fire?
N
Is the PFN voltage proper? (See 6.4.3.)
Y
Y
Failure of the master board.
Replace the master board with a new one. (See 5.9.)
N
Adjust the PFN voltage. (See 6.4.3.)
10 sec
Check the signal of TP3 (TRIG OUT) on the
YL board at the time of the trigger.
12V
Signal at the time of the trigger is ON.
Is the signal of TP3 (TRIG OUT) normal?
Y
Failure of the YAG laser unit.
Replace the YAG laser unit with a new one.
(See 5.12.)
N
Is the problem solved?
N
Failure of the YL power supply board.
Replace the YL power supply board with a new one.
(See 5.20.)
N
Is the wiring between 4th pin of P1 on the YL board and 4th pin of P112 on the master board proper?
Y
Failure of the master board. Replace the master board with a new one.
(See 5.9.)
Y
End
N  Repair the wiring.
4 - 10
XYC14*RDA001E/E
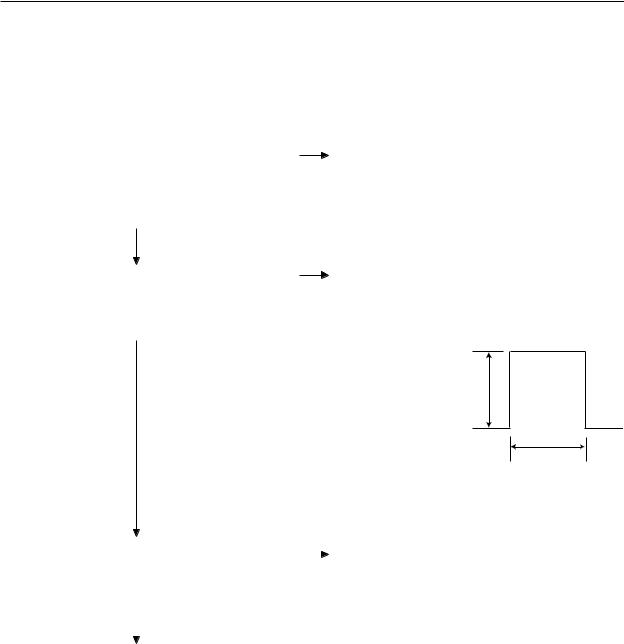
4.5.9 Error 15 appears
Error 15 appears when the output energy of the YAG laser beam is not within ±20 % of the rating.
Measure the output energy of the YAG laser beam.
Is the variability within ±20 % of the rating?
Y
Measure the master board TP9 with the oscilloscope. Is the ratio between the voltage of TP9 and the energy indication 1V : 2.5mJ?
N
N
Failure of the YAG laser unit.
Replace the YAG laser unit with a new one. (See 5.12.)
Y
Failure of the master board.
Replace the master board with a new one. (See 5.9.)
5V: 12.5mJ (1V: 2.5mJ)
Gain the output energy from this length.
10 sec
TP9 VOLTAGE VALUE
Are the wirings of 4th pin of P110 on the |
Y |
Failure of the sample board. |
|
|
|||
master board and that of the sample board |
|
Replace the energy monitor ASSY with a |
|
proper? |
|
new one. |
|
|
N |
|
(See 5.13.) |
|
|
||
|
|
|
|
|
|
|
|
Repair the wiring. |
|
|
|
4 - 11

XYC14*RDA001E/E
4.5.10 Error 30 appears
Error 30 appears when the power supply for the laser head is faulty.
Does the voltage of TP5 on the |
N |
Is the wiring between 6 pin of |
Y |
Failure of the master board. |
||
|
|
|||||
YL board change from LOW |
J1 and 6th pin of P112 on the |
Replace the master board with |
||||
to HIGH when the trigger |
YL board proper? |
a new one. |
||||
switch is pressed? |
|
N |
(See 5.9.) |
|||
|
||||||
|
|
|
|
|
||
|
Y |
|
|
|
|
|
|
Repair the wiring. |
|
||||
|
|
|
|
|
|
|
Does the voltage of TP4 on the |
Y |
Is the wiring between 5th |
|
Y |
|
Failure of the master board. |
|||||||||||||
|
|
|
|
||||||||||||||||
YL power supply board |
pin of J1 and 5th pin of |
|
Replace the master board with |
||||||||||||||||
change from LOW to HIGH |
P 11 2 o n t h e Y L b o a r d |
|
a new one. |
||||||||||||||||
when the trigger switch is |
proper? |
|
(See 5.9.) |
||||||||||||||||
pressed? |
|
|
|
|
N |
|
|
||||||||||||
|
|
|
|
|
|
||||||||||||||
|
N |
|
|
|
|
|
|
|
|
|
|
|
|
|
|
|
|
|
|
|
Repair the wiring. |
|
|
||||||||||||||||
|
|
|
|
|
|||||||||||||||
Failure of the YL power sup- |
|
|
|||||||||||||||||
|
|
|
|
|
|
|
|
|
|
|
|
|
|
|
|
|
|||
ply board. |
|
|
|
|
|
|
|
|
|
|
|
|
|
|
|
|
|
||
Replace the YL power supply |
|
|
|
|
|
|
|
|
|
|
|
|
|
|
|
|
|
||
board with a new one. |
|
|
|
|
|
|
|
|
|
|
|
|
|
|
|
|
|
||
(See 5.20.) |
|
|
|
|
|
|
|
|
|
|
|
|
|
5 V |
|||||
|
|
|
|
TP4 |
|
|
|
|
|
|
|
|
|
|
|
|
|||
|
|
|
|
|
|
|
|
|
|
|
|
|
|
|
|
|
|
|
|
|
|
|
|
|
|
|
|
|
|
|
|
|
|
|
|
|
|
|
|
|
|
|
|
|
|
|
|
|
|
|
|
|
|
|
|
|
|
|
|
|
|
|
|
|
|
|
20 µsec |
|
|
|
|
|
|
|
|
||||
|
|
|
|
|
|
|
|
|
|
|
|||||||||
|
|
|
|
|
|
|
|
|
|
|
|
|
|
|
|
|
|
|
|
|
|
|
|
|
|
|
|
|
|
|
|
|
|
|
|
5 V |
|||
|
|
|
|
TP5 |
|
|
|
|
|
|
|
|
|||||||
|
|
|
|
|
|
|
|
|
|
|
|
|
|
|
|
|
|
|
|
|
|
|
|
|
|
|
|
|
|
|
|
|
|
|
|
|
|
|
|
|
|
|
|
|
|
|
|
|
|
|
|
|
|
|
|
|
|
|
|
|
|
|
|
|
|
|
20 µsec |
|
|
|
|
|
|
|
|||||
|
|
|
|
|
|
|
|
|
|
||||||||||
|
|
|
|
Waveform of TP4 and 5 when the trigger is ON. |
|||||||||||||||
4 - 12

XYC14*RDA001E/E
4.5.11 Error 31 appears
Error 31 appears when the PFN voltage is faulty.
|
Y |
|
|
Y |
|
Compare the setting value |
|
Is the wiring between the YL |
|
Failure of the master board. |
|
|
|
||||
of the PFN voltage at pa- |
power supply board and mas- |
|
Replace the master board with |
||
rameter 10 with that of the |
ter board proper? |
|
a new one. |
||
PFN voltage (between 1st |
|
N |
|
(See 5.9.) |
|
|
|||||
(+) and 5th (-) pins of J2 on |
|
|
|
||
|
|
|
|
||
|
|
|
|
||
the YL board). |
Repairthewiring. |
|
|
||
Is the difference within |
|
|
|
|
|
20V? |
|
|
|
|
|
(See 6.4.3) |
|
|
|
|
|
[CAUTION] Pay attention to the handling since the voltage becomes 440V±10V at maximum.
N
Is the wiring between 8th pin N  Repairthewiring. of J1 on the YL board and 8th
pin of P112 on the master board proper?
Y
Failure of the YL power supply board.
Replace the YL power supply board with a new one.
(See 6.4.3.)
4 - 13

XYC14*RDA001E/E
4.5.12 Error 50 appears
Error 50 appears when the signal from the photodiode is faulty.
Check TP9 on the master board with the |
Y |
Failure of the master board. |
||
|
||||
oscilloscope. |
|
Replace the master board with a new one. |
||
Is the ratio between the voltage of TP9 |
|
(See 5.9.) |
||
and indication on the energy display is 1V |
|
|
||
: 2.5mJ? |
|
|
||
|
N |
|
|
|
|
|
|
||
|
|
N |
|
|
Is the wiring between 4th pin of P110 on the |
Repair the wiring. |
|||
|
||||
master board and 4th land on the sample board |
|
|
||
proper? |
|
|
||
|
Y |
|
|
|
|
|
|
||
|
|
|
|
|
Failure of the sample board. |
|
|
||
Replace the energy monitor ASSY with a new |
|
|
||
one. |
|
|
||
(See 5.13.) |
|
|
||
4.5.13 Error 51 appears
Error 51 appears when the signal from the potentiometer for adjusting the output energy (VR2) is faulty.
Is the voltage of TP8 on the master board |
Y |
Failure of the master board. |
|
|
|||
between approx. 0.2V (min.) and 4.5V (max.) |
|
Replace the master board with a new one. |
|
when the energy control is turned from min. |
|
(See 5.9.) |
|
to max.? |
|
|
|
|
N |
|
|
|
|
|
|
|
|
|
|
Failure of the VR2 inside the energy monitor |
|
|
|
ASSY. |
|
|
|
Replace the energy monitor ASSY with a new |
|
|
|
one. |
|
|
|
(See 5.13.) |
|
|
|
4 - 14

XYC14*RDA001E/E
4.5.14 Error 52 appears
Error 52 appears when the signal from the potentiometer for focus shift (VR3) is faulty.
Is the voltage of TP7 on the master board |
Y |
Failure of the master board. |
|
|
|||
between approx. 0.5V (ANT500) and 4.5V |
|
Replace the master board with a new one. |
|
(POST500) when the YAG focus shift control |
|
(See 5.9.) |
|
is turned? |
|
|
|
|
N |
|
|
|
|
|
|
Failure of the VR3 inside the focus ASSY. |
|
|
|
Replace the focus ASSY with a new one. |
|
|
|
(See 5.10.) |
|
|
|
4.5.15 Error 53 appears
Error 53 appears when only one microswitch in the trigger switch is turned ON.
• Hand switch
Is the voltage of 1-3 and 2-3 of J115 on the master board changed from HIGH (5V) to LOW (0V) when the hand sw is pressed?
N
Repair the wiring inside the HAND SW ASSY.
• Foot switch
Check the voltage between 8th and 10th and 9th and 10th of J113 on the master board using the multimeter.
Is the output voltage DC12V?
Y
Disconnect connector P4 of the foot switch.
Is the output voltage between 8th and 10th and 9th and 10th of J113 on the master board still DC12V?
Y
Wiring failure between P113 and J4 in the YC1600 main body.
It is necessary to repair.
Y
N
N
Failure of the master board.
Replace the master board with a new one. (See 5.9.)
Failure of the master board.
Replace the master board with a new one. (See 5.9.)
Wiring failure inside the foot switch. It is necessary to repair.
4 - 15

XYC14*RDA001E/E
4.5.16 Error 54 appears
Error 54 appears when the input signal of the number of pulses is faulty.
Check the signals of 3rd pin of J110 on the
master board and the signal of TP1 on the
J110-3
sample board.
TP1
Waveform of TP1 and J110-3
|
|
N |
|
Is the signal of 3rd pin of J110 output |
|
Failure of the sample board. |
|
|
|||
properly? |
|
Replace the energy monitor ASSY with a |
|
|
Y |
|
new one. |
|
|
||
|
|
(See 5.13.) |
|
|
|
|
|
|
|
N |
|
|
|
||
Is the waveform of TP1 output properly? |
|
Failure of the sample board. |
|
|
|||
|
|
|
Replace the energy monitor ASSY with a |
|
Y |
|
new one. |
|
|
|
(See 5.13.) |
|
|
N |
|
|
|
||
Is the wiring between the land 3 on the sample |
|
Failure of the master board. |
|
|
|||
board and 7th pin of P110 on the master board |
|
Replace the master board with a new one. |
|
proper? |
|
(See 5.9.) |
|
|
Y |
|
|
|
|
|
|
|
|
|
|
Repair the wiring. |
|
|
|
4.5.17 Error 90 appears
Error 90 appears when the program is faulty.
Replace the IC1 on the master board.
4 - 16
 Loading...