


DiscSpeed

Manual
Nero DiscSpeed

Nero DiscSpeed
Copyright and Trademark Information
Copyright and trademark information
This document, like the software described therein, is provided as a license and may only be used or reproduced in accordance with
the licensing agreement. The contents of this document, as well as the associated software, is subject to change without prior notice.
Nero AG rejects any responsibility for the correctness of the contents of this document and rejects any claims that transcend the
clauses of the guarantee agreement.
This document and all of its contents are protected by copyright and are the property of Nero AG. All rights reserved. In addition, this
document contains material that is protected by internationally valid copyright. This document may not be reproduced, transmitted, or
transcribed in whole or in part without the express written permission of Nero AG.
Please keep in mind that existing graphics, pictures, videos, music titles, and other materials that you may wish to insert or tran-
scribe into projects may be protected by copyright. The unauthorized use of this type of material in your projects may violate the
rights of the owner of the copyright. Make sure that you obtain all necessary authorizations from the owner of the copyright.
Unless you own the copyright, have permission from the copyright owner, or your actions fall under the "fair use" provisions of copy-
right law, you may be violating national or international copyright laws. The transcribing, duplication, modification or publication of
copyright-protected material may lead to claims for damages and the enforcement of other legal measures against you. If you are
unsure of your rights, you should contact your legal advisor.
Some of the applications of the Nero Suite require technology developed by third-party manufacturers and may be included in Nero
Suite as demo versions. These applications can be activated online free of charge or by sending an activation fax to enable unlimited
use of the version. Nero will only transmit the data necessary for activation of the technology licensed from third parties. For unlim-
ited use of Nero Suite, it is therefore necessary to have an Internet connection or a fax machine.
Copyright © 2006 - 2008 Nero AG and its licensors. All rights reserved.
Adobe, Acrobat, Acrobat Reader and Premiere are brands or protected trade names of Adobe Systems, Incorporated.
AMD Athlon™, AMD Opteron™, AMD Sempron™, AMD Turion™, ATI Catalyst™ and ATI Radeon™ are brands or protected trade-
marks of Advanced Micro Devices, Inc.
ASTC is a trademark of Advanced Television Committee.
ICQ is a registered trademark of AOL, LLC.
Apple, iPhone™, iPod, iTunes, FireWire, and Mac are brands or registered trade names of Apple, Inc.
ARM is a registered trademark of ARM, Ltd.
AudibleReady is a registered trademark of Audible, Inc.
BenQ is a trademark of the BenQ Corporation.
Blu-ray Disc is a brand of Blu-ray Disc Association.
CyberLink is a registered trademark of CyberLink Corp.
DLNA is a registered trademark of Digital Living Network Alliance.
DivX and DivX Certified are registered trademarks of DivX, Inc.
Dolby, Pro Logic and the double-D symbol are brands or registered trademarks of Dolby Laboratories, Inc.
DTS and DTS Digital Surround are registered trademarks of DTS, Inc.
DVB is a registered trademark of the DVB Project.
Freescale is a brand of Freescale Semiconductor, Inc.
Google and YouTube are trademarks of Google, Inc.
WinTV is a registered trademark of Hauppauge Computer Works, Inc.
Intel, Intel XScale, Pentium and Intel Core™2 Duo are brands or registered trademarks of the Intel Corporation.
Linux is a registered trademark of Linus Torvalds.
Memorex is a registered trademark of Memorex Products, Inc.
ActiveX, ActiveSync, DirectX, DirectShow, Internet Explorer, Microsoft, HDI, MSN, Outlook, Windows, Windows Mobile, Windows
NT, Windows Server, Windows Vista, Windows Media, Xbox, Xbox 360, the Start button of Microsoft Windows Vista and the Win-
dows logos are brands or registered trademarks of Microsoft Corporation.
MySpace™ is a brand of MySpace, Inc.
NVIDIA, GeForce and ForceWare are brands or registered trademarks of NVIDIA Corporation.
Nokia is a registered trademark of Nokia Corporation.
CompactFlash is a registered trademark of SanDisk Corporation.
Sony, Memory Stick, PlayStation, PLAYSTATION and PSP are brands or registered trademarks of Sony Corporation.
HDV is a brand of Sony Corporation and Victor Company of Japan, Limited (JVC).
UPnP is a registered trademark of the UPnP Implementers Corporation.
Labelflash is a registered trademark of Yamaha Corporation.
All brands are for information purposes only. All trade names and trademarks are the property of their respective owners.
Nero AG, Im Stoeckmaedle 13-15, D-76307 Karlsbad, Germany

Table of contents
Nero DiscSpeed III
Table of contents
1 Start Successfully 5
1.1 About the manual 5
1.2 About Nero DiscSpeed 5
2 Launching the Program 6
3 Main Screen 7
4 Nero DiscSpeed Options Window 11
4.1 User Interface Navigation Entry 11
4.2 Standard Tests Navigation Entry 13
4.3 Transfer Rate Navigation Entry 15
4.4 Access/Seek Times Navigation Entry 18
4.5 Save Navigation Entry 19
4.6 Autorun Navigation Entry 20
4.7 Disc Quality Entry 21
4.8 Capture Navigation Entry 24
5 Benchmark Tab - Standard Tests 25
5.1 Transfer rate 26
5.2 DAE quality 28
5.3 Access/Seek Times 28
5.4 CPU usage 28
5.5 Burst Rate 29
5.6 Spin Up/Down 29
5.7 Load/Eject 29
5.8 Create Data Disc (Classic Version) 30
5.9 Running an individual Standard Test 30
5.10 Running a Standard Test Series 32
6 Create Disc Tab 33
6.1 Creating a Data Disc (Advanced Version) 33
6.2 Running the Create Data Disc Test 36
7 Disc Info Tab 37
8 Disc Quality tab 39
8.1 Quality Test 39
8.2 Running the Disc Quality Test 43
9 ScanDisc tab 44
9.1 Scan Disc 44
9.2 Running the ScanDisc Test 46
10 Advanced DAE Quality Test 48
10.1 Nero DiscSpeed Window - DAE Test Disc 48

Table of contents
Nero DiscSpeed IV
10.2 Creating a Test Disc 50
10.3 Nero DiscSpeed window - Advanced DAE Quality Test 50
10.4 Running the Advanced DAE Quality Test 52
10.5 Error test 53
10.5.1 Advanced DAE Error Correction Test Window 53
10.5.2 Create Image 55
10.5.3 Running the Test with an A-BEX Test Disc 55
10.5.4 Running the Test with a DAE Test Disc 56
11 Overburning test 57
11.1 Nero DiscSpeed - Overburning Test window 58
11.2 Running the Overburning Test 60
12 Saving Test Data 61
13 Loading Test Data 62
14 Erasing a Disc 64
15 Bit Setting 65
15.1 Nero DiscSpeed - Bit Setting Window 65
15.2 Changing the Bit Setting 66
16 Technical Information 67
16.1 System requirements 67
17 Glossary 68
18 Index 72
19 Contact 74
Start Successfully
1 Start Successfully
1.1 About the manual
This manual is intended for all users who want to learn how to use Nero DiscSpeed. It is
process-based and explains how to achieve a specific objective on a step-by-step basis.
To make best use of this documentation, please note the following conventions:
Indicates warnings, preconditions or instructions that have to be pre-
cisely followed.
Indicates additional information or advice.
1. Start …
The number at the beginning of a line indicates a prompt for action.
Carry out these actions in the order specified.
Indicates an intermediate result.
Indicates a result.
OK
Indicates text passages or buttons that appear in the program inter-
face. They are shown in boldface.
(see…)
Indicates references to other chapters. They are executed as links
and are shown in red and underlined.
[…]
Indicates keyboard shortcuts for entering commands.
1.2 About Nero DiscSpeed
Nero DiscSpeed tells you the speed of the available CD/DVD drives. Results can be viewed
either as a graph or as a test log. Nero DiscSpeed also creates special test media for data
and audio.
Nero DiscSpeed 5
Launching the Program
2 Launching the Program
To start Nero DiscSpeed via Nero StartSmart, proceed as follows:
1. Click the Nero StartSmart icon.
The Nero StartSmart window opens.
2. Click the button.
The list of Nero applications is displayed.
Nero StartSmart window
3. Select the Toolbox > Nero DiscSpeed entry in this selection list.
4. The Nero DiscSpeed window opens.
You have launched Nero DiscSpeed via Nero StartSmart.
Nero DiscSpeed 6
Main Screen
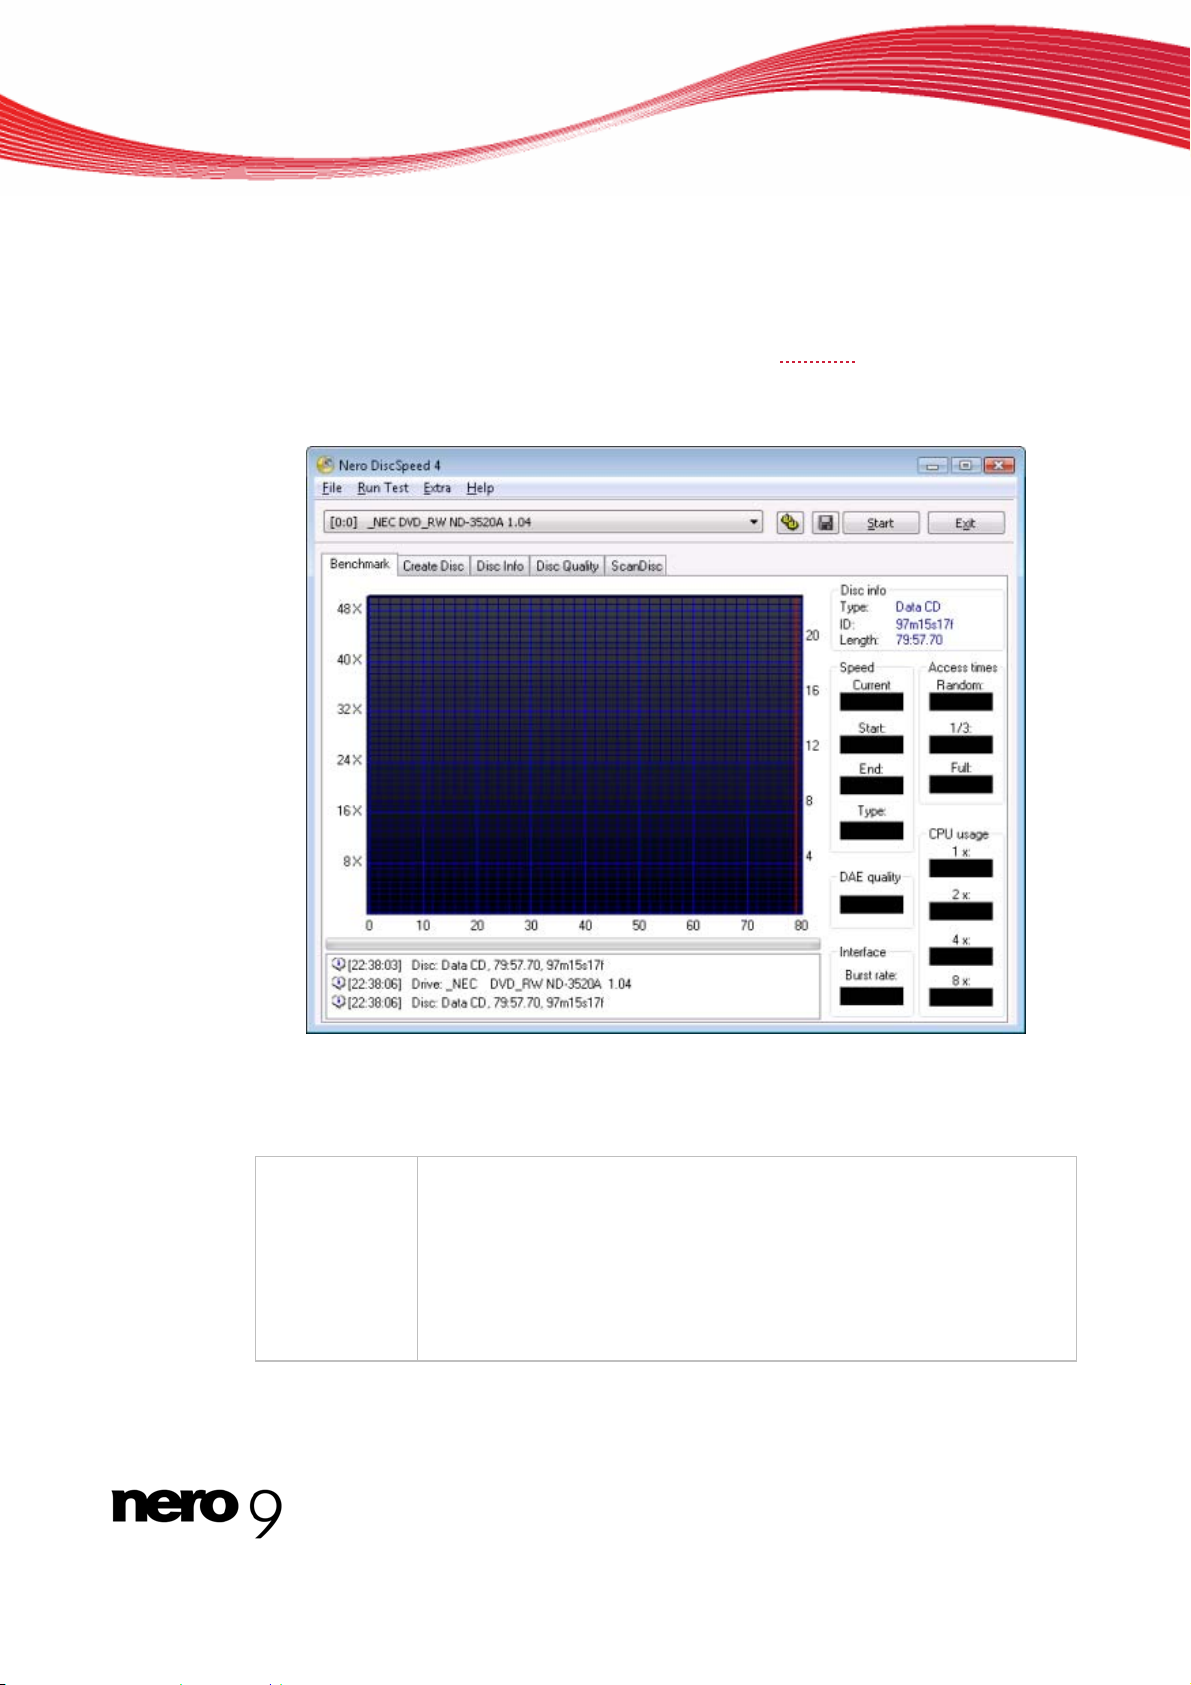
3 Main Screen
The Nero DiscSpeed main screen is the starting point for all actions that you perform using
Nero DiscSpeed.
The drop-down menu lists the optical drives available on the computer using their exact mo-
del designations. It also displays the version number of the firmware
installed on the drive.
You can switch between five tabs within the main screen. These tabs are used to carry out
the different tests and to display information regarding them.
Main Screen
The menu bar in the main screen has four menus.
The following entries are available in the File menu:
Load Results
Contains the following two sub-entries: Load Single File and Data-
base.
Load Single File: Loads a saved test file.
Database: Loads several files at the same time. This way, you can
compare test results and/or the efficiency of optical drives.
Only test files saved as binary files with the extension *.dat can be loa-
ded again.
Nero DiscSpeed 7

Main Screen
Nero DiscSpeed 8
Save Results
Contains the following three sub-entries: Binary (.dat), Text (.csv), and
HTML.
Binary (.dat): Saves the test results as a binary file. Only test files sa-
ved as binary files with the extension *.dat can be loaded again. Use
this format if you want to open the test results in Nero DiscSpeed or in
the Nero DiscSpeed database and compare them.
Text (.csv): Saves the test results as a text file that you can open with
any text editor.
HTML: Saves the test results in a diagram that you can open with any
Web browser. In the Options window, under the Save navigation entry,
you can define how much data will be saved in the file. If the Include
status check box is enabled, the diagram and all other test results are
saved; if it is cleared, only the graph is saved.
Options
Opens the Nero DiscSpeed - Options window, where you can define
settings for the user interface, for the save function, and for various
tests.
Exit
Exits Nero DiscSpeed.
The following entries are available in the Run Test menu:
Selected
Starts a standard test series. All standard tests that you selected in the
Nero DiscSpeed - Options window, under the Standard Tests naviga-
tion entry, are run.
All
Starts the standard test series. All the standard tests that are listed in
the Nero DiscSpeed - Options window, under the Standard Tests na-
vigation entry, are run.
Transfer rate
Starts the transfer rate test.
DAE quality
Starts the DAE quality test.
Access/Seek
Times
Starts the access/seek times test.
CPU usage
Starts the CPU usage test.
Burst Rate
Starts the burst rate test.
Spin Up/Down
Starts the spin up/down test.
Load/Eject
Starts the load/eject test.
Create data
disc
Starts the create data disc test.
Main Screen
Nero DiscSpeed 9
The following entries are available in the Extra menu:
Advanced DAE
Quality Test
Contains the following three sub-entries: Create Test CD, Run
Test, and Error Test.
Create Test CD: Opens the Nero DiscSpeed - DAE Test Disc
window, where you can burn a special test disc in order to run the
advanced DAE quality test.
Run Test: Opens the Advanced DAE Quality Test window, where
you can run the advanced DAE quality test with the help of a previ-
ously created test disc.
Error Test: Contains the Create Image and Run Test sub-entries.
Create Image: Opens the Nero DiscSpeed - Create Advanced
DAE Image window, where you can create an image file of the test
disc. You need a test disc type A-BEX (TCD-714R, TCD-721R, or
TCD-726)
Run Test: Opens the Nero DiscSpeed - Advanced DAE Error
Correction Test window, where you can read the data from an A-
BEX disc and compare it with the data of the created image file.
Overburning test
Opens the Nero DiscSpeed - Overburning Test window, where
you can simulate the overburning test.
Erasing a Disc
Opens the Nero DiscSpeed - Erase window, where you can erase
data from rewritable discs.
Bit Setting
Opens the Nero DiscSpeed - Bitsetting window, where you can
change the bit settings for a DVD recorder.
Capture to clipbo-
ard
Copies a snapshot of Nero DiscSpeed to the clipboard. The results
in all further displays are lost.
You must save the snapshot before removing the disc you are test-
ing from the optical drive. Otherwise the image will be deleted from
the clipboard.
Capture to file
The Save as dialog appears. Opens the Save As window, where
you can save the snapshot on your hard drive.
The following entries are available in the Help menu:
Manual
Opens the Help Information window, where you can download the
manual for Nero DiscSpeed from the Nero website.
About
Opens the About Nero DiscSpeed window, where you can find the
exact version number of Nero DiscSpeed.

Main Screen
The following buttons are available:
Opens the Nero DiscSpeed - Options window, where you can de-
fine settings for the user interface, for the save function, and for va-
rious tests.
Start
Starts the test.
The test that is started depends on the selected tab.
Stop
Stops the test in progress.
Exit
Closes Nero DiscSpeed.
The following tabs are available:
Benchmark
Displays the Benchmark tab. Here you can run the standard tests
offered by the program. This is also where the results are displayed.
Create Disc
Displays the Create Disc tab. Here you can run an advanced test
for writing to disc.
Disc Info
Displays the Disc Info tab, where you can find detailed information
on the disc currently in the optical drive.
Disc Quality
Displays the Disc Quality tab. Here you can run a scan to test the
quality of burned discs.
Scan Disc
Displays the ScanDisc tab. Here you can run a further quality test.
See also:
Transfer rate 26
DAE quality 28
Access/Seek Times 28
CPU usage 28
Burst Rate 29
Spin Up/Down 29
Load/Eject 29
Create Data Disc (Classic Version) 30
Advanced DAE Quality Test 48
Overburning test 57
Erasing a Disc 64
Bit Setting 65
Benchmark Tab - Standard Tests 25
Disc Info Tab 37
Nero DiscSpeed Options Window 11
Saving Test Data 61
Loading Test Data 62
Nero DiscSpeed 10
Nero DiscSpeed Options Window
4 Nero DiscSpeed Options Window
The Nero DiscSpeed - Options window provides various options for customizing the ap-
pearance of the Nero DiscSpeed interface and for configuring settings according to your re-
quirements.
The window can be opened using the
button. It comprises a navigation tree and various
setting options. Different input areas will be displayed depending on the entry selected in the
navigation tree.
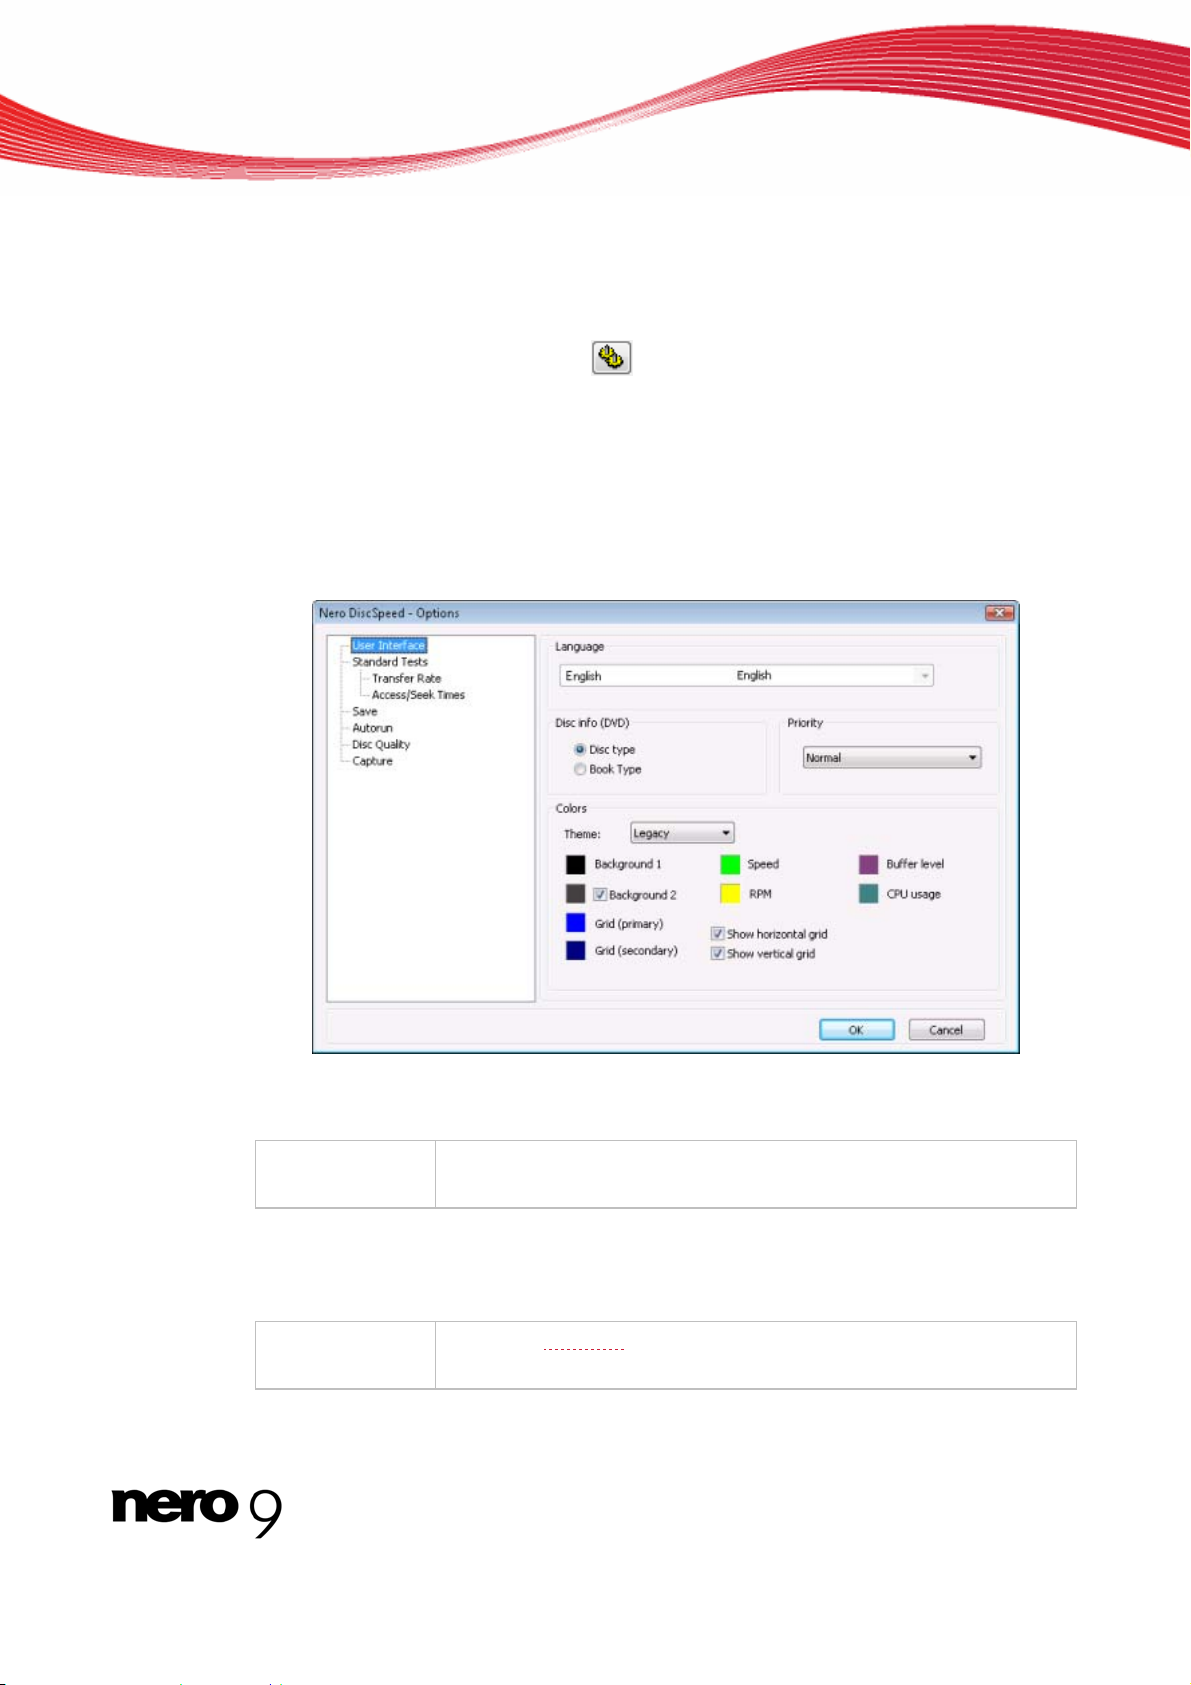
4.1 User Interface Navigation Entry
The User Interface navigation entry offers setting options in the Language, Disc info
(DVD), Priority, and Colors areas.
Nero DiscSpeed - Options - User Interface navigation entry
The following setting options are available in the Language area:
Menu
Language
Specifies the language to be used in the program interface.
In the Disc info (DVD) area, you can select which information is displayed on the Bench-
mark tab on the main screen. This setting will only be available if there is a DVD in the opti-
cal drive. The following setting options are available:
Option button
Disc type
Shows the Disc type
of the DVD.
Nero DiscSpeed 11

Nero DiscSpeed Options Window
Nero DiscSpeed 12
Option button
Book type
Shows the book type
of the DVD.
The following setting options are available in the Priority area:
Menu
Priority
Selects the priority of Nero DiscSpeed. Each process in Windows is
run with a defined priority. This priority defines how efficiently Nero
DiscSpeed can access the computer's resources, e.g. memory.
The following priority levels are available for selection: Low, Normal,
High, and Realtime.
Set the priority to High to prevent your tests from being interfered with
by other processes running concurrently on the computer.
In the Colors area, you can define the colors for theBenchmark tab in the main screen. The
following setting options are available:
Menu
Topic
Selects the desired theme. In addition to predefined themes, you can
also set colors with the User-defined entry. To manually edit a color,
click the colored tile and select the color you want in the dialog box
that appears.
Button
Background 1
Changes the basic color in the background of the graph area.
Button
Background 2
Changes the basic color for shading in the background of the graph
area.
Only works when the Background 2 check box is enabled. Other-
wise, the background of the graph area is displayed in one single
color.
Button
Grid (primary)
Changes the colors for the coarse grid in the graph area.
Only works when at least one of the following check boxes is enabled:
Show horizontal grid and/or Show vertical grid.
Button
Grid (secondary)
Changes the color for the fine grid in the graph area.
Only works when at least one of the following check boxes is enabled:
Show horizontal grid and/or Show vertical grid.
Button
Speed
Changes the color for the graph curve that represents speed (write or
read
speed, depending on the test).
Button
RPM
Changes the color for the graph curve that represents the rotational
speed of the disc.
Button
Buffer level
Changes the color for the Buffer level
curve.
Button
CPU usage
Changes the color for the CPU usage
curve.
Nero DiscSpeed Options Window
Check box
Show horizontal
grid
Shows the horizontal grid lines in the graph area or hides them. This
box is checked by default.
Check box
Show vertical
grid
Shows the vertical grid lines in the graph area or hides them. This box
is checked by default.
4.2 Standard Tests Navigation Entry
The Standard Tests navigation entry offers setting options in the Selected tests, Speed,
and Spin-up time areas.
Nero DiscSpeed - Options - Standard Tests navigation entry
In the Selected tests area, you can define the standard tests that are run automatically if
you click the Start button on the main screen or the menu item Run Test > Selected. These
tests are run on the Benchmark tab. All tests are activated by default.
The following setting options are available:
Check box
Transfer rate
Adds the test to the standard test series. The Transfer rate test
measures the read speed
of data, i.e. the speed at which data is
read from a disc. If the disc inserted is blank, the test measures
the write speed
.
Check box
DAE quality
Adds the test to the standard test series. The DAE quality test
comprises two partial measurements.
Nero DiscSpeed 13

Nero DiscSpeed Options Window
Nero DiscSpeed 14
Check box
Access/Seek Times
Adds the test to the standard test series. The Access/seek times
test measures the access
or seek times of optical drives for discs
inserted in the drive in three partial measurements.
Check box
CPU usage
Adds the test to the standard test series. The CPU usage test
measures the percentage utilization of the CPU (central process-
ing unit) at various speeds (1x, 2x, 4x, and 8x).
Check box
Burst Rate
Adds the test to the standard test series. The Burst rate test
measures the maximum possible transmission rate from the opti-
cal drive to the computer.
Check box
Spin Up/Down
Adds the test to the standard test series. The Spin down test
measures how long it takes an optical drive to stop, while the
Spin up test measures how long it takes before the optical drive
can read data again after stopping.
Check box
Load/Eject
Adds the test to the standard test series. The Load/eject test
measures the time that an optical drive needs to load, detect, and
eject a disc.
Check box
Extra Read Tests
Adds the test to the standard test series. The Extra read tests
test series consists of three tests. One or more sectors
on the
disc are read with defined test samples.
Check box
Create data disc
Adds the test to the standard test series. The Create data disc
test is available in its classic version on the Benchmark tab and
as an advanced version on the Create Disc tab. You can use the
classic test to analyze the write speed and the rotational speed
.
You can use the advanced test to also measure the buffer
level
and the CPU usage
caused by the optical drive.
Check box
Verify data
Checks the data that was written on the disc during the Create
data disc test.
In the Speed area, you can define the read speed for the Transfer rate test and the write
speed for the Create data disc
test. Maximum speed is enabled by default; this speed is also
recommended for testing the optical drive and/or the discs under worst-case conditions. The
following setting options are available:
Option button
Maximum
Selects the maximum speed that an optical drive can achieve.
Option button
Current
Selects the current speed of the optical drive. This speed is not
influenced, and can be affected by other system settings, e.g. o-
ther software or the firmware
settings.
Option button
Selected
Selects the speed manually. Enter the desired value in the input
field.
Nero DiscSpeed Options Window
The following setting option is available in the Spin-up time area:
Spin-up time
Defines the spin-up time.
In order to stabilize the disc and the optical drive, Nero Disc-
Speed starts spinning the disc before the actual test starts. The
default setting here is 10 seconds.
See also:
Transfer rate 26
DAE quality 28
Access/Seek Times 28
CPU usage 28
Burst Rate 29
Spin Up/Down 29
Load/Eject 29
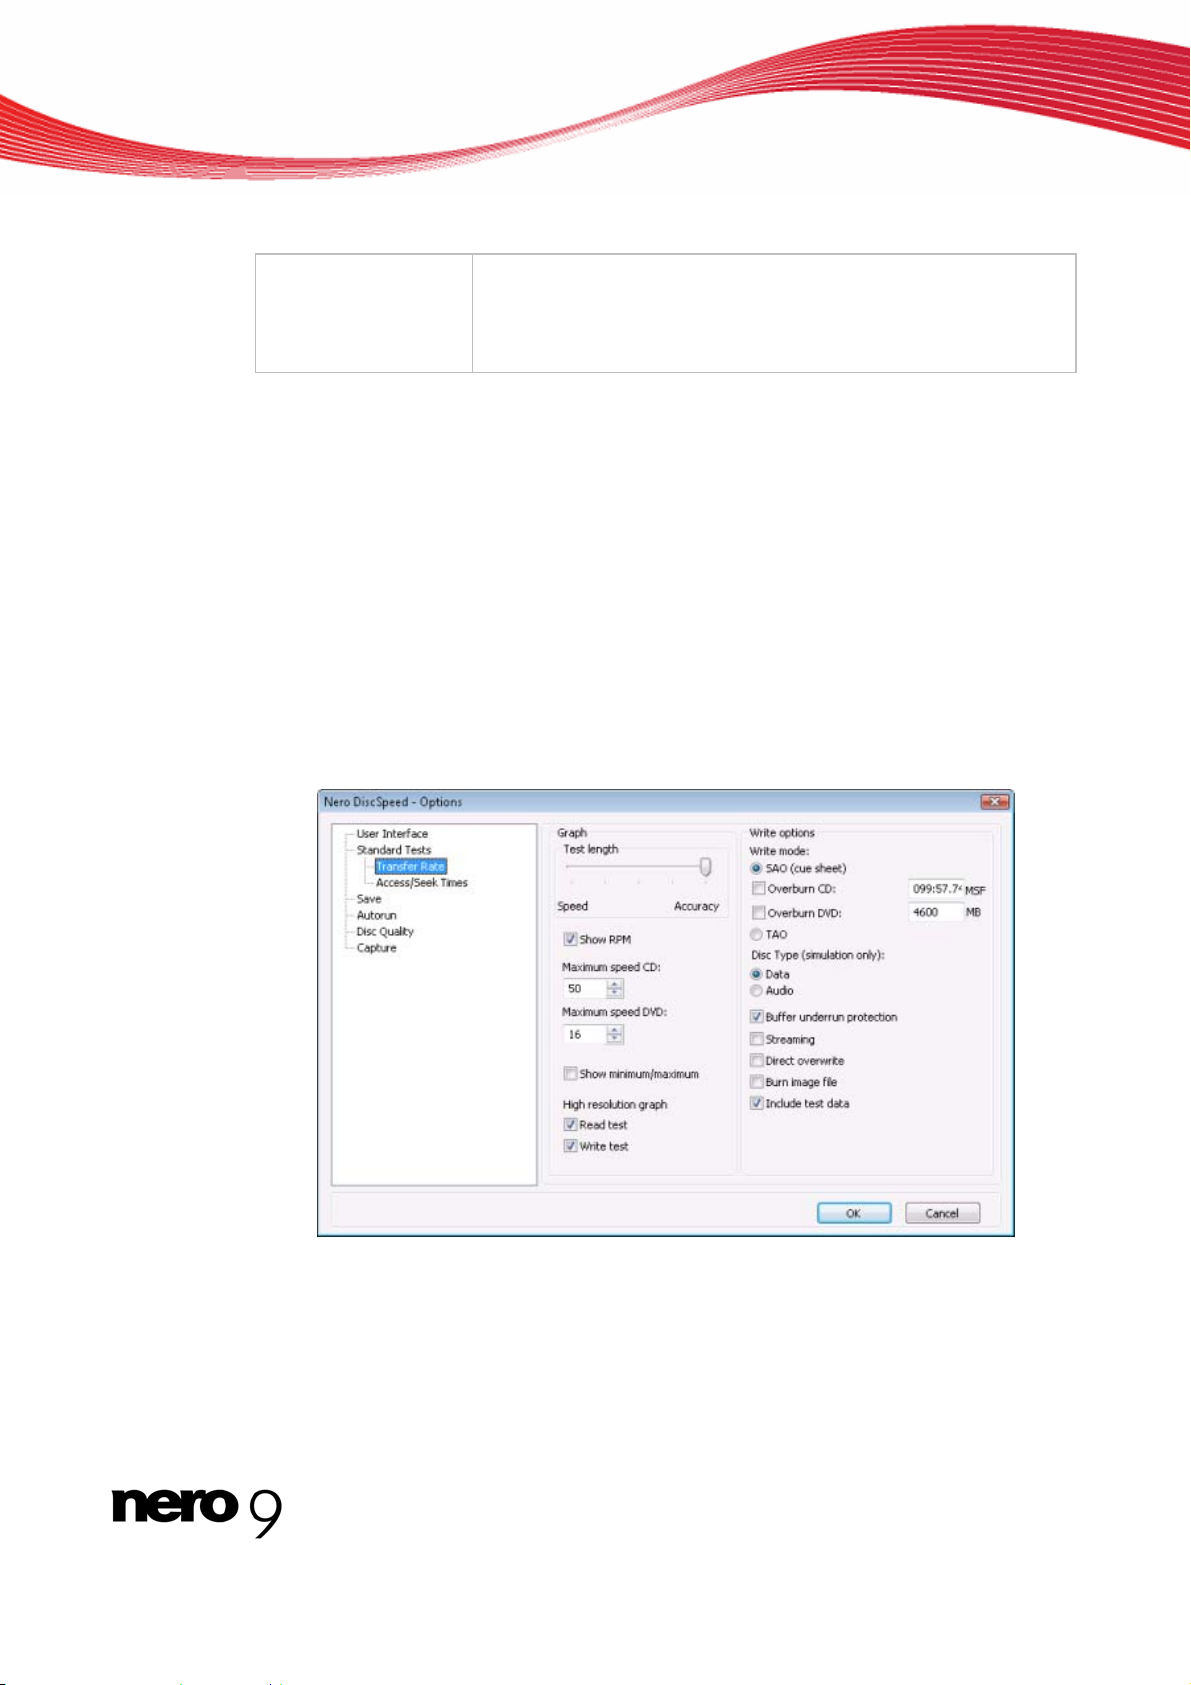
4.3 Transfer Rate Navigation Entry
The Transfer Rate navigation entry offers setting options in the Graph and Write options
areas specifically for the Transfer rate test.
Nero DiscSpeed - Options - Transfer Rate navigation entry
Nero DiscSpeed 15

Nero DiscSpeed Options Window
Nero DiscSpeed 16
You can define the settings for the graph in the Graph area. The following setting options
are available:
Slider
Test length
Defines the accuracy of the transfer rate test.
The higher the accuracy, the more detailed the graph is.
However, higher accuracy results in a longer test dura-
tion.
Check box
Show RPM
Shows the rotational speed
in the graph.
Menu
Maximum speedCD/DVD
Maximum speedCD/DVD
Defines the maximum value shown on the vertical scale
of the graph on the Create Disc tab if a CD/DVD is in-
serted into the optical drive.
To prevent parts of the curve from extending past the
edge of the graph area, we recommend that you choose
a value slightly above the maximum read speed of the
optical drive.
Check box
Show minimum/maximum
Shows the minimum and maximum speed values re-
corded during the transfer rate test.
In a normal curve, the lowest speed is the start speed
while the highest speed is the end speed. In an uneven
curve, the lowest recorded speed is displayed as the mi-
nimum value while the highest recorded speed is dis-
played as the maximum value.
Check box
Read test
Shows the read test curve in either high or low resolution.
Check box
Write test
Shows the write test curve in either high or low resolu-
tion.
The following setting options are available in the Write options area:
Area
Write mode
Selects the SAO (Session-At-Once) or TAO (Track-At-
Once)write mode for discs.
You can also enable the Overburn CD and Overburn DVD
check boxes in Session-At Once mode. Enter the exact da-
ta quantity in the corresponding input fields.
Area
Disc type
Enables burning simulation for either data or audio discs.
Check box
Buffer underrun protec-
tion
Enables protection against optical drive buffer underrun
.
Buffer underrun protection is enabled by default. We rec-
ommend that you leave this box checked.

Nero DiscSpeed Options Window
Nero DiscSpeed 17
Check box
Streaming
Streaming can more than double the write speed. However,
it can have a negative effect on the quality of the disc, sin-
ce the disc is not checked during the burn process and de-
fective sectors are not re-written.
This box is cleared by default, in other words verification is
enabled. If this check box is enabled, verification will be di-
sabled for DVD-RAM
and Blu-ray discs.
Check box
Direct overwrite
If this box is checked, rewritable discs will be directly over-
written without having to delete old data first.
If this box is not checked, a dialog box will notify you when
a disc containing data is inserted for writing.
Check box
Burning an image file
If this check box is enabled, Nero DiscSpeed will run
through the Create data disc test by creating an image file
(ISO or NRG).
If this check box is not enabled, Nero DiscSpeed will run
through the same test by burning binary data until the ma-
ximum capacity of the disc is reached.
Check box
Include test data
If this check box is enabled, additional information about
the test (information on the optical drive, the installed firm-
ware, and the burn process graph) will be burned to the
disc.
See also:
Transfer rate 26
Nero DiscSpeed Options Window
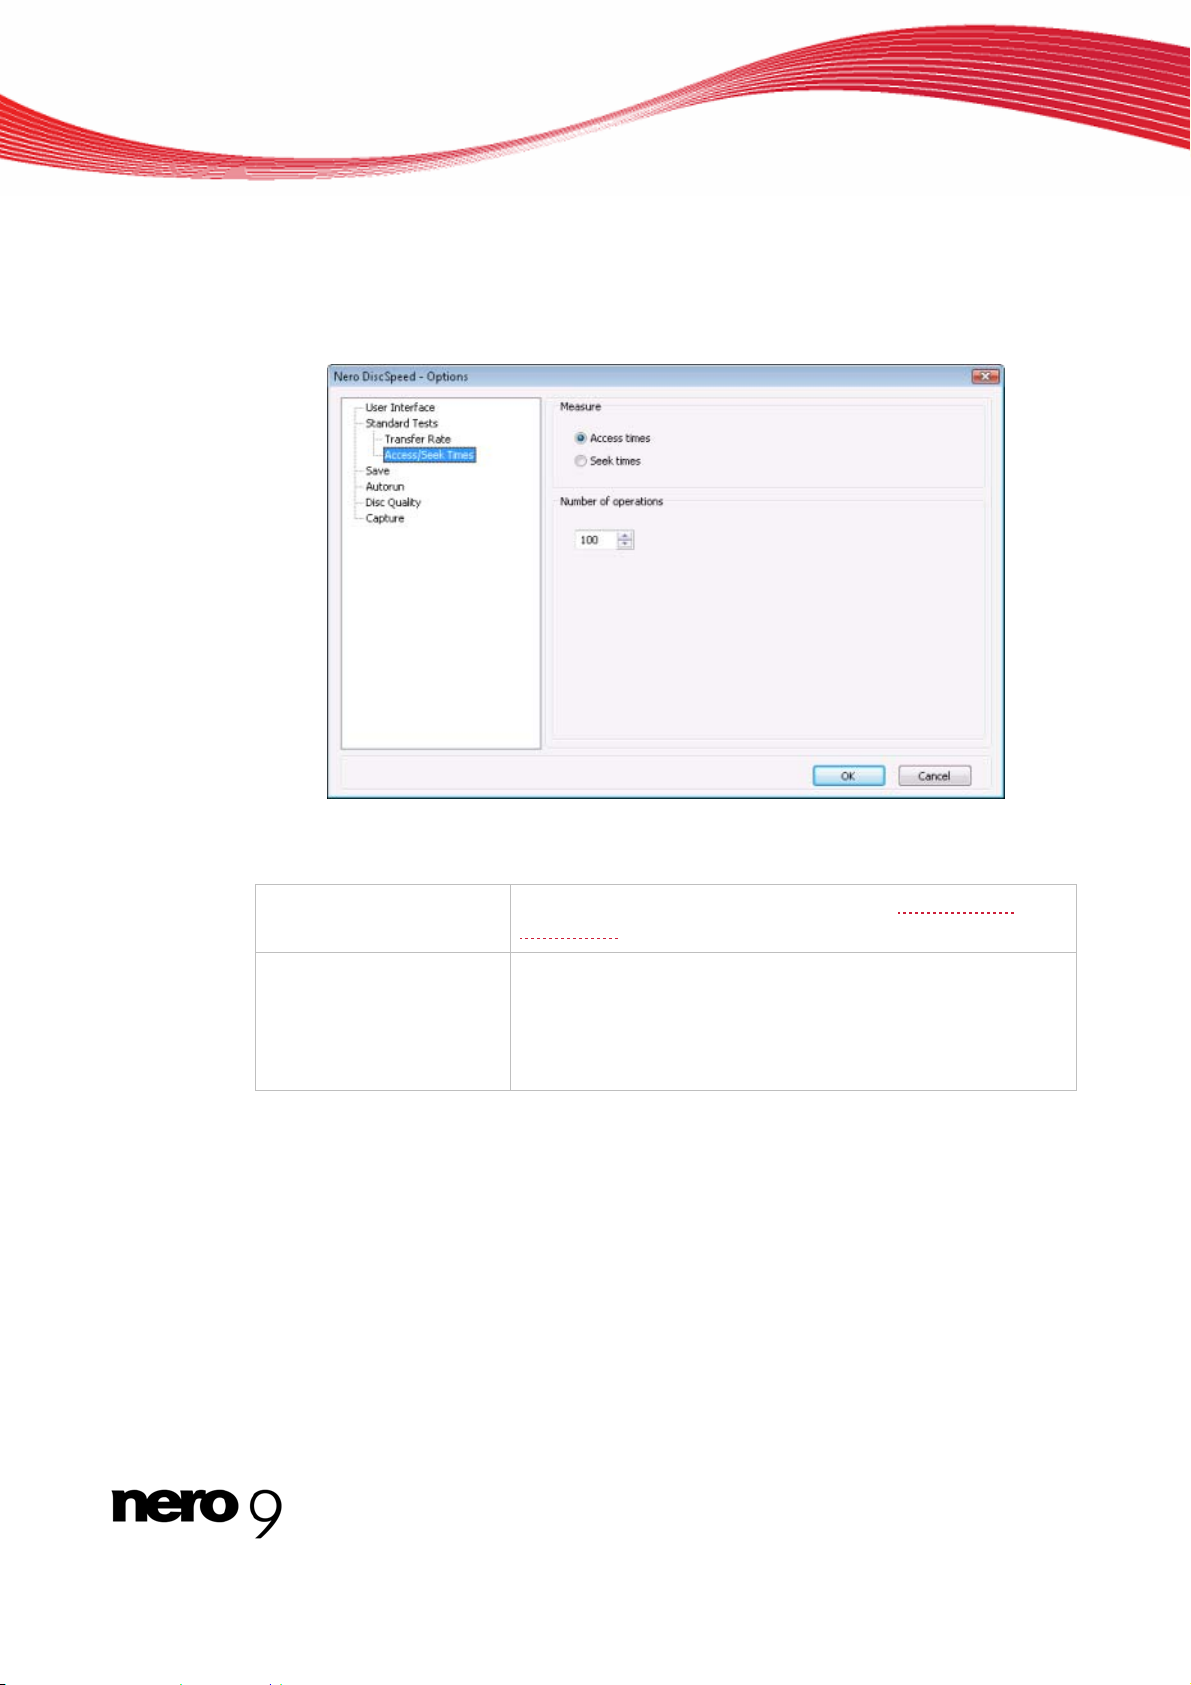
4.4 Access/Seek Times Navigation Entry
The Access/Seek Times navigation entry offers setting options in the Measure and Num-
ber of operations areas specifically for the Access/seek times test.
Nero DiscSpeed - Options - AccessSeek Times navigation entry
The following setting options are available:
Area
Measure
Defines which of the two tests will be run - Access times
or
Seek times
.
Input field
Number of operations
Defines how many times the selected test is run. The higher
the value that you enter, the more accurate the measurement
result is. However, the duration of the test becomes longer if
the test is repeated often. The test is run 100 times by de-
fault.
See also:
Access/Seek Times 28
Nero DiscSpeed 18
Nero DiscSpeed Options Window
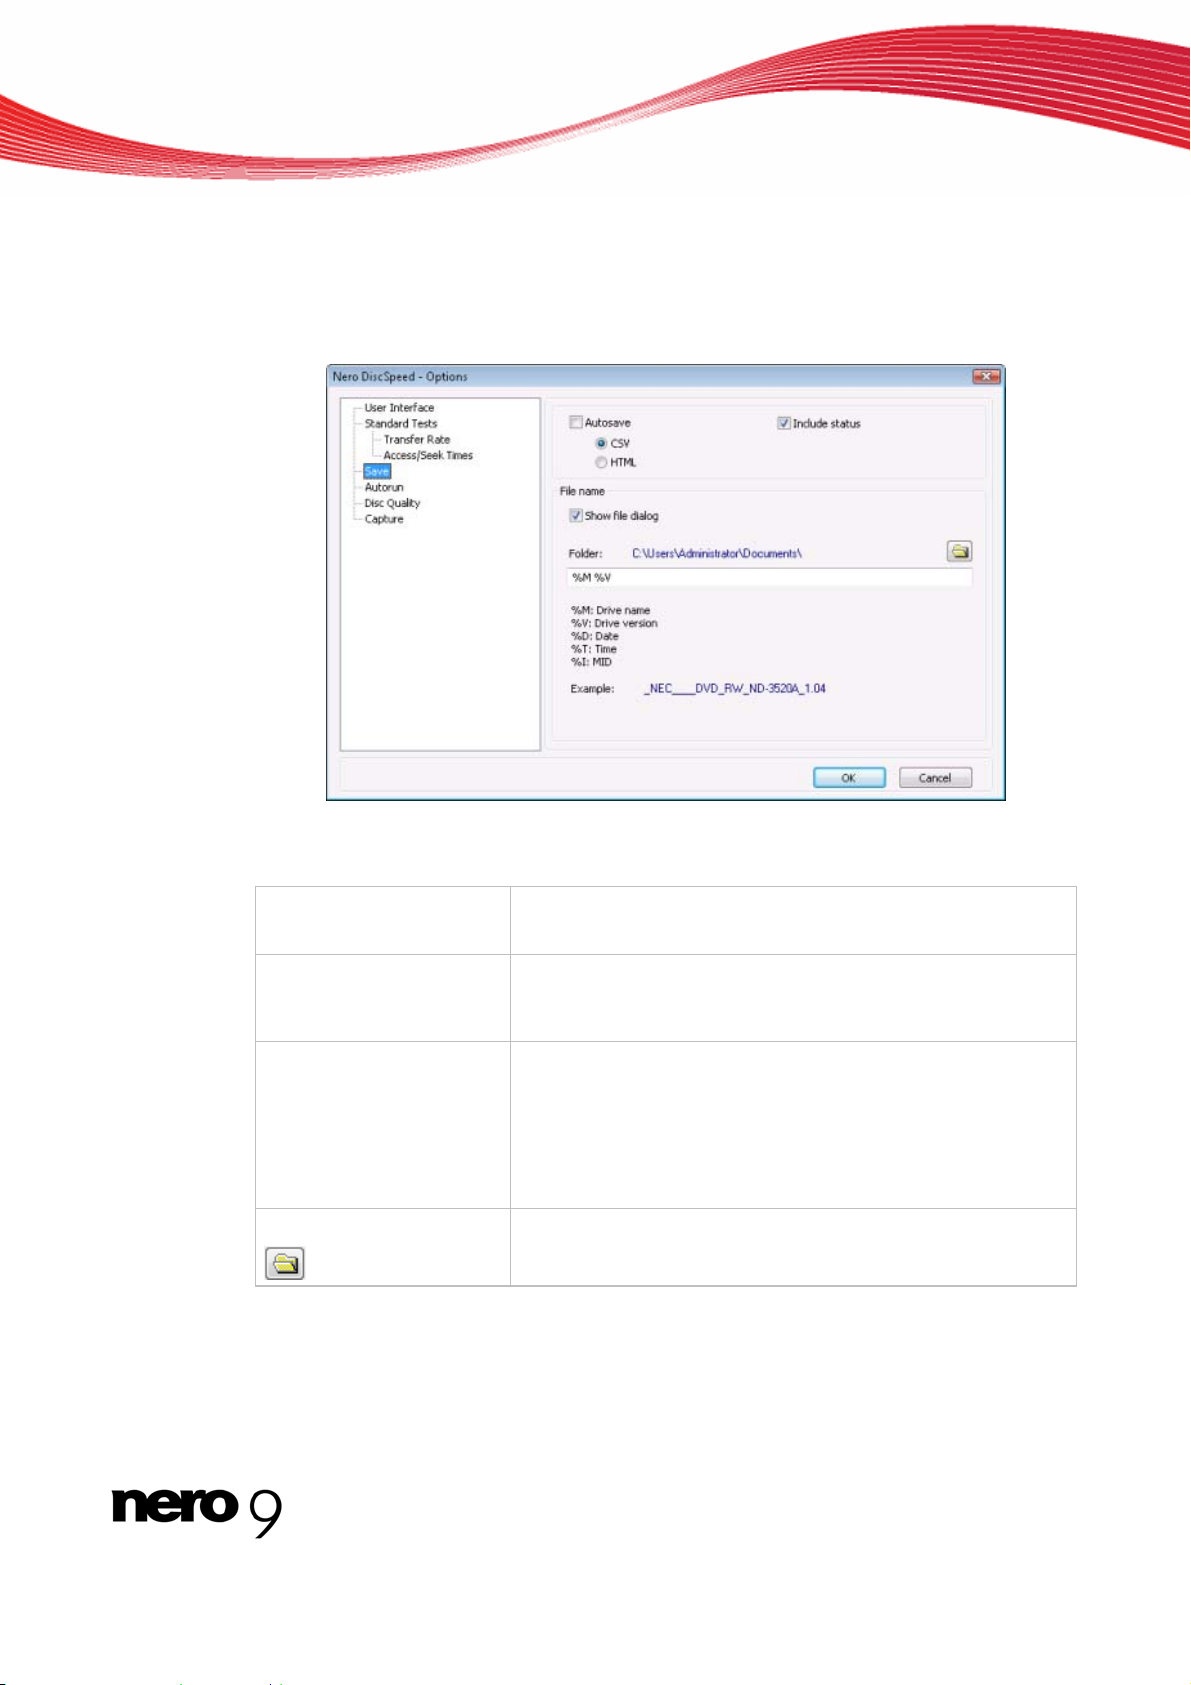
4.5 Save Navigation Entry
Under the Save navigation entry you can specify a storage location and file name that are
automatically selected if you have enabled the Autosave feature.
Nero DiscSpeed - Options - Save navigation entry
The following setting options are available:
Check box
Autosave
If this check box is enabled, Nero DiscSpeed will automati-
cally save all test results, either in CSV or in HTML format.
Check box
Include status
If this check box is enabled, Nero DiscSpeed will not only sa-
ve the graph, but also all additional information appearing in
the display area.
Check box
Show file dialog
If this box is checked, an appropriate dialog box will open be-
fore the file is saved. Here you can choose a file name and
specify where the file is to be saved.
If this box is not checked, then all files will be automatically
saved in the specified folder. The file name is automatically
created.
Button
Opens the Find Folder window. Here, you can specify the
folder in which the file should be saved.
Nero DiscSpeed 19
Nero DiscSpeed Options Window
Input field
Creates file names based on the following user-defined pa-
rameters: drive name, drive version, date, time, and MID
(Media Identification Code).
You can compile the parameters in any order. Arrange all the
parameters you want in the input field.
If all parameters are cleared from the input field, the file name
cannot be automatically generated.
Only works if the Show file dialog check box is enabled.
See also:
Saving Test Data 61
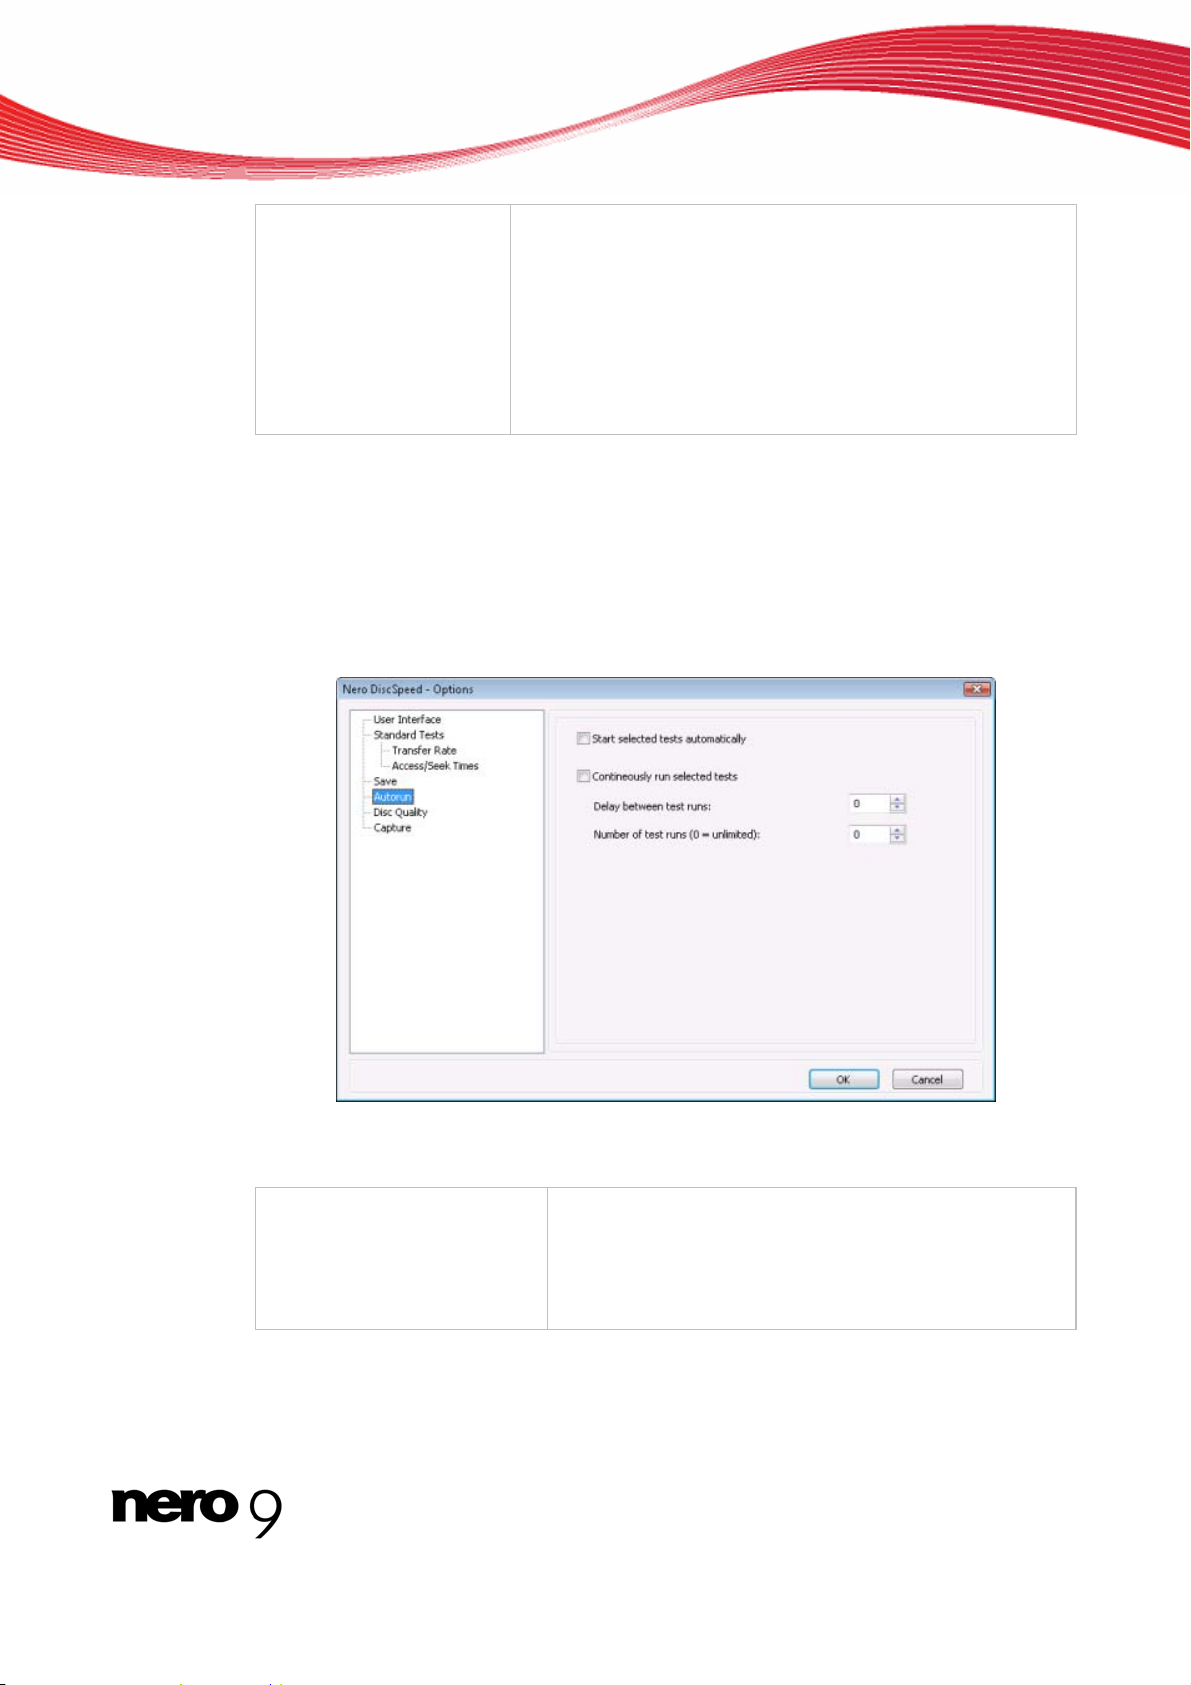
4.6 Autorun Navigation Entry
You can configure detailed settings for the autorun feature under the Autorun navigation en-
try.
Nero DiscSpeed - Options - Autorun navigation entry
The following check boxes are available:
Start selected tests automa-
tically
Automatically starts the series of tests selected under the
Standard Tests navigation entry as soon as a disc is in-
serted in the optical drive.
If this box is not checked, the test series must be manu-
ally started.
Nero DiscSpeed 20
Nero DiscSpeed Options Window
Continuously run selected
tests
Defines how many times the tests selected under the
Standard Tests navigation entry will be run.
The following options are available if this box is checked:
Delay between test runs - Defines the length of the de-
lay between two test runs.
Number of test runs - Defines how many times the tests
will be repeated. If the value selected is 0, the tests will
be repeated until you manually stop them.
See also:
Standard Tests Navigation Entry 13
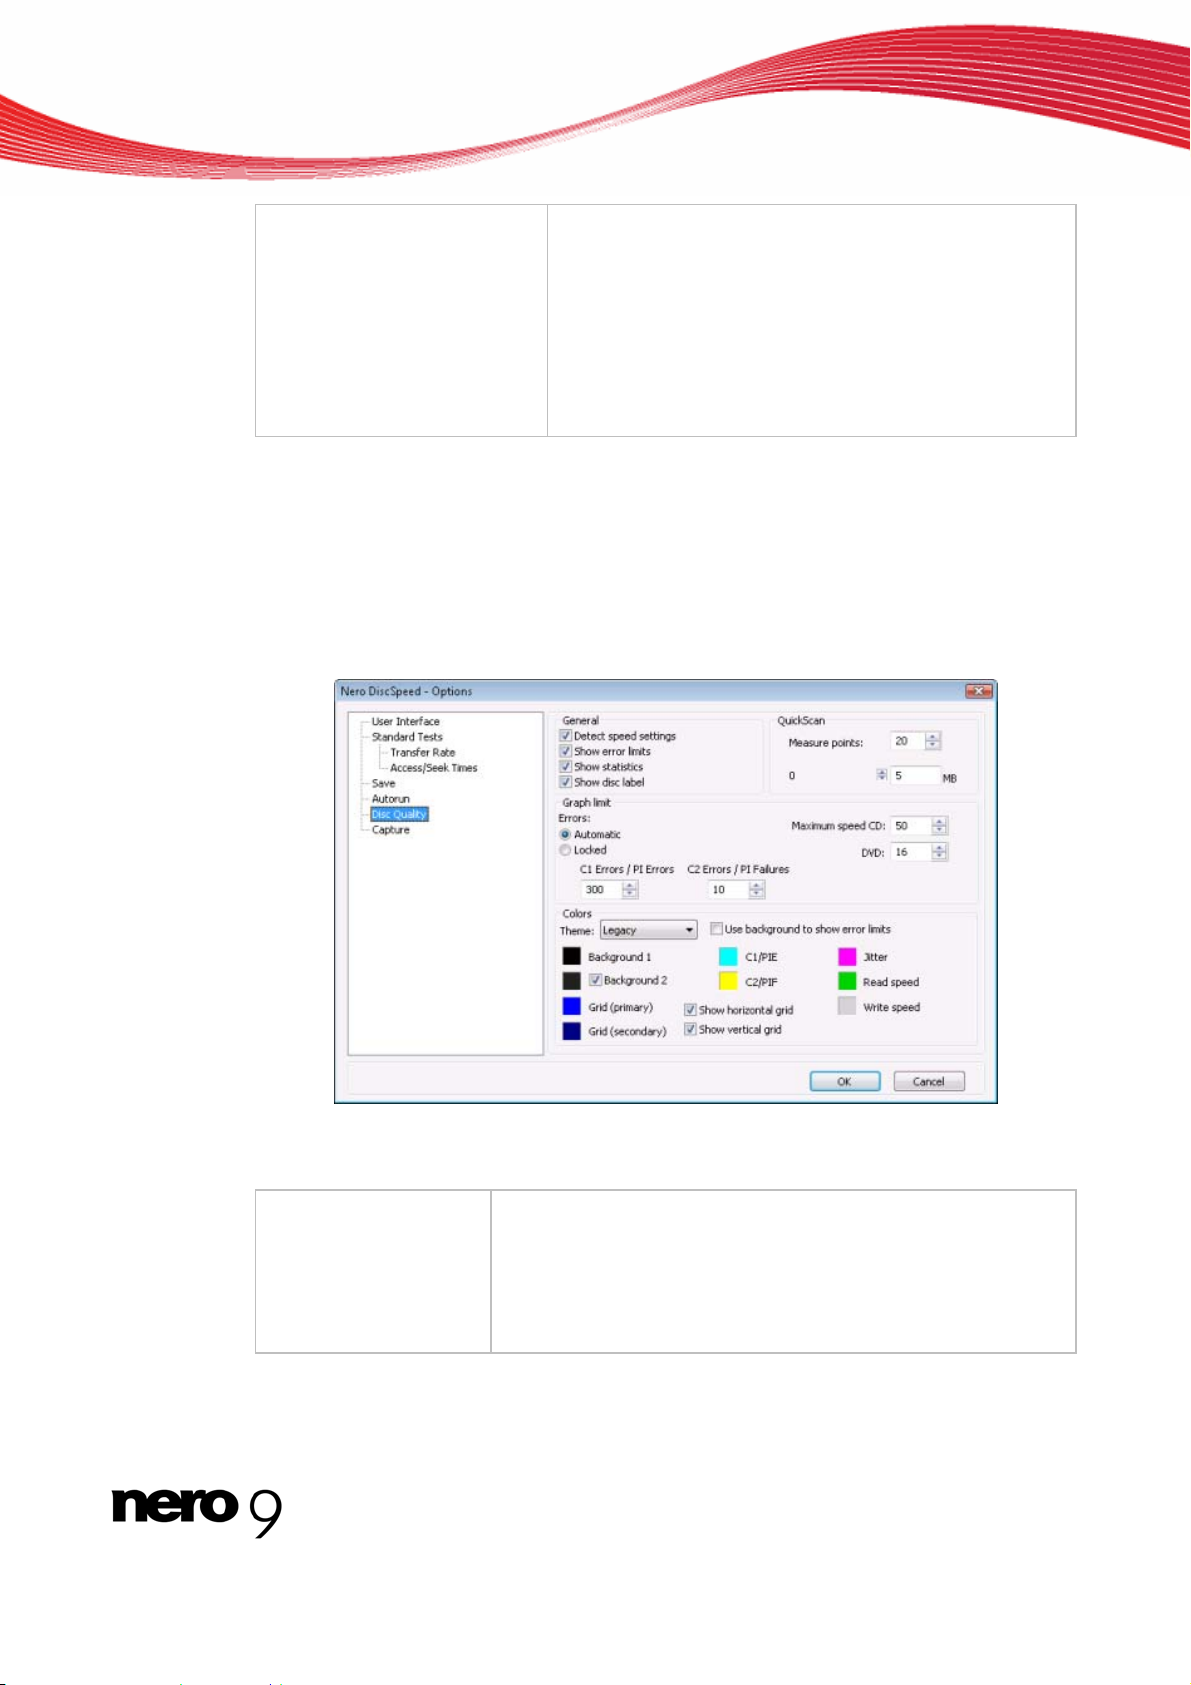
4.7 Disc Quality Entry
The Disc Quality navigation entry offers setting options for the quality test in the General,
QuickScan, Diagram Margins and Colors.
Nero DiscSpeed - Options - Disc quality navigation entry
The following check boxes are available in the General area:
Determing the speed
The speed the Disc Quality is tested, can change with the
choosed optical drive. The speed is connected to the recorder
model and the installed firmware. If the check box is active, Ne-
ro DiscSpeed automatically detects the speed, as soon as the
Disc quality tab in the main screen is selected. If this box is not
checked, the speed must be manually detected.
Nero DiscSpeed 21
Nero DiscSpeed Options Window
Nero DiscSpeed 22
Show error limits
Shows the intervals in the diagram of the graphical representa-
tion in colored graduations.
Depending on the optical drive model and the intervals at which
they occur, detected errors can be classed at a glance as per-
missible, tolerable, or unacceptable.
Show statistics
Shows a statistical overview of the results at the end of the test.
Show disc label
Shows the disc label on the Disc Quality tab.
In the QuickScan area you can define the options for the quick scan. The Disc Quality
could be executed as complete scan. You can choose between the quick and the full scan
on the Disc Quality tab. The quick scan only checks defined points on the disc. All other ar-
eas are ignored. As a result, it requires less time than a complete scan but is less accurate.
Measure points
Defines how many points on a disc will be checked during the
quick scan.
Sample Length
Defines the size of each scan point in MB.
In the Diagram Margins area you can define the maximum scale limits for the graphical rep-
resentation of the error curves. The following setting options are available:
Option button
Automatic
Automatically adapts the graduated scale values to the number
of errors measured. A value of 10 is defined as the initial value
for both C1 Errors/PI Errors and for C2 Errors/PI Failures.
If more errors are found, Nero DiscSpeed automatically adapts
the scales to the higher value.
Option button
Fix
Defines the maximum values on the scales as locked. Enter
the values you want in the C1 Errors/PI Errors and C2 Er-
rors/PI Failures text boxes.
Selection area
Maximum CD speed
Defines the maximum value that will be displayed in the C1 Er-
rors/PI Errors curve for write and read speeds.
This value is separately defined for CDs and DVDs.
In the Colors area you can define the colors on the Disc Quality tab in the main screen.
The following setting options are available:
Menu
Topic
Selects the desired theme. In addition to predefined themes,
you can also set colors with the User-defined entry. To manu-
ally edit a color, click the colored tile and select the color you
want in the dialog box that appears.
Button
Background 1
Changes the basic color in the background of the graph area.
Nero DiscSpeed Options Window
Nero DiscSpeed 23
Button
Background 2
Changes the basic color for shading in the background of the
graph area.
Only works when the Background 2 check box is enabled.
Otherwise, the background of the graph area is displayed in
one single color.
Button
Grid (primary)
Changes the colors for the coarse grid in the graph area.
Only works when at least one of the following check boxes is
enabled: Show horizontal grid and/or Show vertical grid.
Button
Grid (secondary)
Changes the color for the fine grid in the graph area.
Only works when at least one of the following check boxes is
enabled: Show horizontal grid and/or Show vertical grid.
C1/PIE
Line signifying the C1 errors
/PI errors in the graph.
C2/PIF
Line signifying the C2 errors
PI errors in the graph.
Jitter
Representation of Jitter
in the graph.
Read speed
Line signifying the Read speed
in the graph.
Write speed
Line signifying the write speed
in the graph.
This curve will only be displayed if the Include test data box
has been checked under the Transfer Rate navigation entry.
Check box
Show horizontal grid
Shows the horizontal grid lines in the graph area or hides them.
This box is checked by default.
Check box
Show vertical grid
Shows the vertical grid lines in the graph area or hides them.
This box is checked by default.
 Loading...