

Page 1

REAKTOR 5
Operation Manual
Page 2

The information in this document is subject to change without notice and does
not represent a commitment on the part of Native Instruments Software Synthesis
GmbH. The software described by this document is subject to a License Agreement
and may not be copied to other media. No part of this publication may be copied,
reproduced or otherwise transmitted or recorded, for any purpose, without prior
written permission by Native Instruments Software Synthesis GmbH. All product
and company names are trademarks of their respective owners.
And also, if you’re reading this, it means you bought the software rather than stole
it. It’s because of people like you that we can continue to create great tools and
update them. So, thank you very much.
Users Guide written by: Rick Scott, Marius Wilhelmi, Len Sasso, Stephan Schmitt,
Erik Wiegand, James Walker-Hall, Julian Ringel
Special thanks to Henri Hagenow, Dan Santucci and Hanna Felski.
© Native Instruments Software Synthesis GmbH, 2005. All rights reserved.
First Edition, May 2005
REAKTOR is a trademark of Native Instruments Software Synthesis.
Germany USA
Native Instruments GmbH Native Instruments USA, Inc.
Schlesische Str. 28 5631 A Hollywood Boulevard
D-10997 Berlin Los Angeles, CA 90028
Germany USA
info@native-instruments.de info@native-instruments.com
www.native-instruments.de www.native-instruments.com
Page 3

Table of Contents
1. Introduction ........................................................................................ 15
1.1. What is REAKTOR? ...........................................................15
1.2. New/Changed Features in REAKTOR 5 ...............................15
1.3. Event Initialization ............................................................15
1.4. REAKTOR Core Technology ................................................16
1.6. Changed Primary Modules .................................................18
1.7. New Functions ..................................................................19
1.8. Changed Functions .......................................................... 20
1.9. Discarded and Reassigned Functions ..................................21
1.10. Opening REAKTOR 3 Ensembles ........................................21
2. Product Authorization .........................................................................22
2.1. What is the Product Authorization? .................................... 22
2.2. Conducting the Product Authorization ................................ 23
2.3.
2.4. Method B: Internet Connection on another computer ........... 26
2.5. Method C: No Internet Connection available ........................ 28
2.6. Registration support ......................................................... 30
3. Installation under Windows XP ............................................................31
3.1. System Requirements and Recommendations ......................31
3.2. Software Installation .........................................................31
3.3. VST plug-in Installation .................................................... 32
3.4. DXi 2 plug-in Setup ......................................................... 32
3.5. RTAS plug-in installation .................................................. 33
4. Installation under MacOS X .................................................................33
4.1. System Requirements and Recommendations ..................... 33
4.2. Installing REAKTOR 5 OS X ............................................. 34
4.3. MacOS Audio Unit plug-in Installation ................................ 34
4.4. RTAS plug-in installation .................................................. 34
5. Audio Interfaces ..................................................................................35
5.1. Stand-alone Application .................................................... 35
6. REAKTOR 5 as Standalone ...................................................................39
6.1. Soundcard (Audio Interface) ............................................. 39
6.2. Routing ...........................................................................41
6.3. MIDI .............................................................................. 42
Method A: REAKTOR 5 computer has direct access to the internet ...23
Table of Contents – IIIREAKTOR 5
Page 4

7. REAKTOR 5 as Plug-in .........................................................................43
7.1. Automation ID editing ...................................................... 44
7.2. Total Recall ..................................................................... 44
7.3. VST 2.0 Plug-In ............................................................... 48
7.3.1. Using the REAKTOR 5 plug-in in Cubase SX 3 .................... 48
7.3.2. Using the REAKTOR 5 plug-in in Nuendo 2.0 ......................49
7.4. Audio Units Plug-ins ........................................................ 50
7.4.1. Use in Logic 7.x .............................................................. 50
7.4.2. Use in Digital Performer 4.5 ............................................. 52
7.4.3. Use in Garage Band ......................................................... 53
7.5. DXi 2 plug-in .................................................................. 54
7.5.1. Use in Sonar 4 ................................................................ 54
7.7. Usi
8. Open Sound Control (OSC) ...................................................................57
8.1. Application areas ............................................................. 57
8.2. OSC System Setup .......................................................... 58
9. First Steps in REAKTOR .......................................................................61
9.1. Opening and Playing Examples ...........................................61
9.2. Your First DIY Synthesizer ..................................................72
9.3. Your First DIY Structure .................................................... 84
10. Basic Operation ...................................................................................90
10.1. Mouse ............................................................................ 90
10.2. Context Menus .................................................................91
10.3. Key Commands ................................................................91
10.4 Ensemble Panel and Structure Windows ..............................91
11. Menus ................................................................................................93
11.1. File Menu ....................................................................... 93
11.2. Edit Menu ....................................................................... 95
11.3. Settings Menu ................................................................. 97
11.4. System Menu .................................................................. 99
11.8. View Menu .....................................................................106
11.5. ? Menu .......................................................................... 114
12. REAKTOR Toolbars ............................................................................. 115
12.1. Main Toolbar ..................................................................115
12.2. Ensemble Panel Toolbar ..................................................117
12.3. Structure Toolbar ............................................................ 119
13. The Browser ...................................................................................... 120
13.1. Accessing Files ..............................................................121
13.2. Auditioning Files .............................................................124
ng REAKTOR RTAS with Pro Tools 6.x (Mac/Windows) ......55
IV – Table of Contents REAKTOR 5
Page 5

14. Ensemble .......................................................................................... 125
14.1. Ensemble Structure Window ............................................127
14.2. Ensemble Panel Window ..................................................129
14.3. Ensemble Properties Dialog ............................................130
15. Instruments ....................................................................................... 138
15.1. Adding Instruments to an Ensemble ..................................138
15.2. Ports .............................................................................139
15.3. Context Menu .................................................................139
15.4. Instrument Header ..........................................................140
15.5. Instrument Properties .....................................................142
16. Primary Macros ................................................................................155
16.1. What is a Primary Macro? ................................................155
16.2. Adding Macros to a Structure ...........................................156
16.3. Ports .............................................................................157
16.4. Context Menu .................................................................158
16.5. Macro Properties ...........................................................159
17. Primary Structures ............................................................................164
17.1. What is a Primary Structure? ............................................164
17.2. Modules ........................................................................165
17.3. Source Modules ..............................................................170
17.4. Switches ........................................................................ 172
17.5. Terminals ....................................................................... 173
17.6. Wires ............................................................................173
17.7. Signal Processing in REAKTOR ........................................176
17.8. Context Menu .................................................................181
18. Panel Editing ..................................................................................... 182
18.1. What Is a Panel? .............................................................182
18.2. What are Panel Controls? ................................................ 183
18.3. Panel Controls ............................................................... 184
18.4. Panel Control Skins .........................................................191
18.5. Connection Properties of Panel Controls ............................196
18.6. Editing the Panels ...........................................................199
19. Panel Operation ................................................................................200
19.1. Mouse Control ............................................................... 200
19.2. Using Keys to Change Control Settings ............................. 204
19.3. MIDI Control ................................................................. 204
19.4. MIDI Out ...................................................................... 206
19.5. Customized Panels ......................................................... 206
20. Snapshots .........................................................................................212
Table of Contents – VREAKTOR 5
Page 6

21. Sampling and Resynthesis .................................................................222
21.1. Sample Management ...................................................... 222
21.2. Sample Maps .................................................................225
21.3. Sample Map Editor ........................................................ 228
21.4. Akai Import ................................................................... 238
22. Table Modules ...................................................................................240
22.1. Properties ..................................................................... 240
22.2. Context Menu ................................................................ 248
22.3. Advanced Operation ........................................................252
23. “Classic Modular” Macro Collection ..................................................253
23.1. Display ......................................................................... 254
23.2. MIDI .............................................................................255
23.3. Mixer/Amp .................................................................... 256
23.4. Oscillator .......................................................................259
23.5. Sampler ........................................................................ 260
23.6. Sequencer .....................................................................261
23.7. LFO, Envelope ................................................................267
23.8. Filter .............................................................................269
23.9. Delay .............................................................................271
23.10. Audio Modifier ................................................................272
23.11. Event Processing ............................................................273
VI – Table of Contents REAKTOR 5
Page 7

Module Reference ...................................................................................275
Panel ......................................................................................................277
Fader .......................................................................................277
Knob ........................................................................................279
Button .................................................................................... 280
List ..........................................................................................281
Switch ..................................................................................... 282
Lamp ...................................................................................... 283
Level Lamp .............................................................................. 284
RGB Lamp .............................................................................. 285
Meter ...................................................................................... 285
LevelMeter ............................................................................... 286
Picture .................................................................................... 286
Multi Picture ............................................................................ 287
Text ........................................................................................ 288
Multi Text ................................................................................ 288
XY .......................................................................................... 289
Scope ..................................................................................... 290
Multi Display and Poly Display ...................................................291
Mouse Area ............................................................................ 293
Stacked Macro ........................................................................ 295
IC Send ................................................................................... 296
IC Receive ............................................................................... 296
MIDI In ....................................................................................................297
Note Pitch ................................................................................297
Pitchbend .................................................................................297
Gate ....................................................................................... 298
Single Trig. Gate ....................................................................... 298
Sel. Note Gate ......................................................................... 298
On Velocity .............................................................................. 299
Off Velocity .............................................................................. 299
Controller ................................................................................ 299
Ch. Aftertouch ......................................................................... 300
Poly Aftertouch ........................................................................ 300
Sel. Poly AT ............................................................................. 300
Program Change ........................................................................301
Start/Stop ................................................................................301
1/96 Clock ................................................................................................. 301
Sync Clock .............................................................................. 302
Song Pos ....................................................................................................302
Channel Message ..................................................................... 302
Table of Contents – VIIREAKTOR 5
Page 8

MIDI Out ..................................................................................................304
Note Pitch/Gate ....................................................................... 304
Pitchbend ................................................................................ 304
Controller ................................................................................ 304
Ch. Aftertouch ......................................................................... 305
Poly Aftertouch ........................................................................ 305
Sel. Poly AT ............................................................................. 305
Program Change ....................................................................... 306
Start/Stop ............................................................................... 306
1/96 Clock .................................................................................................306
Song Pos ....................................................................................................307
Channel Message .....................................................................307
Math .......................................................................................................309
Constant ................................................................................. 309
Add ........................................................................................ 309
Subtract ................................................................................... 310
Invert, -X ..................................................................................310
Multiply ....................................................................................310
a * b + c ..................................................................................311
Reciprocal 1/x ........................................................................... 311
Divide x/y .................................................................................311
Modulo x % y ............................................................................312
Rectifier ...................................................................................312
Rect./Sign ................................................................................312
Compare ..................................................................................313
Compare/Equal .........................................................................313
Quantize ................................................................................... 314
Expon. (A) ................................................................................ 314
Expon. (F) ................................................................................314
Log (A) ..................................................................................... 315
Log (F) .....................................................................................315
Power x y ..................................................................................315
Square Root ..............................................................................316
1 / Square Root ......................................................................... 316
Sine .........................................................................................316
Sine/Cos ..................................................................................317
Arcsin ...................................................................................... 317
Arccos .....................................................................................317
Arctan ......................................................................................318
VIII – Table of Contents REAKTOR 5
Page 9

Signal Path ............................................................................................. 319
Selector/Scanner ....................................................................... 319
Relay 1,2 ..................................................................................319
Crossfade ................................................................................ 320
Distributor/Panner .................................................................... 320
Stereo Pan ...............................................................................321
Amp/Mixer ................................................................................321
Stereo Amp/Mixer ..................................................................... 322
Oscillator ................................................................................................323
Sawtooth ................................................................................. 323
Saw FM ................................................................................... 323
Saw Sync .................................................................................324
Saw Pulse ................................................................................325
Bi-Saw .....................................................................................325
Triangle ................................................................................... 326
Tri FM ..................................................................................... 326
Tri Sync ....................................................................................327
Tri/Par Symm ............................................................................327
Parabol ................................................................................... 328
Par FM .................................................................................... 328
Par Sync ................................................................................. 329
Par PWM ................................................................................. 330
Sine ........................................................................................ 330
Sine FM ...................................................................................331
Sine Sync .................................................................................331
Multi-Sine ............................................................................... 332
Pulse ...................................................................................... 333
Pulse FM ................................................................................. 334
Pulse Sync .............................................................................. 334
Pulse 1-ramp ........................................................................... 335
Pulse 2-ramp ........................................................................... 336
Bi-Pulse .................................................................................. 337
Impulse ................................................................................... 337
Impulse FM ............................................................................. 338
Impulse Sync ........................................................................... 338
Multi-Step ............................................................................... 339
4-Step .................................................................................... 339
5-Step .................................................................................... 340
6-Step .................................................................................... 340
8-Step .................................................................................... 340
Table of Contents – IXREAKTOR 5
Page 10

Multi-Ramp ............................................................................. 340
4-Ramp ................................................................................... 340
5-Ramp ...................................................................................341
6-Ramp ...................................................................................341
8-Ramp ...................................................................................341
Ramp .......................................................................................341
Clock ...................................................................................... 342
Noise ...................................................................................... 342
Random .................................................................................. 343
Geiger ..................................................................................... 343
Samplers ............................................................................................... 344
Sampler .................................................................................. 345
Sampler FM ............................................................................. 346
Sampler Loop ...........................................................................347
Grain Resynth .......................................................................... 349
Grain Pitch Former ................................................................... 353
Grain Cloud ..............................................................................357
Beat Loop ................................................................................359
Sample Lookup .........................................................................361
Sequencer ..............................................................................................362
Sequencer ............................................................................... 362
6-Step .................................................................................... 362
8-Step .................................................................................... 363
12-Step ................................................................................... 363
16-Step ................................................................................... 363
Multiplex 16 ............................................................................ 363
LFO, Envelope ..........................................................................................365
LFO ........................................................................................ 365
Slow Random ........................................................................... 366
H - Env ................................................................................... 366
HR - Env ................................................................................. 367
D - Env ................................................................................... 368
DR - Env ................................................................................. 368
DSR - Env ............................................................................... 369
DBDR - Env ............................................................................. 369
DBDSR-Env ..............................................................................370
AD - Env ..................................................................................371
AR - Env ..................................................................................371
ADR-Env ..................................................................................372
X – Table of Contents REAKTOR 5
Page 11

ADSR - Env ..............................................................................373
ADBDR - Env ............................................................................373
ADBDSR-Env ............................................................................374
AHDSR - Env ............................................................................375
AHDBDR - Env ..........................................................................376
4-Ramp ....................................................................................377
5-Ramp ...................................................................................378
6-Ramp .................................................................................. 380
Filter .......................................................................................................382
HP/LP 1-Pole ........................................................................... 382
HP/LP 1-Pole FM ..................................................................... 383
Allpass 1-Pole .......................................................................... 383
Multi 2-Pole ............................................................................. 384
Multi 2-Pole FM ....................................................................... 384
Multi/Notch 2-Pole ................................................................... 385
Multi/Notch 2-Pole FM .............................................................. 386
Multi/LP 4-Pole ....................................................................... 387
Multi/LP 4-Pole FM .................................................................. 388
Multi/HP 4-Pole ....................................................................... 389
Multi/HP 4-Pole FM ................................................................. 390
Pro-52 Filter .............................................................................391
Ladder Filter .............................................................................391
Ladder Filter FM ...................................................................... 392
Peak EQ .................................................................................. 393
Peak EQ FM ............................................................................ 393
High Shelf EQ .......................................................................... 394
High Shelf EQ FM .................................................................... 394
Low Shelf EQ ........................................................................... 395
Low Shelf EQ FM ..................................................................... 396
Differentiator ........................................................................... 396
Integrator .................................................................................397
Delay ......................................................................................................398
Single Delay ............................................................................. 398
Multi-Tap Delay ........................................................................ 399
Diffuser Delay .......................................................................... 400
Grain Delay ...............................................................................401
Grain Cloud Delay ..................................................................... 402
Unit Delay ............................................................................... 404
Table of Contents – XIREAKTOR 5
Page 12

Audio Modifier .........................................................................................405
Saturator ................................................................................. 405
Saturator 2 .............................................................................. 405
Clipper .................................................................................... 406
Mod. Clipper ............................................................................ 407
Mirror 1 Level .......................................................................... 407
Mirror 2 Levels ......................................................................... 407
Chopper .................................................................................. 408
Shaper 1 BP ............................................................................ 409
Shaper 2 BP ............................................................................ 409
Shaper 3 BP ............................................................................. 410
Shaper Parabolic ....................................................................... 411
Shaper Cubic ............................................................................ 411
Slew Limiter .............................................................................412
Peak Detector ........................................................................... 412
Sample & Hold ..........................................................................413
Frequency Divider ...................................................................... 413
Audio Table ............................................................................... 414
Event Processing ..................................................................................... 416
Accumulator .............................................................................416
Counter ....................................................................................416
Randomizer .............................................................................. 417
Frequency Divider ...................................................................... 417
Ctrl. Shaper 1 BP ......................................................................418
Ctrl. Shaper 2 BP ......................................................................418
Ctrl. Shaper 3 BP ...................................................................... 419
Logic AND ................................................................................ 419
Logic OR ................................................................................. 420
Logic EXOR ............................................................................. 420
Logic NOT ............................................................................... 420
Order .......................................................................................421
Iteration ...................................................................................421
Separator ................................................................................ 422
Value ...................................................................................... 422
Merge ..................................................................................... 423
Step Filter ............................................................................... 423
Router M->1 ............................................................................ 423
Router 1,2 ................................................................................424
Router 1->M .............................................................................424
Timer .......................................................................................425
XII – Table of Contents REAKTOR 5
Page 13

Hold ........................................................................................425
Event Table .............................................................................. 426
Auxiliary .................................................................................................428
Tapedeck 1-Ch ......................................................................... 428
Tapedeck 2-Ch ..........................................................................431
Audio Voice Combiner ................................................................431
Event V.C. All ........................................................................... 432
Event V.C. Max ......................................................................... 432
Event V.C. Min ......................................................................... 433
A to E ..................................................................................... 433
A to E (Trig) ............................................................................. 433
A to E (Perm) ........................................................................... 434
A to Gate ................................................................................. 434
To Voice .................................................................................. 435
From Voice .............................................................................. 435
Voice Shift .............................................................................. 436
Audio Smoother ....................................................................... 437
Event Smoother ........................................................................ 437
Master Tune/Level .................................................................... 438
Tempo Info .............................................................................. 438
Voice Info ................................................................................ 438
Tuning Info .............................................................................. 439
System Info ............................................................................. 439
Note Range Info ....................................................................... 440
MIDI Channel Info .................................................................... 440
Snapshot ..................................................................................441
Set Random ............................................................................. 443
Unison Spread ......................................................................... 443
Snap Value .............................................................................. 444
Snap Value Array ...................................................................... 444
In Port .................................................................................... 446
Out Port .................................................................................. 446
Send ....................................................................................... 446
Receive ................................................................................... 446
IC Send ................................................................................... 448
IC Receive ............................................................................... 448
OSC Send ............................................................................... 449
OSC Receive ............................................................................ 449
Appendix .................................................................................................450
Index ......................................................................................................451
Table of Contents – XIIIREAKTOR 5
Page 14

14 – Introduction REAKTOR 5
Page 15

1. Introduction
1.1. What is REAKTOR?
REAKTOR is a powerful and flexible program that turns your computer into a
professional-strength synthesis, sampling, and audio-processing system. With
REAKTOR’s completely modular structure, you can build virtually any digital
audio device that you can imagine. From relatively simple analog synths to large
modular systems, from basic sample players to exotic granular (re)samplers,
from elementary delay lines to full-featured reverb units, your creativity will
have virtually no limits.
If building your own instruments and effects is not your top priority, you’ll still
find plenty to do with REAKTOR. It comes packed with hundreds of instruments
and effects of all kinds. Want a simple FM synth? It’s there. Want a sample
player with independent control of time and pitch shifting? Load it up. Want
a multi-effects box to munge your audio files? It’s at your fingertips. And the
best part of the REAKTOR library is that it enables you to get right down to
the business of making music.
If something in the library doesn’t do exactly what you need, its modular structure and its control elements are accessible for you to modify. Nothing is hidden.
And there’s an active user community and online library with new instruments
and effects being added all the time. In short, you decide how to use REAKTOR.
Fire up a pre-built ensemble (combination of instruments) today, add some
snapshots (presets) and make some modifications tomorrow, build your own
instrument from the ground up the next day. Just get started!
1.2. New/Changed Features in REAKTOR 5
REAKTOR 5 represents a major advancement in flexibility, power, and sonic
potential over REAKTOR 4. The following sections present a short overview
of new and changed features in REAKTOR 5.
1.3. Event Initialization
REAKTOR 5 has a new initialization scheme for event inputs that is used if
the REAKTOR 4 Legacy Mode option is disabled (in the Ensemble Properties
dialog). We strongly recommend that you disable REAKTOR 4 Legacy Mode
in your ensembles for the sake of future compatibility!
Introduction – 15REAKTOR 5
Page 16
1.4. REAKTOR Core Technology
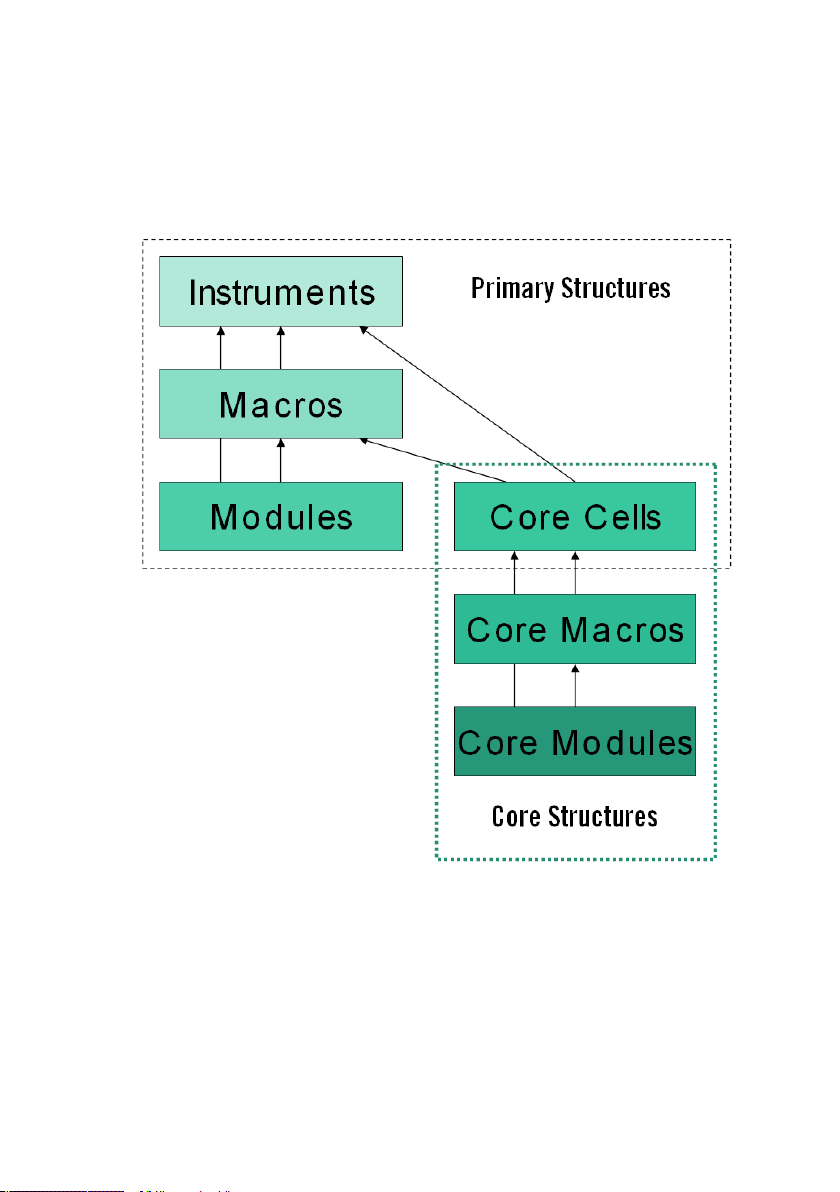
The biggest change to REAKTOR 5 is that it provides two levels of functionality: the primary level and the core level.
The primary level comprises the instruments, macros, and modules as they
are known from REAKTOR 4.
The core level, also known as the REAKTOR Core, comprises three new objects: core cells, core macros, and core modules. A core cell (*.rcc file) is a
macro/module hybrid that serves as a bridge between the primary and core
levels of REAKTOR. Just as primary-level structures consist of primary macros
(*.mdl files) and primary modules, core-cell structures consist of core macros
(*.rcm files) and core modules.
16 – Introduction REAKTOR 5
Page 17

Note that primary and core macros are stored in external files (*.mdl and *.rcm,
respectively), but that primary and core modules are built into the REAKTOR
program. For this reason, modules are referred to as built-in modules.
Core cells, and the core macros and modules they contain, are built upon new
concepts of signal propagation and runtime compilation. Using REAKTOR
Core technology enables builders to design sophisticated signal-processing
structures, that would not have been possible in REAKTOR 4. For a comprehensive introduction to REAKTOR Core technology, please refer to the
separate REAKTOR Core manual.
1.5. New Primary Modules
There are no new primary modules for audio generation and processing in
REAKTOR 5, because this type of low-level functionality is, from now on,
realized at the core level (i.e. within core cells), not at the primary level. The
is a comprehensive, ever-growing library of core cells, core macros, and core
modules for low-level DSP processing.
The new primary modules focus on the user interface, data storage, voice
routing. MIDI input/output, and internal connections.
The new modules are:
• Mouse Area (Panel) - enables other modules (such as Multi Display
and Poly Display) to process mouse actions (button clicks, mouse
drags, changes in position, etc.).
• Multi Display and Poly Display (Panel) - enable REAKTOR users
to generate and manipulate multiple graphical objects (rectangles,
pictures, animations, etc.).
• Stacked Macro and Panel Index (Panel) - enable multiple macros
to share the same display area in an instrument panel, where one
macro is displayed at a time.
• Channel Message (MIDI In) and Channel Message (MIDI Out) - re-
ceive/send all types of MIDI channel messages from/to external MIDI
devices (keyboard, sequencer, file, etc.) or internal instruments.
• Voice Shift (Auxiliary) - shifts specified input voices (e.g. 1, 2) to
specified output voices (e.g. 3, 4).
• Snap Value Array (Auxiliary) - stores/recalls arrays of values to/from
the edit buffer and snapshots.
Introduction – 17REAKTOR 5
Page 18

• IC Send (Terminal) and IC Receive (Terminal) - send/receive mono-
phonic event signals anywhere in the ensemble. IC stands for internal connection.
• Numeric Readout – is a panel element to display numeric values.
For detailed information on each of these modules, see the Primary Modules
Reference.
1.6. Changed Primary Modules
The appearance and functionality of several REAKTOR 4 modules has been
changed in REAKTOR 5:
• Invert, Rectify (Math), and Merge, Order, Value, Logic AND, Logic
OR, Logic XOR, Logic NOT (Event Processing) - the structure icons
for all of these modules are different from those in REAKTOR 4.
• Meter, Lamp, Multi Picture, Multi Text (Panel), MIDI In Controller,
MIDI Out Controller - the Internal Connections list in the Properties
dialog has been removed from all these modules; Internal connections
are now established by the IC Send and IC Receive modules.
• Snap Value (Auxiliary) - can now be run in monophonic or polyphonic
mode. (In REAKTOR 4, Snap Value is a monophonic-only module.)
• Panel Controls (Panel) - the functionality of several REAKTOR 4 panel
control modules has been changed in REAKTOR 5. Control and port
labels can be edited in panel view (in unlocked mode). Control values
can be set in panel view (in locked mode). Most panel controls can
have panel skins. There are new options for instrument and primary
macro background pictures. For detailed information on each of these
modules, see the Primary Modules Reference.
18 – Introduction REAKTOR 5
Page 19

1.7. New Functions
There are several new functions in REAKTOR 5:
• Panelsets - an enhanced replacement for REAKTOR 4 screensets.
• Bookmarking a structure - you can bookmark a structure so that you
can jump straight to it from any other structure in the ensemble.
• Locking an instrument’s voice allocation settings - an instrument’s
voice allocation settings (Voices, Max Unison V, and Min Unison
V) can now be locked by turning on the Lock Voices option (in the
Properties dialog).
• Voice & MIDI Slave option - an instrument’s voice allocation and
MIDI In settings can now be controlled from another instrument in
the ensemble.
• Panel skins - REAKTOR 5 enables you to customize the appearance
of several panel controls by applying skins to them: faders, knobs,
buttons, lists, switches, Receive modules, lamps, and meters.
• Instrument and macro borders - you can now add borders (blank
margins) to instrument panels and framed primary macros.
• Auditioning audio files in the Browser and Sample Map Editor - the
REAKTOR 5 Browser and Sample Map Editor both support audio-file
auditioning (pre-listening).
• Initialization - REAKTOR 5 has a new initialization scheme for event
inputs that is used if the REAKTOR 4 Legacy Mode option is disabled
(in the Ensemble Properties dialog).
• User Content folders - during installation, REAKTOR 5 creates separate
folders for its system files (ensembles, instruments, primary macros,
core cells, core macros), and for user files that are created/maintained
by the user (ensembles, instruments, primary macros, core cells, core
macros, audio, imported files, pictures, snapshots, tables).
• Deleting wires - wires can now be deleted by dragging the mouse
from the input port to which the wire is connected to a blank part of
the structure.
• Debug option - Show Event Initialization Order numbers modules in
a structure to show their initialization sort order.
• CPU peak meter – The CPU meter has been extended. It now also
features a bar to show the average CPU drain (white), peak above
average (yellow), CPU overload (red).
Introduction – 19REAKTOR 5
Page 20

1.8. Changed Functions
Several REAKTOR 4 functions have been changed in REAKTOR 5:
• Ensemble Panel window - there is now only one panel window, the
former Ensemble Panel window. All instrument panels reside within
the Ensemble Panel window.
• Structure windows - in order to minimize Structure window clutter,
REAKTOR 5 displays all structures (ensemble, instrument, primary
macro, core cell, and core macro) in the same Structure window. You
can bypass this feature and open a structure in a separate window by
Alt+double-clicking the structure icon, or WindowsXP: Right-clicking
/ OS X: Ctrl+clicking the icon and selecting Structure Window from
the context menu.
• Main toolbar - several aspects of the REAKTOR 4 Main toolbar have
been changed in REAKTOR 5. The number of Main toolbar elements
has been reduced, because the Ensemble Panel window and Structure
windows now have their own toolbars. In the OS X implementation of
REAKTOR 5, the toolbar is now displayed as a toolbox that can be
placed anywhere on the screen, in order to keep the window headers
visible.
There are now two MIDI activity lamps: External MIDI In and External
MIDI Out. During the compilation of a core structure, the CPU load
indicator changes to a compilation progress bar.
• Ensemble Panel and Structure toolbars - Ensemble Panel window
and Structure windows now have their own toolbars, each with a set
of the most commonly used functions in that window.
• Instrument header - Several aspects of the REAKTOR 4 Instrument
header have been changed in REAKTOR 5. The A, B, and Minimize
buttons have been moved to the left. The panel Lock/Unlock function
now has its own button (wrench icon). The Mute and Solo buttons
have been removed. There are now four MIDI activity lamps: External
and Internal MIDI In, and External and Internal MIDI Out. The In and
Out drop-down menus provide access to all of the input and output
connections (MIDI and wiring) of the instrument.
• Browser item access - The REAKTOR 5 Browser provides dedicated
buttons that enable you to fast access system and custom folders.
20 – Introduction REAKTOR 5
Page 21

1.9. Discarded and Reassigned Functions
Several REAKTOR 4 functions have been discarded or reassigned in
REAKTOR 5:
• There are no longer separate panels for instruments. All instrument
panels are displayed in the Ensemble Panel window. The new Panelset
bar provides easy (one-click) access to all of an ensemble’s instrument panels.
• REAKTOR 4 screensets (storage slots for ensemble layouts) have
been replaced by REAKTOR 5 panelsets (see New Functions, pan-
elsets).
• The Browser no longer supports wiring (this has been reassigned to
the In and Out menus in an instrument’s panel header), structure
browsing, and module loading.
• The internal MIDI connections of an instrument are no longer set
in the instrument’s Properties dialog; they are set in the instrument
panel header’s In and Out menus.
1.10. Opening REAKTOR 3 Ensembles
Ensembles saved with REAKTOR 3 will not open in REAKTOR 5 unless the
REAKTOR 3 USB copy protection key is plugged in. If you have the key, install
it and plug it into your USB port, then open the REAKTOR 3 ensembles in
REAKTOR 5 and save them as REAKTOR 5 files. Once you’ve done this, you’ll
be able to open the ensemble files without using the key. There is also a Batch
Processing function to perform the convertion of many files at once.
Introduction – 21REAKTOR 5
Page 22

2. Product Authorization
Part of the REAKTOR 5 installation is a Product Authorization which has to be
fullfilled in order to make permanent use of the software. We recommend that
you take notice of this chapter first, then proceed with the software installation
as described in the following chapters and finally return to this chapter.
2.1. What is the Product Authorization?
The Product Authorization includes a full registration. After having completed
the authorization, you can make use of all online services related to the registered product. On the Native Instruments website you can read online tutorials,
get technical support, participate in the NI forums and download updates.
REAKTOR 5 requires the Product Authorization in order to use the software
permanently. You can run REAKTOR 5 for 30 days without any limitations.
As long as the software runs unauthorized a message at every program start
reminds you that the authorization has not been completed yet and indicates
how many more days the software is running without an authorization.
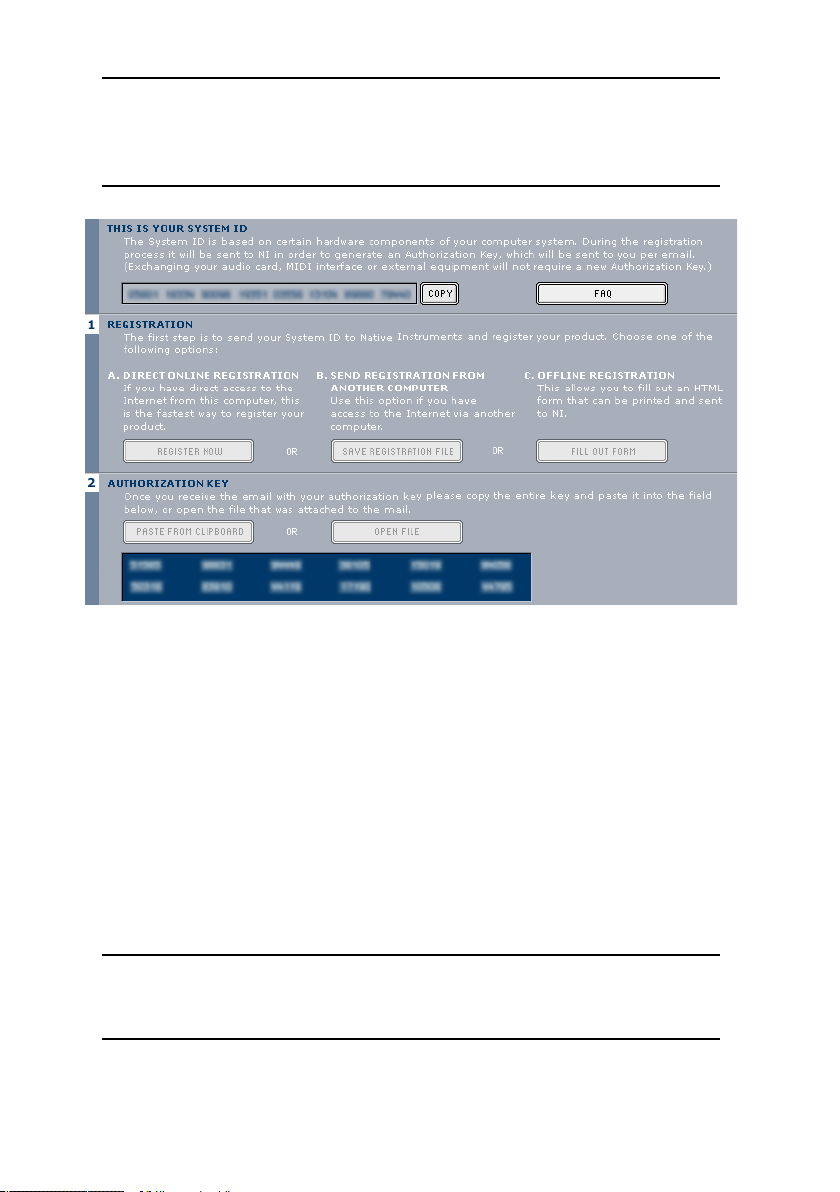
The Product Authorization is performed by a small application called
Registration Tool. The Registration Tool generates a so called System ID which
serves as request code for receiving an Authorization Key. The System ID is
based on some hardware components of your computer system, the operating
system version and the serial number you have entered at the REAKTOR 5
installation.
Note: Exchanging your audio card, MIDI interface or external equipment
will not start the request for a new Authorization Key. Only exchanging a
basic hardware component in your computer or installing a new operating system might produce a new Product Authorization request. In this
case the Registration Tool will reflect the change by displaying a new
System ID and you have to repeat the Product Authorization.
The System ID has to be sent to Native Instruments in order to receive the
Authorization Key which allows the permanent use of REAKTOR 5. Since
the Product Authorization is part of the license agreement REAKTOR 5 will
stop launching after 30 days if it was not authorized until then. Of course, it
is also possible to complete the Product Authorization after 30 days. In this
case the software will launch again as soon as the Product Authorization has
been completed.
22 – Product Authorization REAKTOR 5
Page 23
Note: The data transfer at the online Product Authorization is done via
a secure connection using 128 bit encryption. Native Instruments keeps
your personal data like email and postal address in confidence. No data
will be passed to a third party.
Registration Tool
2.2. Conducting the Product Authorization
Native Instruments has set a high value on making the authorization procedure
as easy and comfortable as possible. In the following sections we describe
three methods of conducting the Product Authorization. We recommend
Method A and Method B since these result in the easiest and fastest way of
receiving the Authorization Key.
2.3
. Method A: REAKTOR 5 computer has direct access to the internet
Important: This method requires a valid email address to complete the
Product Authorization, since the registration code will be sent to you
by email.
Product Authorization – 23REAKTOR 5
Page 24

• Windows: Start the Registration Tool from the start menu (Native
Instruments REAKTOR 5 REAKTOR 5 Registration Tool) or from
the REAKTOR 5 installation folder (default path: C:\Program Files\
Native Instruments\REAKTOR 5\).
• MacOS: Start the Registration Tool from the REAKTOR 5 installation
folder (default path: Applications\REAKTOR 5\).
• A click on the Register Now button opens the Native Instruments
registration webpage. Therefore your standard Internet Browser will
be opened and an internet connection will be established according
to your system settings. Your System ID will be automatically transmitted to the registration form.
• On the first online page you are asked if it is your First Registration at
Native Instruments or if you want to do an Additional Registration.
• Depending on the option you have chosen on the first online page
you now get a login page asking for your username and password or
a form where you can fill out your address data. Please fill out all
required fields and follow the instructions on the screen to complete
the registration.
24 – Product Authorization REAKTOR 5
Page 25
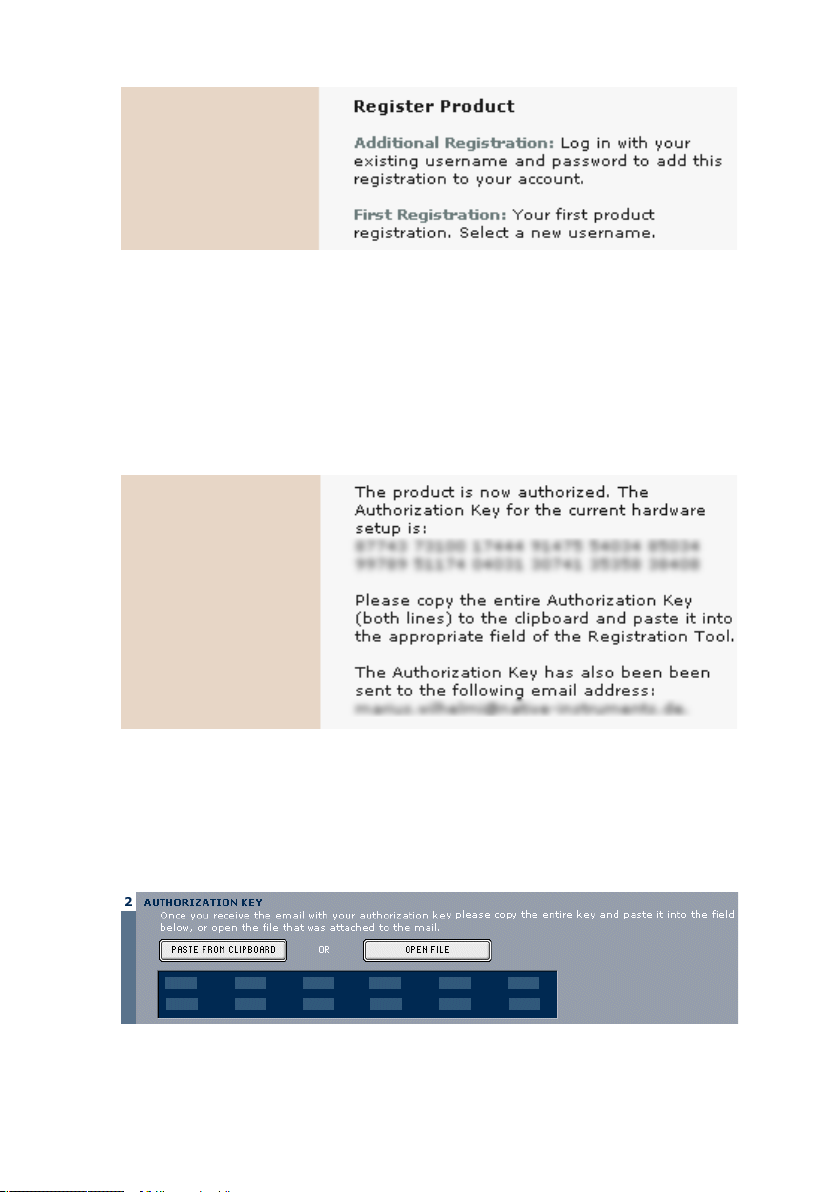
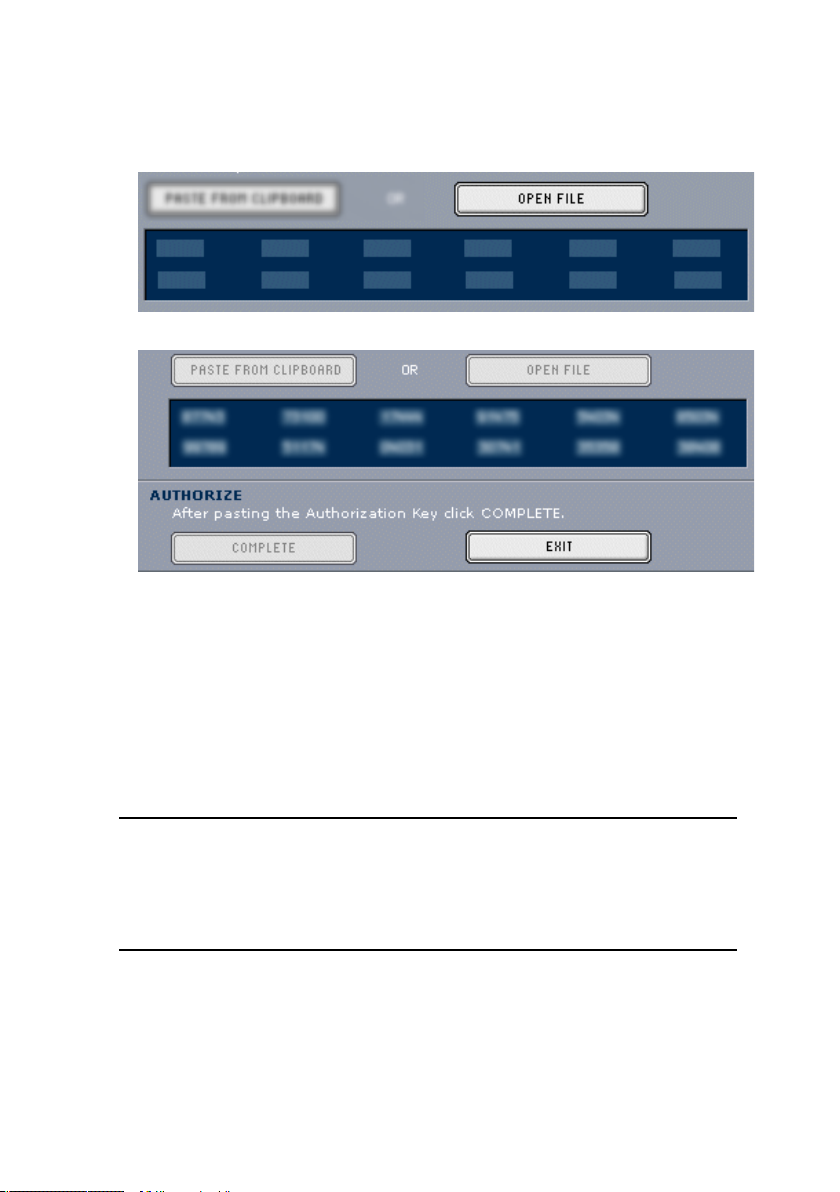
• On the last online registration page your Authorization Key is directly
shown in the browser. Please copy the full number (12 x 5 digits)
and paste it to the registration tool. Within a few minutes you will
also receive an email from the Native Instruments registration system
containing the Authorization key. The Authorization key is available
in the email body and additionally as text attachment. This email
also contains the password which is required for using the online
services.
• Start the Registration Tool again and either copy the Authorization
Key from the email and press the Paste from Clipboard. button in
the Registration Tool or use the Open File button in the Registration
Tool to open the email attachment which you previously have saved
to hard disk.
Product Authorization – 25REAKTOR 5
Page 26
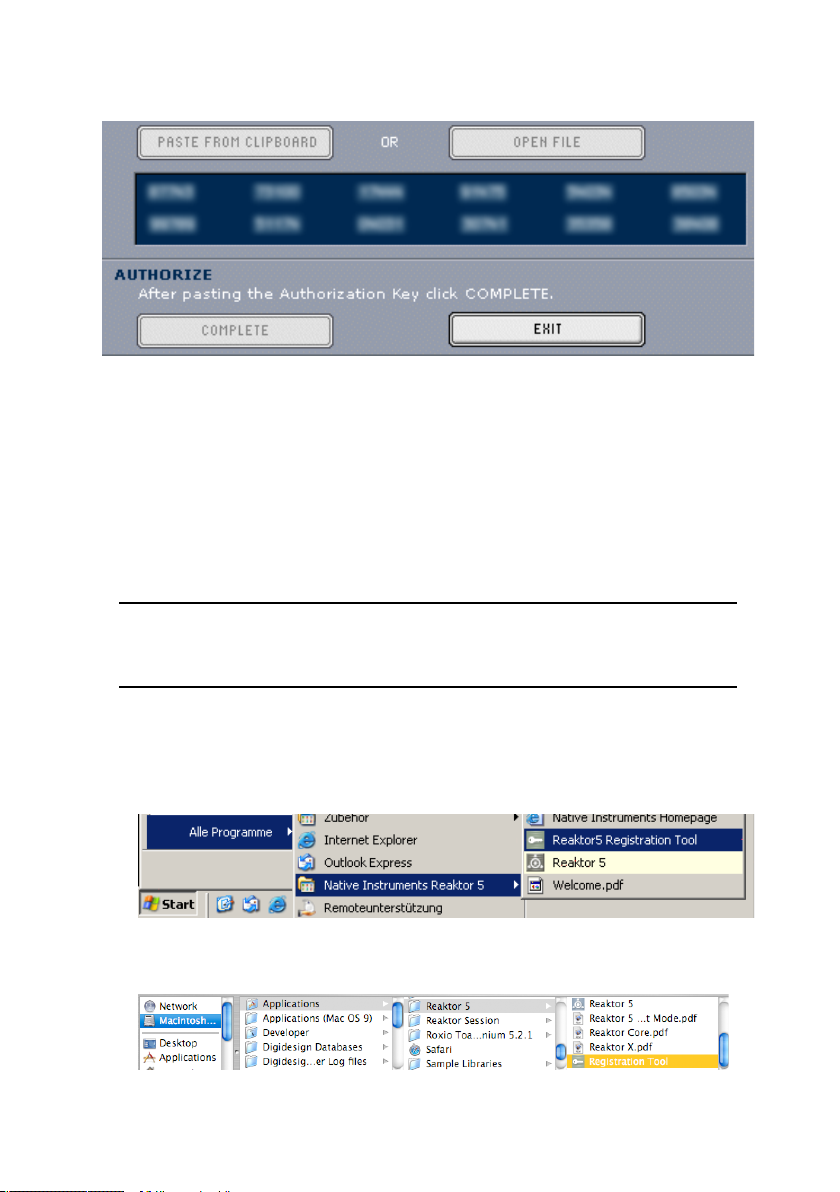
Click on the Complete button.
After completing the Product Authorization the Registration Tool looks like
this
Now the REAKTOR 5 Product Authorization has been completed. The authorization message at every REAKTOR 5 start has disappeared and you can
use the software permanently:
2.4. Method B: Internet Connection on another computer
Important: This method requires a valid email address to complete the
Product Authorization, since the Authorization Key will be send to you
by email.
• Windows: Start the Registration Tool from the start menu (Native
Instruments REAKTOR 5 REAKTOR 5 Registration Tool) or from
the REAKTOR 5 installation folder (default path: C:\Program Files\
Native Instruments\REAKTOR 5\).
• MacOS: Start the Registration Tool from the REAKTOR 5 installation
folder (default path: Applications\REAKTOR 5\).
26 – Product Authorization REAKTOR 5
Page 27

• A click on the Save Registration File button opens a Save dialog for
saving a HTML file. Save the HTML file to any storage medium.
• Transfer the HTML file to another computer where you have internet
access (via floppy disk, CDR etc.).
• Open the HTML file in your internet browser.
• The HTML page contains a link for the registration page on the Native
Instruments website. When you click on this link an internet connection will be established according to your system settings.
• On the first online page you are asked if it is your First Registration at
Native Instruments or if you want to do an Additional Registration.
• Depending on the option you have chosen on the first online page
you now get a login page asking for your username and password or
a form where you can fill out your address data. Please fill out all
required fields and follow the instructions on the screen to complete
the registration.
• Within a few minutes you will receive an email from the Native
Instruments registration system containing the Authorization key.
The Authorization key is available in the email body and additionally
as text attachment. This email also contains the password which is
required for using the online services.
• Transfer the text attachment to the computer where you have installed
REAKTOR 5.
Product Authorization – 27REAKTOR 5
Page 28
• Start the Registration Tool again and use the Open File button in the
Registration Tool to open the email attachment which you previously
have saved to hard disk.
• Click on the Complete button.
After completing the Product Authorization the Registration Tool looks
like this
Now the REAKTOR 5 Product Authorization has been completed. The authorization message at every REAKTOR 5 start has disappeared and you can
use the software permanently:
2.5. Method C: No Internet Connection available
Important: Following this method you will have to fill in a form which
you send to Native Instruments. You will receive the Authorization Key
either by email (recommended), by postal mail or by fax. If you do not
provide Native Instruments with a valid email address in the form, be
prepared to type in the Authorization Key manually (about 60 digits).
If you do not have access to the internet or if you do not have a working email
address, the Product Authorization can also be done via postal mail or fax.
Although Native Instruments goes after a fast handling of your authorization
28 – Product Authorization REAKTOR 5
Page 29

requests, it is generally recommended that you prefer Method A or Method
B for shortest return times and most comfortable operation. Please note the
following instructions to fullfill the Product Authorization:
• Windows: Start the Registration Tool from the Windows start menu
(Native Instruments REAKTOR 5 REAKTOR 5 Registration Tool)
or from the REAKTOR 5 installation folder (default path: C:\Program
Files\Native Instruments\REAKTOR 5\).
• MacOS: Start the Registration Tool from the REAKTOR 5 installation
folder (default path: Applications\REAKTOR 5\)
• A click on the Fill Out Form button opens a local HTML file in the
operating system’s standard browser or another program which you
have defined as standard application for opening HTML files.
• The HTML file contains all information Native Instruments requires
for completing the Product Authorization and registration. Please fill
in the required data and print it out, or write a letter containing the
data.
If you write a letter please attend to a legible handwriting to avoid mistakes at the Native Instruments registration team. Illegible email or postal
addresses can cause problems with the Authorization Key delivery.
Product Authorization – 29REAKTOR 5
Page 30

Send the form to Native Instruments using one of the following contact addresses:
Native Instruments GmbH Native Instruments USA
Registration 5631 A Hollywood Boulevard
Schlesische Straße 28 Los Angeles CA 90028
10997 Berlin USA
Germany
Fax: +49 30 6110352400 Fax: +1-323-372-3676
• You will receive the Authorization Key via email (recommended), fax
or mail.
• Start the Registration Tool again and either copy the Authorization
Key from the email and press the Paste from Clipboard button in
the Registration Tool or use the Open File button in the Registration
Tool to open the email attachment which you previously have saved
to hard disk. If you have received the Authorization Key by mail or
fax, type it in manually.
• Click on the Complete button.
• Now the REAKTOR 5 Product Authorization has been completed. The
authorization message at every REAKTOR 5 start has disappeared
and you can use the software permanently:
2.6. Registration support
If you run into problems during the Product Authorization the Native Instruments
registration support team will be happy to help you. In this case send a support request on the NI website using the following URL:
http://www.native-instruments.com/registersupport.info
Please describe the occurred problem as accurate as possible and provide the
registration support team with the necessary details to solve the problem.
30 – Product Authorization REAKTOR 5
Page 31

3. Installation under Windows XP
3.1. System Requirements and Recommendations
To use the REAKTOR 5 software, you need a computer with the following
minimum specifications:
Hardware
• Pentium III 1 GHz/ Athlon XP 1.33 GHz.
• 512 MB RAM
• Up to 1GB free HD space.
• A sound card compatible with Windows XP
• CD drive
Software
• Windows XP
Important: REAKTOR 5 only runs on processors supporting SSE
3.2. Software Installation
• Insert the REAKTOR 5 CD into the CD drive.
• Use the Windows Explorer to view the contents of the CD.
• Start the installation by double-clicking REAKTOR 5 Setup.exe.
• The setup program will suggest C:\Program Files\Native Instruments\
REAKTOR 5\ as the path for the destination folder. You may also
choose another folder if you wish.
Installed Folders, Files, and Links
The setup program creates a new folder called REAKTOR 5\ in the installation
directory (Program Files\Native Instruments). This folder contains the files
required to operate the software. If you do not choose a different program
group during the installation, links to REAKTOR 5 and a ReadMe file are added
to the Start menu under Programs/Native Instruments.
Installation under Windows XP – 31REAKTOR 5
Page 32

3.3. VST plug-in Installation
• Insert the Installation CD into the CD drive.
• Use the Windows Explorer to view the contents of the CD. To start,
double-click the REAKTOR 5 Setup.exe file.
• When the choice is given by the installer, select VST plug-in from the
list of components to install.
• You can now choose to automatically search for the VST plug-in folder
or manually select the VST plug-in folder of your choice. Please select
the option that best suits your installation requirements.
Note: If more than one host program for VST 2.0 plug-ins is installed
on your computer, the installer lets you install to multiple VST-folders
by shift-clicking them. If you decide to install them at a later date,
simply copy the “REAKTOR 5 VST.dll” file into the VST plug-ins folders
of these programs. Windows: If the VST plug-in files are not visible in
the Windows Explorer, select the Show All Files option. This option is
located in the Explorer menu View Folder Options... on the View tab
below Hidden Files. Optionally, you can set up your programs so that
they all use the same VST plug-ins folder.
3.4. DXi 2 plug-in Setup
DXi 2 is a plug-in interface for software synthesizers and instruments based
on Microsoft DXi technology. Sonar from Cakewalk and Fruity Loops are the
most well known host sequencers that support DXi.
Installation
• Insert the Installation CD into the CD drive of your computer.
• Use the Windows Explorer to view the contents of the CD and dou-
ble-click the REAKTOR 5 Setup.exe file to start the installation.
• Continue the REAKTOR 5 installation until you come to the Choose
plug-ins page. Tick the checkbox DXi plug-in.
The installation program copies the REAKTOR 5 plug-in to your hard disk and
registers it as a DXi 2 plug-in for use in DXi 2-compatible host programs. After
the installation, REAKTOR 5 appears as a plug-in in the host program.
32 – Installation under Windows XP REAKTOR 5
Page 33

3.5. RTAS plug-in installation
• Launch the REAKTOR Installer from the CD.
• Select the Custom installation type.
• Select only RTAS from the list of components to install.
4. Installation under MacOS X
4.1. System Requirements and Recommendations
To use the REAKTOR 5 software, you need a computer with the following
minimum specifications:
Hardware
• Apple PowerMac G4 1 GHz or faster
• 512 MB RAM
• Audio interface compatible with Core Audio
• CoreMIDI compatible MIDI interface for connecting a MIDI keyboard
or an external sequencer (only for the stand-alone version)
• Up to 1GB free HD space
• CD drive
Software
• MacOS 10.2.6
Important: REAKTOR 5 only runs on processors supporting AltiVec
Installation under MacOS X – 33REAKTOR 5
Page 34

4.2. Installing REAKTOR 5 OS X
• Insert the Installation CD into the CD drive of your computer.
• Double-click the installation program Install REAKTOR 5 to start
it.
• The start screen appears first. After clicking Continue and confirm-
ing the license agreement, a dialog opens where you can select the
installation location and the destination folder.
The installation program suggests a path for the REAKTOR 5 folder; if you do
not select a different destination, the REAKTOR 5 folder is created on the first
hard disk. You can choose between Easy Install, where both the stand-alone
and plug-in versions are installed, or Custom Install, where you can select
which versions you want to install.
4.3. MacOS Audio Unit plug-in Installation
• Launch the REAKTOR 5 Installer from the CD
• Select the Custom installation type.
• Select only Audio Unit from the list of components to install.
4.4. RTAS plug-in installation
• Launch the REAKTOR Installer from the CD
• Select the Custom installation type.
• Select only RTAS from the list of components to install.
34 – Installation under MacOS X REAKTOR 5
Page 35

5. Audio Interfaces
Audio interfaces, which include software routines called drivers, allow
REAKTOR 5 (and other programs you have installed, if present) to communicate with your computer’s audio hardware. This section describes how to
use various audio interfaces with REAKTOR 5.
There are two main ways to implement REAKTOR 5:
As a “stand-alone” device that requires no host software. REAKTOR 5’s audio and MIDI connections interact directly with your computer’s audio/MIDI
hardware interface.
As a plug-in that works in conjunction with a “host” program, such as sequencing or hard disk recording software. In this case, the host program interacts
directly with the computer’s hardware interface. REAKTOR 5 connects to the
host program via “virtual patch cords.” REAKTOR 5’s audio outputs appear as
signals in the host’s mixer, and the host passes MIDI data to REAKTOR 5.
We’ll describe each mode in detail, but first let’s look at the various interface drivers and plug-in formats used by different operating systems and
programs.
5.1. Stand-alone Application
REAKTOR 5 works in stand-alone mode with ASIO, MME, DirectSound, and
Core Audio. The REAKTOR 5/computer combination acts as an instrument,
similar to a hardware digital synthesizer. The table shows you which drivers
are available under which Operating System:
Driver Windows MacOS X
ASIO 2.0
DirectSound
MME
Core Audio
Plug-In
Used as a plug-in, REAKTOR 5 is not a stand-alone program but rather a
program “module” that can be integrated into a “host” program such as a
sequencer. plug-in mode allows you to integrate it seamlessly with the sequencer. Furthermore, it has many other uses as a plug-in:
• • (only Jaguar)
•
•
•
Audio Interfaces – 35REAKTOR 5
Page 36

• MIDI sequencing of REAKTOR 5 and audio mix-down of the MIDI
tracks within a single program
• Comfortable automation of REAKTOR 5 parameters in the sequencer
• Further processing of REAKTOR 5 signals using additional plug-ins
• Sample-accurate timing with MIDI controllers (when used as VST 2.0
plug-in)
• Restoring of all plug-in settings when the host document (such as a
song file of the sequencer) is loaded
• Integration with other instruments into a “virtual studio”
The shortcuts / key commands do not work in all sequencers. This is due to
the fact that the host capture keys for themselves and do not pass them on
to the plug-in.
This table provides you with an overview of which interfaces are supported
by which host programs:
Plug-in Interface Host-Program Windows Mac
VST 2.0 Plug-in Cubase, Nuendo • •
DXi Sonar •
Audio Units Logic •
Note: Some hosts include “wrappers” that allow running REAKTOR 5
with a choice of plug-in protocols. Try each one, as one may offer better
performance than another. Example: With Sonar, running REAKTOR 5
as a DXi instrument allows using multiple outputs, while running it as
a VST instrument provides more automation options
Interface Details
The interfaces described below represent different ways REAKTOR 5 can
communicate with your sound card. Available interfaces depend on your
computer, the audio interface (sound card) you’re using, and your computer
platform (REAKTOR 5 supports Windows XP or MacOS X). Choose the fastest
interface protocol supported by your interface, which will likely be ASIO with
Windows, or Core Audio for Mac. For Windows, you can also use DirectSound
and Multimedia (also called MME), but expect a significant delay (called
latency) between the time you play a note and the time you hear it.
36 – Audio Interfaces REAKTOR 5
Page 37

ASIO (Audio Streaming Input Output): This cross-platform plug-in protocol
was developed by Steinberg. It is highly recommended for its low latency,
multi-channel audio card support, and high performance.
DirectSound: Developed by Microsoft, this is a is a component of DirectX 5.0
or higher for Windows. How well DirectX works well depends on your sound
card. If you adjust the interface for an acceptable amount of latency, you
may hear glitches and clicks in the audio output that can only be fixed if you
increase latency.
MME (Multi Media Extension): This is the standard Windows audio driver.
Most sound cards support this interface and work with it quite well. However,
MME is even less suitable than DirectSound for real-time applications due to
its comparatively high latency.
Core Audio: This audio interface for MacOS X is integrated tightly into the
operating system, and works with external audio hardware as well as the Mac’s
integrated audio output.
Plug-In Details
VST (Virtual Studio Technology): Like ASIO, this cross-platform plug-in technology was developed by Steinberg. It is the most common plug-in format,
and many programs are optimized to work with VST plug-ins.
DXi2 (DirectX Instrument 2): Based on Microsoft DirectX technology, this
plug-in interface for software synthesizers and instruments is designed for low
latency and high performance on the Windows platform. Cakewalk Sonar and
Image Line FL Studio are the most well-known hosts that support DXi.
RTAS (Real Time Audio Suite): This interface protocol from Digidesign allows using plug-ins with ProTools (or other Digidesign-compatible software).
Unlike traditional TDM effects that depend on using Digidesign hardware,
RTAS plug-ins are “native;” the host processor performs all computations
needed for the plug-in.
AU (Audio Units): This plug-in format is exclusively for the Macintosh OS X
platform, and is tied in closely with the operating system.
Audio Interfaces – 37REAKTOR 5
Page 38

More About Latency
As with any digital device (including hardware signal processors) that convert
audio to data and back again, a computer adds a certain amount of delay
(“latency”) when processing audio signals. Fortunately, with today’s computers
and low-latency sound card drivers, this delay can be so small that you can’t
hear it (e.g., under 3 milliseconds, which is about the same delay caused by
moving your head one meter further away from a speaker). However, typical
computers are generally not set up for low latency; attempting to play in real
time through REAKTOR will probably be unsatisfying because of the delay.
If your computer is already configured for low-latency operation, keep reading.
38 – Audio Interfaces REAKTOR 5
Page 39

6. REAKTOR 5 as Standalone
When used as a plug-in, the host program has already set up its audio and
MIDI connections, and REAKTOR 5 simply “plugs in” to these. However, with
stand-alone operation REAKTOR 5 communicates directly with your audio
interface. It’s therefore necessary to specify audio and MIDI settings, as well
as the preferred driver protocol (of course, plug-in format is not an issue).
Setup for Mac and Windows machines is essentially identical, except where
indicated. Note that if you change your audio interface, you will almost certainly need to re-adjust these settings.
Call up the Audio + MIDI Settings setup dialog from the Setup menu. You’ll
see three tabs for Soundcard, Routing (audio output patching), and MIDI.
6.1. Soundcard (Audio Interface)
Audio + MIDI Settings dialog
Interface: Choose the fastest interface protocol supported by your interface,
which will be ASIO or Core Audio. For Windows, you can also use DirectSound
and Multimedia (also called MME), but expect a significant delay between
the time you play a note and the time you hear it.
REAKTOR 5 as Stand-alone – 39REAKTOR 5
Page 40

Windows only: Avoid using any drivers listed as “emulated,” as they
provide poorer performance than other drivers. For example, although
DirectSound drivers generally outperform MME drivers, MME drivers
will outperform emulated DirectSound drivers.
Sample rate: The drop-down menu will display compatible sample rates for
your audio interface. 44.1kHz is the same sample rate used for CDs, and is
the most “universal” choice. However, some audio interfaces offer 48kHz
and 96kHz (REAKTOR 5 accepts up to 96kHz sample rates). These higher
rates stress your computer more, but offer somewhat better high frequency
response. If you are using REAKTOR 5 standalone, choose whichever rate
you prefer. When used as a plug-in with a host program (e.g., Cubase, Digital
Performer, Logic, Sonar, etc.), the host will determine the sample rate.
Output Device: Use ASIO written specifically for your audio interface (not
“ASIO DirectX” or “ASIO Multimedia,” unless no other choices are available),
or for the Mac, Core Audio.
Output Latency: This field displays the output latency. For some drivers you
can adjust the latency individually using a fader.
Adjust latency for the fastest possible setting that gives consistent audio
performance. The CPU may not be able to keep up with fast settings, resulting in possible crackles or pops in the audio. Slower settings will give more
consistent audio performance, but the amount of delay may be musically
unsatisfying.
Experiment with the latency setting until you find the best compromise between consistent audio performance and fast response. A quick way to adjust
latency is as follows:
Select any instrument and play it while moving the Latency slider.
Move the Latency slider to the left until you start to hear clicks in the audio
output.
Now move the slider to the right until the clicks disappear. This is the optimum setting.
40 – REAKTOR 5 as Stand-alone REAKTOR 5
Page 41

6.2. Routing
Using the drop-down menu, REAKTOR 5’s Output can be assigned to an
output from a multi-output sound card.
If your sound card offers multiple inputs and outputs, you can choose which
ones connect to REAKTOR 5 Click on Inputs to choose the desired inputs
from the drop-down menus, and click on Outputs to select the outputs, also
from drop-down menus. Note that the right and left channels are independent
and can be assigned to any inputs/outputs – not just stereo pairs – as well
as disconnected from audio ins and outs.
REAKTOR 5 provides up to 8 monophonic outs. Using all of these in standalone mode requires an audio interface with eight output channels.
However, it is not necessary to have this many channels. For example, if a
notebook computer has built-in audio and offers only a single stereo output (two
channels), you can assign all the REAKTOR 5 sounds to the stereo output.
REAKTOR 5 as Stand-alone – 41REAKTOR 5
Page 42

Each drop-down list shows what outputs are available from the driver/audio
interface selected under the Interface tab. Assign each REAKTOR 5 1/2 Right,
Channel 3/4 Left, Channel 3/4 Right, Channel 5, Channel 6, Channel 7, and
Channel 8) to the desired hardware output.
Windows only: The audio interface’s overall level may be determined by
a mixer applet included with your interface hardware, or the built-in Windows mixer. If you encounter excessively low or high levels, please check
the Windows volume control by going Start Programs Accessories
Entertainment Volume Control. Then check the Wave volume slider,
and adjust its level as needed.
6.3. MIDI
When you click on the MIDI tab you’ll see a list of MIDI I/O. Initially, each
one will be Off. This field is a toggle – click on Off to turn an input or output
On, click on On to turn an input or output Off.
If you enable more than one input, they will be merged.
42 – REAKTOR 5 as Stand-alone REAKTOR 5
Page 43

7. REAKTOR 5 as Plug-in
The plug-in version of REAKTOR looks a bit different from the standalone
version, but you have still access to all the software’s main features (unless
they are not applicable to plug-in operation).
A menu is available in the plug-in version as context menu. To call up the
menu, WindowsXP: Right-click / OS X: Ctrl + Click within an empty space
of the toolbar. You can hide the toolbar with the first entry in this context
menu. Even if the toolbar is hidden, you can call up the menu anytime with a
WindowsXP: Right-click / OS X: Ctrl + Click on an empty area of the Browser,
Snapshot or Properties window.
If you hide the toolbar and close all other windows except for the Ensemble
window and finally press the Resize button, your Ensemble fits perfectly into
the plug-in window.
The left part of the plug-in window can be toggled between three different
views: Properties (F4), Browser (F5), Snapshots (F6). Alternatively, you can
hide this area by clicking on the Close button which shows a small cross.
If the toolbar is visible, the button on the right serves for switching to the
Browser view. If it is hidden, use the shortcut F5.
Browser button
The Snapshot view can be accessed by the Snapshot buttons in the Ensemble
and Instrument Headers (F6).
Snapshot button
The Properties view can be accessed by double clicking on any control within
an Instrument panel (F6).
If you open the Sample Map Editor for a Sampler by double clicking a sampler
waveform within an Instrument panel, it will be displayed at the buttom of
the plug-in window.
Ensembles can be saved using the Save button in the Toolbar. You can save
the Ensemble under a new name when you perform a Ctrl click on the Save
button.
REAKTOR 5 as Plug-in – 43REAKTOR 5
Page 44

Automation: If your host supports plug-in automation, REAKTOR will pass
the parameter names and value ranges of the controls used in the currently
loaded ensemble to the host.
7.1. Automation ID editing
Each control element in a REAKTOR ensemble is assigned a unique automation
ID. This enables automation from a host application. The ID determines the
order that the controls appear in the host parameter list. For this reason, the
instrument properties has several functions for re-arranging the automation
ID’s. These functions are particularly important in certain host applications
that only recognize a limited number of parameters.
• Compress ensures that there are no ‘gaps’ between automation
ID’s.
• Sort and compress additionally ensures that ID’s of controls within the
same macro are grouped together (so that they will appear together
in the host parameter list).
• Each instrument in an ensemble also has a unique base ID. This
determines the overall order of Instrument controls within the parameter list. Instrument up and Instrument down increase or decrease
the priority of the instrument in the parameter list.
7.2. Total Recall
Loading a REAKTOR Plug-in
After inserting a REAKTOR plug-in in your host application, you will be pre-
sented with two options: New Ensemble and Load Ensemble....
Selecting New Ensemble will load New.ens (an empty structure in which you
can construct your own ensemble). Selecting Load Ensemble... will present
a file dialog to select an existing file.
It is also possible to load an ensemble by drag and drop from the browser or
from an outside window.
44 – REAKTOR 5 as Plug-in REAKTOR 5
Page 45

The Auto Save Configuration Dialog
After loading an ensemble or creating a new one, the Auto Save Configuration
dialog with the following options will appear.
• Save this instance automatically: Enabling this option is always rec-
ommended. It ensures that the ensemble and all changes made to
it are saved to a separate .ens file when you save your project. This
is safest as amendments to the original ensemble will not affect your
project. When enabled, you are required to choose a destination
folder and a filename for the Auto Save location. When disabled, a
copy of the ensemble is not made, thus saving disk space. The current setting of the ensemble panel controls will be stored within your
project file. But please note, sharing ensembles in this way means
that amendments to the structure of the original ensemble will affect
all projects using the ensemble. Further, changes to event / audio
table data and sampler file references will not be stored when saving
the project.
• Automatic saving by default in this project: When this option is on,
the Auto Save Configuration dialog will open up with each REAKTOR
plug-in that you insert in this project. Keeping this option active
guarantees that the latest state of all ensembles used in this project
will be saved in their own files.
• Auto Save Folder: Here you specify the folder where the ensemble
shall be automatically saved. You can either enter a directory from
the keyboard, or select it from a file browser by clicking on the folder
icon. It is recommended to store ensemble files in the same folder
as the project file itself. This ensures that they will be kept together
when moving the project folder.
REAKTOR 5 as Plug-in – 45REAKTOR 5
Page 46
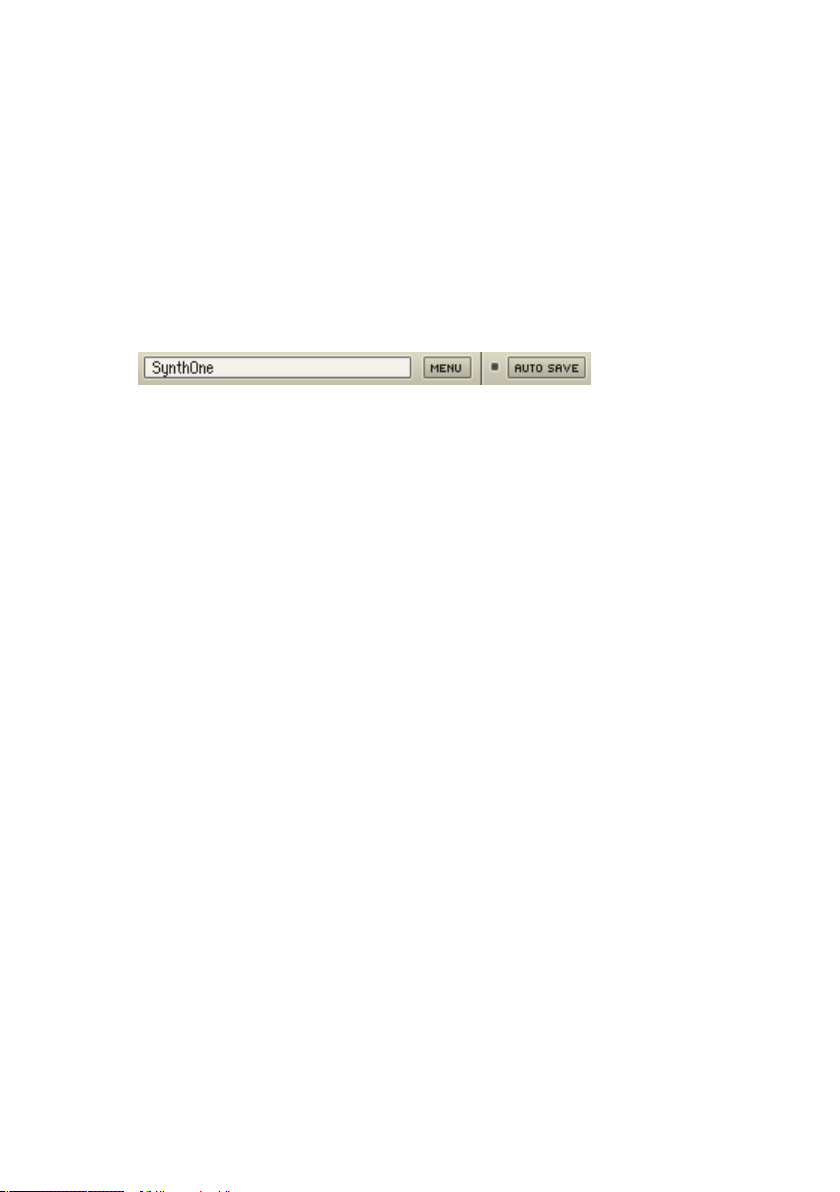
• Ensemble Name: Here you can specify a filename for the ensemble.
We recommend choosing a name that is unique and cannot be confused with the names used for other plug-in instances in the current
project or other projects.
• OK: Selecting OK confirms the Auto Save configuration. If Auto Save
is on, but a folder or ensemble name have not yet been defined, the
option to select “OK” is disabled.
• Cancel: Discards changes and closes the dialog
Auto Save Functions in the Plug-in Header
• The first field shows the file name of the currently loaded ensemble.
This is updated with the file name that has been given in the Auto
Save Dialog.
• The Menu button opens the main menu.
• The lamp between Menu and Auto Save” buttons shows whether the
plug-in is in Auto Save mode or not.
• The Auto Save button opens the Auto Save Configuration dialog. This
allows you to reconfigure Auto Save settings. If you change the Auto
Save folder, the ensemble will be automatically moved to the new
destination. If there are any other instances using the old folder,
you will be asked whether to change the Auto Save folder for those
instances too.
Replacing an Ensemble
If Auto Save is enabled, and you replace the ensemble, the Auto Save configuration dialog will appear. Thus, when auditioning different ensembles it
might be advantageous to disable Auto Save until you decide which ensemble
to use.
Loading a Project and the Ensemble is not Found
If an ensemble is not found when opening a project, a message will appear in
the plug-in window. You can locate the ensemble via a file browser by clicking the Locate Ensemble button, by dragging the correct ensemble into the
window, or by re-configuring the Auto Save dialog. If other plug-in instances
have missing ensembles, an option to try the new folder location for those
other instances will now appear.
46 – REAKTOR 5 as Plug-in REAKTOR 5
Page 47

Working with multiple REAKTOR Plug-ins
If you load another REAKTOR plug-in into your project, the Auto Save mode
and folder are taken from the last REAKTOR plug-in instance.
What is Saved with a Project
When the project is saved (or the host queries the plug-in data for whatever
reason), the following happens:
• If Auto Save is turned on, the ensemble is saved as a file to the
AutoSave folder.
• If Auto Save is turned off, the path of the currently used ensemble
is saved in the project data.
In either case, the following are also saved:
• The current setting of all panel controls
• The last Auto Save mode and folder
• The current window size and mode (minimized, auto-layout or
fixed)
Saving a copy of an Ensemble
In the Plug-in the ‘Save As’ command is replaced by ‘Save A Copy As’. This
allows saving a copy of the ensemble elsewhere without changing the Auto
Save filename and path.
Global Auto Save default
In the Preferences, the Auto Save off by default option determines the default
Auto Save configuration for new instances.
Plug-in Size Functions
Several functions are available for controlling the window size of a plug-in.
These are the last four buttons on the right hand side of the plug-in toolbar.
The first two buttons minimize and maximize the screen respectively. The third
button (‘Manual resize’) resizes the plug-in window to fit the ensemble when
pressed. The fourth button (‘Automatic Resize’) is a toggle button. When
REAKTOR 5 as Plug-in – 47REAKTOR 5
Page 48

activated, the plug-in window will always be automatically resized when required
(for example, switching windows, toggling between A and B panels).
The maximum plug-in window size can now be configured in the preferences.
7.3. VST 2.0 Plug-In
7.3.1. Using the REAKTOR 5 plug-in in Cubase SX 3
• Launch Cubase, go to the Devices menu option and select the VST
Instruments menu option or press F11 on your keyboard.
• A window showing the instrument rack appears. Click on an empty
slot and choose REAKTOR 5 from the available list of instrument
plug-ins.
• The plug-in will now appear in your list and automatically be turned
on. It will also create a set of audio channels in your VST mixer that
will be used for mixdown within your project. This will allow you to
mix, pan, and process REAKTOR 5's output just like any other existing audio track in your Cubase song.
• Click on the Edit button to call up the REAKTOR 5 interface. Here you
can control and edit all the features and functions that REAKTOR 5
has to offer.
• Now go to the “Project” page and add a MIDI track (if you do not
have one already created).
• Go to the Output parameter section for this MIDI Track and click on
the field. This will create a list of available MIDI out ports to assign
to this MIDI track. Choose REAKTOR 5 from the list.
Note: If REAKTOR 5 does not appear in the list of available VST instruments inside your VST 2 host application, then it is not installed correctly.
Please refer to the previous section on installing the plug-in for both
Windows and Mac platforms for more assistance on setting this up.
48 – REAKTOR 5 as Plug-in REAKTOR 5
Page 49

After having loaded an Instrument from the library you should be able to trigger it via MIDI using a keyboard controller. REAKTOR 5’s sound will generate
through the VST mixer and directly to your sound card. If the plug-in does
not receive MIDI or generate audio, then make sure to check the following
areas:
• Make sure “MIDI thru” is enabled in Cubase.
• The MIDI channel of your MIDI track must correspond to the receive
channel of the loaded instrument.
• Make sure that you have properly configured your sound card for use
with Cubase.
(please refer to your Cubase manual for more information)
7.3.2. Using the REAKTOR 5 plug-in in Nuendo 2.0
• Launch an empty or current project in Nuendo.
• Click on the Devices menu and choose VST instruments from the
menu options (or press F11 on your keyboard).
• A window showing the instrument rack appears. Click on an empty
slot and choose REAKTOR 5 VST from the available list of installed
plug-ins.
• The plug-in will now appear in your list and automatically be turned
on. It will also create a set of audio channels in your VST mixer that
will be used for mixdown within your project. This will allow you to
mix, pan, and process REAKTOR 5's output just like any other existing audio track in your Nuendo project.
• Click on the Edit button to call up the REAKTOR 5 interface. Here you
can control and edit all the features and functions that REAKTOR 5
has to offer.
• Now go to the “Project Editor” page and create a MIDI track (if you
do not have one already created).
• Go to the Output parameter section for this MIDI Track and click on
the field. This will create a list of available MIDI out ports to assign
REAKTOR 5 as Plug-in – 49REAKTOR 5
Page 50

to this MIDI track. Choose REAKTOR 5 VST from the list. Also make
sure you assign the MIDI input port to correspond to whatever MIDI
controller your are using.
• Record enable the MIDI track.
Note: If REAKTOR 5 does not appear in the list of available VST instruments inside your VST 2 host application, then it is not installed correctly.
Please refer to the previous section on installing the plug-in for both
Windows and Mac platforms for more assistance on setting this up.
After having loaded an Instrument from the library you should be able to trigger it via MIDI using a keyboard controller. REAKTOR 5’s sound will generate
through the VST mixer and directly to your sound card. If the plug-in does
not receive MIDI or generate audio, then make sure to check the following
two areas:
• Make sure “MIDI thru” is enabled in Nuendo.
• The MIDI channel of your MIDI track must correspond to the receive
channel of the loaded instrument.
• Make sure that you have properly configured your sound card for use
with Nuendo
(please refer to your Nuendo manual for more information).
7.4. Audio Units Plug-ins
7.4.1. Use in Logic 7.x
• Launch Logic and create an audio instrument track or set an existing
audio or MIDI track to an audio instrument track by clicking on it,
holding down the mouse button and choose Audio Audio Instru-
ment Inst 1.
50 – REAKTOR 5 as Plug-in REAKTOR 5
Page 51

• Double click the audio instrument track to open the environment
window. Logic scrolls automatically to the first instrument bus in the
Logic mixer.
• Choose the REAKTOR 5 Audio Unit plug-in in the appropriate insert
slot of the instrument mixer bus, either in the arrange or mixer window. Then click onto the insert slot, hold down the mouse button and
choose Stereo Audio Units Native Instruments REAKTOR 5.
(REAKTOR 5 is also available as a multi-channel insert)
• The plug-in now appears in the instrument slot and is ready to use.
The instrument mixer channel will allow you to mix, pan, and process REAKTOR 5’s output just like any other existing audio track in
Logic.
• If the REAKTOR 5 interface is not already open, double click on the
mixer’s REAKTOR 5 slot to call up the REAKTOR 5 interface. Here you
can control and edit all the features and functions that REAKTOR 5
has to offer.
Note: If REAKTOR 5 does not appear in the list of available AUinstruments
inside your AU host application, then it is not installed correctly. Please
refer to the previous section on installing the plug-in for the Mac platform
for more assistance on setting this up.
After having loaded an Instrument from the library you should be able to trigger it via MIDI using a keyboard controller. REAKTOR 5’s sound will generate
through the mixer and directly to your sound card. If the plug-in does not receive
MIDI or generate audio, then make sure to check the following two areas:
• Make sure the Inst track is selected in the Arrange window.
• The MIDI channel of your MIDI track must correspond to the receive
channel of the loaded instrument.
• Make sure that you have properly configured your sound card for use
with Logic.
(please refer to your Logic manual for more information).
REAKTOR 5 as Plug-in – 51REAKTOR 5
Page 52

7.4.2. Use in Digital Performer 4.5
• Launch Digital Performer and create an instrument track by selecting
Project Add Track Instrument Track REAKTOR 5.
• Create a MIDI track by selecting Project Add Track Midi Track.
In Digital Performer’s track overview window (or in the sequence editor window) assign the ouput of this MIDI track to “REAKTOR 5-1”
and a MIDI channel. If you instantiate further REAKTOR 5 Plug-Ins
they will be named “REAKTOR 5-2”, “REAKTOR 5-3” etc.
• The plug-in is now ready to use. The mixer of Digital Performer will
allow you to mix, pan, and process REAKTOR 5's output just like any
other existing audio track.
• To play REAKTOR 5 with your keyboard, record enable the MIDI track
which you have routed to REAKTOR 5 and make sure Midi Patch
Through is enabled in the Studio menu of Digital Performer.
52 – REAKTOR 5 as Plug-in REAKTOR 5
Page 53

• Double click on the REAKTOR 5 slot in Digital Performers mixing
board to call up the REAKTOR 5 interface. Here you can control and
edit all the features and functions that REAKTOR 5 has to offer.
Note: If REAKTOR 5 does not appear in the list of available Audio Unit
plug-ins inside your Audio Units host application, then it is not installed
correctly. Please refer to the previous section on installing the plug-in
for Mac platforms for more assistance on setting this up.
After having loaded an Instrument from the library you should be able to
trigger it via MIDI using a keyboard controller. REAKTOR 5’s sound will generate through Digital Performers mixer and directly to your sound card. If the
plug-in does not receive MIDI or generate audio, then make sure to check
the following two areas:
• Make sure Midi Patch Through is enabled in the Studio menu of
Digital Performer.
• The MIDI channel of your MIDI track must correspond to the receive
channel of the loaded instrument.
• Make sure that the instruments track output is correctly set.
• Make sure that you have properly configured your sound card for use
with Digital Performer.
(please refer to your Digital Performer manual for more information).
7.4.3. Use in Garage Band
• Launch Garage Band
• Press the “+” button to create a new “Software Instrument” Track.
From here you can choose the icon you wish to use.
• Double-click the instrument track icon or press the “I” icon to get
the Track Info.
• From the Info window expand the Details triangle underneath the
Instrument icon to expose the track settings.
• From the Generator drop-down menu, choose REAKTOR 5 from
among Audio Unit plug-ins.
• Clicking on the pencil icon next to the “Manual” drop-down menu
will open the REAKTOR 5 interface for editing.
REAKTOR 5 as Plug-in – 53REAKTOR 5
Page 54

• REAKTOR 5 can now be played using an external MIDI keyboard.
7.5. DXi 2 plug-in
DXi is a Microsoft DirectX technology based plug-in format
7.5.1. Use in Sonar 4
• Launch Sonar
• In the synth rack choose REAKTOR 5 DXi 2.
Loading the REAKTOR 5 DXi 2 plug-in in the synth rack
• Route a MIDI track to the DXi 2-Plug-in by selecting REAKTOR 5 in
the Out drop down list.
Assign a MIDI track to the REAKTOR 5-DXi-Plug-in
After having loaded an Instrument from the library you should be able to trig-
54 – REAKTOR 5 as Plug-in REAKTOR 5
Page 55

ger it via MIDI using a keyboard controller. REAKTOR 5’s sound will generate
through Sonar’s mixer and directly to your sound card. If the plug-in does
not receive MIDI or generate audio, then make sure to check the following
two areas:
• Make sure Midi Patch Through is enabled in the Studio menu of
Sonar.
• The MIDI channel of your MIDI track must correspond to the receive
channel of the loaded instrument.
• Make sure that the instruments track output is correctly set.
• Make sure that you have properly configured your sound card for use
with Sonar.
(please refer to your Sonar manual for more information).
7.7. Usi
The RTAS format is an interface protocol for Mac OS and Windows that allows
you to use plug-ins with ProTools independently from additional TDM hardware,
while nonetheless offering the widest range of features. In this case, the host
processor alone performs all of the computations for the plug-in.
• Launch Pro Tools
• Create a new AUX track File a New Track
• Create a new MIDI track the same way
• Locate the channel mixer Windows Show mix
• The dark grey box at the topmost section of the AUX channel is the
• Choose REAKTOR 5 from the menu
ng REAKTOR RTAS with Pro Tools 6.x (Mac/Windows)
RTAS insert section. Click on the first empty slot to show all available
RTAS plug-ins.
REAKTOR 5 as Plug-in – 55REAKTOR 5
Page 56

• Now locate the MIDI channel you just created
• In the output slot, choose REAKTOR and the appropriate channel
After record enabling the MIDI track, you will be able to play REAKTOR with
your MIDI keyboard.
Important: If you will to use REAKTOR’s multiple outputs (provided the
REAKTOR ensemble supports this) in Pro Tools 6.7 or higher, you must
create additional stereo/mono Auxiliary tracks in your Pro Tools session.
After creating new tracks, set the aux input source to “plug-in” and
choose the corresponding output from the drop-down list.
(Please refer to your Pro Tools manual for more information on how to record
REAKTOR’s output).
56 – REAKTOR 5 as Plug-in REAKTOR 5
Page 57

8. Open Sound Control (OSC)
OSC is an open, network-independent protocol developed for communication
among computers, sound synthesizers, and other multimedia devices. Compared to MIDI, OSC provides increased reliability, greater user convenience,
and more reactive musical control. Open Sound Control is useful in any situation where multiple music applications have to work together on the same
computer or on networked computers. While MIDI only has the parameters
defined in the standard (note on/off, pitch bend, control change, etc.), OSC
lets each program have its own symbolic, hierarchical, and dynamic address
space.
OSC can be used with any networking technology, including TCP/IP based
LANs and the internet. OSC’s time tags and bundles of messages provide for
exact timing of musical results even if the network has latency and jitter. OSC
supports a variety of argument types which will be successively integrated
into future releases of REAKTOR.
8.1. Application areas
The OSC implementation of REAKTOR allows for easy setup of
• Internet-based collaborative international music making
• Sound installations with dozens of computers coordinating with each
other
• Coordinating synthesis between two (or more) computers to increase the
total processing power
• Communication between music software applications within a single
computer.
The OSC implementation in the current version of REAKTOR only supports
transmission of event data between two or more REAKTOR computers, but
not audio data. In addition to REAKTOR’s general requirements you will need
an ethernet card to use OSC. Also, TCP/IP and UDP protocol stacks must be
installed on your computer.
Open Sound Control – 57REAKTOR 5
Page 58

8.2. OSC System Setup
OSC Sesttings window
REAKTOR’s Open Sound Control (OSC) settings are made using the OSC
Settings window which you can open from the System menu. OSC provides
communication between media devices and software such as REAKTOR using
a variety of network protocols, including TCP/IP and LANs.
58 – Open Sound Control REAKTOR 5
Page 59

Activating OSC
OSC communication can be enabled and disabled at will using the Activate
OSC button at the top-left of the OSC Settings window. OSC communica-
tion is only possible when REAKTOR’s audio processing is active, and as a
consequence, you need an audio card or built-in audio capability on your
computer to activate OSC. The Activate OSC status is preserved between
REAKTOR sessions.
OSC Identification
In addition to the Activate OSC button, the top section of the OSC Settings window contains your Local IP Address, Local Identifier, and Local Port settings.
The settings in this section are all preserved between REAKTOR sessions.
• Local IP Address: This is the current IP address of your computer. It is
recognized automatically and can not be edited.
• Local Identifier: This name will be used to identify you to other OSC
clients. You can choose any name you like.
• Local Port: This is the sub-network identifier by which other OSC clients
recognize your system when they scan the network (see the Scan button
below). Only certain ports are scanned, and you should use a number
between 10,000 and 10,015.
• Apply: When you make changes, you need to click the Apply button to
have them take effect.
OSC Synchronization
The second section of the OSC Settings window contains synchronization
settings.
• Clock Sync (Master): Click this to have REAKTOR send an OSC clock
signal to other OSC clients. OSC clock works exactly like MIDI clock.
Clock will be sent to all clients on the Member list (see below).
• Time Sync (Master): Time Sync is a control circuit system. The client
constantly polls the master for the time stamp, compares the received
time with its own, and adjusts it if neccessary.
• Select Master: When not operating in Clock Sync Master mode, use this
menu to synchronize to an OSC master. Select Clock Sync to synchronize
to Clock Sync signals. Select another OSC member to Time Sync with
that client.
Open Sound Control – 59REAKTOR 5
Page 60

• Sync LEDs: There are small LEDs to the right of the Clock Sync and
Time Sync checkboxes. These indicate when a synchonization signal is
received or sent.
• Sync Errors: This field reports synchronization errors.
• Time Offset (ms): Adds the time offset to each OSC message sent to
the clients. If you enter 1000 ms each message will be received one
second later by the client. This only applies if the participating clients
are in Time Sync mode.
OSC Member List
This list contains all REAKTOR OSC clients to whom a connection has been
established.
You can edit and delete entries in this list. To do so, select an entry and
press the Edit button. To apply any changes you have made, click the Apply
button.
To delete an OSC connection in the OSC member list, just select the entry
and press the Delete button.
The Scan function is able to recognize OSC members within a sub-network
automatically. This only works when the following conditions are met:
• The client must be located within the same subnet.
• REAKTOR must be running on this computer (audio engine active).
• OSC has to be activated in the REAKTOR OSC Settings.
• In the REAKTOR OSC Settings a port address between 10,000 and
10,015 must have been entered.
If you want to connect two computers that are not located in the same subnet
(for instance if you want to establish an OSC connection via the internet),
you will have to enter manually the Identifier, IP address and Port number
of the other computer below the member list area and then press the Apply
button.
OSC Monitor
The bottom section of the OSC Settings window is for monitoring OSC activity.
• OSC Message: This field is for sending text messages to other OSC clients.
It can be used to test OSC connections or as a chat box. First select a
60 – Open Sound Control REAKTOR 5
Page 61

recipient in the Member list, type a message and finish the operation
with the enter key. The message will then be sent to that client.
• OSC Monitor: The monitor displays all received OSC messages.
• Monitor Options: Here you can set certain functions for the monitor
window.
9. First Steps in REAKTOR
The purpose of this chapter is to make you familiar with the basics of the
operation and the functionality of REAKTOR and how to program it.
We will dispense with trying to tell you that REAKTOR is a very simple affair
and that within only a few minutes you will have programmed your own physical modeling synthesizer. That would be a lie. The fact is that REAKTOR is
a complex program that offers complex functions which allow you to achieve
complex things. And if that’s just what you want to do, you won’t really get
around an intensive initial learning phase. After all, real success never comes
easy.
But don’t worry. Although you can work with REAKTOR at a complex level,
you don’t have to. As you will see in our first tour, it is possible to make music
with the software using a number of different instruments, even without any
knowledge of synthesis methods or processing structures. You simply help
yourself to the provided library.
9.1. Opening and Playing Examples
First, make sure that your MIDI controller instrument (master keyboard or MIDI
workstation) is connected to one of the MIDI inputs of your computer. The
input port should have been activated under Input Interface on the MIDI tab
of the Audio + MIDI Settings... dialog. (For more information about activating
MIDI ports, see REAKTOR Standalone). The MIDI transmit channel on your
controller should be set to 1.
Alternatively, you can just use the QWERTY keys on your computer keyboard
to play notes (see Appendix for key mapping).
First Steps in REAKTOR – 61REAKTOR 5
Page 62

SynthOne
Panel Window for SynthOne
Now open the folder Tutorial Ensembles in the REAKTOR Library folder, select
SynthOne.ens and click on Open, or drag the ensemble from the REAKTOR
Browser into the main REAKTOR window.
You should first take a quick look at the Main toolbar.
Is the Run/Stop Audio button on, and does the field next to it show the current
CPU usage? If so, you can now play SynthOne. If not then click the Run/Stop
Audio button to turn on your new synth, and then let ‘er rip! By the way, if
the CPU usage field shows Over or a warning message pops up (“Processor
Overload!”) to inform you that audio processing has been turned off, then you
will need either to reduce the number of Voices in the Instrument header of the
Synth 1 panel from 6 to a smaller number, or to choose a lower sample rate
than the initial 44100 Hz in the toolbar. And if the Out level meter should ever
light up red, this indicates that the sound card is being overloaded – in which
case you should reduce the ensemble volume (by using the Main fader).
With every note you play, the MIDI In lamp in the Instrument Header should
light up red.
This lamp indicates that the SynthOne is receiving MIDI data, while the MIDI
In Ext lamp in the Instrument header indicates that the MIDI data is being
received by the instrument.
SynthOne is a replica of a simple 6 voice analog synthesizer. It contains one
62 – First Steps in REAKTOR REAKTOR 5
Page 63

sawtooth oscillator, a 24-dB lowpass filter, an LFO that affects the pitch,
and an ADSR envelope that modulates the sawtooth amplitude and the filter
cutoff frequency.
In the SynthOne panel you can find the control elements that are available for
changing the sound. From left to right, these are: A(ttack), D(ecay), S(ustain)
and R(elease) for changing the shape of the envelope, Cutoff for controlling
the filter cutoff (or corner) frequency, Reson(ance) for the amount of boost
applied to the frequencies near this cutoff frequency, EnvAmt for setting how
much the filter is affected (modulated) by the envelope, and finally Depth for
setting the LFO intensity and Rate for the LFO speed.
If you have ever had your hands on a synthesizer before, then dealing with this
straightforward device should not be much of a challenge. On the other hand,
if SynthOne is your first synth, you now have the opportunity to experiment
with the effect that these few but essential synthesis parameters have on the
sound. And there’s no reason to worry about getting too lost.
If during your experiments you should come across a sound that you particularly like, you may want to save it. To do so:
• Open the Snapshots window by clicking on the camera icon in the toolbar,
which opens the snapshot window.
The Snapshots window is used for managing (saving, renaming, deleting,
etc.) snapshots, which are like the “patches”, “presets” or “programs”
found in other programmable synthesizers.
• Click the Append button twice (the first click lights the button, the second
un-lights it) to save your current SynthOne sound settings to the first
empty slot in the snapshots list.
• REAKTOR gives your new snapshot a default name. To rename it, doubleclick on the current name, type your new name, and press the Enter
key.
First Steps in REAKTOR – 63REAKTOR 5
Page 64

Padecho
The next ensemble we are going to have a look at is called Padecho.ens.
(Pad-echo = Pad with echo.) You will find it in the same folder from where
we previously pulled out SynthOne.
At this point you will be asked whether you want to save the changes you have
made in SynthOne. You probably want to answer No here, unless you have
just created a snapshot(s) worth keeping.
You will now see three instrument panels, which are labeled Pad, Echo Stereo
and Master. Click on the Structure button (its icon is three little boxes con-
nected by wires) in the Panel toolbar in order to open the Ensemble Structure
window.
64 – First Steps in REAKTOR REAKTOR 5
Page 65

The ensemble is the highest level in REAKTOR and the Ensemble Structure
window provides a bird’s eye view of the complete working environment that is
available to you. In this case it contains the synthesizer Pad, the stereo delay
effect Echo Stereo, and Master which holds the master ensemble controls
Main and Tune.
The output of Pad is connected to the two inputs of Echo Stereo. The outputs
of Echo Stereo are then connected to the top two inputs of the Audio Out
module.
You will find this Audio Out module in every ensemble. It represents the
software’s connection to the rest of the world, which is normally the audio
output of your sound card, but it can also be the Plug-In connection to another
piece of software. Its counterpart, which is also present in every ensemble, is
the Audio In module, which represents the audio inputs of your sound card
(or the Plug-In connection). In this case Audio In is muted (as indicated by
the red M in its title bar), because Padecho doesn’t use any audio input.
A quick look at the Padecho ensemble already brings to light two essential
First Steps in REAKTOR – 65REAKTOR 5
Page 66

features of REAKTOR. One is that an ensemble can consist of more than one
instrument. The other that its generative power is not restricted to synthesizers, because Echo Stereo is an effects unit.
You can switch between the Structure and Panel windows by double-clicking
the black background of the Panel window, or double-clicking the dark grey
background of the Structure window. Give it a try.
You can play the ensemble with the Structure window open (as pressing a
key on your MIDI instrument will show), but there are no control elements
at your disposal, which does detract from the entertainment value of a synth
quite a bit.
The panel of the Master Instrument gives access to two knobs: Main for
controlling the master volume of the ensemble, and Tune for setting the
master tuning.
Together with the panels for Pad and Stereo Echo you see all control elements
of the ensemble.
Before we give you some time alone with the Padecho ensemble, we’ll make
a few short comments regarding its structure. The Pad synth contains two
oscillators that both generate a pulse-wave. The tuning of the second oscillator can be controlled relative to the first one, coarsely with the knob labeled
Interval, and finely with the Fine knob. The pulse width of both oscillators
is set with PWidth and can also be modulated with the LFO. LFO rate sets
the speed, and Depth the amount of LFO modulation. The controllers for the
ADSR envelope, which again affects both filter and amplitude, as well as
the knobs to the right for controlling the filter, correspond to those we got to
know in SynthOne.
The Echo Stereo consists of two delay lines, one of which processes the left
and the other the right stereo channel. Their delay times can be controlled
independently of each other using Del L and Del R, where a setting of zero
means that there is no delay. The desired number of echo repeats is set with
the knobs F(eed)Back and Cross, where FBack controls the amount of signal
of a channel (L or R) going back into itself and Cross the amount going into
the respective other channel. Finally, Wet-Lvl sets how much of the original
signal goes through the delays, controlling the strength of the effect.
66 – First Steps in REAKTOR REAKTOR 5
Page 67

FM Overdrive
The next ensemble we want to present to you is called FM-Overdrive.ens.
(FM-Overdrive = FM with 2 Operators + Overdrive.) You can also find this in
the by now familiar Tutorial Ensembles folder.
As a quick look at the Ensemble structure shows, we again have a combination of two instruments here: the synthesizer FM 2 Operator followed by the
distortion effect Overdrive.
The FM 2 Operator synthesizer demonstrates the flexibility of REAKTOR. In
addition to subtractive synthesis, REAKTOR is capable of other types of synthesis. In this case, FM (frequency modulation), made popular by the Yamaha
DX series of synthesizers, is used for tone generation.
First Steps in REAKTOR – 67REAKTOR 5
Page 68

In our example there aren’t 6 operators (as in the DX7), or 4 like in the
smaller DX models, but only 2 operators, so the whole structure should be
quite clear.
Both operators consist of an oscillator that generates a sine wave. One, called
the carrier, is responsible for generating the fundamental wave and thus setting the pitch of the sound. The other operator is the modulator that affects
the frequency of the carrier and controls the sound’s timbre.
Play a few notes on your MIDI instrument. Not very exciting, is it? Now slowly
turn the FM knob upwards and listen to how the sound changes.
A bell-like element starts to creep into the sound until it dominates it completely when the maximum position is reached. On a technical level, all we
have done by sliding the FM knob up is to increase the level of the modulator
and thereby determine how much it modulates the carrier’s frequency.
In the next step we turn our attention to the Interval knob. The effect that this
parameter has should quickly become quite clear. The knob placed next to it,
Detune, allows you to make fine adjustments to the interval setting.
A very simple envelope is responsible for determining the sound’s development
over time. The carrier’s envelope, which controls volume, has only the two
parameters D(ecay) and R(elease). The envelope for the modulator is even
simpler and has only the one knob for setting the decay, labeled Mod-D.
Armed with this knowledge you should not find it difficult to create your
own sounds with this 2 operator FM synthesizer, and to do it with a sense
of purpose.
Let’s turn briefly to the Overdrive, the purpose of which is simply to furnish
68 – First Steps in REAKTOR REAKTOR 5
Page 69

your FM sound creation with some amount of acoustic grit. The best thing is
probably if you first try out the various snapshots before dedicating yourself
to the following explanation of this device.
Drive sets the level of the signal that is sent to the distorting element and
therefore controls the amount of dirt that is generated. With Asym it is possible to modify the overtone spectrum of the signal in such a way as to make
it “warmer”, i.e. to make it sound as if the sound was generated using a valve
(tube) circuit. The distortion circuit is followed by a filter with the parameters
Freq(ency) for setting its cutoff frequency and Emph(asis) to emphasize this
frequency. The setting of the Volume knob determines the output level of the
sound signal.
16-Step Sequencer Plus Bassline
The ensemble Squnc16*.ens (Squnc16 = 16-Step Sequencer) with which we
are now going to experiment, can also be found in the Tutorial Ensembles
folder.
First Steps in REAKTOR – 69REAKTOR 5
Page 70

A look at the Ensemble structure tells us something about the construction
of this ensemble: Sequenzer16, a 16-Step sequencer (another device that
REAKTOR can provide) controls Bassline, a kind of 303 clone, whose signal
reaches the audio output via the Auto Panner.
The panel of Sequenzer16 is already visible and, if the Run button is already
pushed, you should hear the pattern playing. Press Run once to stop the pat-
tern and another time to restart it. You can change the pitch for every step
with the Pitch faders in the top row, and the volume for each step with the
Lvl (Level) faders in the row below. The tempo is adjustable using the BPM
knob (next to the Run button), and the length of the notes can be manipulated
with knob labeled Length.
Finally, the Reset button located underneath Run resets the sequence to step
1 every time it is pressed. If it is pressed while the sequencer is running, a
nice shifted pattern can be generated. If it is pressed while the sequencer is
stopped, this ensures that, on starting, the sequence will begin at the first
step and not somewhere in the middle.
The Bassline instrument corresponds to what you may know from a 303;
but even if you have never seen such a beast, with such a small number of
controls it’s unlikely that any confusion will arise. Just turn any knobs you
want and listen to the result.
As you have probably already noticed, the sound in this ensemble is always
moving back and forth between the left and right speakers. The Auto Panner
is responsible for this. With Amount you set by how much the signal travels
between the left and right channel and Rate is the speed of this movement.
That is all there is to it.
70 – First Steps in REAKTOR REAKTOR 5
Page 71

Sample Loop Player
The final example for illustrating REAKTOR’s capabilities is called Wav-play*.
ens. You will find it with the previous REAKTOR examples in the Tutorial
Ensembles folder.
This ensemble is made up of the units Loop Player and 12-Band..Before you
can hear anything, you first need to load a sample into Loop Player. Windows
XP: Right-click / OS X: Ctrl+click on the sample slot displaying “untitled*.wav”
in the panel and choose Load Audio in Tapedeck... from the context menu.
In the Open Audio File dialog select any one of the WAV or AIF files on your
hard drive and load it by clicking on Open. Presto, a click on the Play button
and you should hear the newly loaded sample as a loop. If Play is already
pressed and you don’t hear anything, or if the sample fails to loop, press Play
twice to reinitialize it and start playback.
The whole point of the Wav-play ensemble, however, is to be found in the
12-Band effect. The panel looks very much like the classic control panel of a
graphic equalizer – that is, faders which allow the level of various frequency
bands to be controlled. What we have here is a filterbank which allows even
more dramatic manipulation of the sound than an equalizer. Each fader has
a number that indicates what frequency band (measured in Hz) it controls.
Try out the effect of the different frequency bands on the sound, while the
loop is running. You will notice that it’s not just the timbre that changes, but
that it is possible to nearly remove entire parts and so manipulate the musical
character of the loop.
First Steps in REAKTOR – 71REAKTOR 5
Page 72

9.2. Your First DIY Synthesizer
As you may have noticed in the previous examples and by further rummaging
through the library, REAKTOR offers a wealth of ready-made instruments,
effects units and combinations. But the true thrill of REAKTOR is in the possibility of designing and constructing your own instruments. And as you will
see, it isn’t difficult if approached in the right way.
How about a good old-fashioned analog synthesizer? Let’s do it using subtractive synthesis, where an oscillator first produces a signal rich in high frequency
components, some of which are subsequently removed using a time variable
filter. All right, here we go...
Preparation
To construct our synthesizer we will use a method that is very effective – the
use of macros.
Note: REAKTOR supports two kinds of macros: primary macros (macros that reside within the primary level of REAKTOR) and core macros
(macros that reside within the core level of REAKTOR). In this section,
we are speaking exclusively about primary macros. For DIY information
on core macros, see the REAKTOR Core manual.
In REAKTOR terminology, macros are functional blocks that make the construction of complex structures quite easy, and most importantly, everything
remains clearly laid out. In REAKTOR you already have an extensive library
of such macros at your disposal, and we will help ourselves to it.
Initially, turn off the Run/Stop Audio button in the Main toolbar, so that you
don’t get startled when the half-finished construction suddenly starts making
noises.
To begin with we will prepare the workspace in which to construct the synth.
Please open the File menu at the top of REAKTOR and choose the entry
New Ensemble. After this you will see (in the Ensemble structure) our old
friends Audio Out and Audio In, as well as two instruments, Instrument and
Master.
72 – First Steps in REAKTOR REAKTOR 5
Page 73

To proceed, delete the default Instrument since we want to see how to build
an ensemble from ground up. The other instrument called Master should
remain, since it contains the important global controls Level and Tune which
appear in the Panel window.
First we need a shell – a box so to speak – in which we will construct our
synth. For this we take an empty instrument which we find in the library. XP:
Right-click / OS X: Ctrl+click on a blank part of the Ensemble Structure window and in the context menu choose Insert Instrument New - 2In2Out. An
empty instrument named Instrument appears in the structure. Double-click
Instrument to open its structure and delete all terminals inside it except for
the L output terminal and the Audio Voice Combiner ( } ) in front of it.
Double-click on a blank part of the Instrument structure to redisplay the En-
semble structure window. (Double-clicking on a structure is a great shortcut
for moving one structure up in the ensemble hierarchy.) Click on the L output
First Steps in REAKTOR – 73REAKTOR 5
Page 74

port of Instrument, drag the mouse pointer to 1 input port of the Audio Out
module, and release the mouse button.
Do you now see a wire connecting the two components? If not, try again. If
so, we congratulate you on creating your first virtual wire! In the same way
connect the L output of Instrument to the 2 input of Audio Out so that you
can later hear the sound on both channels.
Choice of Components
For our synth we need one or more oscillators whose output signal should go
through a filter and whose volume should be controlled by an envelope, and
that’s it. We will now assemble these components.
Take a look at the Master and Instrument panels (not structures!) in the
Ensemble Panel window.
The Instrument panel is empty (because we haven’t added any visible objects
to its structure yet), and Master contains only the Level and Tune controls.
Open the Structure window for Instrument. It is here that we will insert the
components mentioned above. XP: Right-click / OS X: Ctrl+click in Instrument’s
Structure window and in the context menu choose Macro Building Blocks
Oscillators Osc (pls, saw, tri) . In the Structure window you can now see
the insert macro, which is named Osc 3 Wave.
74 – First Steps in REAKTOR REAKTOR 5
Page 75

A quick look at the Instrument panel, which was empty until just a few moments ago, shows the controls contained in Osc 3 Wave.
We’re making progress.
Before we go on we should make sure that the oscillator is working. As a precautionary measure, set the Level fader of Master to, let’s say, -10 to avoid
any nasty surprises during the following audio test.
In the Instrument structure, connect a wire from the Out port of the Osc 3 Wave
macro to the input port of the Audio Voice Combiner module ( } ). To do this,
click and drag your mouse from one port to the other (the direction doesn’t
matter). The Audio Voice Combiner serves to convert a polyphonic signal
into a monophonic one. This conversion is especially important in front of an
instrument output port, since instrument ports are generally monophonic.
Let’s add an ADSR volume envelope to the Osc 3 Wave macro by using the
context menu again and choosing Macro Building Blocks Envelopes
ADSR - Env. Connect the lower Out output port (the black one, not the red
one) of the ADSR-Env macro to the A input of the Osc 3 Wave macro.
First Steps in REAKTOR – 75REAKTOR 5
Page 76

Now we only need two more important MIDI modules to get a connection to
an external MIDI input device. Insert the NotePitch module (Built-In Module
MIDI In Note Pitch) and connect it to the P input of the Osc 3 Wave
macro. Finally we need a Gate module (Built-In Module MIDI In Gate),
which has to be connected with the G input of the ADSR-Env macro.
Turn on the Run/Stop Audio button in the Main toolbar, and press some keys
on your MIDI keyboard (or computer keyboard). You should hear sounds from
the synth. (If not, check your wiring, and/or save/reload the ensemble.) This
is it, our oscillator in its raw form – not really beautiful (yet) but audible.
Before loading the next component, the filter, first remove the wire you just
drew between Osc 3 Wave and the Audio Voice Combiner. Simply drag from
one port to another again, as if connecting a second wire, and the connection
is gone. Alternatively, just click on the wire to select it (it changes color) and
press the Del key.
76 – First Steps in REAKTOR REAKTOR 5
Page 77

Now load a Filter macro in the same manner as you did the other macros. You
will find it in the context menu under Macro Building Blocks Filter
4 Pole Filter (BP, BLP, LP). Connect the Out port of the Osc 3 Wave macro
to the In port of the 4 Pole Filter macro, and then connect the Out port of
the 4 Pole Filter to the input of the Audio Voice Combiner so that you get a
signal at the output again.
Note that several new filter controls have appeared in the panel. If you cannot
see these controls, because your Instrument panel is a jumble of overlapping
controls, do this to clean it up:
1) Click the Lock/Unlock Panel button (wrench icon) in the Instrument
panel header to unlock the panel;
2) Drag each macro (by its title at the top of its frame) to its own area in
the panel;
First Steps in REAKTOR – 77REAKTOR 5
Page 78

3) click the Lock/Unlock Panel button again to re-lock the panel. You
should now be able to see all three macros clearly: Osc 3 Wave, ADR-
Env, and 4 Pole Filter.
On considering these components you may wonder if a one-oscillator synth
is the be all and end all. After all, it’s well known that two oscillators simply
give a fatter sound. OK, so let’s add another one. In the Instrument structure,
XP: Right-click / OS X: Ctrl+click on the macro Osc 3 Wave (careful, don’t
hit one of the ports), select Duplicate from the context menu. Done.
78 – First Steps in REAKTOR REAKTOR 5
Page 79
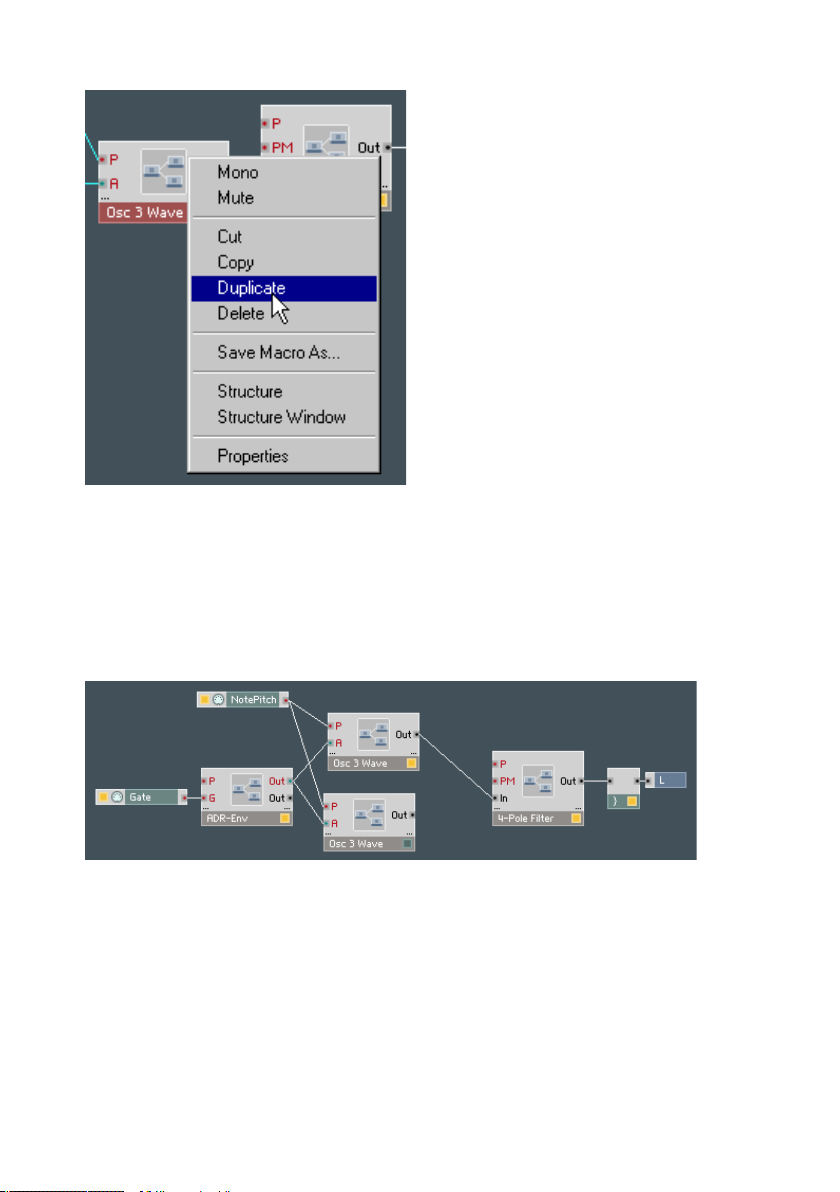
It is important to maintain a clean design – especially when dealing with a
complex synthesizer. It’s easy to create a chaotic layout and wind up spending
hours in search of a problem’s cause. So - if you didn’t do so before like in
the screenshots above - let’s clean up the Structure window a bit. Move the
4 Pole Filter macro to the left of the Out port, with the Audio Voice Combiner
( } ) module in-between. And place the two Osc 3 Wave macros neatly above
one another to the left of the 4 Pole Filter macro.
For the next step, let’s remove some of the confusion between the two oscillators, which at present are identical, even sharing the same name. Let’s give
them different labels. To do so, XP: Right-click / OS X: Ctrl+click on the upper
Osc 3 Wave macro and choose Properties from the context menu. A window
will appear with a field called Label in the top left; here you can enter a new
name, say, Oscillator1. Do the same for the lower Osc 3 Wave macro, but label
it Oscillator2. You can also rename the macro 4 Pole Filter to simply Filter.
First Steps in REAKTOR – 79REAKTOR 5
Page 80

Now we want the signals of both oscillators to enjoy treatment by the filter,
so we need a second wire from Out port of Oscillator2 to the In port of Filter.
We clearly have a problem here, because REAKTOR does not allow you to
connect two wires to the same port. Of course that’s not really surprising,
because you can’t put two jack plugs in the same socket either. The solution
to this problem is to be found with a little bit of thinking. What we are looking
for is a component that can simply combine the signals from the two oscillator
macros and pass the sum on to the In port of Filter. And this component, a
mixer for audio signals, is the Amp/Mixer module.
To insert the Amp/Mixer module, XP: Right-click / OS X: Ctrl+click on a blank
part of the Structure window and in the context menu choose Built-In Module
Signal Path Amp/Mixer.
80 – First Steps in REAKTOR REAKTOR 5
Page 81

Now place the Amp/Mixer module between Oscillator1 / Oscillator2 and Filter
(we want things to be neat), and connect the output of Oscillator1 to the In
port of Amp/Mixer. We need to connect the output of Oscillator2 to Amp/
Mixer also. But Amp/Mixer only has one In port and, as we know, you cannot
connect two wires to the same port. Fortunately, this is not a problem, because the Amp/Mixer module supports dynamic Input port handling. Simply
XP: Ctrl+drag / OS X: X+drag (i.e. hold down Ctrl/APPLE while dragging)
from the Out port of Oscillator2 to a spot just below the occupied In port of
Amp/Mixer. This causes Amp/Mixer to create another In port, to which you
should now complete your connection. The rest is child’s play: a wire from
the output of Amp/Mixer to In of the Filter, and a wire from Out of the Filter
to the input of the Audio Voice Combiner. Done.
As soon as you complete the last connection, the status LEDs of all modules
should light up to indicate that we now have a functional structure.
If you did not use the Dublicate option to get a copy of Oscillator 1 (see above)
but did the good old Copy/Paste action you have to connect the out ports of
the modules Gate and Note Pitch to the P and A in ports of Oscillator2 as
you did for Oscillator1 to transmit MIDI notes to Oscillator2 also.
An extra ADR envelope for the Filter makes our synthesizer sound richer. Duplicate the ADR-Env macro and assign it to the filter by connecting its upper
Out (red) port to the PM input of the Filter macro. Rename it to Filt.Env
First Steps in REAKTOR – 81REAKTOR 5
Page 82

And, finally, let’s exchange the two modules NotePitch and Gate for a single
macro which does the same but also has an integrated module for Pitchbending. Delete NotePitch and Gate from the structure. Select Macro Building
Blocks Pitch+Gate Pitch + Gate to insert the Pitch Gate macro into
the structure. Connect the P output of Pitch Gate to the P inputs of the two
ADR-Env macros, Oscillator 1 and Oscillator 2, and Filter. The Pitch Gate G
output has to be connected to the G inputs of both ADR-Env macros.
Now the synthesizer can be played properly. The pitch and volume of the
incoming MIDI notes are recognized by the synth, and even the pitchbend
wheel on the MIDI keyboard works, because the Pitch Gate macro is set up
to handle all of these tasks.
Arranging the Panel
Have a look now at the Instrument panel. You see a bunch of knobs that are
wrapped up within frames to form groups. Each frame corresponds to one of
the macros that we have inserted, so we know exactly which controls belong
to the Filter, which to Oscillator2, etc.
Now you can start polishing the panel design. For example, at the moment
the controls for Oscillator2 are still overlaying those for Oscillator1. To change
this, unlock the panel by clicking the Lock/Unlock Panel button (wrench
icon) in the instrument panel header. You can tell that the panel is unlocked,
because the Lock/Unlock Panel button is lit, and the panel is overlaid with a
grid. (Note that you can play an instrument when its panel is unlocked, but
you cannot change any of its control settings.) Drag all five macros to suitable
locations in the panel.
82 – First Steps in REAKTOR REAKTOR 5
Page 83

Possible result after polishing the panel layout
Once you are happy with the layout you can freeze it in its current state to
make sure that knobs or frames aren’t moved inadvertently. Simply click again
on the Lock/Unlock Panel button to lock the panel.
Saving
You probably want to save your two-oscillator synthesizer instrument so that
you can reuse it in another ensemble. First, let’s name it something other
than its default name, Instrument. Double-click on the name Instrument in
the panel header to open its Properties dialog. In the Label field, type My
DIY Synth (or similar) and press the Enter key. Now let’s save the instrument.
XP: Right-click / OS X: Ctrl+click on your new name in the panel header and
choose Save Instrument as... from the context menu.
In the Save Instrument dialog that appears, choose a folder in which to store
your instrument file, specify a file name (or use the one that REAKTOR suggests: My DIY Synth) and click on Save. When you are asked later whether
you want to save the ensemble, you can say No because the only part of the
ensemble that’s worth keeping (the My DIY Synth instrument) has already
been saved.
Note: To save the entire ensemble, rather than just one instrument in the
ensemble, use FileSave Ensemble... from the main menu
Luxury
If after some time you feel like adding more features, rest assured that REAKTOR isn’t going to limit your urge for experimentation. Just take a look at the
macros which are included in the demo. You will find a lot of possibilities to
transform this simple synthesizer into a luxurious sound machine. First, try to
change the Envelope type from ADR to ADSR to change the percussive sound
of your first DIY synth and get something like a lead synthesizer.
First Steps in REAKTOR – 83REAKTOR 5
Page 84

9.3. Your First DIY Structure
Our DIY synthesizer project was executed mainly using prebuilt macros. We
would now like to introduce you to the art of constructing a synthesizer
completely from scratch. Contrary to the recommendation we gave above,
which was to always separate larger functional units into macros, this new
synthesizer will be constructed entirely with modules in a single Structure
window, no macros. The main reason for this is the fact that our new device
will be of a quite modest nature. It will consists of so few components that
any further subdivision into macros would probably cause confusion rather
than make things clearer.
Building the Basic Structure
Select FileNew Ensemble from the main menu to open a new ensemble.
In the Ensemble Structure window, delete the default Instrument. All that
should be left is the default Master instrument (containing Level and Tune
controls), and the Audio In and Audio Out modules.
XP: Right-click / OS X: Ctrl+click on a blank part of the Structure window and
choose Insert instrument New - 2In2Out from the context menu. An empty
instrument named Instrument appears in the structure. Rename Instrument
to My DIY Struct (or similar). Double-click My DIY Struct to open its structure
and delete all modules inside it except for the L output terminal and its connected Audio Voice Combiner ( } ) . Double-click on a blank part of the My
DIY Struct structure to move one level up to the Ensemble structure. Connect
the L output port of My DIY Struct to input ports 1 and 2 of Audio Out.
Open the My DIY Struct structure by double-clicking its icon in the Ensemble
structure. It is here, in the My DIY Struct Structure window that we will imple-
ment our synthesizer circuitry.
First we insert an oscillator. Our choice this time is an oscillator module that
generates a triangle wave. XP: Right-click / OS X: Ctrl+click on a blank part
of the Structure window and in the context menu choose Built-In Module
Oscillator Triangle.
The next step is to add modules that will tell the synthesizer about the volume
(gate) and pitch of the incoming MIDI notes. To that end, use the context
menu to select Built-In Module MIDI In Gate and then Built-In Module
MIDI In Note Pitch. For the envelope we choose an ADSR-Env module
(Built-In Module LFO, Envelope ADSR).
Now position and interconnect the modules according to the following il-
84 – First Steps in REAKTOR REAKTOR 5
Page 85

lustration. Use this shortcut to create the Attack, Decay, Sustain, Release
controls that connect to the A, D, S, R input ports of the ADSR-Env module:
XP: Right-click / OS X: Ctrl+click on each of the input ports and select Cre-
ate Control from the context menu. Experienced builders use this “trick” all
the time to create input-port controls (that they then modify, as necessary,
to meet their needs).
How does it all work?
On studying this structure, the following functionality becomes apparent: The
ADSR-Env module generates an envelope whose shape is specified with the
Attack, Decay, Sustain and Release knobs in the My DIY Struct panel window
(keep it tidy!). The envelope is triggered by a rising signal at the gate input
G, in our case generated by the press of a MIDI key. The pitch of the incoming MIDI note is received by the NotePitch module and sent to the Triangle
module through its P(itch) input.
First Steps in REAKTOR – 85REAKTOR 5
Page 86

You can already play this synthesizer, but you will very likely soon get tired of
the sound - other than the volume envelope there’s simply nothing that can
be adjusted. The whole thing, however, becomes much more interesting when
a filter is brought into play.
Adding a Resonant Filter
Use the context menu to insert a 2-pole filter (with FM) into My DIY Struct
structure (Built-In Module Filter Multi 2-PoleFM). Then connect Out of
the Triangle module to ln of the 2-Pole Filter module, and LP of 2-Pole Filter
to the Audio Voice Combiner ( } ) .
Next, using Create Control (as discussed above), create controls for the 2-Pole
Filter inputs F(requency Cutoff) and Res(onance) to make the structure look
something like the picture below.
Filter’s Function
Play a few notes on your keyboard while at the same time changing the position of the knobs F Cutoff and Reson in the My DIY Struct panel window. (To
see these knobs, you’ll have to unlock the panel, arrange the controls, and
lock it again. If the Lock/Unlock Panel button is not visible in an instrument
header, because the header is too narrow, use the header’s context menu to
select Lock/Unlock Panel.)
86 – First Steps in REAKTOR REAKTOR 5
Page 87

F Cutoff sets the filter’s cutoff frequency. When utilizing the output LP (low
pass) of the 2-Pole Filter module, as done here, all frequencies above the
cutoff frequency are removed. By using the other outputs of 2-Pole Filter it
can also be employed as a band pass (BP) or high pass (HP) filter.
Reson sets the resonance of the filter. The higher the resonance value, the
more the frequencies near the cutoff frequency are boosted. If you set Reson
very high, say >= 9.5, the filter will begin to self-oscillate. Beware: This can
cause extremely loud feedback-type sounds which can, potentially, damage
your speakers (and ears)!
Adding Key Tracking
Now play some low notes and then some high notes on your MIDI instrument
and you will notice that the high notes sound relatively dull. This is because
the filter operates at a fixed cutoff frequency. This means that no matter what
pitch you play, the filter always removes all frequencies above the fixed cutoff
frequency. So if you play a note whose frequency is above this cutoff, almost
nothing will be heard. We can change this by matching the filter frequency
to the respective note pitch. Simply connect the NotePitch module with a
second wire to the P(itch) input of the filter module.
The 2-Pole Filter circuit is designed to add the control signal at the P input
to the frequency control signal at the F input. The sum of the two then determines the filter’s cutoff frequency. If you play some high notes they will
sound as you would expect.
First Steps in REAKTOR – 87REAKTOR 5
Page 88

Adding a Filter Envelope
Finally, we also want to control the filter cutoff frequency with an envelope.
For simplicity’s sake we will let the existing ADSR-Env module take over this
task, too. If you wanted to have a more sophisticated synth, you could add a
separate envelope just for the filter.
For the envelope to affect the filter cutoff we first need another component,
a multiplier (Built-In Module Math Multiply). Connect Out of ADSR-Env
to one of the two input ports of Multiply (X), the output of F Cutoff to the
other Multiply (X) input, and the Multiply (X) output to the F input of 2-Pole
Filter, as illustrated below.
Play a few bars and you will hear that the envelope now affects the filter’s
cutoff frequency. It works like this: The ADSR-Env module outputs a control
signal between 0 and 1. This signal is multiplied by the current value of the
knob F Cutoff. When the envelope is at its maximum value (1), the filter’s input
F receives the value 1 x F Cutoff = F Cutoff. When the envelope reaches its
minimum value (0), the signal at F is reduced to zero (0 x F Cutoff = 0).
88 – First Steps in REAKTOR REAKTOR 5
Page 89

The function that F Cutoff now performs is commonly known as “Envelope
Modulation Depth”. To take this into account in the display, open the F Cut-
off Properties dialog by double-clicking on its module and change the label
F Cutoff to Env Mod.
Variations
Here are some suggestions for modifications you could make to the structure
we have just built:
• Try out the HP and BP outputs of the 2-Pole Filter module.
• Replace the 2-Pole Filter module with a 4-Pole Filter module.
• Try out different envelopes.
• Add an extra envelope for the filter module.
So you have other ideas? Go ahead and try them. Always remember that in
contrast to working with hardware components, there’s never any danger of
breaking anything in REAKTOR.
Be warned, however, that unexpected - and potentially very loud - sounds will
be generated from time to time as you experiment with REAKTOR. To protect
both your speakers and your ears, set your initial amplification levels low.
All right! Now get cracking!
First Steps in REAKTOR – 89REAKTOR 5
Page 90

10. Basic Operation
The REAKTOR user interface follows the conventions of your computer’s operating system, so it is easy for someone who has already worked with OS X
or Windows to get used to the software. Nevertheless, we want to explain
some particular characteristics of REAKTOR and draw your attention to some
features that may be new to you.
10.1. Mouse
Practically all functions in REAKTOR can be carried out using the mouse.
The main operations that will be performed are the following:
• Selecting an object is done by clicking on it with the left mouse button.
Selected objects (instruments, macros, modules, etc.) are recognized by
their title bar which is colored red. If you want to select several objects,
hold down the XP: Ctrl key or the OS X: Shift key on your computer
keyboard while clicking on the desired objects one after the other. Alternatively you can click with the left mouse button on a blank part of
the window and open a frame by dragging with the button pressed. All
objects within the frame are selected.
• Moving an object is done by clicking the left mouse button on it and
keeping the button pressed while dragging the mouse pointer, and with
it the object, to the desired location. To move several objects together,
first select all the desired objects, and then move one of the objects as
above. All of them will move together, and all the wiring to other objects
will remain intact, merely stretching like rubber bands. On releasing the
mouse button the modules are aligned on a grid and then remain at the
new position. The grid helps to ensure a tidy appearance.
• Wires are drawn by clicking and holding the left mouse button on the
output port of the object that is to transmit the signal, and then dragging
the mouse pointer, and with it the wire, to the desired input port of the
object that is to receive the signal. Simply release the left mouse button
and the connection is established. Wiring operations can also be carried
out in the reverse direction (from input port to output port) the results
will still be the same.
• Double-clicking the left mouse button on an object (or on the background
of a window) will perform various actions, depending on the object. Actions that can be executed by a double-click appear in bold type in an
object’s corresponding context menu.
90 – Basic Operation REAKTOR 5
Page 91

• Clicking the right mouse button (XP) or holding down the Ctrl key and
clicking the mouse button (OS X) opens the context menu that belongs to
the object (or window) on which the button was clicked. Context menus
play a very important part in REAKTOR’s operation, which is why the
next section is dedicated to explaining them in detail.
10.2. Context Menus
Context menus are lists of commands that are applicable to the object you
are clicking on. So, if you want to perform an action on an object or if you
need information about it, XP: right-click or OS X: Ctrl+click on it. A context
menu will appear whose entries apply to the selected object. Click (with the
left mouse button) on a menu item to select it. The menu will disappear and
the operation will be carried out. For example, you can delete a module by
selecting the entry Delete from its context menu.
10.3. Key Commands
Many functions in REAKTOR can be performed with keys or key combinations
in addition to the mouse. Available key commands are listed in the menues
next to the command.
10.4 Ensemble Panel and Structure Windows
The REAKTOR workspace comprises two windows: the Ensemble Panel window and the Structure window. The Ensemble Panel window contains the
ensemble panel and all of the ensemble’s instrument panels. The Structure
window contains the structure (internal wiring) of the currently selected object
(ensemble, instrument, primary macro, core cell/macro).
There is one Ensemble Panel window. By default, there is one Structure
window also. You can, however, choose to open multiple Structure windows
by Alt + double-clicking the desired objects, or selecting Structure Window
from the context menu. Though we recommend that you work with a single
Structure window to keep your screen (and mind!) uncluttered, REAKTOR
allows you to open as many separate Structure windows as you like.
Basic Operation – 91REAKTOR 5
Page 92

Here are some guidelines for managing your REAKTOR Ensemble Panel and
Structure windows:
• To open the Ensemble Panel window, choose View->Show Panel from
the main menu. Or, if you are working in a Structure window, use this
trick: Double-click on a blank part of the Structure window to display its
parent Structure window. Keep doing this until you reach the Ensemble
Structure window. Double-click there and REAKTOR will display the
Ensemble Panel window.
• To open a Structure window, double-click on the desired object (to open
it in the shared Structure window) or Alt + double-click on the object (to
open it in a separate Structure window).
• All open Ensemble Panel and Structure windows are listed at the bottom
of the View menu. To jump to an open window, select it in the list (or,
if the window is visible, simply click anywhere within it).
• To jump one structure up in the hierarchy – i.e. to the structure that
contains the current structure – double-click on a blank part of the
Structure window.
• You move, resize, minimize, and close REAKTOR windows just as you
would for any other windows on your platform. If a window is too small
to display its entire contents, scrollbars at its right and bottom edges
enable you to scroll through the window’s contents.
The following applies to the use of REAKTOR in Windows:
• As is the norm with Windows programs, all REAKTOR Ensemble Panel
and Structure windows are contained inside the main REAKTOR application window. When this main window is resized, minimized, or covered
by another application, all the contained windows are affected.
• When an Ensemble Panel or Structure window is maximized, it expands
to fill the entire main REAKTOR window, and all other windows are also
maximized until any one of them is reset to a smaller size.
• When a window is minimized, it appears as a small rectangular box at
the bottom of the main window.
• To step through all open windows, use Ctrl + Tab.
92 – Basic Operation REAKTOR 5
Page 93

11. Menus
In addition to the various context menus, the commands for using REAKTOR
are accessible from the menu bar of the main window. The program’s global
functions, controlled from the menu bar, are described below.
11.1. File Menu
New Ensemble
Selecting File->New Ensemble (or pressing XP: Ctrl + N / OS X: X + N)
creates a new ensemble that contains a Master instrument and Audio In and
Audio Out modules.
Open...
Selecting File->Open... (or pressing Windows: Ctrl + O / OS X: X + O) loads
an ensemble file (*.ens) stored on your disk.
Save Ensemble
Selecting File->Save Ensemble (or pressing XP: Ctrl + S / OS X: X + S) stores
the current ensemble together with all its instruments, structures, panels, and
snapshots in an *.ens file.
Save Ensemble As...
Selecting File->Save Ensemble As... (or pressing XP: Ctrl + Shift + S / OS X:
X + Shift + S) is identical to Save Ensemble (see above), but it enables you
to specify a new filename and/or folder for the ensemble.
Save Window As...
Selecting File->Save Window As... (or pressing XP: Ctrl + E / OS X: X + E)
enables you to (re)name and store the contents of the currently selected
window.
If the Ensemble Panel window is selected, the ensemble will be saved (in an
*.ens file), just as if you had used the Save Ensemble menu command.
Menus – 93REAKTOR 5
Page 94

If a instrument structure window is selected, the instrument containing the
structure will be saved (in an *.ism file) together with all its structures, panels,
and snapshots.
If a Macro structure window is selected, the macro containing the structure
will be saved (in an *.mdl file).
Import MIDI File...
There is an integrated MIDI File Player in REAKTOR that enables the import
and playback of MIDI files in the Standard MIDI File format (SMF). Such MIDI
files can be produced by nearly every sequencer program. Under Windows
they have the file name extension .mid.
Because it has an integrated MIDI File Player, REAKTOR can play arrangements
without a separate sequencer. This option can be especially appealing to live
performers: A sequencer running in the background on the same computer
could cause glitches and make your performance more difficult, since you
would have to load new files into the sequencer as well as into REAKTOR.
On top of that, you would then have to alternate between the two programs
in order to access important parameters.
There is another advantage to using the integrated MIDI File Player instead
of an external sequencer: sample accurate timing. All notes in a MIDI file
that begin at the same time will be played by REAKTOR simultaneously, so
the timing is perfectly tight. Of course, the MIDI file’s timing depends on the
accuracy and resolution of the sequencer it was created on.
The REAKTOR MIDI File Player can be loaded either manually or automatically:
For manual operation, use File->Import MIDI File... from the main menu to
load a MIDI file from your disk. For automatic operation, REAKTOR will load a
MIDI file upon opening an ensemble if that file is in the same folder and has
the same name as the ensemble (but with the extension .mid); for example,
mySynth.ens and mySynth.mid.
In the Settings menu there are three entries for navigating the MIDI File
Player. When Play MIDI File is enabled, the MIDI file is played back when
you start the REAKTOR clock (by clicking the Start/Restart Clock button in
the Ensemble Panel Toolbar). The MIDI file will be played in an endless loop
when Loop MIDI File is enabled. You can use this for instance to keep repeat-
ing a pattern or sequence of patterns. Finally, Ignore Tempo Change, when
enabled, causes REAKTOR to ignore all tempo in the MIDI file and play the
file back with the tempo set by the REAKTOR clock (BPM).
94 – Menus REAKTOR 5
Page 95

The transport functions of the MIDI File Player are controlled from the REAKTOR clock:
• Click the Start/Restart Clock button to start MIDI File playback from
the beginning or to restart playback at the place where the file was
paused.
• Click the Pause/Stop Clock button once to pause playback of the MIDI
File. Click the Pause/Stop Clock button a second time to stop playback
and rewind the MIDI file back to the beginning.
Batch Processing
Batch Processing enables batch conversion of REAKTOR 3 files to the REAKTOR 5 format, and the analysis of audio files for the granular sampler modules.
Simply plug in your REAKTOR 3 USB key, select a source and destination
folder, and click on OK.
Recent Ensembles
With a simple mouse click, you can open any one of the eight most recently
accessed ensembles.
Exit
Exit closes the REAKTOR program and all its windows, including those in the
taskbar. If any changes have been made to the current ensemble since it was
last saved, REAKTOR asks if you want to save the file before exiting.
11.2. Edit Menu
Undo
Selecting Edit->Undo (or pressing XP: Ctrl + Z / OS X: X + Z) reverses the
effect of the last editing operation carried out in any of the structures. The
Undo function does not apply to panel control setting changes; i.e. changing
the value of a knob or fader. For this, you want the Compare function in the
Snapshots window.
You can set the maximum number of consecutive Undo commands in the
Preferences dialog -->Options page. If your computer runs low on memory,
try reducing this number.
Menus – 95REAKTOR 5
Page 96

Redo
Selecting Edit->Redo (or pressing XP: Ctrl + Y / OS X: X + Y) reverses the
effect of the most recent Undo operation (i.e. it “undoes” the last Undo).
You can execute Redo as many times as you previously executed Undo until
you wind up back where you started.
Cut
Selecting Edit->Cut (or pressing XP: Ctrl +X / OS X: X + X) cuts (removes) the
current selection and copies it to the clipboard. From there it can be inserted
in another place using the Paste command (see below).
Copy
Selecting Edit->Copy (or pressing XP: Ctrl + C / OS X: X + C) copies the
current selection to the clipboard. From there it can be inserted in another
place using the Paste command (see below).
Paste
Selecting Edit->Paste (or pressing XP: Ctrl + V / OS X: X + V) copies the
current contents of the clipboard into the selected structure.
When using the keyboard shortcut for pasting, you can specify where to paste
to by clicking in the desired Structure window.
Duplicate
Selecting Edit->Duplicate (or pressing XP: Ctrl + D / OS X: X + D) creates a
copy of the current selection. It is equivalent to selecting Copy, then Paste.
Delete
Selecting Edit->Delete (or pressing the Del key) deletes the current selection.
You can also use Delete in the context menu of the selected object (module,
wire, etc.).
96 – Menus REAKTOR 5
Page 97

Select All
Selecting Edit->Select All (or pressing XP: Ctrl + A / OS X: X + A) selects all
the objects in the current window. You can then unselect individual objects
by XP: Ctrl+clicking / OS X: X+clicking on them.
11.3. Settings Menu
Sample Rate
Sample Rate sets the sample rate at which REAKTOR generates and processes
audio signals. With higher sample rates you can achieve better sound quality,
but the CPU load rises proportionally. You can change the internal sample rate
to any of the values in the menu. The range of available values depends on
your sound card or host plug-in. If the internal sample rate is different from
the sound card’s or host plug-in’s sample rate, the Audio In and Audio Out
modules will do the necessary sample-rate conversion.
Control Rate
Control Rate sets the control rate for REAKTOR event signals; i.e. the number
of times per second that event-signal values are updated. The control rate is
applied globally to all primary modules that generate or process events; e.g.
LFO, Slow Random, Event Hold, A-to-E, Event Smoother, and more. Since
the control rate is very low compared to the sample rate, these modules need
very little CPU power. For this reason, good builders choose to work with event
signals rather than audio signals whenever possible (i.e. whenever it doesn’t
degrade the sound).
Higher control rates give a better resolution in time, resulting in finer steps
in the signal.
MIDI Learn
Selecting Settings->MIDI Learn (or pressing XP: Ctrl + T / OS X: X+ T) acti-
vates MIDI Learn mode for the currently selected panel control. This mode is
automatically deactivated after a MIDI-controller message is received. There
is a corresponding MIDI Learn button (midi connector icon) in the Ensemble
Panel Toolbar.
Menus – 97REAKTOR 5
Page 98

Set Protected/Set Unprotected
Enables/disables Protection mode. In protection mode only a very limited edit
of the ensemble panel and structure is possible. Insertion, deletion, movement,
of panel controls and the alteration of voices is disabled.
Automatic Layout
Enables Automatic Layout mode for all instrument panels. (This is equivalent
to turning on Automatic Panel Layout in an ensemble’s Properties dialog, Ap-
pearance page.) By default this option is switched on.
External Sync
Toggles between the internal REAKTOR clock and an external clock (received
via MIDI) for all Sync Clock and 1/96 Clock modules. Also enables control of
Start/Stop modules by external MIDI-Start/Stop messages. When External
Sync is turned on, the tempo cannot be adjusted by the master clock BPM
field in the Main toolbar; instead, the internal clock is adjusted according to
the external clock.
MIDI Clock Out
If you enable this option, REAKTOR sends out MIDI clock ticks on all active
MIDI out ports (as set in the Audio Setup dialog, MIDI page).
Clock Start
Starts the REAKTOR master clock which controls all of the clock-driven
modules in the ensemble. This works with both internal and external clocks.
It sets the output of all Start/Stop modules to “start”. In the Ensemble Panel
toolbar there is a Start/Restart Clock button for the same function.
Clock Stop
Stops the REAKTOR master clock which controls all the Sync Clock and 1/96
Clock modules in the ensemble. This works with both internal and external
clocks. It sets the output of all Start/Stop modules to “on”. In the Ensemble
Panel toolbar there is a Pause/Stop Clock button for the same function.
98 – Menus REAKTOR 5
Page 99

Play MIDI File, Loop MIDI File, Ignore Tempo Change
These commands act on REAKTOR’s integrated MIDI File Player. For more
information about this, please see the Imp.
11.4. System Menu
Run/Stop Audio
With this menu command all audio computations can be started (Run Audio) or stopped (Stop Audio). In effect, this is the main on/off switch for the
REAKTOR software. The same function can be accessed by the Run/Stop
Audio button in the Main toolbar.
Debug
The Debug menu provides four options: Measure CPU Usage, Show Module
Sorting, Show Event Initialization Order, and Optimization.
Measure CPU Usage
The Measure CPU Usage option switches all audio-processing components
(instruments, macros, modules) to CPU-load measuring mode. The current
CPU load is displayed in black labels on the components (in structure view).
This feature is useful for determining how much of the total load is being
caused by each component. This information can help you to streamline the
structure, thus allowing for the generation of more voices.
Some components do not have a number displayed on them, i.e. they keep
their normal label. That’s because they do not actually use up any CPU power
for audio processing, either because they are not active or because they only
do event processing.
The displayed value may differ a little from the actual CPU load in normal
operation.
This mode is only available when Run Audio is active. During load measuring
the audio output is switched off. You can enable the Measure CPU Usage
option with the key combination XP: Ctrl + U / OS X: X + U.
Menus – 99REAKTOR 5
Page 100

CPU Usage Display
Show Module Sorting
The Show Module Sorting option switches all audio-processing modules to
sorting mode. In this mode, the current position of each module within the
overall stream of audio processing is shown. This position will be displayed
as a number in blue label on each module.
Show module Sorting mode
100 – Menus REAKTOR 5
 Loading...