

Page 1

Getting Started Guide
Page 2

The information in this document is subject to change without notice and does not repre
sent a commitment on the part of Native Instruments GmbH. The software described by
this document is subject to a License Agreement and may not be copied to other media.
No part of this publication may be copied, reproduced or otherwise transmitted or record
ed, for any purpose, without prior written permission by Native Instruments GmbH, herein
after referred to as Native Instruments. All product and company names are ™ or ® trade
marks of their respective owners.
Document authored by: Aleksander Rebane
Product Version: 5.5 (06/2010)
Document version: 1.0 (06/2010)
Special thanks to the Beta Test Team, who were invaluable not just in tracking down bugs,
but in making this a better product.
Disclaimer
Page 3

Germany
Native Instruments GmbH
Schlesische Str. 28
D-10997 Berlin
Germany
info@native-instruments.de
www.native-instruments.de
USA
Native Instruments North America, Inc.
5631 Hollywood Boulevard
Los Angeles, CA 90028
USA
sales@native-instruments.com
www.native-instruments.com
Contact
© Native Instruments GmbH, 2010. All rights reserved.
Page 4

Table of Contents
Table of Contents
1 Welcome to REAKTOR
1.1 System Requirements 10
1.2 REAKTOR Modes: Full, Player and Demo 11
1.3 How to Get Started 11
1.4 The REAKTOR Documentation 12
1.5 Special Formatting used in this Document 13
2 Basic Settings in REAKTOR
2.1 Configuring the Audio Hardware 14
2.2 Configuring the MIDI Hardware 23
2.1.1 Accessing the Audio and MIDI Settings… dialog 14
2.1.2 Selecting an Audio Hardware Device 15
2.1.3 Selecting a Sample Rate 17
2.1.4 Adjusting Output Latency 18
2.1.5 Routing: Assigning REAKTOR's Inputs 21
2.1.6 Routing: Assigning REAKTOR's Outputs 22
3 Loading and Playing
3.1 A Few Important Buttons 25
3.2 Ensembles, Instruments and KOMPLETE Instruments 27
3.3 Loading Carbon 2 27
3.4 Playing Carbon 2 and its Snapshots 30
3.5 Adjusting the Sound 33
3.3.1 Opening the Sidepane 27
3.3.2 Opening the Browser 27
3.3.3 Loading a File 30
3.4.1 Loading a Snapshot 31
3.5.1 Switching Effects 33
10
14
25
REAKTOR 5.5 - Getting Started Guide - 4
Page 5

Table of Contents
3.6 Saving Your Settings 35
3.5.2 Changing the Filter Movement 33
3.5.3 Changing the Filter Settings 34
4 Modifying a REAKTOR Ensemble
4.1 Recap 37
4.2 Using the Browser to Load the Ensemble 38
4.3 Instruments inside Ensembles 39
4.4 Snapshot Master for Plug-In and Snapshot Hierarchies 43
4.5 Swapping the Delay Instrument for a Reverb Instrument 46
4.6 Using the Bowser to Search for Instruments 48
4.7 Connecting the Instrument to the Audio Out 51
4.8 Restoring the Correct Snapshot Hierarchy 54
4.3.1 Junatik Panel Overview 40
4.3.2 The Difference Between an Ensemble and an Instrument 41
4.4.1 Snapshot Hierarchy as seen in Properties 43
4.4.2 Recall by MIDI and Snapshot Master for Plug-In 45
4.4.3 Snapshot Properties for the Junatik Instrument 45
4.4.4 Snapshot with a REAKTOR Switch Turned Off 45
4.4.5 Snapshot Flexibility 46
4.5.1 Opening a REAKTOR Structure 46
4.5.2 Removing an Instrument from the Structure 47
4.7.1 Making the Connections 51
4.7.2 Resetting the Positions of Instruments in the Ensemble Panel 52
4.8.1 Opening the Instrument Properties 54
5 Creating a Sequenced Synthesizer
37
56
5.1 Recap and Overview 56
5.2 Creating the Synth Sequencer Ensemble 57
5.2.1 Create a New Ensemble 57
REAKTOR 5.5 - Getting Started Guide - 5
Page 6

Table of Contents
5.3 Making the Synth Sequencer Work 61
5.4 Making the MIDI Connections between Instruments 65
5.5 REAKTOR Run and Stop Buttons 67
5.6 Looking More Closely at Monoliner 68
5.7 Exploring the Snapshots/Show Hints 70
5.2.2 Using the Browser to Load the Instruments 58
5.3.1 Overview of the Structure 62
5.3.2 Removing the Unwanted Instrument 62
5.3.3 Connecting ANALOG Outputs to the Audio Out 63
5.3.4 Overview of Monoliner and ANALOG 64
5.4.1 Using Internal MIDI Connections 66
5.6.1 Changing the Direction and Speed 68
5.6.2 Number of Steps, Step Offset and Shuffle/Swing 70
5.6.3 GATE, VELOCITY and PITCH Knobs and On/Off Buttons 70
5.7.1 Exploring Snapshots in Monoliner and ANALOG 71
5.7.2 Show/Hide Hints 71
6 Exploring a REAKTOR Sampler
6.1 Recap and Overview 72
6.2 Using the Browser to Launch Memory Drum 2 73
6.3 Replacing and Editing Samples in the Sample Map Editor 75
6.4 The Memory Drum Interface 79
6.3.1 Opening the Map and Playing the Samples 75
6.3.2 Using Replace in the Edit Sample List 76
6.3.3 Sample Key-Split and Root Note 77
6.3.4 Using Add from the Edit Sample List 78
6.3.5 Editing the Key-Split 79
6.4.1 Changing Pitch for Just one Sample Slot 79
6.4.2 Exploring the Memory Drum Snapshots 81
72
REAKTOR 5.5 - Getting Started Guide - 6
Page 7

Table of Contents
7 Building a Synth Using Macros
7.1 What is a Macro 83
7.2 Preparation 85
7.3 Adding an Oscillator and an ADSR Env to the Instrument 91
7.4 Inserting the Filter 95
7.5 Adding a Second Oscillator and a Mixer 98
7.6 Playing Your Synth and Making Changes to the Sound 110
7.2.1 Loading a New Ensemble 85
7.2.2 Removing the Default Instrument 87
7.2.3 Inserting a New Instrument 88
7.2.4 Connecting the Instrument to the Audio Out 90
7.3.1 Inserting an Oscillator 91
7.3.2 Inserting the ADSR Env 93
7.3.3 Inserting Pitch and Gate Modules 93
7.3.4 Connecting the Pitch and Gate Modules 94
7.3.5 Safe Output Level 95
7.4.1 Inserting the Filter Macro and Doing Some Rewiring 96
7.4.2 Unlocking the Panel to Move the Macros 97
7.5.1 Adding a Second Oscillator Using Duplicate 98
7.5.2 Using Properties to Rename the Oscillator Macros 99
7.5.3 Adding a Mixer 101
7.5.4 Increasing the Number of Mixer Inputs 103
7.5.5 Adding Faders and Connecting them to the Mixer 104
7.5.6 Using Duplicate to Add a Second ADSR-Env 105
7.5.7 Connecting the NotePitch Module to the ADSR Envelopes and Filter 105
7.5.8 Tidying Up in the Instrument Panel 106
7.5.9 Changing the Appearance of the Faders 108
7.6.1 Changing the Oscillators Waveform, Resetting the Filter and Output Level 110
83
REAKTOR 5.5 - Getting Started Guide - 7
Page 8

Table of Contents
7.6.2 Creating some Snapshots 112
7.6.3 Saving Your Work Using Save As 112
8 Make a Sampler Using REAKTOR Modules
8.1 Recap and Overview 113
8.2 What Kind of Sampler? 113
8.3 Building the Basic Structure 114
8.4 Making the Connections 119
8.5 Loading a Sample into the Sampler 121
8.6 Tidying Up the Appearance and Moving the Modules 124
8.7 Adding More Samples and Changing their Settings 127
8.8 Sample Reverse and Other Playback Possibilities 130
8.3.1 Load up a New Ensemble 114
8.3.2 Inserting the First Modules 115
8.3.3 Inserting the Envelope 117
8.3.4 Adding the Controls for the Envelope 118
8.4.1 Connecting the Sampler to the 2 Audio Voice Combiners 120
8.4.2 Connecting the NotePitch and Gate Modules 120
8.5.1 Opening the Sample Map Editor from the View Menu 121
8.5.2 Adding a Sample to the Sample Map Editor 122
8.6.1 Moving Modules in the Structure 124
8.6.2 Deleting unwanted Modules 125
8.6.3 Using the Panel Lock Button to Move the Knobs 126
8.7.1 Double-clicking on the Waveform to Open the Sample Map 128
8.7.2 Changing the Settings of the Existing Sample 128
8.7.3 Making Changes to the Key-Split and Root Key 128
8.7.4 Adding More Samples 130
8.8.1 Looping, and Direction Buttons 131
8.8.2 Transposing a Sample 132
113
REAKTOR 5.5 - Getting Started Guide - 8
Page 9

8.9 Adding a Filter 133
8.10 Modifying the Existing Sampler 137
8.9.1 Inserting the Filter Into the Structure 133
8.9.2 Creating the Filter Controls and Making the Connections 134
8.9.3 Tidying Up the Appearance in the Instrument Panel 135
8.9.4 Trying the Band-Pass and Hi-Pass Filter Outputs/Saving Your Work 135
8.9.5 Using Save Ensemble to Update Your Already Saved Sampler 137
8.10.1 Overview of Selector Used to Cross-fade 138
8.10.2 Inserting the Selector 138
8.10.3 Connecting the Filter Outputs 139
8.10.4 Increasing the Number of Selector Inputs 140
8.10.5 Adding the Position Fader and Changing its Range 141
8.10.6 Final connections and Panel Appearance 142
8.10.7 Explore Your Sampler and Make Some Snapshots 144
9 What’s Next?
Table of Contents
147
REAKTOR 5.5 - Getting Started Guide - 9
Page 10

Welcome to REAKTOR
1 Welcome to REAKTOR
REAKTOR is a musical instrument. It creates sound. You can play it like any other music
software—stand-alone with a MIDI keyboard, or as plug-in within a sequencing host.
But you define what type of instrument it is. Each time you launch REAKTOR, it will fol
low your musical needs. You need a synthesizer? You need a drum computer? You need
this particular noise-making device you never heard before? Just load the according instru
ment file and start playing.
The full version of REAKTOR comes with over 50 individual instruments. An included col
lection of instruments from earlier REAKTOR versions unfolds more than ten years of lega
cy within electronic music. And the online library holds more than 3000 instruments of
any type you can imagine.
If you don’t own the full version, you can still use the REAKTOR engine’s musical power. A
continuously growing set of KOMPLETE Instruments is separately available for REAKTOR.
When you load any of those instruments, REAKTOR switches into its Player mode. This is
explained in section
However, loading pre-configured instruments only scratches the surface. You can edit your
favorite instrument’s signal processing, adjust its internal structure to a specific song’s
needs or start building your own instrument from scratch, thus designing your very person
al signature sound.
This document will help you get started.
The REAKTOR team at Native Instruments
↑1.2, REAKTOR Modes: Full, Player and Demo below.
1.1
System Requirements
For up-to-date information about system requirements and compatibility with current and
legacy operating systems, please see our website at:
www.native-instruments.com/REAKTOR
REAKTOR 5.5 - Getting Started Guide - 10
Page 11
Welcome to REAKTOR
REAKTOR Modes: Full, Player and Demo
1.2 REAKTOR Modes: Full, Player and Demo
What you can do with the REAKTOR version installed on your computer depends on which
mode REAKTOR is running in. This mode is connected to the kind of license you are us
ing:
▪ Full mode: If you already installed and activated REAKTOR, as a single product or as
part of a bundle like KOMPLETE, you are using it in Full mode. In Full mode, all
functionality is available without restrictions.
▪ Player mode: You installed and activated any of the KOMPLETE Instruments for RE
AKTOR, or a bundle of these Instruments like KOMPLETE Elements. Additionally, you
installed REAKTOR as a player application for these Instruments. In this case you are
using REAKTOR in Player mode. In Player mode you can play Instruments and
change their settings, but cannot edit their internal structure. While REAKTOR's Play
er mode does not support saving of Instruments, all Instrument settings are saved
with your host’s project.
▪ Demo mode: You installed REAKTOR and a number of KOMPLETE Instruments as
demo versions, but did not activate any of the products yet. In this case you are using
the demo license for REAKTOR, and REAKTOR is running in Demo mode. In Demo
mode, you have all functionality but the application will stop generating sound after
30 minutes. Furthermore, storing is disabled.
Installation and activation are explained in detail in the separate Native Instruments Setup
Guide.
1.3 How to Get Started
This document explains all necessary steps to get started with REAKTOR:
▪ Chapters ↑2, Basic Settings in REAKTOR and ↑3, Loading and Playing describe how
to setup the application, and how to load and play an instrument. This part of the
documentation is relevant for all users.
▪ Chapters ↑4, Modifying a REAKTOR Ensemble to ↑9, What’s Next? explain features
only available in REAKTOR’s Full mode. If you are using REAKTOR’s Player mode,
this is not relevant for you.
REAKTOR 5.5 - Getting Started Guide - 11
Page 12
Welcome to REAKTOR
The REAKTOR Documentation
In the course of the following chapters you will learn how to perform the most common
tasks in REAKTOR. Without bothering you with technical detail, a number of tutorials will
teach you how to effectively use REAKTOR’s capacities. Following the order of the tutori
als given in this document is recommended, as later sections will rely on parts explained
earlier.
1.4 The REAKTOR Documentation
Once you are familiar with the basic usage of REAKTOR, you may want to learn more. The
REAKTOR reference documentation contains detailed descriptions of all relevant items
and features within REAKTOR:
▪ The Application Reference explains all elementary concepts of REAKTOR. It tells you
how to operate the application in detail. If you want to use and understand REAK
TOR’s capacities beyond the level of this Getting Started document, the Application
Reference is your starting point.
▪ The Instrument Reference describes all instruments that come with REAKTOR as its
factory content. Read this if you want to explore the musical options of each individu
al instrument in greater detail.
▪ The Module and Macro Reference provides detailed information about all parts availa
ble when designing own instruments in REAKTOR. If you want to leave the beaten
path, this document will become your guide.
▪ The Core Reference, finally, is divided into two parts: The first half is a tutorial that
explains the Core level of REAKTOR, where you can build your own low-level digital
signal processing devices. The second is a comprehensive reference which lists all
Core level components.
These documents are most useful if you are using REAKTOR in Full mode. However, espe
cially the Application Reference will provide a deeper understanding of how to use REAK
TOR’s instruments, so it might be worth a look if you are using REAKTOR in Player mode,
too.
All of these documents are available from REAKTOR’s Help menu.
REAKTOR 5.5 - Getting Started Guide - 12
Page 13
Welcome to REAKTOR
Special Formatting used in this Document
In addition to the manuals coming with REAKTOR, there is more information available on
line: Be sure to visit the Native Instruments user forum at
http://www.native-instruments.com/forum/.
The huge community of REAKTOR users is sharing tips and tricks, and will help you with
specific questions.
1.5 Special Formatting used in this Document
This manual uses particular formatting to point out special facts and to warn you of poten
tial issues. The icons introducing these notes let you see what kind of information is to be
expected:
Whenever this exclamation mark icon appears, you should read the corresponding note
carefully and follow the instructions and hints given there if applicable.
This lightbulb icon indicates that a note contains useful extra information. This informa
tion may often help you to solve a task more efficiently, but does not necessarily apply to
the setup or operating system you are using. However, it should be worth reading for most
users.
REAKTOR 5.5 - Getting Started Guide - 13
Page 14

Basic Settings in REAKTOR
2 Basic Settings in REAKTOR
REAKTOR 5 is capable of running as a stand-alone software with its own interface to your
audio and MIDI hardware. This way you can play REAKTOR using a MIDI keyboard/control
ler attached to your computer. Hereafter we will assume that you are running REAKTOR as
a stand-alone application.
In this chapter you will learn how to link REAKTOR to the MIDI devices and audio hard
ware connected to you computer. You will also get to know REAKTOR a little bit without
the distraction of making music using your DAW.
Before you start your work with REAKTOR 5 it is a good idea to configure its audio settings
to fit your needs.
This only applies to the stand-alone version of REAKTOR 5, as with the REAKTOR 5 plugins all things audio and MIDI are handled by the host software.
2.1 Configuring the Audio Hardware
In order to listen to the sound REAKTOR generates, you need to configure your audio hard
ware device (i.e., your soundcard or external audio interface) for use with REAKTOR.
Use Low-Latency Drivers
Whenever possible you should use low-latency drivers while working with REAKTOR. RE
AKTOR works with two types of low-latency drivers:
▪ ASIO™
▪ Core Audio™ (only on computers running Mac OS® X)
These technologies have been developed to ensure an efficient data transfer between soft
ware and audio hardware and should provide a latency that is suitable for live play, if not
unnoticeable.
2.1.1 Accessing the Audio and MIDI Settings… dialog
When you start REAKTOR for the first time, the Audio and MIDI Settings…dialog should
open automatically. You can call up this dialog again at a later point in time from within
REAKTOR:
1.
Click the Menu button to open the application menu.
REAKTOR 5.5 - Getting Started Guide - 14
Page 15
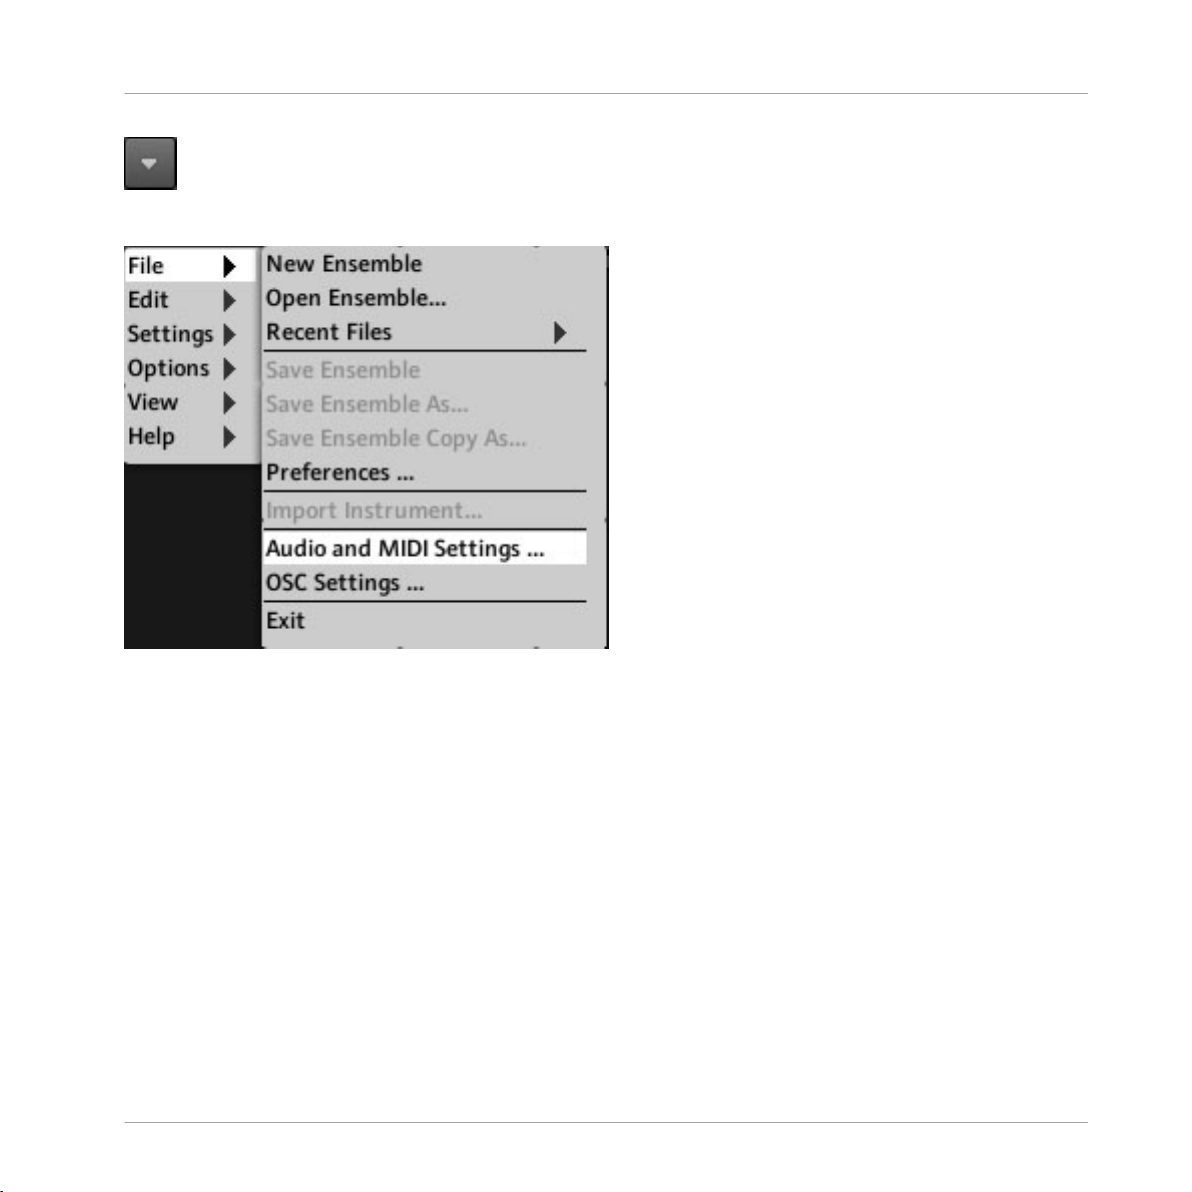
2. Select the File > Audio and MIDI Settings… menu entry:
Basic Settings in REAKTOR
Configuring the Audio Hardware
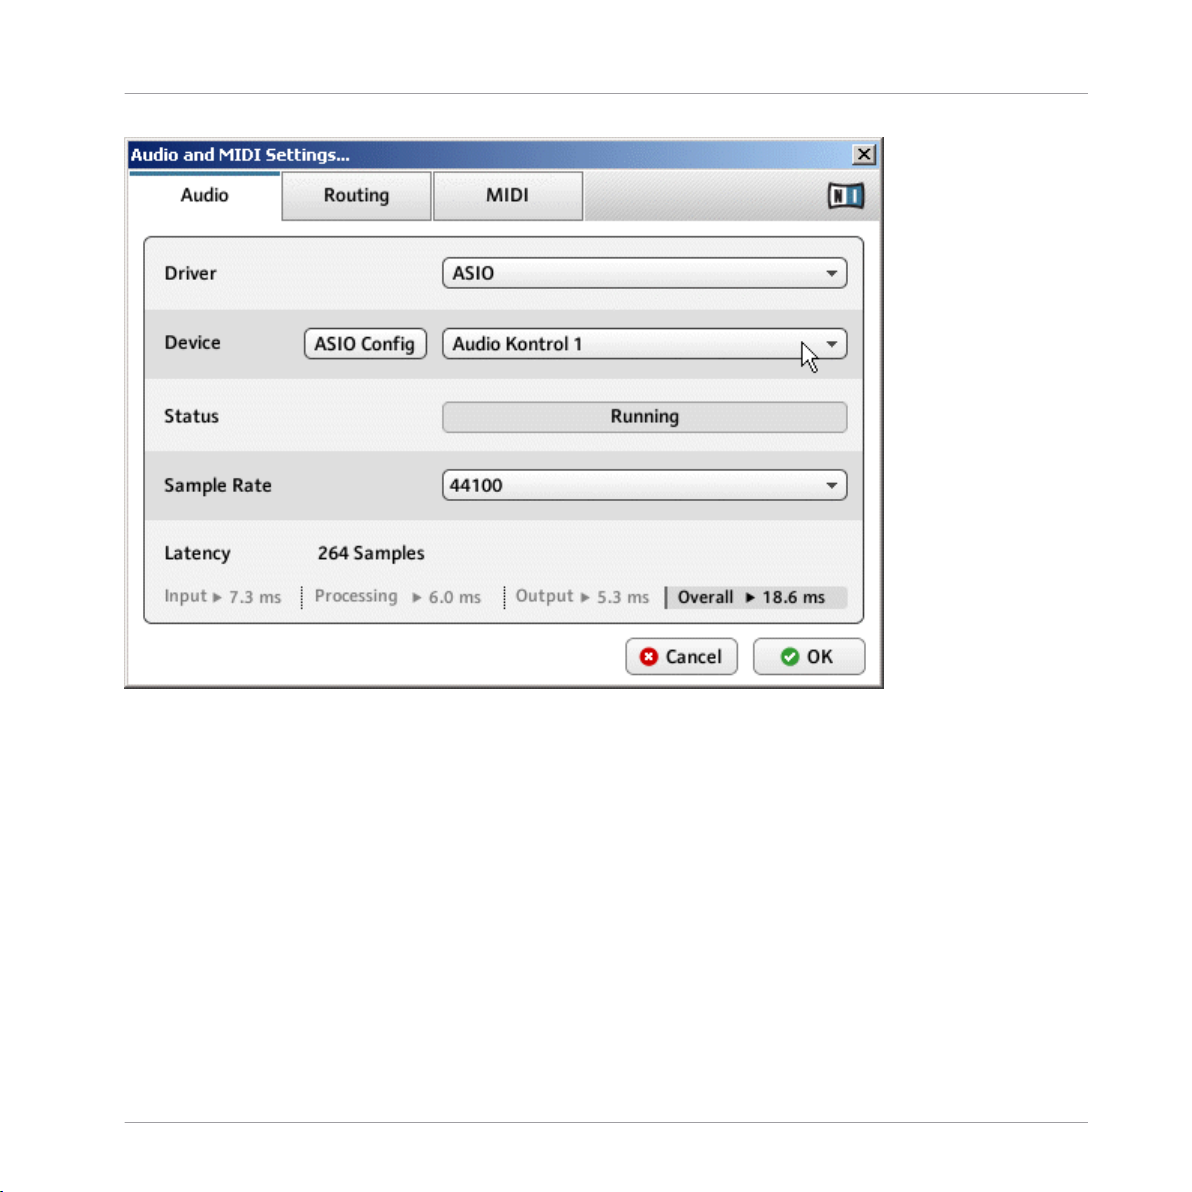
2.1.2 Selecting an Audio Hardware Device
To select the audio hardware device you want REAKTOR to use:
1. Double-click on the REAKTOR application to launch it. You will be presented with the
Audio and MIDI Settings… dialog window.
2.
In the Audio and MIDI Settings… dialog window, click the Device menu to open the
list of available audio interfaces. If only one audio hardware device is present, the de
vice and sample rate will be selected automatically. If there are two or more audio de
vices installed on your computer, select the one you want REAKTOR to use by click
ing its entry in the Device menu.
REAKTOR 5.5 - Getting Started Guide - 15
Page 16
Basic Settings in REAKTOR
Configuring the Audio Hardware
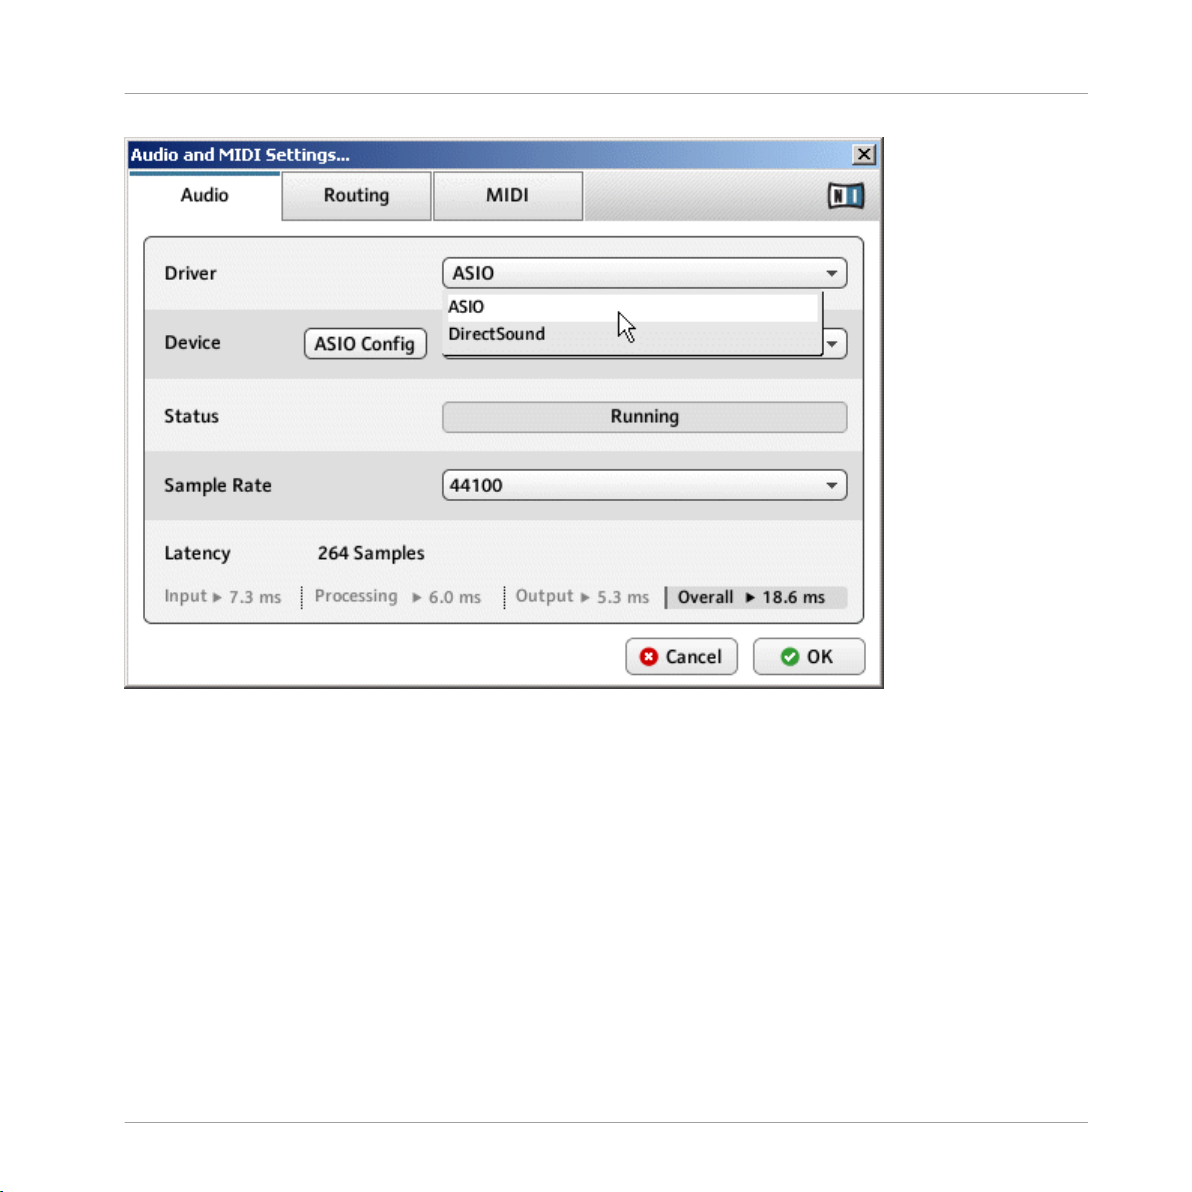
3.
From the Driver menu, select the type of driver you want to use. On computers running
a Windows® operating system, using ASIO™ is highly recommended. On computer
running Mac OS® X, Core Audio™ is pre-selected.
REAKTOR 5.5 - Getting Started Guide - 16
Page 17
Basic Settings in REAKTOR
Configuring the Audio Hardware
Now that you have selected an audio hardware device and according driver, proceed with
the audio hardware setup by selecting a sample rate.
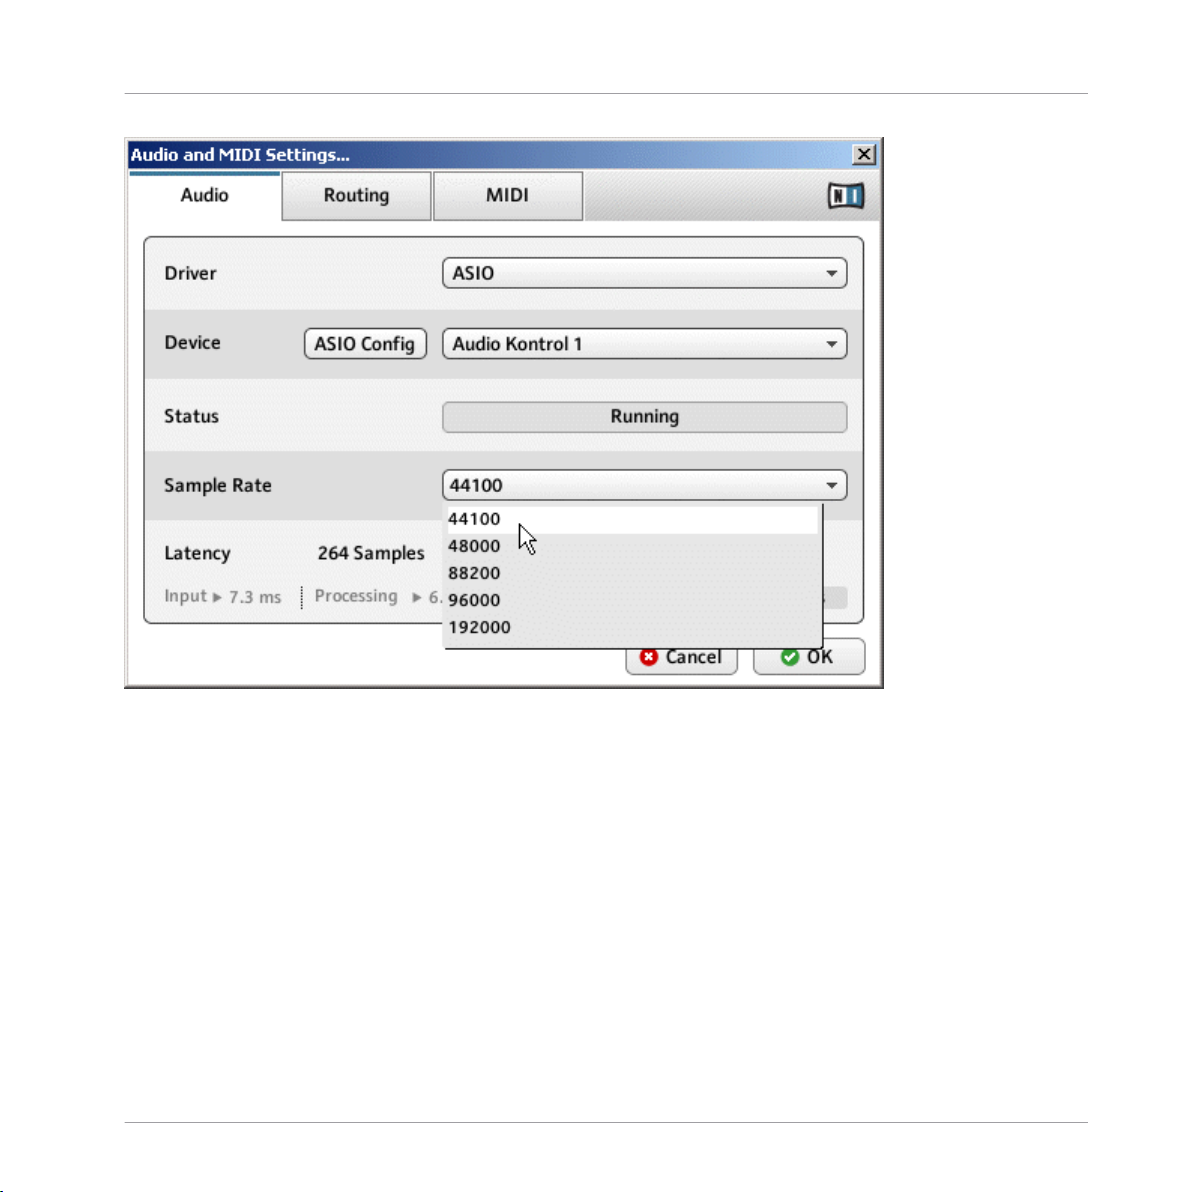
2.1.3
1.
Selecting a Sample Rate
Select the sample rate that you want your audio hardware to work at from the Sample
Rate menu. We recommend selecting a sample rate of 44100 Hz.
REAKTOR 5.5 - Getting Started Guide - 17
Page 18
Basic Settings in REAKTOR
Configuring the Audio Hardware
2. Now that you have selected a sample rate, proceed with the audio hardware setup by
adjusting the output latency.
2.1.4
Adjusting Output Latency
By adjusting the output latency of your audio hardware you can control how quickly the
audio signal generated by REAKTOR becomes audible after you have pressed a key on your
MIDI keyboard. The minimum amount of latency that can be achieved without inducing
crackles and other noises depends on how much CPU power is available to audio process
ing. On a modern computer that has been set up correctly, there should be no perceptible
delay. Older computers may require a more relaxed latency setting. The way the latency is
adjusted from within REAKTOR differs depending on the operating system you are using.
REAKTOR 5.5 - Getting Started Guide - 18
Page 19
Basic Settings in REAKTOR
Configuring the Audio Hardware
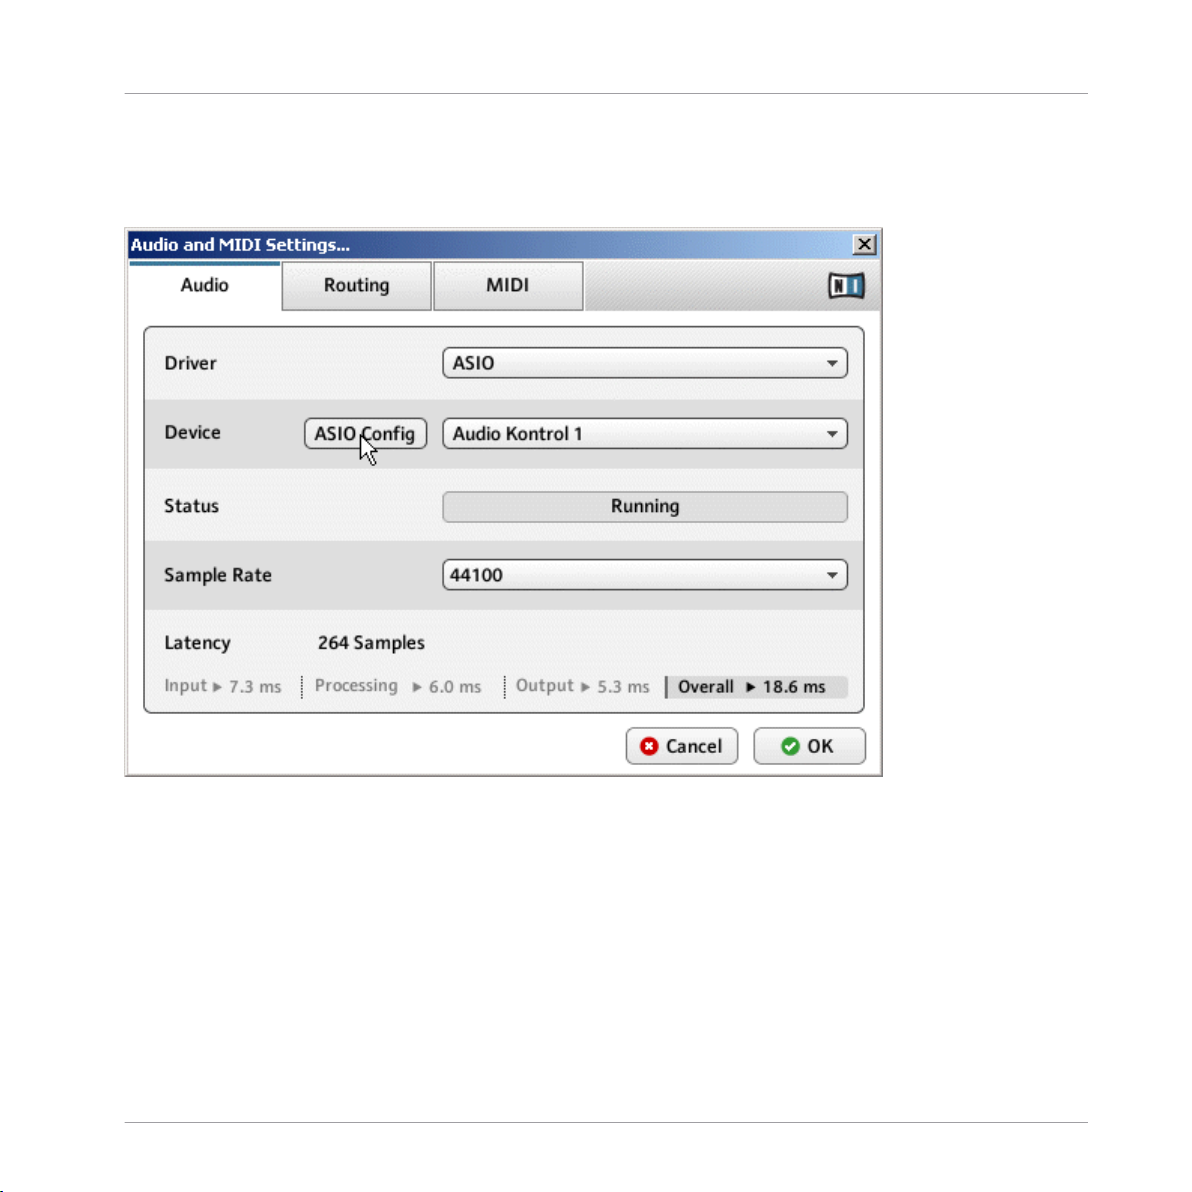
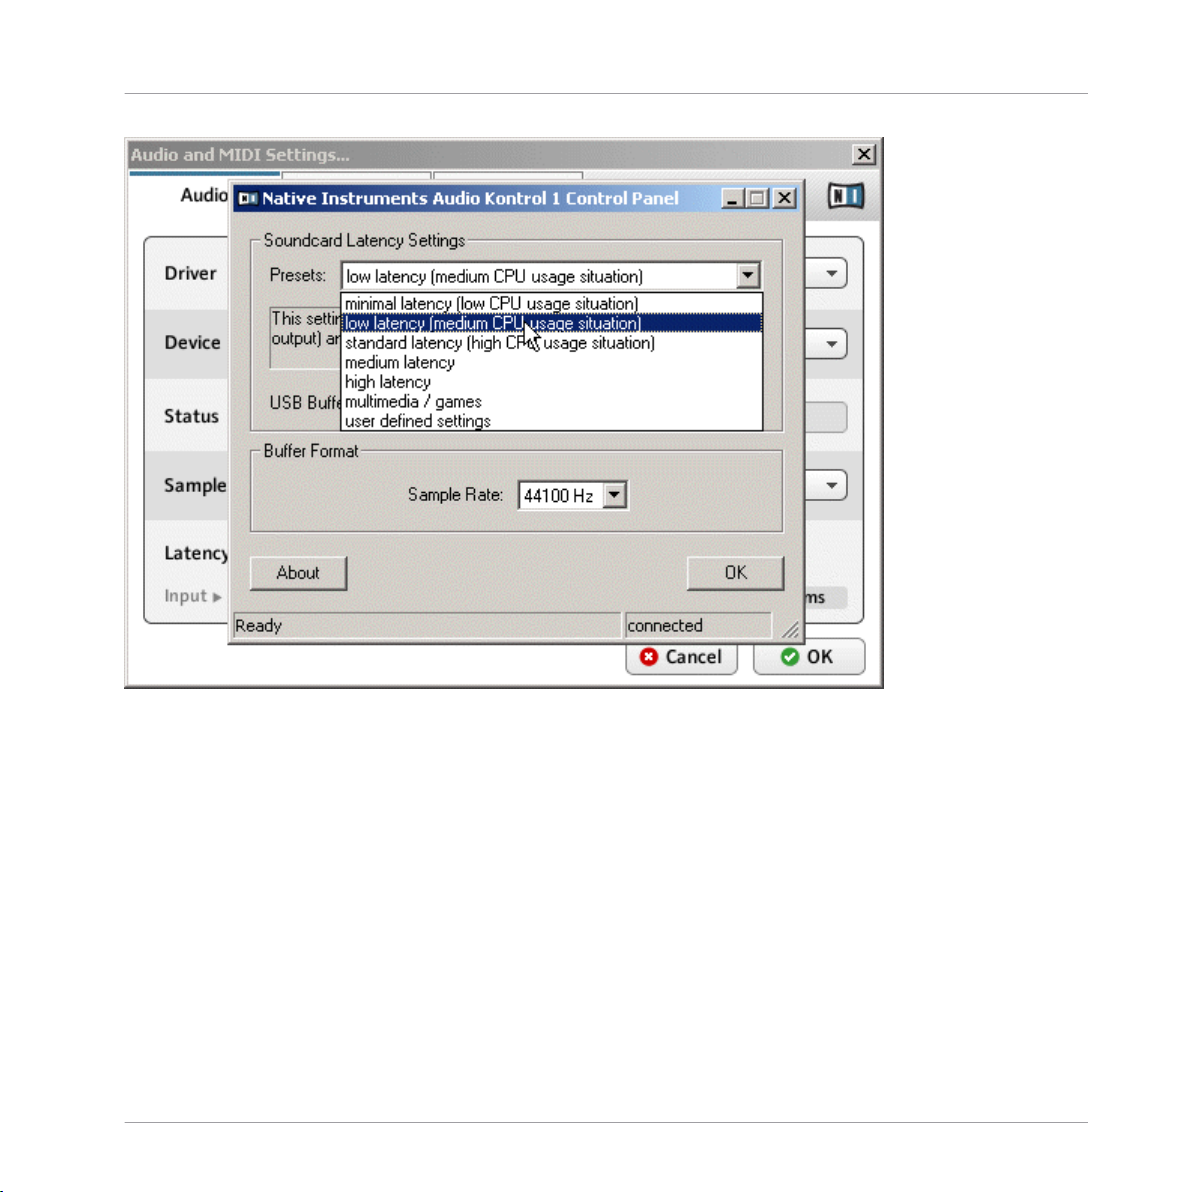
Windows®
1.
Click the ASIO Config button in the Audio and MIDI Settings… dialog to open your audio
hardware's control panel.
2.
In the control panel belonging to your audio hardware, select an output latency of
about 10 ms. This should work well on most computer systems.
REAKTOR 5.5 - Getting Started Guide - 19
Page 20
Basic Settings in REAKTOR
Configuring the Audio Hardware
3.
To confirm the settings you have made, click OK.
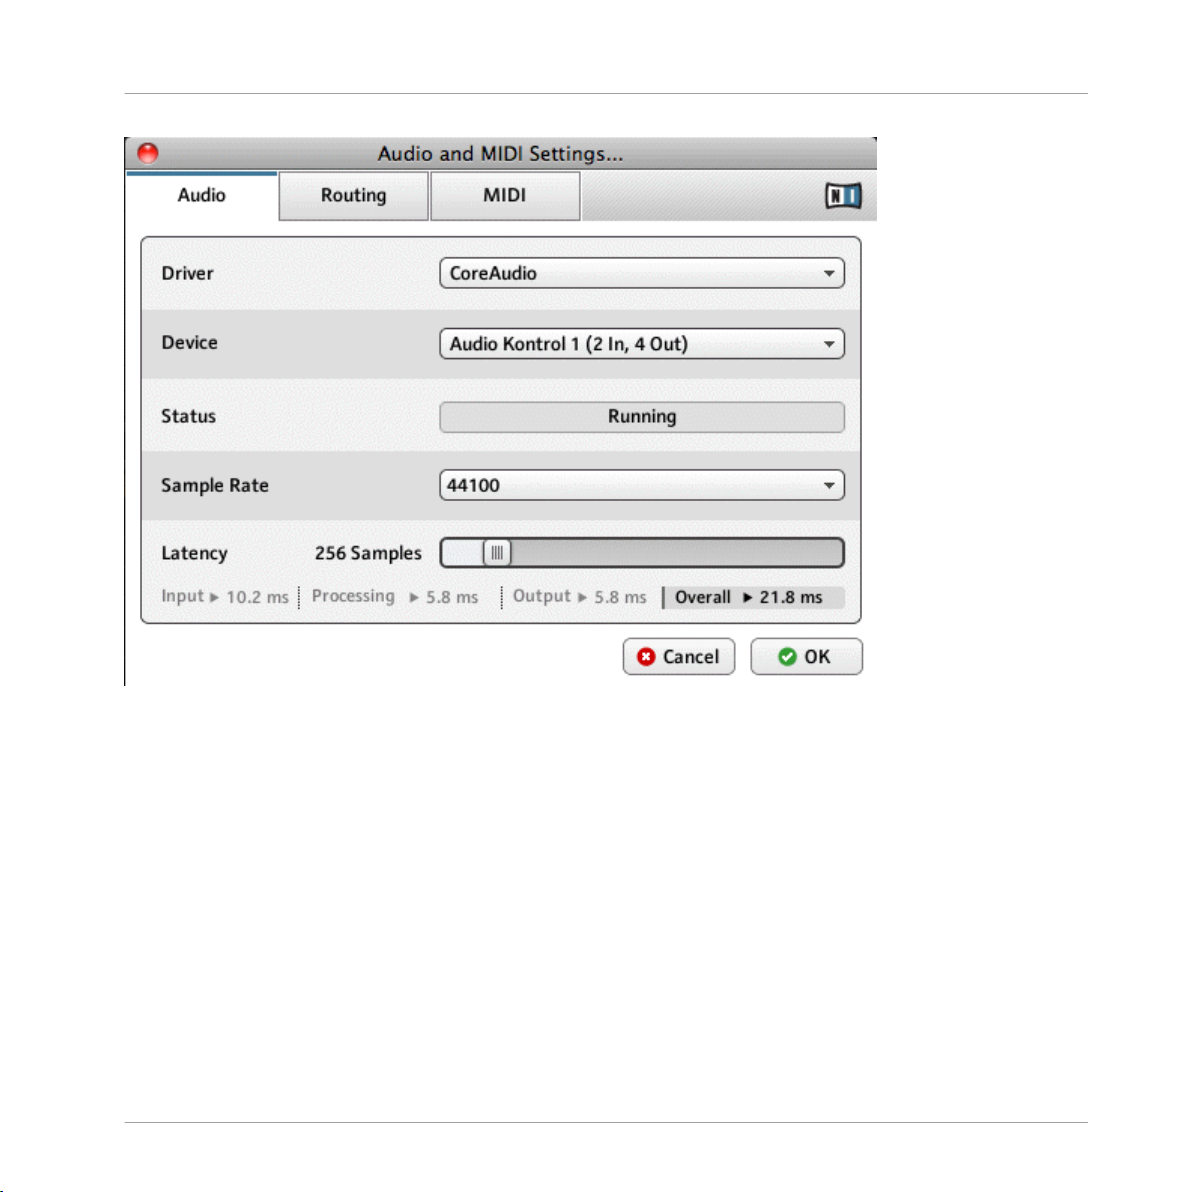
Mac OS® X
1.
Move the Latency slider at the bottom of the Audio and MIDI Settings… dialog to a val
ue of about 256 samples.
REAKTOR 5.5 - Getting Started Guide - 20
Page 21
Basic Settings in REAKTOR
Configuring the Audio Hardware
2.
To confirm the settings you have made, click OK.
2.1.5
Routing: Assigning REAKTOR's Inputs
You can assign each of REAKTOR's input channels to an arbitrary input of your audio de
vice:
1.
In the Audio and MIDI Settings… dialog, click on the Routing tab at the top. (If you are
using Mac OS® X and want to use your Mac’s built-in inputs you will need to setup
an Aggregate Device using “Audio MIDI Setup.app.”)
2.
Click the Inputs button to access the Inputs view.
3. To assign one of REAKTOR's inputs to an input of your audio hardware device, click
the corresponding entry in the right column of the Inputs view.
REAKTOR 5.5 - Getting Started Guide - 21
Page 22

Basic Settings in REAKTOR
Configuring the Audio Hardware
4.
To confirm the selection you have made, click OK.
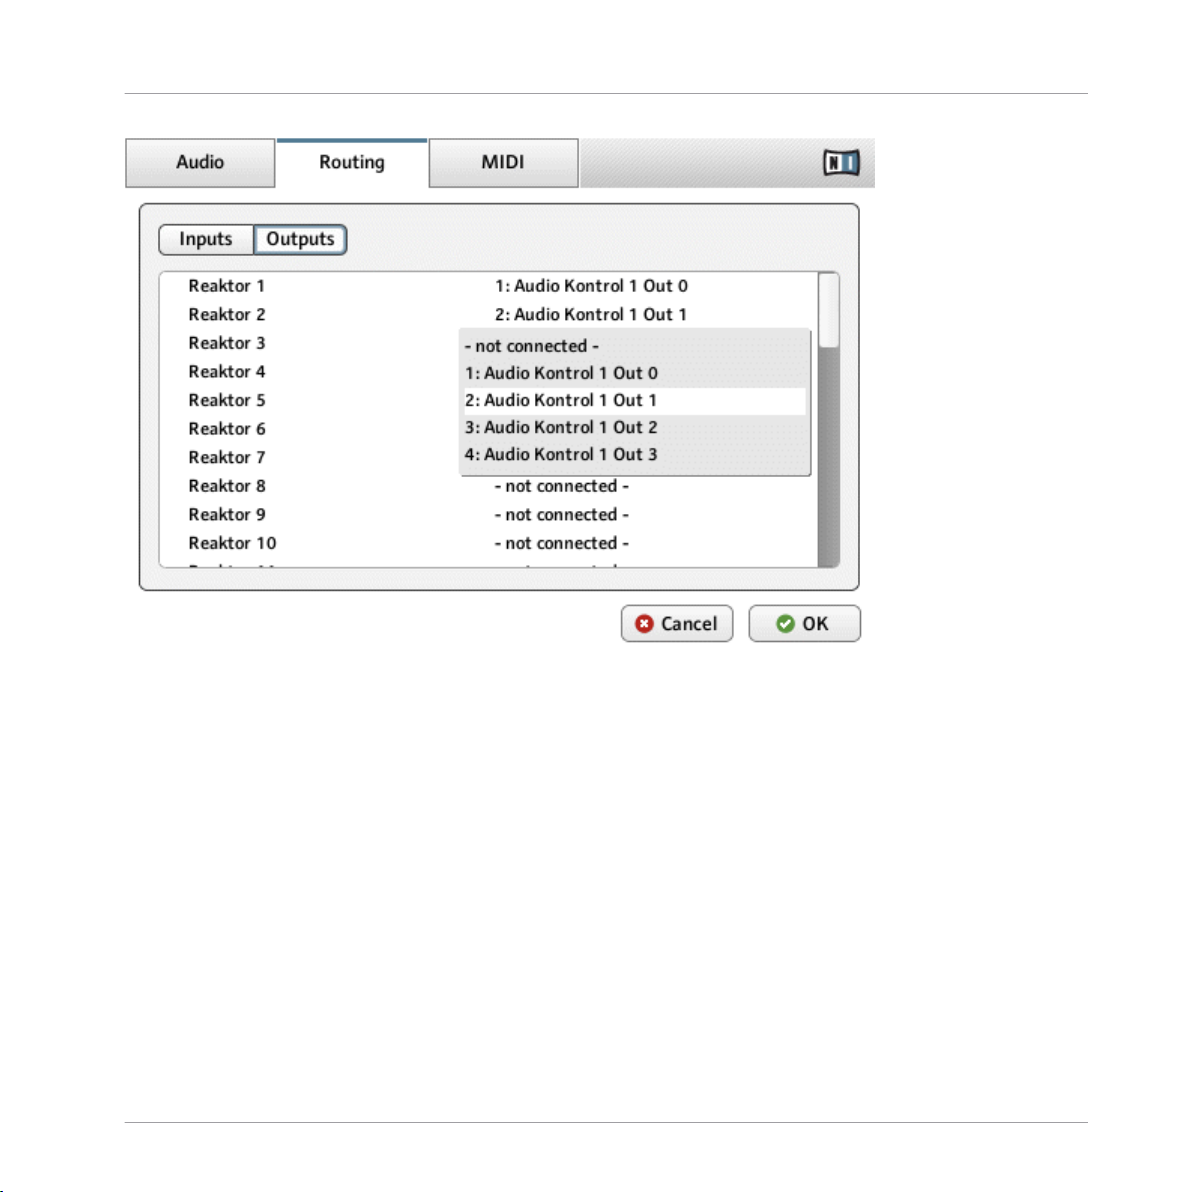
2.1.6
Routing: Assigning REAKTOR's Outputs
You can assign each of REAKTOR's output channels to an arbitrary output of your audio
device:
1.
In the Audio and MIDI Settings… dialog, click on the Routing tab at the top (If you are
using Mac OS® X and want to use your Mac’s built-in outputs you will need to setup
an Aggregate Device using “Audio MIDI Setup.app”).
2.
Click the Outputs button to access the Outputs view.
3. To assign one of REAKTOR's outputs to an output of your audio hardware device,
click the corresponding entry in the right column of the Outputs view.
REAKTOR 5.5 - Getting Started Guide - 22
Page 23
Basic Settings in REAKTOR
Configuring the MIDI Hardware
4.
To confirm the selection you have made, click OK.
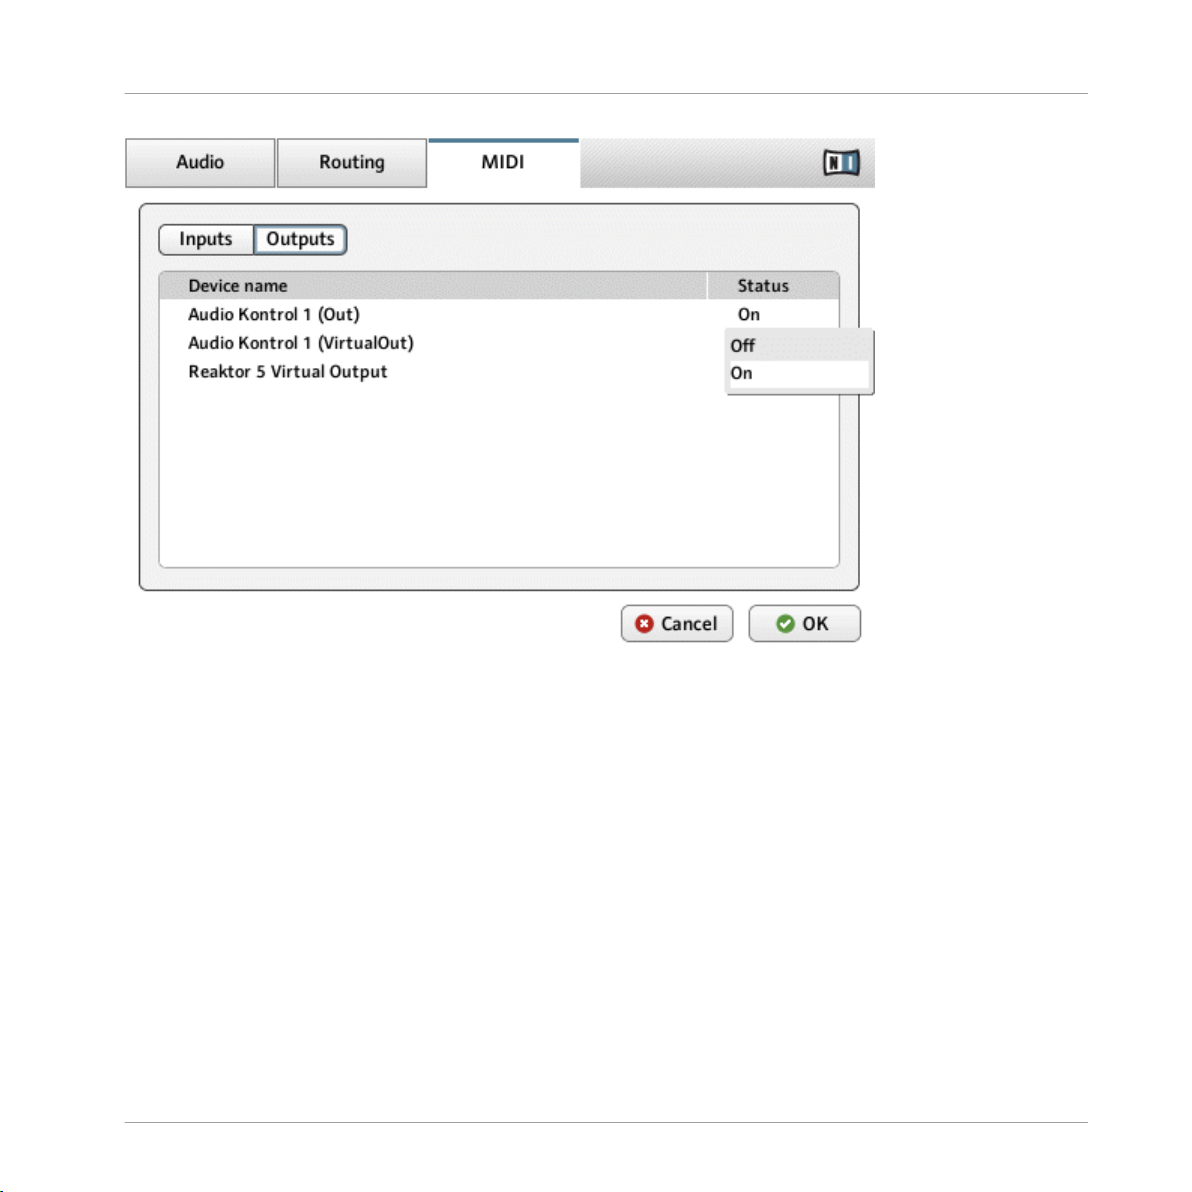
2.2
1.
Configuring the MIDI Hardware
Click the MIDI tab in the Audio and MIDI Settings… dialog. Again you will be presented with
a number of choices depending on what is plugged into your computer.
2. Click the Off text to the right of the device you which to use. The text should read On
next to items you wish to be active.
REAKTOR 5.5 - Getting Started Guide - 23
Page 24
Basic Settings in REAKTOR
Configuring the MIDI Hardware
REAKTOR 5.5 - Getting Started Guide - 24
Page 25
Loading and Playing
3 Loading and Playing
In this tutorial you will learn how to load and play existing instruments.
▪ You will be guided through using the REAKTOR Browser to open REAKTOR Ensem
bles.
▪ We will take a look at Snapshots.
▪ Finally, we will have a look at saving your work.
This tutorial assumes that you installed REAKTOR and the freely available REAKTOR Fac
tory Selection, a collection of KOMPLETE Instruments. Also, it assumes that you use RE
AKTOR as a plug-in within your favorite sequencing host.
If you own the full license of REAKTOR, you don’t need to install the REAKTOR Factory Se
lection package: Carbon 2, the instrument used as an example, is available within REAKTOR’s
factory content within the New Additions > Synthesizers section.
3.1 A Few Important Buttons
Before you start, it is important to familiarize yourself with four very important buttons
found in the Main Bar and the Sidepane.
▪
The Sidepane button in the Main Bar is used to open and close the Sidepane. The
Sidepane is where the Browser, Snapshot, Panelsets, and Properties tabs are located.
Fig. 3.1 The Sidepane button
▪
Click the
Fig. 3.2 The Browser tab
▪
Click the
Browser
Snapshot
morphing presets.
tab to open the Browser, used for finding files in REAKTOR.
button to open the Snapshot tab, used for loading, saving, and
REAKTOR 5.5 - Getting Started Guide - 25
Page 26

Fig. 3.3 The Snapshot button
▪
From here on we will always use the Menu button to access global menu entries. How
ever, all these menu entries can also be accessed from the application menu.
Fig. 3.4 The Menu button
Loading and Playing
A Few Important Buttons
Fig. 3.5 The application File menu (Windows® version shown)
It is possible to access all views in REAKTOR from the global menu entries under the
menu. For the sake of brevity, this will only be mentioned in this part of the Getting Started
manual.
View
REAKTOR 5.5 - Getting Started Guide - 26
Page 27

Loading and Playing
Ensembles, Instruments and KOMPLETE Instruments
We will be using these buttons during the tutorial. Now let’s use the Browser to load our
first REAKTOR Ensemble.
3.2 Ensembles, Instruments and KOMPLETE Instruments
Aside from the buttons, you should understand the following terms, as they are used with
in the REAKTOR community und will be common within this document’s tutorials:
▪ The Ensemble is a set of Instruments that can be loaded directly into REAKTOR. This
can be a single synthesizer or a full channel strip with various effects. The Instru
ments are connected among each other, and they are connected to the application’s
audio input and output. When storing, you typically use the Ensemble file format.
▪ The Instrument is a part of an Ensemble, for instance a single delay effect unit. You
can load Instruments into an Ensemble, to connect them to the application’s audio
inputs and outputs.
▪ The KOMPLETE Instrument is the only file you can use with the Player license. Techni
cally close to an Ensemble (it connects to the inputs and outputs, for instance), it is
called Instrument as it is a single unit from a musical point of view.
3.3 Loading Carbon 2
As a first step, we are going to open Carbon 2, a subtractive synthesizer contained in the
REAKTOR Factory Library.
3.3.1
If not already visible after startup, you need to open the Sidepane which holds REAKTOR’s
File Browser. To open and close the Sidepane, click the Sidepane button in the Main Bar.
Fig. 3.6 The Sidepane button
3.3.2 Opening the Browser
With the Sidepane open, click on the Browser tab, or press [F5] on your computer keyboard.
Opening the Sidepane
REAKTOR 5.5 - Getting Started Guide - 27
Page 28
Loading and Playing
Loading Carbon 2
Fig. 3.7 The Browser tab
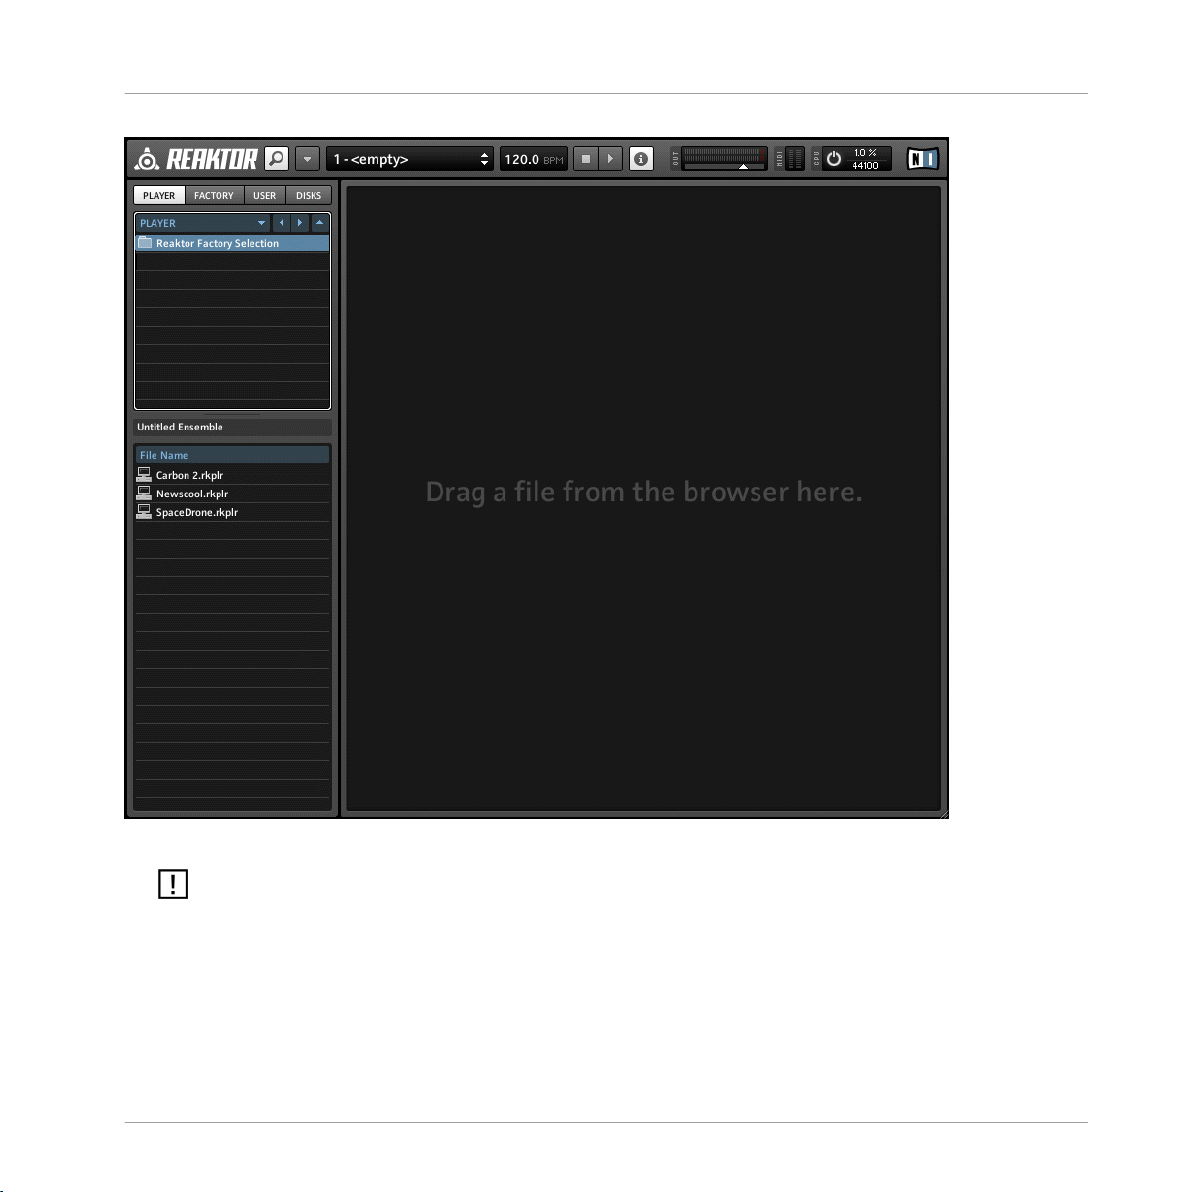
This makes the Sidepane show the File Browser. It is split into three parts: At the top, you
have four buttons to access four different types of content. Below, there is a folder tree.
And at the bottom, there is a list of files contained within the selected folder from the tree
above.
Click the Player button at the Browser’s top. You will see all installed KOMPLETE Instru
ments listed in the upper area. Select the package REAKTOR Factory Selection with a
mouse click.
REAKTOR 5.5 - Getting Started Guide - 28
Page 29
Loading and Playing
Loading Carbon 2
Fig. 3.1 The Browser with Factory Selection selected
The button next to the Player button switches its name depending on your activation of REAK
TOR: It holds the factory content of REAKTOR and reads “Factory” after REAKTOR is activat
ed. Until then, it is labeled “Demo”. This indicates that REAKTOR will switch into Demo
mode if you load any Ensemble from that location.
REAKTOR 5.5 - Getting Started Guide - 29
Page 30
Loading and Playing
Playing Carbon 2 and its Snapshots
3.3.3 Loading a File
As you selected the REAKTOR Factory Selection, its contained instruments are listed in
the Browser’s lower area. Click the entry Carbon 2 and drag it to the application’s main
area. REAKTOR now loads the file.
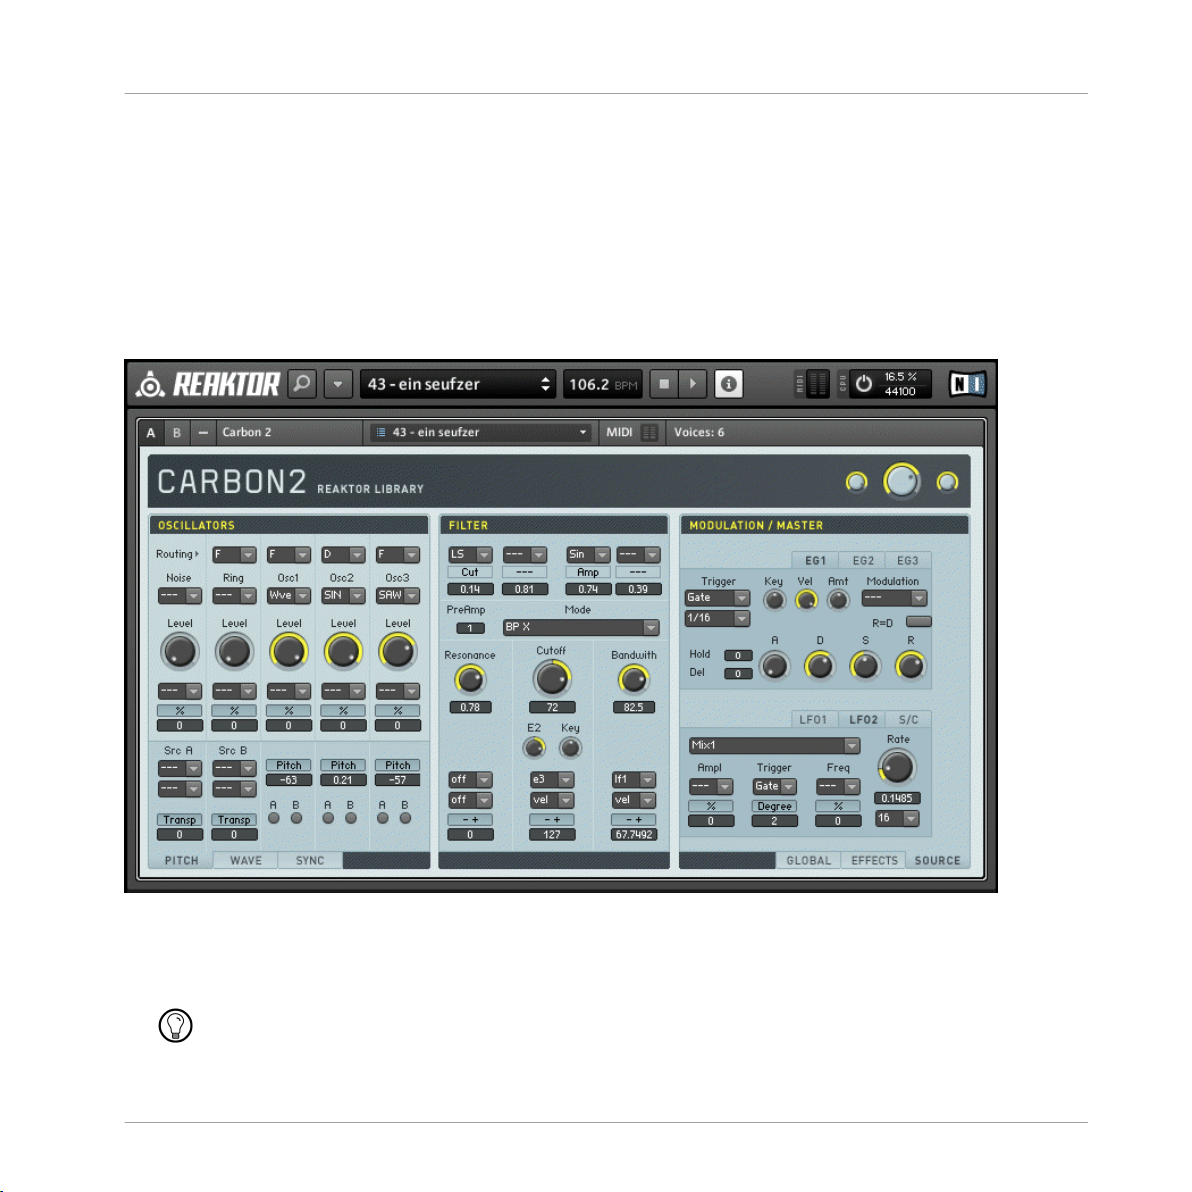
3.4 Playing Carbon 2 and its Snapshots
Fig. 3.2 Carbon 2 loaded in REAKTOR PLAYER
Carbon 2 is a classic subtractive synthesizer with sections for oscillators, filters, modula
tion sources and integrated effect units.
Check the Instrument Reference for a detailed explanation of Carbon 2, or the documentation
that comes with REAKTOR Factory Selection.
REAKTOR 5.5 - Getting Started Guide - 30
Page 31

Loading and Playing
Playing Carbon 2 and its Snapshots
3.4.1 Loading a Snapshot
Play some notes on your MIDI keyboard to get an idea of how the synthesizer sounds.
Then, let’s change the sound completely by loading a different Snapshot.
A Snapshot is REAKTOR’s terminology for a sound, preset, or patch. Each Instrument can
hold Snapshots, and loading any of these Snapshots will set each control of that Instru
ment to a specific value, thus re-creating a particular sound.
The Snapshots of Carbon 2 are accessible from the central control in the application’s
Main Bar.
REAKTOR 5.5 - Getting Started Guide - 31
Page 32

Loading and Playing
Playing Carbon 2 and its Snapshots
Fig. 3.3 The Snapshot control
1.
Click into the Snapshot control to open a drop-down menu. The menu holds all Snap
shots of the instrument.
2. Select the entry In Deep.
3. Play some notes to hear the difference.
REAKTOR 5.5 - Getting Started Guide - 32
Page 33

Loading and Playing
Adjusting the Sound
3.5 Adjusting the Sound
In this section you will learn how to manipulate a sound by making some basic adjust
ments.
3.5.1
Switching Effects
The Snapshot In Deep uses the delay effect excessively to create a spatial sound. Let’s as
sume the song you are working on does not require this type of space: switch the effect off
by clicking the Delay button. Instead of the Delay, switch on the Chorus button to add some
stereo spread.
Fig. 3.4 Effects tab with Chorus and EQ effect activated
3.5.2
Changing the Filter Movement
Also, let’s change the filter's movement.
REAKTOR 5.5 - Getting Started Guide - 33
Page 34

Loading and Playing
Adjusting the Sound
1. To manipulate the filter's movement, switch the right side of the instrument to the
Source section with the according tab.
2.
Select LFO1 within the lower area of the Source section, again using the according tab.
3.
Click the Rate knob and drag it upwards to increase the control’s value to 8.
4. Play a note: the filter movement’s speed has doubled.
Fig. 3.5 The LFO section in the Source tab after changes have been applied
3.5.3
Changing the Filter Settings
To change the filter itself:
1.
In the Instrument’s central Filter section, click the Resonance knob and drag it upwards
until its value is 0.5. This will render the movement more audible.
2. Add brightness to the sound by increasing the Cutoff value, again by clicking the ac
cording knob and dragging it upwards.
REAKTOR 5.5 - Getting Started Guide - 34
Page 35

Loading and Playing
Saving Your Settings
Fig. 3.6 The Filter section after changes have been applied
3.6 Saving Your Settings
There are two ways to save the changes you made to the sound:
▪ Store your host’s project file: This is the most common way when making music, and
the only way if you are using REAKTOR in Player mode. When storing, your host ap
plication will ask the REAKTOR plug-in for all information necessary to restore your
settings, which are then stored with the host project. When you re-load your host
project, REAKTOR will re-create the current state.
▪ Store the Ensemble file: This is only possible if you are using the full license of REAK
TOR. In this case, you create a modified copy of the file you loaded earlier in this tu
torial. You can then re-use the modified sound in a different song by loading the al
tered instrument instead of the original one.
REAKTOR 5.5 - Getting Started Guide - 35
Page 36

Loading and Playing
Saving Your Settings
Please refer to your host’s documentation for details about storing host projects.
To store the Ensemble file as a copy of the original instrument, select the Save As… entry
from the application menu. This will open a default window to select folder and filename.
After you selected the new location and typed in a new filename, click the
Save button.
REAKTOR 5.5 - Getting Started Guide - 36
Page 37

Modifying a REAKTOR Ensemble
4 Modifying a REAKTOR Ensemble
In this tutorial:
▪ We will modify an existing REAKTOR Ensemble called Junatik. Junatik comprises a
Synth Instrument and a Delay Instrument.
▪ We will insert a Reverb Instrument into the Structure, and connect it to the Synth.
▪ We will remove the Delay Instrument from the Structure.
▪ We will also learn more about REAKTOR’s Snapshot system.
▪ We will use the Browser to load up Junatik, but also to insert the Reverb Instrument.
If you are using REAKTOR PLAYER, you do not need to continue reading. After you have read
chapter 2 and 3 you are set to go!
4.1 Recap
In the first tutorial we learnt how to create and save Snapshots using the Append button.
Also we saved our work, using
techniques again, you might want to have a look at the first tutorial again before proceed
ing.
Save Ensemble As…command. As we will be using these
Using REAKTOR Buttons
To recap, in the last tutorial we used:
▪
Click the Sidepane button in the Main Bar to open and close the Sidepane. The Side
pane is where the
Fig. 4.1 The Sidepane button
▪
Clicking the
Fig. 4.2 The Browser tab
Browser
Browser, Snapshot, Panelsets
tab opens the Browser.
, and
Properties
tabs are located.
REAKTOR 5.5 - Getting Started Guide - 37
Page 38

Modifying a REAKTOR Ensemble
Using the Browser to Load the Ensemble
▪
Clicking the Snapshot tab opens the Snapshots list.
Fig. 4.3 The Snapshot tab
In this tutorial we will learn about REAKTOR Properties. We will also learn about the
Structure button.
▪
Clicking the Properties tab opens the Properties of REAKTOR Ensembles, Instruments,
Macros, Modules, et cetera.
Fig. 4.4 The Properties tab
▪
Clicking the
Fig. 4.5 The Structure button
Structure
button opens REAKTOR’s Structure.
It is a good idea to get used to these buttons and their icons as they are very useful, espe
cially later on when you use REAKTOR as a plug-in!
4.2 Using the Browser to Load the Ensemble
Again we will use the Browser to load the Ensemble.
1.
Click on the Sidepane button to open the Sidepane.
2.
Click on the Browser tab to open the Browser.
3.
Click on the Factory button to navigate to the Factory Library.
4. Using the folder tree in the top part of the Browser, navigate to Ensembles > Classics
> Synthesizer
5.
In the bottom part of the Browser, double-click on Junatik to open it.
. You should now see a list of Synths in the bottom part of the Browser.
REAKTOR 5.5 - Getting Started Guide - 38
Page 39

Modifying a REAKTOR Ensemble
Instruments inside Ensembles
Fig. 4.6 Junatik in the Browser
4.3
Instruments inside Ensembles
In this section we will look at REAKTOR’s hierarchy of Ensembles and Instruments.
REAKTOR 5.5 - Getting Started Guide - 39
Page 40

4.3.1 Junatik Panel Overview
Modifying a REAKTOR Ensemble
Instruments inside Ensembles
Fig. 4.7 Junatik Synth with StereoTDelay folded away
Let’s have a look at Junatik. You might be able to tell which one is the Synth (it’s labeled
Junatik). Below the Synth you can see something labeled StereoTDelay. To keep the En
semble panel view tidy, Instruments are often folded away. Indeed the StereoTDelay is
folded away in Junatik.
▪
Click on the A button in the lower right to open it. Clicking on the — button next to A
and B will fold it away again.
REAKTOR 5.5 - Getting Started Guide - 40
Page 41

Modifying a REAKTOR Ensemble
Instruments inside Ensembles
Fig. 4.8 StereoTDelay in full view
4.3.2 The Difference Between an Ensemble and an Instrument
When we looked at 2-Osc, the Delay was built into the Synth. Here the Delay is a separate
Instrument. In REAKTOR terminology, an Ensemble can host more than one Instrument.
On this occasion, there are two Instruments—the Junatik Synth and the StereoTDelay.
In REAKTOR terminology, an Instrument can be a traditional instrument like Synth or
Sampler, an effect like a Delay or Reverb, or anything else like a Sequencer or even just a
picture.
REAKTOR 5.5 - Getting Started Guide - 41
Page 42

Modifying a REAKTOR Ensemble
Instruments inside Ensembles
Fig. 4.9 Junatik Instrument
Fig. 4.10 Delay Instrument
REAKTOR 5.5 - Getting Started Guide - 42
Page 43

Modifying a REAKTOR Ensemble
Snapshot Master for Plug-In and Snapshot Hierarchies
Play some notes, and you will hear the Synth and Delay together. Lets change some of the
Snapshots to hear some different sounds. Because Junatik has a separate Synth Instru
ment and Effect Instrument, the Snapshot system is a little bit different.
4.4 Snapshot Master for Plug-In and Snapshot Hierarchies
Have a look at the top of the Ensemble, and you will see a Panel named Ens – Junatik.
Fig. 4.11 Ensemble Panel
On the Ensemble Panel you will see the Snapshot number 83 – Berlin ambience II.
4.4.1 Snapshot Hierarchy as seen in Properties
We need to bring up Properties, to understand the Snapshot hierarchy. To do this you
need to:
1.
Double-click Ens – Junatik. Alternatively you can click on the Properties tab in the Side
pane.
2.
Click on the Function button to see the Function page of Junatik’s Properties.
Fig. 4.12 The Function button
REAKTOR 5.5 - Getting Started Guide - 43
Page 44

Modifying a REAKTOR Ensemble
Snapshot Master for Plug-In and Snapshot Hierarchies
Fig. 4.13 Ensemble Properties with Recall by MIDI and Snapshot Master ticked
Have a look above at the Properties, in the Snapshot area, the checkboxes Recall by MIDI and
Snapshot Master for Plug-In, are both engaged.
REAKTOR 5.5 - Getting Started Guide - 44
Page 45

Modifying a REAKTOR Ensemble
Snapshot Master for Plug-In and Snapshot Hierarchies
4.4.2 Recall by MIDI and Snapshot Master for Plug-In
▪ Snapshot Master for PlugIn means that when these Snapshots are changed by the En
semble (the master), the Snapshots for the Synth and the Delay will also change to
gether. In other words, the Junatik Instrument and StereoTDelay Instrument are
slaves to the Ensemble master.
▪ Recall by MIDI means that this Instrument can receive Program Change messages. If
the master also has this setting and is on the same MIDI channel, the master's Snap
shot with take precedence.
4.4.3 Snapshot Properties for the Junatik Instrument
If you single click on the Junatik Panel, you will see that the Recall by Parent box is
ticked.
Fig. 4.14 The Snapshot area of the Junatik Instrument Properties with the Recall by Parent checkbox engaged
This confirms that the Snapshots on the Ensemble Panel, are the Master Snapshots.
Try changing some Snapshots and you will see how different Snapshots in the Junatik In
strument, sometimes (but not always), have different Snapshots in the StereoTDelay In
strument. Let’s choose Snapshot “24 – Pointer 1”. Note that the StereoTDelay Snapshot
says,
1 – Delay off. Now try choosing different Snapshots in the Junatik Instrument.
4.4.4 Snapshot with a REAKTOR Switch Turned Off
You will notice that the Snapshots in the Junatik Instrument all play back with no Delay
effect: Snapshot 1 in the StereoTDelay has the Delay turned off, because the On switch—
above the Wet knob, is turned off.
REAKTOR 5.5 - Getting Started Guide - 45
Page 46

Modifying a REAKTOR Ensemble
Swapping the Delay Instrument for a Reverb Instrument
Fig. 4.15 The Delay is switched off
Switches like this not only Mute the Instrument, they also conserve CPU resources. So if
you used this Ensemble in a DAW, and used the DAW’s Effects, it would make sense to
turn the switch off.
4.4.5 Snapshot Flexibility
Of course if you change the Snapshots in the StereoTDelay Instrument, you will have a
choice of different Delay effects without changing the Synth Snapshot. So having different
Instruments, with different Snapshots adds to the flexibility, and having a Snapshot Mas
ter, means being able to change the Snapshots on more than one Instrument!
4.5 Swapping the Delay Instrument for a Reverb Instrument
So we like the Junatik Synth but instead of having a Delay effect we want to try it with a
Reverb. That means we will need to substitute the Delay for one of REAKTOR’s Reverbs.
4.5.1
To do that, we need to have a look at the Structure of the Ensemble.
▪
Fig. 4.16 The Structure button
This will open the Ensemble Structure.
Opening a REAKTOR Structure
Click on the Structure button in the Sidepane.
REAKTOR 5.5 - Getting Started Guide - 46
Page 47

Modifying a REAKTOR Ensemble
Swapping the Delay Instrument for a Reverb Instrument
Fig. 4.17 Ensemble Structure of Junatik
As you can see the Junatik Synth is connected to the StereoTDelay. The L (Left) and R
(Right) Outputs of the Junatik are connected to the L and R Inputs of the StereoTDelay.
The L and R Outputs from the StereoTDelay are connected to the Audio Out Terminals.
Soon we are now going to use the Browser to insert a Reverb Instrument into the Ensemble
Structure. This will be connected to the Junatik Instrument. But before that, we need to
remove the StereoTDelay from the Structure.
4.5.2 Removing an Instrument from the Structure
To remove the Delay from the Structure of this Ensemble:
1. Right-click if you are on Windows® ([Ctrl]+click if you are on Mac OS® X) on the
StereoTDelay Object in the Structure Window—this will open a context menu.
2. Highlight the Delete menu entry with your mouse and click on it. This will remove the
Instrument from the Structure.
REAKTOR 5.5 - Getting Started Guide - 47
Page 48

Modifying a REAKTOR Ensemble
Using the Bowser to Search for Instruments
Fig. 4.18 Deleting an Instrument
The StereoTDelay Instrument should now have disappeared.
4.6 Using the Bowser to Search for Instruments
Now we need to replace the Delay with a Reverb Instrument. We will use the Browser to
load “SpaceMaster.ism.”
1.
In the Sidepane, click on the Browser tab to bring up the REAKTOR Browser.
REAKTOR 5.5 - Getting Started Guide - 48
Page 49

Using the Bowser to Search for Instruments
2. In the folder tree of the Browser, navigate to Instruments > Effects.
Modifying a REAKTOR Ensemble
3.
From the bottom part of the Browser, click and drag Space Master 1 – Stereo.ism into the
Structure area. This will insert this Instrument it into the Ensemble Structure.
REAKTOR 5.5 - Getting Started Guide - 49
Page 50

Modifying a REAKTOR Ensemble
Using the Bowser to Search for Instruments
Fig. 4.19 SpaceMaster has been inserted into the Structure.
You can also right-click in the Structure and see a context menu that contains instruments to
add.
REAKTOR 5.5 - Getting Started Guide - 50
Page 51

Modifying a REAKTOR Ensemble
Connecting the Instrument to the Audio Out
Fig. 4.20 SpaceMaster in Panel View
4.7 Connecting the Instrument to the Audio Out
Now we need to connect the Junatik to the SpaceMaster Reverb and the Reverb to the Au
dio Out Terminals.
4.7.1
Making the Connections
1. Click and hold on the L Output (or the small dot beside it) of the Junatik Instrument,
and then drag your mouse towards the L Input of the SpaceMaster. When you do this,
you should see a wire being dragged by your mouse as your cursor turns into a pointed
finger. When you reach the SpaceMaster L Input or the dot beside it, let go of your
mouse button.
REAKTOR 5.5 - Getting Started Guide - 51
Page 52

Modifying a REAKTOR Ensemble
Connecting the Instrument to the Audio Out
2. Repeat this with all the connections—including connecting the L and R Outputs from
the SpaceMaster to the 1 and 2 Inputs of the Audio Out Terminals.
After having done that, it should look like this:
Fig. 4.21 SpaceMaster connected to Junatik and the Ouputs
Now we need to check how our two Instruments look in the Ensemble Panel.
4.7.2 Resetting the Positions of Instruments in the Ensemble Panel
Now it is possible that the insertion procedure has placed the SpaceMaster Instrument
above the Junatik Instrument in the Ensemble's Panel—if this has not happened, skip this
bit. To change the position, all you have to do is:
1.
Go to Panel View by pressing the Panel button in the Sidebar.
REAKTOR 5.5 - Getting Started Guide - 52
Page 53

Modifying a REAKTOR Ensemble
Connecting the Instrument to the Audio Out
2. Select the SpaceMaster Panel by clicking on its name.
3. Then click and drag the Instrument so that it is below the Junatik, and then let go—it
should snap into place. So the Junatik will back at the top!
Fig. 4.22 Junatik on top
REAKTOR 5.5 - Getting Started Guide - 53
Page 54

Modifying a REAKTOR Ensemble
Restoring the Correct Snapshot Hierarchy
4.8 Restoring the Correct Snapshot Hierarchy
Inserting the SpaceMaster Instrument into the Structure changed the Snapshot hierarchy.
We need to make some changes to restore the Snapshot Master hierarchy—where the En
semble is the Snapshot Master for Plug-In. We will have to change the Properties of the
Junatik Instrument and SpaceMaster Instrument.
4.8.1 Opening the Instrument Properties
First we need to make the Junatik Ensemble the Snapshot Master for Plug-In again and
then turn the Recall by Parent feature on for SpaceMaster.
1.
In the Sidepane, click on the Properties tab.
2. Click on Ens – Junatik header. This will bring up the Junatik Ensemble Properties.
3.
Click on the Function button.
4.
Now engage the Snapshot Master for Plug-In checkbox in the Snapshot area.
REAKTOR 5.5 - Getting Started Guide - 54
Page 55

Modifying a REAKTOR Ensemble
Restoring the Correct Snapshot Hierarchy
5. Now click on the SpaceMaster Panel—clicking on its name will do. This will bring up
the SpaceMaster Properties.
6.
Engage the
Recall by Parent
checkbox.
REAKTOR 5.5 - Getting Started Guide - 55
Page 56

Creating a Sequenced Synthesizer
5 Creating a Sequenced Synthesizer
In this tutorial we will create a Synth Sequencer.
5.1 Recap and Overview
When we looked at the Junatik Ensemble, we learned that Junatik consists of the Junatik
Synth Instrument and the StereoTDelay Instrument. We are now going to create an Ensem
ble that uses two REAKTOR Instruments. One of the Instruments will be a Sequencer
called Monoliner, the other Instrument will be a Synth called Soundschool Analog (or AN
ALOG, in short).
Monoliner emulates classic analog-style Step Sequencers with three rows of knobs, whilst
Soundschool Analog is a classic semi-modular, 2-Oscillator analog style Synth.
We will then make the necessary connections—MIDI and Audio—so that the Sequencer
will trigger the Synth.
REAKTOR 5.5 - Getting Started Guide - 56
Page 57

Creating a Sequenced Synthesizer
Creating the Synth Sequencer Ensemble
Fig. 5.1 Monoliner and Soundschool Analog (ANALOG)
5.2 Creating the Synth Sequencer Ensemble
We need to start from a new Ensemble and then insert the Instruments.
5.2.1 Create a New Ensemble
▪
Create a new Ensemble by pressing the Menu button and choosing the File > New En
semble menu entry.
REAKTOR 5.5 - Getting Started Guide - 57
Page 58

Creating a Sequenced Synthesizer
Creating the Synth Sequencer Ensemble
Fig. 5.2 New Ensemble menu entry in the global menu
Fig. 5.3 The Panel of a new Ensemble
You can also use the keyboard shortcut [Ctrl]+[N] for Windows® ([Cmd]+[N] if you are on
Mac OS® X) to create a new Ensemble.
5.2.2 Using the Browser to Load the Instruments
1.
In the Sidepane, click the Browser tab to open the Browser.
REAKTOR 5.5 - Getting Started Guide - 58
Page 59

Creating a Sequenced Synthesizer
Creating the Synth Sequencer Ensemble
2.
Click the Factory button to go to the Factory Library.
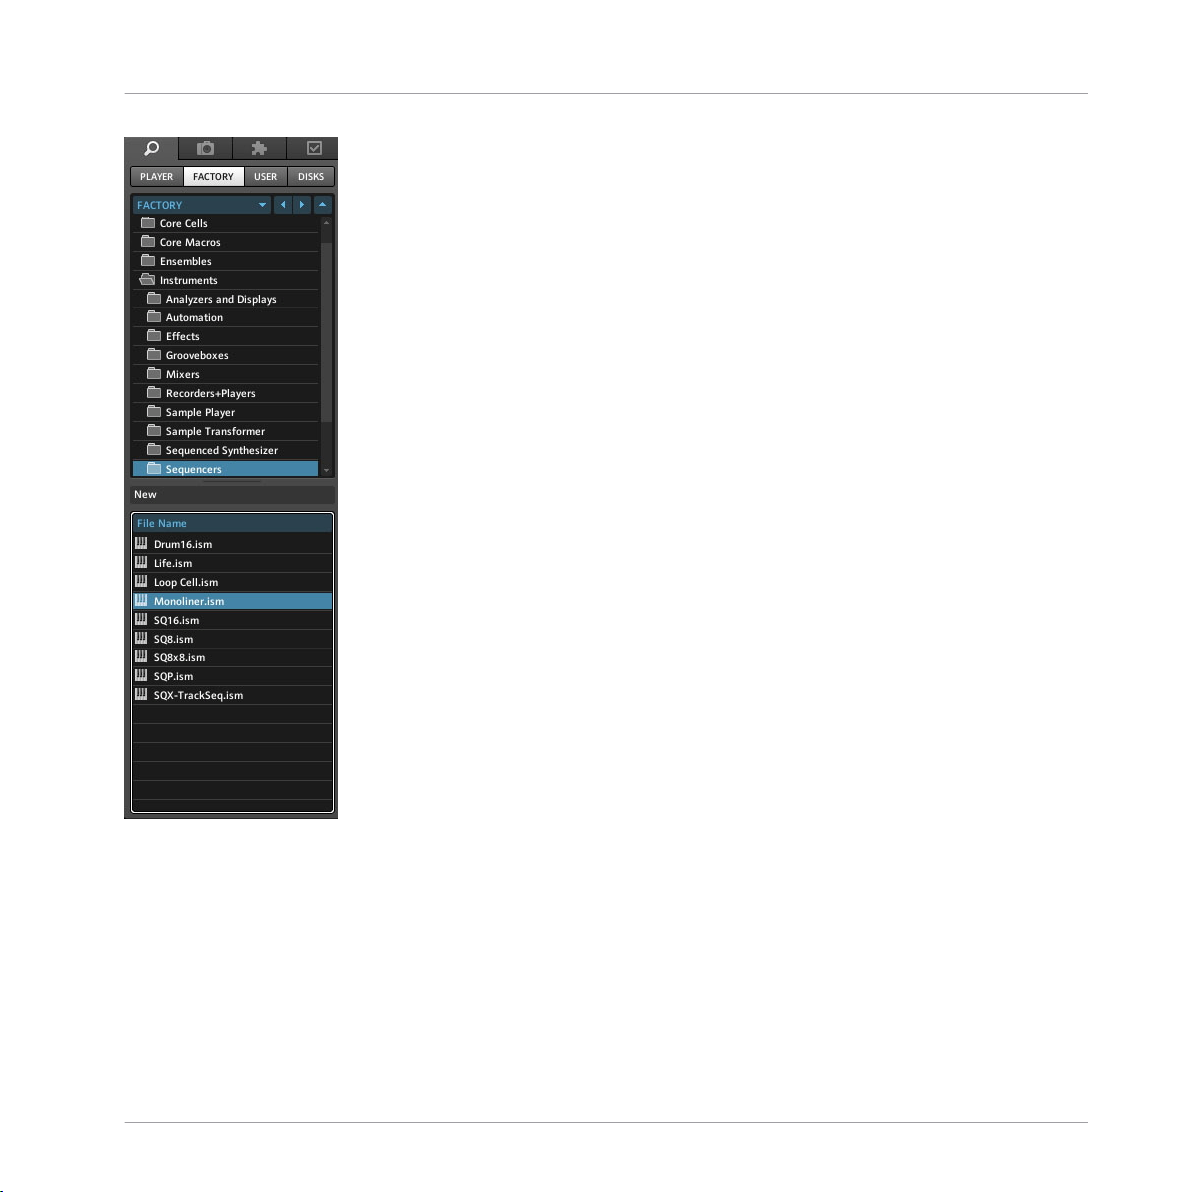
3. Then, using the folder tree of the Browser, navigate to the path Instruments > Se
quencers.
4.
Drag Monoliner.ism from the bottom part of the Browser to the Panel area on the right.
This will insert Monoliner into your Ensemble.
REAKTOR 5.5 - Getting Started Guide - 59
Page 60
Creating a Sequenced Synthesizer
Creating the Synth Sequencer Ensemble
Now we will use the Browser to load Soundschool Analog.
1. Using the folder tree, navigate to Instruments > Synthesizers.
2.
Scroll down until you see Soundschool Analog.ism.
3.
Click and drag Soundschool Analog.ism to the Panel area on the right.
REAKTOR 5.5 - Getting Started Guide - 60
Page 61

Creating a Sequenced Synthesizer
Making the Synth Sequencer Work
Fig. 5.4 Inserting SoundSchool Analog into your Ensemble
5.3
Making the Synth Sequencer Work
We will need to do some wiring and make a MIDI connection from Monoliner to Sound
school Analog.
REAKTOR 5.5 - Getting Started Guide - 61
Page 62

5.3.1 Overview of the Structure
Once loaded, your Structure should look something like this:
Creating a Sequenced Synthesizer
Making the Synth Sequencer Work
Fig. 5.5 Ensemble Structure with Monoliner and ANALOG
We can see the Monoliner and ANALOG Instruments and also the default empty Instru
ment, which is connected to the Audio In and the Audio Out Terminals. Let’s remove the
unwanted Instrument from the Structure.
5.3.2
Removing the Unwanted Instrument
▪ Right-click on Windows® ([Ctrl]+click on Mac OS® X) on top of the Instrument and
choose the Delete menu entry from the context menu.
REAKTOR 5.5 - Getting Started Guide - 62
Page 63

Creating a Sequenced Synthesizer
Making the Synth Sequencer Work
Fig. 5.6 Deleting an Instrument using the context menu
Whilst we are here, let’s connect the L and R Outputs from the ANALOG Synth to the In
puts of the Audio Out Terminals 1 and 2, respectively.
5.3.3
Connecting ANALOG Outputs to the Audio Out
You might remember we did this when we connected the Junatik Synth to the SpaceMas
ter Reverb.
1. Click and drag—so you get a visible wire—from the L (or black dot beside it) towards
the Input of the first Audio Out Terminal or black dot beside it—and let go. A connec
tion will be made.
2. Repeat the same procedure for the R Output and Audio Out Terminal 2.
Your Structure should look like this:
REAKTOR 5.5 - Getting Started Guide - 63
Page 64

Creating a Sequenced Synthesizer
Making the Synth Sequencer Work
Fig. 5.7 ANALOG with its audio outputs connected.
As you can see, we are keeping the Master Instrument, because it has a useful Master Lev
el Fader. Now we will have a look at the two Instruments in the Ensemble Panel.
5.3.4 Overview of Monoliner and ANALOG
▪
To go to the Panel View of your Ensemble, press the Panel button.
Fig. 5.8 The Panel button
REAKTOR 5.5 - Getting Started Guide - 64
Page 65

Creating a Sequenced Synthesizer
Making the MIDI Connections between Instruments
Fig. 5.9 Monoliner and ANALOG
As you can see Monoliner has three rows of knobs, which control Gate, Velocity and Pitch.
The snc&pos section to the left controls the speed and direction of the Sequencer playback,
and also how many steps are used. We will look at the other controls later on. Importantly,
Monoliner has a built-in MIDI Out!
ANALOG features 2 Oscillators with Ring Modulation, 2 Envelopes, an LFO and a built-in
Stereo Delay.
5.4 Making the MIDI Connections between Instruments
As I said above, Monoliner has been programmed to send MIDI to other REAKTOR Synths,
and also external Synths! We do need to make a small connection to make an internal
MIDI connection in this Ensemble. Fortunately this is easy to set up.
REAKTOR 5.5 - Getting Started Guide - 65
Page 66

Creating a Sequenced Synthesizer
Making the MIDI Connections between Instruments
5.4.1 Using Internal MIDI Connections
To internally route the MIDI output of the Monoliner Instrument to the MIDI input of ANA
LOG, you need to go to the Connect page of Monoliner’s Properties.
1.
In the Sidepane, click the Properties tab.
2.
Now click on the Connect button to reach the Connect page of the Properties.
3.
To make the MIDI connection between the Sequencer and Synth, find the Select Instru
ments
drop-down menu in the MIDI Out area of the Connect page. Click on the drop-
down menu and choose the ANALOG menu entry.
4. To check if the connection has been made, go to the Connect page of the ANALOG
Instrument. Just click on the ANALOG Instrument header to select the Instrument.
5. The Connect page of ANALOG should now be shown in the Sidepane. Click on the
Select Instruments drop-down menu in the MIDI In area of the connect page. You will no
tice that the checkbox next to the
Monoliner menu entry is checked now.
REAKTOR 5.5 - Getting Started Guide - 66
Page 67

Creating a Sequenced Synthesizer
REAKTOR Run and Stop Buttons
6. Now save your work by selecting the Save Ensemble As…command from the global
menu. That’s it; you can now try out the Sequencer/Synth combination!
5.5 REAKTOR Run and Stop Buttons
REAKTOR’s Run and Stop buttons are used to start and stop the Sequencer.
Overview of the Run and Stop Buttons
The Run and Stop buttons are found in the Main Toolbar, at the top of the Instrument, next
to the
Fig. 5.10 BPM/Run/Stop
BPM edit field.
▪
To run the Sequencer, click on the
Run
button with your mouse. The Sequencer will
start and you will see it running. The MIDI Activity lamps will also confirm the MIDI
connection. You should also hear sounds coming from the Synth!
REAKTOR 5.5 - Getting Started Guide - 67
Page 68

Creating a Sequenced Synthesizer
Looking More Closely at Monoliner
Fig. 5.11 MIDI Activity lights
Pausing and Resetting the Sequencer
▪
Whilst the sequencer is running, a single click on the Run button will pause the se
quence—it will start from where it stopped when the Run button is pressed again. A
click on the
5.6
Looking More Closely at Monoliner
Stop button will reset the Sequencer to the beginning of the pattern.
Let’s have a closer look at the speed and direction controls.
5.6.1 Changing the Direction and Speed
This Sequencer is very flexible in terms of how it plays back the patterns.
REAKTOR 5.5 - Getting Started Guide - 68
Page 69

Creating a Sequenced Synthesizer
Looking More Closely at Monoliner
▪ To change the direction from forward to backwards and to introduce some random
playback characteristics, open the
direction list by clicking on the side arrow. You can
also similarly change the Speed by clicking the sync menu.
Fig. 5.12 Direction
Fig. 5.13 Speed
The default value, 1/16, divides a bar into 16th notes.
REAKTOR 5.5 - Getting Started Guide - 69
Page 70

Creating a Sequenced Synthesizer
Exploring the Snapshots/Show Hints
5.6.2 Number of Steps, Step Offset and Shuffle/Swing
▪
The stps knob can change the total number of steps—anywhere between 1 and 16.
▪
The offs knob shifts where the sequence starts from.
▪
SHFL adds swing to the playback. Try changing the number of steps to 6 and then shift
the offset to 9.
5.6.3 GATE, VELOCITY and PITCH Knobs and On/Off Buttons
▪
The top row of the knobs—labeled GATE—is used to program the length of each trig
ger.
▪ The knob at the end is the Master, and will affect the overall Gate lengths.
▪
The next row—labeled VELO—programs the volume of each trigger. Again there is a
Master volume.
▪
The bottom row of knobs—labeled PITCH—is for Pitch.
▪ The row of buttons controls Gate On and Off.
Fig. 5.14 Master knobs
Fig. 5.15 Gate On/Off buttons
5.7 Exploring the Snapshots/Show Hints
Let’s explore this combination of Sequencer and Synth.
REAKTOR 5.5 - Getting Started Guide - 70
Page 71

Creating a Sequenced Synthesizer
Exploring the Snapshots/Show Hints
5.7.1 Exploring Snapshots in Monoliner and ANALOG
Monoliner comes with only a few Snapshots but it is worth trying them out. The real fun
with the Sequencer is changing the directions and numbers of steps and offsets in the
snc&pos controls, as this can produce a wide range of variations. You can also randomize
the settings by pressing the rnd! button. The ANALOG Synth has quite a few Snapshots,
and it is very productive to change the Snapshots whilst a sequence is playing.
5.7.2 Show/Hide Hints
Once again I suggest that you make sure your Hints are on by pressing the Hints button. You
will find the Synth in particular has some good information notes which you will see by hover
ing your mouse over the knobs and switches:
Fig. 5.16 Info for FM knob
After you have finished exploring, make sure you re-save your work!
Remember, you can use the Save Ensemble command from the global menu if you want to
overwrite your previously saved version. Or you can use
Save Ensemble As…command if
you want to keep an old version, and save a different version with an amended name.
REAKTOR 5.5 - Getting Started Guide - 71
Page 72

Exploring a REAKTOR Sampler
6 Exploring a REAKTOR Sampler
In this tutorial we will have a look at Memory Drum 2 which is a very useful sample player
for drum kit samples.
6.1 Recap and Overview
Now we have explored two of the Synths in the REAKTOR Library, it is time to have a look
at one of its Sampler Players.
▪ We will learn how to replace one the samples in the Sample Map with one of own
samples.
▪ We will also learn how add a sample to the Sample Map.
▪ We will look at how to select samples in the Sample Map using our MIDI keyboard,
and how we can audition samples by using our mouse.
▪ We will also look at Sample Mapping in REAKTOR.
▪ Finally, we will have a brief look at some of the unique features of Memory Drum.
So first, we are again going to use the Browser to load up Memory Drum 2.
REAKTOR 5.5 - Getting Started Guide - 72
Page 73

Exploring a REAKTOR Sampler
Using the Browser to Launch Memory Drum 2
Fig. 6.1 Memory Drum 2
6.2 Using the Browser to Launch Memory Drum 2
1.
In the Sidepane, click on the Browser tab to open the Browser.
REAKTOR 5.5 - Getting Started Guide - 73
Page 74

Exploring a REAKTOR Sampler
Using the Browser to Launch Memory Drum 2
2. In the folder tree, navigate to Ensembles > New Additions > Sample Player.
3. Double-click on MemoryDrum2.ens to launch it.
Fig. 6.2 Choosing Memory Drum 2 in the Browser
Memory Drum 2 is mapped so that C1 will play the first sample and each semitone will
play a new sound. First of all, explore the sounds by playing different pitches on your key
board. Maybe you are happy with the samples but you would like to replace them with
some of your Samples? To do that, we need to open the Sample Map Editor.
REAKTOR 5.5 - Getting Started Guide - 74
Page 75

Exploring a REAKTOR Sampler
Replacing and Editing Samples in the Sample Map Editor
6.3 Replacing and Editing Samples in the Sample Map Editor
Now we will use the Sample Map Editor to replace Samples. We will open the Sample
Map, use SEL BY KEY so our MIDI keyboard can play Samples in the Map, and also use
our mouse to audition Samples.
6.3.1
Opening the Map and Playing the Samples
1. Double-click on the Sample waveform. The Sample Map Editor will open up. Alterna
tively you can also press the Sample Map button in the Sidebar or use the keyboard
shortcut [F9].
2.
Turn on the Select Sample by Key feature by pressing the Key button in the top-right
of the Sample Map. You can now select Samples with your MIDI keyboard.
REAKTOR 5.5 - Getting Started Guide - 75
Page 76

Exploring a REAKTOR Sampler
Replacing and Editing Samples in the Sample Map Editor
3.
Click on the Sample Prehear button to hear the samples in their original form.
Fig. 6.3 The Sample Prehear button
Let’s replace some samples with some of our own ones. Let’s replace the snare sample on
MIDI Note 48. First of all we need to select it by pressing C2 on our keyboard.
6.3.2 Using Replace in the Edit Sample List
▪
Open the Edit drop-down menu in the top-left of the Sample Map Editor and choose
the Replace menu entry.
REAKTOR 5.5 - Getting Started Guide - 76
Page 77

Exploring a REAKTOR Sampler
Replacing and Editing Samples in the Sample Map Editor
Fig. 6.4 The Replace menu entry replaces the selected sample
This should open the folder that we selected when we chose the pathways to our audio
files in the REAKTOR Preferences. In my example I have replaced the Snare placed on the
slot corresponding to MIDI Note 48.
6.3.3
Sample Key-Split and Root Note
Let’s have a closer look at the sample.
Fig. 6.5 Clap CloseTheBook.wav as seen in the Sample Map Editor
REAKTOR 5.5 - Getting Started Guide - 77
Page 78

Exploring a REAKTOR Sampler
Replacing and Editing Samples in the Sample Map Editor
L and R both have values of 48. That means the Key-split of this sample on the keyboard
is just one note, that of MIDI 48, which is fine for a drum sound. Root is also 48. This
means that the sample will play back at its original pitch, when allocated to the MIDI Note
48.
We have just replaced a sample, now we are going to add a new sample to the map.
6.3.4 Using Add from the Edit Sample List
1. We need to scroll down to the last sample in the list, which is on MIDI Note 77 and
bears the name Sound 9.
2.
Click on the Edit drop-down menu and choose the menu entry Add.
Fig. 6.6 Adding a new sample to the Sample Map using the Add menu entry
REAKTOR 5.5 - Getting Started Guide - 78
Page 79

Exploring a REAKTOR Sampler
The Memory Drum Interface
This time the last folder we opened when we replaced the Sample will open. We can either
choose another sample from that folder or navigate to another folder. Again, double-click
ing on our chosen sample will load it into the map.
6.3.5 Editing the Key-Split
We will edit the Key-split, so that the L and R are the same — 78. To change a value:
1. Double-click on the number in the desired row and column (here, the row correspond
ing to your new sample and the column labeled R).
2. Type in a new number.
3. Press [Enter] when you have finished. That will make it easier to add more samples
4.
Feel free to add more samples. When you are done editing the Sample Map and wish
to close it, just press the
Sample Map button again. In the next section we will have an
other look at the Memory Drum Interface.
Fig. 6.7 The Sample Map button
6.4 The Memory Drum Interface
Each MIDI Note value not only selects a different Sample, but can also select drastically
different characteristics for each Sample Slot.
6.4.1
Let’s go back to the first sample that we replaced and change the pitch. With Memory
Drum it is possible to just change the pitch of one slot without affecting any of the other
slots.
Changing Pitch for Just one Sample Slot
REAKTOR 5.5 - Getting Started Guide - 79
Page 80

Exploring a REAKTOR Sampler
The Memory Drum Interface
▪
Click on the p fader and change the pitch downwards by dragging down in the middle
of the fader:
Fig. 6.8 Changing p setting to change the pitch for that sample
Now play the sample, from your MIDI keyboard, and you should hear a lower pitch. If you
then play another sound… you will see that all the other sounds play back at their original
pitch. This is what is unique with this sample drum player. Each sample sound-slot can
have different settings of all of its parameters. Try changing other controls, you can have
different Envelope, and Filter settings for each Note.
Let’s explore this a bit more.
REAKTOR 5.5 - Getting Started Guide - 80
Page 81

6.4.2 Exploring the Memory Drum Snapshots
Exploring a REAKTOR Sampler
The Memory Drum Interface
Fig. 6.9 The Snapshots list for Memory Drum
The Default Snapshot has the same settings for every drum. Choose one of the other Snap
shots to see / hear different settings. You will notice how different key presses not only
trigger different samples they can also have quite different settings. Maybe you want to
add more samples and change the setting before you save your version of the Ensemble. If
you do make some changes to the Snapshots make sure you save them to a new Snapshot
by pressing the Append button and renaming the Snapshot. When you have finished add
ing / replacing samples, remember to use Save Ensemble As… command. If you don’t, all
REAKTOR 5.5 - Getting Started Guide - 81
Page 82

Exploring a REAKTOR Sampler
The Memory Drum Interface
of your hard work will not have been saved! In the tutorial in chapter ↑8, Make a Sampler
Using REAKTOR Modules, we will also look at various sample playback possibilities such
as reverse, forward / backwards, and forward / backwards reverse. Also, we will learn how
to transpose samples in the Sample Map Editor.
REAKTOR 5.5 - Getting Started Guide - 82
Page 83

Building a Synth Using Macros
7 Building a Synth Using Macros
In this tutorial, we are going to build an analog-style Synth using some pre-build Factory
Macros. The Synth will have two Oscillators, a mixer, two Envelope Shapers and a Filter. It
is assumed that you have done the previous tutorials, as they touch on a number of techni
ques in terms of inserting and connecting.
7.1 What is a Macro
REAKTOR has a whole library of pre-built Macros. A Macro contains a group of Modules
that are already connected and contained in their own Module with just the inputs and
outputs it needs. A Macro is a little like an Instrument but smaller. And it’s a little like a
Module, only customized to make more complex Oscillators, Filters, Envelope Shapers, De
lays, etc. that you might find for example in modular Synths. It's a good idea when you
become a more advanced builder to think of your building ideas as objects and abstract
the Modules that have a specific relationship by encapsulating them in Macros.
Below in the finished Synth you can see the different Macros by where the lines and titles
around groups of controls are.
REAKTOR 5.5 - Getting Started Guide - 83
Page 84

Building a Synth Using Macros
What is a Macro
Fig. 7.1 Finished Synth
The Oscillator 1 Macro contains 3 Oscillators in the Structure, and controls for Pitch,
Fine, P-Width and a Wave Switch. These are all individual Modules, but they have been
connected and put in a small ‘folder’ we call a Macro.
REAKTOR 5.5 - Getting Started Guide - 84
Page 85

Building a Synth Using Macros
Preparation
Fig. 7.2 Oscillator Macro Structure View
Advanced builders will often select parts of an Ensemble that are related and cut them out
and paste them into a new Macro for clarity and re-use.
7.2 Preparation
We need to start off by loading a new Ensemble, deleting the default Instrument, and in
serting an Instrument that is appropriate for the task.
7.2.1
We will start with REAKTOR’s default New Ensemble.
1.
Loading a New Ensemble
Press the Menu button and choose the File > New Ensemble menu entry.
REAKTOR 5.5 - Getting Started Guide - 85
Page 86

Building a Synth Using Macros
Preparation
You will see an Ensemble Panel.
Fig. 7.3 Panel View of a new Ensemble
▪
Press the Structure button to see its Structure.
Fig. 7.4 The Structure button
REAKTOR 5.5 - Getting Started Guide - 86
Page 87

Fig. 7.5 The Structure of a new Ensemble
Building a Synth Using Macros
Preparation
To start off, we will be working with the Structure.
7.2.2 Removing the Default Instrument
As our Synth will have a single output only, we don’t need the default Instrument that has
two Outputs, Left and Right.
▪ To delete the default Instrument right-click on Windows® ([Ctrl]+click on Mac OS®
X) on the Instrument and choose the Delete menu entry from the context menu.
REAKTOR 5.5 - Getting Started Guide - 87
Page 88

Building a Synth Using Macros
Preparation
Fig. 7.6 Deleting the default Instrument
Now we need to insert an Instrument that is right for the Synth, an instrument that has
just one output, because our Synth is not going to be stereo, but mono.
7.2.3
Inserting a New Instrument
▪ To insert a new Instrument, right click if you are in Windows® ([Ctrl]+click for Mac
OS® X) on a blank part of the Ensemble Structure to open the context menu. Choose
the Insert Instrument >_New – 1in1out menu entry.
REAKTOR 5.5 - Getting Started Guide - 88
Page 89

Building a Synth Using Macros
Preparation
Fig. 7.7 Inserting a new Instrument
Our inserted Instrument has an Input and an Output.
REAKTOR 5.5 - Getting Started Guide - 89
Page 90

Building a Synth Using Macros
Fig. 7.8 Inserted Instrument in the Structure
For our Synth, we only need the Output, so we need to delete the Input.
1. Double-click on the Instrument to open it.
2. Right-click (on Windows®; [Ctrl]+click if you are on Mac OS® X) the In Module to
open up its context menu. Then select the Delete menu entry.
Preparation
3. Double-click the Structure background to go back to the top-level Structure.
7.2.4
Connecting the Instrument to the Audio Out
We need to connect the Output of the Instrument to Audio Out Terminals 1 and 2.
1. Place your cursor on Out—or the small dot beside it.
2. Click and hold the mouse down, whilst you move it to the Input port of the Audio Out
Module labeled 1.
3. When you reach 1 (or the dot beside it) of the Audio Out Module, let go, and you
should see a wire connection.
REAKTOR 5.5 - Getting Started Guide - 90
Page 91

Building a Synth Using Macros
Adding an Oscillator and an ADSR Env to the Instrument
Do the same again, but this time connect the Instrument Out to the Input port of the Au
dio Out Module labeled 2. This will place the sound on both Left and Right Outputs to
your audio system. Your connection should look like this. The yellow lamp in the bottom
right corner of the Instrument confirms the connection!
Fig. 7.9 Instrument connected to Output
7.3 Adding an Oscillator and an ADSR Env to the Instrument
Now we need to add an Oscillator Macro, an ADSR Env and make the connections. We al
so need to insert NotePitch and Gate Modules, so that we can play our Synth via our MIDI
keyboard.
7.3.1
Inserting an Oscillator
1. First, make sure you are inside the Instrument. To go inside the Instrument, doubleclick the Instrument Object.
2. To insert an Oscillator Macro into the Instrument Structure, right-click if you are in
Windows® ([Ctrl]+click if you are in Mac OS® X) on a blank part of the Instrument
Structure and choose the
Macro > Building Blocks > Oscillators > Osc (pls, saw, tri)
menu entry. An Osc 3 Wave Oscillator will appear in the Instrument Structure and In
strument Panel.
REAKTOR 5.5 - Getting Started Guide - 91
Page 92

Building a Synth Using Macros
Adding an Oscillator and an ADSR Env to the Instrument
3. In the Instrument Structure connect the Out from the Osc 3 Wave Macro to the Audio
Voice Combiner, by clicking and dragging so that the wire connects, much the same
as we did before when we connected the Instrument to the Audio Output Terminals.
Fig. 7.10 Oscillator connected to Audio Voice Combiner
REAKTOR 5.5 - Getting Started Guide - 92
Page 93

Building a Synth Using Macros
Adding an Oscillator and an ADSR Env to the Instrument
7.3.2 Inserting the ADSR Env
▪ Right-click if you are in Windows® ([Ctrl]+click if you are in Mac OS® X) on a blank
part of the Instrument Structure and choose Macro > Building Blocks > Envelopes >
ADSR – Env menu entry.
Fig. 7.11 Inserting the ADSR-Env
7.3.3 Inserting Pitch and Gate Modules
Next we need to add a couple of components—Modules in REAKTOR terminology. The
Note Pitch and Gate Modules will enable our MIDI keyboard to play this Synth.
1. Right-click if you are in Windows® ([Ctrl]+click if you are on Mac OS® X) on an emp
ty space in the Instrument Structure and choose the Built-In Module > MIDI In >
Note Pitch
menu entry to insert the Note Pitch Module into the Structure.
REAKTOR 5.5 - Getting Started Guide - 93
Page 94

Building a Synth Using Macros
Adding an Oscillator and an ADSR Env to the Instrument
2. Repeat the same procedure but choose the Built-In Module > MIDI In > Gate menu
entry for the Gate Module.
7.3.4 Connecting the Pitch and Gate Modules
Now we need to make connections so that we can play our fledgling Synth.
1. Using the same click and drag techniques as before, connect the NotePitch Module
to the P (Pitch) Input of the Osc 3 Wave Macro.
2. Then connect the Gate Module to the G (Gate) Input of the ADSR-Env Macro.
REAKTOR 5.5 - Getting Started Guide - 94
Page 95

Building a Synth Using Macros
Inserting the Filter
3. Finally, we need to connect the top Out from the ADSR-Env to the A (Amplitude) of
the Osc 3 Wave Macro.
Now your Synth should look like this:
Fig. 7.12 Your Synth with finished connections
7.3.5 Safe Output Level
Before we play our Synth, we need to check that the Output Level will be safe.
1.
To do this, first go to the Ensemble Panel by clicking on the Panel button.
2. Look at the Master Instrument’s Panel, and reset the Level Fader to -10.
Fig. 7.13 Use the Master Instrument to select a safe output level
Now play a few notes, and you should hear the Oscillator change pitch and start and stop
with your key presses!
7.4 Inserting the Filter
The next thing to add is a Filter Macro.
REAKTOR 5.5 - Getting Started Guide - 95
Page 96

Building a Synth Using Macros
Inserting the Filter
7.4.1 Inserting the Filter Macro and Doing Some Rewiring
1. Make sure you are inside the Instrument Structure. If you are looking at the Panel,
first press the Structure button.
2. Then double-click the Instrument Object to enter its Structure.
3. Right-click if you are on Windows® ([Ctrl]+click if you are on Mac OS® X) on a blank
part in the Instrument Structure and choose the
Macro > Building Blocks > Filters >
4 Pole Filter (BP, BLP, LP) menu entry.
We now need to do some rewiring.
1. By clicking and dragging, connect the Out of the Osc 3 Wave Macro to the In of the
4-Pole Filter Macro.
2. Then connect Out of the 4-Pole Filter to the Input of the Audio Voice Combiner la
beled “}”.
Your Synth should now look something like this:
REAKTOR 5.5 - Getting Started Guide - 96
Page 97

Building a Synth Using Macros
Inserting the Filter
We have now finished inserting the Filter Macro into the Instrument Structure. Now we
have to turn our attention to the Instrument Panel view. You will see that all the Macros
are on top of each other. We can fix this by unlocking the Panel.
▪
To view the Instrument Panel, press the Panel button.
Fig. 7.14 The Panel button
7.4.2 Unlocking the Panel to Move the Macros
After unlocking the Panel, you will be able to move the Macros to other positions so that
they are not on top of each other.
1.
Click on the Panel Lock button to unlock the Panel. Alternatively you can use the key
board shortcut [Ctrl]+[P] if you are in Windows® ([Cmd]+[P] if you are in Mac OS® X)
to toggle between a locked and unlocked Panel.
REAKTOR 5.5 - Getting Started Guide - 97
Page 98
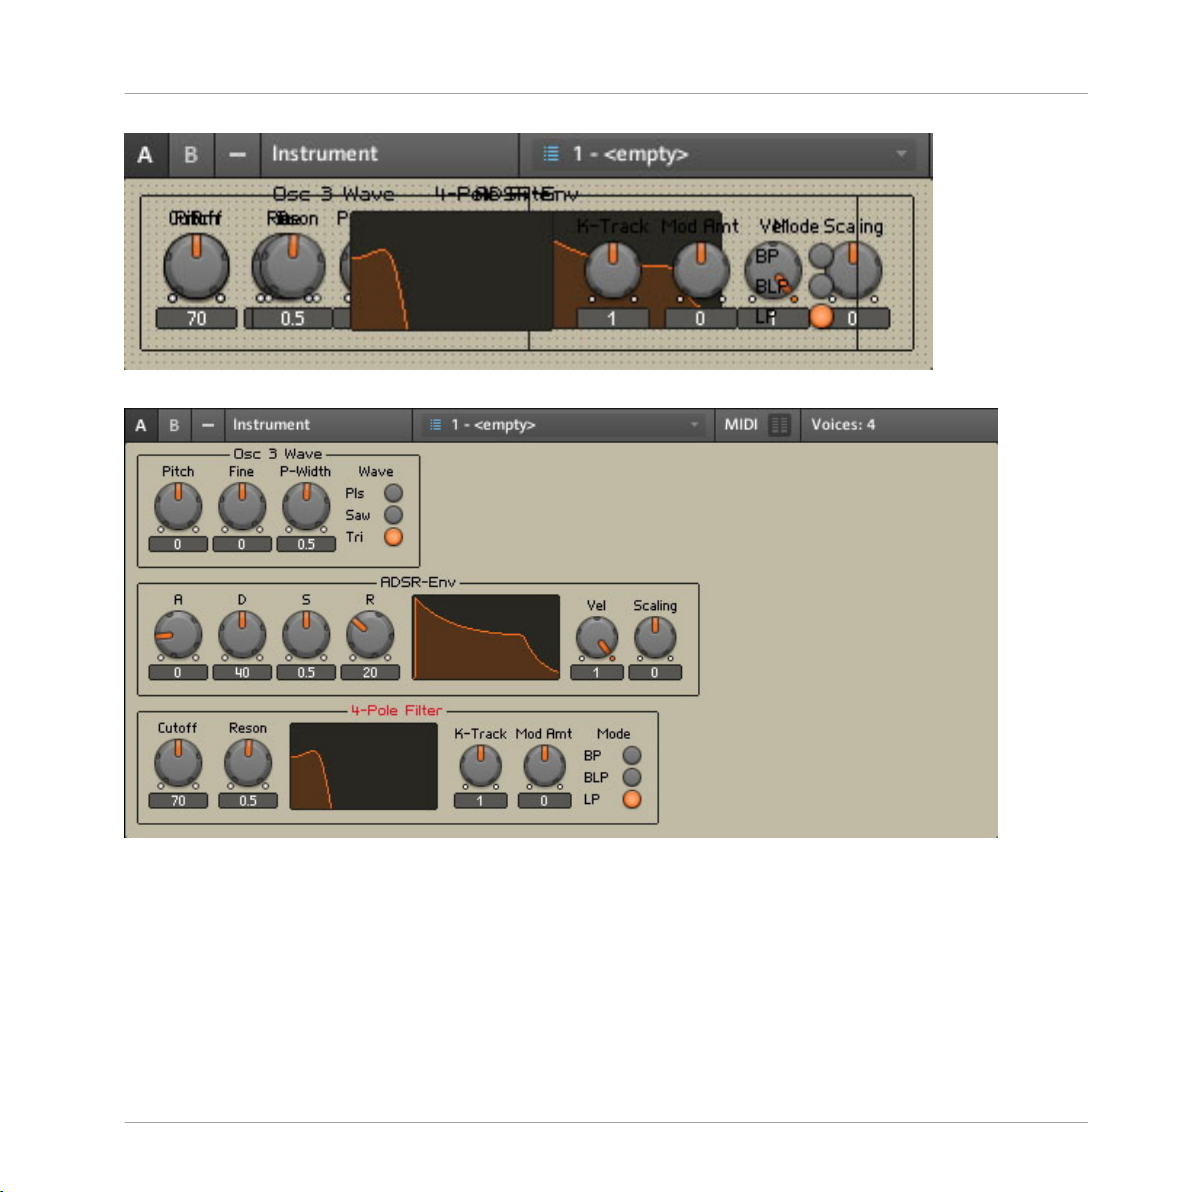
Your Synth will now look a bit like this:
Building a Synth Using Macros
Adding a Second Oscillator and a Mixer
7.5 Adding a Second Oscillator and a Mixer
We will now add a second Oscillator, as this will make a fatter sound. We will also add a
mixer, and make all the necessary connections.
7.5.1
Instead of inserting another Oscillator, we will duplicate the one we already have.
Adding a Second Oscillator Using Duplicate
REAKTOR 5.5 - Getting Started Guide - 98
Page 99

Building a Synth Using Macros
Adding a Second Oscillator and a Mixer
▪ Go back into the Instrument Structure and right-click if you are in Windows® ([Ctrl]
+click if you are in Mac OS® X) on top of the Osc 3 Wave Macro and choose the
Duplicate menu entry.
Fig. 7.15 Duplicating the Oscillator
A copy will be placed on top of the old Osc 3 Wave Macro.
7.5.2
Using Properties to Rename the Oscillator Macros
Both Oscillators have the same name, so we need to rename them.
REAKTOR 5.5 - Getting Started Guide - 99
Page 100

Building a Synth Using Macros
Adding a Second Oscillator and a Mixer
1. Right-click if you are in Windows® ([Ctrl]+click if you are in Mac OS® X) on top of
the first Osc 3 Wave Macro and choose the Properties menu entry. This will open up
the Properties tab for that Macro.
2. In the label area click and drag across the text, and type “Oscillator 1” and press [En
ter].
3. Do the same for the other Oscillator and this time type Oscillator 2.
REAKTOR 5.5 - Getting Started Guide - 100
 Loading...