

Page 1

MANUAL
Page 2

The information in this document is subject to change without notice and does not represent a
commitment on the part of Native Instruments GmbH. The software described by this document is subject to a License Agreement and may not be copied to other media. No part of this
publication may be copied, reproduced or otherwise transmitted or recorded, for any purpose,
without prior written permission by Native Instruments GmbH, hereinafter referred to as Native
Instruments.
“Native Instruments”, “NI” and associated logos are (registered) trademarks of Native Instruments GmbH.
All product and company names are trademarks™ or registered® trademarks of their respective holders. Use of them does not imply any affiliation with or endorsement by them.
All specifications are subject to change without notice.
Document authored by: Native Instruments GmbH
Software version: 1.5.5 (07/2018)
Special thanks to the Beta Test Team, who were invaluable not just in tracking down bugs, but
in making this a better product.
Disclaimer
Page 3

Contact
NATIVE INSTRUMENTS GmbH
Schlesische Str. 29-30
D-10997 Berlin
Germany
www.native-instruments.de
NATIVE INSTRUMENTS K.K.
YO Building 3F
Jingumae 6-7-15, Shibuya-ku,
Tokyo 150-0001
Japan
www.native-instruments.co.jp
NATIVE INSTRUMENTS FRANCE SARL
113 Rue Saint-Maur
75011 Paris
France
www.native-instruments.com
NATIVE INSTRUMENTS North America, Inc.
6725 Sunset Boulevard
5th Floor
Los Angeles, CA 90028
USA
www.native-instruments.com
NATIVE INSTRUMENTS UK Limited
18 Phipp Street
London EC2A 4NU
UK
www.native-instruments.co.uk
SHENZHEN NATIVE INSTRUMENTS COMPANY Limited
5F, Shenzhen Zimao Center
111 Taizi Road, Nanshan District, Shenzhen,
Guangdong
China
www.native-instruments.com
© NATIVE INSTRUMENTS GmbH, 2019. All rights reserved.
Page 4

Table of Contents
Table of Contents
1 Welcome to MASSIVE ................................................................................................
2 Quick Start ................................................................................................................
2.1 First Steps .................................................................................................................................. 8
2.2 Creating Your Own Sound ........................................................................................................... 13
2.1.1 Setting up MASSIVE ................................................................................................... 8
2.1.2 Finding a Sound ........................................................................................................ 9
2.1.3 Playing a Sound ......................................................................................................... 11
2.2.1 Controlling the Wavetable Oscillators ........................................................................ 13
2.2.2 Configuring the Filters ............................................................................................... 15
2.2.3 Setting up MIDI Assignments and Modulation Sources .............................................. 17
2.2.4 Saving Your Sound .................................................................................................... 20
3 Reference .................................................................................................................
3.1 Signal Flow and Voicing ............................................................................................................. 21
3.2 Interaction with the User Interface ............................................................................................. 23
3.3 Standalone Menus and Navigation Bar ...................................................................................... 36
3.4 Oscillator Section ....................................................................................................................... 40
3.2.1 Section Headers and Popup Menus ............................................................................ 24
3.2.2 Faders and Knobs ...................................................................................................... 25
3.2.3 Modulation Controls .................................................................................................. 26
3.2.4 The Center Window .................................................................................................... 31
3.2.5 Macro Controls Automation and MIDI ........................................................................ 33
3.3.1 The Standalone Menus .............................................................................................. 36
3.3.2 The Navigation Bar .................................................................................................... 37
3.4.1 Wavetable oscillators ................................................................................................ 41
3.4.2 Wavetable Controls .................................................................................................... 41
7
8
21
MASSIVE - Manual - 4
Page 5

Table of Contents
3.5 Filter Section .............................................................................................................................. 51
3.6 Insert Effects .............................................................................................................................. 56
3.7 Output Sections .......................................................................................................................... 60
3.8 The Center Window ..................................................................................................................... 66
3.9 Macro Control Section ................................................................................................................. 96
3.10 The Browser and Attributes Views .............................................................................................. 98
3.4.3 Amplification and Routing ......................................................................................... 45
3.4.4 Modulation oscillator ................................................................................................. 46
3.4.5 Noise Section ............................................................................................................. 48
3.4.6 Feedback Section ....................................................................................................... 49
3.5.1 Routing ...................................................................................................................... 52
3.5.2 Filter Types ................................................................................................................ 54
3.6.1 Routing ...................................................................................................................... 56
3.6.2 Delay ......................................................................................................................... 57
3.6.3 Sample & Hold ........................................................................................................... 58
3.6.4 Bitcrusher .................................................................................................................. 58
3.6.5 Frequency Shifter ....................................................................................................... 59
3.6.6 HPLP .......................................................................................................................... 59
3.6.7 Sine Shaper ............................................................................................................... 60
3.6.8 Parabolic Shaper ....................................................................................................... 60
3.7.1 Amp Section .............................................................................................................. 61
3.7.2 Bypass Section .......................................................................................................... 62
3.7.3 Master Effects Section ............................................................................................... 63
3.7.4 Master Volume Section .............................................................................................. 65
3.8.1 General Pages ........................................................................................................... 67
3.8.2 Modulation Pages ...................................................................................................... 80
MASSIVE - Manual - 5
Page 6

Table of Contents
3.10.1 The Attributes Concept and the Sound ...................................................................... 98
3.10.2 Searching and Loading Sounds with the Browser ...................................................... 98
3.10.3 Defining Attributes and Saving Sounds ..................................................................... 106
Index ........................................................................................................................
108
MASSIVE - Manual - 6
Page 7

Welcome to MASSIVE
1 Welcome to MASSIVE
Thank you for choosing MASSIVE! This new software instrument combines a unique synthesis
engine with unparalleled ease of use –- but most of all it is focused on sound creation. MASSIVE is your solution for punchy bass lines and cutting leads, while at the same time it is also
capable of beautiful atmospheric pads and funky rhythmic grooves.
This manual will show you how to use MASSIVE and all of its features. To help you take full
advantage of the creative possibilities of MASSIVE, it will explain the innovative wavetable engine that is at the heart of the synthesizer’s sound, as well as the unique filters that give MASSIVE its characteristic, analog sound. It will describe all internal effects, the internal feedback
circuit and the wide variety of advanced routing capacities that give MASSIVE its power and
flexibility. And, last but not least, the manual will show how to set up modulation routings
within MASSIVE, one of its most powerful yet also most intuitive features.
The manual itself consists of two major parts. Chapter ↑2, Quick Start contains two introductory tutorials. These will guide your first steps with MASSIVE, introducing you to its parts and
features and how to begin using them. This is the point to start from if you are completely new
to MASSIVE. Chapter ↑3, Reference is a systematic reference of all functions of this synthesizer. It covers all aspects of MASSIVE and provides usability hints as well as technical information. If you need more information about a specific part of MASSIVE, here is where you will
find it.
But most of all, we hope that you will enjoy the sound of MASSIVE!
MASSIVE - Manual - 7
Page 8

2 Quick Start
This chapter is the place to start getting acquainted with MASSIVE’s main features. It will
guide you through loading and creating sounds with this exciting new synthesizer. Section
↑2.1, First Steps will focus on how to find and load a sound from MASSIVE’s sound library us-
ing the powerful Browser View, so you can start playing right away. Section ↑2.2, Creating Your
Own Sound will show you how to begin using MASSIVE’s vast sound design capacities to
sculpt your own new sounds.
2.1 First Steps
In this section, you will learn how to set up MASSIVE, use the Browser to search the sound
library, load a sound, tweak some Macro Controls, and have a look at the Range Knobs and see
how they can be controlled by the Macro Controls.
2.1.1 Setting up MASSIVE
Before first working with MASSIVE, you should check its Audio and MIDI Settings. Assuming
that MASSIVE has been properly installed and activated on your computer (see the separate
Setup Guide for more on this), start the standalone version of MASSIVE. To set up the audio
and MIDI interface options, choose File > Audio and MIDI Settings from the menus at the top.
Quick Start
First Steps
On the Soundcard Tab, you should select ASIO on Windows for best results. (On a Mac this will
be set to CoreAudio, your only choice in Mac OSX.) Then use the Output Device field to select
the audio interface. We recommend setting the sample rate to 44100 and setting the output
latency to about 10 ms. (Note that in some cases you may need to adjust the latency/buffer
size in the software control panel for your soundcard; you may need to quit MASSIVE first to
do this.) These are recommended settings that should work well on most computer systems; for
information on what these settings mean, please refer to our Setup Guide where this is explained in more detail.
On the Routing Tab, check that the two virtual outputs of MASSIVE are properly routed to the
audio interface’s outputs. If “Not Connected” is displayed here, you won’t hear anything!
MASSIVE - Manual - 8
Page 9

On the MIDI Tab, check that the MIDI interface or device you are using is turned on. If you see
your interface listed but it is off, click on the “off” label to turn it on. If your MIDI device does
not appear here, there may be a problem with the installation of the device itself (or its software drivers). If you don’t have a MIDI controller available, you can still play MIDI notes by
using the computer’s keyboard. We have assigned the four rows of alphanumeric keys in a similar pattern to that of a piano keyboard. For example, the bottom row of keys on your computer
keyboard (from Z on the left to / on the right) is assigned to the white keys of the piano keyboard, with the Z key being assigned to C. The row of keys above that (from S to ;) covers the
corresponding black keys, with S assigned to C#. The two rows of keys above are assigned in a
similar pattern, but one octave higher.
Please note that there is also another MIDI Setup Tab within the Options Dialog, found in File
> Options; this deals with some additional MIDI setup options, but we don’t need to worry
about this just yet. (More information about this additional setup dialog can be found in section ↑3.3.1, The Standalone Menus.)
Now let’s close the Audio/MIDI Settings dialog and begin working with MASSIVE!
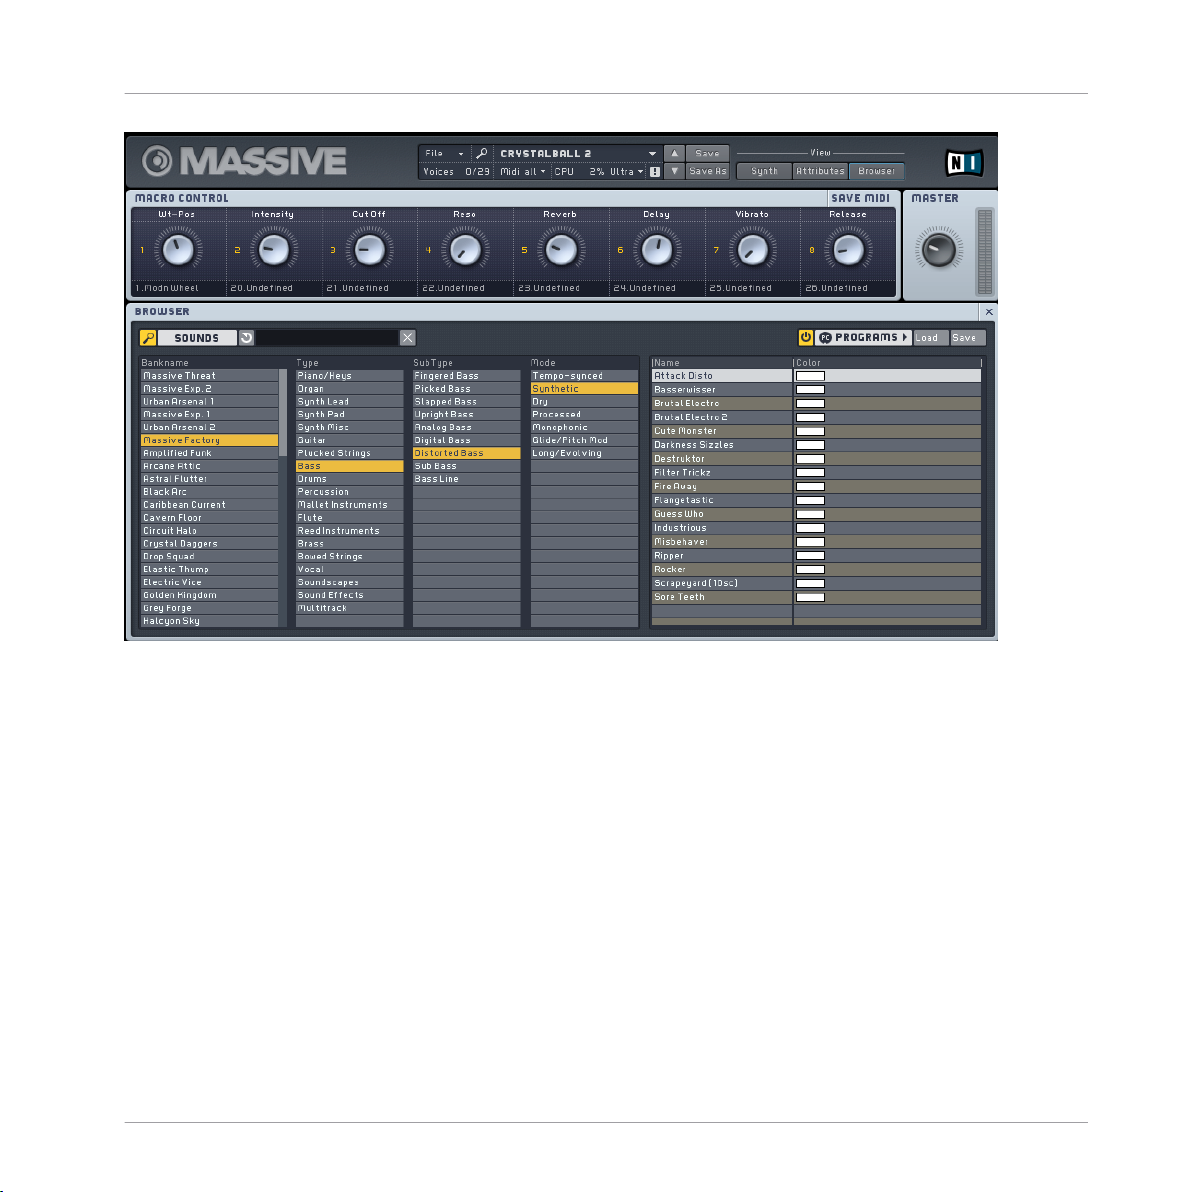
2.1.2 Finding a Sound
First let’s take a look at the Browser and see how to find and load a sound from the built-in
sound library.
Quick Start
First Steps
Switch to the Browser View by clicking the Browser button towards the right side of the Navigation Bar.
MASSIVE - Manual - 9
Page 10
Quick Start
First Steps
You’ll see the Database View of the Browser at the lower left, and the Search Result List to the
right. Above, you will see the eight Macro Control knobs (see section ↑3.2.5, Macro Controls
Automation and MIDI) as well as the Master Volume Control (see section ↑3.7.4, Master Volume Section). The Browser itself is described in detail in section ↑3.10.1, The Attributes Concept and the Sound.
When you first open the Browser View, the Search Result List at the lower right will show the
list of all sounds available in MASSIVE. Now let’s try using the Attributes at the lower left of
the Database View to limit the Search Results:
1. Click on one or more Attributes in any column and they will be highlighted.
2. The Search Results List will update automatically to display only those Sounds that match
the set of active Attributes.
3. Click a selected Attribute again to deselect it.
MASSIVE - Manual - 10
Page 11
4. When no Attributes are selected, the Search Results List will display the list of all available Sounds.
5. Try selecting one or more Attributes from each column left to right and watch how the list
gradually narrows; for example, try selecting (from left to right) “Massive Factory”,
“Bass”, “Distorted Bass”, “Synthetic” and “Lead” and find the sound “Attack Disto” on
the right.
6. Now load this patch from the Search Results List by simply double-clicking on its name.
Using the Attributes is a very convenient and powerful way to quickly find the sound you want
to use!
2.1.3 Playing a Sound
Now that you have loaded “Attack Disto,” try playing some notes with your MIDI keyboard and
you should hear the sound. You might try playing in the lower range of the keyboard, as Attack
Disto is a bass sound. Try modifying the output with one of the Macro Control knobs, arranged
in a row 1-8 just above the Browser: while holding down a MIDI key and sustaining a sound,
click on the third Macro Control and drag the mouse upwards. The Macro Control knob will follow the movement, and you should hear some effect, depending on what the Macro Control is
assigned to in the particular patch you are using. (For more on the Macro Controls and how
they are commonly assigned, see section ↑3.2.5, Macro Controls Automation and MIDI).
Quick Start
First Steps
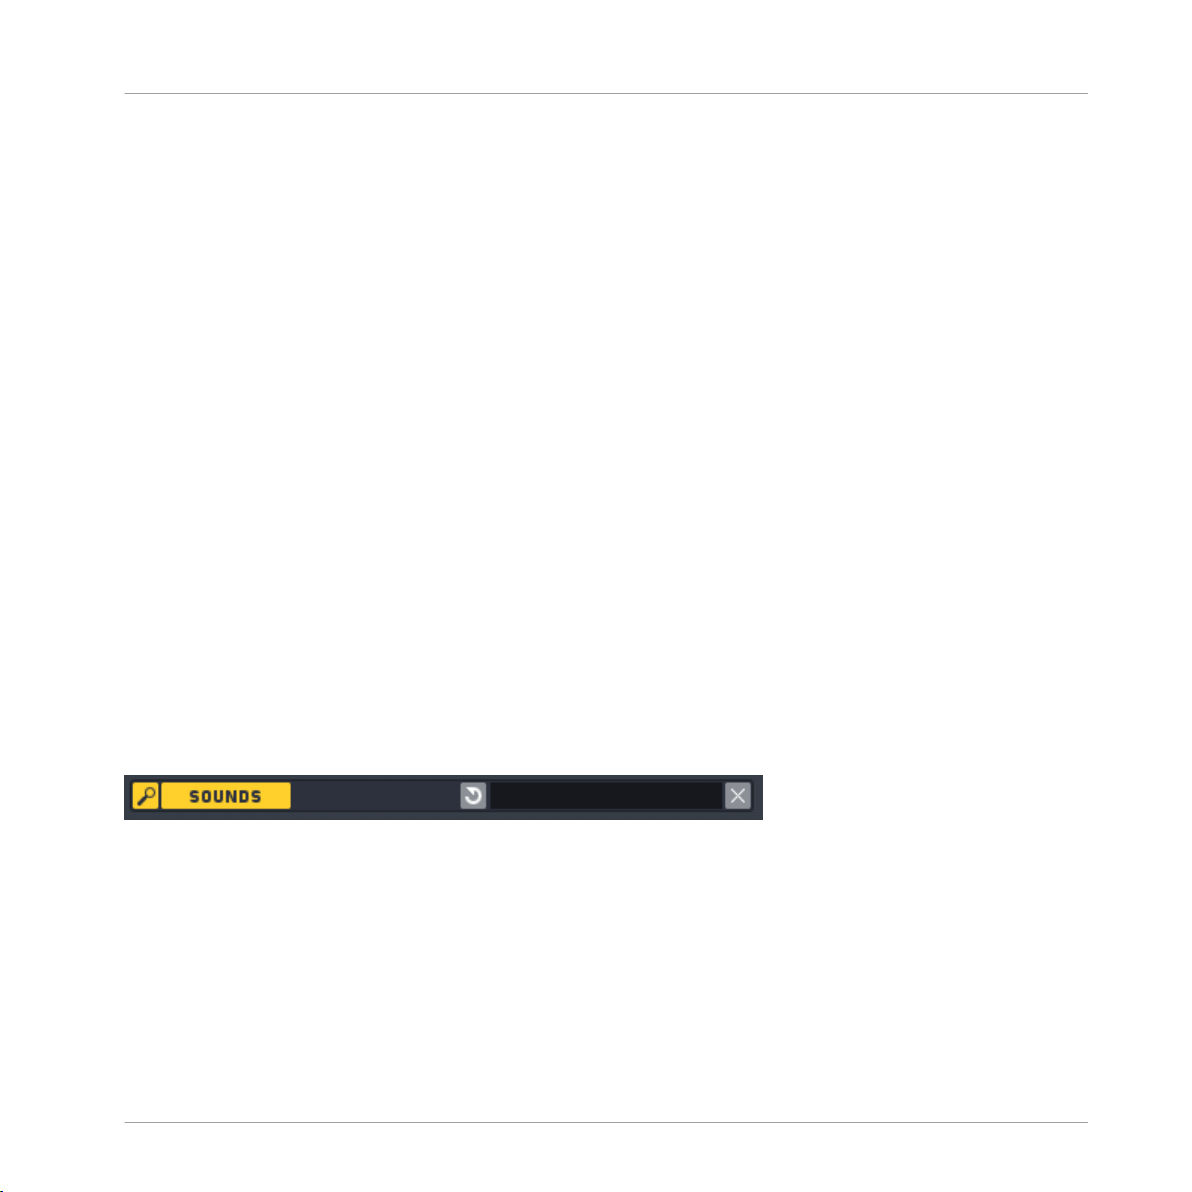
Now try using a different sound. In the bar between the Macro Controls and the Database View,
click the Reset Button (the circle-like icon within the illustration below) and all attributes are
deactivated.
You will see all the sounds in MASSIVE reappear at the right. Now let’s try searching for
sounds another way:
1. Click with the mouse in the Search Term field to the right of the Reset Button.
2. Type “pad” in the Search Term field.
3. You will see the Search Results again automatically update and narrow to include only
those Sounds that contain your search term in their names or other Meta Information
fields (see section ↑3.10.3, Defining Attributes and Saving Sounds).
MASSIVE - Manual - 11
Page 12
4. Double-click one of the matching Sounds you see to load it.
5. Play and hold a MIDI note.
6. Try tweaking the various Macro Controls 1-8 and listen to the variety of sounds that can
be created by different settings.
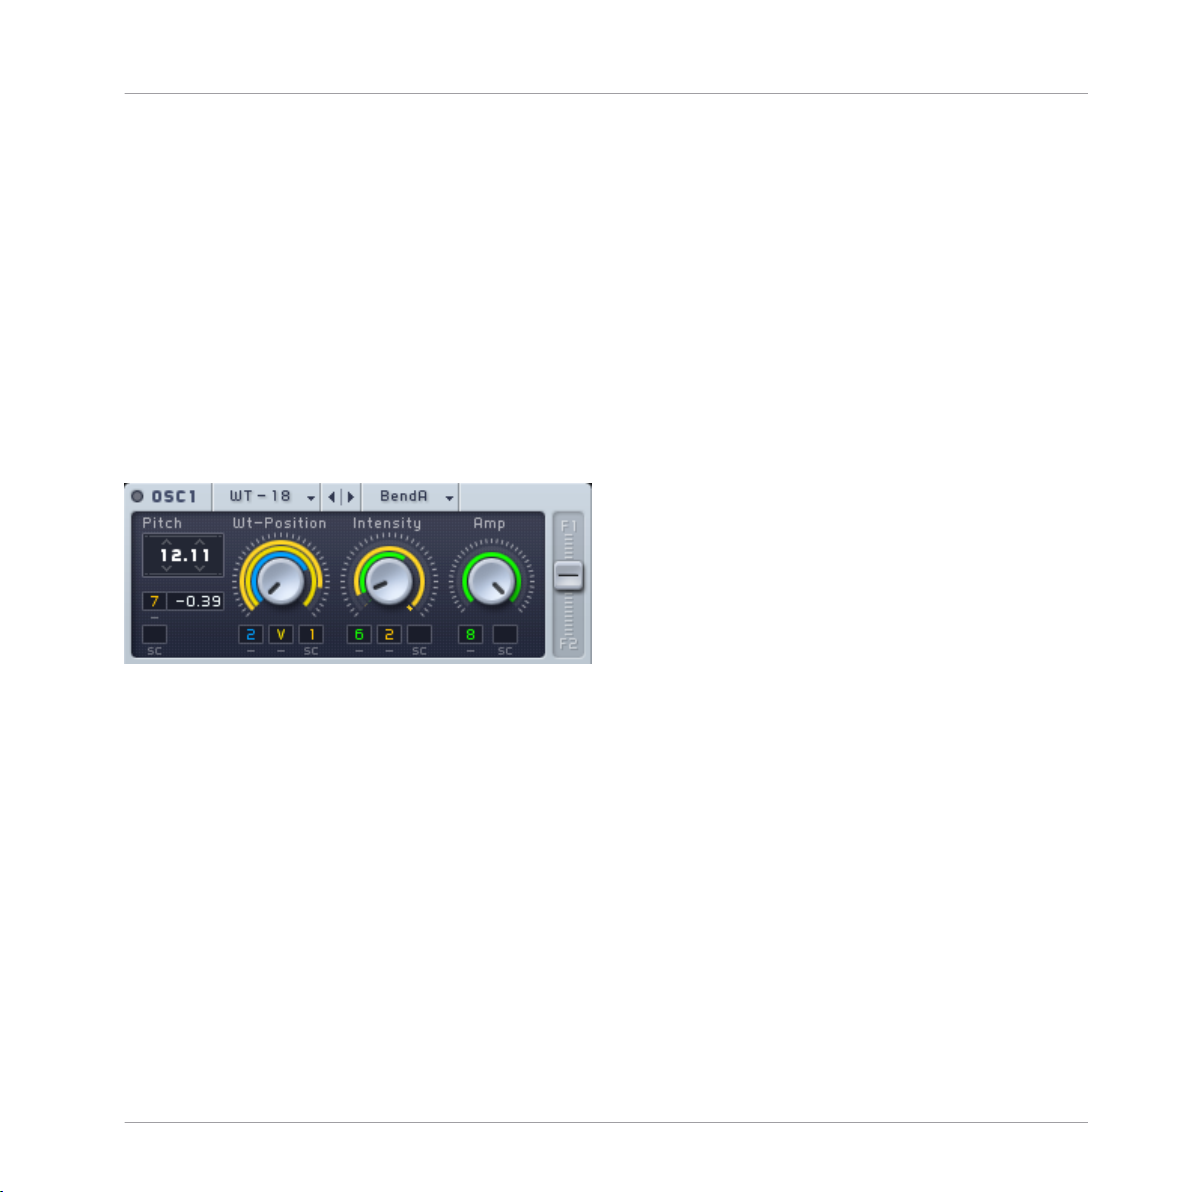
How are these Macro Controls affecting the sound? Let’s change to the Synth View now to get
an idea of how this works. Click the Synth Button towards the right side of the Navigation Bar
to switch to the Synth View. You will see the same eight Macro Control knobs 1-8 in the lower
right corner of the window. However, in the Synth View you can see how each control is modifying the sound, and you can create your own control assignments. For example, in the image
below (displaying the Rampage sound loaded previously), the small yellow numbers beneath
the control knobs indicate that the knobs are being controlled by Macro Controls 1 and 2, respectively.
Quick Start
First Steps
The range of influence of the Macro Control over the control it is affecting is proportional to the
corresponding yellow ring around the control. For example, in the image above we can see that
the influence of Macro Control 2 on the Intensity knob is greater than that of the green modulation source indicated by the numeral “6”. The different color reflects that this modulation
source is not a Macro Control, but an LFO. The blue “2”, finally, denotes an envelope generator.
For more on MASSIVE’s modulation sources, see section ↑3.8.2, Modulation Pages. For a practical example of how to route modulation, see ↑2.2, Creating Your Own Sound.
MASSIVE - Manual - 12
Page 13

Creating Your Own Sound
2.2 Creating Your Own Sound
This section explains how to create a lead synth sound and introduces you to some of the fundamental sound design techniques of MASSIVE. If you are new to MASSIVE, we recommend to
read section --- MISSING LINK --- first.
In the following tutorial you will learn how to select a wavetable for each oscillator and tweak
the controls to modify the sound. We’ll also see how to configure MASSIVE’s filters and control
them with a modulation source.
2.2.1 Controlling the Wavetable Oscillators
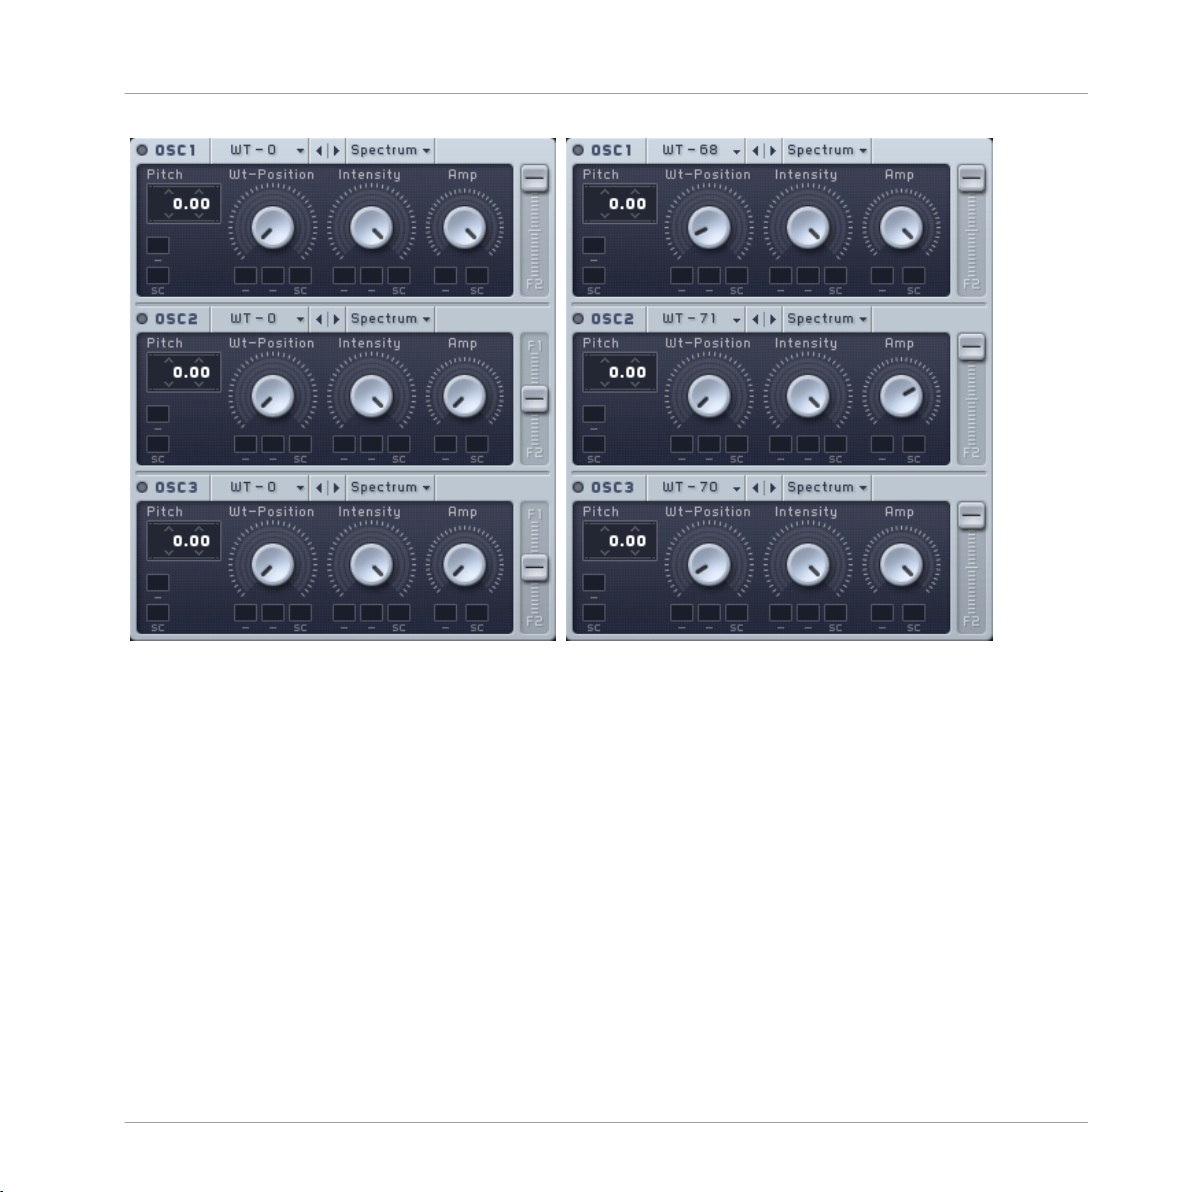
First, create a new, empty sound for editing by selecting File > New Sound from the File menu
in the Navigation Bar. Now look at the Oscillator Section in the upper left corner of MASSIVE:
it should look like the left-hand image below. In the following instructions, we will adjust the
various knobs and faders step-by-step until they match the settings in the right-hand image instead, and explain why.
Quick Start
MASSIVE - Manual - 13
Page 14
Quick Start
Creating Your Own Sound
First, let’s start with some synthesis basics: in most synthesizer designs, oscillators of some
kind are used to generate the raw sound material that is manipulated afterwards by filters (see
section ↑3.5, Filter Section), effects (see sections ↑3.6, Insert Effects and ↑3.7.3, Master Ef-
fects Section), and other controls. One of the most unique features of MASSIVE is that the in-
dividual oscillators generate sound by using wavetables, rather than just simple waveforms as
in many other subtractive synthesizers. This gives it the ability to create dense, unique, morphing sounds that would be impossible to produce using other synthesis techniques. For detailed
information about MASSIVE’s wavetable synthesis engine, see section ↑3.4.1, Wavetable oscil-
lators.
For now, we’re just going to look at how you can creatively work with some of the controls here
without worrying too much about what is actually going on under the hood.
The most fundamental parameter affecting the sound in MASSIVE is the choice of which
wavetable to use for each oscillator. The other parameters here in the Oscillator Section allow
you to modify how that wavetable is used. You can select a wavetable to use for each of MAS-
MASSIVE - Manual - 14
Page 15

Creating Your Own Sound
SIVE’s oscillators independently, by using the popup menus in their headers: click where you
see the indication “WT-0” for each oscillator in turn and set them to “WT-68”, “WT-71”, and
“WT-70” respectively.
Now let’s try adjusting the wavetable position, i.e. which part of the wavetable is to be used: try
adjusting the Wavetable Position Control of the topmost oscillator with the mouse while holding down a MIDI note, and listen to the effect this has on the sound. After playing with this
control a bit to get a feel for it, set this control to a position of about 10%, just like in the
right-hand image above. Now try adjusting the Wavetable Position Control of the third oscillator; do you hear any change in the sound? You will not hear any change because its Amplitude
Control (marked Amp in the image) is turned all the way down.
In order to match the image above, increase the Amplitude Control of Oscillator 3 to the maximum (all the way to the right). Similarly, set the Amplitude Control of Oscillator 2 to about
70%. Finally, set all three oscillators’ Routing Faders (the sliders on the right edge) controlling
the Filter Routing to their top position. The filters will be explained next.
2.2.2 Configuring the Filters
MASSIVE provides two filter busses to shape your sounds, with exceptionally flexible routing
capabilities. Here you can insert a variety of different filter types to manipulate the raw sound
from the oscillators.
Quick Start
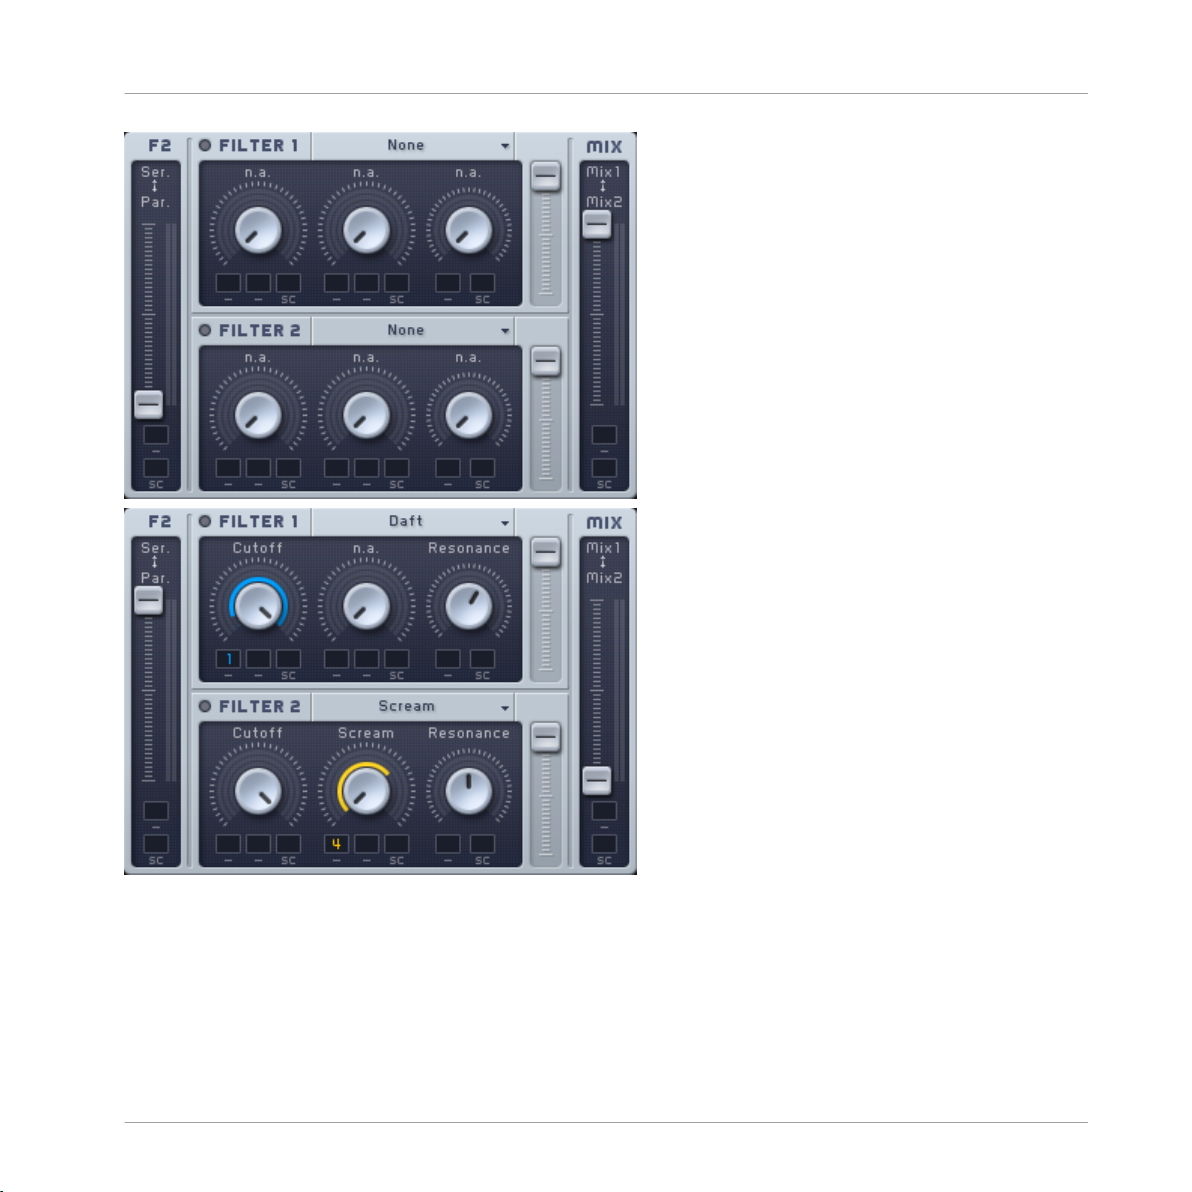
When you start working on a new sound, the Filter Section should look like the left-hand image
below. In the following instructions, we will again adjust the knobs and faders step-by-step until they match the settings on the right.
MASSIVE - Manual - 15
Page 16
Quick Start
Creating Your Own Sound
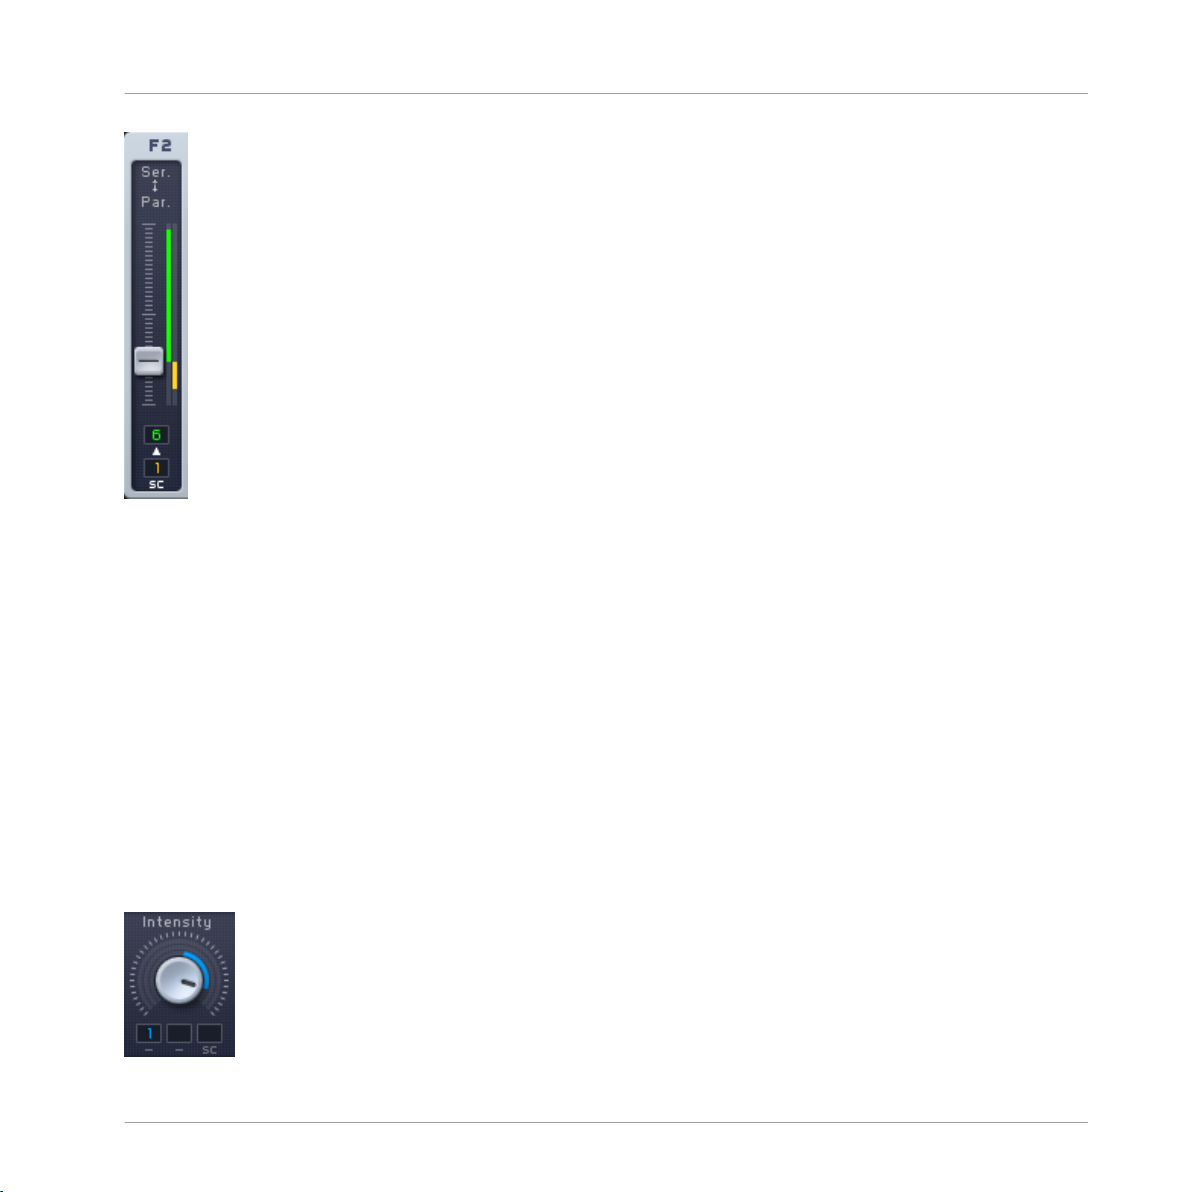
First, set the Filter Input Fader (labeled F2 and marked “Ser<>Par”) all the way to the top.
This sets up a serial filter routing, such that the second filter takes the first filter’s output signal as its input signal. In this example, we want the two filters to process the signal subsequently one after another, not parallel/simultaneously.
MASSIVE - Manual - 16
Page 17

Creating Your Own Sound
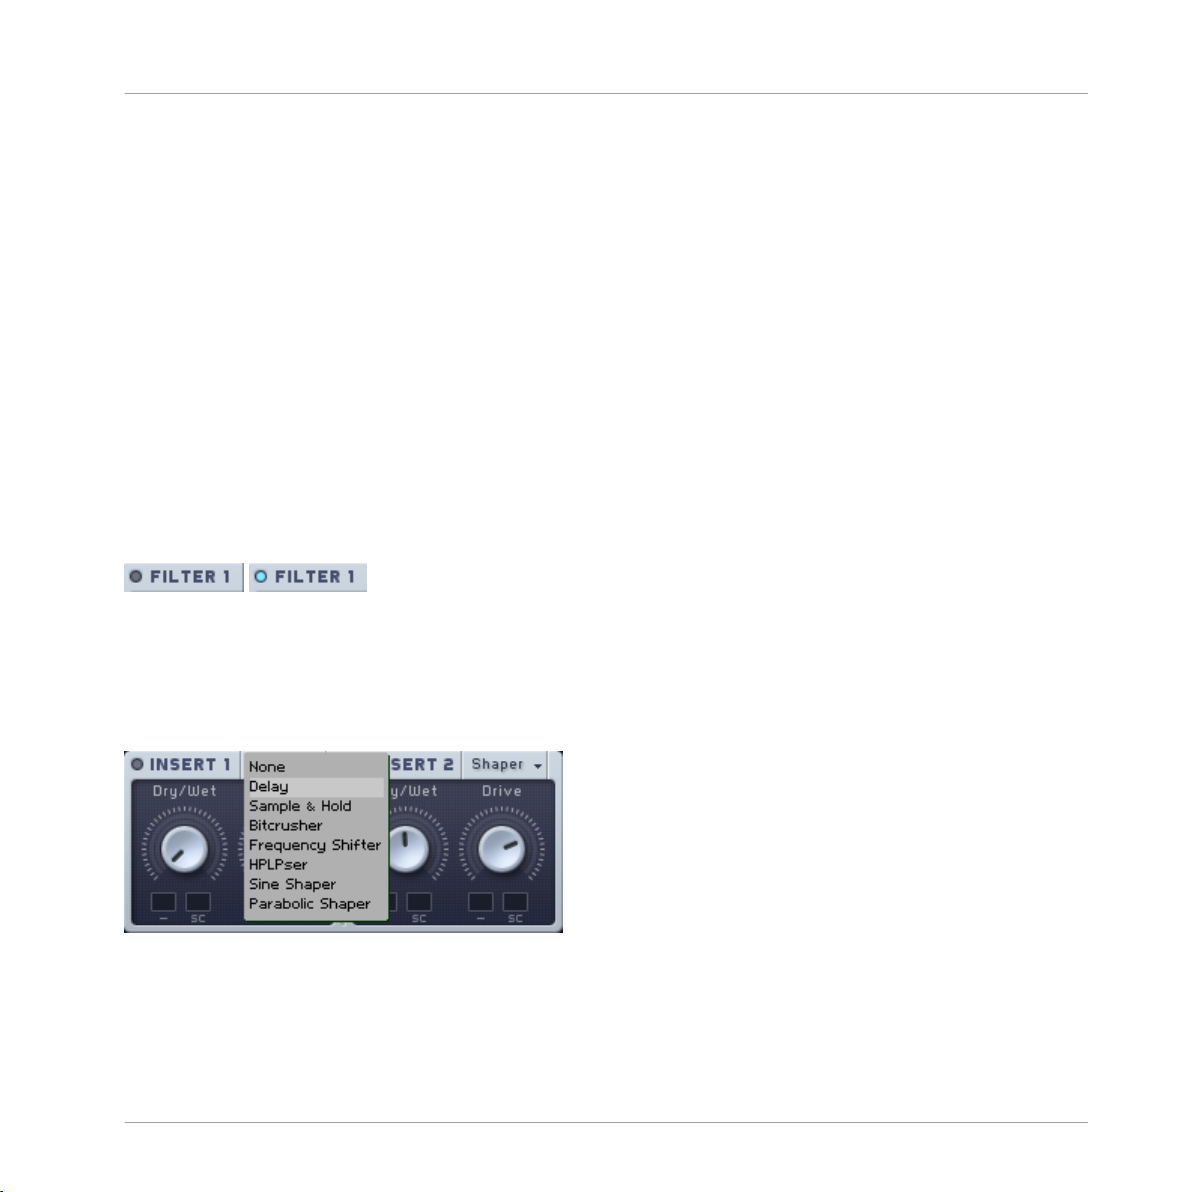
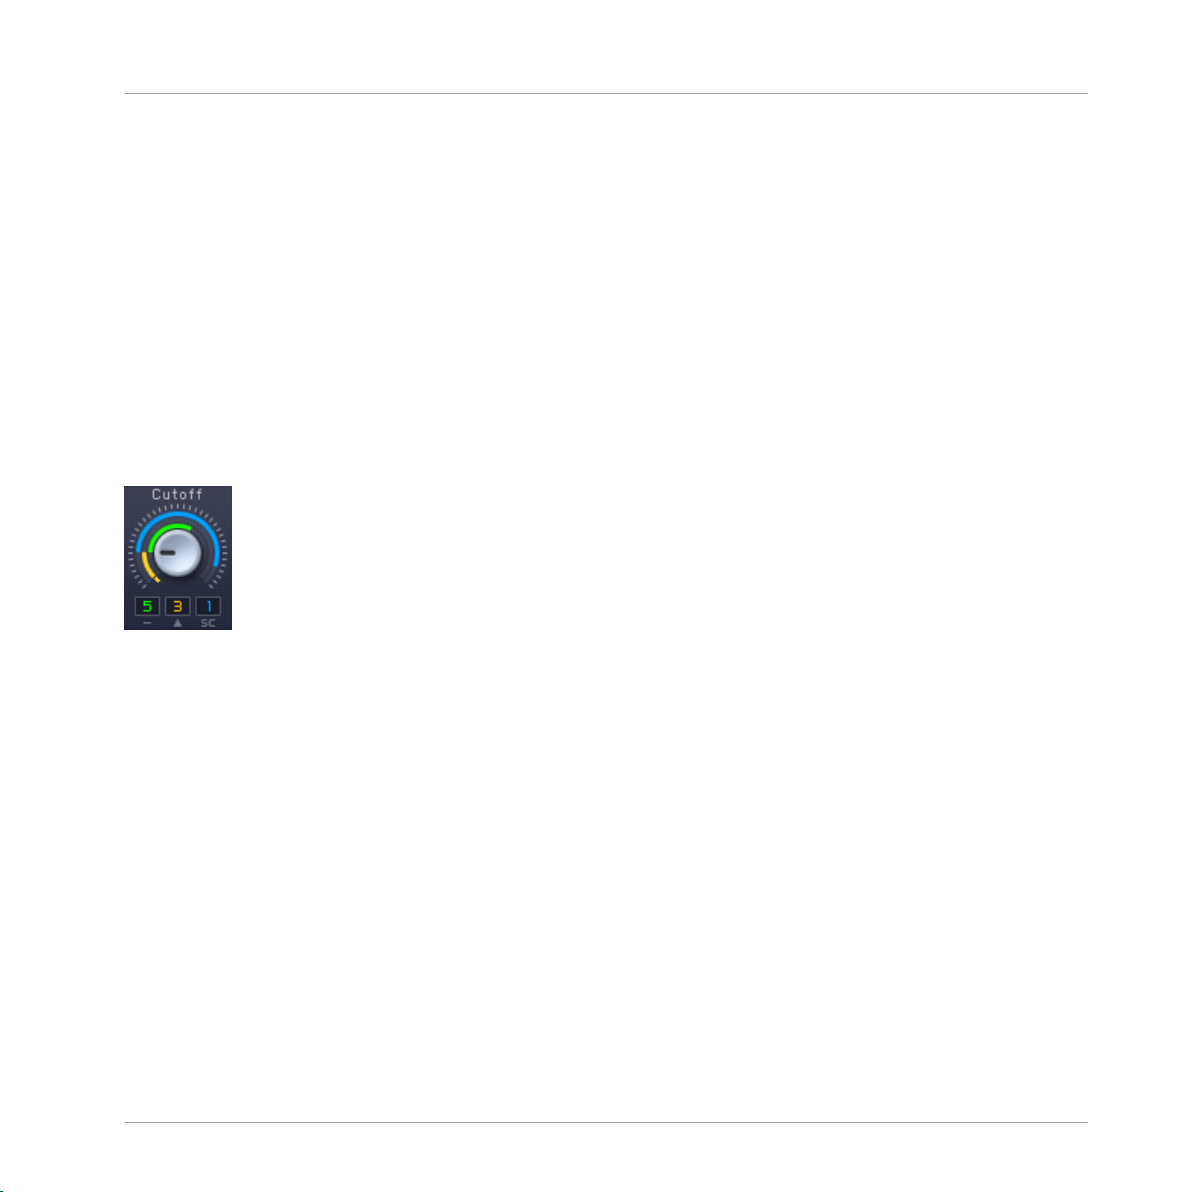
Then, choose the first filter’s type by clicking the header (where “None” is written) and selecting the entry from the list in the popup menu. Let’s choose the Daft filter type for this example.
Now play a MIDI note: you should hear no sound at first, because by default the Filter Cutoff
control is turned all the way down (to the left). Hold the note on your MIDI controller and turn
the Cutoff knob up to the maximum (to the right) by clicking and dragging with the mouse. As
you increase the cutoff, the filter gradually opens and you will hear the sound revealed bit by
bit.
For this example, also turn up the Resonance control to about 60%; tweak the Cutoff again a
bit to listen to the difference it makes in the sound.
Now slide the Output Fader (at the right-hand edge of the Filter Section) all the way to the
bottom. This fader sets the output mix of the complete Filter Section, between Filter 1 and Filter 2. When it is set to the bottom of its range, we will hear only the output of Filter 2 and no
direct output from Filter 1.
Now play a note again: you should hear no difference yet. Although the sound is passing
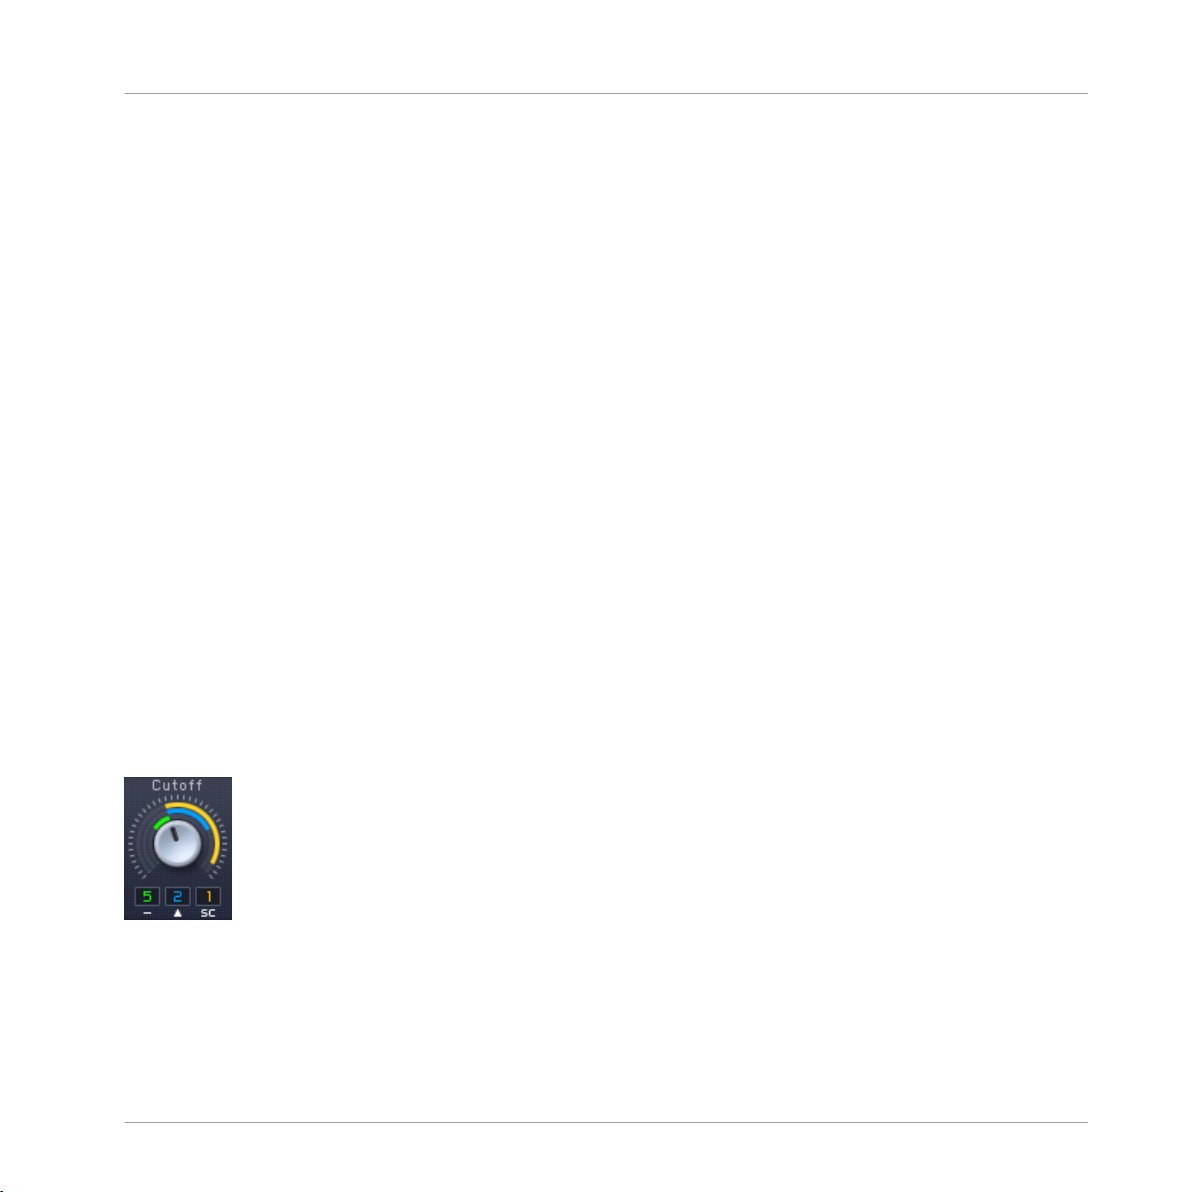
through Filter 2, we haven’t selected any filter to use. Change this by clicking on the popup
menu in the header of Filter 2 and selecting the Scream filter. Now hold a note and gradually
increase the Cutoff control to its maximum value (all the way to the right) by clicking and dragging with the mouse; you should hear the sound gradually change as the cutoff is increased.
Quick Start
Now set the Resonance Control to a middle position, approximately 50% of its total range. If
you play a note, the sound should sound a bit different than without Filter 2, but the difference is still marginal. (Remember, you can compare the sound with and without Filter 2 in the
signal chain by moving the Output Fader up and down with the mouse.)
In order to make more complex and interesting sounds with MASSIVE, we need to add a few
more techniques to our sound design toolkit. In the next section, we’ll look at how to use modu-
lation sources to change the parameters of the oscillators and filters over time.
2.2.3 Setting up MIDI Assignments and Modulation Sources
There are basically two different types of modulation that you can use in MASSIVE: you can set
up MIDI assignments that allow you to change the parameters manually (or by sending MIDI automation commands from a host sequencer), or you can set up modulation sources within MASSIVE that automatically change over time, such as envelopes, LFOs and sequencers.
MASSIVE - Manual - 17
Page 18

Creating Your Own Sound
In the first case, to set up control via MIDI, first drag the cursor to the Macro Control Section
in the lower right corner of MASSIVE’s interface. Here, click on the Modulation Handle of Macro Control 4, i.e. the small cross in the upper right corner. You will see a small numeral “4”
appear, which will be attached to the mouse pointer and follow it. Now, move the cursor to the
rightmost Modulation Slot of the second filter’s Scream Control, i.e. the small dark rectangle
just below the knob. Click here in the Modulation Slot and the 4 attached to the mouse cursor
will disappear, and you will see the 4 visible in the Modulation Slot instead. This indicates that
you have assigned Macro Control 4 to control this parameter, the Scream parameter of the filter. (Note: if you hold down the Alt key and double-click the Modulation Slot holding the 4,
you can remove the assignment. You can also access a context menu to edit your assignments
by right-clicking the Modulation Slot; select the Off entry here to remove an assignment.)
Having made this assignment to the Scream Control, now try tweaking Macro Control 4 with
the mouse while playing a note. You will hear no effect from this assignment yet, because the
amount of effect of Macro Control 4 on the Scream parameter has not been set. Do this by
clicking on the small “4” in the Modulation Slot and dragging the mouse up: you will see a
yellow ring appear, becoming longer as you move the mouse upwards. (You can also shorten it
again by moving the mouse back downwards.) The longer the ring segment, the greater the influence of the source set in the Modulation Slot, i.e. Macro Control 4. Let’s set this to a length
of about 60% around the knob, and then try moving the Macro Control while playing a note.
Now you should be able to hear the effect of the assignment!
Quick Start
To control the Scream parameter with a MIDI device, right-click Macro Control 4 and select
“MIDI Learn” from the context menu. Then move your MIDI controller’s knob or fader that you
want to use - the assignment will take place automatically, assuming that your device is connected correctly. Now you can change Macro Control 4 and the Scream parameter with your
MIDI device.
Let’s look at how you can add an automatic modulation source to modify another parameter in
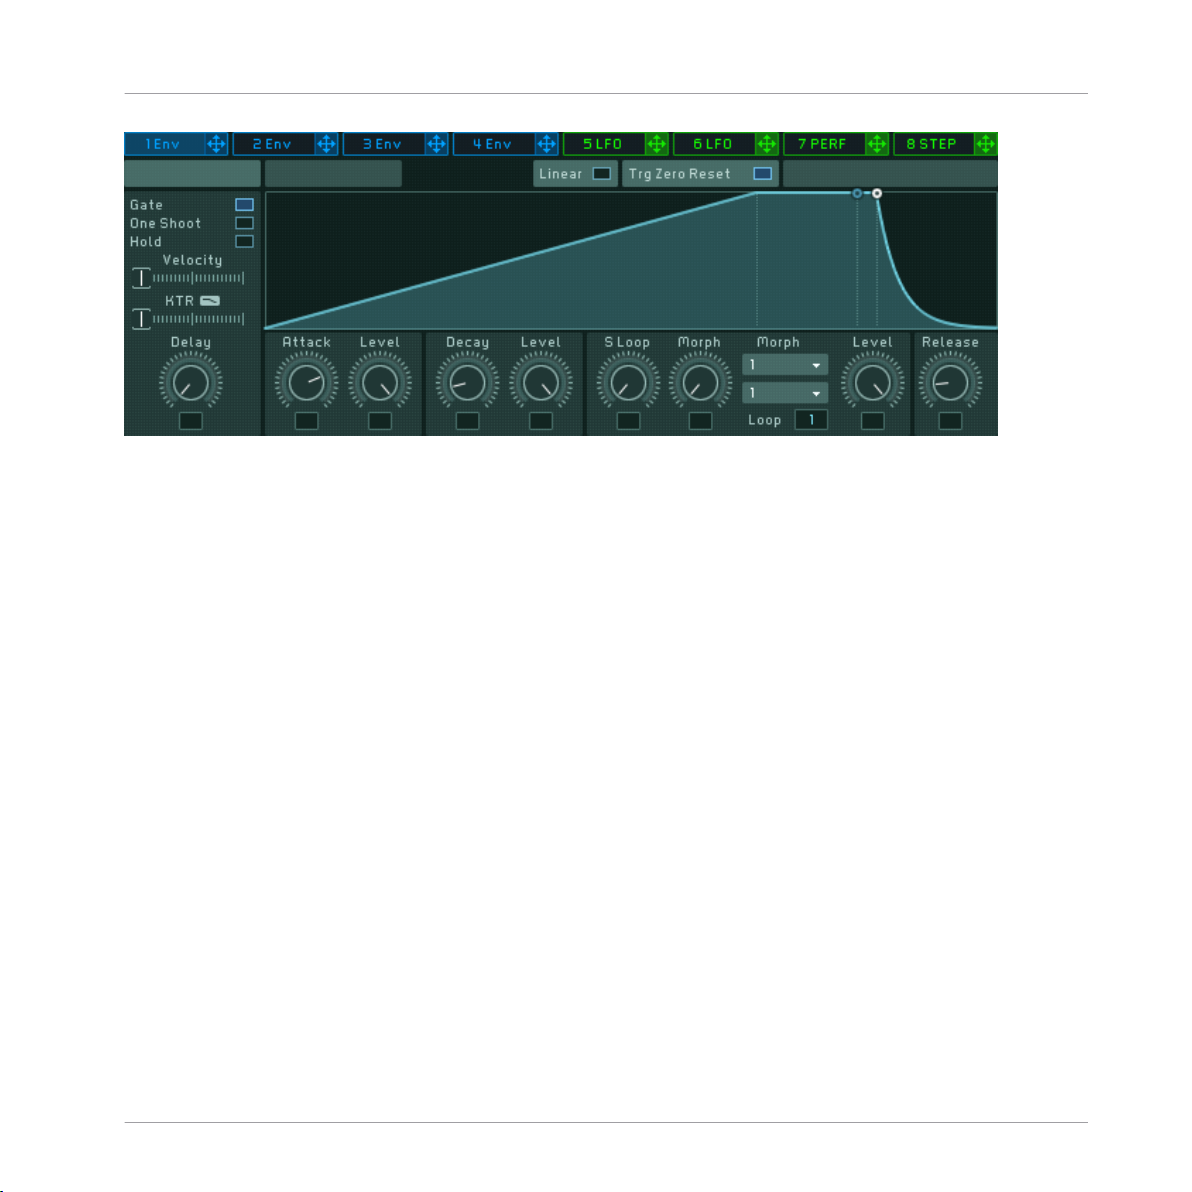
MASSIVE. First, we’ll try assigning one of the envelopes. Click on the blue tab of the first envelope (labeled “1Env”) within the Center Window and you will see something like this:
MASSIVE - Manual - 18
Page 19
Creating Your Own Sound
This page shows us the controls of one of MASSIVE’s four envelope generators. Envelopes are
signals that first rise when a note is played, stay at some fixed level as long as the key is held
(usually), and then fall back to zero when the note is released. Envelopes are often used to define the volume of a note, becoming louder when a key is pressed, holding that volume, and
decaying when the note is released.
For our example, we want to use the envelope to modulate the Cutoff of Filter 1. First we will
set up the envelope shape we want. Try increasing the Attack Control value to about 70% of its
full value so that the initial ramp of the envelope becomes much longer (as in the image
above). Then, click on the Modulation Handle of the envelope (the small blue cross within the
envelope’s Header Tab, just to the right of the label “1Env”). Assign it to the Cutoff of Filter 1
by clicking into the first Modulation Slot under the Cutoff knob; you will see the small blue
“1” appear in the slot when it has been assigned. Once again, the modulation amount needs
to be set before you will hear any effect from the assignment. Click the Modulation Slot again
and drag the mouse downwards. You will see a blue ring start from where the controller is (i.e.,
at the right) and move “inversely” to the left. Set this to about 10% of maximum value, as in
the right-hand image in the previous section. This inverse modulation means that high envelope
values will actually lower the Cutoff value instead of increasing it. Try playing a note on your
MIDI controller: the sound will become duller in the time after you hit the key, as the envelope
signal increases and turns down the Cutoff control. If you try adjusting Macro Control 4 again,
its influence is now also audibly much stronger because of the added influence of the envelope
on the filter cutoff.
Quick Start
For more on envelopes and other modulation sources, see section ↑3.8.2, Modulation Pages.
MASSIVE - Manual - 19
Page 20

Creating Your Own Sound
2.2.4 Saving Your Sound
Congratulations: you have just created your first sound in MASSIVE! Now let’s save it in our
sound library for future reference.
You can save your sound by switching to the Attributes View. Do this by clicking the Attributes
View Button within the Navigation Bar, between the buttons for the Browser View and the
Synth View.
Here in the Attributes View you can set the attributes for your sound so that you can find it in
the database in the future, just as explained in section ↑2.1, First Steps. As we saw, there are
many different attributes available for you to use in categorizing your sounds. (Note: you can
find a complete definition of each one in Appendix B and several examples in Appendix A.) For
this first sound, let’s just quickly select a few Attributes to index our sound. Click on Bass,
Distorted and Sweep/Filter Mod by clicking their labels here.
At this time, you can also add your name in the Author field of the Meta Information at the
right, along with any other descriptive details you might choose to enter to help you find the
sound again when you need it.
When you’re done, click the Save As button within the Navigation Bar and enter the name of
your new sound; clicking OK then saves it to the database. You will now be able to find your
sound from the Browser by using the Attributes or by entering terms in the Search field.
Quick Start
If you would like to hear an example of what could be done to further modify this sound, go to
the Browser, enter “propeller” into the Search Term field and load the Sound “Propeller Saw.”
Switch to the Synth View and you should be able to see some similarities with the example we
have been working with here. If you start looking at what makes this Sound different from our
example, you’ll find a lot of inspiration and techniques for your own creations.
MASSIVE - Manual - 20
Page 21
Signal Flow and Voicing
3 Reference
3.1 Signal Flow and Voicing
This section explains the exact routing of the Signal Flow in MASSIVE. We recommend reading
this part if you really want to understand how MASSIVE works, as it shows exactly how all of
the various parts of the synthesizer are connected and can affect each other.
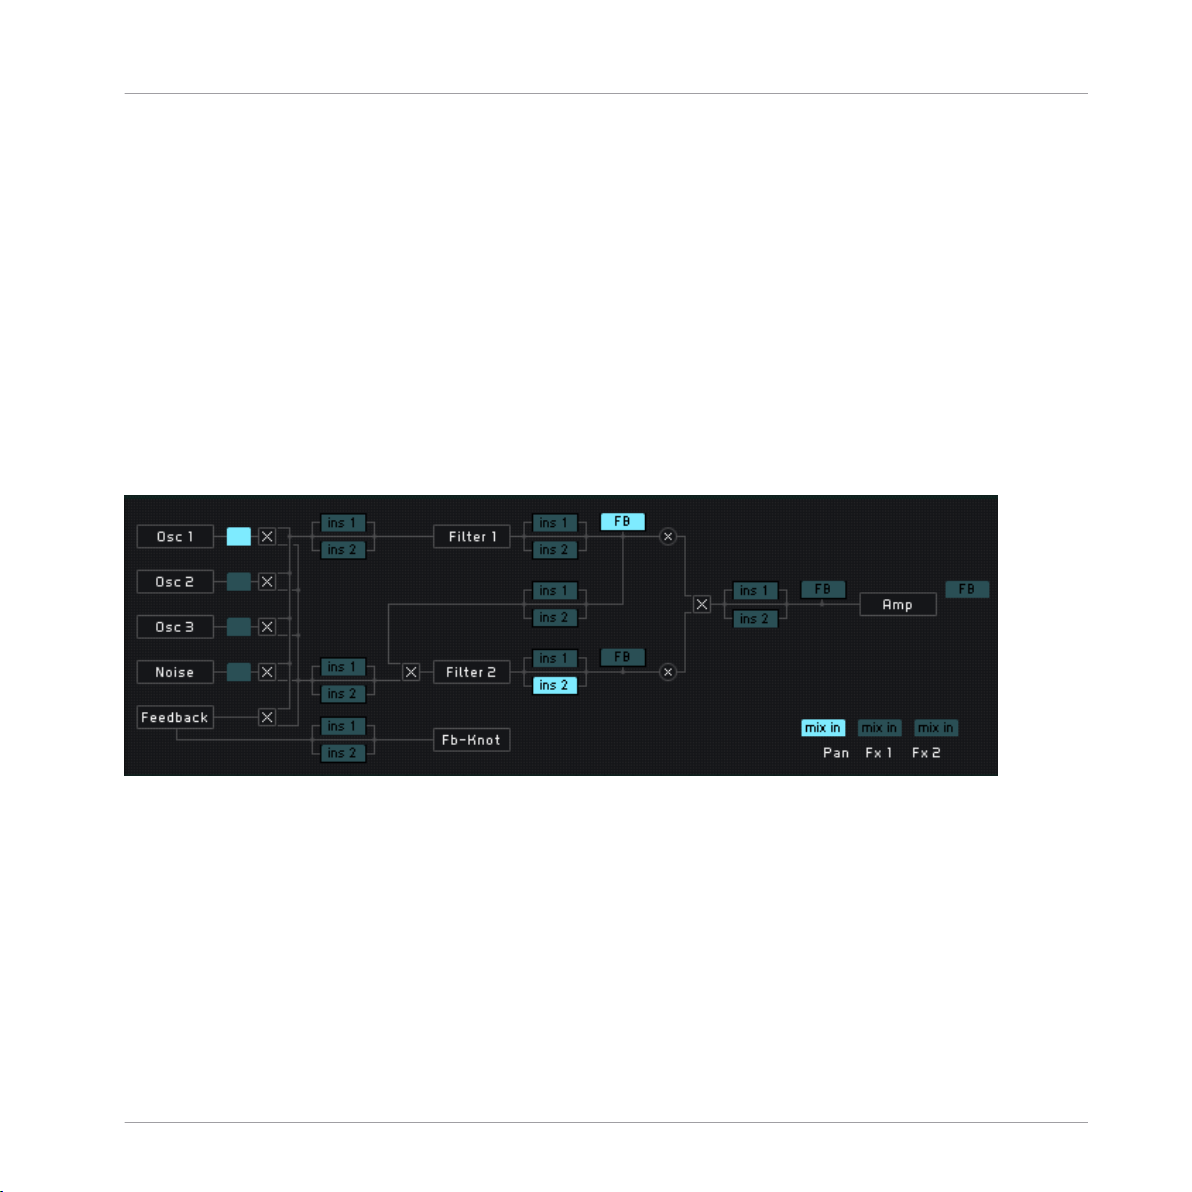
The signal flow in MASSIVE is relatively easy to understand, as it follows the well-known paradigm of a subtractive synthesizer. It is extremely flexible and contains some powerful additional features as well. The Signal Flow is pictured in the Routing Page of the Center Window:
Reference
Here is a basic description of how it works.
Three wavetable oscillators and a noise oscillator generate four audio signals to form the basis
of the sound. There is also an additional modulation oscillator that does not mix its signal into
the audio signal, but is used to modulate the three main oscillators. Various modulation modes
(phase modulation, ring modulation, position modulation) can be selected. Besides these
modes, the modulation oscillator can also be used to modulate the filters’ frequencies. In addition, there is also a feedback bus (explained further below) that brings back part of the signal
from later in the chain and mixes it back in as an input source. Have a look at section ↑3.4,
Oscillator Section for more information about these initial stages of sound generation.
MASSIVE - Manual - 21
Page 22

Signal Flow and Voicing
These source signals are mixed down to two individual filter busses using the Routing Faders
on each source. The Input Fader (labeled Ser <> Par at the top) mixes the second filter bus
signal with the output of the first filter; in other words, you can crossfade between a parallel
filter routing (the second filter uses an individual input bus) and a serial filter routing (the second filter uses the output of the first filter). Note that if this is set to serial and all the oscillators are routed to the f2 bus, you will hear no sound! The Filter Section outputs one combined
signal to the next section, a mix of f1 and f2. See section ↑3.5, Filter Section for details and
examples of different filter routings.
After the filters, the signal is routed to the Amp Section (see section ↑3.7.1, Amp Section) and
the Master Effects (see section ↑3.7.3, Master Effects Section). It goes first through an amplification envelope in the Amp Section, then through a pan control; then parallel voices are
downmixed (more on this below). Then the signal passes through the Master Effects one at a
time, then a final EQ, and finally through a Master Volume to set the global output volume.
Note that there are also a few parts of the signal flow that can be moved or changed: the Insert
Effects, the Bypass Section, and the Feedback Section. The role of these modules in the signal
flow is controlled in the Routing Page (see section ↑3.8.1, General Pages).
The inserts are effects that can be inserted into the signal flow at various places to manipulate
an audio signal. They could be applied to both filter busses individually, or between the filters
with a serial setup, or to the filtered signal before it is amplified, or to feedback signal only.
See section ↑3.6, Insert Effects for more on how this works.
Reference
The Bypass control selects the output from one of the three main oscillators or the noise oscillator and routes this signal directly to the Amp Section at the end of the signal chain, where it
is added to the downmixed signal at various places: after the Pan, or after FX1 or FX2 in the
Master Effects Section. This can be used to keep a direct, raw signal mixed in the output, such
as a subbass. There is more information about this in section ↑3.7.2, Bypass Section.
The Feedback control lets you route an audio signal from a number of different points in the
chain (selectable in the Routing Page) and route it back to the Feedback Section. Feedback
can be used to alter a filter’s frequency characteristics, to saturate/distort the sound, or to use
feedback with delay signals and so on. (See section ↑3.4.6, Feedback Section for details.)
Tightly linked to signal flow is the voicing structure of MASSIVE, which specifies how the synthesizer’s voices are handled. If you want to play chords, you need several voices, one per note,
just as when playing a chord on a keyboard, you need multiple fingers to press all keys simul-
MASSIVE - Manual - 22
Page 23
Interaction with the User Interface
taneously. Each of MASSIVE’s voices can generate one of the notes within the chord, i.e. each
voice can have its individual pitch and starting point. However, all voices share the same structure and general settings as adjusted in the User Interface.
You can see the number of voices when looking at the Navigation Bar: the number of voices
currently being used is displayed first, and the maximum number of voices available is displayed second. (You can adjust this maximum number within the Voicing Page of the Center
Window.)
The sound of each voice is computed independently from all others until the signal is downmixed to generate a stereo output signal (like a downmix in a multi-track sequencer). This
downmix process takes place just before the signal is routed through the Master Effects. This
is particularly important as the tube effects, for example, would sound different and less interesting if the downmix took place after the effect.
In the Voicing Page you can also find the Unisono Control. This can enable you to trigger several internal voices when triggering one note with the MIDI keyboard. This is analogous to the
situation in an orchestra when several violins are playing the same notes, or when several singers sing the same part in a choir. If all singers sang exactly similarly, the sound would only
become louder, but as each singer actually sings just a bit differently, the actual sound becomes richer and more complex when more singers are added. This is also true for MASSIVE:
you can use multiple voices for one note, and can, for instance, detune each voice slightly to
create a choir-like effect. All this can be adjusted within the Voicing Page of the Center Window (see section ↑3.8.1, General Pages).
Reference
Please note that each voice used needs to be computed independently by the computer: the more
voices you use, the heavier the CPU load. Also note that due to internal optimizations, the CPU load
is minimized when the number of voices can be exactly divided by four, i.e. it is preferable to use 4,
8, 12 etc. voices.
3.2 Interaction with the User Interface
This section will describe the conventions of MASSIVE’s graphical user interface (GUI) and explain how to work with its controls. Note that operating MASSIVE on Mac or Windows machines
is largely identical, with some slight differences due to the way the two operating systems handle file systems and keyboards. While key commands are given for Windows, they are parallel
on the Mac. When the text says “right-click,” use ctrl-click on Macs.
MASSIVE - Manual - 23
Page 24
Interaction with the User Interface
Please note that this section is concerned mainly with the mechanics of using the interface
and controls so you can get straight to work with them. It will not provide detailed explanations
about what all these controls actually do or how they work; see the Reference chapters for that
information.
3.2.1 Section Headers and Popup Menus
Each section of MASSIVE’s interface has a header that describes it; for example, OSC1 is oscillator 1 and so on. There are also Mute switches for each section. Click the Mute switch with
the mouse to deactivate a particular section; click again to return to the active state.
It can often be useful to turn off a particular section of the signal chain when you are creating
sounds in MASSIVE. For instance, imagine a filtered sound where you want to check the raw
oscillator signal - simply click the Mutes for both of the filters to turn off the filters. This preserves all the settings of the filters while temporarily making their effect inaudible. Note that
turning a module off will also save CPU power on your system, so keep this in mind if you are
running into CPU overload issues!
Many of these sections also have some kind of popup menu to the right of the section header.
These are used to select from a range of different choices for that section, such as wavetables
and oscillator modes, filter types and effects. These popup menus are easy to use. Clicking one
of them brings up a list of choices you can scroll through; clicking again on one of these entries selects it and automatically closes the list.
Reference
MASSIVE - Manual - 24
Page 25

Interaction with the User Interface
Note that the oscillator modules also feature Previous and Next buttons in the header (see image above), which will load the wavetables one after another in the order of their menu listing.
This is a great way to scroll through and find the appropriate wavetable for your own sound
quickly and conveniently. (For more on wavetables and how they form the basis of your sound
in MASSIVE, see section ↑3.4.1, Wavetable oscillators.)
3.2.2 Faders and Knobs
Faders and knobs are used to control most of MASSIVE’s major functions. In general these
work the same way as faders and knobs you may be used to in other audio software: simply
click a knob with the mouse and drag up and down (while holding down the mouse button) to
alter the knob’s value.
Please note that in most cases the numerical value of the knob’s parameter is not displayed: a
strictly analog approach. We hope that you will trust your ears while working with MASSIVE, in
the same way as the pioneers of electronic music, who had no digital readouts to assist them!
A number of control conventions have been implemented throughout MASSIVE for quick and
accurate editing of its various parameters:
1. Click with the right mouse button to open a context menu providing a list of commands
concerned with MIDI and modulation. The latter point will be explained in section ↑3.2.3,
Modulation Controls below, while MIDI is covered in section ↑3.2.5, Macro Controls Automation and MIDI.
Reference
2. Hold the keyboard’s shift key while changing the knob’s value with the left mouse button
to make finer adjustments to a control.
3. You can also use the mouse wheel to change the value of a control; if you hold down the
shift key while using the mouse wheel, the value will change in coarser steps.
4. Double-click with the left mouse button to reset the knob to its default position.
There are also a couple significant general points about the knobs and faders that you should
be aware of.
▪ For one thing, all of the controls in MASSIVE have been made to function as much as pos-
sible like their physical counterparts in an analog hardware synthesizer. In some cases this
significantly affects the sound that is produced. For example, if you turn up the Amp knob
on one of the oscillators, this will increase the output level of the oscillator into the filter
MASSIVE - Manual - 25
Page 26
Interaction with the User Interface
busses, just as you would expect. However, it may also change the quality of the sound
coming out of the filter as well, as you drive the filter input hotter, just as with real analog
circuitry!
▪ The other important point to understand about the knobs and faders in MASSIVE is how
they are used to map modulation destinations and ranges; this is described further in the
next section.
3.2.3 Modulation Controls
One of the most important innovations in the design of MASSIVE is the way we have made use
of Range Knobs to map and control modulation effects. Colored rings around each knob are
used to indicate which modulation targets are routed to this parameter. Many of the parameters in MASSIVE can be controlled with this technique.
Reference
It is important to understand how to assign modulation sources in MASSIVE, as this is one of
the main sound design techniques you have available. Here’s how it works:
▪ The available Modulation Sources are listed across the top of the Center Window. These in-
clude four independent ADSR envelopes as well as four more sources that can be switched
between LFO, Performer, and Stepper modes (more on these modulation sources below in
section ↑3.8.2, Modulation Pages).
▪ To assign a modulation source to a destination, first simply click on the Modulation Han-
dle: the small cross following the name of the Modulation Source you want to use. You will
then see the source’s number attached to the mouse as it moves. Then move the mouse
towards the destination you want to modulate and click again on one of the Modulation
Slots, the small black boxes near each knob or fader available for modulation.
MASSIVE - Manual - 26
Page 27
Interaction with the User Interface
▪ As you make the assignment, you will see the small colored numeral appear in the Modula-
tion Slot. Obviously, the numeral indicates which modulation source (1-8) has been assigned to the slot, while the color indicates the type of modulation source: blue indicates
an envelope, green indicates an LFO or step sequencer, and orange indicates a Macro Control assignment.
▪ Now you can adjust the modulation amount by clicking on the assigned modulator slot and
dragging up or down. As you do so, you will see a colored ring appear around the knob to
indicate the active range of the modulator. A small break at the limit of the modulation
range serves as a clipping indicator to show if the limit of a modulation range is higher or
lower than the knob or fader’s minimum/maximum value.
Note that you can also access and change modulation settings in a context menu that appears
when you right-click one of the modulation slots (see image). Through this menu you can
mute, unmute, delete (use the OFF menu choice), or create new modulation assignments with
any of the modulation sources in MASSIVE. (See section ↑3.8.2, Modulation Pages for more
information on the modulation sources.)
Also, the additional editing options available for the main controls (such as making finer adjustments by using the Shift key and dragging) are also available for modulation amount
changes.
Reference
Sidechain modulation
If you look closely at the three modulation slots under one of the Wavetable Position knobs in
the Oscillator Section (for example), you will notice that there are two standard modulation
slots (marked with a hyphen beneath them) as well as a third slot marked “SC.”
This third slot can be used to set up sidechain modulation. This is a type of modulation in
which a modulation source can be assigned which will affect the value of other assigned modulation sources. Here’s how this works:
MASSIVE - Manual - 27
Page 28

Interaction with the User Interface
Normally, unless you activate the sidechain modulation, all three of these modulation slots will
allow you to assign modulation sources to change the value of the control, and the range of the
modulation will be set by the Range Knobs as described above. If you assign more than one
modulation source to a single control by using more than one of these slots, their values will be
added together to calculate the total amount of modulation.
However, if you click the small “SC” under the third slot, the sidechain modulation will be activated and the modulation will work somewhat differently. In this case, the third slot will act
as a sidechain modulation slot and its value will be used as a multiplier changing the value of
the other modulation sources. In this case there is no modulation range set for the sidechain
modulator; rather, the value of the sidechain modulation source will be read as a multiplier between 0% and 100%, changing the range of effect of the other modulators.
Sidechain modulation allows you to set up quite dramatic effects with the other available modulation slots, and then vary those effects by a percentage of effect, somewhat similar to using
a wet/dry control to vary the amount of an insert effect.
Try assigning a Macro Control to the sidechain modulation destination to enable the use of an
external MIDI control as a wet/dry control, you can set this up like this:
1. First, set up a modulation routing between one of MASSIVE’s LFOs and the Wavetable Position knob (for example), as described earlier in this section.
Reference
2. Then click the tiny “SC” label under the third Modulation Slot under the Wavetable Position knob to activate sidechain modulation. You also need to click the small line below
the modulation slot you want to influence; it then becomes a small arrow.
3. Moving our attention to the lower-right corner of the screen, click on the modulation handle of Macro Control 1; then drag the mouse back to the upper-left corner of the screen
and release it over the sidechain modulation slot under the Wavetable Position knob.
Set up like this, the LFO is causing the Wavetable Position knob to sweep back and forth,
while moving Macro Control 1 will change the amount of influence the LFO has over the position of the knob, from 0 to 100% of effect. If Macro Control 1 is turned all the way to the left
(minimum), then the LFO will not move the knob at all. Conversely, if Macro Control 1 is
turned all the way to the right, the LFO will cause the knob to sweep back and forth over the
entire range you have assigned.
MASSIVE - Manual - 28
Page 29
Interaction with the User Interface
To add an external MIDI controller to control this, simply right-click on Macro Control 1; you
will see a small MIDI Learn dialog box pop up. Now move a control on your external MIDI controller and the assignment is made. (For more on how to use the Macro Controls, see below and
also in section ↑3.9, Macro Control Section.)
You can also use one of MASSIVE’s other modulation sources as a way to vary the amount of
active modulation instead of using a Macro Control. Still following the example above, try using
the Stepper instead of a Macro Control to modulate the amount of effect the LFO has over the
Wavetable Position knob:
1. Click the modulation handle next to the Stepper modulation source in the Center Window,
then drag the cursor to the same sidechain modulation source under the Wavetable Position Knob, where you had previously assigned Macro Control 1.
2. The small orange numeral 1 representing the Macro Control, replaced by a small green
numeral representing the Stepper.
3. Now the control signals from the Stepper will determine how wide an effect the LFO will
have over the Wavetable Position knob.
Presuming that the Stepper modulator is in tab 8 of the Center Window (this is the default,
although it can be changed if you select a different modulation source in tab 8), your assignments will now look something like this:
Reference
Again, don’t worry too much yet about what all this means or how it will sound as we are just
learning how the controls function here. For more detailed information about how to use the
various modulation sources in MASSIVE in particular, see section ↑3.8.2, Modulation Pages.
Faders in MASSIVE are assigned in the same way as knobs. Some of the fader controls (such
as the Input Fader on the filter bus, labeled “Ser>Par” on the interface) can accept modulation sources in the same fashion as knobs, and have the same small black boxes near them to
serve as modulation slots. After making assignments and dragging up or down to set the modulation range, you will see colored lines along the side of the fader indicating the range you have
set, as in this image:
MASSIVE - Manual - 29
Page 30
Interaction with the User Interface
Note that just as with knobs, some faders in MASSIVE have sidechain modulation slots as well,
with similar functionality.
Bipolar Modulation
Reference
Please note the positive/negative polarity of the modulation source. LFOs are bipolar, i.e., they
oscillate between positive and negative values. For example, if you assign an LFO to an oscillator’s pitch and set the modulation depth to one semitone (a strong vibrato effect), the pitch
will actually oscillate between +1 and –1 semitones. On the other hand, if you assign an envelope to the pitch and apply the same amount of modulation (one semitone), the envelope will
cause the pitch to rise from 0 to +1, then falling back to 0.
This bi-polarity is of importance when you use high modulation amounts around an extreme
general setting. For instance, let’s say you have the Intensity control at about 90% to the right.
Assign an envelope to it and cause it to modulate the control by about -25%. Thus, with high
envelope signals the Intensity is lowered to about 65%:
MASSIVE - Manual - 30
Page 31

Interaction with the User Interface
If you now replace the envelope with an LFO (simply take an LFO’s modulation handle and
drop it into the Intensity knob’s modulation slot that is currently holding the envelope), the Intensity will not only be modulated “to the left”, but also “to the right”. As the adjusted modulation depth is larger than the available range at this “side”, (25% added to a base Intensity
value of 90% sums up to 110%), the modulation signal will be clipped. This does not cause
any problems; but the clipping might not be the effect you desired when setting up the modulation, so you should be aware of how this works.
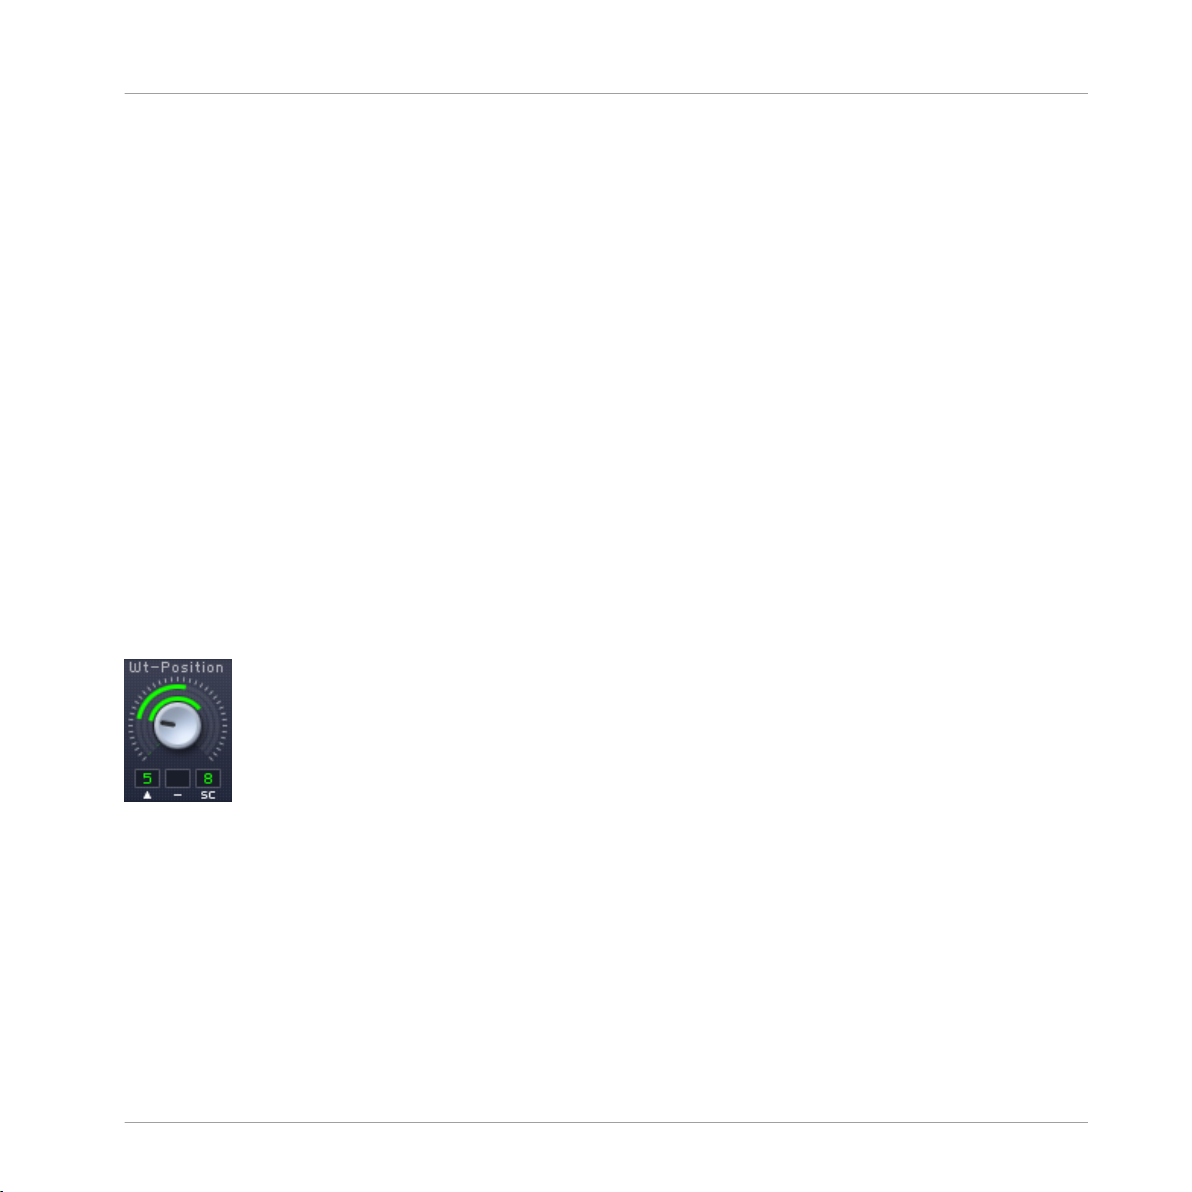
Note that this bi-polarity is also true for voice spreading. If you adjust the Wavetable Position
Spreading control to nearly 100% (as shown in this image) and set the actual Wavetable Position Control in the Oscillator Section to the middle of its range, the voices will spread over the
complete range. If you now turn the Wavetable Position Control to the left, those voices already
using a very low wavetable position due to the spreading will not be able to follow this move.
They will stay at their position. When the control is turned completely to the left, the actual
spreading will only be half as much, as the left half of the controller’s possible motion is clipped and set to the minimum value. (Have a look at section ↑3.8.1, General Pages for more information about voice spreading.)
Reference
3.2.4 The Center Window
One of the main ideas behind MASSIVE is to keep your workflow as simple and fast as possible. MASSIVE basically contains only one main editing page for the oscillators, filters and effects, so most of the basic parameters generating your sound are always kept visible.
The Center Window serves as a display for editing a variety of other parameters that do not
need to be accessed so frequently, as well as in-depth editing of your modulation sources.
MASSIVE - Manual - 31
Page 32

Interaction with the User Interface
The Center Window display can be switched between eight modulation sources and six pages of
general settings. You can choose which page of controls to access by clicking one of the two
rows of labeled tabs across the top of the Center Window. Please note that these tabs are not
hierarchical in any way, i.e. all of the tabs for both the modulation sources and the general
settings are visible at all times regardless of which tab is active in the upper row.
Reference
MASSIVE - Manual - 32
Page 33

Interaction with the User Interface
The eight modulation sources are grouped into envelopes (slots 1-4) and assignable pages (slots
5-8) that allow you to choose between the LFO, Performer, and Stepper modulation sources. If
you have chosen one of these assignable slots, you can choose one of these types by using the
popup menu in the upper-right corner of the modulation source page.
Note the Modulation Handles that appear in this image, just to the right of the name of each of
these sources. As noted above, you must click on one of these handles with the mouse, then
drag the cursor to a modulation slot and release the mouse button in order to make a modulation assignment.
Reference
Check the appropriate sections below for more in-depth information about the functioning of
each of these modulation sources.
3.2.5 Macro Controls Automation and MIDI
The Macro Controls are found in the lower right corner of MASSIVE’s panel when you are in the
Synth View. They help unify your interaction with all of the other controls in MASSIVE, particularly when you are trying to make music instead of just creating and programming new sounds.
Like the modulation sources of the Center Window (the envelopes, LFOs, Stepper and Performer), each Macro Control knob provides a Modulation Handle. With this handle the Macro Controls can be assigned to any parameter of MASSIVE as a modulation source, i.e. any changes
to the value of the Macro Control are then mapped onto the modulated parameter.
MASSIVE - Manual - 33
Page 34

Interaction with the User Interface
Setting up assignments this way can be a very powerful technique, especially in two particular
situations.
In the first place, when designing sounds in MASSIVE you may often find that two or more parameters are interconnected in creating interesting sonic effects although they are not directly
connected in the Signal Flow. For instance, you might want to decrease the Amplitude Control
of the first oscillator whenever the second oscillator’s Amplitude Control is increased, in order
to keep the sound’s overall volume relatively the same. Normally, you would need to tweak two
parameters independently at the same time in order to accomplish this. Using the Macro Controls, you can assign one knob to control both parameters and modulate them in opposite directions. Now, when you change the Macro Control’s value, both modulation targets are
changed simultaneously.
Reference
In addition, the Macro Controls enable you to unify your access to your preferred controls in a
given sound, a functionality that will come in handy in live performance situations particularly.
For example, you can change the frequency spectrum of the sound by altering the filter’s cutoff frequency; however, you can also modify the frequency spectrum by changing the Wavetable Position Control to change the basic waveform(s) used to generate the sound. You can use
the Macro Controls to unify access to these most important parameters, putting them all in one
place where you can easily work with them.
Note that most of the sounds in the preset library included with MASSIVE follow a standard
assignment scheme for the Macro Controls. This control scheme specifies that, for example,
the first two Macro Controls always deal with frequencies and the sound’s spectrum; Macro
Control 5 is always used as the effects’ dry/wet balance; and so on. This scheme is optional for
your own sounds. However, you may find it is easier to remember these assignments and work
with sounds if you always follow a similar control setup. Refer to section ↑3.9, Macro Control
Section for more about this scheme.
MASSIVE - Manual - 34
Page 35

Interaction with the User Interface
Because of their central functionality in interacting with the sonic parameters of MASSIVE, the
Macro Controls are also the most prominent interface for to use for automation. In this case,
automation means that a specific parameter of MASSIVE – for example a filter’s cutoff or the
amount of feedback, or the vibrato depth – is controlled from outside of MASSIVE. This can be
done in two ways:
▪ You can assign any of the Macro Controls to MIDI continuous controllers. Simply right-click
the Macro Control to open a context menu, click the entry “MIDI Learn” and then move a
knob or fader on your external MIDI controller to establish the connection.
▪ You can also control the Macro Controls from a host application (e.g. a sequencer) if MAS-
SIVE is used as a plug-in within that host. MASSIVE will provide a list of automatable parameters to the host, and the Macro Controls will always be at the beginning of the list for
easy access. (Please consult the documentation for your host sequencer for more detailed
information on how to setup automation assignments if you are not sure how to do this.)
Please note that neither MIDI nor automation is bound to the Macro Controls. The Macro Controls are not the only parameters reported to the host program to be automatable –- nearly all
of the controls in MASSIVE’s user interface can be subject to host automation. Also, by using
the context menus that appear when you right-click a control in MASSIVE, you can assign any
of its parameters directly to a MIDI controller without using the Macro Controls.
Reference
You can even save your MIDI assignments to a MIDI setup -- see section ↑3.3.1, The Stand-
alone Menus for more information on how to do this. You can store the complete MIDI assign-
ment layer (e.g., Cutoff assigned to MIDI CC 1, the first oscillator’s Wavetable Position Control
to MIDI CC 12, and the third Macro Control to MIDI CC 64) into a separate MIDI configuration
file without any information about the underlying sound. Consequently, the sounds that are
loaded by MASSIVE don’t contain MIDI CC information either. We have set it up this way for
two main reasons:
▪ You might want to use different MIDI devices with MASSIVE in different situations. For in-
stance, imagine that you work with a small keyboard for live situations with four tiny knobs,
but in the studio you use a full-featured master control keyboard. If you were to set up your
sound’s MIDI assignments with the studio keyboard, you would probably run into problems
when using your small live keyboard as the assignments will be different. Since MASSIVE
separates the sound settings and the MIDI assignments into separate files, you will not
have these problems, as you can easily switch the MIDI setup files depending on the situation.
MASSIVE - Manual - 35
Page 36

Standalone Menus and Navigation Bar
▪ Also, sounds created by somebody else using a different MIDI controller might be useless
for you. This is, however, no problem in MASSIVE as the MIDI configuration is stored in
the independent MIDI Setup file.
Coming finally back to the Macro Controls in MASSIVE’s graphical user interface, beside the
eight knobs there are also four small additional Modulation Handles labeled KTr, Vel, AT and
TrR. They can be used to assign MIDI data like a note’s velocity or aftertouch to a parameter.
You can find more information on this and the Macro Controls in general in section ↑3.9, Mac-
ro Control Section.
3.3 Standalone Menus and Navigation Bar
3.3.1 The Standalone Menus
The Standalone menus are only present in the standalone version of MASSIVE and will not be
seen when it is being used as a plug-in. (However, note that the File menu can also be accessed in plug-in mode by using the File Popup Menu in the Navigation Bar.) The Standalone
menus File and Help provide access to basic file management functionality and to help topics:
Reference
New Sound, Open Sound, Recent Files, Save and Save As
Use these options to load and save your sound files. Refer to section ↑3.10, The Browser and
Attributes Views for general information about file handling.
Options
When you open the Options dialog in the File menu, you will see three tabs: General, MIDI and
Browser.
The General Tab allows you to set the default author’s name, which will then be pasted into
the Author field in the Meta Information of a new sound. You can select whether the name is
pasted in when a new sound is saved, or when a sound is saved under a new filename (i.e. with
the Save As command).
The MIDI Tab controls MIDI CC assignments as MIDI Setups. Each setup saves all MIDI assignments made in the User Interface (refer to section ↑3.2.2, Faders and Knobs). For example, if you have a MIDI keyboard with 8 knobs you can assign them via MIDI learn to the 8
MASSIVE - Manual - 36
Page 37

Standalone Menus and Navigation Bar
Macro Controls and then save that setup here for future use. Note that MIDI CC assignments
are not saved with the Sounds: you don’t have to check which MIDI CCs are assigned to the
Macro Controls in a given sound, but simply use your own customized MIDI Setup to control
them. This greatly unifies and simplifies your MIDI interaction with MASSIVE.
The Browser Tab allows you to add or delete paths from the database, specifying where your
Sounds are stored. All Sounds found within the folders set here (or their sub-folders) will be
integrated into the database when the Rebuild Database button is pressed. (See also section
↑3.10, The Browser and Attributes Views for further details.)
Audio and MIDI Settings
The Audio and MIDI Settings are explained in detail in MASSIVE’s accompanying Setup Guide.
You can find a fast introduction to these settings in section ↑2.1, First Steps.
Help
Here you can find information about MASSIVE: You can launch the Native Access to activate
your copy and check for updates. On the MASSIVE website you will find news and additional
information about the synthesizer. The entry “About Massive” finally opens a screen that displays the software version, your serial number, and a list of all people that helped creating
MASSIVE.
Reference
3.3.2 The Navigation Bar
The Navigation Bar runs along the top of MASSIVE. It features two popup menus (File and
Preset) as well as some control buttons and informational indicators (see image below). Let’s
look at these from left to right and see what they do.
File
The File popup menu is identical to the standalone’s File menu and contains the same entries.
Refer to section ↑3.3.1, The Standalone Menus for details.
MASSIVE - Manual - 37
Page 38

Standalone Menus and Navigation Bar
Preset Selector
The Preset Selector allows you to quickly load a sound without switching over to the Browser
View. Upon clicking here, a list of the current Search Results is displayed. The content of this
list is specified in the Browser View: if you loaded your last sound from the Browser’s File Tree
View, the list will contain all sounds of the last selected folder. If you loaded your last sound
from the Browser’s Database View, the list will contain all Search Results that fit the given set
of attributes. Finally, if you loaded your sound from the Program Change List, the list will show
all sounds contained in that list. The small icon at the menu’s left will indicate the list’s mode.
(See section ↑3.10, The Browser and Attributes Views for more information about the Browser.)
The two small up and down arrows at the menu’s right allow you to step through the list without opening the popup menu.
Voices
The Voices indicator shows two numbers: the first indicates the number of voices currently being played in MASSIVE, while the second indicates the maximum number of voices available,
which can be set in the Voicing Page in the Center Window (see section ↑3.8.1, General Pages
for more on how to set this up; section ↑3.1, Signal Flow and Voicing contains additional information). Note that the maximum number of voices here is a theoretical limit; the actual number of voices you can use in practice for a given preset depends on the complexity of the patch
and the speed of your computer. (See the CPU section below.)
Reference
MIDI
The MIDI indicator shows which MIDI channel MASSIVE is currently receiving messages on. If
OMNI is displayed here, MASSIVE will receive messages on all 16 available MIDI channels.
Select which MIDI channel to use by clicking here.
CPU
The CPU Load Indicator shows you how much of your computer’s CPU resources MASSIVE is
currently using, expressed as a percentage. This will change depending on the particular preset
you have loaded, as each preset will require more or less CPU power depending on how it is
configured.
MASSIVE - Manual - 38
Page 39

Standalone Menus and Navigation Bar
As you play more notes you will notice the CPU meter rise. If the CPU overloads or you notice
the graphic interface starting to get sluggish, just release a few notes. The audio output may
also become grainy or distorted if you are using too much of your CPU power. In this case you
should try increasing the latency/buffer size of your soundcard. If you are running MASSIVE as
a standalone program, you can adjust this in the Audio and MIDI Settings dialog, accessible
from the File menu. On a Mac, you can simply adjust the Latency slider left or right to increase
or decrease the latency. On a PC, you can click the ASIO Setup button in order to open the
control panel of the soundcard you are using, where you can make adjustments to the audio
buffer size. (Note that some PC soundcards may require you to quit all open audio programs
first before allowing you to adjust the buffer size.)
Panic
The Panic button (labeled with a small “!” exclamation point) will stop the sound and reinitialize all internal DSP parameters. If something unexpectedly strange, loud or unpleasant happens, don’t panic: just click this!
Save and Save As
Further to the right from the Preset Selector popup menu, there are two shortcut buttons labeled Save and Save as. These will allow you to quickly save your sounds without having to
access the File menu.
Reference
The View buttons
Moving further to the right, there are three buttons which allow you to switch between different
views in MASSIVE: Browser, Attributes and Synth. When you click the Synth button, you will
be returned to the main view of all the synthesizer controls in MASSIVE. (This is the same view
you see when MASSIVE first starts up.)
Clicking on the Browser or Attributes buttons will switch to views that let you work with MASSIVE’s Browser, where you can save, rename, delete, and describe the factory presets along
with any presets you may have created yourself. See section ↑3.10, The Browser and Attributes
Views for more information about how the Browser works.
MASSIVE - Manual - 39
Page 40

Oscillator Section
3.4 Oscillator Section
The generation of sound in MASSIVE begins from the Oscillator Section, which can be found
at the left-hand side of the interface. It includes three wavetable oscillators, a modulation oscillator that can be used to modulate any or all of these wavetable oscillators, a noise generator, and a feedback section.
Reference
MASSIVE - Manual - 40
Page 41

Oscillator Section
3.4.1 Wavetable oscillators
Three wavetable oscillators form the basis of sound generation in MASSIVE. In this type of synthesis, numerical representations of various types of basic waveforms are stored in wavetables.
Instead of directly computing a sine wave, for example, a wavetable oscillator uses a digital
representation of a sine wave stored in memory. This synthesis technique is similar to sampling: instead of an actual audio source, a digital representation or “recording” of it is used.
Selecting a wavetable is like selecting a waveform on a classic analog synthesizer, like a sine
wave or sawtooth wave.
MASSIVE uses a particular form of wavetable: each wavetable contains not only one waveform,
but at least two of them. Think of these wavetables in two dimensions. The horizontal axis represents time, and the “recorded” waveforms run from left to right on the table just as in any
sample editor: playback starts from the left, and when one complete waveform cycle has been
played from left to right, the playback jumps back to the beginning at the left to loop the waveform.
Along the vertical axis, on the other hand, there are different waveforms one above another,
like the tracks in a multi-track sequencer: at the bottom there is one waveform and at the top
there is another one. Between them are a series of intermediate waveforms that gradually
morph from the bottom waveform shape to the top.
Reference
The vertical position can be controlled to adjust the sound by using the Wavetable Position
Control. For instance, imagine a wavetable where you have a pulse waveform shape at the “bot-
tom” and a sawtooth waveform shape at the “top.” Turning the Wt-position control from left to
right now slowly morphs the waveform shape from pulse to sawtooth.
This method of synthesis allows for highly flexible shifting combinations of various waveforms
as each oscillator can be made to gradually morph from one type of waveform to another.
In order to get a feel for the kinds of sounds you can create with wavetables, just load a wavetable into one of the oscillators and start tweaking the oscillator controls. You’ll immediately
hear the sonic results, and you’ll be able to get a feel for what the controls do very quickly.
3.4.2 Wavetable Controls
Each oscillator has three knobs and two popup menus that control its functioning.
MASSIVE - Manual - 41
Page 42

Oscillator Section
You can choose the specific wavetable to use for each oscillator by using the popup menu at top
left. Here you will see a list of all the different wavetables you can choose from, a wide variety
of different choices and sounds. You can also go through the wavetables in order by using the
Prev and Next buttons here.
You can control the selection of the specific waveform to be played from the oscillator by using
the Wavetable Position Control knob. Turning this knob scans through all of the waveforms included in the wavetable. The number of individual waveforms represented in each table can
range from only 2 to as many as 128 or more.
Complex sweeping effects can be obtained by routing one of the modulation sources in MASSIVE to control the Wavetable Position knob, thus causing the waveform to constantly morph
and change. This is the kind of synthesis technique associated with classic wavetable synthesizers such as the Waldorf PPG Wave.
Reference
Try modulating the Wavetable Position knob with one of MASSIVE’s LFOs and you can hear
how the sound morphs from one waveform to another. Here’s how to set it up:
1. Click on the Modulation Handle following the name of the Modulation Source you want to
use. Then drag the mouse towards the Wavetable Position knob and release the button
over one of the Modulation Slots below it.
2. After making the assignment, you will see a small green numeral appear in the Modulation Slot under the Wt-position knob. The numeral indicates which LFO has been assigned to the slot.
3. Now you can adjust the modulation range by clicking on the assigned modulator slot and
dragging up or down. As you do so, you will see a colored ring appear around the Wt-position knob to indicate the active range of the modulation. Also make sure to turn up the
Amp control in the LFO page itself to adjust the magnitude of effect.
The effect you will hear here depends primarily on which wavetable you have selected.
MASSIVE - Manual - 42
Page 43

Oscillator Section
Even more complex overlapping phasing effects are possible by applying this same technique
to more than one oscillator simultaneously!
The Pitch display allows you to tune the oscillator up or down in frequency, adjusting it by semitones and cents (hundredths of a semitone). Pitch can also be modulated by routing a modulation source to one of the modulation destination slots just below it, allowing you to create
powerful vibrato and arpeggiation effects.
To create a rapid sequence/arpeggio effect, route the Stepper modulator to pitch and assign it
to a wider pitch range. First click on the Modulation Handle to the right of the Stepper in the
Center Window, then drag the cursor to the Modulation Slot under the Pitch Display and release. You will see a small green numeral appear corresponding to the Stepper. Then click and
drag on the small display which appears to the right, indicating the range over which the Stepper modulator will be active. (You also need to set the Amp control in the Stepper Page itself,
this sets the amount of modulation sent from the Stepper.) This will cause MASSIVE to play a
looping sequence of distinct pitches every time you play a MIDI note. (See also section ↑3.8.2,
Modulation Pages on modulation sources for more on the Stepper and how it works.)
The Intensity knob for each oscillator gives you a number of ways of shaping the wavetable
read-out, depending on which oscillator mode is selected in the right-hand popup menu.
Several different modes are available including Spectrum, Formant, and three Bend modes.
The default selection is Spectrum mode. In this mode the Intensity control reduces the higherfrequency harmonics heard in the selected waveform. This functions similarly to a low-pass filter cutoff, even though the algorithm behind it is different from a standard filter design. This is
illustrated below: the upper image displays a wave with minimum Intensity setting; the lower
one has a maximum Intensity value. As you can see, when turning down the Intensity value,
the square wave gradually becomes a sine wave, i.e. only the fundamental sine wave remains.
Reference
MASSIVE - Manual - 43
Page 44

Oscillator Section
When any of the Bend modes are chosen, the Intensity knob will shape the readout curve of
the wavetables. Normally, the wavetable is read out at constant speed. With the Bend modes
you can raise and lower the readout speed depending on the position within the wavetable, e.g.
slow at the beginning and fast at the end. Visually, this is displayed below, taking BendB mode
as an example.
▪ The middle image (Intensity knob at mid position) shows the unaltered waveform.
▪ The upper image (Intensity turned to the left) visualizes a fast readout at the beginning and
end of the waveform, i.e. the wave is compressed at the ends while it is stretched in the
middle
▪ The lower image shows the inverse effect (Intensity turned to the right). Here, the central
part is compressed while the ends are stretched.
Reference
BendA mode only uses the two upper settings, i.e. the Intensity knob only morphs between the
upper image (controller at the left) and the middle image (controller at the right). The third
bend mode, finally, only interpolates between the middle image (Intensity at the left) and the
lower image (Intensity at the right).
MASSIVE - Manual - 44
Page 45

Oscillator Section
The sonic result of these bend modes depends completely on the wavetable you have selected;
it is impossible to describe the effect in general. Just keep in mind that you can always use the
bend modes to vary the basic waveforms provided with MASSIVE. Some wavetables also react
in very interesting ways to modulation of the Intensity knob. This can cause very subtle
changes of the sound’s frequency spectrum.
When Formant mode is chosen, Intensity controls the additional transposition of waveform formants. In practice this sounds a bit like the effect achieved with two oscillators where the
master oscillator synchronizes the slave oscillator’s phase and the Intensity control then
changes the transposition of the slave oscillator. Try modulating the Intensity control with one
of MASSIVE’s modulation sources: this will change the sound’s formant while the pitch still
remains stable, simulating the sound of morphing vowels.
Reference
3.4.3 Amplification and Routing
The Amp knob controls the output volume of the oscillator. Use the three Amp controls (one for
each oscillator) to control the relative balance of each oscillator within the overall sound. For
example, try routing an LFO to the Amp knobs to modulate their values and cause the relative
balance of the oscillators to shift and change as you hold down a single MIDI note. You can set
this up like this:
MASSIVE - Manual - 45
Page 46

Oscillator Section
1. First click the Modulation Handle of one of the LFOs in the Center Window and drag the
cursor to one of the Modulation Slots under the Amp knob for OSC1, then release the
mouse button. You should see a small colored numeral appear in the target Modulation
Slot corresponding to the LFO that you have assigned.
2. Then, click on the numeral and drag the mouse up or down; you should see a colored
band appear around the Amp knob. This indicates the range over which the LFO will modulate OSC1’s output amplitude. Also make sure to check the Amp control of the LFO page
to adjust the magnitude of the effect.
3. To simultaneously modulate the output of a second oscillator, repeat the above procedure,
only use a different LFO as the modulation source, and route it to modulate the Amp knob
controlling the output of OSC2 instead of OSC1.
Now try playing a note on your MIDI keyboard to hear the result. You should be able to hear
two distinct waveforms mixed in the sound, one from each oscillator. However, the relative balance of each waveform in the sound will gradually change, as the output amplitude of each
oscillator is modulated by one of the LFOs.
You can create a tremolo effect by routing the same LFO to the Amp knobs of all of the oscillators at once.
Reference
Each oscillator also has a vertical Routing Fader at the right edge labeled F1-F2. This controls
the balance of the oscillator’s output into either filter 1 or filter 2 or a mix of both. The filters
in turn may be routed in either serial or parallel, or a combination of both (see more on this in
section ↑3.5, Filter Section on MASSIVE’s Filters below).
3.4.4 Modulation oscillator
This oscillator generates sine wave modulation source signals in the audible range. Its output
can be used for ring, phase- and Wt-position modulation of the main oscillators, as well as a
modulation source for filter frequency modulation (FM) effects. This oscillator is a perfect tool
for sculpting aggressive, cutting sounds!
MASSIVE - Manual - 46
Page 47

Oscillator Section
Ring modulation is a well-known technique within electronic music since the 1950s. Its name
is derived from early analog circuits, as the diodes were connected in a ring-like shape. Ring
modulation combines two audio signals in a way such that their frequencies are interrelated,
creating new frequency components in the signal; these are called sidebands. They can be defined as the sum and difference of the various frequency components of the two source signals. Practically speaking, ring-modulating one of MASSIVE’s main oscillators usually creates
bell-like, metallic sounds. Try detuning the modulation oscillator when using the ring modulator; for example, tune the modulation oscillator up or down by a tritone (6 semitones) for some
interesting results.
The Phase modulation implemented in MASSIVE is sonically equivalent to the familiar frequency modulation or FM synthesis technique. The modulation oscillator acts as the modulator
while the main oscillator becomes the carrier. You can use the phase modulation capacities of
MASSIVE to create classic bass sounds, for instance. Try modulating the modulation amount
with a fast envelope, e.g. to create very high modulation amounts at the beginning that then
decay rapidly. This will produce an initial click when the sound is triggered, increasing its
rhythmic presence and clarity.
Reference
Finally, Position modulation is a new and unique type of modulation, made possible by the design of MASSIVE’S new wavetable engine. The modulation is more audible the more the main
oscillator’s wavetable differs from the modulation oscillator’s sine wave. By enhancing the differences of the waves you can make the main oscillator’s sound rougher. This can be used to
establish signals that sound like a bowed (or blown) instrument that has some “surface noise”
in its sound. Also try detuning or transposing the modulation oscillator to vary the effect.
Filter frequency modulation allows you to modulate the frequency of one of the filters with the
Modulation Oscillator. Try setting up the Filter FM like this for some interesting bass sounds:
1. Set Filter 1 to be modulated by Filter FM by clicking on the appropriate box (1) in the
Modulation Oscillator Section. Choose the Daft filter for this example.
MASSIVE - Manual - 47
Page 48

Oscillator Section
2. Transpose the modulation oscillator down by one octave (12 semitones) by clicking and
dragging with the mouse.
3. Now assign one of the Envelopes to modulate the oscillator: click on the modulation handle to the right of one of the Envelopes in the Center Window, move the cursor to one of
the modulation handles under the Filter FM control and click again to make the assignment. Click and drag on the small blue numeral that appears here to set the modulation
range.
4. Then try adjusting the controls on the Envelope like this: decrease the Attack Time Control and increase the Attack Level Control, then reduce the Decay time and increase the
Decay level, then set the Sustain level to minimum.
This will create an initial click, especially effective for bass sounds.
Note that you can set a distinct target in this section for each modulation type. You will see a
different label on the control knob here in this section depending on which mode you currently
have selected. However, note that there is still only one modulation oscillator, so if you change
the pitch for the ring modulation, this will also affect the frequency of the filter’s modulation
and so on.
Also, remember that the modulation oscillator can also be modulated itself in pitch and
amount by all available modulation sources such as the envelopes and LFOs, allowing for even
more complex modulated sounds. Each modulation mode can be affected by a different modulation source as well. For example, an envelope can control the amount of ring modulation on
OSC1 while an LFO changes the amount of phase modulation on OSC2. Try using very slow
LFO speeds to modulate this control; this will achieve very slowly changing, subtly morphing
sounds.
Reference
By default, the modulation oscillator is also pitchtracked, which means that tonal playability of
ring modulation sounds is easily achieved.
3.4.5 Noise Section
The Noise Section incorporates the sound of a noise generator into MASSIVE. There is a Noisetable popup menu at the top of the Noise Section allowing you to choose between different
noise types (based on samples). The Color knob allows you to change the coloration of the
noise by shifting the overall frequency spectrum upwards or downwards, while the Amp knob
MASSIVE - Manual - 48
Page 49

Oscillator Section
adjusts the volume. A Routing Fader just like the ones in the Oscillator Section allows you to
control how much of the output signal is sent to Filter 1 and Filter 2. The controls in the Noise
Section can be modulated by any of the modulation sources.
Why would you want to add noise to a synthesizer sound? One reason is that some types of
sounds, for example “unpitched” sounds such as electronic percussion and drums, are not
based on a pitched waveform but rather a dense cluster of frequencies that are not harmonically related. The synthesis of these types of sounds requires a “noise generator” that produces
all audio frequencies simultaneously, or some variation of this concept. Filtering the output of
a noise oscillator can produce many variations on this type of sound. Many of the most popular
synthesized drum sounds of all time, such as the Roland TR808 and 909, were created using
this technique.
Reference
Here are some creative ideas for using the Noise section:
▪ Try routing the Performer or Stepper modulation sources to control the Amp control in the
Noise Section to create rhythmic hihats or other unpitched percussion effects.
▪ Route an LFO to control the Amp control of the Noise section and designate a relatively
narrow modulation range. Use a fairly slow Rate setting on the LFO to create a subtly varied crackling environment, suitable for soft, intimate sounds.
3.4.6 Feedback Section
The Feedback Section allows you to re-route the signal from any of several different insert
points back to the filter input. The point that the signal is routed back from can be chosen in
the Routing Page of the Center Window (see section ↑3.1, Signal Flow and Voicing). The signal’s source is then shown within the Feedback section.
MASSIVE - Manual - 49
Page 50

Oscillator Section
In the Feedback Section, you can adjust the level of output using the Amp level knob, and adjust the ratio of the output between filter 1 and filter 2 using the Routing Fader. The Amp
knob has 2 modulation slots where you can attach a modulation source to change the output.
A typical case where you might want to make use of the Feedback Section is to create variable
saturation effects. Try setting it up like this:
1. First click the Routing Page in the Center Window so you can see the diagram of MASSIVE’s signal flow.
2. Click one of the small FB icons in this diagram in order to select the source of the feedback signal. For this example, let’s choose the one at the top center of the diagram, a bit
to the right of the Filter 1 icon.
Reference
3. To hear the feedback signal, turn up the Amp control in the Feedback Section. You’ll hear
a heavier, saturated signal.
4. To create changing saturation effects, try assigning one of the modulation sources like an
LFO to the Amp knob. Click on the Modulation Handle on the right part of the LFO tab
and drag the mouse to the small black Modulation Slot under the Amp knob. Then click
and drag on the small green numeral that appears to define the range of the Amplitude
modulation. Also make sure to check the level of the Amp knob on the LFO page; if this is
set to far left, you will hear no effect!
Note that due to the analog-style approach of the filter saturation, higher levels routed back
through the feedback bus can change the filter behavior significantly and generate very different audio results through any effects that you might be using.
Another case where you might want to use the feedback bus would be to smooth out the resonance peak of a filter. Try smoothing the sound by increasing the feedback level back into the
same filter bus like this:
MASSIVE - Manual - 50
Page 51

1. First, in the Filter Section, choose the low-pass filter LP2 in Filter 1 by clicking on the
popup menu in the header.
2. Now try turning the Resonance knob to about 50%. Move the Cutoff knob back and forth
while playing a note on your MIDI keyboard. You should be able to hear the resonant peak
around the cutoff frequency.
3. Now, as in the above example, click the Routing Page in the Center Window so you can
see the diagram of MASSIVE’s signal flow. Then click one of the small FB icons in this
diagram in order to select the source of the feedback signal. Again, choose the one at the
top center of the diagram, a bit to the right of the Filter 1 icon.
4. Turn the Routing Fader at the right edge of the Feedback Section all the way up, towards
where it is labeled “F1.” In this position, all of the output of the Feedback Section will be
routed back into the input of Filter 1.
5. To hear the feedback signal added in, turn up the Amp control in the Feedback Section.
You may hear a heavier, saturated signal; however, the higher level of feedback signal as
you increase the Amp knob will drive the filter circuit hotter and the increasing overtones
in the sound will tend to mask the sharpness of the resonance.
Reference
Filter Section
3.5 Filter Section
MASSIVE features two separate filter busses that can be routed in serial or parallel. You can
insert one filter of any available type in each bus by selecting an entry from the filter dropdown menu. Eleven different filter types are available, including standard low-pass, high-pass
and band-pass filters as well as comb, scream, and others.
Note that the filter section is one of MASSIVE’S most important sound design features, one of
the principal means by which you can sculpt the sound. Although of course the wavetable engine that produces the raw signal is also very important for the final sonic impression, it is the
filters that often give a synthesizer its distinctive sound. When programming new sounds with
MASSIVE, the creative potentials of the filter section should never be ignored.
MASSIVE - Manual - 51
Page 52

3.5.1 Routing
Note that each sound source in the Oscillator section (Osc 1-3, Noise, Feedback) has its own
Routing Fader by which its output into filter 1 and filter 2 can be adjusted. Complex sonic manipulations are possible simply by varying how much of each oscillator’s output goes to each
filter, and how the outputs of the filters themselves are routed within the filter section. For example, you might want to try sending the output of Osc1 and Osc2 to Filter 1, while the output
of Osc3 is sent to Filter 2. In this case you would move the Routing Faders for OSC1 and
OSC2 all the way to the top, while the crossfader for OSC3 would be set to the bottom.
Reference
Filter Section
Note that you can send your signal through the filter busses via a
serial or parallel routing.
When you use a parallel routing, Filter 1 receives all signals that are sent to F1 by using the
oscillators’ Routing Faders described above; in contrast, Filter 2 receives all signals sent to F2.
Both signals are then processed independently. A serial routing, however, routes the output
MASSIVE - Manual - 52
Page 53

signal of Filter 1 to the input of Filter 2, i.e. the signal us filtered twice. MASSIVE can blend
between both routing modes with the Input Fader (labeled F2) at the left of both filters. It controls the signal source of Filter 2: Moved to the top, Filter 2 will use the signal of Filter 1 as its
input (serial routing). Moved all the way to the bottom of its range, Filter 2 will use its independent input signal as controlled by the oscillators’ Routing Faders.
Reference
Filter Section
Note that there is also a Mix Control at the right side of the filter section. It controls which
filter’s signal is used as the filter section’s output. You can blend between the first filter’s signal (at the top) and the second filter’s signal (at the bottom); in between, both signals are
mixed.
Note that this control of the filter section’s output signal interacts with the Input Fader. You
can set up a completely serial routing in which 100% of the output of Filter 1 is passed on to
the input of Filter 2; set it up like this:
1. First, the Input Fader has to be turned up to the top of its range, to the direction marked
“Ser” for serial. This will direct the output of Filter 1 into the input of Filter 2, though the
output of Filter 1 will still be heard at the output of the Filter Section as well.
2. Then, the Mix fader has to be set to allow output from filter 2 only so that we do not hear
any direct output from Filter 1, but only after it has been routed through Filter 2. Turn the
Mix fader all the way down to the bottom of its range, marked “Mix2.”
MASSIVE - Manual - 53
Page 54

For a completely parallel routing you need to move the Input Fader to the bottom and the Mix
Fader to mid position.
3.5.2 Filter Types
MASSIVE provides you with a wide range of different filter types to use. Each filter has the customary Cutoff and Resonance controls, as well as a Bandwidth control which controls the width
of the frequency spread of some filter types such as the band-pass filter. However, for some
filter types the Bandwidth control does not apply; in this case this control will be labeled
“n.a.” instead.
Here is some more specific information regarding the different types of filters available:
▪ LP2/LP4: "normal" low-pass filters, damping all frequencies above the cutoff by 12/24db
per octave. Try using these to remove high-frequency content and make your sound less
"brilliant."
▪ HP2/HP4: "normal" high-pass filters, damping all frequencies below the cutoff by 12/24db
per octave. Use these to remove low frequencies from the sound
▪ AP: this type is an all-pass filter; all frequencies are passed through, but the phase of the
signal is inverted. It also features resonance like the HP and LP filters
Reference
Filter Section
▪ DNA: this is a double-notch filter. Try using this filter to simulate phaser-like sounds, for ex-
ample.
▪ BP/BR: these are band-pass/band-reject filters with 12-db damping/octave at each side and
adjustable bandwidth. In this type of filter, all frequencies around the cutoff within a certain frequency band are rejected or passed through (depending on which filter you are using). These filter types are very useful for focusing in and modifying certain specific parts
of the frequency spectrum. They can, for example, be used to simulate vowel morphings.
Cannot be used for filter frequency modulation.
▪ Scream: this is a type of low-pass filter with additional internal feedback added; the
Scream parameter controls the amount of this feedback. Use this type to create more analog-sounding, dirty filter sounds that employ a strong resonance peak. Cannot be used for
filter frequency modulation.
▪ Daft: another type of low-pass filter with its own particular sound. This filter is very respon-
sive to filter frequency modulation with the Modulation Oscillator.
MASSIVE - Manual - 54
Page 55

▪ Comb: this is a comb filter with internal low-pass damping of the feedback path. The Feed-
back and Dampening are adjustable; if the Feedback control is turned completely to the
left, there is no filtering effect. This filter often has an effect similar to flanging, especially
when the cutoff is modulated slowly at medium feedback settings. Cannot be used for filter
frequency modulation.
You may find it quite useful when designing your sounds to route a MIDI knob or fader to one
of the Filter Cutoff controls by using the Macro Control section (see section ↑3.2.5, Macro
Controls Automation and MIDI of this manual), giving you a quick and easy way to filter out or
emphasize a part of the frequency spectrum.
Other ideas you might want to experiment with include:
▪ Note that all filters (except the band-pass and band-reject filters) are very sensitive regard-
ing their input level. This can be used to create very dynamic sounds that change their
characteristic completely instead of only becoming louder when being played with high velocity.
▪ To add a “cutting” or “biting” edge to your sound, try setting up an envelope with a fast
attack and use this to modulate the filter cutoff; set the filter resonance to a relatively high
level to control the amount of this effect.
Reference
Filter Section
▪ Another interesting idea to experiment with is to set up a parallel routing of the filters as
seen above and set each of the filters to the comb setting. Set up a slow-moving LFO for
modulation of the filter cutoff and use a medium high feedback setting for each filter for
some interesting effects.
▪ Try modulating the cutoff control with the Vel modulation source in the Macro Controls sec-
tion. (See section ↑3.2.5, Macro Controls Automation and MIDI for more on how this controller works.)
▪ Use the Scream filter with a low Scream setting to help create dirty bass sounds.
▪ Choose the allpass filter and set the Resonance control to around 50%. Then try modulat-
ing the filter cutoff with an LFO to create some phase-like effects.
MASSIVE - Manual - 55
Page 56

3.6 Insert Effects
There are two different types of effects in MASSIVE: Insert Effects, which can be placed at
various points in the signal chain (see section ↑3.1, Signal Flow and Voicing on Routing), and
Master Effects, which come at the very end of the chain. We will first discuss the Insert Effects
in this section, while the Master Effects will be covered in section ↑3.7.3, Master Effects Sec-
tion below.
You can select and control the Insert Effects using the Popup Menus, Control Knobs and Mod-
ulation Slots in the Insert Section of the interface.
Reference
Insert Effects
Insert 1 and 2 represent two different audio effects. You can use the Effects Popup Menus to
choose the effect you want to use for each (if any). The two knobs control various parameters
of each effect, depending on which effect you have selected. These knobs will be labeled according to their function for the effect you have chosen. There is one Modulation Slot and one
Sidechain present here for each knob as well; these can be used to modulate each control with
any of the available modulation sources, just as we have seen with the other controls in MASSIVE. For more information on how to set this up, check section ↑3.2, Interaction with the
User Interface.
3.6.1 Routing
As mentioned above, either of the Insert Effects can be placed at a number of different points
in the signal chain. Where the effects are placed will make a crucial difference to the final
sound. Experiment with placing the various effects at different points to get a feel for the sonic
modifications you can achieve.
MASSIVE - Manual - 56
Page 57

You can choose where to place the Insert Effects in the signal chain by using the Routing Page
in the Center Window (see section ↑3.8, The Center Window for more on the Center Window
and the various pages it contains).
As you can see in this picture, there are a number of small buttons labeled “ins1” and “ins2”
present in the Routing Page, placed in various positions between the oscillators, filters and
other components of MASSIVE. These buttons are the Insert Effects Position Selectors. You
can use these to select where exactly each Insert Effect should be placed to modify the sound.
Simply click one of the buttons labeled “ins1” to select where the Insert 1 effect will be
placed, for example.
Reference
Insert Effects
Below is some further information about each of the Insert Effects in MASSIVE and how it
functions.
3.6.2 Delay
This is a standard delay that creates an echo type of effect by taking the incoming signal and
delaying it by a certain amount of time before it is passed on to the next module in the signal
chain.
▪ The Dry/Wet Control adjusts the balance between the unprocessed (dry) signal at the left
and the delayed (wet) signal at the right.
MASSIVE - Manual - 57
Page 58

▪ The Time Control adjusts the delay time: shorter when turned to the left and longer to the
right.
In addition to basic echo-style effects, you can use the Delay to create a wide variety of sounds
depending on the insert point. For example, try using the Delay within the Feedback bus (see
section ↑3.4.6, Feedback Section for more about the feedback functions in MASSIVE) to create feedback delay structures. Try modulating the Time Control just a little bit with one of
MASSIVE’s LFOs to create detuning/vibrato-style effects.
3.6.3 Sample & Hold
This is a “classic” sample and hold effect: It samples the incoming audio signal at a given
time interval, and this sample is held until the next sample is taken. This results in a “stepped,” temporally quantized audio signal.
▪ The Dry/Wet Control adjusts the balance between the unprocessed (dry) signal at the left
and the delayed (wet) signal at the right.
▪ The Pitch Control adjusts the time interval (frequency) at which the signal is sampled;
more slowly to the left, and more quickly as you turn the knob to the right. Slower sample
times will result in “deep,” harsh distortion effects, while higher Pitch Control settings will
result in “high,” subtler distortion sounds.
Reference
Insert Effects
The Sample & Hold effect can be used to create a variety of different distortion effects, depending on the settings you choose. Try using low Pitch Control values to create sounds similar
to old digital synthesizers. This is in effect resampled at a lower sampling rate!
Note that the Pitch Control by default follows the MIDI input pitch. You can control this within
the Center Window’s Keytracking Oscillator Page (see section ↑3.8.1, General Pages).
3.6.4 Bitcrusher
The Bitcrusher is a digital effect that creates distortion in your signal by reducing the bit depth
of the signal.
▪ The Dry/Wet Control adjusts the balance between the unprocessed (dry) signal at the left
and the delayed (wet) signal at the right.
▪ The Crush Control adjusts the amount of bit depth reduction, from no reduction at all when
turned to the left, to maximum reduction/distortion when turned to the right.
MASSIVE - Manual - 58
Page 59

You can use this effect to create “digital degradation” sounds such as were typical with early
digital samplers, or to add a slight bit of noise to your sound when only subtle Crush Control
values
3.6.5 Frequency Shifter
Just as its name implies, the Frequency Shifter shifts the frequency of the incoming signal.
This is a common effect found in many analog synthesizer designs, but is seldom implemented
in digital/software-based instruments.
▪ The Dry/Wet Control adjusts the balance between the unprocessed (dry) signal at the left
and the delayed (wet) signal at the right.
▪ Pitch Control: Adjusts the amount of frequency shift: downward at the left, upwards at the
right.
Try using the Frequency Shifter within the Feedback bus to shift the frequency of the feedback
signal and mix it with the main signal. Try modulating the Pitch Control with the Stepper modulation source to create a stepped series of melodic or harmonic intervals.
Note that the Pitch Control by default follows the MIDI input pitch. You can control this within
the Center Window’s Keytracking Oscillator Page (see section ↑3.8.1, General Pages).
Reference
Insert Effects
3.6.6 HPLP
The HPLP effect contains two simple adjustable filters (low-pass and high-pass), placed one
after the other.
▪ The High-pass Control adjusts the cutoff frequency of the high-pass filter, filtering out all
frequencies lower than the set level.
▪ The Low-pass Control adjusts the cutoff frequency of the low-pass filter, filtering all fre-
quencies higher than the set level.
Given that there are already two powerful and flexible Filters included in MASSIVE, covered
earlier in this manual (see section ↑3.5, Filter Section), you may wonder why we have also included these additional filters here in the Insert Effects Section. These simpler filters can be
used to quickly and easily narrow the frequency band of your signal at a particular point in the
MASSIVE - Manual - 59
Page 60

signal flow by adjusting the cutoff values of the filters. Also, by using modulation sources to
change the High-pass and Low-pass controls, the frequency band can be moved, narrowed or
widened over time without wasting the more elaborate dedicated Filters covered earlier.
3.6.7 Sine Shaper
The Sine Shaper insert effect routes your signal through a wave shaper, in which the signal’s
amplitude is mapped to the rising and falling amplitude of a sine wave.
▪ The Dry/Wet Control adjusts the balance between the unprocessed (dry) signal at the left
and the delayed (wet) signal at the right.
▪ The Drive Control adjusts the amount of distortion: less distortion when turned to the left
and thicker, heavier distortion at the right.
Try using the Sine Shaper as a non-linear type of distortion effect. The Sine Shaper is very sensitive to rapid amplitude changes, such as the “beating” or “wobbling” sound caused by dissonant harmonic intervals. Compare the result when you use this effect while using two oscillators tuned apart from each other at various intervals.
3.6.8 Parabolic Shaper
The Parabolic Shaper is a waveshaping effect like the Sine Shaper, but with a different shaping curve: where the sine shaper uses a sine shape, the parabolic shaper uses an s-like curve.
As you turn up the Drive control, the linear transition becomes a rectangular one, distorting the
smooth transitions of any input curve.
Reference
Insert Effects
▪ The Dry/Wet Control adjusts the balance between the unprocessed (dry) signal at the left
and the delayed (wet) signal at the right.
▪ The Drive Control adjusts the amount of distortion: less distortion when turned to the left
and thicker, heavier distortion at the right.
3.7 Output Sections
The Output Sections in MASSIVE contain modules at the end of the signal flow primarily concerned with the amplitude of the output signal. There are also a variety of high quality effects
here at the end of the chain, in the Master Effects Section.
MASSIVE - Manual - 60
Page 61

Output Sections
The signal flow in the Output Sections passes first through the Amp Section, including the Pan
Control, then through Master Effect 1, then Master Effect 2, and then finally out through the
Master Volume knob. Note that the parallel voices are combined to a stereo down-mix after the
panorama section and before the master effects. See section ↑3.1, Signal Flow and Voicing for
more information.
Reference
The role of the Bypass Section in the signal chain varies depending on how the Routing Page
is configured. See section ↑3.1, Signal Flow and Voicing on Signal Flow for more on this.
3.7.1 Amp Section
The Amp Section allows you to control the stereo panning and amplitude (loudness) of the output signal.
As with most synthesizers, you can trigger single notes by using a MIDI keyboard or other controller. However, technically speaking, you are not triggering notes but amplitude envelopes.
They start at zero and rise to a peak value, (mostly) specified by the note’s velocity. When the
key is released on the keyboard, the amplitude envelope decays back to zero. This shape causes the oscillators’ signal to fade in from zero (no signal heard) to the given peak amplitude
(maximum volume); on the key release the signal fades out again. The oscillator continues pro-
MASSIVE - Manual - 61
Page 62

Output Sections
ducing a signal, but without the triggered envelope it is muted. (Note that, due to this mechanism, the amplitude modulation is tightly connected to the synthesizer’s voicing; refer to section ↑3.1, Signal Flow and Voicing for more information on this.)
MASSIVE provides versatile options for amplitude modulation. You can use any modulation
source (e.g. the Stepper instead of an envelope for rhythmic amplitudes), and you can also
combine two sources, for instance you can fade in the Stepper’s amplitude modulation with an
envelope.
By default, the fourth envelope is assigned to control the amplitude, so you will see a small
blue number “4” appear here when MASSIVE starts up. However, you can freely assign any
modulation source to control this. A second modulation source can be assigned here as well; in
this case, the incoming signal at both Amplitude Modulation Slots is multiplied, just as in a
sidechain modulation assignment elsewhere in MASSIVE.
Note that there is no amplitude control knob or fader here as such, just as with a classic synthesizer amplitude envelope: any modulation of the amplitude controls the output level across
the entire available output range. (The Master Volume Control shapes the overall output loudness at another stage of signal processing.)
Instead, the main visible control in the Amp Section is the Pan knob. There are two modulation slots available here for controlling the stereo pan of the output, the main slot and a sidechain.
Reference
You can use modulation of the Amp Section to create all kinds of volume- or autopan-related
effects. The simplest example might be creating a tremolo effect by routing one of the LFOs to
control the amplitude. Try combining this with a medium-fast LFO as a modulation source for
the pan control for some really interesting effects!
3.7.2 Bypass Section
The Bypass Section allows you to take the direct output of one of the three oscillators or that
of the Noise Section and mix it in with the output from the rest of the signal chain. (The routing of the Bypass Section is explained further in section ↑3.1, Signal Flow and Voicing on Signal Flow. You can specify the oscillator to be used as source of the Bypass signal within the
Routing Page of the Center Window as described in section ↑3.8.1, General Pages.)
There are a number of reasons why you might want to do this. For example, you might create a
sound in which one of the oscillators is outputting a clear subbass type of sound that you want
to mix in with other sounds cleanly, without processing it through all of the other sections.
MASSIVE - Manual - 62
Page 63

Output Sections
There is only one control here, a fader that adjusts the level of bypass signal to be mixed into
the output. There are two modulation slots available here, main and sidechain.
Note that you can also set the point at which the Bypass signal is reintroduced into the sound,
by using the Bypass Target Selector buttons in the Routing Page of the Center Window. (See
section ↑3.8.1, General Pages for more about this.)
3.7.3 Master Effects Section
Following the Amp and Bypass Sections is the Master Effects Section. This contains two slots
in which you can insert a variety of different effects for modifying the final audio output of
MASSIVE. There are two effects slots here, FX1 and FX2, and you can select a different effect
in each. In addition, there is a dedicated EQ section at the end of the chain. As with the other
sections in MASSIVE, you can bypass any of these Master Effects by using their Mute
switches.
The control knobs visible here depend on which effect you currently have selected. There are a
number of different types of effects available, and multiple variations of some types. You can
select the effect you want from a popup menu here.
Note that some effects appear here in both mono and stereo versions; mono versions are indicated with a letter “M” in the name. Also, there are two modulation slots available for each
knob, a regular slot and a sidechain modulation slot.
Reference
Here is some information on the individual effects, along with some description of their controls. Note that although the functions of the four control knobs differ between the various effects, the first knob functions as a Dry/Wet control in all of them.
▪ Space: a reverb effect. There are two versions, SpaceMulti and SpaceSmall. Both use the
same reverb algorithm internally, but the parameters are mapped to different ranges. These
effects can be very effective in giving a sense of spaciousness to your sounds, but use
them carefully: sounds can become less present and lose clarity when too much reverb is
used. Note that you can also try using the dimension expander or a short delay to create
subtle room effects. The controls here enable you to change various parameters of the reverb space, including Size (room size, i.e. the length of the reverberation), Density, (the
diffusion of reverberation, a lower density = more echoes) and Color (a filter to subtly
change the sound of the reverberation: left = duller, right = brighter).
MASSIVE - Manual - 63
Page 64

Output Sections
▪ Flanger: creates classic flanging effects. The signal is slightly delayed while varying the de-
lay time, and the result is mixed with the original signal. Controls here include Rate (the
speed of the delay time change), Depth (the amount of delay time variation), and Feedback
(the amount of delayed signal routed back to the input). The stereo version of this effect
uses a phase-inverted modulation signal for left/right imaging; i.e. when the left signal's
delay time is shortened, the right one's is lengthened and vice versa.
▪ Chorus: creates a chorus effect, i.e. the signal sounds as if it was created by a choir, with
each voice pitched slightly differently. This effect is technically achieved by delaying the
signal and constantly modulating the delay time. The controls for the Chorus effect include
Rate (the modulation speed), Offset (the main delay time), and Depth (the amount of delay
time modulation). The stereo version of this effect, like the Flanger, uses a phase-inverted
modulation signal (see above). There is also a Chorus E version on the list; this E stands for
“Ensemble.” This version uses four different modulation signals for a very rich and smooth
chorus effect. Note that of the various phasing effects, i.e. phaser/chorus/flanger, the chorus is in many ways the most versatile. Its output seems to merge the most with the dry
sound rather than just sounding like an added effect.
▪ Phaser: creates a classic phasing sound as with analog gear like the classic Small Stone
phaser. Technically speaking, this effect is created by routing the signal through several
all-pass filters with modulated frequencies that change the phase of the signal, depending
on the signal's and the filter's frequency. When this changed signal is mixed with the original signal, phase changes create sonically interesting interference patterns. The controls
for the Phaser include Rate (the speed of the all-pass frequency modulation), Depth (the
all-pass frequency modulation amount), and Feedback (the amount of feedback, a high
feedback increases the intensity of the phaser effect).
Reference
▪ Delay: an echo effect. Delay Short is a stereo delay, with controls for Damp (a low-pass fil-
ter with adjustable cutoff on the delayed signal) and left and right delay time. Delay Sync
is a tempo-synced delay which in addition to the Damp control also adds a knob to control
Feedback as well as two displays to set up time-synced delays on left and right (see image
below). Try using the DelayShort effect to simulate very small room sounds, for example.
This can create a subtle spatial effect without losing the punchy rhythmic quality of the
sound. Note that these Delay effects can be very versatile as the delay times can be freely
modulated by any of MASSIVE’s modulation sources.
MASSIVE - Manual - 64
Page 65

▪ Dimension Expander: a combination of delay and chorus effects. The Dimension Expander
creates very clear room-style spatial effects. The sound is more diffuse than DelayShort,
but less cloudy than the Space effects.
▪ Tube: simulates the effect of running your output through a tube amplifier, to help you cre-
ate a “warmer” or “dirtier” sound. The Drive knob controls the amount of input amplification and thus the amount of distortion in the output signal.
▪ Uebersat: another tube amp simulator, a bit softer and a bit more CPU-intensive than Tube.
▪ Braun666Tube: another tube amp simulator, a bit brighter sounding than Tube.
▪ EQ: an output equalizer. The controls here allow you to adjust the low shelf/high shelf boost
as well as the peak frequency and peak boost. Note that these controls are flat when they
are in the center, zero position.
Some general creative applications for the Master Effects might include:
▪ Use the Space effect to add some “air” to the sound; you can also achieve similar spatial
effects with the Dimension Expander.
▪ Try fattening your sound with the Chorus, Flanger or Phaser.
▪ Try distorting and dirtying your sound with the various tube amp simulators.
Reference
Output Sections
3.7.4 Master Volume Section
The Master Volume Section is the simplest section in MASSIVE, providing you with a single
knob with which to adjust the master volume. There is also an output meter that displays the
level of the outgoing stereo signal. Note that it is possible to get digital distortion in your signal
here if you overdrive the output meter. However, even if you want a distorted sound, you will
likely get better results by using one of the Insert Effects or the Feedback Section; this Master
Volume control should only be used to avoid distortion. For best results, adjust it so that the
loudest peaks in your output signal are near the top of the meter without actually reaching the
top.
MASSIVE - Manual - 65
Page 66

The Center Window
3.8 The Center Window
At the center right of the main MASSIVE window, we find the Center Window. This area is the
control center for two important parts of MASSIVE.
Reference
For one thing, the Center Window contains the controls and display for all of MASSIVE’s global
parameters. These are visible on the six upper tabs, called the General Pages.
In addition, the Center Window is the place where you can edit and assign all internal modulation sources. These are accessible via the eight lower tabs, called Modulation Pages.
Note that both rows are of equal level and are not cascaded in any way, i.e. the lower row of
tabs is not a row of sub-tabs of the top row.
Unlike the other parts of MASSIVE (which are always visible), only one of these Pages can be
active at a time. This saves screen space for more important controls that always need to be
visible, such as the Oscillators and Filters. The Center Window is placed centrally so that the
MASSIVE - Manual - 66
Page 67

The Center Window
modulation handles are in a central place, close to any potential modulation target. (For more
info on how to establish a modulation assignment, see section ↑3.1, Signal Flow and Voicing.)
To access any of these Pages, simply click on its tab and all of its controls will be visible.
In this section we will describe all the controls and parameters for each Page of the Center
Window.
3.8.1 General Pages
The General Pages can be opened by clicking on the upper row of tabs. We will describe them
here in order from left to right.
OSC
The OSC Page includes general settings related to the pitch and phase of MASSIVE’s oscillators.
Reference
From left to right, we find several blocks of parameters labeled Glide, Vibrato, Pitchbend and
Phase, respectively. Let’s look at these one at a time.
The Glide block of parameters controls the glide between sequentially played notes. Setting
the glide controls allows smooth transitions between notes with different pitches. The block
contains a switch and a knob:
MASSIVE - Manual - 67
Page 68

The Center Window
▪ The Glide Mode Switch allows you to select from two glide modes. In Equal Mode, all
glides are equal in time, no matter how large the interval. In Rate Mode, the glide depends
on the interval between the consecutive notes: if the two pitches are near each other, the
glide will be shorter, and if the two pitches are further from each other, the glide will take
longer.
▪ The Glide Time Control adjusts the time needed by the glide function to go from the first
note pitch to the following note pitch. When the knob is at full left, there is no glide at all,
the pitch jumping all of a sudden to the next one. When you turn the knob to the right, the
glide time increases and makes the transition between the notes smoother.
The Vibrato block controls the pitch oscillation around the base pitch of the played note:
▪ The Vibrato Rate Control sets the speed of the oscillation.
▪ The Vibrato Depth Control defines the amplitude of the oscillation.
At the top of this block, a Mono Button forces the vibrato to be monophonic, i.e. the same oscillation is used to cause the vibrato for all played notes. In other words, when this button is
activated, you will hear the pitch of all played notes oscillating together (in phase).
The Pitchbend block controls MASSIVE’s response to your master keyboard’s pitch bend wheel
(or corresponding MIDI controller). In the Up and Down fields, you can set the upper and lower
values for the pitch bend range when the pitch bend wheel is at full up or full down on your
master keyboard, respectively. You can even set a Down value higher than the Up value here,
thus inverting the action of your pitch bend wheel.
Reference
The Phase block controls the relative phase of MASSIVE’s three oscillators and modulation oscillator. At the block’s bottom, the Restart Via Gate Button allows you to set each oscillator to
restart at its original phase each time you hit a key. If this Button is activated, the phases are
restarted with each new incoming note. (If the Button is deactivated, the phases are continuously played, and when you hit a key, the oscillators take the current phase as starting phase.)
The Phase Graphic Display shows four lines corresponding to the four oscillators in MASSIVE
(the three main oscillators plus the modulation oscillator). The x-axis represents the phases.
On each line, a Phase Slider indicates the current phase for each oscillator. You can modify
this phase by dragging the Phase Slider to the left or to the right.
The right part of the interface contains an innovative and powerful feature: an internal envelope that can directly modulate the Pitch parameters themselves. Note that you can use all
available modulation sources, e.g. the Stepper, to modulate the OSC Page’s parameters; but
MASSIVE - Manual - 68
Page 69

The Center Window
you can also use this internal modulation source for basic tasks. For instance, the envelope
can be used to slowly increase the vibrato depth, naturally fading in the vibrato after some
time.
This envelope is depicted in the upper right part of the Pitch Page, on the Internal Envelope
Graphic Display. Above, you see a header similar to the Modulation Pages tab headers, and a
modulation handle next to it: You can use the handle like any other modulation handle, particularly to modulate the Glide Time Control and the Vibrato Rate and Depth Controls of this OSC
Page.
Reference
In the lower part of this block, you will find two parameters to control this envelope: the Attack
Time Fader adjusts the attack of the envelope, and the Decay Time Fader adjusts its decay. All
adjustments are represented on the Internal Envelope Graphic Display.
Keytracking Oscillator
The Keytracking Oscillator Page allows you to define the pitch response of the oscillators to the
pitch of the incoming MIDI notes. On an acoustic keyboard instrument (let’s say a piano), the
further to the left that you play a note, the lower the pitch of the sound. The further to the
right you play on the keyboard, the higher the pitch. Thus, the pitch follows the position on the
keyboard in a linear way. With the Keytracking Oscillator Page, you can alter this behavior for
each of MASSIVE’s oscillators.
MASSIVE - Manual - 69
Page 70

The Center Window
The Keytracking Oscillator Page is divided into two parts: at the left, a Mapping Area shows
how the current keytracking response is set up; on the right, a Mapping Selector allows you to
map this keytracking response to the individual oscillators.
Two keytracking responses are available:
▪ The Linear Response is the usual keytracking response (with the lower pitches on the left
and the higher ones on the right like an acoustic keyboard), represented by a simple line
going from (0.0) to (127.127). This response cannot be edited.
Reference
▪ The User Response is freely assignable and you can tweak it according to your wishes.
You can choose to assign one or the other of these keytracking responses for each oscillator
individually. This is done in the Mapping Selector. This is basically a selection matrix. You can
assign the Linear or User Response (represented by the two columns here) to one or several
targets including the three main Oscillators, the Modulation Oscillator and the Insert Effects
(as shown in the five rows here).
To assign a response to a specific target, click on the corresponding box in the matrix. For example, if you want to assign the User Response to Oscillator 3, click on the box in the column
User and the row OSC 3 so that it is activated (you will see it turn blue). In this case, the other
box in the same row is automatically deactivated (since only one or the other of them can be
active at one time). If you click on the box again, it is deactivated. You can decide to deactivate both boxes on a row, removing all keytracking for this target. The outgoing pitch is then
set to 64, no matter what the incoming pitch is.
MASSIVE - Manual - 70
Page 71

The Center Window
The Mapping Area graphically represents how the MIDI incoming pitch is interpreted to produce the outgoing pitch. The horizontal axis shows the incoming pitch, and the vertical axis
shows the resulting outgoing pitch. At the bottom, a virtual keyboard represents the entire
pitch range. The numbers on both axes are the MIDI note numbers, from 0 to 127. When you
hit a key on your master keyboard, a vertical line appears on the Mapping Area showing the
pitch of that incoming note.
Each time you click on a box in the Mapping Selector to activate or deactivate it, the Mapping
Area displays the new keytracking response. If you click on a box in the User column, you will
see a set of Breakpoints appearing on the Mapping Area’s keytracking response line. You can
edit this User Response in the Mapping Area by using these breakpoints.
You can move the three central breakpoints on both axis, and the first and last Breakpoints on
the vertical axis, by simply clicking and dragging them with the mouse. You also have the following options to make your editing easier:
▪ Alt-dragging a breakpoint forces it to move on the vertical axis only, allowing you to define
an output pitch for a particular input pitch.
▪ Shift-dragging a point allows you to make finer adjustments.
In this way you can define new response segments between each Breakpoint pair as in this image:
Reference
When you click on a Breakpoint, both the x- and y-axis display small lines pointing to their coordinates. The coordinate numerical values are also displayed in the two small fields at the
right of the horizontal axis and at the bottom of the vertical axis.
MASSIVE - Manual - 71
Page 72

The Center Window
If you double-click on a particular Breakpoint, you will delete the whole User Response and
replace it by a horizontal line at the Breakpoint’s vertical level, thus creating a constant keytracking response at this particular outgoing pitch.
Keytracking Filter
The Keytracking Filter Page is very similar to the Keytracking Oscillator Page that we just described. It also deals with keytracking responses to incoming MIDI notes. However, it does not
control the oscillators' outgoing pitch but rather affects the parameters of MASSIVE’s Filters.
This can be useful, for example, if you have low-pass filter shaping your sound: if the filter cutoff was constant, you would have louder sounds in the lower part of the key range, and softer
(or even muted) sounds in its higher part, since only the low frequencies pass through the filter. By allowing the filter cutoff value to follow the incoming MIDI note pitch, the filter’s effect
(how it modifies the sound) stays relevant for every incoming note.
Reference
You will find the same basic layout structure here as in the Keytracking Oscillator Page: a Mapping Area on the left, and a Mapping Selector on the right. Please refer to the above section
about the Keytracking Oscillator Page for detailed information on how this Mapping system
works. Here we will describe only how the Keytracking Filter Page differs from the Keytracking
Oscillator Page.
In the first place, the Mapping Selector here looks slightly different:
MASSIVE - Manual - 72
Page 73

The Center Window
▪ Instead of a Linear and a User Response, we find here two editable User Responses, la-
beled Set 1 and Set 2.
▪ The possible targets here are the two Filters, instead of the Oscillators.
Another difference you will notice is that this Mapping Area features two keytracking response
lines, instead of only one. They allow you to control two different parameters of the corresponding filter. The light blue line refers to the Filter’s first parameter and the dark blue line refers
to its second parameter.
For all filters except the Comb filter, these first and second parameters refer to the Cutoff and
Resonance parameters, respectively. In the case of the Comb filter, the affected parameters
are Pitch and Dampening.
For all other controls and behaviors, please refer to the previous section about the Keytracking
Oscillator Page.
Voicing
The Voicing Page allows you to control various parameters dealing with voices and polyphony.
Note that section ↑3.1, Signal Flow and Voicing explains voicing in more detail.
Reference
At left, the Voicing Area allows you to define the polyphonic scheme that you want to use for
MASSIVE. From top to bottom, we find the following controls.
MASSIVE - Manual - 73
Page 74

The Center Window
The Voice Maximum Control defines the maximal number of voices that can be played at the
same time before the oldest is cut off. The range of this control is from 4 to 64. To modify this
value, click on the number field and drag your mouse up or down, or double-click the field and
enter the value via your computer keyboard. Be aware that each voice needs to be computed:
the higher this value, the higher the CPU load shown in the navigation bar.
The Voice Maximum Control is generally known as polyphony, but this does not necessary imply that you can play as many notes at the same time as what is shown in this number field.
This parameter controls the maximal number of voices, not the number of notes: if each pressed key triggers two voices, the maximal number of notes that you can play at the same time
with your MIDI keyboard will actually be half of the maximal number of voices. Thus, the actual polyphony depends on the maximal number of voices and the number of voices triggered
by each single note.
This is exactly what the Voice Unisono Control does: it adjusts the number of voices that should
be played for each key that is pressed on the keyboard. If the Voice Unisono Control is set to 1,
only one voice is played when you hit a key; if it is set to a value higher than 1, then pressing a
key will trigger as many voices as you have set. This control allows you to create thicker-sounding “stacked” sounds. Actually, though, if these unison voices were strictly identical, would
not be of much musical interest. But MASSIVE allows you to modify the additional voices, and
create some very interesting effects. This is called unisono spreading, and this is controlled by
the Unisono Spread Area, which is explained further below.
Reference
Below these two number fields, we find the Mono/Poly Switch. This switch lets you choose
from three polyphonic modes:
▪ Polyphonic allows you to play several notes at the same time, within the limits set by the
Voice Maximum and Unisono Controls.
▪ Monophonic allows you to play only one note at a time. Note that the Monophonic mode
deals with notes (i.e. pressed keys), not with voices. Thus, you can use this mode and still
have many voices per note, as set by the Voice Unisono Control. The next key you press will
mute the previous one, with all its voices.
▪ Monorotate is a special monophonic mode in which two notes are always played alternative-
ly. If a new note is played while the previous one is still held, the old note will stop and the
new one will start, just as in the normal monophonic mode described above. However, the
old one will be faded out quickly to ensure that the abrupt stop of this note will not cause a
click. This can be done as the new note is started on another layer of voices.
MASSIVE - Manual - 74
Page 75

The Center Window
Below the Mono Poly Switch is the Trigger Switch. It defines how and whether the modulation
sources are restarted from the beginning:
▪ Always restarts the modulation sources each time a new MIDI note message is received.
▪ Legato restarts the modulation sources whenever a new MIDI note message is received after
the previously played note has been released; this means that the sources are not re-triggered if the notes are being played tied, slightly overlapping. This also implies that the previous note will be automatically stopped when the next note is played, even if the key has
not been released on the keyboard yet.
▪ Legato Trill restarts the modulation sources whenever a new MIDI note message is received
and all other notes have been released before. This is convenient when playing trills or other ornaments on a keyboard: you only need to hit one of the trill notes while holding the
other one constantly. This mode can be useful if you intend to hold one key all the time as
a fundamental while playing figurations above it.
At the right of the Voice/Unisono Page, the Unisono Spreading Area allows you to control how
the different voices of a same note are differentiated from each other. You have three controls
here: the Pitch and Cutoff, the Wavetable Position and the Panorama Position. Each control
has a slider as in addition to one or more numeric displays and buttons.
Reference
Generally, for each of these parameters, the additional voices will sound more and more “distant” from the original voice. That is why this process is called “spreading”: the additional voices are “spread” out around the original one as you adjust the controls.
The parameters here are arranged in three rows. These rows share the same structure. From left
to right, we find the following controls:
MASSIVE - Manual - 75
Page 76

The Center Window
▪ A Spread Switch allows you to activate the corresponding parameter to spread the voices. If
this switch is set to on (it will turn blue), then the voices will be spread out according to
the controls in the respective section.
▪ A Spread Amount Control slider allows you to set the maximum amount of spreading be-
tween the different voices. Numerical fields allow you to set the spreading range. All active
voices are spread out evenly within this maximum range. Thus, the more active voices you
are using, the closer together each pair individual voices will be.
Here is some more information about the individual rows.
The Pitch and Cutoff Spread Amount Control’s range is set in semitones and cents (hundredths
of cents). The numerical values here can go from -12.00 semitones to +12.00 semitones. At
the right of this slider, a Detune Mode Switch allows you to choose from two detune modes:
▪ Centered: the pitches are symmetrically spread around the main pitch. This is particularly
useful with slight spreading values, up to about one semitone, which are often used to
thicken a sound.
▪ Chord: the pitches are spread alternatively below and above the main pitch. Use this mode
with high spreading values that establish chord-like structures.
Here are two examples to understand how this works:
Reference
With the settings as above, the four active voices will be tuned according to the following list:
Voice 1: -75 cents
Voice 2: -25 cents
Voice 3: +25 cents
Voice 4: +75 cents
As you will notice, the original pitch is not present within this mode; rather, the four different
voices surround it symmetrically. As the voices will be heard to merge into one, chorus-like
sound with only one pitch, the original pitch will be heard nonetheless, as the center of the
voice tunings.
MASSIVE - Manual - 76
Page 77

The Center Window
With these settings, the voices will be tuned like this:
Voice 1: 0 (original pitch)
Voice 2: +12 semitones
Voice 3: -12 semitones
Voice 4: +24 semitones
Here, the original pitch is present (first voice), and the other voices are grouped around it, alternating between pitches below the main pitch (third voice) and above (second and fourth
voice).
Below the Pitch and Cutoff Spread Amount Control you will see the Wavetable Position Spread
Amount Control. The range of this control is set as a percentage. This control will cause the
Wavetable Position (adjusted by the Wt-position knob) of the various voices to spread out
around the original voice.
The Panorama Position Spread Amount Control range is not editable. Rather, it allows you to
adjust the stereo imaging of the voices. With the slider at far right, you will hear the full stereo
image. When it is in the middle, you will hear a centered mono signal, and at far left, you will
hear an inverted stereo image, with left and right signals reversed.
Reference
Routing
As you can see in the image below, the Routing Page shows you a graphic representation of the
signal flow in MASSIVE:
MASSIVE - Manual - 77
Page 78

The Center Window
Here you can see the various modules and Sections in MASSIVE and how the signal flows between them. You can also see a number of buttons that can be activated or deactivated by
clicking them. Activated buttons show up light blue here, deactivated buttons in a darker color.
The signal flow in MASSIVE is explained in detail in section ↑3.1, Signal Flow and Voicing on
Signal Flow and Voicing, please refer to this section for a full explanation of how this works.
However, you should understand the function of the various buttons present here.
Reference
Looking to the left edge of the Routing Page, we see the three oscillators, labeled Osc1, Osc2
and Osc3. Under these is the Noise generator. Now, just to the right of each of these, you can
see a small button that can be highlighted by clicking it. (Notice that only one of these buttons
can be active at a time.) These are the Bypass Source Selectors for each sound source. By
clicking these in turn, you can select which audio signal will be passed directly to the Bypass
Section (see section ↑3.7.2, Bypass Section) towards the end of the signal chain.
There are also three Bypass Target Selector buttons at the lower right of the Routing Page.
Choosing one of these allows you to select the point at which the signal from the Bypass Section will be mixed back into the main signal: after the Pan, or after FX1 or FX2 in the Master
Effects Section.
Looking just a bit further to the right of the Bypass Source Selectors, we see another column of
six buttons marked alternately “ins1,” “ins2,” “ins1,” “ins2” and so on. If we look around a
bit more, we can see that there are a number of other similarly-labelled buttons placed else-
MASSIVE - Manual - 78
Page 79

The Center Window
where on the Routing Page. These are the Insert Effects Position Selectors. You can use these
to set the position of the Insert Effects (see section ↑3.6, Insert Effects) in the signal chain.
Setting the position of these effects can make a big difference in how they modify the sound.
Note that you can only have one “ins1” and one “ins2” button selected at one time.
There are also a number of buttons here labelled “FB.” These are the Feedback Source Selec-
tor buttons. Only one of these can be selected, and it determines the point at which part of the
signal is routed back to the Feedback Section, where it can be reintroduced to the signal chain
at the beginning. Note that you can apply one of the insert effects directly to the feedback signal.
Global
The Global Page contains various parameters that are relevant for all other parts of MASSIVE,
for instance the global tuning. This page also provides some copy and paste functionality as
well as the ability to randomize the current sound’s settings.
Reference
The Global tune parameter allows you to adjust MASSIVE’s tuning in semitones and cents.
The Preset BPM parameter sets the tempo of the internal clock in beats (quarter notes) per
minute. This parameter is saved with the sound, used for example when the Stepper modulator
is used in sync mode. The Preset BPM parameter is not relevant if External Sync is active.
MASSIVE - Manual - 79
Page 80

The Center Window
Clicking on the Reset button resets the internal clock’s song position pointer to zero, like going
to a track’s start in a sequencer. This is used to ensure the reproducibility of modulation
source signal. This parameter is not relevant if External Sync is active.
If the External Sync is on, the internal clock is deactivated and clock is taken from MIDI signals arriving at the synthesizer. This is particularly useful when MASSIVE is used as a plug-in,
as the host will provide a global clock signal for all plug-ins to synchronize them.
The Preset Quality buttons switch between two quality modes. High (using oversampling)
should be used whenever possible, but note that the CPU load is increased with this setting.
Copy/Paste and Randomization can be applied module-wise in this section. There are four
module groups: oscillators, filters, insert effects and master effects, arranged horizontally. For
each group, you can select (vertically) whether the copy/paste/random function is applied to
the parameter values, the modulation depths, or the type selection (e.g. wavetable selection).
Thus you can specify the target of the operation in this table-like structure. Pressing the Ran-
dom button randomizes the adjusted part of MASSIVE, e.g. the oscillators’ parameters. The
amount of randomization is adjusted in percentages in the central boxes. A value of 25, for
instance, changes the target values by a maximum of 25 percent around the actual value.
These can be used to slightly modify settings (low values) or create completely new sounds
(high values). The Copy function here writes the selected target into an internal buffer, and
Paste writes the internal buffer onto the selected target. These functions can be used to copy
parts of a sound (e.g. the filter settings) into another sound by copying the filter data into the
internal buffer, loading another sound, and pasting the buffer again. This overwrites the current settings without asking.
Reference
3.8.2 Modulation Pages
Each of the eight Modulation Pages defines a modulation source that can be used to modulate
MASSIVE’s other parameters. (For more information and step-by-step instructions on how exactly to assign modulation sources to destinations in MASSIVE, see section ↑3.2.3, Modulation
Controls.)
The modulation sources are grouped into two basic types, the Envelopes (tabs 1-4, color-coded
blue) and the Assignable Pages (tabs 5-8, color-coded green). Each of the four Assignable Pages allows you to choose between three specific modulation source types: LFO, Stepper and
Performer. To choose one of these types, use the dropdown menu in the upper-right corner of
the individual modulation page.
MASSIVE - Manual - 80
Page 81

The Center Window
Structure
All of the Modulation Pages share the same basic structure:
▪ The tab header displays the modulation source number and type. Click on it to select a spe-
cific modulation page and display its parameters. When a modulation source is selected,
its tab header is will be highlighted as in the image below:
▪ The modulation handle (the little cross at the right of each tab header) allows you to assign
this modulation source to the desired destination parameter(s), as described above.
It is not necessary to select a modulation source first before assigning it. Even if a modulation
source is not selected (and its parameters not displayed), you can still make an assignment between
its modulation handle and a destination modulation slot, allowing you to quickly make a number of
different assignments without having to flip back and forth between the individual modulation pages here.
▪ The top row of each modulation page includes general options for that particular modula-
tion source.
Reference
Envelopes
The first four Modulation Pages starting from the left allow you to define four individual modulation envelopes. Their tab headers are blue.
These envelopes are designed according to the ADSR (Attack-Decay-Sustain-Release) scheme,
with certain special features related to the sustain stage and for trigger options.
The envelope shape is represented on the Graphic Display:
MASSIVE - Manual - 81
Page 82

The Center Window
The knobs below the Graphic Display are used to edit the envelope. Try moving them and you
will see exactly how each of them influences the envelope shape. The Graphic Display always
shows you the current shape of the envelope, as determined by how you set the knobs and menus.
The top row for the envelope includes two buttons:
▪ The Linear Transition Switch switches the Decay shape from logarithmic to linear. By de-
fault, the Attack shape of the envelope is linear, while the Decay and Release shapes are
logarithmic. With this Switch activated, the Decay shape becomes linear as well.
Reference
▪ The Trigger Mode Switch causes the envelope to retrigger from the beginning every time it
receives an incoming MIDI note. If this is disabled, the envelope will not start at zero if the
previous note’s release period is not over yet; instead using the current level as its starting
point.
At the far left of the Envelope Page, you will find another set of global controls that modify the
envelope response to incoming MIDI notes.
At the top left, the Play Mode Selector allows you to choose from three Play Modes: Gate, One
Shoot and Hold (see below).
This Play mode determines how the envelope will be read:
MASSIVE - Manual - 82
Page 83

The Center Window
▪ With Gate selected, when you press a key, the envelope is started and read until its end.
However, if you release the key before the envelope comes to the end, it will immediately
jump to the Release stage.
▪ With One Shoot selected, as soon as a key is pressed, the envelope is read to the end, even
if the key is released sooner. The full sustain stage (with any possible loops, see below for
more on this) is also read.
▪ With Hold selected, as soon as a key is pressed, the envelope is read until the Sustain end
point (including possible loops). It remains there also if the triggering key is released. The
envelope jumps to the release stage only when the triggering key is pressed a second time,
or if another key is pressed, triggering another note. However, if another key is pressed
while the initial key is still held, the new note will be stacked onto the initial one, building
a chord. All chord notes jump to the release stage simultaneously when all keys have been
released and a new key is pressed. This mode can be particularly useful in live situations
when MASSIVE is being used to generate grooves or rhythmic soundscapes.
Just below the Play Mode Selector, two faders allow you to adjust the influence of incoming
MIDI notes on the overall envelope amplitude:
▪ The Velocity Sensitivity Fader controls the influence of the incoming MIDI note’s velocity
on the overall envelope amplitude. If the Fader is at full left, the envelope amplitude is not
influenced at all by the incoming note’s velocity. If the Fader is at full right, the overall
envelope amplitude is directly proportional to the incoming note’s velocity.
Reference
▪ The Keytracking Fader controls the influence of the incoming note’s pitch on the overall
envelope amplitude as follows: the higher the pitch, the smaller the envelope amplitude. If
the Fader is at full left, the envelope amplitude is not influenced at all by the MIDI pitch.
If you move the Fader to the right, the overall envelope amplitude is more and more influenced by the incoming note’s pitch, with higher sounds becoming lower in volume.
At the bottom of this area, the Delay Time Control allows you to insert a delay between the
time when you hit the key and the time when the envelope starts.
Let’s look now at the parameters for each envelope stage.
The Attack stage starts from zero (no sound) and goes up until it reaches the maximum value
you have set. Two controls allow you to define how the envelope reaches the maximum attack
value:
MASSIVE - Manual - 83
Page 84

The Center Window
▪ The Attack Time Control adjusts the time needed by the envelope to go from zero to the
first maximum point. If you turn the knob clockwise, the attack becomes longer, and your
sound will start more smoothly.
▪ Next to this, the Attack Level Control sets the amplitude of the maximum point. It can be
effective in many cases to give this parameter a higher value than the following Decay Level; this will give some initial punch to your sound when you hit a key.
The Decay stage goes from Attack's maximum value and leads to the Sustain stage. Again, two
controls provide control over the time and level domains:
Reference
▪ The Decay Time Control adjusts the time needed by the envelope to go from the attack’s
maximum value to the decay end point.
▪ The following Decay Level Control sets the amplitude of this final point, thus also adjusting
the value for the sustain starting point.
The Sustain stage provides two special features. First, a loop function allows you to play this
part of the envelope back and forth a set number of times. You can think of this as a kind of
mini-LFO inside the envelope, looping only a certain fixed number of times between the Decay
and Release stages before moving on. Second, a morphing function provides you with two selectable sustain shapes, allowing you to morph the actual sustain shape between these two.
The controls for the Sustain stage are as follows, from left to right:
MASSIVE - Manual - 84
Page 85

The Center Window
▪ The Sustain Loop Length Control adjusts the time between the sustain start and end
points. If you turn it clockwise, you increase the sustain duration, and therefore also lower
the speed of the envelope in the sustain stage.
▪ The Sustain Level Control sets the amplitude of the sustain end point.
▪ The Sustain Morph Control adjusts the actual sustain shape between the two reference sus-
tain shapes defined by the Sustain Morph Popup Menus (see below). If the knob is turned
full left, the sustain shape will be the shape selected in the first Morph Menu. With the
knob at full right, the shape will fit the one selected in the second Morph Menu. In between, the actual sustain shape will be an interpolation between the two selected shapes.
The Graphic Display indicates the actual interpolated curve as you change the morph settings.
▪ The Sustain Morph 1 Popup Menu allows you to select the first boundary for the morphing
function.
▪ The Sustain Morph 2 Popup Menu allows you to select the other boundary for the morphing
function. If you choose the same shape as in the other menu, the morphing function will
be deactivated (as it will have no effect to morph between two shapes that are exactly the
same anyway).
Reference
▪ The Sustain Loop Count, at the lower right of the Sustain stage, defines how many times
the Sustain stage will loop. Actually, the envelope executes a back and forth movement,
and via the Sustain Loop Count you define the number of times it will play forward and
backward. If you select 0, the Sustain stage is ignored; depending on the Play Mode Selector setting (see above), the envelope will then go directly to the Release stage, or stay at
the sustain start point level as long as you hold the key, or stay at this level as long as you
hold the key or no other note comes. If you select 1, the envelope goes once through the
sustain stage, from left to right, then to the Release stage. If you select 2, the envelope
will go from the start point to the end point, and back to the start point, and then it will
jump to the Release stage. And so on. You can turn this up to a maximum of 32 half-cycles
(i.e. 16 times forwards and 16 backwards). However, the menu also allows you to select an
infinite loop (choose inf in the menu, all the way to the top of the popup menu.), which
makes the sustain stage loop forever.
Note: A white dot in the Graphic Display indicates where the cycle process will stop. An odd
number setting for the Sustain Loop Count will cause the envelope to stop on the right side of
the sustain stage, at the sustain level. An even number lets the sustain cycle stop on the left
side of the sustain stage, therefore at the decay level.
MASSIVE - Manual - 85
Page 86

The Center Window
The Release stage defines how the envelope ends up. You only have one control for this stage,
called Release Time Control, adjusting the time for the envelope to fade to zero.
This envelope structure is very versatile, yet you can also use it for classic ADSR envelopes:
just set the Sustain Loop Count to off, then turn the Attack Level to its maximum, and adjust
the Attack and Decay Time Controls to medium values. Now you can use the Decay Level Control as a Sustain Level control.
Reference
Common Controls for LFO, Stepper and Performer
The last four Modulation Pages allows you to define four other modulation sources; in each of
these, you can choose from three different modes: LFO, Stepper and Performer. Their tab
headers are green.
Click on one of the four green tab headers to select the corresponding modulation source and
display its Modulation Page with all its parameters visible.
MASSIVE - Manual - 86
Page 87

The Center Window
Most of the controls in the top row of these three modulation modes are mostly the same, so
let’s have a look at them from left to right:
▪ The Mono Button, when activated, will force the modulator to output a monophonic modu-
lation signal, no matter how many voices are played. You can use this function to “synchronize” the modulations of different voices.
▪ The Mode Popup Menu, at the far right, allows you to select the kind of modulation source
you want to use in this Modulation Page (LFO, Stepper or Performer).
Reference
These three modulation modes also share the same left block of controls:
From top to bottom, we find:
MASSIVE - Manual - 87
Page 88

The Center Window
▪ The Rate Control and its associated Sync Switch. The Rate Control adjusts the speed of the
modulation source. When the Sync Switch is engaged, the modulation source is synchron-
ized with the master clock or external sync (see the Global Page). The Rate Control then
becomes a Ratio Control with two number fields, allowing you to specify the duration of
one step of the modulation source. For LFOs this is one complete cycle; for all other sources this is actually one step within the sequence. The lower value determines the temporal
unit; e.g. a 16 represents a sixteenth note, and 4 represents a quarter note (one beat). The
upper value determines the actual length of the cycle as multiples of the lower unit, e.g.
setting a pair of 3 (upper value) and 16 (lower value) will cause the Stepper to proceed to
the next step after three sixteenth notes have passed according to the global clock (see the
Global Page in section ↑3.8.1, General Pages).
▪ The Restart Switch causes the envelope to re-trigger every time it receives a note (i.e., the
envelope starts from the same point each time). If the Restart Switch is deactivated, the
modulation source runs in the background: when you play a note, it is driven by the modulator, starting at the current modulator position.
Reference
▪ The Amplification Control sets the modulation signal amplitude. Its effect is similar to the
modulation amount setting (set by clicking on the assigned modulation slot under the target
knob and dragging the mouse up or down, see ↑3.2.3, Modulation Controls on setting modulation assignments for more on this). The difference is that if you modulate different targets with this modulation source, this Amplification Control has an effect on all of the targets. Note that your modulation assignments may have no audible effect if this Amplification Control is set to full left, as this is equivalent to no effect!
All the other controls in these pages are specific to the particular modulation source mode you
have chosen, even if there are some similarities between them.
MASSIVE - Manual - 88
Page 89

The Center Window
LFO
LFO stands for Low Frequency Oscillator. This modulator generates a periodic signal at a low frequency. The word “low” here means that its frequency is lower than those which a human ear
interprets as “sound”: The LFO does not directly add anything to the audio content, but instead it can be used to continuously modify the sound’s parameters.
For the controls included in the top row and in the left block, please refer to the previous section (“Common Controls for LFO, Stepper and Performer”).
We will describe here the controls that are specific to the LFO modulation source.
Reference
Note that each LFO in MASSIVE is actually a double LFO: the modulation source features a
morphing function that allows you to interpolate between two curves (similarly to the sustain
stage of the envelope modulation source described above). You can adjust the LFO curve on
the fly by moving the Xfade Curve slider. This is all done in the left part of the interface.
The two curves are represented in the upper and lower part. For each of the two curves, the
interface provides you with:
▪ a Curve Graphic Display representing the curve’s shape
▪ a Curve Morph Quick Selector, allowing you to select a shape among four basic LFO wave-
forms (sine, sawtooth, square and triangle),
▪ a Curve Morph Popup Menu, giving you access to more complex waveforms to choose from.
MASSIVE - Manual - 89
Page 90

The Center Window
At far left, the Curve Morph Control fader allows you to adjust the interpolation between both
curves, which will be the effective played LFO curve. With the fader at full top, you select only
the upper curve. With the fader at full bottom, you select the lower curve. In between, you can
adjust the interpolation of both.
Above the Curve Morph Fader and the Curve Graphic Displays, the Phase Fader sets the starting phase of the curves. In other words, you can choose if you want to start the square LFO at
the upper stage or the lower stage.
The phase position is represented on the Phase Fader by a small yellow triangle and on the
Curve Graphic Displays by a yellow vertical line that indicates where exactly the LFO signal will
start.
The right part of the interface contains a useful feature already seen in the OSC Page: an inter-
nal envelope that can modulate the LFO parameters themselves. This envelope is depicted in the
upper right part of the Modulation Page, on the Internal Envelope Graphic Display. Above, you
can see a header similar to the Modulation Pages tab headers, and a small modulation handle
next to it from which you can make modulation assignments to the three internal targets: the
Rate Control (only possible if the Sync Switch is deactivated), the Amplification Control and
the Curve Morph Control.
Reference
In the lower part, you will find two parameters for this envelope: the Attack Time Fader adjusts
the attack of the envelope, and the c adjusts its decay. All adjustments are represented on the
Internal Envelope Graphic Display.
MASSIVE - Manual - 90
Page 91

The Center Window
Stepper
The Stepper is basically a step sequencer. It allows you to define a certain number of steps,
each of them having a specific amplitude value. The steps are read in a looped sequence, recreating a periodic signal to be used as a modulation.
For the controls included in the top row and in the left block, please refer to the section “Common Controls for LFO, Stepper and Performer.”
We will describe here the controls specific to the Stepper modulation source.
Reference
The main part of the Stepper Modulation Page is occupied by the Stepper Graphic Display,
showing the different steps. For each step, the corresponding amplitude is represented by a
bar. To adjust each amplitude, click on the bar and drag the mouse up or down. Hold the keyboard’s Shift key for fine adjustments.
On the top of the Display, a Loop Area Bar shows the step numbers. On this bar, a yellow triangle indicates the current step being played. The triangle moves through all steps included in
the loop.
The steps included in the loop have their numbers highlighted in the Loop Area Bar.
To edit the loop range, click on the first or last step number in the loop, hold the mouse button
and drag it to the left or to the right: the highlighted numbers follow the mouse movements,
defining a new loop range. The loop speed is controlled by the Rate/Ratio Control, in the left
block of controls described earlier (in the section “Common Controls for LFO, Stepper and Performer.”)
At the left of the Stepper Graphic Display, there are two faders:
MASSIVE - Manual - 91
Page 92

The Center Window
▪ The Glide Modulation Control adjusts the glide between the former step and the current
step. The glide can be used to create soft transitions between steps. When this is turned all
the way down, there is no glide between the steps; when turned up to the top, the glide is
at its maximum. Note that this functionality has to be activated for each step individually
with the Step Activation Rows explained below.
▪ The Amplitude Modulation Control adjusts the overall amplitude of the modulation defined
by the step sequences. When all the way down, there is no modulation (whatever the bars
are); when all the way up, the modulation is at its maximum. Note that this functionality
has to be activated for each step individually with the Step Activation Rows explained below.
These two faders can be modulated, as indicated by the small black modulation slot under each
of them. The modulation amount is then shown on their right side by a vertical bar, with the
color of the modulation source, like all other modulatable parameters.
Each of these faders is related to one of the two Step Activation Rows below the Display. Each
Step Activation Row contains a sequence of boxes, one under each step. Each box defines if
the corresponding step will be affected by the relevant fader or not. If a box is activated (blue),
the corresponding step will follow the fader control. If it’s deactivated (black), the step is not
affected by the fader setting. To activate a box, click on it. You also can hold the mouse button
and drag the mouse to activate or deactivate several boxes.
Reference
For example, in the image above, we can see that:
▪ The loop includes the steps 5 to 16.
MASSIVE - Manual - 92
Page 93

The Center Window
▪ The Glide Modulation Control is at a middle setting, and it is modulated by Macro Control
5.
▪ Only step 10 is affected by this glide modulation (as shown by the lower Step Activation
Row).
▪ The Amplitude Modulation Control is at a low setting, and it is modulated by the Macro
Control 3.
▪ All the steps in the loop are affected by this amplitude modulation (as shown by the upper
Step Activation Row).
Performer
The Performer is quite similar to the Stepper in its implementation, but it allows you to create
much more complex sequences. The Performer lets you generate step-sequenced rhythms with
the aid of waveforms instead of simple vertical bars.
Furthermore, it also features a morph function that allows you to interpolate between two sequences, just as in the envelope and in the LFO modulation sources (see above).
For the controls included in the top row and in the left block, please refer to the section “Common Controls for LFO, Stepper and Performer.”
Reference
We will describe here the controls specific to the Performer modulation source.
The steps are depicted in the Performer Graphic Display. Each step displays its loaded waveform.
MASSIVE - Manual - 93
Page 94

The Center Window
You can choose a specific waveform for each step. To choose a waveform, click on the Load
Curve Button at the top left of the Modulation Page. This will open a matrix with a number of
different waveforms. Here you can select and assign various waveforms to the steps: select one
waveform (by clicking), then click on the target step frame. You can do multiple assignments
(one waveform to several steps) by holding the Shift key and clicking on the desired steps.
Like in the Stepper, you can adjust each step’s amplitude by clicking and holding its waveform
and dragging the mouse up or down. Hold the keyboard’s Shift key for fine adjustments.
Reference
When you are done with the waveform assignments, click again on the Load Curve Button to
close the matrix.
As in the Stepper, a Loop Area Bar on the top of the Performer Graphic Display shows the step
numbers. It also displays a yellow triangle that indicates the current step being played. The
triangle moves through all steps included in the loop.
The steps included in the loop have their numbers highlighted in the Loop Area Bar.
To edit the loop range, click on the first or last step number in the loop, hold the mouse button
and drag it to the left or to the right: the highlighted numbers follow the mouse movements,
defining a new loop range. The loop speed is controlled by the Rate/Ratio Control, in the left
block of controls described earlier (“Common Controls for LFO, Stepper and Performer.”)
At the left of the Performer Graphic Display, we find two faders:
MASSIVE - Manual - 94
Page 95

The Center Window
▪ The Amplitude Modulation Control adjusts the overall amplitude of the modulation defined
by the step sequences. At full down, there is no modulation (whatever the waveforms are);
at full up, the modulation is at its maximum. Note that this functionality has to be activated for each step individually with the Step Activation Rows explained below.
▪ The Sequence Morph Control adjusts the interpolation between both sequences, i.e. the se-
quence effectively played by the Performer. At full down, only the lower sequence is
played; at full up, only the upper sequence is played. In between, you can adjust the interpolation. Note that this functionality has to be activated for each step individually with the
Step Activation Rows explained below.
The two faders can be modulated, as indicated by the small black box under each of them. The
modulation amount is then shown on their right side by a vertical bar, with the color of the
modulation source, like all other modulatable parameters.
Each of these faders is related to one of the two Step Activation Rows below the Display. Each
Step Activation Row contains a sequence of boxes, one under each step. Each box defines if
the corresponding step will be affected by the relevant fader or not. If a box is activated (blue),
the corresponding step will follow the fader control. If it’s deactivated (black), the step is not
affected by the fader setting. You can also hold the mouse button and drag the mouse to activate/deactivate several boxes.
Reference
For example, on the picture above, we see that:
▪ The loop includes the first 9 steps.
▪ The Amplitude Modulation Control is at a quite low setting, and it is modulated by Macro
Control 1.
MASSIVE - Manual - 95
Page 96

Macro Control Section
▪ Only the steps 1, 3, 5-9 are affected by this amplitude modulation (as shown by the lower
Step Activation Row).
▪ The Sequence Morph Control is at a quite high setting, and it is modulated (in the opposite
direction) by the Macro Control 2.
▪ Only the steps 1, 2, 7-9 are affected by this sequence morphing (as shown by the upper
Step Activation Row).
3.9 Macro Control Section
MASSIVE’s Macro Control Section handles incoming MIDI data such as velocity, aftertouch and
other MIDI controller information. It is also the most prominent place to work with incoming
automation data from a host sequencer program when MASSIVE is used as a plug-in. For conceptual information on how to work with the Macro Controls, see section ↑3.2.5, Macro Con-
trols Automation and MIDI.
Reference
There are two types of controls available here.
At the left, there are four small yellow controllers available which can be assigned to modulation destinations in MASSIVE. Each of these routes modulation data triggered by an external
MIDI keyboard or MIDI sequence to the modulation target.
▪ KTr (Keytracking): Generates a modulation signal depending on the pitch of the played
MIDI note.
▪ TrR (Trigger Random): Each played MIDI note trigger generates a new random value at the
output of the TrR modulation source.
▪ AT (Aftertouch): The modulation source provides the aftertouch value of your MIDI messag-
es. Note that relatively few MIDI keyboards send aftertouch information.
MASSIVE - Manual - 96
Page 97

Macro Control Section
▪ Vel (Velocity): This modulation source relays velocity data from your MIDI keyboard or other
MIDI controller.
At the right, the eight Macro Control Knobs can be used to unify your interaction with the
sound of MASSIVE. They can be controlled easily by external MIDI knobs or faders: Right-click
one of the Macro Controls and select MIDI Learn from the context menu. Then move your external controller’s knob or fader to make the assignment. While this can be done with all of
MASSIVE’s parameters, the Macro Controls will probably be your favorite target.
You will find that most of the preset sounds included in MASSIVE’s library already have assignments made to the eight Macro Control Knobs, allowing you to easily assign external MIDI
controls to them and start tweaking and changing the sound in creatively useful ways. The exact assignments for each preset will vary, but in general they conform to the following pattern.
Note that you can assign these knobs to control whatever parameters you want; the descriptions below reflect only the typical settings of the presets in the MASSIVE sound library.
▪ Macro Knobs 1 and 2: Oscillator. Settings related to the oscillator section are generally as-
signed to these first two knobs. Examples: WT-position, Intensity, Pitch (for chords etc.)
▪ Macro Knobs 3 and 4: Spectrum. This column usually controls settings related to the fre-
quency domain, i.e. anything that changes the sound's spectrum. Examples: Filter Cutoff,
Phase distortion level
Reference
▪ Macro Knobs 5 and 6: FX. Effect-related settings are typically assigned to knobs 5 and 6.
The dry/wet parameters of active effects are often assigned to Control knob 5. The other
Control knob may be assigned to other effect parameters such as effect time, feedback,
and so on.
▪ Macro Knobs 7 and 8: Motion/Time. Knobs 7 and 8 are related to the time domain, i.e. any-
thing that changes the sound in time. Parameters such as modulation speed and intensity
or the LFO or Stepper Rate may be assigned here. Examples: Rate/Amp of LFO/Env/Stepper/Performer, Morph speed, Envelope amount.
Note that the Macro Controls will appear (along with all of MASSIVE’s other controls) as automatable parameters in a host sequencer. Thus, you can modulate them with recorded MIDI data in your sequence. You can directly automate any of MASSIVE’s various controls directly from
your sequence as well, but making the assignment via the Macro Controls opens up a number
of new creative possibilities as described in section ↑3.2.5, Macro Controls Automation and
MIDI.
MASSIVE - Manual - 97
Page 98

The Browser and Attributes Views
Please refer to your host’s documentation on information about its automation capacities.
There it will be explained how to access MASSIVE’s parameters from inside your host application.
3.10 The Browser and Attributes Views
3.10.1 The Attributes Concept and the Sound
MASSIVE provides a new and more intuitive way to save, browse and load its preset sounds.
We have left behind the old paradigm of individual sounds contained within separate sound
banks, with all its organizational problems. Instead, the settings for each sound are saved into
single files that can then easily be ported between platforms or projects.
To handle all these Sound files you need a powerful way to browse them. Therefore, each
Sound file also contains information about the sound in musical terms, called the sound’s at-
tributes. The Attributes View of MASSIVE provides a list of about 170 different attributes.
By combining these descriptive terms, each of the synthesizer’s sounds can be described according to its origin or source, its Type, SubType and Mode. You can also enter additional Meta
Information such as the name of the sound’s author and so on.
Reference
All Sound files placed in MASSIVE’s user and factory library folders are automatically integrated into a database of sounds. The Browser View of MASSIVE is your interface to this database.
Within the Browser you can select a combination of attributes to find a sound that fits your
needs. For example, try selecting attributes Bass, Digital Bass, and Monophonic to find exactly
that – a digitally cold yet propulsive bassline sound. Different bank files at various locations on
your disk won’t be an issue anymore. You’ll be able to find the sounds you need for your music
quickly and easily.
The following sections will explain how to use MASSIVE’s attributes to browse your sounds and
load them, and how you can save your own sounds using the attributes.
3.10.2 Searching and Loading Sounds with the Browser
The Browser View is the place where you search and load your MASSIVE sounds, and where
you organize them into programs.
MASSIVE - Manual - 98
Page 99

The Browser and Attributes Views
The Browser can be used in two alternative view modes that are toggled by clicking the Sounds
button in the View’s upper-left corner. When this is deactivated, you will see the File Tree
View; when activated, you can browse your Sounds in the Database View. Both views share the
same structure: at the left you specify which sounds you want to see (i.e. a folder in File Tree
View or a set of attributes in Database View), and on the right you load one of the Sounds from
the Search Results by double-clicking it. When activating the Programs button in either view a
program list is added. All views feature the Browser Control Bar at the top, containing the
Sounds button, the Programs button and further controls.
Reference
Database View
The Database View is visible when the Sounds button is activated by clicking with the mouse.
It consists of the table of attributes itself as well as the Sound Type switch, the Clear button
and the Search Term text field, these three placed within the Control Bar at the top.
MASSIVE - Manual - 99
Page 100

The Browser and Attributes Views
The attributes are grouped into columns, the categories. Bankname, Type, SubType, and Mode
are used.
▪ Type specifies the general type of instrument, for example Synth, Bass, or Soundscape.
▪ SubType refines what was selected in Type, for example SynthLead could be refined by se-
lecting ClassicMonoLead, ClassicPolyLead, etc.
Reference
▪ Mode describes the sound’s articulation and timbre, Arpeggiated, Tempo-synced, Additive,
Granular are examples.
Each of these categories contains a list of attributes describing possible characteristics a given
Sound might have.
To search for a sound within the database, simply select or deselect single attributes by clicking them with the mouse. Any number of attributes can be combined to narrow your search,
except that you can only use one attribute of the Type category. The Clear button deselects all
currently activated attributes. Each additional attribute that you select reduces the total number of matching Sounds in the list at right. The remaining Sounds are displayed in the Search
Results.
Instead of browsing the database by using the attributes you can also search for sounds by entering a search term into the Search Term text field. When you enter a term here and press Enter, the MASSIVE Browser will search through all Sound file names as well as all the text fields
of Meta Information. By using this feature you can, for example, search for all sounds sharing
the same word in their names, all sounds created by a particular author, or you can find those
MASSIVE - Manual - 100
 Loading...