

NAD S-400 Owners manual

S400
RDS FM Tuner
Owner’s Manual
GB
Manuel d’Installation
F
Bedienungsanleitung
D
Manual del Usuario
E
Manuale delle Istruzioni
I
Manual do Proprietário
P
Bruksanvisning
S
Warning: To reduce the risk of fire or electric shock, do not
expose this unit to rain or moisture.
The lightning flash with an arrowhead symbol within an equilateral
triangle, is intended to alert the user to the presence of uninsulated
“dangerous voltage” within the product’s enclosure that may be of
sufficient magnitude to constitute a risk of electric shock to persons.
The exclamation point within an equilateral triangle is intended to
alert the user to the presence of important operating and
maintenance (servicing) instructions in the literature accompanying
the product.
Do not place this unit on an unstable cart, stand or tripod, bracket
or table. The unit may fall, causing serious injury to a child or adult
and serious damage to the unit. Use only with a cart, stand, tripod,
bracket or table recommended by the manufacturer or sold with
the unit. Any mounting of the device on a wall or ceiling should
follow the manufacturer’s instructions and should use a mounting
accessory recommended by the manufacturer.
An appliance and cart combination should be moved with care.
Quick stops, excessive force and uneven surfaces may cause the
appliance and cart combination to overturn.
Read and follow all the safety and operating instructions before
connecting or using this unit. Retain this notice and the owner’s
manual for future reference.
All warnings on the unit and in its operating instructions should be
adhered to.
Do not use this unit near water; for example, near a bath tub,
washbowl, kitchen sink, laundry tub, in a wet basement or near a
swimming pool.
The unit should be installed so that its location or position does not
interfere with its proper ventilation. For example, it should not be
situated on a bed, sofa, rug or similar surface that may block the
ventilation openings; or placed in a built-in installation, such as a
bookcase or cabinet, that may impede the flow of air through its
ventilation openings.
The unit should be situated from heat sources such as radiators,
heat registers, stoves or other devices (including amplifiers) that
produce heat.
The unit should be connected to a power supply outlet only of the
voltage and frequency marked on its rear panel.
The power supply cord should be routed so that it is not likely to be
walked on or pinched, especially near the plug, convenience
receptacles, or where the cord exits from the unit.
Unplug the unit from the wall outlet before cleaning. Never use
benzine, thinner or other solvents for cleaning. Use only a soft
damp cloth.
The power supply cord of the unit should be unplugged from the
wall outlet when it is to be unused for a long period of time.
Care should be taken so that objects do not fall, and liquids are not
spilled into the enclosure through any openings.
This unit should be serviced by qualified service personnel when:
A. The power cord or the plug has been damaged; or
B. Objects have fallen, or liquid has been spilled into the unit; or
C. The unit has been exposed to rain or liquids of any kind; or
D. The unit does not appear to operate normally or exhibits a
marked change in performance; or
E. The device has been dropped or the enclosure damaged.
DO NOT ATTEMPT SERVICING OF THIS UNIT
YOURSELF. REFER SERVICING TO QUALIFIED
SERVICE PERSONNEL
Upon completion of any servicing or repairs, request the service
shop’s assurance that only Factory Authorized Replacement Parts
with the same characteristics as the original parts have been used,
and that the routine safety checks have been performed to
guarantee that the equipment is in safe operating condition.
REPLACEMENT WITH UNAUTHORIZED PARTS MAY RESULT IN FIRE,
ELECTRIC SHOCK OR OTHER HAZARDS.
ATTENTION
POUR ÉVITER LES CHOC ELECTRIQUES, INTRODUIRE LA
LAME LA PLUS LARGE DE LA FICHE DANS LA BORNE
CORRESPONDANTE DE LA PRISE ET POUSSER JUSQU’AU
FOND.
CAUTION
TO PREVENT ELECTRIC SHOCK, MATCH WIDE BLADE OF
PLUG TO WIDE SLOT FULLY INSERT.
If an indoor antenna is used (either built into the set or installed
separately), never allow any part of the antenna to touch the metal
parts of other electrical appliances such as a lamp, TV set etc.
CAUTION
POWER LINES
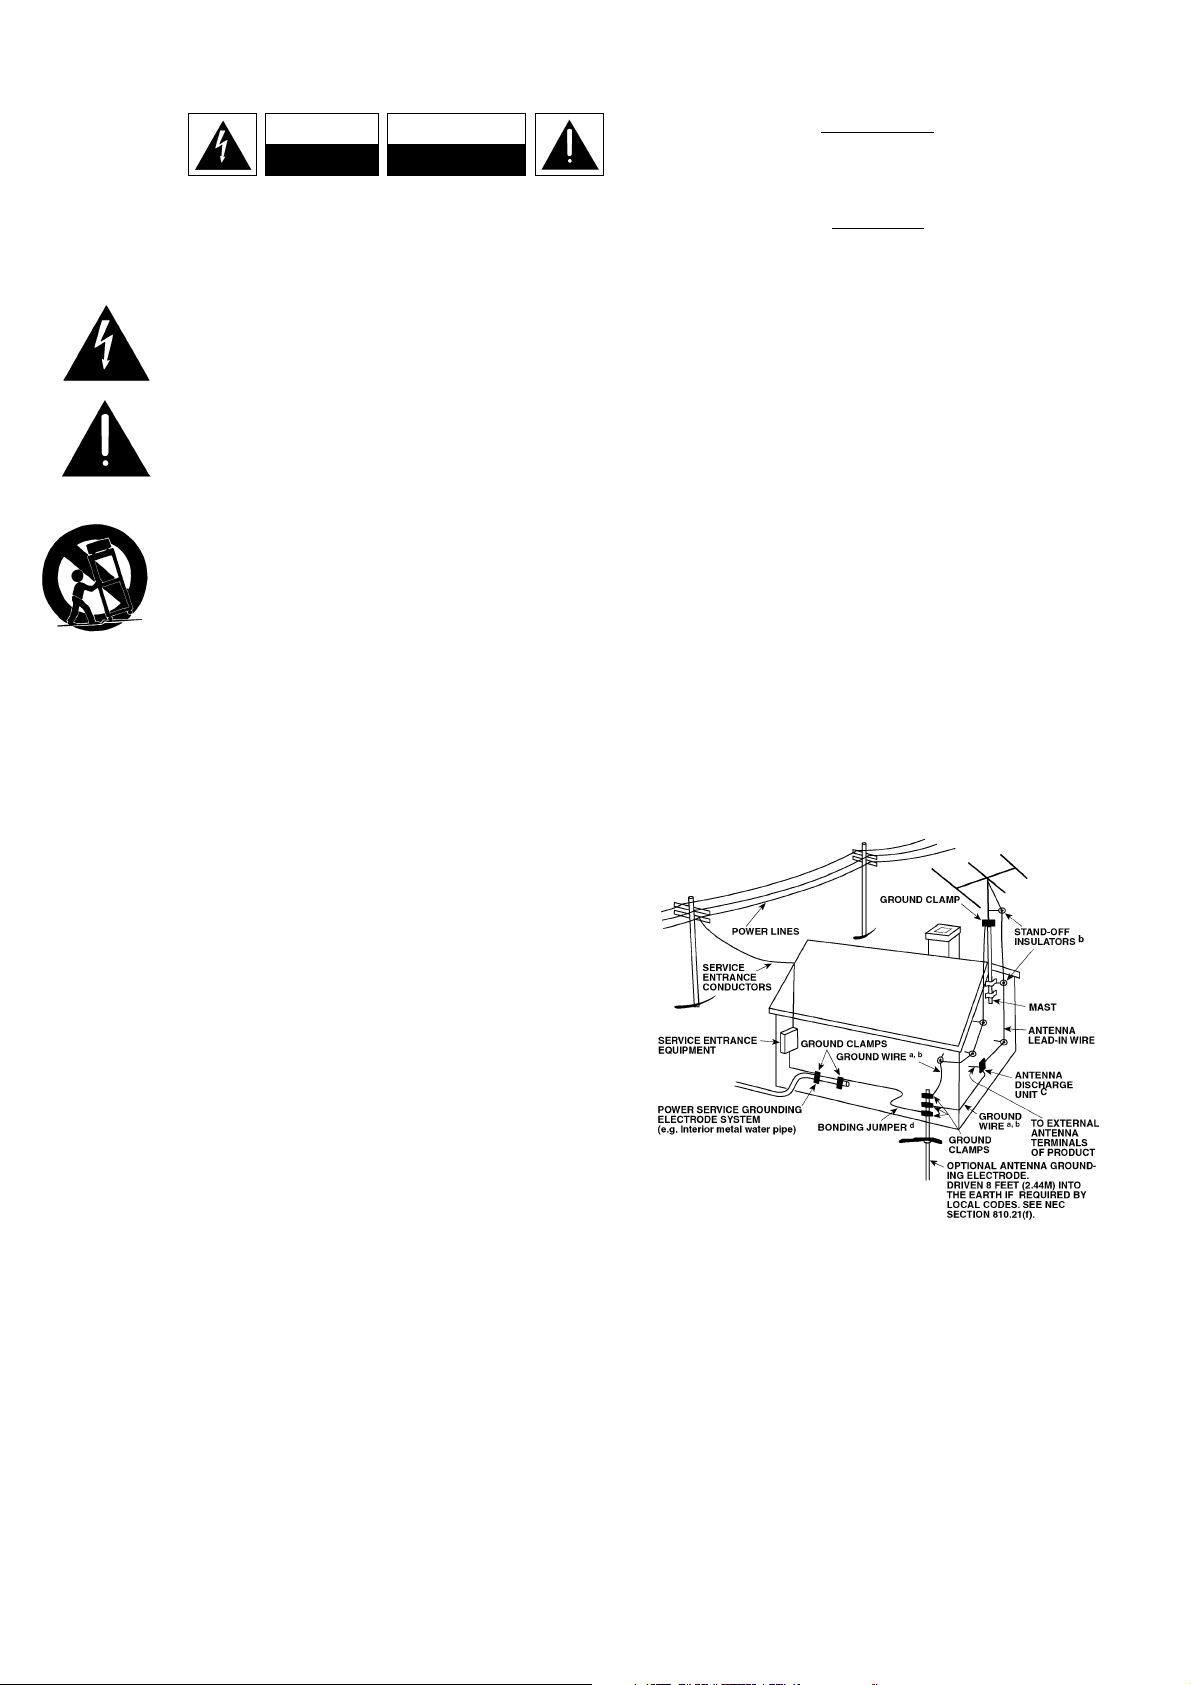
Any outdoor antenna must be located away from all power lines.
OUTDOOR ANTENNA GROUNDING
If an outside antenna is connected to your tuner or tunerpreamplifier, be sure the antenna system is grounded so as to
provide some protection against voltage surges and built-up static
charges. Article 810 of the National Electrical Code, ANSI/NFPA No.
70-1984, provides information with respect to proper grounding of
the mast and supporting structure, grounding of the lead-in wire to
an antenna discharge unit, size of grounding conductors, location of
antenna discharge unit, connection to grounding electrodes and
requirements for the grounding electrode.
a. Use No. 10 AWG (5.3mm2) copper, No. 8 AWG (8.4mm2)
aluminium, No. 17 AWG (1.0mm2) copper-clad steel or bronze
wire, or larger, as a ground wire.
b. Secure antenna lead-in and ground wires to house with stand-off
insulators spaced from 4-6 feet (1.22 - 1.83 m) apart.
c. Mount antenna discharge unit as close as possible to where lead-
in enters house.
d. Use jumper wire not smaller than No.6 AWG (13.3mm2) copper,
or the equivalent, when a separate antenna-grounding electrode
is used. see NEC Section 810-21 (j).
EXAMPLE OF ANTENNA GROUNDING AS PER NATIONAL ELECTRICAL
CODE INSTRUCTIONS CONTAINED IN ARTICLE 810 - RADIO AND
TELEVISION EQUIPMENT.
NOTE TO CATV SYSTEM INSTALLER: This reminder is
provided to call the CATV system installer’s attention to
Article 820-40 of the National Electrical Code that provides
guidelines for proper grounding and, in particular, specifies
that the ground cable ground shall be connected to the
grounding system of the building, as close to the point of
cable entry as practical.
CAUTION
RISK OF ELECTRIC
SHOCK DO NOT OPEN
A TTENTION:
RISQUE DE CHOC ELECTRIQUE
NE PAS OUVRIR
CAUTION: TO REDUCE THE RISK OF ELECTRIC
SHOCK, DO NOT REMOVE COVER (OR BACK). NO
USER SERVICEABLE PARTS INSIDE. REFER SERVICING
TO QUALIFIED SERVICE PERSONNEL.
IMPORTANT SAFETY INSTRUCTIONS
2
3
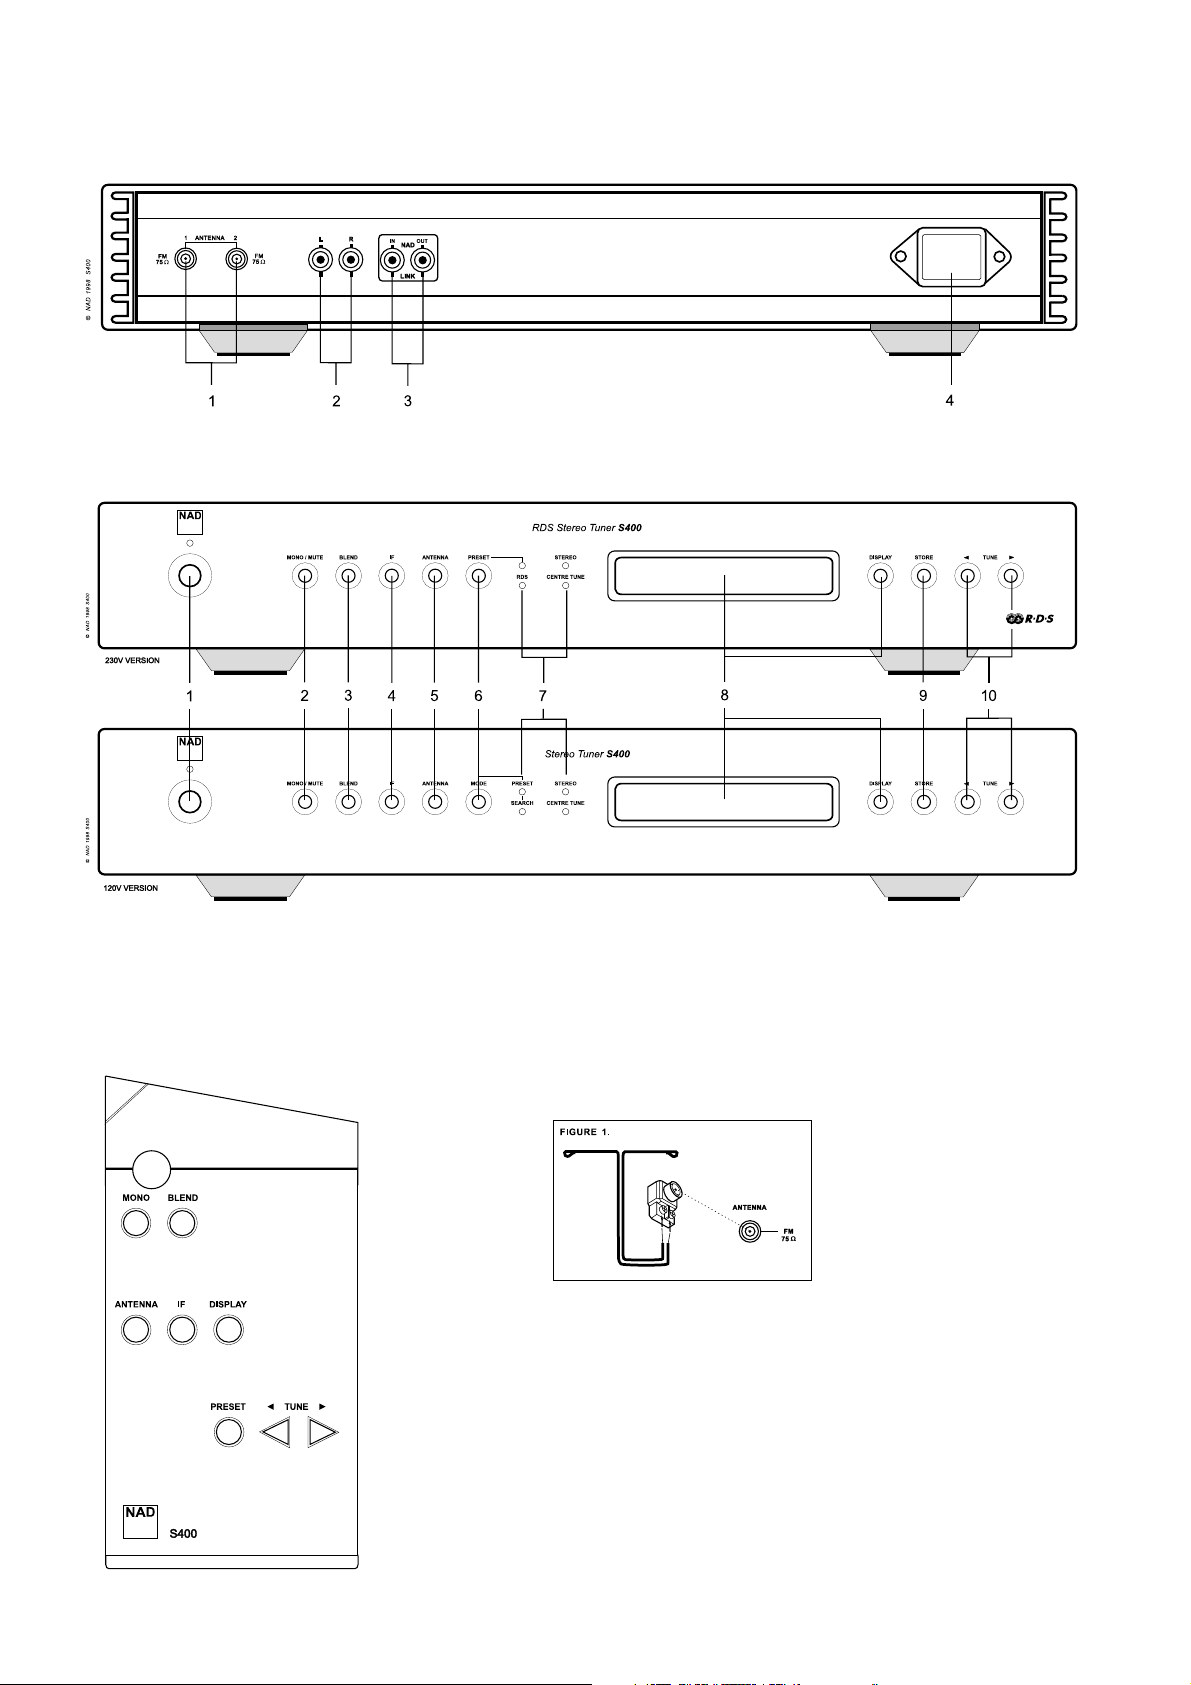
FRONT PANEL CONTROLS
REAR PANEL CONNECTIONS
REMOTE CONTROL

QUICK START
Use the RCA-to-RCA lead to connect the S400 left & right outputs to
the tuner inputs of your amplifier.
1. Plug in the AC Mains cable.
2. Connect FM antenna.
3. Connect S400 outputs to amplifier.
4. Press the POWER button to turn on the S400.
5. Select antenna input to which aerial is connected.
6. Press TUNE or for one second to activate Search mode.
7. When a station is found, search will stop.
NOTES ON INSTALLATION
Your S400 should be placed on a firm, level surface. Avoid placing
the unit in direct sunlight, near sources of heat and damp or in
poorly ventilated positions.
It comes with RCA leads for connection to your amplifier. Ensure that
leads and connectors are not damaged in any way and all connectors
are firmly pushed home.
If the unit is not going to be used for some time, disconnect the plug
from the AC socket.
Should water get into your S400, shut off the power to the unit
and remove the AC Mains cable from the AC socket. Have the
unit inspected by a qualified service technician before attempting
to use it again.
Do not open the tuner or attempt to modify or repair it
yourself. Refer all servicing to a qualified technician. Do not
remove the cover, there are no user-serviceable parts inside.
Use a dry soft cloth to clean the unit. If necessary, lightly dampen the
cloth with soapy water. Do not use solutions containing benzol or
other volatile agents.
REAR PANEL CONNECTIONS
1. FM ANTENNA
The S400 is equipped with two antenna connectors to allow you to
connect simultaneously to for example a cable network and an
outdoor aerial.
A ribbon wire FM antenna is included in order to permit reception
even if no outdoor antenna or cable is available. It should be
connected to one of the FM connectors at the rear of the unit using
the ‘balun’ adapter supplied. See Figure 1.
The ribbon aerial should be mounted on a vertical surface and placed
so that it forms a ‘T’. Experiment with placement of the indoor
antenna to find the position that gives the best signal strength and
lowest background noise. An inadequate FM signal normally results
in high levels of hiss, especially in stereo, and interference from
external electrical sources. In areas of poor FM reception, the tuner
performance can be improved by using an externally mounted FM
antenna. A qualified aerial installer will be able to advise and fit a
recommended aerial for your reception conditions.
2. OUTPUT
Using twin RCA-to-RCA leads, connect the Left (white) and Right
(red) audio outputs to the ‘Tuner’ input or other line-level input such
as ‘Aux’ input of your amplifier.
3. NAD-LINK IN/OUT
The NAD-Link connector is used to pass commands from other units
fitted with NAD-Link connectors. This allows centralised control of a
complete system, and also allows some of the basic functions of the
S400 to be controlled using a NAD-Linked amplifier’s remote control
or gives system control from more than one room. To function with
such other units, connect the Tuner’s NAD-Link IN to the NAD-Link
OUT on the other unit. NAD-Link connectors can be daisy-chained,
IN to OUT, so that a whole system can be controlled from the remote
control facilities of one unit.
4. IEC AC MAINS INPUT
The S400 comes supplied with a separate AC mains cable. Before
connecting the cable to a live wall socket, ensure that it is firmly
connected to the NAD S400’s AC Mains input socket first. Always
disconnect the AC mains cable plug from the live wall socket first
before disconnecting the cable from the S400 Mains input socket.
FRONT PANEL CONTROLS
1. POWER ON/OFF
Press this button to switch on the power to the S400. Press again
and release to switch the power off. The display window lights up
when power is ON. The blue LED above the POWER button lights up
briefly when ON/OFF is activated, but it goes out again immediately.
The blue LED lights up permanently only to indicate stand-by if the
unit is turned off from an NAD system remote control with STANDBY
button. If this option is used, the S400 may be switched on again by
pressing the STANDBY button of the system remote, or by pressing
and releasing the POWER button on the front of the S400 to switch
it off, and then press it again to switch it on. Please note that the
remote control which comes with the S400 does not feature a
STANDBY button.
The S400 uses a non-volatile memory to store preset information.
This information is retained even if the unit is switched off
completely or unplugged.
NOTE: When switching power On, the S400 will go back to the
station last tuned to before the unit was turned off. This will allow
you to make timer recordings using an external timer and recorder.
2. MONO/MUTE
Switches between Stereo mode with Muting (Mute) on and Mono
mode with Muting off. Muting suppresses stations that are too weak
to be received well. If Muting is switched off, even very weak
stations may be heard. As these will always be too weak for stereo
reception, Mono is activated simultaneously. The first press of the
button shows Mute On or Off as well as Stereo or Mono in the
display panel. Press Mute again within approx. five seconds to turn
Muting off (or on) and at the same time switch from stereo to mono.
GB
4
NAD S400 RDS FM Tuner

3. BLEND
High Blend is used for stations that are too remote or weak to permit
noise-free reception in stereo. In order to reduce noise and hiss, this
feature “blends” the stereo channels into mono within a narrow
audio frequency band, thereby reducing hiss considerably while still
maintaining good stereo separation. Pressing BLEND first shows the
status in the display panel. Pressing again within approx. five seconds
changes to ON or OFF.
4. IF
Intermediate Frequency control. Changes the IF between two values,
WIDE for the best possible sound quality and NARROW to remove
interference between stations that are very close to each other in
frequency. Pressing IF first shows the status in the display panel.
Pressing again within approx. five seconds changes to NARROW or
WIDE.
5. ANTENNA
Switches between one of the two antennas that may be connected
to the S400. Pressing ANTENNA first shows the status in the display
panel (Antenna 1 or 2). Pressing again within approx. five seconds
cycles between the two. Simultaneously, the signal strength for the
current antenna is shown as “S” and 0 to 9, where 0 is minimum or
no signal and 9 is maximum signal strength.
6. PRESET (230V VERSION)
OR MODE (120V VERSION)
The PRESET (or MODE) button switches between two ways of using
the TUNE buttons or .
Press the PRESET (or MODE) button until the “PRESET” LED lights up.
Press the button to scroll to a lower number preset. Press the
button to scroll to a higher preset number. A total of 30 preset
memories are available. This is a “wrap-around” function, so that
going from the highest number preset the tuner will go to the
lowest preset number when is pressed.
Refer to section 10. STORING AND RECALLING PRESETS.
NOTE: In the 120V North America version of the S400, which is not
equipped with RDS, the PRESET button is named MODE. It switches
between the Preset and Search functions indicated by the PRESET
and SEARCH LED’s lighting up alternately.
7. LED INDICATORS
The PRESET indicator is explained under section 6. PRESET.
The RDS indicator lights up when a station broadcasting RDS data is
received.
The SEARCH indicator lights up (in 120V version only) when the
S400 is in Search mode.
The STEREO indicator lights up when the S400 receives a stereo
broadcast.
The CENTRE TUNE indicator lights up when the S400 is tuned to the
exact frequency of the transmitter.
8. DOT MATRIX DISPLAY AND DISPLAY BUTTON
The display is the centre of information. It is controlled by the
DISPLAY button, which allows you to read out various details about
the broadcasts.
1. When the S400 is switched on, the display shows the frequency,
the signal strength and the Preset number (if any).
2. After 3 seconds, the display switches to RDS station name and
frequency, or manually entered name. If there is no RDS data or
name, the display remains as a).
3. If the DISPLAY button is pressed, the display shows RADIO TEXT if
the station features this.
4. Pressing the DISPLAY button once more changes back to 1.
5. If the DISPLAY button is pressed and held down, the display will
scroll through the above information followed by all setup details
for Mute, IF, Antenna and Blend. Each line is shown for 2 seconds.
9. STORE
The STORE button is used to store stations into the Preset Memory.
Used in conjunction with the PRESET (or MODE) and TUNE buttons.
10. TUNE AND
The function of these buttons depends on the tuning mode
indicated in the display panel.
In normal operation there are 2 modes:
a) Preset mode Press the PRESET (or MODE) button until the
“PRESET” LED lights up. See section 6. PRESET.
b) Search mode Press the PRESET(or MODE) button until the
“PRESET” LED extinguishes (or in 120V versions, until the SEARCH
LED lights up).
Now you can use the TUNE buttons or to engage
automatic or manual tuning up or down the frequency band.
Auto By keeping one of the TUNE buttons depressed for more than
approx. one second and then letting go, the tuner will search
automatically for the first reasonably strong radio station, where it
will stop. Press and hold the TUNE button again to start searching
again. If a stereo station is received, the “STEREO” LED will light
up.
Manual By tapping one of the TUNE buttons or rapidly,
you can perform manual tuning up or down the frequency band
for precise tuning to a specific frequency. With each successive tap
of the keys, the tuner will take 0.025MHz steps on so you can
accurately tune into the desired frequency. This tuning mode can
also be useful when trying to receive a radio station, which is too
weak for the Search mode.
GB
5

STORING, RECALLING AND NAMING PRESETS
TO STORE A PRESET
1. Tune to the radio station you wish to enter into a preset. If the
station is transmitting RDS information, the RDS indicator will light
up and station initials or name will be shown in the display panel.
If a non-RDS station is found, then just the frequency will be
shown.
2. To store that station as a preset, press STORE button. The display
will indicate the next available preset number by flashing digits,
e.g. “P12”. If you accept the suggested preset number, press
STORE button again, and the station is now stored in that location.
The preset digits stop flashing. If you want to allocate another
preset number after the first press of STORE button, press TUNE
or until the desired preset number appears flashing.
Then press STORE button for the second time, and the station is
now stored in that location.
3. To exit the Store mode without storing a station, leave all the
controls untouched. The Store mode will automatically cancel itself
after five seconds. The station presets have a non-volatile memory,
so they will remain stored even if the tuner is switched off or
unplugged from the mains supply.
NOTE: You can enter a new station into an unused preset or overwrite an existing programmed Memory preset. By doing this you will
replace all the data previously held on that preset number.
RECALLING A PRESET STATION
1. To select a preset station, select the preset mode by pressing the
PRESET (or MODE) button to light up the “PRESET” LED.
2. Press either the TUNE or button until the right preset is
found and shown in the display panel.
Any unused presets will be skipped.
CANCELLING A STORED PRESET
You can empty a preset by deleting the stored information.
1. Select the preset to be emptied.
2. Press the STORE and PRESET (or MODE) buttons simultaneously to
delete the selected preset. The display shows “Delete XX”.
3. Press STORE button again. The selected preset is deleted.
STORING A STATION NAME
When a station is transmitting RDS information, your NAD S400
tuner will automatically show the station name when its preset is
used. Although the tuner automatically shows the frequency of any
other FM or non-RDS preset station, it also allows you to enter the
station name to make it easier to identify which station is stored in
the Memory Preset.
TO ENTER A NAME
1. Select the preset you want to attach a name to.
2. Press STORE and the display will change to Memory No.
3. Then press DISPLAY and the first space in the display panel will
flash.
4. Press the TUNE or button to scroll and select the first
character (see Character list for reference).
5. Pressing DISPLAY will store the first character and move forward to
the next space on the line.
6. Use the TUNE buttons again to select the next character in the
name and press DISPLAY to store it. Continue until the station
name is complete (up to 8 characters).
7. Press STORE again to store the completed name.
There are 69 characters available including a blank space.
NOTE: This function is available for non-RDS stations and RDS
stations as well. If a manually entered name is stored to an RDS
station, the RDS name will not be displayed. If you want to show RDS
name again, you will have to delete the manually entered name first.
TO DELETE A MANUALLY ENTERED NAME
1. Press STORE and the display will change to Memory No.
2. Press DISPLAY.
3. Then press STORE and the name will be deleted.
NOTE: The 120V versions (North America) do not have RDS (Radio
Data System) but will allow you to name a preset manually.
GB
6
0 1 2 3 4 5 6 7 8 9 . , ! ? - _
A B C D E F G H I J K L M N O P Q R S T U V W X Y Z
a b c d e f g h i j k l m n o p q r s t u v w x y z
Note: ‘_’ = SPACE

GB
7
TROUBLESHOOTING
NO SOUND • Power AC lead unplugged or power not
switched on
• Signal leads incorrectly connected
• Station not selected or weak signal with
FM Mute on
• Internal fuse blown
• Wrong antenna input
• Check AC lead
• Check connections to amplifier
• Re-tune or switch off FM Mute
• Consult dealer
• Change antenna input
Problem Cause Solution
NO SOUND IN ONE CHANNEL • Signal leads to amplifier disconnected or
damaged
• Check leads and connections
NOISE, HISS • Weak signal • Check station tuning
Adjust or replace antenna
WHISTLES OR BUZZES ON FM • Interference from other electrical sources -
computers, games consoles
• Check station tuning. Switch off or move
the source of the electrical noise
NO RDS INFORMATION • Station signal too weak
• Station not transmitting RDS data
• Check station tuning
Adjust or replace antenna
• No remedy
DISTORTION • Multi-path signals or interference from
another station
• Check station tuning
Adjust or replace antenna

DEMARRAGE RAPIDE
Utiliser le câble RCA vers RCA pour relier les sorties gauche et droite
du S400 aux entrées prévues pour le tuner sur votre amplificateur.
1. Brancher le cordon d’alimentation CA.
2. Brancher l’antenne FM.
3. Relier les sorties du S400 à l’amplificateur.
4. Appuyer sur le bouton “Marche/Arrêt” [POWER] pour activer le
S400.
5. Sélectionner l’entrée pour antenne sur laquelle l’antenne va être
branchée.
6. Appuyer sur “Accordage” [TUNE ou ] pendant une
seconde pour activer le mode “Recherche” [SEARCH] .
7. Lorsqu’une station est répérée, la recherche s’arrête.
UN MOT SUR L’INSTALLATION
Positionner votre S400 sur une surface stable et plane. Eviter les
rayons directs du soleil et les sources de chaleur et d’humidité, ainsi
que les endroits où une ventilation correcte ne peut pas être assurée.
Votre S400 est pourvu de câbles RCA pour effectuer les connexions à
votre amplificateur. Vérifier que les câbles et les connecteurs ne
présentent aucune détérioration, et que tous les connecteurs sont
bien enfoncés jusqu’en butée. Si l’appareil doit rester inutilisé
pendant un certain temps, débrancher le cordon d’alimentation de la
prise de secteur murale.
Si de l’eau pénètre dans votre S400, il est absolument nécessaire de
couper l’alimentation de l’appareil et d’enlever le cordon
d’alimentation AC de la prise de secteur murale. Faire contrôler
l’appareil par un technicien de service après-ventes qualifié, avant
toute tentative de remise en service.
Ne jamais ouvrir le tuner ou essayer de le modifier ou de le
réparer vous-même. Confier tout travail d’entretien à un
technicien qualifié. Ne pas retirer le couvercle. A l’intérieur, il
n’y a aucun élément sur lequel l’utilisateur peut intervenir.
Utiliser un chiffon doux sec et propre pour nettoyer l’appareil. Si
nécessaire, humecter le chiffon avec un peu d’eau savonneuse. Ne
pas utiliser de solution contenant du benzol ou quelconque autre
agent volatile.
LIAISONS SUR LE PANNEAU ARRIERE
1. ANTENNE FM
Le S400 est équipé de deux connecteurs d’antenne ce qui vous
permet de le relier simultanément à un réseau de télédistribution et
une antenne montée à l’extérieur.
Une antenne filiaire FM, sous forme de câble plat, est livrée avec le
NAD S400. Cette antenne se branche à l’arrière de l’appareil à l’aide
de l’adaptateur “balun” fourni. Se référer à la Fig. 1. L’antenne plate
doit être fixée à une surface verticale de manière qu’elle forme un ‘T’.
Faire des essais en mettant l’antenne intérieure dans différentes
positions, afin de trouver la position qui assure le meilleur signal
possible avec un minimum de bruit de fond. Un signal FM insuffisant
entraîne beaucoup de sifflements, surtout en réception
stéréophonique, et de l’interférence en provenance de sources
électriques externes. Là où la réception FM est mauvaise, vous
pouvez améliorer l’efficacité du tuner en utilisant une antenne FM
montée à l’extérieur. Un installateur d’antennes qualifié pourra vous
donner les conseils appropriés, et poser une antenne adaptée aux
conditions de réception locales.
2. SORTIE
Au moyen de deux câbles jumelés RCA vers RCA, relier les sorties
audio gauche (blanc) et droite (rouge) à l’entrée ‘Tuner’ ou une autre
entrée de niveau ligne telle que l’entrée ‘Aux’ sur votre amplificateur.
3. ENTREE/SORTIE LIAISON-NAD
[NAD-LINK IN/OUT]
Le connecteur de Liaison-NAD [NAD-Link] sert à relayer les
commandes en provenance d’autres appareils équipés de
connecteurs de Liaison-NAD. Ceci permet de commander une
installation complète à partir d’un point central, et de commander
également les fonctions de base du S400 au moyen d’une
télécommande d’amplificateur reliée par une liaison-NAD, ou de
commander le système entier à partir de plusieurs pièces. Afin que le
Tuner puisse fonctionner avec d’autres appareils, il faut relier
l’ENTREE Liaison-NAD du Tuner à la SORTIE Liaison-NAD de l’autre
appareil. Il est possible de relier les connecteurs de Liaison-NAD en
chaîne, ENTREE vers SORTIE, et donc de commander tout un réseau
d’appareils à l’aide de la télécommande d’un seul d’entre eux.
4. ENTREE ALIMENTATION EN CA I.E.C.
Votre appareil S400 est livré avec un cordon d’alimentation CA
détaché. Avant de brancher le cordon dans une prise de secteur
murale sous tension, il faut vérifier en premier lieu que le cordon soit
bien enfoncé jusqu’en butée dans la prise d’entrée d’alimentation
CA du NAD S400. Toujours débrancher le cordon de la prise de
secteur murale sous tension avant de débrancher le cordon de la
prise d’entrée d’alimentation sur le S400.
F
8
Tuner NAD S400

LIAISONS SUR LA FACE PARLANTE
1. ARRET/MARCHE [POWER ON/OFF]
Appuyer sur ce bouton-poussoir pour mettre le S400 sous tension. Pour
couper l’alimentation du lecteur, réapppuyer sur ce bouton-poussoir et
ensuite le relâcher. La fenêtre de visualisation s’allume lorsque l’appareil
est mis sous tension [ON]. Le voyant LED bleu au-dessus du bouton
“Marche-Arrêt” [POWER] s’allume brièvement lorsque le bouton
“Marche/Arrêt] [POWER] est activé, mais il s’éteint de suite.
Le voyant LED blue s’allume uniquement en permanence lorsque
l’appareil se trouve en mode “Veille” [STANDBY], après avoir été mis
hors tension par une télécommande NAD équipée d’un bouton
“veille” [STANDBY]. Si vous vous servez de cette option, vous pouvez
toujours remettre l’appareil sous tension en réappuyant sur le bouton
[STANDBY] de la télécommande, ou en appuyant et en relâchant le
bouton [POWER] sur la face parlante du S400 pour mettre l’appareil
hors tension [Off], et en réappuyant pour le remettre sous tension
[OFF]. Veuillez noter que la télécommande livrée avec le S400 n’offre
pas la facilité du bouton [STANDBY].
Le tuner S400 dispose d’une mémoire rémanente pour mémoriser les
informations des stations préréglées. Ces informations sont retenues
en mémoire même lorsque l’appareil est tout à fait mis hors tension
ou débranché.
NOTA: Dès que le S400 est mis sous tension, il se règle
automatiquement sur la dernière station sélectionnée avant la mise
hors tension. Cette facilité vous permet de faire des enregistrements
chronométrés à l’aide d’une minuterie et un enregistreur externe.
2. MONO/SILENCIEUX DE RECHERCHE
[MONO/MUTE]
Ceci vous permet de changer entre le mode Stéréo avec Silencieux
de Recherche [Mute) et le mode Mono sans Silencieux de Recherche
(Mute). Le Silencieux de Recherche [Mute] supprime les stations trop
faibles et n’offrant pas une bonne réception. Lorsque le Silencieux de
Recherche est désactivé, même des stations très faibles peuvent être
captées. Puisque ces dernières seront toujours trop faibles pour la
réception stéréo, le mode Mono est activé simultanément. Une
première impulsion sur le bouton a comme effet la visualisation
“Silencieux de Recherche - Arrêt ou Marche” [MUTE - ON /OFF] ainsi
que la mention “Stéréo” ou “Mono” sur le panneau d’affichage.
Réappuyer sur [MUTE] dans un délai d’env. 5 s afin d’activer ou de
désactiver le silencieux de recherche et pour changer en même
temps de stéréo en mono.
3. MELANGE [BLEND]
L’on utilise le Haut Mélange [High Blend] pour les stations
excessivement éloignées ou faibles afin d’assurer une réception sans
sifflements en mode stéréo. En vue de réduire le bruit de fond et les
sifflements, cette caractéristique “mélange” les voies stéréo en mono
dans une bande de fréquences audio étroite. Ceci a comme effet de
réduire les sifflements de façon considérable tout en gardant une
bonne séparation stéréo. Une impulsion sur [BLEND] visualise l’état
sur l’affichage. Une deuxième impulsion dans les cinq secondes
suivantes soit active ou désactive la fonction [BLEND].
4. FREQUENCE INTERMEDIAIRE [FI]
Réglage de la Fréquence Intermédiaire. Il fait basculer la [IF] entre les
deux valeurs, “Large” [WIDE] pour la meilleure qualité du son possible
et “Etroit” [NARROW] pour éliminer le brouillage entre les stations dont
les fréquences sont très rapprochées. Une impulsion sur “Fréquence
Intermédiaire” [IF] signale d’abord l’état sur le panneau d’affichage.
Une nouvelle impulsion dans env. les cinq secondes suivantes assure le
basculement sur “Etroit” [NARROW] ou “Large” [WIDE].
5. ANTENNE [ANTENNA]
Cette commande permet de basculer entre les deux antennes qui
sont peut-être reliées au S400. Une première impulsion sur
[ANTENNA] signale d’abord l’état sur l’affichage (Antenne 1 ou 2).
Une nouvelle impulsion dans env. les cinq secondes suivantes assure
le basculement entre les deux. En même temps, la puissance du
signal pour l’antenne actuelle est affichée comme [S] de 0 à 9, où 0
veut dire un signal minimal ou pas de signal du tout, et 9 veut dire
une puissance de signal maximale.
6. STATION PREREGLEE [PRESET] (VERSION
230V) OU MODE (VERSION 120V)
Le bouton [PRESET] (ou [MODE]) bascule entre les deux manières
d’utiliser les boutons “Accordage” [TUNE] ou .
Appuyer sur le bouton [PRESET] (ou [MODE]) jusqu’à ce que le
voyant LED [PRESET] s’allume.
Appuyer sur le bouton pour faire le défilement jusqu’à une
station préréglée ayant un numéro plus bas. Appuyer sur le bouton
pour faire le défilement vers une station ayant un numéro plus
haut. Il est possible de mettre 30 stations préréglées en mémoire. Il
s’agit d’une fonction à “renouement”, ce qui signifie que lorsque
vous appuyez sur , le tuner passera de la station préréglée ayant
le numéro le plus haut à la station ayant le numéro le plus bas.
Se référer à la Section 10. MISE EN MEMOIRE ET RAPPEL DES
STATIONS PREREGLEES
NOTA: Sur la version de 120V du S400 pour l’Amérique du Nord,
qui n’est pas équipée de la fonction RDS, le bouton “Station
Préréglée” [PRESET] s’appelle [MODE]. Il permet le basculement entre
les fonctions “Station Préréglée” [PRESET] et “Recherche” [SEARCH],
qui elles sont signalées par leurs voyants qui s’allument en
alternance.
7. VOYANTS “LED”
La section 6 contient une explication sur le voyant “Station
Préréglée” [PRESET].
Le voyant RDS s’allume, lorsque vous vous accordez sur une station
qui transmet les informations RDS.
Le voyant “Recherche” [SEARCH] s’allume (seulement sur la version
de 120V) lorsque le tuner S400 est en mode “Recherche” [SEARCH].
Le voyant [STEREO] s’allume, lorsque le S400 capte une émission en
stéréo.
Le voyant “Accordage Central” [CENTRE TUNE] s’allume lorsque
vous accordez votre S400 sur la fréquence exacte de l’émetteur.
F
9

8. AFFICHAGE MATRICIEL ET BOUTON D’AFFICHAGE
L’affichage est le centre des renseignements. Il est commandé par le
bouton d’affichage [DISPLAY], qui vous permet de lire des
renseignements divers concernant les émissions.
1. Lorsque le S400 est mis sous tension, l’affichage signale la
fréquence, la puissance du signal et le numéro de la station
préréglée (si disponible).
2. Après un délai de 3 secondes, l’affichage signale le nom de la
station RDS ainsi que sa fréquence, ou le nom qui a été entré
manuellement. Si les données RDS ou le nom ne sont pas
disponibles, l’affichage reste comme auparavant (1).
3. Si vous appuyez sur le bouton “Affichage” [DISPLAY], l’affichage
signalera [RADIO TEXT] si cette fonction est offerte par la station.
4. Une nouvelle impulsion sur le bouton [DISPLAY] remettra
l’affichage en état (1).
5. Si vous appuyez sur le bouton [DISPLAY] et vous le tenez enfoncé,
l’affichage fera défiler les informations ci-dessus ainsi que tous les
détails de réglage pour “Silencieux de Recherche” [MUTE],
“Fréquence Intermédiaire” [IF], [ANTENNA] et “Mélange” [BLEND].
Chaque ligne reste affichée pendant 2 secondes.
9. MISE EN MEMOIRE [STORE]
Le bouton “Mise en Mémoire” [STORE] sert à stocker les stations
dans la Mémoire des Stations Préréglées [Preset Memory]. Il s’utilise
ensemble avec les boutons “Station Préréglée” [PRESET] (ou MODE)
et “Accordage” TUNE.
10. ACCORDAGE ET
[TUNE ET ]
La fonction de ces boutons dépend du mode d’accordage qui est
signalé sur l’affichage.
a) Mode Preset Appuyer sur le bouton “Station Préréglée” [PRESET]
(ou MODE) jusqu’à ce que le voyant LED “PRESET” s’allumee. Se
référer à la section 6. “Station Préréglée” PRESET.
b) Search mode Appuyer sur le bouton “Station Préréglée” PRESET
(ou MODE) jusqu’à ce que le voyant LED “PRESET” s’éteigne (ou
sur les versions de 120V, jusqu’à que le voyant LED “Recherche”
[SEARCH] s’allume.
Maintenant vous pouvez utiliser les boutons d’accordage [TUNE]
ou pour activer l’accordage automatique ou manuel en
ascendant ou descendant la bande de fréquences.
[Auto] En tenant un des boutons d’accordage [TUNE] enfoncé pendant
env. plus d’une seconde et en le relâchant ensuite, le tuner cherchera
automatiquement la première station dont le signal est suffisamment
puissant, où le tuner s’arrêtera. Réappuyer sur le bouton [TUNE] et le
tenir enfoncé pour recommencer la recherche. Dès qu’une station
stéréo est captée, le voyant LED [STEREO] s’allume.
[Manual] Une impulsion légère et rapide sur un des boutons
d’accordage [TUNE] ou , vous permet de faire des essais
d’accordage en ascendant ou en descendant la bande de fréquences
afin d’obtenir un accordage exact sur une fréquence spécifique.
Chaque impulsion légère sur les touches entraîne le tuner à effectuer
des pas de 0,025MHz ce qui vous permet de l’accorder de manière
précise sur une fréquence voulue. Ce mode d’accordage est
également utile lorsque l’on tâche de capter une station radio, qui est
trop faible pour être captée en mode “Recherche” [SEARCH].
MISE EN MEMOIRE, RAPPEL ET DEFINITION
DES STATIONS PREREGLEES
POUR METTRE UNE STATION PRÉRÉGLÉE EN MÉMOIRE
1. Régler la station radio que vous désirez mettre en mémoire comme
une station préréglée. Si la station émet des informations RDS, le
voyant RDS s’allumera et les initiales ou le nom de la station seront
signalés sur l’affichage. Si le tuner répère une station sans RDS,
seule la fréquence sera affichée.
2. Pour mettre cette station en mémoire comme une station
préréglée, appuyer sur le bouton “mise en mémoire” [STORE].
L’affichage signalera le prochain numéro des stations préréglées qui
est libre, en faisant clignoter ce numéro, par ex. “P12”. Si vous
acceptez le numéro qui vous est suggéré, réappuyer sur le bouton
[STORE], et la station est mise en mémoire et attribuée à ce
numéro. Les numéros s’arrêtent de clignoter. Si vous désirez
attribuer un autre numéro des stations préréglées après la première
impulsion sur le bouton de mise en mémoire [STORE], appuyer
alors sur “Accordage” [TUNE] ou jusqu’à ce que le
numéro des stations préréglées requis commence à clignoter.
Ensuite appuyer une deuxième fois sur le bouton [STORE], et la
station est attribuée à ce numéro.
3. Pour quitter le mode [STORE] sans effectuer une mise en mémoire,
veuillez ne pas toucher aux commandes. Le mode [STORE]
s’annulera automatiquement après cinq secondes. Les stations
préréglées sont mises en mémoire rémanente, ce qui signifie
qu’elles resteront en mémoire même si le tuner est désactivé ou
débranché du secteur.
NOTA: Il est possible d’entrer une nouvelle station sous un numéro
non attribué ou de superposer une station préréglée déjà
programmée en mémoire. Ceci efface toutes les anciennes données
mémorisées sous ce numéro.
RAPPEL D’UNE STATION PREREGLEE
1. Pour sélectionner une station préréglée, il faut sélectionner le mode
station préréglée par une impulsion sur le bouton [PRESET] ou
(MODE) pour activer le voyant LED “PRESET”.
2. Appuyer soit sur “Accordage” [TUNE] ou jusqu’à ce
que la station préréglée soit répérée et signalée sur l’affichage.
Toutes les stations préréglées non attribuées seront ignorées.
ANNULER UNE STATION PREREGLEE
MEMORISEE
Il est possible de libérer une station préréglée en effaçant toutes les
données mises en mémoire.
1. Sélectionner la station préréglée à effacer.
2. Appuyer simultanément sur les boutons “Mise en mémoire”
[STORE] et “Station Préréglée” [PRESET] (ou MODE) afin d’effacer
la station préréglée de votre choix. L’affichage signale “effacer XX”
[Delete XX].
3. Réappuyer sur le bouton [STORE]. La station préréglée de votre
choix est effacée.
F
10
 Loading...