


 VC70495MEE Rev4_9225 47507 MEE pump - Jon 25/01/2014 15:12 Page 1
Upright steam cleaner
Please read and keep these instructions
Nettoyeur vapeur vertical
Merci de bien vouloir lire et conserver ces instructions
Standdampfreiniger
Lesen Sie diese Bedienungsanleitung, und heben Sie sie gut auf.
Robot de limpieza vapor vertical
Lea estas instrucciones atentamente y guárdelas
Limpador a vapor vertical
Leia e guarde estas instruções
Pulitore a vapore con configurazione a scopa
Leggere e conservare le presenti istruzioni
Opretstående stilling:
Læs, og gem denne vejledning
Stående ångrengörare
Läs och spara dessa anvisningar
Varrellinen höyrypuhdistin
Lue ja säilytä nämä ohjeet
Pionowy odkurzacz parowy
Należy zapoznać się z dołączoną instrukcją obsługi i zachować ją na przyszłość
Вертикальный пароочиститель
Внимательно изучите и сохраните это руководство
Parní čistič pro práci ve vzpřímené poloze
Přečtěte si tyto pokyny a uschovejte si je
Dikey buharlı temizleyici
Lütfen talimatları okuyun ve saklayın
g
f
d
e
p
i
q
s
v
}
≈
∂
t

 VC70495MEE Rev4_9225 47507 MEE pump - Jon 25/01/2014 15:12 Page 2
g
IMPORTANT SAFETY INSTRUCTIONS
The use of any electrical appliance requires the following common sense safety rules.
Please read these instructions carefully before using the product.
•WARNING: Disconnect from the mains supply before carrying out any routine maintenance.
•This appliance can be used by children aged from 8 years and above and persons with reduced physical, sensory or mental capabilities, or lack of experience and knowledge, if they have been given supervision or instruction concerning the use of the appliance in a safe way and understand the hazards involved.
•Children shall not play with the appliance.
•Cleaning and user maintenance shall not be undertaken by children without supervision.
Personal safety
•WARNING: Never direct steam at electrical components or fittings. If in doubt about the suitability of steam for cleaning an appliance, contact the appliance manufacturer for advice prior to cleaning.
•The plug should be removed from the wall socket after use, before cleaning, filling or changing the accessories, or carrying out user maintenance.
•Keep the appliance out of reach of children when it is energised or cooling down.
•WARNING: Never touch the plug or cable with wet hands.
•WARNING: Nozzles and tools will be hot after use. Allow to cool before attempting to remove.
•WARNING: Do not discharge the steam towards people or animals. Danger of scalding.
STEAM
•WARNING: Do not use the appliance without the filler cap in place.
•WARNING: In the event of a blockage, steam will be released from the steam relief vents.
•To protect against fire, electric shock and personal injury, do not immerse cord, plug or cleaner in water or other liquid.
Location
•Do not use or keep this product outside.
•Do not store the appliance near hot surfaces eg. ovens or heating appliances.
Mains cable
•WARNING: A damaged or severed mains cable fitted with a plug should never be connected to the mains supply. It must be destroyed, as a damaged cable becomes hazardous if connected to a power socket.
•If the supply cord is damaged, it must be replaced by the manufacturer, its service agent, or similarly qualified person to avoid a hazard.
•Do not allow the mains lead to become strained.
2
 VC70495MEE Rev4_9225 47507 MEE pump - Jon 25/01/2014 15:12 Page 3
•
•
•
•
•
•
•
•
•
•
•
•
•
•
•
Product safety
WARNING: Always test on an inconspicuous area first. Never use on materials that can not resist high temperature, such as dralon, natural fur etc.
Never modify the steam cleaner in any way.
Never operate the steam cleaner without water in the tank. Always top-up with water during extended periods of use.
Never fill the steam cleaner’s tank with anything other than deionised, demineralised or distilled water.
The appliance is not to be used if it has been dropped, if there are visible signs of damage or if it is leaking.
Other safety considerations
Do not use any chemical detergents, perfumes, alcohol or descaler etc in water.
Repairs to electrical appliances are only to be undertaken by trained personnel.
Unprofessional repairs can be dangerous for users.
Use only genuine Morphy Richards spare parts and accessories. The appliance must never be left running when unsupervised.
This steam cleaner is intended for domestic use only. Misuse or use for commercial or any other purpose will render the guarantee invalid.
Electrical requirements
Check that the voltage on the rating plate of your
appliance corresponds with your house electricity supply which must be A.C. (Alternating Current).
If the socket outlets in your home are not suitable for the plug supplied with this appliance the plug should be removed and the appropriate one fitted.
WARNING:This appliance must be earthed.
Should the fuse in the mains plug require changing, a 13 amp BS1362 fuse must be fitted.
|
|
1 |
|
|
|
|
2 |
|
|
|
|
3 |
|
|
|
|
4 |
|
|
|
|
5 |
|
|
|
|
6 |
|
|
|
|
7 |
|
|
|
|
8 |
|
|
10 |
|
9 |
10 |
g |
|
|
|||
11 |
|
|
12 |
|
13 |
|
13 |
|
|
|
|
f |
||
14 |
|
|
|
|
|
|
|
|
|
15 |
|
|
|
d |
|
|
|
|
|
|
|
16 |
|
|
|
|
17 |
|
e |
|
|
|
|
|
|
|
18 |
|
|
|
|
|
21 |
p |
|
|
|
|
|
19 |
|
|
20 |
i |
|
|
|
|
|
22 |
25 |
|
28 |
q |
|
|
|||
|
|
|
29 |
s |
|
|
|
|
|
23 |
26 |
|
32 |
v |
|
|
|||
|
|
|
30 |
|
|
|
|
|
|
24 |
27 |
|
|
} |
|
|
|
|
|
|
|
|
31 |
≈ |
|
|
|
|
|
|
|
|
|
∂ |
|
|
|
|
t |
|
|
|
|
3 |

 VC70495MEE Rev4_9225 47507 MEE pump - Jon 25/01/2014 15:12 Page 4
1
g Upright steaming |
Hand-held steaming |
|
|
||
f Utilisation verticale |
Utilisation manuelle |
|
d Dampfbehandlung im Stand |
Dampfbehandlung als Handgerät |
|
e Vapor vertical |
Vapor de mano |
|
p Vaporização vertical |
Vaporização manual |
|
i Utilizzo come scopa |
Utilizzo in modalità portatile |
|
q Opretstående stilling |
Håndholdt damprenser |
|
s Stående ångning |
Handstyrd ångning |
|
v Varrellinen höyrypuhdistin |
Käsikäyttöinen höyrypuhdistin |
|
} Pionowe odkurzanie parowe |
Ręczne urządzenie do odkurzania |
|
|
parowego |
|
≈ Вертикальная подача пара |
Ручная подача пара |
|
∂ Parní čištění ve vzpřímené poloze |
Ruční parní čištění |
|
t Dikey buharlama |
Elde taşınabilir buharlama |
|
|
2 |
|
B

 A
A

 D
D 

C 
 E
E
3
4
5
6
7
4

 VC70495MEE Rev4_9225 47507 MEE pump - Jon 25/01/2014 15:12 Page 5
8
9
10
11
22 25
23 |
24 |
26 |
|
|
12 |
27 |
27 |
27 |
|
|
30 |
28 |
29 |
|
|
|
31 |
13
14
g f d
15
e p i q
16s v
}
≈
∂
t
5
 VC70495MEE Rev4_9225 47507 MEE pump - Jon 25/01/2014 15:12 Page 6
g
Contents
Health and safety |
2 |
|
|
Electrical requirements |
3 |
|
|
Product overview / Features |
4 |
|
|
Operating the appliance |
6 |
|
|
Dual functionality |
6 |
|
|
Upright steaming: assembly |
7 |
|
|
Using in upright steamer mode |
7 |
|
|
Using the hand-held steam cleaner |
7 |
|
|
List of attachments for use on the hand-held steamer |
7 |
|
|
The water tank |
8 |
|
|
After use |
8 |
|
|
Storage |
8 |
|
|
Maintenance |
8 |
|
|
Contact us |
8 |
|
|
Guarantee |
9 |
|
|
Getting the best from your new cleaner...
IMPORTANT:To prevent limescale build-up in the water tank, never fill the steam cleaner’s tank with anything other than deionised, demineralised or distilled water (available from most leading supermarkets).
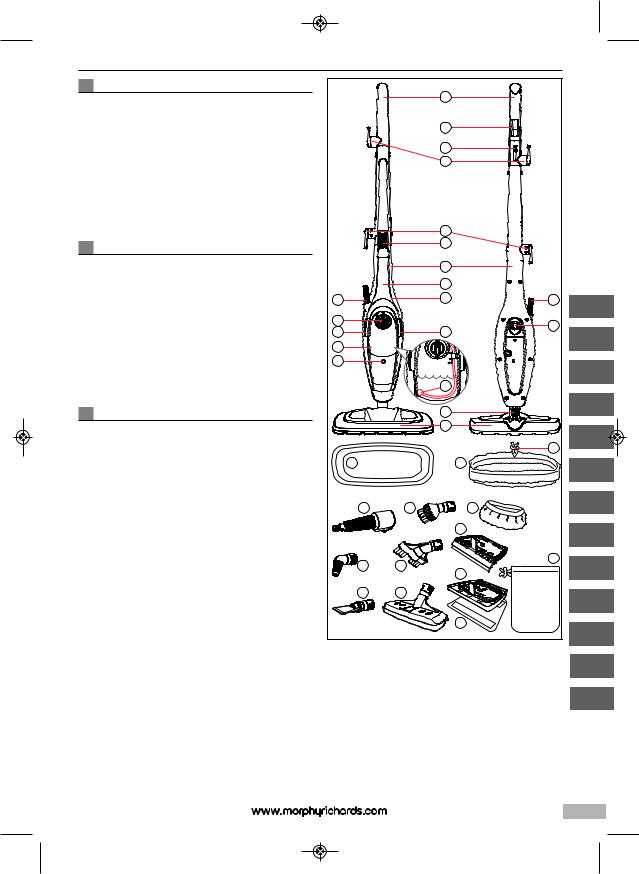
Features
(1)Handle
(2)Steam trigger
(3)Cord holder
(4)Upper cord storage hook (rotatable)
(5)Lower cord storage hook (fixed)
(6)Hand-held release button
(7)Main body
(8)Hand-held steamer
(9)Steam trigger
(on underside of the handle of the hand-held steamer)
(10)Power cord
(11)Filler cap
(12)On/Off power switch
(13)Water tank release buttons
(14)Water tank
(15)Power indicator light
(16)Water tube with brass ball weight attached
(17)Floorhead release button
(18)Floorhead
(19)Carpet glider
(20)Floor cloth
(21)Floor cloth tightening toggle
(22)Accessory adaptor
(23)Angled nozzle attachment
(24)Spatula attachment
(25)Circular brush attachment
(26)Long brush attachment
(27)Utility nozzle
(28)Elasticated utility cloth (attaches to utility nozzle)
(29)Squeegee attachment (attaches to utility nozzle)
(30)Mini cleaning head (attaches to utility nozzle)
(31)Mini cleaning cloth (attaches to mini cleaning head)
(32)Accessory bag
Operating the appliance
IMPORTANT: Please remember that the steam cleaner operates by emitting steam at an increased temperature of 115oC. Always test on an inconspicuous area first. Never use it on objects or surfaces which cannot resist this temperature, or on delicate materials such as dralon, plastic, natural fur etc.
If in doubt, check carefully on a part of the material where minor marks will not matter.
Dual functionality 1
Your steam cleaner can easily be configured into two different cleaning modes:
• Upright steam cleaner for floors and carpets.
• Hand-held steam cleaner (8) for cleaning vertical or hard to reach surfaces.
Attachments (22-31) can be used on the handheld steamer.
6
 VC70495MEE Rev4_9225 47507 MEE pump - Jon 25/01/2014 15:12 Page 7
Upright steaming: Assembly 2
A Insert the handle (1) onto the main body (7).
BInsert one of the screws (supplied) into the hole in the lower cord storage hook (5) and rotate until tight.
Insert the other screw (supplied) into the side of the handle (on the opposite side to the lower cord storage hook) and rotate until tight.
NOTE: Attaching the handle is necessary for first time assembly only.
CLower the main body onto the floorhead (18), with the floorhead release button (17) on the neck of the floorhead to the back of the assembly, until it clicks into place.
DInsert the steam outlet nozzle at the bottom end of the hand-held steamer (8) into the adaptor at the bottom of the space in the front of the main body.
Push the steam cleaner firmly into the space in the main body until it clicks into place.
EAttach the floor cloth (20) to the floorhead and tighten the toggle at the rear.
Using in upright steamer mode
IMPORTANT: Before use, hardfloors should be thoroughly swept and carpets should be thoroughly dry vacuumed. However, we recommend that the steam cleaner is not used on:
•bare wooden floors or any surfaces where wood is exposed (as it will absorb moisture and may distort).
•damaged hardfloors or hardfloors with gaps present (as it will absorb moisture and may distort).
Also, do not keep the mop in one place for an extended period, because the continual heat may cause damage to carpets and laminate flooring.
3Squeeze the buttons (13) on the side of the water tank (14) to remove it from the hand-held steam cleaner (8).
Remove the filler cap (11) by rotating it anti-clockwise to the ‘unlock’ position, then lift it out.
Fill the water tank.
IMPORTANT:To prevent limescale build-up in the water tank, never fill the steam cleaner’s tank with anything other than deionised, demineralised or distilled water (available from most leading supermarkets). Any problems arising from limescale will invalidate the product guarantee.
Replace the filler cap and turn it clockwise to the ‘lock’ position.
Replace the water tank.
4Attach the floor cloth (20) to the floorhead (18), securing it in place by tightening the toggle (21).
5Rotate the upper cord storage hook (4) to quickly release the power cord (10).
Secure the power cord in the cord holder (3).
6WARNING: Before switching ON, ensure the floorhead is located safely away from persons or animals.
Plug in at the mains outlet and switch on the steamer at the
On/Off power switch (12).The power indicator light (15) will illuminate and steam will be ready to be emitted after around 30 seconds (when the steam trigger (2) is pressed).
7Place the floorhead (18) on the floor. Hold the floorhead to the floor with your foot and tilt the main body (7) back.
To emit steam continually, press and hold the steam trigger (2) whilst slowly pushing the cleaner back and forth along the floor. But to prevent over-wetting of the floor, operate the steam trigger intermittently (especially on hard floors).
8If cleaning carpet, rest the floorhead (18) with floor cloth (20) attached into the carpet glider (19) to make it easier to move the floorhead across the carpet.
NOTE:The carpet glider is intentionally a loose fit on the floorhead.
Using the hand-held steam cleaner
9This function is ideal for cleaning vertical surfaces and hard to reach places.
Separate the hand-held steamer (8) from the main body (7) by sliding g the hand-held release button (6) upwards on the front of the main
body.
Pull the hand-held steamer up and out of the main body.
10In order to use all of the accessories, the accessory adaptor (22) must firstly be attached onto the hand-held steamer (8).This can be done by completing the following:
1Slide the adaptor over the nozzle of the steam cleaner with the release catch on the adaptor facing the base of the hand-held steam cleaner.
2Align the keyway on the hand-held steamer with the release catch on the adaptor. Push together and fix into place.
3Attach the desired accessory to the end of the adaptor by aligning the arrow on the accessory with the right-hand arrow on the adaptor and twist the accessory until the arrow aligns with the left arrow of the two on the adaptor.
WARNING: Switch OFF and unplug before changing nozzles. After use, nozzles will be very hot, allow to cool before handling.
List of attachments for use on the handheld steamer 11
•Accessory adaptor (22) this attachment is the base attachment for all hand-held accessories supplied with the product.
•It can also be used alone to clean places or crevices that are not easily accessible.
•Angled nozzle attachment (23) to clean sanitary ware such as toilet bowls, taps or drain covers. Point it directly at non-permanent stains on carpets or upholstery whilst holding a clean cloth near the stained area to capture any loosened dirt.
•Spatula attachment (24) to remove stubborn deposits, or to help deice the refridgerator or freezer.
•Circular brush attachment (25) to remove stains on roomtemperature surfaces, such as tiles, wheel trims, mirrors and windows.
•Long brush attachment (26) to remove dirt from grooves and crevices.
7
 VC70495MEE Rev4_9225 47507 MEE pump - Jon 25/01/2014 15:12 Page 8
12Utility nozzle (27) once attached to the accessory adaptor (22), the utility nozzle is the base attachment for attaching all the following accessories:
•Elasticated utility cloth (28) for covering the utility nozzle when cleaning upholstery and bedding.
13Squeegee attachment (29) can be attached to the utility nozzle by inserting the hooks at the back of the squeegee nozzle into the loops on the back of the utility nozzle, then secure the front of the utility nozzle into the locking clip on the top of the squeegee nozzle (as shown).
•Remove the squeegee after use by holding the locking clip forward.The utlity nozzle should still be hooked into the loops on the rear of the squeegee nozzle, pivot the utility nozzle up and unhook from the loops to lift it away.
14The squeegee nozzle is ideal for cleaning tiled or glass areas such as windows or mirror panels.To clean windows, start at the top, press the squeegee to the surface and drag downwards in straight passes from top to bottom. Wipe the rubber blade and the bottom edge of the window dry after each pass. For small window panels, remove the squeegee tool and spray the steam directly onto the surface. Use the squeegee separately to wipe away the moisture.
WARNING: Do not use on very cold glass, as the sudden temperature change may crack the glass.
•Mini cleaning head (30) with mini cleaning cloth (31) attached attaches to the utility nozzle (using the same method as attaching and unattaching the squeegee nozzle, as shown on the left and above).This accessory is useful for cleaning tiled or glass surfaces, cabinets and worktops in kitchens and bathrooms, plus upholstery, curtains, blinds, pillows and mattresses.
The water tank
The brass ball weight (16)
The brass ball weight inside the water tank is attached to the end of the suction hose.The ball is weighted and designed to freely move around the water tank depending on the position of the product.The ball must remain in the water so steam can be generated whenever the steam trigger is pressed regardless of the orientation of the hand-held steamer.
Rinsing the water tank
Regularly rinse the water tank to release any deposits that have collected on the bottom of the tank. Only use de-ionised, demineralised or distilled water (available from most large supermarkets) and fit the filler cap to allow vigorous rinsing.
After use
Follow the two maintenance steps below after every use.
1Switch the cleaner off and unplug from the socket. Place immediately on a suitable surface (eg. tiled floor) where the residual heat/moisture in the floor nozzle/cloth will not affect the surface. Wait until the cleaner has cooled down completely.
2Empty the water tank (14) by removing the filler cap (11) and pouring out the water. Allow the inside of the water tank to dry out before replacing the filler cap.
8
Storage 16
Wrap the cord around the two cord storage hooks (4/5), rotating the upper storage hook (4) upwards to secure the power cord (10) in place.
Put all accessories into the accessory bag (32) and hang the bag from the upper cord storage hook.
Maintenance
WARNING: Always unplug the Steam cleaner from the mains supply before undertaking any maintenance procedures.
Overall maintenance
Your cleaner is manufactured to withstand normal day-to-day use, but an occasional wipe over with a damp cloth will help maintain it. Abrasive cleaners should not be used.
Cleaning the cloths
The floor cloth (20) and the elasticated utility cloth (28) can all be machine washed (30ºC max). For heavy soiling, soak the cloths in warm water and detergent or a mild stain remover.
IMPORTANT: Do not use bleach or fabric softener.
Allow to completely dry before storing.
Contact our helpline to purchase replacement cloths.
Maintaining the attachments
Dirt and blockages should be regularly removed from the attachments to help prolong their usage.
Contact us
Helpline
If you are having a problem with your appliance, please call our Helpline, as we are more likely to be able to help than the store you purchased the item from.
Please have the product name, model number and serial number to hand when you call to help us deal with your enquiry quicker.
UK Helpline: |
0844 871 0960 |
IRE Helpline: |
1800 409 119 |
Spares: |
0844 873 0726 |
TalkTo Us
If you have any questions or comments, or want some great tips to help you get the most out of your products, join us online:
Blog: |
www.morphyrichards.co.uk/blog |
Facebook: |
www.facebook.com/morphyrichardsuk |
Twitter: |
www.twitter.com/loveyourmorphy |
Website: |
www.morphyrichards.com |
 VC70495MEE Rev4_9225 47507 MEE pump - Jon 25/01/2014 15:12 Page 9
1
2
3
4
5
THIS SECTION IS ONLY APPLICABLE FOR CUSTOMERS IN UK AND IRELAND
REGISTERINGYOURTWOYEAR GUARANTEE
Your standard one year guarantee is extended for an additional 12 months when you register the product within 28 days of purchase with Morphy Richards. If you do not register the product with Morphy Richards within 28 days, your product is guaranteed for 1 year. To validate your 2 year guarantee register with us online at www.morphyrichards.co.uk
N.B. Each qualifying product needs to be registered with Morphy Richards individually. Please refer to the one year guarantee for more information.
YOUR ONE YEAR GUARANTEE
It is important to retain the retailer’s receipt as proof of purchase. Staple your receipt to this back cover for future reference. Please quote the following information if the product develops a fault. These numbers can be found on the base of the product.
Model no. Serial no.
All Morphy Richards products are individually tested before leaving the factory. In the unlikely event of any appliance proving to be faulty within 28 days of purchase, it should be returned to the place of purchase for it to be replaced. If the fault develops after 28 days and within 12 months of original purchase, you should contact the Helpline number quoting Model number and Serial number on the product, or write to Morphy Richards at the address shown.You may be asked to return a copy of proof of purchase. Subject to the exclusions set out below (see Exclusions), the faulty appliance will then be repaired or replaced and dispatched usually within 7 working days of receipt. If, for any reason, this item is replaced during the 1 year guarantee period, the guarantee on the new item will be calculated from original purchase date. Therefore it is vital to retain your original till receipt or invoice to indicate the date of initial purchase. To qualify for the 1 year guarantee, the appliance must have been used according to the instructions supplied. For example, crumb trays should have been emptied regularly.
EXCLUSIONS
Morphy Richards shall not be liable to replace or repair the goods under the terms of the guarantee where:
The fault has been caused or is attributable to accidental use, misuse, negligent use or used contrary to the manufacturer’s recommendations or where the fault has been caused by power surges or damage caused in transit.
The appliance has been used on a voltage supply other than that stamped on the products.
Repairs have been attempted by persons other than our service staff (or authorised dealer).
The appliance has been used for hire purposes or non domestic use.
The appliance is second hand.
6Morphy Richards are not liable to carry out any type of servicing work, under the guarantee.
7Plastic filters for all Morphy Richards kettles and coffee makers are not covered by the guarantee.
8Batteries and damage from leakage are not covered by the guarantee.
9The filters have not be cleaned and replaced as instructed.
This guarantee does not confer any rights other than those expressly set out above and does not cover any claims for consequential loss or damage.This guarantee is offered as an additional benefit and does not affect your statutory rights as a consumer.
YOUR INTERNATIONALTWOYEAR
GUARANTEE
This appliance is covered by two-year repair or replacement warranty.
It is important to retain the retailers receipt as proof of |
g |
purchase. Staple your receipt to this back cover for future |
|
reference. |
|
Please quote the following information if the product develops a fault. These numbers can be found on the base of the product.
Model no. Serial no.
All Morphy Richards products are individually tested before leaving the factory. In the unlikely event of any appliance proving to be faulty within 28 days of purchase it should be returned to the place of purchase for it to be replaced.
If the fault develops after 28 days and within 24 months of original purchase, you should contact your local distributor quoting Model number and Serial number on the product, or write to your local distributor at the addresses shown.
You will be asked to return the product (in secure, adequate packaging) to the address below along with a copy of proof of purchase.
Subject to the exclusions set out below (1-9) the faulty appliance will then be repaired or replaced and dispatched usually within 7 working days of receipt.
If for any reason this item is replaced during the 2-year guarantee period, the guarantee on the new item will be calculated from original purchase date. Therefore it is vital to retain your original till receipt or invoice to indicate the date of initial purchase.
To qualify for the 2-year guarantee the appliance must have been used according to the manufacturers instructions. For example, appliances must have been descaled and filters must have been kept clean as instructed.
The local distributor shall not be liable to replace or repair the goods under the terms of the guarantee where:
1The fault has been caused or is attributable to accidental use, misuse, negligent use or used contrary to the manufacturers recommendations or where the fault has been caused by power surges or damage caused in transit.
2The appliance has been used on a voltage supply other than that
9

 VC70495MEE Rev4_9225 47507 MEE pump - Jon 25/01/2014 15:12 Page 10
stamped on the products.
3Repairs have been attempted by persons other than our service staff (or authorised dealer).
4Where the appliance has been used for hire purposes or non domestic use.
5The appliance is second hand.
6The local distributor are not liable to carry out any type of servicing work, under the guarantee.
7The guarantee excludes consumables such as bags, filters and glass carafes.
8Batteries and damage from leakage are not covered by the guarantee.
9The filters have not be cleaned and replaced as instructed.
This guarantee does not confer any rights other than those expressly set out above and does not cover any claims for consequential loss or damage. This guarantee is offered as an additional benefit and does not affect your statutory rights as a consumer.
AUSTRALIAN WARRANTY
This appliance is guaranteed for 2 years against faulty material, components and workmanship.
This warranty is in addition and does not affect your statutory rights. Proof of purchase must be produced for any warranty benefit.
In the unlikely event of any appliance proving to be faulty, securely pack and return the item to the place of purchase accompanied by the original receipt or invoice.
Our goods come with guarantees that cannot be excluded under the Australian Consumer Law.You are entitled to a replacement or refund for a major failure and for compensation for any other reasonably foreseeable loss or damage.You are also entitled to have the goods repaired or replaced if the goods fail to be of acceptable quality and the failure does not amount to a major failure.
10
NOT COVERED BYTHIS WARRANTY
(Australian only)
•If the appliance has not been used in accordance with the manufacturers’ recommendations or Instructions.
•If the fault is deemed to be caused by abuse, misuse, neglect, modifications or in proper use and or care
Eg: Kettles: Excessive build up of scale.
Toasters: Excessive build up of crumbs or foreign matter etc.
•Connection to incorrect voltage to that stamped on the product.
•Unauthorised repairs.
•Appliance used other than for domestic purposes.
•Excluding bags, filters, glass, carafes, and cutting blades.
•Freight and insurance costs.
If for any reason this item is replaced during the 2 year guarantee period, the guarantee on the new item will be calculated from original purchase date. Therefore it is vital to retain your original receipt or invoice to indicate the date of original purchase.
Morphy Richards’s policy is to continually improve quality design and product quality. The company therefore reserves the right to change any specifications or to carry out modifications as deemed worthy at any time.
The Australian supplier ASKO Appliances reserves the right to repair, modify, exchange or replace the faulty appliance with the same or similar model or product of equivalent value.
 VC70495MEE Rev4_9225 47507 MEE pump - Jon 25/01/2014 15:12 Page 11
f
INSTRUCTIONS DE SÉCURITÉ IMPORTANTES
Lorsque vous utilisez un appareil électrique, vous devez respecter les règles de sécurité et de bon sens suivantes.
Veuillez lire attentivement ces instructions avant d’utiliser ce produit.
•AVERTISSEMENT : Déconnectez l’alimentation électrique avant d’effectuer toute opération d’entretien.
•Cet appareil peut être utilisé par des enfants âgés d’au moins 8 ans et par des personnes ayant des capacités physiques, sensorielles ou mentales réduites ou un manque
d’expérience et de connaissances, à condition d’être surveillés ou d’avoir reçu des instructions concernant l’utilisation de l’appareil en toute sécurité et de comprendre les risques que cela implique.
•Les enfants ne doivent pas jouer avec l’appareil.
•Le nettoyage et l’entretien courant ne doivent pas être effectués par des enfants sans surveillance.
Sécurité personnelle
•AVERTISSEMENT : Ne dirigez jamais la vapeur vers des composants/ accessoires électriques. En cas de doute quant à la pertinence de la vapeur pour nettoyer un appareil, contactez le fabricant de l’appareil pour obtenir des conseils avant de le nettoyer.
•AVERTISSEMENT : Ne touchez jamais la fiche ou le câble lorsque vos mains sont mouillées.
•AVERTISSEMENT : Après utilisation, les embouts et les outils sont chauds. Laissez-les refroidir avant de les démonter.
•AVERTISSEMENT : N’évacuez pas la vapeur en direction d’une personne ou d’un animal. Risque de brûlure.
VAPEUR
•AVERTISSEMENT : N’utilisez jamais l’appareil sans avoir remis en place le bouchon du réservoir.
•AVERTISSEMENT : En cas de blocage, la vapeur sort par les orifices d’évacuation.
•Pour vous protéger des risques d’incendie, de choc électrique et de blessure, ne plongez pas le cordon d’alimentation, la fiche électrique ou l’appareil lui-même dans l’eau ou dans d’autres liquides.
•Vous devez débrancher l’appareil du secteur après utilisation, avant de le nettoyer, de le remplir ou de changer les accessoires, ou effectuer une opération d’entretien.
•L’appareil doit rester hors de portée des enfants tant qu’il est branché ou en train de refroidir.
Emplacement
•N’utilisez pas et ne laissez pas cet appareil à l’extérieur.
•Ne rangez pas l’appareil près d’une surface chaude ou d’un appareil de chauffage.
Câble d’alimentation électrique
•AVERTISSEMENT : Un câble d’alimentation endommagé ou coupé et muni d’une fiche ne doit jamais être branché à l’alimentation secteur. Il doit être détruit car un câble endommagé devient dangereux s’il est branché sur une prise de courant.
•Si le cordon d’alimentation est endommagé, il doit être remplacé par le fabricant, son agent de service ou une personne qualifiée afin d’éviter tout risque.
•Le câble d’alimentation ne doit jamais être étiré, coincé ou subir une contrainte.
g
f
11
 VC70495MEE Rev4_9225 47507 MEE pump - Jon 25/01/2014 15:12 Page 12
Sécurité de l’appareil
•AVERTISSEMENT : Faites toujours un essai sur une zone invisible au préalable. N’utilisez jamais la vapeur sur les matières qui ne peuvent pas résister aux hautes températures, telles que le dralon, la fourrure naturelle, etc.
•Ne tentez pas de modifier l’appareil.
•N’utilisez jamais l’appareil lorsque le réservoir d’eau est vide. Ajoutez régulièrement de l’eau pendant les utilisations prolongées.
•Utilisez uniquement de l’eau déionisée, déminéralisée, ou distillée.
•N’utilisez pas l’appareil s’il a subi un choc, s’il présente des dégâts visibles ou s’il fuit.
Autres consignes de sécurité
•Ne versez aucun détergent chimique, parfum, agent détartrant, alcool, etc. dans l’eau du réservoir.
•Les réparations des appareils électriques doivent être réalisées par des personnes qualifiées.
•Les réparations non-professionnelles peuvent être dangereuses pour les utilisateurs.
•Utilisez uniquement des pièces de rechange et des accessoires Morphy Richards d’origine.
•Ne laissez jamais l’appareil fonctionner sans surveillance.
•Ce nettoyeur vapeur est uniquement destiné à un usage domestique.Toute utilisation abusive, utilisation commerciale ou utilisation pour un usage non-prévu annule la garantie.
Précautions électriques
•Vérifiez que la tension indiquée sur la plaque signalétique de l’appareil correspond à l’alimentation électrique de votre domicile, qui doit être en courant alternatif (CA).
•Si les prises électriques de votre domicile ne correspondent pas à la fiche fournie avec cet appareil, vous devez l’enlever et la remplacer par une fiche conforme.
•AVERTISSEMENT : Cet appareil doit être mis à la terre.
•Si le fusible de la prise doit être remplacé, vous devez utiliser un fusible BS1362 de 13 ampères.
12
Table des matières
Hygiène et sécurité |
11 |
|
|
Précautions électriques |
12 |
|
|
Présentation/ Caractéristiques |
12 |
|
|
Utilisation de l’appareil |
13 |
|
|
Double fonctionnalité |
13 |
|
|
Utilisation verticale : Montage |
13 |
|
|
Utilisation du nettoyeur vapeur en mode vertical |
13 |
|
|
Utilisation du nettoyeur vapeur manuel |
14 |
|
|
Listes des accessoires du nettoyeur vapeur manuel |
14 |
|
|
Réservoir d’eau |
14 |
|
|
Après l’utilisation |
14 |
|
|
Rangement |
14 |
|
|
Entretien |
15 |
|
|
Nous contacter |
15 |
|
|
Garantie |
15 |
|
|
Pour utiliser au mieux votre nouveau
nettoyeur...
IMPORTANT : Pour prévenir l’accumulation de tartre dans le réservoir, utilisez exclusivement de l’eau déionisée, déminéralisée, ou distillée (disponible dans la plupart des grandes surfaces).
Caractéristiques
(1)Poignée
(2)BoutonVapeur
(3)Support du cordon d’alimentation
(4)Crochet supérieur pour ranger le cordon d’alimentation (pivotant)
(5)Crochet inférieur pour ranger le cordon d’alimentation (fixe)
(6)Bouton de libération du nettoyeur manuel
(7)Corps de l’appareil
(8)Nettoyeur vapeur manuel
(9)BoutonVapeur
(sous la poignée du nettoyeur vapeur manuel)
(10)Cordon d’alimentation
(11)Bouchon de réservoir
(12)Bouton Marche/ Arrêt
(13)Bouton de libération du réservoir d’eau
(14)Réservoir d’eau
(15)Indicateur lumineux de mise sous tension
(16)Tube d’eau avec poids en laiton
(17)Bouton de libération du suceur pour sols
(18)Suceur pour sols
(19)Suceur pour moquettes
(20)Chiffonnette pour sols
(21)Coinceur de serrage de la chiffonnette pour sols
 VC70495MEE Rev4_9225 47507 MEE pump - Jon 25/01/2014 15:12 Page 13
(22)Adaptateur pour accessoire
(23)Embout angulaire
(24)Spatule
(25)Brosse circulaire
(26)Brosse longue
(27)Suceur standard
(28)Chiffonnette standard élastique (pour le suceur standard)
(29)Raclette (pour le suceur standard)
(30)Mini tête de nettoyage (pour le suceur standard)
(31)Mini chiffonnette de nettoyage (pour la mini tête de nettoyage)
(32)Sac pour accessoires
Utilisation de l’appareil
IMPORTANT : N’oubliez pas que cet appareil produit de la vapeur à une température maximale de 115 ºC. Faites toujours un essai sur une zone invisible au préalable. Ne l’utilisez jamais sur des objets ou des surfaces qui ne peuvent pas résister à cette température, des matières délicates, du dralon, du plastique, de la fourrure naturelle, etc.
En cas de doute, faites un essai sur une zone sans importance.
Double fonctionnalité 1
Votre nettoyeur vapeur peut être aisément configuré pour fonctionner en deux modes différents :
•Nettoyeur vapeur vertical pour sols et moquettes.
•Nettoyeur vapeur manuel (8) pour surfaces verticales ou difficiles d’accès.
Les accessoires (22-31) peuvent être utilisés avec le nettoyeur vapeur manuel.
Utilisation verticale : Montage 2
A Insérez la poignée (1) dans le corps de l’appareil (7).
BInsérez et serrez une des vis (fournies) dans l’orifice du crochet inférieur du cordon d’alimentation (5).
Insérez et serrez l’autre vis (fournie) dans l’orifice situé sur le côté de la poignée (de l’autre côté du crochet inférieur du cordon d’alimentation).
REMARQUE : Le montage de la poignée est effectué une seule fois.
CIntroduisez le corps de l’appareil dans le suceur pour sols (18), en appuyant sur le bouton de libération du suceur pour sols (17) situé sur l’arrière du tube du suceur pour sols, jusqu’à ce qu’il s’enclenche en position.
DInsérez l’embout vapeur, à l’extrémité inférieure du nettoyeur vapeur manuel (8), dans l’adaptateur situé à l’extrémité inférieure à l’avant du corps de l’appareil.
Poussez le nettoyeur vapeur fermement dans le corps de l’appareil jusqu’à ce qu’il s’enclenche en position.
EPlacez la chiffonnette pour sols (20) sur le suceur pour sols et serrez le coinceur (21) sur l’arrière.
Utilisation du nettoyeur vapeur en mode vertical
IMPORTANT : Avant toute utilisation, les sols durs doivent être soigneusement balayés et les moquettes doivent être intégralement passées à l’aspirateur. En outre, nous conseillons de ne pas utiliser le nettoyeur vapeur sur :
•Des planchers en bois ou autres surfaces contenant des éléments en bois (le bois absorbe l’humidité et peut donc se déformer).
•Des sols durs endommagés ou présentant des fentes (pouvant absorber l’humidité et provoquer des déformations). Vous ne devez pas laisser l’appareil au même endroit pendant parce que l’effet continu de la chaleur peut endommager la moquette ou le plancher laminé.
3Serrez les boutons (13) sur les côtés du réservoir d’eau (14) pour le détacher du nettoyeur vapeur manuel (8).
Retirez le bouchon du réservoir (11) en le tournant dans le sens anti-horaire, jusqu’à la position de déverrouillage et soulevez-le.
Remplissez le réservoir d’eau |
|
|
f |
||
IMPORTANT : Pour prévenir l’accumulation de tartre dans le |
||
réservoir, utilisez exclusivement de l’eau déionisée, déminéralisée, |
|
|
ou distillée (disponible dans la plupart des grandes surfaces).Tout |
|
|
problème provoqué par du tartre annule la garantie du produit. |
|
|
Remettez le bouchon en place et tournez-le dans le sens horaire |
|
|
jusqu’à la position de verrouillage. |
|
|
Remettez en place le réservoir d’eau. |
|
EPlacez la chiffonnette pour sols (20) sur le suceur pour sols (18) et serrez-la avec le coinceur (21).
5Pivotez le crochet supérieur du cordon d’alimentation (4) pour libérer rapidement le cordon (10).
Placez le cordon d’alimentation dans son support (3).
6AVERTISSEMENT : Avant la mise sous tension, vérifiez que le suceur pour sols n’est pas à proximité d’une personne ou d’un animal.
Branchez le cordon au secteur, et allumez le nettoyeur vapeur en appuyant sur le bouton Marche/ Arrêt (12). Le voyant (15) s’allume et l’appareil peut produire de la vapeur après un délai de 30 secondes (en appuyant sur le boutonVapeur (2).
7Placez le suceur (18) sur le sol. Retenez le suceur sur le sol avec votre pied et inclinez le corps de l’appareil (7) vers l’arrière.
Pour produire de la vapeur en continu, maintenez enfoncé le boutonVapeur (2) et déplacez lentement le nettoyeur d’avant en arrière sur le sol. Pour éviter de mouiller excessivement le sol, appuyez sur le boutonVapeur de temps en temps (surtout sur les sols durs).
8Pour nettoyer une moquette, montez le suceur de sols (18) avec la chiffonnette (20) dans le suceur pour moquettes (19) afin de bénéficier d’un déplacement aisé.
REMARQUE : Le suceur pour moquettes est conçu pour être monté souple sur le suceur de sols (18).
13
 VC70495MEE Rev4_9225 47507 MEE pump - Jon 25/01/2014 15:12 Page 14
Utilisation du nettoyeur vapeur manuel
9Ce mode d’utilisation est idéal pour nettoyer des surfaces verticales ou difficiles d’accès.
Séparez le nettoyeur vapeur manuel (8) du corps de l’appareil (7) en faisant glisser vers le haut le bouton de libération (6) situé sur l’avant de l’appareil.
Soulevez le nettoyeur vapeur manuel et sortez-le de l’appareil.
10Pour utiliser tous les accessoires, l’adaptateur (22) doit être fermement fixé sur le nettoyeur vapeur manuel (8). Pour cela, vous devez :
1 Insérez l’adaptateur sur l’embout du nettoyeur vapeur. Le verrou de l’adaptateur doit être orienté vers la base du nettoyeur vapeur manuel.
2Alignez l’encoche du nettoyeur vapeur manuel et le verrou de l’adaptateur. Poussez pour les assembler et les enclencher.
3Montez l’accessoire choisi sur l’adaptateur en alignant la flèche de l’accessoire avec la flèche droite marquée sur l’adaptateur et faites pivoter l’accessoire, jusqu’à ce que sa flèche soit alignée avec la flèche la plus à gauche sur l’adaptateur.
ATTENTION : Éteignez l’appareil et débranchez sa prise avant de changer d’embout ou d’accessoire. Après utilisation, un embout est très chaud. Laissez-le refroidir avant de le toucher.
Listes des accessoires du nettoyeur vapeur manuel 11
•L’adaptateur d’accessoire (22) sert à fixer tous les accessoires fournis avec cet appareil.
•Sans accessoire, il peut aussi servir à nettoyer des endroits ou infractuosités difficiles d’accès.
•L’embout angulaire (23) permet de nettoyer des objets sanitaires, tels que cuvettes de wc, robinets, couvercles d’évacuation. Dirigez-le directement sur des tâches non-permanentes sur des moquettes ou des tissus d’ameublement tout en maintenant un chiffon propre à proximité de la zone tâchée pour capturer de la saleté détachée par la vapeur.
•La spatule (24) sert à éliminer des dépôts plus résistants, ou pour dégivrer un congélateur ou réfrigérateur.
•La brosse circulaire (25) permet d’éliminer des tâches sur diverses surfaces à la température ambiante, telles que carrelages, enjoliveurs, miroirs, fenêtres.
•La brosse longue (26) sert à éliminer la saleté dans des rainures ou des encastrements.
12Une fois fixé à l’adaptateur (22), le suceur standard (27) permet d’utiliser tous les accessoires suivants :
•La chiffonnette standard élastique (28) sert à couvrir le suceur standard pour nettoyer les lits et les tissus d’ameublement.
13La raclette (29) se fixe sur le suceur standard en insérant les crochets situés sur sa partie arrière dans les boucles du suceur standard. Puis abaissez la partie avant du suceur standard sous le crochet vertical de la raclette (comme indiqué).
•Après usage, poussez le crochet vertical vers l’avant pour libérer la raclette. Le suceur est encore retenu par les boucles à l’arrière de la raclette. Pivotez le suceur standard vers le haut et dégagez ses crochets pour le soulever.
14
14La raclette est l’outil idéal pour nettoyer le carrelage, les surfaces vitrées, les fenêtres et les grands panneaux en verre. Pour nettoyer les vitres, commencez en haut de la vitre en appuyant la raclette sur la surface et traînez-la vers le bas, en mouvements réguliers et parallèles de haut en bas. Essuyez la lame en caoutchouc et le bord inférieur de la vitre après chaque passage. Pour les petites surfaces vitrées, retirez la raclette et projetez la vapeur directement sur la surface. Utilisez la raclette seule pour essuyer l’humidité.
AVERTISSEMENT : N’utilisez pas l’appareil sur une vitre très froide car le brusque changement de température pourrait fissurer la vitre.
•La mini tête de nettoyage (30) avec la mini chiffonnette de nettoyage (31) se montent sur le suceur standard (la méthode est identique à celle du montage/ démontage de la raclette, comme indiqué à gauche et ci-dessus). Cet accessoire est très utile pour nettoyer des carrelages ou des surfaces vitrées, le mobilier de cuisine et de salle de bain, mais aussi des tissus d’ameublement, rideaux, stores, oreillers et matelas.
Réservoir d’eau
Poids en laiton (16)
Le poids en laiton situé à l’intérieur du réservoir d’eau est fixé à l’extrémité du tuyau de succion. Ce poids est conçu pour se déplacer librement dans le réservoir d’eau selon la position de l’appareil. Il doit rester dans l’eau pour que la vapeur puisse être généré chaque fois que l’utilisateur appuie sur le boutonVapeur, quelle que soit l’orientation du nettoyeur vapeur manuel.
Rinçage du réservoir d’eau
Rincez régulièrement le réservoir d’eau pour libérer les dépôts éventuellement présents dans le bas du réservoir. Utilisez exclusivement de l’eau déionisée, déminéralisée, ou distillée (disponible dans la plupart des grandes surfaces) et remettez le bouchon du réservoir pour effectuer un rinçage vigoureux.
Après utilisation
Après chaque utilisation, effectuez les deux opérations d’entretien indiquées ci-dessous.
1Éteignez le nettoyeur et débranchez-le du secteur. Placez-le immédiatement sur une surface appropriée (ex. un sol carrelé) où la chaleur et l’humidité résiduelles du suceur/ chiffonnette ne posent aucun risque. Attendez que le nettoyeur ait complètement refroidi.
2Retirez le bouchon et videz le réservoir d’eau (14). Laissez sécher l’intérieur du réservoir d’eau avant de replacer le bouchon de remplissage.
Rangement 16
Enroulez le cordon autour des deux crochets (4/5), puis pivotez le crochet supérieur (4) vers le haut pour bloquer le cordon (10) en position.
Rangez tous les accessoires dans le sac (32) et suspendez-le au crochet supérieur (4).
 VC70495MEE Rev4_9225 47507 MEE pump - Jon 25/01/2014 15:12 Page 15
Entretien
AVERTISSEMENT : Vous devez toujours débrancher le nettoyeur vapeur avant toute opération d’entretien.
Entretien général
Votre nettoyeur est conçu et fabriqué pour une utilisation quotidienne normale. Pour qu’il conserve l’aspect du neuf, vous pouvez l’essuyer de temps à autre avec un chiffon humide. N’utilisez pas de nettoyants abrasifs.
Entretien des chiffonnettes
La chiffonnette pour sols (20) et la chiffonnette standard élastique (28) peuvent être lavées à la machine (30ºC max). Pour éliminer les tâches plus résistantes, faites-les tremper dans de l’eau chaude avec un détergent ou un produit détachant peu agressif.
IMPORTANT : N’utilisez jamais de javel ou d’adoucissant textile.
Laissez sécher complètement avant de les ranger.
Veuillez prendre contact avec notre service d’assistance pour acheter des chiffonnettes de rechange.
Entretien des accessoires
La saleté et autres corps étrangers présents dans les accessoires doivent être régulièrement éliminés pour bénéficier d’un usage prolongé et efficace.
Nous contacter
Service d’assistance
Si vous rencontrez un problème avec votre appareil, veuillez appeler notre service d’assistance. Nous pourrons certainement vous aider plus efficacement que le magasin où vous avez acheté l’article.
Munissez-vous du nom de produit, du numéro de modèle et du numéro de série de l’appareil lorsque vous nous appelez. Cela nous aidera à traiter plus rapidement votre demande.
Dialoguer avec nous
Si vous avez des questions ou des commentaires à formuler ou si vous voulez bénéficier de conseils judicieux pour vous aider à tirer le meilleur parti de vos appareils, retrouvez-nous en ligne :
Blog : |
www.morphyrichards.co.uk/blog |
Facebook: |
www.facebook.com/morphyrichardsuk |
Twitter: |
www.twitter.com/loveyourmorphy |
Site internet : |
www.morphyrichards.com |
VOTRE GARANTIE DE DEUX ANS
Pour la clientèle en France
Il est important de conserver le ticket de caisse comme preuve d’achat. Agrafez votre ticket de caisse à cette notice d'utilisation; vous pourrez ainsi l’avoir sous la main ultérieurement.
Merci de donner les informations ci-dessous si votre appareil tombe en panne. Vous trouverez ces références à la base de l’appareil.
Numéro du modèle Numéro de série
Tous les produits Morphy Richards sont testés individuellement avant de quitter l’usine.
Si un problème survient dans les 24 mois qui suivent l’achat d’origine, vous devez contacter le magasin où vous avez acheté votre appareil muni de votre ticket de caisse, celui ci le renverra à Glen Dimplex France pour expertise.
Sous réserve des exclusions indiquées ci-dessous (1 à 9), l’appareil défectueux sera alors réparé ou remplacé et réexpédié dans un délai de 15 jours ouvrables maximum à compter de son arrivée.
Si, pour quelque raison que ce soit, l’article est remplacé pendant la période de garantie de deux ans, la période de garantie du nouvel article sera calculée à partir de la date d’achat d’origine. Vous devez donc absolument conserver votre ticket de caisse ou votre facture d’origine pour indiquer la date d’achat.
Pour bénéficier de la garantie de deux ans, l’appareil doit avoir été utilisé conformément aux instructions du fabricant. Par exemple, les fers doivent avoir été détartrés et les filtres doivent avoir été nettoyés selon les instructions.
Morphy Richards ne sera pas dans l’obligation de remplacer ou réparer les articles aux termes de la garantie dans les circonstances suivantes :
1Si le problème provient d’une utilisation accidentelle, d’une utilisation abusive ou négligente, ou si l’appareil a été utilisé de manière contraire aux recommandations du fabricant, ou encore lorsque le problème provient de sautes de puissance ou de dégâts occasionnés en transit.
2Si l’appareil a été utilisé sur une alimentation électrique dont la tension est différente de celle qui est indiquée sur l’appareil.
3Si des personnes autres que nos techniciens (ou l’un de nos revendeurs agréés) ont tenté de faire des réparations.
4Si l’appareil a été loué ou utilisé dans un contexte non domestique.
5Si l’appareil est d’occasion.
6Morphy Richards n’est pas dans l’obligation de réaliser des travaux d’entretien, quels qu’ils soient, aux termes de la garantie.
7La garantie exclut les consommables tels que les sacs, les filtres et les carafes en verre.
8Les batteries et les dégâts provoqués par leur fuite ne sont pas couverts par la garantie.
9Les filtres n’ont pas été nettoyés ou remplacés suivant les
f
15

 VC70495MEE Rev4_9225 47507 MEE pump - Jon 25/01/2014 15:12 Page 16
instructions.
Cette garantie ne confère aucun droit à l’exception de ceux qui sont expressément indiqués ci-dessus, et ne couvre aucune réclamation pour dommages immatériels ou indirects. Cette garantie est offerte comme avantage supplémentaire et n’a aucune incidence sur vos droits légaux en tant que consommateur.
Pour la clientèle en Belgique
Les produits de Morphy Richards sont produits conformément les normes de qualité, agrée international. Au-dessus vos droits légaux, Morphy Richards vous garantit qu’à partir d’achat ce produit sera sans défauts de fabrication ou de matériels pendant une période de deux ans.
Il est important de conserver votre bon d’achat comme preuve. Agrafez votre ticket à cette notice d’installation.
Veuillez mentionner ces informations ci-dessous si votre appareil tombe en panne. Vous trouverez ces informations sur la base de l’appareil.
Numéro du modèle Numéro de série
Si, pour quelque raison que ce soit, l’article est remplacé pendant la période de garantie (deux ans), la période de garantie du nouvel article sera calculée à partir de la date d’achat d’origine. Il est donc très importants de conserver votre bon d’achat original afin de connaître la date initiale d’achat.
Cette garantie vaut uniquement quand l’appareil a été utilisé conformément aux instructions du fabricant. Par exemple, les appareils doivent être détartrés et les filtres doivent être tenus propre selon le mode d’emploi.
Morphy Richard ne sera pas dans l’obligation de remplacer ou réparer les articles aux termes de la garantie dans les circonstances suivantes
1Si le problème, prévient d’une utilisation accidentelle, d’une utilisation abusive ou négligente, ou si l’appareil a été utilisé de manière contraire aux recommandations du fabricant, ou encore lorsque le problème provient de source de puissance ou de dégâts occasionnés en transit.
2Si l’appareil a été utilisé sur une alimentation électrique dont la tension est différente de celle qui est indiquée sur l’appareil.
3Si des personnes, autres que nos techniciens (ou revendeurs agrées) ont tenté de faire des réparations.
4Si l’appareil a été loué ou utilisé dans un contexte non domestique.
5Si l’appareil est d’occasion.
6Morphy Richards n’est pas dans l’obligation de réaliser des travaux d’entretien, quels qu’ils soient, aux termes de la garantie.
7La garantie ne couvre pas les sachets, filtres et brocs en verre.
8Les batteries et les dégâts provoqués par leur fuite ne sont pas couverts par la garantie.
9Les filtres n’ont pas été nettoyés ou remplacés suivant les instructions.
Cette garantie ne confère aucun droit à l’exception de ceux qui sont expressément indiqués ci-dessus, et ne couvre aucune réclamation pour dommages immatériels ou indirects. Cette garantie est offerte comme avantage supplémentaire et n’a aucune incidence sur vos droits légaux en tant que consommateur.
16
 VC70495MEE Rev4_9225 47507 MEE pump - Jon 25/01/2014 15:13 Page 17
d
WICHTIGE HINWEISE ZUR SICHERHEIT
Für die Benutzung elektrischer Haushaltsgeräte sind folgende Regeln zur Wahrung der Sicherheit einzuhalten.
Vor der Verwendung des Geräts bitte die Bedienungsanleitung aufmerksam lesen.
•ACHTUNG: Vor einer Routinewartung den Netzstecker ziehen.
•Dieses Gerät kann von Kindern über 8 Jahren, von Personen, deren körperliche oder geistige Unversehrtheit oder deren Wahrnehmungsfähigkeit eingeschränkt ist, sowie von Personen mit mangelnden Kenntnissen oder Erfahrung benutzt werden. Dies gilt
nur unter derVoraussetzung, dass sie beaufsichtigt werden oder dass sie eine Einweisung in die sichere Nutzung des Geräts und die damit verbundenen Gefahren erhalten haben.
•Kinder dürfen nicht mit dem Gerät spielen.
•Reinigung und Wartung dürfen ohne Beaufsichtigung nicht von Kindern durchgeführt werden.
f
d
Eigene Sicherheit
•ACHTUNG: Den Strahl nie direkt auf elektrische Teile/Installationen richten. Wenn Zweifel bestehen, ob ein bestimmter Gegenstand für die Dampfreinigung geeignet ist, sind vor dem Dampfreinigen weitere Ratschläge beim jeweiligen Hersteller einzuholen.
•ACHTUNG: Den Stecker oder das Kabel niemals mit nassen Händen berühren.
•ACHTUNG: Nach dem Gebrauch sind Düsen und Zubehörteile sehr heiß. DieTeile vor dem Entfernen abkühlen lassen.
•ACHTUNG: Den Dampfausstoß nicht gegen Personen oder Haustiere richten. Verbrühungsgefahr.
DAMPF
•ACHTUNG: Das Gerät darf nicht ohne Verschlussdeckel benutzt werden.
•ACHTUNG: Bei einer Verstopfung wird der Dampf über die Dampfablassöffnungen abgelassen.
•Zum Schutz vor Feuer, elektrischen Schlägen und vor Verletzungen dürfen weder das Kabel, noch der Netzstecker oder das Gerät in Wasser oder andere Flüssigkeiten getaucht werden.
•Nach dem Gebrauch oder einer Wartung oder vor dem Reinigen, Nachfüllen oder Wechseln von Zubehör muss der Netzstecker gezogen werden.
•In der Aufladephase und während das Gerät abkühlt, darf das Gerät nicht in Reichweite von Kindern sein.
Aufstellungsort
•Dieses Produkt nicht im Freien verwenden oder aufbewahren.
•Das Gerät nicht in der Nähe heißer Flächen wie z. B. Heizöfen oder Heizkörpern abstellen.
Netzkabel
•ACHTUNG: Ein beschädigtes oder abgetrenntes Netzkabel, an dem sich noch ein Netzstecker befindet, darf keinesfalls an eine Steckdose angeschlossen werden. Es muss unbedingt unbrauchbar gemacht werden, da ein beschädigtes Kabel bei Anschluss an eine Steckdose zu einer Gefahrenquelle wird.
•Wenn das Netzkabel beschädigt ist, muss es vom Hersteller, seinem Kundenservice oder einer gleichermaßen qualifizierten Person ausgetauscht werden, um Gefahrenquellen zu vermeiden.
•Darauf achten, dass das Netzkabel nicht zugbelastet wird.
17
 VC70495MEE Rev4_9225 47507 MEE pump - Jon 25/01/2014 15:13 Page 18
•
•
•
•
•
•
•
•
•
•
•
•
•
•
•
Produktsicherheit
ACHTUNG: Immer zuerst in einem unauffälligen Bereich ausprobieren. Nie auf Stoffen anwenden, die hohen Temperaturen nicht standhalten, wie z. B. Dralon, Naturfelle u. ä.
Das Gerät darf auf keinerlei Art und Weise verändert werden.
Das Gerät darf ohne Wasser im Behälter nicht in Betrieb genommen werden. Den Behälter bei längerem Gebrauch stets mit Wasser auffüllen.
Der Behälter des Dampfreinigers darf nur mit entionisiertem, entmineralisiertem oder destilliertem Wasser befüllt werden.
Das Gerät darf nicht mehr benutzt werden, wenn es auf den Boden gefallen ist, wenn daran Schäden sichtbar sind oder wenn das Gerät undicht ist.
Weitere Sicherheitshinweise
Keine chemischen Reiniger, Duftstoffe, Alkohol oder Entkalker, usw. im Wasser benutzen.
Reparaturen an der Elektrik sind von ausgebildetem Fachpersonal durchzuführen.
Unprofessionelle Reparaturen können für den Endbenutzer gefährlich sein.
Ausschließlich Morphy Richards-Originalersatz- und Zubehörteile verwenden.
Das Gerät darf nicht unbeaufsichtigt in Betrieb zurückgelassen werden.
Dieser Dampfreiniger ist nur für Privathaushalte geeignet. Ein unsachgemäßer oder gewerblicher Gebrauch oder die Benutzung für andere Zwecke macht die Garantie nichtig.
Elektrische Anforderungen
Prüfen Sie, ob die auf demTypenschild angegebene Spannung mit der Spannung in Ihrem Haushalt übereinstimmt; es muss eine Wechselspannung (abgekürzt AC) sein.
Wenn der Gerätestecker nicht in die Steckdosen in Ihren Räumen hineinpasst, sollte er durch einen passenden Netzstecker ausgetauscht werden.
ACHTUNG: Dieses Gerät muss an eine geerdete Steckdose angeschlossen werden.
Falls die Sicherung in dem Sicherungshalter ausgetauscht werden muss, ist eine Sicherung mit 13 A gemäß BS1362 zu verwenden.
Inhalt
Gesundheit und Sicherheit |
17 |
|
|
Elektrische Anforderungen |
18 |
|
|
Produktmerkmale / Ausstattung |
19 |
|
|
Gebrauch des Geräts |
19 |
|
|
Doppelfunktion |
19 |
|
|
Dampfbehandlung im Stand: Zusammenbau |
19 |
|
|
Gebrauch als Standdampfreiniger |
19 |
|
|
Gebrauch als Handgerät |
20 |
|
|
Liste von Zubehörteilen für den Gebrauch als Handgerät |
20 |
|
|
Wasserbehälter |
20 |
|
|
Nach derVerwendung |
21 |
|
|
Aufbewahrung |
21 |
|
|
Wartung |
21 |
|
|
Ansprechpartner |
21 |
|
|
Garantie |
22 |
|
|
Den neuen Dampfreiniger optimal nutzen...
WICHTIG: Um Kalkablagerungen im Wasserbehälter vorzubeugen darf der Behälter des Dampfreinigers darf nur mit entionisiertem, entmineralisiertem oder destilliertem Wasser befüllt werden (zu finden in den meisten größeren Supermärkten).
18
 VC70495MEE Rev4_9225 47507 MEE pump - Jon 25/01/2014 15:13 Page 19
Ausstattung
(1)Griff
(2)Dampfauslöser
(3)Kabelhalterung
(4)Obere Kabelaufwicklung (drehbar)
(5)Untere Kabelaufwicklung (fest)
(6)Handgerät-Ausrasttaster
(7)Standgerät
(8)Dampfreiniger-Handgerät
(9)Dampfauslöser
(an der Unterseite des Handgerätegriffs zu finden)
(10)Netzkabel
(11)Verschlussdeckel
(12)Ein/Aus-Schalter
(13)Wasserbehälter-Entriegelungstasten
(14)Wasserbehälter
(15)Betriebslampe
(16)Wasserschlauch mit Zusatzgewicht aus Messing
(17)Bodenaufsatz-Entriegelungstaste
(18)Bodenaufsatz
(19)Teppichaufsatz
(20)Bodentuch
(21)Bodentuchklemme
(22)Zubehöradapter
(23)Winkelaufsatz
(24)Spachtelaufsatz
(25)Rundbürstenaufsatz
(26)Langbürstenaufsatz
(27)Multifunktionsdüse
(28)Elastisches Multifunktionstuch (für Multifunktionsdüse)
(29)Abstreiferaufsatz (für Multifunktionsdüse)
(30)Mini-Reinigungskopf (für Multifunktionsdüse)
(31)Mini-Reinigungstuch (für Multifunktionsdüse)
(32)Zubehörtasche
Gebrauch des Geräts
ACHTUNG: Denken Sie daran, dass der Dampfreiniger im Betrieb Dampf mit einer hohen Temperatur von 115 °C ausstößt. Immer zuerst in einem unauffälligen Bereich ausprobieren. Benutzen Sie ihn nicht für Gegenstände oder Oberflächen, die diesen Temperaturen nicht gewachsen sind, z. B. empfindliche Stoffe, Dralon, Plastik, Naturfell etc.
Im Zweifelsfall auf einem Stück Stoff ausprobieren, bei dem kleinere Flecken keine Rolle spielen.
Doppelfunktion 1
Der Dampfreiniger kann in zwei unterschiedlichen Betriebsarten verwendet werden:
•Standdampfreiniger für Böden undTeppiche.
•Dampfreiniger-Handgerät 8) zur Reinigung senkrechter oder nur schwer zugänglicher Flächen.
Die Zubehörteile (22-31) können mit dem DampfreinigerHandgerät eingesetzt werden.
Dampfbehandlung im Stand: Zusammenbau C
A Den Griff (1) auf das Standgerät (7) aufsetzen.
BEine der (mitgelieferten) Schrauben in die Öffnung der unteren Kabelaufwicklung (5) einsetzen und handfest einschrauben.
Die andere (mitgelieferte) Schraube in die Öffnung des Griffs (gegenüber der unteren Kabelaufwicklung) einsetzen und handfest einschrauben.
HINWEIS: DieVorbereitung des Griffs ist nur bei dem ersten
Zusammenbau erforderlich.
CDas Standgerät auf dem Bodenaufsatz (18) aufsetzen und mit der Bodenaufsatz-Entriegelungstaste (17) in den Bodenaufsatz einschieben, bis es einrastet.
DDas Dampfreiniger-Handgerät (8) mit der Dampfdüse zuerst in den unteren Adapter des Standgeräts einschieben.
Den Dampfreiniger langsam in die Aussparung des Standgeräts einschieben, bis er einrastet.
EDas Bodentuch (20) auf dem Bodenaufsatz anbringen und mit der Bodentuchklemme rückwärtig befestigen.
Gebrauch als Standdampfreiniger
WICHTIG: Vor dem ersten Gebrauch sollten harte
Bodenbeläge gründlich gekehrt undTeppiche gesaugt sein. d Der Dampfreiniger sollten auf folgenden Oberflächen dennoch
nicht eingesetzt werden:
•Blanke Holzböden oder Böden mit freigelegten Holzflächen (Feuchtigkeit kann eindringen und den Boden beschädigen).
•Beschädigte Hartböden oder Hartböden mit vorhandenen Fugen (Feuchtigkeit kann eindringen und den Boden beschädigen).
Darüberhinaus sollte das Dampfgerät nicht für längere Zeit auf nur einer Stelle gehalten werden, da die fortwährende HitzeeinwirkungTeppiche oder Laminatböden beschädigen kann.
3DieTasten (13) auf beiden Seiten des Wasserbehälters (14) drücken, um den Behälter vom Dampfreiniger-Handgerät (8) abzunehmen.
DenVerschlussdeckel (11) durch Drehen
entgegen des Uhrzeigersinns entriegeln und danach abnehmen. Den Wasserbehälter befüllen.
ACHTUNG: Um Kalkablagerungen im Wasserbehälter vorzubeugen darf der Behälter des Dampfreinigers darf nur mit entionisiertem, entmineralisiertem oder destilliertem Wasser befüllt werden (zu finden in den meisten größeren Supermärkten). Die Garantie wird durch etwaige Kalkablagerungen nichtig.
Verschlussdeckel wieder aufsetzen und durch Drehen im Uhrzeigersinn verriegeln.
Wasserbehälter wieder einsetzen.
4Das Bodentuch (20) auf dem Bodenaufsatz (18) anbringen und mit der Bodentuchklemme (21) befestigen.
5Die obere Kabelaufwicklung (4) drehen, um das Netzkabel (10) abzunehmen.
Das Netzkabel in der Kabelhalterung (3) einhängen.
6ACHTUNG: Noch vor dem EINSCHALTEN des Geräts muss
19
 VC70495MEE Rev4_9225 47507 MEE pump - Jon 25/01/2014 15:13 Page 20
sichergestellt sein, dass der Bodenaufsatz nicht auf Personen oder Haustiere gerichtet ist.
Schließen Sie das Netzkabel an eine Steckdose an und schalten das Gerät am Ein/Aus-Schalter (12) ein. Die Netzlampe (15) leuchtet und das Gerät ist nach ca. 30 Sekunden einsatzbereit (hierzu den Dampfauslöser (2) drücken).
7Den Bodenaufsatz (18) auf den Boden stellen. Den Bodenaufsatz mithilfe ihres Fußes leicht auf den Boden drücken und das Standgerät (7) langsam nach hinten neigen.
Den Dampfauslöser (2) drücken und gedrückt halten, um einen dauerhaften Dampfausstoß zu erzeugen und dabei das Dampfgerät pendelnd über den Boden bewegen. Damit der Boden nicht zu feucht wird den Dampfauslöser (besonders auf Hartböden) nur stoßweise betätigen.
8AufTeppichböden kann derTeppichaufsatz (19) mit Bodenaufsatz (18) und Bodentuch (20) eingesetzt werden, um den Bodenaufsatz leichter über denTeppich bewegen zu können.
HINWEIS: DerTeppichaufsatz ist absichtlich nur leicht auf den
Bodenaufsatz aufgesteckt.
Gebrauch als Handgerät
9Diese Gerätefunktion ist ideal zur Reinigung senkrechter oder nur schwer zugänglicher Flächen.
Das Dampfreiniger-Handgerät (8) durchVerschieben des auf der Vorderseite befindlichen Handgerät-Ausrasttasters (6) nach oben aus dem Standgerät entnehmen (7).
Das Dampfreiniger-Handgerät nach oben aus dem Standgerät herausziehen.
10Der Zubehöradapter (22) muss zuerst am Dampfreiniger-Handgerät
(8) angebracht werden, um alle Zubehörteile verwenden zu können. Dies wird wie folgt erledigt:
1 Den Adapter auf die Düse des Dampfreinigers mit der Entriegelung am Adapter in Richtung des Dampfreiniger-Handgeräts zeigend aufsetzen.
2Die Aussparung auf dem Dampfreiniger-Handgerät muss mit der Aussparung auf der Entriegelung des Adapters bündig verlaufen. Die Teile zusammenschieben und in Position einrasten.
3Das gewünschte Zubehörteil am Ende des Adapters aufsetzen und zum Festziehen so in Position drehen, dass der auf dem Zubehörteil befindliche Pfeil (Pfeil nach rechts) mit dem auf dem Adapter befindlichen Pfeil (Pfeil nach links) übereinstimmt.
ACHTUNG: Vor dem Wechseln der Zubehörteile das Gerät AUSSCHALTEN und den Netzstecker ziehen. Die Düsen der Zubehörteile vor dem Umgang erst abkühlen lassen, da sie nach Gebrauch sehr heiß sind.
Liste von Zubehörteilen für den
Gebrauch als Handgerät 11
•Der Zubehöradapter (22) ist der Hauptadapter für alle anderen mitgelieferten Zubehörteile.
•Der Adapter kann auch ohne Zubehörteile eingesetzt werden, so können Flächen oderVertiefungen gereinigt werden, die nur schwer zugänglich sind.
•Mit dem Winkelaufsatz (23) können sanitäre Flächen/Gegenstände wie z. B.Toilettenschüsseln, Wasserhähne oder Abflüsse gereinigt
20
werden. Das Gerät direkt auf noch frischeTeppichoder Polstermöbelflecke richten und den gelösten Schmutz mit einem sauberenTuch aufnehmen.
•Mit dem Spachtelaufsatz (24) können hartnäckige Flecke entfernt oder z. B. das Auftauen eines Kühl-/Gefrierschranks beschleunigt werden.
•Der Rundbürstenaufsatz (25) entfernt Flecke von Oberflächen bei Raumtemperatur wie z. B. von Fliesen, Radzierblenden, Spiegeln und Fenstern.
•Mit dem Langbürstenaufsatz (26) können Rückstände aus Spalten undVertiefungen entfernt werden.
12Die auf den Zubehöradapter (22) aufgesteckte Multifunktionsdüse
(27)ist der Hauptadapter für folgende Zubehörteile:
•Das um die Multifunktionsdüse gespannte elastische Multifunktionstuch (28), zur Reinigung von Möbeln und Betten.
13Der Abstreiferaufsatz (29) wird an den Einrasthaken auf der Rückseite der Multifunktionsdüse in den Aussparungen des Abstreiferaufsatzes angebracht und dann über den Verschlusshaken auf derVorderseite der Multifunktionsdüse eingerastet (wie abgebildet).
•Der Abstreiferaufsatz kann nach Gebrauch durch Drücken des Verschlusshakens nach vorne abgenommen werden. Danach muss die noch in den Aussparungen eingerastete Multifunktionsdüse aus den Einrasthaken des Abstreiferaufsatzes gelöst und die komplette Düse nach oben angenommen werden.
14Der Abstreiferaufsatzes ist ideal für die Reinigung von Fliesen oder ganzen Glasflächen wie z. B. Fenster oder Spiegel. Zum Fensterreinigen oben am Fenster ansetzen, den Abstreifer auf die Fläche aufdrücken geradlinig von oben nach unten führen. Die Gummileiste und die Unterkante des Fensters nach jeder Bahn trocken wischen. Für kleine Fenster kann der Abstreiferaufsatz entfernt und der Dampf direkt auf die Fläche gesprüht werden. Der Abstreifer kann jetzt separat für die Entfernung der Feuchtigkeit verwendet werden.
ACHTUNG: Nicht auf sehr kaltem Glas benutzen, da die plötzlicheTemperaturänderungen Rissbildung im Glas verursachen kann.
•Der Mini-Reinigungskopf (30) wird mit dem Mini-Reinigungstuch (31) an der Multifunktionsdüse angebracht (siehe Einsetzen des Abstreiferaufsatzes, Abbildung und Beschreibung oben). Dieses Zubehörteil kann zur Reinigung von Fliesen bzw. Glasflächen, Schränken und Arbeitsflächen in der Küche oder im Badezimmer sowie Möbeln,Vorhängen, Markisen, Kissenbezügen und Matratzen eingesetzt werden.
Wasserbehälter
Das Zusatzgewicht aus Messing (16)
Das Zusatzgewicht aus Messing ist am Ende des Saugschlauchs innerhalb des Wasserbehälters angebracht. Die Messingkugel kann sich frei im Wasserbehälter, je nach Position des Geräts, bewegen. Die Messingkugel muss im Behälter verbleiben, so dass beim Betätigen des Dampfauslösers Dampf erzeugt wird, unabhängig von der jeweiligen Lage des DampfreinigerHandgeräts.
 VC70495MEE Rev4_9225 47507 MEE pump - Jon 25/01/2014 15:13 Page 21
1
2
Wasserbehälter ausspülen
Den Wasserbehälter regelmäßig ausspülen, um Kalkablagerungen zu beseitigen, die sich am Behälterboden angesammelt haben. Den Behälter nur mit entionisiertem, entmineralisiertem oder destilliertem Wasser befüllen (zu finden in den meisten größeren Supermärkten) und denVerschlussdeckel anbringen, um stärker durchspülen zu können.
Nach der Verwendung
Nach jedem Gebrauch die beiden folgenden Wartungsschritte ausführen.
Den Dampfreiniger ausschalten und den Netzstecker aus der Steckdose ziehen. Den Dampfreiniger sofort auf eine geeignete Oberfläche stellen (z. B. Fliesenboden), damit die noch in der Düse bzw. in denTüchern enthaltene Restwärme/-feuchtigkeit nicht die Oberfläche beschädigen kann. Warten, bis sich der Reiniger komplett abgekühlt hat.
Wasser aus dem Wasserbehälter (14) durch Entfernen des Verschlussdeckels (11) und Ausgießen des Wassers entleeren. Den Wassertank von innen vollständig trocknen lassen, und danach denVerschlussdeckel wieder anbringen.
Aufbewahrung 16
Das Netzkabel um die beiden Kabelaufwicklungen (4/5) wickeln und die obere Kabelaufwicklung (4) nach oben drehen, um das Netzkabel zu fixieren.
Sämtliche Zubehörteile in die Zubehörtasche (32) geben und an die untere Kabelaufwicklung hängen.
Wartung
ACHTUNG: Vor einer Wartung des Dampfreinigers stets den Netzstecker ziehen.
Allgemeine Wartung
Ihr Gerät behält sein gutes Aussehen im normalen täglichem Einsatz bei. Sie können durch gelegentliches Abwischen mit
einem feuchtenTuch dafür sorgen, dass es möglichst lange gut aussieht.Verwenden Sie keinesfalls scheuernde Reinigungsmittel.
Reinigung derTücher
Das Bodentuch (20) und das elastische Multifunktionstuch (28) können in der Waschmaschine gewaschen werden (30 ºC max.). DieTücher bei starkerVerschmutzung in warmem Wasser und etwas Waschmittel oder einem milden Fleckentferner einweichen.
WICHTIG: Keine Bleichmittel oder Weichspülmittel verwenden.
Vor demVerstauen alles vollständig trocknen lassen.
Zur Bestellung von Ersatztüchern, wenden Sie sich bitte an unsere Helpline.
Wartung der Zubehörteile
Schmutz undVerstopfungen müssen regelmäßig aus den Zubehörteilen entfernt werden, um die Lebensdauer dieserTeile zu verlängern.
Ansprechpartner
Helpline |
|
|
|
|
|
Haben Sie ein Problem mit Ihrem Gerät, rufen Sie unsere Helpline |
|
|
|
|
|
an, da wir Ihnen wahrscheinlich besser als das Geschäft, in dem |
|
|
|
|
|
Sie das Gerät gekauft haben, helfen können. |
|
|
|
|
|
Halten Sie den Gerätenamen sowie die Modellund |
d |
|
|
||
Seriennummer bereit, wenn Sie uns anrufen, damit Ihnen schneller |
|
|
|
|
|
|
|
|
|
||
geholfen wird. |
|
|
|
|
|
Sprechen Sie mit uns |
|
|
|
|
|
Haben Sie Fragen oder Anregungen oder benötigen Sie großartige |
|
|
|
|
|
|
|
|
|
||
Tipps, um unsere Geräte optimal zu nutzen, beteiligen Sie sich |
|
|
|
|
|
|
|
|
|
||
online: |
|
|
|
|
|
Blog: |
www.morphyrichards.co.uk/blog |
|
|
|
|
Facebook: |
www.facebook.com/morphyrichardsuk |
|
|
|
|
Twitter: |
www.twitter.com/loveyourmorphy |
|
|
|
|
Website: |
www.morphyrichards.com |
|
|
|
|
GARANTIEKARTE
Kaufdatum |
|
|
Typen-Nr. |
|
|
|
|
Händlerstempel und Unterschrift |
|
|
Händlerstempel und Unterschrift |
|
|
|
|
Fehler / Mangel |
|
|
|
|
|
|
|
Deutschland: |
Österreich: |
Schweiz: |
|
Bei Störungen oder Schäden |
Bei Störungen oder Schäden |
Kundendienst |
|
wenden Sie sich bitte an |
wenden Sie sich bitte an |
SchweizBLUEPOINT |
|
unseren Kundenservice unter: |
unseren Kundendienst: |
Service SaglVia Cantonale |
|
Tel.: 01805 / 398 346 |
Firma Schurz |
14C.P. 46CH - 6917 |
|
|
|||
(0,14 / Min. aus dem deutschen Festnetz; |
Merangasse 17 |
BarbengoTelefon: (+41) 091 980 49 72 |
|
max. 0,42 /Min. aus dem Mobilfunk) |
A-8010 Graz |
Telefax: (+41) 091 605 37 55 |
|
Fax: 01805 / 355 467 |
Tel.: +43 316 32 30 41 |
E-Mail: info@bluepoint-service.ch |
|
|
|||
eMail: service@glendimplex.de |
Fax: +43 316 38 29 63 |
|
|
|
eMail: office@schurz.biz |
|
|
Die zuständige Stelle in allen anderen Ländern ist der jeweilige Fachhändler bzw. die Bezugsquelle.
21
 VC70495MEE Rev4_9225 47507 MEE pump - Jon 25/01/2014 15:13 Page 22
GESETZLICHE GEWÄHRLEISTUNG
Für dieses Gerät gilt eine Gewährleistung von 2 Jahren.
Als Kaufnachweis sollte die Quittung des Fachhändlers aufgehoben werden. Heften Sie Ihren Beleg an die Rückseite dieser Unterlagen.
Sollte an diesem Gerät ein Fehler auftreten, sind immer nachfolgende Angaben mitzuteilen. Diese Angaben sind auf der Unterseite des Geräts zu finden.
Modellnr.
Seriennr.
Vor dem Verlassen des Werks werden alle Morphy Richards Produkte geprüft. Sollte einmal der Fall auftreten, dass sich ein Gerät innerhalb der Gewährleistung als fehlerhaft erweist, wenden Sie sich bitte an unsere Service-Hotline
Falls das Gerät während der 2-jährigen Gewährleistung aus welchem Grund auch immer ausgetauscht wird, wird zur Berechnung der Restgarantie für das neue Gerät das OriginalKaufdatum zugrunde gelegt. Aus diesem Grunde ist es besonders wichtig, den Original-Kaufbeleg bzw. die Rechnung aufzubewahren, um das Datum des ursprünglichen Kaufs nachweisen zu können.
Damit die 2-jährige Gewährleistung geltend gemacht werden kann, muss das Gerät im Einklang mit den Anweisungen des Herstellers benutzt worden sein. Beispielsweise muss das Gerät entkalkt worden sein und gemäß den Anweisungen gereinigt werden.
Morphy Richards übernimmt keine Verpflichtung zur Reparatur oder zum Austausch der Waren im Rahmen der
Garantiebedingungen, wenn:
1der Fehler auf einen versehentlich Gebrauch, Missbrauch, unachtsamen Gebrauch oder auf einen Gebrauch zurückzuführen ist, der den Empfehlungen des Herstellers entgegenwirkt oder wenn der Fehler durch Stromspitzen oder durchTransportschäden verursacht wurde.
2das Gerät mit einer Spannung versorgt wurde, die nicht auf dem Typenschild abgedruckt ist.
3von anderen Personen als unserem Reparaturund Wartungspersonal (oder von einem unsererVertragshändler) Reparaturversuche unternommen wurden.
4wenn das Gerät fürVermietungszwecke oder nicht allein für private Zwecke gebraucht wurde.
5das Gerät aus zweiter Hand stammt.
6Morphy Richards kann nicht dafür haftbar gemacht werden, Reparaturarbeiten im Rahmen der Gewährleistung auszuführen.
7Verbrauchsmaterialien wieTüten, Filter und Glaskaraffen sind von der Gewährleistung ausgeschlossen.
8Batterien und Schäden aufgrund undichter Batterien sind von der Gewährleistung ausgeschlossen.
9die Filter nicht gemäß Anleitung gereinigt und ausgewechselt wurden
Diese Gewährleistung erkennt Ihnen ausschließlich die Rechte zu, die ausdrücklich in den oben genannten Bestimmungen niedergelegt sind und erstreckt sich nicht auf Forderungen infolge eines Verlustes oder einer Beschädigung. Diese Gewährleistung wird als zusätzliche Leistung angeboten und greift Ihre gesetzlich zuerkannten Rechte als Verbraucher nicht an.
22

 VC70495MEE Rev4_9225 47507 MEE pump - Jon 25/01/2014 15:13 Page 23
e
INSTRUCCIONES DE SEGURIDAD IMPORTANTES
El uso de cualquier aparato eléctrico requiere la aplicación de las normas lógicas de seguridad que se indican a continuación.
Lea estas instrucciones detenidamente antes de utilizar este producto.
•ADVERTENCIA: Desconectar de la red eléctrica antes de realizar cualquier operación rutinaria de mantenimiento.
•Este aparato puede ser utilizado por niños en edades a partir de 8 años y personas con sus capacidades físicas, mentales o sensoriales reducidas, o con falta de experiencia y conocimientos, si han recibido la necesaria supervisión o instrucciones en relación con el uso del aparato y los peligros relacionados.
•No permita a los niños jugar con este aparato.
•No permita a los niños limpiar o realizar el mantenimiento del aparato sin la supervisión de un adulto.
Seguridad personal
•ADVERTENCIA: No dirija nunca el chorro de vapor hacia componentes o elementos eléctricos. Si tiene dudas acerca del efecto que puede tener el chorro de vapor sobre un objeto, póngase en contacto con el fabricante del objeto antes de limpiarlo.
•ADVERTENCIA: No toque nunca el enchufe o el cable con las manos mojadas.
•ADVERTENCIA: Las boquillas y herramientas están calientes después de usarlas. Deje enfriar antes de intentar retirarlas.
•ADVERTENCIA: No lance vapor contra personas o animales. Peligro de quemaduras.
VAPOR
no introduzca el cable, el enchufe o el limpiador en agua o en cualquier otro líquido.
•Desenchufe el cable de la toma de corriente después de usar el robot de limpieza, y antes de limpiarlo, llenarlo, cambiar los accesorios o realizar el mantenimiento de usuario.
•Mantenga el aparato fuera del alcance de los niños cuando esté enchufado o enfriándose.
Ubicación
•No utilice ni guarde este producto en exteriores.
•No guarde este aparato cerca de superficies calientes, tales como hornos, ni de equipos de calefacción.
Cable
•ADVERTENCIA: Nunca debe conectarse a la red eléctrica un cable de alimentación dañado o roto con enchufe incorporado. Debe destruirse, ya que un cable dañado es muy peligroso si se conecta a una toma de corriente.
•ADVERTENCIA: No utilice el aparato sin el tapón del rellenador colocado.
•ADVERTENCIA: En el caso de atasco, el vapor se libera por las ventilaciones de alivio de vapor.
•Para evitar incendios, descargas eléctricas y daños personales,
•Para evitar riesgos, si observa que el cable de alimentación está dañado, deberá ser sustituido por el fabricante, su representante de servicio técnico u otra persona debidamente cualificada.
•Evite retorcer el cable de alimentación.
d
e
23
 Loading...