


DF480002 MUK Rev2
GUARANTEE
Health Fryer
 Please read and keep these instructions for future use
Download the Morphy Richards Cook & Create app for recipe ideas
For competitions, product hints and tips |
www.facebook.com/morphyrichardsuk |
|
and more join us at |
||
|
||
www.morphyrichards.co.uk/blog |
@loveyourmorphy |
|
|
|
* Register online for your 2 year guarantee. See the back of this instruction book for details (UK and Ireland customers only).

Health And Safety
The use of any electrical appliance requires the following common sense safety rules.
Please read these instructions carefully before using the product.
•This appliance can be used by children aged from 8 years and above and persons with reduced physical, sensory or mental capabilities or lack of experience and knowledge if they have been given supervision or instruction concerning use of the appliance in a safe way and if they understand the hazards involved.
•Keep the appliance and its cord out of the reach of children aged less than 8 years.
•Children shall not play with the appliance.
•Cleaning and user maintenance shall not be made by children unless they are older than 8 and supervised.
•This appliance is intended to be used in household and similar applications such as: farm houses, by clients in hotels, motels and other residential type environments, bed and breakfast type environments. It is not suitable for use in staff kitchen areas in shops, offices and other working environments.
•If the supply cable is damaged, it must be replaced with a special cable assembly available from the manufacturer or its service agent in order to avoid a hazard.
•For care and cleaning refer to page 11.
•This appliance is not intended to be operated by means of an external timer or separate remote control system.
2
Health And Safety (Continued)
In addition, we offer the following safety advice.
Location
•Place the appliance on a horizontal, flat and stable heat resistant surface, away from a heating source and where it cannot be splashed by water.
•Allow adequate air space above and on all sides for air circulation.
•Do not use outdoors or near water.
Mains cable
•The mains cable should reach from the socket to the base unit without straining the connections.
•Do not let the cable hang over the edge of the table or the counter and keep it away from any hot surface.
•Do not let the cable run across an open space e.g. between a lower socket and table.
Personal safety
•WARNING: Never attempt to move your Health Fryer until it is completely cool. This can take up to three hours.
•Be careful not to touch those surfaces of the Health Fryer which become hot when in use.
•WARNING: To protect against the risk of electric shock, do not immerse the control unit in water or other liquid.
•Unplug from the electrical outlet when not in use and before cleaning. Allow to cool before putting on or taking off parts, and before cleaning the appliance.
•WARNING: Misuse can cause personal injury.
•Never leave the Health Fryer unattended when connected to the electricity supply.
•Never lean over the Health Fryer when it is in use.
Other safety considerations
•The use of attachments or tools not recommended or sold by Morphy Richards may cause fire, electric shock or injury.
•Do not operate any appliance with a damaged cord or plug or after the appliance malfunctions or has been damaged in any manner.
•Do not use the Health Fryer for anything other than its intended purpose.
Electrical requirements
Check that the voltage on the rating plate of your appliance corresponds with your house electricity supply which must be A.C. (Alternating Current).
WARNING : The plug removed from the mains lead, if severed, must be destroyed, as a plug with a bared flexible cord is hazardous if engaged into a live socket outlet.
Should the fuse in the 13 amp plug require changing, a 13 amp BS1362 fuse must be fitted.
WARNING: This appliance must be earthed.
PLEASE BE AWARE
OF HOT SURFACES
HANDLE WITH CARE
Treating scalds
•Run cold water over the affected area immediately.
•Do not stop to remove clothing.
•Seek medical advice quickly.
3

Introduction |
|
Thank you for your recent purchase of this |
|
Morphy Richards Health Fryer. |
|
Please read the instructions thoroughly before use. |
|
Remember to visit www.morphyrichards.co.uk to register your |
|
product’s two year guarantee. |
|
Contents |
|
Health And Safety ......................................................... |
2 |
Introduction .................................................................. |
4 |
Product Overview ........................................................ |
5 |
Touch Control Panel .................................................... |
6 |
Before First Use ........................................................... |
7 |
Using your Health Fryer Manually ............................... |
7 |
Using your Health Fryer Accessories .......................... |
9 |
Using your Health Fryer Pre-set Programs ................ |
10 |
Hints And Tips ............................................................. |
11 |
Care And Cleaning ....................................................... |
11 |
Cooking Guide ............................................................. |
12 |
Troubleshooting ........................................................... |
13 |
Recipes ......................................................................... |
15 |
Contact Us ................................................................... |
27 |
Guarantee ..................................................................... |
32 |
4

Product Overview
10 5
6
7
4
REVERSE
ADDITIONAL ACCESSORIES
12


 9
9
11
8
Features
(1) |
LED Display |
(7) |
Frying Basket or Frying Pan Handle |
(2) |
Touch Control Panel |
(8) |
Mains Power Cord Socket |
(3) |
Main Body |
(9) |
Air outlet and filter |
(4) |
Drawer |
(10) |
Frying Basket |
(5) |
Basket Release Button Cover |
(11) |
Frying Pan |
(6) |
Basket Release Button |
(12) |
Cake Tin |
|
|
|
|
5
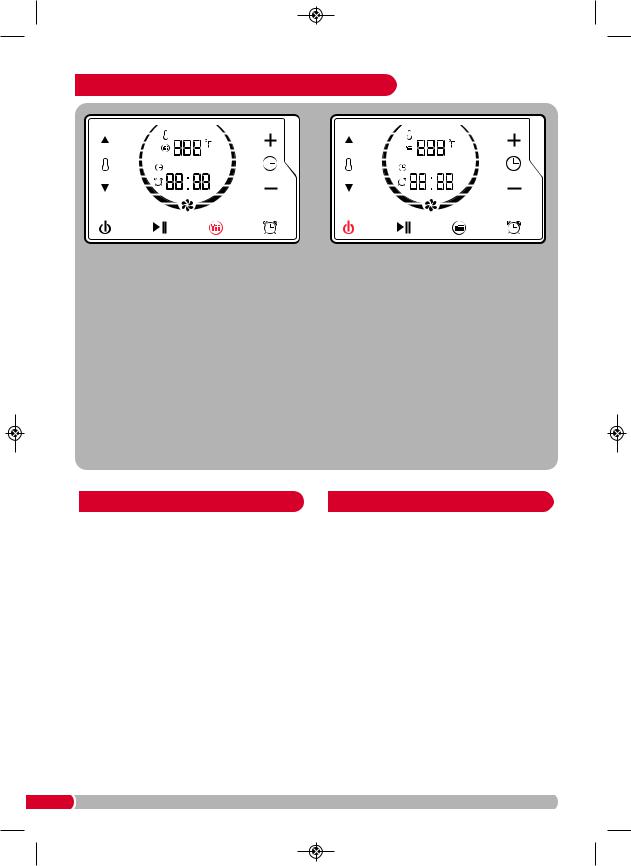
Touch Control Panel
13 |
14 |
15 |
16 |
17 |
18 |
19 |
A |
|
|
|
|
|
C |
20 |
|
|
|
|
|
21 |
B |
|
|
|
|
|
D |
E |
F |
22 |
G |
H |
Touch Sensitive Control Buttons
(A) |
|
|
|
|
Increase Temperature Button (5°C) |
(E) |
|
|
On / Stop Button |
|
|
|
|
|
|
||||
|
|
|
|
|
|
||||
|
|
||||||||
(B) |
|
|
|
|
Decrease Temperature Button (5°C) |
(F) |
|
|
Start / Pause Button |
|
|
|
|
|
|
||||
|
|
|
|
|
|
||||
|
|
|
|
|
|
||||
(C) |
|
|
|
|
Increase Time Button |
(G) |
|
|
Pre-program Function Button |
|
|
|
|
|
|
||||
|
|
|
|
|
|
||||
|
|
|
|
|
|
||||
|
|
|
|
|
|
||||
(D) |
|
|
|
|
Decrease Time Button |
(H) |
|
|
Delay Timer Function Button |
|
|
|
|
|
|
||||
|
|
|
|
|
|
||||
|
|
||||||||
|
|
|
|
|
|
||||
|
|
|
|
|
|
|
|
|
|
|
|
|
|
|
|
|
|
|
|
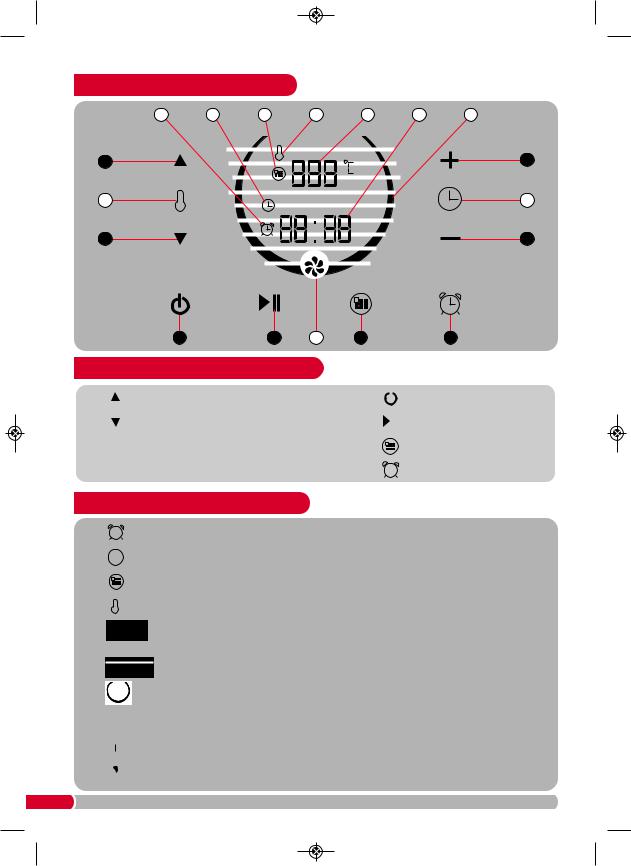
Touch Control Panel Icons
(13) |
|
|
|
|
Delay Timer Icon. When displayed, you can adjust the timer using (C) &(D). |
|
|
|
|
|
|||
|
|
|
|
|||
(14) |
|
|
|
|
Cooking Time Icon. When displayed, you can adjust the cooking time using (C) &(D). |
|
|
|
|
|
|||
|
|
|
|
|||
|
|
|
|
|||
|
|
|
|
|||
(15) |
|
|
|
|
Program Icon. When displayed, you may select your desired program. |
|
|
|
|
|
|||
|
|
|
|
|||
(16) |
|
|
|
|
Temperature adjust Icon. When displayed, you can adjust the temperature using (A) &(B). |
|
|
|
|
|
|||
|
|
|
|
|||
(17) |
|
|
|
|
|
Temperature Read-out. Displays the current selected temperature and the actual |
|
|
|
|
|
||
|
|
|
|
|
||
|
|
|
|
|
|
temperature (when 19 is flashing). |
|
|
|
|
|
|
|
(18) Time Read-out. Displays the current selected time.
(19) Heating Icon. When displayed, the Health Fryer is in operation. When flashing, the
 temperature is increasing to the set temperature.
(20) Temperature Icon. Highlights the temperature-adjust area of the panel.
(21) Time Icon. Highlights the time-adjust area of the panel.
(22) Fan Icon. When displayed, the fan motor is in operation.
6
Before First Use
1Remove all packaging materials.
2Remove all stickers and labels from the appliance (excluding the rating label).
3Clean all parts to remove any dust or manufacturing residues.
4Thoroughly wash all parts by hand with hot water, washing-up liquid and a non-abrasive sponge.
•PLEASE NOTE: All parts are NOT dishwasher safe.
5Wipe the inside and outside of the appliance with a moist cloth.
6Dry all parts of your Health Fryer thoroughly. When replacing the Drawer (4), ensure it is aligned correctly.
7Use the appliance on a horizontal, flat and stable heat resistant surface, away from a heating source and where it cannot be splashed by water.
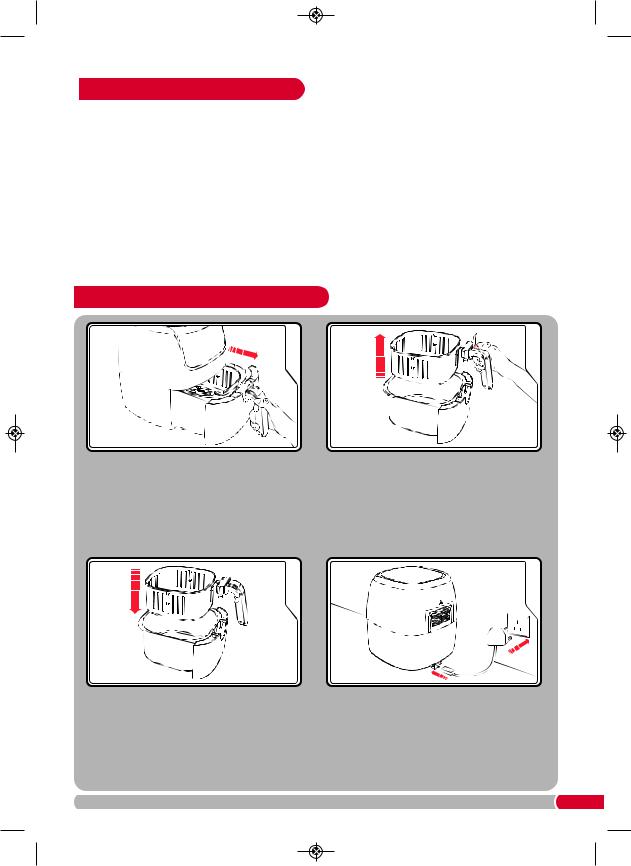
Using Your Health Fryer Manually
Remove the Drawer (4) from the Main Body (3). Pull the Drawer (4) fully out from the Health Fryer.
Place the Frying Basket (10) or Frying Pan (11) into the Drawer and re-insert the Drawer into the Main Body (3) until it clicks into place. Ensure the Drawer (4) is fully closed. A safety switch will prevent it working if not closed properly.
If using the cake tin, place inside the Frying Basket.
Remove the Frying Basket (10) from the Main Drawer (4) by lifting the Basket Release Button Cover (5) and pressing the Basket Release Button (6). Use the Frying Basket Handle (7) or Frying Pan Handle (7) to pull the basket fully out from the Drawer.
Ensuring the lead is inserted into the back of the Main Body (3), plug the Health Fryer into the mains.
7
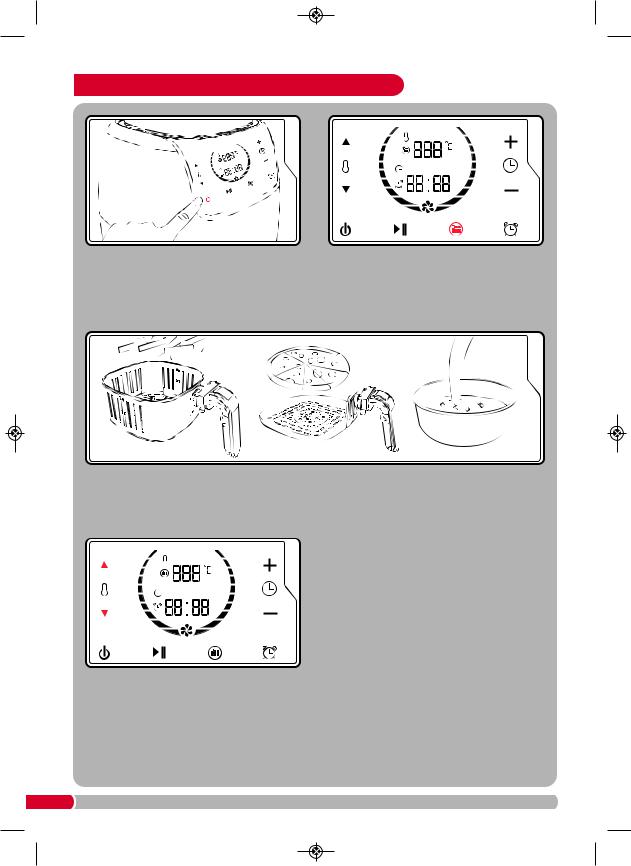
Using Your Health Fryer Manually (Continued)
Press and hold the On / Stop Button (E) until the Touch Control Panel (2) illuminates.
Press the Program Button (G) and select program 1 within the pre-programmed settings. This will activate the pre-heat function. When the pre-heat is complete, it will automatically switch off the Health Fryer.
Remove the Drawer (4) from the Health Fryer (see Step 1).
Place the food into the Frying Basket (10), Frying Pan (11) or Cake Tin (12) and repeat Step 3. Do not put oil or food into the Drawer (4).
Repeat step 5 to switch back on. Using the Temperature Adjust Buttons (A & B), select the correct temperature for the food to be cooked. The temperature will be set at 180°C, and the time at 10 minutes as an automatic default.
8

Using Your Health Fryer Manually (Continued)
Using the Time Adjust Buttons (C & D), select the desired time for the food to be cooked.
Press the Start / Pause Button (F) and the Health Fryer will begin cooking your food.
When the time is up on the timer, the Health Fryer will beep and automatically turn off.
If the food is not cooked to your desired requirements, repeat Steps 7-10.
Tip: Check your food at two minute intervals to ensure food is not overcooked.
Either remove the entire basket (see Step 2), or carefully use plastic or wooden utensils to remove your food.
Using Your Health Fryer Accessories
Remove the Frying Basket (10) from the Main Drawer (4) by lifting the Basket Release Button Cover (5) and pressing the Basket Release Button (6). Use the Frying Basket Handle (7) or Frying Pan Handle (7) to pull the basket fully out from the Drawer.
Place the Frying Pan (11) into the Drawer (4) and re-insert the Drawer (4) into the Main Body (3) until it clicks into place. Ensure the Drawer (4) is fully closed. A safety switch will prevent it working if not closed properly.
To use the Cake Tin (12). Place the Cake Tin (12) into the Frying Basket (10) before re-inserting the Drawer (4) into the Main Body (3).
9
Using Your Health Fryer’s Pre-set Programs
Repeat Steps 1-7 of ‘UsingYour Health Fryer Manually’ on pages 7 & 8).
Press the Program Button (G) until you reach the desired program.
When the time is up on the timer, the Health Fryer will beep and automatically turn off.
If the food is not cooked to your desired requirements, repeat Steps 7-10 of ‘Using Your Health Fryer Manually’ on page 7.
Tip: Check your food at two minute intervals to ensure food is not overcooked.
Either remove the entire basket (see Step2, page 7), or carefully use plastic or wooden utensils to remove your food.
Press the Start / Pause Button (E) and the Health Fryer will begin cooking your food.
Pre-heat Function |
Defrost Function |
•This function is activated by selecting Preset 1 (see ‘UsingYour Health Fryer’ on pages 7 and 9).
•For most manual and Preset cooking options, use this Pre-heat function to ensure the Cooking Drawer is pre-heated. Failure to do this could result in the food being undercooked.
•The Pre-heat lasts for 3 minutes (see ‘Cooking Guide’ on page 11).
•This function is activated by selecting Preset 8 (see ‘Cooking Guide’ on page 12 for examples of suitable foods to be defrosted).
•The Preset 8 is for 5 minutes, this can be increased as required (see ‘UsingYour Health Fryer’s Pre-set Programs’ above).
•Ensure the food is fully defrosted as required before use.
•NOTE: The food will continue to defrost due to residual heat, so check 5-8 minutes after removing from the Drawer / Frying Basket, Frying Pan or Cake Tin.
10
 Loading...