


Intellisteam |
o |
Please read and keep these instructions |

o
Health & Safety
The use of any electrical appliance requires the following common sense safety rules.
Please read these instructions carefully before using the product.
•This appliance is not intended for use by persons (including children) with reduced physical, sensory or mental capabilities, or lack of experience and knowledge, unless they have been given supervision or instruction concerning use of the appliance by a person responsible for their safety.
•Children should be supervised to ensure that they do not play with the appliance.
•Cleaning and user maintenance shall not be made by children.
•For care and cleaning, refer to ‘Care and Cleaning’ section.
•WARNING: Misuse of appliance could cause personal injury.
•The appliance has a heating element which is subject to residual heat after use.
•Keep the appliance and cord out of the reach of children.
•If the supply cable is damaged, it must be replaced by the manufacturer, its service agent or similarly qualified persons in order to avoid a hazard.
•This appliance is intended to be used in household and similar applications such as: farm houses, by clients in hotels, motels and other residential type environments; bed and breakfast type environments. It is not suitable for use in staff kitchen areas in shops, offices and other working environments.
2

Location
•Do not use outdoors or near water.
•Do not place directly under kitchen wall cupboards when in use, as it produces large amounts of steam. Avoid reaching over the steamer when in use.
Mains cable
•The mains cable should reach from the socket to the base unit without straining the connections.
•Do not let the cable hang over the edge of the table or counter and keep it away from any hot surfaces.
•Do not let the cable run across an open space e.g. between a low socket and table.
•The supply cord should be regularly examined for signs of damage, and if the cord is damaged, the appliance must not be used.
Personal safety
•Do not touch hot surfaces. Use oven gloves or a cloth when removing the lid or handling hot containers as hot steam will escape.
•WARNING:To protect against fire, electric shock and personal injury, do not immerse cord, plugs, or appliance in water or other liquid.
•WARNING: Extreme caution must be used when moving the steamer when containing hot food, water, or other hot liquids.
•The temperature of accessible surfaces may be high when the appliance is operating.
•Appliances must not be immersed.
•Unplug from the socket when not in use, before putting on or taking off attachments, and before cleaning.
•Do not operate any appliance with a damaged lead or plug, or after an appliance has malfunctioned, or has been dropped or damaged in any way.
•Do not fill above the maximum level. If the steamer is over-filled, boiling water may be ejected which can scald.
Other safety considerations
•Do not use attachments or tools not recommended by Morphy Richards as this may cause fire, electric shock or injury.
•To open, tilt the lid to direct steam away from you.
•Do not use any steamer parts in a microwave or on any cooking/heated surfaces.
•Do not place on or near a hot gas or electric burner, or in a heated oven.
•Do not switch the steamer on unless it contains at least 1 cup of water, otherwise the steamer may be damaged.
•Always make sure the water does not fall below the minimum level.
Treating scalds
o
•Run cold water over the affected area immediately. Do not stop to remove clothing, get medical help quickly.
Electrical requirements
Check that the voltage on the rating plate of your
appliance corresponds with your house electricity supply which must be A.C. (Alternating Current).
Should the fuse in the mains plug require changing, a 13 amp
BS1362 fuse must be fitted.
WARNING:This appliance must be earthed.
3
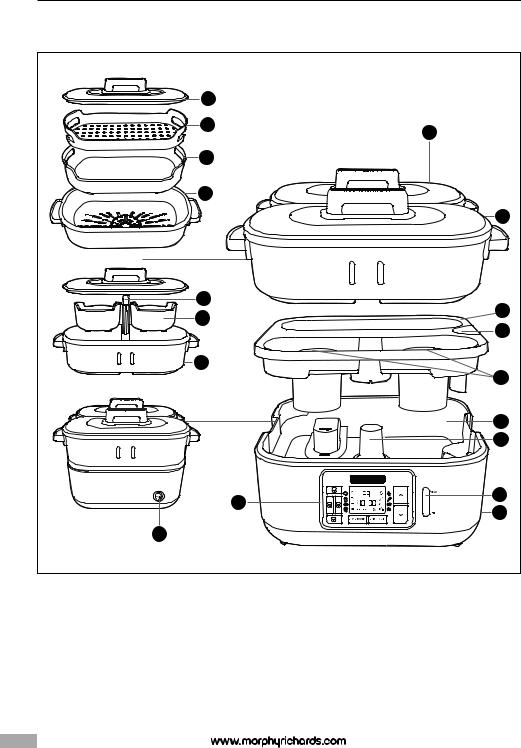
g Overview
1 |
10 |
1 |
11 |
12 |
1 |
13 |
2 |
14 |
3 |
15 |
4 |
5 |
6 |
7 |
9 |
8 |
16 |
4
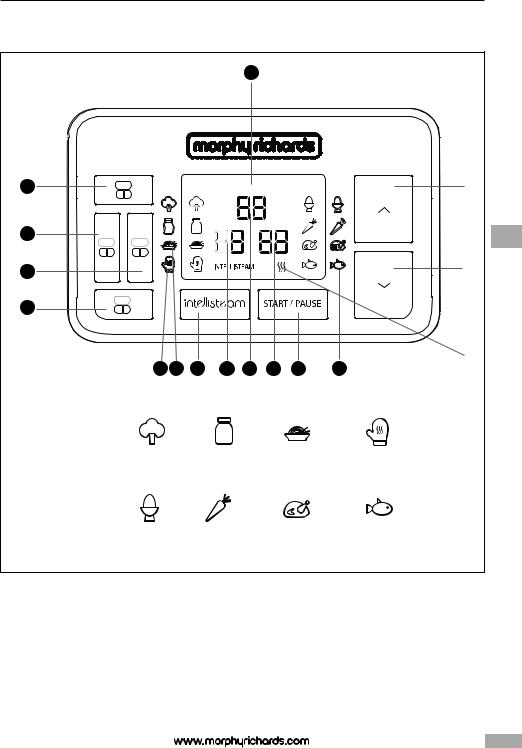
g Control Panel
|
|
|
17 |
|
|
|
18 |
|
|
|
|
|
|
19 |
|
|
|
|
|
o |
20 |
|
|
|
|
|
|
21 |
|
|
|
|
|
|
31 22 |
23 |
24 |
25 |
26 |
27 |
22 |
Leaf/Pod Veg |
|
Sauce |
|
|
Rice |
Keep Warm |
16 mins |
|
30 mins |
|
|
40 mins |
40 mins |
Eggs |
Root Vegetables |
|
Poultry |
Fish |
||
16 mins |
|
35 mins |
|
|
28 mins |
20 mins |
|
|
|
|
|
|
5 |

1 |
2 |
3 |
4 |
5 |
6 |
7 |
8 |
6
9 |
10 |
11 |
12 |
o
13 |
14 |
15 |
16 |
7
17 |
18 |
19 |
20 |

 21
21
8

Introduction
Thank you for your recent purchase of the Intellisteam. Please read this instruction booklet carefully to ensure you get the best performance from your new product.
Contents
Health and Safety |
2 |
Product Overview |
4 |
|
|
Control Panel Features |
5 |
|
|
Introduction |
9 |
|
|
Overview |
9 |
|
|
Before First Use |
10 |
|
|
Using Your Intellisteam |
10 |
|
|
Front Container Overview |
10 |
|
|
Preset Cooking Times |
10 |
|
|
Pausing During Cooking |
10 |
|
|
Steaming Times |
11 |
|
|
Keep Warm |
11 |
|
|
Removing Food From Your Intellisteam |
11 |
|
|
Fitting and Removing The Dividing Wall |
11 |
|
|
Refilling The Water Tank During Use |
11 |
|
|
Boil Dry Alarm and Auto Shut Off |
11 |
|
|
The Intellisteam Button |
11 |
|
|
Saving Time Adjustments |
11 |
|
|
Hints and Tips |
11 |
|
|
Descaling |
12 |
|
|
Care and Cleaning |
12 |
|
|
Using The Accessories |
12 |
|
|
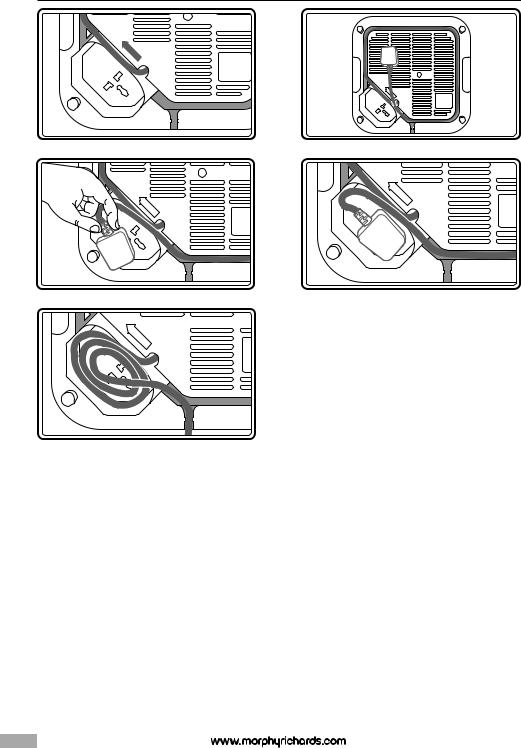
Cable Tidy |
12 |
|
|
Adjusting The Cable Length |
12 |
|
|
Steaming Guide |
13 |
|
|
Recipes |
18 |
|
|
Contact Us |
29 |
|
|
Guarantee |
30 |
|
|
Features
(1) |
Lid |
(2) |
Drip Tray |
(3) |
Water Inlet Filler |
(4) |
Steam Vent |
(5) |
Water Tank |
(6) |
Element |
(7) |
Water Gauge |
(8) |
Main Unit |
(9) |
Control Panel |
(10) |
Steam Tray |
(11) |
Rice Tray |
(12) |
Rear Container |
(13) |
Dividing Wall |
(14) |
Small Pots x2 |
(15) |
Front Container |
(16) |
On/Off Button |
Control Panel Features |
o |
|
(17)LCD Screen
(18)Rear Heater Button
(19)Front Left Heater Button
(20)Front Right Heater Button
(21)Front Dual Heater Button
(22)Food Icons
(23)Intellisteam Button
(24)Timer (Front Left Compartment)
(25)Timer (Rear Compartment)
(26)Timer (Front Right Compartment)
(27)Start/Pause Button
(28)Increase Button
(29)Decrease Button
(30)Steaming Icon
(31)Keep Warm Icon
Overview
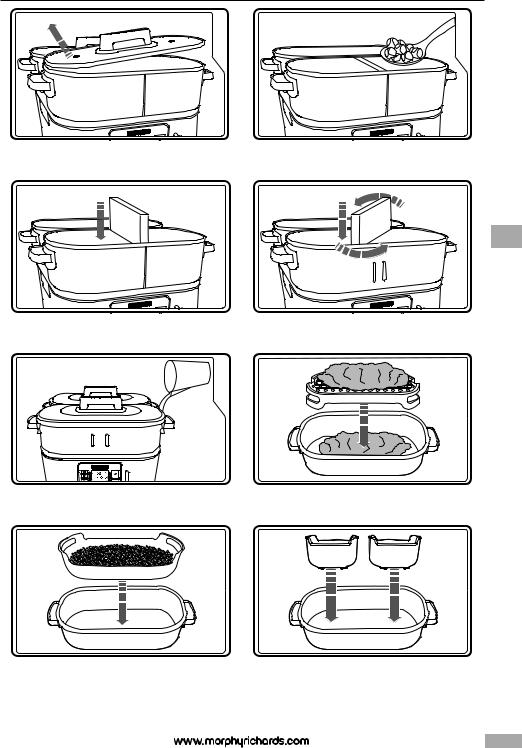
Congratulations on your purchase of the Morphy Richards Intellisteam. Intellisteam is the perfectly synchronised meal solution that will allow you to cook healthy, balanced meals all in one product. With its versatile accessories and 3 cooking chambers you can cook proteins, carbohydrates and vegetables in different combinations as well as much, much more including sauces and desserts. Cooking couldn’t be easier with the intelligent control panel and 8 reprogrammable pre-sets, as Intellisteam manages the cooking process for you so all the elements are finished at the same time ready for you to enjoy.
9

|
Before First Use |
10 Carefully remove the cooked food from your Intellisteam. |
|||
|
WARNING: Never immerse the Main Unit (8), power cord or |
|
|
*Note: If you have selected different times for each |
|
|
|
|
compartment the steaming icon will flash when each |
||
|
mains plug in water. |
|
|
||
|
|
|
compartment begins the steaming process. Only follow |
||
|
It is important to wash all parts except the Main Unit (8) before |
|
|
||
|
|
|
steps 5-7 for compartments you intend to use.The timer |
||
|
first use. See ‘Care and Cleaning’ for cleaning instructions. |
|
|
display (24), (25), (26) will remain at ‘00’ if not selected. |
|
1. |
Wash the Water Tank (5) with hot soapy water and a dishcloth. |
|
|
Front Container Overview |
|
|
|
||||
|
Rinse and dry. |
|
|
||
|
|
|
The Front Container (15) can be used in one of |
||
2. |
Wash the Lids (1), Drip Tray (2), Steam Tray (10), Rice Tray (11), |
|
|
||
|
Small Pots x2 (14), Containers (12), (15) and Dividing Wall (13) in |
|
|
two ways; as two individual cooking compartments or one |
|
|
hot soapy water. Rinse and dry. |
|
|
large single compartment. See ‘Fitting and Removing the |
|
|
Do not use abrasive cleaning products, e.g. scouring |
|
|
Dividing Wall’ for fitting of Dividing Wall (13). |
|
|
|
|
To use the Front Container (15) as a single steaming |
||
|
powders/pads, cream cleaners, steel wool or bleach on any part |
|
|
||
|
of the product as these will damage it. |
|
|
compartment, lift the Dividing Wall (13) out of the container and |
|
|
Please note that when you first use your Intellisteam, you may |
|
|
set aside. Follow steps 1-7 of ‘Using your Intellisteam’. Use the |
|
|
|
|
Front Dual Heater Button (21) to select the steaming time. |
||
|
notice some smoke/vapour emitting from the rear of the Main Unit |
|
|
||
|
|
|
The Dividing Wall (13) should be stored loose when not in use. |
||
|
(8), this is normal and is simply grease applied during the |
|
|
||
|
manufacturing process. After using your Intellisteam a few times |
|
|
Preset Cooking Times |
|
|
|
|
|||
|
this will stop. This is not dangerous and will not contaminate or |
|
|
||
|
|
|
|
||
|
flavour food cooked in your Intellisteam. |
|
|
Your Intellisteam features 8 preset cooking times. These are a |
|
|
UsingYour Intellisteam |
|
|
guide and can be adjusted using the Increase (28) and Decrease |
|
|
|||||
|
|
|
(29) Buttons. |
||
1 |
Fill the Water Tank (5) with cold water to the maximum level. |
||||
|
|
To cycle through the options, and select the desired preset |
|||
2 |
Fit the Drip Tray (2) to the Water Tank (5) and then place Containers |
|
|
cooking time for each compartment, press the relevant Rear (18), |
|
|
(12),(15) on top. |
|
|
Left (19), Right (20), or Dual (21) Heater Button repeatedly. |
|
3 |
Place the food in the Containers (12),(15). Use the Dividing Wall |
|
|
Keep warm is preset at 40 minutes and cannot be increased. |
|
|
(13) when required. Refer to ‘Fitting and Removing the Dividing |
|
|
|
|
Wall’ to fit the Dividing Wall in the Front Container (15) to keep |
Preset cooking times as follows: |
|
|
food separate. Cover each Container with the Lid (1). |
|
4Plug your Intellisteam into the mains and switch on using the On/Off Button (16) at the rear of the Main Unit (8).Your Intellisteam will beep and the LCD screen (17) will illuminate.
5To set the steaming time, press the Heater Button (18), (19), (20), (21) relating to the compartment you would like to use. Press the button repeatedly to cycle through the default steaming times and select the required food group (22).
These are the default settings, see ‘Steaming Guide’ for a guide to steaming times.
6Use the Increase (28) or Decrease (29) Buttons to adjust the cooking time (if required). Press while the relevant Timer Icon (24), (25), (26) is flashing. Repeat steps 5-6 for the other compartments (if required).
7Press the Start/Pause Button (27).Your Intellisteam will beep, the Steaming Icon (30) and selected food icons will illuminate and the display times will start counting down.
8When the timers reach zero the alarm will sound.Your Intellisteam will automatically switch to keep warm for 40 minutes (see ‘Keep Warm’ section). The timer will reset to 40 and the Keep Warm Icon
(31)will illuminate.
9When complete or when ready to serve, press the Start/Pause Button (27), and turn your Intellisteam off at the back of the unit or at the mains. Carefully lift the Lid (1) angling it away from you, to release steam safely.
WARNING: Steam can burn.
Leaf/Pod vegetables |
16 minutes |
Sauce |
30 minutes |
Rice |
40 minutes |
Keep Warm |
40 minutes |
Eggs |
16 minutes |
RootVegetables |
28 minutes |
Poultry |
28 minutes |
Fish |
20 minutes |
Pausing During Cooking
To pause your Intellisteam during the cooking process press the Start/Pause Button (27). The Steaming Icon (30) and Food Icons (22) will go out. To continue steaming, press the Start/Pause Button (27) again. The Steaming Icon (30) will illuminate.
Whilst your Intellisteam is paused, it is possible to amend the cooking times as detailed in steps 5-7 of ‘Using your Intellisteam’. To cancel the steaming cycle, press and hold the Start/Pause Button (27).
10
 Loading...