


Instruction manual |
G |
Please read and keep these instructions for future use |
|
Mode d'emploi |
F |
Merci de bien vouloir lire et conserver ces instructions pour pouvoir les consulter ultérieurement |
|
Bedienungshandbuch |
D |
Lesen Sie bitte diese Anleitungen und bewahren Sie sie für einen eventuellen späteren Gebrauch auf |
|
Manual de instrucciones |
E |
Lea estas instrucciones atentamente y guárdelas |
|
Istruzioni |
I |
Si raccomanda di conservare queste istruzioni per uso futuro |
|
Vejledning |
Q |
Du skal læse og beholde denne vejledning til fremtidig brug |
|
Návod k použití |
∂ |
Přečtěte si tyto pokyny a uschovejte si je pro budoucí použití |
|
Kullanım kılavuzu |
T |
Lütfen gelecekte kullanmak üzere bu talimatları okuyun ve saklayın

G Health & Safety
The use of any electrical appliance requires the following common sense safety rules.
Please read these instructions carefully before using the product.
•This appliance can be used by children aged from 8 years and above and persons with reduced physical, sensory or mental capabilities, or lack of experience and knowledge, if they have been given supervision or instruction concerning the use of the appliance in a safe way and understand the hazards involved.
•Children shall not play with the appliance.
•Cleaning and user maintenance shall not be made by children without supervision.
•Keep the appliance and its cord out of reach of children.
•This appliance is intended to be used in household and similar applications such as: farm houses, by clients in hotels, motels and other residential type environments, bed and breakfast type environments.
It is not suitable for use in staff kitchen areas in shops, offices and other working environments.
2
Location
•Always locate your appliance away from the edge of the worktop.
•Ensure that the appliance is used on a firm, flat surface.
•Do not use the appliance outdoors or near water.
•WARNING: Do not place the appliance onto a metal tray or metal surface whilst in use.
Mains cable
•Do not let the mains cable hang over the edge of the worktop where a child could reach it.
•Do not let the mains cable run across an open space e.g. between a low socket and a table.
•Do not let the mains cable run across a cooker or other hot area which might damage the cable.
•The mains cable should reach from the socket to the base unit without straining the connections.
•If the mains cable is damaged, it must be replaced by the manufacturer, it’s service agent or similarly qualified person in order to avoid a hazard.
Personal safety
•WARNING:To protect against fire, electric shock and personal injury do not immerse cord, plug and appliance in water or any other liquid.
•Unplug from the outlet before cleaning.
•Allow to cool before putting on or taking off parts and before cleaning.
Other safety considerations
•The use of attachments or tools not recommended or sold by Morphy Richards, may cause fire, electric shock or injury.
•Do not use the appliance for any use other than to boil water.
•Do not place the appliance on or near a hot gas or electric burner or in a heated oven.
•The WaterTank must not be in the Main Unit when being filled with water.
•Unplug from the outlet when not in use.
•WARNING:The appliance must not be immersed for cleaning.
CAUTION: To prevent damage to the appliance, do not use alkaline cleaning agents when cleaning. Use a soft cloth and detergent.
Electrical requirements
• Check that the voltage on the rating plate of your |
|
|
appliance corresponds with your house electricity |
G |
|
supply which must be A.C. (Alternating Current). |
|
|
|
|
|
•Should the fuse in the mains plug require changing, a 13
amp BS1362 fuse must be fitted. F
WARNING:This appliance must be earthed.
D
E
I
Q
∂
T

|
|
|
|
|
|
|
5 |
|
|
|
|
6 |
|
|
|
|
|
|
11 |
|
15 |
|
|
|
|
|
|
|
|
|
|
|
|
|
|
|
|
12 |
|
16 |
2 |
3 |
|
|
|
|
|
|
|
|
|
|
|
|
|
|
|
|
|
|
|
|
|
|
|
|
|
|
|
|
|
||||
|
|
|
|
|
|
|
|
|
|
|
|
|
|
|
|
|
||
13 |
14 |
17 |
1 |
|
|
|
|
|
|
|
|
|
|
|
|
|
|
|
|
4 |
|
|
|
|
|
|
|
|
|
|
|
|
|
|
|||
|
|
|
|
|
|
|
|
|
|
|
|
|
|
|
|
|
|
|
|
|
|
6 |
5 |
|
|
|
|
|
|
|
|
|
|
|
|
|
|
|
|
|
|
|
|
|
|
|
|
|
|
|
|
|
|
|
||
|
|
|
|
|
|
|
|
|
|
|
|
|
|
|
|
|
|
|
|
|
3 |
|
7 |
|
7 |
|
|
|
8 |
|
|
|
|
|
|
||
2 |
|
|
|
|
|
|
|
|
|
|
|
|
|
|
|
|
|
|
|
|
|
|
|
|
|
|
|
|
|
|
|
|
|
|
|
||
|
|
|
|
|
|
|
|
|
|
|
|
|
|
|
|
|
||
1 |
|
|
|
|
|
|
|
|
|
|
|
|
|
|
|
|
|
|
18 |
|
4 |
|
|
|
|
|
|
|
|
|
|
|
|
|
|
|
|
5 |
|
|
|
|
|
|
|
|
|
|
|
|
|
|
|
|
|
|
19 |
|
|
|
|
|
23 |
|
|
|
|
|
|
|
|
|
|
|
|
|
|
|
|
|
|
|
|
|
|
|
|
|
|
|
|
|
||
|
|
|
|
|
|
|
|
|
|
|
|
|
|
|
|
|
||
20 |
|
|
|
|
|
|
|
|
|
|
|
|
|
|
|
|
|
|
|
|
|
|
|
|
|
|
|
|
|
|
|
|
|
|
|
|
|
21 |
|
|
|
|
|
|
|
|
|
|
|
|
|
|
|
|
|
|
7 |
|
|
10 |
|
|
|
|
|
|
|
|
|
|
|
|
|
|
|
22 |
|
8 |
9 |
|
|
|
9 |
|
10 |
|
|
|
|
|
||||
|
|
|
|
|
|
|
|
|
|
|
|
|
|
|
|
|
|
|
|
|
|
|
|
|
|
|
|
|
|
|
|
|
|
|
|
|
|
|
|
|
|
|
|
|
|
|
|
|
|
|
|
|
|
|
|
|
|
|
|
|
|
|
|
|
|
|
|
|
|
|
|
|
|
|
|
|
|
|
|
|
|
|
|
|
|
|
|
|
|
|
|
|
|
|
|
|
11 |
|
|
12 |
|
|
|||
1 |
|
|||||||||
|
|
|
|
|
|
|
|
|
|
|
|
|
|
|
|
|
|
|
|
|
|
|
|
|
|
|
|
|
|
|
|
|
|
|
|
|
|
|
|
|
|
|
|
|
|
|
|
|
|
|
|
|
|
|
3 |
|
4 |
|
|
|
|
|
|
13 |
14 |
4
G
F
D
E
I
Q
∂
T
15 |
|
16 |
|
|
|
|
18 |
|
|
|
|
17 |
|
|
|
|
|
|
|
|
|
|
|
|
|
|
|
|
|
|
G |
|
19 |
20 |
||||||
|
|
|||||||
|
|
|
|
|
|
|
|
|
|
|
|
|
|
|
|
|
|
|
|
|
|
|
|
|
|
F |
|
|
|
|
|
|
|
|
|
|
|
|
|
|
|
|
|
|
|
|
|
|
|
|
|
|
D |
|
|
|
|
|
|
|
|
|
|
|
|
|
|
|
|
|
|
|
|
|
|
|
|
|
|
E |
|
|
22 |
|
|||||
|
21 |
|
||||||
|
|
|
|
|
|
|
|
|
|
|
|
|
|
|
|
|
I |
|
|
|
|
|
|
|
|
|
|
|
|
|
|
|
|
|
|
|
|
|
|
|
|
|
|
|
|
|
|
|
|
|
|
|
Q |
|
|
|
|
|
|
|
|
|
|
|
|
|
|
|
|
|
|
|
|
|
|
|
|
|
|
∂ |
|
|
|
|
|
|
|
|
|
|
|
|
|
|
|
|
|
|
|
|
|
|
|
|
|
|
|
|
|
|
|
|
|
|
|
T |
23 |
|
|
|
|
|
|
||
|
|
|
|
|
|
|
|
|
25
seconds
6
BRITA filtration
Filtering your water improves the taste and appearance of beverages by reducing limescale, lead, chlorine and other impurities.
The BRITA MAXTRA Filter Cartridge offers improved filtration due to MAXTRA Technology. The natural
MicroporeFilter in combination with the powerful Protect Filter reduces chlorine and limescale for a great natural taste and further reduces metals such as lead and copper. Unique flow control ensures the perfect
filtration time for best results.
For maximum filter performance and for optimum taste, it is important to change your BRITA MAXTRA Filter Cartridge regularly. BRITA recommends that you replace the cartridge every 4 weeks.
Using the BRITA filtration system is optional. If you do not wish to use the filtration system, simply remove the BRITA Hopper (21) and MAXTRA Filter Cartridge (19) from the Water Tank (7).
Filtering water through the BRITA Filtration System takes roughly 4 minutes to filter 1.5L of water.You can use the system while filtering, providing enough water has filtered into the Water Tank.
Installing a BRITA MAXTRA
Cartrige 1
1Unwrap the BRITA MAXTRA Cartridge (19) and immerse in water, gently shake to loosen any bubbles.
2Push the BRITA MAXTRA Cartridge into place in the BRITA Hopper.
3Place the BRITA Hopper into the Water Tank.
Before returning the Water Tank to the Main Unit, fill the BRITA Hopper with Cold Water and allow the
water to filter through the BRITA MAXTRA Cartridge. Discard the filtered water. Repeat this step twice.
4Fill the Brita Hopper with fresh water and return the Water Tank to the main unit.Your BRITA Cartridge is ready for use with your Hot Water Dispenser.
8
BRITA Memo 2
The BRITA Memo (20) measures the recommended time of use of your MAXTRA Filter Cartridge (19). The BRITA Memo is located in the top of the BRITA Hopper (21).
To reset the BRITA Memo, please press and hold down the Start Button on the Memo until all four bars appear in the display and flash twice. The Cartridge Active Indicator Light in the bottom right corner of the BRITA Memo indicates that it is working. After four weeks, all four bars will disappear and a flashing arrow will indicate that the cartridge should now be changed. After changing the cartridge, reset the Memo.
Replacing the BRITA Memo
The BRITA Memo (20) has a life of approximately 5 years. To remove the exhausted BRITA Memo, place a screwdriver in the notch next to the BRITA Memo and push it out. Please note that BRITA Memo should not be removed for any other reason than to dispose of it.
More information on the use of BRITA filter cartridges and the BRITA Memo can be found in the BRITA information guide supplied with your hot water dispenser.
Telephone our replacement parts helpline (0844 873 0726) for your new BRITA Memo. If you require assistance on using your BRITA MAXTRA filter cartridge or BRITA Memo, please call BRITA Customer Care team on 0844 742 4800.
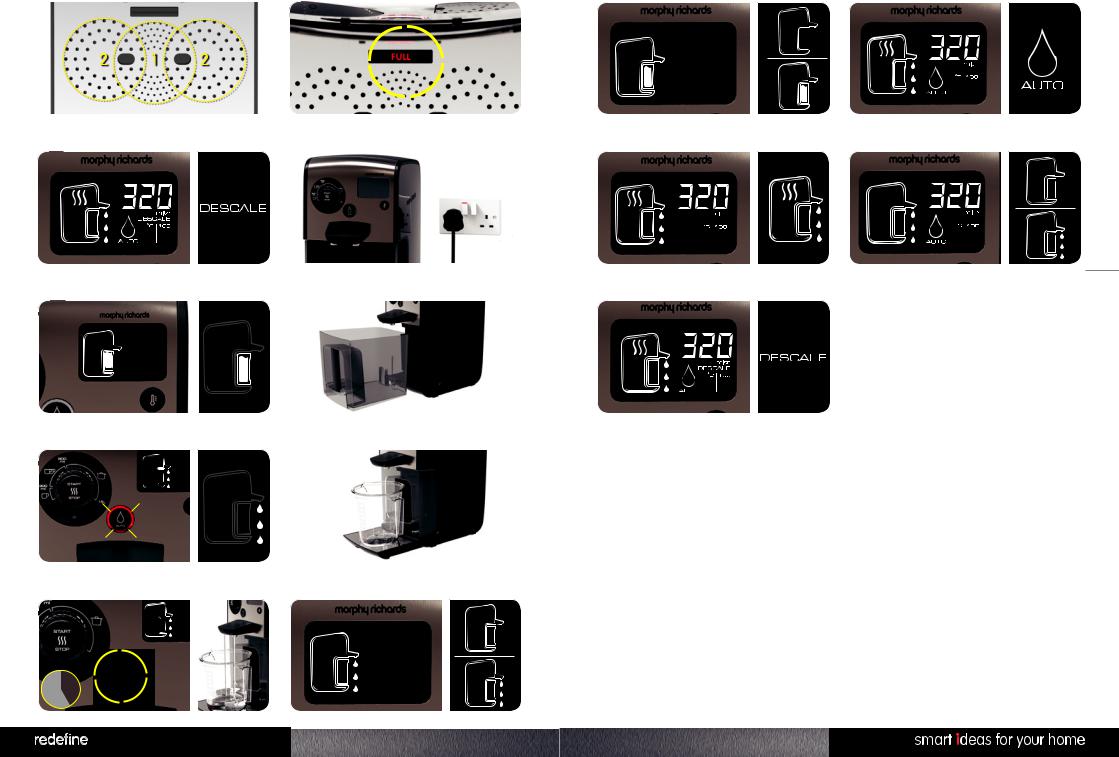
Features
1Start / Stop Button
Starts and pauses the heating process. Can also be used to pause dispense while in progress and put the Hot Water Dispenser into standby mode.
2Water Volume Dial
Controls the volume of water to be heated and dispensed. Volume is displayed on the LCD screen (15).
3LCD Screen
Displays volumes, temperatures, functions, and warnings.
4Temperature Button
Adjusts the temperature of dispensed water, turns sounds on and off.
5Dispense Button
Switches the Auto Dispense feature on and off.
6 Dispense Nozzles
7Water tank
Contains the BRITA MAXTRA Cartridge 19, BRITA Memo 20 and BRITA Hopper 21.
8 DripTray
9 DripTray Cover
10DripTray Indicator
‘Full’ icon indicates when the Drip Tray needs to be emptied.
11Heat Icon
Displays when the heat cycle is in process.
12WaterTank Icon
Displays when the tank needs to be refilled.
13Dispense Icon
Displays when water is ready for dispense.
14Auto Dispense Icon
Displays when the auto dispense feature is enabled.
15Dispense Volume Display
Displays the volume of water to be heated and dispensed.
16Descale Icon
Displays when the Hot Water Dispenser requires descaling.
17Temperature Icon
Displays the temperature the water will be heated to prior to dispense.
18Standby Light
19BRITA MAXTRA Cartridge
20BRITA MEMO
Monitors the life of the MAXTRA Cartridge.
21BRITA Hopper
22Water Level Sensor
23Main Unit
Using the Hot Water
Dispenser
Before using your Hot Water Dispenser, or if it has not been used for over a week, follow these instructions to boil the maximum amount of water, then discard to ensure the system is flushed through.
The following instructions detail the steps to
follow to use your Hot Water Dispenser. For Installation of the BRITA Filtration system see 'Installing a BRITA MAXTRA Cartridge'.
Filtering water through the BRITA Maxtra
Cartridge takes around 4 minutes for 1.5L. Ensure enough water has been filtered and is ready for use in the water tank before heating.
3If required, follow steps of 1-6 of ‘Resetting the system’
to reset the system and then discard the water. If the Hot G Water Dispenser is in standby mode, press any button to
wake.
4 Pull out the Drip Tray (8) from the Main Unit (23) |
|
(if needed). |
F |
|
5 Place the required vessel (cup, pan, pot etc.) under the |
|
|
|
|
|||
Dispense Nozzles (6). One or two vessels can be filled |
|||
at the same time during each dispense cycle, provided |
D |
||
|
|
||
they are the same size. |
|
|
|
E |
|||
6 Adjust the temperature of the water by pressing the |
|||
|
|||
Temperature Button (4) to cycle through the |
|
|
|
options (85,95 & 100°C). The water temperature will be |
|
||
displayed on the screen (17). |
|||
7 Turn the Water Volume Dial (2) to adjust the Dispense |
I |
||
|
|
||
Volume (15).Your Hot Water Dispenser can heat between |
Q |
||
150ml to 1.5L of water per cycle. |
|
||
8You can automatically dispense volumes of water at
600ml and below. To turn this feature on or off, press the Dispense Button (5). This function cannot be selected for ∂ volumes over 600ml. These must be dispensed manually.
9 Press the Start / Stop Button (1) to begin heating.Your
Hot Water Dispenser will sound and the heat cycle will T begin. Once started, the volume and
temperature can only be changed during the first few seconds of the heating cycle.
10Once ready your Hot Water Dispenser will sound. The hot water will be dispensed automatically. If the
manual dispense function has been selected, press the Dispense Button (5) to begin dispensing.
11 To pause the water flow whilst dispensing, press either the Start/Stop or the Dispense Button.
12To resume the water flow, press the Dispense Button again.
NOTE:You must dispense all water heated before you can start the heating cycle again.
Drinks Temperature
Getting the correct water temperature is essential if you are to enjoy your favourite hot drinks with maximum flavour and taste.
By choosing the correct temperature for your drink, not only will you create better tasting drinks, you will also save time and energy too.
85°C
Green, white and herbal teas, powder based cold and flu remedies, black instant coffee.
95°C
French press/cafetiere coffee, instant coffee with milk, hot toddies, malted milk, hot chocolate.
Multiple Cups
Multiple cups can be filled quickly and easily by starting and stopping the dispense cycle and exchanging vessels.
1Set your Hot Water Dispenser unit to heat a desired amount of water with the Auto Dispense featue switched off. Place two cups under the Dispense Nozzles (6) and dispense the water by pressing the Dispense Button (5).
2When the cups are filled press the Dispense Button again to stop the flow.
3Place another two empty cups under the Dispense Nozzles and repeat the process until all remaining water has been dispensed.
Dispense Nozzles 14
There are two Dispense Nozzles (6) on your Hot Water Dispenser. These can be used to fill one or two cups at one time. 15
If dispensing into two vessels try to ensure they are of equal size and heat double the amount of water
required for one. Place your cups on the Drip Tray (underneath the Dispense Nozzles).Your Hot Water Dispenser will dispense an equal amount from each Nozzle.
100°C
Black teas e.g. darjeeling, assam, ceylon, english breakfast and earl grey, noodle / pasta snacks, instant soup type drinks.
Auto/Manual Dispense 13
The auto dispense feature allows you to automatically dispense volumes of water below 600ml. For safety reasons it is not possible to automatically dispense volumes above 600ml.
Before heating, press the Dispense Button (5) to switch the auto dispense feature on or off. The Icon (14) will
appear on the LCD Screen (3) when the feature is enabled. After heating, if the volume is above 600ml, or if the auto dispense is turned off, your Hot Water Dispenser will sound and the Dispense Button will Illuminate. Press the Dispense Button to begin dispensing water from the Dispense Nozzles
(6).
NOTE: All water must be dispensed before you can start the heating cycle again.
10 


Cancel the heating cycle
To cancel the heating cycle at any time, press the Start / Stop Button (1). Press either the Start / Stop Button again to continue the current cycle or press the Dispense Button (5) to empty the water.
Once a heating cycle has begun, the volume and temperature of the water can only be changed during the first few seconds of the heating cycle.
The Water in the heating chamber must be dispensed before a new volume can be selected.
Reheating Water
Any water remaining in the heating chamber that has cooled down by 5 degrees can be reheated.
The Start / Stop Button (1) will illuminate and the Heat Icon (11) will extinguish indicating the reheat
function can be activated. Press the Start / Stop Button to reheat.
Sound
The audible signals from your Hot Water Dispenser can be turned on or off. Press and hold the Temperature Button (4) for 2 seconds to switch the sounds on or off.
Standby
Your Hot Water Dispenser will enter Standby Mode to save power 60 seconds after the end of the heating and dispense cycle. The unit enters standby mode after 5
minutes of inactivity if a heat and dispense cycle hasn’t been completed. To wake the unit, press any button or rotate the Water Volume Dial (2).
The Hot Water Dispenser can be placed in standby mode by pressing the Start/Stop Button (1) for 2 seconds.
Any water remaining in the Heating Chamber when your Hot Water Dispenser enters stand by will need to be dispensed upon exiting standby, or reheated and dispensed before a new volume or temperature can be selected.
Drip Tray 16
The Drip Tray Indicator (10) indicates that the Drip Tray (8) is full and must be emptied. To empty, pull the drip tray outwards until it is free from the runners and
discard the contents. CAUTION! The contents of the drip tray may be hot. Replace the Drip Tray once emptied ensuring the Drip Tray Cover (9) is replaced correctly.
Descale 17
This product is fitted with a concealed element that must be descaled when the Descale Icon (16) illuminates. Excessive scale can cause the product to switch off before the end of the heating cycle and may damage the element invalidating the warranty.
Remove hard scale using a proprietary descaling product. We recommend Oust Descaler (please follow the instructions carefully) which may be purchased from our Helpline or from your local retailer.
To descale the unit:
1Remove the BRITA Hopper (21) and MAXTRA cartridge (19) from the Water Tank (7).
2Fill the Water Tank to the MAX line with cold water add the Oust Descaler as per manufacturers instructions.
3When the crystals have dissolved, set the unit to heat 1.5 litres of water to 85 degrees.
Do not boil to 100 degrees
4Leave the Hot Water Dispenser for 10 minutes.
Do not dispense the water!
5After 10 minutes, dispense the water from the Heating Chamber into a vessel and discard.
6Empty the water tank and rinse thoroughly with cold water.
7Fill the water tank to the MAX line with cold water, set the unit to boil 1.5 litres to 100 degrees and dispense the water. Discard the water and repeat the cycle 3 times
8Replace the BRITA Hopper and MAXTRA cartridge into the Water Tank. Fill with fresh water.
9Press and hold the Start / Stop Button (1) for 5 seconds
|
to reset the descale timer. The descale icon will |
|
|
|
extinguish. The Hot Water Dispenser will reset and the |
|
|
|
|
||
|
unit will return to ready mode. |
||
10 After 60 seconds of inactivity the Hot Water Dispenser |
G |
||
|
will enter standby. |
|
|
|
|
||
|
|
||
|
Cleaning |
F |
|
|
|
|
|
|
|
||
Wipe the outside with a damp cloth. |
|||
|
|
D |
|
WARNING: Always disconnect the plug from the
mains and allow the appliance to cool before cleaning. IMPORTANT: Do not use abrasive cleaners on the E outside of the appliance, as they may scratch the
surface.
I
Q
∂
T
Resetting the system
18Plug your Hot Water Dispenser into the mains outlet and switch on at the socket.
19If the Water Tank (7) is empty, the Empty Tank Icon (12) will illuminate and flash.
20Remove the Water Tank and fill with cold water. Replace ensuring it is returned correctly into the Main Unit (23). If using the BRITA Filtration System refer to the set up guide.
21The Dispense Button (5) will flash and the ‘Dispense Icon’ (13) will appear on the screen.
22Place an empty vessel, such as a measuring jug or saucepan underneath the Dispense Nozzles (6).
23Press the Dispense Button to reset the system. Any remaining water will be dispensed from the system into the vessel below. This takes approximately 25 seconds. It is now ready for use.
Before using your Hot Water Dispenser for the first time, or after it has been unplugged from the mains.You must perform the following steps to reset your Hot Water Dispensers’ heating chamber.
Your Hot Water Dispenser will not function if the system has not been reset.
12 


LCD Display Glossary
Below are some of the icons that may highlight during use, and their meaning. Refer to the instruction book for more information on the settings.
Reset 24
After the Hot Water Dispenser has been switched on, the Dispense Icon (13) and the Dispense Button (5) are flashing. The system needs to be reset before use. Follow the instructions under ‘Resetting the System’.
Auto Dispense 25
The Auto Dispense (14) Icon is lit after heating.
Volumes between 150-600ml will be automatically dispensed unless deselected by pressing the Dispense Button (5). Volumes above 600ml cannot automatically be dispensed.
Water Still to Dispense 26
After heating or being woken from standby, the Dispense Icon (13) is flashing.
There is still water remaining in the heating chamber. Either reheat or dispense water before next use.
Water Tank 27
The Water Tank Icon (12) is flashing.
The Water Tank (7) is either empty or not properly fitted. Fill the Water Tank and ensure the Water Tank is securley fitted to the Main Unit (23).
Heat Icon 28
In manual dispense mode, after heating the water the Heat Icon (11) remains lit.
The Boil Icon remains lit while the water is within 5°C of the desired temperature. If the water drops more than
5°C then the icon will extinguish, the Start Stop Button will illuminate and the water can be reheated by pressing the Start/Stop Button (1).
Descale 29
The Descale Icon (16) is lit.
Your Hot water Dispenser needs descaling. Follow the instructions under ‘Descaling’ to descale the heating chamber.
Troubleshooting
If Water Tank Icon (12) flashes
The tank may be empty OR have insufficent water to heat the selected amount.
Solution
•Fill the Water Tank with water.
•Check the Water Tank is fitted correctly.
•If this does not work check the Water Level Sensor (22) on the rear of the Water Tank is not stuck in the down position. Lightly tap to loosen.
The sound effects have turned |
Solution |
themselves on. |
• Turn the sound effects off. To do so, press and hold the |
If sound is switched off, and your hot water dispense is |
Temperature Button (4) for 2 seconds. |
unplugged, (or there is a power cut), the next time it is |
|
switched on the sound effects will be reactivated. |
|
Hot Water Dispenser will not heat when woken from standby.
If the Water Tank Icon (12) is not flashing and the Dispense Icon (13) is lit. The Hot Water Dispenser has remaining water in the heating chamber that must be dispensed before a new heating process can be started.
Solution |
|
|
|
|
|||
• Press the Dispense Button (5) to empty the chamber |
|||
G |
|||
into a suitable vessel. |
|
|
|
OR |
|
||
• Reheat any water remaining in the chamber by pressing |
F |
||
the Start/Stop Button (1). |
|
|
|
|
|
||
The Hot Water Dispenser will not switch on, there is no response.
If the product is plugged in and switched on at the socket but there is no power.
Solution
•Check your main fuse box has not tripped. Reset the fuse if it has.
•Check the electrical socket with a product you know is working, such as a lamp.
•Replace the fuse in the Hot Water Dispenser plug (13amp fuse).
D
E
I
The Hot Water Dispenser is not dispensing the correct amounts.
The pipes or Dispense Nozzles (6) may be blocked.
|
|
|
|
Q |
|
Solution |
|
|
|
|
|
• Descale your Hot Water Dispenser (see page 9). |
∂ |
|
• Check there are no blockages in the Dispense |
|
|
Nozzles (6). (WARNING - Water remaining in the Nozzles |
|
|
|
|
|
may be HOT). |
T |
|
|
||
The Auto Dispense Icon is not lit |
Solution |
after heating, no water has been |
• Press the Dispense Button to dispense the water that |
dispensed.. |
has just been heated. |
The Auto Dispense feature is not enabled OR you are trying |
|
to heat more than 600ml. |
|
|
|
|
|
Contact Us
Helpline
If you are having a problem with your appliance, please call our Helpline, as we are more likely to be able to help than the store you purchased the item from. Please have the product name, model number and serial number to hand when you call to help us deal with your enquiry quicker.
UK Helpline 0844 871 0960
EIRE Helpline 1800 409 119 Spares 0844 873 0726
If you require assistance on using your BRITA MAXTRA filter cartridge or BRITA Memo, please call BRITA
Customer Care team on the telephone number below.
BRITA Helpline 0844 742 4800
TalkTo Us
If you have any questions or comments, or want some great tips or recipe ideas to help you get the most out of your products, join us online:
Blog www.morphyrichards.co.uk/blog Facebook facebook.com/morphyrichardsuk Twitter @loveyourmorphy
Website www.morphyrichards.com
14 


THIS SECTION IS ONLY APPLICABLE FOR CUSTOMERS IN UK AND IRELAND
Registering your two year guarantee
Your standard one year guarantee is extended for an additional 12 months when you register the product within 28 days of purchase with Morphy Richards. If you do not register the product with Morphy Richards within 28 days, your product is guaranteed for 1 year.To validate your 2 year guarantee register with us online at www.morphyrichards. co.uk
N.B. Each qualifying product needs to be registered with Morphy Richards individually. Please refer to the one year guarantee for more information.
Your one year guarantee
It is important to retain the retailer’s receipt as proof of purchase. Staple your receipt to this back cover for future reference. Please quote the following information if the product develops a fault.These numbers can be found on the base of the product.
Model no. Serial no.
All Morphy Richards products are individually tested before leaving the factory. In the unlikely event of any appliance proving to be faulty within 28 days of purchase, it should be returned to the place of purchase for it to be replaced. If the fault develops after 28 days and within 12 months of original purchase, you should contact the Helpline number quoting Model number and Serial number on the product, or write to Morphy Richards at the address shown.You may be asked to return a copy of proof of purchase. Subject to the exclusions set out below (see Exclusions), the faulty appliance will
then be repaired or replaced and dispatched usually within 7 working days of receipt. If, for any reason, this item is replaced during the 1 year guarantee period, the guarantee on the new item will be calculated from original purchase date.Therefore it is vital to retain your original till receipt or invoice to indicate the date of initial purchase.To qualify for the 1 year guarantee, the appliance must have been used according to the instructions supplied. For example, crumb trays should have been emptied regularly.
EXCLUSIONS
Morphy Richards shall not be liable to replace or repair the goods under the terms of the guarantee where:
1The fault has been caused or is attributable to accidental use, misuse, negligent use or used contrary to the manufacturer’s recommendations or where the fault has been caused by power surges or damage caused in transit.
2The appliance has been used on a voltage supply other than that stamped on the products.
3Repairs have been attempted by persons other than our service staff (or authorised dealer).
4The appliance has been used for hire purposes or non domestic use.
5The appliance is second hand.
6Morphy Richards are not liable to carry out any type of servicing work, under the guarantee.
7Plastic filters for all Morphy Richards kettles and coffee makers are not covered by the guarantee.
8Batteries and damage from leakage are not covered by the guarantee.
9The filters have not be cleaned and replaced as instructed.
This guarantee does not confer any rights other than those expressly set out above and does not cover any claims for consequential loss or damage.This guarantee is offered as an additional benefit and does not affect your statutory rights as a consumer.
Your International two year guarantee
This appliance is covered by two-year repair or replacement warranty.
It is important to retain the retailers receipt as proof of purchase. Staple your receipt to this back cover for future reference.
Please quote the following information if the product develops a fault. These numbers can be found on the base of the product.
Model no. Serial no.
All Morphy Richards products are individually tested before leaving the factory. In the unlikely event of any appliance proving to be faulty within 28 days of purchase it should be returned to the place of purchase for it to be replaced.
If the fault develops after 28 days and within 24 months of original purchase, you should contact your local distributor quoting Model number and Serial number on the product, or
write to your local distributor at the addresses shown.
You will be asked to return the product (in secure, adequate packaging) to the address below along with a copy of proof of purchase.
Subject to the exclusions set out below (1-9) the faulty appliance will then be repaired or replaced and dispatched usually within 7 working days of receipt.
If for any reason this item is replaced during the 2-year guarantee period, the guarantee on the new item will be calculated from original purchase date. Therefore it is vital to retain your original till receipt or invoice to indicate the date of initial purchase.
To qualify for the 2-year guarantee the appliance must have been used according to the manufacturers instructions. For example, appliances must have been descaled and filters must have been kept clean as instructed.
The local distributor shall not be liable to replace or repair the goods under the terms of the guarantee where:
1 |
The fault has been caused or is attributable to accidental |
G |
||
|
use, misuse, negligent use or used contrary to the |
|
||
|
manufacturers recommendations or where the fault has |
|
|
|
|
been caused by power surges or damage caused in |
|
||
|
transit. |
|||
|
|
F |
||
2 |
The appliance has been used on a voltage supply other |
|
|
|
|
than that stamped on the products. |
|
||
3 |
Repairs have been attempted by persons other than our |
|||
D |
||||
service staff (or authorised dealer).
4Where the appliance has been used for hire purposes or
non domestic use. E
5 |
The appliance is second hand. |
|
|
||
6 |
The local distributor are not liable to carry out any type |
|
|
of servicing work, under the guarantee. |
I |
|
|
|
7The guarantee excludes consumables such as bags,
filters and glass carafes. |
|
|
|
Q |
|
8 Batteries and damage from leakage are not covered by |
|
|
the guarantee. |
∂ |
|
9 The filters have not be cleaned and replaced as |
||
instructed. |
|
|
This guarantee does not confer any rights other than those |
T |
|
expressly set out above and does not cover any claims for |
||
consequential loss or damage. This guarantee is offered |
|
|
|
|
|
as an additional benefit and does not affect your statutory |
|
|
rights as a consumer. |
|
|
|
|
|
|
|
|
AUSTRALIAN WARRANTY
This appliance is guaranteed for 2 years against faulty material, components and workmanship.
This warranty is in addition and does not affect your statutory rights.
Proof of purchase must be produced for any warranty benefit.
In the unlikely event of any appliance proving to be faulty, securely pack and return the item to the place of purchase accompanied by the original receipt or invoice.
Our goods come with guarantees that cannot be excluded under the Australian Consumer Law.You are entitled
to a replacement or refund for a major failure and for compensation for any other reasonably foreseeable loss or damage.You are also entitled to have the goods repaired or replaced if the goods fail to be of acceptable quality and the failure does not amount to a major failure.
Not covered by this warranty
(Australian only)
•If the appliance has not been used in accordance with the manufacturers’ recommendations or Instructions.
•If the fault is deemed to be caused by abuse, misuse, neglect, modifications or in proper use and or care Eg: Kettles: Excessive build up of scale.
Toasters: Excessive build up of crumbs or foreign matter etc.
•Connection to incorrect voltage to that stamped on the product.
•Unauthorised repairs.
•Appliance used other than for domestic purposes.
•Excluding bags, filters, glass, carafes, and cutting blades.
•Freight and insurance costs.
If for any reason this item is replaced during the 2 year guarantee period, the guarantee on the new item will be calculated from original purchase date. Therefore it is vital to retain your original receipt or invoice to indicate the date of original purchase.
Morphy Richards’s policy is to continually improve quality design and product quality. The company therefore reserves the right to change any specifications or to carry out modifications as deemed worthy at any time.
The Australian supplier ASKO Appliances reserves the right to repair, modify, exchange or replace the faulty appliance with the same or similar model or product of equivalent value.
16 


F Santé et sécurité
L'utilisation de tout appareil électrique implique de respecter les règles de sécurité et de bon sens suivantes.
Merci de lire attentivement ces instructions avant d'utiliser le produit.
•Cet appareil peut être utilisé par les enfants âgés de 8 ans et plus et les personnes souffrant de facultés physiques, sensorielles ou mentales réduites, ou d'un manque d'expérience ou de connaissances, s'ils sont surveillés ou qu'ils ont reçu des informations suffisantes concernant
l'utilisation de l'appareil en toute sécurité, et s'ils comprennent les dangers en présence.
•Les enfants ne doivent pas jouer avec l'appareil.
•Le nettoyage et l'entretien courant ne doivent pas être effectués par des enfants sans surveillance.
•Tenir l'appareil et le cordon d'alimentation hors de portée des enfants.
•Cet appareil est conçu pour être utilisé dans des applications domestiques et similaires, telles que les fermes, par les clients dans des hôtels, motels et autres environnements
de type résidentiel et les environnements de type « bed and breakfast ».
Il n'est pas adapté à une utilisation en cuisine professionnelle, que ce soit dans un magasin, un bureau ou tout autre espace de travail.
G
F
D
E
I
Q
∂
T
Positionnement
•Positionnez toujours votre appareil loin du bord du plan de travail.
•Utilisez l'appareil sur une surface solide et plate.
•N'utilisez jamais l'appareil dehors ou près d'une source d'eau.
•DANGER : Ne placez pas l'appareil sur un plateau en métal ou sur une surface métallique pendant qu’il fonctionne.
Cordon d'alimentation secteur
•Ne laissez jamais le cordon d'alimentation dépasser du bord d'un plan de travail, à un endroit où un enfant pourrait l'atteindre.
•Ne laissez jamais le cordon d'alimentation traverser un espace accessible, par exemple entre une prise murale basse et une table.
•Ne laissez jamais le cordon d'alimentation passer sur une cuisinière ou toute autre surface chaude qui pourrait l'endommager.
•Positionnez l'appareil de manière à ce que le cordon d'alimentation puisse atteindre une prise électrique sans forcer sur les connexions.
•Si le cordon d'alimentation est endommagé, il doit être remplacé par le fabricant, un agent de son service aprèsvente ou une personne qualifiée afin d'éviter tout risque.
Sécurité personnelle
•DANGER : Pour vous protéger des risques d'incendie, de choc électrique et de blessure, ne plongez pas le cordon d'alimentation, la fiche électrique ou l'appareil dans l'eau ou dans d'autres liquides.
•Débranchez l'appareil du secteur avant de le nettoyer.
•Laissez-le refroidir avant de monter ou de démonter des pièces et avant de le nettoyer.
18 


Autres points relatifs à la sécurité
•N'utilisez pas d'accessoires ni d'outils non recommandés ou commercialisés par Morphy Richards car ils pourraient entraîner un incendie, un choc électrique ou des blessures.
•Utilisez l'appareil uniquement pour faire bouillir de l'eau.
•Ne posez pas l'appareil sur une plaque de cuisson électrique ou à gaz chaude ou dans un four chauffé, ni à proximité immédiate de ces appareils.
•Le réservoir d'eau ne doit pas être placé dans l'unité principale lorsque vous le remplissez d'eau.
•Débranchez l'appareil du secteur lorsque vous ne l'utilisez pas.
•DANGER : Ne pas immerger l'appareil dans l'eau pour le nettoyer.
ATTENTION : Pour éviter toute détérioration de l'appareil, n'utilisez pas de produits de nettoyage alcalins. Utilisez un chiffon doux et un détergent.
Exigences relatives à l'électricité
•Vérifiez que la tension indiquée sur la plaque signalétique de l'appareil correspond à l'alimentation électrique de votre domicile, qui doit être en courant alternatif (CA).
•Si le fusible de la prise secteur doit être changé, utilisez un fusible de remplacement BS1362 de 13 A.
DANGER : Cet appareil doit être mis à la terre.
Filtration BRITA
Filtrer l'eau améliore le goût et l'aspect des boissons en éliminant le calcaire, le plomb, le chlore et d'autres impuretés.
La cartouche filtrante BRITA MAXTRA offre une filtration améliorée grâce à la technologie MAXTRA. Le Micropore Filter naturel et le puissant Protect Filter réduisent le chlore et le calcaire de manière à rendre le goût naturel et réduisent encore davantage les métaux tels que le plomb et le cuivre. Le contrôle du débit unique garantit une durée de filtration parfaite pour de meilleurs résultats.
Pour obtenir une filtration maximale et un goût optimal, il est important de changer la cartouche filtrante BRITA MAXTRA régulièrement. BRITA conseille de remplacer la cartouche toutes les 4 semaines.
L'utilisation du système de filtration BRITA est facultative. Si vous ne souhaitez pas utiliser le système de filtration, retirez simplement la trémie BRITA (21) et la cartouche filtrante MAXTRA (19) du réservoir d'eau (7).
Il faut compter environ 4 minutes pour filtrer 1,5 litre d'eau avec le système de filtration BRITA.Vous pouvez utiliser le système pendant la filtration, à condition qu'une quantité suffisante d'eau ait été filtrée dans le réservoir d'eau.
Installation d'une cartouche BRITA MAXTRA1
1Déballez la cartouche BRITA MAXTRA (19) et plongez-la dans l'eau en la secouant légèrement pour libérer les éventuelles bulles.
2Mettez en place la cartouche BRITA MAXTRA en la poussant dans la trémie BRITA.
3Placez la trémie BRITA dans le réservoir d'eau. Avant de remettre le réservoir d'eau dans l'unité principale, remplissez la trémie BRITA d'eau froide et
laissez l'eau filtrer par la cartouche BRITA MAXTRA. Jetez l'eau filtrée. Répétez cette étape deux fois.
4Remplissez la trémie BRITA d'eau fraîche et replacez le réservoir d'eau dans l'unité principale.Votre cartouche BRITA est maintenant prête à l'utilisation avec votre distributeur d'eau chaude.
Mémo BRITA 2
Le Mémo BRITA (20) mesure la durée recommandée d'utilisation de votre cartouche filtrante MAXTRA (19). Le Mémo BRITA se situe sur le dessus de la trémie BRITA (21).
Pour réinitialiser le Mémo BRITA, appuyez sur le bouton Démarrer du Mémo et maintenez-le enfoncé jusqu'à ce que les quatre barres apparaissent sur l'affichage et clignotent deux fois. Le voyant de cartouche active situé en bas à droite du Mémo BRITA indique que la cartouche est en fonctionnement. Après quatre semaines, les quatre barres disparaîtront et une flèche clignotante indiquera que la cartouche doit maintenant être changée. Après avoir changé la cartouche, réinitialisez le Mémo.
Remplacement du
Mémo BRITA
Le Mémo BRITA (20) a une durée de vie d'environ 5 ans. |
|
|
Pour retirer le Mémo BRITA usagé, placez un tournevis dans |
||
l'encoche voisine et poussez pour l'extraire.Veuillez noter |
G |
|
que le Mémo BRITA ne doit pas être retiré sauf pour son |
|
|
|
||
remplacement. |
||
D'autres informations sur l'utilisation des cartouches filtrantes |
F |
|
BRITA et le Mémo BRITA sont disponibles dans le guide |
|
|
|
||
d'information BRITA fourni avec votre distributeur d'eau |
||
chaude. |
D |
|
|
||
Appelez notre service de pièces détachées (0844 873 0726) |
|
|
|
||
pour commander un Mémo BRITA neuf. Si vous avez besoin |
||
d'aide pour l'utilisation de votre cartouche filtrante BRITA |
E |
|
MAXTRA ou du Mémo BRITA, appelez l'équipe après-vente |
|
|
|
||
BRITA au 0844 742 4800. |
||
|
I |
|
|
|
|
|
|
|
|
Q |
|
|
|
|
|
∂ |
|
|
|
|
|
T |
|
|
|
|
|
|
|
|
|
Caractéristiques
1Bouton Marche/Arrêt
Démarre et arrête le processus de chauffage. Peut également être utilisé pour arrêter la distribution au cours du fonctionnement et mettre le distributeur d'eau chaude en mode veille.
2Molette de commande du volume d'eau
Commande le volume d'eau à chauffer et distribuer. Le volume s'affiche sur l'écran LCD (15).
3Écran LCD
Affiche les volumes, les températures, les fonctions et les avertissements.
4BoutonTempérature
Règle la température de l'eau distribuée, active et désactive les sons.
5Bouton Distribution
Active et désactive la fonction de Distribution automatique.
6 Buses de distribution
7Réservoir d’eau
Contient la cartouche BRITA MAXTRA 19, le Mémo BRITA 20 et la trémie BRITA 21.
8 Bac récupérateur
9 Couvercle du bac récupérateur
10Voyant du bac récupérateur
L'icône « Plein » indique lorsque le bac récupérateur doit être vidé.
11Icône chauffage
Affiche lorsque le cycle de chauffage est en cours.
12Icône réservoir d'eau
Affiche lorsque le réservoir doit être rempli.
13Icône distribution
Affiche lorsque l'eau est prête à être distribuée.
14Icône distribution automatique
Affiche lorsque la fonction de distribution automatique est activée.
15Afficheur du volume de distribution
Affiche le volume d'eau à chauffer et distribuer.
16Icône détartrage
S'affiche lorsque le distributeur d'eau chaude a besoin d'un détartrage.
17Icône température
Affiche la température à laquelle l'eau sera chauffée avant la distribution.
18Voyant de veille
19Cartouche BRITA MAXTRA
20MÉMO BRITA
Surveille la durée de vie de la cartouche MAXTRA.
21Trémie BRITA
22Capteur de niveau d'eau
23Unité principale
20


Utilisation du distributeur d'eau chaude
Avant d'utiliser votre distributeur d'eau chaude, ou s'il n'a pas été utilisé depuis plus d'une semaine, suivez ces instructions pour faire bouillir la quantité d'eau maximale,
puis jetez-la pour vous assurer que le système est bien rincé.
Les instructions détaillent les étapes à suivre pour utiliser votre distributeur d'eau chaude. Pour l'installation du système de filtration BRITA, reportez-vous à la section « Installation d'une cartouche BRITA MAXTRA ».
Filtration de l'eau par la BRITA Maxtra
La cartouche prend environ 4 minutes pour 1,5 l. Assurezvous qu'une quantité d'eau suffisante a été filtrée et est prête à l'utilisation dans le réservoir d'eau avant de chauffer.
3Si nécessaire, suivez les étapes 1 à 6 de la section
« Réinitialiser le système » pour réinitialiser le système. Ensuite, jetez l'eau. Si le distributeur d'eau chaude est en mode veille, appuyez sur n'importe quel bouton pour le réactiver.
4Retirez le bac récupérateur (8) de l'unité principale (23) (si nécessaire).
5Placez le récipient voulu (tasse, casserole, bol, etc.) sous les buses de distribution (6). Un ou deux récipients peuvent être remplis en même temps pendant chaque cycle de distribution à condition qu'ils soient de la même taille.
6Réglez la température de l'eau en appuyant sur le bouton Température (4) pour faire défiler les options (85, 95 et 100 °C). La température de l'eau s'affichera à l'écran (17).
7Tournez la molette de volume d'eau (2) pour ajuster le volume de distribution (15).Votre distributeur d'eau
chaude peut chauffer entre 150 ml et 1,5 l d'eau par cycle.
8Vous pouvez distribuer automatiquement des volumes d'eau de 600 ml et moins. Pour activer ou désactiver cette fonction, appuyez sur le bouton Distribution (5). Cette fonction ne peut pas être sélectionnée pour des volumes supérieurs à 600 ml. Ceux-ci doivent être distribués manuellement.
9Appuyez sur le bouton Marche/Arrêt (1) pour enclencher le chauffage.Votre distributeur d'eau chaude émettra un son et le cycle de chauffage débutera. Une fois le cycle démarré, le volume et la température peuvent uniquement être modifiés pendant les premières secondes du cycle de chauffage.
10Lorsqu'il est prêt, votre distributeur d'eau chaude émet un son. L'eau chaude sera distribuée automatiquement. Si la fonction de distribution manuelle a été sélectionnée, appuyez sur le bouton Distribution (5) pour commencer la distribution.
11Pour interrompre le débit d'eau en cours de distribution, appuyez sur le bouton Marche/Arrêt ou sur le bouton Distribution.
12Pour réactiver le débit d'eau, appuyez de nouveau sur le bouton Distribution.
REMARQUE :Vous devez distribuer toute l'eau chauffée avant de pouvoir redémarrer le cycle de chauffage.
Température des boissons
Il est essentiel d'obtenir la bonne température d'eau pour pouvoir apprécier vos boissons chaudes préférées avec la meilleure saveur et le meilleur goût possibles.
En choisissant la bonne température pour votre boisson, vous créez non seulement des boissons au meilleur goût, mais vous gagnez aussi du temps et de l'énergie.
85°C
Thés verts et blancs, tisanes, remèdes pour le rhume et la grippe sous forme de poudre, café noir instantané.
95°C
Café d'une cafetière à piston, café au lait instantané, grogs, lait malté, chocolat chaud.
100°C
Thés noirs, par ex. Darjeeling, Assam, Ceylan, English breakfast et Earl grey, en-cas à base de nouilles/pâtes, boissons de type soupe instantanée.
Distribution automatique/ manuelle 13
La fonction de distribution automatique vous permet de distribuer automatiquement des volumes d'eau inférieurs à 600 ml. Pour des raisons de sécurité, il n'est pas possible de distribuer automatiquement des volumes supérieurs à 600 ml.
Avant le chauffage, appuyez sur le bouton Distribution (5) pour activer ou désactiver la fonction de distribution automatique. L'icône (14) apparaît sur l'écran LCD (3) lorsque la fonction
est activée. Après le chauffage, si le volume est supérieur à 600 ml, ou si la distribution automatique est désactivée, votre distributeur d'eau chaude émet un son et le bouton Distribution s'allume. Appuyez sur le bouton Distribution pour commencer à distribuer l'eau à partir des buses de distribution (6).
REMARQUE :Toute l'eau doit être distribuée avant de pouvoir redémarrer le cycle de chauffage.
Multiples tasses
De multiples tasses peuvent être remplies rapidement et facilement en démarrant et en arrêtant le cycle de distribution, et en changeant les récipients.
1Réglez votre distributeur d'eau chaude pour qu'il chauffe la quantité d'eau souhaitée avec la fonction de distribution automatique désactivée. Placez deux tasses sous les buses de distribution (6) et distribuez l'eau en appuyant sur le bouton Distribution (5)..
2 Lorsque les tasses sont remplies, appuyez de nouveau |
|
sur le bouton Distribution pour arrêter le débit. |
G |
|
3Placez deux autres tasses vides sous les buses de
|
|
distribution et répétez le processus jusqu'à ce que toute |
|
|
|
|
l'eau restante ait été distribuée. |
F |
|
|
|
|
|
|
|
|
Buses de distribution 14 |
|
|
|
|
|
||
|
|
|||
|
|
D |
||
|
Votre distributeur d'eau chaude comporte deux buses de |
|
|
|
|
|
|||
|
distribution (6). Celles-ci peuvent être utilisées pour remplir |
|||
|
une ou deux tasses à la fois. 15 |
E |
||
|
|
|
||
|
Si la distribution a lieu dans deux récipients, essayez de |
|
|
|
|
|
|||
|
faire en sorte qu'ils soient de la même taille et chauffez le |
|||
|
double de la quantité d'eau nécessaire pour un récipient. |
I |
||
|
Placez vos tasses sur le bac récupérateur (sous les buses de |
|
|
|
|
|
|||
|
distribution).Votre distributeur d'eau chaude distribuera une |
|||
|
quantité égale depuis chaque buse. |
Q |
||
|
|
|
||
|
|
Annuler le cycle de |
|
|
|
|
|
||
|
|
|||
|
|
∂ |
||
|
|
chauffage |
|
|
|
|
T |
||
|
Pour annuler le cycle de chauffage à tout moment, appuyez |
|||
|
sur le bouton Marche/Arrêt (1). Appuyez sur le bouton |
|
|
|
|
Marche/Arrêt à nouveau pour continuer le cycle en cours ou |
|
|
|
|
appuyez sur le bouton Distribution (5) pour vider l'eau. |
|
|
|
|
Une fois qu'un cycle de chauffage a commencé, le volume |
|
|
|
|
et la température de l'eau peuvent uniquement être modifiés |
|
|
|
|
pendant les premières secondes du cycle de chauffage. |
|
|
|
|
|
|
|
|
|
|
|
|
|
L'eau présente dans la chambre de chauffage doit être distribuée avant qu'un nouveau volume puisse être sélectionné.
Réchauffer l'eau
Toute eau restant dans la chambre de chauffage qui a refroidi de 5 degrés peut être réchauffée.
Le bouton Marche/Arrêt (1) s'allume et l'icône Chauffage (11) s'éteint ce qui indique que la fonction de réchauffage peut être activée. Appuyez sur le bouton Marche/Arrêt pour réchauffer.
Son
Les signaux sonores émis par votre distributeur d'eau chaude peuvent être activés ou désactivés. Appuyez sur le bouton Température (4) et maintenez-le enfoncé pendant 2 secondes pour activer ou désactiver les sons.
Veille
Votre distributeur d'eau chaude entre en mode veille pour économiser de l'énergie 60 secondes après la fin du cycle de chauffage et de distribution. L'unité entre en mode veille après 5 minutes d'inactivité si un cycle de chauffage et
de distribution n'a pas été effectué. Pour réactiver l'unité, appuyez sur n'importe quel bouton ou tournez la molette de volume d'eau (2).
Le distributeur d'eau chaude peut être mis en mode veille en appuyant sur le bouton Marche/Arrêt (1) pendant 2 secondes.
Toute eau restant dans la chambre de chauffage lorsque votre distributeur d'eau chaude entre en mode veille devra être distribuée dès la sortie du mode veille, ou réchauffée et distribuée avant qu'un nouveau volume ou qu'une nouvelle température puisse être sélectionné(e).
Bac récupérateur 16
Le voyant du bac récupérateur (10) indique que le bac récupérateur (8) est plein et doit être vidé. Pour le vider, tirez le bac récupérateur vers l'extérieur jusqu'à ce qu'il soit dégagé des glissières et jetez le contenu. ATTENTION ! Il se peut
que le contenu du bac récupérateur soit chaud. Une fois vidé, remettez le bac récupérateur en place en vous assurant que le couvercle du bac récupérateur (9) est remis en place correctement.
Détartrage 17
22 


Ce produit est doté d'un élément dissimulé qui doit être détartré lorsque l'icône Détartrage (16) s'allume. Une quantité excessive de tartre peut faire arrêter le produit avant la fin du cycle de chauffage et peut endommager l'élément, ce qui annulerait la garantie.
Pour le détartrage, utilisez un produit spécial. Nous recommandons le détartrant Oust (veuillez respecter soigneusement les instructions) que vous pouvez acheter auprès de notre service d’assistance ou chez votre revendeurlocal.
Pour détartrer l'appareil :
1Retirez la trémie BRITA (21) et la cartouche MAXTRA (19) du réservoir d'eau (7).
2Remplissez le réservoir d'eau jusqu'à la ligne MAX avec de l'eau froide et ajoutez le détartrant Oust conformément aux instructions du fabricant.
3Une fois que les cristaux sont dissous, réglez l'unité pour qu'elle chauffe 1,5 litre d'eau à 85 degrés.
Ne pas faire bouillir à 100 degrés
4Laissez le distributeur d'eau chaude reposer pendant 10 minutes.
Ne distribuez pas l'eau !
5Au bout de 10 minutes, distribuez l'eau de la chambre de chauffage dans un récipient et jetez-la.
6Videz le réservoir d'eau et rincez-le soigneusement à l'eau froide.
7Remplissez le réservoir d'eau jusqu'à la ligne MAX avec de l'eau froide, réglez l'unité pour faire bouillir 1,5 litre à 100 degrés et distribuez l'eau. Jetez l'eau et répétez le cycle 3 fois.
8Remettez en place la trémie BRITA et la cartouche MAXTRA dans le réservoir d'eau. Remplissez-le avec de l'eau fraîche.
9Appuyez sur le bouton Marche/Arrêt (1) et maintenez-le enfoncé pendant 5 secondes pour réinitialiser le minuteur de détartrage. L'icône détartrage s'éteint. Le distributeur d'eau chaude se réinitialise et l'unité repasse en mode prêt.
10Après 60 secondes d'inactivité, le distributeur d'eau chaude entre en mode veille.
Nettoyage
Essuyez l'extérieur avec un chiffon humide.
DANGER : Débranchez toujours la fiche du
secteur et laissez refroidir l'appareil avant de procéder au nettoyage.
IMPORTANT : N'utilisez pas de produits nettoyants abrasifs sur
l'extérieur de l'appareil, car ils risquent de rayer la surface.
Réinitialiser le système
18Branchez votre distributeur d'eau chaude à la prise secteur et mettez-le sous tension au niveau de la prise.
19Si le réservoir d'eau (7) est vide, l'icône Réservoir vide (12) s'allume et clignote.
20Retirez le réservoir d'eau et remplissez-le d'eau froide. Remettez-le en place en veillant à ce qu'il soit replacé correctement dans l'unité principale (23). Si vous utilisez le système de filtration BRITA, référez-vous au guide d'installation.
21Le bouton Distribution (5) clignote et l'icône Distribution (13) apparaît à l'écran.
22Placez un récipient vide, comme un verre mesureur ou une casserole sous les buses de distribution (6).
23Appuyez sur le bouton Distribution pour réinitialiser le système.Toute eau restante sera distribuée depuis le système dans le récipient situé en-dessous. Cela prend environ 25 secondes. L'appareil est maintenant prêt à l'utilisation.
Avant d'utiliser votre distributeur d'eau chaude pour la première fois, ou une fois qu'il a été débranché du secteur. Vous devez effectuer les étapes suivantes pour réinitialiser la chambre de chauffage de votre distributeur d'eau chaude.
Votre distributeur d'eau chaude ne fonctionnera pas si le système n'a pas été réinitialisé.
Écran LCD Glossaire
Vous trouverez ci-dessous certaines des icônes qui peuvent s'allumer au cours de l'utilisation, ainsi que leur signification. Référez-vous au livret d'instructions pour obtenir davantage d'informations sur les réglages.
Réinitialiser 24
Une fois que le distributeur d'eau chaude est allumé, l'icône Distribution (13) et le bouton Distribution (5) clignotent.
Le système doit être réinitialisé avant l'utilisation. Suivez les instructions figurant dans la rubrique « Réinitialiser le système ».
Distribution automatique 25
L'icône Distribution automatique (14) est allumée après le chauffage.
Des volumes compris entre 150 et 600 ml seront distribués automatiquement sauf si la fonction est désélectionnée en appuyant sur le bouton Distribution (5). Les volumes supérieurs à 600 ml ne peuvent pas être distribués automatiquement.
Eau restant à distribuer 26
Après le chauffage ou la réactivation depuis le mode veille, l'icône Distribution (13) clignote.
Il reste de l'eau dans la chambre de chauffage. Réchauffez ou distribuez de l'eau avant la prochaine utilisation.
Réservoir d'eau 27
L'icône Réservoir d'eau (12) clignote.
Le réservoir d'eau (7) est vide ou n'est pas correctement rempli.
Remplissez le réservoir d'eau et assurez-vous que le réservoir d'eau est solidement fixé à l'unité principale (23).
Icône chauffage 28
En mode distribution manuelle, l'icône Chauffage (11) reste allumée une fois que l'eau a été chauffée.
L'icône Ébullition reste allumée lorsque l'eau est à 5°C
de la température souhaitée. Si l'eau diminue de plus de 5 °C, l'icône s'éteint, le bouton Marche/Arrêt s'allume et l'eau peut être réchauffée en appuyant sur le bouton Marche/Arrêt (1).
Détartrage 29
L'icône Détartrage (16) est allumée.
Votre distributeur d'eau chaude doit être détartré. Suivez les instructions de la rubrique « Détartrage » pour détartrer la chambre de chauffage.
G
F
D
E
I
Q
∂
T
Dépannage
Si l'icône Réservoir d'eau (12) clignote
Le réservoir peut être vide OU contenir une quantité d'eau insuffisante pour chauffer la quantité sélectionnée.
Solution
•Remplissez d'eau le réservoir d'eau.
•Vérifiez que le réservoir d'eau est installé correctement.
•Si cela ne fonctionne pas, vérifiez que le capteur de niveau d'eau (22) situé à l'arrière du réservoir d'eau n'est pas coincé en position abaissée.Tapotez légèrement pour le desserrer.
Les effets sonores se sont activés. |
Solution |
Si le son est désactivé et que votre distributeur d'eau chaude |
• Désactivez les effets sonores. Pour ce faire, appuyez |
est débranché (ou en cas de panne de courant), la prochaine |
sur le boutonTempérature (4) et maintenez-le enfoncé |
fois qu'il sera allumé, les effets sonores seront réactivés. |
pendant 2 secondes. |
Le distributeur d'eau chaude ne chauffe pas lorsqu'il sort du mode veille.
Si l'icône Réservoir d'eau (12) ne clignote pas et que l'icône Distribution (13) est allumée. Le distributeur d'eau chaude contient de l'eau restante dans la chambre de chauffage qui doit être distribuée avant qu'un nouveau processus de chauffage puisse être démarré.
Solution
•Appuyez sur le bouton Distribution (5) pour vider la chambre dans un récipient adéquat.
OU
•Réchauffez l'eau restant dans la chambre en appuyant sur le bouton Marche/Arrêt (1).
Le distributeur d'eau chaude ne s'allume pas, il n'y a pas de réponse.
Si le produit est branché et mis sous tension au niveau de la prise mais qu'il n'y a pas d'électricité.
Solution
•Vérifiez que votre boîte à fusibles principale ne s'est pas déclenchée.
Réinitialisez le fusible si c'est le cas.
•Vérifiez la prise électrique avec un produit dont vous savez qu'il fonctionne, comme une lampe.
•Remplacez le fusible dans la fiche du distributeur d'eau chaude (fusible de 13 ampères).
Le distributeur d'eau chaude ne distribue pas les |
Solution |
|
bonnes quantités. |
• |
Détartrez votre distributeur d'eau chaude (voir page 9). |
Les conduites ou les buses de distribution (6) peuvent être |
• |
Vérifiez qu'il n'y a pas d'obstructions au niveau des |
obstruées. |
|
buses de distribution (6). (DANGER - il se peut que l'eau |
|
|
restant dans les buses soit CHAUDE). |
L'icône Distribution automatique n'est pas allumée |
Solution |
après le chauffage, aucune quantité d'eau n'a été |
• Appuyez sur le bouton Distribution pour distribuer l'eau |
distribuée. |
qui vient d'être chauffée. |
La fonction de distribution automatique n'est pas activée OU |
|
vous essayez de chauffer plus de 600 ml. |
|
24


Nous contacter
Service d'assistance
Si vous rencontrez un problème avec votre appareil, veuillez appeler notre service d'assistance. Nous pourrons
certainement vous aider plus efficacement que le magasin où vous avez acheté l'article. Munissez-vous du nom de produit, du numéro de modèle et du numéro de série de l'appareil lorsque vous nous appelez. Cela nous aidera à traiter plus rapidement votre demande.
Si vous avez besoin d'aide pour l'utilisation de votre cartouche filtrante BRITA MAXTRA ou du Mémo BRITA, appelez l'équipe du service après-vente BRITA au numéro de téléphone indiqué ci-dessous.
Dialoguer avec nous
Si vous avez des questions ou des commentaires à formuler ou si vous souhaitez bénéficier de conseils ou d'idées
de recettes pour vous aider à tirer le meilleur parti de vos appareils, retrouvez-nous en ligne :
Blog |
www.morphyrichards.co.uk/blog |
facebook.com/morphyrichardsuk |
|
@loveyourmorphy |
|
Site web |
www.morphyrichards.com |
Votre garantie de deux ans
Pour la clientèle en France
Il est important de conserver le ticket de caisse comme preuve d’achat. Agrafez votre ticket de caisse à cette notice d'utilisation; vous pourrez ainsi l’avoir sous la main ultérieurement.
Merci de donner les informations ci-dessous si votre appareil tombe en panne. Vous trouverez ces références à la base de l’appareil.
Numéro du modèle Numéro de série
Tous les produits Morphy Richards sont testés individuellement avant de quitter l’usine.
Si un problème survient dans les 24 mois qui suivent l’achat d’origine, vous devez contacter le magasin où vous avez acheté votre appareil muni de votre ticket de caisse, celui ci le renverra à Glen Dimplex France pour expertise.
Sous réserve des exclusions indiquées ci-dessous (1 à 9), l’appareil défectueux sera alors réparé ou remplacé
et réexpédié dans un délai de 15 jours ouvrables maximum à compter de son arrivée.
Si, pour quelque raison que ce soit, l’article est remplacé pendant la période de garantie de deux ans, la période de garantie du nouvel article sera calculée à partir de la date d’achat d’origine. Vous devez donc absolument conserver votre ticket de caisse ou votre facture d’origine pour indiquer la date d’achat.
Pour bénéficier de la garantie de deux ans, l’appareil doit avoir été utilisé conformément aux instructions du fabricant. Par exemple, les fers doivent avoir été détartrés et les filtres doivent avoir été nettoyés selon les instructions.
Morphy Richards ne sera pas dans l’obligation de remplacer ou réparer les articles aux termes de la garantie dans les circonstances suivantes :
1Si le problème provient d’une utilisation accidentelle, d’une utilisation abusive ou négligente, ou si l’appareil a été utilisé de manière contraire aux recommandations du fabricant, ou encore lorsque le problème provient de sautes de puissance ou de dégâts occasionnés en transit.
2 |
Si l’appareil a été utilisé sur une alimentation électrique |
|
|
|
dont la tension est différente de celle qui est indiquée |
G |
|
|
sur l’appareil. |
|
|
|
|
||
3 |
Si des personnes autres que nos techniciens (ou |
||
|
l’un de nos revendeurs agréés) ont tenté de faire des |
F |
|
|
réparations. |
|
|
|
|
||
4 |
Si l’appareil a été loué ou utilisé dans un contexte non |
||
|
domestique. |
D |
|
|
|
|
|
5Si l’appareil est d’occasion.
6 |
Morphy Richards n’est pas dans l’obligation de réaliser |
|
||
E |
||||
|
des travaux d’entretien, quels qu’ils soient, aux termes |
|
|
|
|
de la garantie. |
|
||
7 |
La garantie exclut les consommables tels que les sacs, |
|||
I |
||||
|
les filtres et les carafes en verre. |
|
|
|
8 |
Les batteries et les dégâts provoqués par leur fuite ne |
|
||
|
sont pas couverts par la garantie. |
Q |
||
9Les filtres n’ont pas été nettoyés ou remplacés suivant
les instructions. |
∂ |
Cette garantie ne confère aucun droit à l’exception de |
|
ceux qui sont expressément indiqués ci-dessus, et ne |
|
|
|
couvre aucune réclamation pour dommages immatériels |
T |
ou indirects. Cette garantie est offerte comme avantage |
|
supplémentaire et n’a aucune incidence sur vos droits légaux |
|
|
|
en tant que consommateur. |
|
Pour la clientèle en Belgique |
|
Les produits de Morphy Richards sont produits |
|
conformément les normes de qualité, agrée international. |
|
 Loading...