


Twin loaf breadmaker
Please read and save these instructions
Two year guarantee |
Exclusions |
This guarantee is valid in the UK and Ireland only. It is in your interest to retain the retailers receipt as proof of purchase. Please quote the following information if the product develops a fault. These numbers can be found on the base of the product.
Model No. |
Serial No. |
All Morphy Richards Products are individually tested before leaving the factory. In the unlikely event of any appliance proving to be faulty within 28 days of purchase it should be returned to the place of purchase for it to be replaced.
If the fault develops after 28 days and within 24 months of original purchase, you should contact the helpline number quoting Model number and Serial number on the product, or write to the address below. You will be asked to return the product (in secure, adequate packaging) to the address below along with a copy of proof of purchase. Subject to the exclusions set out below (see ‘Exclusions’) the faulty appliance will then be repaired or replaced and dispatched usually within 7 working days of receipt.
If for any reason this item is replaced during the 2 year guarantee period, the guarantee on the new item will be calculated from original purchase date. Therefore it is vital to retain your original till receipt or invoice to indicate the date of initial purchase.
To qualify for the 2 year guarantee the appliance must have been used according to the manufacturers instructions. For example kettles should have been regularly descaled or an iron cord should have been stored as recommended by the instructions.
Morphy Richards shall not be liable to replace or repair the goods under the terms of the Guarantee where:
1The fault has been caused or is attributable to accidental use, mis-use, negligent use or used contrary to the manufacturers recommendations or where the fault has been caused by power surges or damage caused in transit.
2The appliance has been used on a voltage supply other than that stamped on the products.
3Repairs have been attempted by persons other than our service staff (or authorised dealer).
4Where the appliance has been used for hire purposes or nondomestic use.
5Morphy Richards are not liable to carry out any type of servicing work, under the guarantee.
6Plastic filters for all Morphy Richards kettles and coffee makers are not covered by the guarantee.
This guarantee does not confer any rights other than those
expressly set out above and does not cover any claims for consequential loss or damage. This guarantee is offered as an additional benefit and does not affect your statutory rights as a consumer.
The After Sales Division, Morphy Richards Ltd, Mexborough, South Yorkshire, England, S64 8AJ Helpline (office hours): UK (local rate) 08450 777700, Republic of Ireland 1800 409119 www.morphyrichards.co.uk

IMPORTANT SAFEGUARDS
WHEN USING ELECTRICAL APPLIANCES, BASIC SAFETY PRECAUTIONS SHOULD ALWAYS BE
FOLLOWED, INCLUDING THE FOLLOWING:
1Read all instructions carefully.
2Do not touch hot surfaces. Use oven mitts or oven gloves when removing the hot bread pan. Do not cover the steam vent openings under any circumstances.
3To protect against electrical shock, do not immerse cord or plug in water or other liquid.
4Close supervision is necessary when any appliance is used near children.
5Unplug the power supply cord when the appliance is not in use, or before cleaning.
Allow to cool before putting on or taking off any parts, and before cleaning the appliance.
6If the mains lead of this appliance is damaged do not use it. The lead may only be replaced by Morphy Richards Ltd or an agent of the company, since special purpose tools are required. Telephone Morphy Richards helpline for advice.
7The use of accessory attachments not recommended by the manufacturer may cause damage to the breadmaker.
8Do not use outdoors.
9Do not let the power supply cord hang over the edge of table or counter, or touch hot surfaces.
10Do not place the appliance on or near heat sources such as gas or electric stove ovens, or burners.
11Extreme caution must be given when moving an appliance containing hot contents or liquids.
12To disconnect, press and hold STOP, then switch socket off and remove plug from wall socket.
Never pull on the cord.
13Do not use the breadmaker for other than intended use.
14Avoid contact with moving parts.
15Put ingredients into the baking pan, then fit the baking pan into the breadmaker. The baking pan must be in place prior to switching on the appliance.
16Do not operate this appliance in the presence of explosive and/or flammable fumes.
17This appliance is intended for household use only and not for commercial or industrial use.
18To avoid damaging the machine, do not place the baking pan or any object on top of the unit.
19Do not clean with scouring pads. Do not wash the baking pan, kneading blade measuring cup or spoon in a dishwasher.
Refer to ‘Cleaning’ section of this book.
20Do not use breadmaker for storage purposes nor insert any utensils, as they may create a fire or electric shock.
SAVE THESE INSTRUCTIONS
2

Contents
Operating instructions
Important Safeguards |
2 |
Introduction |
4 |
Before first use |
4 |
Electrical requirements |
4 |
About this breadmaker |
4 |
About the recipes |
4 |
Components |
5 |
Control panels settings and functions |
6 |
Setting descriptions |
7 |
Use your breadmaker |
8 |
Using the timer |
8 |
Slicing and storing bread |
8 |
Care and cleaning |
9 |
Knowing your ingredients |
10 |
Measuring your ingredients |
11 |
Ingredient temperatures |
12 |
Creating your own yeast breads |
12 |
Other tips |
12 |
Special glazes for yeast breads |
12 |
Recipes
Yeast breads |
|
Basic white bread |
13 |
Brown bread |
13 |
Granary bread |
13 |
French bread |
14 |
100% wholemeal bread |
15 |
Soft grain bread |
13 |
Onion bread |
13 |
Italian herb bread |
14 |
Raisin bread |
14 |
Sun-dried tomato bread |
14 |
Sunny orange bread |
14 |
Chocolate bread |
15 |
Mixed fruit bread |
15 |
Malt loaf |
15 |
Fast breads |
|
Basic white bread |
15 |
Wholemeal |
15 |
Raisin |
15 |
Rapide breads |
|
Basic white bread |
15 |
Wholemeal |
15 |
Raisin |
15 |
Cake recipes |
|
Standard cake mix |
16 |
Apple and walnut cake |
16 |
Banana nut bread |
16 |
Dough recipes |
|
White rolls |
16 |
Wholemeal rolls |
16 |
Hot cross buns |
17 |
Pizza dough |
17 |
Raspberry braid |
17 |
Bagels |
17 |
Pasta |
18 |
Jams |
|
Marmalade |
18 |
Raspberry and apple marmalade |
18 |
Further information
Baking cycle times |
19 |
Need help? (questions and answers) |
20 |
3

Introduction
The smell of homemade bread wafting around the home is one of those great smells. Bread, fresh out of the oven, with melting butter is a memorable taste sensation. The Morphy Richards automatic breadmaker can create that experience every morning.
There's very little effort on the part of the baker, because the breadmaker is a sophisticated appliance with a computer memory that does all the work for you.
It’s as simple as one-two-three.
1Put in the ingredients.
2Select program and press start.
3Wait for your bread.
But don't stop at baking bread in this appliance.
Besides being able to do all kinds of speciality breads, including wholemeal, you can also prepare doughs for hot cross buns, bread rolls, pasta, cake and jams.
Everything is easy and tastes homemade - because it is.
Before first use
Before first use, please take a few minutes to read this instruction book and to find a place to keep it handy for reference. Pay particular attention to the safety instructions.
1Carefully unpack the breadmaker and remove all packaging materials. The kneading blades, cup and spoon are packed inside the bread pans.
2Remove any dust that may have accumulated
during packing
3Wipe the baking pan, kneading blade and outside surface of the breadmaker with a clean, damp cloth. Do not use scouring pads or any abrasives on any part of the breadmaker.
In manufacture it is necessary to lightly
grease some parts of the appliance. This may result in the unit emitting some vapour when first used, this is normal.
Electrical requirements
Check that the voltage on the rating plate of your appliance corresponds with your house electricity supply which must be A.C. (Alternating Current).
If the socket outlets in your home are not suitable for the plug supplied with this appliance, the plug should be removed and the appropriate one fitted.
Note: The plug removed from the mains lead, if
severed, must be destroyed as a plug with bared flexible cord is hazardous if engaged into a live socket outlet.
WARNING: THIS APPLIANCE MUST BE EARTHED.
Should the fuse in the 13 amp plug require changing a 13 amp BS1362 fuse must be fitted.
About this breadmaker
•It can make one or two 450g (1lb) loaves (approx weight).
•It has a special Rapide setting.
•A Fruit and Nut beep signals when extra ingredients can be added so they don’t get chopped by the kneading blade.
•Power loss memory feature - program resumes after
short-term power loss.
•Viewing window enables you to watch the breadmaking process
•Do not cover the breadmaker with towels or other materials that may prevent steam from escaping. Some steaming from vents is normal.
About the recipes
The recipes in this booklet have been thoroughly tested to ensure best results. Recipes have been created by home economists specifically for this machine and may not produce acceptable results in other similar machines.
•Always add ingredients in the order they are listed in the recipe.
•Accurate measuring of ingredients is vital. Do not use larger amounts.
4

Components
Control panel
Viewing window
Lid
Lid handle
Air vents
Main body
Kneading blade
Wire handle
Baking pan
Rotating shaft
5
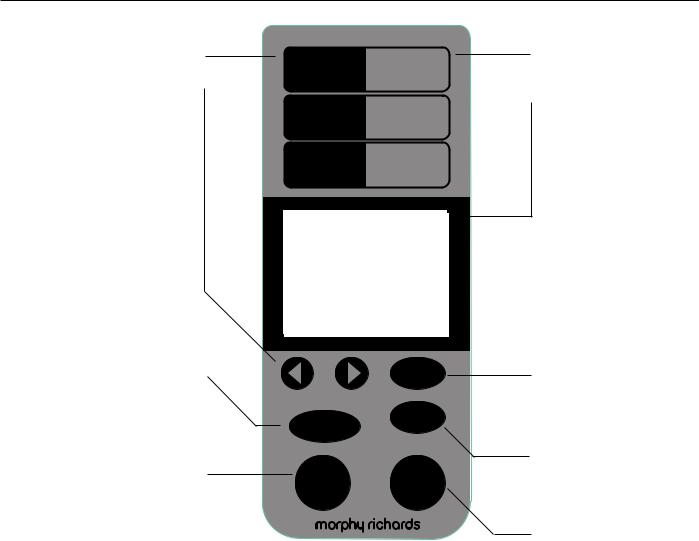
Control panel settings & functions
Mode descriptions
Timer controls
Use when setting the timer to delay the start of baking. Press and buttons to set timer, arrows move time up or down in 10-minute increments. Press and hold buttons for faster movement. Timer is not available on some cycles - please see section ‘Baking cycle times’. Note: If making two loaves simultaneously, both programs will start at the same time.
Left/Right control
Press to choose left pan only, right pan only or both pans.
Mode select button
Press to select from the modes listed on the control panel above. Choose from Normal, Fast or Rapide for making bread; Dough; and Special for jam, quick, cake and bake.
Mode |
|
Menu |
|
Normal |
1 |
Basic |
|
2 |
Sweet |
||
Fast |
|||
3 |
French |
||
Rapide |
|||
4 |
Wheat |
||
|
|||
|
1 |
Pasta |
|
Dough |
2 |
Dough |
|
3 |
Pizza |
||
|
|||
|
4 |
Bagel |
|
|
1 |
Jam |
|
Special |
2 |
Quick |
|
3 |
Cake |
||
|
|||
|
4 |
Extra bake |
|
Normal |
Fast |
Rapide |
MENU MENU
Dough Special
Menu
Colour
Left/Right
Mode Start
select Stop
Menu descriptions
Display window
The top and bottom of the display shows the mode selected.
The central display is divided into 2 sections for the 2 pans and shows:
•Timer delay baking time and the minute-by- minute baking time countdown
•The menu numbers selected
•The crust colour selected
•Temperature too high or too low
Menu button
For choosing the program menu setting listed on the control panel above
Colour button
For selecting crust colour. Choose from Light, medium or dark
Start
Press to start; or if time delay selected, begins countdown to begin operation.
Stop
Press to stop or to cancel incorrect timer setting. Hold until you hear the beep. Note: Do not press Stop when just checking the progress of bread.
6

Setting descriptions
Bread settings |
Dough settings |
Normal
Choose this setting for bread in less than 3 hours, and the best results.
Fast
Choose for bread in less than 2 hours. Only suitable for certain recipes, these recipes call for very warm water at 30-35°C, see fast breads recipes page 15.
Rapide
Choose for bread in less than 1 hour. Only specially designed recipes are appropriate for the rapide setting. These recipes call for very warm water at 30-35ºC and a larger amount of fast rising yeast. Bread baked on this setting is usually smaller with a dense texture. Only suitable for certain recipes, see Rapide bread recipes page 15.
Basic
This setting is used for breads that primarily use strong white bread flour, although some recipes may include small amounts of whole wheat flour. The settings have the minimum number of rising cycles and the shortest overall times until baking is completed. Therefore, loaves will be slightly denser than French or sweet breads.
Sweet
Use this setting for recipes that use fruit juice, additional sugar, or added sweet ingredients such as coconut flakes, raisins, dried fruit, or chocolate. Baking temperature is reduced to prevent burning and a longer rise cycle gives the loaves a light, airy texture.
French
Traditionally, French bread has a crispier crust and lighter texture than basic breads. Not suitable to be baked on fast or rapide.
Wheat
Use the whole wheat setting for recipes with significant amounts of whole wheat or rye flour, oats, or bran. The settings have a longer third rise cycle to allow heavy wheat and grains to expand. Generally, whole wheat and multi-grain breads are shorter and denser than basic, French, or sweet breads. Due to the wholegrain needing to soak water to expand, it is not advised to use the delay timer - can produce poor results.
Pasta, Dough, Pizza, Bagel
These settings only make dough and will not bake the final bread. Remove the dough and shape it to make pasta, pizza, rolls and round or braided breads.
Then bake in a conventional oven, fry in a deep fryer (ie doughnuts), or dry and prepare pasta as directed. You can make the same or different doughs at the same time. Menu combinations of 1+4 and 2+3 cannot be used.
The pasta setting is a 14 minute knead which can be used for general mixing of other flour based recipes - do not exceed 21/2 cups of dry mix in each pan.
Special settings
Speciality settings are used to make non-yeast products, such as quick breads, jams, cakes and other baked goods. Your machine is preprogrammed to run only one type of speciality setting at a time.
Quick
This setting can be used for recipes that contain baking powder or baking soda rather than yeast to make quick breads or cake rise.
Jam
Use this setting for making jam or marmalade from fresh fruits. Do not double recipe quantities or allow ingredients to boil over the pan into the baking chamber. Should this happen, stop the machine immediately. Allow to cool, and clean thoroughly.
Cake
This setting will mix ingredients and then bake for a preset amount of time.
Extrabake
This setting will bake only for 1 hour and can also be used to increase baking time on the selected cycle.
When started, the default time is 1 hour and counts down in 1 minute intervals. You will have to manually switch this off by pressing the stop button when you have completed the extrabake process. You will probably only require 10-20 minutes of of extrabake time.
7

Using your breadmaker
1Take out the pans
Open the lid and remove the baking pans by raising the handles and lifting out. Place baking pans on the work surface. It is important that they are filled with ingredients outside the machine so that any accidental spillage is not ignited by the heating elements.
2Attach the blades
Attach the kneading blades to the shaft by lining up the flat sides and pushing on.
3Measure ingredients
Measure the ingredients required and add them all into the pan in the order listed. See later section ‘Measuring your ingredients’.
•When adding the yeast to the baking pan, take care that the yeast does not come into contact with the water or any other liquid, as it will start to activate immediately.
•Use tepid water 21-28ºC for normal, dough and special. Fast and Rapide require 30-35°C water.
4Put pans back in
Place the baking pan back in the breadmaker and push down until you hear it click firmly into place. Close the lid.
5Plug in
Plug into the power supply (you will hear a beep). The breadmaker will automatically be set to basic bread menu and normal time.
•Every time you press a button you will hear a beep to confirm.
6Select pans
Press Left/Right button to choose to use the left, right or both pans. When selected, the words LEFT and RIGHT are displayed as appropriate in the black bar. Remove the blade from the pan you are not using as the motor blade will still turn.
7Select mode
Press Mode Select button. An arrow in the display points at the chosen selection, Normal, Fast, Rapide at the top of the window, Dough or Special at the bottom of the window. Mode is the same for both pans.
8Select program setting
Choose by pressing the Menu button.
If you are using one pan only:
The display for the chosen pan will scroll through the menu numbers 1, 2, 3, 4. Keep pressing until the display shows the menu number you require.
If you are using both pans:
The display will scroll through preset combinations
in both sides of the window. Keep pressing until the display shows the two menu numbers you require.
•There are 10 preset combinations with Normal, Fast, Rapide; 8 preset combinations with Dough; 4 preset menus with Special.
EXAMPLE
To bake a white and wholemeal loaf simultaneously:
•Select pans Press Left/Right button until left and right are shown in the black bar in the display.
•Select mode Press mode button until Normal is selected by an arrow.
•Select program Press Menu button until 1 appears on the left of the screen and 4 on the right.
9Select colour
Choose desired crust colour by pressing Colour button. An underline indicates if you have chosen LIGHT, MED. or DARK. If you are using both pans, the
display will scroll through 9 preset combinations in each side of the window. This setting is only available on Normal and Fast modes.
10 Select the delay time
If you wish the bread to be ready later, set the time delay now, as described in next section.
11Start
Press the Start Stop button to start the machine. The remaining time will count down in one minute increments.
12Finish
When the program is completed and the bread is baked the display shows 0:00 and will beep 5 times.
13Keep warm
The keep warm function will circulate hot air for a further 60 minutes on most settings (see ‘Baking cycle times’ section). For best results, remove the baking pan within this period or when the initial program is completed.
14Remove the food
Press Stop. Open the lid. Remove the baking pan using oven gloves (taking care as it is very hot).
15Turn out the bread
Turn the pan upside down and tap the bread from the pan onto a rack to cool. Fill the pan with warm water immediately to prevent the blade from sticking to the shaft.
•Occasionally the kneading blade will stay in the loaf. Wait until the loaf is cool and then remove the blade with a wooden or plastic utensil to avoid damage to the non-stick surface.
8
 Loading...