

Page 1
No. 99MCA081
A
SERIES No. 198
QM-Data
QM-Data 300
3D Data Processing Unit
User’s Manual
(Hardware Guide)
Read this User’s Manual thoroughly
before operating the instrument. After reading,
retain it close at hand for future reference.
Page 2
CONVENTIONS USED IN THIS MANUAL
Safety Precautions
To ensure that instrum ents are operated correc tly and safely, Mitutoyo manuals use
various safety symbols (Signal Words and Safety Alert Symbols) to identify and warn against
hazards and potential accidents.
The following signs indicate general warnings:
DANGER
Indicates an imminently hazardous situation which, if not avoided, will result in s er ious inj ur
y
or death.
WARNING
Indicates a potentially hazardous situation which, if not avoided, could result in serious injur
y
or death.
CAUTION
Indicates a potentially hazardous situation which, if not avoided, may result in minor o
r
moderate injury or property damage.
The following signs indicate specific warnings or prohibited actions, or indicate a
mandatory action:
Alerts the user to a specific hazardous situation. The given example means “Caution, risk of
electric shock”.
Prohibits a specific action. The given example means “Do not disassemble”.
Specifies a required action. The given example means “Ground”.
No. 99MCA081A
i
Page 3

CONVENTIONS USED IN THIS MANUAL
Types of Notes
The following types of notes are used in this manual to help the operator obtain
reliable measurement data through correct instrument operation.
IMPORTANT
• An important note provides information es sential to the c ompletion of a task. You c annot
disregard this note to complete the task.
• An important note is a type of precaution, which if neglected could result in a loss of data,
decreased accuracy or instrument malfunction/failure.
NOTE
A note emphasizes or supplements important points of the main text. It also supplies
information about specific situations (e.g., memory limitations, equipment configurations, or
details that apply to specific versions of a program).
TIP
A tip is a type of note that helps the user apply the techniques and procedures described in
the text to his or her specific needs.
It also provides reference information associated with the topic being discussed.
Mitutoyo assumes no liability to any party for any loss or damage, direct or
indirect, caused by use of this instrument not conforming to this manual.
Information in this document is subject to change without notice.
© 2000 Mitutoyo Corporation. All rights reserved.
No. 99MCA081A
ii
Page 4

WARRANTY
In the event that the Mitutoyo data processing unit “QM-Data” should prove def ective
in workmanship or material, within one year from the date of original purchase for use, it will
be repaired or replaced, at our option, free of charge upon its prepaid return to us.
If the unit fails or is dam aged for any of the following reas ons, it will be s ubject to a
repair charge, even if it is still under warranty.
1. Failure or damage owing to inappropriate handling or unauthorized modification.
2. Failure or damage owing to transport, dropping, or relocation of the instrument after
purchase.
3. Failure or damage owing to fire, salt, gas, abnormal voltage, or natural disaster.
This warranty is effective only where the instrument is properly installed and operated
in conformance with the instructions in this manual.
No. 99MCA081A
ii
i
Page 5
PRECAUTIONS FOR USE
1. Prohibition of Disassembly or Unauthorized Modification
Do not disassemble or modify the data processing unit “QM-Data”. Otherwise, the
measuring accuracy or functions may be adversely affected, or an accident may occur. For
inspection or repair the internal parts of the data processing unit, please contact the Mitutoyo
office.
2. Batteries
A Li (lithium) battery is used for memory backup. Please observe the following
precautions.
CAUTION
Li (lithium) battery
• The Li battery is mounted on the printed circuit board in the data processing unit “QM-Data”.
Do not dispose of the data processing unit by burning it. If the data processing unit is thrown
into fire, the battery may leak chemicals, bur st, or burn violently. Comply with government
regulations regarding the disposal method.
3. General Precautions for Handling the Data Processing Unit “QM-Data”
WARNING
Action to take if a problem occurs
• When overheating, smoke, or an abnormal smell occurs in the data processing unit, turn of
f
the power switch immediately, then unplug the AC adapter from the power outlet. Contact
the Mitutoyo office for repair. If you continue to use the data processing unit “QM-Data”
under such conditions, electric shock or fire may occur.
• If foreign matter (such as water or metal) enters the data processing unit “QM-Data”, turn of
f
the power switch immediately, then unplug the AC adapter from the power outlet. Then,
contact the Mitutoyo office for repair. If you continue to use the data processing unit
“QM-Data” when there is foreign m atter in the data processing unit, electric shock or f ire
may occur.
• If the data processing unit “QM-Data” is bumped so har d that the cover or other part is
broken, turn off the power switch, then unplug the AC adapter from the power outlet. Contact
the Mitutoyo office for repair. If you continue to use the data processing unit “QM-Data” in its
damaged condition, electric shock or fire may occur.
No. 99MCA081A
iv
Page 6

WARNING
Handling
• If a malfunction occ urs, such as no picture is displayed on the LCD (liquid crystal display)
even though the power switch is on, do not use the data processing unit “QM-Data”. Contact
the Mitutoyo office for repair. If you continue to use the data processing unit in its damaged
condition, electric shock or fire may occur.
• Do not let any foreign matter such as metal or water, or other liquids get into the data
processing unit “QM-Data” through the opening around the connector s on the rear panel.
Otherwise, electric shock or fire may occur.
• Do not damage or modify the cord of the AC adapter. If a heavy object is placed on the cord,
or if the cord is pulled, bent, twisted, or heated, the AC adapter could be damaged, and
electric shock or fire may occur.
• When a thunderstorm occurs nearby, unplug the AC adapter and the modular jack.
Otherwise, a malfunction, electric shock, or fire may occur.
• Do not touch the power plug of the AC adapter or the modular jack with wet hands.
Otherwise, electric shock may occur.
• When the power plug is inserted in the power outlet, do not touch the metallic portions of the
modular jack of the AC adapter with your hands. Doing so could result in an electric shock.
• Do not directly touch the pin of the connector on the rear panel with your hands. Otherwise,
the resultant static electricity could cause a m alf unction or a f ailure in the internal c ircuitr y.
Use the supplied covers to cover any unused connectors.
• If the power cord or the modular jack of the AC adapter is damaged, or if the power outlet is
loose, do not use the data processing unit “QM-Data”. Contact the Mitutoyo office for repair.
If you continue to use the data processing unit under such conditions, electric shock or f ire
may occur.
• Do not connect the AC adapter to a power supply in which large electric current is flowing, fo
r
example, to a machine tool or a large CNC measuring machine. Furthermore, avoid
complicated wiring.
• If the metallic portion of the AC adapter’s modular jack or the power outlet is dus ty, wet o
r
greasy, wipe with a dry cloth. Otherwise, fire may occur.
• Do not disassemble or m odify the data processing unit “Q M-Data”. Doing so m ay result in
failure. If the data processing unit needs to be ins pected or repaired, contact the Mitutoyo
office.
No. 99MCA081A
v
Page 7
CAUTION
Handling
• Do not bump the LCD panel. Furthermore, do not press against the LCD panel with a sharp
implement. Doing so can crack the LCD panel. If the LCD panel cracks and the liquid
contents get on your skin, wash your skin under running water for at least 15 minutes. If the
liquid enters your eyes, flush them with running water for at least 15 minutes, then consult a
doctor. The LCD contains acutely irritating substances.
• Be sure to press the keys with your fingers. Do not press them with a pencil, a ball-point pen,
or a sharp metal implement. Doing so may break the keys.
• Be sure to use the specified AC adapter only. Otherwise, failure of the internal circuit, fire, o
r
injury may occur.
• When pulling out the power plug or the modular jack of the AC adapter, be sure to hold the
plug or the jack, not the cord. Otherwise, the core of the cord may be exposed or brok en,
possibly resulting in electric shock or fire.
• Be sure to securely insert the modular jack and the power plug of the AC adapter.
Otherwise, fire or failure may occur.
4. Optional Accessories
4.1. Receipt Printer (Small Thermal Printer) (Part No. 06AAX264, 06AAX266, or 06AAX265)
CAUTION
• Before connecting the receipt printer to the data processing unit “QM-Data”, be sure to turn
off the power switch of the data process ing unit and unplug the AC adapter. When the
battery operating time becomes very short, the battery may be depleted. In that case,
contact the Mitutoyo office.
• The receipt printer uses a Ni-MH (nickel-metal hydride) battery for its power supply. Be sure
to read the precautions in the User’s Manual and to observe the following precautions.
• When charging the battery, be sure to keep the ambient tem perature between 0°C and
40°C. Otherwise, the battery may leak or overheat, adversely affecting the performance
and life of the battery.
• Refer to the instructions supplied with the receipt printer to see how the battery is charged.
No. 99MCA081A
vi
Page 8

4.2. Floppy Disk Drive (Part No. 06AAX263)
CAUTION
• Before mounting or removing the floppy disk drive from the data processing unit “QM-Data”,
be sure to turn off the power switch on the data proc essing unit. Furtherm ore, if you are
using the AC adapter, unplug the modular jack.
• When setting or removing a f loppy disk, do not insert your finger into the slot of the f lopp
y
disk drive. Doing so could cause injury.
No. 99MCA081A
vi
i
Page 9

CONTENTS
CONVENTIONS USED IN T HIS MANUAL ..............................................................................................i
WARRANTY...................................................................................................................................................... iii
PRECAUTIONS FOR USE................................................................................................................................iv
1 INTRODUCTION ........................................................................................................................................1-1
1.1 Outline............................................................................................................................................. 1-1
1.2 Component Names and Functions............................................................................................... 1-2
2 SETTING UP ..............................................................................................................................................2-1
2.1 Required Environment for Installation......................................................................................... 2-1
2.2 Mounting the Data Processing Unit ............................................................................................. 2-1
3 BASIC OPERATIONS................................................................................................................................3-1
3.1 Start-up............................................................................................................................................ 3-1
3.2 Compensation Functions.............................................................................................................. 3-2
3.3 Optional Accessories..................................................................................................................... 3-3
3.3.1 Printer...................................................................................................................................3-3
3.3.1.1 Receipt Printer............................................................................................................ 3-3
3.3.1.2 ESC/P Printer.............................................................................................................. 3-3
3.3.2 Floppy Disk Drive................................................................................................................ 3-4
3.3.3 RS-232C Interface................................................................................................................ 3-6
3.3.3.1 RS-232C No. 1............................................................................................................ 3-6
3.3.3.2 RS-232C No. 2............................................................................................................ 3-6
3.3.4 Foot Switch.......................................................................................................................... 3-7
4 MAINTENANCE AND TROUBLESHOOTING........................................................................................... 4-1
4.1 Daily Care........................................................................................................................................4-1
4.2 Troubleshooting.............................................................................................................................4-2
5 SPECIFICATIONS...................................................................................................................................... 5-1
5.1 Basic Specifications ......................................................................................................................5-1
5.2 Power Supply Specifications........................................................................................................ 5-2
5.3 Input and Output Specifications for the Data Processing Unit................................................. 5-3
5.3.1 Output to Printer (Centronics; 8-bit parallel)....................................................................5-3
5.3.2 RS-232C Input and Output.................................................................................................. 5-4
5.3.2.1 RS-232C No. 1............................................................................................................ 5-4
5.3.2.2 RS-232C No. 2............................................................................................................ 5-5
5.4 Standard Accessories.................................................................................................................... 5-5
5.5 Optional Accessories..................................................................................................................... 5-6
No. 99MCA081A
viii
Page 10

5.5.1 List of Optional Accessories...............................................................................................5-6
5.5.2 Floppy Disk Drive.................................................................................................................5-7
5.5.3 Foot Switch...........................................................................................................................5-7
SERVICE NETWORK
No. 99MCA081A
i
x
Page 11

No. 99MCA081A
x
MEMO
Page 12

1 INTRODUCTION
This chapter describes the outline of the data processing unit
“QM-Data”, and the name and function of each component.
1
1.1 Outline
This data processing unit “QM-Data” is used to process data from a manual
coordinate measuring machine (manual CMM).
In this data processing unit, measurement instructions, measurement values, and
various calculation results are displayed graphically on an LCD in a form that is easy to
understand.
Measurement results can be output using the receipt printer, which is a small thermal
printer (an optional accessory), or on a printer handling A4-size paper or continuous paper.
Created part programs, measured data, and measurement results can be stored on a
floppy disk (in this case, the optional floppy disk drive is necessary); the stored part programs,
measured data, and measurement results can then be used when necessary.
No. 99MCA081A
1-1
Page 13
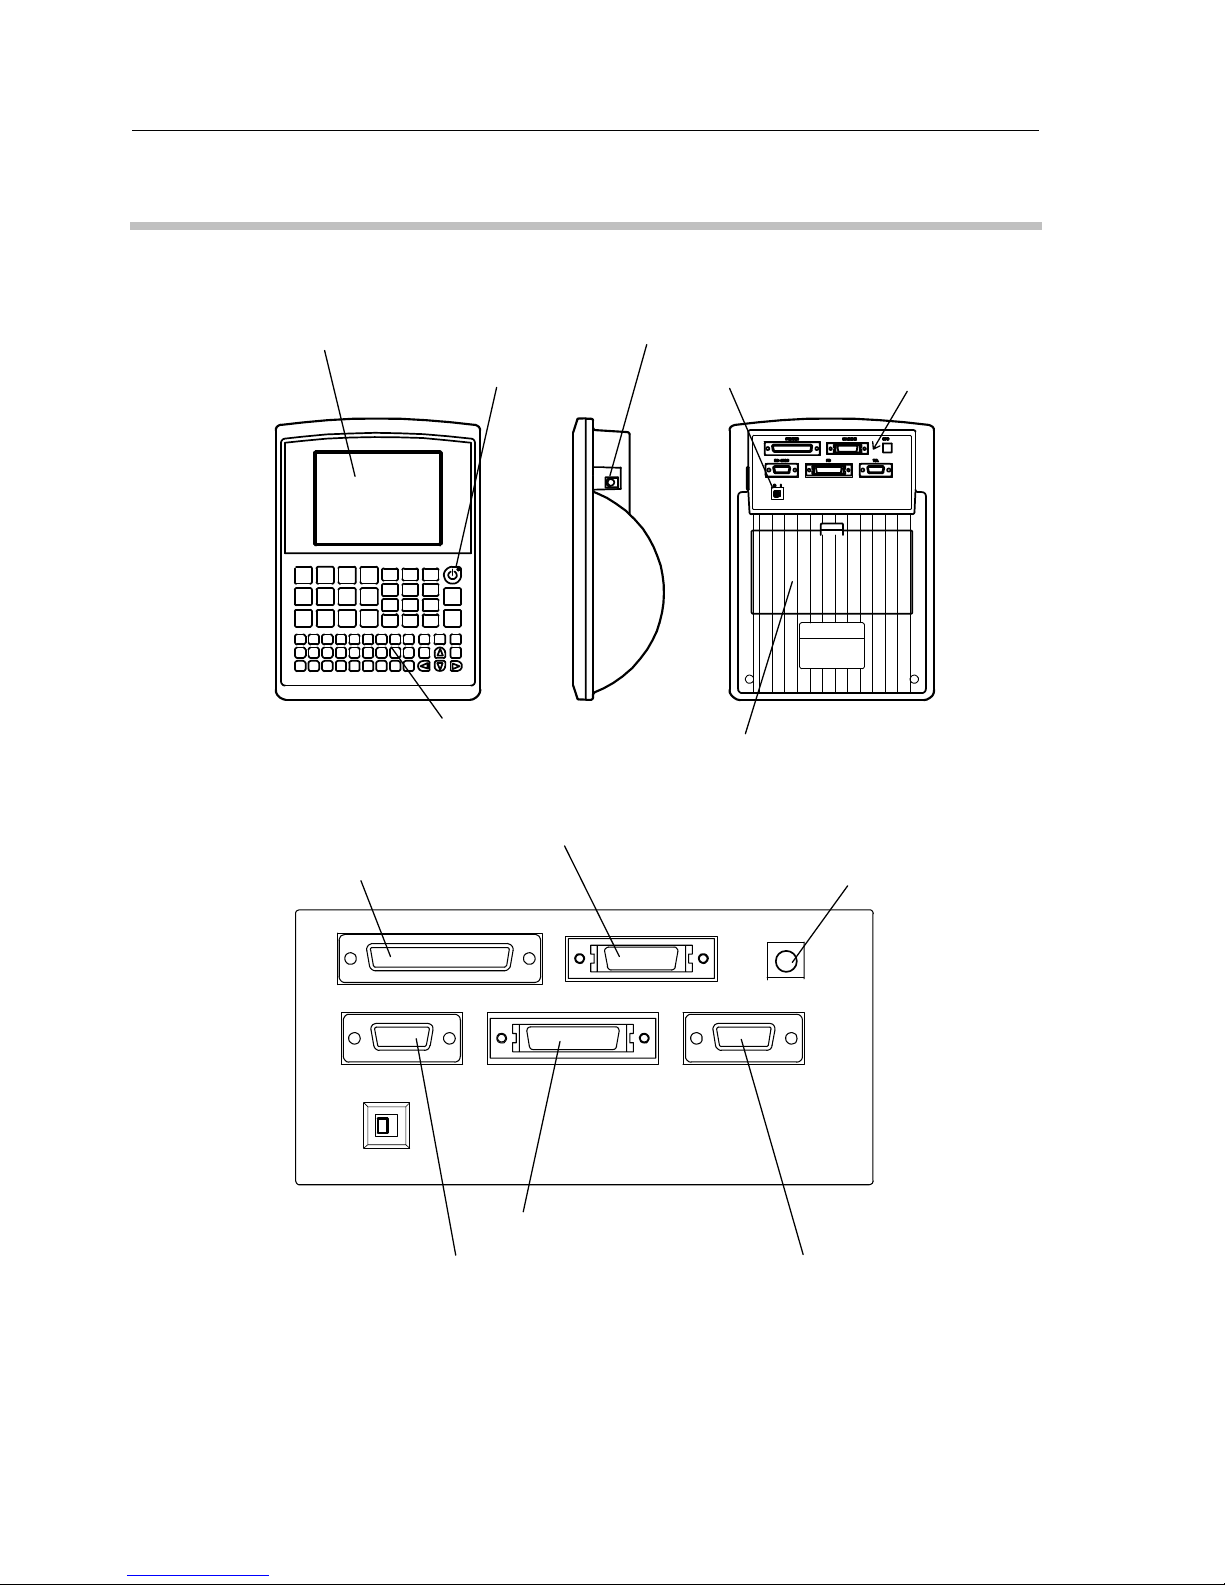
1.2 Component Names and Functions
This section describes the names and functions of the components of the data
processing unit “QM-Data”.
(5) Key panel
(3) DC jack
(4) Power switch
(6) Back cover
(2) Suspend key
(1) Display portion (LCD)
Connectors
Fig. 1-1
(8) CMM connector
(9) Foot switch input jack
(11) FDD connector
(10) RS-232C connector No. 1
(12) RS-232C connector No. 2
(7) Printer connector
FS
RS-232C 1
PRINTER
RS-232C 2
FD
CMM
O |
Fig. 1-2
No. 99MCA081A
1-2
Page 14

1. INTRODUCTION
(1) LCD
The LCD (Liquid Crystal Display) displays measurement result.
(2) Suspend key
When the data processing unit “QM-Data” is in Suspend Mode, the LED
corresponding to this Suspend key lights. If this key is pressed in Suspend Mode, then
the system starts up in the state prior to Suspend Mode. The measured data, obtained
before the Suspend Mode was entered, is retained.
When the data processing unit will not be used for some tim e, for example
during lunch, activate the Suspend Mode to reduce the power consumed by the data
processing unit.
Unlike when the power switch is OFF, a sm all amount of electric ity is used in
Suspend Mode. Consequently, if you do not intend to use the data processing unit for
a long time, for example over a holiday, turn off the power switch on the data
processing unit.
(3) DC jack
This is a jack used to connect the AC adapter which is a standard accessory.
(4) Power switch
Setting the power switch knob to the “|” position turns the power ON; and setting
the power switch knob to the “O” position turns the power OFF.
When electric power is supplied from the AC adapter, the built-in green LED
lights.
When you turn off the power switch, internal setting will be retained, but
measured data that has not been stored will be lost.
(5) Key panel
From this key panel, you can create various settings and perform input. This key
panel includes the measurement command keys.
(6) Back cover
Do not open the back cover. The back cover is for maintenance.
(7) Printer connector (PRINTER connector)
This is a connector for connecting the printer.
(8) CMM connector (CMM connector)
This is a connector for connecting the CMM (Coordinate Measuring Machine).
No. 99MCA081A
1-3
Page 15

No. 99MCA081A
1-4
(9) Foot switch input jack (FS jack)
This is a jack for connecting the optional foot switch.
(10) RS-232C connector No. 1 (RS-232C 1 connector)
This is a connector for connecting a personal computer.
(11) FDD connector (FD connector)
This is a connector for connecting the optional floppy disk drive (Part No.
06AAX263).
(12) RS-232C connector No. 2 (RS-232C 2 connector)
This is a connector for connecting the optional temperature sensors via the
temperature sensor unit.
Page 16

2 SETTING UP
This chapter describes the required environment for installing the data
processing unit “QM-Data”, and the installation of the data processing
unit.
2
2.1 Required Environment for Installation
Because this data processing unit “QM-Data” is used along with a CMM (Coor dinate
Measuring Machine), mak e sure to install the data processing unit in an environment that
satisfies the conditions required for ins talling the CMM in terms of temperature, hum idity,
vibration, and dust. Furthermore, the ins tallation environment should satisfy the following
conditions.
(1) Power supply
Confirm that the power outlet meets the power requirements of the AC adapter
before connecting the AC adapter to the power outlet.
Do not use any AC adapter other than the one provided.
(2) Electromagnetic noise
Do not connect the AC adapter to a power supply that has a large electric
current flowing through it, such as one f or machine tools or large CNC measuring
instruments.
Place the data processing unit “QM-Data” well away from equipment that
generates electromagnetic noise, such as welding equipment or electric discharge
machines (EDMs).
2.2 Mounting the Data Processing Unit
Refer to the User’s Manual of the m ain unit of the CMM f or the m ethod to m ount the
data processing unit “QM-Data” on the CMM (Coordinate Measuring Machine).
No. 99MCA081A
2-1
Page 17

No. 99MCA081A
2-2
MEMO
Page 18

3 BASIC OPERATIONS
This chapter describes the basic operations of the data pr ocessing
unit “QM-Data” and its optional accessories.
3
3.1 Start-up
(1) Connect the AC adapter.
(2) Turn on the power switch. Then wait until the screen shown in Fig. 3-1 is displayed.
F1 F2 F3 F4
Fig. 3-1
TIP
Refer to the “User’s Manual (Software Guide (1) & (2)) (MANUAL Nos. 99MCA082 &
99MCA083)” for information on the settings and measurement methods.
No. 99MCA081A
3-1
Page 19

3.2 Compensation Functions
You can utilize the following compensation functions.
(1) Volumetric error compensation
Volumetric error compensation can be used by setting the scale absolute origin
for each axis in the CMM (Coordinate Measur ing Machine) in accordance with the
instructions displayed.
TIP
Refer to Chapter 1 of the “User’s Manual (Operation Guide) (MANUAL No. 99MCA084)” for
an explanation of the volumetric error compensation function.
(2) Temperature compensation (optional)
By inputting data from the temperature sensors attached to the CMM and the
workpiece, the relative amount of thermal expans ion in the work piece and the CMM
can be compensated for.
TIP
Refer to the “Temperature Compensation Function (MANUAL No. 99MCA089)” for an
explanation of the temperature compensation function.
No. 99MCA081A
3-2
Page 20

3. BASIC OPERATIONS
3.3 Optional Accessories
3.3.1 Printer
Use the printer cable to connect the printer to the PRINTER connector on the rear of
the data processing unit.
Refer to the printer’s operation manual for an explanation of how to set up and operate
the printer.
3.3.1.1 Receipt Printer
The receipt printer is a sm all thermal printer. Measured data can be printed on the
receipt printer.
Refer to the “User’s Manual” of the Main Unit of the CMM (Coordinate Measuring
Machine) for an explanation of how to mount the receipt printer.
IMPORTANT
• Do not use any other AC adapter than the AC adapter supplied with the receipt printer.
Otherwise, the receipt printer might be damaged.
• Before connecting the receipt printer and the data processing unit, be sure to turn off their
power switches.
3.3.1.2 ESC/P Printer
The measured data, the measurement res ults, and the part progr am s can be pr inted
on the ESC/P printer.
IMPORTANT
Be sure to turn off their power switches bef ore connec ting the ESC/P printer and the data
processing unit.
TIP
Check the specifications described in 5.3.1 "Output to Printer” to find out which printers are
compatible.
No. 99MCA081A
3-3
Page 21

3.3.2 Floppy Disk Drive
Use the supplied connection cable to connect the floppy disk drive (FDD) with the FD
connector on the rear of the data processing unit.
The floppy disk drive is used to store and retrieve the part programs or measured data
on the floppy disk.
Connection cable
Eject button
Access LED
Fig. 3-2
IMPORTANT
• Make sure to turn off the power switch on the data processing unit before connecting the
floppy disk drive and the data processing unit.
• For the floppy disk drive, use a 3.5” floppy disk (2HD, 1.44 MB) that has been form atted
for MS-DOS.
• Do not use a cleaning disk in the floppy disk drive.
• When the access LED on the front of the floppy disk drive is lit, do not use the eject button
or connect or disconnect the connection cable.
No. 99MCA081A
3-4
Page 22

3. BASIC OPERATIONS
NOTE
Handling floppy disk
When using a floppy disk, pay attention to the following matters. Mishandling c an result in
damaged data.
1) Do not touch the disk surface directly.
2) Do not put the floppy disk near a magnet or magnetized item.
3) Do not leave the floppy disk where the temperatur e is outside the range of 0°C
through 60°C.
TIP
Refer to the “User’s Manual” of the Main Unit of the CMM (Coordinate Measuring Machine)
for information on how to mount the floppy disk drive.
No. 99MCA081A
3-5
Page 23

3.3.3 RS-232C Interface
3.3.3.1 RS-232C No. 1
The RS-232C No. 1 interface of the data processing unit is used to communicate with
a personal computer or equipment having an RS-232C interface.
IMPORTANT
• The signal names and pin numbers may be different depending on the equipment. Before
setting up the connection, be sure to check that equipment’s manual.
• If the connection cable you are using has been manufactured by a vendor other than
Mitutoyo Corporation, or if you set up the connection cable by yourself, be sure to use core
wire shielded by a knitted shield and ground each end of the knitted shield to the shell of
the RS-232C connector. If you use a core wire without a knitted shield, the data
processing unit “QM-Data” may malfunction owing to outside noise, or the television or the
radio may malfunction owing to high-frequency noise from the data processing unit.
NOTE
Before using the RS-232C No. 1 interface, set up the communication conditions (namely,
baud rate, word length, parity check, stop bit) for the other piece of equipment.
TIP
• Refer to Section 5.3.2 “RS-232C Input and Output” for the connection specifications and
the pin arrangement of the connector.
• Refer to Chapter 14 of the “User’s Manual (Software Guide (2)) (MANUAL No.
99MCA083)” for information on how to set up the RS-232C No. 1 interface.
3.3.3.2 RS-232C No. 2
The RS-232C No. 2 interface on the data processing unit is connected to the
temperature sensors via the temperature sensor unit.
IMPORTANT
Do not use any other temperature sensor than Mitutoyo’s temperature sensor.
Furthermore, do not use any other cable than the specified cable.
No. 99MCA081A
3-6
Page 24

3. BASIC OPERATIONS
TIP
• The communication conditions (namely, baud rate, word length, parity check, stop bit)
were set when the unit shipped.
3.3.4 Foot Switch
Insert the foot switch plug into the foot switch input jack (FS jack ) on the rear of the
data processing unit.
If you step on the foot switch during a measurem ent, the meas ured data at that tim e
will be input to the data processing unit.
No. 99MCA081A
3-7
Page 25

No. 99MCA081A
3-8
MEMO
Page 26

4 MAINTENANCE AND
TROUBLESHOOTING
This chapter describes maintenance and troubleshooting.
4
4.1 Daily Care
Wipe the plastic portion of the data proces s ing unit “Q M-Data” lightly with a cloth that
was moistened with a neutral detergent diluted in water, and then wrung out.
IMPORTANT
Do not apply any solvent to the plastic portion of the data processing unit.
No. 99MCA081A
4-1
Page 27

4.2 Troubleshooting
If you think that operation is abnormal, follow the troubleshooting instructions below.
IMPORTANT
If you cannot solve the problem, make a note of the model name, model number, and serial
number, and then contact your supplier.
(1) No picture is displayed even when the power switch is on.
Point to check Cause and remedy
Is the AC adapter connected correctly?
• Confirm that the plug and the modular jack of the AC adapter
are securely connected. When those connections are normal,
the green LED built in the power switch will light up.
• Confirm that the voltage of the power supply meets the AC
adapter ratings.
Is the Suspend Mode LED lit? Press the Suspend key.
(2) The displayed characters are hard to read.
Point to check Cause and remedy
Has the contrast been adjusted?
• Adjust the contrast of the LCD, referring to Chapter 14 of the “User’s
Manual (Software Guide (2)) (MANUAL No. 99MCA083)”.
• The LCD display quality varies depending on the ambient temperature.
Slight variation is normal. Adjust the contrast so that you can clearly
read the characters.
No. 99MCA081A
4-2
Page 28

4. MAINTENANCE AND TROUBLESHOOTING
(3) It is not possible to move from the initial screen to the next screen; or, although no
operation has been done, the screen returns to the initial screen.
Point to check Cause and remedy
Is there any source generating noise, for
example a machine tool, an electric
discharge machine, a welding machine etc.,
near the data processing unit “QM-Data”?
Move the data processing unit “QM-Data” away from the source
generating the noise. If the data processing unit uses the same
power supply as the source generating the noise, use a different
power outlet.
Does the power supply voltage fluctuate?
If the wiring is complicated, or if the data processing unit
“QM-Data” uses the same power supply as an equipment
through which a large current flows even briefly, use a different
power outlet.
(4) The buzzer volume is too low or too high.
Point to check Cause and remedy
Have you adjusted the volume setting?
Adjust the volume setting, referring to Chapter 14 of the “User’s
Manual (Software Guide (2)) (MANUAL No. 99MCA083)”.
(5) The displayed date and time are not correct.
Point to check Cause and remedy
Have you set the date and time?
Have you set the date and time correctly?
Set the date and time, referring to Chapter 14 of the “User’s
Manual (Software Guide (2)) (MANUAL No. 99MCA083)”.
Input the date and time according to the specified format.
Are you resetting the time periodically?
Since the built-in clock bears a slight error, set the time
periodically.
(6) An error message concerning the memory backup battery appears.
Point to check Cause and remedy
(Memory backup battery error)
• This error message indicates that the memory backup battery is low,
and that if you continue to use the data processing unit “QM-Data”,
backup will not be performed. Save the part programs and measured
data stored in the internal memory of the data processing unit to the
floppy disk or to a personal computer.
• Contact your supplier to replace the battery.
IMPORTANT
Replacing the battery will initialize the internal memory. Be sure to create the necess ary
backups.
No. 99MCA081A
4-3
Page 29

(7) The retained values are different from the values that were set.
Point to check Cause and remedy
Is there an error message about the
memory backup battery?
The data processing unit “QM-Data” is in a state in which it cannot
back up memory. Those part programs or measured data not
saved to a personal computer or floppy disk will be lost.
(8) Errors related to the Digital Scale unit occur frequently.
Point to check Cause and remedy
Is the ambient noise appropriate?
• Connect the AC adapter to a different power supply, one that does
not have large current flowing through it.
• Use the data processing unit “QM-Data” away from equipment
generating electromagnetic noise, for example a welding machine or
electric discharge machine.
• If the problem persists, it may be necessary to adjust the Digital Scale
unit. In that case, contact your supplier.
(9) It is not possible to print from the printer.
1) Confirm that the connector attached to the connection cable is securely connected.
2) Check whether or not an error message is displayed on the printer. If an error
message is displayed, correct the error by following the instructions in the printer
manual.
3) Disconnect the connection cable between the printer and the data processing unit,
then try the test print described in the printer manual.
No. 99MCA081A
4-4
Page 30

4. MAINTENANCE AND TROUBLESHOOTING
(10) It is not possible to write or read data using a floppy disk.
Point to check Cause and remedy
Is the floppy disk set to write-protect?
Shift the write-protect tab on the floppy disk to the
write-enable position.
Is the floppy disk inserted correctly? Insert the floppy disk correctly, then try again.
Are the connectors in the connection cable between
the floppy disk drive and the data processing unit
“QM-Data” securely connected?
Confirm the connection of the connectors in the
connection cable.
Is the floppy disk formatted properly?
Reformat the floppy disk using your personal
computer (1.44 MB; 2HD).
Is the floppy disk formatted?
Format the floppy disk using your personal computer
(1.44 MB; 2HD).
The contents of the floppy disk might be damaged.
The damaged contents cannot be recovered. If there
is a backup floppy disk, use it.
(11) Data cannot be input using the touch signal probe.
Point to check Cause and remedy
Is the touch signal probe’s cable connection OK?
Check the connection between the touch signal
probe's cable and the main unit of the CMM
(Coordinate Measuring Machine).
(12) Data cannot be input by stepping on the foot switch.
Point to check Cause and remedy
Is the foot switch cable connection OK?
Check the connection between the foot switch cable
and the data processing unit “QM-Data” .
No. 99MCA081A
4-5
Page 31

No. 99MCA081A
4-6
MEMO
Page 32

5 SPECIFICATIONS
This chapter describes the specif ic ations f or the data pr oc es sing unit
“QM-Data”, the standard accessories, and the optional accessories.
5
5.1 Basic Specifications
Item Specification
Monitor Graphic LCD (320 × 240 dots; with backlight)
Displayable languages Japanese / English / German / French / Italian / Spanish / Portuguese
Power supply AC adapter
Electric power consumption Max. 24 W (not including any optional accessories)
Dimensions 200 (W) × 90 (D) × 280 (H) mm
Mass 1.2 kg
Operating temperature range 10 ~ 30 °C
Operating humidity range 20 ~ 80 %RH (Must be free from condensation)
Storage temperature range -10 ~ 50 °C
Storage humidity range 5 ~ 90 %RH (Must be free from condensation)
TIP
Refer to the “User’s Manual (Software Guide (1) & (2)) (MANUAL Nos. 99MCA082 &
99MCA083)” for information on the data processing functions.
No. 99MCA081A
5-1
Page 33

5.2 Power Supply Specifications
Standard accessories include an AC adapter and a power cord for the AC adapter.
The power cord corresponds to the power sour ce voltage in the country where the data
processing unit “QM-Data” is used.
1) Specifications of the AC adapter
Item Specification
Part No. 357651
External dimensions 121 (D) x 60 (W) x 34.5 (H) mm
Mass 0.35 kg
Range of input voltage from
power supply
100 ~ 240 V ±10%
DC output
+12 V ± 5% (Output current: 0.3 ~ 3.5A)
0 V
MAIN (12 V)
Device
specifications
Display When the power supply is on, the green LED is lit.
2) Power cord for the AC adapter
Part No. Corresponding country
930966T For 100 V / for Japan
930966T Meeting the UL, CSA regulations / for United States of America, Canada
930967 Meeting the CEE regulation / for Germany, Europe
930968 Meeting the BS regulation / for the United Kingdom
933098 Meeting the SAA regulation / for Australia
No. 99MCA081A
5-2
Page 34

5. SPECIFICATIONS
5.3 Input and Output Specifications for the Data
Processing Unit
The data processing unit “QM-Data” has the following input and output connectors for
connecting to external devices.
5.3.1 Output to Printer (Centronics; 8-bit parallel)
The measured data and graphs can be output to the receipt printer (optional
accessory) or the ESC/P printer. Graphs can be output only to the ESC/P printer.
1) Printer specifications
(1) Centronics; 8-bit parallel input.
(2) Printer control code: ESC/P.
(3) Being operable by MS-DOS.
(4) Paper size: A4-size or Letter-size for pieces of paper; and 8-inch width (80
characters) for continuous paper.
(5) Color mode printout using a color ribbon cartridge.
<Recommended printer model>: LQ-300 or LQ570+ (by EPSON Inc.)
2) Printer connection cable
Use the following dedicated cable to connect the printer.
(1) Cable for connecting the receipt printer
Use the cable supplied with the receipt printer.
(2) Cable for connecting the ESC/P printer
2 m (Part No. 12AAA804) or 4 m (Part No. 12AAA805)
No. 99MCA081A
5-3
Page 35

5.3.2 RS-232C Input and Output
5.3.2.1 RS-232C No. 1
The RS-232C No. 1 interface is used storing and reading measured data or part
programs on a personal computer.
1) Specifications
• Communication specification: Half-duplex
• Communication method: Asynchronous
• Communication speed: 1200, 2400, 4800, or 9600 bps.
2) Pin arrangement of the connector
Connector: JES-9P-2A3A (9-pin, D-sub)
manufactured by Nihon Attyaku Tanshi Inc.
5
1
6
9
Fig. 5-1
The connection specifications for connecting the RS-232C No. 1 interface to data
terminal equipment (DTE), such as a personal computer are as follows:
Data terminal equipment (DTE),
such as personal computer Data processing unit “QM-Data”:
(PC/AT compatible) (Data terminal equipment (DTE))
Signal name Pin No. Pin No. Signal name Description
DCD 1 1 NC No connection
RxD 2 2 RxD Received data
TxD 3 3 TxD Transmit data
DTR 4 4 DTR Data terminal ready
SG 5 5 SG Signal ground
DSR 6 6 DSR Data set ready
RTS 7 7 RTS Request to send
CTS 8 8 CTS Clear to send
RI 9 9 NC No connection
Shield Shell Shell Shield Frame ground
9-pin, D-sub 9-pin, D-sub
Fig. 5-2
No. 99MCA081A
5-4
Page 36

5. SPECIFICATIONS
5.3.2.2 RS-232C No. 2
RS-232C connector No. 2 (RS-232C 2 connector) is used to connect the temperature
sensors via the temperature sensor unit.
NOTE
RS-232C connector No. 2 (RS-232C 2 connector) is exclusively used for connecting the
temperature sensors via the temperature sensor unit. Do not connect any device other than
the temperature sensor unit to this connector.
5.4 Standard Accessories
Part No. Part name Quantity
357651 AC adapter 1
- Power cord for AC adapter 1
06AAE848A CMM connection cord (3 m) (UD cable-2) 1
99MCA081
99MCA082
99MCA083
99MCA084
99MCA085
User’s manual (hardware guide)
User’s manual (software guide (1))
User’s manual (software guide (2))
User’s manual (operation guide)
Quick help manual
1 set
- Inspection certificate 1
No. 99MCA081A
5-5
Page 37

5.5 Optional Accessories
5.5.1 List of Optional Accessories
Part No. Part name
Receipt printer (with cable)
06AAX264 For 100 V
06AAX266 For 230 V
06AAX265 For 120 V
06AAX290 Printer paper for receipt printer (10 pieces)
12AAA804 Printer cable for ESC/P printer (2 m)
12AAA805 Printer cable for ESC/P printer (4 m)
06AAX263 Floppy disk drive (with exclusively used cable)
12AAA807 RS-232C cable (2 m)
12AAA808 RS-232C cable (4 m)
937179T Foot switch
No. 99MCA081A
5-6
Page 38

5. SPECIFICATIONS
5.5.2 Floppy Disk Drive
Item Specification
Part No. 06AAX263
External dimensions 44 (W) x 200 (D) x 125 (H) mm
Mass 1.1 kg
Power consumption Max. 3.85 W
Device specifications
Storage media
3.5” formatted floppy disk
(2HD, 1.44 MB, MS-DOS format)
5.5.3 Foot Switch
Item Specification
Part No. 937179T
External dimensions 80 (W) x 75 (D) x 35 (H) mm
Mass 200 g
Device specifications
Cable length 1.8 m
No. 99MCA081A
5-7
Page 39

No. 99MCA081A
5-8
MEMO
Page 40

[MEMO]
Page 41

Mitutoyo Corporation
20-1, Sakado 1-chome, Takatsu-ku, Kawasaki, Kanagawa 213-0012, Japan
Cable: MITUTOYO Kawasaki
Phone: (044)813-8230 Fax: (044)813-8231
 Loading...