


No. 99MBC094
A
SERIES No. 544
LSM-500S/501S/503S/
506S/512S/516S
Laser Scan
Micrometer
(Measuring Unit)
User’s Manual
Read this User’s Manual thoroughly
before operating the instrument. After reading,
retain it close at hand for future reference.
[MEMO]

CONVENTIONS USED IN USER’S MANUAL
Mitutoyo manuals use various safety signs. The visual cues and the contents of
description appended to each cue are described below.
Safety Precautions
To ensure that instruments are operated correctly and safely, Mitutoyo manuals use safety
signs (Signal Words and Safety Alert Symbols) to identify and warn against hazards and
potential accidents.
The following signs indicate general warnings:
Indicates an imminently hazardous situation which, if not avoided, will result in serious
injury or death.
DANGER
WARNING
CAUTION
Indicates a potentially hazardous situation which, if not avoided, could result in serious
injury or death.
Indicates a potentially hazardous situation which, if not avoided, may result in minor or
moderate injury or property damage.
The following signs indicate specific warnings or prohibited actions, or indicate a
mandatory action:
Alerts the user to a specific hazardous situation. The given example means “Caution, risk
of electric shock”.
Prohibits a specific action. The given example means “Do not disassemble”.
No. 99MBC094A
Specifies a required action. The given example means “Ground”.
i

CONVENTIONS USED IN USER’S MANUAL
Various Types of Notes
The following types of notes are provided to help the operator obtain reliable
measurement data through correct instrument operation.
IMPORTANT
NOTE
TIP
• An important note is a type of note that provides information essential to the completion
of a task. You cannot disregard this note to complete the task.
• An important note is a type of precaution, which if neglected could result in a loss of
data, decreased accuracy or instrument malfunction/failure.
A note emphasizes or supplements important points of the main text. A note supplies
information that may only apply in special cases (e.g., Memory limitations, equipment
configurations, or details that apply to specific versions of a program).
A tip is a type of note that helps the user apply the techniques and procedures described
in the text to his or her specific needs.
It also provides reference information associated with the topic being discussed.
Mitutoyo assumes no liability to any party for any loss or damage, direct or
indirect, caused by use of this instrument not conforming to this manual.
Information in this document is subject to change without notice.
ii
© Copyright Mitutoyo Corporation 2003. All rights reserved.
© Copyright Mitutoyo Corporation 2005. All right reserved.
No. 99MBC094A

NOTES FOR EXPORTING
Before exporting this product confirm the final purpose of use at the export destination to
prevent the product from being used for developing weapons of mass destruction or
military affairs. In the case of export to the U.S., this product requires an application for
prior approval of CDRH (Center for Devices and Radiological Health) in FDA (Food and
Drug Administration). An additional cost generates in application procedure. For detailed
information consult a Mitutoyo sales office. Also, if this product is exported with it
incorporated in equipment, the final product requires an application for FDA approval. If
this is the case, note that the client must file an application for approval.
No. 99MBC094A
iii

INSTALLATION CONDITIONS
The Mitutoyo Laser Scan Micrometer LSM-500H series is an instrument for indoor use.
Also, this series is a precision optical instrument and a precision electronic instrument.
Therefore, it must be carefully installed and the following conditions must be taken into
account to attain the highest possible accuracy. Mitutoyo assumes no liability for any
accident or damage caused by use of this instrument not conforming to these conditions.
1. Vibration
Install the LSM in a place with minimum vibration. If the LSM is subjected to vibrations for
a long period of time, precision components in the system may malfunction, thus affecting
the measuring accuracy.
If the vibrations are significant, minimize them by laying a vibration damping rubber pad,
etc.
2. Dust/Grit
Dust, if present in the installation site, will affect the optical components such as
protection glass (in the measuring unit) and electronic components (in the display unit).
Install the LSM in a place that is as free as possible from dust/grit.
3. Direct sunlight
If this instrument is exposed to direct sunlight, the heat may deform the instrument and
adversely affect the measuring accuracy.
If this instrument must be placed by a window where it will be subject to direct sunlight,
protect the instrument by shading it with curtains, etc.
4. Blow from the air conditioner
If the measuring place is exposed to hot or cool air blow from the air conditioner, the
laser beam may be refracted due to the difference in air density and adversely affect the
measuring accuracy.
If this is the case, block direct air flow with curtains, etc.
5. Ambient temperature and humidity
Avoid installing this instrument in an environment where there is rapid temperature or
humidity change. Otherwise, it may reduce measuring accuracy. This instrument must be
operated in the following ambient conditions.
Temperature: 0°C to 40°C
Humidity: 35%RH to 85%RH
iv
No. 99MBC094A

WARRANTY
This instrument has been manufactured under rigorous Mitutoyo quality control. Should
it malfunction under normal use within one year from the date of original purchase, it will
be repaired or replaced, at our option, free of charge. Contact your dealer or the nearest
Mitutoyo representative for more information.
However, the following damages may be subject to a repair charge even if damage
occurs within the warranty period:
1. Unit malfunction or damage arising from improper handling, or unauthorized retrofit or
repair by the user.
2. Unit malfunction or damage as the result of moving, dropping, or transporting after
purchase.
3. Unit malfunction or damage due to fire, salt, gas, abnormal voltage, or natural
catastrophe.
This warranty is not transferable and is only valid within the country of the original
purchase.
No. 99MBC094A
v

CONTENTS
CONVENTIONS USED IN USER’S MANUAL....................................................................................................i
NOTES FOR EXPORTING................................................................................................................................iii
INSTALLATION CONDITIONS.........................................................................................................................iv
WARRANTY.......................................................................................................................................................v
1. INTRODUCTION...................................................................................................................................... 1-1
1.1 Outline........................................................................................................................................... 1-1
1.2 Introduction...................................................................................................................................1-1
1.3 Inspection and Maintenance....................................................................................................... 1-2
1.3.1 Laser emission display LED............................................................................................. 1-2
1.3.2 Cleaning optical parts.......................................................................................................1-2
1.3.3 Replacement of protection glass..................................................................................... 1-3
2. CALIBRATION ........................................................................................................................................ 2-1
2.1 Calibration Gage........................................................................................................................... 2-2
2.1.1 With-holder type ................................................................................................................2-2
2.1.2 Straight type.......................................................................................................................2-2
2.1.3 Stepped type...................................................................................................................... 2-2
3. SPECIFICATIONS OF MEASURING UNIT ............................................................................................3-1
3.1 LSM-500S ......................................................................................................................................3-2
3.2 LSM-501S ......................................................................................................................................3-4
3.3 LSM-503S ......................................................................................................................................3-6
3.4 LSM-506S ......................................................................................................................................3-8
3.5 LSM-512S ....................................................................................................................................3-10
3.6 LSM-516S ....................................................................................................................................3-12
4. DESIGNING THE FIXTURES.................................................................................................................. 4-1
4.1 Outline........................................................................................................................................... 4-1
4.2 Consideration to Calibration....................................................................................................... 4-1
4.2.1 Measuring position and resulting accuracy................................................................... 4-1
4.2.2 On measuring gap............................................................................................................. 4-2
4.3 Optical Axis Alignment................................................................................................................ 4-3
4.3.1 Optical axis alignment in horizontal plane ..................................................................... 4-3
4.3.2 Optical axis alignment in vertical plane.......................................................................... 4-3
4.3.3 Permissible error for optical axis alignment .................................................................. 4-3
4.4 Confirming the Optical Axis........................................................................................................ 4-4
4.4.1 Confirming with the laser beam....................................................................................... 4-4
vi
No. 99MBC094A

4.4.2 Confirming the optical axis with an oscilloscope...........................................................4-5
4.5 Measurement with Two Measuring Units ...................................................................................4-6
4.5.1 DXY type..............................................................................................................................4-6
4.5.2 DF type ................................................................................................................................4-8
4.6 Radiuse of Cable Bend...............................................................................................................4-11
5. SAFETY PRECCAUTIONS FOR LASER BEAM....................................................................................5-1
5.1 Caution .........................................................................................................................................5-1
5.2 Safety Precaution labels located on LSM-500S Series.............................................................5-2
SERVICE NETWORK
No. 99MBC094A
vii

MEMO
viii
No. 99MBC094A
1 INTRODUCTION
1
1.1 Outline
The Laser Scan Micrometer is a high-precision laser measuring system that performs
non-contact dimensional measurements with a high-speed scanning laser beam.
With non-contact measurement capability, this system features high-precision
measurement of workpieces that are difficult for conventional measuring systems to
measure, including hot workpieces, brittle or elastic workpieces, workpieces that must be
kept free from contamination, and soft workpieces subject to the measuring force.
1.2 Introduction
This chapter describes the maintenance and inspecton of the Laser
Scan Micrometer (LSM) measuring unit.
This measuring unit is used with the display unit of the LSM-6200. Since this User’s
Manual primarily describes the specifications of the measuring unit, please refer to the
User’s Manual of the LSM-6200 for details about connection with a display unit, functions,
and measurement procedures.
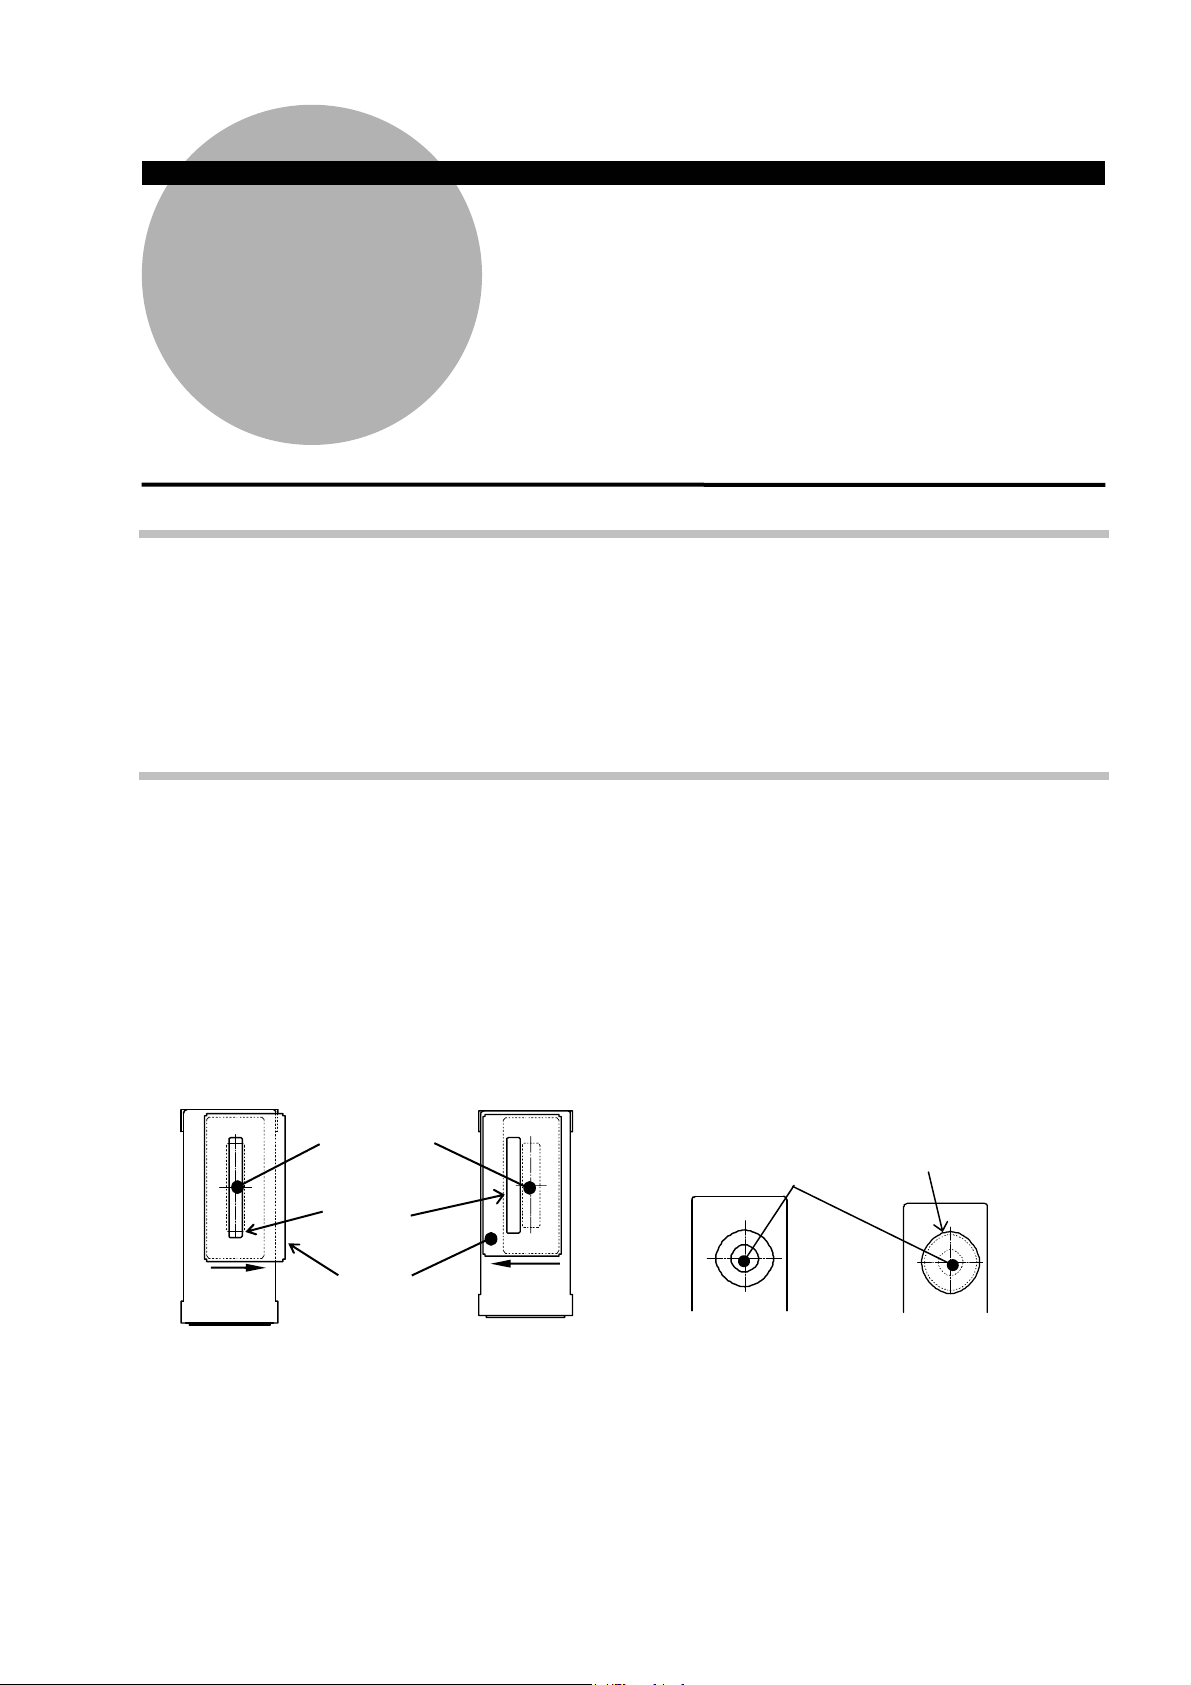
The measuring unit is provided with a shutter or cap on the emission unit and reception
unit. Laser equipment has such safety precautions.
During measurement: Open the shutter by sliding it as shown in the below left diagram
of fig-a), or remove the lens cap as shown in the below left diagram of fig-b).
During no-measurement: Close the shutter by sliding it as shown in the below right
diagram of fig-a), or mount the lens cap as shown in the below right diagram of fig-b).
Laser beam
Open Close
a) LSM-501S/503S/506S/512S/516S
window
Shutter
window
Shutte
Laser beam
window
Open Close
b) LSM-500S
Lens cap
No. 99MBC094A
1-1
1.3 Inspection and Maintenance
This section describes the inspection and maintenance procedures of the measuring unit.
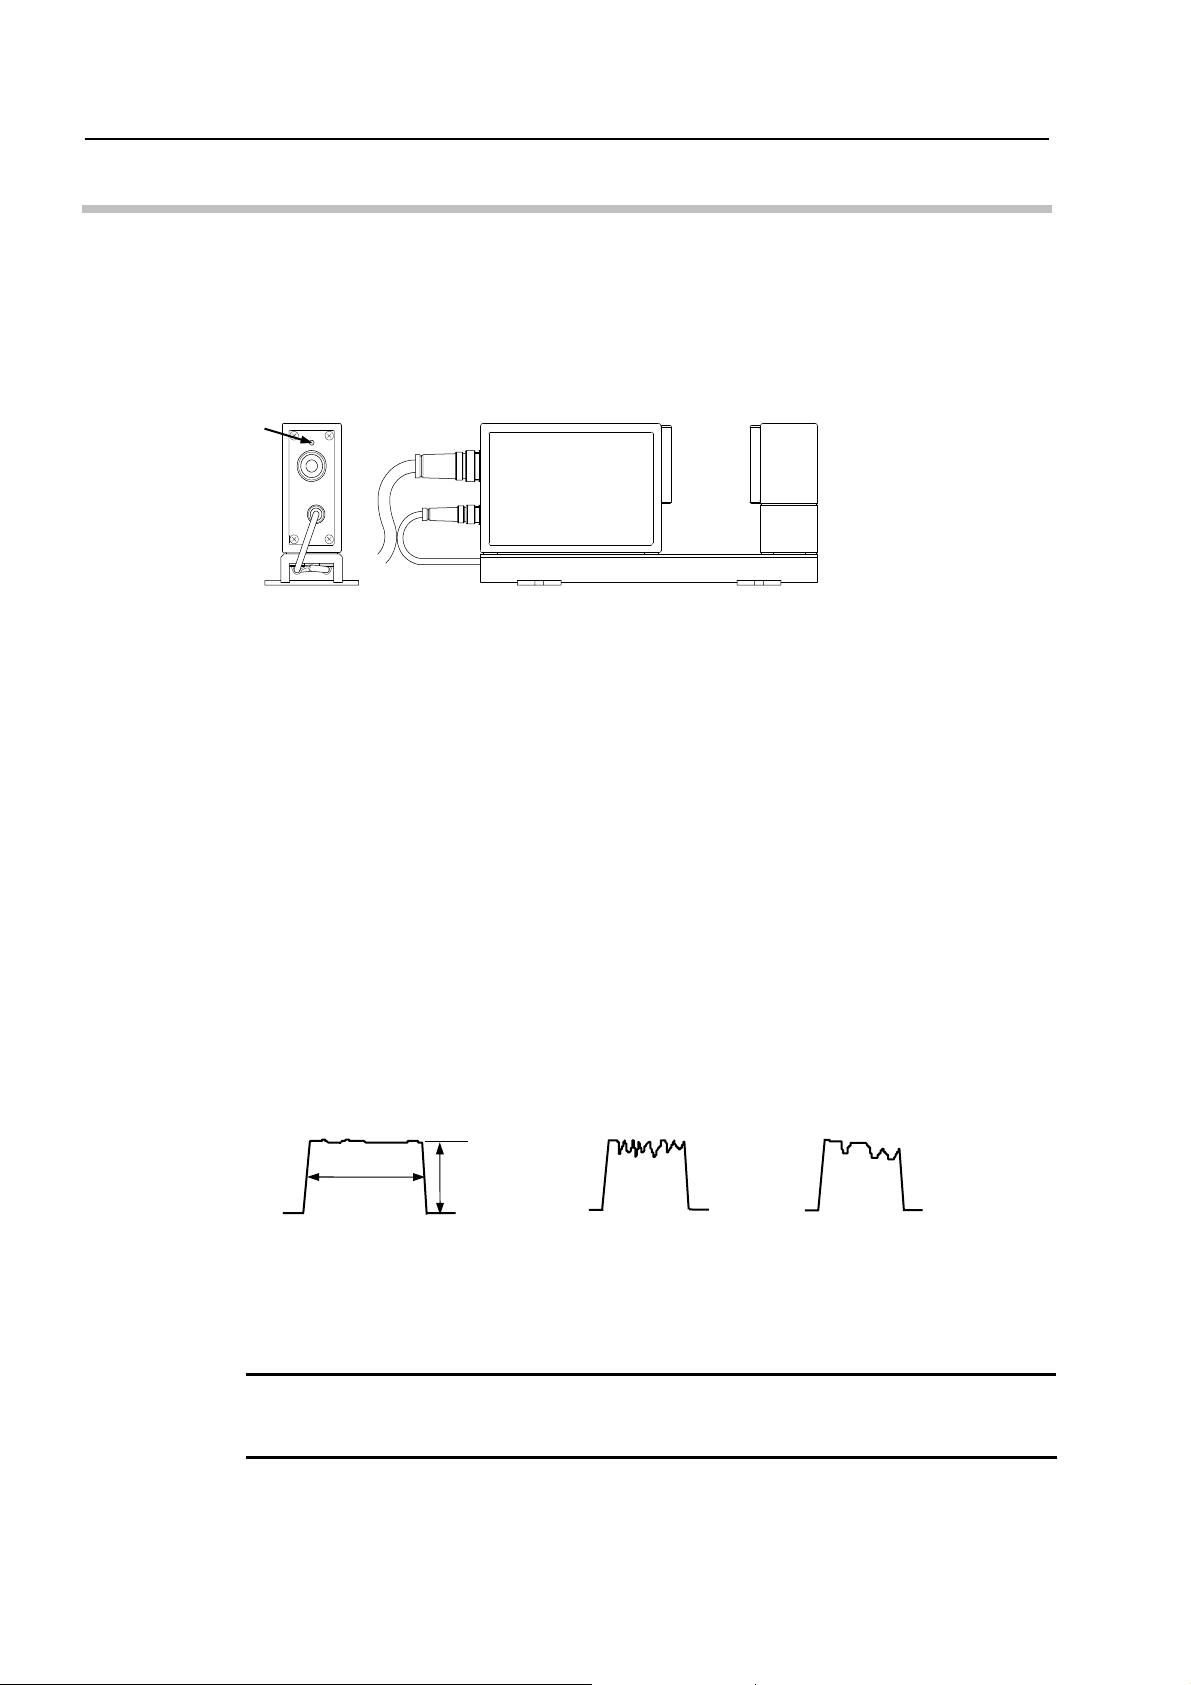
1.3.1 Laser emission display LED
The Laser Emission Display LED that is provided on the rear side lights while the laser
is being emitted to call the operator’s attention for safety. Do not look the laser beam.
Laser emission
display LED
1.3.2 Cleaning optical parts
To clean the optical parts, turn off the power switch and disconnect the signal cable for
safety.
Always keep the protective glass of the emission unit and reception unit clean. Soiled
protective glass will not only result in reduced measurement accuracy, but possibly
produce erroneous measurements due to dust and foreign particles being treated as part
of the workpiece.
For cleaning, use a blower brush or use gauze slightly dampened with ethyl alcohol to
gently wipe clean soiled portions using very light pressure.
z Checking the contamination of the protective glass using an oscilloscope
A monitor connector, “SCAN SIG.-1”, of the reception light signal is provided on the
rear panel of the display unit. Check the reception light signal by connecting the probe of
the oscilloscope with the monitor connector. Oscilloscope setup is as follows:
z Vertical sensitivity: 0.1V/DIV (with a probe of 10:1)
z Horizontal sensitivity: 100 µs/DIV
If the waveform generated by the oscilloscope looks like either of the ones shown in (b)
or (c), clean the protective glass to reduce the disorder of waveform to less than 0.3V.
Approx.
310μS
(a) Normal
Approx.
4V
(b) Soiled glass
(c) Soiled glass
NOTE
1-2
・The protective glass of the windows is a precision optical part. Handle with care so as
not to scratch the glass.
No. 99MBC094A
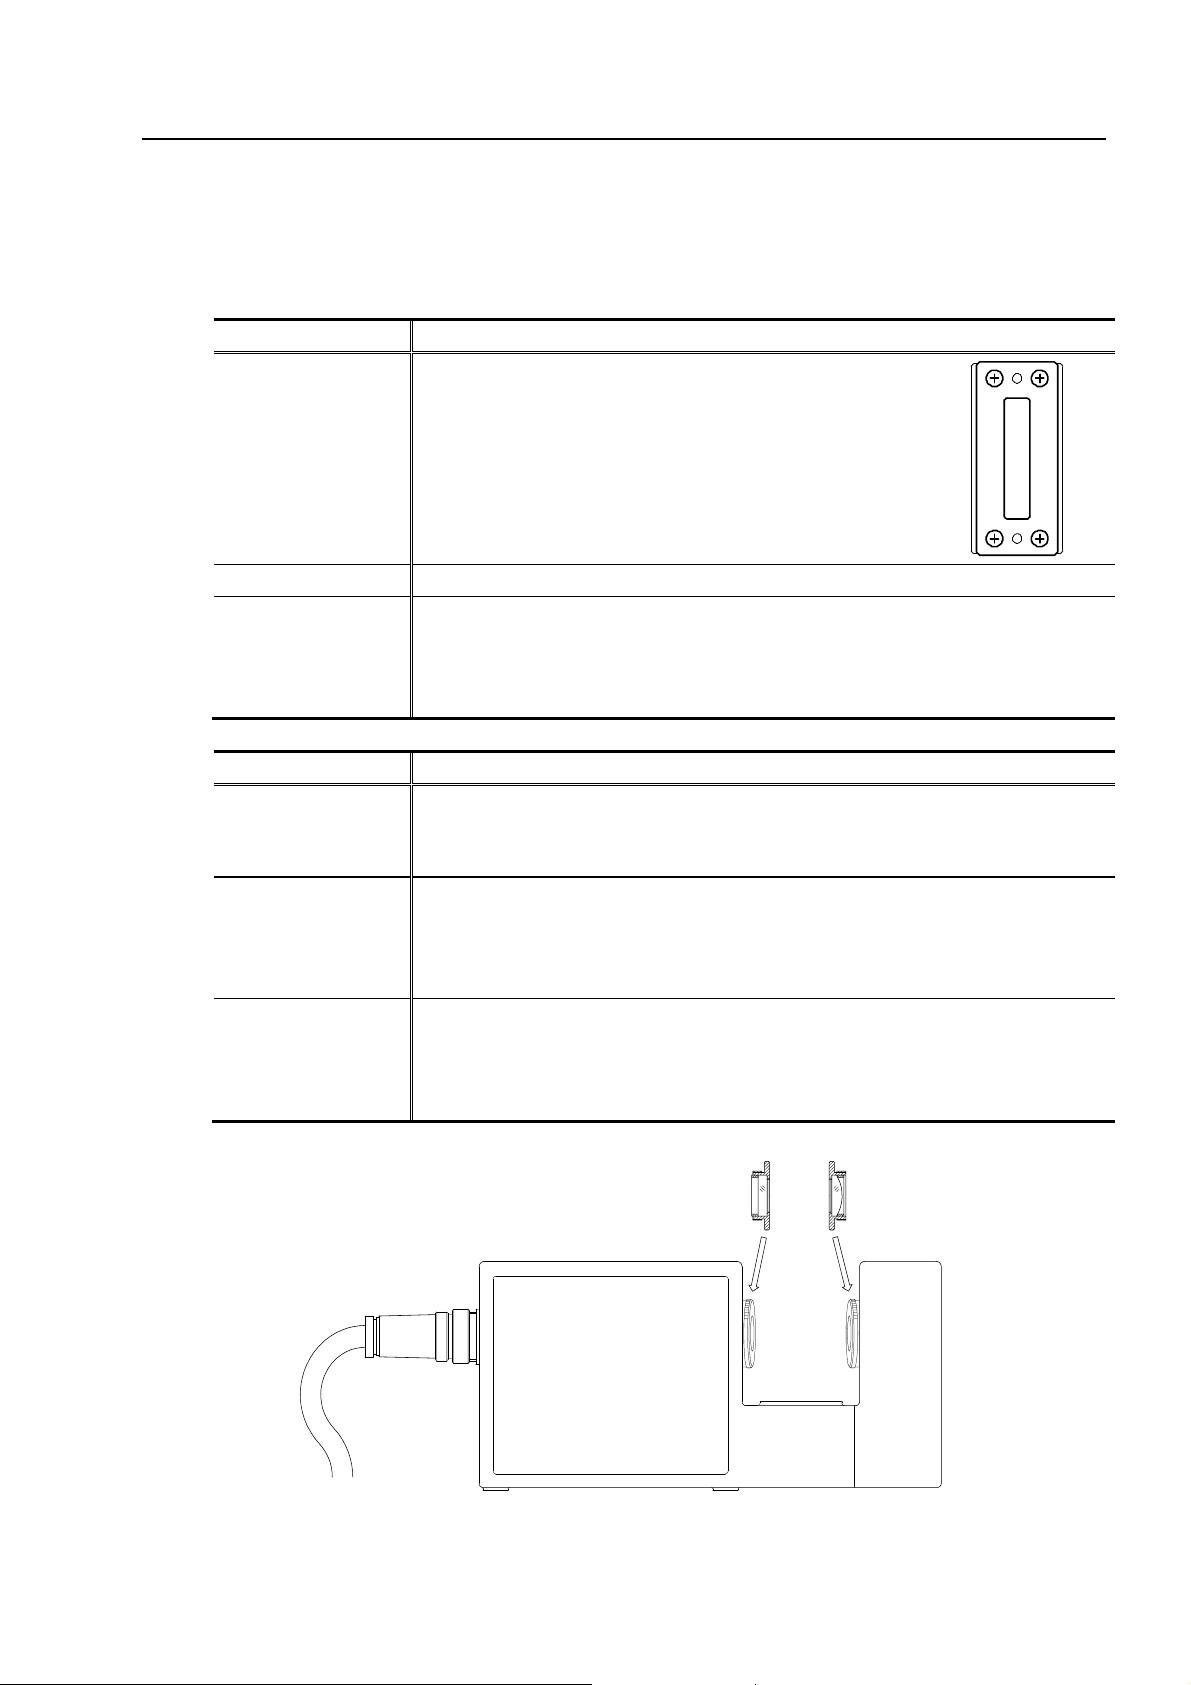
1.3.3 Replacing the protective glass and the condenser lens
Follow the procedures below to remove the protective glass for replacement or cleaning.
To replace the protective glass, first turn off the power switch, then disconnect the signal
cable for safety.
Model LSM-501S/LSM-503S/LSM-506S/LSM-512S/LSM-516S
Removing steps Unscrew the screws that secure the protective glass.
Remove the protective glass and the rubber packing.
Remounting steps Remount the protective glass by reversing the steps above.
NOTE Dust will enter the enclosure if the protective glass is not re-installed. In a
humid environment damp air will enter the enclosure, causing reduced
optical clarity. So, ensure that the work is done in an air-conditioned room
that is free from dust.
Model LSM-500S
Removing steps Remove the protective glass and the condenser lens by rotating them
counterclockwise.
Remove the O-ring.
Remounting steps Attach the O-ring.
Mount the protective glass and the condenser lens in place by rotating them
clockwise, as shown below. If mounted in the wrong order, measurement
cannot be taken.
NOTE Dust will enter the enclosure if the protective glass is not re-installed. In a
humid environment damp air will enter the enclosure, causing reduced
optical clarity. So, ensure that the work is done in an air-conditioned room
that is free from dust.
1. INTRODUCTION
Protective glass
No. 99MCA094A
Condenser lens
1-3

MEMO
1-4
No. 99MBC094A
GAGE
GAGE
2 CALIBRATION
2
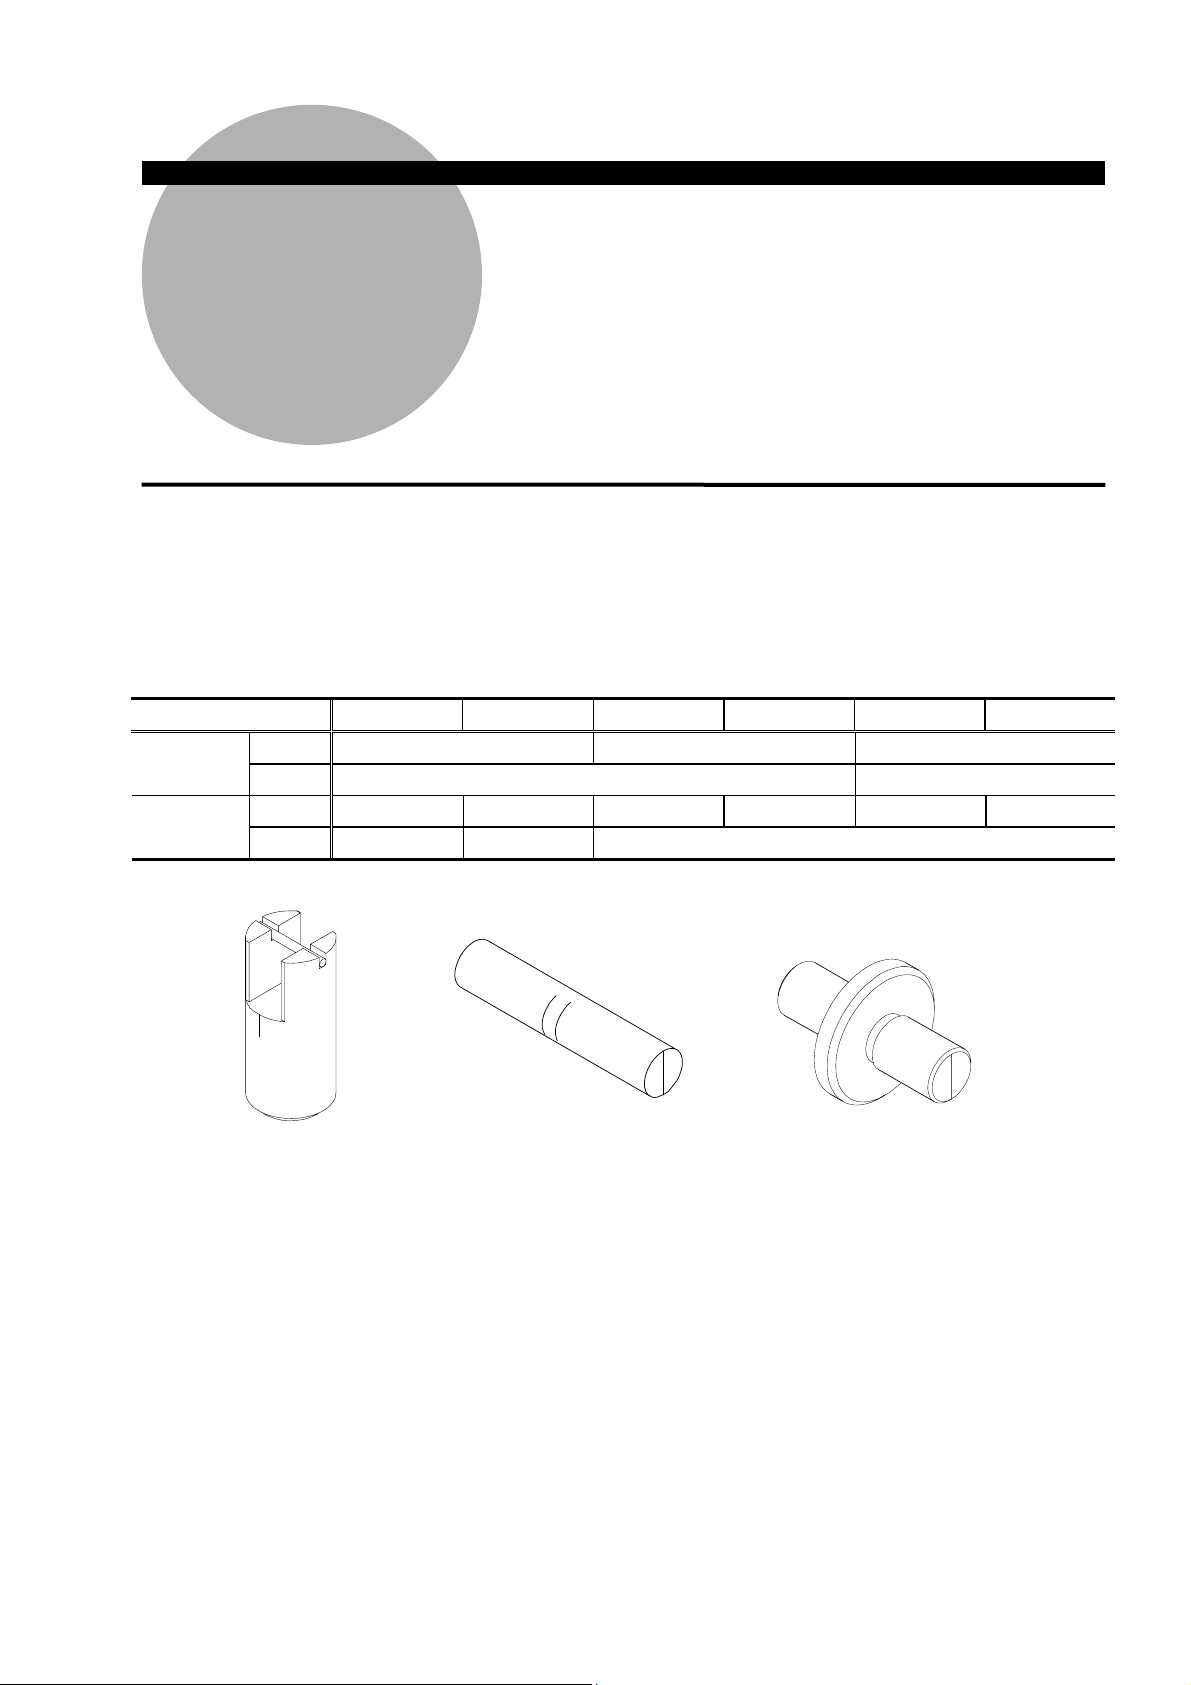
The accuracy of the instrument has been verified by two-point calibration using two
reference gages.
High-precision calibration is possible and simple to perform, as mentioned in the User’s
Manual attached to the display unit. Calibrate the instrument properly. Types and sizes of
the calibration gages are as follows:
Model LSM-500S LSM-501S LSM-503S LSM-506S LSM-512S LSM-516S
Size φ0.1mm φ 1mm φ 20mm LOW CAL
Type With-holder Stepped
Size φ 2mm φ 10mm φ 30mm φ 60mm φ 120mm φ 160mm HIGH CAL
Type With-holder Straight Stepped
With-holder type
No. 99MBC094A
Straight type Stepped type
2-1

2.1 Calibration Gage
2.1.1 With-holder type:
z The center point of the gage, which is indicated by an arrow (Æ), is the calibration point.
z Set up the gage on the stand so that the laser beam is aligned with the vertical line ( | )
marked on the side of the gage holder.
2.1.2 Straight type:
z The center point of the marks ( || ) of the gage, which is indicated by an arrow (Æ), is the
calibration point.
z Set up the gage on the stand so that the mark ( | ) on the end face of the gage comes to
vertical.
2.1.3 Stepped type:
z The center point of the gage, which is indicated by an arrow (Æ), is the calibration point.
z Set up the gage on the stand so that the mark ( | ) on the end face of the gage comes to
vertical.
2-2
Stepped type Straight type With-holder type
No. 99MBC094A

3
3
This chapter gives the specifications of the following models.
Model Measuring range Code No.
LSM-500S
LSM-501S
LSM-503S
LSM-506S
LSM-512S
LSM-516S
SPECIFICATIONS OF
MEASURING UNIT
φ 0.005mm to φ 2mm
φ 0.05mm to φ 10mm
φ 0.3mm to φ 30mm
φ 1mm to φ 60mm
φ 1mm to φ 120mm
φ 1mm to φ 160mm
544-532
544-534
544-536
544-538
544-540
544-542
No. 99MBC094A
3-1

3.1LSM-500S
(1)Specifications
MODEL
Order No.
Applicable display unit
Laser scanning range
Measuring range
Resolution
Repeatability[*2] µm(inch)
Linearity [*2] µm(inch)
Positional error [*2][*5] µm(inch)
Measuring region
Number of scans for averaging scan 16 to 2048[*6]
Laser classification
Number of laser scans /sec 3200
Laser scanning rate m/sec (inch/sec)
Protection level IP64
Temperature 0 °C to 40 °C
Operation environment
Storage environment
[*1]:Measuring range available when set to “No extra-fine wire measurement” or “Edge specification” in the basic setup
mode.
[*2]:Environment for accuracy validation: 20
[*3]:The value of ±2σ with a 2mm-diameter gage has been measured for two minutes with a measurement interval of
0.32 seconds, where σ is the standard deviation.
[*4]:The value of measurements in the center of the measurement region.
[*5]:Error due to the positional shift of the workpiece in the optical axis direction or scanning direction.
[*6]:Averaging scans between 1 and 8 times can be made if “No extra-fine wire measurement” is specified in the basic
setup mode. The measuring range, however, is limited to 0.1 mm to 2 mm in this case.
Temperature -15 °C to 55 °C
(2)Standard accessories
Part No. Item Qt.
―
02AGN770A Signal cable (5m / 16ft) 1
99MBC094A User’s manual 1
[*7]:The ID unit stores data unique to the measuring unit. A replacement ID unit is available at extra cost.
ID unit [*7] 1
(3)Optional accessories
Order No. Item
02AGD110
02AGD200 Guide pulley unit for LSM-500H (also available for LSM-500)
02AGD220 Air-blow unit for LSM-500H (also available for LSM-500)
02AGN780A/B Extension signal cables ( 5m/10m)(16ft/32ft)[*8] [*9]
[*8]:The signal cable can be extended up to 20 m(64ft).
[*9]:The length of the signal cable other than the standard, may affect the accuracy .
Calibration gages set φ 0.1 mm φ 2 mm
LSM-500S
544-532
LSM-6200
mm(inch)
mm(inch)
µm(inch) 0.01 to 10 (.000001” to .0005”) [Selectable]
mm(inch)
Humidity 35 %RH to 85 %RH [without condensation]
Altitude 2000 m or less
Humidity
(Detecting regions is limited to about 10 mm (.4”) approx.)
[Optical axis direction × Scanning direction]
Class 2 (Max. Output:1.3mW with a scanning laser, semiconductor laser:
35 %RH to 85 %RH [without condensation]
Up to 12.5(.49”)
0.005 to 2 (.0002” to .08”)
0.1 to 2 (.004” to .08”)[*1]
±0.03 (±.0000012”) [*3]
±0.3 (±.000012”) [*4]
±0.4 (±.000016”)
1 × 2 (.04” × .08”)
wavelength 650nm)
76(2992”/sec)
°C ± 1°C temperature; 50% ± 10% humidity.
3-2
No. 99MBC094A

(4)External dimensions
3. SPECIFICATIONS OF MEASURING UNIT
【Mass】
z Measuring unit
z Signal cable
No. 99MBC094A
Unit:mm (inch)
: 1.0 kg
: 0.5 kg
3-3

3.2LSM-501S
(1)Specifications
MODEL LSM-501S
Order No. 544-534
Applicable display unit LSM-6200
Laser scanning range mm(inch) Up to 19 (.74”)
Measuring range mm(inch) 0.05 to 10 (.002” to .4”)
Resolution µm(inch) 0.01 to 10 (.000001” to .0005) [Selectable]
Repeatability [*1] µm(inch)
Linearity
[*1]
Positional error [*1][*5] µm(inch)
Measuring region mm(inch)
Number of scans for averaging scan 1 to 2048
Laser classification
Number of laser scans /sec 3200
Laser scanning rate m/sec(inch/sec)
Protection level IP64
Distance between the laser
emission unit and reception unit
Operation environment
Storage environment
[*1]: Environment for accuracy validation: 20°C ± 1°C temperature; 50% ± 10% humidity.
[*2]: A value of ±2σ with a 10mm-diameter gage has been measured for two minutes with a measurement interval of
0.32 seconds, where σ is the standard deviation.
[*3]: The value of measurements in the center of the measurement region.
[*4]: ΔD is the difference in diameter of the workpiece and the master gage.
[*5]: Error due to the positional shift of workpiece in optical axis direction or scanning direction.
[*6]: The distance between the laser emission unit and reception unit other than the standard, may affect the accuracy .
Whole range µm(inch)
Narrow measuring
range
mm(inch)
Temperature
Humidity 35 %RH to 85 %RH [without condensation]
Altitude 2000 m or less
Temperature
Humidity 35 %RH to 85 %RH [without condensation]
µm
inch
±( 0.3 + 0.1 ΔD )
±( .000012” + .000004” ΔD )
2 × 10(.08” × .4”) (Measuring region: 0.05 to 0.1(.002” to .004”))
4 × 10 (.16” × .4”) (Measuring region: 0.1 to 10(.004” to .4”))
[Optical axis direction × Scanning direction]
Class 2 (Max. Output:1.3mW with a scanning laser, semiconductor
(2)Standard accessories
±0.04 (±.0000016”)[*2]
±0.5 (±.00002”)[*3]
[*3][*4]
±0.5 (±.00002”)
laser: wavelength 650nm)
113(4449”/sec)
Standard 68(2.68”)
Max. 100 (3.93”) [*6]
0 °C to 40 °C
-15 °C to 55 °C
Part No. Item Qt.
―
02AGN770A Signal cable (5m / 16ft) 1
99MBC094A User’s manual 1
[*7]: The ID unit stores data unique to the measuring unit. A replacement ID unit is available at extra cost.
ID unit [*7] 1
(3)Optional accessories
Order No. Item
02AGD120
02AGD210 Guide pulley unit for LSM-501H (also available for LSM-501)
02AGD230 Air-blow unit for LSM-501H (also available for LSM-501)
02AGD270 Workstage for LSM-501 / 503 / 902 (also available for LSM-501)
02AGD400 Adjustable Workstage for L SM-501(also available for LSM-501)
02AGN780A/B Extension signal cables ( 5m/10m)(16ft/32ft)[*8][*10]
02AGD150 A Extension connecting cables(1m)(3.2ft)[*9][*10]
[*8] : The signal cable can be extended up to 20 m(64ft).
[*9] : The connecting cable can be extended up to 2 m(6.4ft).
[*10]: The length of the
3-4
Calibration gages set φ 0.1 mm φ 10 mm
signal cable and the connecting cable other than the standard, may affect the accuracy .
No. 99MBC094A

(4)External dimensions
3. SPECIFICATIONS OF MEASURING UNIT
【Mass】
z Emission unit : 0.7 kg
z Reception unit : 0.4 kg
z Base : 0.3 kg
z Signal cable : 0.5 kg
No. 99MBC094A
Unit:mm (inch)
3-5

3.3LSM-503S
(1)Specifications
MODEL LSM-503S
Order No. 544-536
Applicable display unit LSM-6200
Laser scanning range mm(inch)
Measuring range mm(inch)
Resolution µm(inch)
Repeatability [*1] µm(inch)
Linearity
[*1]
Positional error[*1][*5] µm(inch)
Measuring region mm(inch)
Number of scans for averaging scan 1to2048
Laser classification
Number of laser scans /sec 3200
Laser scanning rate m/sec(inch/sec)
Protection level IP64
Distance between the laser
emission unit and reception unit
Operation environment
Storage environment
[*1]: Environment for accuracy validation: 20°C ± 1°C temperature; 50% ± 10% humidity.
[*2]: A value of ±2σ with a 30mm-diameter gage has been measured for two minutes with a measurement interval of
0.32 seconds, where σ is the standard deviation.
[*3]: The value of measurements in the center of the measurement region.
[*4]: ΔD is the difference in diameter of the workpiece and the master gage.
[*5]: Error due to the positional shift of workpiece in optical axis direction or scanning direction.
[*6]: The distance between the laser emission unit and reception unit other than the standard, may affect the accuracy .
Whole range µm(inch)
Narrow
measuring range
Temperature
Temperature
µm
inch
mm(inch)
Humidity 35 %RH to 85 %RH [without condensation]
Altitude 2000 m or less
Humidity 35 %RH to 85 %RH [without condensation]
Class 2 (Max. Output:1.3mW with a scanning laser, semiconductor
0.02 to 100 (.000001” to .005”) [Selectable]
±( 0.6 + 0.1 ΔD )
±( .000024” + .000004” ΔD )
[Optical axis direction × Scanning direction]
(2)Standard accessories
Part No. Item Qt.
―
02AGN770A Signal cable (5m / 16ft) 1
99MBC094A User’s manual 1
[*7]: The ID unit stores data unique to the measuring unit. A replacement ID unit is available at extra cost.
ID unit [*7] 1
(3)Optional accessories
Order No. Item
02AGD130
02AGD240 Air-blow unit for LSM-503 (also available for LSM-503)
02AGD270 Workstage for LSM-501 / 503 / 902 (also available for LSM-503)
02AGD490 Adjustable Workstage for L SM-503 (also available for LSM-503)
02AGN780A/B/D Extension signal cables ( 5m/10m/20m)(16ft/32ft/64ft)[*8][*10][*11]
02AGD150A/B Extension connecting cables(1m/3m)(3.2ft/9.6ft)[*9][*10][*11]
[*8] : The signal cable can be extended up to 30 m(96ft).
[*9] : The connecting cable can be extended up to 5 m(16ft).
[*10]: The total length of the signal cable and the intermediate cable can be extended up to 32 m.
[*11]: The length of the
Calibration gages set φ 1 mm φ 30 mm
signal cable and the connecting cable other than the standard, may affect the accuracy .
Up to 34 (1.3”)
0.3 to 30 (.012” to 1.18”)
±0.11 (±.0000044”)[*2]
±1.0 (±.00004”)[*3]
[*3][*4]
±1.5(±.00006”)
10 × 30 (.4” × 1.18”)
laser: wavelength 650nm)
226 (8898”/sec)
Standard 130(5.12”)
Max. 350 (13”) [*6]
0 °C to 40 °C
-15 °C to 55 °C
3-6
No. 99MBC094A

(4)External dimensions
3. SPECIFICATIONS OF MEASURING UNIT
【Mass】
z Emission unit : 1.1 kg
z Reception unit : 0.6 kg
z Base : 0.5 kg
z Signal cable : 0.5 kg
No. 99MBC094A
Unit:mm (inch)
3-7

3.4LSM-506S
(1)Specifications
MODEL LSM-506S
Order No. 544-538
Applicable display unit LSM-6200
Laser scanning range mm(inch)
Measuring range mm(inch)
Resolution µm(inch)
Repeatability [*1] µm(inch)
Linearity
[*1]
Positional error [*1][*5] µm(inch) ±4.0 (±.00016)
Measuring region mm(inch)
Number of scans for averaging scan 1to2048
Laser classification
Number of laser scans /sec 3200
Laser scanning rate m/sec(inch/sec)
Protection level IP64
Distance between the laser
emission unit and reception unit
Operation environment
Storage environment
[*1]: Environment for accuracy validation: 20°C ± 1°C temperature; 50% ± 10% humidity.
[*2]: A value of ±2σ with a 60mm-diameter gage has been measured for two minutes with a measurement interval of
0.32 seconds, where σ is the standard deviation.
[*3]: The value of measurements in the center of the measurement region.
[*4]: ΔD is the difference in diameter of the workpiece and the master gage.
[*5]: Error due to the positional shift of workpiece in optical axis direction or scanning direction.
[*6]: The distance between the laser emission unit and reception unit other than the standard, may affect the accuracy .
Whole range µm(inch) ±3.0 (±.00012)[*3]
Narrow measuring
range
Temperature
Temperature
µm
inch
Class 2 (Max. Output:1.3mW with a scanning laser, semiconductor
mm(inch)
Humidity 35 %RH to 85 %RH [without condensation]
Altitude 2000 m or less
Humidity 35 %RH to 85 %RH [without condensation]
0.05 to 100 (.000002” to .005”) [Selectable]
±( 1.5 + 0.5 ΔD )
±( .00006” + .00002” ΔD )
[Optical axis direction × Scanning direction]
(2)Standard accessories
Part No. Item Qt.
―
02AGN770A Signal cable (5m / 16ft) 1
99MBC094A User’s manual 1
[*7]: The ID unit stores data unique to the measuring unit. A replacement ID unit is available at extra cost.
ID unit [*7] 1
(3)Optional accessories
Order No. Item
02AGD140
02AGD250 Air-blow unit for LSM-506 (also available for LSM-506)
02AGD520 Adjustable Workstage for L SM-506 (also available for LSM-506)
02AGN780A/B/D Extension signal cables ( 5m/10m/20m)(16ft/32ft/64ft)[*8][*10][*11]
02AGD150A/B Extension connecting cables(1m/3m)(3.2ft/9.6ft)[*9][*10][*11]
[*8] : The signal cable can be extended up to 30 m(96ft).
[*9] : The connecting cable can be extended up to 5 m(16ft).
[*10]: The total length of the signal cable and the intermediate cable can be extended up to 32 m.
[*11]: The length of the
Calibration gages set φ 1 mm φ 60 mm
signal cable and the connecting cable other than the standard, may affect the accuracy .
Up to 66 (2.6”)
1 to 60 (.04” to 2.36”)
±0.36 (±.000014”)[*2]
[*3][*4]
20 × 60(.8” × 2.36”)
laser: wavelength 650nm)
452(17795”/sec)
Standard 273(10.75”)
Max. 700 (27”) [*6]
0 °C to 40 °C
-15 °C to 55 °C
3-8
No. 99MBC094A

(4)External dimensions
3. SPECIFICATIONS OF MEASURING UNIT
【Mass】
z Emission unit : 1.4 kg
z Reception unit : 0.8 kg
z Base : 0.8 kg
z Signal cable : 0.5 kg
No. 99MBC094A
Unit:mm (inch)
3-9

3.5LSM-512S
(1)Specifications
MODEL LSM-512S
Order No. 544-540
Applicable display unit LSM-6200
Laser scanning range mm(inch)
Measuring range mm(inch)
Resolution µm(inch)
Repeatability [*1] µm(inch) ±0.85 (±.000033)[*2]
Linearity
[*1]
Positional error [*1][*5] µm(inch) ±8.0 (±.0003)
Measuring region mm(inch)
Number of scans for averaging scan 1 to 2048
Laser classification
Number of laser scans /sec 3200
Laser scanning rate m/sec(inch/sec)
Protection level IP64
Distance between the laser
emission unit and reception unit
Operation environment
Storage environment
[*1]: Environment for accuracy validation: 20°C ± 1°C temperature; 50% ± 10% humidity.
[*2]: A value of ±2σ with a 120mm-diameter gage has been measured for two minutes with a measurement interval of
0.32 seconds, where σ is the standard deviation.
[*3]: The value of measurements in the center of the measurement region.
[*4]: ΔD is the difference in diameter of the workpiece and the master gage.
[*5]: Error due to the positional shift of workpiece in optical axis direction or scanning direction.
[*6]: The distance between the laser emission unit and reception unit other than the standard, may affect the accuracy .
Whole range µm(inch) ±6.0 (±.00024)[*3]
Narrow measuring
range
Temperature
Temperature
µm
inch
Class 2 (Max. Output:1.3mW with a scanning laser, semiconductor
mm(inch)
Humidity 35 %RH to 85 %RH [without condensation]
Altitude 2000 m or less
Humidity 35 %RH to 85 %RH [without condensation]
0.1 to 100 (.000005” to .005”) [Selectable]
±( 4.0 + 0.5 ΔD )
±( .00016” + .00002” ΔD )
[Optical axis direction × Scanning direction]
(2)Standard accessories
Part No. Item Qt.
―
02AGN770A Signal cable (5m / 16ft) 1
99MBC094A User’s manual 1
[*7]: The ID unit stores data unique to the measuring unit. A replacement ID unit is available at extra cost.
ID uni[*7] 1
(3)Optional accessories
Order No. Item
02AGD150
02AGD260 Air-blow unit for LSM-512 (also available for LSM-512)
02AGN780A/B/D Extension signal cables ( 5m/10m/20m)(16ft/32ft/64ft)[*8][*10][*11]
02AGD150A/B Extension connecting cables(1m/3m)(3.2ft/9.6ft)[*9][*10][*11]
[*8] : The signal cable can be extended up to 30 m(96ft).
[*9] : The connecting cable can be extended up to 5 m(16ft).
[*10]: The total length of the signal cable and the intermediate cable can be extended up to 32 m.
[*11]: The length of the
Calibration gages set φ 1 mm φ 120 mm
signal cable and the connecting cable other than the standard, may affect the accuracy .
Up to 126 (5.0”)
1 to 120 (.04” to 4.72”)
[*3][*4]
30 × 120 (1.2” × 4.72”)
laser: wavelength 650nm)
904 (35590”/sec)
Standard 321(12.64”)
Max. 700 (27”) [*6]
0 °C to 40 °C
-15 °C to 55 °C
3-10
No. 99MBC094A

(4)External dimensions
3. SPECIFICATIONS OF MEASURING UNIT
【Mass】
z Emission unit : 3.0 kg
z Reception unit : 1.2 kg
z Base : 1.8 kg
z Signal cable : 0.5 kg
No. 99MBC094A
Unit:mm (inch)
3-11

3.6LSM-516S
(1)Specifications
MODEL LSM-516S
Order No. 544-542
Applicable display unit LSM-6200
Laser scanning range mm(inch)
Measuring range mm(inch)
Resolution µm(inch)
Repeatability [*1] µm(inch) ±1.4 (±.000055)[*2]
Linearity
[*1]
Positional error [*1][*5] µm(inch) ±8.0 (±.0003)
Measuring region mm(inch)
Number of scans for averaging scan 1 to 2048
Laser classification
Number of laser scans /sec 3200
Laser scanning rate m/sec(inch/sec)
Protection level IP64
Distance between the laser
emission unit and reception unit
Operation environment
Storage environment
[*1]: Environment for accuracy validation: 20°C ± 1°C temperature; 50% ± 10% humidity.
[*2]: A value of ±2σ with a 160mm-diameter gage has been measured for two minutes with a measurement interval of
0.32 seconds, where σ is the standard deviation.
[*3]: The value of measurements in the center of the measurement region.
[*4]: ΔD is the difference in diameter of the workpiece and the master gage.
[*5]: Error due to the positional shift of workpiece in optical axis direction or scanning direction.
[*6]: The distance between the laser emission unit and reception unit other than the standard, may affect the accuracy .
Whole range µm(inch) ±7.0 (±.00028)[*3]
Narrow measuring
range
Temperature
Temperature
µm
inch
Class 2 (Max. Output:1.3mW with a scanning laser, semiconductor
mm(inch)
Humidity 35 %RH to 85 %RH [without condensation]
Altitude 2000 m or less
Humidity 35 %RH to 85 %RH [without condensation]
0.1 to 100 (.000005” to .005”) [Selectable]
±( 4.0 +2.0 ΔD )
±( .00016” + .000079” ΔD )
[Optical axis direction × Scanning direction]
(2)Standard accessories
Part No. Item Qt.
―
02AGN770A Signal cable (5m / 16ft) 1
99MBC094A User’s manual 1
[*7]: The ID unit stores data unique to the measuring unit. A replacement ID unit is available at extra cost.
ID uni[*7] 1
(3)Optional accessories
Order No. Item
02AGM300 Calibration gages set for LSM-516H
02AGN780A/B/D Extension signal cables ( 5m/10m/20m)(16ft/32ft/64ft)[*8][*10][*11]
02AGC150A/B Extension connecting cables(1m/3m)(3.2ft/9.6ft)[*9][*10][*11]
[*8] : The signal cable can be extended up to 30 m(96ft).
[*9] : The connecting cable can be extended up to 5 m(16ft).
[*10]: The total length of the signal cable and the intermediate cable can be extended up to 32 m(102ft).
[*11]: The length of the
signal cable and the connecting cable other than the standard, may affect the accuracy .
Up to 170 (6.7”)
1 to 160 (.04” to 6.3”)
[*3][*4]
40 × 160 (1.57” × 6.3”)
laser: wavelength 650nm)
1206 (47480”/sec)
Standard 400(15.74”)
Max. 800 (32.72”) [*6]
0 °C to 40 °C
-15 °C to 55 °C
3-12
No. 99MBC094A

(4)External dimensions
3. SPECIFICATIONS OF MEASURING UNIT
【Mass】
z Emission unit : 7.6 kg
z Reception unit : 3.7 kg
z Base : 2.8 kg
z Signal cable : 0.5 kg
No. 99MBC094A
Unit:mm (inch)
3-13

MEMO
3-14
No. 99MBC094A

4 DESIGNING THE FIXTURES
4
4.1 Outline
In application, the emission unit and the reception unit may have to be detached from the
support base of the measuring unit and attached to a dedicated fixture. If this is the case,
the measuring accuracy cannot be ensured unless the emission unit and the reception unit
are properly aligned on the dedicated fixture. Design a proper fixture according to this
section.
4.2 Consideration to Calibration
This chapter describes precautions to be observed when attaching
the emission unit and the reception unit, which have been detached
from the support base of the measuring unit, to a specially arranged
dedicated fixture.
To ensure accurate measurements, design the fixture so that the workpiece to be
measured can be positioned at the point of measurement that is the focal point of the
emission unit. Also, make allowances for calibration and for a calibration gage to be
mounted on the fixture.
4.2.1 Measuring position and resulting accuracy
As shown in the figure below, the scanning beam of the measuring unit is produced by
reducing the thick beam to a beam of the minimum diameter at the measuring position that
is the focal point.
However, since the inclination of the reception signal is defined as “beam
diameter/scanning speed”, the inclination will be the steepest at measuring point (b) and will
be less steep at points (a) and (c), off from the measuring point.
The less steep the inclination of the reception signal, the more susceptible the signal is to
noise and light disturbance, resulting in degraded repeatability. Thus, due attention should
be paid to ensure that the workpiece is located at the measuring position.
Emission unit side
Inclination of the reception
Measuring region
Measuring position that is focal point.
Reception unit side
No. 99MBC094A
(a) (b) (c)
4-1

4.2.2 On measuring gap
For measuring segment 1, as in the case of measuring
the runout, be sure to arrange a reference pin or
knife-edge at the focal point, as shown on the right. The
inclination of the reception signal becomes large, resulting
in degraded repeatability, unless the reference pin is
provided.
Reference pin or knife-edge
Segment 1
Workpiece
4-2
No. 99MBC094A

4.3 Optical Axis Alignment
The optical axis of each measuring unit should be aligned to within the limits shown
below.
4.3.1 Optical axis alignment in horizontal plane
a. Parallel deviation in reference lines C and D
by X in width direction.
Reference line C
Reference line D
b. Angular deviation in reference lines C and D
4. DESIGNING THE FIXTURES
by θx in angle.
Reference line C
Reference line D
X
4.3.2 Optical axis alignment in vertical plane
c. Parallel deviation in reference planes A and
B by Y in height.
Reference line C Reference line D
Y
d. Angular deviation in reference planes A and
B by θy in angle.
Reference line C
4.3.3 Permissible error for optical axis alignment
Model
LSM-501S
LSM-503S
Distance between Emission unit and
Reception unit
68mm or less 0.5 mm within 0.4° (7mrad) within
100mm or less 0.5 mm within 0.3° (5.2mrad) within
130mm or less
350mm or less
For both X and Y For both θx and θy
1 mm within
1 mm within
θx
Reference line D
θy
0.4° ( 7mrad) within
0.16°(2.8mrad) within
LSM-506S
273mm or less
700mm or less
321mm or less
LSM-512S
700mm or less
LSM-516S 800mm or less
No. 99MCA094A
1 mm within
1 mm within
1 mm within
1 mm within
1 mm within
0.2° (3.5mrad) within
0.08°(1.4mrad) within
0.18°( 3.6mrad) within
0.08°(1.4mrad) within
0.05°(0.9mrad) within
4-3

4.4 Confirming the Optical Axis
The optical axis of a measuring unit can be confirmed by the following methods.
4.4.1 Confirming with the laser beam
As shown on the right, the red laser beam is visible on a
piece of white paper placed on the reception window.
Adjust it so that the incidence of the laser beam is in the
center of the reception window.
The incidence should be in the center horizontally and at
the position where “a” is equal to “b” vertically. Make
adjustments to reduce such deviations, as shown in the
figures below, where (a) is the vertical deviation, (b) is the
horizontal deviation,(c) is the inclination of the laser beam.
(a): Vertical orientation (b): Horizontal orientation (c): Laser beam inclination
Reception window
a
Red laser
beam
b
Vertical adjustment
: a = b
NOTE
The laser scanning range is defined by the distance between the emission unit and the
reception unit mounted on the standard support base. If the distance between the
emission unit and the reception unit is greater than standard, a slight machining error will
be amplified to the extent it disables the proper reception of the scanning beam. This
should be considered when designing a dedicated fixture.
4-4
No. 99MBC094A

4. DESIGNING THE FIXTURES
4.4.2 Confirming the optical axis with an oscilloscope
To monitor with an oscilloscope, use the two monitor connectors provided on the rear
panel of the display unit, “SCAN SIG.-1” and “SCAN SIG.-2”, for measuring unit 1 and
measuring unit 2, respectively.
Oscilloscope setting:
Vertical sensitivity : 0.1V/DIV for a probe of 1/10
Horizontal sensitivity : 50μs/DIV
Among the waveforms shown below, (a) represents the waveform of normal light
reception.
mounting position between the emission unit and the reception unit to ensure that the light
comes to the center of the light reception element.
If the protective glass is soiled, a waveform such as that shown in (b) or (c) will result. If
this is the case, clean the protective glass according to 1.3.2 Cleaning optical parts to
reduce the disorder of the waveform to less than 0.3V.
Approx.
310μS
(a) Normal
If the light incidence is not normal to the light reception element, adjust the
Approx.
4V
(b) Glass contaminated
(c) Glass contaminated
No. 99MCA094A
4-5

4.5 Measurement with Two Measuring Units
To perform dual measurement with a combination of two measuring units, each
measuring unit must have been optically aligned.
Refer to “4.3 Optical Axis Alignment” for more information.
Also note that the appropriate considerations must be taken into account according
to the type of dual measurement, DXY type or DF type.
4.5.1 DXY type
If a workpiece with a high-reflection coefficient is
measured with two measuring units being
completely crossed (in a DXY-type setup), the
scanning beam from one measuring unit will be
reflected into the reception window of the other
measuring unit, reducing the measuring accuracy.
An arrangement is required in such a case so that
the light from one measuring unit will not be
reflected from the workpiece into the reception
window of the counterpart measuring unit.
Light from the Y-axis
reflected to the X-axis.
isX-ax
Y-axis
(1) Arrangement to provide a step
As shown on the right, arrange a step of L
between the X axis and the Y axis.
The step L should not be smaller than 10 mm.
(2) Arrangement to provide an angle
As shown on the right, arrange an angle θ
between the X axis and the Y axis.
The angle θ should not be smaller than 15 degrees
or 0.25 radians.
is
X-ax
Y-axis
L
Y-axi
X-axis
θ
4-6
No. 99MBC094A

4. DESIGNING THE FIXTURES
(3) Confirming the presence of reflecting light
With the segment set to 1, close the shutter of the emission unit on the X axis,
then check that the reflection light from the Y axis will not be directed into the
reception window of the X axis. Allow 5 to 10 minutes for this check of the
reflecting light as scanning beams from the X axis and the Y axis are
asynchronous.
Under the normal state, the Err-0 message will be displayed.
Perform the same check with the Y axis.
With the oscilloscope connected to the monitor connector on the rear panel of the
display unit, it is also possible to check for the presence of the reception signal
due to the reflection light. For a model with a visible laser beam, the reflection light
can be checked by placing a piece of paper on the reception window.
No. 99MCA094A
4-7

4.5.2 DF type
measuring the gap between two measuring units 1 and 2 and referring to the
predetermined offset value of the reference gage.
(1) Improvement of the measurement accuracy
・ To ensure better measuring accuracy of gap measurement, use reference pins or
・ The reference pin will help reduce the effect of possible fluctuation of the emission
In a DF-type setup shown below, a workpiece of a larger diameter can be measured by
knife-edges as located at the focal point.
(a) Example of setup for stack of two
units Segment (1 + 5)
unit being subject to a force.
In a setup without reference pins, the fluctuation of the emission unit due to some
external force will produce a significant difference between the measurements B
and B’ as shown in (c) and (d) below.
Reference pins
Measuring
unit 2
Measuring
unit 1
Measuring
unit 2
Measuring
unit 1
(b) Example of setup for facing of two
units Segment (1 + 5)
(a) Initial state incorporated with
reference pins
(c) Initial state without
reference pins
B
A’
(b) Effect of fluctuation of the
emission unit in a setup
incorporating reference
B’
(d) Effect of fluctuation of the
emission unit in a setup
without reference pins.
Difference of A and A’ : Small
Difference of B and B’ : Large
4-8
No. 99MBC094A

4. DESIGNING THE FIXTURES
・ Size of reference pins
The diameter of the reference pin should be such
that it can block the laser beam by more than 2
mm and the beam will not cross the pin. A pin of
about 10 mm diameter would meet such a
requirement.
The setup must also be fairly robust so that the
gap between the reference pins will not change
while in service.
(2) Parallelism adjustment
Set up two measuring units integrating the emission unit and the reception unit so
that the parallelism of the two measuring units can be adjusted.
First align the optical axis of each measuring unit, then adjust the parallelism
between the two measuring units.
If the parallelism adjustment is inadequate, errors will generate when the
workpiece is shifted in the optical axis direction.
The degree of accuracy to which the adjustment should be made depends on user
requirements. For reference, three example accuracy ranges are given below:
a. Should be ±20 to ±50 μm with the gage shifted within ±50 mm from the
measuring point.
b. Should be ±5 to ±10 μm with the gage shifted within ±10 mm from the
measuring point.
c. Should be ±5 to ±10 μm with the gage shifted within ±5 mm from the
measuring point.
Generally, the larger the amount of shift of the gage, the easier will be the
adjustment.
The most appropriate size of the gage would be the median value of the
measuring range.
Emission unit
Emission unit
Measuring position
Gage shift
direction
Gage shift
direction
Reception unit
Reception unit
L
φD
No. 99MCA094A
4-9

(3) Precautions for transparent object measurement
Set the measuring units
with the support bases
facing one another.
To measure a larger diameter transparent glass rod, the external diameter of a
plastic object, or the width of a transparent sheet, arrange the measuring units with
the support bases fitted so the scanning laser beams are opposing one another, and
set the segment to (1 + 5). If the laser scanning direction of each unit is reversed to
the direction shown below, measurement will be disabled.
If two measuring units are set up with the support bases
facing one another, a step L will be produced between the
two units through inconformity of the optical axis of the two
units, as shown at the right. The step values according to
model are listed below.
Emission unit
Measuring
unit 2
Measuring
unit 1
Model Step L
LSM-501S 10mm
LSM-503S 10mm
LSM-506S 10mm
LSM-512S 22mm
LSM-516S 33mm
Scanning
direction
Scanning
direction
5
1
Reception unit
Side view
Measuring unit
2 side
Optical axis
Measuring unit
1 side
L
4-10
No. 99MBC094A

4.6 Radius of Cable Bend
)
The signal cables and the connecting cable will break if bent to an excessively small
radius. Allow sufficient space for bending cables according to the figures below.
Cable space
: more than 70 (2.8”)
Signal cable
R20 (.79”)
4. DESIGNING THE FIXTURES
Cable space
: more than 80 (3.2”
or more
Signal cable
R10 (.4”)
or more
Measuring unit Display unit
Connecting cable
R20 (.79”) or more
Unit: mm(inch)
NOTE
Supplied cables are not robot cables, which have superior flexibility in bending. Special
cables with a high flexibility will be available at extra cost. Contact a Mitutoyo sales office.
No. 99MCA094A
4-11

MEMO
4-12
No. 99MBC094A

5
5.1 Caution
The LSM-500S series uses a low powered, visible laser beam which has been designed
CAUTION
for safe operation. However, observe the following points when setting up and operating.
1) This measuring unit conforms to IEC 60825-1, the safety code for lasers. This code
2) This unit is a “Class 2 laser product”, as defined by IEC code.(Maximum output
3) IEC (International Electrotechnical Commission) defines IEC 60825-1 as an
4) Safety precaution labels are described on page 5-2.
5) Do not remove the safety precaution labels on the unit.
6) Do not look directly into the laser beam.
(Never look into the emission window, even when the laser seems to be inactive.)
7) Do not observe the laser beam directly through an optical instrument, such as a
8) When measuring flat objects with a mirror finish, do not look at the reflection on the
9) If measuring a workpiece with reflective parts, avoid fixing your eyes on the
10) Close the beam shutter when the measuring unit is not in use.
11) The laser beam doesn’t harm human skin when irradiating.
12) “CAUTION - Use of controls or adjustments or performance of procedures other
Never open the cover on this measuring unit.
5
SAFETY PRECAUTIONS
FOR LASER BEAM
was established in January, 2001.
power: 1.3 mW, semiconductor laser with a wavelength of 650 nm)
international standard. This unit satisfies EN-60825-1 (Europe), FDA / CDRH /
Laser Notice No.50 (America), and JIS C 6802 (Japan) corresponding to this
standard.
magnifying lens.
surface.
measured surface.
than those specified herein may result in hazardous radiation exposure.”
No. 99MBC094A
5-1

5.2 Safety Precaution Labels Located on LSM-500S Series
Laser Emission LED
Shutter
5-2
No. 99MBC094A

SERVICE NETWORK
Mitutoyo America Corporation
Illinois Repair Service
958 Corporate Blvd., Aurora, IL. 60504, U.S.A.
TEL: (630) 820-3334 FAX: (630) 820-2530
Michigan Repair Service
45001 Five Mile Rd., Plymouth, MI 48170, U.S.A.
TEL: (734) 459-2810 FAX: (734) 459-0455
Los Angeles Repair Service
16925 East Gale Ave., City of Industry, CA 91745, U.S.A.
TEL: (626) 961-9661 FAX: (626) 333-8019
for Advanced Technical Support Service
3
M
Solution Center Indiana:
TEL: (317) 577-6070 FAX: (317) 577-6080
3
M
Solution Center Massachusetts:
TEL: (978) 692-7474 FAX: (978) 692-9729
3
M
Solution Center North Carolina:
TEL: (704) 875-8332 FAX: (704) 875-9273
Mitutoyo Canada Inc.
2121 Meadowvale Blvd., Mississauga, Ont. L5N 5N1, CANADA
TEL: (905) 821-1261 to 3 FAX: (905) 821-4968
Mitutoyo Sul Americana Ltda.
AV. João Carlos da Silva Borges, 1240, CEP 04726-002 Santo
Amaro P.O. Box 4255 São Paulo, BRASIL
TEL: (011) 5643-0000 FAX: (011) 5641-3722
Argentina Branch
Av. Mitre 891/899 -C.P.(B1603CQI) Vicente Lopez-Pcia.
Buenos Aires, ARGENTINA
TEL: (011) 4730-1433 FAX: (011) 4730-1411
Mitutoyo Mexicana S.A. de C.V.
Prol. Ind. Electrica #15 Col. Parq. Ind. Naucalpan C.P.53370,
Naucalpan, Edo. de Mexico, MEXICO
TEL: 52-55-5312-5612 FAX: 52-55-5312-3380
Mitutoyo Meßgeräte GmbH
Borsigstr. 8-10, 41469 Neuss F.R. GERMANY
TEL: (02137) 102-0 FAX: (02137) 8685
Mitutoyo Polska Sp.z o.o.
ul. Minska, nr54-56, Wroclaw, POLAND
TEL: (48) 71-3548350 FAX: (48) 71-3548355
Mitutoyo Cesko s.r.o
Dubska 1626, 415 01 Teplice, CZECH REPUBLIC
TEL: (420) 417 579 866 FAX: (420) 417 579 867
Mitutoyo Hungaochria Muszaki Szolgaltato KFT.
Ugyeszu. 3 1122 Budapest, Hungary
TEL: (00361) 2141447 FAX: (00361) 2141448
Mitutoyo Nederland B.V.
Postbus 550, Landjuweel 35, 3905 PE Veenendaal,
NETHERLANDS
TEL: 0318-534911 FAX: 0318-516568
Mitutoyo Scandinavia A.B.
Box 712, Släntvägen 6, 194 27 Upplands-Väsby, SWEDEN
TEL:(07) 6092135 FAX: (07) 6092410
Mitutoyo Belgium N.V.
Hogenakkerhoekstraat 8, 9150 Kruibeke, BELGIUM
TEL: 03-254 04 04 FAX: 03-254 04 05
Mitutoyo France S.A.R.L.
123, rue de la Belle Etoile, B.P. 50267-Z.I. Paris Nord II 95957
Roissy CDG Cedex, FRANCE
TEL: (01) 49 38 35 00 FAX: (01) 49 38 35 35
Mitutoyo France S.A.R.L., Agence de Lyon
TEL: (04) 78 26 98 07 FAX: (04) 72 37 16 23
Mitutoyo France S.A.R.L., Agence de Strasbourg
TEL: (03) 88 67 85 77 FAX: (03) 88 67 85 79
Mitutoyo Italiana S.R.L.
Corso Europa No.7, 20020 Lainate, Milano, ITALY
TEL: (02) 935781 FAX: (02) 9373290
Mitutoyo Schweiz AG
Steinackerstrasse 35, 8902 Urdorf-Zürich, SWITZERLAND
TEL: (01) 7361150 FAX: (01) 7361151
Mitutoyo (U.K.) Ltd.
Joule Road, West Point Business Park, Andover,
Hampshire SP10 3UX UNITED KINGDOM
TEL: (01264) 353123 FAX: (01264) 354883
Mitutoyo Asia Pacific Pte. Ltd.
Regional Headquarters
24 Kallang Avenue, Mitutoyo Building, SINGAPORE 339415
TEL: 6294-2211 FAX: 6299-6666
Mitutoyo (Malaysia) Sdn. Bhd.
Mah Sing Integrated Industrial Park 4, Jalan Utarid U5/14, Section
U5, 40150 Shah Alam, Selangor Darul Ehsan, MALAYSIA
TEL: (60) 3-78459318 FAX: (60) 3-78459346
Mitutoyo Thailand Co.,Ltd.
No.668/3, Moo7 Chaengwattana Rd. Anusaowaree, Bangkaen,
Bangkok 10220, THAILAND
TEL: (02) 521-6130 to 5 FAX: (02) 521-6136
Representative Office
Indonesia:
TEL: (62) 21-837-93765 FAX: (62) 21-837-93768
Vietnam (Ho Chi Minh City):
TEL: (08) 910-0485 to 6 FAX: (08) 910-0487
Vietnam (Hanoi):
TEL: (04) 934-7098 FAX: (04) 934-7072
Philippines:
TEL: (02) 842-9305 FAX: (02) 842-9307
Mitutoyo South Asia Pvt. Ltd.
C-122, Okhla Industrial Area, Phase-Ι,
New Delhi-110 020, INDIA
TEL: 91-11-26372090 FAX: 91-11-26372636
Mitutoyo Taiwan Co.,Ltd.
4F., No.71, Zhouzi St, Neihu District,
Taipei City114, TAIWAN, R.O.C.
TEL: (02) 8752-3266 FAX: (02) 8752-3267
Mitutoyo Korea Corporation
KOCOM Building 2F, #260-7, Yeom Chang-Dong, Kang
Seo-Gu, Seoul, 157-040, KOREA
TEL: (02) 3661-5546 to 7 FAX: (02) 3661-5548
Mitutoyo (Beijing) Liaison Office
#1011, Beijing Fortune Bldg., No.5 Dong Sanhuan Bei-Lu
Chaoyang District, Beijing, 100004, P.R. CHINA
TEL: 010-65908505 FAX: 010-65908507
Mitutoyo Measuring Instruments Co., Ltd.
Shanghai:
Room B 11/F, Nextage Business Center No.1111 Pudong South
Road, Pudong New District, Shanghai, 200120, P.R. CHINA
TEL: 021-5836-0718 FAX: 021-5836-0717
Suzhou:
46, Bai Yu Street, Suzhou, 215021, P.R. CHINA
TEL: 0512-62522660 FAX: 0512-62522580
Tianjin:
1•2F East Block, No67 Zijinshan-Road, Hexi District,
Tianjin, 300061, P.R. CHINA
TEL: 022-8558-1221 FAX: 022-8558-1234

[MEMO]

[MEMO]

Mitutoyo Corporation
20-1, Sakado 1-chome, Takatsu-ku, Kawasaki, Kanagawa 213-8533, Japan
Phone: 81-44-813-8230 Fax: 81-44-813-8231
Home page: http://www.mitutoyo.co.jp/global.html
 Loading...