Mitsubishi PKFY-NFMU-A, PKFY-NGMU-A, PLFY-NAMU-A, PKFY-NAMU-A OPERATION MANUAL

Air-Conditioners For Building Application
INDOOR UNIT
PLFY-NAMU-A / PKFY-NAMU-A PKFY-NGMU-A / PKFY-NFMU-A
OPERATION MANUAL
For safe and correct use, please read this operation manual thoroughly before operating the air-conditioner unit.

Contents |
1. |
Safety Precautions |
|
2. |
Names and functions of various parts |
1. |
Safety Precautions .................................................................................... |
2 |
|
2. |
Names and functions of various parts ....................................................... |
2 |
|
3. |
Operation ................................................................................................... |
3 |
|
|
3.1. |
ON/OFF ....................................................................................... |
3 |
|
3.2. |
Mode select ................................................................................. |
3 |
|
3.3. |
Selecting a temperature .............................................................. |
4 |
|
3.4. Selecting a fan speed .................................................................. |
4 |
|
|
3.5. Adjusting the vertical airflow direction ......................................... |
4 |
|
|
3.6. Adjusting the horizontal airflow direction (manual adjustment) ... |
4 |
|
|
3.7. |
Using the timer ............................................................................ |
5 |
4. |
Care and cleaning ..................................................................................... |
5 |
|
|
4.1. Cleaning the filters and the indoor unit ........................................ |
5 |
|
5. |
Troubleshooting ......................................................................................... |
6 |
|
6. |
Specifications ............................................................................................ |
7 |
|
Symbols used in the illustrations
 : Indicates an action that must be avoided.
 : Indicates that important instructions must be followed.
  : Indicates a part which must be grounded.
 Warning:
Carefully read the labels affixed to the main unit.
1
2 |
B |
|
|
3 |
A |
|
0 |
C
4 5 6 8 7 9
sBefore installing the unit, make sure you read all the “Safety precautions”.
sThe “Safety precautions” provide very important points regarding safety. Make sure you follow them.
Symbols used in the text
 Warning:
Describes precautions that should be observed to prevent danger of injury or death to the user.
 Caution:
Describes precautions that should be observed to prevent damage to the unit.
 Warning:
•The unit should not be installed by the user. Must be installed by an authorized technician or dealer. If the unit is installed improperly, water leakage, electric shock or fire may result.
•Never repair the unit or transfer it to another site by yourself.
•Do not stand on, or place any items on the unit.
•Do not splash water over the unit and do not touch the unit with wet hands.
•Do not spray combustible gas close to the unit.
 Caution:
•Do not use any sharp object to push the buttons, as this may damage the remote controller.
•Never wipe the remote controller with benzene, thinner, chemical rags, etc.
•Never block or cover the indoor or outdoor unit’s intakes or outlets.
 Warning:
•Do not remove the front panel or the fan guard from the outdoor unit when it is running.
•When you notice exceptionally abnormal noise or vibration, stop operation, turn off the power switch, and contact your dealer.
•Never insert fingers, sticks etc. into the intakes or outlets.
•If you detect odd smells, stop using the unit, turn off the power switch and consult your dealer. Otherwise, a breakdown, electric shock or fire may result.
•This air conditioner is NOT intended for use by children or infirm persons without supervision.
•Young children should be supervised to ensure that they do not play with the air conditioner.
•If the refrigeration gas blows out or leaks, stop the operation of the air conditioner, thoroughly ventilate the room, and contact your dealer.
Disposing of the unit
When you need to dispose of the unit, consult your dealer.
1 |
[Room temperature adjustment] Button |
7 |
[Up/down airflow direction] Button |
2 |
[Timer/continuous] Button |
8 |
[Ventilation] Button |
3 |
[Selecting operation] Button |
9 |
[Checking/built-in] Button |
4 |
[Time selection] Button |
0 |
[Test run] Button |
|
[Time-setting] Button |
A [Filter] Button |
|
|
|
||
5 |
[Louver] Button |
B [ON/OFF] Button |
|
|
|
||
6 |
[Fan speed adjustment] Button |
C Position of built-in room temperature |
|
|
|
||
•Never expose the remote controller to direct sunlight. Doing so can result in the erroneous measurement of room temperature.
•Never place any obstacle around the lower right-hand section of the remote controller. Doing so can result in the erroneous measurement of room temperature.
2

2.Names and functions of various parts
3.Operation
D CB A U T Q S
|
R |
|
P |
E |
O |
F |
N |
|
|
|
M |
G H |
I KLJ |
A
1
A
B
1
2
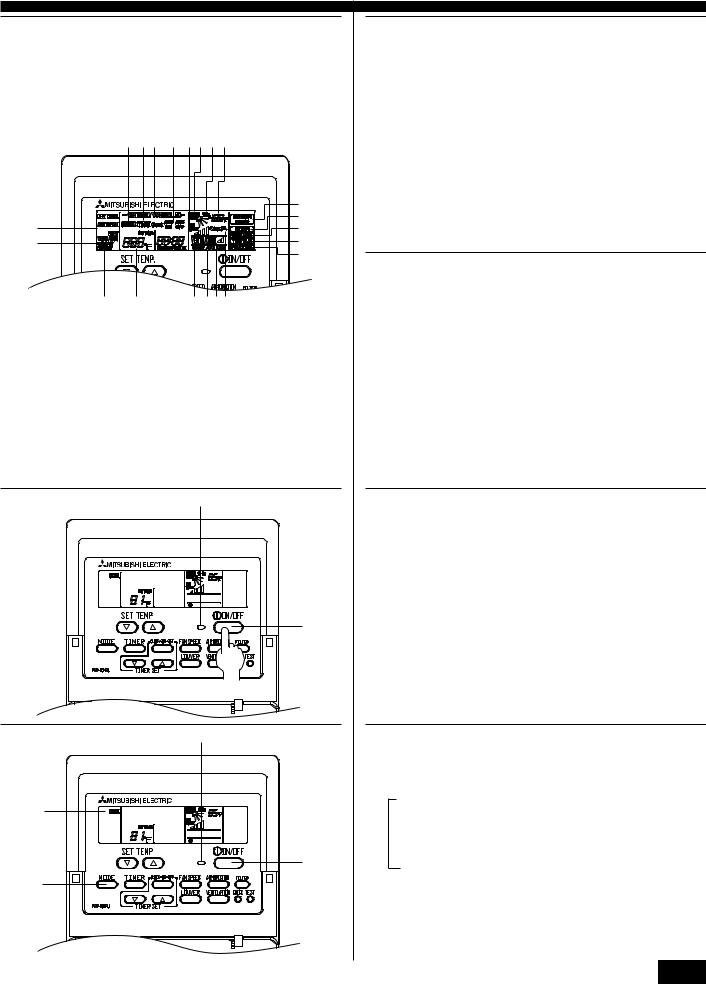
A Current time/Timer |
P Filter sign |
B Centralized control |
Q Set effective for 1 hr. |
C Timer ON |
R Sensor position |
D Abnormality occurs |
S Room temperature |
E Operation mode: COOL, DRY, AUTO, FAN, HEAT |
T Airflow |
F Preparing for Heating mode |
U Fan speed |
G Defrost mode |
|
H Set temperature |
|
I Power ON |
|
J Louver |
|
K Not available function |
|
L Ventilation |
|
M Function setting mode |
|
N Test run mode |
|
O Error check mode |
|
Before starting operation
•Make sure that the power supply is turned ON before use.
•Start running after the “HO” display has disappeared. (max. 2 minutes)
•In some systems, more than one indoor unit may be connected to a single outdoor unit. When a remote controller for one indoor unit is used to change modes at the same time as a different indoor unit is working together with the outdoor unit, the operation underway stops, and the new operation begins. Until the old operation is complete, the display on the remote controller flashes to indicate that the new operation is in “waiting” status.
 Warning:
Check and confirm the power circuit before use.
3.1. ON/OFF
Start an operation/Stop an operation
1Press [ON/OFF] button
Operation lamp lights up/off and operation starts/stops.
A Operation lamp
 Caution:
Even if the operation button is pressed immediately after the operation is stopped, operation is not restarted for about 3 minutes.
3.2. Mode select
1 If the unit is off, press the ON/OFF button to turn it on.
A The ON indicator should light up.
2Press the operation MODE button and select the operation mode.
B
s COOL
DRY
AUTO
FAN
HEAT
3
 Loading...