

Page 1

User Guide
Page 2

Notice
The information contained in this document is believed to be accurate in all respects but is not warranted by Mitel Networks#x00ae;
Corporation. The information is subject to change without notice and should not be construed in any way as a commitment by Mitel
Networks or any of its affiliates or subsidiaries. M
omissions in this document. Revisions of this document or new editions of it may be issued to incorporate any such changes.
® and its affiliates and subsidiaries assume no responsibility for any errors or
ITEL
Nothing in this document may be reproduced in any manner, either wholly or in part for any use whatsoever, without written
permission from M
S
IMPORTANT! This telephone is NOT suitable for direct connection to the public-switched telephone network. Connect the telephone
to a Mitel telephone system only.
™ Copyright© 2001, Mitel Networks Corporation. All rights reserved. Printed in Canada.
UPERSET
® Networks Corporation.
ITEL
Page 3

Contents
ABOUT YOUR PHONE
TIPS FOR YOUR COMFORT AND SAFETY
Don't cradle the handset! 2
Protect your hearing 2
Adjusting the viewing angle 2
Changing Handsets 3
CUSTOMIZING YOUR PHONE
Ringer Control 4
Handset Receiver Volume Control 4
Speaker Volume Control 4
Display Contrast Control 4
Feature Keys 5
Language Change 5
Clean Mode 5
MAKING AND ANSWERING CALLS
1
2
4
6
Make a call 6
Answer a call 6
Phonebook 6
Redial 7
Redial - Saved Number 7
Speed Call Keys 8
Speed Call - Personal 9
Handsfree Operation 10
Auto-Answer 11
-i-
Page 4

CALL HANDLING
Hold 12
Transfer 12
Conference 12
Conference Split 13
Add Held 13
Swap 13
Call Forward 14
Call Forward - I Am Here 15
Call Forward - End Chaining 16
Call Forward - Forced 16
Call Forward - Override 16
Messaging - Advisory 16
Messaging - Callback 17
12
USING ADVANCED FEATURES
Account Codes 19
Callback 19
Call Park 20
Call Pickup 20
Campon 20
Do Not Disturb 21
Override 21
Paging 21
Direct Paging 22
Reminder 23
Headset Operation 23
Headset Operation (with Feature Control Switch) 24
Music 24
Calculator 25
Group Paging / Meet Me Answer 25
Trunk Flash 26
USING MLPP
19
26
-ii-
Page 5

FEATURE ACCESS CODES
29
-iii-
Page 6

ABOUT YOUR PHONE
j
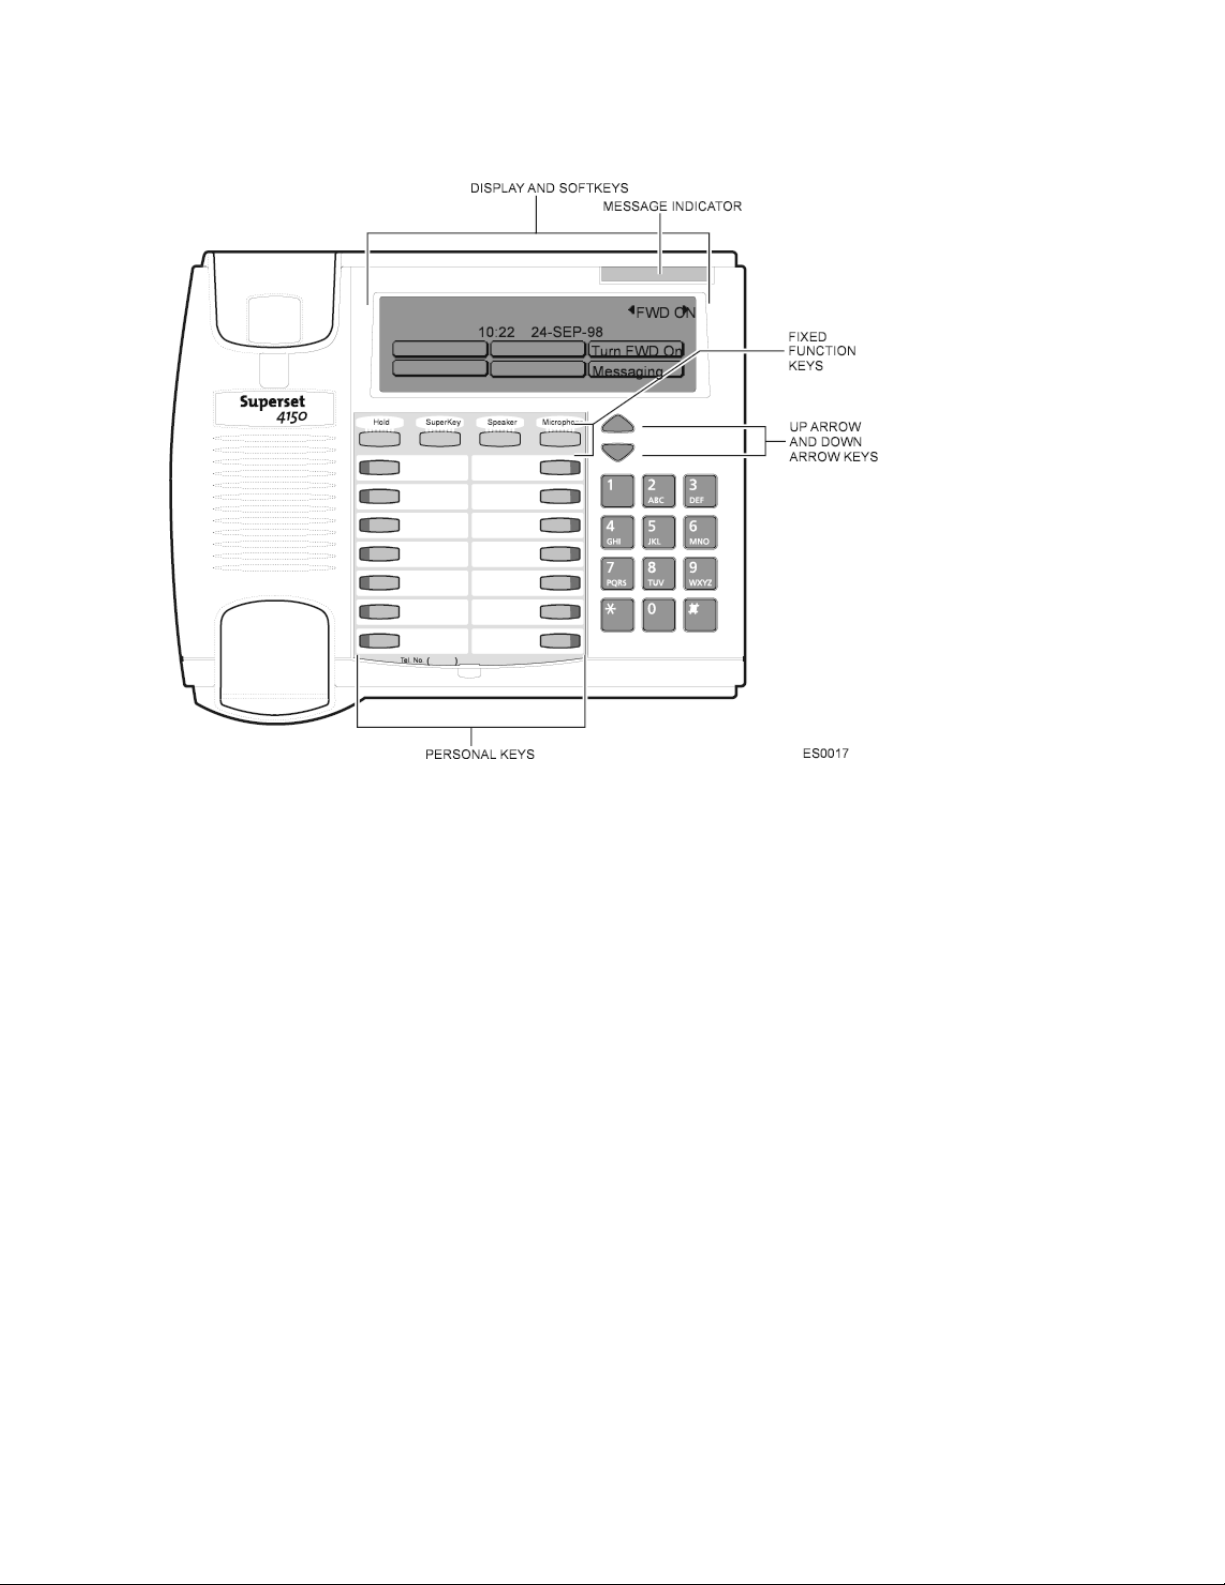
The SUPERSET 4150 has six fixed-function keys ( HOLD, SUPERKEY,
SPEAKER, MICROPHONE, , ) and 14 personal keys with built-in status
indicators. The personal key on the bottom right is always your Prime Line;
the remaining personal keys can be programmed as Feature, Speed Call, or
Line Appearance keys. See Feature Keys for personal key programming
instructions.
Personal Keys can be programmed as feature keys (such as Swap key) by
you or by your Administrator.
Your telephone also features a touch-sensitive display for softkey feature
access, Handsfree operation, and a large Message Indicator.
Note: When using the Superkey, press the Backup softkey to back up one
menu level.
Your SUPERSET 4150 may be connected to a PC. See your system
administrator for computer-telephony features that may be available to you
if your telephone has been connected in this way.
IMPORTANT NOTE FOR HEADSET USERS:
Mitel Networks Headsets with Feature Control Switch (PN9132-800-500NA/9132-800-501-NA) must be installed in the dedicated headset jack (the
ack nearest the front of the set). Installation will disable your handset
microphone. Disconnecting the headset at the jack or at the quickdisconnect plug restores handset operation.
Telephone status indicators
When line is the indicator is
Idle Off
Busy On
Ringing Flashing slowly
On hold at your set Flashing rapidly
On hold at another set Flashing slow on/fast off
-1-
Page 7
TIPS FOR YOUR COMFORT AND SAFETY
Don't cradle the handset!
Prolonged use of the handset can lead to neck, shoulder, or back discomfort,
especially if you cradle the handset between your ear and shoulder. If you
use your phone a lot, you may find it more comfortable to use a headset.
See the section on headset usage elsewhere in this guide for more
information.
Protect your hearing
Your phone has a control for adjusting the volume of the handset receiver or
headset. Because continuous exposure to loud sounds can contribute to
hearing loss, keep the volume at a moderate level.
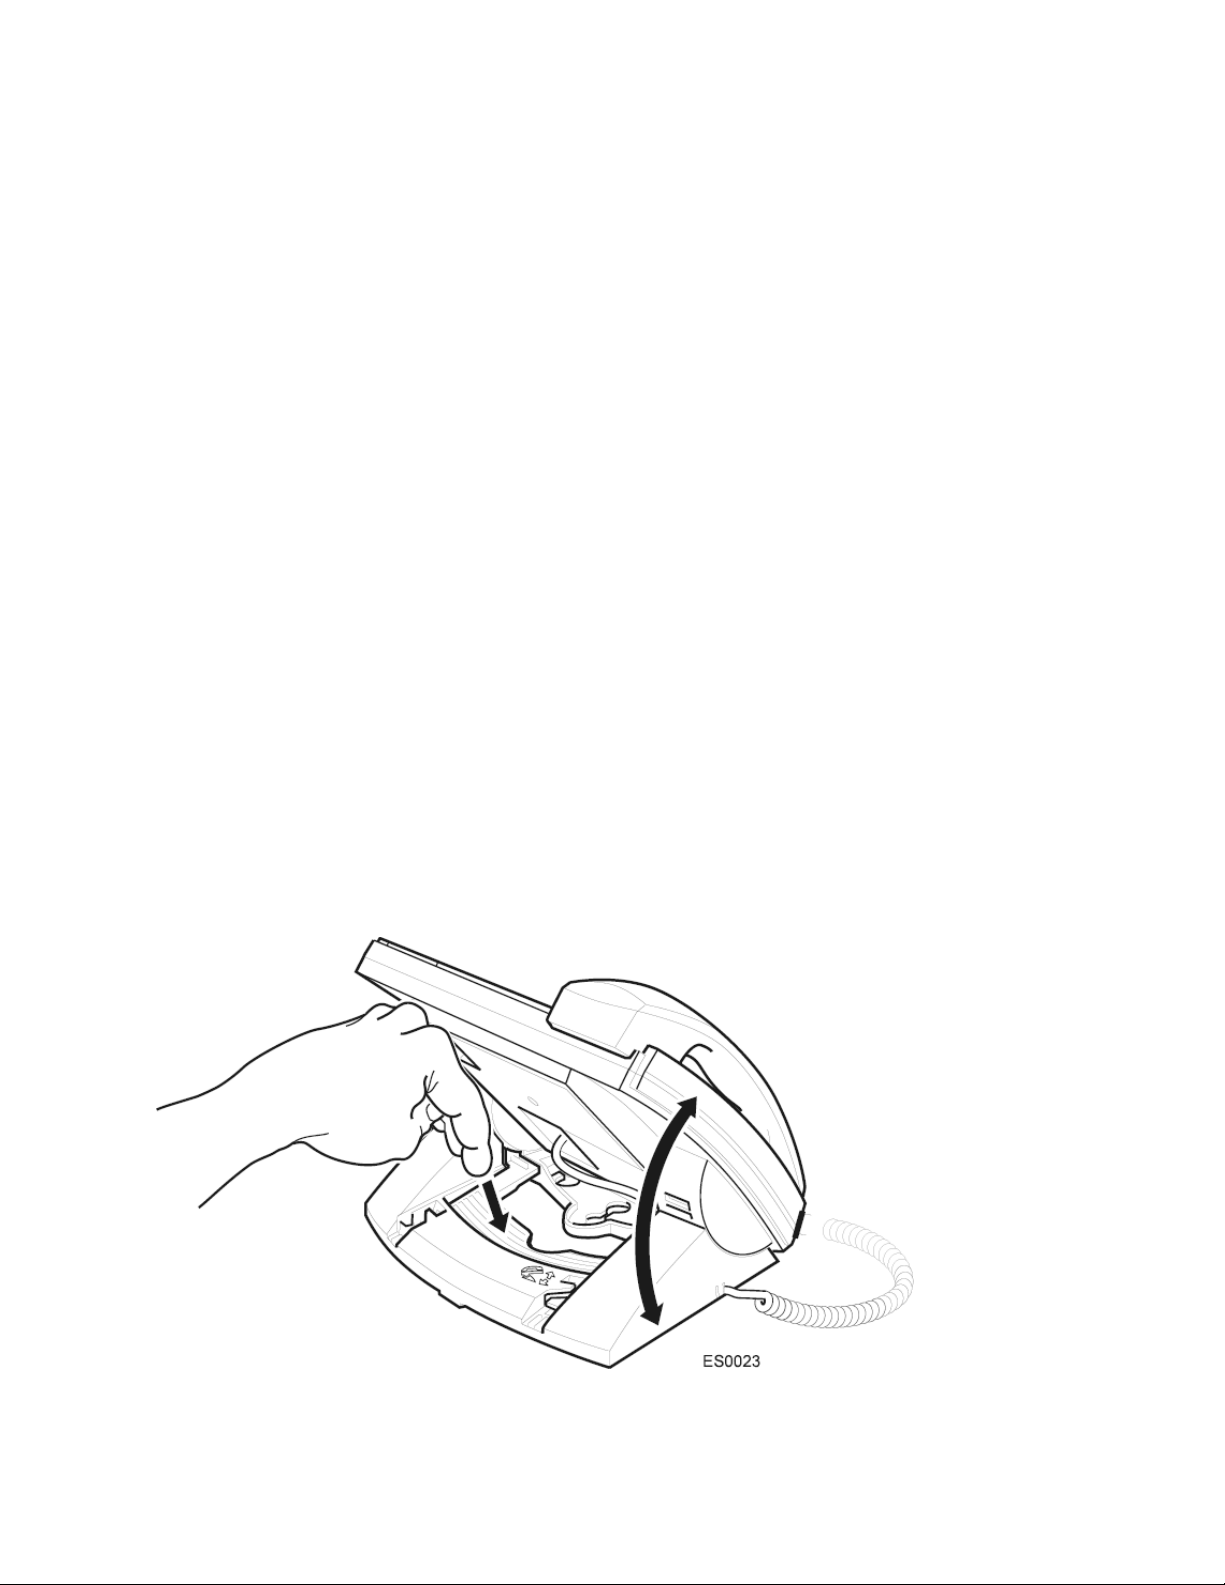
Adjusting the viewing angle
The stand built into your phone tilts to give you a better view of the keys.
To tilt your telephone for better viewing:
1. Press the tilt-release paddle on the telephone base.
2. Tilt your telephone to the desired angle.
3. Release the tilt-release paddle.
-2-
Page 8
Changing Handsets
Your SUPERSET 4150 telephone is compatible with several specialty
handsets. To remove the handset shipped with your set from the handset
cord:
1. Bend a paper clip to produce approximately 4 cm (1.5 in.) of straight
wire.
2. On the handset, locate the plastic groove leading into the handset jack.
The groove is on the side of the jack that is closest to the handset
microphone.
3. Slide the end of the wire into the handset jack along the groove until it
stops underneath the handset cord clip.
4. While gently pulling on the handset cord, use the wire to pry the clip
upward. The cord will separate from the handset.
5. Store the original handset in a safe place.
-3-
Page 9

CUSTOMIZING YOUR PHONE
Ringer Control
To adjust the Ringer Volume while the set is ringing:
z
Press or .
To adjust the Ringer Pitch while the set is idle:
1. Press SUPERKEY.
2. Press the More softkey until the Ring Adjust softkey appears.
3. Press the Ring Adjust softkey.
4. Press the Ringer Pitch softkey.
5. Press or .
6. Press SUPERKEY.
Handset Receiver Volume Control
To adjust the Handset Receiver Volume when you are using the
handset:
z
Press or .
Speaker Volume Control
To adjust the Speaker Volume when making an on-hook call or when
listening to background music:
z Press or .
Display Contrast Control
To adjust the Display Contrast while your set is idle:
z
Press or .
-4-
Page 10

Feature Keys
To display information about a key:
1. Press SUPERKEY.
2. Press a personal key.
3. Press SUPERKEY.
To re-program a personal key:
1. Press SUPERKEY.
2. Press the More softkey until the Display Keys softkey appears.
3. Press the Display Keys softkey.
4. Press a personal key that isn't a line key.
5. Do one of the following:
To change the key, press the Change Key softkey, and select a new
key type.
To clear the key, press the Clear Key softkey.
6. Press SUPERKEY.
Language Change
To change the display language:
1. Press SUPERKEY.
2. Press the More softkey until the Language softkey appears.
3. Press the Language softkey.
4. Press the softkey for the desired language.
Clean Mode
To disable the touch-sensitive display so that it can be cleaned (use a
dry tissue):
1. Press SUPERKEY.
2. Press the More softkey until the Clean LCD softkey appears.
3. Press the Clean LCD softkey.
4. Clean the surface of the display.
5. Press SUPERKEY.
-5-
Page 11

MAKING AND ANSWERING CALLS
Make a call
1. Lift the handset.
2. If you want to use a Non-Prime Line, press a Line Appearance key.
3. Dial the number,
OR
-
-
Press a Speed Call key.
-OR-
Press REDIAL.
Answer a call
z
Lift the handset.
-OR-
Press the flashing Line appearance key and lift the handset.
Phonebook
For each letter in the name, press the appropriate key on the keypad until
the letter is shown in the display; for example, if the letter C is required,
press the digit 2 three times. Use the
letter in a name is on the same key as the previous letter, press the
softkey before proceeding. If required, use the softkey to add a space
between the first and last name.
softkey to correct errors. If the next
To use Phonebook:
1. Press the Phonebook softkey.
2. Enter the name of the desired party.
-OR-
3. Press the Options softkey, and then complete the desired field(s).
4. Press the Lookup softkey.
5. If no match exists, edit the original entry.
6. If the name is not unique, press the Next softkey.
7. Do one of the following:
To make the call, press the Call softkey.
To edit the entry, press the Backup softkey.
To exit, press SUPERKEY.
-6-
Page 12

Redial
To redial the last number that you manually dialed:
1. Lift the handset.
2. Press REDIAL.
Redial - Saved Number
To save the last number that you manually dialed:
1. Lift the handset.
2. Dial **79.
To Redial a saved number:
1. Lift the handset.
2. Dial *6*.
-7-
Page 13

Speed Call Keys
You may use Speed Call Keys to make a call or to send a string of digits
during a call (press a Speed Call Key during a call to send a multi-digit
password, for instance).
To dial a stored Speed Call number:
1. Lift the handset.
2. Press a Speed Call key.
To store a Speed Call number:
1. Press SUPERKEY.
2. Press the More softkey until the Speed Call softkey appears.
3. Press the Speed Call softkey.
4. Press a personal key that isn't a line key.
5. Enter the number you want to store.
Press HOLD between digits to create a pause during dialing; press
HOLD more than once to lengthen the pause.
To enter a trunk flash, press the Insert Flash softkey. (See "Trunk
Flash" for more information about the use of this feature.)
To enter the last number dialed, press REDIAL.
6. If you want the number to be private, press the Make Private softkey.
7. Press the Save softkey.
8. Press SUPERKEY.
-8-
Page 14

Speed Call - Personal
To dial a stored personal Speed Call number:
1. Lift the handset.
2. Dial 58.
3. Enter an index number between 00 and 09.
To store a personal Speed Call number:
1. Lift the handset.
2. Dial 67.
3. Enter an index number between 00 and 09.
4. Dial the number to be stored (press HOLD between digits to create a
pause during dialing; press HOLD more than once to lengthen the
pause).
5. Hang up.
-9-
Page 15

Handsfree Operation
g
Your telephone is capable of both half-duplex and full-duplex handsfree
operation.
Both modes of operation allow you to conduct conversations without the use
of a handset or headset. Full-duplex operation allows you and another user
with full-duplex capability to converse without overridin
The other user may be using a handset, a headset, or they may be in
speakerphone mode.
Full-duplex operation requires that your telephone be connected to an
external power adapter. For some environments (e.g. noisy locations), fullduplex handsfree operation may not be suitable. To return to full-time, halfduplex mode, disconnect the external power adapter.
For best performance, users should note the following:
z After a conversation begins, your telephone may take several seconds to
determine ideal speaker and microphone levels before commencing fullduplex operation. During this time, your telephone will operate in halfduplex mode.
z While in speakerphone mode, your set may temporarily shift to half-
duplex mode if room conditions change (i.e. other persons enter the room)
or your hand passes in front of the microphone.
z
Your speakerphone works best in a quiet, echo-free environment. (NOTE:
Excessive background noise originating with other connected parties can
impair communication using the speakerphone. If the noise persists,
continue the call using the handset or switch to half-duplex operation by
disconnecting the power adapter.)
z Do not place your set near sources of noise such as PC fans, etc.
z
You should face your telephone when you speak and you should be no
more than four to six feet away. Take care not to block the microphone
with papers or other objects.
each other's voices.
To use Handsfree Operation to make calls:
1. If you want to use a Non-Prime Line, press a Line Appearance key.
2. Dial the number.
3. Communicate by using the speaker and the microphone.
-10-
Page 16

To use Handsfree Operation to answer calls:
1. Press the flashing line key.
2. Communicate by using the speaker and the microphone.
To hang up while using Handsfree Operation:
z
Press SPEAKER.
To temporarily disable the microphone during Handsfree Operation:
z
Press MICROPHONE (the microphone LED turns off).
To re-enable the microphone and return to the conversation:
z Press MICROPHONE (the microphone LED turns on).
To disable Handsfree Operation:
z
Lift the handset.
To return to Handsfree Operation:
1. Press SPEAKER.
2. Hang up.
Auto-Answer
To enable or disable Auto-Answer:
z
Press Auto-Answer feature key.
To answer a call when you hear ringback:
z Communicate by using the speaker and the microphone.
To terminate a call:
z
Press the Hang-Up softkey.
-OR-
Wait for the caller to hang up.
-11-
Page 17

CALL HANDLING
Hold
To place a call on Hold:
z
Press Hold.
To retrieve a call from Hold:
1. Lift the handset.
2. Press the flashing line key.
To retrieve a call from Hold at another station:
z
Press the flashing line key.
-OR-
Dial **1 and the number of the station that placed the call on Hold.
Transfer
To Transfer an active call:
1. Press TRANS/CONF.
2. Dial the number of the third party.
3. Do one of the following:
To complete the Transfer, hang up.
To announce the Transfer, wait for an answer, consult, and hang up.
To cancel the Transfer, press the Back To Held softkey.
Conference
To form a Conference when a two-party call is already in place, or to
add another party to an existing Conference:
1. Press TRANS/CONF.
2. Dial the number of the next party.
3. Wait for an answer.
4. Press the Conference softkey.
To leave a Conference:
z
Hang up.
-12-
Page 18

Conference Split
To Split a Conference and speak privately with the original party:
z
Press the Split softkey.
Add Held
To move a call on Hold to another line appearance:
1. Press the available line key.
2. Press the Addheld softkey.
3. Press the flashing line key.
To add a call on Hold to an existing conversation or conference:
1. Press the Addheld softkey.
2. Press the flashing line key.
Swap
To call another party when you are in an established two-party call:
1. Press TRANS/CONF.
2. Dial the number.
To alternate between the two parties:
z
Press the Trade Calls softkey.
-13-
Page 19

Call Forward
Call Forward lets you redirect incoming calls to an alternate number. Busy
(Internal, External, and Both) redirects your calls when your telephone is
busy. No Answer (Internal, External, and Both) redirects your calls after
several rings if you don't answer. Always redirects all incoming calls
regardless of the state of your telephone.
Note: For information about using the To Me softkey, see "Call Forward - I
Am Here."
To program Call Forward:
1. Press SUPERKEY.
2. Press the More softkey until the Forwarding softkey appears.
3. Press the Forwarding softkey.
4. Press either the Busy, No Answer, or Always softkey.
5. If you pressed the Busy or No Answer softkey, press either the
Internal, External, or Both softkey.
6. Dial the destination number.
7. Do one of the following:
To save and turn forwarding on, press the Save/On softkey.
To save and leave forwarding off, press the Save/Off softkey.
8. Press SUPERKEY.
To turn Call Forward on and off (once it has been programmed):
1. Press the Forwarding softkey.
2. Press the Next softkey until the type of Call Forward appears.
3. Do one of the following:
To turn forwarding on, press the Turn Fwd On softkey.
To turn forwarding off, press the Turn Fwd Off softkey.
4. Press SUPERKEY softkey.
-14-
Page 20

To cancel Call Forward:
1. Press SUPERKEY softkey.
2. Press the More softkey until the Forwarding softkey appears.
3. Press the Forwarding softkey.
4. Select the type of Call Forward.
5. Press the Save/Off softkey.
6. Press SUPERKEY softkey.
Call Forward - I Am Here
To forward calls from a remote station to your current location:
1. Press SUPERKEY.
2. Press the More softkey until the Forwarding softkey appears.
3. Press the Forwarding softkey.
4. Press the To Me softkey.
5. Dial the extension of the remote station.
6. Press the Save/On softkey.
7. Press SUPERKEY.
To cancel Call Forward - I Am Here from the station that set the
remote forwarding:
1. Lift the handset.
2. Dial **77.
3. Dial the extension of the remote station.
4. Hang up.
To cancel Call Forward - I Am Here from the station that was
forwarded:
1. Press Forwarding softkey.
2. Press the Turn Fwd Off softkey.
3. Press SUPERKEY.
-15-
Page 21

Call Forward - End Chaining
To ensure that calls do not get forwarded again by the destination
number:
1. Lift the handset.
2. Dial 64.
3. Hang up.
To again allow calls to be forwarded by the destination number:
1. Lift the handset.
2. Dial **73.
3. Hang up.
Call Forward - Forced
To force an incoming call to be forwarded:
z Press the Forward Call softkey.
Call Forward - Override
To override Call Forward and ring a station:
1. Lift the handset.
2. Dial *1*.
3. Dial the extension number.
Messaging - Advisory
To turn Messaging - Advisory on:
1. Press the Messaging softkey.
2. Press the Advisory softkey.
3. Press the Next Msg softkey until the desired message appears.
4. Press the Turn Msg On softkey.
To turn Messaging - Advisory off:
1. Press the Messaging softkey.
2. Press the Advisory softkey.
3. Press the Turn Msg Off softkey.
-16-
Page 22

Messaging - Callback
To leave a message waiting indication on a telephone when you hear
busy or ringback tone:
z Press Leave A Msg softkey.
To respond to a message waiting condition on your telephone:
z
Do one of the following:
Press Messaging followed by Call.
Lift the handset, and then press Messaging.
A call is placed to the message sender (voice mail system or extension user)
that left the oldest message.
To read messages before responding:
1. Press the Messaging softkey.
2. If a password is required, enter your password and press the Enter
softkey.
3. Press the softkey. Read Message softkey.
4. Press the Call Me Back softkey.
5. Do one of the following:
To call the message sender, press the Call softkey.
To delete the message, press the Erase Msg Call softkey.
To view the next message, press the Next Msg softkey.
To check for messages from a remote station:
1. Press the Messaging softkey.
2. Press the Remote Msgs softkey.
3. Dial your extension number.
4. Press the Enter softkey.
5. If a password is required, enter your password and press the Enter
softkey.
6. Press the Read Message softkey.
-17-
Page 23

To set a password (up to 7 digits, not including 0):
1. Press the Messaging softkey.
2. Press the New Password softkey.
3. Enter a password.
4. Press the Enter softkey.
5. Enter the password again.
6. Press the Enter softkey.
7. Press SUPERKEY.
To change or clear your password:
1. Press the Messaging softkey.
2. Press the New Password softkey.
3. Enter your current password.
4. Press the Enter softkey.
5. Press the New Password softkey.
6. Enter your current password.
7. Press the Enter softkey.
8. Do one of the following:
To change your password, enter a new password and press the Enter
softkey.
To clear your password, press 0.
9. Press SUPERKEY.
-18-
Page 24

USING ADVANCED FEATURES
Account Codes
To use Forced Account Codes:
1. Lift the handset.
2. Dial the Account Code digits.
3. Do one of the following:
To submit the Account Code, press the # key.
To correct an entry error, press the softkey.
To cancel, press SUPERKEY.
To enter an Account Code during a call:
1. Press the Account Code softkey.
2. Dial the account code digits.
3. Do one of the following:
For a verified account code, press the Verify/Save softkey.
For a non-verified account code, press the Save softkey.
Callback
To request a Callback when you reach a busy or unanswered station:
z
Press the Call Me Back softkey.
To answer a Callback:
z
Lift the handset.
To view and/or cancel outstanding Callbacks:
1. Press SUPERKEY.
2. Press the More softkey until the Callbacks softkey appears.
3. Press the Callbacks softkey.
4. Press the Next and Previous softkeys (if required).
5. Do one of the following:
To cancel a callback, press the Cancel softkey.
To call the number shown, press the Call Again softkey.
-19-
Page 25

Call Park
To retrieve a call parked by the attendant:
1. Lift the handset.
2. Dial *23.
3. Dial the console ID and the Hold Slot number.
Call Pickup
To answer a call that is ringing at another station in your Pickup
Group:
1. Lift the handset.
2. Press the Pickup Call softkey.
To answer a call that is ringing at a station not in your Pickup Group:
1. Lift the handset.
2. Dial **6.
3. Dial the number of the ringing station.
Campon
To Campon to a busy station:
z
Press the I Will Wait softkey.
To retrieve a call when you hear Campon tone:
1. Press the Call Waiting softkey.
2. Press the Trade Calls softkey.
-20-
Page 26

Do Not Disturb
To activate or deactivate Do Not Disturb:
z
Press the Do Not Disturb feature key.
To activate Do Not Disturb from a remote station:
1. Lift handset.
2. Dial **5.
3. Dial the number of the station to which Do Not Disturb is to apply.
4. Hang up.
To deactivate Do Not Disturb from a remote station:
1. Lift handset.
2. Dial ##5.
3. Dial the number of the station with Do Not Disturb activated.
4. Hang up.
Override
To use Override when you encounter busy tone:
z
Press the Intrude softkey.
To use Override when you encounter DND tone:
z
Press the Press the Ring Anyway softkey.
Paging
To use Paging:
1. Lift handset.
2. Press the Pager feature key.
3. Dial the Paging zone number (if required).
4. Make the announcement.
-21-
Page 27

Direct Paging
Direct Paging allows you to page a party through their telephone speaker. If
the paged party has Off-Hook Voice Announce enabled, the page will be
heard even when the party is on a handset or headset call.
To page a party:
1. Lift the handset or press MICROPHONE.
2. Press the Direct Paging feature key.
3. Dial the extension number.
4. Speak to the dialed party after the tone.
If Handsfree Answerback has been turned on at your set and you receive a
Direct Page while your set is idle, or while you are on a handset or headset
call, a handsfree call will automatically be established after a single burst of
tone.
The following instructions assume that Handsfree Answerback is not enabled
on your set.
To answer a Direct Page (indicated by a single burst of tone):
z
Lift handset.
- OR -
Press MICROPHONE.
To answer a page while using the handset:
z Press MICROPHONE.
To enable or disable Handsfree Answerback:
z
Press MICROPHONE while the set is id le.
-22-
Page 28

Reminder
To program a Reminder:
1. Press SUPERKEY.
2. Press the Reminder softkey.
3. Enter the time in 24-hour format.
4. Press the Save softkey.
To view, change, and/or cancel a pending Reminder:
1. Press SUPERKEY.
2. Press the Reminder softkey.
3. Do one of the following:
To change the Reminder, enter the new time and press the Save
softkey.
To cancel the Reminder, press the Cancel softkey.
To exit without canceling the Reminder, press SUPERKEY.
To acknowledge a Reminder when your set rings once:
z
Press the Acknowledge softkey.
Headset Operation
To enable Headset Operation:
z Press the Headset feature key.
To answer a call (when Auto Answer is disabled):
z
Press the flashing line key.
To hang up:
z
Press Hang-Up softkey.
To disable Headset Operation:
z
Press the Headset feature key.
-23-
Page 29

Headset Operation (with Feature Control Switch)
IMPORTANT NOTE: Mitel Networks Headsets with Feature Control Switch
(PN9132-800-500-NA/9132-800-501-NA) must be installed in the dedicated
headset jack (the jack nearest the front of the set). Installation will disable
your handset microphone. Disconnecting the headset at the jack or at the
quick-disconnect plug restores handset operation. If handset operation is
required for an extended period of time, you should press the Headset
feature key to return the telephone to handset mode.
To enable Headset Operation:
z
Press the Headset feature key.
To answer a call:
z
Press flashing Line Appearance key
-OR-
Quickly press and release the headset's feature control switch.
To mute the headset microphone:
z
Press and hold the headset's feature control switch.
To hang up:
z Press Hang-up softkey.
-OR-
Quickly press and release the headset's feature control switch.
To disable Headset Operation:
z
Press the Headset feature key.
Music
To turn Music on and off when the set is idle:
z Do one of the following:
To turn the music on, press the Music On softkey.
To turn the music off, press the Music Off softkey.
-24-
Page 30

Calculator
To use the Calculator:
1. Press SUPERKEY.
2. Press Calculator softkey.
3. Use the telephone keypad as the numeric keypad.
The * key is used as a decimal point key. The following operations as well
as the Clear Entry/Clear (CE/CLR) and another decimal point are
presented as softkeys: ( x,÷, -, +, /, = )
4. Press SUPERKEY.
Group Paging / Meet Me Answer
Group Paging allows you to page a group of telephones through their built-in
speakers. You can belong to to as many as three paging groups with one
group designated as your "prime" group.
When you need to respond to a Group Page but don't know the identity or
extension number of the paging party, use the Meet Me Answer feature. You
have up to 15 minutes after receiving the page to use Meet Me Answer.
To make a Group Page:
1. Lift the handset.
2. Press Direct Page or dial *37.
3. Do one of the following:
To page your prime page group, press #.
To page a specific page group, dial the page group directory number.
4. Speak to the dialed party after the tone.
To respond to a Group Page by using Meet Me Answer:
1. Lift handset.
2. Dial *88.
3. Do one of the following:
To respond to a page from your prime page group, press #.
To respond to a page from a specific page group, dial the page group
directory number.
-25-
Page 31

Trunk Flash
The Trunk Flash feature allows you to access Centrex features (if available)
while you are talking on an outside call.
To flash a trunk while talking on an outside call:
1. Press TRANS/CONF.
2. Dial *57 for a single flash or *56 for a double flash.
3. Wait for dial tone.
4. Dial the Centrex feature access code.
USING MLPP
Multi-Level Precedence and Preemption (MLPP) facilitates emergency
communications for the military. MLPP enables authorized users to specify a
precedence level when making a call, and to preempt calls with a lower
precedence level.
-26-
Page 32

To make a precedence call:
g
r
1. Dial the precedence access digit (a number between 2 and 9). Wait for
dial tone to end.
2. Dial the appropriate precedence level digit (a number from 0 to 3, such
as 1 for Flash). Note that if you have chosen a higher precedence level
than you are authorized to use, the system either routes the call to an
announcement or you hear an error tone.
3. Dial the ARS leading digit (if necessary) and the destination telephone
number (for example, 7-555-1234). If the destination is idle, the phone
will ring and you will hear the Precedence Ringback tone. If the
destination is busy and preemption is successful, you will hear silence
until the called party acknowledges preemption by hanging up. You will
then hear the Precedence Rin
the Preemption tone.
4. If the destination is busy and preemption is unsuccessful, you will receive
a Blocked Precedence Announcement (BPA). If you get BPA, hang up and
then retry the call at a higher precedence level if you are authorized to
do so. If you get BPA and cannot retry the call at a higher precedence
level, you can call MLPP attendant and ask the attendant to place the call
for you.
5. Once you are connected, carry on your conversation. During the call,
your telephone set will display both the precedence of the call and its
duration.
6. When you finish the call, hang up.
back tone. The preempted parties will hear
To answer a precedence call:
If your telephone is idle and you receive a call with a precedence level highe
than routine, you will hear the MLPP precedence ring. If your telephone has
a display, it will indicate the precedence level of the incoming call.
1. When you hear the MLPP precedence ring (short ring, very short pause,
short ring, long pause), answer the telephone. As you talk, the display
indicates the precedence level of the call as well as the duration of the
call.
2. When you have finished the call, hang up.
-27-
Page 33

To respond to preemption:
z
If you are engaged in a call and hear a continuous preemption warning
tone, a call of higher precedence is attempting preemption. Hang up
immediately, wait for an MLPP ring, and then answer the telephone.
As you talk, the display indicates the priority of the call as well as the
duration of the call.
z
If you are engaged in a call and hear three seconds of preemption tone, it
means that the person you were talking to has been preempted. You
should hang up. You may place another call if required.
-28-
Page 34

FEATURE ACCESS CODES
Save Last Number **79
Repeat Last Number Saved *6*
Personal Speedcall - Invoke 58
Personal Speed Call - Upper Range Index Number 09
Personal Speedcall - Store 67
Call Hold - Remote Retrieve **1
Cancel Call Forwarding Follow Me - Remote **77
Call Forwarding - End Chaining 64
Cancel Call Forwarding - End Chaining **73
Call Forwarding - Override *1*
Call Park - Remote Retrieve *23
Call Pickup - Directed **6
Do Not Disturb - Remote **5
Do Not Disturb - Cancel Remote ##5
Direct Page *37
Meet Me Answer *88
Trunk Single Flash *57
Trunk Double Flash *56
-29-
 Loading...