

MiTAC Mio 8380 Operation Manual

Operation Manual
Part Number: 5615 1426 0010
Revision: R00
July, 2003

Trademarks
All brand and product names are trademarks or registered trademarks of their respective companies.
Note
The information in this manual is subject to change without notice.

i
Safety Precautions
General Guidelines for Your Smartphone
Avoid placing the Smartphone in a location subject to extreme temperatures, high humidity,
or heavy dust.
The Smartphone and its accessories are not waterproof. Please keep them in a dry place.
Do not knock, shake, or toss the Smartphone. Doing so may cause leakage, overheating, or
fire.
Do not disassemble the Smartphone or its accessories without authorized permission.
Do not place the Smartphone near the edge of a surface, especially when the vibration
function of the Smartphone is turned on. The Smartphone may move and drop due to the
vibration.
Keep the Smartphone in place when driving. Do not place it on the passenger seat or where it
can break loose in a collision or sudden stop.
Do not delete files in the Windows folder of the Smartphone. Doing so may cause
malfunction.
Guidelines for Using the Phone Feature
Use the Smartphone in a normal position. Do not cover the antenna unnecessarily; doing so
may affect the communication quality and consume more power.
Use a phone headset or pull over your car first if using the Smartphone when driving.
Your Smartphone produces the electromagnetic wave with the specific absorption rate (SAR)
of 1.02W/kg, lower than the standard value of 1.6W/kg. However, to reduce the effects of the
electromagnetic wave on the human body, please use the phone feature with care. For
example, make short calls as possible as you can.
Your Smartphone is a low-power RF (radio frequency) device. It receives and sends out RF
signals when the phone feature is turned on. Therefore, be careful of the following:
• Most RF devices are shielded from RF signals. However, your Smartphone may still
interfere with or get interfered by nearby devices, such as a TV set, radio, or computer.
• Turn off the phone feature where posted notices are set up to avoid interference or
danger.
• Turn off the phone feature near hospitals or medical equipment (such as pacemakers or
hearing aids) to avoid interference.
• Turn off the phone feature near gas stations, fuel depots, chemical factories, or blasting
areas.
• Turn off the phone feature on an aircraft to avoid interference with the flight instruments
for possible danger.

ii
Guidelines for Using the AC Adapter
Use only the AC adapter (PHIHONG, PSC05R-050) that comes with the Smartpnone. Using
other AC adapters may cause malfunction or danger.
This product is intended to be supplied by a LISTED Power Unit marked “LPS” and output
rated + 5 Vdc / 1.0A minimum.
Do not use the AC adapter in a humid environment. Do not touch the AC adapter with wet
limbs.
Place the AC adapter in a well-ventilated location.
Connect the AC adapter to a proper power source. The voltage and grounding requirements
are described on the device or its package.
Do not use the AC adapter when the power cord is damaged.
Guidelines for Usign the Battery
There is danger of explosion if using the wrong battery. Discard used batteries according to
the local regulations.
Use only the AC adapter that comes with the Smartphone to charge the battery.
Store the battery where the temperature is between -20°C (-4°F) and 60°C (140°F) to avoid
danger.
To avoid a short circuit, do not allow the contact of the battery’s + and – ends with the metal
objects, such as paper clips or power cords.
Keep the battery away from fire sources or heaters to avoid leakage, overheating, or fire.
Keep the battery from water, rain, or extreme humidity.
Do not disassemble or pierce the battery, or place it in fire. The battery may break, explode, or
release dangerous chemical materials.
All batteries have limited lives. The battery life will decrease after repeated discharging and
recharging. When the operating time is obviously decreasing and recharging the battery is not
useful, replace the battery with a new one.

iii
Preface
Welcome
Congratulations on purchasing this Windows® Powered Smartphone. Your Smartphone is more
than a mobile phone. It nto only provides the full features of a GPRS mobile phone, but also allows
you to take photos, record videos, browsing the Internet and WAP web pages, receiving and
sending messages (such as emails, instant messages and MMS multimedia messages), listening to
music, play JAVA games, and lots more. Whenever you need to communicate, capture images,
seach for information, send messages or enjoy yourself, the Smartphone can help you get what you
want any time any place.
With the Windows® Smartphone 2002 operating system, you can always use Microsoft®
ActiveSync® to synchronize your personal Microsoft Outlook data between the Smartphone and
desktop computer, including Contacts, Calendar, Inbox, and Tasks.
About this Manual
This manual tells you how to use the Smartphone, including the basic operations, core programs of
Microsoft Smartphone 2002, and the system settings.
_ NOTE`
Depending on the model you purchased, the appearance of your Smartphone may not
be exactly the same as those shown in this manual.
Some of the features are provided by the wireless mobile network services and not
described in details in this manual. Please contact your service provider for further
information.
Depending on the continuing developments of the product, the software supplied with
your Smartphone may be changed or updated. If there is any difference between the
information in this manual and your product, the operation should be based on the
product you have.

iv
Where to Find Information
If you cannot find information in this manual, refer to the following table to acquire the specific
information:
For information on See this source
First time startup Quick Start Guide
Chapter 7 of this manual. More information on Microsoft ActiveSync
ActiveSync Help on your desktop PC.
Information on non-core programs, such as
PhoneCamera, jMMS and jBrowser, games,
etc
Software Manual
Last-minute updates and detailed technical
information
The readme files in the “Microsoft ActiveSync”
folder on your desktop PC or the Smartphone
Companion CD.
The Microsoft Mobile Devices Web site:
www.pocketpc.com
Latest information on Windows Powered
Smartphone

v
Table of Contents
Safety Precautions ........................................................................................................ i
Preface.......................................................................................................................... iii
1 Getting Started ....................................................................................................... 1
1.1 Hardware Features ................................................................................................................. 2
Front Components.................................................................................................................. 2
Side Components ................................................................................................................... 2
Top and Bottom Components ................................................................................................ 3
Back Components .................................................................................................................. 3
Cover-Open Components....................................................................................................... 4
1.2 ActiveSync Cable and USB Cradle........................................................................................ 5
1.3 Install SIM Card and Battery ................................................................................................. 6
1.4 Charging the Battery.............................................................................................................. 7
1.5 Turning Your Smartphone On and Off .................................................................................. 8
Turning On............................................................................................................................. 8
Turning Off............................................................................................................................ 8
Power Management ............................................................................................................... 8
1.6 Installing ActiveSync............................................................................................................. 9
1.7 Expanding Your Smartphone............................................................................................... 11
Accessories .......................................................................................................................... 11
Using the Phone Headset ..................................................................................................... 11
Using a SD/MMC Card........................................................................................................ 12
2 Basic Skills ........................................................................................................... 13
2.1 Navigation Methods............................................................................................................. 14
Navigation Pad..................................................................................................................... 14
Action Button....................................................................................................................... 14
Home Button........................................................................................................................ 14
Back Button ......................................................................................................................... 14
Soft Keys ............................................................................................................................. 15
Numeric Keypad ..................................................................................................................15
2.2 Home Screen and Screen Elements...................................................................................... 16
Home Screen........................................................................................................................ 16
Status Icons.......................................................................................................................... 18
Programs.............................................................................................................................. 19
Menus .................................................................................................................................. 19
Quick List ............................................................................................................................ 19
2.3 Entering Text and Numbers ................................................................................................. 20
Entering Text in Multipress Mode ....................................................................................... 20
Entering Text in T9 Mode.................................................................................................... 21
Entering numbers in Numeric mode .................................................................................... 22
Miscellaneous Input Tasks................................................................................................... 22
2.4 Securing the Smartphone ..................................................................................................... 23
Locking the Keypad............................................................................................................. 23
Locking the Smartphone ...................................................................................................... 23
Locking the SIM Card.......................................................................................................... 24

vi
3 Using the Phone................................................................................................... 27
3.1 Making a call........................................................................................................................ 28
Dialing a call........................................................................................................................ 28
Making a Call from a Number on the SIM Card .................................................................. 29
Making a Call from Contacts ............................................................................................... 29
Making a Call from Speed Dial............................................................................................ 30
Making a Call Using a Recently-dialed Number.................................................................. 30
Making a Call from the Call History List............................................................................. 30
Making a Call from a Hyperlink ..........................................................................................30
3.2 Responding to an Incoming Call .......................................................................................... 31
Answering an Incoming Call................................................................................................ 31
Rejecting an Incoming Call.................................................................................................. 31
3.3 Managing More than One Call............................................................................................. 32
Holding a Call to Take a Second Call .................................................................................. 32
Rejecting the Second Call .................................................................................................... 32
Holding a Call to Make a Second Call................................................................................. 32
Swapping between Calls ...................................................................................................... 32
Setting Up a Conference Call............................................................................................... 32
3.4 In-Call Options..................................................................................................................... 33
Adjusting the Phone Volume ...............................................................................................33
Speakerphone....................................................................................................................... 33
In-Call Options..................................................................................................................... 33
3.5 MySIM................................................................................................................................. 34
Opening MySIM .................................................................................................................. 34
Dialing a Number from MySIM........................................................................................... 35
Add a Phone Number........................................................................................................... 35
MySIM Settings ................................................................................................................... 36
MySIM Menu....................................................................................................................... 37
3.6 Call History.......................................................................................................................... 38
Opening Call History ........................................................................................................... 38
Call History Menu................................................................................................................ 38
3.7 Speed Dial............................................................................................................................ 39
Create a Speed Dial for a Phone Number............................................................................. 39
Viewing Speed Dials You Have Created..............................................................................39
3.8 Voice Mail ...........................................................................................................................40
Setting Up the Voice Mail Phone Number........................................................................... 40
Checking Your Voice Mail .................................................................................................. 40
3.9 PhoneRing............................................................................................................................ 41
Enabling Booting Music.......................................................................................................41
Selecting a Ring Tone .......................................................................................................... 41
Playing Ring Tones..............................................................................................................42
Deleting Ring Tones ............................................................................................................42
3.10 International Call.................................................................................................................. 43
Entering an International Country Code............................................................................... 43
Inserting a 3-second Pause in a Dialing Sequence................................................................43
Inserting a Manually Pause in a Dialing Sequence...............................................................43
3.11 Turning Off the Radio.......................................................................................................... 44

vii
4 Setting UP Your Smartphone.............................................................................. 45
4.1 Settings (Page 1) .................................................................................................................. 46
Telephony ............................................................................................................................ 47
Sounds ................................................................................................................................. 48
Profiles................................................................................................................................. 48
Home Screen........................................................................................................................ 50
About ................................................................................................................................... 50
Accessibility......................................................................................................................... 50
Data Connections................................................................................................................. 51
4.2 Settings (Page 2) .................................................................................................................. 54
Date and Time...................................................................................................................... 55
Owner Information...............................................................................................................55
Power Management ............................................................................................................. 55
Regional Settings ................................................................................................................. 55
Remove Programs................................................................................................................ 56
Security................................................................................................................................ 56
5 Messaging Features............................................................................................. 57
5.1 Sending E-mail and SMS Messages..................................................................................... 58
Composing an E-mail or SMS Message............................................................................... 58
Inserting Predefined Text into Messages ............................................................................. 59
Inserting Voice Recordings into Messages .......................................................................... 59
5.2 Receiving E-mail and SMS Messages.................................................................................. 60
Opening a E-mail or SMS Message..................................................................................... 60
Receiving a Complete Message ........................................................................................... 60
Receiving Message Attachments ......................................................................................... 61
5.3 Managing Inbox................................................................................................................... 62
Viewing Inbox ..................................................................................................................... 62
Inbox Menu.......................................................................................................................... 63
Customizing Inbox Options ................................................................................................. 64
5.4 SMS Messages..................................................................................................................... 65
Importing SMS Messages from the SIM Card to Inbox....................................................... 65
5.5 MSN Messenger...................................................................................................................66
Getting Started with MSN Messenger.................................................................................. 66
6 Pocket Outlook..................................................................................................... 69
6.1 Contacts ............................................................................................................................... 70
Viewing Contacts................................................................................................................. 70
Creating a New Contact ....................................................................................................... 72
Deleting a Contact................................................................................................................ 72
Finding a Contact................................................................................................................. 72
Editing a Contact.................................................................................................................. 73
Selecting a Ring Tone for a Contact .................................................................................... 73
Copying Phone Numbers from SIM Card to Contacts ......................................................... 73
Calling a Contact.................................................................................................................. 74

viii
6.2 Calendar ............................................................................................................................... 75
Creating a New Appointment............................................................................................... 75
Viewing an Appointment ..................................................................................................... 75
Editing an Appointment ....................................................................................................... 75
Deleting an Appointment ..................................................................................................... 76
Viewing Your Schedule ....................................................................................................... 76
Importing Calendar Information...........................................................................................77
6.3 Tasks .................................................................................................................................... 78
Creating a New Task............................................................................................................ 78
Viewing Tasks List ..............................................................................................................79
6.4 Voice Notes.......................................................................................................................... 80
Creating a Voice Note.......................................................................................................... 80
Listening to a Recording ...................................................................................................... 80
6.5 Beaming Information ........................................................................................................... 81
Beaming a Contact or an Appointment ................................................................................81
Receiving Beamed Information............................................................................................ 81
7 ActiveSync............................................................................................................ 83
7.1 ActiveSync Overview ..........................................................................................................84
7.2 Using ActiveSync................................................................................................................. 85
Synchronizing information................................................................................................... 85
Results of Synchronization................................................................................................... 86
Creating a Schedule to Synchronize..................................................................................... 87
7.3 Setting Up Server ActiveSync.............................................................................................. 88
Setting Up Server ActiveSync.............................................................................................. 88
Stopping Synchronizing with a Server ................................................................................. 88
7.4 Synchronizing Remotely...................................................................................................... 89
Synchronizing Remotely with a Desktop Computer ............................................................ 89
Synchronizing Remotely with a Server................................................................................ 89
7.5 Synchronizing Using an Infrared Connection ......................................................................90
8 Internet, Entertainment, and More...................................................................... 91
8.1 Internet Explorer .................................................................................................................. 92
Navigating in Pocket Internet Explorer................................................................................ 92
Using the Favorites list......................................................................................................... 93
Cached Web Pages............................................................................................................... 93
Pocket Internet Explorer Options......................................................................................... 94
8.2 Media Player ........................................................................................................................ 95
Playing Files......................................................................................................................... 95
Menu Options When Playing a File .....................................................................................96
Using Media Player Favorites.............................................................................................. 97
Licenses ............................................................................................................................... 98
Media Player Compatibility ................................................................................................. 98
8.3 Modem Link......................................................................................................................... 99
8.4 Solitaire.............................................................................................................................. 100
8.5 Calculator........................................................................................................................... 101

ix
9 Reference Information ....................................................................................... 103
9.1 Product Specification ......................................................................................................... 104
9.2 Technical Support and Troubleshooting ............................................................................ 105
FAQ ................................................................................................................................... 105
Product Service .................................................................................................................. 105
9.3 Restoring Factory Default State......................................................................................... 106
9.4 Regulatory Information...................................................................................................... 107
Class B Regulations........................................................................................................... 107
European Notice................................................................................................................. 108
Japanese Notice.................................................................................................................. 108

1
1
Getting Started
This chapter introduces you to the external components of your Smartphone and guides you
through the process of setting up your Smartphone for use.
This chapter includes:
1.1 Hardware Features.............................................2
1.2 ActiveSync Cable and USB Cradle ................... 5
1.3 Installing the SIM Card and Battery ..................6
1.4 Charging the Battery..........................................7
1.5 Turning Your Smartphone On and Off ..............8
1.6 Installing ActiveSync ........................................9
1.7 Expanding Your Smartphone...........................11
2
1.1
Hardware Features
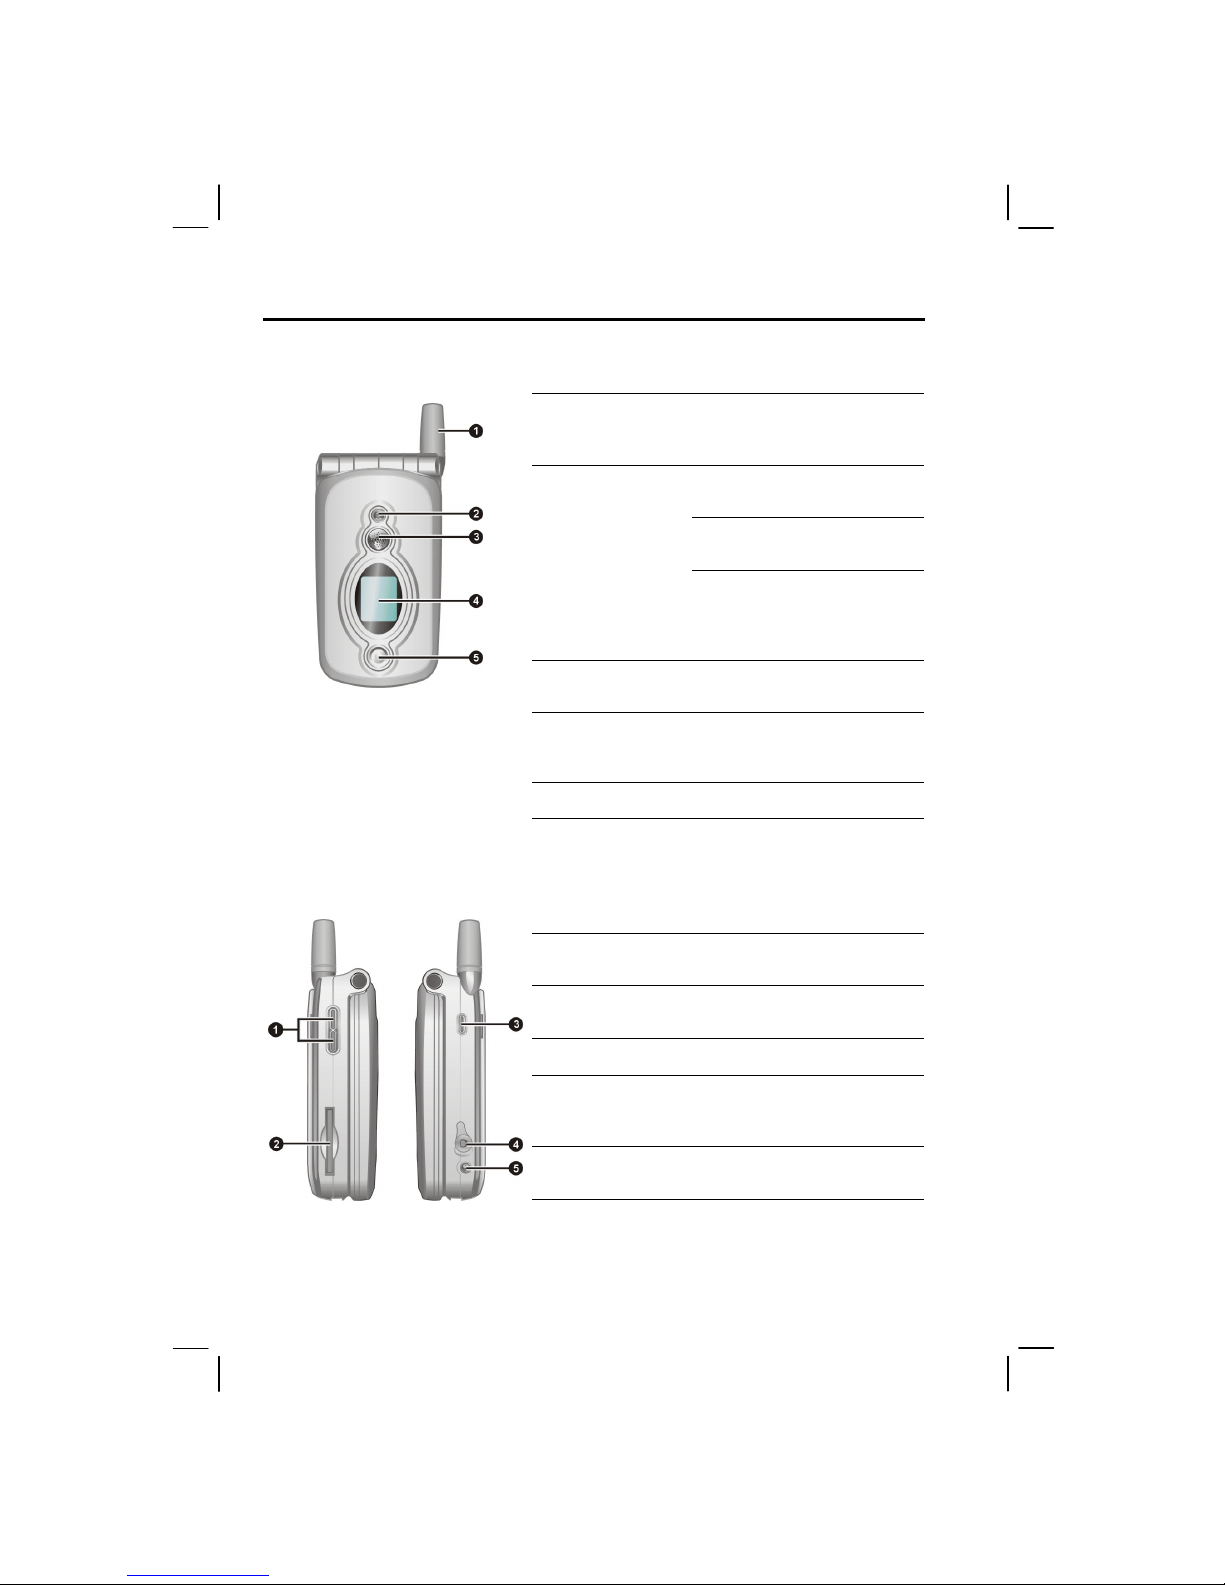
Front Components
Fixed Antenna
Receives and transmits wireless
radio when you are using the
phone.
Flashing in green informs you of
events, alarms and reminders.
Flashing in red indicates low
battery status.
Notification
Indicator
Glowing in red indicates that
battery charging is in progress.
Glowing in green indicates that
the battery is fully charged.
Speaker
Sends out voice, music, audible
reminders and alerts.
Small Status
Display
Displays current time, battery
power, signal strength, number of
missed calls and messages.
Camera Lens
Takes photos or record videos.
Side Components
Volume
Control
Adjusts the volume by pressing
the upper or lower button.
SD/MMC Card
Slot
Accepts an optional SD/MMC
card for removal memory.
Record Button
Records voice notes.
Headphone
Connector
Connects to a pair of stereo
headphones or a hands-free phone
headset.
Power
Connector
Connects to the AC adapter.
3
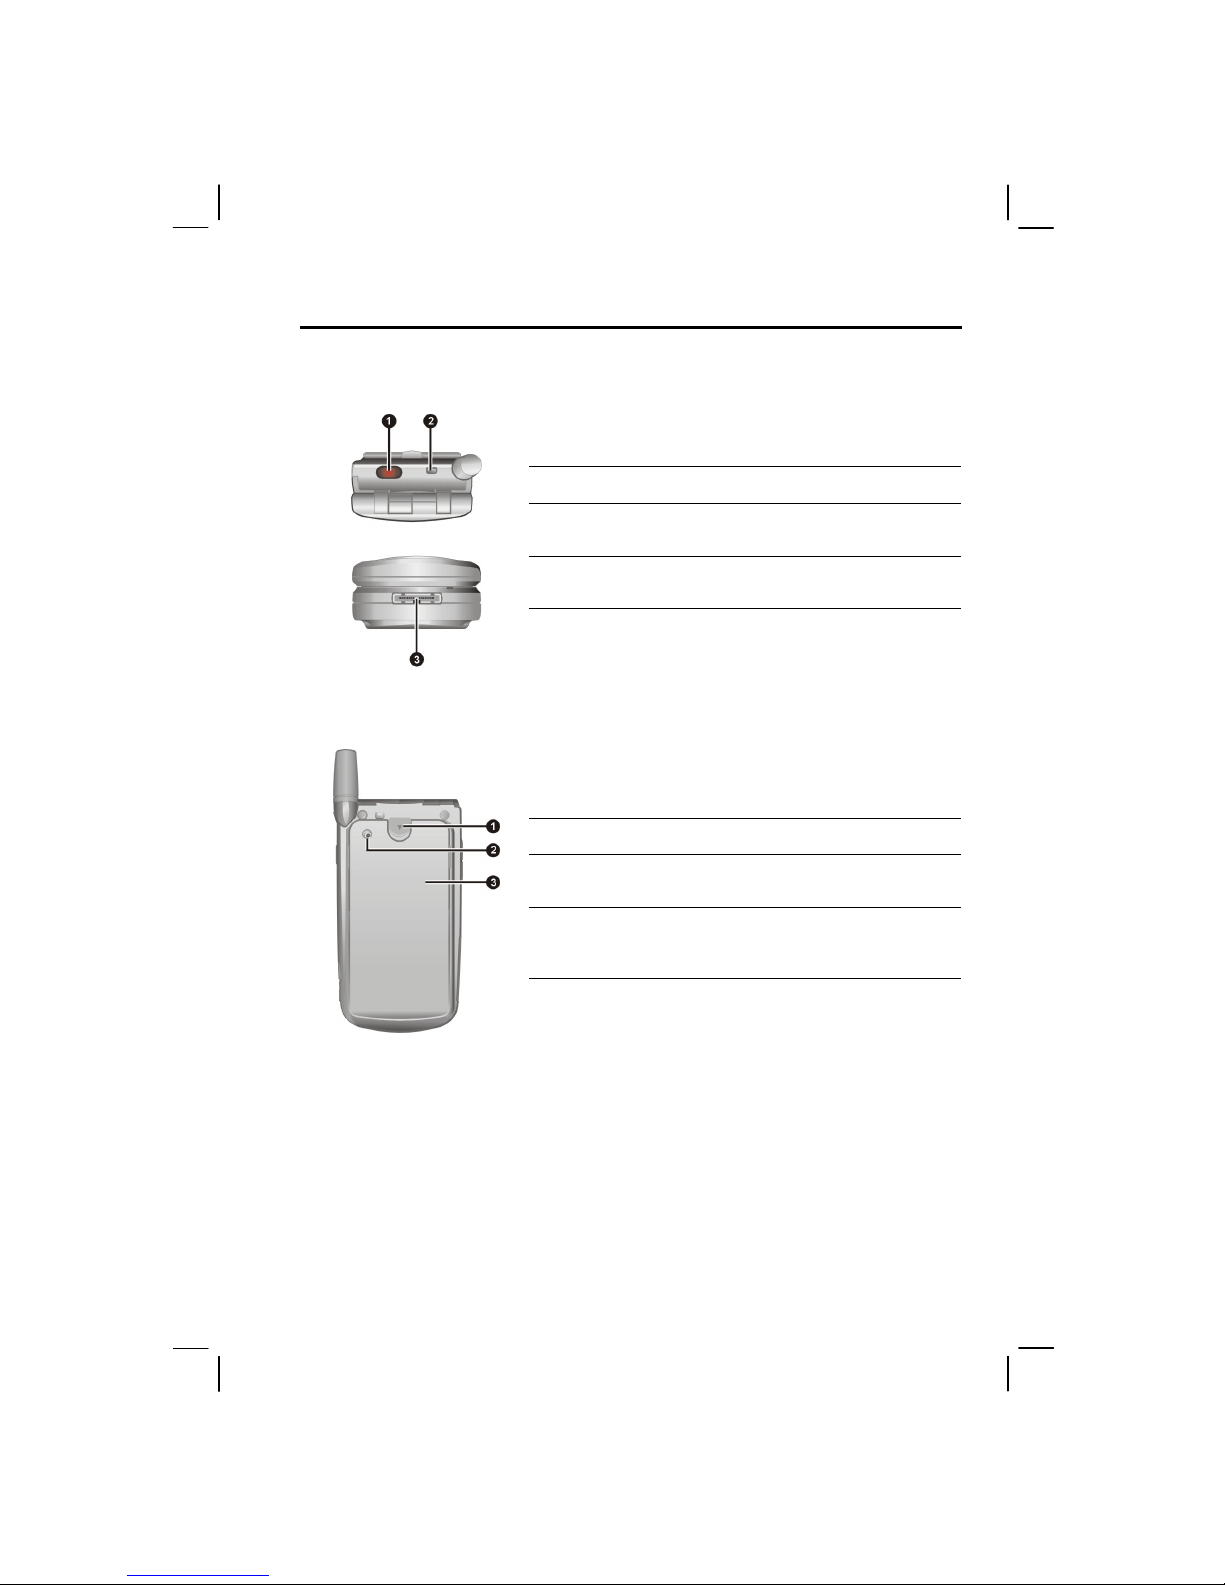
Top and Bottom Components
IR Port
Beams files to other mobile devices.
Lanyard
Eyelet
Lanyard attaches to this opening.
ActiveSync
Connector
Connects to your desktop computer for
data synchronization.
Back Components
Battery Lock
Secures the battery in place.
Car Antenna
Jack
Connects the car antenna.
Battery
Serves as the internal power source for
your Smartphone. You can recharge the
battery by connecting to AC power.

4
Cover-Open Components
Earpiece
Serves as the phone earpiece.
Screen
Displays the Home screen, status icons,
active programs and soft key commands.
Navigation
Pad
Moves up, down, left or right by pressing
the corresponding area of the pad.
Soft Key
Performs the command shown on the
display immediately above the keys.
Action
Button
Confirms your selection, similar to the
Enter key on a keyboard.
Navigates to the previous screen.
Back Button
Backspaces over one or more characters
when you are in a text field.
Turns your Smartphone on or off.
End Button
Ends or rejects a call.
Numeric
Keypad
Enters numbers and characters.
Serves as the phone transmitter during a
call.
Microphone
Receives sound and voice to record voice
notes.
Talk Button
Dials or answers a call.
Home Button
Displays the Home screen.
5
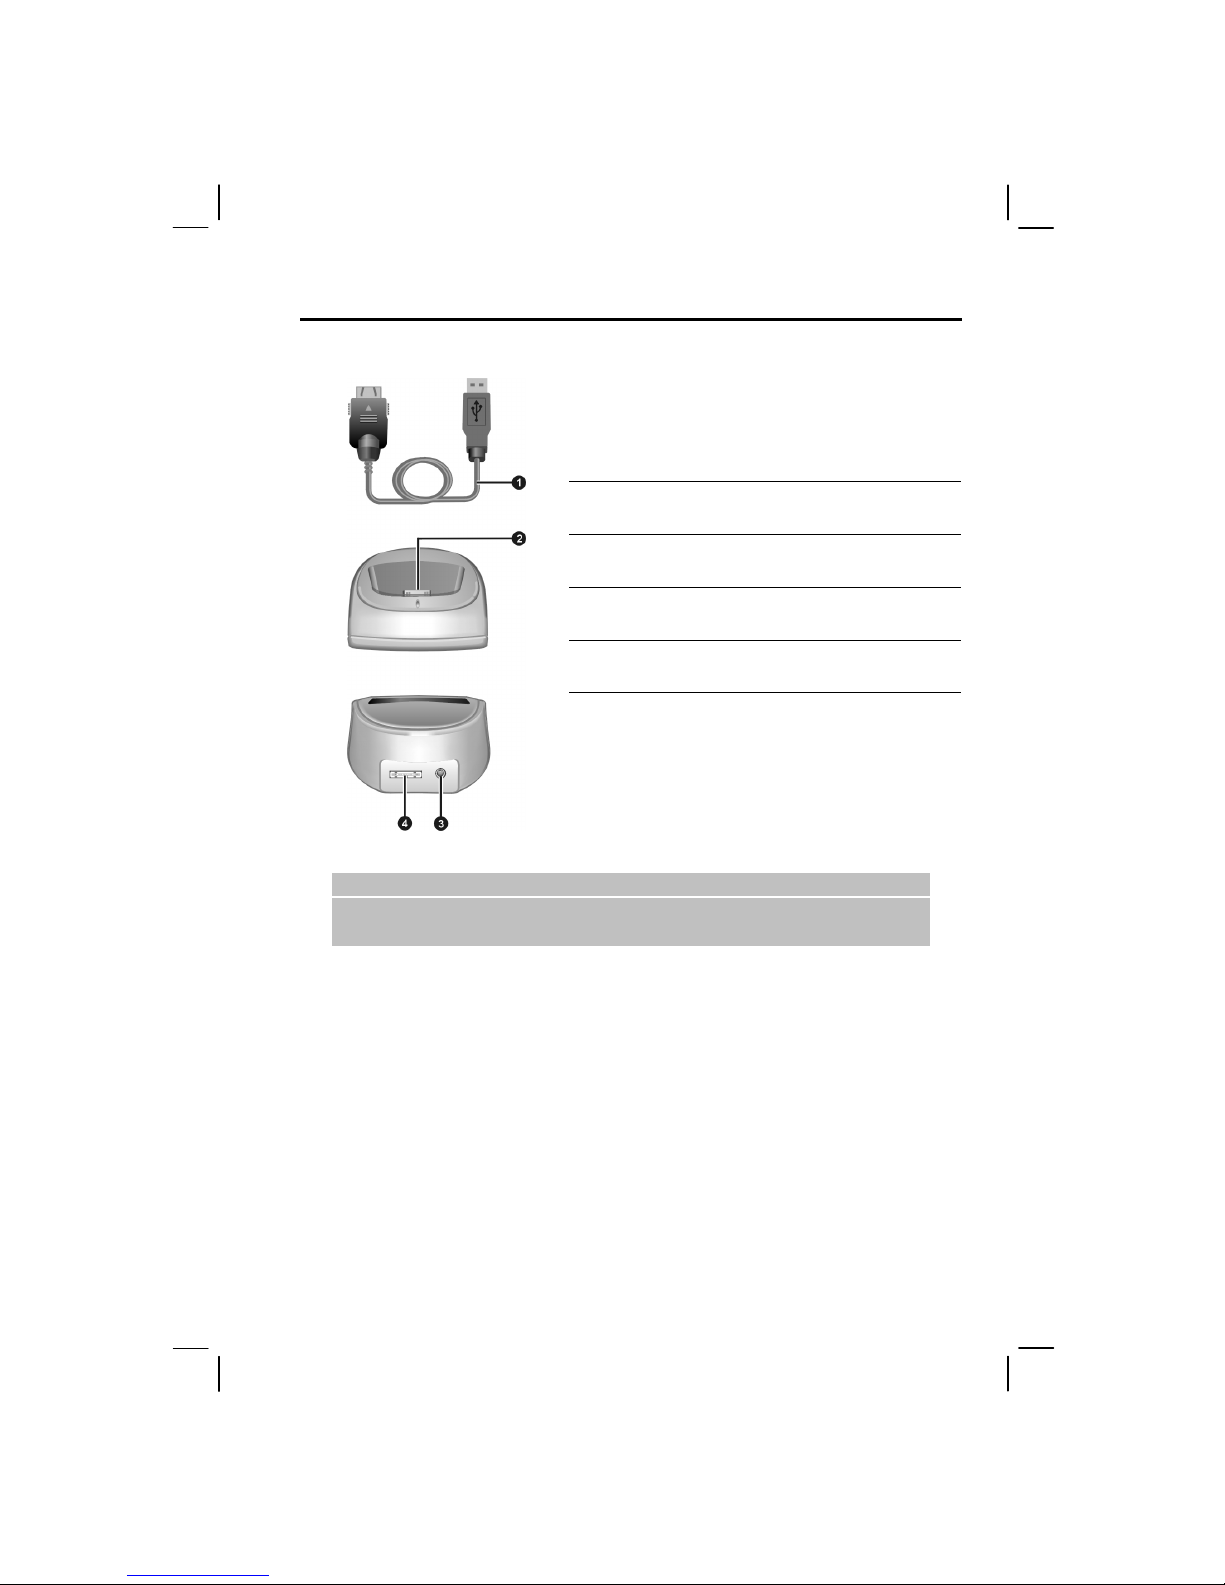
1.2
ActiveSync Cable and USB Cradle
ActiveSync
Cable
Connects your Smartphone to the
desktop PC.
Smartphone
Connector
Connects your Smartphone。
Power
Connector
Connects the AC adapter.
ActiveSync
Connector
Connects the ActiveSync cable.
_ NOTE`
Depending on the model you purchased, the cradle may not be included as a standard
accessory.
Cradle Front
Cradle Back
6
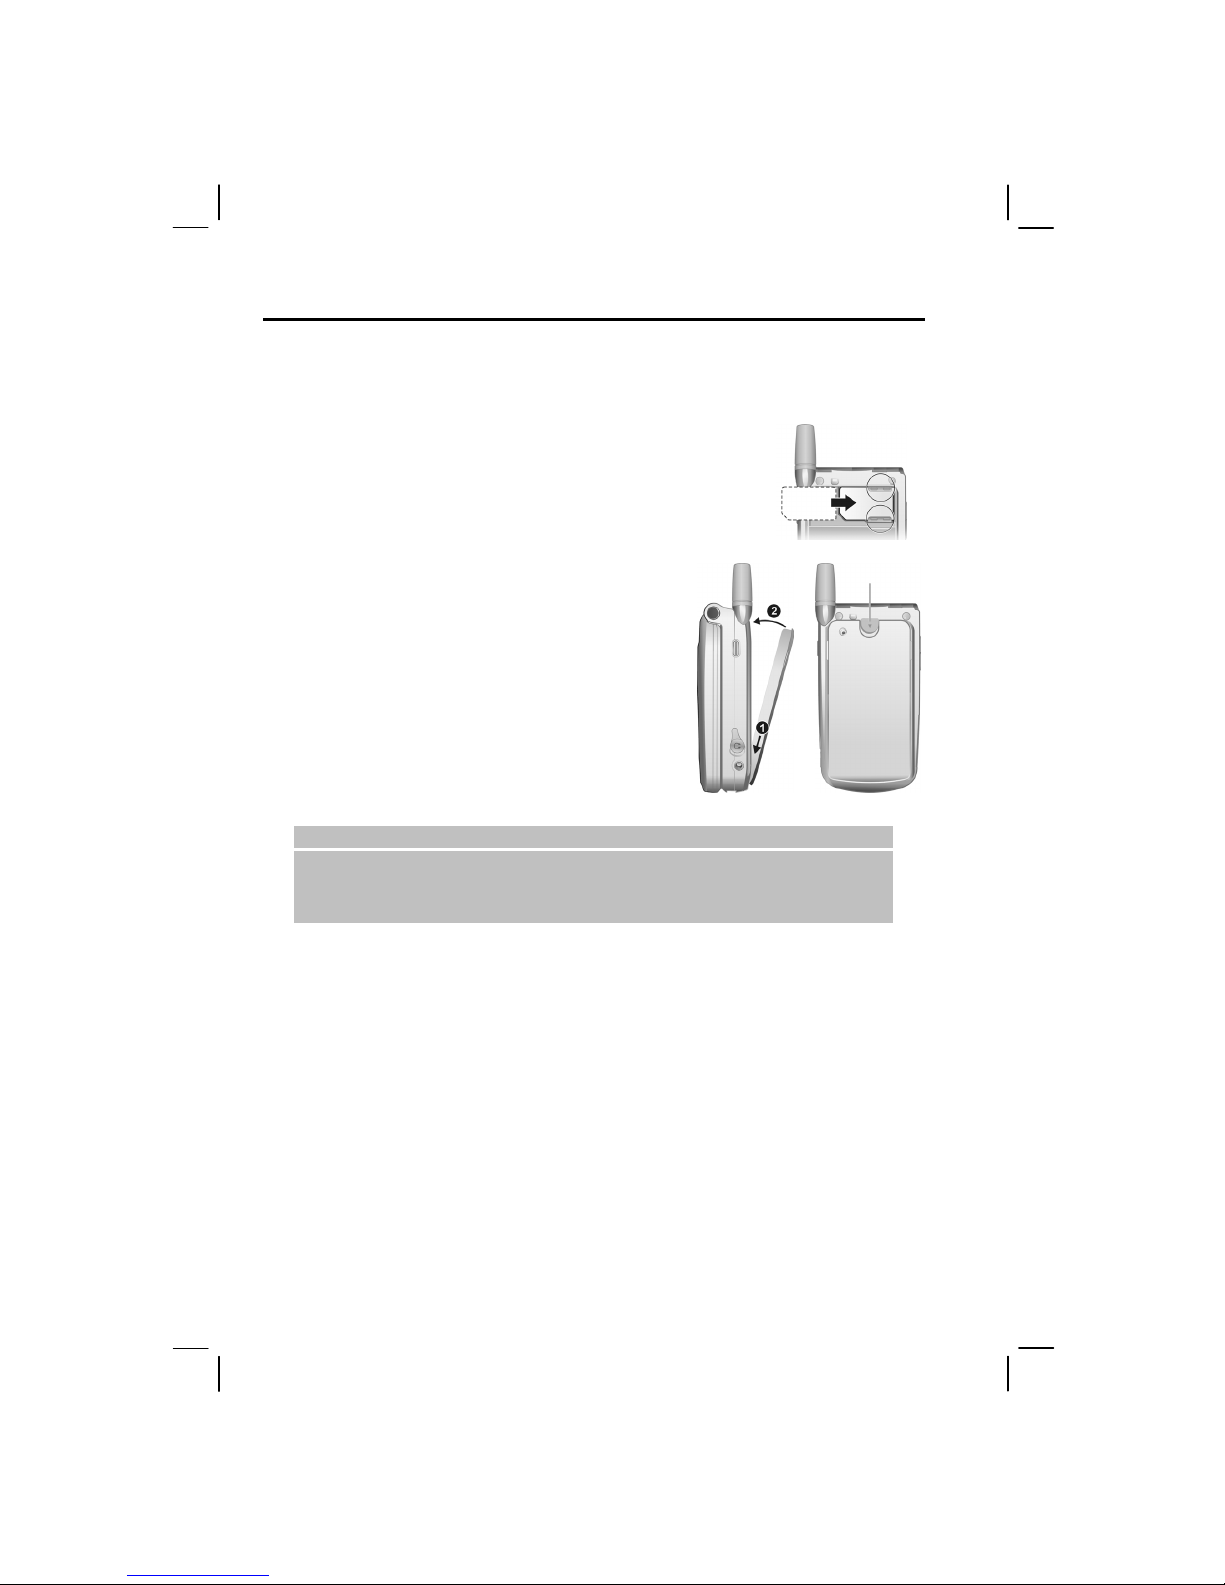
1.3
Install SIM Card and Battery
After applying for an account with a mobile phone service provider, you will be provided a SIM
(Subscriber Identification Module) card. This card contains your mobile phone account details,
contacts that can be stored and any additional services to which you have subscribed. You must
install a SIM card before you can make or receive phone calls or use wireless data services.
1.
Insert the SIM card with the contact area facing downward (the
angled corner is in left-bottom position). Make sure that the SIM
card should be engaged below the two metal holders.
2.
To install the battery, insert the two projecting parts on
the battery into the holes in the battery compartment,
and then press to close the battery. You should hear a
“click” sound indicating that the battery is locked.
_ NOTE`
To remove the battery, push and hold the battery lock downward, and then detach the battery
from its compartment.
Insert and remove the SIM card with care. Do not bend the SIM card or scratch the contact area.
Battery Lock
7
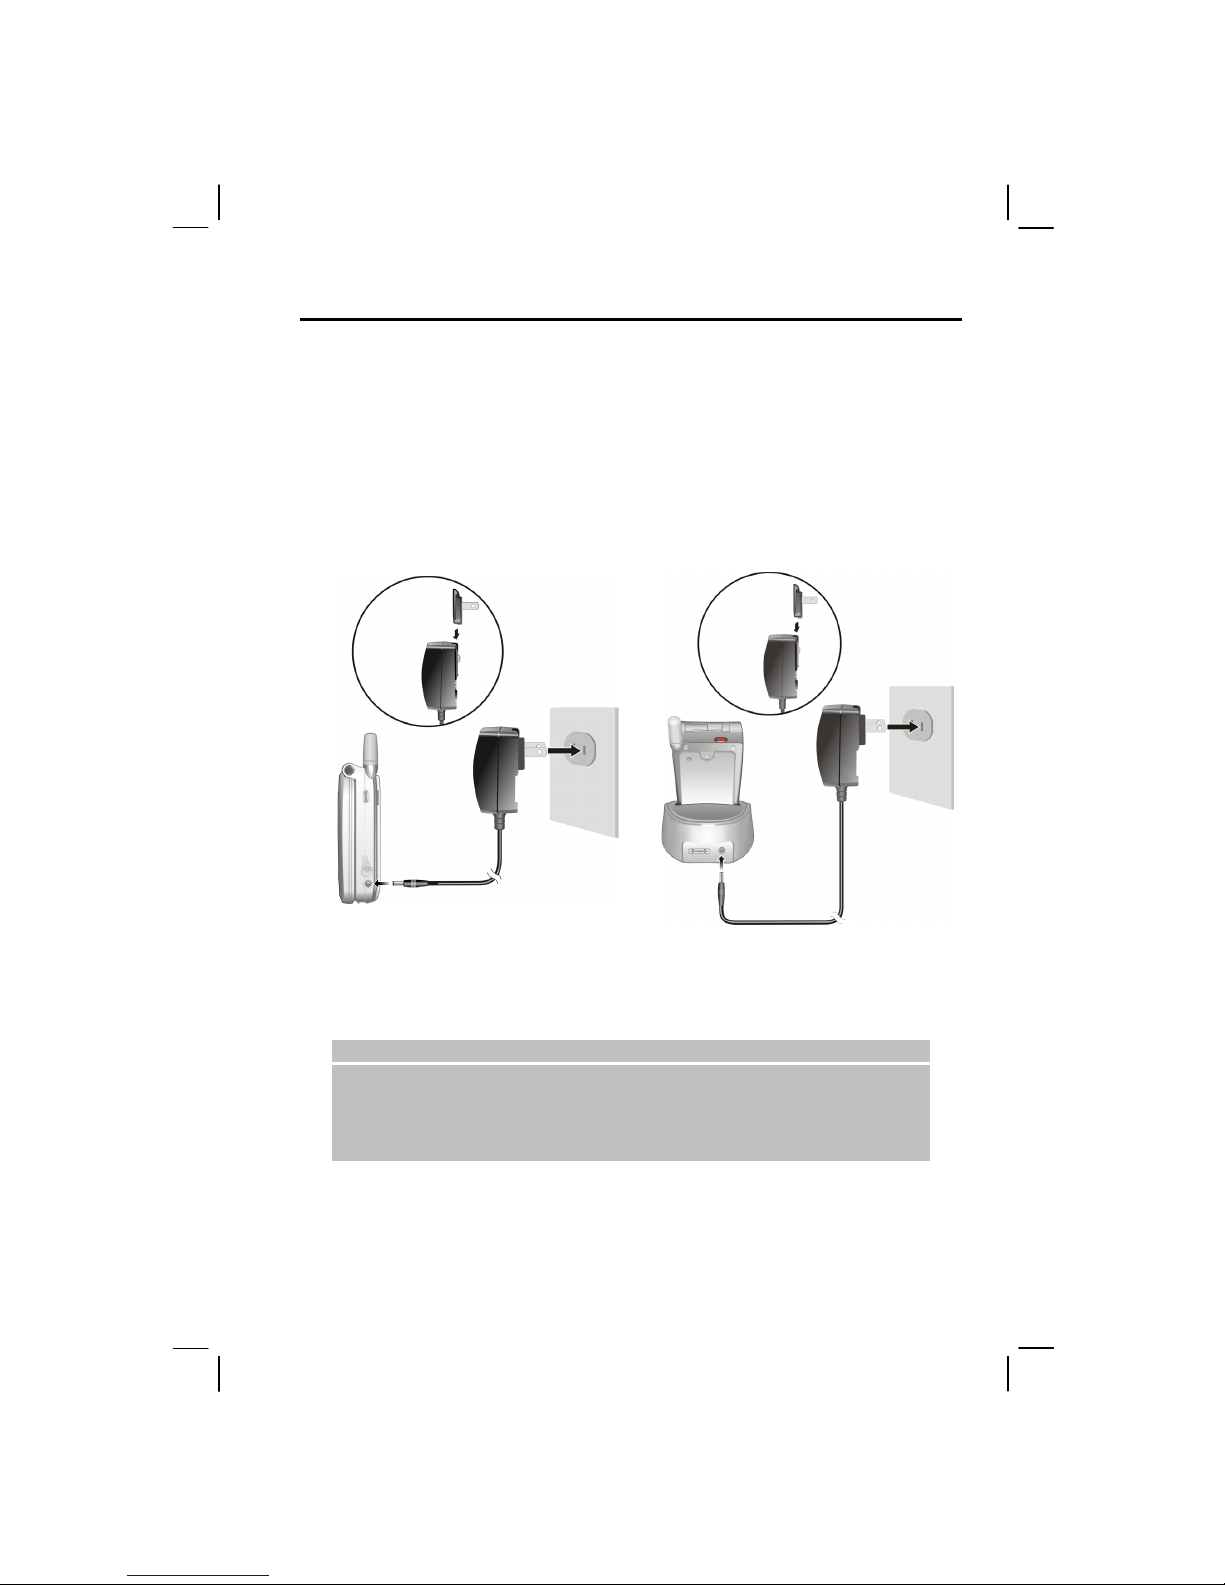
1.4
Charging the Battery
You must fully charge the battery before starting to use your Smartphone for the first time.
1.
Attach the converter to the AC adapter.
2.
If you have the cradle, you can place the Smartphone on the cradle to charge the battery.
Not using the cradle
Connect the DC end of the AC adapter
to the power connector on the right side
of the Smartphone, and the other end to
the electrical outlet on the wall.
Using the cradle
Slide the Smartphone into the cradle.
Connect the DC end of the AC adapter to
the power connector on the rear of the
cradle, and the other end to the electrical
outlet on the wall.
3.
The notification indicator on the Smartphone’s top cover glows in red to indicate that battery
charging is in progress. Do not disconnect the AC adapter until the battery is fully charged.
The indicator will change to green when the battery is fully charged.
_ NOTE`
When charging the battery for the very first time, you should charge it for at least eight hours.
A discharged battery can be fully charged after three hours. The charging time may vary under
different conditions.
You can use your Smartphone during charging.
converte
r
converter

8
1.5
Turning Your Smartphone On and Off
Turning On
1.
Open the top cover. Press the End button . The backlight of the keypad will glow, and
your Smartphone will display startup screens followed with a “beep” sound and then display
the Home screen.
2.
If the service provider (or you) has set the PIN, you will be prompted to enter the PIN. Enter
the PIN and press OK soft key. (For details on PIN, see “Locking the SIM Card” in section
2.4.)
3.
Your Smartphone starts to search the mobile network and the service provider’s name will be
displayed on the screen. You can now use your Smartphone.
_ NOTE`
You can turn off the radio (phone function) and use other functions of your Smartphone without
installing the SIM card. (To turn off the radio, see section 3.11.)
You can make your Smartphone play a melody during the startup process (See section 3.9.)
Turning Off
1.
Press and hold the End button until the Quick List appears.
2.
The first option is Power off. Press the Action button or OK soft key to turn off your
Smartphone.
Power Management
By default, your Smartphone will automatically turn off the screen’s and keypad’s backlight after
being idle for 30 seconds. In addition, your Smartphone may enter the sleep mode, causing the
screen to blank, after being idle for a specific time. To end the sleep mode, press and hold any key.
The screen will restore. (For information on Power Management, see “Power Management” in
section 4.2.)
_ NOTE`
The battery’s operating time relies on the mobile network status, the way you use your
Smartphone and the ambient environment. The power consumption is higher under the
following conditions:
•
Your Smartphone has to frequently search mobile network because of weak signals, moving
in high speed or being out of the range of the mobile network.
•
You use the vibration function, hands-free solution, alarm, play games or use the camera.
•
The backlight is on.
•
The phone’s volume is set to maximum.
•
The operating time is shorter in low temperatures.

9
1.6
Installing ActiveSync
You can use Microsoft ActiveSync technology to synchronize information on your desktop
computer or a Microsoft Exchange® Server with the information on your Smartphone. ActiveSync
compares the information on the Smartphone with the information on the desktop computer or the
server and updates all locations, keeping you up-to-date with the most recent information.
_ NOTE`
Before installation, make sure that you have Microsoft Outlook installed on your desktop
computer. If you do not have Outlook or your version of Outlook is earlier than the version
provided on the Companion CD, install Outlook from the Companion CD.
Do not connect your Smartphone to your desktop computer before ActiveSync is installed.
During the New Partnership setup, select “Synchronize with this desktop computer.” Do not
select “Synchronize with Microsoft Mobile Information Server and/or this desktop computer”
unless you are sure that your company is running Microsoft Mobile Information Server 2002 or
later. Contact your network administrator or ISP for detailed information.
ActiveSync is already installed on your Smartphone. You need to install ActiveSync on your
desktop computer. Follow the procedure below:
1.
Turn on your desktop computer.
2.
Insert the Companion CD into the CD-ROM drive of your desktop computer.
3.
Click the arrow on the first screen to enter the main screen and click Start Here.
4.
In the following screen, click Install ActiveSync 3.6 on the left column.
5.
In the following screen, click Install to start installation.
6.
If you use Windows XP, select Open when the “File Download” window appears on the
screen; if you use Windows 2000/Me/98, select Run this program from its current location
and click OK.
7.
Follow the onscreen instructions to install ActiveSync.
10
8.
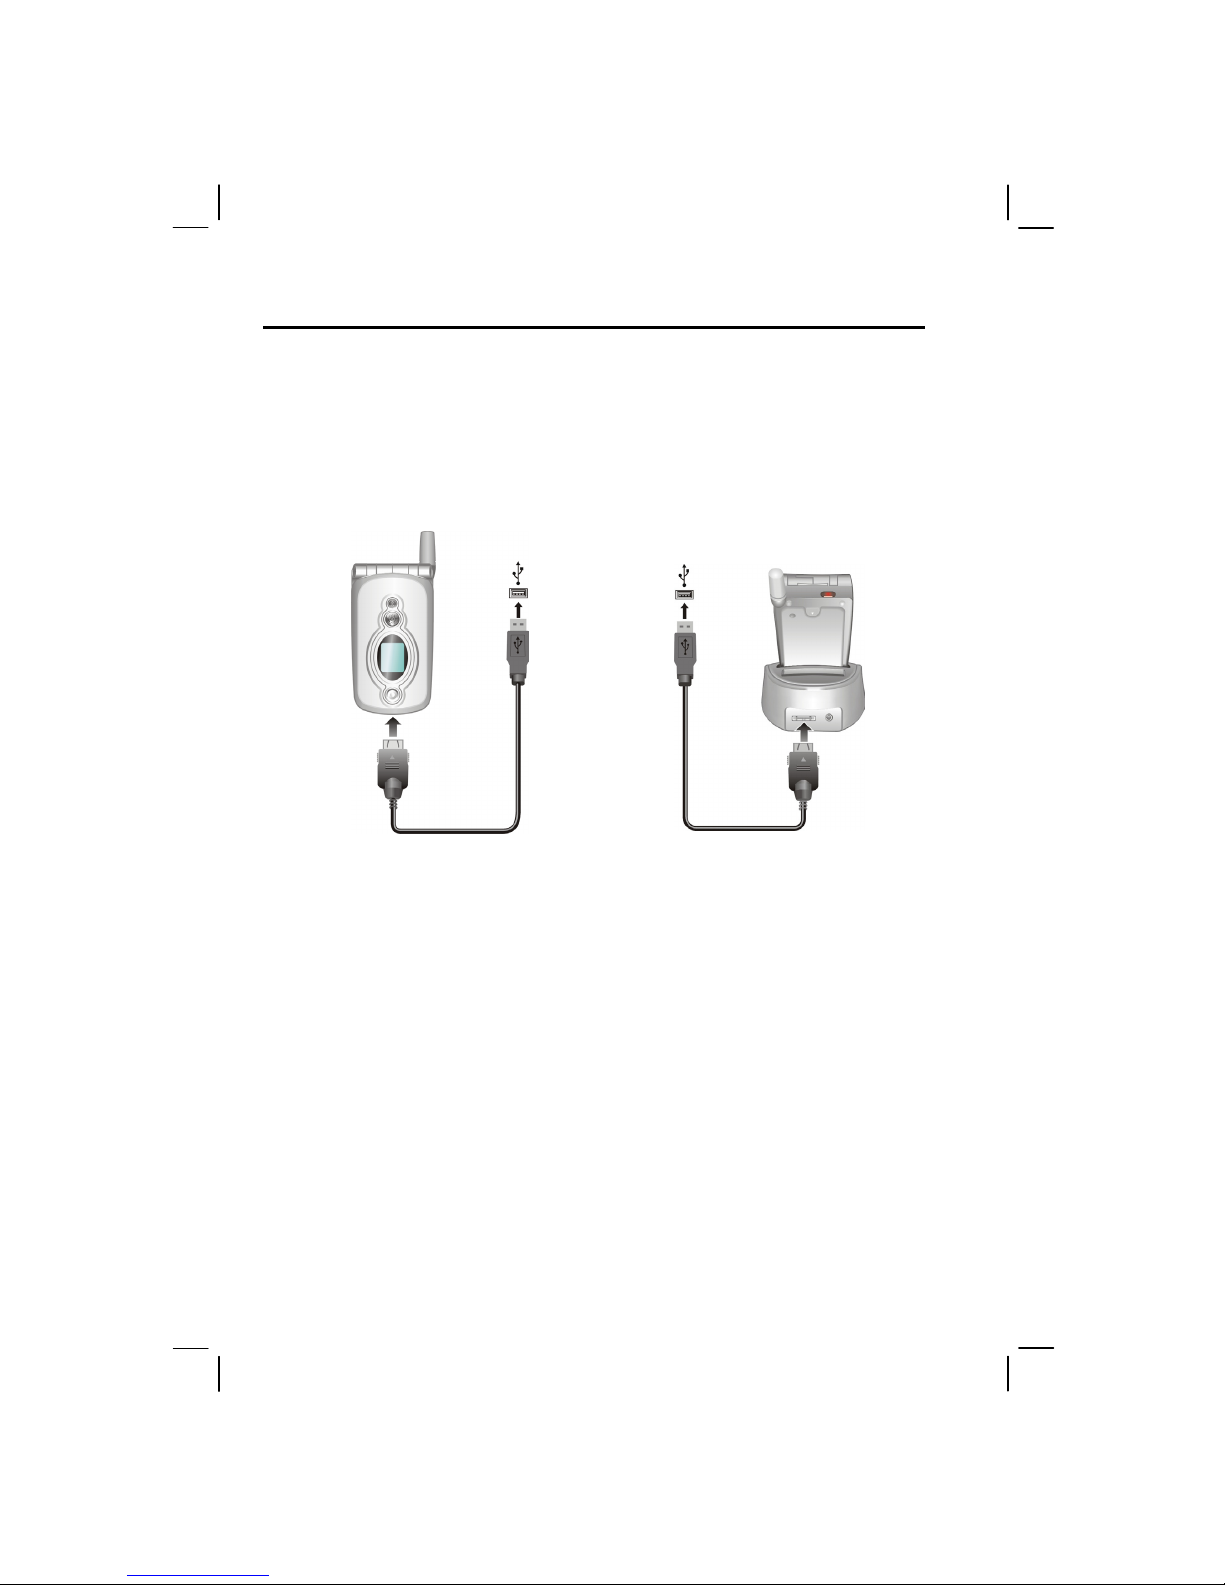
When prompted, connect your Smartphone to your desktop computer. If you have the cradle,
you can use it to connect.
Not using the cradle
Connect the appropriate end of the
ActiveSync cable to the bottom of the
Smartphone and the other end to a USB
port on your desktop computer.
Using the cradle
Slide the Smartphone into the cradle.
Connect the appropriate end of the
ActiveSync cable to the connector on the
rear of the cradle, and the other end to a
USB port on your desktop computer.
9.
The “Add New Hardware Wizard” should automatically install the USB driver. (If you need
to specify the location of the driver, click
Browse
and select the CD-ROM drive containing
the Companion CD.)
10.
Follow the onscreen instructions to establish a partnership and synchronize your Pocket PC
with your desktop computer.
11.
You will see the data saved in your Outlook (such as the Calendar, Contacts, and Tasks)
appears on your Smartphone. (For more information on ActiveSync, see Chapter 7.)
11
1.7
Expanding Your Smartphone
_ NOTE`
The availability of accessories from the Smartphone manufacturer may vary by regions. For the
latest information, please contact your local dealer.
The use of unauthorized accessories will void your Warranty
Depending on the model you purchased, the phone headset may be included as a standard
accessory.
Accessories
You can expand the capabilities of your Smartphone or facilitate your operation by purchasing
accessories designed for your Smartphone. For example, you can use the cradle, phone headset,
SD/MMC card, Car Charger, and Car Antenna.
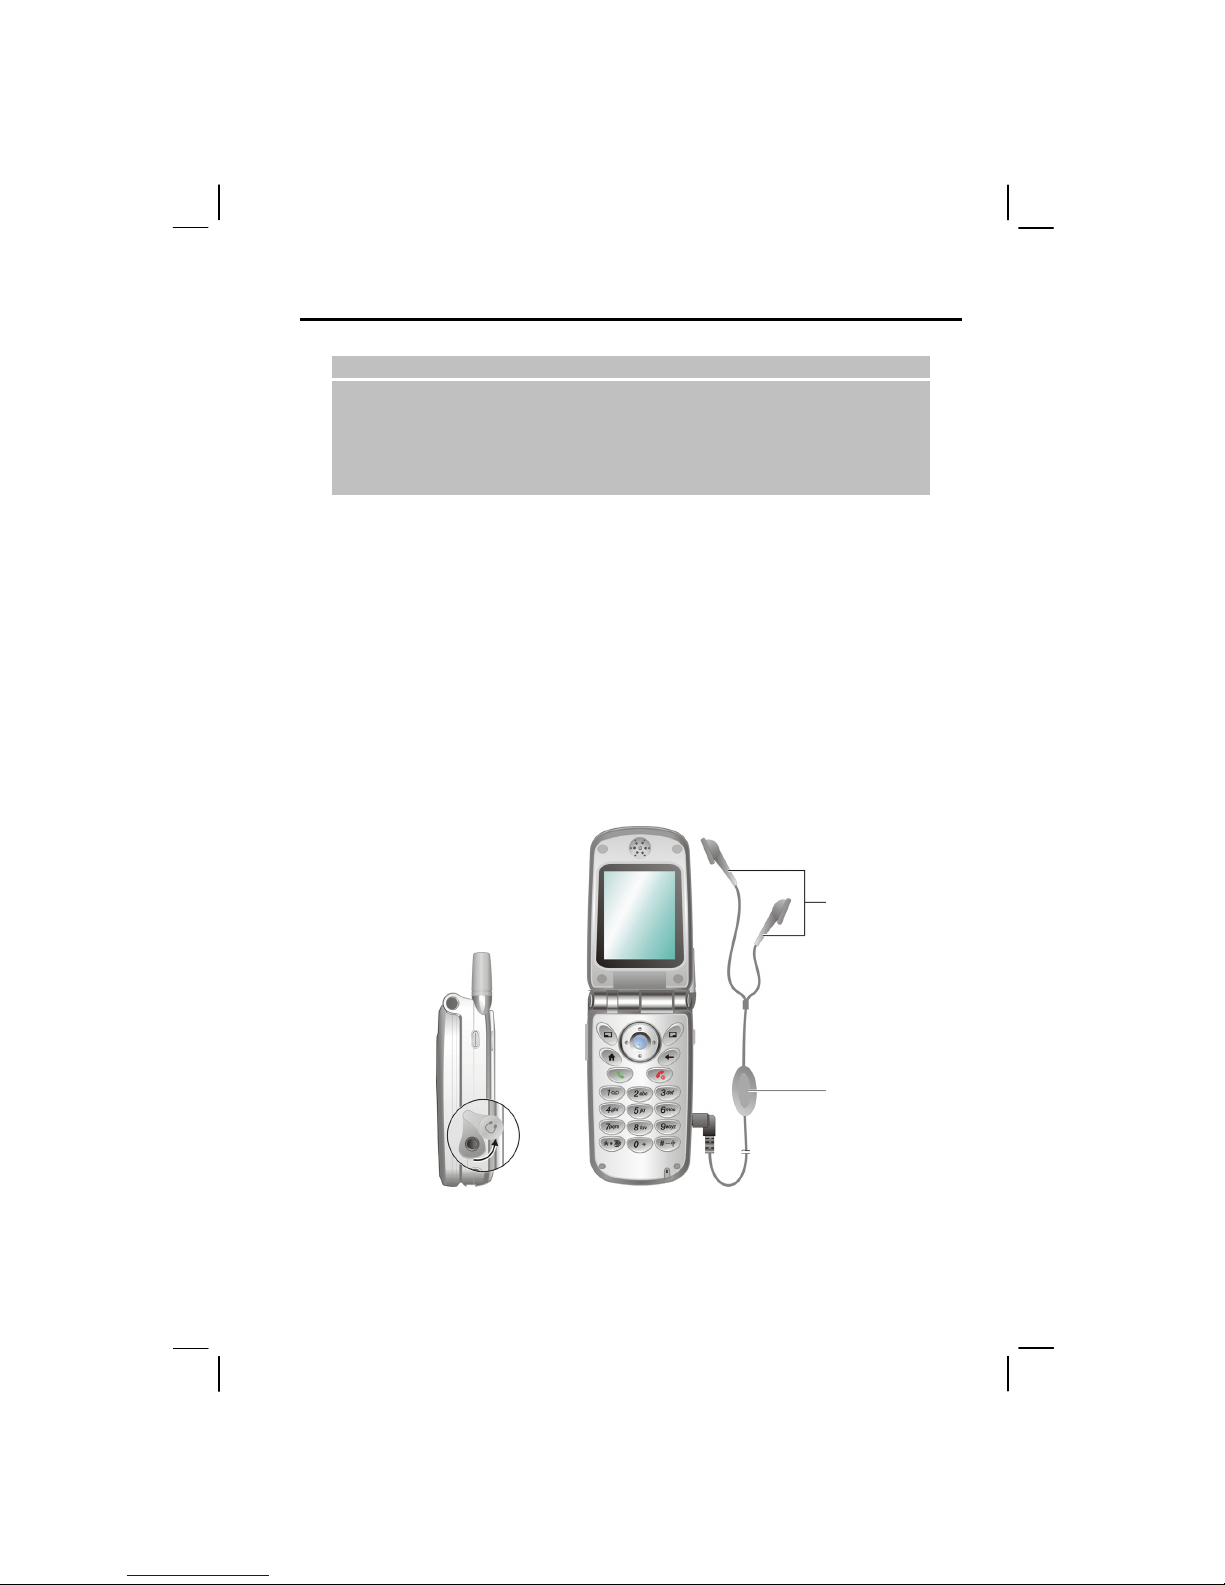
Using the Phone Headset
The phone headset includes a microphone and a set of earphone, allowing you to talk conveniently
using a hands-free solution.
Your Smartphone has an earphone connector on its right side. You can plug the phone headset after
opening the protective cover on the connector.
Earphone
Microphone
12
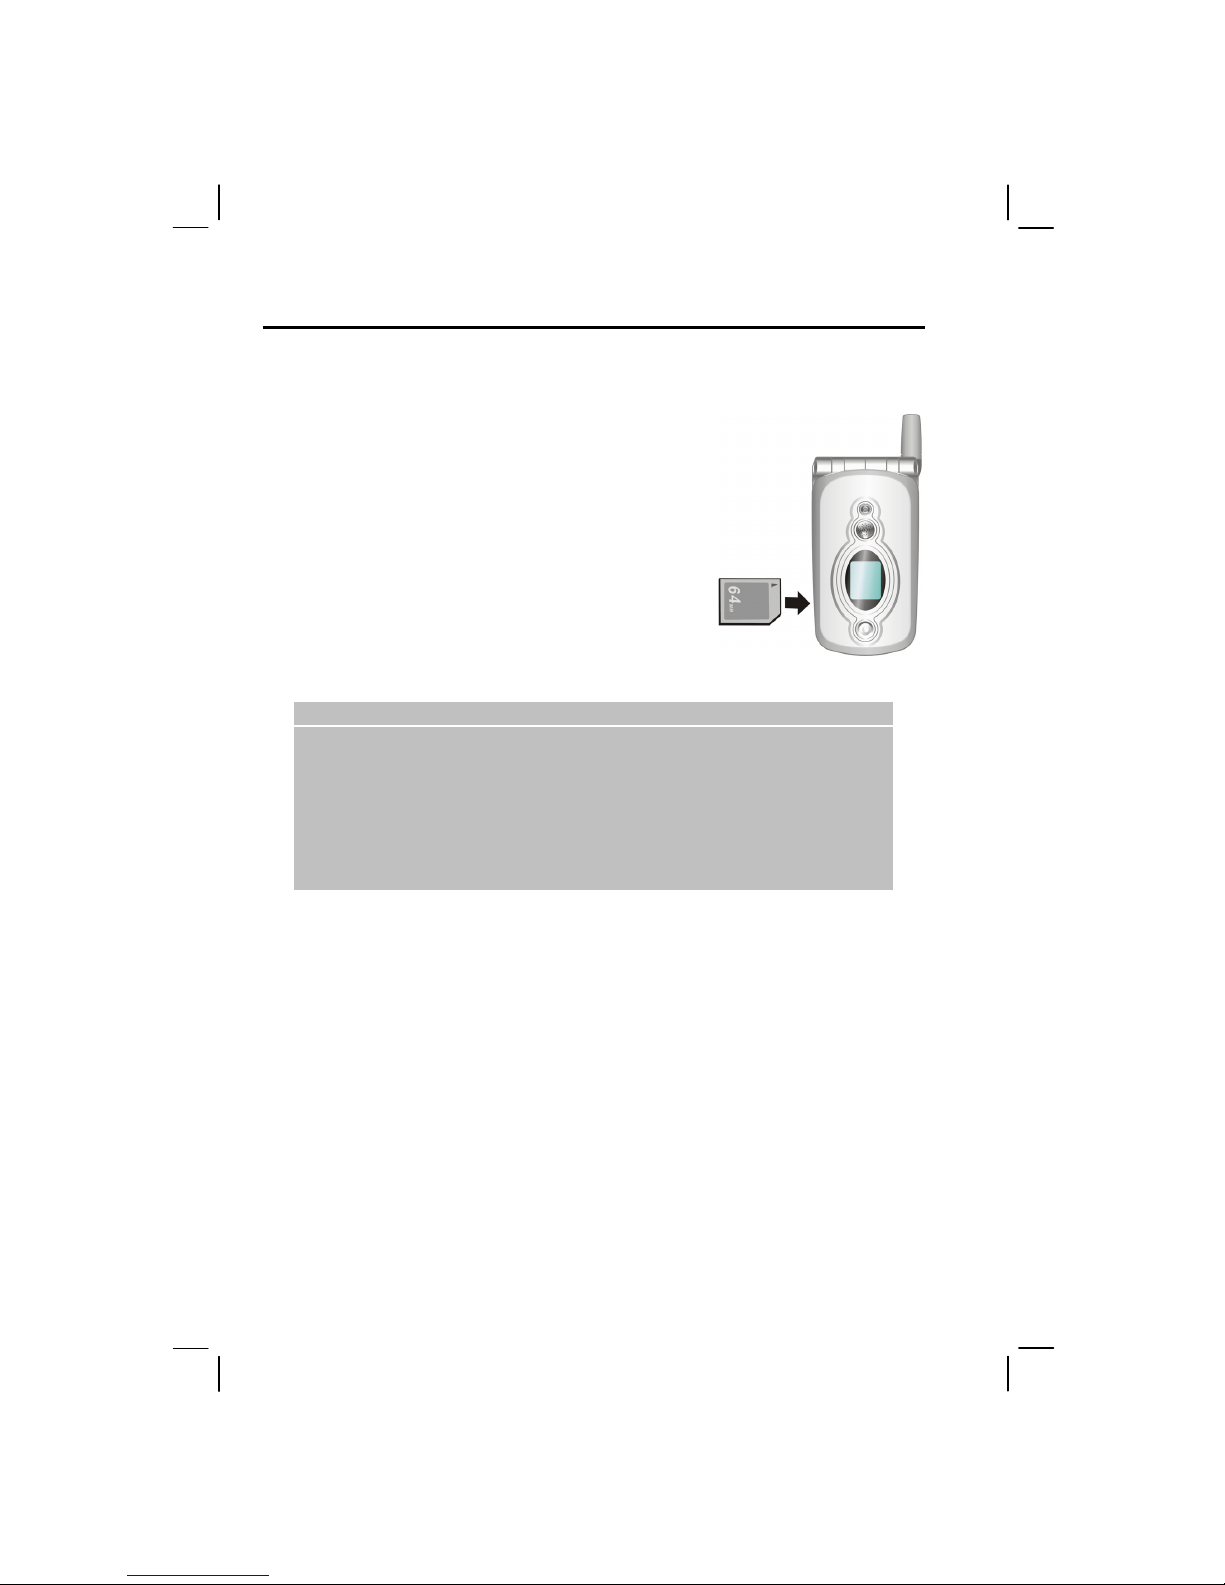
Using a SD/MMC Card
Your Smartphone has a SD/MMC card slot that accepts a SD
(Secure Digital) or MMC (MultiMediaCard) storage card. You
can purchase such cards if you need to expand the memory
capacity of your Smartphone.
To insert a SD/MMC card, insert the card with its label facing
the front and the connector pointing to the slot of the
Smartphone, as shown in the diagram. Then push it into the
slot until it clicks into place.
To remove a card, first make sure that no application is
accessing the card, then slightly push the top edge of the card
to release it and pull it out of the slot.
_ NOTE`
A storage card is also called as a memory card.
For more information, please refer to the document of the SD/MMC card.
If there is a dummy card inserted in the SD/MMC card slot, remove it before inserting a SD/MMC
card. Insert the dummy card inside the slot when you are not using a SD/MMC card.
Make sure that no foreign objects enter the SD/MMC card slot.
Keep a SD or MMC card in a well-protected box to avoid dust and humidity when you are not
using it.

13
2
Basic Skills
This chapter familiarizes you with the basic operations of your Smartphone, such as using the
Navigation Button, understanding the Home screen and screen elements, entering text and numbers
and taking care of your Smartphone.
This chapter includes:
2.1 Navigation Methods.........................................14
2.2 Home Screen and Screen Elements..................16
2.3 Entering Text and Numbers.............................20
2.4 Securing the Smartphone.................................23

14
2.1
Navigation Methods
Your Smartphone has various buttons that allow you to move around and select. This is particularly
useful for one-hand operation.
Navigation Pad
The Navigation Pad consists of four buttons. You can use them to move
horizontally and vertically on the screen for selecting the item you want.
If you are in a text field, pressing the Left/Right button allows you to
move the cursor between the text blocks.
Action Button
The Action button confirms your selection. You can think of the Action button
as the “Do It” button. In some cases, confirming your selection will take you to
a program or setting.
Home Button
The Home button takes you to the Home screen, the main screen of the
Smartphone.
Back Button
The Back button navigates to the previous screen.
When you are typing text, the Back button moves the cursor back to delete the
character in a text field. Pressing and holding the Back button deletes multiple
characters.
UP
Down
Left
Right
Action Button
15
Soft Keys
There are two soft keys on the two sides of your Smartphone,
located directly below the display screen.
Each soft key performs the command displayed immediately
above it on the screen, making it easy to navigate around the
Smartphone and to perform common commands.
Numeric Keypad
You can use numbers to navigate quickly to programs and settings on
your Smartphone. Just press the number on the keypad that corresponds
to the number shown next to the program or setting you want.
Though options in a Menu are normally not labeled with numbers, you
can still use numbers to select menu options by pressing the number that
corresponds to the menu options in top-down order.
Right Soft Key
Left Soft Key
16
2.2
Home Screen and Screen Elements
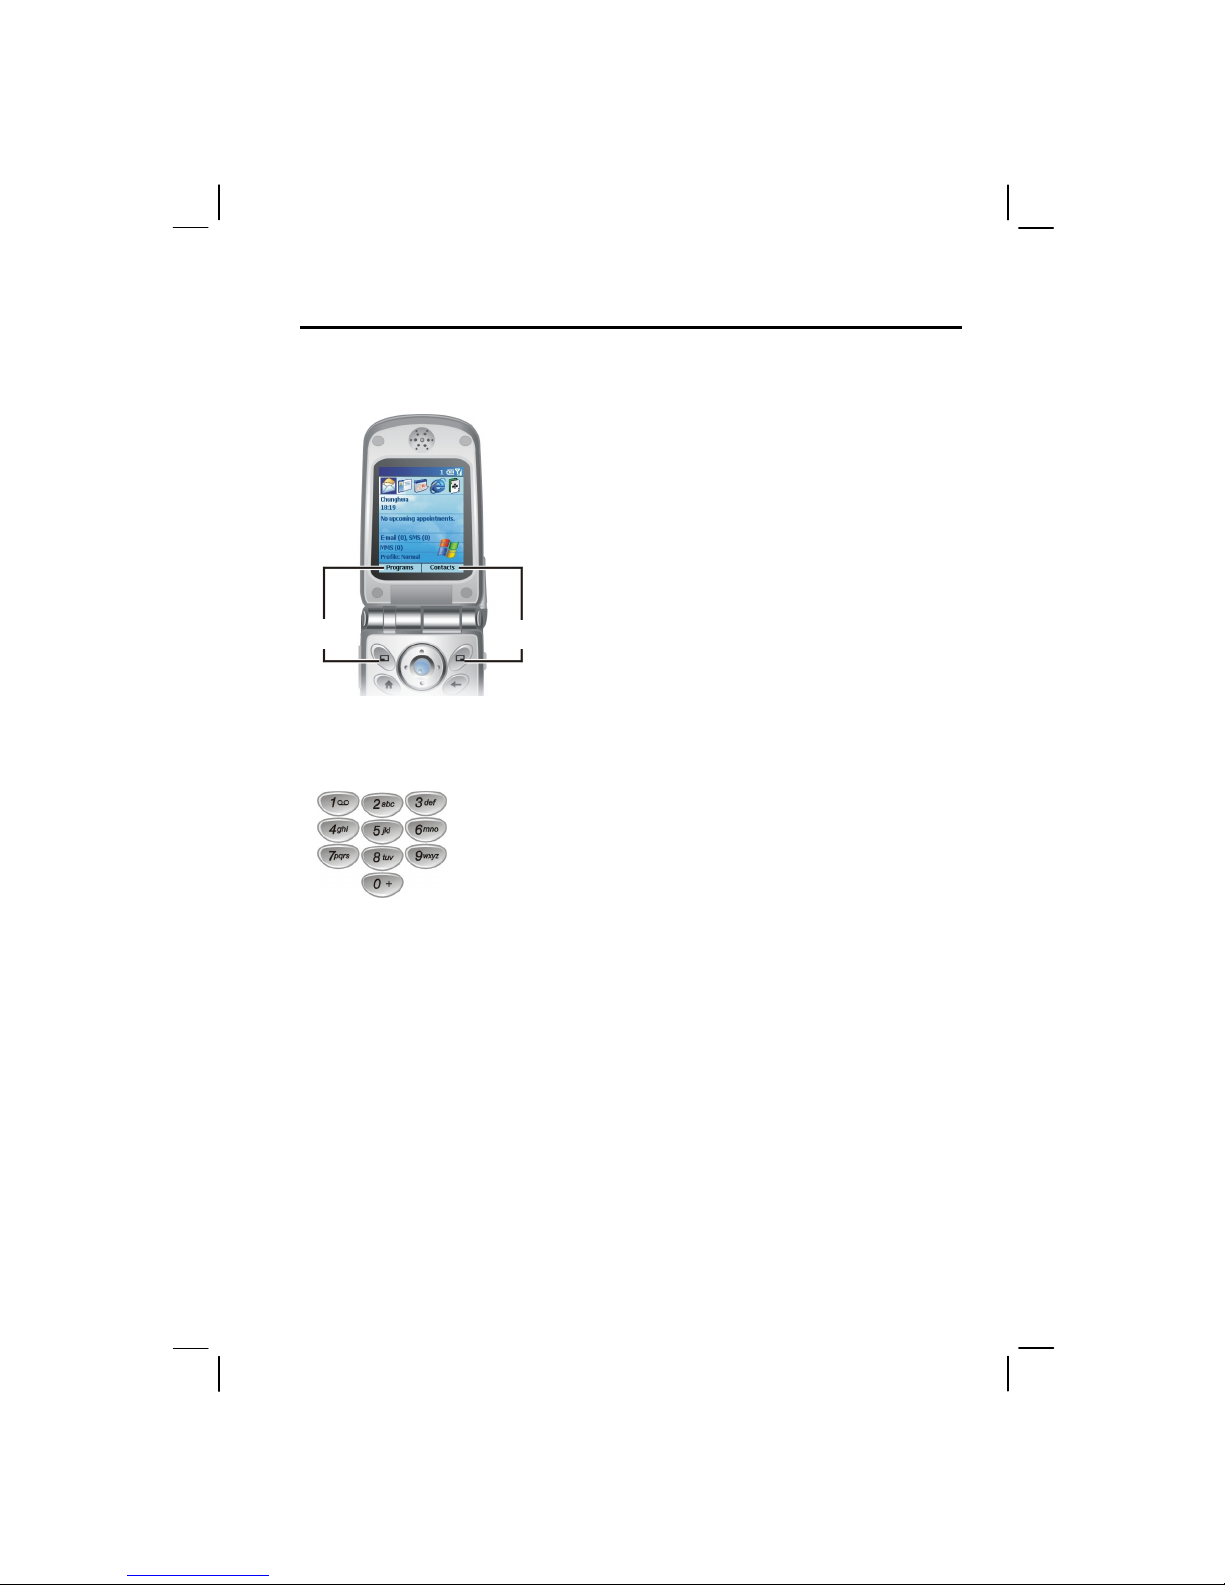
Home Screen
The Home screen is your starting place for most tasks. The screen automatically displays when you
turn your Smartphone on or leave it idle. You can navigate to the Home screen at any time by
pressing the Home button.
The top of the Home screen displays the five programs you have most recently used. It also displays
the current time, your next appointment, the number of new messages in Inbox, and your current
profile. You can open an associated program quickly by using the navigation pad to move around
and then pressing the Action button.
Mio Program List
“Mio program list” is the default Home screen of your Smartphone. It provides a shortcut for
opening the Mio program list. When you press the Down button to select Mio program list and
press the Action button, you will see on the screen nine large icons (as shown below). From here,
you can easily navigate to any program or setting on the Smartphone.
Each large icon represents a program or folder. Use the navigation pad to select an icon and press
the Action button to open the program, if it is a program icon, or open the folder, if it is a folder
icon. When you open a folder, you will see other program icons.
Select and press the Action
Button to open your most
recently-used programs.
Next appointment
Open Mio program list.
Number of unread messages
Current profiles
Status Bars
Program/Folder Icons
Left Soft Ke
y
Right Soft Key

17
The nine icons are described below:
Icon Function Refer to
MMS To receive and send MMS. Software Manual
Ring tone To select a ring tone. Section 3.9
Settings This folder contains the following program
icons:
Date-Time
Language
Home screen
Backlight
Chapter 4
Game MetalStrike Software Manual
Mio To connect to the manufacturer’s website
(www.justmio.com).
NOTE: Make sure that you
have set up the connection.
Others
jBrowser
and other programs you installed.
Software Manual
PhoneViewer To view JPEG and BMP pictures Software Manual
VideoPlayer To view the videos you recorded using your
Smartphone.
Software Manual
Product Service To view and access the service information
such as web site and telephone.
NOTE: Make sure that you
have set up the connection.
The soft keys on Mio program list screen are Camera and PhoneBook.
Soft Keys Function Refer to
Camera To take photos and record videos. Software Manual
PhoneBook To manage the phone numbers stored on the
SIM card.
Section 3.5
_ NOTE`
In addition to the “Mio program list” layout for the Home screen, Microsoft provides four layouts.
(For information on selecting the layout, see “Home Screen” in section 4.1.)
18
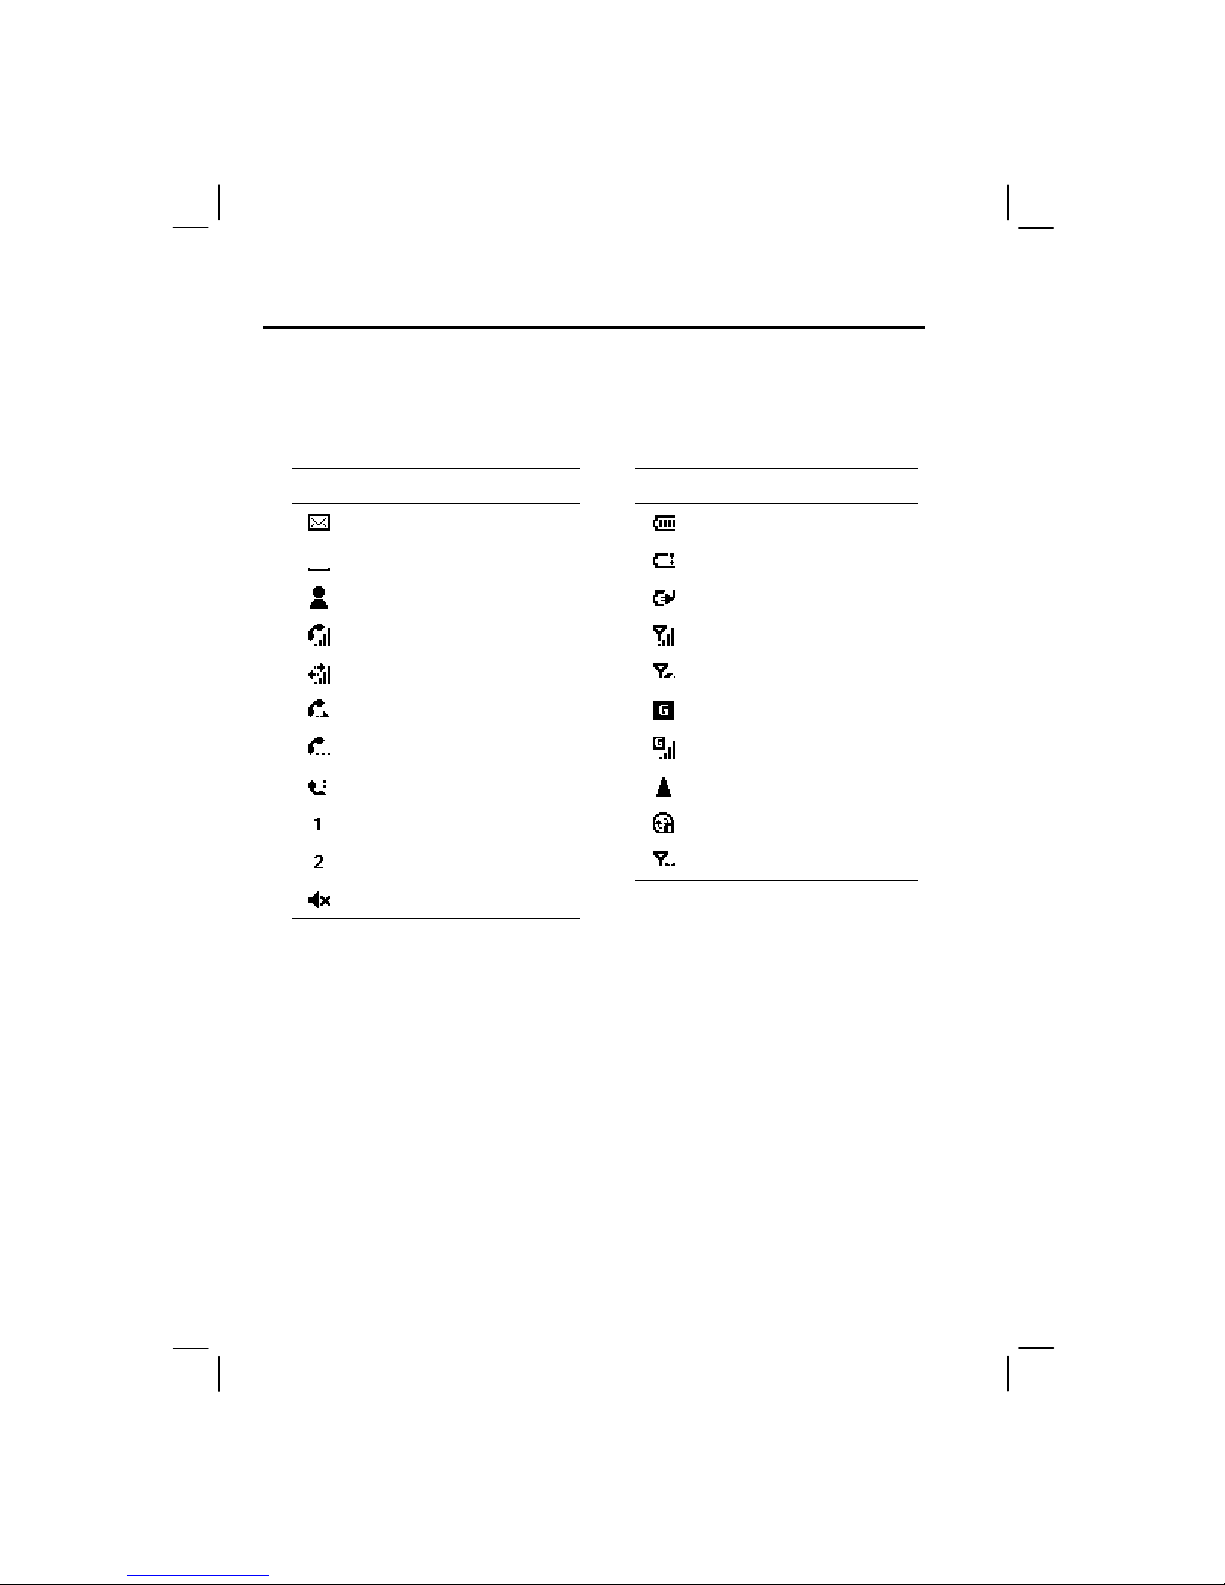
Status Icons
Status icons are displayed at the top of the Smartphone’s screen. The following table lists common
status icons and their meanings.
Icon Meaning Icon Meaning
New e-mail or SMS.
Battery level.
New voice mail.
Low battery.
New instant message.
Battery charging.
Voice call active.
Signal strength.
Data call active.
No signal.
Call forwarding.
GPRS available.
Call on hold.
GPRS in use.
Missed call.
Roaming.
Line 1.
Sync error.
Line 2.
Radio off.
Ringer off.
19
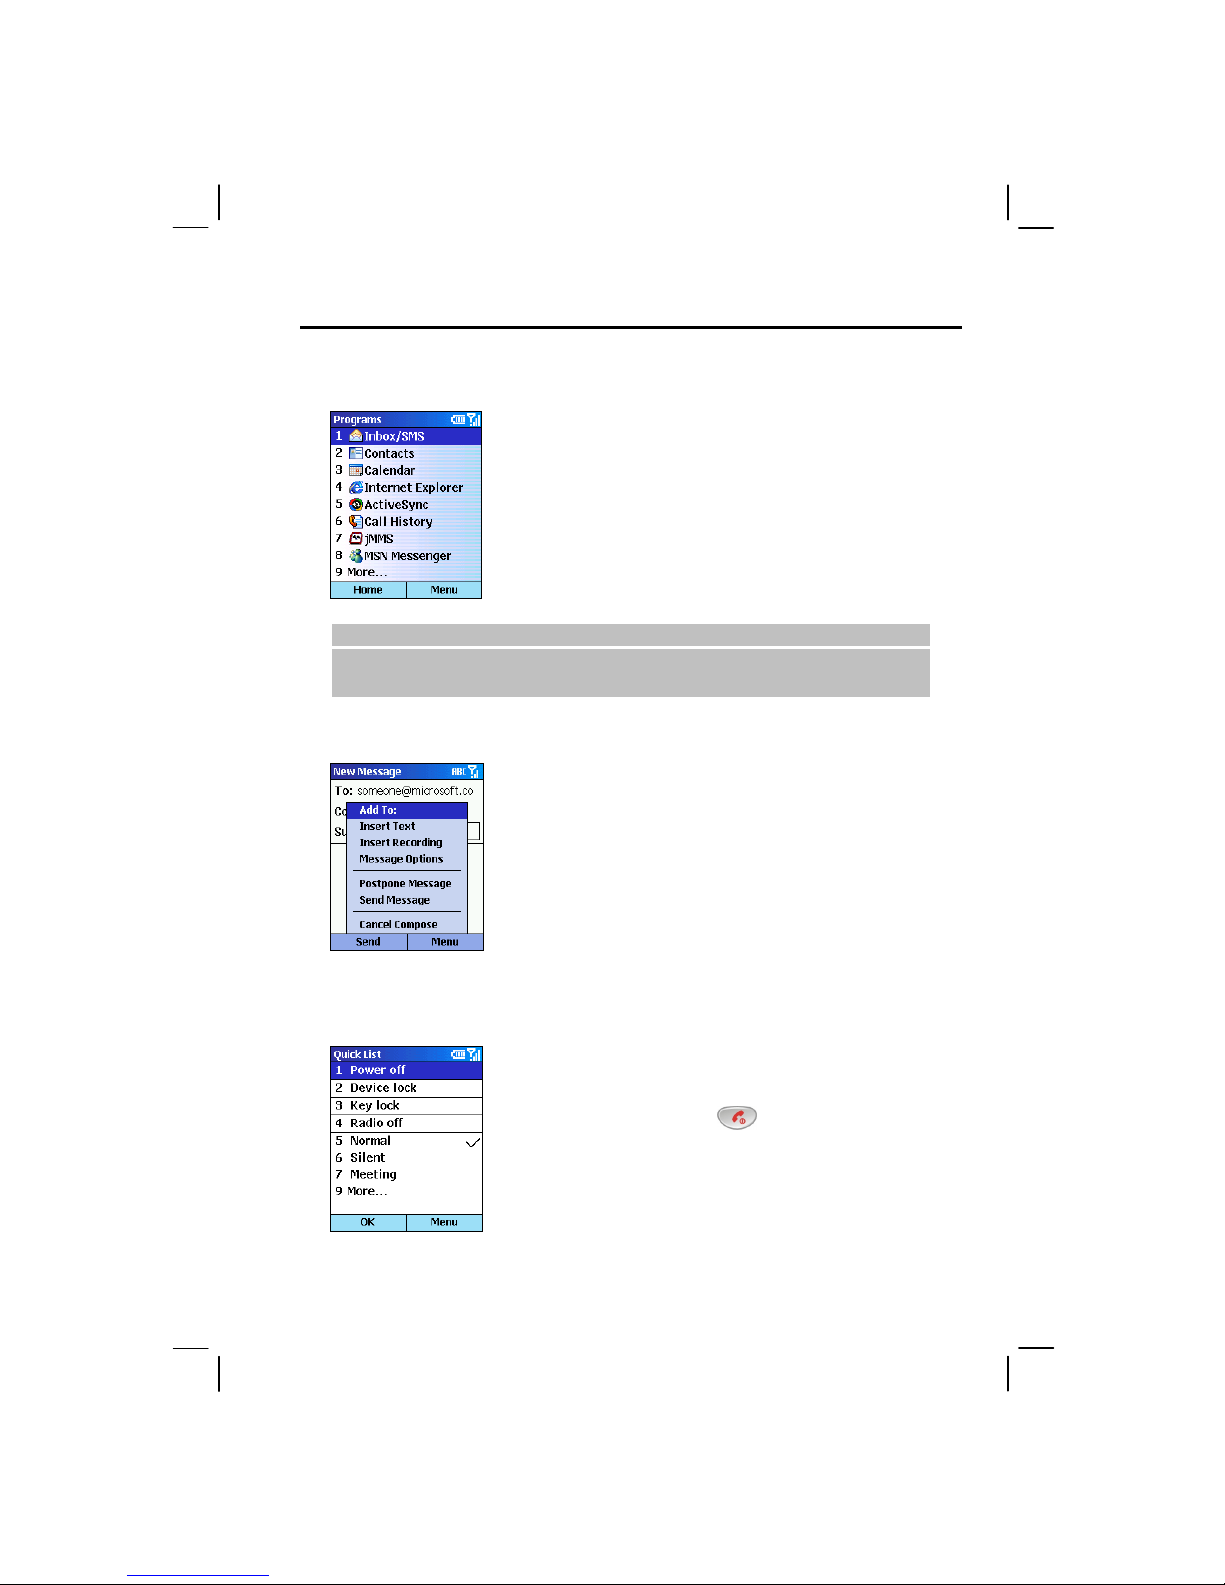
Programs
Your Smartphone comes pre-installed with many programs that you
can start using.
The left soft key of the Home screen is Programs. When you pressing
the Programs soft key, you will see the programs list. You can press
the Up/Down button to select a program and then press the Action
button to open the program.
The More option in the list indicates that you can select More to
access the next page of the list.
_ NOTE`
If your SIM card supports the STK (SIM Tool Kit) function, you can also run the program(s) in the
SIM card.
Menus
On many screens, the right soft key is labeled Menu. The Menu soft
key displays a list of menu options that are relevant to the screen you
are viewing. Selecting a menu option will either perform the
command or take you to another part of the user interface where you
can perform the command.
Quick List
The Quick List allows you to quickly perform a command, such as
locking the Smartphone, turning off the radio, and changing the
profile type.
Press and hold the End button
until the Quick List appears;
then, press the number to perform the command; or, press the
Up/Down button to select an option and the press the Action button or
OK soft key.
 Loading...