

Page 1
SERVICE MANUAL FOR
8050
BY:
Repair Technology Research Department /EDVD
Repair Technology Research Department /EDVD
Grass
Grass
Feb.2004
.Ren
.Ren
Page 2
Contents
8050
8050
N/B Maintenance
N/B Maintenance
1. Hardware Engineering Specification …………………………………………………………………..
1.1 Introduce ……………………………………………………………………………………………….
1.2 System Overview ……………………………………………………………………………………….
1.3 System Hardware Parts ………………………………………………………………………………....
2. System View & Disassembly …………………………………………………………………………..
2.1 System View …………………………………………………………………………………………...
2.2 System Disassembly …………………………………………………………………………………….
3. Definition & Location of Connectors / Switches Setting ………………………………………………
4. Definition & Location of Major Component …………………………………………………………..
5. Pin Description of Major Component…………………………………………………………………..
5.1 Pentium4 (Willamette/Northwood) processor …………………………………………………………...
5.2 Sis650 North Bridge …………………………………………………………………………………….
5.3 Sis962 South Bridge …………………………………………………………………………………….
6. System Block Diagram ……………………………………………………….………………………….
7. Maintenance Diagnostics ………………………………………………………………………………..
7.1 Introduction ……………………………………………………………………………………………
7.2 Debug Card ……………………………………………………………………………………………
7.3 Error code……………………………………………………………………………………………..
3
3
6
9
34
34
37
57
60
62
62
66
75
83
84
84
85
86
1
Page 3
Contents
8050
8050
N/B Maintenance
N/B Maintenance
8. Trouble Shooting …………………………………………………………………………………………
8.1 No Power ……………………………………………………………………………………………….
8.2 Battery Can not Be Charged …………………………………………………………………………….
8.3 No Display ……………………………………………………………………………………………..
8.4 External Monitor No Display …………………………………………………………………………....
8.5 Memory Test Error …………………………………………………………………………………….
8.6 Keyboard/Touch-pad Test Error ………………………………………………………………………..
8.7 USB Port Test error……………………………………………………………………………………..
8.8 Hard Disk Drive Test Error……………………………………………………………………………...
8.9 CD-ROM Test Error ……………………………………………………………………………………
8.10Audio Test Failure……………………………………………………………………………………..
8.11 LAN Test Error ……………………………………………………………………………………….
8.12 Modem Test Error…………………………………………………………………………………….
8.13 Mini-PCI Test Error……….. ………………………………………………………………………...
8.14 Card Bus&Reader Test Error…………………………………………………………………………..
8.15 TV Encoder Test Failure ………………………………………………………….…………………
8.16 IEEE1394 Test Failure …………………………………………………………………………….…..
9. Spare Parts List ………………………………………………………………………………………….
89
90
95
97
103
105
107
109
111
113
115
118
120
122
124
126
128
130
10. System Exploded View …………………………………………………………………………………
11. Circuit Diagram ………………………………………………………………………………………..
12. Reference Material …………………………………………………………………………………….
141
142
176
2
Page 4

8050
8050
N/B Maintenance
N/B Maintenance
1. Engineer Hardware Specification
1.1 Introduce
The MiTAC 8050 model is designed for Intel Ba nias processor with 400MHz FSB with Micro-FCPGA package.
It can support Banias 1.5G ~ 1.9GHz/Dothan 2.0GHz and above.
This system is based on PCI architecture and is fully compatible with IBM PC/AT specification, which has
standard hardware peripheral interface. The power management complies with Advanced Configuration and
Power Interface (ACPI) 2.0. It also provides easy configuration through CMOS setup, which is built in system
BIOS software and c an be pop-up by pressing F2 key at system start up or warm reset. System also provides icon
LEDs to display system status, such as AC Power indicator, Battery Power indicator, Battery status indicator,
HDD,CD-ROM, NUM LOCK, CAP LOCK, SCROLL LOCK, RF on/off Card Reader indicator. It also equipped
with LAN, 56K Fax MODEM, 3 USB port, S-Video and audio line in/out , external microphone functio n.
The memory subsystem supports two expansion DDR SDRAM slot with unbuffered PC1600/PC2100 DDRSDRAM.
The Montara-GME GMCH Host Memory Controller integrates a high performance host interface for Intel
Banias processor, a high performance 2D/3D Graphic Engine, a high perform ance memory controller, Dig ital
Video port (DVOB & DVOC) interface, and Intel Hub interface Technology connecting with Intel 82801DBM
ICH4-M.
The Intel ICH4-M integrates three Universal Serial Bus 2.0 Host Controllers Interface (UHCI), the Audio
Controller with AC97 interface, the Ethernet includes a 32-bit PCI controller, the IDE Master/Slave controllers,
3
Page 5

8050
8050
and Intel Hub interface technology.
The MOBILITY M10 provide s one of the fastest and most advanced 2D, 3D, and multimedia graphics 2
performance for notebooks. It’s architecture introduces the latest achievements in the graphics industry, which
enable the use of the progressive new features in upcoming applications, but without compromising performance.
ATIs support of support of DirectX® 9 features, highly optimized Open GL® support, and flexible memory
configurations allow implementations targeted at the gaming enthusiast, consumer, business and workstation
platforms.
The Realtek RTL8100C(L) is a highly integrated, cost-effective single-chip Fast Ethernet controller that provides
32-bit performance, PCI bu s master capability, and full compliance with IEEE 802.3u 100Base-T specifications
and IEEE 802.3x Full Duplex Flow Control. It also supports t he Advanced Configuration Power management
Interface (ACPI).
N/B Maintenance
N/B Maintenance
The VT6307L is a si ngle chip PCI Host Con troller for IEEE 1394-1995 Release 1.0 and IEEE 1394a P2000. It
implements the Link and PHY layers for IEEE 1394-1995 High Performance Serial Bus specification release 1.0
and 1394a P2000. It is compliant with 1 394 Open HCI 1.0 and 1.1 with DMA e ngine support for high
performance data transfer vi a a 32-bit bus master PCEI host bus interface. The VT6307L supports 100, 200 and
400 Mbit/sec transmission v ia an integrated 2-p ort PHY. The VT6307L services two types of data packets:
asynchronous and isochronous(real time). The 1394 link core performs arbitration requesting, packet generation
and checking, and bus cycle master operations. It also has root node capability and performs retry operations.
The RICOH R5C592 CardBus/Media Reader controller functions as a single slot PCI to Cardbus bridge and also
PCI interface smart card and MS/SD/MM C flash card reader. The R5C592 provide one Cardbus slot and all reader
interface may operate simultaneously.
4
Page 6

8050
8050
The CH7011A is a di splay controller dev ice which accepts a digital gra phics input signal, and encodes and
transmits data to a TV output (analog composite, s-video or RGB). The device accepts data over one 12-bit wide
variable voltage data port which supports five different data format including RGB and YcrCb. The TV-Out
processor will perform non-interlace to interlace conversion with scaling and flicker filters, and encode the data
into any of the NTSC or PAL video standards. The scaling and flicker filter is adaptive and programmable to
enable superior text display. Eight graphics resolutions are supported up to 1024 X 768 with full vertical and
horizontal under scan capability in all modes. A high accuracy low jitter phase locked loop is integrated to create
outstanding video quality. Support is provided for Macrovision and RGB bypass mode which enable driving a
VGA CRT with the input data.
The W83L950D is a high performance m icrocontroller on-chip supporting func tions optimized for embedded
control.These include ROM, RAM, four types of timers, a serial communication interface, optional I²C bus
interface, host interface, A/D converter, D/A converter, I/O ports, and other functions needed in control system
N/B Maintenance
N/B Maintenance
configurations, so that compact, high performance systems can be implemented easily.
A full set of software drivers and utilities are available to allow advanced operating systems such as Windows ME,
Windows 2000 and Windows XP to take full advantage of the hardware capabilities . Features such a s bus
mastering IDE, Plug and Play, Advanced Power Managem e nt (APM) with application restart, software-controlled
power shutdown.
Following chapters will have more detail description for each individual sub-systems and functions.
5
Page 7
8050
8050
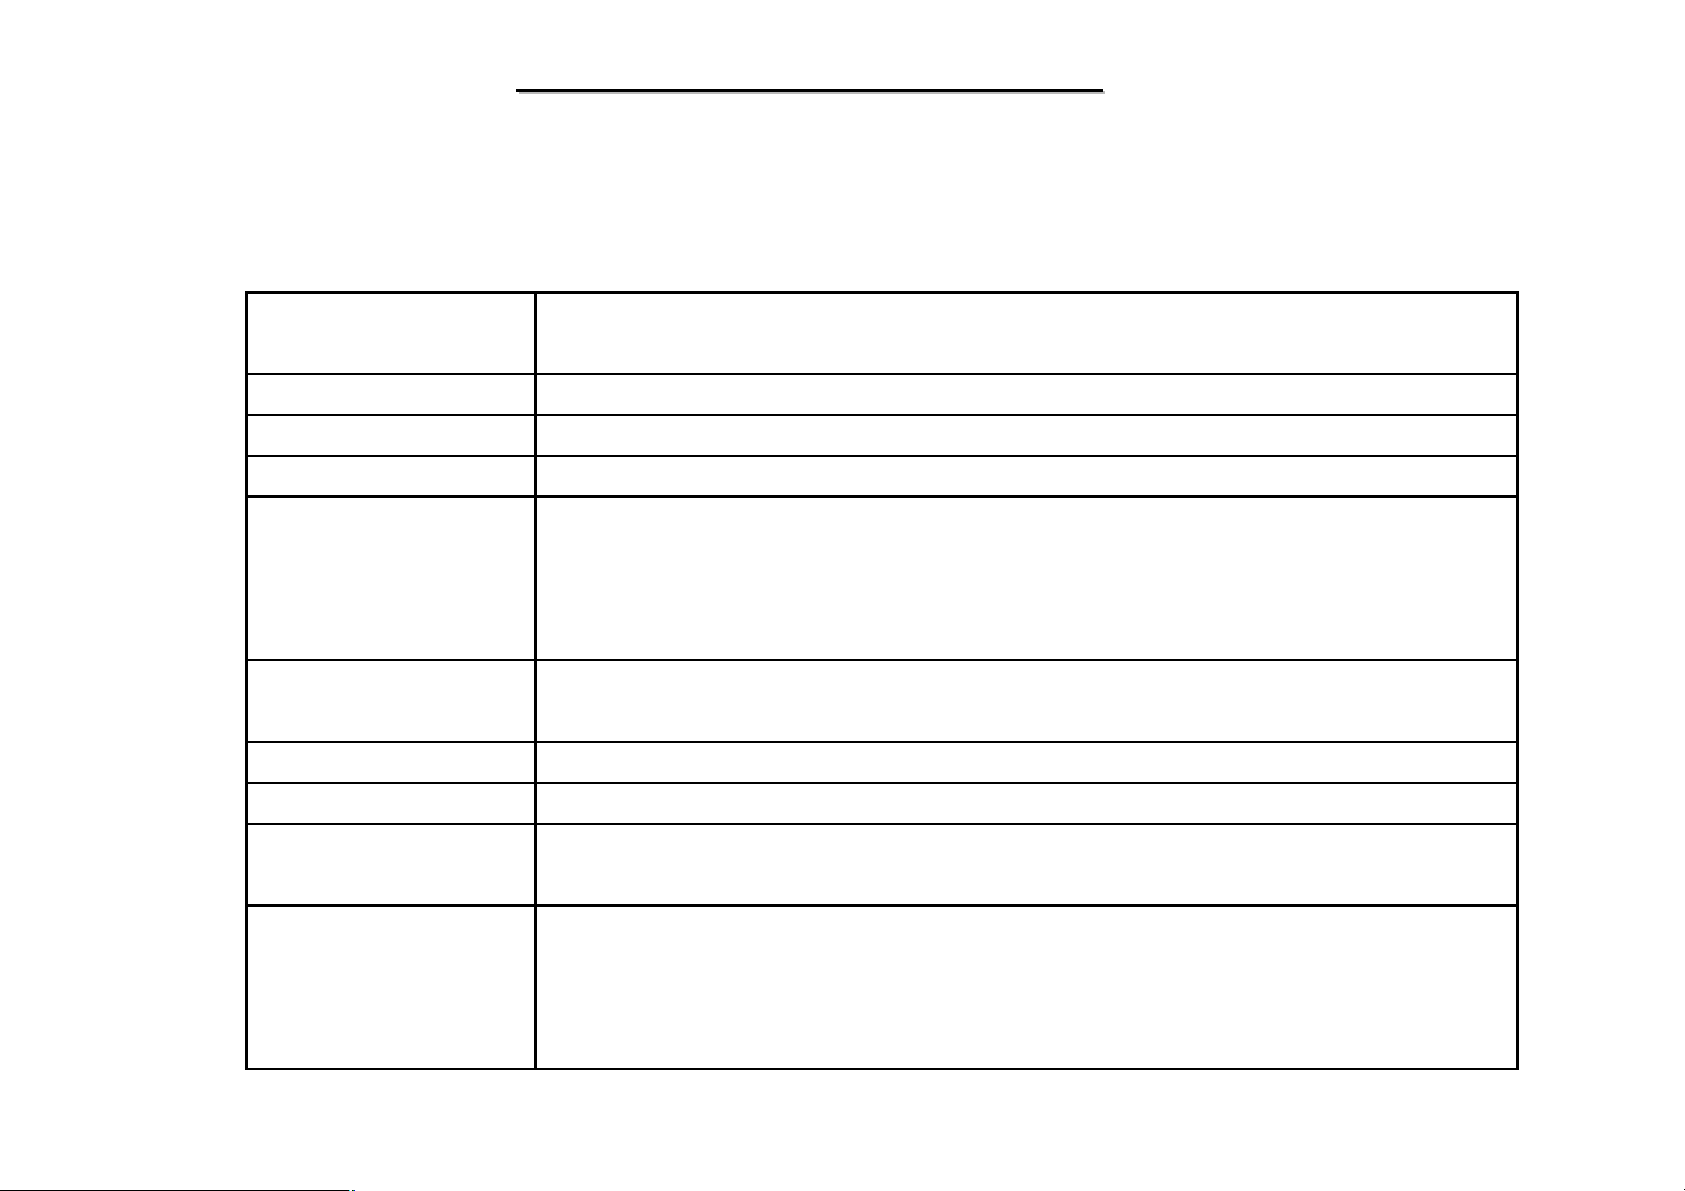
1.2 System Overview(1)
N/B Maintenance
N/B Maintenance
CPU
Chip Set
L2 Cache
System BI OS
Memory
Video Controller
Optical drive
FDD
HDD
Intel Mobile Pentium-M Processor 1.5G ~ 1.9GHz/Dothan 2.0GHz and above
-Thermal spec 35W TDP
Intel 855GME+ICH4
1MB on-die for Pentium-M/ 2MB for Dothan
512KB Flash EPROM - include System BIOS, VGA BIOS - Plug&Play capability -ACPI
0MB DDR266/333 SDRAM memory on board
- 200pin DDR266/333 SDRAM SO-DIMM Memory Module
- Expandable to 1,024MB
- 1.25-inch height memory module supported
1.SMA
2.Reserve external VGA for Ati M10/M11
Combo / DVD-RW, DVD-RAM (12.7mm)
External USB I/F Option
2.5" 30GB / 40GB / 60GB / 80GB HDD(9.5mm) 4200rpm or 5400rpm
Display
- Ultra DMA 100
15.4" Wide WXGA+ TFT
-Resolution: 1280x800
- 1 CCFT Typical 185cd/m2
-16.77 Million Colors with dithering
6
Page 8
8050
8050
1.2 System Overview(2)
Continue to previous page
N/B Maintenance
N/B Maintenance
Keyboard
Pointing Device
Audio System
Card Reader
I/O Port
US/UK/Japanese keyboard layout(Use the Orignal KBD that other model used)
- 19mm key pitch / 3mm stroke
- Hot key spec: Fn+F1 : WirelessLAN ON/OFF, Fn+F3/E4 : Volume down/up, Fn+F5 :
LCD/CRT output change
Fn+F6/F7: Brightness up/down, Fn+F11: Display ON/OFF, Fn+F12: Standby
TouchPad (No scroll button)
TypeII x 1
-PCMCIA Standard Rev.2.1 , CardBus support , w/o ZV port
Built-in Sound system
- SCMS support - AC97 I/F
- 16-bit Sampling and Playback - 16-bit stereo - Full duplex supported - 3D sound supported
- AC-3 support
- Built-in 2W Woofer
- Built-in stereo speaker, Built-in microphone
- Sound Volume control by Hot-Key (Fn + F3 : Volume down, Fn + F4 : Volume up)
Support Mulit Card Reader
USB(2.0) x 3
IEEE1394 port x 1(4pins)
Mic-in(mono) x 1
Headphone-out(stereo)/SPDIFx 1
8
Page 9
8050
8050
1.2System Overview(3)
Continue to previous page
Line-in x 1
TV-out (PAL/NTSC) x 1 (Macrovision supported)
RJ-45 LAN Jack x 1 (with cap) RJ-11Modem Jack x 1 (with cap)
Mini-PCI connetor (for WirelessLAN Card)
VGA port x 1 DC-in x 1
Communication
Battery
Power Supply
Safety Lock
Dimension
Weight
OS
Accessories
Windows Logo
56Kbps(V.90) Fax Modem(MDC) and 100Base-TX LAN
Wireless LAN (IEEE802.11b, g,a/g)
Li-ion Battery 2200mAh(6-cell) - Battery Life: (TBD)
-RTC bckup battery(Lithium) Standard -Power-ON charge available
60W Universal AC Adapter(100-240V)
Security Lock hole
W353.8 x D250 x H25~32mm
(P)3.0kg
Windows XP Home Service Pack 1
TBD
Support PC2001 Specification
N/B Maintenance
N/B Maintenance
EMI / Safety / Regulation
- need to get the Logo for WindowsXP Home, WHQL Certified
EMI:CE/FCC/UL/TUV, BSMI/CCC(TBD)
Wireless:CE/FCC,WiFi, PTT:CE/FCC, USB:USB2.0 Logo, Energy Star, Harmonic Noise
regulations
8
Page 10

8050
8050
N/B Maintenance
N/B Maintenance
1.3 System Hardware Parts
1.3.1 Intel Banias processors in Micro-FCPGA package.
Intel Banias Processors with 478 pins Micro-FCPGA package.
The first Intel mobile processor with the Intel Ne tBurst micro-architecture which fea tures include hy per-pipelined
technology, a rapid execution engine, a 400MHz system, an execution trace cache, advanced dynamic execution,
advanced transfer cache, enhanced floating point and multi-media unit, and Streaming SIMD Extensions 2
(SSE2).
The Streaming SIMD Extensions 2 (SSE2) enable brea k-through levels of performance in multimedia applications
including 3-D graphics, video decoding/encodi ng, and speech recognition.
Use Source-Synchronous Transfer (SST) of address and data to improve performance by transferring d a ta four
times per bus clock.
Support Enhanced Int e l SpeedStep technology, which enables real-time dynamic switching of the voltag e and
frequency between t wo performance modes.
1.3.2 Clock Generator
System frequency synthesizer: ICS950810 Programmable output frequency, divider ratios, output rise/fall time,
9
Page 11

8050
8050
output skew. Programmable spread percentage for EMI control . Watchdog timer technology to reset system if
system ma lfunctions. Programma ble watchdog safe frequency. Support I2C Index read/write and blo c k read/write
operations. Use external 14.318MHz crystal.
N/B Maintenance
N/B Maintenance
1.3.3 Montara-GME GMCH IGUI 3D Graphic DDR/SDR Chipset
Montara-GME GMCH IGUI Host Mem ory Controller integrates a high performance host interface for Intel
Banias processor, a high performance 2D/3D Graphic Engine, a high perform ance memory controller, an AGP 4X
interface, and Intel®’ I/O Hub architecture INTEL 82801DBM ICH4-M.
Montara-GME GMC H Host Interface features th e AGTL & AGTL+ compliant bus driver technology with
integrated on-die termination to support Intel Banias processors. Montara-GME GMCH provides a 12-deep InOrder-Queue to support maximum outst anding transactions up to 12. It integrated a high performance 2D/ 3D
Graphic Engine, Video Accelerator and Advanced Hardware Accelera tion MPEGI/MPEGII Video Decoder for
the Intel Banias series based PC systems. It also integrates a high performance 2.1GB/s DDR266 Memory
controller to sustain the bandwidth demand from the integrated GUI or external AG P master, host processor, as
well as the multi I/O masters. In additi on to integrated GUI, Montara-GME GMCH a lso can support ex ternal AGP
slot with AGP 1X/2X/4X capability and Fast Write Transactions. A high bandwidth and mature Intel®’ I/O Hub
architecture is incorporated to connect M ontara-GME GMCH and INTEL 82801DBM ICH4-Mtogether. Intel®’
I/O Hub architecture is developed into three layers, the Multi-threaded I/O Link Layer delivering 1.2GB
bandwidth to connect embedded DMA Master devices and external PCI masters to interface to Multi-threaded I/O
Link layer, the Multi-threaded I/O Link En coder/Decoder in INTEL 82801DBM ICH4-M to transfer data w/ 53 3
MB/s bandwidth
10
Page 12

8050
8050
from/to Multi-threaded I/O Link layer to/from Montara-GME GMCH, and the Multi-threaded I/O Link
Encoder/Decoder in Montara-GME GMCH to transfer data w/ 533 M B/s from/to Multi-threaded I/O Link layer
to/from INTEL 82801DBM ICH4-M.
An Unified Memory Controller supporting DDR266 DR AM is incorpora ted, delivering a high performance data
transfer to/from memory subsystem from/to the Host processor, the integrated graphic engine or external AGP
master, or the I/O bus masters. The memory controller also supports the Suspend to RAM func tion by retaining
the CKE# pins asserted in ACPI S3 state in which only AUX source deliver power. The Montara-GME GMCH
adopts the Shared Memory Architecture, eliminating the need and thus the cost of the frame buffer memory by
organizing the frame buffer in the system memory. The frame buffer size can be allocated from 8MB to 64MB.
N/B Maintenance
N/B Maintenance
Features
Processor/Host Bus Support
Intel® Banias processor
Support host bus Dynamic Bus Inversion (DBI)
2X Address, 4X data
Supports system bus at 400MT/s (100 MHz) Supports 64-bit host bus addressing
8-deep In-Order-Queue
11
Page 13

8050
8050
AGTL+ bus driver technology with integrated GTL termination resist ors and low voltage operation
(1.05V)
Support s Enhanced Intel® Speed Step TM Technology (EIST) and Geyserville III
Support for D P WR# signal to Banias processor for PSB power management
N/B Maintenance
N/B Maintenance
Memory System
Directly supports one DDR channel, 64-bts wide (72-b with ECC).
Supports 200-MHz and 266-MHz D DR devices with max of 2 Double-Sided SO-D IMMs(4 rows popula ted)
with unbuffered PC1600/PC2100 DDR(with ECC).
Supports 128-Mb, 256-Mb and 512-Mbit technologies providing maximum capacity of 1-GB with only x 16
devices.
All supported de vic es have 4 banks.
Supports up to 16 simultaneous open pages.
Supports page sizes of 2KB, 4KB, 8KB, and 16KB. Page size is individually selected for every row. UMA
support only.
System Interrupt
12
Page 14

8050
8050
Supports 8259 and Processor
System Bus interrupt delivery mechanism
Supports interrupts signaled as u pstream Memory Writes from PCI and Hub interface
MSI sent to the CPU through the system Bus
From IOxAPIC in ICH4-M
Provides redirection for upstream interru pts to the System Bus
Video Stream Decoder
N/B Maintenance
N/B Maintenance
Improved HW Motion Compensation for MPEG2
All format decoder (18 ATSC formats) supported Dynamic Bob and Weave support for Video Streams
Software DVD at 60 fields/second and 30 frames/second full screen
Support for 720x480 pixel resoluti on DVD quality encoding at low CPU utilization Video Overlay
Single high quality scalable overlay and second Sprite to support second overlay
Multiple overlay functionality provided via Arithmetic Stretch Blt
Direct YUV from Overlay to TV-out
13
Page 15

8050
8050
Independent Gamma Correction
Independent Brightness / Contrast / Saturation
Independent Tint / Hue support
Destination Color keying
Source Chroma keying
Maximum source resolution of 1920x1080 pixels
Maximum overlay clock of 133 MHz/200 MHz provides a pixel resolution up to 1600x1200@ 60Hz or
1280x1024@ 85 Hz
N/B Maintenance
N/B Maintenance
Display
Analog Display Support 350 MHz in tegrated 24-bit RAMDAC that can drive a standard progressive scan
analog monitor up to 1800x1350 @ 85 H z accompanying I2C and DDC channels provided t hrough
multiplexed interface hot plug and display support
Dual independent pipe with single display support Simultaneous: Same images and native display timings on
each display device
DVO (DVOB) su pport
Digital video out port DVOB with 165-MHz dot clock on 12-bit interface
14
Page 16

8050
8050
Variety of DVO devices channel
Compliant with DVI Specification 1.0, thereby providing support for a flat panel up to 2048x1536 pixel
resolution, or digital CRT up to 1920x1080 pixel resolution
N/B Maintenance
N/B Maintenance
1.3.4 I/O Controller Hub : INTEL 82801DBM
The INTEL 82801DBM ICH4-M integrates three Universal Serial Bus 2.0 Host Controllers, the Audio Controller
with AC 97 Interface, the IDE Master/Slave controllers, and Intel®’ I/O Hub architecture. The PCI to LPC Bridge,
I/O Advanced Program mable Interrupt Controller, l e gacy syste m I/O and legacy pow er management
functionalities are integrated as well.
The integrated Unive r sal Serial Bus Host Controllers features Dual Independent UHCI Compliant Host controllers
with six USB ports delivering 480 Mb/s bandwid th and rich connectivity. Besides, Legacy USB device s as well as
over current detection are also implemented.
The Integrated AC97 v2.3 compliance Audio Controller that features a 7-channels of audio speaker out and HSP
v.90 modem support. Additionally, the AC97 interface supports 4 separate SDATAIN pins that is capable of
supporting multiple audio codecs with one separate modem codec.
The integrated IDE Master/Slave controllers features Dual Independent IDE channels supporting PIO mode
transfers up to 16 M bytes/sec and Ultra DMA 33/66/ 100. It provides two separate data paths for the dual IDE
channels that sustain the hi gh data transfer rate in the multitasking environment.
15
Page 17

8050
8050
INTEL 82801DBM ICH 4-M supports 6 PCI masters and complies with PCI 2.2 specification. It also incorporates
the legacy system I/O like: two 82C37 compatible DMA controllers, Channels 0-3 are hardwired to 8 bit, three
8254 compatible programmable 16-bit counters channels 5-7, hardwired keyboard controller and PS2 mouse
interface(not use in MiTAC 8050 model), Real Time clock with 512Bytes CMOS SRAM and two 82C59
compatible Interrupt controllers. Be sides, the I/O APIC managing up to 14 interrupts with both Serial and FSB
interrupt delivery modes is supported.
The integrated power management module incorporates the ACPI 1.0b c ompliance functions, the APM 1.2
compliance functions, and the PCI bus pow er management inte rface spec. v1.1. Numerous power-up events and
power down events are also supported. 21 general purposed I/O pins are provided to give an easy to use logic for
specific application. In addition, the INTEL 82801DBM ICH4-M supports Deeper Sleep power state for Intel
Mobile process or.
N/B Maintenance
N/B Maintenance
A high bandwidth and mature Intel®’ I/O Hub architecture is incorporated to connect Montara and Intel
82801DBM ICH4-M Hub interface together. Intel®’ I/O Hub architecture is develope d.
1.3.5 Introducing MOBILITY M10(Option)
The MOBILITY M10 provide s one of the fastest and most advanced 2D, 3D, and multimedia graphics
performance for notebooks. Its architecture introduces the latest achievements in the graphics industry, which
enable the use of the progressive new features in upcoming applications, but without compromising performance.
ATI’s support of DirectX® 9 features, highly optimized OpenGL® support, and flexible memory configurations
allow implementations targeted at the gaming enthusiast, consumer, business and workstation platforms.
16
Page 18

8050
8050
SMARTSHADER™ 2.0 — Advanced Shader Technology
Provides com plete hardw are-a cce lerate d sup port for the new DirectX® 9 programmable shader model,
enabling more complex and realistic texture and lighting effects than ever before.
Significant improvement over fir st-generation shaders introduced in DirectX® 8, with a much more
powerful and intuitive instruction set. Offers full support for this feature in OpenGL® applications.
MOOTHVISION™ 2.0 — Flexible Anti-Aliasing and Anisotropic Filtering
2x/4x/6x full-scene anti-aliasing modes
Adaptive algorithm with program mable sample patterns
N/B Maintenance
N/B Maintenance
2x/4x/8 x/16x anisotropic filtering modes
Adaptive algorithm with bi-linear (performance) and tri-linear (quality) options
High Performance Memory Support
Incorporates support for DDR SDRAM/SGRAM.
Features key items from ATI’s third generation HYPER Z™ III technology that conserves memory
bandwidth for improved performance in demanding applications.
Du al Display Support
17
Page 19

8050
8050
Leading-edge technology, fully optimized with HYDRA VISION™, flexibly supports multiple
combinations of notebook LCD, traditional CRT monitors, flat panel displays and TV.
Features Dual Channel DVI support.
230MHz LVDS transmitter supports LCD panels up to QXGA (2048x1536) resolution.
Integrated 165MHz TMDS transmitter supports external flat panels up to UXGA (1600x1200) resolution.
High performance DAC speeds of 400MHz.
Features in Deta il
VIDEO Accelerat ion
N/B Maintenance
N/B Maintenance
M10 allows the integration of industry leading digital video features, including advanced de-interlacing
algorithms for unprecede nted video quality and integrated digital TV decode capability. Inclu des
programmable,independent gamma control for the video ov e rlay.
New FULL STREAM™ technology removes blocky artifact s from streaming and Internet video and
provides sharper im age quality.
Integrated general purpose xDCT engine (capable of performing both forward and inverse discrete cosine
transform) and motion compensation (MC) support for the acceleration of MPEG encoding and decoding
as well as DV (digital video) encoding and decodi ng.
18
Page 20

8050
8050
N/B Maintenance
N/B Maintenance
1.3.6 TV CH7011
The CH7011 is a Display controller device which accepts a digital graphics input signal, and encodes and
transmits data to a TV output (analog composite, s-video or RGB). The device accepts data over one 12-bit wide
variable voltage data port which supports five different data for mats including RGB and YCrCb.The TV-Out
processor will perform non-interlace to interlace conversion with scaling and flicker filters, and encode the data
into any of the NTSC or PA L video standards. The scaling and flicker filter is adaptive and pro grammable to
enable superior text display. Eight graphics resolutions are supported up to 1024 by 768 with full vertical and
horizontal under scan capability in all modes. A high accuracy low jitter phase locked loop is integrated to create
outstanding video quality. Support is provided for Macrovision™ and RGB bypass mode which enables driving a
VGA CRT with the input data.
Features
TV output supporting up t o 1024x768 graphics resolut ions
Macro visi on™ 7.X copy protection su pport
Programma ble digital interface su pports RGB and YCrCb
True scale rendering engine supports under scan in all TV output resolutions
Enhanced text sharpness and adaptive fl icker removal with up to 7 lines of filtering
Support for all NTSC and PAL formats
19
Page 21

8050
8050
Provides CVBS, S-Video and SCART (RGB) outputs
TV connection detect
Programma ble power management
10-bit video DAC outputs
Fully programmable through serial port
Complete Windows and DOS driver support
Low voltage interface support to graphics device
N/B Maintenance
N/B Maintenance
1.3.7 AC’97 AUDIO SYSTEM: Advance Logic, Inc, ALC655
The ALC655 is a 16-bit, full duplex AC'97 2.3 compatible six channels audio CODEC de signed for PC
multimedia systems,including host/soft audio and AMR/CNR based designs. The ALC655 incorporat es
proprietary converter technology to meet performance requirements on PC99/2001 systems. The ALC655
CODEC provides three pairs of stereo outputs with 5-Bit volume controls, a mono output, and multiple stereo and
mono inputs, along with flexible mixing, gain and mute functions to provide a complete integrated audio solution
for PCs. The digital interface circuitry of the ALC655 CODEC operates from a 3.3V power supply for use in
notebook and PC applications. The ALC655 integrates 50mW/20ohm headset audio amplifiers at Front-Out and
Surr-Out, built-in 14.318M 24.576MHz PLL and PCBEEP generator, those can save BOM costs. The ALC655
20
Page 22

8050
8050
also supports the S/PDIF input and output function, which can offer easy connection of PCs to consumer
electronic product s, such as AC3 decoder/spea ker and mini disk devices. AL C655 supports host/soft audio from
Intel ICHx chipsets as well as audio controller based VIA/SIS/ALI/AMD/nVIDIA/ATI chipset. Bu ndled Windows
series drivers (Win XP/ME/2000/98/N T), EAX/Direct Sound 3D / I3DL2/ A3D compatible sound effect utilities
(supporting Karaoke, 26-kind of environment sound emulation,10-band equalizer), HRTF 3D positional audio and
Sensaura™ 3D (optional) provide an excellent entertainment package and game experience for PC users. Besides,
ALC655 includes Re alt ek’ s im peda nce se n sing te c hniq ue s tha t m akes de vic e load on outp uts and inputs can be
detected.
Meets performance requirements for audio on PC99/2001 sy stems
Meets Microsoft WHQL/WLP 2.0 audio requirem ents
N/B Maintenance
N/B Maintenance
16-bit Stereo ful l-duplex CODEC w ith 48KHz sam pling rate
Compliant with AC’97 2.3 specifications
Front-Out, Surround-Out, MIC-In and LINE In Jack Sensing
14.318MHz- 24.576MHz PLL to save crystal
12.288MHz BITCLK input can be consumed
Integrated PCBEEP generator to save buzzer
Interrupt capability
21
Page 23

8050
8050
Three analog line-level stereo inputs with 5-bit volume control: LINE_IN, CD, AUX
High quality differential CD input
Two analog line-level mono input: PCBEEP,PHONE-IN
Two software selectable MIC inputs
A dedicated Front-MIC input for front panel applications (software selectable)
Boost preamplifier for MIC input shared with Center and LFE output
Both Front-ou t and Surround-Out built-in
N/B Maintenance
N/B Maintenance
LINE Input shared with s urround ou tp ut;
MIC 50mW/20 amplifier
1.3.8 MDC:PCTEL MODEM DAUGHTER CARD PCT2303W (ASKEY
V1456VQL-P1)
The PCT2303W chipset is designed to meet the demand of this emerging worldwide AMR/MDC market. Theof
PC-TEL’s well proven PCT2303W chipset and the HSP56TM MR software modem driver allows systems
manufactures to implement modem functions in PCs at a lower bill of materials (BOM) while maintaining higher
system performance.
22
Page 24

8050
8050
PC-TEL has streamlined the traditional modem into the Host Signal Processing (HSP) solution. O perating with
the Pentium class processors, HSP becomes part of the host computer’s system software. It requires less power to
operate and less physical space than standard modem solutions. PC-TEL’s HSP modem is an easily integrated,
cost-effective communications solution that is flexible enough to carry you into the future.
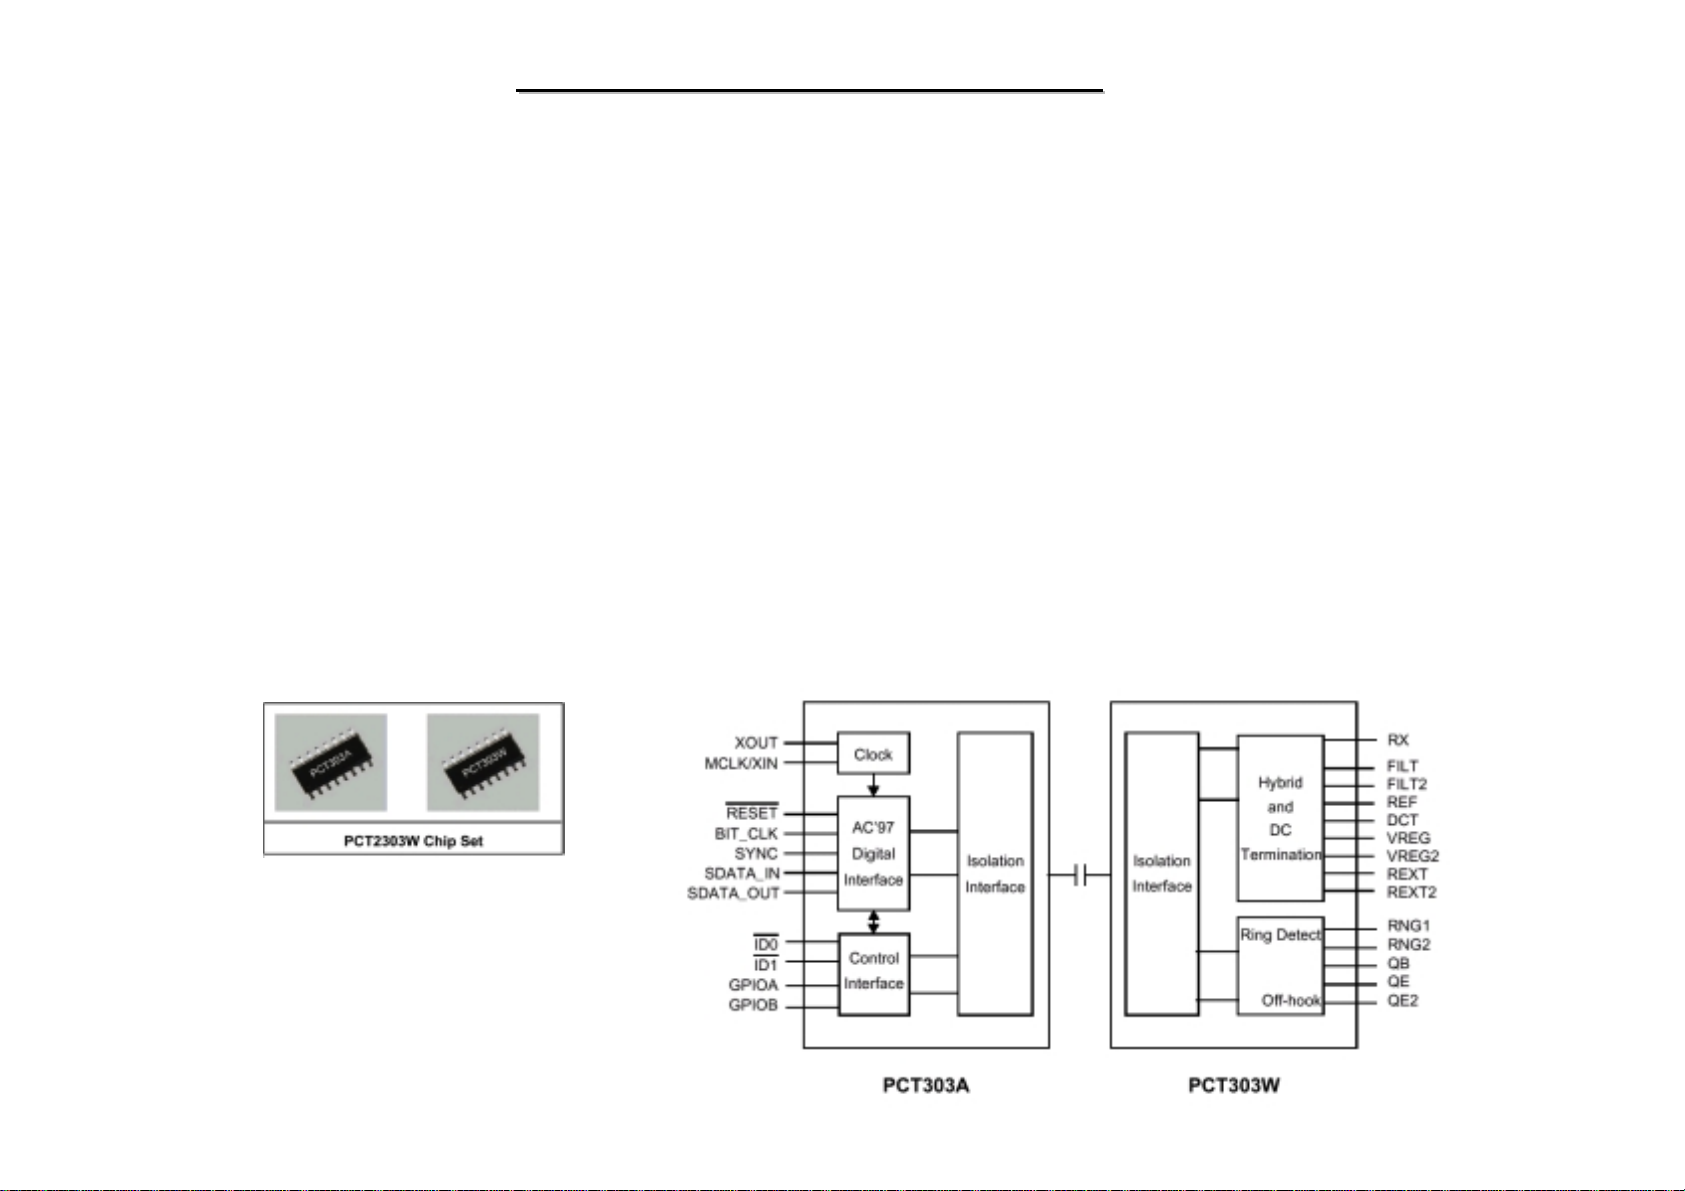
The PCT2303W chip set is an integrated direct access arrangement (DAA) and Codec that provides a
programmable line interface to meet international telephone line requirements. The PCT2303W chip set is
available in two 16-pin small outline packages (AC’97 interface on PCT303A and phone-line interface on
PCT303W). The chip set eliminates t he need for an AFE, an isolation transformer, relays, opto-isolators, and 2-to
4-wire hybrid. The PCT2303W chip set dramatically reduces the number of discrete components and cost
required to achieve compliance with international regulatory requirements. The PCT2303W complies with
AC’97 Interface specification Rev. 2.1.
N/B Maintenance
N/B Maintenance
The chip set is fully programmable to meet world-wide telephone line interface requirements including those
described by CTR21, NET4, JATE, FCC, and various country-specific PTT specifications. The programmable
parameters of the PCT2303W chip set incl ude AC termination, DC termination, ringer impedance, a nd ringer
threshold. The PCT2303W chip set has been designed to meet stringent world-wide requirements for out-of-band
energy, billing-t one immunity, lightning surge s, and safety requirements.
Features
Virtual com port with a DTE throughout up to 460. 8Kbps.
G3 Fax compatible
23
Page 25

8050
8050
Auto dial and auto answer
Ring detecti on
Codec/DAA Features
AC97 2.1 compliant
86dB dynamic range TX/RX paths
2-4-wire hybrid
Integrated ring detector
N/B Maintenance
N/B Maintenance
High voltage isolation of 4000V
Support for “Caller ID”
Compliant with FCC Part68, CTR21, Net4 and JATE
Low power standby
Low profile SOIC package 16 pins 10x3x1.55mm
Low power consumption
10mA @ 3.3V operation
24
Page 26
8050
8050
1mA @ 3.3V power down
Integrated modem codec
Standard Features
Data ITU-T V.90 (56Kbps), V.34 (4.8Kbps TO 33.6 Kbps), V.32 bis (4.8Kbps to 14.4Kbps), V.22 bis (1.2 bps
to 2.4 Kbps), V .21 and Bell 103 and 212A(300 to 1200 bps) modulation protocol.
Data Compression ITU-T V.42bis MNP Class 5
Error Correction ITU-T V.42 LAPM MNP 2-4
Fax ITU-T V. 17, V.29, V.27ter, V. 21, Channel 2, Group 3, EIA Class I
N/B Maintenance
N/B Maintenance
25
Page 27

8050
8050
N/B Maintenance
N/B Maintenance
1.3.9 IEEE1394 VT6307L (Option)
1.3.9.1 Overview
The VT6307 IEEE 1394 OHCI Host Controller provides high performance serial connectivity. It implements the
Link and Phy layers for IEEE 1394-1995 High Performance Serial Bus specification release 1.0 and 1394a-2000.
It is compliant with 1394 Open HCI 1.0 and 1.1 with DMA engine support for high performance data transfer via
a 32-bit bus m a ster PCI host bus interface. The VT6307 supports 100, 20 0 and 400 M bit/sec transmission via an
integrated 2-port PHY . The VT6307 services two types of dat a packets: asynchronous and i sochronous (real time).
The 1394 link core performs arbitration requ esting, packet generation and checking, and bus cycle master
operations. It also has root node capability and performs retry operations. The VT6307 is ready to provide
industry-standard IE EE 1394 peripheral connections for desktop and mobile PC platforms. Support for the
VT6307 is buil t into Microsoft W indows 98, Windows ME, Windows 2000, and Windows XP.
1.3.9.2. Features
32 bit CRC generator and checker for receive and transmit da ta
On-chip isochronous and asynchronous receive and transmit FIFOs for packets (2K for general receive plus
2K for isochronous transmit plus 2K for asynchronous transmit)
8 isochronous transmit contexts
4 isochronous receive contexts
26
Page 28

8050
8050
3-deep physical post-wr ite queue
2-deep physical respon se queue
Dual buffer mode enhancements
Skip Processing enhancements
Block Read Request handling
Ack_tardy processing
N/B Maintenance
N/B Maintenance
1.3.10 System Flash Memory (BIOS)
Firmware Hub for Intel® 810, 810E, 815, 815E,815EP, 820, 840, 850 Chipsets
Flexible Erase Capability
Uniform 4 K Byte Sectors
Uniform 16 K By te overlay blocks for SST49LF00 2A
Uniform 64 K By te overlay blocks for SST49LF004ATop boot block protection
16 K Byte for SST49LF002A
27
Page 29

8050
8050
64 K By te for SST49LF004A
Chip-Erase for PP Mode
Single 3.0-3.6V Read and Write Operations
Superior Reliability
Firmware Hub Hardware Interface Mode
5-signal communication interface supporting byte Read and Write
33 MHz clock frequency operation
N/B Maintenance
N/B Maintenance
WP# and TBL# pins provide har dware write protect for entire chip and/or top Boot Block
Block Lock ing Register for all bloc ks
Standard SDP Command Set
Data# Polling and Toggle Bit for End-of-Write detection
5 GPI pins for system design flexibility
4 ID pins for multi-chip selection
28
Page 30

8050
8050
N/B Maintenance
N/B Maintenance
1.3.11 Memory System
1.3.11.1 64MB, 128MB, 256MB, 512MB (x64) 200-Pin DDR SDRAM SODIMM
JEDEC-standard 200-pin, small-outline, dual i n-line memory module (SODIMM)
Utilizes 200 Mb/s and 266 Mb/s DDR SDRAM components
64MB (8 M e g x 64 [H]); 128MB (16 Meg x 64, [H] and [HD]); 256MB (32 Meg x 64 [HD]); 512MB
(64Meg x 64 [HD])
VDD= VDDQ= +2.5V ±0.2V
VDDSPD = +2.2V to +5.5V
2.5V I/O (SSTL_2 compatible)
Commands entered on each p ositive CK edge
DQS edge-aligned with data for READs; center-aligned with data for WRITEs
Internal, pipelined double data rate (DDR) architecture; two data accesses per clock cycle Bidirectional data
strobe (DQS) transmitted/received with data—i.e.,source-synchronous data capture
Differential clock inputs (CK and CK# - can be multiple clocks, CK0/CK0#, CK1/CK1#, etc. )
29
Page 31

8050
8050
Four internal device banks for concurrent operation
Selectable burst lengths: 2, 4, or 8
Auto precharge option
Auto Refresh and Self Refresh Modes
15.6µs (MT4VDDT864H, MT8VDDT1664HD), 7.8125µ s (MT4VDDT1664H, MT8VDDT3264HD,
MT8VDDT6464HD ) maximum average periodic refresh interval
Serial Presence Detect (SPD) with EEPROM
Fast data transfer rates PC2100 or PC1600
N/B Maintenance
N/B Maintenance
Selectable READ CAS latency for maximum compatibility
Gold-plated edge contacts
1.3.12 PHY: 3.3-V 10Base-T/100Base-TX Integrated PHY Ceiver ,The ICS1893
is a low-power, physical-layer device (PHY)
General
The Realtek RTL8100C(L) is a highly integrated, cost-effective single-chip Fast Ethernet controller that provides
32-bit performance, PCI bu s master capability, and full compliance with IEEE 802.3u 100Base-T specifications
30
Page 32

8050
8050
and IEEE 802.3x Full Duplex Flow Control. It also supports t he Advanced Configuration Power management
Interface (ACPI), PCI power management for modern operating systems that are capable of Operating System
Directed Power Management (OSPM) to achieve the most efficient power management possible.The
RTL8100C(L) does not support CardBus mode as the RTL8139C does. In addition to the ACPI feature, the
RTL8100C(L) also supports remote wake-up (including AMD Magic Packet, LinkChg, and Microsoft® wakeupframe) in both ACPI and APM environments. The RTL8100C(L) is capable of performing an internal reset
through the application of auxiliary power. When auxiliary power is applied and the main pow er remains off, the
RTL8100C(L) is ready and wa iting for the Magic Packet or Link Change to wa ke the system up. Also, the
LWAKE pin provides 4 different output signals including active high, active low, positive pulse, and negative
pulse. The versatility of the RTL8100C(L) LWAKE pin provides motherboards with Wake-On-LAN (WOL)
functionality. The RTL8100C(L) also supp orts Analog Auto- Power-down, that is , the analog part of the
RTL8100C(L) can be shut down temporarily according to user requirements or wh en the RTL8100C(L) is in a
N/B Maintenance
N/B Maintenance
power down state with the wakeup function disabled.In addition, when the analog part is shut down and the Isolate
B pin is low (i.e. the main power is off), then both the analog and digital parts stop functioning and the power
consumption of the RTL8100C(L) will be negligible. The RTL8100C(L) also supports an a uxiliary power
auto-detect function, and will auto-configure related bits of their own PCI power management registers in
PCI configuration space.
128 pin QFP/LQFP
Integrated Fast Ethernet MAC, Physical chip and transceiver in one chip
10 Mb/s and 100 Mb/s operation
Supports 1 0 Mb/s and 100 Mb/s N-way Auto-negotiation operation
31
Page 33

8050
8050
PCI local bus sing le-chip Fast Ethernet controller
Compliant t o PCI Revision 2.2Supp orts PCI clock 16.75MHz-40MHz
Supports PCI target fast back-to-back transaction
Provides PC I bus master data transfers and PCI
Memory space or I/O space mapped data transfers of RTL8100C(L)'s operational registers
Supports PCI VPD (Vital Product Data)
Supports ACPI, PCI power management
N/B Maintenance
N/B Maintenance
Supports 25MHz crystal or 25MHz OSC as the internal
Clock source. The frequ ency deviation of either crystal or OSC must be w ithin 50 PPM.
Compliant to PC99/PC2001 standard
Supports Wake-On-LAN function and remote wake-up (Magic Packet*, LinkChg and Microsoft® wake-
up frame)
Supports 4 Wake-On-LAN (WOL) signals (active high, active low, positive pulse, and negative pulse)
Supports auxiliary power-on internal reset, to be ready for remote wake-up when main power still
remains off
32
Page 34

8050
8050
Supports auxiliary power auto-de tect, and sets the related capability of power management registers in PCI
configuration space.
Includes a programmable, PCI burst size and early Tx/Rx threshold. Supports a 32-bit general-purpose
timer with the external PCI clock as clock source, to generate timer-interrupt
Contains two large (2Kby te) independent receive and transmit FIFOs
Advanced power saving mode when LAN function or w a keup function is not used
Uses 93C46 (64*16-bit EEPROM) to store resource config uration, ID parameter, and VPD data.
Supports LED pins for various network activity indications
Supports loopback capability
N/B Maintenance
N/B Maintenance
Half/Full dupl ex ca pa bil ity
Supports Full Duplex Flow Control (IEEE 802.3x)
33
Page 35
8050
8050
N/B Maintenance
N/B Maintenance
2. System View and Disassembly
2.1 System View
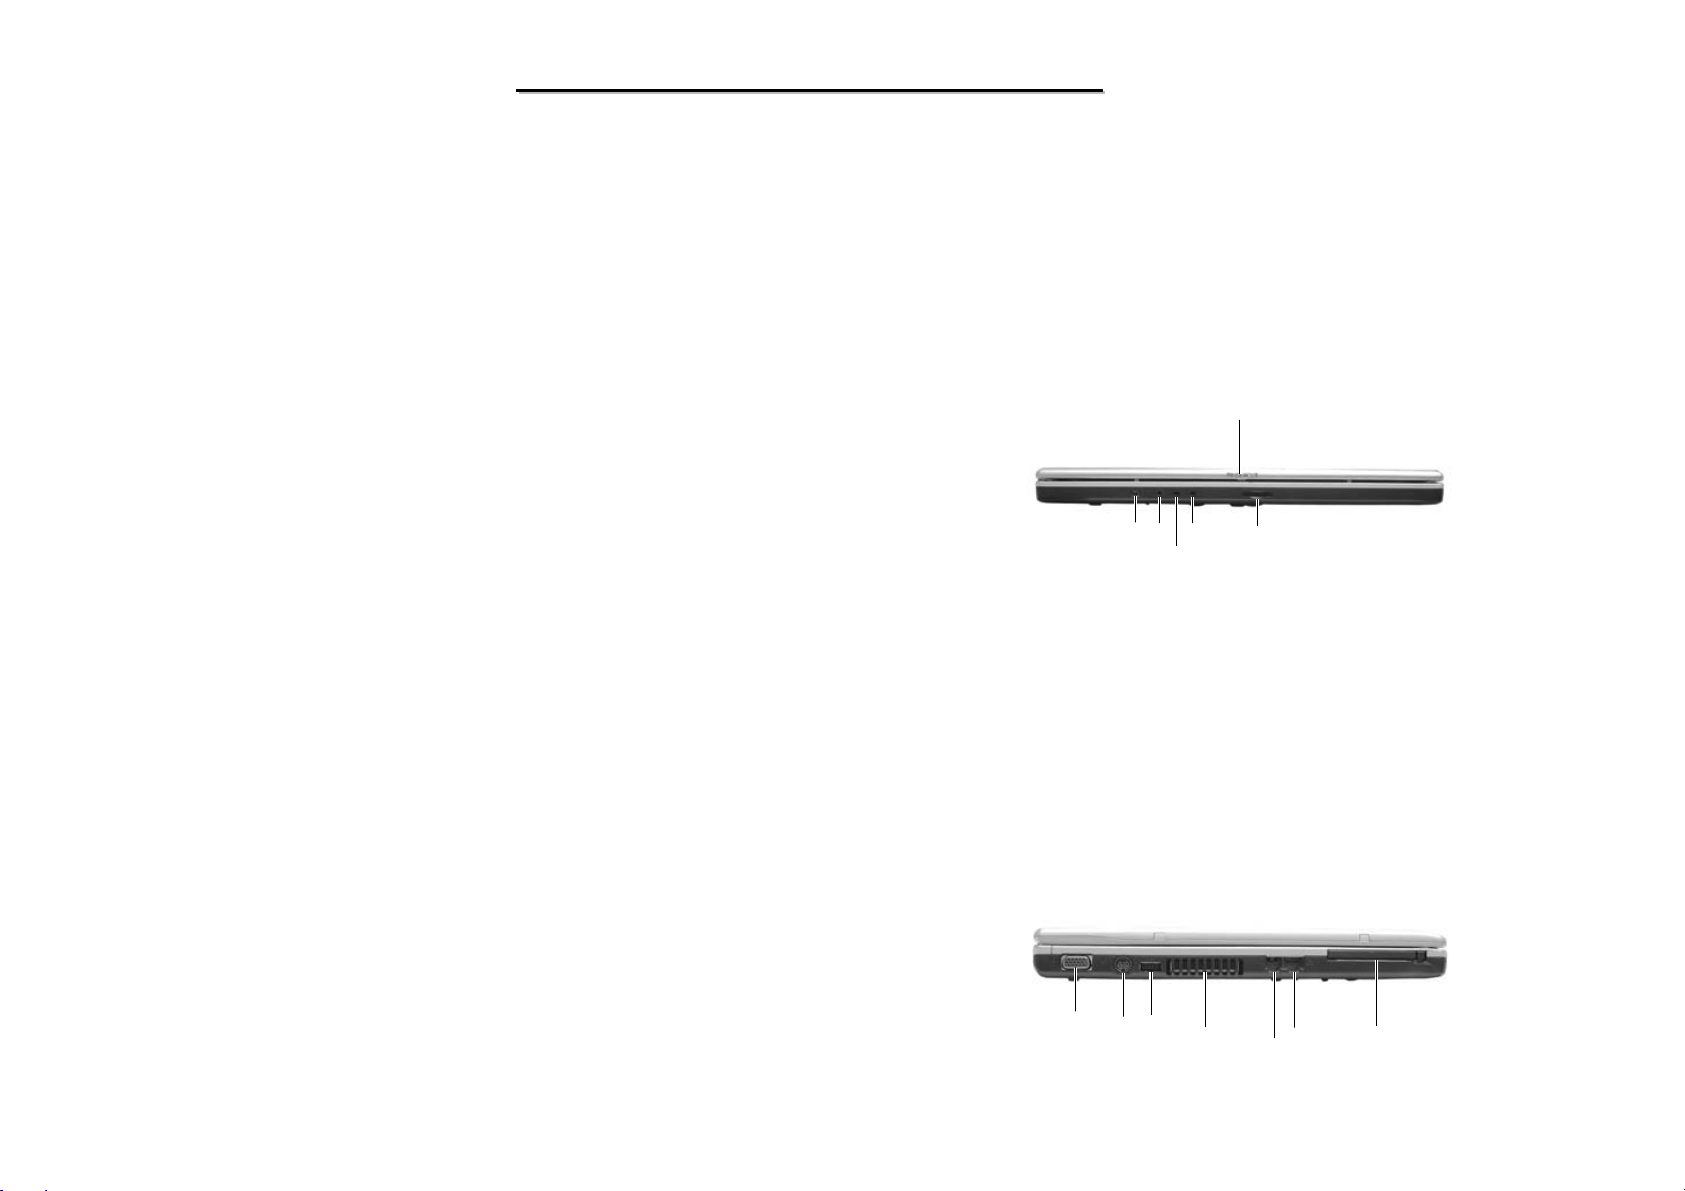
2.1.1 Front View
1394 Jack
Line Out Connector
Line In Connector
MIC In Connector
SD Card Slot
Top Cover Latch
2.1.2 Left-side View
VGA Port
S-Video Port
USB Ports *1
Ventilation Openings
RJ-11 Connector
RJ-45 Connector
PCMCIA Card Socket
34
Page 36

8050
8050
2.1.3 Right-side View
CD-ROM/DVD-ROM Drive
Kensington Lock
N/B Maintenance
N/B Maintenance
2.1.4 Rear View
Kensington Lock
Power Connector
USB Port*2
35
Page 37
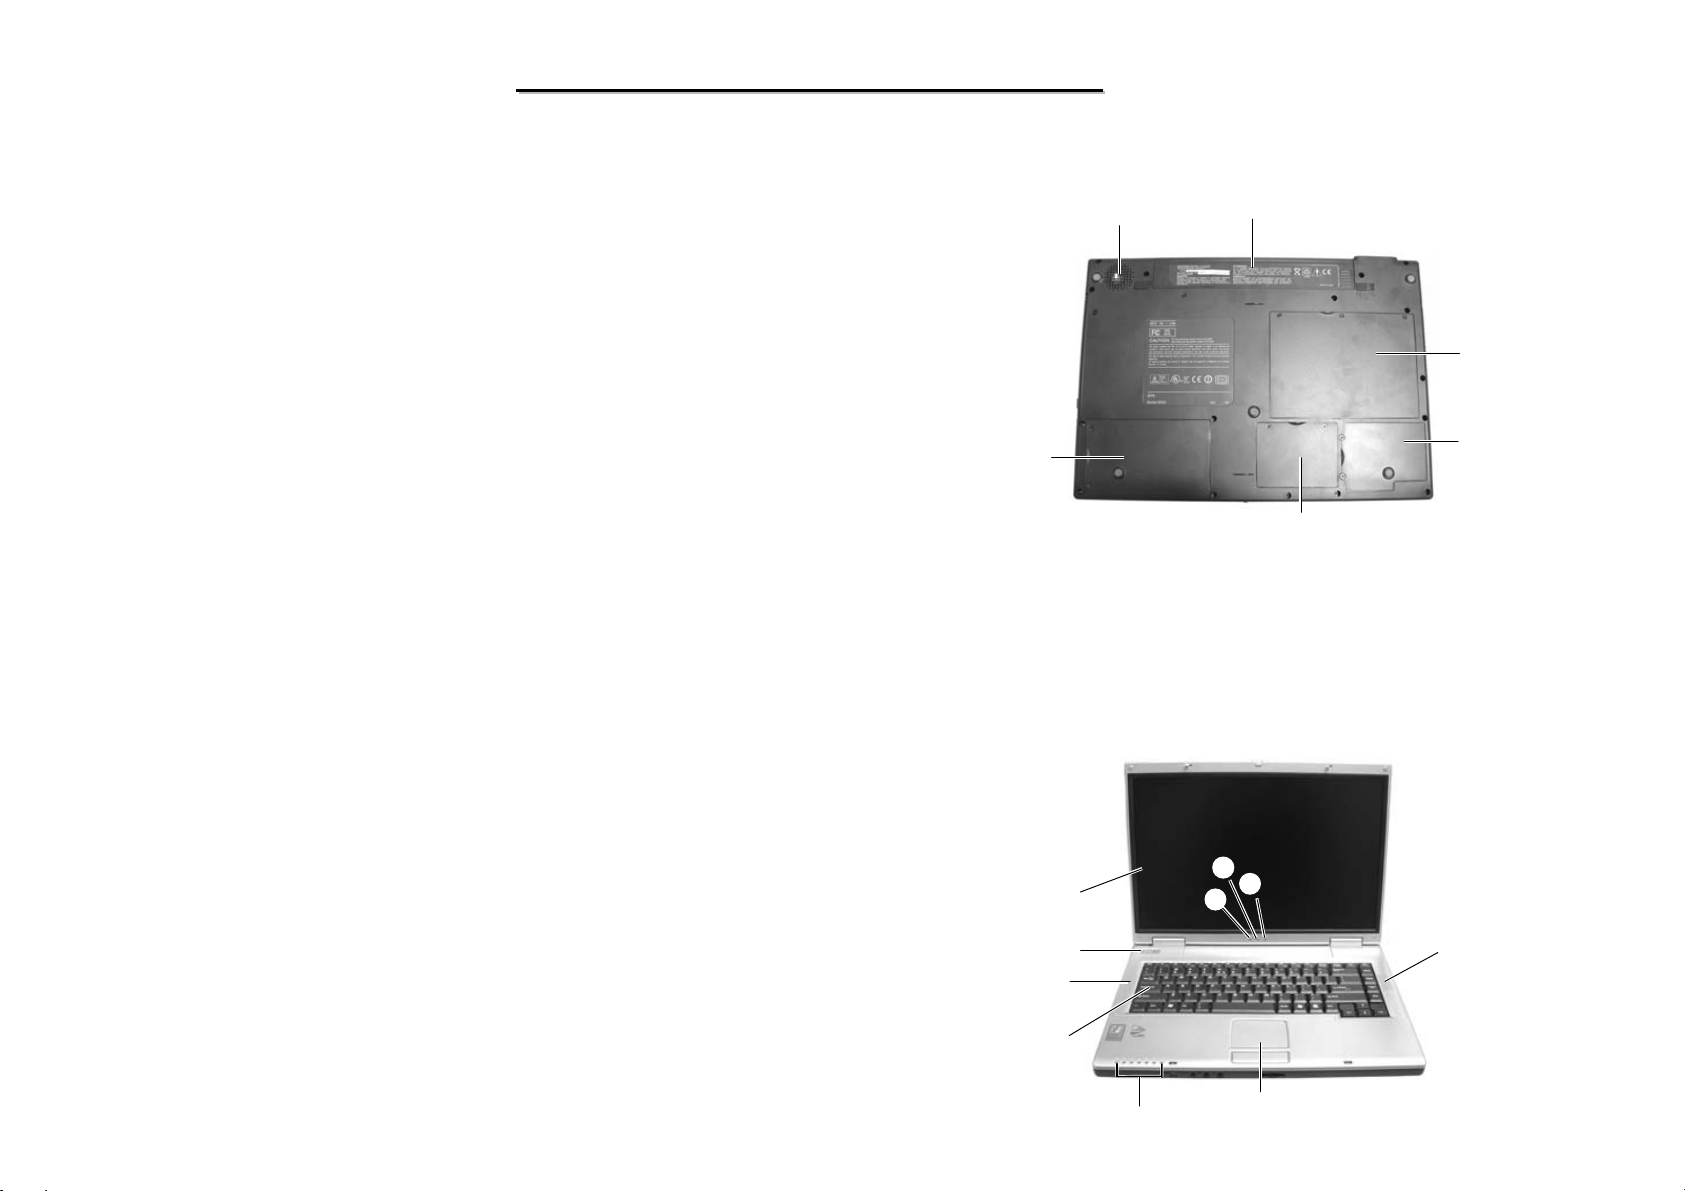
2.1.5 Bottom View
Hard Disk Drive
DDR SDRAM Card
Wireless Card
CPU
Battery Park
Stereo Speaker Set
8050
8050
N/B Maintenance
N/B Maintenance
2.1.6 Top-open View
LCD Screen
Power Button
Stereo Speaker Set
Keyboard
Device LED Indicators
Touch Pad
Hard Disk Drive Indicator
Battery Power Charging Indicator
Power Indicator
36
Page 38
8050
8050
N/B Maintenance
N/B Maintenance
2.2 System Disassembly
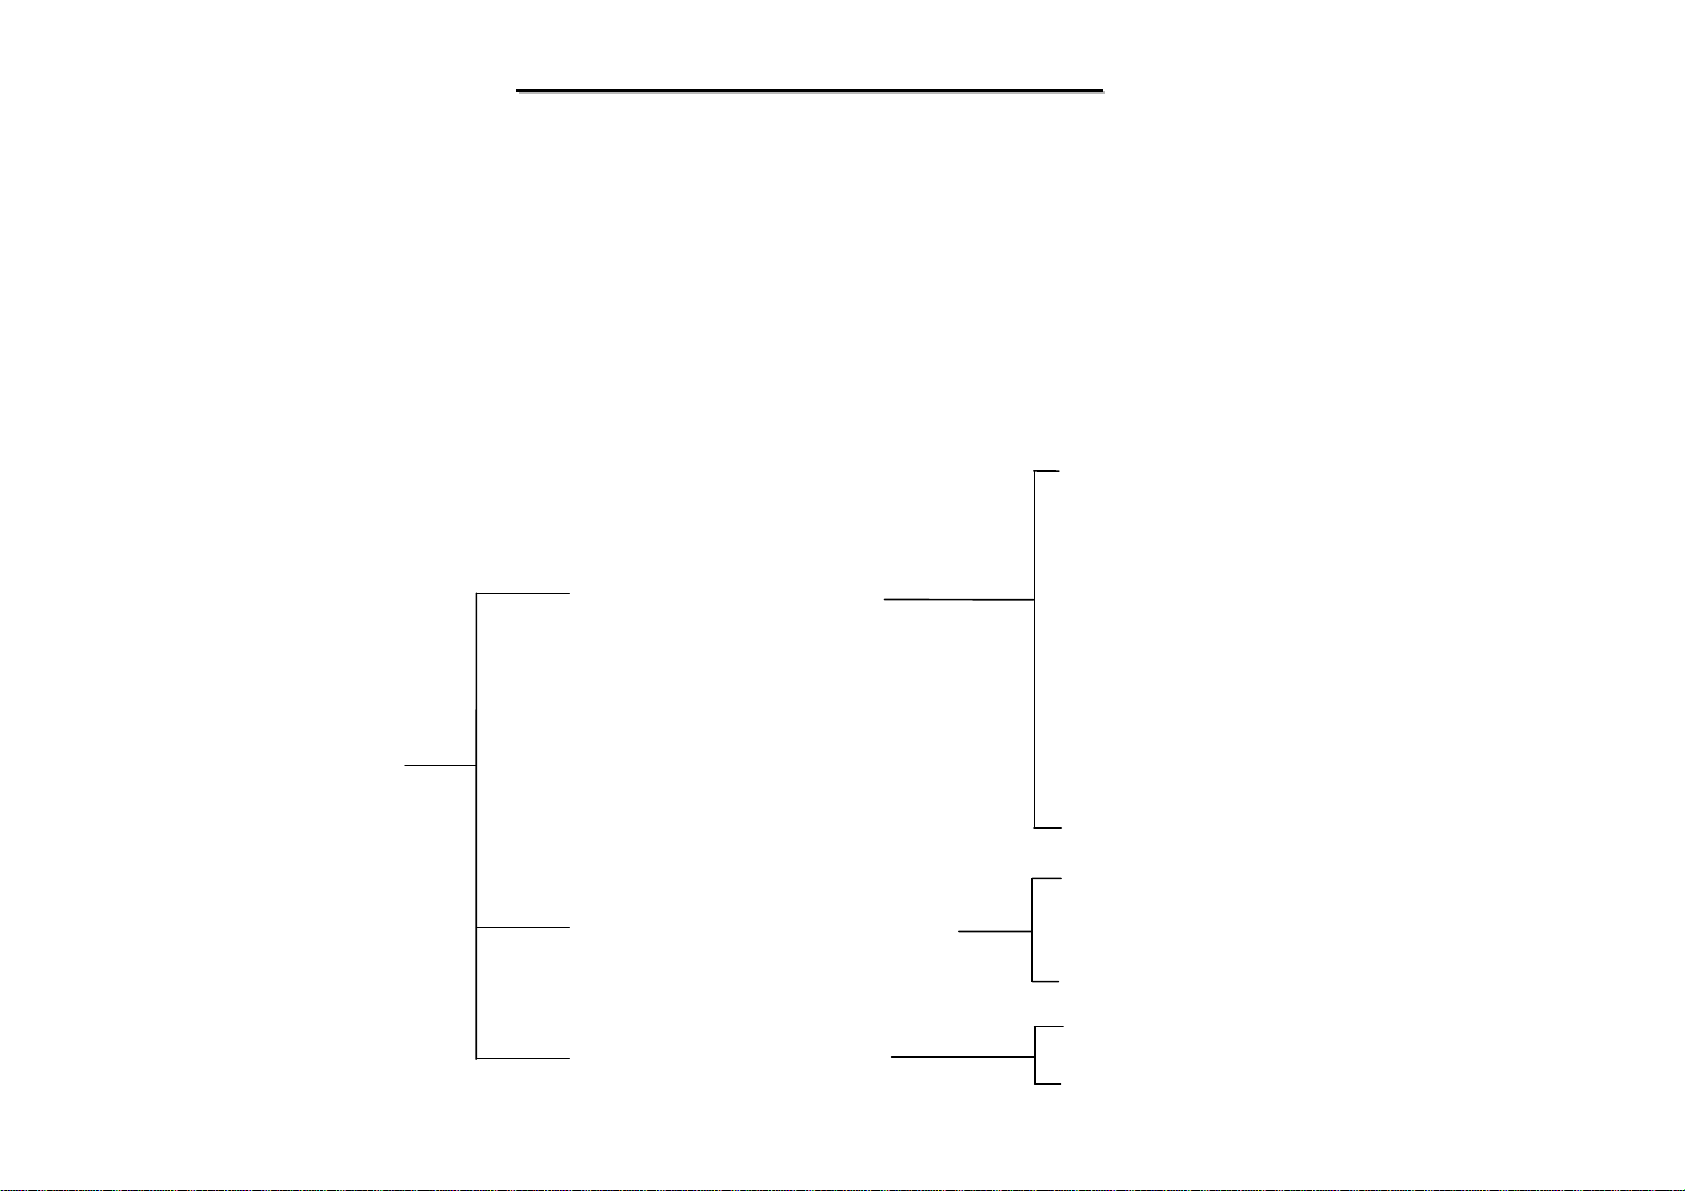
The section discusses at length each maj or component for disas sembly/reassembly and show corresponding
illustrations.Use the chart bel ow to determine the di sassembly sequence for removing compone nts from the
notebook.
NOTE: Before you start to install/replace these modules, disconnect all peripheral devices and make sure the
notebook is not turned on or connected to AC power.
2.2.1 Battery Pack
2.2.2 Keyboard
2.2.3 CPU
Modular Components
2.2.4 HDD Module
NOTEBOOK
LCD Assembly Components
Base Unit Components
2.2.5 DVD-ROM Drive
2.2.6 Wireless Card
2.2.7 Modem Card
2.2.8 DDR-SDRAM
2.2.9 LCD Assem bly
2.2.10 LCD Panel
2.2.11 Inverter Board
2.2.12 System Board
2.2.13 Touch Pad
37
Page 39
8050
8050
N/B Maintenance
N/B Maintenance
2.2.1 Battery Pack
Disassembly
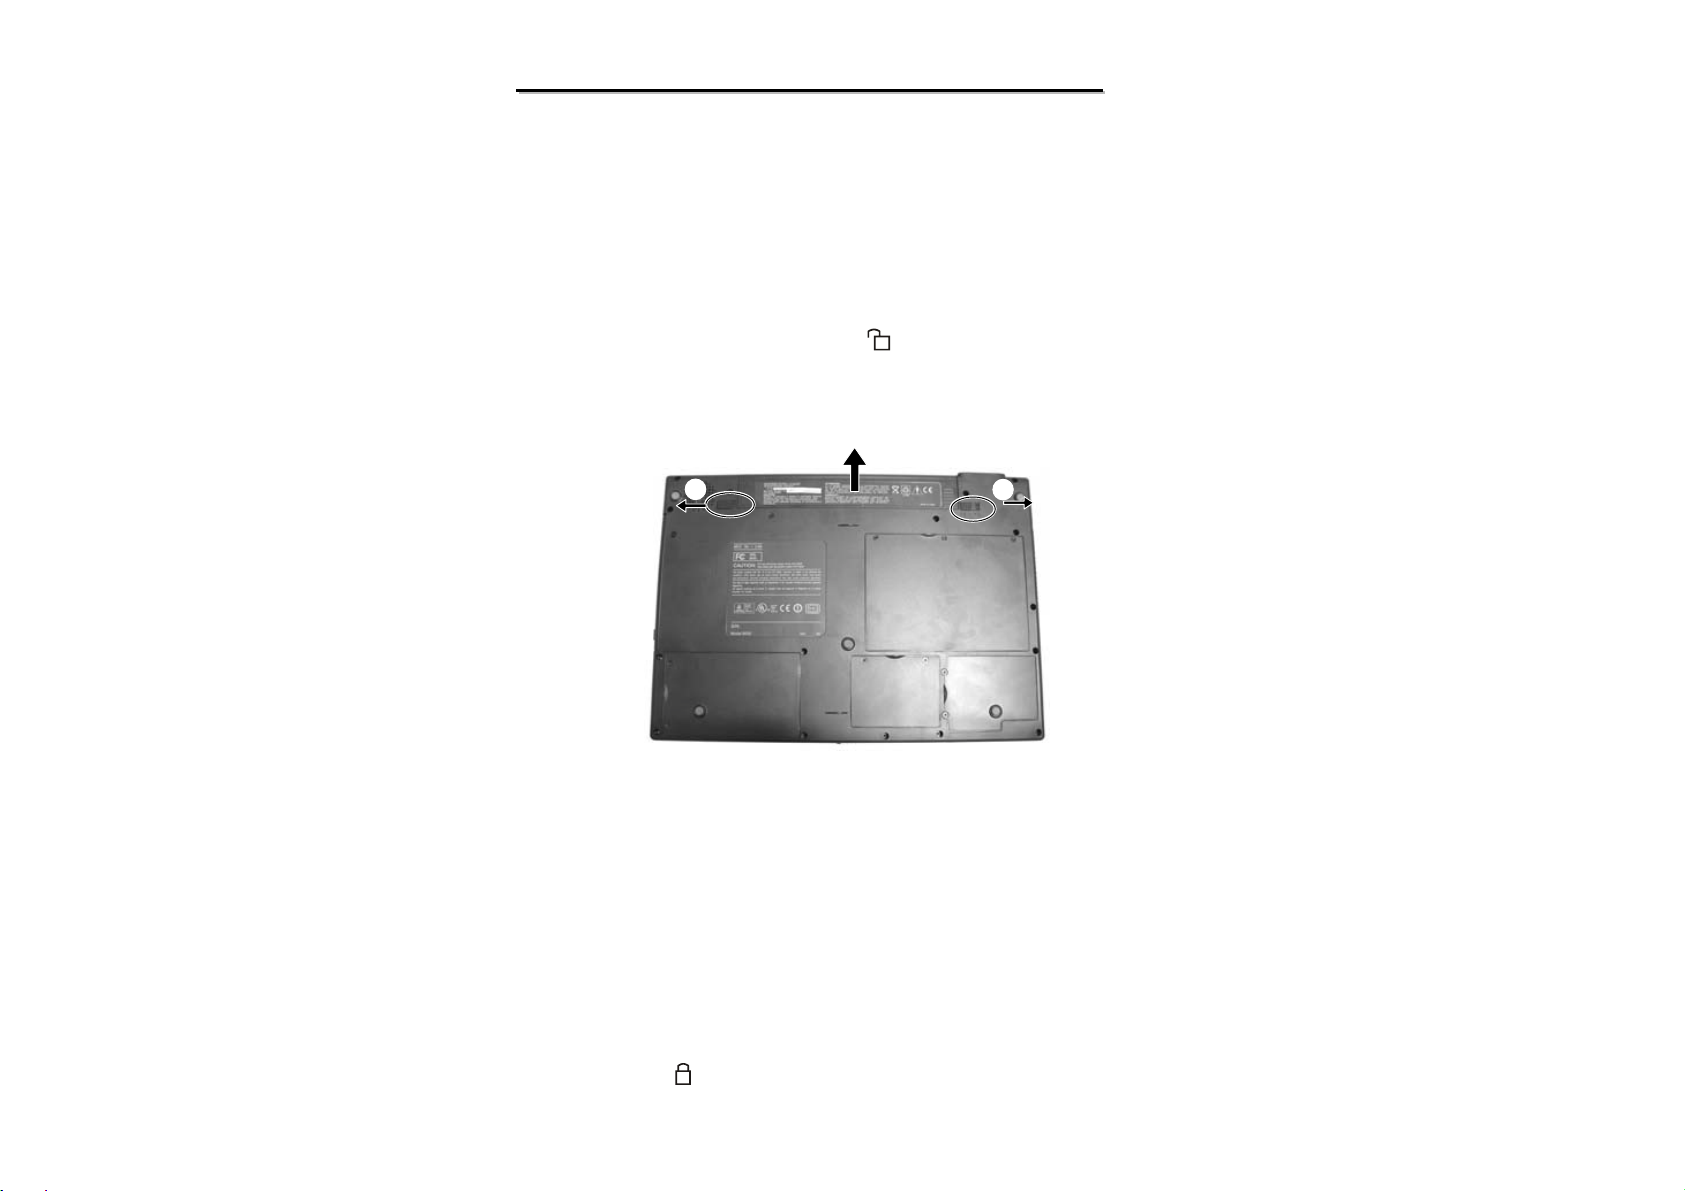
1. Carefully put the notebook upside down.
2. Slide the two release lever outwards to the “unlock” ( ) position (), while take the battery pack out of the
compartment (). (Figure 2-1)
Figure 2-1 Remove the battery pack
Reassembly
1. Replace the battery pack into the compartment. The battery pack should be correctly connected when you
hear a clicking sound.
2. Slide the release lever to the “lock” ( ) position.
38
Page 40
8050
8050
N/B Maintenance
N/B Maintenance
2.2.2 Keyboard
Disassembly
1. Remove the battery pack. (Refer to section 2.2.1 Disassembly)
2. Open the top cover.
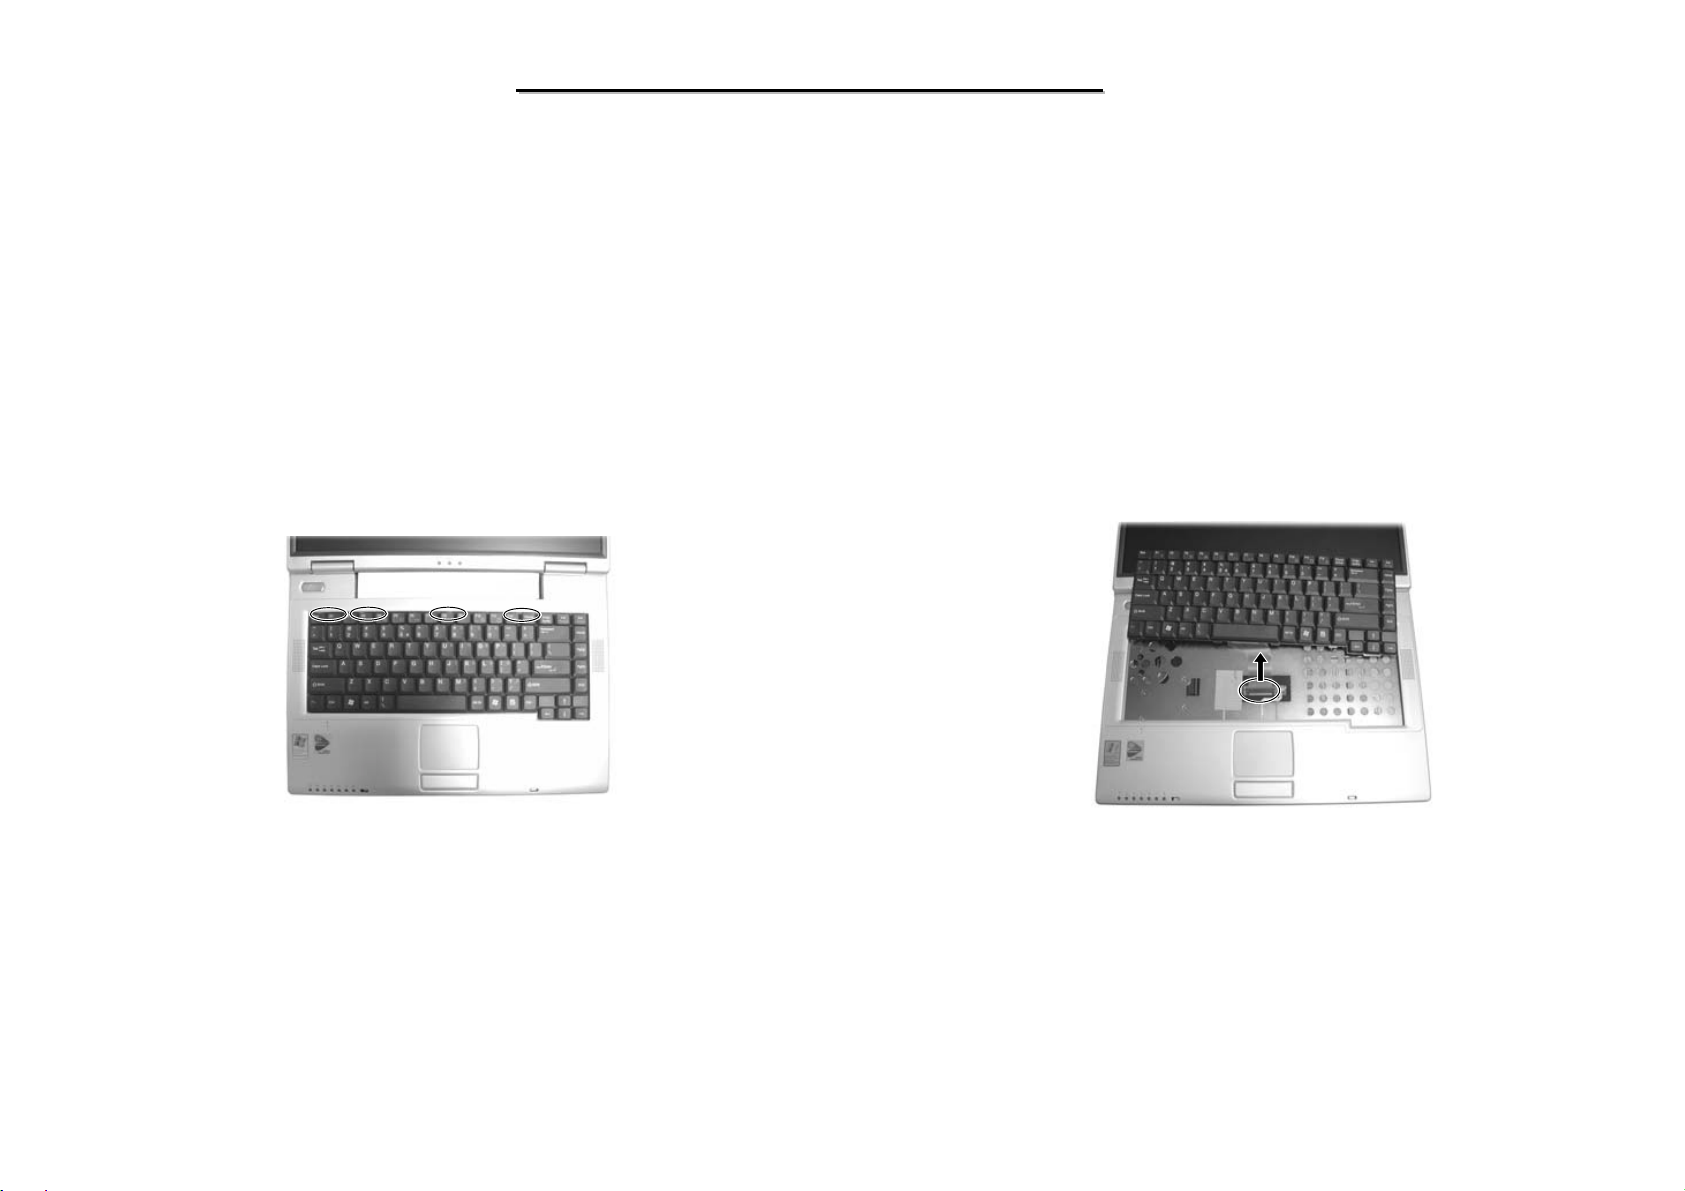
3. Loosen the four lat c hes locking the keyboard. (Figure 2-2)
4. Slightly lift up the keyboard and disconnect the cable from the mother board, then separate the keyboard.
(Figure 2-3)
Figure 2-2 Loosen the four latches Figure 2-3 Disconnect the cable
Reassembly
1. Reconnect the keyboard cable and fit t he keyboard back into place with four latches.
2. Replace the battery pack. (Refer to section 2.2.1 reassembly)
39
Page 41
8050
8050
N/B Maintenance
N/B Maintenance
2.2.3 CPU
Disassembly
1. Remove the battery pack. (Refer to section 2.2.1 Disassembly)
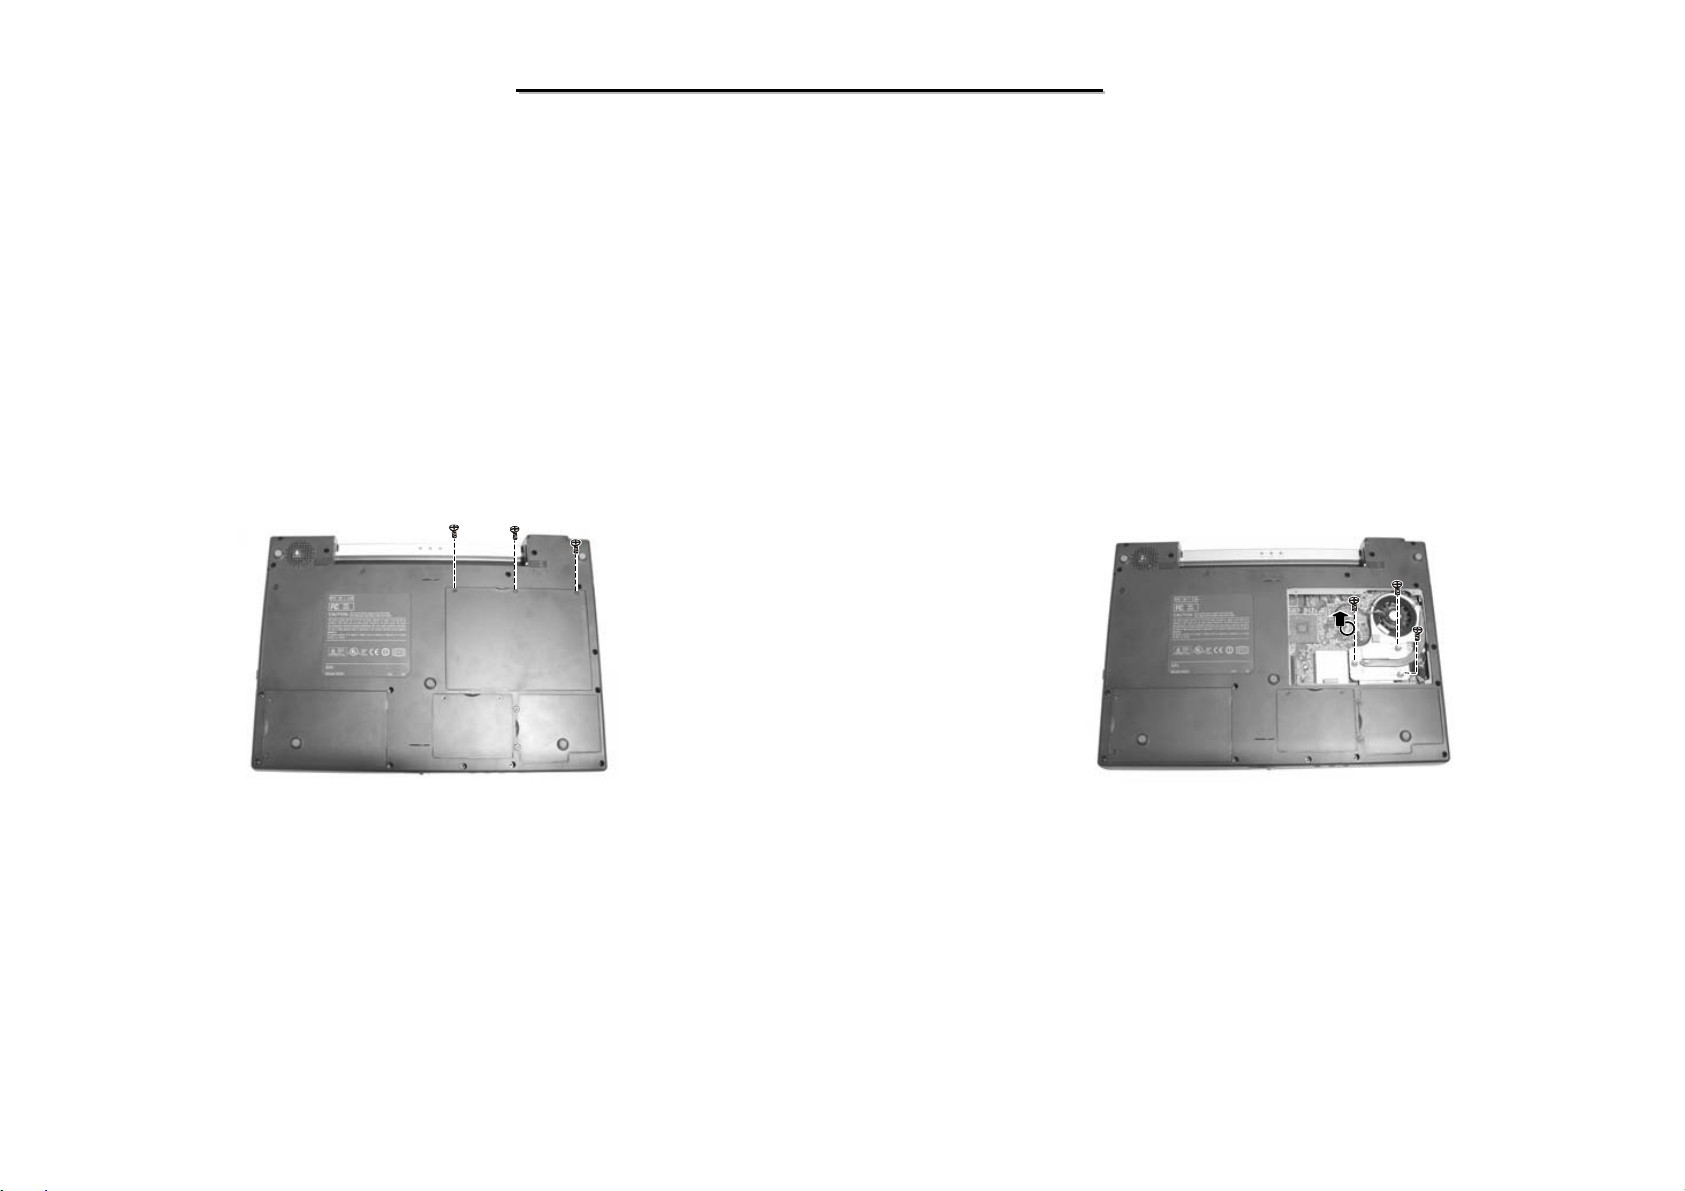
2. Remove three screws fastening the heatsink cover. (Figure 2-4)
3. Remove three spring screws that secure the heatsink upon the CPU and disconnect the fan’s power cord
from system board. (Figure 2-5)
Figure 2-4 Remove three screws
Figure 2-5 Free the heatsink
40
Page 42
8050
8050
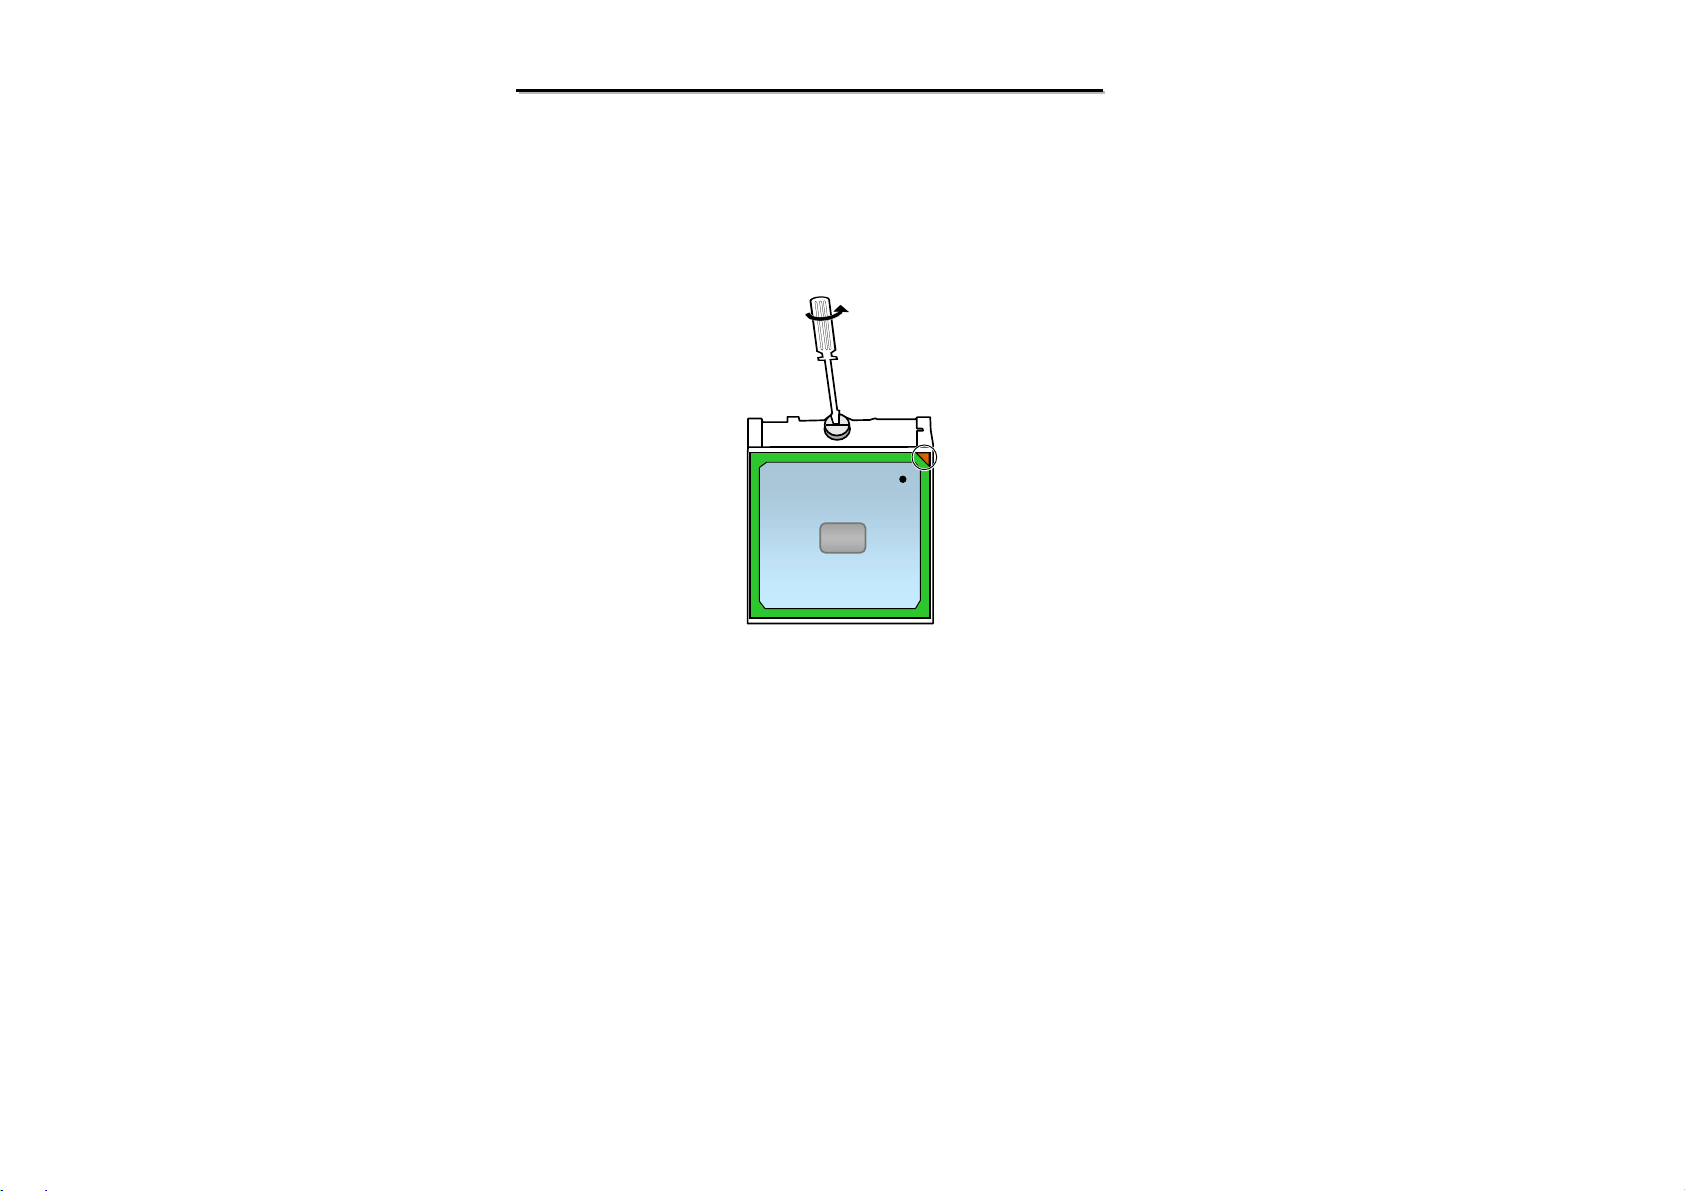
4. To remove the existing CPU, Loosen the screw by a flat screwdriver,upraise the CPU socket to unlock
the CPU. (Figure 2-6)
N/B Maintenance
N/B Maintenance
Figure 2-6 Remove the CPU
Reassembly
1. Carefully, align the arrowhead corner of the CPU with the beveled corner of the socket, then insert CPU
pins into the holes. Tighten the screw by a flat screwdriver to locking the CPU.
2. Connect the fan’ s power cord to the system board, fit the he atsink upon the CPU and secure with three
spring screws.
3. Replace the CPU cover and secure with three screws.
4. Replace the battery pack. (Refer to section 2.2.1 reassembly)
41
Page 43
8050
8050
2.2.4 HDD Module
Disassembly
1. Carefully put the notebook upside down. Remove the battery pack. (Refer to section 2.2.1 Disassembly)
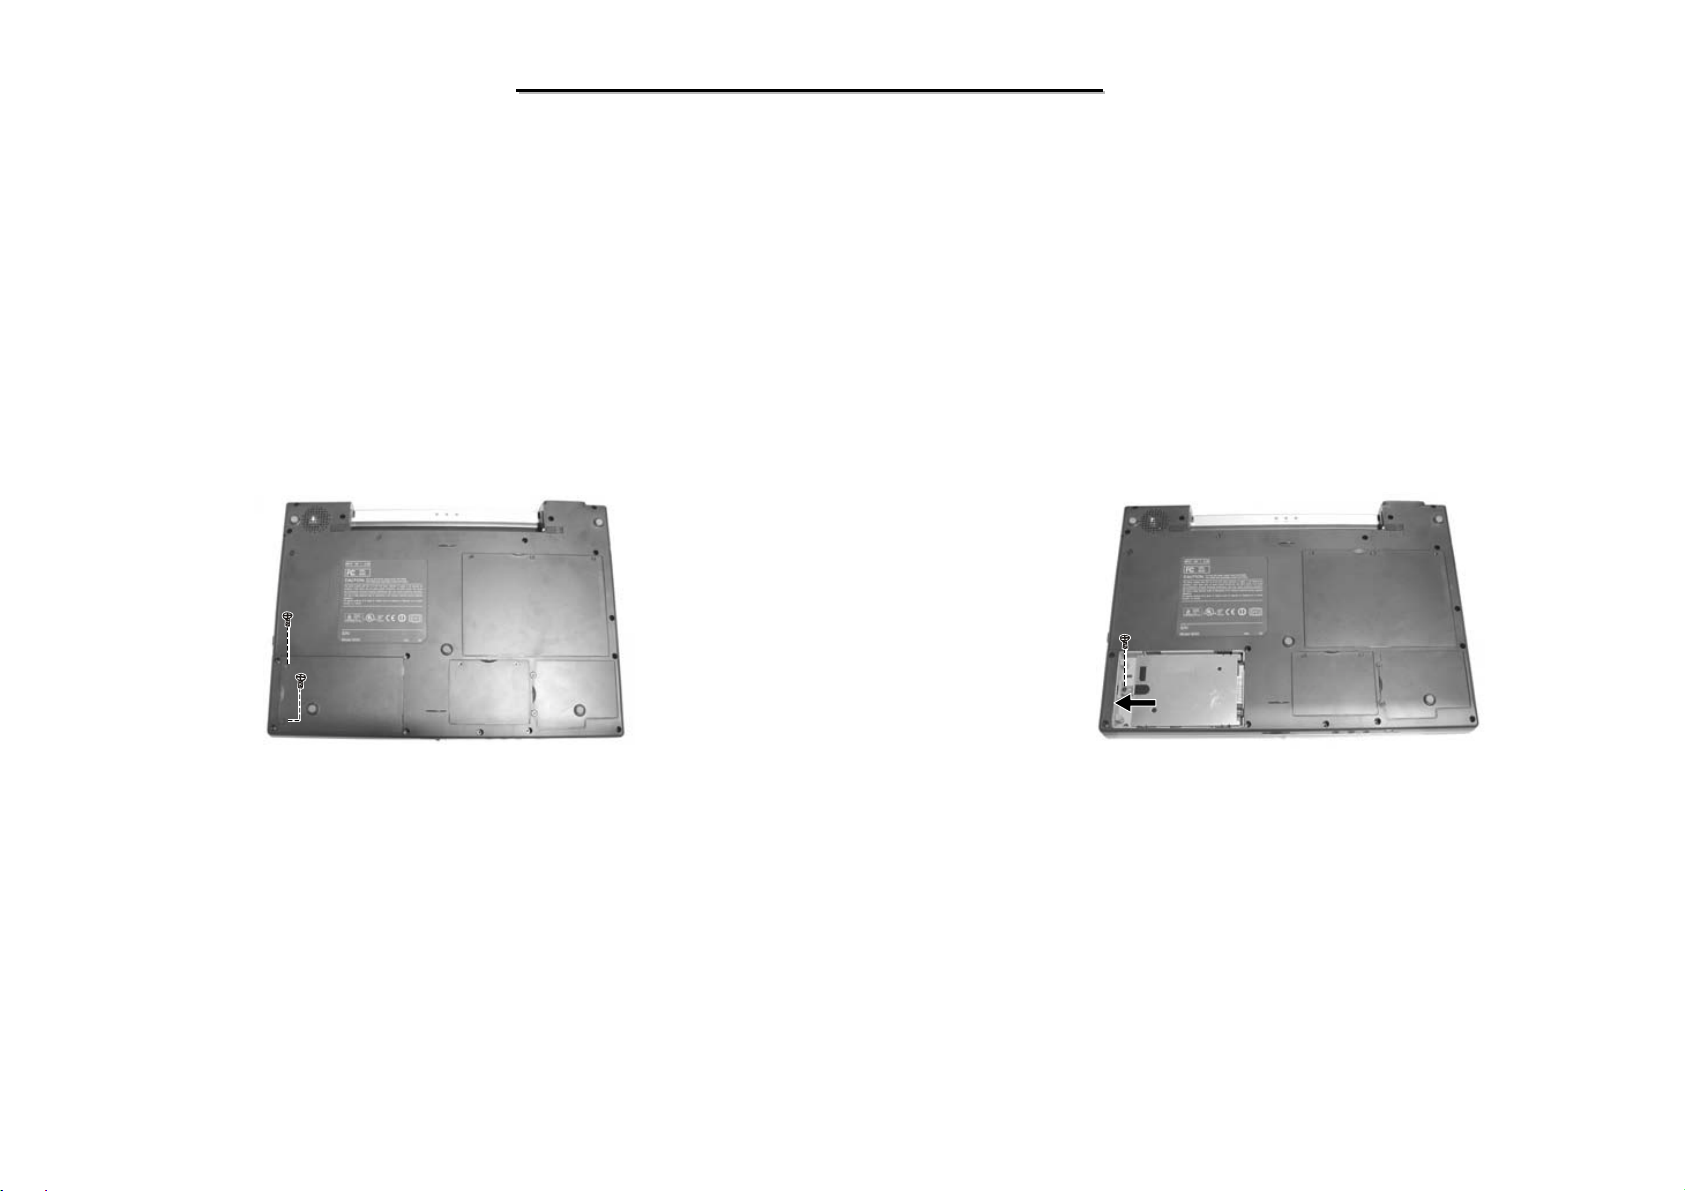
2. Remove two screws fastening the HDD compartment cover. (Figure 2-7)
3. Remove the one screw and slide the HDD module out of the compartment. (Figure 2-8)
N/B Maintenance
N/B Maintenance
Figure 2-8 Remove HDD moduleFigure 2-7 Remove the HDD compartment cover
42
Page 44
8050
8050
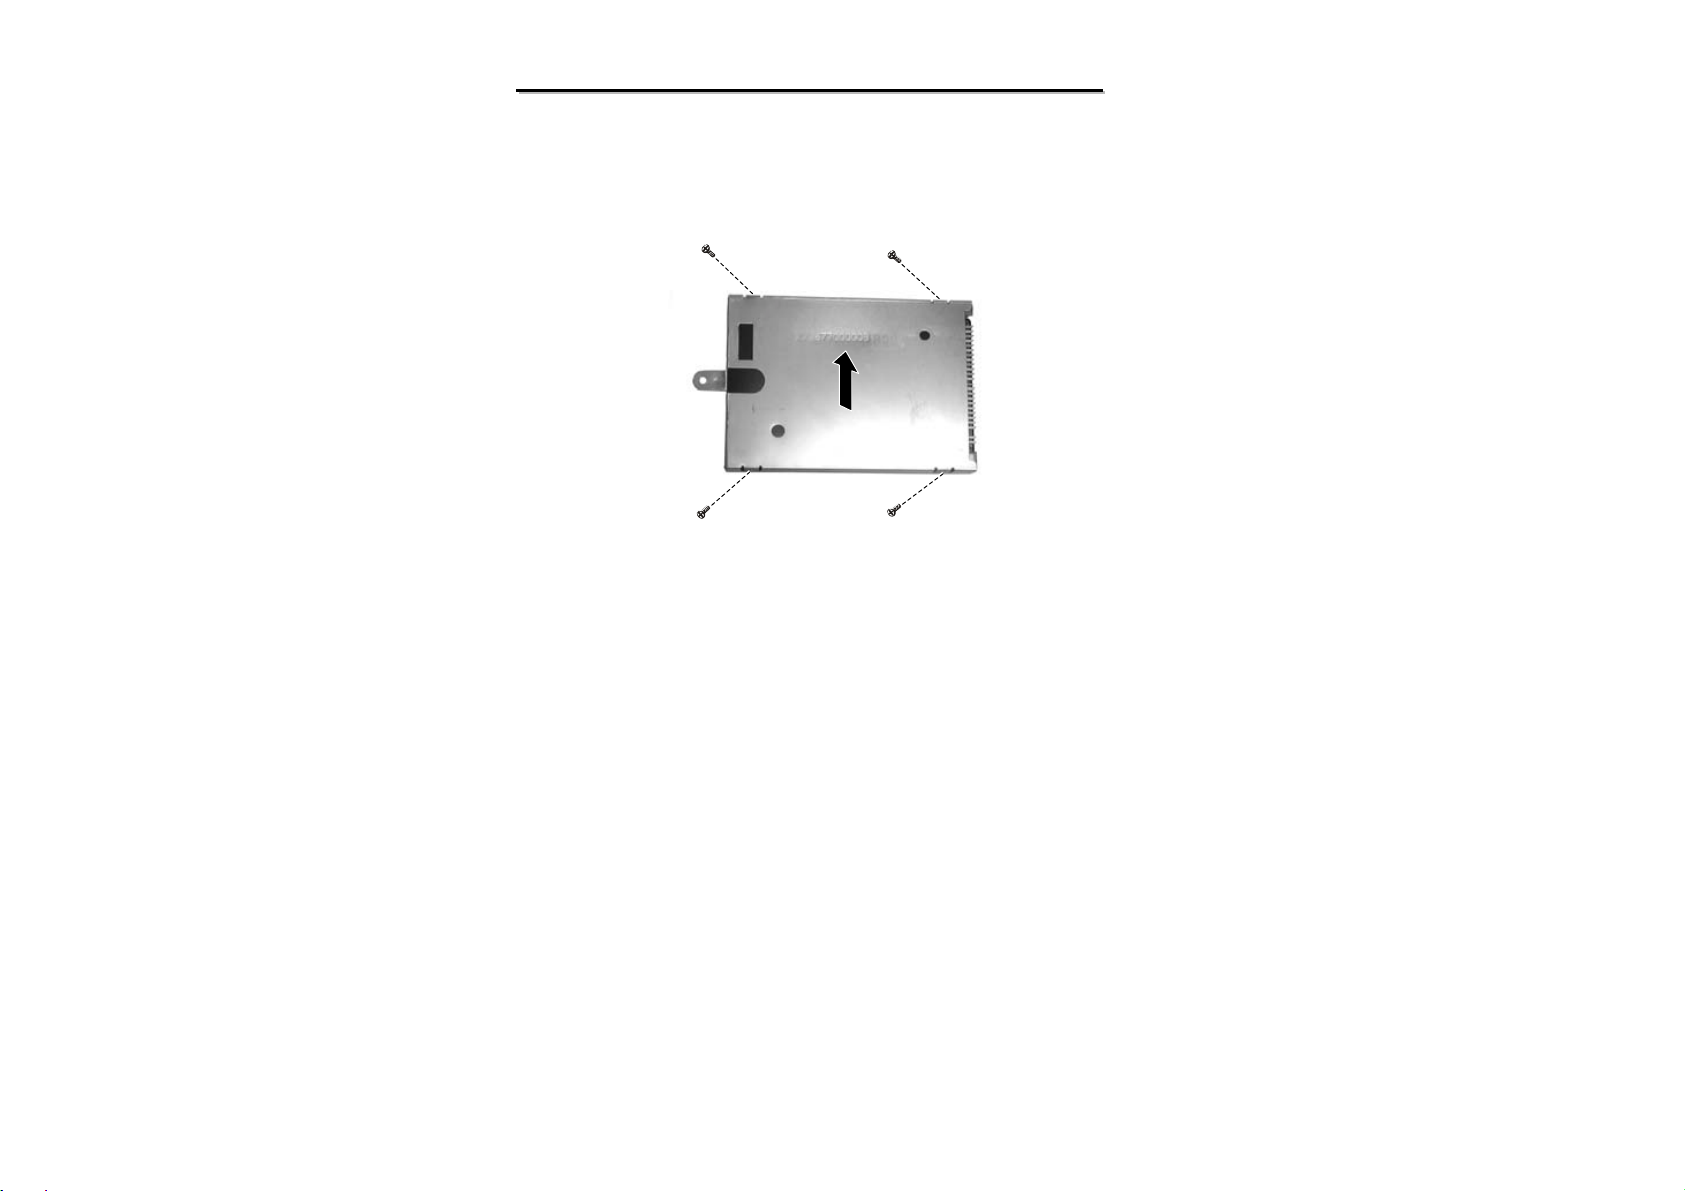
4. Remove four screw s to separate the hard disk drive from the bracket, remove four screws.
(Figure 2-9)
N/B Maintenance
N/B Maintenance
Figure 2-9 Remove hard disk drive
Reassembly
1. Attach the bracket to hard disk drive and secure with four screws.
2. Slide the HDD module into the compartment and secure with one screw.
3. Place the HDD compartment cover and secure with two screws.
4. Replace the battery pack. (Refer to section 2.2.1 reassembly)
43
Page 45
8050
8050
N/B Maintenance
N/B Maintenance
2.2.5 CD/DVD-ROM Drive
Disassembly
1. Carefully put the notebook upside down. Remove the battery pack. (Refer to section 2.2.1 Disassembly)
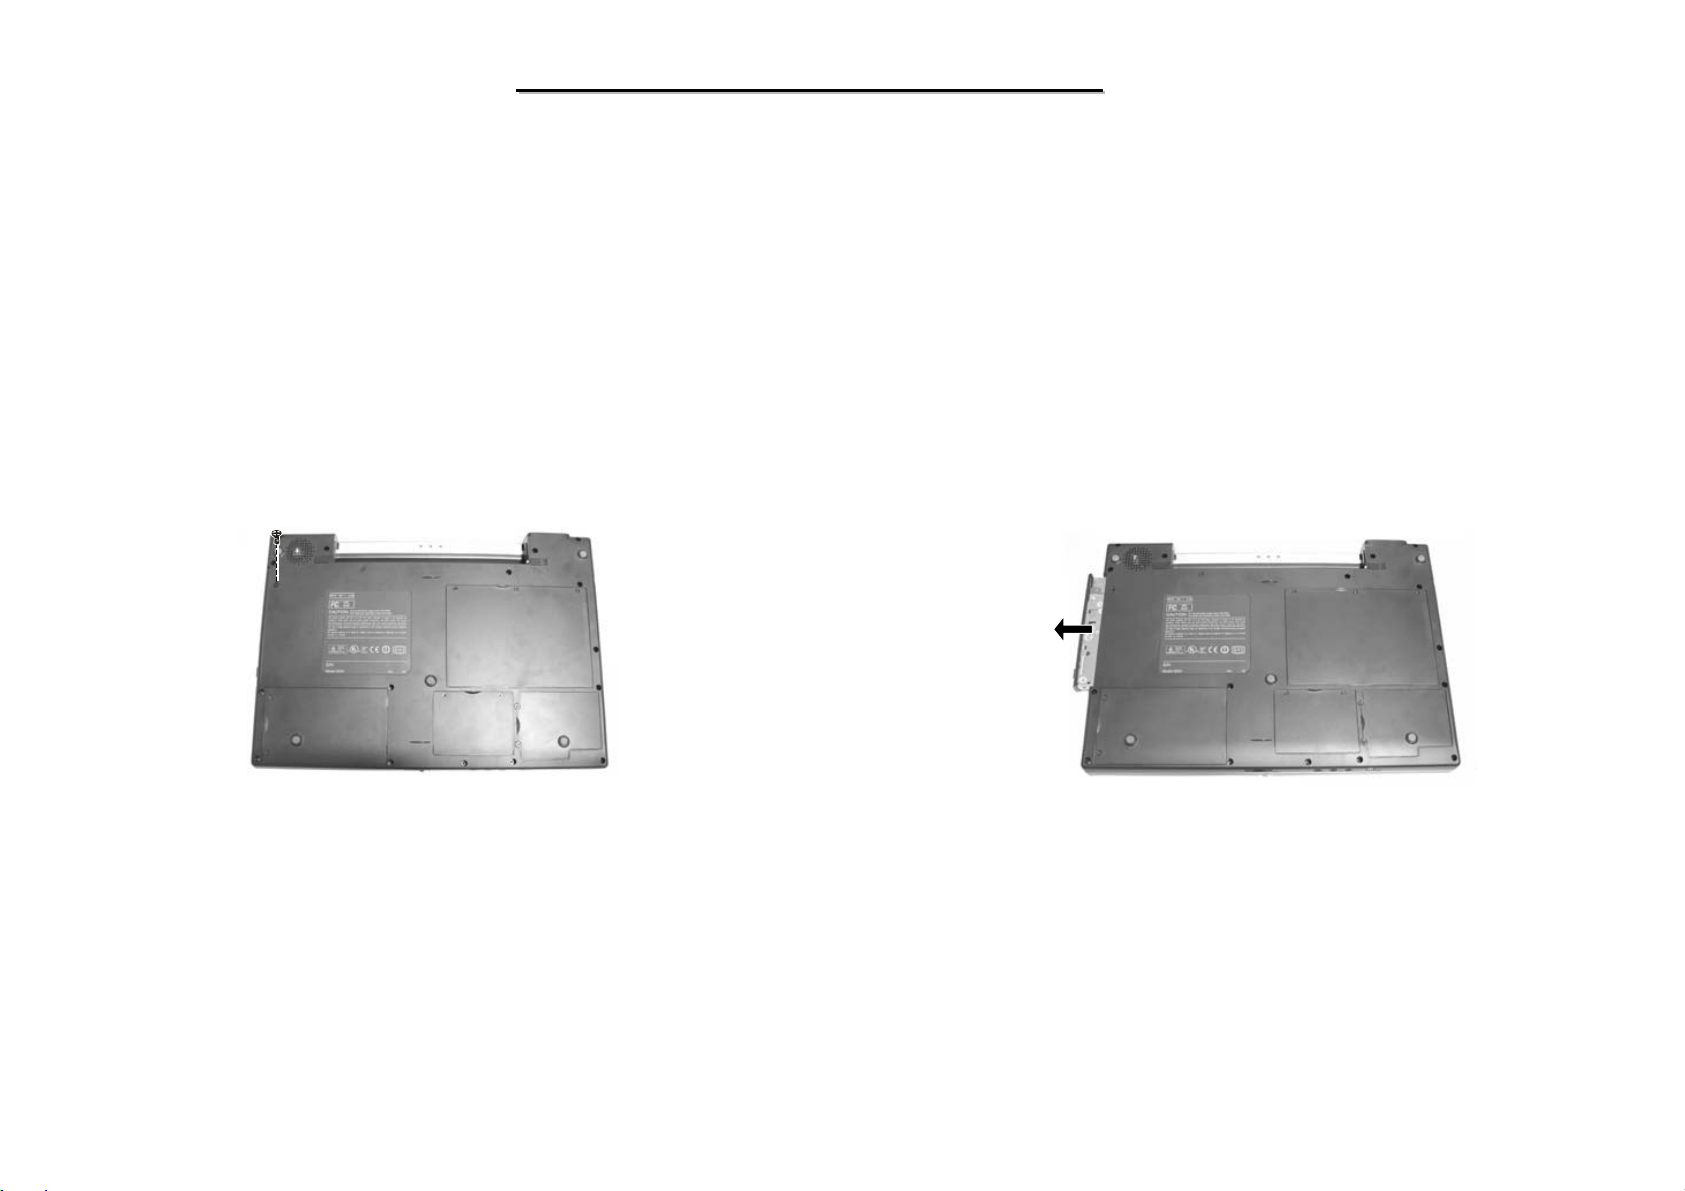
2. Remove one screw fastening the CD/DVD-ROM drive. (Figure 2-10)
3. Push firmly to release the tray. Then gently pull out the CD/DVD-ROM drive by holding the tray that
pops out. (Figure 2-11)
Figure 2-10 Remove one screw
Reassembly
1. Push the CD/DVD-ROM drive into the compartment and secure with one screw.
2. Replace the battery pack. (Refer to section 2.2.1 reassembly)
Figure 2-11 Remove the CD/DVD-
ROM drive
44
Page 46
8050
8050
N/B Maintenance
N/B Maintenance
2.2.6 Wireless Card
Disassembly
1. Carefully put the notebook upside down. Remove the battery pack. (Refer to sections 2.2.1 Disassembly)
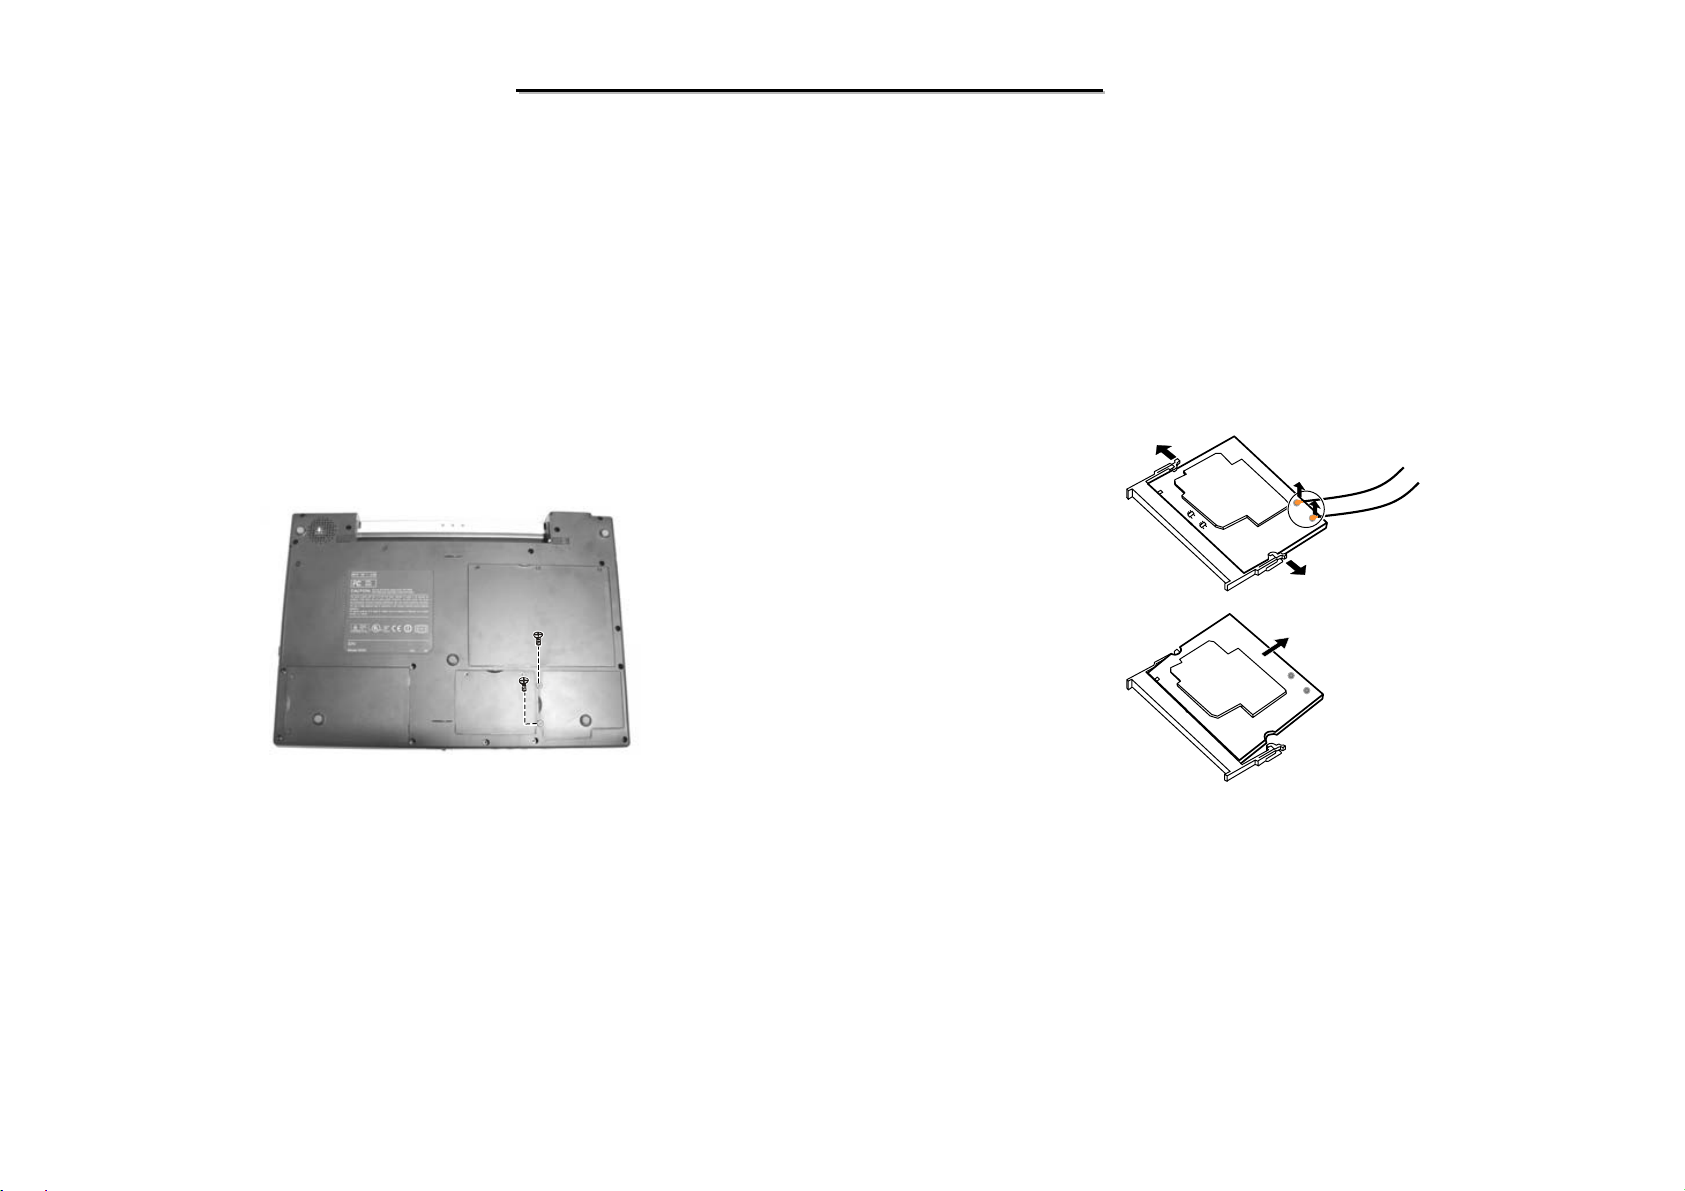
2. Remove the two screws fastening the Mini PCI compartment cover. (Figure 2-12)
3. Disconnect th e wireless card’s antennae first (). Then pull the retaining clips outwards () and remove
the wireless card (). (Figure 2-13)
Figure 2-12 Remove two screws
Reassembly
1. To install the wireless card, match the wireless card 's notched part with the socket's projected part and firm ly
insert it into the socket. Then push down until the retaining clips lock the wireless card into position. Then
sure that the antennae fully populated.
2. Tighten the screws to secure the wireless c ard compartment cover to the housing.
3. Replace the battery pack. (Refer to section 2.2.1 reassembly)
Figure 2-13 Remove the Wireless card
45
Page 47
8050
8050
N/B Maintenance
N/B Maintenance
2.2.7 Modem Card
Disassembly
1. Carefully put the notebook upside down. Remove the battery pack. (Refer to section 2.2.1 Disassembly)
2. Remove two screws fastening modem card’s compartment cover. (Refer to steps 1-2 of section 2.2.6
Disassembly)
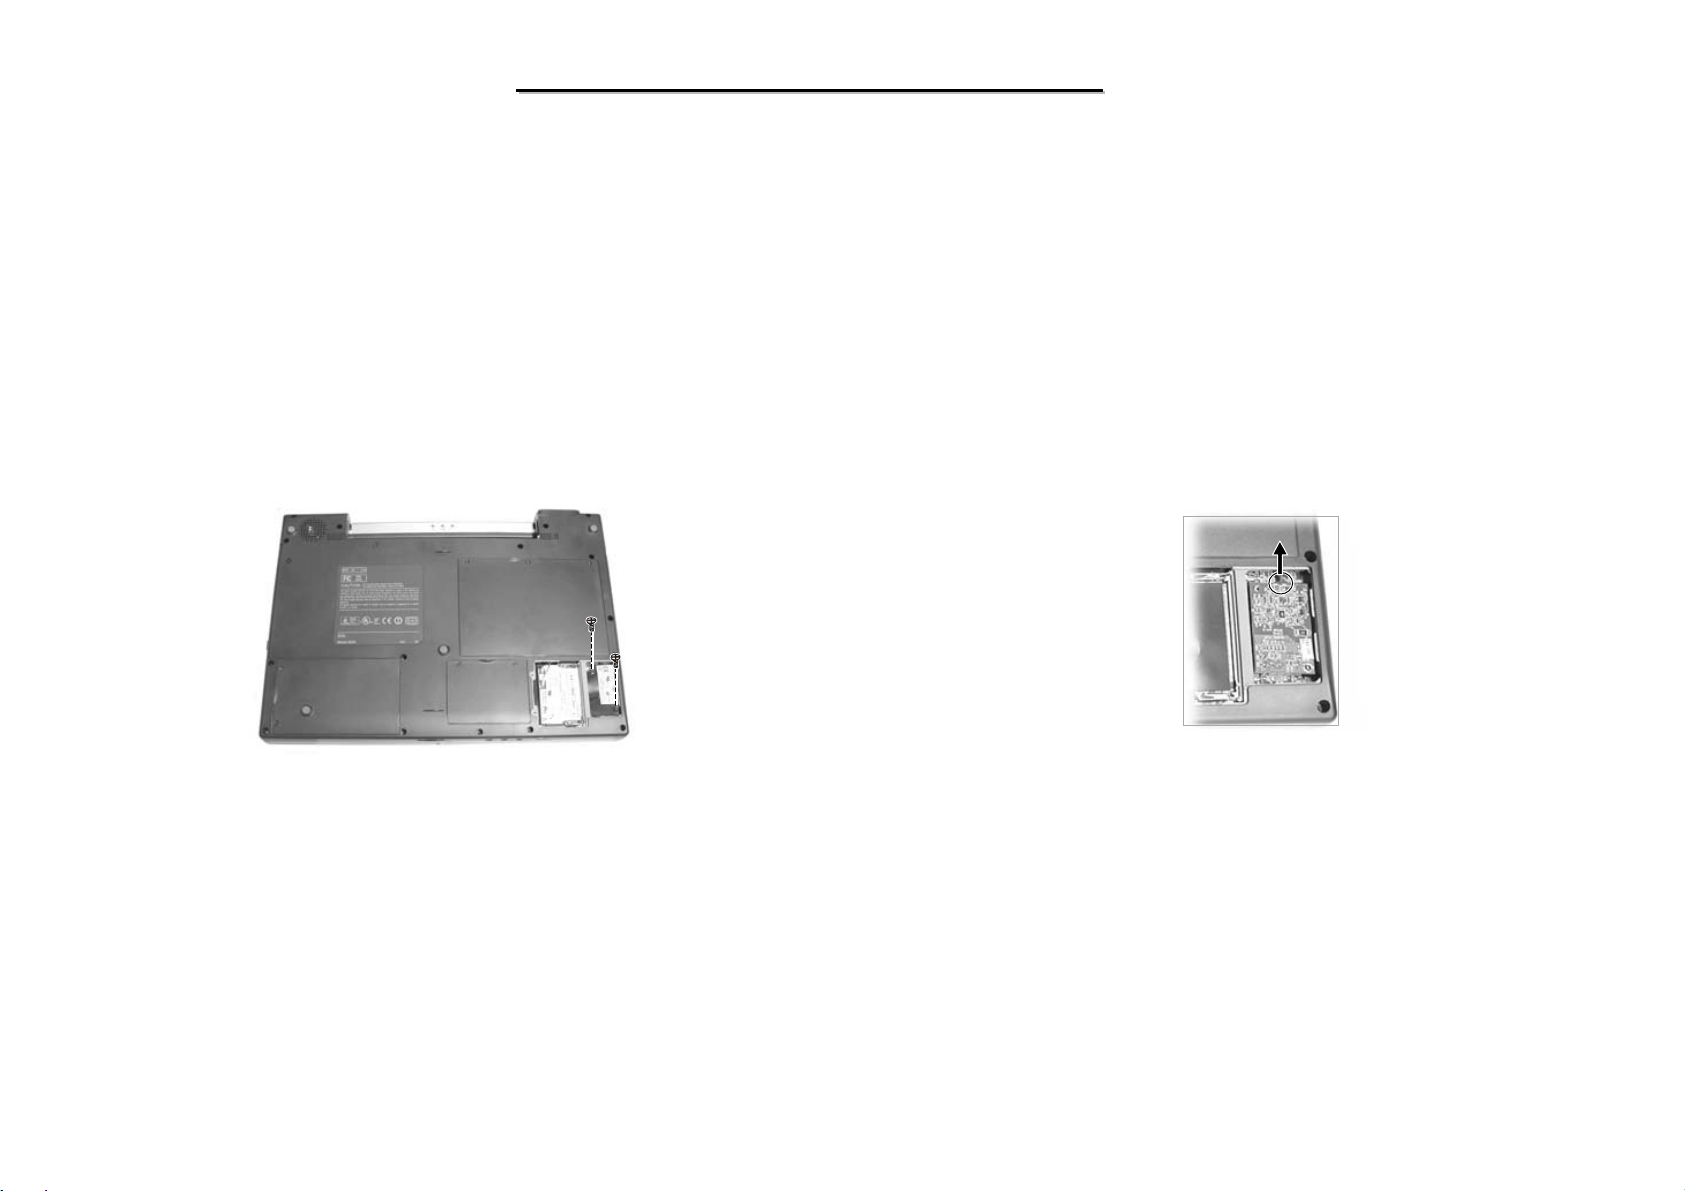
3. Remove two screws fastening the modem card. (Figure 2-14)
4. Lift up the modem card and disconnect the cord. (Figure 2-15)
Figure 2-14 Remove two screws Figure 2-15 Disconnect the cord
Reassembly
1. Reconnect the cord and fit the modem card.
2. Fasten the modem card by two screws.
3. Replace the modem card’s compartment co ver by two screws. (Refer to step 2 of section 2.2.6 reassembly).
4. Replace the battery pack. (Refer to section 2.2.1 reassembly)
46
Page 48
8050
8050
N/B Maintenance
N/B Maintenance
2.2.8 DDR-SDRAM
Disassembly
1. Carefully put the no tebook upside down. And remove the battery pack. (See sec tion 2.2.1 disassembly)
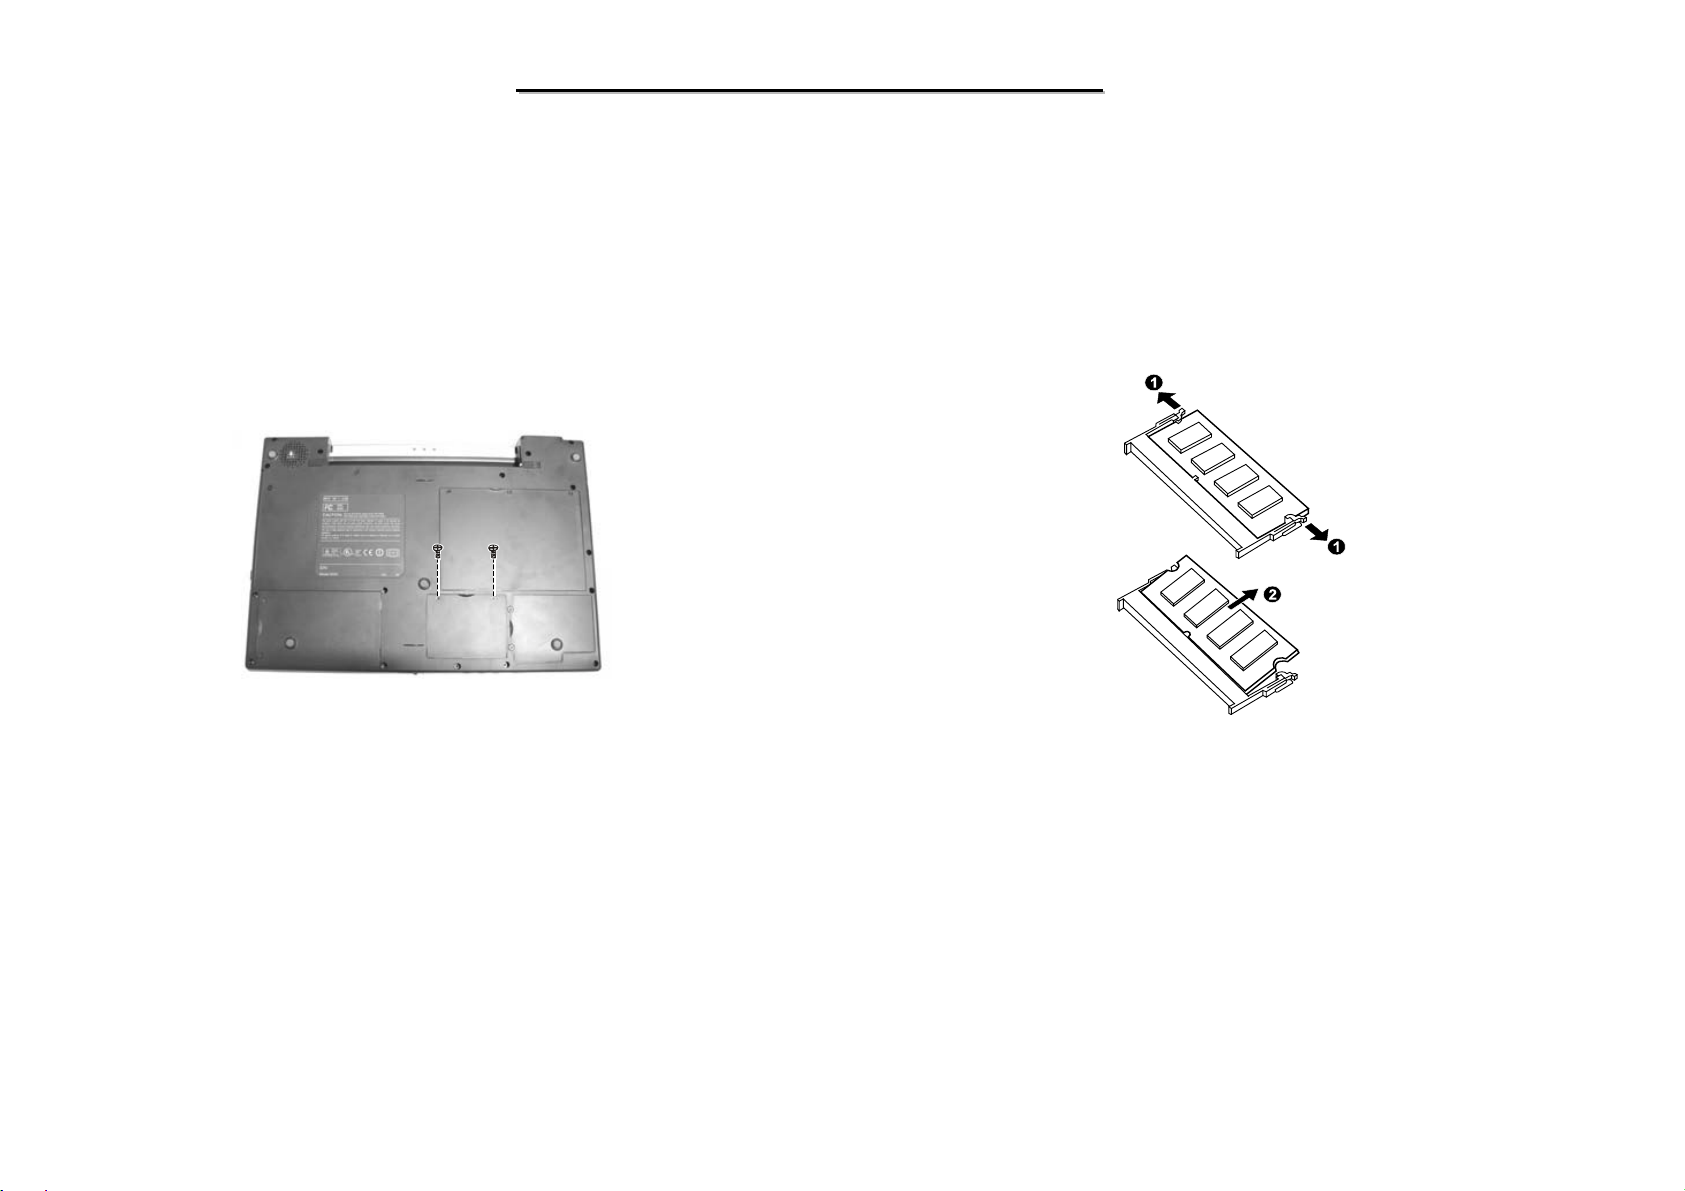
2. Remove two screws fastening the DDR compartment cover to access the SO-DIMM socket. (Figure 2-16)
Figure 2-16 Remove the cover Figure 2-17 Remove the SO-DIMM
3. Pull the retaining clips outwards () and remove the SO-DIMM (). (Figure 2-17)
Reassembly
1. To install the DDR, match the DDR's notched part with th e socket's projected part and firmly insert the
SO-DIMM into the socket at 20-degree angle. Then push down until the retaining clips lock the DDR
into position.
2. Replace two screws to fasten the DDR compartment cover.
3. Replace the battery pack. (See section 2.2.1 reassembly)
47
Page 49

8050
8050
N/B Maintenance
N/B Maintenance
2.2.9 LCD ASSY
Disassembly
1. Remove the battery pack, keyboard,CPU, hard disk drive, CD/DVD-drive and wireless card.
(See sections 2.2.1,2.2.2, 2.2.3, 2.2.4, 2.2.5 and 2.2.6 Disassembly)
2. Remove the nineteen screws on t he bottom of notebook. (Figure 2-18)
3. Remove the four screws that secure the hi nge cover. (Figure 2-19)
Figure 2-18 Remove nineteen screws Figure 2-19 Remove four screws
48
Page 50
8050
8050
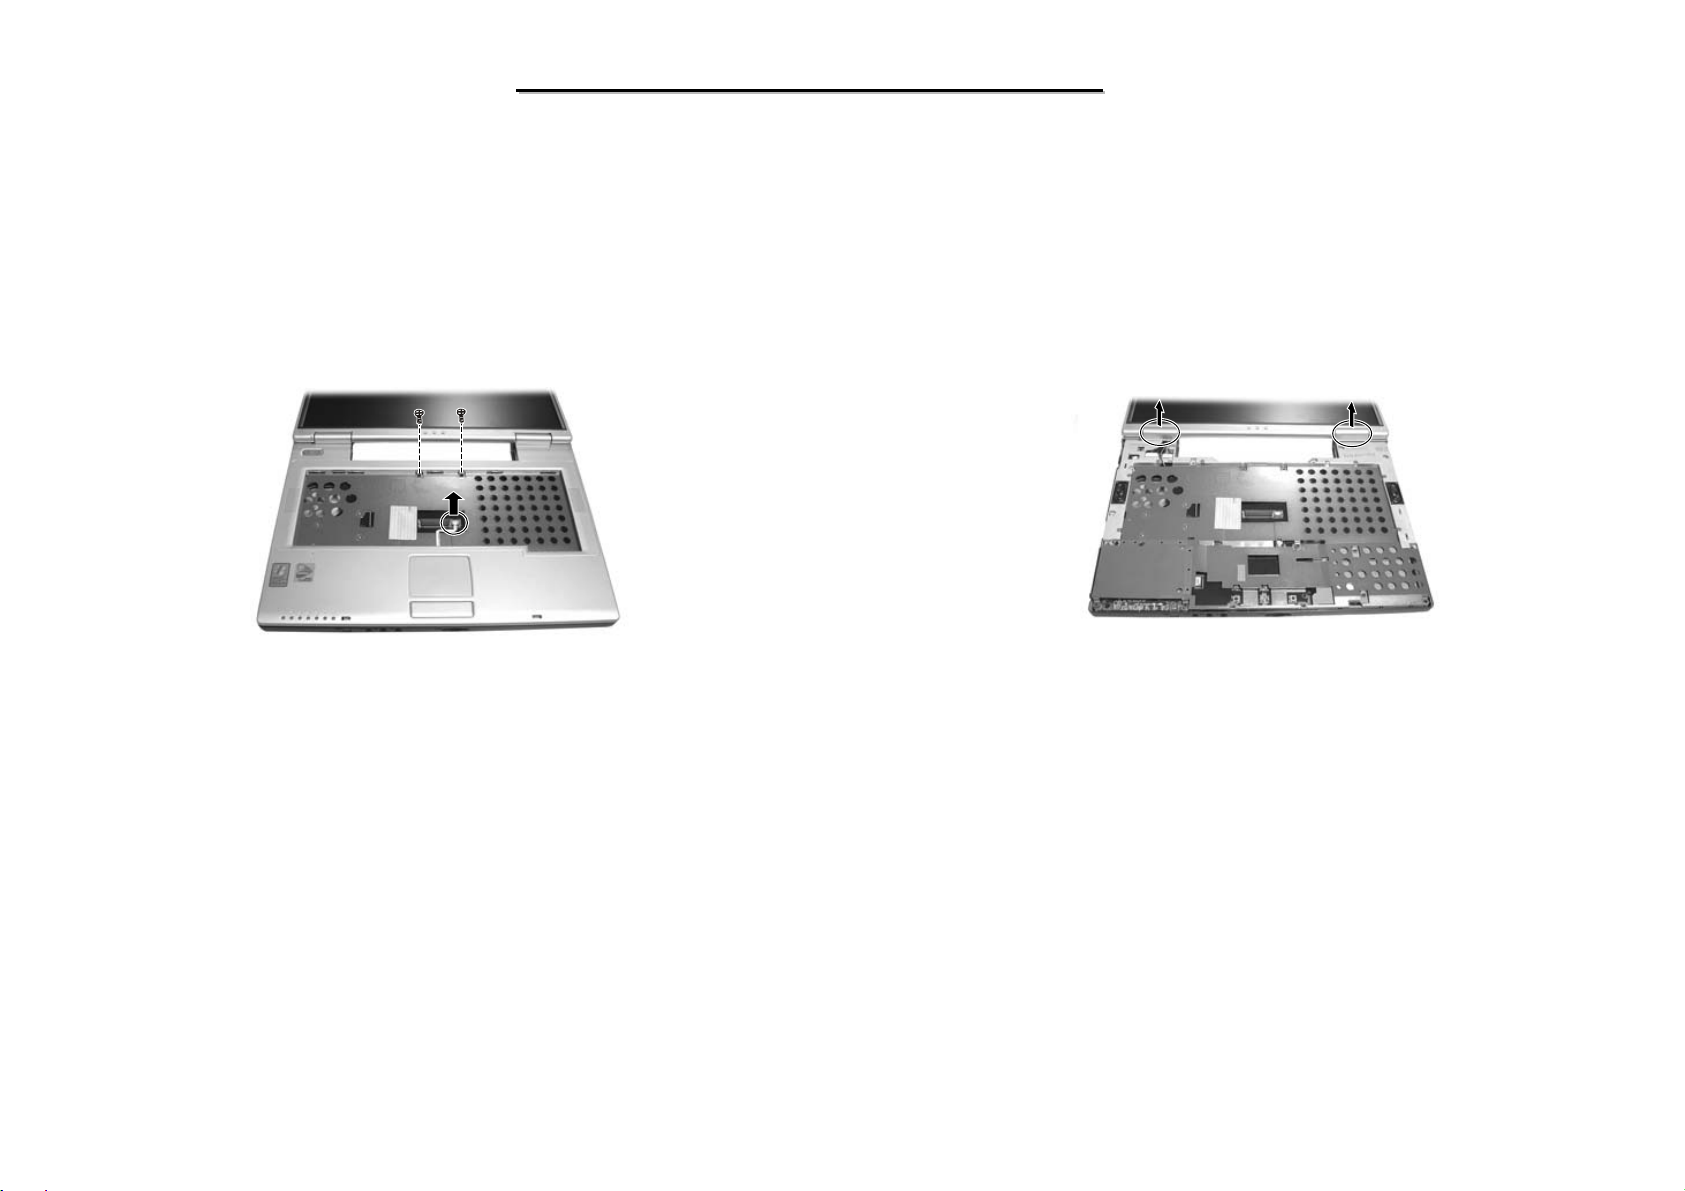
4. Remove the two screws and disconnect the touch pad’s cable, then free the top cover.(Figure 2-20)
5. Remove the two hinge covers. (Figure 2- 21)
N/B Maintenance
N/B Maintenance
Figure 2-20 Free the Top cover Figure 2-21 Remove the hinge covers
49
Page 51
8050
8050
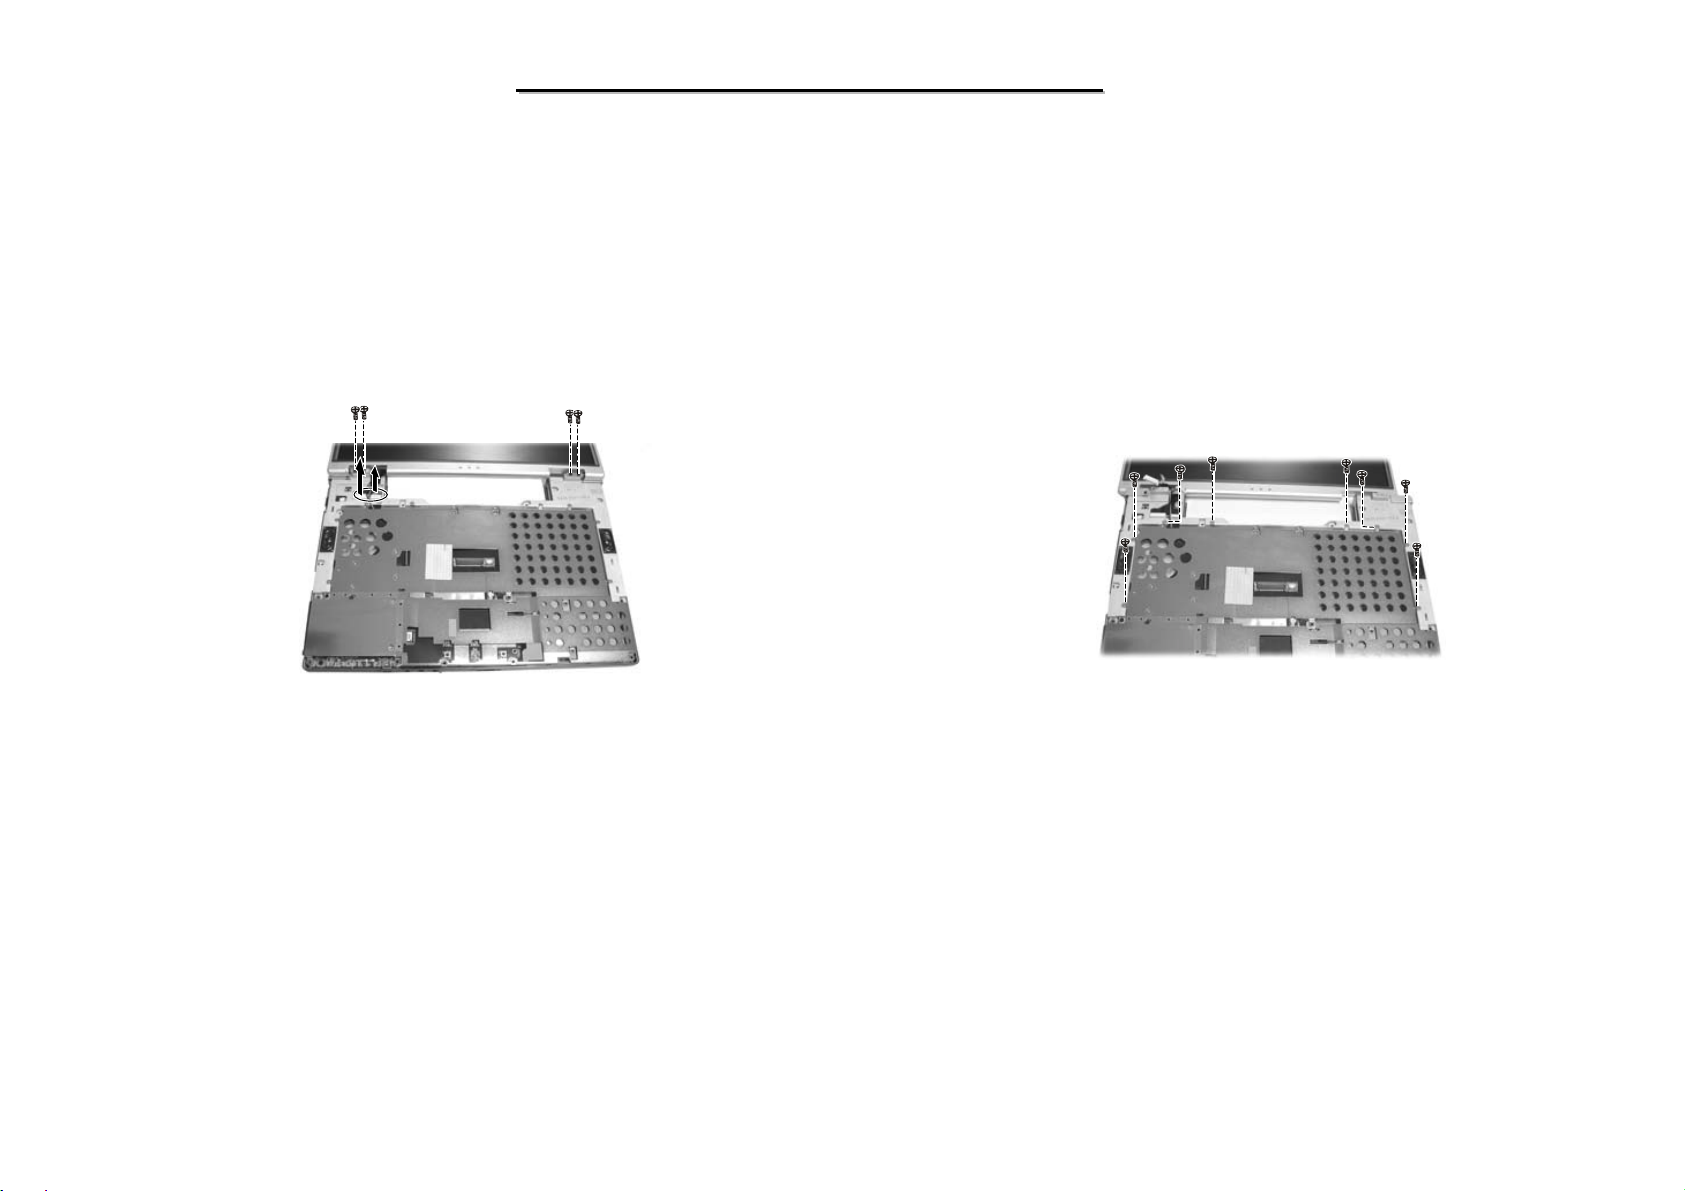
6. Disconnect the two cables and remove the four screws. (Figure 2-22)
7. Remove the eight screws. (Figure 2-23)
N/B Maintenance
N/B Maintenance
Figure 2-22 Remove the four screws and
Disconnect the two cables
Figure 2 -23 Remo ve the eight screws
50
Page 52
8050
8050
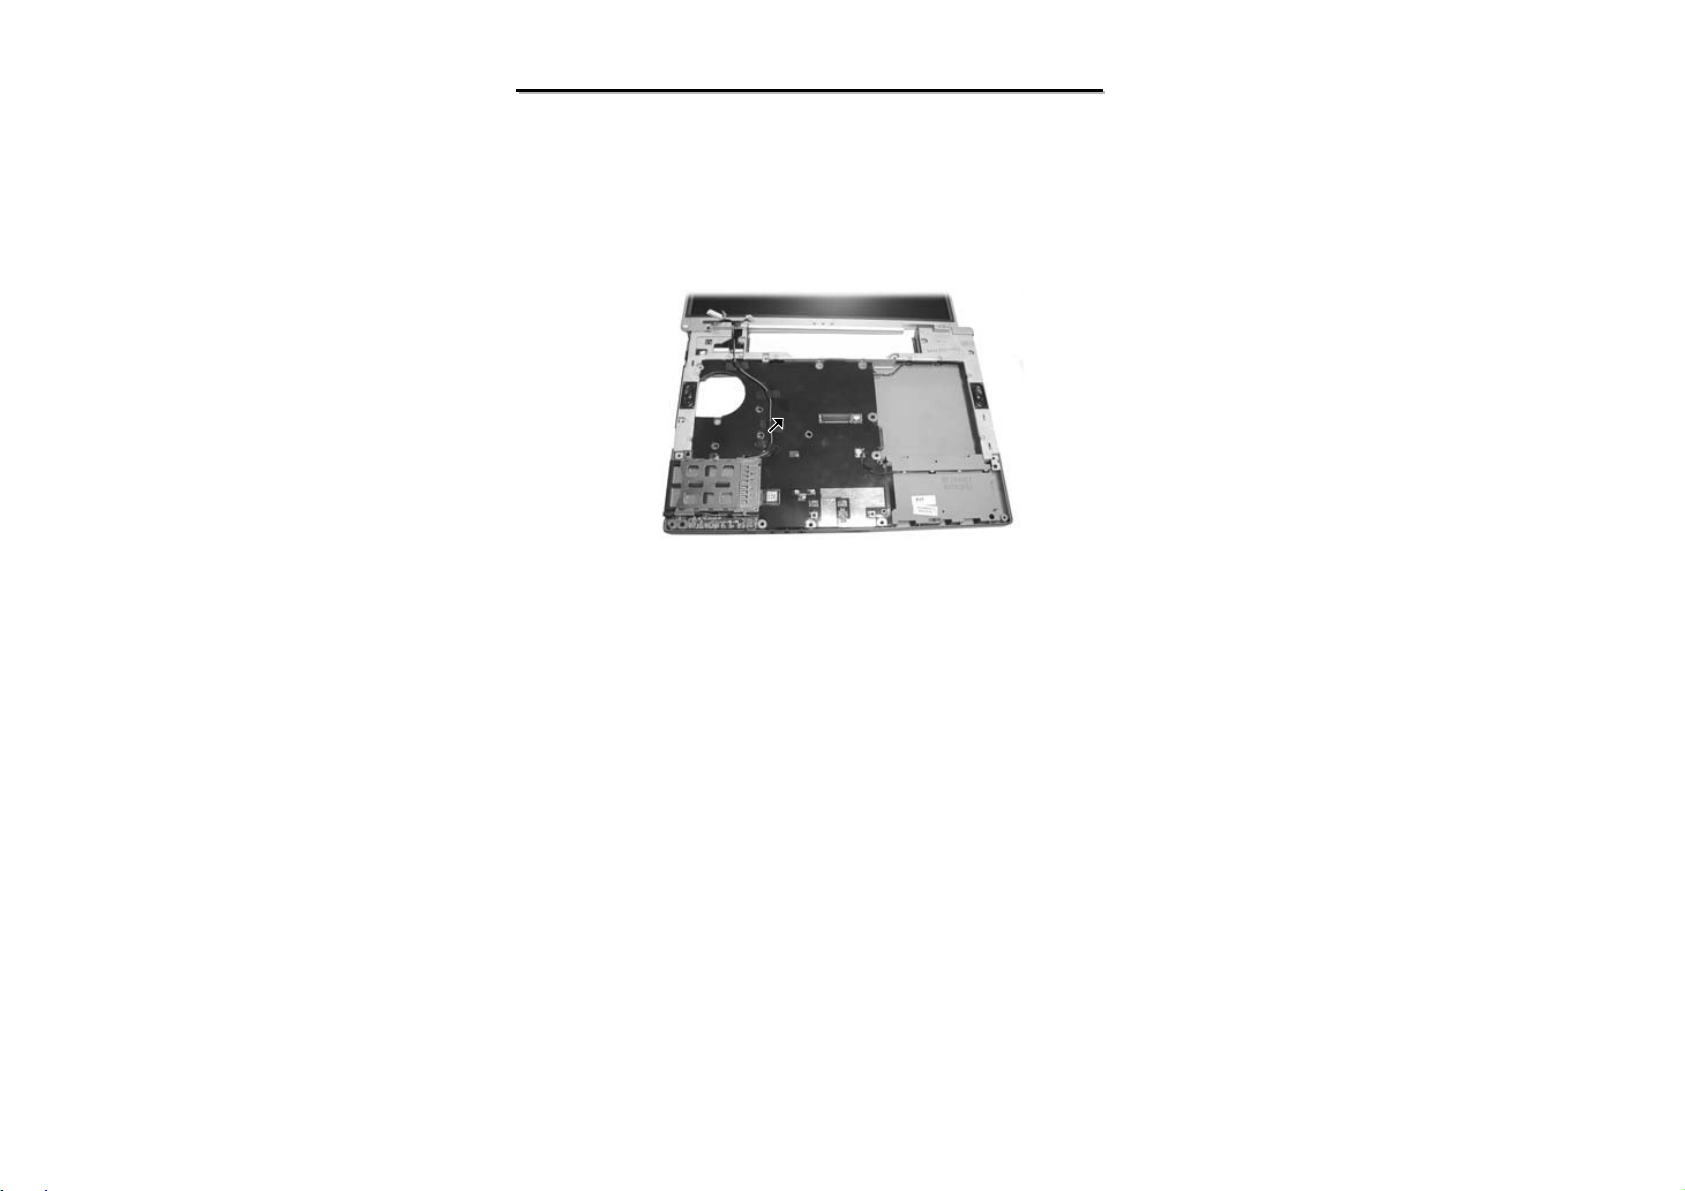
8. Carefully pull the antenna wires out. Now you can lift up the LCD ASSY from base unit. (Figure 2-24)
N/B Maintenance
N/B Maintenance
Figure 2-24 Free the LCD ASSY
Reassembly
1. Attach the LCD assembly to the base unit and secure with four screws.
2. Rip the antenna wires back into Min-PCI compartment.
3. Reconnect the two cables to the system board. Screw the hinge covers by two screws.
4. Replace the shield and secure with eight screws.
5. Replace the top co ver and secure with two screws. And reconnect the touch pad’s cable.
6. Upside down the notebook. secure the housing by nineteen screws and secure two screws in the rear.
7. Replace the Wireless card, CD/DVD-ROM, hard disk drive, CPU, keyboard and battery pack. (Refer to
sections 2.2.6, 2.2.5, 2.2.4, 2.2.3, 2.2.2 and 2.2.1 reassembly)
51
Page 53
8050
8050
N/B Maintenance
N/B Maintenance
2.2.10 LCD Panel
Disassembly
1. Remove the battery, keyboard, hard disk drive, CD/DVD-ROM drive and LCD assembly. (Refer to
section 2.2.1, 2.2.2, 2.2.4, 2.2.5 and 2.2.9 Disassembly)
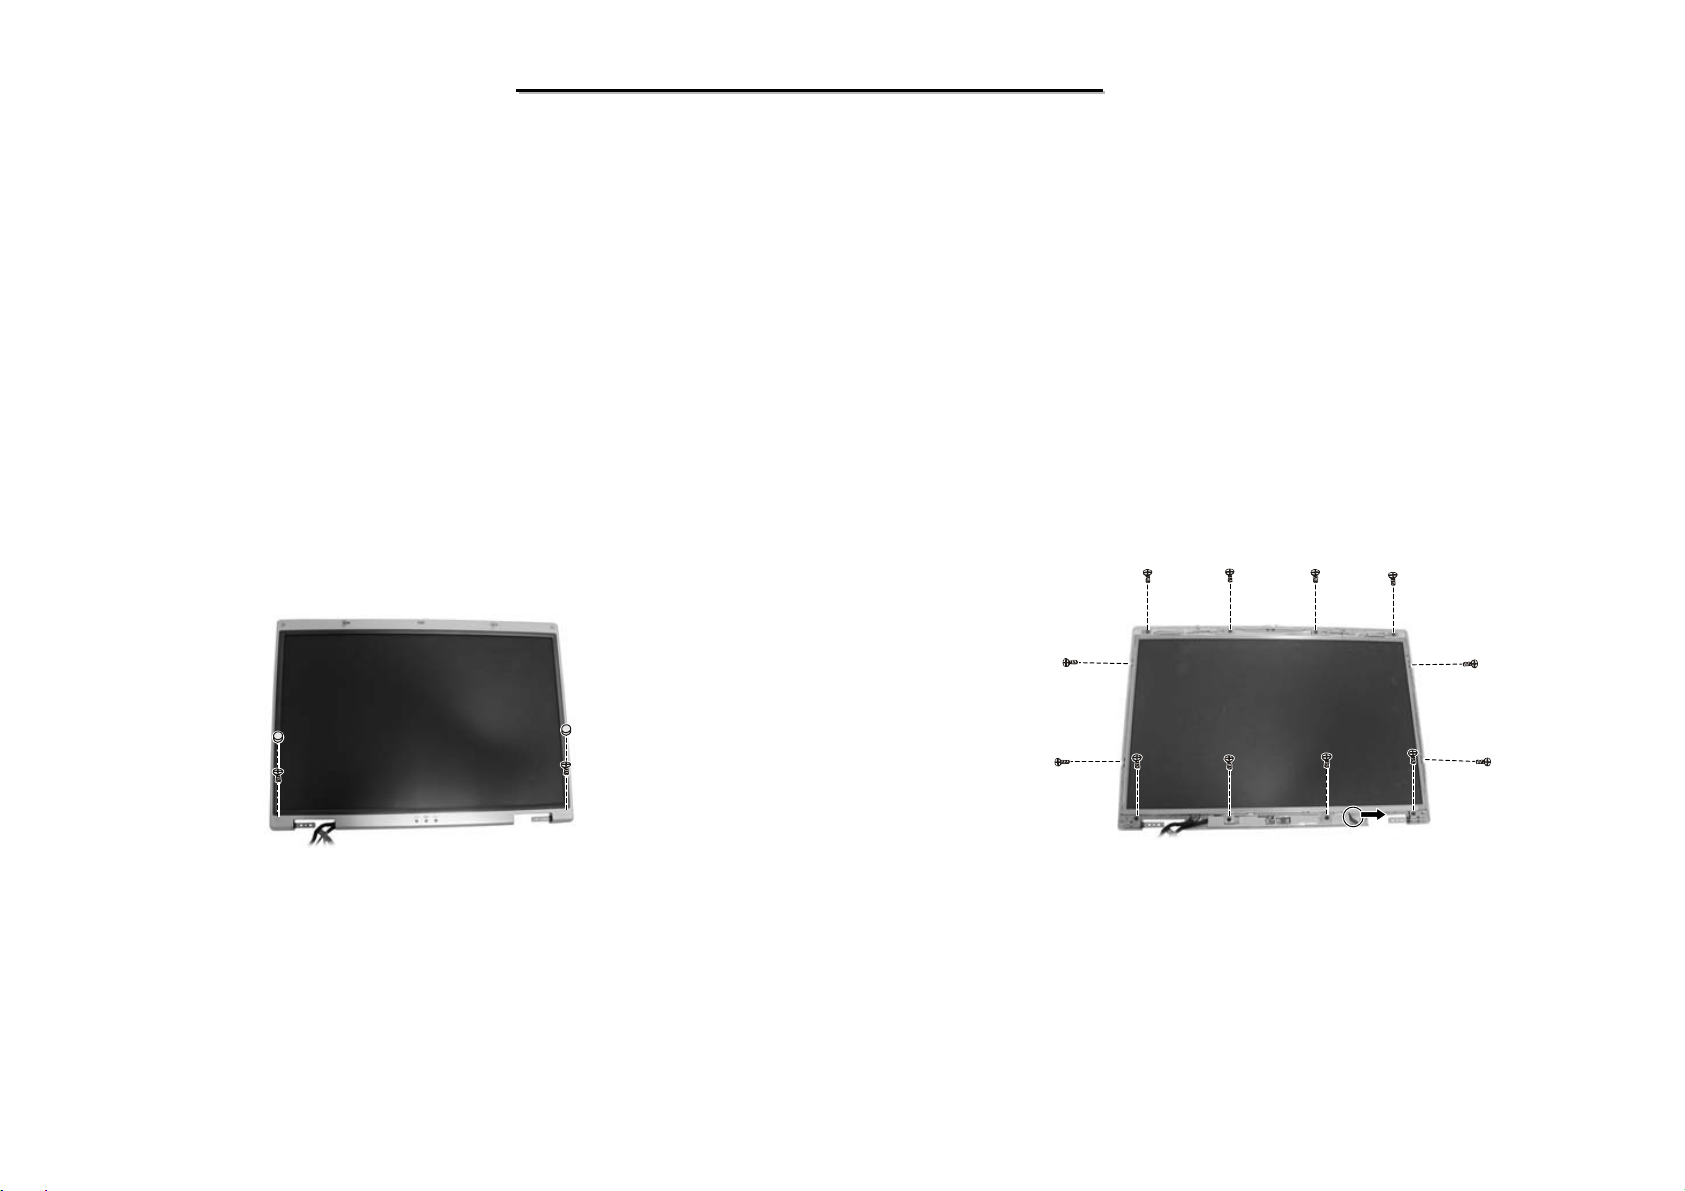
2. Remove the two rubber pads and two screws on the corners of the panel. (Figure 2-25)
3. Insert a flat screwdriver t o the lower part of the LCD co ver and gently pry the frame out. Repeat the
process until the cover is completely separated from the housing.
4. Remove the twelve screws and disconnect the cable. (Figure 2-26)
Figure 2-25 Remove LCD cover
Figure 2-26 Remove twelve screws and
disconnect the cable
52
Page 54
8050
8050
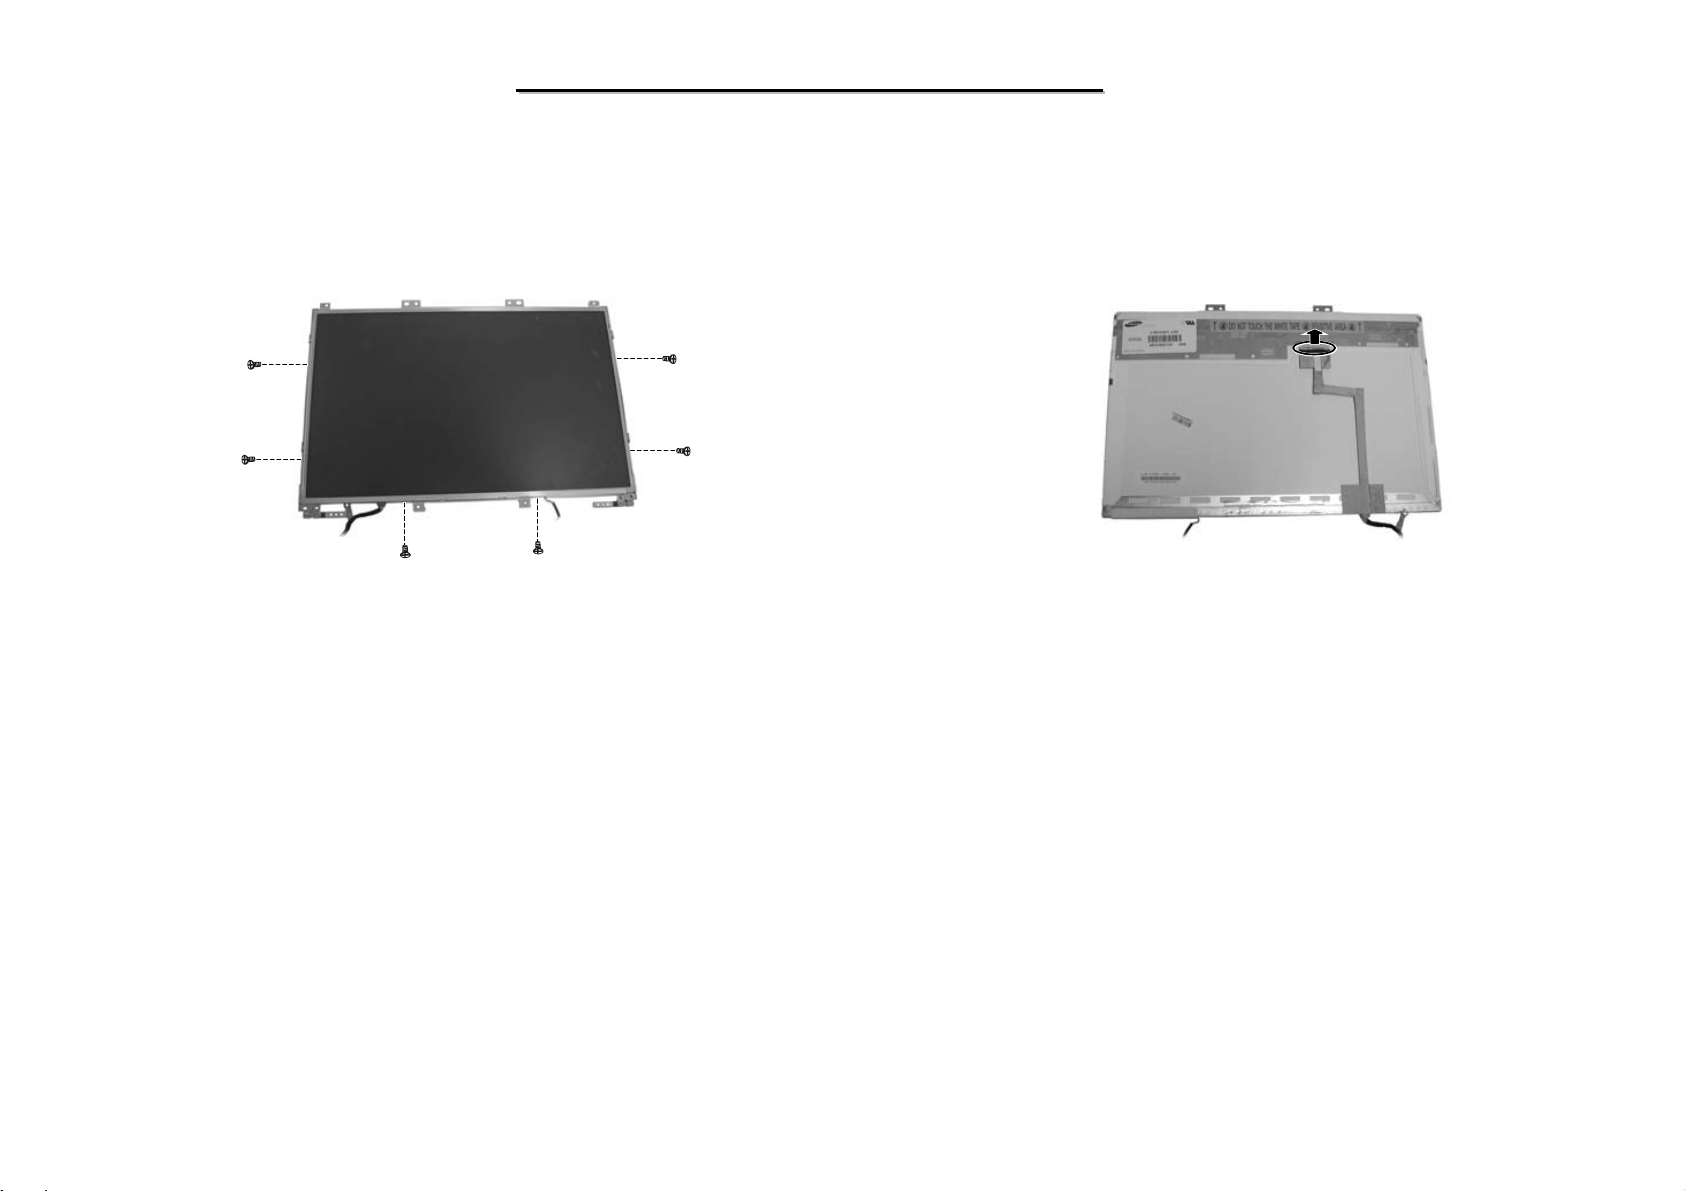
5. Remove the six screws that secure t he LCD bracket. (Figure 2-27)
6. Disconnect the cable to free the LCD panel. (Figure 2-28)
N/B Maintenance
N/B Maintenance
Figure 2 -27 Remo ve the six scre ws
Reassembly
1. Replace the cable to the LCD.
2. Attach the LCD panel’s bracket back to LCD panel and secure with s ix screws.
3. Replace the LCD panel into LCD housing.and reconnect two cables to inverter board and secure with two
screws.
4. Fasten the LCD panel by ten screws.
5. Fit the LCD cover and secure with two screws and rubber pads.
6. Replace the LCD as sembly, CD/DVD-ROM drive, hard disk driv e, keyboard, battery pack. (See sections
2.2.9, 2.2.5, 2.2.4, 2. 2.2, and 2. 2. 1 reas s embly)
Figure 2-28 Free the LCD panel
53
Page 55

8050
8050
N/B Maintenance
N/B Maintenance
2.2.11 Inverter Board
Disassembly
1. Remove the battery, keyboard, hard disk drive, CD/DVD-ROM drive and LCD assembly. (Refer to
section 2.2.1, 2.2.2, 2.2.4, 2.2.5 and 2.2.9 Disassembly)
2. Remove the LCD cover and LCD panel. (Refer to the steps 1-4 of section 2.2.10 Disassembly )
3. Remove the one screw fastening the inverter board and disconnect the cable, Then free the inverter board.
(Figure 2-29)
Figure 2-29 Free the inverter board
Reassembly
1. Reconnect the cable. Fit the inverter board back into place and secure with one screw.
2. Replace the LCD Panel and LCD cover. (Refer to section 2.2.10 reassembly)
3. Replace the LCD assembly. (Refer to section 2.2.9 reas sembly)
4. Replace the CD/DVD-ROM drive, hard disk drive, keyboard and battery pack. (Refer to sections 2.2.5,
2.2.4, 2.2.2 and 2.2.1 reassembly)
54
Page 56
8050
8050
N/B Maintenance
N/B Maintenance
2.2.12 System Board
Disassembly
1. Remove the battery, keyboard, hard disk drive, CD/DVD-ROM drive, Wireless card and LCD assembly.
(Refer to sections 2.2.1, 2.2.2, 2.2.4, 2.2.5, 2.2.6 and 2.2.9 Disasse mbly)
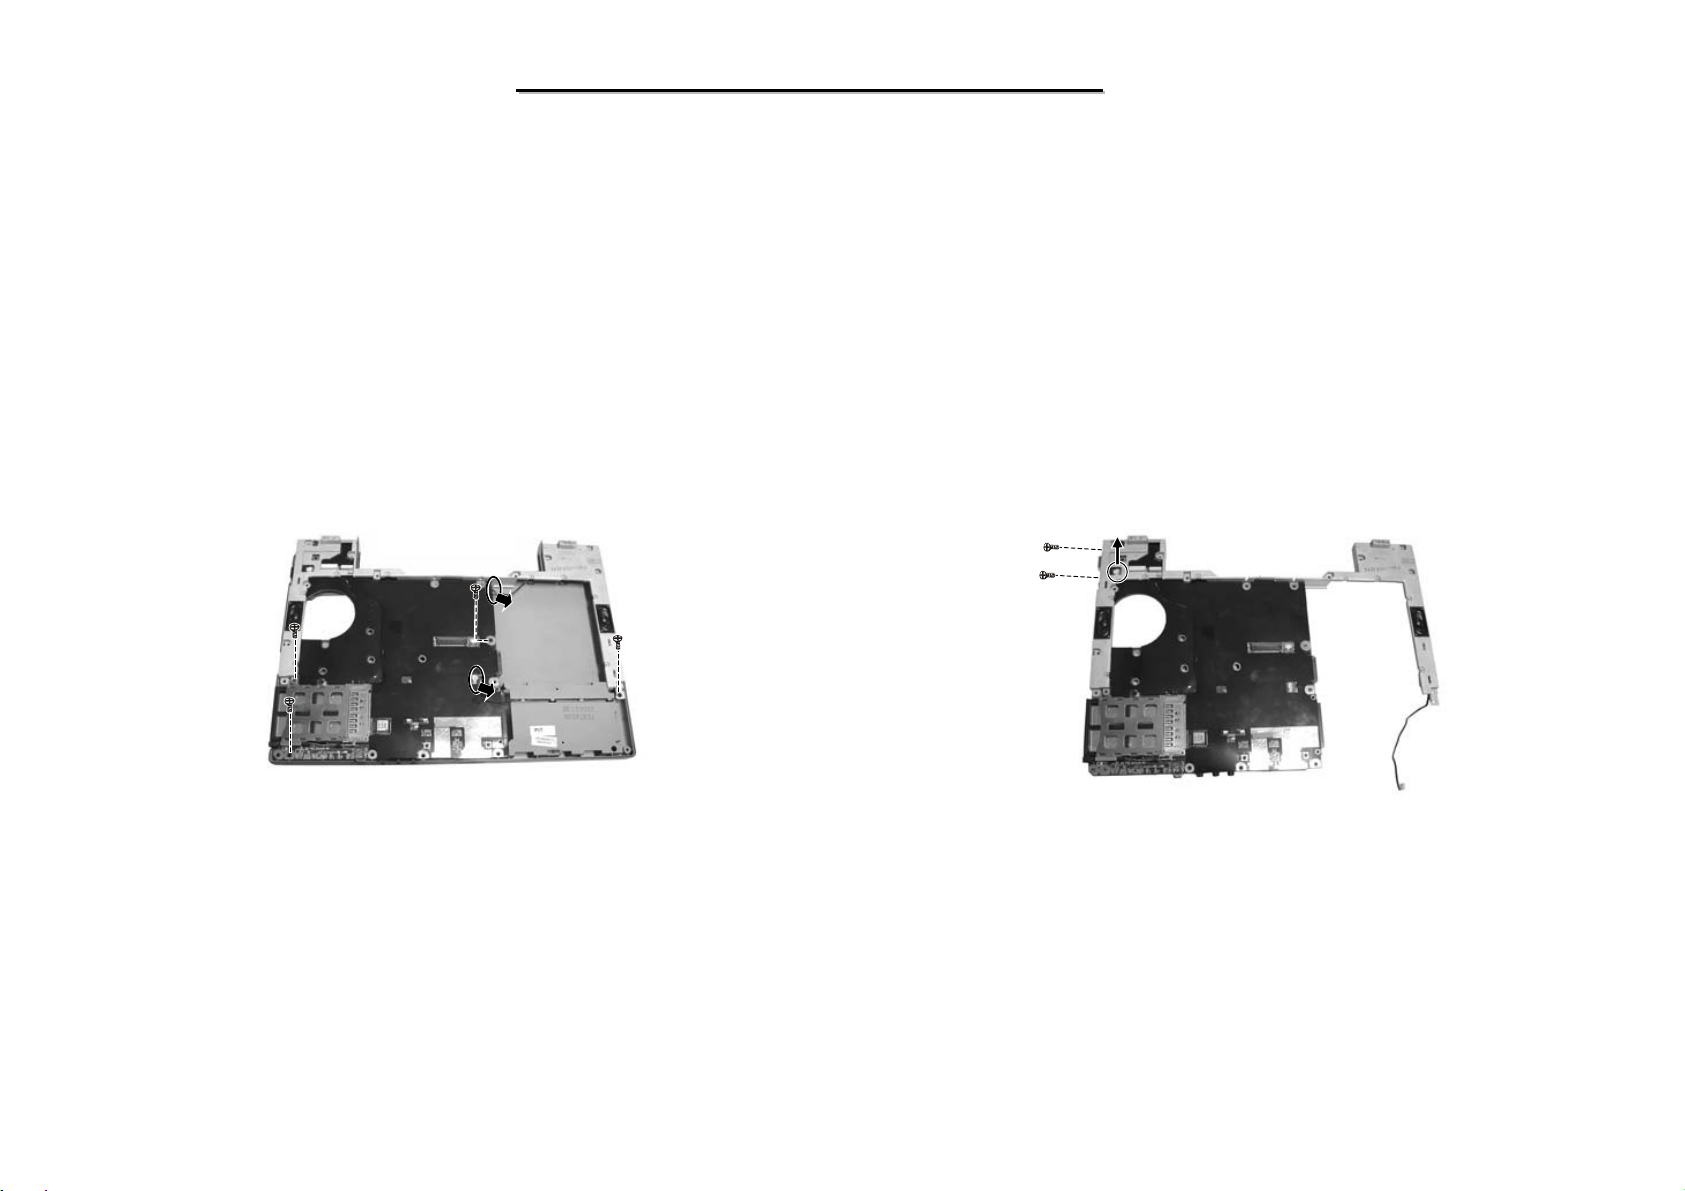
2. Remove the four s c rews that secure the system board and disconnect the two speaker’s cab les. Then lift it
up from the housing. (Figure 2-30)
3. Disconnect th e one speaker’s cables from the system board and remove th e two screws, Then separate the
bracket and free the system board. (Figure 2-31)
Figure 2-30 Remove four screws and
disconnect the two cables Figure 2-31 Free the system board
Reassembly
1. Fit the bracket and secure with two screws .
2. Turn over the system board. Reconne ct the speaker’s cords.
3. Replace the system board back into the housing and secure with four screws, then reconnect the cable.
4. Replace the LCD assembly, CD/DVD-ROM, HDD, keyboard and battery pack. (Refer to previous section
reassembly)
55
Page 57
8050
8050
N/B Maintenance
N/B Maintenance
2.2.13 Touch Pad
Disassembly
1. Remove the battery pack, keyboard, hard disk drive and CD/DVD-drive. (See sections 2.2.1,2.2.2 , 2.2.4 and
2.2.5 Disas sembly)
2. Remove the top cover. (See steps 1-5 in section 2.2. 9 Disassembly)
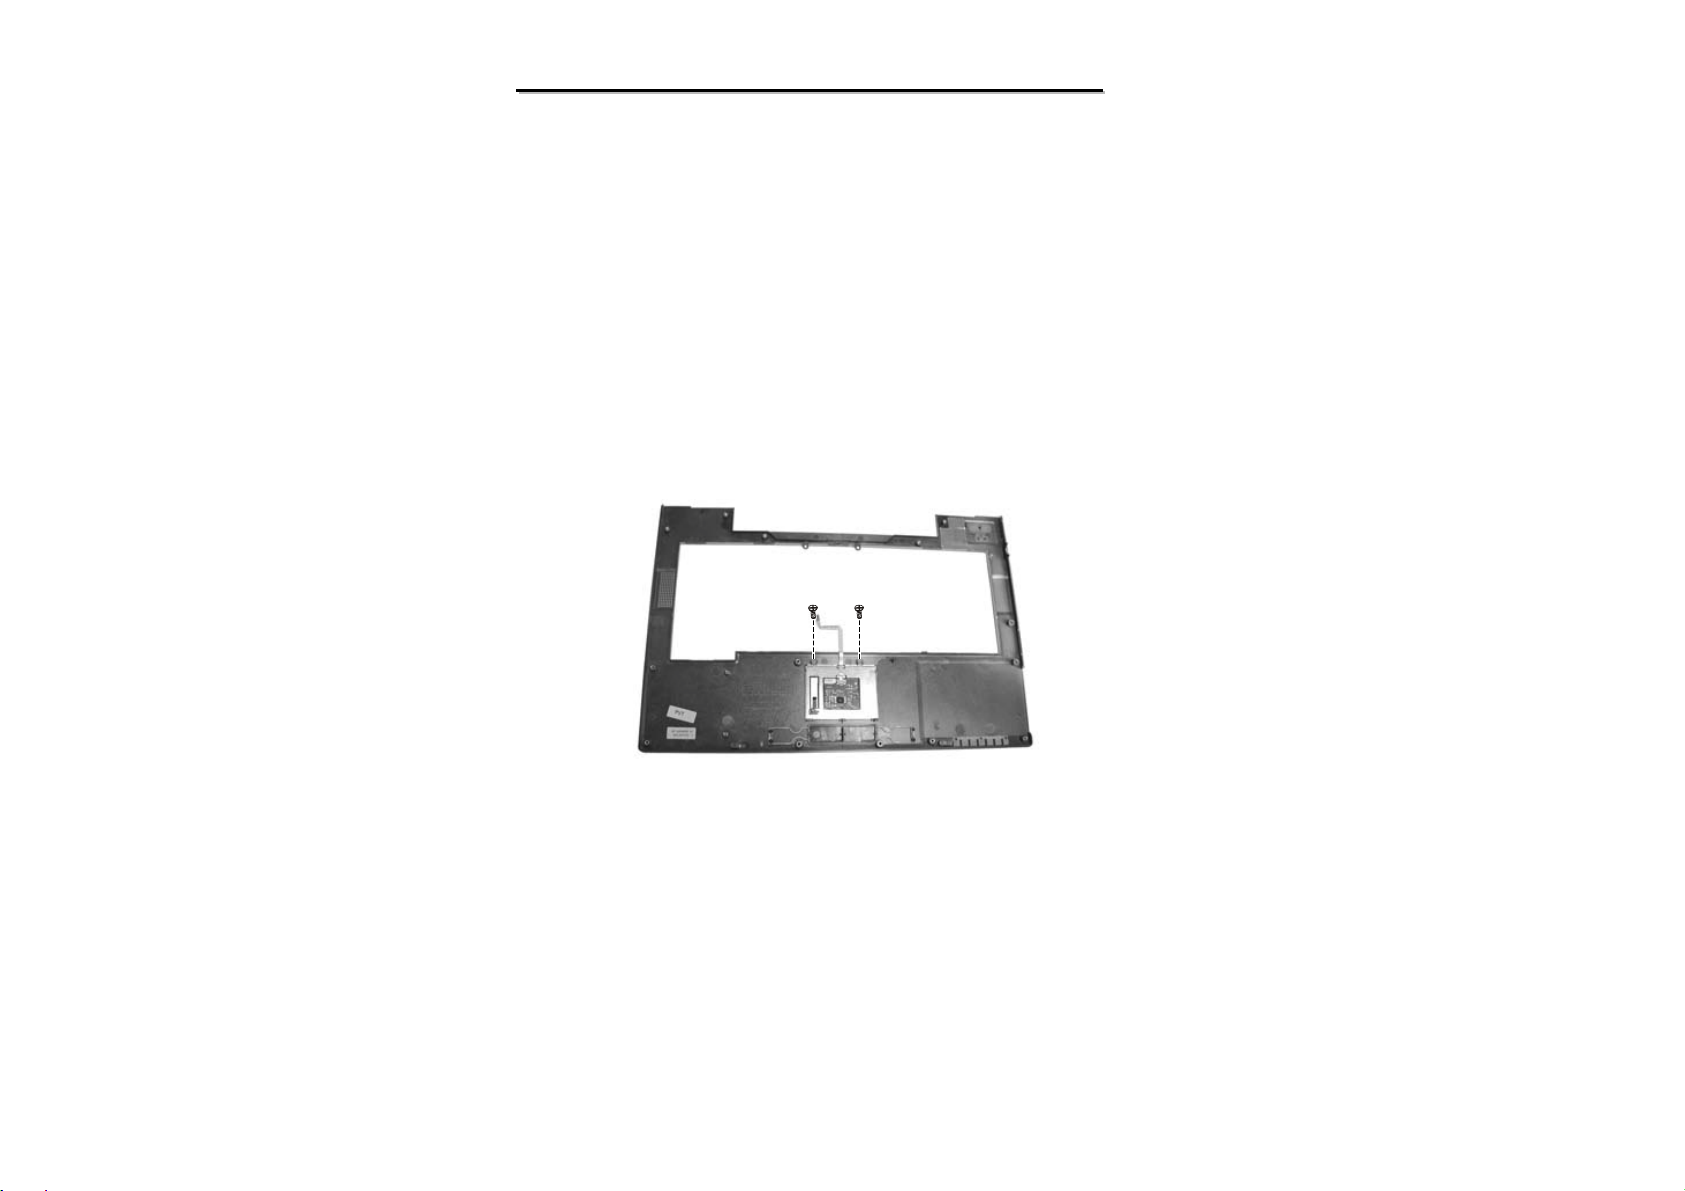
3. Remove the two screws and free the touch pad. (Figure 2-32).
Figure 2-32 Remove the two screws
Reassembly
1. Replace the touch pad and secure the two screws.
2. Replace the top cover. (Refer to the section in 2.2.9 reassembly)
3. Replace the battery pack, keyboard, hard disk drive and CD/DVD-drive. (See sections 2.2.1,2.2.2 ,
2.2.4 and 2.2.5 D isassembly).
56
Page 58
8050
8050
N/B Maintenance
N/B Maintenance
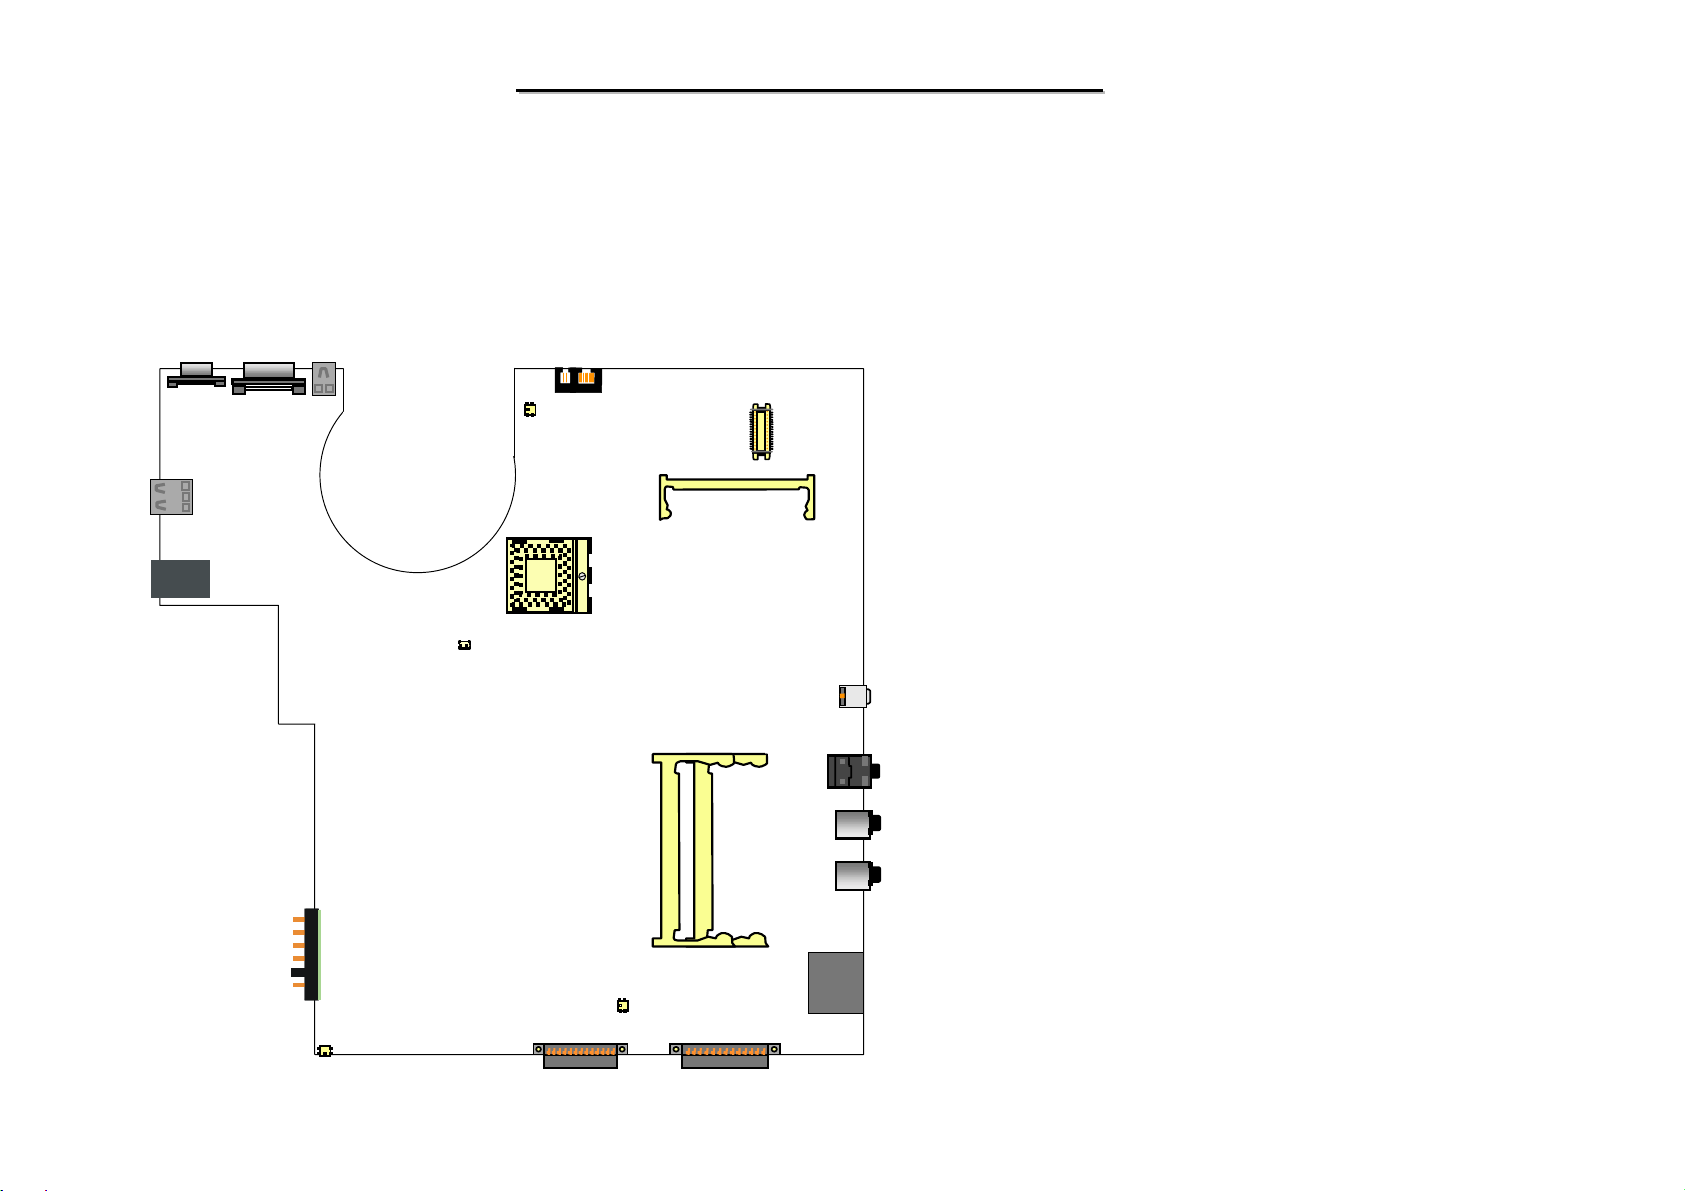
3. Definition & Location of Connectors / Switches
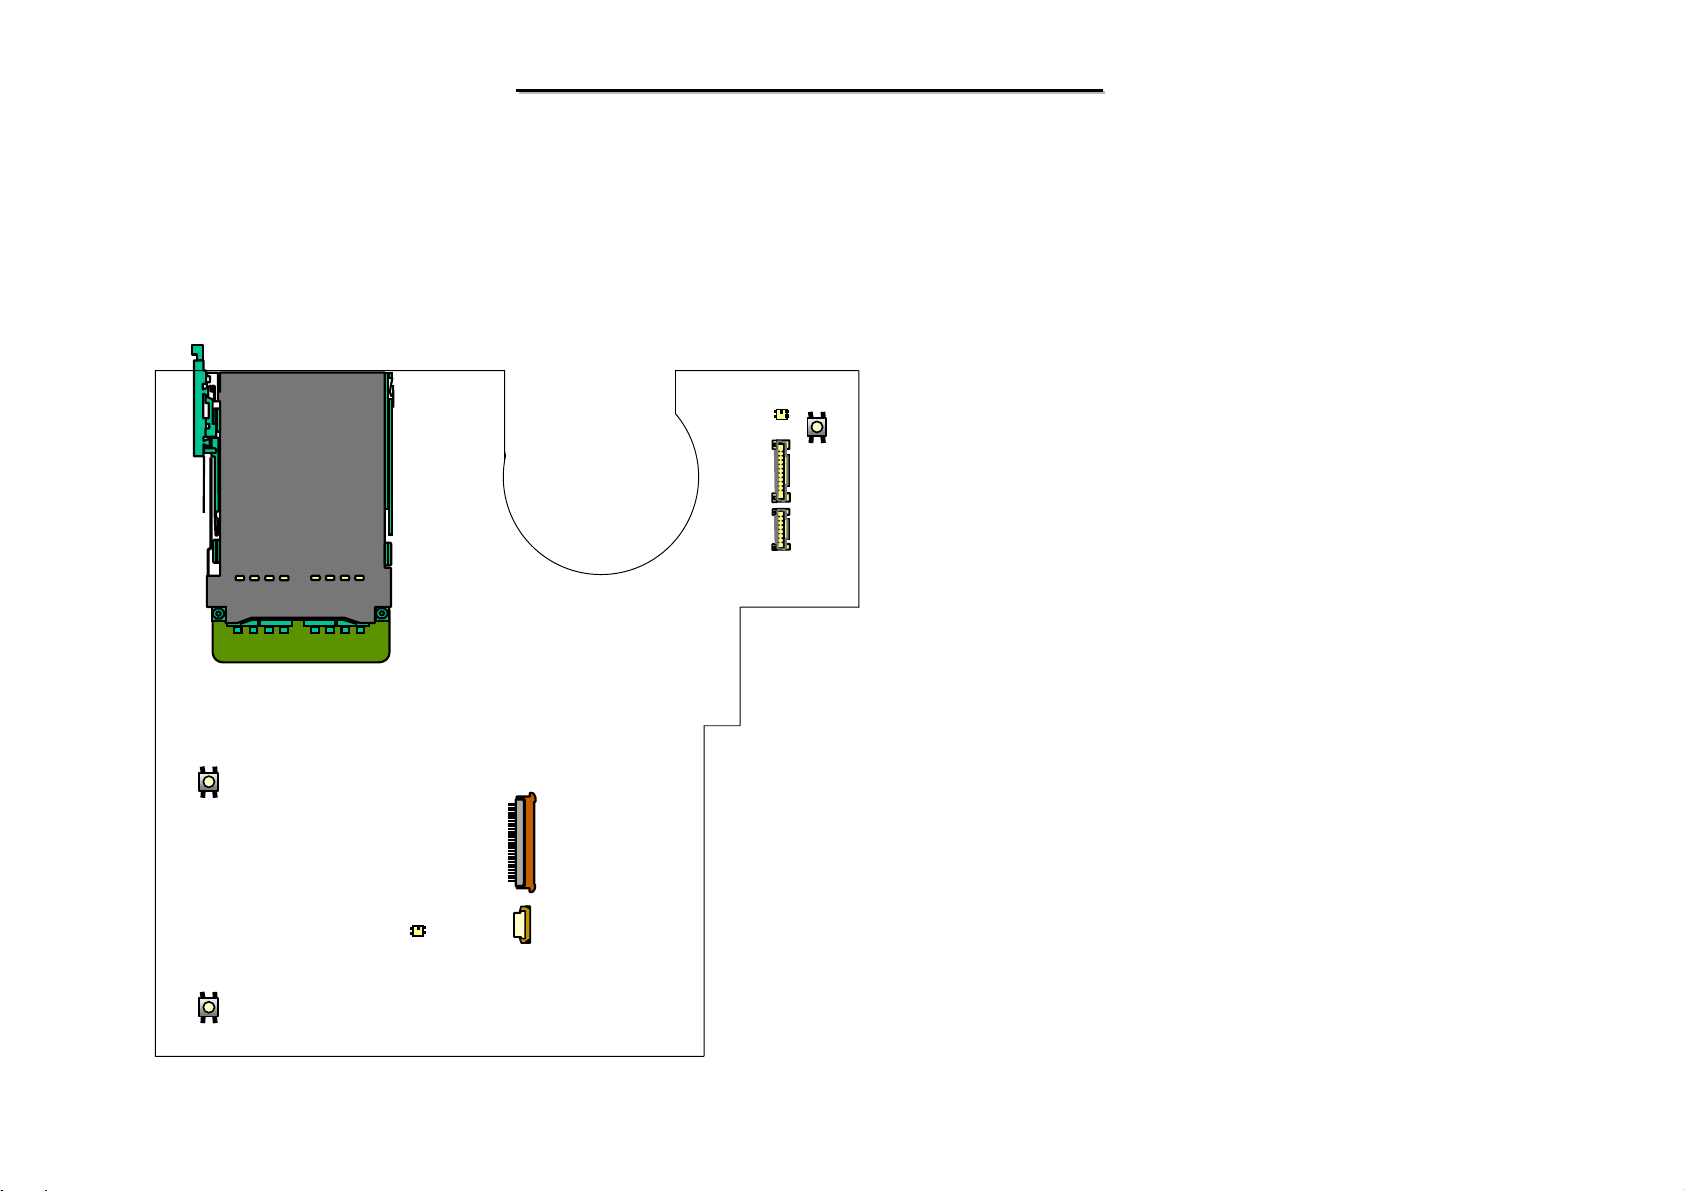
3.1 Mother Board - A
SW4
SW5
J6
J7
J5
J4
J3
J2
J1
SW2
J1 : Inverter Board Connector
J2 : LCD panel connector
J3 : Internal Left Speaker Connector
J4 : Touch-pad Module Connector
J5 : Internal Key-board Connector
J6 : PCMCIA Card Connector
J7 : Internal Right Speaker Connector
SW2 : Power Button
SW4 : Left Button Switch of Touch-pad
SW5 : Right Button Switch of Touch-pad
57
Page 59
8050
8050
N/B Maintenance
N/B Maintenance
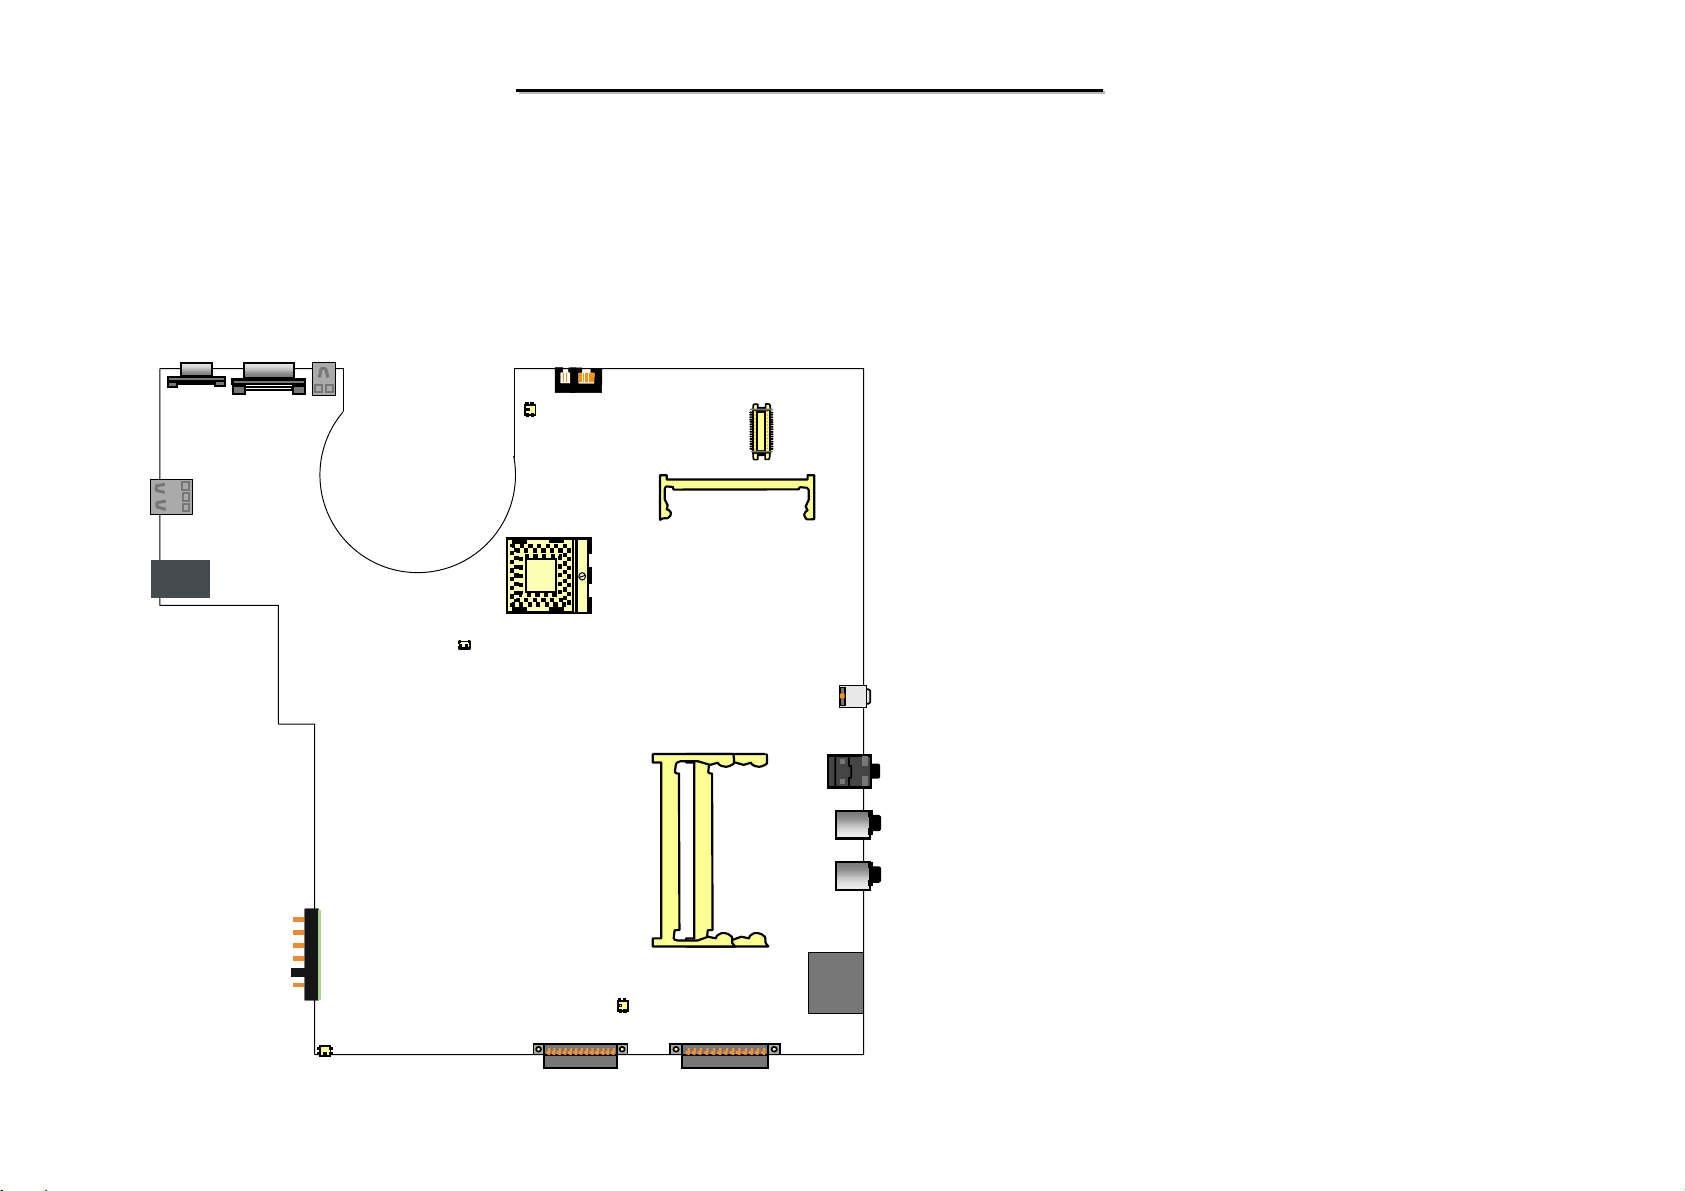
3. Definition & Location of Connectors / Switches
3.2 Mother Board - B
J702 J704
J701
PJ701
J703
J706
J707
J709
J710
J711
PJ701 : AC Adaptor Connector
J701&J706 : USB Port Connector
J702 : CRT Connector
J713
J703 : Battery Connector
J704 : External VGA Connector
J705 : Internal Subwoofer Speaker
J707: FAN Connector
J708 : CD-ROM IDE Connector
J709: Lan & Phone Lan Connector
J710 : RTC Battery Connector
J712
J711&J712 : DDR SO-DIMM Module Socket
J713 : Mini-PCI Connector
J714 : Hard Disk Driver Connector
J705
J708 J714
-----To next page-----
58
Page 60
8050
8050
N/B Maintenance
N/B Maintenance
3. Definition & Location of Connectors / Switches
3.2 Mother Board - B
-----Continue From Previous Page-----
J715
J717
J718
J720
J721
J719
J715&J717: Modem Daughter Board Connector
J716 : SD&MS Card Socket
J718 : IEEE 1394 Connector
J719 : External Micro Phone Jack
J720 : Line Out HP/OPT Jack
J721 : External Line-in Jack
J716
59
Page 61
8050
8050
N/B Maintenance
N/B Maintenance
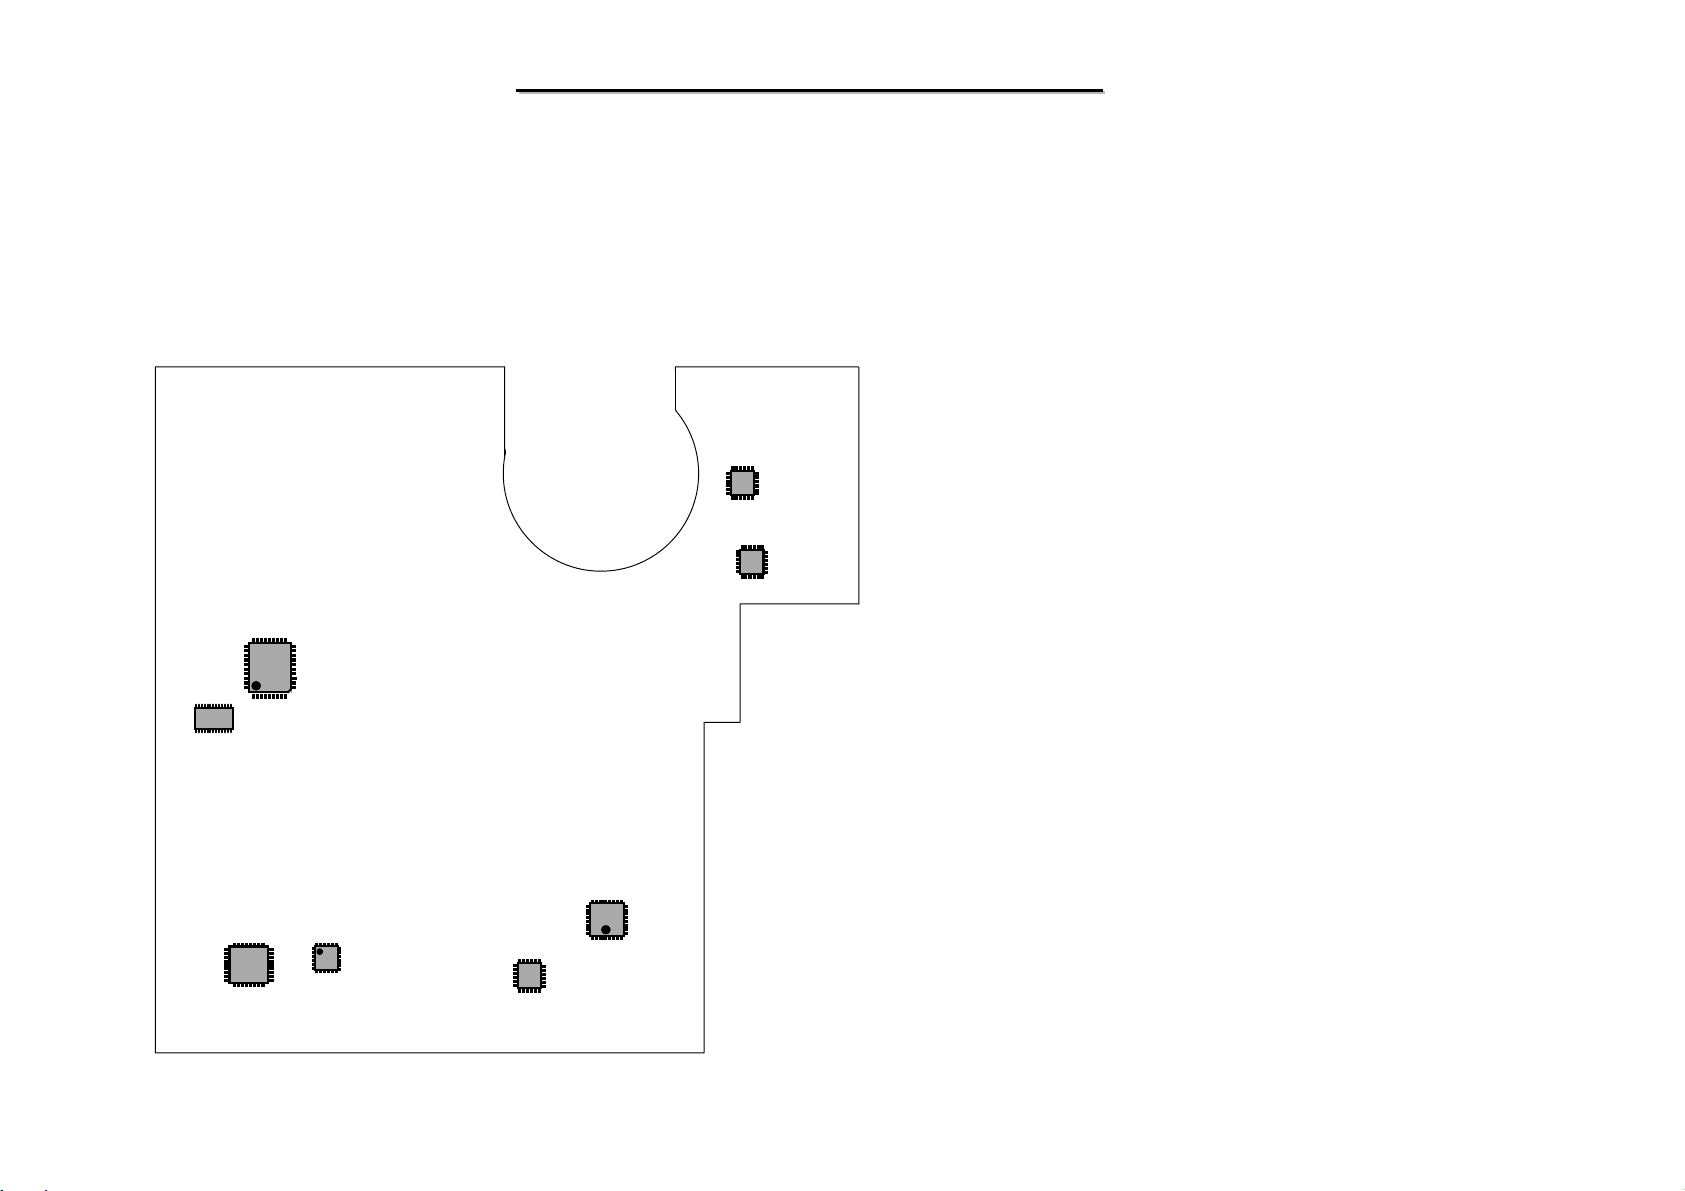
4. Definition & Location of Major Components
4.1 Mother Board - A
PU2 : +3VS/+5VS Voltage Generator
PU3 : CPU Core Voltage Generator
PU14: +1.8V/+1.35V Voltage Generator
PU2
PU15 : +2.5VS/+1.25V Voltage Generator
U524
U16
U15
PU15
PU14
U2
PU3
U2 : TV Encoder Controller
U15: SYS BIOS Controller
U16: WINBOND KBC Controller
U524: TPA02012 Audio Amplifier
60
Page 62
8050
8050
N/B Maintenance
N/B Maintenance
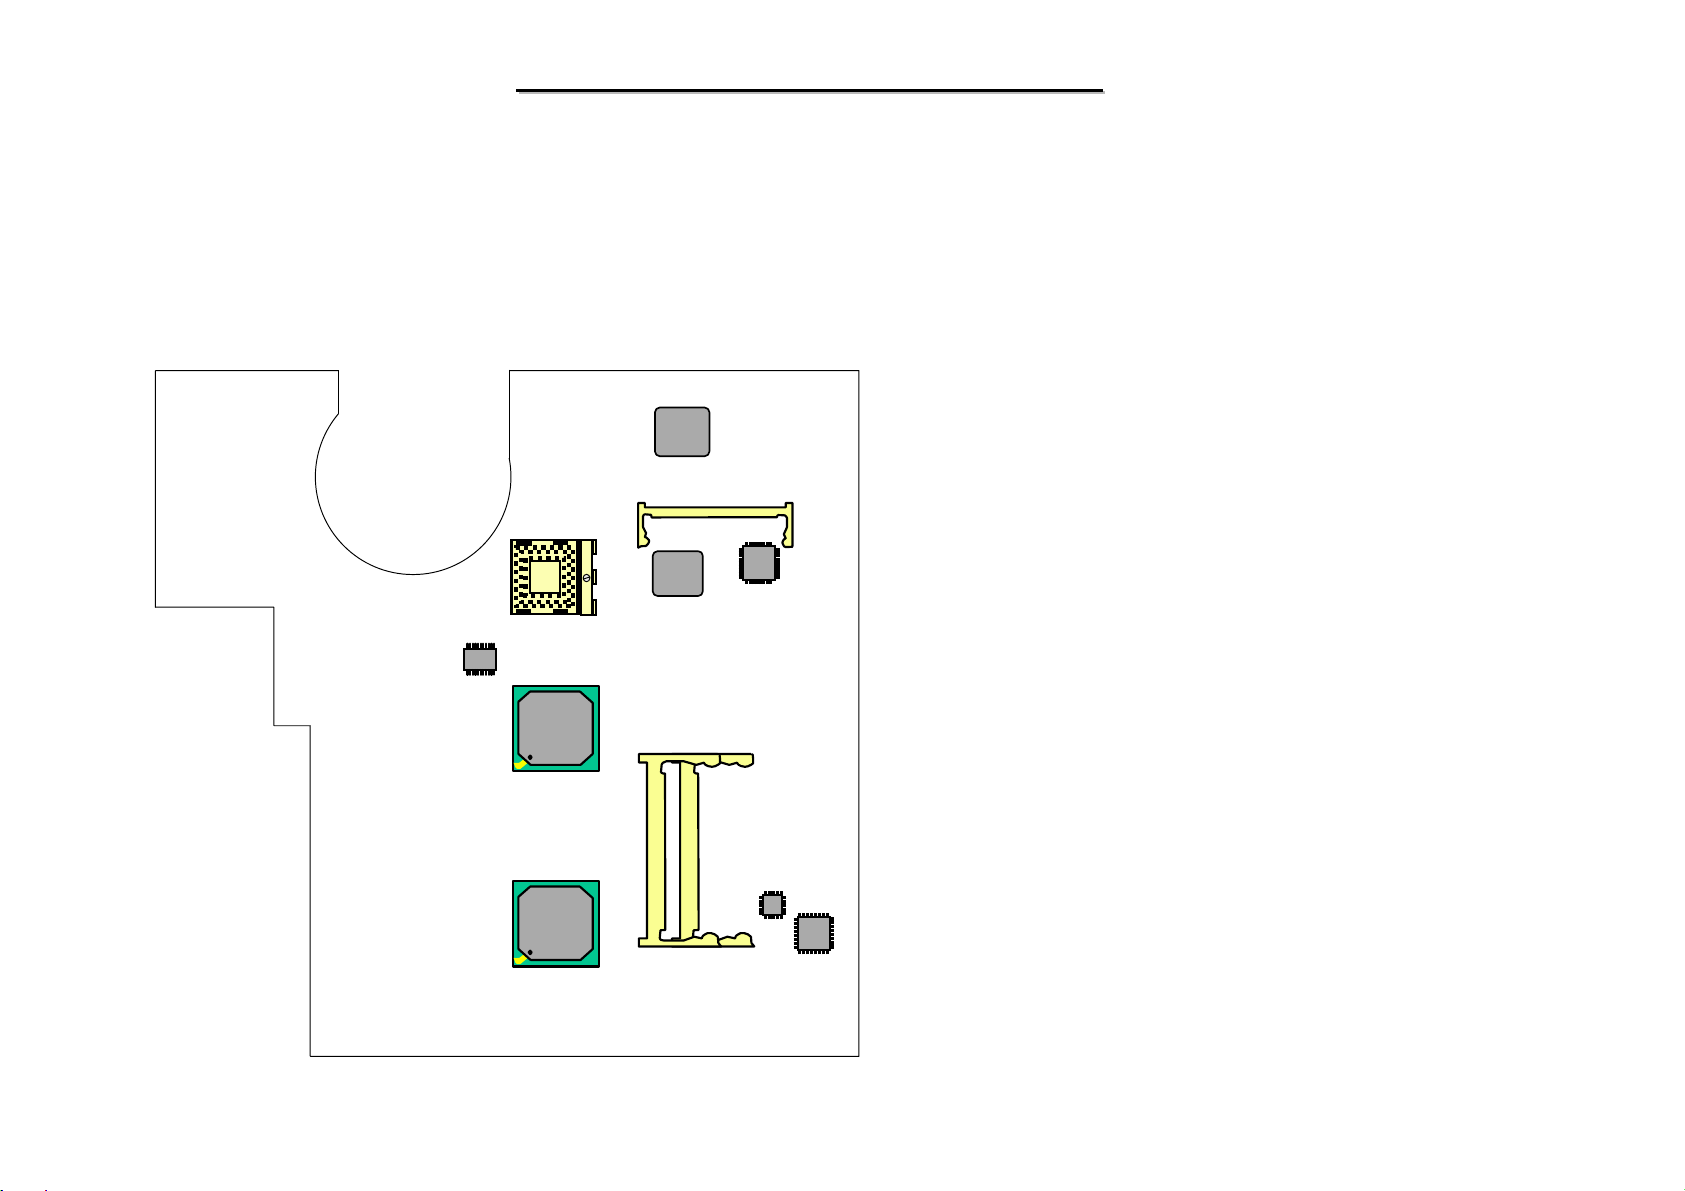
4. Definition & Location of Major Components
4.2 Mother Board - B
U706 : Thermal Sensor/Fan Controller
U713 : Intel BANIAS CPU
U719
U714 : Intel 855GM/GME North Bridge
U715 : Intel ICH4-M South Bridge
U706
U713
U714
U715
U727
U724
U725
U719 : LAN-RTL8100CL Controller
U724 : IEEE1394 Controller
U725 : SUBWOOFER AMP Controller
U726 : Audio CODEC(ALC655)
U727 : CB710 Card Bus Reader Controller
U726
61
Page 63
8050
p
b
8050
N/B Maintenance
N/B Maintenance
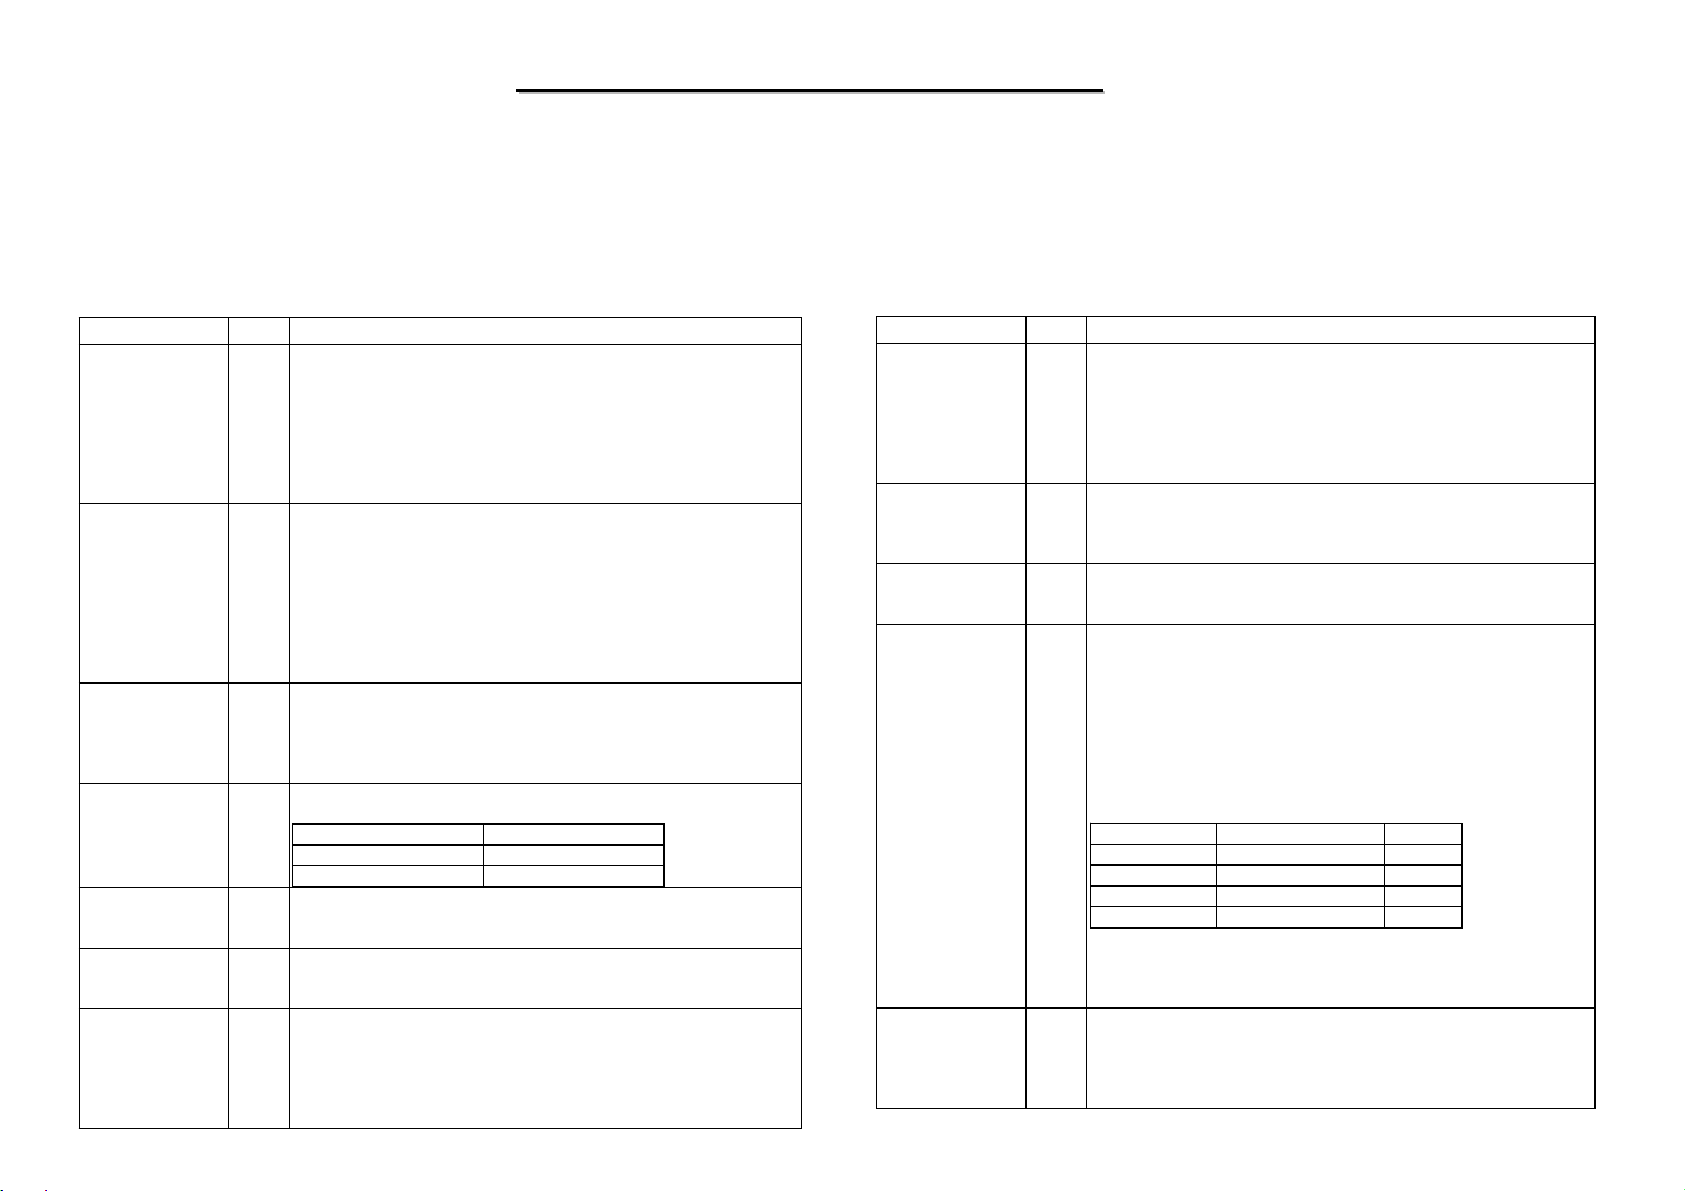
5. Pin Descriptions of Major Components
5.1 Intel Banias Pentium M Processor(1)
Signal Name Type Description
A[31:3]#
A20M#
ADS#
ADSTB[1:0]#
BCLK[1:0]
BNR#
BPM[2:0]#
BPM[3]
I/O A[31:3]# ( Address) define a 2 32 -byte physical memory address space.
In sub-phase 1 of the address phase, these pins transmit the address of a
transaction. In sub-phase 2, these pins transmit transacti on type
information. These signals must connect the appropriate pins of both
agents on the Intel Pentium M
synchronous signals and are latched into the receiving buffers by
ADSTB[1:0]#. Address signals are used as straps which are sampled
before RESET# is deasserted.
I If A20M# (Address-20 Mask) is asserted, the processor masks physical
address bit 20 (A20#) before looking up a line in any internal cache and
before driving a read/write transaction on the bus. Asserting A20M#
emulates the 8086 processor's address wrap-around at the 1-Mbyte
boundary. Assertion of A20M# is only supported in real mode.
A20M# is an asynchronous signal. However, to ensure recognition of
this signal following an Input/Output write instruction, it must be valid
along with the TRDY# assertion of the corresponding Input/Output
Write bus transaction.
I/O ADS# (Address Strobe) is asserted to indicate the validity of the
transaction address on the A[31:3]# and REQ[4:0]# pins. All bus agents
observe the ADS# activation to begin parity checking, protocol
checking, address decode, internal snoop, or deferred reply ID match
operations associated with the new transaction.
I/O Address strobes are used to latch A[31:3]# and REQ[4:0]# on their rising
and falling edges. Strobes are associated with signals as shown below.
Signals Associated Strobe
REQ[4:0]#, A[16:3]# ADSTB[0]#
A[31:17]# ADSTB[1]#
I The differential pair BCLK (Bus Clock) determines the system bus
frequency. All processor system bus agents must receive these signals to
drive their outputs and latch their inputs.
I/O BNR# (Block Next Request) is used to assert a bus stall by any bus agent
that is unable to accept new bus transactions. During a bus stall, the
current bus owner cannot issue any new transactions.
O
BPM[3:0]# (Breakpoint Monitor) are breakpoint and performance
I/O
monitor signals. They are outputs from the processor that indicate the
status of breakpoints and programmable counters used for monitoring
processor performance. BPM[3:0]# should connect the appropriate pins
of all Intel Pentium M processor system bus agents. This includes debug
or performance monitoring tools.
rocessor system bus. A[31:3]# are source
Signal Name Type Description
BPRI#
BR0#
COMPP3:0]
D[63:0]#
DBR#
I BPRI# (Bus Priority Request) is used to arbitrate for ownership of the
processor system bus. It must connect the appropriate pins of both
processor system bus agents. Observing BPRI# active (as asserted by
the priority agent) causes the other agent to stop issuing new requests,
unless such requests are part of an ongoing locked operation. The
priority agent keeps BPRI# asserted until all of its requests are
completed, then releases the bus by deasserting BPRI#.
I/O BR0# is used by the processor to request the bus. The arbitration is done
between the Intel Pentium M processor (Symmetric Agent) and the
MCH-M (High Priority Agent) of the Intel 855PM or Inte l 855GM
chipset.
Analog COMP[3:0] must be terminated on the system board using precision
(1% tolerance) resistors. Refer to the platform design guides for more
implementation details.
I/O D[63:0]# (Data) are the data signals. These signals provide a 64-
path between the processor system bus agents, and must connect the
appropriate pins on both agents. The data driver asserts DRDY# to
indicate a valid data transfer.
D[63:0]# are quad-pumped signals and will thus be driven four times in
a common clock period. D[63:0]# are latched off the falling edge of
both DSTBP[3:0]# and DSTBN[3:0]#. Each group of 16 data signals
correspond to a pair of one DSTBP# and one DSTBN#. The following
table shows the grouping of data signals to data strobes and DINV#.
Quad-Pumped Signal Groups
Data Group DSTBN#/DSTBP# DINV#
D[15:0]# 0 0
D[31:16]# 1 1
D[47:32]# 2 2
D[63:48]# 3 3
Furthermore, the DINV# pins determine the polarity of the data signals.
Each group of 16 data signals corresponds to one DINV# signal. When
the DINV# signal is active, the corresponding data group is inverted and
therefore sampled active high.
O DBR# (Data Bus Reset) is used only in processor systems where no
debug port is implemented on the system board. DBR# is used by a
debug port interposer so that an in-target probe can drive system reset. If
a debug port is implemented in the system, DBR# is a no connect.
DBR# is not a processor signal.
it data
62
Page 64
8050
p
8050
N/B Maintenance
N/B Maintenance
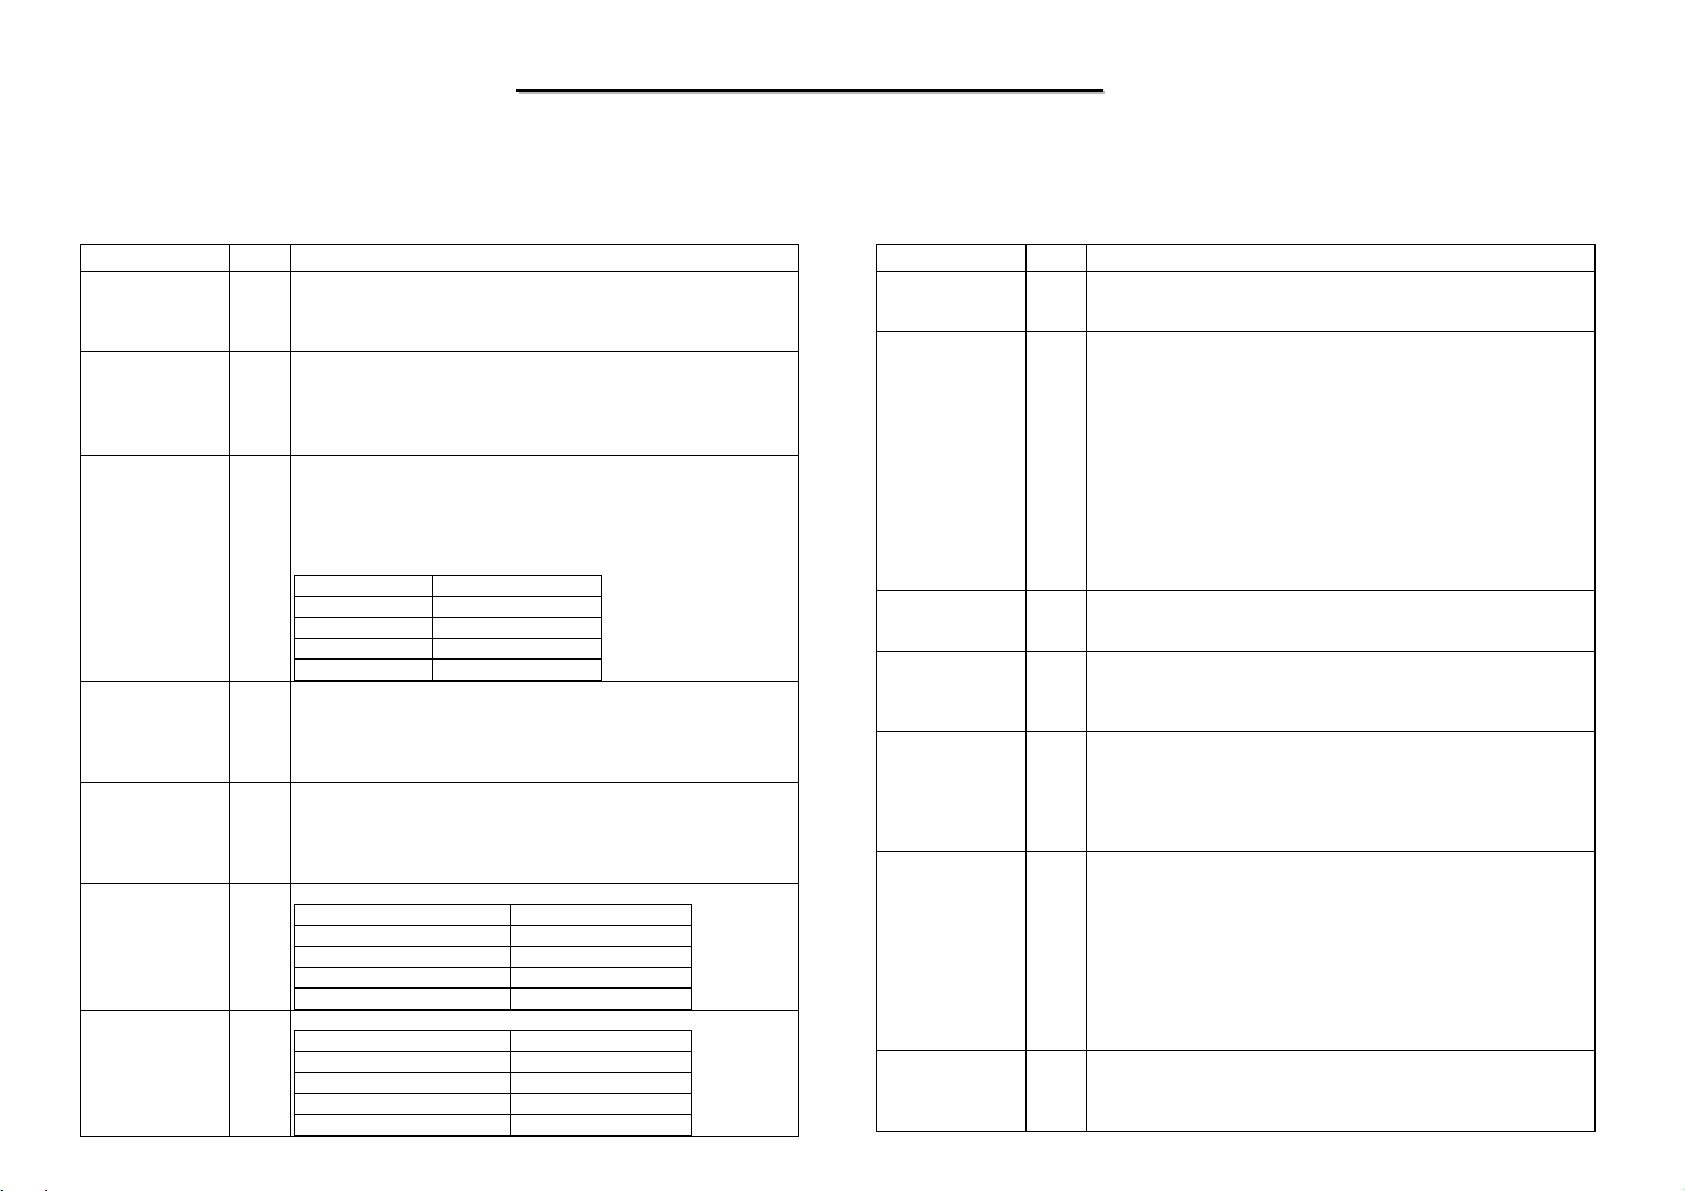
5.1 Intel Banias Pentium M Processor(2)
Signal Name Type Description
DBSY#
DEFER#
DINV[3:0]#
DPSLP#
DRDY#
DSTBN[3:0]#
DSTBP[3:0]#
I/O DBSY# (Data Bus Busy) is asserted by the agent responsible for driving
data on the processor system bus to indicate that the data bus is in use.
The data bus is released after DBSY# is deasserted. This signal must
connect the appropriate pins on both processor system bus agents.
I DEFER# is asserted by an agent to indicate that a transactio n cannot be
guaranteed in-order completion. Assertion of DEFER# is normally the
responsibility of the addressed memory or Input/Output agent. This
signal must connect the appropriate pins of both processor system bus
agents.
I/O DINV[3:0]# (Data Bus Inversion) are source synchronous and indicate
the polarity of the D[63:0]# signals. The DINV[3:0]# signals are
activated when the data on the data bus is inverted. The bus agent will
invert the data bus signals if more than half the bits, within the covered
group, would change level in the next cycle.
DINV[3:0]# Assignment To Data Bus
Bus Signal Data Bus Signals
DINV[3]# D[63:48]#
DINV[2]# D[47:32]#
DINV[1]# D[31:16]#
DINV[0]# D[15:0]#
I DPSLP# when asserted on the platform causes the processor to
transition from the Sleep state to the Deep Sleep state. In order to return
to the Sleep state, DPSLP# must be deasserted. DPSLP# is driven by the
ICH4-M component and also connects to the MCH-M component of the
Intel 855PM or Intel 855GM chipset.
I/O DRDY# (Data Ready) is asserted by the data driver on each data
transfer, indicating valid data on the data bus. In a multi-common clock
data transfer, DRDY# may be deasserted to insert idle clocks. This
signal must connect the appropriate pins of both processor system bus
agents.
I/O Data strobe used to latch in D[63:0]#.
Signals Associated Strobe
D[15:0]#, DINV[0]# DSTBN[0]#
D[31:16]#, DINV[1]# DSTBN[1]#
D[47:32]#, DINV[2]# DSTBN[2]#
D[63:48]#, DINV[3]# DSTBN[3]#
I/O Data strobe used to latch in D[63:0]#.
Signals Associated Strobe
D[15:0]#, DINV[0]# DSTBP[0]#
D[31:16]#, DINV[1]# DSTBP[1]#
D[47:32]#, DINV[2]# DSTBP[2]#
D[63:48]#, DINV[3]# DSTBP[3]#
Signal Name Type Description
DPWR#
FERR#/PBE#
GTLREF
HIT#
HITM#
IERR#
IGNNE#
REQ[4:0]#
I DPWR# is a control signal from the Intel 855PM and Intel 855GM
chipsets used to reduce power on the Intel Pentium M data bus input
buffers.
O FERR# (Floating-point Error)/PBE#(Pending Break Event) is a
multiplexed signal and its meaning is qualified by STPCLK#. When
STPCLK# is not asserted, FERR#/PBE# indicates a floating point when
the processor detects an unmasked floating-point error. FERR# is
similar to the ERROR# signal on the Intel 80387 coprocessor, and is
included for compatibility with systems using MS-DOS* type
floating-point error reporting. When STPCLK# is asserted, an assertion
of FERR#/PBE# indicates that the processor has a pending break event
waiting for service. The asserti on of FERR#/PBE# indicates that the
processor should be returned to the Normal state. When FERR#/PBE# is
asserted, indicating a break event, it will remain asserted until
STPCLK# is deasserted. Assertion of PREQ# when STPCLK# is active
will also cause an FERR# break event.
I GTLREF determines the signal refe rence level for AGTL+ input pins.
GTLREF should be set at 2/3
receivers to determine if a signal is a logical 0 or logical 1.
I/O
HIT# (Snoop Hit) and HITM# (Hit Modified) convey transaction snoop
I/O
operation results. Either system bus agent may assert both HIT# and
HITM# together to indicate that it requires a snoop stall, which can be
continued by reasserting HIT# and HITM# together.
O IERR# (Internal Error) is asserted by a processor as the result of an
internal error. Assertion of IERR# is usually accompanied by a
SHUTDOWN transaction on the processor system bus. This transaction
may optionally be converted to an external error signal (e.g., NMI) by
system core logic. The processor will keep IERR# asserted until the
assertion of RESET#, BINIT#, or INIT#.
I IGNNE# (Ignore Numeric Error) is asserted to force the processor to
ignore a numeric error and continue to execute noncontrol floatinginstructions. If IGNNE# is deasserted, the processor generates an
exception on a noncontrol floating-point instruction if a previous
floating-point instruction caused an error. IGNNE# has no effect when
the NE bit in control register 0 (CR0) is set.
IGNNE# is an asynchronous signal. However, to ensure recognition of
this signal following an Input/Output write instruction, it must be valid
along with the TRDY# assertion of the corresponding Input/Output
Write bus transaction.
I/O REQ[4:0]# (Request Command) must connect the appropriate pins of
both processor system bus agents. They are asserted by the current bus
owner to define the currently active transaction type. These signals are
source synchronous to ADSTB[0]#.
VCCP
. GTLREF is used by the AGTL+
oint
63
Page 65
8050
p
8050
N/B Maintenance
N/B Maintenance
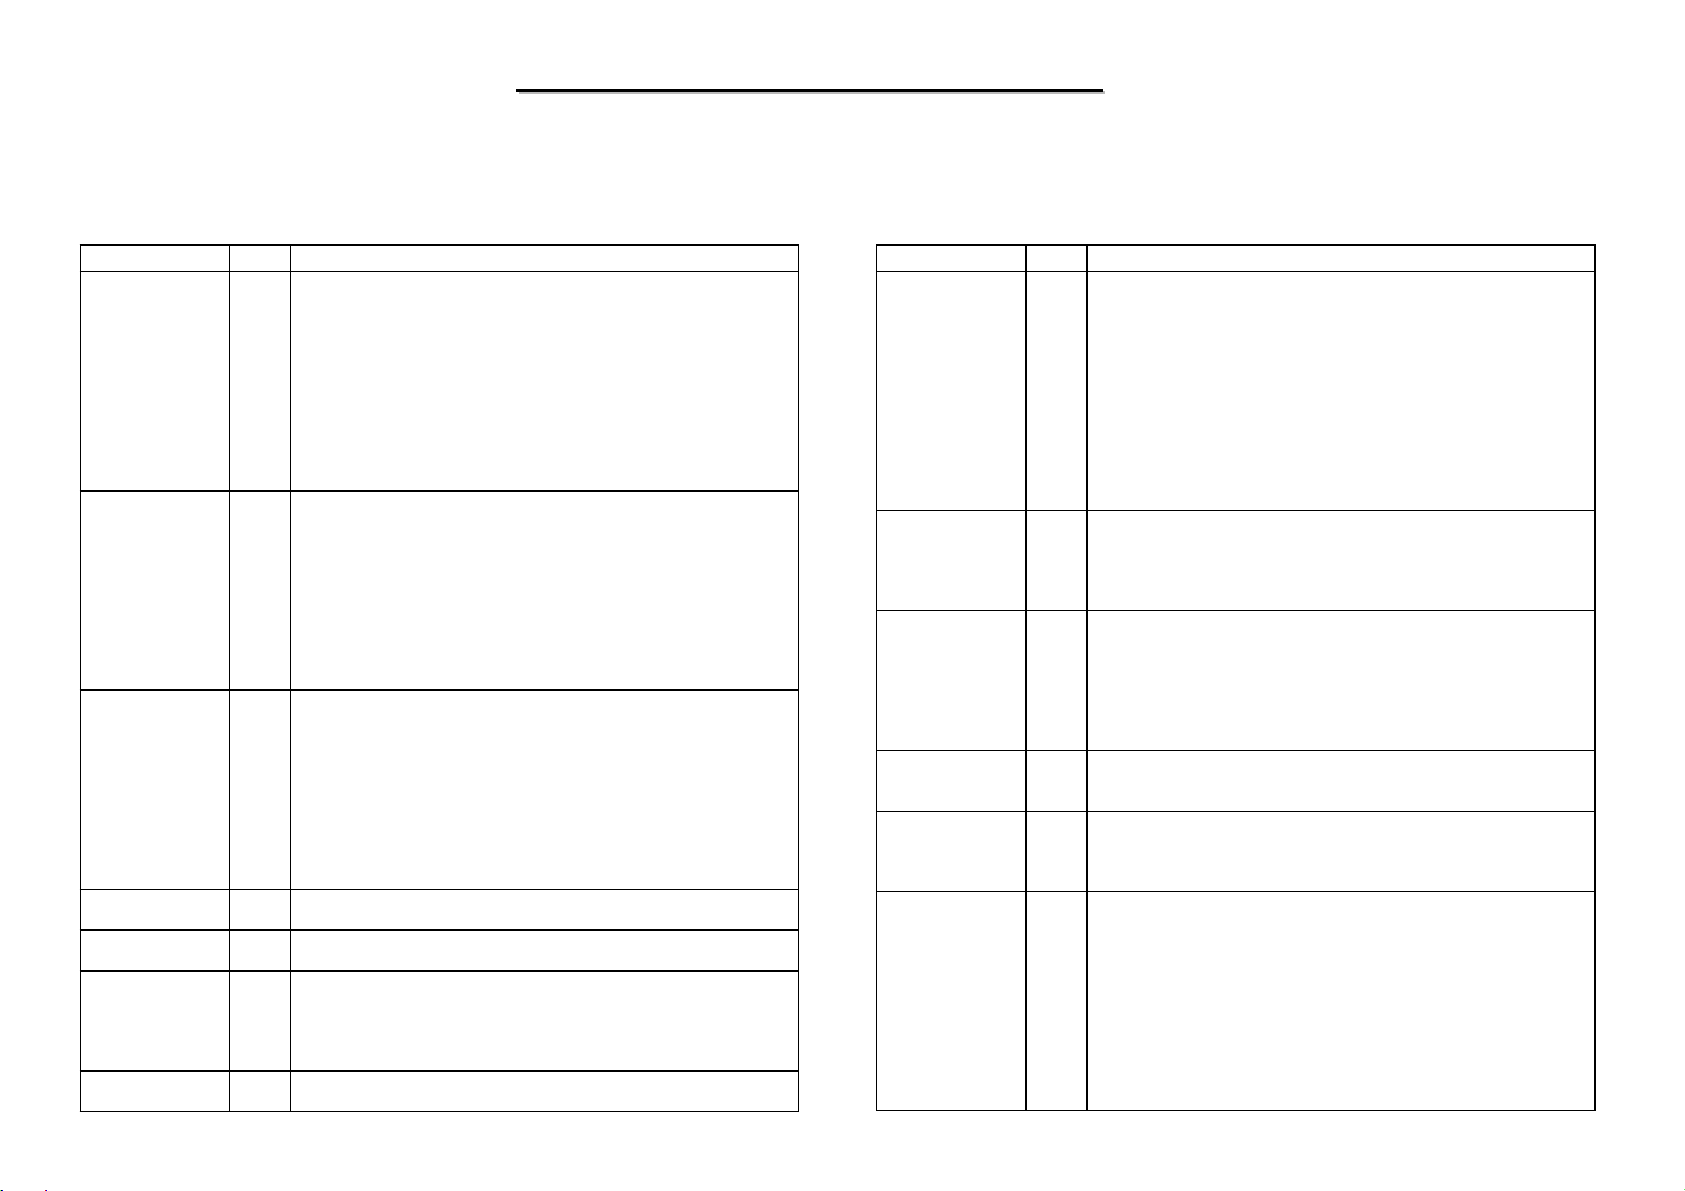
5.1 Intel Banias Pentium M Processor(3)
Signal Name Type Description
INIT#
LINT[1:0]
LOCK#
PRDY#
PREQ#
PROCHOT#
PSI#
I INIT# (Initialization), when asserted, resets integer registers inside the
processor without affecting its internal caches or floatingThe proc es s o r t hen begi ns execution at t he power on R es et vector
configured during power on configuration. The processor continues to
handle snoop requests during INIT# assertion. INIT# is an asynchronous
signal. However, to ensure recognition of this signal following an
Input/Output Write instruction, it must be valid along with the TRDY#
assertion of the corresponding Input/Output Write bus transacti on.
INIT# must connect the appropriate pins of both processor system bus
agents. If INIT# is sampled active on the active to inactive transition of
RESET#, then the processor executes its Built-in Self-Test (BIST)
I LINT[1:0] (Local APIC Interrupt) must connect the appropriate pins of
all APIC Bus agents. When the APIC is disabled, the LIN T0 signal
becomes INTR, a maskable interrupt request signal , and LINT1
becomes NMI, a nonmaskable interrupt. INTR and NMI are backward
compatible with the signals of those names on the Pentium processor.
Both signals are asynchronous.
Both of these signals must be software configured using BIOS
programming of the APIC register space and used either as NMI/INTR
or LINT[1:0]. Because the APIC is enabled by default after Reset,
operation of these pins as LINT[1:0] is the default configuration.
I/O LOCK# indicates to the system that a transaction must occur atomically.
This signal must connect the appropriate pins of both processor system
bus agents. For a locked sequence of transactions, LOCK# is asserted
from the beginning of the first transaction to the end of the last
transaction.
When the priority agent asserts BPRI# to arbitrate for ownership of the
processor system bus, it will wait until it observes LOCK# deasserted.
This enables symmetric agents to retain ownership of the processor
system bus throughout the bus locked operation and ensure the
atomicity of lock.
O Probe Ready signal used by debug tools to determine processor debug
readiness.
I Probe Request signal used by debug tools to request debug operation of
the processor.
O PROCHOT# (Processor Hot) will go active when the processor
temperature monitoring sensor detects that the processor has reached its
maximum safe operating temperature. This indicates that the processor
Thermal Control Circuit has been activated, if enabled.
This signal may require voltage translation on the motherboard.
O Processor Power Status Indicator signal. This signal is asserted when the
processor is in a lower state (Deep Sleep and Deeper Sleep).
oint registers.
Signal Name Type Description
PWRGOOD
ITP_CLK[1:0]
RESET#
RS[2:0]#
RSVD
SLP#
I PWRGOOD (Power Good) is a processor input. The processor requires
this signal as a clean indication that the clocks and power supplies are
stable and within their specifications. ‘Clean’ implies that the signal will
remain low (capable of sinking leakage current), without glitches, from
the time that the power supplies are turned on until they come within
specification. The signal must then transition monotonically to a high
state. PWRGOOD can be driven inactive at any time, but clocks and
power must again be stable before a subsequent rising edge of
PWRGOOD.
The PWRGOOD signal must be supplied to the processor; it is used to
protect internal circuits against voltage sequencing issues. It should be
driven high throughout the boundary scan operation.
I ITP_CLK[1:0] are copies of BCLK that are used only in processor
systems where no debug port is implemented on the system board.
ITP_CLK[1:0] are used as BCLK[1:0] references for a debug port
implemented on an interposer. If a debug port is implemented in the
system, ITP_CLK[1:0] are no connects. These are not processor signals.
I Asserting the RESET# signal resets the processor to a known state and
invalidates its internal caches without writing back any of their contents.
For a power-on Reset, RESET# must stay active for at least two
milliseconds after VCC and BCLK have reached their proper
specifications. On observing active RESET#, both system bus agents
will deassert their outputs within two clocks. All processor straps must
be valid within the specified setup time be fore R ESET# is deasserted.
I RS[2:0]# (Response Status) are driven by the response agent (the agent
responsible for completion of the current transaction), and must connect
the appropriate pins of both processor system bus agents.
- These pins are RESERVED and must be left unconnected on the board.
However, it is recommended that routing channels to these pins on the
board be kept open for possible future use. Please refer to the platform
design guides for more details.
I SLP# (Sleep), when asserted in Stop-Grant state, causes the processor to
enter the Sleep state. During Sleep state, the processor stops providing
internal clock signals to all units, leaving only the Phase-Locked Loop
(PLL) still operating. Processors in this state will not recognize snoops
or interrupts. The processor will recognize only assertion of the
RESET# signal, deassertion of SLP#, and removal of the BCLK input
while in Sleep state. If SLP# is deasserted, the processor exits Sleep
state and returns to Stop-Grant state, restarting its internal clock signals
to the bus and processor core units. If DPSLP# is asserted while in the
Sleep state, the processor will exit the Sleep state and transition to the
Deep Sleep state.
64
Page 66
8050
8050
N/B Maintenance
N/B Maintenance
5.1 Intel Banias Pentium M Processor(4)
Signal Name Type Description
SMI#
STPCLK#
TCK
TDI
TDO
TEST1,
TEST2,
TEST3
THERMDA
THERMDC
THERMTRIP#
TMS
TRDY#
TRST#
I SMI# (System Management Interrupt) is asserted asynchronously by
system logic. On accepting a System Management Interrupt, the
processor saves the current state and enter System Management Mode
(SMM). An SMI Acknowledge transaction is issued, and the processor
begins program execution from the SMM handler.
If SMI# is asserted during the deassertion of RESET# the processor will
tristate its outputs.
I STPCLK# (Stop Clock), when asserted, causes the processor to enter a
low power Stop-Grant state. The processor issues a Stop-Grant
Acknowledge transaction, and stops providing internal clock signals to
all processor core units except the system bus and APIC units. The
processor continues to snoop bus transactions and service interrupts
while in Stop-Grant state. When STPCLK# is deasserted, the processor
restarts its internal clock to all units and resumes execution. The
assertion of STPCLK# has no effect on the bus clock; STPCLK# is an
asynchronous input.
I TCK (Test Clock) provides the clock input for the processor Test Bus
(also known as the Test Access Port).
I TDI (Test Data In) transfers serial test data into the processor. TDI
provides the serial input needed for JTAG specification support.
O TDO (Test Data Out) transfers serial test data out of the processor. TDO
provides the serial output needed for JTAG specification support.
I TEST1, TEST2, and TEST3 must be left unconnected but should have a
stuffing option connection to V SS separately using 1-k, pull-down
resisitors.
Other Thermal Diode Anode.
Other Thermal Diode Cathode.
O The processor protects itself from catastrophic overheating by use of an
internal thermal sensor. This sensor is set well above the normal
operating temperature to ensure that there are no false trips. The
processor will stop all execution when the junction temperature exceeds
approximately 125°C. This is signalled to the system by the
THERMTRIP# (Thermal Trip) pin.
I TMS (Test Mode Select) is a JTAG specification support signal used by
debug tools.
I TRDY# (Target Ready) is asserted by the target to indicate that it is
ready to receive a write or implicit writeback data transfer. TRDY#
must connect the appropriate pins of both system bus agents.
I TRST# (Test Reset) resets the Test Access Port (TAP) logic. TRST#
must be driven low during power on Reset.
Signal Name Type Description
VCC
VCCA[3:0]
VCCP
VCCQ[1:0]
VCCSENSE
VID[5:0]
VSSSENSE
I Processor core power supply.
I VCCA provides isolated power for the internal processor core PLL’s.
I Processor I/O Power Supply.
I Quiet power supply for on die COMP circuitry. These pins should be
connected to VCCP on the motherboard. However, these connections
should enable addition of decoupling on the VCCQ lines if necessary.
O VCCSENSE is an isolated low impedance connection to processor core
power (VCC ). It can be used to sense or measure power near the silicon
with little noise.
O VID[5:0] (Voltage ID) pins are used to support automatic selection of
power supply voltages (Vcc). Unlike some previous generations of
processors, these are CMOS signals that are driven by the Intel Pentiu m
M processor. The voltage supply for these pins must be valid before the
VR can supply Vcc to the processor. Conversely, the VR output must be
disabled until the voltage supply for the VID pins becomes valid. The
VID pins are needed to support the proc essor voltage spec ifica ti on
variations.
O VSSSENSE is an isolated low impedance connect ion to processor core
VSS. It can be used to sense or measure ground near the silicon with
little noise.
65
Page 67
8050
8050
5.2 Intel 855GM/GME North Bridge(1)
Host Interface Signal Descriptions
Signal Name Type Description
ADS#
BNR#
BPRI#
BREQ0#
CPURST#
DBSY#
DEFER#
I/O
AGTL+
I/O
AGTL+
AGTL+
I/O
AGTL+
AGTL+
I/O
AGTL+
AGTL+
Addres s St r obe: The system bus owner asserts ADS# to indicate the
first of two cycles of a request phase. The GMCH can assert this
signal for snoop cycles and
interrupt messages.
Block Next Request: Used to block the current request bus own er
from issuing a new request. This signal is used to dynamically control
the CPU bus pipeline depth.
O
Bus Priority Request: The GMCH is the only Priority Agent on the
system bus. It asserts this signal to obtain the ownership of the
address bus. This signal has priority over symmetric bus requests and
will cause the current symmetric owner to
stop issuing new transactions unless the HLOCK# signal was
asserted.
Bus Request 0#:
low during CPURST#. The signal is sampled by the processor on the
active-to-inactive transition of CPURST#. The minimum setup time
for this signal is 4 BCLKs. The minimum hold time is 2 clocks and
the maximum hold time is 20 BCLKs. BREQ0# should be tristated
after the hold time requirement has been satisfied.
During regular operation, the GMCH will use BREQ0# as an early
indication for FSB Address and Ctl input buffer and sense amp
activation.
O
CPU Reset: The CPURST# pin is an output from the GMCH. The
GMCH asserts CPURST# while RESET# (PCIRST# from ICH4-M)
is asserted and for approximately 1 ms after RESET# is deasserted.
The CPURST# allows the processor to begin execution in a known
state.
Note that the ICH4-M must provide CPU strap set-up and hold-times
around CPURST#.
This requires strict synchronization between GMCH, CPURST#
deassertion and ICH4-M driving the straps.
Data Bus Busy: Used by the data bus owner to hold the data bus for
transfers requiring more than one cycle.
Defer:
O
GMCH will generate a deferred response as defined by the
rules of the GMCH’s Dynamic Defer policy. The GMCH will also
use the DEFER# signal to indicate a CPU retry response.
The GMCH pulls the processor bus BREQ
N/B Maintenance
N/B Maintenance
Signal Name Type Description
I/O
AGTL+
I
CMOS
I/O
AGTL+
I/O
AGTL+
I/O
AGTL+
I/O
AGTL+
0#
DINV[3:0]#
DPSLP#
signal
DRDY#
HA[31:3]#
HADSTB[1:0]#
HD[63:0]#
Dynamic Bus Inversion: Driven along with the HD[63:0]# signals.
Indicates if the associated signals are inverted or not. DINV[3:0]# are
asserted such that the number of data bits driven electrically low (low
voltage) within the corresponding 16-bit group never exceeds 8.
DINV# Data Bits
DINV[3]# HD[63:48]#
DINV[2]# HD[47:32]#
DINV[1]# HD[31:16]#
DINV[0]# HD[16:0]#
Deep Sleep #: This signal comes from the ICH4-M device, providing
an indication of C3 and C4 state control to the CPU. Deassertion of
this signal is used as an early indication for C3 and C4 wake up (to
active HPLL). Note that this is a low-voltage
CMOS buffer operating on the FSB VTT power plane.
Data Ready: Asserted for each cycle that data is transferred.
Host Address Bus: HA[31:3]# connects to the CPU address bus .
During processor cycles the HA[31:3]# are inputs. The GMCH drives
HA[31:3]# during snoop cycles on behalf of Hub interface.
HA[31:3]# are transferred at 2x rate. Note that the
address is inverted on the CPU bus.
Host Address Strobe: HA[31:3]# connects to the CPU address bus.
During CPU cycles, the source synchronous strobes are used to
transfer HA[31:3]# and HREQ[4:0]# at the 2x transfer rate.
Strobe Address Bits
HADSTB[0]# HA[16:3]#, HREQ[4:0]#
HADSTB[1]# HA[31:17]#
Host Data: These signals are connected to the CPU data bus.
HD[63:0]# are transferred at 4x rate. Note that the data signals are
inverted on the CPU bus.
66
Page 68
8050
8050
N/B Maintenance
N/B Maintenance
5.2 Intel 855GM/GME North Bridge(2)
Host Interface Signal Descriptions (Continued)
Signal Name Type Description
HDSTBP[3:0]#
HDSTBN[3:0]#
HIT#
HITM#
HLOCK#
HREQ[4:0]#
HTRDY#
RS[2:0]#
I/O
AGTL+
I/O
AGTL+
I/O
AGTL+
I/O
AGTL+
I/O
AGTL+
AGTL+
AGTL+
Differential Host Data Strobes: The differential source synchronous
strobes are used to transfer HD[63:0]# and DINV[3:0]# at the 4x
transfer rate.
Strobe Data Bits
HDSTBP[3]#, HDSTBN[3]# HD[63:48]#, DINV[3]#
HDSTBP[2]#, HDSTBN[2]# HD[47:32]#, DINV[2]#
HDSTBP[1]#, HDSTBN[1]# HD[31:16]#, DINV[1]#
HDSTBP[0]#, HDSTBN[0]# HD[15:0]#, DINV[0]#
Hit: Indicates that a caching agent holds an unmodified version of the
requested line. Also, driven in conjunction with HITM# by the target
to extend the snoop window.
Hit Modified: Indicates that a caching agent holds a modified version
of the requested line and that this agent assumes responsibility for
providing the line.
Also, driven in conjunction with HIT# to extend the snoop window.
Host Lock: All CPU bus cycles sampled with the assertion of
HLOCK# and ADS#, until the negation of HLOCK# must be atomic,
i.e. no Hub interface snoopable access to system memory is allowed
when HLOCK# is asserted by the CPU.
Host Request Command: Defines the attributes of the request.
HREQ[4:0]# are transferred at 2x rate. Asserted by the requesting
agent during both halves of the Request Phase. In the first half the
signals define the transaction type to a level of
detail that is sufficient to begin a snoop request. In the second half the
signals carry additional information to define the complete transaction
type.
The transactions supported by the GMCH Host Bridge are defined in
the Host Interface section of this document.
O
Host Target Ready: Indicates that the target of the processor
transaction is able to enter the data transfer phase.
O
Response Status: Indicates the type of response according to the
following the table:
RS[2:0]# Response type
000 Idle state
001 Retry response
010 Deferred response
011 Reserved (not driven by GMCH)
100 Hard Failure (not driven by GMCH)
101 No data response
110 Implicit Write back
111 Normal data response
DDR SDRAM Interface Descriptions
Signal Name Type Description
O
SCS[3:0]#
SSTL_2
SMA[12:0]
SSTL_2
SBA[1:0]
SSTL_2
SRAS#
SSTL_2
SCAS#
SSTL_2
SWE#
SSTL_2
SDQ[71:0]
SSTL_2
Chip Select: These pins select the particular DDR SDRAM
components during the active state.
NOTE: There is on e SCS# per DD R - S D R AM Physica l SO- DIMM
device row.
These signals can be toggled on every rising System Memory Clock
edge (SCMDCLK).
O
Multiplexed Memory Address: These signals are used to provide
the multiplexed row and column address to the DDR SDRAM.
O
Bank Select (Memory Bank Address): These signals define which
banks are selected within each DDR SDRAM row. The SMA and
SBA signals combine to address every possible location within a
DDR SDRAM device.
O
DDR Row Address Strobe: SRAS# may be heavily loaded and
requires tw0 DDR SDRAM clock cycles for setup time to the DDR
SDRAMs. Used with SCAS# and SWE# (along with SCS#) to define
the system memory commands.
O
DDR Column Address Strobe: SCAS# may be heavily loaded and
requires two clock cycles for setup time to the DDR SDRAMs. Used
with SRAS# and SWE# (along with SCS#) to define the system
memory commands.
O
Write Enable: Used with SCAS# and SRAS# (along with SCS#) to
define the DDR SDRAM commands. SWE# is asserted during writes
to DDR SDRAM.
SWE# may be heavily loaded and requires two clock cycles for setup
time to the DDR SDRAMs.
I/O
Data Lines: These signals are used to interface to the DDR SDRAM
data bus.
NOTE: ECC error detection is supported: by the SDQ[71:64] signals.
67
Page 69
8050
8050
N/B Maintenance
N/B Maintenance
5.2 Intel 855GM/GME North Bridge(3)
DDR SDRAM Inte r fa ce De scriptions (Continued )
Signal Name Type D escription
SDQS[8:0]
SCKE[3:0]
SMAB[5,4,2,1]
SDM[8:0]
RCVENOUT#
RCVENIN#
I/O
SSTL_2
SSTL_2
SSTL_2
SSTL_2
SSTL_2
SSTL_2
Data Strobes: Data strobes are used for capturing data. During
writes, SDQS is centered on data. During reads, SDQS is edge
aligned with data. The following list matches the data strobe with the
data bytes.
There is an associated data strobe (DQS) for each data signal (DQ)
and check bit
(CB) group.
SDQS[7] -> SDQ[63:56]
SDQS[6] -> SDQ[55:48]
SDQS[5] -> SDQ[47:40]
SDQS[4] -> SDQ[39:32]
SDQS[3] -> SDQ[31:24]
SDQS[2] -> SDQ[23:16]
SDQS[1] -> SDQ[15:8]
SDQS[0] -> SDQ[7:0]
NOTE: ECC error detection is supported by the SDQS[8] signal.
O
Clock Enable: These pins are used to signal a self-refresh or power
down command to the DDR SDRAM array when entering system
suspend. SCKE is also used to dynamically power down inactive
DDR SDRAM rows. There is one
SCKE per DDR SDRAM row. These signals can be toggled on every
rising SCK edge.
O
Memory Address Copies: These sign als are identical to
SMA[5,4,2,1] and are used to reduce loading for selective
CPC(clock-per-command). These copies are not inverted.
O
Data Mask: When activated during writes, the corresponding data
groups in the DDR SDRAM are masked. There is one SDM for every
eight data lines. SDM can be sampled on both edges of the data
strobes.
NOTE: ECC error detection is supported by the SDM[8] signal.
O
Clock Output: Reserved, NC.
O
Clock Input: Reserved, NC.
AGP Addressing Signal Descriptions
Signal Name Type Description
I
GPIPE#
AGP
GSBA[7:0]
AGP
5 contains two mechanisms to queue requests by the AGP master. Note that the master can only use
one mechanism. The master may not switch methods without a full reset of the system. When PIPE# is
used to queue addresses the master isnot allowed to queue addresses using the SBA bus. For example,
during configuration time, if the master indicates that it can use either mechanism, the configuration
software will indicate which mechanism the master will use. Once this choice has been made, the
master will continue to use the mechanism selected until the master is reset (and reprogrammed) to use
the other mode. This change of modes is not a dynamic mechanism, but rather a static decision when
the device is first being configured after reset
Pipelined Read: This signal is asserted by the AGP master to
indicate a full width address is to be enqueued on by the target using
the AD bus. One address is placed
in the AGP request queue on each rising clock edge while PIPE# is
asserted. When PIPE# is deasserted no new requests are queued
across the AD bus.
During SBA Operation: This signal is not used if SBA (Side Band
Addressing) is selected.
During F R AM E# Oper atio n: This signal is not used during AGP
FRAME# operation.
PIPE# is a sustained tri-state signal from masters (graphics
controller), and is an input to the GMCH.
I
Side-band Address: These signals are used by the AGP master
(graph ic s co nt rolle r ) to pass addr ess and co m m a nd t o th e GMCH . T h e
SBA bus and AD bus operate independently. That is, transactions can
proceed on the SBA bus and the
AD bus simultaneously.
During PIPE# Operation: These signals are not used during PIPE#
operation.
During F R AM E# Oper atio n: These signals are not used during
AGP FRAME# operation.
NOTE: When sideband addressing is disabled, these signals are
isolated (no external/internal pull-ups are required).
68
Page 70
8050
8050
N/B Maintenance
N/B Maintenance
5.2 Intel 855GM/GME North Bridge(4)
AGP Status Signal Descriptions
Signal Name Type Description
O
GST[2:0]
AGP
Status: Provides
information from
the arbiter to an
AGP Master on
what it may do.
ST[2:0] only
have meaning
to the master
when its GNT# is
asserted. When
GNT# is
deasserted
these signals have
no meaning and
must be gnored.
ST[2:0 Meaning
000 Previously requested low priority
read data is being returned to the
master arbiter to an AGP
001 Previously requested high priority
read data is being returned to the
master
010 The master is to provide low priority
write dat a fo r a pr ev i ously queued
write command
011 The master is to provide high
priority write data for a previously
queued write command.
100 Reserved
101 Reserved
110 Reserved
111 The master has been given
permission to start a bus transaction.
The master may queue AGP requests
by asserting PIPE# or start a PCI
transaction by asserting FRAME#
AGP Flow Control Signals
Signal Name Type Description
I
GRBF#
AGP
GWBF#
AGP
Read Buffer Full: Read buffer full indicates if the master is ready to
accept previously requested low priority read data. When RBF# is
asserted the GMCH is not allowed to initiate the return low priority
read data. That is, the GMCH can finish
returning the data for the request currently being serviced. RBF# is
only sampled at the beginning of a cycle.
If the AGP master is always ready to accept return read data then it is
not required to implement this signal.
During FRAME# Operation: This signal is not used durin g AGP
FRAME# operation.
I
Write-Buffer Full: indicates if the master is ready to accept Fast
Write data from the GMCH. When WBF# is asserted the GMCH is
not allowed to drive Fast Write data to the AGP master. WBF# is
only sampled at the beginning of a cycle.
If the AGP master is always ready to accept fast write data then it is
not required to implement this signal.
During FRAME# Operation: This signal is not used durin g AGP
FRAME# operation.
69
Page 71
8050
b
8050
N/B Maintenance
N/B Maintenance
5.2 Intel 855GM/GME North Bridge(5)
AGP/PCI Signals-Semantics Descriptions
Signal Name Type Description
GFRAME#
GIRDY#
I/O
AGP
I/O
AGP
G_FRAME: Frame.
During PIPE# and SBA Operation: Not used by AGP SBA and
PIPE# operations.
During Fast Write Operation: Used to frame transactions as an
output during Fast Writes.
During FRAME# Operation:
GMCH acts as an in itiator on the AGP Interface. G_FRAME# is
asserted by the GMCH to indicate the
beginning and duration of an access. G_FRAME# is an input when
the GMCH acts as a FRAME#-based AGP target. As a
FRAME#-based AGP target, the G MCH latches the C/BE[3:0]# and
the AD[31:0] signals on the first clock edge on which
GMCH samples FRAME# active.
G_IRDY#: Initiator Ready.
During PIPE# and SBA Operation: Not used while enqueueing
requests via AGP SBA and PIPE#, but used during the data phase of
PIPE# and SBA transactions.
During FRAME# Operation: G_IRDY# is an output when GMCH
acts as a FRAME#acts as a FRAME#-based AGP target. The assertion of G_IRDY#
indicates the current FRAME#-based AGP bus initiator's ability to
complete the current data phase of the transaction.
During Fast Write Operation: In Fast Wr ite mode , G_IRDY#
indicates that the AGP-compliant master is ready to provide all write
data for the current transaction. Once G_IRDY# is asserted for a write
operation, the master is not allowed to insert wait states. The master is
never allowed to insert a wait state during the initial data transfer (32
bytes) of a write transaction. However, it may insert wait states after
each 32-byte block is transferred.
ased AGP initiator and an input when the GMCH
G_FRAME# is an output when the
AGP Strobe Descriptions
Signal Name Type Description
I/O
GADSTB[0]
AGP
GADSTB#[0]
AGP
GADSTB[1]
AGP
GADSTB#[1]
AGP
GSBSTB
AGP
GSBSTB#
AGP
Address/Data Bus Strobe-0: provides timing for 2x and 4x data on
AD[15:0] and C/BE[1:0]# signals. The agent that is providing the
data will drive this signal.
I/O
Address/Data Bus Strobe-0 Complement: With AD STB0, forms a
differential strobe pair that provides timing information for the
AD[15:0] and C/BE[1:0]# signals. The agent that is providing the
data will drive this signal.
I/O
Address/Data Bus Strobe-1: Provides timing for 2x and 4x data on
AD[31:16] and C/BE[3:2]# signals. The agent that is providing the
data will drive this signal.
I/O
Address/Data Bus Strobe-1 Complement: With AD STB1, forms a
differential strobe pair that provides timing information for the
AD[15:0] and C/BE[1:0]# signals in 4X mode. The agent that is
providing the data will drive this signal.
I
Sideband Strobe: Provides timing for 2x and 4x data on the
SBA[7:0]
been configured for 2x or 4x sideband address mode.
I
Sideband Strobe Complement: The differential complement to the
SB_STB signal. It is used to provide timing 4x mode.
bus. It is driven by the AGP master after the system has
70
Page 72
8050
b
8050
5.2 Intel 855GM/GME North Bridge(6)
AGP/PCI Signals-Semantics Descriptions (Continued)
Signal Name Type Description
GTRDY#
GSTOP#
GDEVSEL#
GREQ#
I/O
AGP
I/O
AGP
I/O
AGP
AGP
G_TRDY#: Target Ready.
During PIPE# and SBA Operation: Not used while enqueueing
requests via AGP SBA and PIPE#, but used during the data phase of
PIPE# and SBA transactions.
During FRAME# Operation: G_TRDY# is an input when the
GMCH acts as an AGP initiator and is an output when the GMCH
acts as a FRAME#-based AGP target. The assertion of G_TRDY#
indicates the target’s ability to complete the current data phase of the
transaction.
During Fast Write Operation: In Fast Write mode, G_TRDY#
indicates the AGP-compliant target is ready to receive write data for
the entire transaction (when the transfer size is less than or equal to 32
bytes) or is ready to transfer the initial or
subsequent block (32 bytes) of data when the transfer size is greater
than 32 bytes. The target is allowed to insert wait states after each
block (32 bytes) is transferred on write transactions.
G_STOP#: Stop.
During PIPE# and SBA Operation: This signal is not used during
PIPE# or SBA operation.
During FRAME# Operation: G_STOP# is an input when the
GMCH acts as a FRAME#the GMCH acts as a FRAME#-based AGP target. G_STOP# is used
for disconnect, retry, and abort sequences on the AGP interface.
G_ DEVSEL#: Device Select.
During PIPE# and SBA Operation: This signal is not used during
PIPE# or SBA operation.
During FRAME# Operation: G_DEVSEL#, when asserted,
indicates that a FRAME#-based AGP target device has decoded its
address as the target of the current access. The GMCH asserts
G_DEVSEL# based on the DDR SDRAM
address range being accessed by a PCI initiator. As an input,
G_DEVSEL# indicates whether the AGP master has recognized a
PCI cycle to it.
I
G_REQ#: Request.
During SBA Operation: This signal is not used during SBA
operation.
During PIPE# and FRAME# Operation: G_REQ#, when as s erted,
indicates that the AGP master is requesting use of the AGP interface
to run a FRAME#- or PIPE#-based operation.
ased AGP initiator and is an output when
N/B Maintenance
N/B Maintenance
Signal Name Type Description
GGNT#
GAD[31:0]
GCBE#[3:0]
GPAR
PCIRST# from the ICH4-M is assumed to be connected to RSTIN# and is used to reset AGP interface
logic within the GMCH. The AGP agent will also typically use PCIRST# provided by t he ICH4-M as
an input to reset its internal logic.
O
AGP
I/O
AGP
I/O
AGP
I/O
AGP
G_GNT#: Grant.
During SBA, PIPE# and FRAME# Operation:
with the information on the ST[2:0] signals (status bus), indicates
how the AGP interface will be used next. Refer to the AGP Interface
Specification, Revision 2.0 for further explanation
of the ST[2:0] values and their meanings.
G_AD[31:0]: Address/Data Bus.
During PIPE# and FRAME# Operation: The G_AD[31:0] signals
are used to transfer both address and data information on the AGP
interface.
During SBA Operation: The G_AD[31:0] signals are used to
transfer data on the AGP interface.
Command/Byte Enable.
During FRAME# Operation:
transaction, the G_CBE[3:0]# signals define the bus command.
During the data phase, the G_CBE[3:0]# signals are used as byte
enables. The byte enables determine which byte lanes carry
meaningful data. The commands issued on the G_CBE# signals
during FRAME#-based AGP transactions are the same G_CBE#
command described in the PCI 2.2 specification.
During PIPE# Operation: When an address is enqueued using
PIPE#, the C/BE# signals carry command information. The command
encoding used during PIPE#-based AGP is different than the
command encoding used during FRAME#-based AGP cycles (or
standard PCI cycles on a PCI bus).
During SBA Operation: These signals are not used during SBA
operation.
Parity.
During FRAME# Operation: G_PAR is driven by the GMCH when
it acts as a FRAME#-based AGP initiator during address and data
phases for a write cycle, and during the address phase for a read
cycle. G_PAR is driven by the GMCH when it acts as a
FRAME#-based AGP target during each data phase of a
FRAME#-based AGP memory read cycle. Even parity is generated
across G_AD[31:0] and G_CBE[3:0]#.
During SBA and PIPE# Operation: This signal is not used during
SBA and PIPE# operation.
During the address phase of a
G_GNT#, along
71
Page 73

8050
8050
N/B Maintenance
N/B Maintenance
5.2 Intel 855GM/GME North Bridge(7)
Hub Interface Signals
Signal Name Type Description
HL[10:0]
HLSTB
HLSTB#
I/O
Hub
I/O
Hub
I/O
Hub
Packet Da ta: Data signals used for HI read and write operations.
Packet Strobe: One of two differential strobe signals used to transmit
or receive packet data over HI.
Packet Strobe Co mpl e ment: One of two differential strobe signals
used to transmit or receive packet data over HI.
Dedicated LVDS LCD Flat Panel Interface Signal Descriptions
Name Type Voltage Description
O
ICLKAP
LVDS
ICLKAM
LVDS
IYAP[3:0]
LVDS
IYAM[3:0]
LVDS
ICLKBP
LVDS
ICLKBM
LVDS
IYBP[3:0]
LVDS
IYBM[3:0]
LVDS
1.25 V± 225 mV
O
1.25 V±225 mV
O
1.25 V±225 mV
O
1.25 V±225 mV
O
1.25 V±225 mV
O
1.25 V±225 mV
O
1.25 V±225 mV
O
1.25 V± 225 mV
Channel A differential clock pair output (true):
245-800 MHz
Channel A differential clock pair output
(compliment): 245-80 0 MHz.
Channel A differential data pair 3:0 output (true):
245-800MHz.
Channel A differential data pair 3:0 output
(compliment): 245-80 0 MHz.
Channel B differential clock pair output (true):
245-800 MHz.
Channel B differential clock pair output
(compliment):
Channel B differential data pair 3:0 output (true):
245-800MHz.
Channel B differential data pair 3:0 output
(compliment): 245-80 0 MHz.
245-800 MHz.
Digital Video Output B (DVOB) Port Signal Descriptions
Name Type Description
DVOBD[11:0]
DVOBHSYNC
DVOBVSYNC
DVOBBLANK#
DVOBFLDSTL
O
DVO
O
DVO
O
DVO
O
DVO
I
DVO
DVOB Data: This data bus is used to drive 12-bit RGB data on each
edge of the differential clock signals, DVOBCLK and DVOBCLK#.
This provides 24-bits of data per clock period. In dual channel mode,
this provides the lower 12-bits of pixel data.
DVOBD[11:0] should be left as left as NC (“Not Connected”) if not
used.
Horizontal Sync: HSYNC signal for the DVOB interface.
DVOBHSYNC should be left as left as NC (“Not Connected”) if not
used.
Vertical Sync: VSYNC signal for the DVOB interface.
DVOBVSYNC should be left as left as NC (“Not Connected”) if the
signal is NOT used when using internal graphics device.
Flicker Blank or Border Period Indication: DVOBBLANK# is a
programmable output pin driven by the GMCH.
When programmed as a blank period indication, this pin indicates
active pixels excluding the border. When programmed as a border
period indication, this pin indicates active pixel including the border
pixels.
DVOBBLANK# should be left as left as NC (“Not Connected”) if not
used.
TV Field and Flat Panel Stall Signal. This input can be
programmed to be either a TV Field input from the TV encoder or
Stall input from the flat panel.
DVOB TV Field Signal: When used as a Field input, it synchronizes
the overlay field with the TV encoder field when the overlay is
displaying an interleaved source.
DVOB Flat Panel Stall Signal: When used as the Stall input, it
indicates that the pixel pipeline should stall one horizontal line. The
signal changes during horizontal blanking. The panel fitting logic,
when expanding the image vertically, uses this.
DVOBFLDSTL needs to be pulled down if not used.
72
Page 74

8050
8050
N/B Maintenance
N/B Maintenance
5.2 Intel 855GM/GME North Bridge(8)
DVOB and DVOC Port Common Signal Descriptions
Name Type Description
DVOBC Interrup
DVOBCINTR#
ADDID[7:0]
DVODETECT
I
DVO
I
DVO
I
DVO
used to indicate a hot plug or unplug of a digital display.
ADDID[7:0]: These pins are used to communicate to the Video BIOS
when an external device is interfaced to the DVO port.
Note: Bit[7] needs to be strapped low when an on-board DVO device
is present.
The other pins should be left as NC.
DVODETECT: This strapping signal indicates to the GMCH
whether a DVO device is present or not. When a DVO device is
connected, then DVODETECT = 0.
t: This pin is used to signal an interrupt, typically
Analog CRT Display Signal Descriptions
Pin Name Type Description
O
VSYNC
HSYNC
RED
RED#
GREEN
GREEN#
BLUE
BLUE#
CMOS
CMOS
Analog
Analog
Analog
Analog
Analog
Analog
CRT Vertical Synchronization: This signal is used as the vertical
sync signal.
O
CRT Horizontal Synchronization: This signal is used as the
horizontal sync signal.
O
Red (Analog Video Output): This signal is a CR T Analog video
output from the internal color palette DAC. The DAC is designed for
a 37.5-§Ù equivalent load on each pin (e.g., 75-§Ù resistor on the
board, in parallel with the 75-§Ù CRT load).
O
Red# (Analog Output): Tied to ground.
O
Green (Analog Video Output): This signal is a CRT analog video
output from the internal color palette DAC. The DAC is designed for
a 37.5-§Ù equivalent load on each pin (e.g.,75-§Ù resistor on the
board, in parallel with the 75- §Ù CRT load).
O
Green# (Analog Output): Tied to ground.
O
Blue (Analog Video Output) : This signal is a CRT Analog video
output from the internal color palette DAC. The DAC is designed for
a 37.5-§Ù equivalent load on each pin (e.g., 75ohm resistor on the board, in parallel with the 75-§Ù CRT load).
O
Blue# (Analog Output): Tied to ground.
Digital Video Output C (DVOC) Port Signal Descriptions
Name Type Description
O
DVOCD[11:0]
DVO
DVOCHSYNC
DVO
DVOCVSYNC
DVO
DVOCBLANK#
DVO
DVOCFLDSTL
DVO
DVOC Data: This data bus is used to drive 12-bit RGB data on each
edge of the differential clock signals, DVOCCLK and DVOCCLK#.
This provides 24-bits of data per clock period. In dual channel mode,
this provides the upper 12-bits of pixel data.
DVOCD[11:0] should be left as left as NC (“Not Connected”) if not
used.
O
Horizontal Sync: HSYNC signal for the DVOC interface.
DVOCHSYNC should be left as left as NC (“Not Connected”) if not
used.
O
Vertical Sync: VSYNC signal for the DVOC interface.
DVOCVSYNC should be left as left as NC (“Not Connected”) if the
signal is NOT used when using internal graphics device.
O
Flicker Blank or Border Period Indication: DVOCBLANK# is a
programmable output pin driven by the GMCH.
When programmed as a blank period indication, this pin indicates
active pixels excluding the border. When programmed as a border
period indication, this pin indicates active pixel including the border
pixels.
DVOCBLANK# should be left as left as NC (“Not Connected”) if not
used.
I
TV Field and Flat Panel Stall Signal. This input can be
programmed to be either a TV Field input from the TV encoder or
Stall input from the flat panel.
DVOC TV Field Signal: When used as a Field input, it synchronizes
the overlay field with the TV encoder field when the overlay is
displaying an interleaved source.
DVOC Flat Panel Stall Signal: When used as the Stall input, it
indicates that the pixel pipeline should stall one horizontal line. The
signal changes during horizontal blanking. The panel fitting logic,
when expanding the image vertically, uses this.
DVOCFLDSTL needs to be pulled down if not used.
73
Page 75
8050
8050
5.2 Intel 855GM/GME North Bridge(9)
GPIO Signal Descriptions
GPIO I/F Total Type Comments
I
RSTIN#
PWROK
AGPBUSY#
EXTTS_0
LCLKCTLA
LCLKCTLB
PANELVDDEN
PANELBKLTE
N
PANELBKLTC
TL
DDCACLK
DDCADATA
DDCPCLK
DDCPDATA
CMOS
CMOS
CMOS
CMOS
CMOS
CMOS
CMOS
CMOS
CMOS
CMOS
CMOS
CMOS
CMOS
Reset: Primary Reset, Connected to PCIRST# of ICH4-M.
I
Power OK: Indicates that power to GMCH is stable.
O
AGPBUSY: Output of the GMCH IGD to the ICH4-M, which
indicates that certain graphics activity is taking place. It will indicate
to the ACPI software not to enter the C3 state. It will
also cause a C3/C4 exit if C3/C4 was being entered, or was already
entered when
AGPBUSY# went active. Not active when the IGD is in any ACPI
state other than D0.
I
External Thermal Sensor Input: This signal is an active low input
to the GMCH and is used to monitor the thermal condition around the
system memory and is used for triggering a read throttle. The GMCH
can be optionally programmed to send a SERR, SCI, or SMI message
to the ICH4-M upon the triggering
of this signal.
O
SSC Chip Clock Control: Can be used to control an external clock
chip with SSC control.
O
SSC Chip Data Control: Can be used to control an external clock
chip for SSC control.
O
LVDS LCD Flat Panel Power Control: This signal is used enable
power to the panel interface.
O
LVDS LCD Flat Panel Backlight Enable: This signal is used to
enable the backlight inverter (BLI)
O
LVDS LCD Flat Panel Backlight Brightness Control: This signal
is used as the Pulse
Width Modulated (PWM) control signal to control the backlight
inverter.
I/O
CRT DDC Clock: This signal is used as the DDC clock signal
between the CRT monitor and the GMCH.
I/O
CRT DDC Data: This signal is used as the DDC data signal between
the CRT monitor and the GMCH.
I/O
Panel DDC Clock: This signal is used as the DDC clock signal
between the LFP and the GMCH.
Panel DDC Data:
I/O
between the LFP and the GMCH.
This signal is used as the DDC data signal
N/B Maintenance
N/B Maintenance
GPIO I/F Total Type Comments
MI2CCLK
MI2CDATA
MDVICLK
MDVIDATA
MDDCDATA
MDDCCLK
I/O
DVO
I/O
DVO
I/O
DVO
I/O
DVO
I/O
DVO
I/O
DVO
DVO I2C Clock: This signal is used as the I2C_CLK for a digital
display (i.e. TV-Out Encoder, TMDS transmitter). This signal is
tri-stated during a hard reset.
DVO I2C Data: This signal is used as the I2C_DATA for a digital
display (i.e. TV-Out Encoder, TMDS transmitter). This signal is
tri-stated during a hard reset.
DVI DDC Clock:
display connector (i.e. primary digital monitor). This signal is
tri-stated during a hard reset.
DVI DDC Data: The signal is used as the DDC data for a digital
display connector (i.e. primary digital monitor). This signal is
tri-stated during a hard reset.
DVI DDC Clock:
display connector (i.e. secondary digital monitor). This signal is
tri-stated during a hard reset.
DVI DDC Data: The signal is used as the DDC clock for a digital
display connector (i.e. secondary digital monitor). This signal is
tri-stated during a hard reset.
This signal is used as the DDC clock for a digital
The signal is used as the DDC data for a digital
74
Page 76
8050
8050
N/B Maintenance
N/B Maintenance
5.3 Intel 82801DBM I/O Controller Hub 4 Mobile (ICH4-M)(1)
Hub Interface Signals
Signal Name Type Description
HI[11:0]
HI_STB/HI_STBS
HI_STB#/
HI_STBF
HICOMP
HI_VSWING
LAN Connect Interface Signals
Signal Name Type Description
LAN_CLK
LAN_RXD[2:0]
LAN_TXD[2:0]
LAN_RSTSYNC
EEPR OM Interface Signals
Signal Name Type Description
EE_SHCLK
EE_DIN
EE_DOUT
EE_CS
I/O
Hub Interface Signals
I/O Hub Interface Strobe/ Hub Interface Strobe Second: One of two
differential strobe signals used to transmit and receive data through
the hub interface.
Hub Interface 1.5 mode this signal is not differential and is the
second of the two strobe signals.
I/O
Hub Interface Strobe Complement / Hub Interface Strobe First:
One of two differential strobe signals used to transmit and receive
data through the hub interface.
Hub Interface 1.5 mode this signal is not differential and is the first
of the two strobe signals.
I/O Hub Interface Compensation: Used for hub interface buffer
compensation.
I Hub Interface Voltage Swing: Analog input used to control the
voltage swing and impedance strength of hub interface pins.
I LAN I/F Clock: Driven by the LAN Connect component.
Frequency range is 5 MHz to 50 MHz.
I Received Data: The LAN Connect component uses these signals to
transfer data and control information to the integrated LAN
Controller. These signals have integrated weak pull-up resistors.
Transmit Dat
O
to transfer data and control information to the LAN Connect
component.
O LAN Reset/Sync: The LAN Connect component’s Reset and Sync
signals are multiplexed onto this pin.
O EEPROM Shift Clock: Serial shift clock output to the EEPROM.
I EEPROM Data In: Tran s f er s d a ta from the EEPRO M to the ICH3.
This signal has an integrated pull-up resistor.
O EEPROM Data Out: Transfers data from the ICH3 to the
EEPROM.
O EEPROM Chip Select: Chip select s i g n al to th e E E PR O M.
a: The integrated LAN Controller uses these signals
Firmware Hub Interface Signals
Signal Name Type Description
FWH[3:0]/
LAD[3:0]
FWH[4]/
LFRAME#
PCI Interface Signals
Signal Name Type Description
AD[31:0]
C/BE[3:0]#
DEVSEL#
I/O Firmware Hub Signals. Muxed with LPC address signals.
I/O LFRAME# Firmware Hub Signals. Muxed with LPC LFRAME#
signal.
I/O PCI Address/Data: AD[31:0] is a multiplexed address and data
bus. During the first clock of a transaction, AD[31:0] contain a
physical address (32 bits). During subsequent clocks, AD[31:0]
contain data. The ICH4 drives all 0s on AD[31:0] during the address
phase of all PCI Special Cycles.
I/O Bus Command and Byte Enables: The command an d byte enable
signals are multiplexed on the same PCI pins. During the address
phase of a transaction, C/BE[3:0]# define the bus command. During
the data phase, C/BE[3:0]# define the Byte Enables.
C/BE[3:0]# Command Type
0 0 0 0 Interrupt Acknowledge
0 0 0 1 Special Cycle
0 0 1 0 I/O Read
0 0 1 1 I/O Write
0 1 1 0 Memory Read
0 1 1 1 Memory Write
1 0 1 0 Configuration Read
1 0 1 1 Configuration Write
1 1 0 0 Memory Read Multiple
1 1 1 0 Memory Read Line
1 1 1 1 Memory Write and Invalidate
All command encodings not shown are reserved. The ICH4 does not
decode reserved values, and therefore will not respond if a PCI
master generates a cycle using one of the reserved values.
I/O Device Select: The ICH4 asserts DEVSEL# to claim a PCI
transaction. As an output, the ICH4 asserts DEVSEL# when a PCI
master peripheral attempts an access to an internal ICH4 address or
an address destined for the hub interface (main memory or AGP).
As an input, DEVSEL# indicates the response to an ICH4-initiated
transaction on the PCI bus. DEVSEL# is tri-stated from the leading
edge of PCIRST#. DEVSEL# remains tri-stated by the ICH4 until
driven by a Target device.
75
Page 77
8050
p
8050
N/B Maintenance
N/B Maintenance
5.3 Intel 82801DBM I/O Controller Hub 4 Mobile (ICH4-M)(2)
PCI Interface Signals (Continued)
Signal Name Type Description
FRAME#
IRDY#
TRDY#
PAR
I/O Cycle Frame: The current Initiator drives FRAME# to indicate the
beginning and duration of a PCI transaction. While the Initiator
asserts FRAME#, data transfers continue. When the Initiator
negates FRAME#, the transaction is in the final data phase.
FRAME# is an input to the ICH4 when the ICH4 is the Target, and
FRAME# is an output from the ICH4 when the ICH4 is the Initiator.
FRAME# remains tri- stated by the ICH4 until driven by an
Initiator.
I/O Initiator Ready: IRDY# indicates the ICH4's ability, as an
Initiator, to compl ete the current data phase of the transaction. It is
used in conjunction with TRDY#. A data
clock that both IRDY# an d TRDY# are sampled asserted. During a
write, IRDY# indicates the ICH4 has valid data present on
AD[31:0]. During a read, it indicates the ICH4 is prepared to latch
data. IRDY# is an input to the ICH4 when the ICH4 is the Target
and an output from the ICH4 when the ICH4 is an Initiator. IRDY#
remains tri-stated by the ICH4 until driven by an Initiator.
I/O Target Ready: TRDY# indicates the ICH4's ability, as a Target, to
complete the current data phase of the transaction. TRDY# is used
in conjunction with IRDY#. A data phase is completed when both
TRDY# and IRDY# are sampled asserted.
During a read, TRDY# indicates that the ICH4, as a Target, has
placed valid data on AD[31:0]. During a write, TRDY# indicates
that the ICH4, as a Target, is prepared to latch data. TRDY# is an
input to the ICH4 when the ICH4 is the Initiat or and an output from
the ICH4 when the ICH4 is a Target. TRDY# is tri-stated from the
leading edge of PCIRST#. TRDY# remains tri-stated by the ICH4
until driven by a target.
I/O Calculated/Checked Parity: PAR uses “even” parity calculated on
36 bits, AD[31:0] plus C/BE[3:0]#. “Even” parity means that the
ICH4 counts the number of 1s within the 36 bits plus PAR and the
sum is always even. The ICH4 always calculates PAR on 36 bits
regardless of the valid byte enables. The ICH4 generates PAR for
address and data phases and only guarantees PAR to be valid one
PCI clock after the corresponding address or data phase. The ICH4
drives and tri-states PAR identically to the AD[31:0] lines except
that the ICH4 delays PAR by exactly one PCI clock. PAR is an
output during the address phase (delayed one clock) for all I CH4
initiated transactions. PAR is an output during t he data phase
(delayed one clock) when the ICH4 is the Initiator of a PCI write
transaction, and when it is the Target of a read transaction. ICH4
checks parity when it is the Target of a PCI write transaction. If a
parity error is detected, the ICH4 will set the appropriate internal
status bits, and has the option to generate an NMI# or SMI#.
hase is completed on any
PCI Interface Signals (Continued)
I/O
I/O
I
O
I
O
I/O
I/OD
STOP# indicates that the ICH4, as a Target, is requesting the
Stop:
Initiator to stop the current transaction. STOP# causes the ICH4, as
an Initiator, to stop the current transaction. STOP# is an output
when the ICH4 is a Target and an input when the ICH4 is an
Initiator. STOP# is tri-stated from the le ading edge of PCIRST#.
STOP# remains tri-stated until driven by the ICH4.
Parity Error:
receives data that has a parity error. The ICH4 drives PERR# when
it detects a parity error. The ICH4 can either generate an NMI# or
SMI# upon detecting a parity error (either detected internally or
reported via the PERR# signal).
PCI Requests:
REQ[5]# is muxed with PC/PCI REQ[B]# (must choose one or the
other, but not both). If not used for PCI or PC/PCI,
REQ[5]#/REQ[B]# can ins tead be used as GPIO[1].
REQ[0]# is programmable to have improved arbitration
NOTE:
latency for for supporting PCI-based 1394 controllers.
PCI Grants:
GNT[5]# is muxed with PC/PCI GNT[B]# (must choose one or the
other, but not both). If not needed for PCI or PC/PCI, GNT[5]# can
instead be used as a GPIO.
Pull-up resistors are not required on these signals. If pull-ups are
used, they should be tied to the Vcc3_3 power rail.
GNT[B]#/GNT[5]#/GPIO[17] has an internal p ull-up.
PCI Clock:
all transactions on the PCI Bus.
This clock does not stop based on STP_PCI# signal.
NOTE:
PCICLK only stops based on SLP_S1# or SLP_S3#.
PCI Reset:
the PCI bus. The ICH4 asserts PCIRST# dur ing pow er-up and when
S/W initiates a hard reset sequence thro ugh the RC (CF9h) register.
The ICH4 drives PCIRST# inactive a minimum of 1 ms after
PWROK is driven acti ve. The ICH4 drives PCIRST# active
a minimum of 1 ms when initiated through the RC register.
PCI Lock:
may require multiple transactions to complete. ICH4 asserts
PLOCK# when it performs non- exclusive transactions on the PCI
bus. Devices on the PCI bus (other than the ICH4) are not permitted
to assert the PLOCK# signal.
System Error:
detects a system error condition. Upon sampling SERR# active, the
ICH4 has the ability to generate an NMI, SMI#, or interrupt.
Signal Name Type
STOP#
PERR#
REQ[4:0]#
REQ[5]#/
REQ[B]#/
GPIO[1]
GNT[4:0]#
GNT[5]#/
GNT[B]#/
GPIO[17]
PCICLK
PCIRST#
PLOCK#
SERR#
Description
An external PCI device drives PERR# when it
The ICH4 supports up to 6 masters on the PCI bus.
The ICH4 supports up to 6 masters on the PCI bus.
This is a 33 MHz clock. PCICLK provides timing for
ICH4 asserts PCIRST# to reset devices that reside on
This signal indicates an exclusive bus operation and
SERR# can be pulsed active by any PCI device that
76
Page 78
8050
8050
5.3 Intel 82801DBM I/O Controller Hub 4 Mobile (ICH4-M)(3)
PCI Interface Signals (Continued)
Signal Name Type Description
PME#
CLKRUN#
REQ[A]#/
GPIO[0]
REQ[B]#/
REQ[5]#/
GPIO[1]
GNT[A]#/
GPIO[16]
GNT[B]#/
GNT[5]#/
GPIO[17]
IDE Interface Signals
Signal Name Type Description
PDCS1#, SDCS1#
PDCS3#, SDCS3#
PDA[2:0],
SDA[2:0]
I/OD PCI Power Management Event: PCI peripherals drive PME# to
wake the system from low-power states S1-M–S5. PME# assertion
can also be enabled to generate an SCI from the S0 state. In some
cases the ICH4 may drive PME# active due to an internal wake
event. The ICH4 will not drive PME# high, but it will be pulled up
to VccSus3_3 by an internal pull-up resistor.
I/O PCI Clock Run: Used to support PCI Clock Run protocol.
Connects to PCI devices that need to request clock re-start, or
prevention of clock stopping.
NOTE: An external pu ll-up to the core power plane is required.
PC/PCI DMA Request [A:B]:
I
DMA Requests for the purpose of running ISA-compatible DMA
cycles over the PCI bus. This is used by devices such as PCI based
Super I/O or audio codecs which need to perform legacy 8237 DMA
but have no ISA bus.
When not used for PC/PCI requests, these signals can be used as
General Purpose Inputs. REQ[B]# can instead be used as the 6th
PCI bus request.
O PC/PCI DMA Acknowledges [A: B]: This grant serializes an
ISA-like DACK# for the purpose of running DMA/ISA Master
cycles over the PCI bus. This is used by devices such as PCI based
Super/IO or audio codecs w hich need to perform legacy 8237 DMA
but have no ISA bus.
When not used for PC/PCI, these signals can be used as General
Purpose Outputs. GNTB# can also be use d as the 6th PCI bus
master grant output. These signal have internal pull-up resistors.
O
Primary and Secondary IDE Device Chip Selects for 100 Range:
For ATA command register block. This output signal is connected
to the corresponding signal on the primary or secondary IDE
connector.
O
Primary and Secondary IDE Device Chip Select for 300 Range:
For ATA control register block. This output signal is connected to
the corresponding signal on the primary or secondary IDE
connector.
O Primary and Secondary IDE Device Address: These output
signals are connected to the corresponding signals on the primary or
secondary IDE connectors. They are used to indicate which byte in
either the ATA command block or control block is being addressed.
N/B Maintenance
N/B Maintenance
This request serializes ISA -like
IDE Interface Signals (Continued)
Signal Name Type Description
PDD[15:0],
SDD[15:0]
PDDREQ,
SDDREQ
PDDACK#,
SDDACK#
PDIOR#/
(PDWSTB/PRDMA
RDY#)
SDIOR#/
(SDWSTB/SRDMA
RDY#)
PDIOW#/
(PDSTOP)
SDIOW#/
(SDSTOP)
I/O Primary and Secondary IDE Device Data: These signals directly
drive the corresponding signals on the primary or secondary IDE
connector. There is a weak internal pull-down resistor on PDD[7]
and SDD[7].
I Primary and Secondary IDE Device DMA Request: These input
signals ar e directly driven from the DRQ signals on the pr imary or
secondary IDE connector. It is asserted by the IDE device to request
a data transfer, and use d in co njunction with the PCI bus m aster ID E
function and are not associated with any AT compatible DMA
channel. There is a weak internal pull-down resistor on these
signals.
O Primary and Secondary IDE Device DMA Acknowledge: These
signals directly drive the DAK# signals on the primary and
secondary IDE connectors. Each is asserted by the ICH4 to indicate
to IDE DMA slave devices that a given data transfer cycle (assertion
of DIOR# or DIOW#) is a DMA data transfer cycle. This signal is
used in conjunction with the PCI bus master IDE function and are
not associated with any AT-compatible DMA channel.
O
Primary and Secondary Disk I/O Read (PIO and Non-Ultra
DMA):
data onto the PDD or SDD lines. Data is latched by the ICH4 on the
deassertion edge of PDIOR# or SDIOR#. The IDE device is
selected either by the ATA register file chip selects (PDCS1# or
SDCS1#, PDCS3# or SDCS3#) and the PDA or SDA lines, or the
IDE DMA acknowledge (PDDAK# or SDDAK#).
Primary and Secondary Disk Write Strobe (Ultra DMA Writes to
Disk): This is the data write strobe for writes to disk. When writing
to disk, ICH4 drives valid data on rising and falling edges of
PDWSTB or SDWSTB. Primary and Secondary Disk DMA Ready
(Ultra DMA Reads from Disk): This is the DMA ready for reads
from disk. When reading from disk, ICH4 deasserts
PRDMARDY# or SRDMARDY# to pause burst data transfers.
O
Primary and Secondary Disk I/O Write (PIO and Non-Ultra
DMA): This is the command to the IDE device that it may latch
data from the PDD or SDD lines. Data is latched by the IDE device
on the deassertion edge of PDIOW# or SDIOW#. The IDE device is
selected either by the ATA register file chip selects (PDCS1# or
SDCS1#, PDCS3# or SDCS3#) and the PDA or SDA lines, or the
IDE DMA acknowledge (PDDAK# or SDDAK#).
Primary and Secondary Disk Stop (Ultra DMA): ICH4 asserts this
signal to terminate a burst.
This is the command to the IDE device that it may drive
77
Page 79
8050
8050
N/B Maintenance
N/B Maintenance
5.3 Intel 82801DBM I/O Controller Hub 4 Mobile (ICH4-M)(4)
IDE Interface Signals (Continued)
Signal Name Type Description
PIORDY#/
(PDRSTB/PWDMA
RDY#)
SIORDY#/
(SDRSTB/SWDMA
RDY#)
Interrupt Signals
Signal Name Type
SERIRQ
PIRQ[D:A]#
PIRQ[H:E]#/
GPIO[5:2]
IRQ[14:15]
APICCLK
APICD[1:0]
I Primary and Secondary I/O Channel Ready (PIO): This signal
will keep t h e s t r o b e a c tive (PDIOR # or SD IOR # on reads, P DIOW#
or SDIOW# on writes) longer than the minimum width. It adds wait
states to PIO transfers.
Primary and Secondary Disk Read Strobe (Ultra DMA Reads from
Disk): When reading from disk, the ICH4 latches data on rising and
falling edges of this signal from the disk.
Primary and Secondary Disk DMA Ready (Ultra DMA Writes to
Disk): When writing to disk, this is de-asserted by the disk to pause
burst data transfers.
I/O Serial Interrupt Request: This pin implement s the serial inte rrupt
protocol.
I/OD PCI Interrupt Requests: In Non-APIC Mode the PIRQx# signals
can be routed to interrupts 3, 4, 5, 6, 7, 9, 10, 11, 12, 14 or 15 as
described in the Interrupt Steering section. Each PIRQx# line has a
separate Route Control Register.
In APIC mode, these signals are connected to the internal I/O AP IC
in the following fashion: PIRQ[A]# is connected to IRQ16,
PIRQ[B]# to IRQ17, P IRQ[C]# to IRQ18, and PIRQ[D]# to IRQ19.
This frees the legacy interrupts.
I/OD PCI Interrupt Requests: In Non-APIC Mode the PIRQx# signals
can be routed to interrupts 3, 4, 5, 6, 7, 9, 10, 11, 12, 14 or 15 as
described in the Interrupt Steering section. Each PIRQx# line has a
separate Route Control Register.
In APIC mode, these signals are connected to the internal I/O APIC
in the following fashion: PIRQ[E]# is connected to IRQ20,
PIRQ[F]# to IRQ21, PIRQ[G]# to IRQ22, and PIRQ[H]# to IRQ23.
This frees the legacy interrupts. If not needed for interrupts, these
signals can be used as GPIO.
I Interrupt Request 14:15: These interrupt inputs are connected to
the IDE drives. IRQ14 is used by the drives connected to the
Primary controller and IRQ15 is used by the drives connected to the
Secondary controller.
I APIC Clo c k: This clock operates up to 33.33 MHz.
I/OD APIC Data: These bi-directional open drain signals are used to
send and receive data over the APIC bus. As inputs the data is valid
on the rising edge of APICCLK. As outputs, new data is driven
from the rising edge of the APICCLK.
Description
LPC Interface Signals
Signal Name Type Description
LAD[3:0]/
FWH[3:0]
LFRAME#/
FWH[4]
LDRQ[1:0]#
USB Interface Signals
Signal Name Type Description
USBP0P,
USBP0N,
USBP1P,
USBP1N
USBP2P,
USBP2N,
USBP3P,
USBP3N
USBP4P,
USBP4N,
USBP5P,
USBP4N
OC[5:0]#
USBRBIAS
USBRBIAS#
I/O LPC Multiplexed Command, Address, Data: For the LAD[3:0]
signals, internal pull-ups are provided.
O LPC Frame: LFRAME# indicates the start of an LPC cycle, or an
abort.
I LPC Serial DMA/Master Request Inputs: LDRQ[1:0]# are used
to request DMA or bus master access. These signals are typically
connected to an external Super I/O device. An internal pull-up
resistor is provided on these signals.
I/O Universal Serial Bus Port 1:0 Differential: These differential
pairs are used to transmit data/address/command signals for ports 0
and 1. These ports can be routed to USB UHCI Controller #1 or the
USB EHCI Controller.
NOTE: No external resistors are required on these signals. The
ICH4 integrates 15 k . pull-downs and provides an output driver
impedance of 45 . which requires no external series resistor
I/O Universal Serial Bus Port 3:2 Differential: These differential
pairs are used to transmit data/address/command signals for ports 2
and 3. These ports can be routed to USB UHCI Controller #2 or the
USB EHCI Controller.
NOTE: No external resistors are required on these signals. The
ICH4 integrates 15 k . pull-downs and provides an output driver
impedance of 45 . which requires no external series resistor.
I/O Universal Serial Bus Port 5:4 Differential: These differential
pairs are used to transmit data/address/command signals for ports 4
and 5. These ports can be routed to USB UHCI Controller #3 or the
USB EHCI Controller
NOTE: No external resistors are required on these signals. The
ICH4 integrates 15 k . pull-downs and provides an output driver
impedance of 45 . which requires no external series resistor
I/O Overcurrent Indicators: These signals set corresponding bits in
the USB controllers to indicate that an overcurrent condition has
occurred.
O USB Resistor Bias: Analog connection point for an external
resistor to ground. USBRBIAS should be connected to
USBRBIAS# as close to the resistor as possible.
I USB Resistor Bi as Complement: Analog connection point for an
external resistor to ground. USBRBIAS# should be connected to
USBRBIAS as close to the resistor as possible.
78
Page 80
8050
8050
N/B Maintenance
N/B Maintenance
5.3 Intel 82801DBM I/O Controller Hub 4 Mobile (ICH4-M)(5)
Power Management Interface Signals
Signal Name Type Description
THRM#
THRMTRIP#
SLP_S1#
SLP_S3#
SLP_S4#
SLP_S5#
PWROK
PWRBTN#
RI#
SYS_RESET#
RSMRST#
I Thermal Alarm: This is an active low signal generated by external
hardware to start the hardware clock throttling mode. The signal can
also generate an SMI# or an SCI.
I Thermal Trip: When low, THRMTRIP# indicates that a thermal
trip from the processor occurred; the ICH4 will immediately
transition to a S5 state. The ICH4 will not wait for the processor
stop grant cycle since the processor has overheated.
O S1 Sleep Control: SLP_S1# provides Clock Synthesizer o r Power
plane control. Optional use is to shut off power to non-critical
systems when in the S1- M (Powered On Suspend), S3 (Suspend To
RAM), S4 (Suspend to Disk) or S5 (Soft Off) states.
O S3 Sleep Control: SLP_S3# is for power plane control. It shuts off
power to all non-critical systems when in S3 (Suspend To RAM),
S4 (Suspend to Disk), or S5 (Soft Off) states.
O S4 Sleep Control: SLP_S4# is for power plane control. It shuts
power to all non-critical systems when in the S4 (Suspend to Disk)
or S5 (Soft Off) state.
S5 Sleep Control:
O
is used to shut power off to all non-critical systems when in the S5
(Soft Off) states.
I Power OK: When asserted, PWROK is an indication to the ICH4
that core power and PCICLK have been stable for at least 1 ms.
PWROK can be driven asynchronously. When PWROK is negated,
the ICH4 asserts PCIRST#.
NOTE: PWROK must deassert for a minimum of 3 RTC clock
periods for the ICH4 to fully reset the powe r and properly generate
the PCIRST# output
I Power Button: The Power Button causes SMI# or SCI to indicate a
system request to go to a sleep state. If the system is already in a
sleep state, this signal causes a wake event. If PWRBTN# is pressed
for more than 4 seconds, this causes an unconditional transition
(power button override) to the S5 state with only the PWRBTN#
available as a wake event. Override occurs even if the system is in
the S1-M–S4 states. This signal has an internal pull-up resistor.
I Ring Indica te: This signal is an input from the modem interface. It
can be enabled as a wake event, and this is preserved across power
failures.
I System Reset: This pin forces an internal reset after being
debounced. The ICH4 will reset immediately if the SMBus is idle;
otherwise, it will wait up to 25 ms ± 2 ms for the SMBus to idle
before forcing a reset on the system.
I Resume Well Reset: This signal is used for resetting the resume
power plane logic.
SLP_S5# is for power plane control. The signal
Power Management Interface Signals (Continued)
Signal Name Type Description
LAN_RST#
SUS_STAT#/
LPCPD#
C3_STAT#
SUSCLK
AGPBUSY#
STP_PCI#
STP_CPU#
BATLOW#
CPUPERF#
SSMUXSEL
VGATE/
VRMPWRGD
I L A N Reset: This signal must be asserted at least 10 ms after the
resume well power (VccLAN3_3 and V ccLAN1_5 is valid. When
deasserted, this signal is an indication that the resume well power is
stable.
O Suspend Status: This signal is asserted by the ICH4 to indicate that
the system will be entering a low power state soon. This can be
monitored by devices with memory that need to switch from normal
refresh to suspend refresh mode. It can also be used by other
peripherals as an indication that they should isolate their outputs
that may be going to powered-off planes. This signal is called
LPCPD# on the LPC I/F.
O C3_STAT#: This signal will typically be configured as C3_STAT#.
It is used for indicating to an AGP device that a C3 state transition
is beginning or ending. If C3_STAT# functionality is not required,
this signal may be used as a GPO.
NOTE: This signal will be asserted in S1-M on the ICH4-M.
Suspend Clock:
O
chips for refresh clock.
AGP Bus Busy:
I
indication that the AGP device is busy. When this signal is asserted,
the BM_STS bit will be set. If this functionality is not needed, this
signal may be configured as a GPI.
O Stop PCI Clock: This signal is an output to the external clock
generator for it to turn off the PCI clock. Used to support PCI
CLKRUN# protocol. If this functionality is not needed, This signal
can be configured as a GPO.
O Stop CPU Clo ck: Output to the external clock generator for it to
turn off the processor clock. Used to support the C3 state. If this
functionality is not needed, this signal can be configured as a GPO.
Battery Low:
I
that there is insufficient power to boot the system. Assertion will
prevent wake from S1-M–S5 state. Can also be enabled to cause an
SMI# when asserted.
OD CPU Performance: CPUPERF# is used for Intel SpeedStep
technology support. The signal selects which power state to put the
processor in.
O SpeedStep Mux Select: SSMUXSEL is used for Intel SpeedStep
technology support. The signal selects the voltage level for the
processor.
I VGATE/VRM Power Good: VGATE/ V RMPWRGD is u s ed for
Intel SpeedStep technology support. This is an output from the
processor’s voltage regulator to indicate that the voltage is stable.
This signal may go inactive during an Intel SpeedStep transition.
Output of the RTC generator circuit to use by other
To support the C3 state. This signal is an
This signal is an input from the battery to indicate
79
Page 81
8050
8050
N/B Maintenance
N/B Maintenance
5.3 Intel 82801DBM I/O Controller Hub 4 Mobile (ICH4-M)(6)
Power Management Interface Signals (Continued)
Signal Name Type Description
DPRSLPVR
Processor Interface Signals
Signal Name Type Description
A20M#
CPUSLP#
FERR#
INTR
O Deeper Sleep - Voltag e Regula tor : This signal is used to lower the
voltage of VRM during C4 and S1-M states. When the signal is
high, the voltage regulator outputs the lower “Deeper Sleep”
voltage. When the signal is low (default), the voltage regulator
outputs the higher “Normal” voltage. During PCIRST#, the output
driver is disabled and an internal pull-down is enabled. This is
needed for implementing a strap on the pin. When PCIRST#
deasserts, the output driver is enabled. To guarantee no glitches on
the DPRSLPVR pin, the pull-down is disabled after the output
driver is fully enabled.
NOTE: DPRSLPVR is sampled at the rising edge of PWROK as a
functional strap.
O Mask A20: A20M# will go active based on either setting the
appropriate bit in the Port 92h register, or based on the A20GATE
input being active.
Speed Strap: During the reset sequence, ICH4 drives A20M# high
if the corresponding bit is set in the FREQ_STRP register.
O CPU Sleep: This signa l puts th e processor into a state that saves
substantial power compared to Stop-Grant state. However, during
that time, no snoops occur. The ICH4 can optionally assert the
CPUSLP# signal when going to the S1-M state.
I Numeric Coproce ssor Erro r: This signal is tied to the coprocessor
error signal on the processor. FERR# is only used if the ICH4
coprocessor error reporting function is enabled in the General
Control Register (Device 31:Function 0, Of fset D0, bit 13). If
FERR# is asserted, the ICH4 generates an internal IRQ13 to its
interrupt controller unit. It is also used to gate the IGNNE# signal to
ensure that IGNNE# is not asserted to the processor unless FERR#
is active. FERR# requires an external weak pull-up to ensure a high
level when the coprocessor error function is disabled.
NOTE: FERR# can be used in some states for notification by the
processor of pending interrupt events. This functionality is
independent of the General Control Register bit setting.
O CPU Interrupt: INTR is asserted by the ICH4 to signal the
processor that an interrupt request is pending and needs to be
serviced. It is an asynchronous output and normally driven low.
Speed Strap: During the reset sequence, ICH4 drives INTR high if
the corresponding bit is set in the FREQ_STRP register.
Processor Interface Signals (Continued)
Signal Name Type Description
IGNNE#
INIT#
NMI
SMI#
STPCLK#
RCIN#
A20GATE
O Ignore Numeric Error: This signal is connected to the ignore error
pin on the processor. IGNNE# is only used if the ICH4 coprocessor
error reporting function is enabled in the General Control Register
(Device 31:Function 0, Offset D0, bit 13). If FERR# is active,
indicating a coprocessor error, a write to the Coprocessor Error
Register (F0h) causes the IGNNE# to be asserted. IGNNE# remains
asserted until FERR# is negated. If FERR# is not asserted when the
Coprocessor Error Register is written, the IGNNE# signal is not
asserted.
Speed Strap: During the reset sequence, ICH4 drives IGNNE# high
if the corresponding bit is set in the FREQ_STRP register.
O Initialization: INIT# is asserted by the ICH4 fo r 16 PCI clocks to
reset the processor. ICH4 can be configured to support CPU BIST.
In that case, INIT# will be active when PCIRST# is active.
O Non-Maskable Interrupt: NMI is used to force a non-Maskable
interrupt to the processor. The ICH4 can generate an NMI when
either SERR# or IOCHK# is asserted. The processor detects an NMI
when it detects a rising edge on NMI.
NMI is reset by setting the corresponding NMI source
enable/disable bit in the NMI Status and Control Register.
Speed Strap: During the reset sequence, ICH4 drives NMI high if
the corresponding bit is set in the FREQ_STRP register.
O System Management Interrupt: SMI# is an active low output
synchronous to PCICLK. It is asserted by the ICH4 in response to
one of many enabled hardware or software events.
O Stop Clock Request: STPCLK# is an active low output
synchronous to PCICLK. It is asserted by the ICH4 in response to
one of many hardware or software events. When the processor
samples STPCLK# asserted, it responds by stopping its internal
clock.
I Keyboard Controller Reset CPU: The keyboard controller can
generate INIT# to the processor. This saves the external OR gate
with the ICH4’s other sources of INIT#. When the ICH4 detects the
assertion of this signal, INIT# is generated for 16 PCI clocks.
NOTE:
The ICH4 ignores RCIN# assertion during transitions to the
S1-M, S3, S4 and S5 states.
I A20 Gate: A20GATE is from the keyboard controller. The signal
acts as an alternative method to force the A20M# signal active. It
saves the external OR gate needed with various other PCIsets.
80
Page 82
8050
b
8050
N/B Maintenance
N/B Maintenance
5.3 Intel 82801DBM I/O Controller Hub 4 Mobile (ICH4-M)(7)
Processor Interface Signals (Continued)
Signal Name Type Description
CPUPWRGD
DPSLP#
SMBus Interface Signals
Signal Name Type Description
SMBDATA
SMBCLK
SMBALERT#/
GPIO[11]
OD CPU Power Good: This signal should be connected to the
processor’s PWRGOOD input. To allow for Intel ® SpeedStep™
technology support, this signal is kept high during an Intel
SpeedStep technology state transition to prevent loss of processor
context. This is an open-drain output signal (external pull-up
resistor required) that represents a logical AND of the ICH4’s
PWROK and VGATE / VRMPWRGD signals.
O Deeper Sleep: This signal is asserted by the ICH4 to the processor.
When the signal is low, the processor enters the Deeper Sleep state
by gating off the processor Core clock inside the processor. When
the signal is high (default), the processor is not in the Deeper Sleep
state. This signal behaves identically to the STP_CPU# signal, but
at the processor voltage level.
I/OD SMBus Data: External pull-up is required.
I/OD SMBus Clock: External pull-up is required.
I SMBus Alert: This signal is used to wake the system or generate
SMI#. If not used for SMBALERT#, it can be used as a GPI.
System Management Interface Signals
Signal Name Type Description
INTRUDER#
SMLINK[1:0]
I Intruder Detect: Can be set to disable system if box detected open.
This signal’s status is readable, so it can be used like a GPI if the
Intruder Detection is not needed.
I/OD System Management Link: SMBus link to optional external
system management ASIC or LAN controller. External pull-ups are
required.
Note that SMLINK[0] corresponds to an SMBus Clock signal, and
SMLINK[1] corresponds to an SMBus Data signal.
Real Time Clock Interface Signals
Signal Name Type Description
RTCX1
RTCX2
Other Clock Signals
Signal Name Type Description
CLK14
CLK48
CLK66
Special Crystal Input 1: This signal is co nn ected to t he 32.768 kHz cryst al .
Special Crystal Input 2: This signal is co nn ected to t he 32.768 kHz cryst al .
I Oscillator Clock: Used for 8254 timers. It runs at 14.3181 8 MHz.
This clock is permitted to stop during S1-M (or lower) states.
I 48 MHz Clock: This clock is used to run the USB controller. It runs
at 48 MHz. This clock is permitted to stop during S1-M (or lower)
states.
I 66 MHz Clock: This is used to run the hub interface. It runs at 66
MHz. This clock is permitted to stop during S1-M (or lower) states.
Miscellaneous Signals
Signal Name Type Description
SPKR
RTCRST#
O Speaker: The SPKR signal is the output of counter 2 and is
internally “ANDed” wit h Port 61h bit 1 to provide Speaker Data
Enable. This signal drives an external speaker driver device, which
in turn drives the system speaker. Upon PCIRST#, its output state is
0.
NOTE: SPKR is sampled at the rising edge of PWROK as a
functional strap.
I RTC Reset: When asserted, this signal resets register bits in the
RTC well and sets the RTC_PWR_STS bit (bit 2 in
GEN_PMCON3 register).
NOTES:
1. Clearing CMOS in an ICH4a jumper on RTCRST# or GPI, or using SAFEMODE strap.
Implementations should not attempt to clear CMOS by using a
jumper to pull VccRTC low.
2. Unless entering the XOR Chain Test Mode, the RTCRST# input
must always be high when all other RTC power planes are on.
ased platform can be done by using
81
Page 83
8050
8050
N/B Maintenance
N/B Maintenance
5.3 Intel 82801DBM I/O Controller Hub 4 Mobile (ICH4-M)(8)
AC’97 Link Signals
Signal Name Type Description
AC_RST#
AC_SYNC
AC_BIT_CLK
AC_SDOUT
AC_SDIN[1:0]
NOTE: An integrated pull-down resistor on AC_BIT_CLK is enabled when either: The ACLINK
Shutoff bit in the AC’97 Global Control Register is set to 1, or Both Function 5 and Func tion 6 of
Device 31 are disabled. Otherwise, the integrated pull-down resistor is disabled.
General Purpose I/O Signals
Signal Name Type Description
GPIO[43:32]
GPIO[31:29]
GPIO[28:27]
GPIO[26]
GPIO[25]
GPIO[24:18]
GPIO[17:16]
GPIO[15:14]
GPIO[13:12]
GPIO[11]
GPIO[10:9]
GPIO[8]
GPIO[7]
GPIO[6]
GPIO[5:2]
GPIO[1:0]
NOTE: Main power well GPIO are 5V tolerant, except for GPIO[43:32]. Resume power well GPIO
are not 5V tolerant.
O AC ’97 Reset: This signal is a master hardware reset to external
Codec(s).
O AC ’97 Sync: This signal is a 48 kHz fixed rate sample sync to the
Codec(s).
I AC97 Bit Clock: This signal is a 12.288 MHz serial data clock
generated by the external Codec(s). This signal has an integrated
pull-down resistor.
AC97 Serial Data Out:
O
NOTE:
AC_SDOUT is sampled at the rising edge of PWROK as a
functional strap.
I AC97 Serial Data In 2:0: These signals ar e S erial TDM data input s
from the three Codecs.
I/O Can be input or output. Main power well.
O Not implemented.
I/O Can be input or output. Resume power well. Unmuxed.
I/O Not implemented.
I/O Can be input or output. Resume power well. Unmuxed.
I/O Not Implemented in Mobile (Assign to native Functionality).
O Fixed as Output only. Main power well. Can be used instead as
PC/PCI GNT[A:B]#. GPIO[17] can also alternatively be used for
PCI GNT[5]#. Integrated pull-up resistor.
I Not implemented.
I Fixed as Input only. Resume power well. Unmuxed.
I Fixed as Input only. Resume power well. Can be used instead as
SMBALERT#.
I Not implemented.
I
Fixed as Input only. Resume power well. Unmuxed.
I
Fixed as Input only. Main power well. Unmuxed.
I
Not Implemented in Mobile (Assign to Native Functionality)
I Fixed as Input only. Main power well. Can be used instead as
PIRQ[E:H]#.
I Fixed as Input only. Main power well. Can be used instead as
PC/PCI REQ[A:B]#. GPIO[1] can also alternatively be used for PCI
REQ[5]#.
Serial TDM data output to the Codec(s).
Power and Ground Signals
Signal Name Description
VCC3_3
VCC1_5
VCCHI
V5REF
HIREF
VCCSUS3_3
VCCSUS1_5
V5REF_SUS
VCCLAN3_3
VCCLAN1_5
VCCRTC
VCCPLL
VBIAS
V_CPU_IO
VSS
3.3 V supply for core well I/O buffers. This power may be shut off in S3, S4, S5
or G3 states.
1.5 V supply for core well logic. This power may be shut off in S3, S4, S5 or G3
states.
1.5 V supply for Hub Interface 1.5 logic.
1.8 V supply for Hub Interface 1.0 logic.
This power may be shut off in S3, S4, S5 or G3 states.
Reference for 5 V tolerance on core well inputs. This power may be shut off in
S3, S4, S5 or G3 states.
Analog Input. Expected voltages are:
• 0.9 V for HI 1.0 (Normal Hub Interface) Series Termination
• 350 mV for HI 1.5 (Enhanced Hub Interface) Parallel Termination
This power is shut off in S3, S4, S5, and G3 states.
3.3 V supply for resume well I/O buffers. This power is not expected to be shut
off unless the main battery is removed or completely drained and AC power is
not available.
1.5 V supply for resume well log ic. This power is not expected to be shut off
unless the main battery is removed or completely draine d and AC power is not
available.
Reference for 5 V tolerance on resume well inputs. This power is not expected
to be shut off unless the main battery is removed or completely drained and AC
power is not available.
3.3 V supply for LAN Connect interface buffers. This is a separate power plane
that may or may not be powered in S3–S5 states depending upon the presence or
absence of AC power and network connectivity. This plane must be on in S0 and
S1-M.
1.5 V supply for LAN Controller logic. This is a separate power plane that may
or may not be powered in S3–S5 states depending upon the presence or absence
of AC power and network connectivity. This plane must be on in S0 and S1-M.
3.3 V (can drop to 2.0 V min. in G3 state) supply for the RTC well. This power
is not expected to be shut off unless the RTC battery is removed or completely
drained.
NOTE: Implementations should not attempt to clear CMOS by using a jumper
to pull VccRTC low. Clearing CMOS in an ICH4-based platform can be done
by using a jumper on RTCRST# or GPI, or using SAFEMODE strap.
1.5 V supply for core well logic. This signal is used for the USB PLL. This
power may be shut off in S3, S4, S5 or G3 states.
RTC well bias voltage. The DC reference voltage applied to this pin sets a
current that is mirrored throughout the oscillator and buffer circuitry.
Powered by the same supply as the processor I/O voltage. This supply is used to
drive the processor interface outputs.
Grounds.
82
Page 84
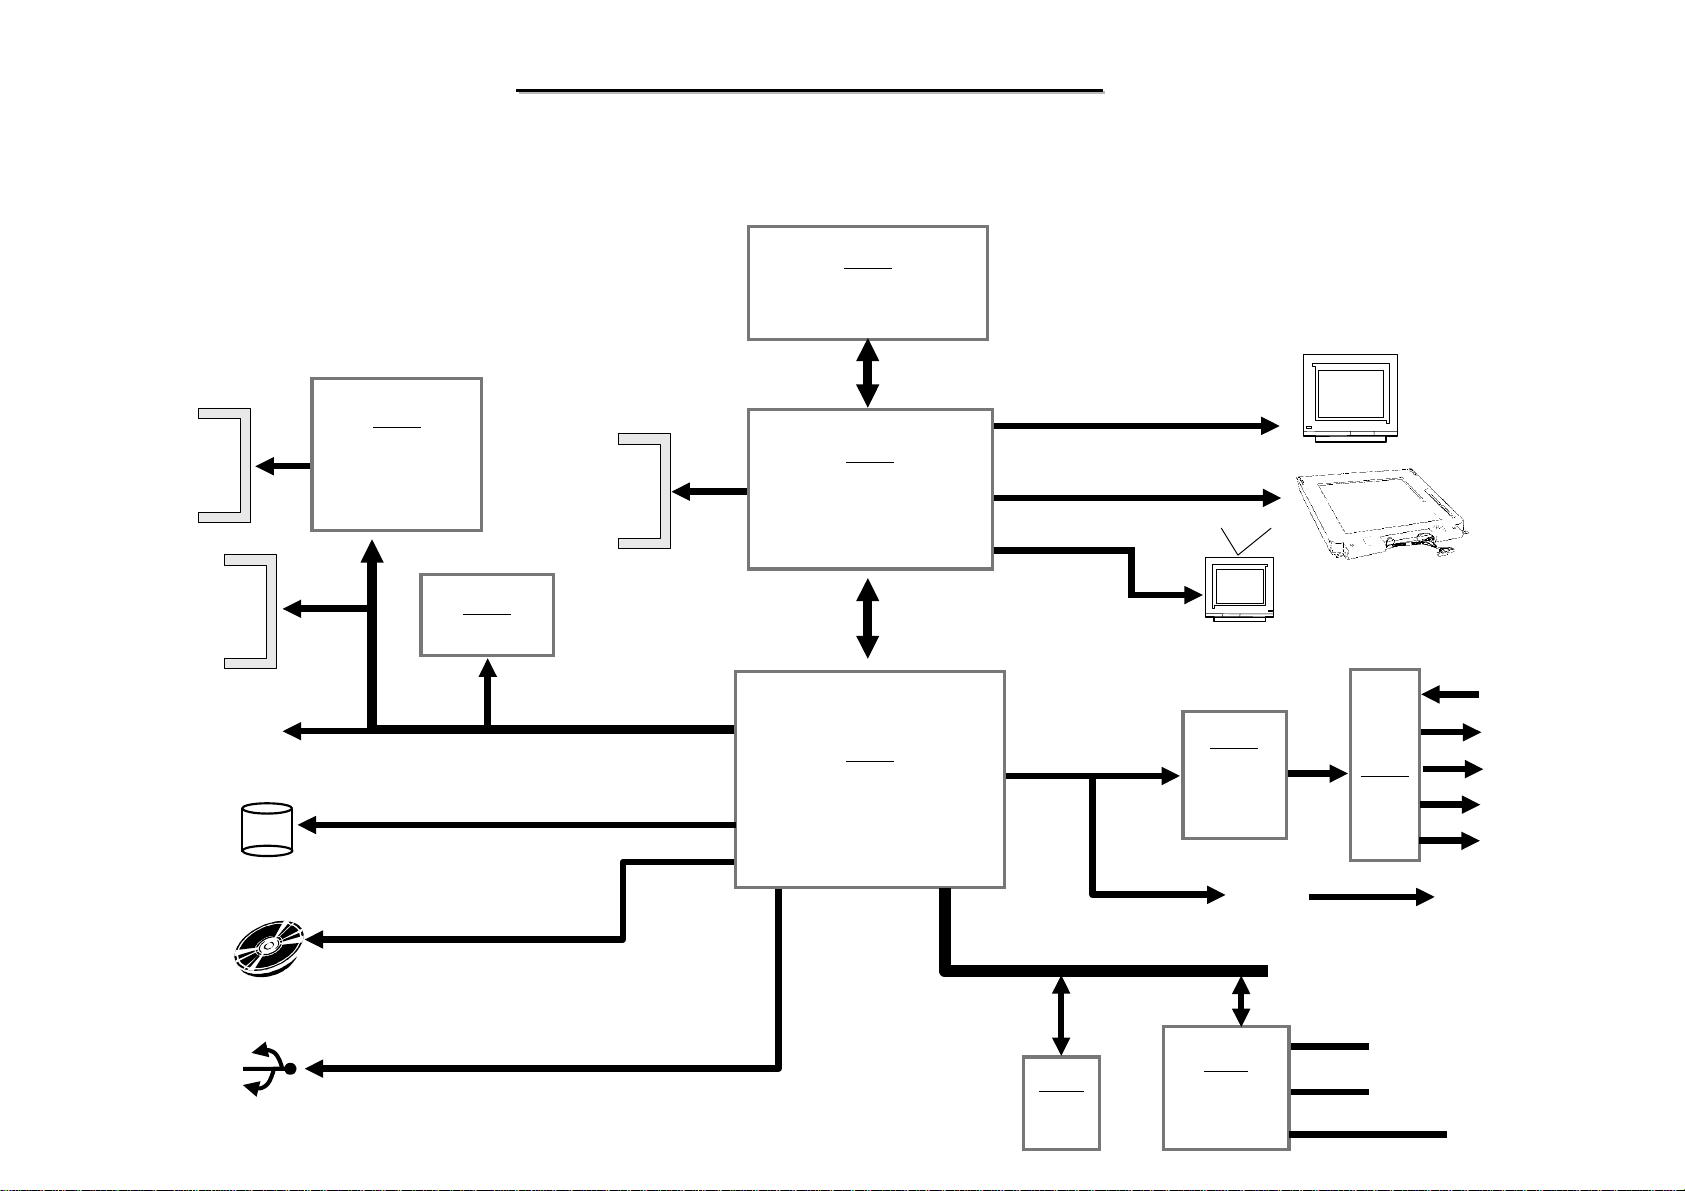
8050
8050
6. System Block Diagram
J6
U727
Card Reader
Socket
PCMCIA
CARD READER
CB710
J711
DDR 266
N/B Maintenance
N/B Maintenance
U713
INTEL
BANIAS/DOTHAN
Host
400MHZ
U714
North Bridge
855GME
RGB
LVDS
CRT
D
D
C
C
L
L
Mini PCI
Card Socket
IEEE 1394
HDD
CD-ROM
USB2.0
U719
RTL8100CL
PCI BUS
66MHZ
U715
ICH4-M
AC 97
LPC BUS
U15
FWH
BIOS
TV
U726
AUDIO
CODEC
ALC655
MDC
U16
WINBOND
W83L950D
Amplifier
TPA0212
U524
Internal KB
Touch Pad
MIC
Speaker
HP/OPT Jack
Subwoofer
Line In
RJ11
FAN
83
Page 85

8050
8050
N/B Maintenance
N/B Maintenance
7. Maintenance Diagnostics
7.1 Introduction
Each time the computer is turned on, the system BIOS runs a series of internal checks on the hardware. This
power-on self test (post) allows the computer to detect problems as early as the power-on stage. Error messages of
post can alert you to the problems of your computer.If an error is detected during these tests, you will see an error
message displayed on the screen. If the error occurs before the display is initialized, then the screen cannot display
the error message. Error codes or system beeps are used to identify a post error that occurs when the screen is not
available.
The value for the diagnostic port is written at the beginning of the test. Therefore, if the test failed, the user can
determine where the problem occurred by reading the last valu e written to the port by the debug card plug at MINI
PCI slot.
84
Page 86
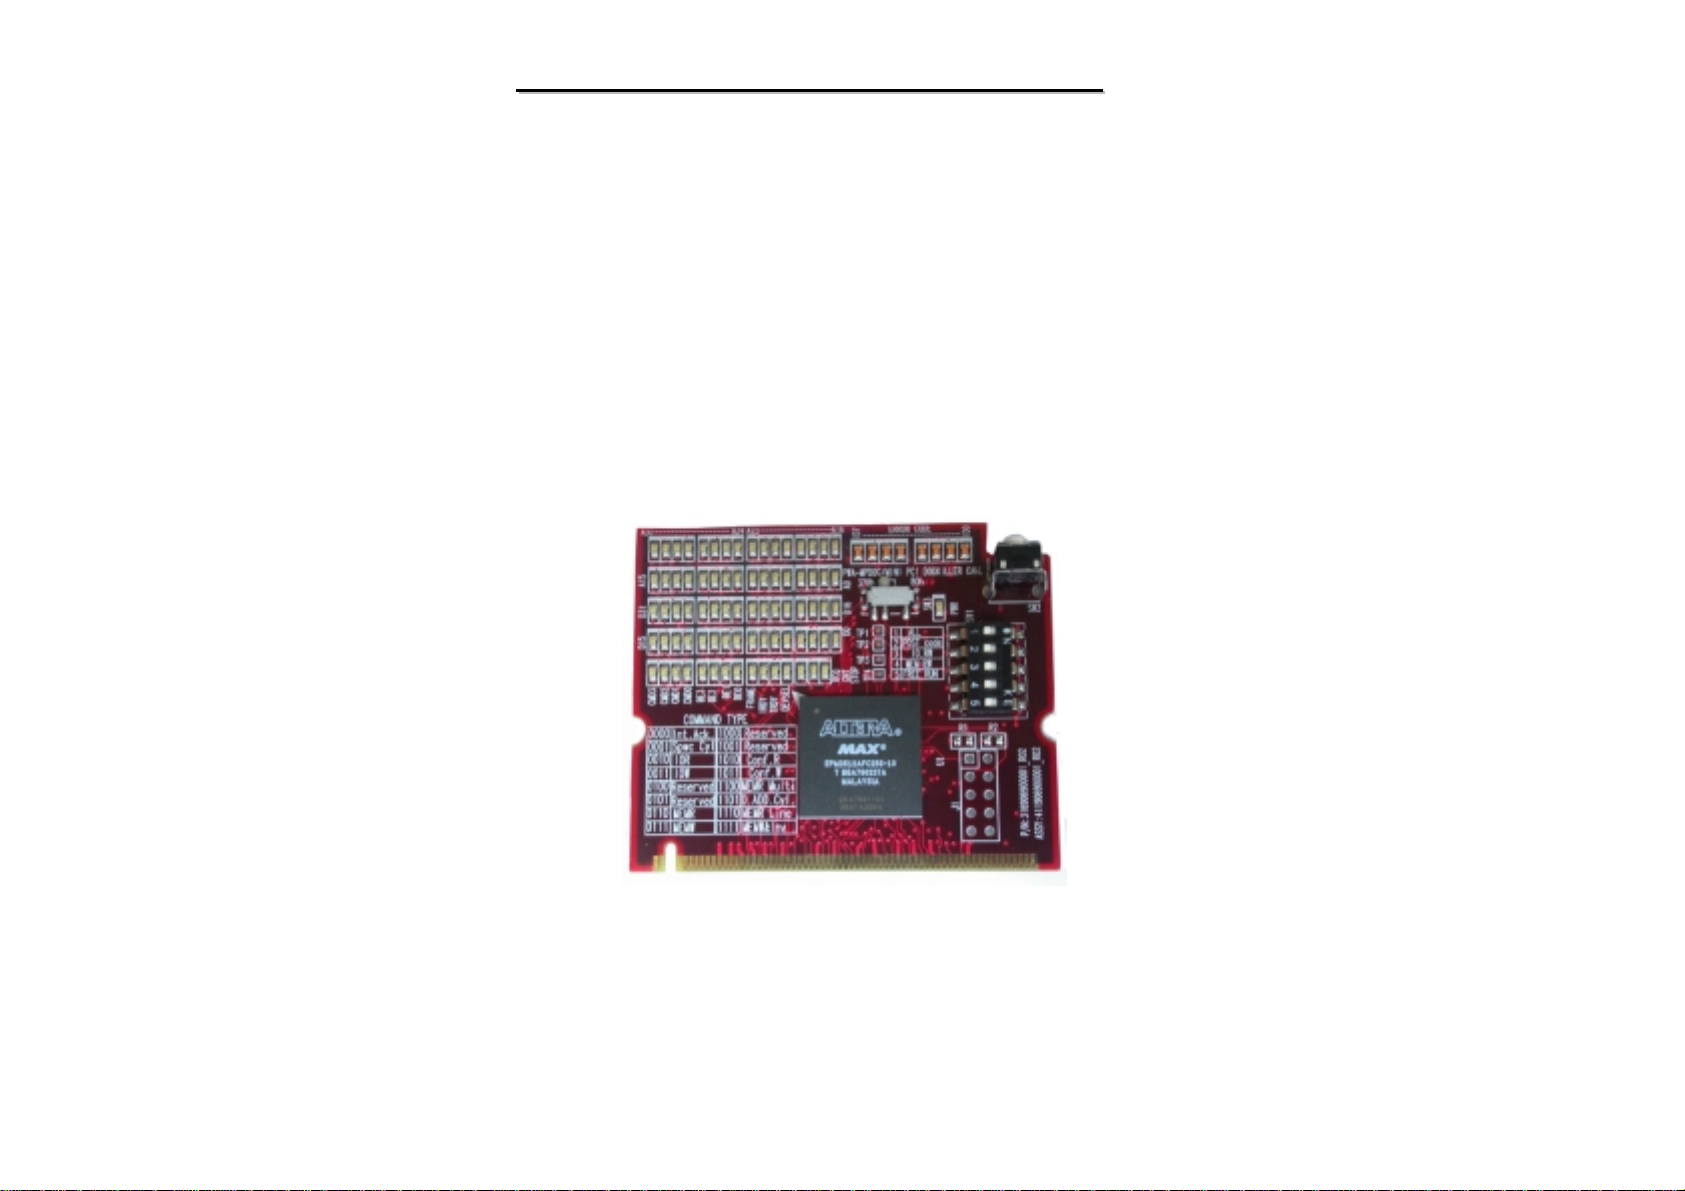
8050
8050
N/B Maintenance
N/B Maintenance
7.2 Diagnostic Tool for Mini PCI Slot :
The Mini PCI DOG killer card is a single-step debug tool which utilizes Mini PCI interface (Type III A) and is
able to hold a PCI bus cycle so that address, data and control bus states on PCI bus can be inspected. Especially,
the tool can help an engineer trace address/data bus for BIOS read cycles as soon as power on and debug open
or short circuit problems easily. Usually, this sort of problem will make a PC motherboard fail to boot.
P/N:411906900001
Description: PWA-MPDOG;MINI PCI DOGKELLER CARD
Note: Order it from MIC/TSSC
85
Page 87
7.3 Error Codes - 1
Following is a list of error code s in sequent display on the debug board.
8050
8050
N/B Maintenance
N/B Maintenance
POST (HEX) DESCRIPTION
00h Boot started
01h Disable A20 through A20
02h Initialize CS
03h Test RAM
04h Move BL into the RAM
05h Execution in RAM
06h Check OVERRIDE option
07h Shadow System BIOS
08h Checksum System BIOS ROM
09h Proceed with Normal Boot
0Ah Proceed with Crisis Boot
0Fh Fatal Error
F0h .... - No RAM
F1h ..._ - RAM test failed
99h Resume SMRAM not Found
10H Some Type Of Long Reset
11H Turn off FASTA20 for POST
12H Signal Power On Reset
13H Ini t ialize the Chipset
14H Search For ISA Bus VGA Adapter
15H Reset Counter/Timer 1
16H user register con fig through CMOS
POST (HEX) DESCRIPTION
17H Size Memory
18H Dispatch To RAM Test
19H checksum the ROM
1AH Reset PIC's
1BH Initialize Video Adapter(s)
1CH Initialize Video (6845 Regs)
1DH Initia lize Color Adapter
1EH Initialize Monochrome Adapter
1FH Test 8237A Page Registers
20H Test Keyboard
21H Test Keyboard Controller
22H Check If CMOS Ram Valid
23H Test Battery Fail & CMOS X-SUM
24H Test the DMA controlle rs
25H Ini t ialize 8237A Co n troller
26H Initialize Int Vectors
27H RAM Quick Sizing
28H Protected mode entered safely
29H RAM test completed
2AH Protected mode exit successful
2BH Setup Shadow
2CH Going To Initialize Video
86
Page 88
7.3 Error Codes - 2
Following is a list of error code s in sequent display on the debug board.
8050
8050
N/B Maintenance
N/B Maintenance
POST (HEX) DESCRIPTION
2DH Search For Monochrome Adapter
2EH Search For Color Adapter
2FH Signon messages displayed
30H special init of keyboard ctlr
31H Test If Keyboard Present
32H Test Keyboard Interrupt
33H Test Keyboard Command Byte
34H TEST, Blank and count all RAM
35H Protected mode entered safely (2).
36H RAM test complete
37H Protected mode exit successful
38H Update OUTPUT port
39H Setup Cache Controller
3AH Test If 18.2Hz Periodic Working
3BH test for RTC ticking
3CH initialize the hardware vectors
3DH Search and Init the Mouse
3EH Upd a te NUMLOCK status
3FH special init of COMM and LPT ports
40H Configure the COMM and LPT ports
41H Ini t ialize the flopp i es
POST (HEX) DESCRIPTION
42H Ini t ialize the hard d i s k
43H Initialize option ROMs
44H OEM's init of power management
45H Update NUMLOCK status
46H Test For Coprocessor Installed
47H OEM functions before boot
48H Dispatch To Op. Sys. Boot
49H Jump Into Bootstrap Code
50H ACPI INIT
51H PM INIT & GEYSERVILLE CPU INIT
52 H USB HC INIT
F8H PXE BIOS decomp error
F9H PCI BIOS decomp error
FAH PNP BIOS decomp error
FBH LOGO BIOS decom p er ro r
FCH LOGO Image decom p er ro r
FDH Energy Image decomp error
FEH ROMDEBUG Image decomp error
88H PM code decomp error
CAH CPU SMM remap code
CBH CPU SMM BASE remap Done
87
Page 89
7.3 Error Codes - 3
Following is a list of error code s in sequent display on the debug board.
8050
8050
N/B Maintenance
N/B Maintenance
POST (HEX) DESCRIPTION
D0H check rom signature, 1.x video
D1H enable RAM area in regs
D2H copy ROM to RAM in regs
D3H update segment range attr
D4H configure memory registers
D5H configure I/O registers
D6H configure IRQ assignments
D7H turn on PCI device
D8H 2.x video r/w segment
D9H OEM defined, rom init
DAH disable add-in rom card decode
DBH PCI return(config and no video)
DCH enable RAM area in regs
DDH copy ROM to RAM in regs
DEH update segment range attr
DFH configure memory registers
E0H configure I/O registers
E1H configure IRQ assignments
E2H turn on PCI device
E3H 2.x video r/w segment
E4H OEM defined, rom init
POST (HEX) DESCRIPTION
E5H disable add-in rom card decode
E6H PCI return(config and no video)
E7H look for PCI bridge device
E8H search IDE controllers on the PCI bus
E9H start of cardbus config
A1H Enable/Verify R/W Status Runtime Data
A2H Get/Verrify R/W Stattus NVRAM data area
A3H Resolve System Nodes with th e C MOS sett i ngs
A4H Init. var. in the PNP BIOS Runtime Data area
A5H Hook INT 15
A6H copy/setup $PnP Install Check in F0000 seg.
A7H Allow the OEM any Last Minute Hooks
A8H Write protect RTData Area & NVRAM Copy Buffer
A9H return from pnp_init proc
88
Page 90

8050
8050
8. Trouble Shooting
N/B Maintenance
N/B Maintenance
8.1 No Power
8.2 Battery Can not Be Charged
8.3 No Display
8.4 External Monitor No Display
8.5 Memory Test Error
8.6 Keyboard/Touch pad Test Error
8.9 CD-ROM Driver Test Error
8.10 Audio Failure
8.11 LAN Test Error
8.12 Modem Test Error
8.13 MINI-PCI Test Error
8.14 Card Bus&Reader Test Error
8.7 USB Port Test Error
8.8 Hard Disk Drive Test Error
8.15 TV Encoder Test Failure
8.16 IEEE 1394 Failure
89
Page 91
8.1 No Power
When the power button is pressed, nothing happens, no fan activity is heard and power indicator is not light up.
8050
8050
N/B Maintenance
N/B Maintenance
P32
Power In
PJ 701
PF703
PU7
PL710
PD713
PL1 PL2
PR701
P32
PL708
PQ707
PD709
P33
Charge
P27
PD702PF1
P32
PWR_VDDIN
PQ701
PD703 JS704
ADINP
P32
PD704
DVMAIN
PQ704
PD704
Discharge
Battery
NOTE:.
Page on M/B board circuit diagram.
P32
PU2
PL701
U11
P25
VDD3_AVREF
PL703
PU702
PR711
PL702
PR707
PU701
P25
Q13
VDD5 VDD5S
Q48
P25 P25 P25
VDD3
P27
JS711,JS713,JS715
P24
+3VS-P +3VS
P27
+5VS_P
JS718,JS719,JS721
PU3,PU9,PU10,PU11
P24
+5VS
+VCC_CORE
PU12,PU13,PL711,
PD718,PR740
Q43
P31
P25
U707,Q701
L706,L707
L743
U701
U705,L708
U704,L70 3
L704,Q10
Q51,L71
L702
L701
U6F3,U13
VDD3S VDD1.5
P25
+3V
P25
L746
P18
1394_AVCC
+PHYVDD
P15
+VCC_USB_0
+VCC_USB_1
+VCC_USB_2
P25
+5V
U728
U18
P17
+CARD_VCC
P20
VA
To Next Page
90
Page 92
8.1 No Power
When the power button is pressed, nothing happens, no fan activity is heard and power indicator is not light up.
Continue To Previous Page
P27
DVMAIN
8050
8050
N/B Maintenance
N/B Maintenance
JS706,PL712
PU14
JS10,PL3
PU703
JS703,PL716
PU15
PU705,PL713,PR739
PU707,PL714,PR741
PU6,PL707,PR732
PU4,PL706,PR719
PU709,PL717,PR744
PU708,PL715,PR742
P29 P24
+1.8V_P
P29
+1.35V_P
P28
+1.05V_P
P28 P24
+1.5V_P
+1.25V_DDR_P
P26 P24
+2.5VS_DDR_P
JS71,JS717
JS72,JS722
JS728,JS729,JS730
JS72,JS725
JS1,JS12
JS708,JS709,JS710
+1.8V
P5
+1.35V
P24
+VCCP
+1.5V
P24P26
+1.25V_DDR
+2.5VS_DDR
L732
P16
DVDD
91
Page 93
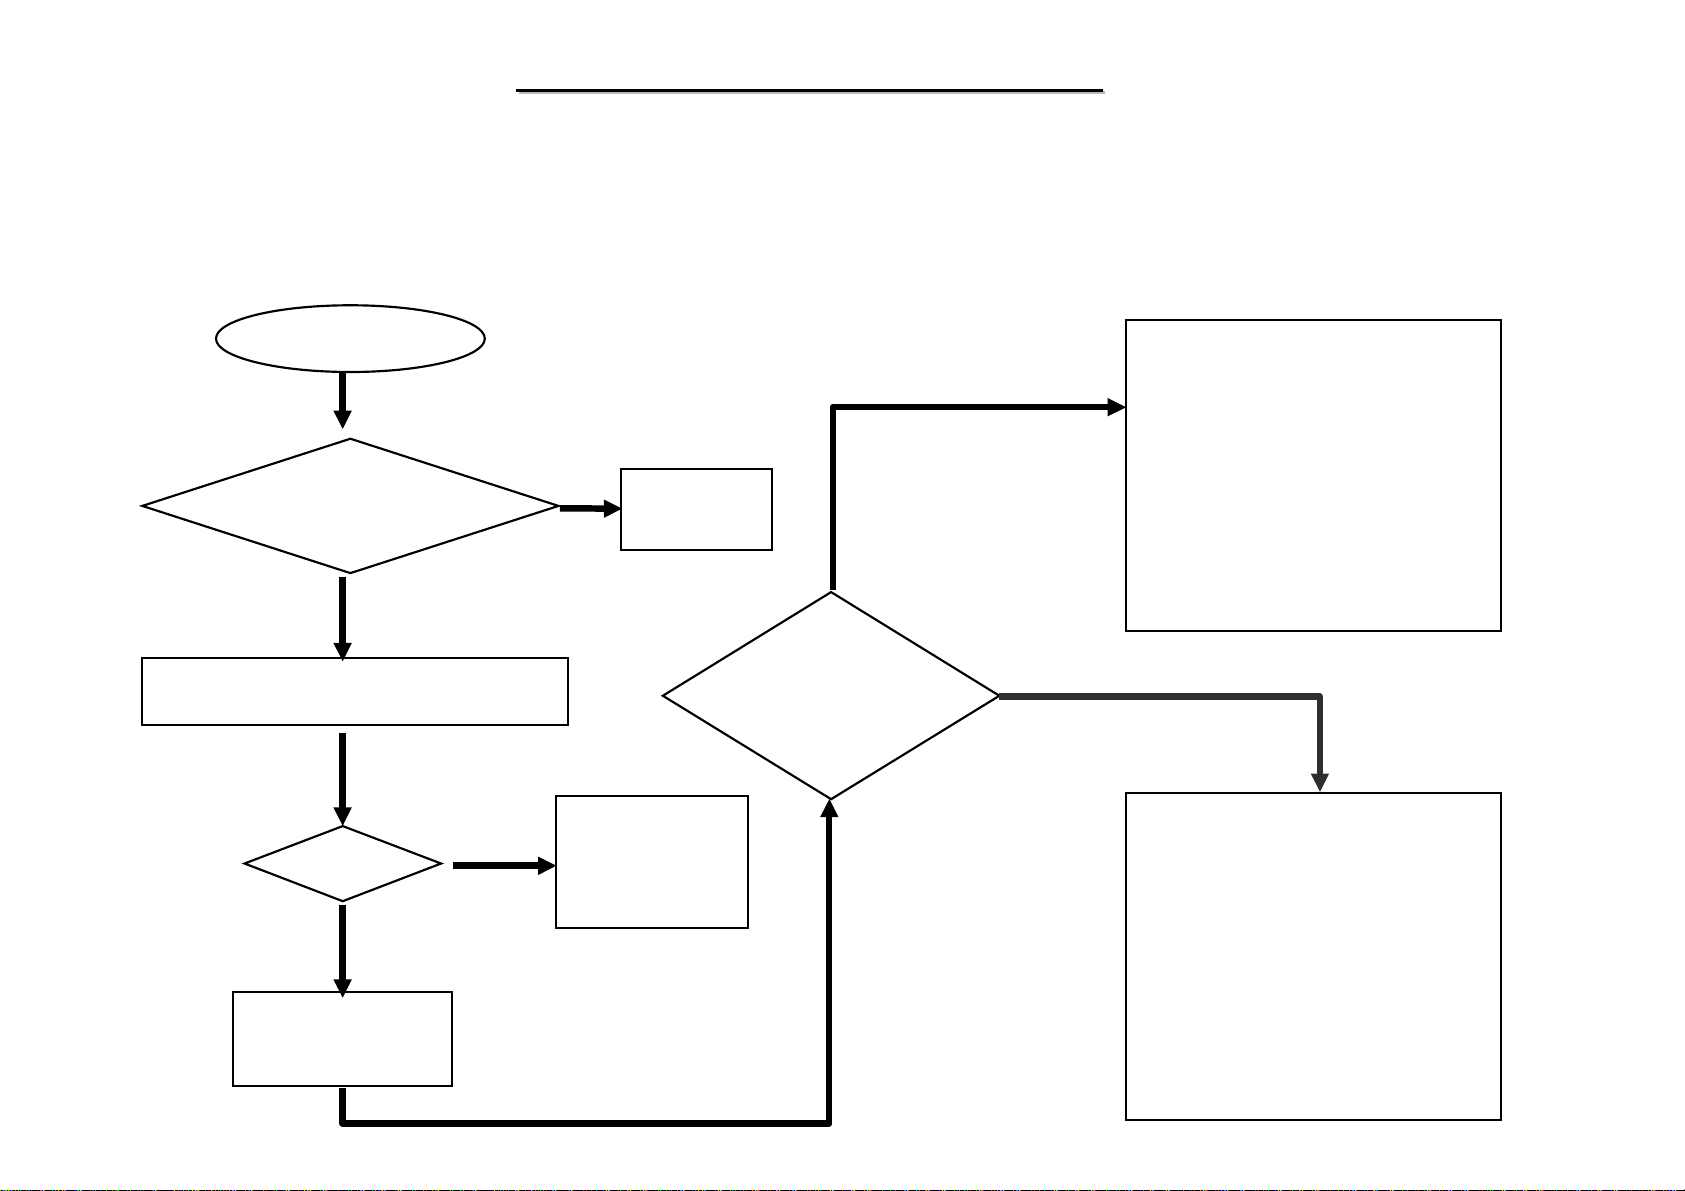
8.1 No Power
When the power button is pressed, nothing happens, no fan activity is heard and power indicator is not light up.
No power
8050
8050
N/B Maintenance
N/B Maintenance
AC
POWER
Check following parts and signals:
Parts: Signals:
Is the
Notebook conne cted
to power (Either AC adaptor
or battery )?
Yes
Please try another known good battery
or AC adapter.
Power
OK?
NO
Board-level
Troubleshooting
Yes
No
Please replace
the faulty
AC adaptor or
Battery.
Connect
AC adaptor
or battery
Where
From Power Source
Problem(F irst use
AC to power it)
BATTERY
PF1
PL1
PL2
PD702
PQ701
Check following pa rts and signals:
Parts: Signals:
J703
PF702
PQ6
PQ704
PL704
PL705
ALWAYS
DVMAIN
ADEN#
BATT_DEAD
BATT
92
Page 94
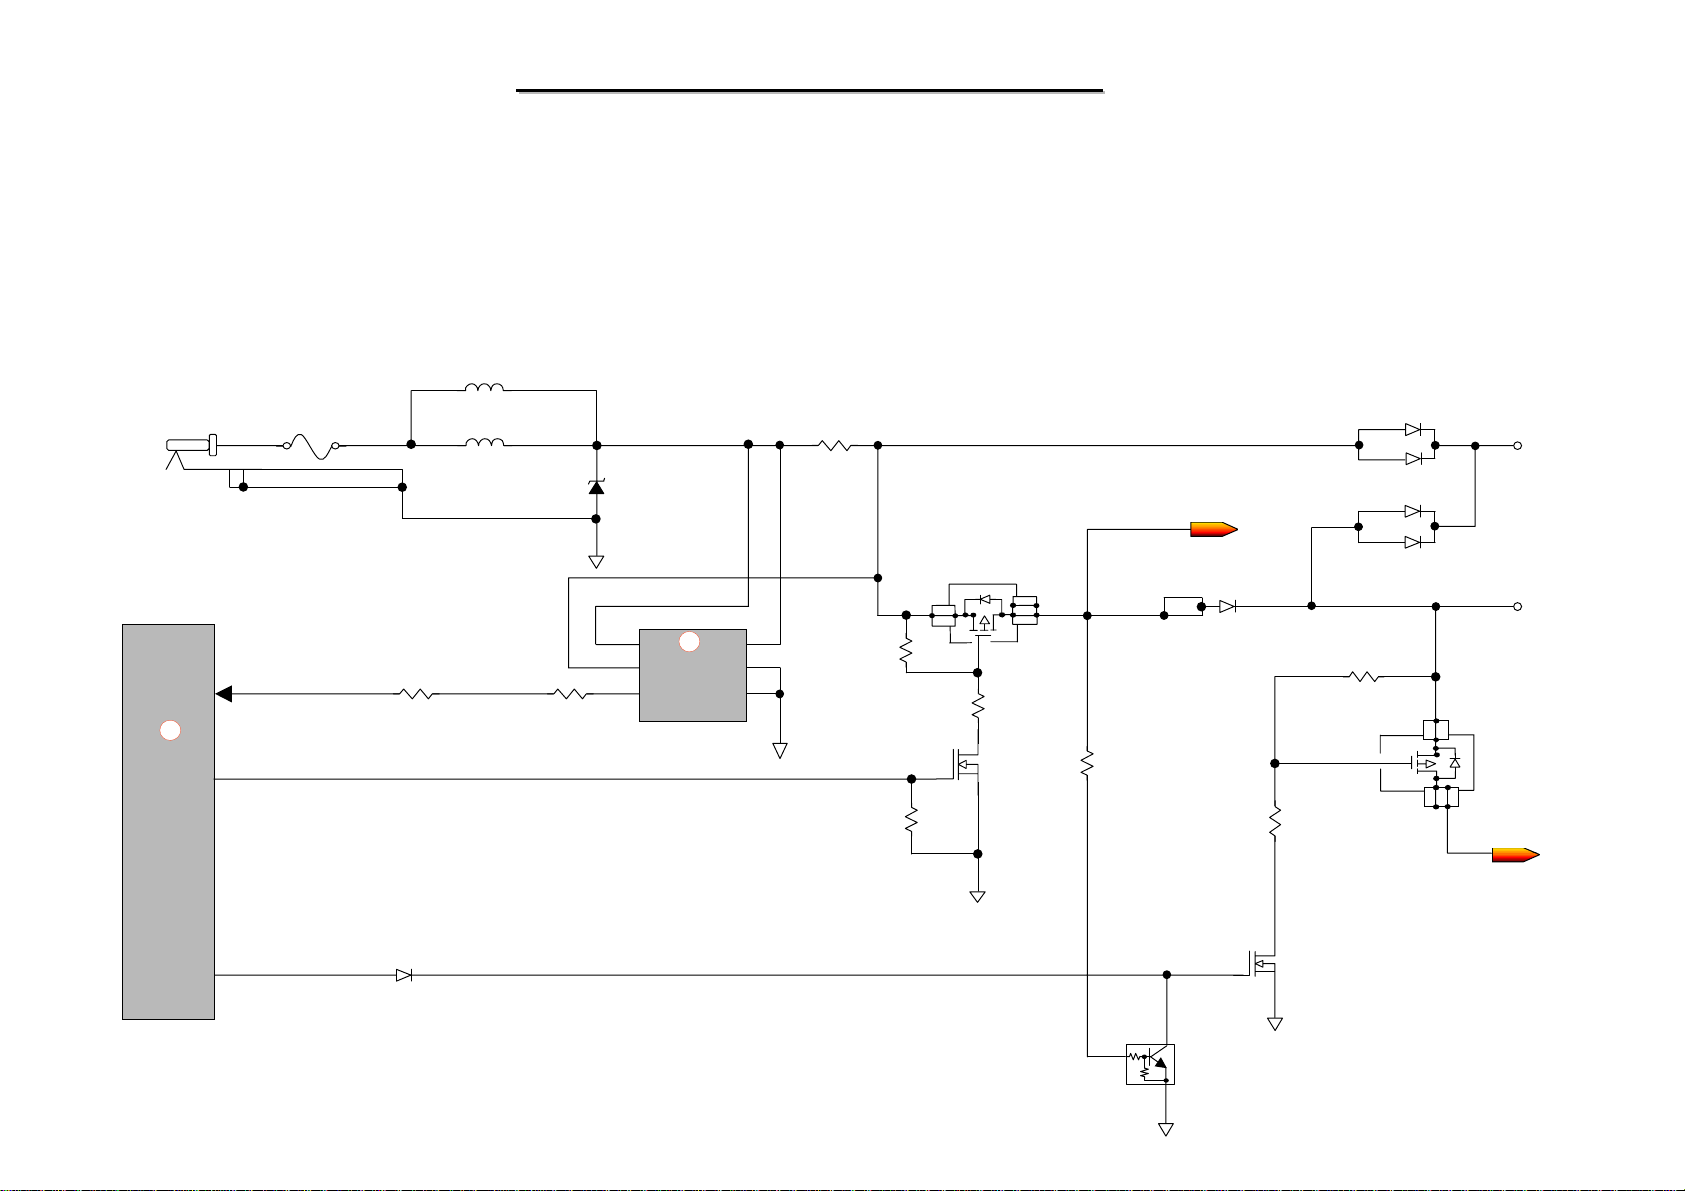
8.1 No Power(1)
When the power button is pressed, nothing happens, no fan activity is heard and power indicator is not light up.
8050
8050
N/B Maintenance
N/B Maintenance
PJ701
P22
U16
WINBOND
KBC
PF1 PL2
76
23
14
H8_I_LIMIT
LEARNING
7A/24VDC
R428
RLS4148
D21
PL1
I_LIMIT PR1
120Z/100M
120Z/100M
RLZ24D
PD701
PD702
BAV70LT1
PR701
PU1
4
P32
RS+
5
100
RS-
6
OUT
VCC
GND1
GND0
3
2
1
.01
PR702
470K
ADEN#
PR705
1M
PD704
To chapter 8. 2
ADINP
PQ701
AO4407
G
D
PR703
100K
PQ702
2N7002
8
7
6
5
PR71
226K
3
2
1
S
SBM1040
1
2
PD703
3
PR720
PR45
33K
PQ6
2N7002
BAV70LT1
100K
G
D
PWR_VDDIN
DVMAIN
231
S
PQ704
AO4407
6
785
BATT
PQ24
DTC144WK
93
Page 95

8.1 No Power(2)
When the power button is pressed, nothing happens, no fan activity is heard and power indicator is not light up.
VDD3S
PR20
P32
BATTCONNECTOR
J703
7
6
5
4
3
2
1
4.99K
PF702
7A/24VDC
8050
8050
PL705
120Z/100M
PL704
120Z/100M
PC722
0.01U
PR23
0
N/B Maintenance
N/B Maintenance
PQ704
AO4407
4
P22
U16
3
2
1
14 ADEN#
PR714
100K
PR716
499K
BAT_V
BAT_T
8
7
BATT
RP45
22*4
8
7
6
5
1
78
2
77
WINBOND
BAT_C
6
3
KBC
2
PR720
100K
D21
RLS4148
PR45
33K
PQ6
2N7002
PD704
BAV70LT1
PWR_VDDIN
DVMAIN
PR24
0
PD3
BAV99
BAT_D
BAV99
PD2
45
3
VDD3
94
Page 96
8050
8050
N/B Maintenance
N/B Maintenance
8.2 Battery Can not Be Charged
There are problems in charging the battery.
Battery can not Charge
Board-level
Troubleshooting
Is the
notebook connected
to power (AC adaptor)?
Yes
1. Make sure that the battery is good.
2. Make sure that the battery is installed properly.
Battery charge
OK?
Yes
No
Please replace the
faulty Battery.
Connect
AC adaptor.
Replace
Motherboard
Check following parts and signals:
Parts Signal
PF703
PL708
PQ707
PL710
PD713
PD714
PD709
PQ13
PQ14
PU7
PQ15
PD5
PR65
PR70
PQ11
PC33
PR63
PU5
PR74
PR75
PR76
PQ12
ADINP
CHANGING
BATT
BAT_V
BAT_T
BAT_C
BAT_D
BATT_DEAD
I_CTRL
No
95
Page 97
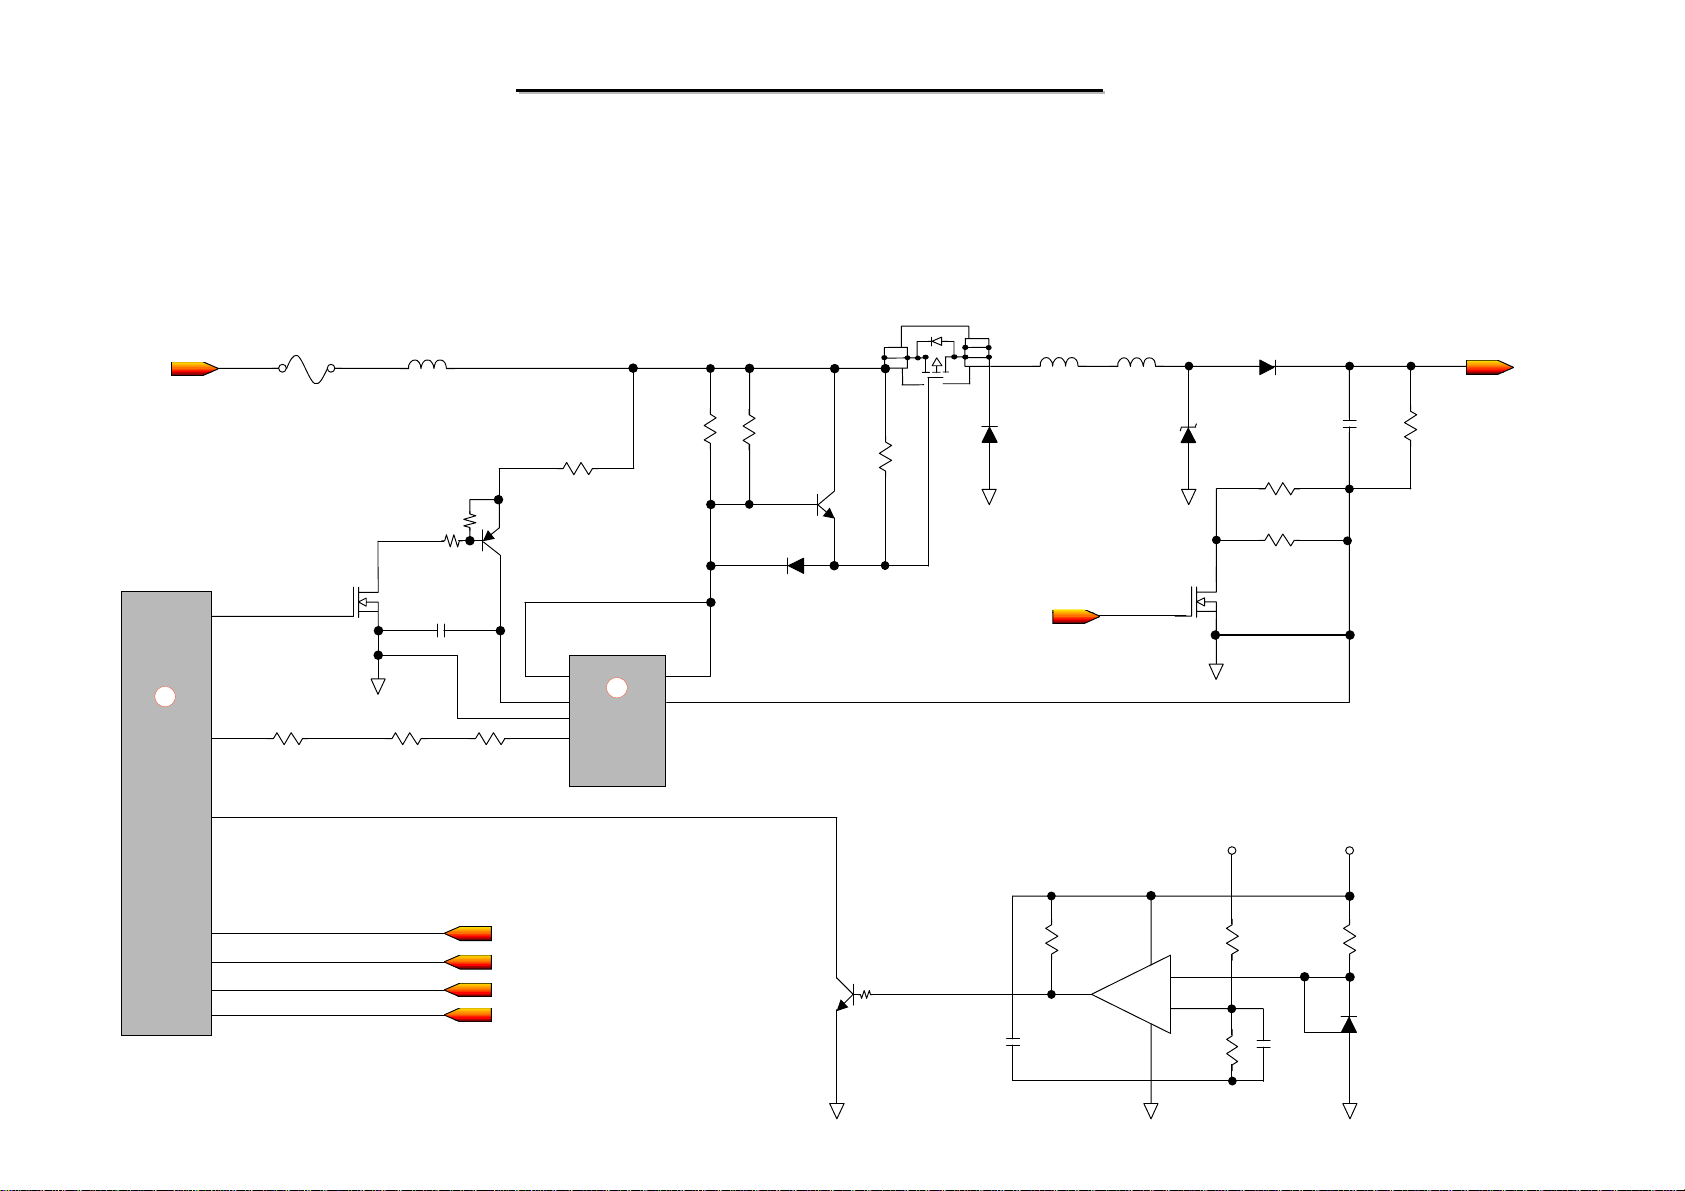
8050
8050
N/B Maintenance
N/B Maintenance
8.2 Battery Can not Be Charged
There are problems in charging the battery.
From chapter 8.1(1)
ADINP
PF703
TR/3216FF-3A
PL708
BEAD_120Z/100M
3
2
1
PQ707
AO4407
S
G
8
7
6
5
D
PL710
33UH
PL709
3.0UH
PD713
EC31QS04
Reference chapter 8.1(1)
BATT
P22
U16
WINBOND
KBC
CHARGING
26
R483 0
10 I_CTRL
15
78
77
2
3
PQ13
DTA144WK
PQ14
2N7002
PC48 0.01U
PR78
0
Reference chapter 8.1(2)
PR79 124K
BAT_V
BAT_T
BAT_C
BAT_D
PR86
11
C2
12
VCC 21IN+
13
2
TL594C
0
P33
PU7
PR70PR65
PC39
1000P
SCK431LCSK-.5
PR87
4.7K
8
C1
16
PR88
MMBT2222A
PD5
BAS32L
BATT_DEAD#
DTC144TKA
4.7K
Q39
PQ15
PR89
100K
21N+
7
PU5
LMV393M
PD709
BZV55C15V
8
+
-
4
PR74
13.7K
PR76
249K
PQ12
2N7002
DVMAIN VDD5
590K 3.3K
5
6
PR63
80.6K
1.25V
PC33
0.1U
PD714
EC31QS04
From U16
CHARGING
PR69
100K
BATT_DEAD=8.56V
PC36
0.01U
PQ11
PR75
20K
96
Page 98
8.3 No Display
There is no display on both LCD and VGA monitor after power on although the LCD and monitor is known-good.
No Display
8050
8050
N/B Maintenance
N/B Maintenance
Monitor
or LCD module
OK?
Yes
Make sure that CPU module,
DIMM memory are installed
Properly.
Display
OK?
No
1.Try another known good CPU
module, DIMM module and BIOS.
2.Remove all of I/O device (FDD,
HDD, CD-ROM…….) from
motherboard except LCD or monitor.
No
Yes
Replace monitor
or LCD.
Correct it.
Board-level
Troubleshooting
Replace
Motherboard
Using debug card,depending
on the error codes to make
sure which parts maybe faulty
Using circuit diagram ,check
the faulty parts
Display
OK?
No
Yes
1. Replace faulty part.
2. Connect the I/O devic e to the
M/B one at a time to find out
which part is ca us i ng the problem.
97
Page 99
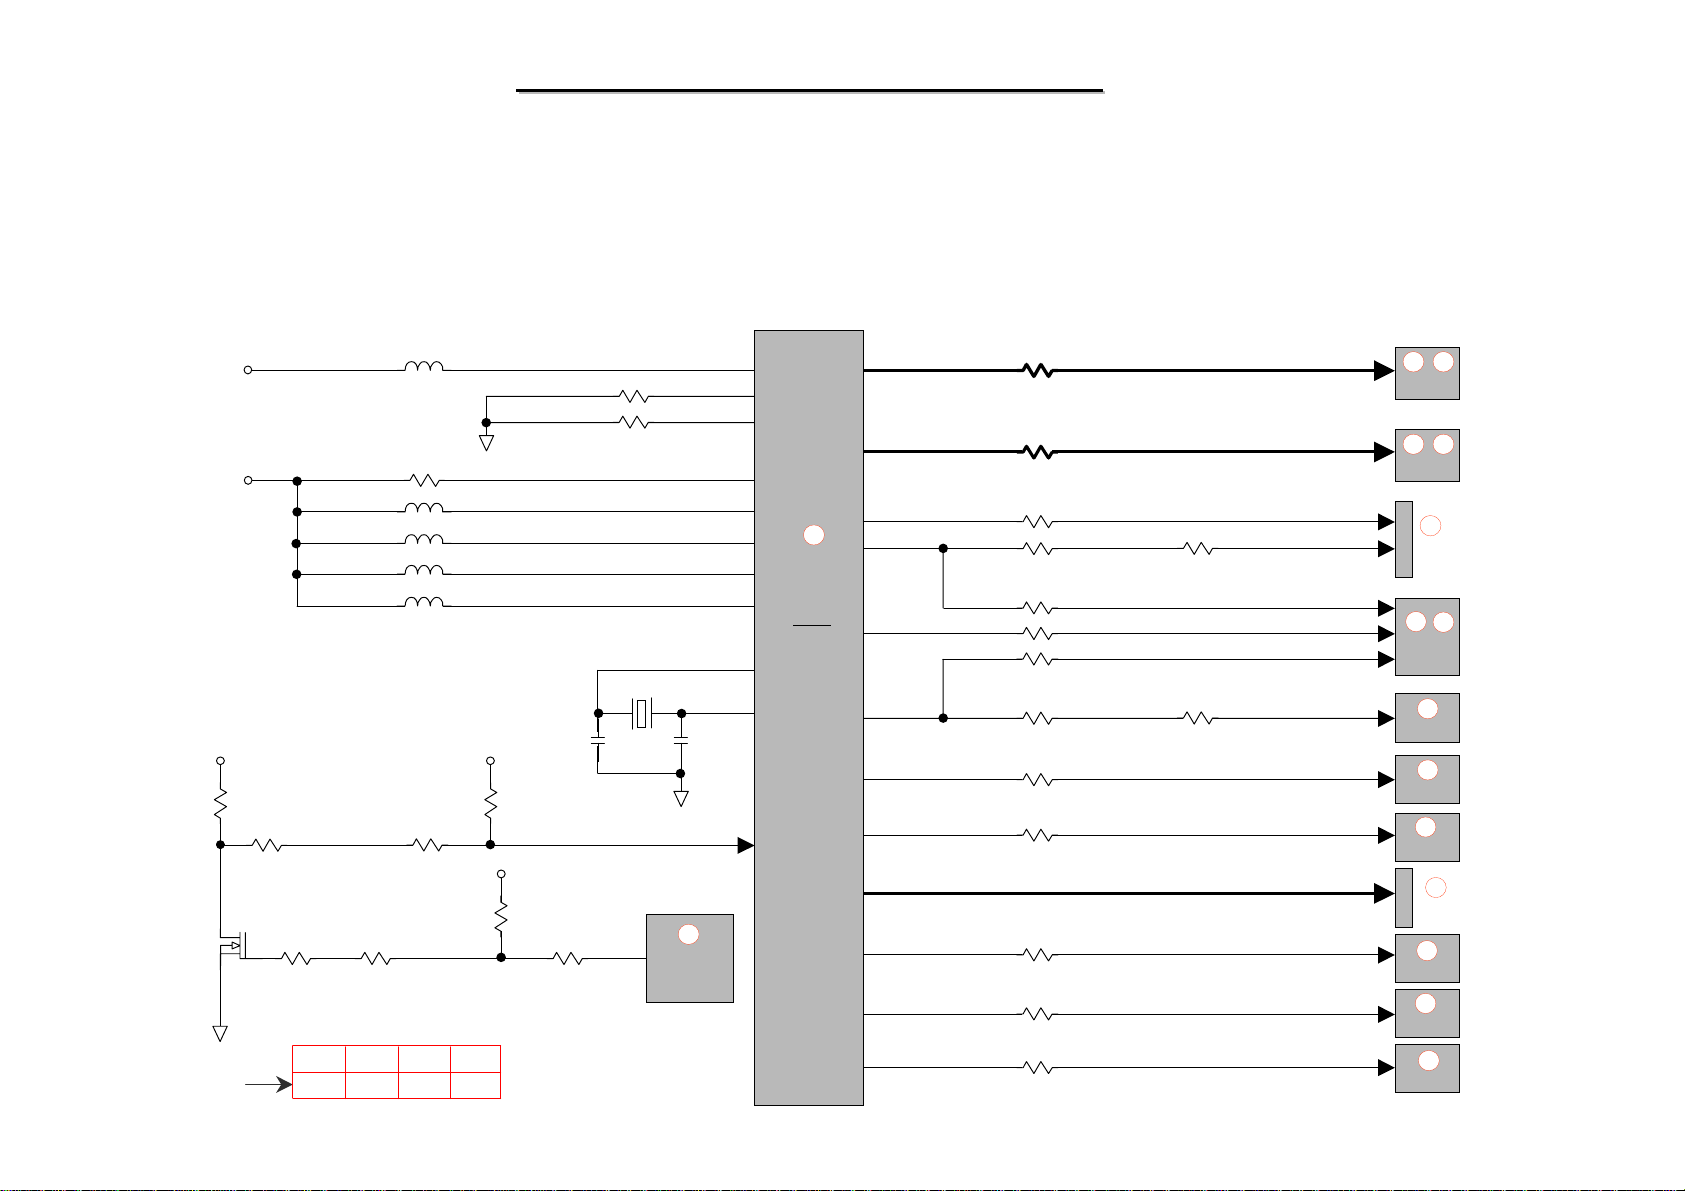
8.3 No Display(1)
8050
8050
N/B Maintenance
N/B Maintenance
****** System Clock Check ******
PR731
2K
PQ8
2N7002
+3V
001
+3V
+3V
PR56
0
CORE_CLKEN#
PR59
1M
PR57 0
FS2 FS1 FS0 CPU
0:00
1:3.3V
R860
R863
L722 CLKANA
L726
L43
L718
01x100.00
4.7K
8.2K
120Z/100M
120Z/100M
120Z/100M
120Z/100M
R821
0
VCCP_PWRGD
UNIT:MHZ
FS0
FS1
FS2
+3V
R831
10K
+3VS_P
PR715
100K
PR717 0 27
R863 4.7K
R894 4.7K
CLK66
CLKCPU
CLKPCI 8,14
14.318MHZ
C804 C794
27P 27P
VTT_PWRGD#
X703
PU703
LTC3728L
P28
1,26,37
19,32
46,50
54
55
40
43
2
3
28
P11
U712
Clock
Generator
ICS950810
R874
R87544,45
35,38
48,49
39
7
56
12 R826
29,30
10 R825 PCICLK_FWH
17 R817 PCICK_KBC
R865 R872
R873 R878
R81611
R895
R877
R824 PCICLK_ICH
R858
R859
R82713 PCICLK_LAN
R828
33*2 HCLK_CPU HCLK_CPU#
33*4
33
33
33
33
33
33 0
33
33
33
33
33
48M_DREFCLK
66M_DEFSSCLK
R1137 MINIPCI_SIO48M
R472 14M_CODEC
0
HCLK_MCH
HCLK_MCH#
PCICLK_MINIPCI
USBCLK_ICH
14M_ICH
PCICLK_CARD
SMBCLK
SMBDATA
PCICLK_139416
P2 P3
U713
P4 P5
U714
P19
J713
P13
U715
P20
U726
P17
U727
P16
U719
P6
J711
P18
U724
P23
U15
P22
U16
CPU
NB
MINI
-PCI
P14
ICH4_M
AUDIO
CODEC
CARDBUS
READER
LAN
DDR
SODIMM
IEEE
1394
BIOS
SYS
WINBOND
KBC
98
Page 100

VDD3
8.3 No Display(2)
SW2
TC010-PSS11CET
R531
10K
CONNECTOR
HDD
CONNECTOR
CDROM
P17
U727
CARDBUS
READER
P23
U15
BIOS
SST49LFOO4A
3
4
P15
J714
P15
J708
U21
IMP811
MN
VCC
44
2
R7
1K
P25
RESET
RSTDRV1#
R909
RSTDRV2#5
PWRBTN# 1
H8_RESET#
2
0
P11
U2 13
TV_CARD
CH7011A
P19
CONNECTOR
J713
MINIPCI
25
R492
Q41
DTC144TKA
8050
8050
P22
U16
WINBOND
KBC
W83L950D
+5V
10K
R476
10K
N/B Maintenance
N/B Maintenance
****** System Reset Check ******
P25
U10
MAX809
+3V
3
VRMPWRGD
ICH_PWRBTN#
SUSB#
RESET#VCC
GND
1
U9A
3
74AHC08_V
U9C
9
74AHC08_V
2
+3V
1
2
+3V
7
8
H8_PWRON
18
ICH_PWRBTN
7
H8_RSMRST
8
H8_SUSB
Q37
DTC144TKA
CARD_PCIRST#
MINIPCI_PCIRST#26
FWH_PCIRST#
TV_PCIRST#
P18
U724
1394
VT6307L
P27
P26 P31
Power
Module
LTC3728L
Q31
Convert to
FDV301N
92
+3VS
Q42
Q49
Convert to
PCIRST#0
1394_PCIRST#
JL7
JL8
JL9
JL10
Convert
JL3
JL1
+3V
PWROK
RSMRST#
U9D
ICH_VGATE
PCIRST#
4
5
74AHC08_V
+3V
P14P13
U715
ICH4_M
U9B
6
PWROK
+VCCP
R301
330
HPWRGD
P4
P5
U714
NORTH
BRIDGE
855GM
/GME
JL4
MCH_PCIRST#
JL5
KBC_PCIRST# 64
JL6
LAN_PCIRST# 27
HCPURST#
HPWRGD
P2
P3
U713
BANIAS
P22
U16
WINBOND
KBC
P16
U719
LAN
Controller
RTL8100CL
99
 Loading...