

Miele PTT 7189 Vario Operating instructions
Operating and installation instructions
for tumble dryer stack
PTT 7189 Vario
To avoid the risk of accidents or
damage to the machine, it is
essential to read these instructions
before it is installed, commissioned
and used for the first time.
en - AU, NZ
M.-Nr. 09 484 621
Caring for the environment
Disposing of the packing
material
The transport and protective packing
has been selected from materials which
are environmentally friendly for disposal
and should be recycled.
Ensure that any plastic wrappings,
bags, etc. are disposed of safely and
kept out of the reach of babies and
young children. Danger of suffocation.
Disposing of your old
appliance
Electrical and electronic appliances
often contain materials which, if
handled or disposed of incorrectly
could be potentially hazardous to
human health and to the environment.
They are, however, essential for the
correct functioning of your appliance.
Please do not dispose of it with your
general waste.
Please dispose of it at your local
community waste collection/recycling
centre or contact your dealer for
Energy saving tips
To avoid unnecessarily long drying
times and high consumption of energy:
Make sure that your laundry is
–
thoroughly spun before drying.
The higher the spin, the greater the
savings that can be made in energy
and time during drying.
Load according to the optimum
–
amount of laundry recommended for
the programme being used.
Underloading is uneconomical.
Overloading gives a poorer quality of
drying, and may cause unnecessary
creasing.
– Make sure the room in which the
dryer stack is located is well
ventilated.
– Remove the fluff from the filters when
necessary (see "Cleaning and Care").
– Check all parts of the ventilation
system on a regular basis, and
remove any build-up of fluff etc.
–
The vent ducting should be as short,
straight and smooth as possible to
minimise any resistance to the air
throughflow..
advice. Ensure that it presents no
danger to children while being stored
for disposal.
2

Contents
Caring for the environment..........................................2
Warning and Safety instructions .....................................5
Operating the tumble dryer.........................................15
Control panel .....................................................15
Before using for the first time.........................................15
Display ..........................................................16
Operating the tumble dryer in Laundrette mode ..........................18
Notes and tips on laundry care .....................................19
1. Sort the laundry .................................................19
2. Load the tumble dryer ............................................20
3. Select a programme .............................................20
Short instructions ................................................21
Selecting a programme ............................................25
Selecting/changing a programme .....................................25
Low temperature ..................................................27
Saving a programme as a favourite....................................27
Timer ...........................................................28
Changing the programme sequence .................................29
Payment system...................................................29
Once a programme has started ......................................29
- changing the programme........................................29
- cancelling the programme .......................................29
Adding or removing laundry after a programme has started ................29
Power cuts .......................................................29
Time remaining ...................................................29
Cleaning and care ................................................30
Cleaning the fluff filter ..............................................30
Removing the filter ..............................................30
Taking the filter apart ............................................30
Cleaning the filter whilst dry .......................................31
Cleaning the fluff filter with water ...................................31
Replacing the filter ..............................................31
Cleaning the filter housing ...........................................32
Quick cleaning .................................................32
Extra cleaning ..................................................32
–Fan.........................................................32
– The cover in the door opening....................................33
3

Contents
Cleaning the tumble dryer stack ......................................34
Problem solving guide ............................................35
Problem solving guide ..............................................35
Check and fault messages in the display ...............................35
An unsatisfactory drying result .......................................37
Other problems ...................................................38
Changing the lamp ................................................41
Peak load cut-out..................................................42
Service interval ...................................................42
After sales service ................................................43
Repairs..........................................................43
Optical interface PC................................................43
Optional accessories ...............................................43
Installation and connection ........................................44
View from the side ..............................................45
View from above ................................................45
Rear view .....................................................45
Payment system ................................................45
Installing the appliance .............................................46
Transporting the appliance........................................46
Levelling the appliance...........................................47
Installing the top tumble dryer ........................................48
Securing the tumble dryer stack against slippage......................51
Room ventilation ................................................51
Electrical connection ...............................................52
Installation - extraction ducting .....................................53
General .........................................................53
To calculate the total duct length .....................................54
Procedure .....................................................54
Calculation example .............................................55
Dimensions for exhaust connection....................................56
Venting system with plastic piping ....................................57
Technical data ...................................................62
4
Warning and Safety instructions
It is essential to read these instructions.
~
This tumble dryer stack conforms to current safety requirements.
Inappropriate use can, however, lead to personal injury and
damage to property.
To avoid the risk of accidents and damage to the tumble dryer
stack, please read these instructions carefully before using it for
the first time. They contain important information on its safety,
installation, use and maintenance.
Keep these instructions in a safe place and ensure that they are
made available to new users. They must be made aware of these
Warning and Safety instructions.
Pass these instructions on to any future users/owners.
Correct application
This tumble dryer stack is only intended for drying fabrics which
~
have been washed in a water solution, and marked on the
manufacturer's care label as being suitable for tumble drying.
"Dry cleaning kits" for freshening up garments in a tumble dryer are
increasingly available on the market. If using, do so at your own risk,
and follow the instructions provided on the packaging.
Any other applications may be dangerous. Miele cannot be held
liable for damage resulting from incorrect or improper use or
operation.
5

Warning and Safety instructions
This tumble dryer must be used as described in these
~
instructions and must be checked on a regular basis to make sure it
is functioning correctly. Maintenance must be carried out when
necessary.
The appliance stack is not intended for outdoor use.
~
This tumble dryer stack is not intended for use by people with
~
reduced physical, sensory or mental capabilities, or lack of
experience or knowledge, unless they are are supervised whilst
using it or have been shown how to use it by a person responsible
for their safety.
Children under 8 years of age must be kept away from the tumble
~
dryer unless they are constantly supervised.
Children 8 years and older may only use the tumble dryer
~
unsupervised if they have been shown how to use it in a safe way
and recognise and understand the consequences of incorrect
operation.
Children must not be allowed to clean or maintain the tumble
~
dryer unsupervised.
Please supervise children in the vicinity of the tumble dryer and
~
do not let them play with it. This tumble dryer is not a toy. To avoid
the risk of injury, do not allow children to play on or near it or to play
with its controls.
If the tumble dryer stack is used in a publically accessible room,
~
it is the supervisor's responsibility to ensure that suitable measures
are in place which enable operators to use it safely.
6

Warning and Safety instructions
Technical safety
Before setting up the tumble dryer stack, check it for any
~
externally visible damage.
Do not install or use a damaged appliance.
Do not make any alterations to the tumble dryer stack, unless
~
authorised to do so by Miele.
The electrical safety of this tumble dryer stack can only be
~
guaranteed when it is correctly earthed. It is most important that this
basic safety requirement is observed and regularly tested, and
where there is any doubt the on-site wiring system should be
inspected by a qualified electrician. Miele cannot be held liable for
the consequences of an inadequate earthing system (e.g. electric
shock).
Unauthorised repairs could result in unforeseen dangers for the
~
user, for which Miele cannot accept liability. Repairs should only be
undertaken by a Miele approved service technician, otherwise any
subsequent damage will not be covered by the guarantee.
Faulty components must only be replaced by genuine Miele
~
original spare parts. Only when these parts are fitted can the safety
standards of the appliance be guaranteed.
To ensure the correct performance of the appliance and to
~
prevent the risk of faults and fire, it is important to check it and carry
out maintenance on a regular basis.
7

Warning and Safety instructions
In the event of a fault or for cleaning purposes, the appliance is
~
only completely isolated from the electricity supply when:
both connection plugs on the tumble dryer stack have been
–
withdrawn, or
– the on-site fuse has been disabled for both dryers, or
– the screw-out fuse has been disabled for both dryers in the stack
(in countries where this is applicable).
This tumble dryer stack must not be used in a non-stationary
~
location (e.g. on a ship).
In areas which may be subject to infestation by cockroaches or
~
other vermin, pay particular attention to keeping the appliance stack
in a clean condition at all times. Any damage which may be caused
by cockroaches or other vermin will not be covered by the
guarantee.
8

Warning and Safety instructions
Correct use
Caution! Risk of fire.
,
To avoid the possible danger of fire please red these warnings carefully.
A clogged filter is a hazard! The lint filter must be cleaned after
,
every programme.
Do not let anyone sit or lean on the doors, as this can cause the
~
tumble dryer stack to tip up. Danger of injury.
Always close the doors after use. This way you will avoid the
~
danger of:
– children climbing into the appliance or hiding things in it.
–
pets or other small animals climbing into it.
Do not use a pressure washer or hose to clean the appliance.
~
Always keep the area around the tumble dryer stack free of dust
~
and fluff. Dust drawn into the appliance can cause blockages over
time. Faults can then occur as well as the risk of fire.
The tumble dryer stack must only be used when it is connected to
~
a suitable ducting system. The installation site must be adequately
ventilated.
9

Warning and Safety instructions
The ducting must not be connected to
~
a chimney or vent flue which is in use,
–
or to ducting which ventilates rooms with fireplaces,
–
or to chimneys being used by other appliances.
–
Smoke or exhaust fumes can cause poisoning.
Check all parts of the extraction system on a regular basis (e.g.
~
wall vent, external grille, bends in the ducting etc.) and make sure
they are all free of any hindrance. A build-up of fluff will prevent a
free flow of air through the system. If the dryer is to be connected to
an existing ducting system, this must be checked for suitability
beforehand.
Adequate ventilation is essential to avoid the danger of
~
asphyxia and toxic fumes where another appliance which also
uses the room air (e.g. gas, oil or coal fired heater, continuous flow
or other water heater) is installed in the same or an adjacent room.
To ensure safe operation, and to prevent gases given off by these
appliances being drawn back into the room, an underpressure of 4
Pa is the maximum permissible.
Ventilation can be maintained by:
–
air inlets in the external wall which cannot be closed or blocked,
or
–
by fitting a window contact switch which ensures that the
appliance can only be operated when the window is open.
If in doubt, the advice of a competent builder must be sought.
If more than one tumble dryer stack is being installed using a joint
~
ducting system, each dryer must have its own non-return flap to the
joint ducting system.
Otherwise the dryers could be damaged, endangering their
electrical safety.
10

Warning and Safety instructions
The fluff filters must be cleaned regularly.
~
The tumble dryer stack must not be used without the fluff filters in
~
place or if the fluff filters are damaged in any way. Damaged filters
can cause operational faults and blockages in the airways, the
heating elements and in the ducting. Fire hazard!
In the event of a damaged filter, switch the appliance off and
replace the filter with a new one.
Do not install the tumble dryer stack in a room where there is a
~
risk of frost occurring. At temperatures around freezing point the
appliance may not be able to operate properly.
The ambient room temperature should be between +2°C and +50°C
To prevent the risk of fire, the following textiles must not be dried
~
in this tumble dryer stack:
– items which have not been washed.
– items, such as workwear, which have not been thoroughly
cleaned and which are still soiled with grease, oil or other
deposits (such as cosmetics, lotions etc).
If items have not been thoroughly cleaned there is a danger that
these might ignite when heated, even after they have been
removed from the dryer at the end of the programme.
–
items which have been treated with inflamable cleaning agents or
contain residues of acetone, alcohol, benzine, petrol, stain
remover, turpentine, wax, wax remover or other chemicals (e.g.
mops and floor cloths).
–
items which have been splashed with hair lacquer, hair spray, nail
varnish remover or similar substances.
When washing such heavily soiled items ensure that you use
sufficient detergent and select a high temperature. If in doubt,
wash the items several times.
11

Warning and Safety instructions
To prevent the risk of fire, the following must not be tumble dried
~
in this tumble dryer stack:
items which have been cleaned using chemicals (e.g.
–
professional dry-cleaning agents).
fabrics which contain a large proportion of rubber, foam rubber or
–
rubber-like materials. For example, products made from latex
foam rubber, shower caps, waterproof textiles, rubberised articles
and items of clothing and pillows with foam rubber filling.
damaged items which contain padding or fillings (e.g. pillows,
–
jackets). When damaged, the filling can get out with the risk of
igniting in the dryer.
12

Warning and Safety instructions
In many programmes, the heating phase is followed by a cooling
~
down phase to ensure that the items are not too hot to handle when
you remove them (this also avoids the danger of the laundry
self-igniting). The programme is not finished until the cooling down
phase has been completed.
Ensure that you always wait until the end of the programme before
removing the laundry.
Warning: Do not switch the tumble dryer off before the end of the
~
drying programme. If this was done and the laundry was then
removed immediately it could give off a great amount of heat.
Fabric conditioner and similar products must be used according
~
to the instructions on the manufacturer's packaging.
13

Warning and Safety instructions
Benzine, petrol, paraffin or any easily flammable liquid must not
~
be stored or used near the tumble dryer. Fire and explosion risk!
Do not allow air contaminated with chlorine, fluorine or other
~
vapours containing solvents to get into the tumble dryer. Fire
hazard.
For tumble dryer stacks with stainless steel surfaces:
~
Liquid cleaning and disinfecting agents which contain chlorine or
sodium hypochlorite must not come into contact with stainless steel
surfaces. These agents can have a corrosive effect on stainless
steel.
Aggressive vapours containing chlorine can also be corrosive.
~
Do not store containers of these agents near the machine.
Accessories
Only use genuine Miele original spare parts and accessories with
~
this tumble dryer stack. Using spare parts or accessories from other
manufacturers will invalidate the guarantee, and Miele cannot
accept liability.
Miele cannot be held liable for damage caused by
non-compliance with these Warning and Safety instructions.
14
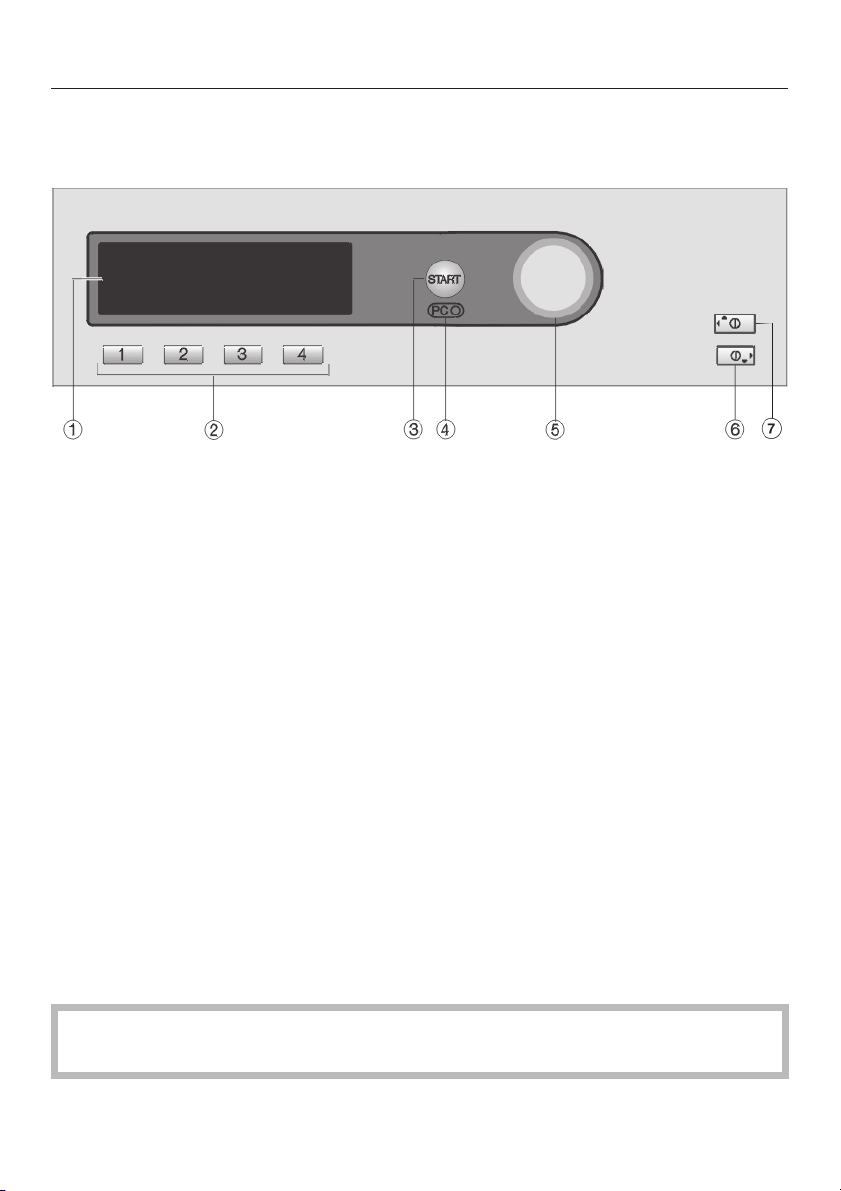
Operating the tumble dryer
Control panel
Left hand side for the top tumble dryer, right hand side for the lower tumble
dryer.
a Display
See the following pages for more information.
b Short cut buttons
For selecting an individual programme quickly. These buttons can be
programmed to select your own favourite drying programmes.
c Start button
d Optical interface PC
This is used by service technicians to run diagnostic checks on your appliance,
and can also be used to update programming data in the future.
e Multi-function selector
This is used to select menu options (by turning it) and to confirm your selection
(by pressing it).
f On-Off button s, lower tumble dryer
g On-Off button s, top tumble dryer
Before using for the first time
Before using the tumble dryer stack for the first time, ensure that it is correctly
installed and connected. See "Installation and connection".
Commission the appliance as described in the separate booklet "Commissioning,
Programme chart and Settings" supplied with the appliance.
15

Operating the tumble dryer
Display
Entry menu
1 Cottons
2 Minimum iron Settings F ...
3 Woollens handcare
4 Smoothing 10:00
When the tumble dryer is switched on, the entry menu (with
four favourite programmes listed) appears with Programme
selection highlighted.
Multi-function selector
Turning the multi-function selector moves the highlighting to
the next option.
Pressing the multi-function selector selects the highlighted
option.
Shortcut buttons
Pressing a shortcut button selects one of the four favourite
programmes shown on the left of the display.
If you wish to change the programmes shown in this list you
can do so (see "Selecting a programme - Saving a
programme as a favourite" for more information).
The shortcut buttons have different functions in the other
menus. Where this is the case, an arrow H will appear in the
display above the shortcut button, together with a description
of its function .
Programme selection ...
Programme selection
There are two ways of selecting a programme:
–
–
16
Option 1:
Select the Programme selection menu in the
display and confirm your selection by pressing the
multi-function selector.
Option 2:
Press shortcut button DEFor G . This
will automatically take you into the main menu for that
programme.

Programme selection menu
Operating the tumble dryer
Programme
selection
You can use the multi-function selector to select any
programme. The highlighting will move up or down
depending on the direction the multi-function selector is
turned in.
The HV arrows on the right of the display, indicate further
options.
Pressing the multi-function selector takes you to the main
menu of the programme selected.
Drying programme main menu
Cottons Normal
Duration 0:50 h
Low temp.HTimer Y
^ Turn the multi-function selector to highlight either the
"Drying level" or the "Programme".
–
Pressing the multi-function selector selects the highlighted
option and opens the relevant sub-menu.
Back A
Cottons
Minimum iron
Delicates H
Save
H
H
Back A
H
Settings menu J
–
Low temperature and Timer can be selected by pressing
shortcut buttons D or E.
–
To go back to the entry menu press shortcut button G.
Alternatively, you can also highlight and confirm all options by
just using the multi-function selector.
The Settings menu J is used to alter the tumble dryer's
electronics to suit different requirements. See the separate
booklet "Commissioning, Programme chart and Settings" for
further information.
17

Operating the tumble dryer
Operating the tumble dryer in Laundrette mode
The entry menu will vary depending on the Controls setting
selected.
The dryer is operated either with shortcut keys D, E,
^
F, G or the multi-function selector.
WS-shortcut keys, basic
Cottons Normal+
1
2 Minimum iron Normal
3 Woollens handcare
4 Cool air
4 programmes are available to choose from. To specify which
programmes are available, go to the Settings/supervisor level
menu.
WS-shortcut keys + Logo
M
PROFESSIONAL
##
H
12 drying levels and timed programmes are available to
choose from. To specify which programmes are available, go
to the Settings/supervisor level menu.
P
H
#
H
More
H
WS-shortcut keys, ex/int time
Q
H
4 timed programmes with different temperature levels are
available to choose from. To specify which programmes are
available, go to the Settings/supervisor level menu.
18
M
PROFESSIONAL
R
H
S
H
T
H

Notes and tips on laundry care
1. Sort the laundry
Garment care label symbols
Drying
q Normal/higher temperature.
r Reduced temperature:
Select Low temperature
(for delicate textiles).
s Do not tumble dry.
Ironing
I Very hot.
H Hot.
G Warm.
J Do not iron.
Before drying
– Wash heavily soiled items very
thoroughly, ensuring that you use
sufficient detergent and select a high
temperature. If in doubt, wash the
items several times.
–
Do not put soaking wet items into the
tumble dryer. Make sure that your
laundry is thoroughly spun before
drying.
The higher the spin, the greater the
savings that can be made in energy
and time during drying.
New dark-coloured garments should
–
be washed and dried separately
from light-coloured garments the first
few times they are washed to avoid
the risk of colours running and
discolouring other garments or even
the plastic components in the tumble
dryer.
Dark-coloured fibres can also settle
on light-coloured garments and vice
versa.
Starched laundry can be dried in the
–
tumble dryer. To achieve the usual
finish, double the amount of starch
should be used.
– Check the seams of padded or
down-filled items to prevent the risk
of fillings coming out. These could
catch fire in the tumble dryer.
– Tie together textile belts and apron
ties to stop them getting tangled.
– Fasten...
. . . duvet covers etc. to prevent
small items from being trapped
inside them. . ., hooks and eyes etc.
–
Stitch in or remove loose underwiring
from bras.
–
Leave jackets open and undo any
long zips so that textiles dry evenly.
–
For an even drying result, it is
important to...
. . . spin,
. . . shake out,
. . . and sort items according to
fabric type, size, care label and the
drying level required.
19

Notes and tips on laundry care
2. Load the tumble dryer
Using the tumble dryer
,
incorrectly could cause a fire. Read
the "Warning and Safety instructions"
before using the tumble dryer.
Make sure that objects, e.g.
,
detergent dispensing balls, have
been removed from the laundry.
They could melt and cause damage
to the dryer or the laundry.
Do not overload the drum.
–
Overloading can cause unnecessary
wear and tear to the laundry, give a
disappointing drying result and
cause more creasing.
– To save energy, always observe the
maximum load for each programme
(see the separate booklet
"Commissioning, Programme chart
and Settings").
–
Minimum iron fabrics tend to crease
more the greater the load. This is
also the case for garments made
from very fine weave fabrics, such as
shirts or blouses.
If necessary, reduce the size of the
load for these types of fabrics.
3. Select a programme
–
On many programmes, different
drying levels can be selected
depending on individual
requirements. . . e.g.Normal+ for
laundry that you want to fold and put
away immediately after drying.
. . . e.g. Machine iron or Hand iron if
the laundry needs further processing
after drying, e.g. machine ironing.
See separate booklet
"Commissioning, Programme chart
and Settings".
For delicate fabrics with the r care
–
label, select Low temperature as
well.
Down-filled garments have linings
–
which have a tendency to shrink,
depending on the quality of the item.
They can be partially dried using the
Smoothing programme.
– Pure linen should only be machine
dried if specified as suitable by the
manufacturer on the care label, as
the surface of the fabric may
otherwise become rough. It can be
partially dried using the Smoothing
programme.
– Woollens and wool blends tend to
become matted and shrink if dried in
a tumble dryer. Only dry these
fabrics in a Woollens programme.
–
Loopknit garments (e.g. T-shirts and
underwear) tend to shrink depending
on their quality. Do not over-dry
these textiles. When purchasing
these garments it is advisable to take
their shrinkage properties into
account.
20
 Loading...