

Page 1

Operating Instructions
Washer-disinfector
G 7899
To prevent accidents
and machine damage
read these instructions
before
installation or use.
en-US
M.-Nr. 09 461 360
Page 2

2
Page 3

Contents
IMPORTANT SAFETY INSTRUCTIONS
Intended use
Guide to the machine
Opening and closing the door
To open the door using the emergency release ..........................13
Water softener
Setting the water softener ...........................................14
Filling the salt reservoir .............................................16
Add salt indicator..................................................17
Applications
Loading the machine ...............................................19
Water connector spring adapter ......................................20
Height adjustable top basket.........................................20
Surgical instruments ...............................................21
ENT ............................................................22
GYN............................................................23
Rigid Endoscopy ..................................................25
Ophthalmology ...................................................26
Possible effects of using non-recommended Cleaning Agents
Dispensing cleaning agents
Add rinse aid indicator .............................................31
Adding rinse aid ..................................................31
Setting the dosage.................................................32
Adding neutralizing agent ...........................................33
Add neutralizing agent indicator .....................................34
Adding cleaning agent .............................................35
Using powder cleaning agents .......................................35
Operation
Turning on .......................................................37
Starting a program.................................................37
Selecting “Drying” 0............................................37
Program sequence indicators ........................................38
At the end of the program ...........................................38
Additional drying................................................38
Canceling a program...............................................39
Turning off .......................................................39
3
Page 4

Contents
Program chart
Programmable functions
To activate the programming mode .................................42
Saving values in programming mode................................42
Exiting the programming mode without saving ........................42
Resetting the operating hours counter for the filter in the drying unit ..........43
DOS 1 (liquid detergent) ............................................44
Setting the dosage concentration...................................44
Priming the dispensing system.....................................45
DOS 3 (neutralizer) ................................................46
Setting the neutralizer dosage .....................................46
Priming the dispensing system.....................................47
Buzzer ..........................................................48
Changing program parameters .......................................49
Changing wash and rinse parameters ...............................49
Changing the drying parameters ...................................49
Changing the temperature ........................................50
Changing the temperature holding time..............................50
Restoring to factory default settings ...................................51
Setting the time and date............................................52
Process documentation
Cleaning and care
Cleaning the filters in the wash cabinet.................................56
Cleaning the spray arms ............................................58
Baskets and inserts ................................................60
Drying unit (TA) - Maintenance .......................................61
Cleaning the drain pump and non-return valve...........................62
Cleaning the water intake filters.......................................63
Frequently asked questions
After sales service
Caring for the environment
Installation
Electrical connection
Plumbing
Technical data
4
Page 5
IMPORTANT SAFETY INSTRUCTIONS
This washer-disinfector complies
with all applicable safety
regulations. However, improper use
may cause material damage and/or
personal injury.
Read the operating instructions
carefully before using this
appliance. This will help keep you
safe and avoid damage to the
appliance.
Keep these instructions in a safe,
accessible location.
Intended use
This washer-disinfector is not
~
intended for any purpose that is not
specified in the operating instructions.
Conversions, modifications, and other
unintended uses are considered to be
dangerous. The cleaning and
disinfection processes described
herein apply only to those medical
products that are specifically designed
by the manufacturer to be re-used and
thermally disinfected. Always follow the
instrument manufacturer’s instructions.
This washer-disinfector is intended
~
for stationary indoor use only.
Please pay attention to the following
to maintain safe procedures.
Installation and repair work should
~
only be performed by a Miele
authorized service technician. Work by
unqualified persons could be
dangerous and may void the warranty.
The installation and the work flow of
~
the instruments must be in such a way,
that a recontamination of disinfected
instruments and a mixed up of clean
and dirty instruments is not possible.
AMMI ST79 shows an example of
proper layout and work-flow.
Do NOT install the appliance in an
~
area where there is a risk of explosion
or freezing.
The electrical safety of this
~
appliance is only ensured if it is
connected to a properly grounded
electrical system. It is very important to
verify this fundamental safety feature. If
in doubt have the wiring checked by an
electrician.
A damaged or leaking
~
washer-disinfector may be dangerous
and pose a safety hazard. If you
suspect a leak, shut down the
washer-disinfector and immediately
contact Miele.
As standard, the washer-disinfectors
~
drain water will reach temperatures
greater than 160°F. These temperature
can damage the drain system. In order
to reduce the drainage temperature
Miele offers an optional drain
temperature reduction Kit.
5
Page 6

IMPORTANT SAFETY INSTRUCTIONS
Operators must be trained on a
~
regular basis. Untrained personnel
should not be allowed access to the
appliance or its controls.
Please do not use the
~
washer-disinfector, before it has been
set up by a Miele Service Technician.
The Technician will perform the initial
set-up and verification of the machine.
Always exercise caution when
~
handling cleaning agents. Some are
corrosive and irritants. Wear safety
glasses and gloves! Always follow the
manufacturer’s safety
recommendations when using cleaning
agents.
The washer-disinfector is designed
~
to operate with water and the
recommended cleaning agents only!
The appliance MUST NOT be used with
organic solvents or flammable liquids.
These may cause an explosion or
damage rubber and plastic
components, which in turn could cause
leaks.
Avoid inhaling powdered products.
~
Never swallow cleaning agents as this
can result in chemical burns to the
mouth and throat, or suffocation.
The water in the wash cabinet is
~
NOT safe to drink!
When operating the
~
washer-disinfector, beware of the high
temperatures involved. Bypassing the
electronic door lock to open the door
carries the risk of burns or scalding.
Allow mobile units, baskets, inserts,
~
and loads to cool before removing
them. Empty any water from hollow
items into the wash cabinet before
removing.
Do not touch the heating elements.
~
They may still be hot enough to cause
burns several minutes after the
program has ended.
NEVER hose down the
~
washer-disinfector or the immediate
vicinity with a water hose, steam
cleaner, or power washer.
Before servicing the
~
washer-disinfector, disconnect it from
the power supply.
To assist in maintaining quality
standards when processing medical
devices (such as surgical
instruments), to protect patients, and
to avoid damage to property, the
following items should be observed!
Only authorized persons should
~
interrupt a program, and only in
exceptional cases.
Do not lean or sit on the open door.
~
This could damage the
washer-disinfector or cause it to tip
over.
Take care when loading items with
~
sharp, pointed ends. Position them in
the wash cabinet so that they do not
pose a risk of injury.
6
It is the responsibility of the operator
~
to check that the required cleaning and
disinfection standards are met. Process
results need to be regularly checked
and documented through inspection.
Page 7

IMPORTANT SAFETY INSTRUCTIONS
Under certain circumstances, some
~
cleaning agents can cause damage to
the appliance. Consult the cleaning agent
manufacturer for recommendations. For
concerns involving possible damage to
the appliance or materials, please
contact Miele.
Pre-treating (e.g. with cleaners or
~
disinfectants) as well as some types of
soiling and the interaction of cleaning
agents can cause foaming. Foam can
have an adverse effect on cleaning and
disinfection.
Some disinfectant can denaturate
~
proteins which has an adverse effect on
cleaning. Please only use non foaming
and non denaturation cleaners or
disinfectants for manual prewash.
To prevent damage to the
~
washer-disinfector and accessories
from the effects of cleaning agents only
use chemical agents which have been
approved by their manufacturer for use
in the application you are using. Miele
can recommend suitable products.
Even when a cleaning agent is
~
recommended, the appliance
manufacturer takes no responsibility for
the effect of such chemicals on the
items being washed.
Note that formulation changes, storage
conditions, etc. that are not disclosed
by the manufacturer may adversely
affect the cleaning results.
Always follow the manufacturer’s
~
instructions when using cleaning
agents. To avoid possible chemical
reactions, only use cleaning agents for
the applications and purposes intended
by their manufacturer.
For critical applications where very
~
high processing quality requirements
must be met, it is strongly
recommended that all process-related
factors (cleaning agents, water quality,
etc.) be discussed in advance with
Miele.
Use mobile units, baskets and
~
inserts only as instructed by the
manufacturer.
Hollow items must be positioned so
they receive full exposure to wash
water.
Empty all containers and hollow
~
items before loading them in the
washer.
Ensure that no acid or solvent
~
residues, especially hydrochloric acid
or chloride solutions, get inside the
wash cabinet. Any items that can rust
should also be avoided.
Any solvents used should not be
present in more than trace amounts.
To avoid corrosion, ensure that the
~
stainless steel exterior does not come
into contact with solvents containing
hydrochloric acid / vapors.
Whenever work is conducted on the
~
water supply, the supply lines to the
washer must be bled.
Failure to do so can result in damage to
the appliance.
Follow the instructions in this manual
~
and in the Installation manual.
7
Page 8
IMPORTANT SAFETY INSTRUCTIONS
Accessories
Whatever the application, only Miele
~
accessories should be connected to, or
used in, this machine. Consult Miele on
the type and application of such
equipment.
Use only Miele mobile units, baskets
~
and inserts. If Miele accessories are
altered in any way, or equipment from
another manufacturer is used, cleaning
and disinfection results cannot be
ensured. Damage caused in these
cases may be excluded from the
warranty.
Only use Miele approved cleaning
~
agents. Use of other cleaning agents
may void the warranty and may result is
poor cleaning results.
Please consult Miele Applications
(medical@mieleusa.com) for any
questions regarding detergents and
effects on the items being cleaned.
Symbols on the appliance
Warning:
Observe the operating
instructions!
Warning:
Risk of electric shock!
Disposing your old appliance
Please note that the appliance may
~
be contaminated by blood or other
bodily fluids and must be
decontaminated before disposal.
For safety and environmental
protection, be sure to remove all
chemical residue, in compliance with
safety regulations (wear protective
eyewear and gloves!).
Remove or destroy the door latch, to
prevent children from locking
themselves inside. The appliance can
now be sent for disposal through the
proper resource recovery facilities.
SAVE THESE
INSTRUCTIONS
8
Page 9

Intended use
This washer-disinfector can be used to
clean, rinse, intermediate-level
thermally disinfect, and dry a wide
range of reusable medical devices in
hospitals, surgery centers, and clinics.
Always follow the surgical instrument
manufacturer’s instructions for
machine-based cleaning. This
washer-disinfector provides an
automated process for the initial steps
of cleaning and intermediate-level
disinfection of re-useable surgical
instruments prior to sterilization
G 7899 is designed for applications
such as:
General Surgical Instruments
^ Reusable, hard-surfaced surgical
instruments such as scissors,
forceps, etc.
^ Stainless steel lumened instruments.
These can be processed but must be
connected to Miele injection ports
according to loading instructions
provided with the specific Miele
accessory.
Minimally Invasive Surgical (MIS)
Instruments
. The
Microsurgical Instruments
Such as instruments used in eye
^
surgery
When processing instruments in the
Miele washer-disinfector you must:
Follow the instrument manufacturer’s
^
instructions for cleaning and
disinfection. Instruments must be
disassembled according to the
manufacturer’s instructions
Follow Miele instructions for proper
^
loading (included with specific
accessories and in the “applications”
section of this manual). Proper
instrument loading and connection of
lumened instruments to injection
ports is required
^ This washer-disinfector is intended to
provide the initial step in
reprocessing of soiled, re-usable
medical devices. Any devices that
contact blood or compromised
tissues must be sterilized prior to
re-use following industry best
practices such as AAMI ST79.
^
Rigid endoscopes
^
Note: The G 7899 is NOT intended
for reprocessing of flexible
endoscopes of any kind.
Containers and utensils
^
Such as kidney dishes, sterilization
containers, trays, etc.
9
Page 10

Intended use
Processing instruments by machine
achieves reproducible results with less
opportunity for human error when
compared with to manual cleaning.
Thermal disinfection can be carried out
using the Vario TD program which
meets the parameters to achieve
intermediate-level disinfection.
The cleaning program as well as
chemical agents must be chosen
according to the type of soil and load
being processed.
Medical devices are best processed
using the Vario TD program. The final
result will be instruments that are clean,
free of residue, and ready for
subsequent sterilization. Only then can
the instruments be safely used.
The use of a suitable load carrier
(basket, module, insert, etc.) is
important to ensure the adequate
cleaning of the load. Examples are
given in the “Applications” section.
The washer-disinfector can be
programmed to perform the final rinse
with tap water, or with purified water of
a quality to suit the application
(de-ionized, de-mineralized, reverse
osmosis (RO), distilled). We
recommend the use of purified water.
All instruments and accessories
cleaned in the washer-disinfector
(with the exception of non-critical
items) must be sterilized before use.
10
Page 11

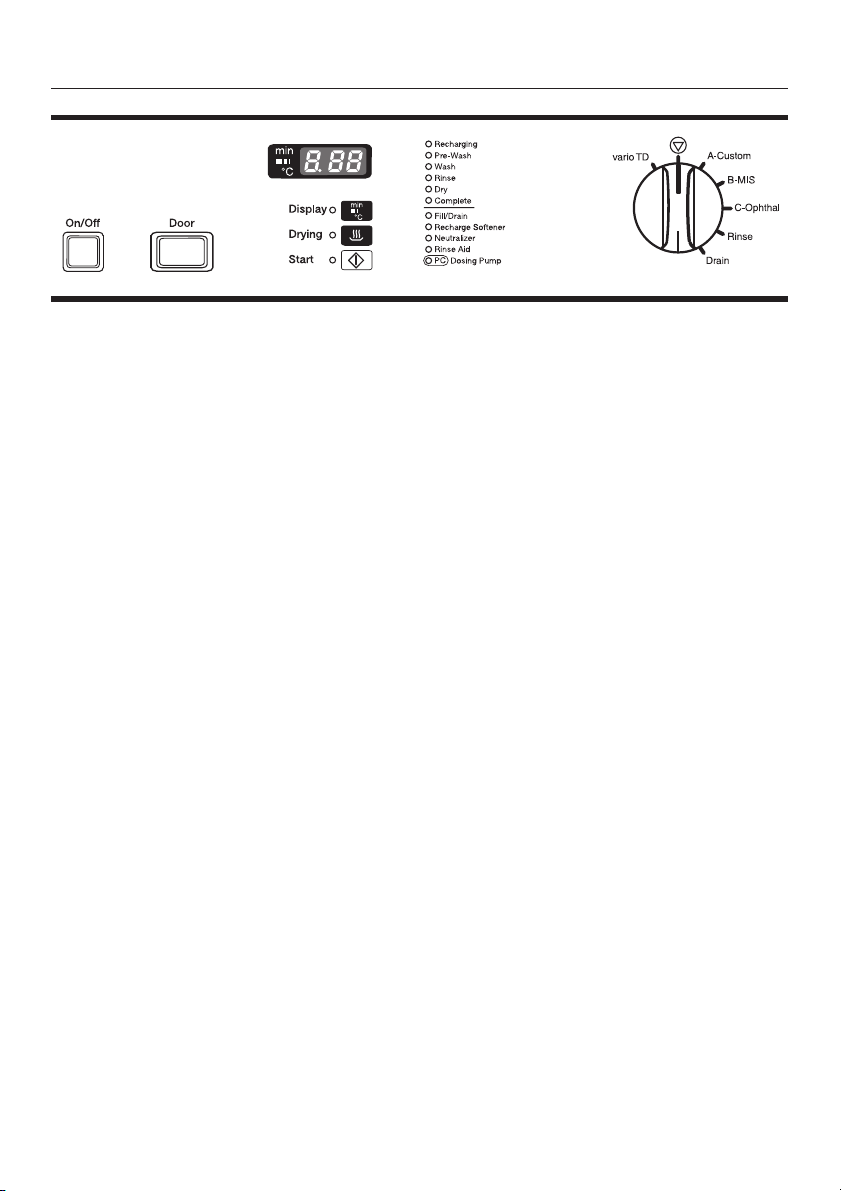
Guide to the machine
a “On/Off” button
b “Door” button
c Display
d “Display” indicator
e “Drying” indicator
f “Start” indicator
g “Start” 6 button
h “Drying” 0 button
i “Display” ß button
to toggle between the:
- actual Temperature in °C
- elapsed time
- active wash blocks
j “8 Dosing Pump” indicator and
optical interface for
service technician.
Also used as an
“add liquid cleaning agent”
indicator when connected
toaK60DOSmodule for
liquid cleaning agent
k Refill “Rinse Aid” indicator
l Refill “Neutralizer” indicator
m “Recharge Softener” indicator
n “Fill/Drain” indicator
o Program sequence display
p Program selector
11
Page 12
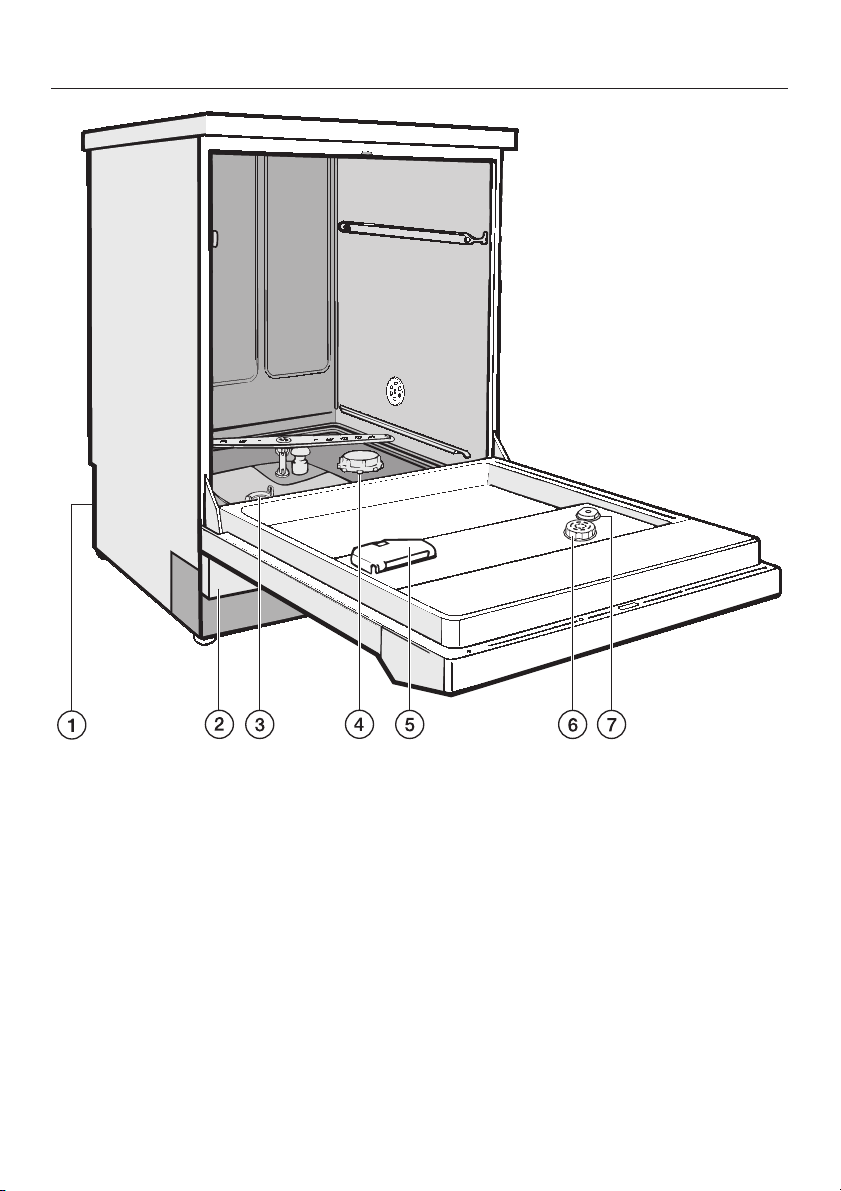
Guide to the machine
a Connection for the optional K 60
DOS module for liquid cleaning
agents
b Service panel
c Combination filter
d Salt reservoir
e Dispenser for powder cleaning agent
12
f Rinse aid reservoir (with dosage
selector)
g Rinse aid level indicator
At the rear of the machine:
–
RS 232 Interface connection
(used for optional process
documentation via a printer or
software)
–
Suction tube for external neutralizing
agent container
Page 13
Opening and closing the door
Electric door lock
This machine is equipped with an
electric door lock.
The door can only be opened when:
the electrical supply to the machine
^
is on and
the “On/Off” button is pressed.
^
To open the “Door”
Press the door release switch in as
^
far as it will go, and at the same time
grip the handle and and pull the door
open.
Do not touch the heating
,
elements, you could burn yourself.
They remain hot for some time after
the end of the program.
The door cannot be opened after a
wash program has been started, and it
will remain locked until the end of the
program. It is possible however to open
the door during the “Rinse” and “Drain”
programs.
The machine can also be programmed
(by a Miele service technician) to open
during “Drying”.
To close the door
Lift the door and push it until it clicks
shut. Do not press the door release
button while shutting the door.
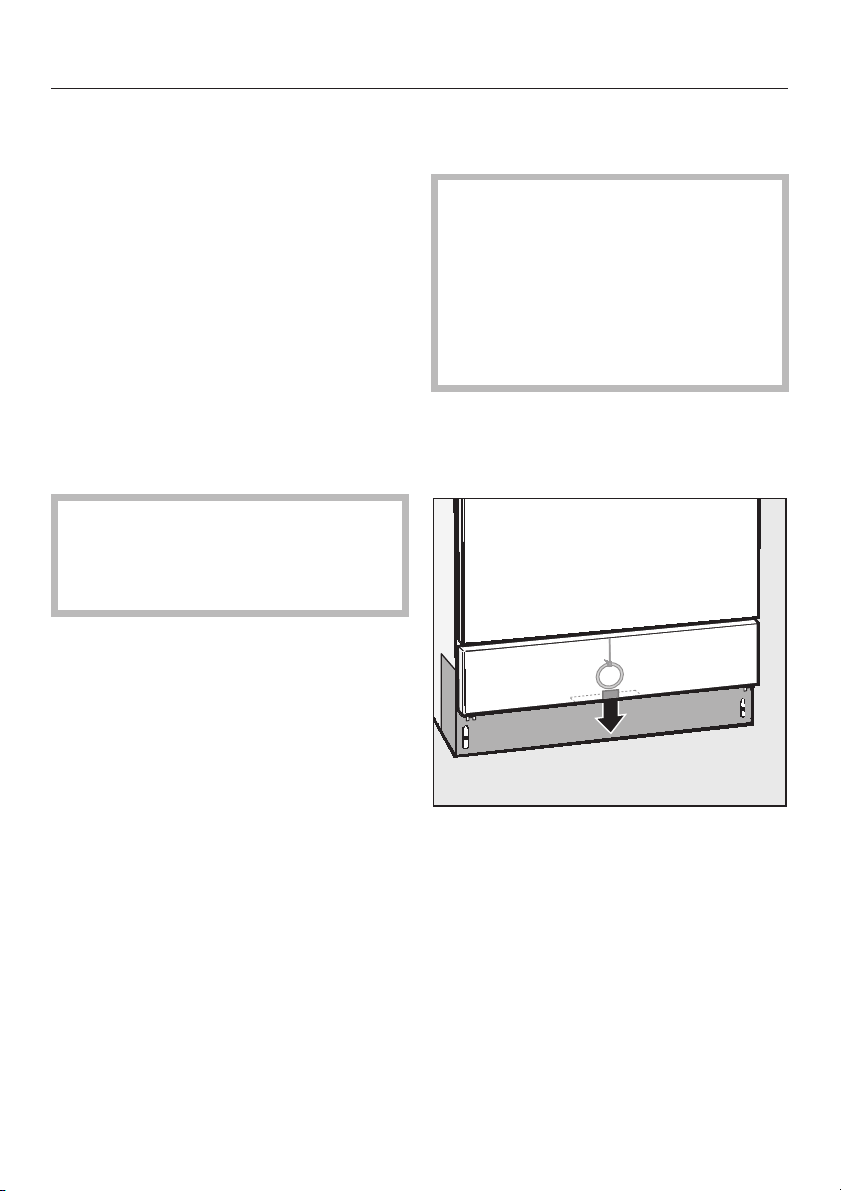
To open the door using the
emergency release
The emergency release should only
be used when the door cannot be
opened normally, such as in the
event of a power failure.
If the door is opened using the
emergency release cord, there is a
danger or burning or scalding!
Turn the program selector to f.
^
Turn the machine off with the
^
“On/Off” button.
^
The emergency release cord is
located at the bottom of the machine
behind the service panel. Pull it
downwards to open the door.
13
Page 14

Water softener
Before using the washer-disinfector for
the first time, the water softener should
be programmed. The water should be
softened to avoid calcium deposits on
instruments and in the washer
chamber.
If the water supply is harder or softer
than the default factory setting of
19 gr/gal (340 ppm CaCO
), the setting
3
should be changed. See “Setting the
water softener”.
In order to function properly, the
–
water softener requires a supply of
reactivation salt.
– The washer must be programmed to
match the hardness of the water
supply.
– Your local water authority can
provide information about the
hardness of the tap water in your
area.
If the water hardness is known to
fluctuate, always program the softener
for the highest value.
Setting the water softener
Close the door.
^
Use the On/Off button to turn off the
^
machine.
Turn the program selector to f.
^
Simultaneously press and hold the
^
“Display” ß and “Start” 6 buttons,
while pressing the On/Off button.
The current program version P....
will appear in the display, and the
“Fill/Drain” indicator will light.
Press the “Drying” 0 button once.
^
E01 will appear in the display.
^ Turn the program selector switch to
the one o’clock position.
The number 19 will appear in the
display (this indicates the factory
setting in gr/gal).
Please refer to the “Water softener Settings” table on the following page to
determine the setting you will need.
The built-in water softener can be
programmed between1-60gr/gal
(20 - 1080 ppm).
Please note the water hardness in the
space provided here:
gr/gal or ppm CaCO
This may be needed for any
troubleshooting should problems occur
in the future.
14
^
Press and hold the “Display” ß
button until the required value
appears in the display.
(Once the 60 setting has been
reached, the counter will begin again at
0.)
^
Press “Start” 6.
SP will appear in the display.
3
^
Press “Start” 6 again.
The setting you selected is now stored
in memory. The display light(s) will turn
off.
The machine is now ready for use.
Page 15

Settings
Water softener
Settings
1-30
1
2
3
4
5
6
7
8
9
10
11
12
13
14
15
16
17
18
19
20
21
22
23
24
25
26
27
28
29
30
gr/gal
1-30
1
2
3
4
5
6
7
8
9
10
11
12
13
14
15
16
17
18
19 *)
20
21
22
23
24
25
26
27
28
29
30
ppm
CaCO
20
40
50
70
90
110
130
140
160
180
200
220
230
250
270
290
310
320
340
360
380
400
410
430
450
470
490
500
520
540
Settings
3
31 -60
31
32
33
34
35
36
37
38
39
40
41
42
43
44
45
46
47
48
49
50
51
52
53
54
55
56
57
58
59
60
gr/gal
31 -60
31
32
33
34
35
36
37
38
39
40
41
42
43
44
45
46
47
48
49
50
51
52
53
54
55
56
57
58
59
60
ppm
CaCO
560
580
590
610
630
650
670
680
700
720
740
760
770
790
810
830
850
860
880
900
920
940
950
970
990
1010
1030
1040
1060
1080
3
*) factory setting
15
Page 16
Water softener
Filling the salt reservoir
Only use reactivation salt with granules
of approx.1-4mm.Donotuseother
types of salt such as cooking salt,
agricultural grade or road salt. These
may contain insoluble additives which
can impair the functioning of the water
softener. If in doubt please contact
Miele.
Reactivation salt can be ordered
directly from Miele.
The salt reservoir holds approx.
2.5 kg of salt.
Inadvertently filling the salt
,
reservoir with cleaning agent will
damage the water softener.
Before filling the salt reservoir
make sure that there is no fluid
covering the salt reservoir cap.
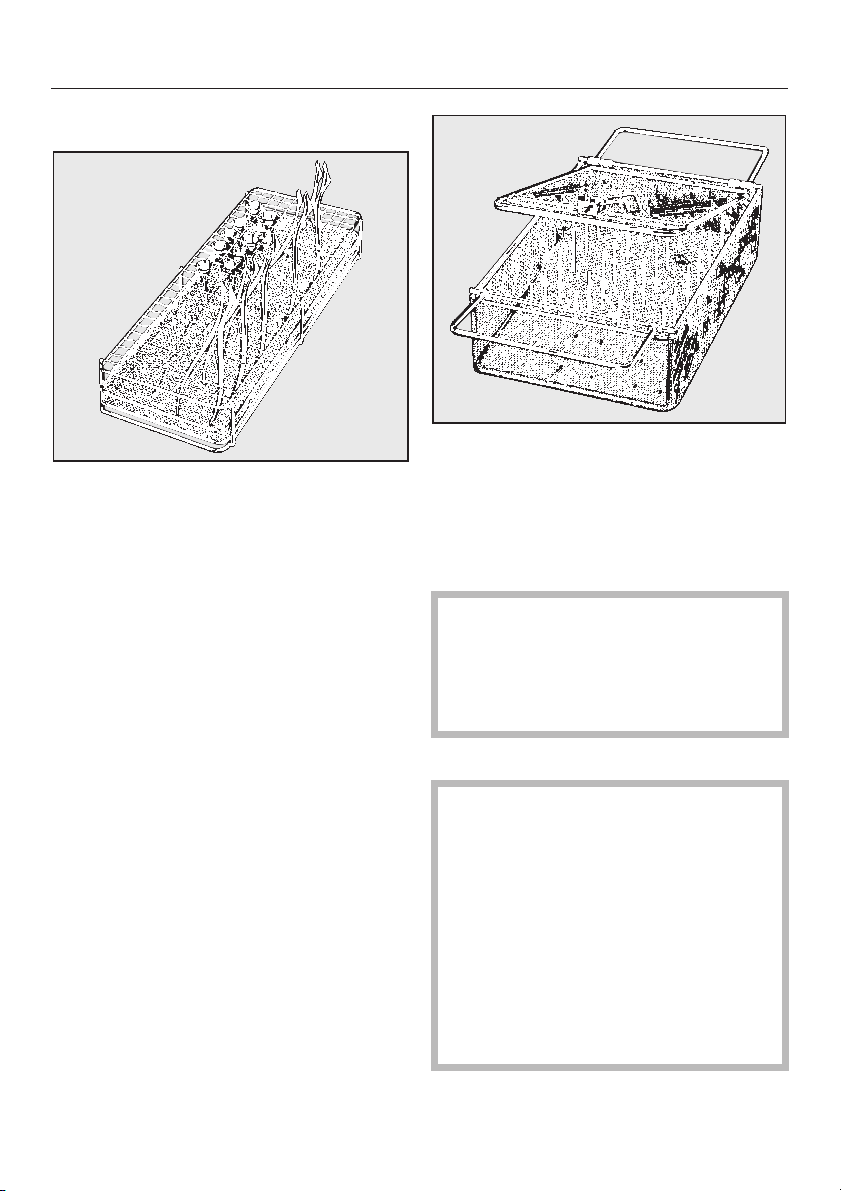
Remove the bottom basket from the
^
machine.
Unscrew the salt reservoir cap.
^
Before filling the salt reservoir with
reactivation salt for the first time, you
will have to fill the reservoir with
approx. 2/3 gal (2.5 liters) of clean
water to enable the salt to dissolve.
Once the machine has been used,
this will no longer be necessary.
16
^
Place the provided funnel in position.
^
Fill carefully with salt.
As it is poured in, displaced water will
run out.
Page 17
Remove the funnel and wipe any
^
residual salt off the seal and the
screw threads.
^ Screw the cap back on firmly.
^ Run the “Rinse” program to remove
any traces of salt from the cabinet.
The program sequence may be
delayed for a few minutes after the
start of the “Rinse” program. This is
normal as the water softener is
being reactivated.
Water softener
Add salt indicator
Reactivation will take place
automatically when needed prior to the
start of your selected program. The
“Recharging” indicator lamp a will be
lit during this process.
^ Add salt when the “Recharge
Softener” indicator b lights up.
17
Page 18

Applications
This washer-disinfector normally
requires a top and bottom basket.
Various inserts and special baskets are
available for a wide variety of
instruments and utensils.
Select baskets and inserts which are
appropriate for the application.
Applications and loading examples are
given on the following pages.
Before starting a program, visually
check the following:
– Is everything correctly
loaded/connected?
– Are the lumen or necks of hollow
instruments positioned so that water
can access them unhindered?
– Are the spray arms clean and do
they freely rotate?
– Are the filters clean? Remove any
coarse soils and clean them if
necessary.
–
Is the adapter connecting the water
supply to the spray arms/jets
connected correctly?
–
Are all chemical containers
sufficiently filled?
At the end of each program:
Visually check the load for
–
cleanliness.
Check that all hollow shafted
–
instruments are still securely
positioned on their jets.
Any hollow instruments that have
,
become disconnected from their
adapters during processing must be
processed again.
Check that the lumen of hollow
–
instruments are free of obstruction.
– Check that jets and connectors are
securely in position in the baskets or
inserts.
Verification testing
For verification of the cleaning process,
periodic testing as outlined in current
best practices documents such as
AAMI ST79 is highly recommended.
While Miele washers automatically
monitor critical parameters such as
time, temperature and dispensing,
periodic verification to ensure proper
soil removal should be part of your
quality and safety program.
Miele also offers process
documentation to support your periodic
verification.
18
Page 19

Loading the machine
For proper cleaning, arrange the
–
load so that water can access all
surfaces.
Do not place items inside other
–
pieces where they may be
concealed.
Hollow instruments must be
–
throughly cleaned, internally and
externally.
Ensure that instruments with long
–
narrow hollow sections can be
flushed through properly before
placing them in inserts or connecting
them to jets.
Applications
Only process instruments made of
–
surgical steel, as these are less
susceptible to corrosion.
Nickel plated instruments, colored
–
anodized aluminum instruments, or
disposable instruments are not
suitable for machine reprocessing.
Preparing the load
Empty all containers before loading
^
them into the machine.
Ensure that acids and residual
,
solvents, especially those containing
hydrochloric acid or chlorides, do
not get into the wash cabinet.
– Hollow vessels should be inverted
and placed in the correct baskets or
inserts to ensure that water can flow
into and out of them unrestricted.
– Large or concave items should be
placed at an angle to make sure
water runs off them freely.
–
Tall, narrow, hollow items should be
placed in the center of the baskets to
ensure better water coverage.
–
Lightweight items should be secured
with a cover net (e.g. an A 6) and
small items placed in a mesh tray to
prevent them from bouncing around
or blocking the spray arms.
–
The spring adapter of the mobile
units or baskets must be correctly
engaged.
–
The spray arms must not be blocked
by items which are too tall or which
hang down in their path.
Loading instruments
Contaminated instruments can be
placed directly in the machine without
pre-treatment (no soaking required).
Always refer to the surgical instrument
manufacturer’s instructions for
cleaning.
,
Chemically pre-treated
instruments must be thoroughly
rinsed before placing them in the
machine.
19
Page 20
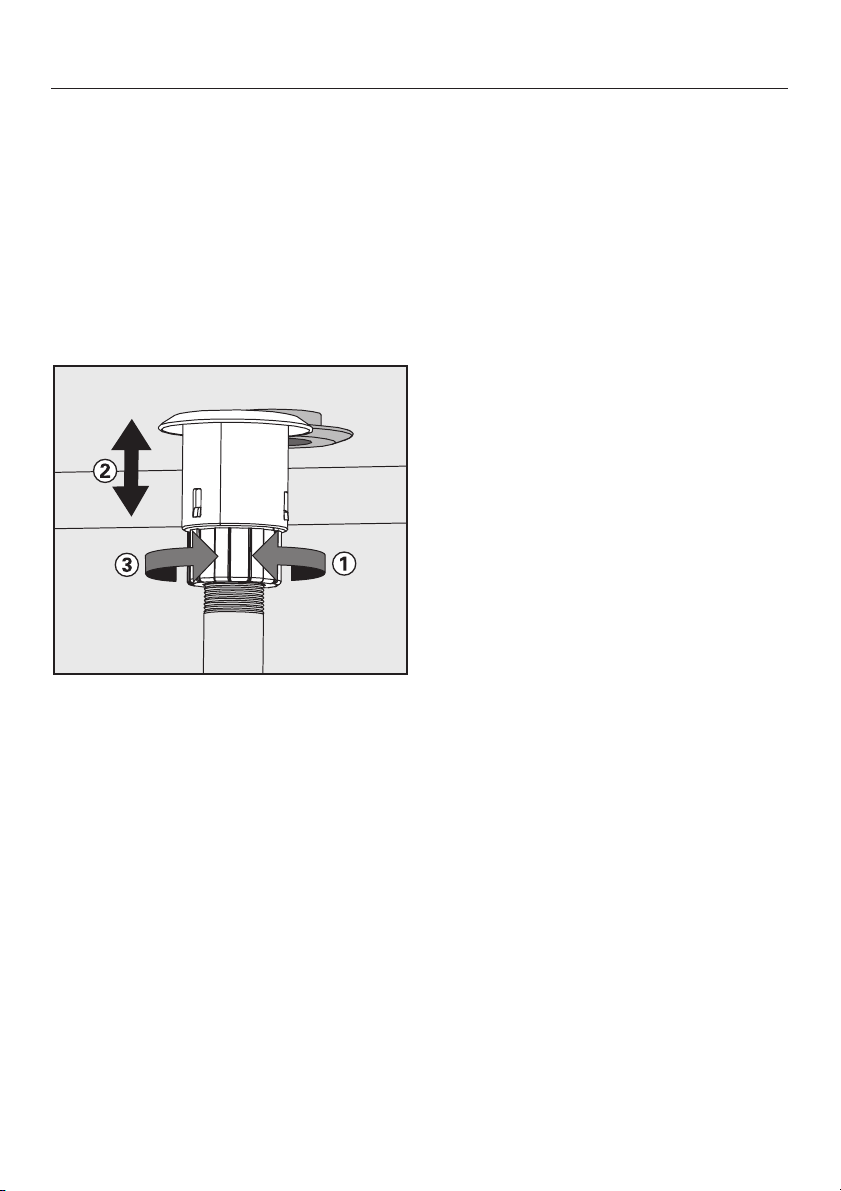
Applications
Water connector spring
adapter
Make sure that the spring adapter to
the water connector engages correctly
when a basket or injector unit is
inserted in the machine. It must be
4-5 mm higher than the water
connection inlet in the machine.
If it is not, adjust the adapter as follows.
^ Loosen the lock ring a.
Height adjustable top basket
The top basket can be adjusted above
and below its middle position by 2 cm.
Items of different heights can be
cleaned in this machine by changing
the position of the upper basket.
To adjust the top basket:
Pull out the basket until a resistance
^
is felt; lift it from the runners and
remove.
Loosen the roller bearings on both
^
sides of the basket witha7mm
wrench and reposition it to the height
desired.
^ Re-tighten the roller bearings.
^
Push the adaptor b up.
^
Tighten the lock ring c.
20
Page 21

Surgical instruments
Surgical instruments should be stored
for as short a time as possible before
cleaning them.
Disinfection of surgical and minimally
invasive instruments is performed
thermally, after they have been
cleaned. Deionized water should be
used for the final rinse to help prevent
spotting and corrosion.
More information regarding the water
quality you can find in the AAMI
publication TIR34:2007
Open up any hinged instruments and
place them in mesh trays so that they
are not touching each other.
Instruments with very narrow lumen
must be manually pre-rinsed where
necessary. Follow the
manufacturer’s instructions on how
to process them.
Applications
21
Page 22
Applications
ENT
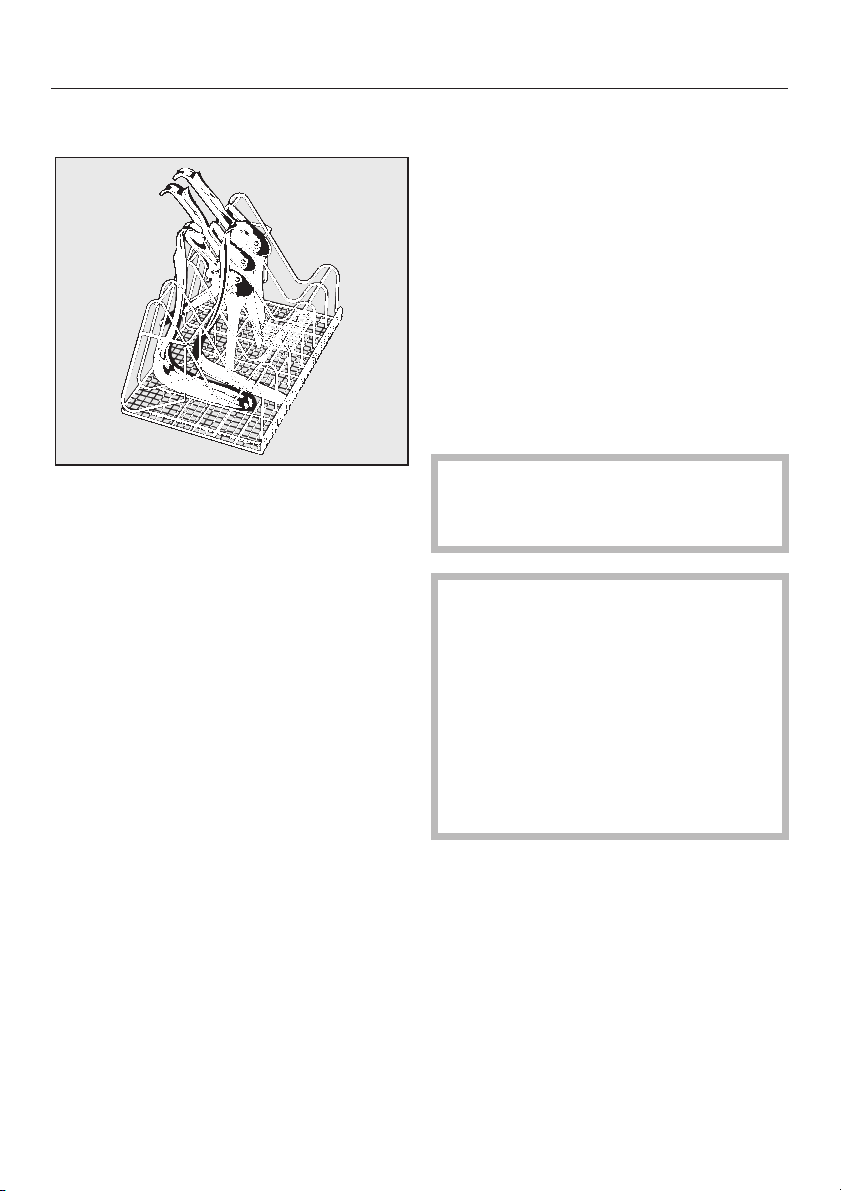
E 373 Insert
E 417 Insert
For ear funnels and ear and nasal
specula. This insert can be placed in
the top or bottom basket.
^ Open the specula before loading so
the water can access all surfaces.
For ENT instruments, such as ear
funnels. The insert can be placed in the
top basket.
The thin chrome plating on ear
funnels can be very sensitive to
neutralizing agents. Make sure your
neutralizer is compatible with your
funnels before washing.
Please note:
The Miele washer-disinfector is
intended for cleaning and
intermediate-level disinfection only.
This cleaning and disinfection
process is intended as a preliminary
step prior to sterilization.
Semi-critical instruments such as
those used for this type of
application should be sterilized
before use.
22
Page 23
Applications
GYN
E 416 Insert
Insert for gynecology specula.
^ Load as shown in the illustration.
One part specula:
Place opened one part specula
^
between the holders.
Two part specula:
Place the lower parts in the narrow
^
section of the insert (on the left in the
illustration).
Place the upper parts in the wide
^
sections of the insert (on the right in
the illustration).
Specula should always be arranged
so that they do not come into
contact or cover each other.
Please note:
The Miele washer-disinfector is
intended for cleaning and
intermediate-level disinfection only.
This cleaning and disinfection
process is intended as a preliminary
step. Semi-critical instruments such
as those used for this type of
application should be sterilized
before use.
23
Page 24
Applications
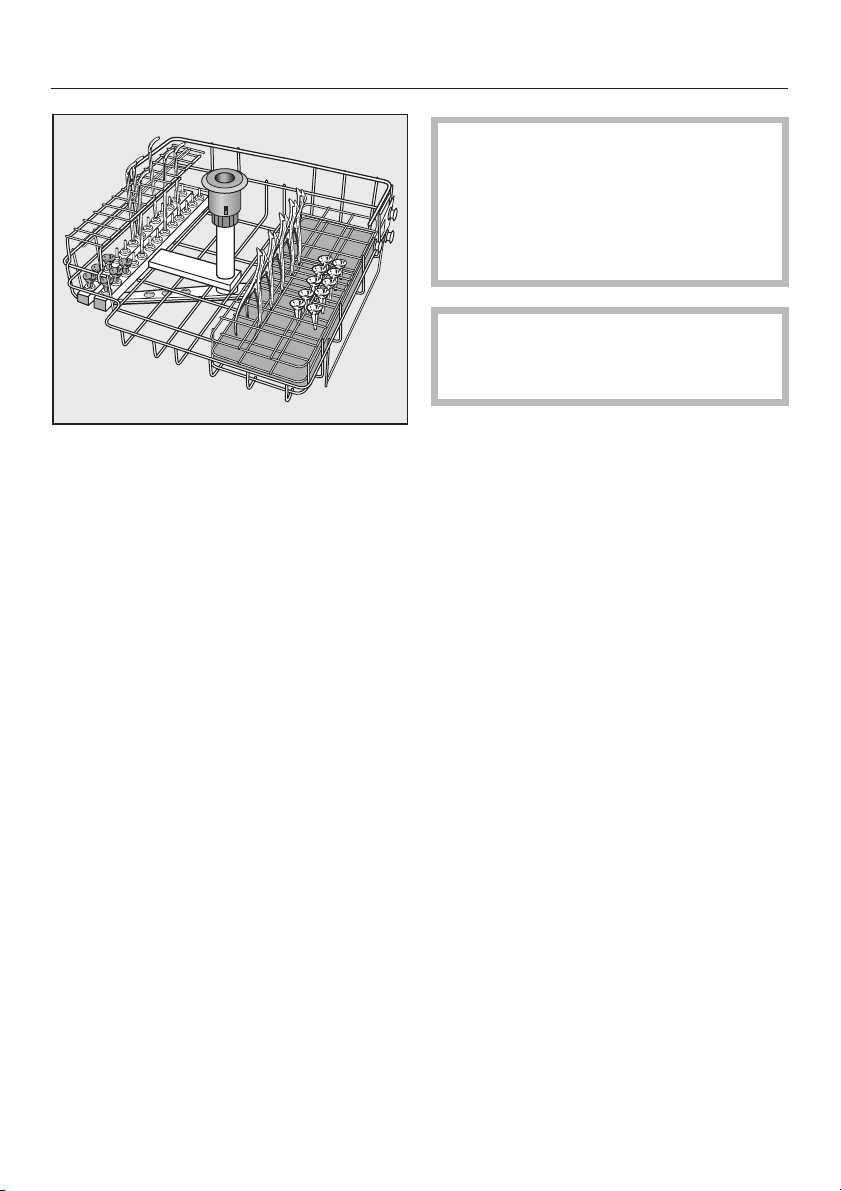
O 177/1 Top injector basket
The left side of the O 177/1, has a
retaining grid with 28 jets in silicone
receptacles for hollow-bodied
instruments. The jets spray the wash
water directly into the instrument so that
the recesses can be thoroughly
flushed, cleaned, and disinfected.
To avoid injury from instruments
,
that are pointed at both ends or
standing instruments with
upward-facing probes, the washer
should be loaded from back to front,
and unloaded from front to back.
The O 177/1 Top basket and E 337/1
insert come with their own
instructions for use.
Depending on the items to be cleaned,
special nozzles, bushings or adapters
are required. Further information can be
obtained from the Miele Professional
Sales Department.
The right side of the O 177/1 is left free
to hold various inserts, such as the
E 337/1 (shown) for standing
instruments.
24
Page 25

Rigid Endoscopy
O 176/1 Top Injector Basket
Please note that the washer
disinfector is designed for RIGID
Endoscope cleaning and
disinfection only. The endoscopes
must first be disassembled for the
best cleaning results. Always
consult the manufacturer’s
instuctions before processing any
instrument in the washer-disinfector.
To ensure that water can flow in and out
of the hollow parts of instruments,
remove any caps and/or seals. Open
valves and arrange according to the
manufacturer’s instructions.
The left hand side of the basket is left
free for inserts, such as the E 379.
Applications
To minimize the risk of injury
,
from instruments that have a probe
at the end, the washer should be
loaded from back to front and
unloaded from front to back.
This basket should be loaded only with
slightly contaminated items.
25
Page 26

Applications
Ophthalmology
The “C - Ophtha” program is
especially designed for ophthalmic
applications. This program has an
additional rinse which uses
deionized water.
This program is locked at the factory.
To unlock this program please contact
Miele Technical Service.
To prevent cross contamination
,
of lumen or hollow items, the
treatment of ophthalmic instruments
should only be performed in a
washer-disinfector designed for this
application. Also, do not use plastic
fiber cover nets (Miele nets A2 or
A3) at any time in a washer
disinfector that is also used for
ophthalmic instrument processing.
,
Do not use Rinse Aid or any
other rinsing agents when
processing ophthalmic items.
The E 429 mobile injector can be used
to clean and disinfect surgical,
ophthalmic instruments used in the OR.
The top of the injector unit has
connections for hollow instruments
such as rinsing or suction hand pieces
and cannulae, as well as silicone
holders that are used to secure the
instruments to their hose connections.
The lower level of the E 429 mobile
injector can accommodate E 441/1
inserts or E 142 mesh trays that can be
used for holding solid bodied
instruments.
The E 429 mobile injector unit for
surgical ophthalmic instruments
comes with its own operating
instructions.
,
Use of the E 429 requires a
modification to the water intake path
inside the wash chamber. This
means that the E 429 cannot be
used interchangeably with other
mobile units or baskets.
26
Page 27

Possible effects of using non-recommended Cleaning Agents
Cleaning Agents
Effect Remedy
Damage to elastomer (seals and hoses)
or plastic components of the
washer-disinfector may cause the
materials to swell, shrink, harden or
become brittle and develop cracks.
This will impair their function or
generally lead to leaks.
Strong foaming during the program will
prevent proper cleaning and rinsing of
the load. Foam escaping from the wash
cabinet can also result in damage to
the washer-disinfector.
If foaming occurs, the cleaning process
cannot be standardized and validated.
Corrosion on the stainless steel of the
wash cabinet and accessories can
have various appearances:
– rust formation (red spots / stains),
– black spots / stains,
– white spots / stains (smooth surface
is slightly pitted).
Corrosion that forms holes can result in
leaks in the washer-disinfector.
Depending on the application, the
corrosion may also impair the cleaning
and/or rinsing results or cause the
instruments or other items to corrode.
Find and correct the cause of the
–
damage.
Find and correct the cause of the
–
foaming.
Checking the process regularly in
–
order to eliminate foaming.
– Find and correct the cause of the
corrosion.
27
Page 28

Possible effects of using non-recommended Cleaning Agents
Cleaning Agents
Effect Remedy
The ingredients of the cleaning agents
can have a considerable effect on the
durability of the dispensing systems.
The dispensing hoses and pumps are
generally designed for a specific type
of cleaning agent.
General categories are:
alkaline to pH-neutral products,
–
acidic to pH-neutral products,
–
hydrogen peroxide.
–
The cleaning agents can damage the
elastomer and plastic components of
the washer-disinfector and its
accessories.
The instructions and
–
recommendations of the
manufacturer of the cleaning agents
must be observed.
Perform regular visual inspections of
–
the dispensing system.
Regularly check the flow rate of the
–
dispensing system.
– The instructions and
recommendations of the
manufacturer of the cleaning agents
must be observed.
– Perform regular visual inspections of
all accessible elastomer and plastic
components.
28
Page 29

Possible effects of using non-recommended Cleaning Agents
Cleaning Agents
Effect Remedy
Cleaning agents and rinse aids
containing tensides can cause
excessive foaming.
The foaming can occur:
in the program section in which the
–
cleaning agent is added, or
in the subsequent program section
–
due to carry-over.
Anti-foaming agents, particularly
silicone-based ones, can cause the
following:
– deposits in the wash cabinet,
– deposits on the items,
– damage to the elastomer and plastic
components of the
washer-disinfector,
– degradation of certain plastics (e.g.
polycarbonates, plexiglass, etc.) in
the load.
The process parameters of the wash
–
program (e.g. dispensing
temperature, dosage concentration,
etc.) must be set so that the overall
process creates little or no foam.
Follow the instructions of the
–
cleaning agent manufacturers.
Use anti-foaming agents only in
–
exceptional cases or when they are
absolutely necessary for the process.
– Consult Miele Professional Sales
29
Page 30

Possible effects of using non-recommended Cleaning Agents
Soiling
Effect Remedy
The following substances can cause
excessive foaming during washing and
rinsing:
disinfection agents or detergents
–
foaming substances in general, such
–
as tensides.
The following substances can cause
corrosion of the stainless steel in the
wash cabinet and the accessories:
– hydrochloric acid,
– other substances that contain
chlorides (e.g. sodium chloride)
– concentrated sulphuric acid,
– chromic acid,
– iron particles and shavings.
Reactions between cleaning agents and soils
Effects Remedy
In combination with alkaline cleaning
agents, items with soil that contain
proteins, such as blood, can cause
excessive foaming.
Rinse the items with a sufficient
–
quantity of water before placing them
in the washer-disinfector.
Select a wash program with one or
–
more short pre-rinses with cold or hot
water.
Rinse the items with a sufficient
–
quantity of water before placing them
in the washer-disinfector.
– Let the items drip dry on the counter
or in the sink before putting them in
the baskets or inserts or placing
them in the wash cabinet.
–
Select a wash program with one or
more short pre-rinses with cold
water.
In combination with very acidic or
alkaline cleaning agents, metals such
as aluminum, magnesium and zinc may
release hydrogen (explosive gas).
30
–
Follow the instructions of the
cleaning agents manufacturer.
Page 31

Use only chemicals specifically
,
made for thermal
washer-disinfectors and observe the
manufacturer’s recommendations for
use. In particular, always observe
the manufacturer’s instructions
regarding allowed residual amounts
that do not pose any toxicological
risk. Suitable cleaning agents can
be obtained from Miele.
Add rinse aid indicator
Dispensing cleaning agents
Adding rinse aid
To dispense rinse aid in the final
rinse, the DOS 2 program block has
to be activated by a Miele service
technician.
Liquid rinse aid can be used to prevent
water spots on items and to help them
dry faster.
The dispensing of rinse aid should only
be activated if deionized water is not
used in the final rinse program.
Rinse aid residue will remain on the
surface of the clean items after
drying. Rinse aid should only be
used if it is appropriate for the
application and the items intended
use.
^
Add liquid rinse aid to the rinse aid
reservoir when the “Rinse Aid”
indicator lights up.
,
Do not use rinse aids on
ophthalmic items!
Rinse aid is poured into its reservoir
and the set amount is then dispensed
automatically.
The rinse aid reservoir holds approx.
180 ml.
,
Only fill the rinse aid reservoir
with liquid rinse aid formulated for
washer-disinfectors.
Never fill with cleaning agent as this
will damage the reservoir!
31
Page 32

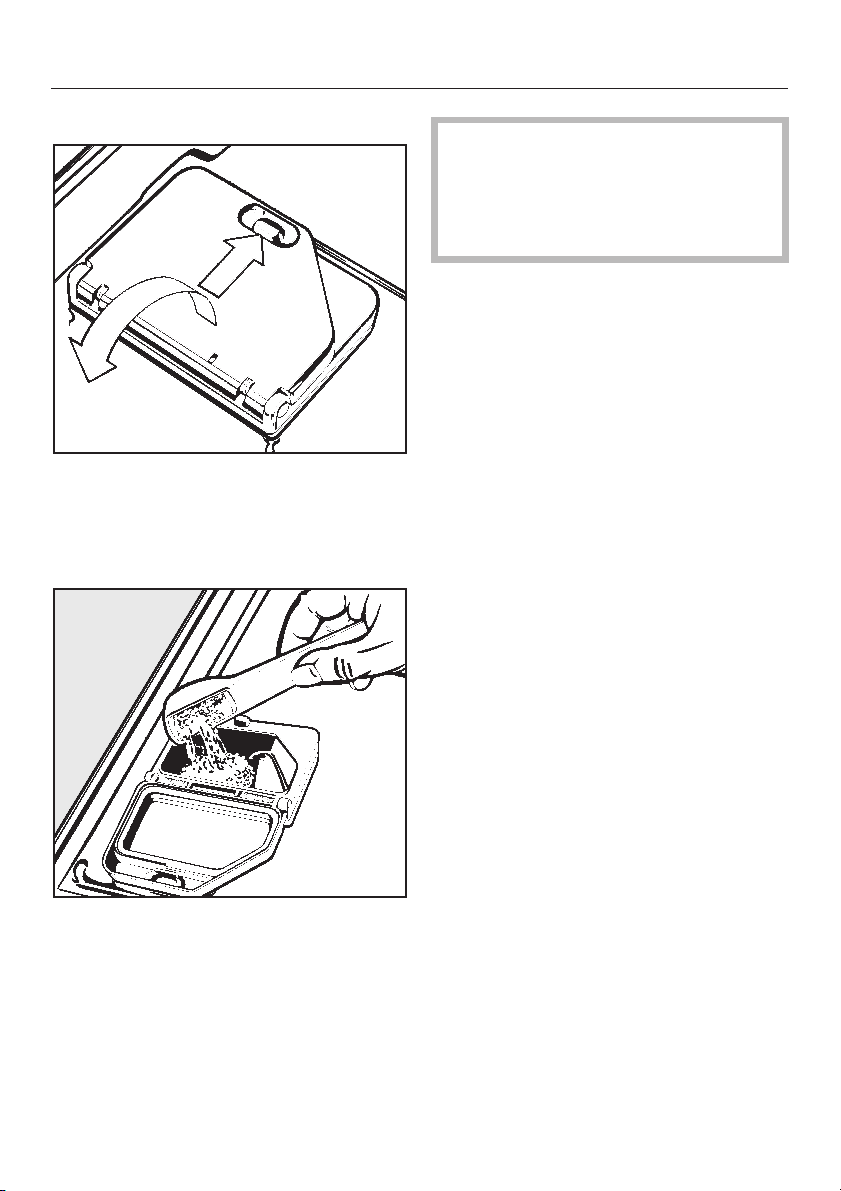
Dispensing cleaning agents
Open the door all the way.
^
^ Unscrew the cap.
^ Add liquid rinse aid until the level
indicator is dark (see arrow in the
illustration). Use a funnel if
necessary.
Setting the dosage
The dosage adjuster is under the
reservoir fill cap and has settings
adjustable from 1 to 6 (1-6 ml). It is set
to 3 (3 ml) at the factory.
If spots appear on items:
^ Use a higher setting.
If clouding or smearing appears on
items:
^
Screw the cap back on.
^
Wipe up any spilled rinse aid. This
help prevent over-foaming during the
next program.
32
^
Use a lower setting.
Page 33

Adding neutralizing agent
Neutralizing agent is used in the interim
rinse stage to help prevent
discoloration and rust spots appearing
on the items, especially at the joints.
Acidic neutralizing agents neutralize
residues of alkaline cleaning agents on
the surface of instruments and utensils.
If the cleaning agent being used is
mildly alkalinic, use a phosphoric
acid based neutralizing agent.
If using a neutral, enzyme based
liquid cleaning agent, you will need
to use a citric acid based
neutralizing agent.
Dispensing cleaning agents
Insert the siphon tube into the
^
container and screw the cap on
securely (observe the color code).
The neutralizing agent is automatically
dispensed in the rinse cycle of the
wash program. The dispensing system
container should be filled with
neutralizing agent and primed prior to
starting the machine.
Match the red capped container to the
red siphon connection and blue
container to the blue siphon hose.
The red is the acid neutralizing agent
and the blue is the cleaning agent,
which may be alkaline.
Do not mix the connections as this may
cause the cleaning agents to react with
each other, clogging the tubing.
^
Place the container on the floor next
to the washer-disinfector or in an
adjoining cabinet.
See the “Programmable functions”
section for details on how to prime the
dispensing system and set the dosage.
33
Page 34
Dispensing cleaning agents
Add neutralizing agent
indicator
^ Replace the neutralizing agent with a
full container when the “Neutralizer”
indicator lights up.
Please remember to exchange the
container before it runs empty. If
allowed to empty completely, you
will have to prime the pump again.
34
Page 35

Dispensing cleaning agents
Adding cleaning agent
Only use cleaning agents
,
suitable for thermal
washer-disinfectors. Do not use
cleaning agents designed for
domestic dishwashers.
Using a liquid cleaning agent
A liquid cleaning agent can be
dispensed via the K 60 DOS module
(dispensing pump for liquid cleaning
agent). The machine must be set up for
this by a Miele service technician. The
DOS module is connected externally.
See “Programmable functions” for
details on how to prime the dispensing
system and set the dosage.
In general, Miele recommends the
optional K 60 DOS Module for
dispensing liquid cleaning agents.
Using powder cleaning agents
Avoid inhaling powdered
,
products.
Never swallow cleaning agents as
this can result in chemical burns to
the mouth and throat, or suffocation.
Before starting a wash program, fill the
dispenser with powder cleaning agent.
Follow the agent manufacturer’s
instructions for dosing if they differ.
Dosage example:
Approx. 10.5 liters of water are in the
“Main wash” program.
30 g of cleaning agent will be required
for a concentration of approx. 3 g/l .
Dosages need not be exact. If in doubt,
adding a little more detergent will not
harm the items or the machine.
When using the following top
baskets, liquid cleaning agents
must be dispensed using the K 60
DOS module:
– O 176
– O 176/1
– O 183
– O 190/2
It is only necessary to use one type
of cleaning agent. Do not use both
powder and liquid agents
simultaneously!
35
Page 36
Dispensing cleaning agents
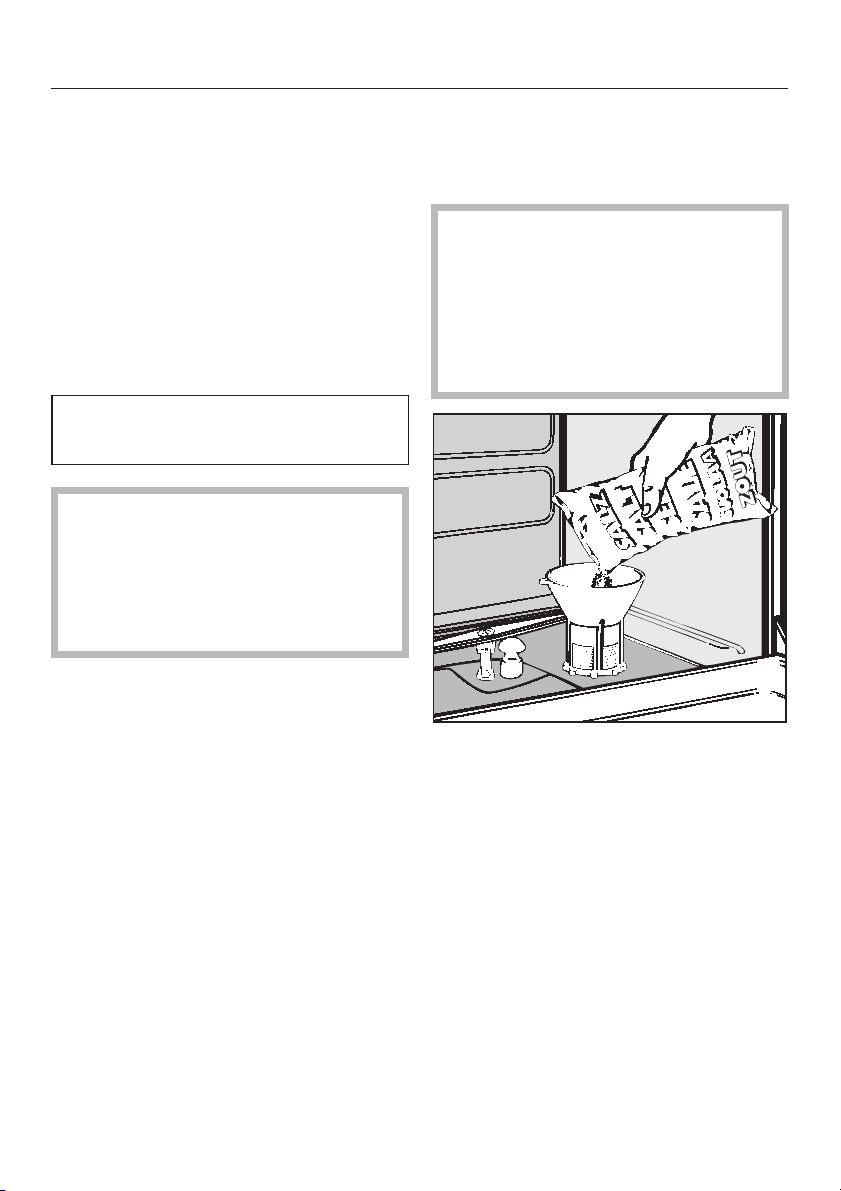
To add powder agent
^ Press the button on the dispenser
cover. The cover will pop open.
The cover will already be open after a
completed wash program.
Certain types of soil may require
special combinations of cleaning
agents and additives to achieve an
acceptable result. In such cases,
please contact Miele.
^
Add the correct amount of cleaning
agent to the compartment.
^
Snap the cover closed.
36
Page 37
Operation
Turning on
Close the door.
^
Make sure the water valves are open.
^
Press the “On/Off” button.
^
When the program selector is at f,a
dot will light up in the display.
Starting a program
Choose your program according to the
type of items to be cleaned.
The different programs and their uses
are described in the “Program chart”.
^
Turn the program selector clockwise
or counterclockwise to the desired
program.
The temperature of the first stage of the
selected program will appear in the
display (except with the “Rinse” and
“Drain” programs).
The indicator light next to the start
button 6 will flash.
Selecting “Drying” 0
“Drying” may be chosen immediately
after the program has been selected
(except with the program “Rinse”).
To do this:
^ Press 0.
The program will be extended by
Drying block 1 and 2, (see the times in
the Program chart).
The display shows the time that has
been selected for Drying block 2. This
can be altered in 5 minute increments
by pressing the 0 button.
The total running time for the program
will increase accordingly.
The drying program activates the
heater coils in the bottom of the wash
chamber. Narrow lumen instruments
will not dry thoroughly as there is not
active airflow in the chamber.
^
Press the Start button 6.
The current temperature will appear in
the display.
The indicator light next to the Start
button 6 will light up.
37
Page 38

Operation
Once the program has started, all other
programs are locked out.
If the program selector is turned to
another program, the display will go out
but the program will continue running.
The values can be seen again by
turning the program selector back to
the position of the currently running
program.
During a program, you can switch
between the following displays:
the current temperature,
–
the elapsed program time and
–
– the current program block:
1 = Pre-Wash 1
2 = Pre-Wash 2
3 = Main Wash 1
4 = Main Wash 2
6 = Rinse 1
7 = Rinse 2
8 = Rinse 3
9 = Rinse 4
10 = Final Rinse 1
11 = Final Rinse 2
12 = Drying 1
13 = Drying 2
^
Press the ß button to switch
between the displays.
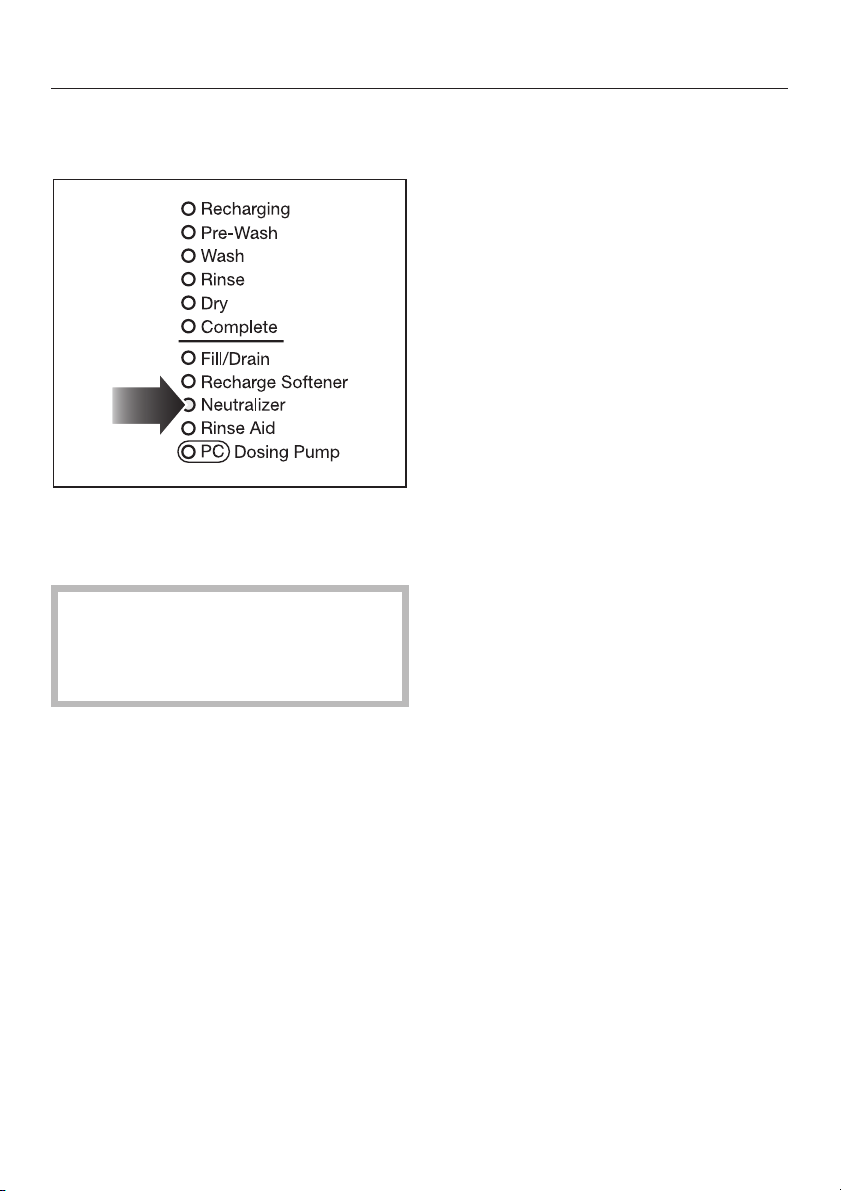
Program sequence indicators
The indicator light for the current
program step will light up during the
program:
Recharging
Pre-Wash (Pre-Wash1+2)
Wash (Main Wash1+2)
Rinse (Rinse1-4/
Final Rinse1+2)
Drying (Drying1+2)
Complete Program parameters
achieved
At the end of the program
The program has ended when the
“Complete” indicator in the program
sequence display is on and the 6
indicator has gone out. A 0 will appear
in the middle of the display. All the
other indicators light in sequence.
A buzzer will also sound for a maximum
of 30 seconds.
The buzzer time can be changed (see
“Programmable functions”).
Use the ß button to view the total
running time of a program or the
current temperature.
Additional drying
38
If additional drying is required after the
end of a program, the “Drain” program
can be used with the additional
“Drying” function. The running time for
this will be 1 minute more than the
drying time displayed.
Page 39

Operation
Canceling a program
If a program is canceled, the
,
items in the washer-disinfector must
be reprocessed!
Program cancellation due to a fault
If the program is canceled before
completion, a fault message “F..” will be
displayed.
Depending on the cause, appropriate
measures may need to be taken to
resolve the problem. See the
“Frequently asked questions” section.
Canceling the program manually
Avoid canceling a running program
unless absolutely necessary, for
instance if items in the wash cabinet
are moving around excessively or the
wrong program was selected.
Turn the program selector to f.
^
The washer-disinfector will stop running
after approx. 2 seconds.
Press the “Door” button and open the
^
door.
Caution! The items may be hot.
,
There is a risk of burns or scalding.
^ Rearrange the items. Wear protective
gloves where necessary, and
observe appropriate health and
safety regulations relating to
infectious diseases.
^ If required, add detergent.
^ Close the door.
^
Start the “Drain” program.
The water is pumped out.
^
Re-select and re-start the program.
Turning off
^
Press and release the “On/Off”
button.
Because of the electric door lock,
the door can only be opened if the
“On/Off” button is pushed in (see
Opening and closing the door).
39
Page 40

Program chart
Program When to use
A-Custom
B-MIS
C-Ophthal
RINSE
DRAIN
varioTD
Custom program for special applications. Contact Miele Service to arrange for
special programming.
For treating instruments used in minimally invasive surgery.
Contains 5 minute final rinse plus two intermediate rinses.
Use when processing ophthalmic instruments.
* This program is locked at the factory. To unlock this program please contact
Miele Technical Service.
For rinsing off chemical residues, e.g. after soaking them in disinfecting agent, to
avoid a build-up of foam in the washer-disinfector.
For draining water out of the washer-disinfector, such as when a program has
been canceled.
Program that meets general hygiene requirements for intermediate level
disinfection.
40
Page 41

Program chart
Program sequence
Pre-wash
12
CW CW
CW CW
CW CW
CW = cold water
DW = distilled water
°C = temperature
min = holding time
DOS 1 = dispensing of cleaning agent when 40°C is reached
DOS 3 = dispensing of neutralizing agent when water intake is finished
Main wash
12
DOS 1
55°C
10 min
DOS 1
55°C
5 min
DOS 1
55°C
5 min
Rinse
12
DOS 3
DOS 3
DOS 3
34
CW
CW
CW
CW DW
Rinse
Final rinses *
CW DW
93°C
5 min
DW DW DW
CW
12
93°C
5 min
93°C
5 min
x
Drying
12
99°C
35 min
99°C
35 min
65°C
30 min
99°C
35 min
* The DOS 2 rinse aid dosage must be activated by Miele Technical Service. Do not use any rinsing
agents on ophthalmic items!
x = Additional function
41
Page 42

Programmable functions
For future service work, please document any alterations to the factory default
settings in the appropriate box.
General notes:
Switch positions that have not been allocated a function are indicated in the
–
middle part of the display by a bar ( - ).
The programming level is called up via the f position.
–
It is shown as E.. in the display.
When processing medical devices, any changes made to programs or
–
dispensing systems should be documented and the machine’s cleaning and
disinfecting ability should be verified.
The following applies to all programmable functions:
To activate the programming mode
^ Turn the program selector to f.
^ Turn off the machine.
^ Press ß and 6 at the same time,
hold them in and, while doing so,
press the On/Off switch.
Saving values in programming mode
^
Press 6.
^
Press 6 again.
Exiting the programming mode without saving
^
Press the On/Off button to turn off
the machine.
42
The current program version P.. will
appear in the display. The Fill/Drain
indicator light will come on.
SP appears in the display.
The change is saved.
Any change is canceled.
Page 43

Programmable functions
Resetting the operating hours counter for the filter in the drying
unit
After the filter in the drying unit has been changed, the operating hours counter
needs to be reset.
Step Display / Result
Activate the programming mode (see
^
“Programmable functions - To activate
programming mode”.
Press the “Drying” 0 button as often as
^
necessary or hold it pressed in until E04 appears
in the display.
Turn the program selector to the 7 o’clock position. The current value will appear
^ Press the “Display” ß button once.
^ Save the changes (see “Programmable functions
- Saving values in programming mode”).
Once the setting has been saved and you leave the programming mode, the
operating hours counter will go out.
E04
in the display, e.g. 105
000
43
Page 44

Programmable functions
DOS 1 (liquid detergent)
Setting the dosage concentration
The dosage concentration only needs to be set for liquid detergents. Set
the concentration according to the detergent manufacturer’s
recommendations. Do not change the setting if you are using powdered
detergent in the door dispenser.
The volume of water used is 10.5 l in the main wash cycle.
Step Display / Result
Activate the programming mode (see
^
“Programmable functions - To activate
programming mode”.
^ Press the “Drying” 0 button until E02
appears in the display.
^ Turn the program selector to B - MIS
(2-o’clock-position).
without DOS Module connected:
with DOS Module connected:
^ Press or hold down the “Display” ß button
until the required time or dosage
concentration appears in the display,
(e.g. 0.50).
^
Save the changes (see “Programmable
functions - Saving values in programming
mode”).
Dosage concentration setting :
E02
10 = 10 sec dosage length
1.00 = 1.0 % dosage concentration
0.50
The dosage time / dosage
concentration is now set.
44
Page 45

Programmable functions
Priming the dispensing system
The dispensing system must be primed:
– when the dosage concentration is set for the first time,
– if the liquid cleaning agent container runs out and is not replaced in time.
Step Display / Result
Activate the programming mode (see
^
“Programmable functions - To activate
programming mode”.
Press 0 until E02 appears.
^
Turn the program selector to A-
^
Custom (1-o’clock-position).
Press ß.
^
^ Exit the programming mode.
Start the “Rinse” program.
E02
d§1
The dispensing system will be primed
automatically. 0 will appear in the
display when the priming process has
finished.
Any agents which are in the wash
cabinet after the priming process will
be diluted before being drained away.
45
Page 46

Programmable functions
DOS 3 (neutralizer)
Setting the neutralizer dosage
Set dosage concentration according to the neutralizer manufacturer’s
recommendations.
Step Display / Result
Activate the programming mode (see
^
“Programmable functions - To activate
programming mode”.
Press 0 until E02 appears.
^
E02
Turn the program selector to the
^
6-o’clock-position.
^ Press ß as many times as necessary or
hold pressed in until the required value
appears in the display, e.g. 0.20.
^ Save the changes (see “Programmable
functions - Saving values in programming
mode”).
Dosage concentration setting :
The dosage concentration which is
programmed will appear in the
display,
e.g. 0.10 = 0.1 %
0.20
The dosage concentration level has
now been set.
46
Page 47

Programmable functions
Priming the dispensing system
The dispensing system must be primed:
– when the dispensing system is used for the first time,
– if the neutralizing agent container runs out and is not replaced in time.
Step Display / Result
Activate the programming mode (see
^
“Programmable functions - To activate
programming mode”.
Press 0 until E02 appears
^
Turn the program selector to the
^
5-o’clock-position.
E02
d§3
^ Press ß
^ Exit the programming mode.
Start the “Rinse” program.
The dispensing system will be
primed automatically. 0 will appear
in the display when the priming
process has finished.
Any agents which are in the wash
cabinet after the priming process
will be diluted before being drained
away.
47
Page 48

Programmable functions
Buzzer
A buzzer can be programmed to sound for the following:
– a constant tone will sound at the end of a program,
– at one second intervals as a fault warning, and
– 3 short beeps followed by a 2 second pause, then 3 short beeps
as a reminder to remove an item for testing.
The buzzer settings are displayed as numbers:
20 Switched off
21 At the end of a program (factory default setting)
22 Fault indication
23 At end of a program + fault indication
24 Reminder to remove an item
25 At the end of a program + reminder to remove an item
26 Fault indication + reminder to remove an item
27 At the end of program + fault indication + reminder to remove an item.
Step Display / Result
^ Activate the programming mode (see
“Programmable functions - To activate
programming mode”.
^ Press 0 until E04 appears
^ Turn the program selector to B - MIS
(2-o’clock-position).
^
Press ß repeatedly or hold pressed in until
the required number appears in the display,
e.g. 26.
^
Save the changes (see “Programmable
functions - Saving values in programming
mode”).
Value set :
The buzzer will sound at the selected time for 30 seconds.
To switch the buzzer off early:
- turn the program selector to f,or
- press ß,or
- open the door.
48
E04
21
26
Page 49

Programmable functions
Changing program parameters
The factory-default temperature and holding time settings for the individual
program blocks are listed in the program chart.
Be sure to document any changes made to a program, by making a note in the
corresponding column in the program chart.
Changing wash and rinse parameters
The temperatures and holding times for the program blocks “Main Wash” 2 (in
program “B - MIS”) and “Final Rinse” can be changed.
Adjustable temperature range:
86°F - 199°F (30°C - 93°C)
–
Temperatures above 131°F (55°C) can cause blood to denature and set.
Appropriate infection-control measures must be observed for all programs.
Adjustable temperature holding time range:
1 - 15 min.
Changing the drying parameters
The drying temperature and drying time can both be changed in program blocks
“Drying” 1 (if available) and “Drying” 2.
The temperature range is: 131°F - 199°F (50 °C -99 °C)
Values which can be set for the drying times:
Drying 1: 1-99 minutes in 1-minute increments
Drying 2: 5-95 minutes in 5-minute increments
The drying time for program block “Drying” 2 can also be altered using the 0
button (see “Operation - Selecting Drying”).
49
Page 50

Programmable functions
Changing the temperature
Step Display / Result
Activate the programming mode (see
^
“Programmable functions - To activate programming
mode”.
Press or hold down the 0 button until the desired
^
program block level appears in the display.
Turn the program selector to the program you wish to
^
change, e.g. B-MIS.
E09 for Main wash 1
E12 for Main wash 2
E25 for Final rinse 2
E28 for Drying 1
E31 for Drying 2
°C ~55
^ Press or hold down the ß button until the desired
value appears in the display, e.g. 158°F (70°C).
^ Save the changes (see “Programmable functions -
Saving values in programming mode”).
Changing the temperature holding time
Step Display / Result
^
Activate the programming mode (see
“Programmable functions - To activate
programming mode”.
^
Press or hold down the 0 button until the
desired program block level appears in the
display.
^
Turn the program selector to the program you
wish to change, e.g. B-MIS.
^
Press or hold down the ß button until the
desired value appears in the display, e.g. 10.
°C ~70
E10 for Main wash 1
E13 for Main wash 2
E26 for Final rinse 2
E29 for Drying 1
E32 for Drying 2
min _ 5
min _ 10
^
Save the changes (see “Programmable functions
- Saving values in programming mode”).
50
Page 51

Programmable functions
Restoring to factory default settings
Step Display / Result
Activate the programming mode (see “Programmable
^
functions - To activate programming mode”.
Press or hold down the 0 button until E33 appears
^
in the display.
Turn the program selector to a program.
^
E33
Factory default setting:
The program was changed:
When PP is displayed, press the ß button.
^
^ Save the changes (see “Programmable functions -
Saving values in programming mode”).
Please note: The factory default setting for the water softener is also restored
during this process. Reprogramming is required (see “Setting the water
softener”).
Changes that were made to the customized programs “A - Custom”, “B-MIS”
and “C-Ophthal” are maintained.
00
PP
00, the factory default
settings have been
restored.
51
Page 52

Programmable functions
Setting the time and date
If your washer-disinfector is connected to a printer through the RS 232 serial
interface, you can set the time and date that will be displayed in the printout.
The individual values of date and time are stored according to the position of the
program selector:
“1 o’clock” position: Calendar day 01 - 31
“2 o’clock” position: Month 01 - 12
“3 o’clock” position: Year 00 - 99 = 2000 - 2099
“4 o’clock” position: Hours 00 - 23 (24 hour time)
“5 o’clock” position: Minutes 00 - 59
If the serial interface is not being used, a “-” will appear in the display each time
E34 is selected.
Step Display / Result
^ Activate the programming mode (see
“Programmable functions - To activate
programming mode”.
^ Press 0 repeatedly or hold it pressed in until
E34 appears in the display.
Wait 30 seconds before continuing. The control unit is reading
^
Turn the program selector to the position of the
parameter you wish to change, e.g. the “4 o’clock”
position to change the hours.
^
Press ß repeatedly until the desired value
appears in the display.
^
Save the changes (see “Programmable functions Saving values in programming mode”).
The new values will be transmitted to the serial interface and printer once you
have saved them and left the programming mode. Wait 30 seconds before turning
off the machine.
52
E34
the current values.
current value
new value
Page 53

Process documentation
The washer-disinfector provides the
option of documenting the treatment
process (process documentation).
Process documentation can be
generated by using special software or
via a printer.
For this purpose, the washer-disinfector
is equipped with a serial interface at the
rear.
The interface must be configured by
Miele.
Process documentation using
documentation software
The process parameters are sent to
external documentation software for
digital archiving.
Process documentation using a
printer
The process parameters are printed
and are archived in hard copy format.
No digital storage is possible.
As a program is running, the following
data are recorded:
Date and machine number:
–
Program start and program name
–
Blocks used in the program
–
Dispensing system number with
–
dosage amount, temperature and, if
applicable, dosage target quantity
Target values for temperatures and
–
holding times
Minimum temperature during holding
–
time
– Any faults detected (e.g. Water inlet
fault)
– Program end time
– Messages (e.g. insufficient salt)
The reports can be generated in
German, English, French, Italian and
Spanish.
Please contact Miele if you require
further information about suitable
printers and software.
53
Page 54

Cleaning and care
Periodic checks
After every 1000 hours of operation
or at least once a year, Miele
recommends that routine maintenance
and process verification is performed
on your washer-disinfector.
Maintenance covers inspections/repairs
to the following:
Electrical safety check
–
Door mechanism and door seal
–
Any screw connections and
–
connectors in the wash cabinet
– Water inlet and drainage
– Internal and external dispensing
systems
– Spray arms
– Combination filter
– Sump including drain pump and
non-return valve
The following operational tests will also
be performed as part of the
maintenance visit:
A program test run
–
Temperature measurements of the
–
wash cabinet
Seals will be tested for water
–
tightness
All relevant measuring systems will
–
be safety tested, including fault
displays.
To schedule a regular
maintenance/verification check,
please contact the Miele Service
Department.
– All baskets, inserts and modules
–
Drying unit
and where applicable:
–
Steam condenser
–
Printer
54
Page 55

Cleaning and care
Process verification
The cleaning and disinfection process
of an automated washer should be
verified annually. In addition,
verification should take place when the
unit is first installed, after any major ser
vice repair to the washer, and after
repair or replacement of utilities
connected to the washer.
Routine checks
The frequency of routine checks should
be determined by the end users, based
on use. High use means checking the
operation more often.
The following items must be checked:
All filters in the wash cabinet
–
The spray arms in the
–
washer-disinfector and in the baskets
The wash cabinet and the door seal
–
The dispensing systems
–
– Baskets and inserts.
When using a powder cleaning agent,
the temperature at the time of
dispensing should be checked every
14 days.
Check the temperature during the
program sequence. When the sound of
the dispenser cover flipping open is
heard, read the temperature in the
display, document it and compare it
with the temperature in the past
verification record.
,
Notify Miele Technical Service if
the displayed temperature deviates
from the temperature in the
verification record by more than
+/- 2°C.
55
Page 56
Cleaning and care
Cleaning the filters in the wash
cabinet
The filters in the base of the wash
cabinet are designed to prevent coarse
soils from getting into the circulation
system.
A build-up of these soils can cause the
filters to clog. They should be checked
routinely and cleaned if necessary.
DO NOT use the machine
,
without all filters in place.
Watch out for glass splinters,
,
needles etc. which could cause
injury.
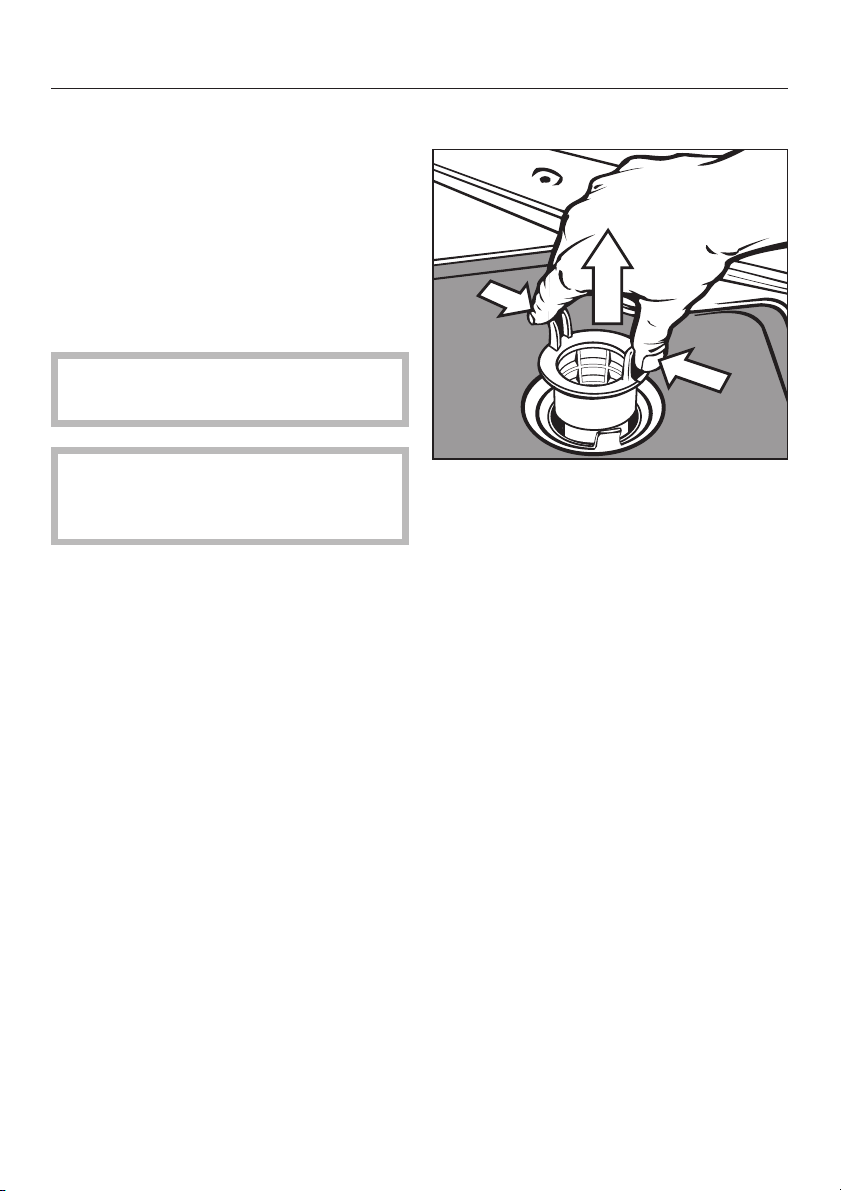
Cleaning the coarse filter
^ Press the two lugs together, remove,
and clean the coarse filter.
^ Put the clean filter back in position
and press down until it clicks in
place.
56
Page 57
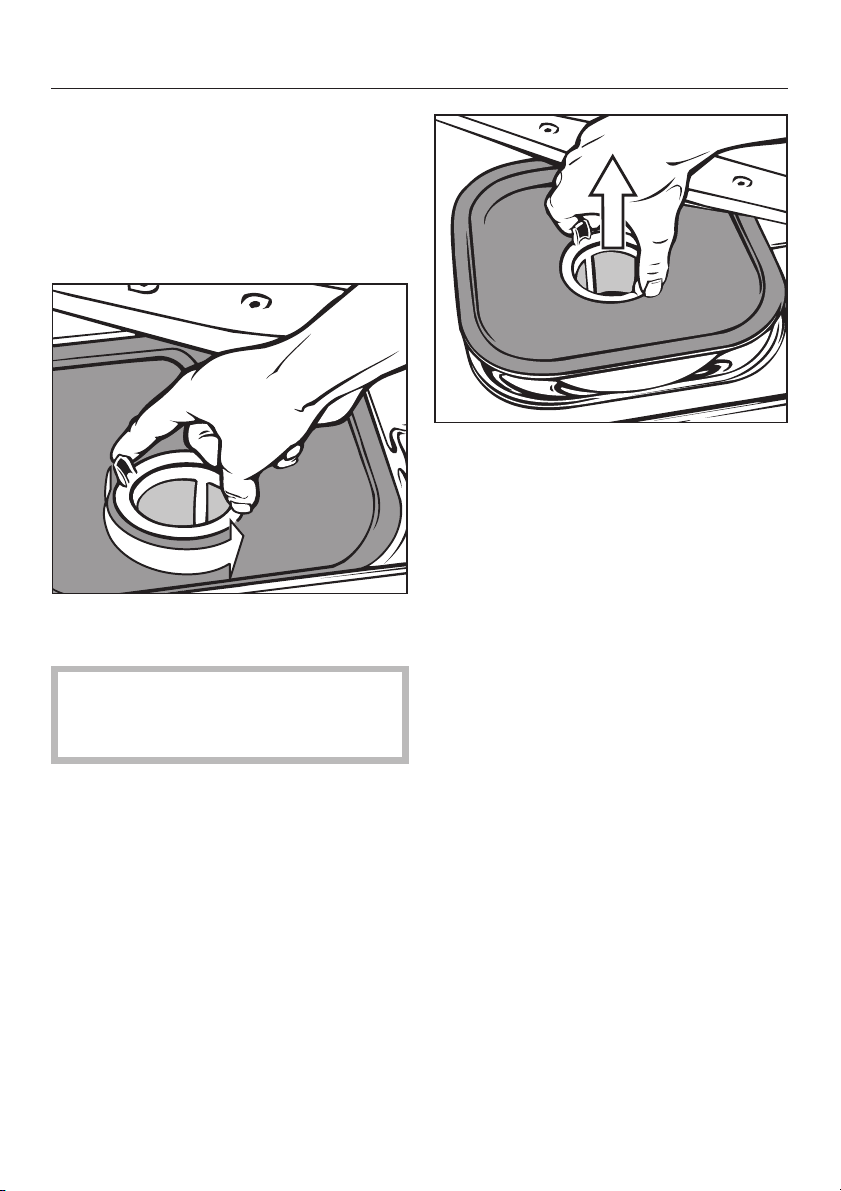
Cleaning the flat and micro-fine
filters
Remove the coarse filter.
^
Remove the fine filter (not shown)
^
which sits inside of the micro-fine
filter.
^ To unscrew the micro-fine filter, turn
twice counterclockwise.
Cleaning and care
Then pull out the micro-fine filter
^
together with the flat filter.
^ Clean the filters.
^ Replace the filters by performing the
above steps in the reverse order.
Ensure that the filters sit flat in the
base of the wash cabinet.
,
Watch out for glass splinters,
needles etc. which could cause
injury.
57
Page 58

Cleaning and care
Cleaning the spray arms
The water jets in the spray arms can
become blocked and should be
checked periodically.
Remove the spray arms as follows:
Take any baskets out of the wash
^
cabinet.
For spray arms on the bottom of top
baskets or mobile units:
Loosen the nut on the spray arm and
^
take the spray arm off.
Metal nuts have a reverse thread,
while ceramic nuts have a regular
thread.
For spray arms inside of the wash
cabinet:
Unscrew the upper spray arm.
^
Loosen the knurled thumb nut to
^
unscrew the lower spray arm.
Use a pointed object to push
^
particles into the spray arm jets, and
then rinse well under running water.
After cleaning the spray arms, fit
^
them and screw them back into
position.
After replacing the spray arms,
check that they rotate freely.
58
Page 59

Cleaning the control panel
The control panel should only be
^
cleaned using a damp cloth or with a
cleaning agent made for glass or
plastic surfaces.
A disinfecting agent can be used to
wipe the surfaces.
Do not use abrasive cleaners
,
or all-purpose cleaners.
Using them could damage the
control panel.
Cleaning and care
Never clean the machine or
,
objects near by with a hose, steam,
or a pressure washer.
Cleaning the wash cabinet
The wash cabinet is generally
self-cleaning.
However, should a build-up of deposits
occur in the cabinet please contact
Miele for advice.
Cleaning the front of the
machine
^ The front panel can be cleaned using
a damp cloth or a non-abrasive
cleaning agent designed for use on
stainless steel.
,
Do not use any cleaning
agents containing ammonia or
thinners as these can damage the
surface material.
Checking the door seals
Seals which are no longer tight or which
have suffered damage must be
replaced with new ones by an
authorized Miele technician.
Dispensing systems
All dispensing systems should be
monitored regularly to make sure they
are functioning properly.
59
Page 60

Cleaning and care
Baskets and inserts
Baskets and inserts should be regularly
checked to make sure they are
functioning correctly. The frequency
should be determined by the end user
based on use.
Check that rollers on the
–
baskets/inserts are free of hindrance
and that they are secure.
Check that the basket connector
–
(spring adapter) is at the correct
height and screwed on correctly.
Check that jets, sleeves and hose
–
adapters are not bent or broken and
that they are securely held in their
positions.
– Check that washing solution can flow
unhindered through all jets, sleeves
and hose adapters.
See the specific instructions that
come with your baskets or inserts for
further information on cleaning them
or their filters and components.
– Make sure any caps or closures on
sleeves are correctly positioned.
– Check that the locking caps in the
module connectors of modular
system mobile units are working
properly.
and where applicable:
–
Make sure that the spray arms rotate
freely.
–
Make sure the spray arm jets are free
of any obstructions. See “Cleaning
the spray arms”.
60
Page 61

Drying unit (TA) - Maintenance
SF2 in the display: Change the filter
The filter must be changed if SF2 starts
to flash in the display.
To ensure the machine operates
correctly, only use original Miele
HEPA filters.
Cleaning and care
^ Remove the filter from its holder, and
replace it with a new one.
^ Lift the service panel upward and
push until it clicks shut.
Reset the filter’s operating hours
counter after changing the filter.
See “Programmable functions” for
information how to do this.
^ Press the service panel firmly at both
sides a to release the locking
mechanism.
^
While pressing, place a finger into
each of the openings below the ser
vice panel b and push up the
locking pins.
^
Tilt the service panel forward to open
it.
-
61
Page 62

Cleaning and care
Cleaning the drain pump and
non-return valve
If water remains in the machine at the
end of a program, the drain pump or
the non-return valve might be blocked.
They are easy to clean.
Remove the combination filter from
^
the wash cabinet.
^ Release the locking clamp.
^
Lift up the non-return valve and rinse
it under running water. The ball inside
should move freely.
The drain pump is situated under the
non-return valve (see arrow).
^ Before replacing the non-return
valve, check that the drain pump is
free of obstructions.
^ Carefully replace the non-return valve
and secure with the locking clamp.
For safety reasons, the load should
be put through the original cycle
again.
,
Watch out for glass splinters,
needles, etc. which could cause
injury.
62
Page 63

Cleaning and care
Cleaning the water intake
filters
Filters are incorporated in water intake
connections to protect the intake
valves. If these filters get dirty they
need to be cleaned, or sufficient water
may not flow into the wash cabinet.
The plastic housing of the water
,
connection contains an electrical
component. It must not be dipped in
water.
To clean the filters
Disconnect the machine from the
^
power supply.
Turn off the water valve and unscrew
^
the water intake hose.
Check and/or replace the rubber
^
washer if necessary.
^ Clean the large area filter (1) and fine
filter (2), and/or replace with new
filters if necessary.
^
Make sure they are seated correctly.
^
Reconnect the hose to the valve,
making sure it goes on correctly and
is not cross-threaded.
Open the valve gradually to test for
leaks.
If there is a leak, the hose might not be
on securely or it may have been
screwed on at an angle.
^
Unscrew and reconnect it to the
water valve correctly.
63
Page 64

Frequently asked questions
The following guide can be used to help address minor problems without a ser
vice call.
Repairs should only be carried out by a qualified and trained person in
,
accordance with local and national safety regulations. Unauthorized repairs
could cause personal injury or machine damage.
To help avoid unnecessary service calls, please check whether an error message
can be repeated or was due to operator error.
To do so:
Turn the program selector to f. The error message is erased.
^
Press the On/Off button to turn off the machine.
^
^ Turn the machine back on and reselect the program. Run the program.
^ If the error occurs again and cannot be corrected, contact Miele Technical Ser-
vice for assistance.
Please provide the error code ( “F...”) .
Fault Possible cause Solution
The machine does not
start.
The machine does not
work.
The door is not closed. Close the door firmly.
The circuit breaker is
defective or has tripped.
The machine is not turned
on.
Fault code: F04-F17,
F20-F--
Fault code: F31-33 There is a fault with the
Reset the breaker.
(For minimum breaker rating:
see the data plate).
Press the On/Off button and
select a program.
Contact Miele Service.
controls for the dispensing
system.
Contact Miele Service.
-
64
Page 65

Frequently asked questions
Fault Possible cause Solution
The 8 Dosing pump
indicator starts
flashing before the
start of a program. The
program cannot be
started.
Fault code Fdo,orthe
container for liquid
cleaning agent is empty.
A few minutes after the
start of a program, the
8 Dosing pump
indicator flashes and
the program is
canceled.
Fault code Fdo, or fault
with the liquid cleaning
agent dispensing system.
Before trying to fix the
problem, you must:
Turn the program selector
–
to f (the fault indicator
goes out).
Turn the machine off using
–
the On/Off button.
Replace it with a new, full
container.
Then:
Turn the machine on.
–
– Start the program again.
Before trying to fix the
problem, you must:
– Turn the program selector
to f (the fault indicator
goes out).
– Turn the machine off using
the On/Off switch.
Replace the empty container
with a new, full container.
Prime the dispensing system;
see “Programmable
functions”.
Then:
–
Turn the machine on.
–
Start the program again.
65
Page 66

Frequently asked questions
Fault Possible cause Solution
The “Neutralizer”
indicator starts
flashing before the
start of a program. The
program cannot be
started.
Fault code Fdo,orthe
neutralizing agent
container is empty.
A few minutes after the
start of a program, the
“Neutralizer” indicator
flashes and the
program is canceled.
Fault code Fdo, or there
is a fault with the
neutralizing agent
dispensing system.
Before trying to fix the
problem, you must:
Turn the program selector
–
to f (the fault indicator
goes out).
Turn the machine off using
–
the On/Off button.
Replace it with a new, full
container.
Then:
Turn the machine on.
–
– Start the program again.
Before trying to fix the
problem, you must:
– Turn the program selector
to f (the fault indicator
goes out).
– Turn the machine off using
the On/Off button.
Replace the empty container
with a new, full container.
Prime the dispensing system;
see “Programmable
functions”.
Then:
–
Turn the machine on.
–
Start the program again.
66
Page 67

Frequently asked questions
Fault Possible fault Solution
Before the start of a
program, the “Rinse
Aid” indicator flashes,
and the program can’t
be started.
Fault code Fdo, or the rinse
aid reservoir is empty.
A few minutes after the
start of a program, the
“Rinse Aid” indicator
flashes, and the
program is cancelled.
Fault code Fdo, or the rinse
aid reservoir is empty.
Before trying to fix the
problem, you must:
Turn the program
–
selector to f (the fault
indicator goes out).
Turn the machine off
–
using the On/Off button.
Fill the reservoir with rinse
aid.
Then:
Turn the machine on.
–
Start the program again.
–
Before trying to fix the
problem, you must:
– Turn the program
selector to f (the fault
indicator goes out).
– Turn the machine off
using the On/Off button.
Fill the reservoir with rinse
aid.
Then:
–
Turn the machine on.
–
Start the program again.
67
Page 68

Frequently asked questions
Fault Possible cause Solution
The “Recharge
Softener” indicator
flashes.
A few minutes after the
start of a program,
the"Fill/Drain"
indicator flashes and
the program is
canceled.
The salt reservoir has not
been replenished,
meaning that the water
softener could not be
reactivated.
Fault code F..E:
There is a water intake
fault.
Fill the salt reservoir with
reactivation salt.
Before trying to fix the
problem, you must:
Turn the program selector
–
to f (the fault indicator
goes out).
Turn the machine off using
–
the On/Off button.
Check that the valve is
–
open.
– Clean the water intake
filter; see “Cleaning and
care”.
– The water pressure is too
low. Ask a plumber for
advice.
Then:
– Turn the machine on.
–
Start the program again.
68
Page 69

Frequently asked questions
Fault Possible cause Solution
The program is
canceled and the
"Fill/Drain" indicator
flashes.
Water in the wash
cabinet is not heated;
the program lasts too
long.
Fault code F..A:
There is a drain fault.
Fault code F01 - F03,
F18, F19
This machine has a
resettable limiter which
will turn off the heating
elements if they
over-heat. This could be
caused by large articles
covering the heating
elements or if the filters in
the wash cabinet are
blocked.
Before trying to fix the
problem, you must:
Turn the program selector
–
to f (the fault indicator
goes out).
Turn the machine off using
–
the On/Off button.
Clean the filters in the
–
wash cabinet.
Clean the drain pump.
–
Clean the non-return valve.
–
Remove any kinks and
–
straighten the drain hose.
Then:
– Turn the machine on.
– Run the “Drain” program
– Start the wash program
again.
To rectify the problem:
– Clean the filters in the
wash cabinet.
–
Rearrange the load.
–
Reset the thermal cut-out
(see “Thermal cut-out”).
69
Page 70

Frequently asked questions
Fault Possible fault Solution
After a program, there is
cleaning agent residue
left in the dispenser.
The dispenser cover
cannot be closed.
There is a knocking
noise in the wash
cabinet.
There is a rattling noise
in the wash cabinet.
There is a knocking
noise from the water
pipe.
The dispenser was wet
when the cleaning agent
was added.
The dispenser cover was
blocked.
Cleaning agent residue is
blocking the latch.
A spray arm is hitting one
of the items.
Items in the wash cabinet
are moving.
This may be caused by the
installation or the diameter
of the water pipe.
Make sure the dispenser is
dry before filling it.
Always arrange the items
such that the dispenser
cover can open.
Remove the cleaning
–
agent residue.
The items to be cleaned
–
must be reprocessed.
Remove the cleaning
agent residue.
Interrupt the program and
re-arrange the items that
are blocking the spray arm
(see “Canceling a
program”).
Interrupt the program and
re-arrange the items that
are loose (see “Canceling
a program”).
This has no effect on the
washer-disinfector. If it
continues, contact a
plumber.
70
Page 71

Frequently asked questions
Fault Possible cause Solution
Instruments show
signs of corrosion
White residue is visible
on items.
The items are not suitable
for treatment in the
washer-disinfector.
No neutralization took
place in the program
sequence.
The chloride content of
the water is too high.
Rust has entered the
wash cabinet due to:
– the iron content of the
water being too high,
– rusty instruments being
cleaned in the
machine.
The salt reservoir cap has
not been screwed on
correctly.
The water softener is
programmed to a setting
which is too low.
The salt reservoir is
empty.
The salt reservoir cap has
not been screwed on
correctly.
The rinse aid dosage is
set too low, causing water
spots.
Use only instruments made of
instrument steel.
Fill the neutralizing agent
–
container.
For custom programs
–
without a factory-set
neutralizing step, have it
programmed in by Miele
Technical Service.
Have the water analyzed. If
necessary, connect the
machine to an external water
softener unit and use
deionized water.
– Check the water supply.
– Dispose of any rusty
instruments.
Replace it making sure it is
screwed on correctly.
Check the water hardness
level of the water supply and
program the water softener
correctly.
Fill with salt.
Replace it, making sure it is
screwed on correctly.
Increase the rinse aid dosage
setting.
71
Page 72

Frequently asked questions
Fault Possible cause Solution
Items have spots The rinse aid dosage is
set too low.
The rinse aid reservoir is
empty.
The cleaning result is
unsatisfactory.
Baskets or inserts have
been incorrectly loaded
or overloaded.
The cleaning agent used
is not suitable for the type
or degree of soiling.
Soil has been allowed to
dry for too long.
The motion of the spray
arms is restricted.
The jets in the spray arms
or the inserts are
blocked.
The filters in the wash
cabinet are dirty.
The basket or insert is not
correctly connected to its
water intake port.
Increase the rinse aid dosage
setting.
Add rinse aid.
Rearrange the items.
Do not overload the baskets
or inserts.
Use a cleaning agent suitable
for your soil and machine
reprocessing.
Items should only be left
unwashed for a maximum of
6 hours before machine
cleaning.
Rearrange the items.
Check the jets and clean
them if necessary.
Check the filters, and clean
them if necessary.
Adjust the adapter
connecting the water to the
basket or insert.
72
Page 73

Thermal cut-out
This machine has a resettable limiter
which will shut off the heating elements
in the event of over-heating. This could
be caused by large articles covering
the heating elements or if the filters in
the wash cabinet are blocked.
If the fault code: F01 - F03, F18, F19
appears in the display, proceed as
follows:
Remove the cause of the fault.
^
Remove the service panel.
^
^ Press the reset button on the heater
limiter located on the right-hand side
of the base.
^ Replace the service panel.
If the limiter trips again, contact the
Miele Service Department.
Frequently asked questions
73
Page 74

After sales service
This washer-disinfector must be
,
installed, maintained and repaired
by an authorized Miele service
technician. Maintenance and repair
work performed by unqualified
persons can place the user at risk.
In the event of a fault which you cannot
correct yourself please contact the
Miele Technical Service Department
U 1-800-991-9380
techserv@mieleusa.com
Please have the model and
^
Fabrication (serial) number of your
washer-disinfector available. This
information can be found on the right
side of the open door frame.
74
Page 75

Caring for the environment
Disposal of the packing
materials
The cardboard box and packing
materials protect the appliance during
shipping. They have been designed to
be biodegradable and recyclable.
Ensure that any plastic wrappings,
bags, etc. are disposed of safely and
kept out of the reach of children.
Disposal of an old appliance
Old appliances may contain materials
that can be recycled. Please contact
your local agencies about recycling in
your area.
Ensure that the appliance presents no
danger to children while being stored
for disposal. See “IMPORTANT SAFETY
INSTRUCTIONS”.
75
Page 76

Installation
Please refer to the installation
diagrams supplied with the
washer-disinfector!
Furniture and fittings installed
,
near the machine must be of a
commercial standard able to
withstand the effects of steam and
condensation.
The washer/disinfector must be
installed correctly and leveled.
Height adjustments or unevenness in
the floor can be compensated for by
raising and lowering the feet of the
washer.
The washer-disinfector can be installed
in the following ways:
– Free-standing
– Slide-in with a lid:
Next to other machines or furniture,
or in a suitable space. The space
must be at least 23 5/8" (60 cm) wide
and 23 5/8" (60 cm) deep.
–
Undercounter:
The washer-disinfector can be
installed under a continuous
countertop or sink drainer.
The recess must be at least 23 5/8"
(60 cm) wide, 23 5/8" (60 cm) deep
and 32 5/16" (82 cm) high.
Undercounter installation
To install the washer-disinfector under a
continuous countertop, the machine lid
must be removed as follows:
Open the door.
^
^ Unscrew the left and right fastening
screws in the upper frame, in front of
the door seal.
^ Pull the lid forward lift it up and
remove.
To prevent steam damage to the
countertop the self adhesive
protective foil supplied (25 x 58 cm)
must be stuck in place underneath
the countertop near the steam
condenser.
76
Page 77

Installation
Positioning and securing the
washer-disinfector
To ensure stability, the
washer-disinfector must first be aligned
and then secured to the countertop.
Open the door.
^
^ Screw the washer-disinfector to the
countertop through the left and right
holes in the front trim.
Protecting the countertop
The underside of a wood or other
porous countertop should be protected
from steam damage by a metal plate.
Contact Miele for countertop protection
kits.
DO NOT use silicone sealant to seal
the gaps between the
washer-disinfector and any adjacent
cabinets/appliances as this would
block ventilation to the circulation
pump.
77
Page 78

Electrical connection
All electrical work must be
,
carried out by a suitably qualified
and competent person in strict
accordance with current local and
national safety regulations.
If the washer-disinfector is
–
connected via a plug. The electrical
outlet must be accessible after the
appliance has been installed. This
facilitates access when the
appliance is being repaired or
serviced.
If the appliance is hard wired, a
–
multiple-pole circuit breaker must be
installed. Access to the breaker
panel must be provided.
– If replacing the power supply cable,
use only original Miele replacement
parts or a suitable cord
recommended by Miele.
– Technical data can be found on the
data plate behind the service panel,
on the wiring diagram, or on the rear
of the appliance.
The appliance must only be
operated with the voltage,
frequency, and breaker rating
shown on the data plate.
Conversion from 3 phase to single
phase is possible, as long as the
wiring diagrams are followed.
WARNING
THIS APPLIANCE MUST BE
GROUNDED
Grounding connection
At the back of the appliance is a
terminal marked with the grounding
symbol z to which a ground can be
connected, if so desired.
78
Page 79

Plumbing
Connecting the water supply
The water in the
,
washer-disinfector must not be used
as drinking water.
The washer-disinfector must be
–
connected to the water supply in
accordance with local and national
regulations.
The deionized water used in the final
–
rinse in the C - Ophthal program
should be low in endotoxins /
pyrogens.
– Water with high iron content can
leave a rust film on stainless steel
items and on the machine itself.
– If the chloride content in the water
supply is above 50 mg/l, the risk of
corrosion damage to the items is
greatly increased.
– If there are too many impurities in the
local water supply, it may be
necessary to operate the steam
condenser with ionized water..
–
The minimum flow pressure for the
cold water supply is 14.5 psi and
9 psi for the deionized water supply.
–
The recommended flow pressure
for a cold water supply is 0 36 psi
and 0 22 psi for the deionized water
supply.
If the water pressure is not within the
–
ranges specified above. The
“Fill/Drain” indicator light may come
on and the fault code “F E” may
appear in the display). If this occurs,
please contact Miele.
The washer-disinfector is equipped
–
for connection to a cold water
supply. Connect the intake hose to a
cold water valve.
A valve with a 3/4" male hose thread
–
is required. The tap must be easily
accessible after the machine has
been installed so it can be turned off
when necessary.
– The water intake hose is a pressure
hose approx. 5’ long with a 3/4 inch
female hose thread end. Do not
remove the filter in the hose
connector.
– Large-surface filters are included
with the machine for installation
between the water valve and the
intake hose (see the illustration in
“Cleaning the filters in the wash
cabinet’”). The large-surface filter for
the deionized water is made of
chrome-nickel steel and can be
recognized by the matte surface.
–
The maximum permitted static
water pressure is 145 psi.
79
Page 80
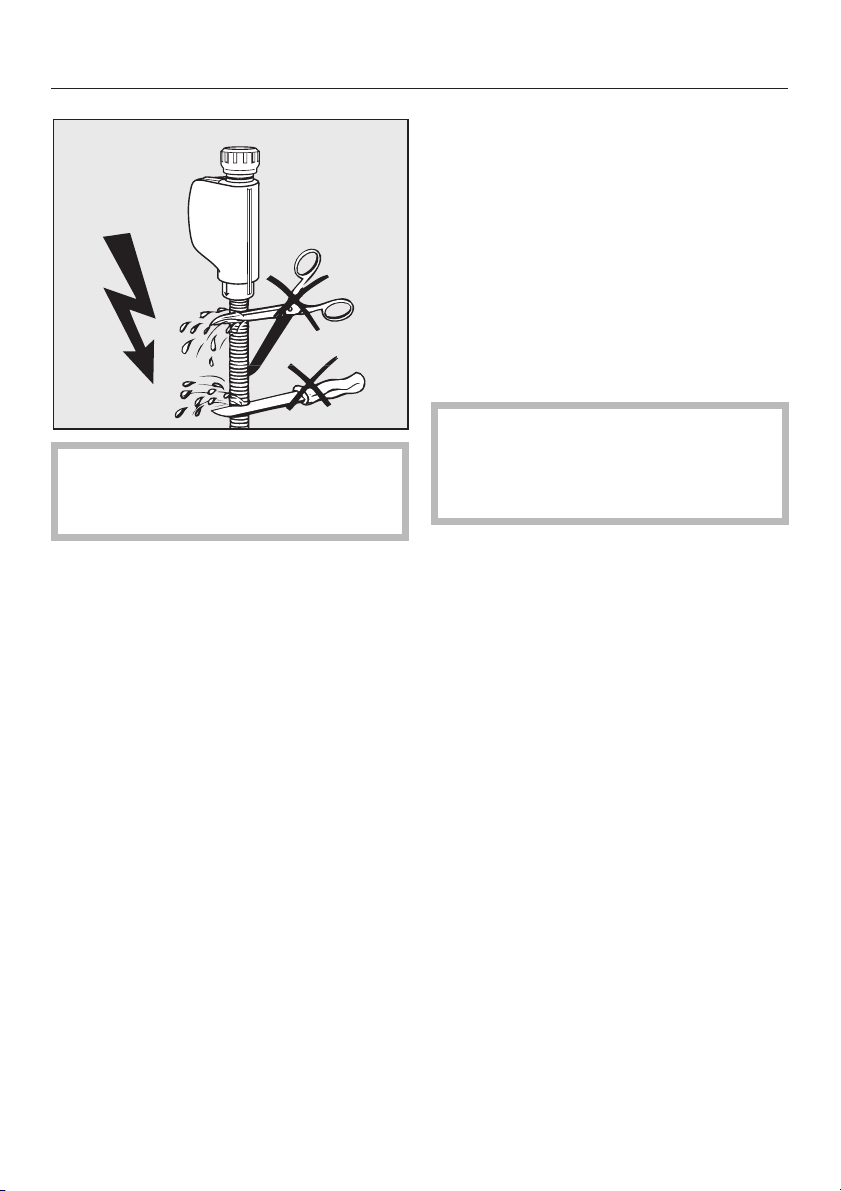
Plumbing
Do NOT shorten or otherwise
,
damage the intake hose (see
illustration)!
DI (deionized) water connection
The pressure range for the DI water
intake is between 9 - 145 psi. If the
water pressure (flow pressure) is below
22 psi, the water intake time will be
automatically extended.
The pressure hose for DI water
^
(marked “H
female hose thread end should be
connected to the on-site DI water
valve.
If the DI water hose is not used, the
appliance must be reprogrammed
by Miele. The water intake hose can
remain at the back of the machine.
O pure”) with a 3/4"
2
80
Page 81

Drain
The drain system incorporates a
–
non-return valve which will prevent
dirty water from flowing back into the
machine via the drain hose.
The machine should be connected to
–
a dedicated standpipe.
If separate drainage is not available,
contact your Miele application
specialist for professional advice.
The standpipe should be situated
between 1 ft. (0.3 m) and 3 ft. (1 m)
above the floor.
If it is lower than (1 ft.) 0.3 m, water
may siphon out of the machine
during use.
The drain must be able to take a
minimum flow of 4 gal/min (16 l/min).
– The flexible drain hose is approx. 5
ft. (1.4 m) long and has an internal
diameter of 3/4" (22 mm). It should
not be shortened.
Hose clamps are supplied for
securing it in position.
Plumbing
As standard, the machine drain
,
water will reach temperatures
greater than 160°F. In order to meet
local building codes Miele offers an
optional drain temperature reduction
kit. Please contact Miele for details.
–
The steam condenser required an
additional cold water supply and an
additional drainage line. Please see
our installation specification for
details and proper installation.
–
A longer drain hose (up to 12 ft./4m
long) is available to order from Miele.
–
The overall length of the drain hose
must not exceed 12 ft. (4 m).
81
Page 82

Technical data
English Metric
Height with lid:
without lid:
Width: 23 5/8" 60 cm
Depth:
Depth with the door open:
Net weight: 154 Ibs 70 kg
Voltage / Fuse: see data plate
Power cord: approx. 5’ 11" approx. 1.8 m
Water temperature
Cold water:
DI water:
Static water pressure: 145 psi max. 1000 kPa
Minimum water pressure
Cold water connection (flow rate):
DI water connection (flow rate):
Recommend water pressure
Cold water connection (flow rate):
DI water connection (flow rate):
Delivery head: min. 1 ft., max. 3.3 ft. min. 0.3 m, max. 1 m
Drainage 4 gal/min 16 l/min
Surrounding temperature: from 40°F to 104°F from 5°C to 40°C
Max. relative humidity:
Linear reduction up to:
Height above sea level*: up to 1640 yds up to 1500 m
Noise level in dB (A):
Sound pressure level LpA
during washing and drying < 70
Test marks: CSA
Manufacturer’s address: Miele & Cie. KG, Carl-Miele-Straße 29,
33.5"
32.5"
23 5/8"
47 1/4"
max. 70°F
max. 160°F
14.5 psi
9.0 psi
0 36 psi
0 22 psi
85 cm
82 cm
60 cm
120 cm
max. 20°C
max. 70°C
100 kPa
60 kPa
0 250 kPa
0 150 kPa
80% for temperature up to 88°F / 31°C
50% for temperature up to 104°F / 40°C
33332 Gütersloh, Germany
* If the machine is installed above 5000 ft (1500 m), the wash water will boil at a lower temperature. In
such cases, contact Miele Technical Service to lower the disinfection temperature and lengthen the
holding time (A
82
value).
0
Page 83

83
Page 84
Alteration rights reserved / Publication date: 1/11/2013
INFORMATION IS SUBJECT TO CHANGE. PLEASE REFER TO OUR WEBSITE TO OBTAIN THE MOST
CURRENT PRODUCT SPECIFICATIONS, TECHNICAL & WARRANTY INFORMATION.
M.-Nr. 09 461 360 / 00M.-Nr. 09 461 360 / 00
 Loading...