

Miele CVA6405 Installation Manual
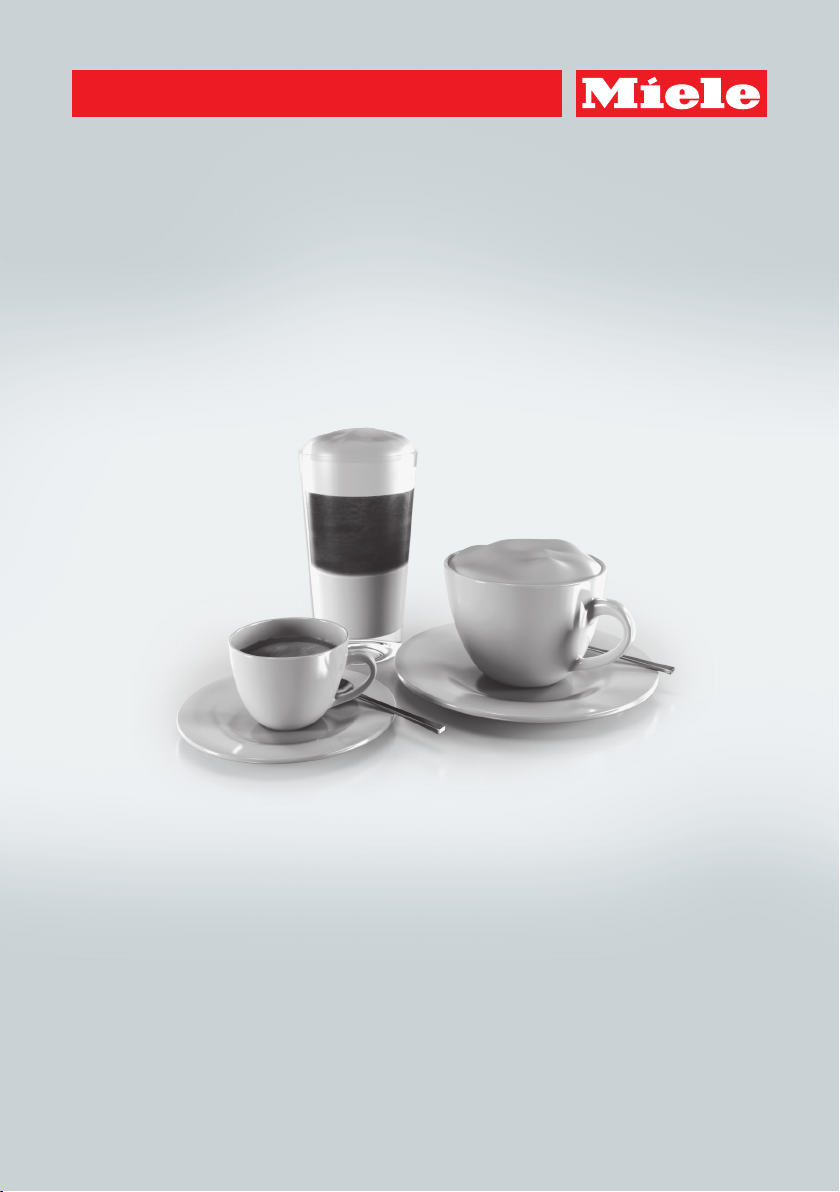
Operating and Installation Instructions
Built-in Coffee System
To prevent accidents and machine damage, you absolutely must read
these instructions before installation or use.
en – US, CA M.-Nr. 10 214 170

Contents
IMPORTANT SAFETY INSTRUCTIONS ................................................................ 5
Preparing your appliance for an extended vacation.............................................. 15
SAVE THESE INSTRUCTIONS .............................................................................. 15
Guide to the appliance .......................................................................................16
Controls and display ...........................................................................................18
Accessories ......................................................................................................... 19
Before using for the first time ............................................................................ 20
Before using for the first time................................................................................ 20
Turning on for the first time ................................................................................... 20
Water hardness ..................................................................................................... 21
Operation.............................................................................................................. 23
Filling the water tank........................................................................................... 24
Filling the coffee bean container .......................................................................25
Turning the machine On and Off ........................................................................ 26
Adjusting the coffee dispensers to the cup height .......................................... 27
Preparing beverages........................................................................................... 28
Making a coffee drink............................................................................................ 28
Double portion....................................................................................................... 29
Canceling preparation ........................................................................................... 29
Coffee pot: Preparing several cups of coffee one after the other ......................... 30
Making coffee drinks from ground coffee ............................................................. 30
Drinks with milk ..................................................................................................... 32
Preparing hot water............................................................................................... 33
Preparing user profile drinks ................................................................................. 34
After a drink has been prepared............................................................................ 34
Coffee the way you like it ................................................................................... 35
Grinder setting....................................................................................................... 35
Amount of coffee, brew temperature and pre-brewing ......................................... 36
Amount of coffee..............................................................................................36
Brewing temperature ........................................................................................ 37
Pre-brewing ground coffee............................................................................... 37
Portion size .......................................................................................................... 38
2

Contents
Profiles.................................................................................................................. 40
Accessing a profile ................................................................................................ 40
Creating a user profile ...................................................................................... 40
Selecting a user profile..................................................................................... 41
Changing the name .......................................................................................... 41
Deleting a user profile.......................................................................................41
Changing a user profile .................................................................................... 42
Settings ................................................................................................................ 43
Accessing the "Settings" menu............................................................................. 43
Changing and saving settings ............................................................................... 43
Setting options ...................................................................................................... 44
Language............................................................................................................... 46
Time of day............................................................................................................ 46
Date ....................................................................................................................... 46
Timer ..................................................................................................................... 46
Eco mode .............................................................................................................. 48
Lighting.................................................................................................................. 49
Info (displaying information) .................................................................................. 49
Locking the coffee system (System lock) ......................................................... 50
Water hardness ..................................................................................................... 50
Display brightness................................................................................................. 50
Volume................................................................................................................... 50
Activating and deactivating water connection ...................................................... 50
Factory default setting........................................................................................... 51
Showroom program (Demo mode)........................................................................ 51
Cleaning and care ............................................................................................... 52
Overview................................................................................................................ 52
Clean by hand or in dishwasher............................................................................ 53
Drip tray................................................................................................................. 55
Drip tray cover....................................................................................................... 56
Water tank ............................................................................................................. 56
Waste unit.............................................................................................................. 57
Main dispenser...................................................................................................... 57
Maintenance of the milk valve............................................................................... 59
Milk flask with lid ................................................................................................... 60
Bean container ...................................................................................................... 61
Interior and machine front ..................................................................................... 62
Main dispenser connector..................................................................................... 62
Brew unit ............................................................................................................... 63
Remove the brew unit and wash by hand........................................................ 63
3

Contents
Care programs....................................................................................................... 64
Accessing the "Maintenance" menu ................................................................ 64
Rinsing the coffee system ..................................................................................... 65
Rinsing the milk pipework ..................................................................................... 65
Cleaning the milk pipework ................................................................................... 66
Degreasing the brew unit ...................................................................................... 68
Descaling the machine ....................................................................................... 69
Frequently Asked Questions .............................................................................. 72
Messages in the display........................................................................................ 72
Unusual performance of the coffee system .......................................................... 75
Unsatisfactory results............................................................................................ 80
Problems when preparing milk.............................................................................. 82
Exchanging the elbow connector.......................................................................... 83
Technical Service................................................................................................. 85
Saving energy ...................................................................................................... 86
Packaging material / Disposal of old machine ................................................ 87
Plumbing ..............................................................................................................88
Electrical connection ..........................................................................................91
Installation............................................................................................................ 92
Installation and combination options .................................................................... 92
Ventilation.............................................................................................................. 94
Installing the coffee system................................................................................... 95
Adjusting the door hinges ..................................................................................... 96
4
IMPORTANT SAFETY INSTRUCTIONS
Please read these instructions carefully to prevent accidents and
machine damage.
This appliance complies with current safety requirements. Improper use of the appliance can cause personal injury and material
damage. Read this safety information carefully before operating
the appliance.
They contain important information on the safe installation, operation, and care of your coffee system. To avoid the risk of personal
injury or damage to the coffee system, it is important that you
carefully read the instructions. Miele cannot be held liable for damage caused by non-compliance with these IMPORTANT SAFETY
INSTRUCTIONS.
Keep these instructions in a safe place and pass the on to any future user.
5

IMPORTANT SAFETY INSTRUCTIONS
Intended use
Use this coffee system only in standard household environments
for making coffee beverages such as espresso, cappuccino, latte
macchiato, etc. Any other type of use is not permitted.
The coffee system is not suitable for outdoor use.
The machine is intended only for the preparation of coffee-based
drinks such as espresso, cappuccino, latte macchiato etc. Any other
usage is not supported.
Persons which lack physical, sensory or mental abilities or experi-
ence with the machine should not use it without supervision or instruction by a responsible person.
6
IMPORTANT SAFETY INSTRUCTIONS
Safety with children
Caution! Danger of burning and scalding on the dispensing
dispensers.
Children's skin is far more sensitive to high temperatures than that
of adults.
Ensure children do not touch hot surfaces of the coffee system or
place parts of their body under the dispensing dispensers.
Keep the coffee system out of reach of children.
Children must be kept away from the machine unless they are
constantly supervised.
Children should be supervised when they are near the coffee sys-
tem. Do not allow them to play with it or to use the controls.
Children must not be allowed to clean the coffee system unsuper-
vised.
Remember that coffee and espresso are not suitable drinks for
children.
Danger of suffocation!
Keep children away from any packing material.
7

IMPORTANT SAFETY INSTRUCTIONS
Technical safety
Installation and repairs may only be carried out by a Miele-autho-
rized service technician. Installation, repairs and other work by unqualified persons can cause considerable danger to users.
A damaged coffee system could be dangerous. Before building in
the machine, check it for any externally visible damage. Do not use a
damaged machine.
Before connecting the coffee system, check the voltage and fre-
quency indicated on the data plate against the voltage and frequency of the household electrical supply.
This data must correspond in order to prevent damage to the coffee
system. If in doubt, consult a qualified electrician.
Be certain your appliance is properly installed and grounded by a
qualified technician. To guarantee the electrical safety of this appliance, continuity must exist between the appliance and an effective
grounding system. It is imperative that this basic safety requirement
be met. If there is any doubt, have the electrical system of the house
checked by a qualified electrician.
Reliable and safe operation of the coffee system can only be guar-
anteed if it is connected to the electrical supply.
Do not connect the machine to the electrical supply using an ex-
tension cord or power bar.
The coffee system may not be used in mobile installations such as
ships.
For safety reasons, this machine may only be used when it has
been built in.
If the coffee system is to be built in above another appliance,
there must be a full-width, closed shelf between them.
Only use the coffee system in rooms where the ambient tempera-
ture is between +50°F (10°C) and +100°F (38°C).
8

IMPORTANT SAFETY INSTRUCTIONS
Do not cover or block the aeration and ventilation cross-sections.
Condensation water can damage the coffee system or surrounding
cabinets.
Ensure that there is sufficient ventilation around the coffee sys-
tem.
The ventilation gaps in the housing unit and the gap between the top
of the housing unit and the ceiling must be at least 78 3/4" (200cm2).
Otherwise condensation can build up and damage the machine or
the housing unit.
If the coffee system is installed behind a cabinet door, it may only
be used with the door open. This will prevent the formation of heat
and humidity and subsequent damage to the appliance and/or housing unit. Do not close the cabinet door while the coffee system is in
use. Ensure the coffee system has cooled down completely before
closing the door.
Repair work should only be performed by a Miele-authorized ser-
vice technician. Repairs by unqualified persons can cause considerable danger to users.
For repairs, the coffee system must be disconnected from the
electrical power supply.
The coffee system is only disconnected from the power supply if
– the circuit breaker has been tripped, or
– the fuse is removed, or
– the power cord is disconnected from the power supply.
Pull the plug, not the cord, to disconnect the appliance from the
power supply.
Repairs must only be performed by a trained technician in accor-
dance with national and local safety regulations. Repairs and other
work by unauthorized persons could be dangerous and may void the
warranty.
9

IMPORTANT SAFETY INSTRUCTIONS
Defective components should be replaced by Miele original parts
only. Only with original Miele parts can the manufacturer guarantee
the safety of the appliance.
Never open the outer casing of the machine. Tampering with elec-
trical connections or components and mechanical parts is highly
dangerous to the user and can cause operational faults or electric
shock.
Use only genuine original Miele parts. If parts or accessories from
other manufacturers are used, the warranty may become void.
The use of accessory attachements not recommended by Miele may
result in fire, electric shock or injury to persons.
10

IMPORTANT SAFETY INSTRUCTIONS
Plumbing
Do not connect the coffee system to a hot water supply.
The non-return valve must be easily accessible when the coffee
system is built in.
The protective sleeve of the water intake hose must not be dam-
aged or become kinked. This will cause it to leak.
The integrated Waterproof System offers protection from water
damage, provided the following conditions are met:
– the coffee system is correctly installed, connected to the electrical
supply and plumbed in.the coffee system is correctly installed,
connected to the electrical supply and plumbed in.
– if a fault is identified, the machine must be repaired immediately.
– The water supply is shut off during extended periods of non-use
(e.g. vacation).
11
IMPORTANT SAFETY INSTRUCTIONS
Proper use
Danger of burning and scalding from the dispensers.
The liquids and steam dispensed are very hot.
Please note:
– Keep away from the area underneath the dispensers when hot liq-
uids and steam are being dispensed.
– Do not touch hot components.
– Hot liquid or steam could spatter from the dispensers. Ensure that
the main dispenser is clean and fitted correctly.
– Water in the drip tray can also be very hot. Take care when emp-
tying it.
Never look directly at the lighting or use optical instruments to
look at it.
Please note the following regarding water:
– In case a water tank is used: Fill the water tank only with fresh,
cold tap water. Hot or warm water or other liquids could damage
the coffee system.
– Change the water every day to prevent a build-up of bacteria.
If the machine is connected to the water supply: Empty the water
tank once a day.
– Do not use mineral water. Mineral water will cause lime scale de-
posits to build up in your machine and damage it.
– Do not use water from a reverse osmosis unit in this machine.
This would damage it.
Only fill the bean container with roasted espresso or coffee beans.
Do not fill the bean container with coffee beans that have been
treated or with ground coffee.
Do not fill liquids in the bean container.
12

IMPORTANT SAFETY INSTRUCTIONS
Do not use green (unroasted) coffee beans or mixtures of coffee
beans which contain green coffee beans. Green coffee beans are
very hard and still contain a certain amount of residual moisture.
These can damage the coffee system grinder as soon as grinding
begins.
Do not use coffee beans that have been treated with caramel,
sugar or other substances. Sugar will damage the coffee system.
Only add ground coffee or cleaning tablets to the ground coffee
chute.
Do not use any caramelized ground coffee. The sugar in the cof-
fee will stick to and block the brew unit of the coffee system. The
cleaning tablets for degreasing the brew unit will not remove this
type of deposit.
Only use plain milk. Most sugary additives can clog the milk lines.
and damage the machine.
If using dairy milk make sure that it has been pasteurized.
Do not place any alcohol mixtures which are alight underneath the
main dispenser. The flames could ignite plastic components and
cause them to melt.
Do not swing from or hang anything on the machine front when it
is open as this could damage the hinges of the machine.
The main dispenser connector cap is lubricated with silicone
grease. Take care not to get this on your clothes when removing or
replacing the containers or other components.
Do not use the coffee system to clean objects.
13

IMPORTANT SAFETY INSTRUCTIONS
Cleaning and care
The coffee system must be disconnected from the electrical sup-
ply before cleaning or maintenance.
Clean the coffee system and the milk flask thoroughly before us-
ing for the first time (see "Cleaning and care").
All parts of the milk system need to be cleaned thoroughly and
regularly.
Do not use a steam cleaner to clean this machine. Steam could
reach electrical components and cause a short circuit.
Descale the coffee system regularly depending on the water hard-
ness level in your area. Descale the machine more frequently in areas
with very hard water. Miele cannot be held liable for damage arising
from insufficient descaling, the use of incorrect descaling agent or
the use of descaling agent that is not of the appropriate concentration.
Degrease the brew unit regularly with Miele cleaning tablets. De-
pending on the natural oil content of the coffee used, the brew unit
can become blocked quite quickly.
Rinsing coffee grounds down the drain can cause the sink to clog.
Instead, dispose of your coffee grounds appropriately as biodegradable waste (where facilities exist) or by composting.
14

IMPORTANT SAFETY INSTRUCTIONS
For machines with stainless steel surfaces:
Do not use sticky notes, transparent adhesive tape, masking tape
or other types of adhesive on stainless steel surfaces. These damage the surface, causing it to lose its dirt repellent protective coating.
The finish on stainless steel surfaces is susceptible to scratching.
Even magnets can cause scratching.
Preparing your appliance for an extended vacation
If you elect to turn off the water to your home for an extended pe-
riod of time, please note that this may not be enough to reduce the
risk of a leak. To be completely safe, you must turn off the water
supply to each individual appliance. This means under the sink for a
dishwasher, at the laundry bib for your washer, etc.
SAVE THESE INSTRUCTIONS
15
Guide to the appliance
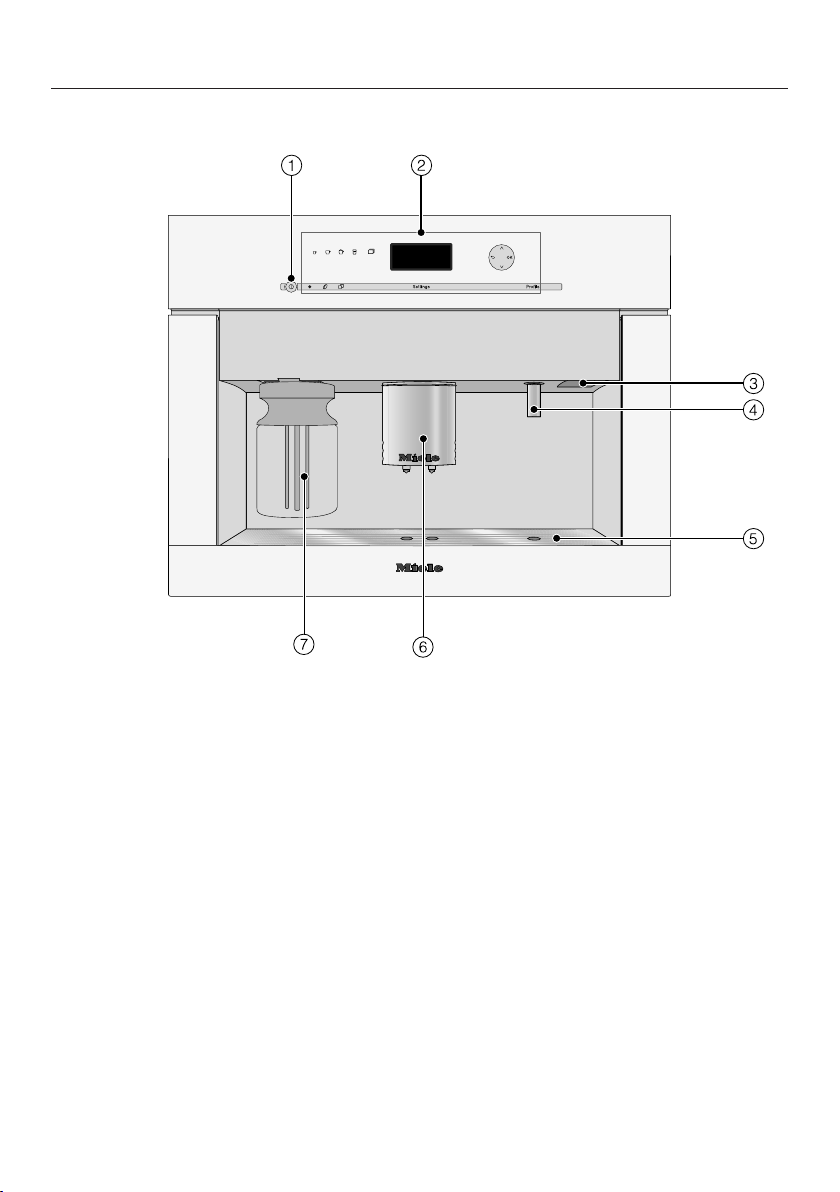
Front view
a
On / Off button
b
Controls and display
c
Door handle
d
Hot water dispenser
e
Drip tray cover
f
Height-adjustable main dispenser with lighting
g
Milk flask with lid
16
Interior view
Guide to the appliance
h
Ground coffee chute cover
i
Brew unit
j
Ground coffee chute
k
Grind control lever
l
Coffee bean container
m
Water tank with intake device
n
Drip tray with no-spill grid
o
Waste unit
p
Drip catcher
q
Main dispenser connector
r
Service cover
17

Controls and display
a
On / Off button
Turning the machine On and Off
b
Drink buttons
For making espresso, coffee ,
cappuccino , or latte macchiato
c
Additional programs
Additional drinks such as lungo cof-
fee, caffè latte, hot milk, milk froth,
and hot water,
menu Maintenance
d
Display
Shows information on current activity
or status
e
Back
For returning to the previous menu,
canceling unwanted actions
f
Arrow buttons
For showing more selection options
in the display and highlighting a se-
lection
g
OK button
For confirming display messages and
saving settings
h
Profile
For saving and editing user profiles
i
Settings
For altering settings, displaying information or checking which settings
are currently active.
j
Double portion
For preparing two portions of a drink
k
Parameters
Check or change settings for preparing coffee
l
Optical interface
(for Miele Service only)
18

Accessories
Additional accessories are available.
Contact Miele or visit the Miele website
for more information. These products
and other useful accessories can be ordered via the Miele website.
Miele online shop:
mielestore.com
Included accessories
– Measuring scoop
For ground coffee
– Milk flask with lid
For storing milk and preparing drinks
with milk
– Cleaning agent for milk pipework
For cleaning the milk system (starter
set)
– 2 cleaning containers (large and
small)
For cleaning and maintenance of the
machine
– Descaling tablets
For descaling the water pipework
(starter set)
– Milk pipework elbow connector
Spare part
Optional accessories
Miele also offers a range of optional accessories, as well as cleaning and conditioning products for your coffee system.
– Milk flask with lid
For storing milk and preparing drinks
with milk
– Compact lid
For storing the milk flask in the refrigerator
– Cleaning agent for milk pipework
for cleaning the milk system
– Descaling tablets
for descaling the water pipework
– Cleaning tablets
for degreasing the brew unit
– Silicone grease
For lubricating the seal on the main
dispenser connector
– Cleaning tablets
For degreasing the brew unit
(starter set)
– Test strips
For determining the water hardness
level
– Silicone grease
For lubricating the seal on the main
dispenser connector
– Cleaning brush
For cleaning the milk pipework
– Main dispenser connector cap
Spare part
19

Before using for the first time
Before using the coffee system for
the first time, please read these instructions and make yourself familiar
with the appliance and its controls.
Before using for the first time
Install the coffee system and connect
it to the electrical supply (see "Electrical connection" and "Installation").
Remove any protective coverings
from the front of the machine.
Clean the appliance thoroughly before filling it with water and coffee
beans (see "Cleaning and care").
Turning on for the first time
When the coffee system is switched on
for the first time, you will be asked to
set the following settings:
– Language and country
– Date
Selecting a language
Use the arrow keys to highlight
the desired language.
Then tap OK.
Use the arrow keys to highlight
the desired country.
Then tap OK.
The setting is now saved.
Setting the time of day
Use the arrow keys until the time
of day appears.
Then tap OK.
The setting is now saved.
Setting the date
Use the arrow keys until the cur-
rent date appears.
Then tap OK to confirm the year, the
month, and the day.
The setting is now saved.
– Time of day
– Display (time of day)
Tap the On / Off button .
Miele - Willkommen appears briefly in the
display.
20

Before using for the first time
Display
You can choose from the following options:
– On: The time and date are always vis-
ible in the display when the appliance
is turned off.
– Off: The display is dark when the ap-
pliance is turned off.
– Night dimming: The date and time of
day is displayed from 5:00 am to
11:00 pm.
Use the arrow keys to highlight
the desired display type. Then tap
OK.
Depending on the setting selected, the
coffee system may use more energy. A
message will appear in the display to
inform you of this.
Select the water supply (Main water
connection)
The coffee system is intended for operation with a water connection. You can
select the water supply from the following possibilities:
– On: The water tank is automatically
filed with water through the water
connection.
– Off: You must fill the water tank man-
ually. A corresponding message appears in the display.
Using the arrow keys , select the
water supply and tapOK.
The setting is now saved.
The coffee system is now successfully
set up for use.
Fill the water reservoir with cold, fresh
tap water.
Water hardness
The water hardness level indicates how
much calcium is dissolved in the water.
The higher the calcium content, the
harder the water, and the harder the
water, the more often the coffee system
will need to be descaled.
The coffee system measures the
amount of water used and steam made.
Depending on the level of water hardness set, more or fewer drinks can be
dispensed before the appliance needs
to be descaled.
Program the coffee system to the water
hardness level of your area so that it
functions correctly and does not get
damaged. At the correct time a prompt
will then appear in the display to
descale the appliance.
You can program four hardness levels
on the appliance:
Water hardness Water
0 - 8.7 gr/gal
(0 - 8.4°dH)
8.7 - 14.6 gr/gal
(8.4 - 14°dH)
14.6 - 21.9 gr/gal
(14 - 21°dH)
> 21.9 gr/gal
(21°dH)
hardness
level in
your area
Soft Soft 1
Medium Medium 2
Hard Hard 3
Hard Very hard 4
The appliance is programmed ex-works
to hardness level 3.
Setting
(water hardness level)
21
Before using for the first time
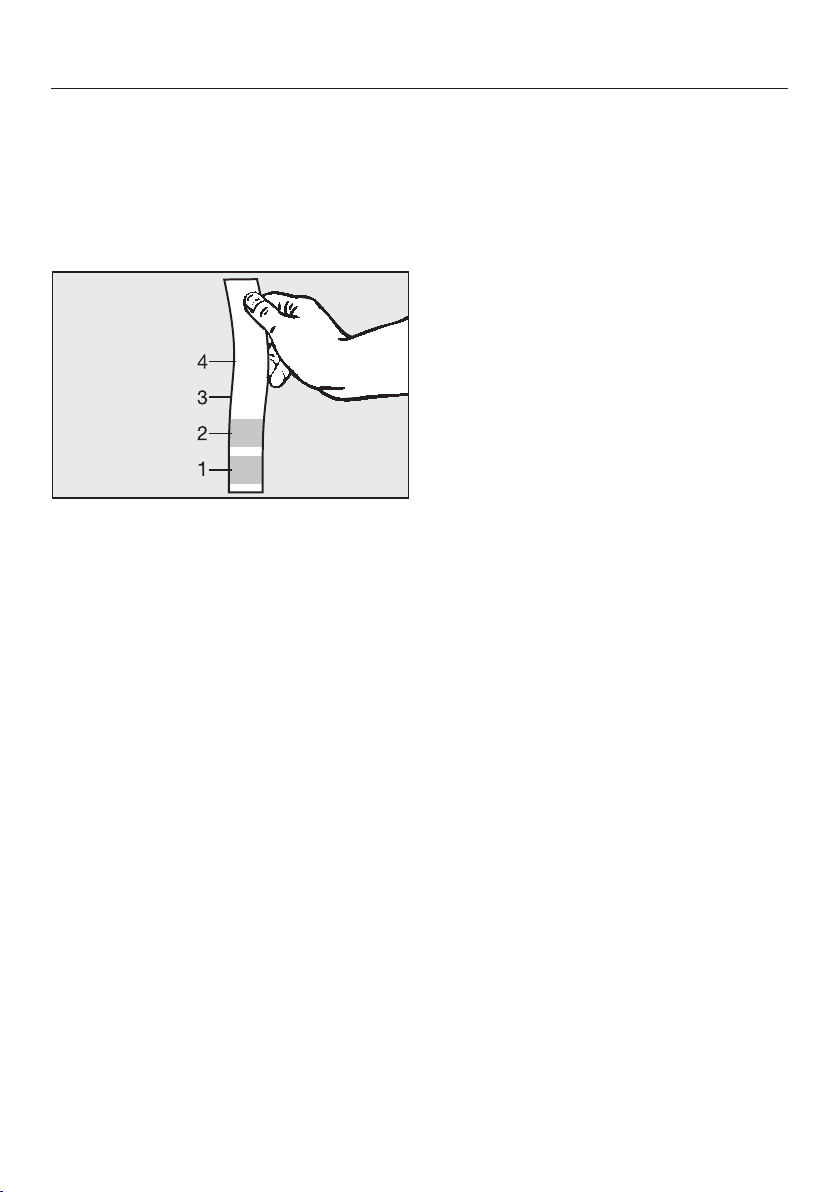
Determining the water hardness
You can measure the water hardness
yourself using the enclosed test strip.
Alternatively, your local water authority
will be able to tell you the hardness of
water in your area.
Dip the test strip in your drinking wa-
ter for approximatelyonesecond,
then shake off any excess water. The
result will be evident after about
aminute.
Setting the water hardness level
Tap Settings.
Use the arrow keys to select Wa-
ter hardness and tap OK.
Use the arrow keys to select the
required water hardness. Then tap
OK.
The setting is now saved.
22

Operation
Miele
Select drink
Settings
Time
Date
Language
To operate the coffee system, tap the
touch controls with your finger.
When the following appears in the display, you are in the drinks menu:
To prepare a coffee drink, tap one of the
drink buttons.
You can find more drinks in the Addi-
tional programs menu.
Selecting a menu and navigating within a menu
To select a menu, tap the relevant button. You will then be able to start an action or change settings in the menu.
Leaving the menu or canceling an action
To exit the current menu, tap Back.
A scroll bar at the right of the display
shows that additional options or text
are available. Use the arrow keys to
display them.
The setting which is currently selected
will have a checkmark beside it.
To select a setting use the arrow keys
until the setting you want is highlighted.
To confirm the selection, tap OK.
23

Filling the water tank
Change the water every day to
prevent a build-up of bacteria.
If the coffee system is plumbed into the
water supply, the water tank will fill automatically as soon as the machine is
switched on.
The intake device in the lid ensures that
the water is taken in slowly.
If the coffee system has not been
used to make any drinks for a long
time, the water is left in the supply
hose.
This can impair the taste of the coffee.
Discard the first full container of water.
You can also fill the container manually
if you are not using the water supply
(see "Settings – Main water").
When using the coffee system with
water tank operation:
Fill the water tank only with fresh,
cold tap water.
Hot or warm water or other liquids
can damage the coffee system.
Do not use mineral water. Mineral
water will cause serious limescale
deposits to build up in your machine
and damage it.
Open the appliance door.
Pull the water tank forwards to re-
move it.
Take off the lid and fill the water tank
with fresh, cold tap water up to the
"max." mark.
Push the water tank back in the ma-
chine until it clicks into place.
If the water tank protrudes slightly or
is a little high, check whether the surface that the water tank sits on is dirty.
If the water tank is not positioned correctly, the outlet valve will not connect
properly and could leak. Clean the
surface, if necessary.
24

Filling the coffee bean container
Fill the coffee bean container with
roasted coffee or espresso beans if you
want to use freshly ground coffee beans
for each cup of espresso or coffee.
Alternatively, you can make coffee or
espresso with ground coffee (see "Making coffee drinks from ground coffee").
Important! Risk of damage to the
grinder.
Only put roasted coffee or espresso
beans in the container. Anything
else, including ground coffee, will
damage the grinder.
Do not pour liquids in the bean container.
Pull out the coffee bean container.
Push back the lid and fill the con-
tainer with roasted coffee beans.
Slide the lid back into place.
Important! Sugar damages the coffee
system.
Do not use coffee beans that have
been treated with sugar, caramel, or
other substances containing sugar in
the coffee bean container.
Do not use green (unroasted) coffee
beans or mixtures of coffee beans
which contain green coffee beans.
Green coffee beans are very hard
and still contain a certain amount of
residual moisture. These can damage the coffee system grinder as
soon as grinding begins.
Tip: You can use a nut or seed grinder
to grind green coffee beans. These
types of grinder generally have a rotating stainless steel blade. You can then
add the ground green coffee portion by
portion to the ground coffee chute and
make the desired coffee drink (see
"Making coffee drinks from ground coffee").
Push the coffee bean container fully
back into the coffee system. Close
the front.
25

Turning the machine On and Off
Turning on
When the coffee system is switched on,
it heats up and rinses the pipework.
This not only cleans the pipework, but
also warms it before coffee is prepared.
If the coffee system still has an operating temperature higher than 140°F
(60°C), rinsing will not take place.
Tap the On / Off button .
The appliance will begin rinsing after
the heating-up phase. Hot water will
come out of the main dispenser.
You can now prepare drinks.
Tip: If you do not want the water from
the rinsing process to flow into the drip
tray, place a suitable container (e.g., the
small cleaning container) underneath
the main dispenser before preparing the
first coffee of the day.
Turning off
Tap the On / Off button .
After a coffee has been dispensed, the
machine pipework is rinsed before the
machine switches off.
Turning off for longer periods of time
If the coffee system is not going to be
used for a longer period of time:
Empty the drip tray, the waste unit
and the water tank.
26
Clean all components thoroughly, in-
cluding the brew unit, the main dispenser connector and the small drip
tray located inside the door.
Turn off the appliance.
If you leave the door open for an extended period of time, unplug or disconnect it from the power supply to
save energy.
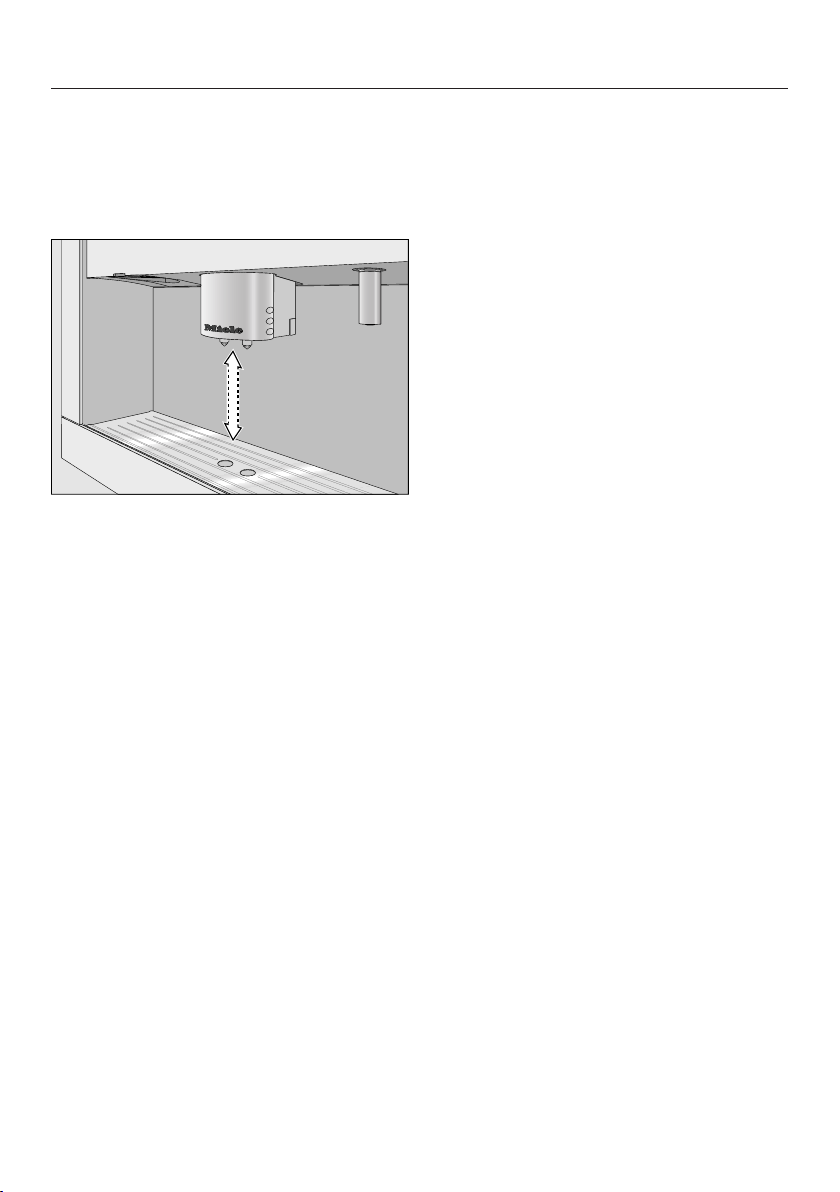
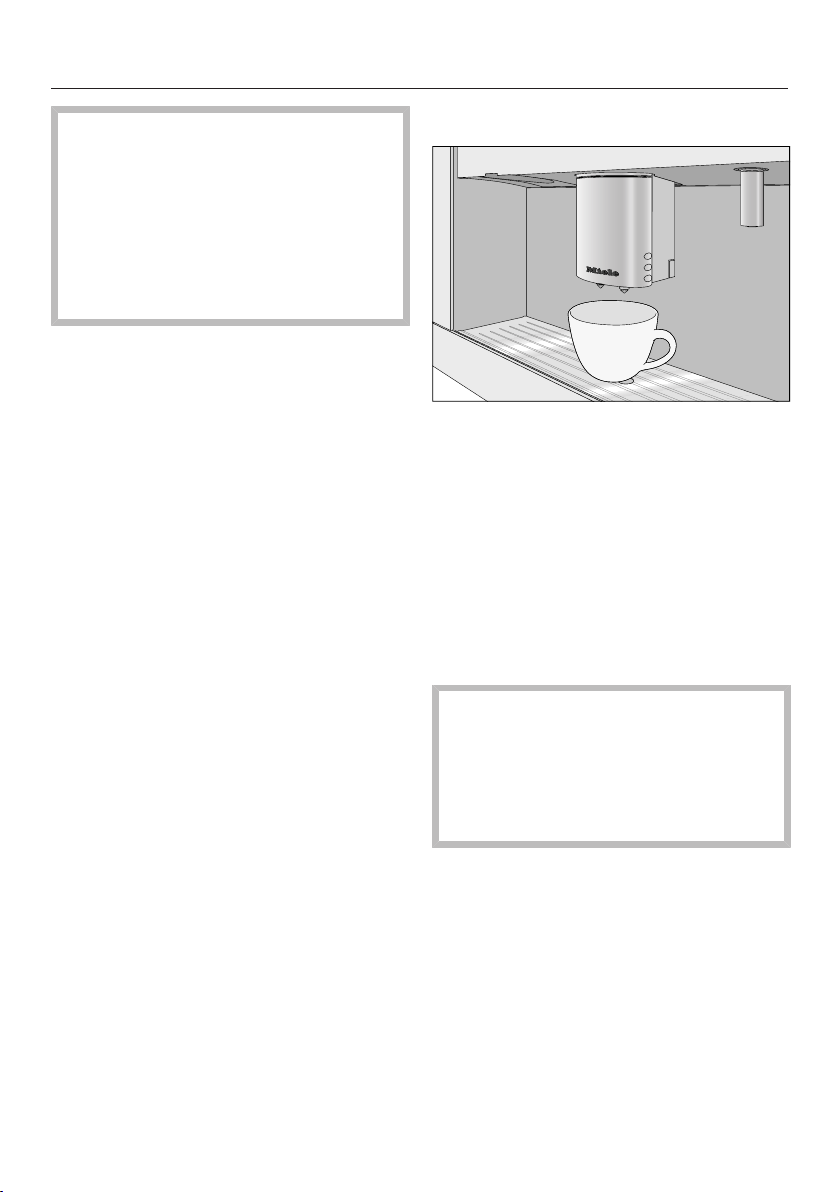
Adjusting the coffee dispensers to the cup height
You can adjust the main dispenser to
suit the height of the cup you are using
so that the coffee or espresso will not
cool down as quickly and the crema will
have a better consistency.
Pull the main dispenser down until it
is at the same level as the rim of the
cup.
Alternatively, push the main dispenser up until there is enough room
to fit a larger cup or mug underneath.
27
Preparing beverages
Danger of burning and scalding
from the dispensers.
The liquids and steam dispensed are
very hot.
Keep away from the area underneath
the dispensers when hot liquids and
steam are being dispensed.
Do not touch hot components.
You can choose from a variety of specialty coffees:
– Espresso is a strong, aromatic
coffee with a thick hazelnut-brown
cream layer – the crema – on top.
Use espresso-roasted coffee beans
for preparing espresso.
– Coffee differs from espresso by
the increased amount of water and
the roast of the beans.
Use coffee beans of the correct roast
to make coffee.
– Lungo coffee is a coffee with sig-
nificantly more water.
Making a coffee drink
Place a cup under the main dis-
penser.
Tap the sensor button for the desired
drink:
Espresso
Coffee
in Additional programs: Longo coffee
The drink you have selected will be dispensed from the main dispenser into
your cup.
To ensure that any residues from the
factory testing process are removed
from the brewing system, please discard the first two cups of coffee
when using the machine for the first
time.
28

Preparing beverages
Double portion
You can request two portions of
espresso or coffee at once in one cup
or in two separate cups simultaneously.
To fill two cups at the same time:
Place one cup under each of the cof-
fee dispensers.
Tap .
The button lights up.
Tap the sensor button for the desired
drink.
Canceling preparation
Drink preparation can be canceled as
long as Stop is visible in the display.
TapOK.
When making two portions at once,
tapping the OK button once will stop
the first drink only. Keep the button
pressed to stop the entire dispensing
procedure.
Two portions of the desired drink will be
dispensed from the main dispenser.
Tip: If, after a while, you have not
tapped one of the drink buttons, the
"Double portion" option will revert
back to single portions.
29

Preparing beverages
Coffee pot: Preparing several cups of coffee one after the other
You can automatically prepare several
cups of coffee one after the other
(max.1l) using the Coffee pot function.
Up to eight cups can be prepared at the
one time.
You can use the Coffee pot function
twice in a row. After that, a longer
cooling down time of one hour is necessary so that the coffee system does
not become damaged.
Place a sufficiently large container
under the main dispenser.
Tap .
Use the arrow keys to highlight
Coffee pot.
Then tap OK.
Use the arrow keys to highlight
the desired number of cups (3 to 8).
Then tap OK.
Follow the instructions given.
Each portion will be ground, brewed
and dispensed individually. The display
will inform you about the progress.
You can cancel the process at any time:
Tap OK or .
Making coffee drinks from ground coffee
To make espresso or coffee using
ground coffee, add a portion of ground
coffee to the ground coffee chute.
This gives you the option of preparing a
cup of decaffeinated coffee, for example, even though the coffee bean container is filled with roasted coffee
beans.
The coffee system will automatically
recognize that ground coffee has been
placed in the chute.
Only one portion of coffee or espresso
can be prepared at a time when using
ground coffee.
Adding ground coffee
Do not add more than one level
scoop of ground coffee to the coffee
chute. If too much is added, the
brew unit will not be able to process
the coffee.
The coffee system will use all the
ground coffee that has been added to
the chute to make the next coffee.
Use the scoop supplied with the machine to ensure the correct amount of
ground coffee is used.
30
 Loading...